

- Welcome to the Fairy Godmother Stories: Dark Deal Walkthrough
- Someone in Fairy Tale Land is selling wishes, but at what cost?
- Whether you use this document as a reference when things get difficult or as a road map to get you from beginning to end, we're pretty sure you'll find what you're looking for here.
- This document contains a complete Fairy Godmother Stories: Dark Deal game walkthrough featuring annotated screenshots from actual gameplay!
- We hope you find this information useful as you play your way through the game. Use the walkthrough menu below to quickly jump to whatever stage of the game you need help with.
- This walkthrough was created by Nina de Boo, and is protected under US Copyright laws. Any unauthorized use, including re-publication in whole or in part, without permission, is strictly prohibited.
Walkthrough Menu
- General Tips
- Chapter 1: The Seller
- Chapter 2: The University
- Chapter 3: The Mermaid
- Chapter 4: Setting Sail
- Chapter 5: Yellenhoff
- Chapter 6: Rapunzel
- Chapter 7: The Seven Dwarves
- Chapter 8: The Snow Queen's Castle
General Tips
- This is the official guide for Fairy Godmother Stories: Dark Deal.
- This guide won't tell you when to zoom into a location; the screenshots show each zoom scene.
- Hidden-object puzzles are referred to as HOPs. Only the locations of the HOPs will be shown.
- Use the map for fast travel to a location.
Chapter 1: The Seller

- Talk (A); receive GOODWIN'S HAT.
- Use GOODWIN'S HAT; take hint rose, BARRETTE and COUPONS 1/4 (B).
- Open; take DIAMOND RING (C).
- Use BARRETTE; take task book, CLOSED CASE and MONEY 1/2 (D).

- Take MONEY 2/2 and BROOM (E).
- Open (F).
- Offer MONEY for HOP (G); receive CALMING TEA.
- Offer CALMING TEA (H); receive WRENCH.
- Use WRENCH (I).
- Go (J).

- Use BROOM; take HEART HALF INLAY 1/2 and COUPONS 2/4 (K).
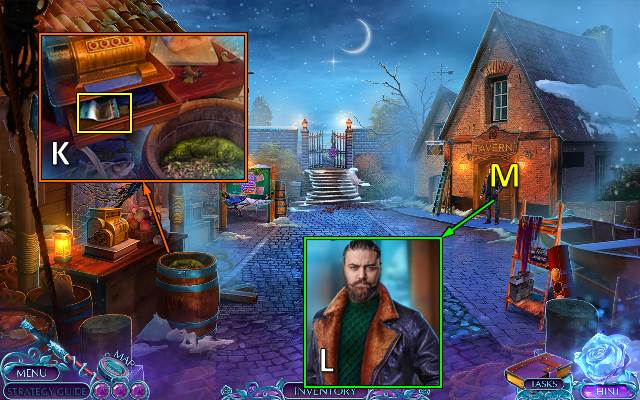
- Use DIAMOND RING; take map, NUT, COUPONS 3/4 and note (L).
- Take PAPER and COUPONS 4/4 (M).
- Walk down.

- Use COUPONS; take WIRE CUTTER and MULTICOLOR PEN (N).
- Use PAPER and MULTICOLOR PEN (O); receive LOST AND FOUND CODE.
- Go (P).

- Place LOST AND FOUND CODE; easy and hard solution (Q).
- Take HEART HALF INLAY 2/2 (R).
- HEART HALF INLAY on CLOSED CASE; take note, CHAIN and magic wand.
- Use magic wand (S).
- Go (T).

- Use WIRE CUTTER; take BOWL and MAGNET (U).
- Take BOARD (V).
- Walk down.

- CHAIN on MAGNET; receive MAGNET ON CHAIN.
- Take LIGHTER with MAGNET ON CHAIN (W).
- Walk down.
- Use LIGHTER; take BOX SYMBOL (X).
- Go to Flower Exhibition.

- Place BOX SYMBOL (Y).
- Easy solution: Y-Z.
- Hard solution: A-B.

- Take TAPE and WHEEL (C).
- Place WHEEL and NUT (D).
- Go (E).
- Talk (F).
- Play HOP.
- Receive ROPE.

- Use ROPE; take COMB (G).
- Place BOARD (H).
- Take SLINGSHOT and SNOWFLAKE AMULET (I).
- Use BOWL; take WHEEL CUTTER and energy sphere 1 (J).
- Walk down twice.

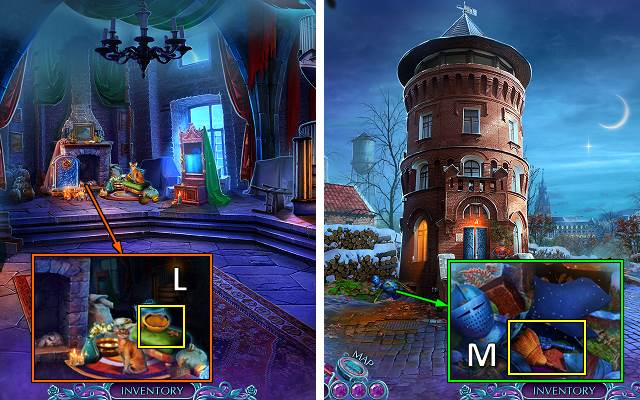
- Place SNOWFLAKE AMULET (K); take energy sphere 2 and FORK (L).
- Go to Lake.
- Use FORK; take SPONGE and SWAN AMULET (M).
- Place SWAN AMULET; take EMPTY POUCH and STICK (N).
- Walk down.

- STICK and TAPE on COMB; receive RAKE.
- Use RAKE; take SOAP, FOUNTAIN ELEMENT and energy sphere 3 (O).
- Place FOUNTAIN ELEMENT (P); easy solution.
- Hard solution (Q).
- Take BOAT KEY (R).
- Go (S).

- Use magic wand (T).
- Use BOAT KEY (U).
Chapter 2: The University

- Take DETERGENT RECIPE with WHEEL CUTTER (V).
- Take WRENCH and GLOVE; take WASHING SODA with EMPTY POUCH (W).
- Take WATER with SLINGSHOT (X).

- WATER, SOAP and WASHING SODA on DETERGENT RECIPE; receive DETERGENT.
- Take HOOK and note and move jar; use SPONGE and DETERGENT (Y).
- Play HOP (Z); receive WHISTLE.
- Use WHISTLE (A).
- Go (B).

- Talk (C); receive MERLIN'S SIGNET.
- Use WRENCH; take PACKAGE and UNIVERSITY EMBLEM HALF 1/2 (D).
- Use GLOVE; take UNOPENED CAN and UNIVERSITY EMBLEM HALF 2/2 (E).
- Use MERLIN'S SIGNET (F); take POINTING STICK and HAIR TIE (G).
- Walk down.

- Place UNIVERSITY EMBLEM HALF; take SELFIE STICK (H).
- HOOK and HAIR TIE on SELFIE STICK; receive STICK WITH HOOK.
- Take GROWTH POTION with STICK WITH HOOK (I).
- Go (J).
- Offer GROWTH POTION (K); receive ACCESS CARD.
- Use ACCESS CARD (L).


- Easy solution (M): 1-6.
- Hard solution (N): 1-8.

- Take CAN OPENER; use POINTING STICK (O). Take HAIRPIN and CABINET BUTTON (P).
- Take CORK; place CABINET BUTTON (Q).
- Walk down twice.

- CAN OPENER on UNOPENED CAN; receive CAT FOOD.
- Offer CAT FOOD (R); take BOLT AND NUT and SCISSORS (S).
- Go to Archive.
- SCISSORS on PACKAGE; take AQUARIUM CLEANER and PEG.
- Use AQUARIUM CLEANER (T).
- Play HOP (U); receive GNOME.
- Walk down.

- Place GNOME; take FILE BOX KEY (V).
- Go (W).
- Use FILE BOX KEY (X).
- Easy solution (Y): I-Hx2-Z-Hx2-Ix3-L-M-Jx2-B-Jx2-Mx3-L-O-Px2-D-Px2-Ox3-L-K-Nx2-F.
- Hard solution (Y): I-Hx2-Z-Hx2-I-A-Ix2-L-M-Jx2-B-Jx2-M-C.
- Mx2-L-O-Px2-D-Px2-O-E-Ox2-L-Kx2-G-Kx3-Nx2-F.
Chapter 3: The Mermaid

- Take BROKEN LADDER (Q).
- Use CORK; take BLACKSMITH STATUETTE (R).
- Take JACK (S). Place BLACKSMITH STATUETTE; take PLASTIC CARD and CUTTER HALF (T).

- Take NAILS with HAIRPIN (U); take BROKEN BOLT CUTTER (V).
- CUTTER HALF and BOLT AND NUT on BROKEN BOLT CUTTER; receive BOLT CUTTER.
- Use BOLT CUTTER (W).
- Go (X).

- Take CRANK; use PEG (Y).
- Take LEAF AMULET and BOARDS (Z).
- Place LEAF AMULET; take HAMMER, BRUSH and energy sphere 1 (A).

- HAMMER, NAILS and BOARDS on BROKEN LADDER; receive LADDER.
- Place LADDER (B).
- Play HOP (C); receive OILCAN.
- Use OILCAN and BRUSH (D).
- Go (E).

- Talk (F); receive CORAL.
- Use PLASTIC CARD (G); take MATCHES and STETHOSCOPE (H).
- Place JACK; take DYNAMITE, BROKEN SHOVEL and energy sphere 2 (I).

- Take UMBRELLA HANDLE with CORAL (J).
- Place DYNAMITE and MATCHES; take CROWBAR and CRESCENT AMULETS 1/3 (K).
- Walk down twice.

- Place STETHOSCOPE (L).
- Easy solution (M).
- Hard solution (N).
- Take LOCKED CASE and energy sphere 3 (O).

- Place CRANK; take WEIGHT (P).
- Place WEIGHT; take CRESCENT AMULETS 2/3 and FEATHERS (Q).
- Go (R).

- Use magic wand (S).
- Take TWEEZERS and PEG (T).
- Go (U).
- UMBRELLA HANDLE and PEG on BROKEN SHOVEL; receive SHOVEL.
- Use SHOVEL; take PHONOGRAPH HORN (V).
- Walk down.

- Place PHONOGRAPH HORN; take CRESCENT AMULETS 3/3 and DIAMOND RING (W).
- Go (X).

- CRESCENT AMULETS on LOCKED CASE; take KNIFE.
- Use KNIFE (Y).
- Play HOP (Z); receive FUEL.
- Open; use FUEL (A).
Chapter 4: Setting Sail

- Use CROWBAR; take CABIN KEYS 1/2 and INCOMPLETE LAMP (B).
- Take FILE; take CABIN KEYS 2/2 with TWEEZERS (C).
- Use CABIN KEYS (D).
- Go (E).

- Take WINE 1/3; use FILE (F). Take CORKSCREW and LIGHTER (G).
- Use FEATHERS; take CAPTAIN'S CLOAK and LAMP HANDLE (H).

- Use DIAMOND RING; take MAGNET and WICK (I).
- WICK, LAMP HANDLE and LIGHTER on INCOMPLETE LAMP; receive LIT LAMP.
- Place LIT LAMP (J).
- Easy solution (K): Ux2-Xx2-Zx3-T-X-Tx2-Xx2-U-Xx3-U-Tx2-Q-Tx2-S-Ox2-Rx2-V-R-Yx3.
- Hard solution (K): Ux2-Xx2-Zx3-T-X-Tx2-Xx2-U-Xx3-U-Tx2-Q-Tx2-S-Ox2-Rx2-V-R-Yx3-Ax2-N-Lx3-M.

- Use CORKSCREW; take GEMS 1/4 (B).
- Use MAGNET (C); take CHEST AMULET and GEMS 2/4 (D).

- Place CAPTAIN'S CLOAK (E).
- Take BRUSH and WINE 2/3 (F).
- Use BRUSH; take CANNONBALL (G).
- Walk down.

- Place CHEST AMULET (H). Find items; take PARROT STATUETTE (I).
- Place PARROT STATUETTE (J); take GEMS 3/4 and PARROT COOKIE (K).
- Walk down.

- Offer PARROT COOKIE (L); receive CAPTAIN'S COMPASS.
- Offer CAPTAIN'S COMPASS (M).
- Take TWEEZERS and WINE 3/3 (N).
- Go to Wine Cellar.

- Place WINE (O).
- Play HOP (P); receive GUN.
- Use GUN (Q); take COCONUT and GEMS 4/4 (R).
- Walk down.

- Place GEMS; take GLOVE, SPUR and EMPTY POUCH (S).
- Go (T).
- Take GUN POWDER with EMPTY POUCH (U).
- Walk down twice.

- Place GUN POWDER and CANNONBALL; use torch (V).
Chapter 5: Yellenhoff

- Use COCONUT; take BROKEN AMULET and COIN (W).
- Take HEAVY STATUETTE; take AMBER GEMSTONE with TWEEZERS (X).
- Use GLOVE; take BOOMERANG and GREEN GEMSTONE (Y).

- AMBER GEMSTONE and GREEN GEMSTONE on BROKEN AMULET; receive COLORFUL AMULET.
- Place COLORFUL AMULET (Z).
- Easy solution (A): C; move to 1; B; move to 2.

- Hard solution (D): move to 1; Ex2; move to 2.
- Go (F).

- Use BOOMERANG; take CARABINER and CASHBOX BUTTONS 1/4 (G).
- Use HEAVY STATUETTE; take HORN and CASHBOX BUTTONS 2/4 (H).
- Use COIN; take SEASHELL and CASHBOX BUTTONS 3/4 (I).
- Use SPUR; take CASHBOX BUTTONS 4/4 and PICKLOCK (J).
- Walk down.
- Place CASHBOX BUTTONS; take MONEY (K).
- Offer MONEY (L).
- Go (M).

- Talk (N); receive DARTS.
- Use PICKLOCK (O).
- Play HOP (P); receive VINYL RECORD.
- Place VINYL RECORD; take energy sphere 1 and GAME PIECES 1/4 (Q).

- Use DARTS (R).
- Easy solution: hit 1-2-3.
- Hard solution: hit 4-4-4-5-6.
- Take CHAIN and GAME PIECES 2/4 (S).
- Walk down.

- Use HORN; take PIN and HAT (T).
- Place SEASHELL (U); take FISHING ROD (V).
- Go (W).

- Place CARABINER and CHAIN; take MUSIC NOTE and TUBE (X).
- Use FISHING ROD; take energy sphere 2 and PAINTBRUSH (Y).
- Go to Inn.

- Take GAME PIECES 3/4 with PIN (Z).
- Place MUSIC NOTE (A); take GAME PIECES 4/4 and SCISSORS (B).
- Go to Yellenhoff Square.

- Place GAME PIECES (C).
- Play random puzzle (D).
- Take COOLING SPRAY (E).
- Use COOLING SPRAY; take energy sphere 3 and AX BLADE (F).
- Go to Inn.

- Use magic wand (G).
- Go (H).
Chapter 6: Rapunzel

- Use HAT; take LILY and MIRROR (I).
- Take PINE CONE (J).
- Use TUBE; take WIRE HOOK and WISHBONE (K).
- Place WISHBONE, LILY and PINE CONE (L).
- Go (M).

- Place PAINTBRUSH (N).
- Play HOP (O); receive FIRE AMULET.
- Place FIRE AMULET; take SCOOP and AX HANDLE (P).

- Use SCISSORS (Q); take CHEST CODE 1/3 and GRINDSTONE (R).
- AX HANDLE and GRINDSTONE on AX BLADE; receive AX.
- Use AX (S).
- Go (T).

- Talk (U); receive CHANDELIER SWITCH.
- Place CHANDELIER SWITCH (V).
- Take RAPUNZEL'S BOX (W).
- Place MIRROR and WIRE HOOK (X); take KNIGHT STATUETTE and CHEST CODE 2/3 (Y).
- Walk down twice.

- Use SCOOP; take CHEST CODE 3/3 and SCRAPER (Z).
- Place CHEST CODE (A).
- Easy solution: D-Bx2-D-Cx2-D-Bx2-D-Cx3-D-B-D-Bx2-D-B-D-Cx2-D-Bx2-D.
- Hard solution: Cx3-D-Bx4-D-C-D-Cx3-D-Bx2-D-Bx4-D-C-D-Cx3-D.
- Take FAN and FLEUR-DE-LIS 1/2 (E).
- Go (F).

- Place KNIGHT STATUETTE; take TWO-PRONGED FORK and AMETHYST (G).
- Use FAN; take RUBY and STICK (H).
- Go (I).

- Use SCRAPER; take EMERALD and WIRE (J).
- EMERALD, AMETHYST and RUBY on RAPUNZEL'S BOX; take MAGIC COMB.
- Offer MAGIC COMB (K); receive YARN.
- Walk down.
- Offer YARN; take HELMET and FLEUR-DE-LIS 2/2 (L).
- Walk down.
- Place FLEUR-DE-LIS; take BROOM and HOOKED SPEAR (M).
- Go to First Floor.

- STICK and WIRE on HOOKED SPEAR; receive HARPOON.
- Take BOOK KEY with HARPOON (N).
- Use BOOK KEY (O).
- Play HOP (P); receive SUN AMULET.
- Walk down twice.
- Place SUN AMULET (Q).
- Go (R).
Chapter 7: The Seven Dwarves

- Use TWO-PRONGED FORK (S); take BENT NAIL and GEMS 1/3 (T).
- Use HELMET; take GEMS 2/3 and LEMON JUICE (U).

- Use BROOM; take CORKSCREW, TWEEZERS and GEMS 3/3 (V).
- Place GEMS (W).
- Go (X).

- Take SAFE CODE with TWEEZERS (Y).
- Use BENT NAIL; take ROPE, energy sphere 1 and LIGHTER (Z).
- LEMON JUICE and LIGHTER on SAFE CODE.
- Place SAFE CODE (A).

- Easy solution (B): as shown.
- Hard solution (B): Dx6-Ex5-Fx7-Gx4-Hx7-Ix2-Kx6.
- Take ACID and energy sphere 2 (L).
- Use ACID (M).
- Go (N).

- Take DWARVES' BOX (O). Use CORKSCREW; take CHAINED PULLER (P).
- Take BROKEN FISHING ROD; place ROPE (Q). Take SALT AND PEPPER SHAKERS 1/2 and SIGNET (R).
- Use CHAINED PULLER; take REEL and SIGNET (S).
- Walk down twice.

- SIGNET x2 on DWARVES' BOX; take ACCESS CARD.
- Use ACCESS CARD (T); take PORTRAITS 1/3 and energy sphere 3 (U).
- Use magic wand (V).
- Receive WIRE CUTTERS.
- Go (W).

- Use WIRE CUTTERS; take PENCIL (X).
- Go (Y).
- Use PENCIL; take SALT AND PEPPER SHAKERS 2/2 and DIAMOND RING (Z).
- Place SALT AND PEPPER SHAKERS (A).
- Play HOP (B); receive COOKIE.
- Walk down twice.

- Offer COOKIE (C); take PORTRAITS 2/3, PAPERWEIGHT and FISHING LINE (D).
- FISHING LINE and REEL on BROKEN FISHING ROD; receive FISHING ROD.
- Use FISHING ROD; take SKATES and PORTRAITS 3/3 (E).
- Go (F).
- Place PORTRAITS; take DWARF STATUETTE (G).
- Go to Dining Room.

- Place DWARF STATUETTE; take MAGNET and MONOPOD (H).
- Use MAGNET (I); take LEVER (J).
- Walk down twice.

- Place LEVER (K).
- Easy solution (L).
- Hard solution (M).
Chapter 8: The Snow Queen's Castle

- Place SKATES (N).
- Take SCREWDRIVER and GAS NOZZLE (O).
- Use DIAMOND RING; take ROD and KNIFE HANDLE (P).
- Use ROD and PAPERWEIGHT; take BROKEN BURNER and PIN (Q).
- GAS NOZZLE on BROKEN BURNER; receive BURNER.
- Use BURNER (R).
- Go (S).

- Use SCREWDRIVER (T); take GRINDSTONE and TONGS (U).
- Take AWL and DULL BLADE with MONOPOD (V).

- DULL BLADE and GRINDSTONE on KNIFE HANDLE; receive SHARP KNIFE.
- Use SHARP KNIFE (W).
- Play HOP (X); receive SNOWFLAKE AMULET.
- Place SNOWFLAKE AMULET (Y).
- Go (Z).

- Take HEART AMULET with AWL (A).
- Use PIN (B); take NUT (C).
- Walk down.

- Place HEART AMULET; receive BROKEN SCEPTER (D).
- Offer NUT; take BOOK (E).
- Go (F).

- Place BOOK; take RAPUNZEL'S TOWER MODEL (G).
- Place RAPUNZEL'S TOWER MODEL; take FOUNTAIN COMBINATION (H).
- Walk down twice.

- Place FOUNTAIN COMBINATION (I).
- Easy solution (J).
- Hard solution (K).

- Take CHANDELIER LEVER (L).
- Take STONE OF COLD with TONGS (M).
- Go to Throne Room.

- Place CHANDELIER LEVER (N); take SCEPTER TOP (O).
- SCEPTER TOP and STONE OF COLD on BROKEN SCEPTER; receive SNOW QUEEN'S SCEPTER.
- Use SNOW QUEEN'S SCEPTER (P).

- Easy and hard solution (Q).
- Congratulations, you have completed Fairy Godmother Stories: Dark Deal.