Walkthrough Menu
- General Tips
- Chapter 1: The Mill
- Chapter 2: The Archive
- Chapter 3: Across the River
- Chapter 4: The Train
- Chapter 5: The Amusement Park
- Chapter 6: The Church
General Tips
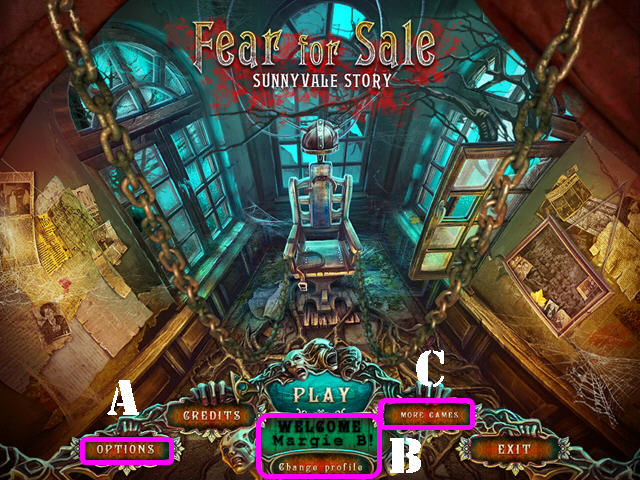
- This is the official guide for Fear for Sale: Sunnyvale Story Standard Edition.
- The Options (A) Button allows you to adjust the screen size, music, cursor, and sound.
- The 'Change profile' button (B) can be used to manage your profiles in the game.
- The 'More Games' button (C) shows you other games by this developer.
- There is a Journal located in the lower left that will be updated as you play; it will sparkle with every update.
- All mini-games can be skipped once the skip button has recharged.
- This guide will refer to Hidden Object Scenes as 'HOS'. The lists in HOS are random. Items written in green in HOS require an extra step before they become visible.
- If you place your cursor on a character and the cursor turns into a dialogue bubble, it means you can speak to them.
- Your cursor will change to an arrow when you can head to another area.
- The hints are unlimited but you must wait for it to recharge between uses.
- Excessive random clicking will cause you to lose control of your cursor for a few seconds.
- Use the arrows on either sides of the inventory bar to scroll through your inventory.
- Move your cursor to the bottom of the screen to bring up the inventory bar.
Chapter 1: The Mill
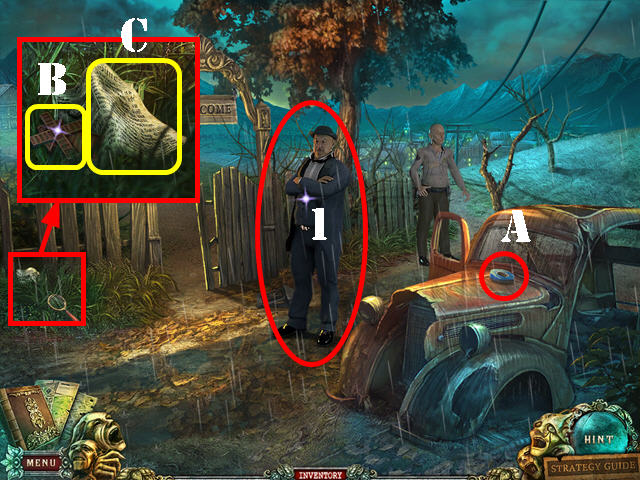
- Talk to the mayor (1).
- Take the INSULATING TAPE (A).
- Examine the fence; take the MILL INLAY (B); click on the paper twice to add a journal page clue to your journal (C).
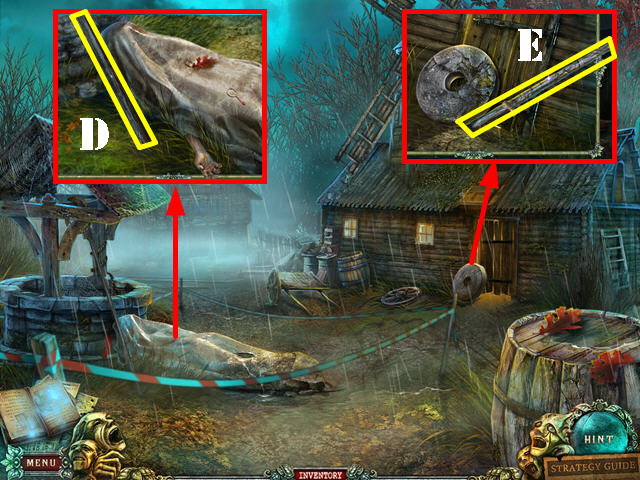
- Go through the door; talk to the sheriff.
- Examine the body on the ground; take the WOOD BEAM (D).
- Zoom into the door; put the WOOD BEAM on the millstone and click on the beam (E).
- Enter the mill.
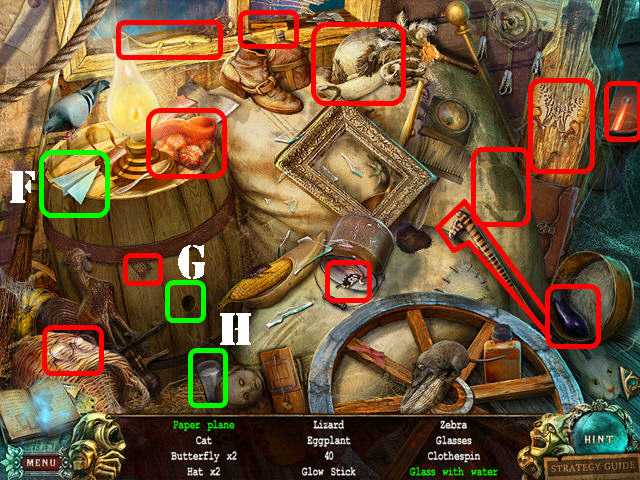
- Play the HOS.
- Click on the paper 4 times; take the paper plane (F).
- Remove the cork (G); take the glass with water (H).
- The GLOW STICK will be added to inventory.
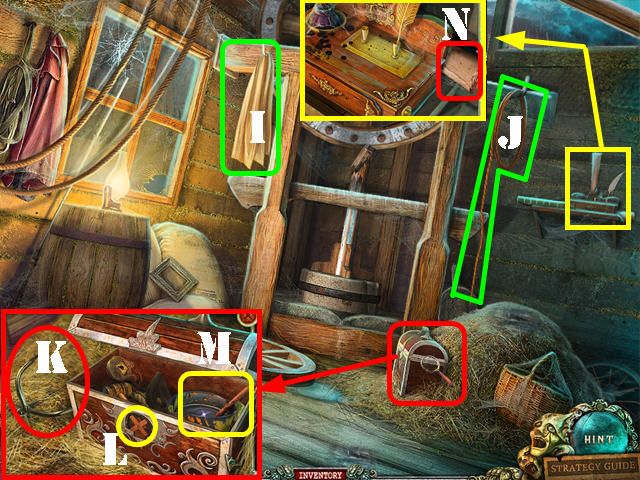
- Take the WHITE LINEN (I) and the ROPE (J).
- Click on the stack of hay twice; zoom into the chest and take the HOOK (K).
- Put the MILL INLAY on the lock (L).
- Click on the lock; remove the sheet and take the PITCH (M).
- Examine the shelf; take the journal page clue (N).
- Go outside.
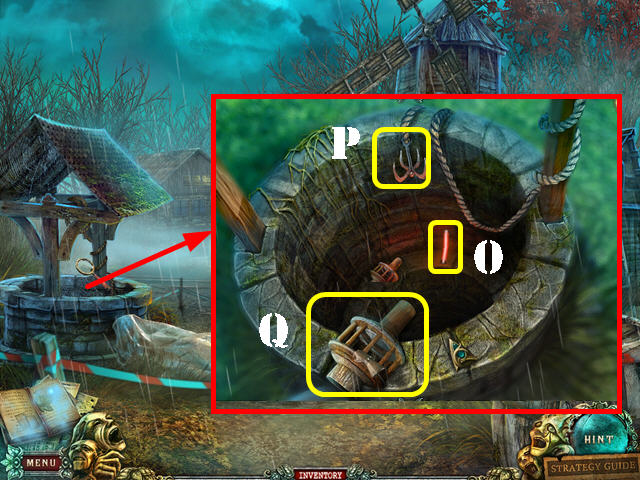
- Zoom into the well.
- Place the GLOW STICK in the well (O).
- Click on the rope; attach the HOOK to it (P).
- Click on the hook to attach it to the item in the well. Click on the hook again and take the MILL GEAR (Q).
- Go back into the mill.
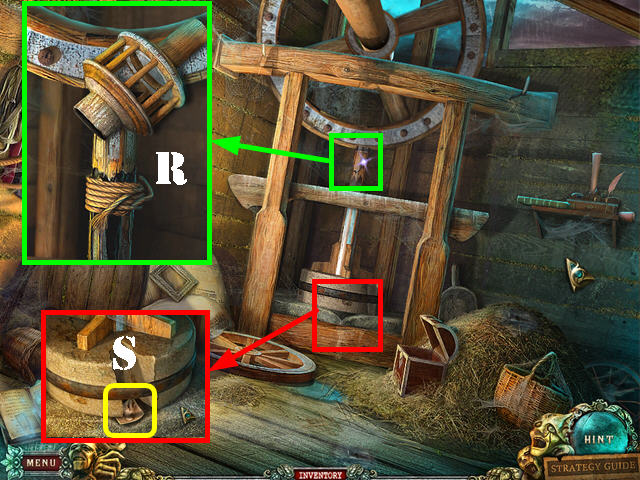
- Zoom into the top of the shaft and click on it (R).
- Use the PITCH on the shaft.
- Wrap the ROPE around the shaft.
- Place the MILL GEAR on the shaft.
- Zoom into the bottom of the shaft; take the PHOTO (S) after you click on it several times.
- Walk down twice.
- Give the PHOTO to the mayor.
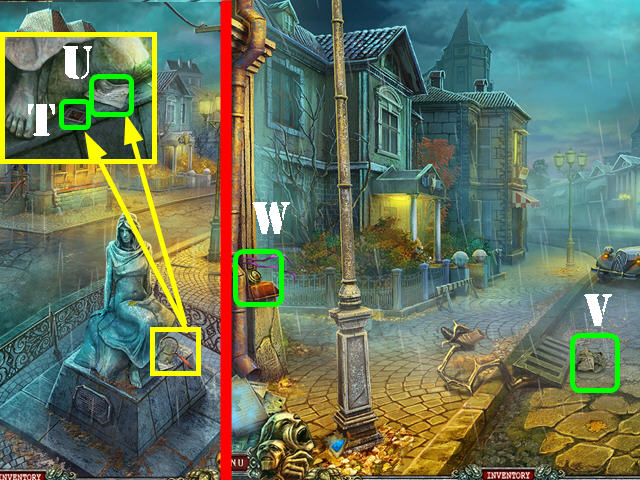
- Go towards the right after the policeman and the mayor disappear.
- Examine the base of the statue; take the SLIDE (T) and the journal page clue (U).
- Head right.
- Zoom into the paper by the grate; take the journal page clue (V).
- Remove the leaves; take the LENS (W).
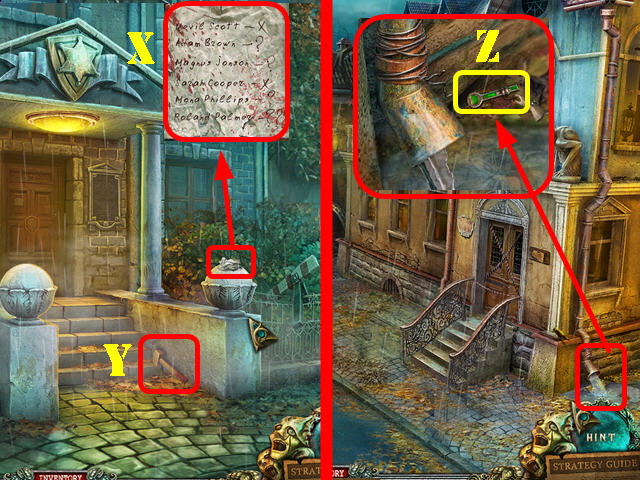
- Go towards the center building; talk to the sheriff.
- Examine the post; take the journal page clue (X).
- Grab the HAMMER (Y).
- Click down twice and head towards the center building.
- Zoom into the rain spout; take the GREEN KEY (Z).
- Walk down and go towards the guard's hut.
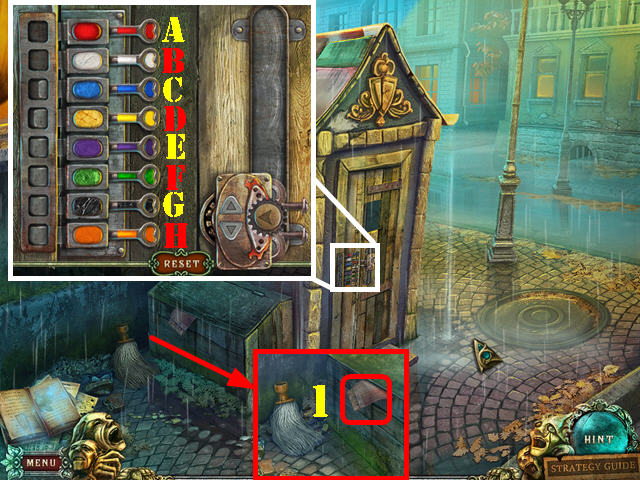
- Zoom into the mop head; take the journal page clue (1).
- Examine the door; put the GREEN KEY on the lock to activate a puzzle.
- Your goal is to place the keys next to their matching slots. Use the arrows on the slider to switch the keys.
- To solve the puzzle, switch the keys in this order: Grab D, E and place them in F, G. Grab A, B and place them in D, E. Grab E, F, and put them in A, B. Your red and white keys should now be in the first two slots.
- Grab G, H and put them in E, F. Grab C, D and put them in G, H. Put the keys on the slider in C, D. Grab G, H and put them in C, D. Grab D, E and put them in G, H. Grab F, G and put them in C, D. Your blue and yellow keys should now be in the 3rd and 4th slots.
- Put the green and black keys in spots F, G to complete the puzzle.
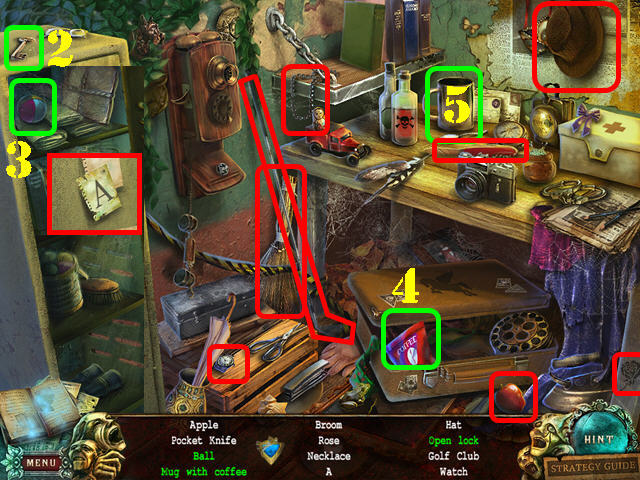
- Open the door to trigger a HOS.
- Take the key (2) and place it on the lock on the locker; take the open lock.
- Open the locker; take the ball (3).
- Open the suitcase. Put the coffee (4) into the mug (5); take the mug with coffee.
- The POCKET KNIFE will be added to inventory.
- Walk down and head towards the archive (center building).
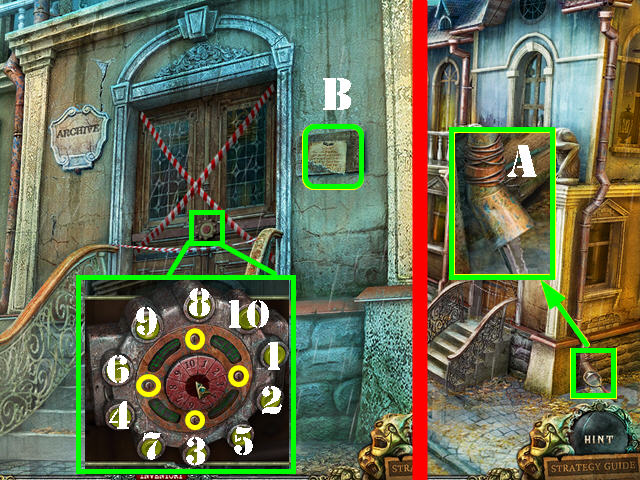
- Zoom into the rain spout; cut the wires with the POCKET KNIFE 4 times and take the TORN BELT (A).
- Zoom into the door; remove the police tape.
- Look at the journal note clue (B).
- Zoom into the door; remove the 4 screws with the POCKET KNIFE (yellow).
- You have to click on the lights in the correct order to solve the puzzle.
- Please look at the screenshot for the correct order.
- Go into the archive.
Chapter 2: The Archive
- Click on the shaking portrait for the ghost to appear.
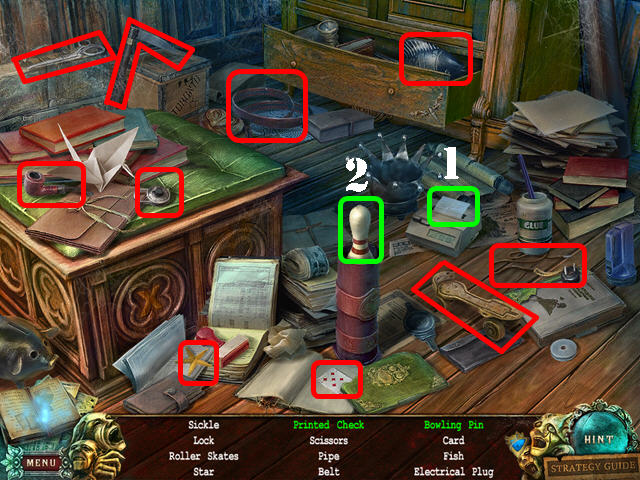
- Play the HOS.
- Click on the printer; take the printed check (1).
- Click on the tube; take the bowling pin (2).
- The ELECTRICAL PLUG will be added to inventory.
- Go right.
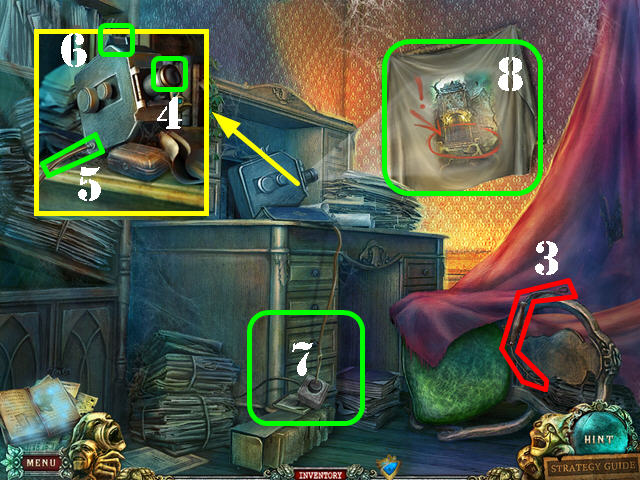
- Take the BUCKET HANDLE on the chair (3).
- Zoom into the projector; put the LENS (4), ELECTRICAL PLUG (5), and the SLIDE (6) into the right spots.
- Click on the plug hanging down (7).
- Zoom into the picture; place the WHITE LINEN over it and click on the linen (8).
- Walk down.
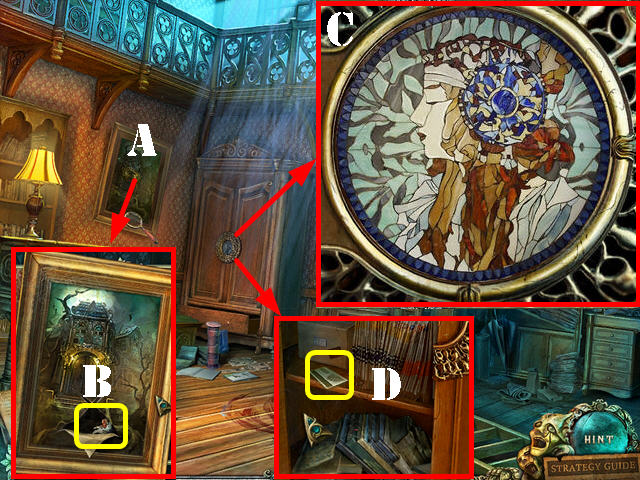
- Zoom into the portrait; it's the same house shown on the projector (A).
- Use the POCKET KNIFE on the portrait twice.
- Click on the tear and take the PUZZLE PIECE (B).
- Take a closer look at the wardrobe lock; put the PUZZLE PIECE on it to activate a puzzle.
- You will receive one puzzle piece at a time; put the pieces into the correct spots.
- Please look at the screenshot for the solution (C).
- Click on the knob; zoom into the door and take the KEY CARD (D).
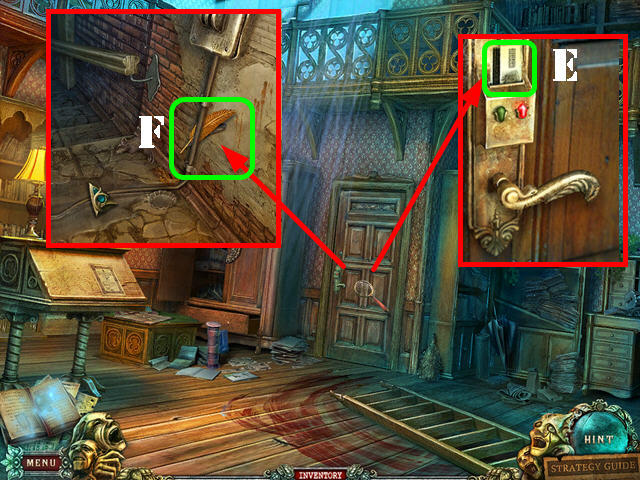
- Examine the door; use the KEY CARD in the lock (E).
- Click on the key card; open the door and look in it.
- Take the GOLDEN QUILL (F).
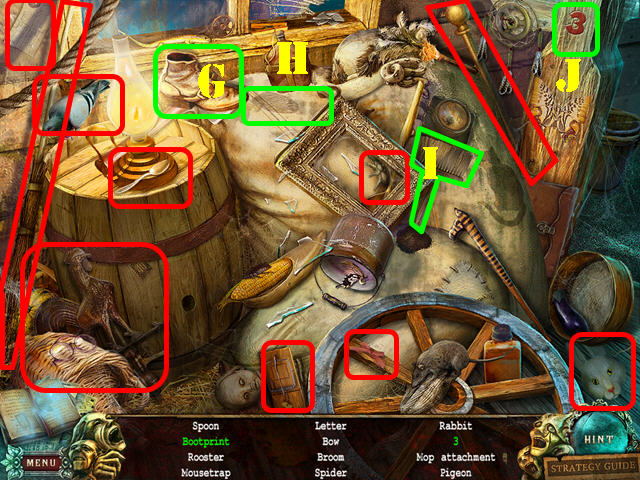
- Go back into the mill.
- Play the HOS.
- Click on the shoe (G); take the bootprint (H).
- Use the brush (I); on the board twice and take the 3 (J).
- The MOP HANDLE will be added to inventory.
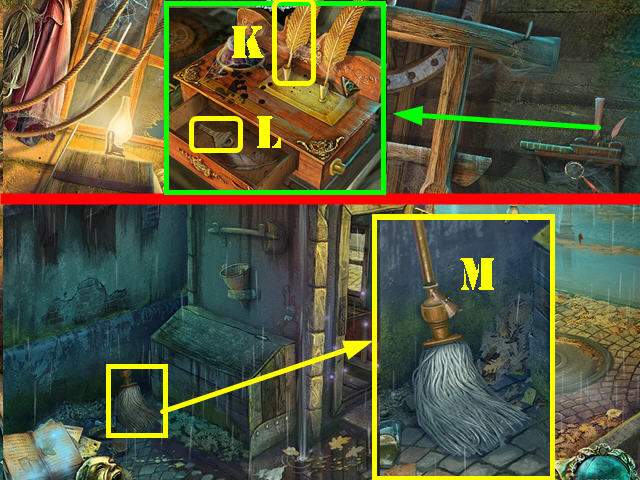
- Examine the shelf; put the GOLDEN QUILL (K) in the holder and take the KEY (L).
- Return to the guard's hut.
- Zoom into the mop head; attach the MOP HANDLE to it and take the MOP (M).
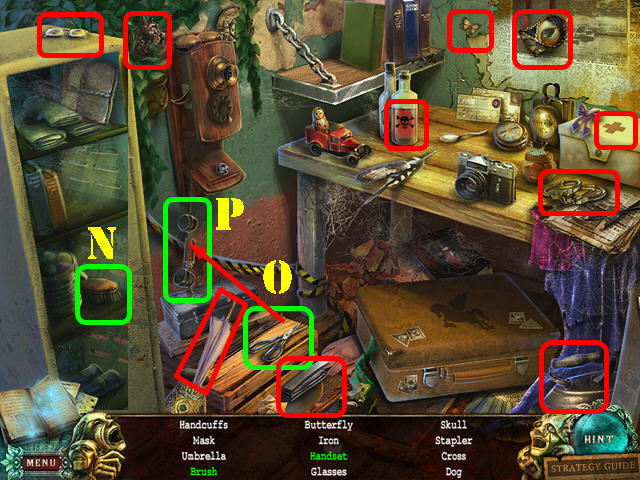
- Play the HOS.
- Open the locker door; take the brush (N).
- Cut the cord with the scissors (O); take the handset (P).
- The STAPLER will be added to inventory.
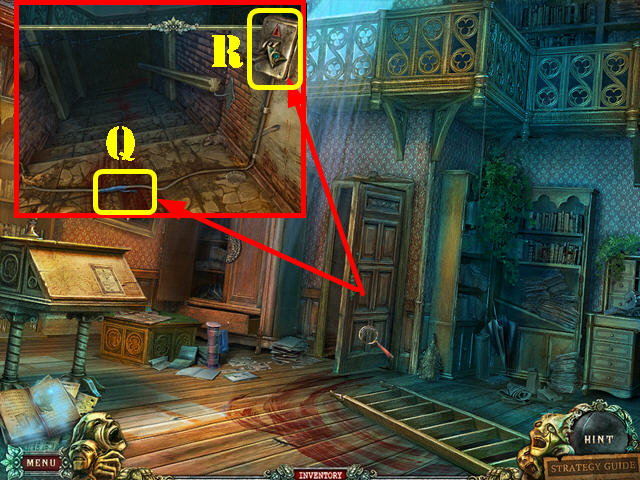
- Return to the inside of the archive.
- Look inside the door.
- Use the MOP on the water 2 times.
- Click on the left wire and put the INSULATING TAPE on the wires (Q).
- Click on the switch (R) and go through the door.
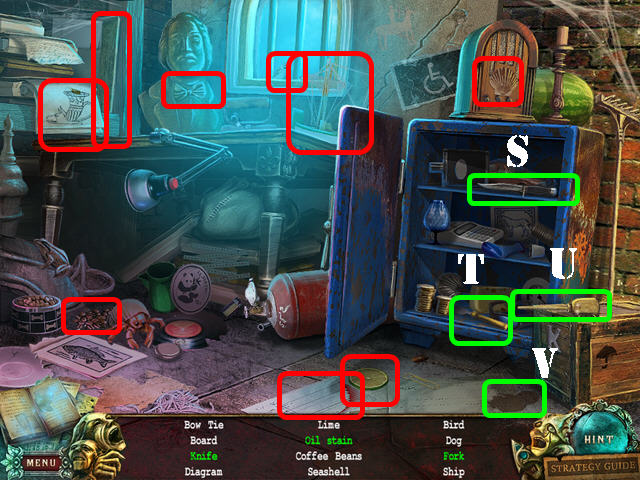
- Play the HOS.
- Open the safe door; take the knife (S) and the fork (T).
- Click on the oil can (U) and then on the oil stain (V).
- The WOOD BOARD will be added to inventory.
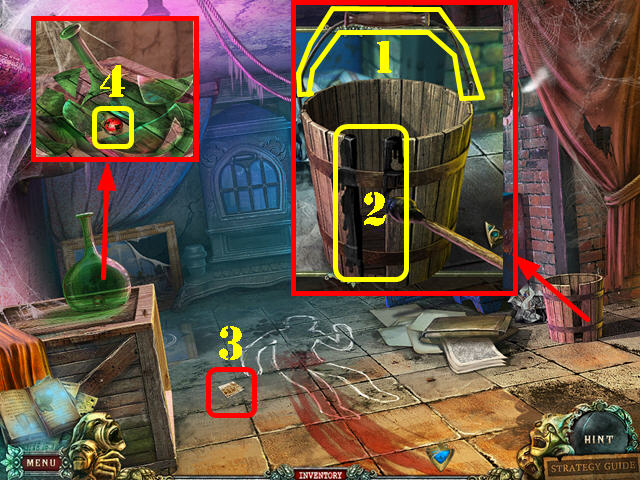
- Examine the bucket; add the BUCKET HANDLE to it (1).
- Place the PITCH in the gap (2).
- Put the WOOD BOARD in the gap.
- Take the BUCKET.
- Look at and take the journal page clue (3).
- Examine the flask; break it with the HAMMER and take the RED BUTTON (4).
- Exit the archive and head left to reach the dock.
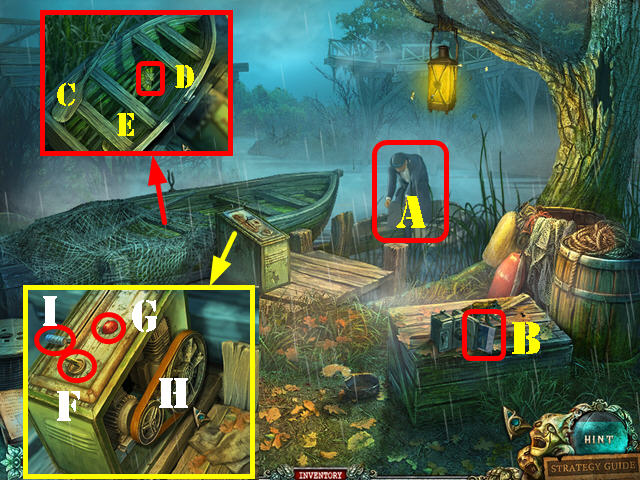
- Click on the mayor (A); he takes off on the boat.
- Take the journal page clue in the camera (B).
- Examine the boat; cut the net with the POCKET KNIFE 3 times.
- Click on the oar (C).
- Use the BUCKET in the boat 4 times to remove the excess water.
- Take the POLICE SIGN PIECE (D) and click on the oar (E).
- Zoom into the mechanism; put the KEY in the lock (F).
- Insert the RED BUTTON into the slot (G).
- Put the TORN BELT on the mechanism and click on it once (H).
- Use the STAPLER on the belt.
- Click on the KEY and then on the red button.
- Click on the lever (I).
- Go forward to go across the river.
Chapter 3: Across the River
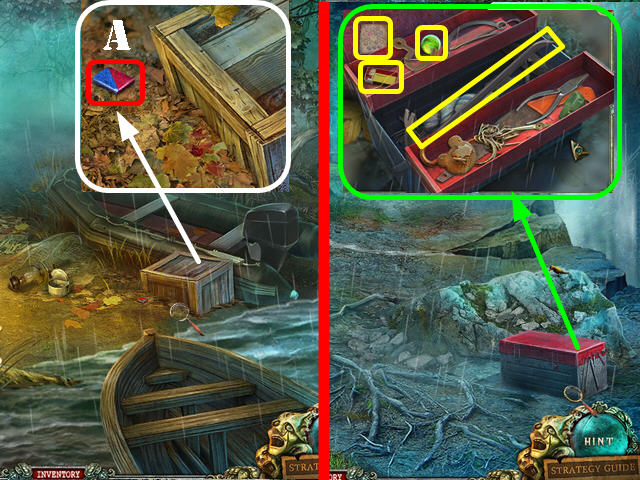
- Examine the crate; take the LATCH (A).
- Go forward.
- Examine the toolbox; put the LATCH on the left and open both latches.
- Take the MATCHES, CROWBAR, STRANGE CODE, and BUTTON GREEN (yellow).
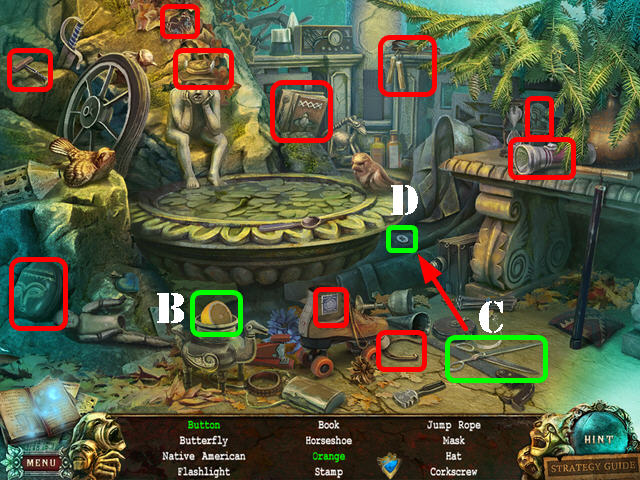
- Play the HOS.
- Open the lid; take the orange (B).
- Cut the string around the button with the scissors (C); take the button (D).
- The JUMP ROPE will be added to inventory.
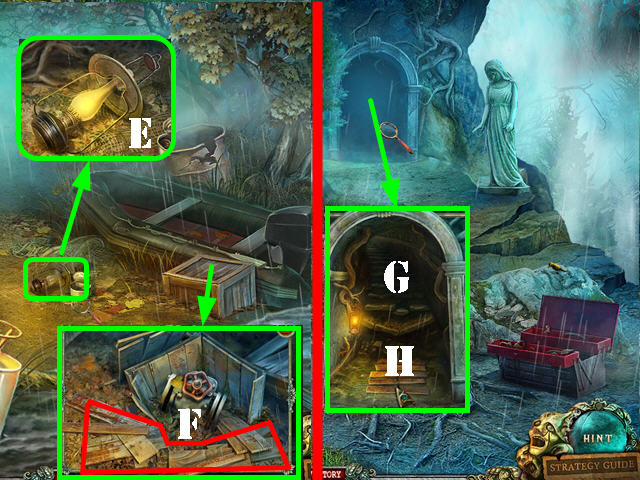
- Walk down.
- Zoom into the broken lamp; put the MATCHES in it; take the LIT LAMP (E).
- Zoom into the crate; use the CROWBAR on it twice and take the BOARDS (F).
- Go forward; look through the doorway and place the LIT LAMP inside (G).
- Put the BOARDS on the ground (H).
- Use the JUMP ROPE on the boards and go forward.
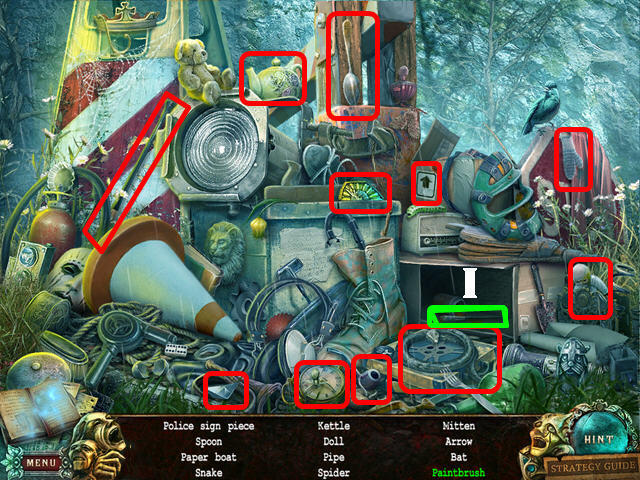
- Click on the police officer to trigger a HOS; play it.
- Open the box and take the paintbrush (I).
- The POLICE SIGN PIECE will be added to inventory.
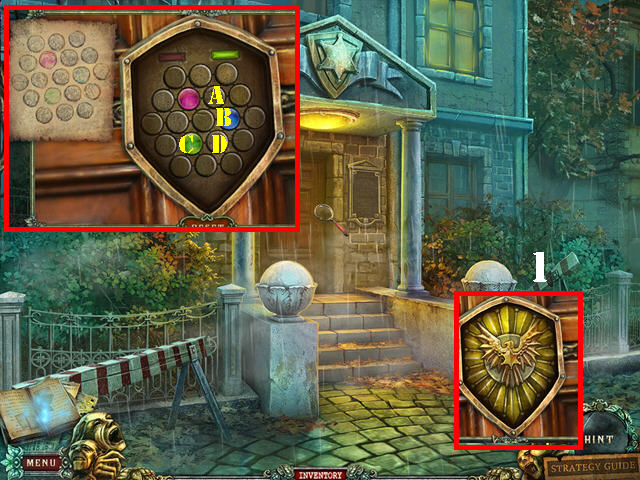
- Return to the center of town and head right. Go towards the police station on the left.
- Zoom into the door; put the 2 POLICE SIGN PIECES in the slot (1).
- Click on the sign to reveal a puzzle; put the STRANGE CODE on the side of the lock.
- Put the BUTTON GREEN on the lock to activate the puzzle.
- To solve the puzzle, click on the buttons in this order: B x 5, A x 4, C x 5, A x 2, D x 3, and A x 3.
- Open the door and go through it.
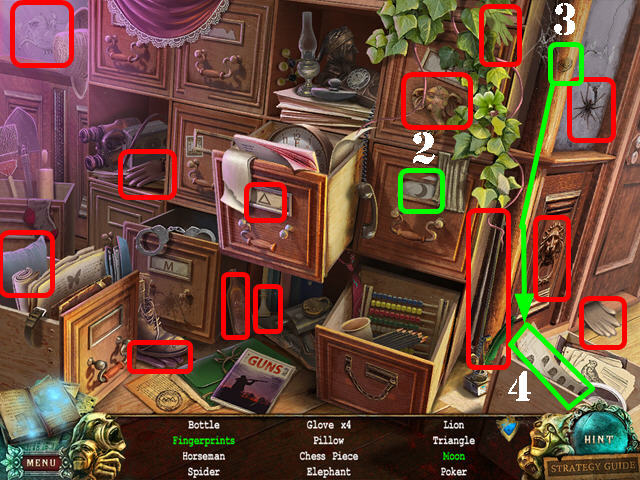
- Play the HOS.
- Remove the cloth; take the moon (2).
- Drag the fingerprint (3) to the card (4); take the fingerprints.
- The POKER will be added to inventory.
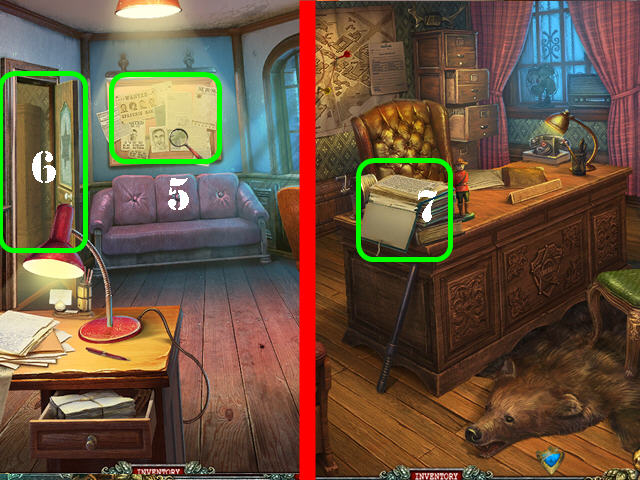
- Click on the bulletin board to add a journal page clue (5).
- Open the left door and go through it (6).
- Look at the stack of notes on the desk (7); take the journal page clue.
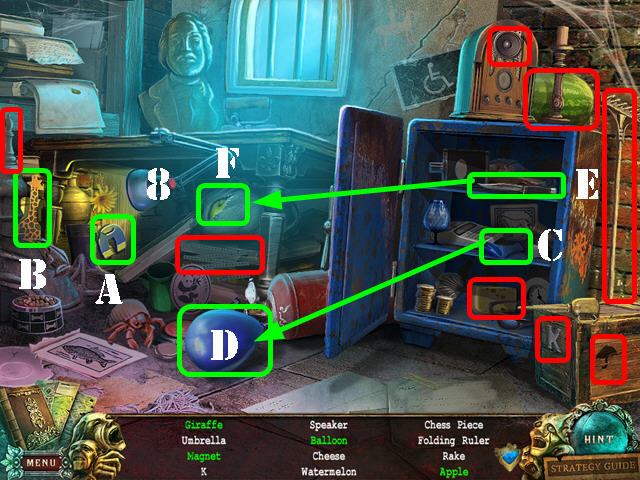
- Go back into the archive and go through the door.
- Play the HOS.
- Click on the lamp (8); take the magnet (A) and the giraffe (B).
- Drag the deflated balloon (C) to the tank; click on the tank and take the balloon (D).
- Cut the sack with the knife (E); take the apple (F).
- The SPEAKER will be added to inventory.
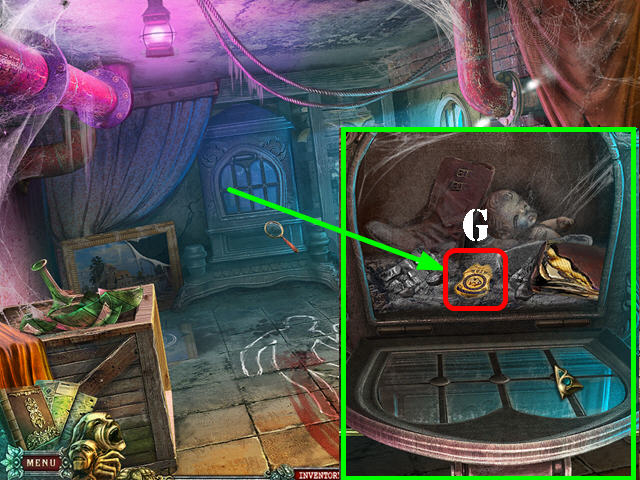
- Examine and open the oven door.
- Use the POKER in the oven and take the POLICE BADGE (G).
- Walk down.
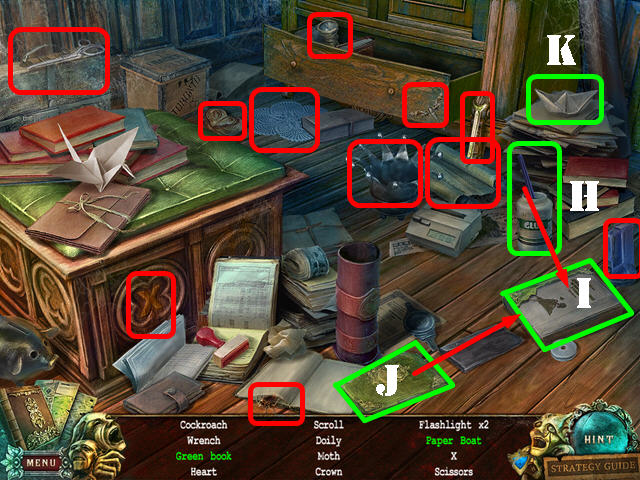
- Play the HOS.
- Put glue (H) on the book (I) 3 times. Drag the cover (J) to the book and take the green book.
- Click on the paper 3 times; take the ship (K).
- The WRENCH will be added to inventory.
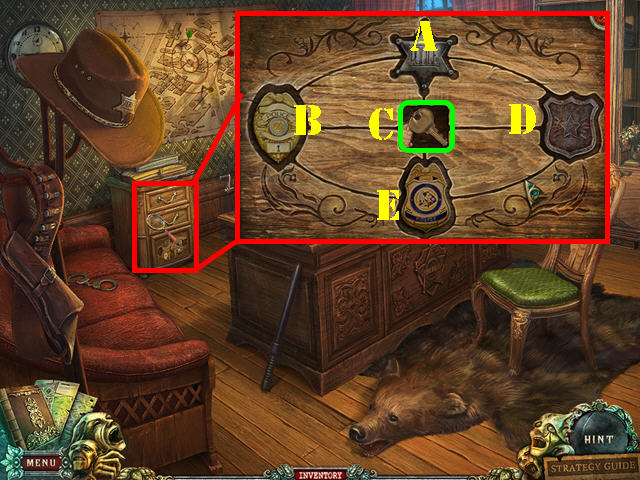
- Return to the police station and go into the office on the left.
- Examine the cabinet and put the POLICE BADGE on it to activate a puzzle.
- Put the badges into the right slots.
- To solve the puzzle, click on the badges in this order: B, E, C, A, B, C, D, E, C, B, E, and C.
- Take the KEY FROM A POLICE VAN (green).
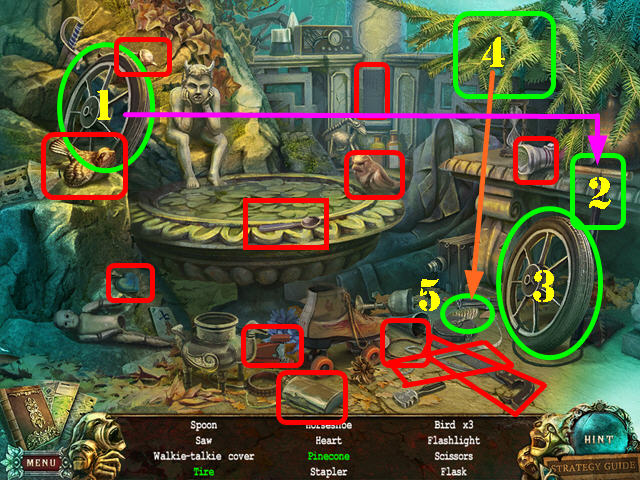
- Take the boat back to the other side of the river and go forward.
- Play the HOS.
- Drag the deflated tire (1) to the pump (2); click on the pump twice and take the tire (3).
- Click on the branches (4); take the pinecone (5).
- The WALKIE-TALKIE COVER will be added to inventory.
- Go forward.
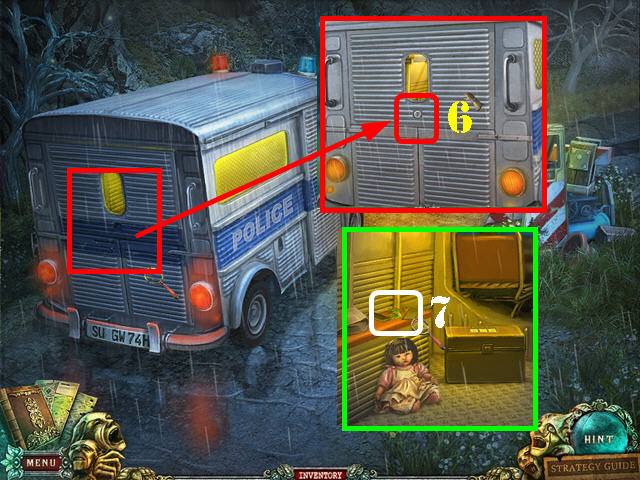
- Examine the back of the van; use the KEY FROM A POLICE VAN in the lock (6).
- Click on the lock and open the 2 parts of the back door.
- Examine the broken walkie-talkie (7).
- Put the SPEAKER and the WALKIE-TALKIE COVER next to the other parts.
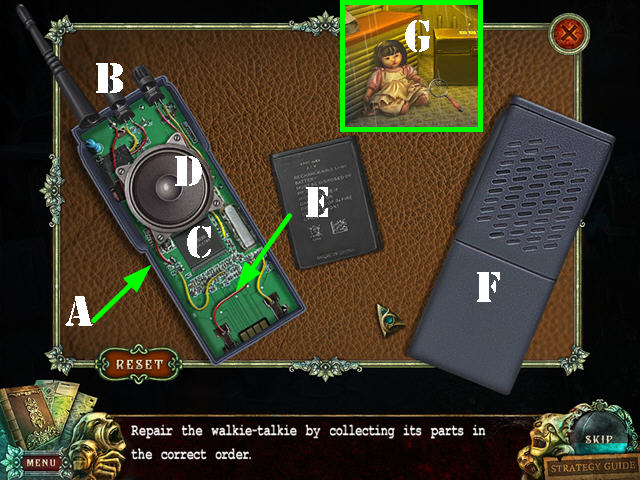
- Place the motherboard on the left piece (A).
- Place the antenna above the left piece (B).
- Put the processor as shown (C).
- Put the wires over the motherboard and then put the SPEAKER (D) on.
- Put the battery (E) at the bottom and place the WALKIE-TALKIE COVER on (F).
- Take the WALKIE-TALKIE.
- Click on the doll (G).
- Give the WALKIE-TALKIE to the doll.
- Go forward.
Chapter 4: The Train
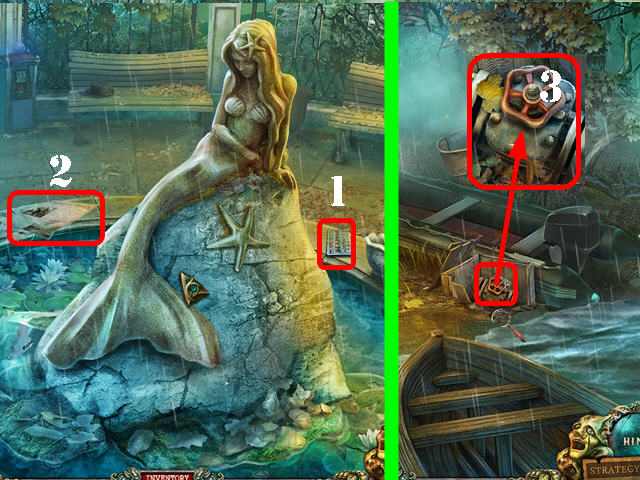
- Zoom into the fountain; take the CODE LABEL (1).
- Look at and take the journal page clue (2).
- Walk down 4 times.
- Zoom into the valve (3); use the WRENCH on the VALVE 3 times and take it.
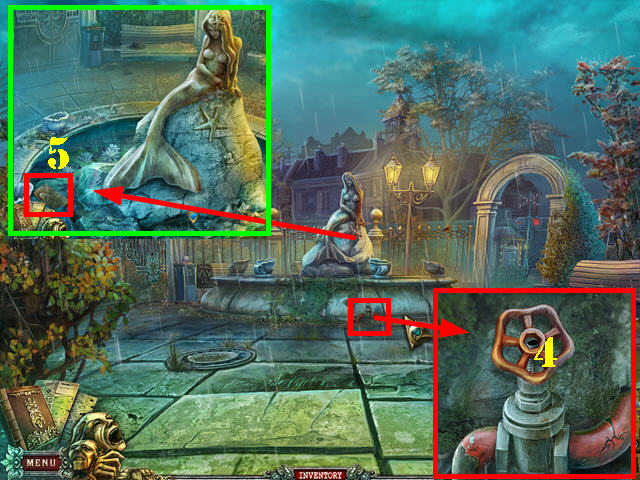
- Go back to the fountain.
- Examine the tap; put the VALVE on it (4).
- Zoom into the fountain; take the OVEN MITT (5).
- Click down; go right and go into the train.
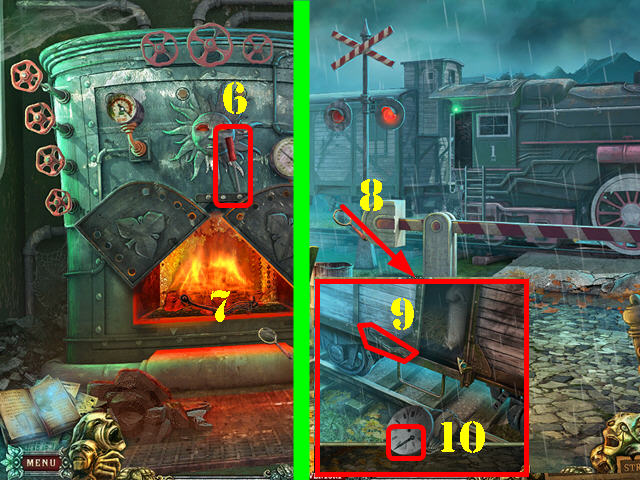
- Click on the lever (6); put the OVEN MITT into the oven (7) to receive the TRAIN CAR LEVER.
- Exit the train and zoom into the undercarriage (8).
- Use the TRAIN CAR LEVER on the door and click on it (9); take the DIAL NEEDLE (10).
- Go back into the train.
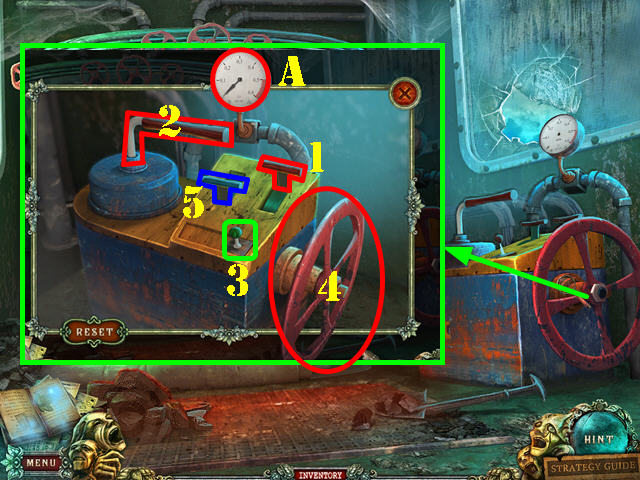
- Zoom into the mechanism; put the DIAL NEEDLE on the thermostat (A) to activate a puzzle.
- You have to click on the levers in the correct order so that the boiler does not overheat.
- Solution: Red lever (1) Large Lever (2), Green Lever (3), Valve (4), and Blue Lever (5).
- Go forward down the path after the train moves.
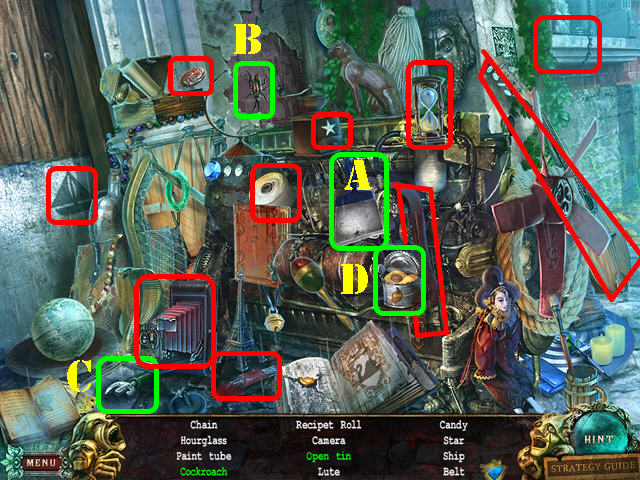
- Play the HOS.
- Use the scraper (A) on the wall; take the COCKROACH (B).
- Open the tin can with the can opener (C); take the open tin (D).
- The RECEIPT ROLL will be added to inventory.
- Head right.
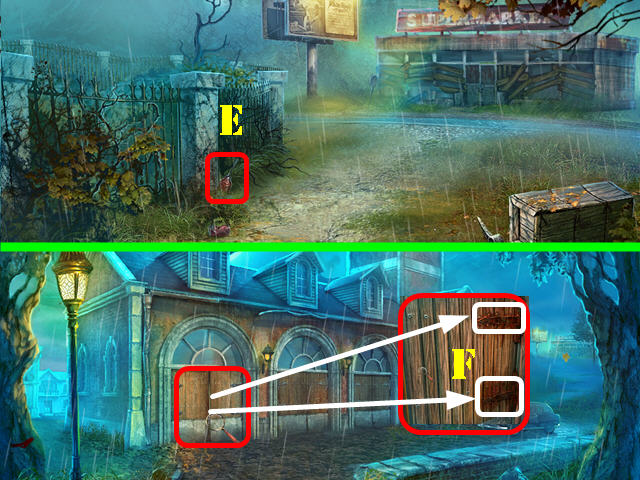
- Take the OILER (E).
- Walk down.
- Zoom into the left door; use the OILER on the 2 rusty hinges (F).
- Open the door and go through it to access the fire station.
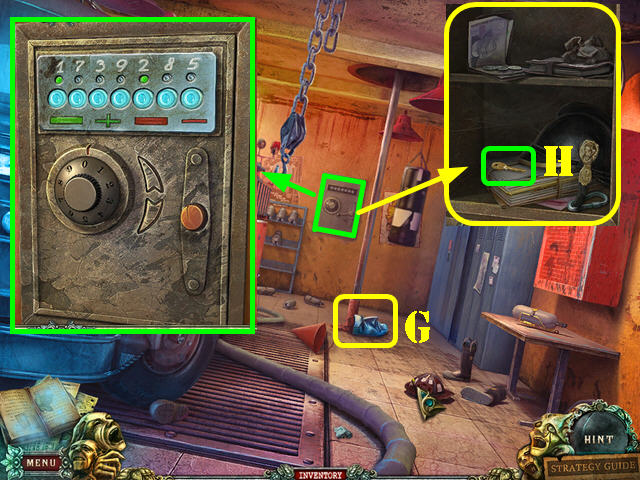
- Take the SAD MASK 1/2 (G).
- Zoom into the safe; put the CODE LABEL on it to activate a puzzle ().
- To obtain the solution, you must first decipher the equations. Use the numbers that light up on the dial as a clue. If both numbers are green, add them both up. If one number is red, subtract the numbers.
- First: 1 + 2 = 3, Second: 3 minus 2 = 1, Third: 3 + 5 = 8, Fourth: 1 + 3 = 4, Fifth: 9 minus 2 = 7, Sixth: 8 minus 3 = 5, and Seventh: 1 + 7 = 8.
- You must turn the dial (using the arrows) to the result of each equation and click on the red button for each result.
- The solution: is 3-1-8-4-7-5-8.
- Take the SUPERMARKET KEY (H) from inside the safe.
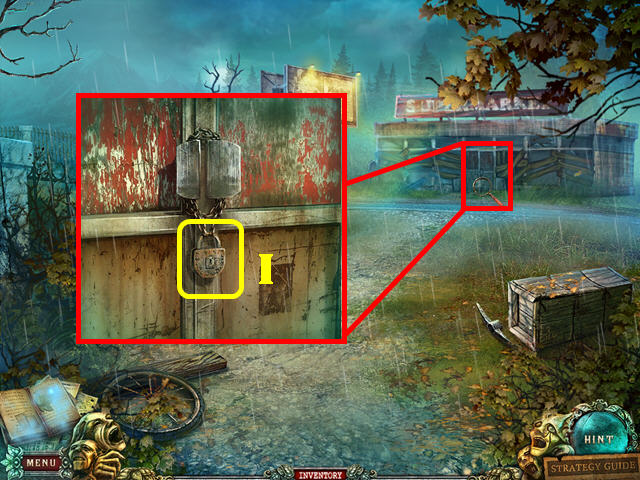
- Exit the fire station; go right and zoom into the supermarket door.
- Use the SUPERMARKET KEY in the lock (I).
- Open the door and enter the supermarket.
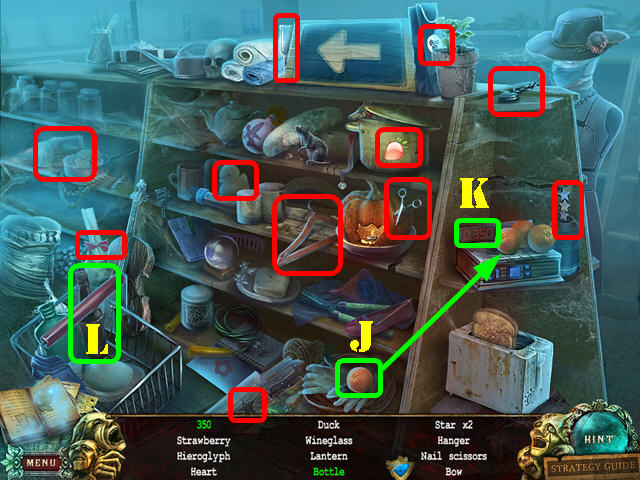
- Play the HOS.
- Remove the leaf in the lower right; take the orange (J) and place it on the scale; take the 350 (K).
- Remove the cloth; take the bottle (L).
- The NAIL SCISSORS will be added to inventory.
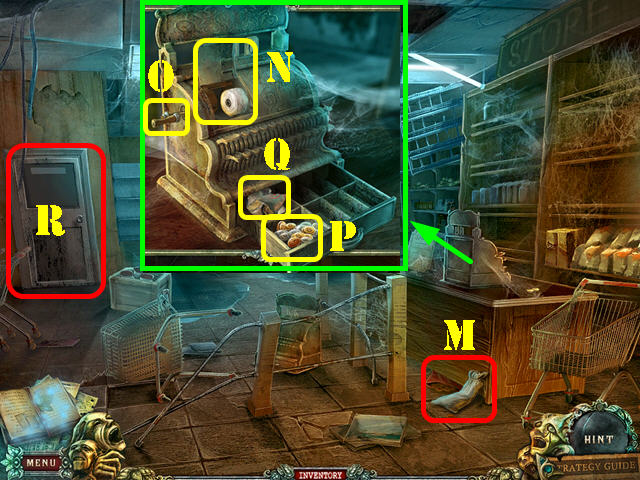
- Take the EMPTY SACK (M).
- Zoom into the cash register; open the lid and put the RECEIPT ROLL in it (N).
- Close the lid and click on the handle (O) to open the drawer.
- Take the HANDFUL OF COINS (P) and the journal page clue (Q).
- Open the left door (R) and go through it.
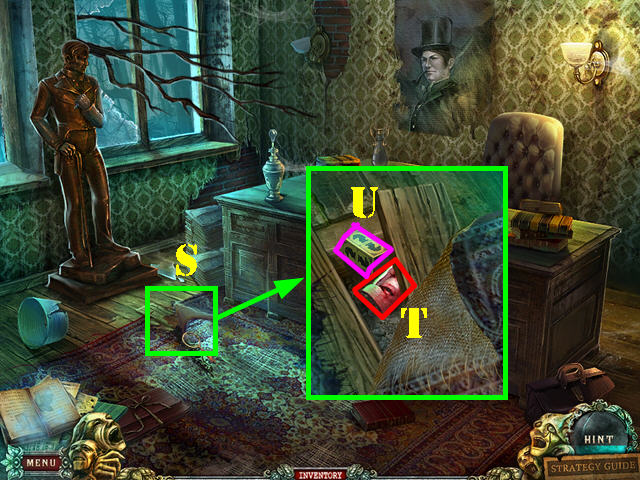
- Zoom into the carpet (S); cut it with the NAIL SCISSORS and click on the cut carpet.
- Remove the nails with the CROWBAR by clicking on each nail twice.
- Click on the board; take the HAPPY MASK 1/2 (T) and the KNIGHT (U).
- Go back to the outside of the fire station.
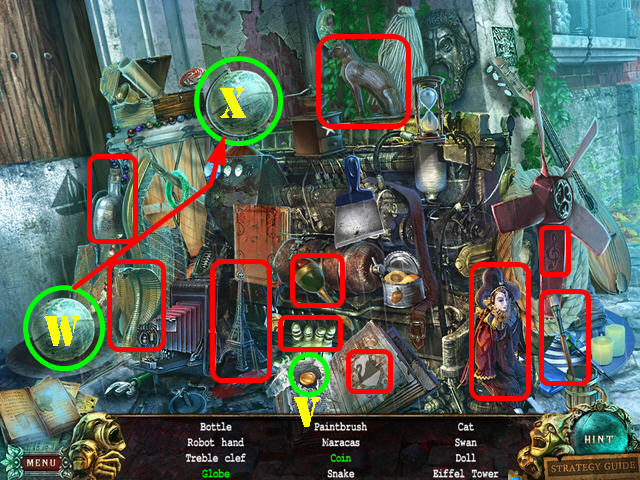
- Play the HOS.
- Click on the book page; take the coin (V).
- Drag the globe (W) to the stand (X); take the globe.
- The ROBOT HAND will be added to inventory.
- Walk down twice and head left.
- Talk to the ghost.
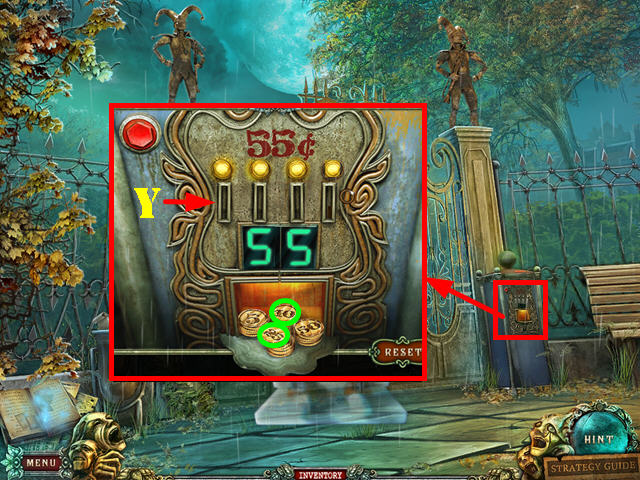
- Examine the machine; use the HANDFUL OF COINS in the slots (Y) to activate a puzzle.
- Put 4 coins into the slots that add up to fifty-five cents: add 25, 10, 10, and 10.
- Go through the gate to access the amusement park.
Chapter 5: The Amusement Park
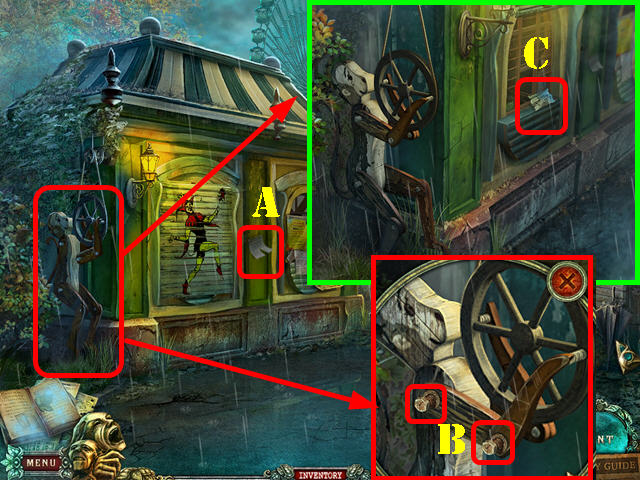
- Take the journal page clue (A).
- Examine the mechanical monkey; zoom into it and click on the loose arm.
- Put the OILER on the 2 bolts (B).
- Tighten the bolts with the WRENCH and take the journal page clue (C).
- Walk down 3 times.
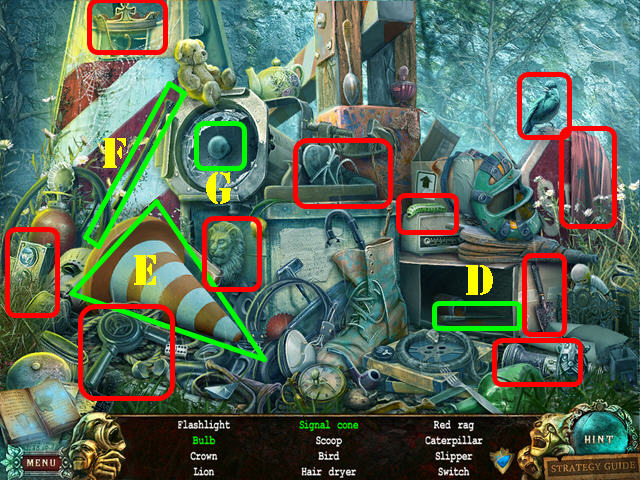
- Play the HOS.
- Put the paintbrush (D) on the cone (E) 2 times; take the signal cone.
- Use the bat (F) on the light 2 times; take the BULB (G).
- The SWITCH will be added to inventory.
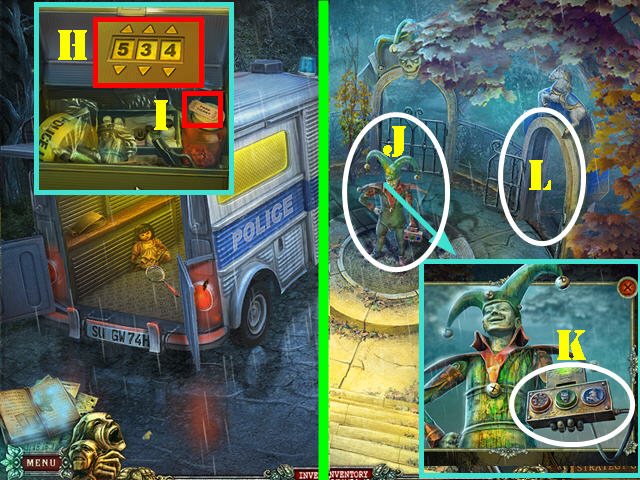
- Examine the back of the van.
- Zoom into the locked box; enter the numbers 534 on the dials (H).
- Take the TICKET from inside the box (I).
- Go back to the amusement park and go through the welcome archway.
- Zoom into the jester (J); put the ROBOT HAND on its arm.
- Put the SWITCH in the hand (K).
- Use the TICKET in the slot and click on the blue button to open the right gate.
- Go through the right gate to access the carousel (L).
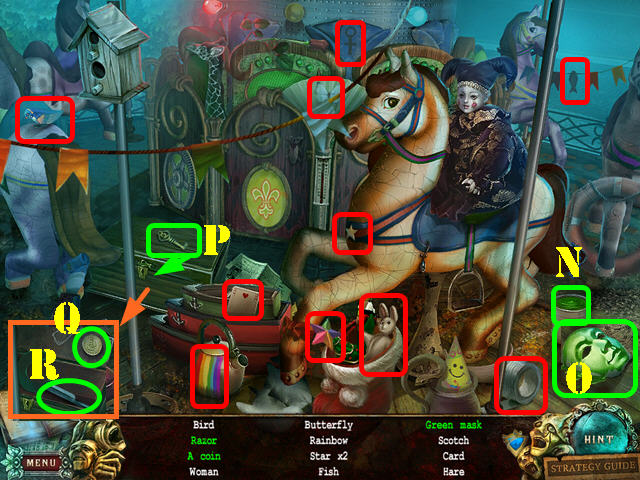
- Play the HOS.
- Pour the paint can (N) on the mask; take the green mask (O).
- Open the lock with the key (P); take the coin (Q) and the razor (R).
- The COIN will be added to inventory.
- Walk down 3 times.
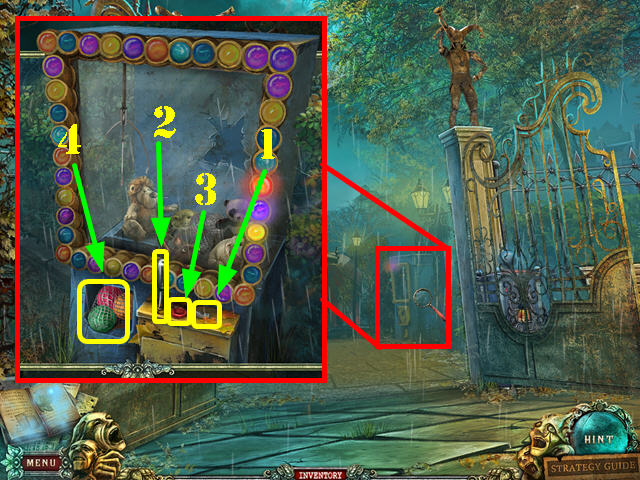
- Zoom into the machine; use the COIN in the slot (1).
- Click on the coin; pull the lever (2) and click on the red button (3).
- Take the SEVERAL BALLS (4).
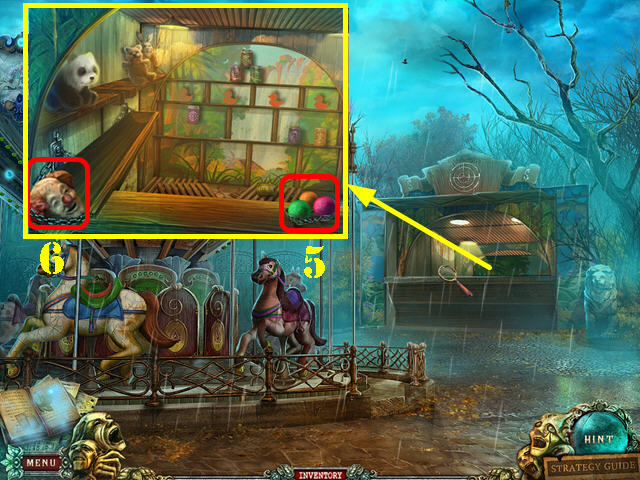
- Go back to the jester; zoom into it and click on the blue button (if it isn't already down).
- Go right to the carousel.
- Examine the booth; put the SEVERAL BALLS down (5).
- Click on the 3 balls and take the CLOWN'S HEAD (6).
- Go back to the jester; click on the red button to unlock the left gate.
- Go through the left gate to access the Ferry wheel.
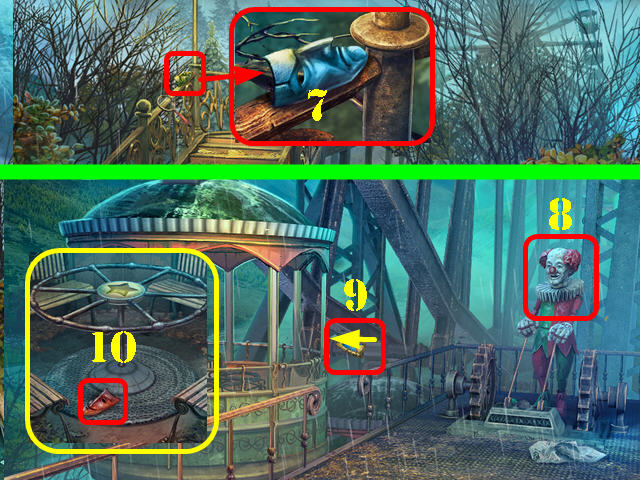
- Zoom into the railing; take the 2/2 SAD MASK (7).
- Go over the bridge.
- Put the CLOWN'S HEAD on the clown body (8).
- Go into the Ferris wheel (9).
- Open the door and take the HAPPY MASK 2/2 (10).
- Go back to the jester and click on the green button to unlock the center gate.
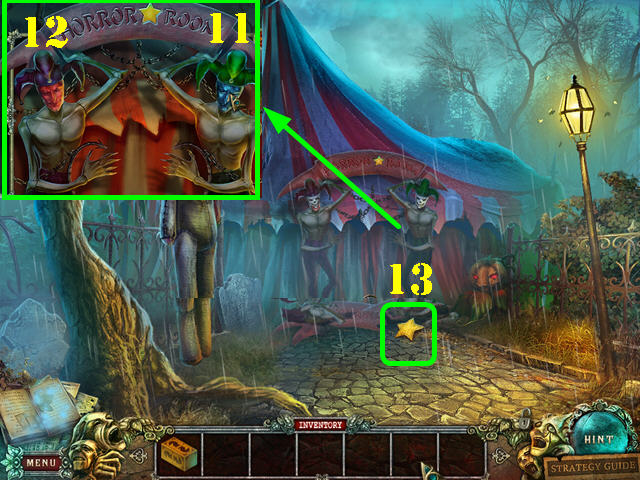
- Go through the center gate to access the horror room.
- Place the 2 SAD MASK pieces on the right jester's face (11).
- Place the 2 HAPPY MASK pieces on the left jester's face (12).
- Take the STAR-SHAPED KEY (13).
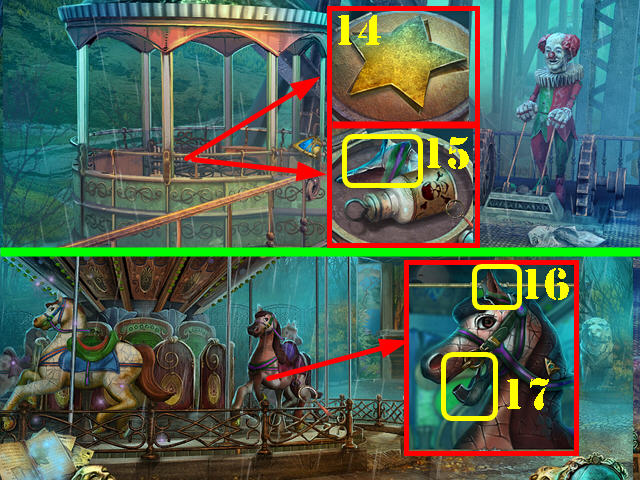
- Go back to the gondola inside of the Ferris wheel.
- Zoom into the center and put the STAR-SHAPED KEY into the slot (14).
- Open the cover and take the HORSE'S EAR (15).
- Go back to the carousel.
- Examine the right horse; put the HORSE'S EAR on its head (16) and take the PIPE (17).
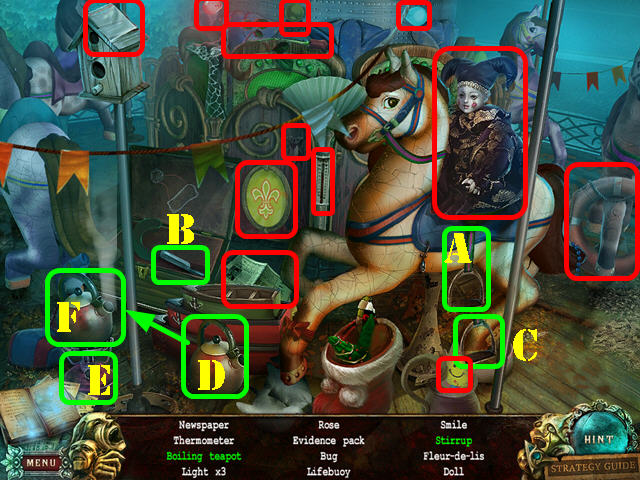
- Play the HOS.
- Cut the strap around the stirrup (A) with the razor (B) and take the stirrup (C).
- Put the teapot (D) on the burner (E); click on the burner and take the boiling teapot (F).
- The EVIDENCE PACK will be added to inventory.
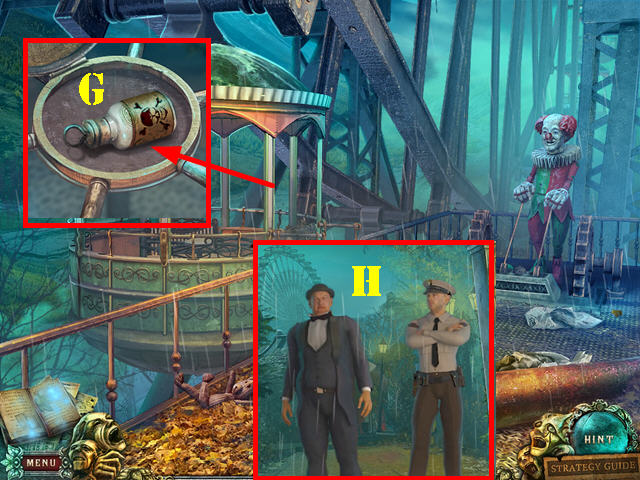
- Go back to the Ferris wheel; zoom into the wheel in the gondola.
- Use the EVIDENCE PACK to grab the MURDERER'S FINGERPRINT (G).
- Walk down until you reach a cut scene (H); you will be automatically transported to the police station.
Chapter 6: The Church
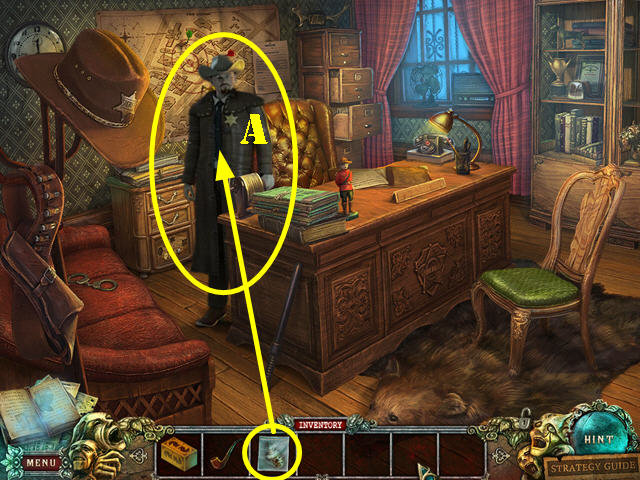
- Talk to the sheriff (A).
- Give the MURDERER'S FINGERPRINT to the sheriff.
- Walk down.
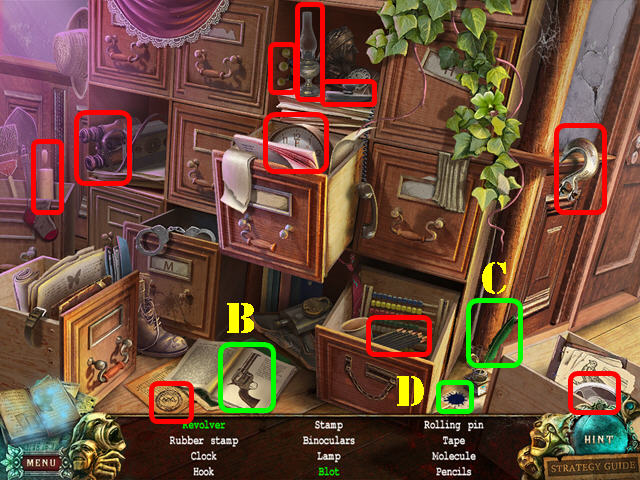
- Play the HOS.
- Turn the magazine page 4 times; take the revolver (B).
- Use the quill (C) on the paper; take the blot (D).
- The TRUCK HOOK will be added to inventory.
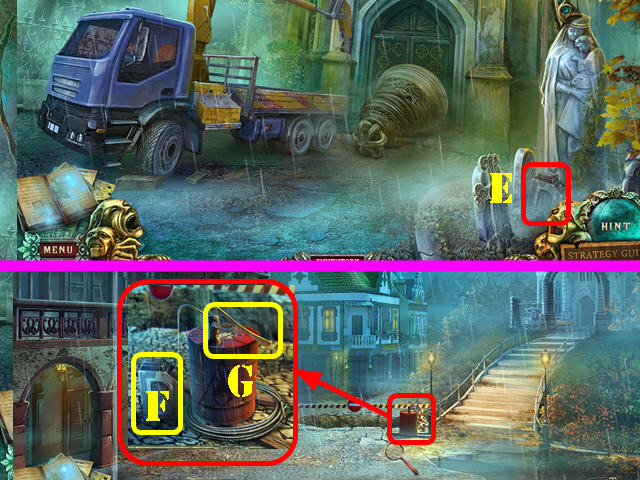
- Walk down twice; go forward and head towards the church.
- Take the EMPTY GAS CAN (E).
- Walk down.
- Zoom into the container; put the EMPTY GAS CAN on the ground (F).
- Click on the handle (G); take the FULL GAS CAN.
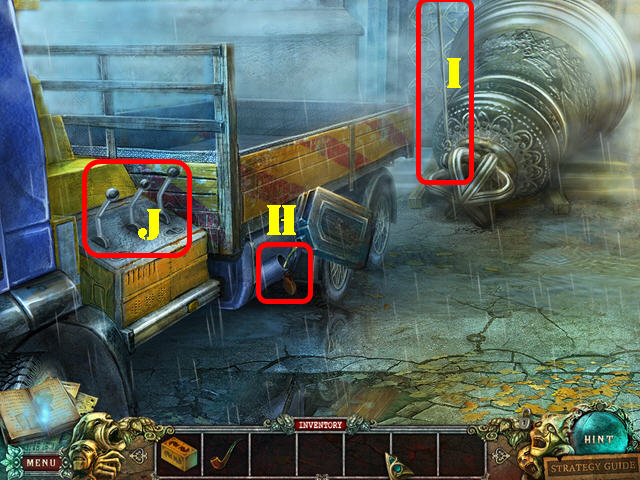
- Go towards the church and zoom into the truck.
- Open the gas cap and put the FULL GAS CAN into it (H).
- Put the TRUCK HOOK on the rope (I).
- Click on the levers (J); open the back door and go through it.
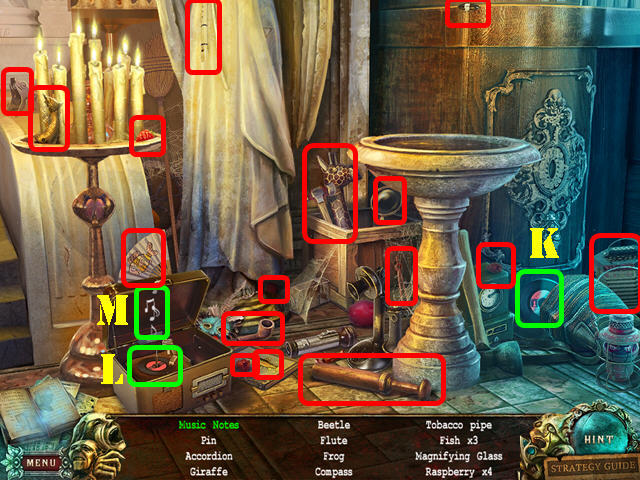
- Go towards the altar once inside the church.
- Play the HOS.
- Drag the record (K) to the player (L); take the music notes (M).
- The MUSIC SHEET will be added to inventory.
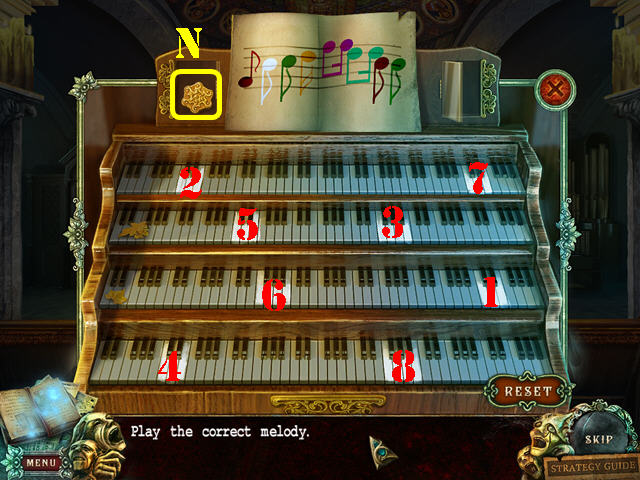
- Click down and zoom into the organ on the right.
- Put the MUSIC SHEET on the organ to activate a puzzle.
- Reproduce the sequence on the sheet music.
- Please look at the screenshot for the solution and click on the keys in the order shown.
- Take the SYMBOL (N).
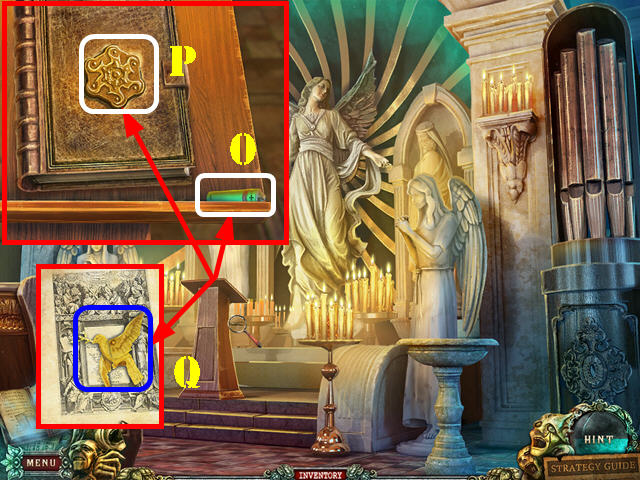
- Go forward.
- Examine the podium; take the BATTERY (O).
- Put the SYMBOL on the book (P).
- Take the DOVE (Q).
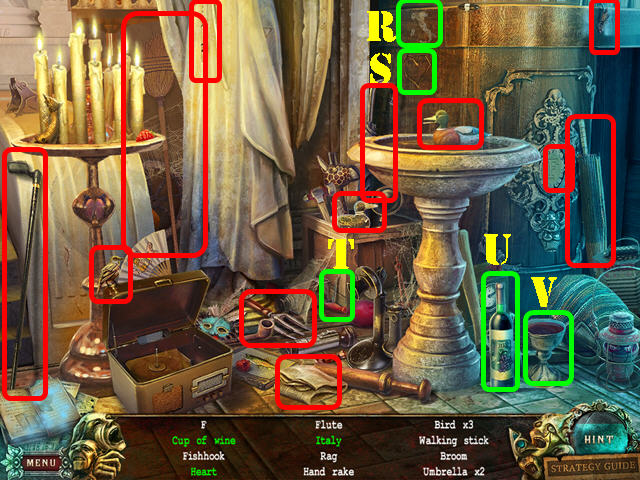
- Play the HOS.
- Open the curtain; take Italy (R) and the heart (S).
- Use the corkscrew (T) on the bottle (U); pour the wine in the glass and take the cup of wine (V).
- The RAG will be added to inventory.
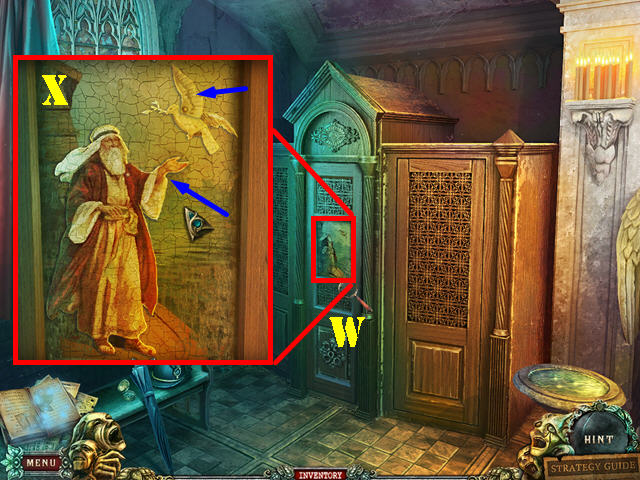
- Walk down and go left.
- Zoom into the dirty picture (W); wipe it with the RAG 3 times.
- Put the DOVE on the picture to activate a puzzle.
- Position the images in the correct positions by clicking on the arm and the wing (blue arrows).
- Please look at the screenshot for the solution (X).
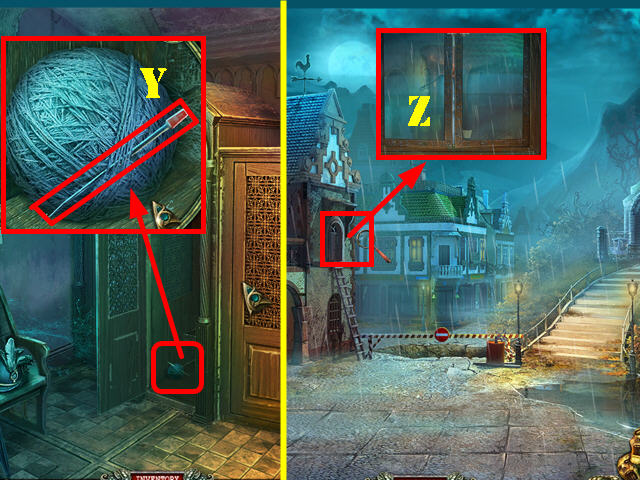
- Talk to the juror that comes out of the confessional.
- Examine the confessional; take the NEEDLE (Y).
- Exit the church and walk down twice.
- Look at the window; use the NEEDLE on the window and go into it (Z).
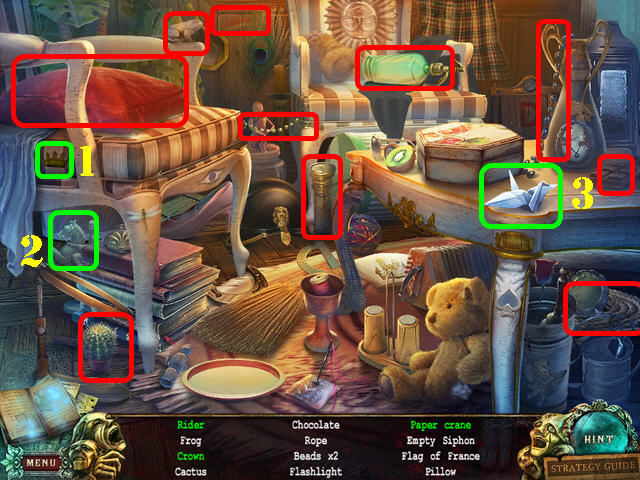
- Play the HOS.
- Move the cloth; take the crown (1) and the rider (2).
- Click on the paper 4 times; take the paper crane (3).
- The EMPTY SIPHON will be added to inventory.
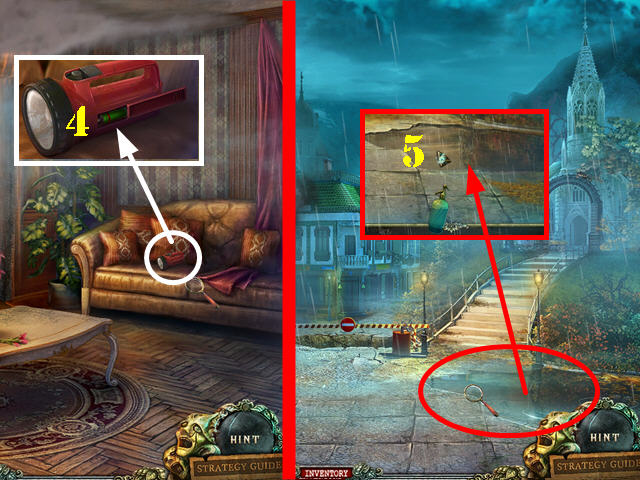
- Take a closer look at the couch.
- Open the battery cover; insert the BATTERY in the flashlight (4).
- Close the cover and take the FLASHLIGHT.
- Walk down.
- Zoom into the puddle in the lower right; put the EMPTY SIPHON in the water to obtain the FULL SIPHON (5).
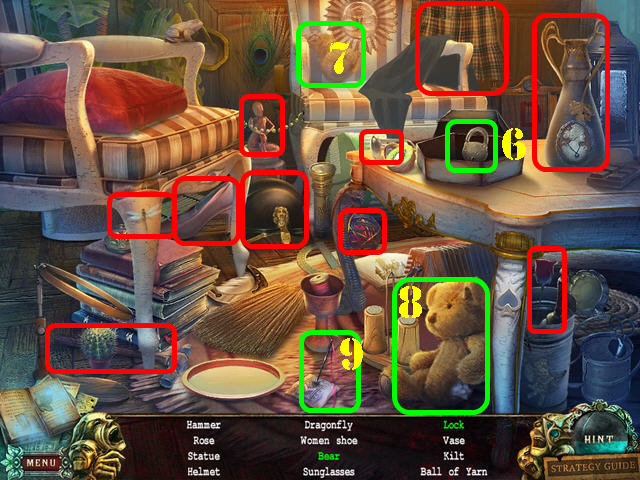
- Return to the living room.
- Play the HOS.
- Open the box and take the lock (6).
- Drag the leg (7) to the bear (8); use the needle and thread (9) on the leg. Take the bear.
- The WOMAN'S SHOE will be added to inventory.
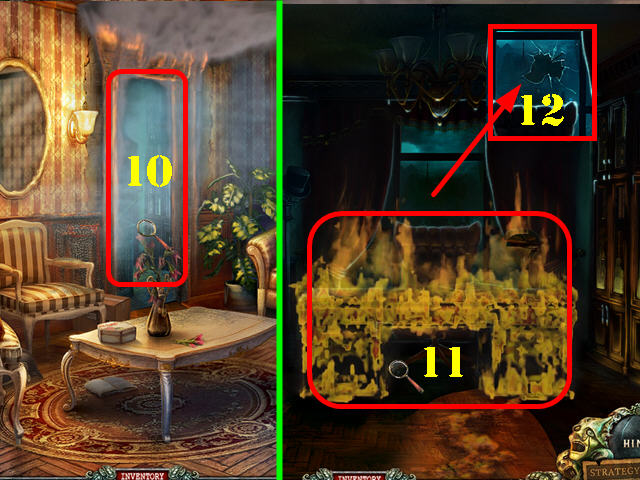
- Use the FULL SIPHON on the fire to extinguish it (10).
- Go through the door.
- Use the FULL SIPHON to extinguish the desk fire (11).
- Break the window with the WOMAN'S SHOE (12).
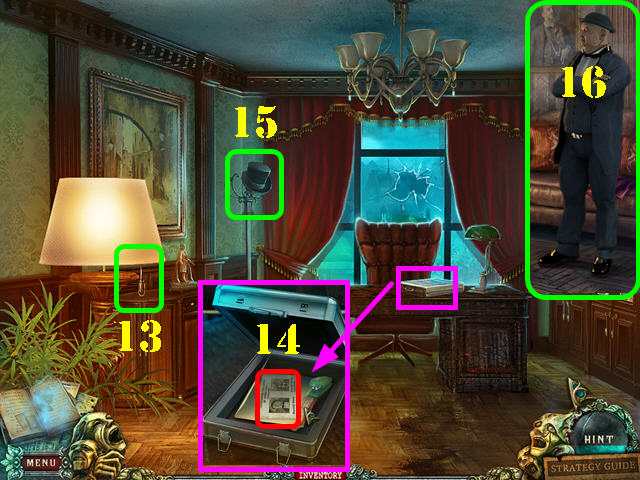
- Use the FLASHLIGHT on the scene; click on the lamp's chain (13).
- Zoom into the desk.
- Open the briefcase; open the folder and take the journal page clue (14).
- Take the TOP HAT (15).
- Walk down.
- Talk to the mayor (16).
- Take the boat back to the other side of the river. Return to the fire station and head right for a cut scene to appear.
- Go into the supermarket.
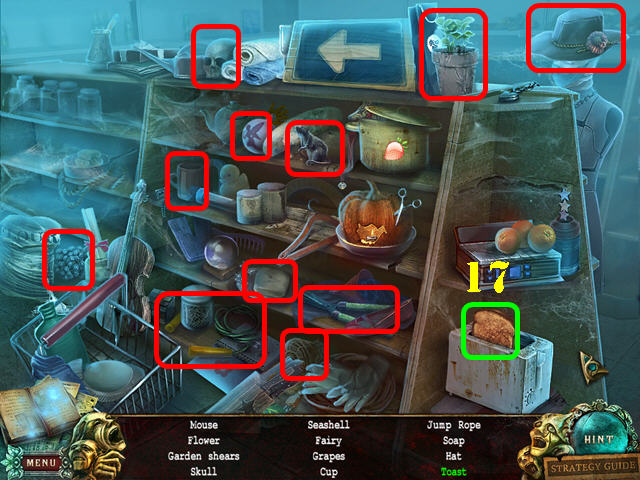
- Play the HOS.
- Click on the toaster handle; take the toast (17).
- The GARDEN SHEARS will be added to inventory.
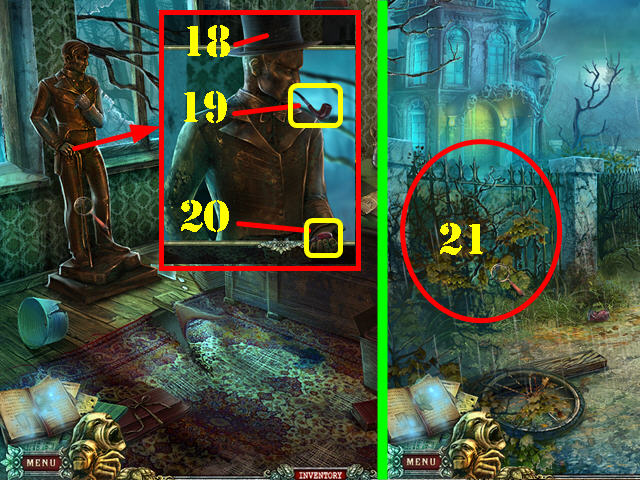
- Go into the office in the supermarket.
- Examine the statue; put the TOP HAT (18) on the head and the PIPE (19) in its mouth.
- Take JEAN'S BLOOD (20).
- Walk down twice.
- Examine the bushes (21); use the GARDEN SHEARS on them and go through the gate.
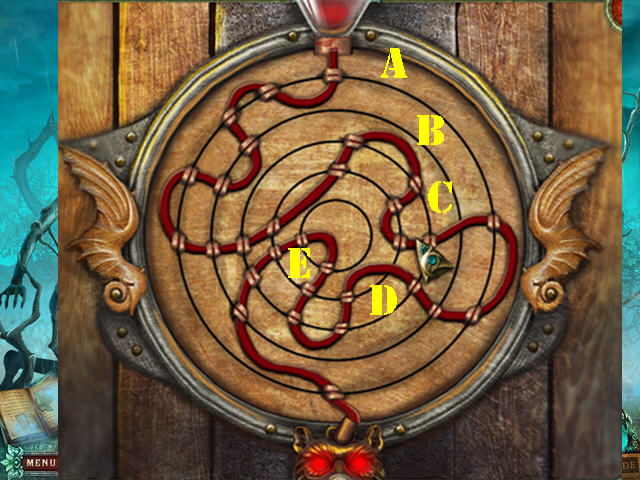
- Zoom into the door; put JEAN'S BLOOD on the door to activate a puzzle.
- Click on the rings until the right image is formed.
- To solve the puzzle, click on the rings in this order: A x 4, E x 4, B x 5, C x 5, and D x 2.
- Enter the ghost house.
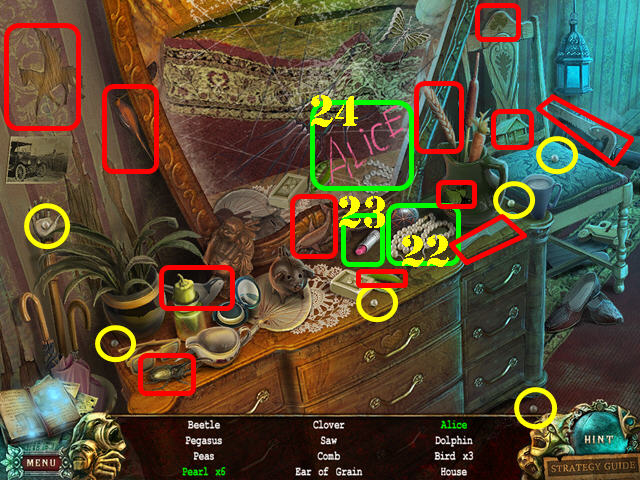
- Play the HOS.
- Click on the pearl necklace (22); take the 6 pearls are marked in yellow.
- Drag the lipstick (23) to the mirror; click on Alice (24).
- The SAW will be added to inventory.
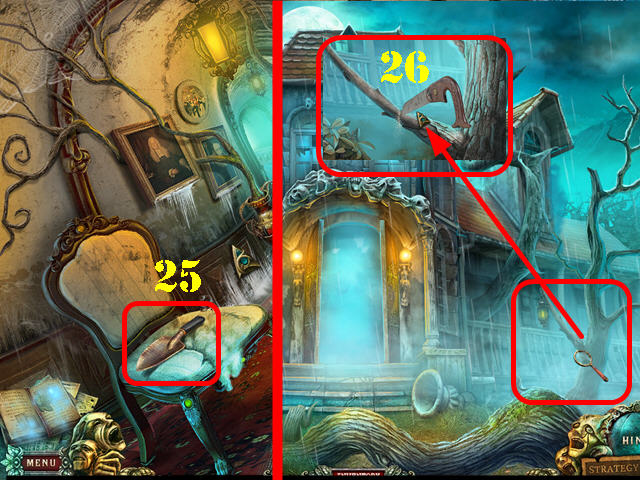
- Open the back door and go through it.
- Take the SHOVEL (25).
- Exit the house.
- Zoom into the tree branch; use the SAW on it to obtain the STICK (26).
- Walk down.
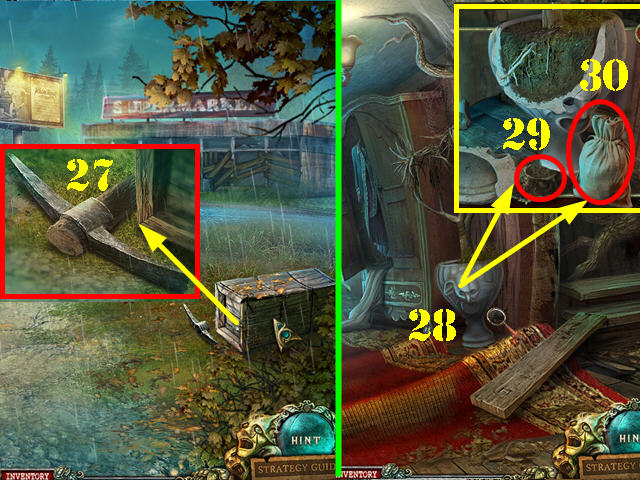
- Zoom into the crate; use the STICK on the axe head; take the PICKAXE (27).
- Go back inside the mansion.
- Zoom into the potted plant (28); break the pot with the PICKAXE.
- Put the EMPTY SACK on the ground; use the SHOVEL on the dirt (29) and take the FULL SACK (30). Note: You can pick up the EMPTY SACK in the supermarket if you haven't done so already.
- Go through the back door.
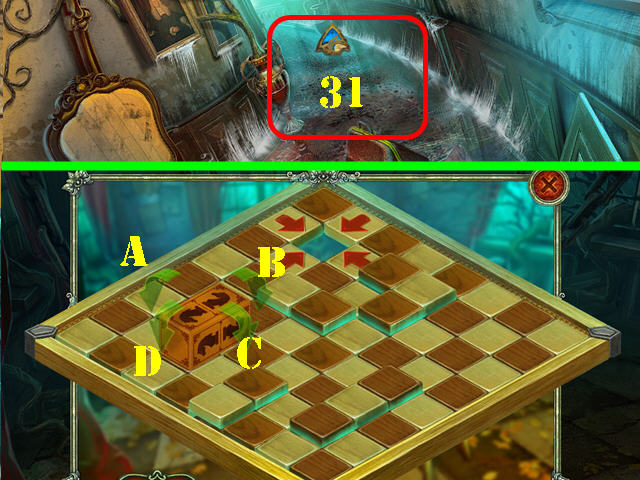
- Put the FULL SACK on the ground and go forward (31).
- Click on the ghost.
- Put the KNIGHT on the board to activate a puzzle.
- Your goal is to land the knight into the hole with the red arrows. Use the green arrows on the block to move it in the desired direction.
- To solve the puzzle, click on the arrows in this order: B x 3, A x 2, D, A x 2, D, A, and B x 3.
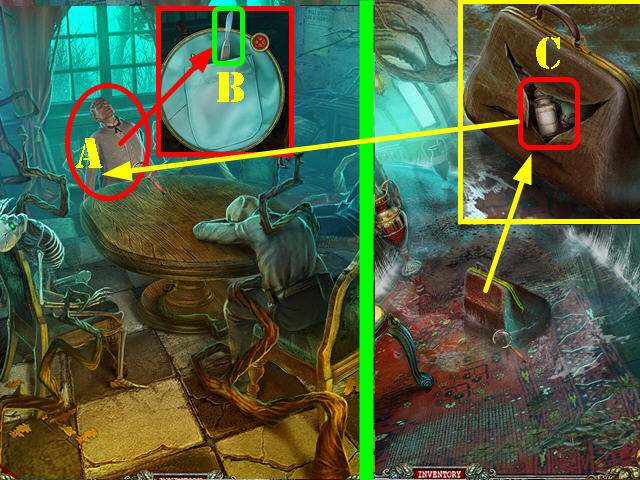
- Zoom into the juror's pocket; take the SCALPEL (A).
- Walk down.
- Zoom into the medical bag; cut it with the SCALPEL and take the LIQUID AMMONIA (B).
- Go down the hall.
- Use the LIQUID AMMONIA on the juror by the window (C) and click on him after he wakes up.
- Congratulations! You have completed Fear for Sale: Sunnyvale Standard Edition!
Created at: 2012-01-17

