

Walkthrough Menu
- General Tips
- Chapter 1 – Atala
- Chapter 2 – Elderly Couple's House
- Chapter 3 – Elixir
- Chapter 4 – The Black Kitten
- Chapter 5 – The Attic
- Chapter 6 - Cemetery
General Tips
- Select Options to adjust the Music, Sound, Ambient, and Voice Volume.
- In Options, you may also adjust Full Screen and Custom Cursor.
- You may set your difficulty level and choose between Casual, Advanced, and Hard Modes.
- Throughout the guide, we will use the acronym 'HOS' for Hidden Object Scenes.
- Puzzles may be skipped.
- There are 24 cats hidden throughout the game to find.
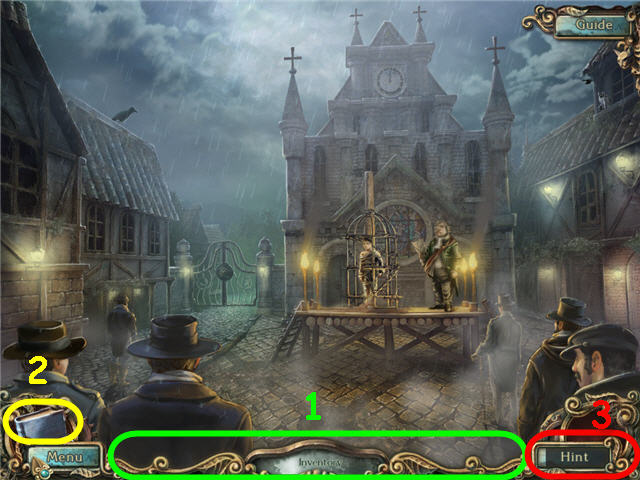
- Move your cursor to the bottom of the screen to access the Inventory Bar (1).
- The Diary (2) at the bottom left of the screen contains all important game info.
- Select the Hint (3) button in the lower right to get a hint in either the Hidden Object Scenes or regular gameplay.
- This game is not linear and you may do things in a different order as the guide. If you cannot do an action or find a HOS when stated in the guide, please check the previous entries to see if you missed something.
Chapter 1 – Atala
- You will automatically get MENES'S RING.
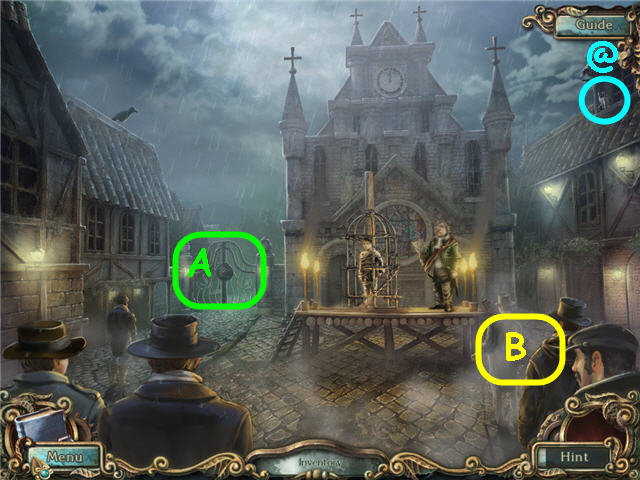
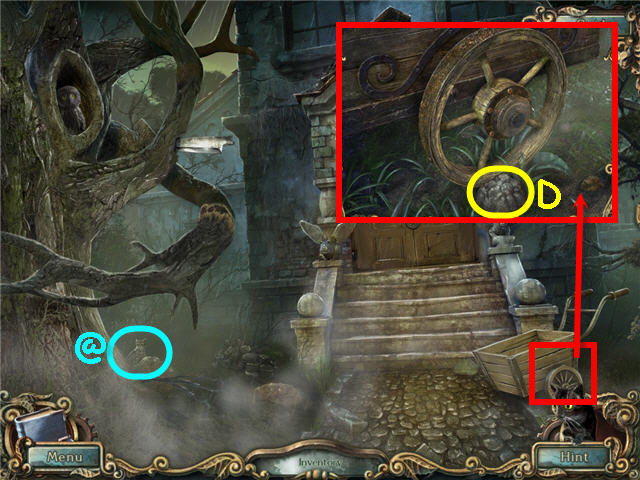
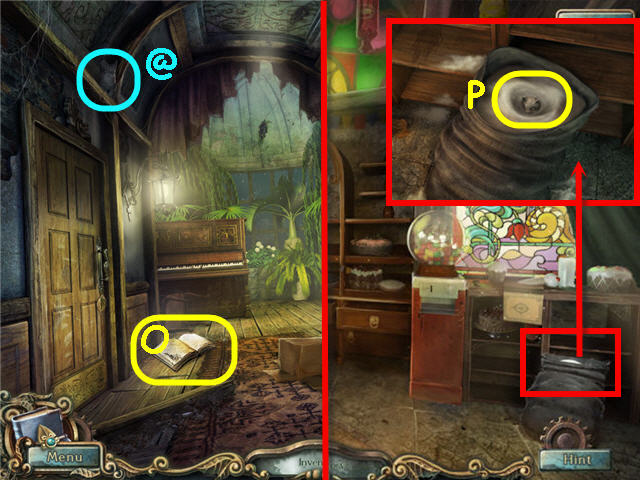
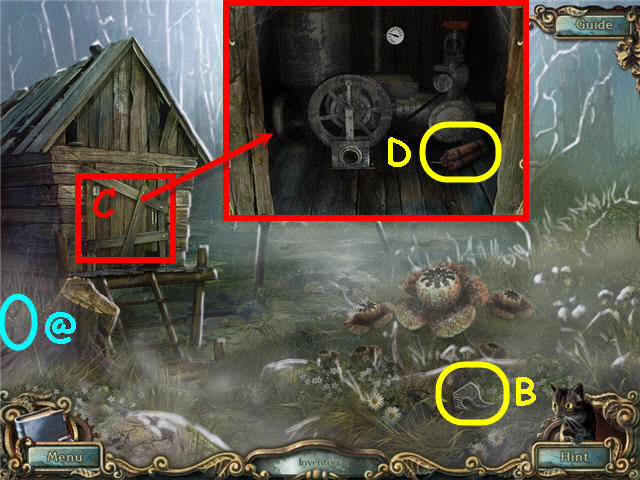
- Collect the CAT 1/24 (@).
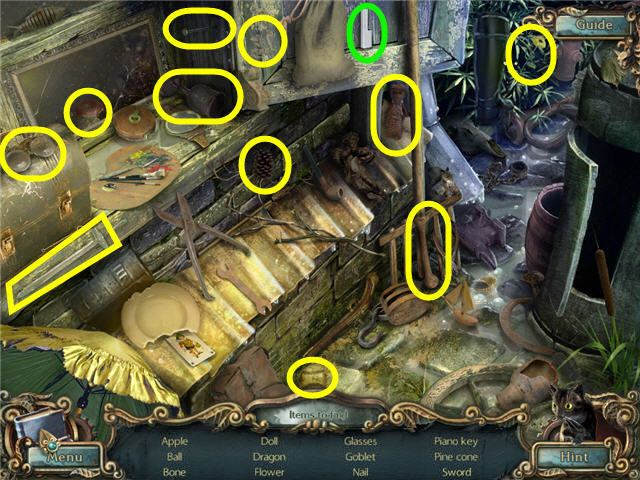
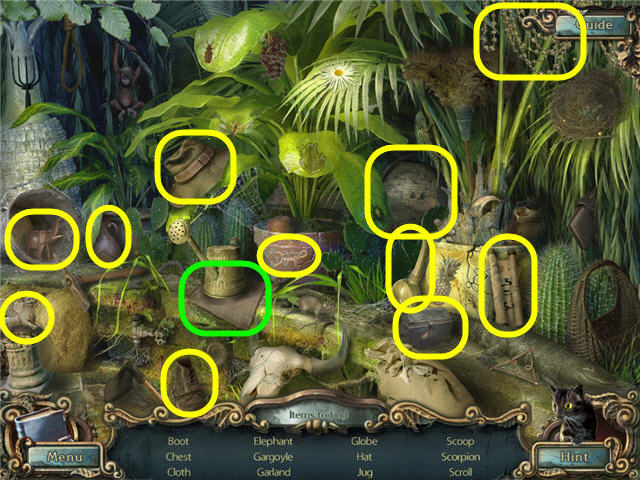
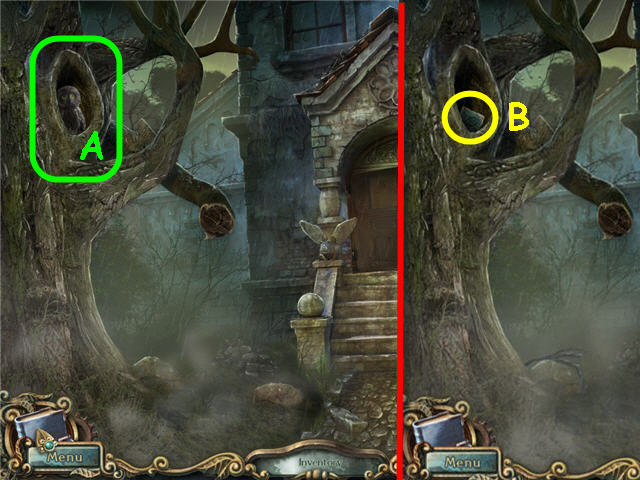
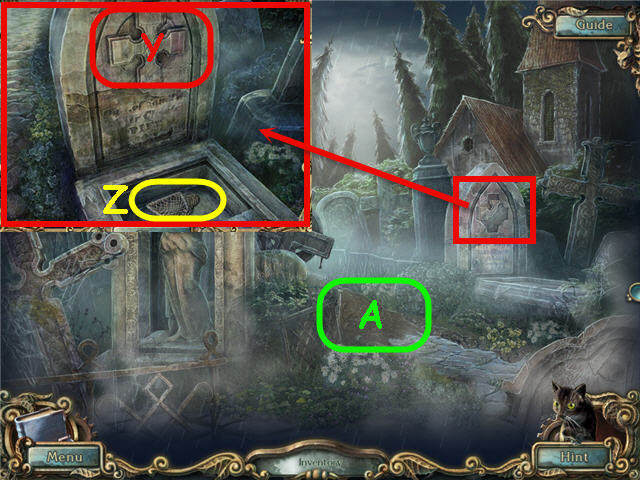
- Examine the gate (A) to trigger a HOS.
- Examine the men on the right (B) to access a HOS.
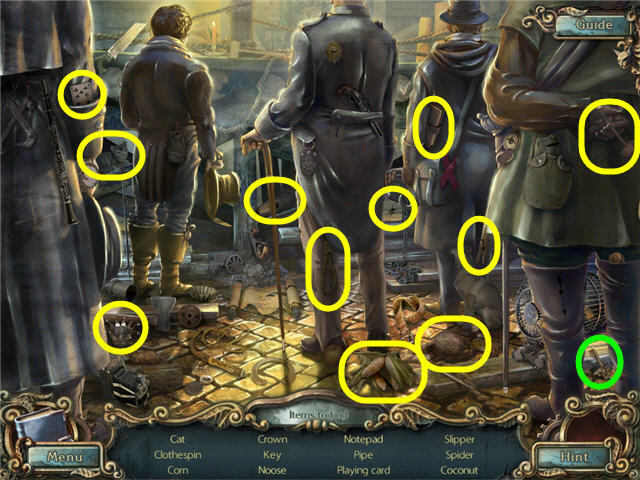
- Find the items listed and get a GATE KEY.
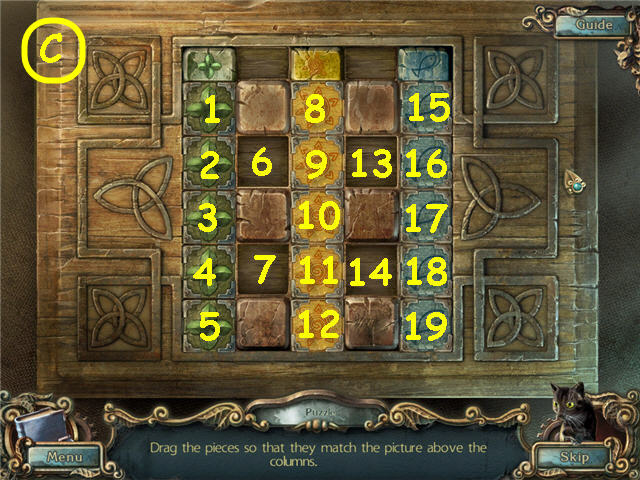
- Examine and use the GATE KEY on the gate; turn the key to trigger a puzzle.
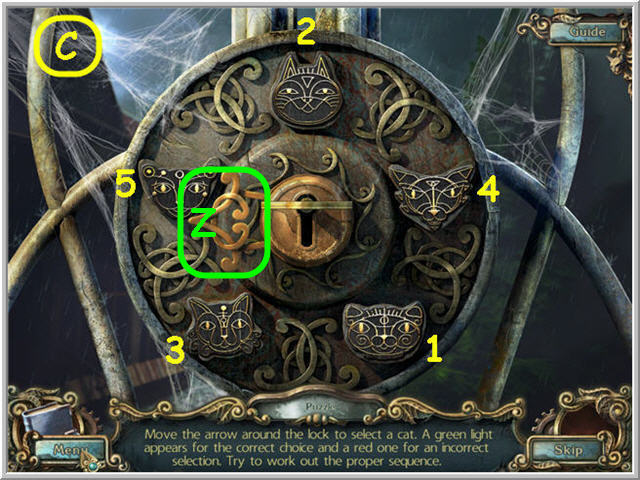
- Find the correct sequence of cats by moving the arrow (Z).
- This puzzle is random. See screenshot (C) for my solution.
- Go through the gate and go right after talking to Atala.
- Collect the CAT 2/24 (@).
- Examine the cart; take the ROCK (D).
- Back out and go forward.
- Examine the pole with bulletins on the right to access a HOS.
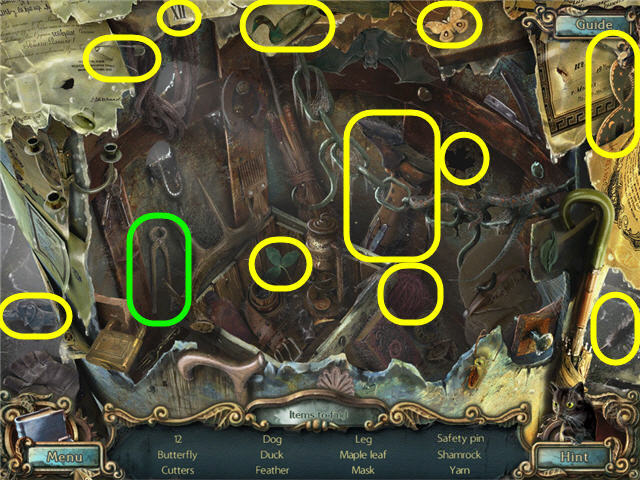
- Find the items listed and get CUTTERS.
- Back out.
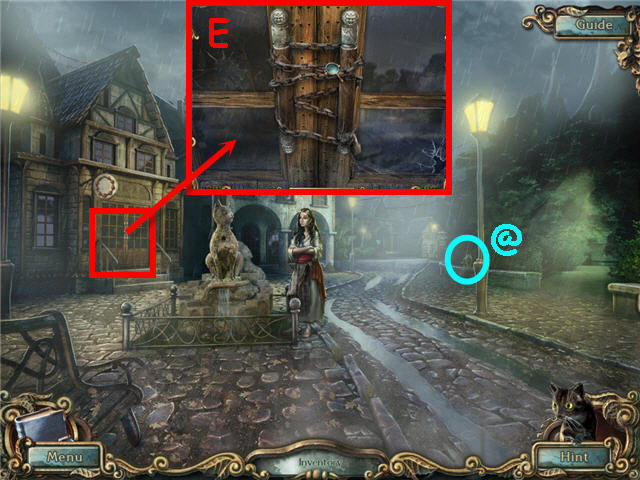
- Collect the CAT 3/24 (@).
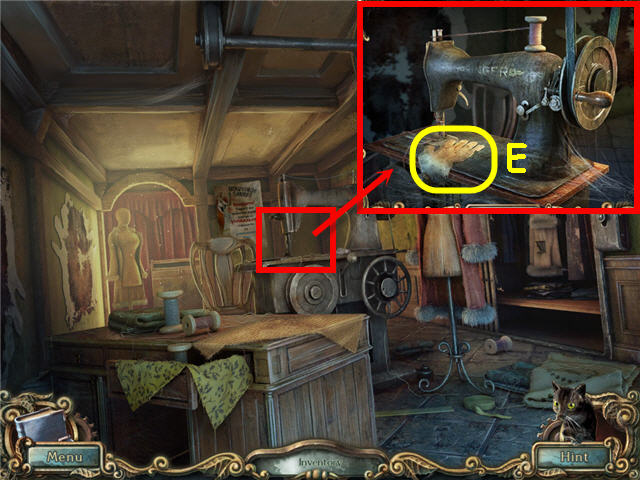
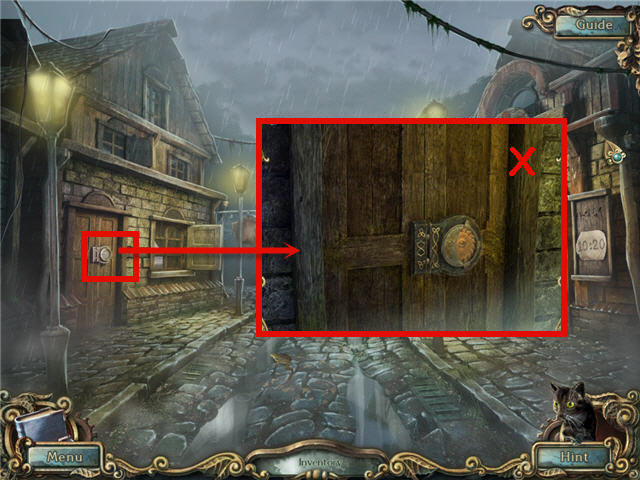
- Examine the shop door; use the CUTTERS on the chains (E) and enter.
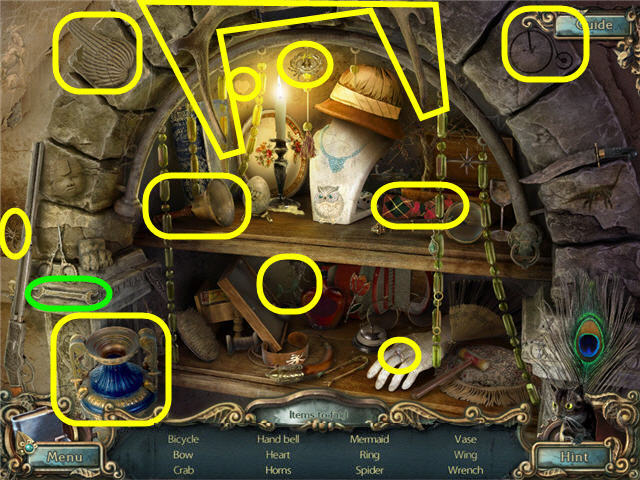
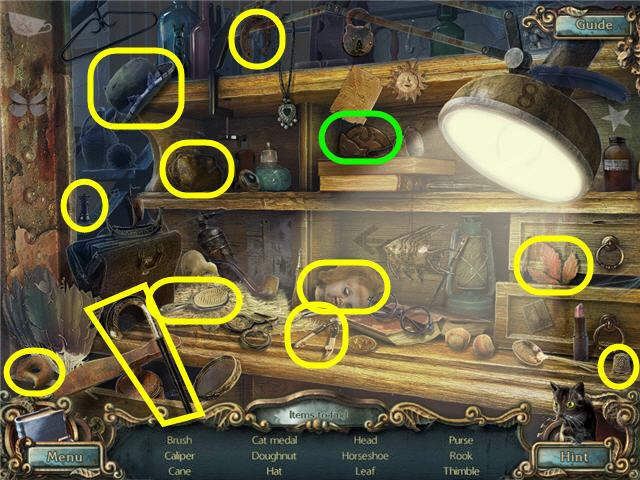
- Examine the shelves on the left to access a HOS.
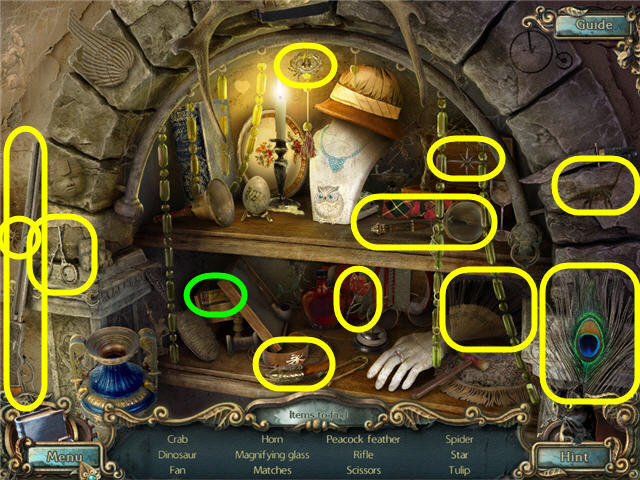
- Find the items listed and get MATCHES.
- Back out and go forward.

- Take the CAT 4/24 (@).
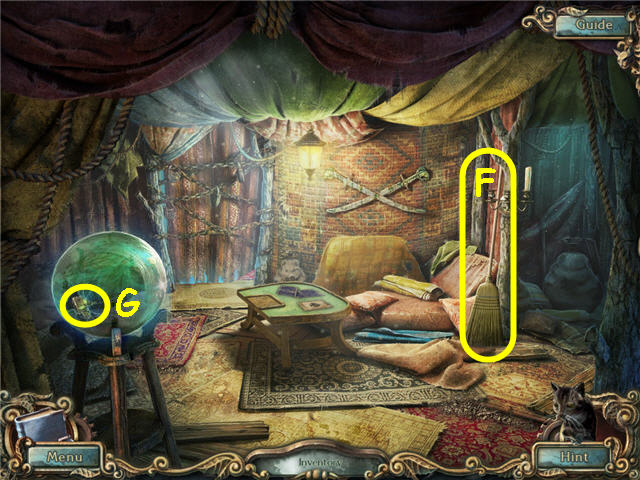
- Examine and use the MATCHES on the lantern; take the VISE SHAFT (F).
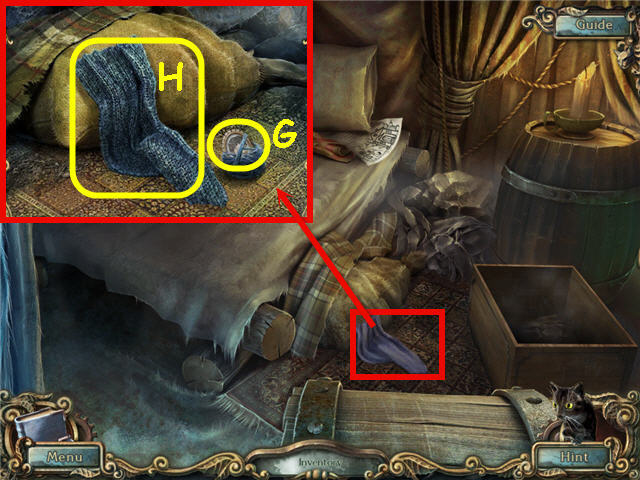
- Take the PIECE OF PAPER (G).
- Go straight.
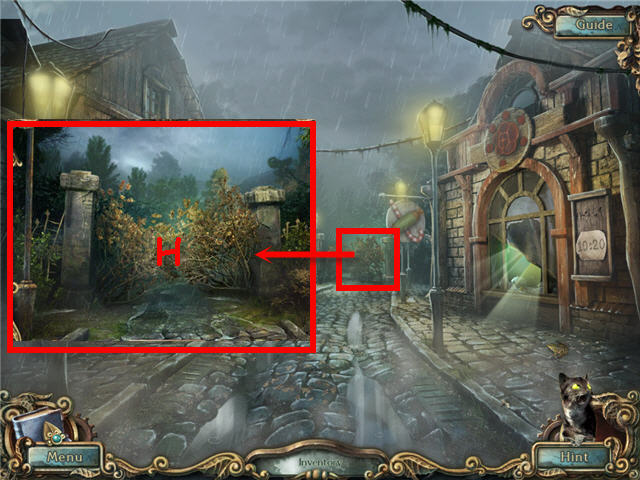
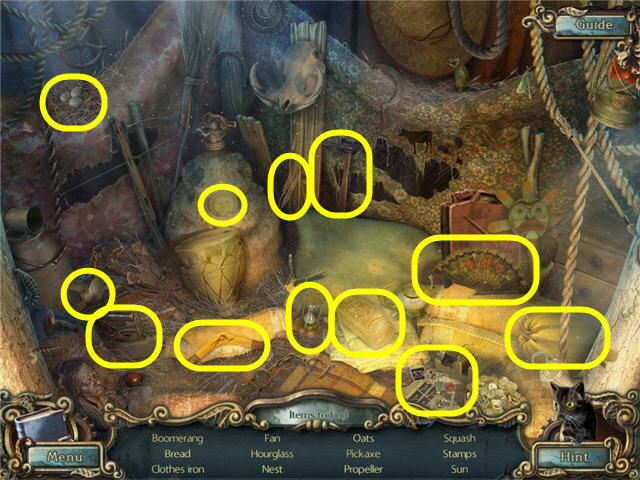
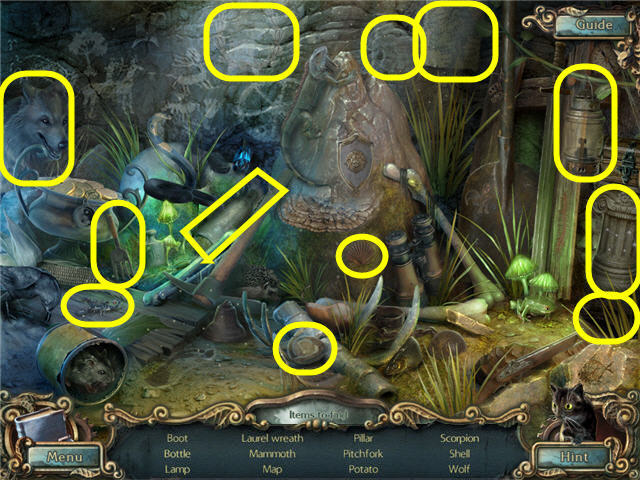
- Examine the shutter on the shop at the left to access a HOS.
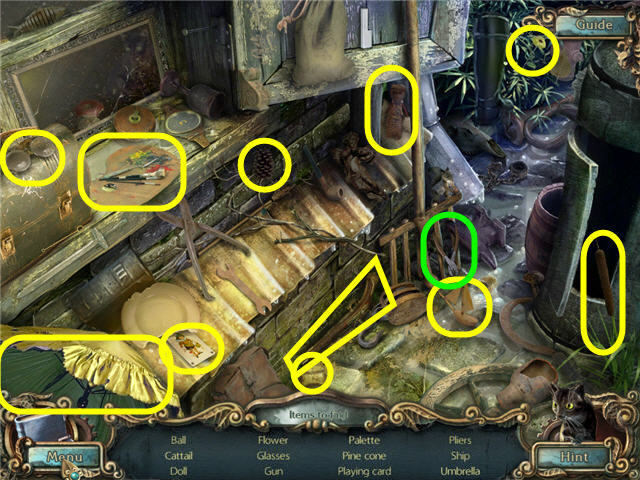
- Find the items listed.
- You will earn PLIERS.
- Use the ROCK on the right shop window.
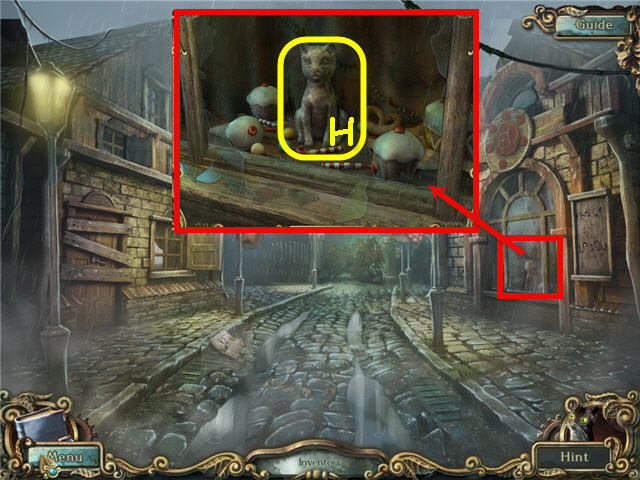
- Examine the broken window; take the STATUE (H).
- Back out twice and enter the jewelry shop on the left.
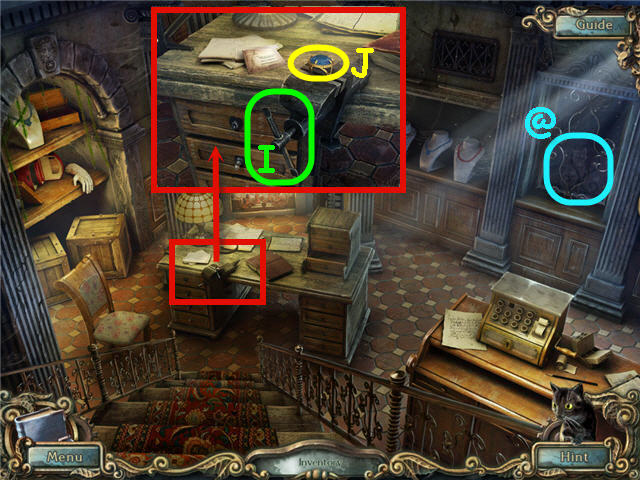
- Collect the CAT 5/24 (@).
- Examine the vise; place the VISE SHAFT on the handle (I); turn the handle to get a NEEDLE.
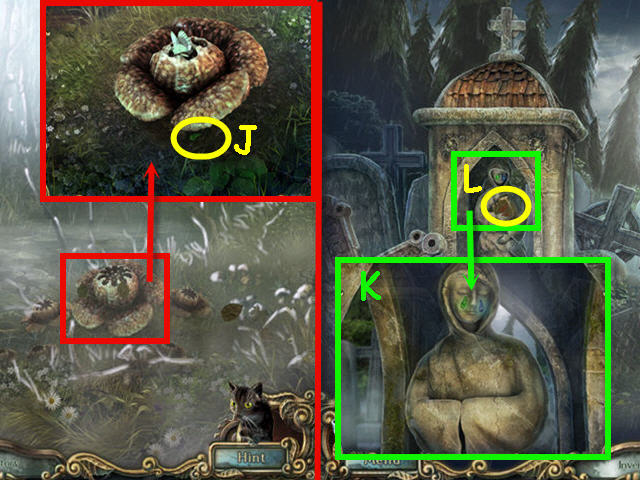
- Place MENES'S RING in the vise; use the PLIERS on the ring; get a RING GEM (J).
- Back out.
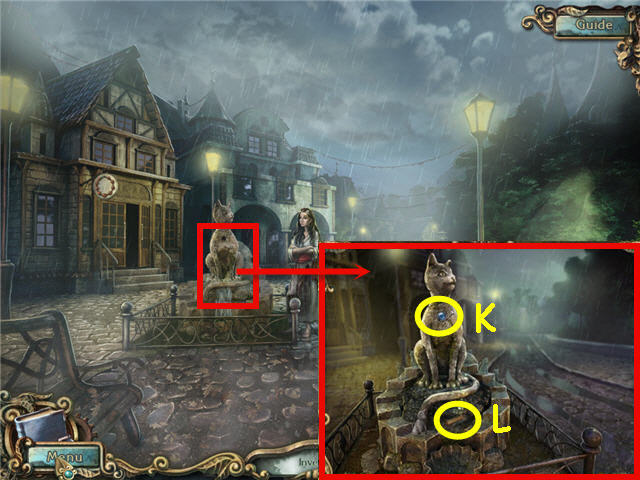
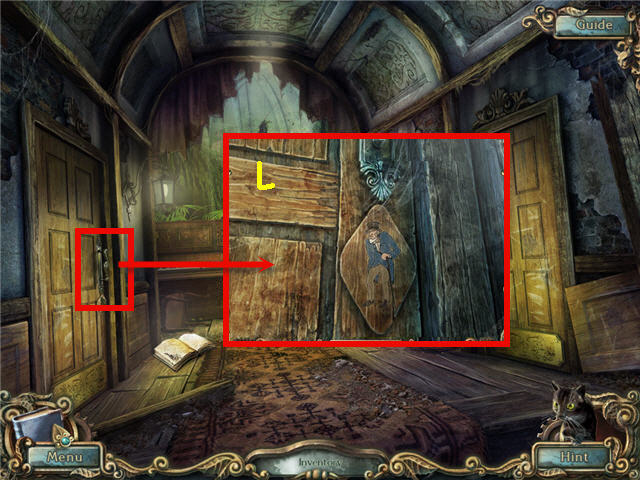
- Examine the fountain; place the RING GEM in the slot (K).
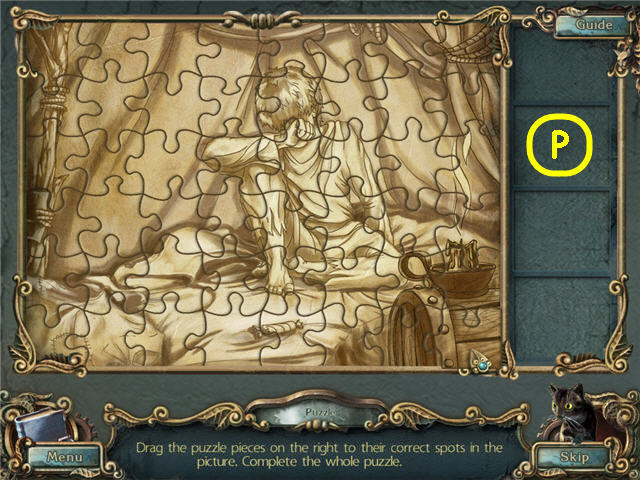
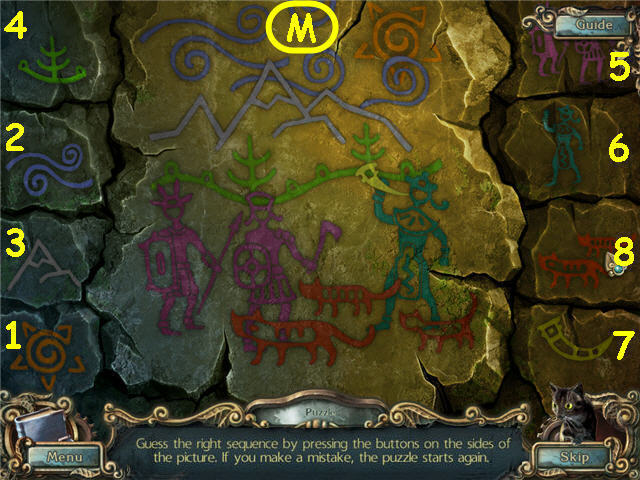
- Place the STATUE on the pedestal; take the scroll (L) to trigger a puzzle.
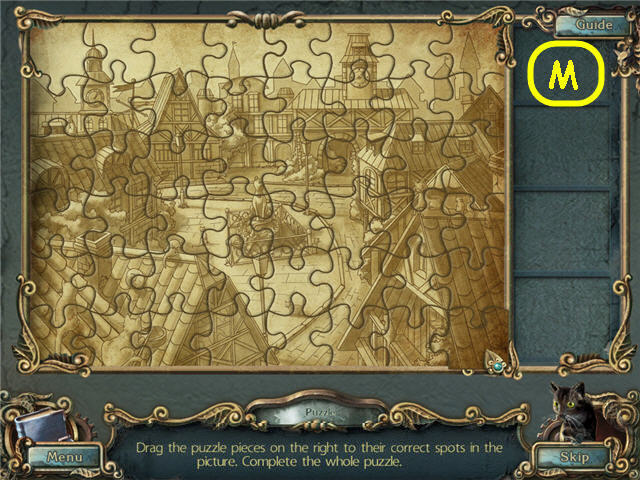
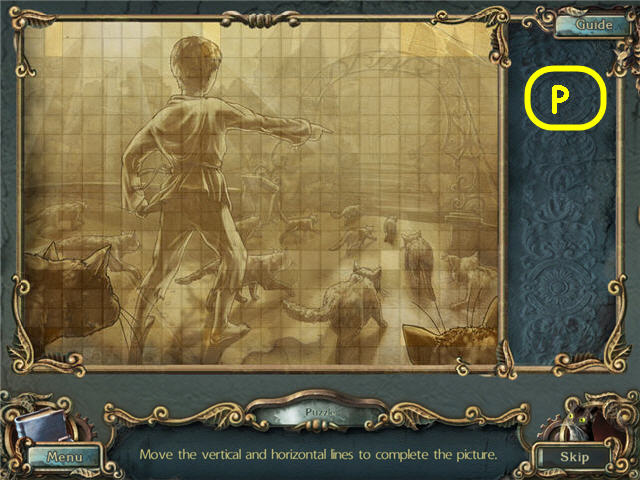
- Assemble the puzzle pieces to complete the picture.
- See screenshot (M) for solution.
- Take the TARPAULIN from the base.
- Go right.
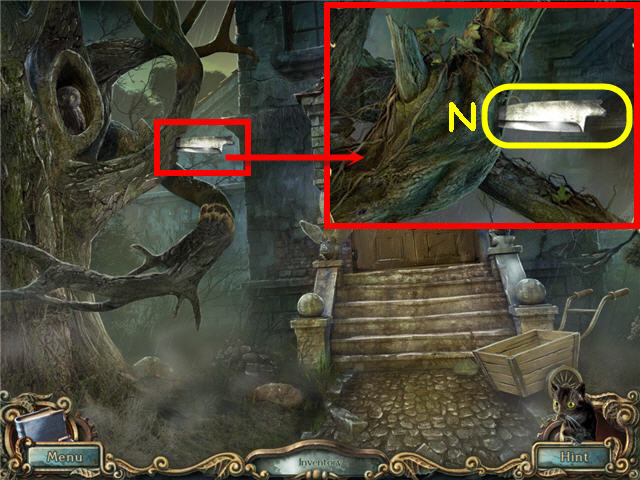
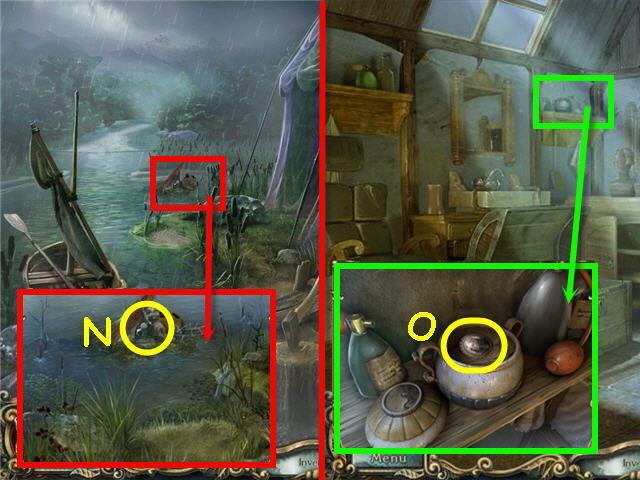
- Examine and use the TARPAULIN on the blade; get a KNIFE (N).
- Back out and go forward.
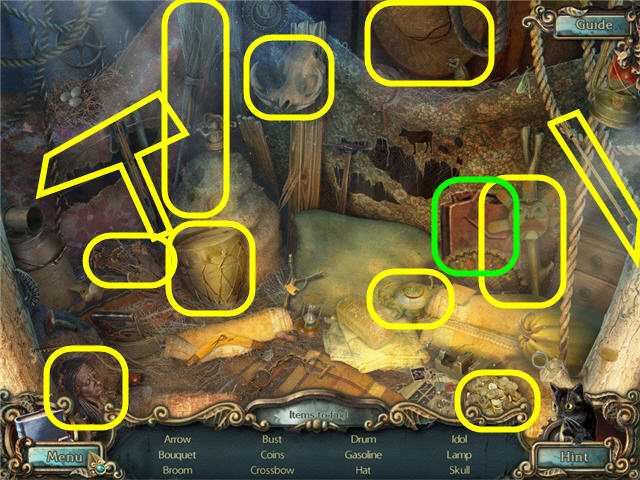
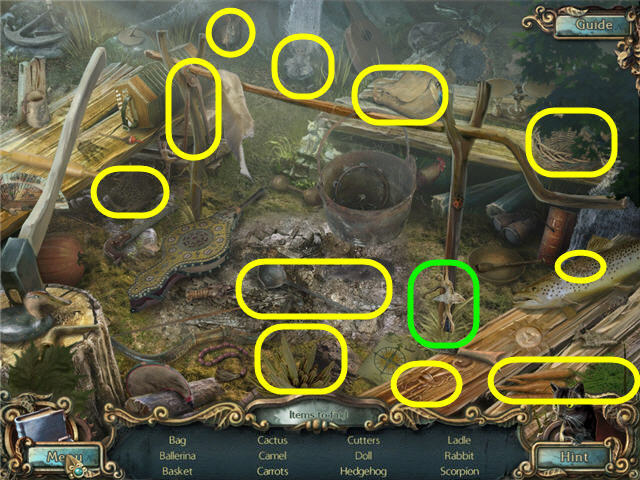
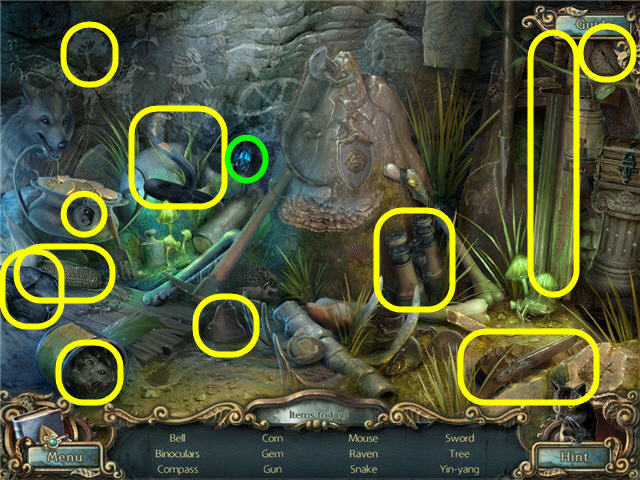
- Examine the pole with bulletins to access a HOS.

- Find the items listed and get a STEEL LEAF.
- Go forward.
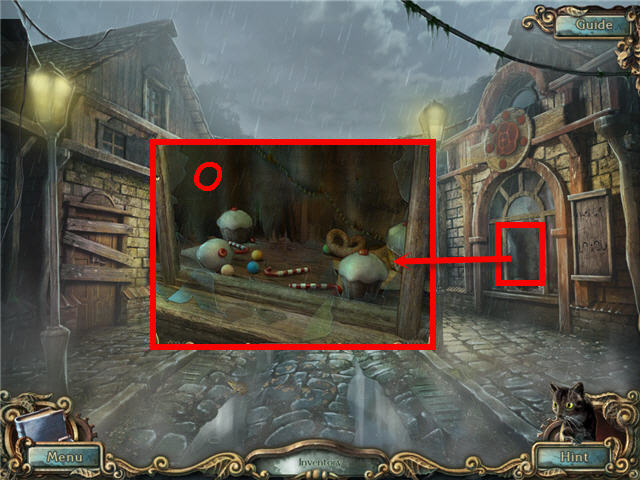
- Examine the right shop window; use the KNIFE on the curtain (O).
- Enter the right shop window.
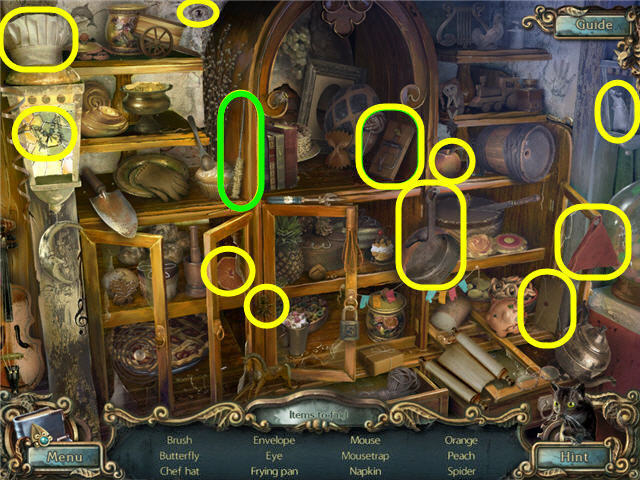
- Examine the center shelves to access a HOS.
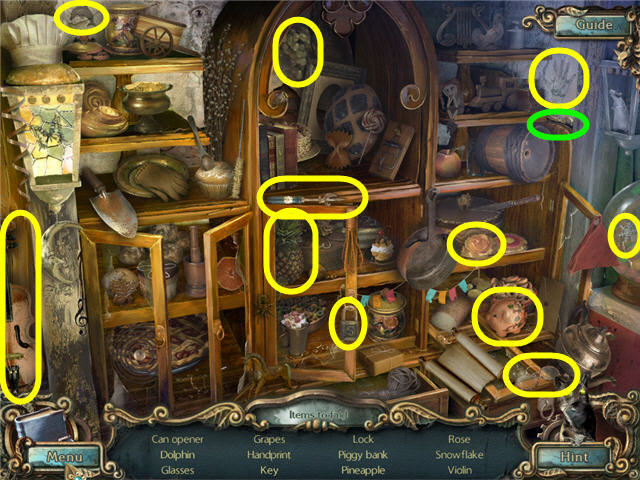
- Find the items listed.
- You will earn a REGISTER KEY.
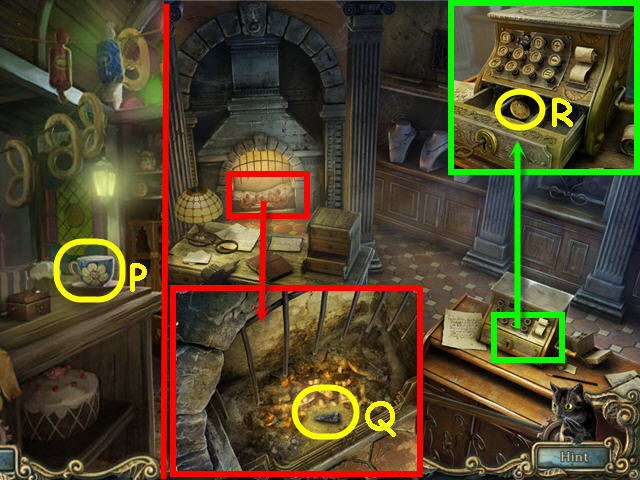
- Take the CUP OF WATER (P).
- Back out three times; go left into the jewelry shop.
- Examine and use the CUP OF WATER on the fireplace; take the COAL (Q).
- Examine and use the REGISTER KEY on the register lock; turn the key twice; take the COIN (R).
- Back out; go forward twice and right into the candy shop.
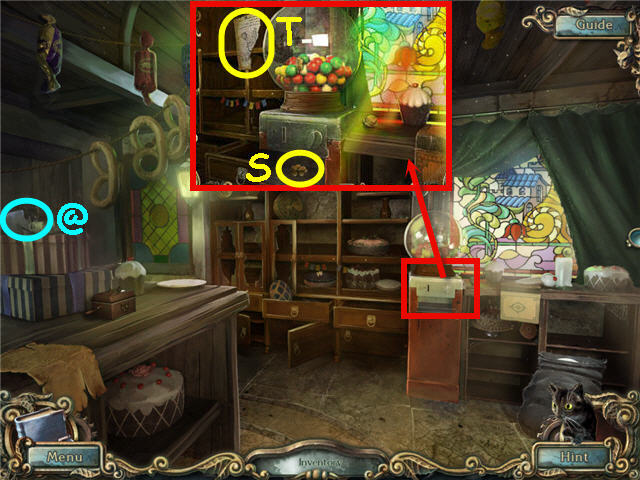
- Collect the CAT 6/24 (@).
- Examine and place the COIN in the gumball machine; push the coin in; take the 2nd STEEL LEAF (S).
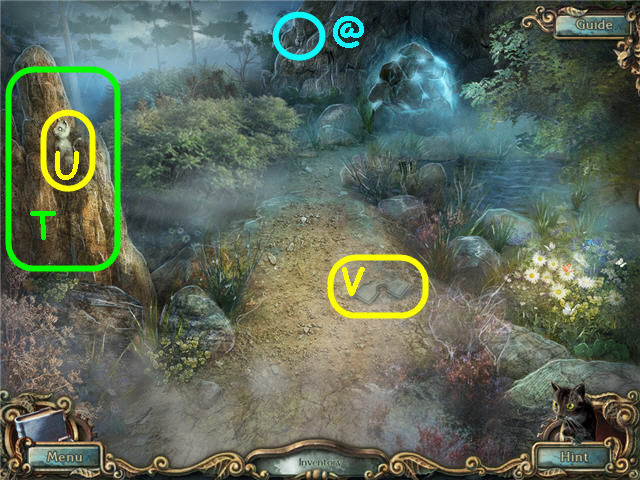
- Take the HALF OF A RECIPE (T).
- Back out.
Chapter 2 – Elderly Couple's House
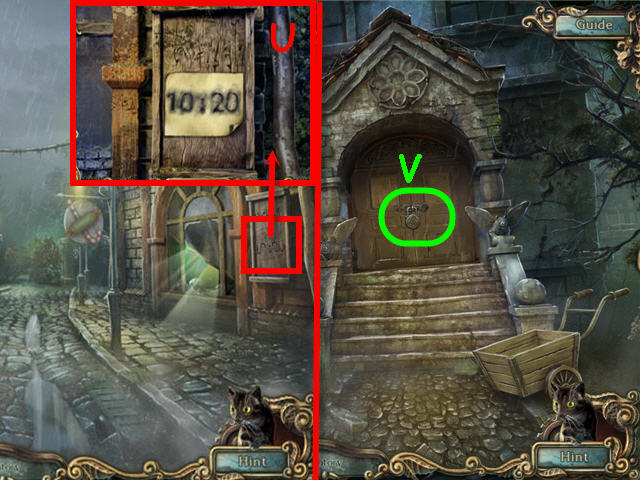
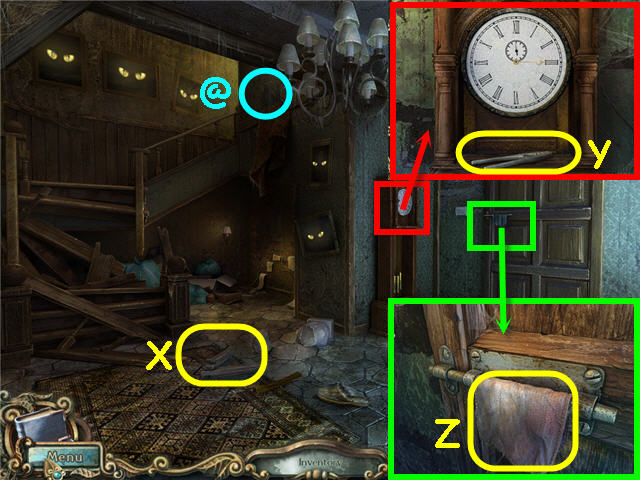
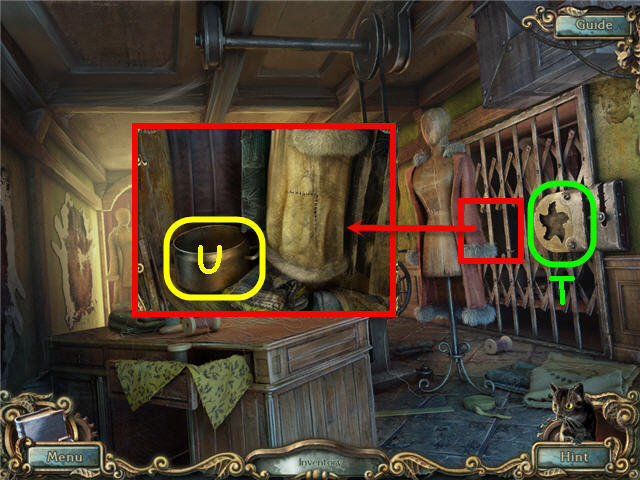
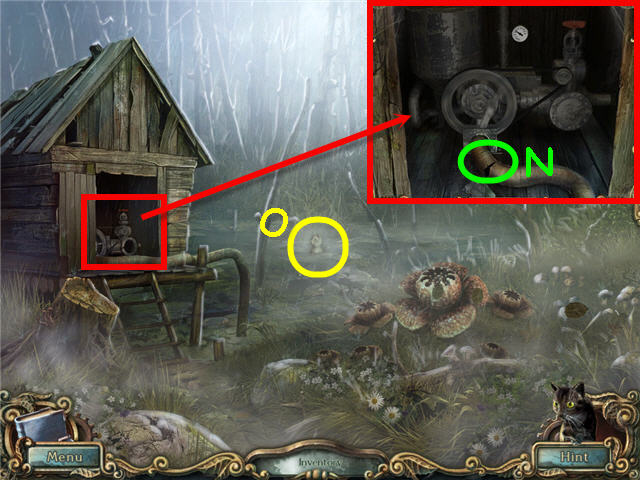
- Examine and use the PIECE OF PAPER and COAL on the wooden board; note the time - 10:20 (U).
- Back out twice and go right.
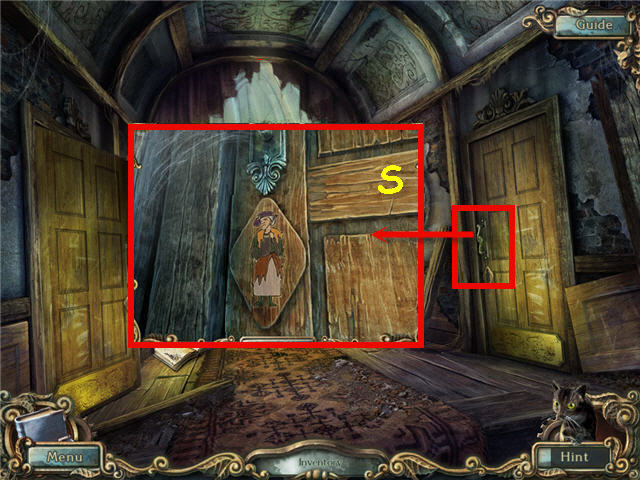
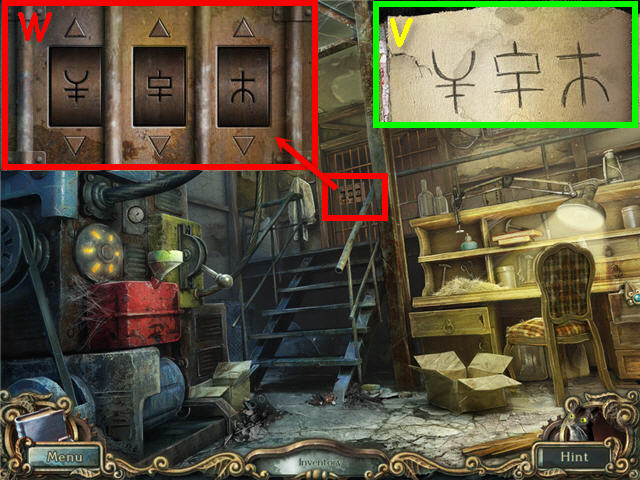
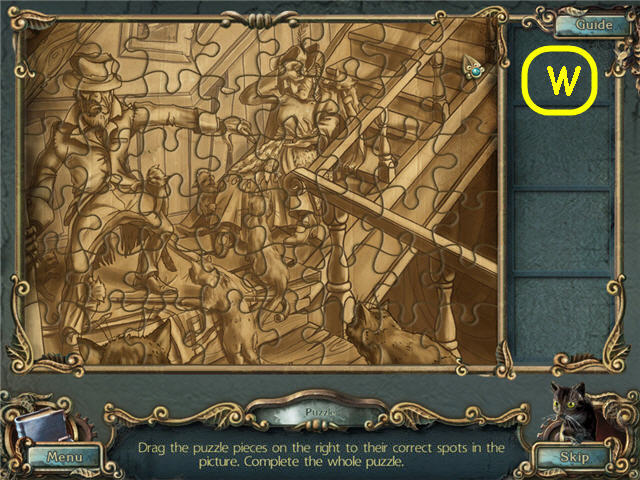
- Examine and place the 2 STEEL LEAVES on the lock (V) to trigger a puzzle.
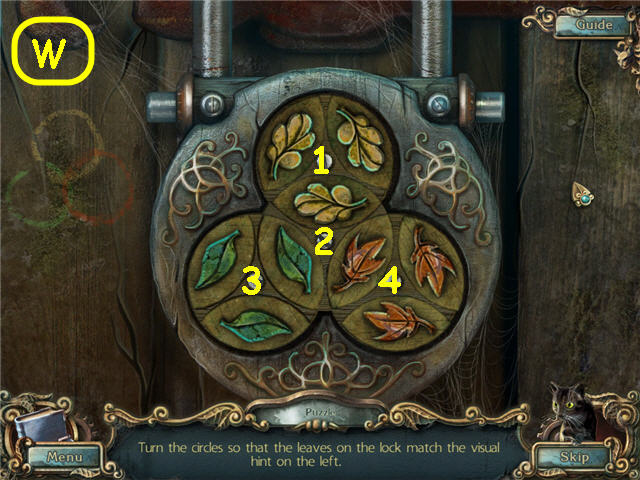
- Arrange the colored leaves on the lock to match the colored pattern on the left.
- Solution: Rotate the circles by pressing on the screws in the following order; 4, 2, 4, 1x2, 3, 2, 3x2, 2. See screenshot (W) for solution.
- Enter the house.
- Collect the CAT 7/24 (@).
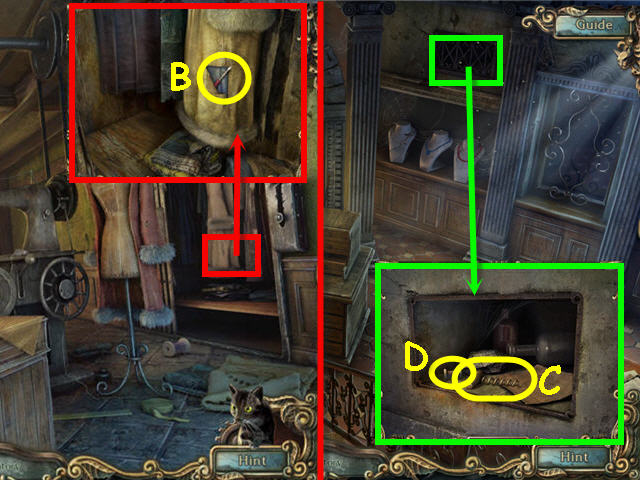
- Take the STEPS (X).
- Examine the clock; take the NUTCRACKER (Y).
- Examine the door latch; take the RAG (Z).
- Back out twice; speak to Atala.
- Go forward twice and right into the candy shop.
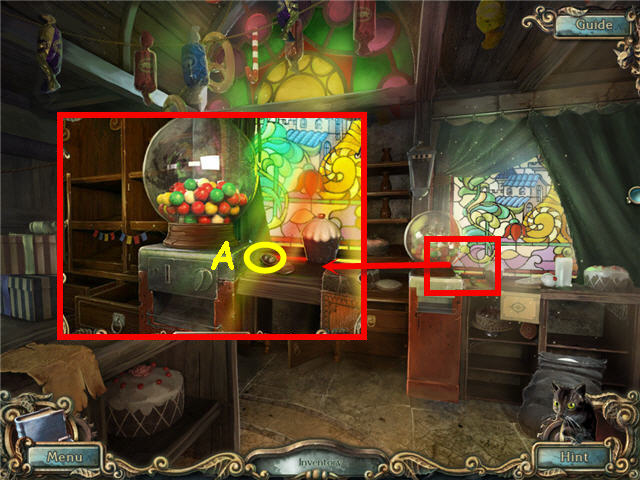
- Examine the gumball machine; use the NUTCRACKER on the nut and take the DRAWER HANDLE (A).
- Back out three times; go left into the jewelry shop.
- Examine the left alcove to access a HOS.
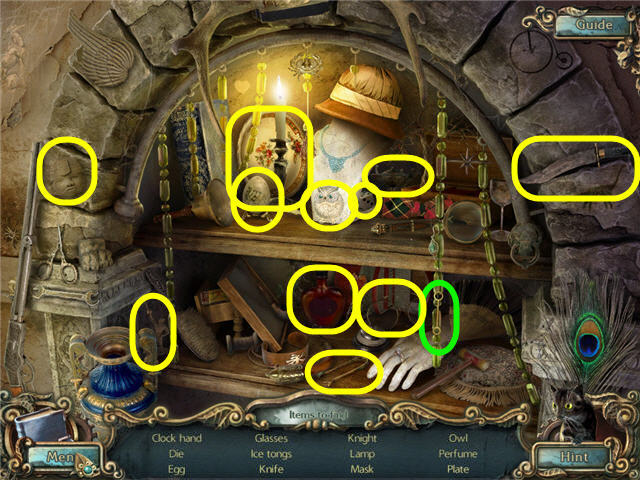
- Find the items listed.
- You will earn a MINUTE HAND.
- Examine and place the DRAWER HANDLE on the drawer.
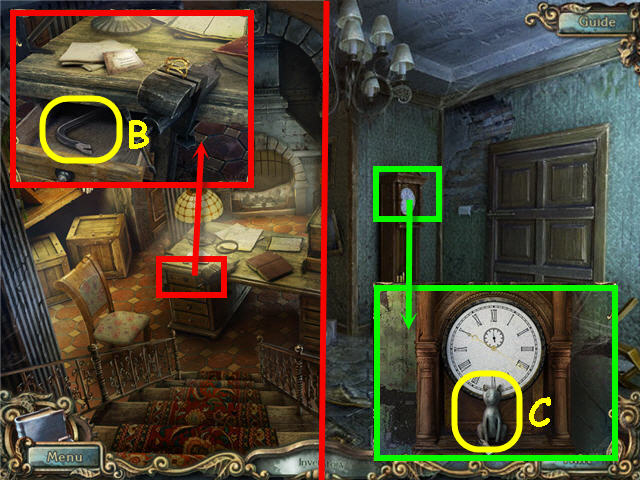
- Open the drawer; take the CROWBAR (B).
- Back out; go right and enter the house.
- Examine and place the MINUTE HAND on the clock.
- Set the clock to the time from the board outside the candy shop; 10:20.
- Take the STATUE (C).
- Back out twice.
- Examine and place the STATUE on the fountain; take the scroll to trigger a puzzle.
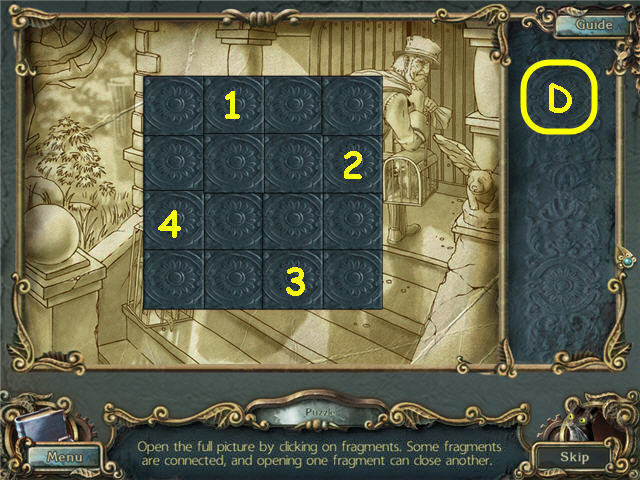
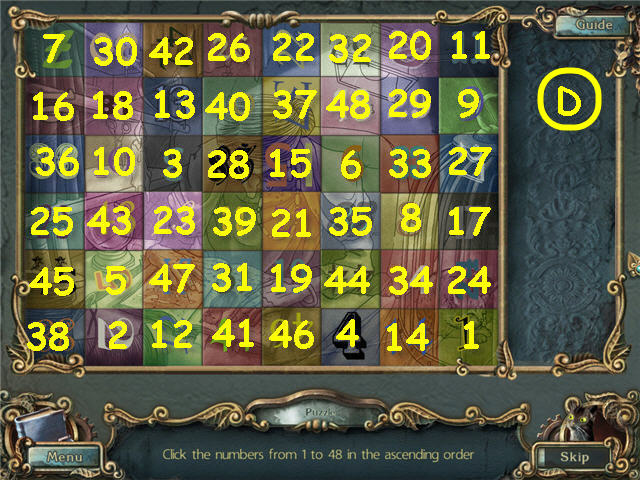
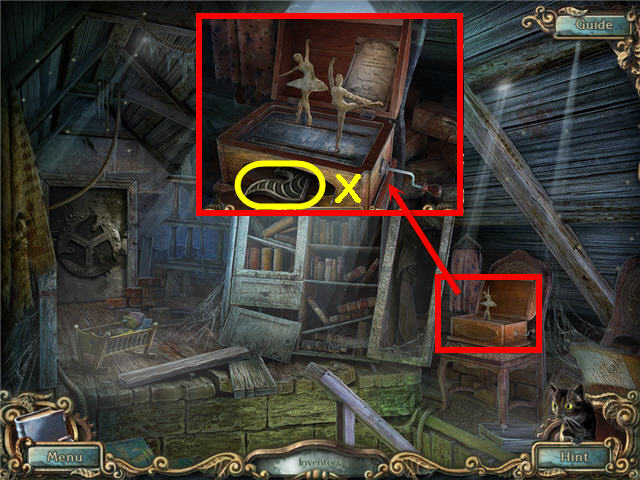
- Complete the picture by turning over the correct pieces.
- See screenshot (D) for the pieces to turn.
- Take the AXE from the base of the cat statue.
- Go straight twice.
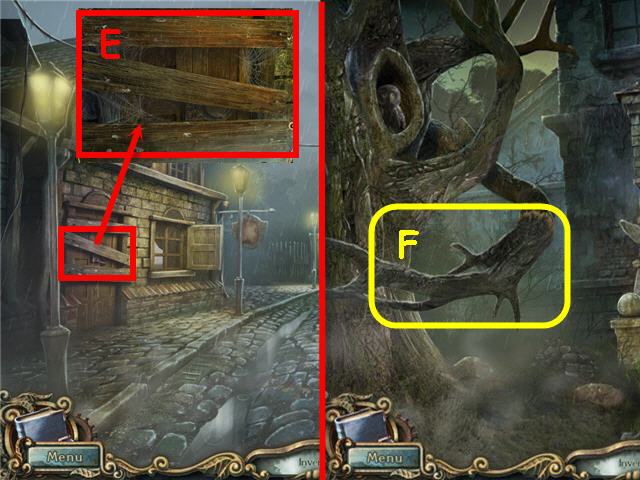
- Examine the left door; use the CROWBAR on each of the three boards (E) and get a NAIL.
- Back out twice and go right.
- Use the AXE on the branch to get FIREWOOD (F).
- Enter the house.
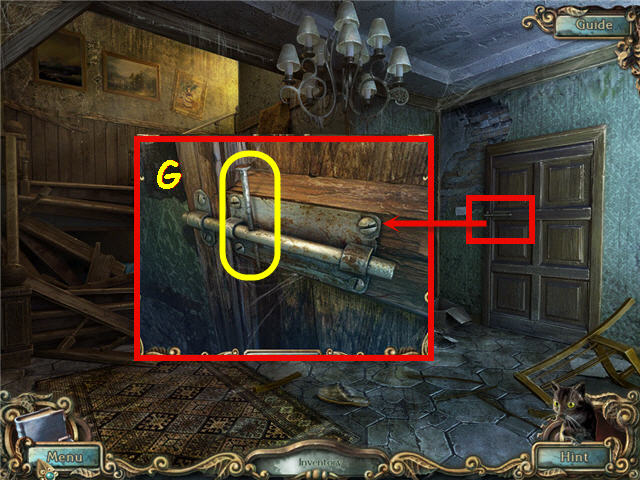
- Examine and use the NAIL on the door latch (G); slide the latch open.
- Go through the right door.
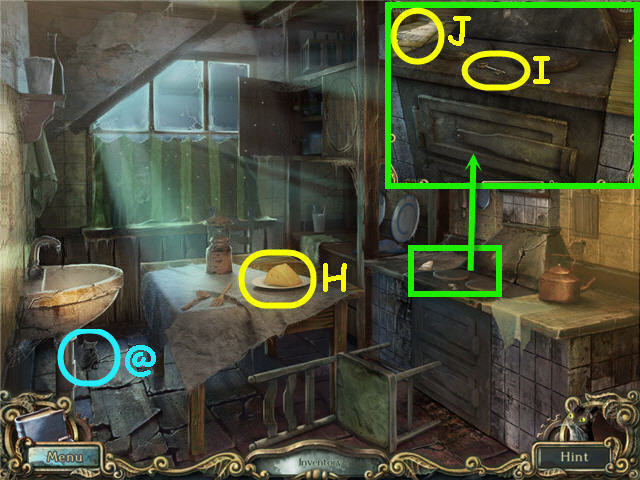
- Collect the CAT 8/24 (@).
- Take the CHEESE (H).
- Examine the stove; take the WORKSHOP KEY (I).
- Examine and place the HALF OF A RECIPE on the recipe (J).
- Back out three times and go forward.
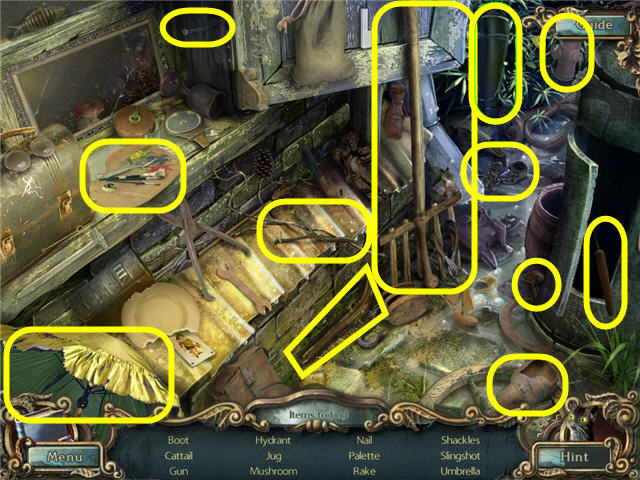
- Examine the pole with bulletins to access a HOS.
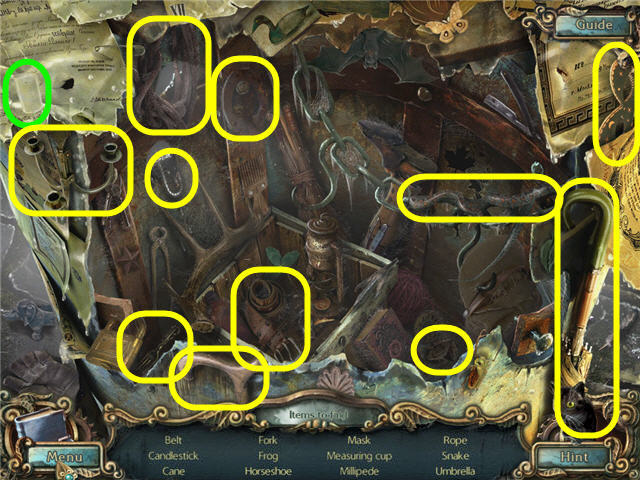
- Find the items listed.
- You will earn a MEASURING CUP.
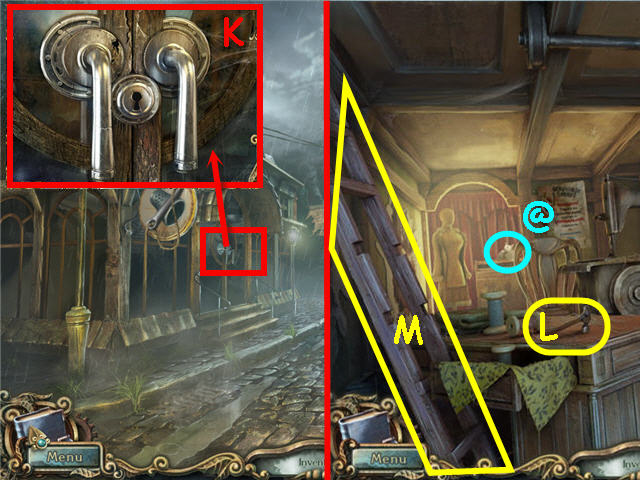
- Examine and use the WORKSHOP KEY on the tailor's door lock (K); turn to open.
- Enter the shop.
- Collect the CAT 9/24 (@).
- Take the HAMMER (L).
- Use the STEPS and HAMMER on the broken ladder; take the LADDER (M).
- Back out twice; go right and straight.
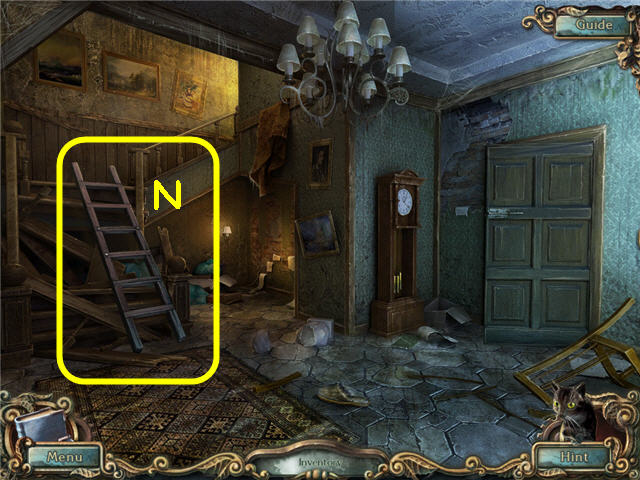
- Place the LADDER against the broken stairs (N).
- Go up the stairs.
- Examine the palm tree to access a HOS.
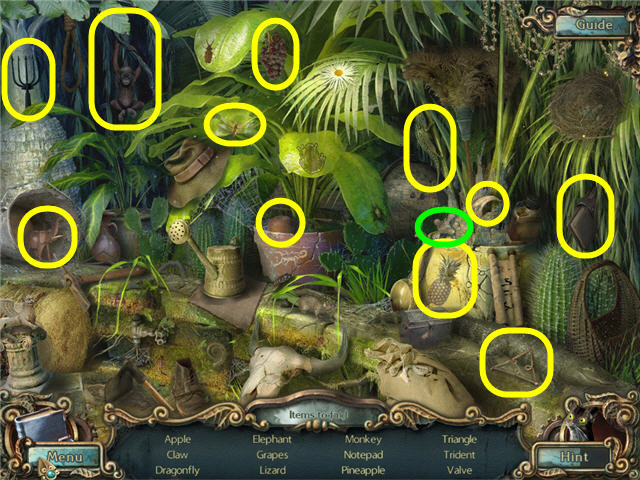
- Find the items listed.
- You will earn a VALVE.
- Collect the CAT 10/24 (@).
- Examine and read the book (O).
- Back out three times; go forward twice and right into the candy shop.
- Examine and use the MEASURING CUP on the bag to get a CUP OF FLOUR; take the STATUE (P).
- Examine the middle shelves to access a HOS.
- Find the items listed and get a BRUSH.
- Back out three times.
- Examine and place the STATUE on the fountain; take the scroll to trigger a puzzle.
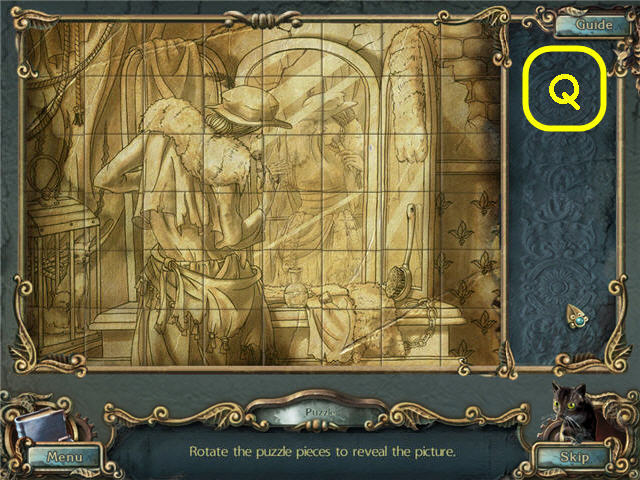
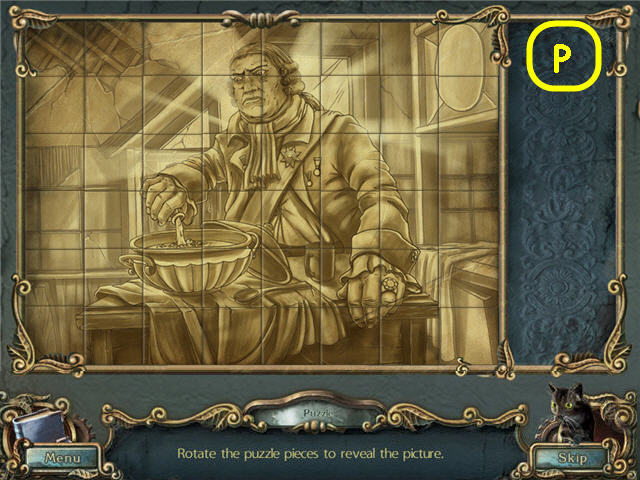
- Rotate the pieces to complete the picture.
- See screenshot (Q) for solution.
- Take the PAINTBRUSH from the base.
- Go right; straight and right into the kitchen.
Chapter 3 – Elixir
- Examine the faucet; take the BOLT (R).
- Place the VALVE on the faucet; use the BRUSH on the tap and take the STAR (S).
- Back out three times; go forward and left into the tailor shop.
- Place the STAR on the lock (T).
- Examine the closet; take the PAN (U).
- Back out twice; go right, straight and right into the kitchen.
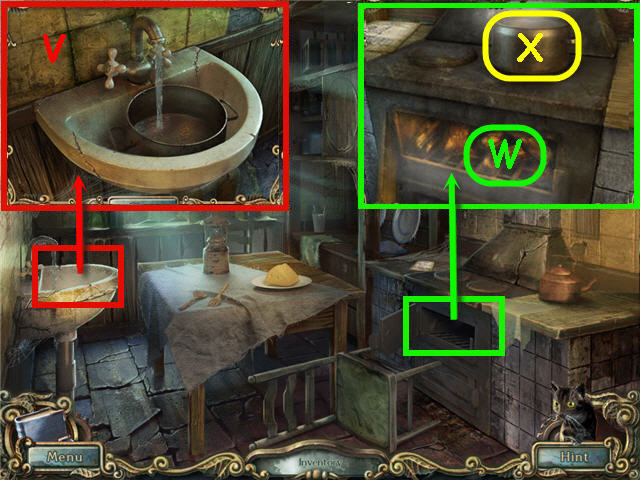
- Examine and use the PAN on the sink (V) to get a POT OF WATER.
- Examine and open the firebox; place the FIREWOOD inside (W); use the MATCHES on the wood.
- Place the POT OF WATER on the stovetop; add the CUP OF FLOUR and take the GLUE (X).
- Back out.
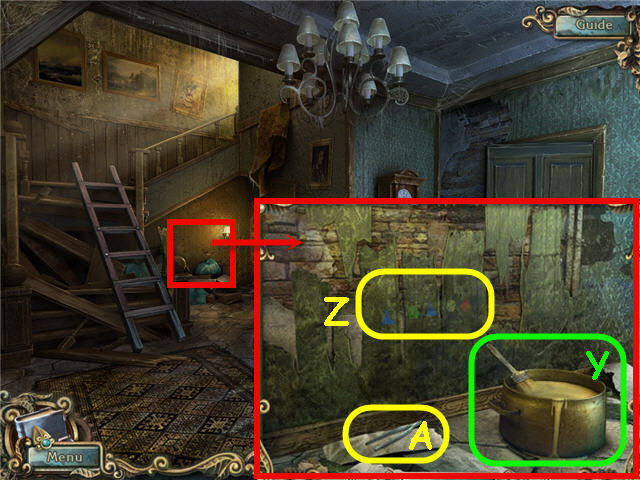
- Examine and place the GLUE in the area under the stairs.
- Use the PAINTBRUSH on the GLUE (Y); use the PAINTBRUSH on the wall five times.
- Note the code (Z).
- Take the TWEEZERS (A).
- Back out twice and then go forward twice.
- Examine the shutter on the left shop to access a HOS.
- Find the items listed and get a PIANO KEY.
- Back out twice; go left into the jewelry shop.
- Examine the left alcove to access a HOS.
- Find the items listed.
- You will earn a WRENCH.
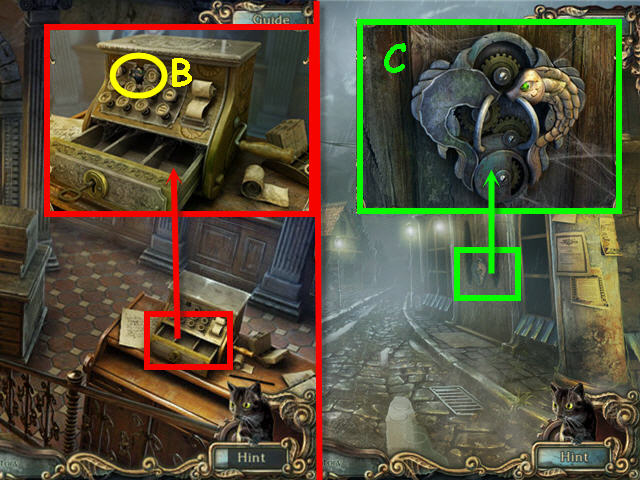
- Examine the cash register; use the TWEEZERS to get the BUTTON (B).
- Back out and go forward.
- Examine and use the BUTTON on the hair salon door lock (C).
- Enter the hair salon on the right.
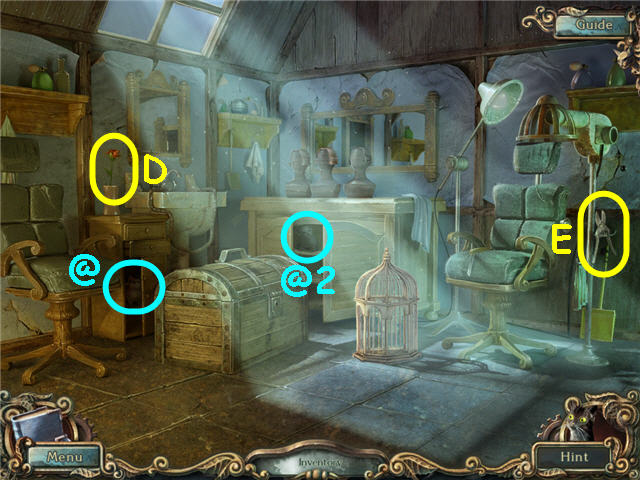
- Collect the CAT 11/24 (@) and the CAT 12/24 (@2).
- Take the FLOWER (D) and the PRUNER (E).
- Back out.
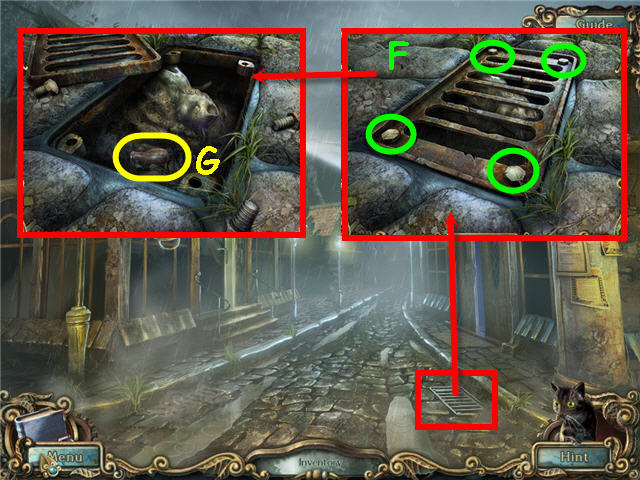
- Examine and use the WRENCH on the each of the four bolts on the grate (F); take the SEWING MACHINE GRIP (G).
- Go forward.
- Examine and use the PRUNER three times on the bushes (H).
- Go forward.
- Speak to Atala.
- Examine the fire ring to access a HOS.
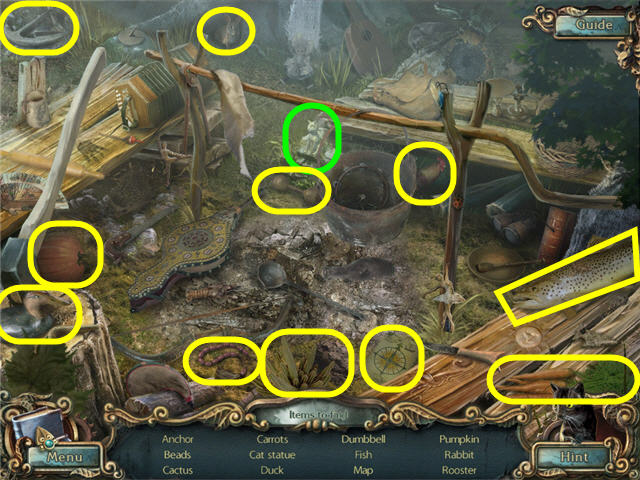
- Find the items listed and get a STATUE.
- Back out three times.
- Examine and place the STATUE on the fountain; take the scroll to trigger a puzzle.
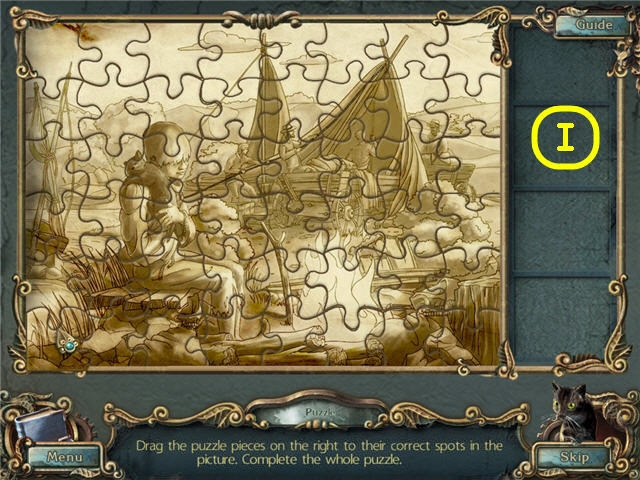
- Place the puzzle pieces in the frame to complete the picture.
- See screenshot (I) for solution.
- Take the CHEST KEY from the base.
- Go forward and right into the hair salon.
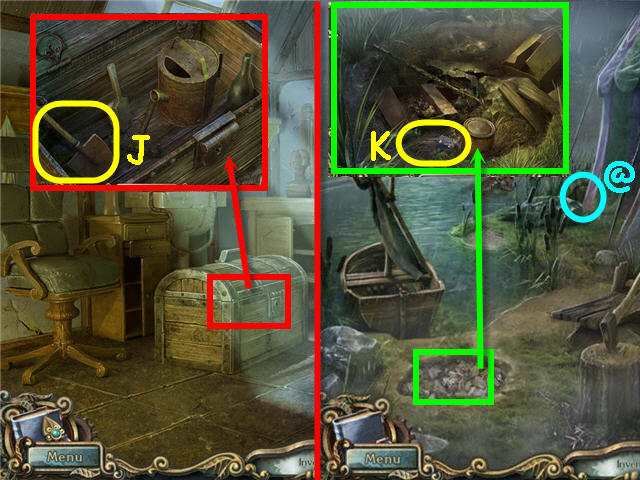
- Use the CHEST KEY on the chest; examine the chest; take the SHOVEL (J).
- Back out and go forward twice.
- Collect the CAT 13/24 (@).
- Examine and use the SHOVEL on the ring of debris; get a SHOVELFUL OF SOIL.
- Take the OLD MAN'S ROOM KEY (K).
- Back out three times; go right, forward and up the stairs.
- Examine and place the OLD MAN'S ROOM KEY on the left door lock (L).
- Go left into the room.

- Collect the CAT 14/24 (@).
- Open the cage lid (M) and examine the cage.
- Take the STRING (N).
- Back out four times; go straight twice and right into the candy shop.
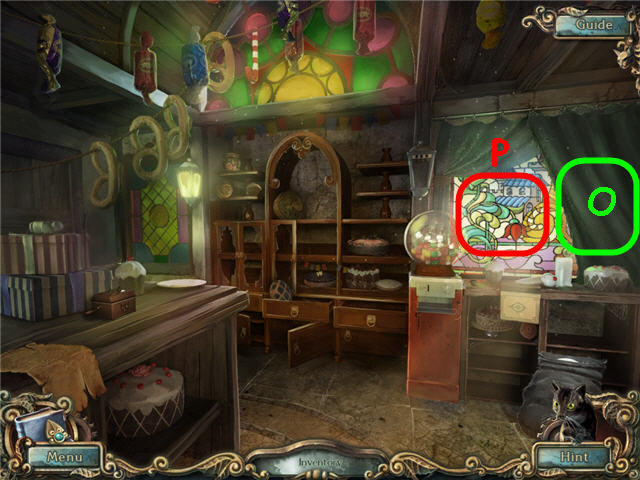
- Place the STRING on the right curtain (O).
- Examine the stained glass window (P) twice to trigger a puzzle.
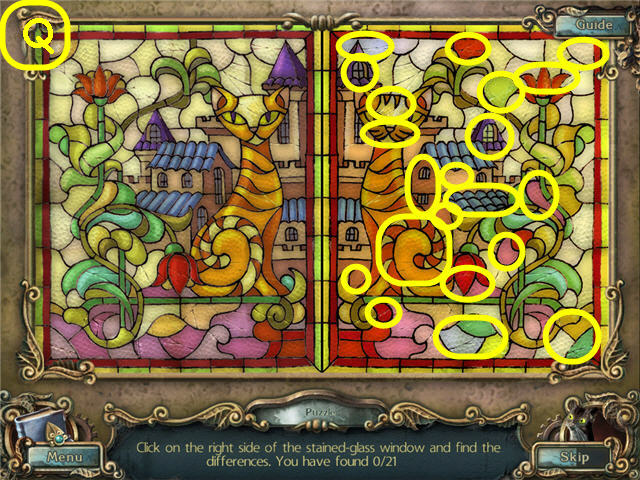
- Find the differences in the picture.
- See screenshot (Q) for solution.
- Take the CAN OPENER.
- Back out and go forward.
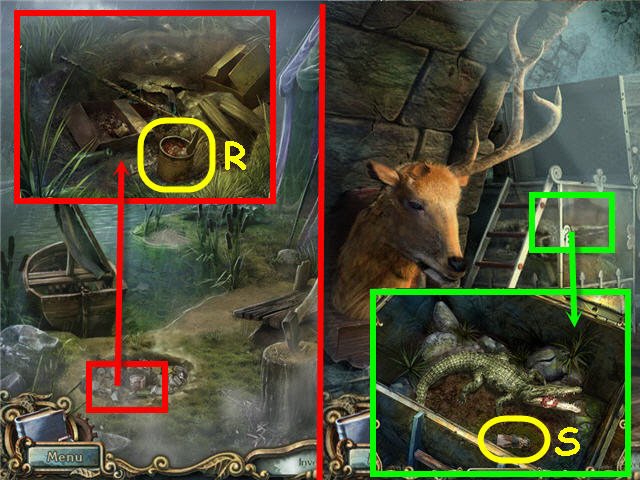
- Examine the ring of debris; use the CAN OPENER on the can and take the STEWED MEAT (R).
- Back out three times; go right, straight, up the stairs and left into the old man's room.
- Examine and place the STEWED MEAT in the cage; take the OLD WOMAN'S ROOM KEY (S).
- Back out.
- Examine the palm tree to access a HOS.
- Find the items listed.
- You will earn a CLOTH.
- Examine and place the OLD WOMAN'S ROOM KEY on the right door lock (S).
- Enter the room on the right.
- Collect the CAT 15/24 (@).
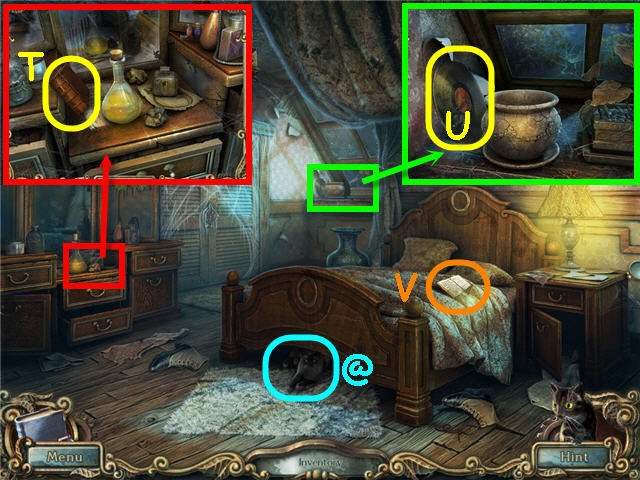
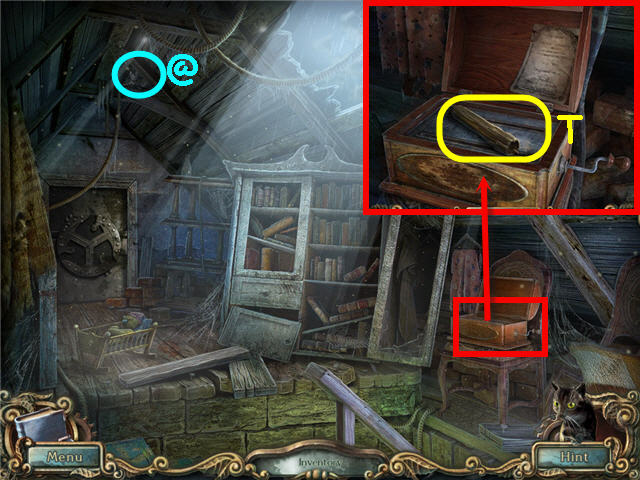
- Examine the dresser; take the BOOK (T).
- Examine the window ledge; take the RECORD (U).
- Read the book on the bed (V).
- Back out and go into the left room.
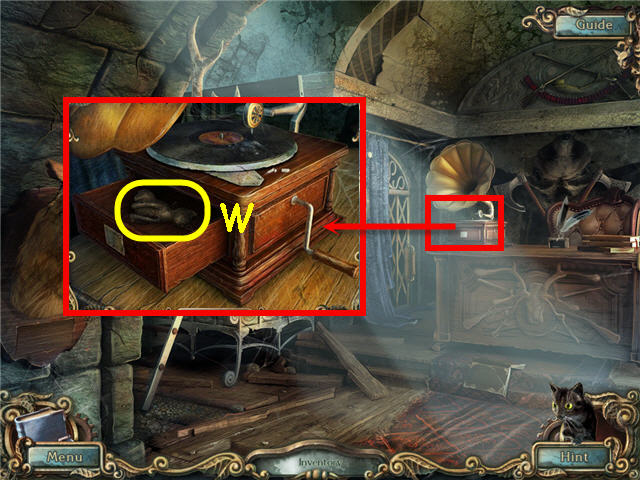
- Examine and place the RECORD and NEEDLE on the gramophone.
- Take the STATUE (W).
- Back out four times.
- Examine and place the STATUE on the fountain; take the scroll to trigger a puzzle.
- Find the matching pairs to uncover the picture.
- See screenshot (X) for solution.
- Take the HALF OF SCISSORS from the base.
- Go right, straight, up the stairs and into the right room.
Chapter 4 – The Black Kitten
- Examine the nightstand; place the HALF OF SCISSORS and BOLT on the half of scissors; take the SCISSORS (Y).
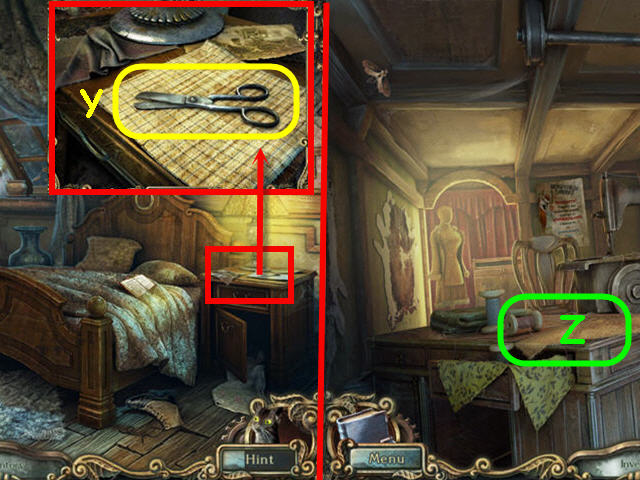
- Back out four times; go forward and left into the tailor shop.
- Place the CLOTH on the table (Z) to trigger a puzzle.
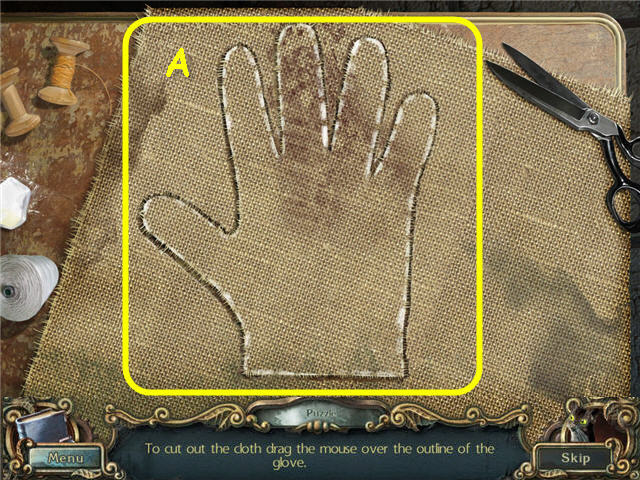
- Use your cursor to trace the hand print.
- Press anywhere on the completed hand to get the CUT CLOTH (A).
- Examine the closet; use the SCISSORS on the stitches; take the SCREWDRIVER (B).
- Back out twice and go left into the jewelry shop.
- Examine and use the SCREWDRIVER on the all four screws on the vent; take the CORKSCREW (C) and SPOOL OF THREAD (D).
- Back out and go forward; go left into the tailor shop.
- Examine and place the CUT CLOTH, SEWING MACHINE GRIP, and SPOOL OF THREAD on the sewing machine; turn the wheel and take the GLOVE (E).
- Back out.
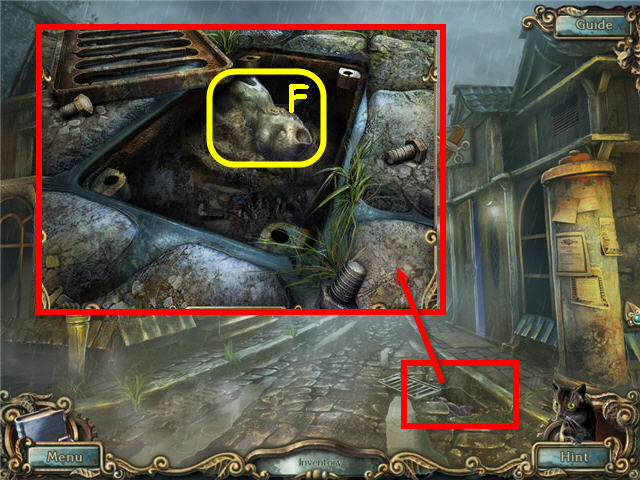
- Examine the grate; use the GLOVE to get a STATUE (F).
- Back out.
- Examine and place the STATUE on the fountain; take the scroll to trigger a puzzle.
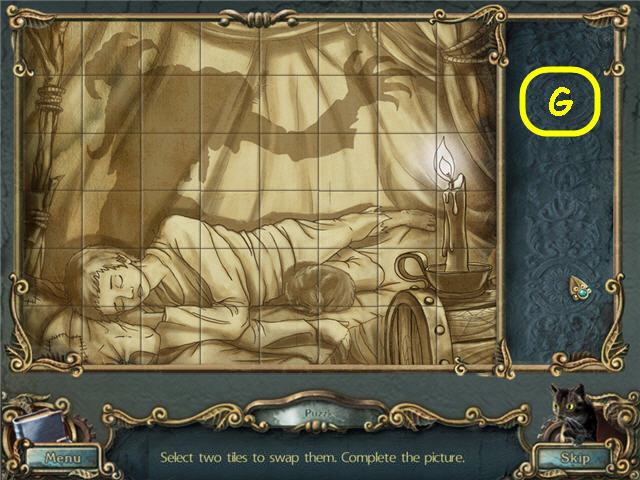
- Swap any two tiles to switch them and complete the picture.
- See screenshot (G) for solution.
- Take the 2nd PIANO KEY from the base.
- Go right, straight and then up.
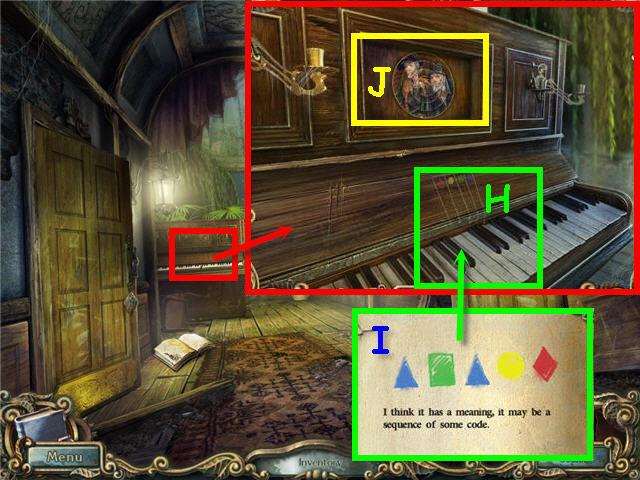
- Examine and place the 2 PIANO KEYS on the piano.
- Press the piano keys (H) that match the code (I) found on the wall under the stairs on the first floor.
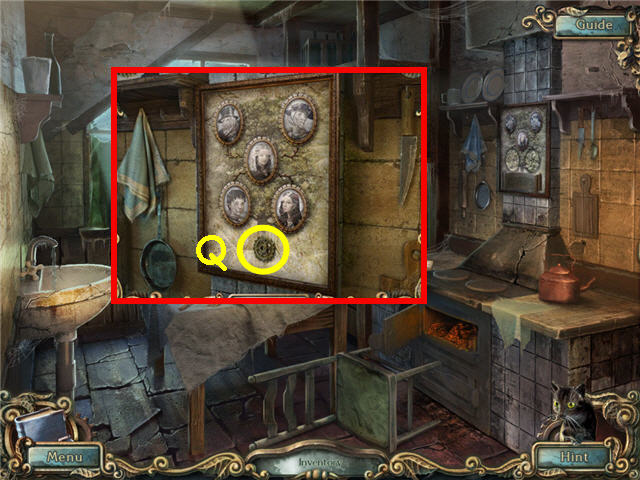
- Examine the disks (J) in the newly opened compartment to trigger a puzzle.
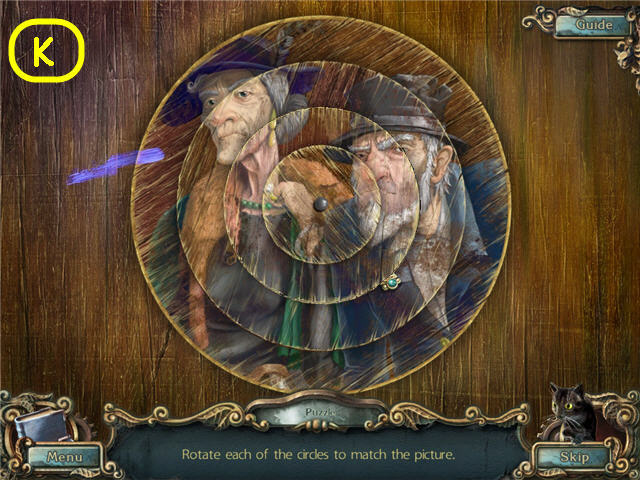
- Rotate the rings to complete the picture.
- Solution: rotate the outer ring to line up the blue line on the left. Rotate the 2nd largest ring to match the outer ring.
- Rotate the center ring to line up the face. Rotate the 2nd largest ring to match the outer ring. Rotate the 2nd smallest ring to complete the picture.
- See screenshot (K) for solution.
- Take the SEED.
- Go into the right room.
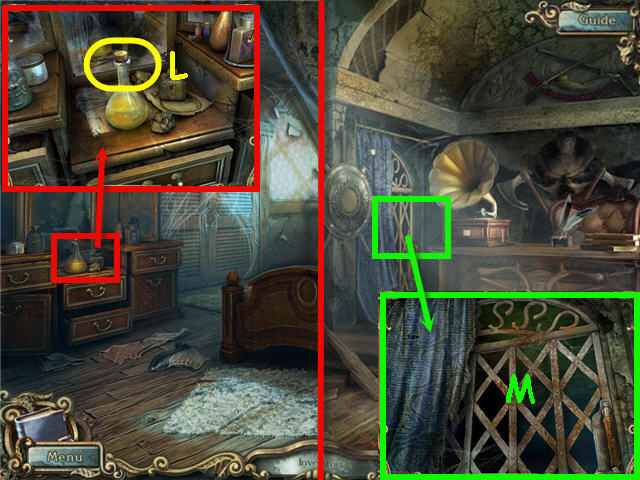
- Examine the dresser; use the CORKSCREW and RAG on the bottle (L); get an OILY RAG.
- Back out and go into the room on the left.
- Examine and use the OILY RAG on the metal gate (M) three times.
- Enter through the newly opened gates.
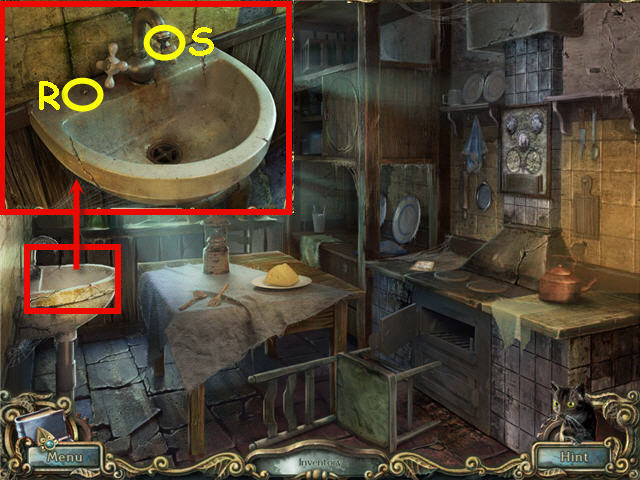
- Examine the bathtub to trigger a puzzle.
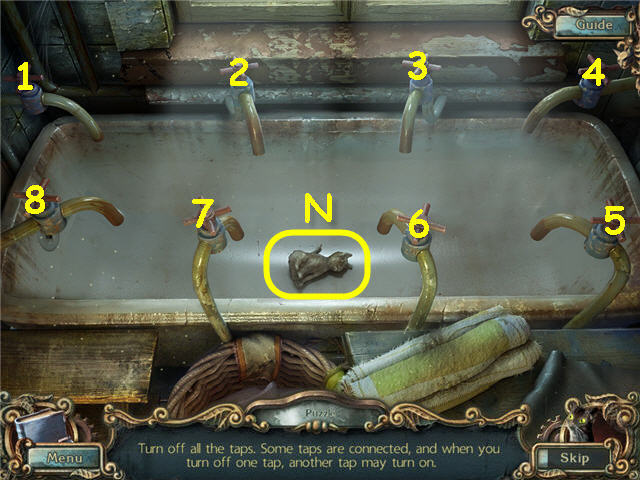
- Turn off all the taps.
- Shutting off one tap can open and close others.
- Solution: Turn the following taps in this order; 6x2, 2, 4, 1x2, 7, and 3.
- Take the STATUE (N).
- Collect the CAT 16/24 (@).
- Examine the window; take the CAGE DOOR (O).
- Back out five times.
- Examine and place the STATUE on the fountain; take the scroll to trigger a puzzle.
- Place the pieces in the frame to complete the picture.
- See screenshot (P) for solution.
- Take the ANTLER from the base.
- Go right; straight, up the stairs and into the left room.
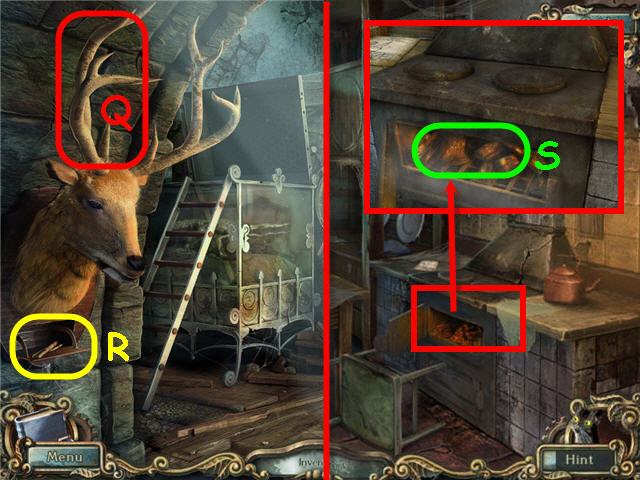
- Place the ANTLER on the buck head (Q); take the CURLING IRON (R).
- Back out twice; go into the room on the right.
- Examine the stove; place the CURLING IRON in the fire (S) to get a HOT CURLING IRON.
- Back out three times; go forward and right into the hair salon.
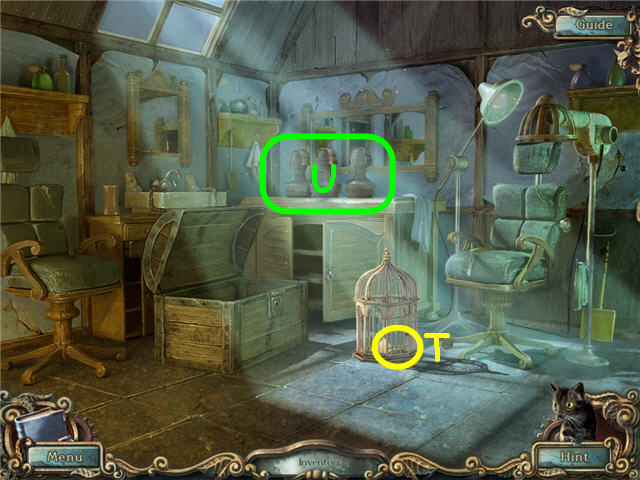
- Place the CAGE DOOR and the CHEESE on the cage; take the MOUSE (T).
- Examine and use the HOT CURLING IRON on the wigs (U) to trigger a puzzle.
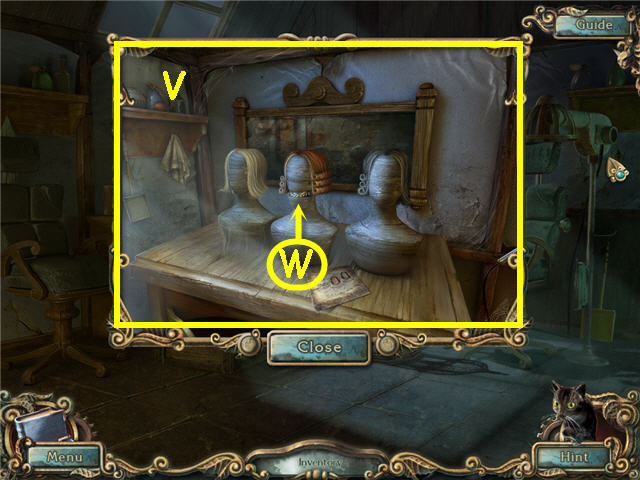
- Curl the hair to match the picture.
- Solution: Curl the right and left side of the middle head and the left side of the right head. See screenshot (V) for solution.
- Take the METALLIC SUN (W).
- Back out and go forward.
- Examine and place the METALLIC SUN on the shop door (X) on the left.
- Enter the shop.
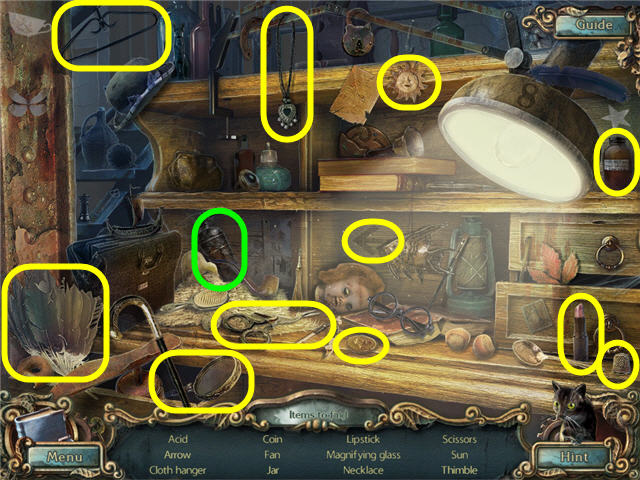
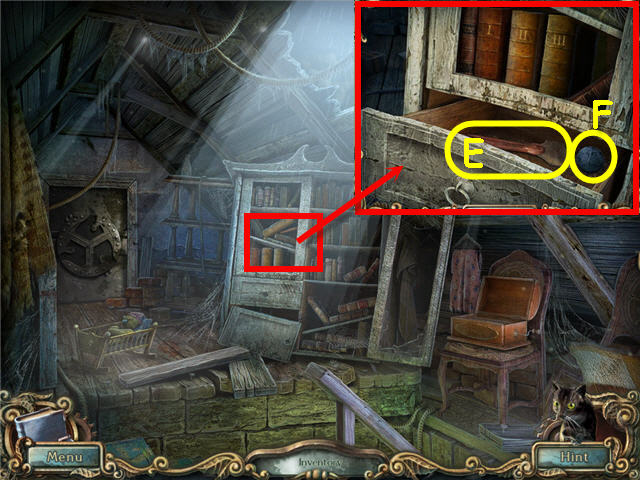
- Examine the desk to access a HOS.
- Find the items listed.
- You will earn a MEDALLION FROM THE ATTIC DOOR.
- Collect the CAT 17/24 (@).
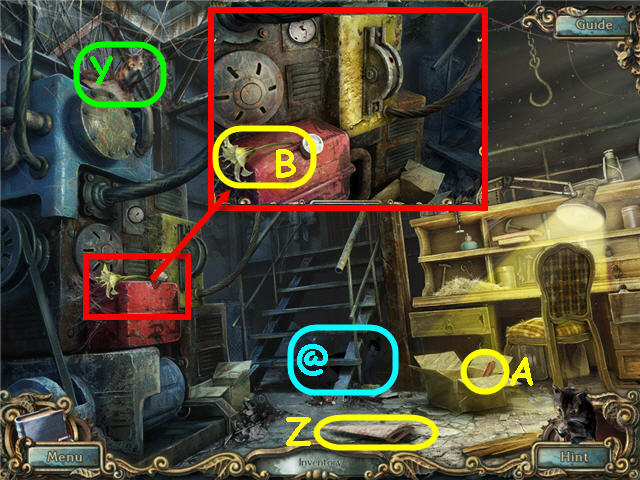
- Give the MOUSE to the cat (Y); take the SAW (Z).
- Take the RED CANDLE (A).
- Examine the generator; take the 2nd FLOWER (B).
- Back out three times; go right.
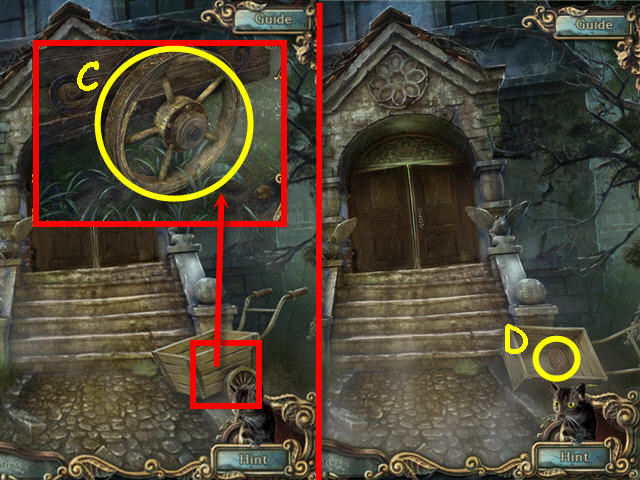
- Examine the cart; use the SAW to get the WHEEL (C).
- Take the SPOUT (D).
- Back out; go forward three times.

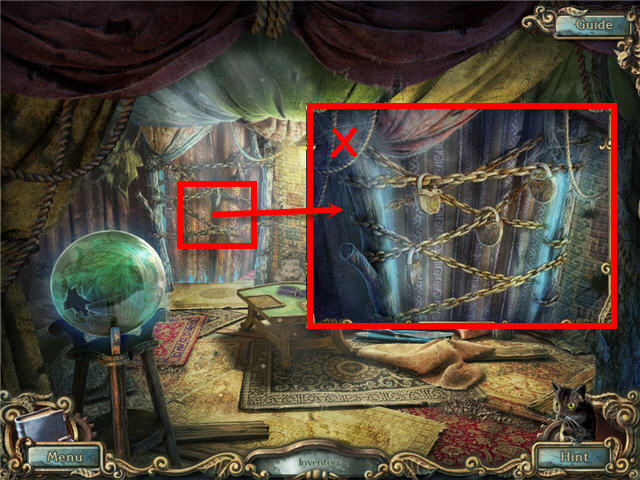
- Examine and place the WHEEL on the winch (E).
- Enter the tent.
- Examine the far right to access a HOS.
- Find the items listed.
- You will earn GASOLINE.
Chapter 5 – The Attic
- Take the BROOM (F).
- Use the HAMMER on the orb; take the CHIP (G).
- Back out twice.
- Examine the left shop shutter to access a HOS.
- Find the items listed and get a FUNNEL.
- Back out and enter the hair salon on the right.
- Examine the trunk; place the SPOUT on the can; take the WATERING CAN (H).
- Back out twice; go right, straight and right into the kitchen.
- Examine and use the WATERING CAN on the sink (I) to get the WATERING CAN WITH WATER.
- Back out; go upstairs and into the room on the right.
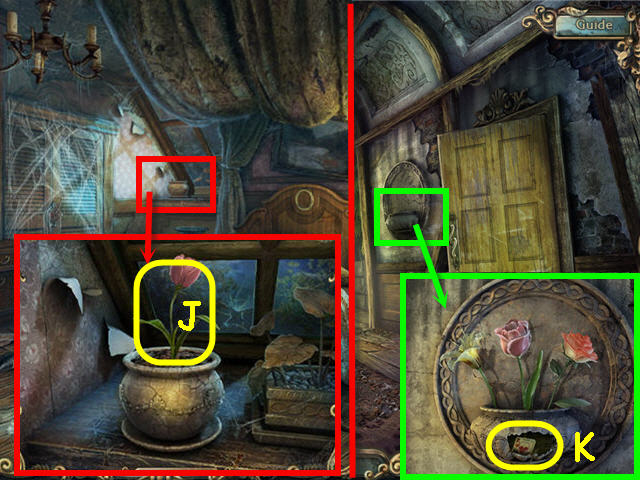
- Examine the window ledge; use the SHOVELFUL OF SOIL, SEED and WATERING CAN WITH WATER on the pot.
- Take the 3rd FLOWER (J).
- Back out.
- Examine and place the 3 FLOWERS in the planter; take the PLAYING CARD (K).
- Back out three times; go forward three times and enter the tent.
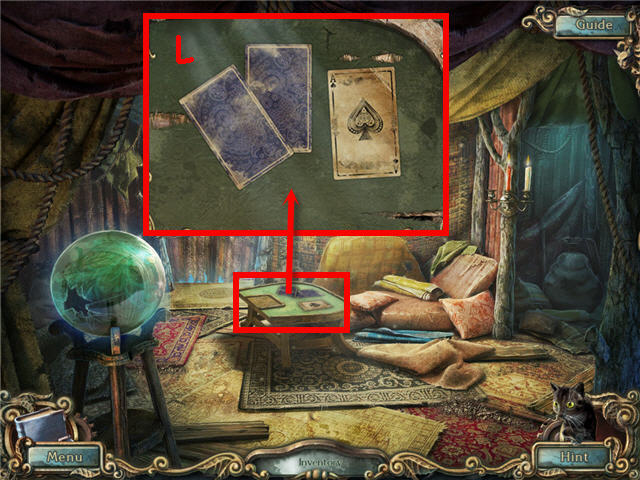
- Examine the table.
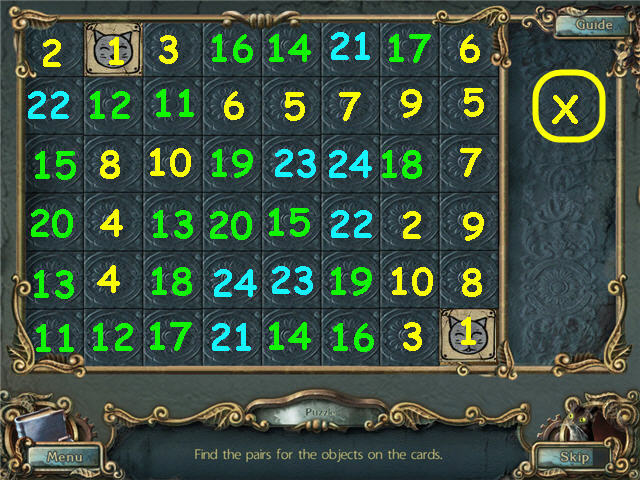
- Place the PLAYING CARD on the cards (L) to trigger a puzzle.
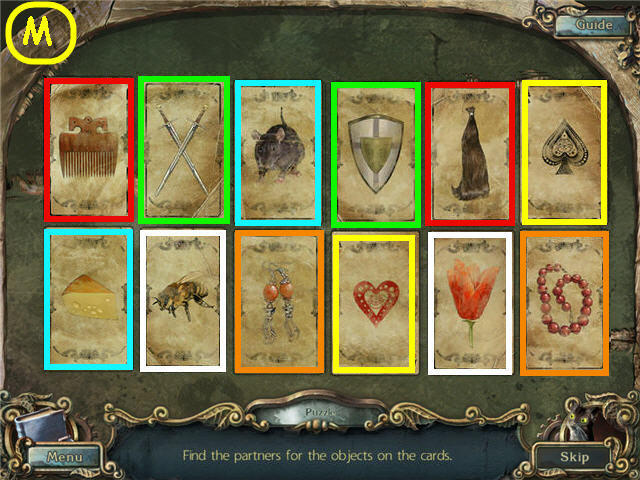
- Find the corresponding pairs.
- See screenshot (M) for solution.
- Press the left mouse button with the cursor on the puzzle to exit.
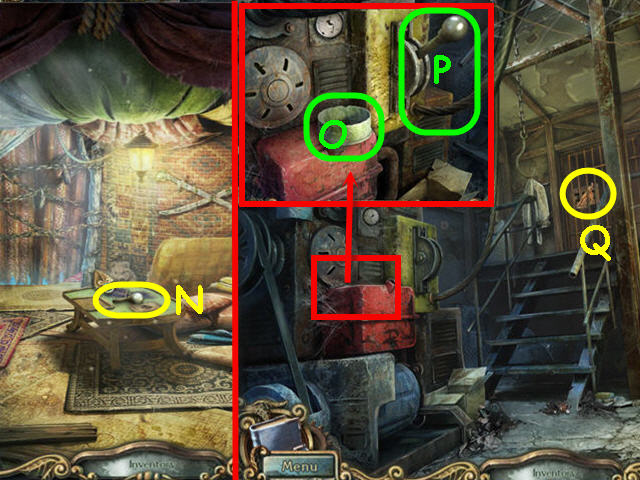
- Take the GENERATOR HANDLE (N).
- Back out twice; go left into the shop.
- Examine the generator; remove the cap and place the FUNNEL and GASOLINE in the tank (O).
- Place the GENERATOR HANDLE on the switch (P) and pull the handle.
- Take the 2nd MEDALLION FROM THE ATTIC DOOR (Q).
- Back out three times; go right, straight, up and into the room on the right.
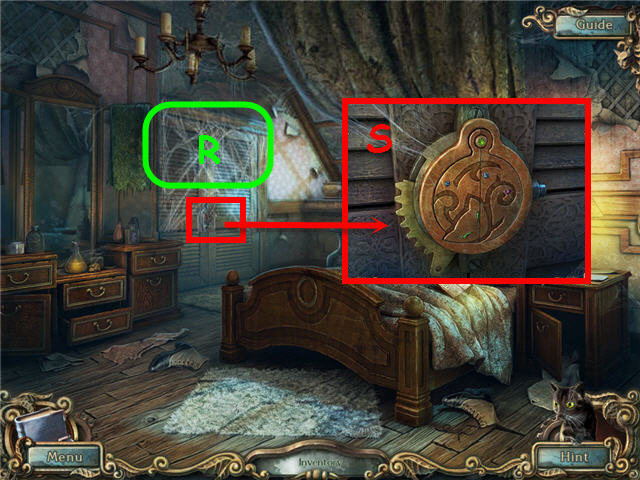
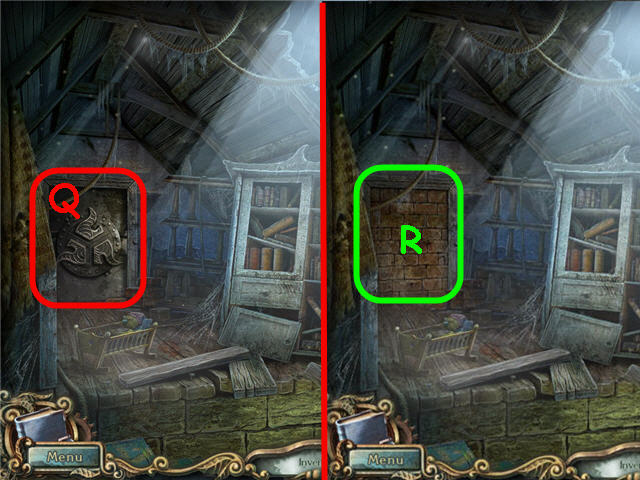
- Use the BROOM on the cobwebs (R).
- Examine and place the 2 MEDALLIONS FROM THE ATTIC DOOR on the door lock (S).
- Go through the newly opened door.
- Examine the shelves in the rear to access a HOS.
- Find the items listed.
- You will earn a BEDSHEET.
- Collect the CAT 18/24 (@).
- Examine the box; take the BLACK CANDLE (T).
- Back out five times; go forward three times and enter the tent.
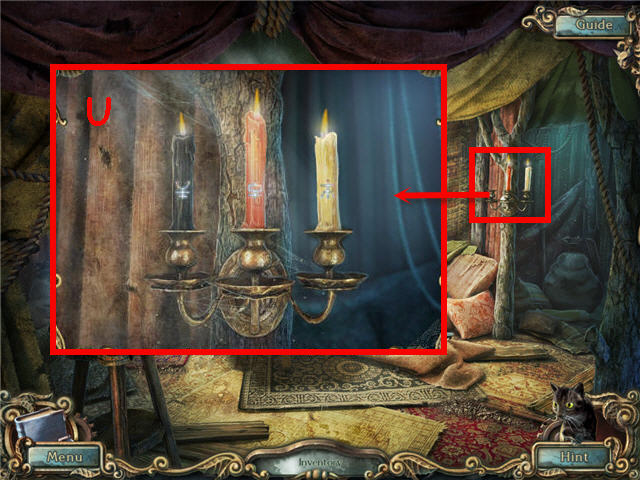
- Examine and place the RED CANDLE and the BLACK CANDLE in the candle holder.
- Light all three candles and note the code on the candles (U).
- Back out twice and go left into the shop.
- Examine the gate lock; enter the code from the candles in the lock (V).
- See screenshot (W) for solution.
- Examine the desk to access a HOS.
- Find the items listed and get ACID.
- Back out; go forward and enter the tent.
- Examine and use the ACID on the locks (X) four times.
- Enter through the newly opened door.
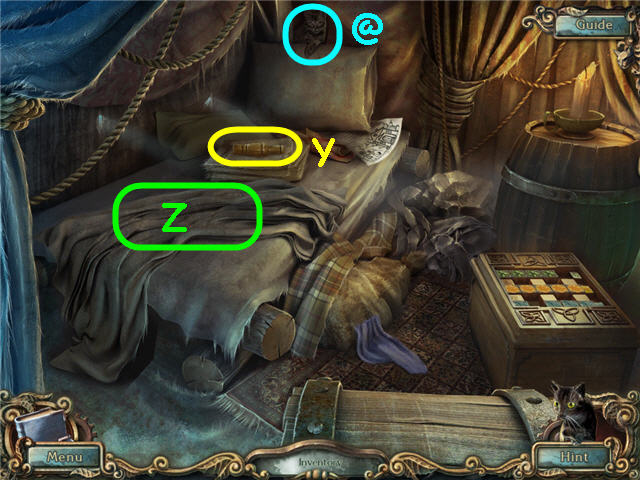
- Collect the CAT 19/24 (@).
- Take the HUNTER'S WHISTLE (Y).
- Use the BEDSHEET on the bed sheet (Z) to get a ROPE MADE OF BEDSHEETS.
- Back out five times and go right.
- Use the HUNTER'S WHISTLE on the owl (A).
- Take the 2nd CHIP (B).
- Back out and go forward three times. Go into the tent and then into the left rear room.
- Place the 2 CHIPS on the board to trigger a puzzle.
- Move the chips under their matching symbol row.
- Solution: Move the numbered chips on the screenshot left- L, right – R, down – D, or up – U as noted; 9L, 10U-R, 11U2x, 12U2x, 18L2x-D, 4R4x, 5U-R3x, 10D-L2x-D, 3D-R2x-U, 2D2x -R2x, 1D3x-R, 6L-U, 9L2x-D2x, 13L3x-D, 8D-L2x, 16L2x-U, 15D-L3x, 17U-L2x, 18U3x, 19U3x-L, 14R-D, 11R2x-U2x, 7R3x-U, 10D-R2x, 9D2x, 6R-D, 13L. See screenshot (C) for solution.
- Take the STATUE and HALF OF A CROSS from the opened box.
- Back out five times.
- Examine and place the STATUE on the fountain; take the scroll to trigger a puzzle.
- Remove the blocks by selecting them in numerical order.
- See screenshot (D) for solution.
- Take the 2nd BOOK from the base.
- Go right; straight, up the stairs, into the room on the right and through the doors to the attic.
- Examine the left side of the bookcase; place the 2 BOOKS in the shelf; take the PALETTE KNIFE (E) and the YARN (F).
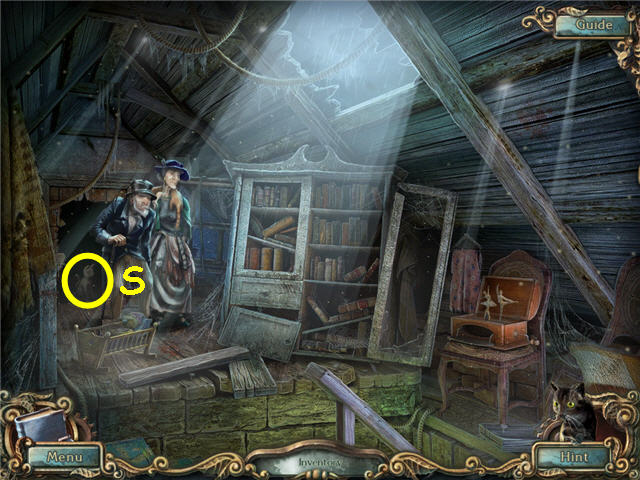
- Select any book on the shelf to get a journal update.
- Back out five times; go forward three times and enter the tent.
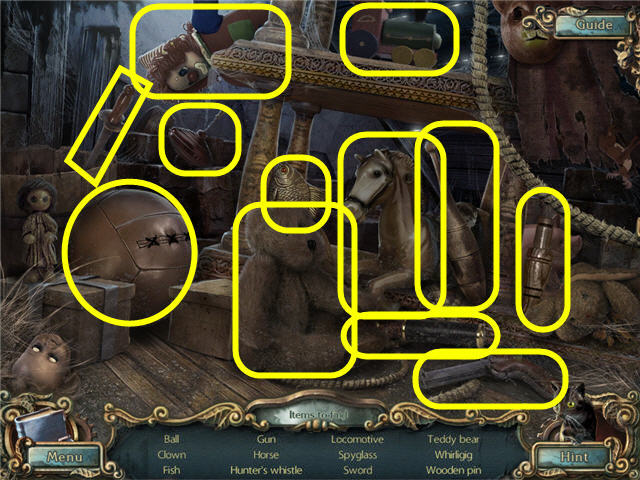
- Examine the right room to access a HOS.
- Find the items listed and get the INSULATING TAPE.
- Go through the blue curtains on the left rear of the room.
- Examine and use the YARN on the knitting; take the MENES'S MEDALLION (G) and the DOLL BLANKET (H).
- Back out five times; go right, straight, up the stairs, into the room on the right and through the doors to the attic.
Chapter 6 – Cemetery
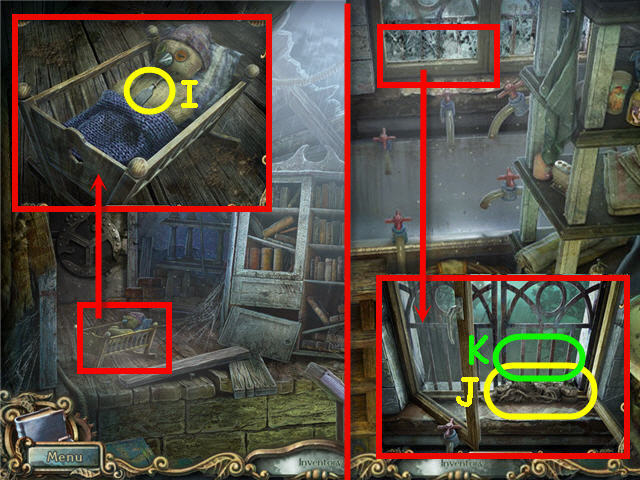
- Examine the cradle; place the DOLL BLANKET on the puppet and take the FILE (I).
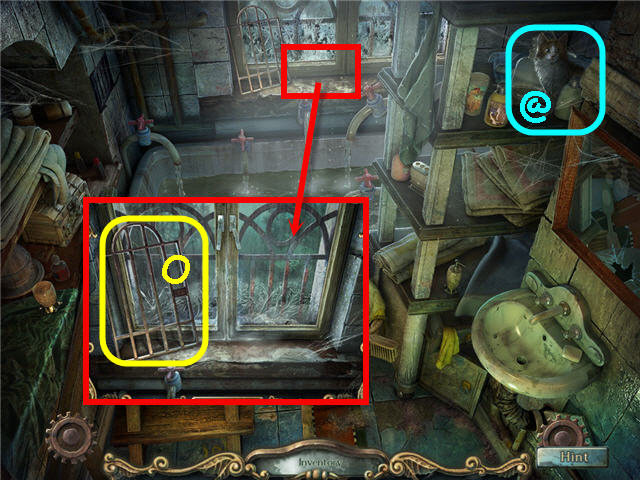
- Back out twice; go into the room on the left and into the bathroom in the left rear.
- Examine and use the PALETTE KNIFE on the window; open the window and take the FISHING NET (J).
- Use the FILE on the bars (K); use the ROPE MADE OF BEDSHEETS on the hole.
- Go out the window.
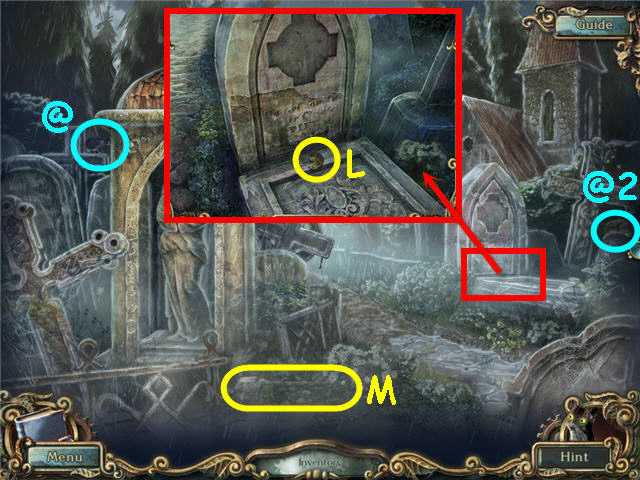
- Collect the CAT 20/24 (@) and CAT 21/24 (@2).
- Examine the grave; take the LOCK FROM THE JAR (L).
- Use the BROOM on the leaves; take the OAR (M).
- Back out to the fountain; go forward three times.
- Examine the fire ring to access a HOS.
- Find the items listed.
- You will earn a FIGURINE.
- Examine and use the FISHING NET on the debris in the water; get a STATUE (N).
- Back out twice and go right into the hair salon.
- Examine the shelf; place the LOCK FROM THE JAR on the pottery lid; remove the lid and take ATALA'S MEDALLION (O).
- Back out twice.
- Examine and place the STATUE on the fountain; take the scroll to trigger a puzzle.
- Move the columns and rows to complete the picture.
- See screenshot (P) for solution.
- Take the 2nd OAR from the base.
- Go right; straight and then right.
- Examine and place ATALA'S MEDALLION and MENES'S MEDALLION in the frame; take the COGWHEEL (Q).
- Back out; go up the stairs, into the left room and through the blue curtain.

- Examine and place the COGWHEEL on the box; press on the bottom and top lock to open it and take the REPELLENT (R).
- Back out to the fountain and go forward to the tent.
- Examine and place the 2 OARS on the boat (S).
- Take the boat across the water.
- Collect the CAT 22/24 (@).
- Use the REPELLENT on the ants (T); take the STATUE (U).
- Take the 2nd HALF OF A CROSS (V).
- Back out to the fountain.
- Examine and place the STATUE on the fountain; take the scroll to trigger a puzzle.
- Place the puzzle pieces in the frame to complete the picture.
- See screenshot (W) for solution.
- Take the 2nd FIGURINE from the base.
- Go right; straight, upstairs, right and through the doors to the attic.
- Examine and place the 2 FIGURINES on the box; turn the crank and take the PENDANT (X).
- Back out twice; enter the left door and go through the blue curtains.
- Examine the lower right shelf to access a HOS.
- Find the items listed and get BOOTS.
- Go straight out the window.
- Examine and place the 2 HALF OF A CROSS on the headstone (Y) and take the NET (Z).
- Use the BOOTS on the mud (A).
- Go straight up the muddy path.
- Collect the CAT 23/24 (@).
- Take the 2nd PENDANT (B).
- Use the CROWBAR on each of the 3 wooden planks (C); open the door.
- Examine the shed and take the DYNAMITE (D).
- Back out to the fountain; go forward to the tent and use the boat to cross the water.
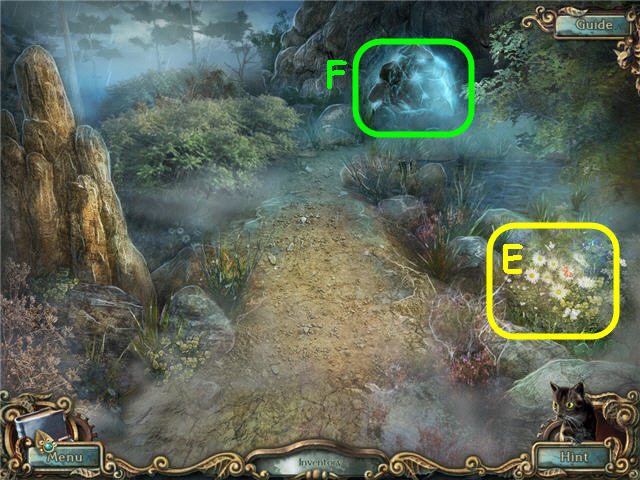
- Use the NET to catch a BUTTERFLY (E).
- Use the DYNAMITE and MATCHES on the rocks (F).
- Go into the cave.
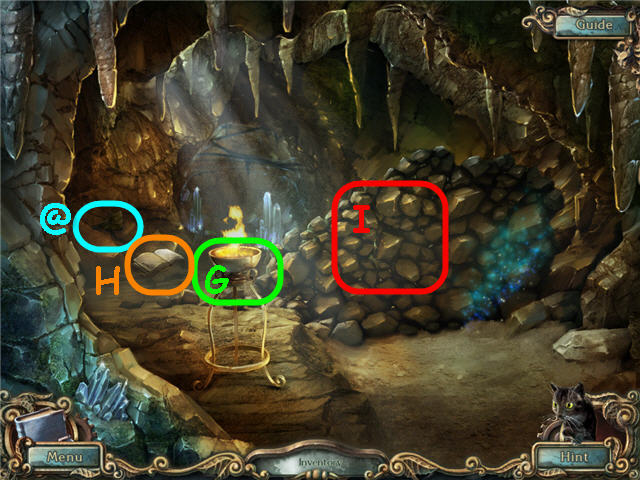
- Use the MATCHES on the oil lamp (G).
- Collect the CAT 24/24 (@).
- Examine and read the book (H).
- Use the CROWBAR on the stone wall (I).
- Examine the rocks on the right to access a HOS.
- Find the items listed and get a TEARDROP.
- Back out to the fountain; go right, straight, up the stairs, into the left room, through the blue curtains, out the window and up the muddy path.
- Examine and place the BUTTERFLY on the plant; take the 2nd TEARDROP (J) when the plant leaves move away from the ground.
- Back out.
- Examine and place the 2 TEARDROPS on the statue (K); take the STONE (L).
- Back out to the fountain; go forward to the tent, cross the river and go into the cave.
- Examine the rocks on the right to access a HOS.
- Find the items listed and get a HOSE.
- Place the STONE on the glyphs on the back wall to trigger a puzzle.
- Note: If you do not see the back wall, be sure you previously knocked down the stone wall.
- Press the glyphs in the correct sequence.
- See screenshot (M) for solution.
- Take the SLEDGEHAMMER.
- Back out to the fountain; go right, straight, up the stairs, into the left door, through the curtains, out the window and forward.
- Examine the shed; place the HOSE on the generator; use the INSULATING TAPE on the hole (N).
- Take the STATUE (O).
- Back out to the fountain.
- Examine and place the STATUE on the fountain; take the scroll to trigger a puzzle.
- Rotate the pieces to complete the puzzle.
- See screenshot (P) for solution.
- Take the 3rd PENDANT from the base.
- Go right; straight, up the stairs, into the room on the right and through the doors to the attic.
- Place the 3 PENDANTS on the door lock (Q).
- Use the SLEDGEHAMMER on the bricks (R).
- Take the STATUE (S).
- Back out to the fountain.
- Examine and place the STATUE on the fountain; take the scroll to trigger a puzzle.
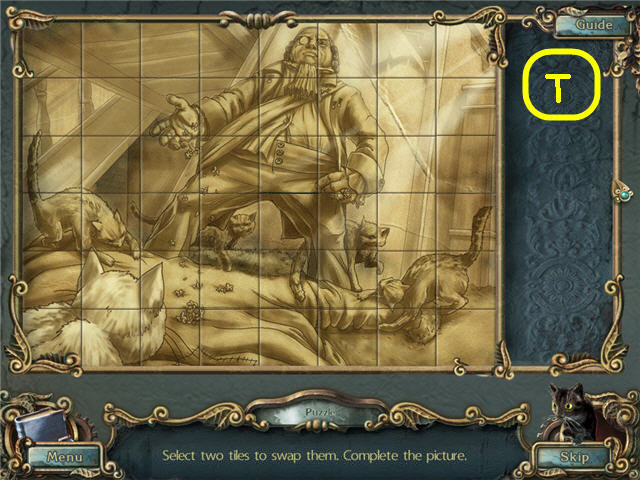
- Swap any two tiles to complete the picture.
- See screenshot for solution (T).
- Take the CAT WAR HORN.
- Back out.
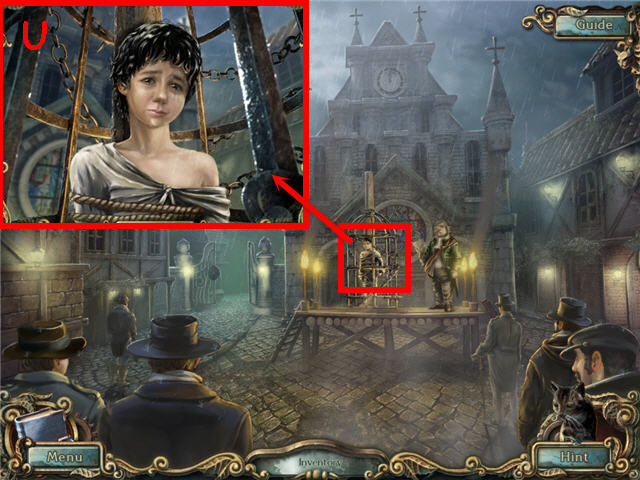
- Examine and give the CAT WAR HORN to Menes (U).
- Congratulations! You have successfully completed Ghost Towns: The Cats of Ulthar Standard Edition.
Created at: 2012-03-10