

Walkthrough Menu
- General Tips
- Chapter 1: The Main Floor
- Chapter 2: The Second Floor
- Chapter 3: The Future
- Chapter 4: The Dungeon
- Chapter 5: The Labyrinth
- Chapter 6: The Office
- Chapter 7: The Maid's Room
General Tips
- This is the official guide for Grim Tales: The Heir.
- This guide will not mention when you have to zoom into a location; screenshots will show each zoom scene.
- The screenshots show where to play a Hidden-Object Puzzle (HOP).
- Some inventory items require further actions.
- This guide will give step-by-step solutions for all puzzles which are not random. Read the instructions in the game for each puzzle.
Chapter 1: The Main Floor
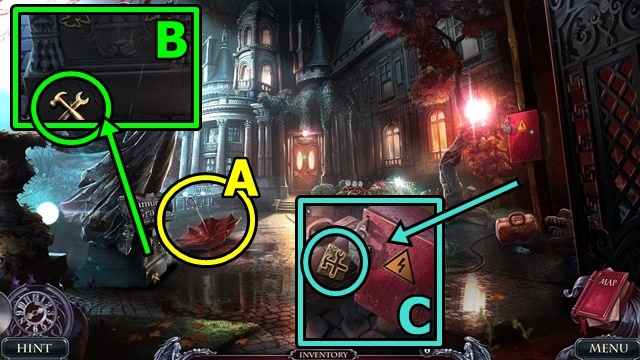
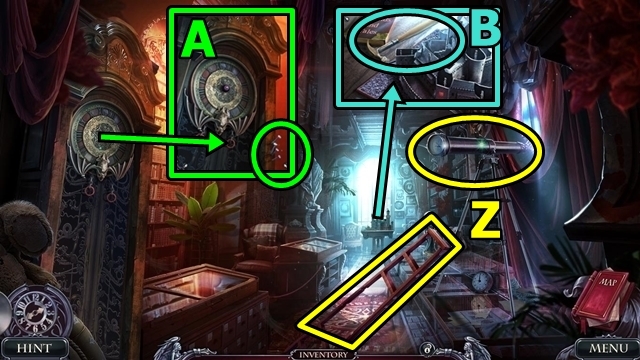
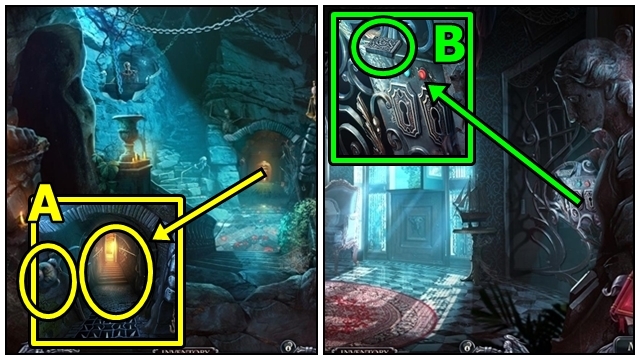
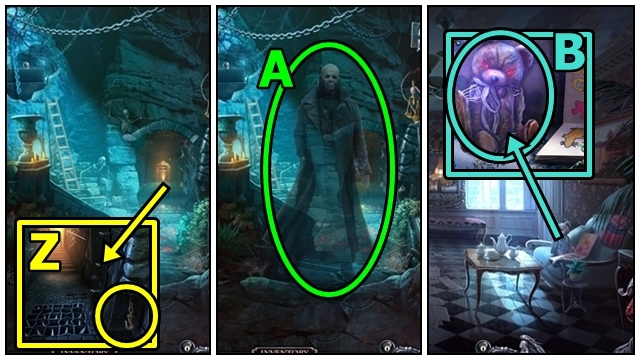
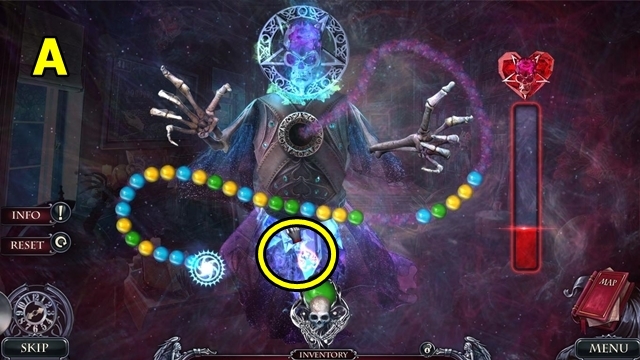
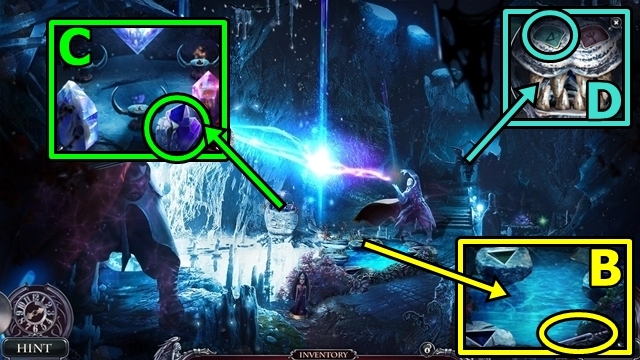
- Take the BROKEN UMBRELLA (A).
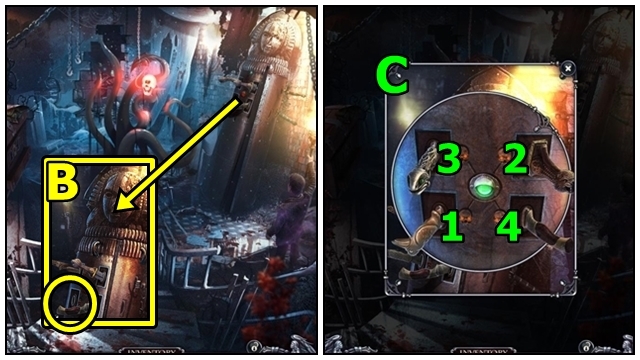
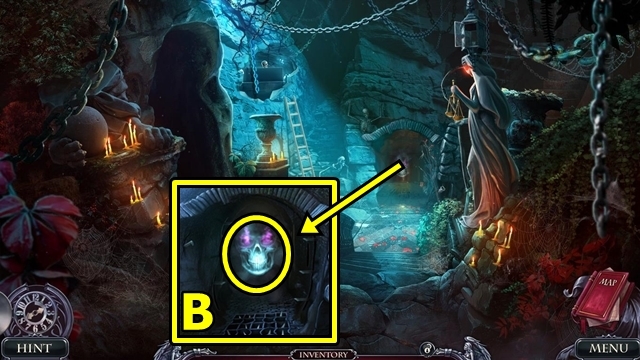
- Take the TOOL AMULET (B).
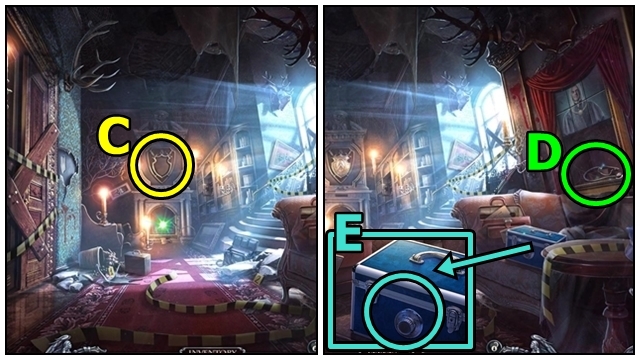
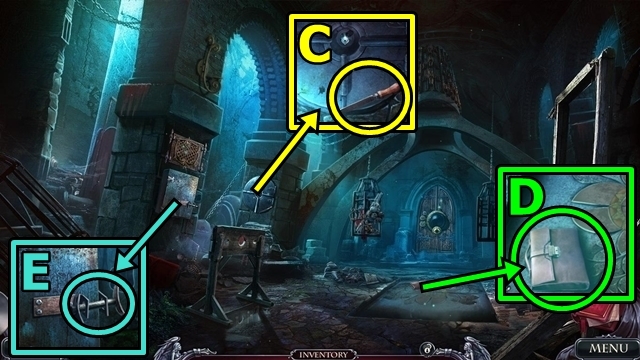
- Insert the TOOL AMULET (C); take the PLIERS and WEDGE.
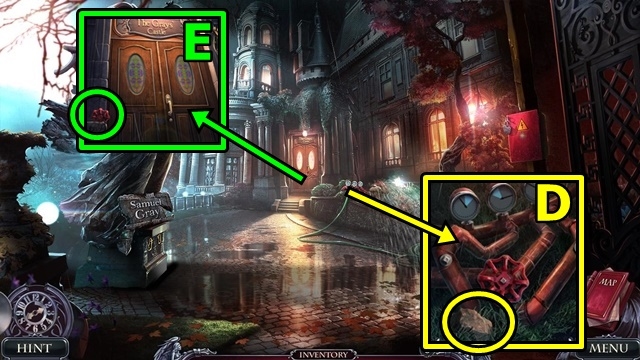
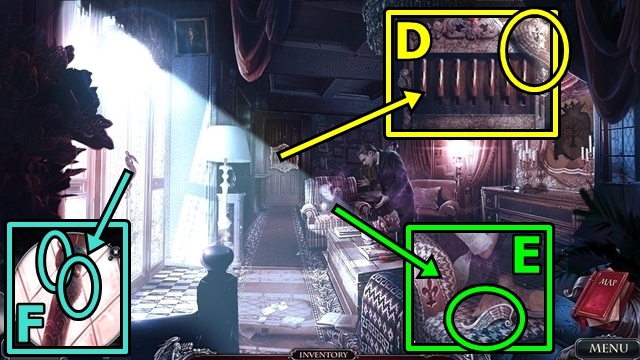
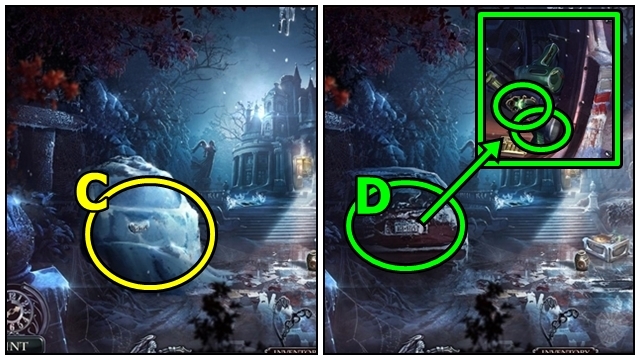
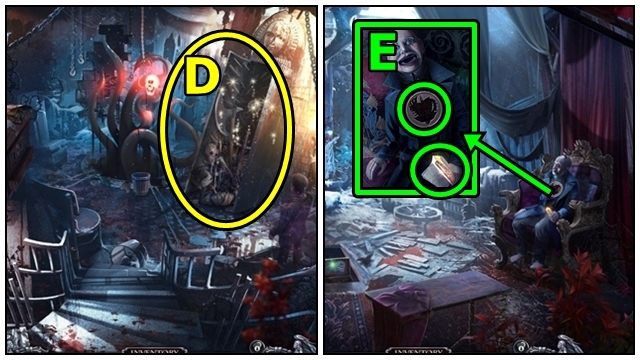
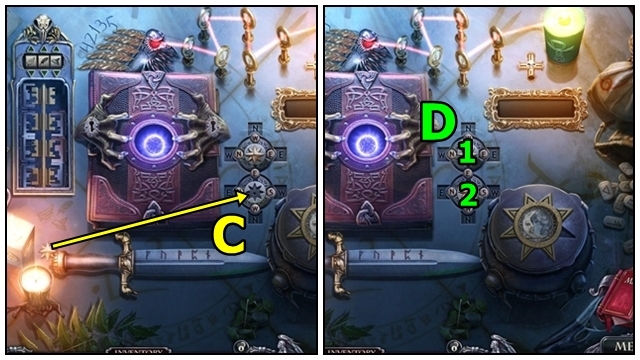
- Take the ROCK (D).
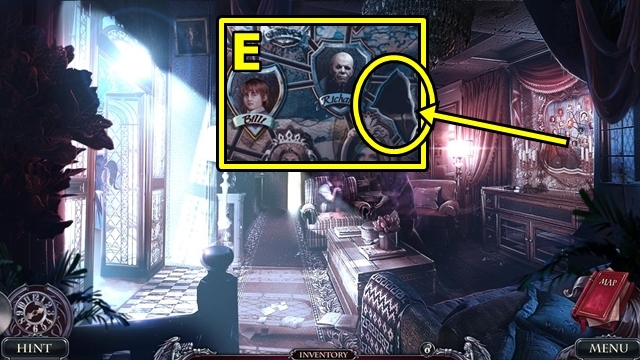
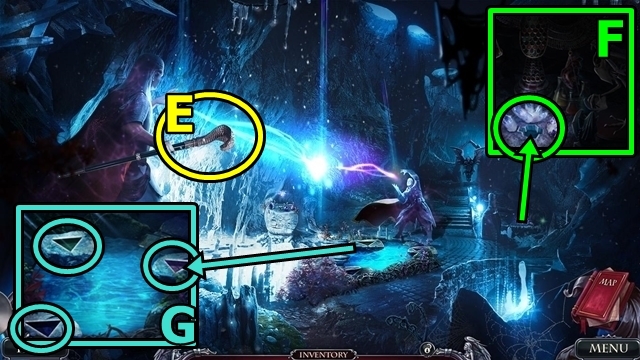
- Use the WEDGE (E), then the ROCK; receive the VALVE (1/2).
- Use the PLIERS on the BROKEN UMBRELLA (inventory); take the UMBRELLA.
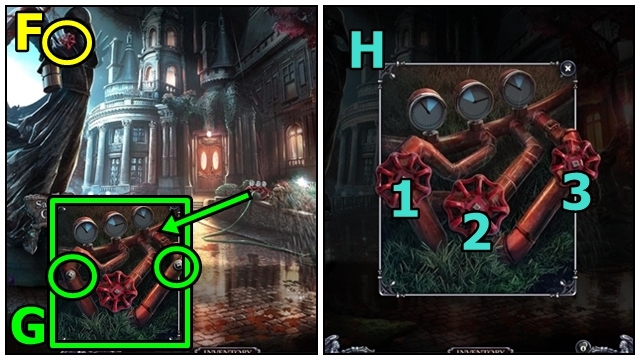
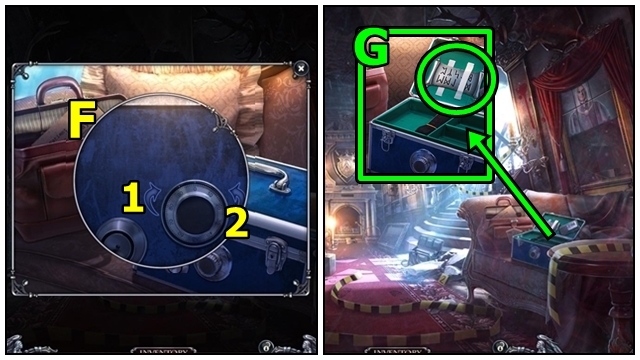
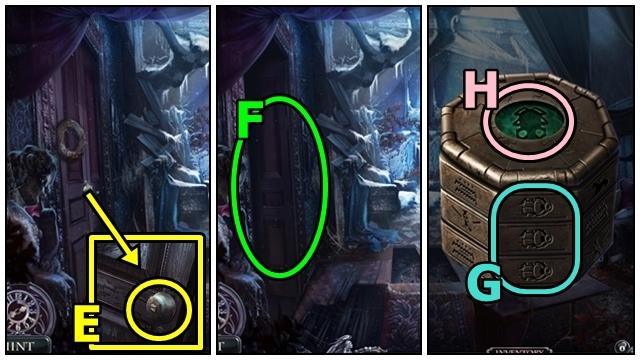
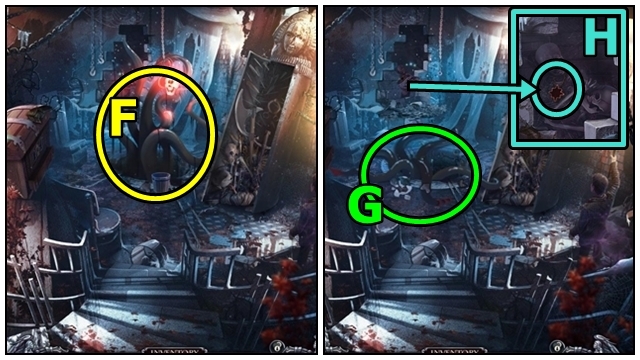
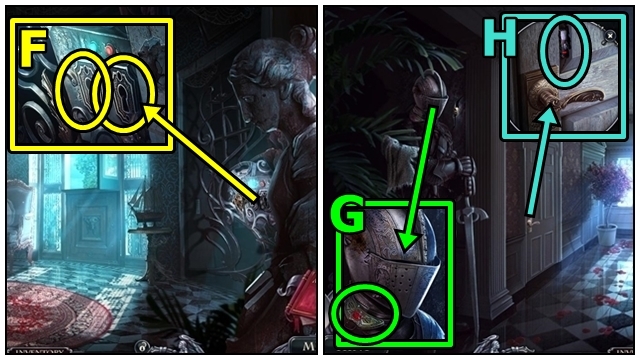
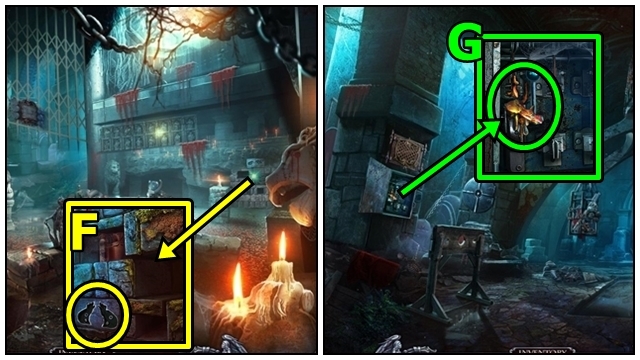
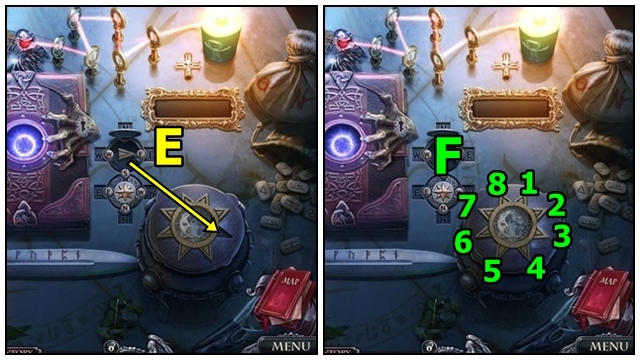
- Use the UMBRELLA (F); receive the VALVE (2/2).
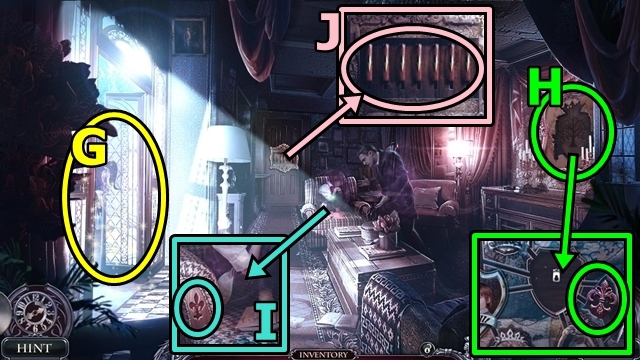
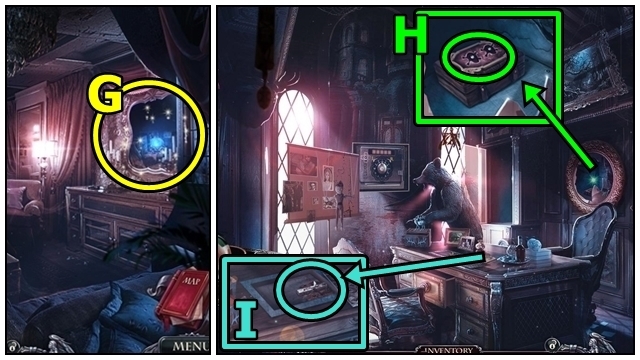
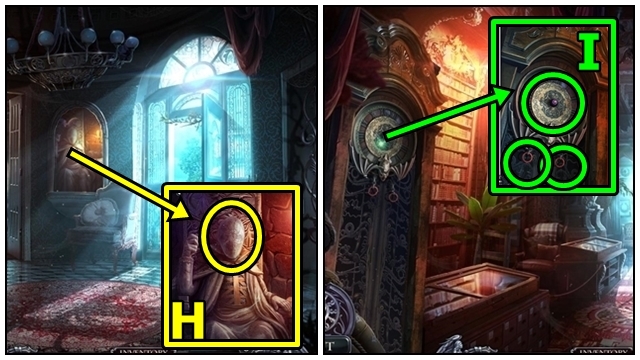
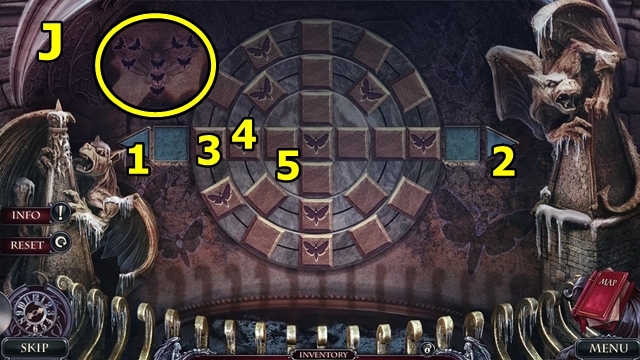
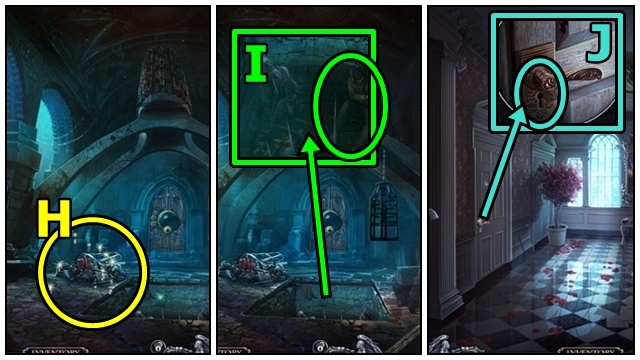
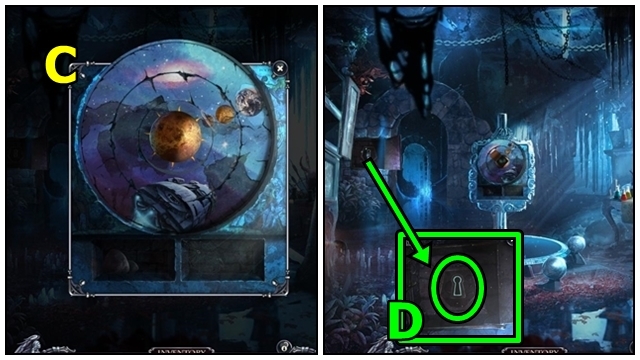
- Attach the VALVES (G); play the mini-game.
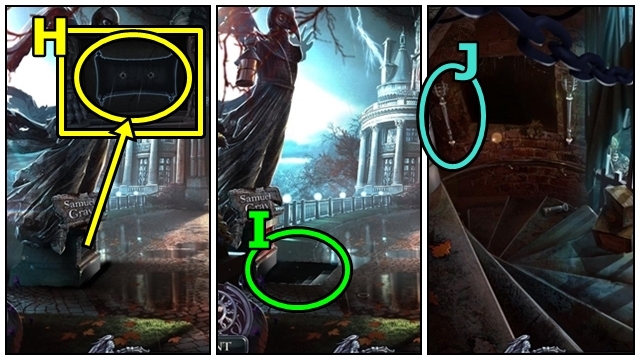
- Solution: 1x4-2x5-3x5 (H).
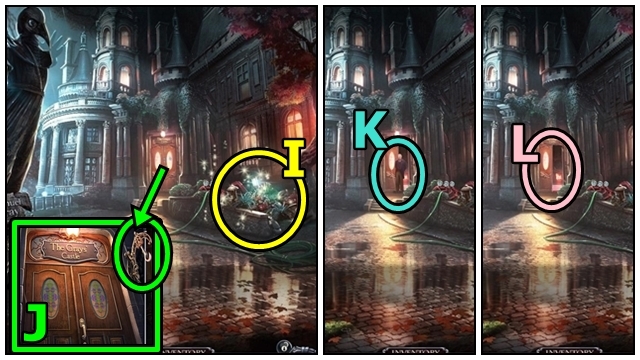
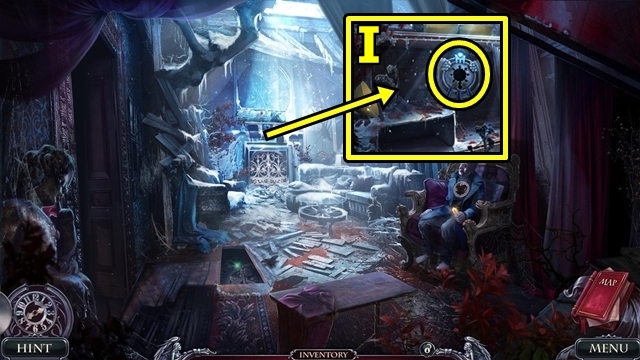
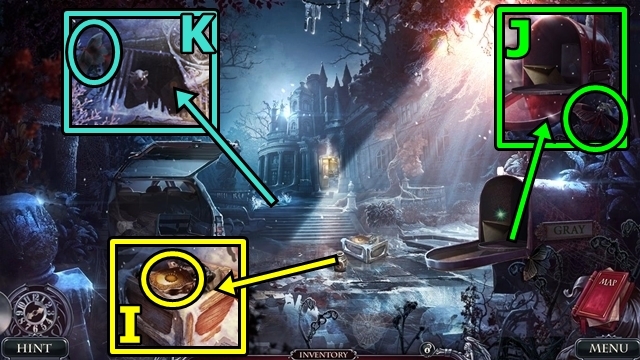
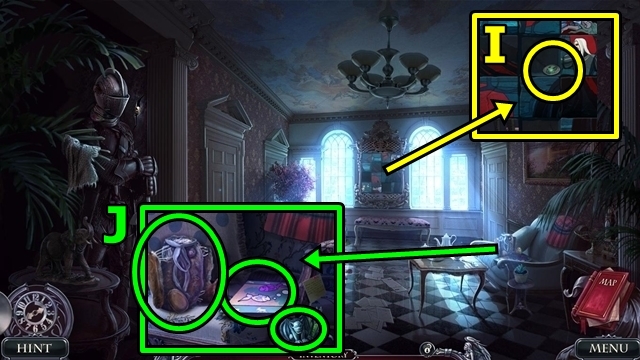
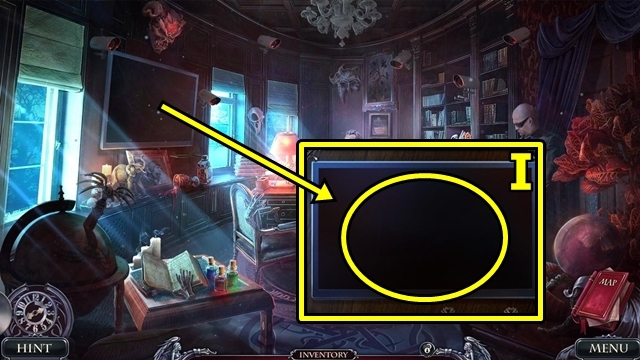
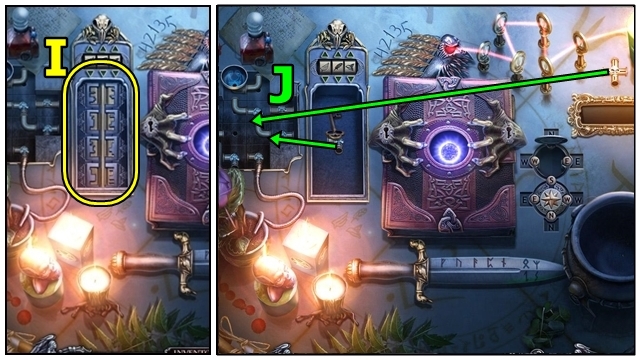
- Play the HOP (I); receive the BELL.
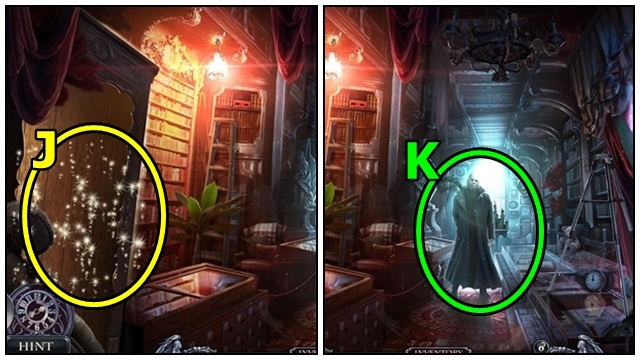
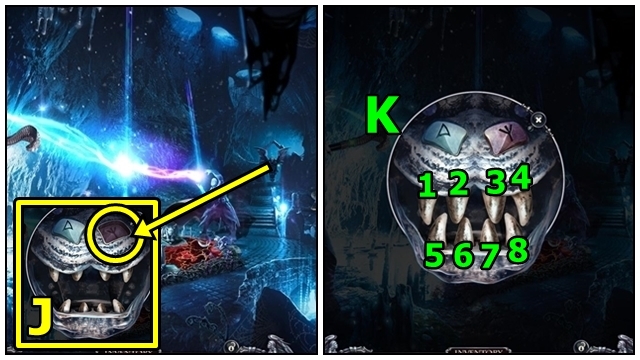
- Attach the BELL (J), then ring it.
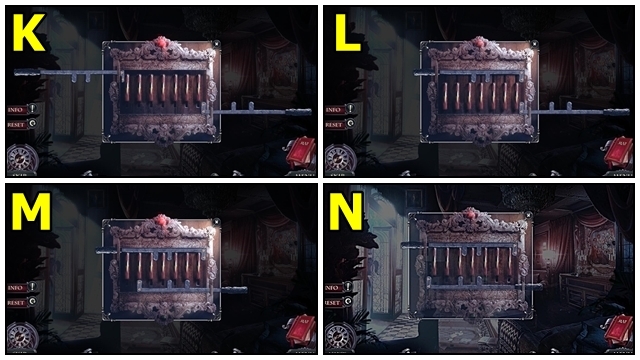
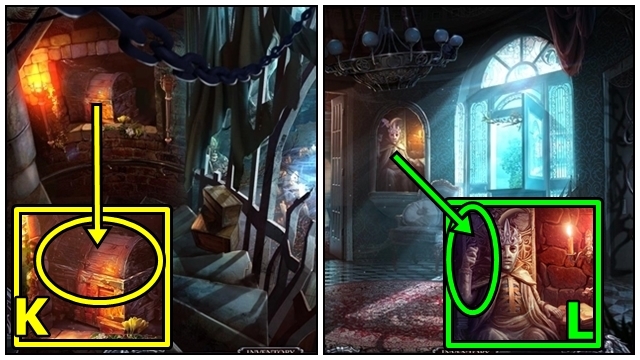
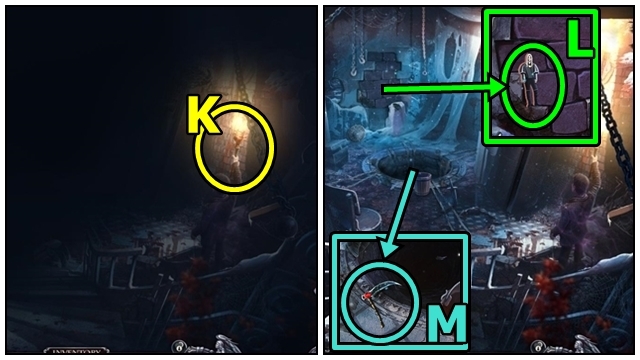
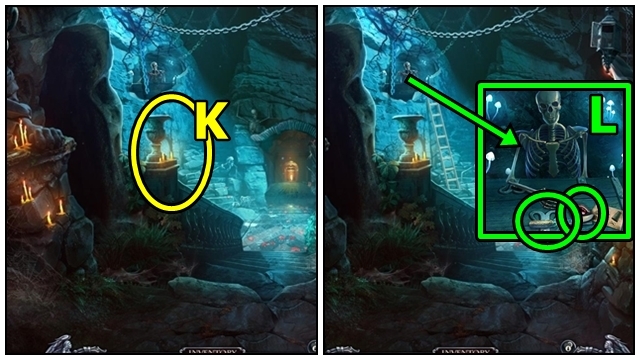
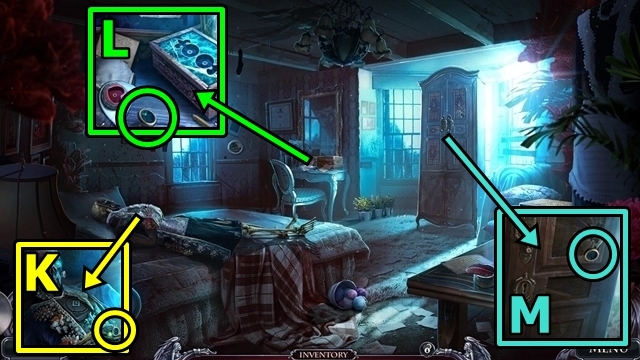
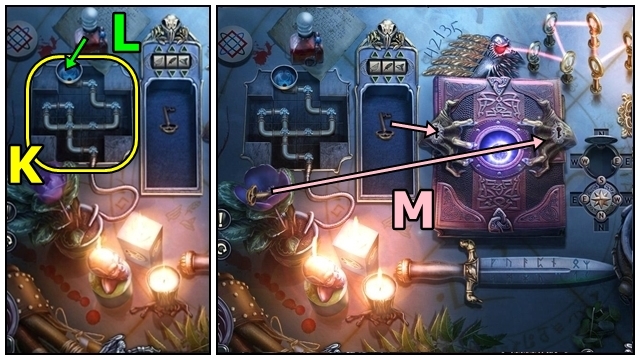
- Talk to Alfred (K).
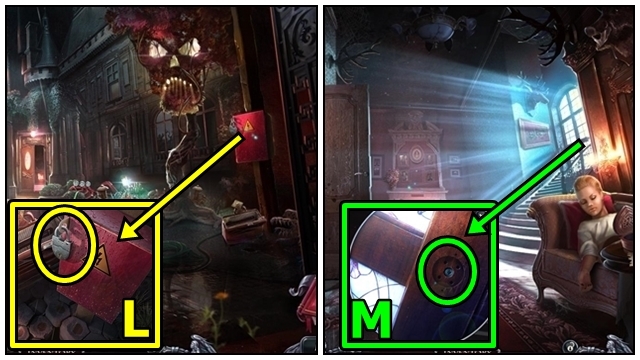
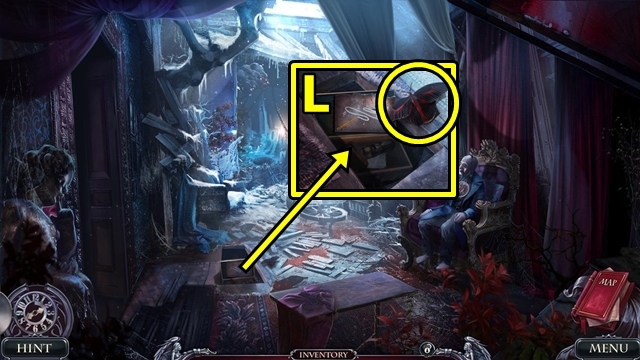
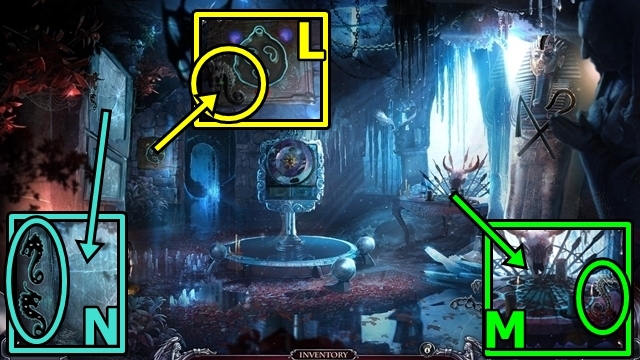
- Move forward (L).
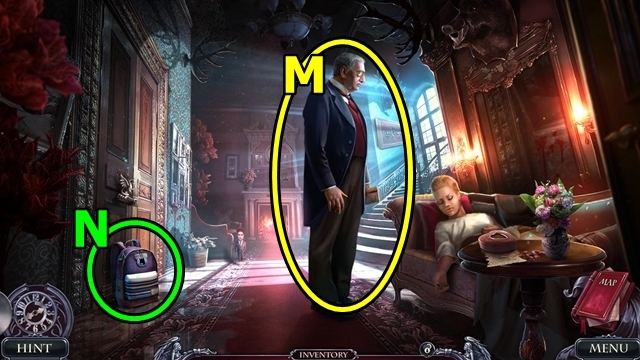
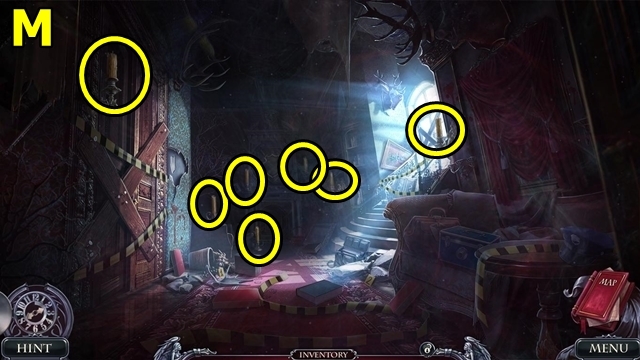
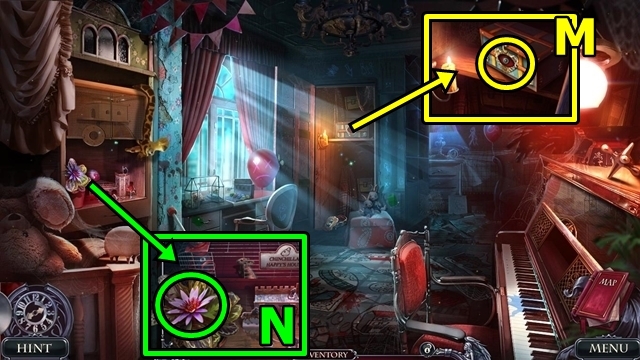
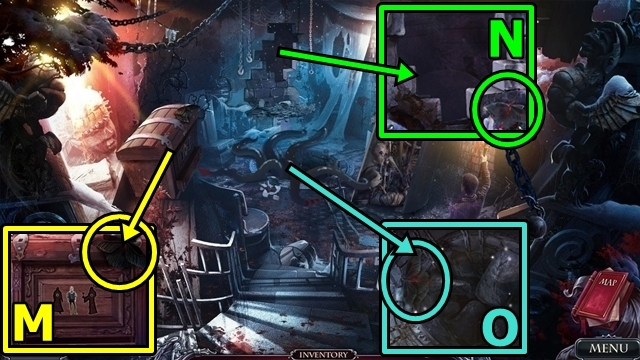
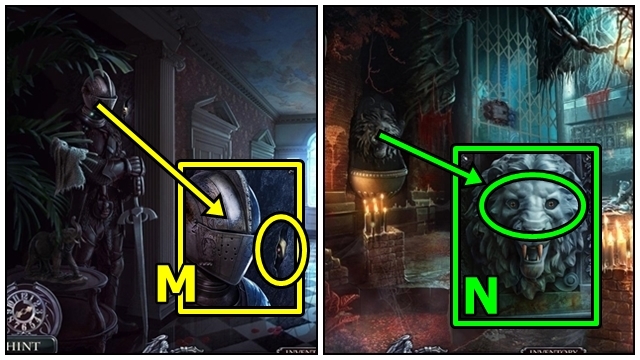
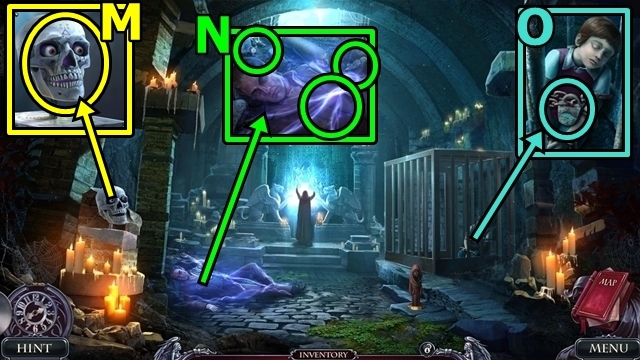
- Talk to Alfred (M). Receive the ENVELOPE.
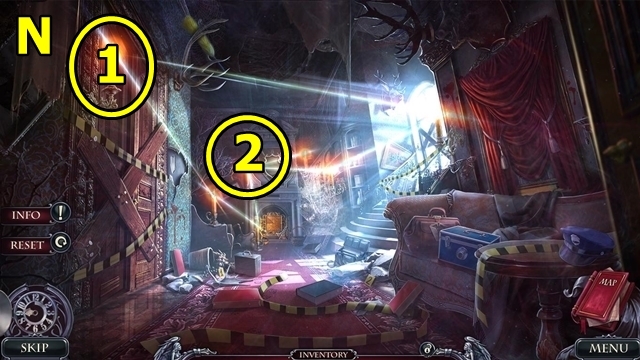
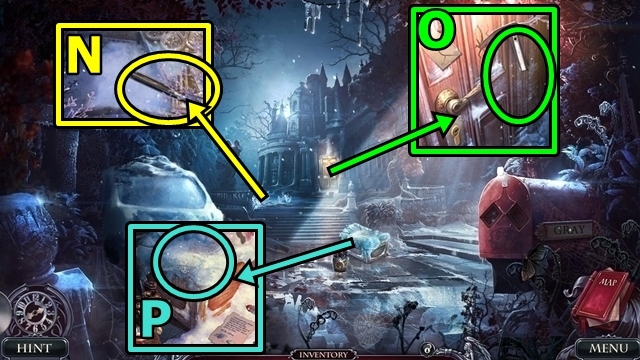
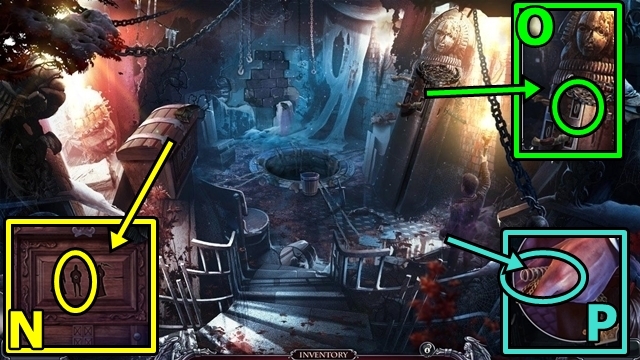
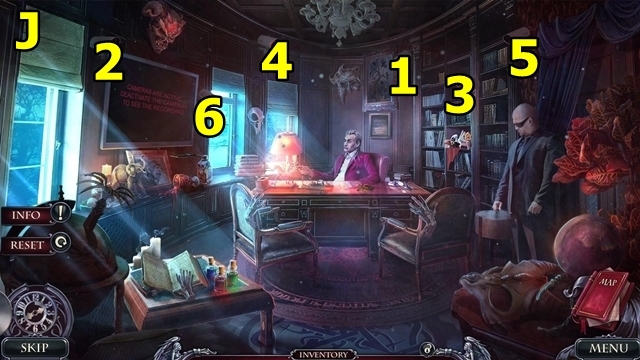
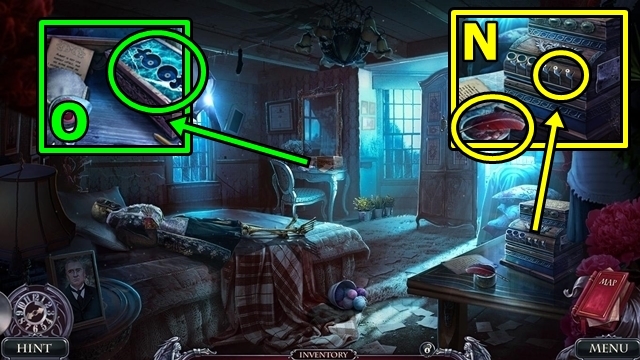
- Take the BACKPACK (N).
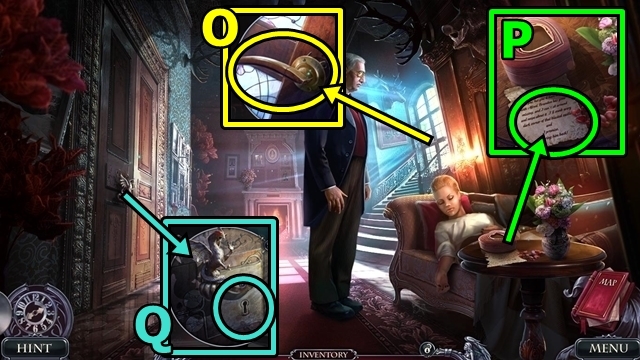
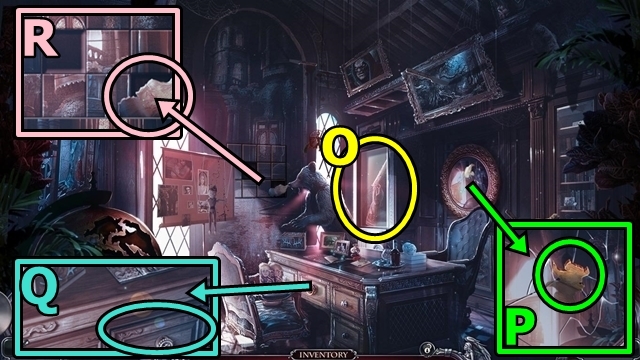
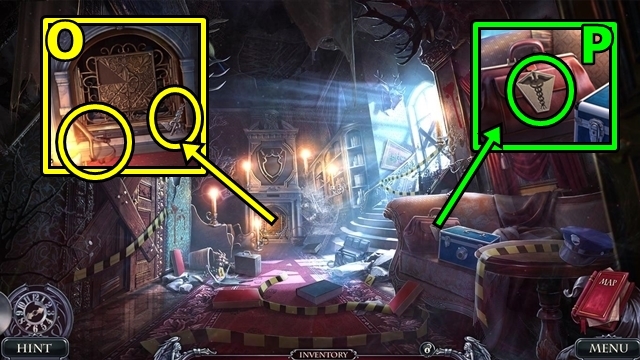
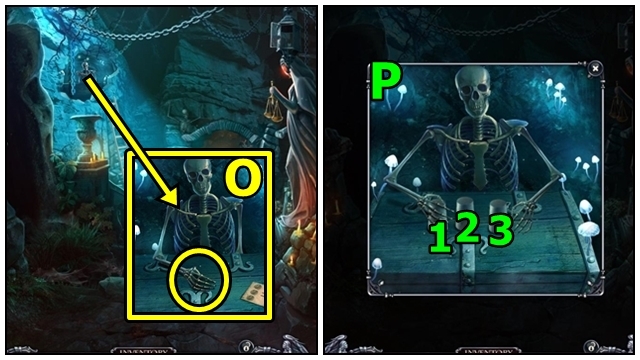
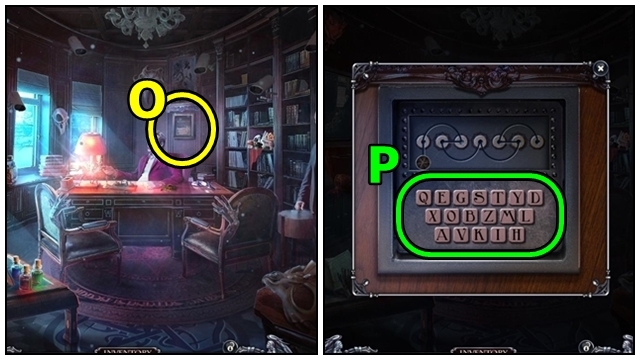
- Take the BROKEN HANDLE (O).
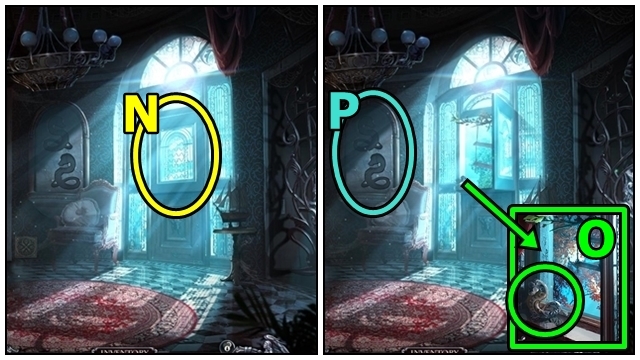
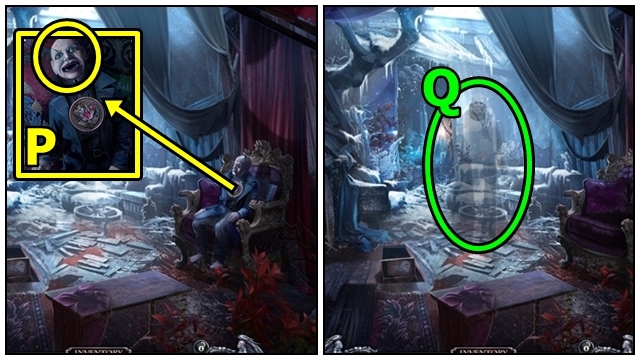
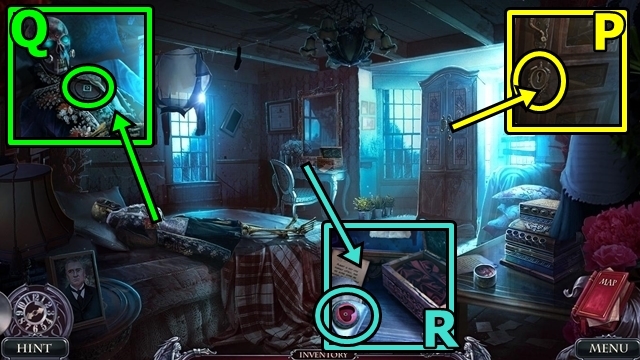
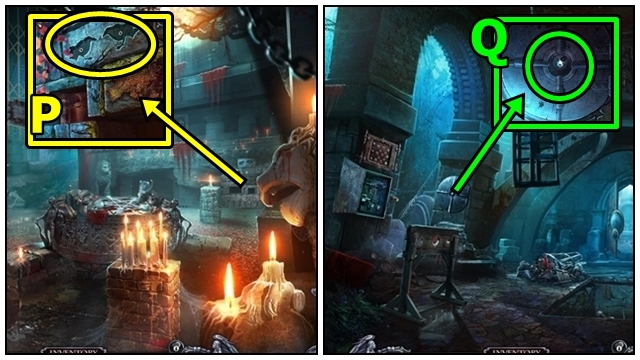
- Read the note (P); take the SCISSORS.
- Use the SCISSORS on the ENVELOPE (inventory). Move the note; take BILLY'S ROOM KEY.
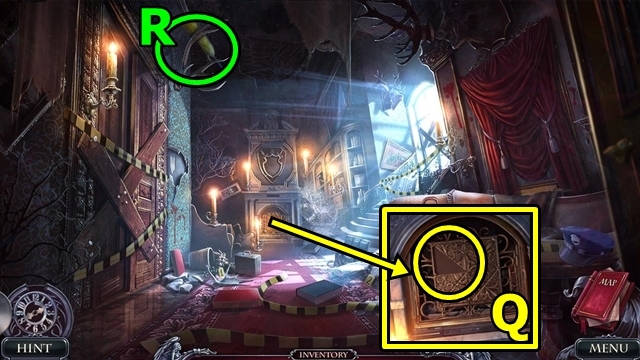
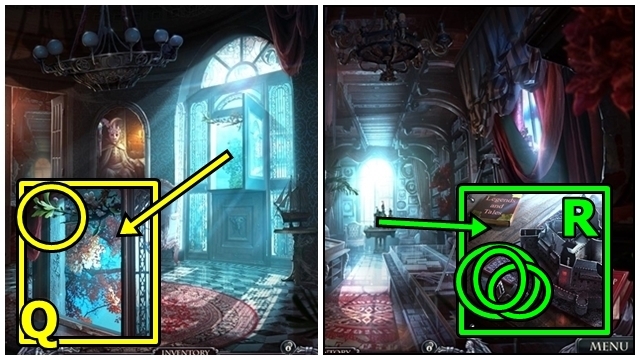
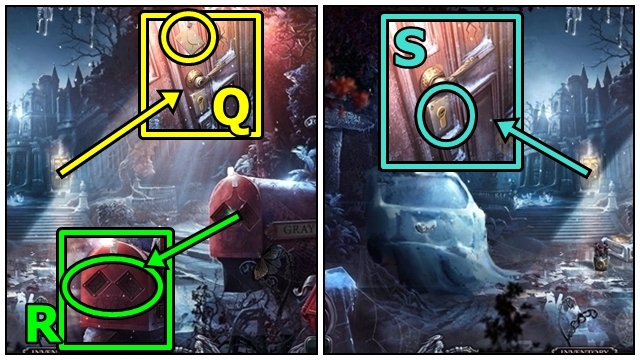
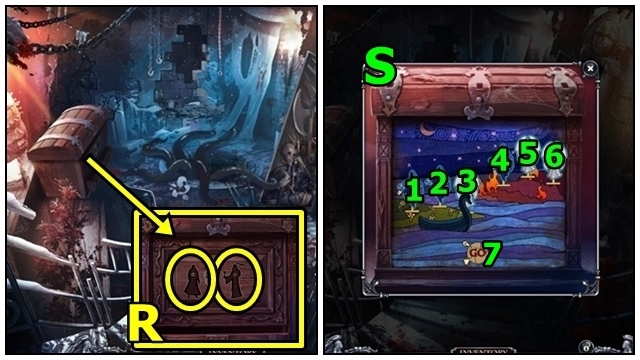
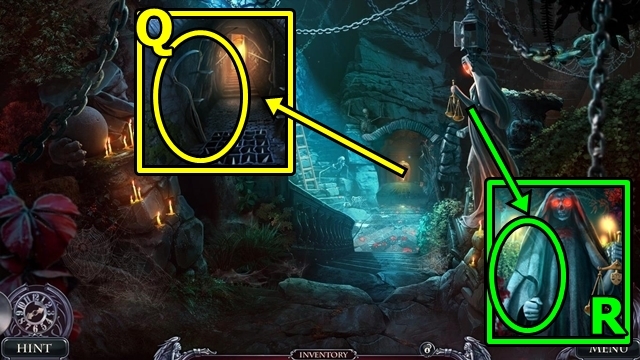
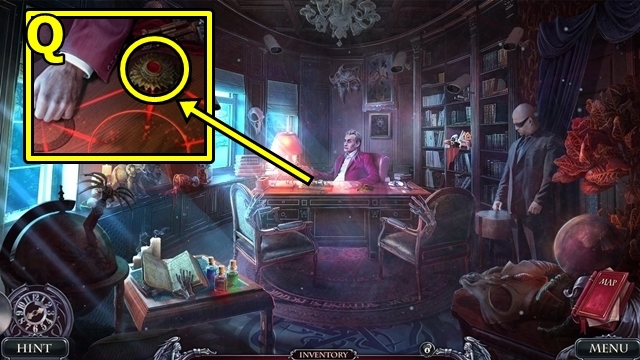
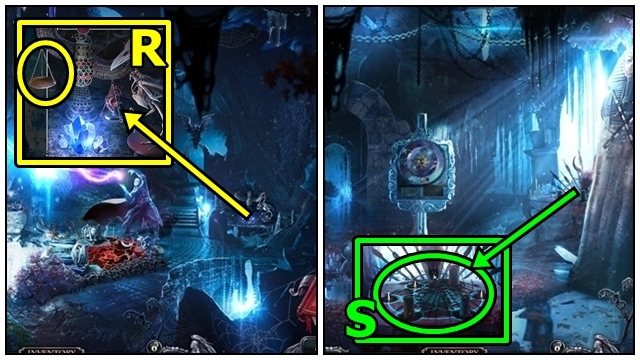
- Insert BILLY'S ROOM KEY (Q); turn it. Play the mini-game.
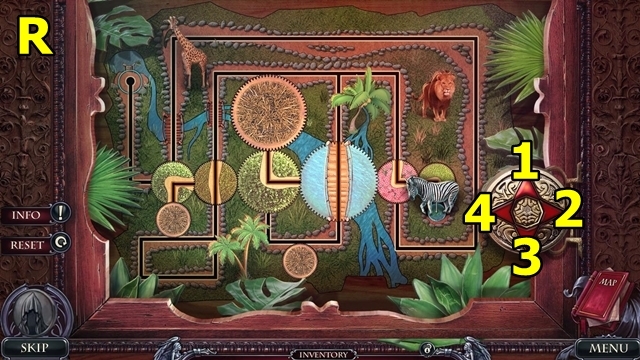
- Solution: 1-4-1-4x2-3x2-4-1-2-3-4-1-2-3-4-1-2-3-4-1-2-1-2-3-4-1-2-3-2-1-4-3-4-1 (R).
- Enter Billy's Room.
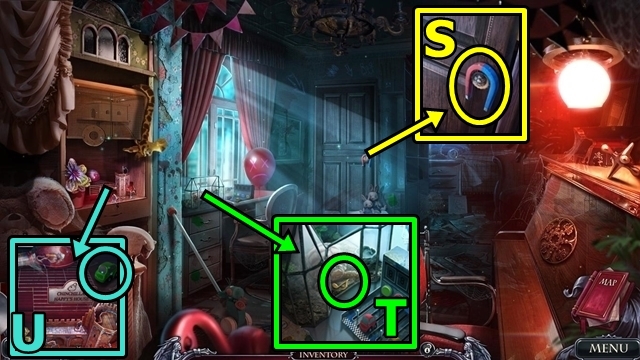
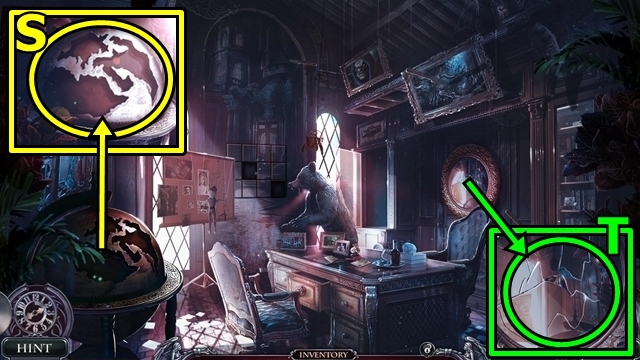
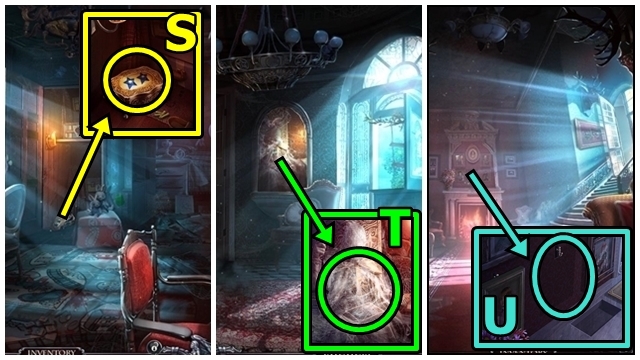
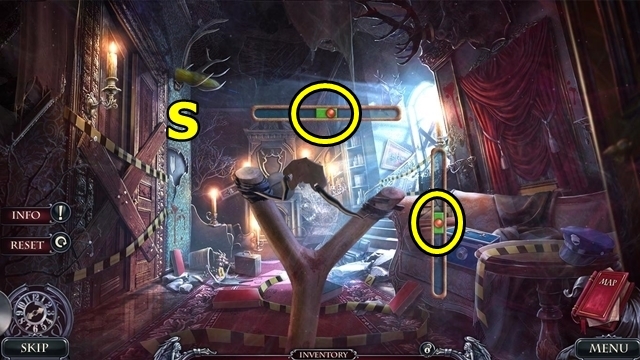
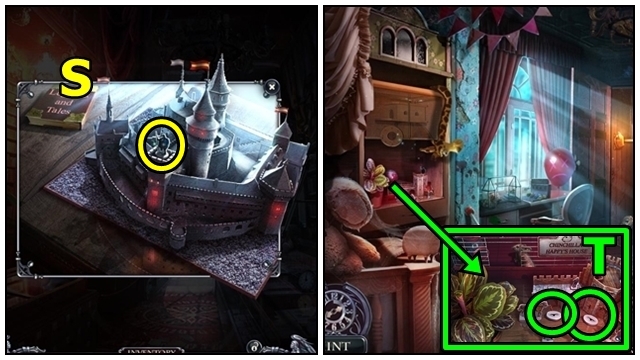
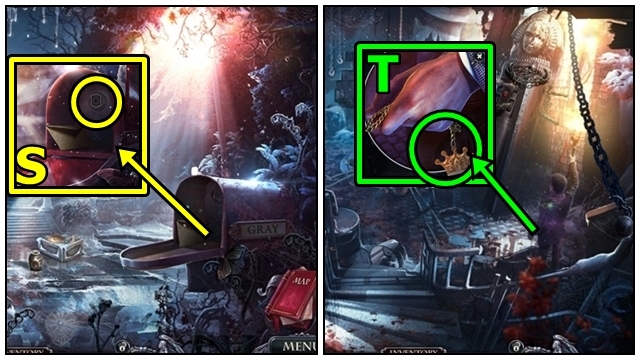
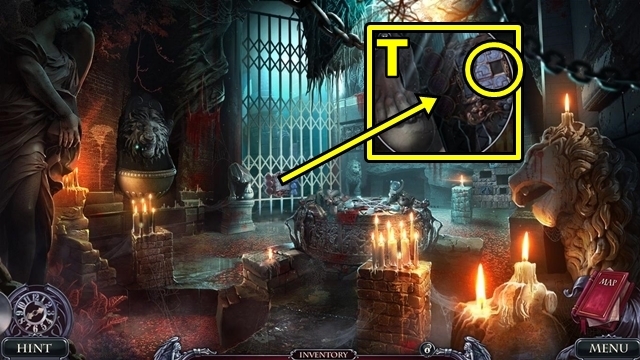
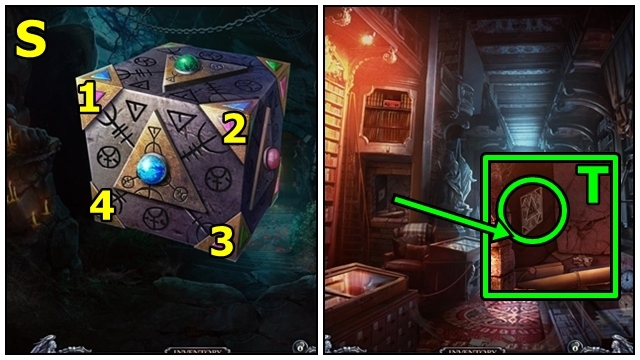
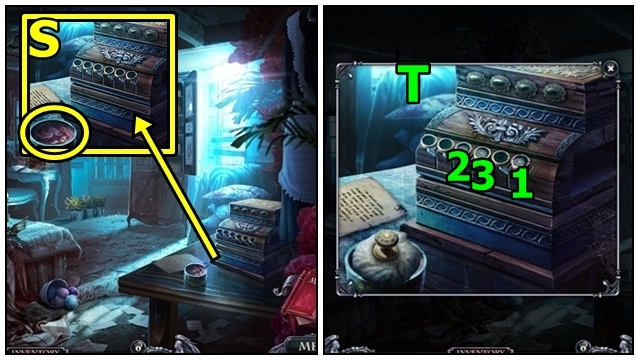
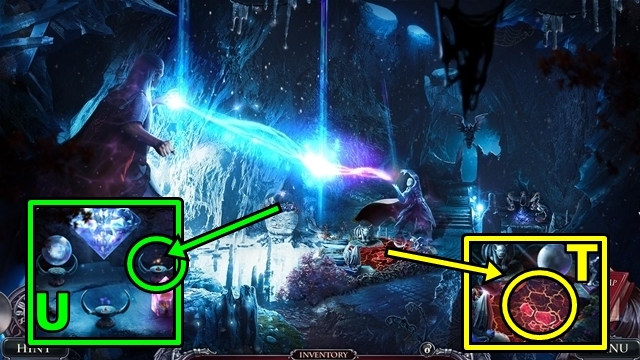
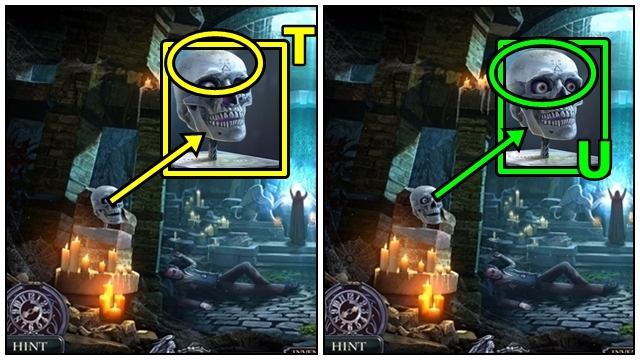
- Take the MAGNET (S).
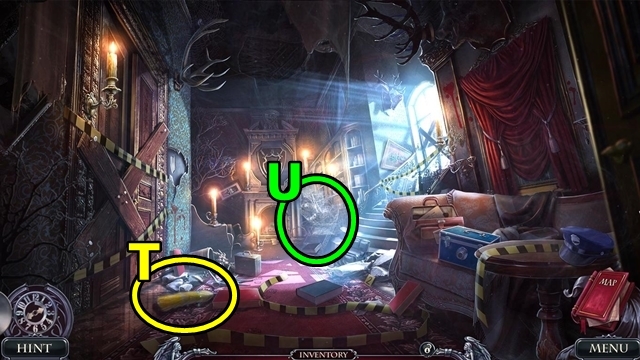
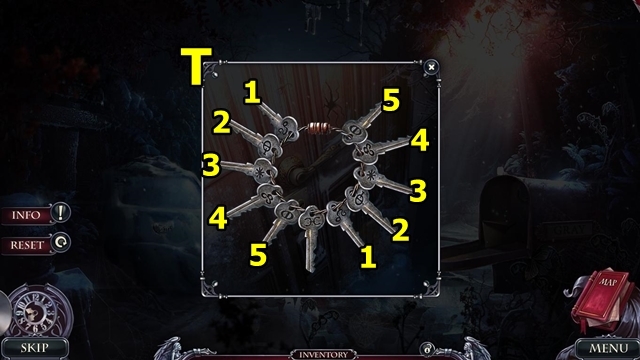
- Use the MAGNET (T); receive the MUSICAL NOTE AMULET (1/3).
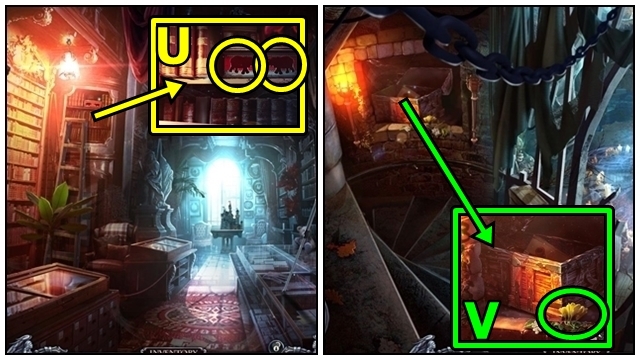
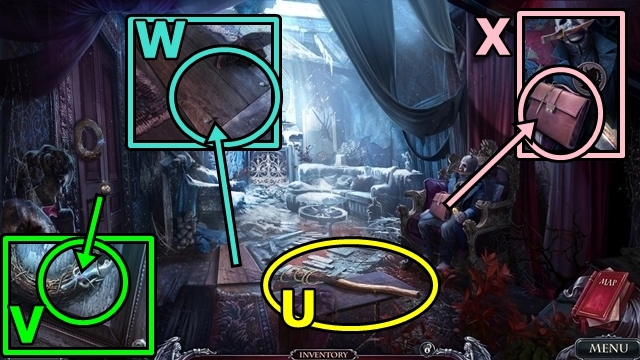
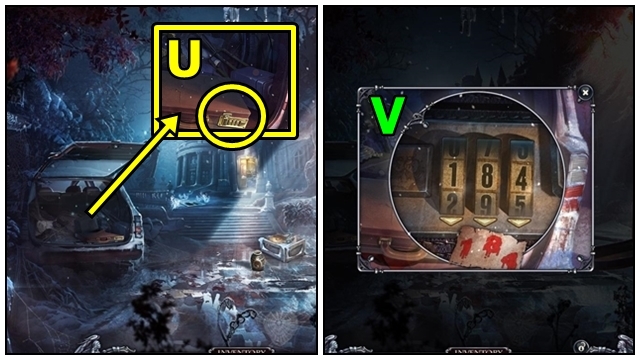
- Take the CAR (U).
- Take the MUSICAL NOTE AMULET (2/3) from the BACKPACK (inventory).
- Use the PLIERS on the BROKEN HANDLE (inventory); take the MUSICAL NOTE AMULET (3/3).
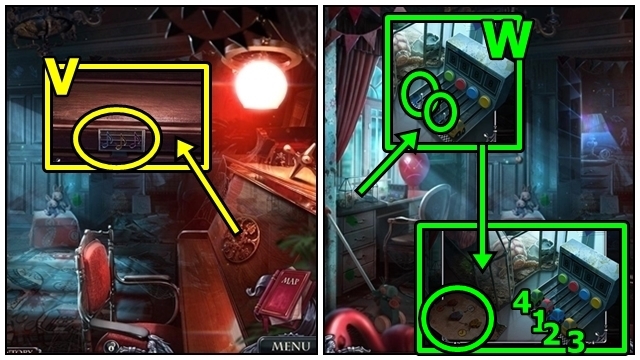
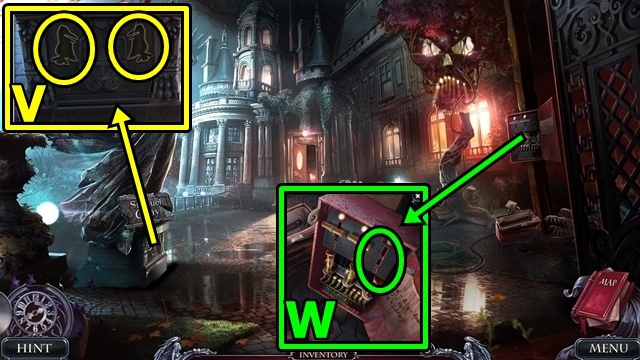
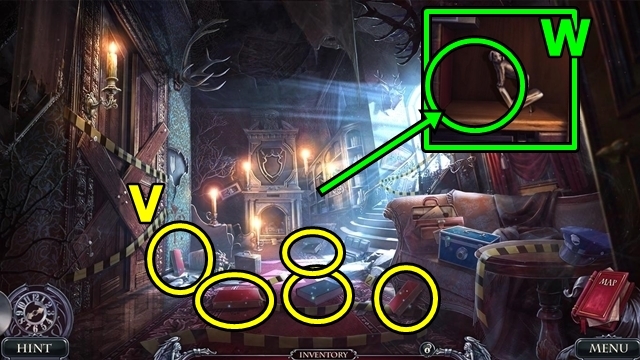
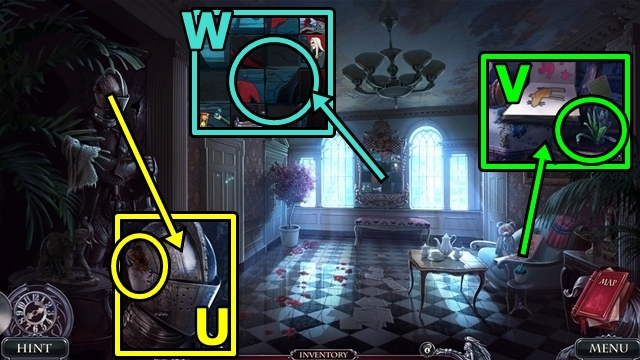
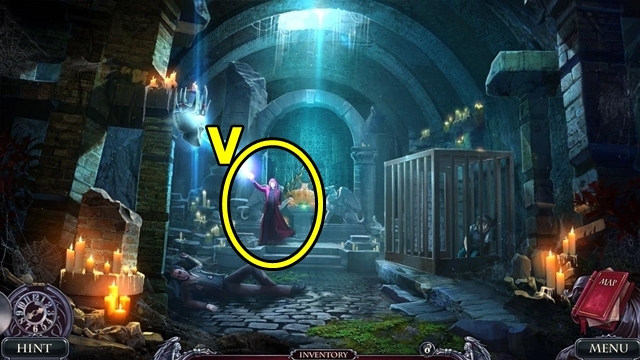
- Insert the MUSICAL NOTE AMULETS (V); play the HOP. Receive the MATCHES. Take the CAR.
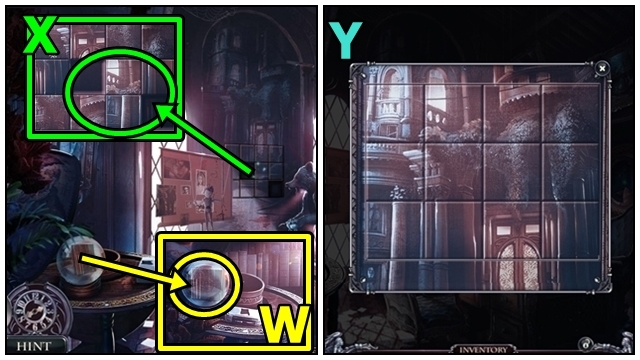
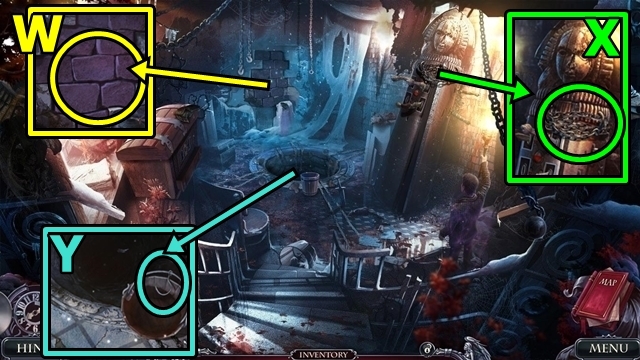
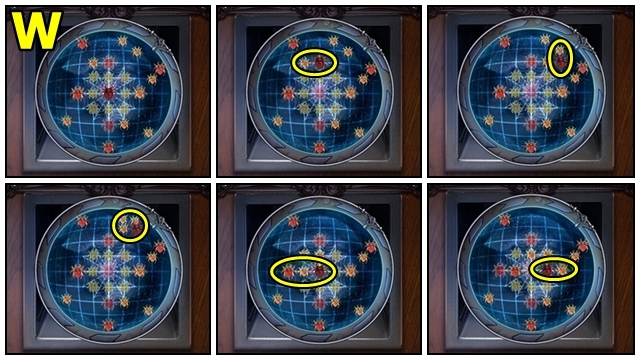
- Insert the CARS (W); examine the diagram. Press the cars. Take the HEART BUTTON and DIARY.
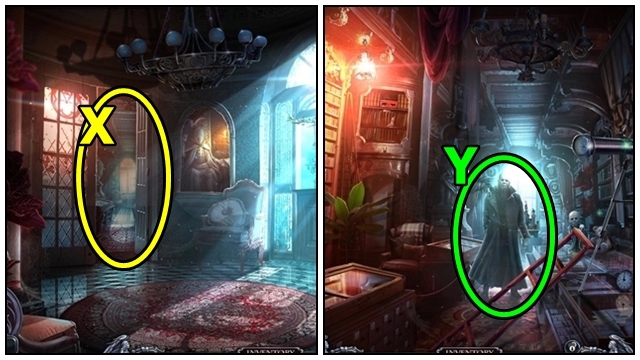
- Move down.
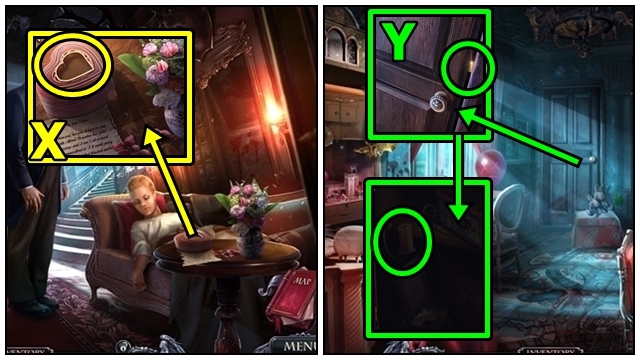
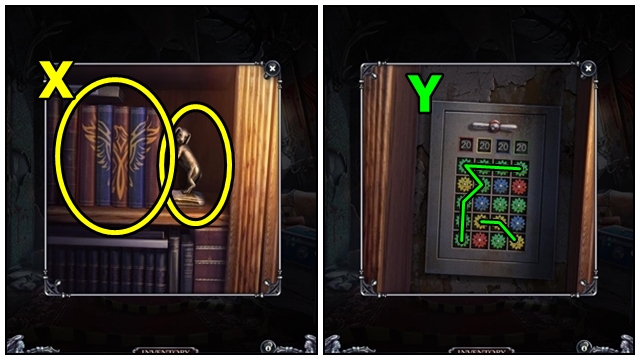
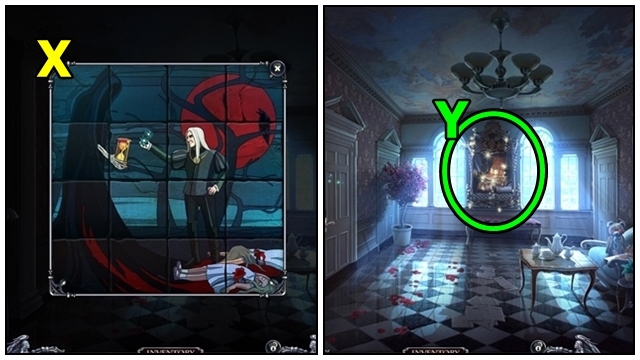
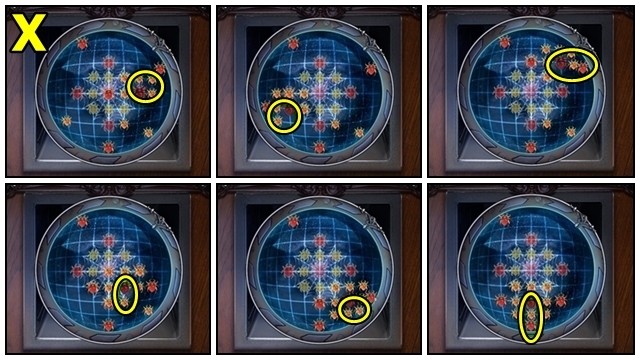
- Insert the HEART BUTTON (X); read the note; take BILLY'S PHOTO and BANK CARD.
- Move left.
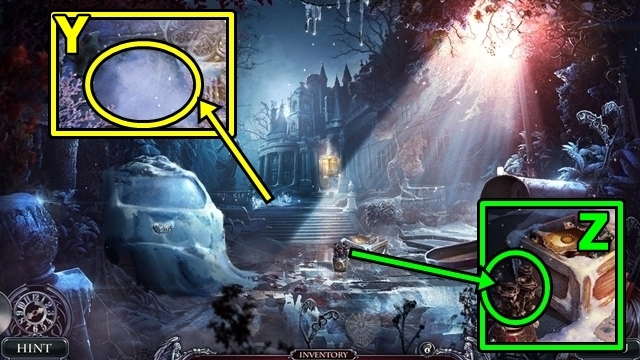
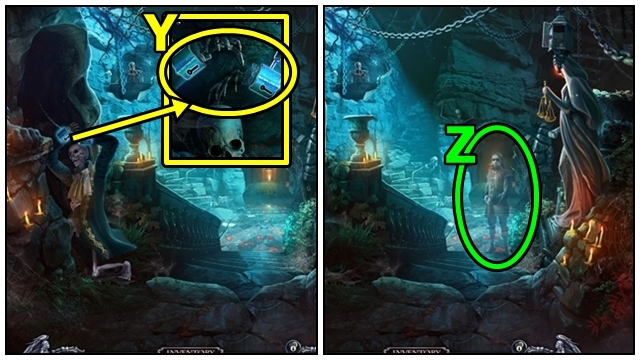
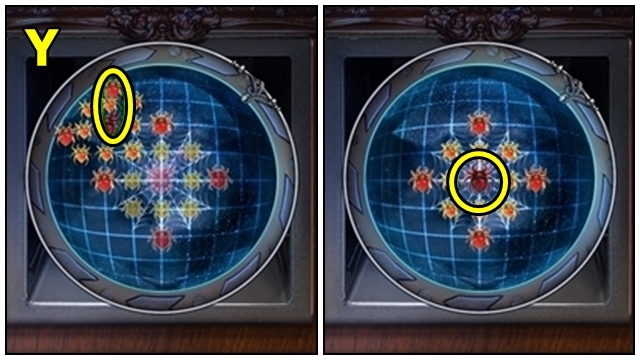
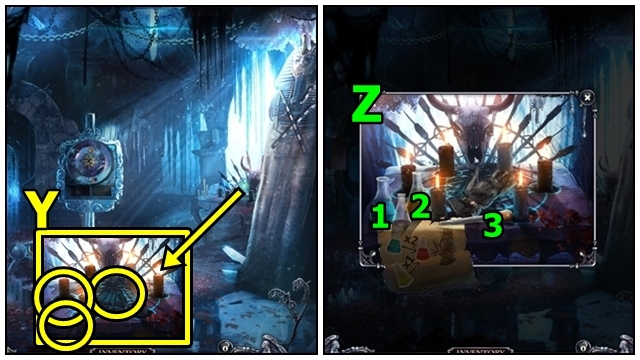
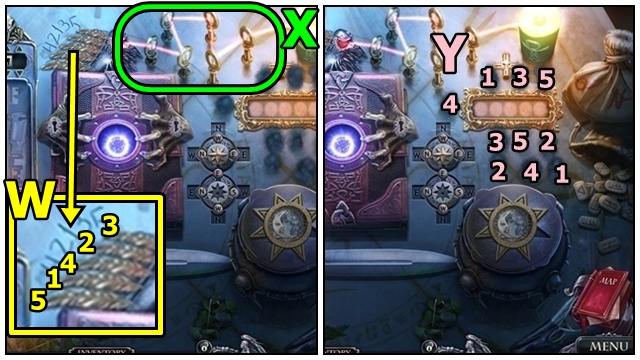
- Insert the BANK CARD (Y). Use the MATCHES. Take the CORKSCREW, SKULL AMULET (1/2), HANDLE and FRAME.
- Move down twice.
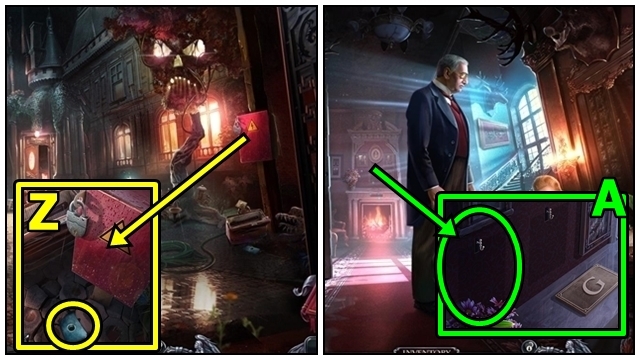
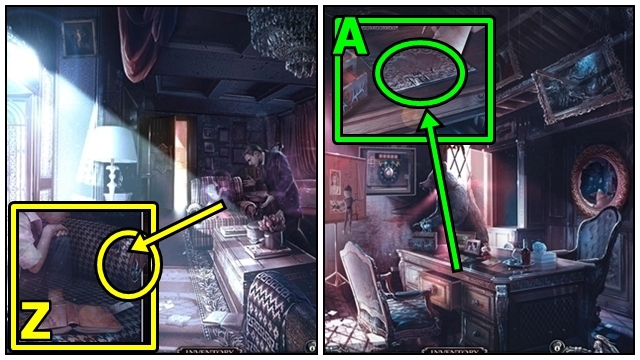
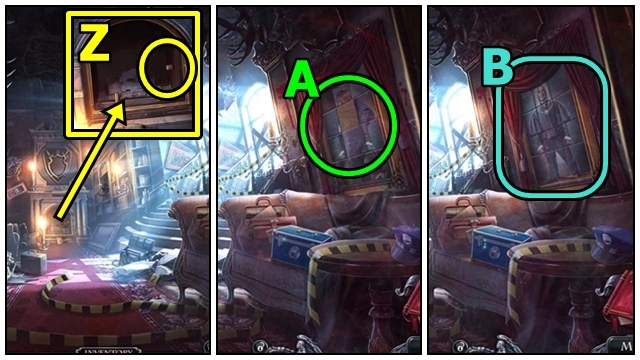
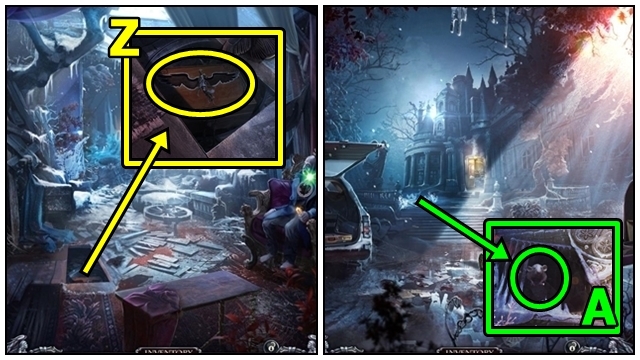
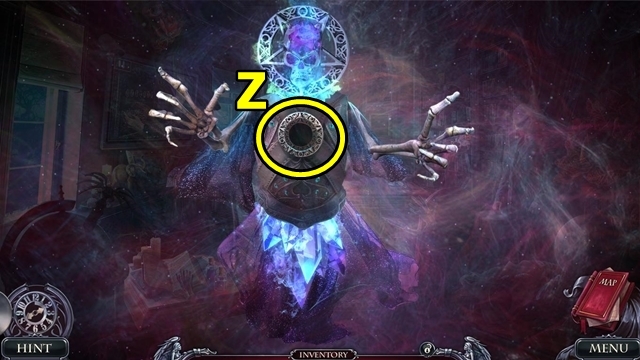
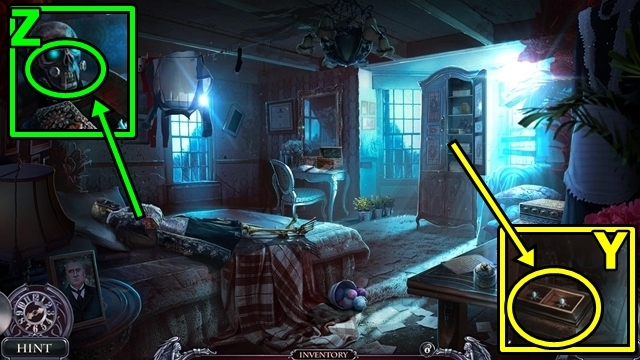
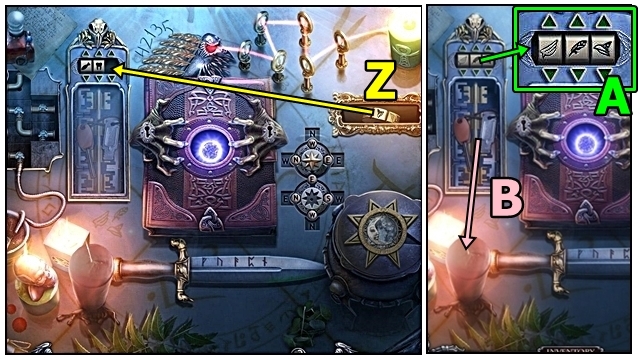
- Insert the HANDLE (Z); take the TURTLE AMULET and BUTTON.
- Move forward.
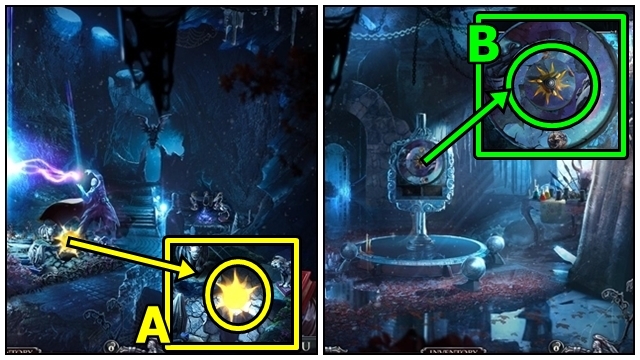
- Insert BILLY'S PHOTO on the FRAME (inventory); take BILLY'S PORTRAIT.
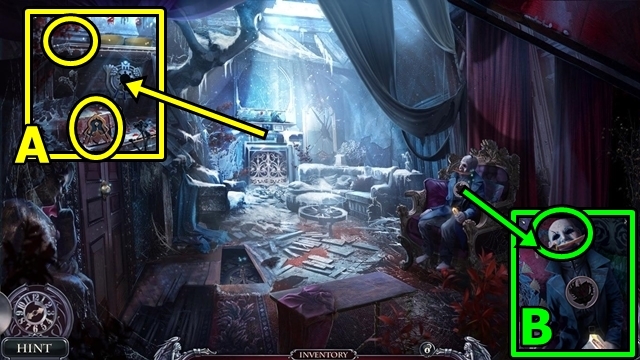
- Place BILLY'S PORTRAIT (A); take the CAT AMULET.
- Move left.
- Insert the BUTTON onto the BACKPACK (inventory); then open; take the notebook. Take the CHINCHILLA FOOD and MINIATURE PIECE.
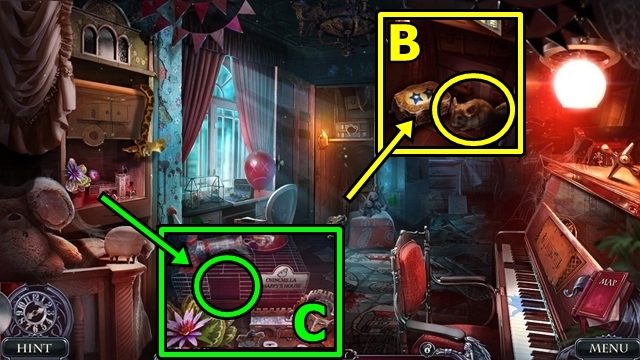
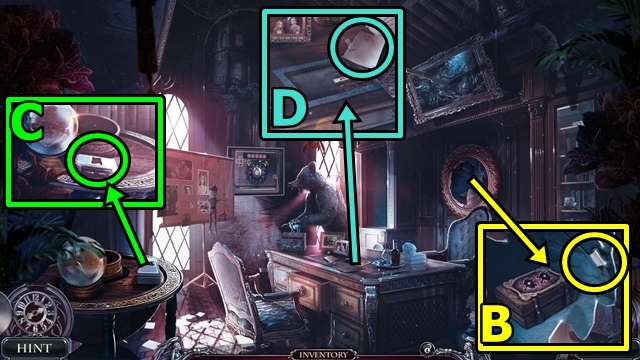
- Offer the CHINCHILLA FOOD (B); take the CHINCHILLA.
- Place the CHINCHILLA (C); take the CHINCHILLA AMULET.
- Insert the CAT AMULET, TURTLE AMULET and CHINCHILLA AMULET on the DIARY (inventory); read the diary.
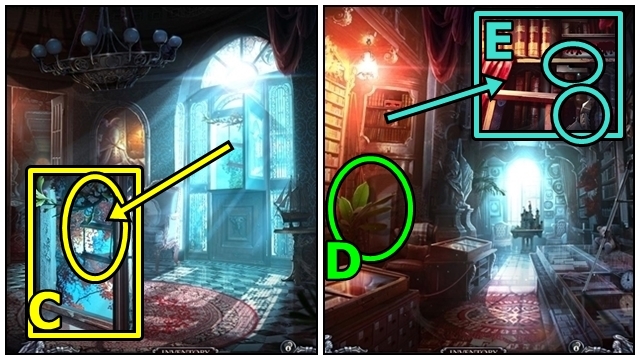
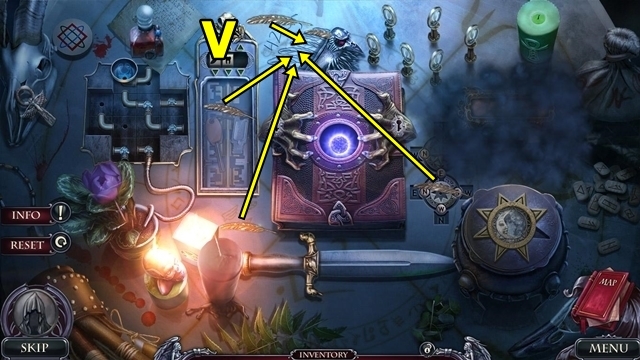
- Take the WING (D).
- Take the WING (E).
- Add the WINGS (F).
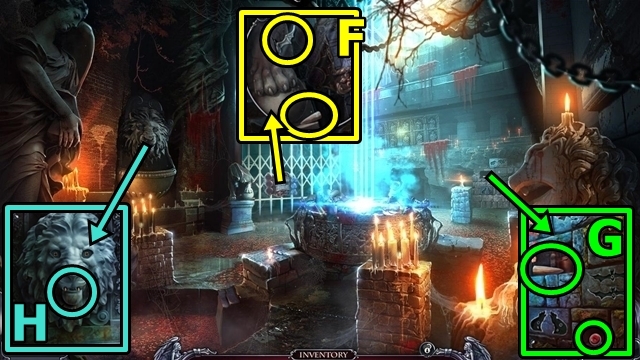
- Play the HOP (G); receive the COAT OF ARMS.
- Insert the COAT OF ARMS (H). Take the FLEUR DE LIS.
- Insert the FLEUR DE LIS (I); take the LOCKPICK SET.
- Insert the LOCKPICK SET (J); play the mini-game.
- Solution: (K-N).
- Move forward.
- Open the cabinet (O); take the GUN.
- Take the CONTINENT (1/3) (P).
- Open the drawer (Q); take the FUSE (1/2) and CONTINENT (2/3).
- Take the CONTINENT (3/3) (R).
- Add the CONTINENTS (S); take the DEER. Use the CORKSCREW; take the WOLF AMULET.
- Insert the WOLF AMULET onto the GUN (inventory); take the GLOVES.
- Use the GLOVES (T); take RICHARD'S PORTRAIT.
- Move down.

- Insert RICHARD'S PORTRAIT (U); take the RUBY.
- Move forward.
- Place the DEER (V); take the FUSE (2/2) and PICTURE PIECE.
- Use the RUBY (W); take the PICTURE PIECE.
- Insert the PICTURE PIECES (X); play the mini-game.
- Solution: (Y). Take the FLEUR DE LIS.
- Move down.
- Insert the FLEUR DE LIS (Z); take the CHISEL.
- Move forward.
- Use the CHISEL (A); take the FAMILY TREE PIECE and TWEEZERS.
- Use the TWEEZERS (B); receive the MANUSCRIPT AMULET.
- Insert the MANUSCRIPT AMULET (C); take the INK DEVELOPER.
- Use the INK DEVELOPER (D); take the CODE.
- Move down.
- Place the FAMILY TREE PIECE (E); play the mini-game.
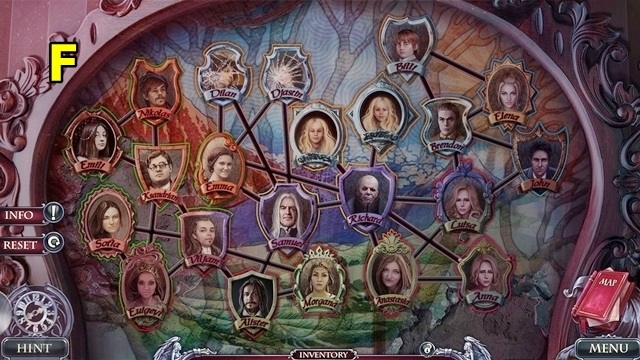
- Solution: (F).
- Play the HOP (G); receive the SKULL AMULET (2/2).
- Move forward.
- Insert the SKULL AMULETS (H); take the ACID.
- Use the ACID (I); slide the lever; take the SPARE PARTS and SAFE HANDLE.
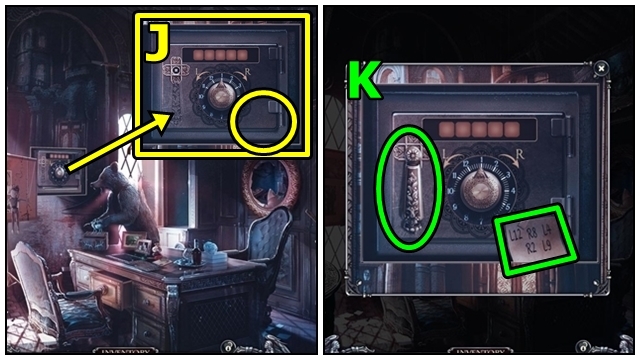
- Add the CODE (J) and SAFE HANDLE; play the mini-game.
- Solution: Enter the code; turn the handle (K). Read the diary. Take the SNAKE AMULET (1/2).
- Move down twice.
- Use the ACID (L); open the panel. Remove the fuses, add the FUSES; lower switches 1 and 2.
- Move forward.
- Insert the SPARE PARTS on the BROKEN HANDLE (inventory); take the HANDLE.
- Insert the HANDLE (M).
- Go to the Second Floor.
Chapter 2: The Second Floor
- Open the window (N).
- Take the SNAKE AMULET (2/2) (O).
- Insert the SNAKE AMULETS (P).

- Use the MATCHES (Q); take the STAR AMULET. Play the HOP; receive the STATUE PIECE.
- Use the CHISEL (R); take the STAR AMULET.
- Return to Billy's Room.
- Insert the STAR AMULETS (S); take the BAT WEIGHT and DUSTER.
- Return to the Second Floor.
- Use the DUSTER (T); take SAMUEL'S PORTRAIT.
- Move down.
- Place SAMUEL'S PORTRAIT (U); take the STATUE PIECE.
- Move down.
- Insert the STATUE PIECES (V); take the FIGURINE and MASTER SWITCH.
- Insert the MASTER SWITCH (W); lower the switch.
- Return to the Second Floor. Enter the Library (X).
- Talk to Richard (Y). Receive the CLOCK HANDS.
- Take the BROKEN LADDER (Z) and TELESCOPE.
- Take the NAILS (A).
- Take the HAMMER (B).
- Move down.
- Use the TELESCOPE (C); take the PLANKS.
- Enter the Library.
- Add the PLANKS, NAILS and HAMMER to the BROKEN LADDER (inventory); take the LADDER.
- Place the LADDER (D).
- Take the MINIATURE PIECE (E) and KEY.
- Return to Billy's Room.
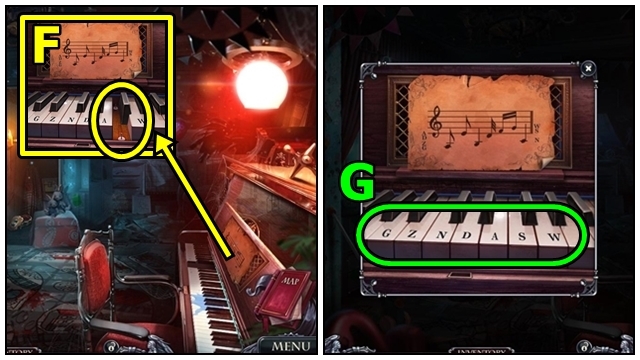
- Insert the KEY (F); play the mini-game.
- Solution: GAZDSWN (G). Take the MASK and TOY SOLDIER.
- Return to the Second Floor.
- Place the MASK (H); take the BAT WEIGHT.
- Enter the Library.
- Add the CLOCK HANDS (I) and BAT WEIGHTS. Pull the cuckoo.
- Play the HOP (J); receive the SAND OF TIME.
- Talk to Richard (K). Receive the CRYSTAL BALL.
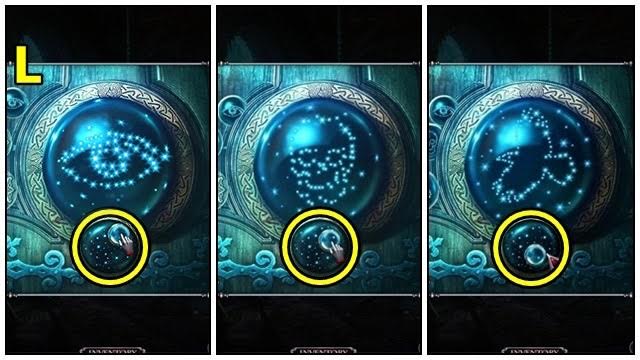
- Pour the SAND OF TIME over the CRYSTAL BALL (inventory).
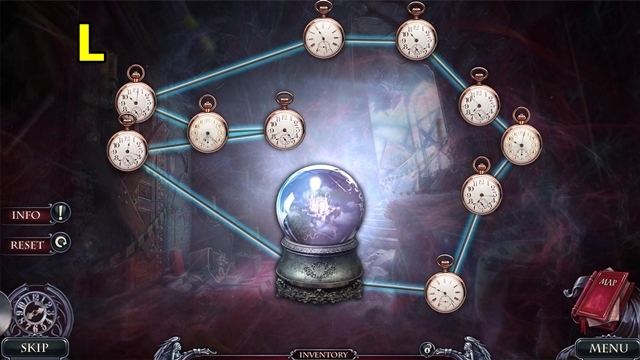
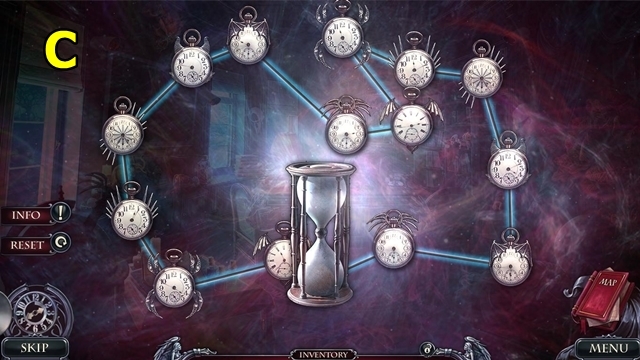
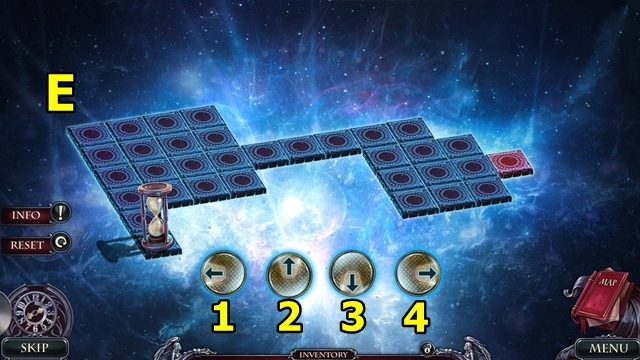
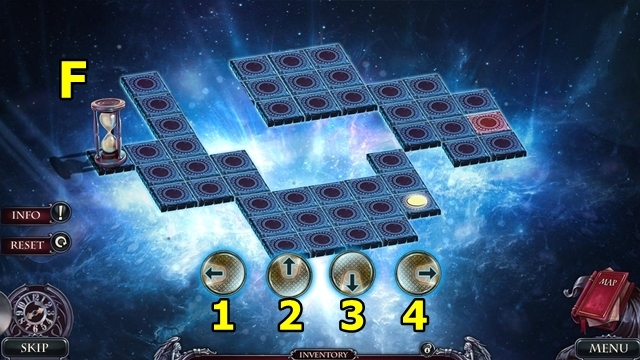
- Play the mini-game.
- Solution: (L).
Chapter 3: The Future
- Use the MATCHES (M).
- Play the mini-game.
- Solution: (N).
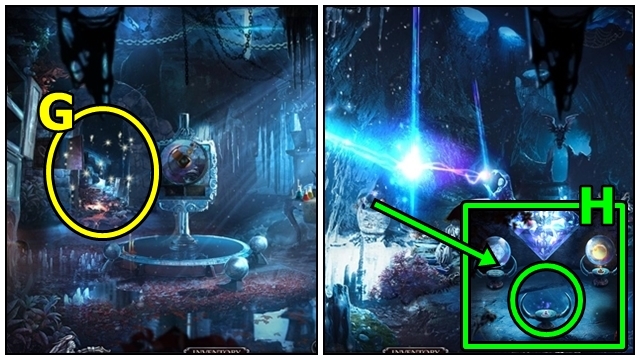
- Take the SLINGSHOT (O) and CADUCEUS.
- Insert the CADUCEUS (P). Read the file; take the PUZZLE PIECE.
- Insert the PUZZLE PIECE (Q). Open the paper; take the STONES.
- Use the SLINGSHOT WITH STONES (R); play the mini-game.
- Solution: Repeat three times (S).
- Take the DUSTER (T).
- Use the DUSTER (U).
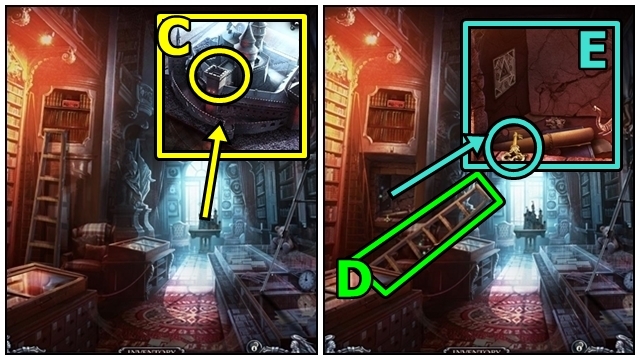
- Take the five BOOKS (V).
- Add the BOOKS (W); play the mini-game.
- Solution: (X). Pull the book-end.
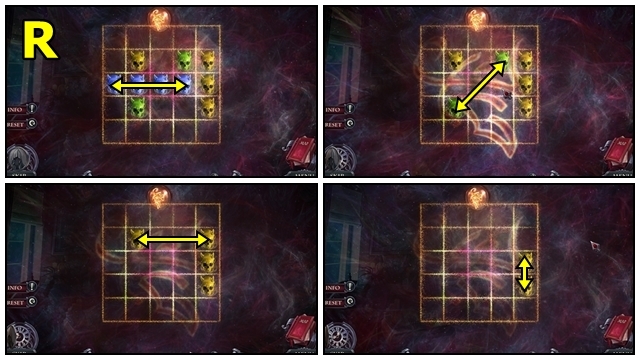
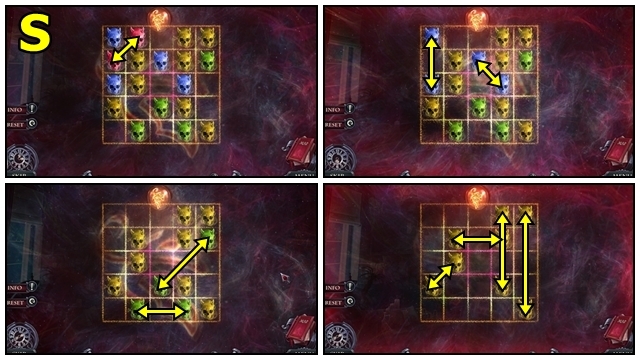
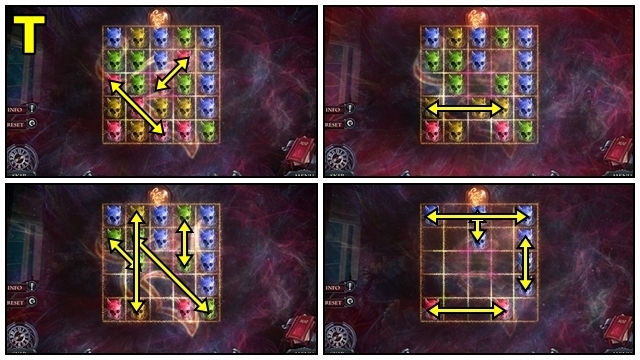
- Play the mini-game.
- Solution: This puzzle is random. The screenshot shows possible moves (Y). Take the LEVER and PICTURE PIECE.
- Insert the LEVER (Z); then pull.
- Add the PICTURE PIECE (A); play the mini-game.
- Solution: (B). Take the SHIELD.
- Insert the SHIELD (C).
- Take the STETHOSCOPE (D).
- Place the STETHOSCOPE (E); play the mini-game.
- Solution: 1x2-1x5-2x3 (F). Play the tape.
- Take the SILVER SCROLL (G).
- Move down.
- Insert the SILVER SCROLL (H).
- Enter the Dungeon (I).
- Use the MATCHES (J).
- Open the chest (K); take the ELEPHANT and SCEPTER.
- Return to the Second Floor.
- Add the SCEPTER (L). Take the GLASS EYE and MINIATURE PIECE.
- Return to Billy's Room.
- Insert the GLASS EYE (M); take the ALCHEMY SET.
- Take the RECIPE from the ALCHEMY SET (inventory).
- Use the RECIPE (N); receive the INGREDIENT.
- Move down.

- Use the RECIPE (O); receive the INGREDIENT.
- Use the RECIPE (P); receive the INGREDIENT.
- Go to the Second Floor.
- Use the RECIPE (Q); receive the INGREDIENT.
- Enter the Library.
- Add the MINIATURE PIECES (R); play the mini-game.
- Solution: (S). Take the TOY SOLDIER.
- Return to Billy's Room.
- Add the TOY SOLDIERS (T); take the ELEPHANT.
- Return to the Library.
- Add the ELEPHANTS (U); take the DART.
- Return to the Dungeon.
- Use the RECIPE (V) to receive the INGREDIENT.
- Add the INGREDIENTS, then RECIPE to the ALCHEMY SET (inventory); play the mini-game.
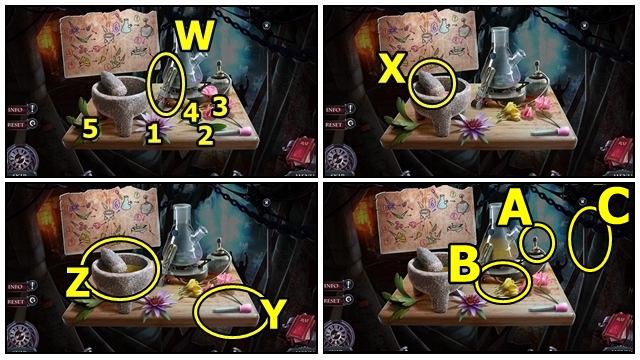
- Solution: Use the tongs (W) to collect flowers in order shown (1-5). Grind (X). Use dropper (Y) on bowl (Z). Turn on gas (A); use the MATCHES (B). Add the DART (C). Take the DART WITH SLEEPING POTION.
- Put the DART WITH SLEEPING POTION in the GUN (inventory); take the LOADED GUN.
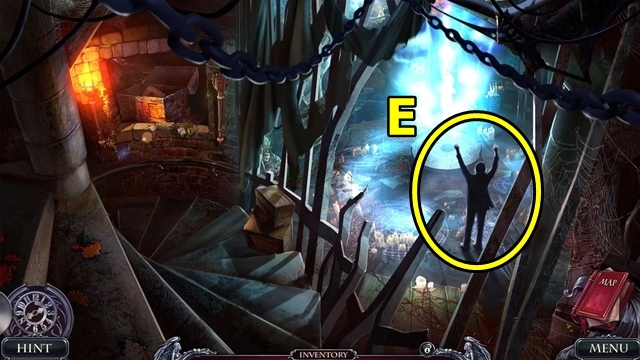
- Use the LOADED GUN (E).
Chapter 4: The Dungeon
- Take the FANGS (1/2) (F). Use the TWEEZERS; receive the BAT AMULETS (1/2).
- Take the FANGS (2/2) (G) and MAGIC TRAP PART.
- Add the FANGS (H); take the PACKAGE.
- Use the SCISSORS on the PACKAGE (inventory). Take the magic trap; add the MAGIC TRAP PART. Take the MAGIC TRAP.

- Use the MAGIC TRAP (I).
- Take the BAT AMULETS (2/2) (J).
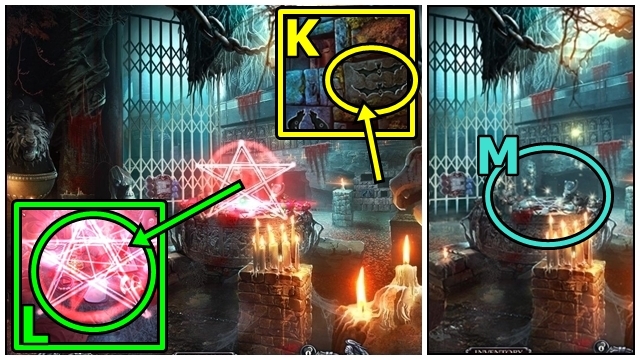
- Add the BAT AMULETS (K); take the PENTAGRAM.
- Use the PENTAGRAM (L).
- Play the HOP (M).
- Take the HANDLE (N).
- Insert the HANDLE (O); take the ICEBREAKER.
- Use the ICEBREAKER (P); take the NAIL PULLER, TAIL and LETTERS (1/2).
- Use the NAIL PULLER (Q); receive the LETTERS (2/2).
- Insert the LETTERS (R); take the KEY RING.
- Use the KEY RING (S); play the mini-game.
- Solution: (T).
- Move forward.
- Take the BROOMSTICK (U).
- Take the DAGGER AMULETS (1/2) (V) and TWIGS.
- Use the NAIL PULLER (W); take the ROPE and WITHERED ROSE.
- Take BRANDON'S BRIEFCASE (X).
- Move down.
- Add the TWIGS to the BROOMSTICK (inventory); take the BROOM.
- Use the BROOM (Y). Insert the ROPE and ICEBREAKER; take the BOWL.
- Insert the WITHERED ROSE (Z); take the EYES (1/2).
- Move forward.
- Take the DAGGER AMULETS (2/2) from BRANDON'S BRIEFCASE (inventory).
- Add the BOWL (A); take the EYES (2/2). Insert the DAGGER AMULETS; take the POMMEL and WHETSTONE.
- Add the EYES (B); receive the RUSTY DAGGER.
- Use the WHETSTONE on the RUSTY DAGGER (inventory); add the POMMEL; take the LION DAGGER.
- Move down.
- Use the BROOM (C).
- Use the LION DAGGER on BRANDON'S BRIEFCASE (inventory); take the ALARM.
- Use the ALARM (D). Open the trunk; take the SCARAB and FLASHLIGHT. Play the HOP; receive the DRILL.
- Move forward.
- Use the DRILL (E).
- Use the FLASHLIGHT (F); play the HOP; receive the KEY AMULET.
- Examine the KEY AMULET (inventory); play the mini-game.
- Solution: (G). Insert the SCARAB (H); take the OPEN AMULET KEY.
- Insert the OPEN AMULET KEY (I); play the mini-game.
- Solution: 4x3-5x3-3x2-1-3-2-3x2-5x2-1-4x3-2-3x3-1-5-4x4-3x2 (J).
- Move forward.
- Take the torch (K).
- Take the SAMUEL FIGURINE (L).
- Take the SCYTHE AMULETS (1/3) (M).
- Insert the SAMUEL FIGURINE (N); take the SCYTHE AMULETS (2/3).
- Insert the LION DAGGER (O); take the SCYTHE AMULETS (3/3).
- Take the SPRING (P).
- Move down.

- Insert the SCYTHE AMULETS (Q); play the mini-game.
- Solution: (R). Take the SIGNET.
- Move down.
- Insert the SIGNET (S); take the SCORPION.
- Return to the Basement.
- Insert the TAIL on the SCORPION (inventory). Remove the flap; add the SPRING; replace the flap; take the SCORPION NIPPERS.
- Use the SCORPION NIPPERS (T); receive the BUTTON.
- Move down twice.
- Take the case from BRANDON'S BRIEFCASE (inventory); add the BUTTON; take the SUITCASE CODE.
- Add the SUITCASE CODE (U); play the mini-game.
- Solution: (V). Take the GUN and PICKAXE.
- Return to the Basement.
- Use the PICKAXE (W); take the ANGEL'S WINGS (1/2).
- Use the SCORPION NIPPERS (X); take the CHAIN.
- Add the CHAIN (Y); take the ANGEL'S WINGS (2/2).
- Move down.
- Insert the ANGEL'S WINGS (Z); take the FLUTE.
- Move down.
- Use the FLUTE (A); receive the RAVEN DAGGER.
- Return to the Basement.
- Insert the RAVEN DAGGER (B); play the mini-game.
- Solution: (C).
- Play the HOP (D); receive the HEART.
- Move down.
- Insert the HEART (E); take the CRYSTAL.
- Move forward.
- Use the MAGIC TRAP on the CRYSTAL (inventory); add the GUN. Take the MAGICAL GUN.
- Use the MAGICAL GUN (F).
- Play the HOP (G); receive the TWINS MEDALLION.
- Insert the TWINS MEDALLION (H); receive the BROOCH.
- Move down twice.
- Insert the BROOCH (I); take the PORCELAIN CHAMELEON.
- Use the PORCELAIN CHAMELEON (J); take the MASK PARTS.
- Use the PORCELAIN CHAMELEON (K); take the MASK PARTS.
- Move forward.
- Use the PORCELAIN CHAMELEON (L); take the MASK PARTS.
- Move forward.
- Use the PORCELAIN CHAMELEON (M); take the MASK PARTS.
- Use the PORCELAIN CHAMELEON (N); take the MASK PARTS.
- Use the PORCELAIN CHAMELEON (O); take the MASK PARTS.
- Move down.
- Reassemble the MASK PARTS (inventory); take the MASK OF DEATH.
- Place the MASK OF DEATH (P).
- Talk to Richard (Q). Receive the RICHARD FIGURINE.
- Move forward.
- Insert the RICHARD FIGURINE (R) and DEATH FIGURINE. Play the mini-game.
- Solution: 1-7-5-7-2-7-6-7-1 (S). Take the MECHANISM PART and DEATH AMULET.
Chapter 5: The Labyrinth
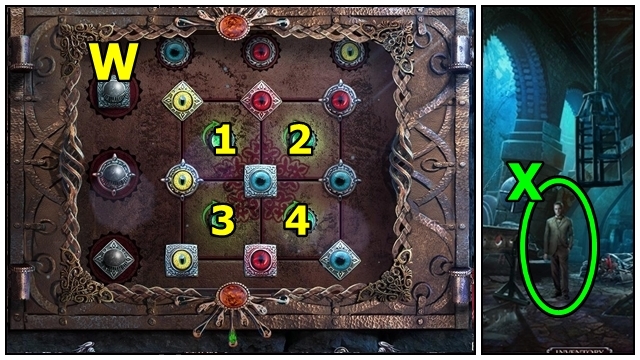
- Insert the MECHANISM PART (T); play the mini-game.
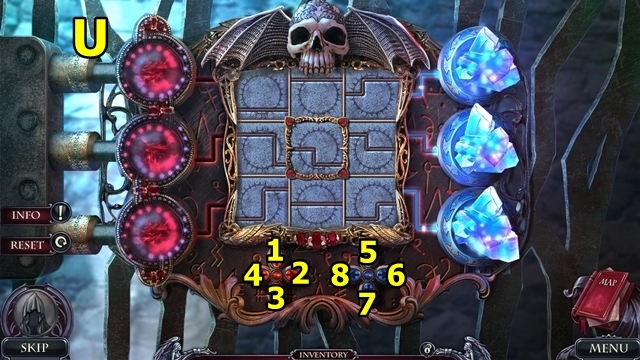
- Solution: 1-8-3-8-5-2-6-5-6-5-8-7-3-7-6-6-5-8 (U).
- Move forward.
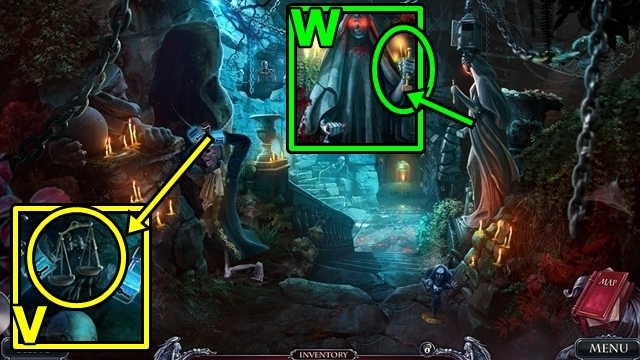
- Take the SCALES (V).
- Add the SCALES (W); play the mini-game.
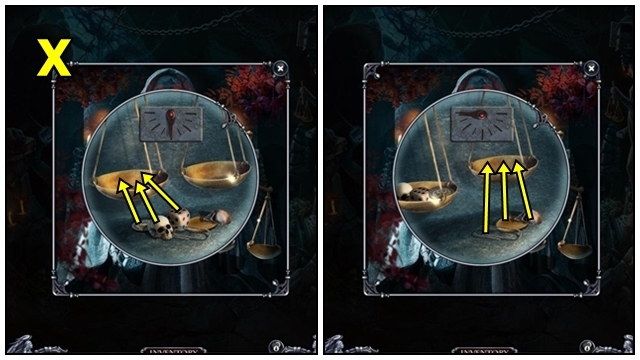
- Solution: (X). Take the SHACKLES KEY.
- Use the SHACKLES KEY (Y).
- Talk to the spirit (Z); receive the GATE KEY.
- Examine anywhere (A). Take the BEAR'S HEAD.
- Return to the Second Floor.
- Take the MINIATURE TOWER PIECE (B).
- Enter the Library.
- Place the MINIATURE TOWER PIECE (C).
- Take the LADDER (D).
- Take the GATE KEY (E).
- Move down.
- Insert the GATE KEYS (F).
- Move right.
- Take the PART (G).
- Use the TWEEZERS (H); receive the FRESCO PARTS (1/3).
- Take the COINS (1/3) (I).
- Take the FIGURINE (J). Place the BEAR'S HEAD; open the book; take the COINS (2/3).
- Return to the Labyrinth.
- Place the LADDER (K).
- Take the CHISEL (L) and FOUNTAIN PARTS (1/2).
- Return to the Corridor.
- Use the CHISEL (M); receive the FOUNTAIN PARTS (2/2).
- Return to the Dungeon.
- Add the FOUNTAIN PARTS (N); take the COINS (3/3).
- Move forward.
- Offer the COINS (O); play the mini-game.
- Solution: Round 1: 2, Round 2: 1, Round 3: 2 (P). Take the PUZZLE KEY and GAUNTLET.
- Use the GAUNTLET (Q); receive the SCYTHE.
- Add the SCYTHE (R); take the PUZZLE.
- Return to the Library.
- Put the PUZZLE KEY in the PUZZLE (inventory); play the mini-game.
- Solution: 1-1-2-3-3 (S). Take the OPEN PUZZLE.
- Insert the OPEN PUZZLE (T); take the GROWTH POTION and OIL.
- Return to the Corridor.
- Use the OIL (U); lift the visor; take the FRESCO PARTS (2/3).
- Use the GROWTH POTION (V); take the FRESCO PARTS (3/3).
- Insert the FRESCO PARTS (W); play the mini-game.
- Solution: (X).
- Play the HOP (Y); receive the TRAP WEIGHT.
- Return to the Labyrinth.
- Attach the TRAP WEIGHT (Z).
- Talk to Richard (A). Receive the THREADS OF DESTINY.
- Return to the Corridor.
- Use the THREADS OF DESTINY (B); take the LITTLE BEAR.
- Pour the SAND OF TIME on the LITTLE BEAR (inventory).
- Play the mini-game.
- Solution: (C).
Chapter 6: The Office
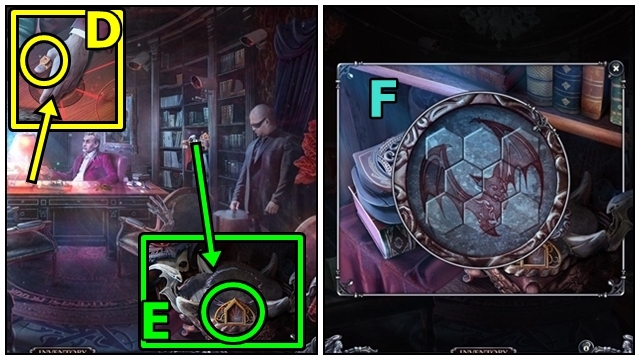
- Take the RING (D).
- Insert the RING (E); play the mini-game.
- Solution: (F). Take the RAVEN.

- Insert the RAVEN (G); play the mini-game.
- Solution: (H). Take the REMOTE.
- Use the REMOTE (I). Play the mini-game.
- Solution: Lower the cameras (J).

- Play the mini-game (K).
- Solution: (L-N).
- Play the mini-game (O).
- Solution: HATEEDB (P). Take the QUILL.
- Insert the QUILL (Q); play the mini-game.
- Solution: (R-T). Receive the RUNE.
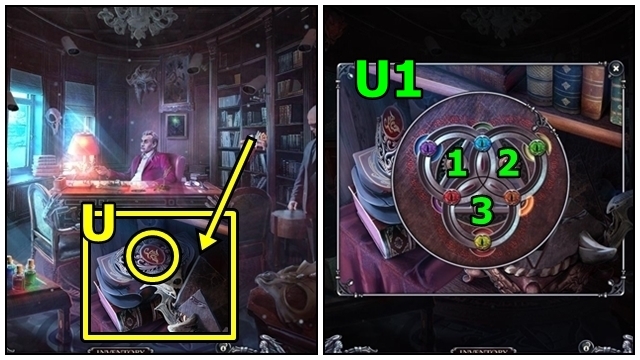
- Insert the RUNE (U); play the mini-game.
- Solution: 1-1-3-3-2-2-3 (U1). Take the SPHERE.
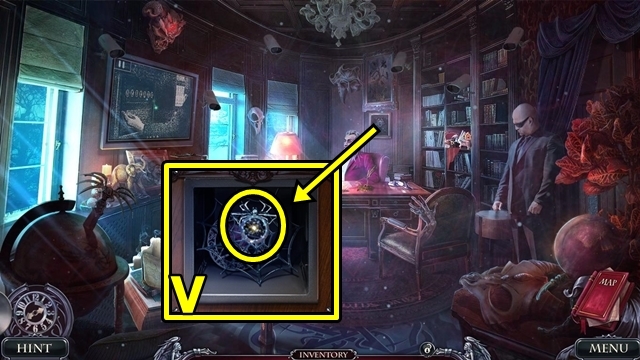
- Insert the SPHERE (V); play the mini-game.
- Solution: (W-Y). Take the item.
- Offer the DEATH AMULET (Z); play the mini-game.
- Solution: (A). Receive the WARLCOCK'S AMULET.
- Return to the Labyrinth.
- Use the WARLOCK'S AMULET (B).
Chapter 7: The Maid's Room
- Take the FILE (C).
- Take the MAN'S BRIEFCASE (D).
- Use the FILE (E); take the WOLF AMULETS (1/2).
- Return to the Dungeon.
- Open the MAN'S BRIEFCASE (inventory); take the WOLF AMULETS (2/2).
- Insert the WOLF AMULETS (F); take the CLEANING FLUID and SYMBOLS (1/2).
- Return to the Undercroft.
- Use the CLEANING FLUID (G); pull the lever.
- Play the HOP (H); receive the BROOCHES (1/2).
- Talk to Brandon (I); receive the KEY RING.
- Return to the Corridor.
- Use the KEY RING (J); select the keys.
- Enter the Maid's Room.
- Take the BUTTONS (1/3) (K).
- Take the BUTTONS (2/3 (L).
- Take the BUTTONS (3/3) (M).
- Take the QUILL (N). Insert the BUTTONS. Press a button; take the BROOCHES (2/2).
- Insert the BROOCHES (O); take the HAIRPIN.
- Use the HAIRPIN (P); take the WINDING KEY.
- Insert the WINDING KEY (Q); take the HEART.
- Insert the HEART (R); take the POWDER PUFF.
- Dip the POWDER PUFF (S); play the mini-game.
- Solution: (T). Take the GRAY'S STAMP and PART.
- Return to the Undercroft.

- Insert GRAY'S STAMP (U).
- Play the mini-game (V).
- Solution: 1-1-4-4-3-3-2-2 (W).
- Talk to Brandon (X). Receive the BROKEN AMULET.
- Return to the Maid's Room.
- Take the SYMBOL (2/2) from the BROKEN AMULET (inventory).
- Insert the SYMBOLS (Y); take the MASK KEY.
- Use the MASK KEY (Z); take the MAIN PART.
- Insert the PARTS and the MAIN PART to the BROKEN AMULET (inventory). Play the mini-game.
- Solution: (A).
- Take the TUNING FORK (B).
- Use the TUNING FORK (C); take the RUNE and CRYSTAL.
- Insert the RUNE (D); take the FIGURINE.
- Take the CANE (E).
- Insert the CRYSTAL (F); take the FIGURINE and PHIALS.
- Add the FIGURINES (G); play the HOP; receive the WATER SPHERE.

- Place the WATER SPHERE (H); take the RAVEN SKULL.
- Place the RAVEN SKULL (I); receive the RUNE.
- Insert the RUNE (J); play the mini-game.
- Solution: Round 1: 5-2-7-4; Round 2: 1-7-4-6; Round 3: 2-7-3-6-1-8 (K).
- Move forward.
- Take the DRAGON FIGURINES (1/2) (L).
- Take the DRAGON FIGURINES (2/2) (M).
- Insert the DRAGON FIGURINES (N); take the CROOK and EARTH.

- Insert the EARTH (O); take the FLAIL.
- Take the GATEWAY AMULET from the CANE (inventory). Take the COBRA.
- Insert the CROOK (P), FLAIL and COBRA.
- Play the HOP (Q); receive the WEIGHT.
- Move down.
- Place the WEIGHT (R); take the CANDLES.
- Move forward.
- Add the CANDLES (S); take the LIVING FLAME.
- Move down.
- Add the LIVING FLAME (T); play the HOP; receive the FIRE SPHERE.
- Place the FIRE SPHERE (U); take the MOON.
- Move forward.

- Insert the MOON (V); take the ACID.
- Spray the ACID (W); open the casket; take the GLOVE.
- Insert the GATEWAY AMULET (X); take the RECIPE.
- Place the RECIPE (Y); add the GLOVES and PHIALS. Play the mini-game.
- Solution: 3-1-3-1-3-2 (Z). Take the FIREPROOF GLOVE.
- Move down.
- Use the FIREPROOF GLOVE (A); receive the SUN.
- Move forward.
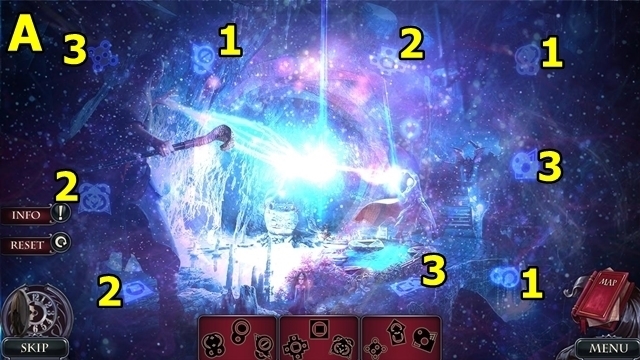
- Place the SUN (B); play the mini-game.
- Solution: (C). Take the UNIVERSE KEY.
- Insert the UNIVERSE KEY (D); play the mini-game.
- Solution: 2x2-4x5-3x3-4-2-1x2-3-4-2-4 (E); 4-3x2-4-3-4-3-4-2-4-1-2-1-3-1-2x2-1-2x3-4x3-3x2-1-2-4x2-3-4-3x2-4 (F).
- Play the HOP (G); receive the TIME SPHERE.
- Move down.
- Place the TIME SPHERE (H); take the SPIRIT TALISMAN, POWER STONE and GATE KEY.

- Examine anywhere (I).
- Use the pencil (J); take the HINT.
- Return to the Undercroft.
- Insert the GATE KEY (K); play the mini-game.
- Solution: (L).
- Move forward.
- Examine the skull (M); take the SPELL.
- Use the SPIRIT TALISMAN (N); take the SMALL KEY and RAVEN AMULETS (1/2).
- Use the SMALL KEY on the MAN'S HANDBAG (inventory); take the MAGIC POWDER.
- Use the MAGIC POWDER, then QUILL on the SPELL (inventory); take the ANTI-MAGIC SCROLL.
- Use the ANTI-MAGIC SCROLL (O); receive the RAVEN AMULETS (2/2).
- Return to the Dungeon.
- Insert the RAVEN AMULETS (P); take the HANDLE.
- Return to the Undercroft.
- Insert the HANDLE (Q); add the HINT. Play the mini-game.

- Solution: 1x5-1x5-2x2-1x7-1x4-2x5-1x6-2x3 (R).
- Play the HOP (S); receive the BLACK CROWN.
- Move forward.
- Place the BLACK CROWN (T); take the PHOTO PORTRAITS..
- Pour the SAND OF TIME on the PHOTO PORTRAITS (inventory). Play the HOP; receive the CROWN PART. Repeat two times, receive two CROWN PARTS.
- Place the CROWN PARTS on the BROKEN CROWN (inventory); take DEATH'S BLACK CROWN.
- Place DEATH'S BLACK CROWN (U); add the POWER STONE.
- Play the mini-game (V).
- Solution: Place the feathers (V). Pull feathers (W); arrange the mirrors (X); match the symbols (Y). Place the reel (Z). Arrange the icons (A). Use the flint (B). Insert the star (C). Adjust the dials: 1-2-1-1-2-2 (D).

- Solution (continued): Insert the pointer (E). Press the pointers: 2-2-1-1-8 (F). Press the bubbles: Round 1: 1-2-4; Round 2: 4-1-3-5-2; Round 3: 5-3-2-4-1-3-5 (G). Place the teeth (H). Arrange the teeth (I). Add the pipe pieces (J). Arrange the pipe pieces (K). Pour the ink (L). Insert the keys (M).
- Congratulations! You've completed Grim Tales: The Heir.
Created at: 2016-03-25