Walkthrough Menu
- General Tips
- Chapter 1: Greg Duffy
- Chapter 2: Town Outskirts
- Chapter 3: The Fire
- Chapter 4: The Yard
- Chapter 5: The Plane Crash
- Chapter 6: The Control Tower
General Tips
- This is the official guide for Grim Tales: Threads of Destiny.
- This guide will not mention each time you have to zoom into a location; the screenshots will show each zoom scene.
- Hidden-object puzzles are referred to as HOPs. This guide will not show HOP solutions. It will identify the location of the HOP and the inventory item acquired.
- This guide will show solutions for non-random puzzles. Please read the in-game instructions for each puzzle.
- In this game, you will sometimes have to select the new scene to trigger dialog, cut-scenes, or tasks prior to interacting with the scene.
Chapter 1: Greg Duffy
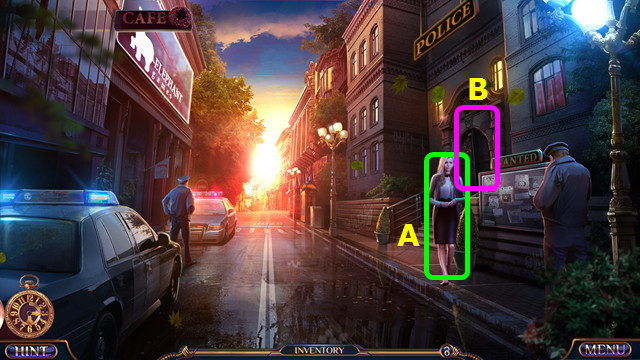
- Talk to Jackie (A).
- Walk right (B).
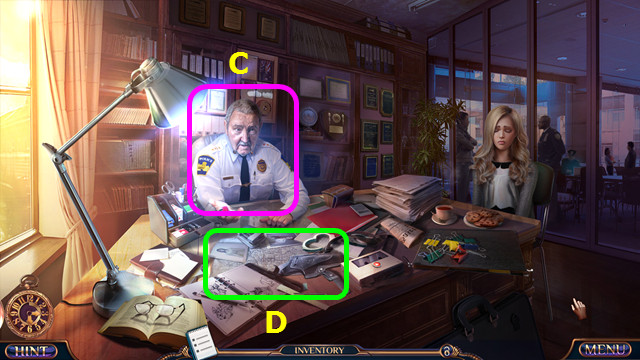
- Talk to the Sheriff (C).
- Play the HOP; earn the CASE NOTES and KILLER'S PHOTO (D).
- Talk to the Sheriff again (C); earn the CAR KEY.
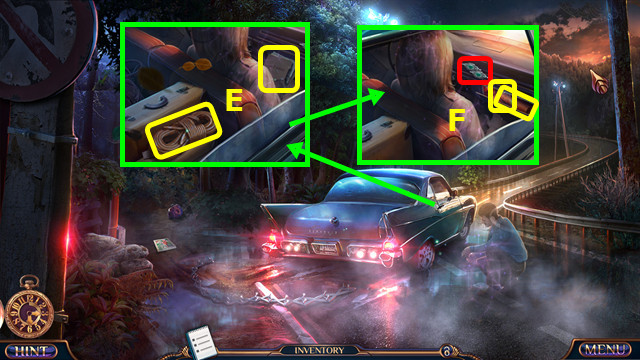
- Select the CASE NOTES to lower them.
- Take the ROPE and FOLDER (E).
- Read the FOLDER; take the DECORATIVE SLIDER and DOVE EMBLEM (inventory).
- Place and select the DECORATIVE SLIDER; take the MAP and METAL DISC (F).
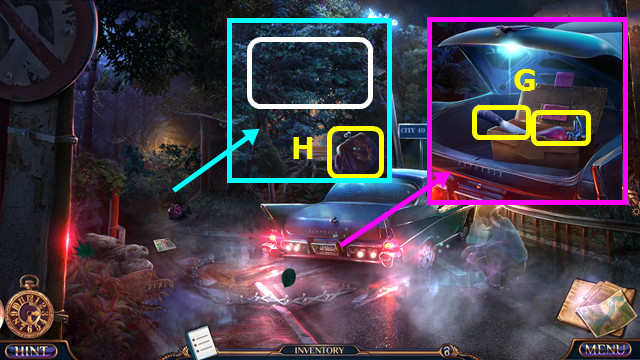
- Use the CAR KEY and place the METAL DISC; take the AXE and EXTINGUISHER (G).
- Take the COIN PURSE; use the AXE 4x (H).
- Walk left.
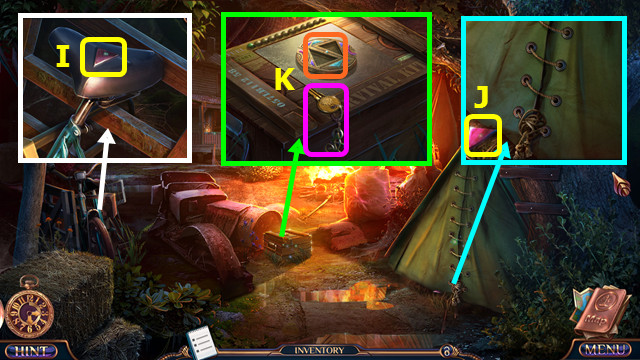
- Take the 1/2 TRIANGLE EMBLEMS (I).
- Take the 2/2 TRIANGLE EMBLEMS (J).
- Touch the key; place the 2 TRIANGLE EMBLEMS (K).
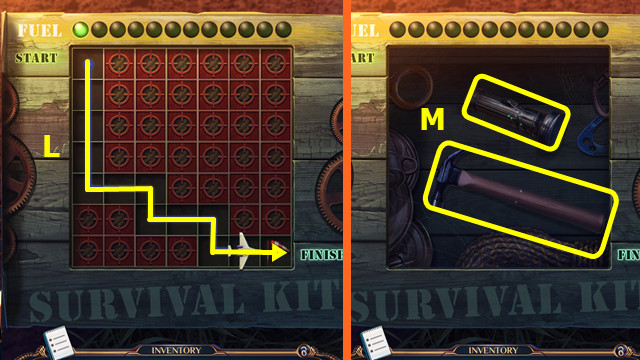
- Solution (L).
- Take the HAMMER and FLASHLIGHT (M).
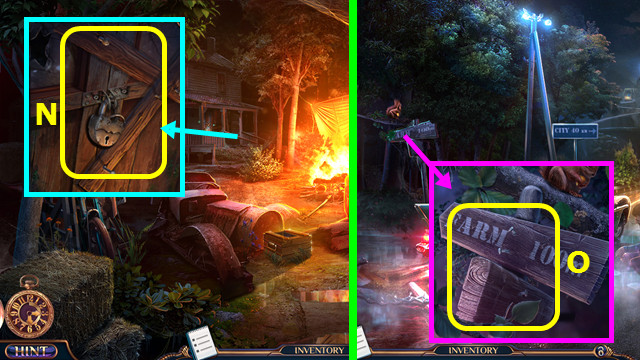
- Use the HAMMER to take 2 PLANKS and 4 NAILS (N).
- Walk down.
- Use the HAMMER to take 2 PLANKS and 4 NAILS (O).
- Walk left.
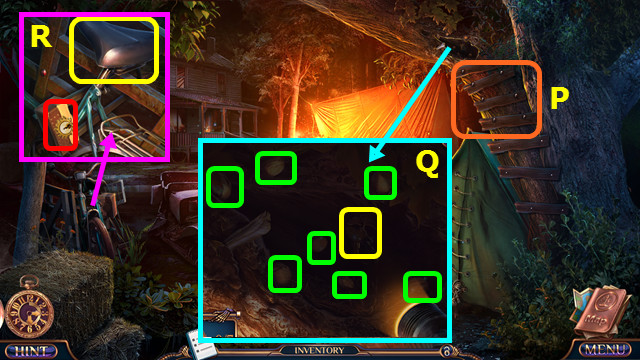
- Use the 4 PLANKS, 8 NAILS, and HAMMER (P).
- Use the FLASHLIGHT; collect the 7 NUTS and BICYCLE KEY (Q).
- Use the BICYCLE KEY; take the BICYCLE (R).
- Walk down.
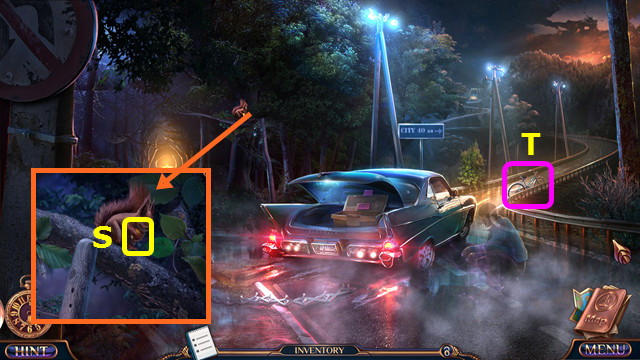
- Use the NUTS to take the GOLDEN NUT (S).
- Combine the COIN PURSE and GOLDEN NUT; take the THREAD and SCRAP PAPER (inventory).
- Use the BICYCLE (T).
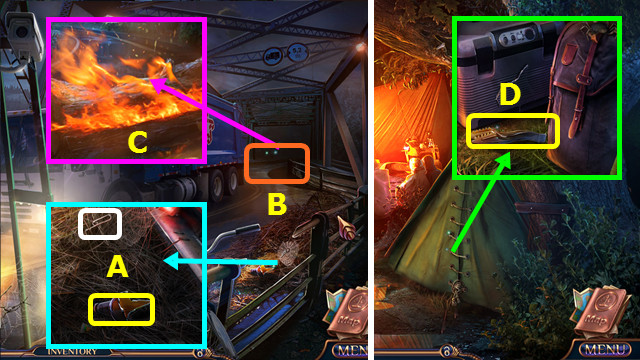
- Select the clip; take the SHARD (A).
- Go forward (B).
- Use the EXTINGUISHER (C).
- Walk down and left.
- Use the SHARD; take the TONGS (D).
- Walk down and right.
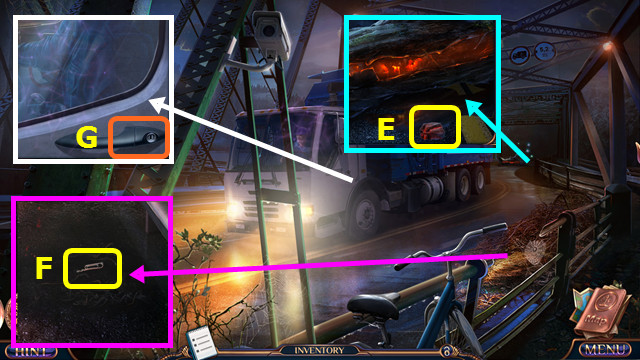
- Use the TONGS to take the BURNING CHARCOAL (E).
- Use the BURNING CHARCOAL; take the LOCKPICK (F).
- Use the LOCKPICK; open the door (G).
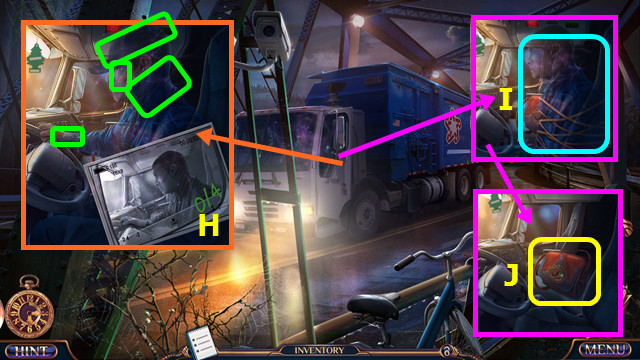
- Place the KILLER'S PHOTO (H).
- Select the 4 items (green).
- Use the ROPE; select Greg Duffy (I).
- Take the STOLEN PURSE (J).
- Combine the STOLEN PURSE and DOVE EMBLEM; read the note, take the 1st WOODEN CAR, and GLOVES (inventory).
- Walk down and left.
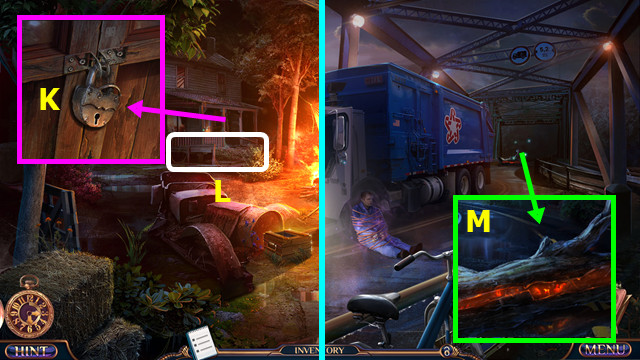
- Use the LOCKPICK (K).
- Play the HOP; earn the CHAINSAW (L).
- Walk down and right.
- Use the CHAINSAW (M).
- Go right.
Chapter 2: Town Outskirts
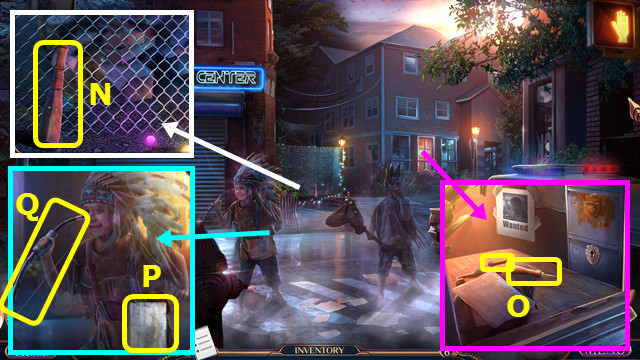
- Take the BASEBALL BAT (N).
- Use the BASEBALL BAT and GLOVES; take the AWL and PENCIL (O).
- Use the SCRAP PAPER and PENCIL; take the OWL SKETCH (P).
- Take the BOW (Q).
- Walk down 2x; go left.
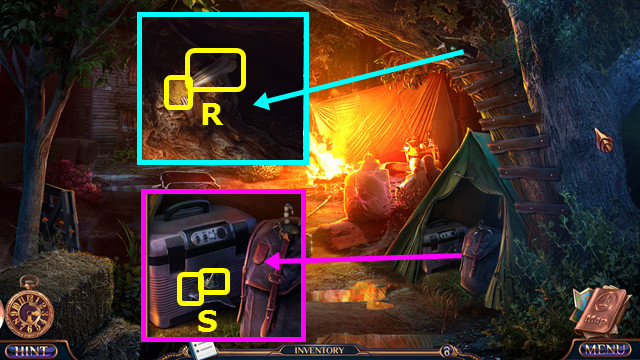
- Use the AWL; take the 1/2 COINS and FEATHERS (R).
- Use the AWL; take the TOGGLE SWITCH and IRON CHUNK (S).
- Combine the IRON CHUNK and OWL SKETCH (inventory).
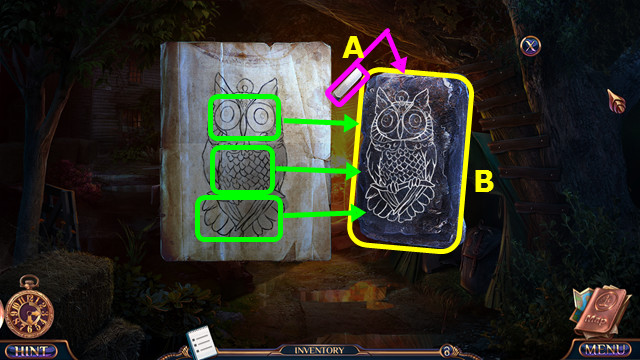
- Use the chalk on the iron chunk (A).
- Change the features to match the sketch (green).
- Use the AWL; take the OWL EMBLEM (B).
- Walk down and right.
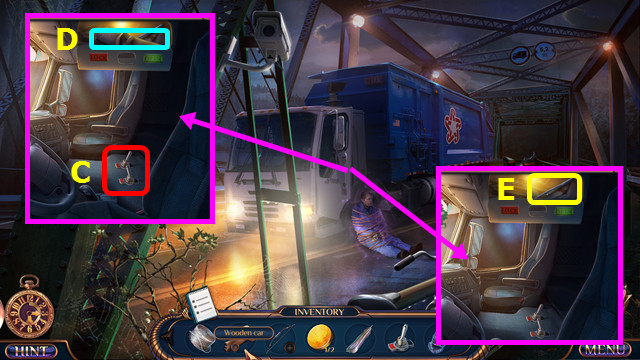
- Place and select the TOGGLE SWITCH (C).
- Take the case and look at the photos (D).
- Take the ARROW (E).
- Walk right.
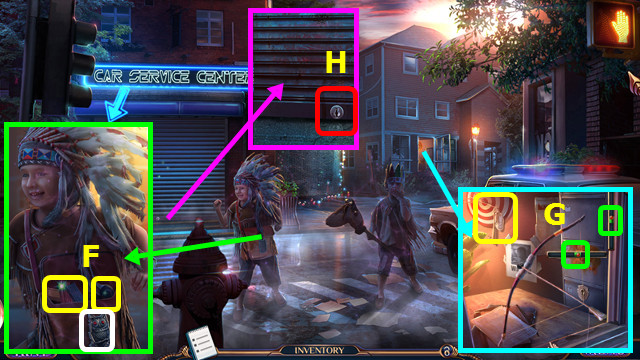
- Place the OWL EMBLEM; take the DUCT TAPE and STICKY CLAY (F).
- Combine the BOW, ARROW, STICKY CLAY, FEATHERS, and THREAD to make the BOW AND ARROW (inventory).
- Use the BOW AND ARROW; click when the ball is in the green areas (G). You earn the GARAGE KEY.
- Use the GARAGE KEY (H).
- Go forward.
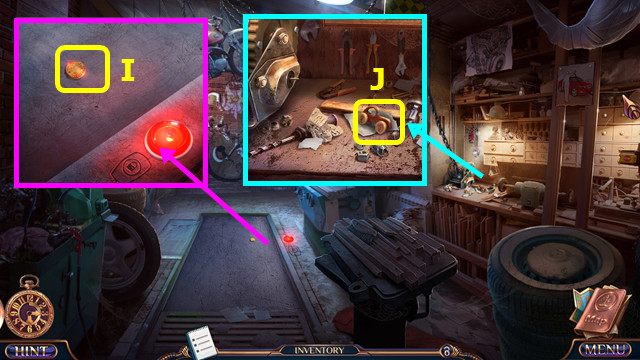
- Take the 2/2 COINS (I).
- Take the 2nd WOODEN CAR (J).
- Walk down.
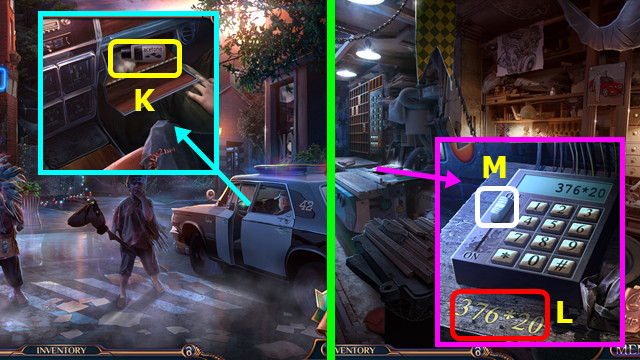
- Place the 2 WOODEN CARS; take the ACETONE (K).
- Go forward.
- Use the ACETONE (L).
- Press 3-7-6-*-2-0; slide the switch (M).
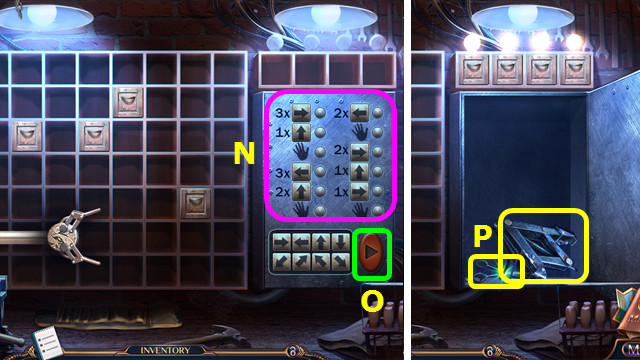
- Solution (N).
- Press (O).
- Take the RUSTY JACK and SCISSORS (P).
- Walk down.
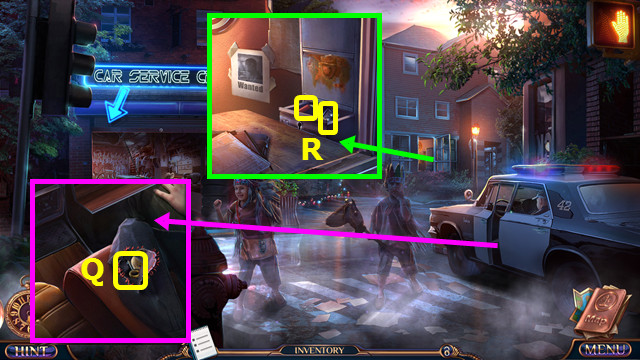
- Use the SCISSORS; take the CABINET KEY (Q).
- Use the CABINET KEY; take the CRANK and BROKEN KEY FOB (R).
- Go forward.
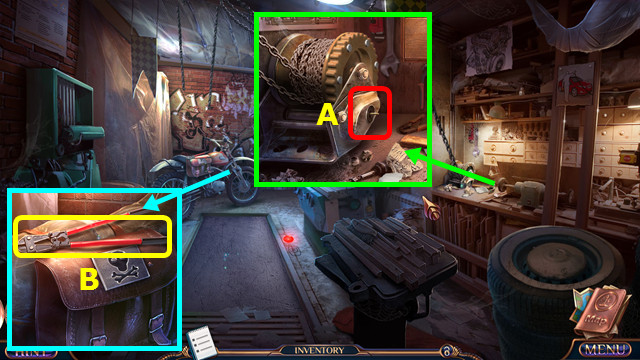
- Use the CRANK (A).
- Take the BOLT CUTTERS (B).
- Walk down.
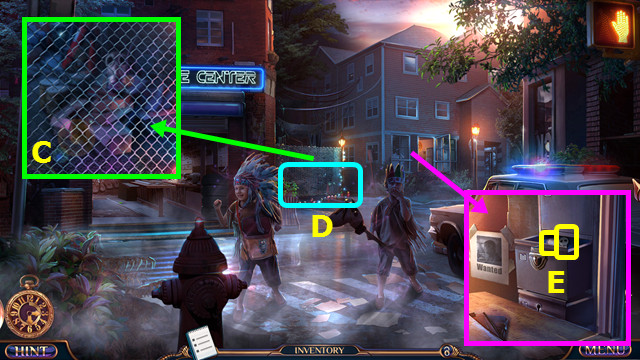
- Use the BOLT CUTTERS (C).
- Play the HOP; earn the ANTI-RUST SOLUTION (D).
- Combine the RUSTY JACK and ANTI-RUST SOLUTION to find the CAR JACK and CROSSBONES EMBLEM (inventory).
- Use the ANTI-RUST SOLUTION, open the drawer, and take the 1/2 BUTTON BATTERIES and SKULL EMBLEM (E).
- Go forward.
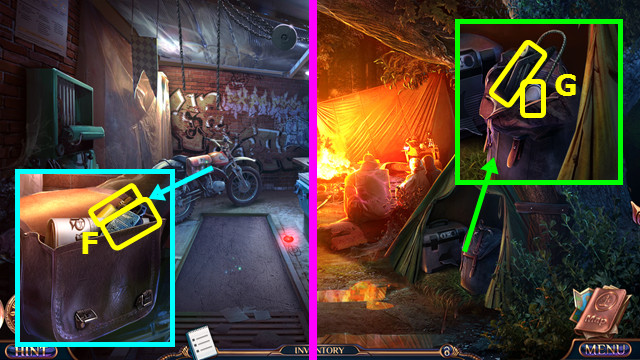
- Place the SKULL EMBLEM and CROSSBONES EMBLEM; take the LIGHTER, move the newspaper, and take the INSECTICIDE (F).
- Walk down 3x; go left.
- Use the INSECTICIDE and open the pack; take the FOOT PUMP and 2/2 BUTTON BATTERY (G).
- Return to the Repair Shop.
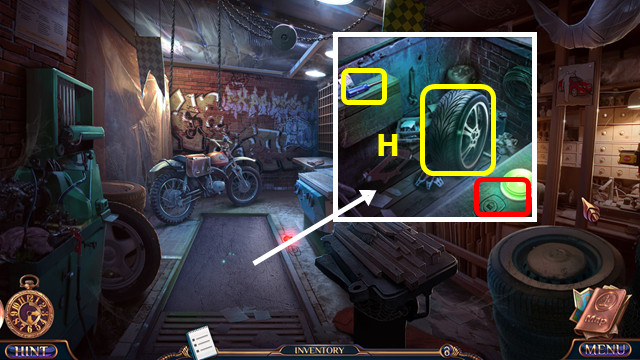
- Combine the BROKEN KEY FOB, 2 BUTTON BATTERIES, and DUCT TAPE to make the REMOTE KEY FOB (inventory).
- Use the REMOTE KEY FOB; take the 1/2 TIRE and SCREWDRIVER (H).
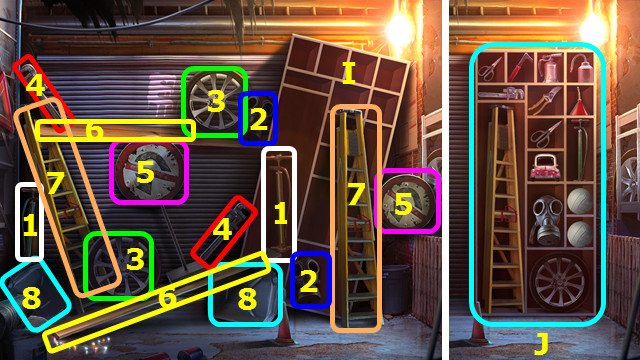
- Select the pairs (1-8); select the shelf (I).
- Restore the items (J).
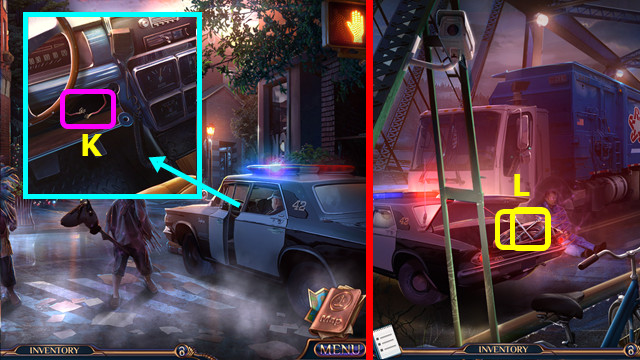
- Use the SCREWDRIVER; touch the wires (K).
- Take the TIRE IRON and 2/2 TIRES (L).
- Walk down.
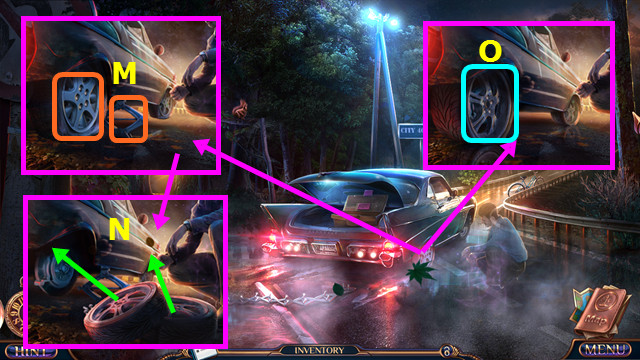
- Use the CAR JACK and TIRE IRON (M).
- Place the 2 TIRES; place the tires on the wheels and use the TIRE IRON (N).
- Remove the car jack and use the FOOT PUMP (O).
Chapter 3: The Fire
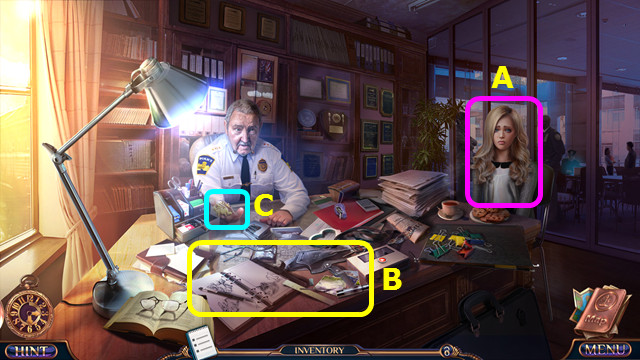
- Talk to Jackie (A).
- Play the HOP; earn the CASE NOTES and MAP (B).
- Touch the paper (C).
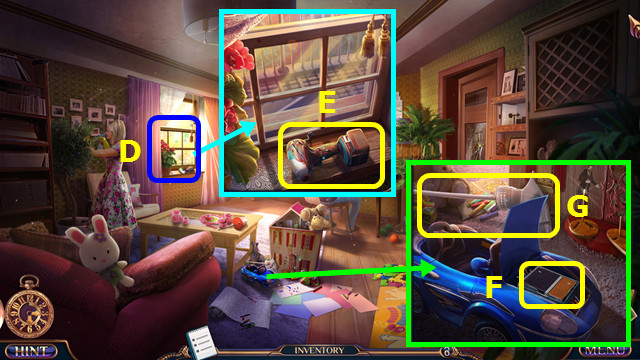
- Select (D).
- Take the BROKEN SCREW GUN (E).
- Open the hood; take the BATTERY (F).
- Take the SPRAY NOZZLE (G).
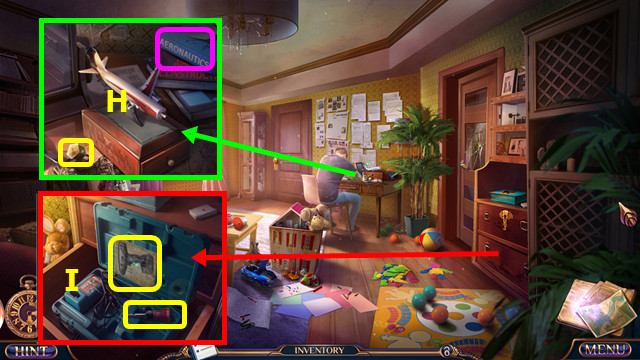
- Take the CASE BUTTON and read the book (H).
- Open the drawer; place and push the CASE BUTTON. Take the SCREW GUN CHUCK and SCREW GUN MANUAL (I).
- Combine the BROKEN SCREW GUN, SCREW GUN MANUAL, SCREW GUN CHUCK, and BATTERY (inventory).
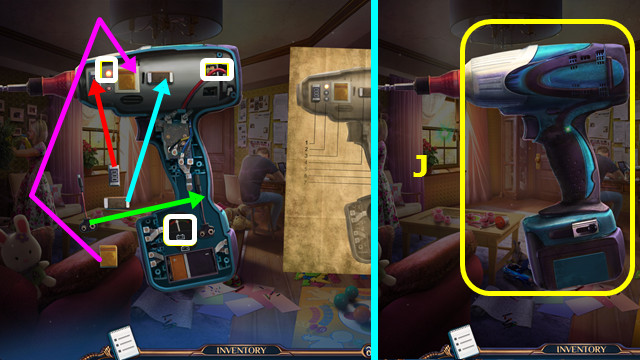
- Restore the 4 items per the arrows; select the 3 locations in white.
- Take the SCREW GUN (J).
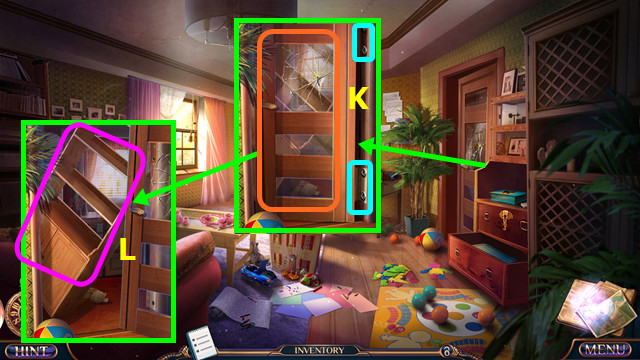
- Use the SCREW GUN and remove the door (K).
- Move the bookshelf (L).
- Walk right.
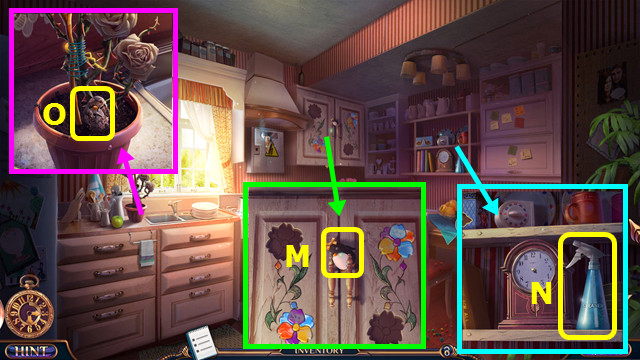
- Take the 1st PENGUIN (M).
- Place the SPRAY NOZZLE; take the CLEANER (N).
- Use the CLEANER; take the 2nd PENGUIN (O).
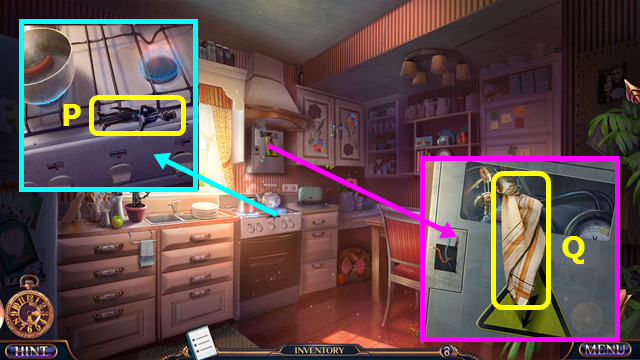
- Take the BUTLER (P).
- Take the HANKY (Q).
- Walk down.
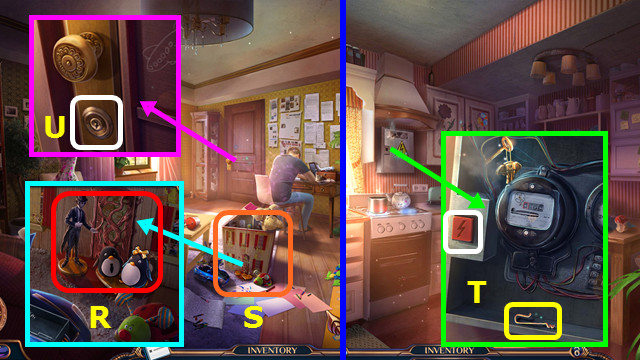
- Place the BUTLER and 2 PENGUINS (R).
- Play the HOP; earn the DOLL (S).
- Take the ELECTRICAL BUTTON and 1st JEWELED SNAIL from the DOLL (inventory).
- Walk right.
- Place and push the ELECTRICAL BUTTON; take the WIRE (T).
- Walk down.
- Use the WIRE (U).
- Walk forward.
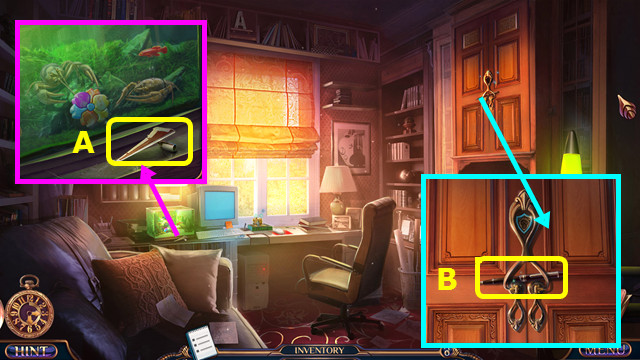
- Take the PLANE WING (A).
- Take the FOUNTAIN PEN (B).
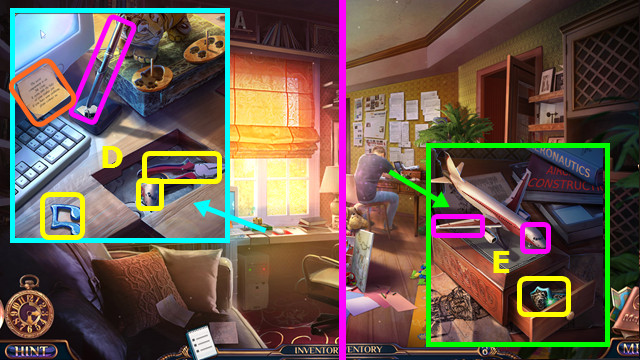
- Place the FOUNTAIN PEN; take the PLANE NOSE, PLIERS, 1st MUSIC NOTE, and read the note (D).
- Walk down.
- Place the PLANE NOSE and PLANE WING; take the FAMILY RING (E).
- Walk forward.
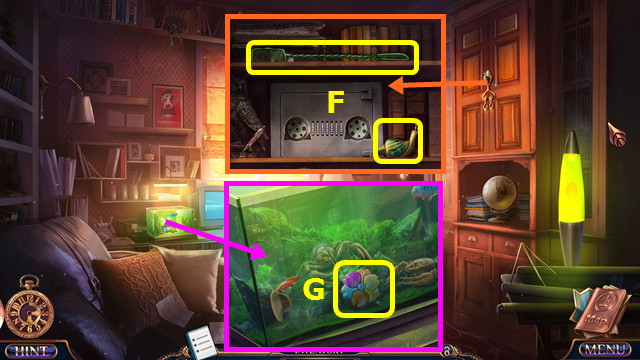
- Place the FAMILY RING; take the SCOOP NET and 2nd JEWELED SNAIL (F).
- Use the SCOOP NET to take the 1st GLASS FLOWER (G).
- Walk down and right.
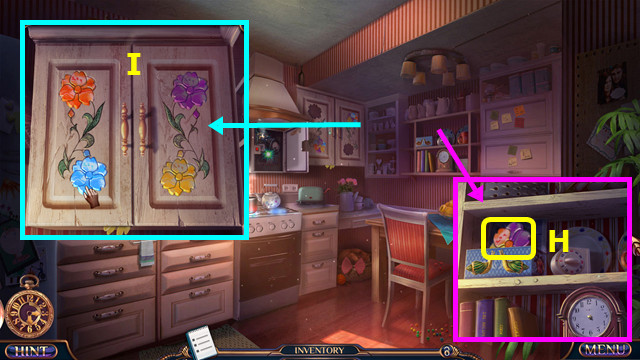
- Place the 2 JEWELED SNAILS; take the 2nd GLASS FLOWER (H).
- Place the 2 GLASS FLOWERS; restore the petals as shown (I).
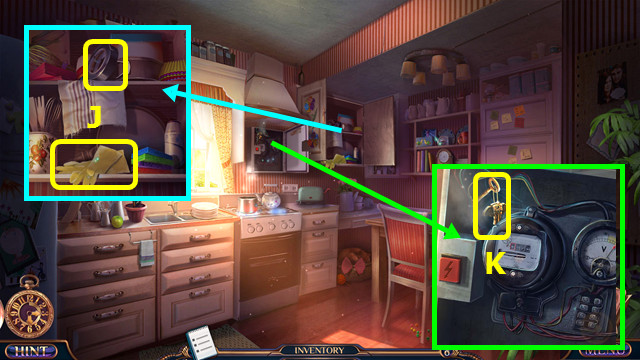
- Take the ELECTRICAL TAPE and RUBBER GLOVES (J).
- Use the ELECTRICAL TAPE; take the ELEPHANT KEY (K).
- Walk down.
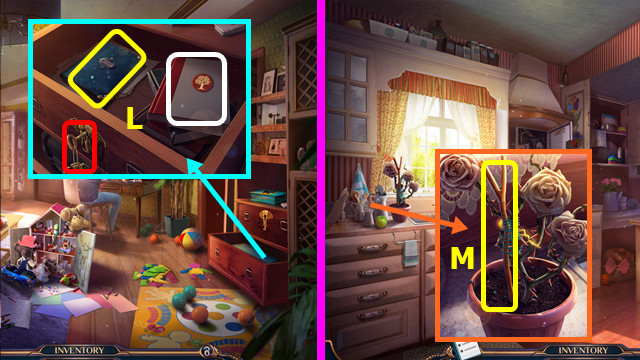
- Use the ELEPHANT KEY; take the FOLDER and read the book (L).
- Open the FOLDER; take the RAZOR BLADE and 1/2 DOWEL ROD (inventory).
- Walk right.
- Use the RAZOR BLADE; take the FORKED STICK (M).
- Walk down.
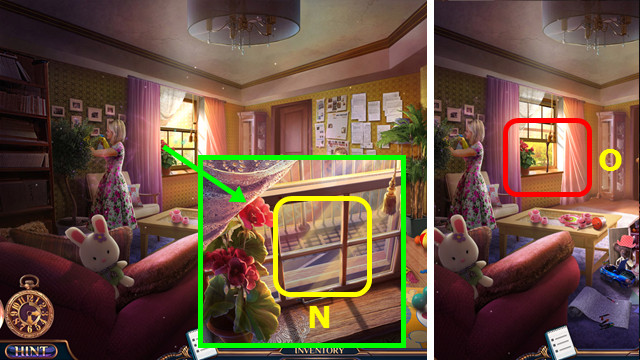
- Use the FORKED STICK (N).
- Walk left (O).
Chapter 4: The Yard
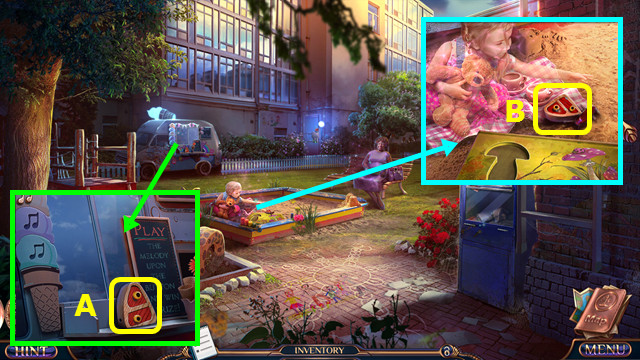
- Take the 1st BUTTERFLY PART (A).
- Take the 2nd BUTTERFLY PART (B).
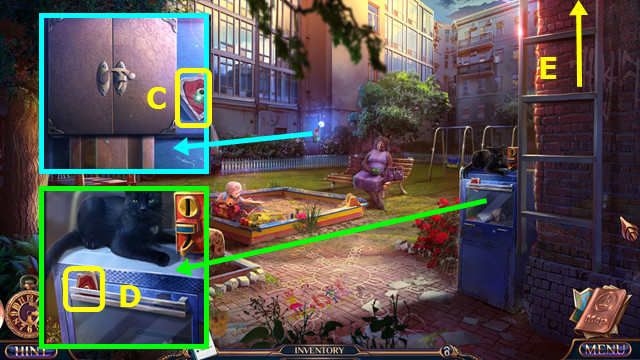
- Take the 3rd BUTTERFLY PART (C).
- Take the 4th BUTTERFLY PART (D).
- Combine the 4 BUTTERFLY PARTS to make the BUTTERFLY EMBLEM (inventory).
- Go up (E).
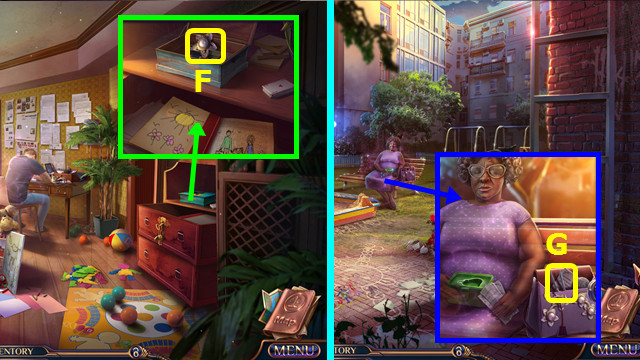
- Place the BUTTERFLY EMBLEM; take the PEARL BROOCH (F).
- Go left.
- Use the PEARL BROOCH; take the TONGS and read the 2 notes (G).
- Return to the Kitchen.
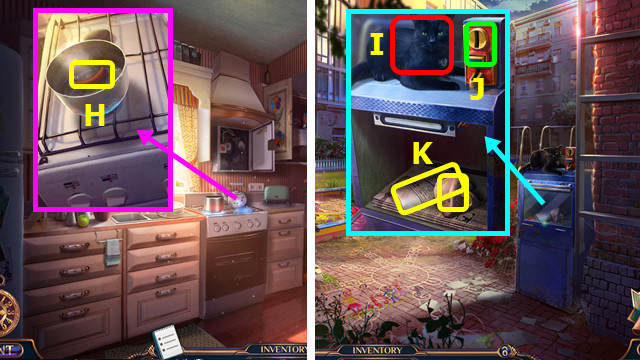
- Use the TONGS to take the HOT DOG (H).
- Return to the Yard.
- Use the HOT DOG (I).
- Use the 2 COINS (J); take the WRAPPED ITEM and NEWSPAPER (K).
- Open the WRAPPED ITEM; take the PEAR EMBLEM (inventory).
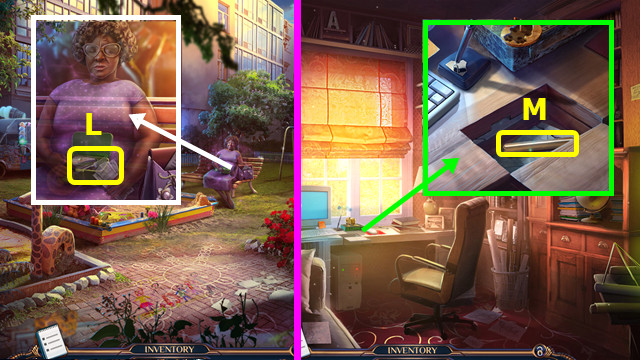
- Place the PEAR EMBLEM; take the FORK (L).
- Combine the FORK and PLIERS to make the TWO-PRONGED FORK (inventory).
- Go up and forward.
- Use the TWO-PRONGED FORK; take the 2nd DOWEL ROD and read the note (M).
- Return to the Yard.
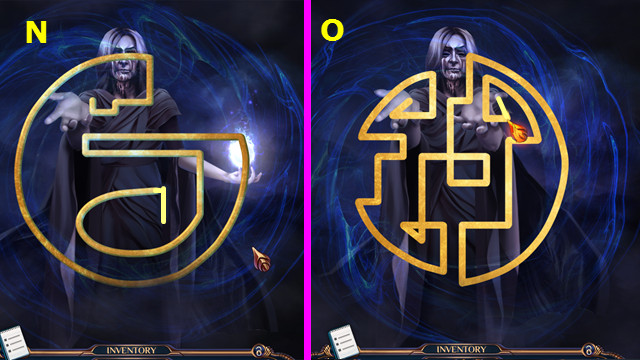
- Use the NEWSPAPER and LIGHTER; trace the symbol (N).
- Trace the 2nd symbol (O).
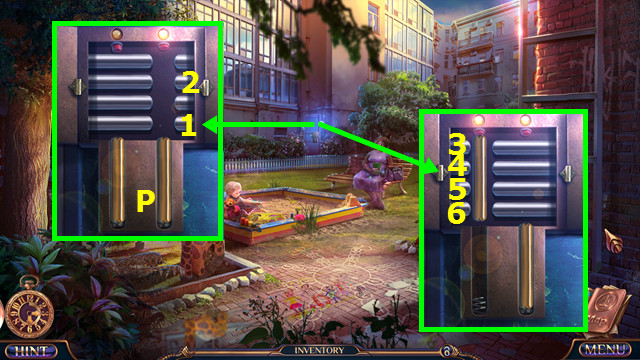
- Open the latch and place the 2 DOWEL RODS (P).
- Set the rods (1-2).
- Set the rods (3-6).
- Walk forward.
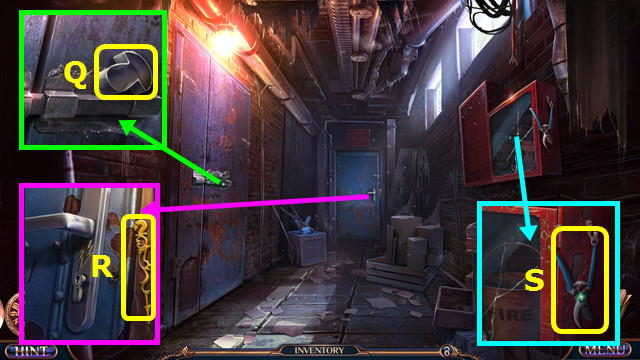
- Take the MUSHROOM MOLD (Q).
- Take the 1/2 CLOCK HAND (R).
- Take the PRUNERS (S).
- Return to the Kitchen.
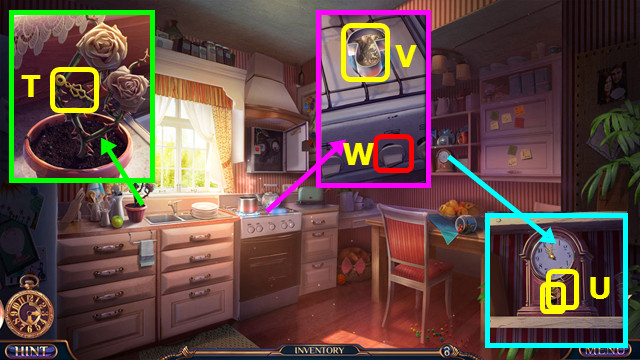
- Use the PRUNERS; take the 2/2 CLOCK HAND (T).
- Place the 2 CLOCK HANDS; take the 1/2 BIRD CHARM and PLASTIC SOLDIER (U).
- Place the MUSHROOM MOLD and PLASTIC SOLDIER (V).
- Select (W).
- Take the TOY MUSHROOM.
- Go to the Yard.
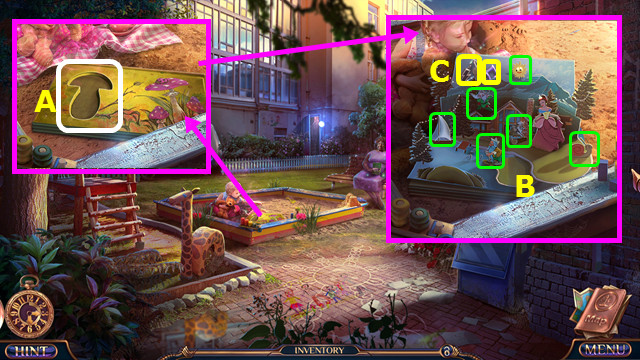
- Place the TOY MUSHROOM (A).
- Arrange the figures as shown (B).
- Take the ELECTRICAL KEY and 2nd MUSIC NOTE (C).
- Go forward.
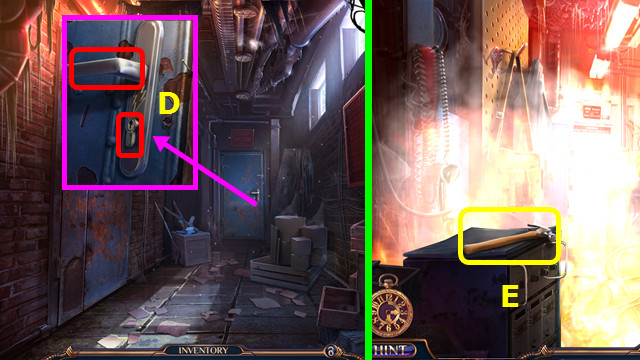
- Use the ELECTRICAL KEY; turn the handle (D).
- Go forward.
- Take the HAMMER (E).
- Walk down.
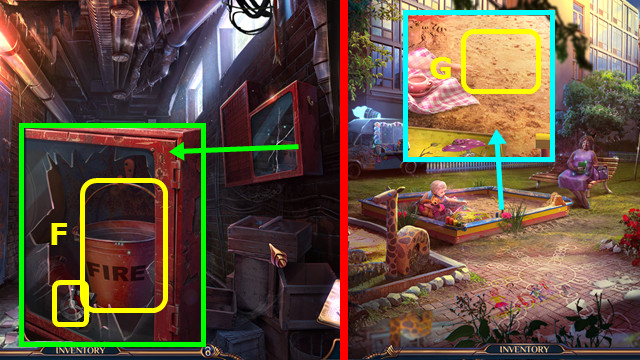
- Use the HAMMER; take the 1st SAFE VALVE and BUCKET (F).
- Walk down.
- Use the BUCKET to take the BUCKET OF SAND (G).
- Go forward 2x.
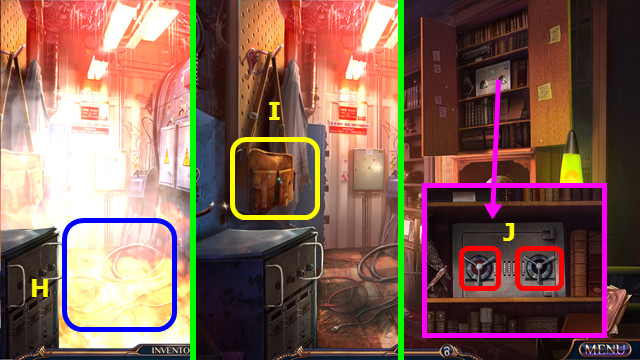
- Use the BUCKET OF SAND (H).
- Take the BURNT BAG (I).
- Look at the BURNT BAG; take the 2nd SAFE VALVE (inventory).
- Go to Alexander's Study.
- Place the 2 SAFE VALVES (J).
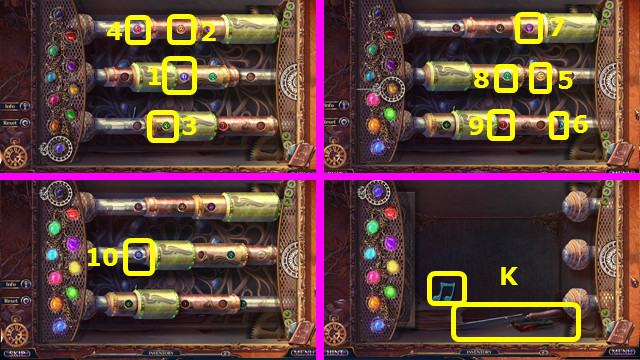
- Move the bars as shown; select 1-10.
- Open the grill; take the 3rd MUSIC NOTE and the FILE (K).
- Go to the Yard.
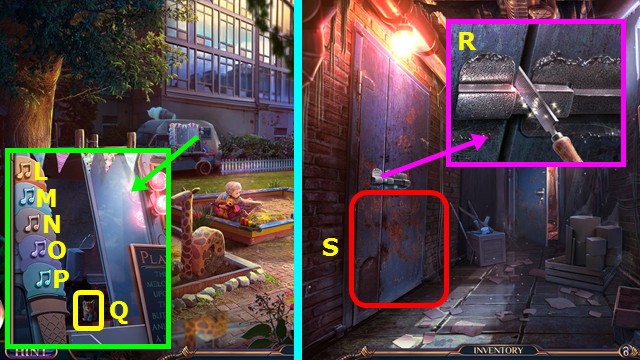
- Place the 3 MUSIC NOTES; select; M-N-P, N-O-P-L-M.
- Take the 1st CUB FIGURINE (Q).
- Go forward.
- Use the FILE (R).
- Play the HOP; earn the OLD CHEST (S).
- Open the OLD CHEST; take the 2nd CUB FIGURINE and KNIFE (inventory).
- Use the KNIFE on the BURNT BAG; take the FUSES and ELECTRIC PLUG (inventory).
- Go to Alexander's Study.
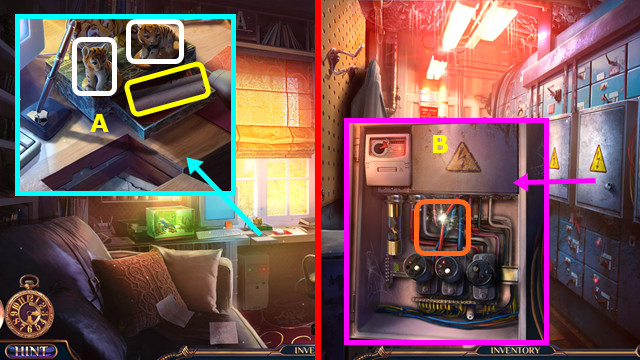
- Place the 2 CUB FIGURINES; take the CONTROL ROOM DIAGRAM (A).
- Open the CONTROL ROOM DIAGRAM to find the PLAN (inventory).
- Go to the Control Room.
- Open the panel; use the RUBBER GLOVES and ELECTRICAL TAPE (B).
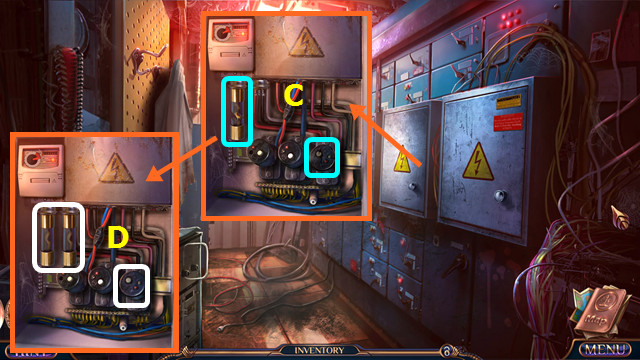
- Remove the broken fuse and plug (C).
- Place the FUSES and ELECTRIC PLUG (D).
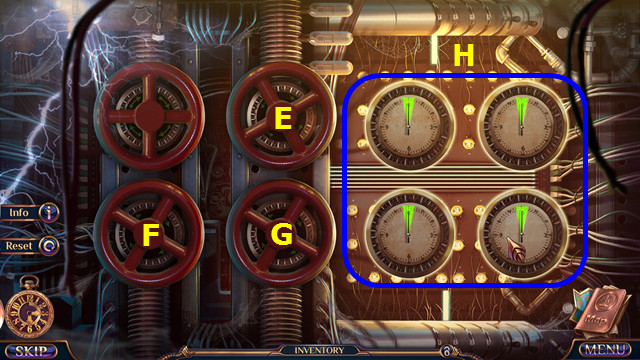
- Select E-F-F-G-G.
- Final position (H).
Chapter 5: The Plane Crash
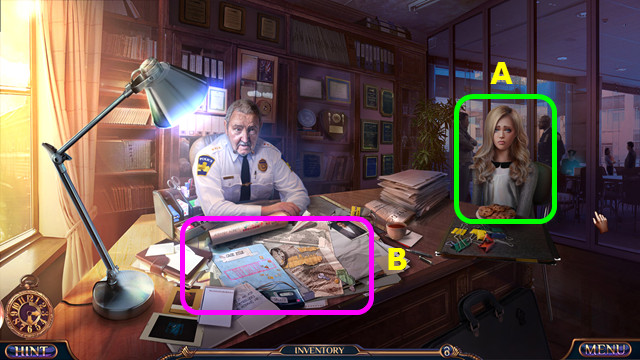
- Talk to Jackie (A).
- Play the HOP; earn the CASE NOTES and MAP (B).
- Talk to Jackie again (A).
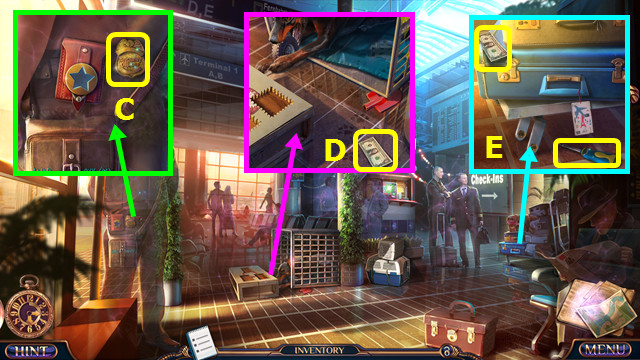
- Take the SECURITY BADGE (C).
- Take the 1/3 DOLLARS (D).
- Take the 2/3 DOLLARS and SCREWDRIVER (E).
- Go forward.
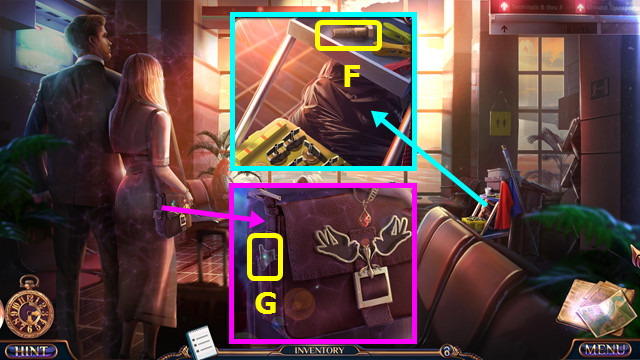
- Take the BOLT (F).
- Open the flap; take the 3/3 DOLLARS (G).
- Walk down.
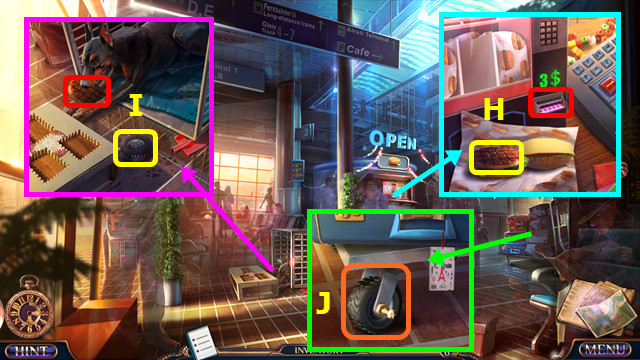
- Use the 3 DOLLARS; open the sandwich and take the BEEF PATTY (H).
- Use the BEEF PATTY; take the TRUCK WHEEL (I).
- Use the TRUCK WHEEL, BOLT, and SCREWDRIVER; move the cart (J).
- Walk right.
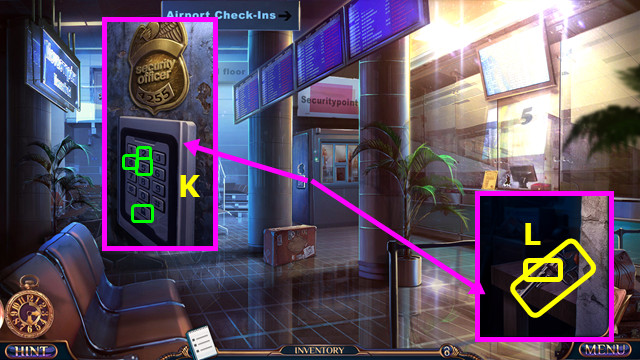
- Place the SECURITY BADGE; press 4-2-5-5-lock symbol (K).
- Take the EMPTY GUN and KNOB (L).
- Walk down and forward.
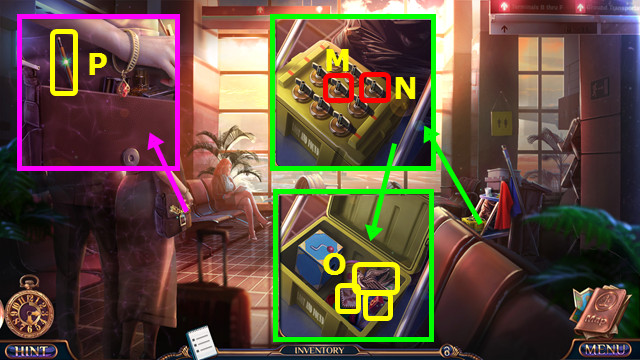
- Place the KNOB; select M-N.
- Take the 2/2 BIRD CHARM, 1/3 STAMP EMBLEM, and the 3 BUTTON (O).
- Place the 2 BIRD CHARMS; take the PENCIL (P).
- Walk down and right.
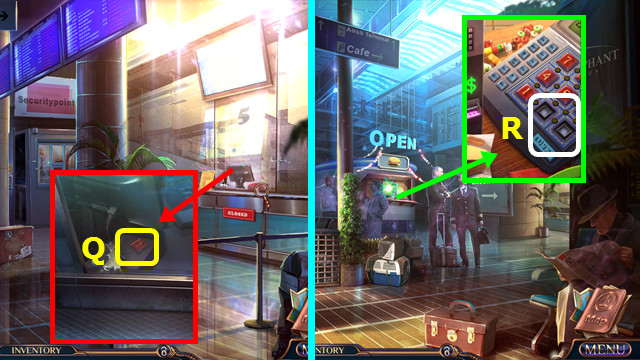
- Use the PENCIL to take the 2 BUTTON (Q).
- Walk down.
- Place the 2 BUTTON and the 3 BUTTON (R).
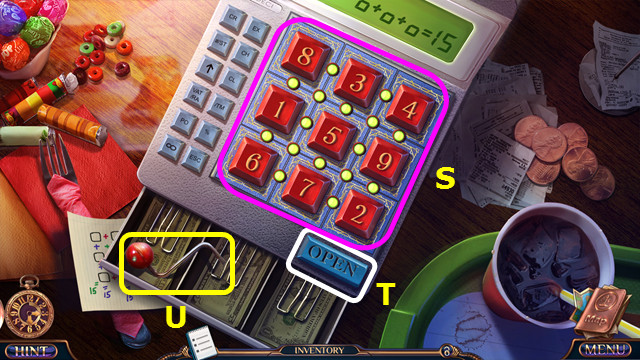
- Solution (S).
- Press (T).
- Take the CRANK (U).
- Go forward.
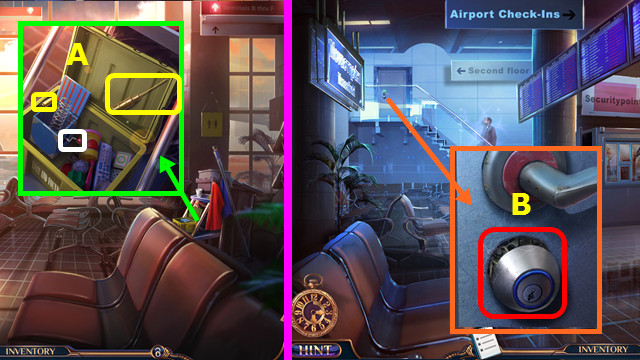
- Use the CRANK; take the BULLET and OIL (A).
- Combine the EMPTY GUN, OIL, and BULLET to make the LOADED GUN (inventory).
- Walk down and right.
- Use the LOADED GUN (B).
- Walk forward.
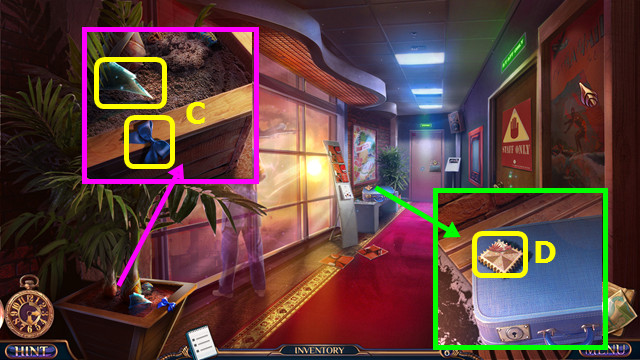
- Take the SHARP SHARD and BOW (C).
- Take the 2/3 STAMP EMBLEMS (D).
- Walk down 2x.
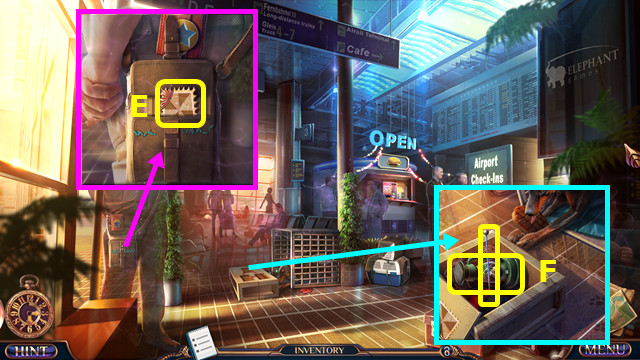
- Use the SHARP SHARD; open the bag and take the 3/3 STAMP EMBLEMS (E).
- Place the 3 STAMP EMBLEMS; take the KNITTING NEEDLE and EXTINGUISHED LANTERN (F).
- Walk right and forward.
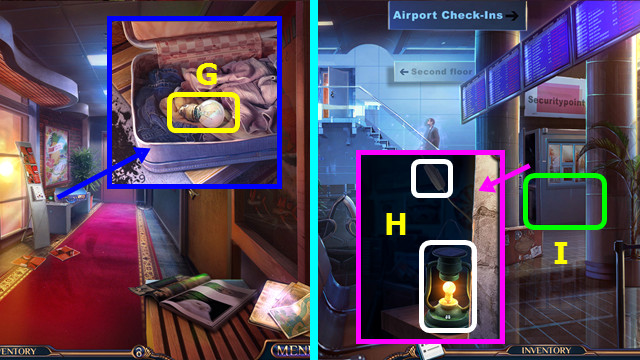
- Use the KNITTING NEEDLE; take the BULB (G).
- Combine the EXTINGUISHED LANTERN and BULB to make the LANTERN (inventory).
- Walk down.
- Place the LANTERN; select the switch (H).
- Play the HOP; earn the TRIANGULAR KEY (I).
- Walk forward.
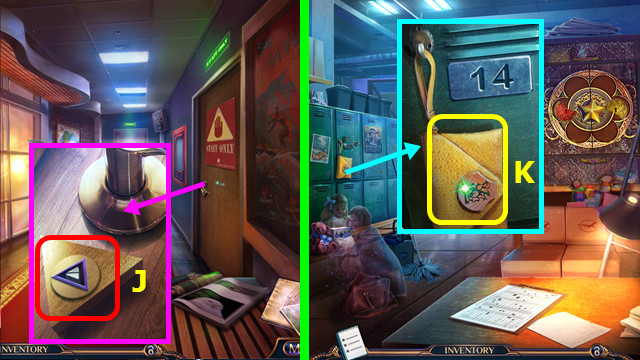
- Use the TRIANGULAR KEY (J).
- Walk right.
- Take the HANDBAG (K).
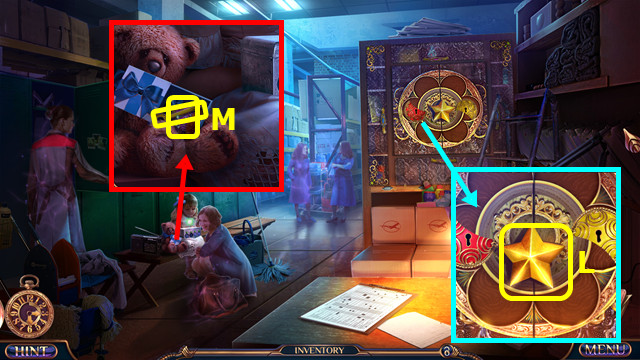
- Take the STAR (L).
- Place the BOW; take the HANDLE and 1/4 LOCK SHIELDS (M).
- Walk down 3x.
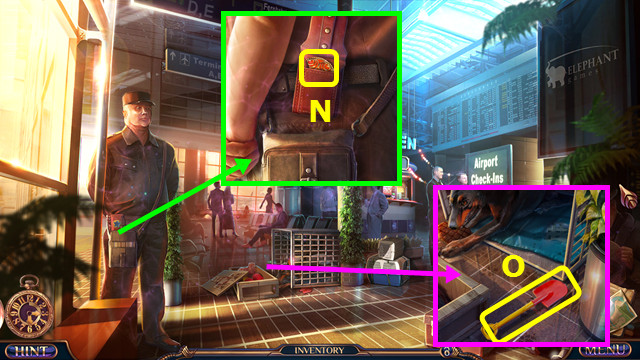
- Place the STAR; take the 2/4 LOCK SHIELDS (N).
- Use the HANDLE to take the SHOVEL (O).
- Walk right and forward.
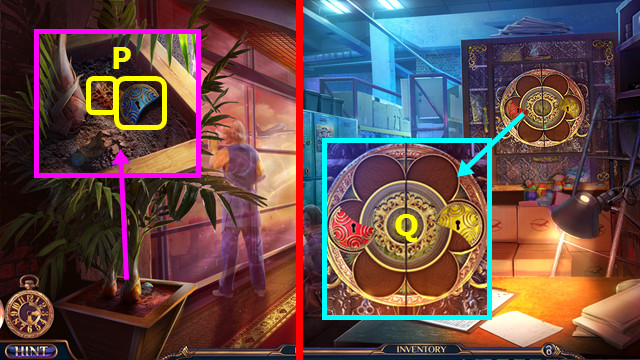
- Use the SHOVEL; take the 3/4 LOCK SHIELDS and 7 EMBLEM (P).
- Combine the HANDBAG and 7 EMBLEM; take the 1/2 TOY GEARS and 4/4 LOCK SHIELDS (inventory).
- Walk right.
- Place the 4 LOCK SHIELDS (Q).
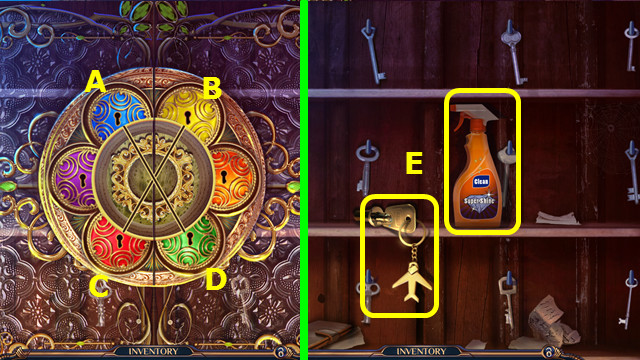
- Solution: DA-DA-AD-DA-DA-CB-AD-BC-BC
- Take the PLANE KEY and CLEANER (E).
- Walk down.
Chapter 6: The Control Tower
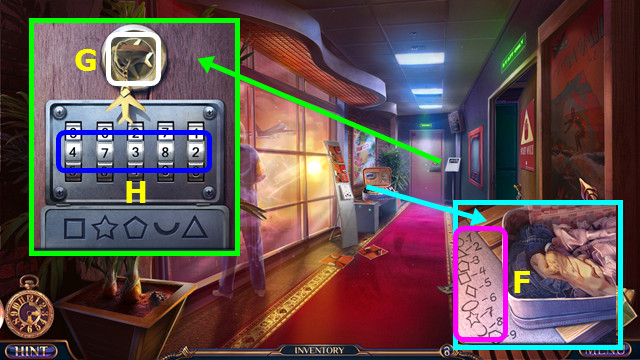
- Use the CLEANER and HANKY (F).
- Use the PLANE KEY (G).
- Set the code (H).
- Go forward.
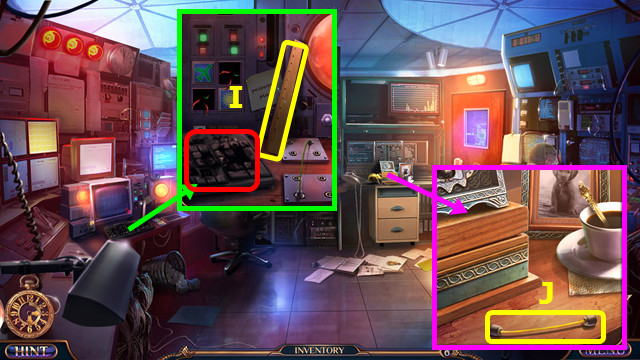
- Remove the old keyboard; take the RULER (I).
- Take the 1/3 WIRE (J).
- Walk down and right.
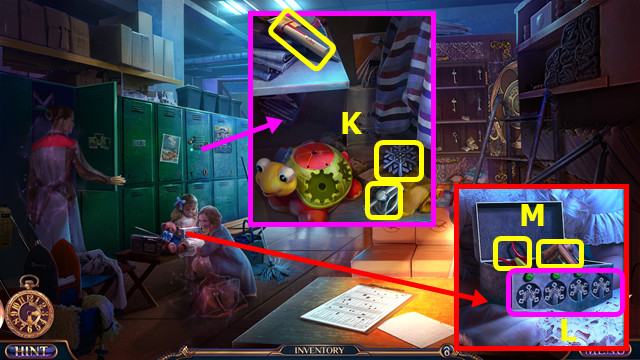
- Use the RULER; take the GLUE, SNOWFLAKE, and 1/2 PROPELLER EMBLEM (K).
- Place the SNOWFLAKE; change the snowflakes as shown (L).
- Take the CHILD'S SCISSORS and BROKEN FRAME (M).
- Walk down.
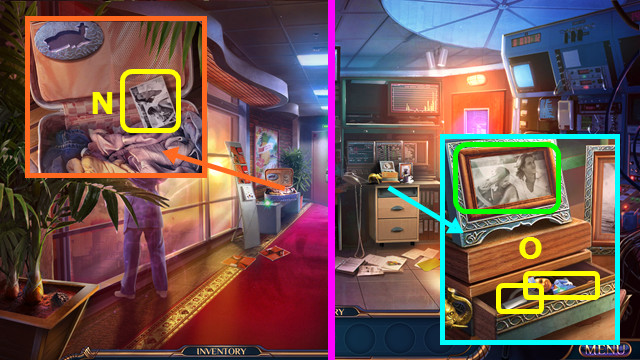
- Use the CHILD'S SCISSORS; take the PHOTO (N).
- Combine the BROKEN FRAME, GLUE, and PHOTO to make the FRAMED PHOTO (inventory).
- Go forward.
- Place the FRAMED PHOTO; take the STEWARDESS FIGURINE and 2/2 PROPELLER EMBLEM (O).
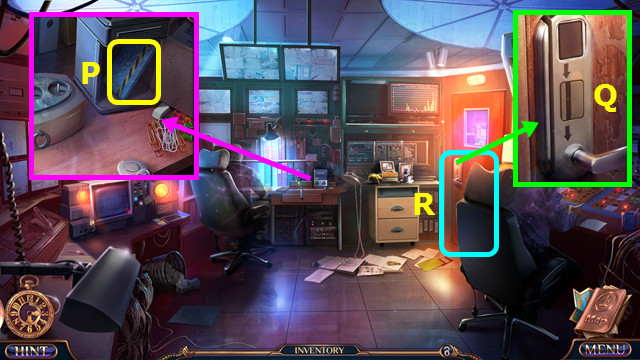
- Place the 2 PROPELLER EMBLEMS; take the ACCESS CARD (P).
- Use the ACCESS CARD (Q).
- Play the HOP; earn the POUCH (R).
- Open the POUCH; take the PILOT FIGURINE, WRENCH, and 2/3 WIRE (inventory).
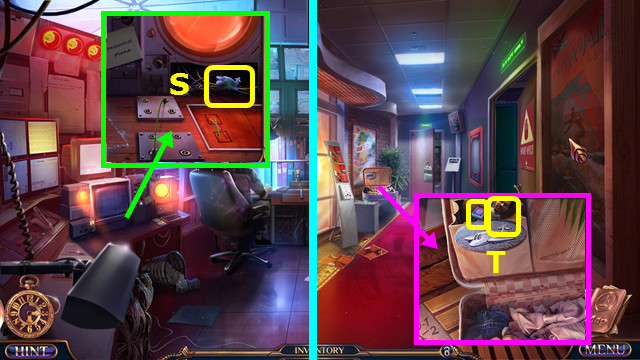
- Use the WRENCH and take the PLANE EMBLEM (S).
- Walk down.
- Place the PLANE EMBLEM; take the MECHANIC FIGURINE and the WARNING BUTTON (T).
- Go forward.
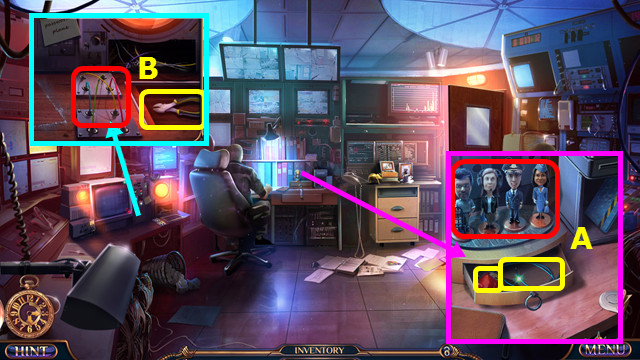
- Place the STEWARDESS FIGURINE, PILOT FIGURINE, and MECHANIC FIGURINE; take the 2/2 TOY GEARS and 3/3 WIRE (A).
- Place the 3 WIRES; take the NIPPERS (B).
- Walk down and right.
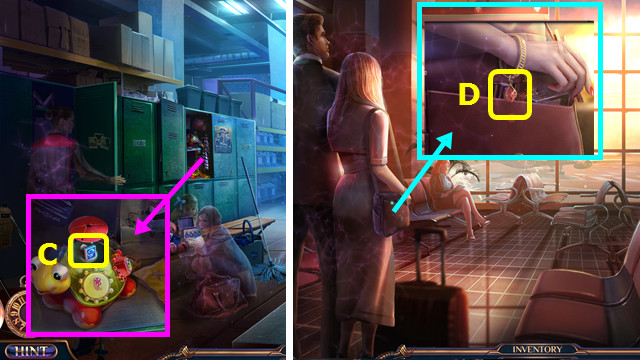
- Place the 2 TOY GEARS; take the WEATHER BUTTON (C).
- Go to the Waiting Area.
- Use the NIPPERS; take the RED DIAMOND (D).
- Walk down and right.
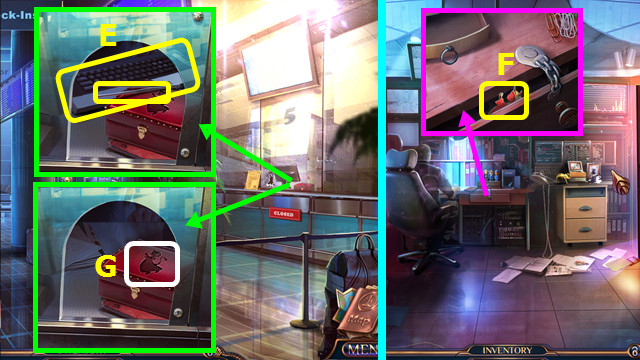
- Use the RED DIAMOND; take the TWEEZERS and KEYBOARD (E).
- Go to the Control Tower.
- Use the TWEEZERS to take the IMP EMBLEM (F).
- Walk down 2x.
- Place the IMP EMBLEM (G).
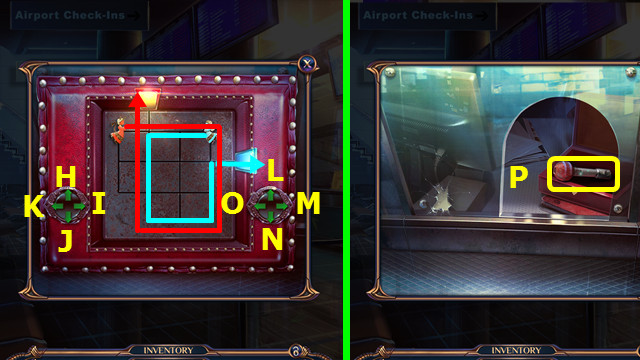
- Select O-N-M-I-L-M-J-K-H.
- Take the LEVER (P).
- Go forward 2x.
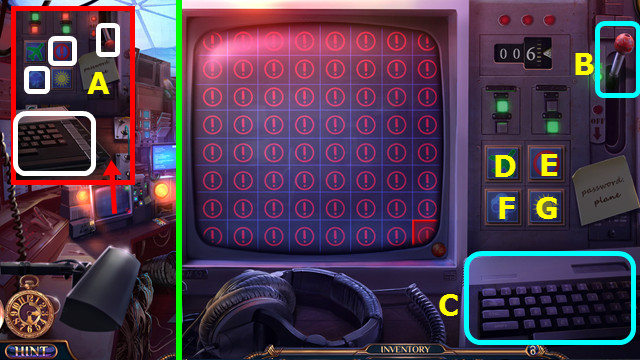
- Place the WARNING BUTTON, WEATHER BUTTON, KEYBOARD, and LEVER (A).
- Select (B); select (C).
- Select D-G-E-D-F-D-G-F-E.
- Congratulations! You have completed Grim Tales: Threads of Destiny!
Created at: 2015-11-06

