Walkthrough Menu
- General Tips
- Chapter 1: The Restaurant
- Chapter 2: The Lighthouse
- Chapter 3: New City
- Chapter 4: The Fair
- Chapter 5: The Underwater Lab
General Tips
- You will not need to follow the exact path of this guide; however, some actions will need to be performed before you can complete another scene.
- Zoom into the sparkling areas to trigger a Hidden Object Scene. Throughout the guide, we will use the acronym 'HOS' for Hidden Object Scenes.
- The HOS are random. The screenshots in this walkthrough should be used as an example.
Chapter 1: The Restaurant
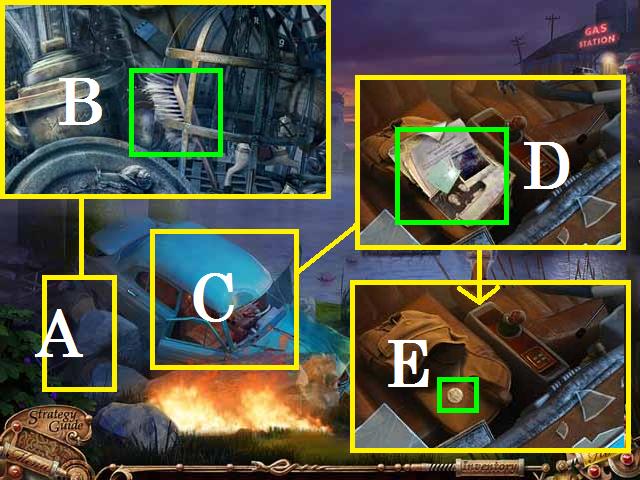
- Zoom into the rocks (A) and pick up the BRUSH (B).
- Zoom into the car (C) and then the papers (D).
- Once it is available pick up the photo.
- Pick up the now available COIN (E).
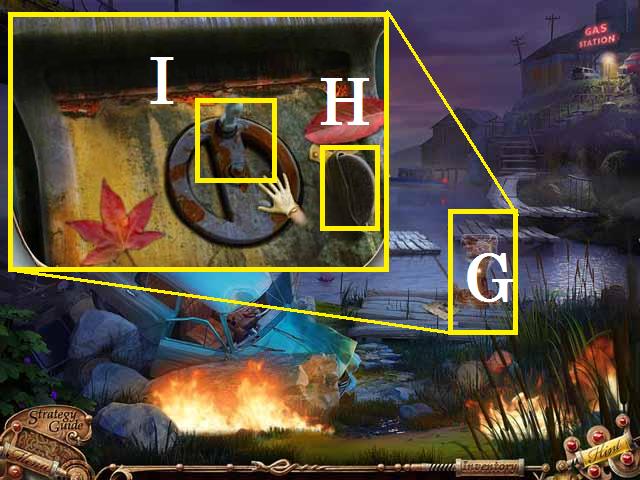
- Zoom into the control box (G).
- Remove the cobwebs with the BRUSH.
- Place the COIN in the slot (H) and spin the handle (I).
- Move towards the restaurant.
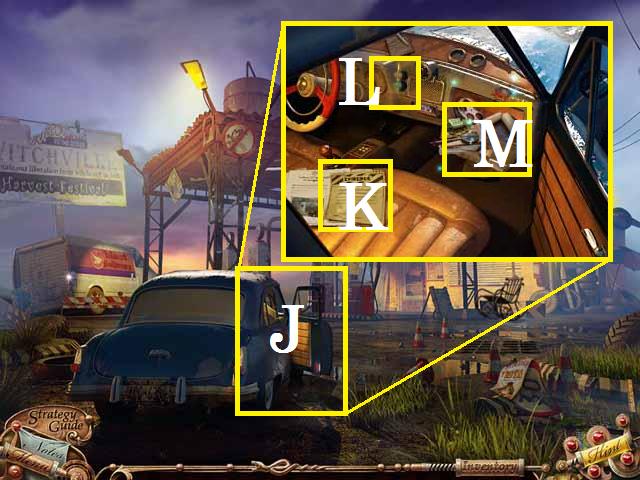
- Zoom into the car (J).
- Pick up the paper (K), and zoom into the radio (L).
- Zoom into the sparking glove box (M) to play a HOS.
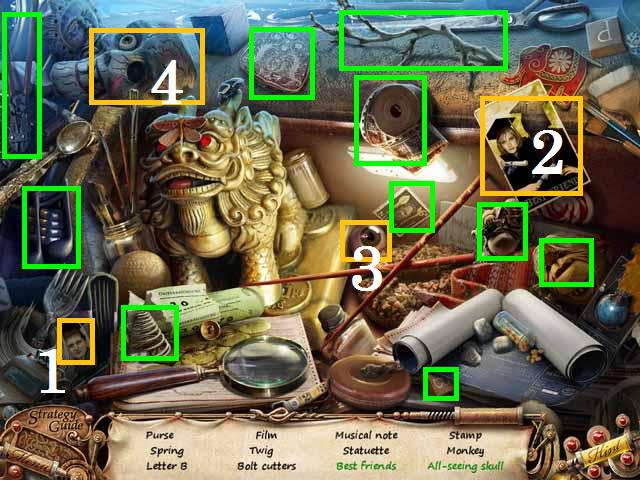
- Place the head (1) on the photo (2) and pick it up.
- Place the eye (3) in the skull (4) and pick it up.
- Complete the HOS to receive the BOLT CUTTERS.
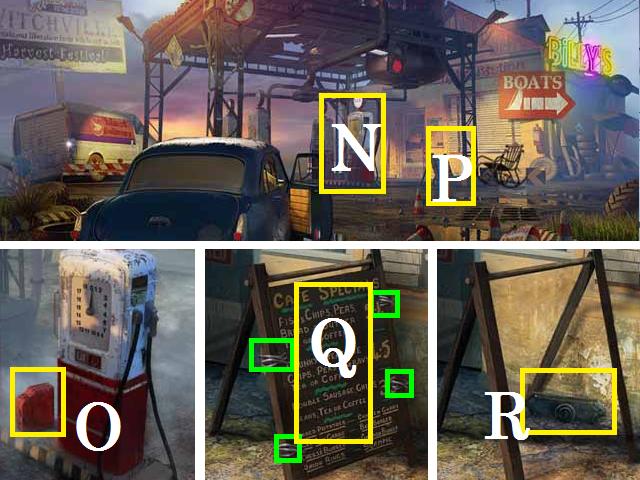
- Zoom into the gas tank (N); pick up the LEAKY GAS CAN (O).
- Zoom into the sign (P).
- Remove all four wires (green) with the BOLT CUTTERS and pick up the BOARD (Q).
- Pick up the DOOR HANDLE (R).
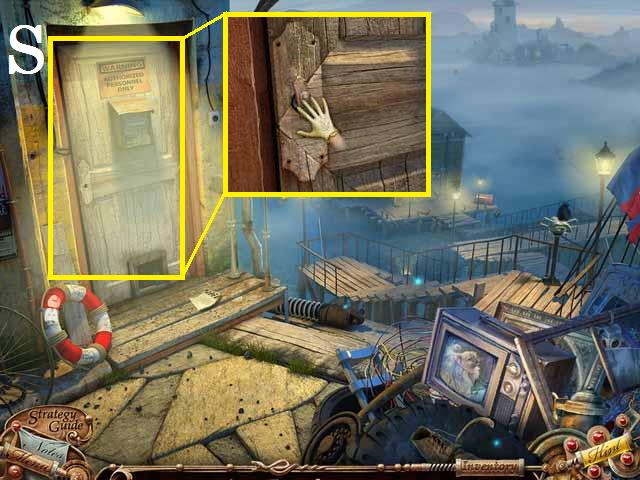
- Move to the right towards the restaurant's back door.
- Zoom into the door (S) and place the DOOR HANDLE.
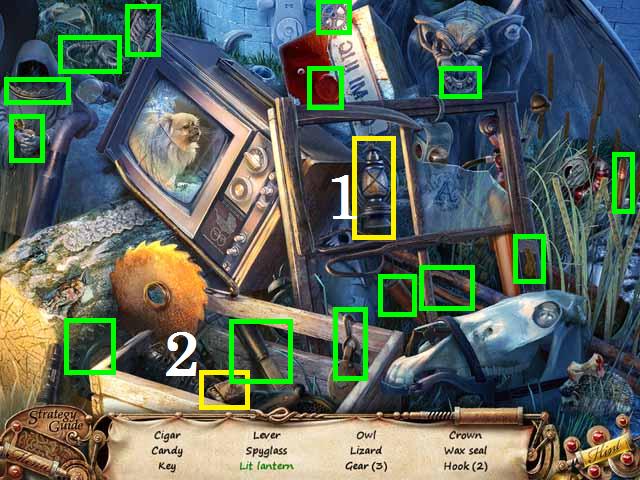
- Zoom into the sparkles to play a HOS.
- Light the LANTERN (1) with the matches (2).
- Receive the DIRTY TRUNK KEY.
- Enter the restaurant.
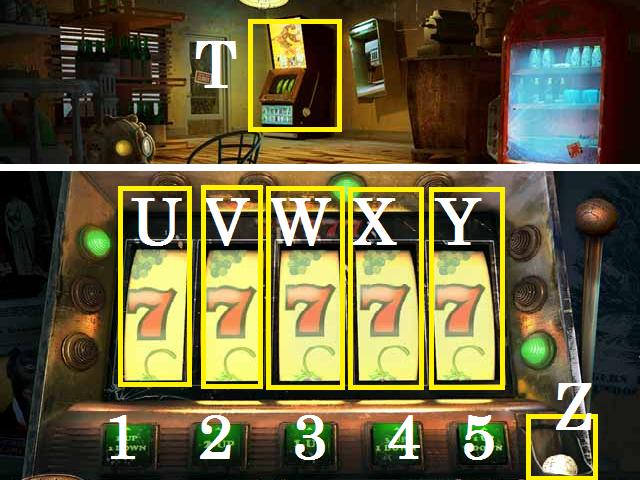
- Zoom into the slot machine (T).
- Set the dials all to 7's: first set the fourth (X) dial using button (4).
- Set the first (U) dial using the (1) button followed by the fifth (Y) dial using the (2) button.
- Finish with the second (V) dial using the (3) button.
- Pick up the COIN (Z).
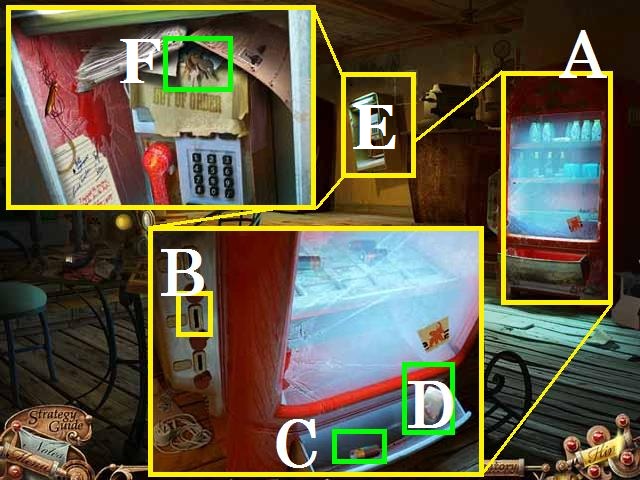
- Zoom into the vending machine (A).
- Place the COIN in the slot (B); pick up the BATTERY (C) and NAIL POLISH REMOVER (D).
- Zoom into the telephone (E); move the papers and pick up the MAIL TRUCK KEYS (F).
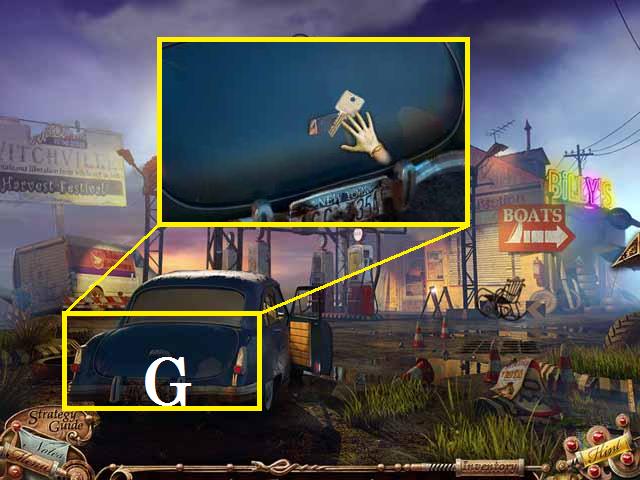
- Move back 2 scenes to the front of the restaurant.
- Combine the NAIL POLISH REMOVER and the DIRTY TRUNK KEY to create the TRUNK KEY.
- Zoom into the trunk of the car (G).
- Open the trunk using the TRUNK KEY to play a HOS.
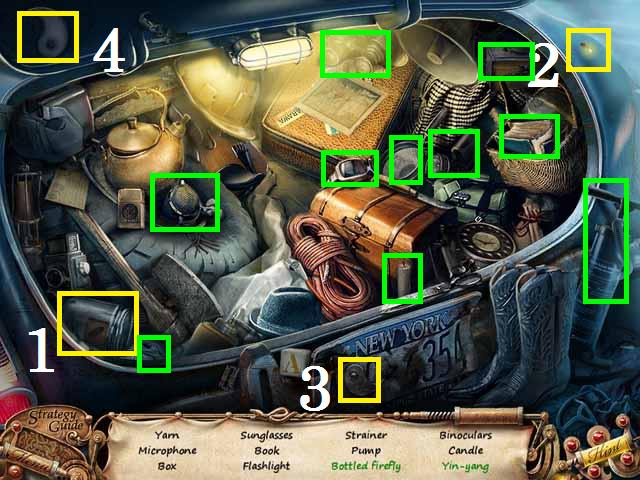
- Place the bottle (1) over the firefly (2).
- Place the yang piece (3) with the yin (4).
- Receive the EMPTY FLASHLIGHT.
- Combine the EMPTY FLASHLIGHT and the BATTERY to create the FLASHLIGHT.
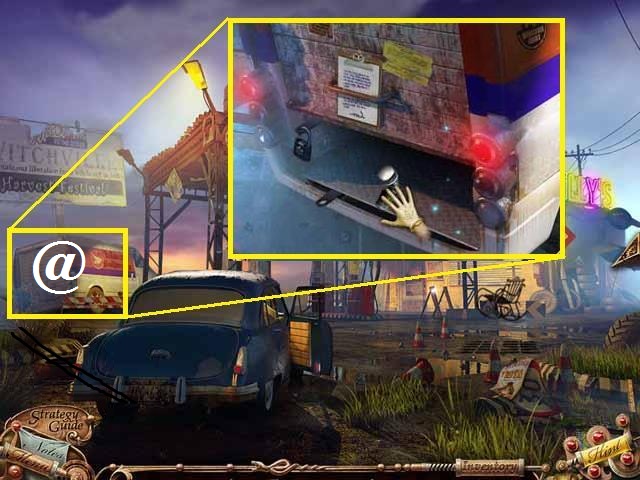
- Zoom into the truck (@) and open the lock with the MAIL TRUCK KEYS.
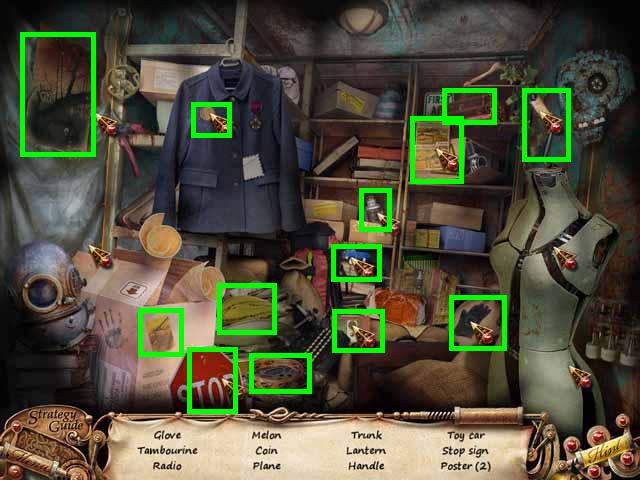
- You need to pick up the FLASHLIGHT before entering the truck to play a HOS.
- Receive the HANDLE.
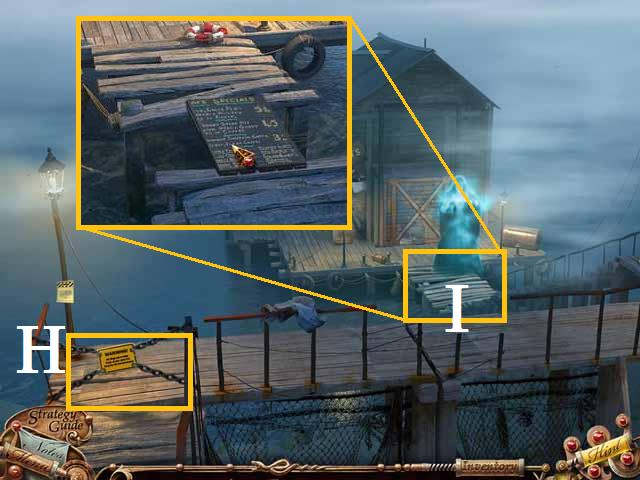
- Move towards the dock.
- Use the BOLT CUTTERS on the chain (H).
- Zoom into the broken dock (I) and place the BOARD.
- Cross the dock.
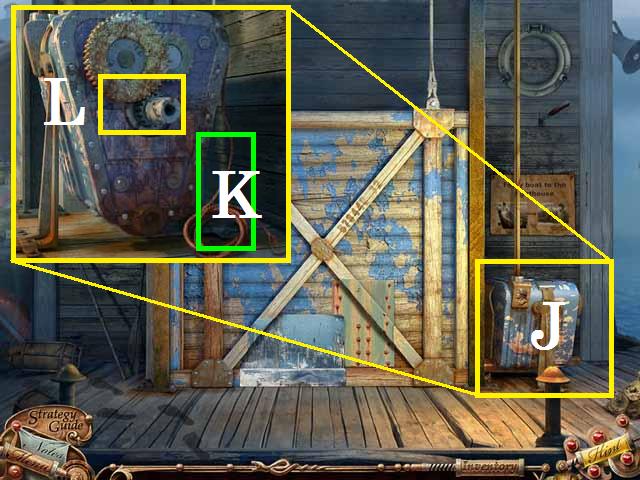
- Zoom into the mechanism (J); pick up the FISHING LINE (K) and place the HANDLE (L).
- Move to the left before entering the boat house.
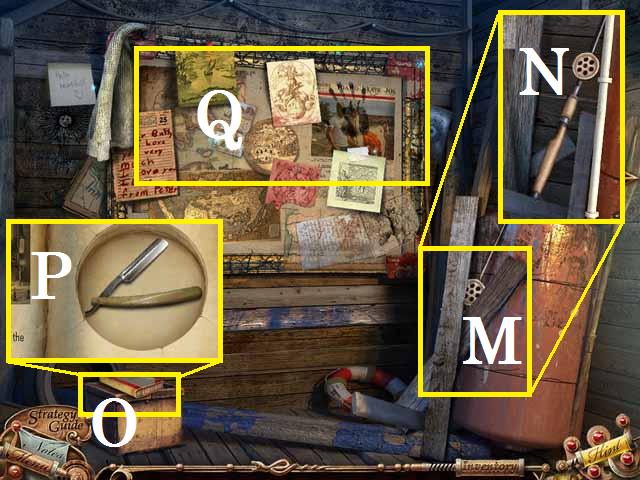
- Zoom into the wood (M); move the pieces and pick up the FISHING ROD (N).
- Zoom into the book (O); flip the page and pick up the RAZOR (P).
- Zoom into the wall (Q) to play a HOS.
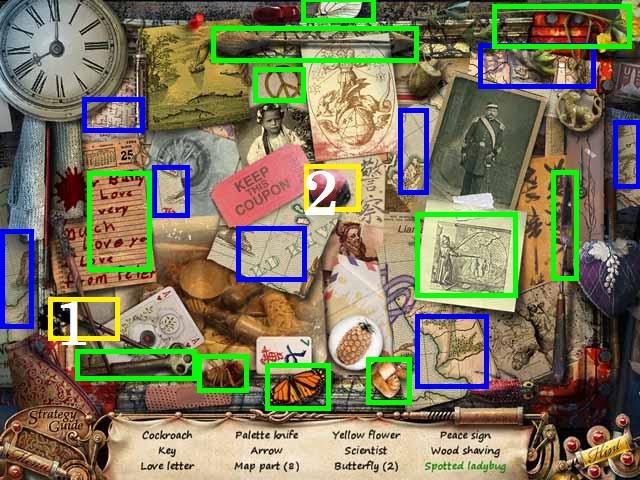
- Drag the paintbrush (1) over the ladybug (2) and pick it up.
- Receive the MAP PIECES.
- Go back one scene and enter the boat house.
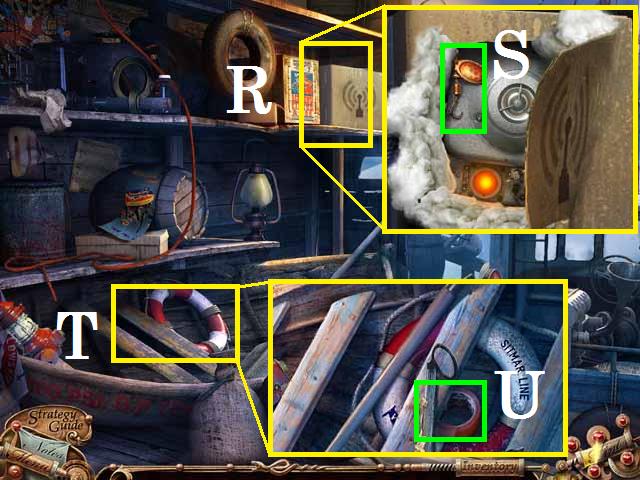
- Zoom into the box (R); cut it open with the RAZOR and pick up the FISHING HOOK (S).
- Zoom into the buoy (T) and pick up the STICKY TAPE (U).
- Combine the FISHING ROD, FISHING LINE, and FISHING HOOK.
- Move back two scenes and zoom back into the dock.
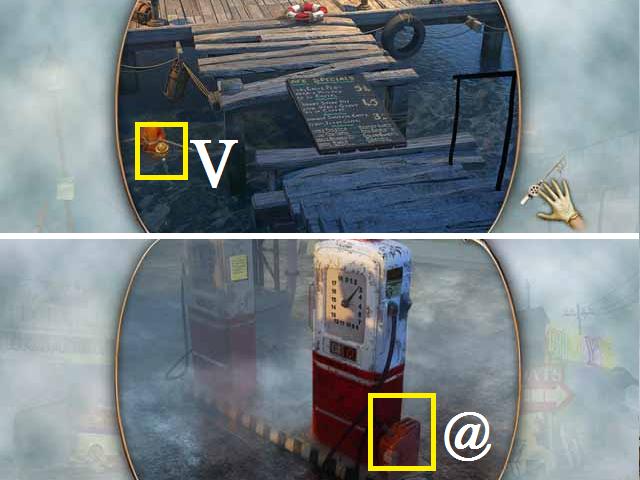
- Pick up the BOAT KEY (V) with the ROD.
- Combine the STICKY TAPE and LEAKY GAS CAN to obtain the PATCHED GAS CAN.
- Return to the front of the restaurant and zoom into the gas tank.
- Place the GAS CAN next to the pump and pick it back up (@).
- Return to the boat house.
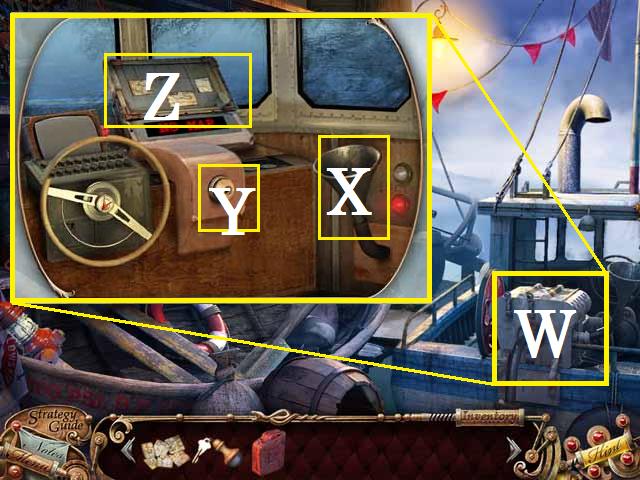
- Zoom into the boat (W).
- Pour the FULL GAS CAN in the funnel (X) and place the BAOT KEY (Y).
- Place the MAP PIECES (Z).
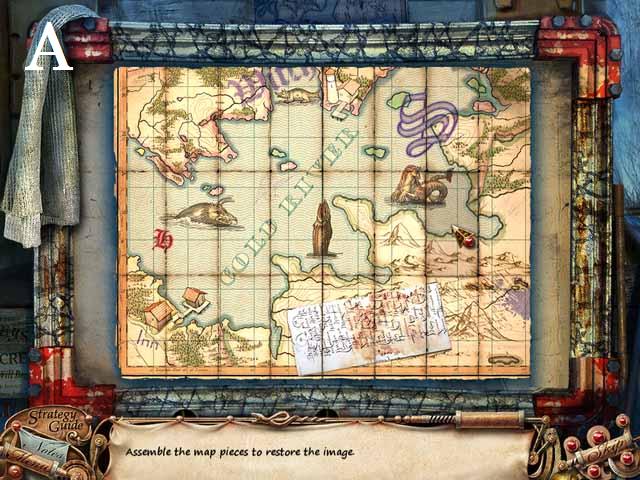
- Unscramble the map.
- See the screenshot for the final image (A).
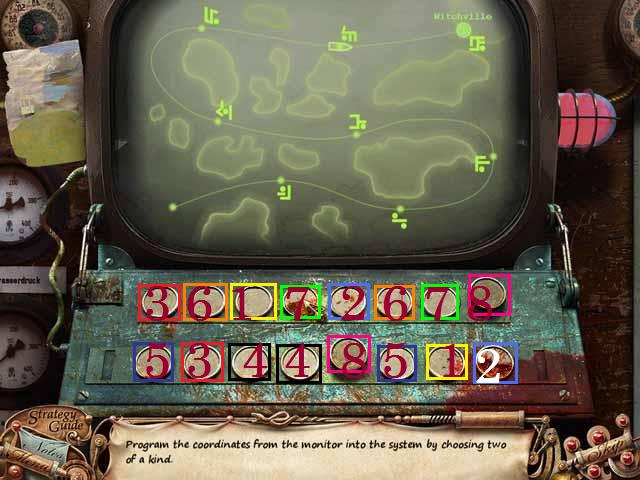
- Press the matching pairs of buttons in sequential order of (1-8).
Chapter 2: The Lighthouse
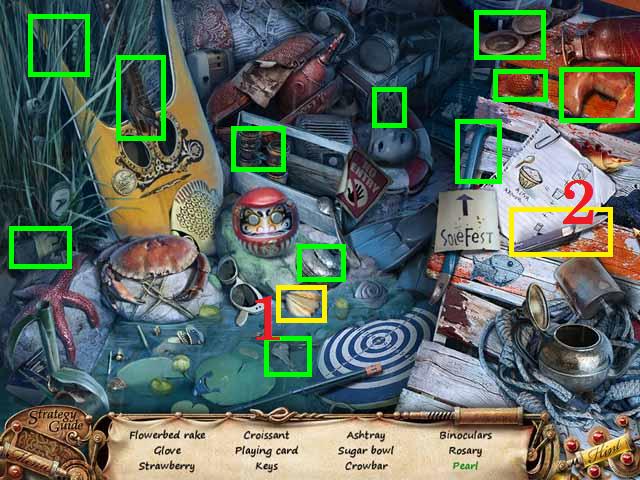
- Zoom into the lighthouse.
- Zoom into the sparkles to play a HOS.
- Open the shell (1) with the knife (2).
- Receive the CROWBAR.
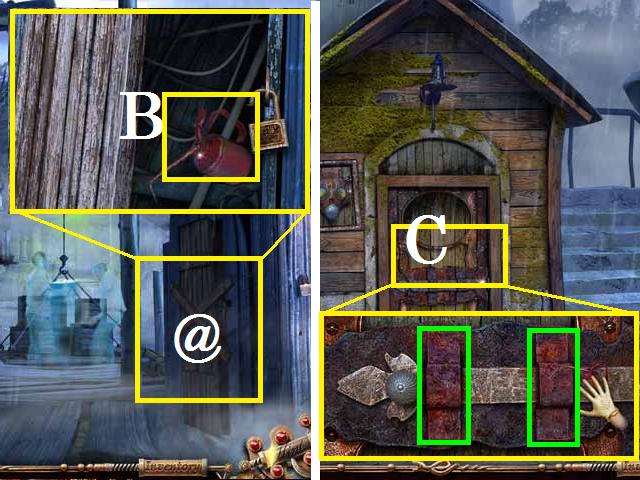
- Move towards the ship.
- Zoom into the tool shed (@); remove the boards and the lock with the CROWBAR.
- Pick up the OIL CAN (B).
- Return to the lighthouse steps and zoom into the lower door (C).
- OIL both hinges (green); slide the lock open and go inside.
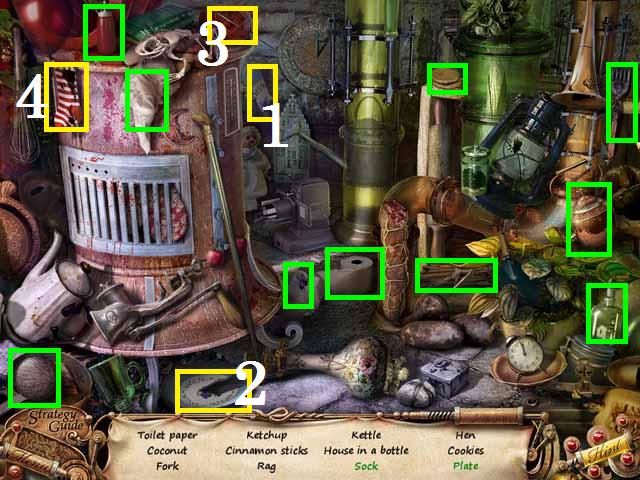
- Zoom into the sparkles to play a HOS.
- Put the plate piece (1) on the plate (2).
- Drop the yarn (3) over the sock (4).
- Receive the RAG.
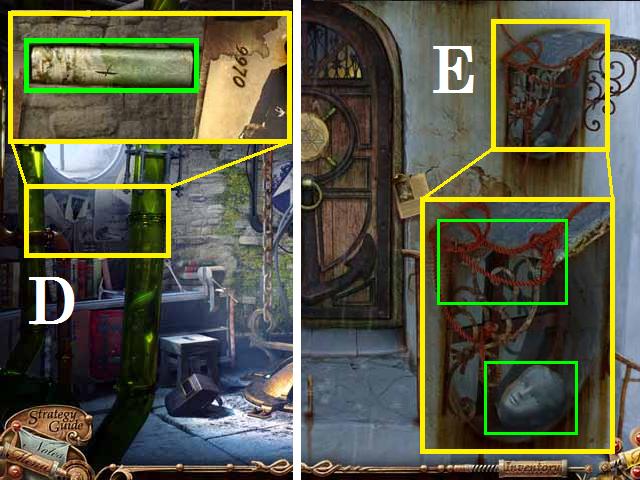
- Zoom into the wall (D); move the paper and pick up the LIBRARY BOOK (green) (Note: you will need the code on the paper later).
- Move back one scene and take the stairs up.
- Zoom into the awning (E); pick up the ROPE (green) and the STATUE'S HEAD (green).
- Move back to the boat.
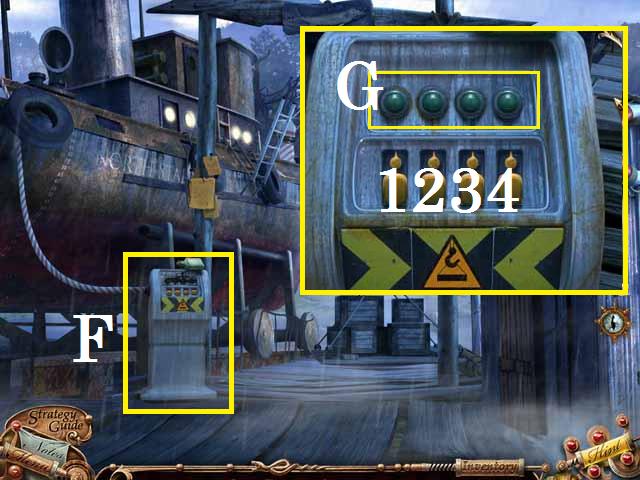
- Zoom into the control panel (F) and clean the lights (G) with the RAG.
- Pull the levers in the following order: 3, 4, 1, and then 2.
- Take the path to New City Gate, once the dialogue is over, return to the boat.
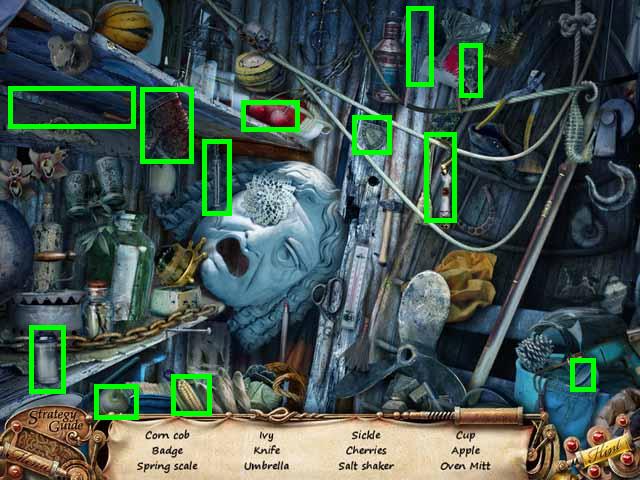
- Zoom into the tool shed to play a HOS.
- Receive the OVEN MITT.
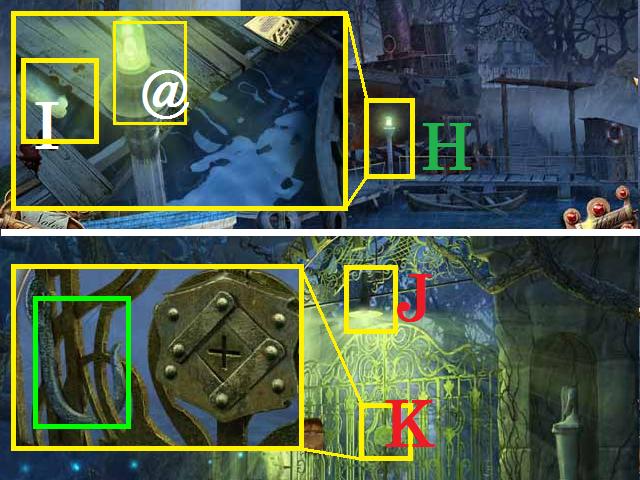
- Move back one scene and zoom into the light (H).
- Remove the LIGHT BULB (@) with the OVEN MITT.
- Move the two boards (I) and pick up the STATUE'S WING.
- Return to the New City Gate.
- Replace the LIGHT BULB (J).
- Zoom into the gate's lock (K); pick up the HOOK (green).
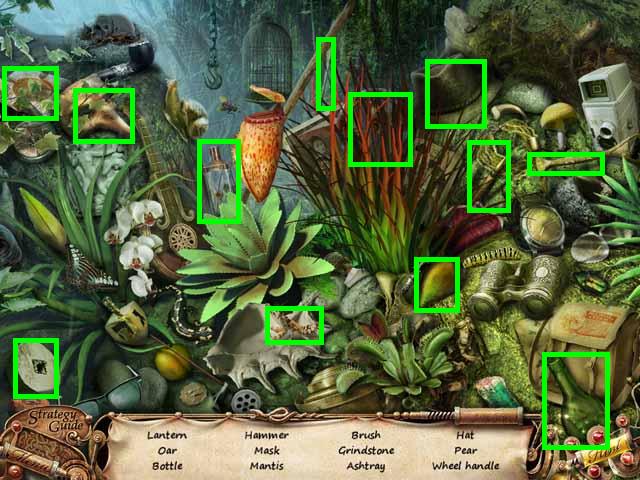
- Zoom into the sparkles to play a HOS.
- Receive the WHEEL HANDLE.
- Return to the boat.
- Combine the HOOK and ROPE to create the HOOK WITH ROPE.
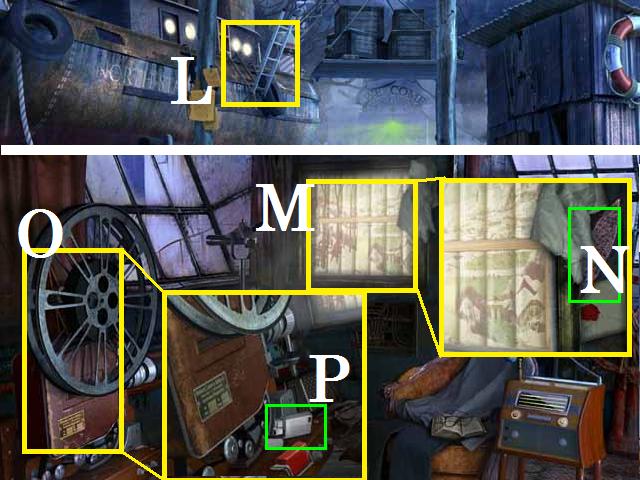
- Drop the HOOK WITH ROPE over the ladder (L).
- Go up the ladder and enter the boat cabin.
- Zoom into the projection (M) on the wall and pick up the PUZZLE LOCK PART (N).
- Zoom into the projector (O) and pick up the LIGHTER (P).
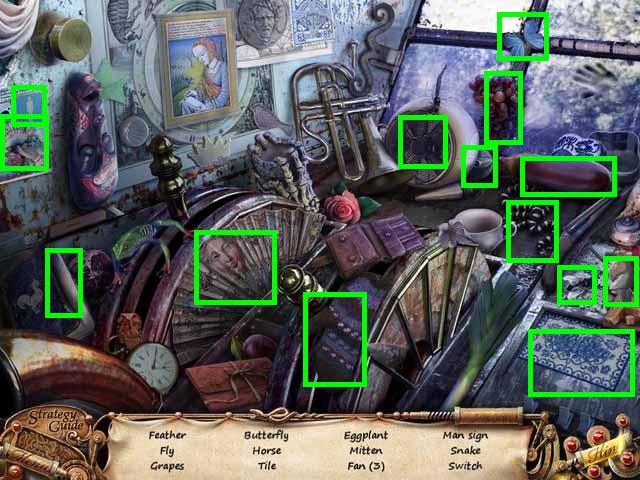
- Zoom into the sparkles to play a HOS.
- Receive the SWITCH.
- Return to the lighthouse and enter the lower level.
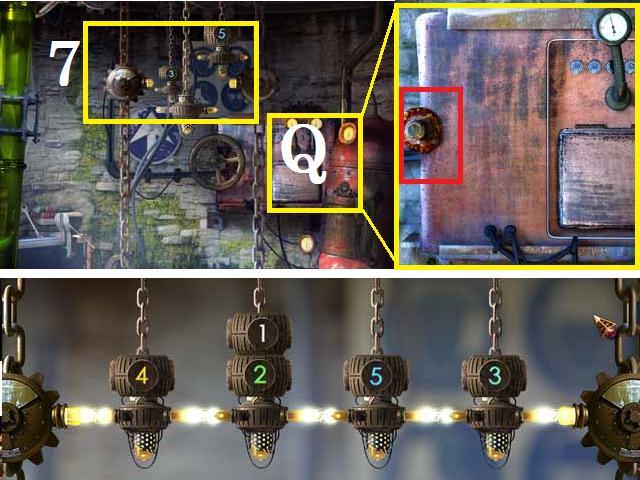
- Zoom into the panel (Q) and place the WHEEL HANDLE (red).
- Zoom into the weights (7).
- Move the weights to the positions shown in the screenshot. (Hint: First place the 5 with the 4 on top. Next, place the 3, 2 and 1. Finish with the 4).
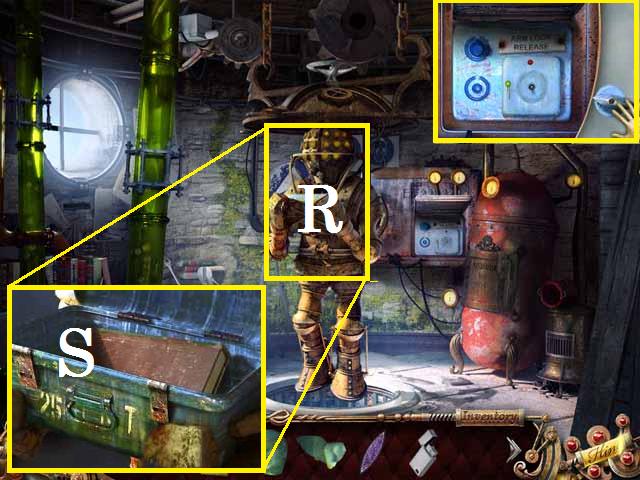
- Zoom back into the panel; place the SWITCH and turn it.
- Zoom into the dive suits hands (R) and pick up the LIBRARY BOOK (S).
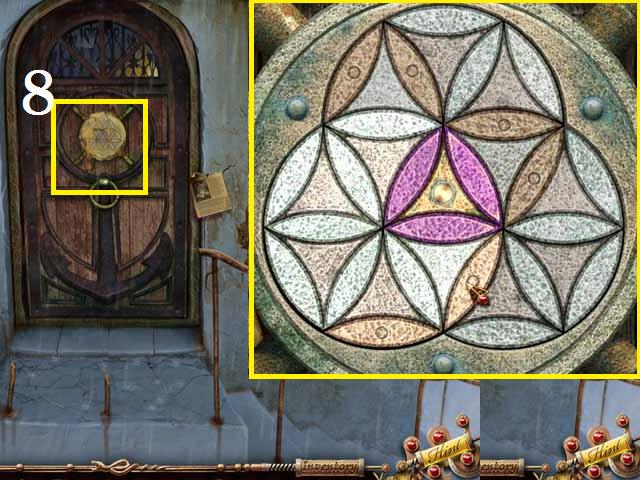
- Go upstairs; melt the wax over the door lock with the LIGHTER (8).
- Place the PUZZLE LOCK PART in the open slot.
- Spin the top dial so that the purple PUZZLE LOCK PARTS are in the middle as shown in the screenshot. (Note: the beginning positions are random; simply back out and zoom back in to change the pattern for an easier solution).
- Enter the lighthouse.
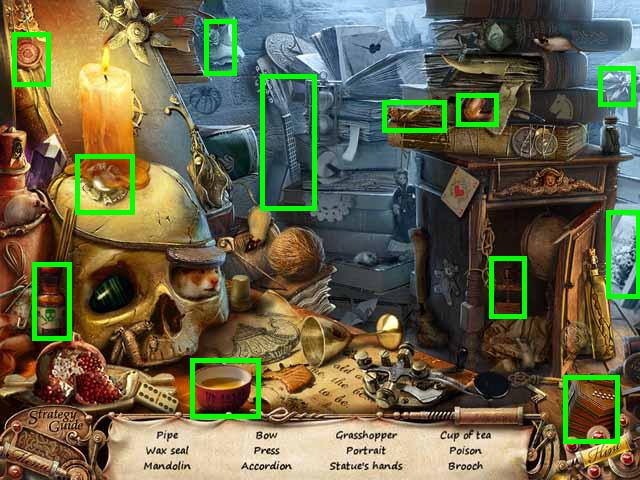
- Zoom into the sparkles to play a HOS.
- Receive the STATUE'S HANDS.
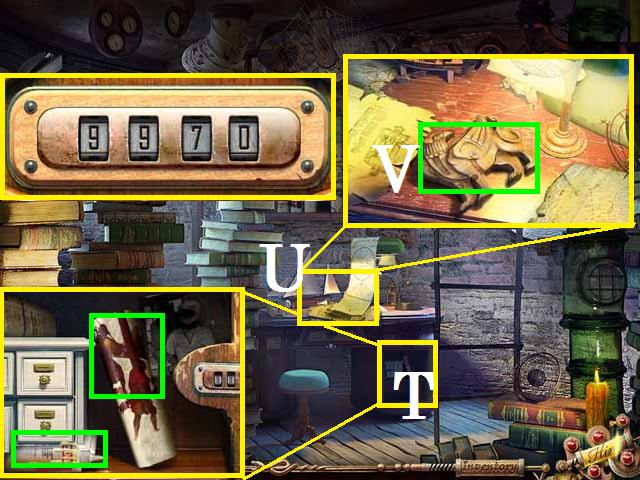
- Zoom into the desk door (T); (the code can be found in your notes) set it to 9970.
- Zoom into the cabinet; pick up the GLUE (green) and LIBRARY BOOK (green).
- Zoom into the desk top (U); move the papers and pick up the GRYPHON KEY (V).
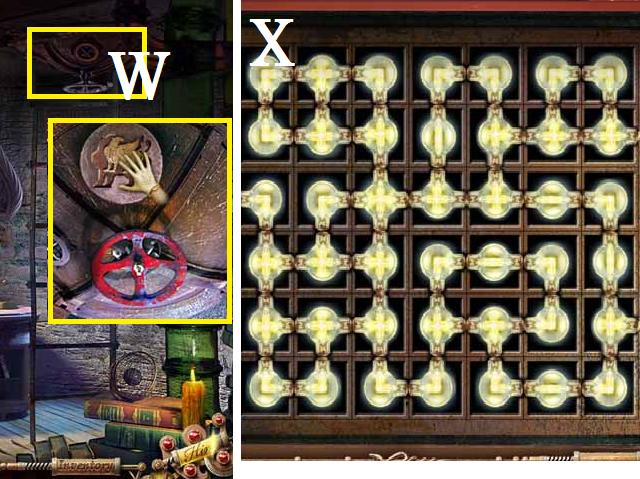
- Zoom into the hatch (W); place the GRYPHON KEY, turn the wheel and go upstairs.
- Zoom into the panel; rotate the elements as shown in the screenshot (X).
- Pick up the LIBRARY BOOK .
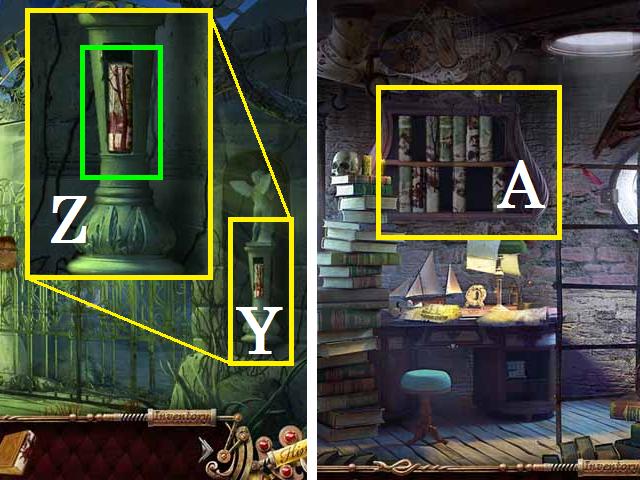
- Return to the gate to New City.
- Zoom into the broken statue (Y); place the GLUE followed by the STATUE'S HANDS, STATUE'S WINGS, and the STATUE'S HEAD.
- Zoom back in and pick up the last LIBRARY BOOK (Z).
- Return to the upstairs of the lighthouse.
- Zoom into the shelf (A) and place all of the LIBRARY BOOKS.
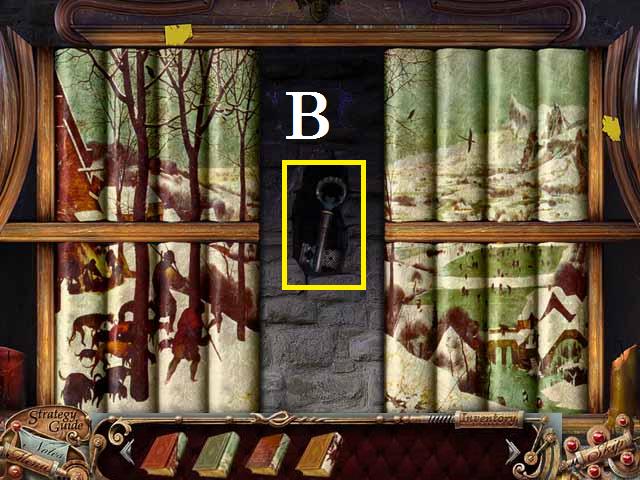
- Arrange the books to create the image as shown in the screenshot.
- Pick up the GATE KEY (B).
- Return to the Gate; unlock the gate and enter New City.
Chapter 3: New City
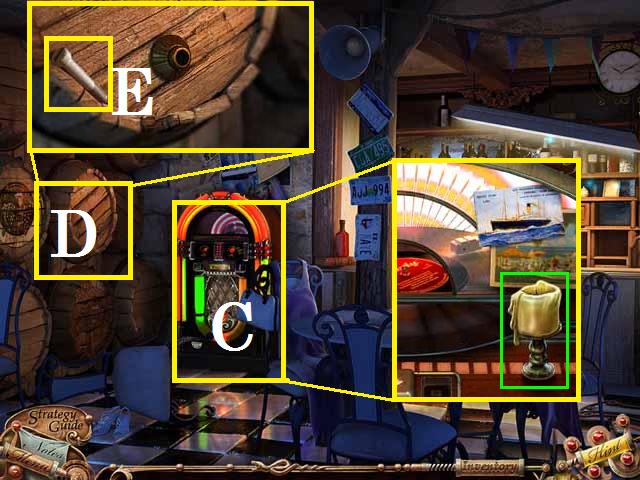
- Move to the restaurant.
- Zoom into the jukebox (C); pick up the CANDLE (green).
- Zoom into the barrel (D); pick up the SCREW (E).
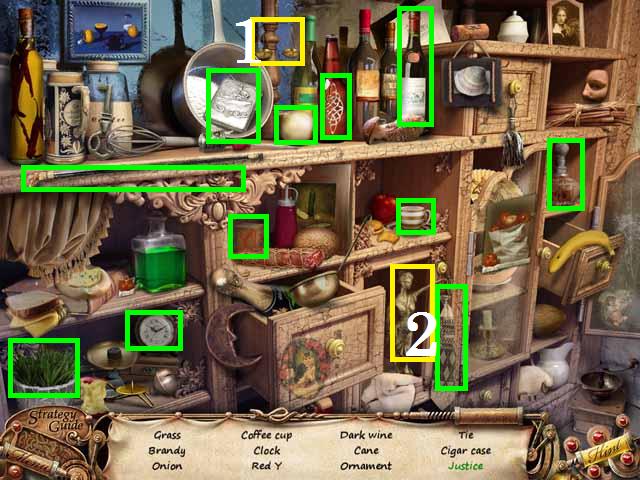
- Zoom into the sparkles to play a HOS.
- Place the scales (1) on the justice statue (2).
- Receive the ORNAMENT.
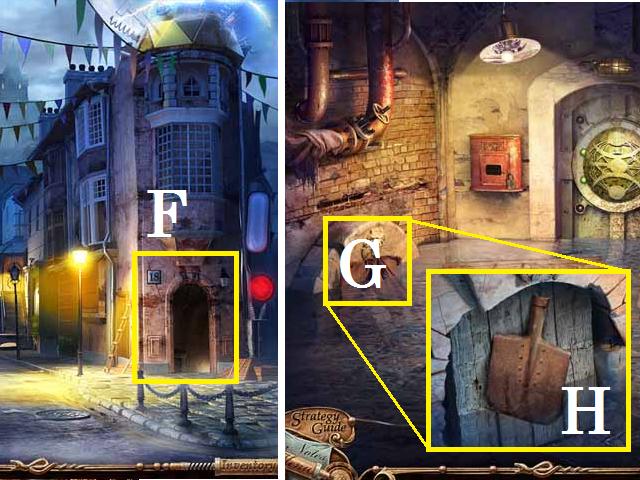
- Move back one scene and enter the building 18 (F).
- Zoom into the drain (G); move the debris and pick up the SPADE BLADE (H).
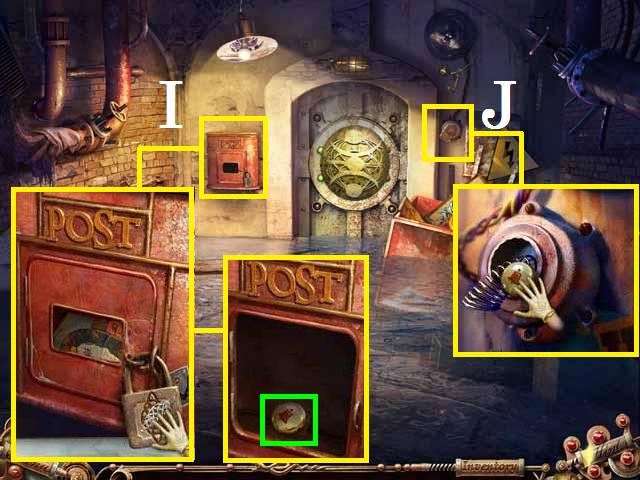
- Zoom into the mailbox (I).
- Place the ORNAMENT on the lock and open the door.
- Pick up the PICTURE and the DOORBELL (green).
- Place the DOORBELL (J) to drop the TOY SHOP KEY into the garbage can.
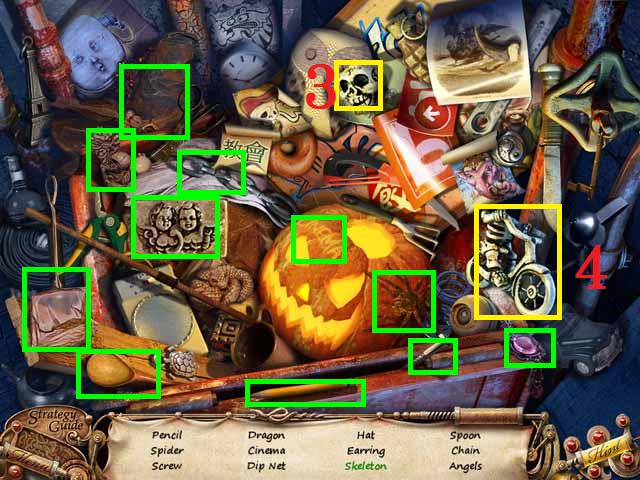
- Zoom into the sparkles to play a HOS.
- Place the skeleton head (3) on the trike (4).
- Receive the TOY SHOP KEY.
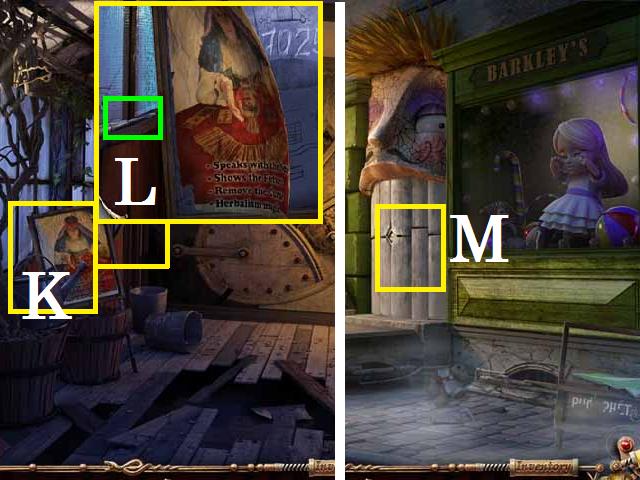
- Back out one scene and move forward towards the toyshop.
- Go up the stairs.
- Zoom into the poster (K) and click on it to reveal the code.
- Pick up the SCREWDRIVER (L).
- Go back downstairs.
- Zoom into the door (M); open it with the TOY SHOP KEY.
- Enter the Toy Shop.
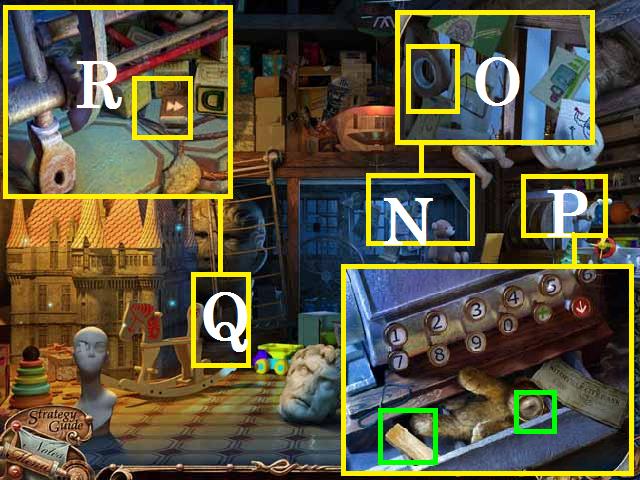
- Zoom into the back wall (N); pick up the DUCT TAPE (O).
- Zoom into the cash register (P); key in the code 7025 from the poster upstairs.
- Pick up the LENS (green) and WHETSTONE (green) from the open drawer.
- Zoom into the ladder (Q); pick up the SKIP BUTTON (R).
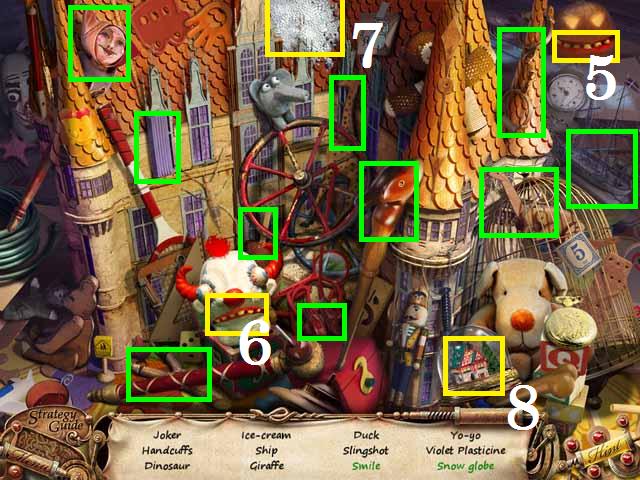
- Zoom into the sparkles to play a HOS.
- Place the smile (5) on the face (6).
- Place the snow (7) in the globe (8).
- Receive the WOODEN TOYS.
- Return to the restaurant.
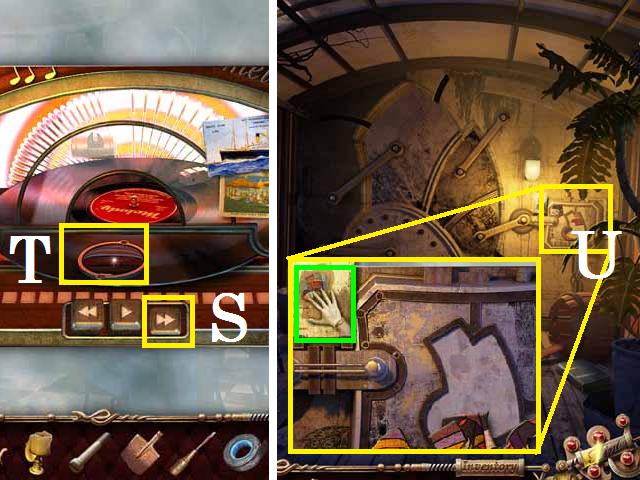
- Zoom into the jukebox and place the SKIP BUTTON (S).
- Hit the BUTTON and pick up the LENS (T).
- Move back towards the toy shop and go back upstairs.
- Zoom into the door lock (U) and place the PICTURE (green).
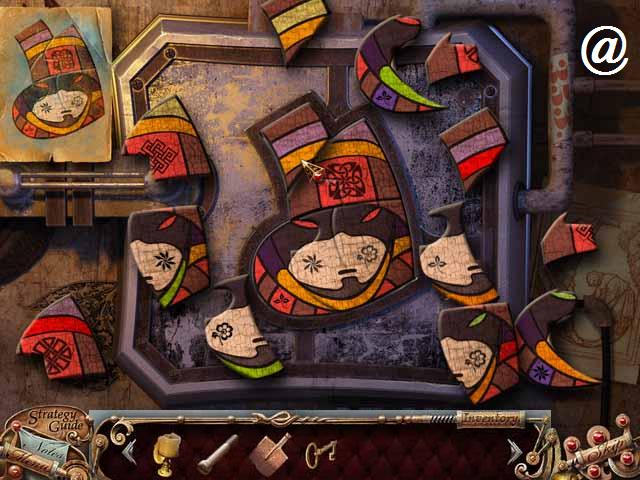
- Arrange the pieces to make the picture, as shown in the screenshot (@).
- Enter the graveyard.
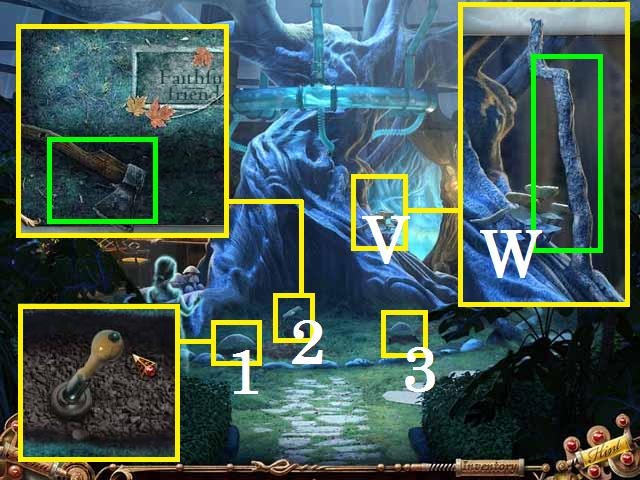
- Zoom into the faithful friend grave (2); pick up the BLUNT AXE (green).
- Combine the AXE and WHETSTONE to create the SHARPENED AXE.
- Zoom into the tree (V); cut the branch (W) with the SHARPENED AXE.
- Combine the SPADE BLADE and SPADE HANDLE to create the SPADE ().
- Dig up all three graves (1-3) with the SPADE and turn each handle.
- Go into the back room.
- Return to the graveyard.
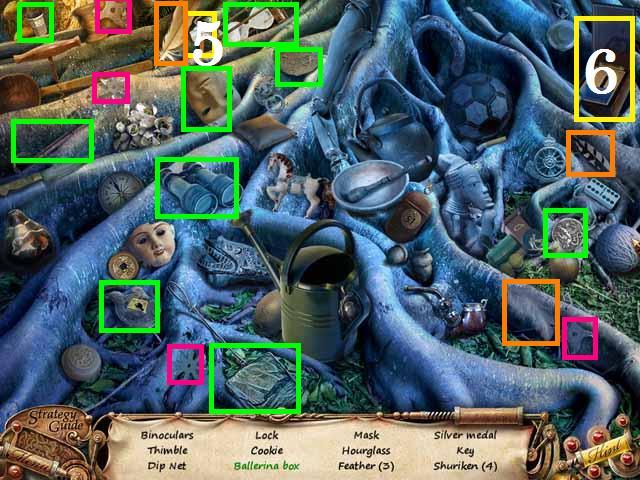
- Click on the sparkles to play a HOS.
- Place the ballerina (5) in the box (6). For ease of identification the FEATHERS have been marked in orange and the SHURIKEN have been marked in pink in the screenshot.
- Receive the DIP NET.
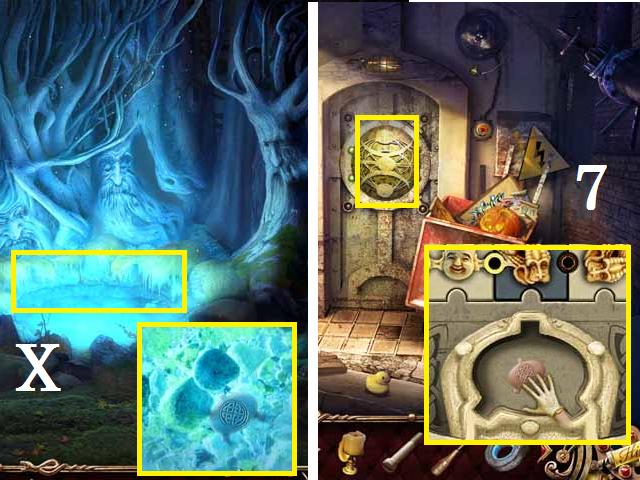
- Return to the back room; zoom into the magical well (X) and pick up the SPECIAL KEY with the DIP NET.
- Return to building 18.
- Zoom into the door; place the SPECIAL KEY (7).
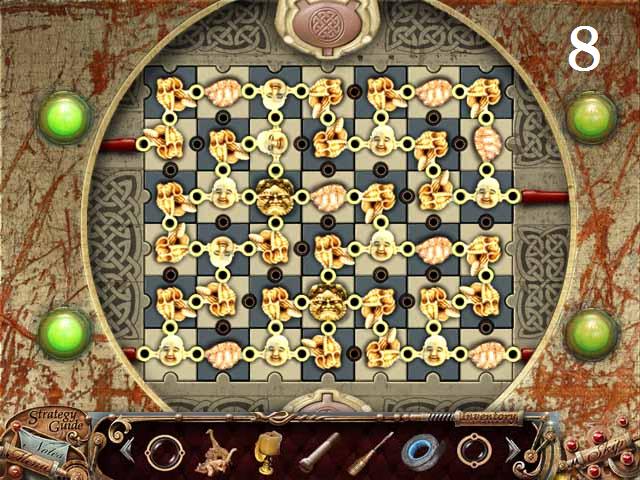
- Spin the elements as shown in the screenshot (8).
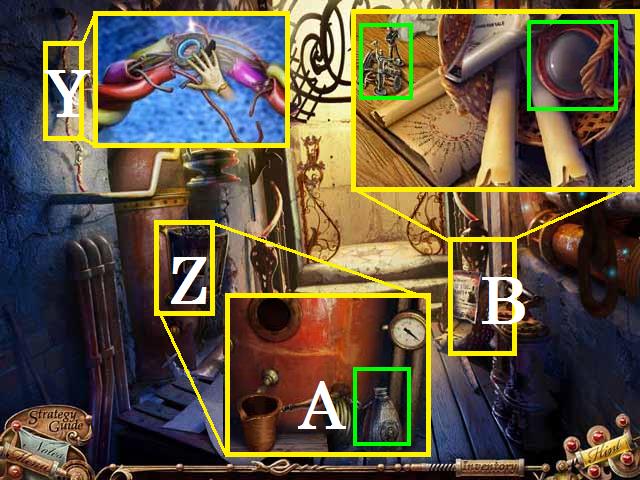
- Enter the hallway; zoom into the wires (Y) and fix with the DUCT TAPE.
- Zoom into the stove (Z) and pick up the EMPTY FLASK (A).
- Zoom into the corner (B); move the papers and pick up the LENS and TIN SOLDIERS (green).
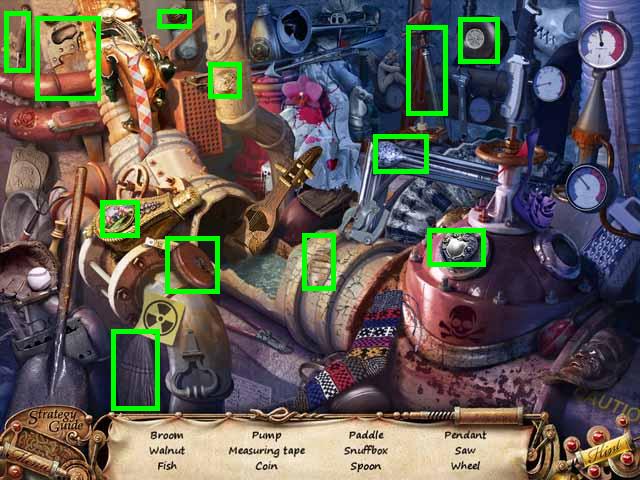
- Zoom into the sparkles to play a HOS.
- Receive the WHEEL.
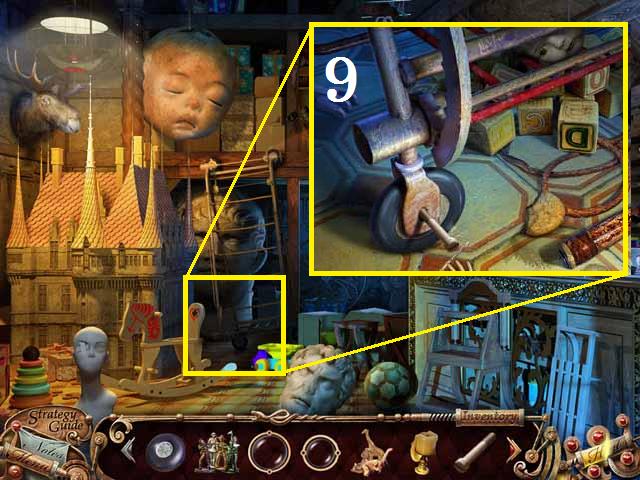
- Return to the toy store.
- Zoom back into the ladder.
- Place the WHEEL (9) followed by the SCREW and the SCREWDRIVER.
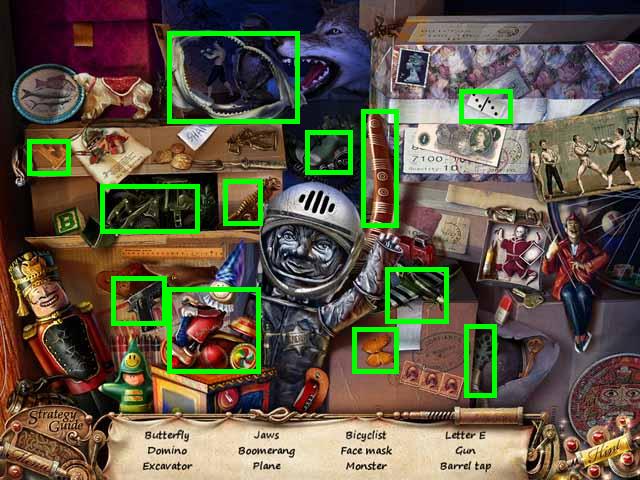
- Zoom into the sparkles above to play a HOS.
- Receive the BARREL TAP.
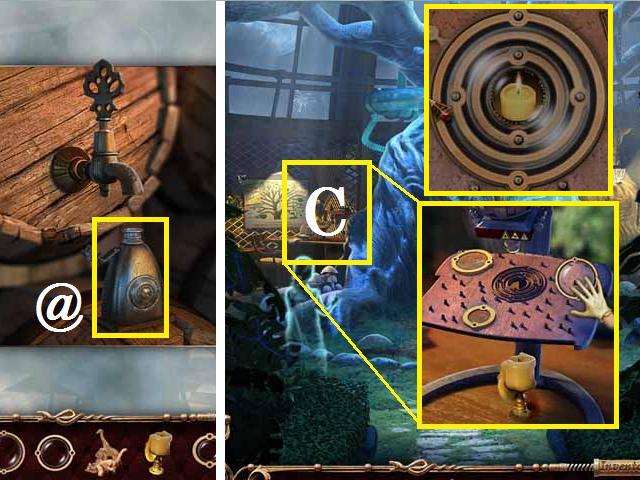
- Move to the restaurant.
- Zoom back into the alcohol barrel; place the TAP and the FLASK.
- Pull the TAP, and then pick up the FULL FLASK (@).
- Return to the graveyard; zoom into the microscope (C).
- Place the three LENSES and the CANDLE.
- If you move one LENS at a time, alternating sides, you can get them all into the center, as shown in the screenshot. (Hint: click over the peg to move the LENS).
- Receive the LIT CANDLE.
- Move back to building 18 and enter the hallway.
- Zoom into the stove; place the WOODEN TOYS, the FULL FLASK, and the LIT CANDLE inside.
- Place the TIN SOLDIERS in the stove and pick up the MOLTEN TIN (green).
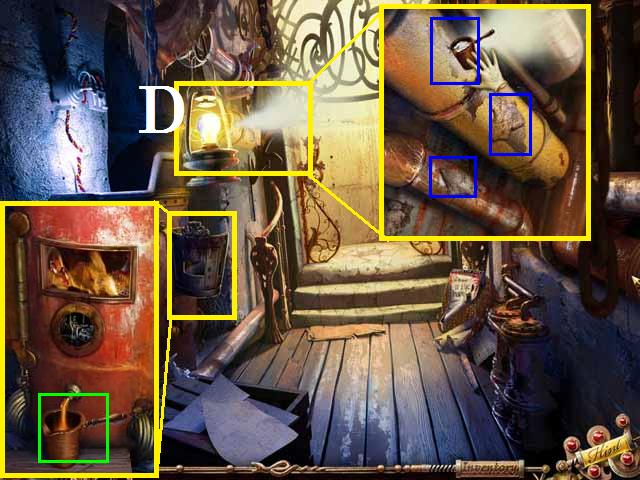
- Zoom into the pipes (D); fix all three holes (blue) with the MOLTEN TIN.
- Use the elevator to go upstairs.
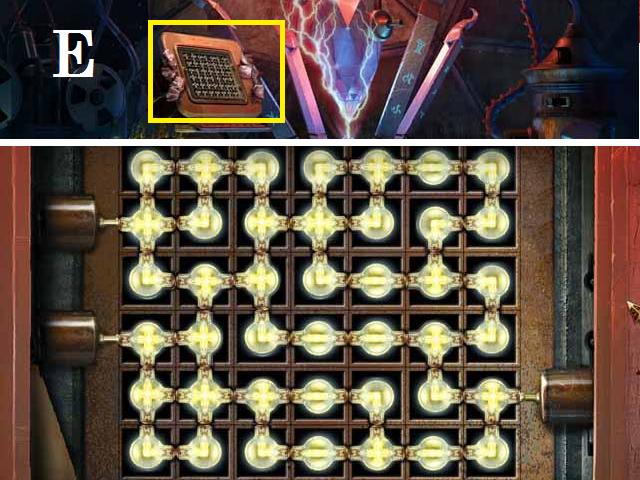
- Zoom into the panel (E).
- Rotate the elements as shown in the screenshot.
- Pick up the FUSE.
- Go back outside.
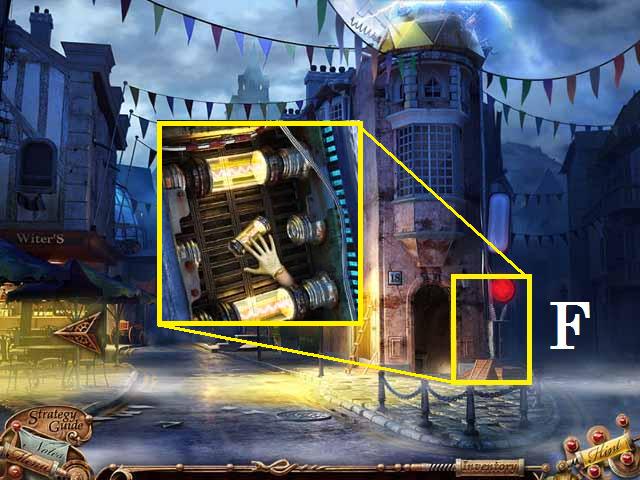
- Zoom into the side of building 18 (F) and place the FUSE.
- Take the now available path.
Chapter 4: The Fair
- Move left toward the fountain and garage.
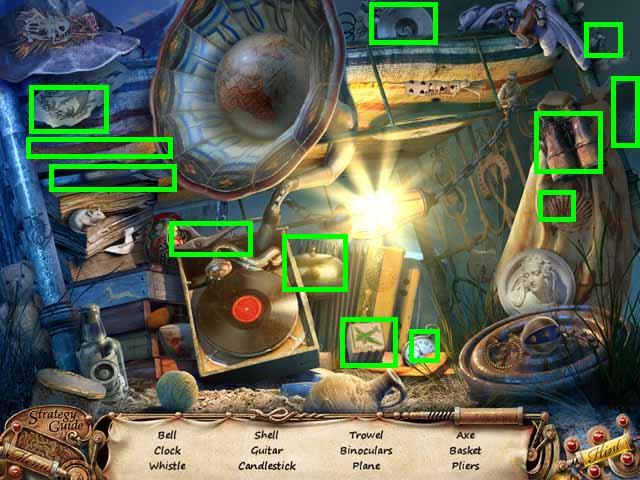
- Zoom into the sparkles to play a HOS.
- Receive the PLIERS.
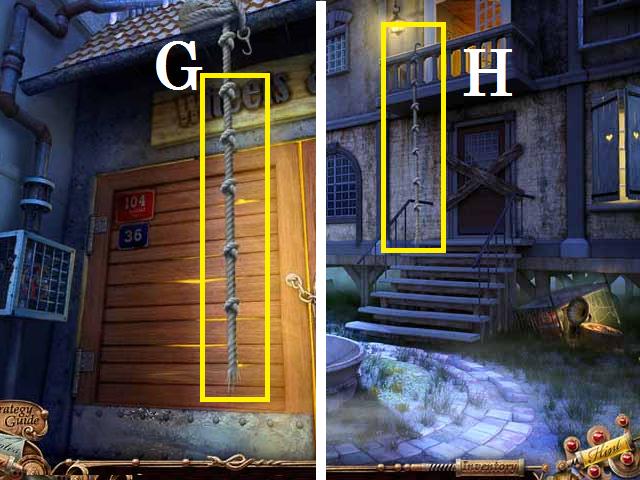
- Move toward the garage; pick up the ROPE with HOOK (G).
- Back up one scene.
- Drape the ROPE with HOOK over the balcony (H) and go upstairs.
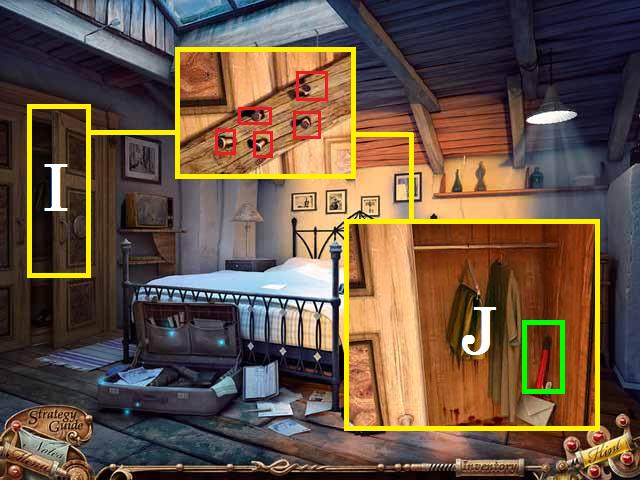
- Zoom into the closet door (I); remove the nails (red) with the PLIERS.
- Move the letter and pick up the WRENCH (J).
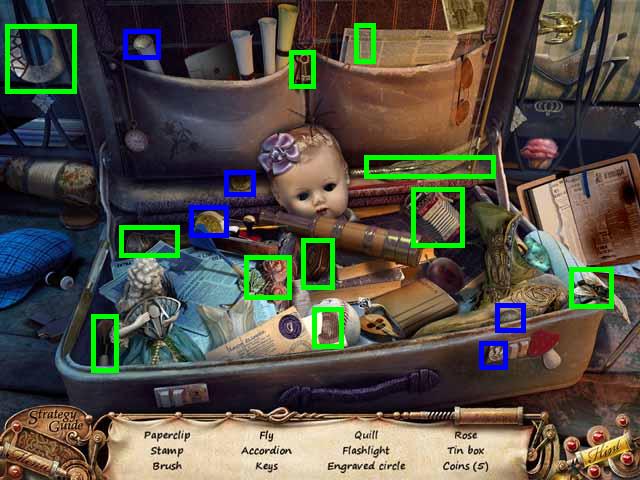
- Zoom into the sparkles to play a HOS.
- The 5 coins are marked in blue.
- Receive the ENGRAVED CIRCLE.
- Return to the garage door.
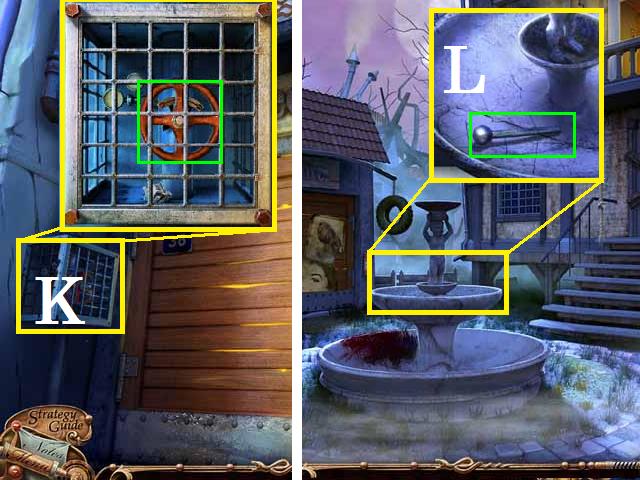
- Zoom into the cage (K); remove all four bolts with the WRENCH and spin the handle.
- Move back one scene and zoom into the top tier of the fountain.
- Pick up the HANDLE (L).
- Return to the garage door.
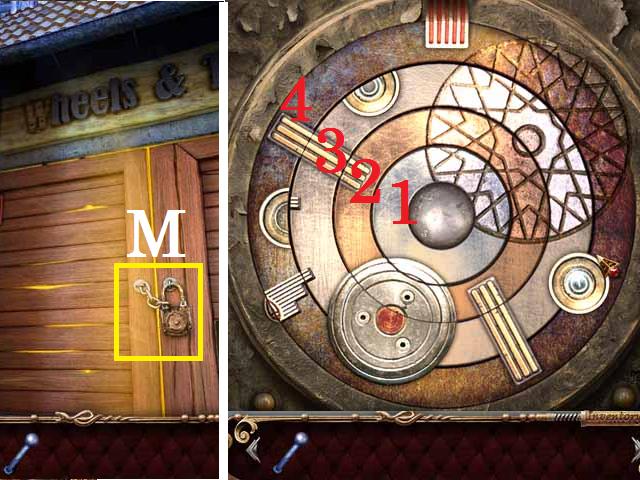
- Zoom into the lock (M); place the ENGRAVED CIRCLE.
- To set the circles, as shown in the screenshot, start with the inner most circle (1), followed by the third (3), second (2), and finish with the outer ring (4).
- Enter the garage.
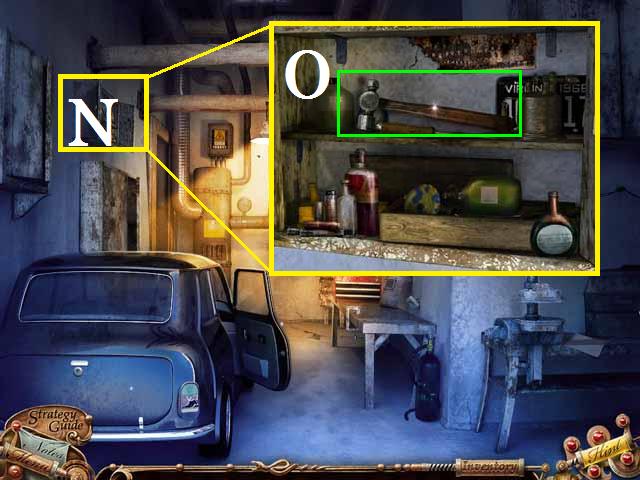
- Zoom into the shelf (N).
- Move the items on the shelf and pick up the HAMMER (O).
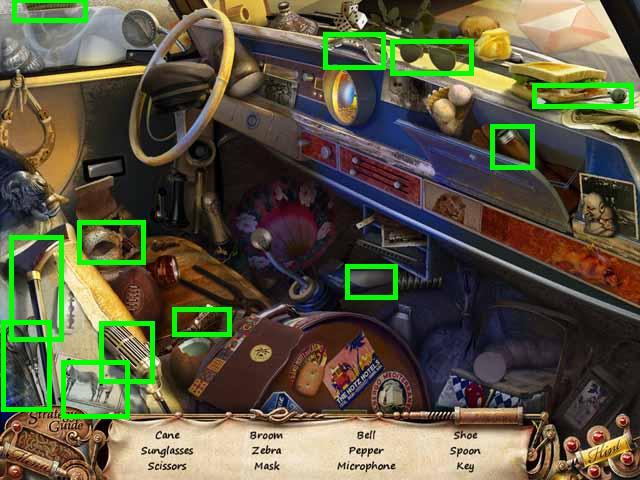
- Zoom into the sparkles to play a HOS.
- Receive the BENT CAR KEY.
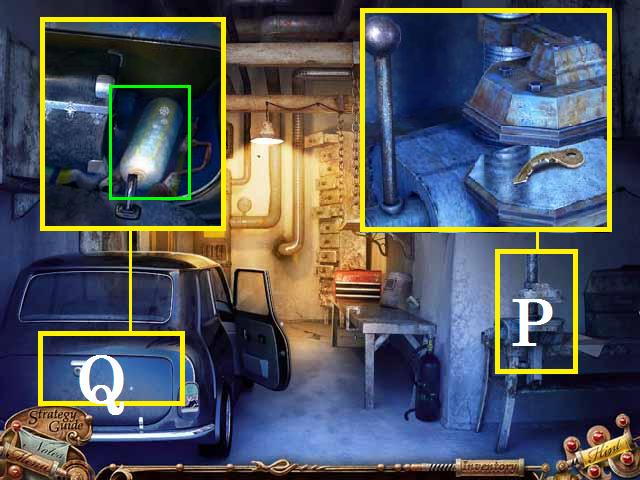
- Zoom into the vice (P); place the BENT CAR KEY and the HANDLE.
- Pull the HANDLE and pick the CAR KEY back up.
- Zoom into the trunk (Q) and open it with the CAR KEY.
- Pick up the LIQUID NITROGEN (green).
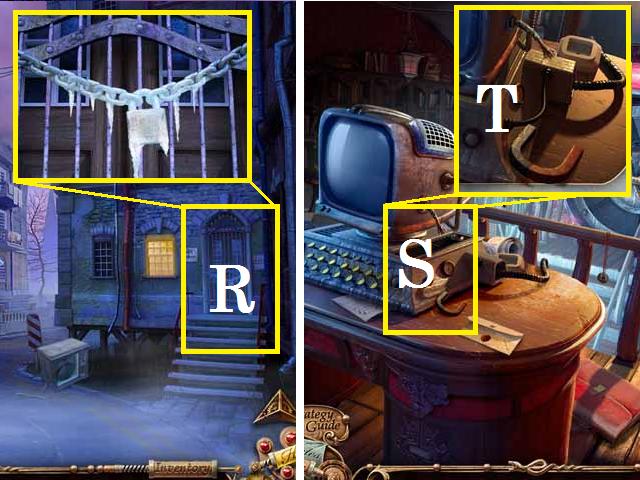
- Back up three scenes.
- Move toward the archive building.
- Zoom into the door lock (R); spray the LIQUID NITROGEN on the lock and break it with the HAMMER.
- Go inside and zoom into the computer (S).
- Pick up the MAGNET (T).
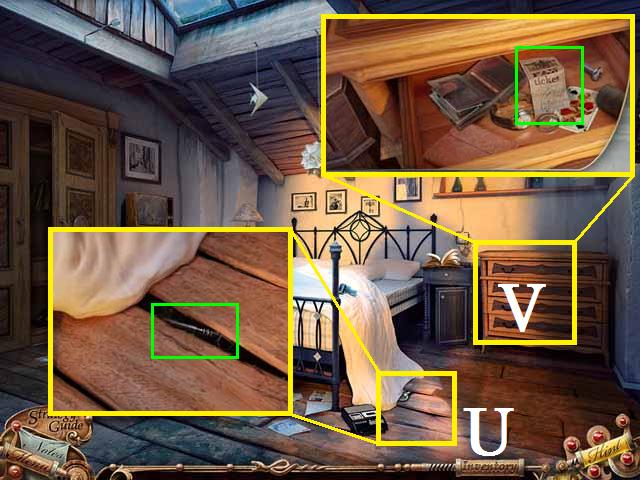
- Return to the hotel room.
- Zoom into the floor (U) and pick up the KEY (green) with the MAGNET.
- Zoom into the dresser (V) and open the door with the KEY.
- Pick up the FUNFAIR TICKET (green).
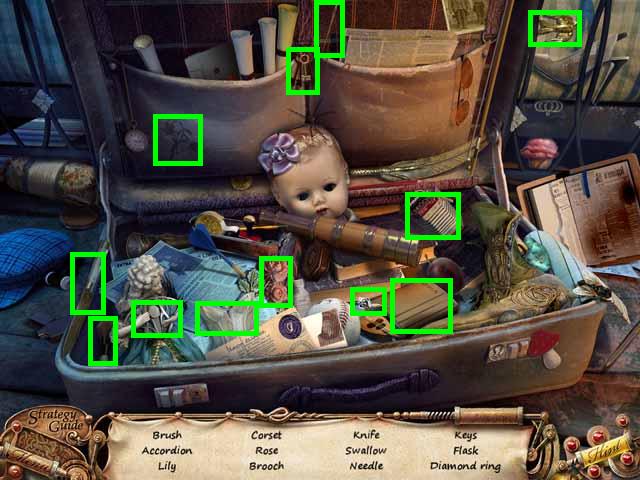
- Zoom into the sparkles to play a HOS.
- Receive the DIAMOND RING.
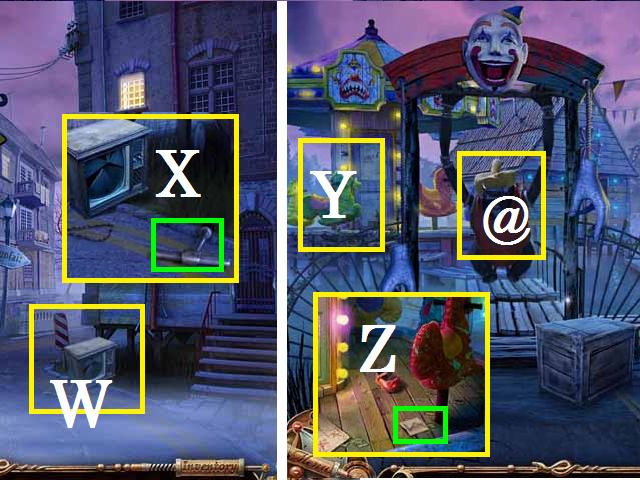
- Back out two scenes.
- Zoom into the TV (W) and pick up the SPECIAL KEY (X).
- Move towards the fair grounds.
- Give the FUNFAIR TICKET to the gatekeeper (@).
- Zoom into the carousel(Y); pick up the SIGN (Z).
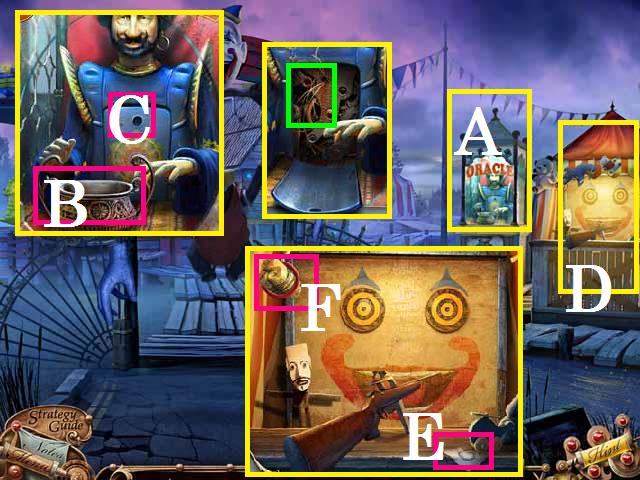
- Zoom into the fortune teller (A); cut the glass with the DIAMOND RING and pick up the EMPTY POT (B).
- Open the panel (C) with the SPECIAL KEY and pick up the WIRE (green).
- Zoom into the shooting gallery (D); pick up the SIGN (E) and the CANDLES (F).
- Enter the fair.
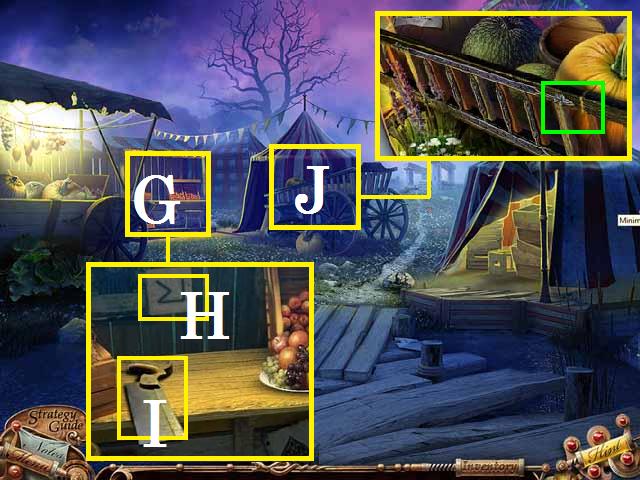
- Zoom into the stand (G); pick up the SIGN (H) and the SAW (I).
- Zoom into the cart (J); SAW the side (green) to get the LADDER PART.
- Move forward down the path.
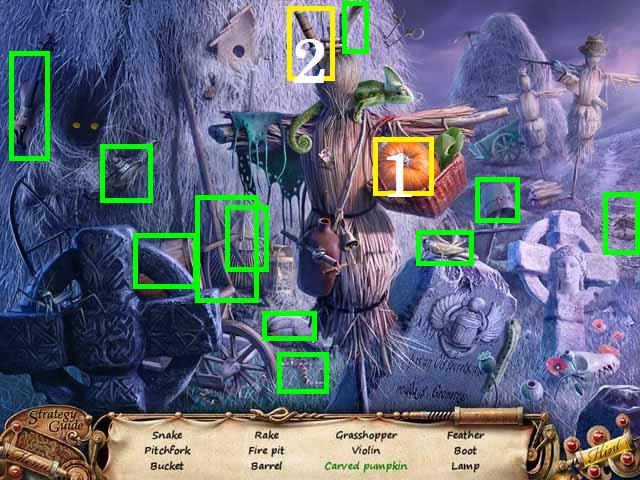
- Zoom into the sparkles to play a HOS.
- Carve the pumpkin (1) with the knife (2).
- Receive the LAMP.
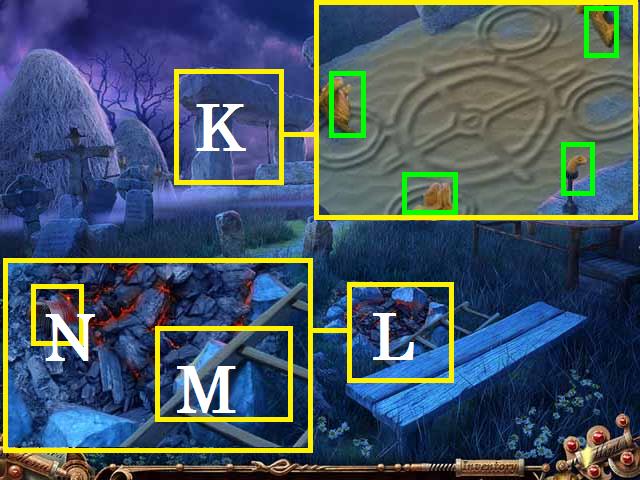
- Zoom into the altar (K); pick up the CANDLE PIECES (green).
- Zoom into the fire pit (L); pick up the LADDER PART (M) and click the can (N) two times.
- Place all of the CANDLE PIECES in the can; pick up the CANDLE.
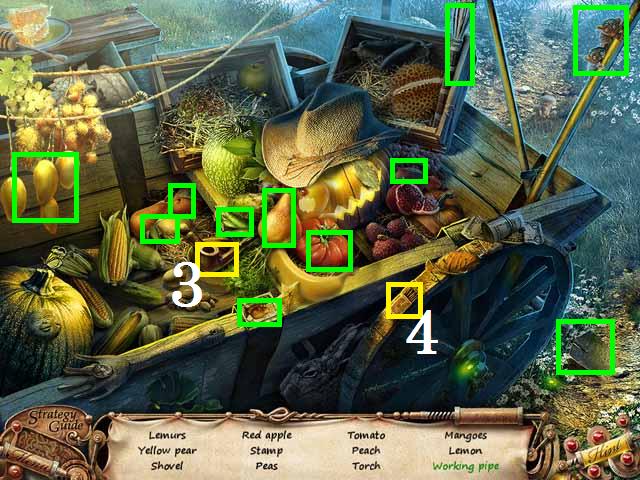
- Combine the two LADDER PARTS to create the NEW LADDER.
- Move back one scene.
- Zoom into the sparkles to play a HOS.
- Light the pipe (3) with the matches (4).
- Receive the UNLIT TORCH.
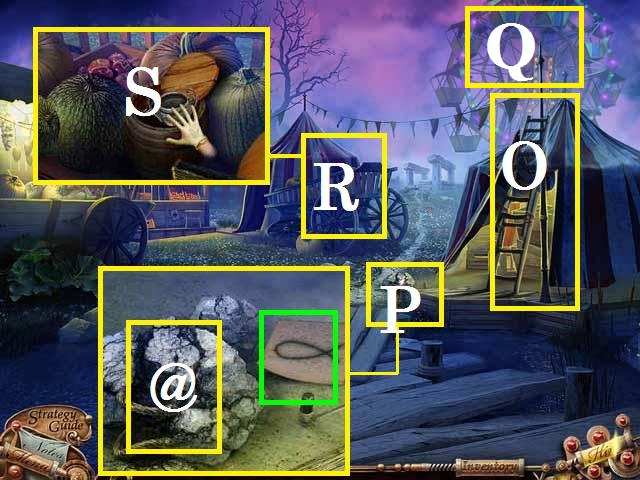
- Lean the NEW LADDER on the tent (O).
- Zoom into the stand (P); pick up the SIGN (green) and place the TORCH (@).
- Place the WIRE on the tent top (Q).
- Pick up the LIT TORCH.
- Zoom into the wagon (R); move the pumpkins and the lid (S).
- Fill the EMPTY POT from the barrel of water.
- Move forward down the path.
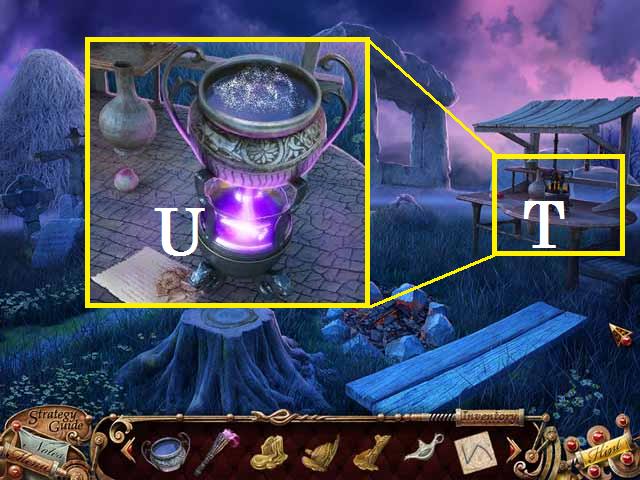
- Zoom into the table (T).
- Light the burner (U) with the LIT TORCH and set the FULL POT on top.
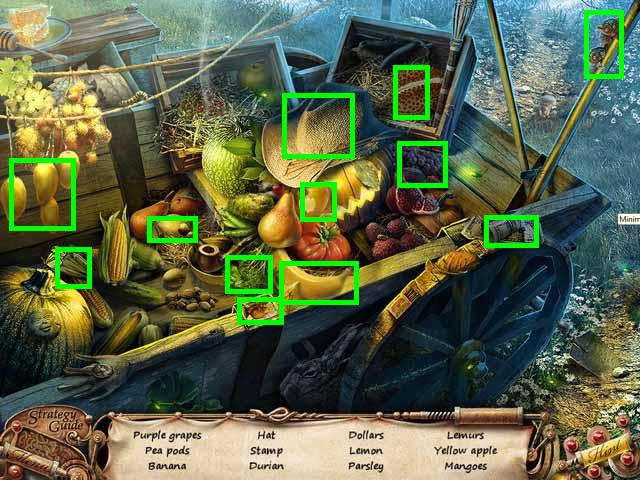
- Move back one scene; zoom into the sparkles to play a HOS.
- Receive the INGREDIENTS.
- Return to the ritual place.
- Zoom back into the table and place the INGREDIENTS in the POT.
- Fill the LAMP from the POT.
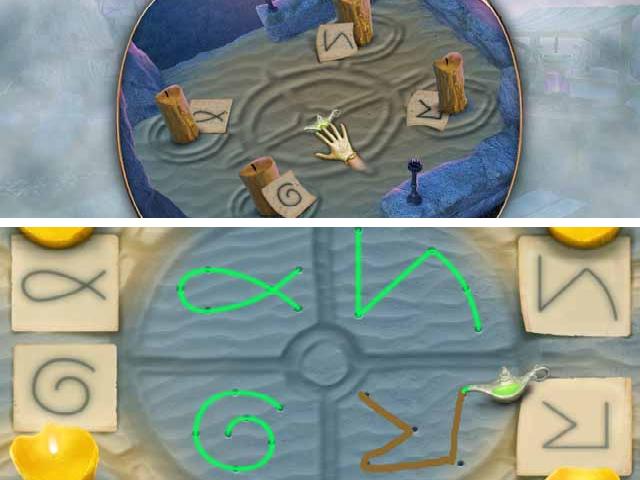
- Zoom back into the altar; place the four CANDLES, SIGNS, and the MAGIC POTION.
- Draw the symbols as shown in the screenshot.
- Back up to the fair's entrance.
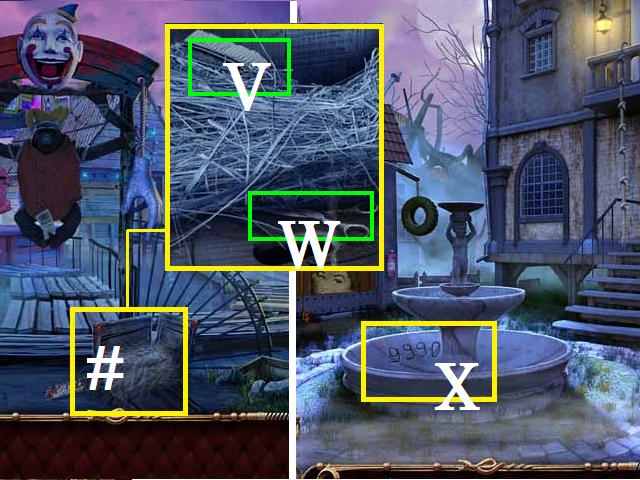
- Zoom into the crate (#); pick up the BRUSH (V) and SCISSORS (W).
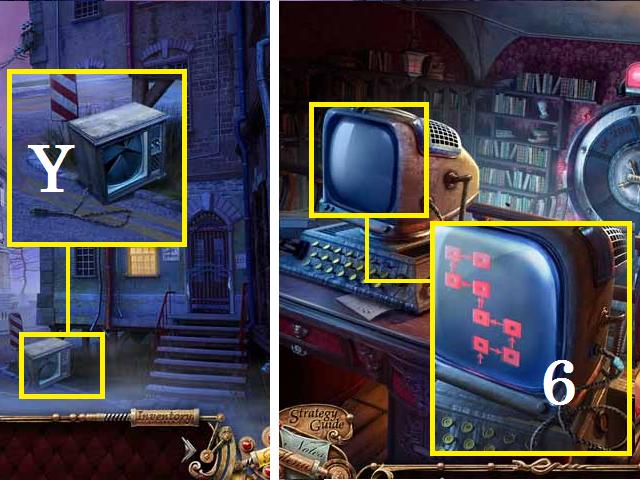
- Return to the fountain; scrub the dirt (X) with the BRUSH to get the code.
- Move back one scene.
- Zoom back into the TV; cut the CORD (Y) with the SCISSORS.
- Go inside the archives; zoom back into the computer.
- Place the CORD to see the path (6) through the archives.
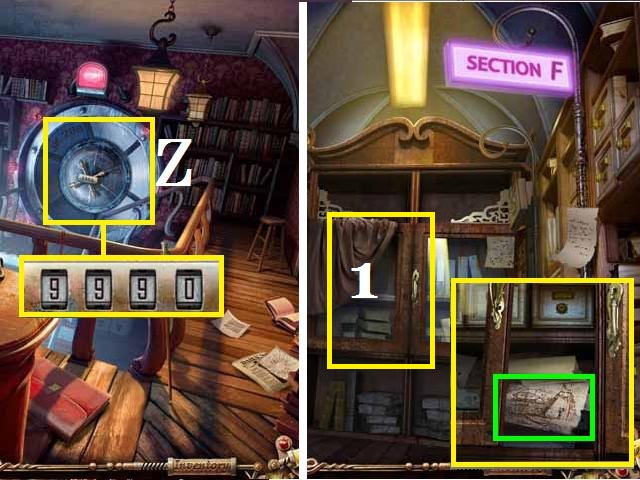
- Zoom into the door lock (Z); enter the code 9990.
- Move through the archives as follows: forward, right, forward, left, forward, left, forward, right.
- When you get to section F zoom into and open the cabinet (1).
- Pick up the paper (green).
Chapter 5: The Underwater Lab
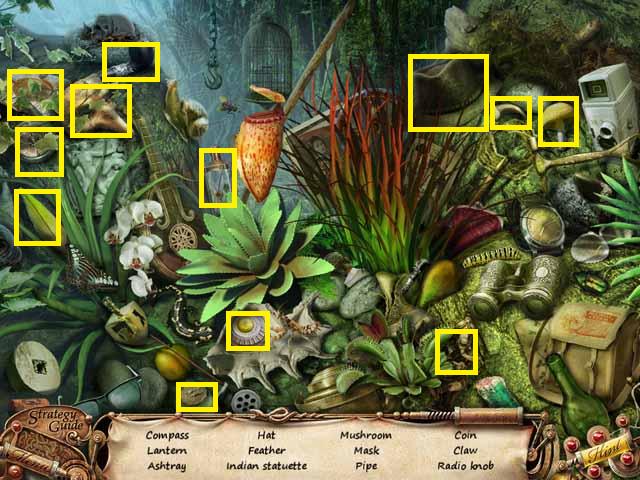
- Zoom into the sparkles to play a HOS.
- Receive the RADIO KNOB.
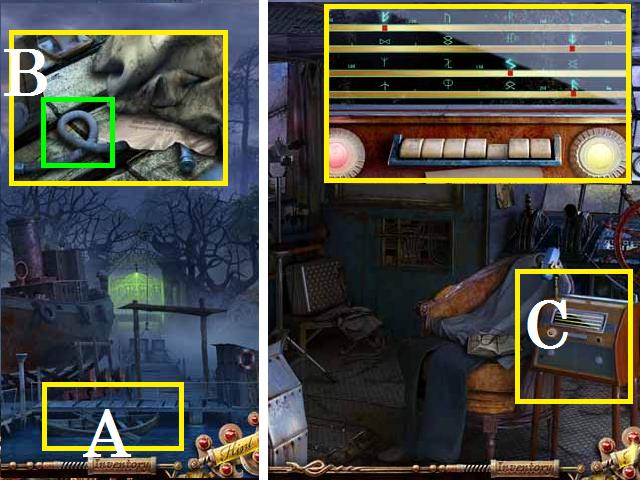
- Move back two scenes.
- Zoom into the row boat (A); move the cloth and pick up the HOSE (B).
- Move to the boat and enter the cabin.
- Zoom into the radio (C); place the RADIO KNOB.
- Click both knobs until the symbols light up as shown in the screenshot.
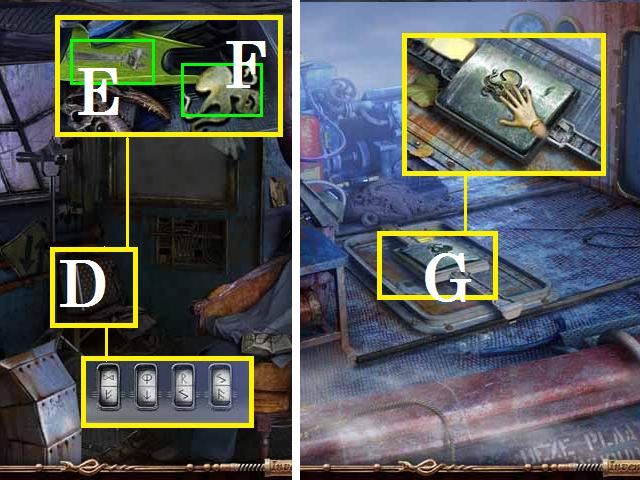
- Zoom into the suitcase (D); key in the code from the radio.
- Pick up the WRENCH (E) and OCTOPUS KEY (F).
- Stay on the boat but exit the cabin.
- Place the OCTOPUS KEY on the hatch (G) and enter the hold.
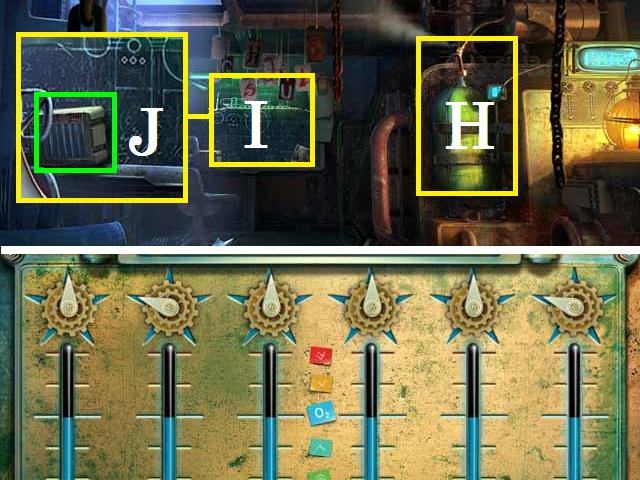
- Zoom into the busted hose (H).
- Remove the hose with the WRENCH and attach the new HOSE.
- Set the dials, as shown in the screenshot, and receive the OXYGEN TANK.
- Zoom into the desk (I) and pick up the EMPTY BATTERY (J).
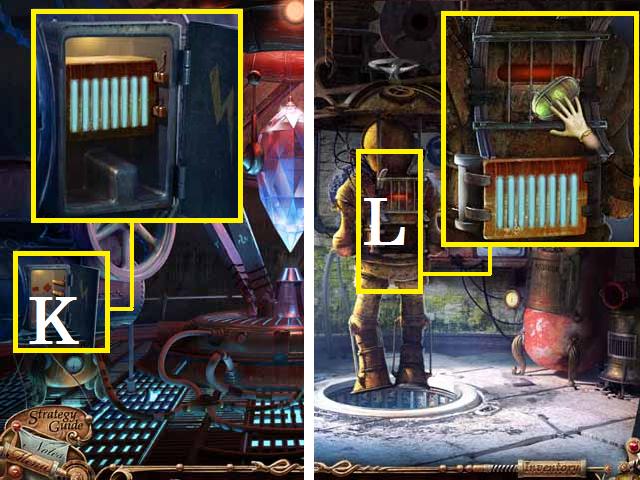
- Go to the upstairs of the lighthouse and enter the attic.
- Place the EMPTY BATTERY in the charger (K); pick it up after it is fully charged.
- Go downstairs and enter the lower level.
- Zoom into the dive suit (L); place the OXYGEN TANK and CHARGED BATTERY on it.
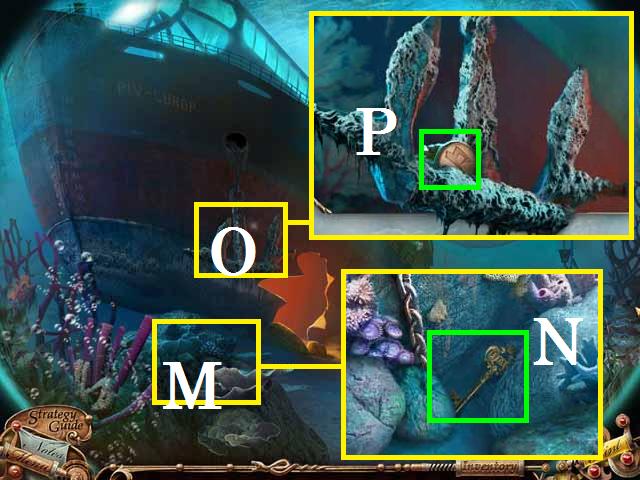
- Zoom into the rocks (M); move them and pick up the ANCIENT KEY (N).
- Zoom into the anchor (O) and pick up the GUARDIAN KEY (P).
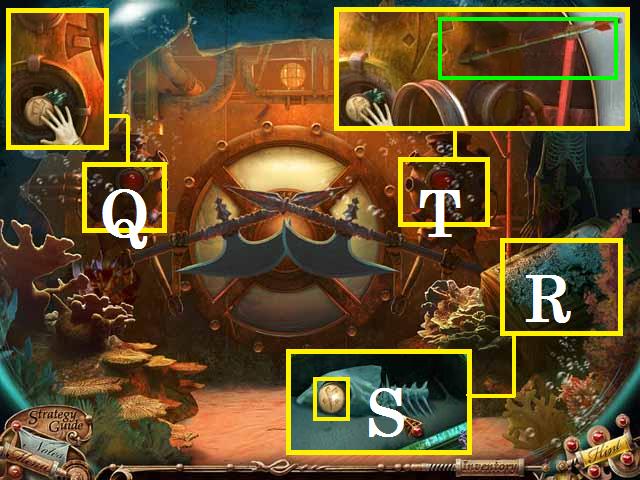
- Enter the sunken ship.
- Zoom into the left GUARDIAN (Q); open the glass and place the GUARDIAN KEY.
- Zoom into the trunk (R); unlock it with the ANCIENT KEY and pick up the GUARDIAN KEY (S).
- Zoom into the right GUARDIAN (T); open the glass, place the KEY and pick up the ARROW (green).
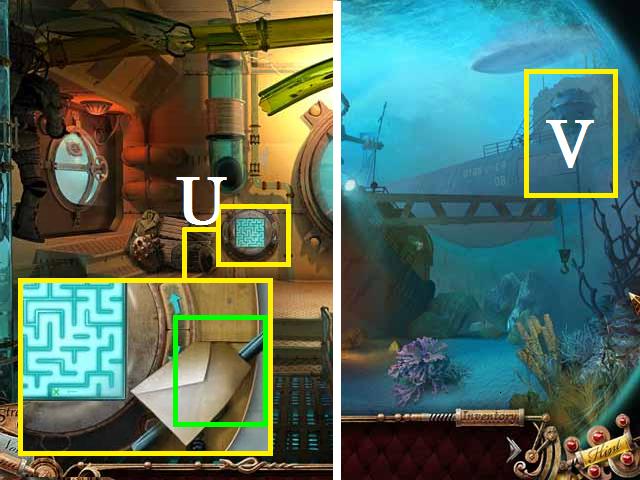
- Move forward through the door.
- Zoom into the puzzle lock (U) and pick up the EMPTY HARPOON GUN (green).
- Combine the EMPTY HARPOON GUN and ARROW to create the HARPOON.
- Exit the ship.
- Shoot the HARPOON at the mine (V).
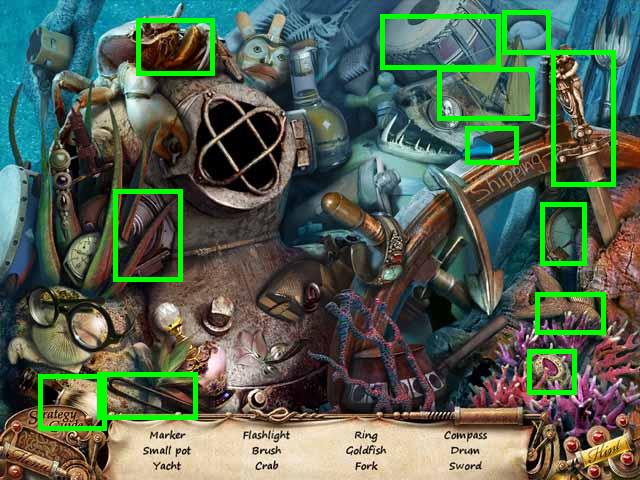
- Zoom into the sparkling wreck to play a HOS.
- Receive the KNIFE.
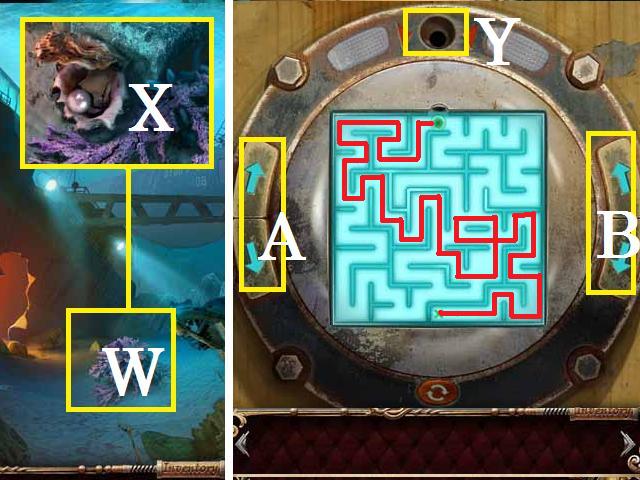
- Zoom into the seaweed (W); cut IT with the KNIFE and pick up the PEARL (X).
- Go back inside and zoom into the puzzle lock.
- Place the PEARL in the hole (Y).
- Use the arrows (A-B) to rotate the board and move the pearl along the labyrinth.
- Follow the path marked in red in the screenshot.
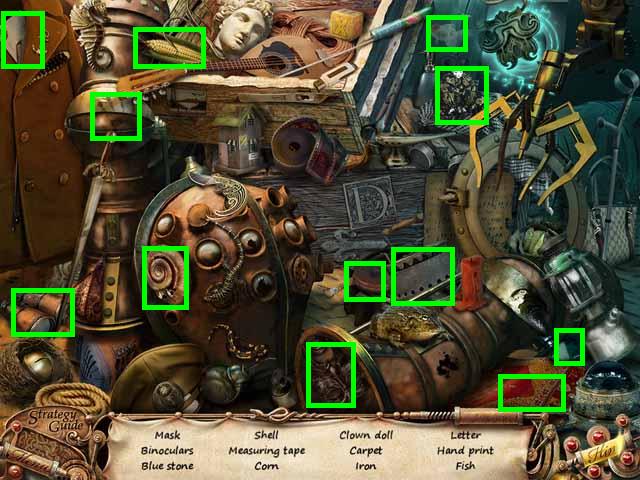
- Zoom into the sparkling pile of crates to play a HOS.
- Receive the OIL CAN.

- OIL the door's track (D) and move forward.
- Zoom into the stand (E); move the book and pick up the HOOK (F).
- Zoom into the drain (G); move the paper and pick up the KEY (@) with the HOOK.
- Move the other paper and pick up the PUNCH CARD (I).
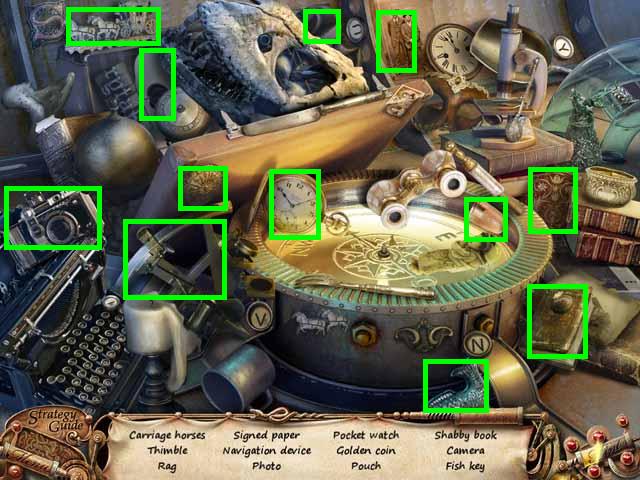
- Zoom into the sparkles to play a HOS.
- Receive the FISH KEY.
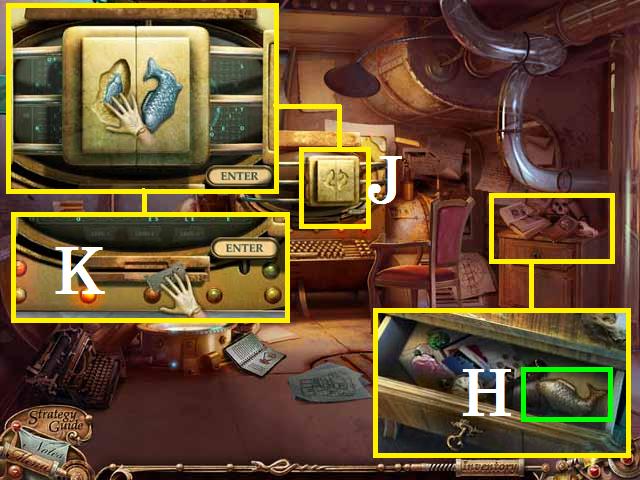
- Zoom back into the stand; unlock the drawer with the KEY and pick up the FISH KEY (H).
- Zoom into the lock (J) and place both FISH KEYS.
- Insert the PUNCH CARD into the slot (K).
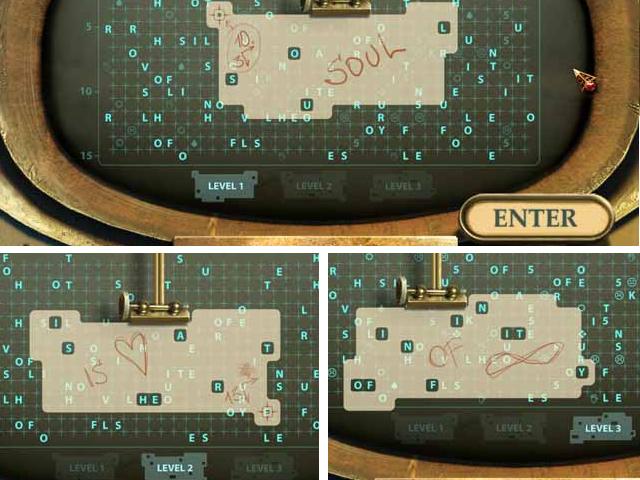
- Move the PUNCH CARD to spell out 'soul', 'is heart' and 'of infinity' as shown in the screenshot and hit enter.
- Exit one scene and zoom back into the sparkles to play a HOS.
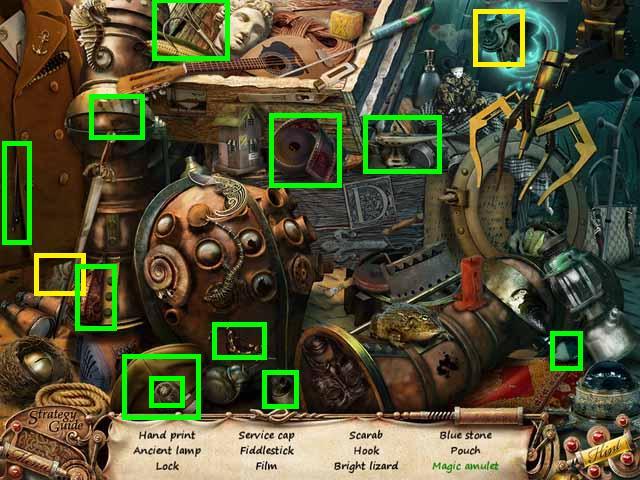
- Combine the two pieces (yellow) of the AMULET.
- Receive the MAGIC AMULET.
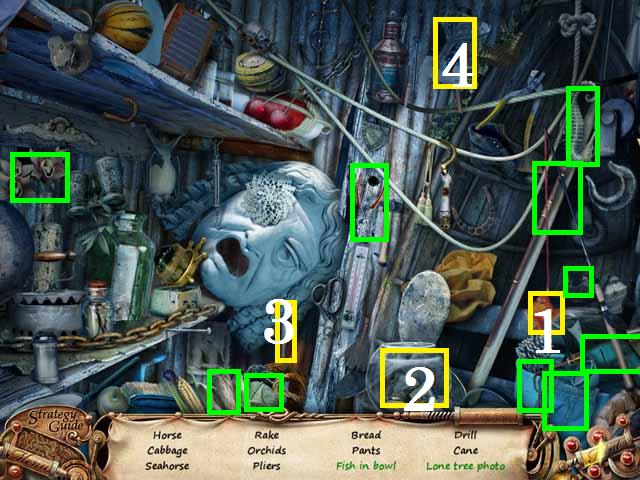
- Once back on top, zoom into the sparkling shed to play a HOS.
- Place the fish (1) in the bowl (2).
- Use the MARKER (3) to scribble out the man in the picture (4).
- Receive the PLIERS.
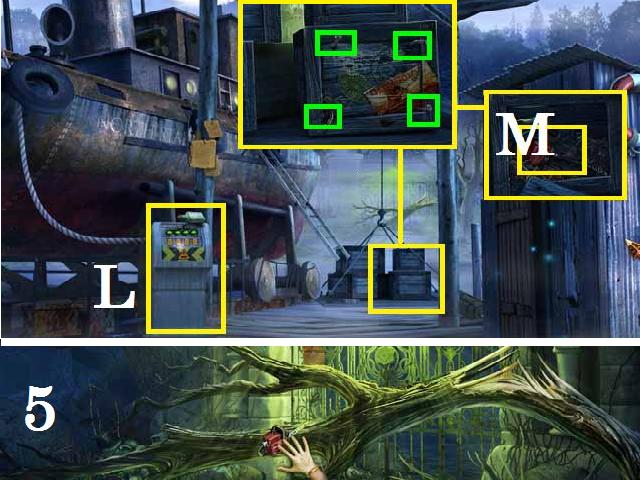
- Zoom into the crate; remove the nails (green) with the PLIERS and pick up the SAW (M).
- Raise the crates, using the control panel (L), and move forward to the gate.
- Cut the fallen tree (5) with the SAW three times until the gate opens.
- Go through the gate.
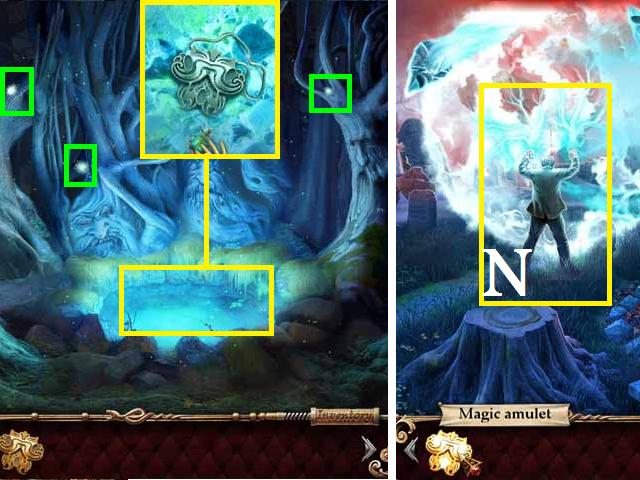
- Pick up the three MAGIC BEETLES (green).
- Zoom into the magic pool; place the MAGIC AMULET and the BEETLES.
- Pick up the MAGIC AMULET.
- Back out one scene.
- Drop the MAGIC AMULET over Daniel (N).
- Congratulations! You have completed Guardians of Beyond: Witchville!
Created at: 2012-01-16

