
Walkthrough Menu
- General Tips & Information
- Chapter One
- Chapter Two
- Chapter Three
- Chapter Four
- Chapter Five
- Chapter Six
- Chapter Seven
- Chapter Eight
- Chapter Nine
- Chapter Ten
General Tips & Information
- This game may be played in windowed or full screen mode.
- There is no timer in this game.
- Hints are unlimited, but you must wait for the meter to recharge.
- Click on the hint button to find an object.
- Each hidden object scene has a Harlequin logo that will automatically recharge the hint meter.
- The Harlequin logo is marked in pink on each hidden object screenshot.
- Finding consecutive items rapidly will give you a speed bonus that will recharge the hint meter.
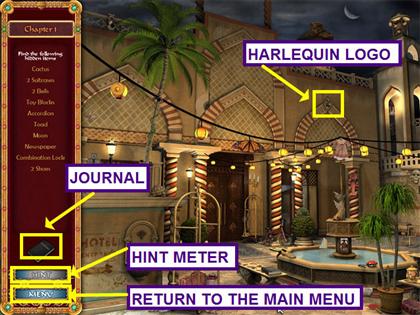
- Select the menu button to return to the main menu.
- While at the main menu, you may select the Harlequin Book to open a PDF file with a romance story.
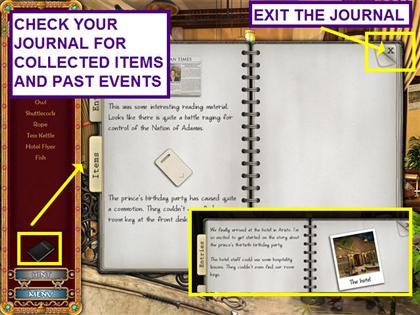
- Just above the hint meter in the sidebar is your journal.
- Read your journal for a recap of events and to view the items you have collected.
Chapter One
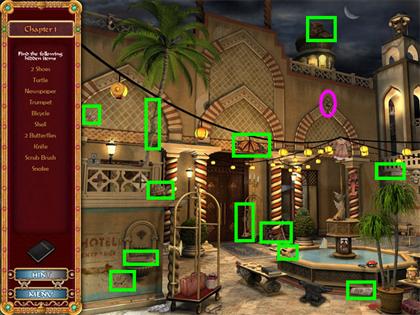
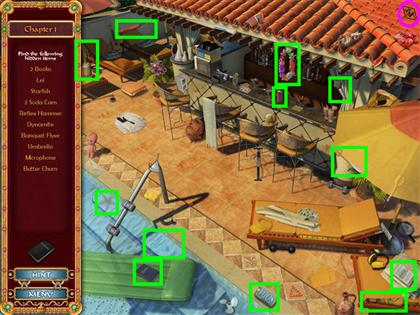
- Locate the hidden objects at the hotel entrance.
- Find the Harlequin logo prior to the last item to recharge the hint meter.
- The Harlequin logo is at the top of the right arch.
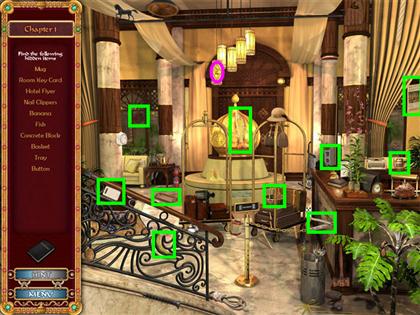
- Locate the hidden objects in the hotel lobby.
- Find the Harlequin logo prior to the last item to recharge the hint meter.
- The Harlequin logo is on the hanging lights in the center.
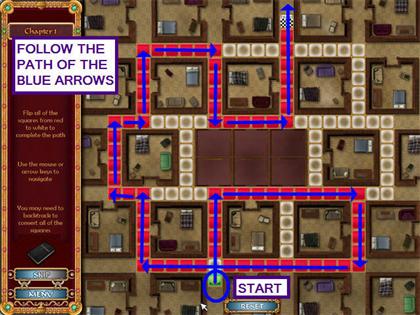
- The object of this mini game is to walk a path through the maze and turn all the red spaces to white.
- You may use the mouse or the arrow keys.
- The green square shows the start of the maze and the checkered square identifies the end.
- You may sometimes need to retrace or cross your path to turn all the squares white.
- Move in the direction of the blue arrows to solve this level.
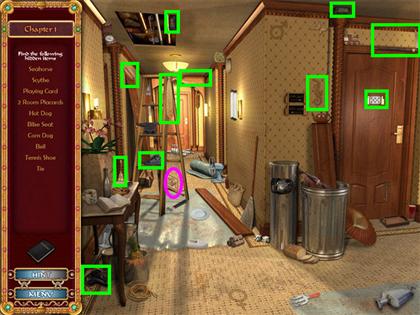
- Locate the hidden objects at the hotel hallway.
- Find the Harlequin logo prior to the last item to recharge the hint meter.
- The Harlequin logo is near the bottom of the ladder.
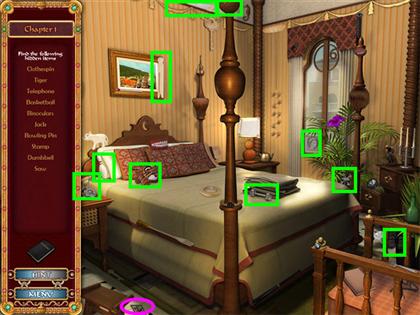
- Locate the hidden objects in Allie's hotel room.
- Find the Harlequin logo prior to the last item to recharge the hint meter.
- The Harlequin logo is at the bottom left near the footstool.
- Locate the hidden objects at the hotel pool.
- Find the Harlequin logo prior to the last item to recharge the hint meter.
- The Harlequin logo is in the upper right corner.
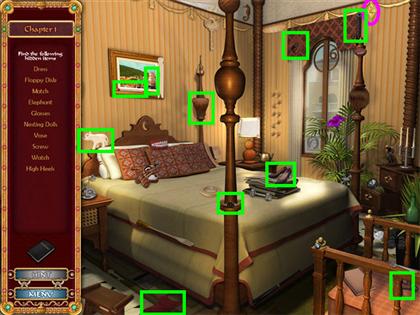
- Locate the hidden objects in Allie's hotel room.
- Find the Harlequin logo prior to the last item to recharge the hint meter.
- The Harlequin logo is at the top right corner of the valance.
Chapter Two
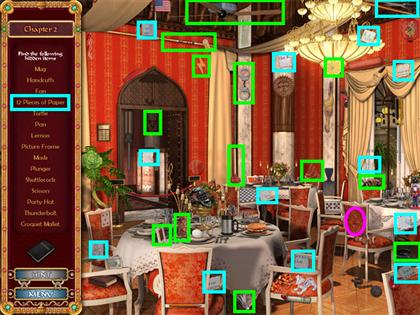
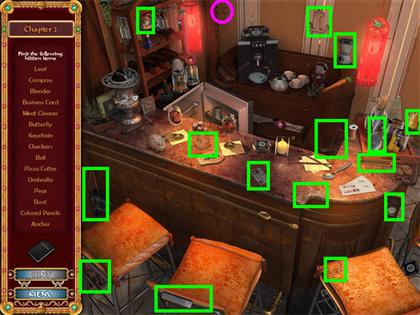
- Locate the hidden objects at the banquet room.
- Find the Harlequin logo prior to the last item to recharge the hint meter.
- The Harlequin logo is on the back of the chair at the right table.
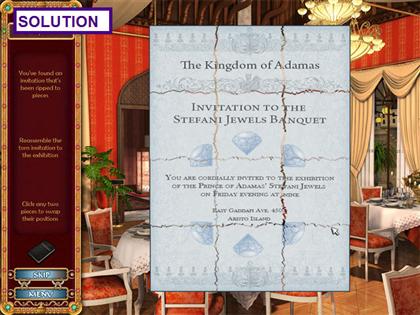
- The object of this mini-game is to reassemble the torn invitation.
- Click on two pieces to swap their locations.
- Locate the hidden objects at the bar.
- Find the Harlequin logo prior to the last item to recharge the hint meter.
- The Harlequin logo is at the upper center edge of the scene.
Chapter Three
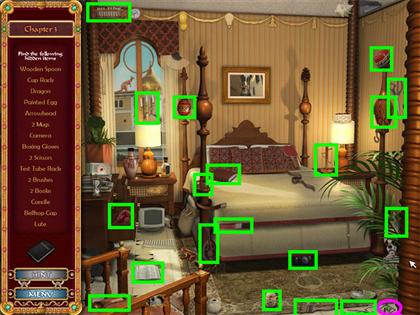
- Locate the hidden objects in Shaun's hotel room.
- Find the Harlequin logo prior to the last item to recharge the hint meter.
- The Harlequin logo is at the bottom right corner of the scene.
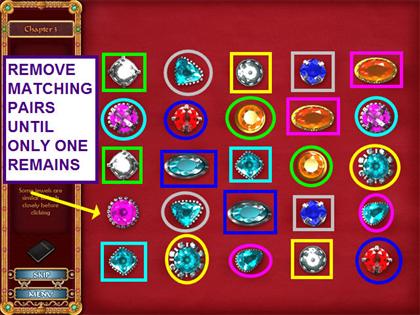
- The object of this mini-game is to remove pairs of jewels until only one gem remains.
- Click on each matching pair of gems to remove them from the board.
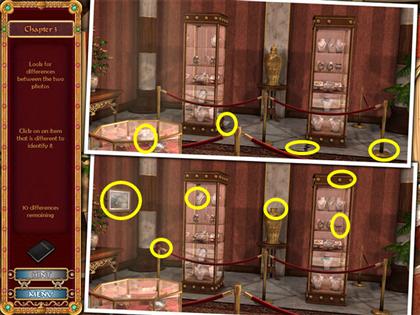
- Locate the ten differences between the top and bottom pictures.
- You will have a double cursor for this level.
- You may click on the top or the bottom scene.
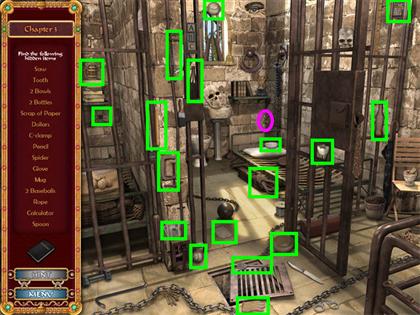
- Locate the hidden objects in Shaun's jail cell.
- Find the Harlequin logo prior to the last item to recharge the hint meter.
- The Harlequin logo is in the corner of the cell, just above the cot.
Chapter Four
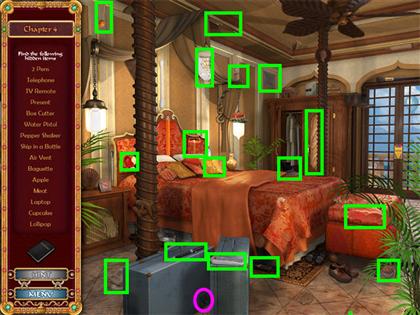
- Locate the hidden objects in Allie's upgraded hotel room.
- Find the Harlequin logo prior to the last item to recharge the hint meter.
- The Harlequin logo is on the bottom corner of the left suitcase.
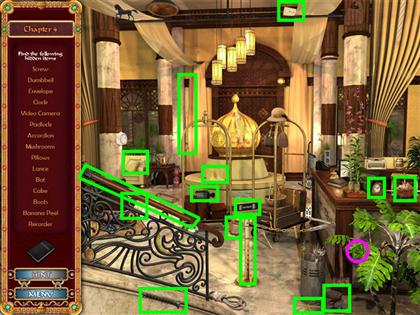
- Locate the hidden objects in the hotel lobby.
- Find the Harlequin logo prior to the last item to recharge the hint meter.
- The Harlequin logo is in the lower right corner on a palm leaf.
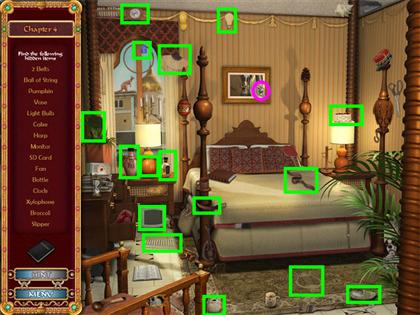
- Locate the hidden objects in Shaun's hotel room.
- Find the Harlequin logo prior to the last item to recharge the hint meter.
- The Harlequin logo is on the lower right corner of the painting.
- The object of this mini-game to to determine the password.
- Enter a series of four numbers using the keyboard or the mouse.
- The blue box on the right will indicate number of correct digits.
- The green box will show how many of the correct digits are in the correct location.
- Enter another guess, using the digits you have correct from the previous guess.
- Continue this process until all the digits are correct.
- The code is random, so your solution may vary.

Chapter Five
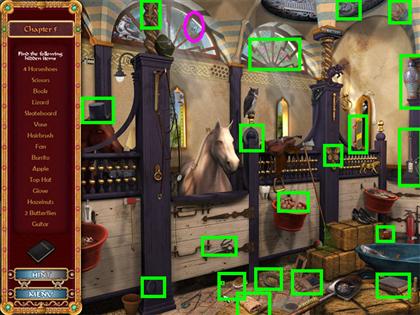
- Locate the hidden objects in the stable.
- Find the Harlequin logo prior to the last item to recharge the hint meter.
- The Harlequin logo is on the right side of the left window.
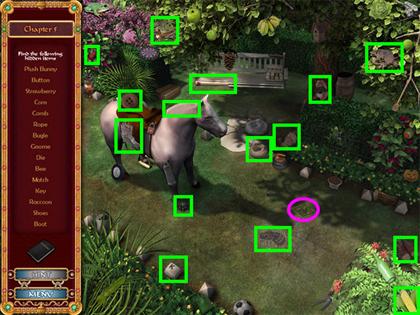
- Locate the hidden objects on the riding path.
- Find the Harlequin logo prior to the last item to recharge the hint meter.
- The Harlequin logo is on the grass below the footprint.
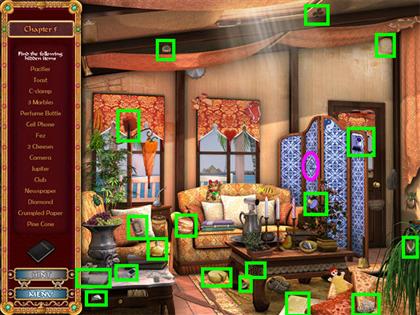
- Locate the hidden objects at the cottage.
- Find the Harlequin logo prior to the last item to recharge the hint meter.
- The Harlequin logo is near the middle of the folding screen.
Chapter Six
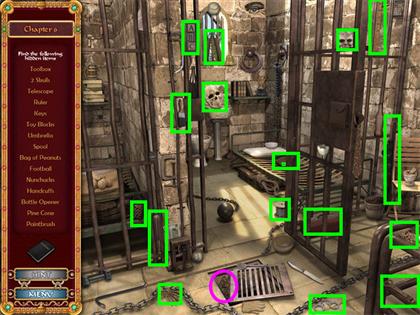
- Locate the hidden objects in Shaun's jail cell.
- Find the Harlequin logo prior to the last item to recharge the hint meter.
- The Harlequin logo is inside the open grate.
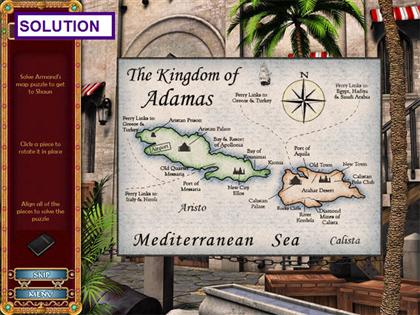
- The object of this mini-game is to reassemble the map.
- Click on each tile to rotate it into the correct position.
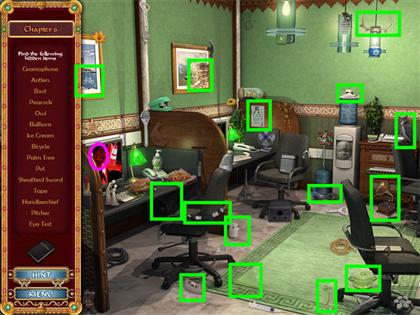
- Locate the hidden objects in the hotel's computer room.
- Find the Harlequin logo prior to the last item to recharge the hint meter.
- The Harlequin logo is on the computer monitor.
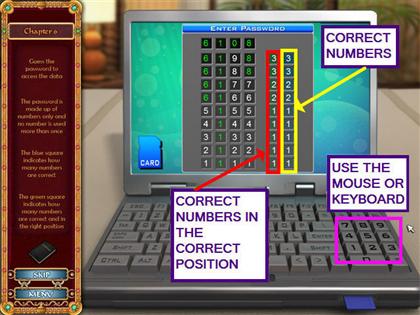
- The object of this mini-game to to determine the password.
- Enter a series of four numbers using the keyboard or the mouse.
- The blue box on the right will indicate number of correct digits.
- The green box will show how many of the correct digits are in the correct location.
- Enter another guess, using the digits you have correct from the previous guess.
- Continue this process until all the digits are correct.
- The code is random, so your solution may vary.
Chapter Seven
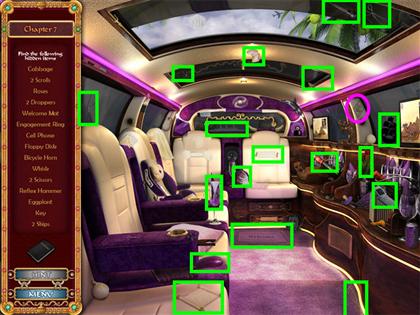
- Locate the hidden objects in the limousine.
- Find the Harlequin logo prior to the last item to recharge the hint meter.
- The Harlequin logo is between the two right windows.
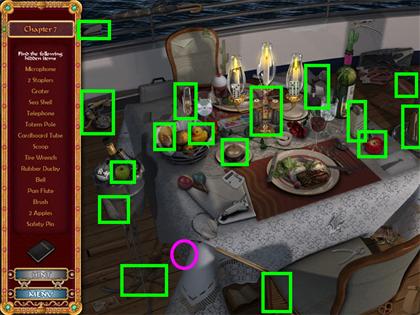
- Locate the hidden objects on the ship's deck.
- Find the Harlequin logo prior to the last item to recharge the hint meter.
- The Harlequin logo is on the left edge of the tablecloth.
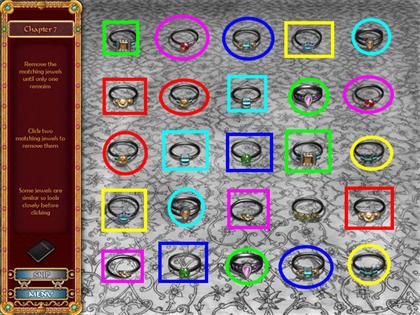
- The object of this mini-game is to remove matching rings until only one ring remains.
- Click on each matching pair of rings to remove it from the board.
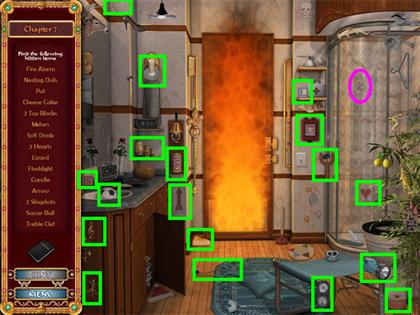
- Locate the hidden objects in the ship's powder room.
- Find the Harlequin logo prior to the last item to recharge the hint meter.
- The Harlequin logo is on the shower wall.
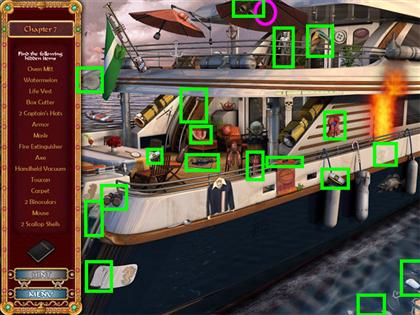
- Locate the hidden objects on the ship's stern.
- Find the Harlequin logo prior to the last item to recharge the hint meter.
- The Harlequin logo is in the center of the umbrella.
Chapter Eight
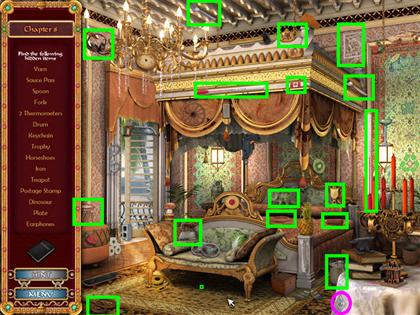
- Locate the hidden objects in the prince's chamber.
- Find the Harlequin logo prior to the last item to recharge the hint meter.
- The Harlequin logo is on the edge of the tablecloth in the lower right.
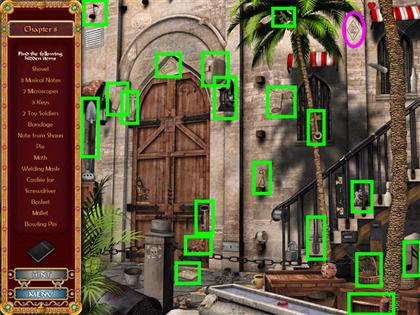
- Locate the hidden objects at the gate.
- Find the Harlequin logo prior to the last item to recharge the hint meter.
- The Harlequin logo is just to the right of the palm fronds.
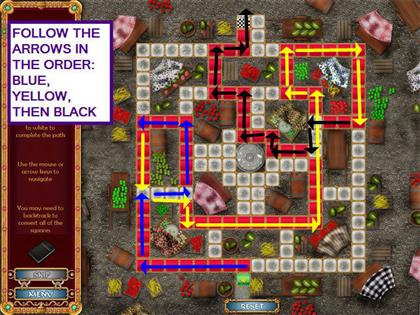
- The object of this mini game is to walk a path through the maze and turn all the red spaces to white.
- You may use the mouse or the arrow keys.
- The green square shows the start of the maze and the checkered square identifies the end.
- You may sometimes need to retrace or cross your path to turn all the squares white.
- Move in the direction of the arrows in the order of blue, yellow, then black to solve this level.
Chapter Nine
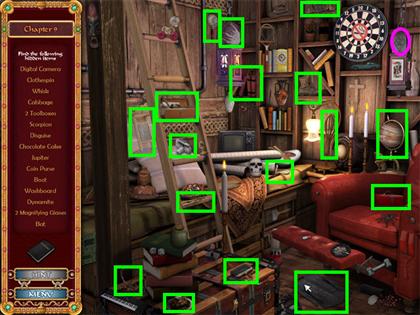
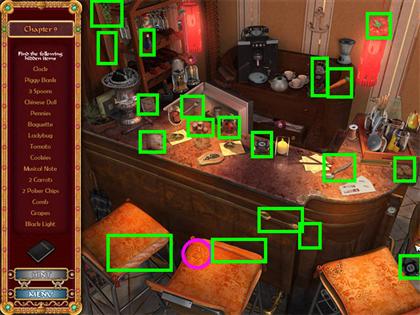
- Locate the hidden objects at Armand's hideout.
- Find the Harlequin logo prior to the last item to recharge the hint meter.
- The Harlequin logo is to the right of the dart board.
- Locate the hidden objects at the bar.
- Find the Harlequin logo prior to the last item to recharge the hint meter.
- The Harlequin logo is on the left corner of the middle barstool.
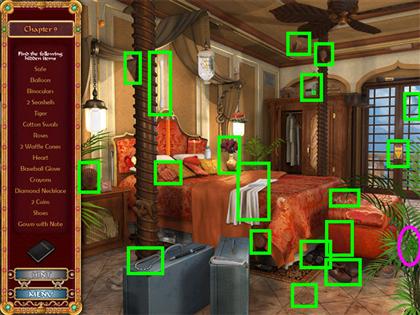
- Locate the hidden objects in Allie's upgraded hotel room.
- Find the Harlequin logo prior to the last item to recharge the hint meter.
- The Harlequin logo is on the plant in the lower right corner.
Chapter Ten
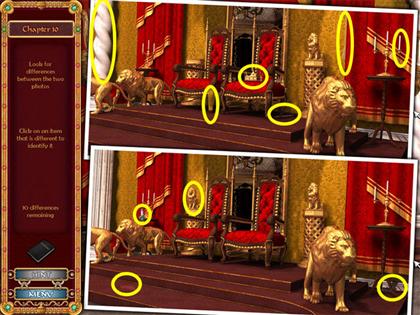
- Locate the ten differences between the top and bottom pictures.
- You will have a double cursor for this level.
- You may click on the top or the bottom scene.
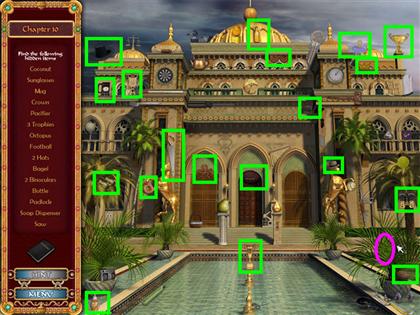
- Locate the hidden objects in the courtyard.
- Find the Harlequin logo prior to the last item to recharge the hint meter.
- The Harlequin logo is on the small palm in the lower right corner.
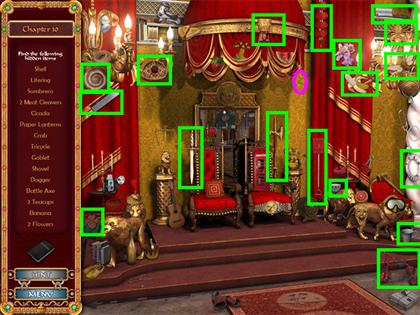
- Locate the hidden objects in the throne room.
- Find the Harlequin logo prior to the last item to recharge the hint meter.
- The Harlequin logo is on the gold wall just to the left of the right curtain.
 Congratulations! You have just completed Harlequin Presents: The Hidden Objects Of Desire!
Created at: 2009-12-13