Walkthrough Menu
General Tips
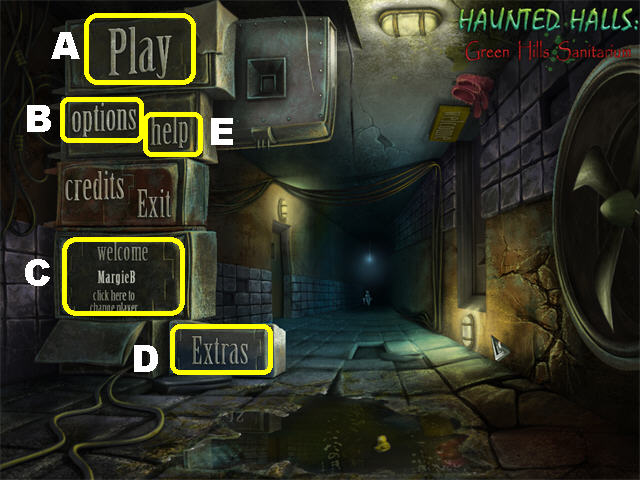
- This is the Official Guide for Haunted Halls: Green Hills Sanitarium.
- Click on “Play” (A) to begin your adventure.
- The “options” (B) button allows you to adjust the screen, music, cursor, and sound.
- The “welcome” button (C) can be used to manage your profiles in the game.
- The “Extras” (D) button has a link that will take you to the Collector’s Edition version of this game.
- The “help” (E) button has a link that will take you to the Forums for this game.
- A cluster of red sparkles indicates a Hidden Object Scene which will grant an inventory item upon completion.
- A cluster of green sparkles is an area in which a puzzle is located.
- Click on the Eye Icon, when it appears, to take a closer look at a section.
- The Hand Icon allows you to pick up inventory items or explore certain areas.
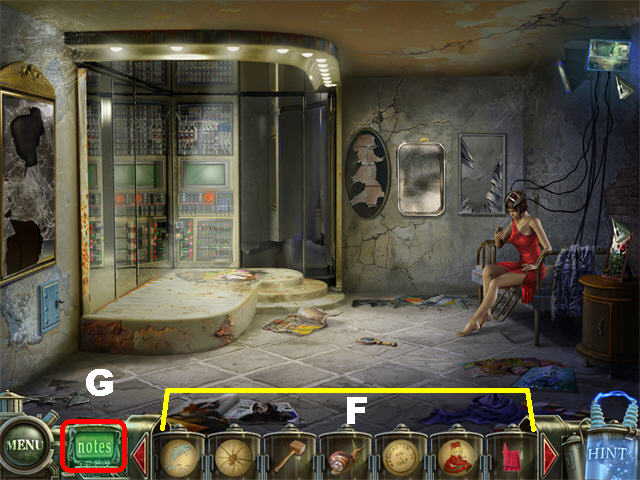
- Inventory Items can be used more than once and will remain in your inventory until they are no longer of use.
- Inventory items will appear at the bottom of the scene (F). Use the arrows in your inventory tray to scroll through all the items you’ve collected.
- Open your “notes” (G), in the lower left, to find clues and read part of the story.
- To use an inventory item, select the one you want to use, drag it to the desired location, and click it into the spot in which you want it used.
- You can skip a mini-game once the “SKIP” button fills. The “SKIP” button only appears in mini-game sections; it is located in the lower right corner.
- You have unlimited hints in the game but you must wait for them to recharge between uses.
Chapter 1
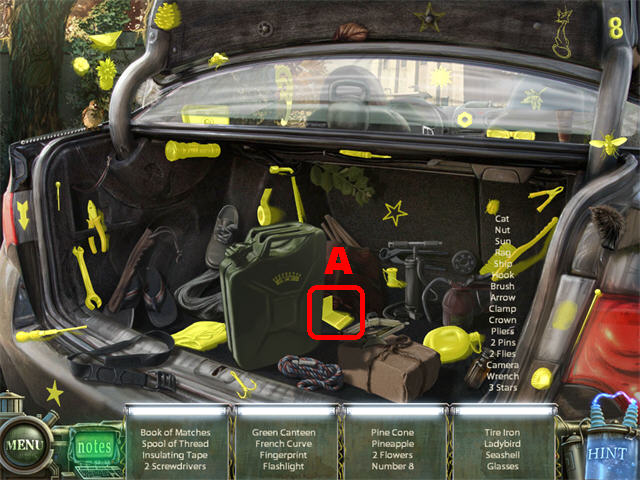
- Open the trunk on the left car to trigger a Hidden Object Scene.
- The BOOK OF MATCHES (A) will be added to inventory.
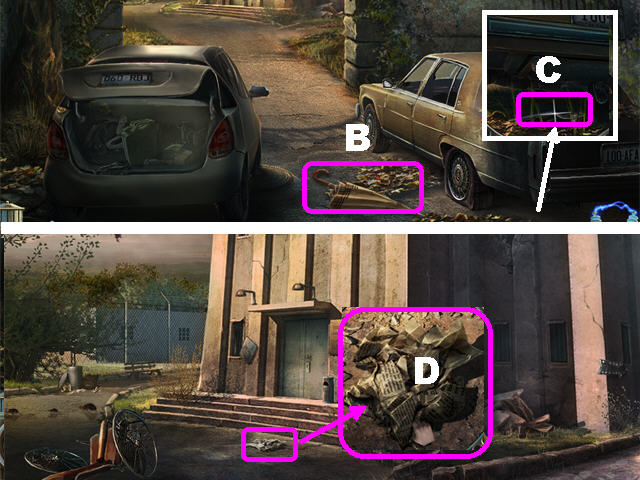
- Take the UMBRELLA (B) on the ground.
- Zoom into the bottom back side of the right car; use the UMBRELLA to take the VALVE (C).
- Go forward.
- Zoom into the NEWSPAPER (D) on the ground and take it.
- Go to the right of the building.
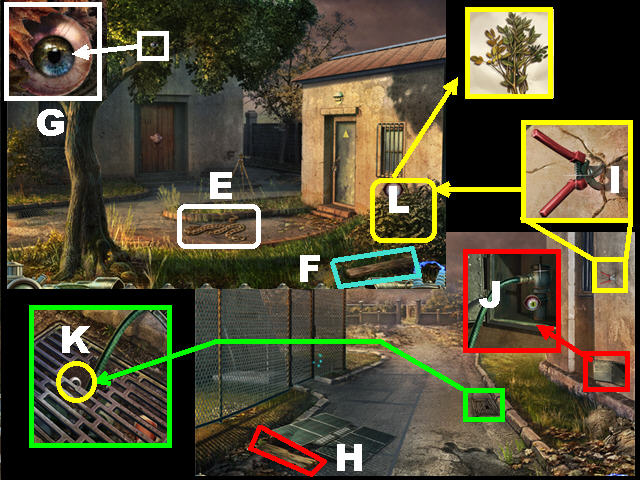
- Touch the snake on the floor and it will change into a HOSE (E); pick it up.
- Take the BOARD 1/3 (F) in the lower right.
- Zoom into the tree; take the EYE 1/6 (G).
- Go left and turn left by the building.
- Take the BOARD 2/3 (H) on the ground.
- Zoom into the top right side of the wall; take the CLIPPERS (I).
- Zoom into the niche on the right side of the wall (J); attach the VALVE and the HOSE to the spigot and take EYE 2/6 (K) in the grate.
- Click down and make a right.
- Zoom into the bushes in the lower right; cut the BRANCHES (L) with the CLIPPERS.
- Make a left, turn left by the building, and head right.
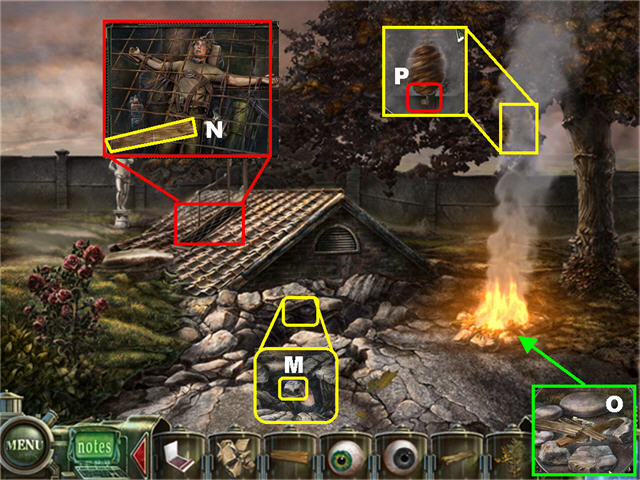
- Zoom into the hole in the ground; take the STONE and EYE 3/6 (M).
- Zoom into the roof; take BOARD 3/3 (N).
- Zoom into the pit below the tree; place the NEWSPAPER, 3 BOARDS, and the BOOK OF MATCHES in the pit to start a fire (O).
- Add the BRANCHES to the fire to smoke out the hive.
- Zoom into the hive and take the KEY (P).
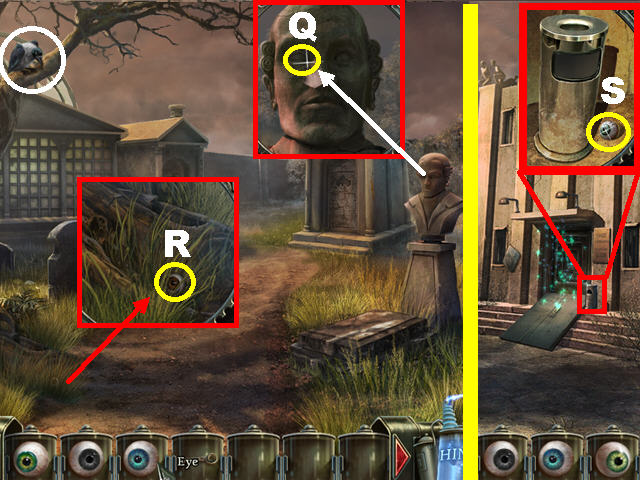
- Click down and go forward to reach the graveyard.
- Zoom into the bust; Click on the left eye twice to take EYE 4/6 (Q).
- Throw the STONE at the crow and take EYE 5/6 (R) that falls on the ground.
- Click down twice and zoom into the front door; place the KEY in the keyhole.
- Turn the key twice.
- Take a closer look at the trashcan by the door; take EYE 6/6 (S).
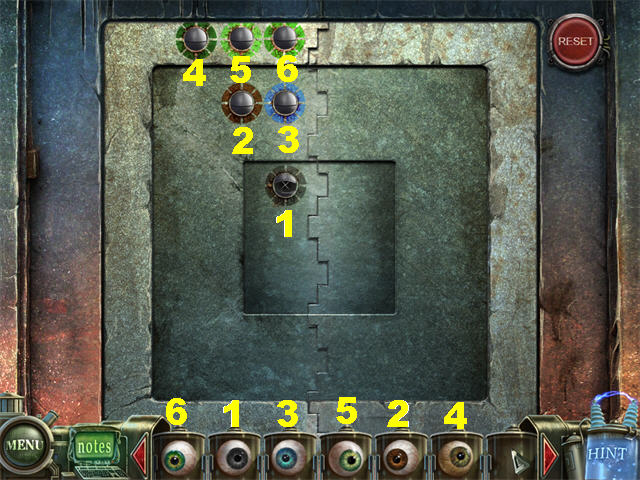
- Zoom into the door again.
- Place the 6 EYES, starting with the gray eye, as shown on the screenshot.
- Use the arrows to move the eyes all the way to the bottom. If you get stuck, click on the RESET button in the upper right.
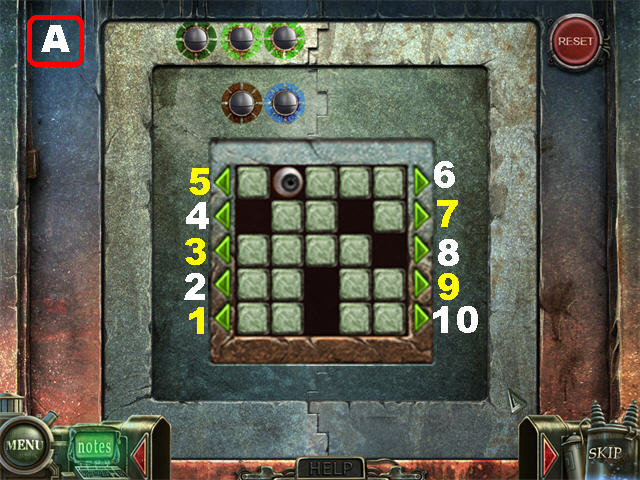
- Click, in the following order, on arrows 6, 4, 3, 7, 9, and 10 to solve the first round of this puzzle (A).
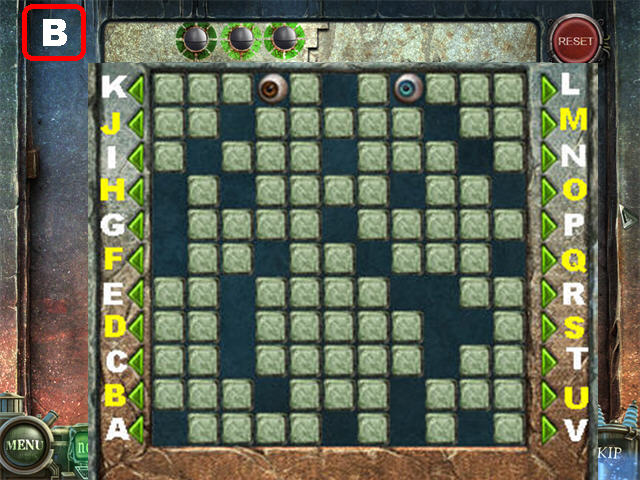
- Click, in the following order, on arrows K, L, L, J, M, M, I, I, H, H, P, Q, Q, R, T, C, C, U, and U to solve the following round of this puzzle (B).
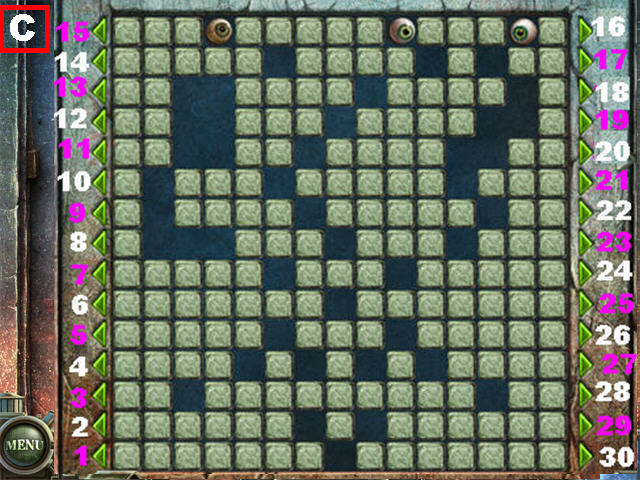
- Click, in the following order, on arrows 16, 16, 15, 15, 15, 17, 14, 14, 14, 13, 12, 11, 11, 21, 22, 9, 9, 23, 23, 7, 7, 24, 24, 24, 8, 8, 8, 7, 7, 6, 6, 5, 25, 25, 25, 24, 24, 24, 6, 5, 27, 4, 4, 4, 27, 27, 27, 27, 28, 28, 4, 4, 4, 4, 2, 2, 1, 1, 29, 2, 29, 27, 27, 27, 27, 3, 3, 3, 3, 29, 29, 29, 30, 30, 30, 30, and 2 to solve the final round of this puzzle (C).
- Enter the building.
Chapter 2
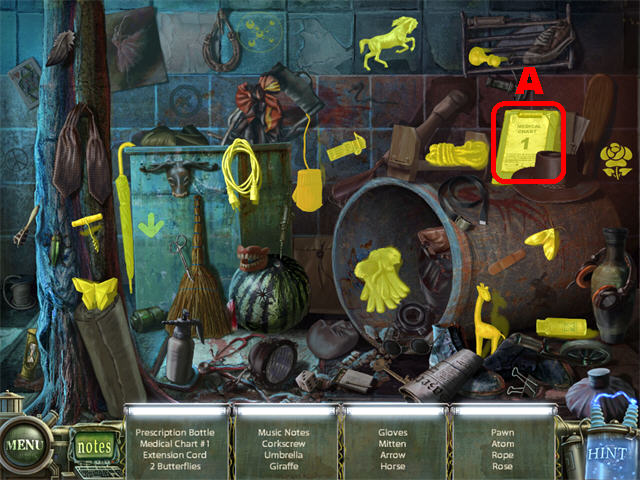
- Play the Hidden Object Scene to obtain MEDICAL CHART 1 (A).
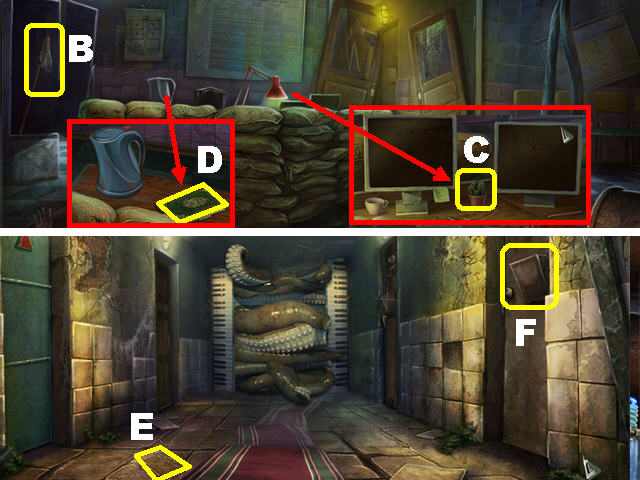
- Take the NET (B) in the locker.
- Zoom in by the lamp above the sacks; take the CACTUS (C).
- Zoom in by the coffee pot above the sacks; take the BOOK 1/4 (D).
- Go through the door.
- Take BOOK 2/4 (E) on the ground.
- Place MEDICAL CHART 1 on the right door and go through it (F).
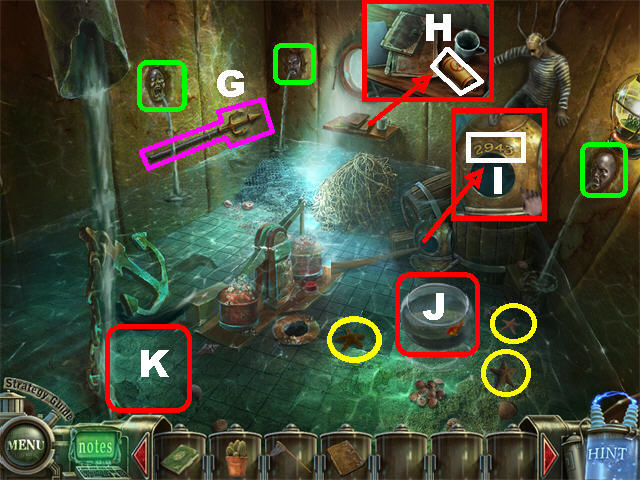
- Take the TRIDENT (G) on the left wall.
- Collect the 3 STARFISH marked in yellow.
- Plug the 3 small holes marked in green on the wall with the 3 STARFISH.
- Zoom into the shelf on the back wall; take the FLYPAPER (H).
- Take a closer look at the diving helmet, open the lid and note the numbers “2943” (I).
- Use the NET to catch the FISH in the fish bowl (J).
- Place the FISH in the left side of the water and the eel will disappear.
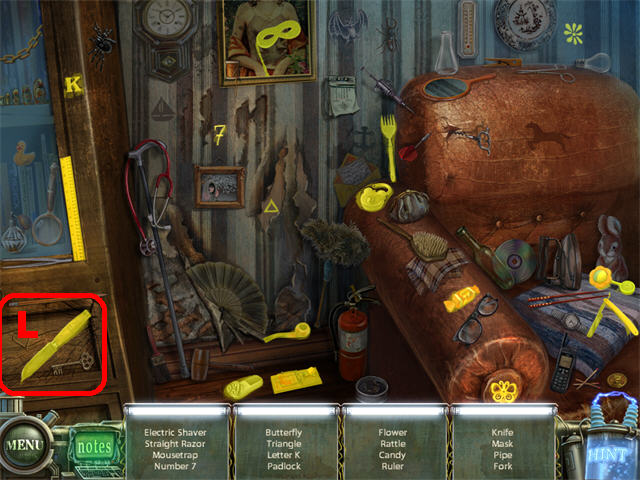
- Click down and go into the far left door.
- Play the Hidden Object Scene to obtain the KNIFE (L).
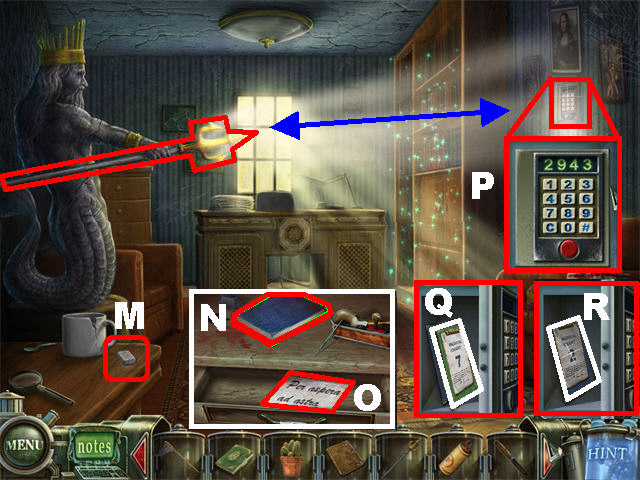
- Take the SUGAR (M) in the lower left.
- Zoom into the desk; take BOOK 3/4 (N).
- Open the drawer; the note inside says “per aspera ad astra” (O).
- Place the TRIDENT in Neptune’s hand and a safe will appear on the right side of the wall.
- Take a closer look at the keypad and enter the numbers 2943 (P).
- Press the red button and take MEDICAL CHART 7 (Q) and MEDICAL CHART 2 (R) inside the safe.
- Click down twice to access the reception area.
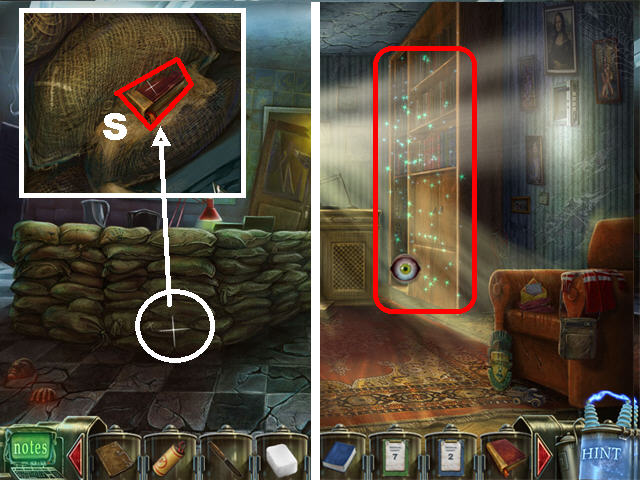
- Zoom into the bottom of the sacks; cut the sack with the KNIFE and take BOOK 4/4 (S).
- Return to Neptune’s room.
- Take a closer look at the right bookcase; place the 4 BOOKS into the empty slots that match the book colors.
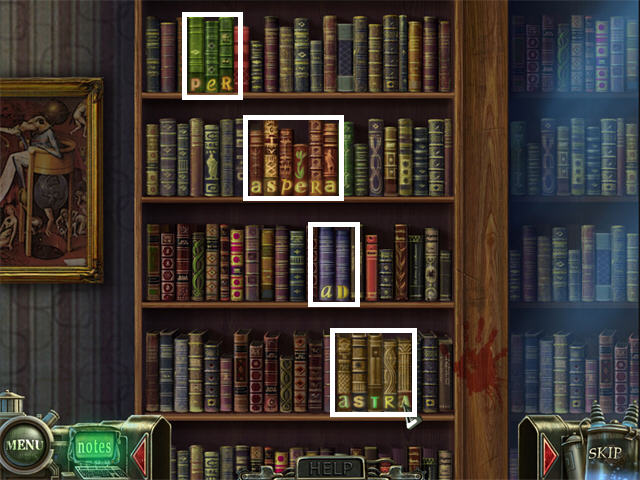
- Spell out the words “Per aspera as astra” by swapping the books around.
- Go through the hidden entrance.
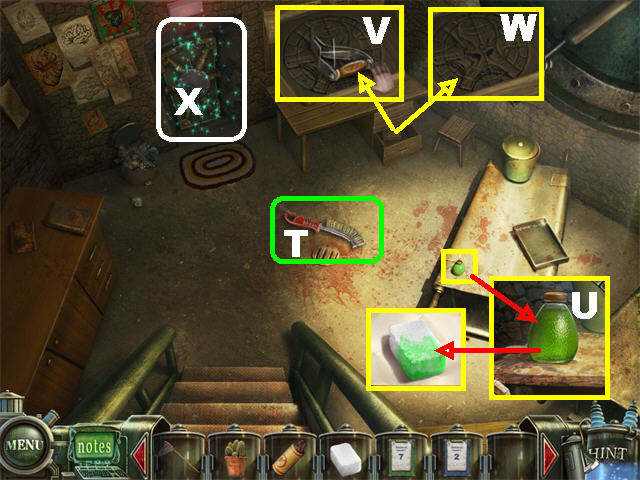
- Take the BRUSH (T) on the ground.
- Zoom into the poison bottle on the table; take the top off the bottle.
- Place the SUGAR on the bottle to create the POISONED SUGAR (U).
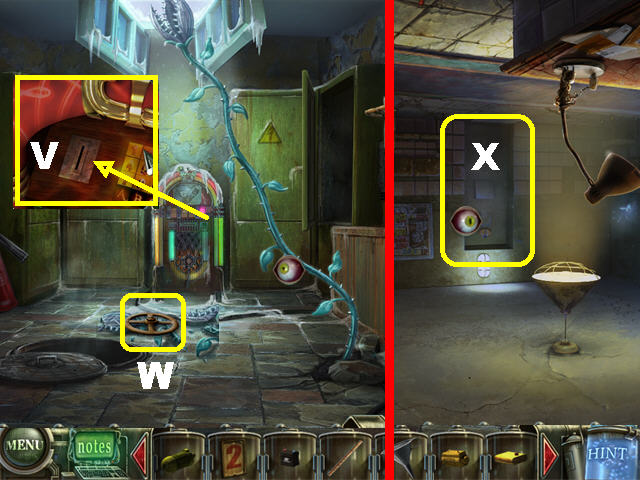
- Look at the drawer on the right; take the SWITCH (V). Note the image carved inside the drawer (W).
- Zoom into the back door (X).
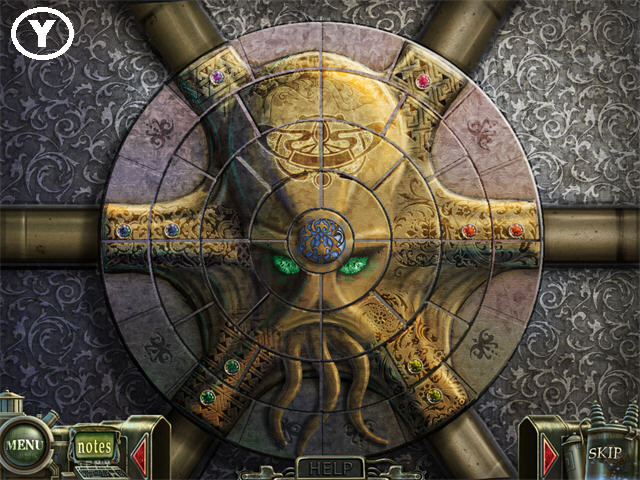
- Change the image to match the one carved inside the drawer.
- Click on 2 pieces within the same disk to swap their positions. Once a disk is set, rotate it to the correct position.
- Please look at the screenshot for the solution (Y).
- Go through the door.
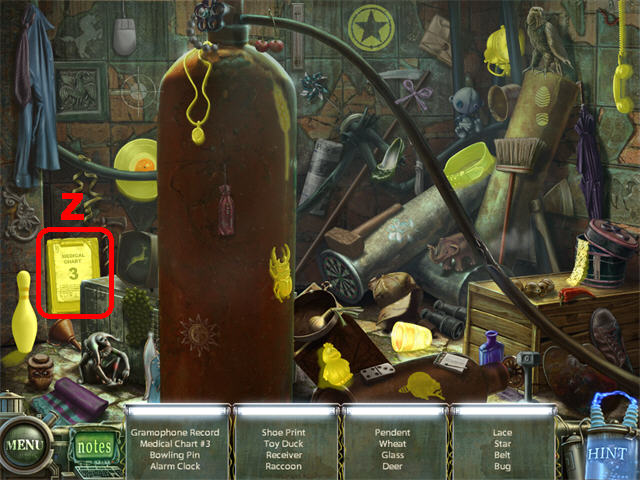
- Play the Hidden Object Scene to obtain MEDICAL CHART 3 (Z).
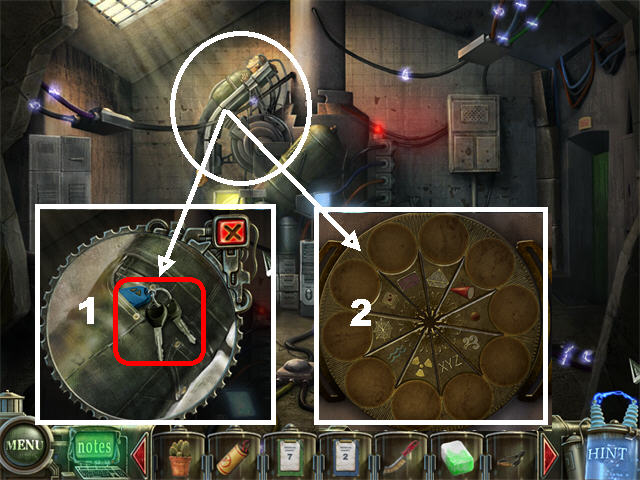
- Take a closer look at Tim; take the KEYS (1) in his pocket.
- When you click on Tim again, a puzzle (2) will appear; leave it be for now.
- Click down twice.
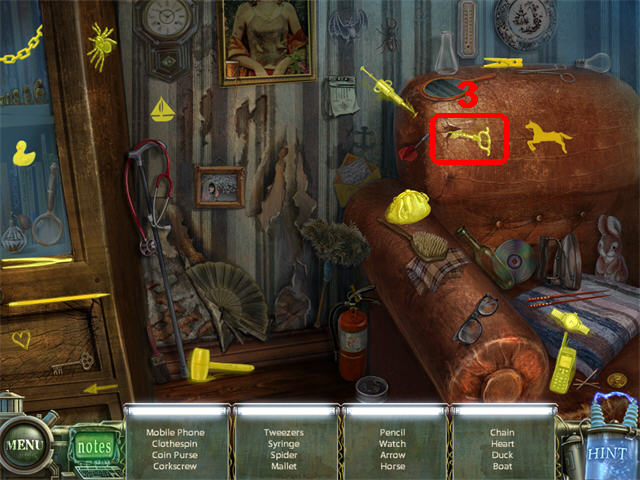
- Play the Hidden Object Scene in Neptune’s room to obtain the CORKSCREW (3).
- Click down twice.
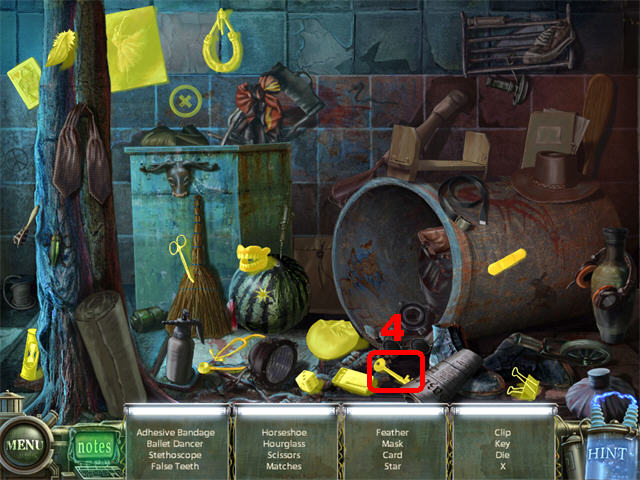
- Play the Hidden Object Scene to obtain the KEY (4).
- Click down.
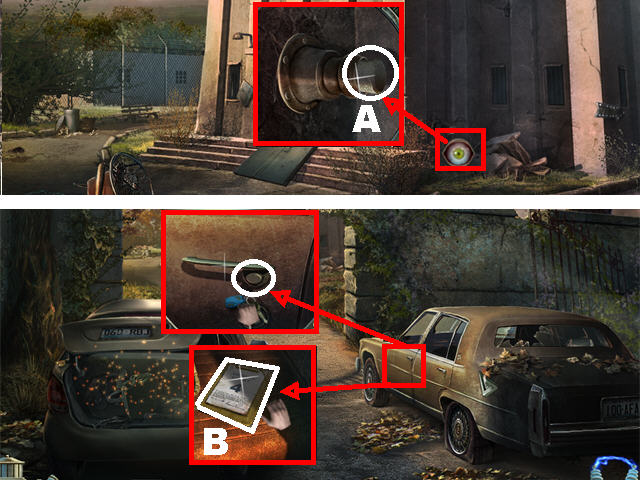
- Zoom into the pipe on the right side of the building; use the CORKSCREW to obtain the PUMP PLUG (A).
- Click down.
- Zoom into the right car’s door; place the KEYS in the lock and take MEDICAL CHART 4 (B).
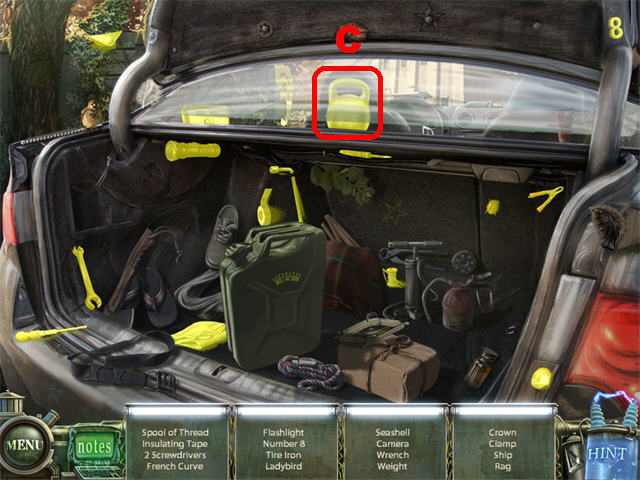
- Play the Hidden Object Scene by the left car to obtain the WEIGHT (C).
- Go forward and then right.
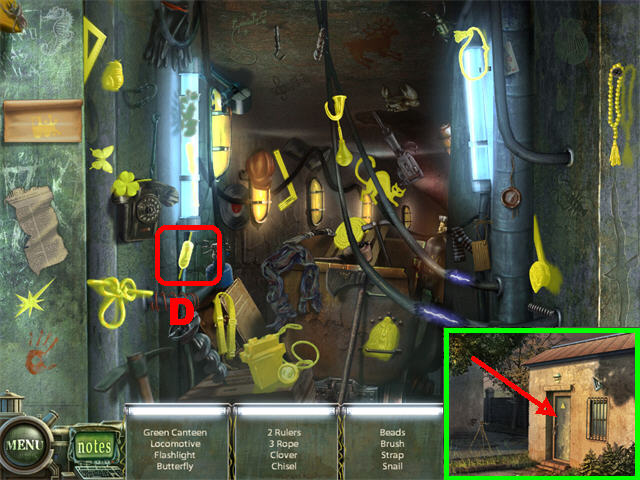
- Zoom into the right door; place the key in the lock.
- Turn the key in the lock 3 times and go inside.
- Open the right locker to trigger a Hidden Object Scene; the FUSE (D) will be added to inventory.
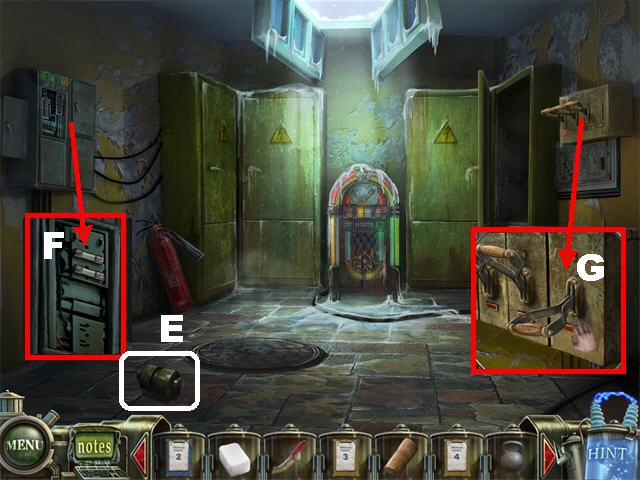
- Take the DYNAMO (E) on the floor.
- Look at the fuses on the left; place the FUSE in the empty slot (F).
- Take a closer look at the switches on the right; place the SWITCH in the empty slot (G).
- Flip the switch; this action lights up the room on the left side of the main hallway inside the asylum.
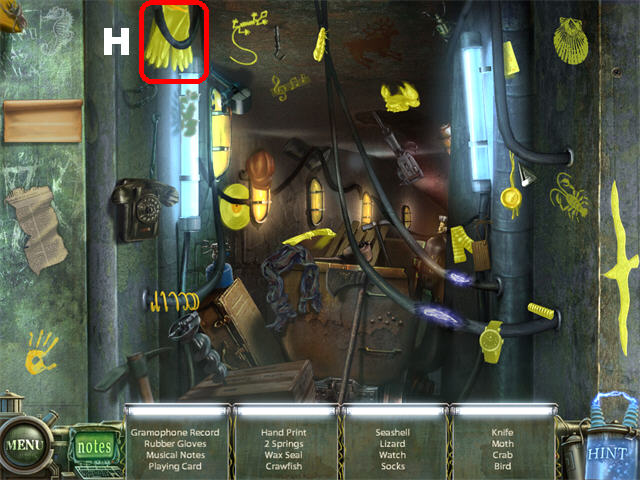
- Play the second Hidden Object Scene by the lockers to obtain the RUBBER TUBING GLOVES (H).
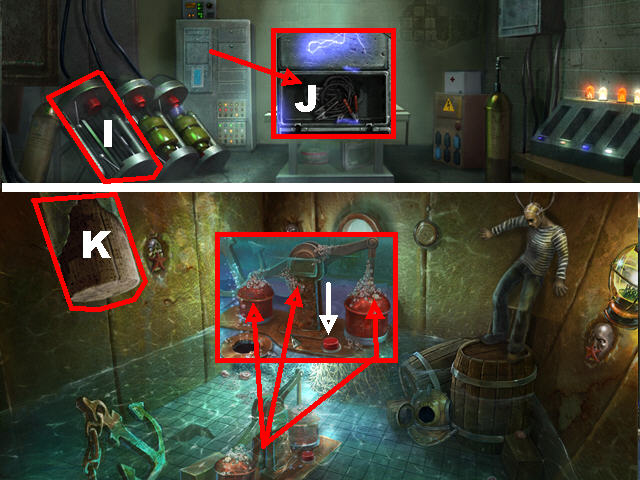
- Return to the hallway inside the asylum and go into the left door.
- Place the DYNAMO on the apparatus on the left (I).
- Zoom into the cabinet on the back wall; take the WIRES with the RUBBER TUBING GLOVES (J).
- Click down.
- Go into the right door.
- Place the PUMP PLUG into the large pipe in the upper left (K).
- Zoom into the pump on the ground; clean the 3 dirty areas there with the BRUSH.
- Press the RED BUTTON to suck all the water out.
- The DOLPHIN PUZZLE will be added to inventory once you save the man.
- Click down.
- Place MEDICAL CHART 2 on the far right door and go inside.
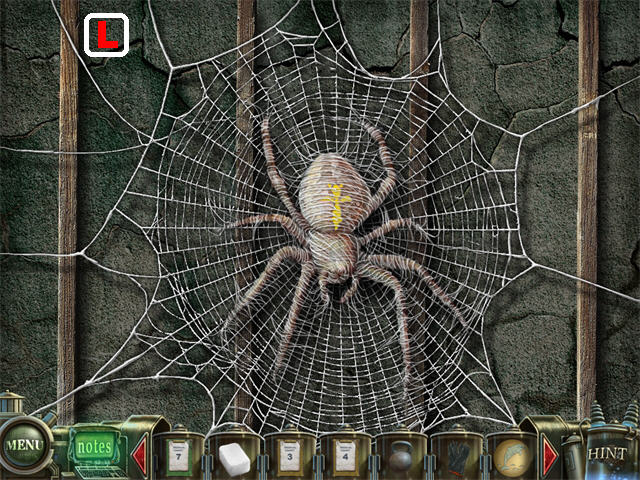
- Zoom into the ceiling to access a puzzle.
- Right-click on a piece to rotate it while it is in the center of the puzzle.
- Assemble the spider web according to the image in the screenshot (L).
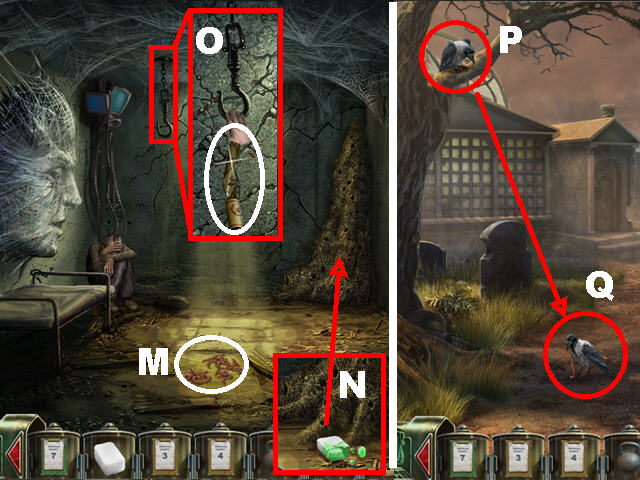
- Grab a WORM (M) on the ground.
- Zoom into the ant hill; place the POISONED SUGAR on the ants (N).
- Zoom into the hook in the ceiling; place the FLYPAPER on the hook and take a FLY (O).
- Return to the Graveyard.
- Give the WORM to the crow (P).
- Catch the CROW with the NET once it goes down to the ground to eat the worm (Q).
- Return to chamber 2 inside the asylum.
- Put the CROW on the ground so it can eat the worms (M).
- You’ve saved the man in the room; the SPIDER PUZZLE will be added to inventory.
- Exit this room and go down to the basement where Tim is.
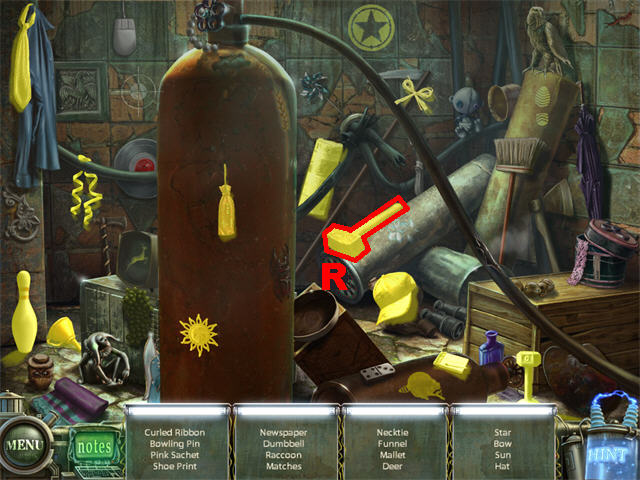
- Play the Hidden Object Scene to obtain the MALLET (R).
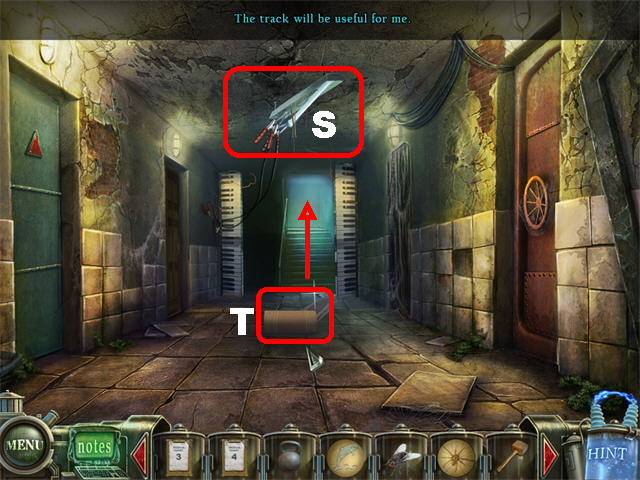
- Return to the hallway upstairs.
- Break the lights in the ceiling with the MALLET (S).
- Place the WIRES on the lights to remove the monster.
- Take the RUG (T) on the ground.
- Go forward.
Chapter 3
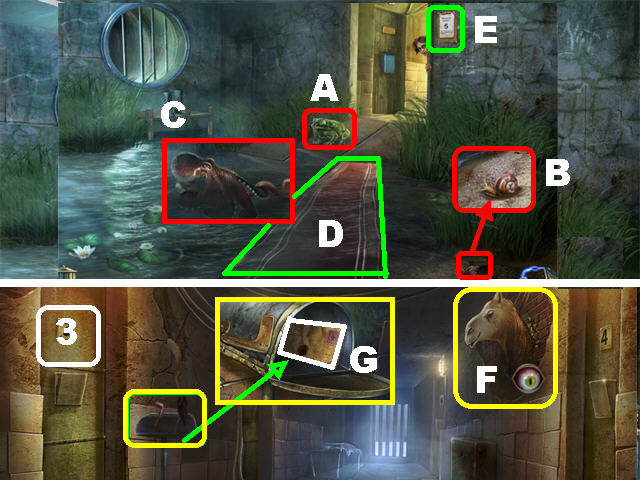
- Give the FLY to the frog (A).
- Zoom into the lower right; take the SNAIL (B).
- Place the WEIGHT on the octopus to get rid of it (C).
- Place the RUG on the ground (D).
- Take MEDICAL CHART 5 on the wall by the door (E).
- Go through the door to reach the second hallway.
- Look closer at the camel; give it the CACTUS and the mailbox on the left will open (F).
- Zoom into the mailbox and take the SEALED ENVELOPE (G).
- Place MEDICAL CHART 3 on the left door and go inside (3).
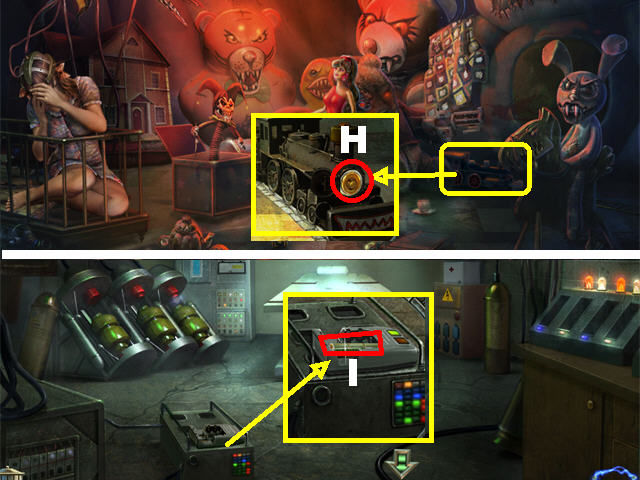
- Zoom into the train on the right; take the DEAD BATTERY (H).
- Click down 3 times and go into the left door.
- Zoom into the controls in the lower left; place the DEAD BATTERY in the charger and take the CHARGED BATTERY (I).
- Return to the second hallway.
- Place MEDICAL CHART 4 on the right door and go inside.
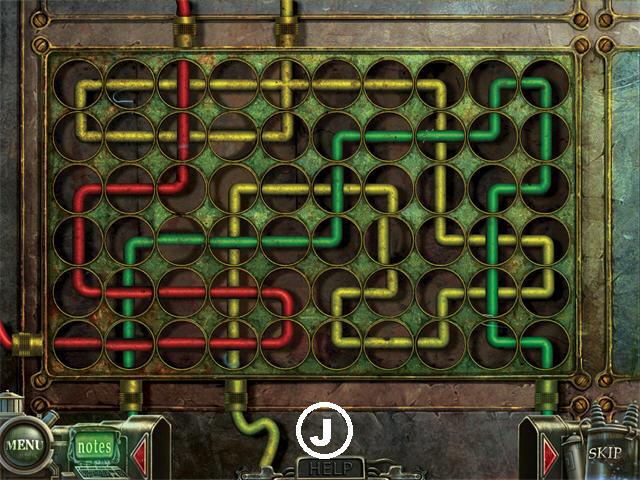
- Play the puzzle on the left.
- Click on the wires to rotate them.
- Connect the wires as shown in the screenshot (J).
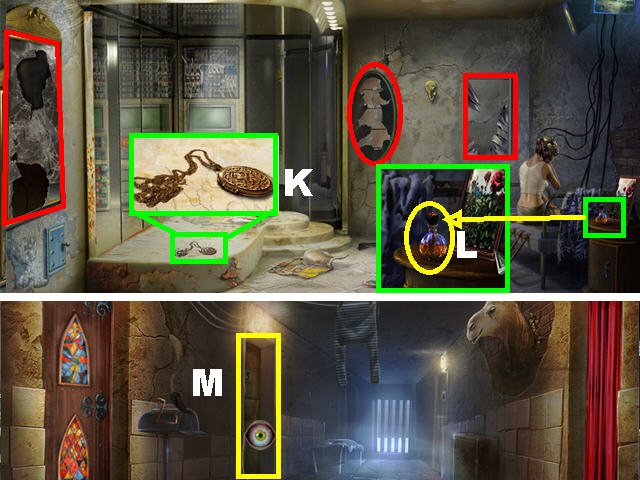
- Break the 3 mirrors marked in red with the MALLET.
- Zoom into the base on the left; take the MEDALLION (K).
- Zoom into the dresser next to the bed and take the ROSE OIL (L).
- Exit this scene and place MEDICAL CHART 5 on the far left door.
- Go inside the far left door to access the stamp room (M).
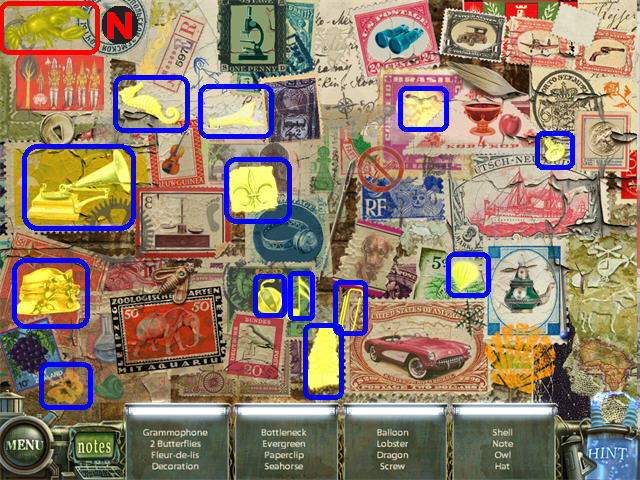
- Play the Hidden Object Scene on the left to obtain the BRASS LOBSTER (N).
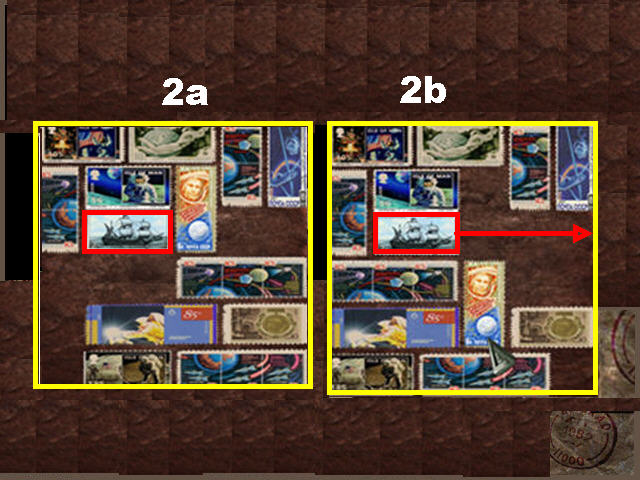
- Zoom into the puzzle on the right side of the wall.
- Move the main stamp to the exit on the right.
- Complete four rounds to beat this puzzle.
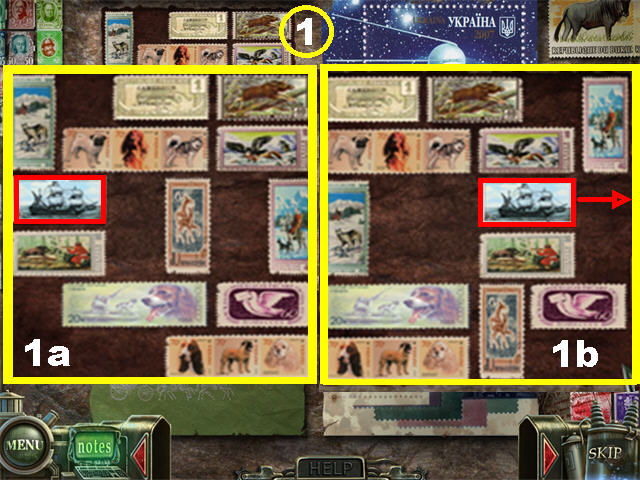
- This solution is for the first round of this puzzle (1).
- This solution is for the second round of this puzzle (2).
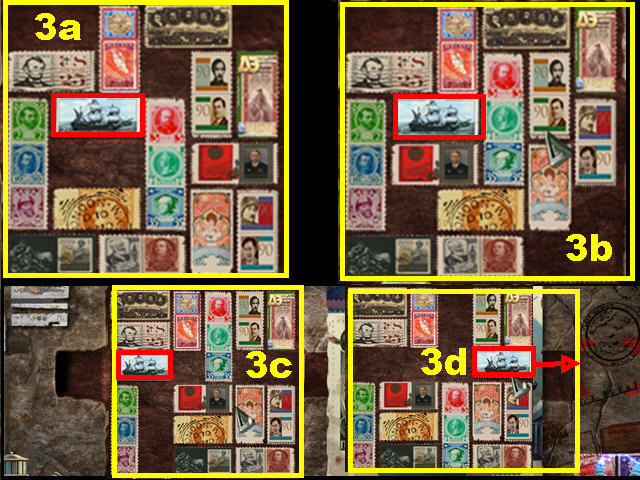
- This solution is for the third round of this puzzle (3).
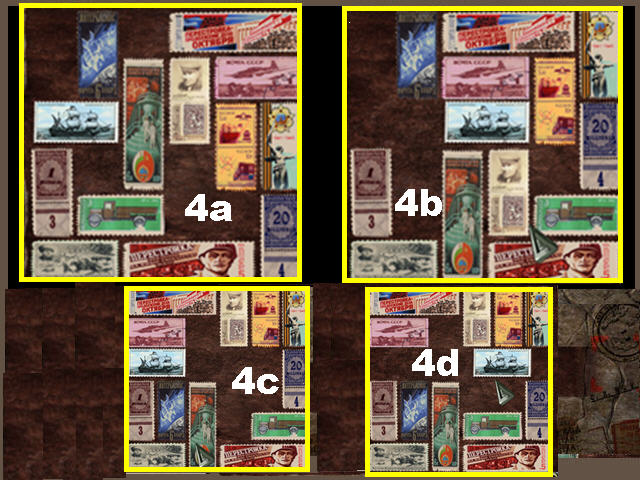
- This solution is for the fourth round of this puzzle (4).
- The SHIP STAMP will be added to inventory once you complete the puzzle.
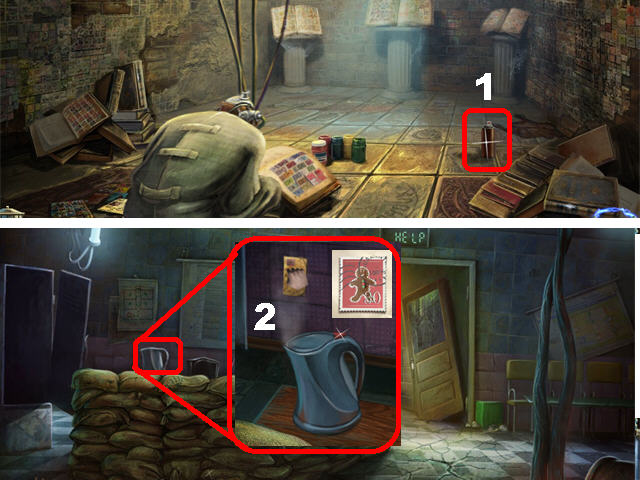
- Take the POLISH on the ground (1).
- Return to the reception area with the pile of sacks.
- Zoom into the coffee pot; click on the button so steam appears.
- Place the SEALED ENVELOPE over the steam to obtain the CHILD’S STAMP (2).
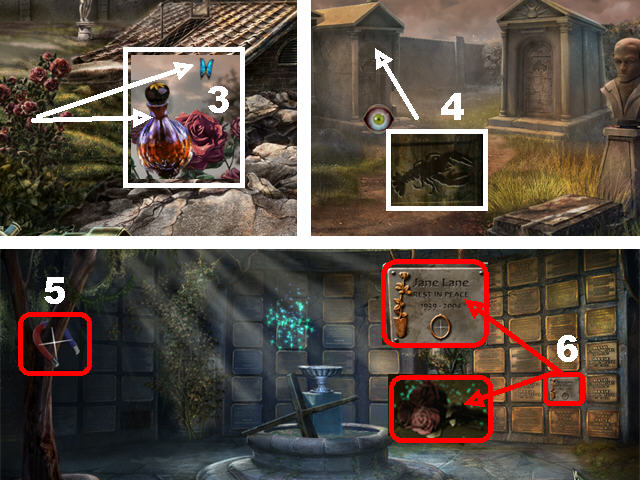
- Click down, go left by the building, and head right.
- Zoom into the roses on the left; place the ROSE OIL over it and catch the BUTTERFLY (3) using the NET.
- Click down and go forward.
- Zoom into the brass lobster door on the left; place the BRASS LOBSTER over the door and go inside (4).
- Take the MAGNET (5) on the left.
- Zoom into the plaque in the lower right; put the MEDALLION in the ring and take the DRIED FLOWERS (6).
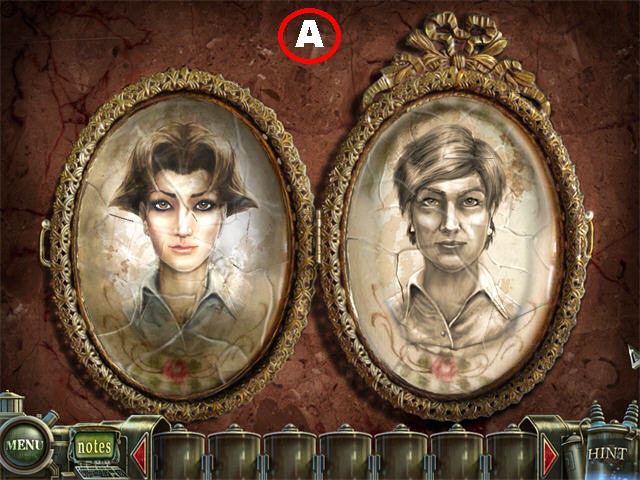
- Click on the sparkly area to trigger a puzzle.
- Assemble both sides of the locket using the image in the screenshot (A). Correct pieces will lock into place.
- The MEDALLION will go back into inventory after the puzzle has been completed.
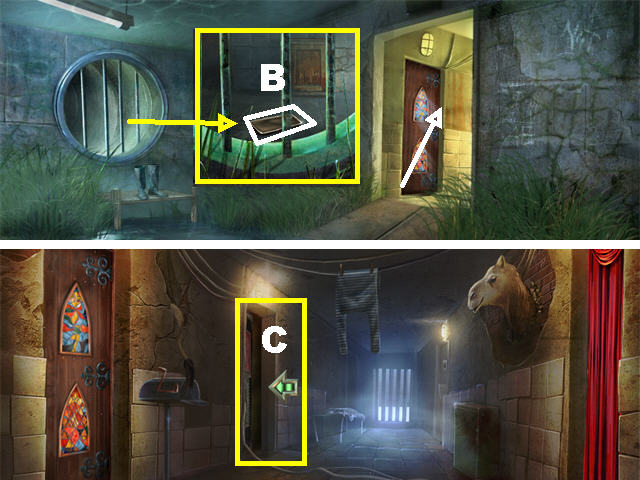
- Go into the asylum’s first hall and go forward.
- Zoom into the bars on the left; use the MAGNET to obtain the TRAY (B).
- Go forward and enter the far left door (C).
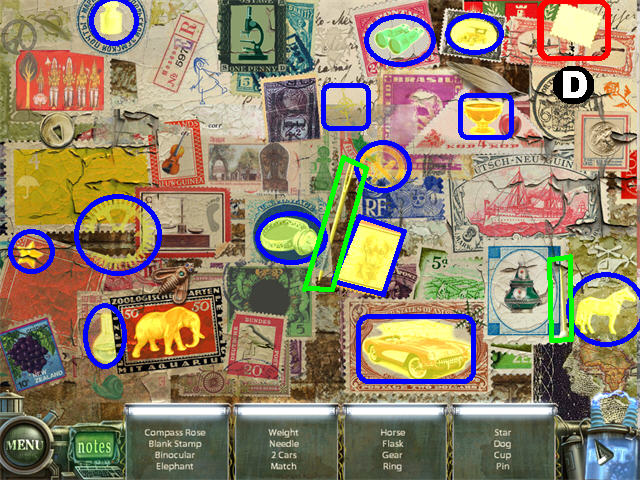
- Play the Hidden Object Scene to obtain the BLANK STAMP (D).
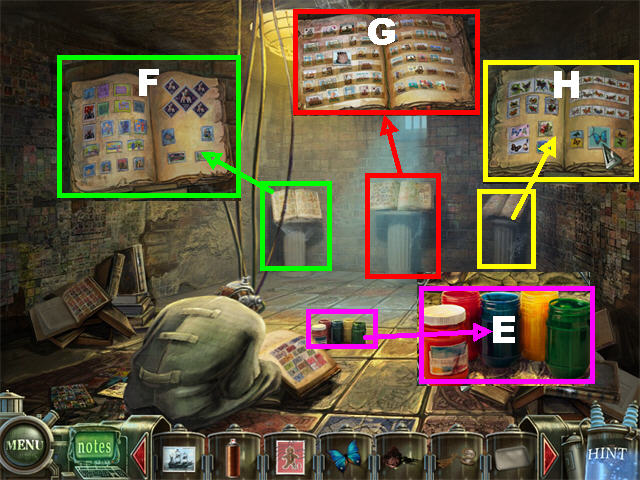
- Zoom into the paints; place the DRIED FLOWERS on the paint to create the BRIGHT FLOWERS (E).
- Zoom into the left pedestal and place the CHILD’S STAMP on the book (F).
- Zoom into the middle pedestal; Place the SHIP STAMP in the book (G).
- Zoom into the right pedestal; place the BLANK STAMP in the book; then place the BUTTERFLY over the blank stamp (H).
- The STAMP PUZZLE will be added to inventory.
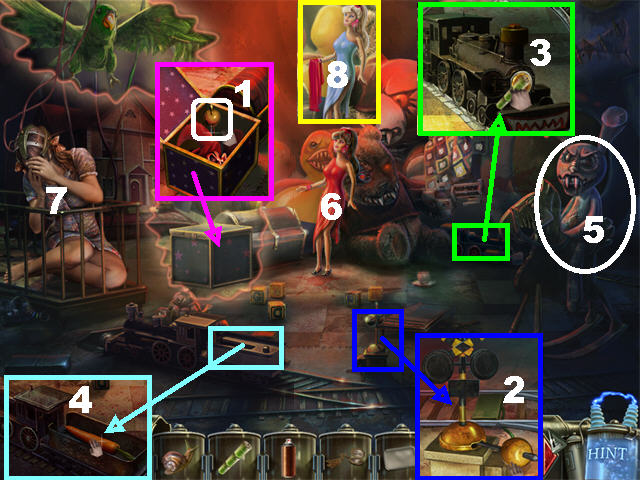
- Click down and go into the left door.
- Look at the jack in the box; click on it and take the LEVER (1).
- Zoom into the control on the ground; place the LEVER and then click on it (2).
- Look closer at the train.
- Put the CHARGED BATTERY on the train and close the lid.
- Click on the train to move it (3).
- Zoom into the back of the train once it comes forward.
- Open the back compartment and take the CARROT (4).
- Give the CARROT to the rabbit on the right (5).
- Give the BRIGHT FLOWERS to the doll (6).
- The DOLL PUZZLE (7) will be added to inventory.
- Click on the doll to receive the DRESS (8).
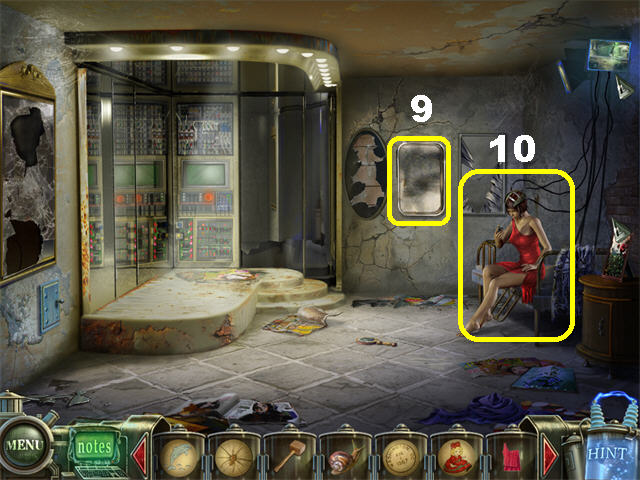
- Exit this room and go into the right door.
- Place the TRAY on the hook in the back wall (9).
- Spray the TRAY with the POLISH.
- Give the MEDALLION to the girl on the bed (10).
- Give the DRESS to the girl on the bed.
- The MIRROR PUZZLE will be added to inventory.
- Return to the basement where Tim is.
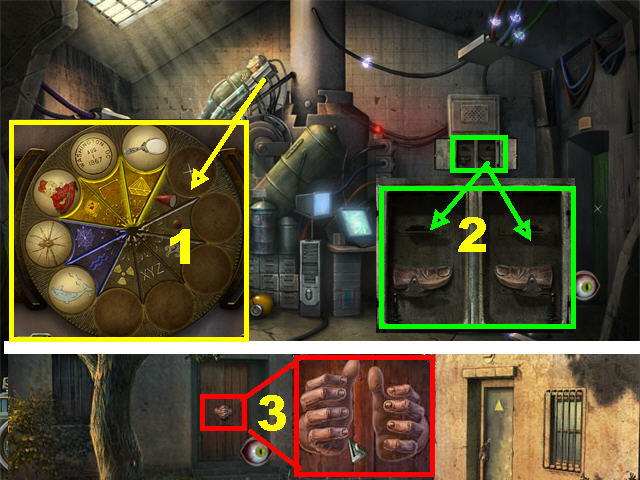
- Zoom into Tim; place the MIRROR PUZZLE, STAMP PUZZLE, DOLL PUZZLE, SPIDER PUZZLE, and DOLPHIN PUZZLE into the appropriate slots (1).
- Zoom into the back panel and take the 2 THUMBS (2).
- Leave the building and head right.
- Zoom into the left door.
- Place both THUMBS on the door and go inside (3).
Chapter 4
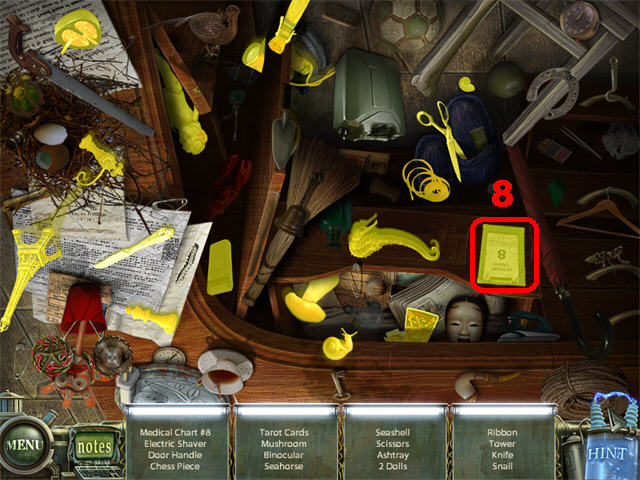
- Play the Hidden Object Scene to obtain MEDICAL CHART 8 (8).
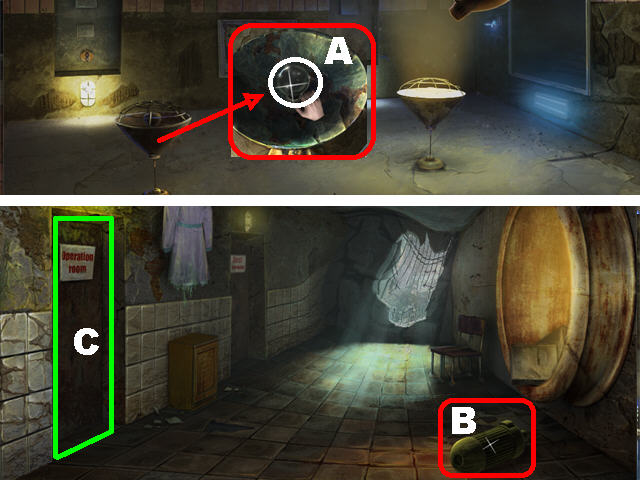
- Zoom into the left lamp on the ground.
- Click on the lamp cover and take the LIGHTBULB (A).
- Go through the right entrance.
- Take the ENGINE ROTOR (B) on the ground.
- Go into the operating room on the left (C).
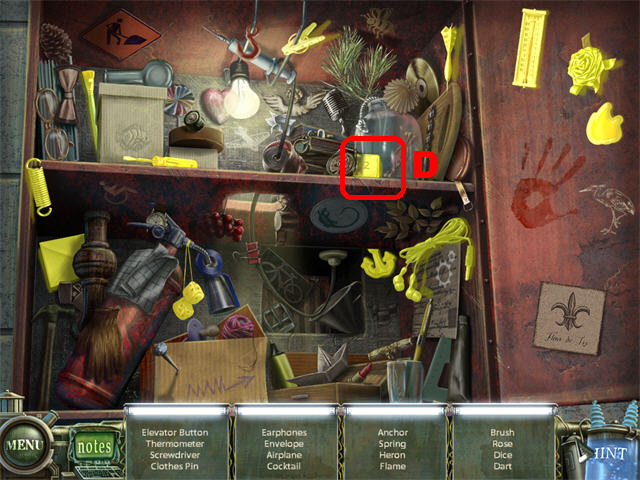
- Open the red cabinet in the upper right to trigger a Hidden Object Scene; the ELEVATOR BUTTON (D) will be added to inventory.
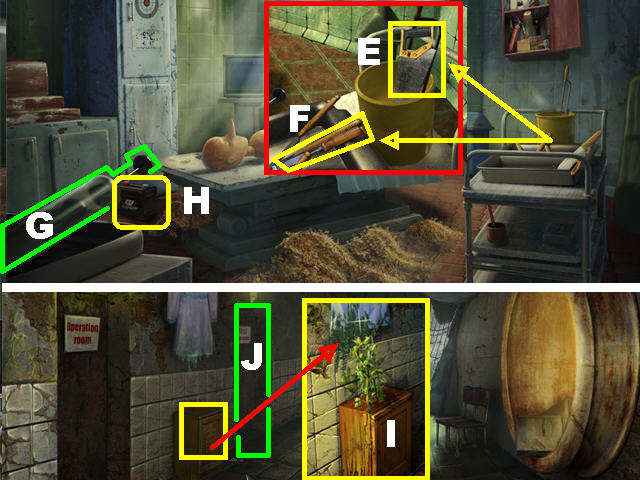
- Zoom into the tray on the right; take the SAW (E) and the CHISEL (F).
- Grab the SYRINGE (G) in the lower left.
- Take the ENGINE ACCUMULATOR (H) next to the bed.
- Click down.
- Zoom into the small cabinet; put the SYRINGE on the gooey mess, after the plant grows, to obtain the FULL SYRINGE (I).
- Go into the far left door (J).
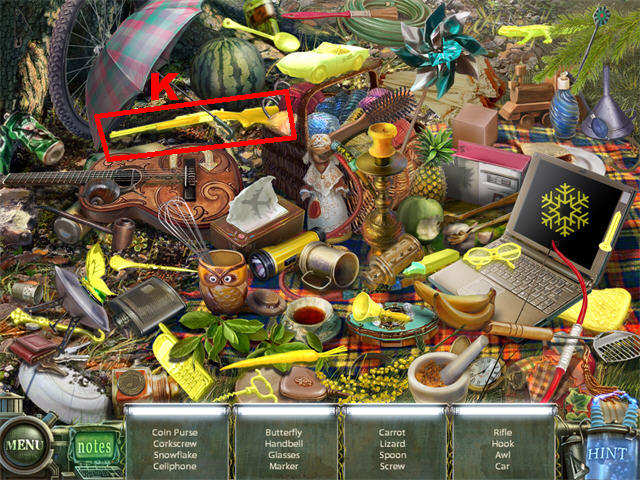
- Play the Hidden Object Scene to obtain the RIFLE (K).
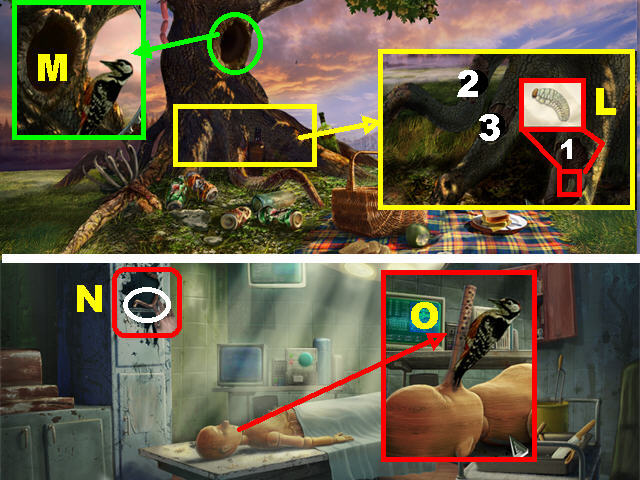
- Zoom into the base of the tree; cut the (1, 2, and 3) trunk with the CHISEL and take the BARK BEETLE (L).
- Zoom into the hole in the tree; give the WOODPECKER the BARK BEETLE and grab the WOODPECKER (M) using the NET.
- Return to the operating room.
- Place the RIFLE on the left cabinet and take the MANHOLE HANDLE (N).
- Zoom into the puppet; place the FULL SYRINGE on the puppet and the HALF-FULL SYRINGE will be added to inventory (O).
- Place the WOODPECKER on the puppet’s nose.
- Take the FLUTE using the SAW. This action triggers a Hidden Object Scene.
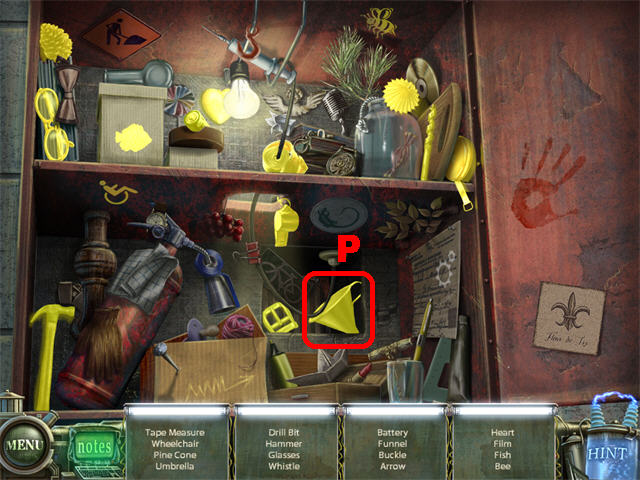
- The FUNNEL (P) will be added to inventory after your search.
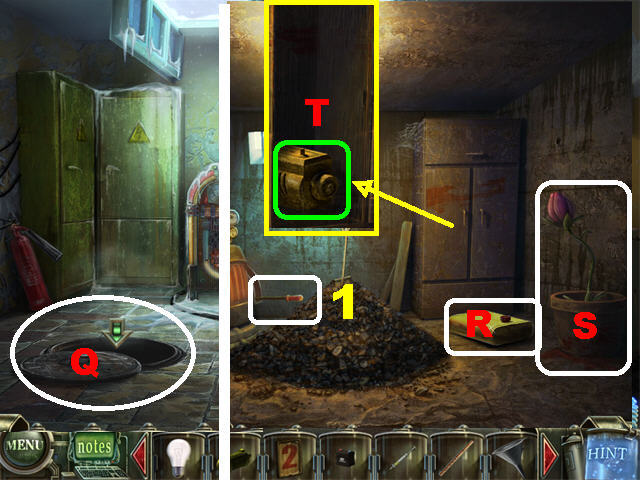
- Exit this building and enter the building on the right.
- Place the MANHOLE HANDLE on the manhole and go inside (Q).
- Take the ENGINE TANK (R) on the ground.
- Place the HALF-FULL SYRINGE on the plant (S).
- Zoom into the cabinet, open the door and take the ENGINE (T).
- Exit this building and return to the picnic area in the next building.
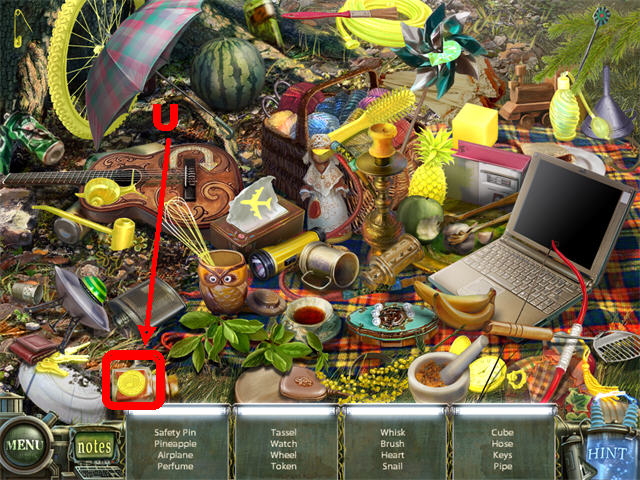
- Play the Hidden Object Scene to obtain the TOKEN (U).
- Leave this building and enter the next one.
- Zoom into the jukebox and place the TOKEN in the slot (V).
- The plant will go through the ceiling and freeze.
- Break the frozen plant with the MALLET to obtain the VALVE HANDLE (W).
- Return to the next building.
- Place MEDICAL CHART 7 on the right door and enter the elevator (X).
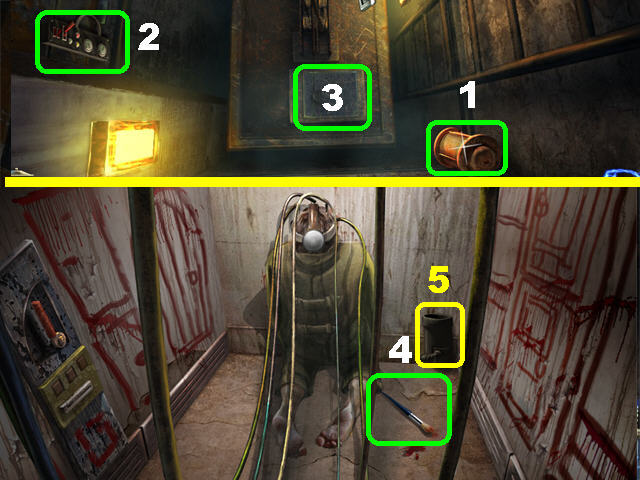
- Take the ENGINE GENERATOR in the lower right (1).
- Take the ENGINE CONSOLE on the left (2).
- Place the VALVE HANDLE on the elevator and go in (3).
- Take the BRUSH (4) on the ground.
- Take the ENGINE FILTER (5) on the ground.
- Exit the elevator.
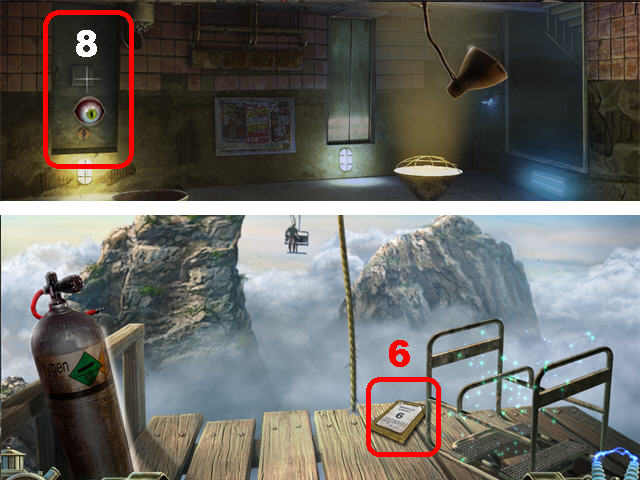
- Place MEDICAL CHART 8 on the left door and then go inside (8).
- Take MEDICAL CHART 6 on the ground (6). This action triggers a search scene in the hallway.
- Click down.
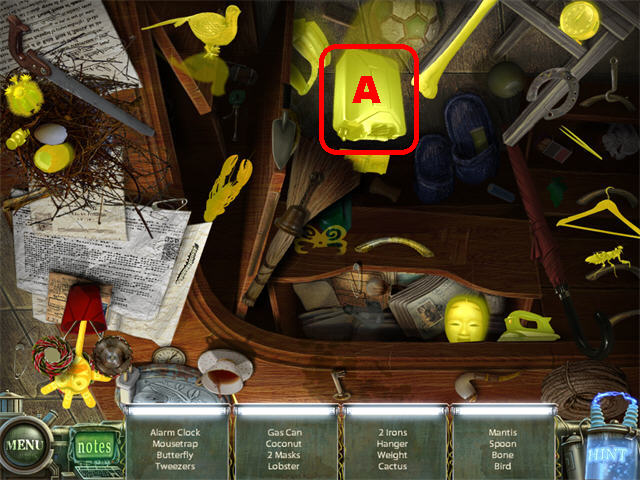
- Play the Hidden Object Scene in the upper right to obtain the GAS CAN (A).
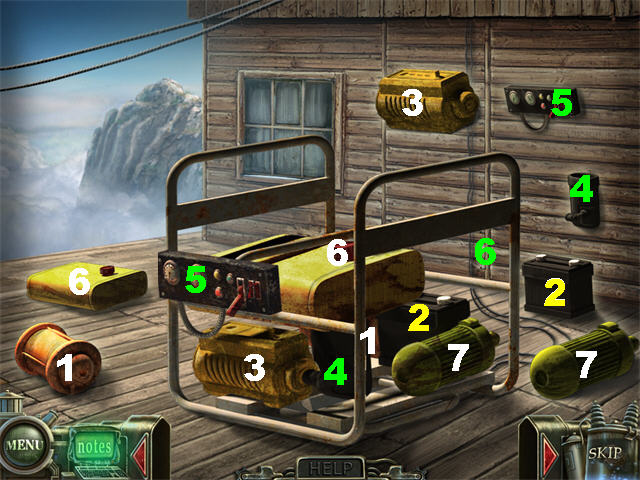
- Go into the left door. Click on the lift in the lower right.
- Place the following items into their matching silhouettes: ENGINE GENERATOR (1), ENGINE ACCUMULATOR (2), ENGINE (3), ENGINE FILTER (4), ENGINE CONSOLE (5), ENGINE TANK (6), and ENGINE ROTOR (7).
- Now assemble the engine on the lift in the order shown in the screenshot.
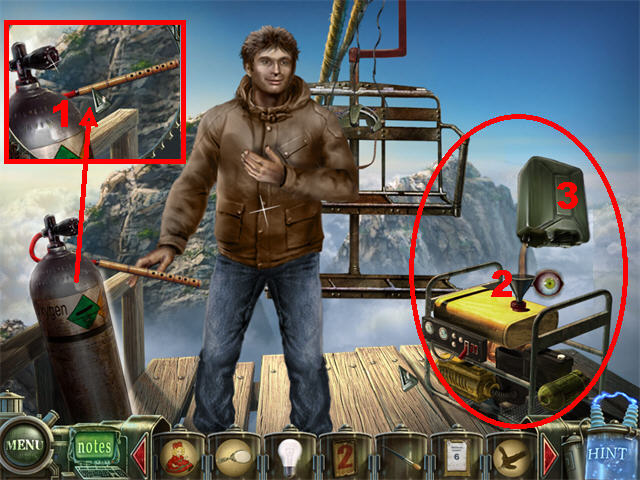
- Zoom into the tank on the left; place the FLUTE over the hose (1).
- Place the FUNNEL on the generator (2).
- Pour the GAS CAN into the funnel (3).
- Click on the generator and the man will come forward.
- The BIRD PUZZLE will be added to inventory.
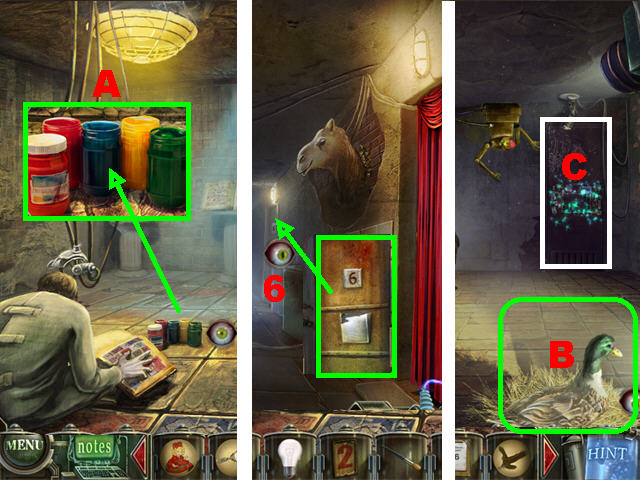
- Return to the stamp room in the second hallway of the main building.
- Zoom into the paints; dip the BRUSH into the paint to obtain BRUSH WITH PAINT (A).
- Click down.
- Zoom into the far right door.
- Put MEDICAL CHART 6 on the door and go inside (6).
- Give the SNAIL to the duck (B).
- Zoom into the back door to trigger a puzzle (C).
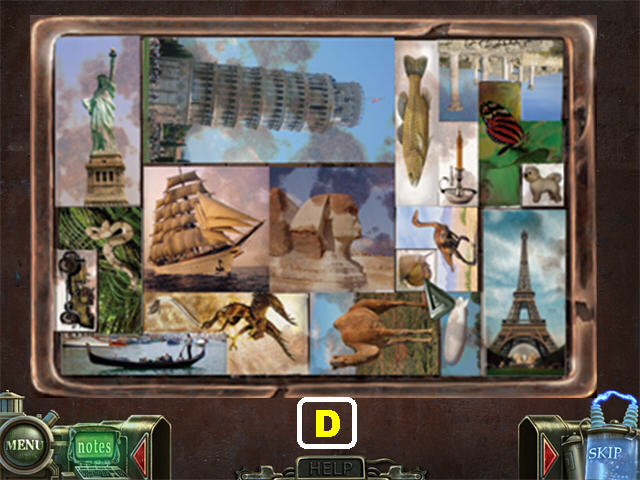
- Fit all the stamps inside the box according to the image in the screenshot (D).
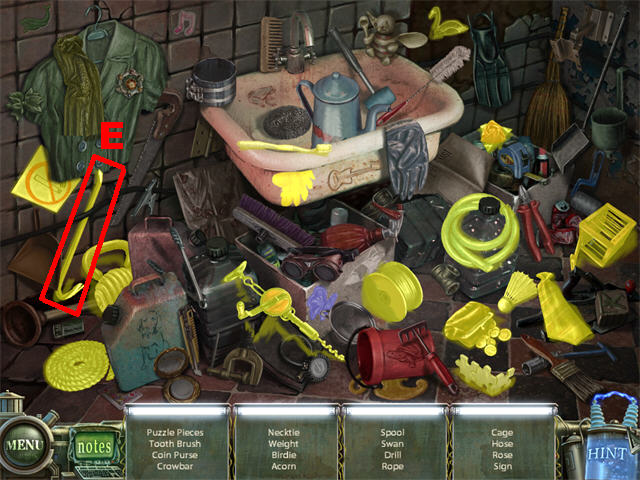
- Go through the door.
- Play the Hidden Object Scene to obtain the CROWBAR (E).
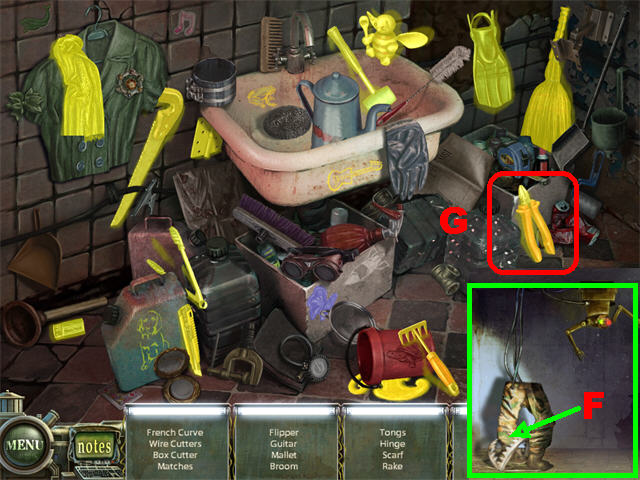
- Exit this room.
- Place the CROWBAR on the trap (F) around the legs on the ground.
- Go through the door.
- Play the Hidden Object Scene to obtain the WIRE CUTTERS (G).
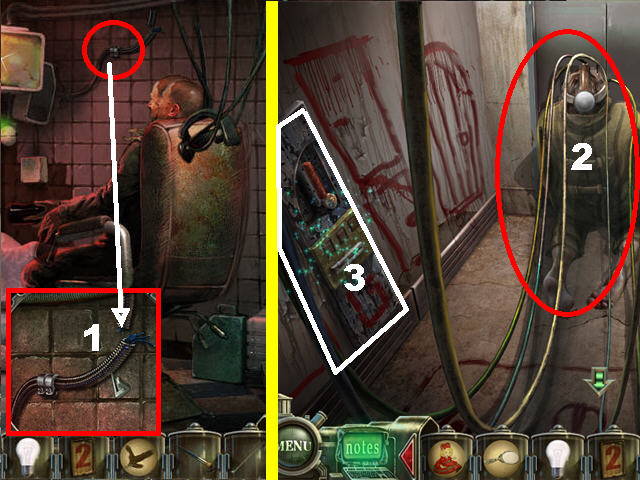
- Cut the wires above the man with the WIRE CUTTERS to save him (1).
- He will give you the EYE PUZZLE.
- Exit this scene and return to the elevator in the other building (hand on doors).
- Go into the elevator.
- Give the BRUSH WITH PAINT to the man (2) so he can paint a door in which to exit.
- Click on the lever on the left (3) to access a puzzle.
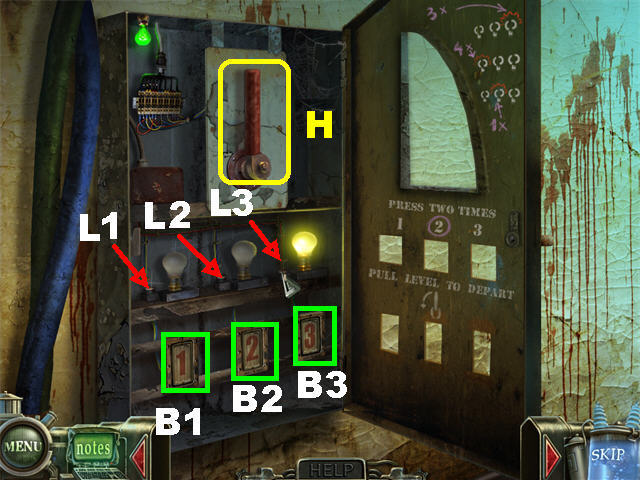
- Place the LIGHTBULB and ELEVATOR BUTTON on the panel to activate the puzzle.
- The solution for the puzzle is scribbled on the right wall. The light bulb in the top left will light up green when a correct sequence has been given, and red when an incorrect sequence has been given.
- Click, in the following order, on buttons L3, L3, L3, L1, L1, L1, L1, L2, B2, B2, and H.
- The WALL PUZZLE will be added to inventory after the puzzle has been completed.
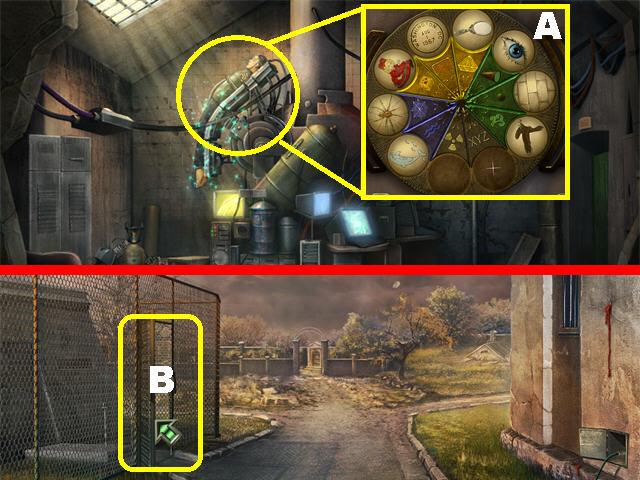
- Return to the basement where Tim is.
- Zoom into Tim; place the EYE PUZZLE, WALL PUZZLE, and BIRD PUZZLE into the appropriate slots, cutting the electricity to the asylum fence (A).
- Exit the building and head left. Go through the fence on the left (B).
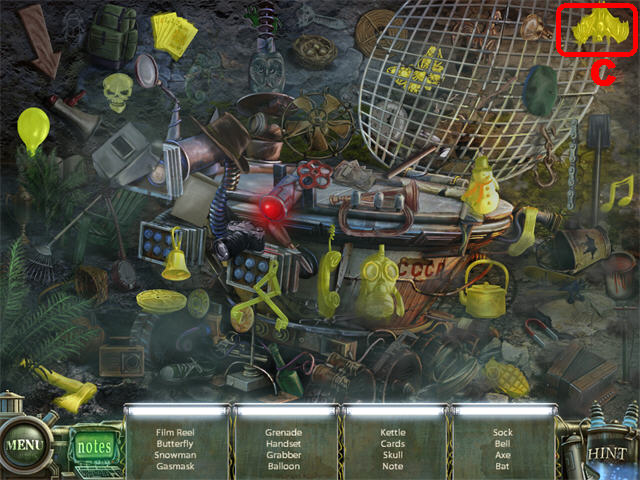
- Play the Hidden Object Scene to obtain the BAT (C).
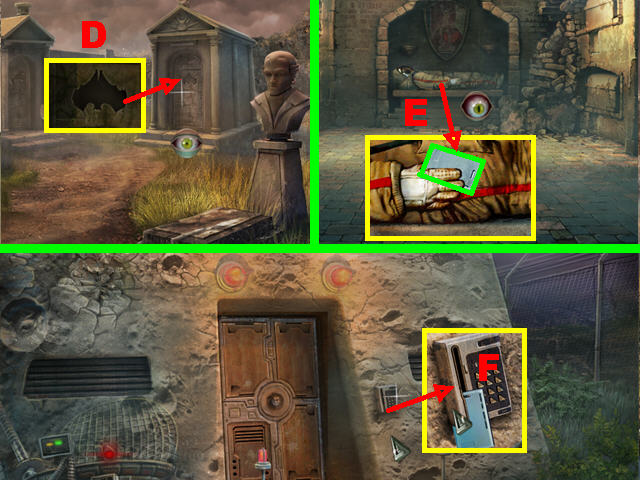
- Click down and go forward.
- Zoom into the door on the right; place the BAT on the door and go inside (D).
- Zoom into the mummy on the back wall and take the ACCESS CARD (E).
- Go through the fence again.
- Zoom into the panel on the right.
- Place the ACCESS CARD on the keypad and then go through the door (F).
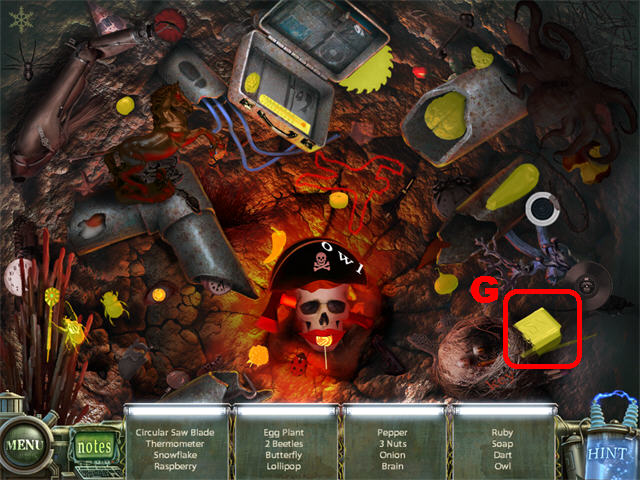
- Play the Hidden Object Scene in the lower right corner to obtain the SOAP (G).
- Go through the left door.
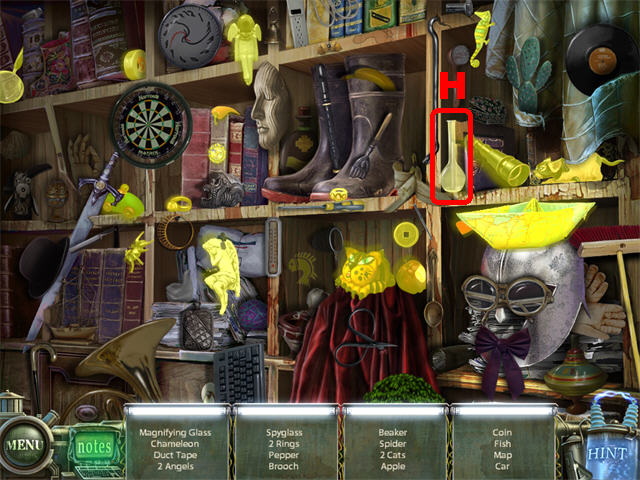
- Play the Hidden Object Scene to obtain the FLASK (H).
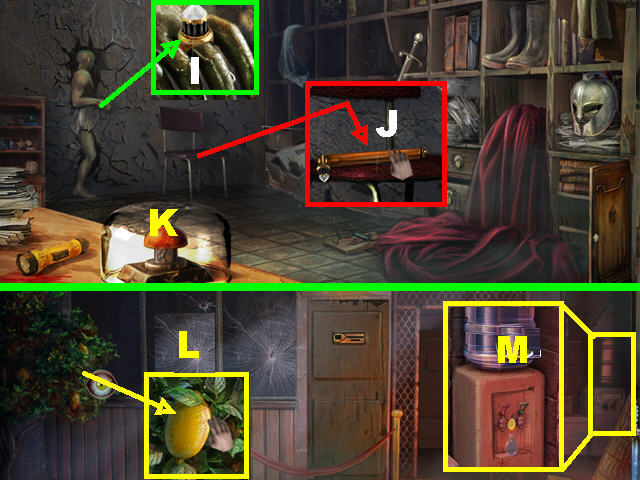
- Zoom into the statue on the left; place the SOAP on the finger and take the RING (I).
- Zoom into the chair; place the RING on the PEN to obtain the GLASS CUTTER (J).
- Cut the glass dome with the makeshift GLASS CUTTER.
- Push the button to open the other door in the hallway (K).
- Click down.
- Zoom into the left tree; take the LEMON (L).
- Zoom into the water cooler; place the FLASK on the cooler and pull the right handle (M).
- Place the LEMON on the flask and take the LEMONADE.
- Go into the left door.
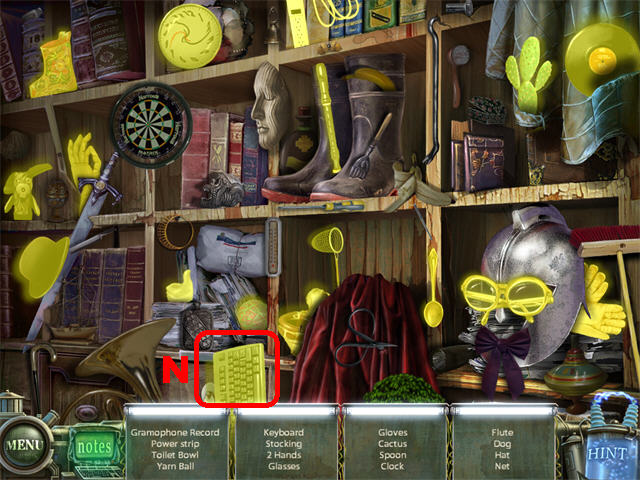
- Play the Hidden Object Scene on the right to obtain the KEYBOARD. (N).
- Click down and go into the right door.
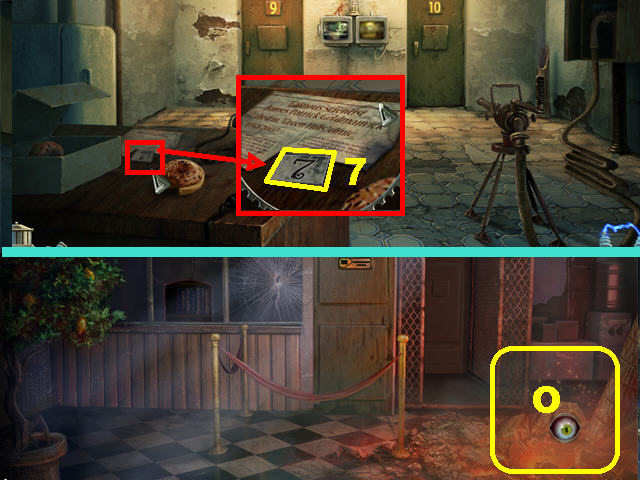
- Take the NUMBER (7) on the desk.
- Click down.
- Play the Hidden Object Scene in the lower right corner (O).
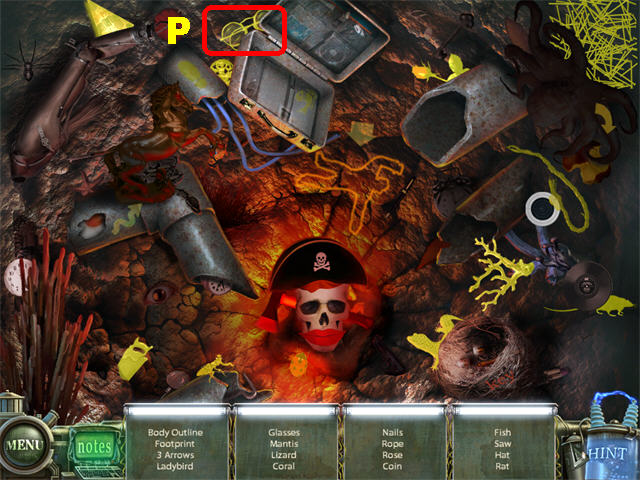
- The GLASSES (P) will be added to inventory after your search.
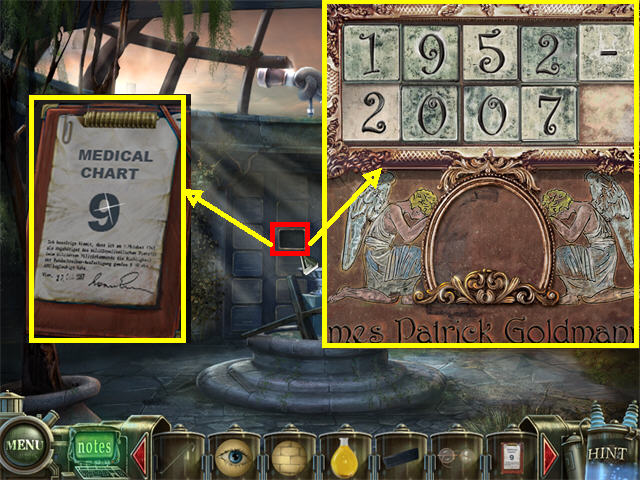
- Go to the graveyard and enter the left door.
- Zoom into the sparkly area; place the NUMBER on the plaque to activate the puzzle.
- Move the tiles around until you form the dates “1952-2007.”
- Take MEDICAL CHART 9 after the puzzle has been solved.
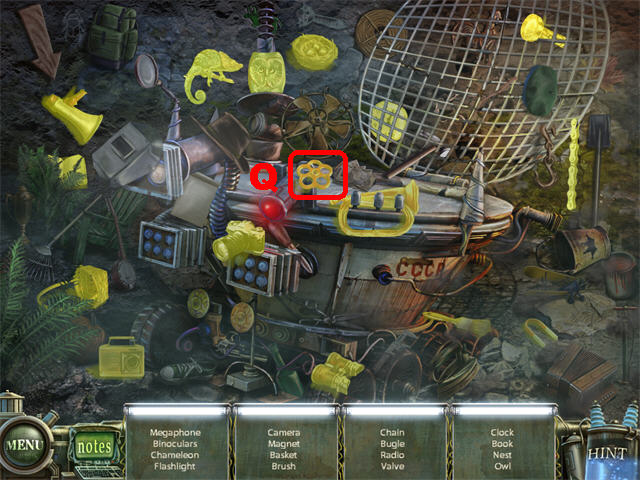
- Click down twice and go through the fence.
- Play the Hidden Object Scene to obtain the VALVE (Q).
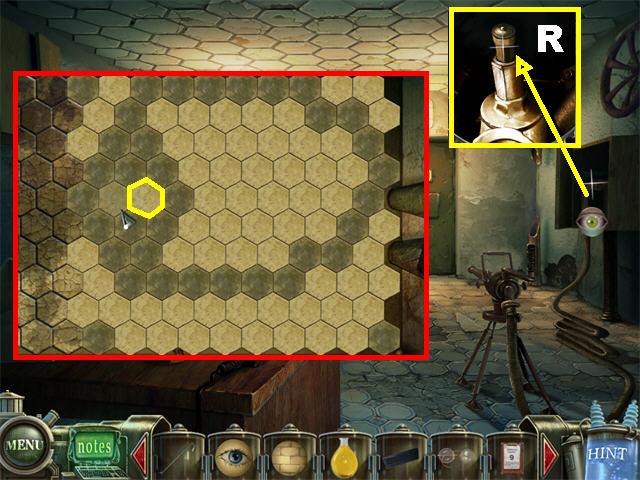
- Go forward and through the right door.
- Take a closer look at the right wall; place the VALVE on the pipe (R).
- Zoom into the sparkly area to access the puzzle.
- Trap the person hiding under the ceiling tiles by blocking their way.
- Click on a tile you want to block; water will spray on that spot, darkening it.
- Do not let the person reach the corners of the ceiling or you will lose that round.
- It is better to block off the corners of the ceiling first and work your way in.
- Once you’ve blocked the person in, start closing the tiles in around them until they have no place else to go.
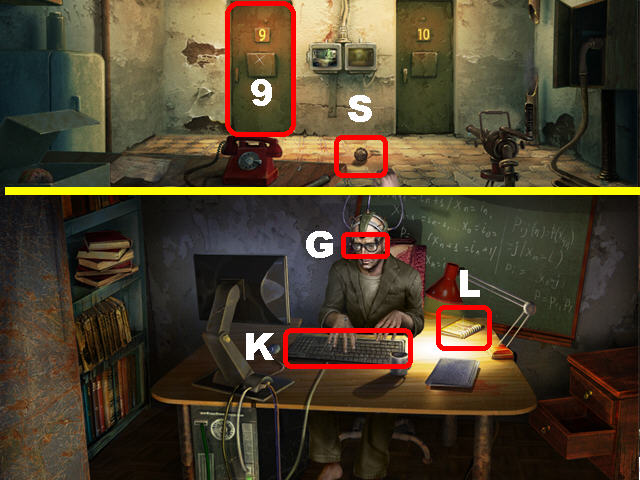
- Take the WOODEN AMULET (S) that falls on the ground.
- Place MEDICAL CHART 9 on the left door and go inside (9).
- Give the man his glasses (G).
- Place the KEYBOARD on the desk (K).
- Zoom into the notebook.
- Spill the LEMONADE onto the notebook pages (L).
- The PEN PUZZLE will be added to inventory.
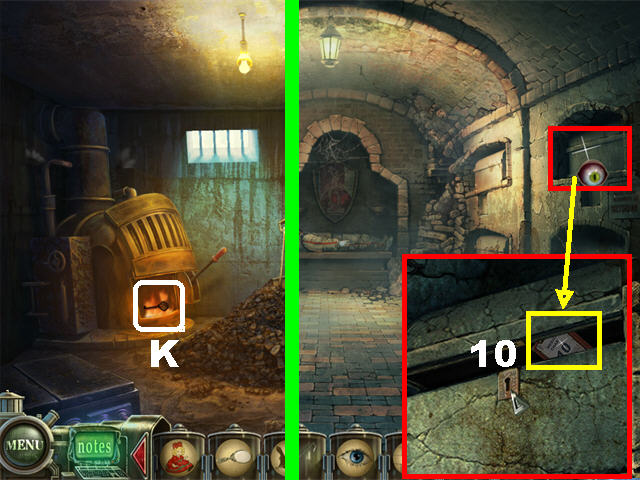
- Go to the room with the jukebox.
- Go into the manhole.
- Click on the stove’s lever.
- Toss the WOODEN AMULET in the fire and then take the KEY (K) with the CROWBAR.
- Return to the bat building by the graveyard.
- Zoom into the tomb in the upper right; open it with the KEY and take MEDICAL CHART 10 (10).
- Go through the fence, go forward, and enter the right door.
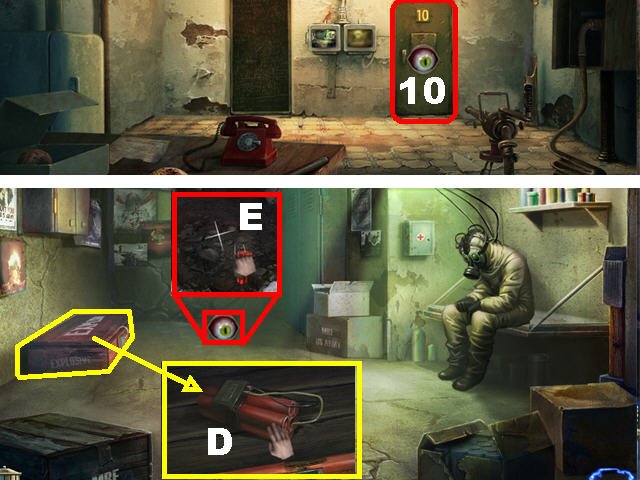
- Place MEDICAL CHART 10 on the right door and go inside (10).
- Take a closer look at the box on the left; open it with the CROWBAR and take the DYNAMITE (D).
- Zoom into the crack on the back of the floor; place the DYNAMITE in the hole (E).
- The BULLET PUZZLE will be added to inventory.
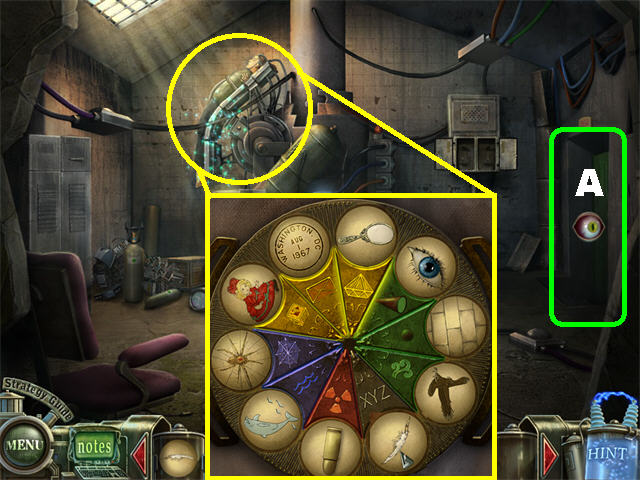
- Return to the main building.
- Go into the first hallway.
- Go into the far left door and all the way down to reach Tim.
- Zoom into Tim; place the PEN PUZZLE and the BULLET PUZZLE into the appropriate slots to complete the puzzle.
- Follow Tim through the right door (A).
- Go through the right door.
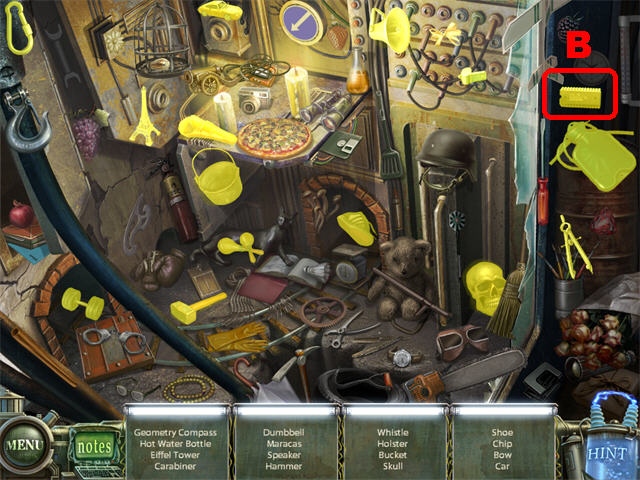
- Play the Hidden Object Scene to obtain the CHIP (B).
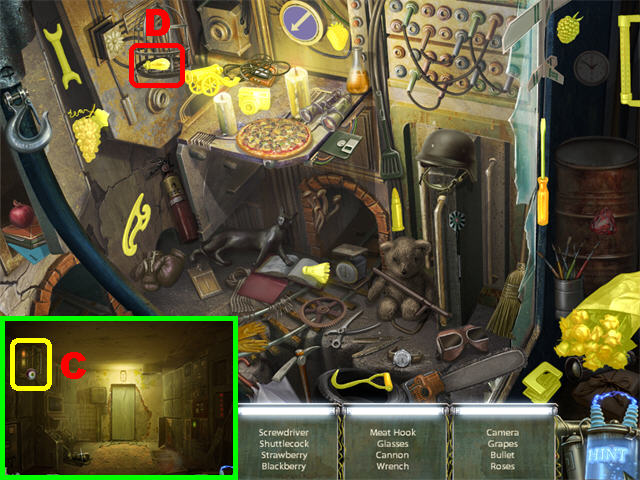
- Zoom into the panel in the upper left; place the CHIP in the slot (C).
- Play the Hidden Object Scene to obtain the SMALL LIGHT BULB (D).
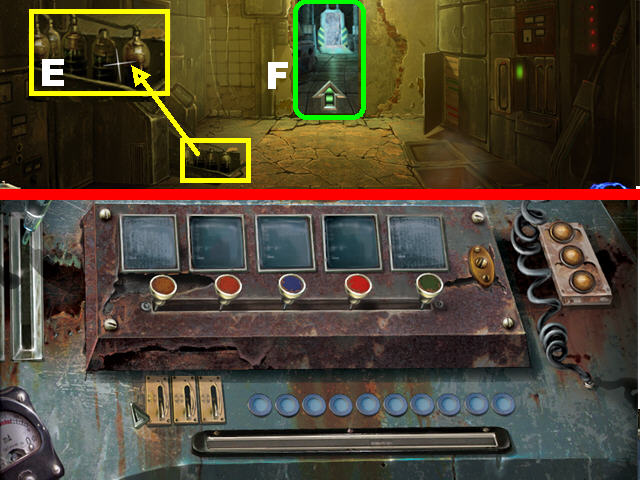
- Zoom into the apparatus in the lower left; place the SMALL LIGHT BULB in the slot (E).
- Go through the door (F).
- Click on the puzzle on the left.
- Look at the lights on the console.
- Reproduce the light sequence you are shown.
- If you make a mistake, a red light will appear on the right; get three red lights and you will have to start over from the beginning.
- The sequences are random; solve 10 rounds to win the game.
- Congratulations! You’ve completed Haunted Halls: Green Hills Sanitarium!
Created at: 2010-11-26

