

Walkthrough Menu
- General Tips
- Chapter 1: Entrance and Reception
- Chapter 2: Second Floor and Beyond
- Chapter 3: Garden and Basement
- Chapter 4: Tomb
- Chapter 5: Room 13
- Chapter 6: Shrine
- Chapter 7: Altar
General Tips
- This is the official guide for Haunted Hotel: Ancient Bane.
- This guide will not mention each time you have to zoom into a location; the screenshots will show each zoom scene.
- We will use the acronym HOP for Hidden-object puzzles. Interactive items will be color-coded and some will be numbered; please follow the numbers in sequence when appropriate.
- The HOP lists may be random; our lists may vary from yours.
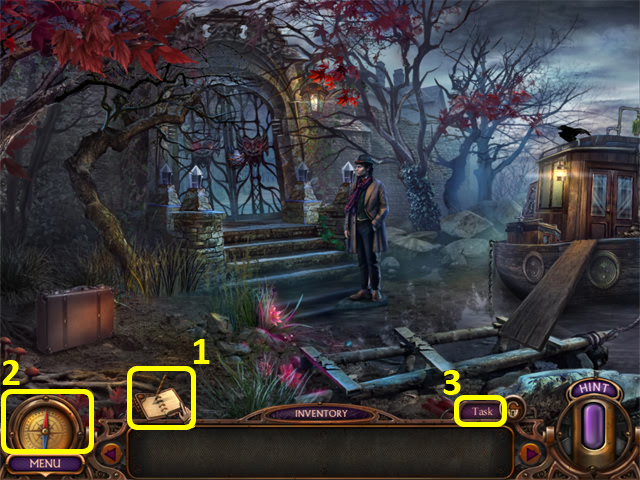
- Select the diary (1) for story updates.
- Select the compass (2) for a map.
- Select the button (3) for current objective.
Chapter 1: Entrance and Reception
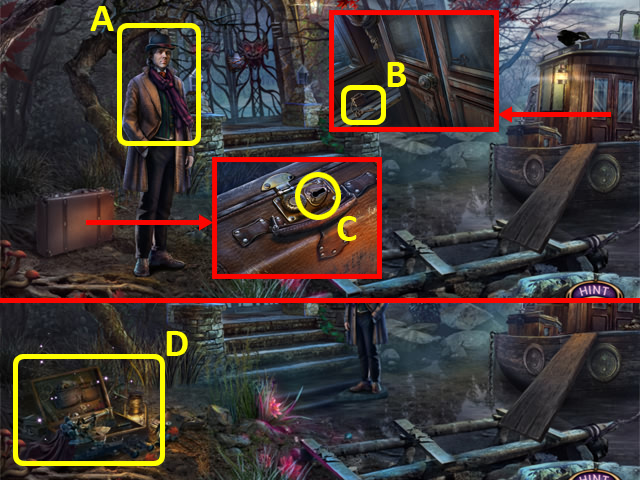
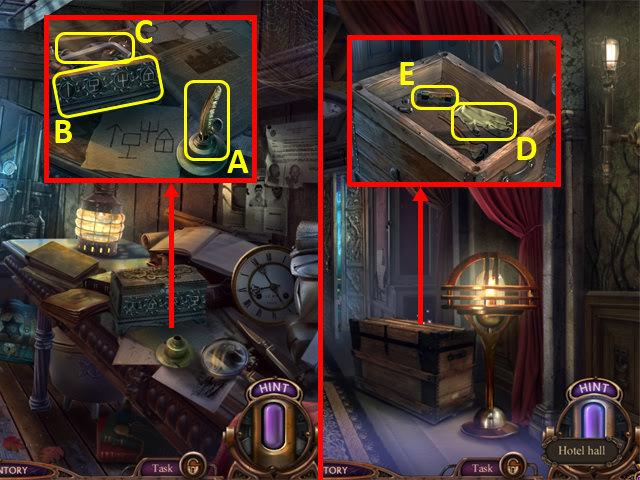
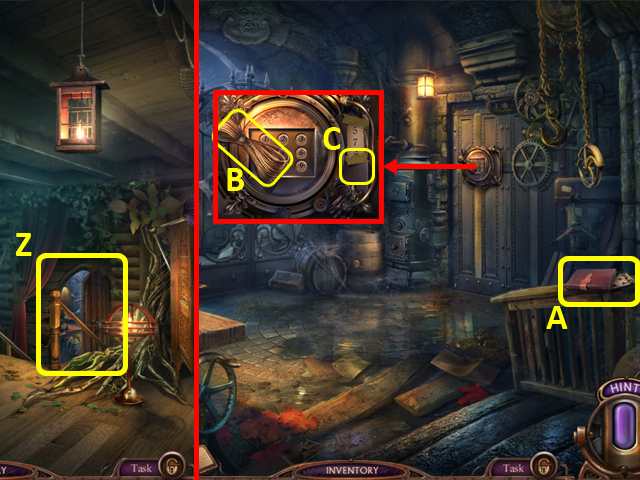
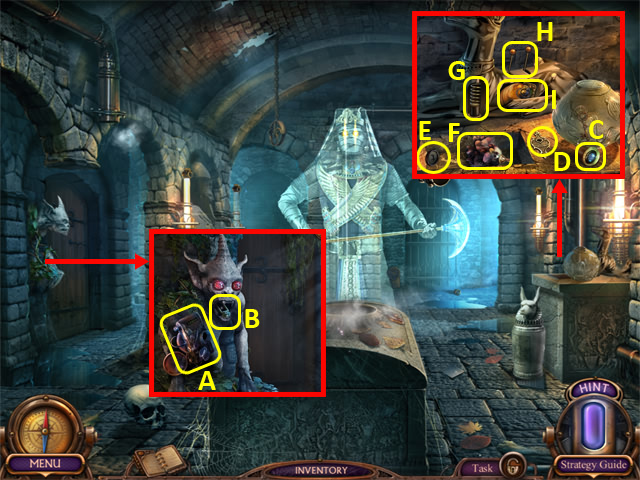
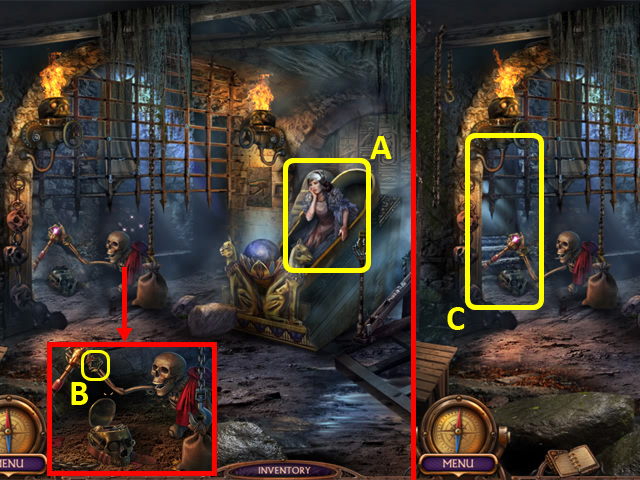
- Talk to James (A).
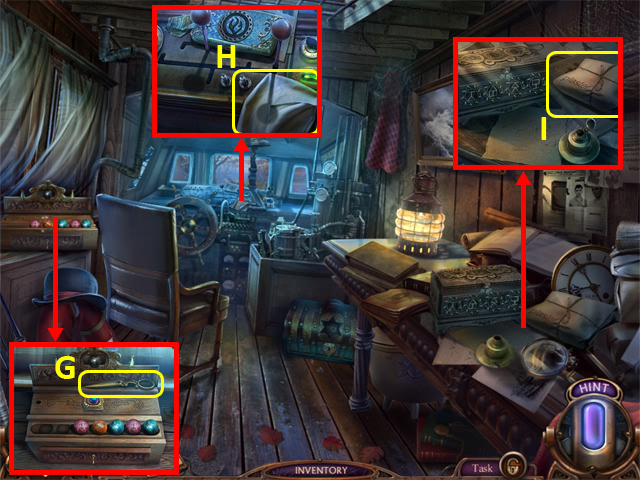
- Grab the SUITCASE KEY (B).
- Use the SUITCASE KEY (C).
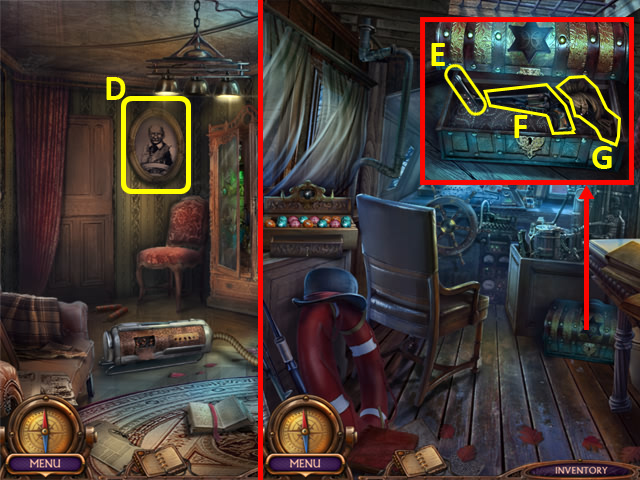
- Examine the suitcase to access a HOP (D).
- Play the HOP.
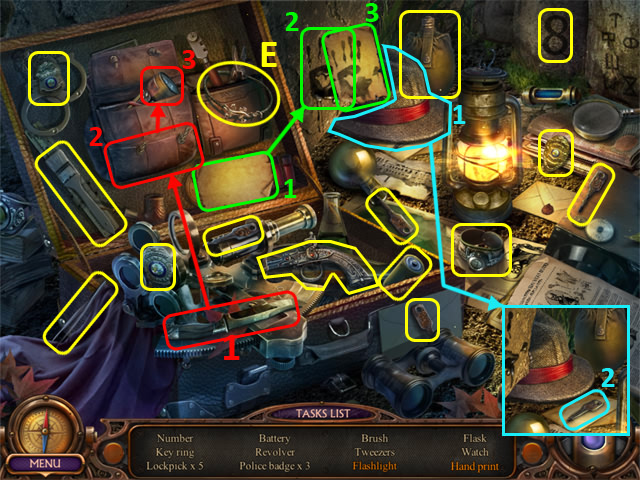
- You receive a KEY RING (E).
- You receive a LOCK PICK PART from James.
- Select the LOCK PICK PART in your Inventory.
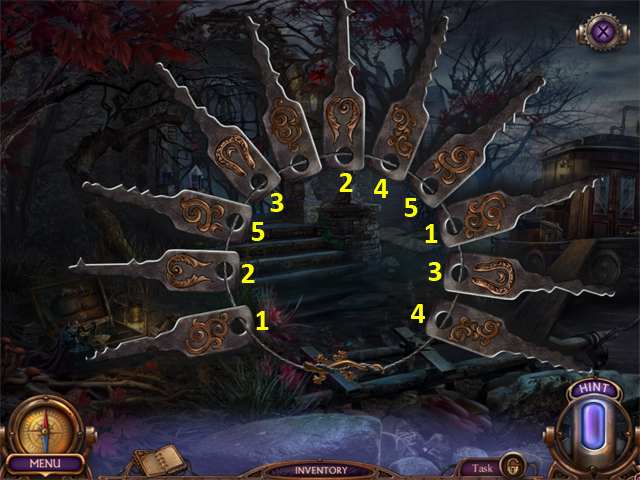
- Match pairs of lock picks.
- Take the LOCK PICK.
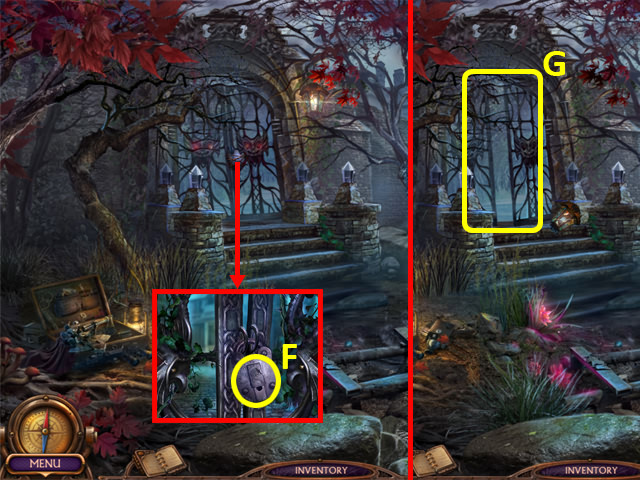
- Remove the wire; use the LOCK PICK (F).
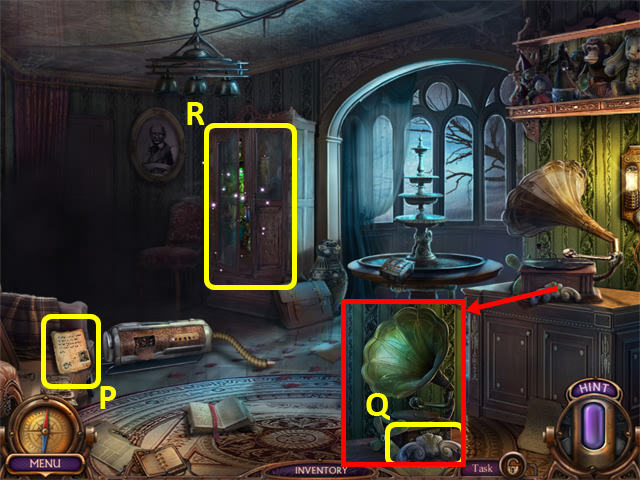
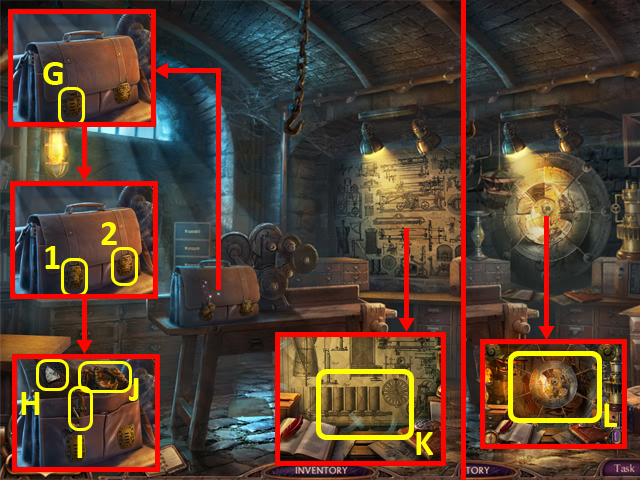
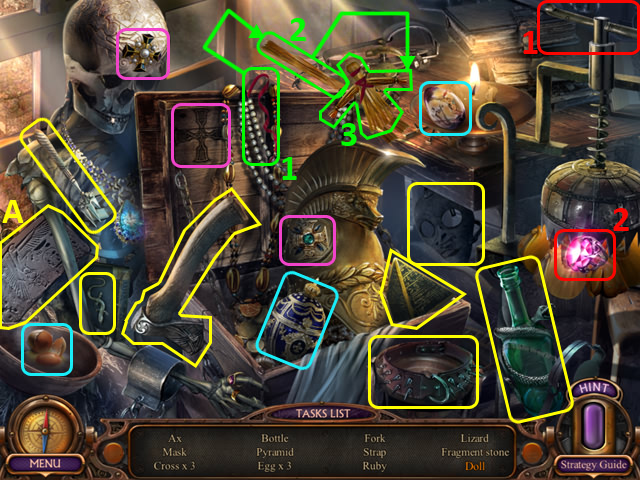
- Enter the Hotel Porch (G).
- Select the scene.
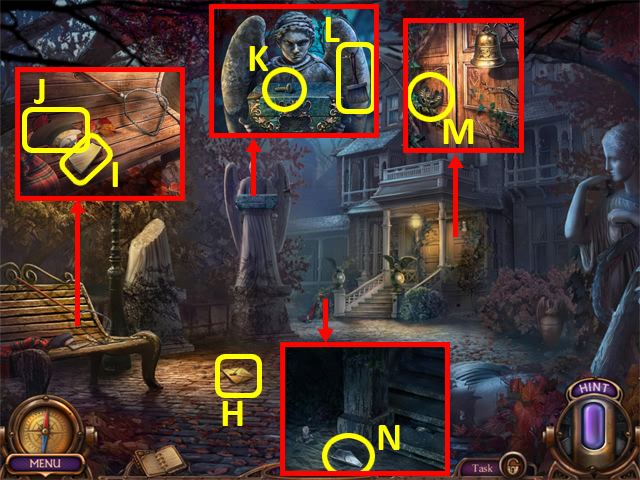
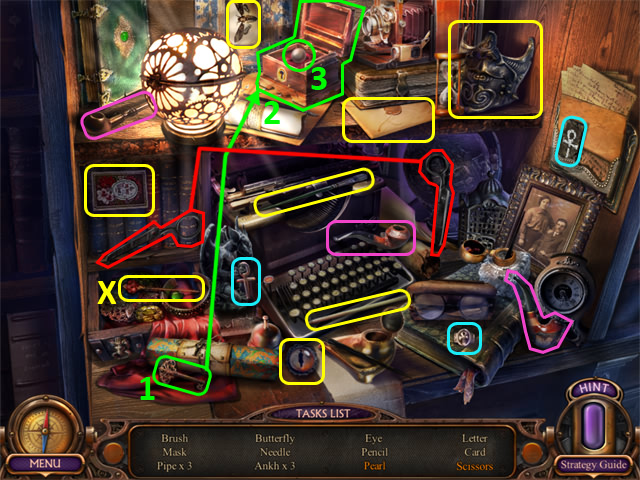
- Read the note (H).
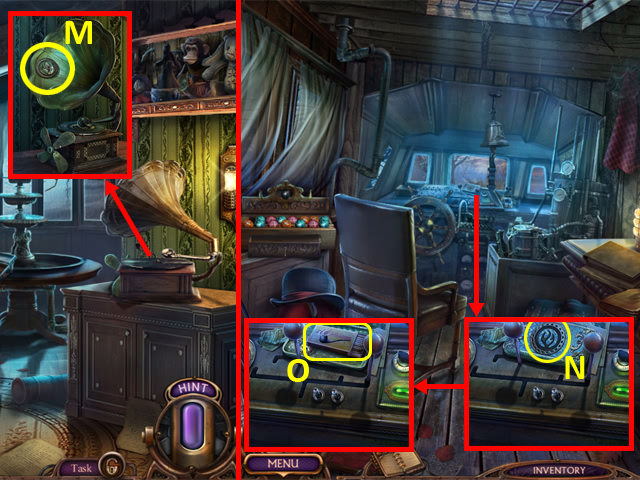
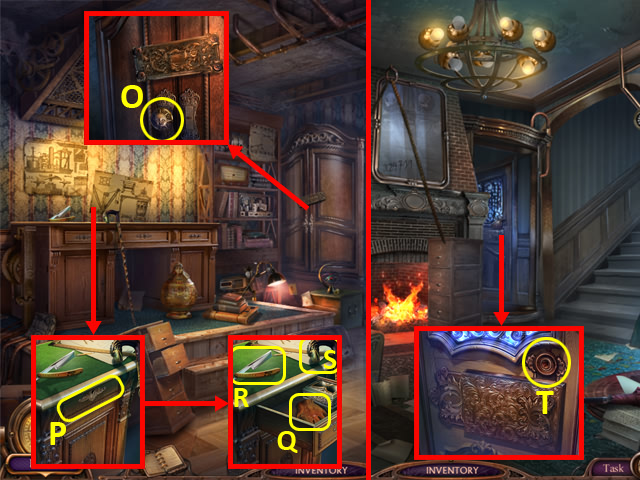
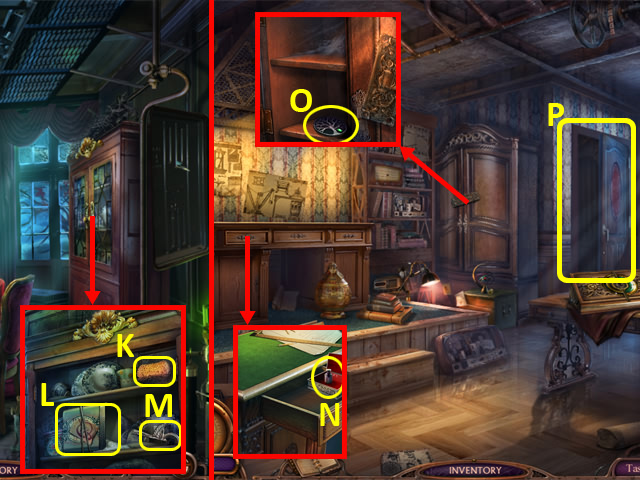
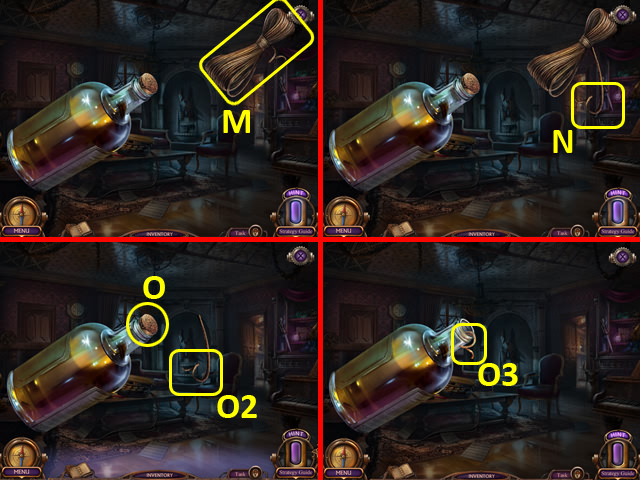
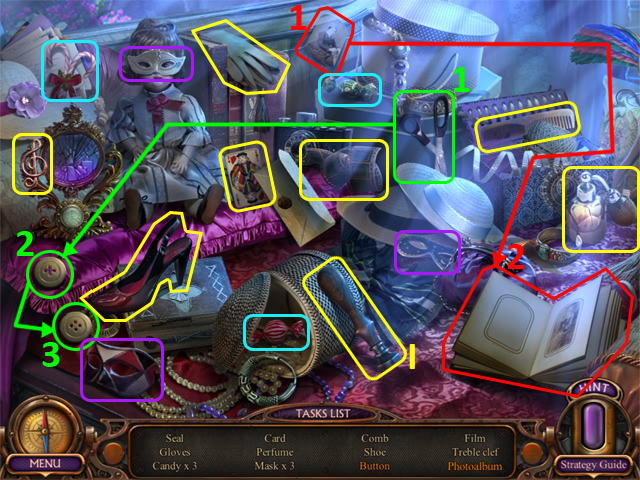
- Grab the GLASS LEAF 1/3 (I), RECORD PIECE 1/4 (J), SCREW (K), FEATHER DUSTER (L) and DECORATION (M).
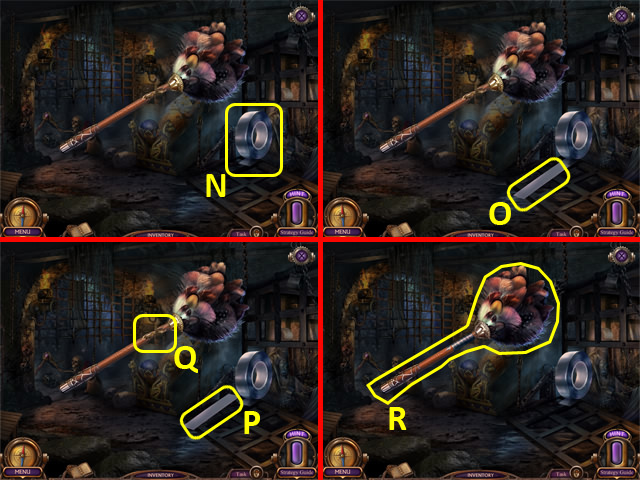
- Move the sand; take the GLASS LEAF 2/3 (N).
- Back out.
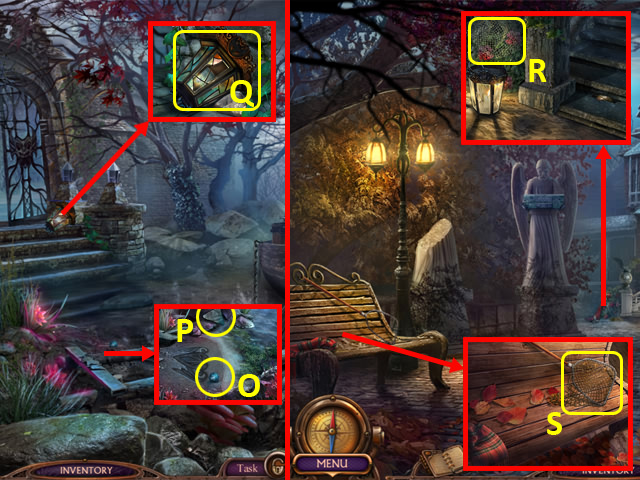
- Grab the MARBLE (O) and GLASS LEAF 3/3 (P).
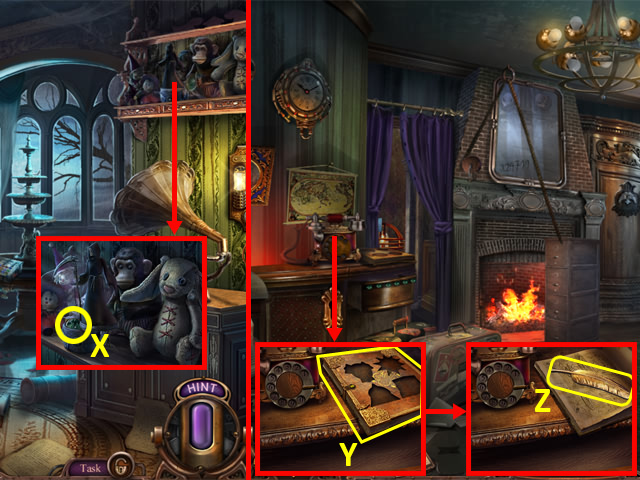
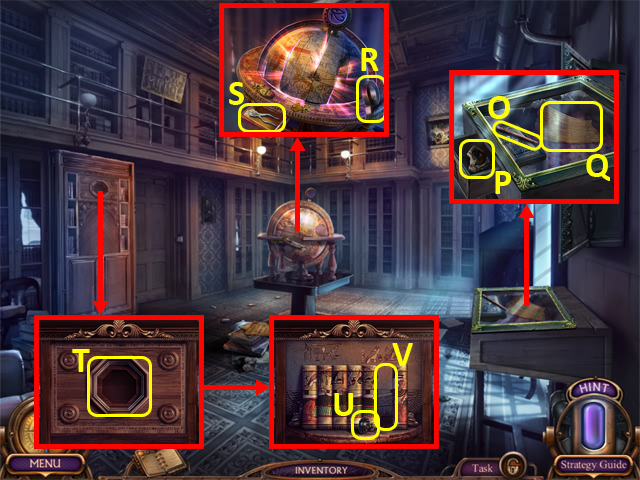
- Add the GLASS LEAF and DECORATION to the lantern (Q); take it.
- Walk forward.
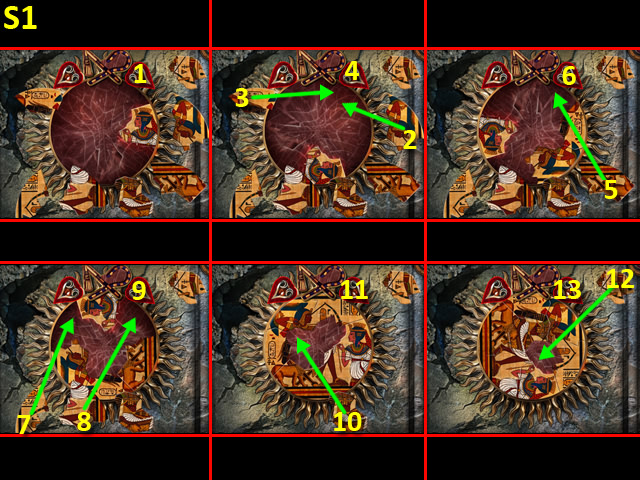
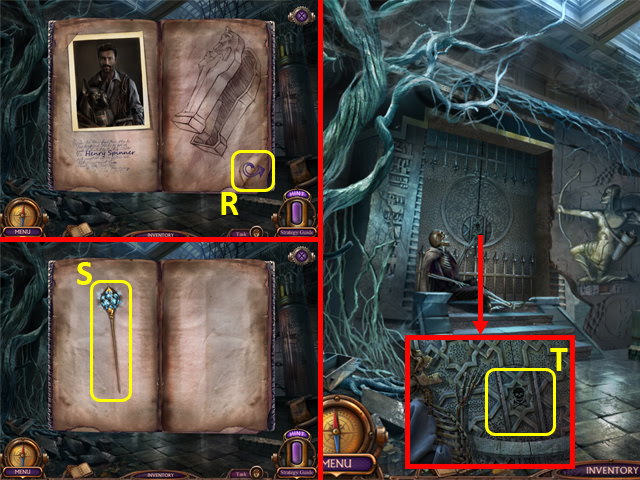
- Place the LANTERN on the candle; take the TORN NET (R).
- Place the TORN NET and select it 3 times; take the NET (S).
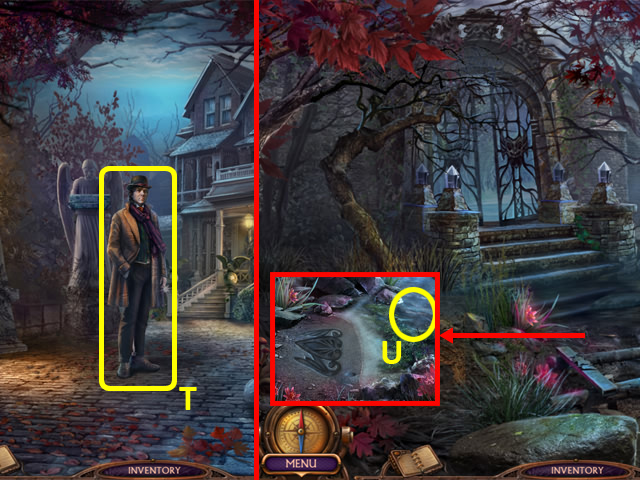
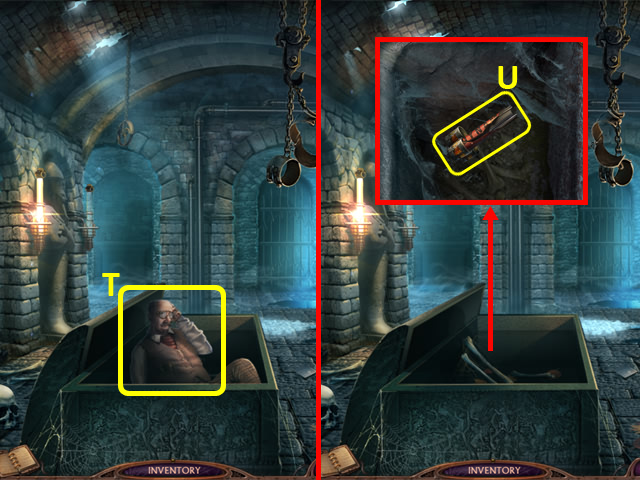
- Talk to James (T); you receive a LIGHT AMULET.
- Back out.
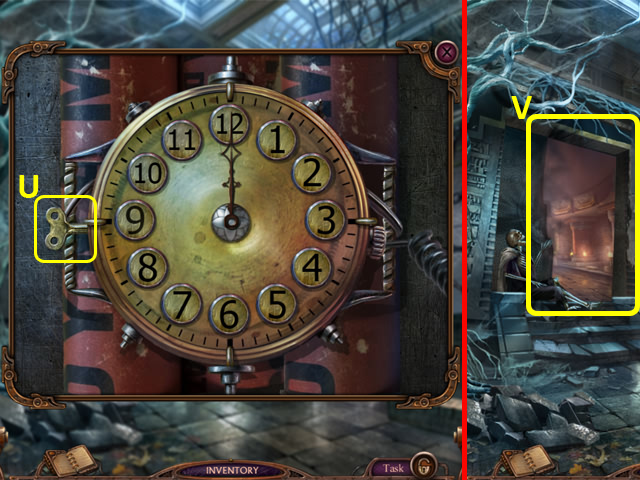
- Use the NET to get the BELL CLAPPER (U).
- Walk forward.
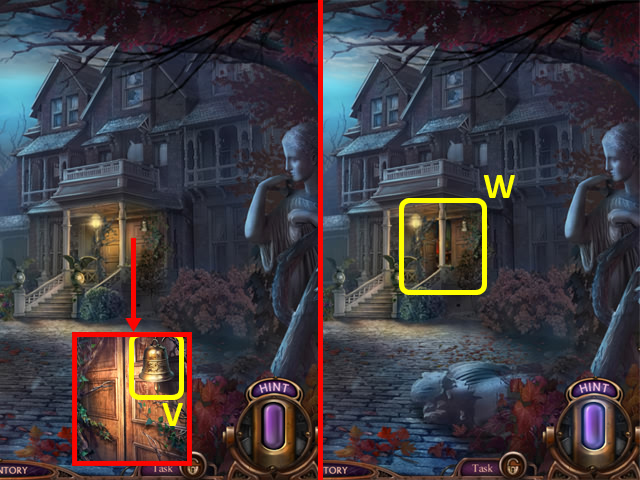
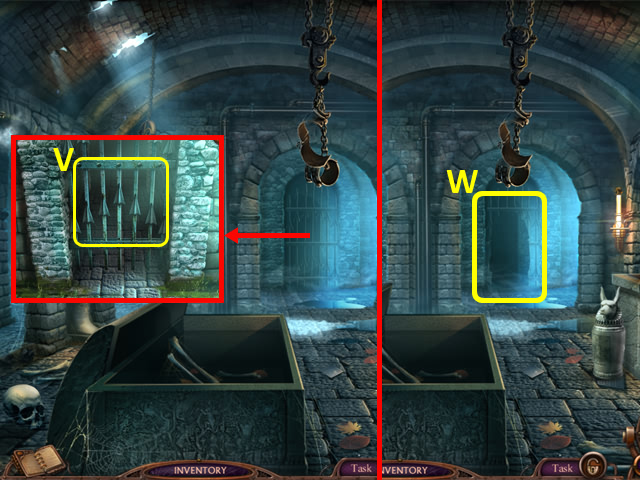
- Place the BELL CLAPPER (V); ring the bell.
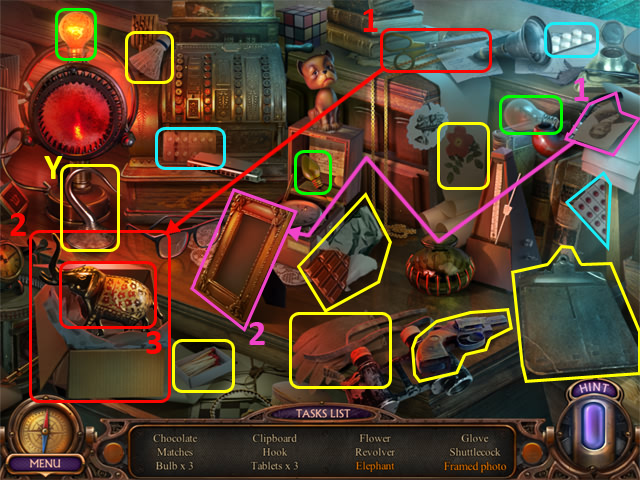
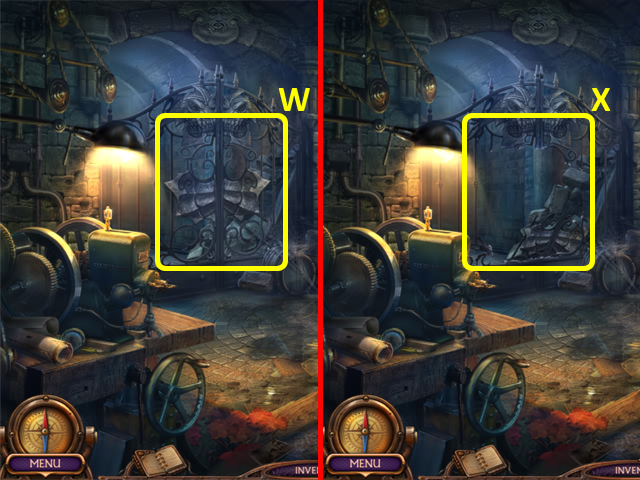
- Enter the Hotel Hall (W).
- Talk to James twice.
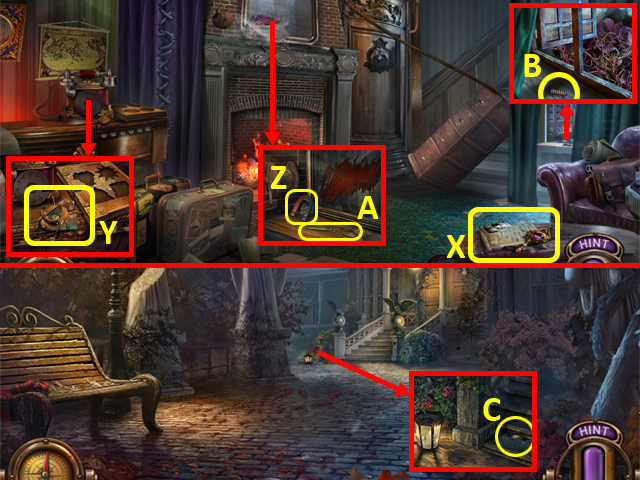
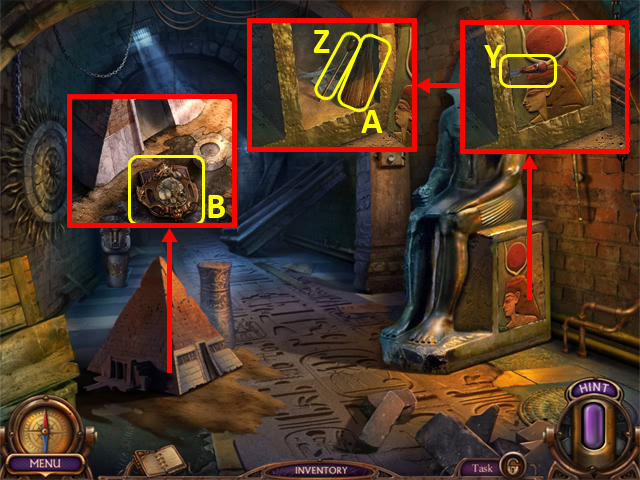
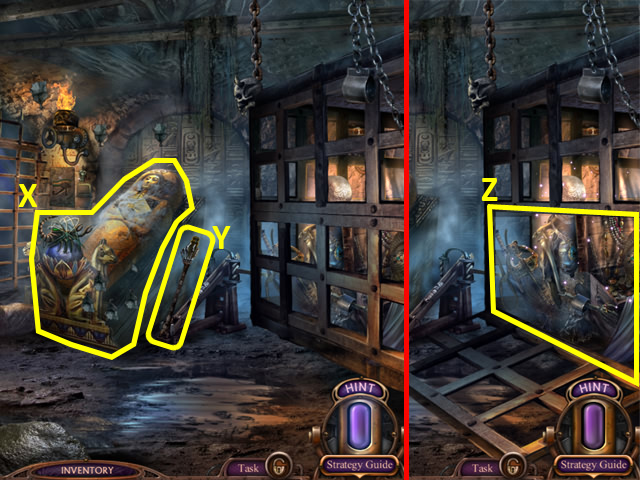
- Read the note (X).
- Take the BROKEN SCARAB (Y); read the note underneath.
- Remove the cobwebs with the FEATHER DUSTER; grab the MAGNET (Z) and HALF OF SCISSOR (A).
- Take the SPRING (B).
- Back out.
- Use the MAGNET to get the METALLIC WING (C).
- Select the BROKEN SCARAB in your Inventory.
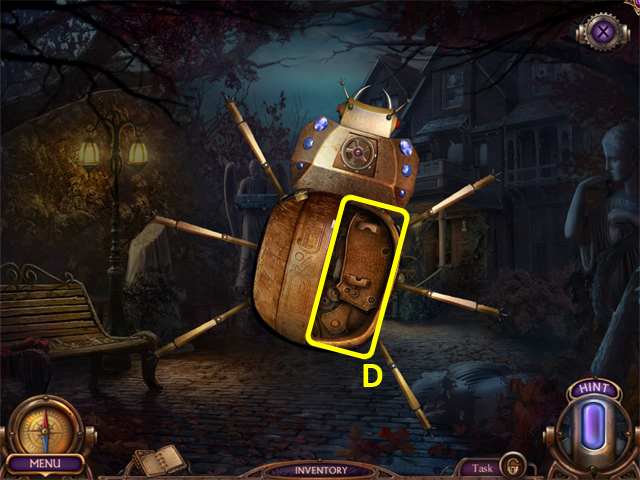
- Remove the broken wing and broken spring. Attach the SPRING and METALLIC WING (D); take the SCARAB.
- Back out.
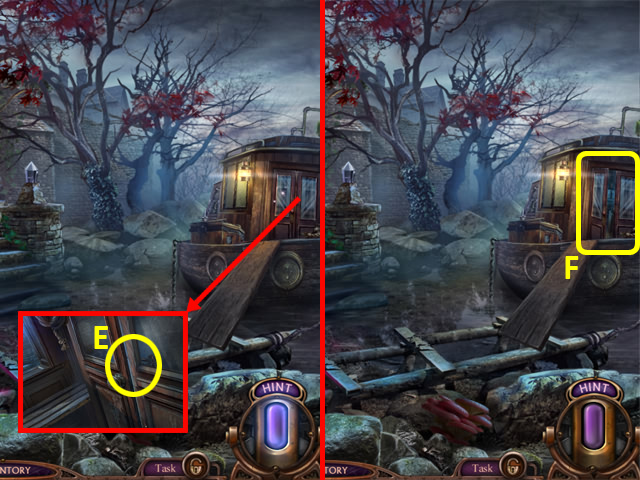
- Use the SCARAB (E).
- Enter James' Boat (F).
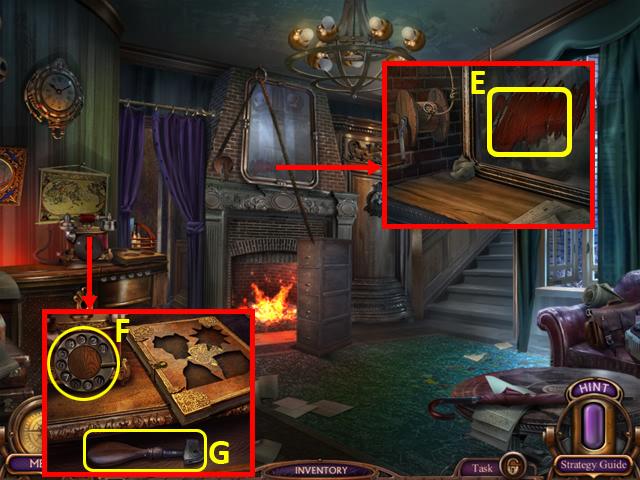
- Grab the HALF OF SCISSOR (G), RAG (H), and PLASTER (I).
- Select the SCISSOR PART in your Inventory.
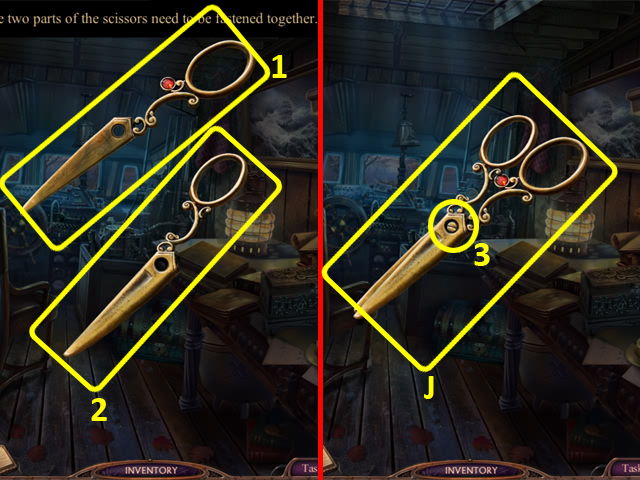
- Grab the HALF OF SCISSOR (1); add it to the HALF OF SCISSOR (2).
- Insert and then select the SCREW (3); take the VINTAGE SCISSORS (J).
- Back out.
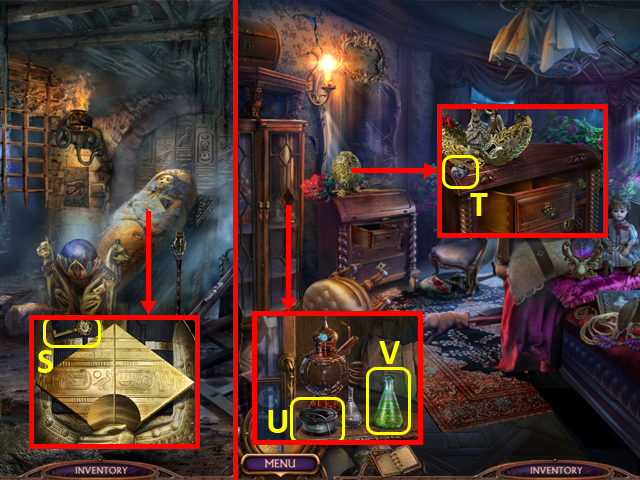
- Place the PLASTER in the impression; take the BAS-RELIEF (K).
- Return to the Hotel Hall.
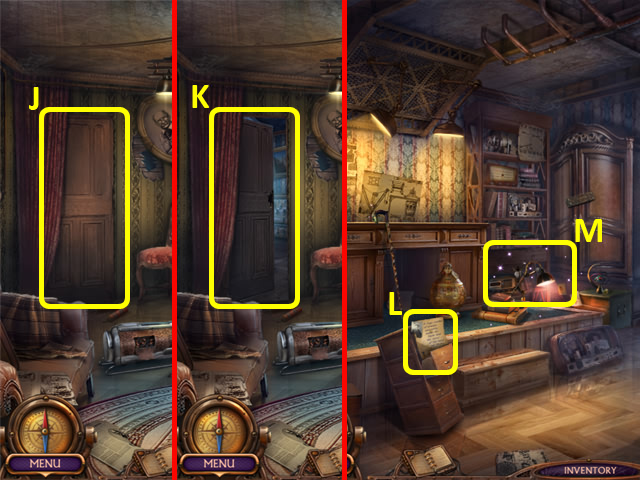
- Cut the knot (L) with the VINTAGE SCISSORS and receive some ROPE; open the curtains.
- Cut the branches with the VINTAGE SCISSORS; take the TELEPHONE DIAL (M).
- Attach the ROPE and crank the handle (N).
- Walk up to the Second Floor (O).
Chapter 2: Second Floor and Beyond
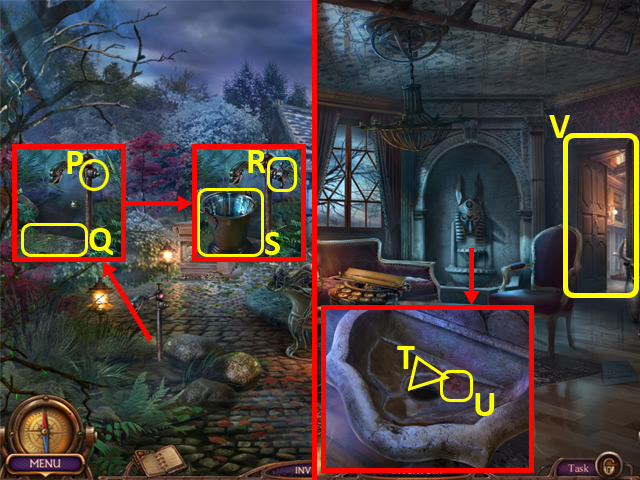
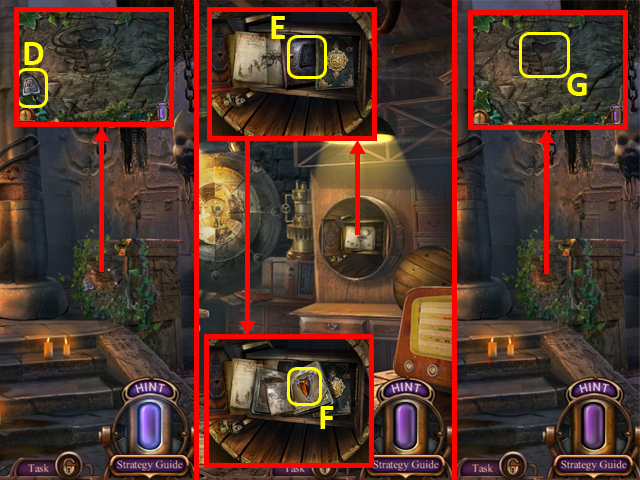
- Read the note (P).
- Grab the BAS-RELIEF (Q).
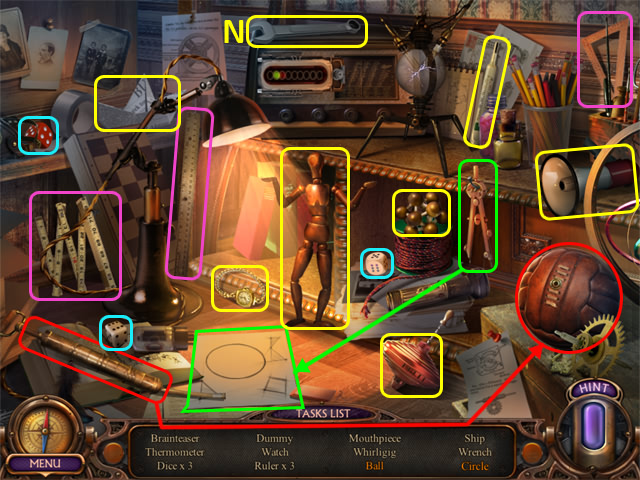
- Open the wardrobe; examine inside to access a HOP (R).
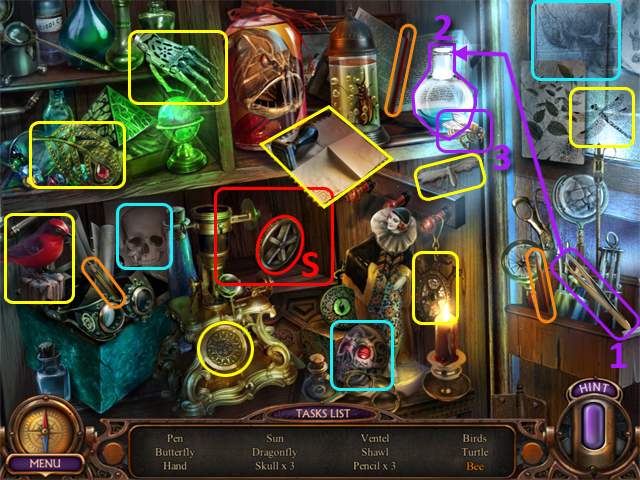
- Play the HOP.
- You receive a FAUCET HANDLE (S).

- Place the FAUCET HANDLE (T) and turn it; take the MARBLE (U).
- Return to the Hotel Porch.
- Place the BAS-RELIEFS into the chest; grab the MECHANISM PART (V).
- Return to James' Boat.
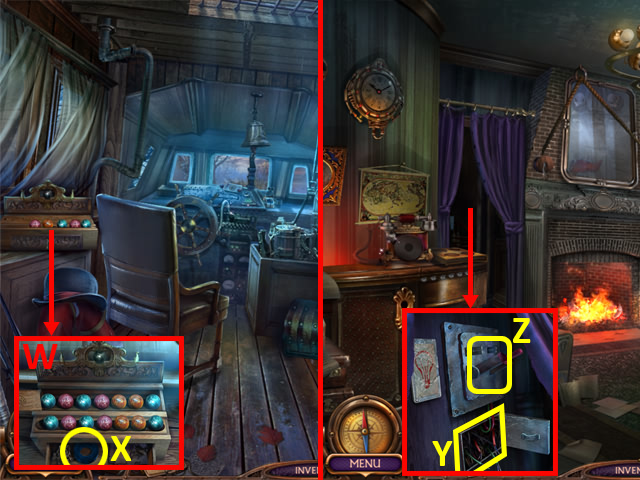
- Place the MARBLES in the front row and arrange as shown (W); take the INSULATING TAPE (X).
- Return to the Hotel Hall.
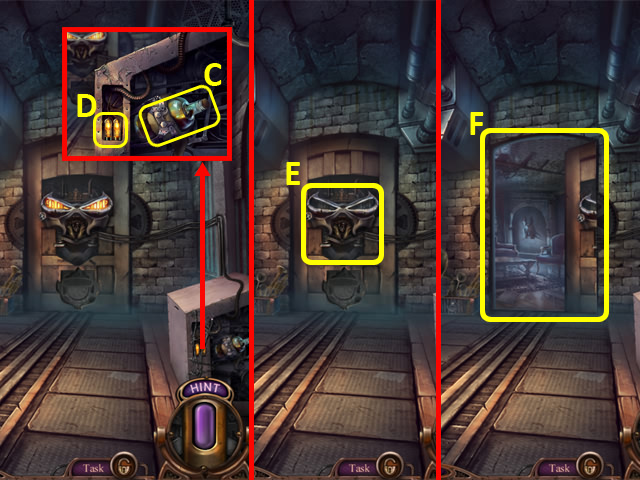
- Use the INSULATING TAPE (Y); flip the switch (Z).
- Enter the Scary Corridor (A).
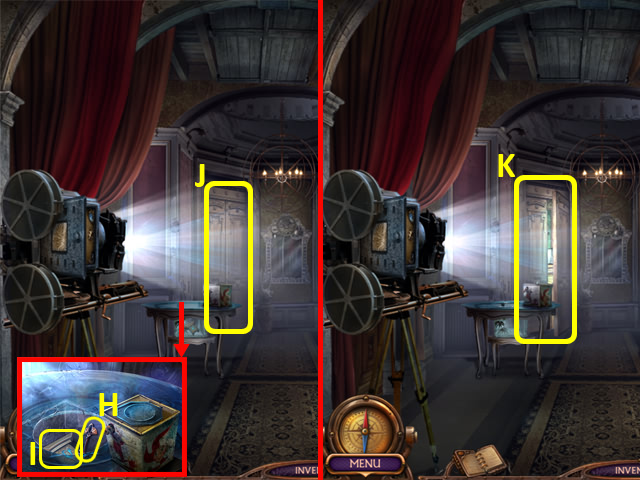
- Grab the AMULET (B) and SOLVENT (C).
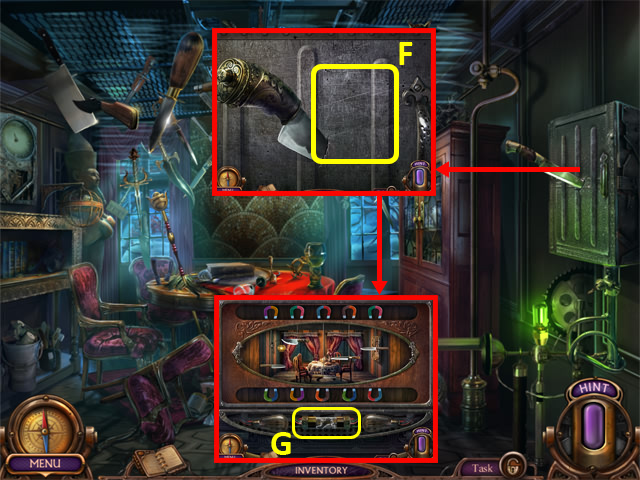
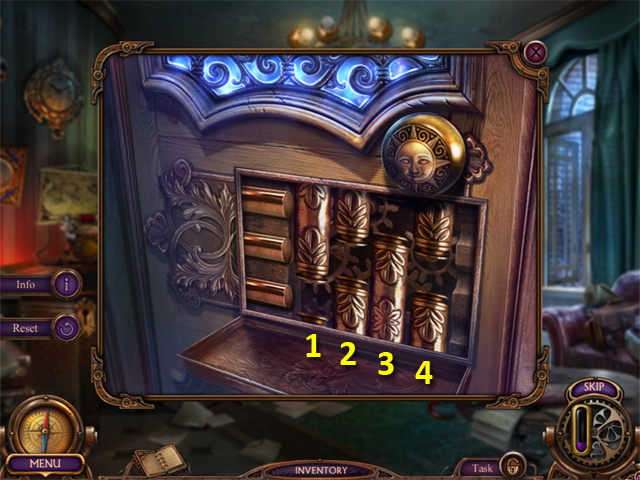
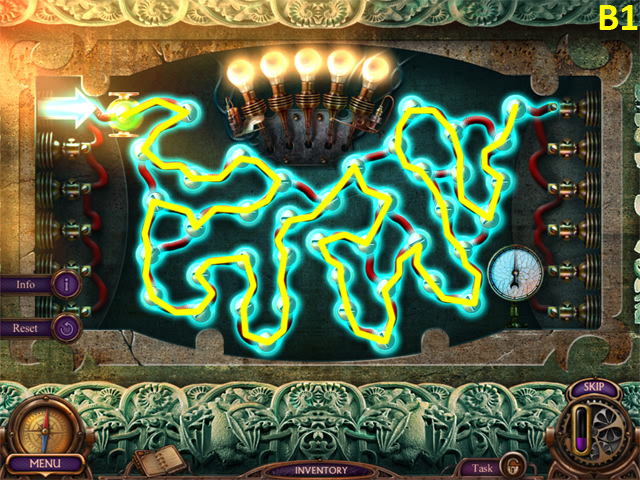
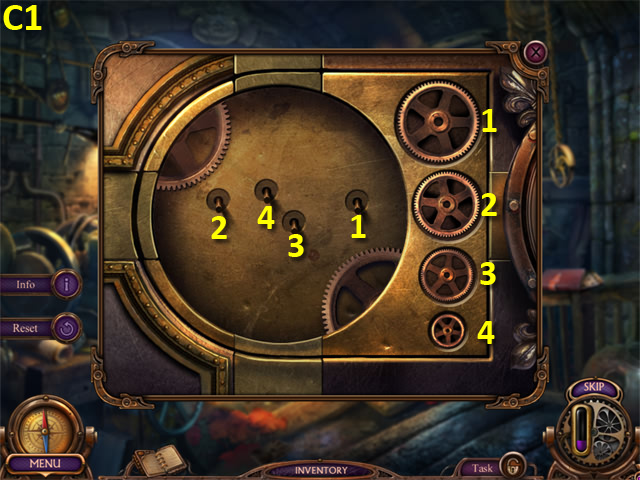
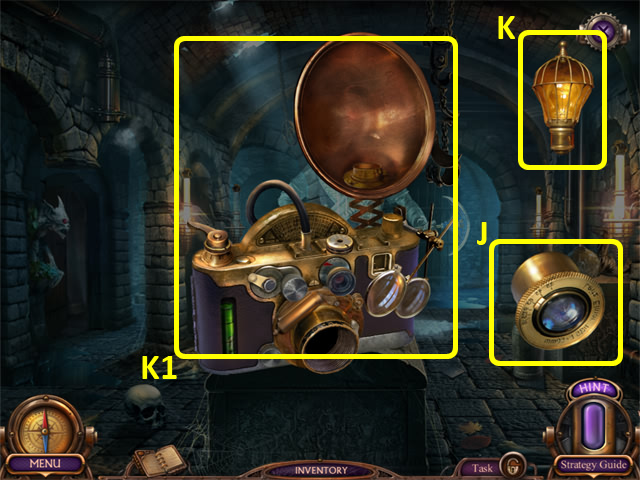
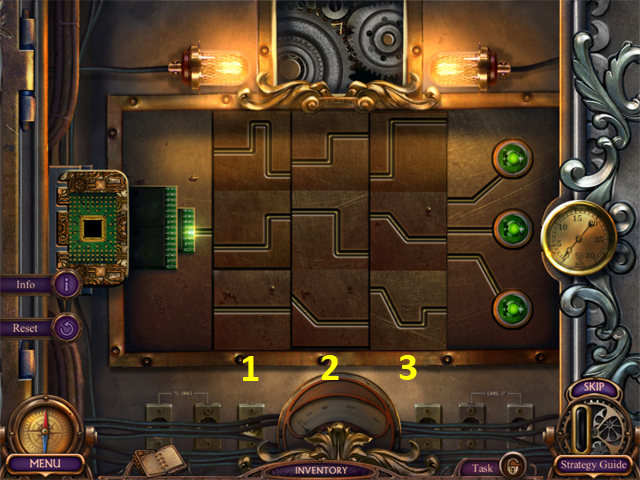
- Open the camera cover; place the MECHANISM PART (D) to trigger a puzzle.
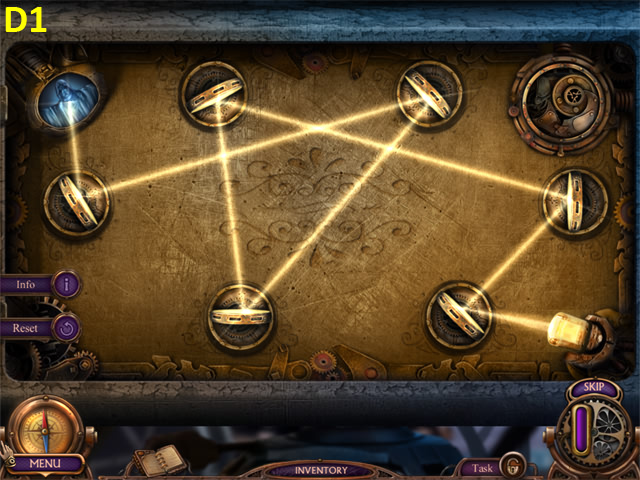
- Solution (D1).
- Back out.
- Use the SOLVENT and RAG on the mirror (E).
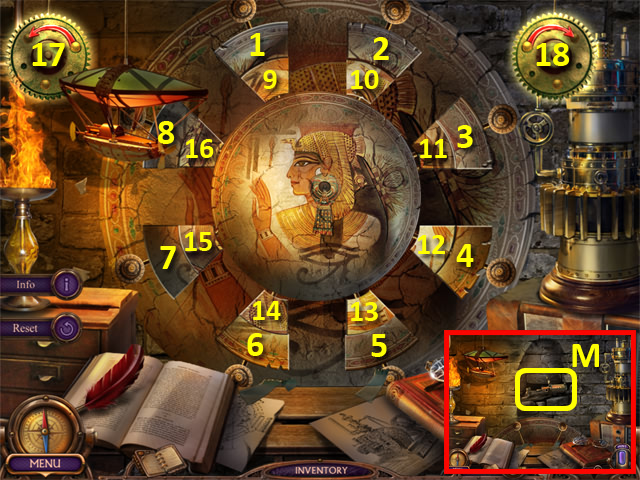
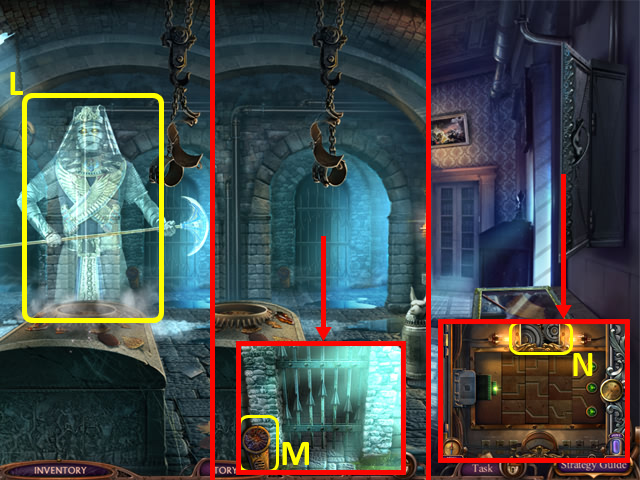
- Place the TELEPHONE DIAL (F); dial: 324719.
- Grab the GLASS CUTTER (G).
- Walk forward.
- Use the GLASS CUTTER on the table; take the ROOM KEY (H) and LIGHT AMULET PIECE (I).
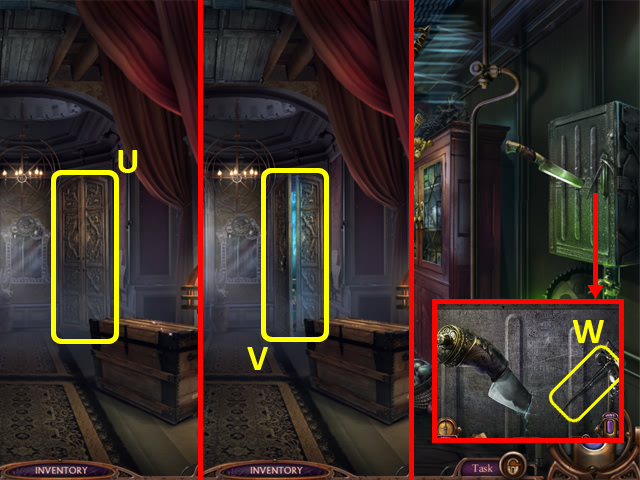
- Unlock the door (J) with the ROOM KEY.
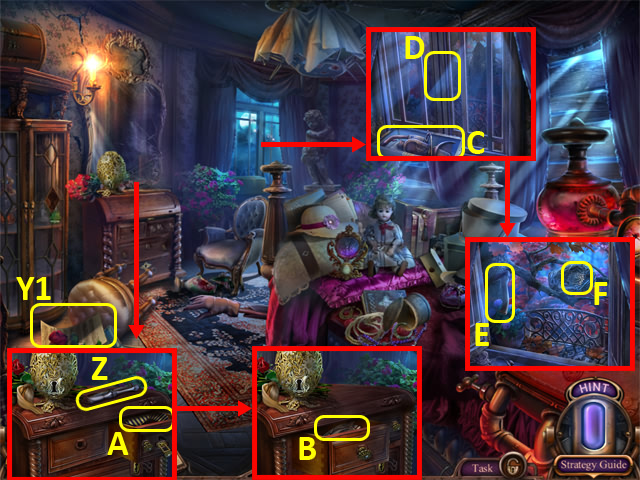
- Enter the Victim's Room (K).
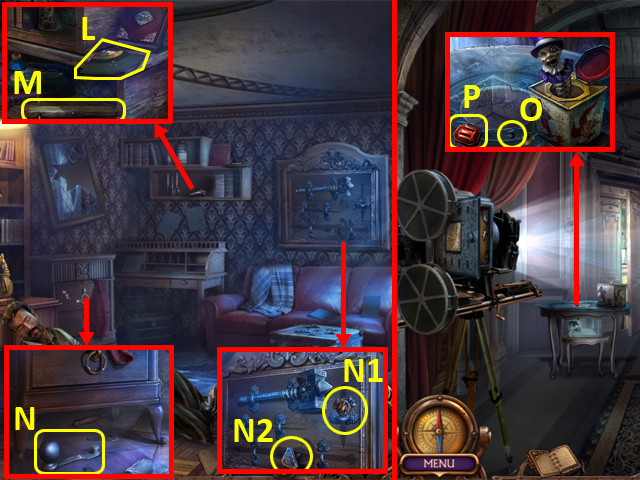
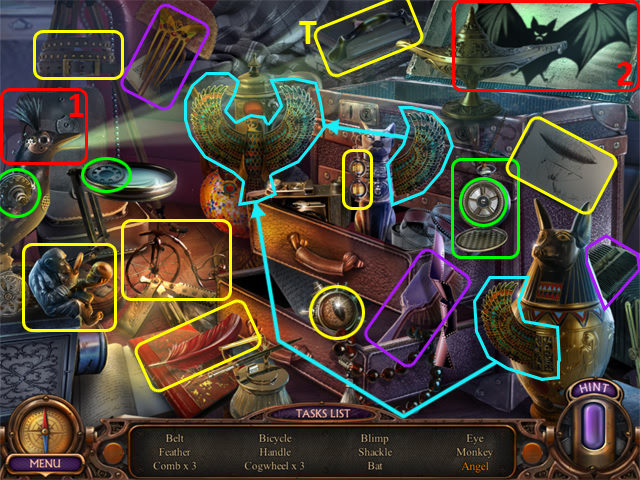
- Grab the RECORD PIECE 2/4 (L), WEDGE (M), HANDLE (N), AMULET (N1), and BUTTON (N2).
- Back out.
- Place the HANDLE in the box and turn it; grab the BUTTON (O) and GEM (P).
- Return to the Second Floor.
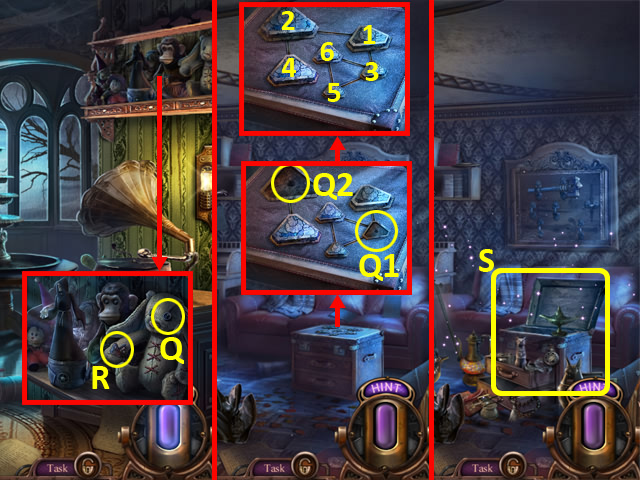
- Place the BUTTON (round/black) (Q); take the CHEST BUTTON (R).
- Return to the Victim's Room.
- Place the CHEST BUTTON (Q1) and BUTTON (Q2); press the buttons in the order shown (1-6).
- Examine the chest to access a HOP (S).
- Play the HOP.
- You receive a HANDLE (T).
- Talk to James; you receive an AMULET.
- Back out.
- Select the door (U); attach the HANDLE and open the door.
- Enter the Dining Room (V).
- Grab the SCYTHE (W).
- Return to the Second Floor.
- Place the SCYTHE on the Grim Reaper; grab the AMULET (X).
- Back out.
- Place the four AMULETS (Y); open the book and take the GOLDEN FEATHER (Z).
- Return to James' Boat.
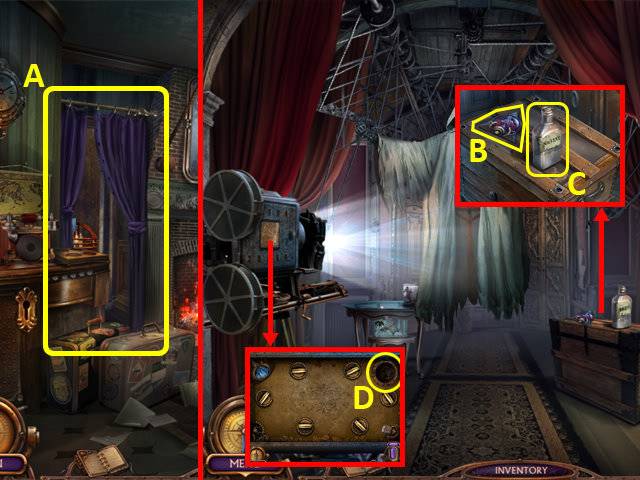
- Place the GOLDEN FEATHER in the inkwell (A) and then select it.
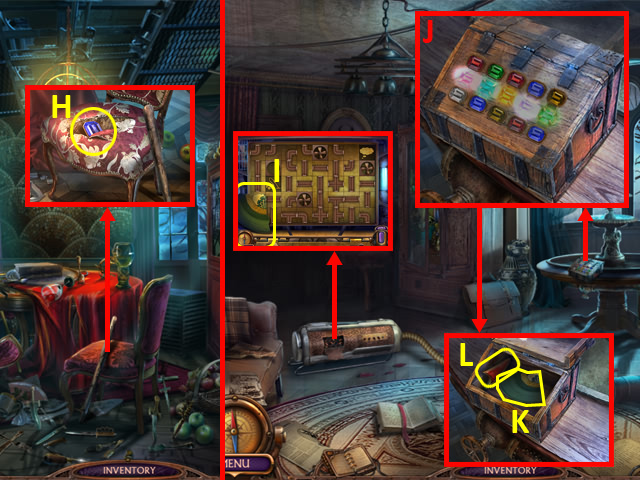
- Arrange the buttons as shown (B); open the box and take the HEX KEY (C).
- Return to the Scary Corridor.
- Use the HEX KEY on the box; grab the RUBBER GLOVE (D) and FUSE (E).
- Enter the Dining Room.
- Use the RUBBER GLOVE to open the cover (F).
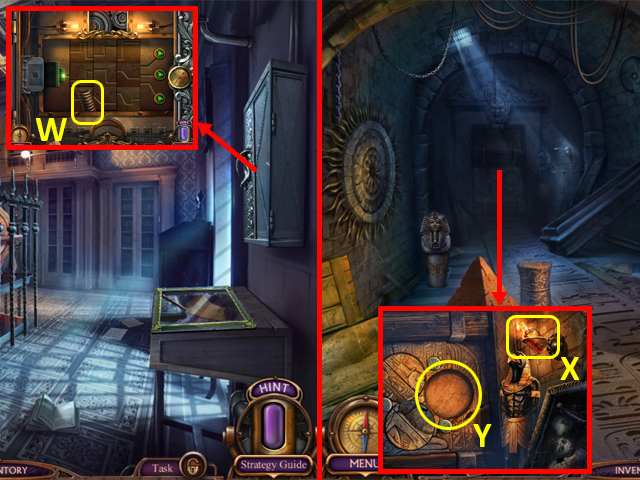
- Replace the broken fuse with the FUSE (G) to trigger a puzzle.

- Swap the magnets.
- Solution (G1).
- Talk to James; you receive some GLUE.
- Use the VINTAGE SCISSORS on the chair; take the GEM (H).
- Return to the Second Floor.
- Grab the RECORD PIECE 3/4 (I).
- Place the GEMS in the box and arrange as shown (J).
- Take the RECORD PIECE 4/4 (K) and LIGHT AMULET PIECE (L).
- Select the RECORD PIECES in your Inventory.
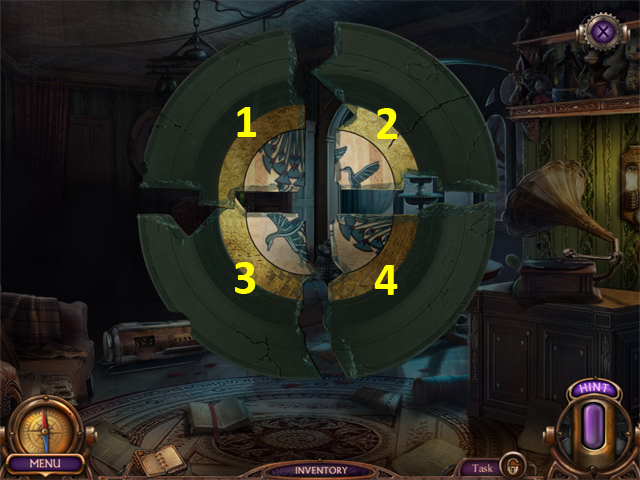
- Use the GLUE on the record parts.
- Swap parts: 1/3, 3/4.
- Take the CRACKED RECORD.
- Place the CRACKED RECORD on the record player; take the CIGARETTE CASE (M).
- Return to James' Boat.
- Place the CIGARETTE CASE (N); open the case and grab the MATCHES (O).
- Return to the Dining Room.
- Light the candle (P) with the MATCHES; take the UTILITY KNIFE (Q).
- Back out.
- Use the UTILITY KNIFE on the metal snips (R); you receive some METAL SNIPS.
- Walk forward to the Victim's Room.
- Use the METAL SNIPS on the HAMMER (S); take it.
- Return to the Dining Room.
- Grab the WOODEN BAS-RELIEF (S1).
- Place the WEDGE into the crack; use the HAMMER on the wedge (T) and grab the SCEPTER (U).
- Place the SCEPTER on the statue; grab the COUNTER KEY (V).
- Return to the Hotel Hall.
- Use the COUNTER KEY (W).
- Examine the counter to access a HOP (X).
- Play the HOP.
- You receive a HOOK (Y).
- Return to the Dining Room.
- Place the HOOK on the wooden stick; take the GAFF (Z).
- Return to the Victim's Room.
- Use the GAFF to get the SCREWDRIVER (A).
- Return to the Second Floor.
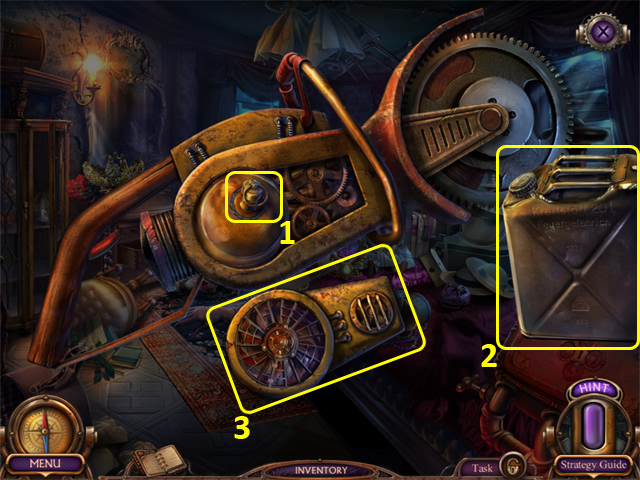
- Unscrew the FAN (B) with the SCREWDRIVER; take it.
- Place the FAN (C) to trigger a puzzle.
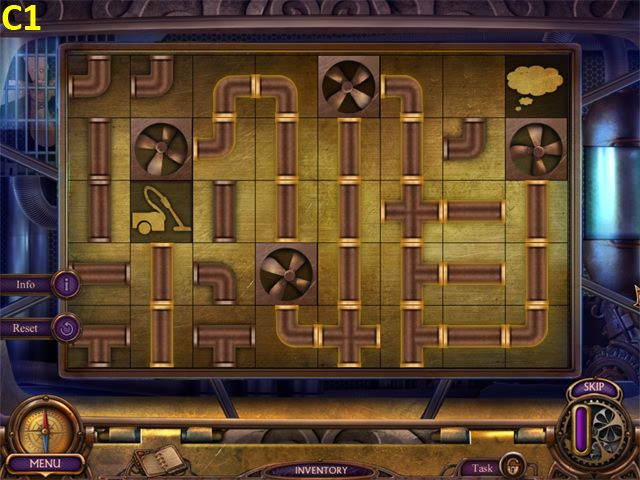
- Create a path from the vacuum cleaner to the smoke, passing through the fans.
- Solution (C1).
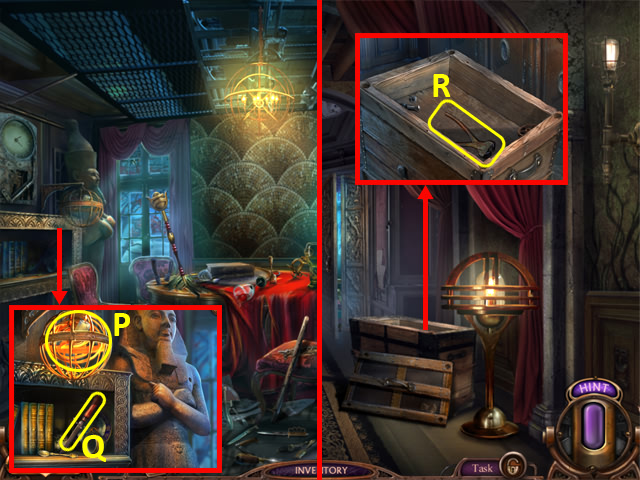
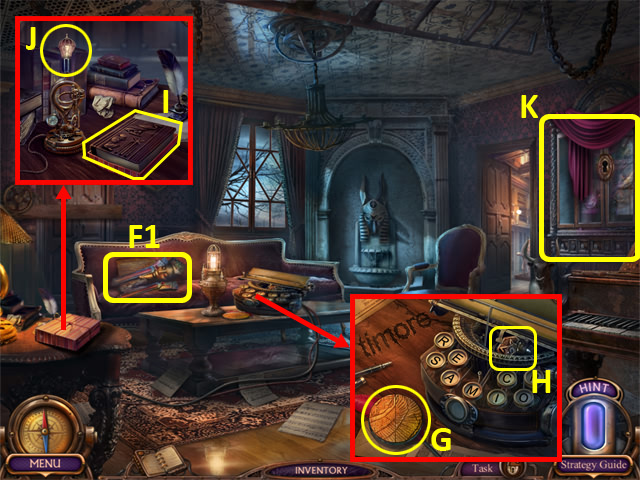
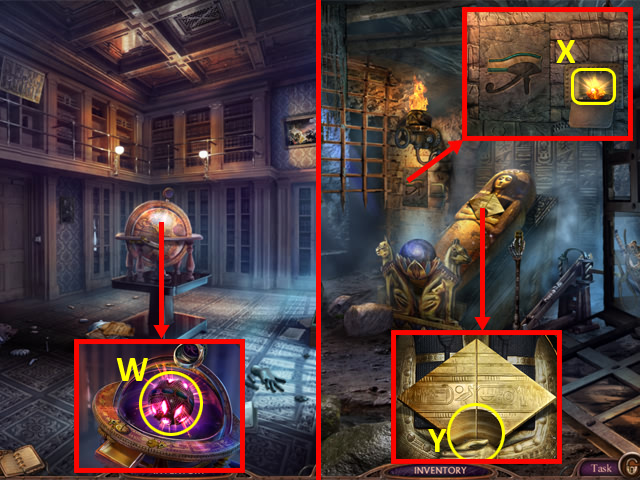
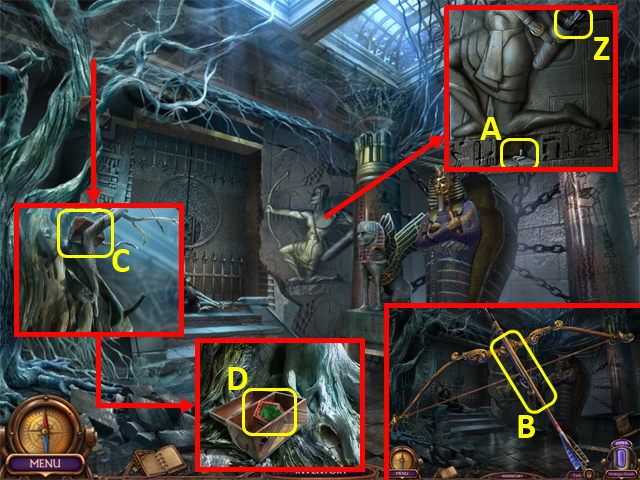
- Select the painting (D).
- Talk to James; receive a BULLET and DETECTIVE'S KEY.
- Return to James' Boat.
- Unlock the chest with the DETECTIVE'S KEY; open it and take the KNITTING NEEDLE (E), REVOLVER (F) and WOODEN BAS-RELIEF (G).
- Return to the Hotel Hall.

- Place the two WOODEN BAS-RELIEFS (H).
- Grab the GUN POWDER (I).
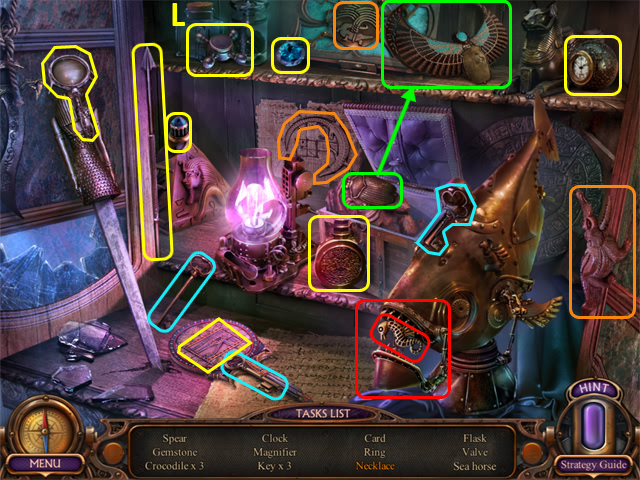
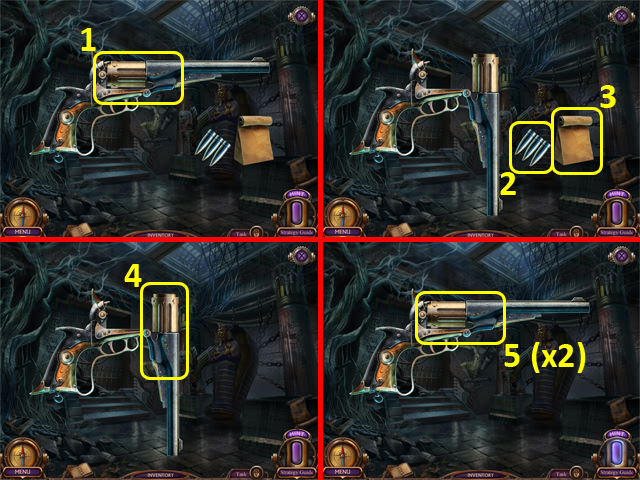
- Select the REVOLVER in your Inventory.
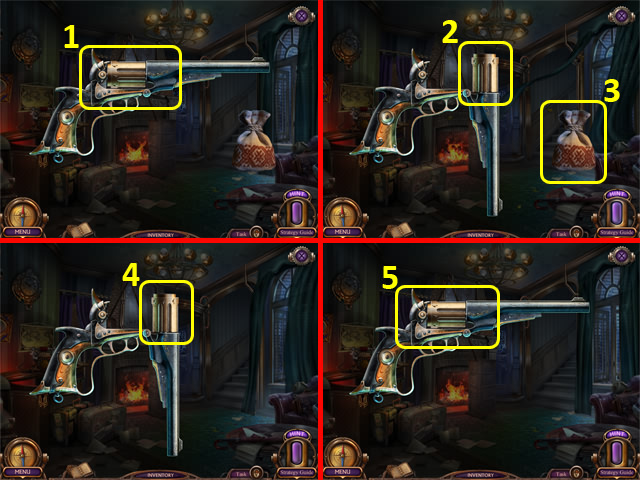
- Select the gun (1).
- Add the BULLET (2).
- Select the gunpowder (3).
- Select the gun (4).
- Select the gun (5) twice.
- You receive a CHARGED REVOLVER.
- Walk up.
- Shoot the door (J) with the CHARGED REVOLVER; open it.
- Enter Abraham's Room (K).
- Read the note (L).
- Open the cupboard, and examine inside to access a HOP (M).
- Play the HOP.
- You receive a WRENCH (N).
- Grab the SUN-SHAPED HANDLE (O).
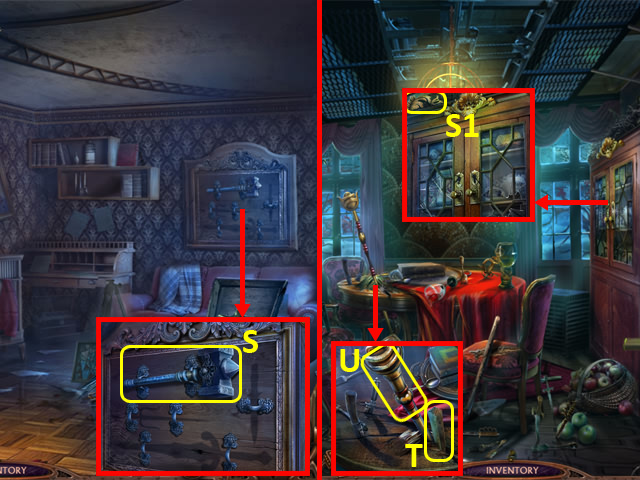
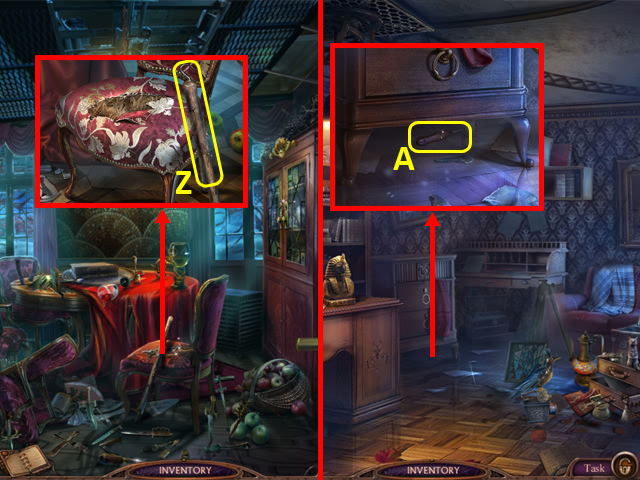
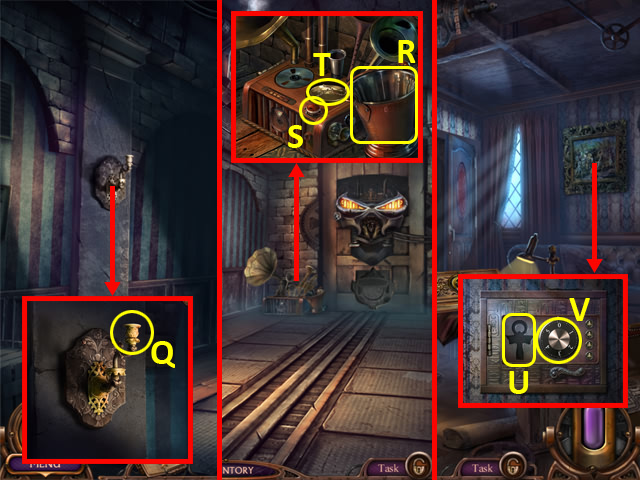
- Use the KNITTING NEEDLE (P); open the drawer and take the LEATHER GLOVE (Q), RAZOR (R) and CANE (S).
- Return to the Hotel Hall.
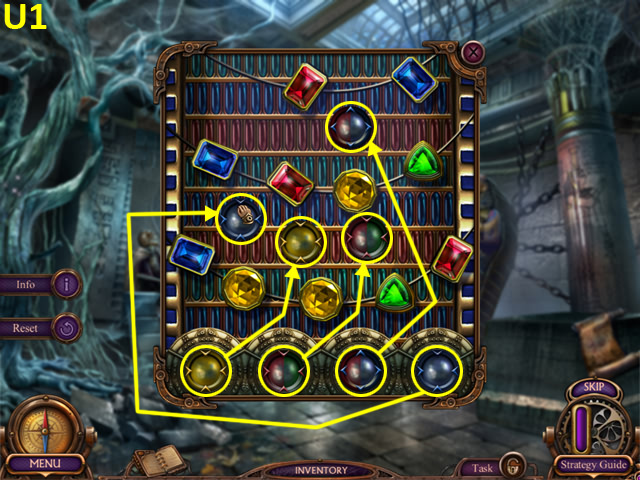
- Place the SUN-SHAPED HANDLE to trigger a puzzle (T).
- Move the tumblers up and down to release the locks.
- Solution: 1U, 3D, 4D, 3D, 4Ux2, 3Ux2.
Chapter 3: Garden and Basement
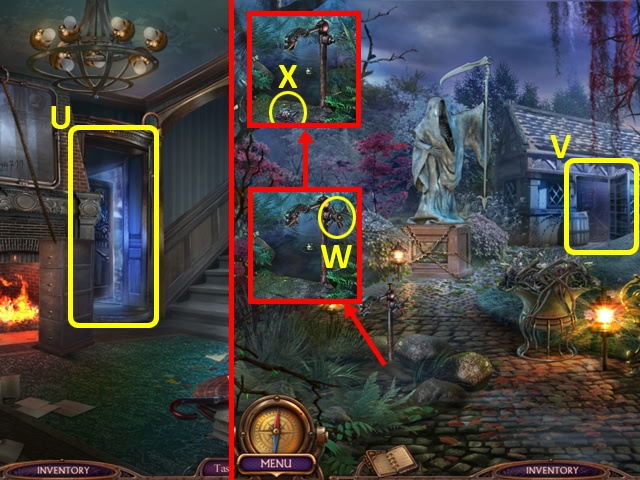
- Enter the Garden (U).
- Select the bungalow door (V).
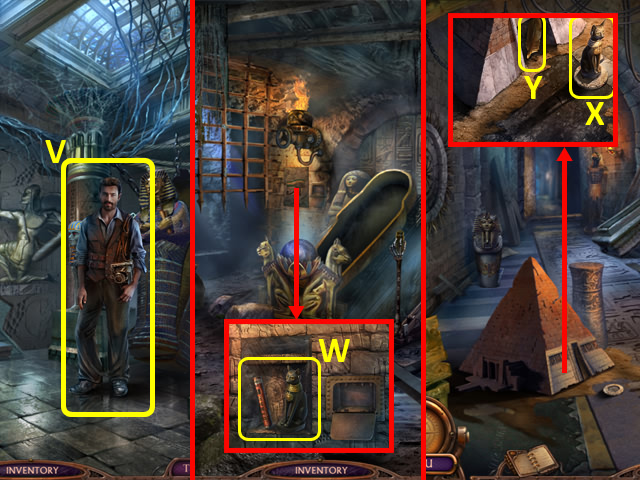
- Use the WRENCH (W); turn the tap and grab the DETECTIVE'S BADGE (X).
- Return to James' Boat.
- Place the DETECTIVE'S BADGE (Y); grab the HACKSAW (Z).
- Return to the Garden.
- Use the HACKSAW (A); remove the coverings (B) to trigger a puzzle.
- Move through all the points just once.
- Solution (B1).
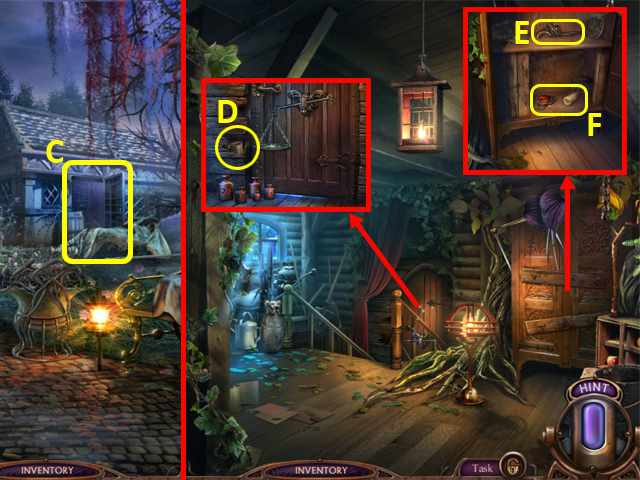
- Enter the Gardener's Bungalow (C).
- Talk to James; you receive a LIGHTER.
- Use the SCARAB (D); you receive some FERTILIZER.
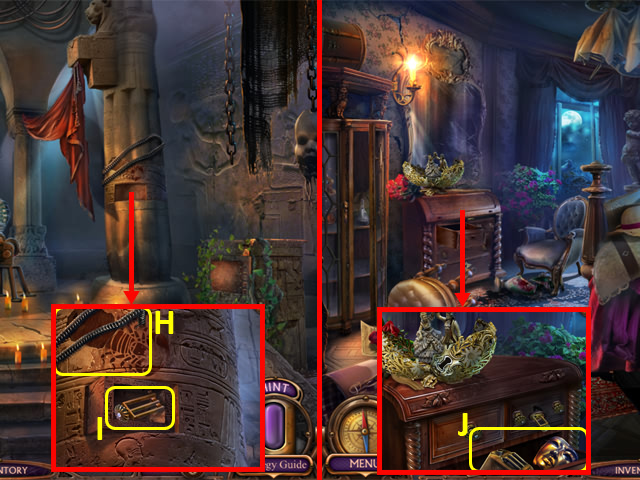
- Remove the planks from the cupboard and open the door; take the ANKH KEY (E).
- Use the SCREWDRIVER to remove the panel; grab the BUTTON and CANDLE (F).
- Back out.
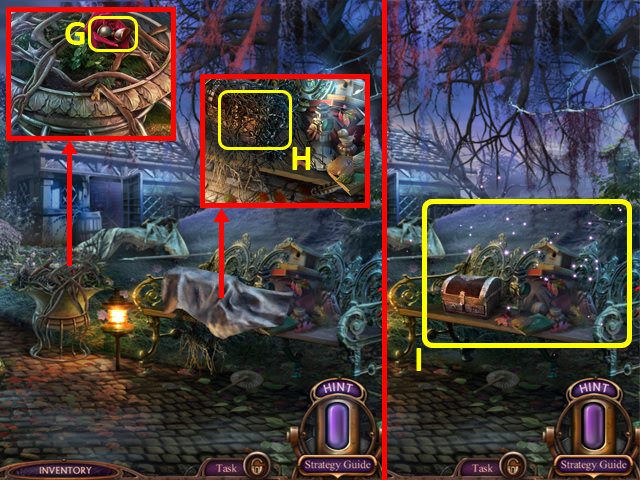
- Use the RAZOR on the roots; pour the FERTILIZER and grab the HOURGLASS AMULET (G).
- Remove the cover with the CANE; use the LIGHTER to burn the dry vines (H), and then open the chest.
- Examine the bench to access a HOP (I).
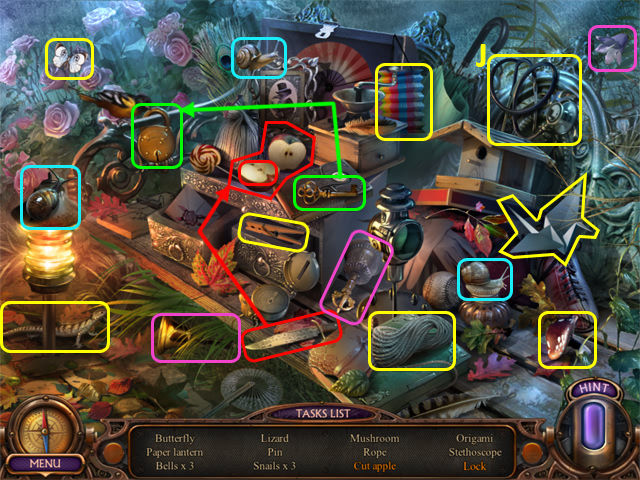
- Play the HOP.
- You receive a STETHOSCOPE (J).
- Return to the Dining Room.
- Use the LEATHER GLOVE on the cabinet; open it and take the SPONGE (K).
- Use the KNITTING NEEDLE (L); grab the ANKH KEY (M).
- Return to Abraham's Room.
- Place the HOURGLASS AMULET in the box; open it and take the WEIGHT (N).
- Use the SCREWDRIVER on the plaque and open the wardrobe; use the SPONGE on the cobwebs and take the GARDENER'S AMULET (O).
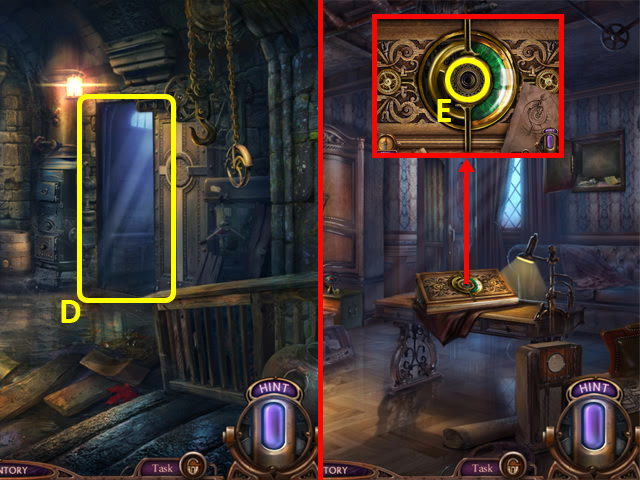
- Enter the Mysterious Corridor (P).
- Place the CANDLE (Q); light it with the LIGHTER.
- Take the BUCKET (R) and place the BUTTON (S); press it and grab the PART OF SCALES (T).
- Back out.
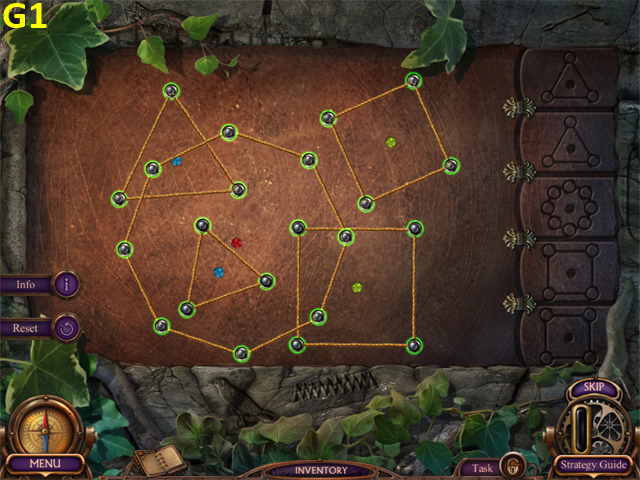
- Use the RAZOR on the painting and remove the frame; place the ANKH KEYS (U) and STETHOSCOPE (V) to trigger a puzzle.
- Open the safe; solution: 2,1,1, 2, 1, 2, 2, 1.
- Grab the PIECE OF CODE (W).
- Return to the Gardener's Bungalow.
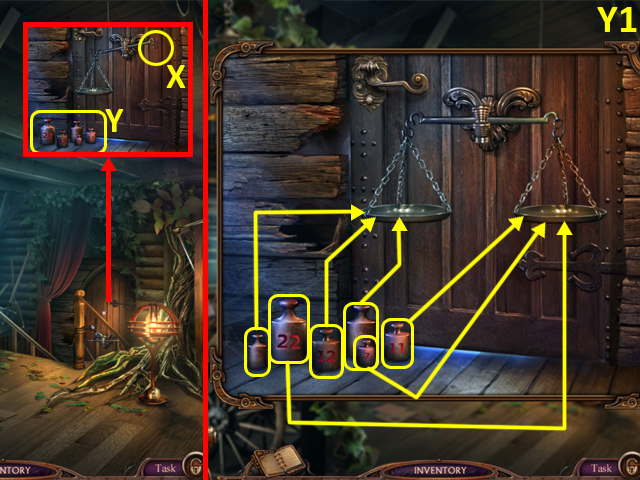
- Place the PART OF SCALES (X) and WEIGHT (Y) to trigger a puzzle.
- Balance the scales; solution (Y1).
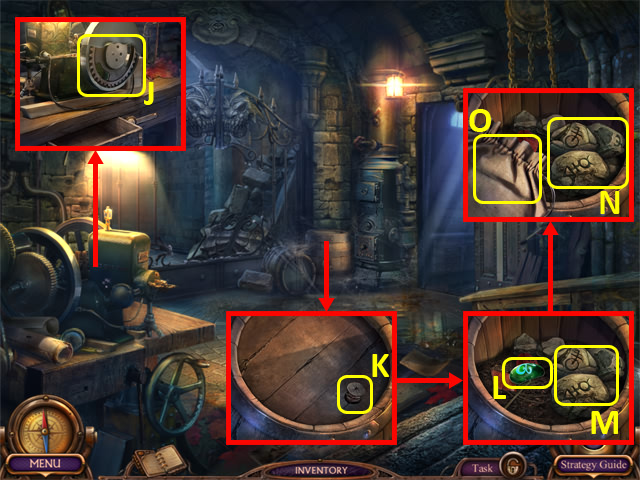
- Enter the Basement (Z).
- Read the note (A).
- Grab the FUSE (B).
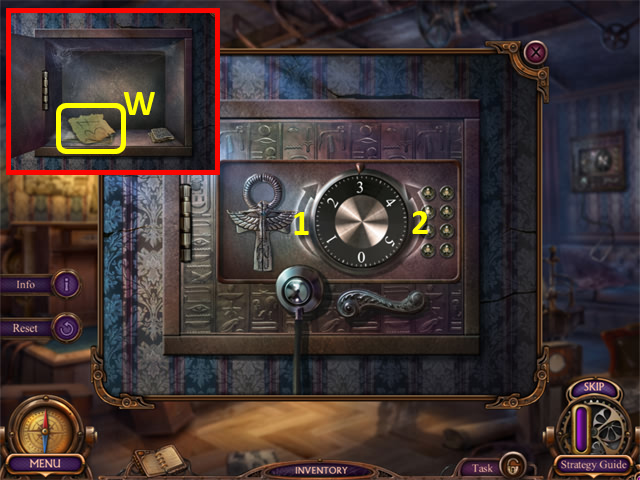
- Place the PIECE OF CODE (C); enter code: 57824 to trigger a puzzle.
- Insert the gears in the correct places.
- Solution (C1).
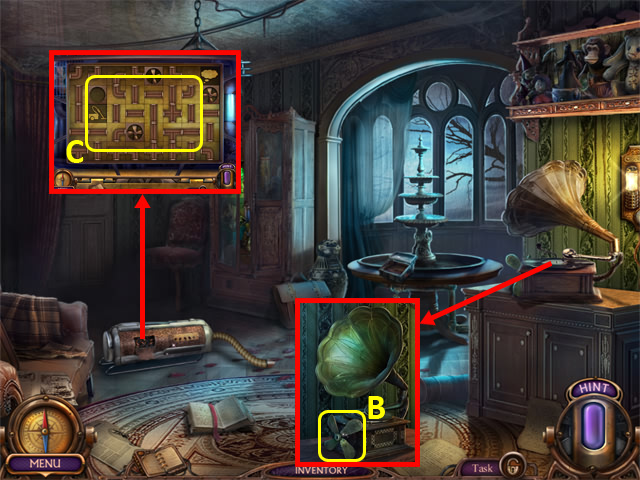
- Enter the Workshop (D).
- Talk to James; you receive a LEVER.
- Return to Abraham's Room.
- Place the LEVER to trigger a puzzle (E).
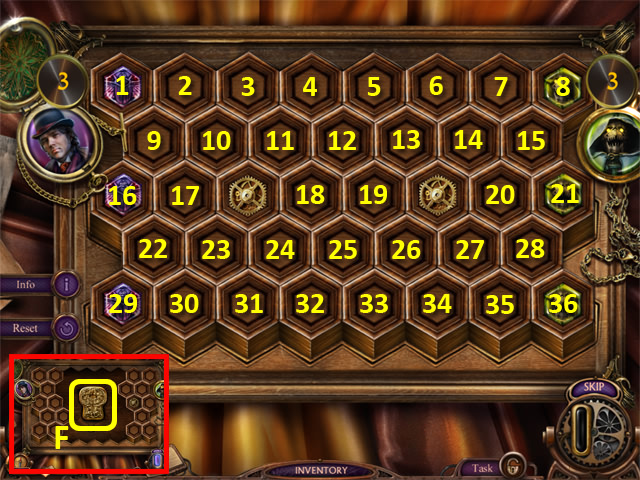
- Play the game.
- Solution: 1-2, 2-9, 9-10, 10-17, 17-22, 16-10, 29-30, 2-9, 30-31, 10-11, 11-12, 11-18, 24-25, 19-26, 19-14, 13-19, 13-20, 20-27, 34-35.
- Take the ENGRAVED LOCK (F).
- Return to the Workshop.
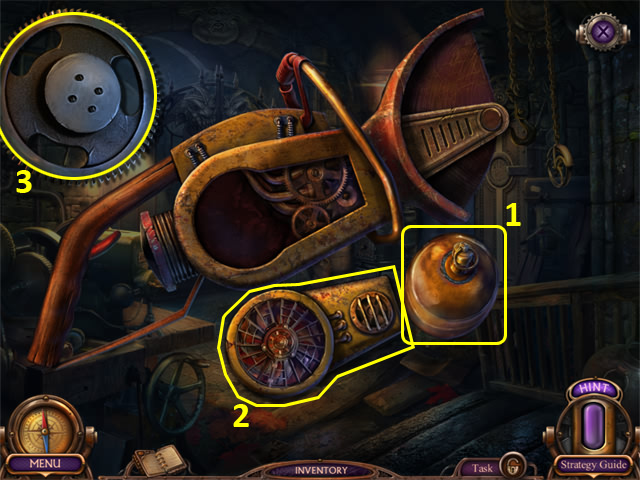
- Remove the broken lock; place the ENGRAVED LOCK (G) to trigger a puzzle.
- Unlock the briefcase; solution: 1, 1, 2, 2, 1, 2, 2, 1.
- Cut the lining with the RAZOR; take the PIECE OF MURAL (H).
- Grab the CORKSCREW (I) and GAS CAN (J).
- Cut the picture with the RAZOR (K).
- Place the PIECE OF MURAL to trigger a puzzle (L).
- Move the pieces to make a complete picture.
- Solution: 12, 18x2, 13, 17x3, 9, 18x3, 11, 17x3, 15, 18x2, 16, 17, 14, 17x3, 10, 17x2, 2, 17x2, 1, 17x2, 8, 17x2, 7, 17x4, 4, 18, 6, 17x2, 5, 17x3, 3, 17.
- Grab the BURNER TUBE (M).
- Back out.

- Grab the HOSE (N).
- Use the WRENCH (O); open the drawer and take the PROBE (P).
- Back out.
- Read the note (Q).
- Use the PROBE to open the cabinet. Use the GARDENER'S AMULET in the box; open it and take the CHISEL (R).
- Click the GAS CAN in your inventory.
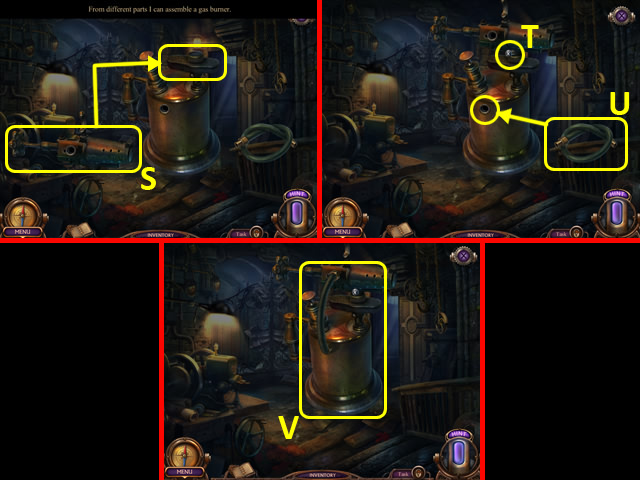
- Place the BURNER TUBE (S).
- Use the SCREWDRIVER (T).
- Select the HOSE (U); place it.
- Take the TORCH (V).
- Walk down.
- Use the TORCH (W).
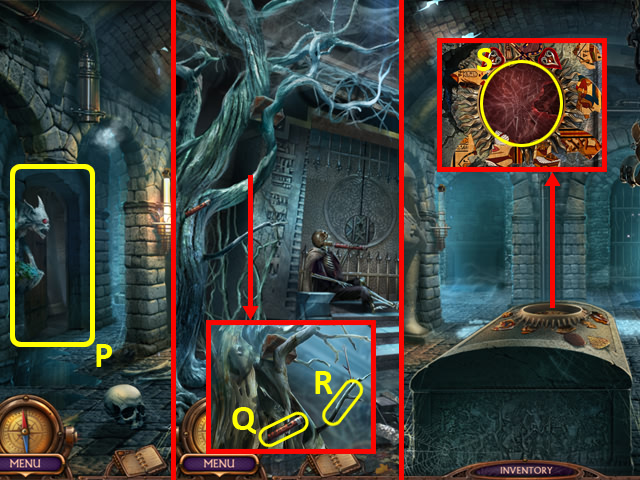
- Enter the Catacombs (X).
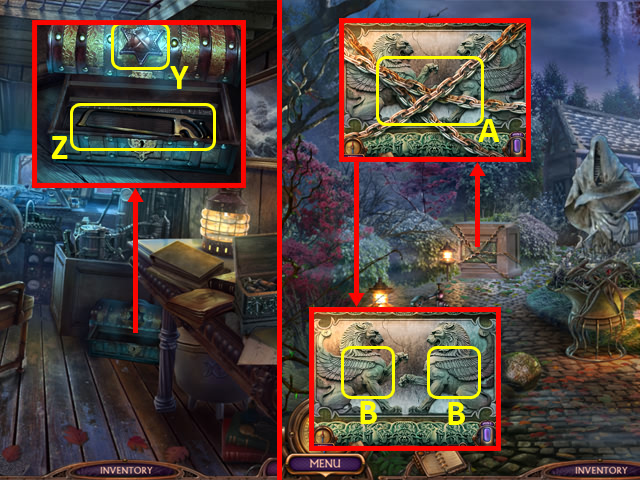
- Insert the CHISEL (Y) and select twice; grab the CABINET LEVER (Z) and BROOM (A).
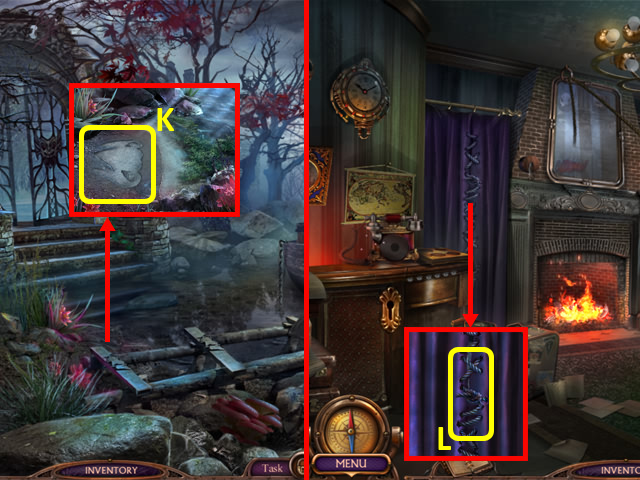
- Use the BROOM to clear the sand; take the PICTURE OF EMBLEM (B).
- Return to the Mysterious Corridor.
- Use the WRENCH on the BOTTLE OF OIL (C); take it.
- Move the barbed wire with the LEATHER GLOVE; select the two lights (D).
- Place the PICTURE OF EMBLEM (E).
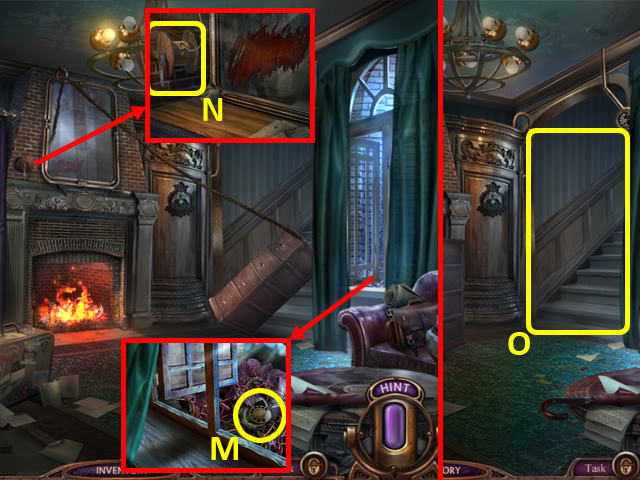
- Enter the Living Room (F).
Chapter 4: Tomb
- Read the note (F1).
- Grab the STONE DISK (G).
- Use the SCARAB to get the HEXAHEDRON AMULET (H).
- Use the RAZOR on the package; remove the wrapping and take the BOOK (I).
- Select the lamp twice; use the LEATHER GLOVE to grab the LIGHTBULB (J).
- Open the cupboard (K); examine it to access a HOP.
- Play the HOP.
- You receive a VALVE (L).
- Select the BOTTLE OF OIL in your Inventory.
- Select the FUSE (M).
- Cut the fuse (N) with the RAZOR.
- Use the CORKSCREW (O).
- Select the FUSE (O2).
- Light the FUSE (O3) with the lighter.
- You receive a TORCH.
- Return to the Garden.
- Place the VALVE (P) and BUCKET (Q).
- Turn the valve (R); take the FULL BUCKET (S).
- Return to the Living Room.
- Pour the FULL BUCKET into the sink; grab the TRIANGULER AMULET (T) and GLOWING GEMS (U).
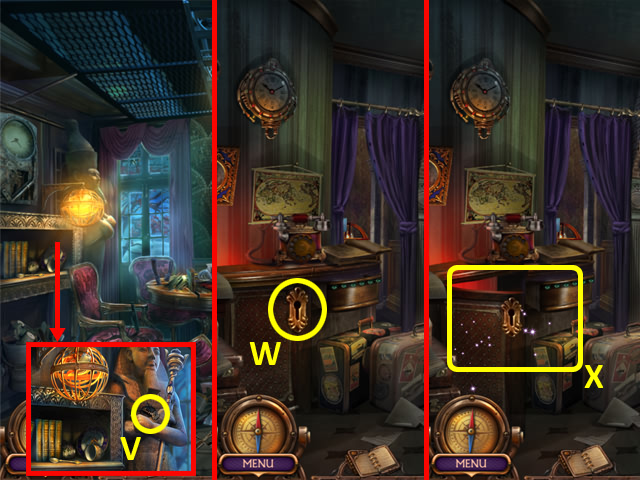
- Enter the Library (V).
- Select the scene.
- Open the cabinet; grab the SPRING (W).
- Return to the CATACOMBS.
- Place the TORCH (X).
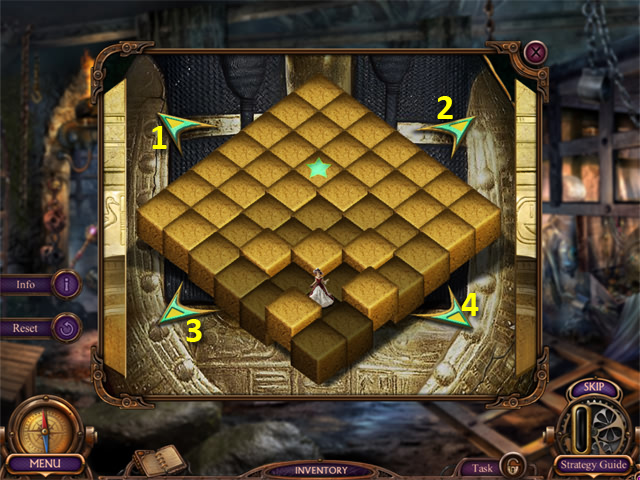
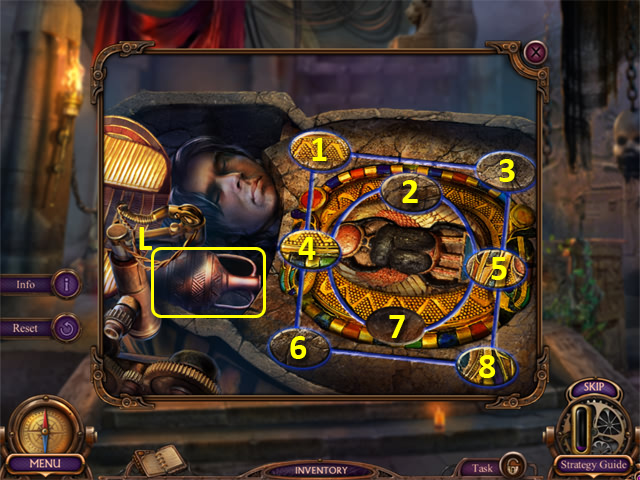
- Place the STONE DISK to trigger a puzzle (Y).
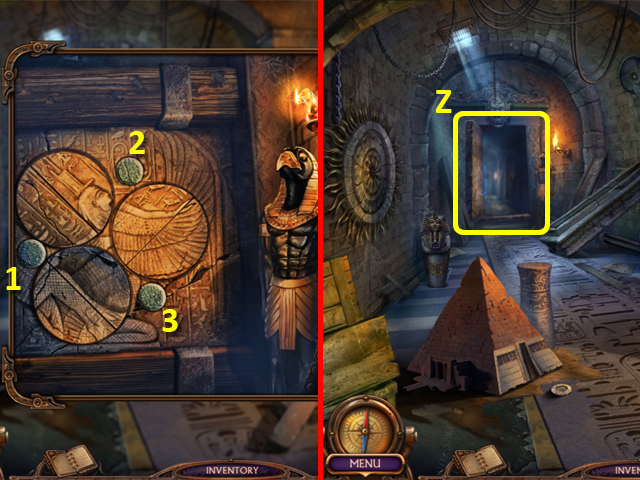
- Rotate the discs to make a complete picture; solution: 1, 2x7, 3x5.
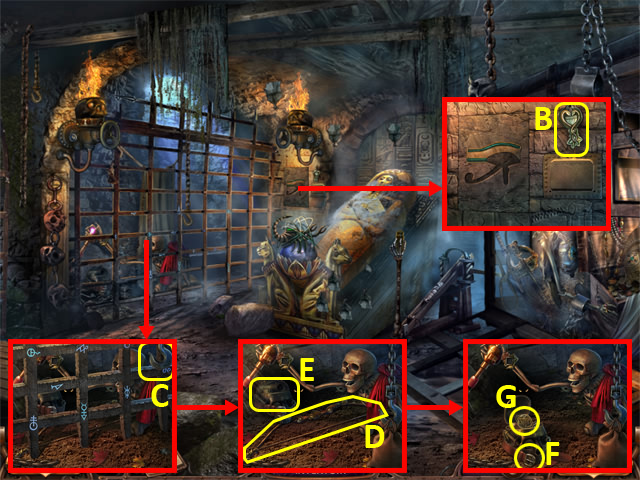
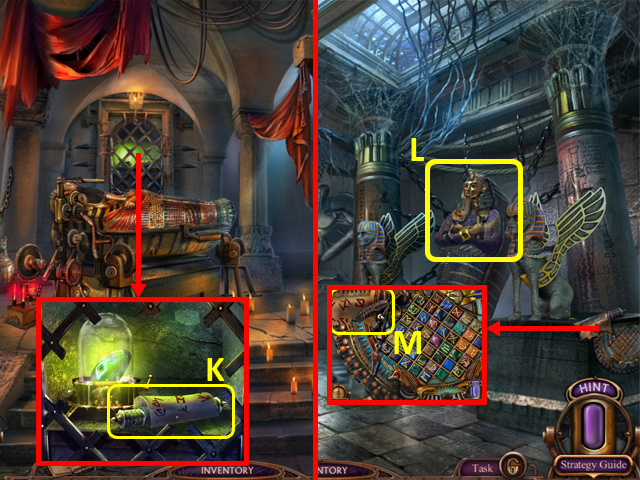
- Enter the Tomb (Z).
- Select the scene twice.
- Use the RAZOR on the vines; grab the CAMERA (A).
- Place the GLOWING GEMS in the statue's eye sockets; take the DOUBLE KEY (B).
- Grab the CAMERA LENS (C).
- Use the KNITTING NEEDLE (D); take the TYPEWRITER KEY (E) and DUSTER PART (F).
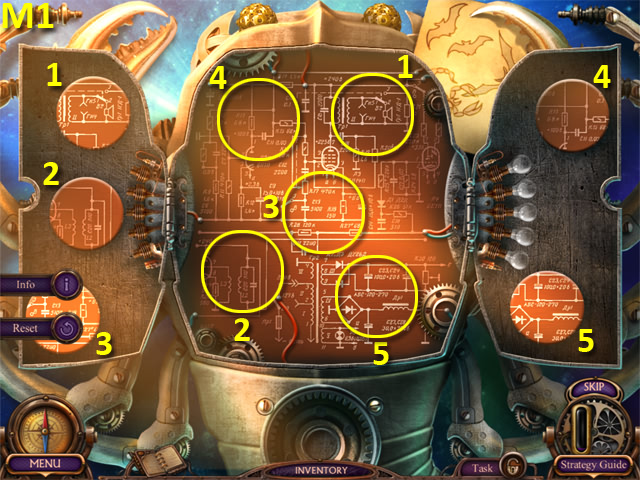
- Place the SPRING (G); move the levers (H) and grab the CANISTER OF GASOLINE and COMPUTER CHIP (I).
- Select the CAMERA in your Inventory.
- Select the camera lens (J) and light bulb (K).
- Take the CAMERA WITH FLASH (K1).
- Use the CAMERA WITH FLASH (L).
- Grab the CUTOFF SAW WITHOUT GASOLINE (M).
- Return to the Library.
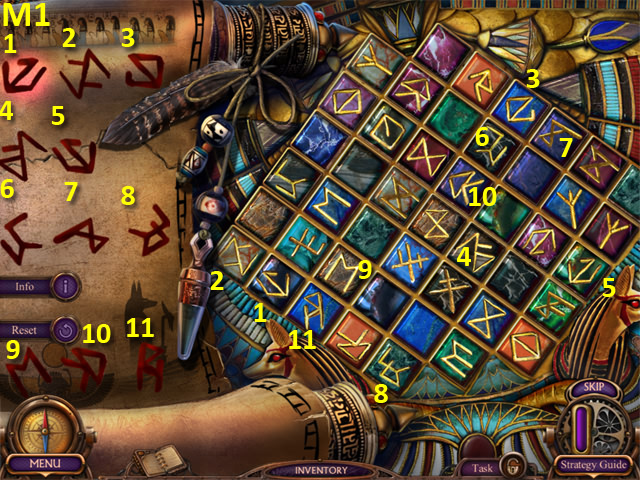
- Place the COMPUTER CHIP to trigger a puzzle (N).
- Select the columns to connect the lights left to right.
- Solution: 1, 2x4, 3, 1, 2x4, 3, 2, 3x3.
- Grab the DUSTER PART (O).
- Place the TRIANGULAR AMULET in the slot; take the PIECE OF MURAL (P).
- Use the SCARAB with the glass (Q) to get the PARCHMENT.
- Grab the TAPE (R).
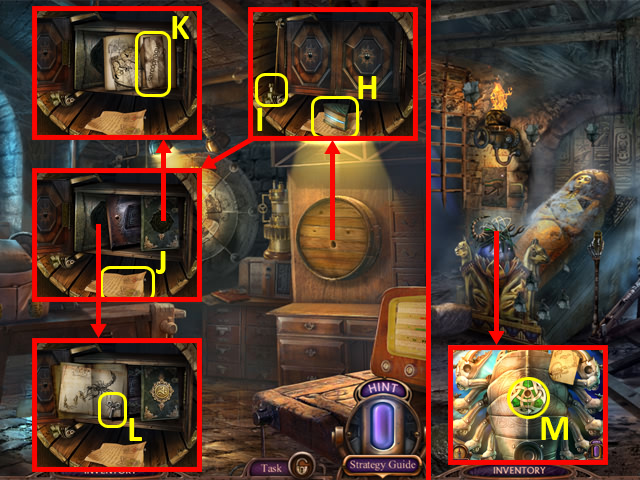
- Select the globe, use the SCREWDRIVER on the screws, and select the drawer; take the TONGS (S).
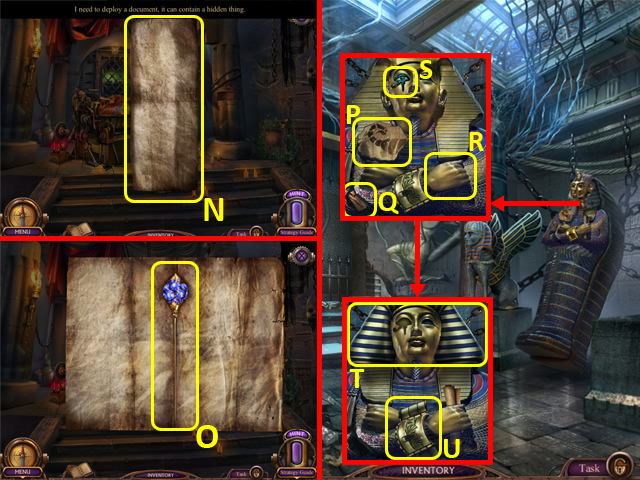
- Place the HEXAHEDRON AMULET (T); open the panel and grab the DRAWER HANDLE (U).
- Place the BOOK to trigger a puzzle (V).
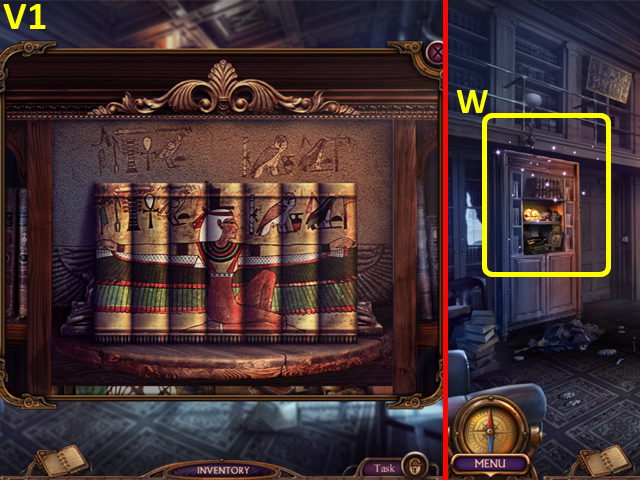
- Re-arrange the books; solution (V1).
- Examine the bookcase to access a HOP (W).
- Play the HOP.
- You receive a NEEDLE 1/4 (X).
- Back out.

- Place the TYPEWRITER KEY into the typewriter to trigger a puzzle; select the keys in the order shown (1-6).
- Enter Room 13 (Y).
Chapter 5: Room 13
- Read the note (Y1).
- Grab the TONGS (Z).
- Unlock the drawer with the DOUBLE KEY; open it and take the THREAD (A).
- Attach the DRAWER HANDLE to the drawer; open it and take the EMPTY SACK (B).
- Cut the box with the RAZOR; take the CUTOFF SAW (C).
- Use the CHISEL (D).
- Grab the SMALL AXE (E).
- Use the CAMERA WITH FLASH; grab the TRISKELION AMULET (F).
- Return to the Tomb.

- Use the TONGS (G) to get the KEY WITH GEARS (G1).
- Return to Room 13.
- Insert the KEY WITH GEARS (H) and turn it to trigger a puzzle.

- Rotate the arrows to connect the colours left to right.
- Solution (H1).
- Examine the bed to access a HOP.
- Play the HOP.
- You receive a SEAL STAMP (I).
- Return to the basement.
- Use the TONGS; take the SAW BLADE (J).
- Use the CORKSCREW with the CORK (K); pull it twice to take it.
- Open the barrel; move the cover and grab the LIGHT AMULET PIECE (L).
- Use the EMPTY SACK (M).
- Put the three rocks (N) in the sack; take the SACK OF ROCKS (O).
- Select the CUTOFF SAW in your Inventory.
- Select the parts in the order shown (1-3).
- You receive a CUT-OFF SAW.
- Return to the Tomb.
- Enter the Underground Hall (P); select the scene.
- Grab the STICK OF DYNAMITE (Q).
- Use the SMALL AXE (R); you receive a DRY BRANCH and HARPOON.
- Back out.
- Place the PIECE OF MURAL to trigger a puzzle (S).
- Place the mural pieces to make a complete picture.
- Solution (S1).
- Talk to Abraham Shadowy (T).
- Grab the DYNAMITE BASE (U).
- Use the CUT-OFF SAW on the bars (V); you receive CUT-OFF SAW WITHOUT GASOLINE.
- Enter the Dungeon (W).
- Select the scene.
- Select the sarcophagus (X).
- Pull the lever (Y).
- Examine the cage (Z) to access a HOP.
- Play the HOP.
- You receive a STONE FRAGMENT (A).
- Grab the BOWL AMULET (B).
- Place the SACK OF ROCKS (C).
- Grab the BOW (D).
- Use the DRY BRANCH (E).
- Select the belt buckle; take the BELT BUCKLE (F).
- Use the SEAL STAMP in the skull; grab the AMULET OF INFINITY (G).
- Return to the Workshop.
- Use the CORK in the barrel and open it; remove the wrapping and take the LIGHT AMULET PIECE (H).
- Place the CABINET LEVER (I) and pull it.
- Select the note (J).
- Place the TRISKELLION AMULET; take the DELIVERY DOCUMENT (K).
- Place the AMULET OF INFINITY; take the WINDUP KEY (L).
- Return to the Dungeon.
- Remove the bindings four times; place the WINDUP KEY (M) to trigger a puzzle.
- Match the tiles to the centre board.
- Solution (M1).
- Select the DUSTER PART in your Inventory.
- Select the tape (N).
- Use the RAZOR on the tape (O).
- Attach the tape (P) to the handle (Q).
- Take the DUSTER (R).
- Use the DUSTER on the cobwebs; grab the ENGRAVED KEY (S).
- Return to Room 13.
- Open the egg with the ENGRAVED KEY; take the SIGNET RING (T).
- Place the BOWL AMULET in the door; open it and grab the FISHING LINE (U) and ACID (V).
- Return to the Library.
- Place the SIGNET RING in the top of the globe; take the ANCIENT SPHERE (W).
- Return to the Dungeon.
- Open the slot and pour the ACID on the bars; grab the AMBER STONE (X).
- Place the ANCIENT SPHERE (Z) to trigger a puzzle.
- Guide the figurine to the star.
- Solution: 1, 3, 1, 1, 2, 2, 4, 2, 4, 2, 2, 1, 2, 1, 1, 1, 3, 3, 4, 4.
- You receive an ANCIENT COIN.
- Talk to the girl (A); you receive a NEEDLE 2/4.
- Place the AMBER STONE (B).
- Enter the Shrine (C).
Chapter 6: Shrine
- Grab the EARTH AMULET (D).
- Return to the Workshop.
- Place the EARTH AMULET (E).
- Take the GLOWING CONE (F).
- Return to the Shrine.
- Place the GLOWING CONE to trigger a puzzle (G).
- Place the pieces.
- Solution (G1).
- Grab the ELECTRIC WIRE (H).
- Place the STONE FRAGMENT in the pillar; take the TRIPLE KEY (I).
- Return to Room 13.
- Use the TRIPLE KEY with the bottom drawer; open it and take the GASOLINE CAN and MASK (J).
- Select the CUT-OFF SAW WITHOUT GASOLINE in your Inventory.
- Select the items in the order shown (1-3).
- You receive a CUT-OFF SAW.
- Return to the Shrine.
- Use the CUT-OFF SAW on the grating; grab the SCROLL WITH SYMBOLS (K).
- Return to the Underground Hall.
- Select the sarcophagus (L).
- Attach the SCROLL WITH SYMBOLS to trigger a puzzle (M).
- Select symbols that are mirror images of the symbols on the parchment.
- Solution (M1).
- Select the DELIEVERY DOCUMENT in your Inventory.
- Select the document (N) three times; take the NEEDLE 3/4 (O).
- Select the sarcophagus; grab the SCORPION FRAGMENT (P).
- Use the SCARAB to get the GUNPOWDER (Q).
- Place the PARCHMENT (R); take the EYE AMULET (S).
- Place the THREAD (T); take the ANUBIS BRACELET (U) to trigger a puzzle.
- Move the pieces into position.
- Solution (U1).
- Talk to the Historian (V); you receive the HISTORIAN'S DIARY.
- Return to the Dungeon.
- Place the EYE AMULET into the rock; take the STICK OF DYNAMITE and CAT FIGURINE (W).
- Return to the Catacomb.
- Place the CAT FIGURINE (X); grab the GOLDEN FEATHER (Y).
- Return to the Underground Hall.
- Place the BELT BUCKLE on the quiver; take the ARROW (Z).
- Place the GOLDEN FEATHER in the stone; grab the BULLETS (A).
- Select the BOW in your Inventory; select the arrow (B) twice and take the BOW.
- Use the BOW with the chest (C); open it and take the LIGHT AMULET PIECE (D).
- Select the REVOLVER in your INVENTORY.
- Select the items in the order shown (1-5); you receive a CHARGED REVOLVER.
- Return to the Shrine.

- Place the SCORPION FRAGMENT (E); take the LIGHT AMULET PIECE (F).
- Select the container (G); use the CHARGED REVOLVER on the ghost (H).
- Place the ANCIENT COIN in the container; grab the LIGHT AMULET PIECE (I).
- Place the MASK (J) and ANUBIS BRACELET (K) to trigger a puzzle.
- Grab the JAR (L).
- Slide the pieces to make a complete picture; solution: 4, 1, 3, 5, 2, 4, 1, 3, 5, 8, 6, 4, 1.
- Talk to James (M); you receive a WATCH.
- Return to Room 13.
- Use the JAR (N); take the LIGHT AMULET LIQUID (O).
- Select the LIGHT AMULET in your Inventory.
- Unwrap the package three times and read and take the note; select the items in the order shown (1-8) and take the LIGHT AMULET (P).
- Return to the Underground Hall.
- Use the LIGHT AMULET on the skeleton; grab the STICK OF DYNAMITE (Q).
- Select the DYNAMITE BASE in your Inventory.
- Select the items in the order shown (1-6); you receive some DYNAMITE.
- Select the HISTORIAN'S DIARY in your Inventory.
- Select the arrow (R) twice; take the NEEDLE 4/4 (S).
- Place the DYNAMITE to trigger a puzzle (T).
- Wind the watch (U).
- Solution: 3, 6, 9, 12, then 1, 5, 7, 10, then 2, 4, 8, 11.
- Enter the Altar to trigger a puzzle (V).
Chapter 7: Altar
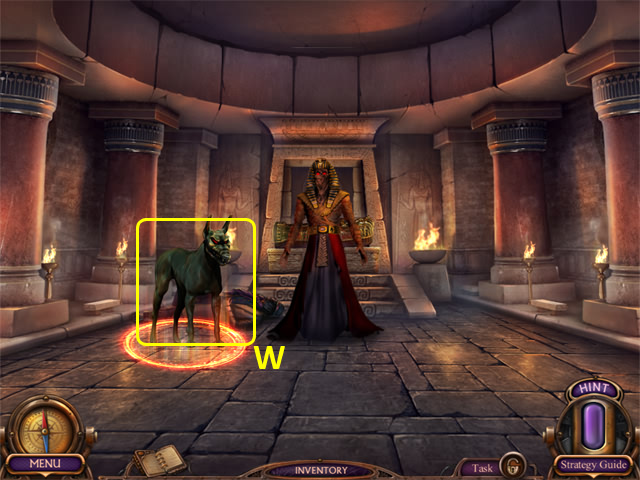
- Select the dogs in the correct order.
- Use the LIGHT AMULET (W) to trigger a puzzle.
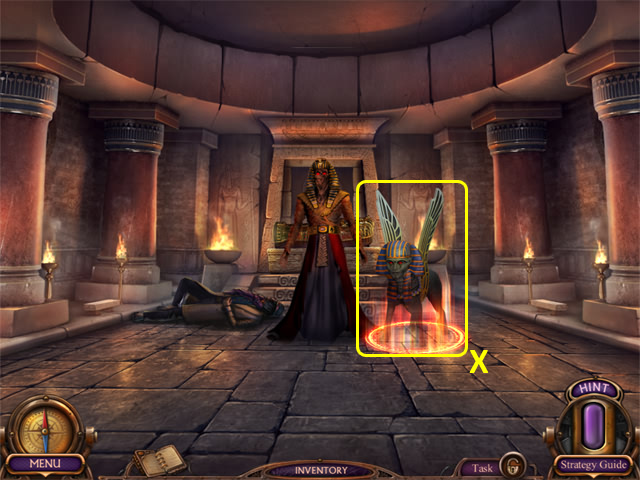
- Select the Sphinxes in the correct order.
- Use the LIGHT AMULET (X) to trigger a puzzle.
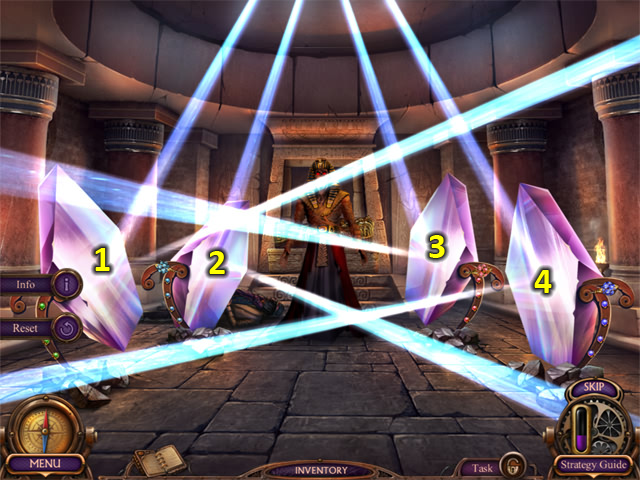
- Place the NEEDLE WITH EMERALD (1), NEEDLE WITH SAPPHIRE (2), NEEDLE WITH RUBY (3), and NEEDLE WITH TOPAZ (4).
- Solution: 4up, 1down, 3down, 3down.
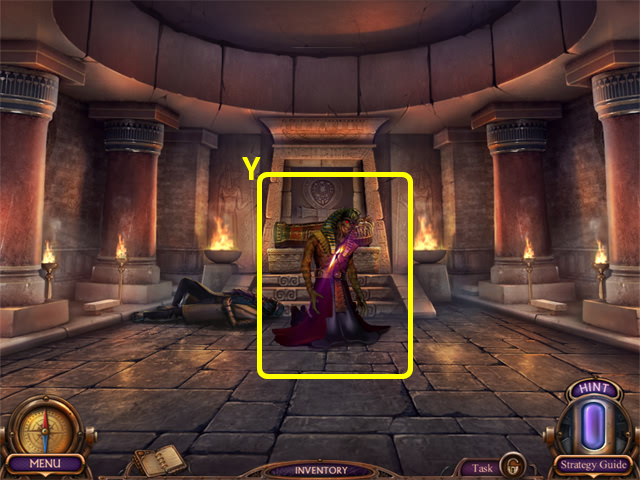
- Use the LIGHT AMULET (Y).
- Congratulations, you've completed Haunted Hotel: Ancient Bane.
Created at: 2014-06-27