

Walkthrough Menu
- General Tips
- Chapter 1: Isaac
- Chapter 2: Norton
- Chapter 3: Marshall
- Chapter 4: Redmond
- Chapter 5: O'Connor
- Chapter 6: Room 23
General Tips
- This is the official guide for Haunted Hotel: Death Sentence!
- This guide does not mention each time you have to zoom into a location; the screenshots show each zoom scene.
- Hidden-object puzzles are referred to as HOPs. This guide does not show screenshots of the HOPs, however, it is mentioned when a HOP is available and the inventory item collected.
- This guide will give step-by-step solutions for all puzzles that are not random. Please read the instructions in the game for each puzzle.
- Use the map to travel quickly to a location.
Chapter 1: Isaac
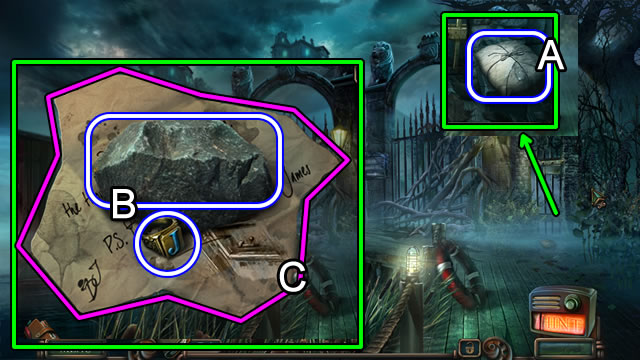
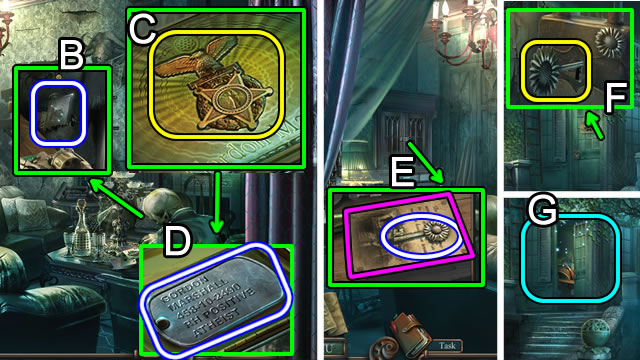
- Remove the debris; take the NOTE (A).
- Select, untie and unwrap the NOTE (Inventory).
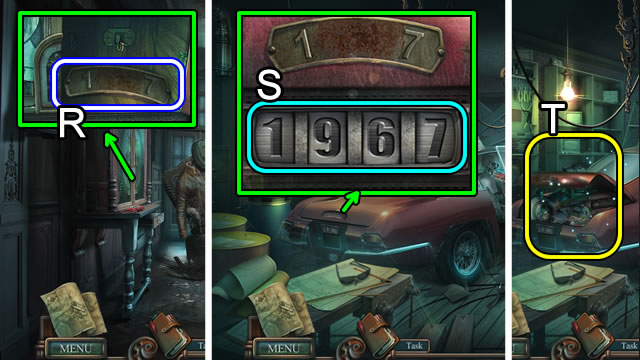
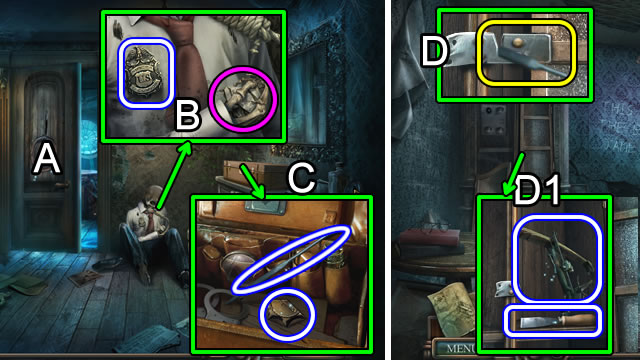
- Take the STONE and JAMES'S RING (B); read the note (C).
- Use the STONE twice; slide the latch; open the door (D).
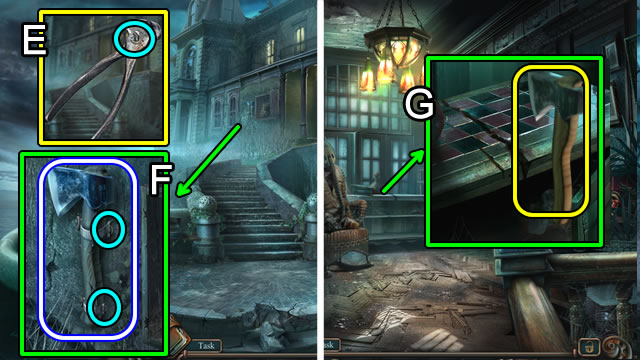
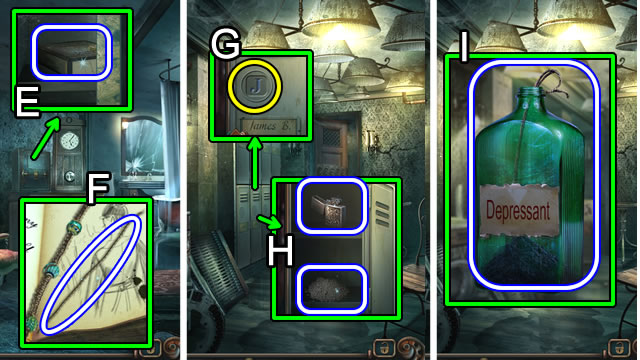
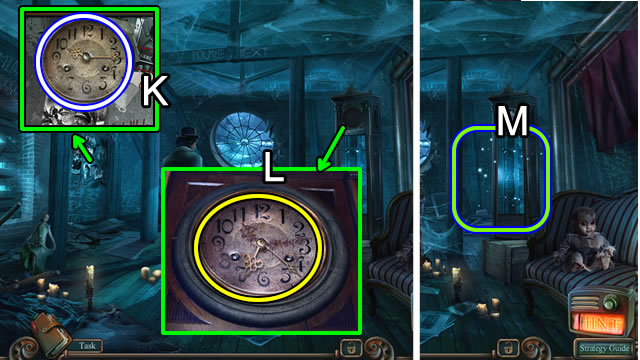
- Play the HOP (E). Receive a TRIANGULAR KEY.
- Lift the cover; place and turn the TRIANGULAR KEY (F).
- Walk forward.

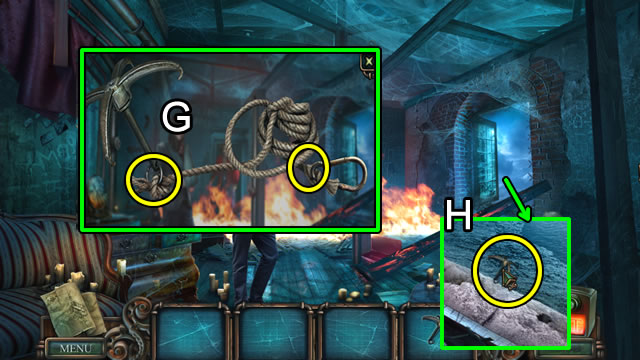
- Take the LADDER; uncover and take the GLUE (G).
- Attempt to enter the house.
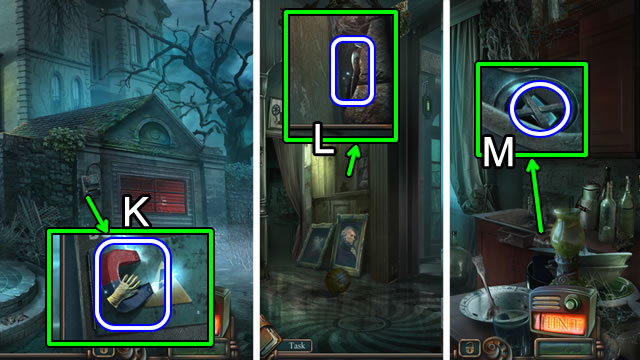
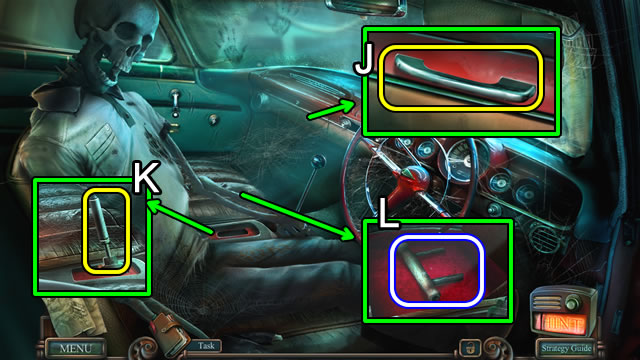
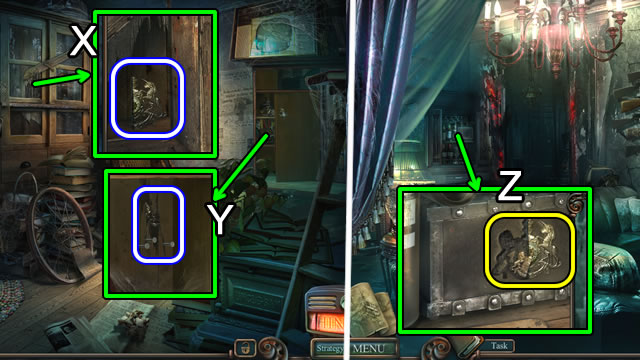
- Take the BROKEN DOOR HANDLE 1/3, 2/3 (H).
- Lift the mat. Take BROKEN DOOR HANDLE 3/3 (I).
- Select the BROKEN DOOR HANDLE 3/3 (Inventory).
- Use the GLUE (1) and (3). Affix fragments (2) and (3) to (1). Take the DOOR HANDLE.
- Place the DOOR HANDLE (J).
- Slide the plate for a puzzle.

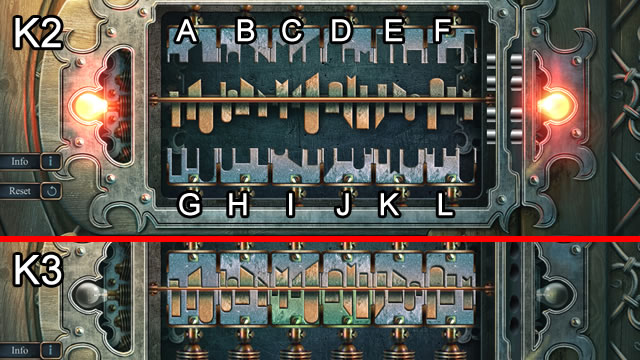
- Solution part 1 (K1). B-C, C-D, A-B, A-G, B-C, A-B, G-H, A-G, G-H, D-E, C-D, B-C, A-B.
- Solution part 2 (K2). K-L, J-K, I-J, J-K, F-L, E-F, K-L, F-L, D-E, E-F, K-L, J-K.
- Solved (K3).
- Walk forward.
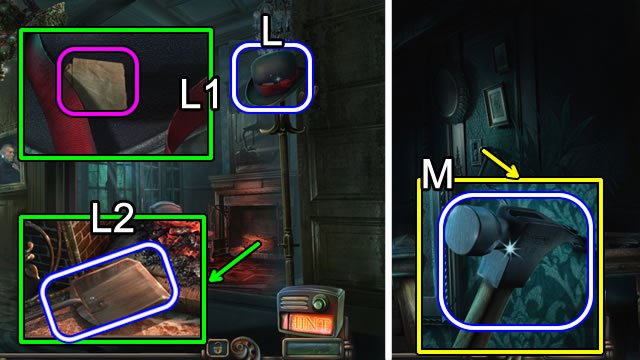
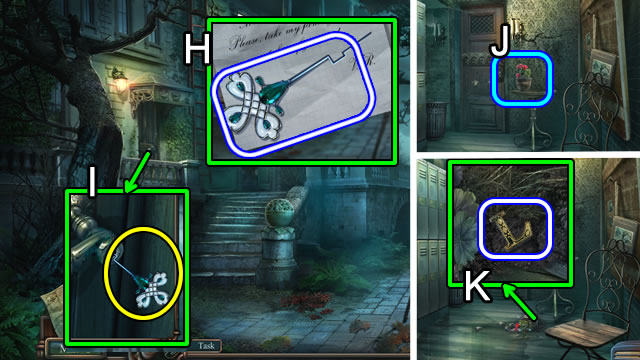
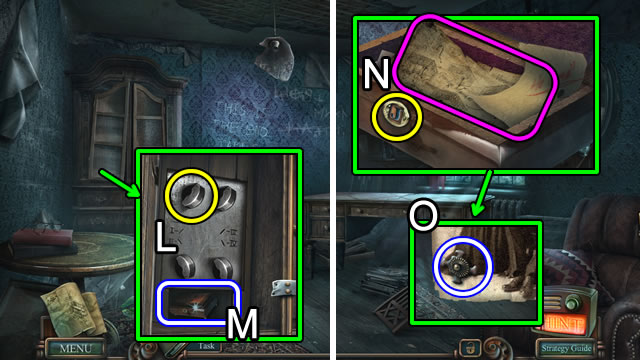
- Take JAMES'S HAT (L).
- Select JAMES'S HAT (Inventory). Untie the ribbon; read the note (L1); take JAMES'S HAT.
- Take the SHOVEL (L2).
- Attempt and then walk upstairs.
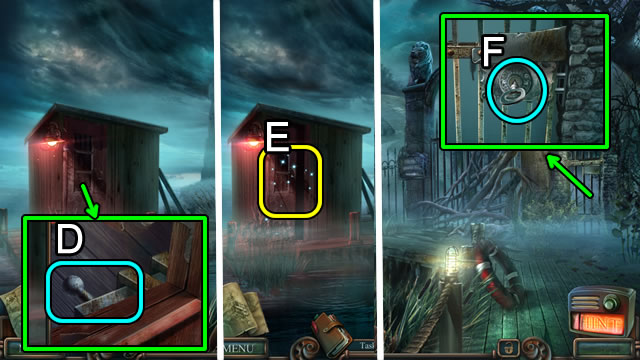
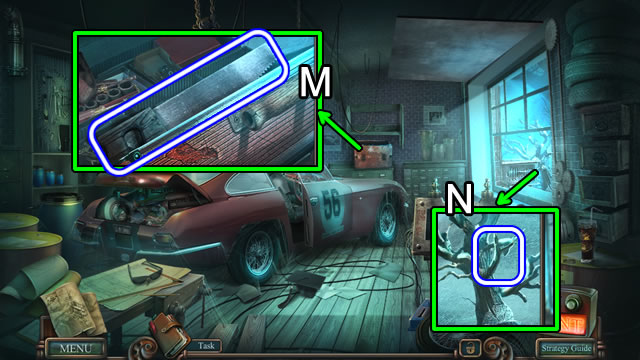
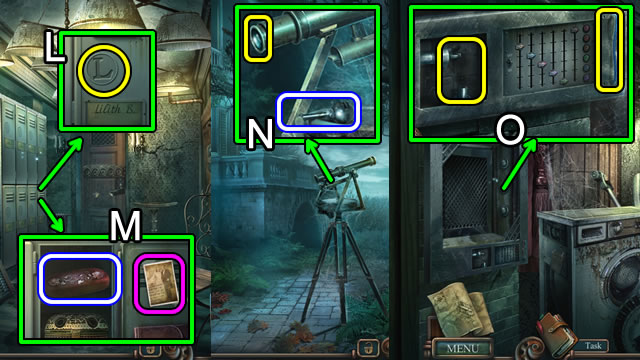
- Loosen and take the HAMMER (M).
- Walk down.
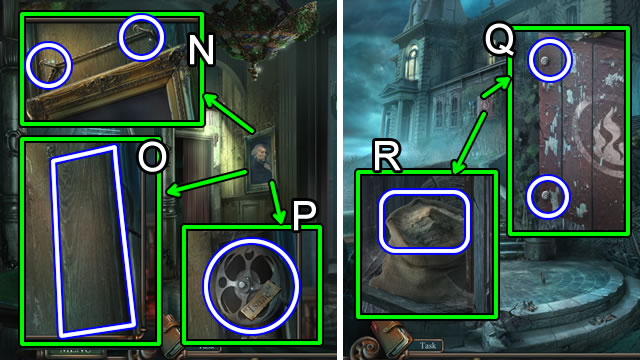
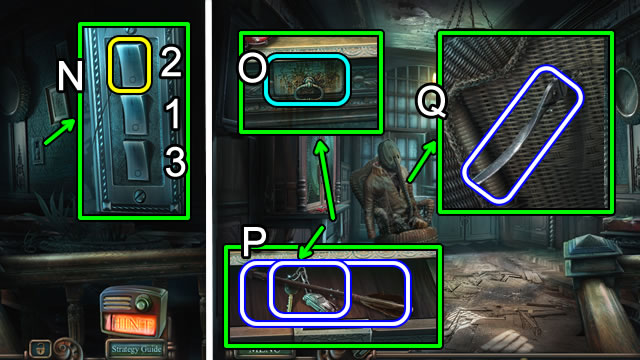
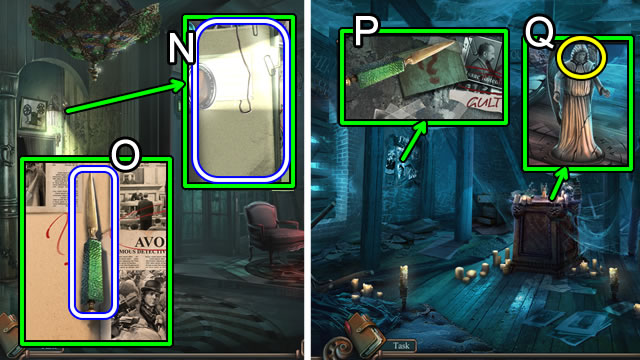
- Use the HAMMER for NAILS 1/6, 2/6 (N).
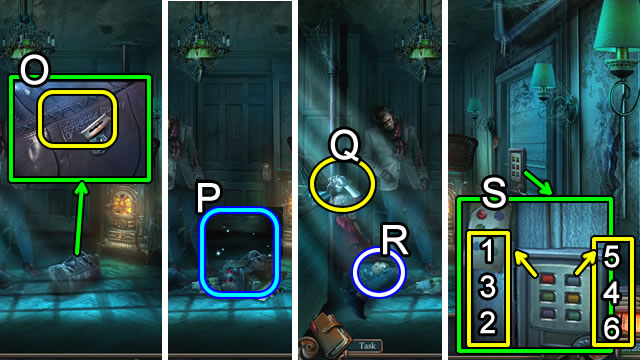
- Take the PLANK 1/3 (O).
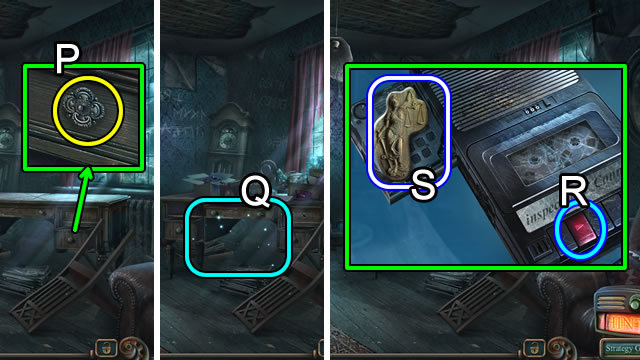
- Take ISAAC'S REEL (P).
- Walk down.
- Use the HAMMER to loosen then take NAILS 3/6, 4/6 (Q).
- Open the cabinet; untie and open the sack.
- Use the SHOVEL; receive a SCOOP OF SAND (R).
- Walk down.
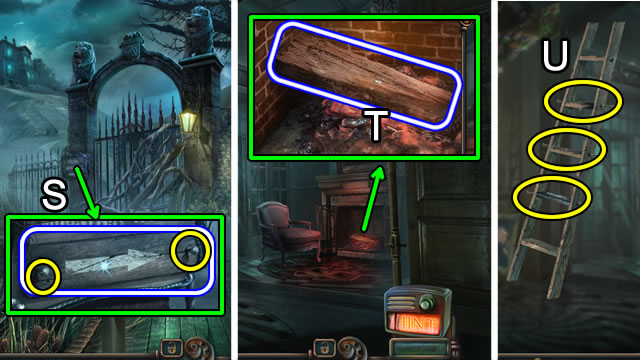
- Use the HAMMER for NAILS 5/6, 6/6; take PLANK 2/3 (S).
- Walk forward twice.
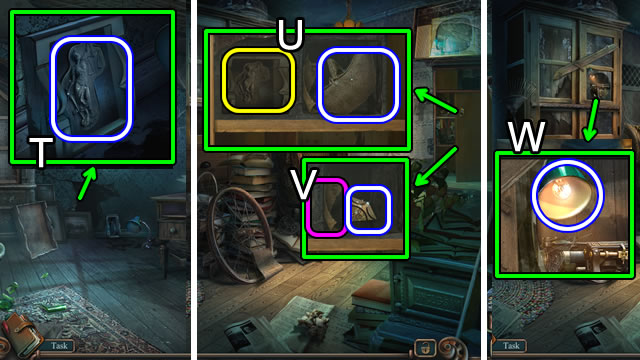
- Place the SCOOP OF SAND (T); take PLANK 3/3.
- Select the LADDER (Inventory). Place PLANKS 3/3 and NAILS 6/6 (U).
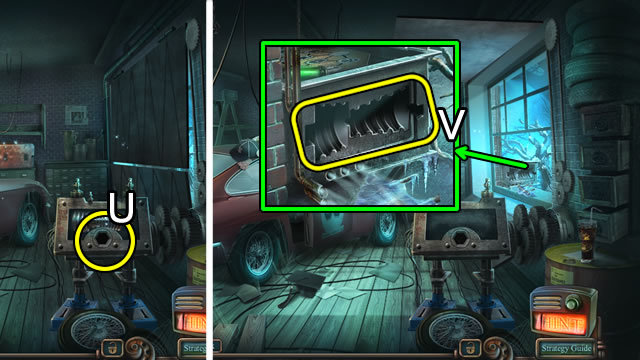
- Use the HAMMER 3x; take the LADDER (Inventory).
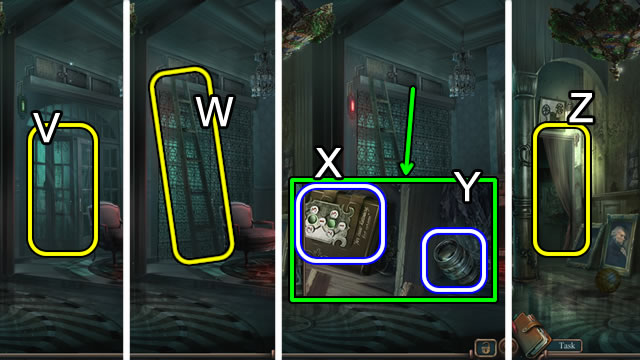
- Attempt to enter (V).
- Place the LADDER (W).
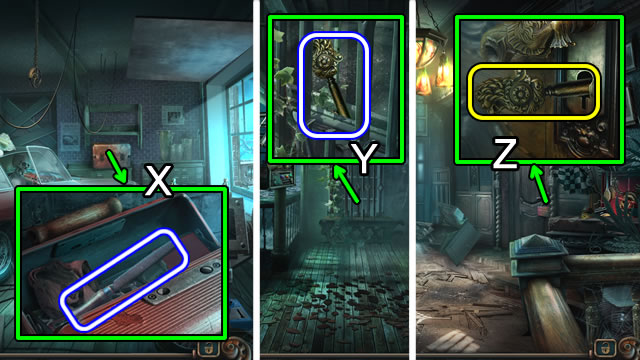
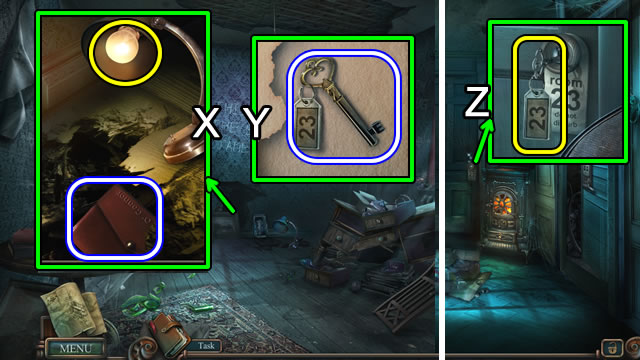
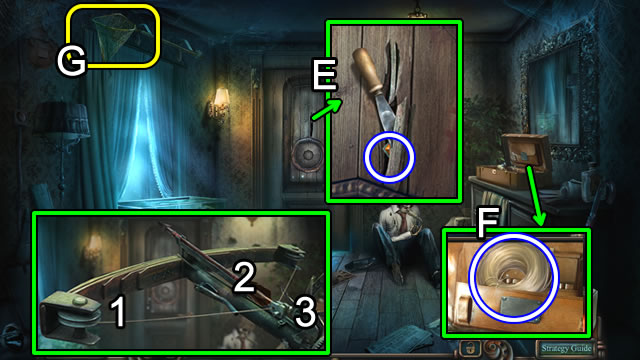
- Open the cabinet doors; take ISAAC'S DIARY (X) and the LENS (Y).
- Move the drape (Z); select for a puzzle.
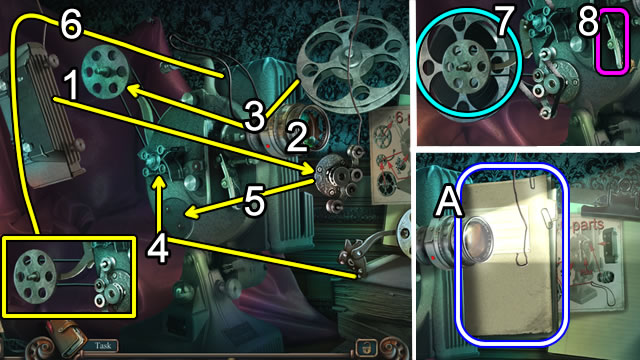
- Solution. Place (1); replace (2) with the LENS. Place 3-6.
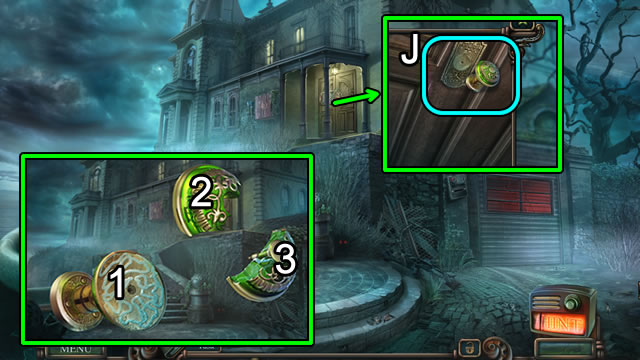
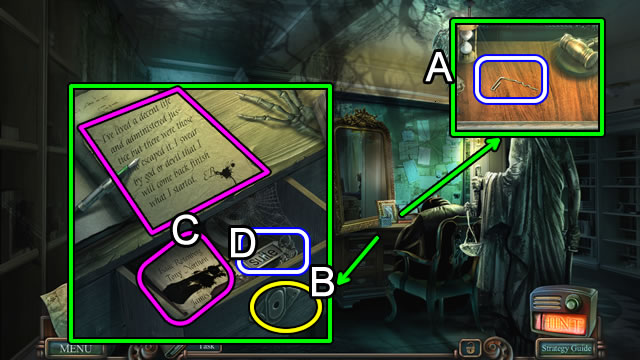
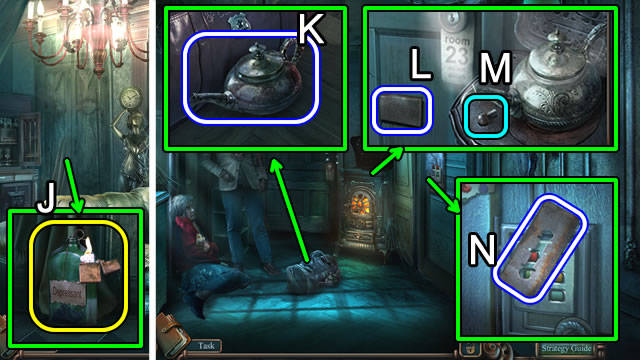
- Place ISAAC'S REEL (7); press the switch (8); take ISAAC'S DOSSIER (A).
- Select ISAAC'S DOSSIER (Inventory); take ISAAC'S CODE (B).
- Walk down twice.
- Select ISAAC'S DIARY (Inventory) for a puzzle.
- Solution. C-Dx4-Cx2-Dx3-C-D-C-D-Cx2-Dx3-Cx2-Dx2.
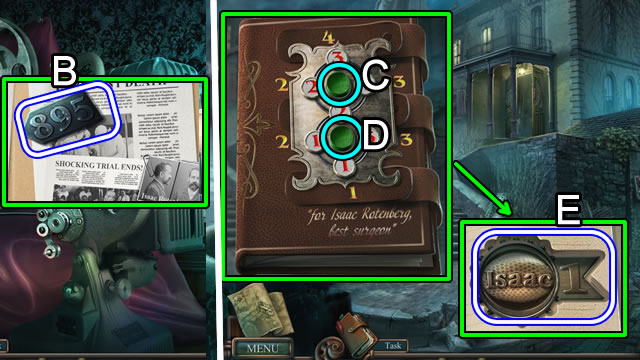
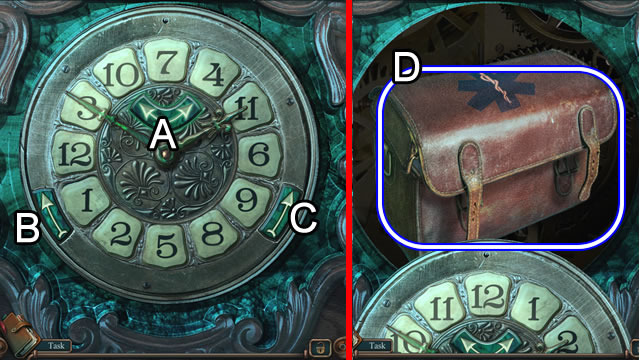
- Read the diary; take ISAAC'S MEDALLION (E).
- Place ISAAC'S MEDALLION (1) and ISAAC'S CODE (2). Set the dials (3) to 1-8-9-5.
- Take the POUCH.
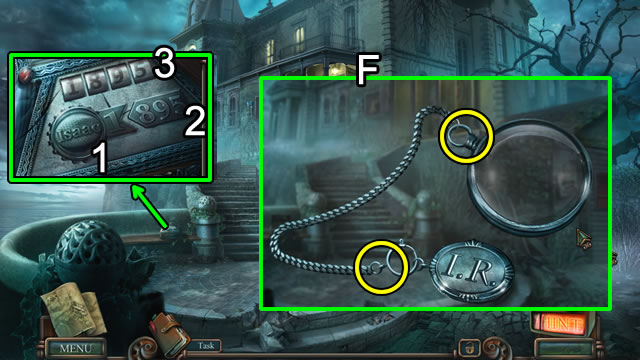
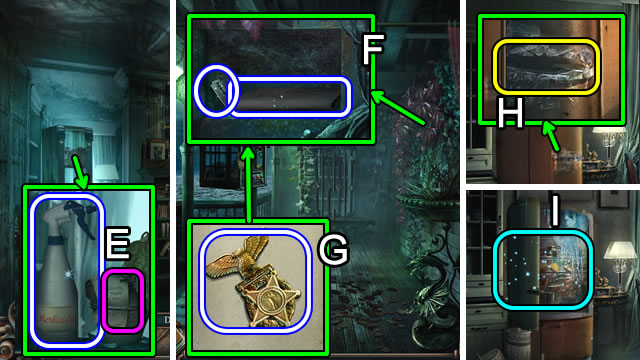
- Select and open the POUCH (Inventory). Take the chain; detach the magnifier and tag (F); receive a CHAIN.
- Walk forward.
- Replace the broken chain with the CHAIN (G).
- Enter the dining room.
- Open the pocket (H); read the note.
- Take the SMALL KEY (I).
- Place and select the SMALL KEY; take the RUST-AWAY and RUBBER GLOVE (J).
- Walk down twice.
Chapter 2: Norton
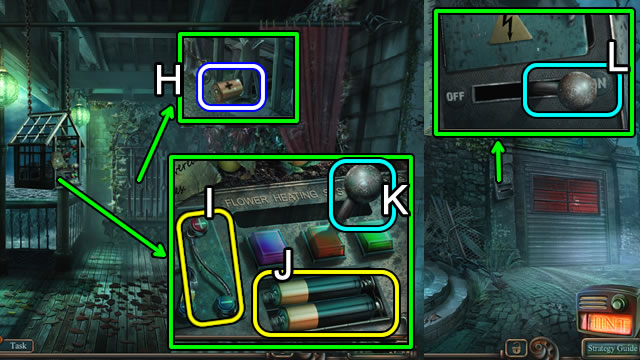
- Use the RUBBER GLOVE; receive a MAGNET (K).
- Return to the front hall.
- Use the MAGNET; receive BROKEN CUTTERS 1/2 (L).
- Enter the dining room.
- Use the MAGNET; receive a TOGGLE SWITCH (M).
- Return to the second floor corridor.
- Place the TOGGLE SWITCH (N); select the switches 1-2-3.
- Use the RUST-AWAY (O); open the drawer; read the note.
- Take the ARROW and CAR KEY (P).
- Loosen and take the BROKEN CUTTERS 2/2 (Q).
- Take NORTON'S DIARY; select NORTON'S DIARY (Inventory) for a puzzle.
- Solution. Rx3-Sx2-Tx2-U-Vx2-Wx3.
- Read the diary; take the ZIPPER PULL (X).
- Place and select the ZIPPER PULL (Y).
- Play the HOP (Z); receive a DRAGON.
- Return to the dining room.
- Place and select the DRAGON (A).
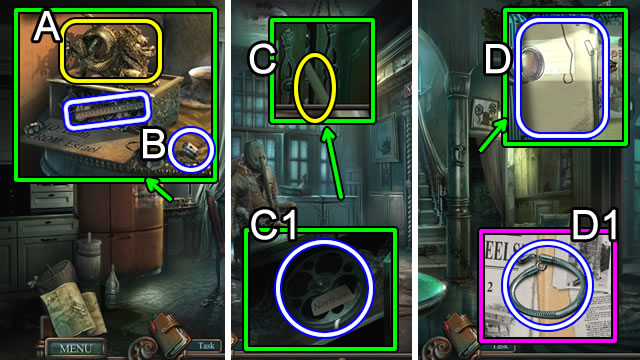
- Uncover the RULER; loosen and take the BATTERY (B).
- Return to the second floor corridor.
- Use the RULER (C); open and take NORTON'S REEL (C1).
- Walk down.
- Place NORTON'S REEL on the projector; select the switch.
- Take NORTON'S DOSSIER (D).
- Select NORTON'S DOSSIER (Inventory). Take NORTON'S BRACELET (D1).
- Walk down twice.
- Select the BROKEN CUTTERS 2/2 (Inventory).
- Place the three pieces; turn the screw; take the CUTTERS (E).
- Use the CUTTERS (F); take the FIRE AXE.
- Return to the second floor corridor.
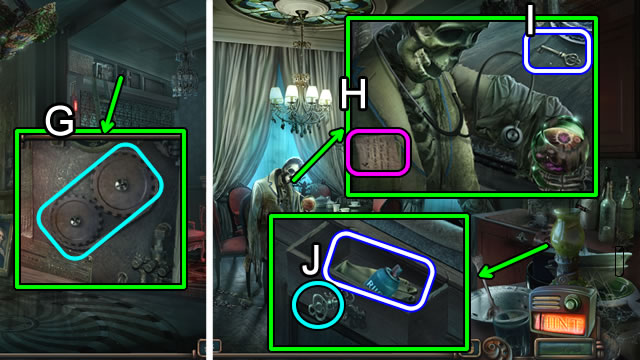
- Use the FIRE AXE (G).
- Walk forward.
- Loosen and take the BATTERY (H).
- Remove and replace the wire with NORTON'S BRACELET (I).
- Remove the cover; place two BATTERIES (J).
- Slide the lever (K); receive a LEVER.
- Walk down three times.
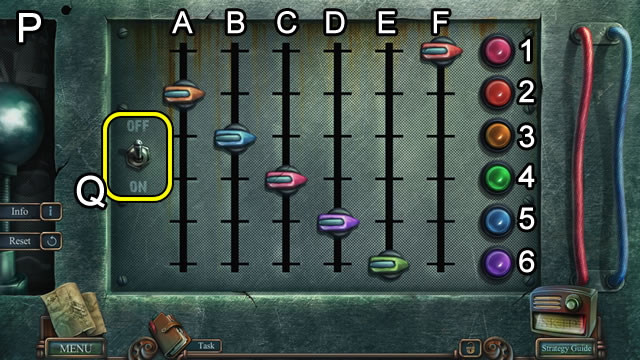
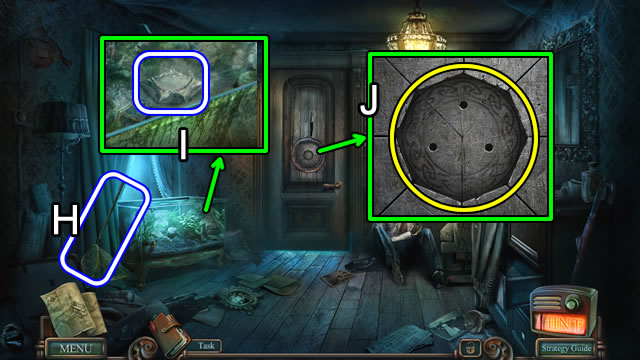
- Place and slide the LEVER (L); remove the plate for a puzzle.
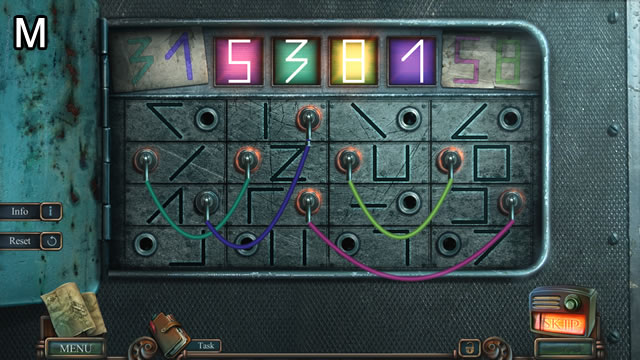
- Solution (M).
- Enter the garage.
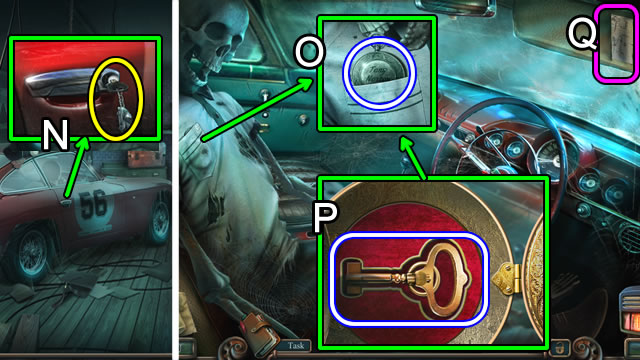
- Place and select the CAR KEY (N); enter the car.
- Take NORTON'S WATCH (O).
- Select NORTON'S WATCH (Inventory). Open and touch the face; take a WIND-UP KEY (P).
- Lower the visor; read the note (Q).
- Return to the second floor corridor.
- Place and select the WIND-UP KEY. Take the TRUNK PLATE (R).
- Return to the garage.
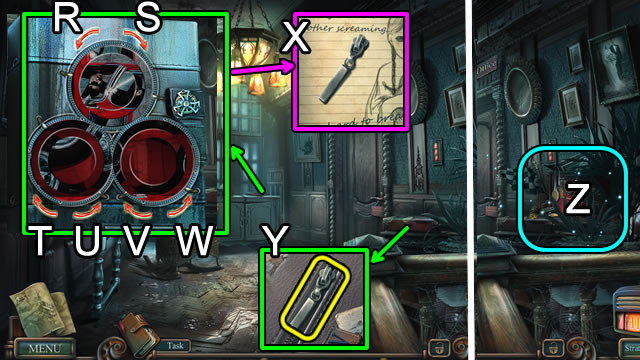
- Place the TRUNK PLATE for a puzzle.
- Solution (S).
- Play the HOP (T); receive a HEX KEY.
- Place the HEX KEY (U); receive a TURBINE.
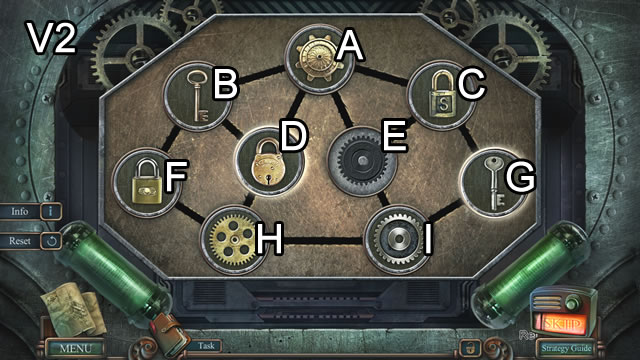
- Place the TURBINE (V) for a puzzle.
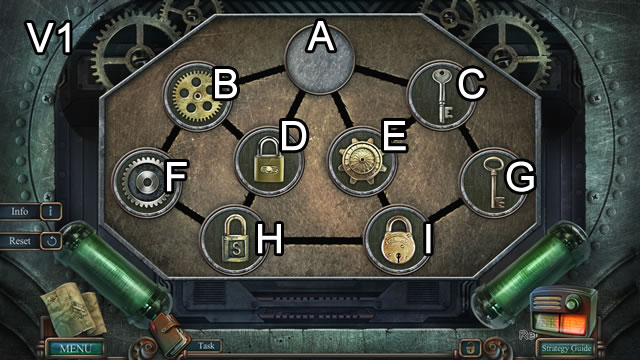
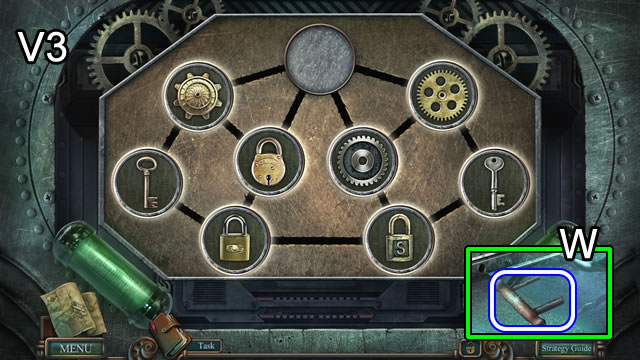
- Solution part one (V1). E-I-G-C-A-E-I-H-F-B-D-A-E-I-H-F-B-A-C-E.
- Solution part two (V2). I-H-F-B-A-C-G-I-E-C-G-I-E-A-C-G-I-E-C-A.
- Solved (V3).
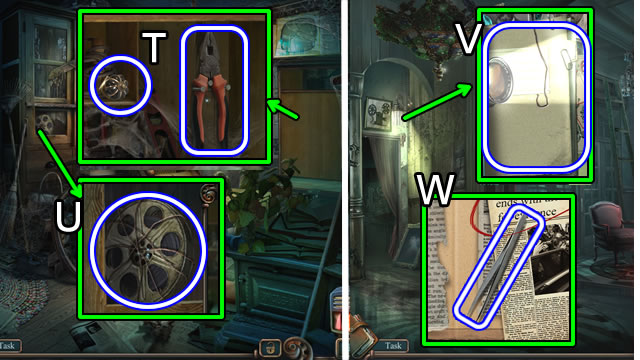
- Take the DRAWER HANDLE (W).
- Place and select the DRAWER HANDLE; take the FILE (X).
- Return to the balcony.
- Use the FILE; take ESRAEL'S KEY (Y).
- Walk down.
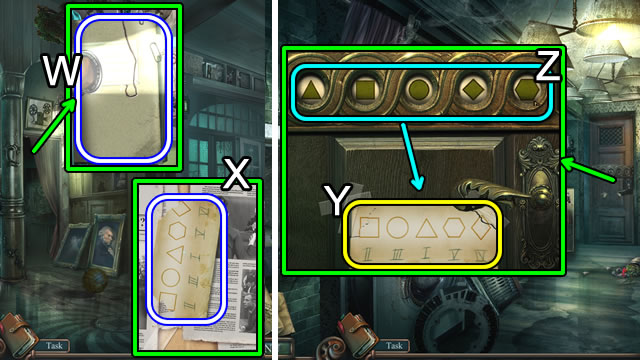
- Remove and select the sign; read the note.
- Place and select ESRAEL'S KEY (Z).
- Enter Esrael's office.
- Uncover and take a CLIP (A).
- Place and select the CLIP (B). Open the drawer.
- Read the notes (C); take the SUITE KEY (D).
Chapter 3: Marshall
- Move the books; read the note, take the HERBICIDE (E).
- Return to the balcony.
- Use the HERBICIDE; uncover a BLADE and MARSHALL'S DIARY (F).
- Select and read MARSHALL'S DIARY (Inventory); take the MARSHALL'S MEDAL (G).
- Return to the dining room.
- Use the BLADE (H); remove the tape; open the door.
- Play the HOP (I); receive a CHROME HANDLE.
- Return to Esrael's car.
- Place and select the CHROME HANDLE (J); take the SEAT LEVER.
- Place and pull the SEAT LEVER (K).
- Read the note; take the DRAWER HANDLE (L).
- Exit the car.
- Place and select the DRAWER HANDLE; take the HANDSAW (M).
- Use the HANDSAW; receive a BRANCH (N).
- Walk forward.
- Take the STEEL BALLS (O).
- Use the BLADE; take the CUT RUBBER BAND (P).
- Select the BRANCH (Inventory).
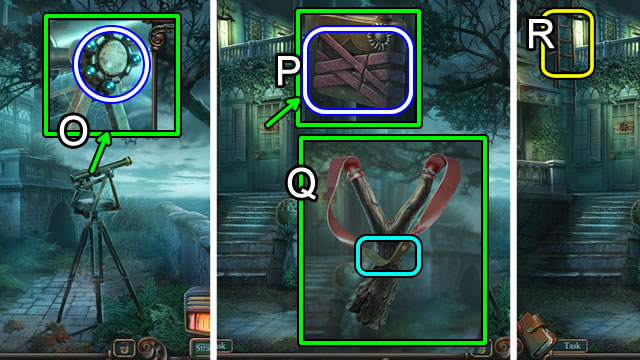
- Place and attach the CUT RUBBER BAND; add the STEEL BALLS; take the SLINGSHOT (Q).
- Place the SLINGSHOT (R) for a puzzle.

- Solution (S).
- Uncover and take the CHROME SLIDER (T).
- Return to Esrael's car.
- Place and select the CHROME SLIDER (U).
- Take MARSHALL'S REEL (V).
- Return to the front hall.
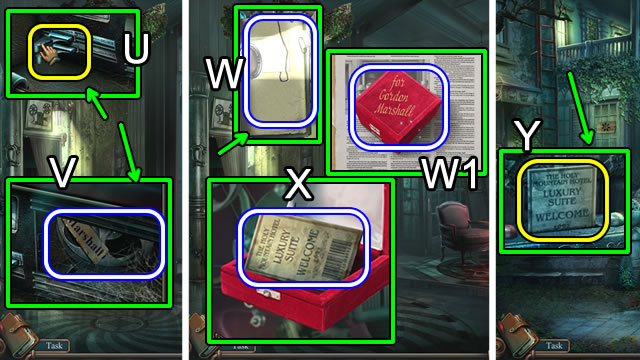
- Place MARSHALL'S REEL; select the switch; take MARSHALL'S DOSSIER (W).
- Select MARSHALL'S DOSSIER (Inventory); take the VELVET BOX (W1).
- Select and open the VELVET BOX (Inventory); take the PERMIT (X).
- Return to the terrace.
- Place the PERMIT (Y).
- Look again for a puzzle.

- Solution (Z). E-O-M-C-E-L-W.
- Place and select the SUITE KEY (A).
- Walk forward.
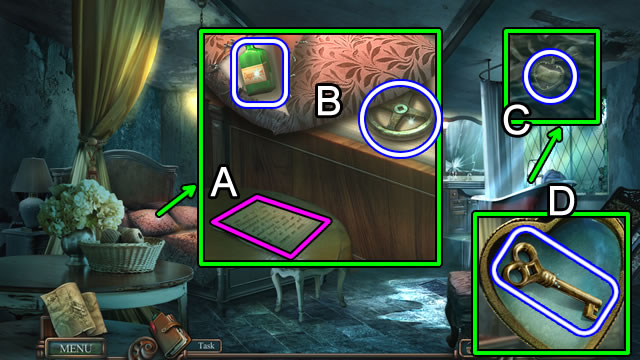
- Move the curtain. Slide out and take MARSHALL'S CIGAR CASE (B).
- Select MARSHALL'S CIGAR CASE (Inventory).
- Place MARSHALL'S MEDAL (C); open; lift holder; take the DOG TAG (D).
- Place the DOG TAG; open and take the SUNFLOWER KEY; read the note (E).
- Walk down.
- Place and select the SUNFLOWER KEY (F); open the door.
- Play the HOP (G); receive an ENVELOPE.
Chapter 4: Redmond
- Select and open the ENVELOPE (Inventory).
- Read the note; select the pin; take the HAIRPIN (H).
- Remove the WIRE; place and select the HAIRPIN (I); open the door.
- Enter the back hallway.
- Knock over the plant (J).
- Use the HERBICIDE; take the L MEDALLION (K).
- Place the L MEDALLION (L).
- Select the picture; take the GLASSES CASE (M).
- Select the GLASSES CASE (Inventory); open the case; select the glasses; receive a LENS.
- Walk down.
- Remove the broken lens; place the LENS; take the HINGE JOINT (N).
- Return to the back hallway.
- Place the HINGE JOINT and replace the WIRE (O) for a puzzle.
- Solution (P). D-6, B-5, C-1, A-1, E-4, C-1.
- Flip the switch (Q).
- Enter the laundry room.
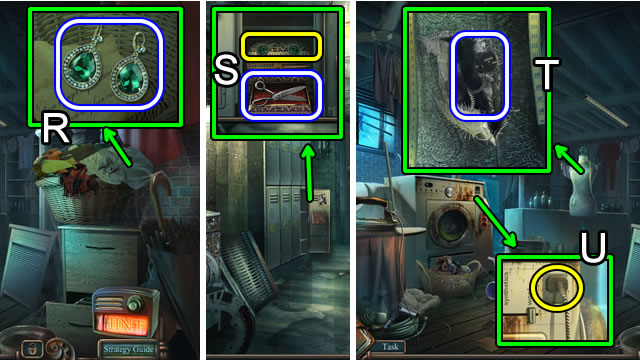
- Remove the clothes; take the EARRINGS (R).
- Walk down.
- Place the EARRINGS; open; take the SCISSORS (S).
- Return to the laundry room.
- Use the SCISSORS; uncover and take the CONNECTOR CORD (T).
- Place the CONNECTOR CORD (U) for a puzzle.
- Slide to 'cotton' (1); set to '60' (2), press the first and third buttons (3); slide to 'on' (4).
- Play the HOP (V); receive the REDMOND'S REEL.
- Return to the front hall.
- Place REDMOND'S REEL; press the switch; take VERONICA'S DOSSIER (W).
- Select VERONICA'S DOSSIER (Inventory); take the CODE (X).
- Return to the back hallway.
- Place the CODE (Y).
- Solution (Z).
- Enter the economy room.
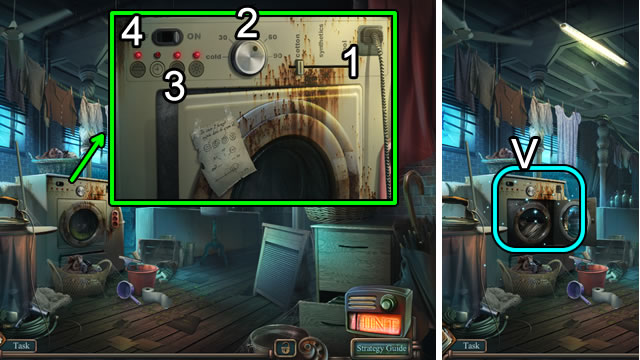
- Read the note (A); use the SCISSORS on the pillowcase; lift the covers. Take the EMPTY FLASK and VALVE (B).
- Uncover and take VERONICA'S LOCKET (C).
- Select VERONICA'S LOCKET (Inventory). Open, remove the glass and picture; take the TINY KEY (D).
- Place the VALVE; turn. Take VERONICA'S DIARY (E).
- Select VERONICA'S DIARY (Inventory); place the TINY KEY; read the diary; select the bookmark; take the WICK (F).
- Walk down.
- Place JAMES'S RING (G).
- Read the note; take the LIGHTER and GUNPOWDER (H).
- Select the EMPTY FLASK (Inventory). Add the GUNPOWDER and WICK (I). Take the EXPLOSIVE.
- Return to the deluxe suite.
- Place the EXPLOSIVE; use the LIGHTER (J).
- Walk forward.
- Take the KETTLE OF WATER (K).
- Take the GRINDSTONE (L).
- Place the KETTLE OF WATER; turn the knob; take the BOILING WATER (M).
- Pour the BOILING WATER; take the RUSTY BLADE (N).
- Select the RUSTY BLADE (Inventory) and the GRINDSTONE. Take a RAZOR BLADE.
- Use the RAZOR BLADE (O).
- Play the HOP (P); receive HANDCUFFS.
- Place the HANDCUFFS (Q); take LILITH'S CODE (R).
- Place the LILITH'S CODE.
- Solution (S).
- Open the door; enter the storage room.
Chapter 5: O'Connor
- Open the door; take the WIRE CUTTERS and DRAWER PULL (T).
- Move and take the WRAPPED FILM (U).
- Select the WRAPPED FILM (inventory); use the WIRE CUTTERS; remove the wire; take O'CONNOR'S REEL.
- Return to the front hall.
- Place O'CONNOR'S REEL; press the switch; take O'CONNOR'S DOSSIER (V).
- Select O'CONNOR'S DOSSIER (Inventory); open; take the TWEEZERS (W).
- Return to the storage room.
- Uncover and take the CREST PART (X).
- Use the TWEEZERS to take a second CREST PART (Y).
- Return to the deluxe suite.
- Place the CREST PARTS (Z) for a puzzle.
- Solution. Bx3-A-B-A-C-A-Cx3-A-Cx2-A-Cx2-A-B-A-Cx2-A-Bx2-A-Bx2-A-Bx6.
- Take the FIRST AID KIT (D).
- Walk forward.
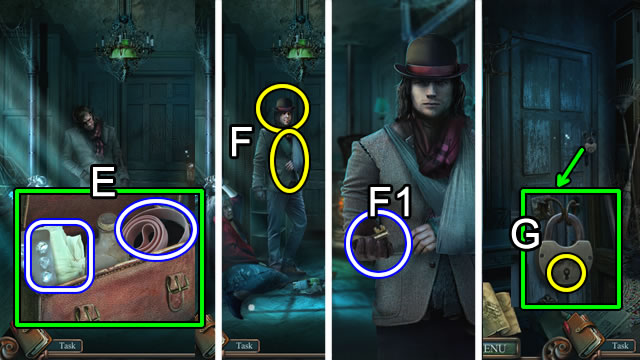
- Select the FIRST AID KIT (Inventory). Open, uncover and take the BANDAGE and TOURNIQUET (E).
- Place the TOURNIQUET and BANDAGE. Place JAMES'S HAT (F).
- Speak with James; take the PADLOCK KEY (F1).
- Walk right.
- Place and select the PADLOCK KEY twice (G).
- Walk forward.
- Remove and replace the knob with the DRAWER PULL (H).
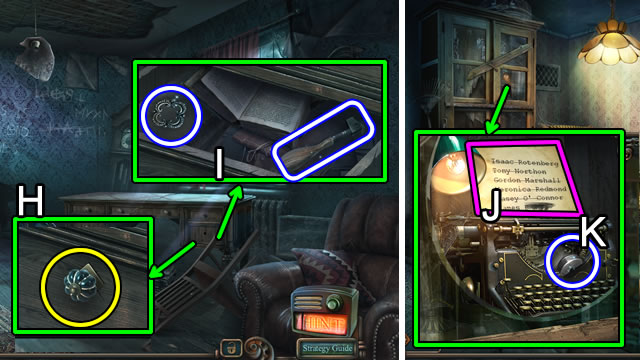
- Open the drawer; take the SILVER DECORATION and GLASS CUTTER (I).
- Walk down.
- Use the GLASS CUTTER. Press the keys; read the note (J); take the SILVER HANDLE (K).
- Walk forward.
- Open the door; place the SILVER HANDLE; set the switches (L).
- Take JAMES'S NOTES (M).
- Select JAMES'S NOTES (inventory); place JAMES'S RING; open the box; flip through the notes (N).
- Take the HANDLE (O).
- Place SILVER DECORATION and HANDLE (P); open the drawer.
- Play the HOP (Q); receive the O'CONNOR'S RECORDER.
- Select the O'CONNOR'S RECORDER (Inventory). Press (R); take the BAS-RELIEF FIGURE (S).
- Place the BAS-RELIEF FIGURE; select and take the BAS-RELIEF (T).
- Walk down.
- Place the BAS-RELIEF; press; take the OVEN MITT (U). Read the note; receive the MEDALLION PART (V).
- Use the OVEN MITT; take the BULB (W).
- Walk forward.
- Place the BULB; take O'CONNOR'S DIARY (X).
- Select and open O'CONNOR'S DIARY (Inventory). Read the diary; take the KEY TO ROOM 23 (Y).
- Walk down twice.
- Place and select twice the KEY TO ROOM 23 (Z).
- Walk forward.
Chapter 6: Room 23
- Attempt to enter the next room (A).
- Take the note and O'CONNOR'S BADGE (B).
- Place O'CONNOR'S BADGE; unlatch and open the case; take the NAIL FILE and second MEDALLION PART (C).
- Walk down, right and forward.
- Use the NAIL FILE (D); open the door; take the CROSSBOW FRAME and CHISEL (D1).
- Return to room 23.
- Place and select the CHISEL; take the DIAMOND BUTTON (E).
- Place the DIAMOND BUTTON; press and take the FISHING LINE (F).
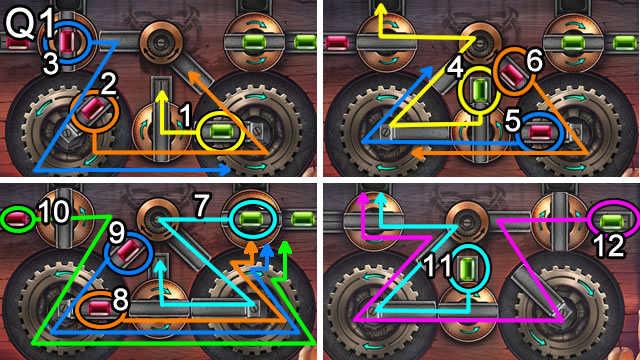
- Select the CROSSBOW FRAME (Inventory); place and attach the FISHING LINE (1), place and select to add the ARROW (2), pull the cocking mechanism (3). Take the CROSSBOW.
- Select and place the CROSSBOW on the net (G).
- Take the NET (H).
- Use the NET; receive the third MEDALLION PART (I).
- Place each MEDALLION PART (J).
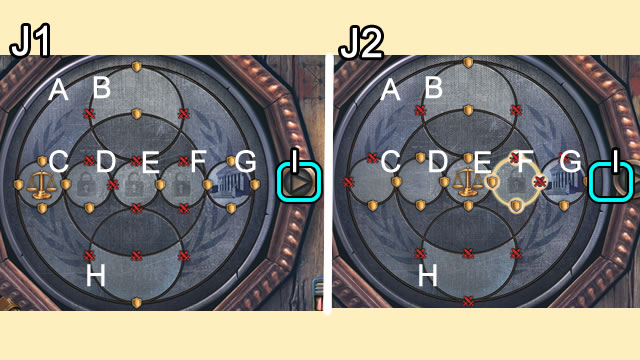
- Solution (J1). B-Ix2-H-Ix2-E-I-D-I-E-I-F-I-G-I-F-I-G-I-A-I-C-I-A-I-E-I-F-I.
- Solution (J2). G-I-C-I-A-I-C-I-F-I-G-I-A-I-G-I-A-I.
- Walk forward.
- Speak to James; take the CLOCKFACE (K).
- Place and select the CLOCKFACE twice(L).
- Play the HOP (M); receive the JAMES'S REEL.
- Return to the front hall.
- Place JAMES'S REEL; press the switch; take JAMES'S DOSSIER (N).
- Select JAMES'S DOSSIER (Inventory); open; take the GREEN SPLINTER (O).
- Return to the altar.
- Use the GREEN SPLINTER (P); take the STATUETTE HEAD.
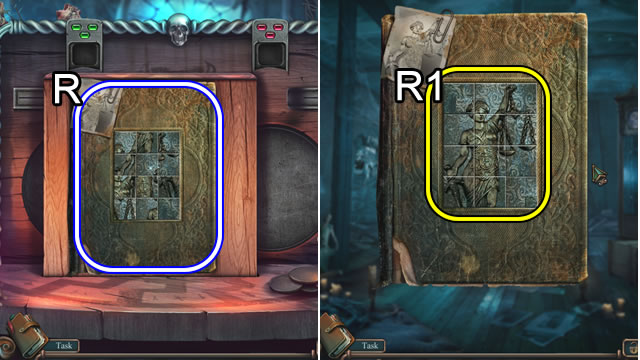
- Place and select the STATUETTE HEAD (Q) for a puzzle.
- Solution (Q1).
- Receive LILITH'S DIARY (R).
- Select LILITH'S DIARY (Inventory) for a puzzle.
- Solution (R1).
- Read then give LILITH'S DIARY to James.
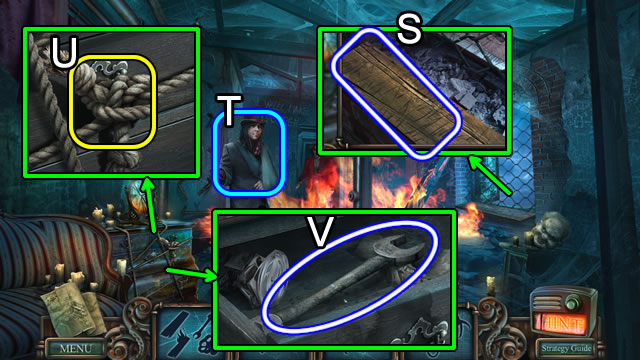
- Select, loosen and take the WOOD (S).
- Give the WOOD (T); take a TORCH.
- Place the TORCH (U); receive a ROPE.
- Open the drawer; take the WRENCH (V).
- Use the WRENCH; receive a VALVE. Take the HOOK (W).
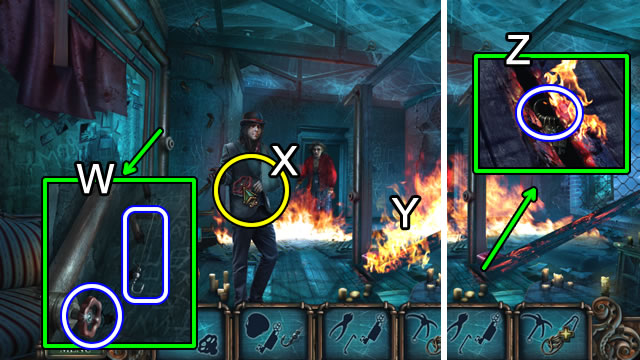
- Give the VALVE (X); take a BUCKET OF WATER.
- Place the BUCKET OF WATER (Y).
- Use the HOOK; take the KEY RING (Z).
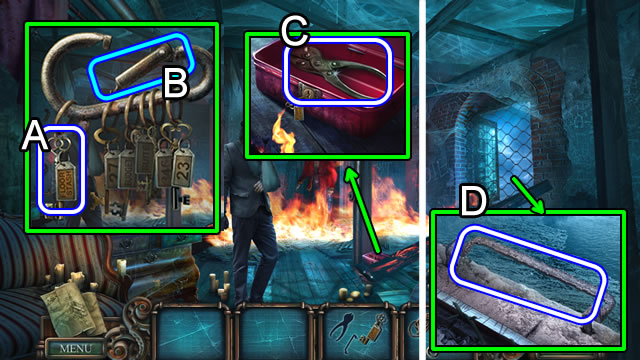
- Select the KEY RING (Inventory); remove the last FIRE KEY (A).
- Select the clip (B) to receive a CARABINER (B).
- Place and select the FIRE KEY twice; take the CUTTERS (C).
- Use the CUTTERS; take the METAL RUNG (D).
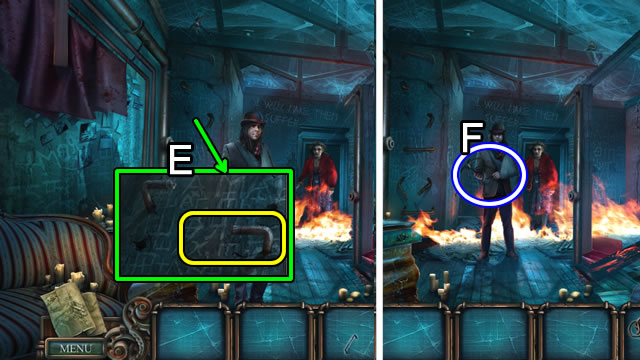
- Place the METAL RUNG (E).
- Take the GRAPPLING HOOK (F).
- Select the ROPE (Inventory). Select, place and attach the GRAPPLING HOOK and CARABINER (G).
- Take the ROPE SWING.
- Place the ROPE SWING (H).
- Congratulations. You have completed playing Haunted Hotel: Death Sentence .
Created at: 2015-01-16