Walkthrough Menu
- General Tips
- Chapter 1: Kevin Reynolds
- Chapter 2: The Hotel Lobby
- Chapter 3: The Bar
- Chapter 4: The Lower Level
- Chapter 5: The Ventilation Room
- Chapter 6: Terence's Room
General Tips
- This is the official guide for Haunted Hotel: Eternity.
- This guide will not mention each time you have to zoom into a location; the screenshots will show each zoom scene.
- Hidden-object puzzles are referred to as HOPs. This guide will not show screenshots of the HOPs, however, it will mention when an HOP is available and the inventory item you'll collect from it.
- Some inventory items require further actions.
- This guide will give step-by-step solutions for all puzzles which are not random. Read the instructions in the game for each puzzle.
Chapter 1: Kevin Reynolds
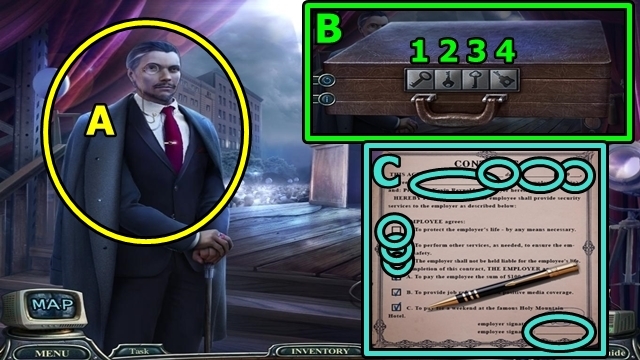
- Talk to Mr. Reynolds (A).
- Examine MY BRIEFCASE (inventory); play the mini-game.
- Solution: 2-4-1-3 (B); play the HOP; you receive the DETECTIVE LICENSE.
- Show the DETECTIVE LICENSE to Mr. Reynolds.
- Take the pen and complete the form (C).
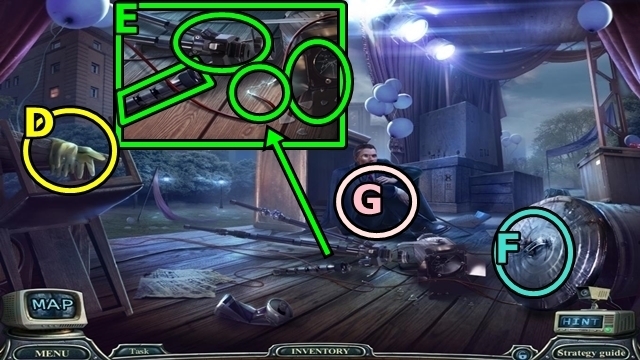
- Take the GLOVES (D).
- Use the GLOVES (E); move the debris; take the TELESCOPING LEG.
- Use the GLOVES (F); grab the lid.
- Move to the Podium (G).
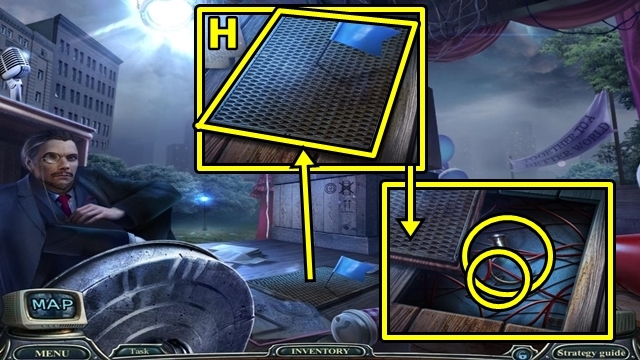
- Move the grate (H); use the GLOVES, move the wires; take the HOOK.
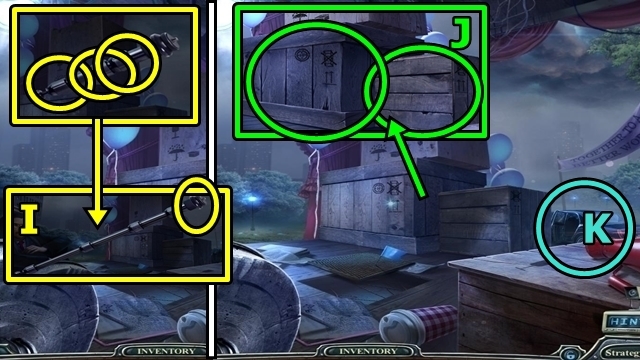
- Expand the TELESCOPING LEG (inventory); add the HOOK (I); take the HOOKED POLE.
- Use the HOOKED POLE (J).
- Move to the Car (K).
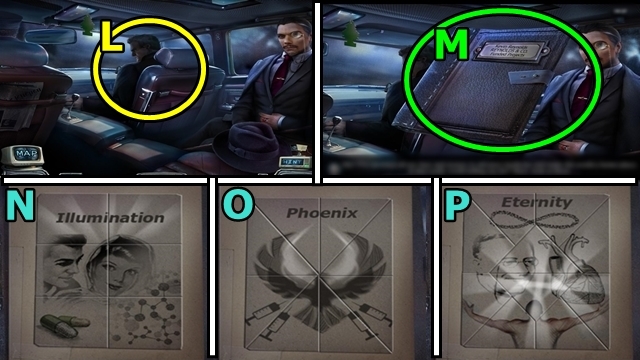
- Talk to Tobias (L).
- Open the folder (M); play the mini-game.
- Solution: (N, O, P).
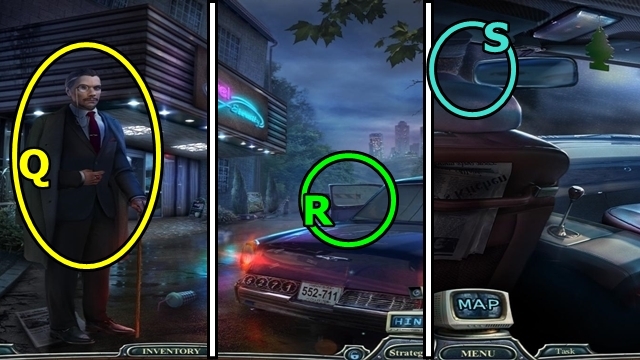
- Talk to Mr. Reynolds (Q).
- Enter the Car (R).
- Talk to the Driver (S); play the mini-game.
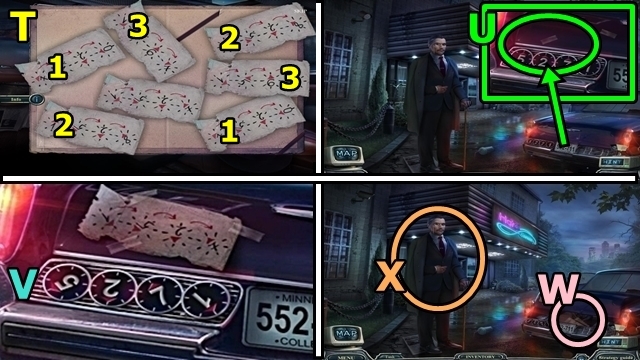
- Solution: (T). You receive the TRUNK CODE.
- Move down.
- Use the TRUNK CODE (U); play the mini-game.
- Solution: (V).
- Remove the items (W); take REYNOLD'S BRIEFCASE.
- Offer the REYNOLD'S BRIEFCASE (X).
Chapter 2: The Hotel Lobby
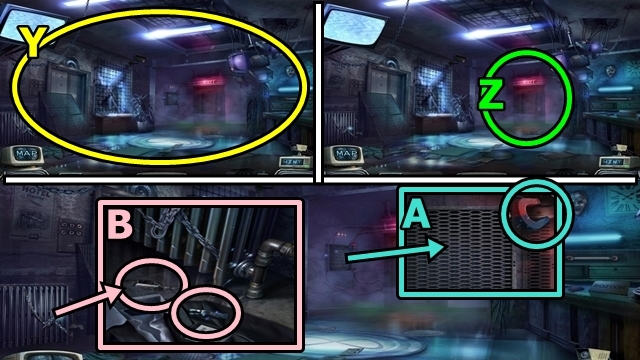
- Try to look around (Y).
- Try to go through the exit (Z).
- Take the MAGNET (A).
- Take the ZIPPER PULL (B); use the MAGNET; receive the X BUTTON.
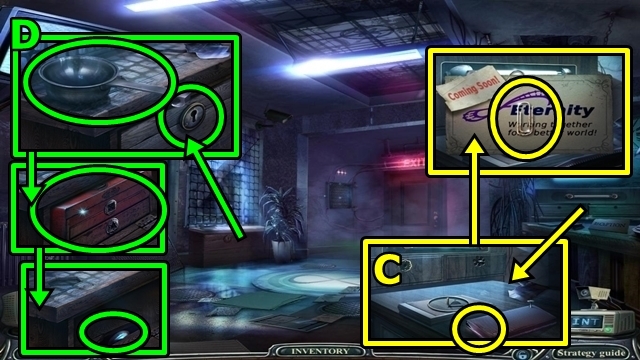
- Use the ZIPPER PULL (C), then pull; examine the card; reshape the paperclip; take the LOCKPICK.
- Take the PAN (D); insert the LOCKPICK. Take the TOOLBOX. Use the MAGNET; receive the DESK BELL.
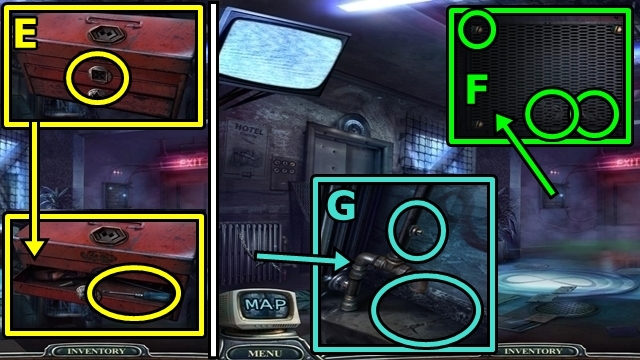
- Insert the X BUTTON (E) in the TOOLBOX (inventory); take the SCREWDRIVER.
- Use the SCREWDRIVER (F); take the VALVE and SWIRLED KNOB.
- Place the PAN (G); insert the VALVE, then turn. Take the PAN OF WATER.
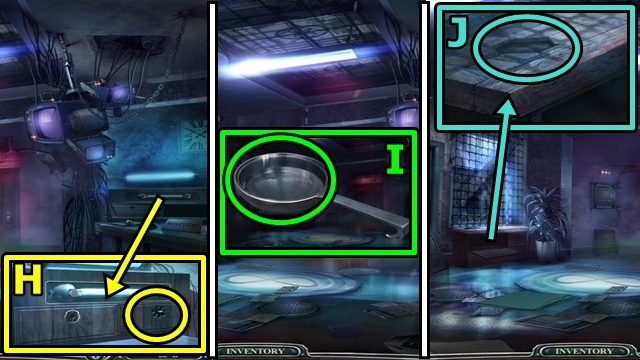
- Insert the SWIRLED KNOB (H); open the drawer; take the GYPSUM PLASTER.
- Pour the GYPSUM PLASTER (I) in the PAN OF WATER (inventory); take the WET PLASTER.
- Pour the WET PLASTER (J); take the HEXAGON.
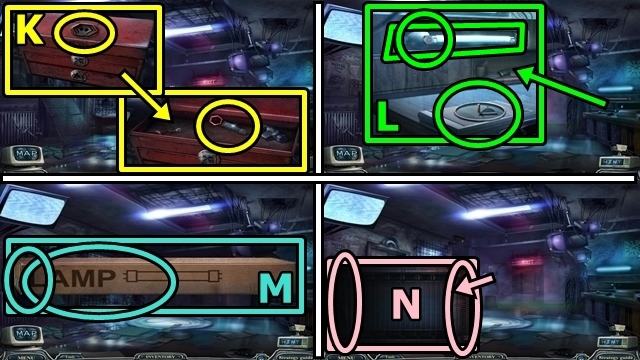
- Insert the HEXAGON (K) in the TOOLBOX (inventory); take the HEX WRENCH.
- Use the HEX WRENCH (L); take the FLUORESCENT LAMP. Insert the DESK BELL; ring the bell; take the LAMP BOX.
- Open the LAMP BOX (inventory); take the FLUORESCENT LAMP (M).
- Insert the two FLUORESCENT LAMPS (N); play the mini-game.
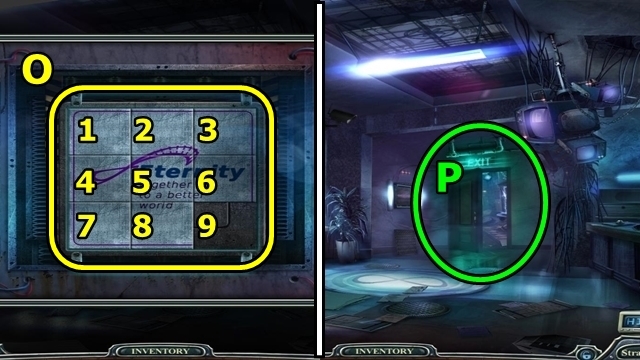
- Solution: 6-5-8-7-4-5-2-1-4-5-2-3-6-9-8-5-4-7-8-5-6-9-8-7-4-5-8-9 (O).
- Go through the door (P).
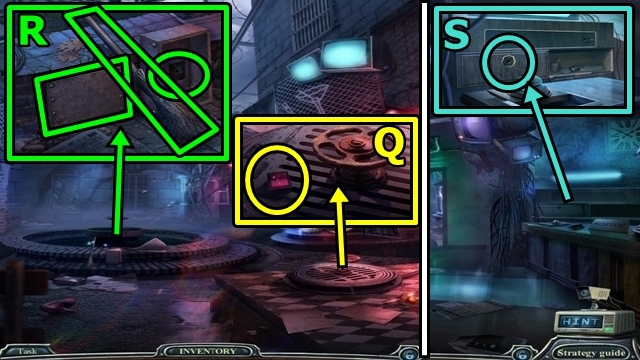
- Take the TOGGLE SWITCH (Q).
- Take the BROOM (R); insert the TOGGLE SWITCH; flip the switch; take the KNOB and CODED PAPER.
- Move down.
- Insert the KNOB (S); take the AXE and SECRET LIQUID.
- Move forward.
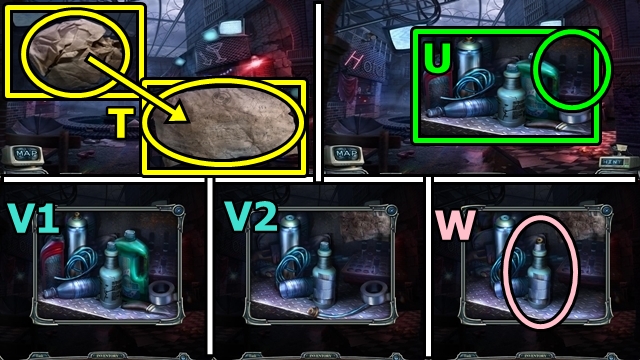
- Unfold the CODED PAPER (inventory); pour the SECRET LIQUID (T); take the ANTI-RUST RECIPE.
- Add the ANTI-RUST RECIPE (U); play the mini-game.
- Solution: Follow the recipe (V1, V2). Take the ANTI-RUST SPRAY (W).
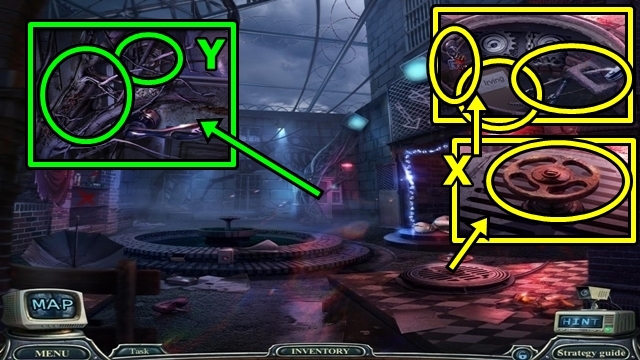
- Use the ANTI-RUST SPRAY (X); turn the valve; read the folder; take the GAME ROOM KEY and the CROSSBOW.
- Use the AXE (Y); insert the GAME ROOM KEY, then turn and open the door.
- Enter the Game Room.
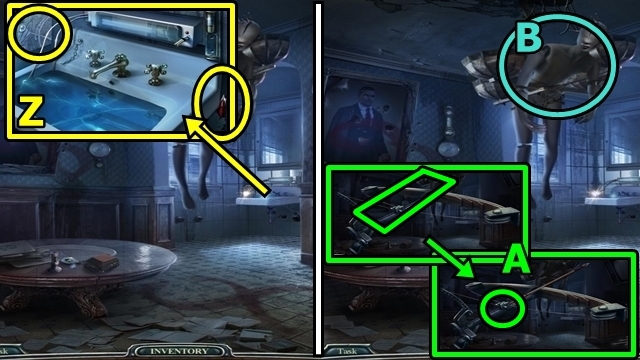
- Use the MAGNET (Z); receive the ARROW. Use the SCREWDRIVER; receive the MARTINI TILE.
- Put the ARROW (A) on the CROSSBOW (inventory); draw the bow; take the LOADED CROSSBOW.
- Aim the LOADED CROSSBOW (B); play the mini-game.
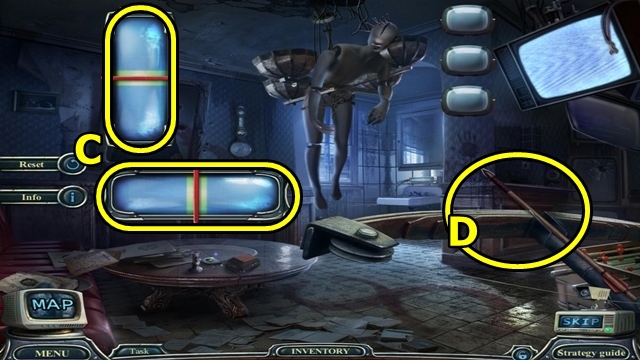
- Solution: Get the red line in the green zones (C), then shoot (D). Repeat three times.
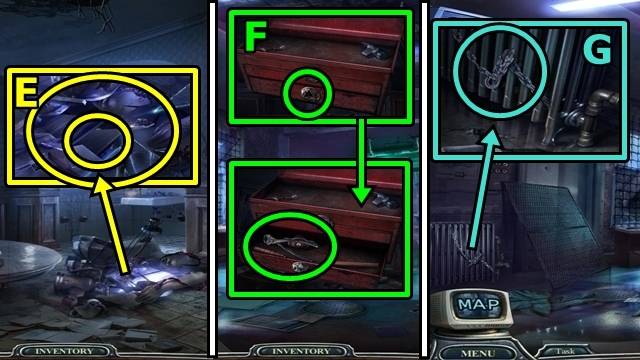
- Try to examine anything. Use the BROOM (E); take the GLASS FIGURINE; play the HOP; receive the TRIANGULAR BUTTON.
- Move down twice.
- Insert the TRIANGULAR BUTTON (F) into the TOOLBOX (inventory); take the BOLT CUTTERS.
- Use the BOLT CUTTERS (G); take the CHAIN (1/2) and HOOK.
- Return to the Game Room.
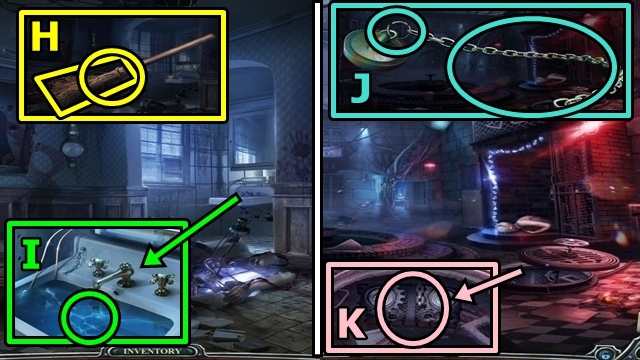
- Remove the straw from the BROOM (inventory); add the HOOK (H); take the BOAT HOOK.
- Use the BOAT HOOK (I); receive the DRAIN PLUG.
- Move down.
- Remove the plug (J) from the DRAIN PLUG (inventory); take the CHAIN (2/2).
- Add the two pieces of CHAIN (K); play the mini-game.
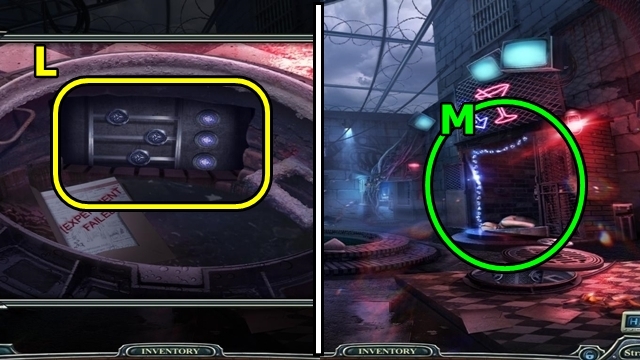
- Solution: (L).
- Enter the Bar (M).
Chapter 3: The Bar
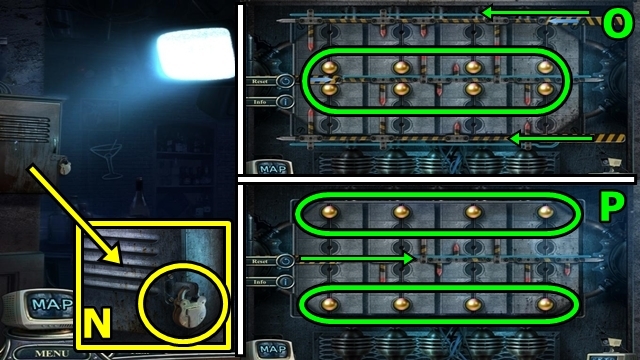
- Use the BOLT CUTTERS (N); open the panel; play the mini-game.
- Solution: Arrange the marbles, then move the slider (O, P). Take the FUSE.
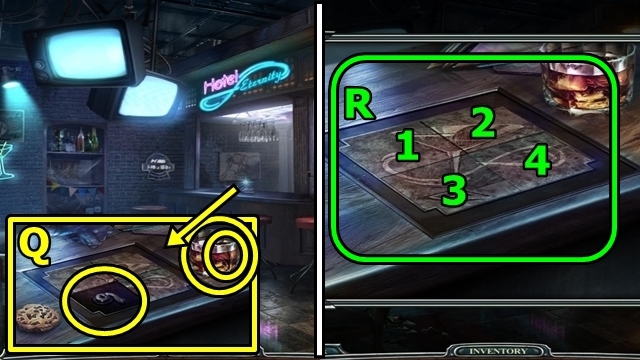
- Move the glass (Q); take the TRIANGLE (1/3); insert the MARTINI TILE; play the mini-game.
- Solution: 1-4-2-3 (R). Take the REGISTRY LOG.
- Return to the Game Room.
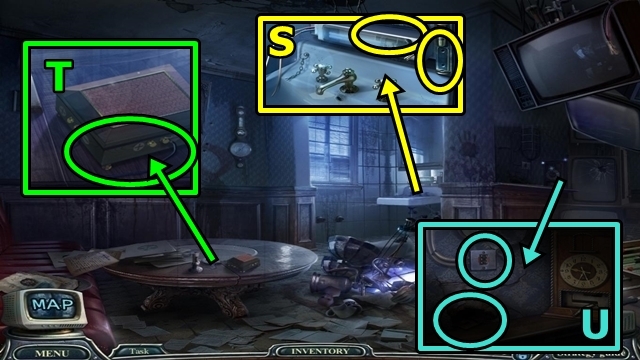
- Insert the FUSE (S); flip the switch; take the WIRE.
- Insert the WIRE (T); open the box; take the SWITCH.
- Insert the SWITCH (U); flip the switch; take the MOUSETRAP.
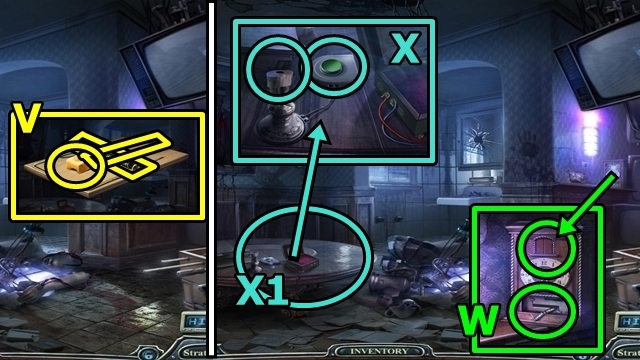
- Move the cheese (V) and wire from the MOUSETRAP (inventory); take the SPRING.
- Remove the spring; add the SPRING (W); take the FIGURINE PART.
- Place the FIGURINE PART (X); press the button; play the HOP (X1); receive the HAMMER.
- Return to the Bar.
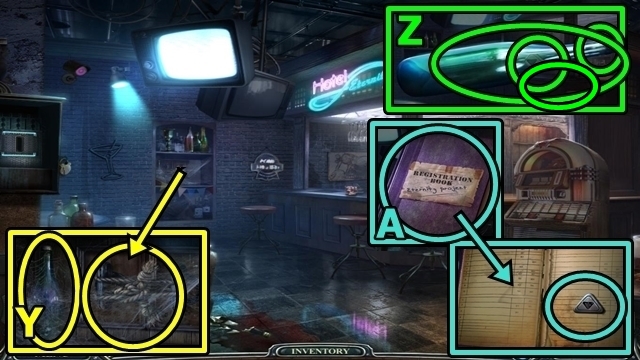
- Brush away the cobwebs; take the BOTTLE (Y).
- Use the HAMMER (Z) on the BOTTLE (inventory); take the SHARP SHARD, TRIANGLE (2/3) and CORK.
- Turn the pages (A) of the REGISTRY LOG (inventory); take the TRIANGLE (3/3).
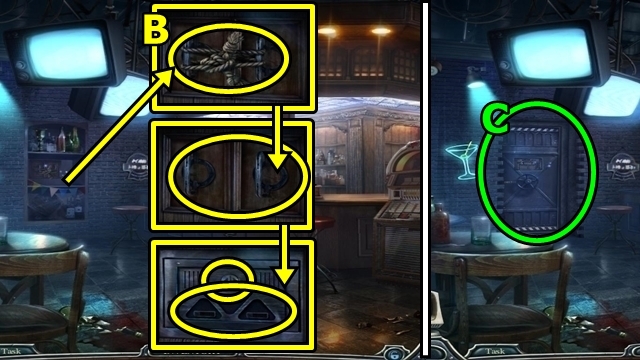
- Use the SHARP SHARD (B); take the ROPE. Open the panel. Add the three TRIANGLES; press the button.
- Examine the door (C); play the mini-game.
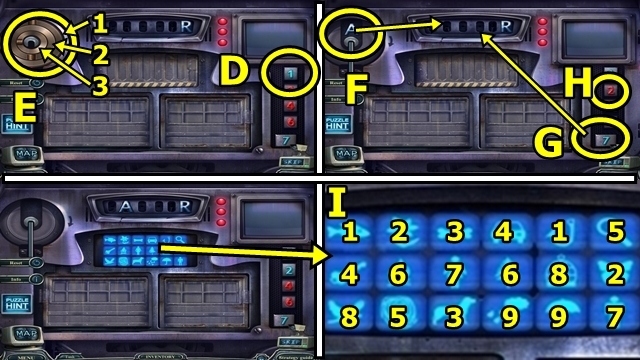
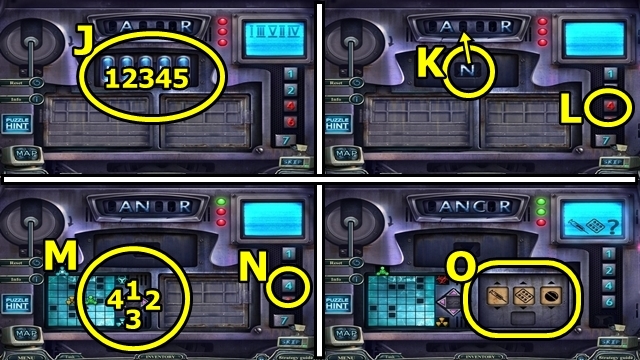
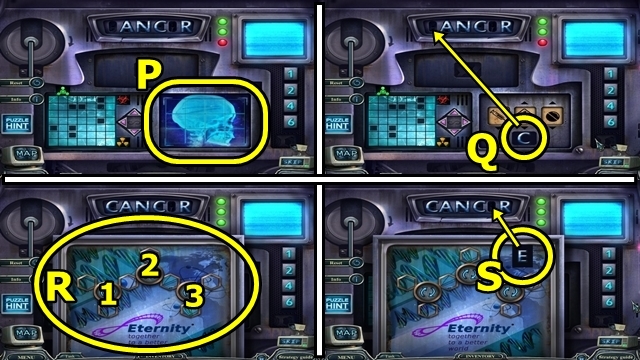
- Solution: Press 1 twice (D); 2-2-1-1-3 (E). Place the A (F); press 7 (G); place the C.
- Press 2 (H). Match the symbols (I). 1-3-5-2-4 (J). Place the N (K); press 4 (L). 4-1-2-1-2-3-2 (M); press 6 (N).
- Match the symbols (O). Swap adjacent tiles (P). Place the C (Q). 3-2-3-3-2-3 (R). Place the E (S).
- Go through the door.
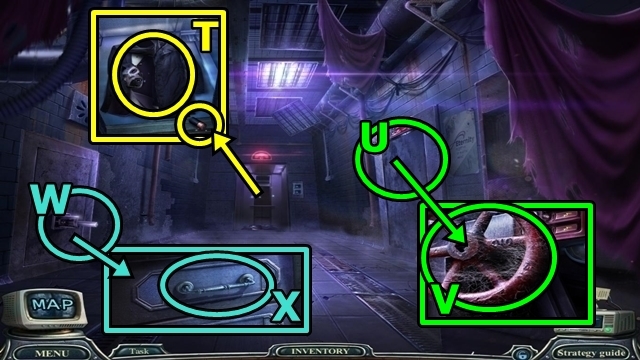
- Take the BATTERY (1/2); try to take the jacket (T).
- Lift the panel (U). Remove the cobwebs (V); take the WHEEL HANDLE.
- Attach the WHEEL HANDLE (W), then turn.
- Open the drawer (X); take the BATTERY (2/2).
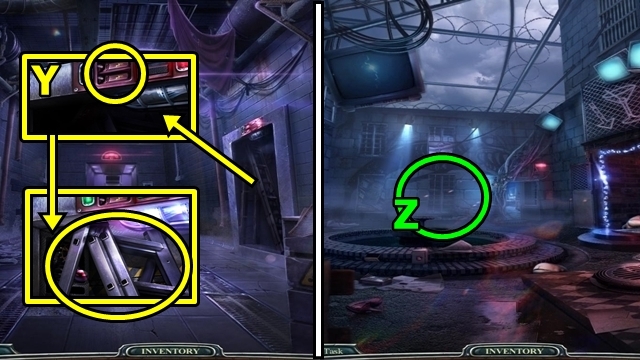
- Insert the two BATTERIES (Y). Receive the BATTERIES (2/2); take the STEPLADDER.
- Return to the Courtyard.
- Place the STEPLADDER (Z); enter the Children's Room.
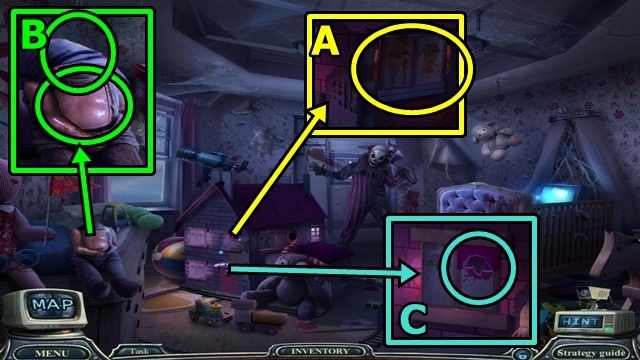
- Use the ANTI-RUST SPRAY (A); open the shutters; take the DOLL HEAD.
- Attach the DOLL HEAD (B); take the DOLLHOUSE PART.
- Insert the DOLLHOUSE PART (C); take the TRIANGLE KEY.
- Return to the Corridor.
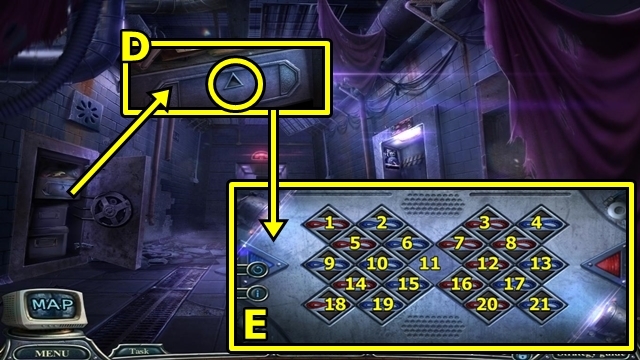
- Insert the TRIANGLE KEY (D); turn the key; play the mini-game.
- Solution: 7-17-12-21-17-20-13-8-16-12-4-8-3-11-15-5-10-1-5-2-11-7-15-10-6-14-10-18-14-19-11-16-6-11-20-16-12-7-15-10-6-11-15-10-6-16-11 (E).
- Take the ROLLER.
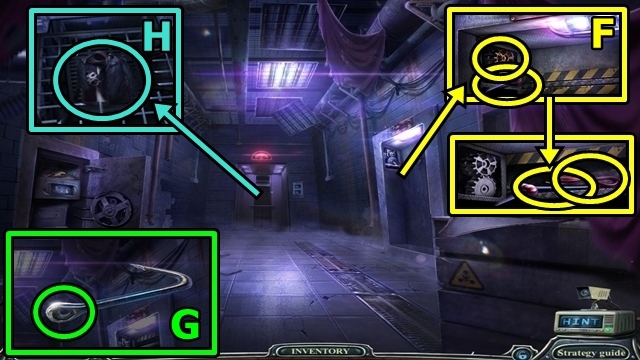
- Try to pull the lever (F); insert the ROLLER; move the lever. Take the RED WIRE and HOOK.
- Add the ROPE (G) to the HOOK (inventory); take the ROPE WITH HOOK.
- Use the ROPE WITH HOOK (H); play the mini-game.
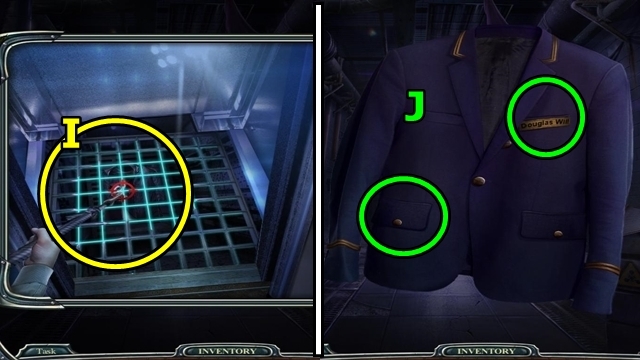
- Solution: (I). You receive DOUGLAS' BELONGINGS.
- Look in the pockets (J) of DOUGLAS' BELONGINGS (inventory); take the HANDKERCHIEF and DOUGLAS'S ID CARD.
- Return to the Children's Room.
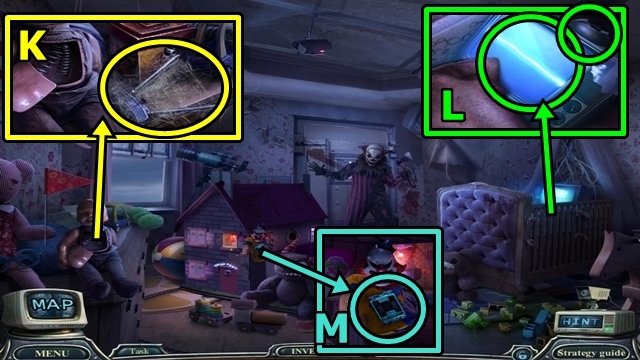
- Use the HANDKERCHIEF (K); take the ANTENNA.
- Place the ANTENNA (L); take the CIRCUIT BOARD.
- Insert the CIRCUIT BOARD (M); receive the DUMMY HAND.
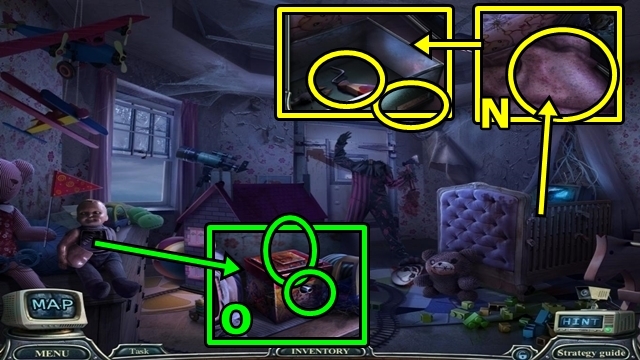
- Move the blanket (N); use the DUMMY HAND; take the HANDLE.
- Insert the HANDLE (O), then turn it. Take the VOODOO DOLL.
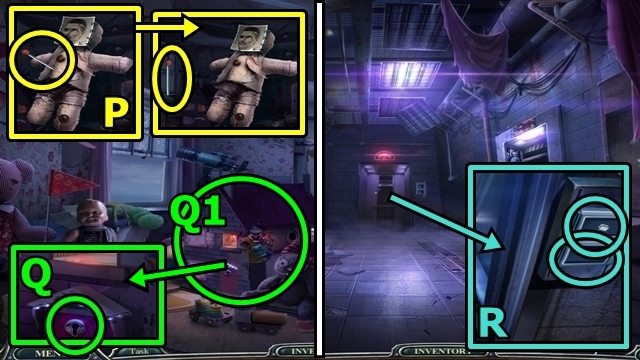
- Take the pin (P) from the VOODOO DOLL (inventory); reshape the pin to receive the TINY LOCKPICK.
- Insert the TINY LOCKPICK (Q). Play the HOP (Q1); receive KEVIN'S ID CARD.
- Return to the Corridor.
- Insert DOUGLAS' ID CARD and KEVIN'S ID CARD (R). Press the button. Move down to the Lower Level.
Chapter 4: The Lower Level
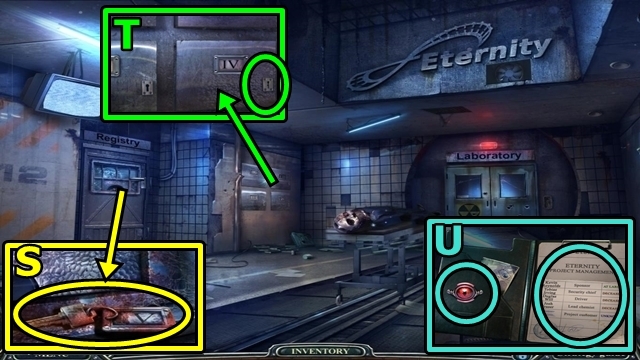
- Use the ANTI-RUST SPRAY (S); take MORGUE KEY 4.
- Insert MORGUE KEY 4 (T); move the items; take REGISTRATION ENTRIES.
- Open REGISTRATION ENTRIES (inventory); take DOUGLAS' AMULET (U).
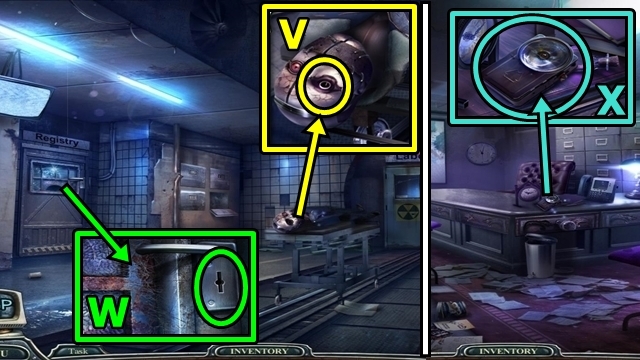
- Insert DOUGLAS' AMULET (V); take the REGISTRY KEY.
- Insert the REGISTRY KEY (W); turn the key; enter the Registry.
- Take the FLASHLIGHT (X).
- Move down.
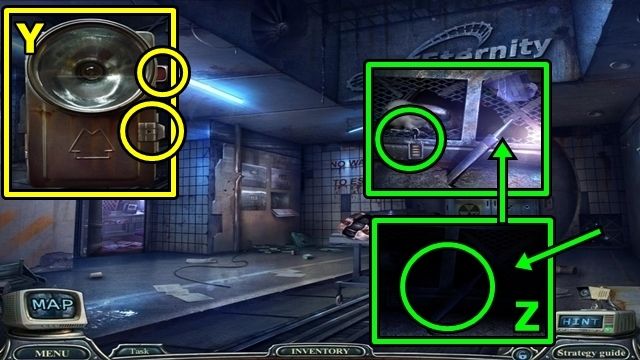
- Open the cover (Y) of the FLASHLIGHT (inventory); insert the BATTERIES; close the cover; press the red switch; take the WORKING FLASHLIGHT.
- Use the WORKING FLASHLIGHT (Z); take MORGUE KEY 3.
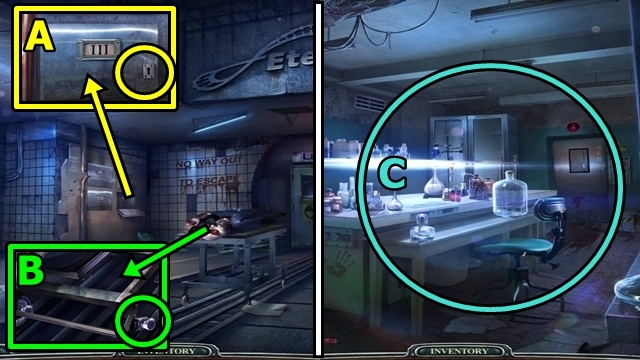
- Use MORGUE KEY 3 (A); take the GAS MASK and GURNEY WHEEL.
- Insert the GURNEY WHEEL (B); enter the Lab.
- Try to examine anything. Use the GAS MASK (C).
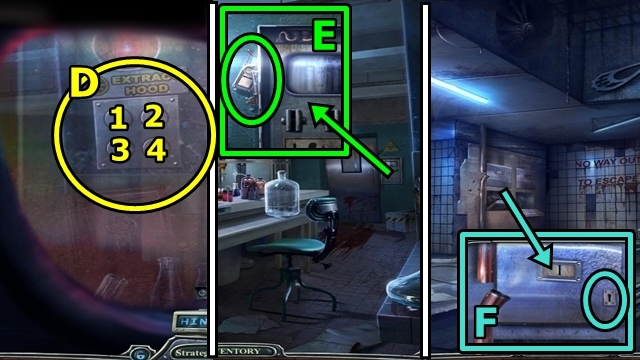
- Ventilate the lab: 3-2-1-4 (D).
- Take MORGUE KEY 1 (E).
- Move down.
- Insert MORGUE KEY 1 (F); move the items; take the CHEESE.
- Return to the Registry.
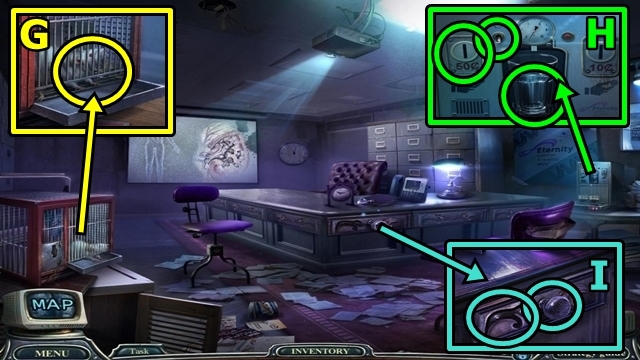
- Offer the CHEESE (G); take the COIN.
- Insert the COIN (H); flip the switch; take the DRAWER CARVING.
- Insert the DRAWER CARVING (I); open the drawer; take the SURGICAL CLIP.
- Move down.
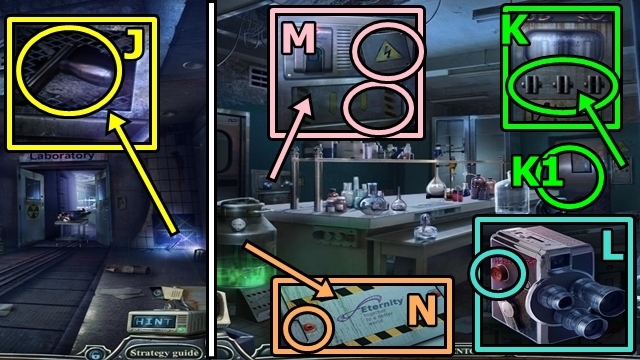
- Use the SURGICAL CLIP (J); receive the MASTER SWITCH.
- Return to the Lab.
- Insert the MASTER SWITCH (K); pull down. Play the HOP (K1); receive the CAMERA.
- Press the record button (L) on the CAMERA (inventory); take the BLUE WIRE.
- Move the panel (M); add the RED WIRE and BLUE WIRE. Take the HEX KEY.
- Use the HEX KEY (N); take the COIN.
- Return to the Registry.
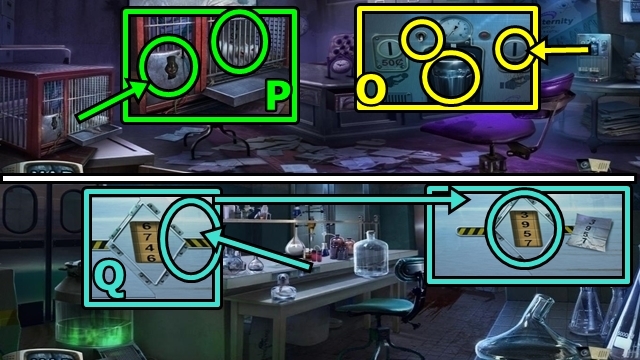
- Insert the COIN (O); flip the switch; take the SWITCH.
- Insert the SWITCH (P); push the switch; take the ACCESS CODE.
- Return to the Lab.
- Use the ACCESS CODE (Q); enter 3-9-5-7; play the mini-game.
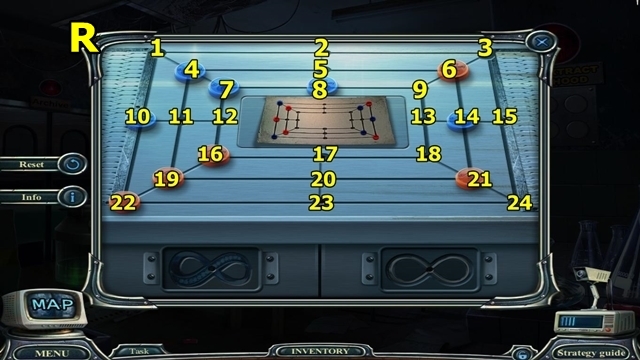
- Solution: 4-1, 19-11, 11-4, 22-19, 10-22, 16-12, 12-11, 11-10, 6-3, 21-24, 14-15, 8-9, 9-13, 13-18, 18-21, 7-8, 8-9, 9-6 (R).
- Take the LAB ASSISTANT'S KEY.
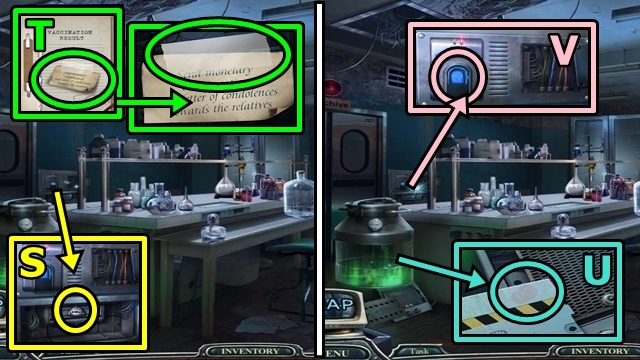
- Insert the LAB ASSISTANT'S KEY (S); turn the key; take the PATIENT PROFILE.
- Open the PATIENT PROFILE (inventory); read the note; take the TAPE PIECE (T).
- Use the TAPE PIECE (U); receive the FINGERPRINT.
- Use the FINGERPRINT (V).
- Enter the Archives.
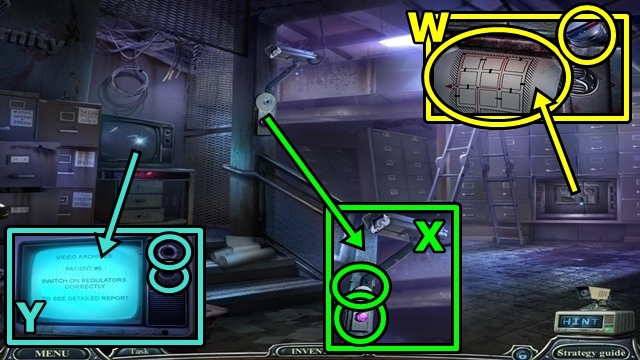
- Take the VOLUME CONTROL (W) and VENTILATION SYSTEM PLAN.
- Use the HEX KEY (X); take the BUTTON.
- Insert VOLUME CONTROL (Y) and CORK; take the BUTTON.
- Move down.
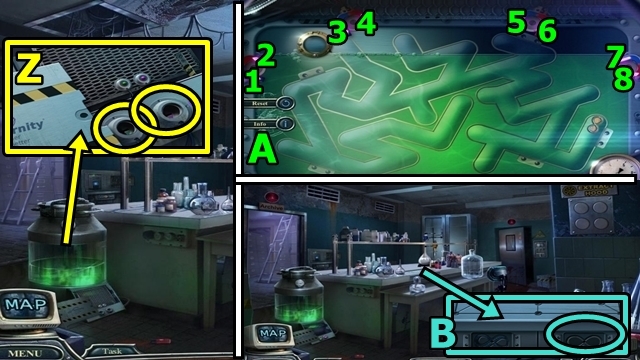
- Insert the two BUTTONS (Z); press the two buttons; play the mini-game.
- Solution: 5-2-6-7-4-8-2-7x3-6-2-4-2 (A). You receive the ETERNITY EMBLEM. Take the DNA-SHAPED SEAL.
- Insert the ETERNITY EMBLEM (B); take the FILE HANDLE.
- Move down.
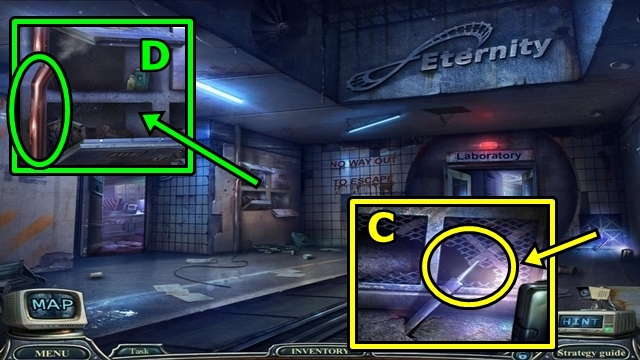
- Attach the FILE HANDLE (C); take the FILE.
- Use the FILE (D); take the PIPE PIECE.
- Return to the Archives.
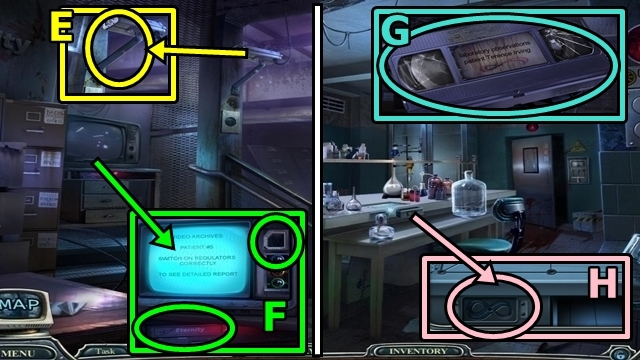
- Use the PIPE PIECE (E); take the CHIP.
- Insert the CHIP (F); take the VIDEOTAPE.
- Move down.
- Remove the top (G) of the VIDEOTAPE (inventory); take the ETERNITY EMBLEM.
- Insert the ETERNITY EMBLEM (H); take MORGUE KEY 2.
- Move down.
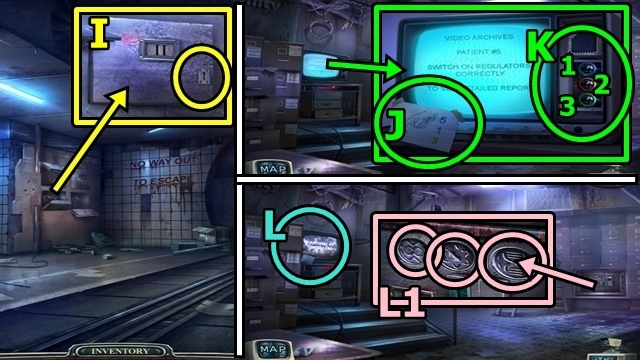
- Insert MORGUE KEY 2 (I); take the HINT and the ATOM-SHAPED SEAL.
- Return to the Archives.
- Place the HINT (J); play the mini-game.
- Solution: 1x5-3x1-2x3 (K).
- Play the HOP (L); receive the INFINITY-SHAPED SEAL.
- Insert the DNA-SHAPED SEAL, the ATOM-SHAPED SEAL and the INFINITY-SHAPED SEAL (L1); play the mini-game.
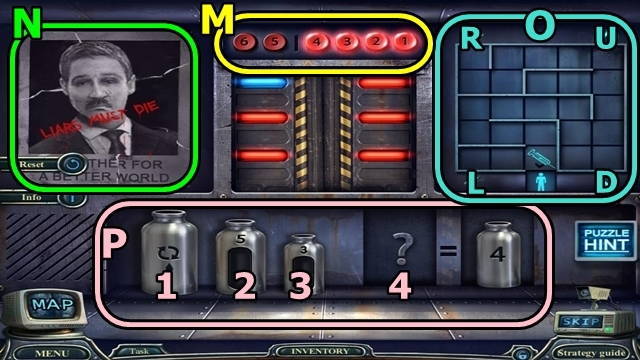
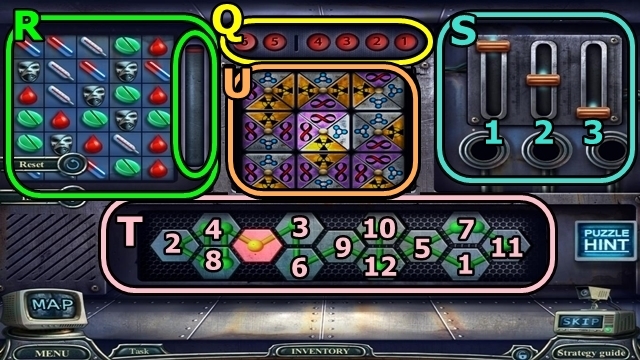
- Solution: The screenshot was edited for simplicity. 4-1-3-2 (M).
- Recreate image (N). 1-3-4-2 (M). D-R-U-Rx3-Dx3-L-U-Lx3-D-Rx2-Dx2 (O). 1-2-3-4 (M). 1-3, 3-2, 1-3, 3-2, 2-1, 3-2, 1-3, 3-2, 2-4 (P). 2-4-3-1-5 (Q).
- Play the match-3 game (R); fill the meter. Adjust levers 1-3-2 (S).
- Match the symbols (T). 4-2-1-3-6-5 (Q). Adjust the tiles (U).
Chapter 5: The Ventilation Room
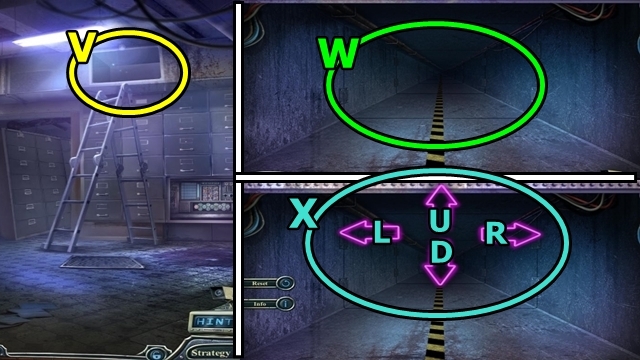
- Enter the ventilation shaft (V).
- Use the VENTILATION SYSTEM PLAN (W); play the mini-game.
- Solution: Ux2-R-L-U-L-U-L-U-R (X).
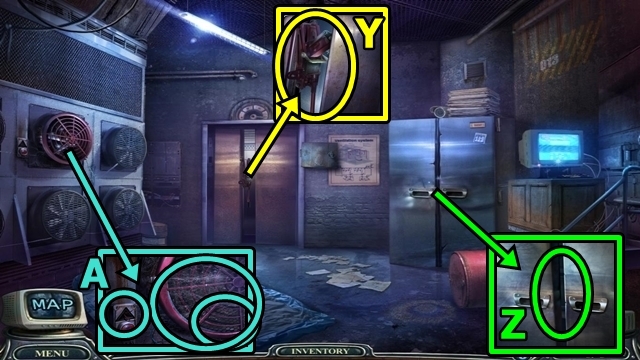
- Take the HORIZONTAL JACK (Y).
- Use the HORIZONTAL JACK (Z); take the BOLT CUTTER PART (1/2) and EMERGENCY BUTTON.
- Insert the EMERGENCY BUTTON (A); remove the cobwebs; take the CODE and SET OF SYMBOLS.
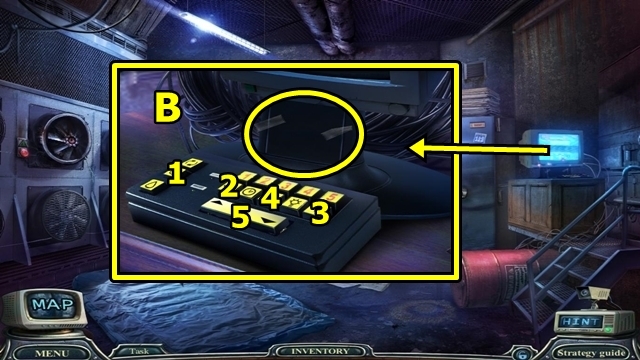
- Place the SET OF SYMBOLS (B).
- Press the symbols. Take the SLIDE RULE.
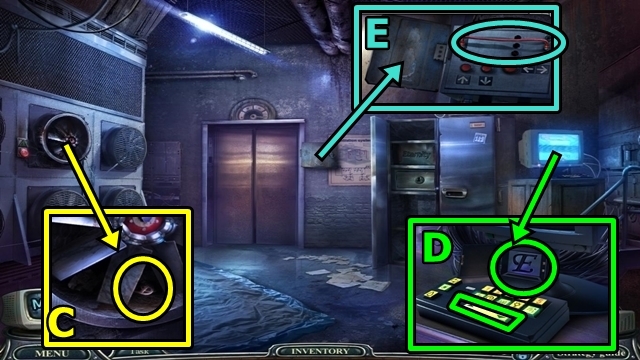
- Use the SLIDE RULE (C); take the LOGO.
- Insert the LOGO (D); take the CABLE.
- Open the panel; place the CABLE (E).
- Move forward to the Electrical Room.
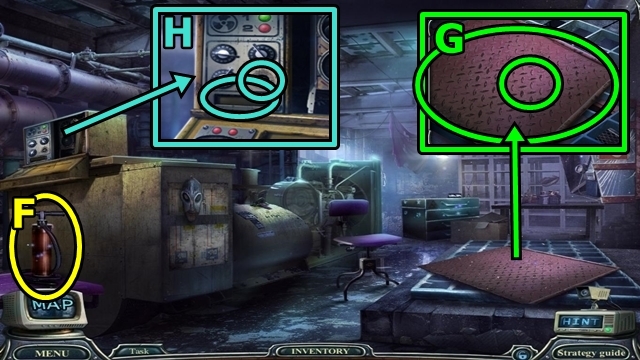
- Take the PUMP (F).
- Move the mat (G); take the DIAL.
- Place the DIAL (H); turn the dial; take the SPACE BAR.
- Move down.
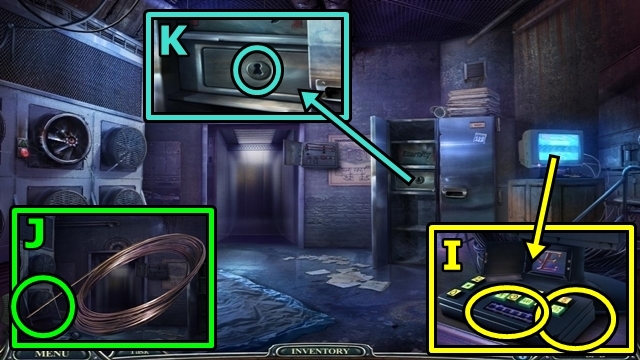
- Add the SPACE BAR (I); take the WIRE.
- Uncurl the WIRE (inventory); take a WIRE PIECE (J).
- Use the WIRE PIECE (K); take the PLIERS.
- Move forward.
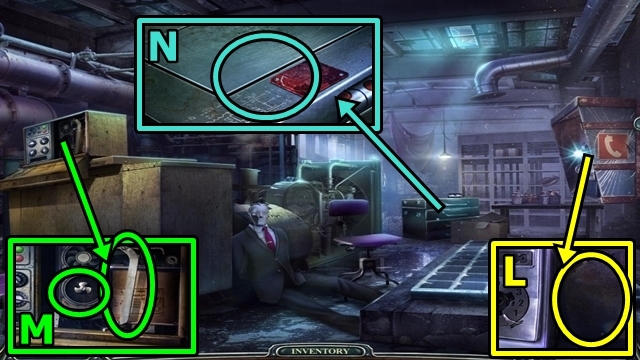
- Use the PLIERS (L); take the FAN.
- Add the FAN (M); take the FLAT METAL.
- Insert the FLAT METAL (N); pull the flat metal; take the PHONE DIAL.
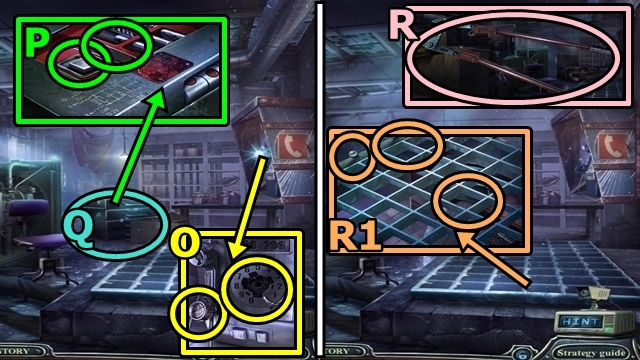
- Place the PHONE DIAL (O); take the SPRING.
- Insert the SPRING (P); press the button.
- Play the HOP (Q); receive the BOLT CUTTER PART (2/2).
- Reattach (R) the two BOLT CUTTER PARTS (inventory); take the BOLT CUTTER.
- Use the BOLT CUTTER (R1); take the IRON CASE.
- Move down.
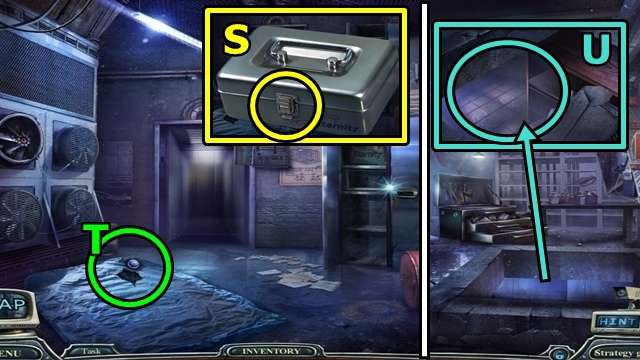
- Open (S) the IRON CASE (inventory); move the items; take the PATCH and GLUE.
- Place the PATCH (T), use the GLUE and PUMP. Take the INFLATED MATTRESS.
- Move forward.
- Drop the INFLATED MATTRESS (U).
- Go down into Terence's Room.
Chapter 6: Terence's Room
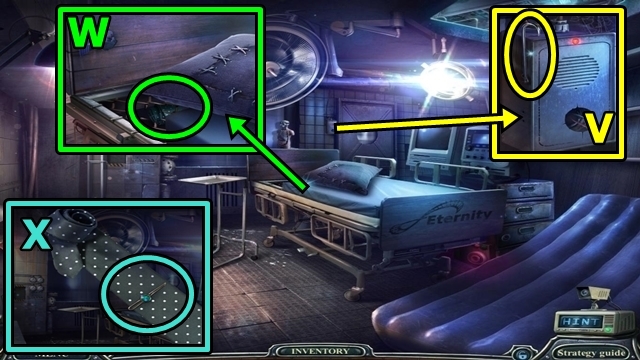
- Take the HOOK (V).
- Use the HOOK (W); receive TERENCE'S TIE.
- Unroll TERENCE'S TIE (inventory); take the TIE CLIP (X).
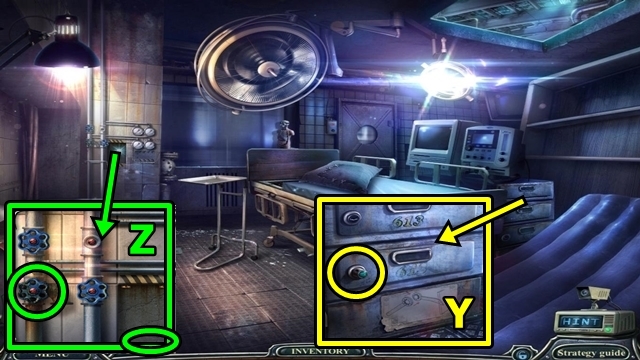
- Insert the TIE CLIP (Y); turn the clip; take the OIL CAN.
- Use the OIL CAN (Z); take the BRONZE EMBLEM.
- Return to the Ventilation Room.
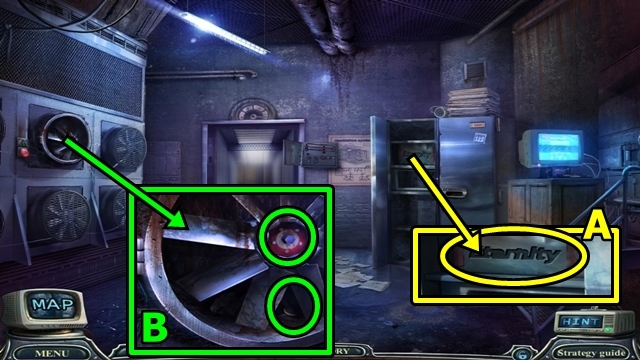
- Insert the BRONZE EMBLEM (A); take the SMALL SLIDER and WRENCH. Look at the photo.
- Use the WRENCH (B); take the GAUGE (1/2).
- Move forward.
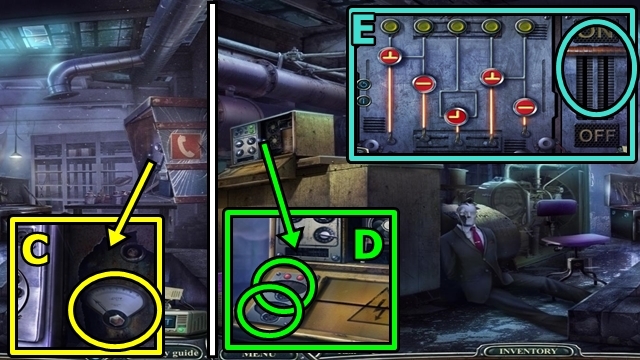
- Use the WRENCH (C); take the GAUGE (2/2).
- Add the two GAUGES (D); play the mini-game.
- Solution: Turn off the currents, then pull the lever (E). Take the SPROCKET WRENCH.
- Go down to Terence's Room.
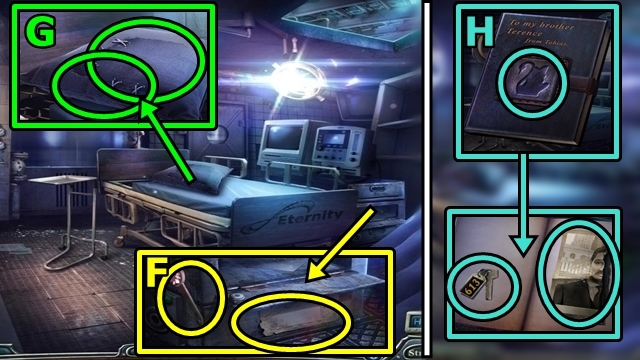
- Attach the SPROCKET WRENCH (F); take the SCISSORS; read the note.
- Use the SCISSORS (G); lift the material. Read the note; move the photo album; take TERENCE'S DIARY.
- Insert the GLASS FIGURINE (H) in TERENCE'S DIARY (inventory); turn the pages; take the DRAWER KEY and PHOTO PART.
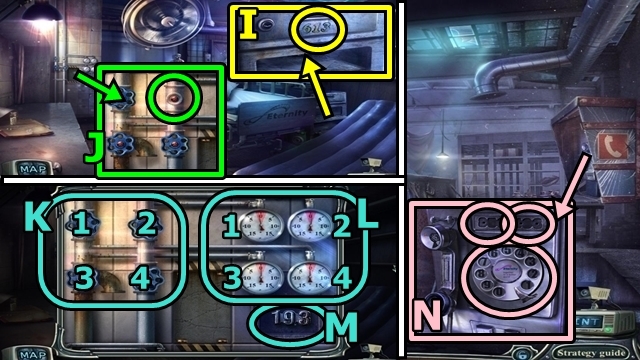
- Insert the DRAWER KEY (I); turn the key; take the TAP HANDLE.
- Attach the TAP HANDLE (J); play the mini-game.
- Solution: Turn valve #2 (K) clockwise to set dial #3 (L). Turn valve #4 counter-clockwise to set dial #4. Turn valve #1 clockwise to set dial #1 and dial #2.
- Dials 1 and 2 move at different speeds; continue to turn valve #1 clockwise and counter-clockwise until dials 1 and 2's levers enter the red zone. Take the CODE (M).
- Return to the Electrical Room.
- Add the two CODES (N); dial 856-193; take the CONTROLLER.
- Go down to Terence's Room.
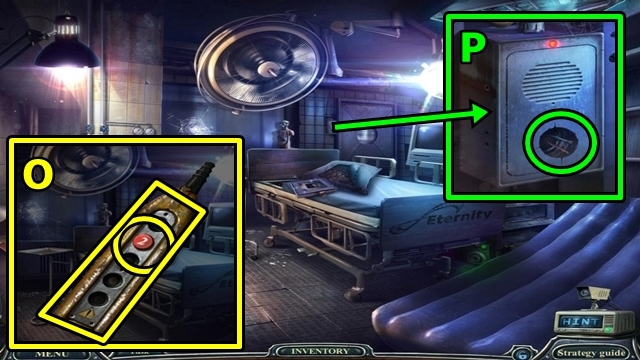
- Remove the plate (O) from the CONTROLLER (inventory); take the SECOND FLOOR BUTTON.
- Insert the SECOND FLOOR BUTTON (P); press the button.
- Go to the Second Floor.
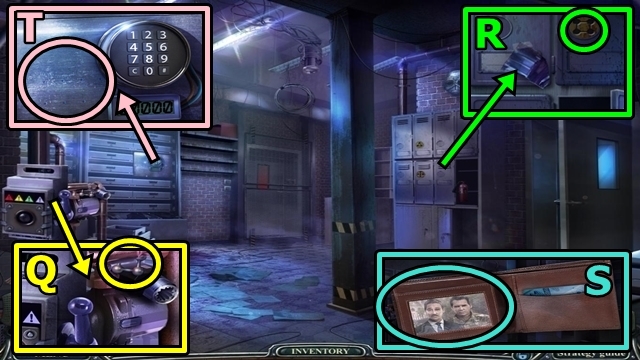
- Use the HOOK (Q); take the MOLECULE.
- Insert the MOLECULE (R); take TOBIAS' WALLET.
- Open TOBIAS' WALLET (inventory); examine the photo (S); take TOBIAS' CODE.
- Place TOBIAS CODE' (T); play the mini-game.
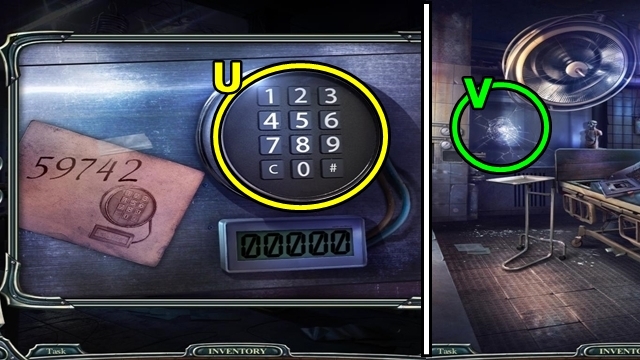
- Solution: 5-9-7-4-2 (U). Take the SLEDGEHAMMER.
- Move down.
- Use the SLEDGEHAMMER (V); play the HOP; receive the REGULATOR.
- Move forward.
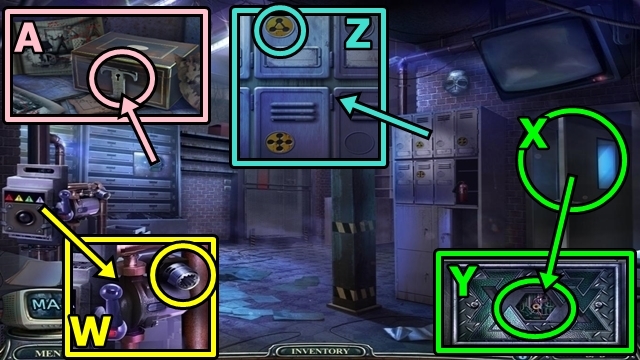
- Insert the REGULATOR (W); take the METAL ORNAMENT.
- Try the door (X). Insert the METAL ORNAMENT (Y); take the MOLECULE.
- Insert the MOLECULE (Z); take TOBIAS' KEY.
- Insert TOBIAS' KEY (A); open the box; take the WATCH.
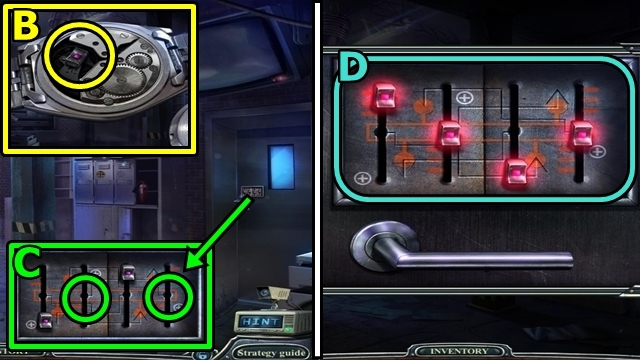
- Turn over the WATCH (inventory); remove the back; take the SMALL SLIDER (B).
- Insert the two SMALL SLIDERS (C); play the mini-game.
- Solution: (D). Enter the Surveillance Room.
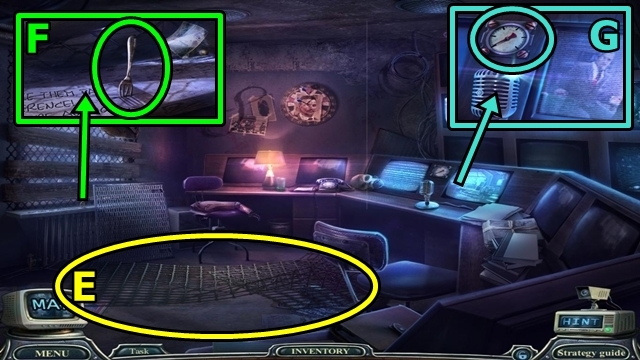
- Take the NET TRAP (E).
- Take the SCREWDRIVER (F).
- Use the SCREWDRIVER (G); take the GAUGE.
- Move down.
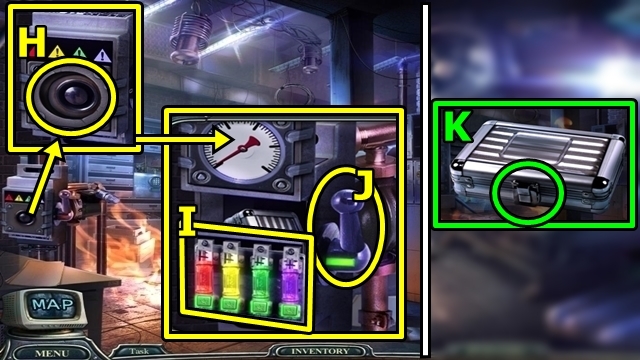
- Add the GAUGE (H); play the mini-game.
- Solution: Set the fuses (I), then pull the lever (J). Take the LEAD BOX.
- Move down.
- Open (K) the LEAD BOX (inventory); take the PHOTO PART and TOBIAS' SECURITY CHIP.
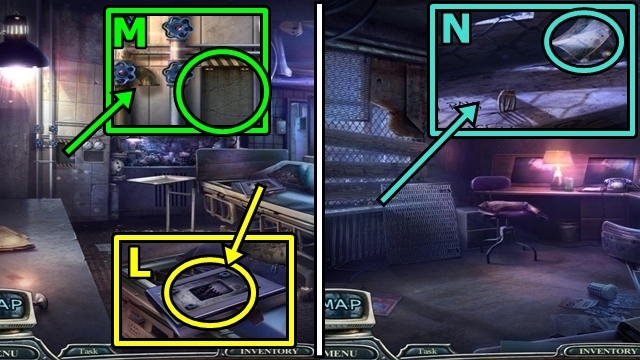
- Insert the two PHOTO PARTS (L); take the TILE.
- Insert the TILE (M); take the TWEEZERS; read the note.
- Return to the Surveillance Room.
- Move the card (N); brush away the cobwebs; use the TWEEZERS to receive the MOLECULE.
- Move down.
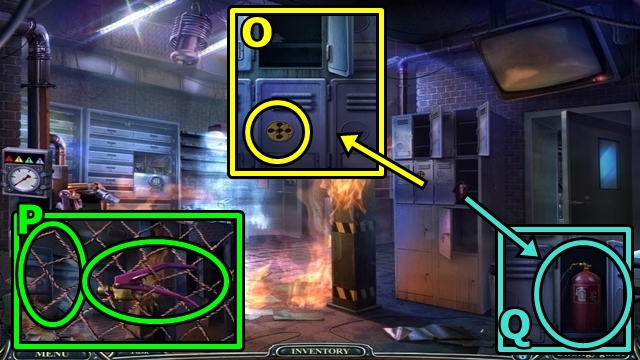
- Insert the MOLECULE (O); take the ENGRAVED KNIFE.
- Take the FIRE EXTINGUISHER NOZZLE (P) from the NET TRAP (inventory); use the ENGRAVED KNIFE; make a LASSO.
- Attach the FIRE EXTINGUISHER NOZZLE (Q); take the FIRE EXTINGUISHER NOZZLE.
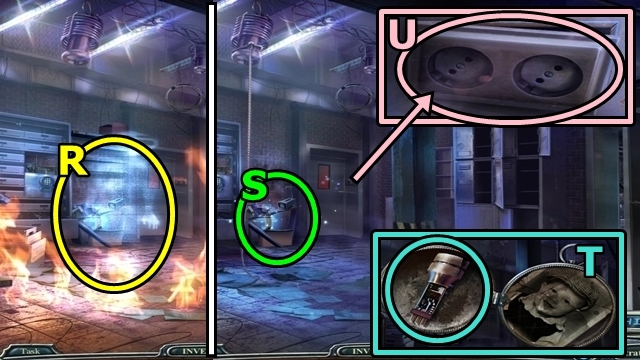
- Use the FIRE EXTINGUISHER NOZZLE (R); then the LASSO.
- Play the HOP (S); receive TERENCE'S MEDALLION.
- Open TERENCE'S MEDALLION (inventory); take TERENCE'S SECURITY CHIP (T).
- Remove the panel; insert TERENCE'S SECURITY CHIPS (U); push the chips.
- Enter the Torture Room.
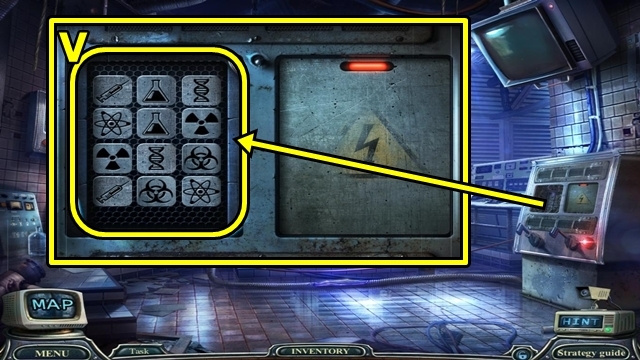
- Play the mini-game.
- Solution: (V). Take the HANDLE.
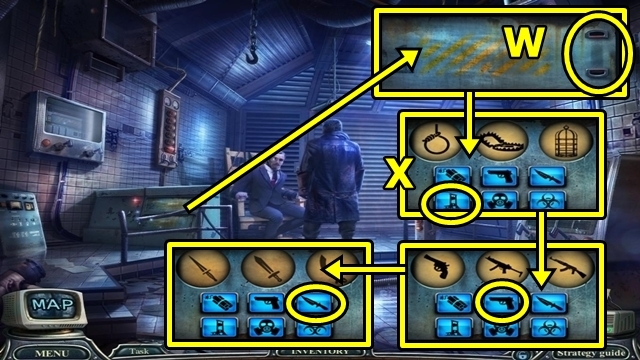
- Insert the HANDLE (W); open the panel; play the mini-game.
- Solution: (X). Take the PROFESSOR'S WALKING STICK.
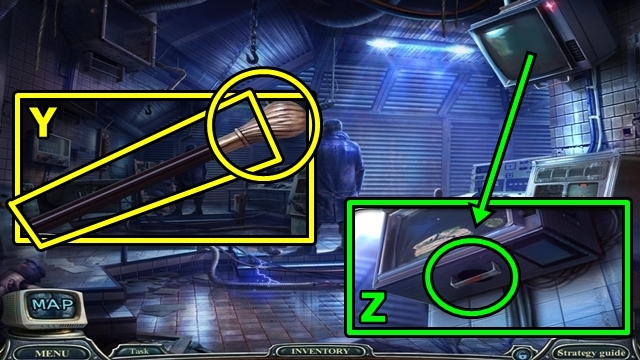
- Remove the top (Y) from the PROFESSOR'S WALKING STICK (inventory); take the STICK WITH HOOK.
- Use the STICK WITH HOOK (Z); play the mini-game.
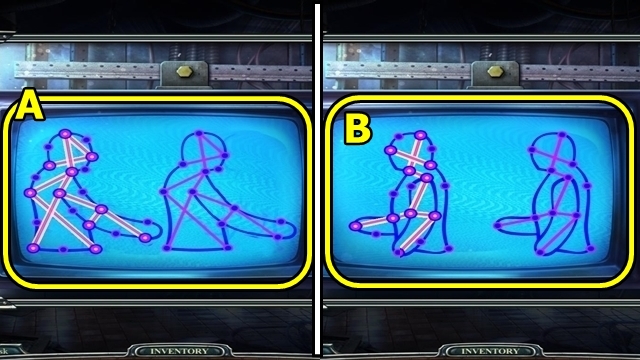
- Solution: (A, B). Take the DIODE.
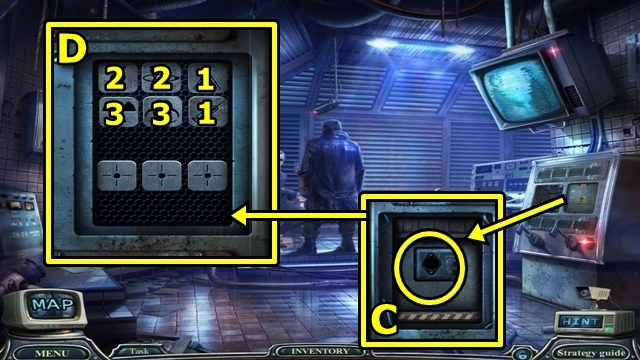
- Insert the DIODE (C); play the mini-game.
- Solution: (D). Take the HANDLE.
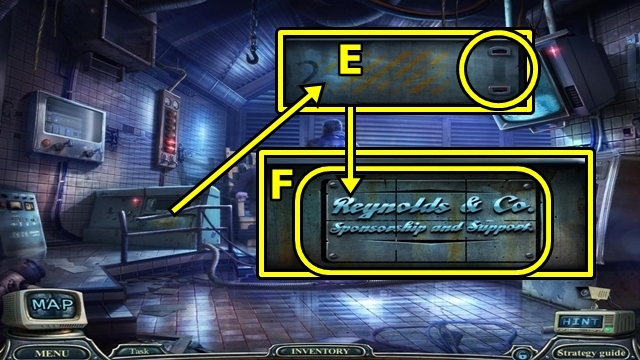
- Insert the HANDLE (E); open the panel; play the mini-game.
- Solution: (F). Take the HAMMER.
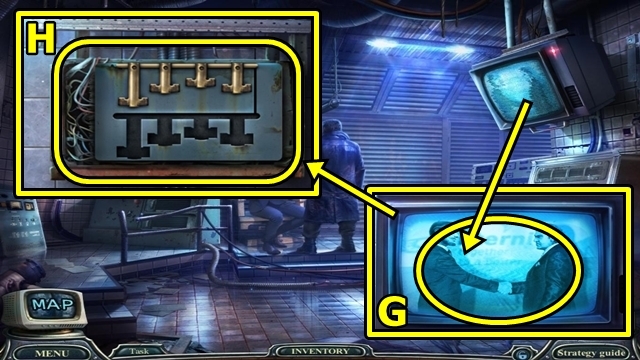
- Use the HAMMER (G); play the mini-game.
- Solution: (H). Take the LEVER.
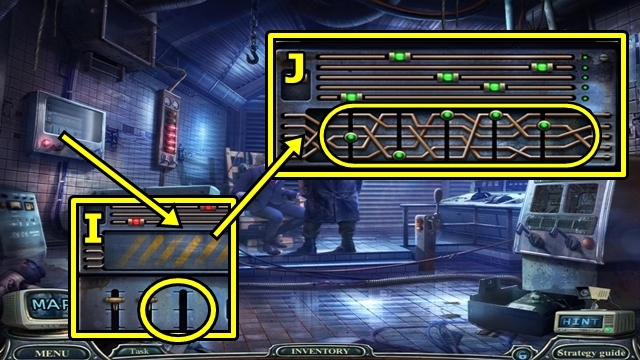
- Insert the LEVER (I); play the mini-game.
- Solution: (J). Take the FUSE.
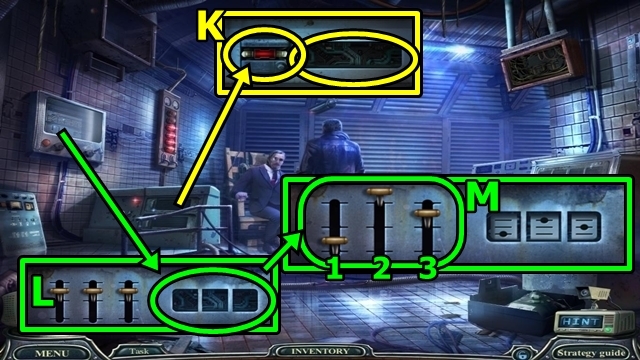
- Insert the FUSE (K); take the COMBINATION.
- Insert the COMBINATION (L); play the mini-game.
- Solution: Set 1-3-2 (M).
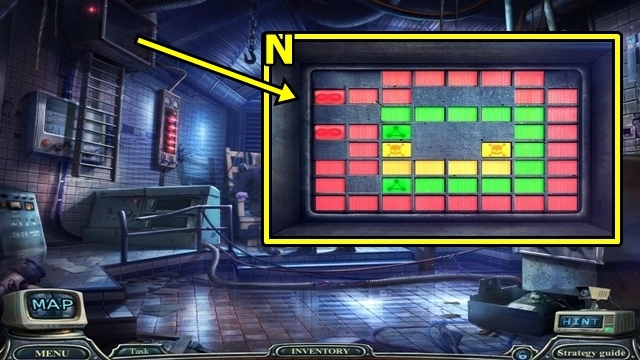
- Play the mini-game.
- Solution: Select a symbol, then drag the cursor along the path to its matching symbol (N). Take the EMERGENCY SWITCH.
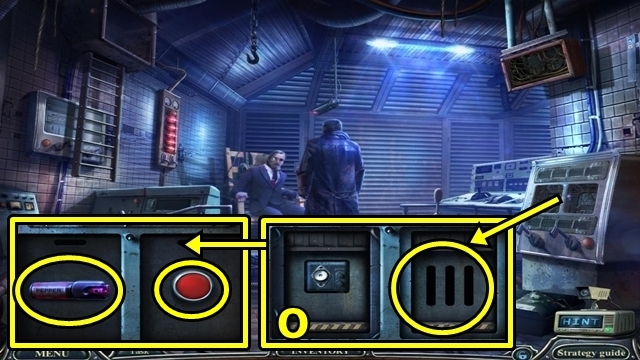
- Insert the EMERGENCY SWITCH (O); pull the switch. Select either option. If PEPPER SPRAY is selected, spray the man.
- Congratulations! You've completed Haunted Hotel: Eternity.
Created at: 2015-05-29

