

Walkthrough Menu
- General Tips
- Chapter 1: Stone Spires
- Chapter 2: Reynolds Hall
- Chapter 3: The Bunker
- Chapter 4: Amanda's Office
- Chapter 5: The Workshop
- Chapter 6: The Mountaintop
General Tips
- This is the official guide for Haunted Hotel: Phoenix.
- This guide will not show when you have to zoom into a location; the screenshots will show each zoom scene.
- Hidden-object puzzles are referred to as HOPs. This guide will not show screenshots of the HOPs, however, it will mention when an HOP is available and the inventory item you'll collect from it.
- Use the Map to fast travel to a location.
Chapter 1: Stone Spires
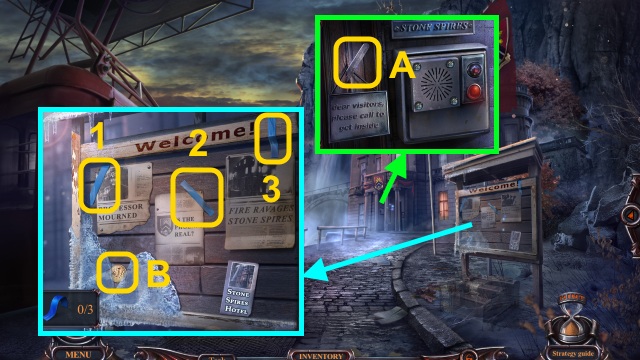
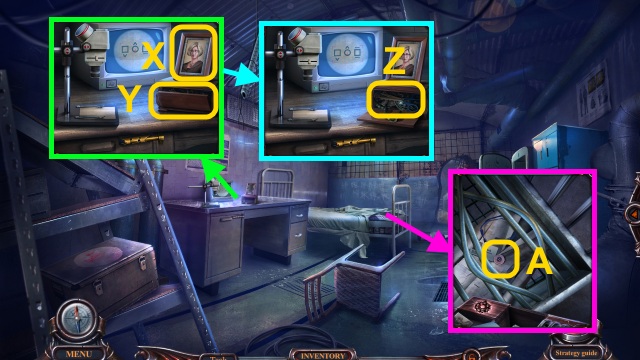
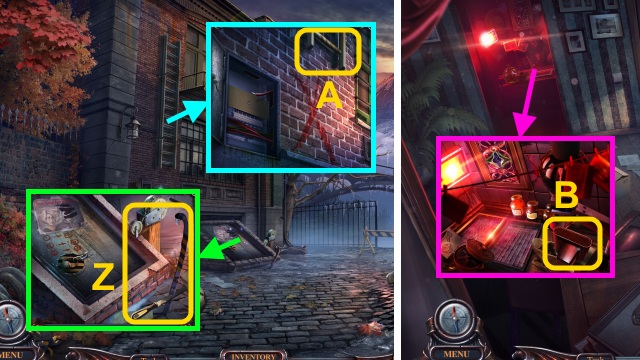
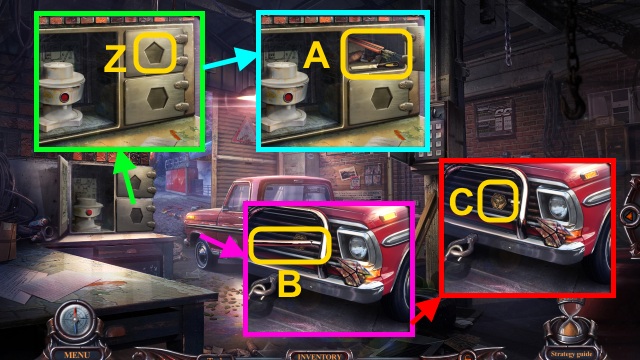
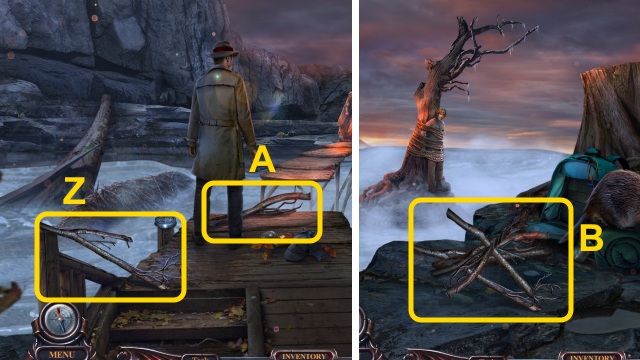
- Take the WOODEN STAKE (A).
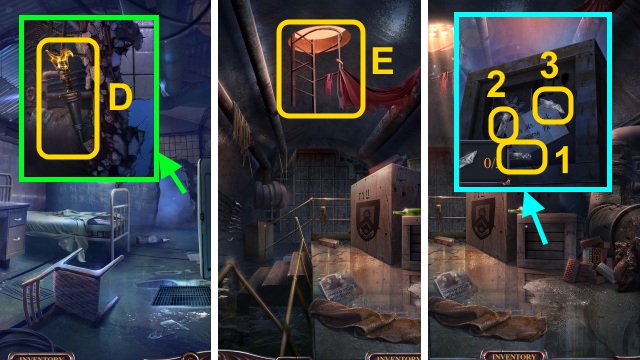
- Use the WOODEN STAKE; take the COIN (B).
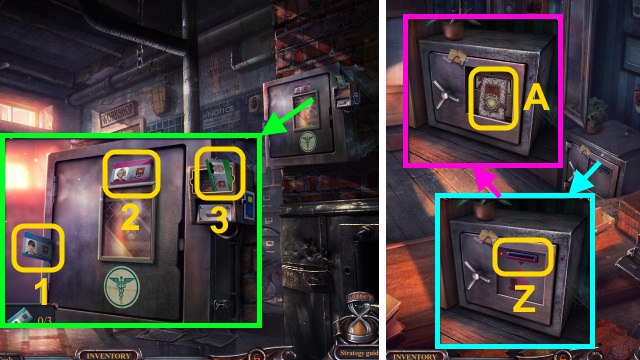
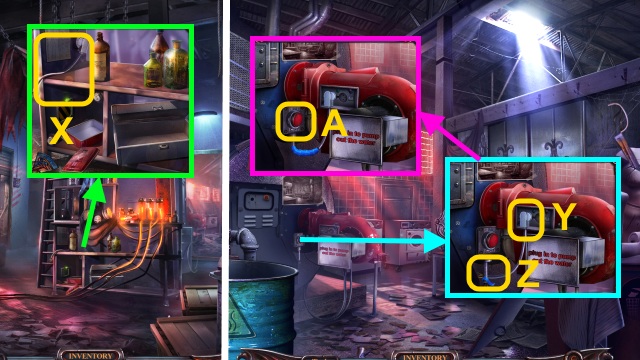
- Gather the TAPE (1-3).
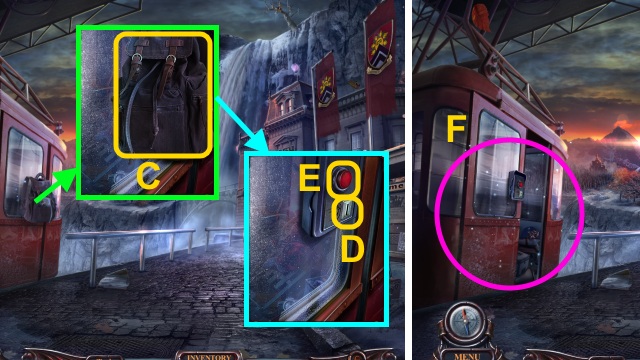
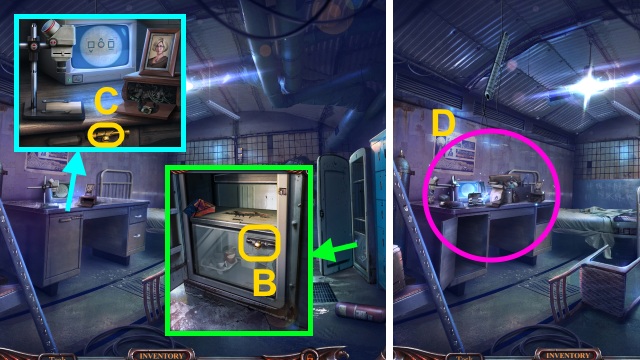
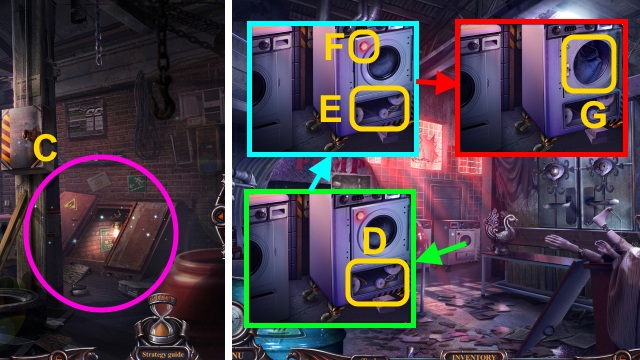
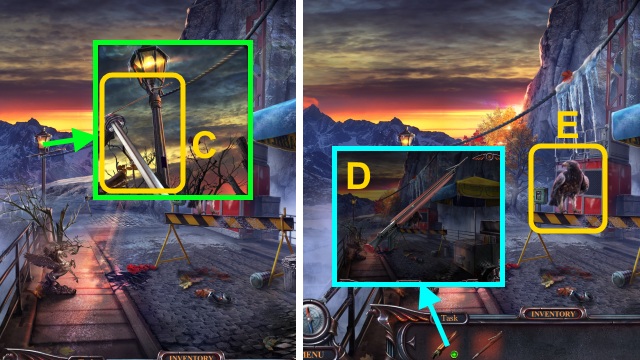
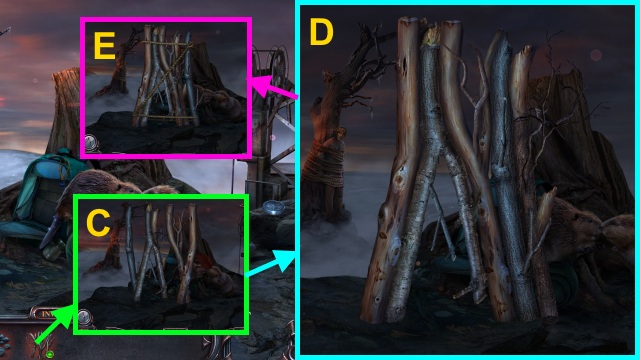
- Move the backpack (C).
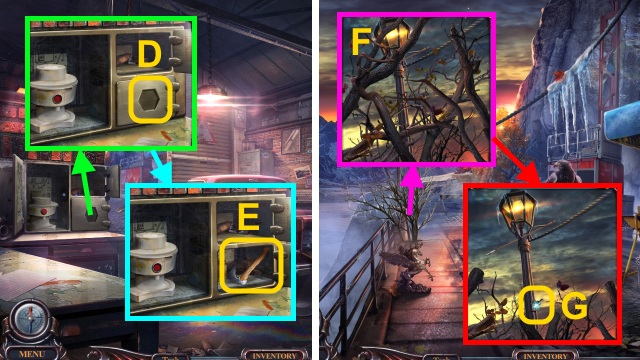
- Insert the COIN (D); press the button (E).
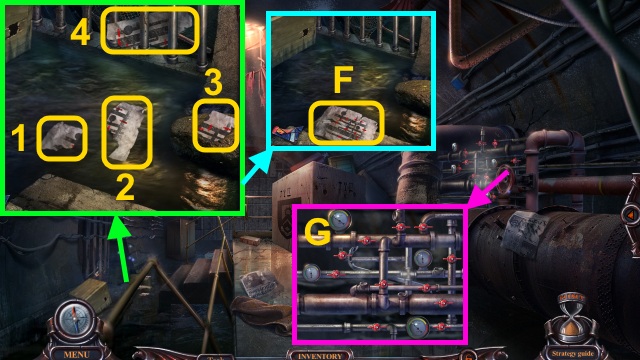
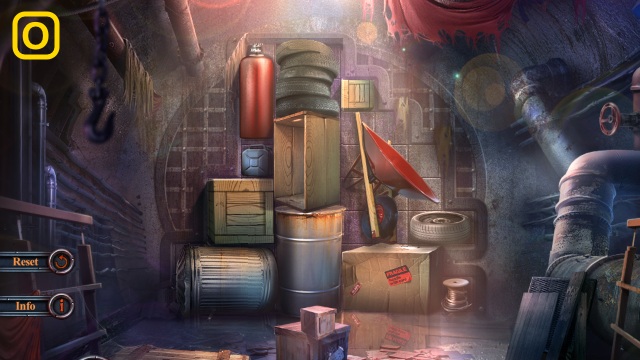
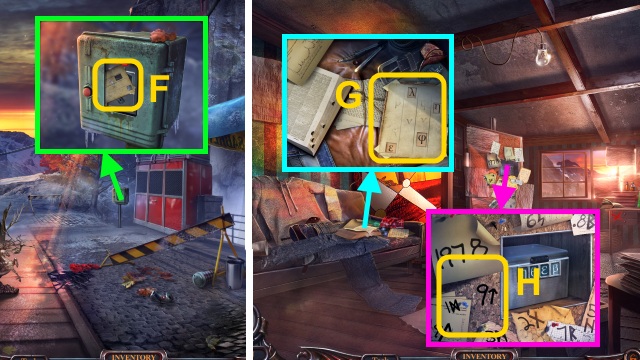
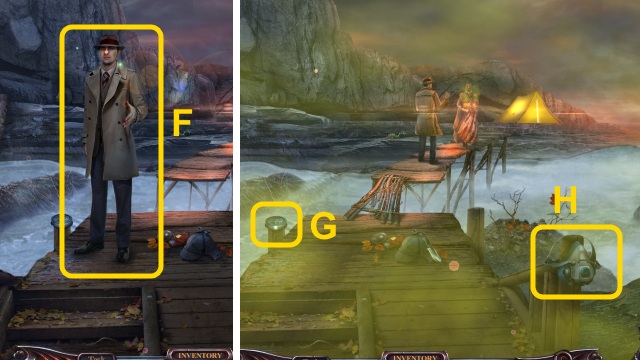
- Play the HOP to receive the SCREWDRIVER (F).
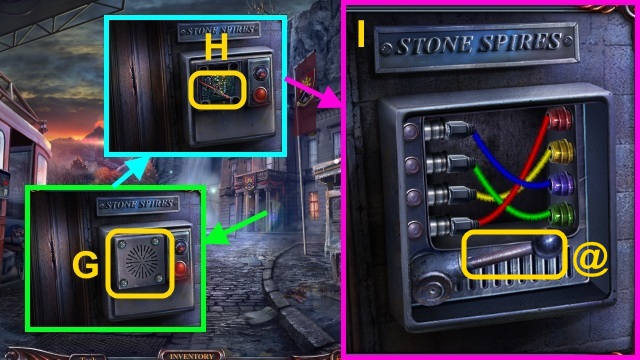
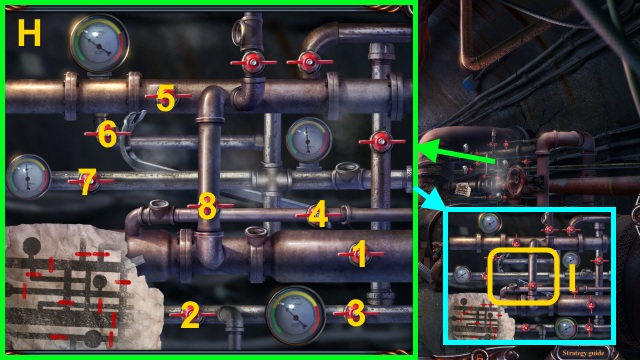
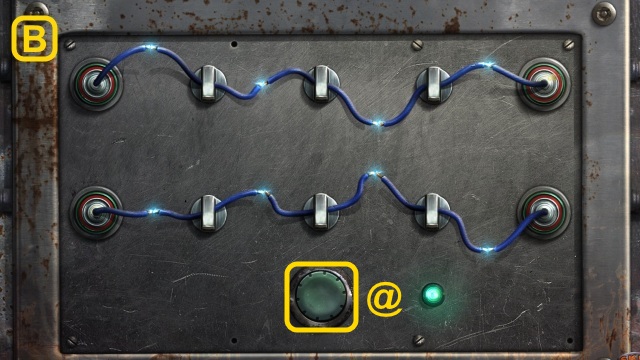
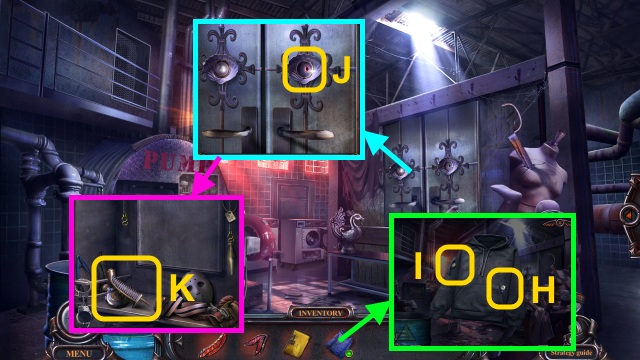
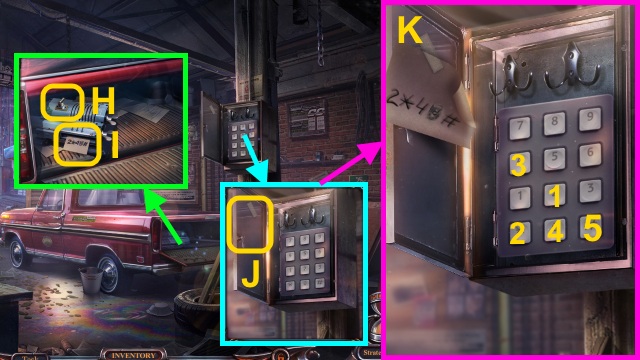
- Use the SCREWDRIVER (G); use the TAPE for a mini-game (H).
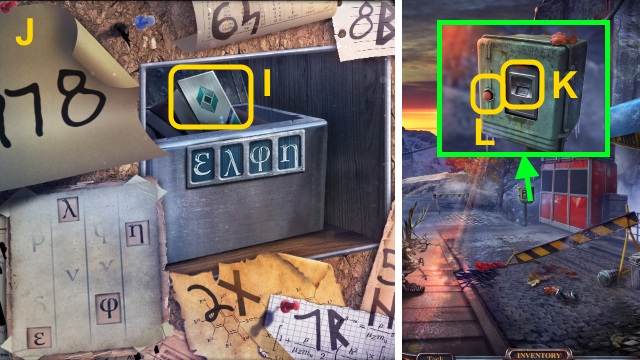
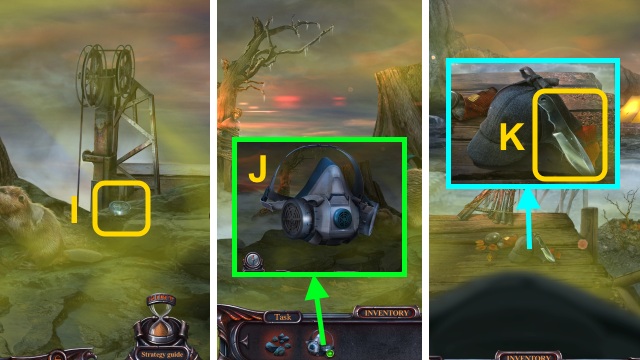
- Solution (I); pull the lever (@)
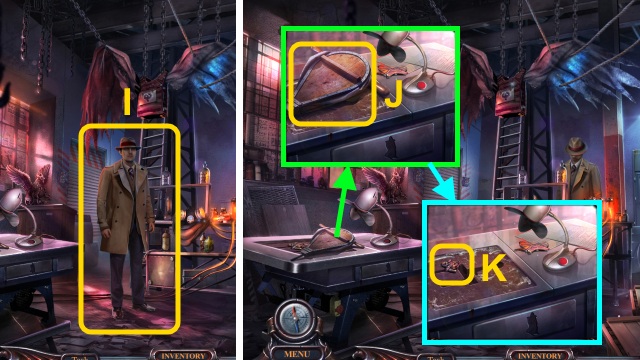
- Walk forward.
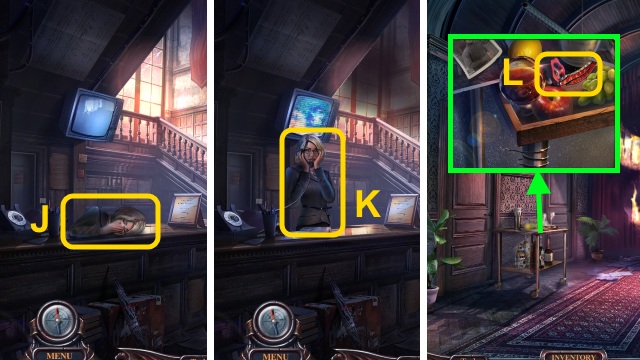
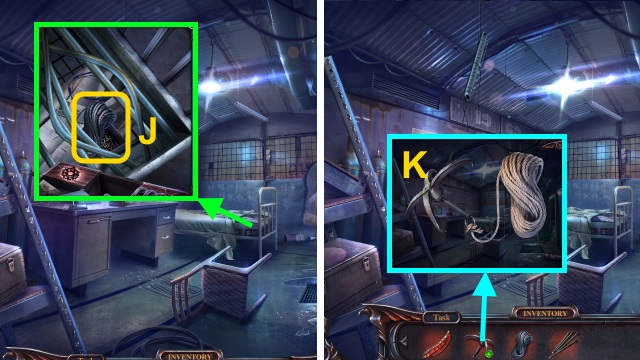
- Examine the woman (J); talk to her.
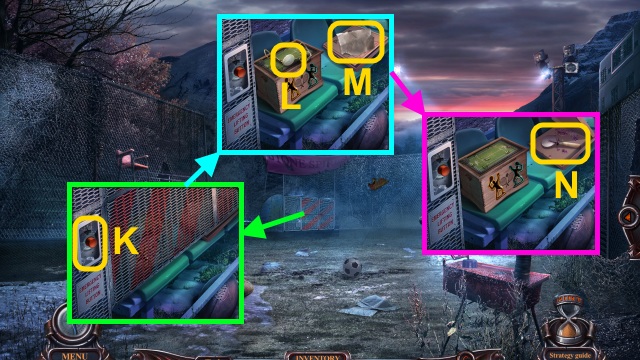
- Talk to Amanda (K); receive the FIRE BOX KEY.
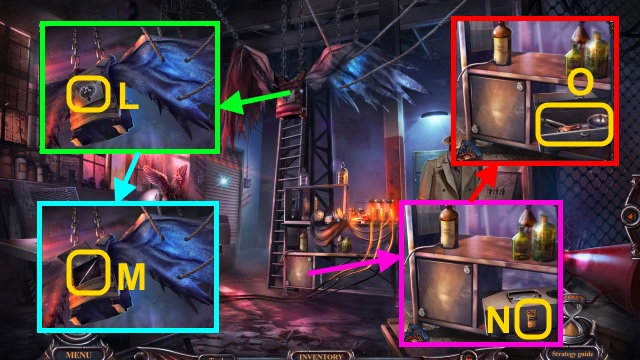
- Go left.
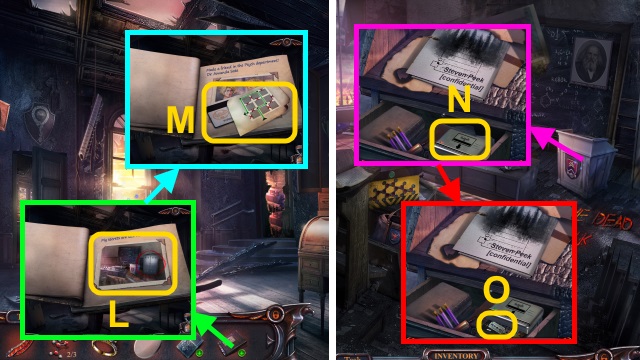
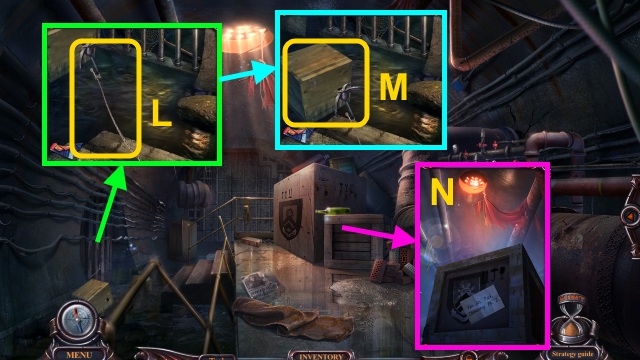
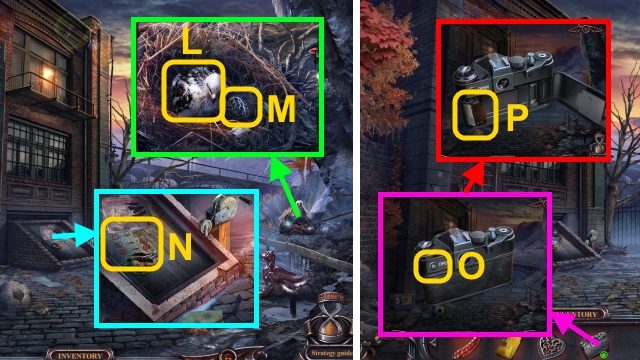
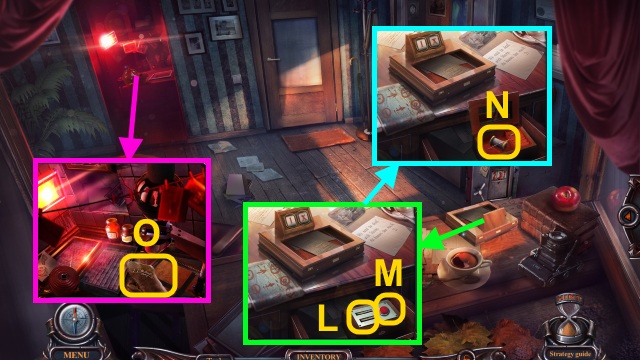
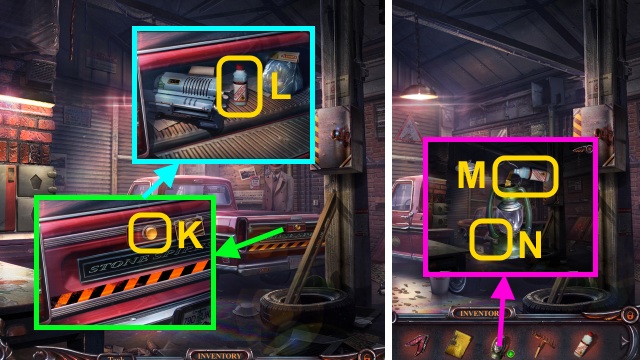
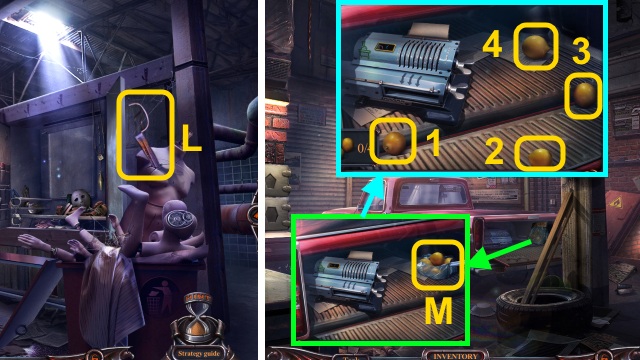
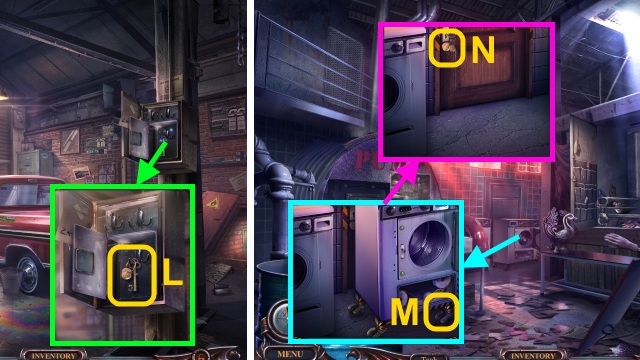
- Move the photos and fruit; take the STAINED GLASS PIECE and VALVE (L).
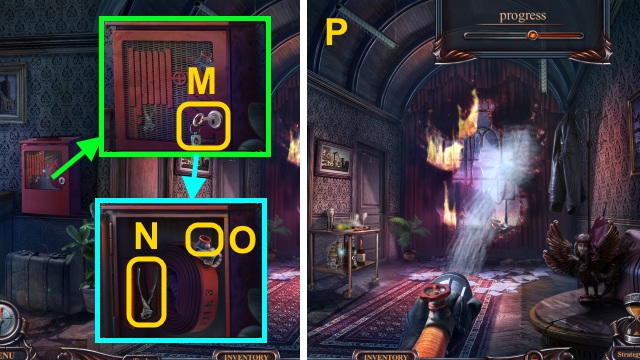
- Use the FIRE BOX KEY (M).
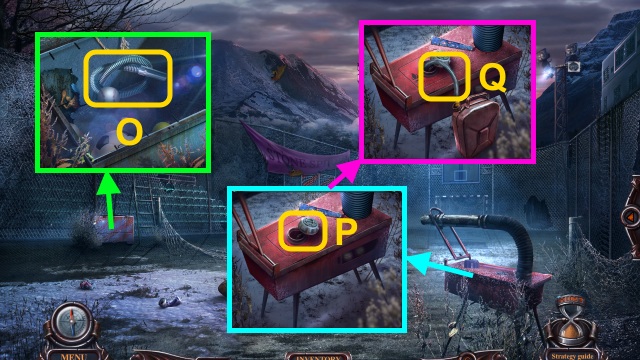
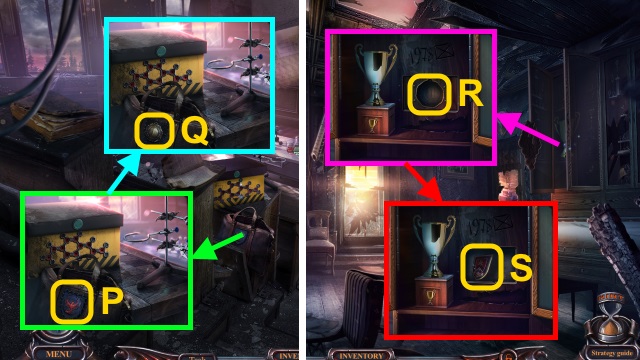
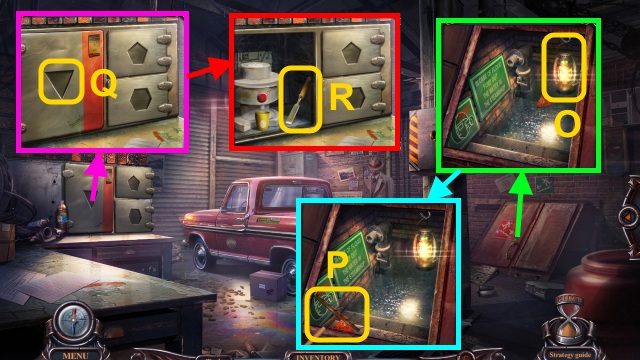
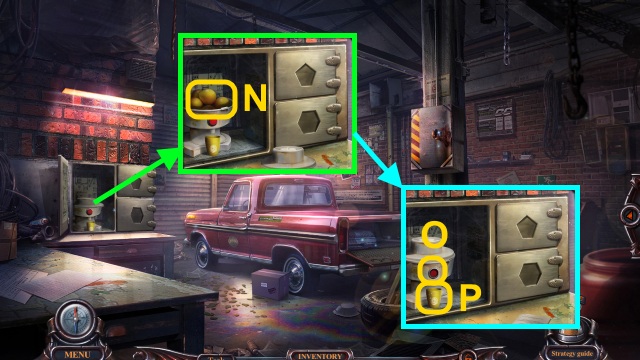
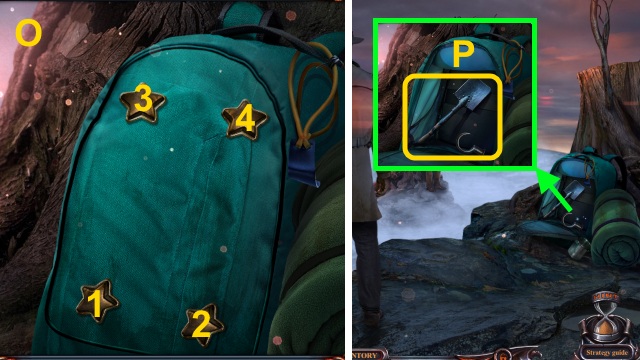
- Take the WIRE CUTTERS (N); place the VALVE for a mini-game (O).
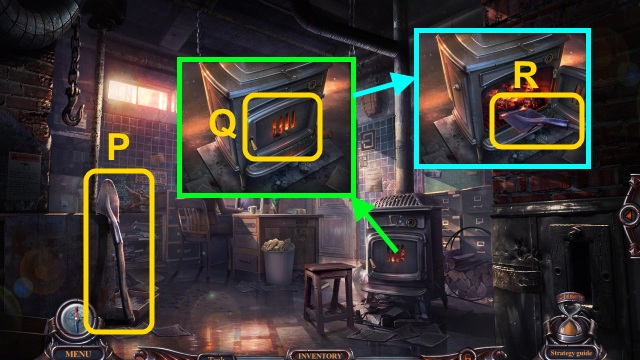
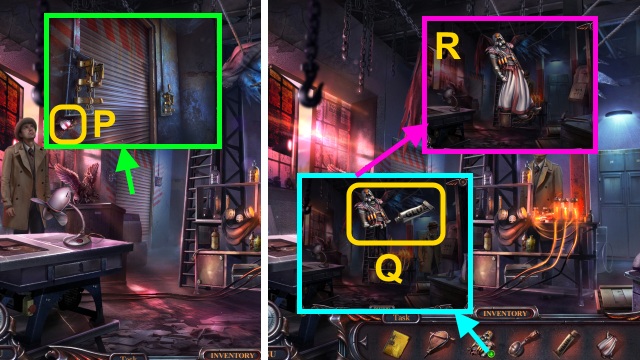
- Put the fire out (P).
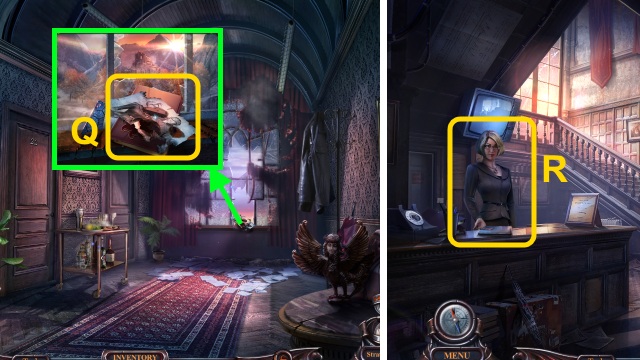
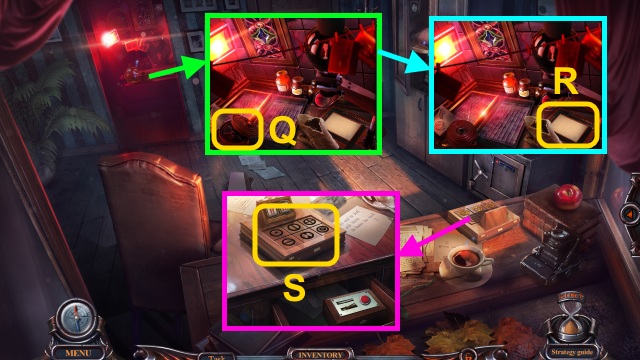
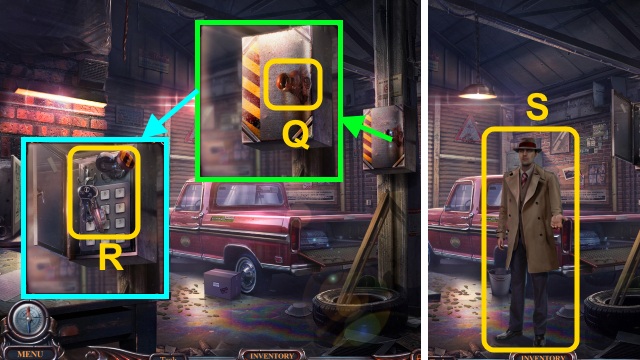
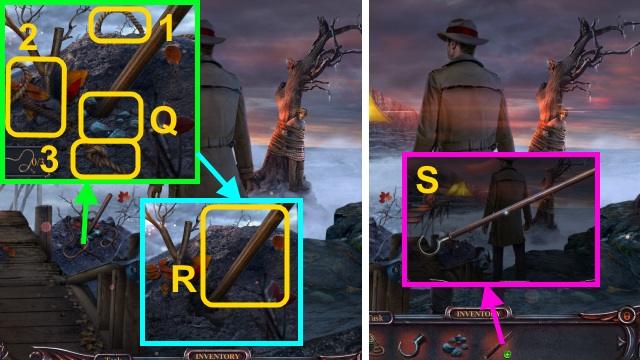
- Take the SMOLDERING PICTURE and DIARY (Q).
- Walk down.
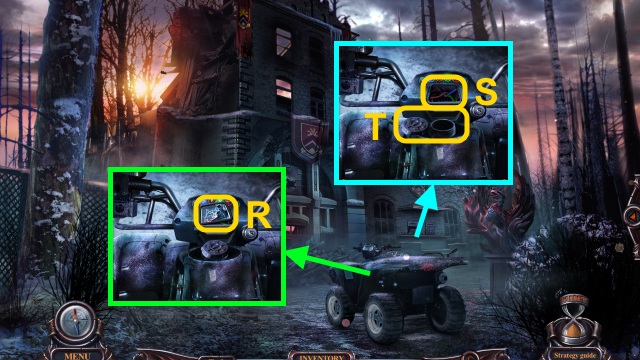
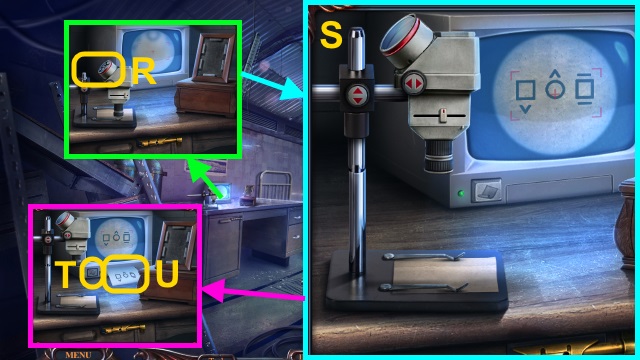
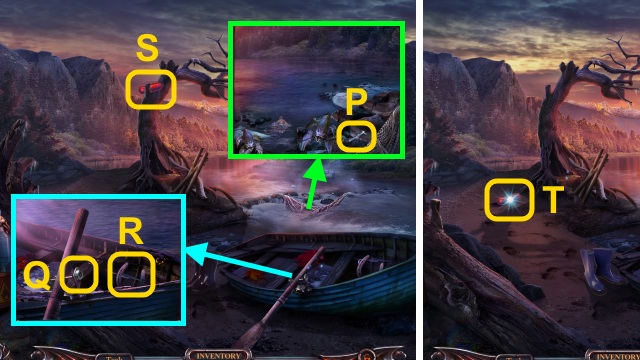
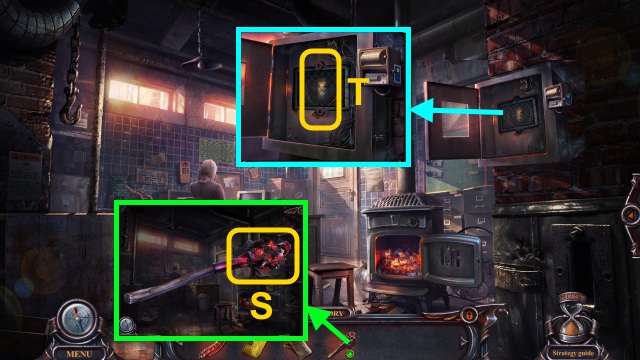
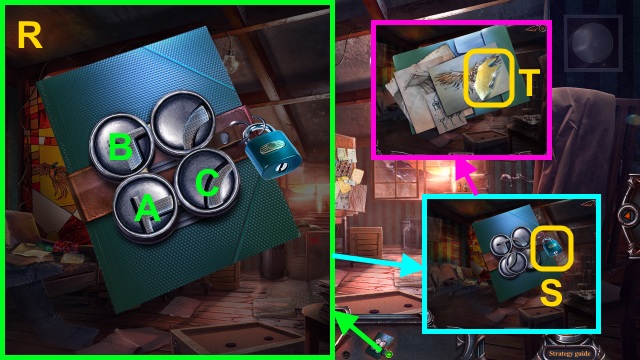
- Give the SMOLDERING PICTURE for a mini-game (R).
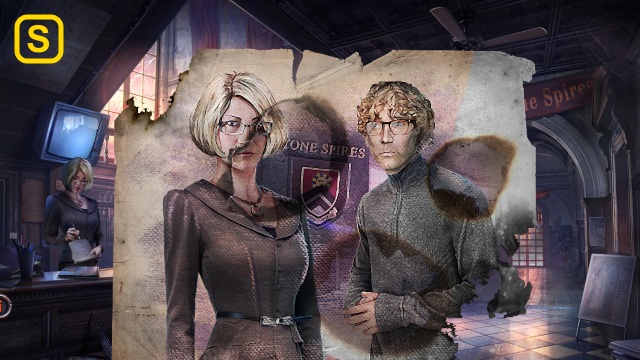
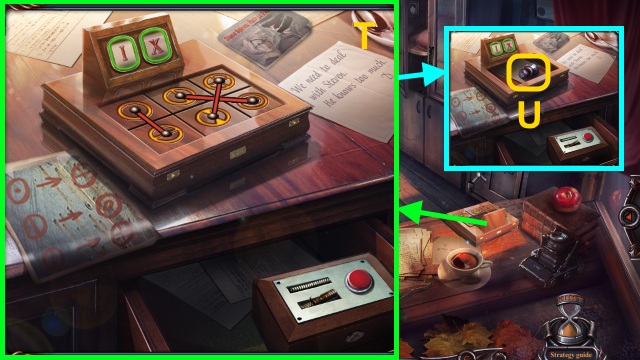
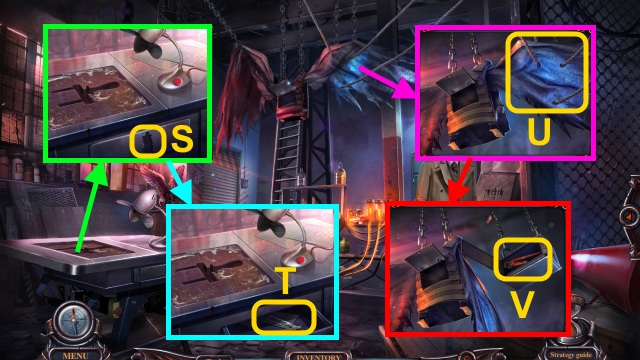
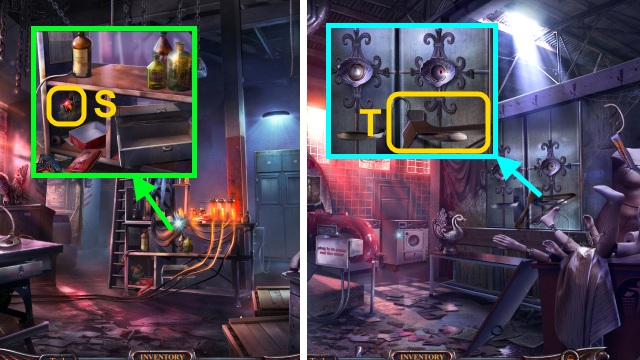
- Solution (S).
- You receive the UNIVERSITY MAP.
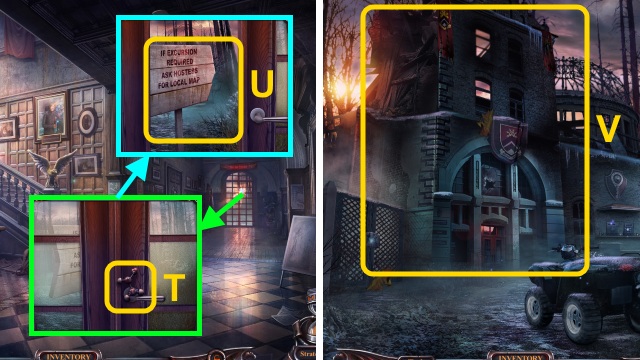
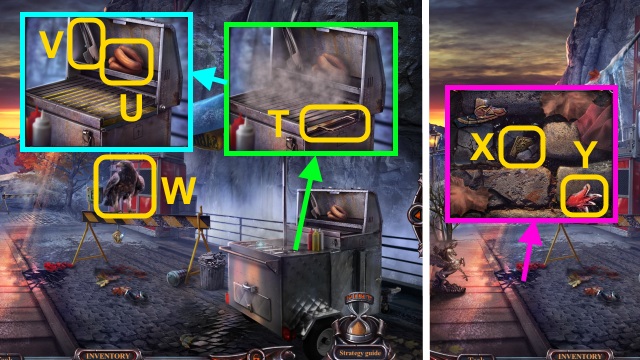
- Take the MOLECULE MODEL (1/3) (T); open the door.
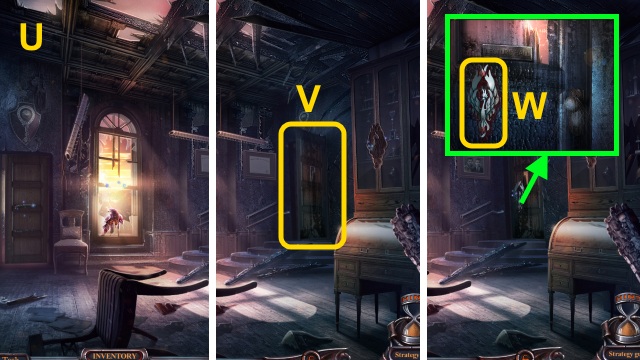
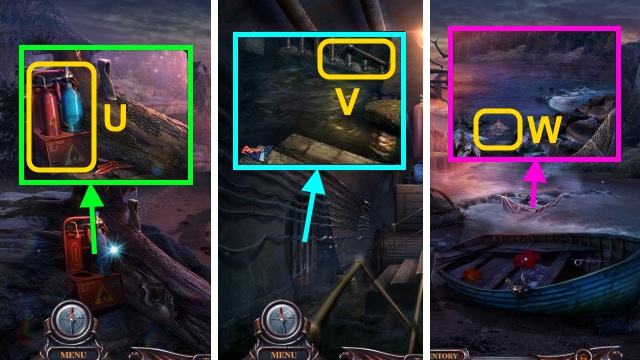
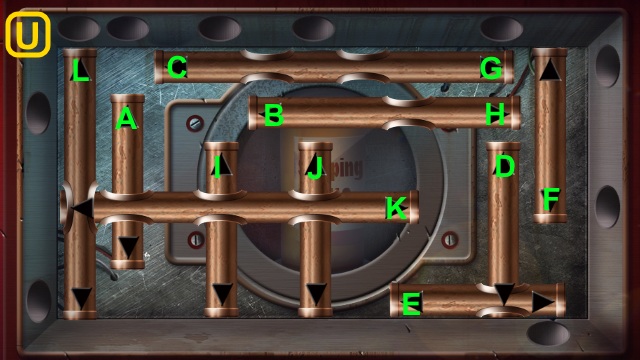
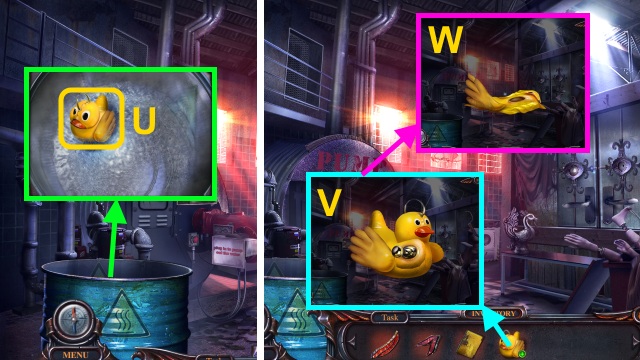
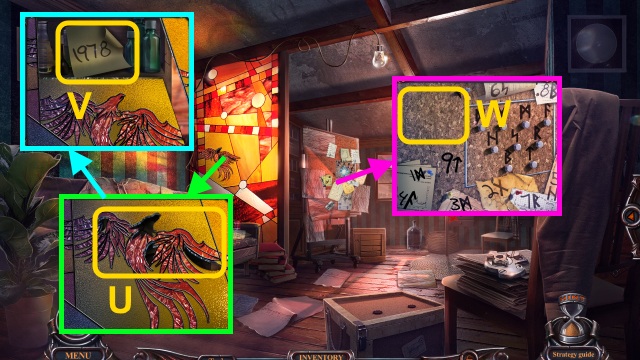
- Use the UNIVERSITY MAP (U).
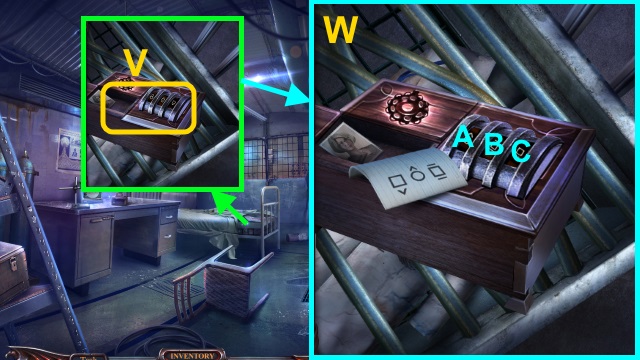
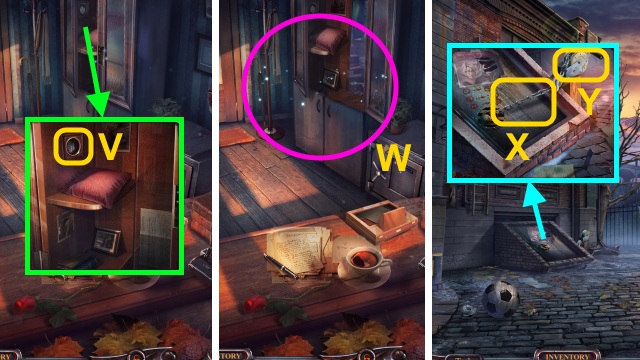
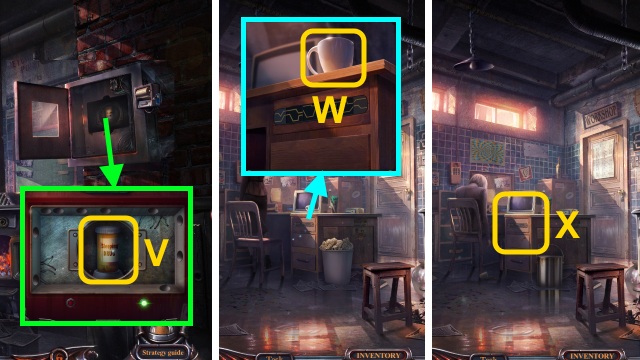
- Examine the building (V).
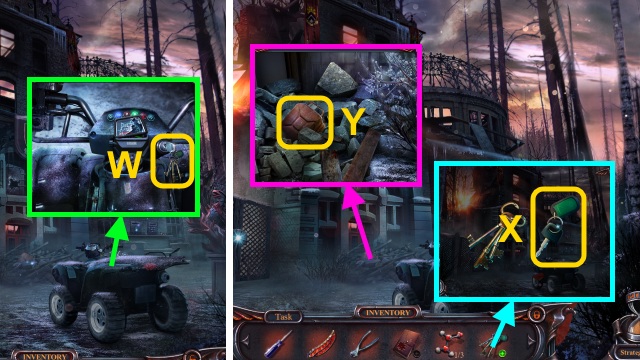
- Take the KEY RING (W).
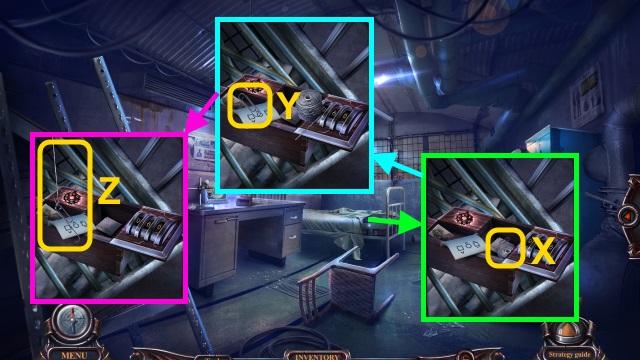
- Examine the KEY RING; take the LETTER BOX KEY (X).
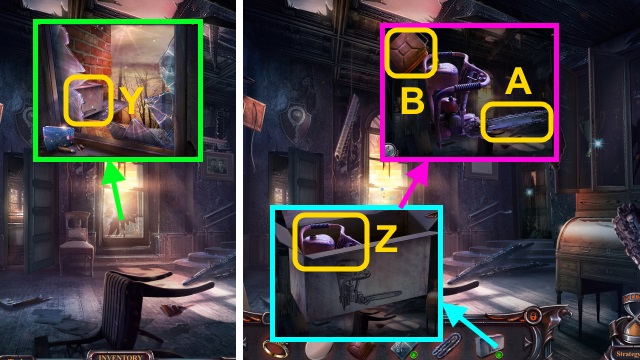
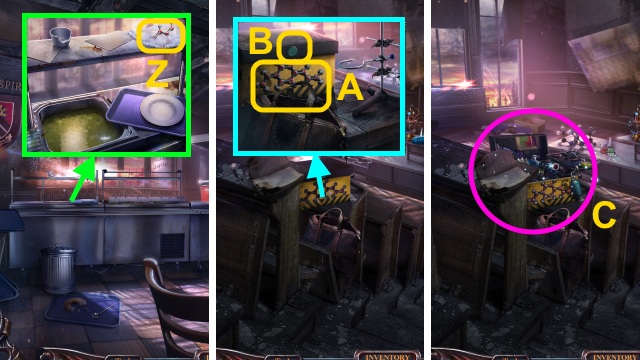
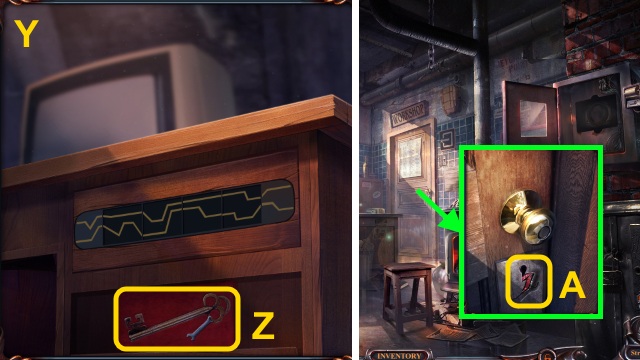
- Move the debris; take the EMPTY GAS CAN (Y).

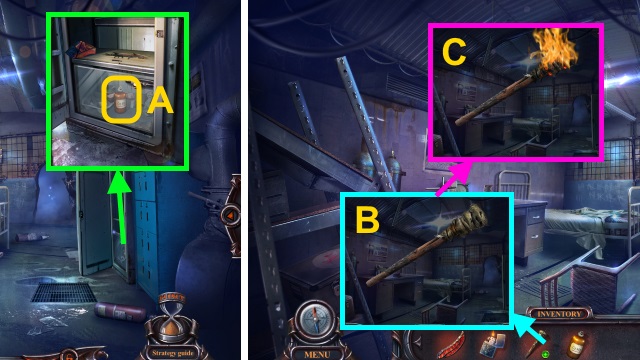
- Take the MOLECULE MODEL (2/3) (A).
- Use the LETTER BOX KEY (A); move the mail.
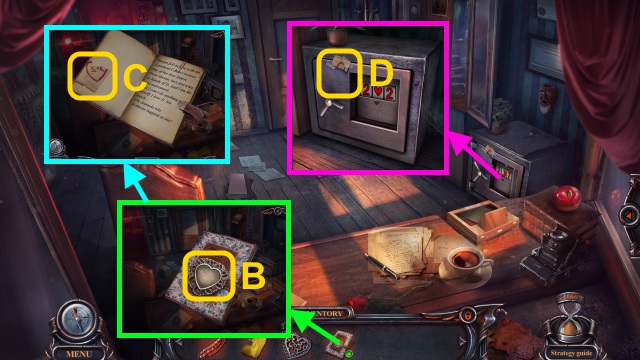
- Take the LETTER FOR AMANDA (B).
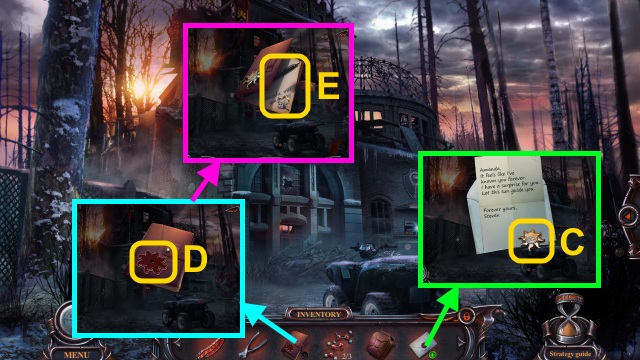
- Open the LETTER FOR AMANDA; take STEVEN'S SUN (C).
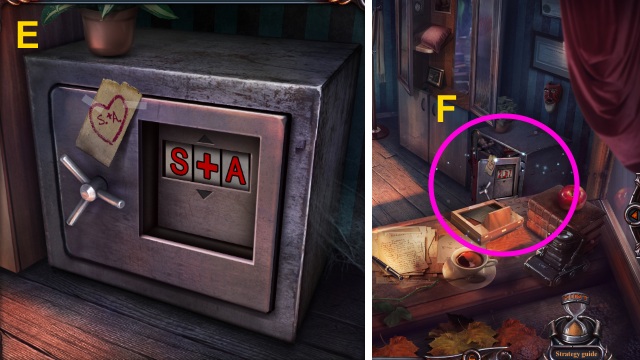
- Place STEVEN'S SUN on the DIARY (D); take the ENGAGEMENT RING and PEN (E).
- Walk down, then left.
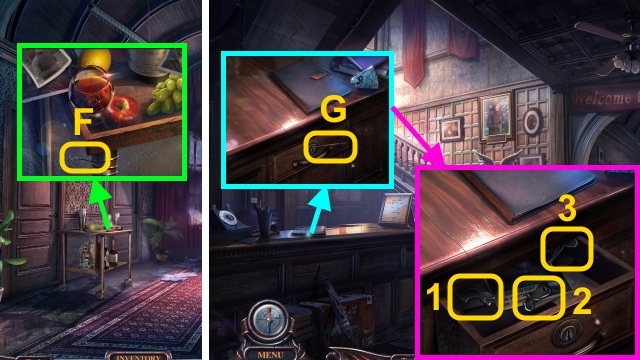
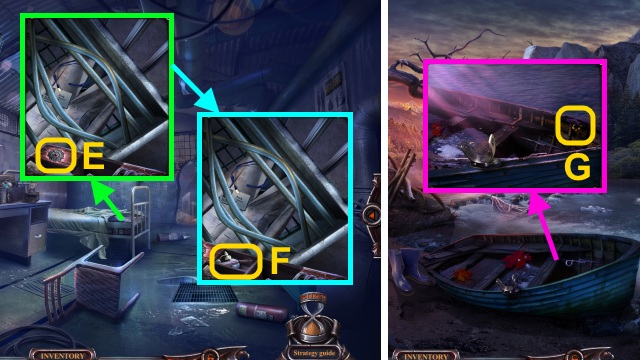
- Use the WIRE CUTTERS to take the WIRE (F).
- Walk down.
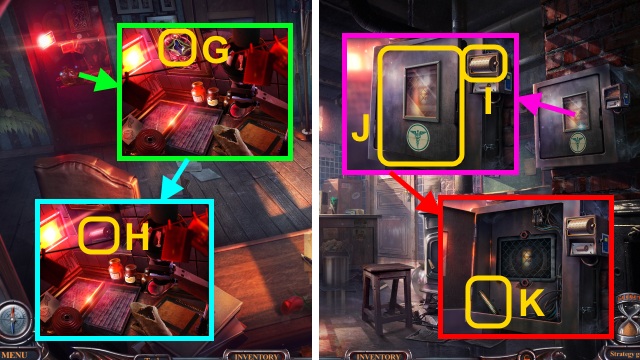
- Use the WIRE (G); open the drawer.
- Gather the ATHLETE EMBLEM (1-3).
- Walk right.
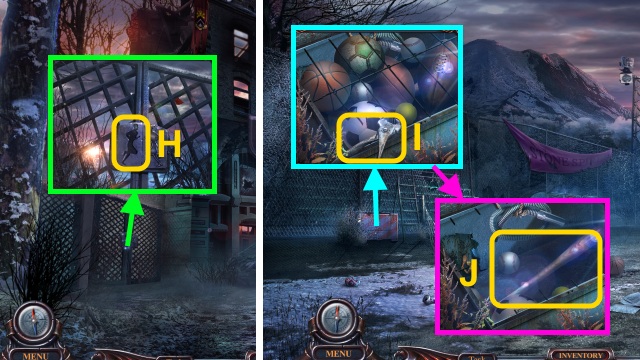
- Place the ATHLETE EMBLEM (H); open the gate.
- Walk left.
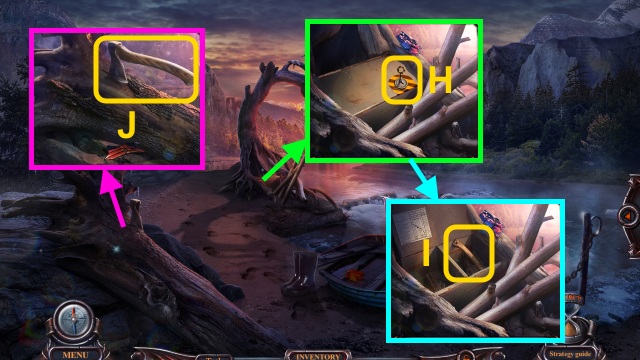
- Use the WIRE CUTTERS (I); move the balls.
- Take the BASEBALL BAT (J).
- Use the BASEBALL BAT; press the button (K).
- Take the LENS (L) and PAPER (M).
- Open the box; take the PIZZA CUTTER (N).
- Use the PIZZA CUTTER; take the HOSE (O).
- Remove the cap (P); place the HOSE and EMPTY GAS CAN.
- Examine the hose; receive the FULL GAS CAN (Q).
- Walk down.
- Remove the glass (R); connect the wires 3x (S).
- Remove the cap; pour the FULL GAS CAN (T).
- Walk forward.
Chapter 2: Reynolds Hall
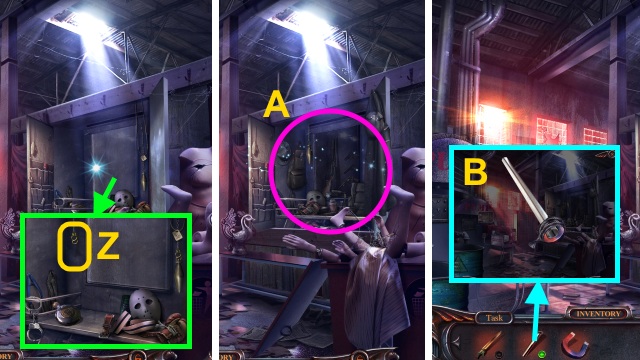
- Examine the room (U).
- Examine the door (V); use the SCREWDRIVER to take the PHOENIX EMBLEM (W).
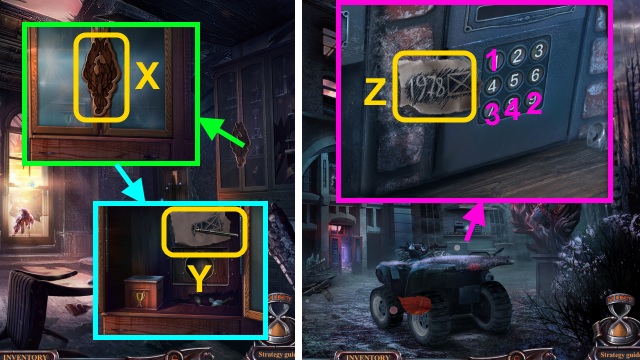
- Place the PHOENIX EMBLEM (X).
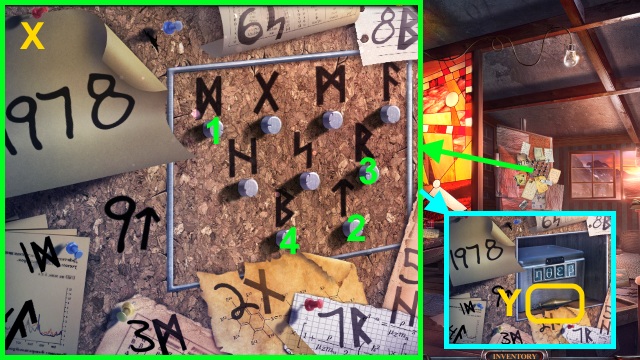
- Place the PAPER; use the PEN (Y).
- Take the PAPER HINT.
- Walk down.
- Place the PAPER HINT (Z); enter the code (1-4).
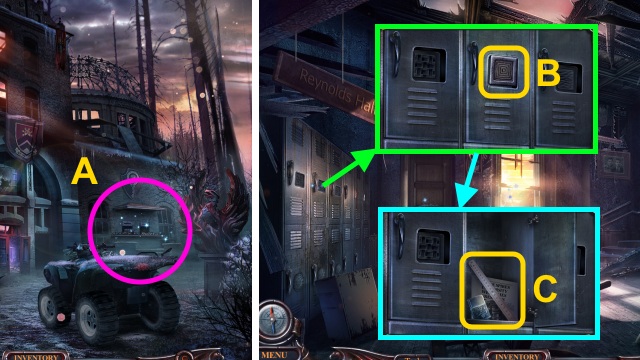
- Play the HOP to receive the LOCKER BUTTON (A).
- Walk forward.
- Place the LOCKER BUTTON (B); press it.
- Take the LIGHTER and RULER (C).
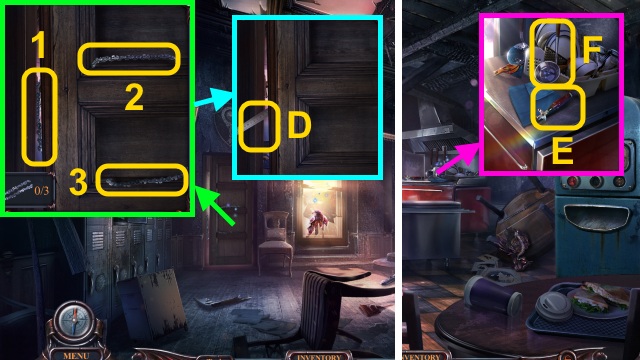
- Gather the CHAIN (1-3); use the RULER (D).
- Walk left.
- Take the CAN OPENER (E) and LADLE (F).
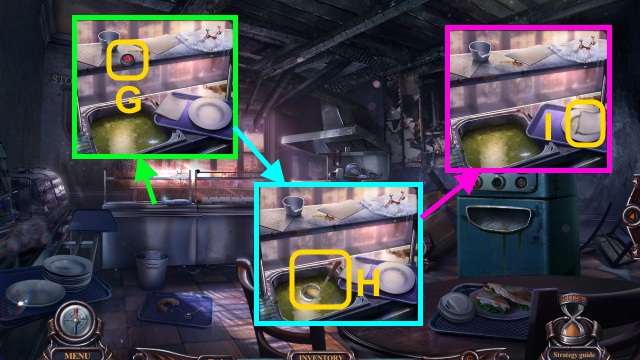
- Examine the button (G); use the LADLE (H).
- Use the napkin (I); receive the MACHINE BUTTON.
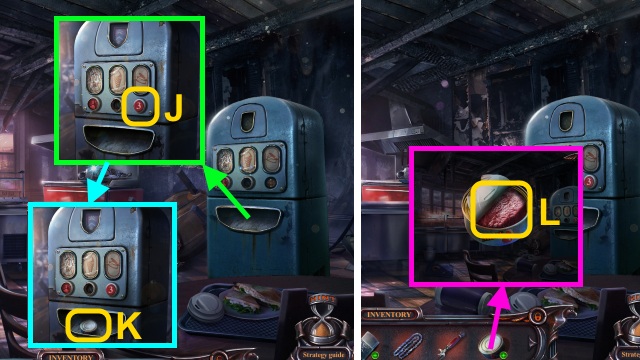
- Place the MACHINE BUTTON; press it (J).
- Take the TIN CAN (K).
- Use the CAN OPENER on the TIN CAN; take the MEAT (L).
- Walk down.
- Give the MEAT (M); take the LOCKER BUTTON (N).
- Place the LOCKER BUTTON; press it (O).
- Open the case; take the TWEEZERS (P).
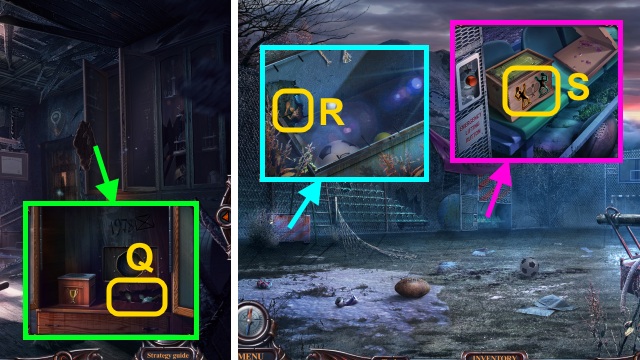
- Use the TWEEZERS to take the TENNIS PLAYER EMBLEM (Q).
- Walk down, then left.
- Use the TWEEZERS to take the TENNIS PLAYER EMBLEM (R).
- Place the TENNIS PLAYER EMBLEMS for a mini-game (S).
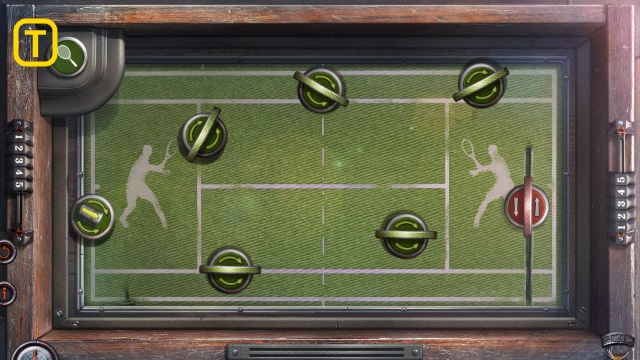
- Solution (T).

- Take the TROPHY (U).
- Walk down, then forward.
- Place the TROPHY (V); take the TELESCOPING GOLF CLUB (W).
- Open the TELESCOPING GOLF CLUB; take the GOLF CLUB (X).
- Use the GOLF CLUB; take the BOX (Y).
- Open the BOX; take the chainsaw (Z).
- Use the CHAIN (A) and FULL GAS CAN (B); take the CHAINSAW.

- Use the CHAINSAW (C).
- Walk right.
- Gather the RECIPE (1-6).
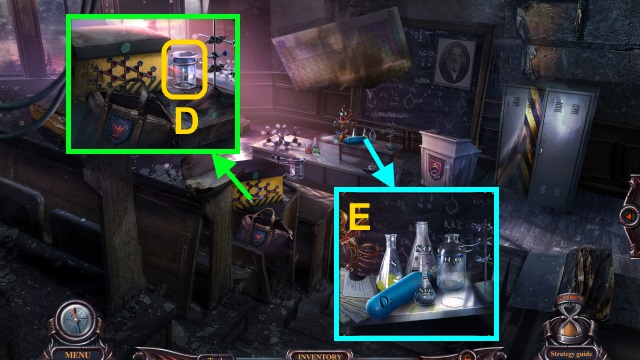
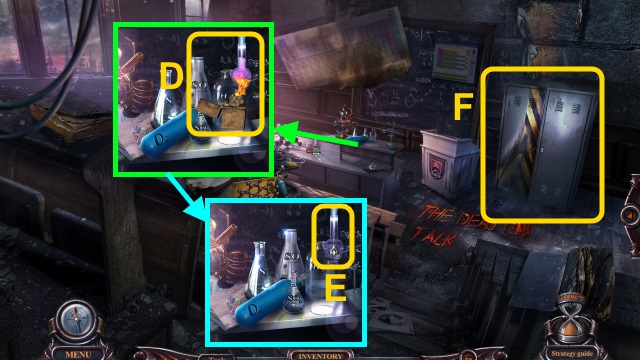
- Take the BEAKER (D).
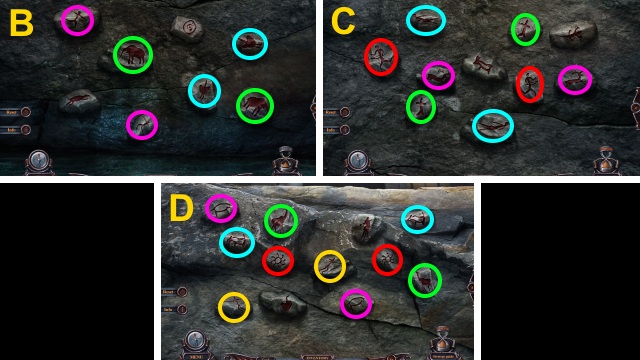
- Place the RECIPE and BEAKER for a mini-game (E).
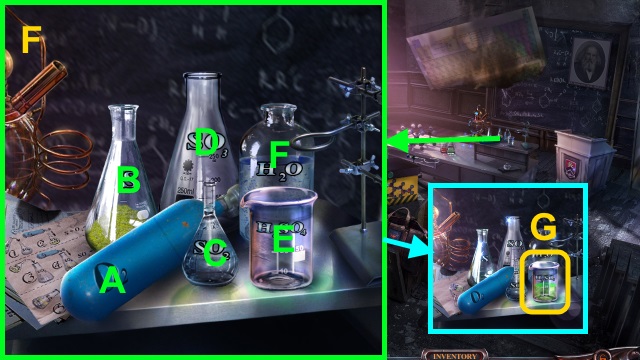
- Solution (F): (B-C)(A-C)(C-D)(A-D)(D-E)(F-E).
- Take the ACID (G).
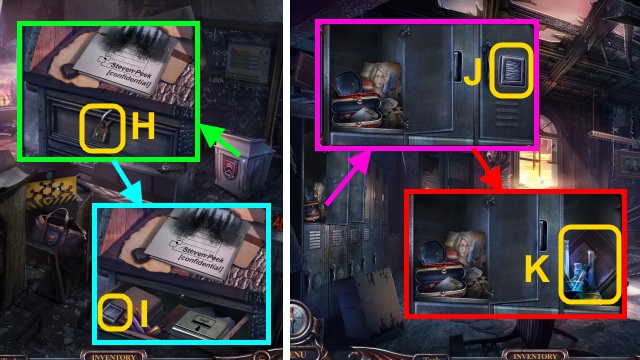
- Pour the ACID (H); open the drawer.
- Take the LOCKER BUTTON (I).
- Walk down.
- Close the locker; place the LOCKER BUTTON (J).
- Press the button; take STEVEN'S ALBUM (K).
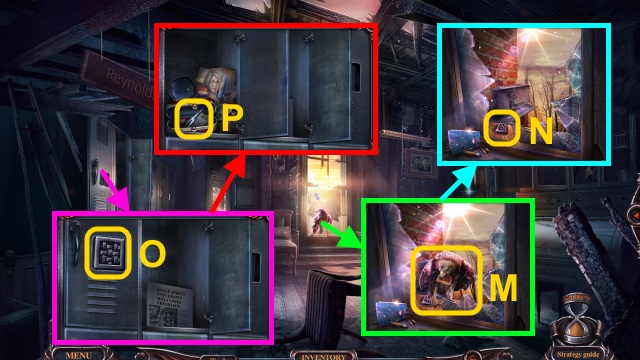
- Flip through STEVEN'S ALBUM; take STEVEN'S SECRET (L).
- Turn the page; take the SECRET MAP and STEVEN'S ID (M).
- Walk right.
- Use STEVEN'S ID (N); take the RAZOR BLADE (O).
- Use the RAZOR BLADE (P); remove the patch.
- Take the MEDAL (Q).
- Walk down.
- Place the MEDAL (R); take the UNIVERSITY CREST (S).
- Walk left.

- Place the UNIVERSITY CREST (T); take the CABLE (U).
- Remove the cover; place the CABLE (V).
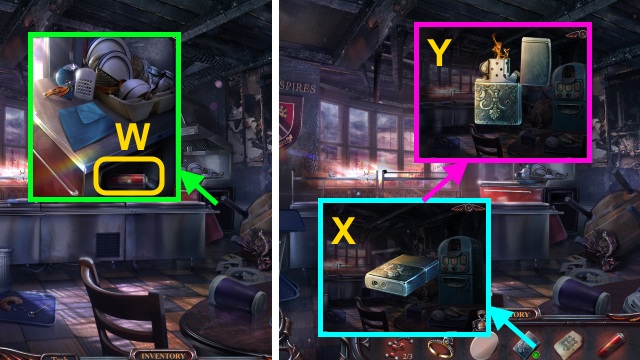
- Take the GAS CAN (W).
- Examine the LIGHTER; use the GAS CAN (X).
- Examine the LIGHTER; take the LIT LIGHTER (Y).
- Use the LIT LIGHTER; take the MOLECULE MODEL (3/3) (Z).
- Walk down, then right.
- Place the MOLECULE MODEL (3/3) (A); press the button (B).
- Play the HOP to receive the CHEMICAL AGENT (C).
- Place the CHEMICAL AGENT; use the LIGHTER (D).
- Take the EXPLOSIVE (E).
- Use the EXPLOSIVE (F).

- Open the door (G).
- Take the flashlight (H); use the SECRET MAP for a mini-game (I).
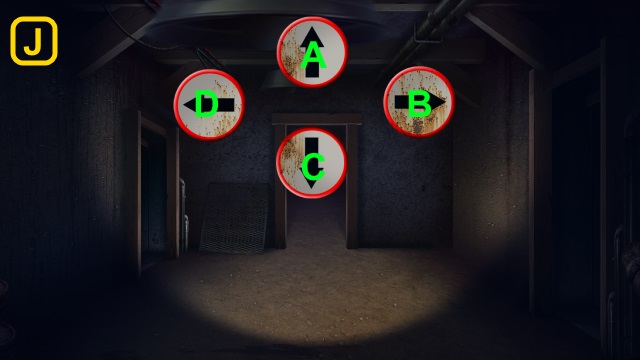
- Solution (J): A-A-B-D-A-D-A-D-A-B.
Chapter 3: The Bunker
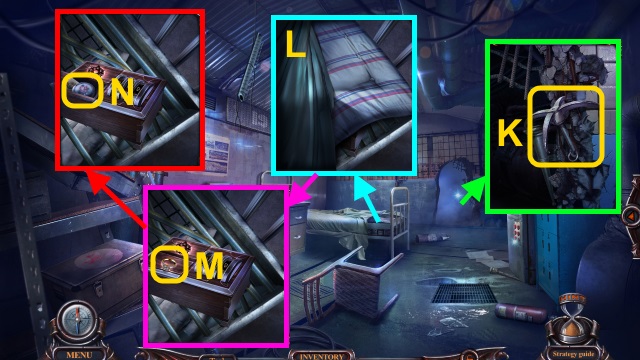
- Take the HOOK (K).
- Move the mattress (L).
- Place the ENGAGEMENT RING (M); press it.
- Take the POWDER COMPACT (N).
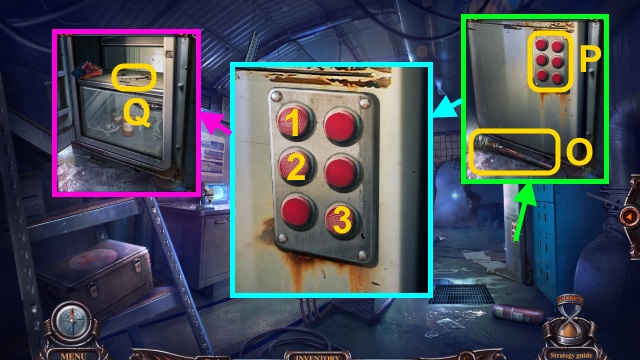
- Take the DAMP TORCH (O); use the POWDER COMPACT (P).
- Press the buttons (1-3).
- Take the MICROSCOPE BRACE (Q).
- Remove the lens; place the LENS and MICROSCOPE BRACE for a mini-game (R).
- Solution (S).
- Press the button (T); take the CIPHER (U).
- Place the CIPHER for a mini-game (V).
- Solution (W): Ax2-Bx2-Cx2.
- Examine the string (X); examine the paperclip 2x (Y).
- Take the BENT HOOK (Z).
- Use the BENT HOOK to take the ALCOHOL VIAL (A).
- Use the ALCOHOL VIAL on the DAMP TORCH (B); use the LIGHTER.
- Take the TORCH (C).
- Place the TORCH (D).
- Walk forward.
- Examine the ladder (E).
- Gather the TAPE (1-3).
- Gather the papers (1-4).
- Use the TAPE; take the PRESSURE SCHEMATIC (F).
- Place the PRESSURE SCHEMATIC for a mini-game (G).
- Solution (H).
- Take the CROWBAR (I).
- Walk down.
- Use the CROWBAR; take the ROPE and NAILS (J).
- Combine the HOOK and ROPE; take the GRAPPLING HOOK (K).
- Walk forward.
- Use the GRAPPLING HOOK; pull it (L).
- Take the BOX (M).
- Place the BOX for a mini-game (N).
- Solution (O).
- Go up.
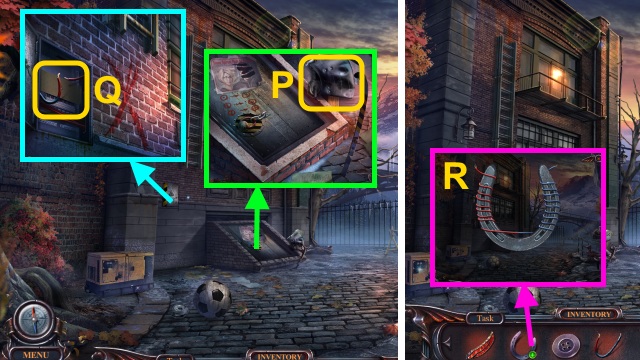
- Take the HEX KEY (P).
- Use the HEX KEY (Q); receive the OAR.
- Take the HORSESHOE (R).
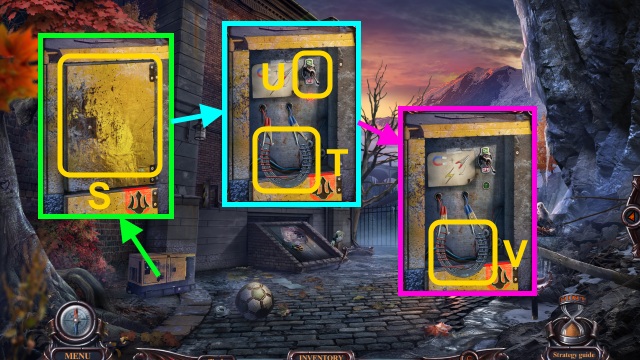
- Use the OAR (S).
- Take the FUEL (T).
- Place the FUEL; take the WELDER (U).
- Walk down.
- Use the WELDER; take the BUTTERFLY NET (V).
- Go up.
- Use the BUTTERFLY NET; receive AMANDA'S PHOTO (W).
- Walk down twice.
- Place AMANDA'S PHOTO (X); open the box (Y).
- Move the bracelet; take the SCISSORS (Z).
- Use the SCISSORS; take the COPPER BUTTON (A).
- Use the COPPER BUTTON (B); receive the BOLT PIECE.
- Place the BOLT PIECE (C); slide the latch.
- Play the HOP to receive AMANDA'S LOCKET (D).
- Place AMANDA'S LOCKET (E); examine it.
- Take the TWEEZERS (F).
- Go forward, then up.
- Use the TWEEZERS (G); receive the OLD KEY.
- Use the OLD KEY (H); take the AXE HANDLE (I).
- Place the AXE HANDLE (J); pull it 2x.
- Take the AXE.
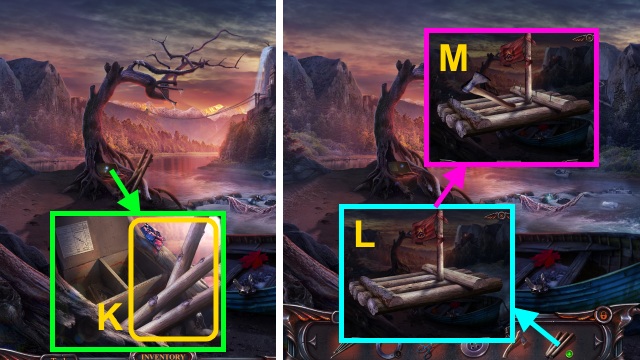
- Use the AXE; take the BEAMS (K).
- Examine the BEAMS; place the pieces (L).
- Use the NAILS and AXE (M); take the RAFT.
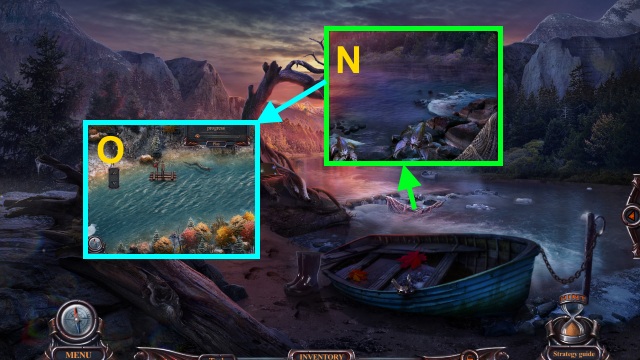
- Use the RAFT for a mini-game (N).
- Steer the raft (O).
Chapter 4: Amanda's Office
- Use the SCISSORS to take the RUBBER PIECE (P).
- Open the door; use the RUBBER PIECE to take the WIRE (Q).
- Combine the HORSESHOE and WIRE (R); take the WIRE HORSESHOE.
- Examine the plate (S); take the METAL PLATE.
- Place the WIRE HORSESHOE (T); flip the switch (U).
- Take the MAGNET (V).

- Use the MAGNET (W); receive the TRIDENT AMULET.
- Place the TRIDENT AMULET (X); take the FILE (Y).
- Use the FILE to take the METAL ROD (Z).
- Use the METAL ROD (A).
- Go up.
- Move the film; take the CAMERA (B).
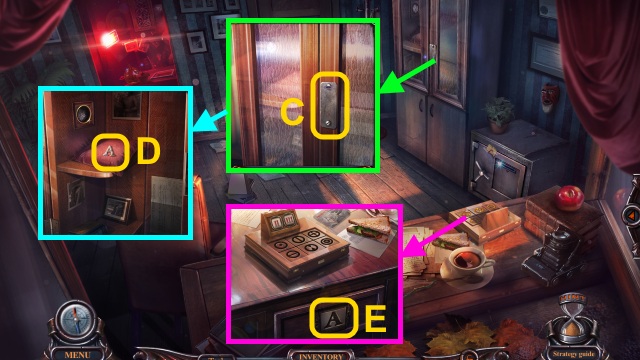
- Use the COPPER BUTTON (C); open the door.
- Take the LETTER 'A' (D).
- Take the SANDWICH; place the LETTER 'A' (E).
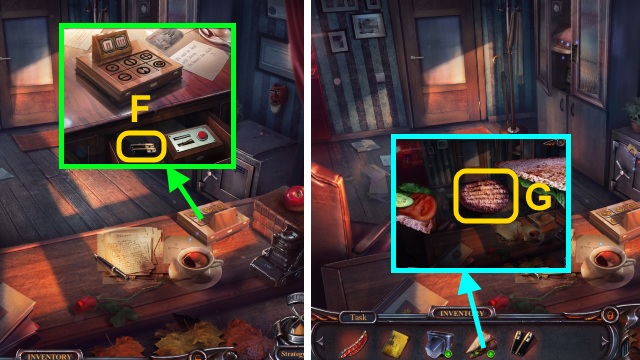
- Take the BATTERIES (F).
- Examine the SANDWICH; take the MEAT PATTY (G).
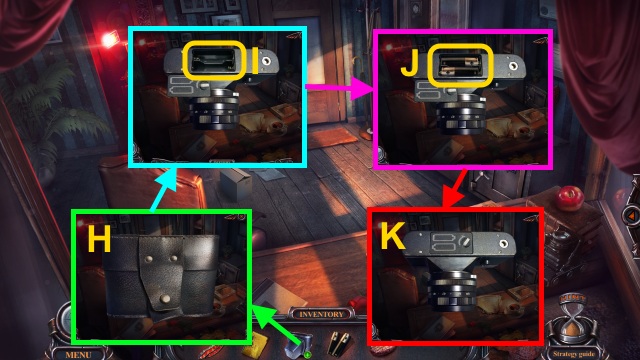
- Examine the CAMERA; open the case (H).
- Turn the CAMERA; open the cover (I).
- Place the BATTERIES (J); place the cover.
- Take the CAMERA (K).
- Walk down.
- Give the MEAT PATTY (L); take the HEART LOCKET (M).
- Use the CAMERA (N).
- Examine the CAMERA; press the button (O).
- Open the cover; take the FILM (P).
- Go up.
- Place the FILM (Q); open the lid.
- Examine the paper (R); receive the SET OF SYMBOLS.
- Place the SET OF SYMBOLS for a mini-game (S).
- Solution (T).
- Take AMANDA'S SEAL (U).
- Use AMANDA'S SEAL (V).
- Play the HOP to receive the CHAIN (W).
- Walk down.
- Place the CHAIN (X); turn the crank (Y).
- Go forward.
- Gather the cards (1-3); receive AMANDA'S CARD.
- Go down, then up.
- Use AMANDA'S CARD (Z); take AMANDA'S DIARY (A).
- Place the HEART LOCKET on AMANDA'S DIARY (B); flip through it.
- Take the HEART SYMBOL (C); turn the page.
- Place the HEART SYMBOL for a mini-game (D).
- Solution (E).
- Play the HOP to receive the GOLDEN PENDULUM (F).
- Place the GOLDEN PENDULUM (G).
- Move the book; take the CYLINDER (H).
- Go down, then forward.
- Place the CYLINDER (I); open the door (J).
- Take the SPRING (K).
- Walk down, then up.
- Remove the spring; place the SPRING (L).
- Press the button (M).
- Take the NEEDLE AND THREAD (N).
- Use the NEEDLE AND THREAD; take the MITT (O).
- Walk down, then forward.
- Take the SHOVEL (P).
- Open the door (Q).
- Use the SHOVEL (R); receive the SHOVEL OF COAL.
- Use the MITT on the SHOVEL OF COAL (S); receive the BOX WRENCH.
- Use the BOX WRENCH for a mini-game (T).
- Solution (U): Ax2-B-C-Dx3-E-Fx3-Gx3-H-Ix3-Bx2-Jx3-Kx4-L-Bx3-Ex7.
- Take the SLEEPING PILLS (V).
- Use the SLEEPING PILLS (W).
- Examine the desk for a mini-game (X).
- Solution (Y).
- Take the WORKSHOP KEY (Z).
- Take the STAINED GLASS PIECE (A); use the WORKSHOP KEY.
- Walk forward.
Chapter 5: The Workshop
- Play the mini-game; solution (B-D).
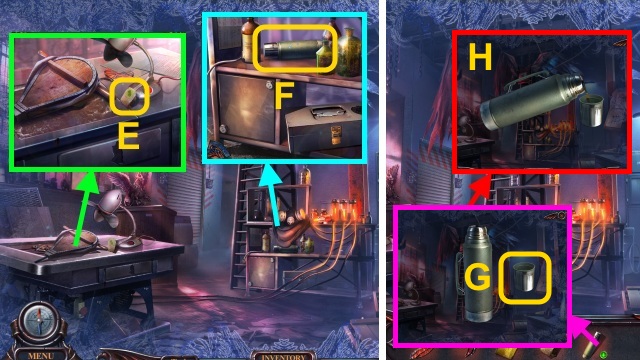
- Take the TEA (E).
- Move the bottle; take the VACUUM FLASK (F).
- Open the VACUUM FLASK; use the TEA (G).
- Pour the tea (H); drink it.
- Talk to James (I); receive the PHOENIX SIGN.
- Take the BELLOWS (J) and FIGURINE PART (K).
- Place the PHOENIX SIGN (L); take the FILE (M).
- Use the FILE (N); take the LADLE and GLUE (O).
- Take the FIGURINE PART (P).
- Use the GLUE on the FIGURINE PART (Q).
- Attach the FIGURINE PART; receive the FIGURINE (R).
- Place the FIGURINE (S); open the drawer.
- Take the STRAIGHT RAZOR (T).
- Use the STRAIGHT RAZOR (U).
- Open the case; take the ADJUSTABLE WRENCH (V).
- Use the ADJUSTABLE WRENCH (W).
- Open the box; take the TIN SOLDIERS (X).
- Walk down.
- Place the LADLE and TIN SOLDIERS; use the BELLOWS (Y).
- Play the HOP to receive the MELTED TIN (Z).
- Walk forward.
- Pour the MELTED TIN (A); press the button (B).
- Take the DOUBLE LEVER (C).
- Place the DOUBLE LEVER (D); pull it.
- Walk left.
- Talk to James (E).
- Take the OIL LAMP (F); place the chain (G).
- Take the RAKE (H).
- Use the RAKE (I).
- Take the KNOB (J).
- Remove the broken knob; place the KNOB (K).
- Press the knob.
- Take the KEROSENE (L).
- Combine the OIL LAMP and KEROSENE (M); light the lamp (N).
- Take the LIT LAMP.
- Open the door; place the LIT LAMP (O).
- Use the RAKE; take the TRIGONAL AMULET (P).
- Place the TRIGONAL AMULET (Q); take the CHISEL (R).
- Walk down.
- Use the CHISEL (S); press the button.
- Walk right.
- Take the HANGER (T).
- Use the HANGER (U); receive the RUBBER DUCK.
- Turn the RUBBER DUCK (V); unplug it.
- Take the RUBBER GLOVE (W).
- Walk down.
- Move the bottle; use the RUBBER GLOVE to take the ACTIVATION SWITCH (X).
- Walk right.
- Place the ACTIVATION SWITCH (Y); attach it (Z).
- Press the button for a mini-game (A).
- Solution (B); press the button (@).
- Walk down, then left.
- Play the HOP to receive the BELT (C).
- Walk down, then right.
- Open the cover; remove the belt (D).
- Place the BELT (E); press the button (F).
- Take the VILLIAN'S CLOTHES (G).
- Examine the VILLIAN'S CLOTHES; take the PEARL (H).
- Open the pocket; read the note (I).
- Place the PEARL (J); open the cupboard.
- Take the SABER HILT (K).
- Place the SABER HILT (L); receive the SABER.
- Walk down, then left.
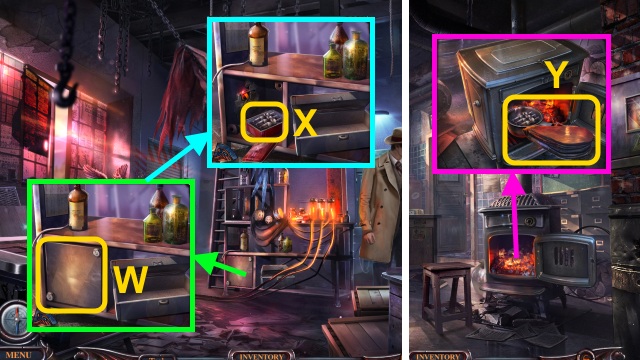
- Use the SABER (M); gather the LEMONS (1-4).
- Remove the lid; place the LEMONS (N).
- Place the lid; press the button (O).
- Take the CITRIC ACID (P).
- Pour the CITRIC ACID (Q); open the box.
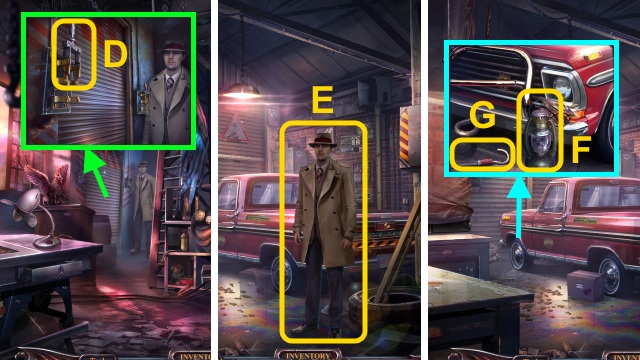
- Take the TRUCK KEY and WHEEL (R).
- Give the TRUCK KEY (S).
- Walk forward.
Chapter 6: The Mountaintop
- Pull the handle (T); place the METAL PLATE.
- Take the SAUSAGES (U) and TONGS (V).
- Give the SAUSAGES (W).
- Use the TONGS to take the PENTAHEDRAL AMULET (X); take the STAINED GLASS PIECE (Y).
- Walk down.
- Place the PENTAHEDRAL AMULET (Z); take the HARPOON and FILE (A).
- Use the FILE; receive the METAL ROD (B).
- Take the HEXAHEDRAL AMULET (C).
- Place the HEXAHEDRAL AMULET (D); take the HATCHET (E).
- Walk forward.
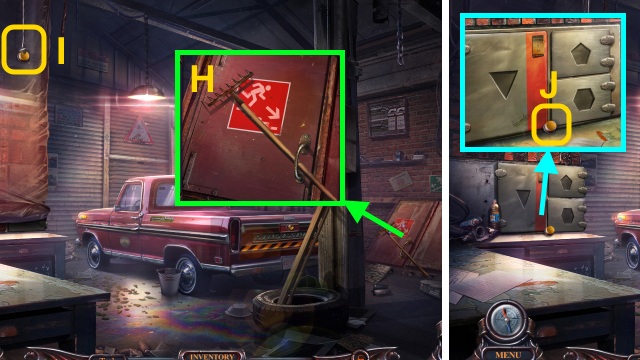
- Use the HATCHET (F); take the TOGGLE SWITCH (G).
- Walk down.
- Place the TOGGLE SWITCH; flip it (H).
- Take the KEY COMBINATION (I).
- Place the KEY COMBINATION for a mini-game (J).
- Solution (K).
- Take the OFFICE KEY (L).
- Walk down, then right.
- Place the WHEEL (M); roll the machine.
- Use the OFFICE KEY (N).
- Walk forward.

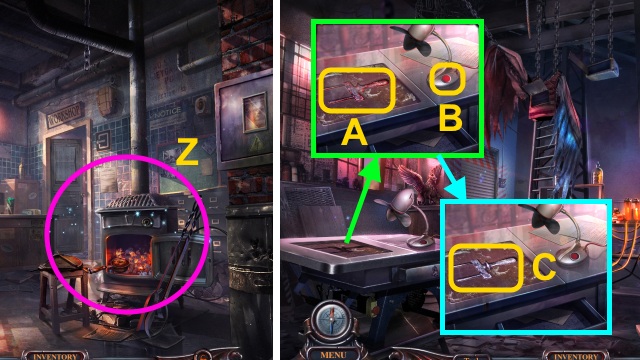
- Move the paper; take the FIRE SYMBOL (O).
- Place the FIRE SYMBOL (P); take the FOLDER WITH DRAWINGS (Q).
- Examine the FOLDER WITH DRAWINGS for a mini-game (R).
- Solution: A-Bx3-Cx2.
- Use the key (S); open the folder.
- Move the papers; take the STAINED GLASS PIECE (T).
- Place the STAINED GLASS PIECES (U); take the CODE (V).
- Place the CODE for a mini-game (W).
- Solution (X).
- Take the BRASS WEIGHT (Y).
- Walk down.
- Place the BRASS WEIGHT (Z).
- Play the HOP to receive the MAGNET (A).
- Combine the METAL ROD and MAGNET (B); take the ROD WITH MAGNET.
- Go to the Bridge.
- Use the ROD WITH MAGNET; receive the HARPOON BOLT (C).
- Combine the HARPOON and HARPOON BOLT (D); take the LOADED HARPOON.
- Use the LOADED HARPOON (E).
- Take the SYMBOL CARD (F).
- Go to Duke's Office.
- Place the SYMBOL CARD; take the SET OF SYMBOLS (G).
- Place the SET OF SYMBOLS for a mini-game (H).
- Solution (I).
- Take the ELEVATOR CARD (J).
- Go to the Bridge.
- Place the ELEVATOR CARD (K); press the button for a mini-game (L).
- Solution (M).

- Move the lid and hat; Gather the STAR (1-4).
- Place the STAR for a mini-game (N).
- Solution (O).
- Take the SHOVEL and HOOK (P).
- Take the STONE (Q); gather the ROPE (1-3).
- Use the SHOVEL; take the STICK (R).
- Combine the STICK and HOOK; take the STICK WITH HOOK (S).
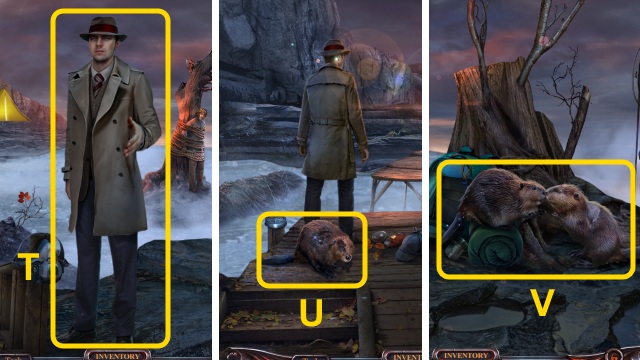
- Give the STICK WITH HOOK (T).
- Take the BEAVERS (U).
- Scroll right.
- Place the BEAVERS (V).
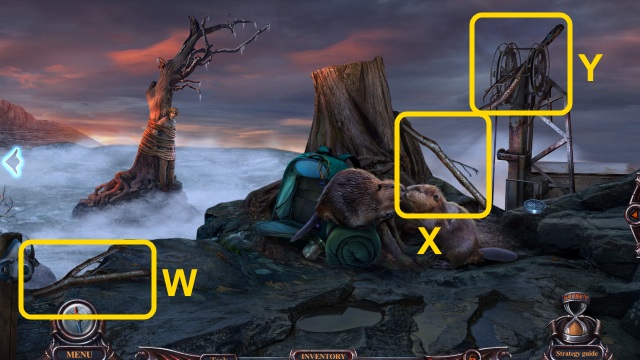
- Gather the sticks (W-Y).
- Scroll left.
- Gather the sticks (Z-A).
- Scroll right.
- Take the WOOD BLOCKS (B).
- Examine the WOOD BLOCKS for a mini-game (C).
- Solution (D).
- Tie the ROPE; take the WOOD FLOORING (E).
- Scroll left.
- Give the WOOD FLOORING (F).
- Take the RESPIRATOR PARTS (1/3) (G) and RESPIRATOR PARTS (2/3) (H).
- Scroll right.
- Take the RESPIRATOR PARTS (3/3) (I).
- Examine the RESPIRATOR PARTS (J); arrange them.
- Take the gas mask.
- Scroll left.
- Take the ARMY KNIFE (K).

- Use the ARMY KNIFE; take the CUT BRANCH (L).
- Scroll right.
- Use the ARMY KNIFE; receive the RUBBER PIECE (M).
- Combine the CUT BRANCH, RUBBER PIECE, and STONE (N); take the SLONGSHOT.
- Scroll left.
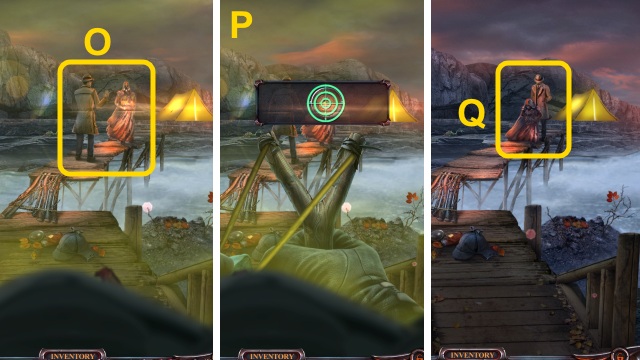
- Use the SLINGSHOT for a mini-game (O).
- Stop the target inside the circle 3x (P).
- Talk to James; receive DUKE'S KEYS (Q).
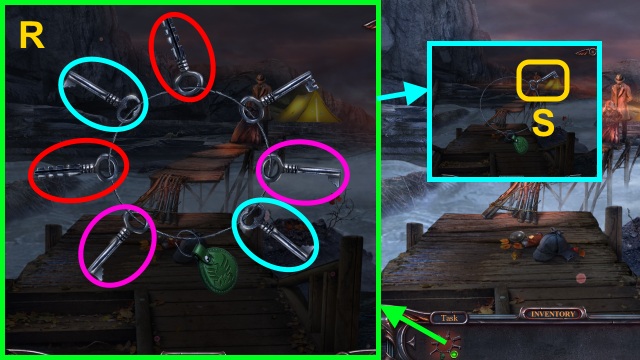
- Examine DUKE'S KEYS for a mini-game; solution (R).
- Take the OLD KEY (S).
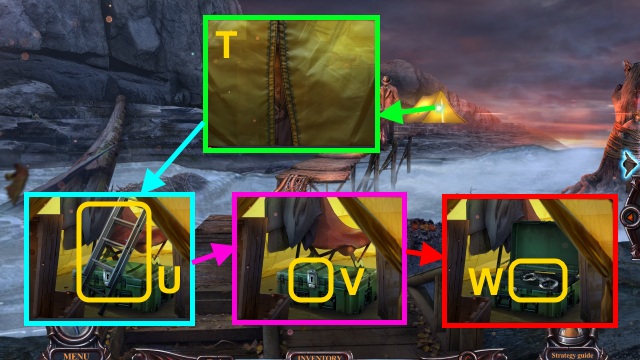
- Open the tent (T); move the boxes.
- Take the FOLDING LADDER (U).
- Use the OLD KEY (V); open the case.
- Take the HANDCUFFS (W).
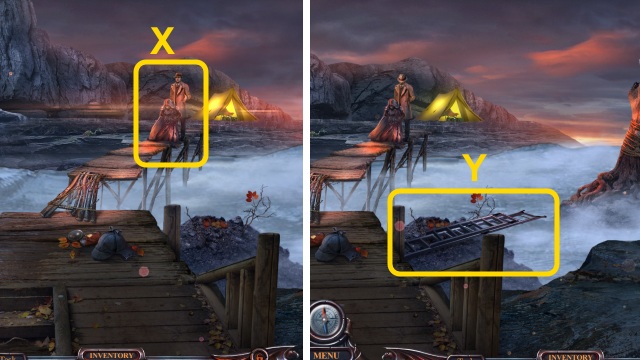
- Use the HANDCUFFS (X).
- Place the FOLDING LADDER (Y); unfold it.
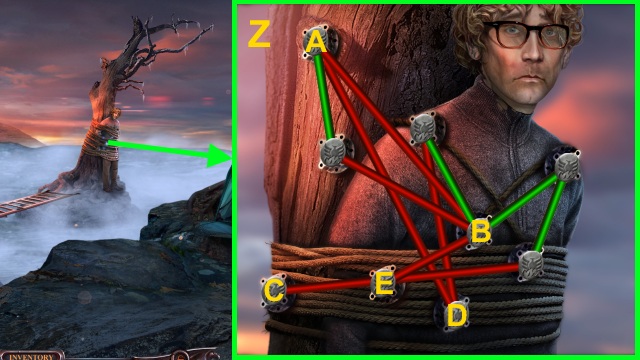
- Examine Steven for a mini-game; solution (Z): (A-B)(C-D)(C-B)(C-E).
- Congratulations! You have completed Haunted Hotel: Phoenix.
Created at: 2015-09-13