

Walkthrough Menu
- General Tips
- Chapter 1: The Closed Room
- Chapter 2: The Terrace
- Chapter 3: The Wine Cellar
- Chapter 4: The Stairway
- Chapter 5: The Armory
General Tips
- This is the official guide for Haunted Hotel: Silent Waters.
- This guide will not mention each time you have to zoom into a location; the screenshots will show each zoom scene.
- Hidden-object puzzles are referred to as HOPs. This guide will not show HOP solutions. It will identify the location of the HOP and the inventory item acquired.
- This guide will show solutions for non-random puzzles. Please read the in-game instructions for each puzzle.
- In this game, you will sometimes have to select the new scene to trigger dialog, cut-scenes, or tasks prior to interacting with the scene.
Chapter 1: The Closed Room
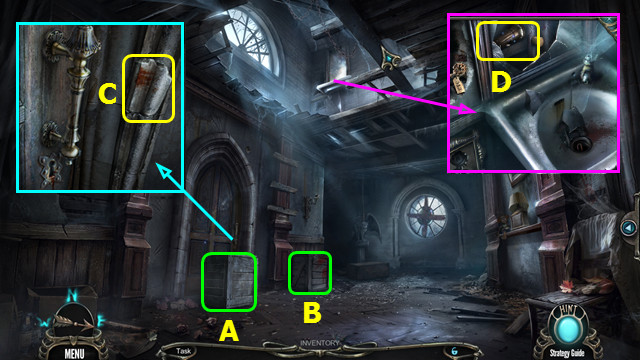
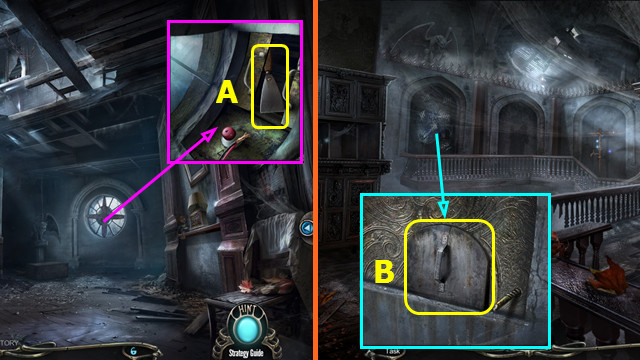
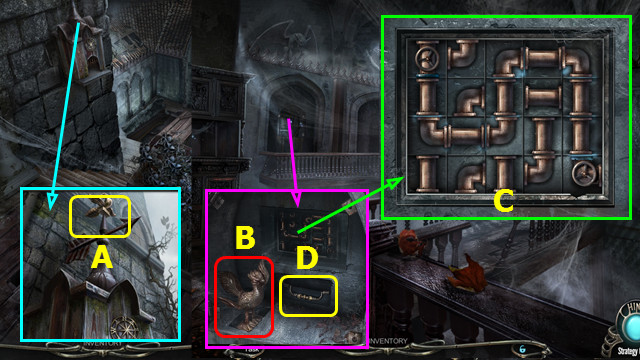
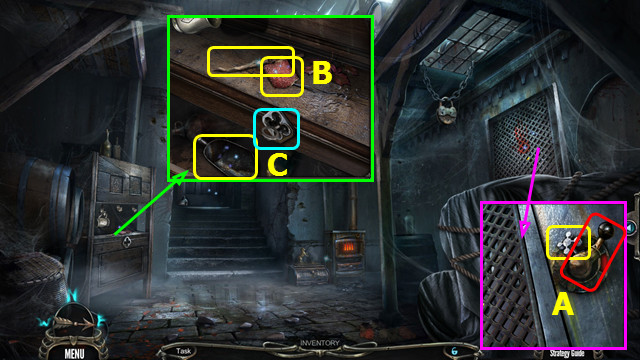
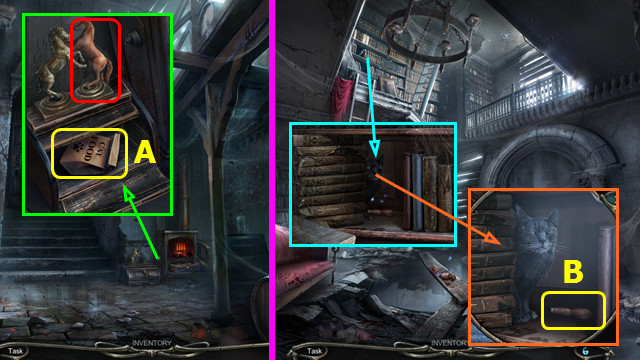
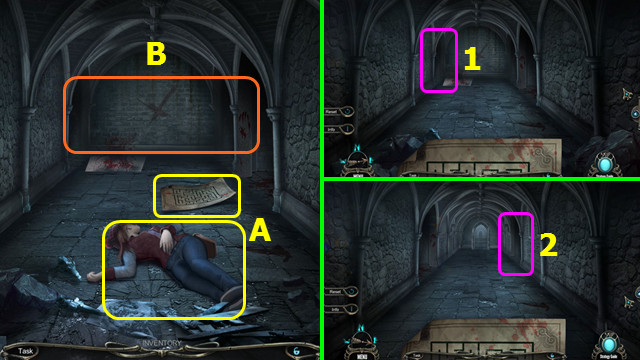
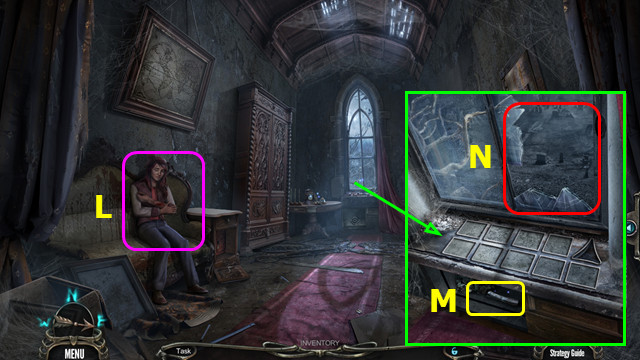
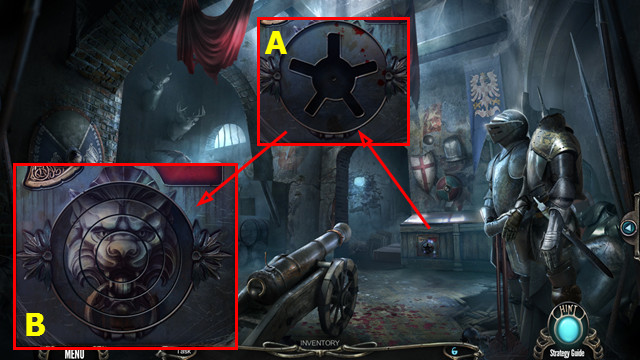
- Select (A-B).
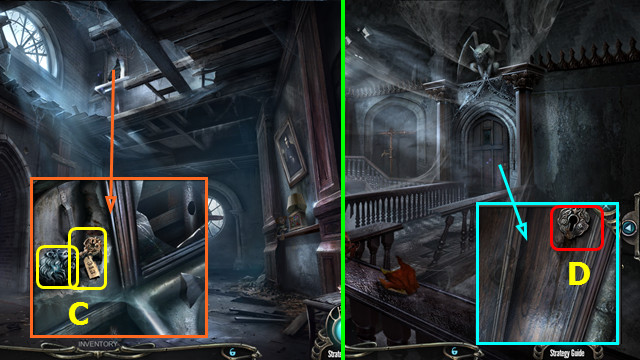
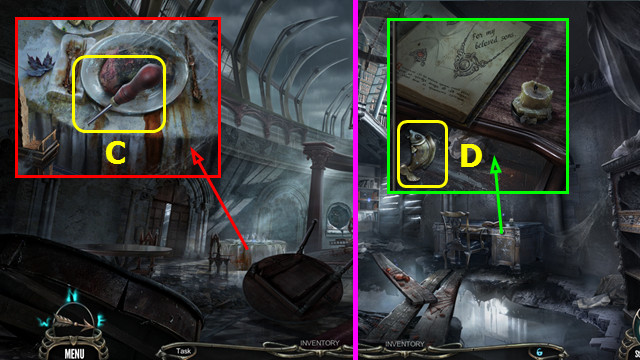
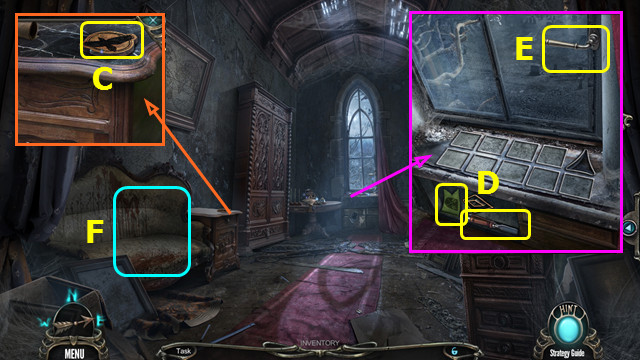
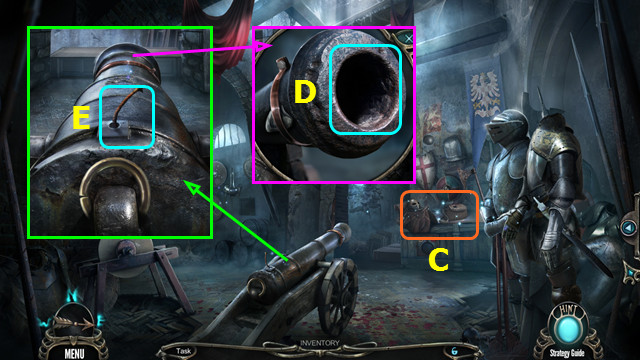
- Take the STONE (C).
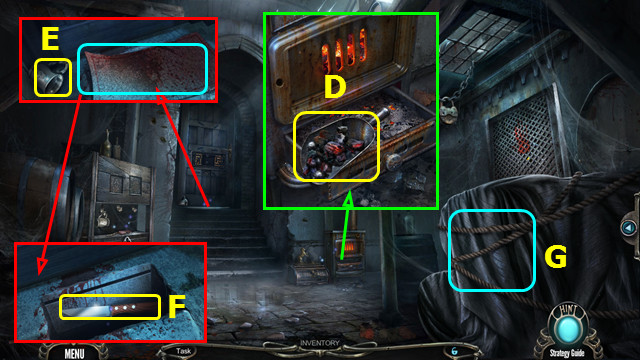
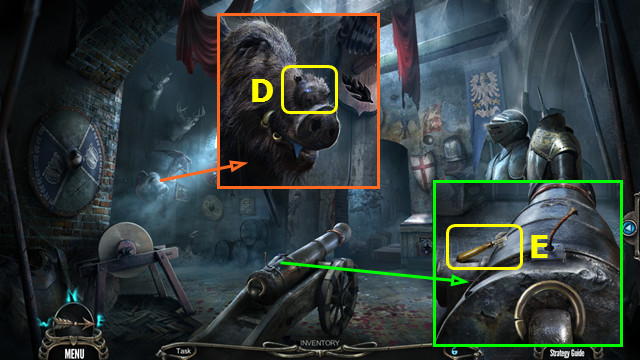
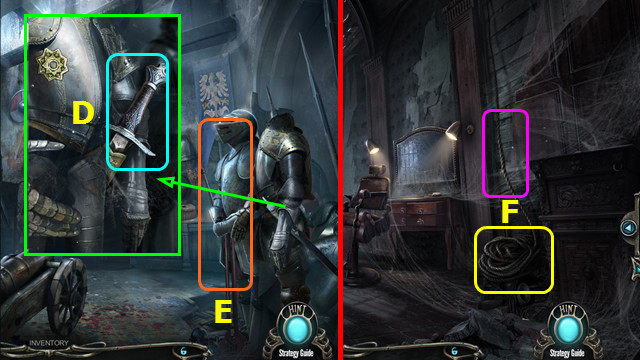
- Use the STONE; take the FLASHLIGHT (D).
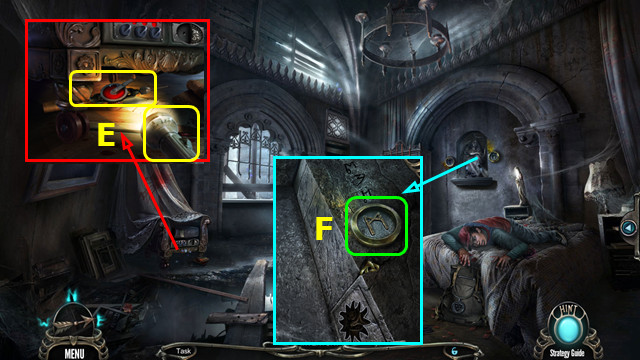
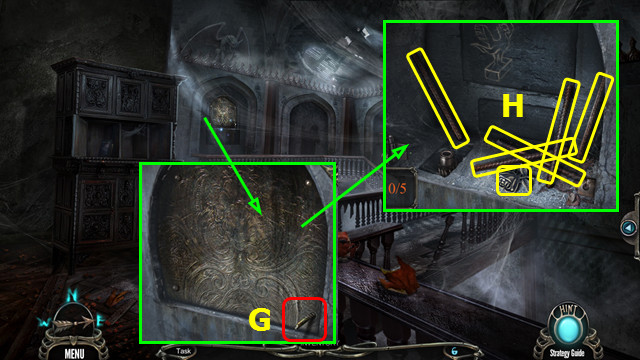
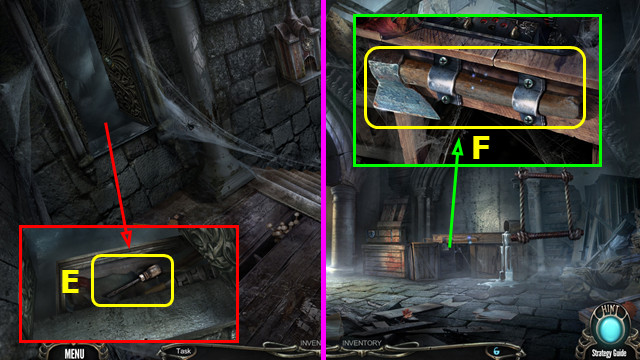
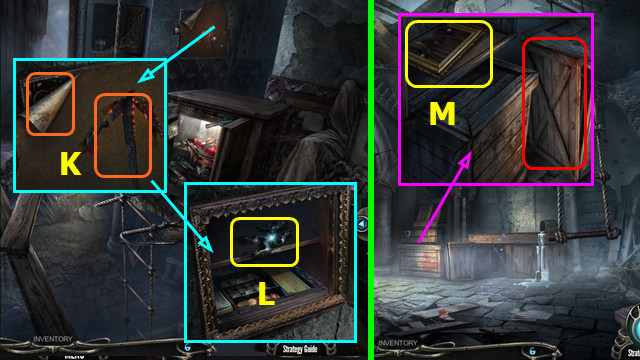
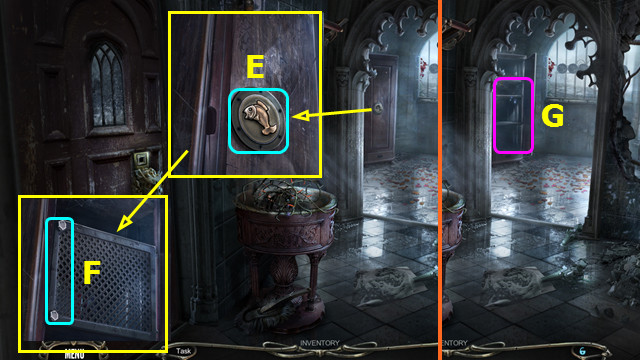
- Use the FLASHLIGHT; play the HOP to earn the BALLOON (E).
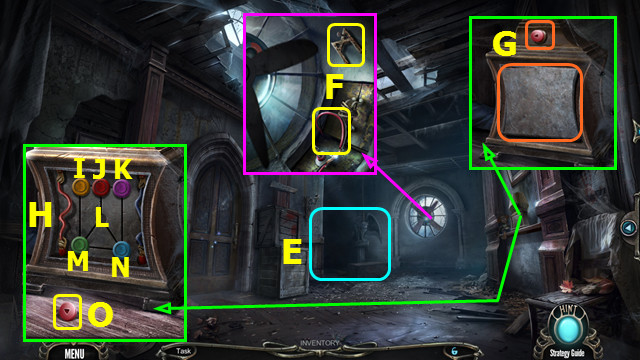
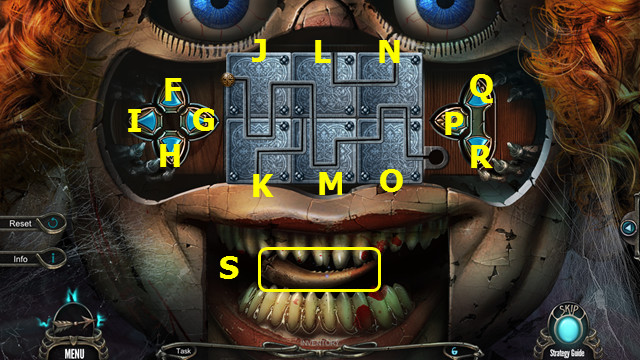
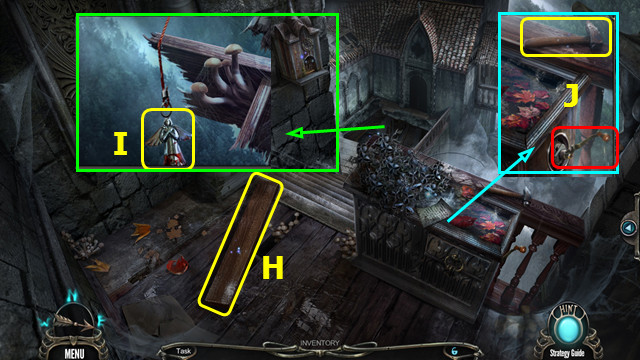
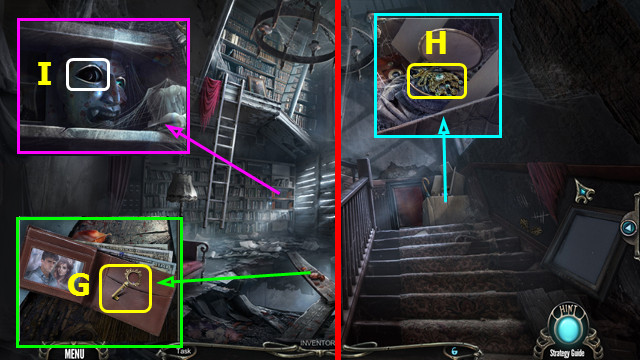
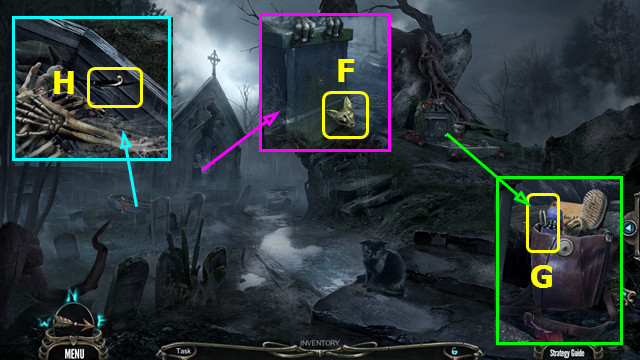
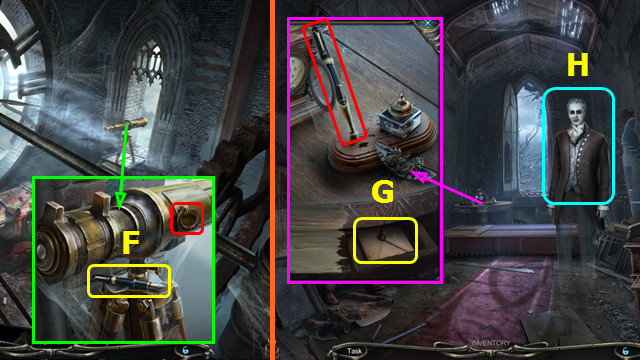
- Take the CARVED AMULET; use the BALLOON to take the SMALL WIRE (F).
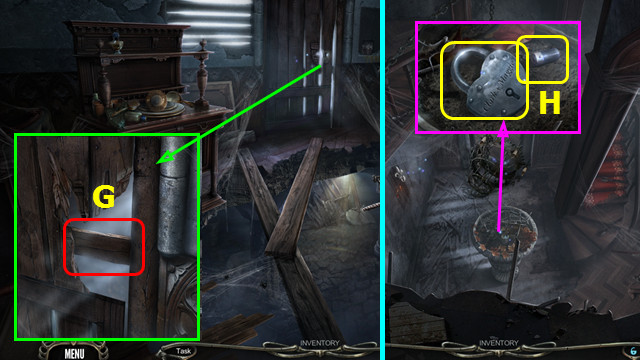
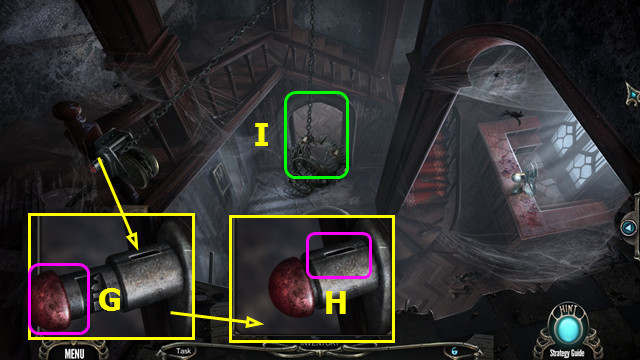
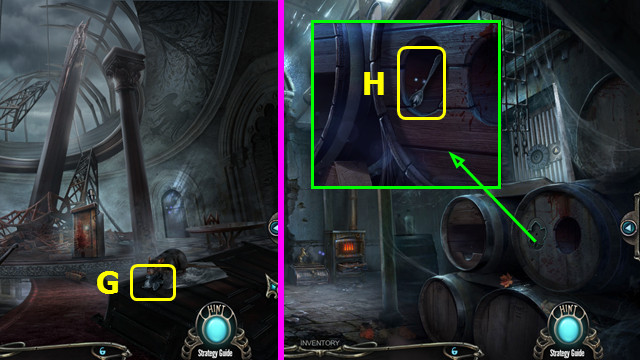
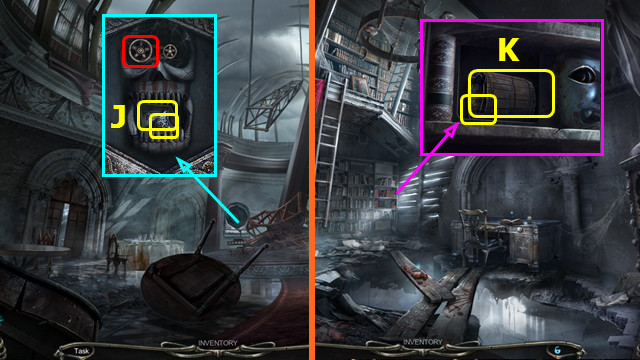
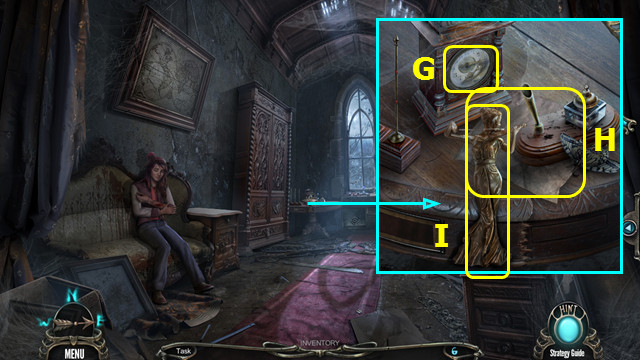
- Press the button and remove the cover (G).
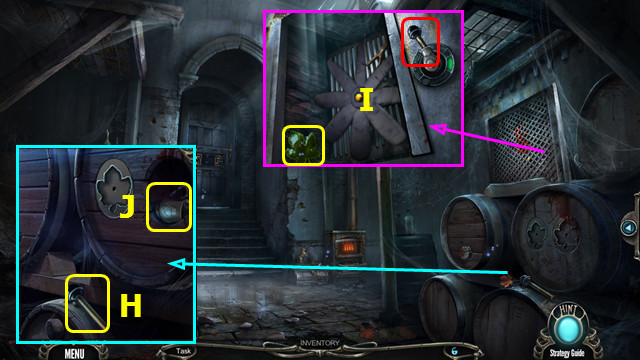
- Place the SMALL WIRE (H).
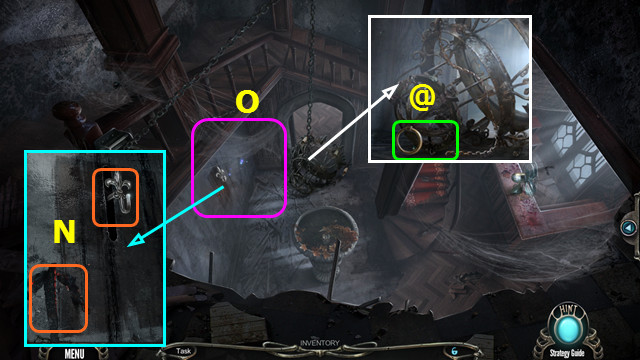
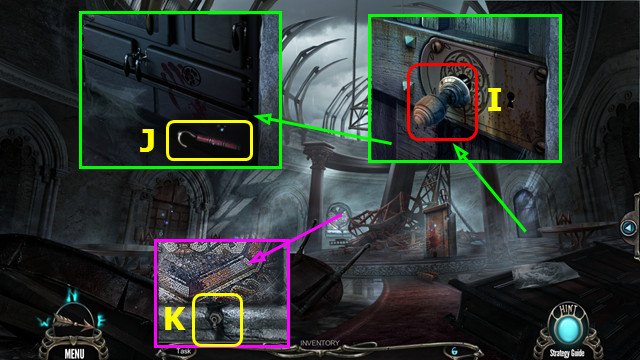
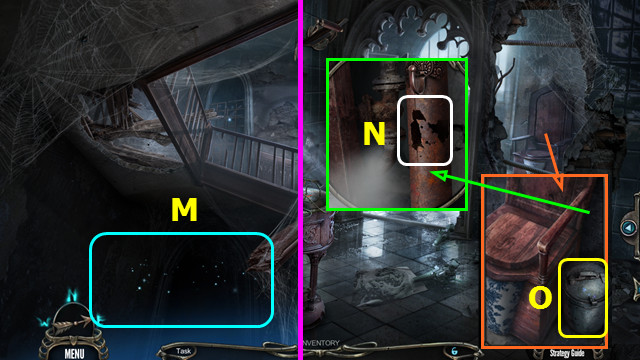
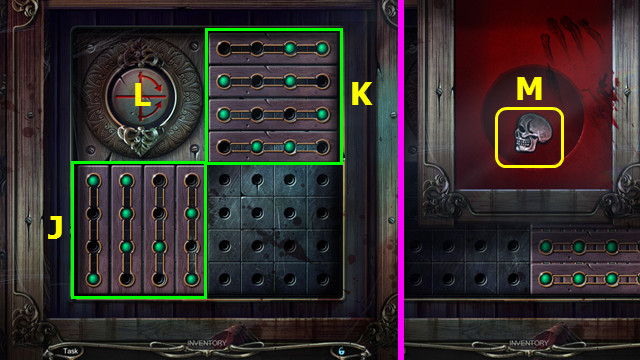
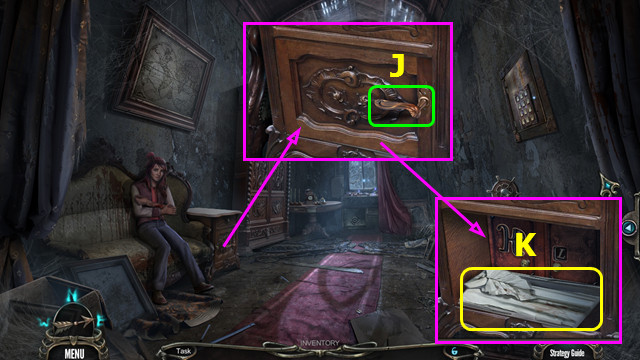
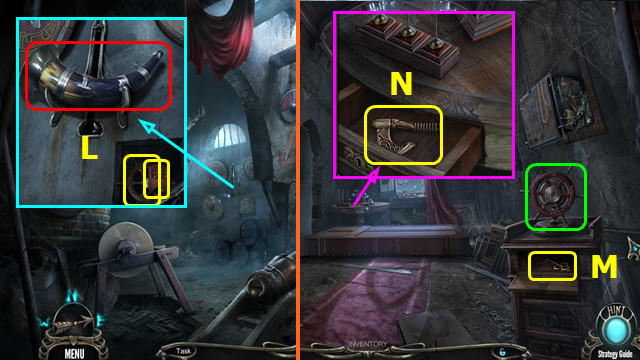
- Select M-N-L-J-K-N-L-J-I-M-N-L.
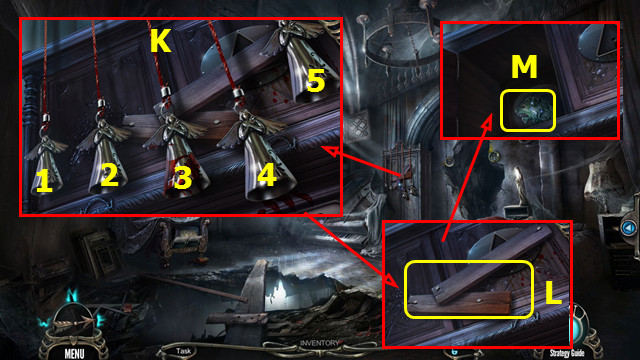
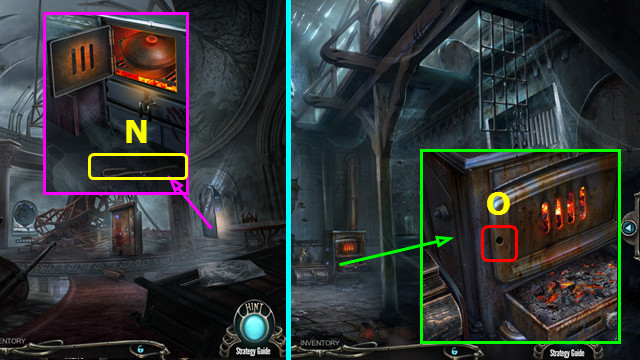
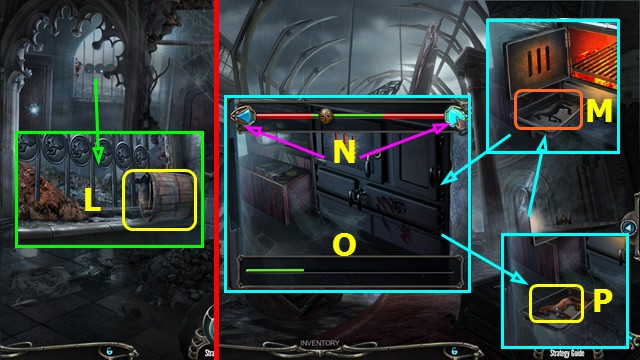
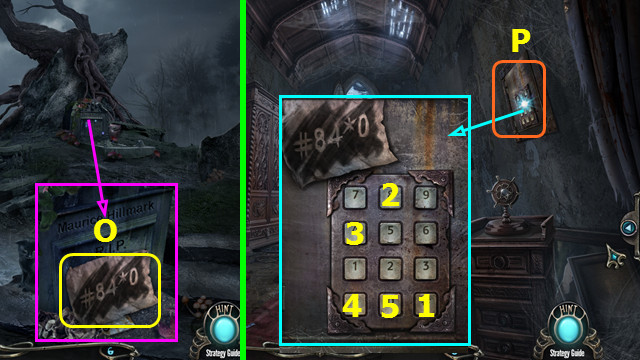
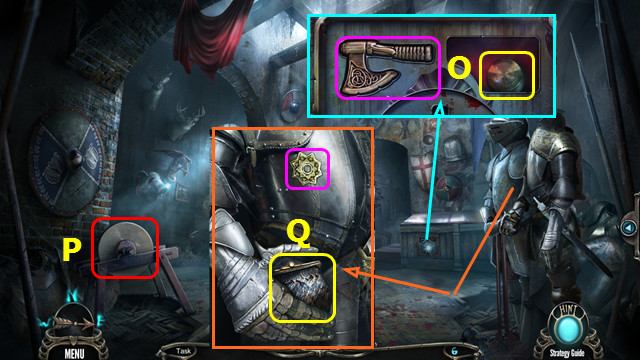
- Take the BUTTON (O).
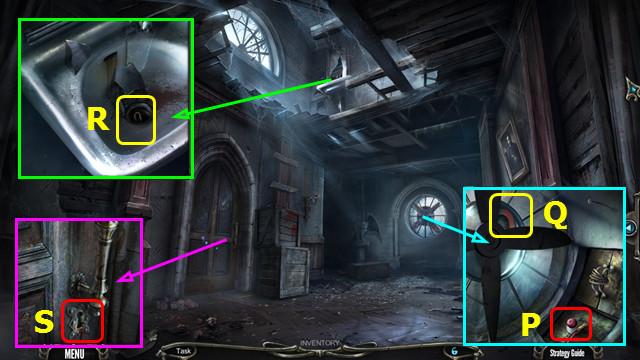
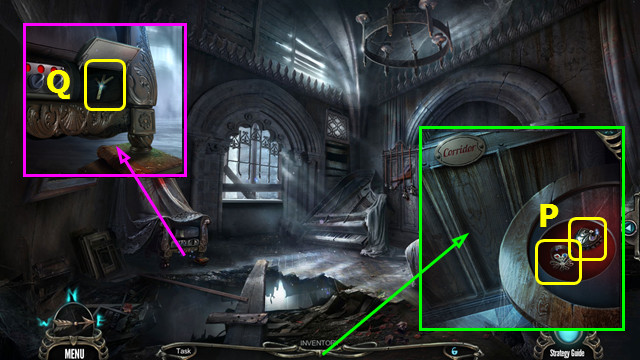
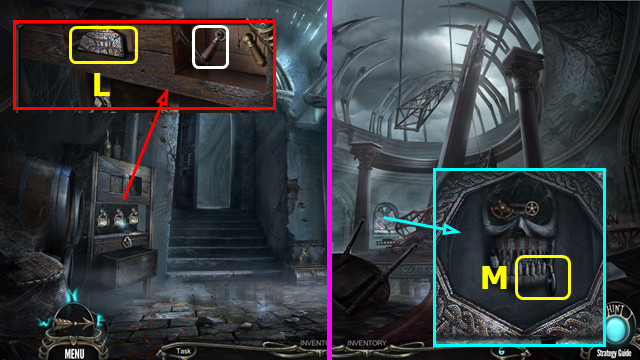
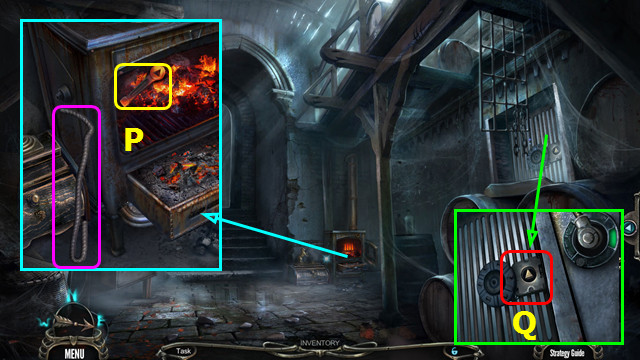
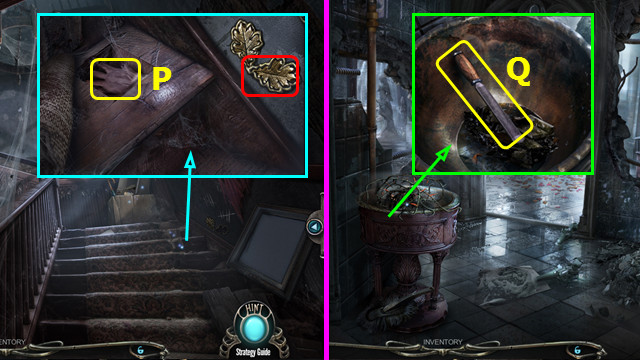
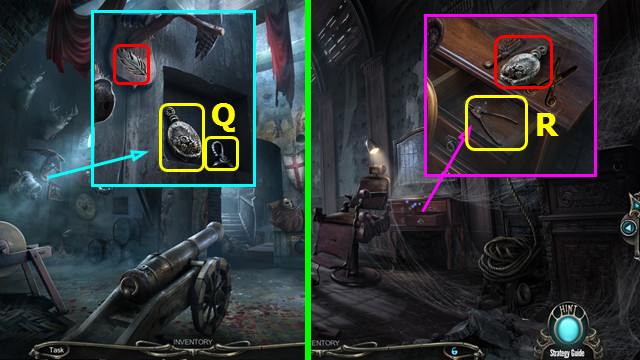
- Place and press the BUTTON (P); take the MAGNET (Q).
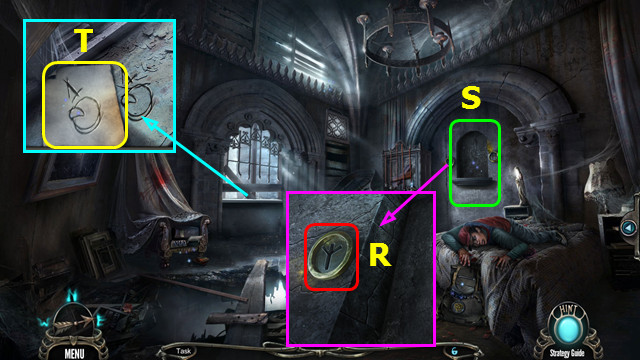
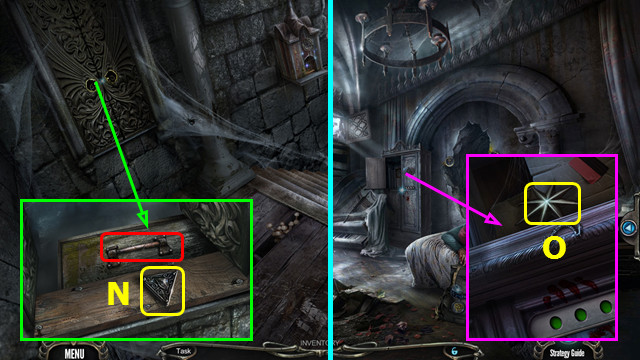
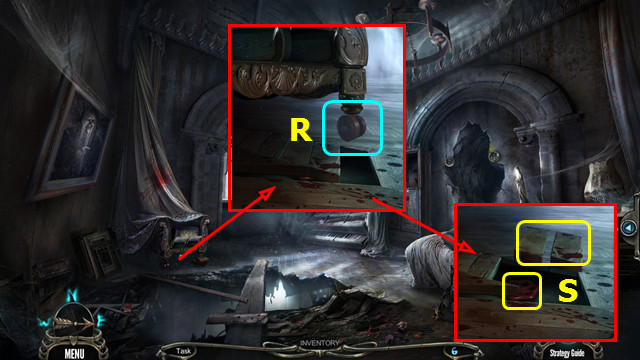
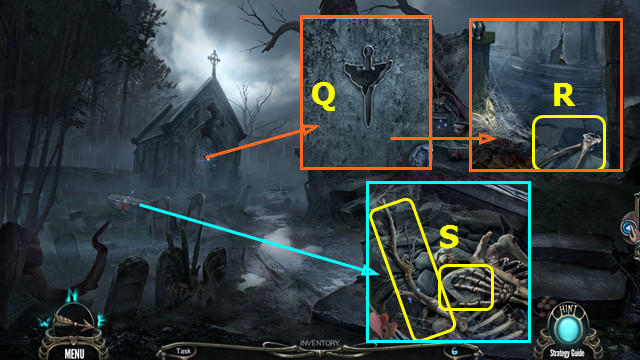
- Use the MAGNET; take the WIRE (R).
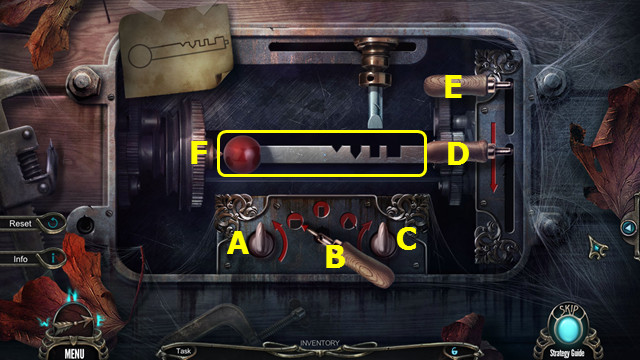
- Bend the WIRE 2x to make the LOCKPICK (inventory).
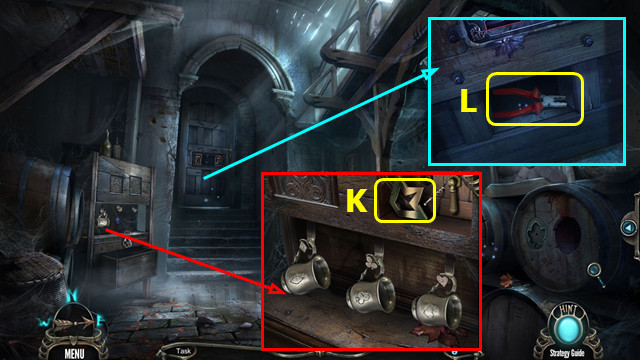
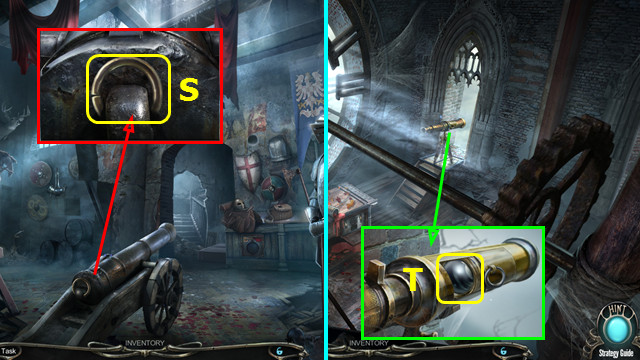
- Use the LOCKPICK (S).
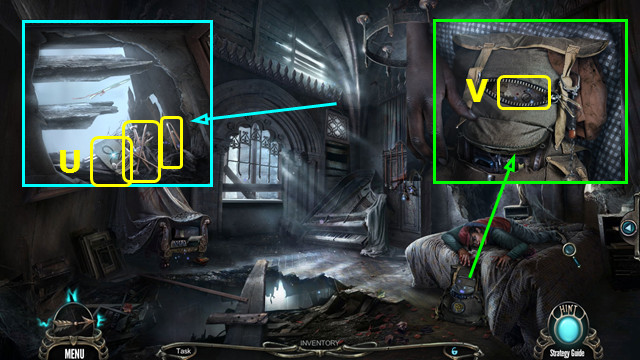
- Walk left.
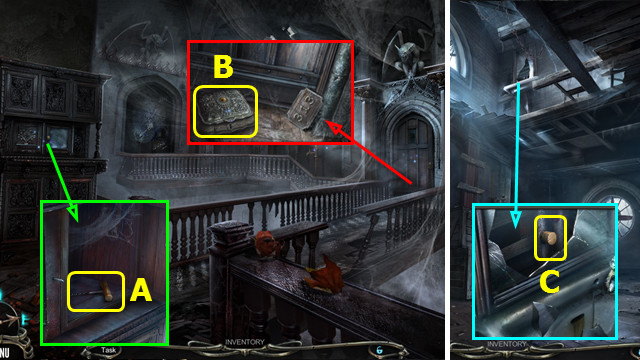
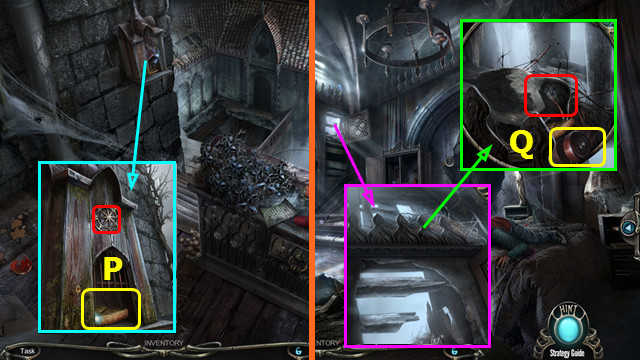
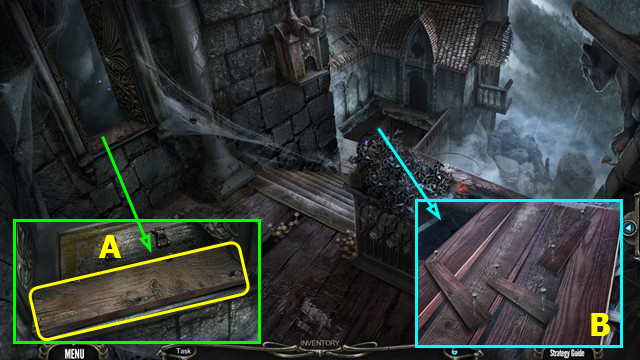
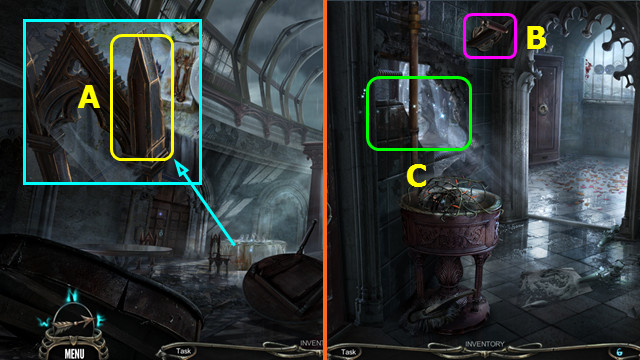
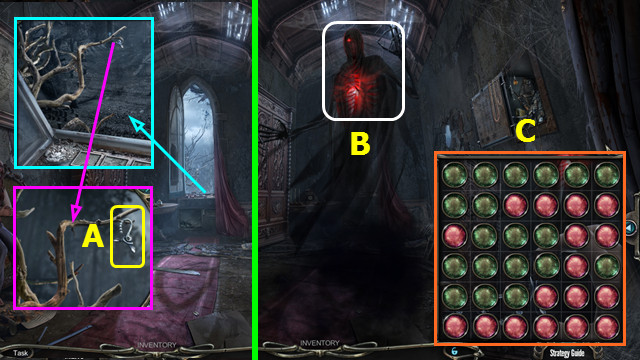
- Open the door; take the CORKSCREW (A).
- Take the BOX (B).
- Walk down.
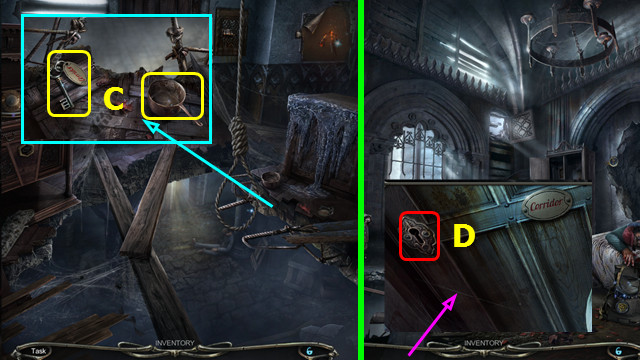
- Use the CORKSCREW to take the CORK (C).
- Walk left.

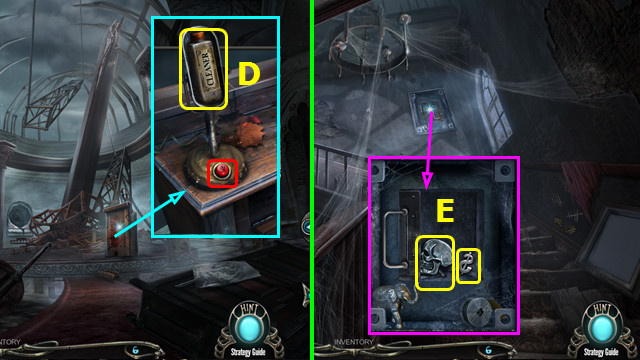
- Use the CORK on the door; use the MAGNET and take the BOX KEY (D).
- Combine the BOX and BOX KEY; take the EYE (inventory).
- Walk down.
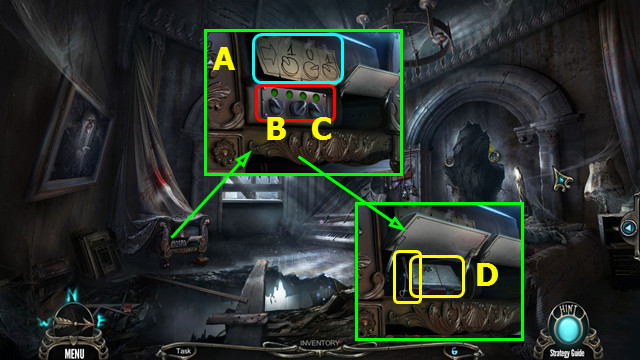
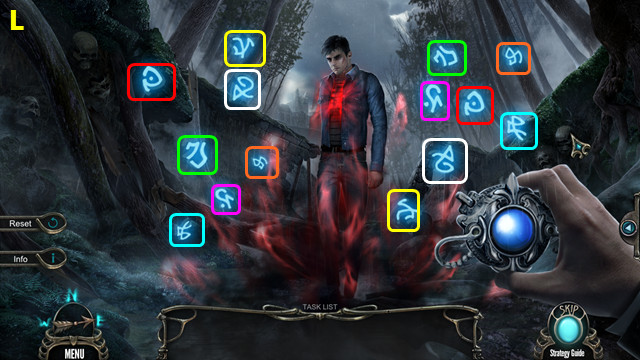
- Place the EYE (E).
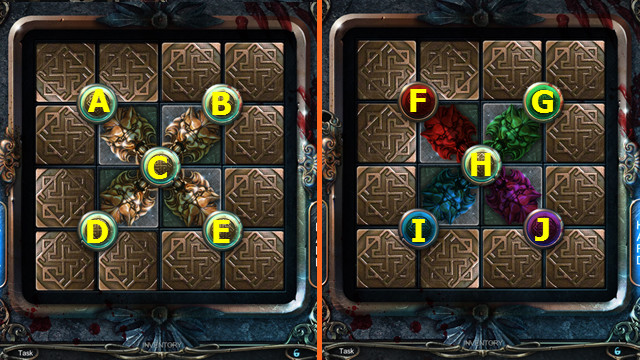
- Select O-Q-O-Px3-M-Q-Px3-M-Px2-K-Q-P-K-Px2.
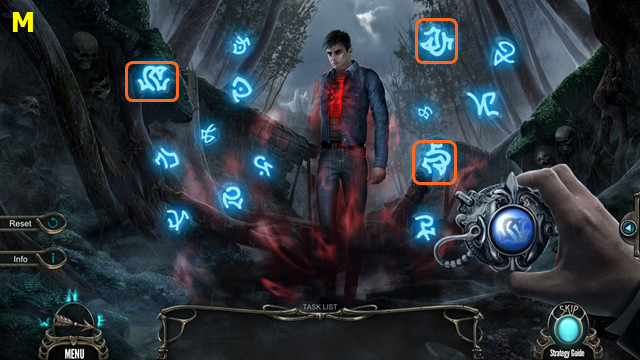
- The squares should now be arranged as shown.
- Select G-H-G-F-G-H-G-F-G-F-G-H-G.
- Take the SHARP TOOTH (S).
- Use the SHARP TOOTH; take the SCRAPER (A).
- Walk left.
- Use the SCRAPER; take the SCREEN (B).
- Walk down.
- Place the SCREEN; take the 1st LION HEAD and ROOM 313 KEY (C).
- Walk left.
- Use the ROOM 313 KEY (D).
- Walk right.
- Use the FLASHLIGHT; take the DRILL and FLASHLIGHT WITHOUT BATTERIES (E).
- Place and press the CARVED AMULET (F).
- Walk down.
- Remove the broken screw and use the DRILL (G).
- Take the 5 METAL RODS and ROSE (H).
- Walk down.
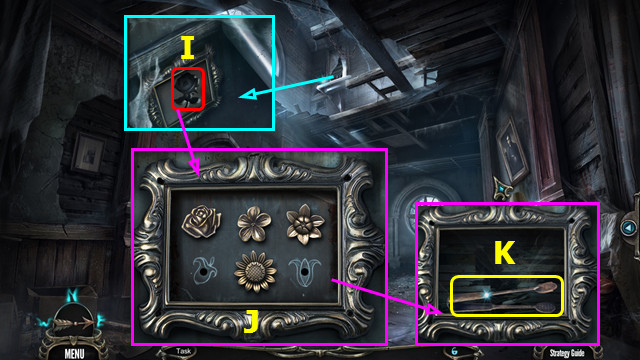
- Place the ROSE (I).
- Place the flowers as shown (J).
- Take the TONGS (K).
- Walk left and right.
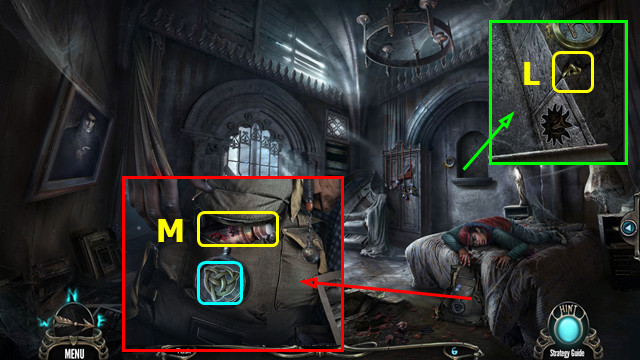
- Use the TONGS; take the BAG AMULET (L).
- Place the BAG AMULET; take the BUG SPRAY (M).
- Walk down.
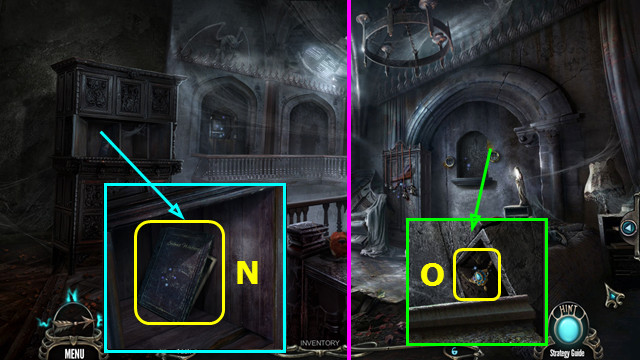
- Use the BUG SPRAY; take the OLD ALBUM (N).
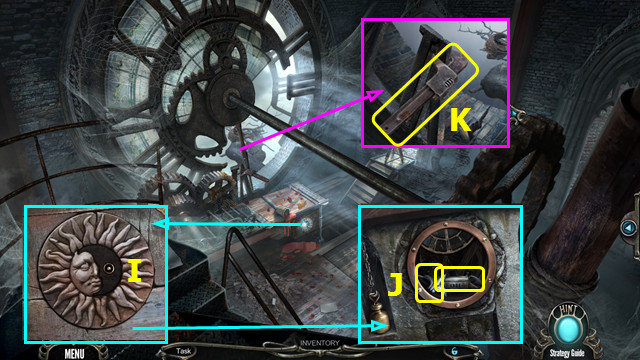
- Open the OLD ALBUM; play the HOP and take the SUN AMULET (inventory).
- Walk right.
- Place the SUN AMULET; take the NECKLACE (O).
- Take the DIAMOND from the NECKLACE (inventory).
- Use the DIAMOND; take the RING and PLATE PIECE (P).
- Place the PLATE PIECE; take the CARVED AMULET (Q).
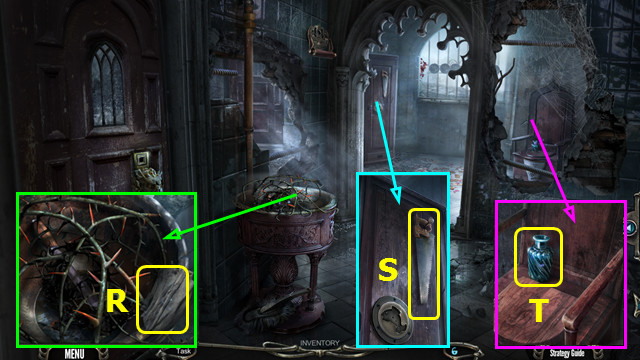
- Place the CARVED AMULET (R).
- Play the HOP; earn the PAPER AND PENCIL (S).
- Use the PAPER AND PENCIL; take the 1st CODE PART (T).
- Use the RING; take the NAILS, PAPER CLIP, and 2nd CODE PART (U).
- Use the PAPER CLIP; take the 3rd CODE PART (V).
- Place the 3 CODE PARTS (A).
- Select B-C.
- Take the FIRST AID KIT and TONGS (D).

- Use the TONGS to take the CROCHET HOOK (E).
- Use the CROCHET HOOK; take the FIRST AID BADGE (F).
- Combine the FIRST AID KIT and FIRST AID BADGE; open the left cover and take the NAIL PULLER (inventory).
- Use the NAIL PULLER (G).
- Go forward.
Chapter 2: The Terrace
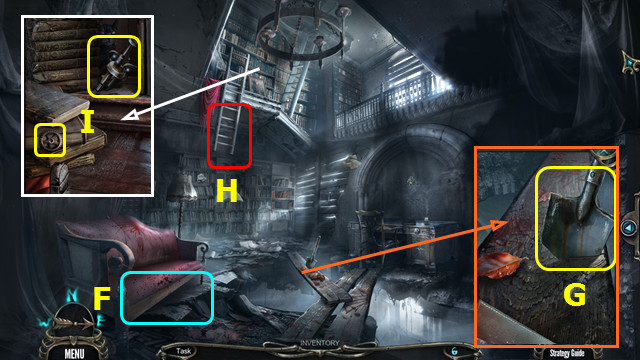
- Take the 1/4 WOODEN PLANK (H).
- Take the ANGEL (I).
- Take the HAMMER and remove the handle (J).
- Walk down.
- Place the ANGEL (K).
- Select 1-4-5-3-2, 3-4-1-5-2, 2-1-3-4-5.
- Use the HAMMER to take the 2/4 WOODEN PLANK (L).
- Open the cabinet; take the 2nd LION HEAD (M).
- Go forward.
- Place the 2 LION HEADS; take the TRIANGLE SYMBOL and remove the broken handle (N).
- Walk down.
- Place the TRIANGLE SYMBOL; take the COMPASS ROSE (O).
- Go forward.
- Place the COMPASS ROSE; take the BREAD CRUST (P).
- Walk down.
- Use the BREAD CURST; take the WHEEL (Q).
- Remove the books; place and select the WHEEL (R).
- Use the HAMMER; take the 3/4 WOODEN PLANK and VALVE (S).
- Go forward.
- Use the HAMMER; take the 4/4 WOODEN PLANK (A).
- Use the 4 WOODEN PLANKS, NAILS, and HAMMER (B).
- Go forward.
- Take the CORRIDOR KEY and LARGE LADLE (C).
- Walk down 2x.
- Use the CORRIDOR KEY (D).
- Walk down.

- Place the LARGE LADLE and VALVE; turn the valve and take the BOILING WATER (E).
- Go to Room 211.
- Use the BOILING WATER (F).
- Play the HOP and earn the WOODEN AMULET (G).
- Walk down 2x.
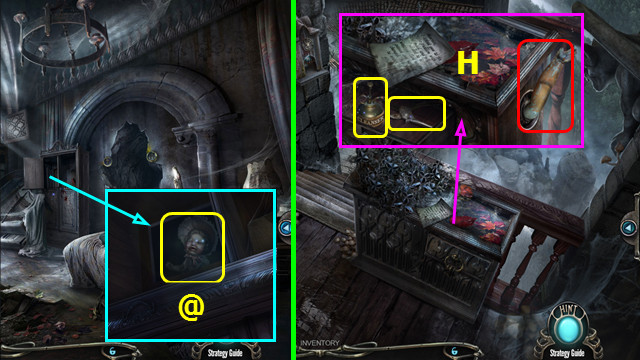
- Place the WOODEN AMULET; take the WOODEN DOLL (@).
- Remove the arm from the WOODEN DOLL to make an IMPROVISED HANDLE (inventory).
- Go forward.
- Use the IMPROVISED HANDLE; take the CLEANING AGENT and PRUNERS (H).
- Go forward.
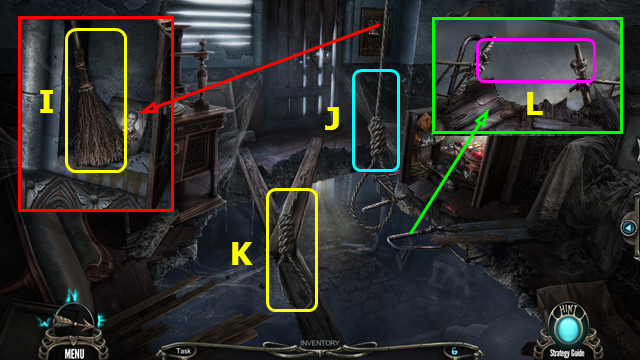
- Use the CLEANING AGENT and open the door; take the BROOM (I).
- Use the PRUNERS (J).
- Take the ROPE (K).
- Combine the METAL RODS and ROPE to make the ROPE LADDER (inventory).
- Place the ROPE LADDER (L).
- Go down the ladder.
- Use the BROOM; the STICK will return to inventory (M).
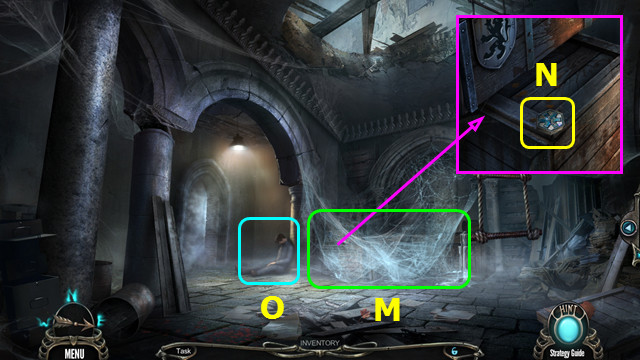
- Take the FIRST AID BADGE (N).
- Combine the FIRST AID KIT and FIRST AID BADGE; open the lid and take the AMMONIA (inventory).
- Use the AMMONIA (O).
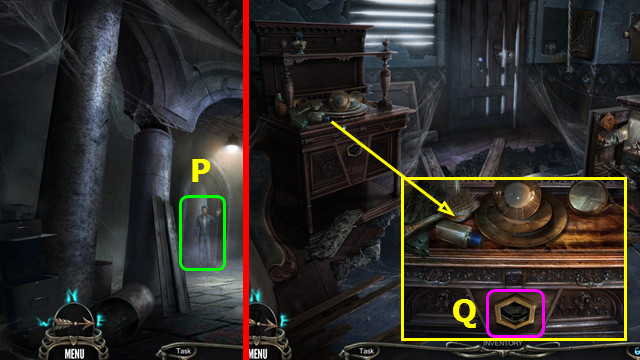
- Select and talk to Clark; earn the HEXAGON (P).
- Go up.
- Place the HEXAGON (Q).
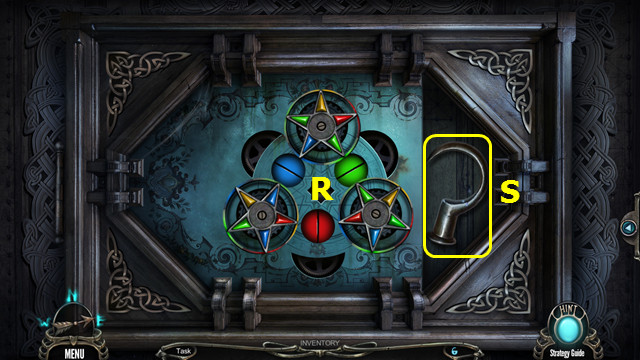
- Rotate the stars as shown (R).
- Take the HOOK (S).
- Combine the STICK and HOOK to make the STICK WITH HOOK (inventory).
- Walk down.
- Use the STICK WITH HOOK; take the PHOENIX FIGURINE (A).
- Walk down 2x.
- Place the PHOENIX FIGURINE (B).
- Restore the pipes as shown (C).
- Take the CARVED HANDLE (D).
- Return to the Terrace.
- Place the CARVED HANDLE; take the SCREWDRIVER (E).
- Go forward and down the ladder.
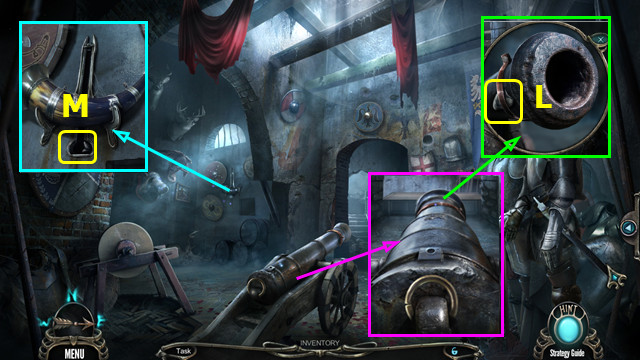
- Use the SCREWDRIVER to take the AXE (F).
- Go up the ladder.
- Use the AXE and select the latch (G).
- Go forward.
- Use the PRUNERS; take the LOCK and 1st BATTERY (H).
- Use the CLEANING AGENT and SCREWDRIVER; take the 2nd BATTERY (I).
- Combine the FLASHLIGHT WITHOUT BATTERIES and the 2 BATTERIES to make the FLASHLIGHT (inventory).
- Return to the Service Room.
- Use the FLASHLIGHT; take the ACID (J).
- Go up the ladder.
- Select the symbol and remove the paper (K).
- Use the ACID; take the LION STONE (L).
- Go down the ladder.
- Place the LION STONE; take the FAMILY PORTRAIT and remove the crate lid (M).
- Climb up and go forward.
- Place the LOCK (@).
- Touch the symbol and place the FAMILY PORTRAIT (N).
- Play the HOP; earn the SKULL AMULET (O).
- Go to the Service Room.

- Place the SKULL AMULET; take the METAL BLANK (P).
- Place the METAL BLANK (Q).
- Select (R).
- Select B-D-C-Bx3-D-Ax2-Bx2-D-A-E.
- Take the METAL LEVER (F).
- Climb up and go forward.
- Select (G); place the METAL LEVER (H).
- Select (I).
Chapter 3: The Wine Cellar
- Use the CLEANER; take the TOGGLE KEY and remove the handle (A).
- Take the STICK and SANDPAPER (B).
- Use the TOGGLE KEY; take the SCOOP (C).
- Open the drawer and use the SCOOP; take the SCOOP (D).
- Combine the SCOOP and STICK; take the 1/6 SKULL, SYMBOL, and METAL BALLS (inventory).
- Take the 1st MUG and remove the mat (E).
- Place the SYMBOL; take the KNIFE (F).
- Use the KNIFE (G).
- Take the LEVER (H).
- Use the LEVER; take the GRAPE LEAF (I).
- Place the GRAPE LEAF; take the 2nd MUG (J).
- Place the 2 MUGS; take the PATTERN FRAGMENT (K).
- Place the PATTERN FRAGMENT; take the PLIERS (L).
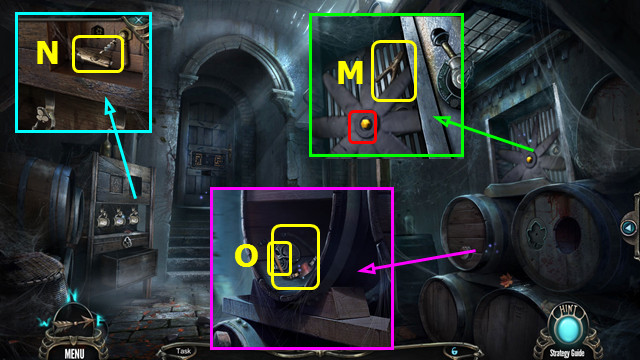
- Use the PLIERS; take the FORKED STICK (M).
- Use the SANDPAPER on the FORKED STICK; break off the CORKSCREW HANDLE (inventory).
- Use the CORKSCREW HANDLE; take the CORKSCREW (N).
- Use the CORKSCREW and remove the lid; take the 2/6 SKULL and RUBBER SLING (O).
- Combine the STICK and RUBBER SLING; add the METAL BALLS to make the SLINGSHOT (inventory).
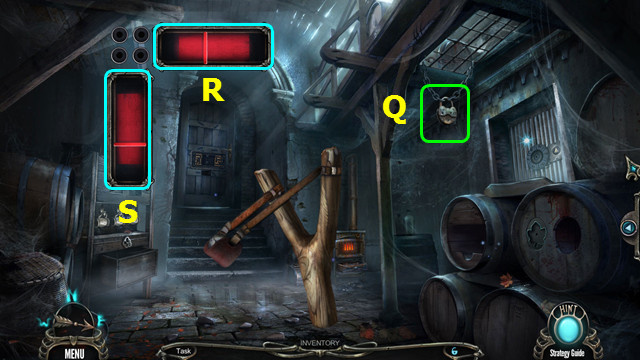
- Use the SLINGSHOT (Q).
- Click when each moving bar is in the red area (R-S).
- You will need to do this 4 times.
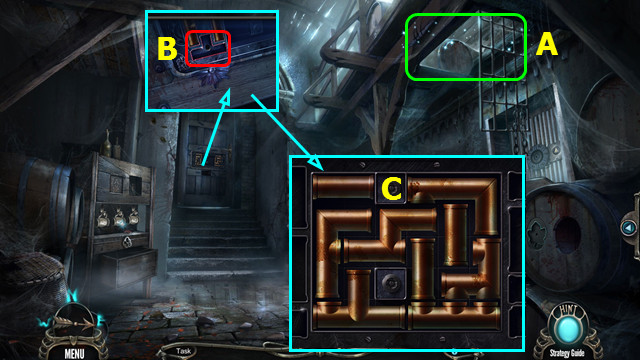
- Play the HOP; earn the LOCK MECHANISM (A).
- Place the LOCK MECHANISM (B).
- Arrange the elements as shown (C).
- Go forward.
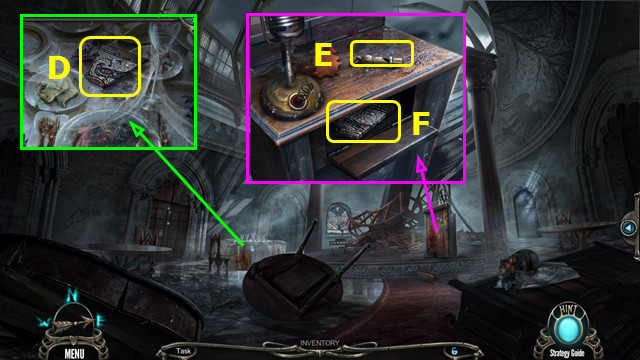
- Take the 1st STAINED GLASS PART (D).
- Take the WHISTLE (E).
- Open the panel; take the 2nd STAINED GLASS PART (F).
- Use the WHISTLE; take the GRAPE LEAF (G).
- Walk down.
- Place the GRAPE LEAF; take the SPOON (H).
- Walk forward.
- Remove the handle and use the SPOON (I).
- Take the HOOK (J).
- Use the HOOK; take the BOX SPANNER (K).
- Walk down.
- Use the BOX SPANNER; take the 3rd STAINED GLASS PART (L).
- Go forward.
- Place the 3 STAINED GLASS PARTS; take the IRON HANDLE (M).
- Remove the old handle and use the IRON HANDLE; take the ROD (N).
- Combine the ROD and PLIERS to make the BENT ROD (inventory).
- Walk down.
- Use the BENT ROD (O).
- Select the bent rod; take the LOCK PART (P).
- Use the LOCK PART (Q).
- Walk right.
- Take the RAG (R).
- Take the SAW (S).
- Take the BOTTLE (T).
- Walk down and forward.
- Use the SAW; take the CHAIR FINIAL (A).
- Walk down and right.
- Use the CHAIR FINIAL (B).
- Play the HOP; earn the OVEN FORK (C).
- Walk down and forward.

- Use the OVEN FORK; take the DUTCH OVEN (D).
- Combine the DUTCH OVEN and RAG; move the items and take the OLD KEY (inventory).
- Use the OLD KEY (E).
- Walk left.
- Play the HOP; earn the HOOK (F).
- Take the SAPPER SHOVEL (G).
- Use the HOOK (H).
- Take the GEAR and SPRAYER (I).
- Walk down.
- Replace the GEAR; take the OLD AMULET and FIGURINE SHAPE (J).
- Walk left.
- Move the books and place the OLD AMULET; take the OLD BUCKET and 3/6 SKULL (K).
- Return to the Restroom.
- Use the OLD BUCKET and SAPPER SHOVEL; take the BUCKET WITH CLAY (L).
- Walk down and forward.
- Use the FIGURINE SHAPE and BUCKET WITH CLAY (M).
- Press the 2 arrows to keep the marker in the green area (N) so the meter fills (O).
- Take the HORSE FIGURINE (P).
- Walk down.
- Place the HORSE FIGURINE; take the CAT FOOD (A).
- Walk forward and left.
- Use the CAT FOOD; take the AWL HANDLE (B).
- Walk down.
- Place the AWL HANDLE; take the AWL (C).
- Walk left.
- Use the AWL; take the FISH FIGURINE (D).
- Return to the Restroom.
- Place and press the FISH FIGURINE (E).
- Use the PLIERS (F).
- Select (G).

- Open the book and restore the items (H-I-J).
- Take the SQUARE KEY (K).
- Use the SQUARE KEY (L).
- Walk left.
Chapter 4: The Stairway
- Use the FLASHLIGHT and play the HOP; earn the IRON TRAY (M).
- Walk down.
- Place the IRON TRAY (N).
- Take the TRASH CAN (O).
- Open the TRASH CAN and move the items; take the LEAF AMULET (inventory).
- Walk left.
- Move the carpet and place the LEAF AMULET: take the GARDEN GLOVE (P).
- Walk down.
- Use the GARDEN GLOVE; take the FILE (Q).
- Walk left.

- Use the FILE and move the debris; take the BOX WRENCH and 4/6 SKULL (A).
- Remove the portrait and use the BOX WRENCH (B).
- Take the BUTTON (C).
- Return to the Event Hall.
- Place and press the BUTTON; take the CLEANER (D).
- Combine the BOTTLE, CLEANER, and SPRAYER to make the CLEANING SPRAY (inventory).
- Return to the Stairway.
- Use the CLEANING SPRAY and open the panel; take the 5/6 SKULL and DOLLAR SIGN (E).
- Go to the Library.
- Place the DOLLAR SIGN; take the WORN KEY (G).
- Go to the Stairway.
- Use the WORN KEY; take the DECORATION (H).
- Take the ARTIFICIAL EYE from the DECORATION (inventory).
- Go to the Library.
- Place the ARTIFICIAL EYE (I).
- Swap the pieces as shown (J-K).
- Press (L).
- Take the 6/6 SKULL (M).
- Return to the Restroom.
- Place the 6 SKULLS; select 4-5-3-2-1-6 (N).
- Go forward.
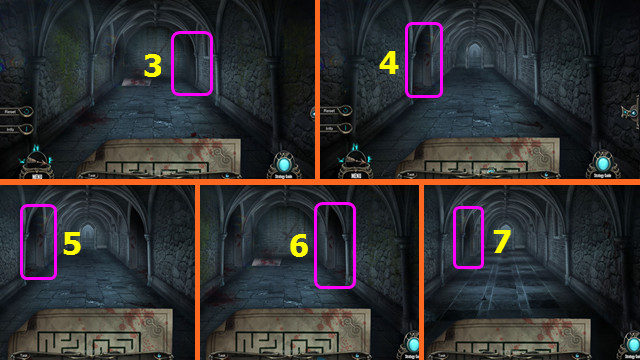
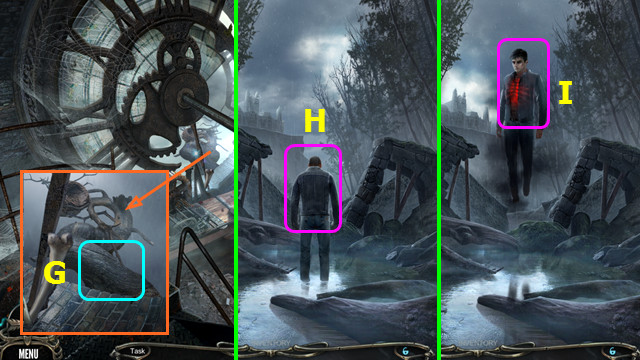
- Take the DUNGEON MAP and MAGGIE (A).
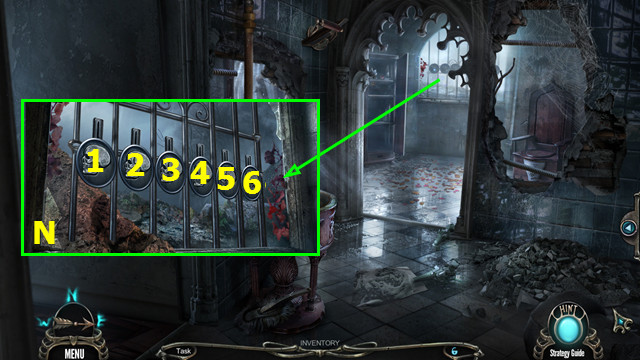
- Use the DUNGEON MAP (B).
- Select the doorways (1-7).
- Take the DISK (C).
- Place the DISK; take the CHISEL and 1st FLAG (D).
- Touch and take the WROUGHT HANDLE (E).
- Place MAGGIE (F).
- Open the clock; take the HANDS (G).
- Take the CRUMPLED PAPER (H).
- Use the CHISEL; take the FIGURINE (I).
- Replace the WROUGHT HANDLE (J).
- Take the TORN SHIRT (K).
- Finish tearing the TORN SHIRT to make the CLOTH BANDAGE (inventory).
- Use the CLOTH BANDAGE; earn the DECORATIVE FRAGMENT (L).
- Place the DECORATIVE FRAGMENT; take the CHARCOAL (M).
- Use the FIGURINE and open the window (N).
- Go forward.
- Use the CRUMPLED PAPER and CHARCOAL; take the CODE (O).
- Walk down.
- Place the CODE; press 1-5.
- Play the HOP; earn the GOTHIC PATTERN (P).
- Go out the window.
- Place the GOTHIC PATTERN (Q).
- Take the PINCERS (R).
- Use the PINCERS and remove the lid; take the 1st STONE EAR and SAPLING (S).
- Walk down.
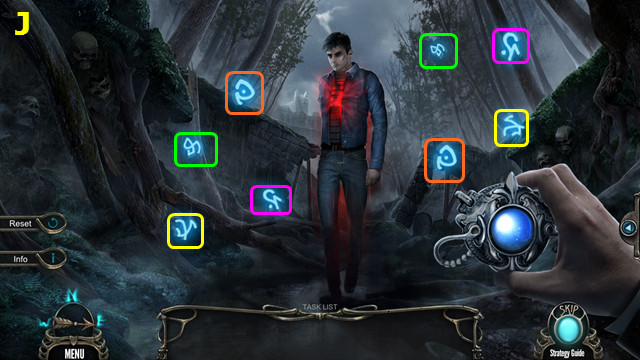
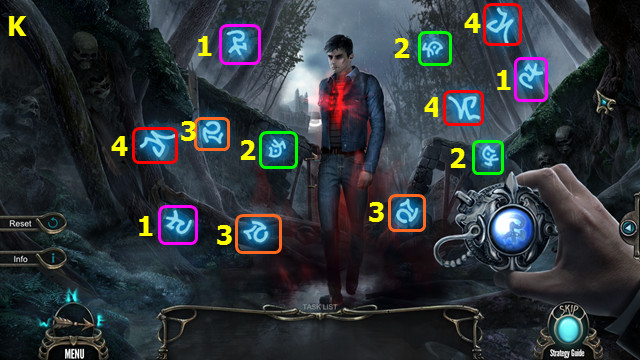
- Use the SAPLING; take the 1st AMULET PART (A).
- Use the 1st AMULET PART (B).
- This mini-game is randomly generated.
- Winning example shown (C).
- Walk left.
Chapter 5: The Armory
- Take the FEATHER DUSTER (D).
- Take the OPENER (E).
- Go to the Cemetery.
- Use the FEATHER DUSTER; take MAGGIE'S SIGN (F).
- Place MAGGIE'S SIGN; open the bag, move the items, and take the TWEEZERS (G).
- Use the TWEEZERS; take HILLMARKS' MONOGRAM (H).
- Walk down.
- Place HILLMARKS' MONOGRAM; take the CAN (I).
- Use the OPENER on the CAN to make the CAT FOOD (inventory).
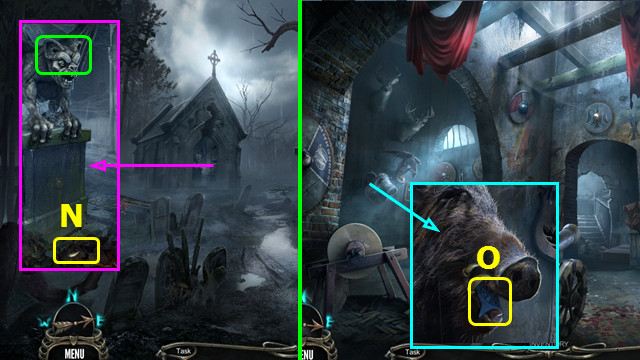
- Go to the Cemetery.
- Place the CAT FOOD; earn the BLACK CAT (J).
- Use the BLACK CAT; take the HUNTER HORN (K).
- Walk down and left.
- Place the HUNTER HORN; take the STEERING WHEEL and 2nd FLAG (L).
- Go forward.
- Place the STEERING WHEEL; take the GOLDEN KEY (M).
- Use the GOLDEN KEY; take the BRONZE AXE (N).
- Walk left.
- Place the BRONZE AXE; take the COMPASS (O).
- Open the COMPASS; take the MAGNET and RUSTY MEDALLION (inventory).
- Use the RUSTY MEDALLION to make HILLMARKS' MEDALLION (P).
- Place HILLMARKS' MEDALLION; take the LEATHER PURSE (Q).
- Open the LEATHER PURSE; take the FIRE STRIKER, move the items, and take the LOCK EMBLEM (inventory).
- Place the LOCK EMBLEM (A).
- Restore the image (B).
- Play the HOP; earn the CANNONBALL (C).
- Place the CANNONBALL (D).
- Use the FIRE STRIKER (E).
- Go forward and right.
- Take the INK PEN and remove the ring (F).
- Walk down.
- Place the INK PEN; take the WILL (G).
- Open the WILL; take the MOON SHARD and read the will (inventory).
- Talk to Lucien; earn the WHITE GHOST AMULET (H).
- Walk right.
- Place the MOON SHARD (I).
- Place the HANDS; take the 2nd AMULET PART and OIL (J).
- Use the OIL; take the ADJUSTABLE WRENCH (K).
- Walk down and left.
- Use the ADJUSTABLE WRENCH to take the 2nd STONE EAR (L).
- Use the MAGNET; take the 3rd AMULET PART (M).
- Go to the Cemetery.
- Place the 2 STONE EARS; take the FANG (N).
- Return to the Armory.
- Place the FANG; take the 3rd FLAG (O).
- Walk forward.
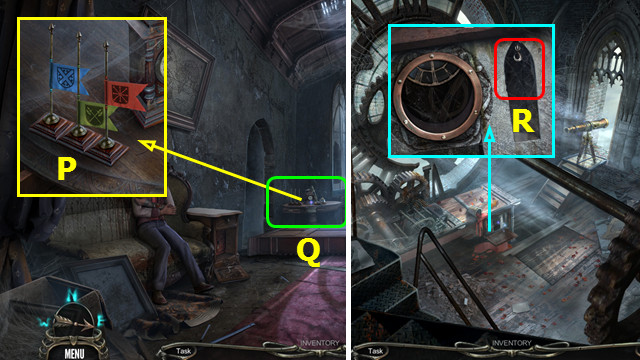
- Place the 3 FLAGS; arrange them as shown (P).
- Play the HOP; earn the CLOCK WEIGHT (Q).
- Walk right.
- Place the CLOCK WEIGHT (R).
- Casual solution: Dx3-A-Cx3-A.
- Hard solution: H-Ix3-Hx2-F-H-I-F.
- Enter the trap door.
- Take the LUCIEN'S SIGNET (K).
- Take the GLASS CUTTER (L).
- Walk down 2x.
- Place LUCIEN'S SIGNET; take the BARBER KEY and 4th AMULET PART (M).
- Return to the Barber Shop.
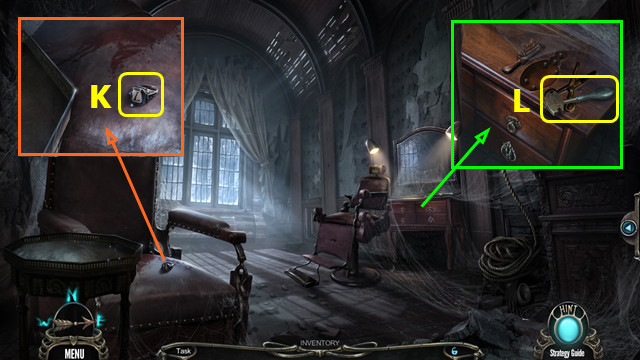
- Use the BARBER KEY; move the items and take the CROSS (N).
- Go to the Cemetery.
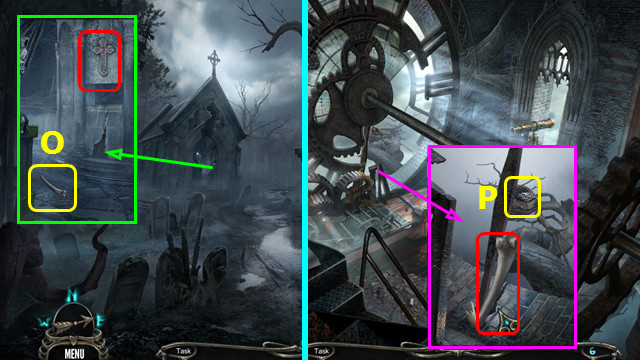
- Place the CROSS; take the BONE (O).
- Return to the Tower.
- Place the BONE; use the BLACK CAT to take the FEATHER (P).
- Return to the Armory.
- Place the FEATHER; take the BOTTLE and 5th AMULET PART (Q).
- Go to the Barber Shop.
- Place the BOTTLE; take the ROUND-NOSE PLIERS (R).
- Go back to the Armory.
- Use the ROUND-NOSE PLIERS; take the RING (S).
- Go to the Tower.
- Use the RING; take the EYEPIECE (T).
- Enter the trapdoor.
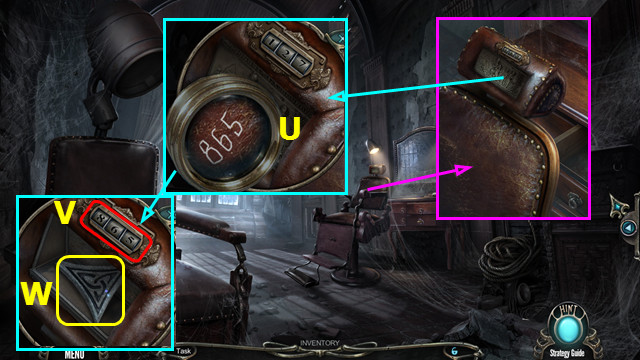
- Use the EYEPIECE (U).
- Enter 8-6-5 (V).
- Take the BAS-RELIEF (W).
- Walk down 2x.
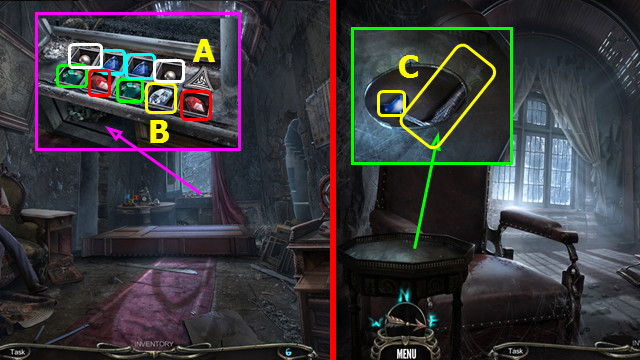
- Place the BAS-RELIEF (A).
- Select pairs (color-coded).
- Take the DIAMOND (B).
- Add the DIAMOND to the GLASS CUTTER (inventory).
- Go to the Barber Shop.
- Use the GLASS CUTTER; take the 6th AMULET PART and SWORD HILT (C).
- Combine the WHITE GHOST AMULET and 6 AMULET PARTS (inventory).
- Go to the Armory.
- Place and select the SWORD HILT (D).
- Play the HOP; earn the SWORD (E).
- Go to the Barber Shop.
- Use the SWORD; take the ROPE (F).
- Walk down.
- Use the ROPE (G).
- Go forward.
- Select (H).
- Talk to Maurice; use the WHITE GHOST AMULET (I).
- Select color-coded pairs (J).
- Select sets of three 1-4 (K).
- Select color-coded pairs (L).
- Select the 3 symbols (M).
- Congratulations! You have completed Haunted Hotel: Silent Waters.
Created at: 2016-10-16