

Walkthrough Menu
- General Tips
- Chapter 1: The Manor
- Chapter 2: Alfred's Room
- Chapter 3: The Study
- Chapter 4: The Street
- Chapter 5: The Cemetery
- Chapter 6: The Castle
General Tips
- This is the official guide for Haunted Legends: Faulty Creatures.
- Hidden-object puzzles are referred to as HOPs. This guide will not show screenshots of the HOPs, however, it will mention when an HOP is available and the inventory item you'll collect from it.
- This guide will not mention each time you have to zoom into a location; the screenshots will show each zoom scene.
Chapter 1: The Manor
- Select anything.
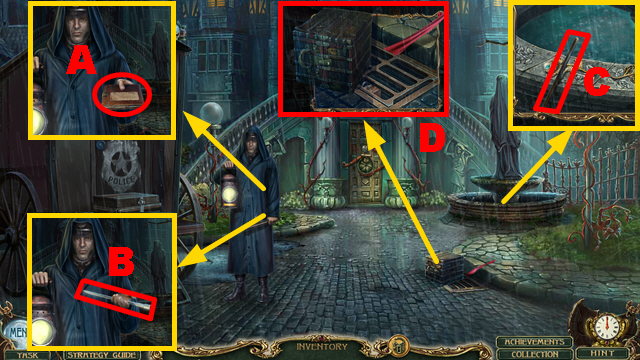
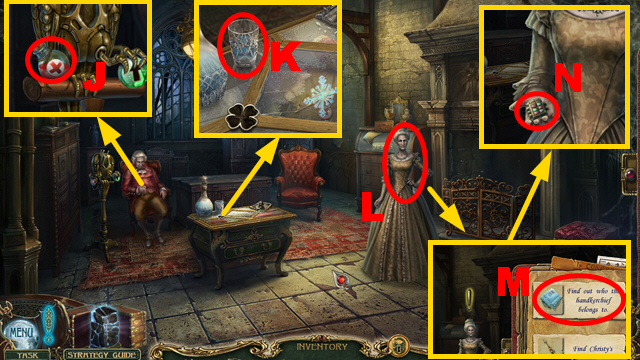
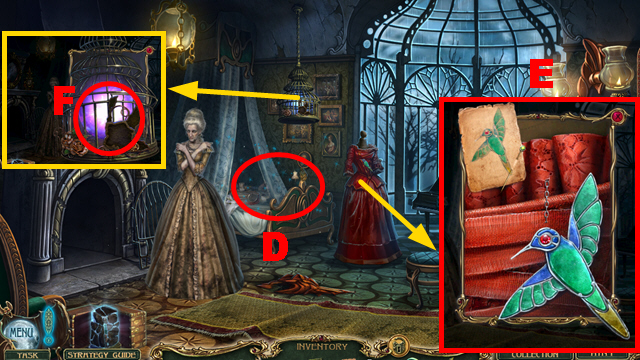
- Give the LETTER, talk to the man, take the book, move 5 pages, and take the map (A).
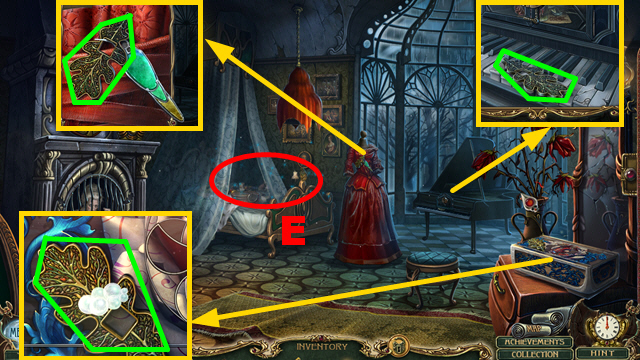
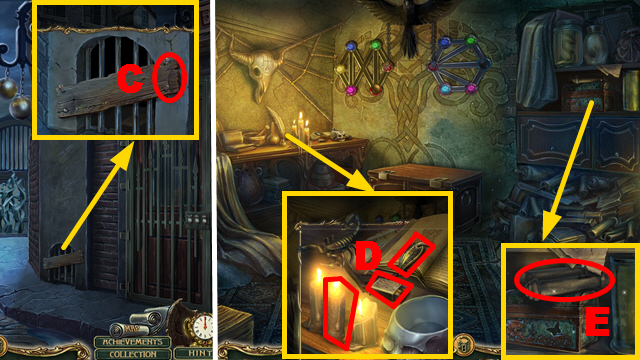
- Take the CANE BLADE (B), CANE STICK (C), box, and lift the grate (D).
- Open the crate, take the TORCH BASE, move 2 objects, and take the CANE HANDLE (E).
- Place the CANE BLADE and CANE HANDLE on the CANE STICK; combine them, and take the CANE.
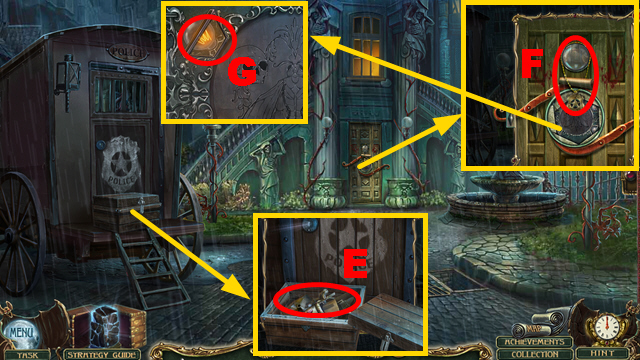
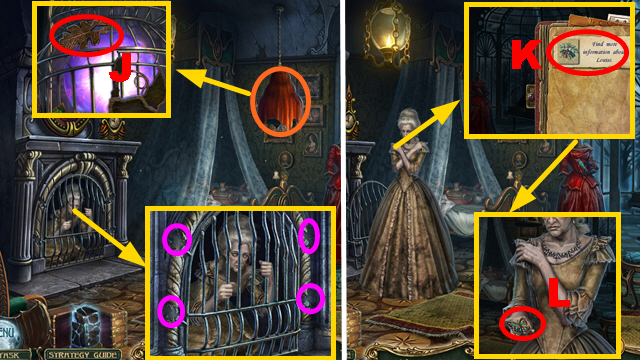
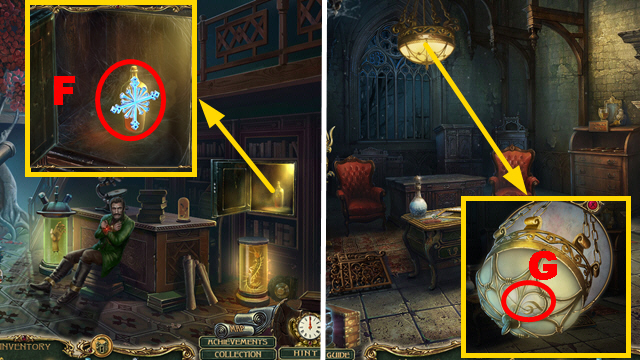
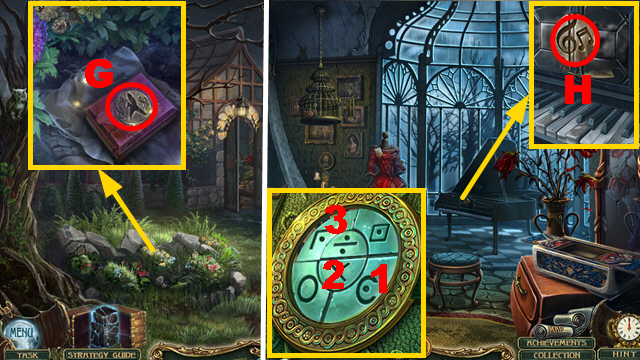
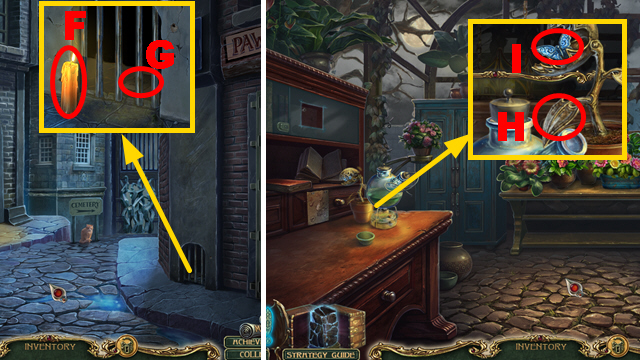
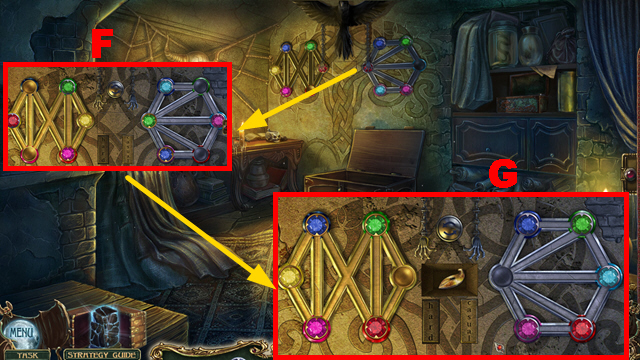
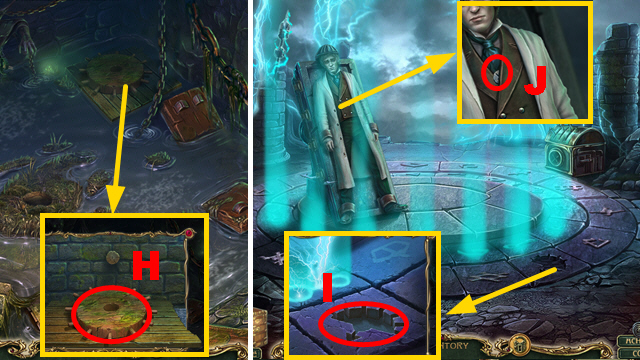
- Look through the window, take the note, and ELEVATOR CHAIN KEY (F); break the glass (G).
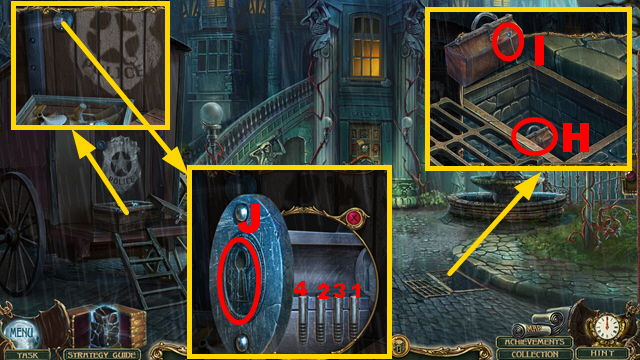
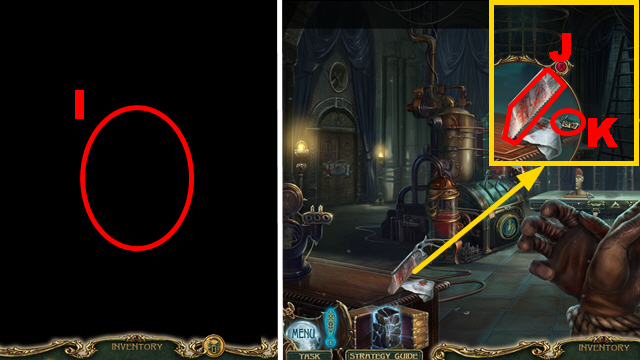
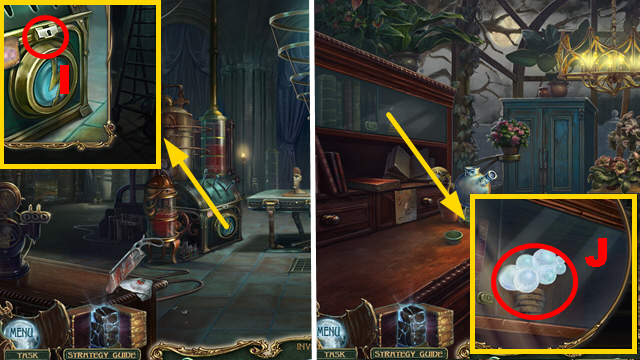
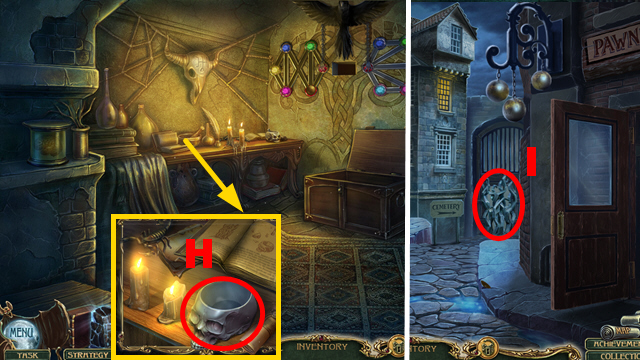
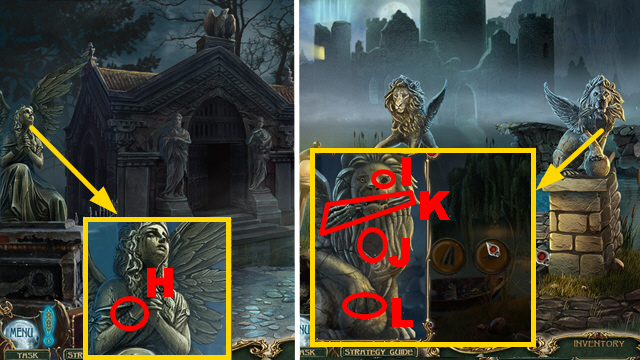
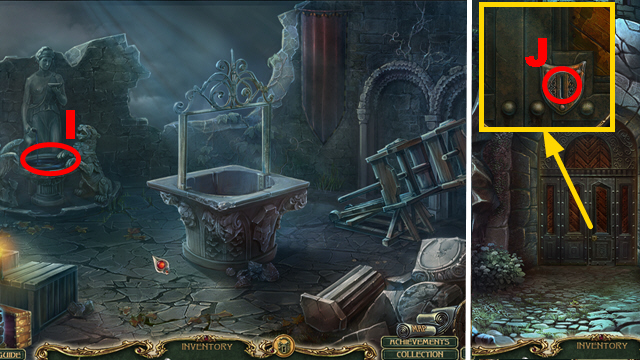
- Use the CANE (H); take the HAIRPIN LOCKPICK (I).
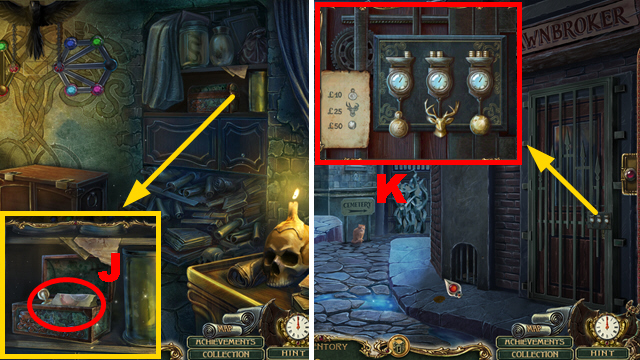
- Insert the HAIRPIN LOCKPICK (J) and push 1-4.
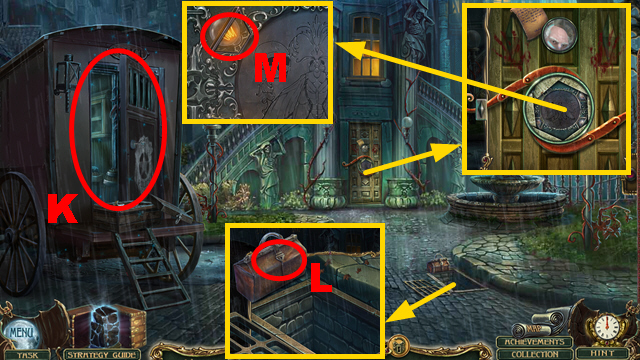
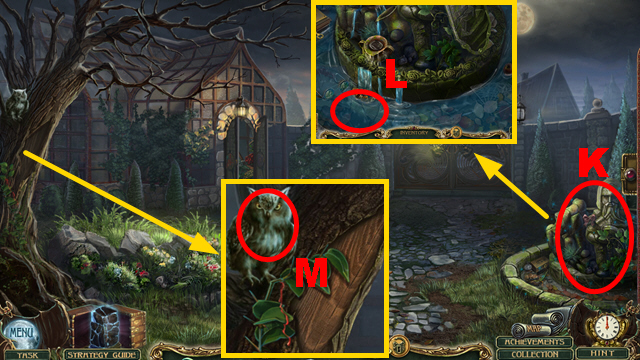
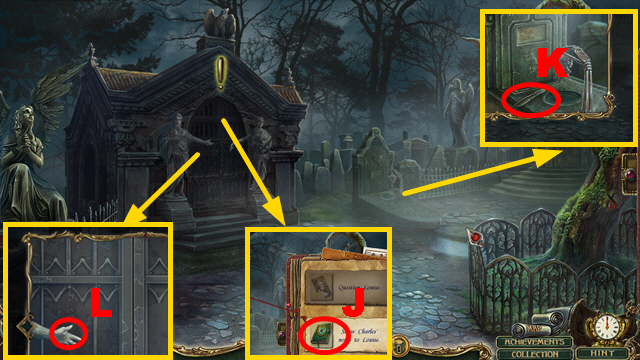
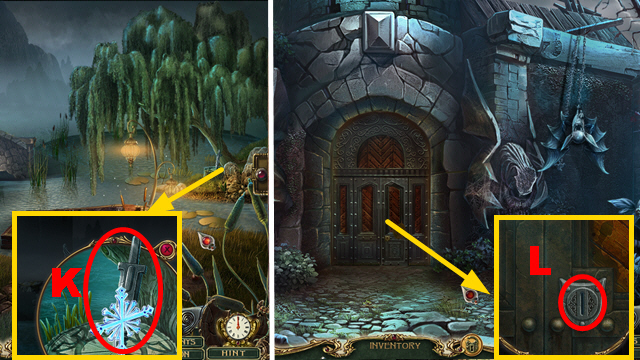
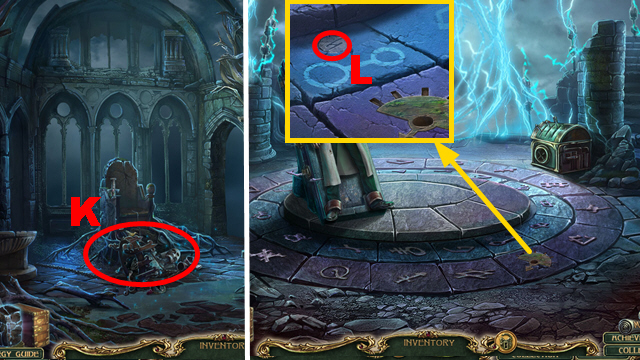
- Play the HOP (K); receive the BAG KEY.
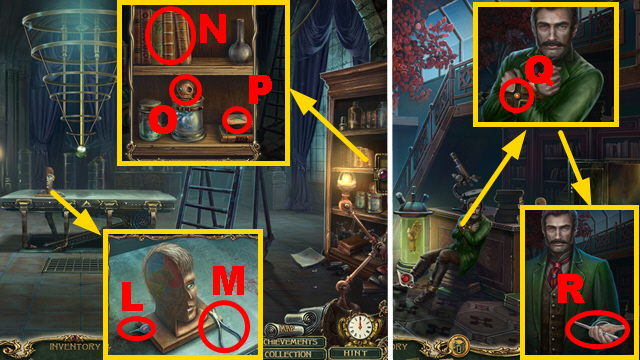
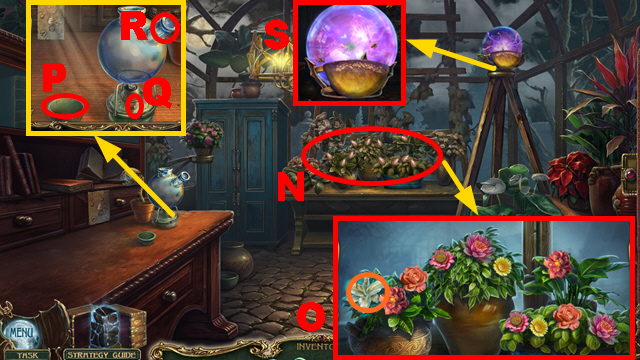
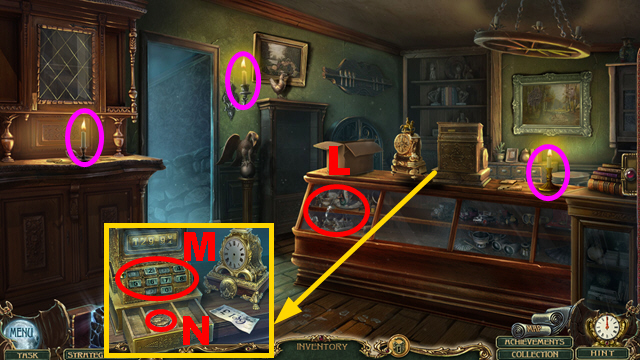
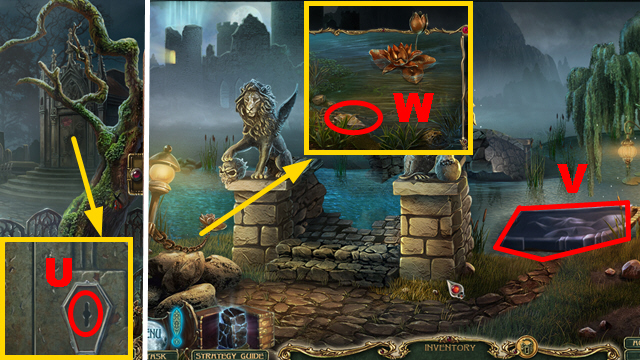
- Insert the BAG KEY, turn it twice, take the TORCH NOZZLE, and GLASS (L).
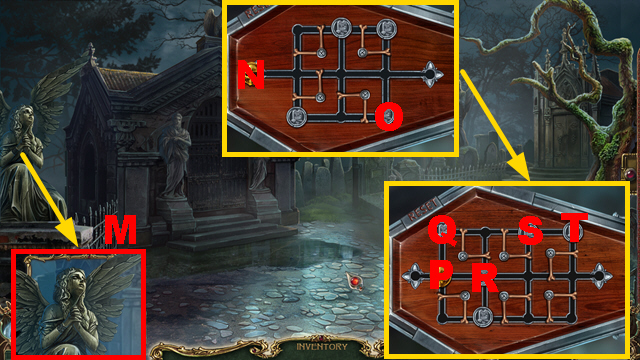
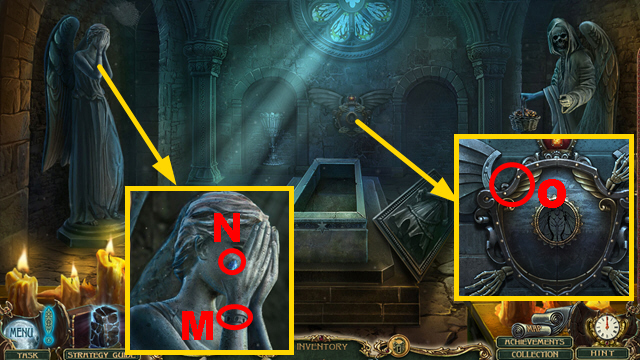
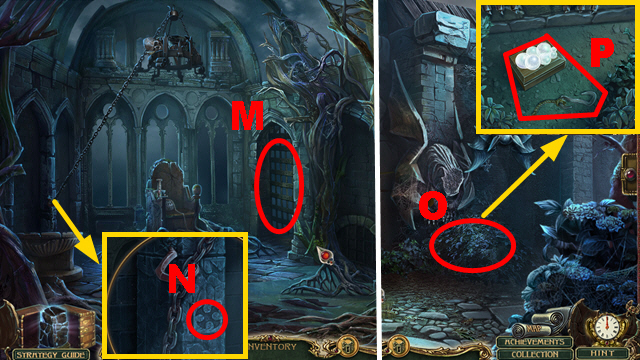
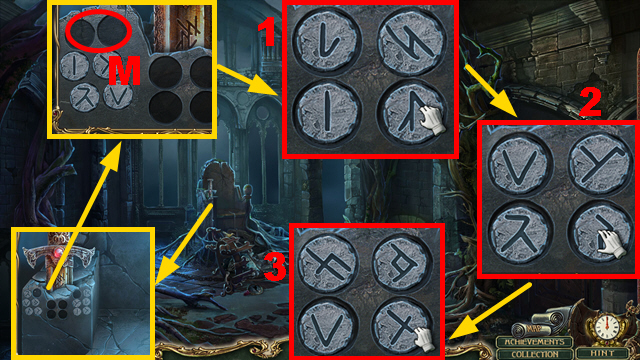
- Place the GLASS (M).
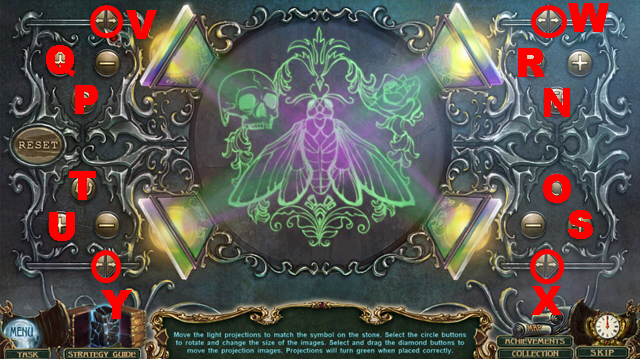
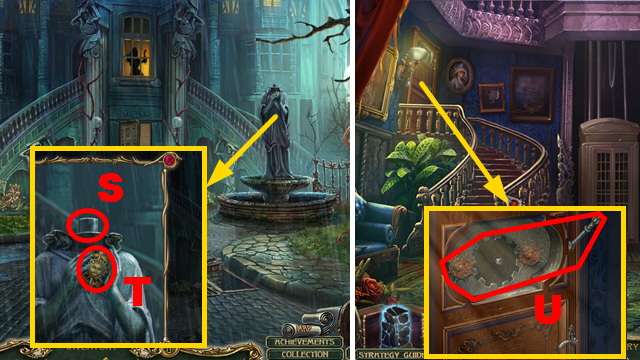
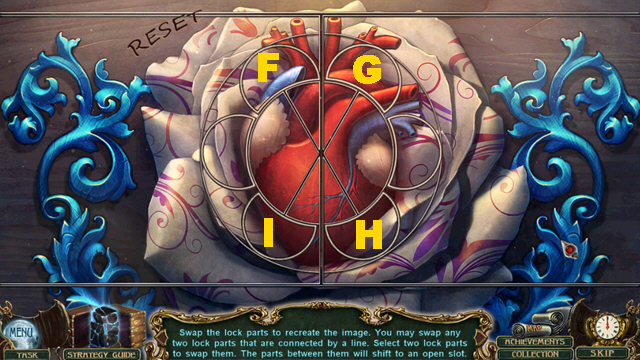
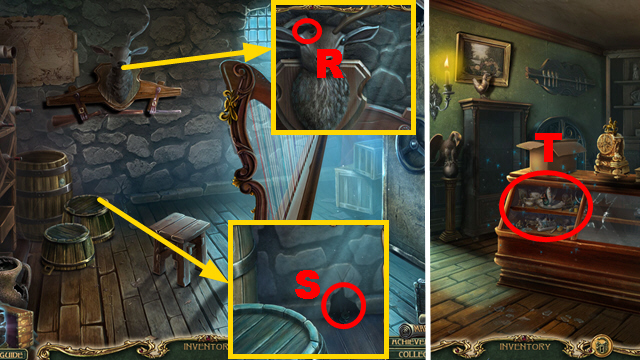
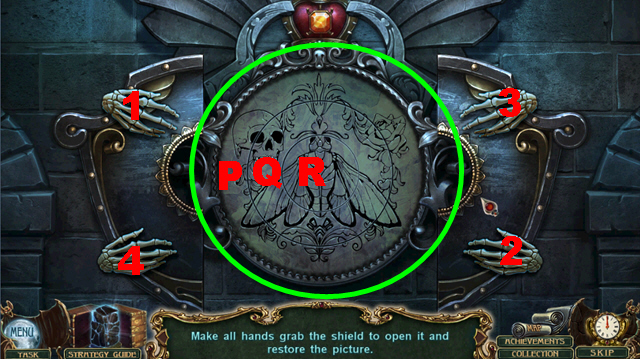
- Play the mini-game.
- Solution: Nx2-O-Px3-Qx4-Rx4-Sx5-T-Ux6-V-W-X-Y.
- Go forward.
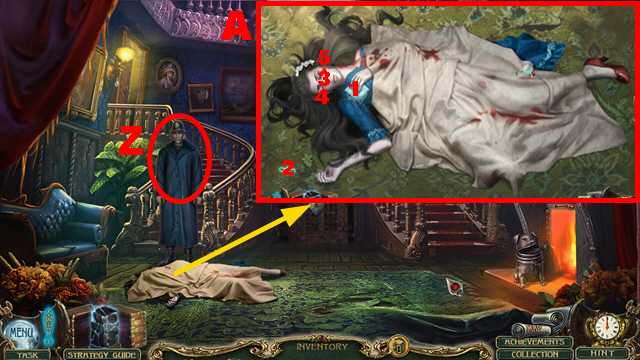
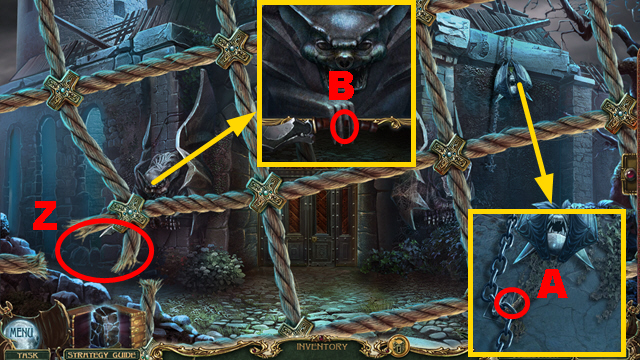
- Talk to the Constable (Z).
- Remove the blanket, inspect the body, and play the mini-game.
- Solution: (A).
- Search for clues: 3-4-3-5-1-2.
- Talk to the Constable.
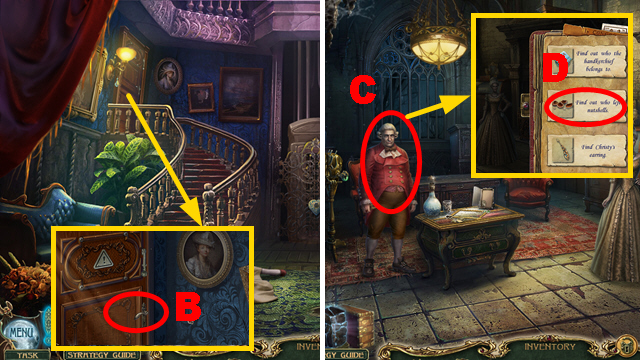
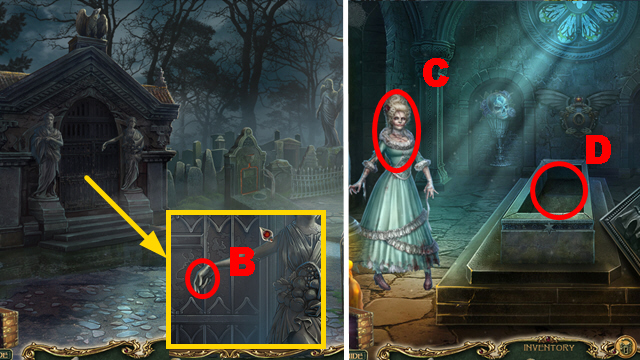
- Select the door twice (B).
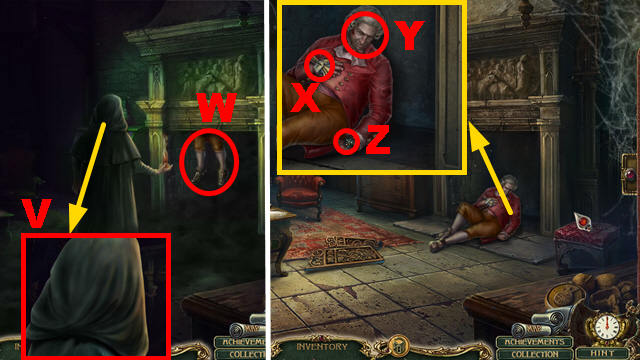
- Go forward.
- Talk to the man (C); use the clue (D).
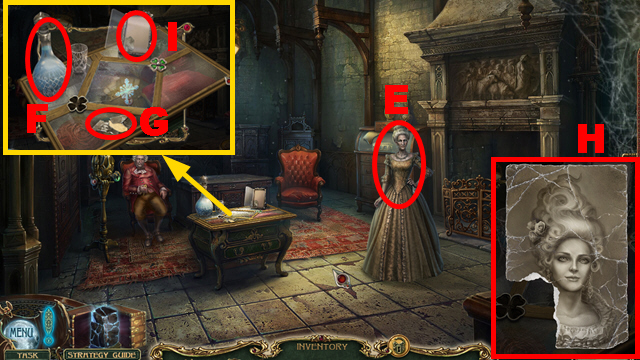
- Talk to the woman (E).
- Use the carafe (F); take the PHOTO PIECES (G).
- Assemble the PHOTO PIECES correctly and take the PHOTO (H).
- Place the PHOTO, close it, and take the PENCIL (I).
- Take the DROPS (J).
- Use the DROPS and take the MEDICINE (K).
- Give the MEDICINE (L).
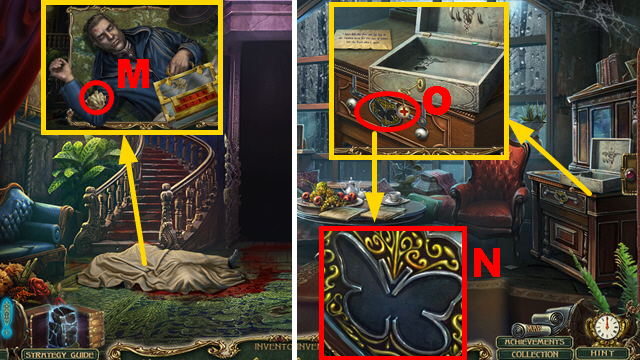
- Use the clue (M); take the ELEVATOR KEY (N).
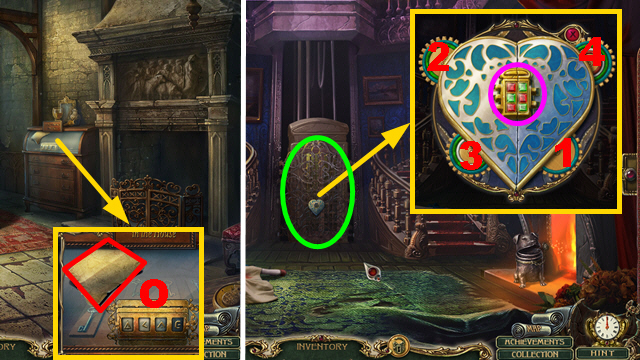
- Take the PAPER (O).
- Walk down.
- Place the ELEVATOR KEY (purple); activate discs 1-4.
- Open the elevator door (green).
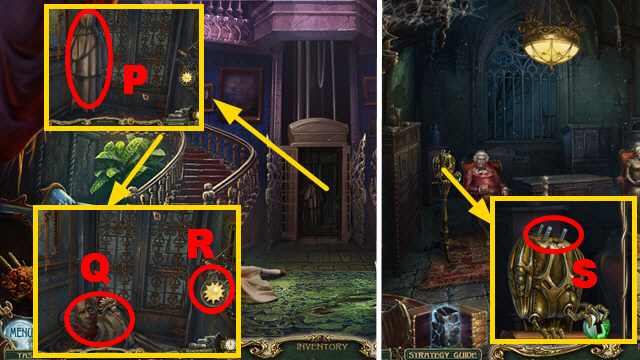
- Pull the blanket (P).
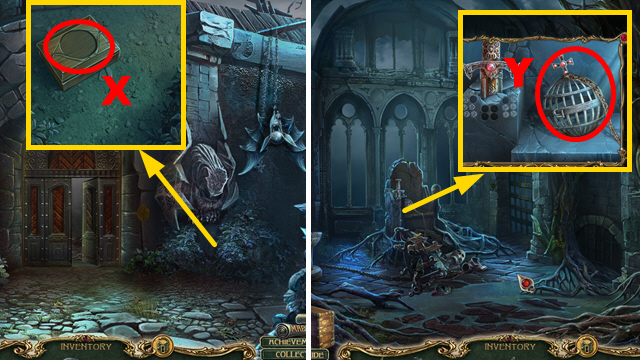
- Take the BIRD'S HEAD and ANATOMY DUMMY (Q).
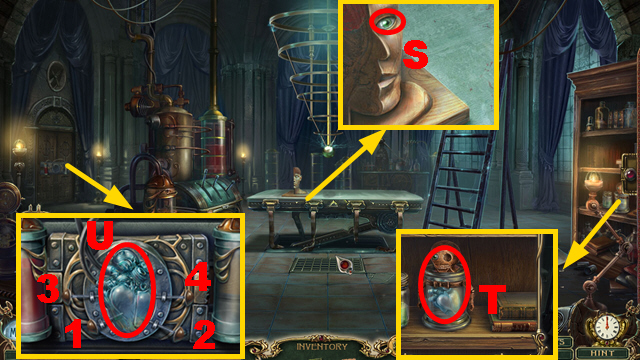
- Take the burning sun and place the ELEVATOR CHAIN KEY (R).
- Turn left.
- Place the BIRD'S HEAD (S); receive the BUTTON.
- Walk down.
Chapter 2: Alfred's Room
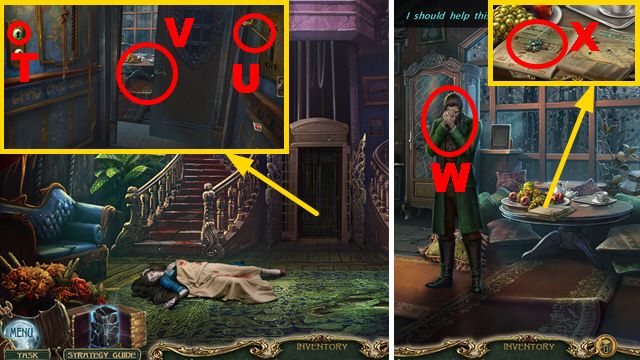
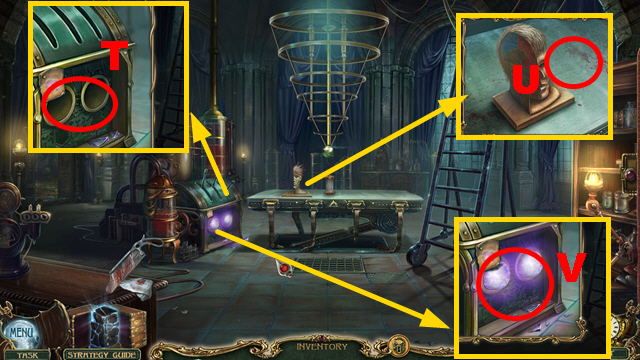
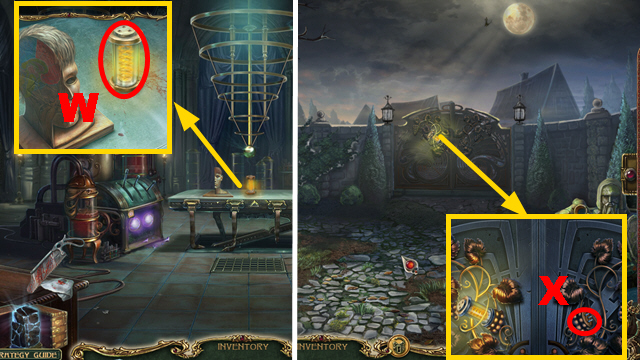
- Place the BUTTON (T), push the lever (U), and the button.
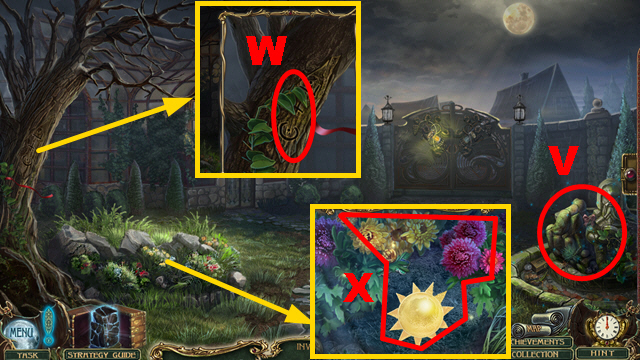
- Open and peek through the door (V).
- Go forward.
- Talk to the man (W).
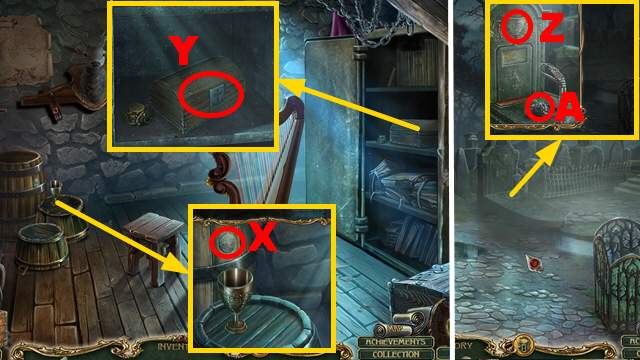
- Move 3 items and take the TABLE ORNAMENT (X).
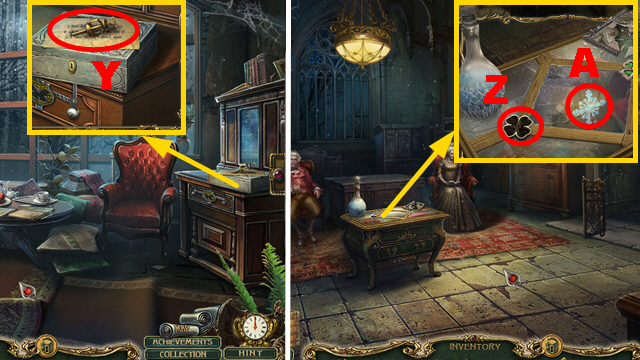
- Take the PUMP and note (Y).
- Walk down, go left.
- Place the TABLE ORNAMENT (Z); move the plate, and take the snowflake and FIRST AID KEY (A).
- Walk down, go forward.
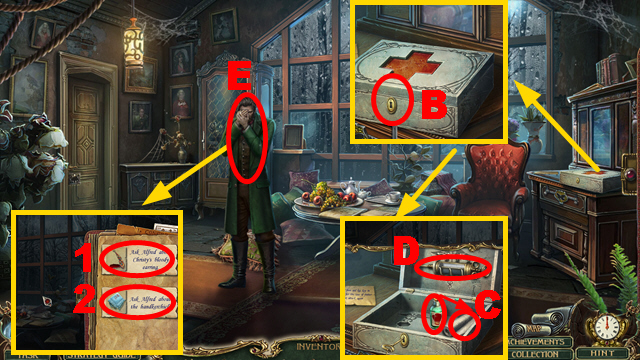
- Insert the FIRST AID KEY, turn it, and take the earring (B); use the medicine, take the COMPRESS (C) and EMPTY SYRINGE (D).
- Give the COMPRESS, talk to the man (E), and ask him about clues 1-2.

- Talk to the Constable (F).
- Take the GUN (G).
- Walk down.
- Use the GUN (H); take the EMPTY BUCKET (I).
- Walk down.
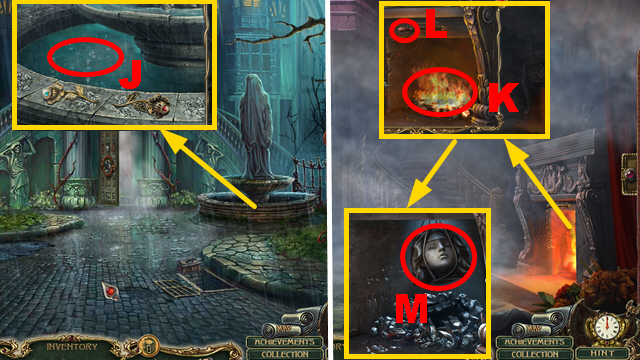
- Use the EMPTY BUCKET (J); receive the BUCKET OF WATER.
- Go forward.
- Use the BUCKET OF WATER (K); pull the lever (L) and take the STATUE HEAD (M).
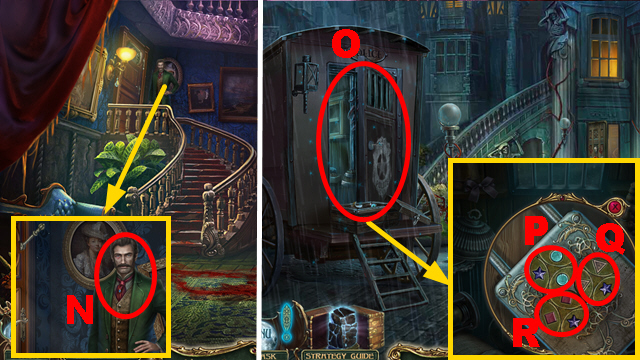
- Talk to the man twice (N).
- Walk down.
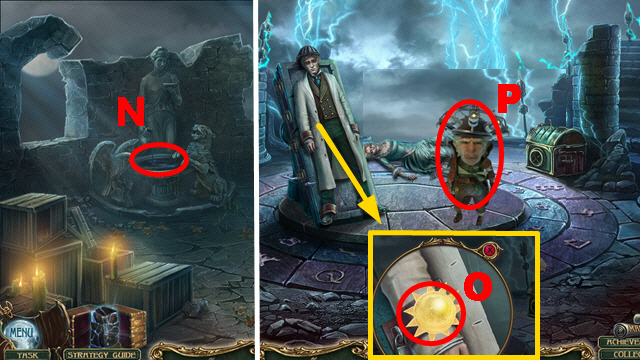
- Play the HOP (O).
- Mini-game solution: Px2-Q-Rx2.
- Receive the OIL.
- Place the STATUE HEAD (S); take the GEAR (T).
- Go forward.
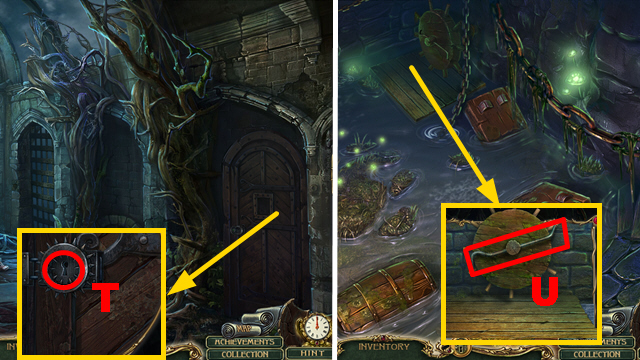
- Place the GEAR, use the OIL, and pull the lever (U).
- Turn left.
- Pull the hood (V) and body (W).
- Take the note and MEDICINE (X).
- Place the EMPTY SYRINGE on the MEDICINE, open the medicine, put the EMPTY SYRINGE in it; receive the MEDICINE INJECTION.
- Use the MEDICINE INJECTION (Y); take Louise's brooch.
- Walk down.
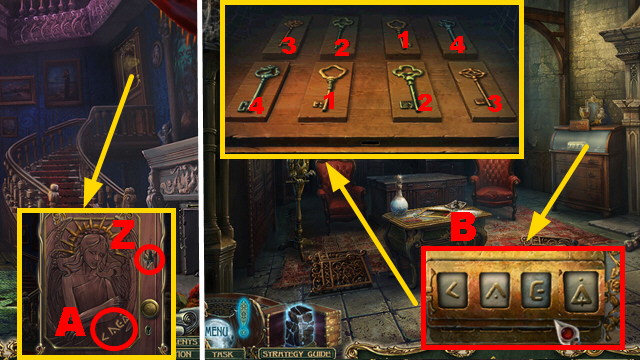
- Peek through the hole (Z); use the PAPER, PENCIL, and take the KEY BOX CODE (A).
- Turn left.
- Place the KEY BOX CODE and enter the correct code (B).
- Uncover pairs 1-4 and take LOUISE'S ROOM KEY.
- Walk down.
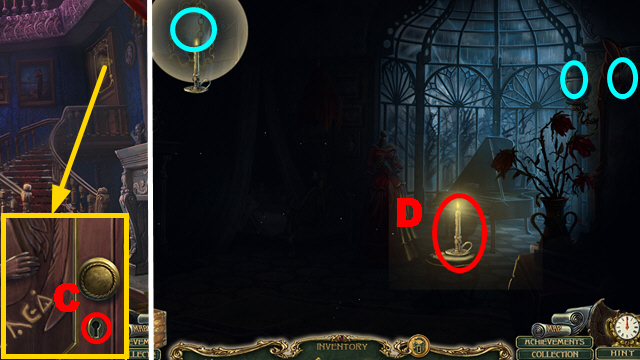
- Insert LOUISE'S ROOM KEY (C); turn it.
- Go right.
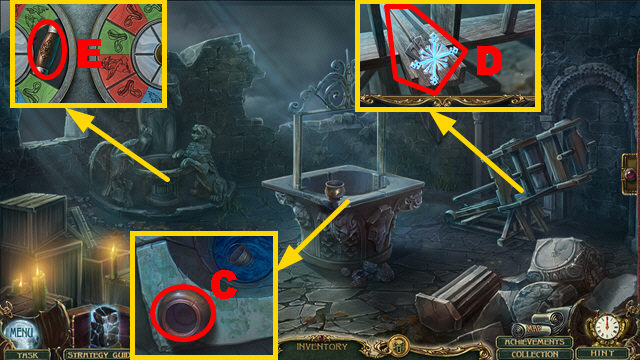
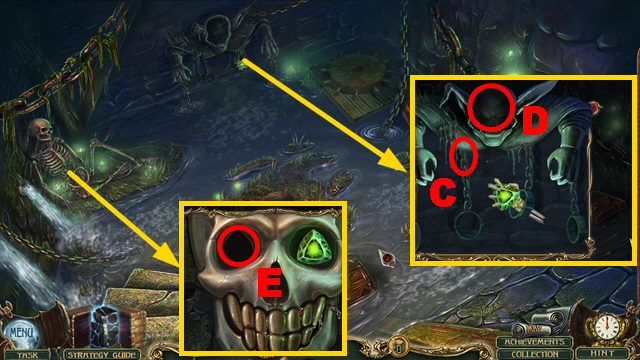
- Take the LIT CANDLE (D).
- Use the LIT CANDLE anywhere and then three times (blue).
- Play the HOP (E); receive SATURN.
- Take the 3 METAL LEAVES and the rain cloud (green).
- Play the mini-game.
- Solution: (H-F)-(H-F)-(F-H)-(H-F)-(H-F)-(I-G)-(F-H)-(G-I)-(G-I).
- Move the flower; take the PAPER.
- Unfold the PAPER twice; take the HEART CHIP.
- Remove the cloth (orange); take METAL LEAF 4/4 (J).
- Place 4 METAL LEAVES (purple); turn 4 leaves, and remove the grate.
- Talk to the woman; use the clue (K), and take the DESK KEY (L).
- Walk down.
- Remove the blanket and take the note (M).
- Go forward.
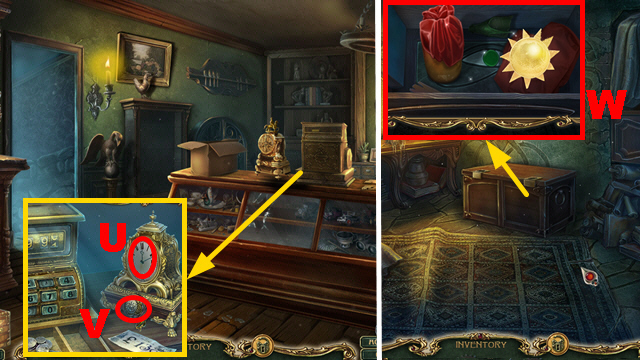
- Insert the DESK KEY (N); take the JAR, package, open it twice, move 4 pages, and take OCTOPUS 1/2 (O).
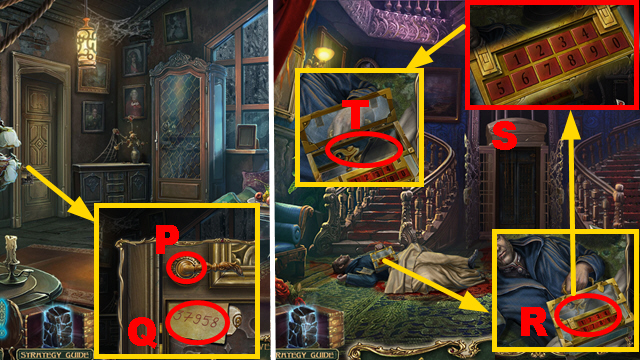
- Move the door handle, peek through the hole (P), and take the BOX CODE (Q).
- Walk down.
- Place the BOX CODE (R); enter the code '37958' (S).
- Open the box; take the note and OCTOPUS 2/2 (T).
- Go forward.
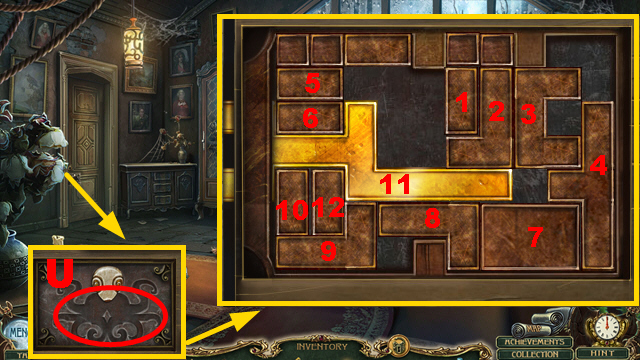
- Place 2 OCTOPI (U).
- Play the mini-game.
- Solution: (1-leftx2)-(2-leftx2)-(3-leftx2)-(4-upx2)-(3-rightx2)-(2-rightx2)-(1-rightx2)-(5-rightx3)-(6-up)-(7-right)-(8-right)-(9-right)-(10-down)-(11-right)-(12-right)-(11-right).
- Go left.
Chapter 3: The Study
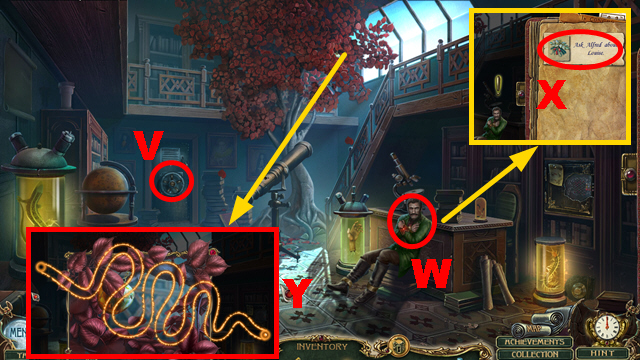
- Inspect the door (V).
- Talk to the man (W); use the clue (X).
- Remove the leaves and guide the dot (Y); receive the GOLDEN APPLE.
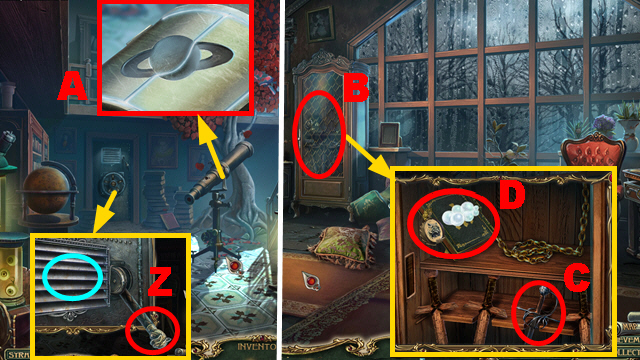
- Take the LEVER (Z) and peek through the opening (blue).
- Place SATURN and take the LIGHTNING CHIP (A).
- Walk down.
- Open the cabinet (B).
- Take the LONG RAPIER (C); place the LEVER, take the rain cloud, open the book, and take the DEATH MEDALLION (D).
- Place the DEATH MEDALLION on the GOLDEN APPLE, select it twice, and take the SKULL CHIP.
- Turn left.

- Place the SKULL CHIP, LIGHTNING CHIP, and HEART CHIP (E).
- Play the mini-game.
- Solution: 1-5.
- Take the snowflake and FUEL (F).
- Walk down twice, go left.
- Use the LONG RAPIER (G); receive the TREBLE CLEF.
- Take the note from the TORCH BASE.
- Place the TORCH NOZZLE, PUMP, JAR, and FUEL on the TORCH BASE; combine the 5 items and take the BURNER.
- Walk down, go forward, go left.

- Use the BURNER (H); select it.
- Play the mini-game.
- Solution: Connect the dots of figures 1-4.
- Go forward.
- Use the LIT CANDLE (I).
- Select the knife (J); take the SHACKLE KEY (K).
- Take the HUMMINGBIRD HEAD (L) and CLIPPERS (M).
- Use the CLIPPERS on the ANATOMY DUMMY; receive the ARM.
- Move 3 books (N) to receive the JOURNAL; take the HUMMINGBIRD SOLUTION (P) and place the ARM (O).
- Walk down.
- Place the SHACKLE KEY (Q); take the KNIFE (R).
- Go forward.
- Use the KNIFE (S); receive the EYE.
- Place the EYE and take the HEART (T).
- Remove the broken heart and place the HEART (U); push sticks 1-4.
- Go left.
- Inspect anywhere.
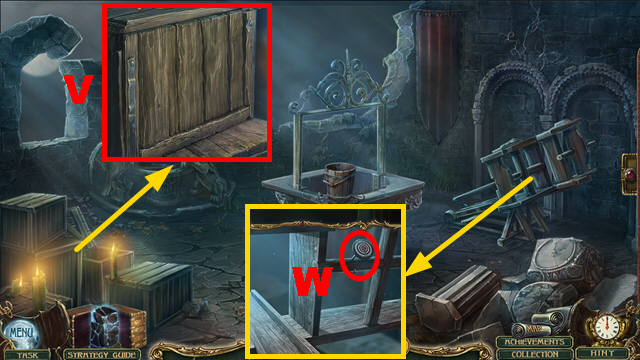
- Play the HOP (V); receive the DOOR PART.
- Use the KNIFE (W); receive the BARK WITH SYMBOLS.
- Take the burning sun, remove flowers twice, and take the HUMMINGBIRD WINGS (X).
- Take the UNCHARGED BATTERY (Y).
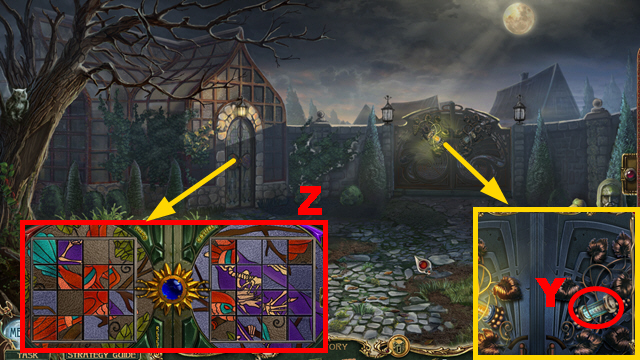
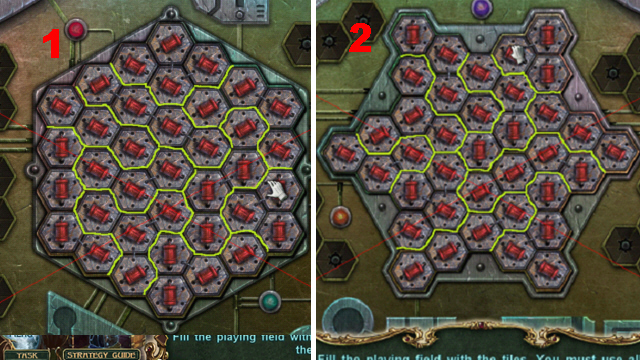
- Place the DOOR PART (Z).
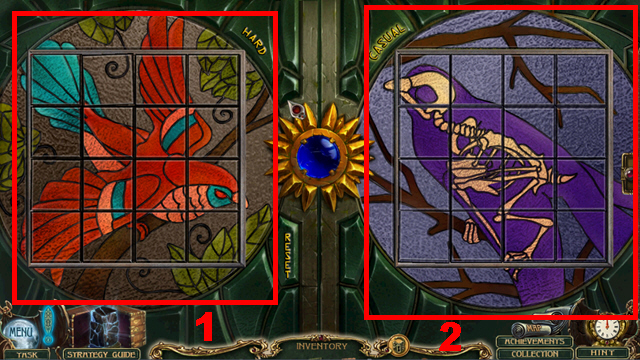
- Play the mini-game.
- Solution: Recreate images 1-2 correctly.
- The starting position is randomized.
- Turn left.
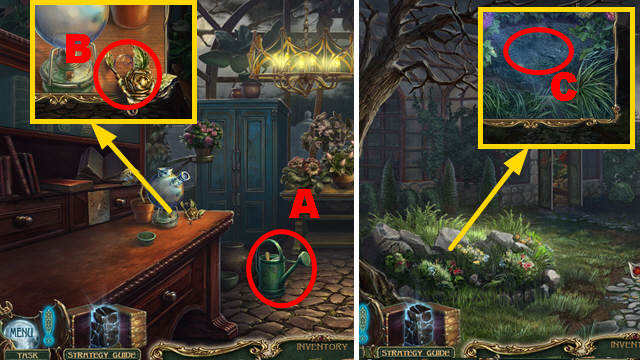
- Take the WATERING CAN (A) and BIRDCAGE KEY (B).
- Select the WATERING CAN and take the SPADE from it.
- Walk down.
- Use the SPADE and open the package (C).
- Walk down four times, go right.
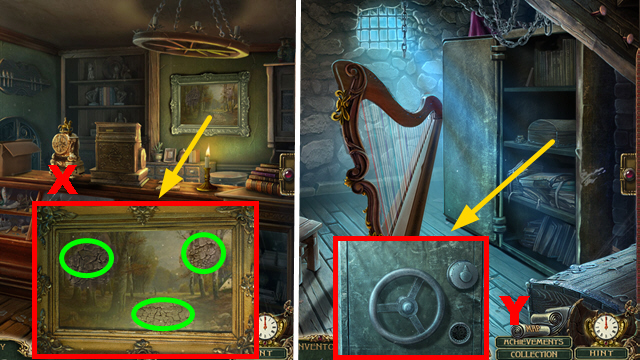
- Play the HOP (D); receive the SPRAY BOTTLE.
- Place the HUMMINGBIRD SOLUTION, HUMMINGBIRD WINGS, HUMMINGBIRD HEAD, adjust the hummingbird, and use the CLIPPERS (E); receive the HUMMINGBIRD MEDALLION.
- Place the BIRDCAGE KEY and take BALL 1/2 (F).
- Walk down, go forward, turn left, go forward, turn left.
- Insert the HUMMINGBIRD MEDALLION and take the MUSICAL NOTES and DIAMOND RING (G).
- Walk down 4 times, go right.
- Place the TREBLE CLEF, MUSICAL NOTES, take the letter, and LOCK PART (H).
- Place the BARK WITH SYMBOLS and LOCK PART on the JOURNAL; push buttons 1-3, select the journal twice, and take the MACHINE KEY.
- Walk down, go forward, turn left, go forward.
- Insert the MACHINE KEY, turn it, and remove the broken ball (I).
- Turn left twice.
- Use the DIAMOND RING, remove the glass, take the rain cloud, and COOKIES (J).
- Walk down.
- Play the HOP (K).
- Place the WATERING CAN (L); receive the FILLED CAN.
- Use the COOKIES (M); receive the VINE.
- Turn left.
- Use the FILLED CAN (N).
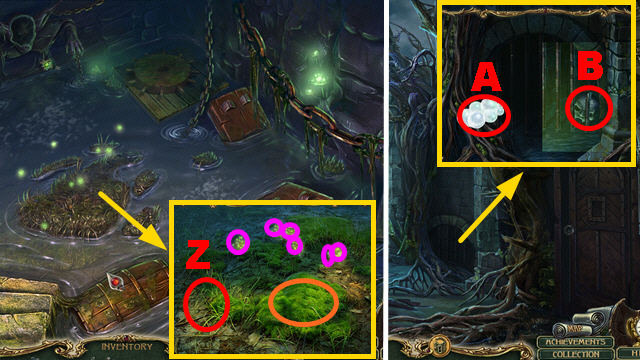
- Play the mini-game.
- Solution: Find six pairs of flowers (O).
- Take the LILY (orange).
- Place the VINE (P), select it twice, place the LILY (P), select it twice, push the button (Q), and place the SPRAY BOTTLE (R); receive the REPELLENT.
- Use the REPELLENT and take BALL 2/2 (S).
- Walk down twice.
- Place 2 BALLS (T).
- Place the UNCHARGED BATTERY (U).
- Inspect the area (V).
- Play the mini-game.
- Solution: 1-2.
- Pull the lever.
- Take the CHARGED BATTERY (W).
- Turn left.
- Place the CHARGED BATTERY (X).
- Go forward.
Chapter 4: The Street

- Move the curtain and play the HOP (Y); receive the MIRROR.
- Take the WIRE (Z).
- Bent the WIRE twice; receive the HOOK.
- Take the PRICE TAG (A).
- Take the CHISEL, note, use the DIAMOND RING, MIRROR, and HOOK (B).
- Use the CHISEL (C).
- Go left.
- Take the MATCHES, LEAF, CANDLE (D), and STONE SCROLL (E).
- Walk down.
- Use the CANDLE and MATCHES (F); take the DOOR CODE (G).
- Walk down, go left.
- Place the LEAF (H); take the BUTTERFLY (I).
- Walk down, go forward, go left.
- Place the BUTTERFLY, take the note, and BRONZE WATCH (J).
- Walk down.
- Place the DOOR CODE, BRONZE WATCH, and adjust the tokens correctly (K).
- Go right.
- Use the MATCHES three times (purple).
- Move the door and play the HOP (L); receive the NECKLACE.
- Place the PRICE TAG and enter '139' (M); take COIN 1/2 (N).
- Go downstairs.

- Grab the hands (O).
- Walk down twice.
- Play the HOP (P); receive the HORN.
- Give the NECKLACE (Q); receive the CAT.
- Go right and downstairs.
- Place the HORN (R); receive the GUN.
- Use the CAT (S); receive the HANDS.
- Walk down.
- Play the HOP (T); receive COIN 2/2.
- Place the HANDS (U); take the COGWHEEL (V).
- Walk down, go left.
- Place 2 COINS, take the burning sun, SOLVENT, WIRE, and move the cloth (W).
- Walk down, go right.
- Place the SOLVENT, use it 3 times (green), and take the COMBINATION (X).
- Go downstairs.
- Place the COMBINATION, COGWHEEL, and take the FIRESTONE (Y).
- Walk down twice.

- Use the GUN to collect the SOLDIER (A).
- Go right.
- Place the SOLDIER, take JEWEL 1/2, the snowflake and GOBLET (B).
- Go downstairs.
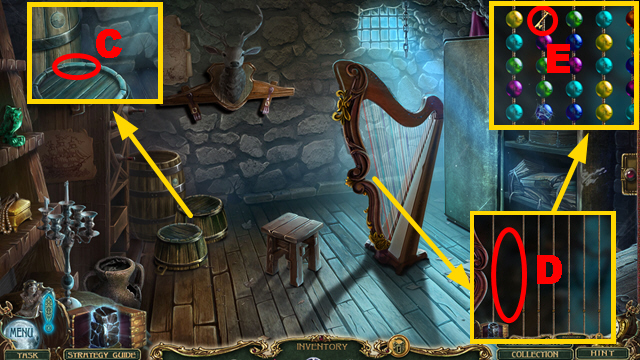
- Place the GOBLET (C) and WIRE (D).
- Play the mini-game.
- Solution: Match 3 or more beads of the same color to get the key (E) down.
- The puzzle is randomized.
- Take JEWEL 2/2.
- Walk down twice, go left.
- Place 2 JEWELS (F).
- Play the mini-game.
- Solution: Slide the jewels into the correct positions (G).
- This puzzle is randomized.
- Take the OIL.
- Place the FIRESTONE, select it, use the OIL, and take the FLAME POTION (H).
- Walk down.
- Use the FLAME POTION (I).
- Go forward.
Chapter 5: The Cemetery
- Use the clue (J); receive FEATHER 1/2.
- Take FEATHER 2/2 (K).
- Place the STONE SCROLL (L).
- Place 2 FEATHERS (M); receive the KEY.
- Inspect the KEY.
- Play the mini-game.
- Solution part 1: (O-left)-(O-up)-(O-down)-(N-rightx3).
- Solution part 2: (R-right)-(Q-right)-(P-up)-(Q-down)-(P-right)-(Q-left)-(P-down)-(S-left)-(R-up)-(P-right)-(S-down)-(R-left)-(T-left)-(P-right).
- Receive the KEY.
- Insert the KEY (U); turn it.
- Go right.
- Take the CLOTH and play the HOP (V); receive the CORKSCREW.
- Take the SHARP STONE, pull the chain, take the LILY, and EMBLEM (W).
- Walk down twice, go right, go downstairs.
- Use the CORKSCREW (X); receive the GOBLET OF WINE.
- Place the EMBLEM and take the HAMMER (Y).
- Walk down twice, go forward.
- Use the GOBLET OF WINE (Z); take the GRAPES (A).
- Place the GRAPES (B).
- Go forward.
- Talk to Louise (C).
- Play the HOP (D); receive the LION'S EYE.
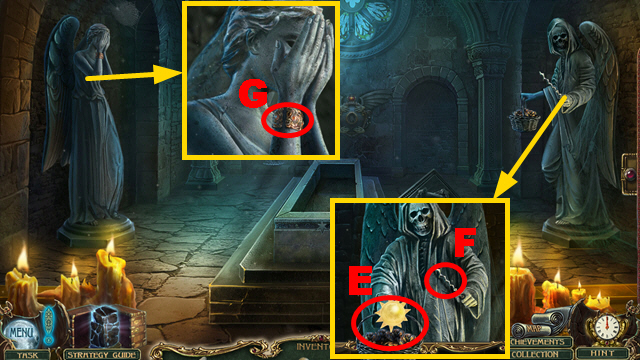
- Take the burning sun and place the LILY (E); take the DRILL BIT (F).
- Take the BRACELET (G).
- Walk down.
- Place the BRACELET and take the SHIELD (H).
- Go right.
- Place the LION'S EYE (I) and SHIELD (J); take the HAND (K) and SPIKE BRACELET (L).
- Walk down, go forward.
- Place the SPIKE BRACELET (M); take the TEAR (N).
- Place the HAND (O).
- Play the mini-game.
- Solution part 1: 1-4.
- Solution part 2: Put the rings P-R into the correct positions to assemble the image (green).
- Take the JEWEL.

- Place the JEWEL (S) and play the HOP; receive the NAILS.
- Walk down twice, go left.
- Place the TEAR and take the DRILL BASE (T).
- Place the DRILL BIT on the DRILL BASE; take the DRILL.
- Walk down, go forward.
- Use the DRILL and CLOTH (U); receive the SAP.
- Go right.
- Place the HAMMER (V), SAP (W), and NAILS (X).
- Play the HOP (Y); receive the MEDALLION PIECE.
- Go forward.
- Use the SHARP STONE (Z).
- Take the FINGER (A).
- Place the FINGER (B).
- Go left.
- Take the JAR (C), snowflake, ARROW (D), and BLADE HANDLE (E).
- Walk down.

- Use the ARROW and take the TILE (F).
- Go left.
- Place the TILE (G).
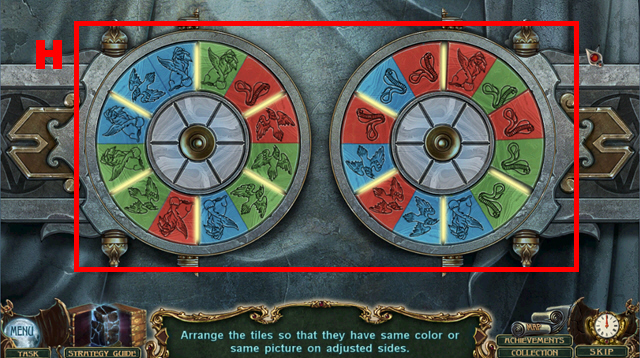
- Play the mini-game.
- Solution: Arrange the tiles correctly (H).
- This puzzle is randomized.
- Use the JAR (I); receive the JAR WITH OIL.
- Walk down.
- Use the JAR WITH OIL (J).
- Walk down.
- Take the snowflake and use the BLADE HANDLE (K); receive the KNIFE KEY.
- Go forward.
- Insert the KNIFE KEY (L); turn it.
- Go forward.
Chapter 6: The Castle
- Inspect the area (M).
- Push the button and take the MAP (N).
- Walk down.
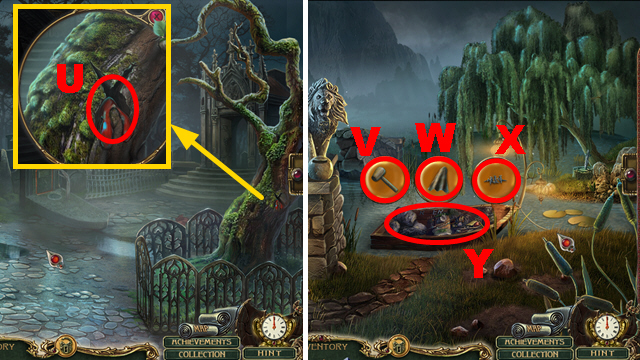
- Use the MAP (O); remove leaves twice, take the rain cloud, and HOOK (P).
- Go forward.

- Use the HOOK (Q).
- Play the HOP (R); receive the CHAIN.
- Walk down, go left.
- Place the CHAIN, HOOK, select the chain twice, and take the SPIKED KEY (S).
- Walk down, go forward.
- Insert the SPIKED KEY (T); turn it.
- Go right.
- Take the CROWBAR (U).
- Walk down twice, go left.
- Use the CROWBAR three times, take the SHACKLE, and BOLTCUTTER (V).
- Use the BOLTCUTTER (W); receive the EMBLEM.
- Walk down.
- Place the EMBLEM and take the SHOVEL (X).
- Go forward.
- Use the BOLTCUTTER and take the CAGE (Y).
- Go right.
- Place the CAGE (Z); collect 6 fireflies (purple) and take the LAMP.
- Use the SHOVEL, pull out the package, take the, note, CARVING BLADE, and LEATHER (orange).
- Walk down.
- Take the rain cloud and place the LAMP (A); take the STONE MASK (B).
- Go right.
- Place the SHACKLE (C) and STONE MASK (D); receive the JEWEL.
- Place the JEWEL (E).
- Play the mini-game.
- Solution: 1-3.
- Take the MEDALLION PART.
- Walk down.

- Place 2 MEDALLION PARTS (F).
- Go forward.
- Use the LEATHER and take the SYMBOL OUTLINE (G).
- Walk down, go right.
- Place the SYMBOL OUTLINE, use the CARVING BLADE, and take the WOODEN SYMBOL (H).
- Walk down, go forward.
- Place the WOODEN SYMBOL (I).
- Take the RUNE (J).
- Walk down.
- Play the HOP (K); receive the AWL.
- Go right.
- Use the AWL (L); receive the RUNE.
- Walk down.
- Place 2 RUNES (M).
- Play the mini-game.
- Solution: 1-3.
- Receive the RUSTY SWORD.
- Walk down, go left.
- Place the RUSTY SWORD (N); receive the SWORD.
- Walk down, go forward twice.
- Take the burning sun and use the SWORD (O).
- Select the man (P).
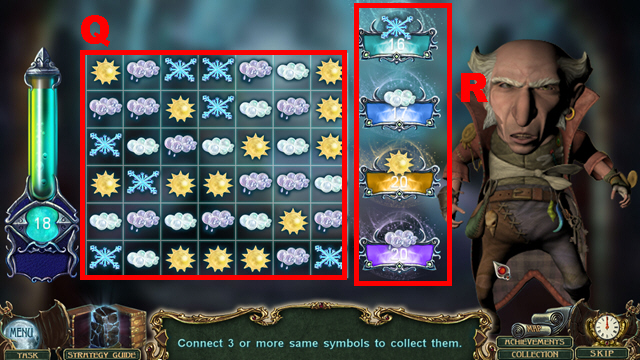
- Play the mini-game.
- Solution: Connect 3 or more symbols on board (Q) to collect the required number (R).
- This puzzle is randomized.
- Make a choice.
- Congratulations! You have completed Haunted Legends: Faulty Creatures.
Created at: 2017-01-01