

Walkthrough Menu
- General Tips
- Chapter 1: Pier
- Chapter 2: Catacombs
- Chapter 3: Castle Square
- Chapter 4: Castle Hall
- Chapter 5: Beach
General Tips
- This is the official guide for Haunted Legends: Monstrous Alchemy.
- This guide won't tell you when to zoom into a location; the screenshots show each zoom scene.
- Hidden-object puzzles are referred to as HOPs. Only the locations of the HOPs will be shown.
- Use the Map to fast travel to a location.
Chapter 1: Pier
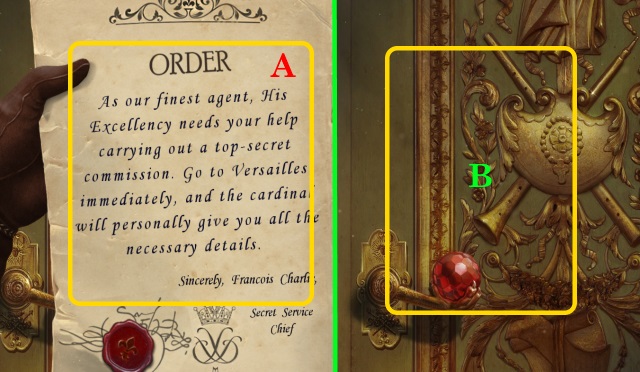
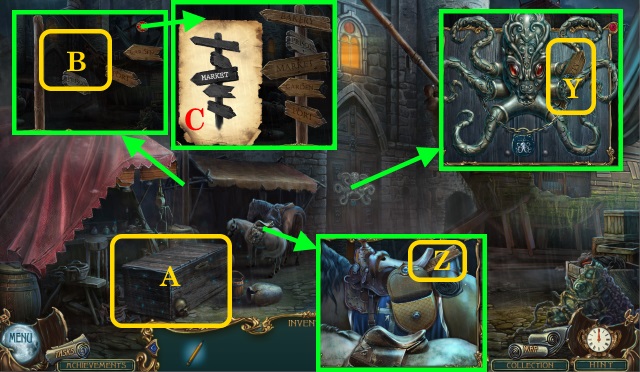
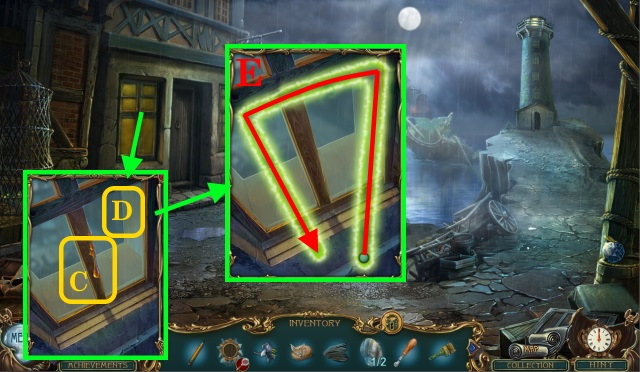
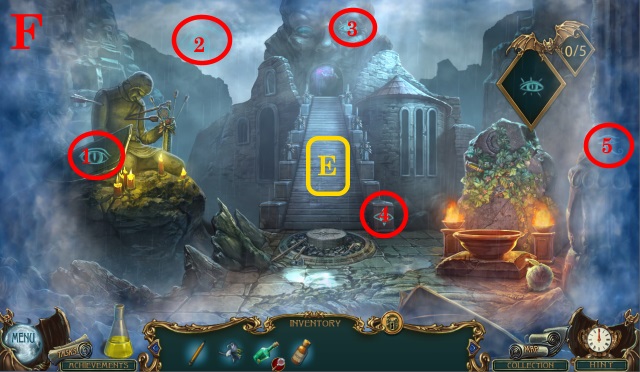
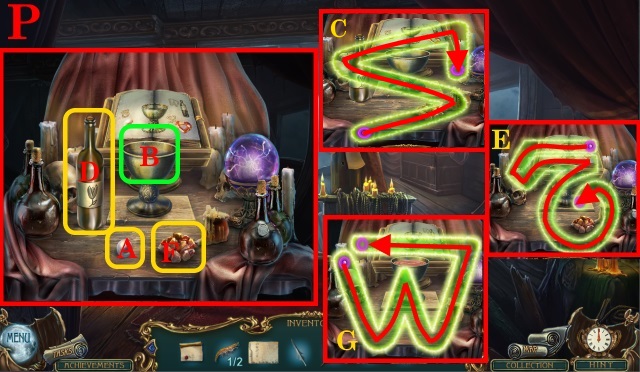
- Read (A); knock (B).
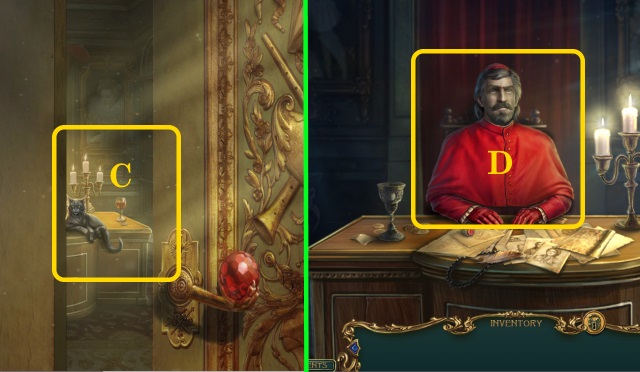
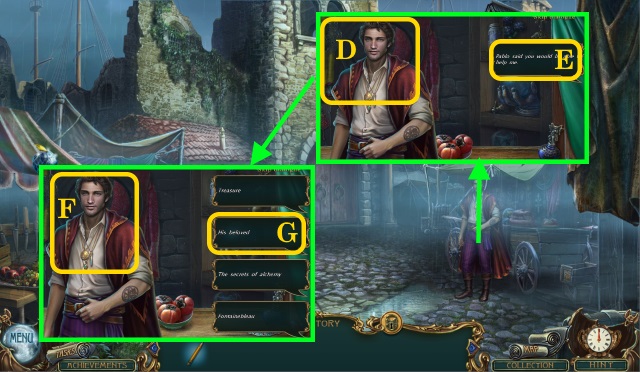
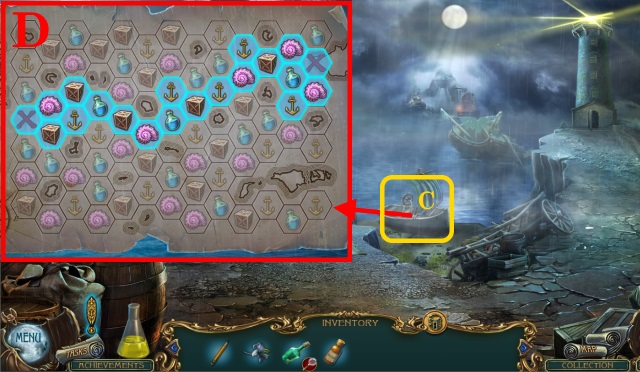
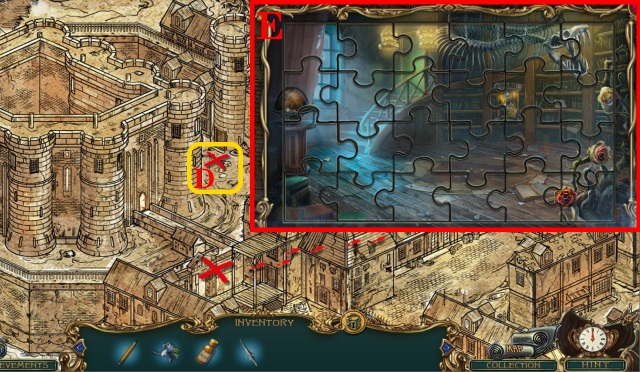
- Enter (C); speak (D).
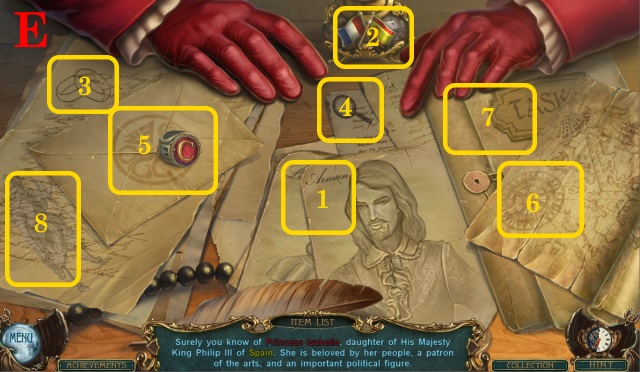
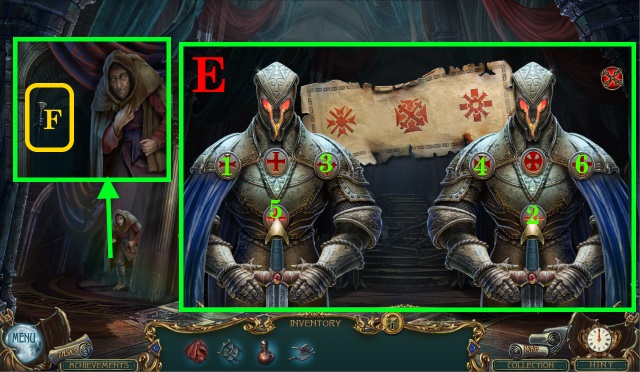
- Solution (E): 1-8.
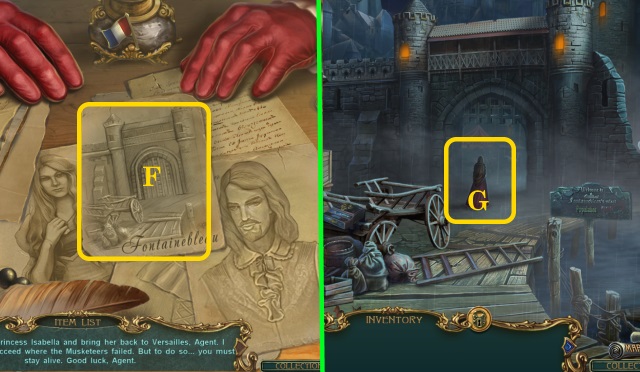
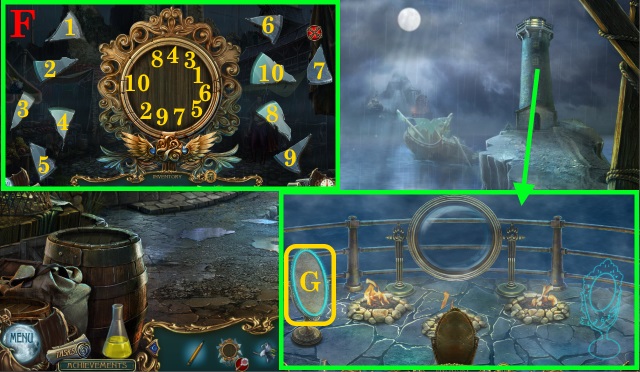
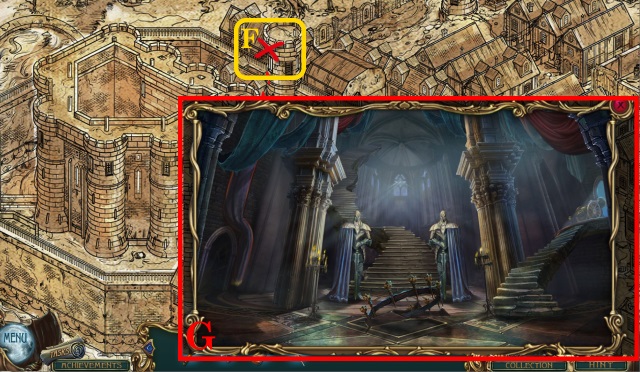
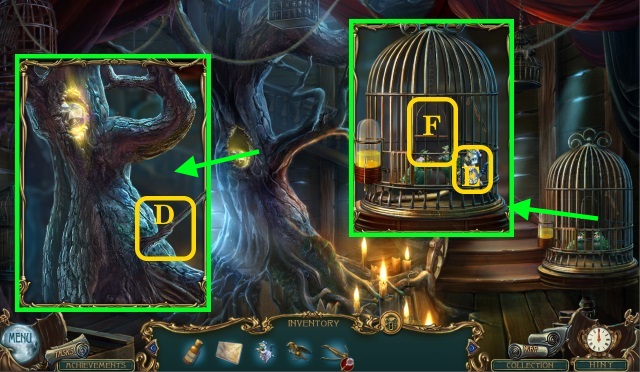
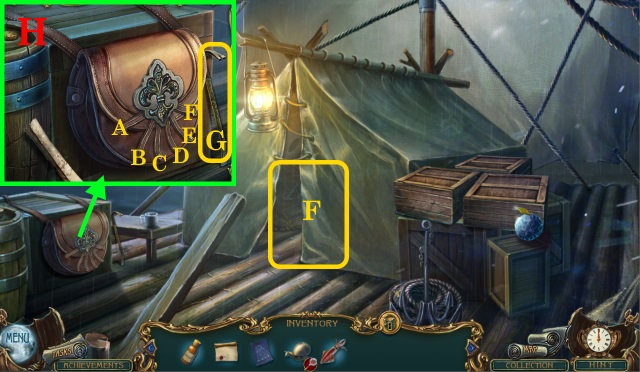
- Inspect (F); receive CARDINAL'S RING.
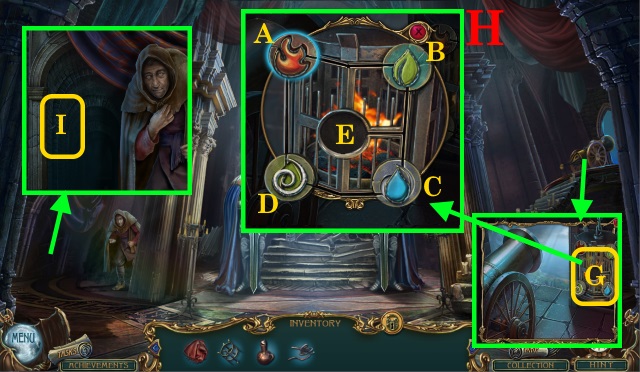
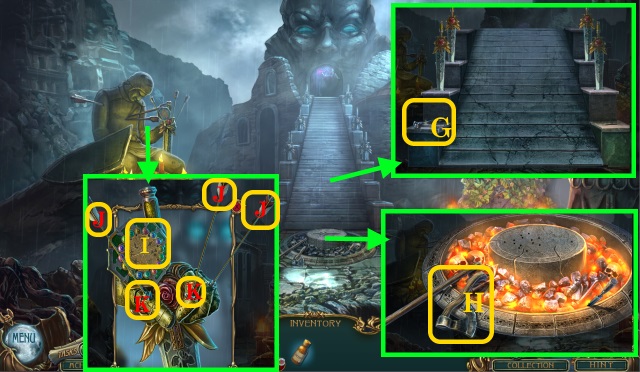
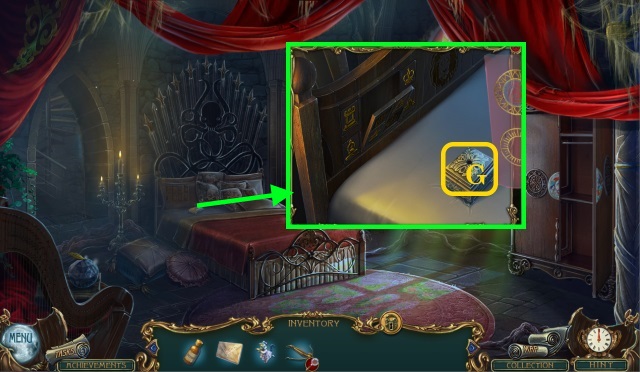
- Look (G).
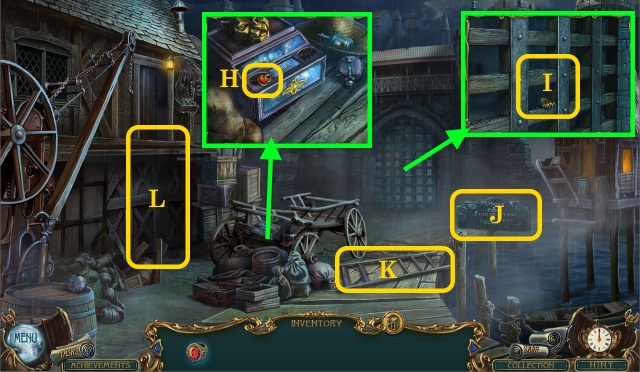
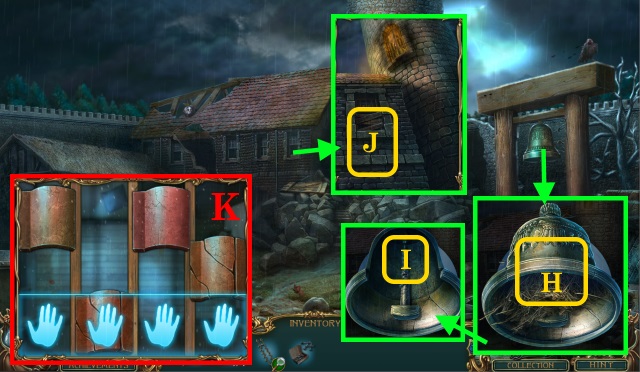
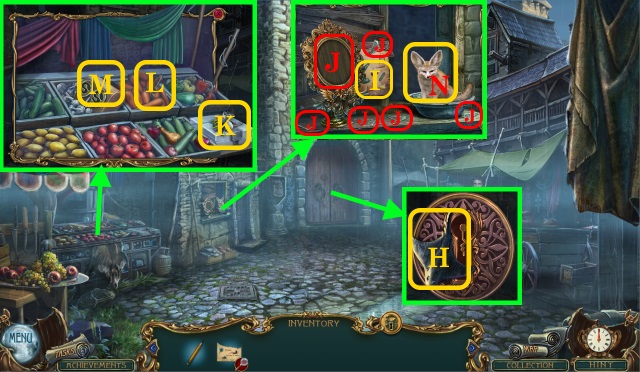
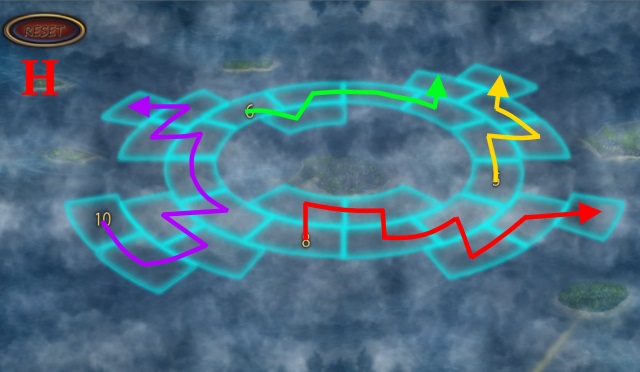
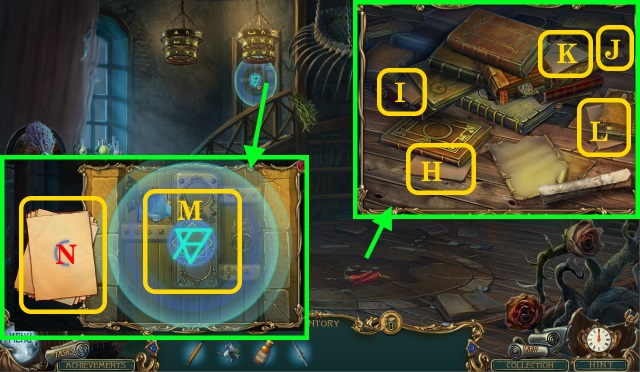
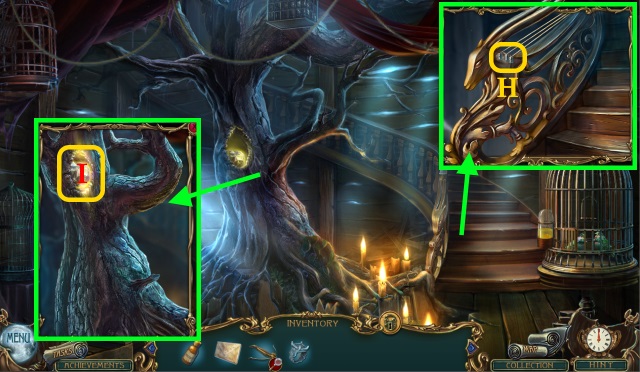
- Pick up FLAME EMBLEM (H).
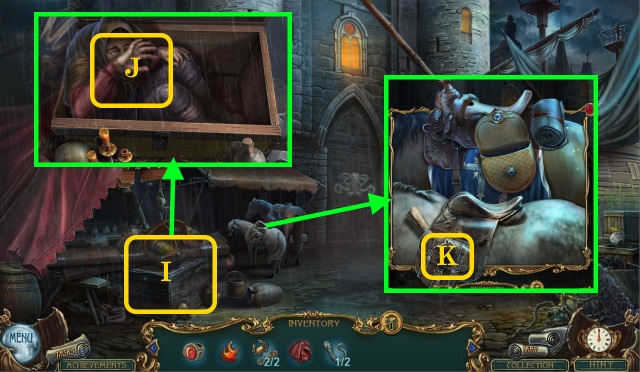
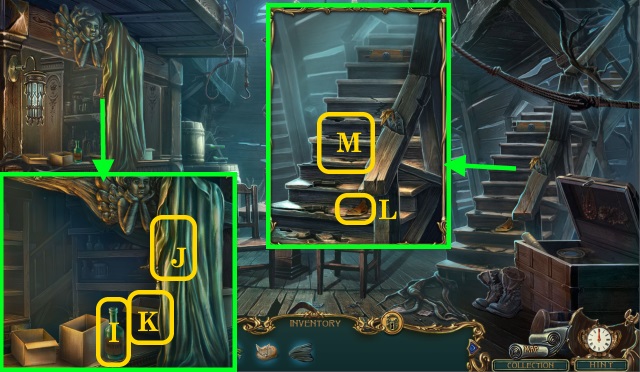
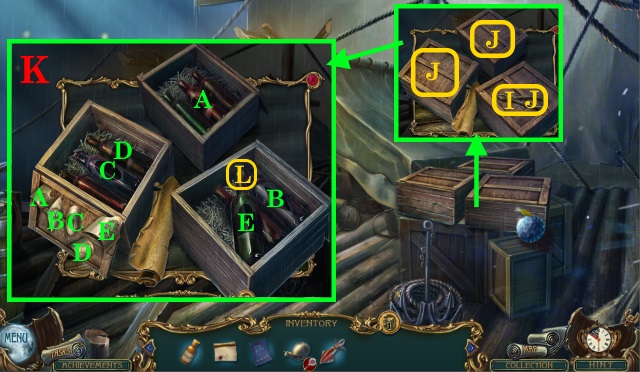
- Look (I); pick up TIGER PAW 1/2.
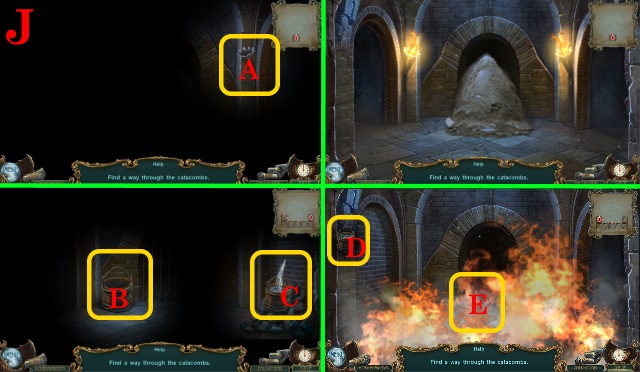
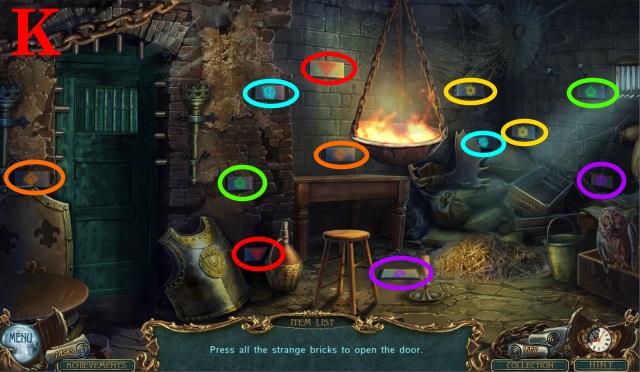
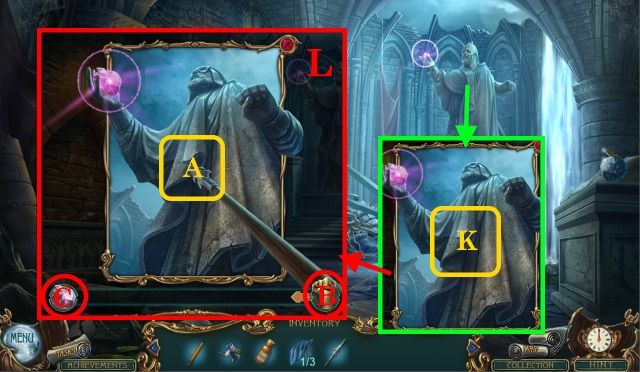
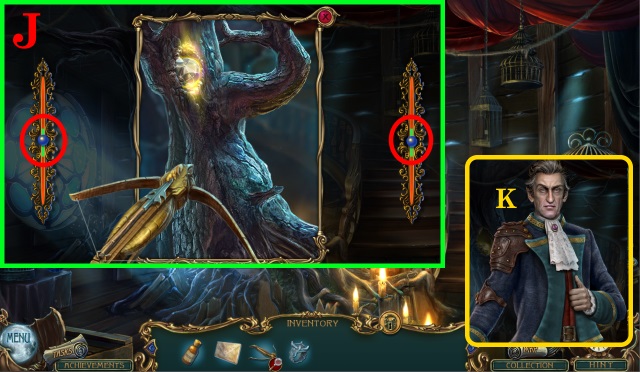
- Inspect (J).
- Move (K-L).
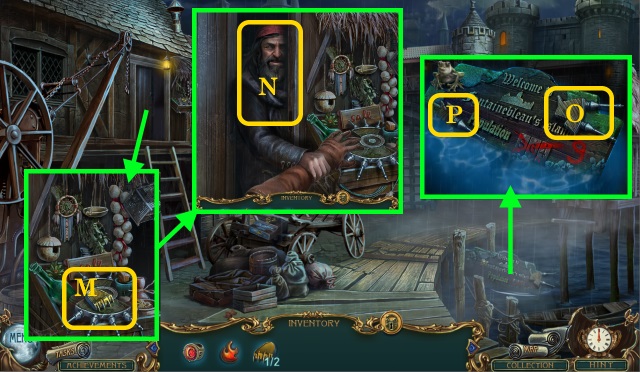
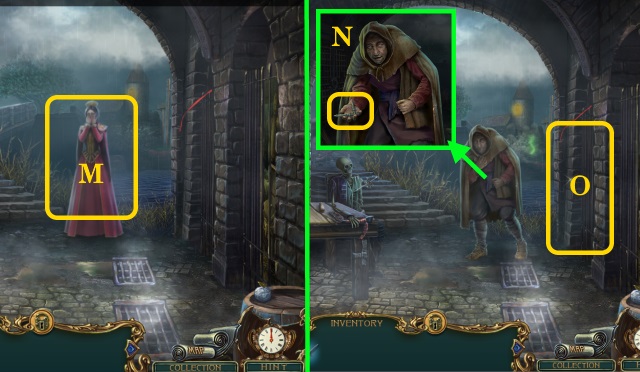
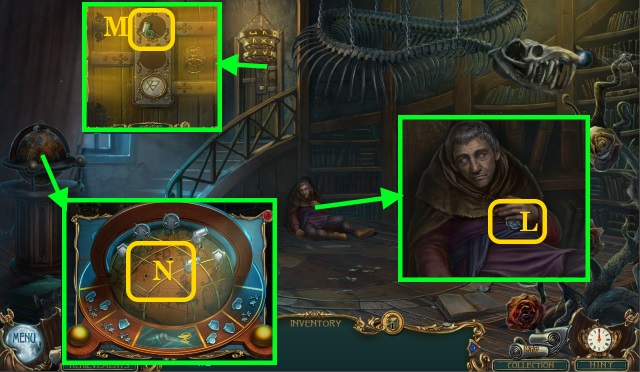
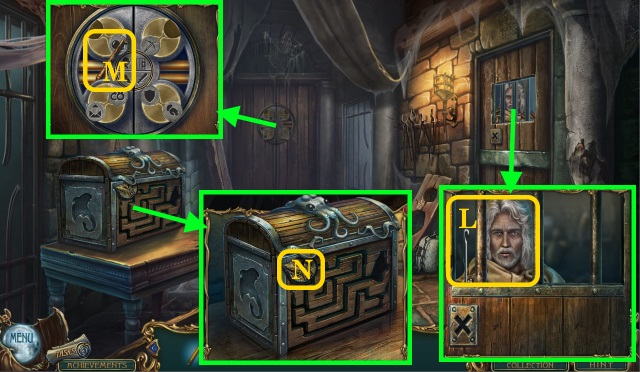
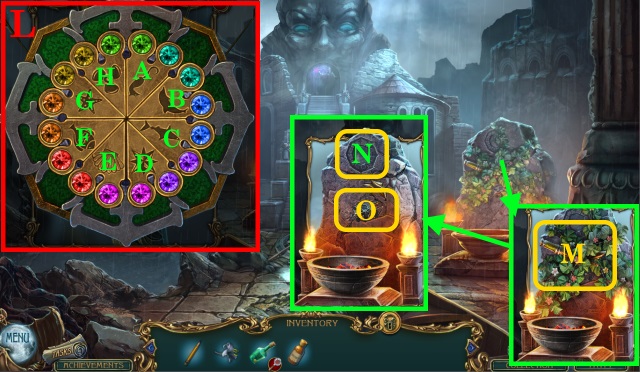
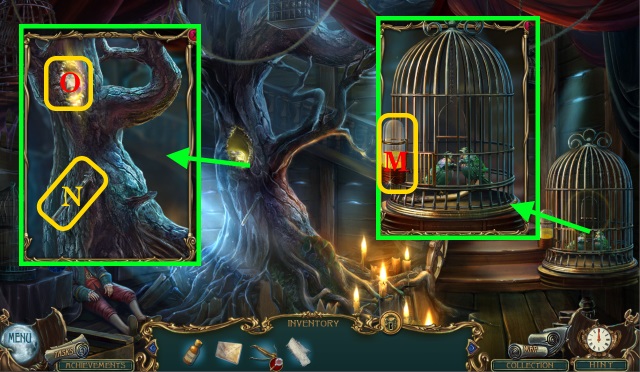
- Pick up TIGER PAW 2/2 (M); inspect.
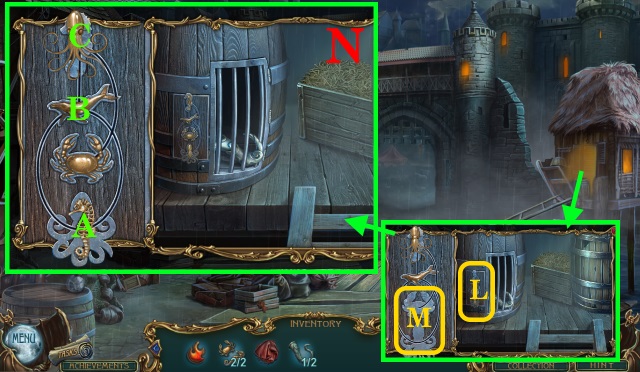
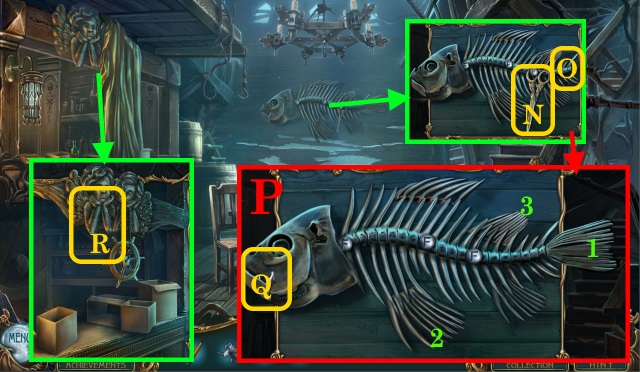
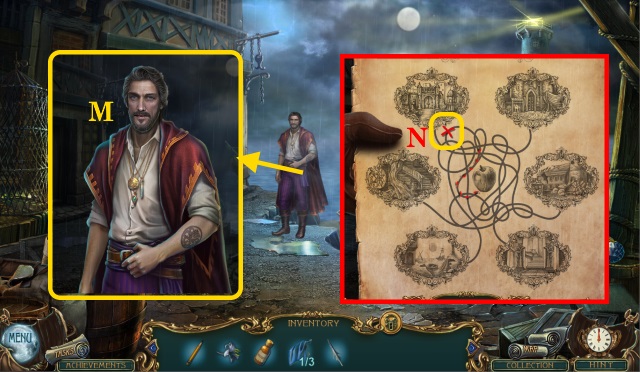
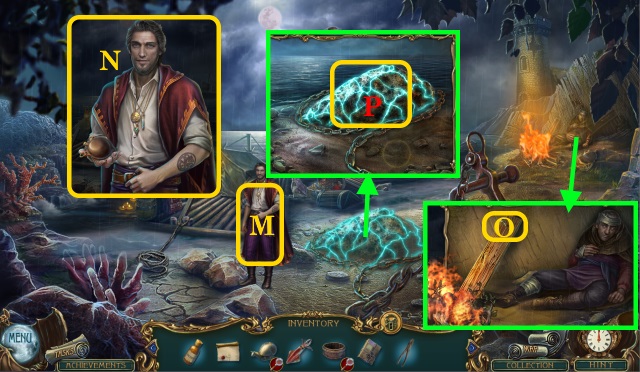
- Speak (N).
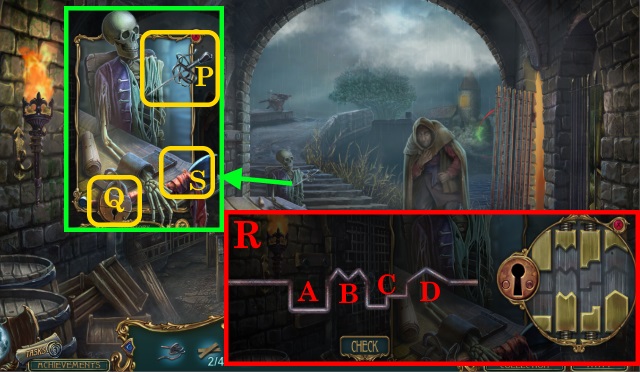
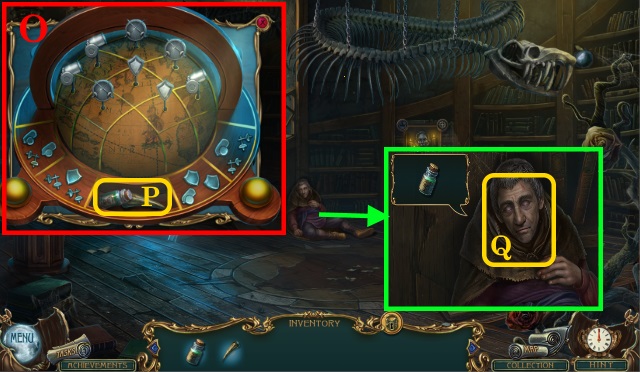
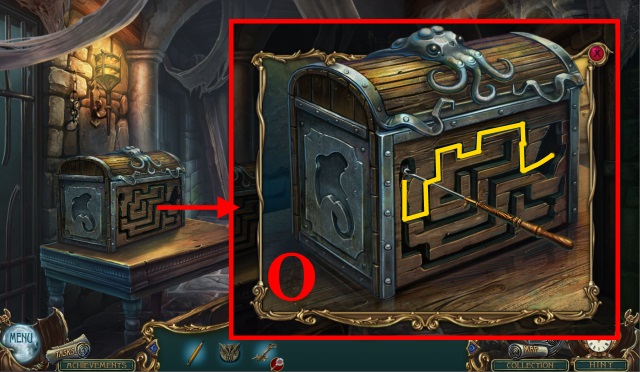
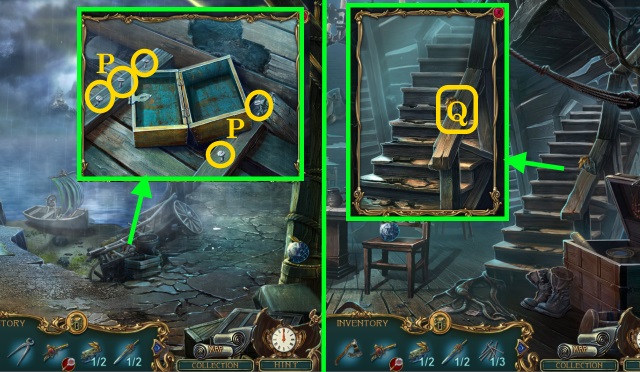
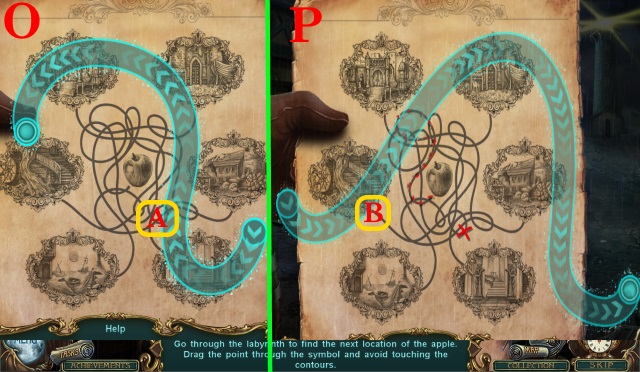
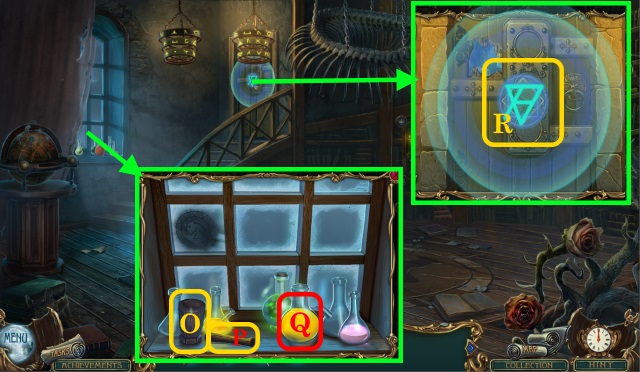
- Pick up WHEEL PART 1/7 (O); pick up WHEEL PART 2/7 (P).
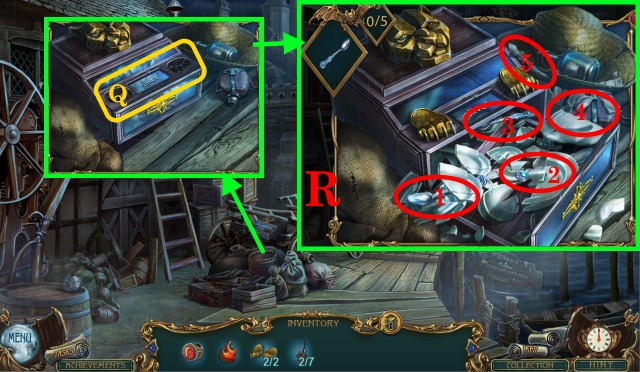
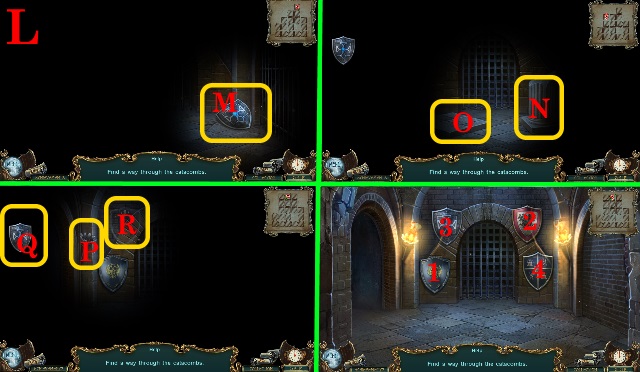
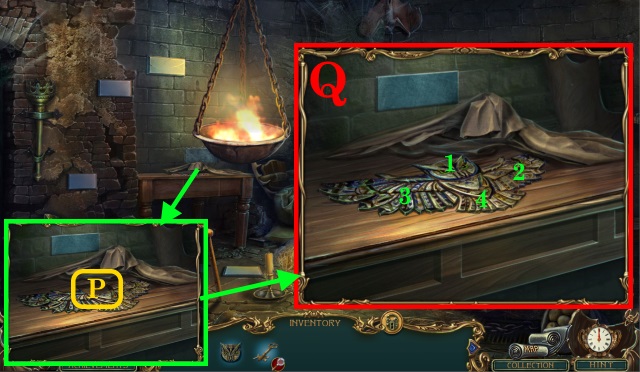
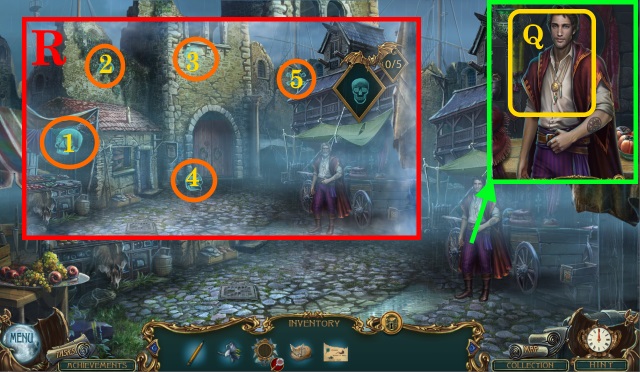
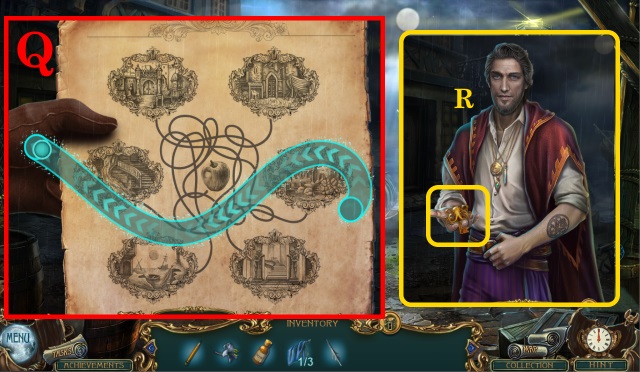
- Place TIGER PAW (Q).
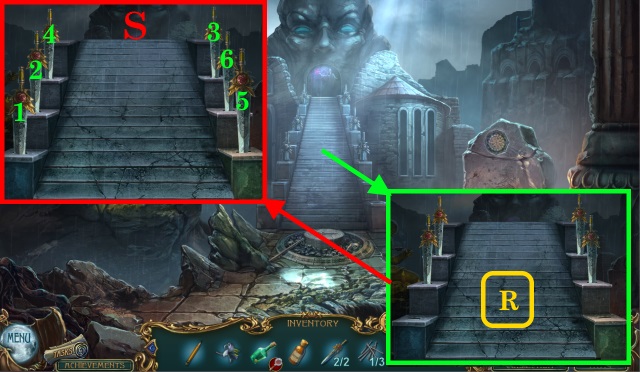
- Solution (R): 1-5.
- Receive SILVER SPOONS.
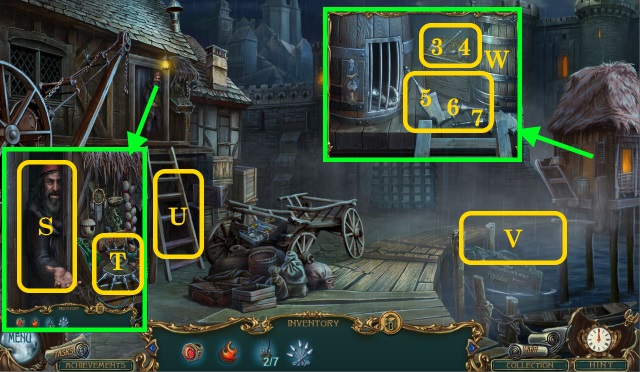
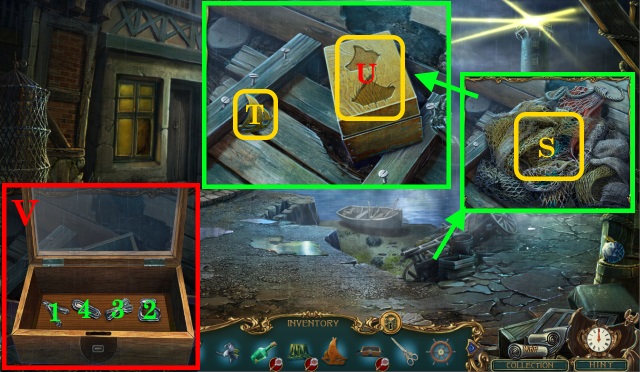
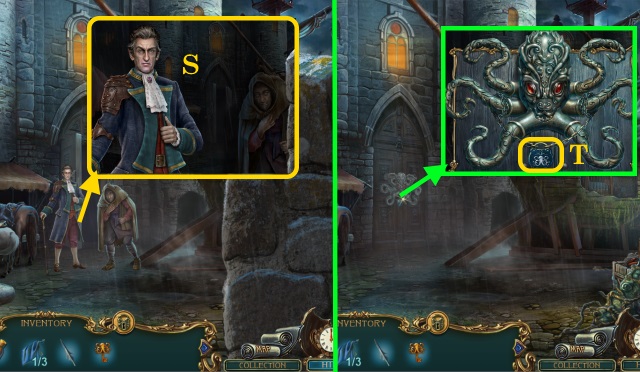
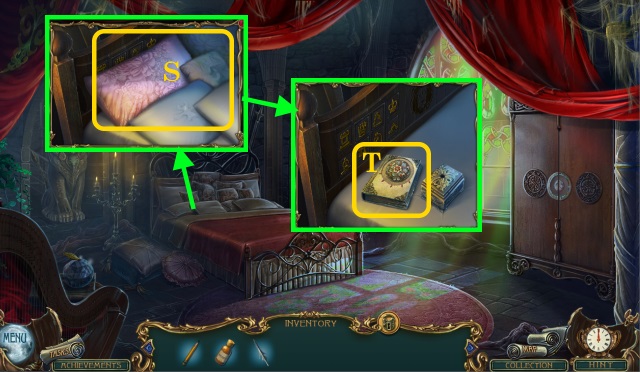
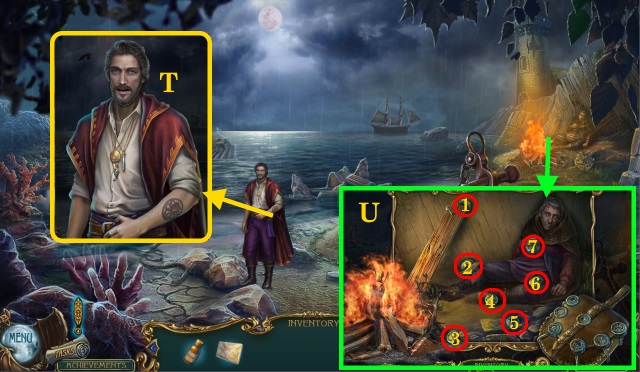
- Give SILVER SPOONS (S); speak.
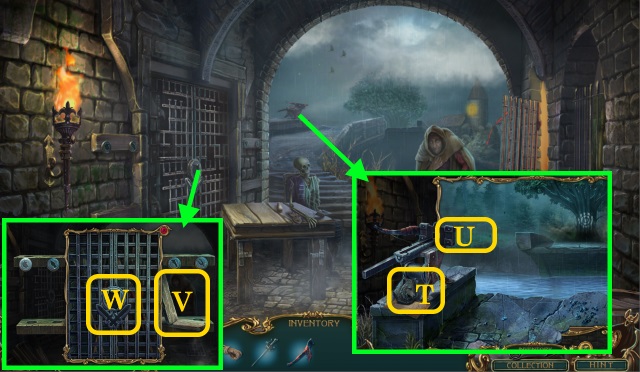
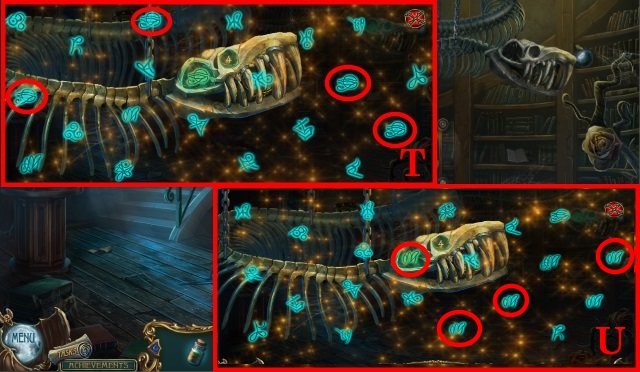
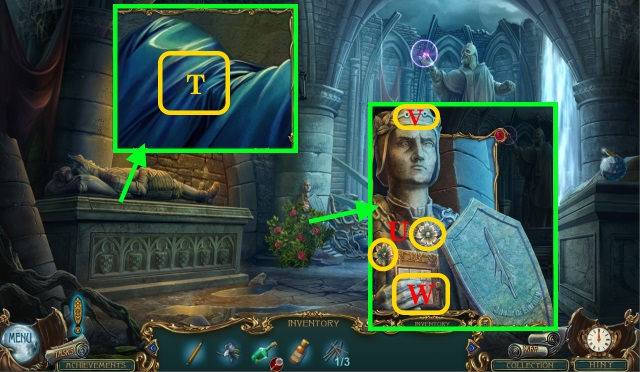
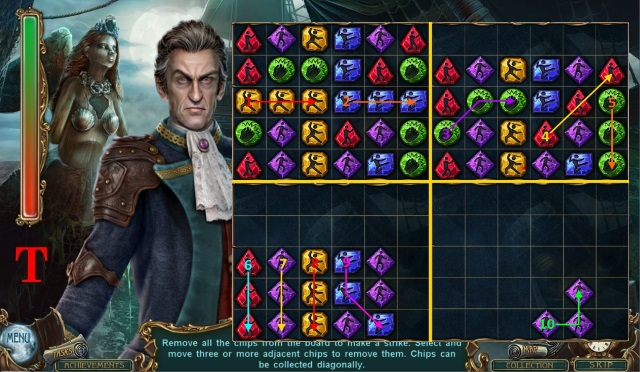
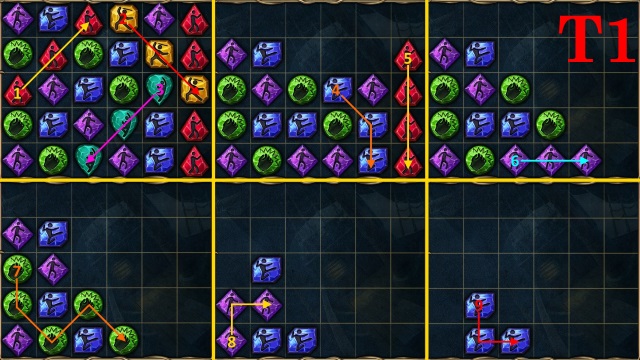
- Take GATE WHEEL (T).
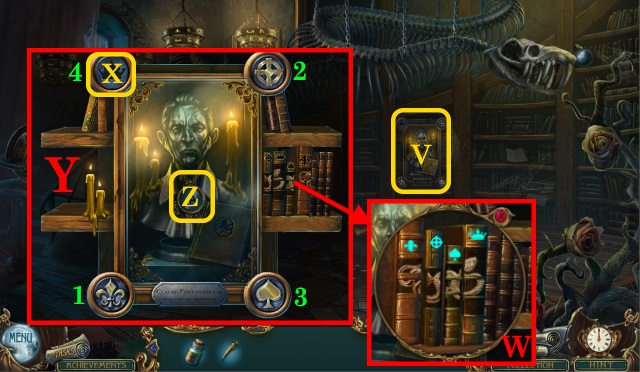
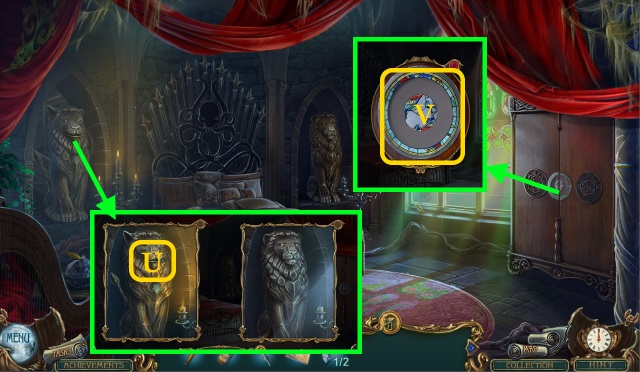
- Move (U-V).
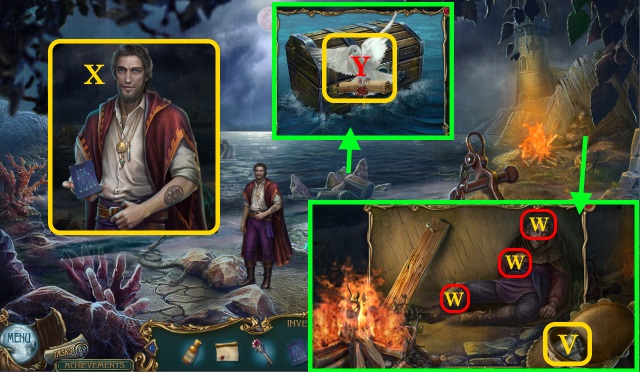
- Collect (3-7); receive WHEEL PART 7/7.
- WHEEL PART on GATE WHEEL.
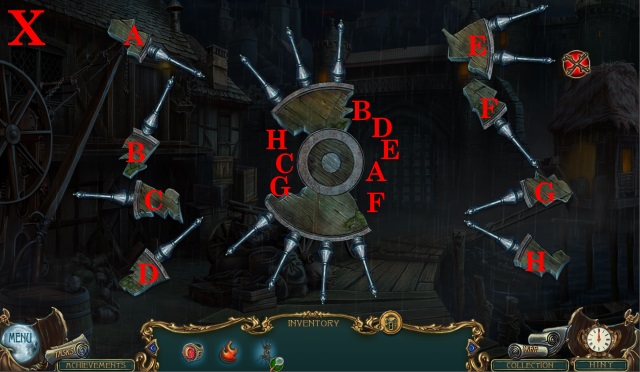
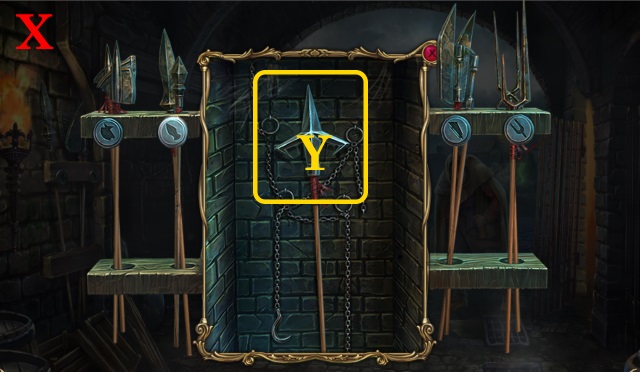
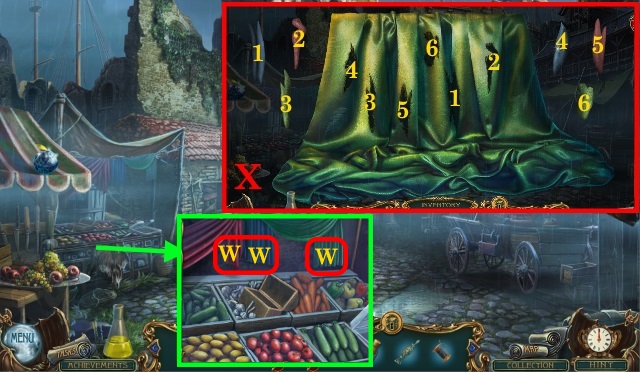
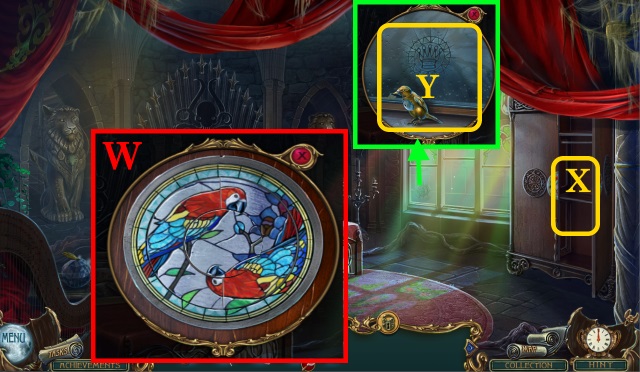
- Solution (X): Match A-H.
- Pick up GATE WHEEL.
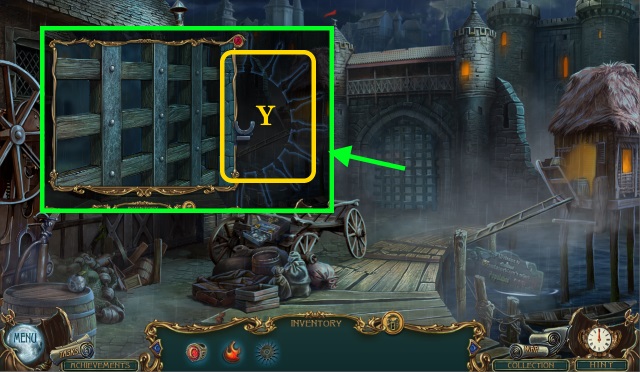
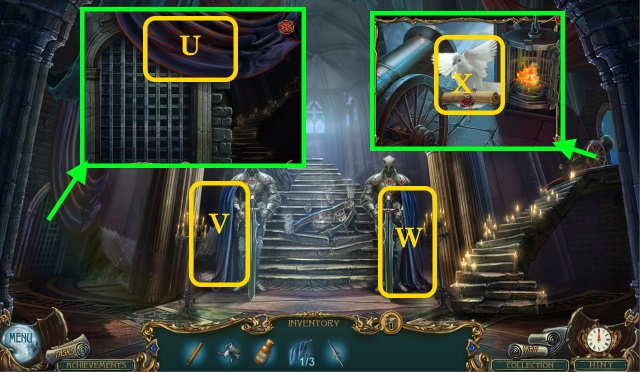
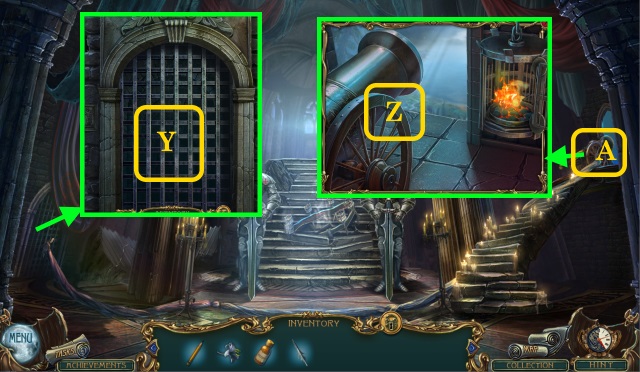
- Use GATE WHEEL (Y).
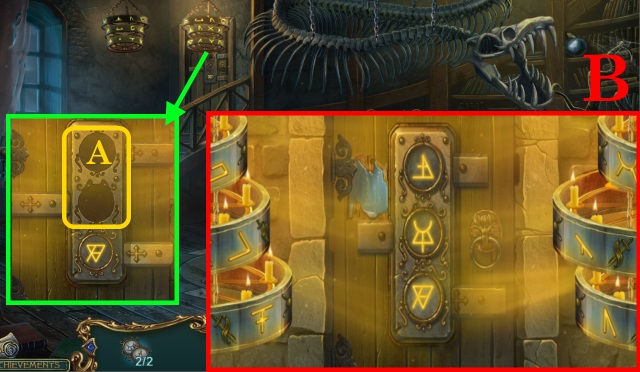
- Walk forward.
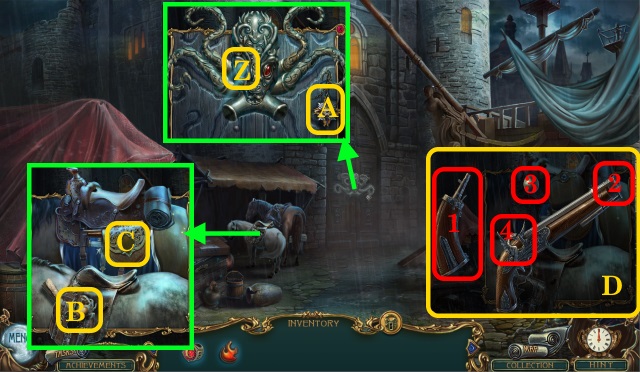
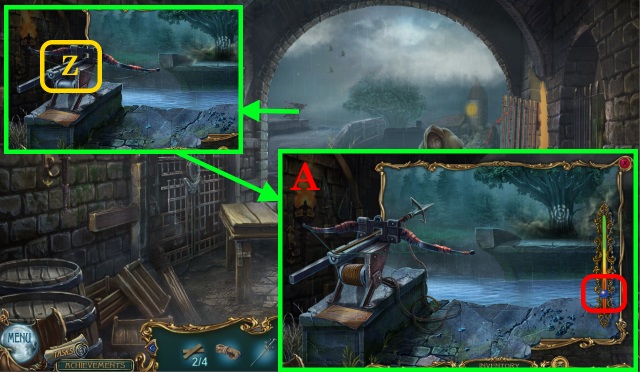
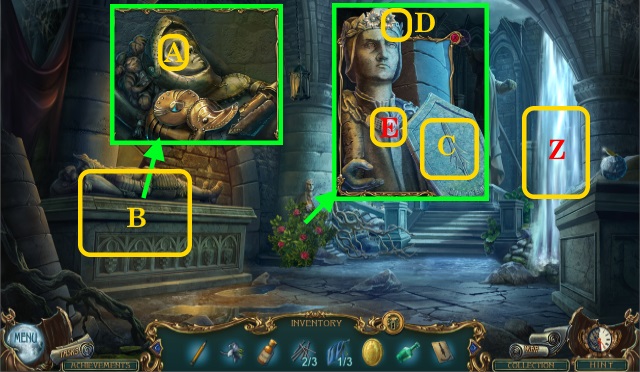
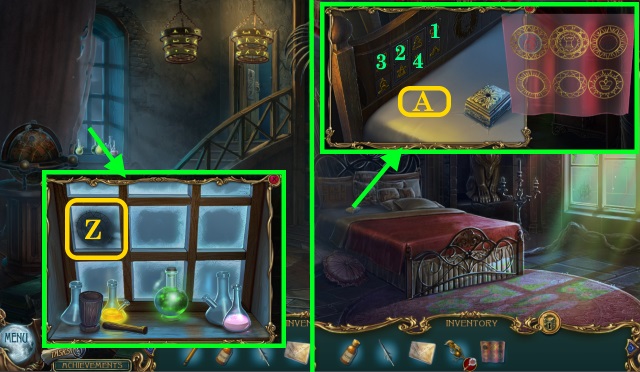
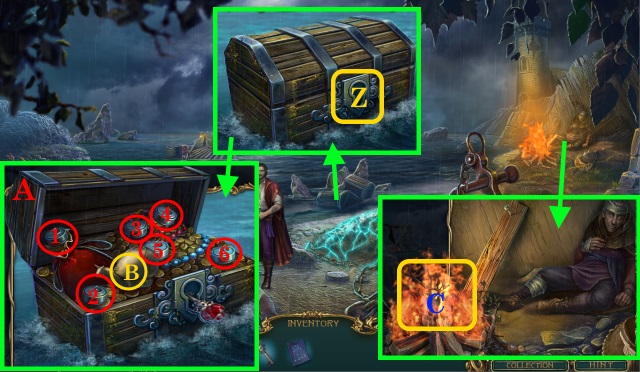
- Look (Z); pick up MEDAL (A).
- Pick up BRASS FIGURE 1/2 (B); place MEDAL (C); find PISTOL.
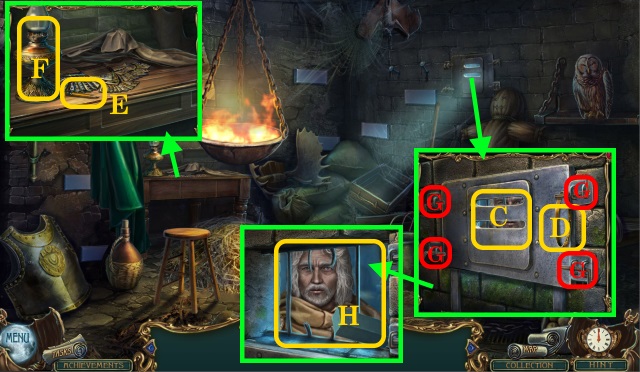
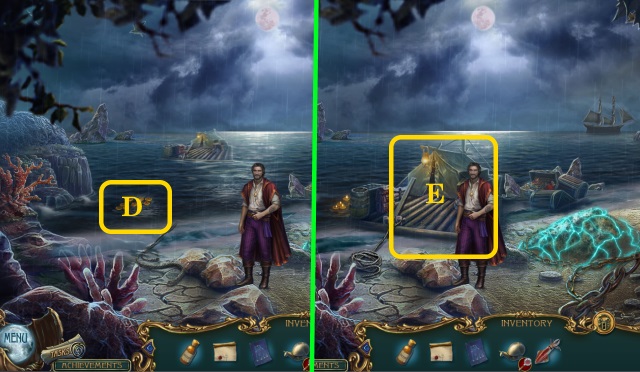
- Investigate PISTOL (D).
- Move 1-2; 3-2; 4; take PISTOL.
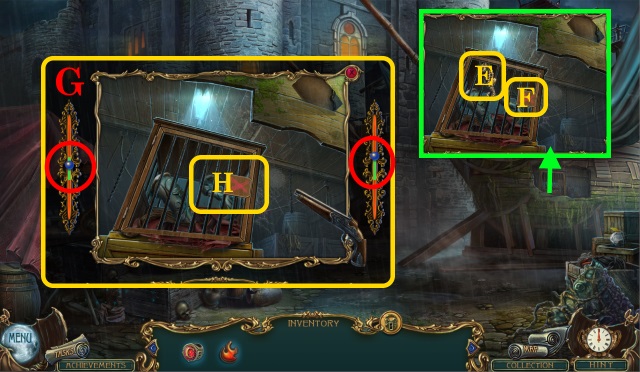
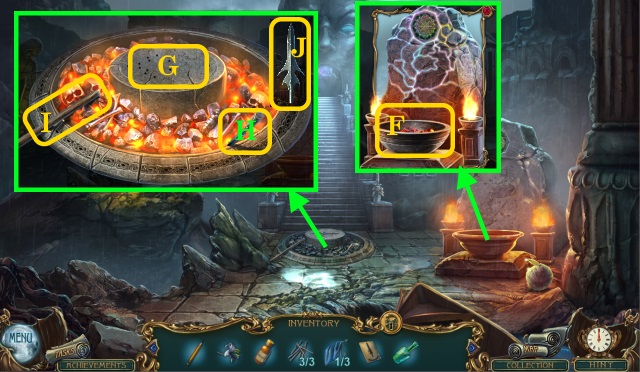
- Pick up BRASS FIGURE 2/2 (E); point PISTOL (F).
- Solution (G): Recommended strategy shown.
- Open (H); find SAIL and OCTOPUS PART 1/2.
- Complete HOP (I); speak (J); give CARDINAL'S RING.
- Take HORSE AMULET.
- Place HORSE AMULET (K); find RUBY EYE.
- Walk down.
- Look (L).
- Place BRASS FIGURE (M).
- Solution (N): A-B; C-B; B-A.
- Pick up OCTOPUS PART 2/2; walk forward.
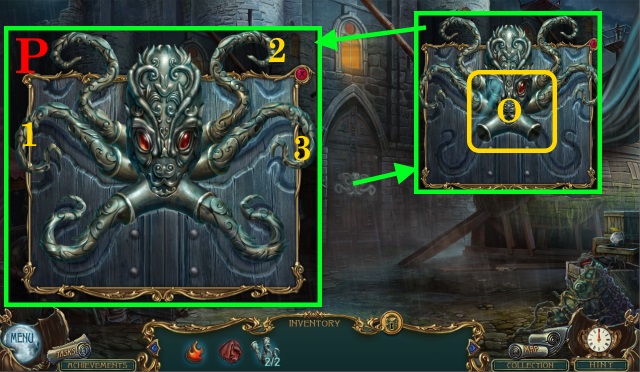
- Place RUBY EYE and OCTOPUS PART (O).
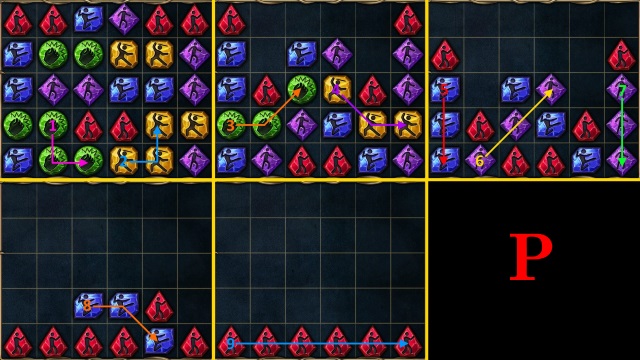
- Solution (P): 1-2-3.
- Walk forward.
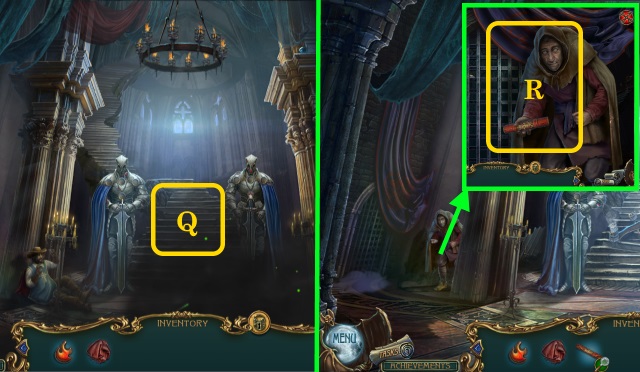
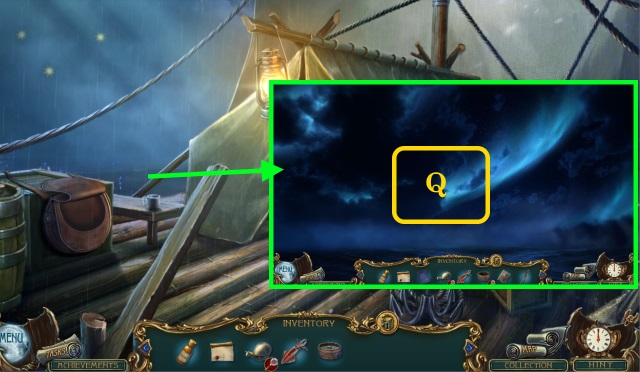
- Look (Q).
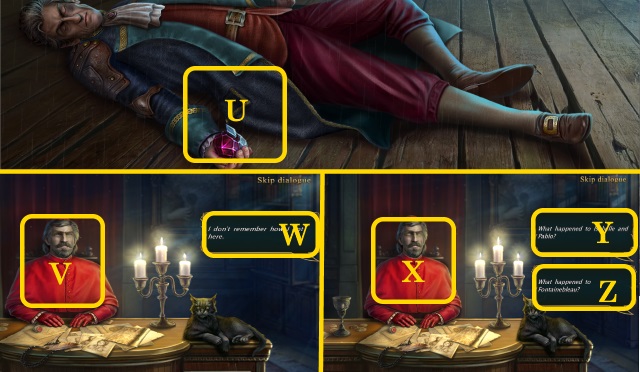
- Speak (R); take SCROLL.
- Inspect SCROLL.
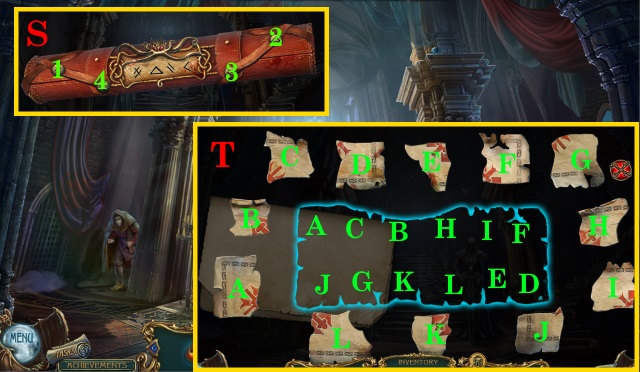
- Solution (S): 1-2-3-4; inspect.
- Solution (T): Match A-L.
- Take CODE and BONY FINGER.
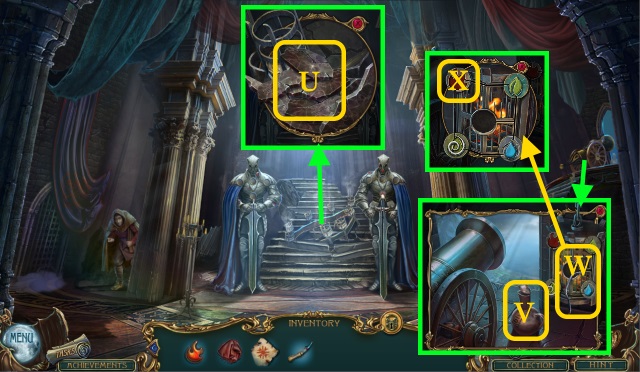
- Search (U); find TORCH PART.
- Pick up OIL (V) and WIRE (W); inspect.
- Place FLAME EMBLEM (X).
- Walk down.
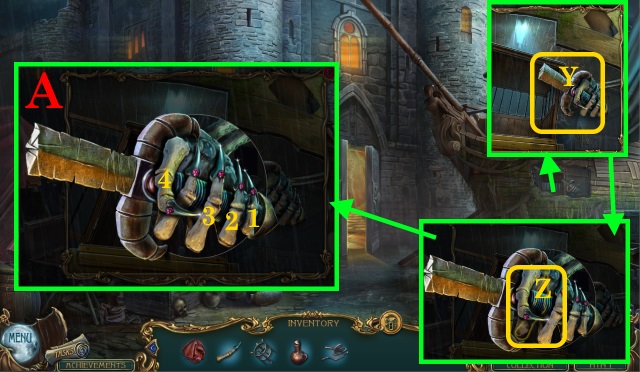
- Look (Y); place BONY FINGER (Z).
- Solution (A): 1-2-3-4.
- Receive HILT.
- Walk forward.
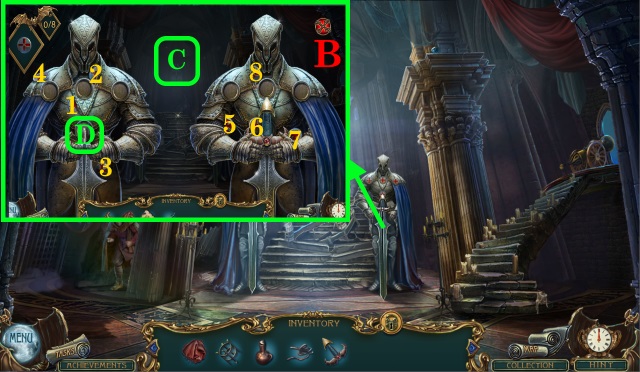
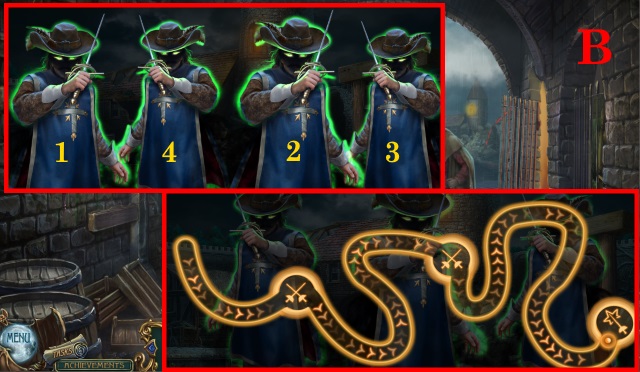
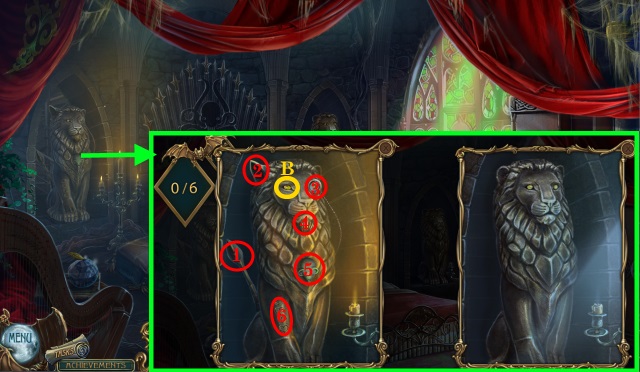
- Solution (B): 1-8.
- Place CODE (C); place HILT (D).
- Solution (E): 1-6.
- Pick up TORCH (F).
- TORCH PART, SAIL and OIL on TORCH.
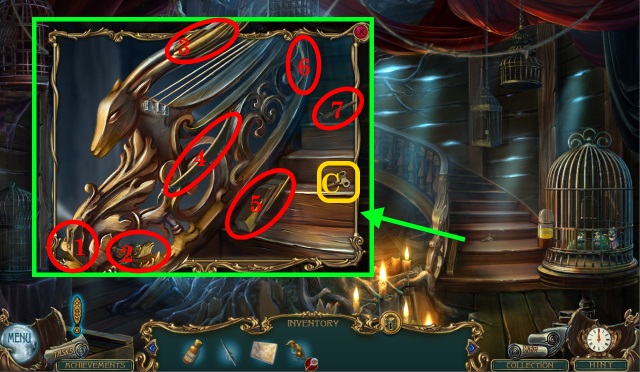
- Look (G).
- Solution (H): B-E; A-B; D-A; C-D; B-C; A-B; D-A; C-D; E-C; B-E; A-B; D-A; C-D; E-C.
- Light TORCH (G).
- Use TORCH (I).
- Solution (J).
- Look (A); right x2; forward.
- Fill (B) at (C); pick up WATER.
- Back; left x4; forward.
- Use (D) on (E).

- Solution (K).
- Right and forward; take SHOVEL (F).
- Back; left; back; right x2.
- Use (G) on (H).
- Forward x2; right x2.
- Take BOARDS x4 (I); walk left x2.
- Place (J) on (K).
- Forward; right; forward.
- Solution (L).
- Pick up SHIELD (M).
- Back; left x2.
- Move (N) to (O).
- Forward; right; look (P).
- Move (Q) to (R): 1-2-3-4.
- Walk forward.
Chapter 2: Catacombs
- Look (M).
- Speak (N); take KNIVES.
- Inspect (O); use TORCH on scene; complete HOP; receive ROPE.
- Take SWORD (P); use WIRE (Q).
- Solution (R): Ax4; Bx3; Cx2; D; select Check.
- Pick up BALLISTA PART (S).
- Pick up WOLF (T).
- Place BALLISTA PART (U).
- Pick up BOARDS 1/4 and 2/4 (V); place KNIVES and WOLF (W).
- Solution (X).
- Pick up BALLISTA BOLT (Y).
- ROPE on BALLISTA BOLT; tie; receive ROPED BOLT.
- Load ROPED BOLT (Z).
- Solution (A): Recommended strategy shown.
- Walk forward.
- Solution (B): 1-2-3-4.
- Recommended strategy shown.
- Pick up MAGNET and LADDER (C).
- Pick up BOARDS 3/4 and 4/4 (D).
- Inspect (E); use MAGNET (F).
- Solution (G): 1-2-3-4-A-5-6-7-8.
- Receive NAILS.
- Search (H); use SWORD (I); receive BELL CLAPPER.
- BOARDS, NAILS and BELL CLAPPER on LADDER.
- Place LADDER (J).
- Solution (K): Solution is random.
- Take PIN EMBLEM 1/2 (L).
- Pick up PIN EMBLEM 2/2 (M).
- Place PIN EMBLEM (N).
- Solution (O).
- Pick up SMELLING SALTS and FANG (P).
- Give SMELLING SALTS (Q); speak; take CROWN EMBLEM.

- Place FANG (R).
- Solution (S): Solution may be random; recommended strategy shown.
- Solution (T).
- Solution (U).
- Pick up MEDALLION 1/2.
- Complete HOP (V).
- Solution (W).
- Place CROWN EMBLEM (X).
- Solution (Y): 1-2-3-4.
- Pick up MEDALLION 2/2.
- Place MEDALLION (A).
- Solution (B).
- Walk forward.
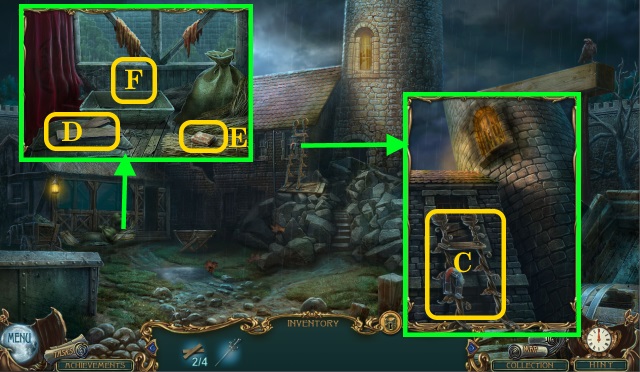
- Speak (C); pick up LAMP DECORATION (D).
- Pick up PENCIL (E) and OIL LAMP (F).
- LAMP DECORATION on OIL LAMP; find OIL.
- Use OIL (G); slide.
- Speak (H); take STRANGE BRICK.
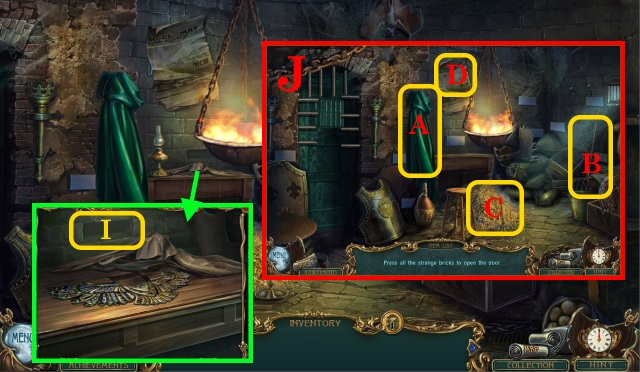
- Place STRANGE BRICK (I).
- Solution (J).
- Move (A); use (B) at (C); move (D).
- Solution (K); match.
- Walk left.
- Speak (L); take HOOK.
- Pick up HANDLE (M).
- HOOK on HANDLE; receive LONG HOOK.
- Pick up OWL HEAD (N); use LONG HOOK.
- Solution (O).
- Receive BROKEN KEY.
- Walk down.
- Place OWL HEAD (P).
- Solution (Q): 1-2-3-4.
- Pick up KEY PART and DOOR EMBLEM 1/2.
- Walk left.
- KEY PART on BROKEN KEY; receive PRISON KEY.
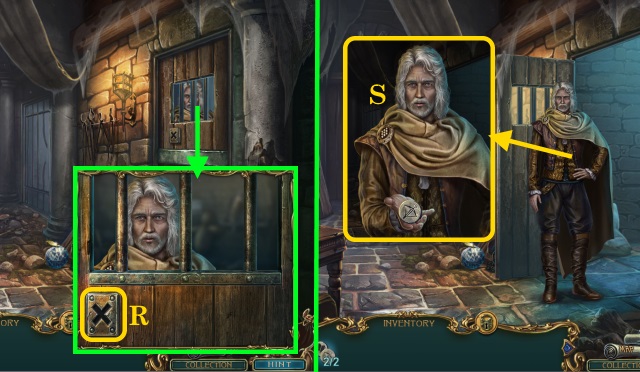
- Use PRISON KEY (R); speak (S); take DOOR EMBLEM 2/2.
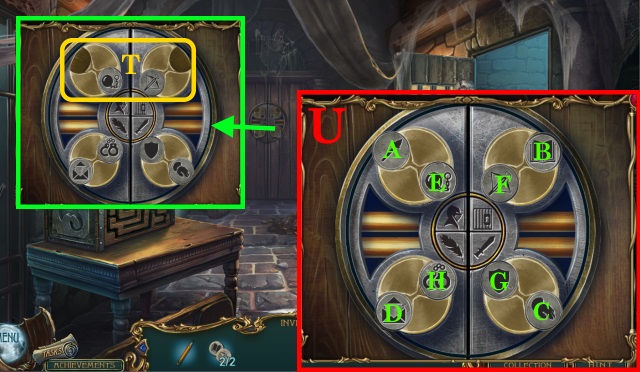
- Place DOOR EMBLEM (T).
- Solution (U): A-C; A-E; C-G; H-D; B-D; F-B; B-C; B-A.
- Walk forward.
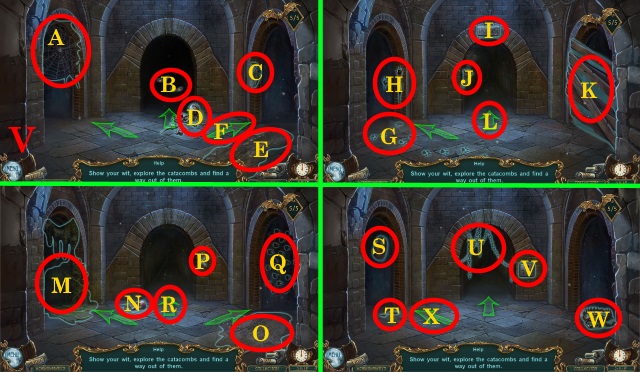
- Solution (V): A-X.
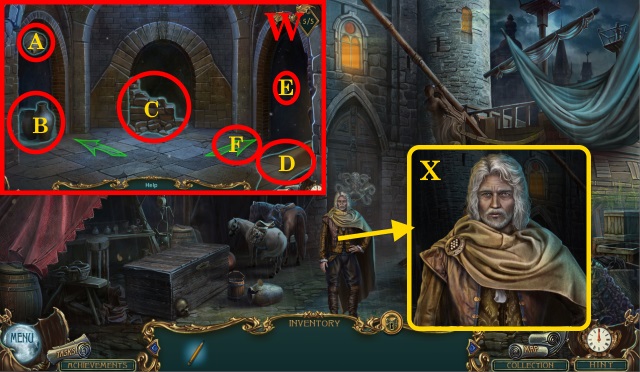
- Solution (W): A-F.
- Speak (X).
Chapter 3: Castle Square
- Pick up POINTER 1/2 (Y).
- Pick up POINTER 2/2 (Z).
- Complete HOP (A); receive CITY MAP.
- Place POINTER and CITY MAP (B).
- Solution (C).
- Walk left.
- Speak (D); select (E).
- Speak (F); select (G).
- Speak (F); complete HOP; receive POTION INGREDIENTS.
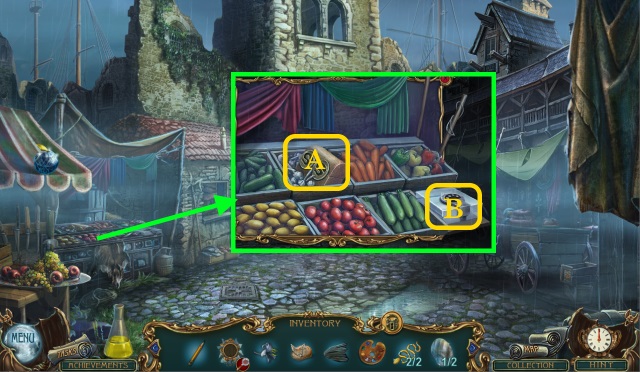
- Pick up METAL DEVILFISH (H).
- Pick up FOOD LIST (I); take CRUSHED MIRROR (J).
- Take LILY (K) and KNIFE (L).
- Use FOOD LIST (M); complete HOP; take CHICKEN LEG.
- Give CHICKEN LEG (N); pick up CUTE FOX and SILVER DISH.
- Walk down.

- Use KNIFE (O); receive HORSEHAIR.
- Walk right.
- Place METAL DEVILFISH (P); find FLOWER and FILE.
- FILE on SILVER DISH; take SILVER DUST.
- Move to Market.
- HORSEHAIR, FLOWER and SILVER DUST on POTION INGREDIENTS.
- Give POTION INGREDIENTS (Q); speak.
- Solution (R): 1-5.
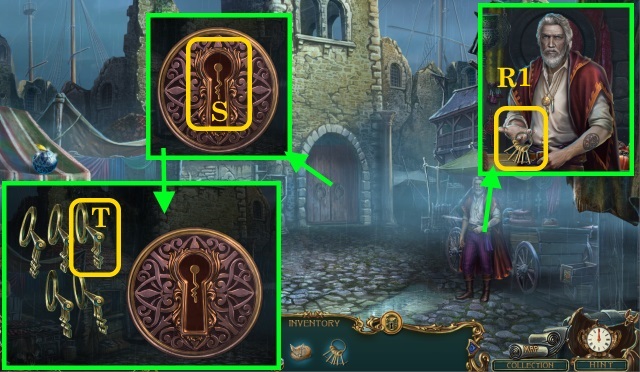
- Speak (R1); take PORT KEYS.
- Use PORT KEYS (S); select (T).
- Walk forward.
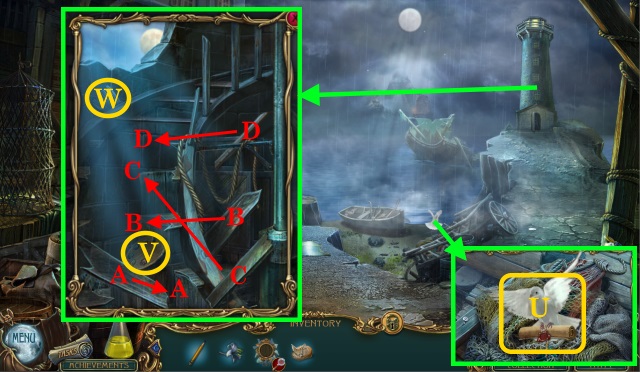
- Read (U) and send.
- Pick up PALETTE (V) and FISH'S TAIL (W).
- Match A-D.
- Pick up SNAKE 1/2 (X).
- Pick up SNAKE 2/2 (Y).
- Take MIRROR 1/2 (Z).
- Walk down.
- Place SNAKE (A); pick up GLASS CUTTER.
- Use PALETTE (B); take BRUSH.
- Walk forward.
- Use BRUSH (C); receive BRUSH WITH RESIN.
- Use GLASS CUTTER (D).
- Solution (E): Recommended strategy shown.
- Inspect CRUSHED MIRROR; assemble.
- Solution (F): 1-10.
- BRUSH WITH RESIN on CRUSHED MIRROR; pick up MIRROR 2/2.
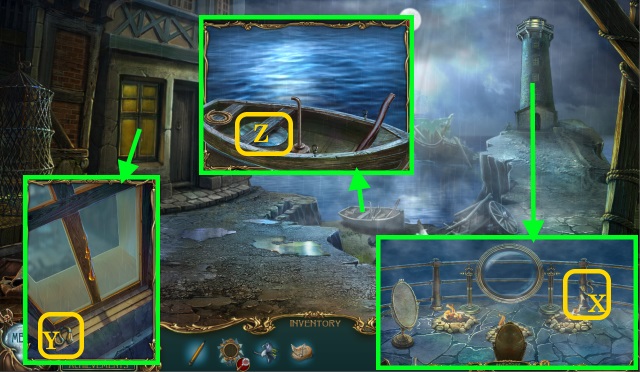
- Place MIRROR (G).
- Solution (H).
- Walk left.
- Pick up BOTTLE (I); take TORN CURTAIN (J).
- Inspect (K); pick up CRACKERS.
- Take SHIP (L); place CUTE FOX and CRACKERS (M); receive TOOLBOX.
- Take SCISSORS (N); place FISH'S TAIL (O).
- Solution (P): 1-2-3.
- Take ANCHOR (Q).
- Place ANCHOR (R); receive SHIP'S WHEEL.
- Walk down.
- Search (S).
- Move (T) to (U); place SHIP (U); take TOOLS EMBLEM.
- TOOLS EMBLEM on TOOLBOX; take SOLVENT and SCREWDRIVER.
- Solution (V): 1-2-3-4.
- Find NEEDLE.
- Walk down.
- Use SCISSORS (W); receive PIECES OF CLOTH.
- PIECES OF CLOTH on TORN CURTAIN.
- Solution (X): Match 1-6.
- NEEDLE on TORN CURTAIN; take SAIL.
- Move to Tavern.

- Use SCREWDRIVER (Y); take SPINE.
- Walk down.
- Place SPINE and SHIP'S WHEEL (Z).
- Move (A) to (Z); use (B) on (Z).
- Drape SAIL (Z).
- Look (C).
- Solution (D).
- Look (E).
- Solution (F): 1-5.
- Pick up TONGS (G).
- Take AXE (H).
- Pick up IDOL DISK (I).
- Remove (J); use TONGS (K); take STONE SWORD 1/2.
- Inspect IDOL DISK.
- Solution (L): B-E; F-H; E-G; E-F.
- Take IDOL DISK.
- Pick up BROKEN SWORD (M); clear.
- Place IDOL DISK (N); pick up SWORD PART 1/2 (O).
- Walk down.
- Use TONGS (P); receive SILVER 1/3.
- Walk left.
- Use AXE (Q); take SWORD PART 2/2.
- Go to Island.
- SWORD PART on BROKEN SWORD; assemble; take STONE SWORD 2/2.
- Place STONE SWORD (R).
- Solution (S): 1-6.
- Walk forward.
- Take CLOAK (T).
- Move (U) to (V); take BOOK (W).
- Inspect BOOK.

- Take CORKSCREW (X).
- Solution (Y): 6-5-4-7-8-5-2-1-4-7-8-5-4-7-8-9-6-5-4-1-2-3-6-5-8-9-6-3-2-1-4-5-2-3-6-9-8-7-4-1.
- Open; find CROWN PIECE and PAPER.
- CORKSCREW on BOTTLE; take COIN and EMPTY BOTTLE.
- Fill EMPTY BOTTLE (Z); receive WATER.
- Place COIN (A); inspect.
- Complete HOP (B); receive SILVER 2/3.
- Use PAPER and PENCIL (C); take SPEAR OUTLINE.
- Place CROWN PIECE (D); pick up SILVER 3/3 (E).
- Walk down.
- Place SILVER (F); pick up HOT METAL.
- Place SPEAR OUTLINE (G); move (H) to (G); pour HOT METAL and WATER.
- Inspect (G); move (I) to (J); take SPEAR.
- Walk forward.
- Use SPEAR (K).
- Solution (L): Thrust (A) until (B) reaches (C).
- Receive SPEARHEAD.
- Walk down.
- Speak (M).
- Select (N).
- Solution (O): Recommended strategy shown.
- Select (A).
- Solution (P): Recommended strategy shown.
- Select (B).
- Solution (Q): Recommended strategy shown.
- Speak (R); take DOOR KEY.
- Go to Castle Square.
Chapter 4: Castle Hall
- Speak (S).
- Use DOOR KEY (T).
- Walk forward.
- Take CLOTH (U).
- Take CLOAK 2/3 (V).
- Take CLOAK 3/3 (W).
- Read (X) and send.
- CLOAK on CLOTH; assemble; receive ROPE.
- Tie ROPE (Y); tie ROPE (Z); push (A).
- Walk left.
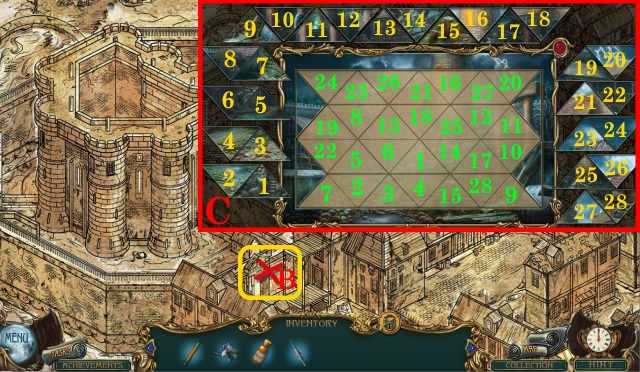
- Select (B).
- Solution (C): Match 1-28.
- Select (D).
- Solution (E).
- Select (F).
- Solution (G).
- Read (H-L).
- Receive SYMBOL SOLUTION.
- Place SYMBOL SOLUTION (M); read (Nx5).
- Complete HOP; receive INGREDIENTS.
- Place LILY (O); use (P); pour (O) in (Q).
- Place INGREDIENTS (O); use (P); add (O) to (Q).
- Take POTION.
- Use POTION (R).
- Walk forward.
- Move (S); take DIARY (T).
- Read DIARY; find LETTERS and CUPBOARD PART 1/2.
- Pick up CUPBOARD PART 2/2 (U).
- Place CUPBOARD PART (V).
- Solution (W).
- Pick up SHAWL (X).
- Take SLEEPING BIRD (Y); use SHAWL and PENCIL; receive CODE FRAGMENT.
- Walk down.
- Use CODE FRAGMENT and PENCIL (Z); take CODE.
- Walk forward.
- Place CODE (A): 1-2-3-4.
- Find LION EYE.
- Place LION EYE (B); select 1-6.
- Walk left.
- Pick up WINDER (C); collect 1-7; take CROSSBOW.
- Take BRANCH (D).
- WINDER on SLEEPING BIRD; take BIRD.
- Take BALLERINA (E).
- Release BIRD (F); receive TRIGGER.
- Walk down.
- Place BALLERINA (G); pick up SPECIAL RING.
- Walk left.
- Use SPECIAL RING (H); receive STRING.
- Inspect CROSSBOW.
- SPEARHEAD, BRANCH, TRIGGER and STRING on CROSSBOW; load; receive LOADED CROSSBOW.
- Shoot LOADED CROSSBOW (I); receive CROSSBOW.
- Solution (J): Recommended strategy shown.
- Speak (K).
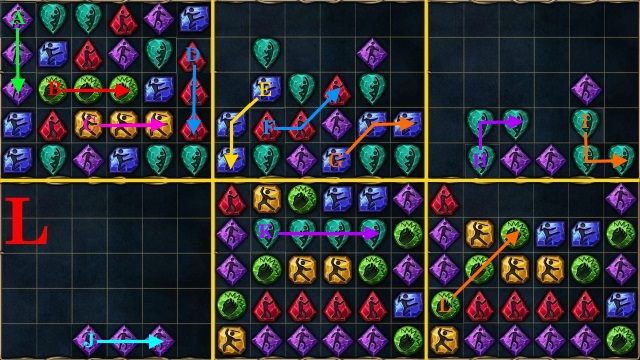
- Solution (L): (A-L).
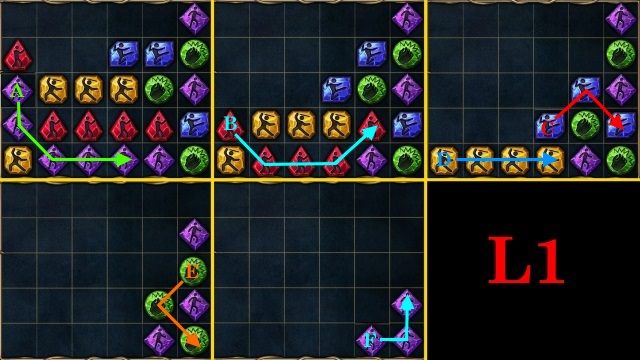
- Solution (L1): (A-F).
- Receive CLOTH.
- Use CLOTH (M); receive OILED CLOTH.
- Use OILED CLOTH (N); take ARROW.
- ARROW on CROSSBOW; load; receive LOADED CROSSBOW.
- Shoot LOADED CROSSBOW (O).
- Solution (P): (1-9).
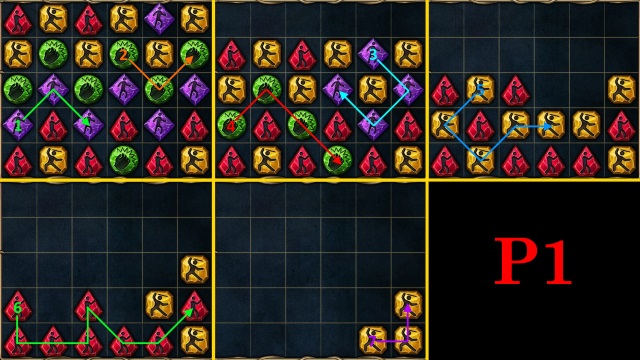
- Solution (P1): (1-7).
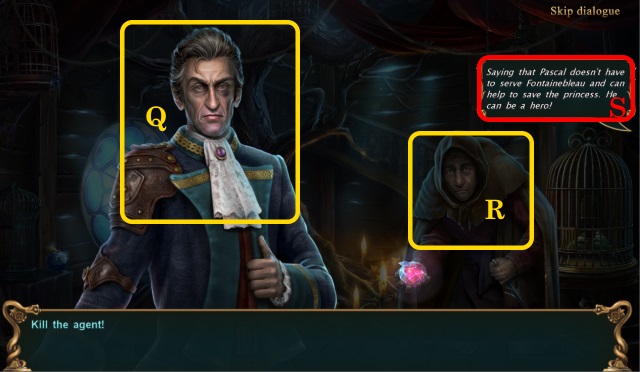
- Speak (Q); speak (R).
- Select (S); speak (R).
Chapter 5: Beach
- Speak (T).
- Collect 1-7 (U).
- Use (V) on (W); take KEY.
- Speak (X); take CONSTELLATION.
- Read (Y); receive CARDINAL'S DIRECTIVE; give LETTERS.
- Use KEY (Z); collect 1-6; receive CANDLES.
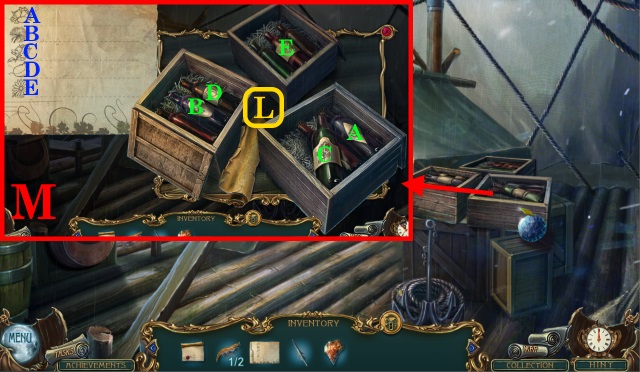
- Pick up SNAIL BOX (B).
- Light CANDLES (C); receive LIT CANDLES.
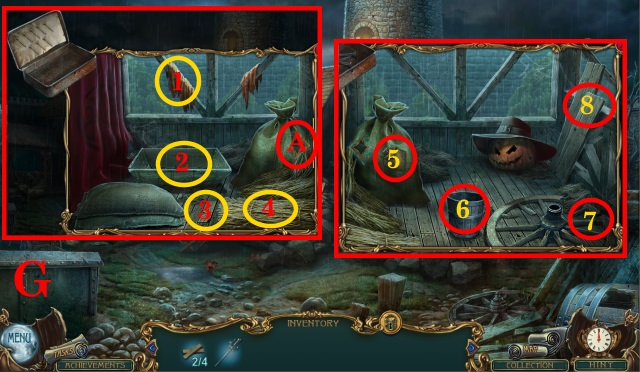
- Place LIT CANDLES (D); complete HOP; receive SQUID.
- Pull (D); board (E).
- Inspect (F); complete HOP; receive VESSEL.
- Pick up CROWBAR (G).
- Solution (H): F-D-A-B-D.
- Take SAUL'S SHIPMENT.
- Pick up PLIERS (I).
- Use CROWBAR (J).
- Solution (K): Match A-D.
- Take CORK (L).
- Walk down.
- Give SAUL'S SHIPMENT (M); speak (N); take WATER.
- Use PLIERS (O); receive NAIL.
- Investigate (Px3); use NAIL; receive MAGNETIZED NAIL.
- Walk forward.
- WATER, CORK and MAGNETIZED NAIL on VESSEL; assemble; receive COMPASS.
- Use CONSTELLATION and COMPASS (Q).
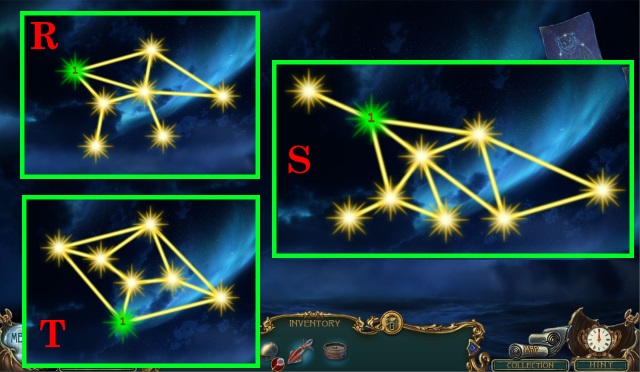
- Solution (R).
- Solution (S).
- Solution (T).
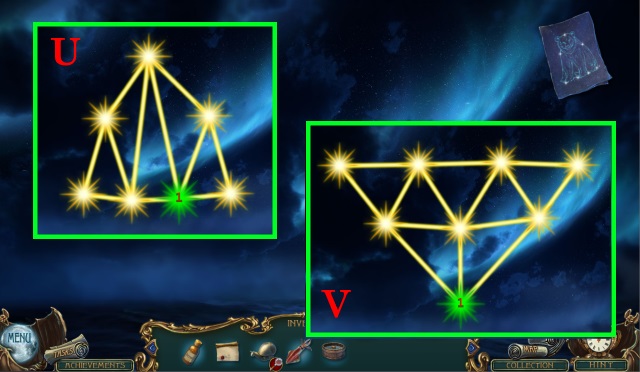
- Solution (U).
- Solution (V).
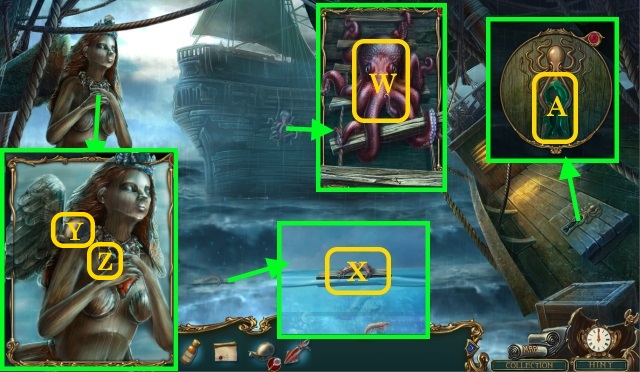
- Give SQUID (W).
- Pick up SHRIMP 1/2 (X).
- Pick up SNAIL (Y) and SEAHORSE (Z).
- SNAIL on SNAIL BOX; find HOLD KEY.
- Use SOLVENT and HOLD KEY (A).
- Walk right.
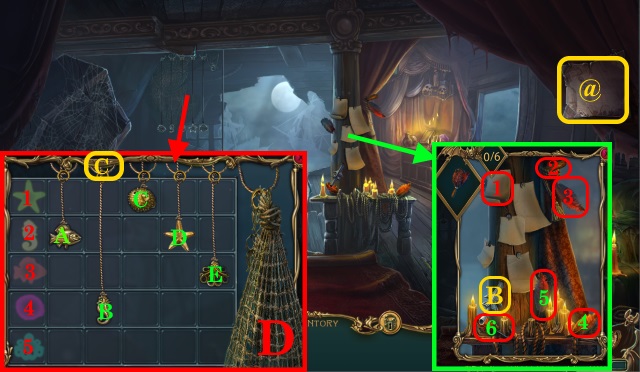
- Pick up WINE LIST (@).
- Pick up SPEAR OF ETERNITY (B); collect 1-6; take DUSTER.
- Place SEAHORSE (C).
- Solution (D): A-3; C-2; E-1; D-1; E-5.
- Pick up CLOSED SHELL.
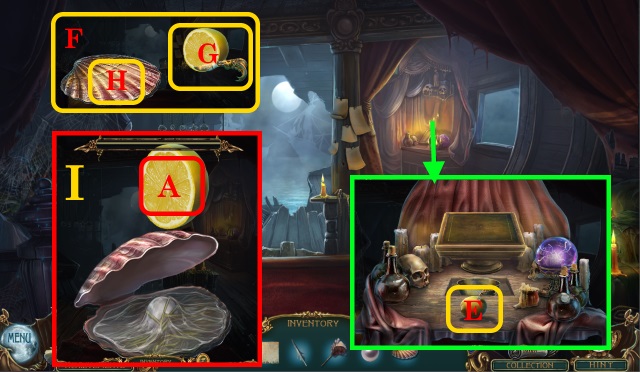
- Pick up LEMON (E).
- LEMON on CLOSED SHELL (F); cut (G); use (G) on (H).
- Solution (I).
- Squeeze (A); take PEARL and CROWN PART.
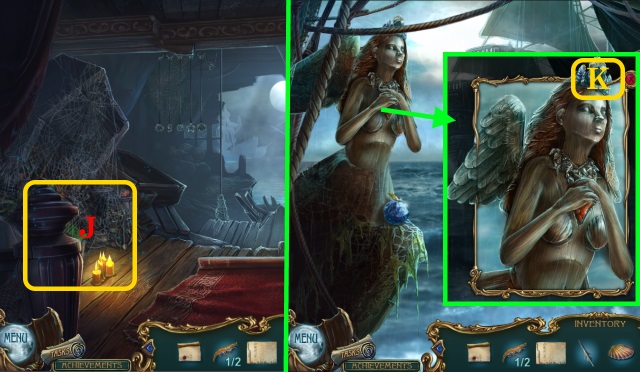
- Inspect (J); use DUSTER on scene; complete HOP; receive ALCHEMY RECIPE.
- Walk down.
- Place CROWN PART (K); pick up AMBER HEART.
- Walk down.
- Place WINE LIST (L).
- Solution (M): Match A-E.
- Pick up WINE.
- Move to Old Ship.
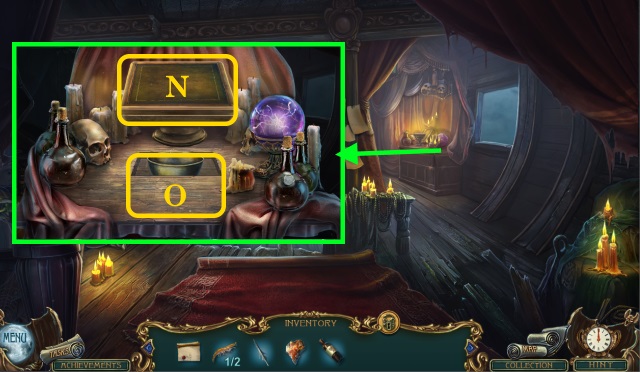
- Place ALCHEMY RECIPE (N); open.
- Place WINE, AMBER HEART and PEARL (O).
- Solution (P).
- Place (A) into (B); complete (C): Recommended strategy shown.
- Pour (D) into (B); complete (E): Recommended strategy shown.
- Place (F) into (B); complete (G): Recommended strategy shown.
- Take POTION.
- Walk down.

- Use POTION (Q); complete HOP; receive SHRIMP 2/2.
- Feed SHRIMP (R).
- Walk forward.
- Speak (S); give CARDINAL'S DIRECTIVE; talk.
- Solution (T): (1-10).
- Solution (T1): (1-9).
- Use SPEAR OF ETERNITY (U).
- Speak (V); select (W).
- Speak (X); select (Y).
- Speak (X); select (Z).
- Congratulations, you've completed Haunted Legends: Monstrous Alchemy!
Created at: 2018-04-22