

Walkthrough Menu
- General Tips
- Chapter 1: Town Square
- Chapter 2: Manor Garden
- Chapter 3: Count's Parlor
- Chapter 4: City Square
- Chapter 5: Garden Maze
General Tips
- This is the official guide for Haunted Legends: The Call of Despair.
- This guide will not mention each time you have to zoom into a location; the screenshots will show each zoom scene.
- Hidden-object puzzles are referred to as HOPs. This guide will not show HOP solutions. It will identify the location of the HOP and the inventory item acquired.
- This guide will show solutions for non-random puzzles. Please read the in-game instructions for each puzzle.
- In this game, you will sometimes have to select the new scene to trigger dialog, cut-scenes, or tasks prior to interacting with the scene.
Chapter 1: Town Square
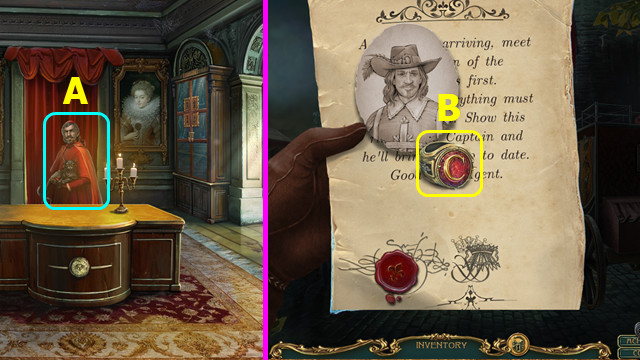
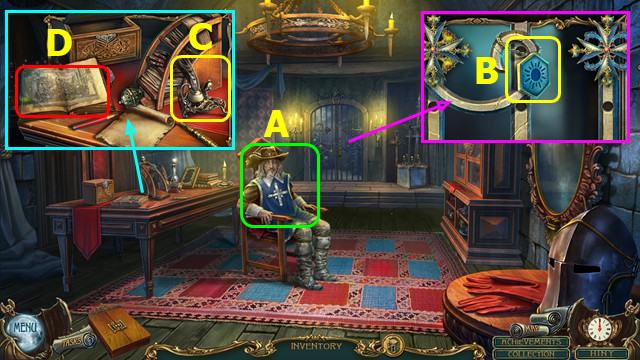
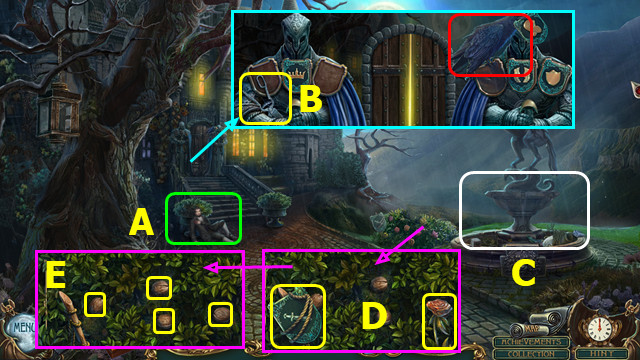
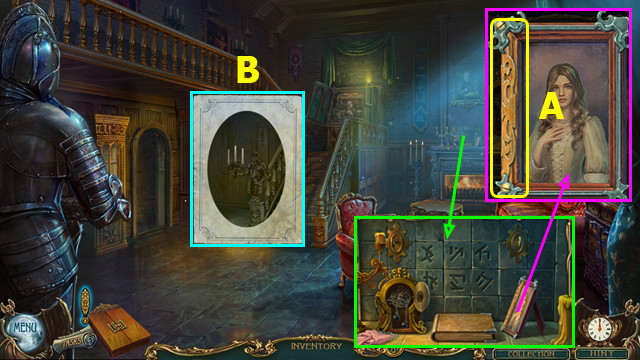
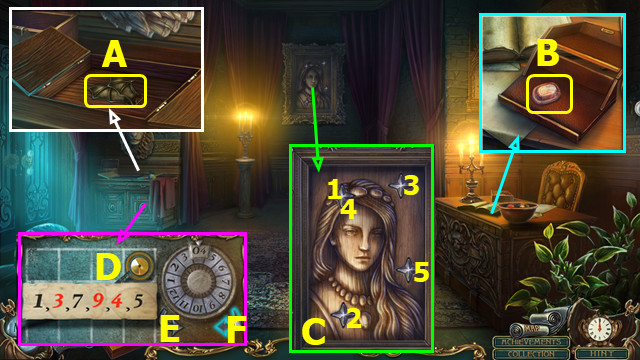
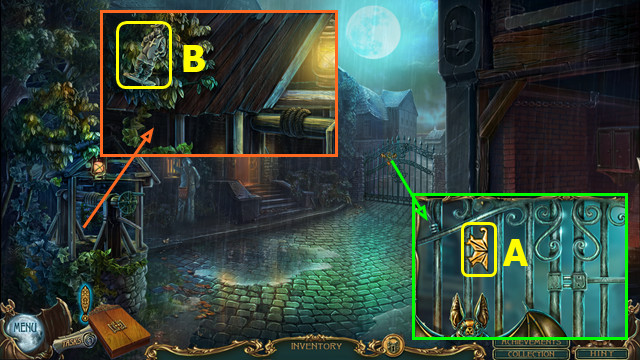
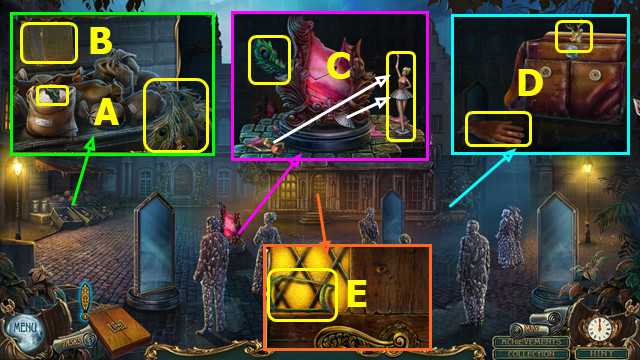
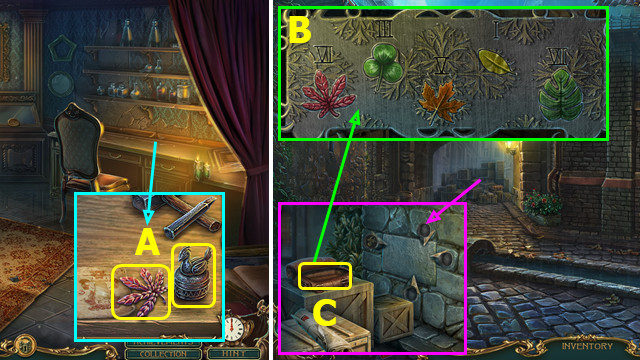
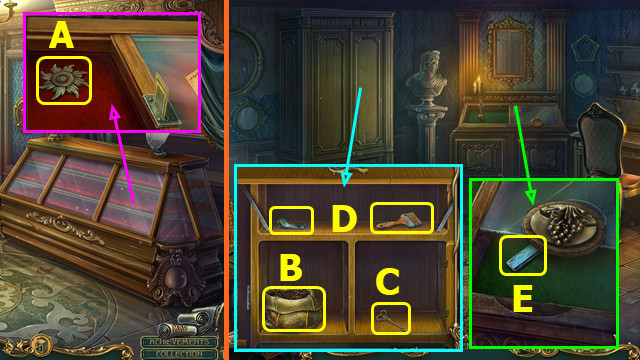
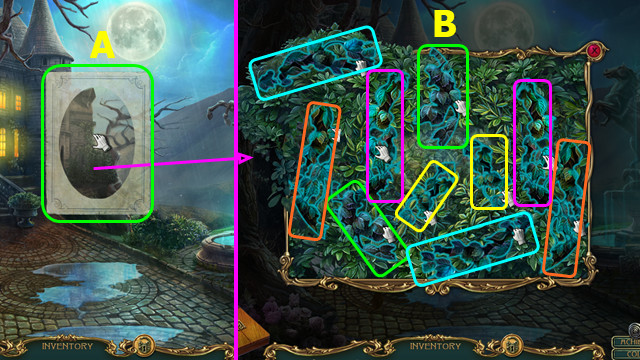
- Talk (A); take envelope.
- Open envelope; take CARDINAL'S SIGNET RING; read note (B).
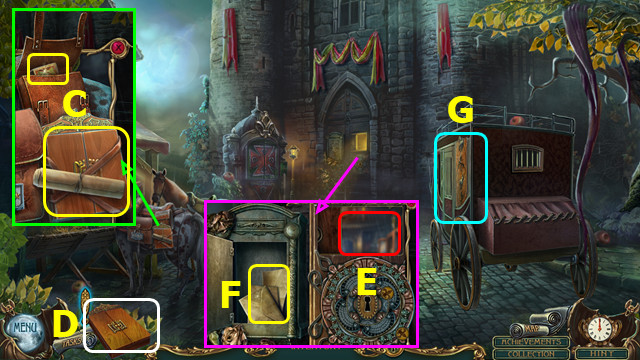
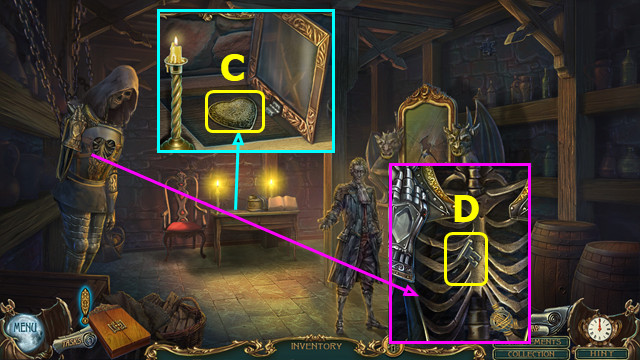
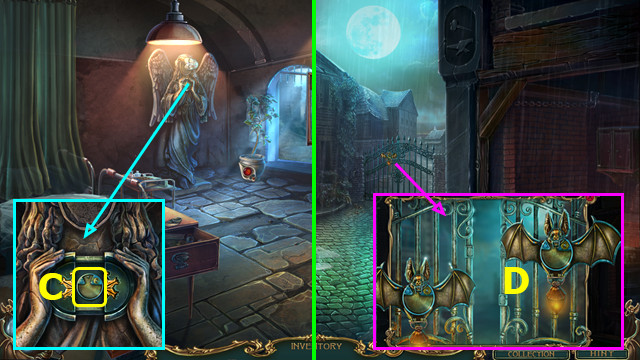
- Read note; take CASKET (C). Open pouch; take MATCHBOX.
- Casket is now on the user interface (D).
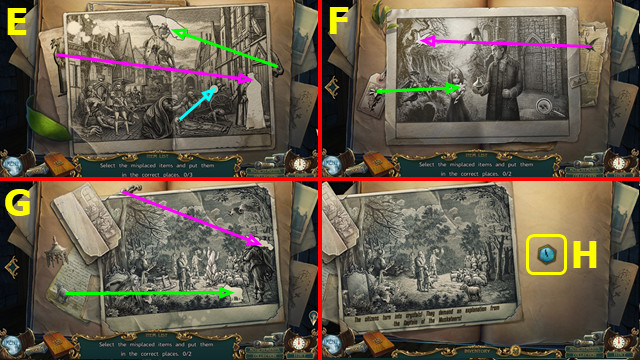
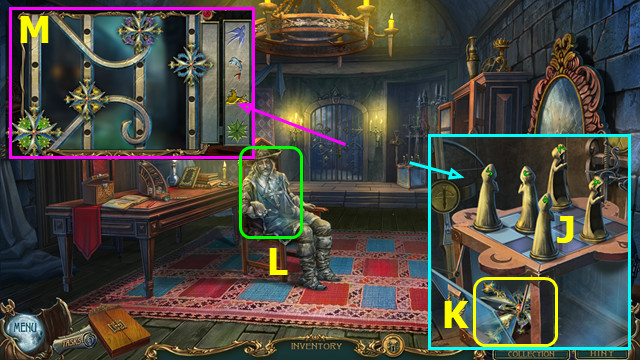
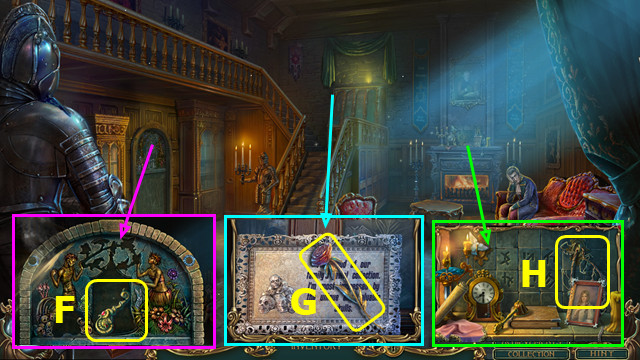
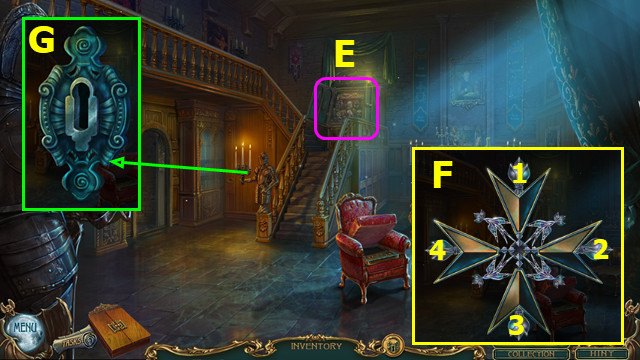
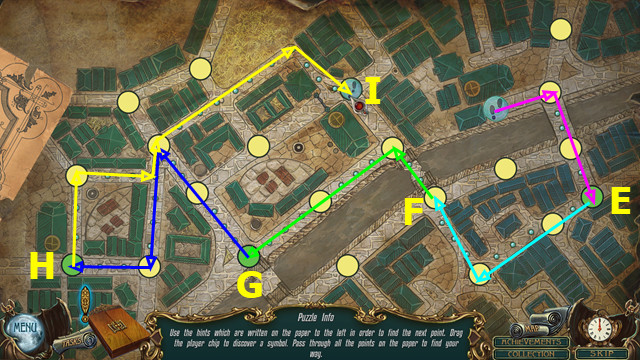
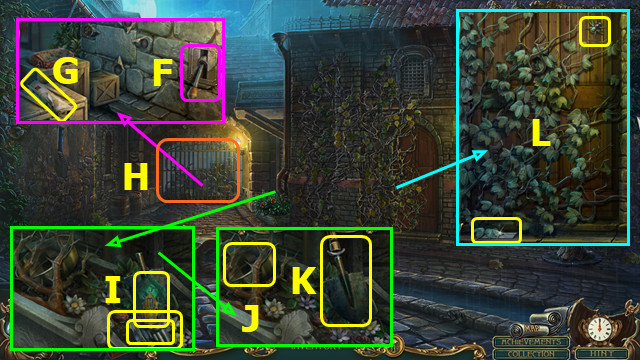
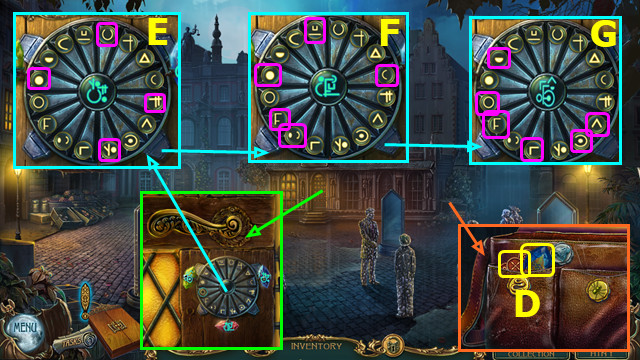
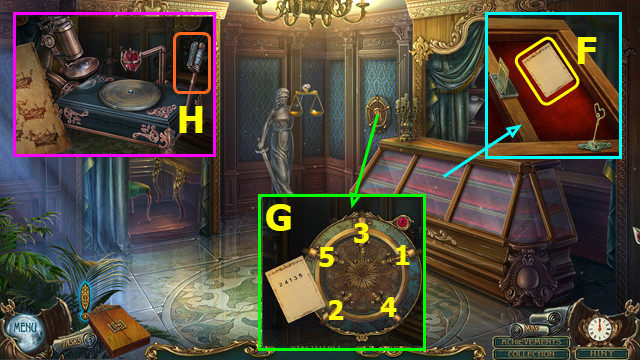
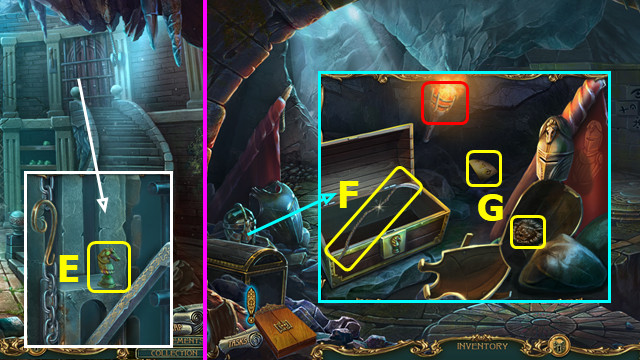
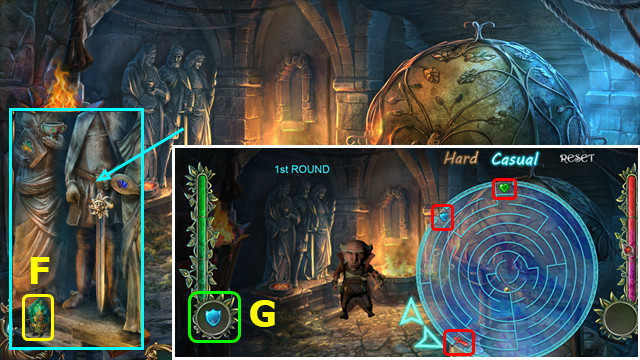
- Select (E); play HOP. Read notes; take 1/2 CARRIAGE EMBLEMS (F).
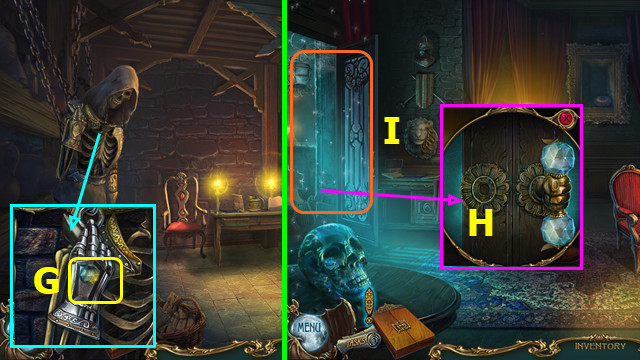
- Play HOP; earn MATCHES (G).
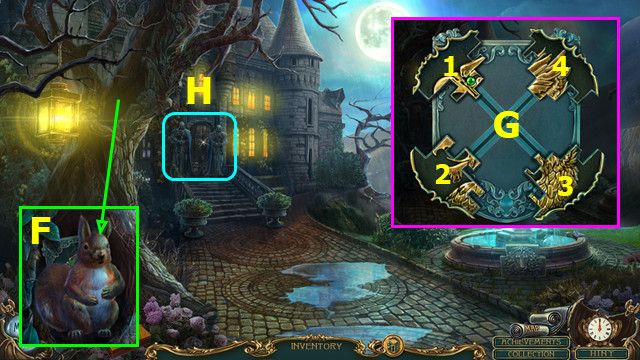
- Open MATCHBOX; add MATCHES; earn MATCHES.
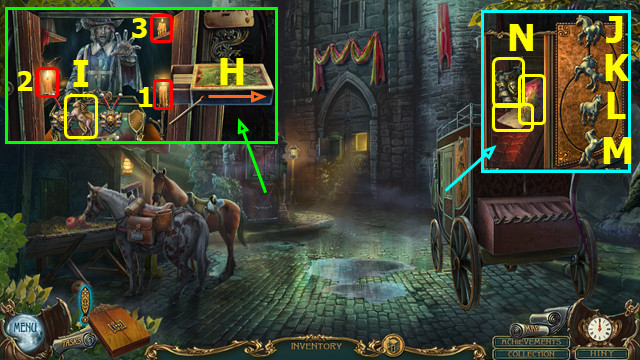
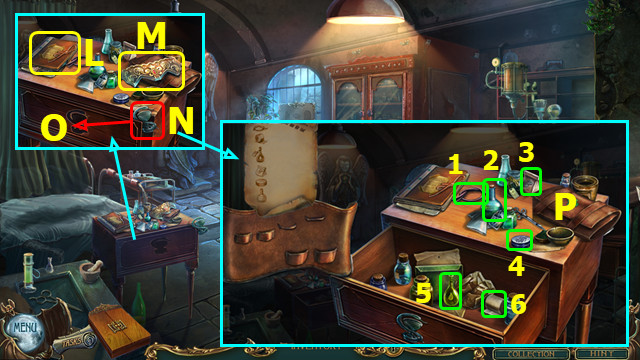
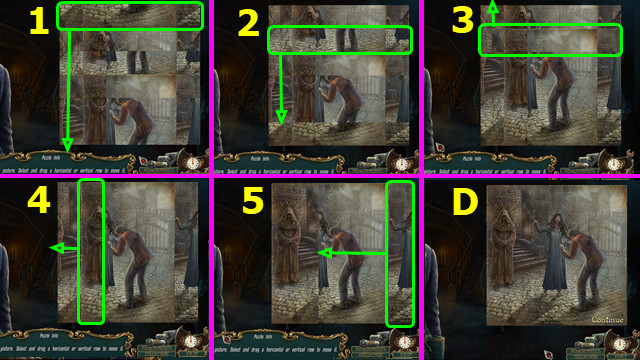
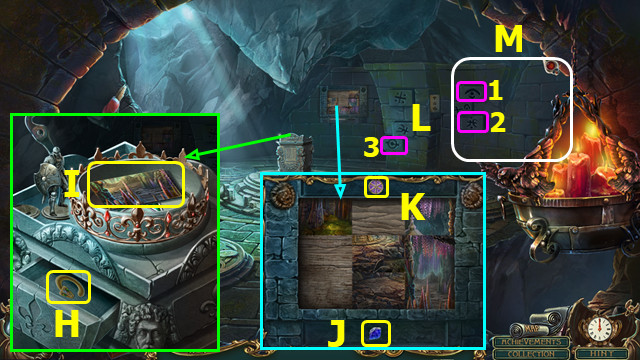
- Read notes, open doors, and place MATCHES. Open matchbox and drag match on side (H).
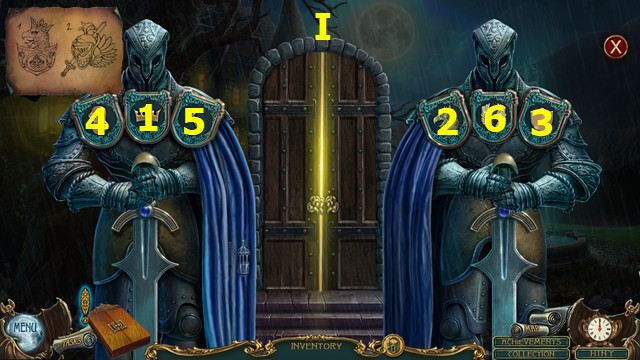
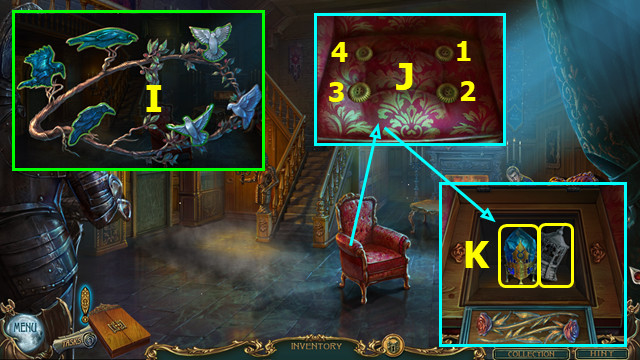
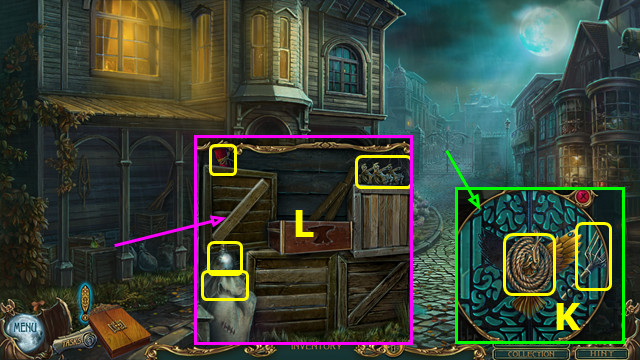
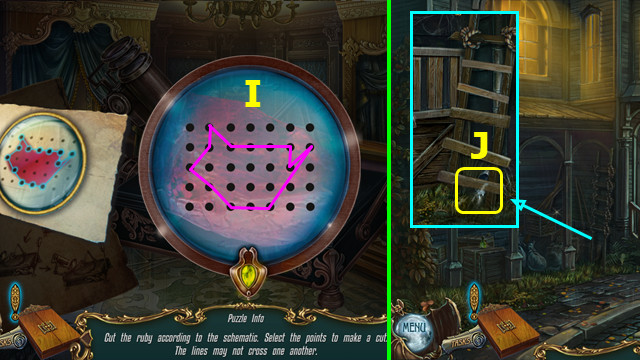
- Select 1-2-3; take 2/2 CARRIAGE EMBLEMS (I).
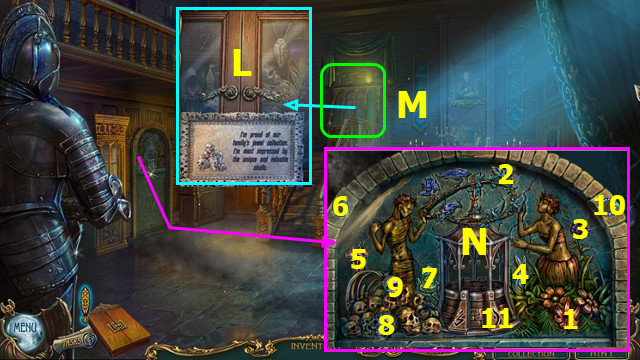
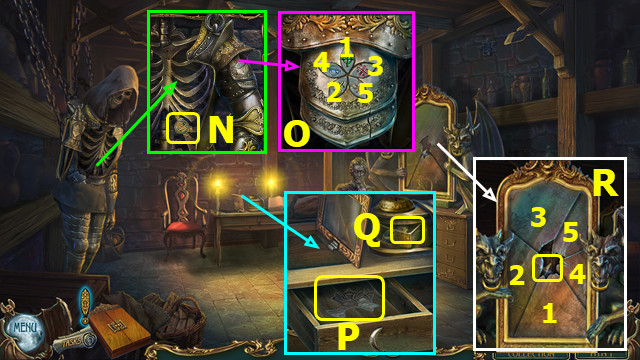
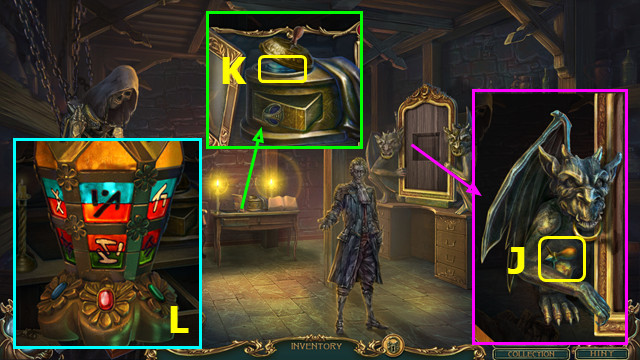
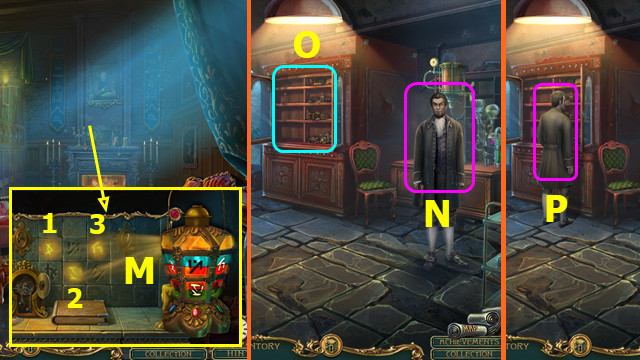
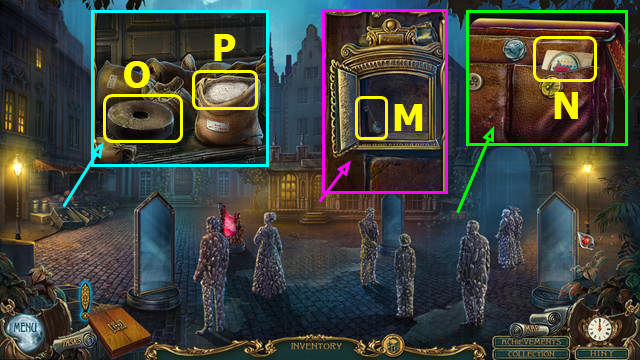
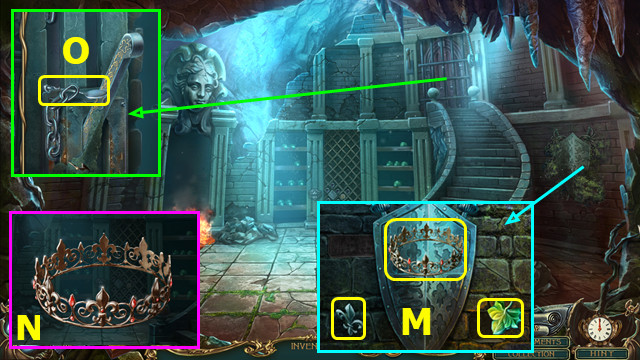
- Place CARRIAGE EMBLEMS; select (K-M)-(K-J)-(J-L)-(J-K)-(K-M).
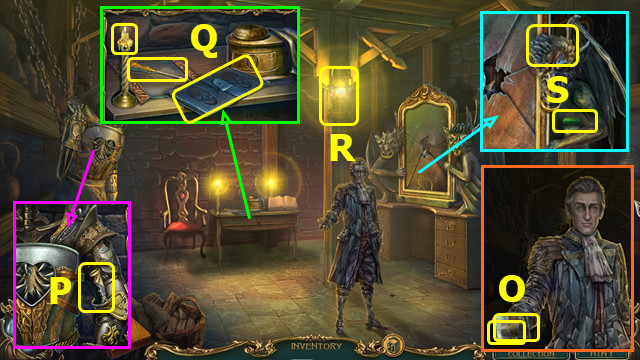
- Take 1/2 LION INSIGNIAS, 1/12 MAGIC CRYSTALS, and CODE (N).
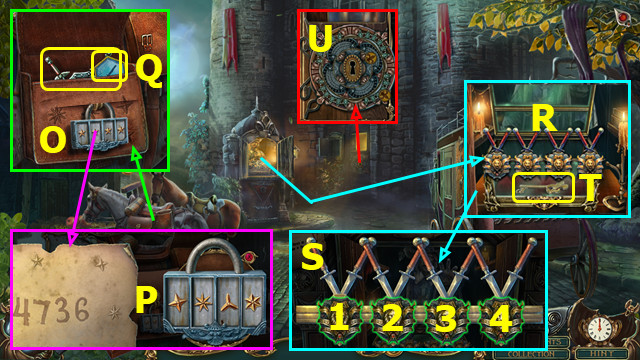
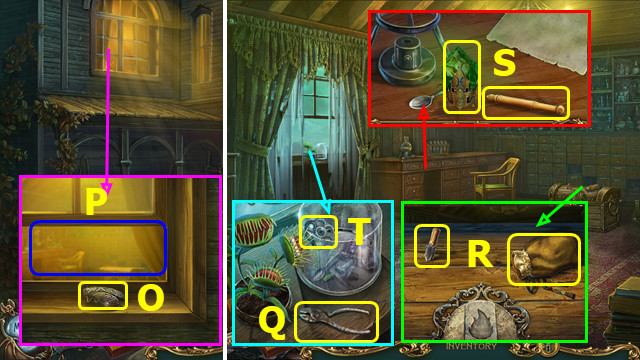
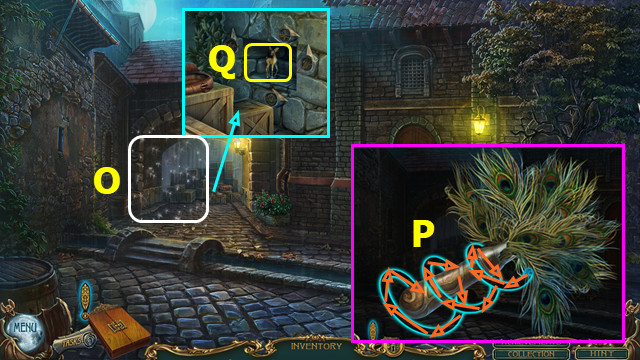
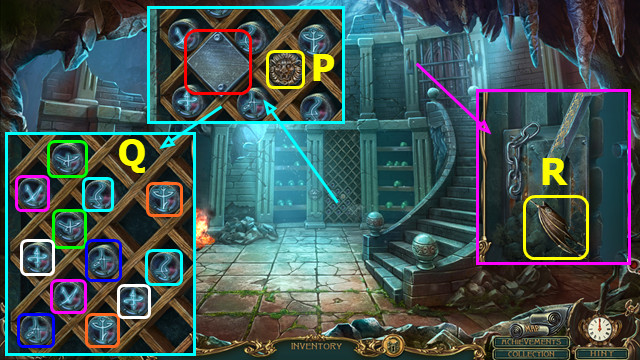
- Select (O); solution (P).
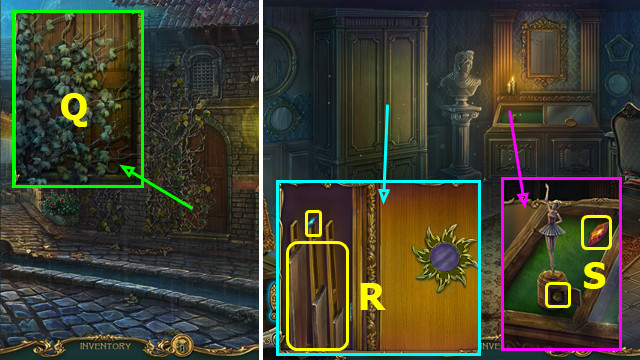
- Take 1/4 WARDROBE TOKENS and 2/2 LION INSIGNIAS (Q).
- Place LION INSIGNIAS (R).
- Select 1-4 (S).
- Take OFFICE KEY (T).
- Use OFFICE KEY (U).
- Go forward.
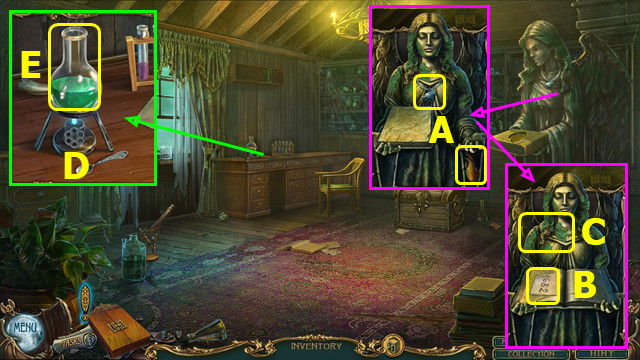
- Talk; give CARDINAL'S SIGNET RING (A). Take 1/3 CADUCEI and picture.
- Take 2/4 WARDROBE TOKENS (B).
- Take INKPOT (C).
- Select; play HOP; select (D).
- Restore items (E-G).
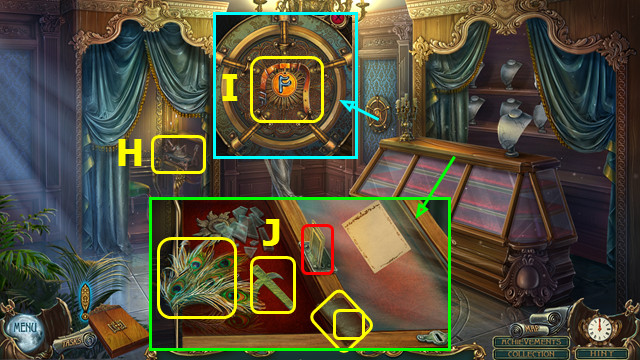
- Play HOP; take 3/4 WARDROBE TOKENS (H).
- Restore weapons as shown (I); take 4/4 WARDROBE TOKENS (J).
- Select (K).
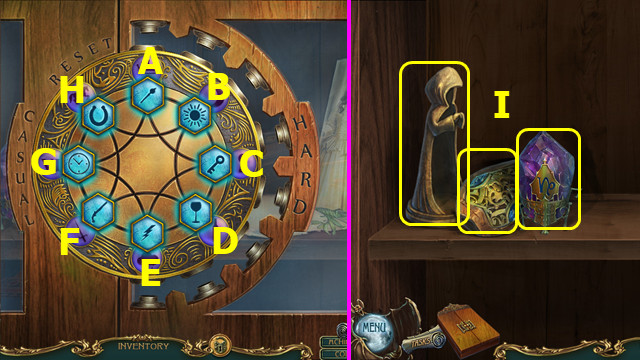
- Place WARDROBE TOKENS; casual solution G-D-F-B.
- Hard solution G-A-G-B-D-Cx2-D-E-F.
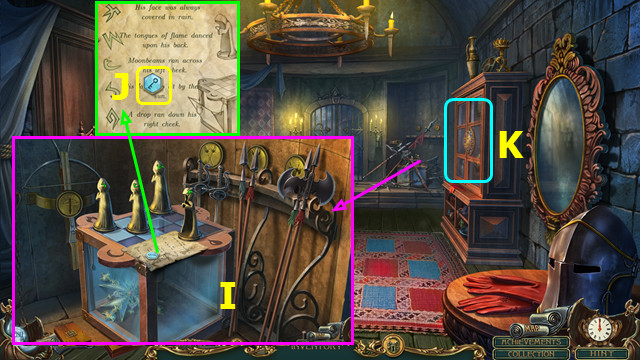
- Take 2/12 MAGIC CRYSTALS, 1/2 CARRIAGE EMBLEMS, and CHESS FIGURINE; read note (I).
- Place CHESS FIGURINE; solution (J).
- Take GATE AMULET (K).
- Select (L).
- Place GATE AMULET; solution (M).
- Go forward.
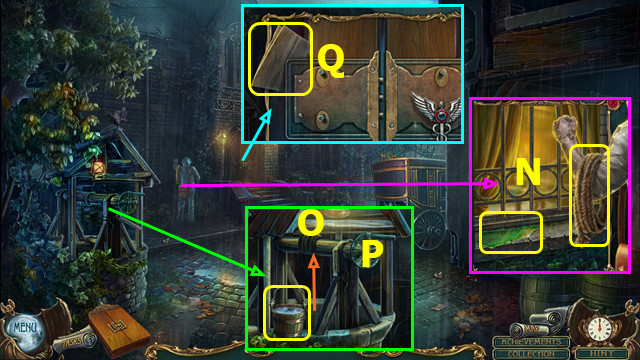
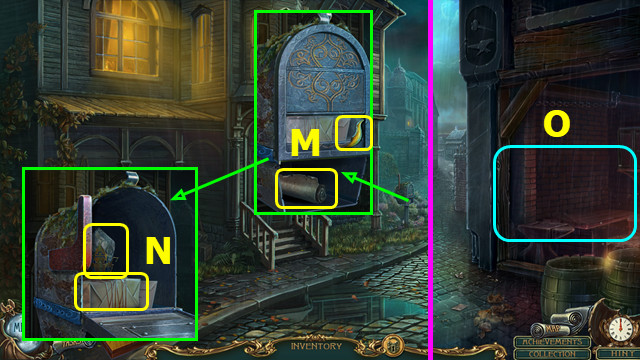
- Take GLASS SHARD and ROPE (N).
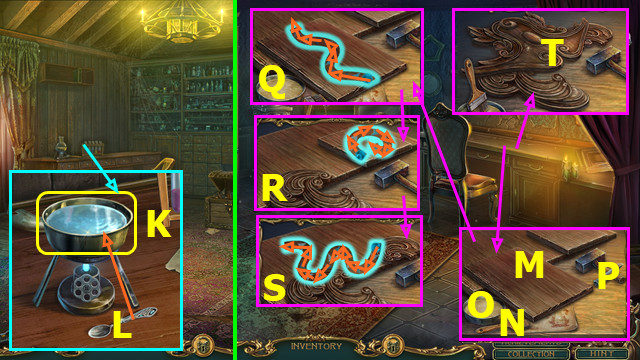
- Place ROPE (O); move bucket to rope.
- Select (P); take BUCKET OF WATER.
- Read note; take 2/2 CARRIAGE EMBLEMS (Q).
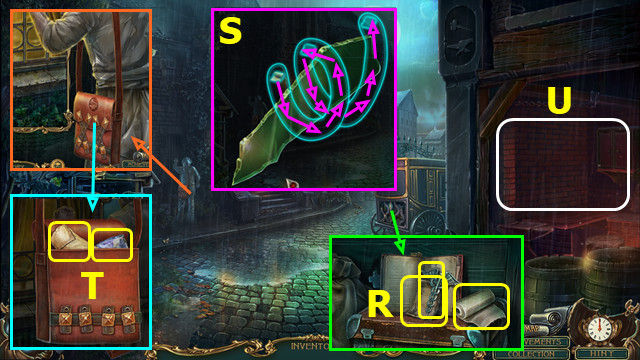
- Place CARRIAGE EMBLEMS; take 2/3 CADUCEI, FIRST AID KIT LIST, and BANDAGE (R).
- BANDAGE on GLASS SHARD; drag spiral (S); take GLASS WITH BANDAGE.
- Use GLASS WITH BANDAGE 2x; open pouch; take 3/12 MAGIC CRYSTALS and TONGS; read note (T).
- Select (U).
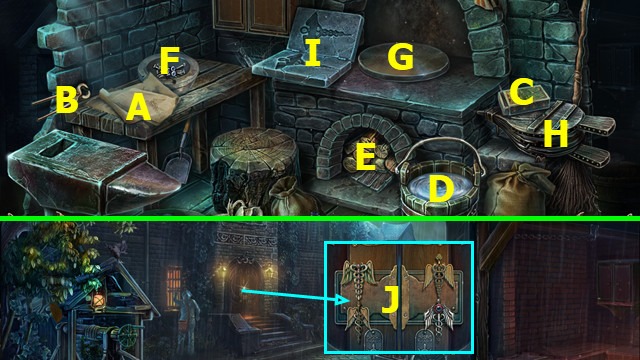
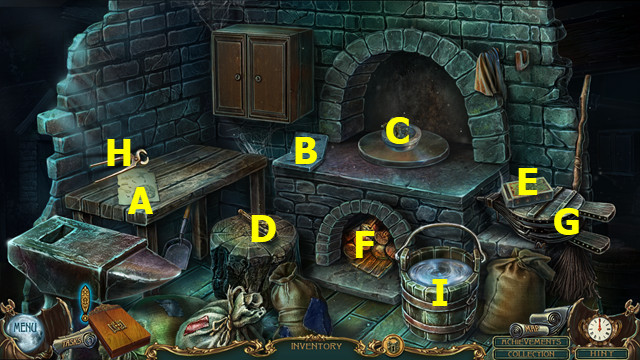
- Read instructions (A); place TONGS (B), MATCHES (C), and BUCKET OF WATER (D). Play HOP.
- Select (C); drag match on striker; use on (E).
- Move (F-G); select (H).
- Use (B-G-I)-(I-D); earn 3/3 CADUCEI.
- Place CADUCEI (J).
- Go left.
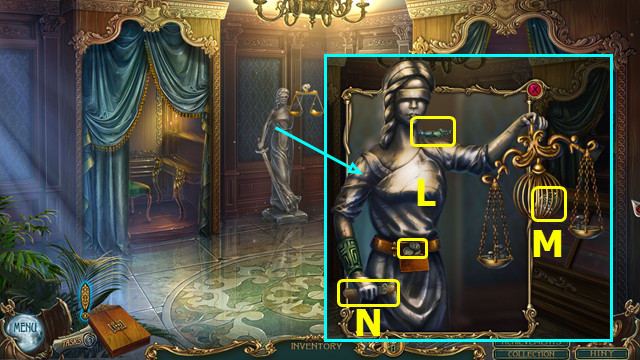
- Read notebook; take SKULL TOKEN (L).
- Take CROWN (M); move (N-O).
- Select (P); select 1-6; earn FIRST AID KIT.
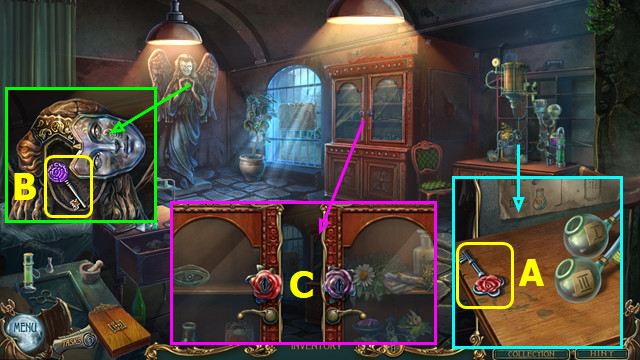
- Take RED KEY (A).
- Place CROWN; take PURPLE KEY (B).
- Use RED KEY and PURPLE KEY (C).
- Take EYE TOKEN, 1st REAGENTS, and CASKET (D).
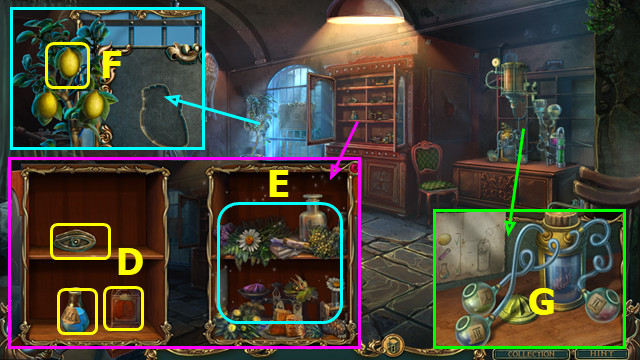
- Play HOP; earn 2nd REAGENTS (E).
- Select; take LEMON (F).
- Use REAGENTS and LEMON (G).
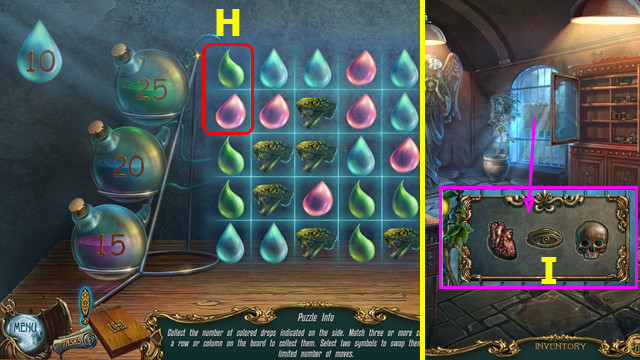
- This mini-game is randomly generated.
- Play match-3; swap to make rows of 3 or more (H).
- Earn HEART TOKEN.
- Place HEART TOKEN, EYE TOKEN, and SKULL TOKEN (I).
- Go forward.
Chapter 2: Manor Garden
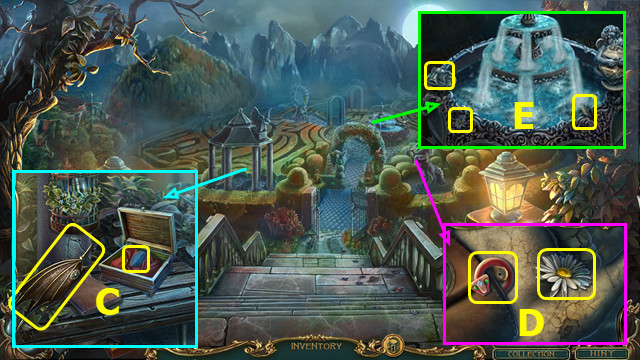
- Talk; use FIRST AID KIT; take CLUE (A).
- Take SCISSORS; select bird (B).
- Play HOP; earn 1/3 SHIELD EMBLEMS (C).
- Play HOP; use SCISSORS: earn 2/3 SHIELD EMBLEMS; take 1/2 ROSE EMBLEMS (D).
- Take 1/4-4/4 WALNUTS (E).
- Use WALNUTS; earn SHIELD EMBLEM (F).
- Select SHIELD EMBLEM; press 1-4; take 3/3 SHIELD EMBLEMS (G).
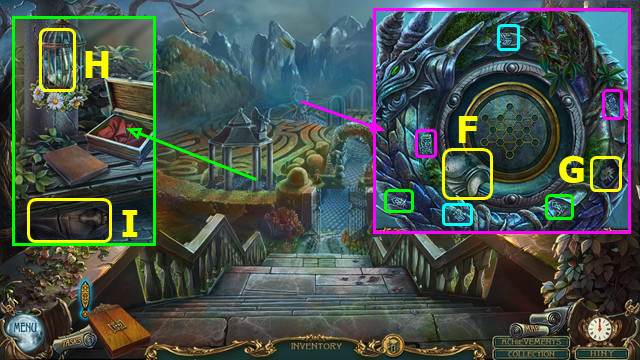
- Select (H).
- Place SHIELD EMBLEMS; select 1-6 (I).
- Go forward.

- This mini-game is randomly generated.
- Watch and repeat the sequence of moves 4x (J).
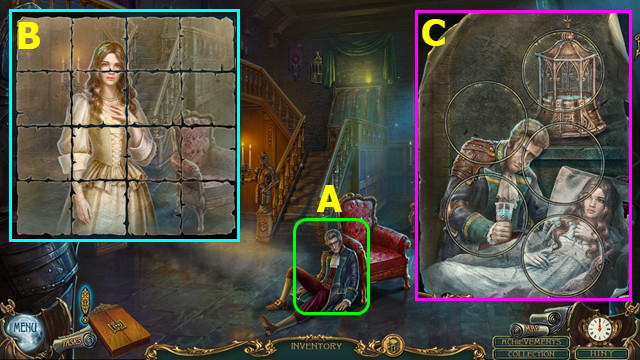
- Talk (A).
- Solution (B).
- Solution (C).
- Drag 1-6; final image (D).
- Take SOLUTION.
- Take 1/2 SHOWCASE HANDLES (F).
- Take 2/2 ROSE EMBLEMS (G).
- Take 1st BAS-RELIEF PART; play HOP (H).
- Restore and take 1st BAS-RELIEF PART (I).
- Select 1-4; take 2/2 SHOWCASE HANDLES (J).
- Place ROSE EMBLEMS; take 4/12 MAGIC CRYSTALS and 2nd BAS-RELIEF PART (K).
- Use SHOWCASE HANDLES (L).
- Play HOP; earn 3rd BAS-RELIEF PART (M).
- Place BAS-RELIEF PARTS; select 1-11 (N).
- Go left.
- Take SECRET PASSAGE CLUE and BROKEN DOUBLE-EDGED KEY (O).
- Take KNIFE HANDLE (P).
- Take WAX, SCREWDRIVER, and FOLDER (Q).
- Take COUNT'S PUZZLE-LAMP (R).
- Take GARGOYLE RING from COUNT'S PUZZLE-LAMP.
- Place GARGOYLE RING; take 1/3 LAMP BUTTONS and LION'S MANE (S).
- Walk down.
- Use SCREWDRIVER; earn FRAME PART (A).
- Place SECRET PASSAGE CLUE (B).
- Go left.
- Place FRAME PART, open, and take IRON HEART (C).
- Place IRON HEART; take DOUBLE-EDGED KEY PART (D).
- DOUBLE-EDGED KEY PART and WAX on BROKEN DOUBLE-EDGED KEY; Take DOUBLE-EDGED KEY.
- Walk down.
- Play HOP; earn BROKEN MEDAL (E).
- Restore BROKEN MEDAL; select 1-4 (F); earn ROYAL MEDAL.
- Use DOUBLE-EDGED KEY (G).
- Go forward.
Chapter 3: Count's Parlor

- Take STETHOSCOPE and BALCONY DOORKNOB (H).
- Place ROYAL MEDAL; take IRON MOON and CRYSTAL APPLE TOP (I).
- Place LION'S MANE; take STONE PETAL (J).
- Use KNIFE HANDLE; earn KNIFE (K).
- Take FONTENBLU SIGNET RING (L).
- Take CLOTH; use KNIFE; earn METAL BAT HEAD (M).
- Walk down, left.
- Use KNIFE; take COUNT'S AMULET (N).
- Place STONE PETAL; select 1-5 (O); take SAFE CLUE.
- Place IRON MOON; take TREE TILE (P).
- Use FONTENBLU SIGNET RING; take PRISMATIC SCARAB (Q).
- Use CLOTH; select 1-5; take METAL STAR (R).
- Walk down, forward.
- Place TREE TILE; take METAL BAT WINGS (A).
- Place PRISMATIC SCARAB; take 2/3 LAMP BUTTONS (B).
- Place METAL STAR; select 1-5 (C); take 1/2 COUNT'S ORDER PARTS and TOPAZ.
- Use STETHOSCOPE and SAFE CLUE; move stethoscope to (D).
- Rotate Ex9-Fx5-E; take 5/12 MAGIC CRYSTALS and COUNT'S NOTES.
- Walk down, left.
- Place TOPAZ; take CRYSTAL APPLE BOTTOM (G).
- CRYSTAL APPLE TOP and CRYSTAL APPLE BOTTOM on BALCONY DOORKNOB.
- Walk down, forward.
- Use BALCONY DOORKNOB (H).
- Play HOP; earn GARGOYLE WING (I).
- Walk down, left.
- Place GARGOYLE WING; take CROSS-SHAPED STAMP (J).
- Use CROSS-SHAPED STAMP; take 3/3 LAMP BUTTONS (K).
- LAMP BUTTONS on COUNT'S PUZZLE-LAMP; solution (L); take PRISMATIC LAMP.
- Walk down.
- Place PRISMATIC LAMP; select 1-3 (M); take SKULL BOLT.
- SKULL BOLT on FOLDER; take DOCTOR'S SIGNATURE and 2/2 COUNT'S ORDER PARTS.
- COUNT'S AMULET on COUNT'S NOTES; Use KNIFE; place COUNT'S ORDER PARTS and DOCTOR'S SIGNATURE; take ALCHEMIC ORDER.
- Walk down 2x.
- Talk; give ALCHEMIC ORDER; take METAL BAT LEGS (N).
- Play HOP; earn ADDRESS BOOK (O).
- Give ADDRESS BOOK; take ADDRESSES (P).
- Walk down.
- Take 1/2 BRONZE LEAF HALVES (A).
- Use KNIFE; earn 2/2 BRONZE LEAF HALVES; take MUSKETEER FIGURE (B).
- MUSKETEER FIGURE on CASKET; take OIL and BAT LANTERN.
- Go left.
- Place BRONZE LEAF; take METAL BAT BODY (C).
- METAL BAT BODY, METAL BAT WINGS, METAL BAT LEGS, and BAT LANTERN on METAL BAT HEAD; take METAL BAT OF ILLUMINATION.
- Walk down.
- Use METAL BAT OF ILLUMINATION and ADDRESSES (D).
- Move token (E-F-G-H-I).
- Take ROPE and TORCH HOLDER (K).
- Play HOP; earn ANVIL PARTS; take FLASK, CLOTH, COAL, and IRON FIGURINES (L).
- Use CLOTH; read note; take BLACKSMITH SCHEMATIC and 1/3 FLAME SYMBOL (M).
- Use OIL and select flag; take 6/12 MAGIC CRYSTALS, read note, open package, and take 1/5 INGREDIENTS (N).
- CLOTH, OIL, and MATCHES on TORCH HOLDER; take BURNING TORCH.
- Walk down.
- Select (O).
- Place BLACKSMITH SCHEMATIC (A), ANVIL PARTS (B), IRON FIGURINES (C), COAL (D), and MATCHES (E).
- Use (D-F)-(E-F); select (G).
- Use (H-C-B)-(B-I); earn ANVIL.
- Go forward.
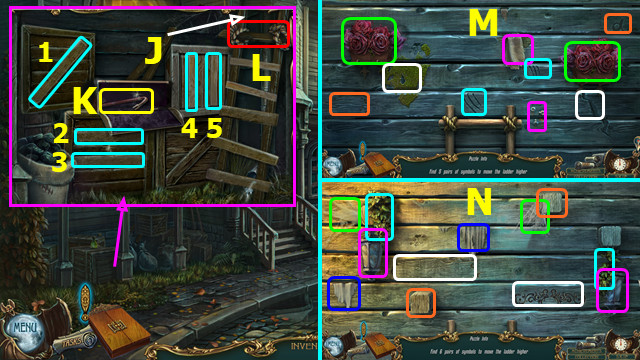
- Move 2 boards (J).
- Place ANVIL; take and use CROWBAR 1-5 (K).
- Use ROPE (L); select.
- Select pairs (M-N).
- Take CICADA and use CROWBAR (O).
- Go (P).
- Take PLIERS (Q).
- Take POUCH; use PLIERS; take GLASS CUTTER HEAD (R).
- Take 7/12 MAGIC CRYSTALS; place GLASS CUTTER HEAD; take GLASS CUTTER (S).
- Use GLASS CUTTER; take VALVE (T).
- Use BURNING TORCH; take 2/3 FLAME SYMBOL and WOLF HEAD EMBLEM (A).
- Place CICADA; take CRYPTEX CODE (B).
- Use POUCH; earn CHEMICALS (C).
- Place and select VALVE (D); use FLASK and CHEMICALS; take HERBICIDE (E).
- Use HERBICIDE; take 3/3 FLAME SYMBOL and 2/5 INGREDIENTS (F).
- Place FLAME SYMBOL (G).
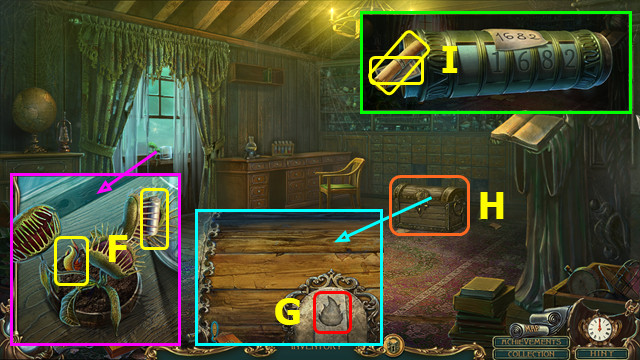
- Play HOP; earn CRYPTEX (H).
- CRYPTEX CODE on CRYPTEX; enter 1-6-8-2; read note; take SCROLL and JEWELRY CARD (I).
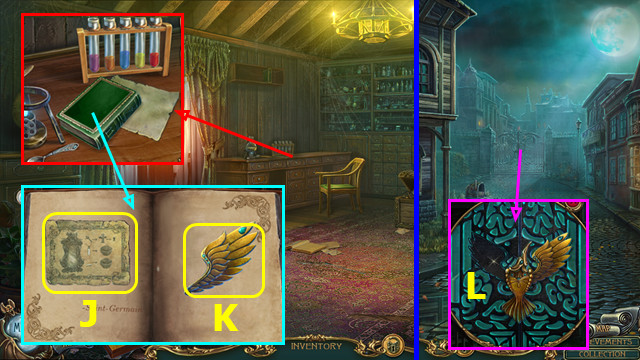
- Use INKPOT and SCROLL; take RUBY MIRROR SCHEMATIC (J); take WING (K).
- Walk down.
- Select; place WING (L).
- Go forward.
Chapter 4: City Square
- Open sack; take BROKEN ANGEL STATUETTE and DUSTER HANDLE (A).
- Read notes; take LEVER and 1/3 CRYSTALS (B).
- Take 1/2 FEATHERS; restore and take BALLERINA FIGURINE (C).
- Place WOLF HEAD EMBLEM; take 1/2 DEER and GLOVE (D).
- Take 1/3 BRACER PARTS (E).
- Go right.
- Use LEVER (F); read paper; earn SHOVEL HANDLE (G).
- Play HOP; earn BLUNT CLEAVER (H).
- Take 8/12 MAGIC CRYSTALS; move items; take 1/2 METAL TABLET PARTS and ANGEL STATUETTE PART (I).
- Use GLOVE; take BOWL (J). Use SHOVEL HANDLE; take SMALL SHOVEL (K).
- Take SPIDER TOKEN and ENVELOPE EMBLEM (L).
- Walk down.
- Place ENVELOPE EMBLEM, open compartment; take CLOSET KEY (M).
- Place SPIDER TOKEN; take GEM-CUTTING SCHEMATIC (N).
- Use BLUNT CLEAVER; take SHARPENED CLEAVER (O).
- Use SMALL SHOVEL; earn BOWL OF FLOUR (P).
- Go right.
- Use SHARPENED CLEAVER 4x (Q); go forward.
- Use CLOSET KEY; take WOODEN SLABS and 2/3 CRYSTALS (R).
- Take 3/3 CRYSTALS. Place BALLERINA FIGURINE; take SNAKE TOKEN (S).
- Take COUNTERWEIGHT and FLORAL ORNAMENT (A).
- Walk down.
- Place FLORAL ORNAMENT; solution (B).
- Take 2/3 BRACER PARTS (C).
- Walk down.
- Place SNAKE TOKEN; take 9/12 MAGIC CRYSTALS and 3/5 INGREDIENTS (D).
- Place 3 CRYSTALS; solution (E-G).
- Go forward.
- Open drape; take GEM-CUTTING MACHINE (H).
- Take FONTENBLU MEDAL (I).
- Use JEWELRY CARD; take 2/2 FEATHERS, 2/2 METAL TABLET PARTS, HAMMER INSIGNIA and 3/3 BRACER PARTS (J).
- Place HAMMER INSIGNIA; take METAL SYMBOLS and ANGEL STATUETTE PART (L).
- Place COUNTER WEIGHT; earn IRON GRAPES (M).
- Place BRACER PARTS; take 4/5 INGREDIENTS (N).
- Walk down, right.
- Play HOP; earn RED RIBBON (O).
- FEATHERS and RED RIBBON on DUSTER HANDLE; drag ball through spiral (P); take DUSTER.
- Place METAL SYMBOLS; take 2/2 DEER (Q).
- Walk down, forward.
- Use DUSTER; take SUN MEDALLION (A).
- Walk down, right, and forward.
- Place SUN MEDALLION; take STARCH (B).
- Place DEER; take WIRE (C).
- Place METAL TABLET PARTS; take ANGEL STATUETTE PART and PAINTBRUSH (D).
- Place IRON GRAPES; take 5/5 INGREDIENTS (E).
- Walk down 2x; go forward.
- Use WIRE; take SAFE CODE (F).
- Place SAFE CODE; select 1-5 (G); take 10/12 MAGIC CRYSTALS and RUBY SHARDS.
- GEM-CUTTING SCHEMATIC and RUBY SHARDS on GEM-CUTTING MACHINE; select (H).
- Solution (I); take RUBY GLASS.
- Walk down 2x.
- Use BOWL; earn BOWL OF WATER (J).
- Go left.
- Place BOWL OF WATER, STARCH, and BOWL OF FLOUR (K).
- Use (L-K); take BOWL WITH GLUE.
- Return to Workshop.
- Place WOODEN SLABS (M), PAINTBRUSH (N), and BOWL WITH GLUE (O).
- Use (P-M); drag ball (Q-R-S).
- Place RUBY GLASS (T).
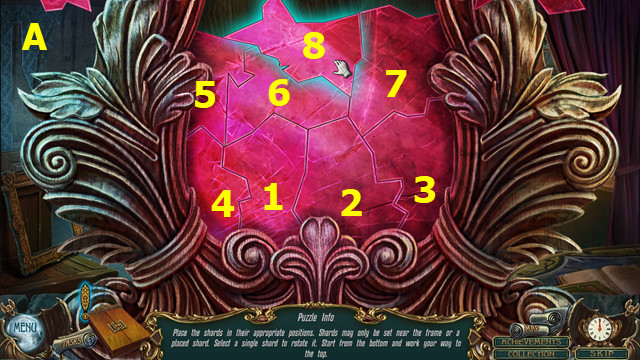
- Restore pieces 1-8 (A).

- Restore pieces 1-10 (B).
- Take RUBY MIRROR.
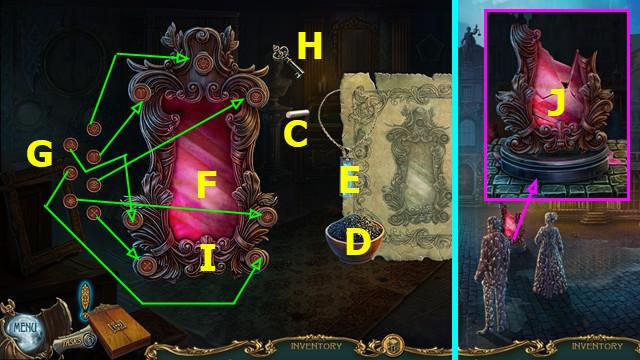
- RUBY MIRROR and INGREDIENTS on RUBY MIRROR SCHEMATIC.
- Solution (C-D)-(E-D)-(D-F).
- Restore symbols (G).
- Use (H-I); take RUBY MIRROR.
- Walk down 2x.
- Place RUBY MIRROR (J).
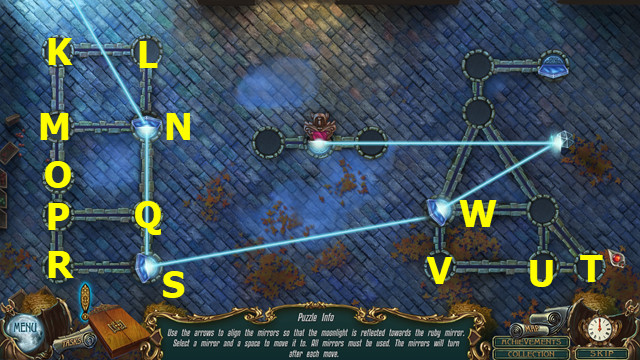
- Solution (L-K-M-O-P-R-P-O-M-N)-(S-R-P-Q-S)-(T-U-V-W).
- Earn SECRET PASSAGE CLUE; go to Manor Garden.
- Use SECRET PASSAGE CLUE (A).
- Select pairs (B); go (A).
Chapter 5: Garden Maze
- Place FONTENBLU MEDAL; take STONE SCALE and 1/2 DRAGON WINGS (C).
- Take 1/3 SNAKE VALVES and 1/3 CHAMOMILE (D).
- Take ANGEL STATUETTE PART, 2/3 CHAMOMILE, and CANDLE (E).
- Take ANGEL STATUETTE PART (F).
- Select pairs; place STONE SCALE: take 3/3 CHAMOMILE (G).
- Place CHAMOMILE; take ANGEL STATUETTE PART (H).
- Use CANDLE; take KNIGHT'S HELM (I).
- ANGEL STATUETTE PART on BROKEN ANGEL STATUETTE; take ANGEL STATUETTE (J).
- Place ANGEL STATUETTE; go forward (K).
- Play HOP; take BROKEN CROWN, STONE LILY, and CRYSTAL LEAF (M).
- Restore BROKEN CROWN; earn KEEPER'S CROWN (N).
- Take SILVER SPOON (O).
- Take 1/2 STONE LION HEADS; use SILVER SPOON (P).
- Select pairs; take ANCIENT VINEGAR (Q).
- Use ANCIENT VINEGAR; take 2/2 DRAGON WINGS (R).
- Walk down.

- Use ANCIENT VINEGAR; take SOAKED MOSS and HOOK (A).
- Place DRAGON WINGS; select B-C-B-C; take HILT (D).
- Go forward.
- Use HOOK; select lever; take HORSE EMBLEM (E).
- Go right.
- Place HORSE EMBLEM; take SCYTHE (F).
- Place SOAKED MOSS and KNIGHT'S HELM; take 2/2 STONE LION HEADS and SYMBOLS SOLUTION (G).
- Place STONE LILY; take 2/3 SNAKE VALVES (H).
- Place KEEPER'S CROWN; take 1/3 MOSAIC TILES (I).
- Place HILT; take BLUE ICE (J).
- Place STONE LION HEADS; take ANCIENT CHIP (K).
- Place SYMBOLS SOLUTION; select 1-3 (L).
- Play HOP; earn 3/3 SNAKE VALVES (M).
- Walk down 2x.
- Use SCYTHE (A).
- Play HOP; earn RAPIER (B).
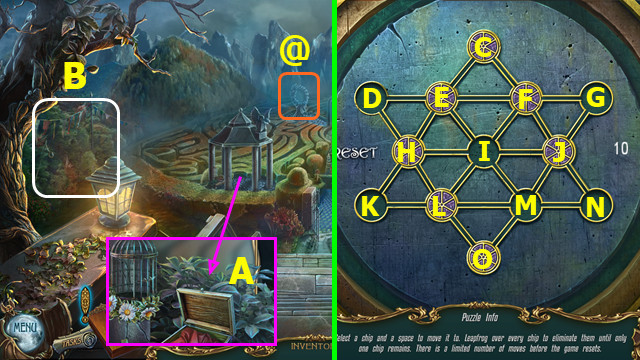
- Place ANCIENT CHIP (@); solution (H-I)-(E-M)-(L-I)-(M-E)-(C-H)-(F-N)-(O-M)-(N-L)-(H-O).
- Earn FLINT WITH STEEL.
- Go forward.
- Use RAPIER; take 2/3 MOSAIC TILES (P).
- Place SNAKE VALVES (Q).
- Go left.
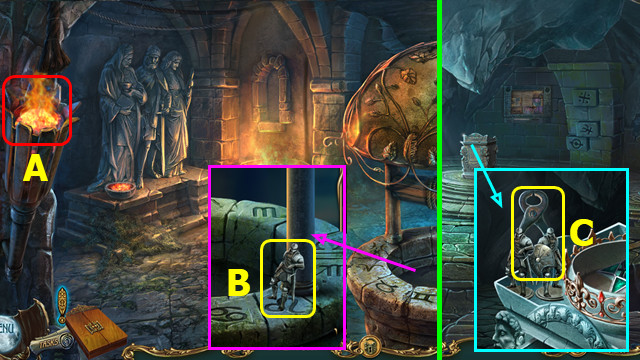
- Use FLINT WITH STEEL (A).
- Take KNIGHT STATUETTE (B).
- Walk down, right.
- Place KNIGHT STATUETTE; take PLIERS (C).
- Walk down, left.
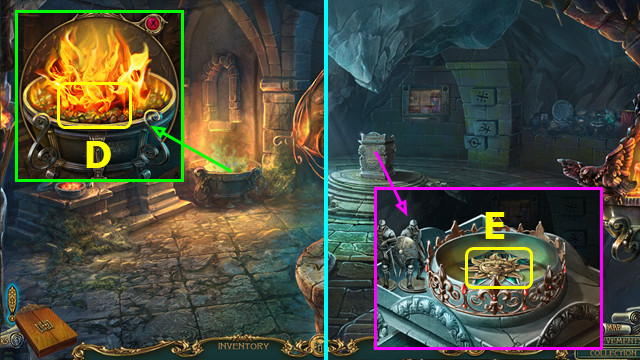
- Place PLIERS; use to take HOT COAL (D).
- Walk down, right.
- Place HOT COAL; take GOLDEN SUN (E).
- Walk down, left.
- Place CRYSTAL LEAF, GOLDEN SUN, and BLUE ICE; take 11/12 MAGIC CRYSTALS (F).
- This mini-game is randomly generated.
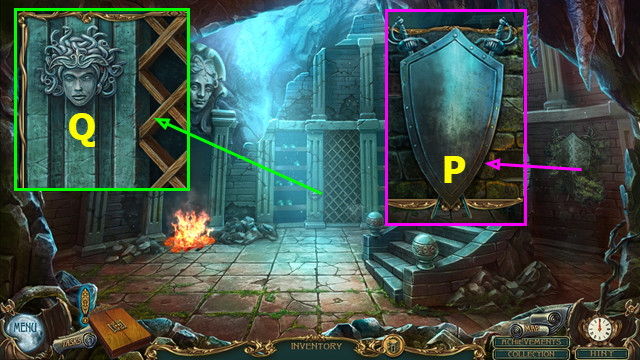
- Your opponent's choice is (G); use the maze to get to the best actions (red).
- Tip: choose the shield if your opponent selects the sword, otherwise, selecting the sword each time should win.
- Earn 3/3 MOSAIC TILES.
- Walk down, right.
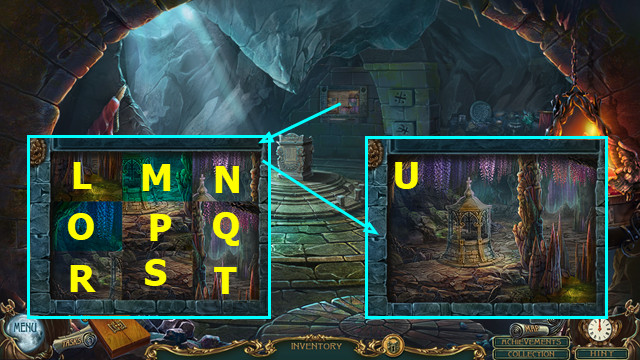
- Place MOSAIC TILES; NEED SOLUTION.
- Final image (U).
- Take 12/12 MAGIC CRYSTALS.
- Walk down, left.
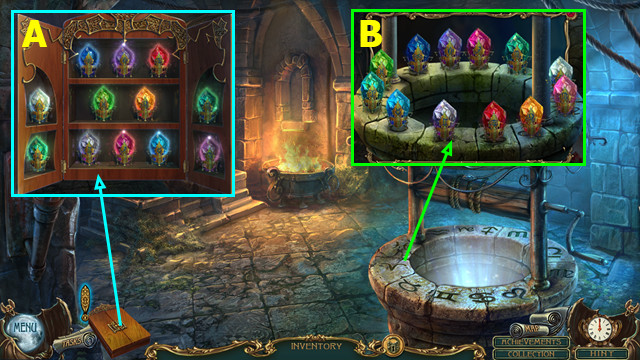
- Select each MAGIC CRYSTAL (A).
- Place MAGIC CRYSTALS; solution (B).
- Congratulations! You have completed Haunted Legends: The Call of Despair!
Created at: 2019-06-07