

Walkthrough Menu
- General Tips
- Chapter 1: Malloy Manor
- Chapter 2: The Secret Laboratory
- Chapter 3: The Cemetery
- Chapter 4: Through the Portal
General Tips
- This is the official guide for Haunted Legends: The Cursed Gift.
- This guide won't tell you when to zoom into a location; the screenshots show each zoom scene.
- Hidden-object puzzles are referred to as HOPs. Only the locations of the HOPs will be shown.
- Use the Map to fast travel to a location.
Chapter 1: Malloy Manor
- Receive LETTER.
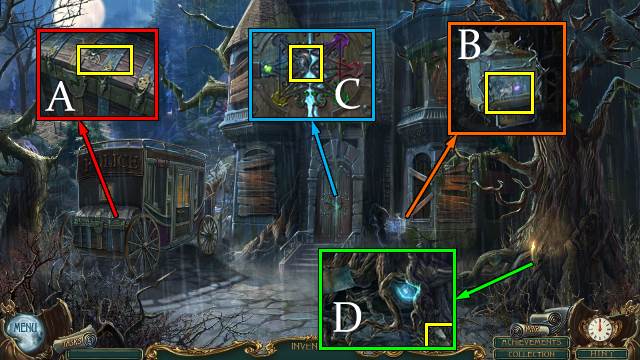
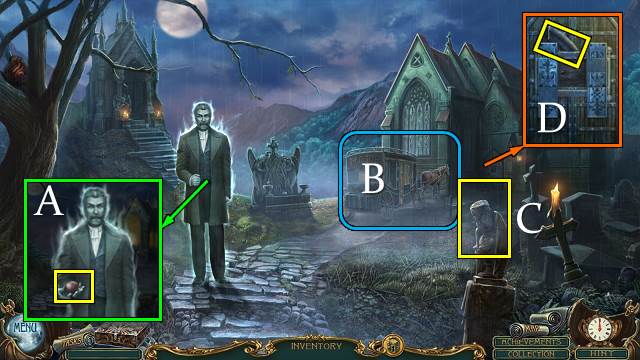
- Take KEY (A).
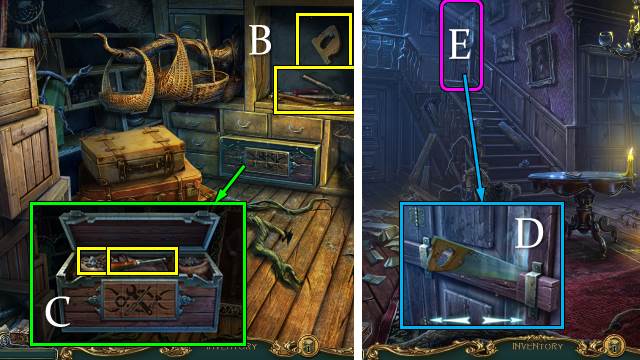
- Take DEER; use KEY. Take STONE 1/4 (B).
- Take HORSE 1/2 (C).
- Take HORSE 2/2 (D).
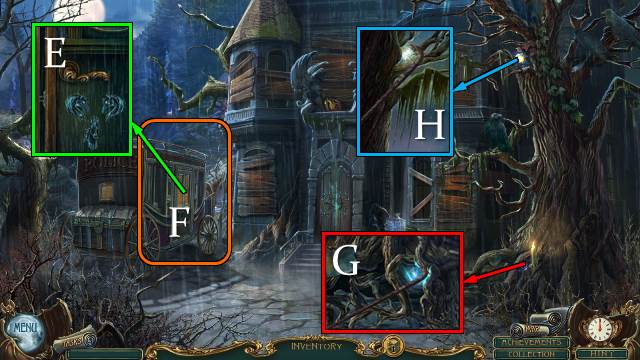
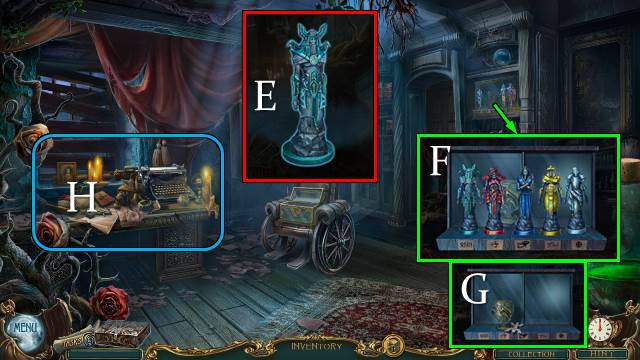
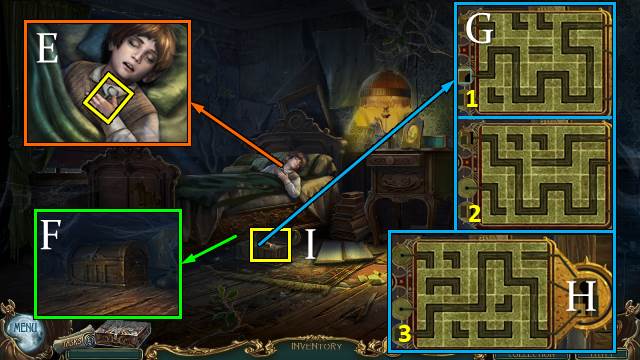
- Use HORSE (E).
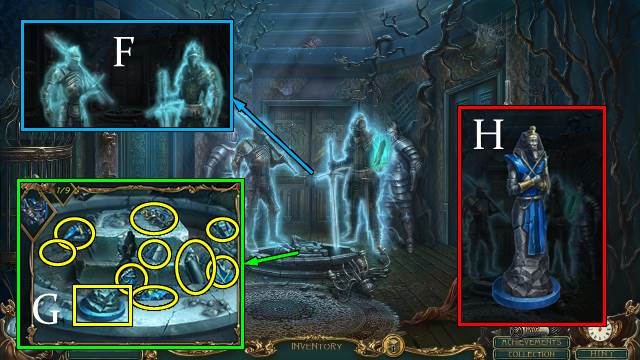
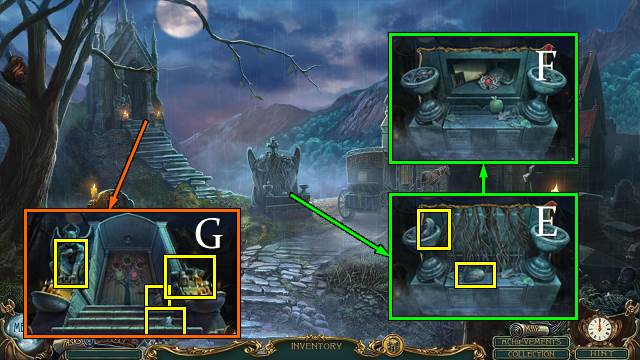
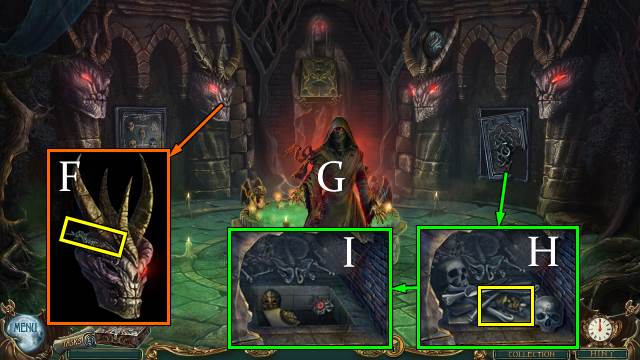
- Play HOP (F); receive CANE.
- Use CANE; take STONE 2/4 (G).
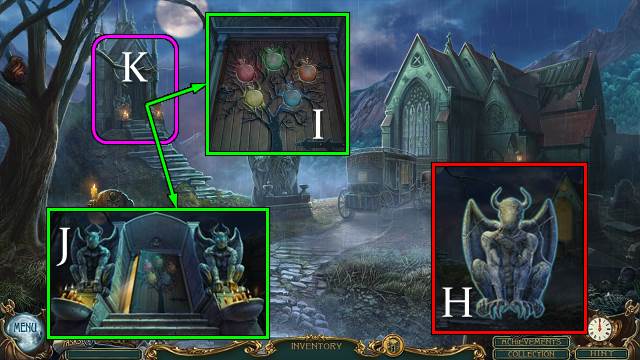
- Take STONE 3/4 with CANE (H).
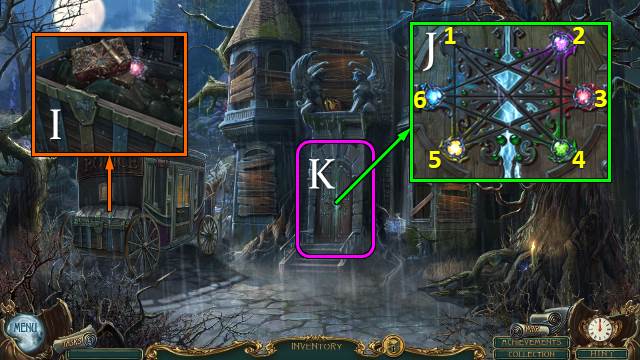
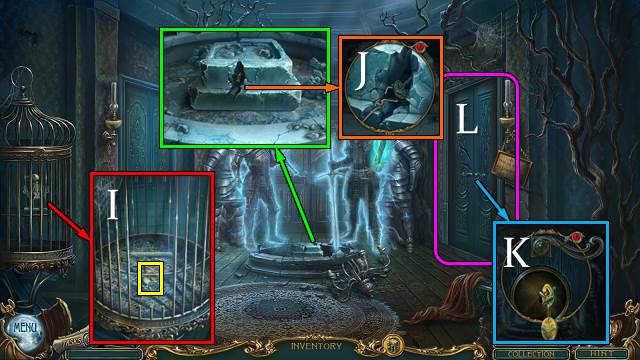
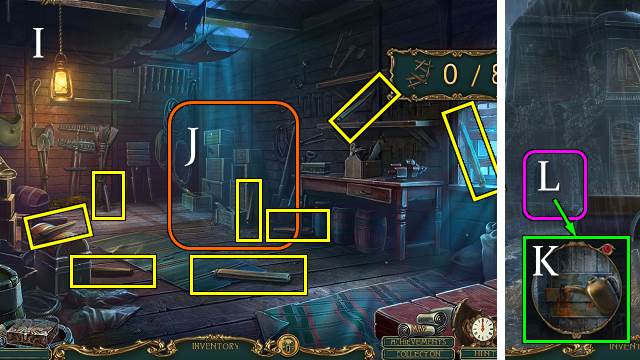
- Place DEER; take casket, MATCHES and STONE 4/4 (I).
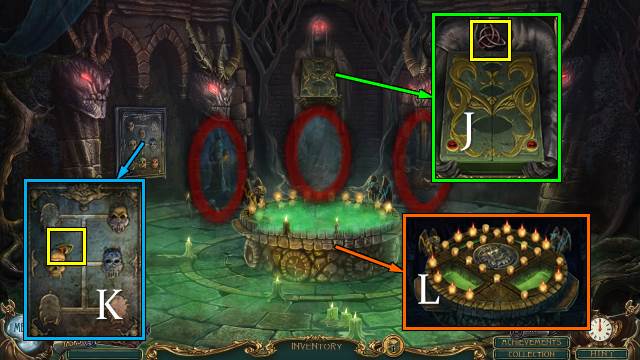
- Place STONE (J). Solution: 5-2-4-1-5-2-4-6-3-5-1.
- Go (K).
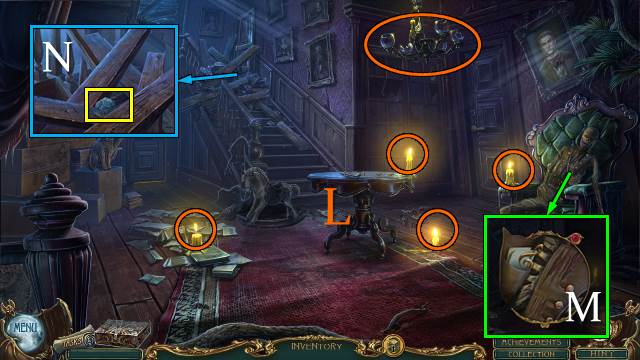
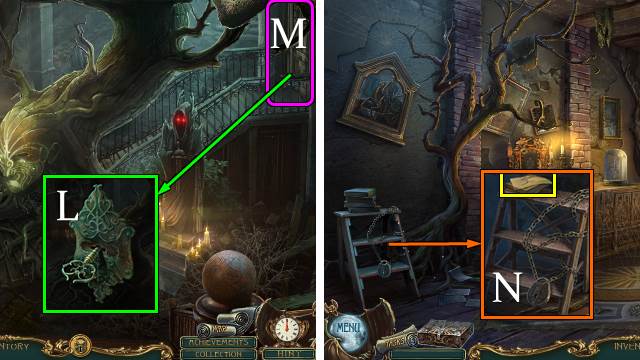
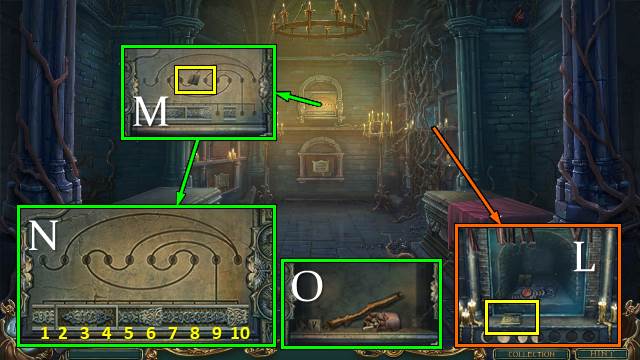
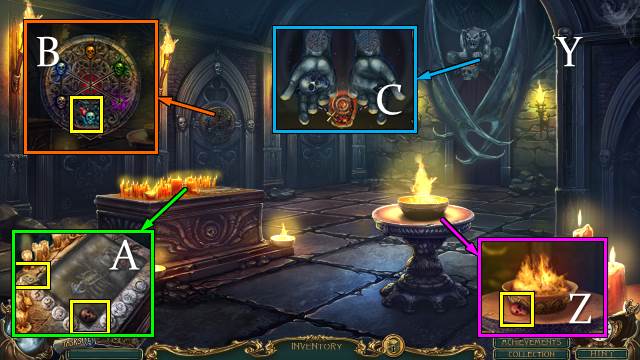
- Light candles with MATCHES (L).
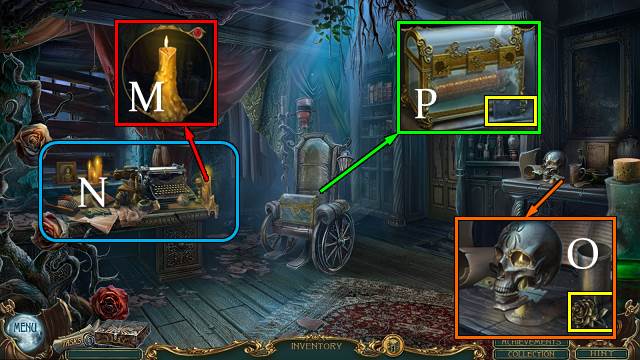
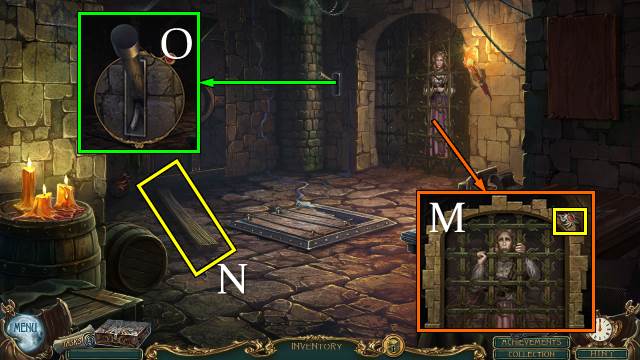
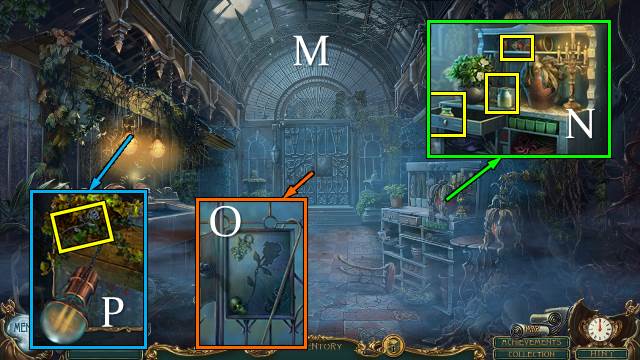
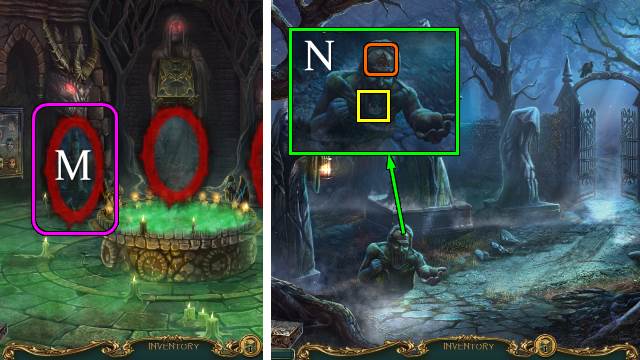
- Open coat; take TREBLE CLEF 1/3 (M).
- Remove rocks; take OWL TOKEN. Remove planks (N).
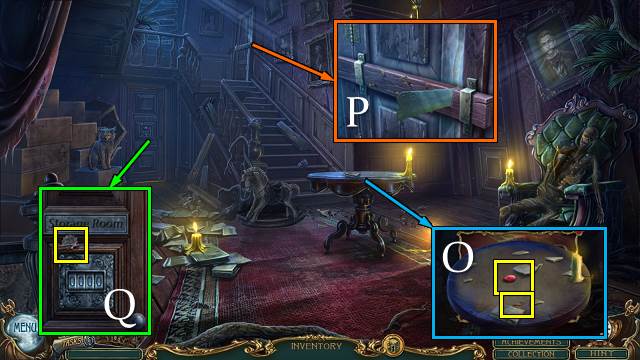
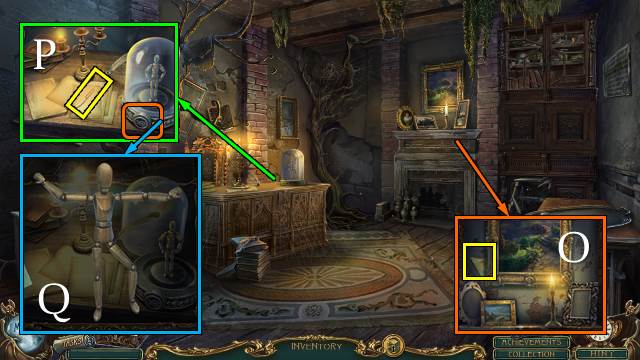
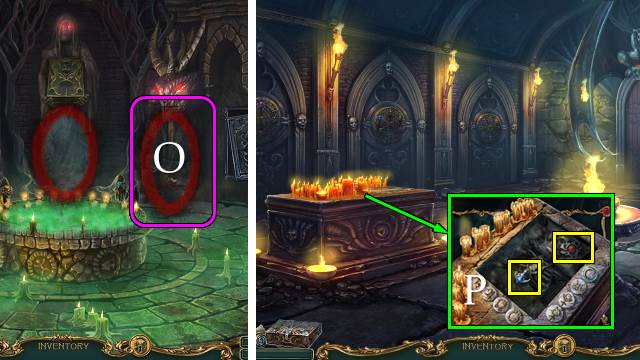
- Take TREBLE CLEF 2/3 and EYE; collect all shards (O).
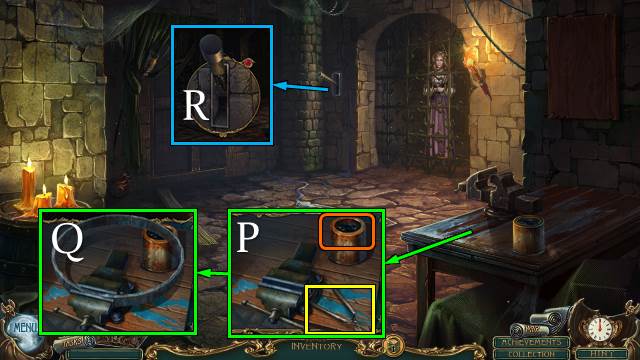
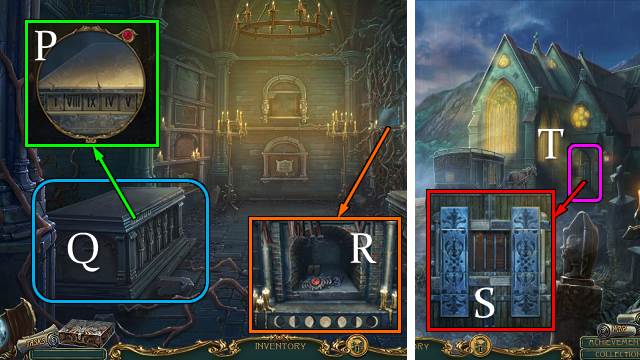
- Take BLADE (P).
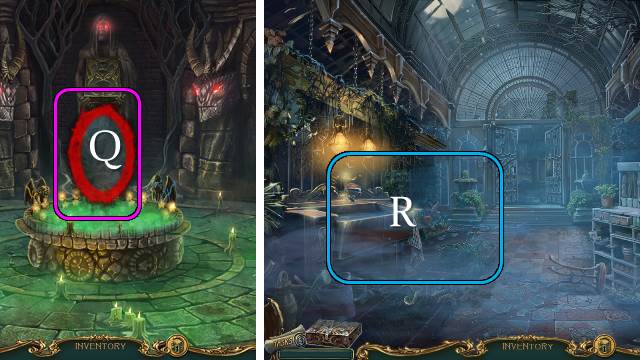
- Take SNAKE TOKEN (Q).
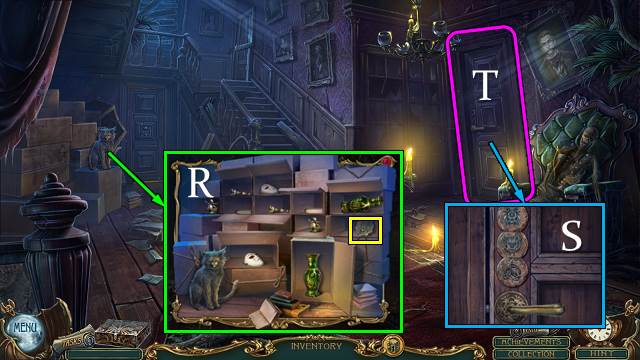
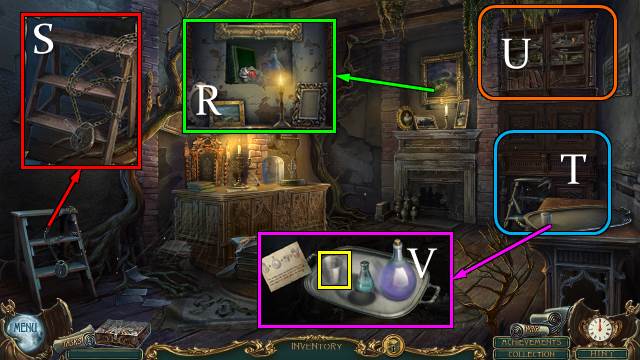
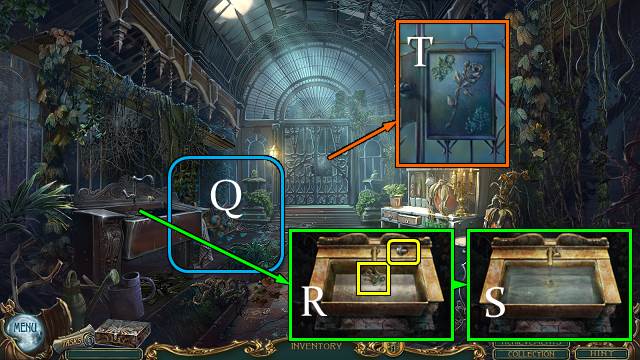
- Find matching items; take LION TOKEN (R).
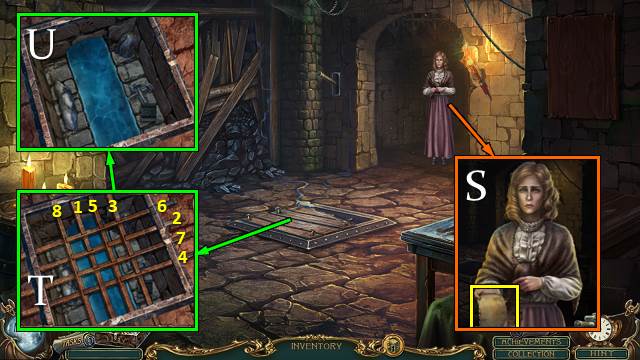
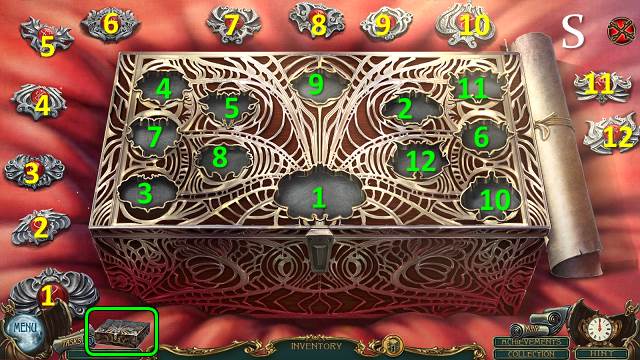
- Use LION TOKEN, OWL TOKEN and SNAKE TOKEN (S).
- Go (T).
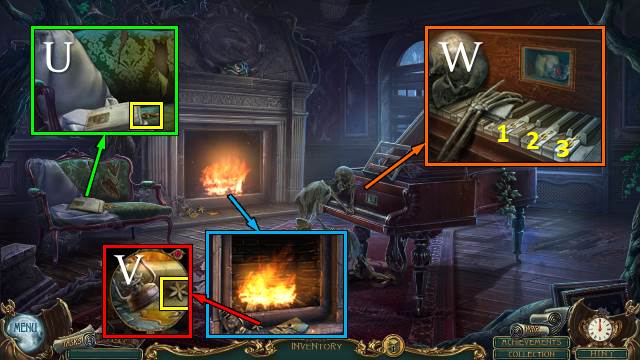
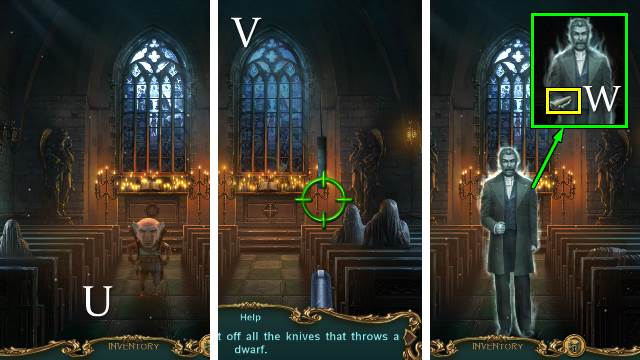
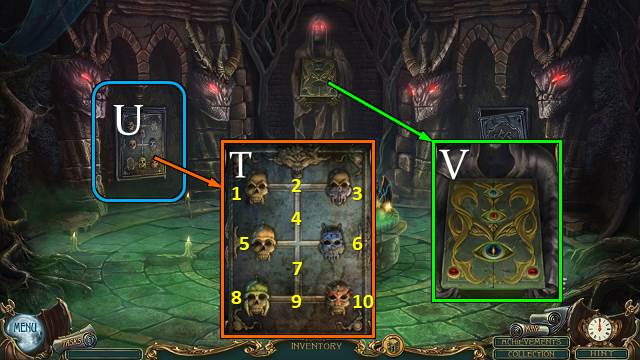
- Take TREBLE CLEF 3/3 (U).
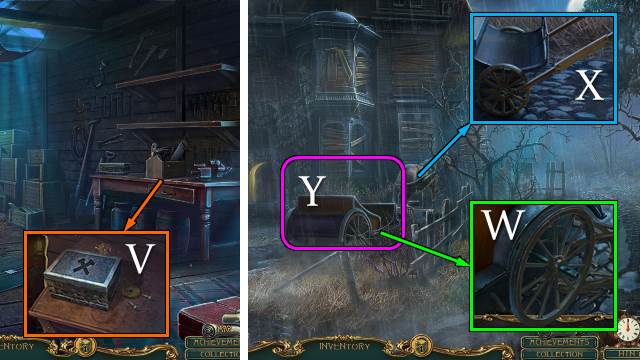
- Take TABLE INLAY 1/3 (V).
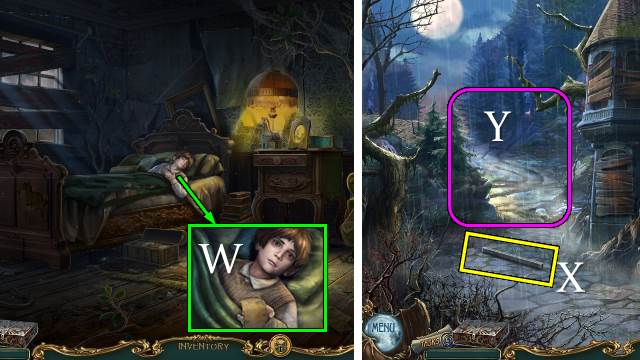
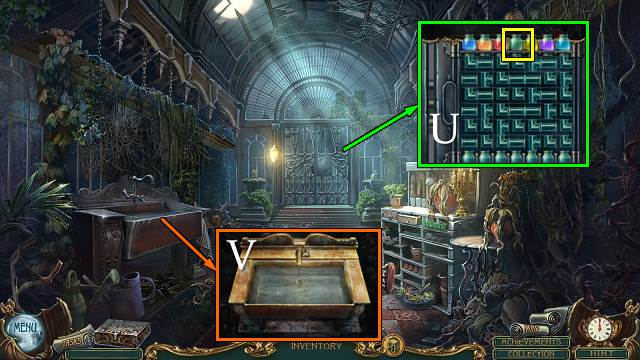
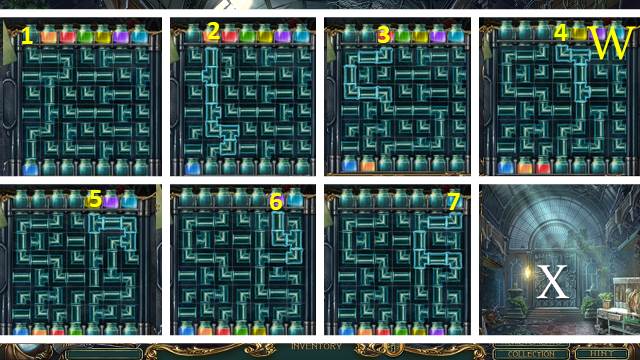
- Place TREBLE CLEF (W). Solution: 3-1-2. Take seal and CODE.
- Walk down.
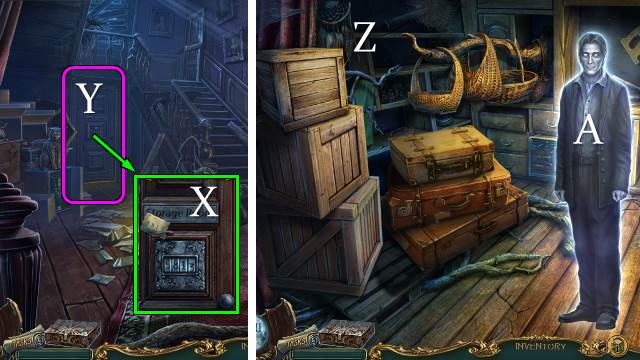
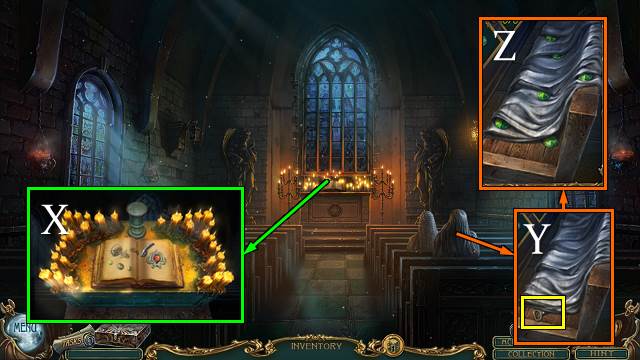
- Place CODE; enter 5813 (X).
- Go (Y).
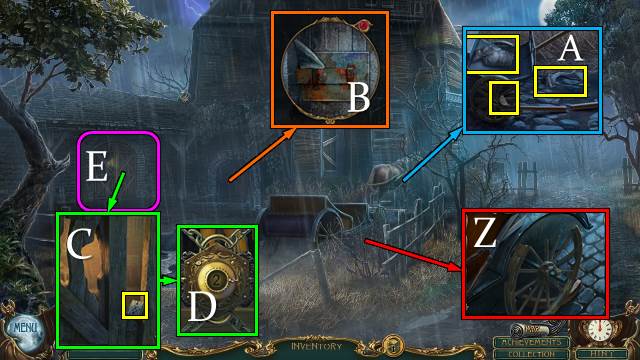
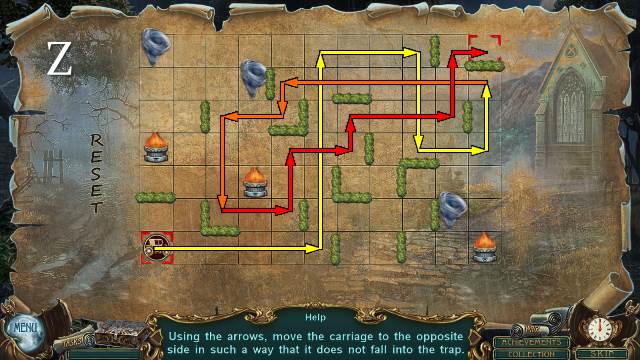
- Tidy storage room (Z).
- Talk (A).
- Take CUTTERS and HANDLE (B).
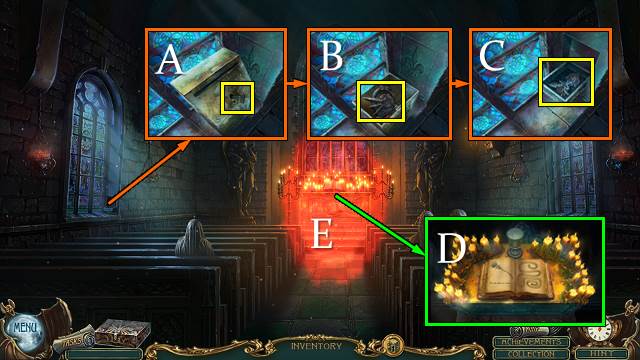
- Solution; take SCREWDRIVER and SCREWS (C).
- HANDLE, SCREWS and SCREWDRIVER on BLADE; take SAW.
- Walk down.
- Use SAW (D).
- Go (E).
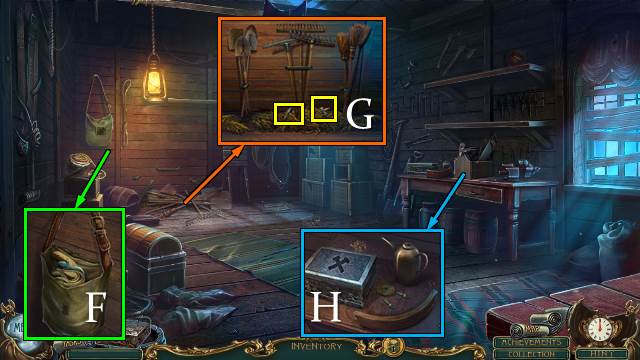
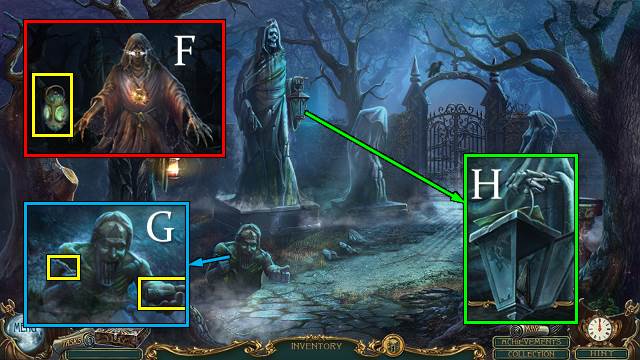
- Talk; offer LETTER (F).
- Take STATUE and 9 STATUE PIECES (G).
- STATUE PIECES on STATUE; restore STATUE (H).
- Take WIRE with CUTTERS; take BIRD SKULL (I).
- Turn WIRE into HOOK.
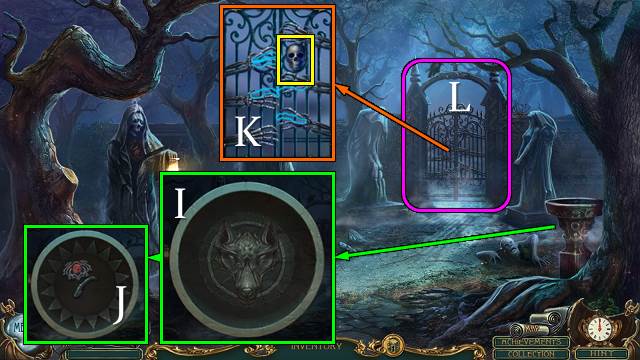
- Take DOOR KEY with HOOK (J).
- Use DOOR KEY (K).
- Go (L).
- Use MATCHES (M).
- Play HOP (N); receive ROSE 1/2.
- Take ROSE 2/2 (O).
- Take KEY PART; use ROSE (P).

- Take BEETLE and play HOP (Q); receive KALEIDOSCOPE.
- Take LOCK PIECE (R).
- Place STATUE and take STATUE BASE (S).
- Walk down.
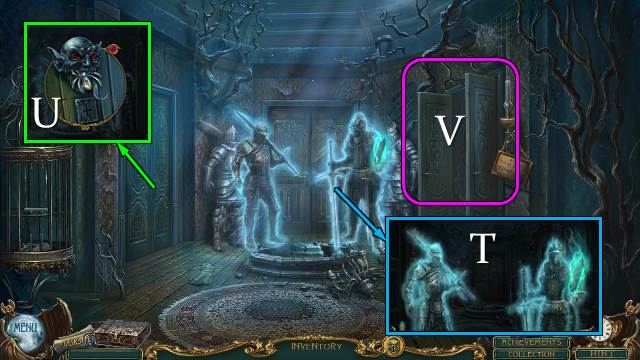
- Offer KALEIDOSCOPE (T).
- Place EYE; take SPIDER (U).
- Go (V).
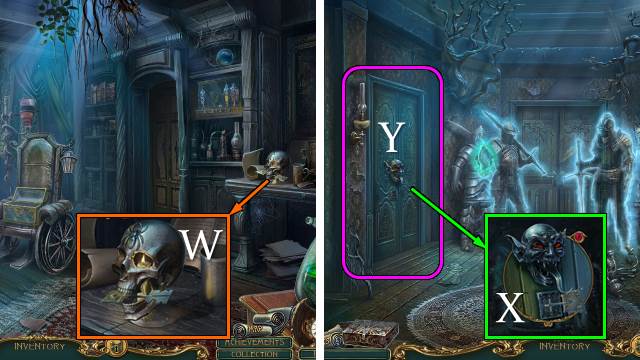
- Place SPIDER; take BROKEN KEY (W).
- Walk down.
- KEY PART on BROKEN KEY; take KEY.
- Use KEY (X).
- Go (Y).
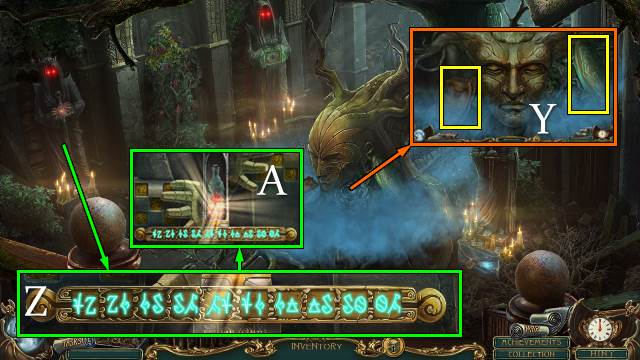
- Take RITUAL ALTAR and recipe (Y).
- Solution (Z).
- Take RED POISON (A).
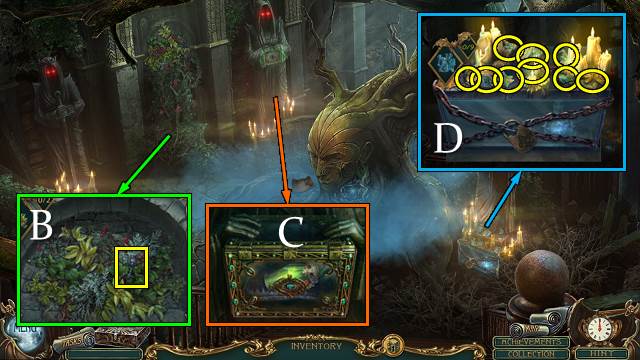
- Take SKULL KEY; match HERBS (B).
- Place BEETLE. Copy random sequence. Take seal and GREEN ESSENCE (C).
- Take 9 STATUE PIECES. Place LOCK PIECE; take BLUE SOULS and MESSENGER SYMBOL (D).
- Go to Study.
- STATUE PIECES on STATUE BASE; restore STATUE (E).
- Place STATUE. Solution (F).
- Take LITERARY SYMBOL and GOBLET (G).
- Play HOP (H); receive CHALK.
- Go to Totem Room.
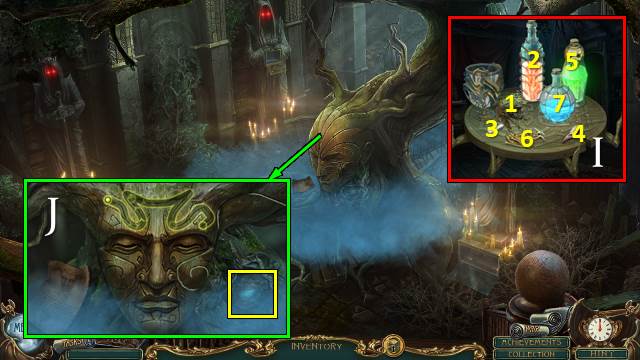
- GREEN ESSENCE, RED POISON, HERBS, BIRD SKULL, BLUE SOULS, CHALK and GOBLET on RITUAL ALTAR. Add ingredients in indicated order. Take AWAKENING POTION (I).
- Use AWAKENING POTION; trace lines (J).
- Play HOP (J); receive AMULET.
- Walk down.

- Offer AMULET (K).
- Go (L).
- Talk (M).
- Go (N).
Chapter 2: The Secret Laboratory
- Talk (O).
- Take STAR KEY (P).
- Take HORSESHOE (Q).
- Take CHIP 1/4 and LOCK TUMBLER (R).
- Take CLOTH; place STAR KEY (S).
- Take BONE and CHIP 2/4 (T).
- Place BONE; take CHIP 3/4, NOTE 1/3 and CHARCOAL (U).
- CHARCOAL on CLOTH; take WRITING SURFACE.
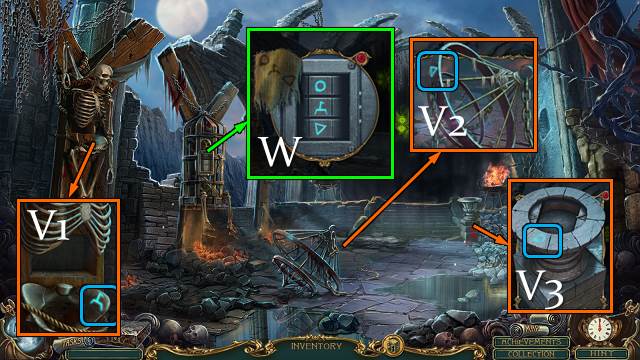
- Use WRITING SURFACE three times (V1-3).
- Receive CODE.
- Place LOCK TUMBLER and CODE; enter code (W).

- Play HOP (X); receive CHIP 4/4.
- Place CHIP (Y); match pairs.
- Go (Z).

- Talk; take RECIPE and TABLE INLAY 2/3 (A).
- Take BOOK (B).
- Place HORSESHOE; take RING and KNIFE (C).
- Take seal and MIRROR (D).
- Take CHEST KEY (E).
- Move items (F).
- Use KNIFE; solution (G).
- Use CHEST KEY (H).
- Take NOTE 2/3 (I).
- Go to Living Room.

- LITERARY SYMBOL on BOOK; take NOTE 3/3.
- Place NOTE. Solution: J2x5-J1x5-J3x5. Take TABLE INLAY 3/3 (J).
- Walk down.
- Place TABLE INLAY; take LABORATORY KEY (K).
- Go to Totem Room.
- Use LABORATORY KEY (L).
- Go (M).
- Move books; take PAPER (N).
- Take SOLUTION PART (O).
- PAPER on SOLUTION PART; take SOLUTION.
- Take CLIP; use RING (P).
- Place SOLUTION; solution (Q).
- Take seal and POTION (R).
- Use CLIP; take STEPLADDER (S).
- Replace STEPLADDER (T).
- Open cabinet. Play HOP (U); receive MEDICINE.
- Place RECIPE, POTION and MEDICINE. Pour potion and medicine; take MEDICINE (V).
- Go to Nursery.
- Offer MEDICINE; take MAP (W).
- Go to House Exterior.
- Take METAL BAR (X).
- Go (Y).
Chapter 3: The Cemetery
- Take GARDEN SHEARS, PEG, DISASSEMBLED WHEEL and RIM 1/4 (Z).
- Take PIECE 1-2/13 and MOON 1/3 (A).
- Take PIECE 3/13 (B).
- Take PANEL 1/2 (C); place MIRROR for mini-game (D).
- Go (E).
- Use MESSENGER SYMBOL; take APPLE 1/3 and RIM 2/4 (F).
- Hang tools; take EMBLEM and MALLET (G).
- Take RIM 3/4 and OIL (H).
- Open crates (J); find 8 SPOKES (I).
- Play mini-HOP (J); receive RIM 4/4.
- Walk down.
- Use OIL (K).
- Go (L).
- Talk. Take seal; offer LETTER (M).
- Take BOARD (N).
- Take PIECE 4/13 and BROKEN LEVER (O).
- Take FORCEPS. Use BROKEN LEVER; receive LEVER (P).
- Place METAL BAR and use MALLET; take OUTER RIM (Q).
- Use LEVER (R).
- Talk. Offer MAP; take ADDRESS (S).
- Use FORCEPS. Solution (T).
- Take PIECE 5-6/13, TILE 1/3 and SYMBOL (U).
- Go to Barn.
- Use SYMBOL. Take MOON 2/3 and 7 NAILS (V).
- Walk down.
- SPOKES, RIM and OUTER RIM on DISASSEMBLED WHEEL. Take WHEEL.
- Use WHEEL, PEG and MALLET (W).
- Use BOARD, NAILS and MALLET (X).
- Use ADDRESS (Y).
- Solution (Z).
- Talk; take APPLE 2/3 (A).
- Play HOP (B); receive OPAL.
- Take PIECE 7/13 (C).
- Take PIECE 8/13 (D).
- Take PIECE 9-10/13; use GARDEN SHEARS (E).
- Use SKULL KEY; take APPLE 3/3, seal, PIECE 11/13 and NUMBER 1/3 (F).
- Take TILE 2/3, PIECE 12-13/13 and GARGOYLE (G).
- PIECE on GARGOYLE; restore GARGOYLE (H).
- Place APPLE; solution (I).
- Place GARGOYLE (J).
- Go (K).
- Use GARDEN SHEARS; take TILE 3/3 (L).
- Take NUMBER 2/3 and place TILE (M).
- Solution (N): 2-5-4-6-1-7-8-3-10-9.
- Take ARTIFACT, BULLETS and NUMBER 3/3 (O).
- Place NUMBER; select I-IV-V-VIII-IX (P).
- Play HOP (Q); receive MOON 3/3.
- Place MOON; solution. Take seal, EMPTY REVOLVER and PANEL 2/2 (R).
- BULLETS in EMPTY REVOLVER. Take REVOLVER.
- Walk down.
- Place PANEL. Solution (S).
- Go (T).
- Talk (U).
- Use REVOLVER (V).
- Talk; take PAGE (W).
- Take seal and FINGERS 1/5. Place PAGE (X).
- Take KEY (Y) and 6 STONES (Z).
- Take PETALS 1/3 (A).
- Use KEY; take ARTIFACT PIECE and STAR (B).
- Place EMBLEM; take ARTIFACT PIECE (C).
- OPAL, STONES and 2x ARTIFACT PIECE on ARTIFACT.
- Use ARTIFACT (D); trace line.
- Go (E).
Chapter 4: Through the Portal
- Talk; take LANTERN (F).
- Take FINGERS 2/5. Open fist and take PETALS 2/3 (G).
- Use STAR; take SOLUTION, PETALS 3/3 and FINGERS 3-4/5 (H).
- Place PETALS. Solution (I).
- Take seal and FINGERS 5/5 (J).
- Take SKULL 1/5; place FINGERS (K).
- Go (L).
- Use LANTERN (M).
- Take seal, YELLOW BOTTLE and ORANGE LIQUID (N).
- Take SKULL 2/5 and ROD (O).
- Mate leaves; take FLOWER (P).
- Play HOP (Q); receive KNOB.
- Use ROD; take BLOSSOM and SYMBOL 1/3. Take and place PLUG (R).
- Use KNOB; take YELLOW LIQUID with YELLOW BOTTLE (S).
- Place BLOSSOM and FLOWER (T).
- Place ORANGE LIQUID and YELLOW LIQUID; take GREEN BOTTLE (U).
- Take GREEN LIQUID with GREEN BOTTLE (V).
- Place GREEN LIQUID and SOLUTION (U).
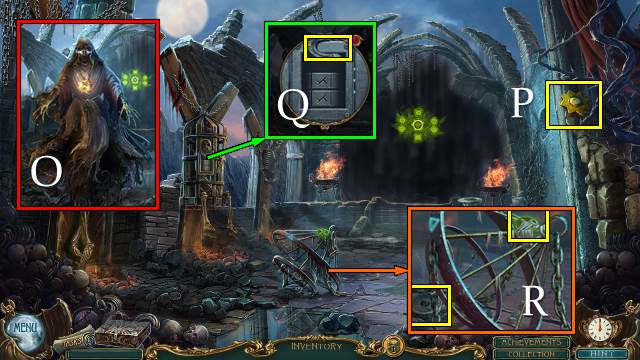
- Solution (W).
- Go (X).
- Use LANTERN (Y).
- Take SKULL 3/5 (Z).
- Take SKULL 4/5 and SYMBOL PART (A).
- Take EYE (B).
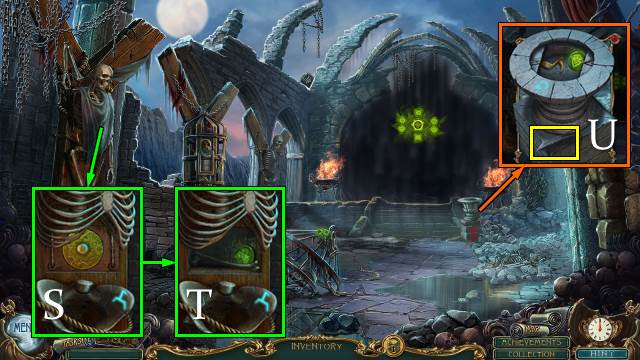
- Place SYMBOL PART. Swap symbols and take SKULL 5/5 and SYMBOL 2/3 (C).

- Place SKULL for a random mini-game (D).
- Go (E).
- Take HIPPOCAMPUS; place EYE (F).
- Talk (G).
- Move items; take ANOTHER SKULL 1/3 and SYMBOL 3/3 (H).
- Place HIPPOCAMPUS; take seal, PAGE and ANOTHER SKULL 2/3 (I).
- Take SIGN (J).
- Take EYE 1/3 (K).
- Take ARTIFACT (L).
- EYE 2/3 from ARTIFACT.
- Go (M).
- Place SIGN; take ANOTHER SKULL 3/3 (N).
- Go (O).
- Place SYMBOL; copy sequence. Take seal and ARTIFACT PIECE (P).
- Go (Q).
- Play HOP (R); receive ARTIFACT PIECE.
- Put all seals on casket (S); take ARTIFACT PIECE.
- Place ANOTHER SKULL (T).
- Solution: (9-10)-(7-8)-(4-9)-(3-5)-(9-3)-(1-9)-(5-1)-(9-5)-(8-2)-(5-8)-(2-9)-(1-5)-(9-1).
- Play HOP (U); receive EYE 3/3.
- Place EYE and PAGE; take ARTIFACT PIECE (V).
- Place 4x ARTIFACT PIECE on ARTIFACT.
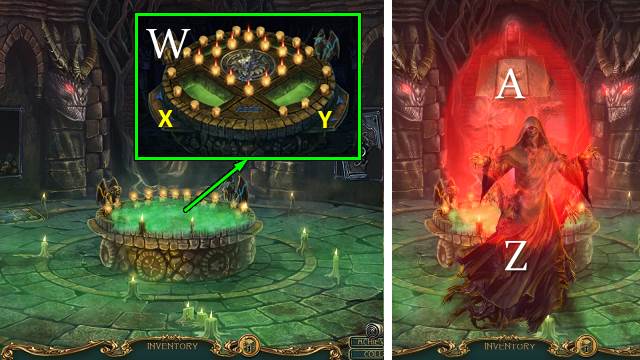
- Place ARTIFACT (W).
- Solution: 4Y-4X.
- Talk (Z).
- Go (A).
- Congratulations, you have completed Haunted Legends: The Cursed Gift.
Created at: 2017-09-22