Walkthrough Menu
- General Tips
- Chapter 1: The Portrait
- Chapter 2: Crumbling Tower
- Chapter 3: Soul Vial
- Chapter 4: The Mine
- Chapter 5: Windmill
- Chapter 6: Dungeon
- Chapter 7: The Ring
- Chapter 8: Flooded City
- Chapter 9: Rosary
General Tips
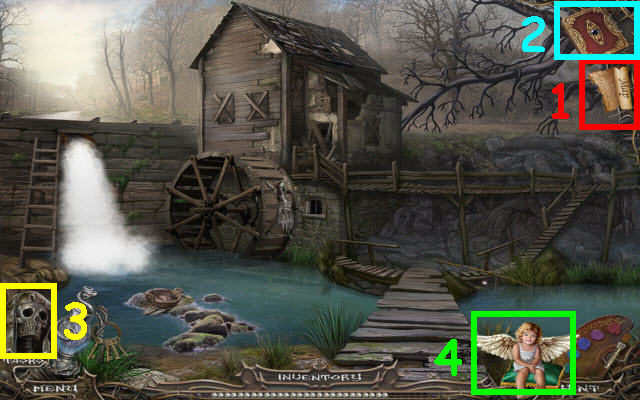
- This is the official guide for Haunted Manor: Painted Beauties.
- This guide will not mention each time you have to zoom into a location; the screenshots will show each zoom scene.
- We will use the acronym HOP for Hidden-object puzzles. Interactive items will be color-coded and some will be numbered; please follow the numbers in sequence.
- The HOP lists may be random; our lists may vary from yours.
- Use the map (1) to travel to previously unlocked locations.
- Select the journal (2) for clues and story updates.
- Select the skull (3) for your task list.
- Select the angel to get a Hint (4).
Chapter 1: The Portrait
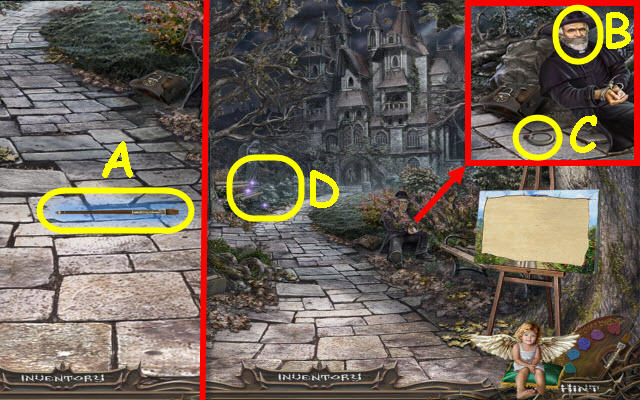
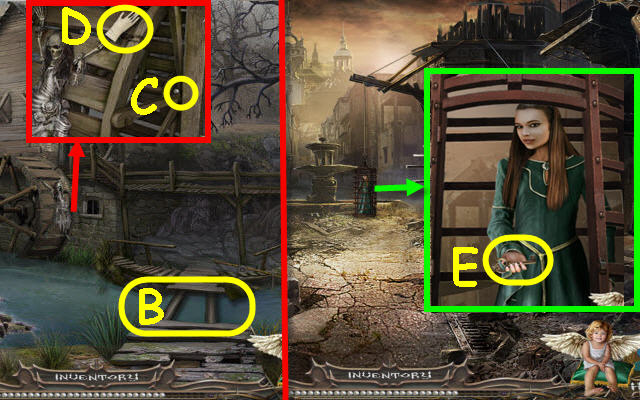
- Pick up the brush (A).
- Move the branch; zoom in and remove the gag (B).
- Take the DOOR HANDLE (C).
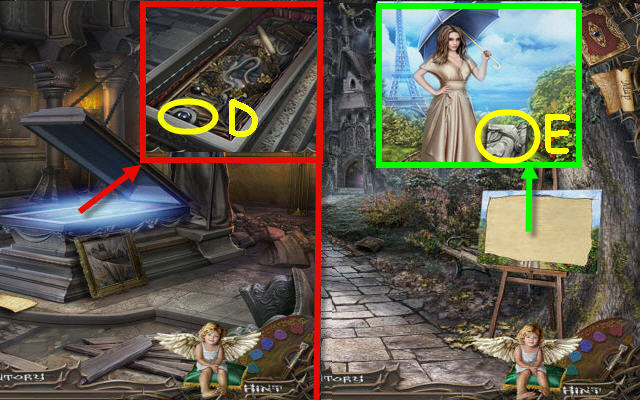
- Play the HOP (D).
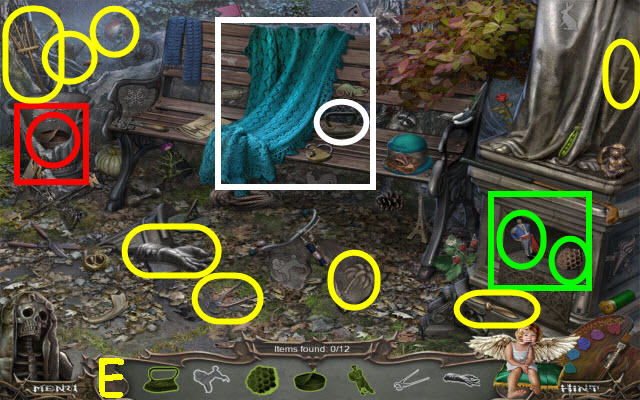
- You receive NIPPERS (E).
- Go forward.
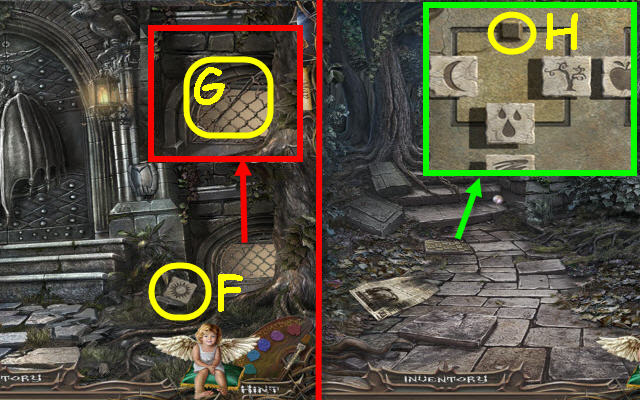
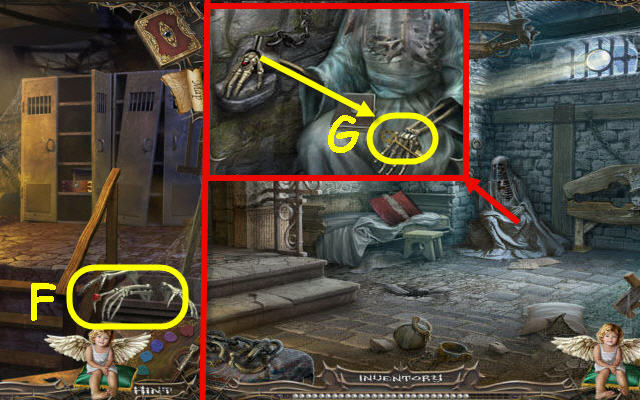
- Take the SUN TILE (F).
- Use the NIPPERS (G); receive a CROWBAR.
- Back out; go left.
- Place the SUN TILE to trigger a puzzle (H).
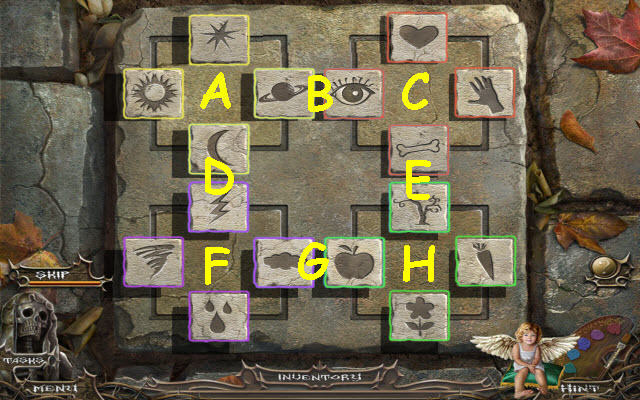
- Correctly arrange the tiles.
- Solution: Fx2, G, H, F, G, H, B, C, E, A, D, F, G, F, D, Ax3, B, Cx2, B, C, D, A, Fx2, D, Ax2 and B.
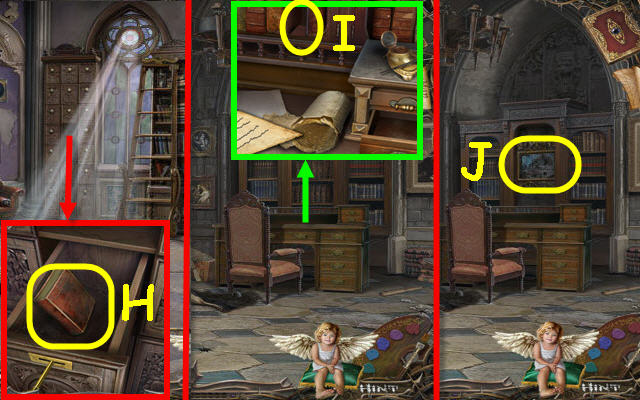
- Take the 2nd DOOR HANDLE.
- Go forward.
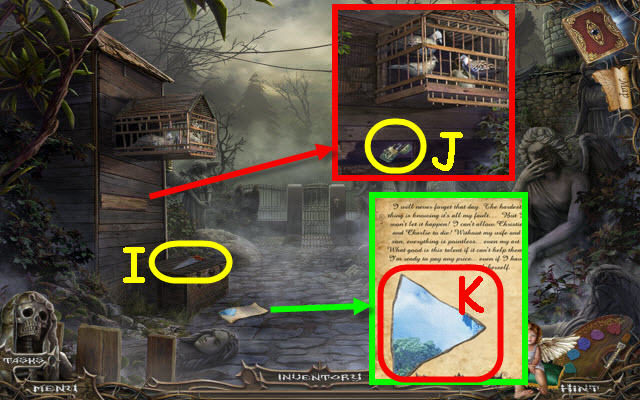
- Select the ghost; take the HANDSAW (I).
- Use the CROWBAR on the board; take the LIGHTER (J).
- Take the CANVAS SCRAP 1/15 (K).
- Go to the Manor Porch.
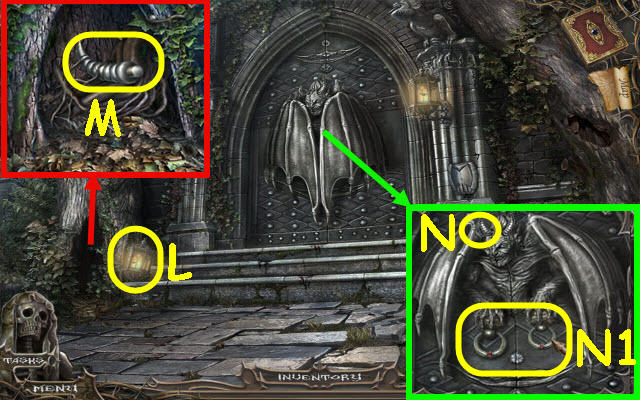
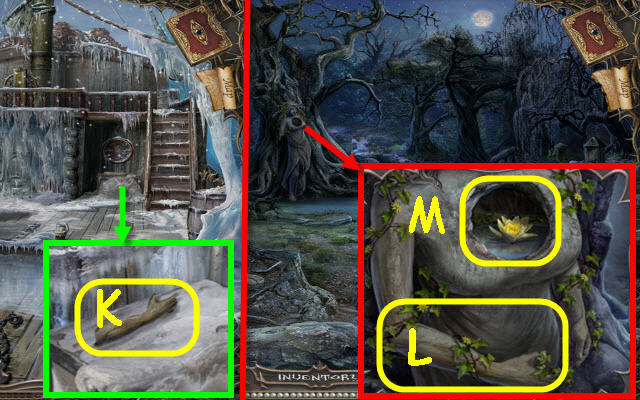
- Open the lantern; use the lighter on it (L).
- Use the HANDSAW on the branch; take the HORN (M).
- Place the HORN (N) and the 2 DOOR HANDLES (N1).
- Go forward.
- Examine the table to access a HOP.
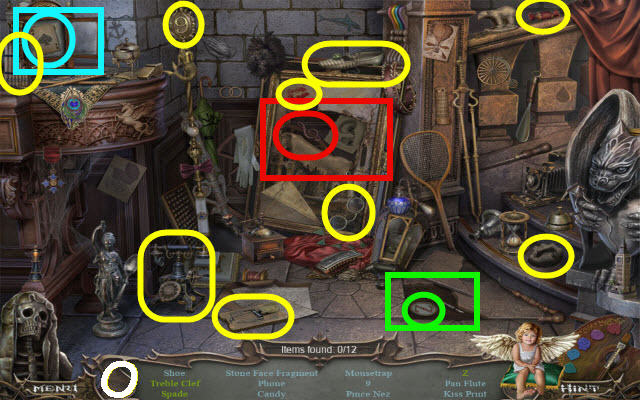
- Play the HOP.
- You receive a STONE FACE FRAGMENT (O).
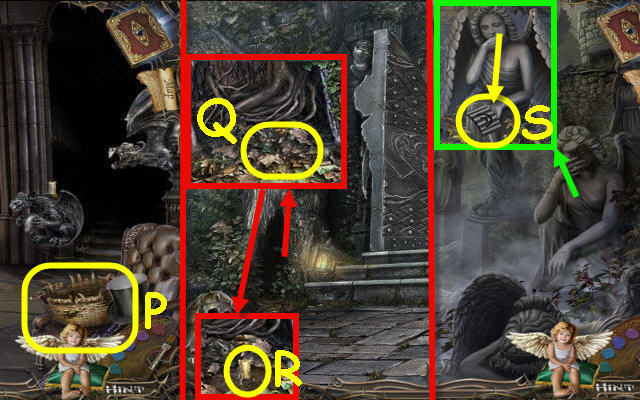
- Take the EMPTY BASKET (P).
- Back out.
- Place the EMPTY BASKET (Q); receive a BASKET OF LEAVES.
- Take the CANDLE (R).
- Go to the Statue Garden.
- Place the STONE FACE FRAGMENT; take the COLUMN SECTION (S).
- Go to the Main Hall.
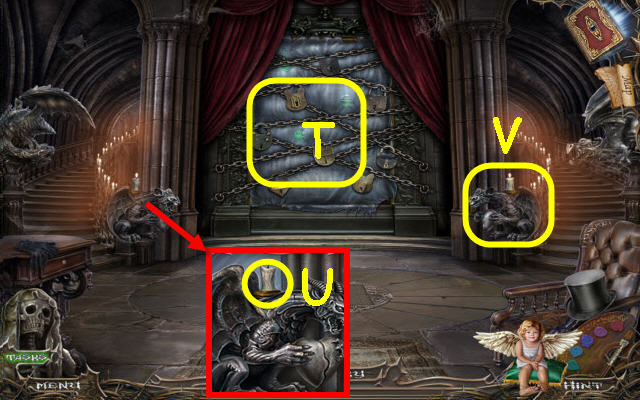
- Open the curtain (T).
- Place the CANDLE; use the LIGHTER on it (U).
- Use the LIGHTER on the candle (V).
- Go up the right staircase.
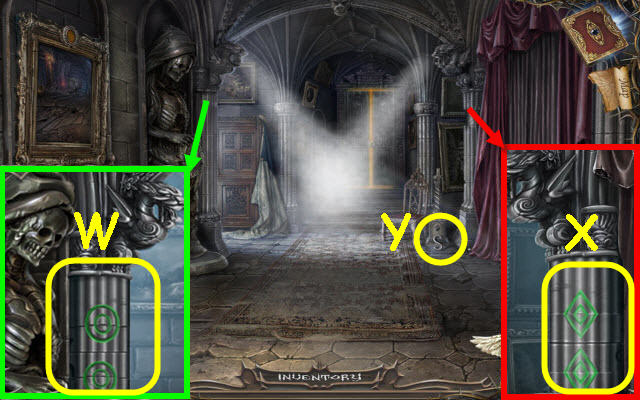
- Turn the pieces to complete the image (W).
- Place the COLUMN SECTION on the column; turn the pieces to complete the image (X).
- Take the S HOOK (Y).
- Back out; go up the left.
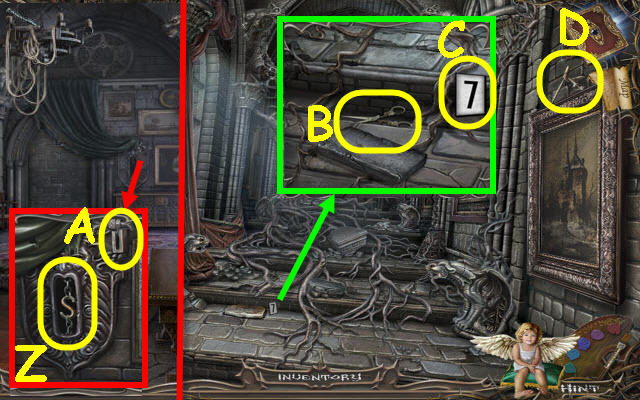
- Place the S HOOK (Z); pull the lever (A).
- Go forward.
- Use the CROWBAR on the tile; take the SCISSORS (B) and DIGIT (C).
- Use the SCISSORS (D).
- Go to the Front Drive.
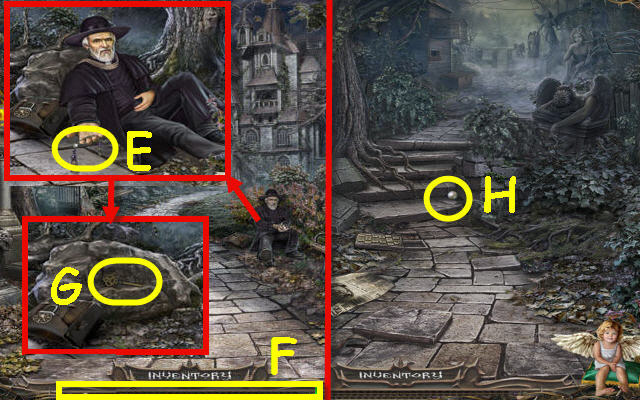
- Use the SCISSORS on the rope; take the rosary bracelet (E) which will be added to your toolbar along with the 1st Rosary Bead (F).
- Take the WARDROBE KEY (G).
- Go left.
- Take the 2nd Rosary Bead (H).
- Go to the East Wing.
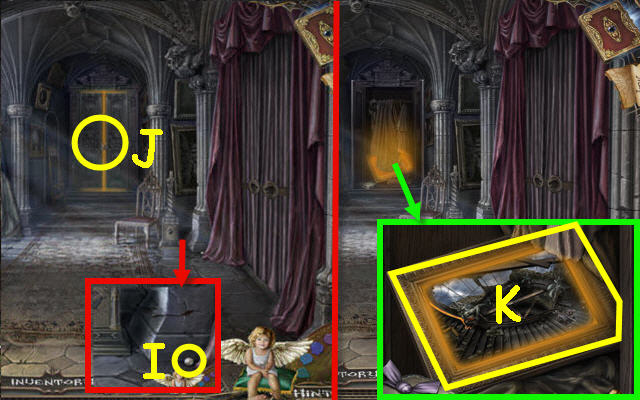
- Take the 3rd Rosary Bead (I).
- Use the WARDROBE KEY on the padlock (J).
- Move the clothes and zoom in; enter the painting (K).
Chapter 2: Crumbling Tower
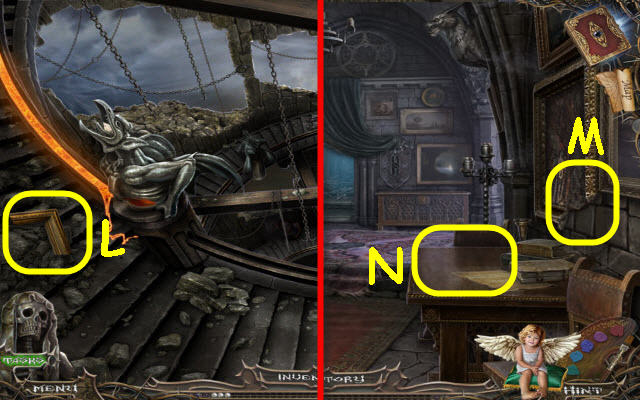
- Take the FRAME CORNER (L).
- Go to the West Wing.
- Place the FRAME CORNER (M).
- Play the HOP (N).
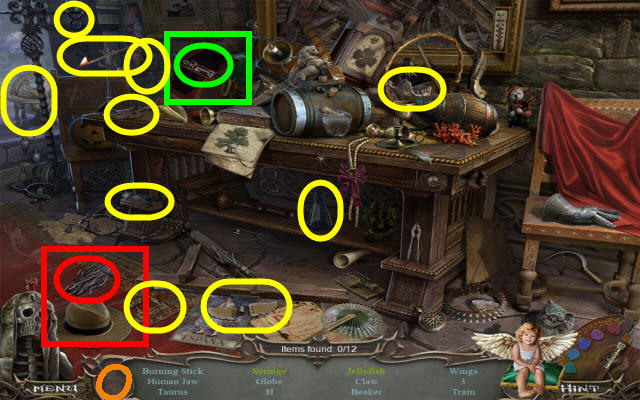
- You receive a BURNING STICK (O).
- Go forward.
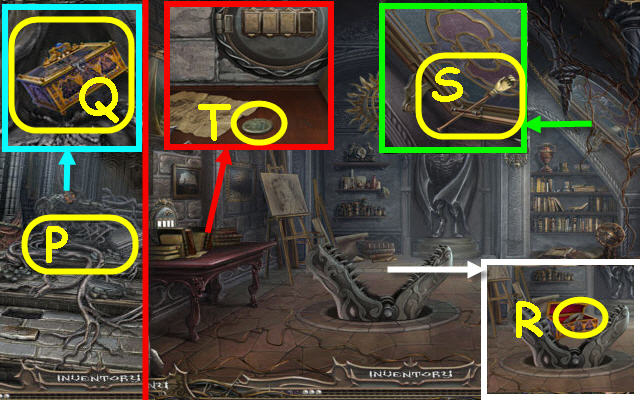
- Use the BURNING STICK and BASKET OF LEAVES (P).
- Take the IRON BOX (Q).
- Open the door; go forward.
- Place the IRON BOX; take the COLLAR (R).
- Take the BACK SCRATCHER (S).
- Move the books and paper; take the COIN (T).
- Go to the West Wing.
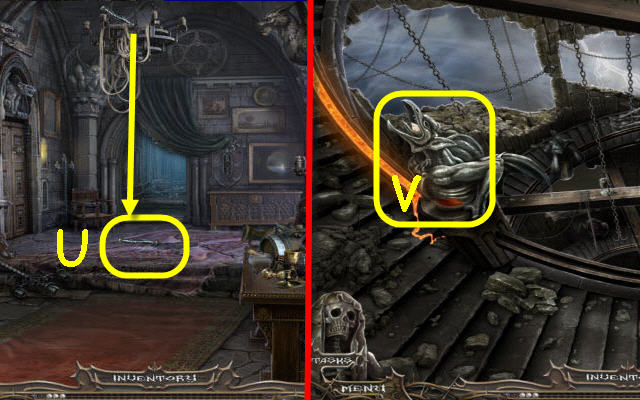
- Use the BACK SCRATCHER on the chandelier; take the WIRE CABLE (U).
- Go to the Crumbling Tower.
- Place the COLLAR to trigger a puzzle (V).
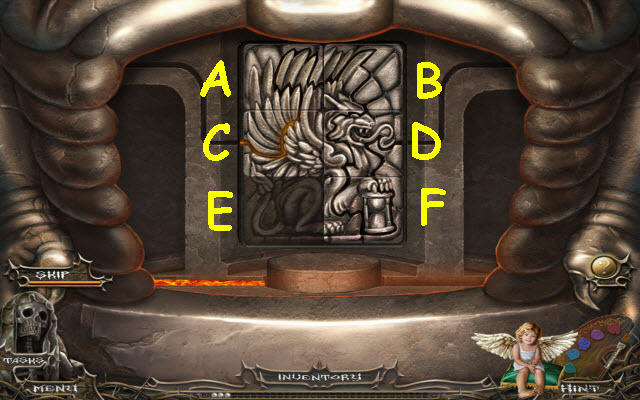
- Complete the image.
- Select the following: F, D, B, A, C, D, B, A, C and E.
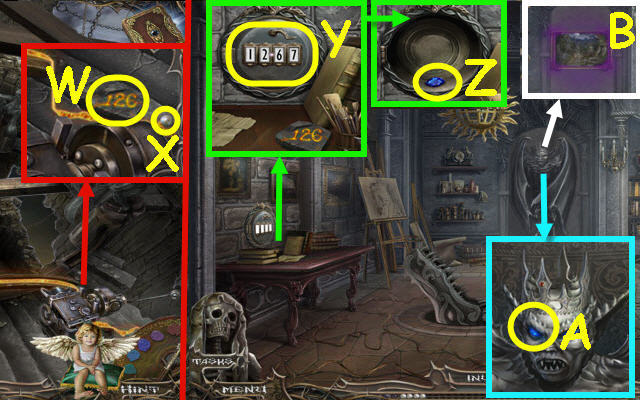
- Take the STONE WITH CODE (W) and 4th Rosary Bead (X).
- Go to the Observatory.
- Place the DIGIT and STONE WITH CODE; enter the code 1267 (Y). Take the SAPPHIRE EYE (Z).
- Place the SAPPHIRE EYE (A).
- Enter the painting (B).
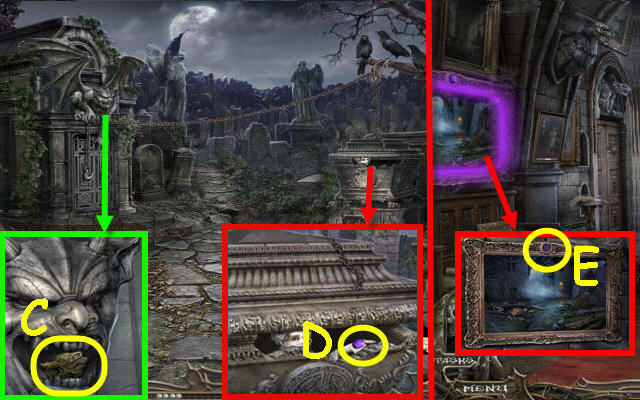
- Take the WOLF HEAD (C).
- Speak to the woman; take the VIOLET GEM (D).
- Go to the West Wing.
- Place the VIOLET GEM (E).
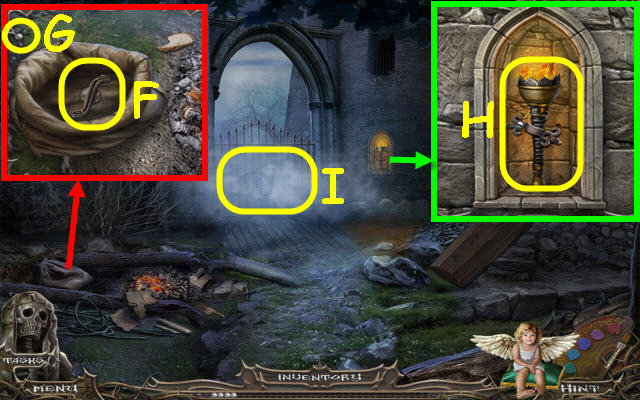
- Open the bag; take the MECHANISM HANDLE (F) and 5th Rosary Bead (G).
- Use the COIN on the screw; take the TORCH (H).
- Examine the gate (I).
- Go to the West Hallway.
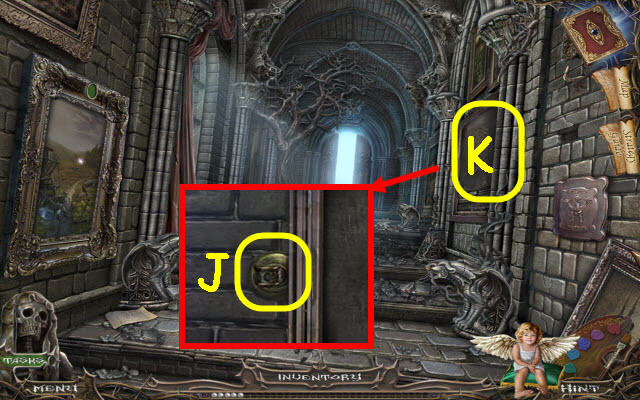
- Place the TORCH (J).
- Play the HOP (K).
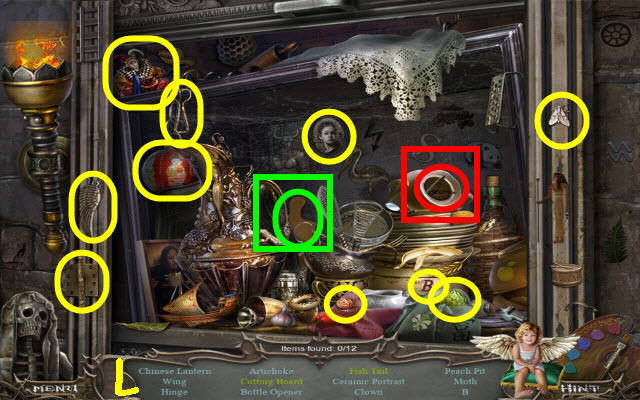
- You receive a CERAMIC PORTRAIT (L).
- Go to the Endless Cemetery.
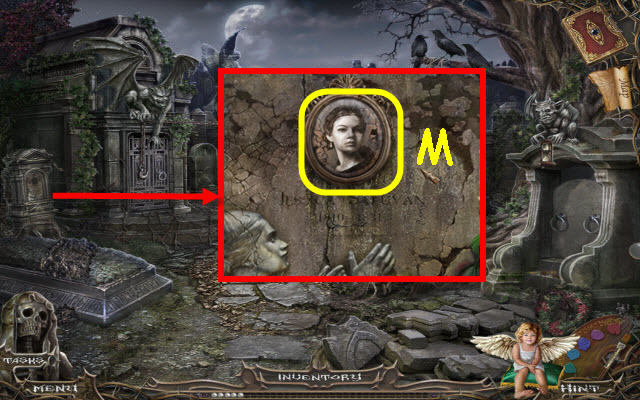
- Place the CERAMIC PORTRAIT (M).
- You will trigger a puzzle.
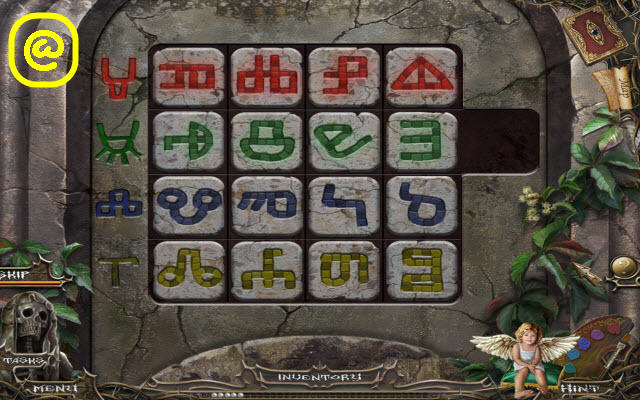
- Arrange the tiles.
- The starting layout is random.
- Solution (@).
- Take the BOOKMARK.
- Go to the Observatory.
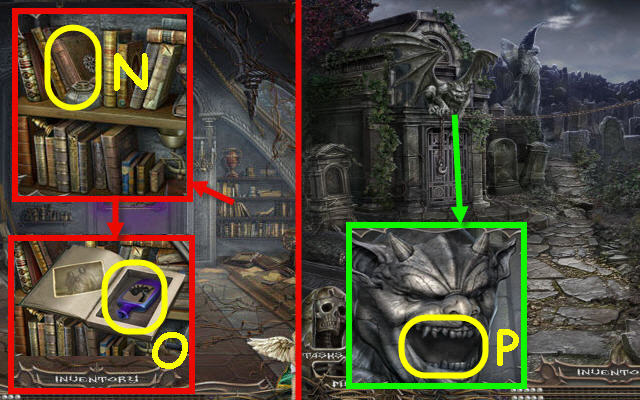
- Place the BOOKMARK on the book (N), open it and take the DEMON EXPELLING DRINK (O). Select the photo.
- Go to the Endless Cemetery.
- Place the DEMON EXPELLING DRINK (P).
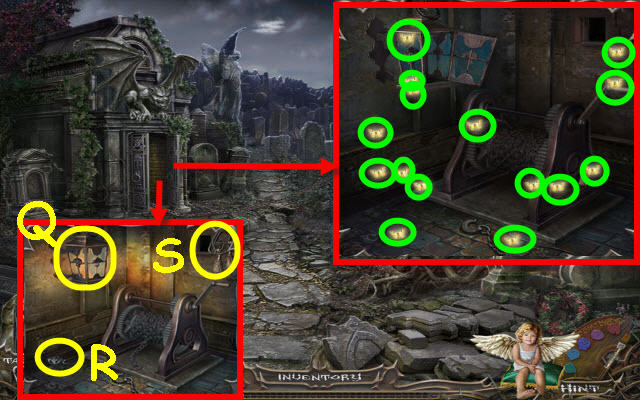
- Collect all 15 FIREFLIES (green).
- Place the 15 FIREFLIES (Q); take the SWAN MEDALLION (R) and CURTAIN TIE (S).
- Go to the Abandoned Castle.
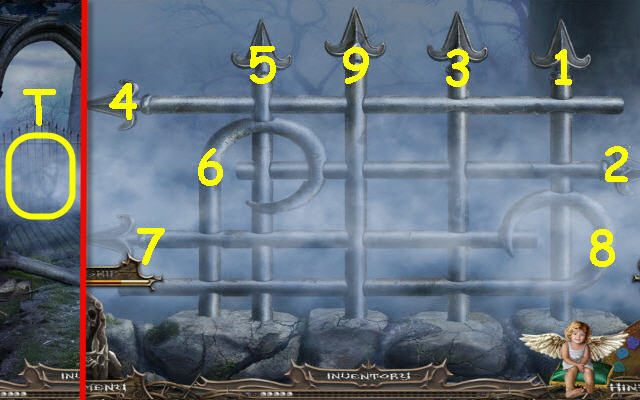
- Give the SWAN MEDALLION to the ghost (T).
- Pull the bars in order.
- Solution (1-9).
- You receive an IRON ROD.
Chapter 3: Soul Vial
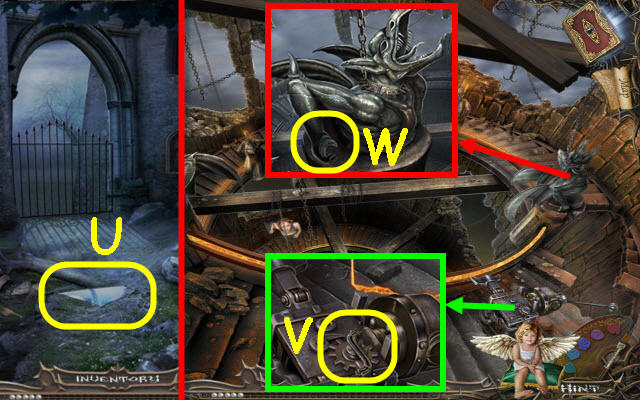
- Take the CANVAS SCRAP 2/15 (U).
- Go to the Crumbling Tower.
- Place the MECHANISM HANDLE (V).
- Place the IRON ROD (W).
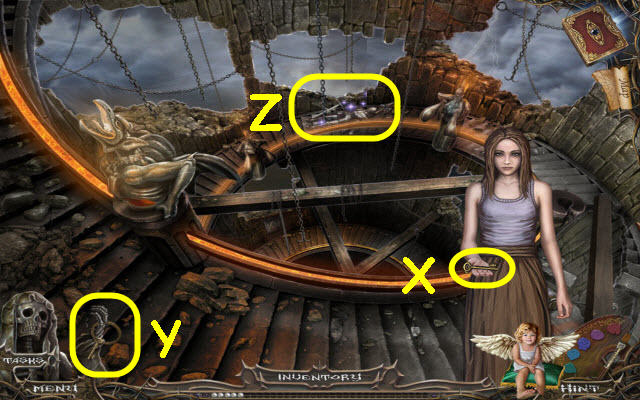
- Take the 1st key (X) which is added to the toolbar (Y).
- Play the HOP (Z).
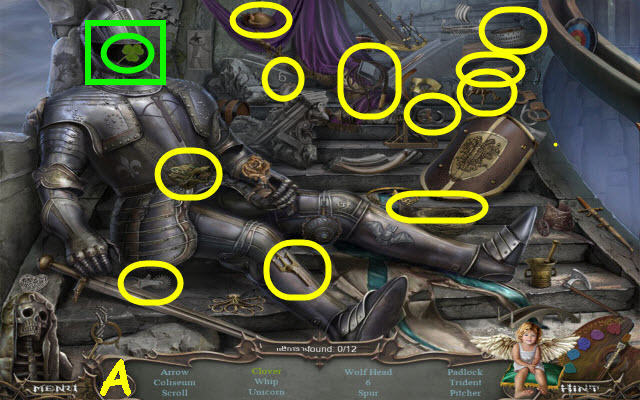
- You receive a 2nd WOLF HEAD (A).
- Back out.
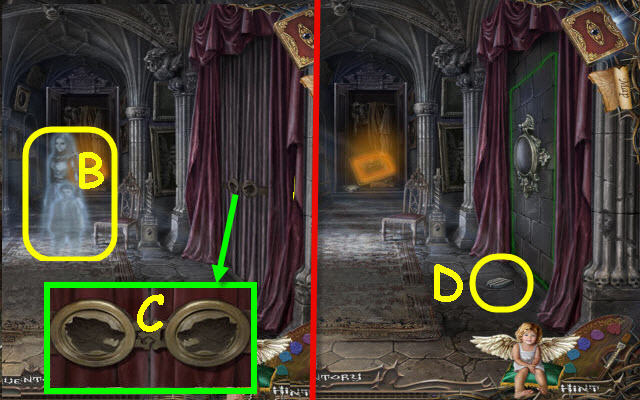
- Speak to the ghosts (B).
- Place the 2 WOLF HEADS (C).
- Take the BAG CLASP (D).
- Go to the Front Drive.
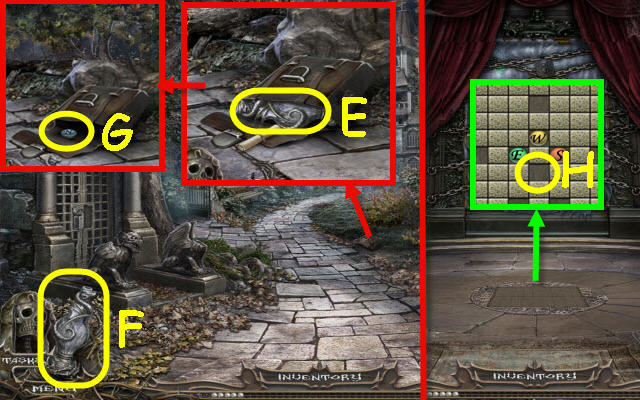
- Place the BAG CLASP on the clasp; read the scroll and take the Soul Vial (E) which is added to your toolbar (F).
- Take the LETTER N (G).
- Go to the Main Hall.
- Place the LETTER N to trigger a puzzle (H).
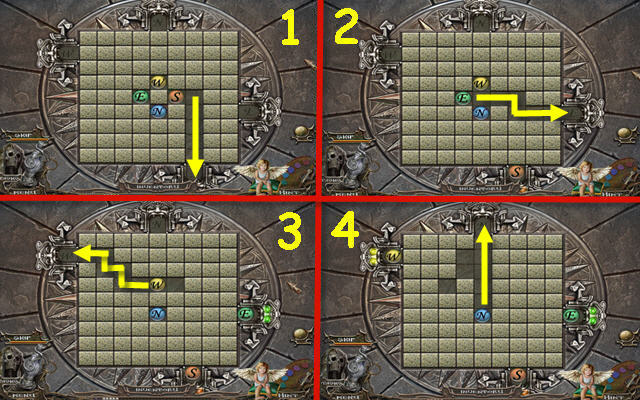
- Move the tiles to clear a path.
- Solution (1-4).
- Go down the stairs.
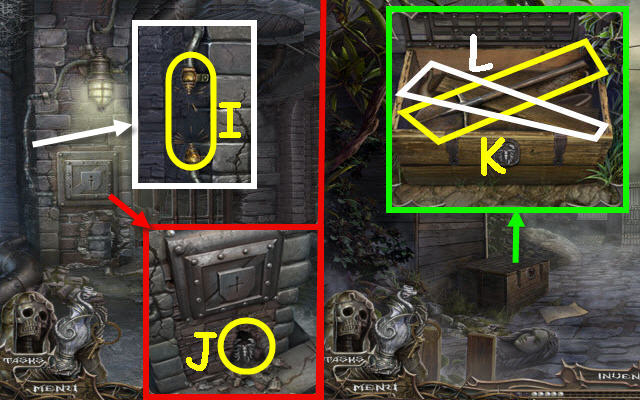
- Place the WIRE CABLE (I).
- Remove the bricks; take the SCORPION (J).
- Go to the Statue Garden.
- Place the SCORPION on the lock; take the SHOVEL (K) and PLANKS (L).
- Go to the Endless Cemetery.
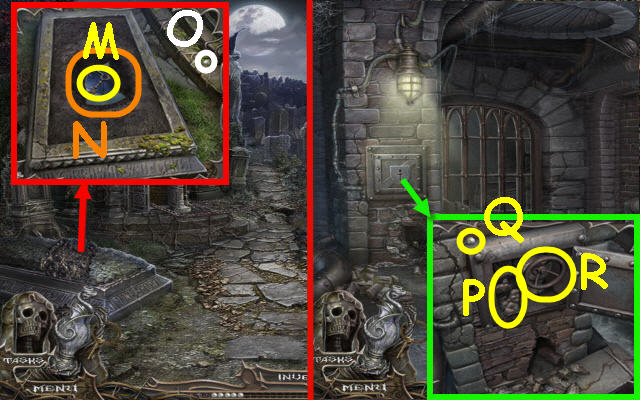
- Use the SHOVEL on the dirt; take the CROSS KEY (M), CANVAS SCRAP 3/15 (N) and the 6th Rosary Bead (O).
- Go to the Sewer.
- Use the CROSS KEY on the lock; take the GAUNTLET (P) and 7th Rosary Bead (Q).
- Turn the valve to trigger a puzzle (R).
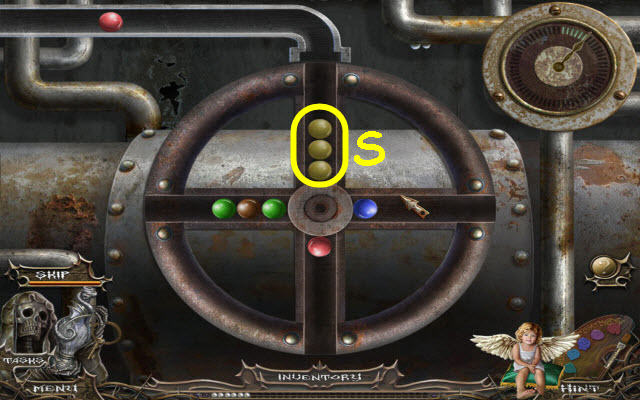
- Make groups of 3 balls.
- Example (S).
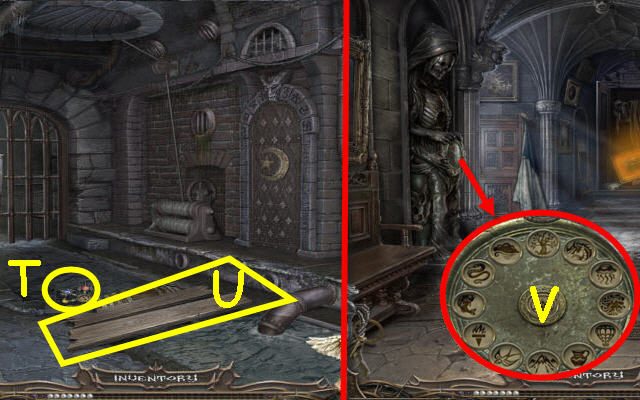
- Take the CLOCK HANDS (T).
- Place the PLANKS (U).
- Go to the East Wing.
- Place the CLOCK HANDS to trigger a puzzle (V).
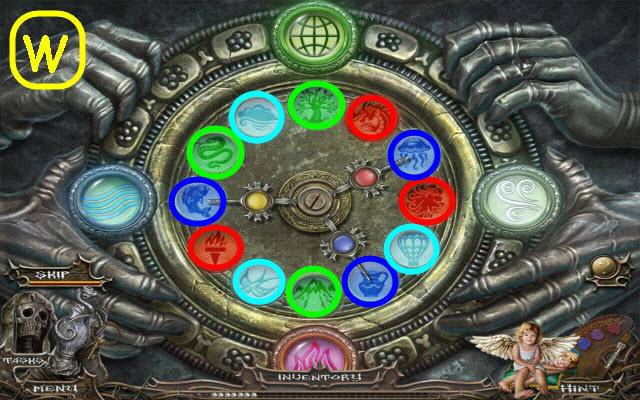
- Match the elements.
- Solution (W).
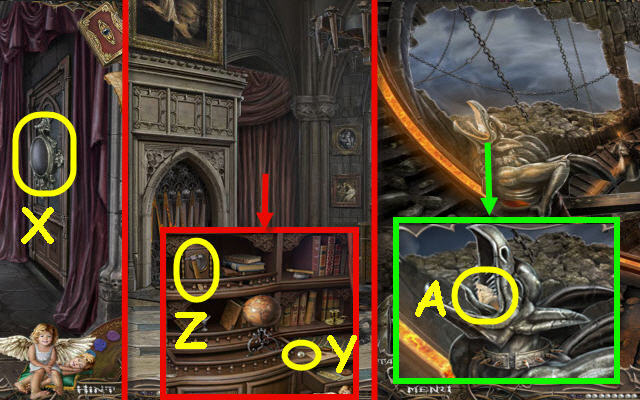
- Open the door; go right (X).
- Place the CURTAIN TIE on the curtain; take the 8th Rosary Bead (Y) and HAMMER (Z).
- Go to the Crumbling Tower.
- Use the GAUNTLET to get the FIREPLACE CONTROL CARD (A).
- Return to the Study.
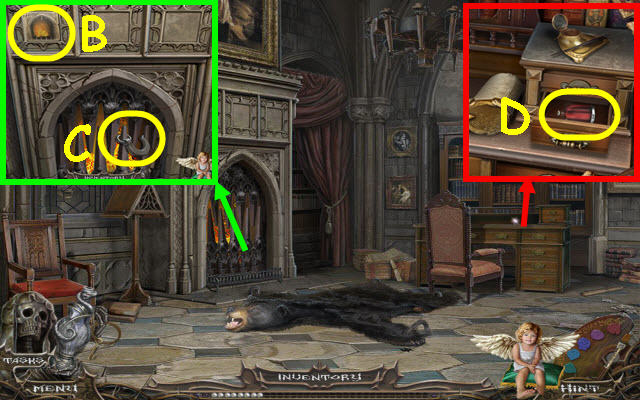
- Place the FIREPLACE CONTROL CARD (B); receive a HOOK (C).
- Open the drawer; take the RED PAINT (D).
- Go to the Endless Cemetery.
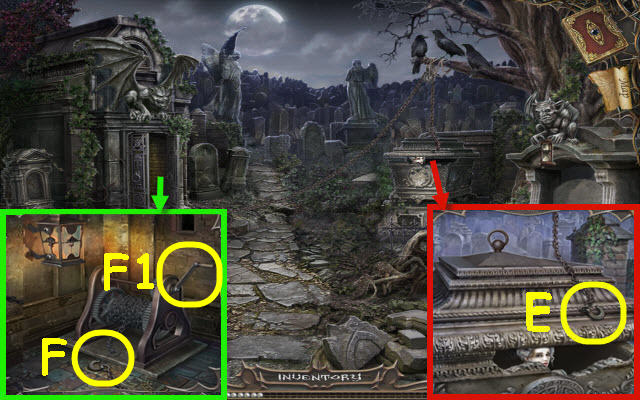
- Place the HOOK (E).
- Attach the chain (F); turn the crank (F1).
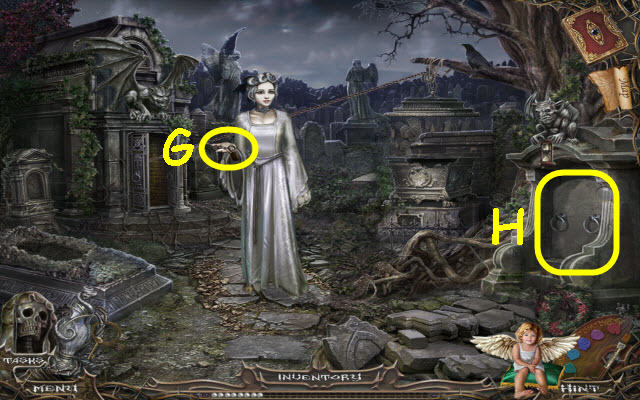
- Speak to the Countess; take the 2nd key (G).
- Use the HAMMER on the door; play the HOP (H).
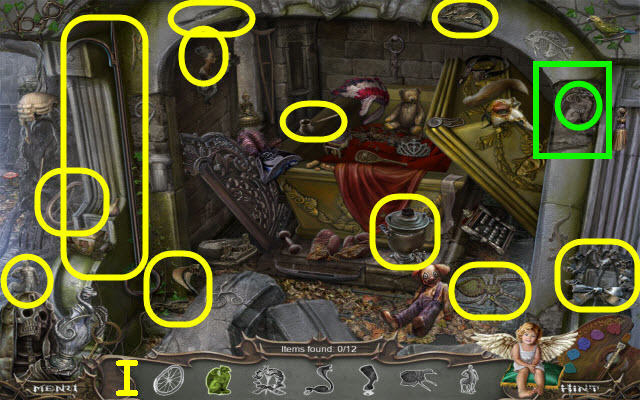
- You receive a GAFF (I).
- Go to the Sewer.
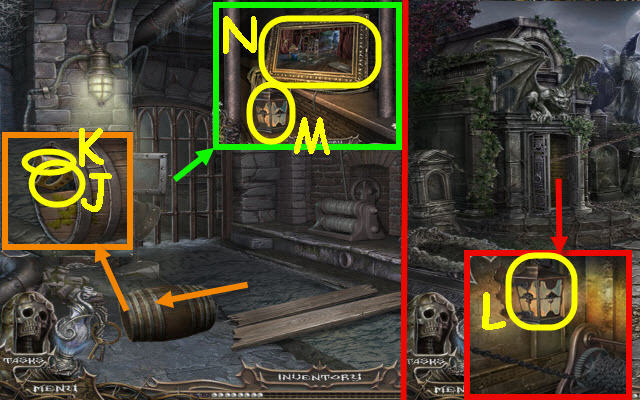
- Use the GAFF on the barrel; take the HACKSAW (J) and SCREWDRIVER (K).
- Go to the Endless Cemetery.
- Use the SCREWDRIVER to get the LANTERN (L).
- Return to the Sewer.
- Use the HACKSAW on the bars; place the LANTERN inside (M).
- Unwrap the painting; enter it (N).
Chapter 4: The Mine
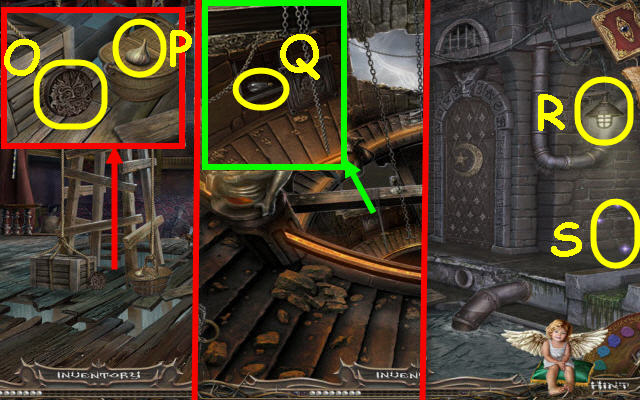
- Take the COMPARTMENT SEAL (O) and GARLIC (P).
- Go to the Crumbling Tower.
- Place the COMPARTMENT SEAL on the panel; take the LIGHT BULB (Q).
- Go to the Sewer.
- Open the lantern; place the LIGHT BULB inside (R).
- Play the HOP (S).
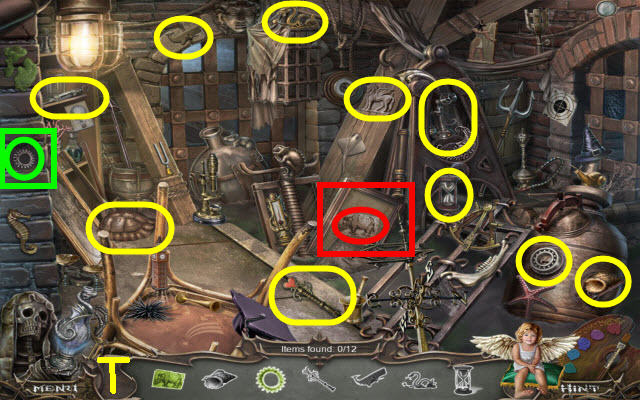
- You receive a HEART KEY (T).
- Go to the Theater of Terror.
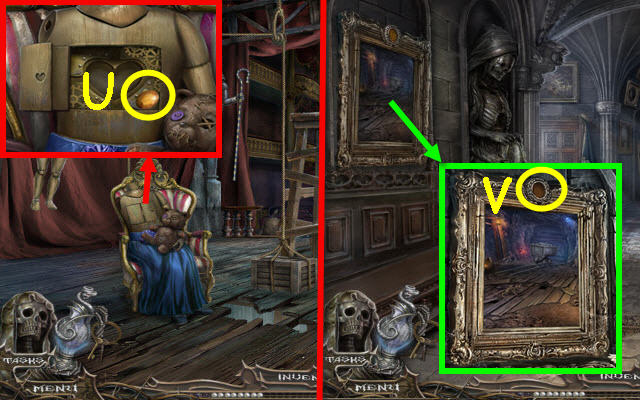
- Use the HEART KEY in the heart; take the ORANGE GEM (U).
- Go to the East Wing.
- Place the ORANGE GEM (V).
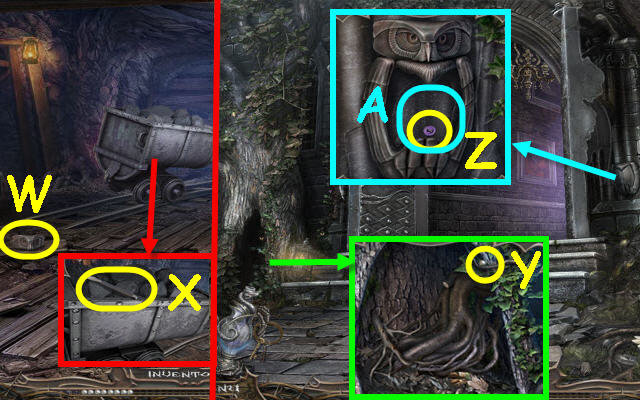
- Take the OWL HEAD (W).
- Take the CHISEL (X).
- Go to the Manor Porch.
- Take the 9th Rosary Bead (Y).
- Place the OWL HEAD on the body; take the BUTTON (Z) and remove the panel (A).
- Go to the Theater of Terror.
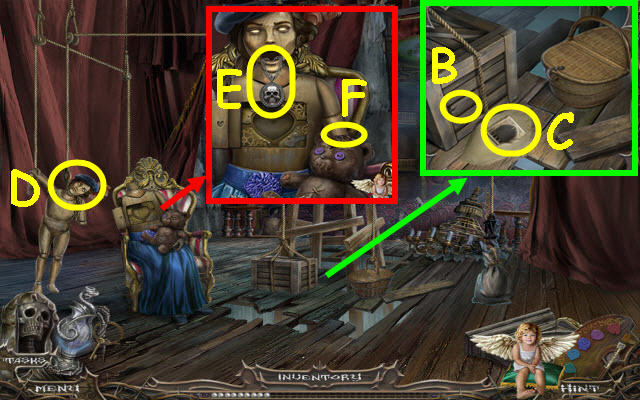
- Uses the CHISEL on the crate (B); take the FIREPLACE CONTROL CARD (C).
- Take the DOLL HEAD (D).
- Place the DOLL HEAD on the doll; take the SKULL MEDALLION (E).
- Place the BUTTON on the teddy bear; take a LOCKPICK (F).
- Go to the Main Hall.
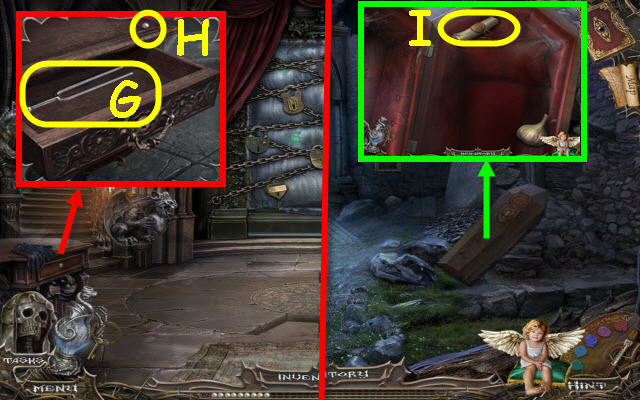
- Use the LOCKPICK on the keyhole; take the TUNING FORK (G) and 10th Rosary Bead (H).
- Go to the Abandoned Castle.
- Place the SKULL MEDALLION on the coffin; use the GARLIC on the body and take the MOSAIC SCHEME (I).
- Go to the Study.
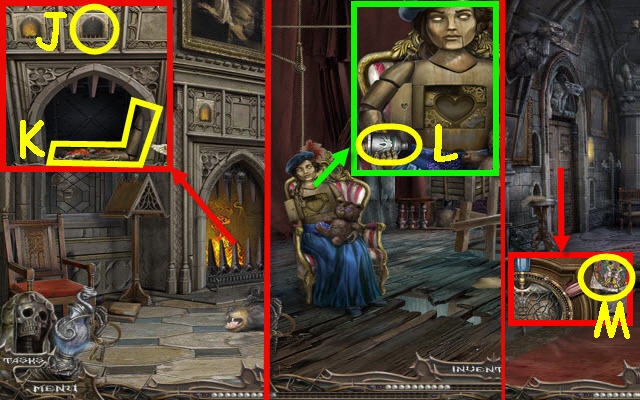
- Place the FIREPLACE CONTROL CARD (J); receive a HAND PUPPETS (K).
- Go to the Theater of Terror.
- Place the HAND PUPPETS in the socket; take the SOLVENT (L).
- Go to the West Wing.
- Place the RED PAINT and SOLVENT on the door and the MOSAIC SCHEME in the upper right (M) to trigger a puzzle.
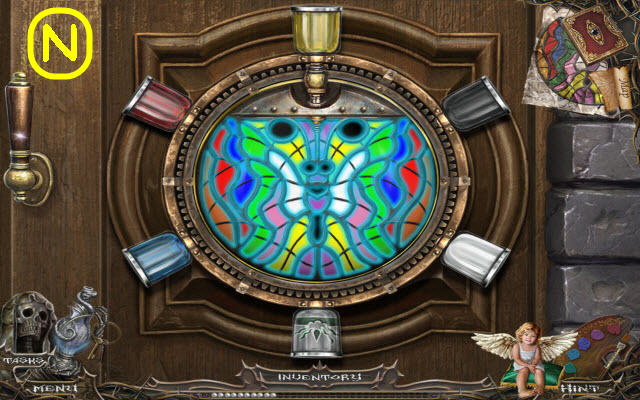
- Paint the butterfly.
- Use the lever to change the colors.
- Solution: Mix blue and red for purple, red and white for pink, blue and yellow for green and red and yellow for orange (N).
- Go left.
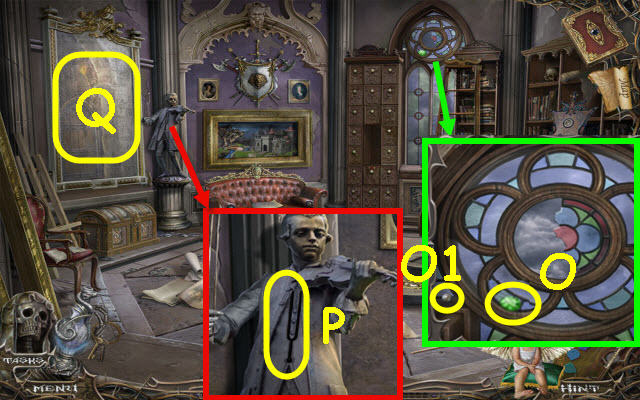
- Take the EMERALD GEM (O) and 11th Rosary Bead (O1).
- Place the TUNING FORK (P).
- Go through the frame (Q).
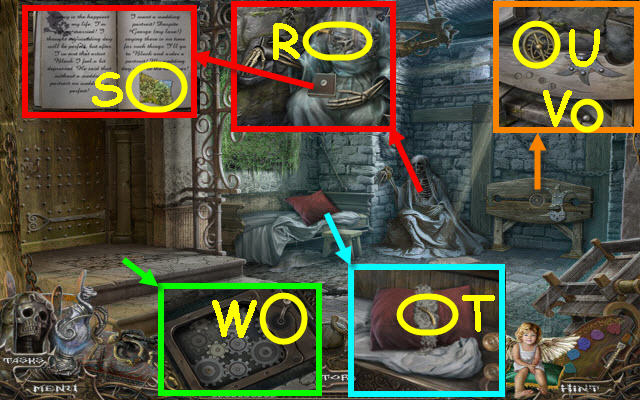
- Take the HUNTING KNIFE (R).
- Open the book; take the CANVAS SCRAP 4/15 (S).
- Use the HUNTING KNIFE on the pillow; take the GRATING PART (T).
- Use the LOCKPICK on the padlock; take the 2nd GRATING PART (U) and 12th Rosary Bead (V).
- Place the 2 GRATING PARTS on the grate; turn the handle (W).
- Go to the Main Hall.
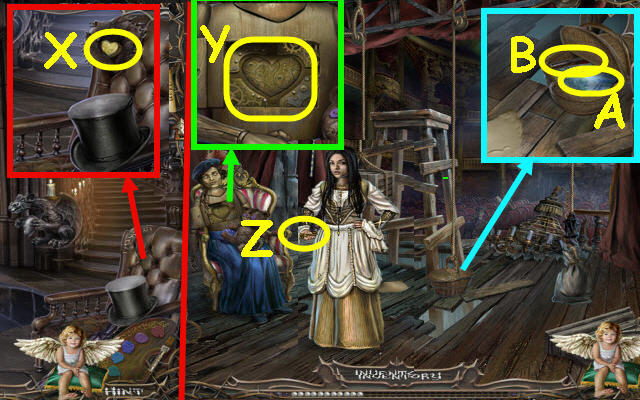
- Use the HUNTING KNIFE on the stitches; take the DOLL HEART (X).
- Go to the Theater of Terror.
- Place the DOLL HEART; select it (Y).
- Speak to the girl; take the 3rd key (Z).
- Use the HUNTING KNIFE on the latch and open it; take the CANVAS SCRAP 5/15 (A) and WINCH LEVER (B).
- Back out.
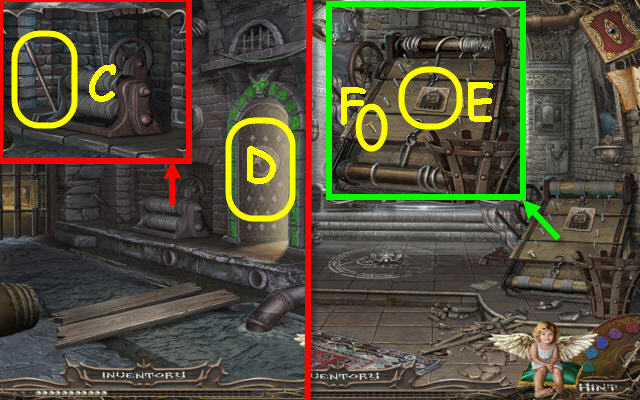
- Place the WINCH LEVER; pull it (C).
- Go forward (D).
- Take the FIREPLACE CONTROL CARD (E) and NAIL (F).
- Go to the Study.
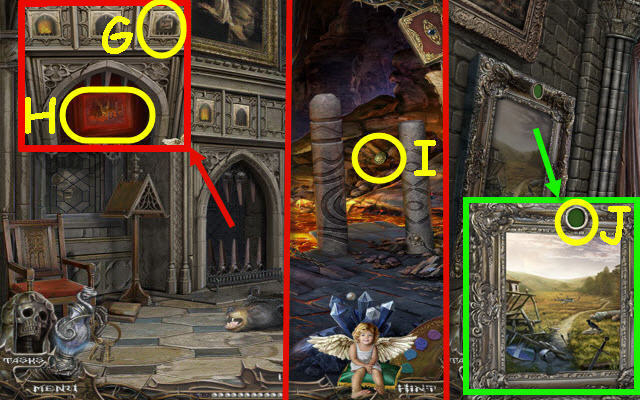
- Place the FIREPLACE CONTROL CARD (G); enter the painting (H).
- Take the STONE SEAL (I).
- Go to the West Hallway.
- Place the EMERALD GEM (J).
Chapter 5: Windmill
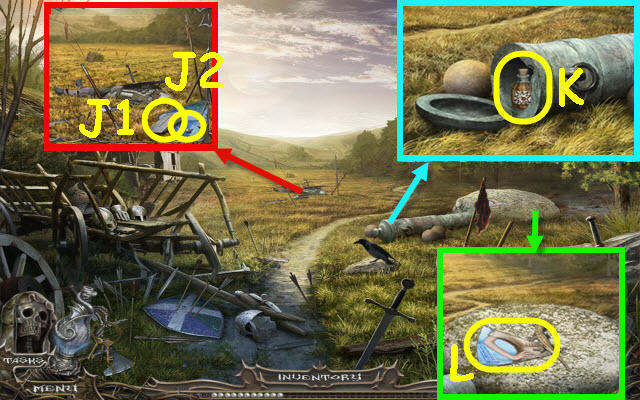
- Take the WEDGE (J1) and 13th Rosary Bead (J2).
- Use the NAIL on the lid; take the EXPLOSIVE LIQUID (K).
- Take the CANVAS SCRAP 6/15 (L).
- Go to the Statue Garden.
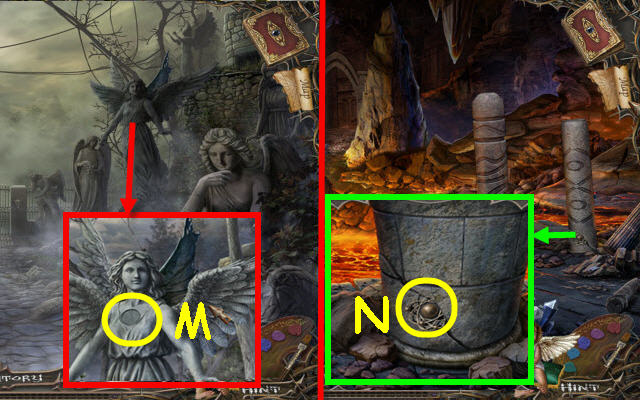
- Place the STONE SEAL (M); receive a WING.
- Go to Lava River.
- Use the WEDGE on the crack; receive an ATOM SYMBOL (N).
- Go to the Endless Cemetery.
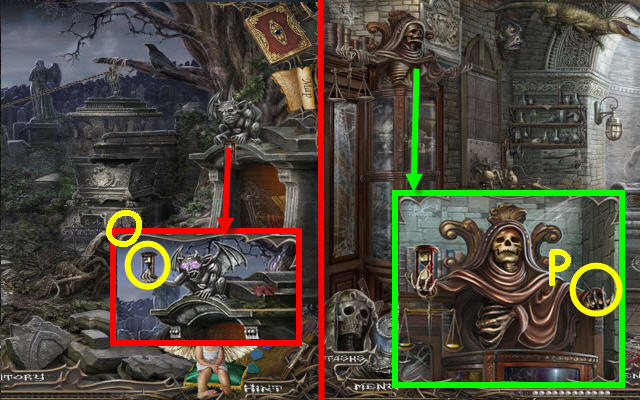
- Place the WING on the imp; take the HOURGLASS (O).
- Go to the Laboratory.
- Place the HOURGLASS in the left hand; take the DETONATOR PLUNGER (P).
- Go to the Mine.
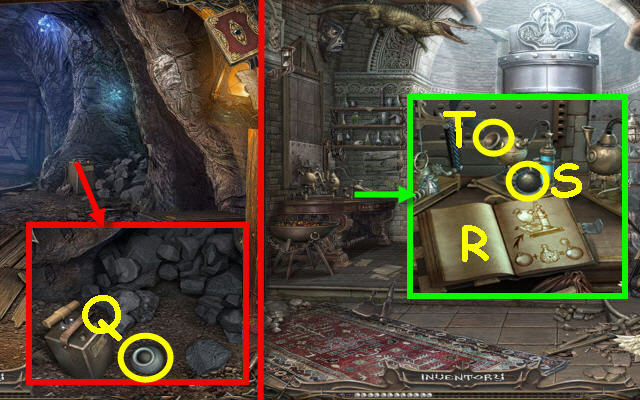
- Place the DETONATOR PLUNGER on the detonator; take the EMPTY IRON BALL (Q).
- Go to the Laboratory.
- Place the ATOM SYMBOL on the book; turn the page (R).
- Place the EMPTY IRON BALL (S).
- Pour the EXPLOSIVE LIQUID (T); receive a BOMB.
- Go to the Lava River.
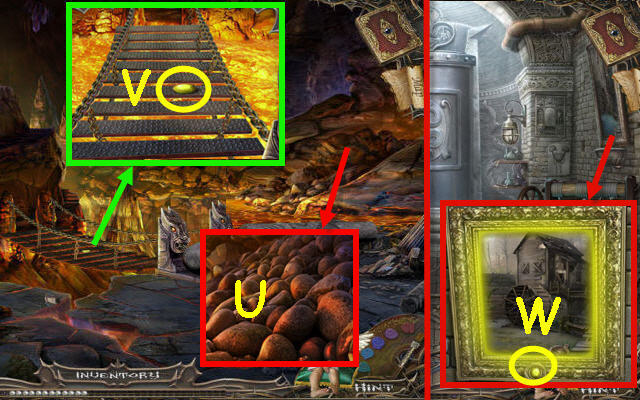
- Place the BOMB (U).
- Take the YELLOW GEM (V).
- Go to the Laboratory.
- Place the YELLOW GEM (W).
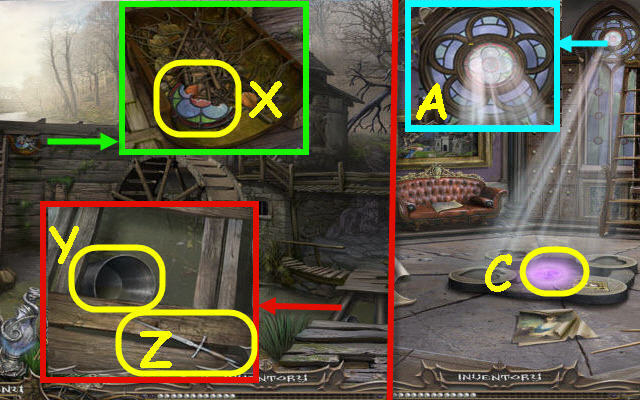
- Take the STAINED-GLASS FRAGMENT (X).
- Take the BUCKET (Y) and DAGGER (Z).
- Go to the Studio.
- Place the STAINED-GLASS FRAGMENT on the window (A).
- Take the REFLECTIVE PRISM (C).
- Go to the Lava River.
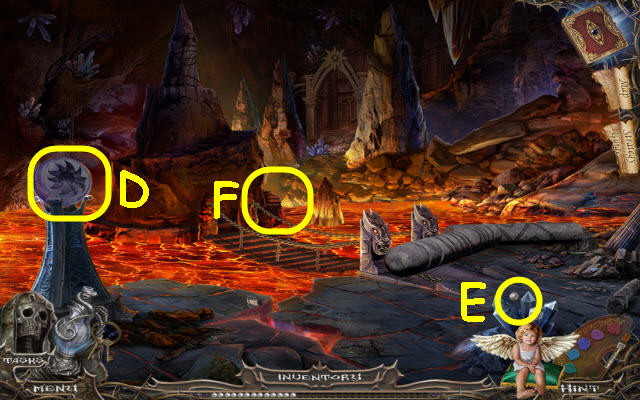
- Place the REFLECTIVE PRISM in the holder (D).
- Take the 14th Rosary Bead (E).
- Play the HOP (F).
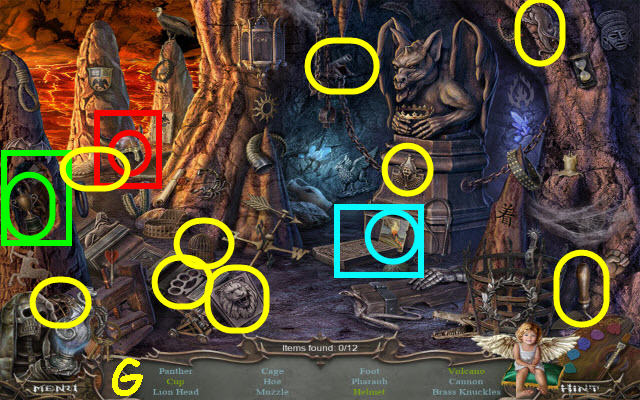
- You receive a HOE (G).
- Go to the Watermill.
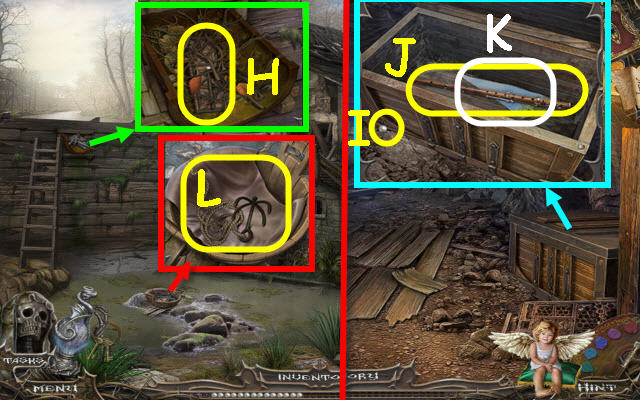
- Use the HOE; receive a CARVED PLANK (H).
- Go to the Mine.
- Place the CARVED PLANK on the lid; take the 15th Rosary Bead (I), FLUTE (J) and CANVAS SCRAP 7/15 (K).
- Return to the Watermill.
- Use the FLUTE on the snake and move the cloth; take the GRAPPLING HOOK (L).
- Go to the Lava River.
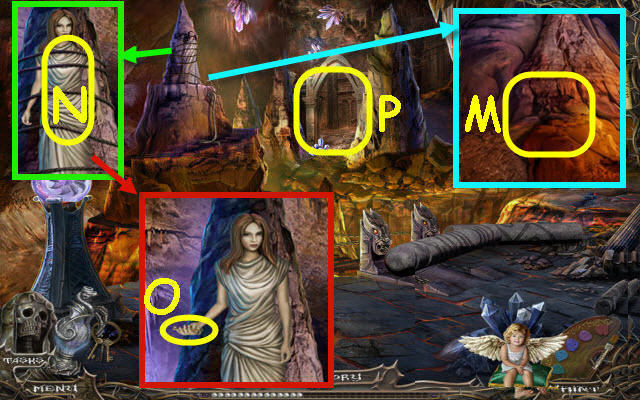
- Place the GRAPPLING HOOK (M).
- Use the DAGGER (N).
- Speak to the woman; take the 4th key (O).
- Go forward (P).
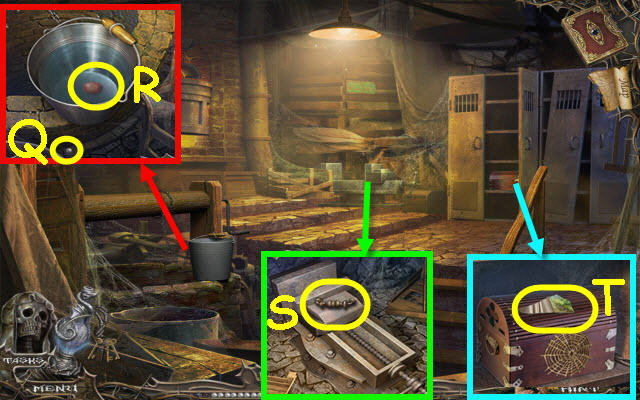
- Place the BUCKET on the chain; take the 16th Rosary Bead (Q) and RUBY GEM (R).
- Take the LOCKER HANDLE (S).
- Open the cabinet; take the CANVAS SCRAP 8/15 (T).
- Go to the Study.
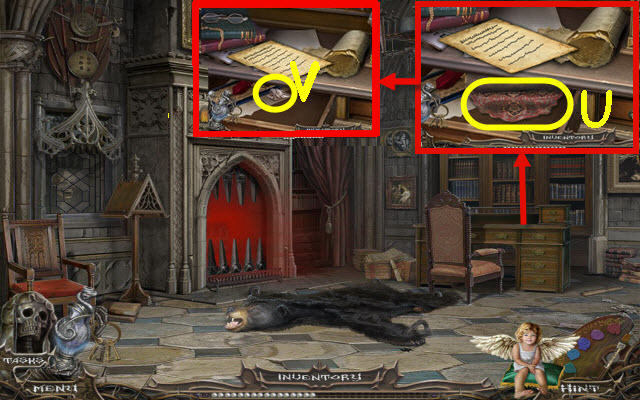
- Use the LOCKER HANDLE on the drawer; take the CARPET SECTION (U) and DOG HEAD (V).
- Go to the West Wing.
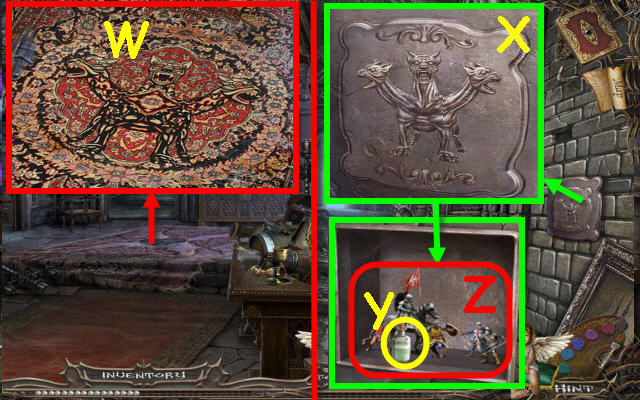
- Place the CARPET SECTION; select it (W).
- Go to the West Hallway.
- Place the DOG HEAD on the door; arrange the heads like the carpet pattern (X).
- Take the ACID (Y) and TOY SOLDIERS (Z).
- Go to the Studio.
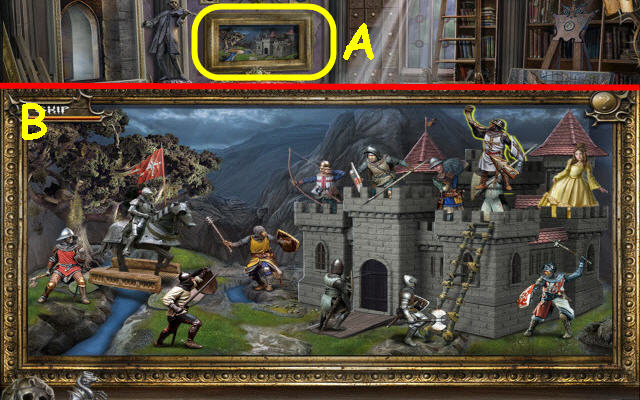
- Place the TOY SOLDIERS in the scene to trigger a puzzle (A).
- Place the figures in their matching locations.
- Solution (B).
- Enter the scene.
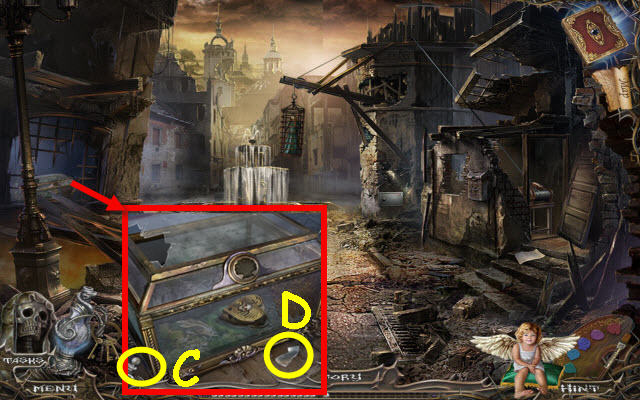
- Take the LENS SHARD (C) and 17th Rosary Bead (D).
- Go to the Observatory.
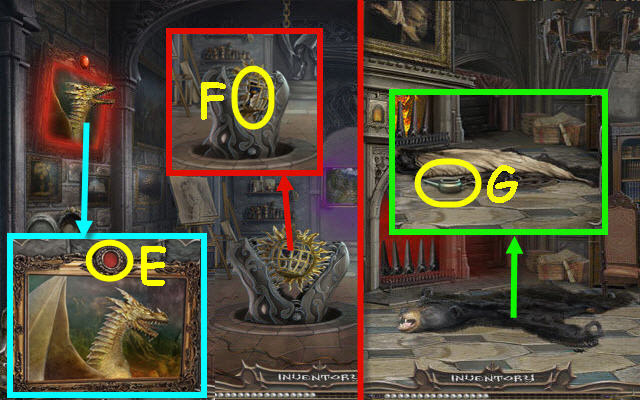
- Place the RUBY GEM (E).
- Select the cage twice; take the EMPTY GOBLET (F).
- Go to the Study.
- Use the ACID on the metal by the paw; take the EMPTY OILER (G).
- Go to the Dungeon.
Chapter 6: Dungeon
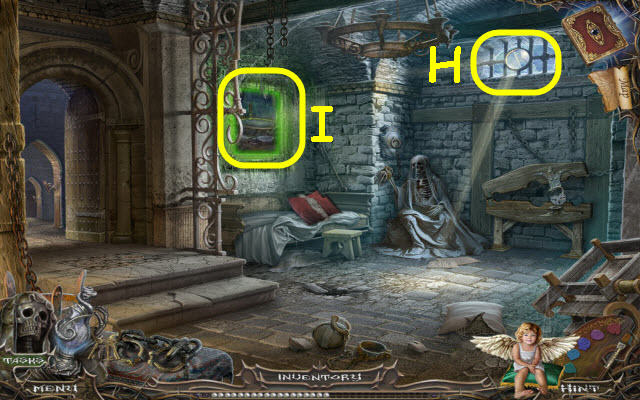
- Place the LENS SHARD in the lens (H).
- Go through the painting (I).
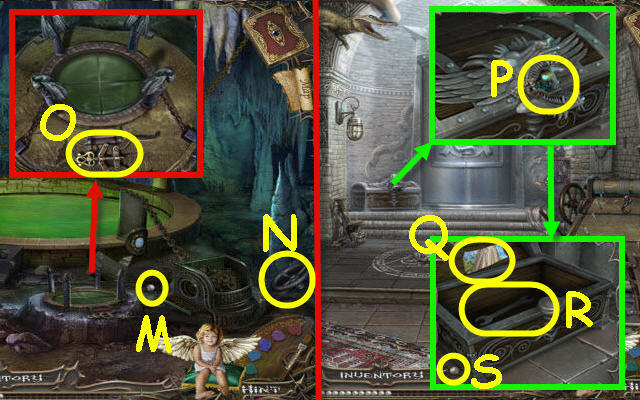
- Take the 18th Rosary Bead (M) and VALVE (N).
- Take the JACK SCREW (O).
- Go to the Laboratory.
- Use the JACK SCREW; select it (P).
- Take the CANVAS SCRAP 9/15 (Q), WRENCH (R) and 19th Rosary Bead (S).
- Go to the Watermill.
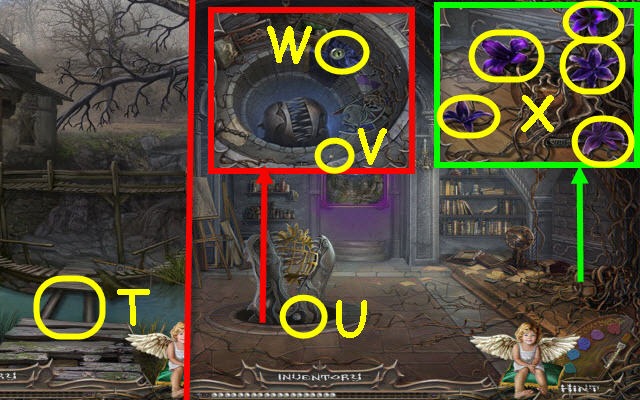
- Use the EMPTY GOBLET in the water; receive a GOBLET OF WATER (T).
- Go to the Observatory.
- Use the WRENCH on the nut (U); take the 20th Rosary Bead (V) and SNAKE EYE (W).
- Use the GOBLET OF WATER (X); take the 5 BLACK FLOWERS (yellow).
- Go to the Laboratory.
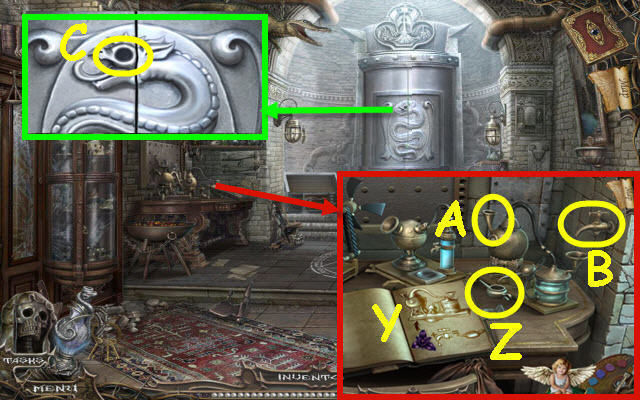
- Turn the page (Y).
- Place the EMPTY OILER on the spout (Z); place the 5 BLACK FLOWERS (A).
- Turn the tap (B); receive a FULL OILER.
- Place the SNAKE EYE (C) to trigger a puzzle.
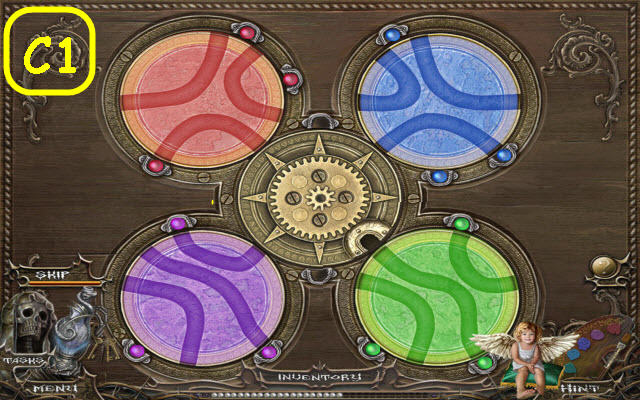
- Move the colored balls to their matching disks.
- The starting layout is random.
- Solution (C1).
- Go forward and through the painting.
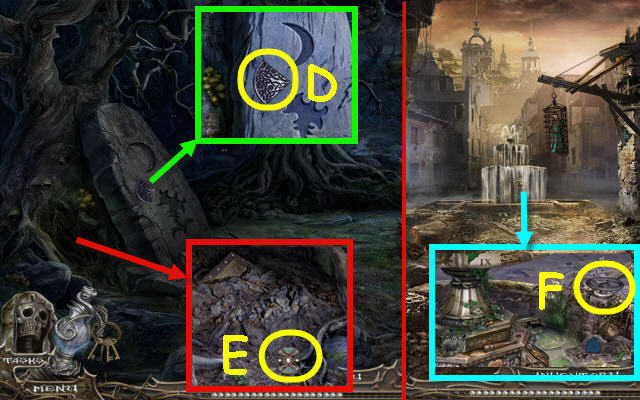
- Take the IRON PLATE PART 1/4 (D).
- Move the roots and zoom in; take the METAL BUTTERFLY (E).
- Go to Dead City.
- Place the VALVE to trigger a HOP (F).
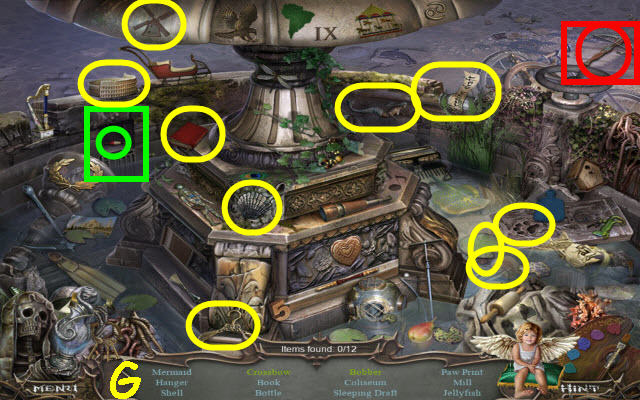
- Play the HOP.
- You receive a SLEEPING POTION (G).
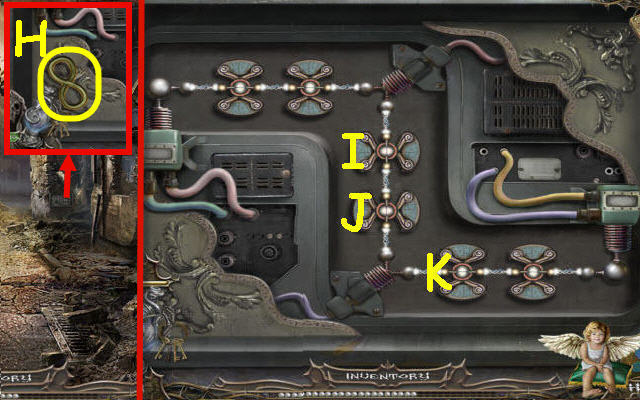
- Open the panel; take the INFINITY SYMBOL (H); place the METAL BUTTERFLY on the empty slot to trigger a puzzle.
- Complete the circuit.
- Select the following: I, J and K.
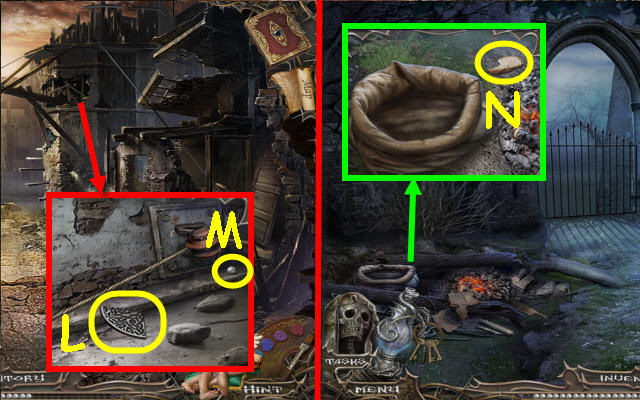
- Take the IRON PLATE PART 2/4 (L) and 21st Rosary Bead (M).
- Go to the Abandoned Castle.
- Use the SLEEPING POTION; take the DRUGGED BREAD (N).
- Go to the Mine.
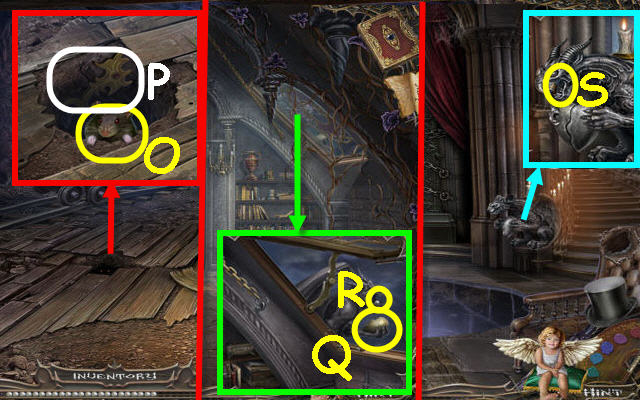
- Give the DRUGGED BREAD to the rat (O); take the FLOWER SYMBOL (P).
- Go to the Observatory.
- Use the FULL OILER on the hinge; take the HEART HALF (Q) and 22nd Rosary Bead (R).
- Go to the Main Hall.
- Place the HEART HALF on the heart; take the GOLDEN THREADS (S).
- Go to the Theater of Terror.
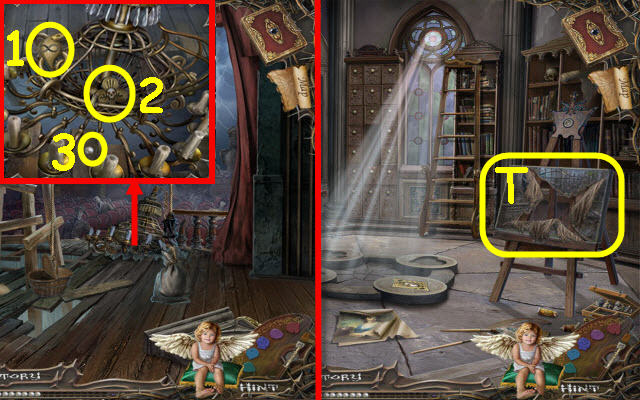
- Place the INFINITY SYMBOL (1); take the SKULL OF CLUBS (2) and 23rd Rosary Bead (3).
- Go to the Studio.
- Use the GOLDEN THREADS on the canvas and play the HOP (T).
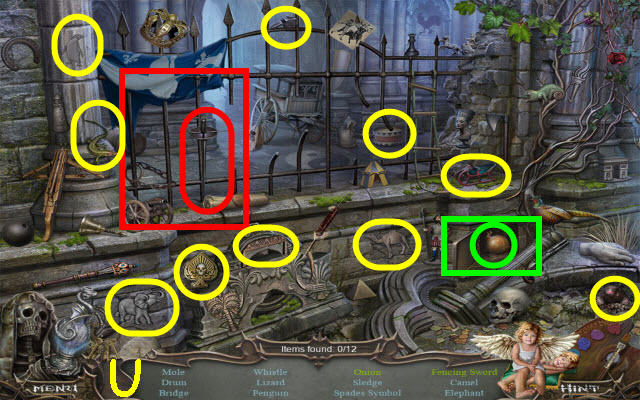
- You receive a SKULL OF SPADES (U).
- Go to the Black Forest.
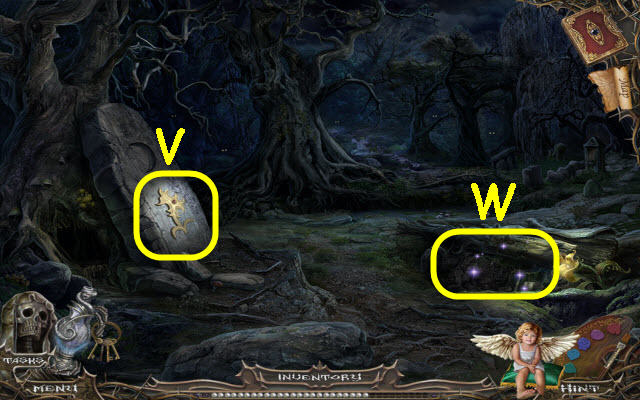
- Place the FLOWER SYMBOL in the slot (V).
- Play the HOP (W).
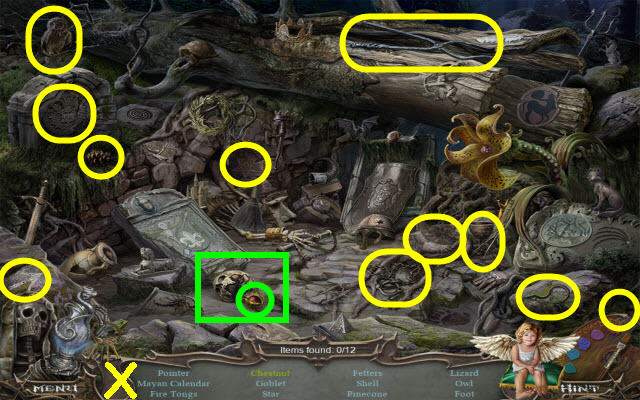
- You receive the FIRE TONGS (X).
- Go to the Lava River.
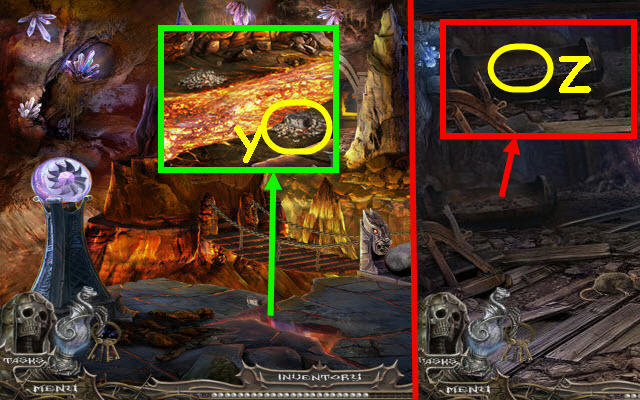
- Use the FIRE TONGS (Y); receive a BURNING EMBER.
- Go to the Mine.
- Place the BURNING EMBER (Z); play the HOP.
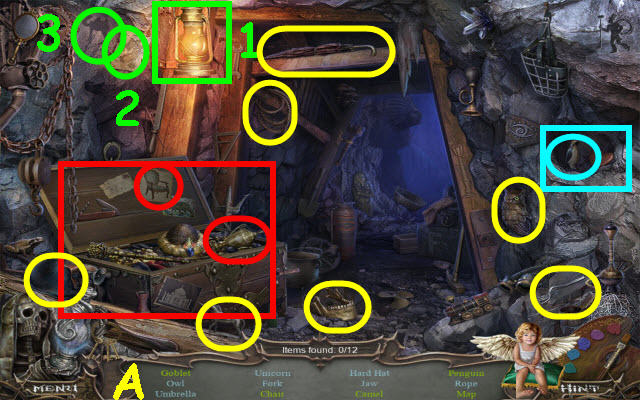
- You receive a LOWER JAW (A).
- Go to the Statue Garden.
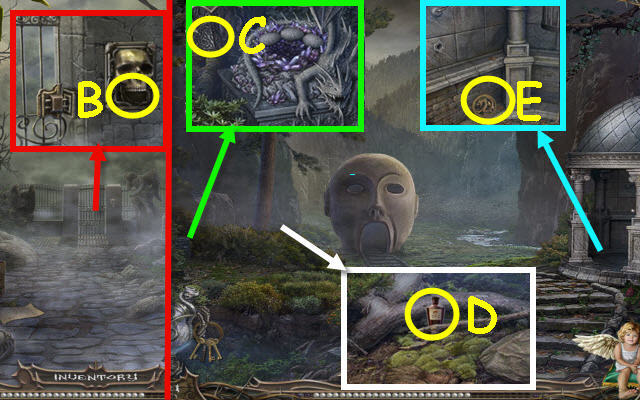
- Place the LOWER JAW (B).
- Go forward.
- Take the IRON PLATE PART 3/4 (C).
- Take the HERBICIDE (D).
- Take the DRAGON SEAL (E).
- Go forward.
Chapter 7: The Ring
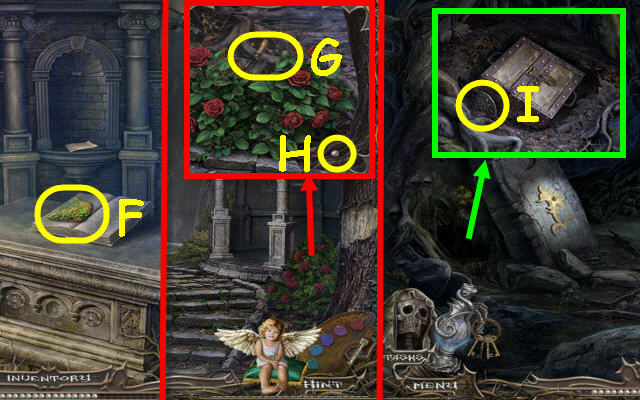
- Take the CANVAS SCRAP 10/15 (F).
- Back out.
- Move the roses; take the SHOVEL (G) and 24th Rosary Bead (H).
- Go to the Black Forest.
- Use the SHOVEL on the dirt; take the IRON PLATE PART 4/4 (I).
- Go to the Rotted Lake.
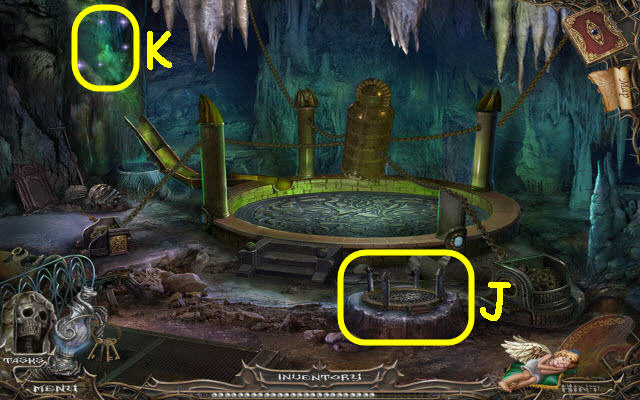
- Place the 4 IRON PLATE PARTS on the panel (J).
- Play the HOP (K).
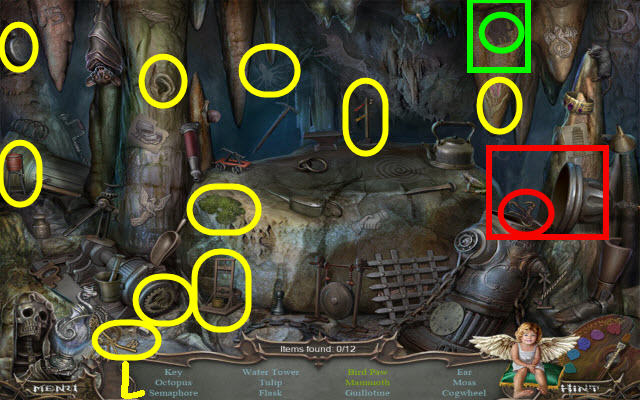
- You receive a BENT KEY (L).
- Go to the Forge.
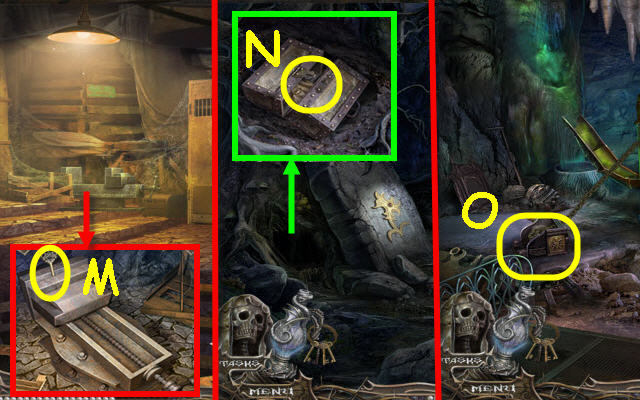
- Place the BENT KEY (M); receive a CHEST KEY.
- Go to the Black Forest.
- Use the CHEST KEY on the lock; take the SNAKE MOSAIC (N).
- Go to the Rotted Lake.
- Place the SNAKE MOSAIC on the mechanism to trigger a puzzle (O).
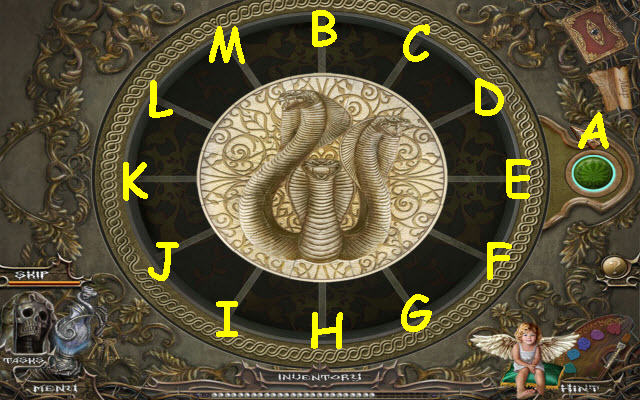
- Complete the image.
- Select the following: C, G, K, M, A, F, J, Ax3, D, Ax2, B, H, Ax2, L, Ax3, I and E.
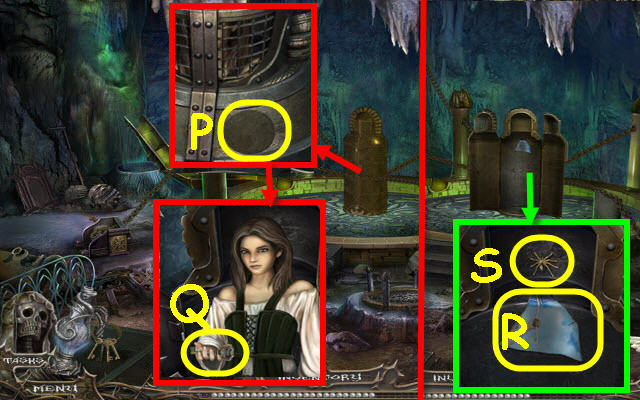
- Place the DRAGON SEAL (P).
- Take the 5th key (Q).
- Take the CANVAS SCRAP 11/15 (R) and GOLDEN SPIDER (S).
- Go to the Forge.
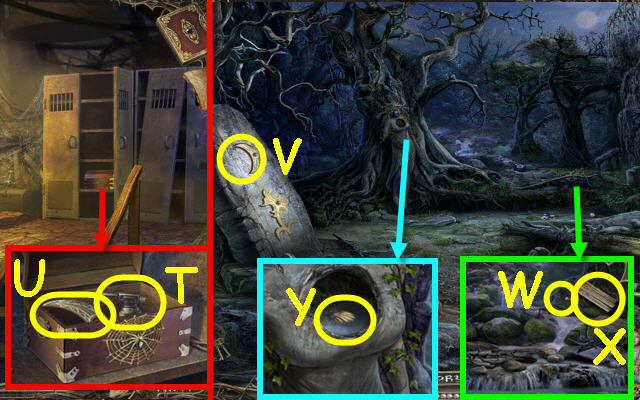
- Place the GOLDEN SPIDER on the web; take the BURNER (T) and MOON SYMBOL (U).
- Go to the Black Forest.
- Place the MOON SYMBOL (V).
- Use the HERBICIDE on the foliage; take the 25th Rosary Bead (W) and BOARDS (X).
- Take the SHELL (Y).
- Go to Dead City.
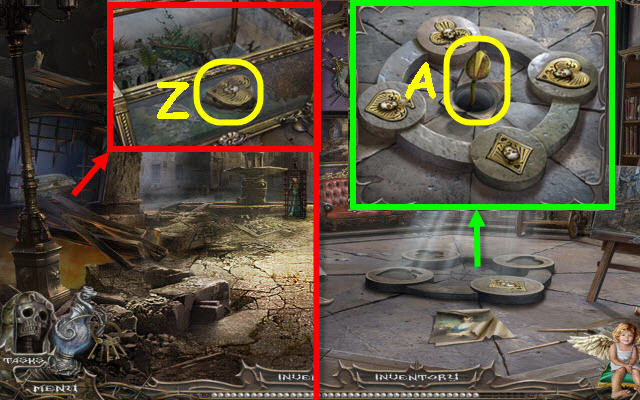
- Place the SHELL in the lock; take the SKULL OF HEARTS (Z).
- Go to the Studio.
- Place the SKULL OF CLUBS, SKULL OF SPADES and SKULL OF HEARTS in their matching slots; take the WATER LILY SEEDLING (A).
- Go to the Watermill.
- Place the BOARDS over the gap (B).
- Take the 26th Rosary Bead (C) and GLOVE (D).
- Go to the Dead City.
- Use the BURNER on the latch; take the 6th key (E).
- Go to the Forge.
- Place the GLOVE (F); receive a RUBY RING.
- Go to the Dungeon.
- Place the RUBY BRING on the finger; take the GOLDEN KEY (G).
- Go to the Studio.
- Remove the seal; use the GOLDEN KEY on the lock and take the OLD BOOK (H).
- Go to the Study.
- Place the OLD BOOK (I).
- Go through the painting (J).
- Take the WOODEN HAND (K).
- Go to the Black Forest.
- Place the WOODEN HAND (L) and the WATER LILY SEEDLING in the water (M).
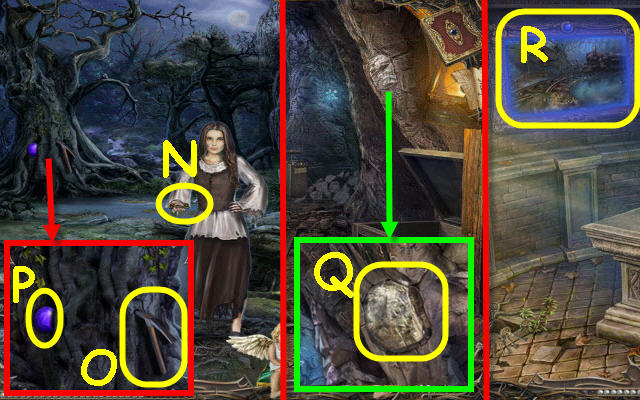
- Take the 7th key (N).
- Take the PICKAX (O) and SAPPHIRE GEM (P).
- Go to the Mine.
- Use the PICKAX to get the IRON STONE (Q).
- Go to the Family Chapel; go forward.
- Place the SAPPHIRE GEM; enter the painting (R).
Chapter 8: Flooded City
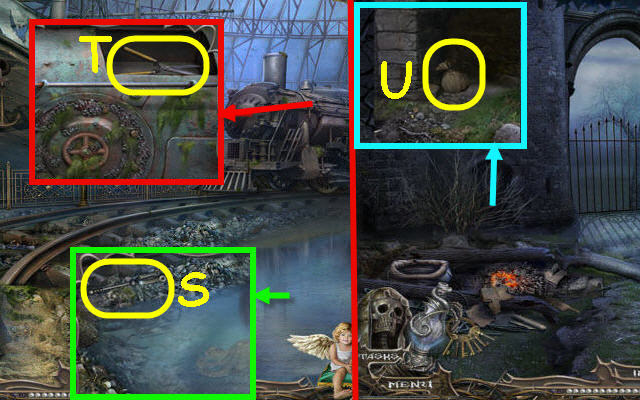
- Take the LEVER 1/2 (S).
- Open the compartment; take the HEDGE CLIPPERS (T).
- Go to the Abandoned Castle.
- Use the HEDGE CLIPPERS on the bushes; take the GUNPOWDER (U).
- Go to the Forge.
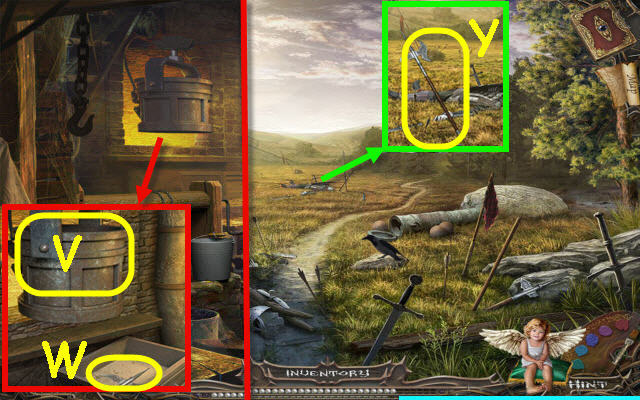
- Place the IRON STONE in the cauldron (V); take the HALBERD BLADE (W).
- Go to the Battlefield.
- Place the HALBERD BLADE (Y); receive a HALBERD.
- Go to the Frozen Frigate.
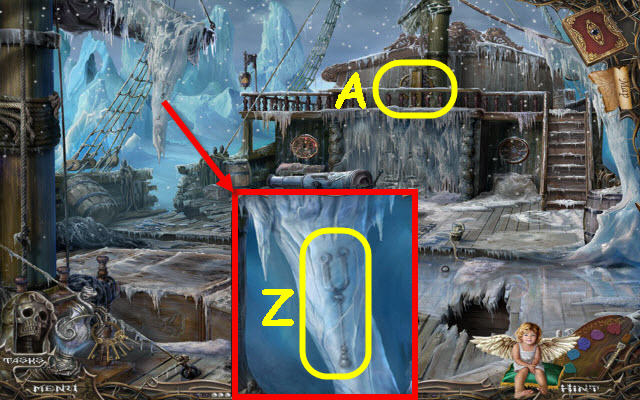
- Use the PICKAX on the icicle to get a LEVER 2/2 (Z).
- Play the HOP (A).
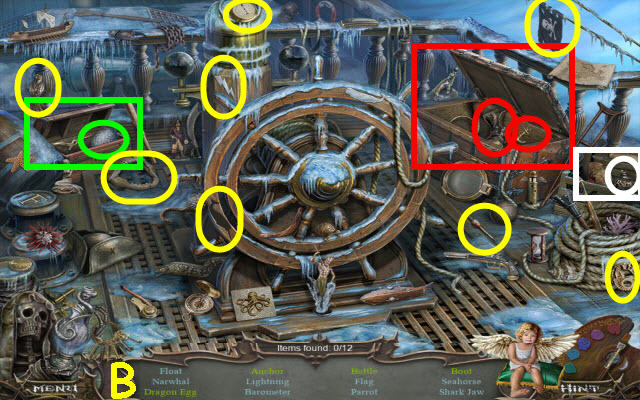
- You receive a DRAGON EGG (B).
- Go to the Family Chapel.
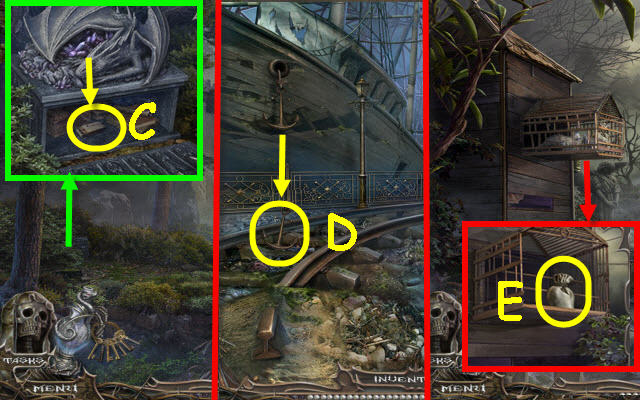
- Place the DRAGON EGG in the nest; open the panel and take the MATCHES (C).
- Go to the Flooded City.
- Use the HALBERD on the anchor; take the ANCHOR (D).
- Go to the Statue Garden.
- Hang the ANCHOR on the cage; take the SACK OF GRAIN (E).
- Go to the Frozen Frigate.
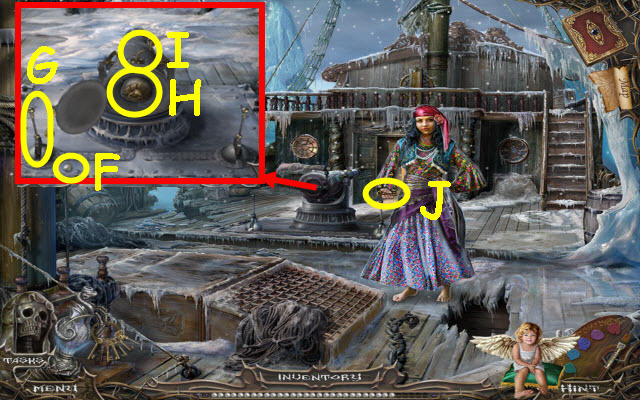
- Take the 27th Rosary Bead (F).
- Place the 2 LEVERS (G); select it.
- Open the cannon; place the GUNPOWDER (H); select it.
- Use the MATCHES (I).
- Take the 8th key (J); receive a BUNCH OF KEYS.
- Go to the Main Hall.
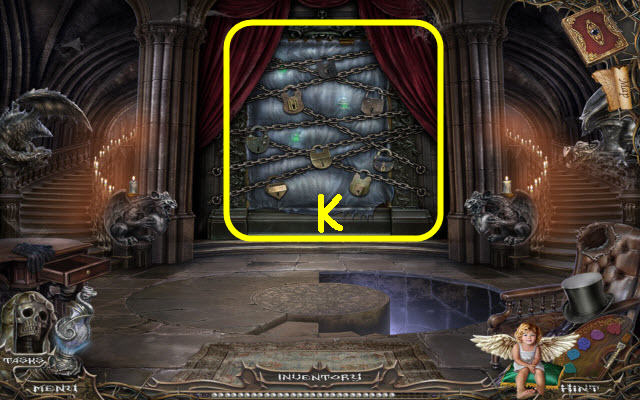
- Examine the locks; use the BUNCH OF KEYS on any one of the locks (K).
- Go forward.
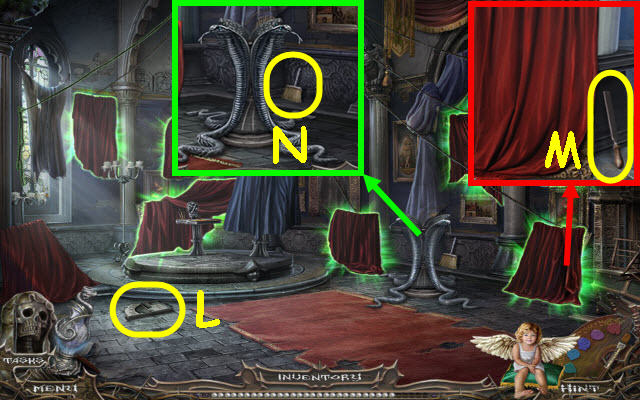
- Take the PLATE (L).
- Move the drape; take the FILE (M).
- Take the BROOM (N).
- Go to the Front Drive.
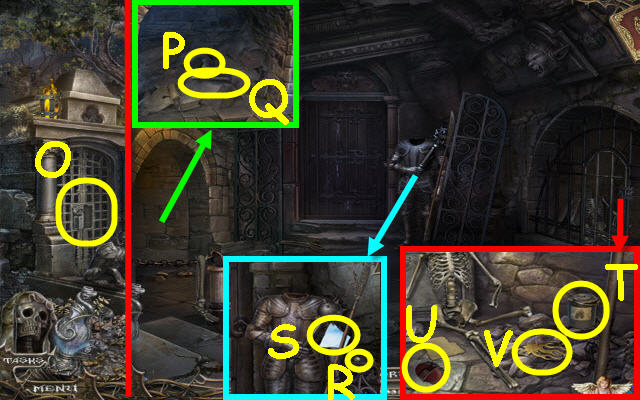
- Place the PLATE on the lock and enter (O).
- Use the BROOM on the cobwebs; take the EMPTY FLASK (P) and GRAVE ROD (Q).
- Take the 28th Rosary Bead (R) and CANVAS SCRAP 12/15 (S).
- Use the FILE on the chain; take the KEROSENE (T), BRUSH (U) and COMET (V).
- Go to the Manor Porch.
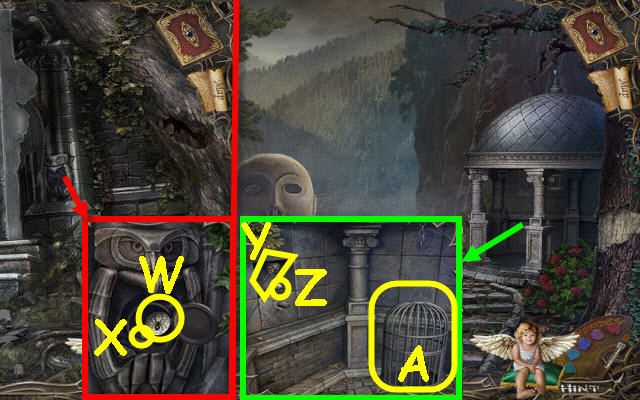
- Place the COMET on the panel; take the SPIDER MOSAIC (W) and 29th Rosary Bead (X).
- Go to the Family Chapel.
- Place the GRAVE ROD in the hole; take the SKELETON KEY (Y), 30th Rosary Bead (Z) and CAGE (A).
- Go to the Flooded City.
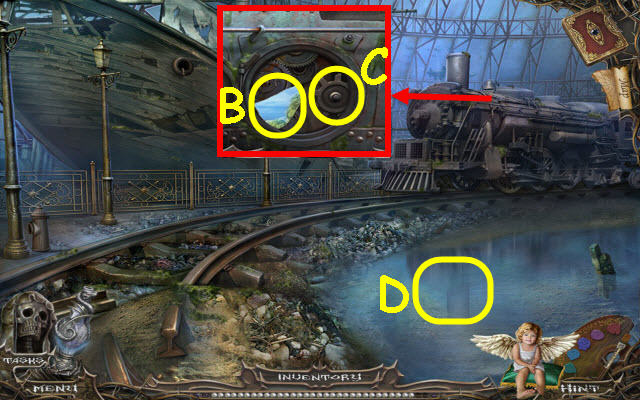
- Use the BRUSH on the hatch; take the CANVAS SCRAP 13/15 (B) and GEAR (C).
- Dip the EMPTY FLASK (D); receive a FLASK OF SALT WATER.
- Go to the Battlefield.
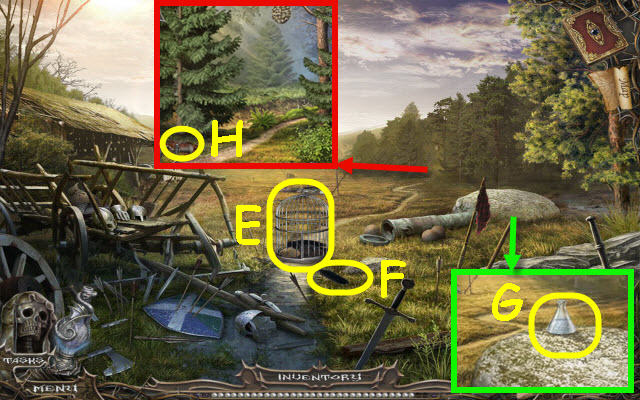
- Set the CAGE and place the SACK OF GRAIN in it (E); receive an EMPTY SACK.
- Take the FEATHER (F).
- Place the FLASK OF SALT WATER on the stone; take the FLASK OF SALT (G).
- Use the KEROSENE and MATCHES on the twigs; take the JACKSCREW (H).
- Go to the Mine.
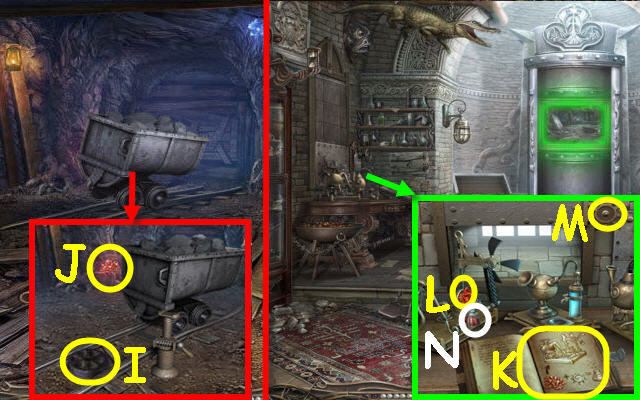
- Place the JACKSCREW by the wheels; push the cart. Take the WHEEL (I) and RED CRYSTAL (J).
- Go to the Laboratory.
- Turn the book back two pages (K).
- Place the RED CRYSTAL (L) and GEAR (M).
- Take the RED POTION (N).
- Go to the Family Chapel.
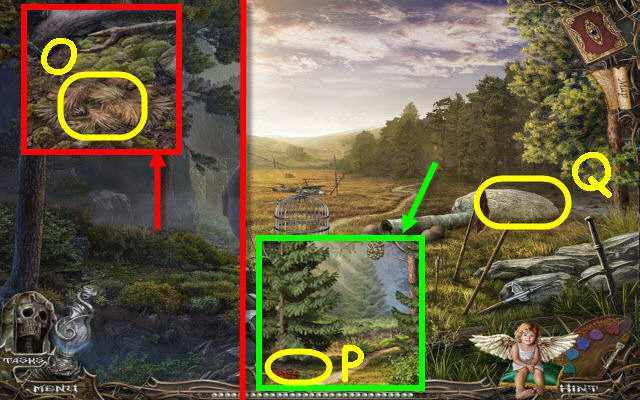
- Use the EMPTY SACK (O); receive a SACK OF PINE NEEDLES.
- Go to the Battlefield.
- Place the SACK OF PINE NEEDLES (P); receive a STONE FLOWER.
- Play the HOP (Q).
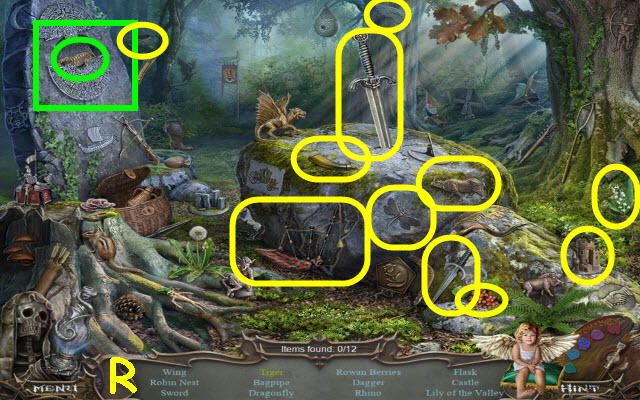
- You receive a SWORD (R).
- Go to the Family Chapel; go forward.
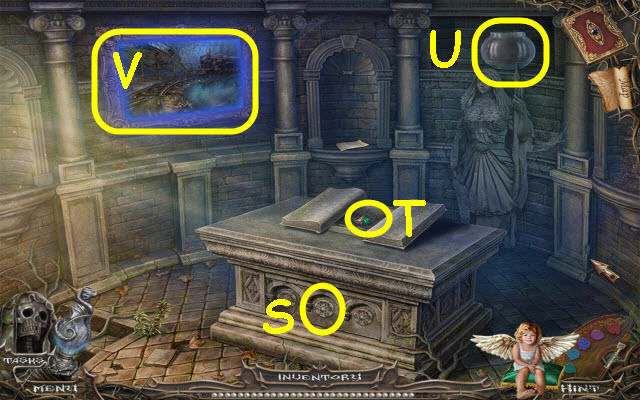
- Place the STONE FLOWER (S).
- Take the RING 1/3 (T) and FISH BOWL (U).
- Go through the painting (V).
Chapter 9: Rosary
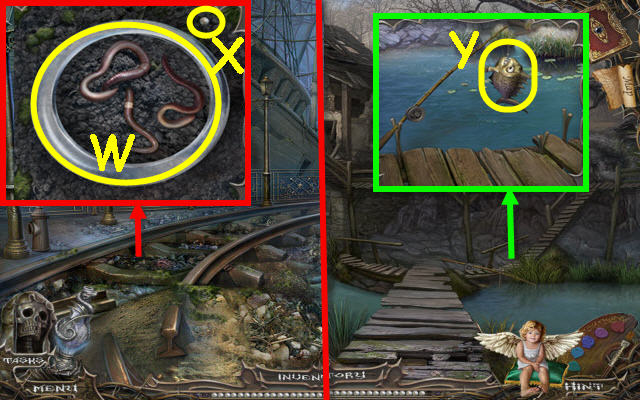
- Use the FISH BOWL; take the BOWL OF WORMS (W) and 31st Rosary Bead (X).
- Go to the Watermill.
- Use the BOWL OF WORMS on the hook; take the FISH (Y).
- Go to the Frozen Frigate.
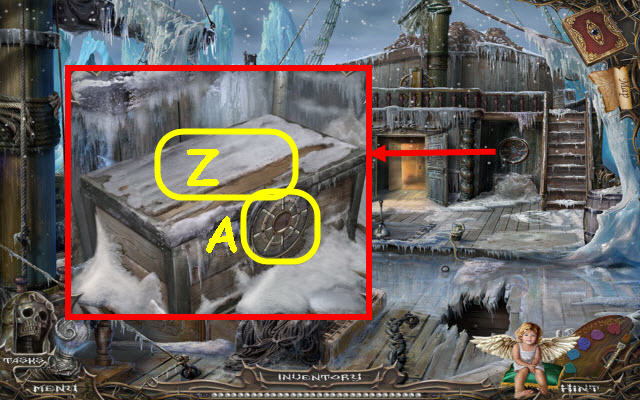
- Use the FLASK OF SALT (Z).
- Zoom in and place the SPIDER MOSAIC to trigger a puzzle (A).
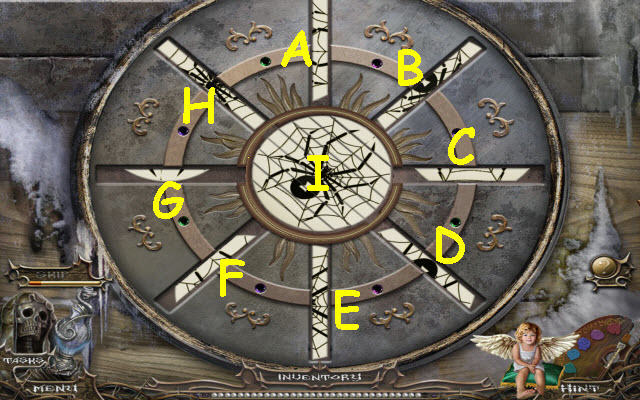
- Complete the image.
- Select the following: C, Ix4, G, I, D, Ix2, F, Ix2, A, E, I, B, Ix2 and H.
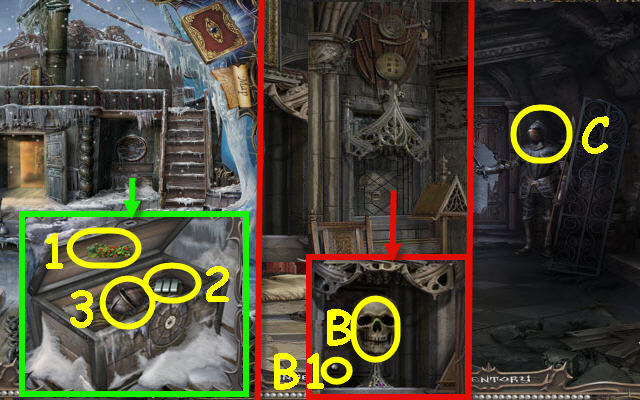
- Take the CANVAS SCRAP 14/15 (1), ORGAN KEYS (2) and HELMET (3).
- Go to the Study.
- Use the SKELETON KEY on the lock; take the SKULL (B) and 32nd Rosary Bead (B1).
- Go to the Crypt Door.
- Place the HELMET (C).
- Go forward.
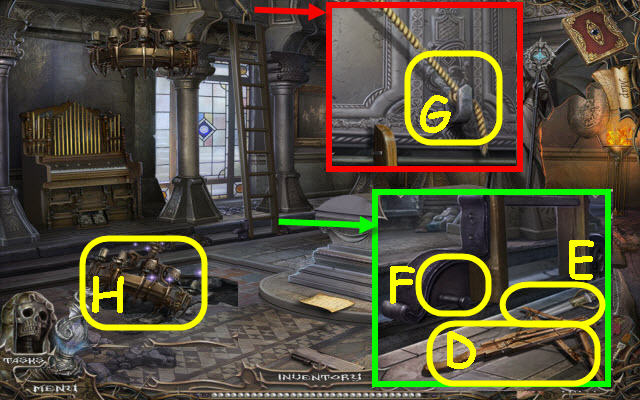
- Take the CROSSBOW (D) and EMPTY PIPETTE (E); place the WHEEL (F).
- Use the SWORD (G).
- Examine the chandelier to access a HOP (H).
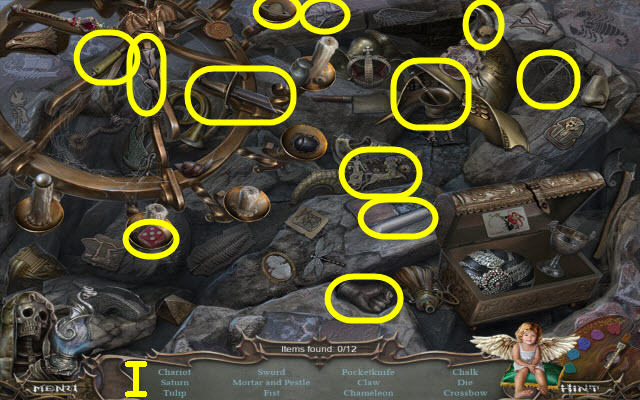
- Play the HOP.
- You receive a CHALK (I).
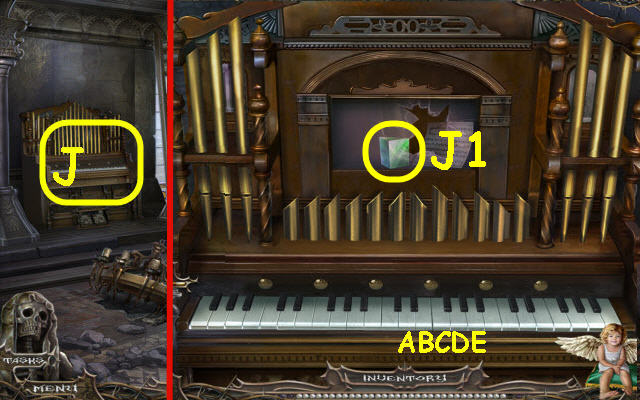
- Examine the piano and place the ORGAN KEYS on it to trigger a puzzle (J).
- Duplicate the pattern.
- Solution: Ax2-B-Cx2-Bx2-A, Cx2-D-E-C-E-D-C, Bx2-C-D-B-D-C-B and Ax2-B-Cx2-Bx2-A.
- Smash the glass; take the PRISM (J1).
- Go to the Flooded City.
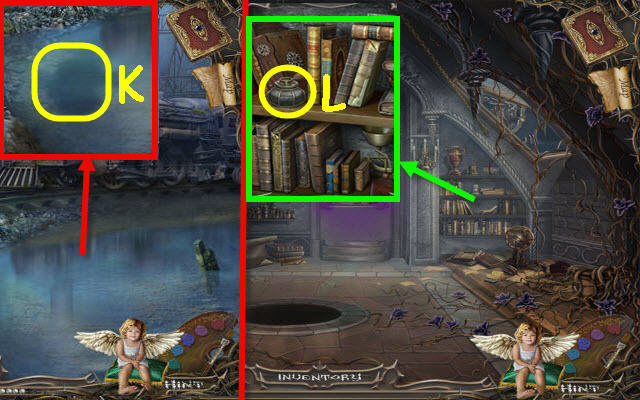
- Give the FISH to the octopus and use the EMPTY PIPETTE on the ink; receive a PIPETTE OF INK (K).
- Go to the Observatory.
- Use the PIPETTE OF INK; take the INKWELL (L).
- Go to the Laboratory.
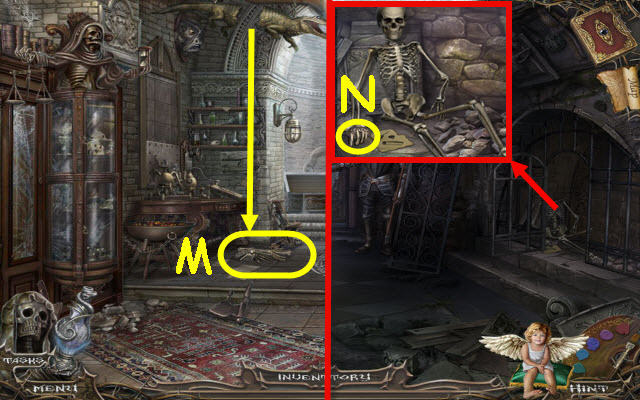
- Examine and use the CROSSBOW on the alligator; take the BONES (M).
- Go to the Crypt Door.
- Place the BONES, SKULL and RED POTION on the skeleton; take the MEDALLION (N) and examine the note.
- Go to the Study.
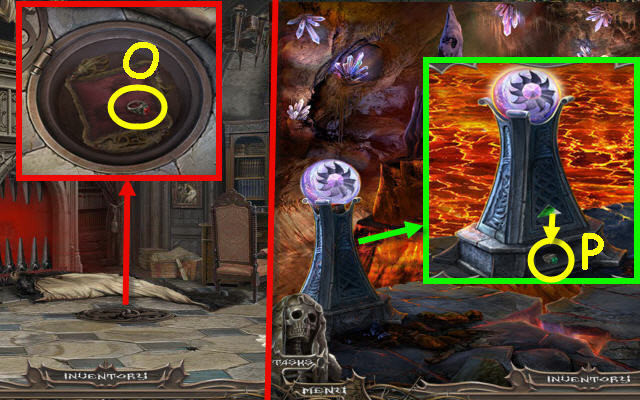
- Use the MEDALLION on the round latch; take the RING 2/3 (O).
- Go to the Lava River.
- Place the PRISM in the slot; take the RING 3/3 (P).
- Go to the Crypt.
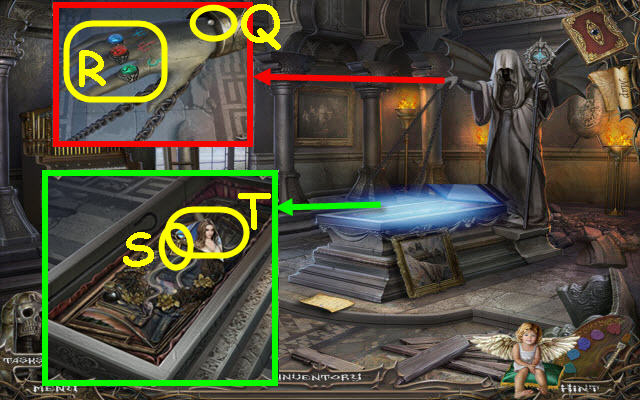
- Take the 33rd Rosary Bead; receive ROSARY BEADS (Q).
- Place the 3 RINGS on the fingers (R).
- Take the ANKH (S) and CANVAS SCRAP 15/15 (T).
- Go to the Theater of Terror.
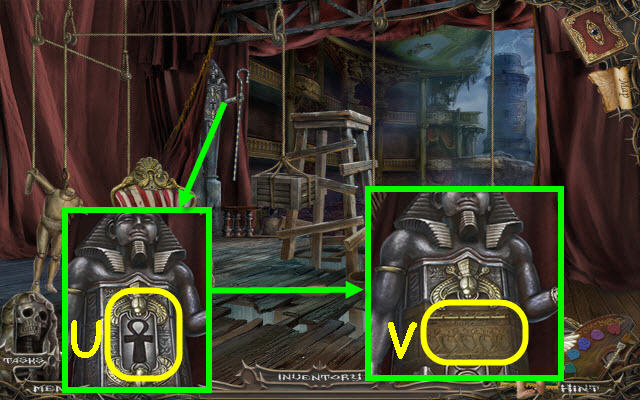
- Place the ANKH (U).
- Examine the etching to trigger a puzzle (V).
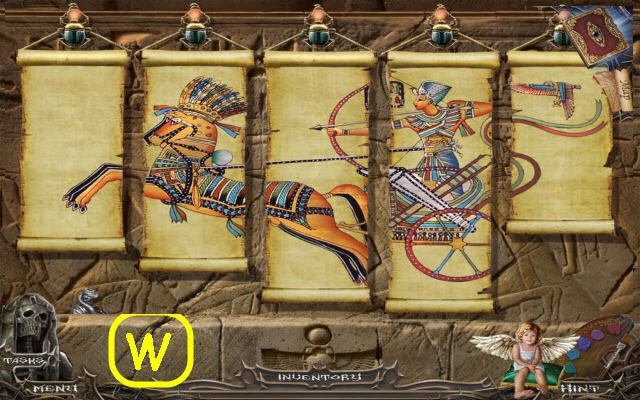
- Complete the image.
- Solution (W).
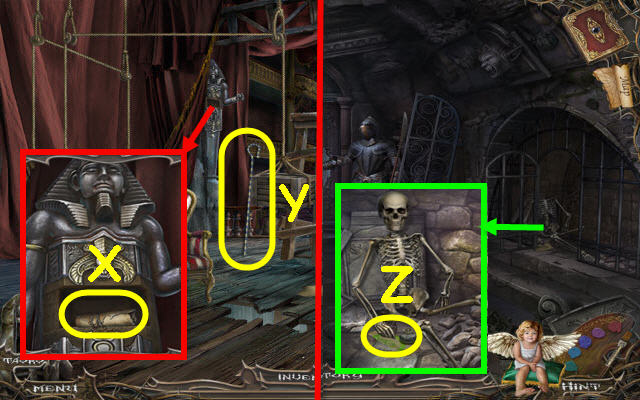
- Take the SCROLL (X).
- Take the PHARAOH STAFF (Y).
- Go to the Crypt Door.
- Give the INKWELL, FEATHER and SCROLL to the skeleton; receive a PAGE (Z).
- Go to the Laboratory.
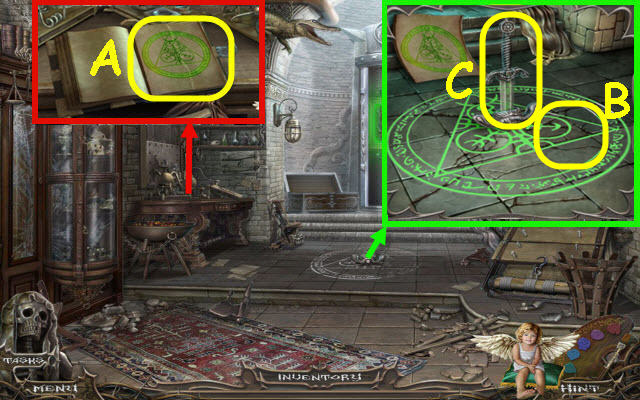
- Flip the pages 3x and place the PAGE; take the COMPLETE SYMBOL (A).
- Place the COMPLETE SYMBOL and CHALK on the unfinished symbol (B).
- Place the SWORD in the center; take the ENCHANTED SWORD (C).
- Go to the Crypt.
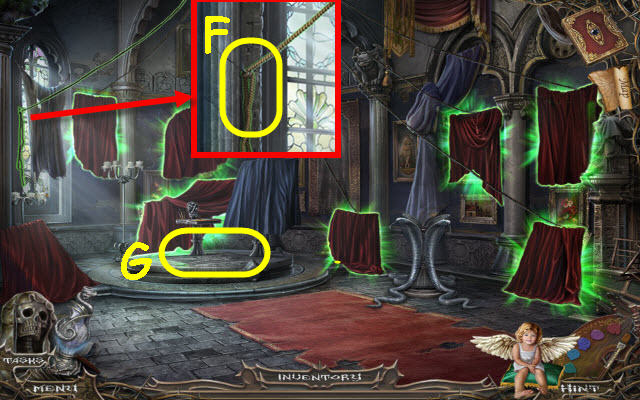
- Place the PHARAOH STAFF in the side slot; take the BLACK GEM (D).
- Go to the Front Drive.
- Place the 15 CANVAS SCRAPS on the canvas; take the STONE MOSAIC (E).
- Go to the Secret Gallery.
- Use the ENCHANTED SWORD (F).
- Zoom into the pedestal and place the STONE MOSAIC on it to trigger a puzzle (G).
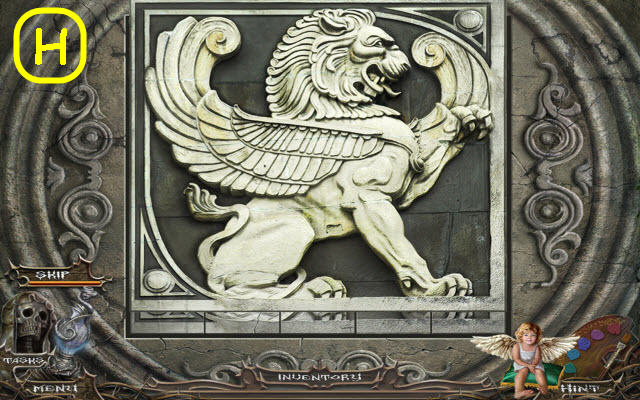
- Complete the image.
- The starting layout is random.
- Solution (H).
- You receive a SOUL VIAL.
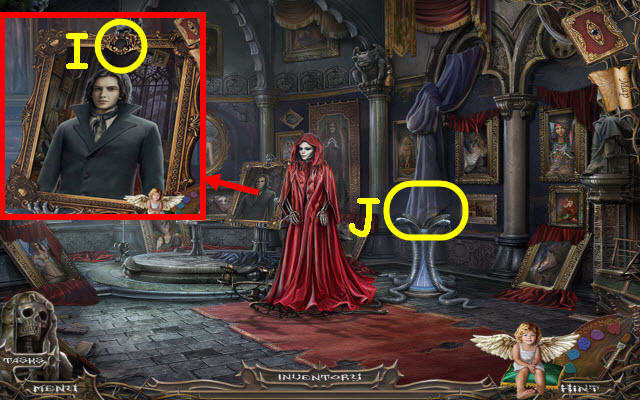
- Give the ROSARY BEADS to the woman.
- Place the BLACK GEM in the slot (I).
- Place the SOUL VIAL on the pedestal (J).
- Congratulations, you've completed Haunted Manor: Painted Beauties
Created at: 2014-06-22

