

Walkthrough Menu
- General Tips
- Chapter 1: Station Square
- Chapter 2: Canal Bridge
- Chapter 3: Spirit Car
- Chapter 4: Behind Opera
- Chapter 5: Opera Hall
- Chapter 6: Water Station
- Chapter 7: Parliament Square
General Tips
- This is the official guide for Haunted Train: Clashing Worlds.
- This guide will not mention each time you have to zoom into a location; the screenshots will show each zoom scene.
- Hidden-object puzzles are referred to as HOPs. This guide will not show HOP solutions. It will identify the location of the HOP and the inventory item acquired.
- This guide will show solutions for non-random puzzles. Please read the in-game instructions for each puzzle.
- In this game, you will sometimes have to select the new scene to trigger dialog, cut-scenes, or tasks prior to interacting with the scene.
Chapter 1: Station Square
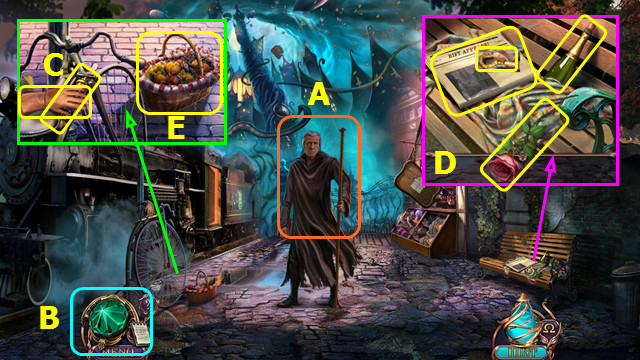
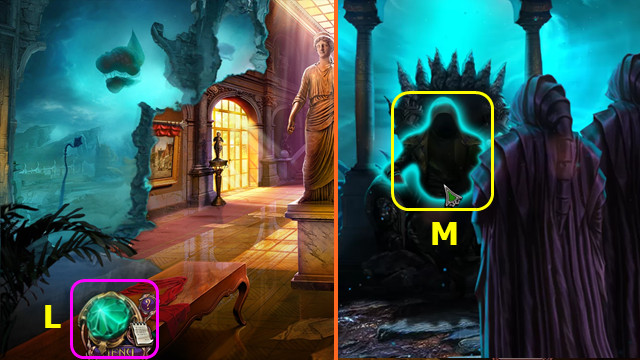
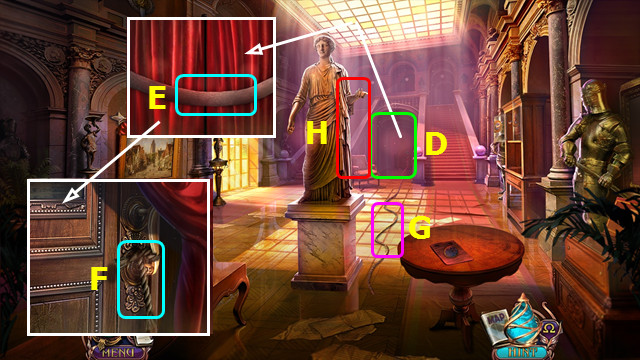
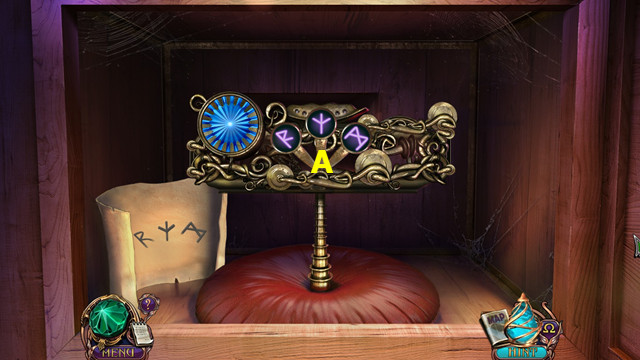
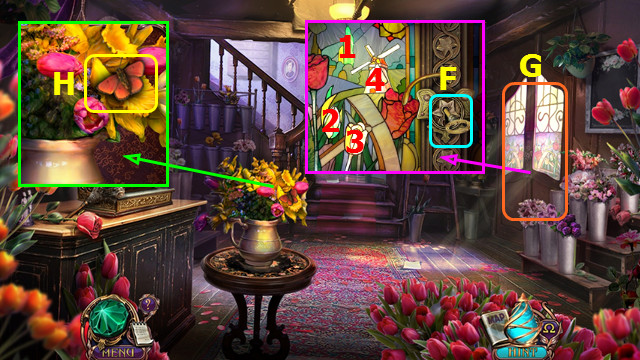
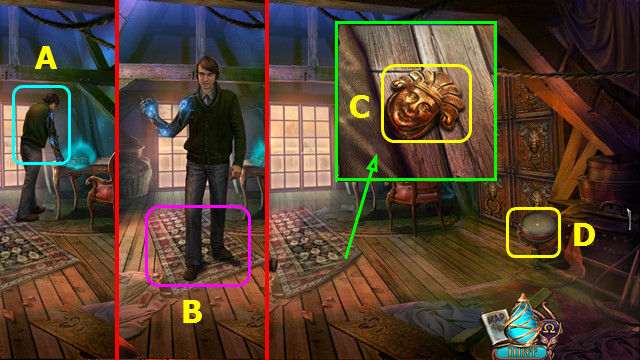
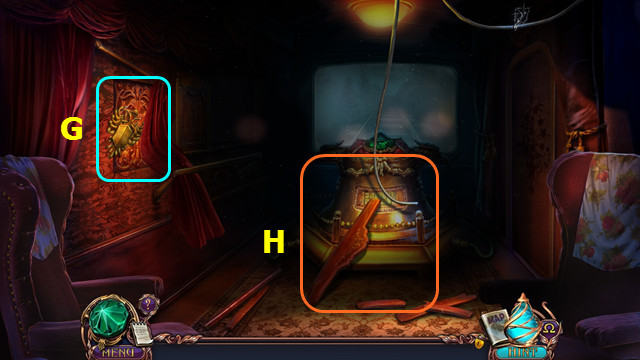
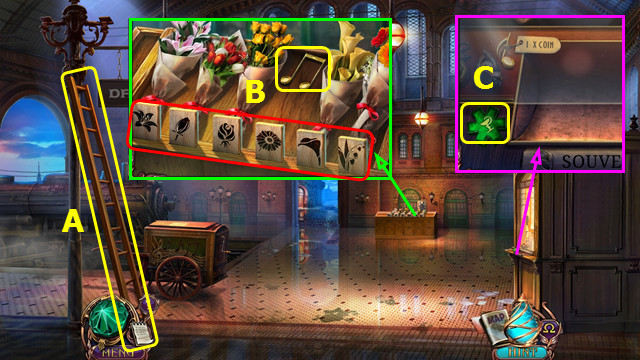
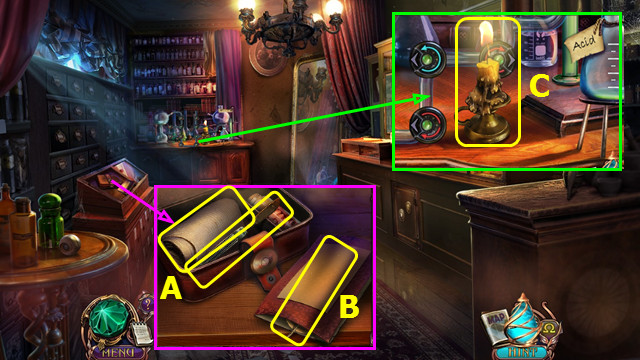
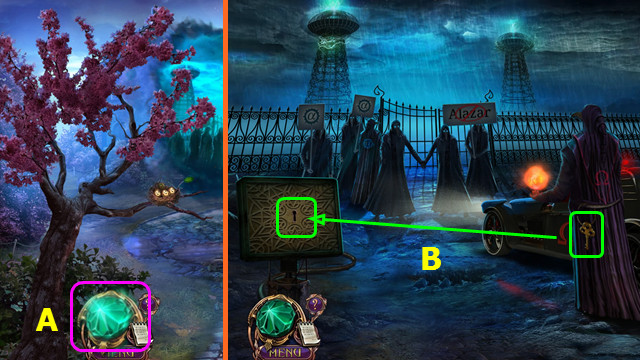
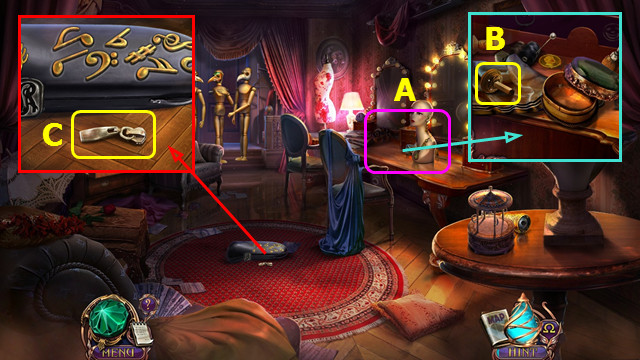
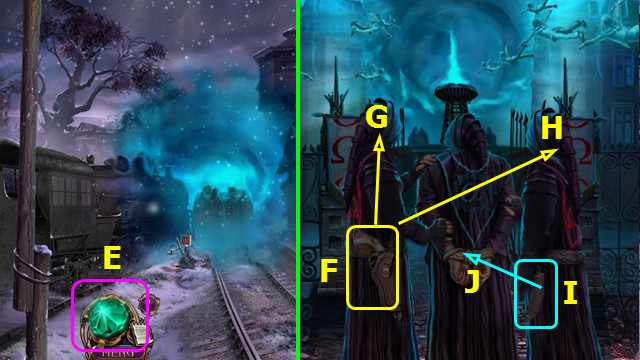
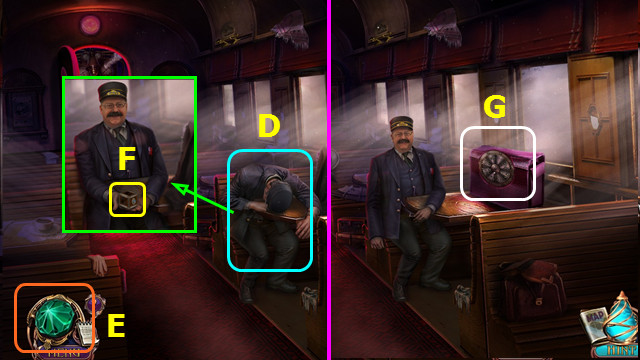
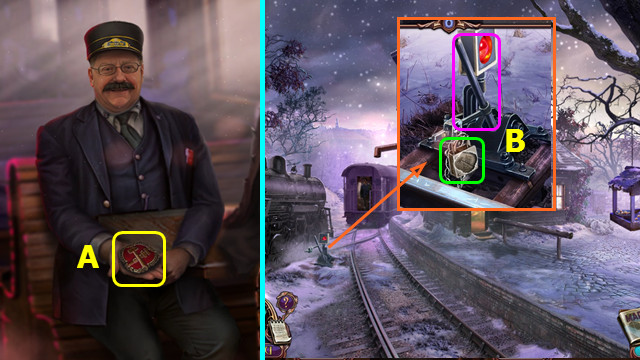
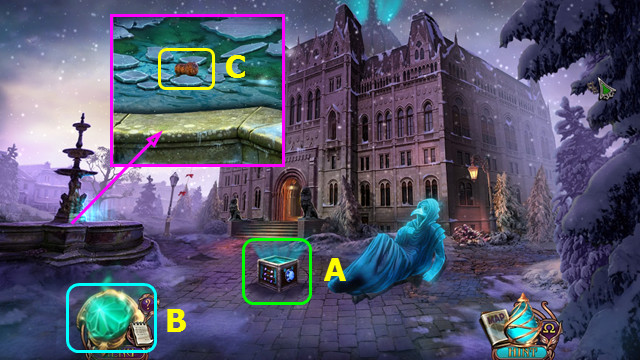
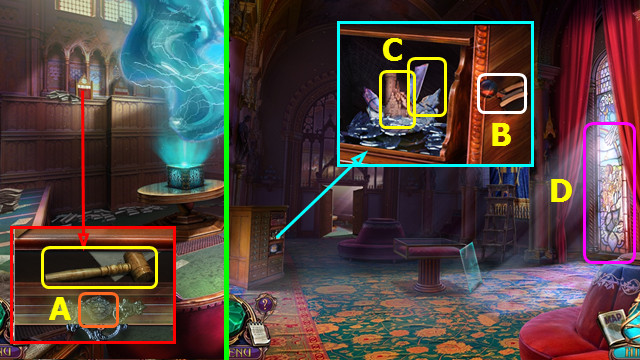
- Talk to Charon take the AMULET (A).
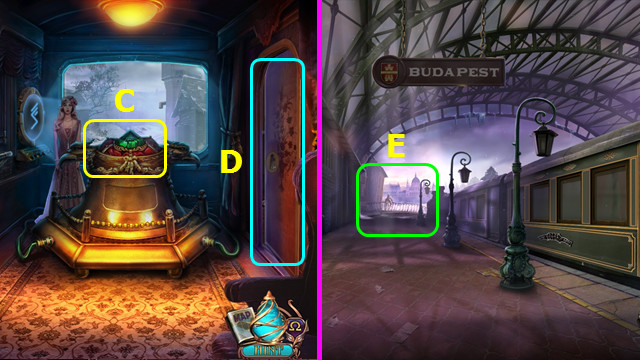
- Select the AMULET (B).
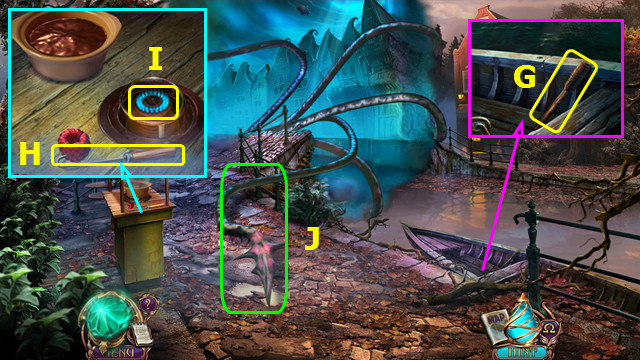
- Take the GLOVE; remove and take the PUMP (C).
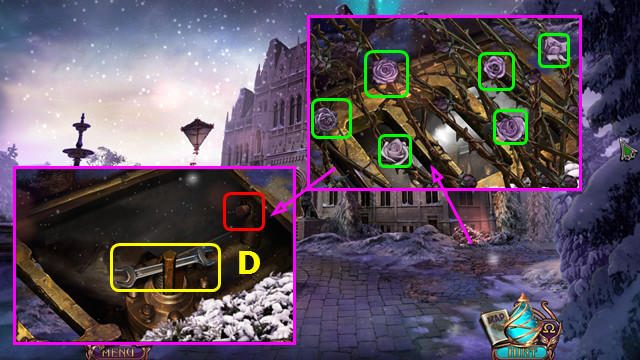
- Take the NEWSPAPER, HOOK, and WINE BOTTLE; use the GLOVE to take the ROSE (D).
- Use the ROSE; take the HEAVY BASKET (E).
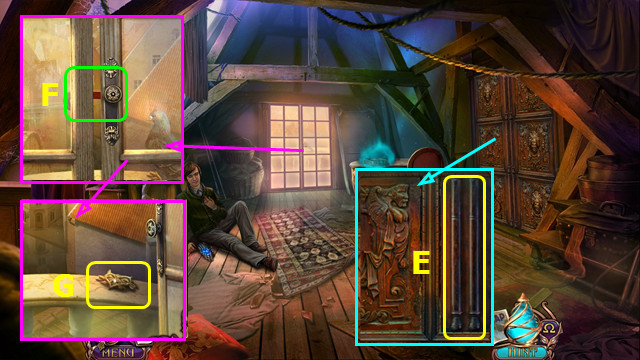
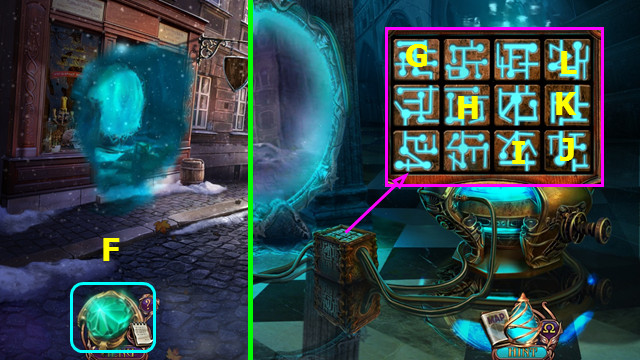
- Place the HOOK (F).
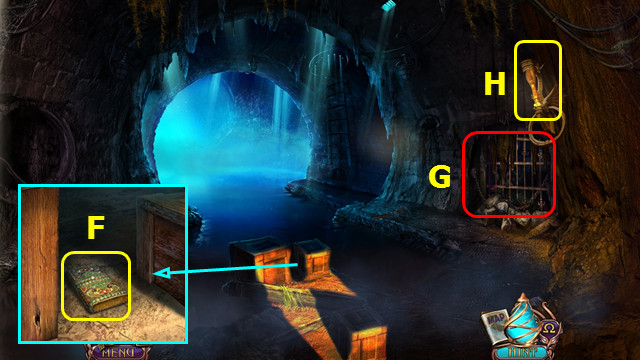
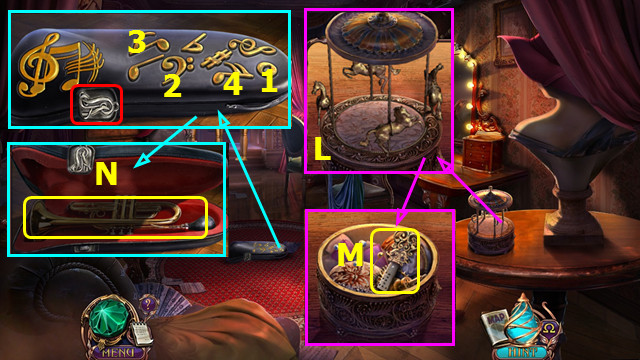
- Play the HOP; earn the MUSIC BOX (G).
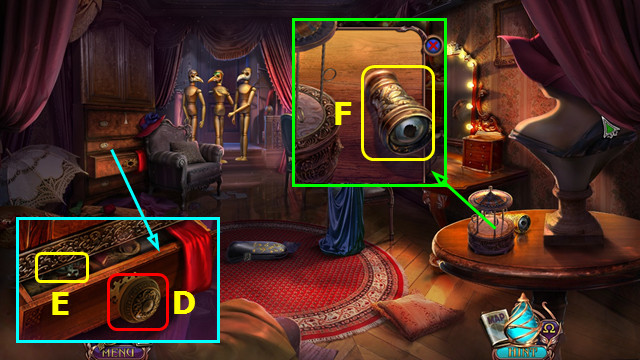
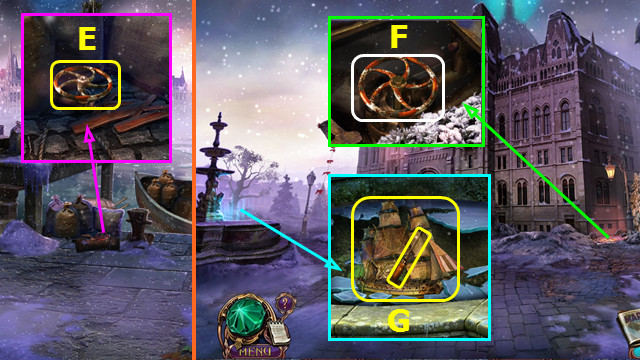
- Take the CRANK HANDLE from the MUSIC BOX (inventory).
- Take the GAS CAN (H).
- Remove the sign; place and select the CRANK HANDLE (I).
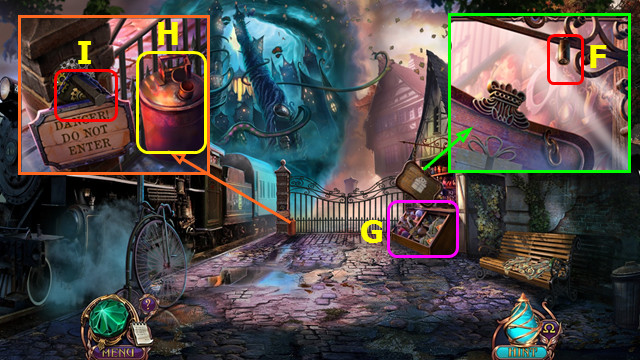
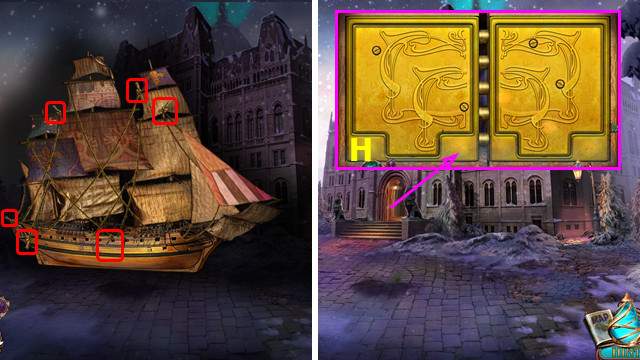
- Go forward.
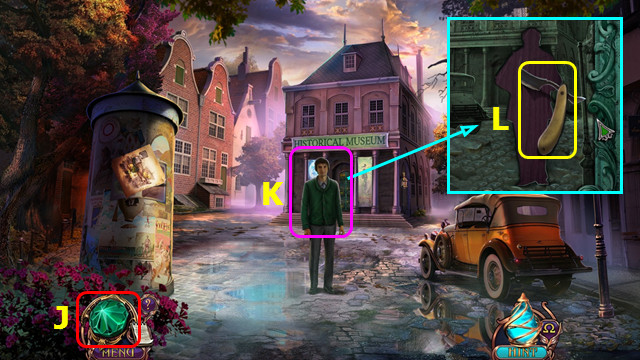
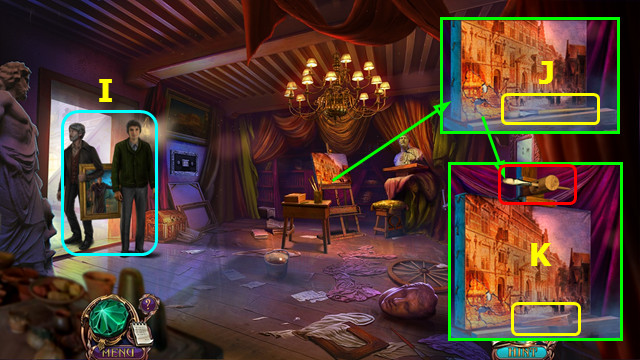
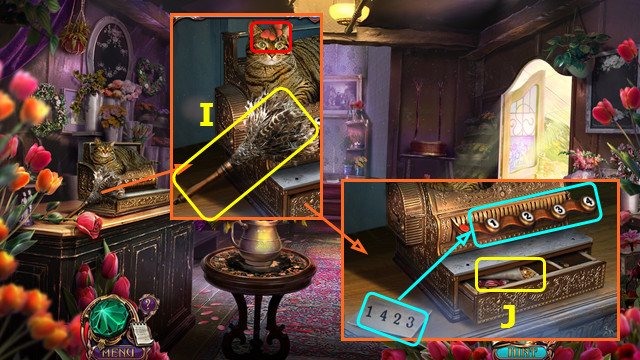
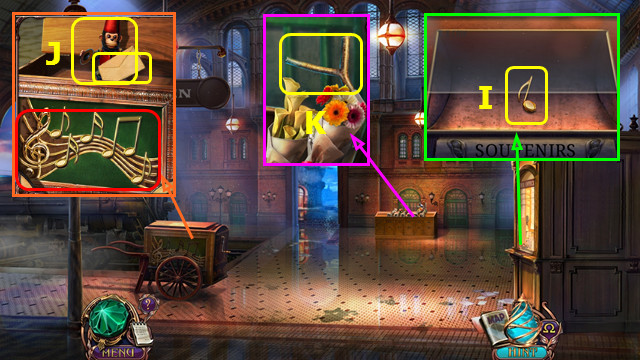
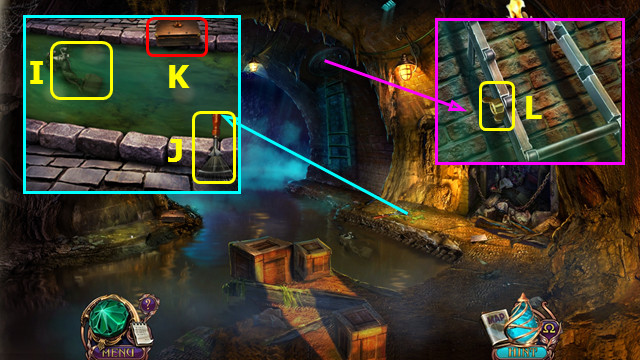
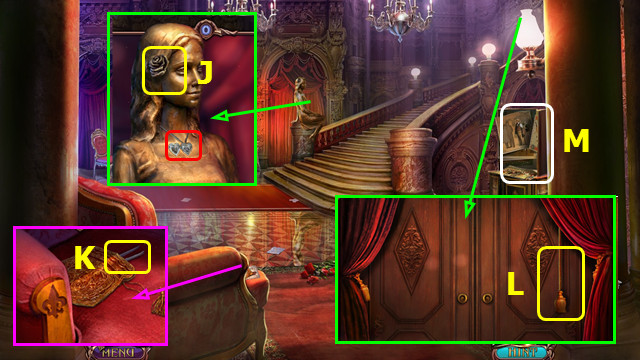
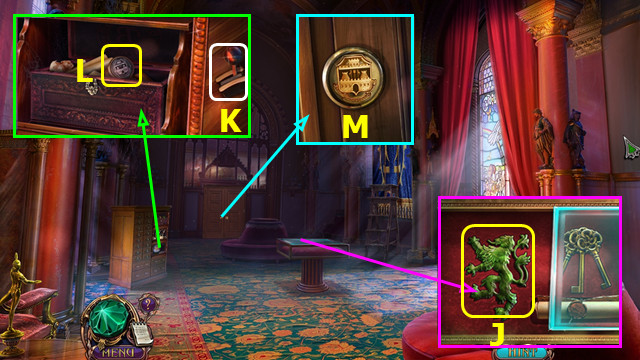
- Select the AMULET (J).
- Talk to Gerard (K).
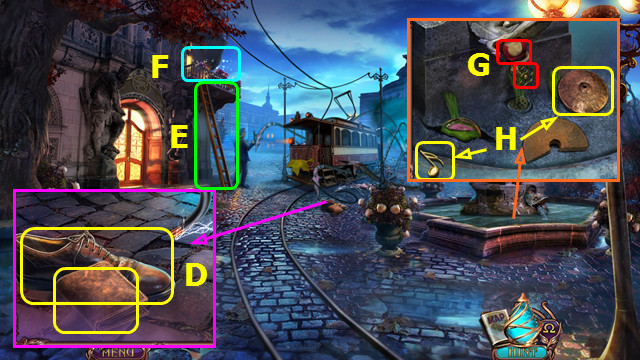
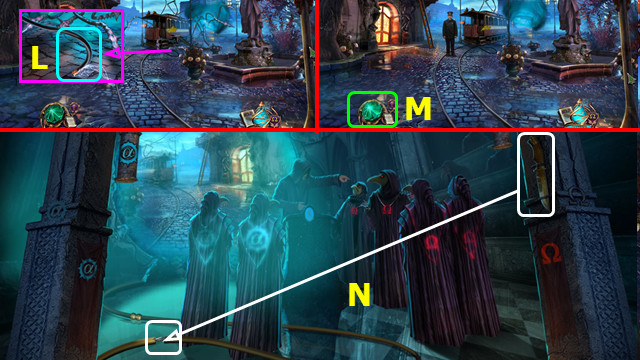
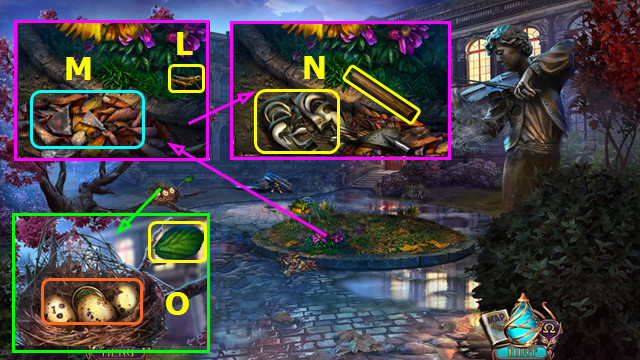
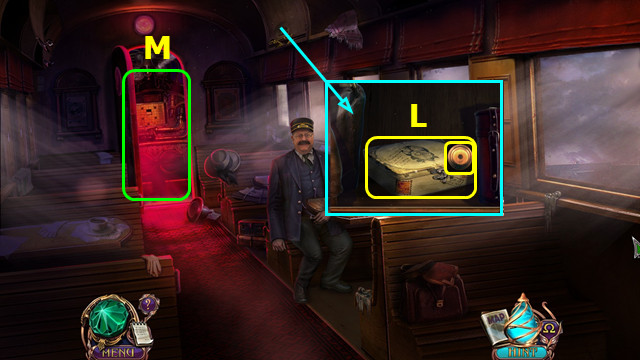
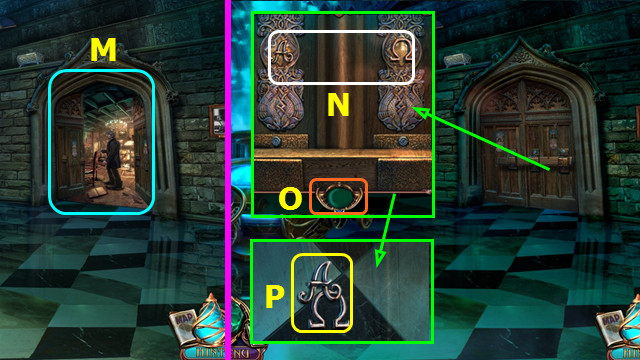
- Take the RAZOR (L).

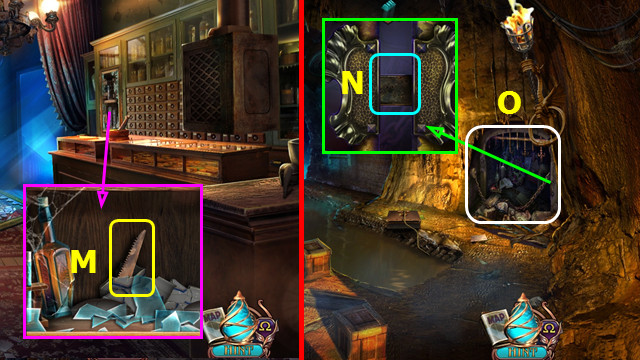
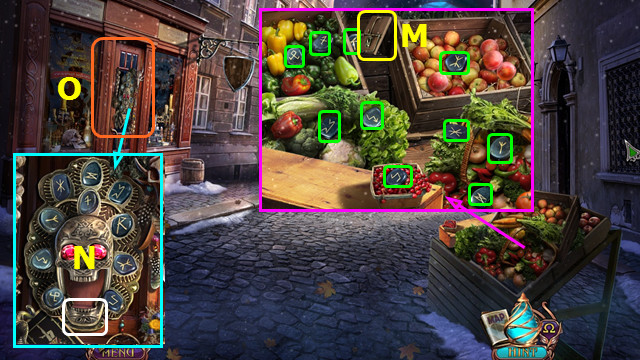
- Take the MAP and HAT TOKEN (M).
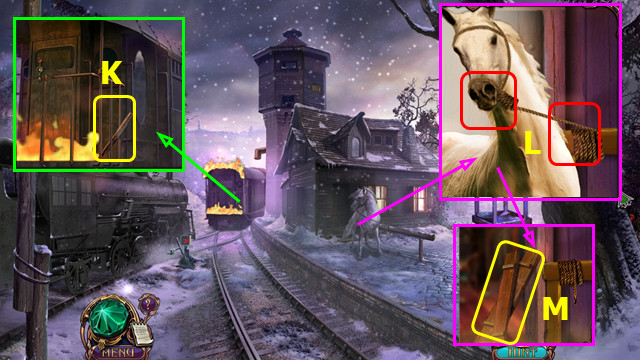
- Use the RAZOR; take the MALE FIGURE (N).
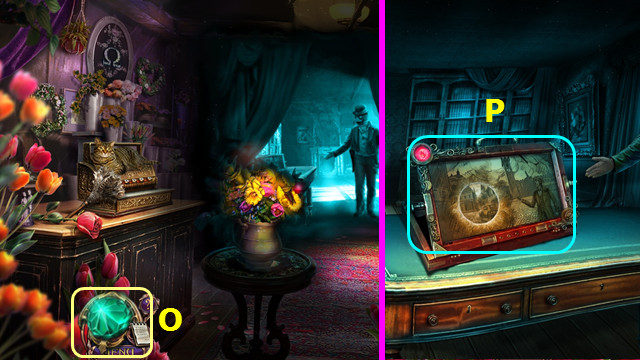
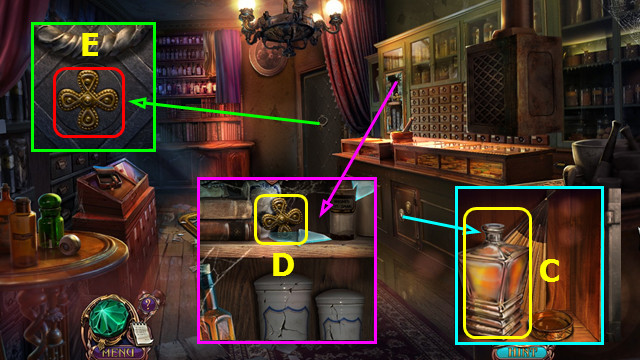
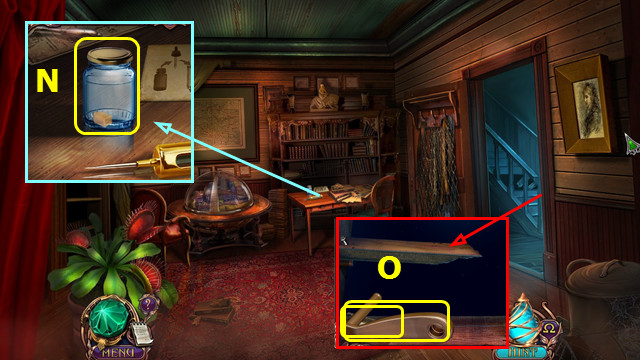
- Open the clasp; take the LANTERN and CORKSCREW (O).
- Use the CORKSCREW on the WINE BOTTLE; take the CORK (inventory).
- Combine the GAS CAN and CORK to make the EMPTY GAS CAN (inventory).
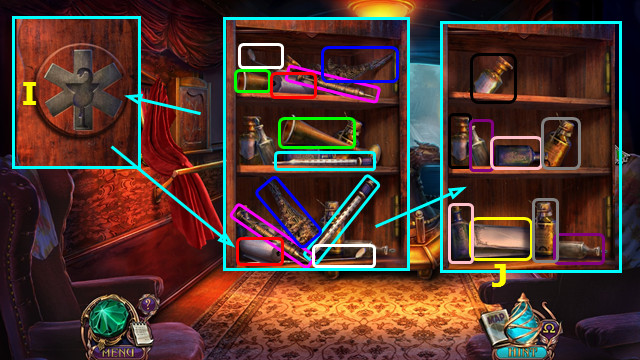
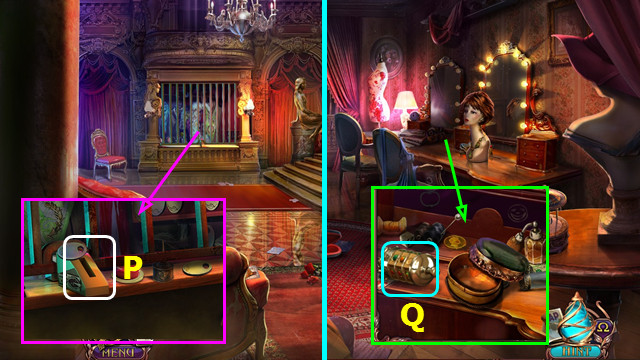
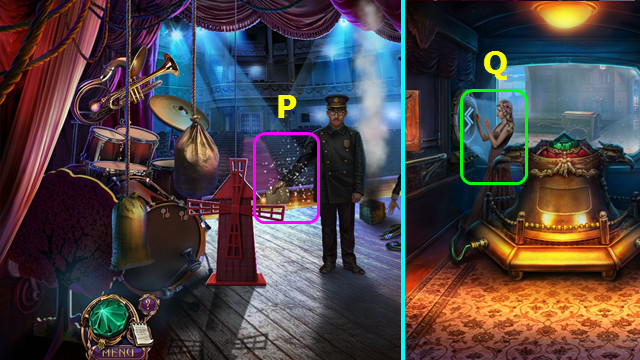
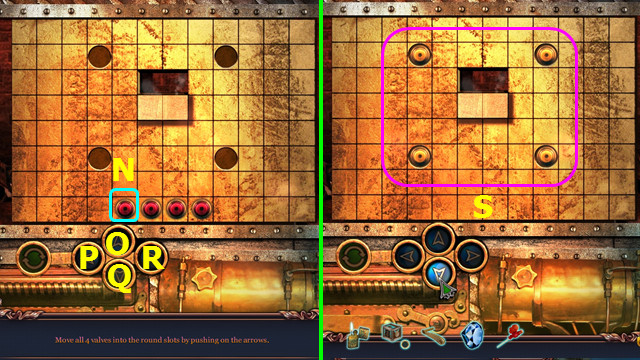
- Select (P).
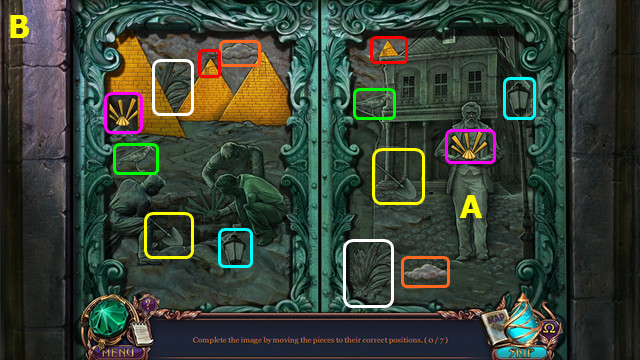


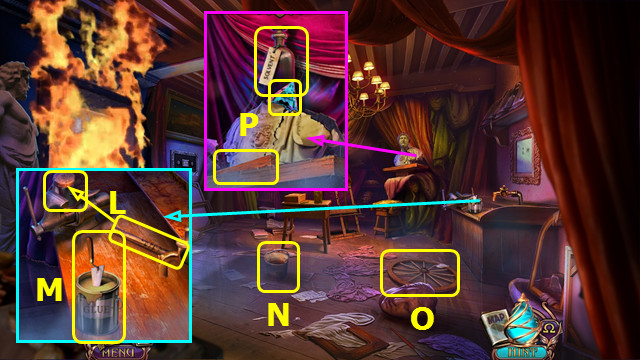
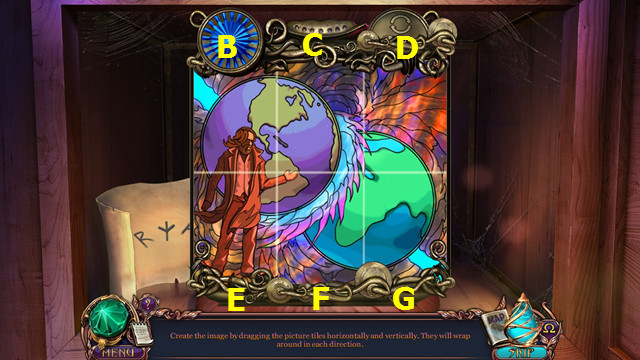
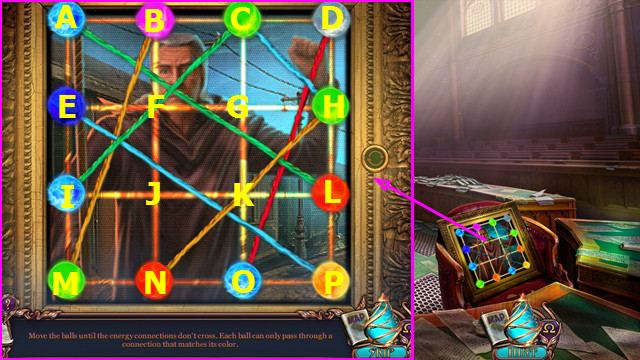
- Place the MALE FIGURE (A).
- Restore the color-coded items (B).
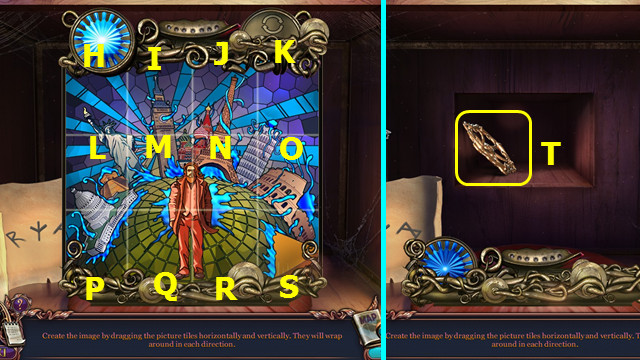
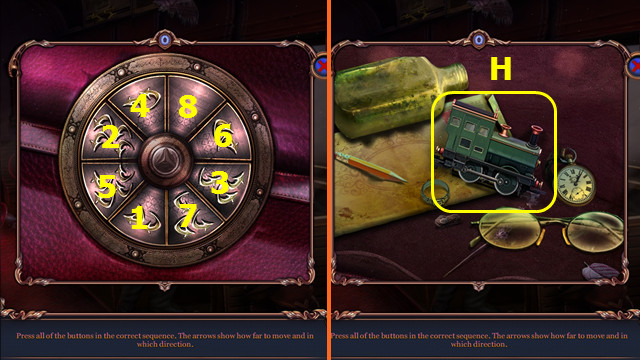
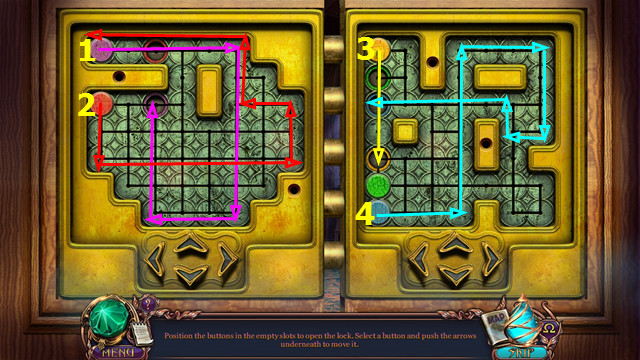
- Select G-Cx42-Dx3-H-Fx19-D-I-Cx31-Dx2-J-Cx21-Dx3.
- Move the discs as indicated (K).
- Walk forward.
- Select the AMULET (L).
- Select (M).
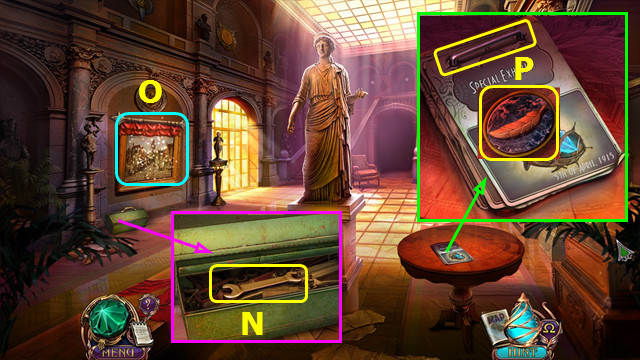
- Open the toolbox; take the WRENCH (N).
- Use the WRENCH to take the HOSE from the PUMP (inventory).
- Play the HOP; earn the SCISSORS (O).
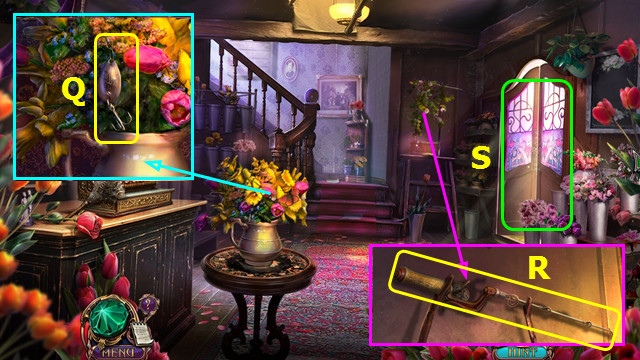
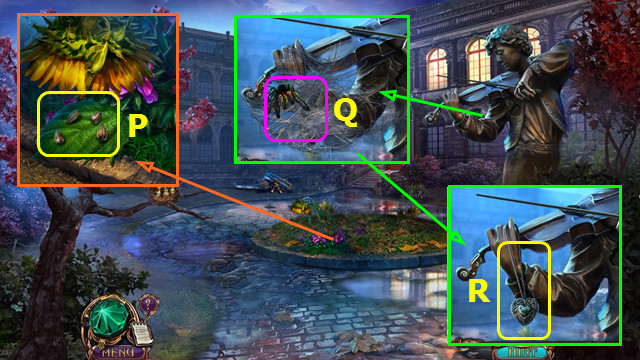
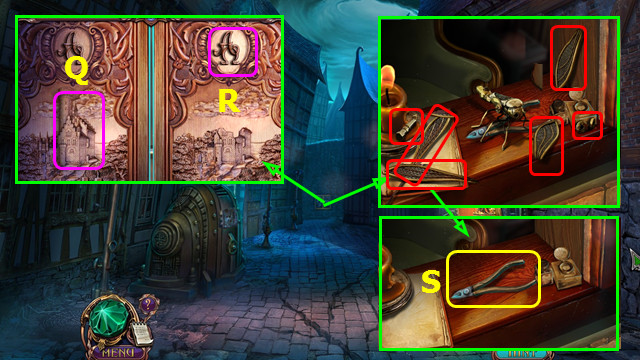
- Take the WIRE and remove the pages; take the FEATHER TOKEN (P).
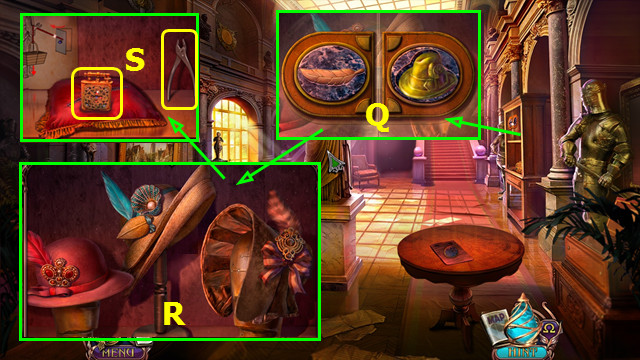
- Place the FEATHER TOKEN and HAT TOKEN (Q).
- Swap the decorations as shown (R).
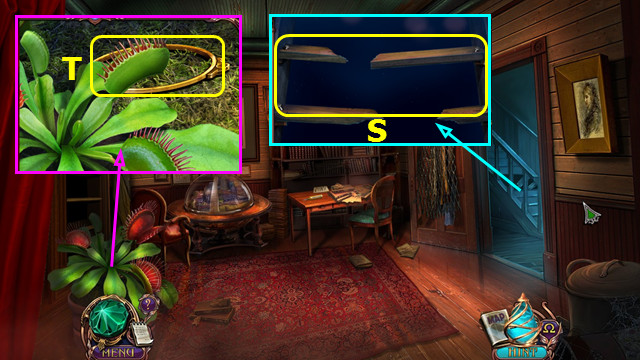
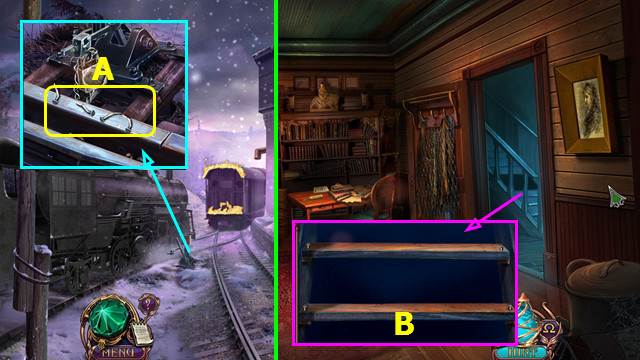
- Move the items and use the SCISSORS; take LIGHTER and PLIERS (S).
- Use the PLIERS 4x on the WIRE to make the LOCKPICK (inventory).
- Walk down.
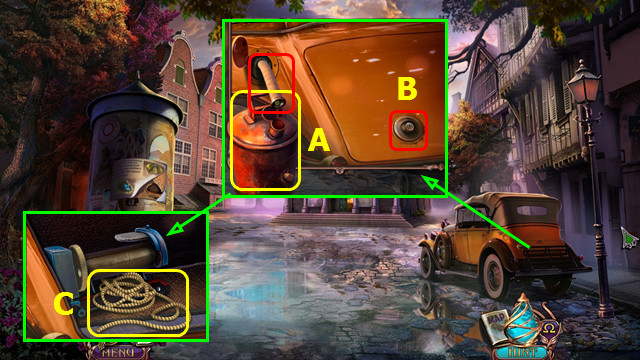
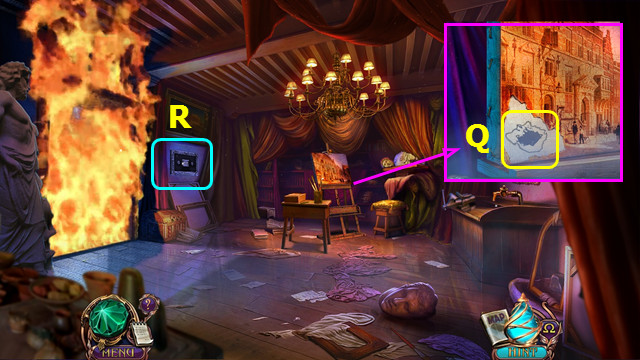
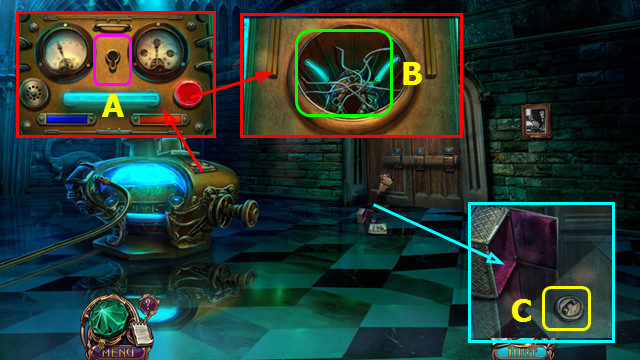
- Open the gas cap; use the HOSE and EMPTY GAS CAN. Take the GAS (A).
- Use the LOCKPICK (B).
- Use the WRENCH; take the ROPE (C).
- Open the LANTERN; add the GAS and use the LIGHTER (inventory).
- Go forward.
- Use the LANTERN (D).
- Use the SCISSORS and open the curtains (E).
- Use the ROPE (F).
- Select (G).
- Place the HEAVY BASKET (H).
- Walk forward.
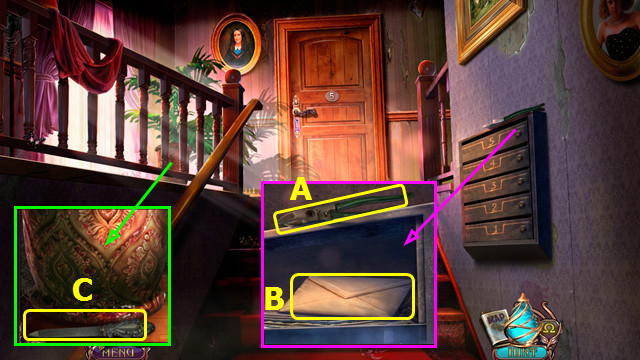
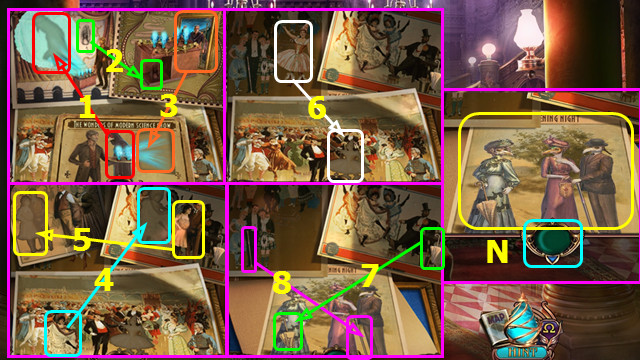
- Select (I).
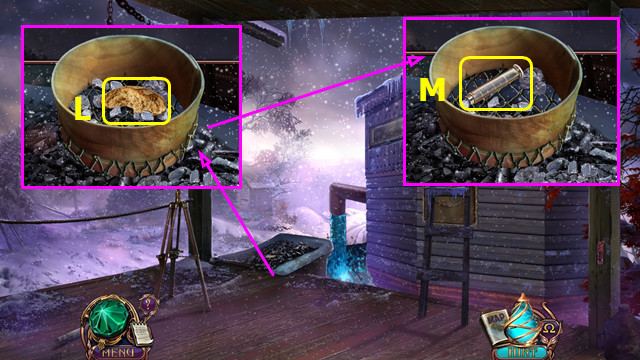
- Take the PAINTBRUSH (J).
- Use the PAINTBRUSH; take the WEDGE (K).
- Place the handle; take the MALLET (L).
- Take the DRY GLUE (M).
- Take the EMPTY BUCKET (N) and CARTWHEEL (O).
- Use the WEDGE and MALLET; take the ENERGY CRYSTAL, SOLVENT, and WEDGE (P).
- Combine the DRY GLUE and SOLVENT; take the SCRAPER (inventory).
- Use the SCRAPER; take the SECRET MESSAGE (Q).
- Combine the SECRET MESSAGE and SOLVENT to find the CODE (inventory).
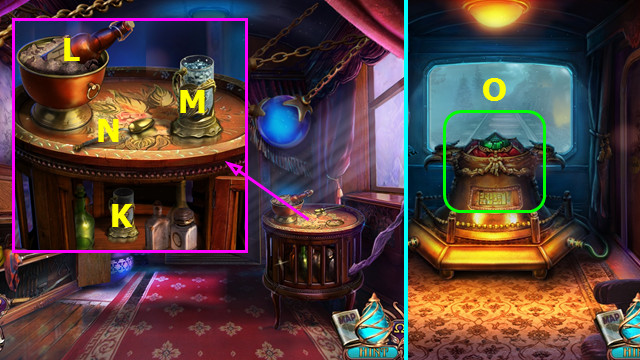
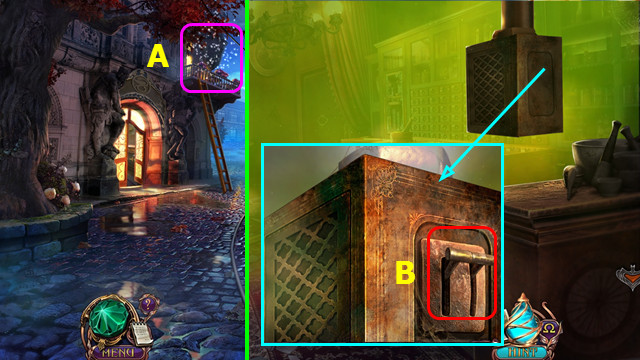
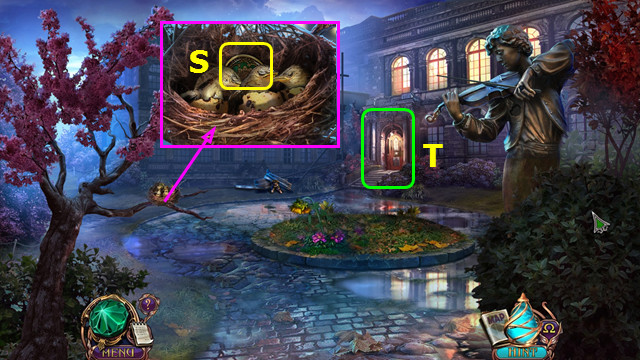
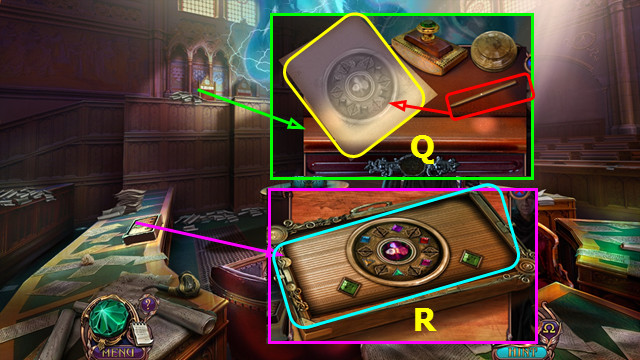
- Open the door and select (R).
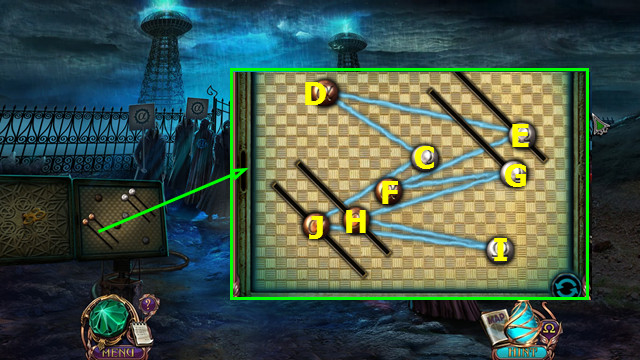
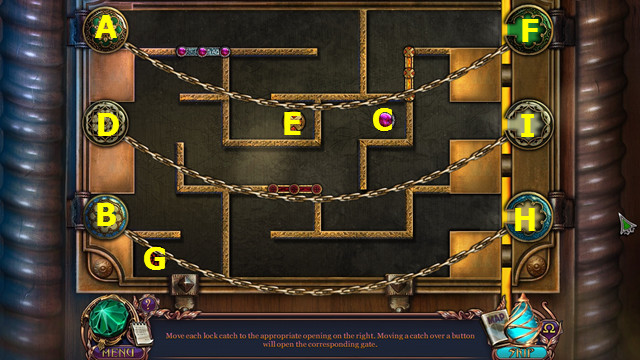
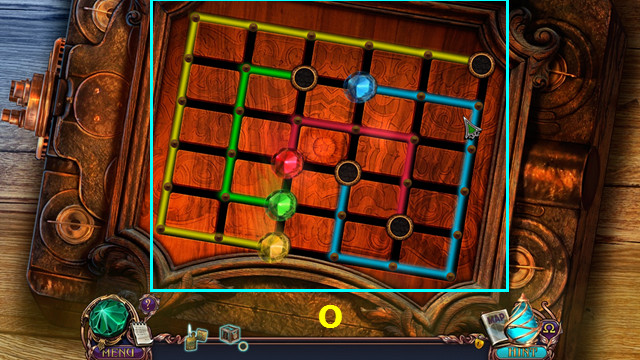
- Place the ENERGY CRYSTAL and CODE; change the code to match (A).
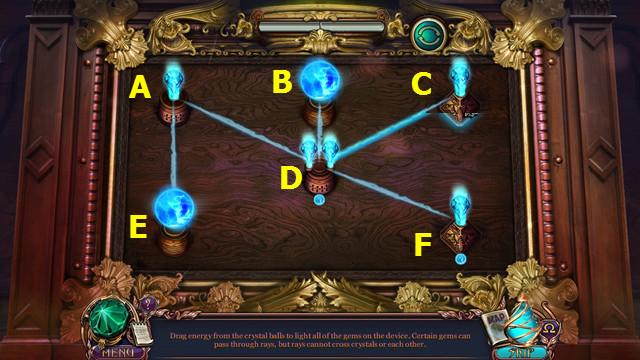
- Drag (E-G)-(C-F)-(D-G)-(B-E)-(C-B)-(E-B)-(F-E)-(D-G).
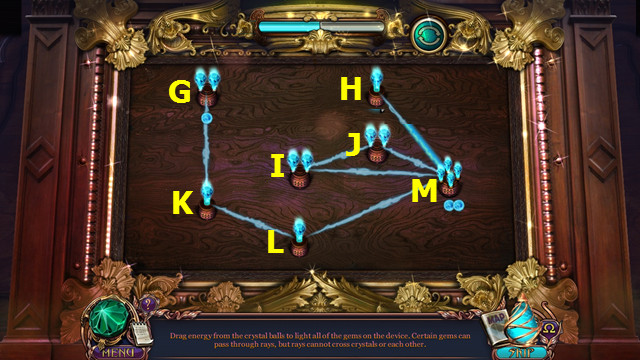
- Drag (P-Q)-(J-R)-(O-M)-(P-L)-(L-M)-(S-K)-(J-K)-(K-S)-(K-H)-(L-H)-(H-J)-(L-P)-(H-I).
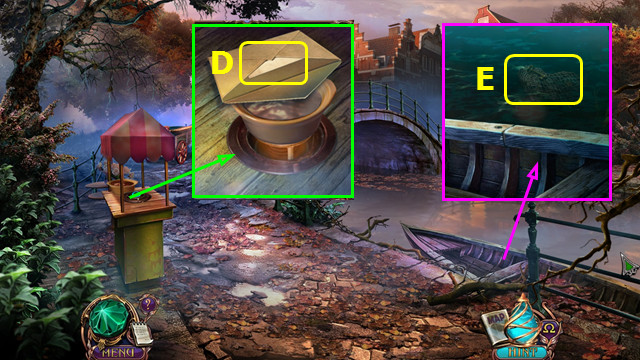
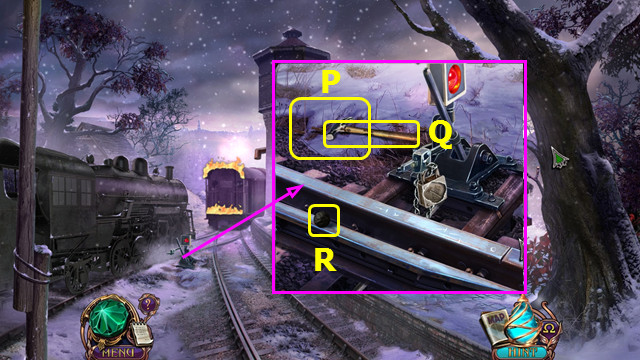
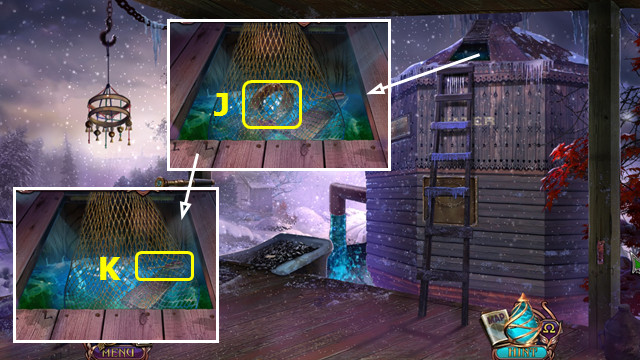
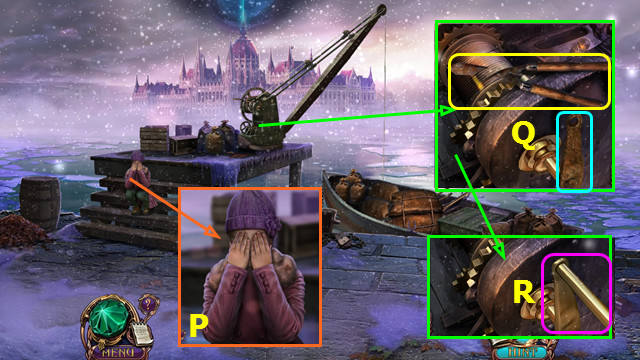
- Take the TAP HANDLE (T).
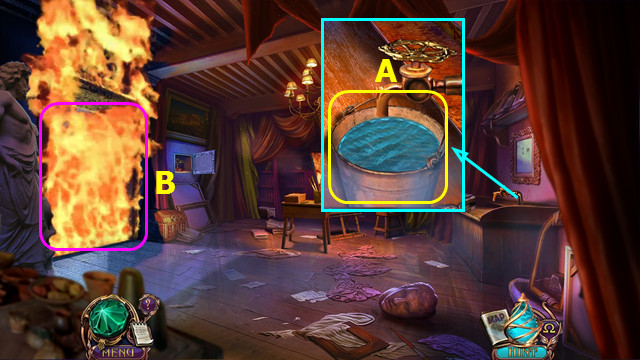
- Place the EMPTY BUCKET. Place and select the TAP HANDLE; take the BUCKET OF WATER (A).
- Use the BUCKET OF WATER (B).
- Walk left.

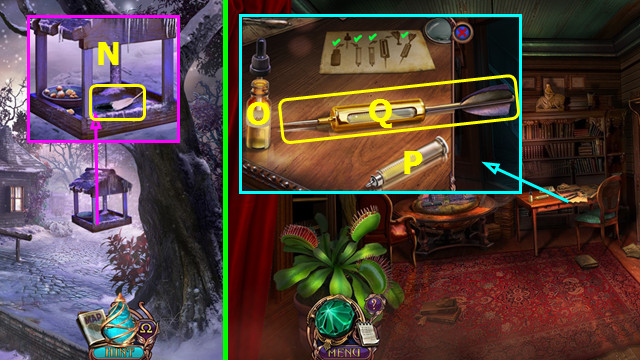
- Open the curtain; play the HOP to earn the AWL (C).
- Place and select the NEWSPAPER (D).
- Use the AWL (E).
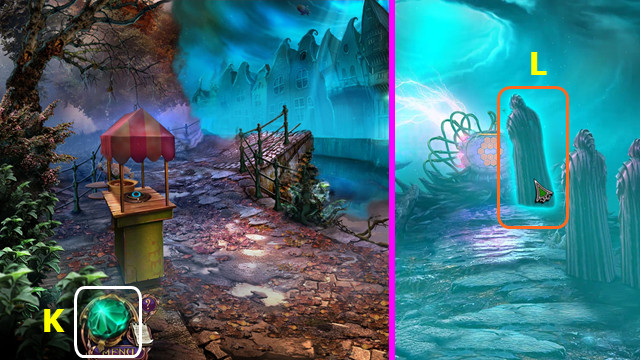
- Pull the newspaper and take the KEY; use the KEY (F).
- Walk left.
Chapter 2: Canal Bridge
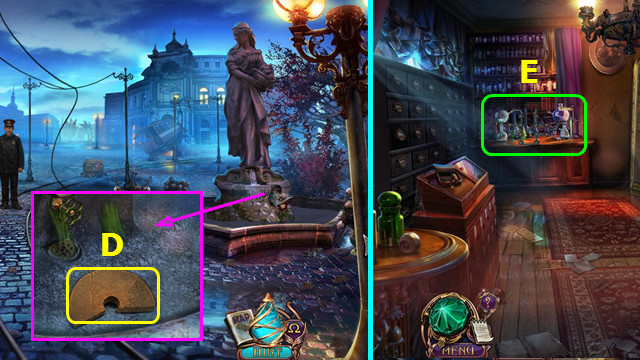
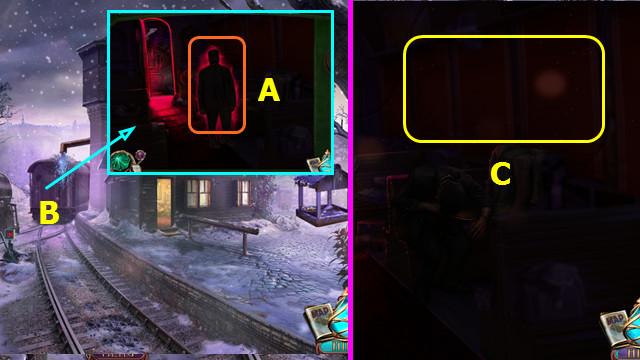
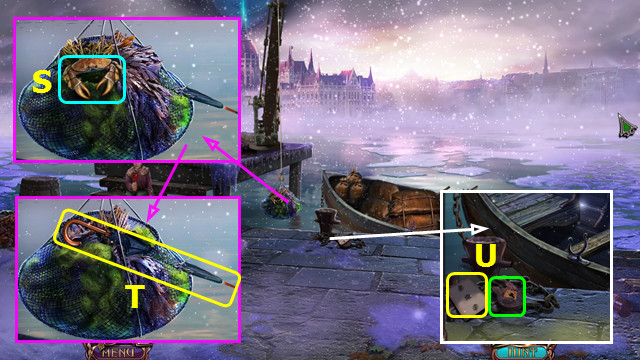
- Take the TORCH (G).
- Remove the berry and take the WIRE HOOK (H).
- Move the crock and use the TORCH; take the BURNING TORCH (I).
- Use the BURNING TORCH (J).
- Select the AMULET (K).
- Select (L).
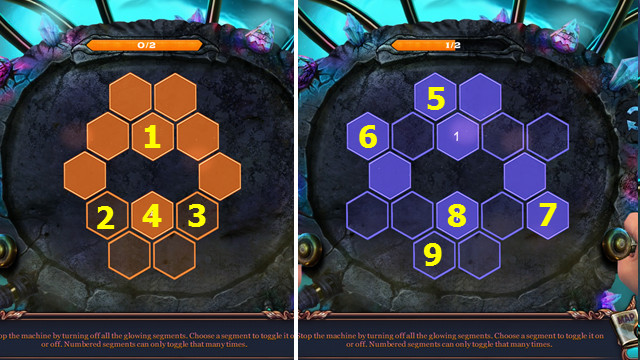
- Select 1-4.
- Select 5-9.
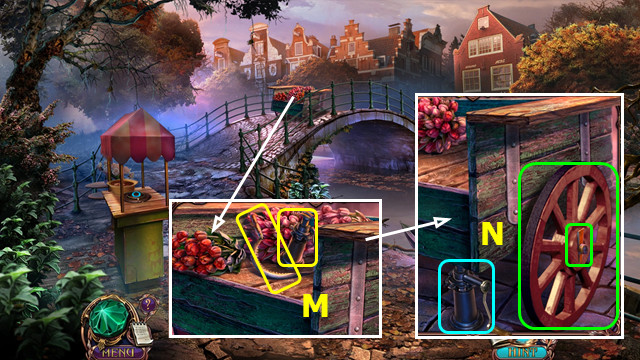
- Move the flowers 2x and take the SICKLE; move the flowers 2x and take the JACK (M).
- Place and select the JACK; place the CART WHEEL and WEDGE (N).
- Move the cart and go right.
- Select the AMULET (O).
- Select (P); play the HOP.
- Move the flowers 2x; take the LURE (Q).
- Use the SICKLE 3x; take the FISHING POLE (R).
- Open the doors and play the HOP; earn the REEL (S).
- Add the REEL and LURE to the FISHING POLE (inventory).
- Go forward.
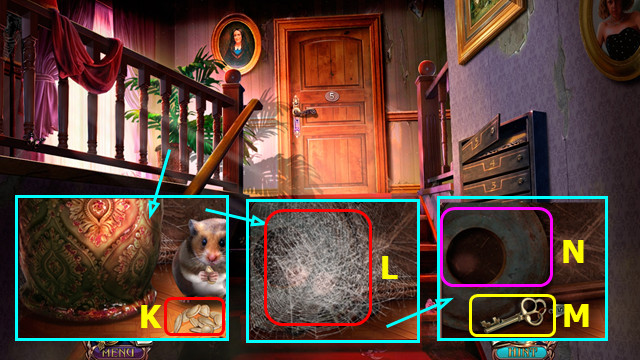
- Take the BROKEN WIRE CUTTER (A).
- Use the WIRE HOOK and open the door; move the items, read the note, and take the LETTER (B).
- Take the NAIL FILE (C).
- Walk down 2x.
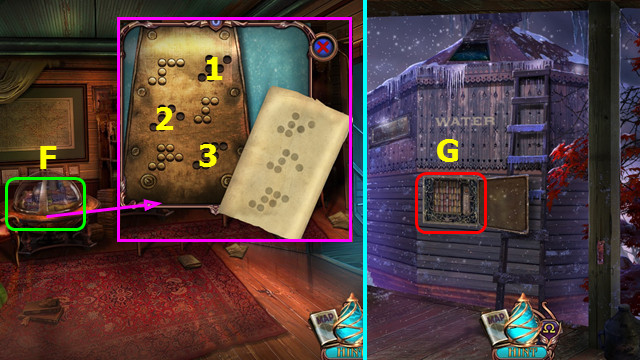
- Move the crock on the burner; place the LETTER and take the COMBINATION (D).
- Place the FISHING POLE and select the reel; take the GREENHOUSE KEY and FISHNET (E).
- Go right.
- Use the GREENHOUSE KEY (F).
- Select 1-4.
- Play the HOP; earn the NET HANDLE (G).
- Combine the NET HANDLE and FISHNET to make the SCOOP NET (inventory).
- Use the SCOOP NET to take the BUTTERFLY (H).
- Use the BUTTERFLY; take the DUSTER (I).
- Place the COMBINATION and select 1-4-2-3; take the PUMPKIN SEEDS (J).
- Go forward.
- Select the pot and use the PUMPKIN SEEDS (K).
- Select the pot again; use the DUSTER (L).
- Take the ROOM 5 KEY (M).
- Use the FILE; take the SCREWDRIVER (N).
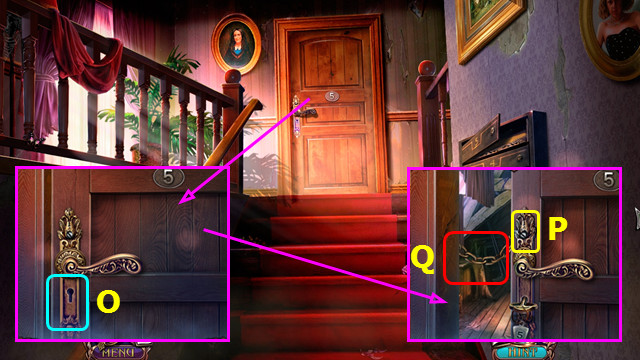
- Use the ROOM 5 KEY (O).
- Use the SCREWDRIVER to take the SCREW (P).
- Combine the BROKEN WIRE CUTTER, SCREW, and SCREWDRIVER to make the WIRE CUTTER (inventory).
- Use the WIRE CUTTER and open the door (Q).
- Go forward.
- Talk to Gerard (A).
- Select (B).
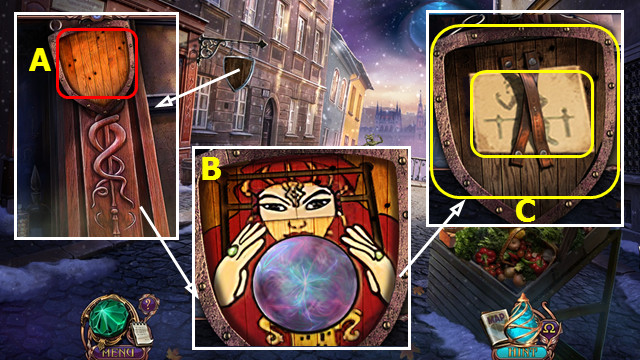
- Move the rug; take the 1st CARVING PART (C).
- Take the DRUM (D).
- Take the DRUMSTICKS (E).
- Combine the DRUM and DRUMSTICKS to make the NOISY DRUM (inventory).
- Use the WIRE HOOK; open the doors (F).
- Use the NOISY DRUM; take the 2nd CARVING PART (G).
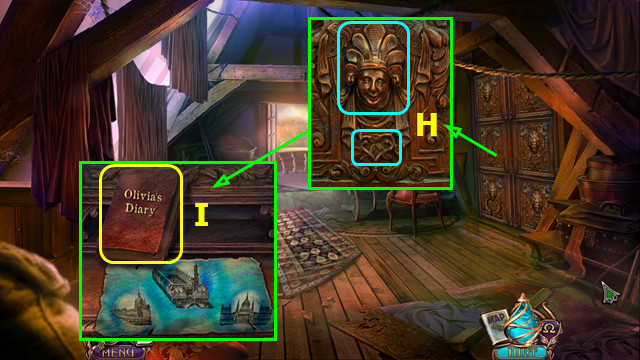
- Place the 2 CARVING PARTS (H).
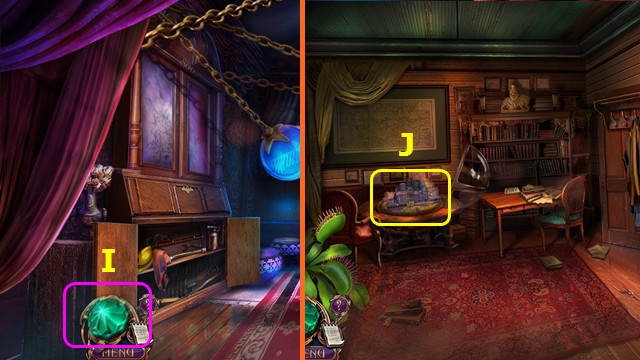
- Read Olivia's Diary; take the ENERGY CRYSTAL (I).
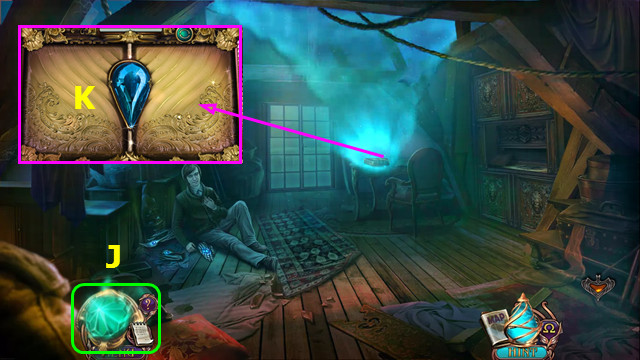
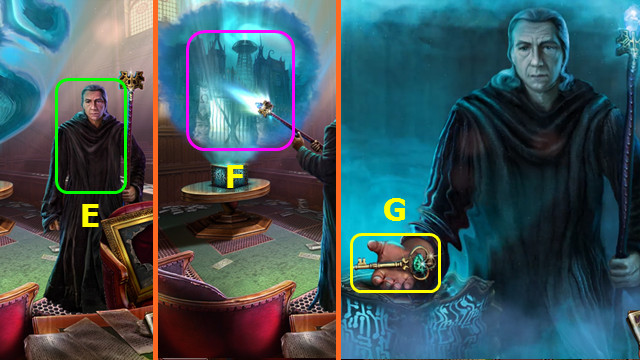
- Select the AMULET (J).
- Place the ENERGY CRYSTAL (K).
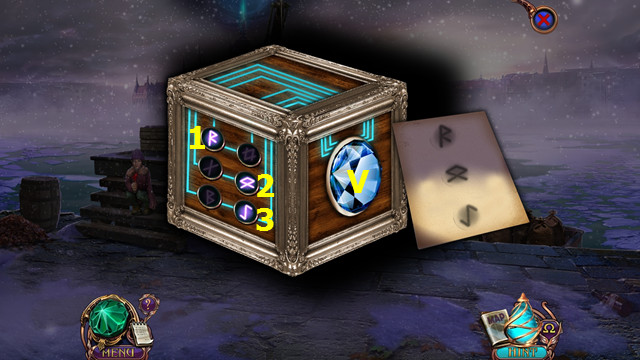
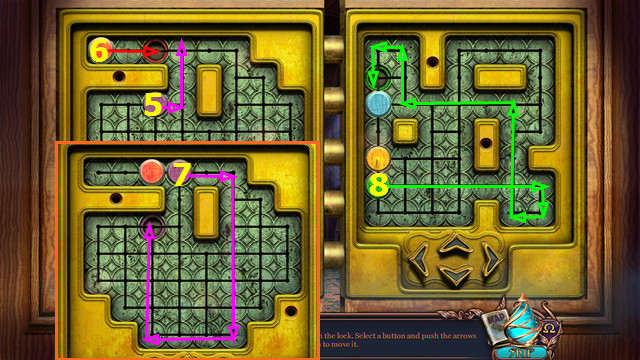
- Select E-A-A-D-D-F-B-D-D-C.
- Select G-K-K-L-L-M-M-I-I-J-J-M-M-H.
- Talk to Gerard.
Chapter 3: Spirit Car
- Select the AMULET (A).
- Take the TRIANGULAR KEY (B).
- Use the TRIANGULAR KEY; move the items and take the JACK (C).
- Select (D).
- Place and select the JACK (E).
- Take the SNAKE CUP (F).
- Go forward.
- Select 2x; play the HOP and earn the ROAD GUIDE (G).
- Select 3x (H).
- Place the SNAKE CUP (I).
- Select the pairs (color-coded).
- Take the HEADACHE POWDER (J).
- Walk down.
- Open the door and move the items; select the cup (K).
- Select 2x (L).
- Place the HEADACHE POWDER (M).
- Use (N) on (M).
- Take the cup (M).
- Go forward.
- Select 2x (O).
- Place the ROAD GUIDE (P).
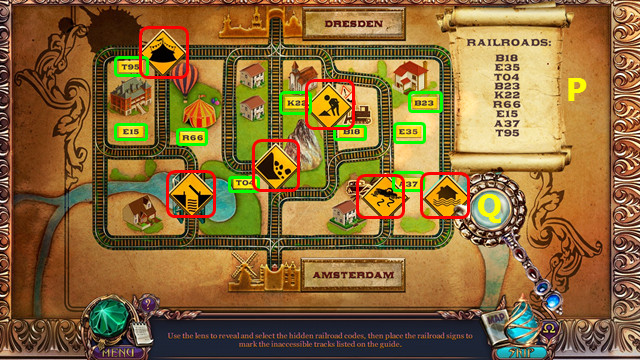
- Use the magnifier (Q) to locate the 9 signs (green).
- Place the signs as shown (red).
- Take the LADDER (A).
- Arrange the signs as shown; take the 1st NOTE (B).
- Take the MEDKIT LATCH (C).
- Walk forward.
- Take the WALLET and OLD SHOE (D).
- Open the WALLET; take the COIN (inventory).
- Place the LADDER (E).
- Play the HOP; earn the APPLE (F).
- Place the APPLE and turn the valve (G).
- Take the 2nd NOTE and CYMBAL (H).
- Walk down.
- Place the COIN; take the 3rd NOTE (I).
- Place the 3 NOTES; take the SECRET LETTER and MONKEY (J).
- Combine the MONKEY and CYMBAL; take the REPAIR KIT KEY (inventory).
- Use the OLD SHOE; take the POLE (K).
- Walk forward.
- Use the POLE (L).
- Select the AMULET (M).
- Use the knife on the cable (N).

- Move the items; take the MAGNET (O).
- Place the REPAIR KIT KEY; take the PLIERS and KERCHIEF (P).
- Use the PLIERS; take the POWDER BOX (Q).
- Use the KERCHIEF on the POWDER BOX; open it and take the APOTHECARY KEY (inventory).
- Use the APOTHECARY KEY (R).
- Walk left.
- Place and select the MEDKIT LATCH; take the BLUNT SCALPEL and ROLLED BANDAGE (A).
- Open the paper; take the FIRECRACKER (B).
- Take the CANDLE (C).
- Walk down.
- Use the BLUNT SCALPEL to make the SCALPEL (D).
- Use the SCALPEL on the SECRET LETTER. Open it and use the CANDLE to make the RECIPE (inventory).
- Walk left.
- Select (E).
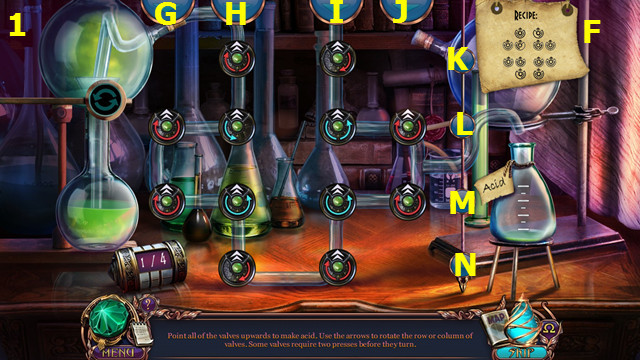
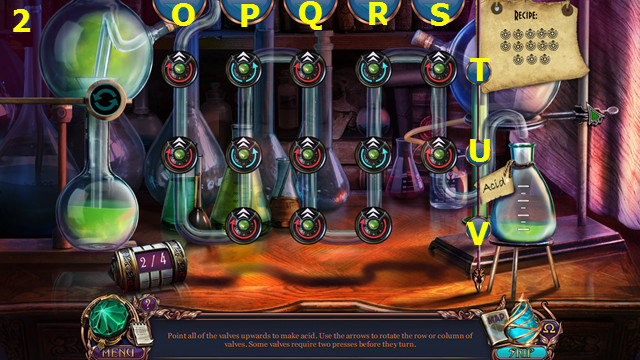
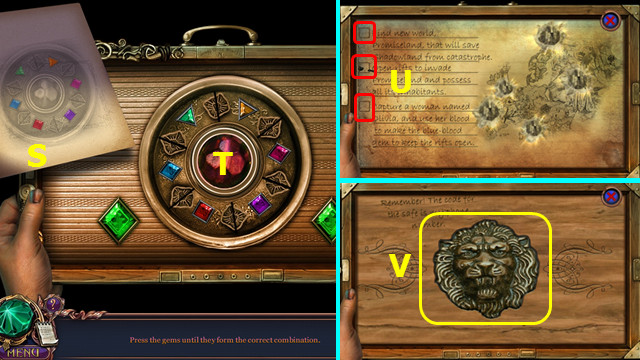
- Place the RECIPE (F).
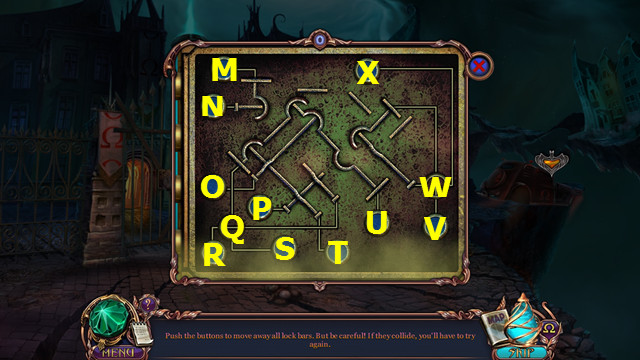
- Level 1, select H-I-Lx4-Mx3-Nx2-Ix7-K.
- Level 2, select Ox3-Px5-Rx5-Sx2-Ux2-Vx3-P-R.
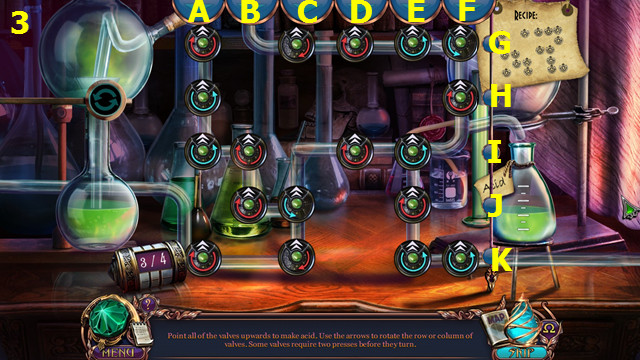

- Level 3, select Gx3-Dx3-Hx3-Ix2-J-Kx3.
- Level 4, select R-Sx3-Ux3-V-Mx3-R-Mx4-N-Tx2.
- Take the ACID (W).
- Walk down.
- Play the HOP; earn the VENTILATOR LEVER (A).
- Walk left.
- Use the PLIERS. Place and select the VENTILATOR LEVER (B).
- Use the ACID; take the ALCOHOL (C).
- Use the KERCHIEF; take the PUZZLE KEY (D).
- Take the ROPE; place and select the PUZZLE KEY (E).
- Walk right.
- Use the FIRECRACKER; move the items and take the LIGHTER (F).
- Select 2x to play the HOP; earn the STEEL TORCH (G).
- Combine the STEEL TORCH, ROLLED BANDAGE, ALCOHOL, and LIGHTER to make the LIT TORCH (inventory).
- Take the MINISAW HANDLE and place the LIT TORCH (H).
- Use the MAGNET; take the HEAVY STATUETTE (I).
- Take the GARDEN RAKE (J).
- Use the ROPE (K).
- Take the WING NUT (L).
- Walk down.
- Use the HEAVY STATUETTE; take the SAW BLADE (M).
- The HEAVY STATUETTE becomes the STATUETTE.
- Combine the SAW BLADE, MINISAW HANDLE, and WING NUT to make the HACKSAW (inventory).
- Walk right.
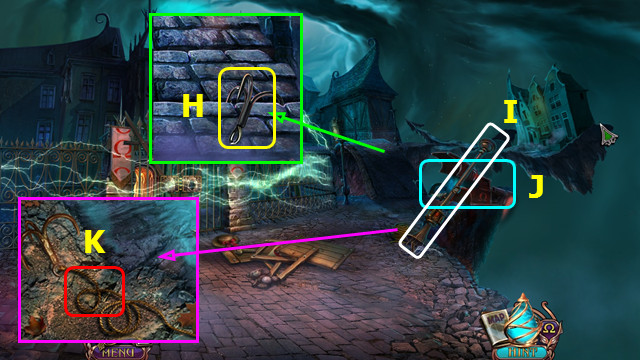
- Use the HACKSAW (N).
- Play the HOP; earn the CROWBAR (O).

- Use the CROWBAR; take the RUNGS (P).
- Use the SCALPEL; take the ROPE (Q).
- Place the RUNGS and ROPE; select the ladder (R).
- Use the CROWBAR (S).
- Go up the ladder.
Chapter 4: Behind Opera
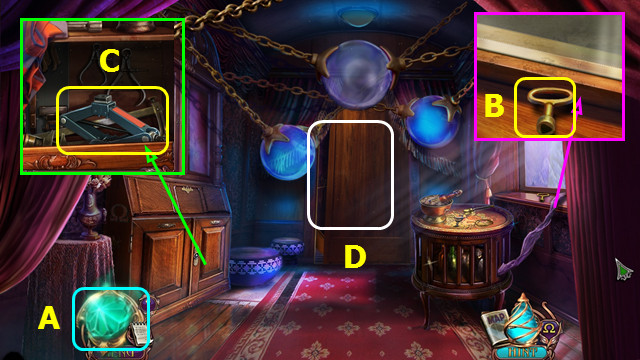
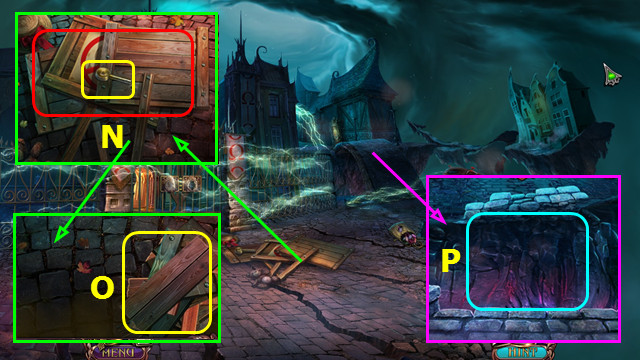
- Select the AMULET (A).
- Use the key on the lock (B).
- Select C-D-E-F-G-H-I-J-C.
- Other solutions are possible.
- Take the GRASSHOPPER (L) and use the RAKE (M).
- Take the BROKEN MASK and RAKE HANDLE (N).
- Touch the eggs and take the LEAF (O).
- Use the LEAF; take the SUNFLOWER SEEDS (P).
- Place the GRASSHOPPER; use the LIGHTER (Q).
- Take the HEART MEDALLION (R).
- Use the SUNFLOWER SEEDS 3x; take the LOCK CATCH (S).
- Select (T).
- Place the LOCK CATCH (A).
- Move (B-C)-(D-E)-(A-F)-(E-G)-(C-H)-(G-I).
- Go right.
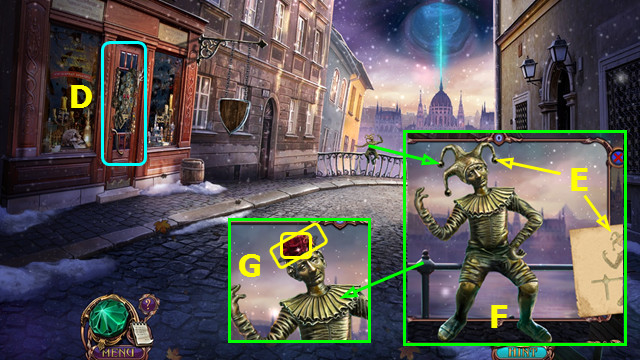
- Place the HEART MEDALLION; take the BRONZE ROSE (J).
- Move the items; take the TWEEZERS (K).
- Go right.
- Take the CORD (L).
- Select (M).
- Restore the items (1-8).
- Take the MANNEQUIN POSTER and pan down (N).
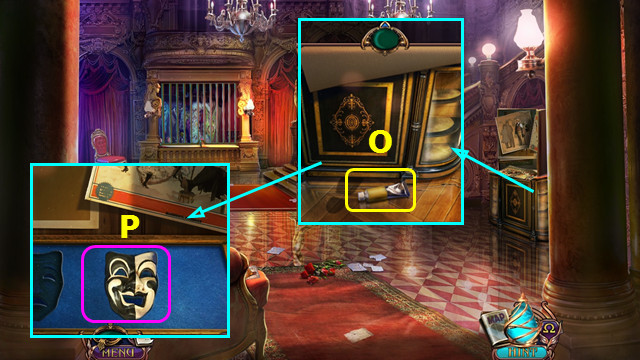
- Take the GLUE; pan up (O).
- Use the GLUE on the BROKEN MASK (inventory).
- Remove the cover and place the BROKEN MASK (P).
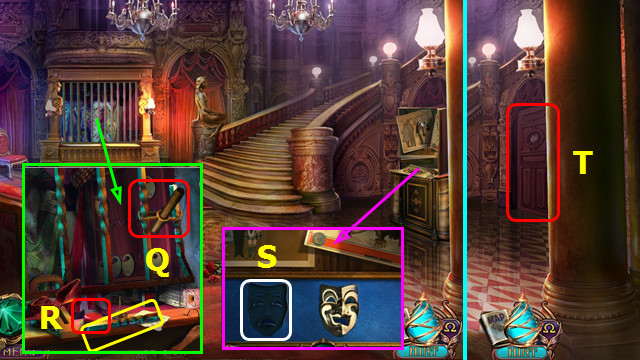
- Use the CORD and RAKE HANDLE (Q).
- Take the STEEL ROD and press the button (R).
- Play the HOP; earn the MASK.
- Place the MASK (S).
- Open the door and walk right (T).
- Play the HOP (A).
- Take the DRAWER HANDLE (B).
- Take the ZIPPER (C).
- Place and select the DRAWER HANDLE (D).
- Use the TWEEZERS to take the 2nd STATUETTE (E).
- Take the BROKEN MONOCLE (F).
- Walk down 2x.
- Place the STEEL ROD; select it 3x (G).
- Take the PUPPY and CLUTCH (H).
- Combine the CLUTCH and ZIPPER; open the clutch. Read the note and take the MONOGRAM PENDANT (inventory).
- Place the BRONZE ROSE; take the WEDDING RING (I).
- Walk right.
- Place the WEDDING RING; take the SIGNET RING (J).
- Walk down.
- Place the SIGNET RING; take the 3rd STATUETTE (K).
- Walk right 2x.
- Place the 3 STATUETTES (L).
- Take the UNUSUAL KEY (M).
- Use the MONOGRAM PENDANT; select 1-4.
- This sequence is randomly generated; yours may differ.
- Take the TRUMPET (N).
- Walk down.
- Use the UNUSUAL KEY (P).
- Play the HOP; earn the POUCH.
- Open the POUCH; take the GEMS (inventory).
- Walk right.
- Move the handkerchief and select (Q).
- Place the GEMS (R).
- Place a gem (1-3); you earn the FLEUR-DE-LIS.
- Walk down.
- Place the FLEUR-DE-LIS; take the FILE (S).
- Walk down.
- Use the FILE, remove the lid, and take the MANNEQUIN HAND (T).
- Give the PUPPY (U).
- Walk right 2x.
- Select (V).
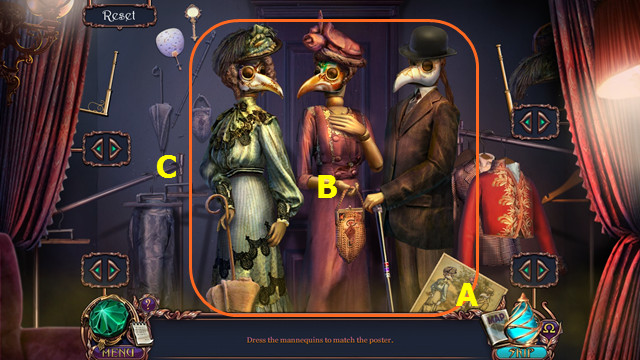
- Place the MANNEQUIN POSTER (A).
- Place the MANNEQUIN ARM (B).
- Dress the mannequins as shown (C).
- Open the door and go forward.
Chapter 5: Opera Hall

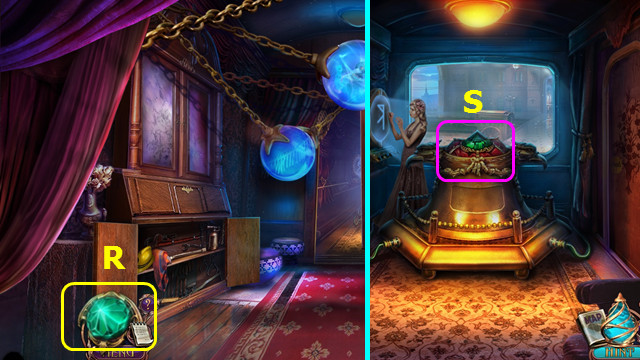
- Place the TRUMPET (D).
- Select 1-3.
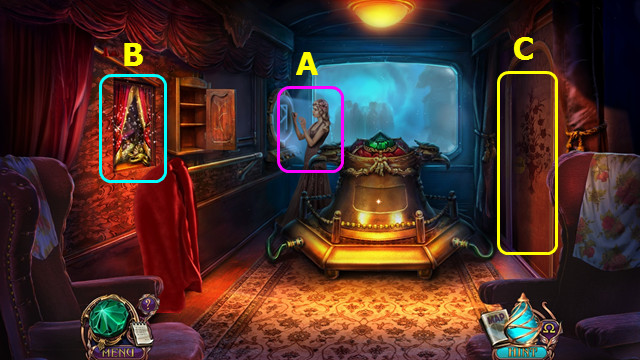
- Select the AMULET (E).
- Select and talk to Olivia (F).
- Play the HOP; earn the CANE HANDLE (G).
- Take the ARTIFACT PUZZLE; move the items and take the CANE (H).
- Combine the CANE and CANE HANDLE; take the BLADE (inventory).
- Walk down.
- Use the BLADE and open the drawer; move the items and take the LENS (K).
- Combine the BROKEN MONOCLE and LENS to make the MONOCLE (inventory).
- Walk down.
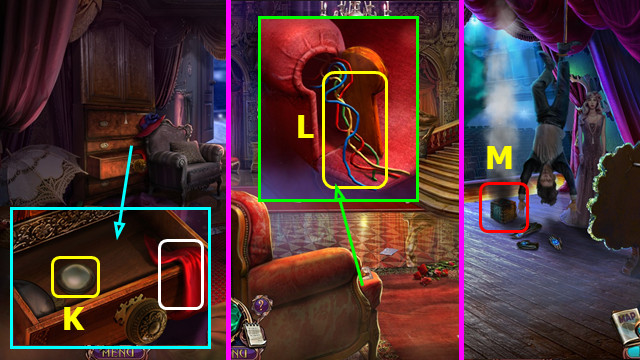
- Use the BLADE; take the WIRES (L).
- Walk right and forward.
- Select (M).
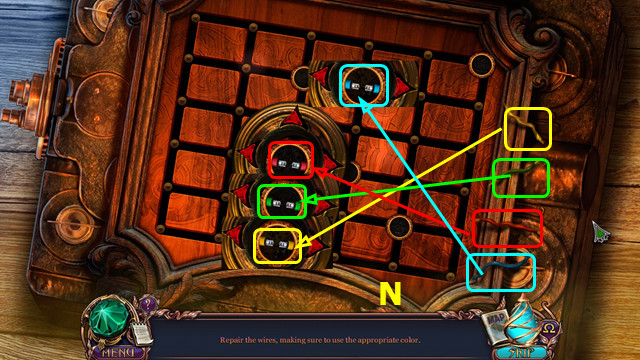
- Place the MONOCLE and WIRES on the board.
- Move the monocle and place the wires (N).
- Move the gems on the paths (O).
- Play the HOP; earn the ELASTIC (P).
- Talk to Olivia (Q).
- Walk down.
- Select the AMULET (R).
- Walk forward.
- Select (S).
- Talk to Olivia (A).
- Remove the drape and play the HOP; earn the APPLE (B).
- Open the door and walk right (C).
- Select the AMULET (E).
- Select the scene 4x.
- Select (F-G-H).
- Select (I-J).
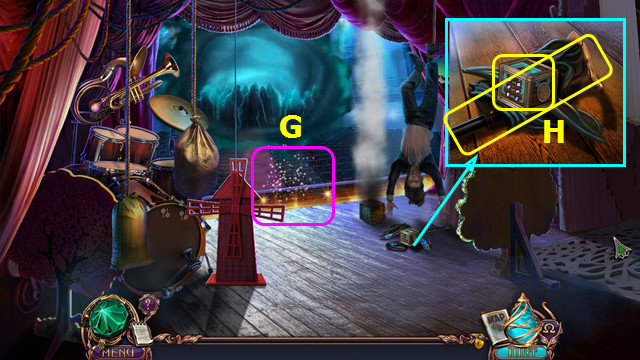
- Take the BURNING PLANK (K).
- Give the APPLE; use the BURNING PLANK (L).
- Take the BOARDS (M).
- Go forward.
- Take the EMPTY JAR (N).
- Take the CRANE HANDLE and SEDATIVE (O).
- Walk down.
- Use the EMPTY JAR to take the JAR OF ANTS (P).
- Take the CLAW HAMMER (Q).
- Take the STONE (R).
- Go forward.
- Use the CLAW HAMMER; take the BENT NAILS (S).
- Use the JAR OF ANTS; take the TELESCOPE RING (T).
- Walk down.
- Use the BENT NAILS and CLAW HAMMER; take the NAILS (A).
- Go forward.
- Use the BOARDS, NAILS, and CLAW HAMMER (B).
- Go right.
Chapter 6: Water Station

- Place the TELESCOPE RING; move the rings as shown (C).
- Select (D).
- Take the DOME CODE (E).
- Walk down.
- Place the DOME CODE; select 1-3.
- Play the HOP; earn the PIPE (F).
- Walk right.
- Select (G).

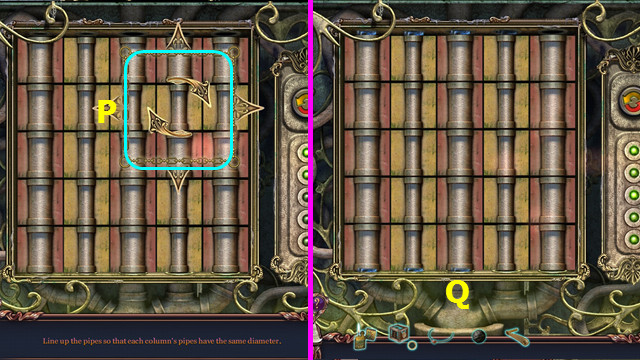
- Place the PIPE in the frame.
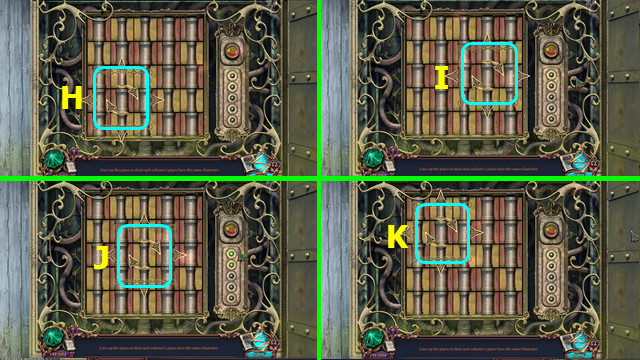
- Move the mechanism and rotate once at each location (H-P).
- Final solution (Q).
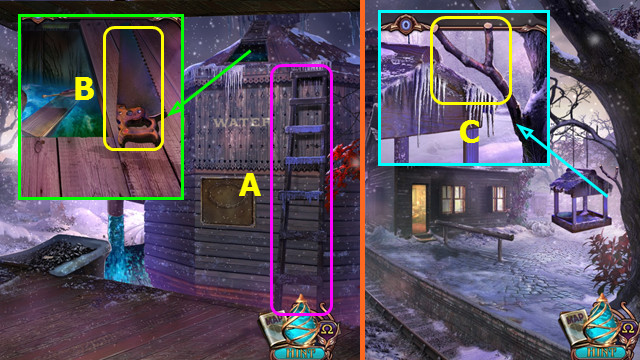
- Select (A).
- Take the SAW (B).
- Walk down 2x.
- Use the SAW to take the SLINGSHOT (C).
- Combine the SLINGSHOT, ELASTIC, and STONE to make the LOADED SLINGSHOT (inventory).
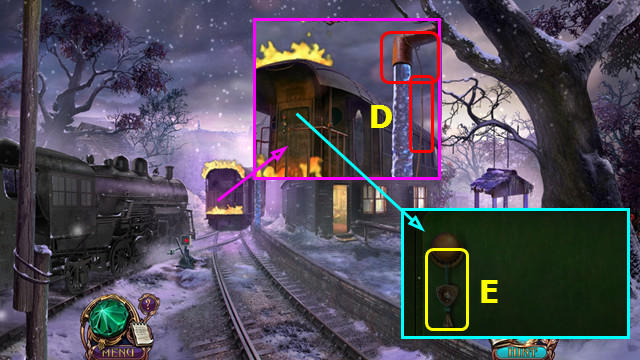
- Use the SLINGSHOT; select the rope (D).
- Take the BELL (E).
- Go forward and right.
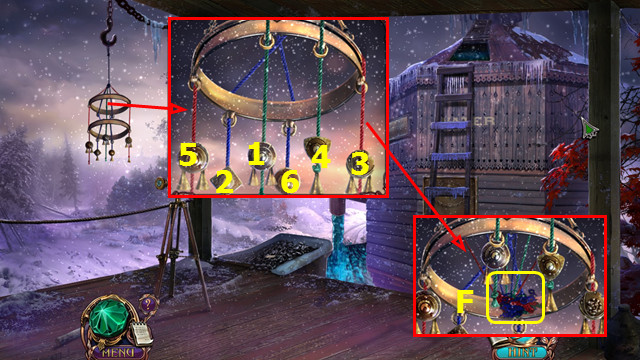
- Place the BELL; select 1-6.
- Take the TANGLED THREAD (F).
- Untangle the TANGLED THREADS to make the BALLS OF YARN (inventory).
- Walk down.

- Place the BALLS OF YARN and repair the net as shown (H).
- Take the NET And GUN.
- Go right.
- Place and select the NET; take the BROKEN SIEVE (J).
- Select the net; take the BROKEN DART TAIL (K).
- Combine the BROKEN SIEVE and NET to make the SIEVE (inventory).
- Use the SIEVE; take the BREAD (L).
- Select the sieve; take the DART BARREL (M).
- Walk down 2x.
- Place the BREAD; take the BIRD FEATHER (N).
- Combine the BROKEN TAIL DART and BIRD FEATHER to make the DART TAIL (inventory).
- Go forward.
- Place the SEDATIVE (O) and DART BARREL (P).
- Select (O); use the dropper on (P).
- Use (P) on (Q).
- Place the DART TAIL on (Q); take the TRANQUILIZER DART.
- Combine the GUN and TRANQUILIZER DART to make the LOADED GUN (inventory).
- Walk down.
- Use the LOADED GUN (A).
- Enter the Tainted Car (B).
- Open the blinds (C).
- Select (D).
- Select the AMULET (E).
- Take the BROKEN ARTIFACT BOX (F).
- Take the ENERGY CRYSTAL from the BROKEN ARTIFACT BOX (inventory).
- Select (G).
- Select 1-8.
- Take the TRAIN ENGINE (H).
- Walk down 3x.
- Select the AMULET (I).
- Go to the Railroad House.
- Select (J).
- Select and place the 4 items (1-4).
- Place the TRAIN ENGINE (K).
- Play the HOP; earn the BUDAPEST COAT OF ARMS.
- Go to the Tainted Car.
- Place the BUDAPEST COAT OF ARMS and move the luggage 3x; take the BOX OF SWEETS and VALVE (L).
- Open the BOX OF SWEETS; move the items and take the LOLLIPOP (inventory).
- Select (M).
- Place the VALVE (N).
- Select Ox4-P-R-Ox2-R-O-Px2-Rx4-Qx3-P-Ox2.
- Px3-Qx2-Px2-Rx2-Ox3-Px2-Q-P-O-Rx2-Q.
- Final positions (S).
- Take the TRACK MEDALLION (A).
- Walk down.
- Place the TRACK MEDALLION and select the control (B).
- Walk down.
- Select (C).
- Open the door and walk right (D).
- Go forward (E).
- Select the AMULET (F).
- Select G-H-I-J-K-L-G-H-I.
- Uncover and select the runes (green); take the RUNE STONES.
- Take the MOUSETRAP (M).
- Place the RUNE STONES; add them to the skull as shown and select the jaw (N).
- Play the HOP; earn the WOODEN SIGN (O).
- Go right.
- Use the LOLLIPOP; take the BOAT KEY (P).
- Remove the old handle and take the RUSTY SHEARS (Q).
- Place and select the CRANE HANDLE (R).
- Use the MOUSETRAP (S).
- Move the items; take the UMBRELLA and select the net (T).
- Take the ARTIFACT CODE; use the BOAT KEY (U).
- Combine the ARTIFACT PUZZLE and ARTIFACT CODE (inventory).
- Select 1-3.
- Place the ENERGY CRYSTAL (V).
- Take the SPIRIT TRAP.
- Walk down.
- Use the UMBRELLA (A).
- Place the WOODEN SIGN and restore the image (B).
- Take the STATUE SKETCH and SHIELD (C).
- Select the door 2x; play the HOP and earn the BELL (D).
- Place the BELL and STATUE SKETCH (E).
- Pose the statue as shown (F).
- Take the SLEEPING POWDER and GRINDSTONE (G).
- Use the GRINDSTONE on the RUSTY SHEARS to make the SHEARS (inventory).
- Walk right.

- Use the SHEARS and move the sacks; take the OARS (H).
- Remove the old paddle and place the OARS (I).
- Go forward.
Chapter 7: Parliament Square
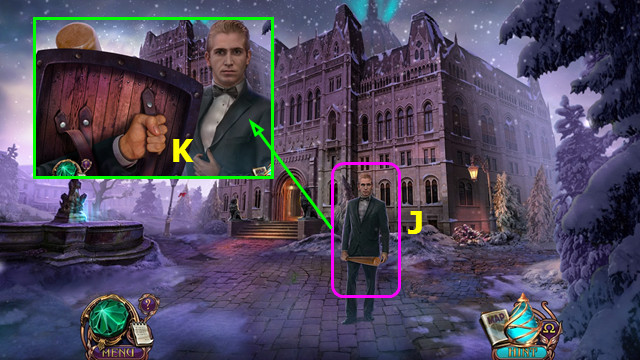
- Talk to the Man (J).
- Use the SHIELD and SLEEPING POWDER (K).
- Place the SPIRIT TRAP (A).
- Select the AMULET (B).
- Select the boat; take the CORK (C).
- Use the SHEARS; select the roses (green).
- Move the grate and place the CORK; take the WRENCH (D).
- Walk down.
- Use the WRENCH; take the VALVE (E).
- Go forward.
- Place the VALVE (F).
- Take the SCREWDRIVER and SHIP (G).
- Select the SHIP (inventory).
- Select the 6 knots (red); take the CANVAS.
- Use the SCREWDRIVER to remove the covers (H).
- Move the chips on the indicated paths (1-4).
- Move the chips on the indicated paths (5-8).
- Walk right.

- Select 2x (A).
- Take the SCALE (B).
- Select (A).
- Place the SCALE; take the SILVER LION (C).
- Select (D).
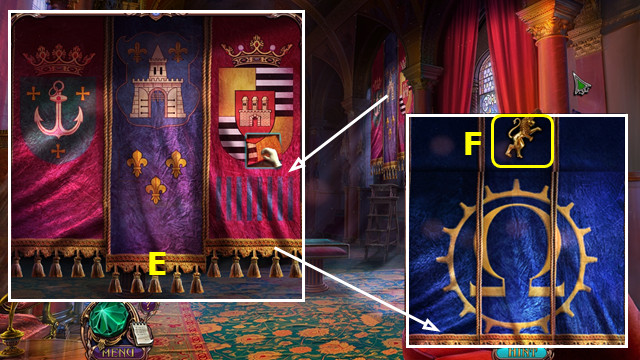
- Place the CANVAS; restore the banners (E).
- Restore the symbol; take the GOLDEN LION (F).
- Play the HOP; earn the KITE REEL (H).
- Walk down.
- Use the KITE REEL to take the KITE STRING (I).
- Go forward.
- Use the KITE STRING; take the CRYSTAL LION (J).
- Select the lever (K).
- Place the CRYSTAL LION, GOLDEN LION, and SILVER LION; move the items and take the WOODEN STAMP (L).
- Use the WOODEN STAMP (M).
- Go forward.
- Solution (N-J)-(C-G)-(G-F)-(D-C)-(O-N)-(H-G)-(L-H)-(P-L)-(J-K)-(N-J)-(K-O)-(O-P).
- (L-K)-(K-O)-(O-N)-(P-O)-(H-L)-(G-H)-(J-K)-(C-D)-(F-G)-(N-J)-(B-C)-(M-N)-(A-B).
- (E-A)-(I-E)-(E-F)-(F-E)-(E-I)-(B-A)-(A-E)-(N-J)-(J-F)-(G-F)-(E-A)-(A-B)-(K-J)-(L-P).
- (H-L)-(L-K)-(B-C)-(O-N)-(K-O)-(J-K)-(P-L)-(L-H)-(H-G).
- Move the pencil over the paper to make a rubbing; take the TABLET CODE (Q).
- Select (R).
- Place the TABLET CODE (S).
- Change the gems as shown (T).
- Check each box on all 3 pages (U).
- Take the MEDALLION (V).
- Place the MEDALLION; move the papers and take the GAVEL (A).
- Walk down.
- Select the lever 2x (B).
- Use the GAVEL; take the CASTLE and GLASS SHARDS (C).
- Select (D); place the GLASS SHARDS and play the HOP to earn the CRYSTALS.
- Separate the CRYSTALS to find the CRYSTAL (inventory).
- Go forward.
- Give the CRYSTAL (E).
- Enter the portal (F).
- Take ALAZAR'S KEY (G).
- Take the HOOK (H).
- Select (I).
- Play the HOP; earn the DAGGER (J).
- Place the HOOK and select the rope (K).

- Take the CROWBAR (L).
- Use the DAGGER; take the BURLAP (M).
- Take the PHONE BOX HANDLE; use the CROWBAR 3x (N).
- Take the PLANKS (O).
- Select the bridge; place the PLANKS (P).
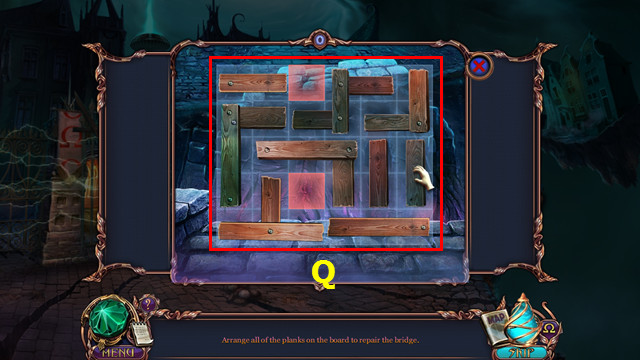
- Place the planks as shown (Q).
- Go forward.
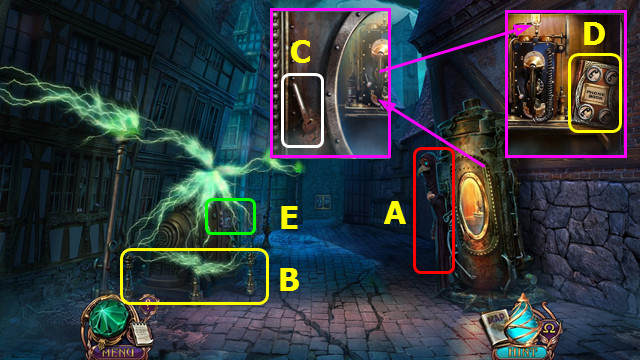
- Talk to the Alpha; take the RUBBER GLOVES (A).
- Use the RUBBER GLOVES to take the ELECTRIC TRAP (B).
- Use the CROWBAR; place the PHONE BOX HANDLE (C).
- Take the PHONE BOOK (D).
- Select (E).
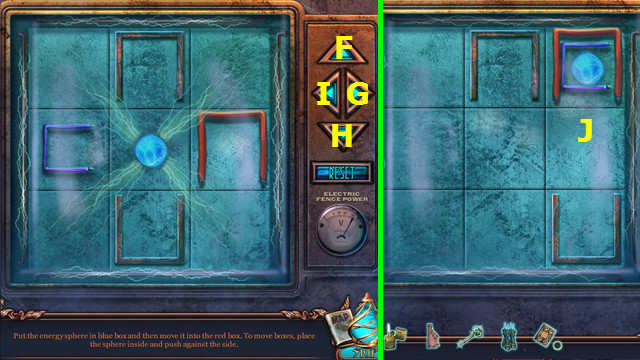
- Use the BURLAP on the screen.
- Select H-G-Fx2-H-Ix2-H-G-Fx2-I-H-G-H-I-F-Gx2-H-I-F-I-F-G-Hx2-G-Fx2.
- Final position (J).
- Walk down.
- Select and play the HOP; earn the OWL PUZZLE (K).
- Place the OWL PUZZLE (L).
- Select N-M-P-R-T-Q-O-U-S-W-X-W-V.
- Enter the gate.
- Select (M).
- Select (N).
- Pan down (O).
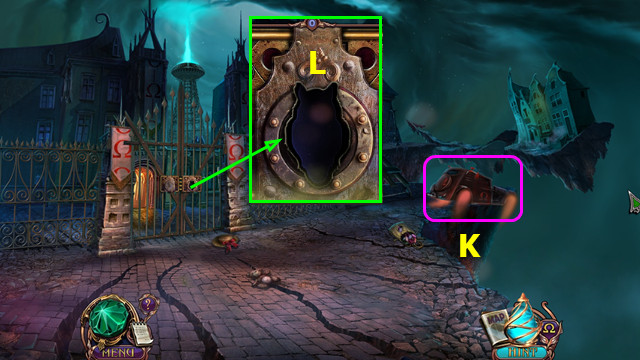
- Remove the pieces; take the ALPHA AND OMEGA (P).
- Go to the Side Street.
- Place the CASTLE (Q) and ALPHA AND OMEGA (R).
- Locate and select the 6 pieces (red).
- Take the PINCERS (S).
- Return to the Academy.
- Use ALAZAR'S KEY (A).
- Use the PINCERS 2x (B).
- Move the pieces; take the PHONEBOOK PUZZLE (C).
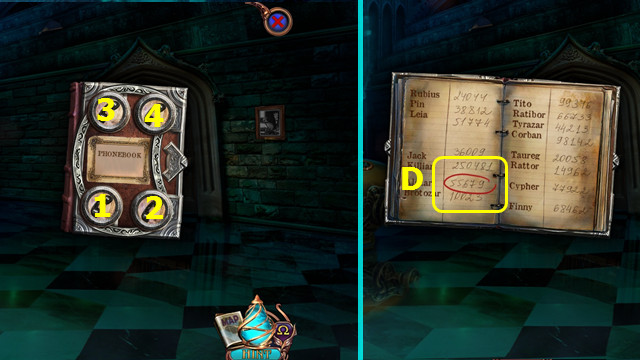
- Combine the PHONEBOOK and PHONEBOOK PUZZLE (inventory).
- Select 1-4.
- Select and take the PHONE NUMBER (D).
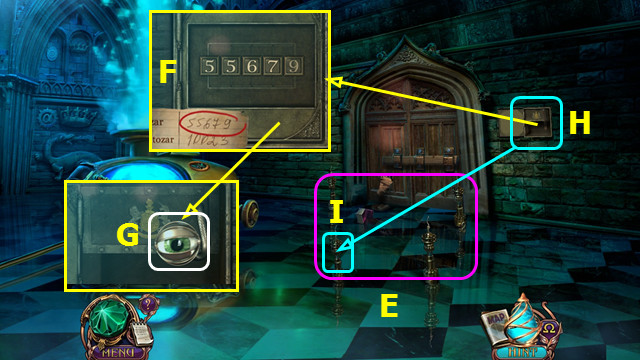
- Place the ELECTRIC TRAP (E).
- Remove the picture and place the PHONE NUMBER; set the code to match (F).
- Remove the items and select (G).
- Select (H-I).
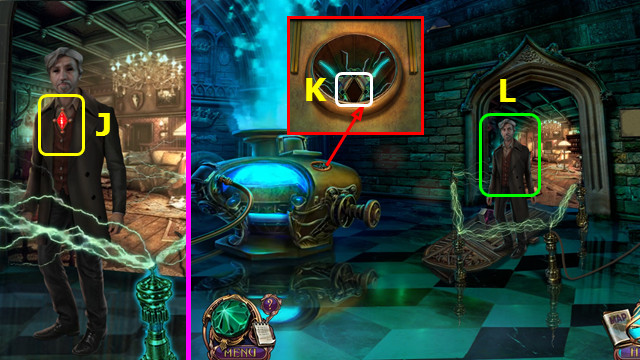
- Take the VIAL OF OLIVIA'S BLOOD (J).
- Place the VIAL OF OLIVIA'S BLOOD (K).
- Select Alazar (L).
- Congratulations! You have completed Haunted Train: Clashing Worlds.
Created at: 2016-11-17