Walkthrough Menu
- General Tips
- Chapter 1: The Spirit Train
- Chapter 2: Paris
- Chapter 3: Long Journey
- Chapter 4: Unexpected Stop
- Chapter 5: Way to Rome
- Chapter 6: Rome
- Chapter 7: Way to Germany
- Chapter 8: Hamelin
- Chapter 9: Way to Eastern Europe
- Chapter 10: Prague
- Chapter 11: Way to the Villain's Lair
- Chapter 12: Final Chapter
General Tips
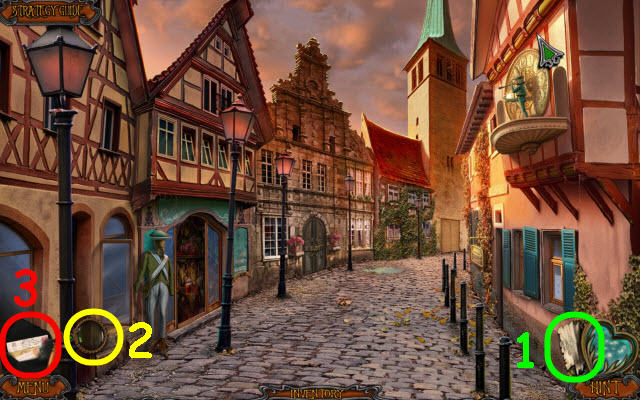
- This is the official guide for Haunted Train: Spirits of Charon.
- This guide will not mention each time you have to zoom into a location; the screenshots will show each zoom scene.
- We will use the acronym HOP for Hidden-object puzzles. Interactive items will be color-coded and some will be numbered; please follow the numbers in sequence.
- The HOP lists may be random; our lists may vary from yours.
- Use the map (1) to check objective locations and fast travel to previously unlocked locations.
- Use the monocle (2) on green glowing mystical areas.
- Select the journal (3) for story updates and clues.
Chapter 1: The Spirit Train
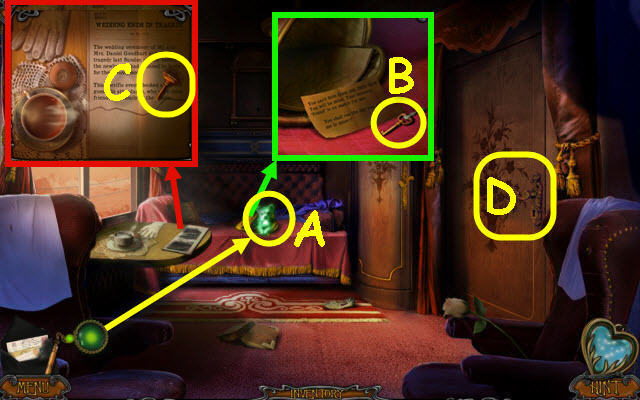
- Use the monocle on the dog (A).
- Read the newspaper; take the COMPARTMENT KEY (B) and select the note.
- Open the paper; take the WINDOW KNOB (C).
- Use the COMPARTMENT KEY on the door (D) and exit.
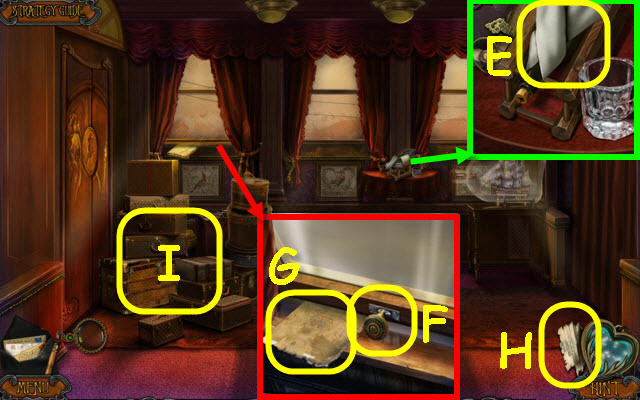
- Take the TOWEL (E).
- Place the WINDOW KNOB in the slot; lift up (F).
- Take the map (G) which will be added to your toolbar (H).
- Examine the luggage to access a HOP (I).
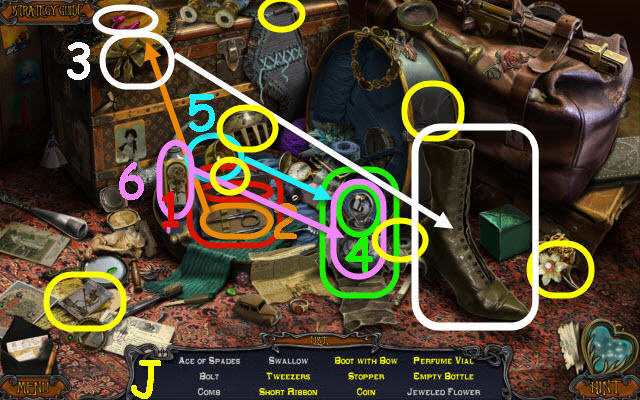
- Play the HOP.
- You receive a JEWELED FLOWER (J).
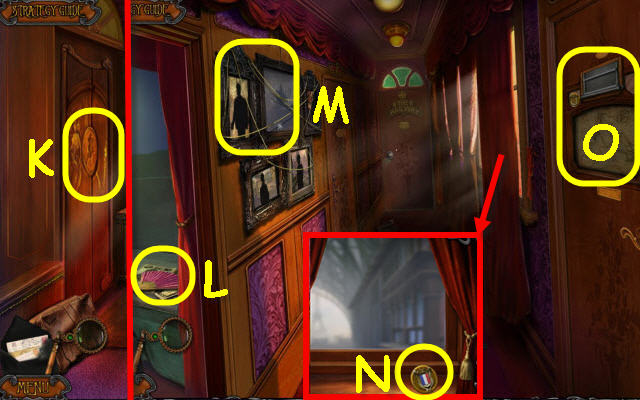
- Use the JEWELED FLOWER on the lock; go left (K).
- Take the FAN (L) and select the magazines.
- Take the LACE (M).
- You receive MARY'S LOCKET.
- Use the LACE on the curtain; take the FRENCH FLAG BUTTON (N).
- Place the FRENCH FLAG BUTTON on the door to trigger a puzzle (O).
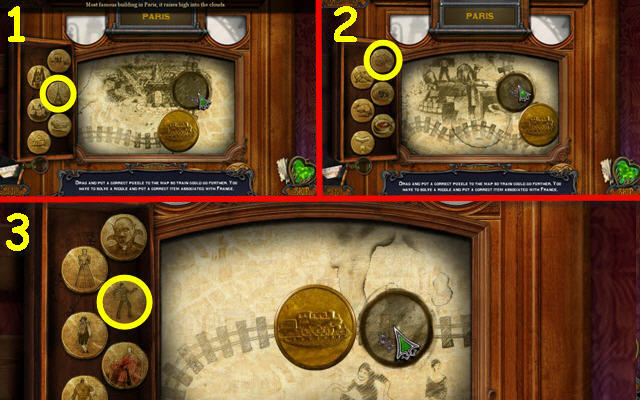
- Drag the correct token to solve the riddles.
- Solution: Eiffel Tower, croissant and mime (1-3).
- Go right.
Chapter 2: Paris
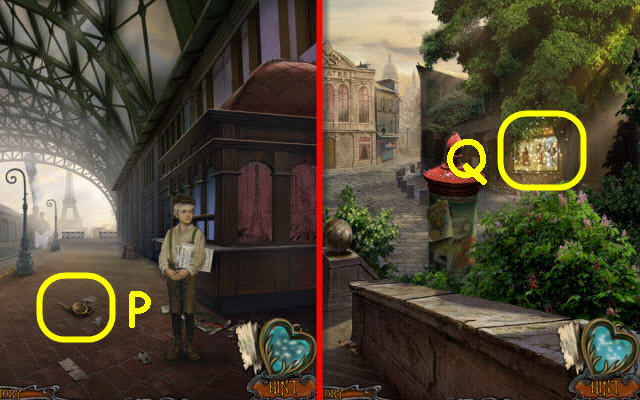
- Take the OILCAN (P).
- Go forward.
- Examine the storefront to access a puzzle (Q).
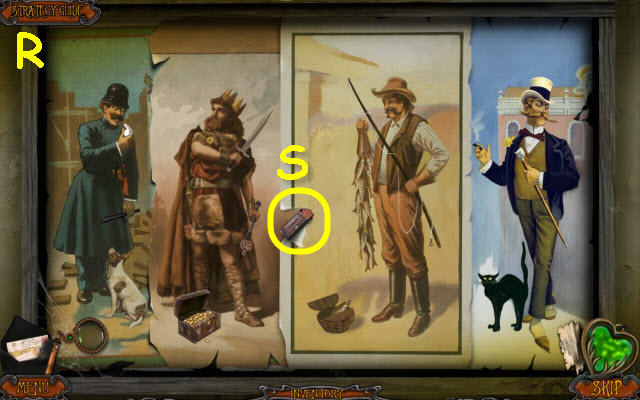
- Place the matching accessories to each character.
- See screenshot for solution (R).
- Take the MATCHES (S).
- Go forward up the path.
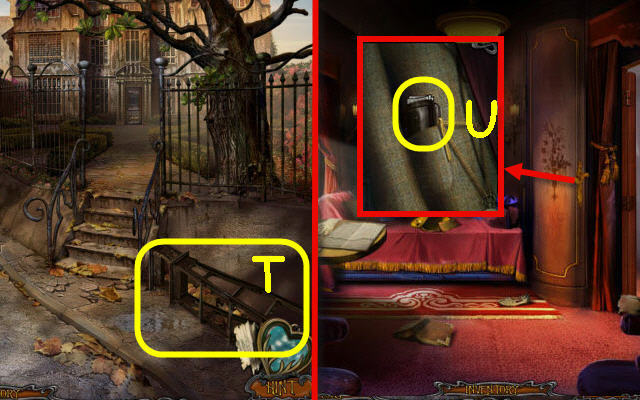
- Take the LADDER (T).
- Go to Luxury coupe.
- Use the OILCAN on the hinge; open the door. Take the WALLET (U).
- Go to Railroad terminal.
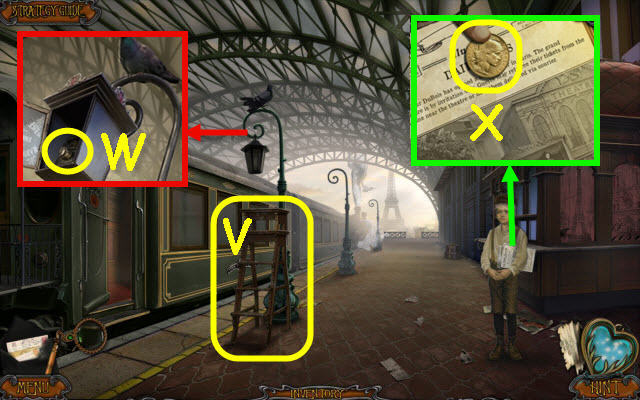
- Place the LADDER by the post (V).
- Open the lantern; turn the gas valve and use the MATCHES on it (W). Take the LANTERN.
- Use the WALLET on the boy; take the COIN (X) and select the newspaper.
- Go forward.
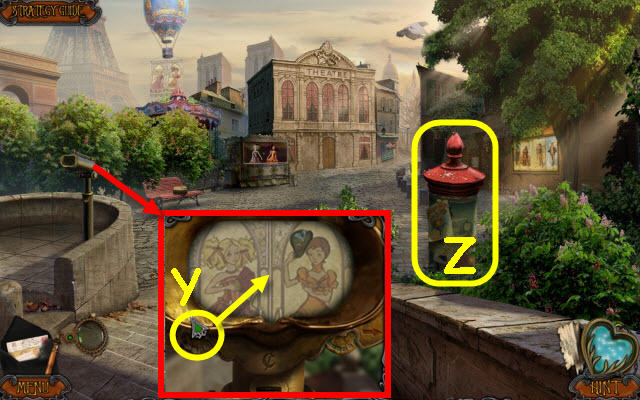
- Use the COIN in the viewer slot; scroll to the left (Y).
- Select the pillar on the right to access a HOP (Z).
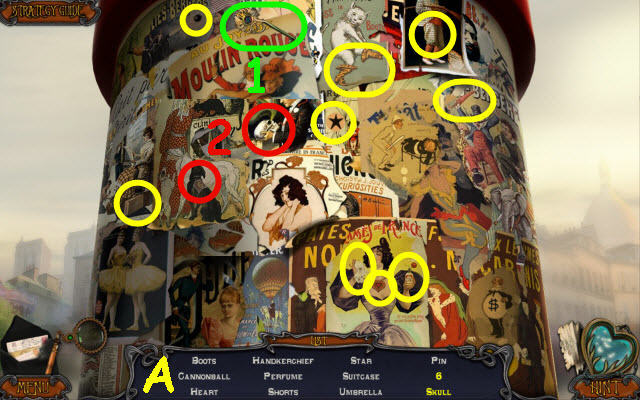
- Play the HOP.
- You receive a PIN (A).
- Go to Mansion yard.
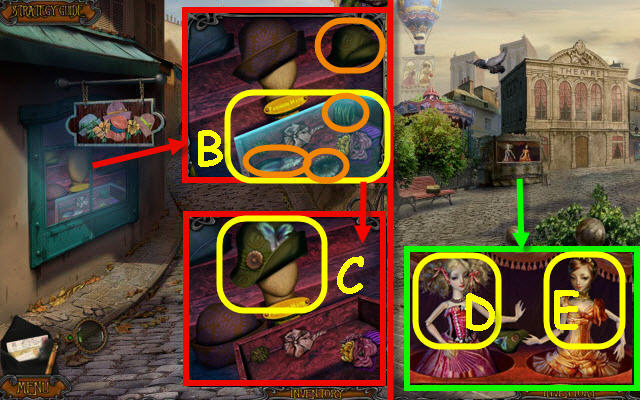
- Use the PIN on the latch; take the GLASS PANE (B).
- Assemble the correct hat; correct items circled in orange and take the BONNET (C).
- Back out.
- Give the FAN to the left mannequin (D) and the BONNET to the right one (E) to trigger a puzzle.
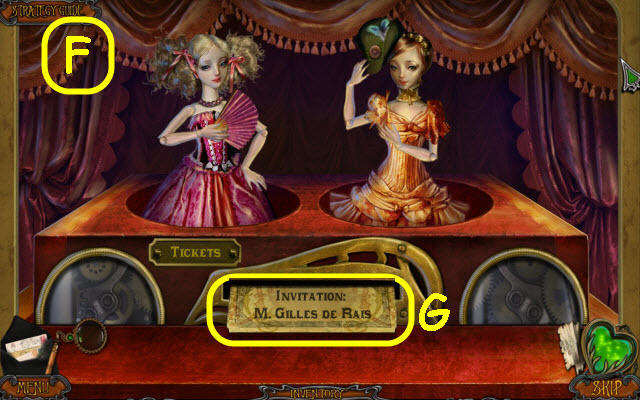
- Arrange the limbs to match the advertisement.
- See screenshot for solution (F).
- Take the TICKET (G).
- Go to Mansion yard.
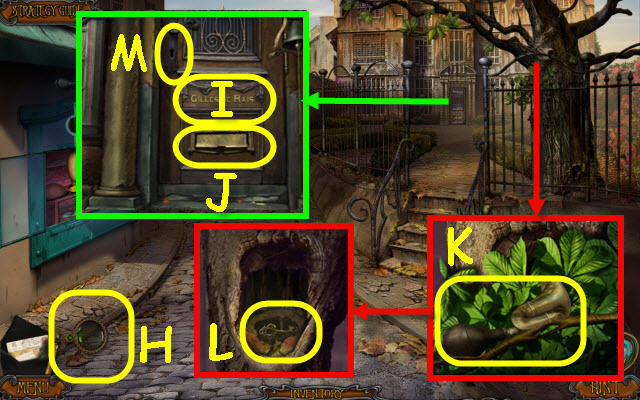
- Use the monocle (H) on the nameplate (I).
- Place the TICKET in the slot (J).
- Take the BICYCLE HORN (K).
- Move the branch; place the LANTERN in the hole. Move the leaves 4x; take the MANSION KEY (L).
- Use the MANSION KEY in the lock (M) and enter.
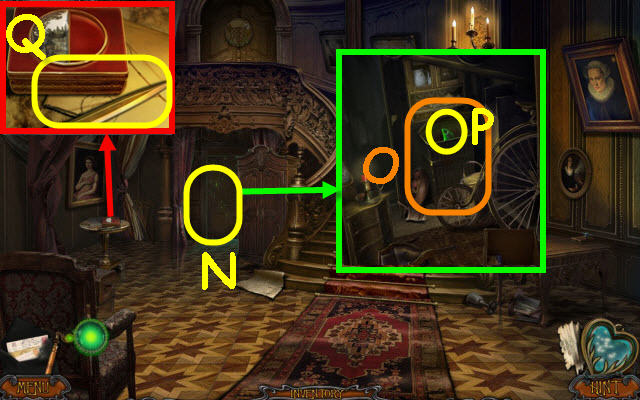
- Use the monocle on the door (N) and then again on the cabinet (O).
- Remove the items from the top of the cabinet and open it; take the COLORED GLASS SHARD (P).
- Take the KNIFE (Q).
- Go to Theater square.
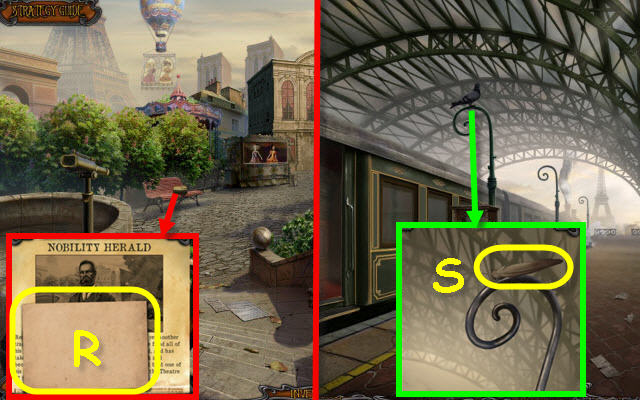
- Use the KNIFE on the twine; select the papers and take the LETTER SHEET (R).
- Go to Railroad terminal.
- Use the BICYCLE HORN on the pigeon; take the FEATHER (S).
- Go to Bluebeard's hall.
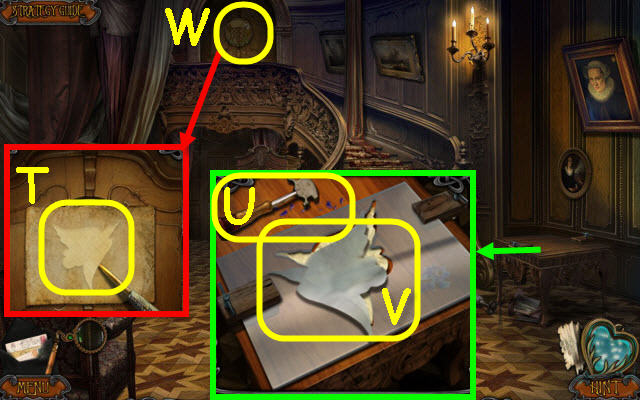
- Use the LETTER SHEET and KNIFE on the mosaic; receive a BIRD TEMPLATE (T).
- Place the GLASS PANE and BIRD TEMPLATE on the table. Use the glass cutter (U) on the glass; take the BIRD (V).
- Place the BIRD on the mosaic (W); turn it and enter.
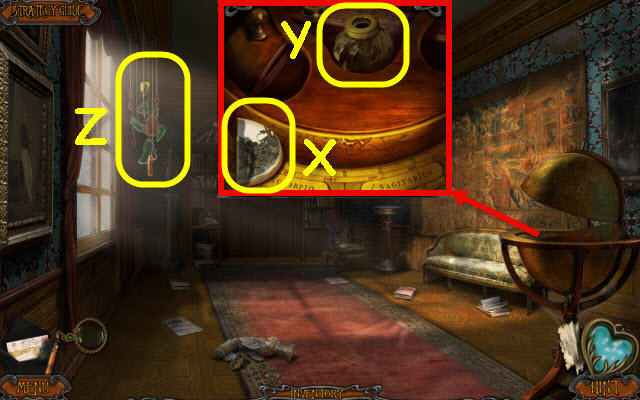
- Take the IMAGE PIECE (X).
- Use the KNIFE on the slit; take the INK POT (Y).
- Move the curtain; hang the COLORED GLASS SHARD on the hook to trigger a puzzle (Z).
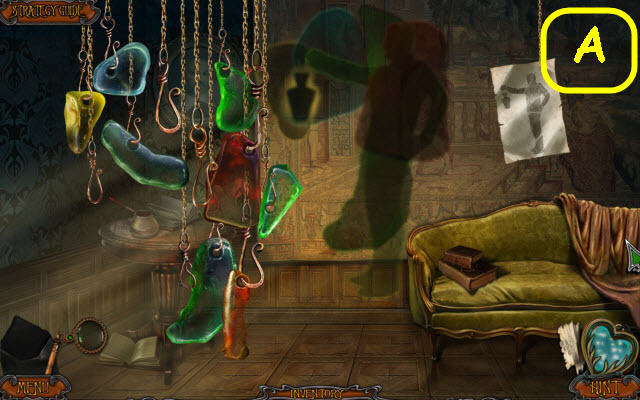
- Arrange the shards to complete the image.
- See screenshot for solution (A).
- Back out.
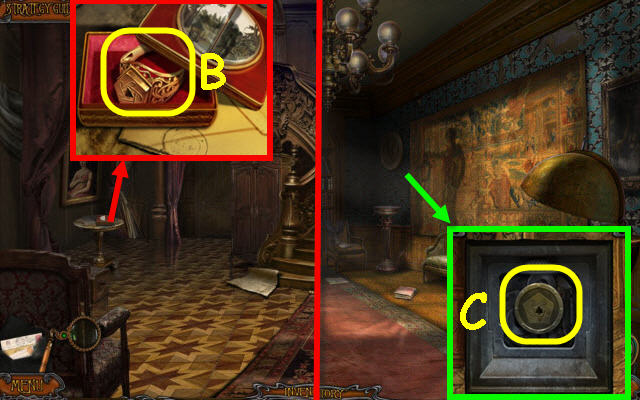
- Place the IMAGE PIECE on the box and open it; take the SEAL RING (B).
- Go upstairs.
- Remove the pin; place the SEAL RING in the recess (C).
- Go forward.
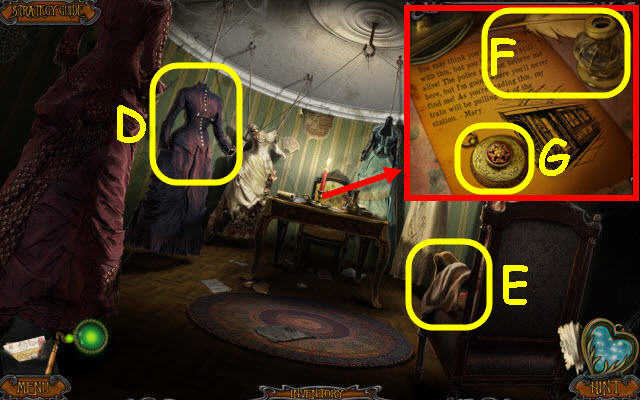
- Use the monocle on the dress (D).
- Examine the dress (E).
- Move the papers; place the INK POT and FEATHER on the table (F).
- Dip the feather in the ink pot; place MARY'S LOCKET on the imprint (G).
- Back out three times; then follow Bluebeard to the Passenger car.
Chapter 3: Long Journey
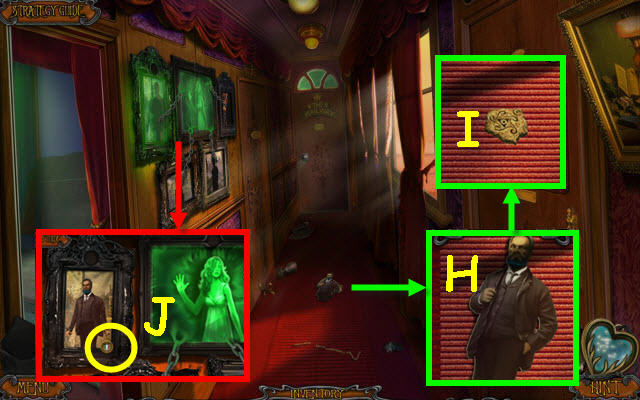
- Take the BLUEBEARD PORTRAIT (H) and INTRICATE KEY (I).
- Place BLUEBEARD PORTRAIT in the frame; take the ITALIAN FLAG BUTTON (J).
- Back out.
- Examine the suitcases to access a HOP.
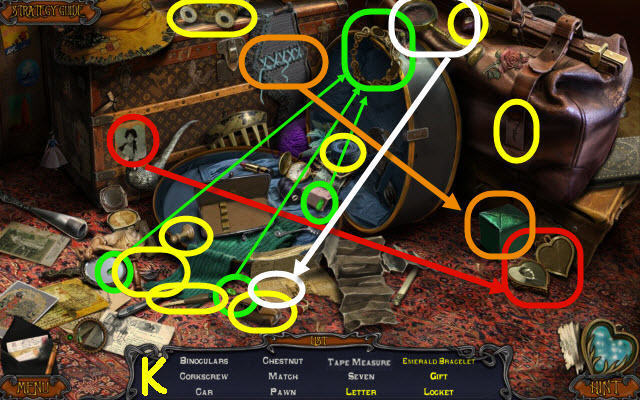
- Play the HOP.
- You receive a CORKSCREW (K).
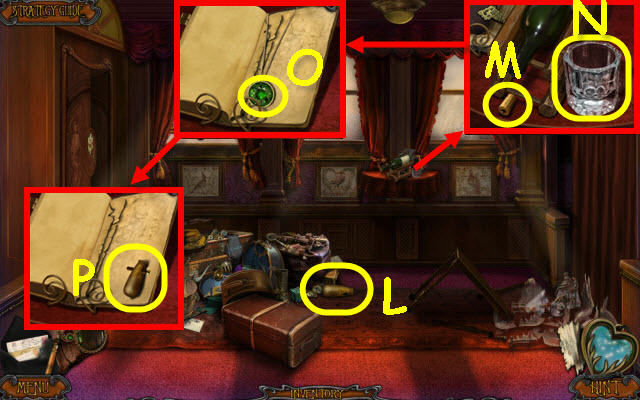
- Take the USELESS HANDLE (L).
- Use the CORKSCREW on the cork; take the CORK (M) and GLASS (N).
- Use the monocle and INTRICATE KEY on the book cover. Turn the pages 3x; take the EMERALD (O).
- Place the USELESS HANDLE on the dowel; take the DOOR HANDLE (P).
- Go left.
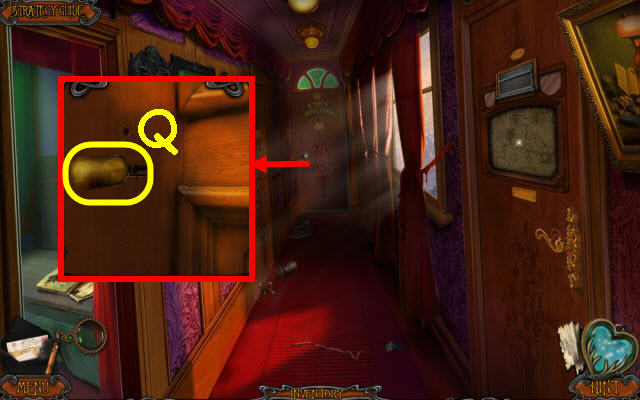
- Remove the doorknob; place the DOOR HANDLE in its' place and turn it (Q).
- Go forward.
Chapter 4: Unexpected Stop
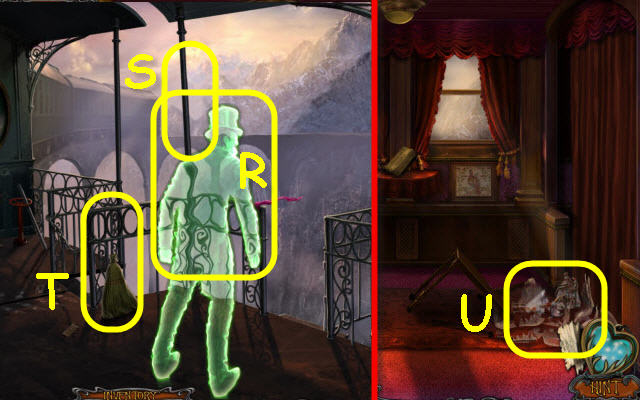
- Use the monocle on the gentleman (R).
- Take the BROOM HANDLE (S).
- Connect the BROOM HANDLE to the broom; take the BROOM (T).
- Back out twice.
- Use the BROOM on the glass (U).
- Go right.
- Receive an INDICATOR BULB.
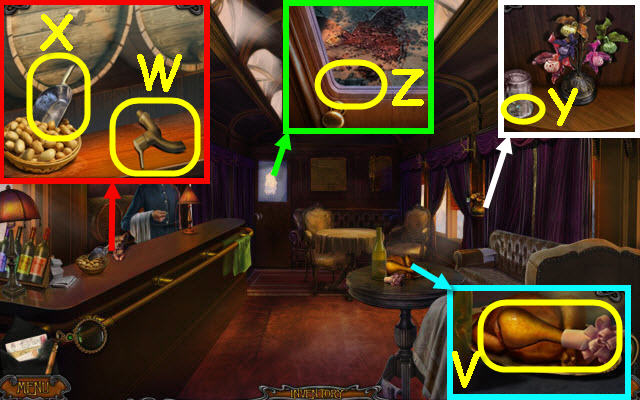
- Place the frill on the leg; take the CHICKEN LEG (V).
- Give the CHICKEN LEG to the dog and place the CORK on the tap; take the TAP (W).
- Take the SCOOP (X).
- Place the GLASS over the bug; take the MECHANICAL BUG (Y).
- Use the TOWEL on the glass; move the latch (Z).
- Go forward.
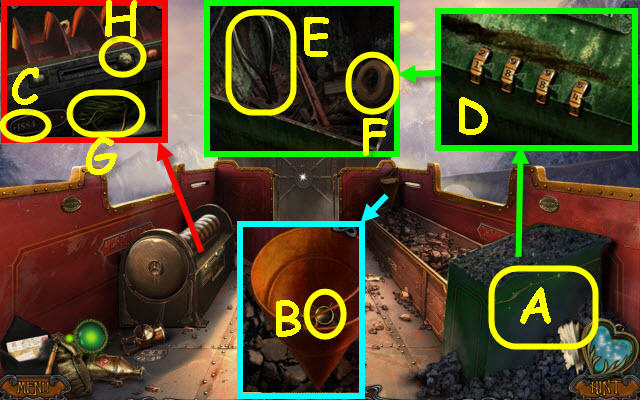
- Use the monocle on the coal bin (A).
- Use the SCOOP on the sand 4x; take the EMPTY OILER (B).
- Select the date (C).
- Move the coal and enter 1884 on the tumbler (D).
- Move the tools and rag; take the NIPPERS (E) and ELECTRICAL TAPE (F).
- Open the compartment; use the ELECTRICAL TAPE on the wires (G) and slide the knob (H).
- Back out.
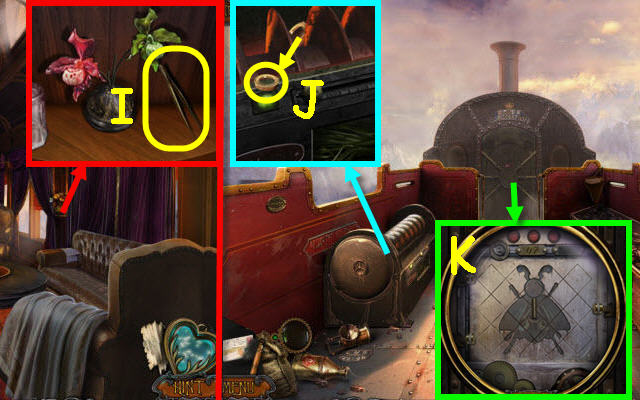
- Use the NIPPERS on the flowers; take the TWEEZERS (I).
- Go forward.
- Use the TWEEZERS on the lens; take the LENS (J).
- Remove the center panel; use the LENS and MECHANICAL BUG on it to trigger a puzzle (K).
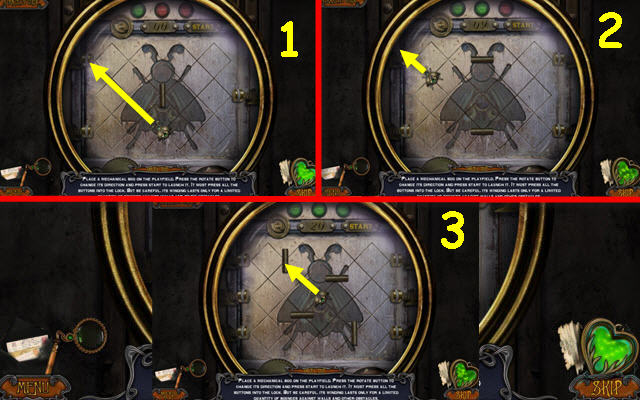
- Rotate the bug to hit all the buttons.
- Solution: Rotate to face the upper left each time (1-3).
- Go forward.
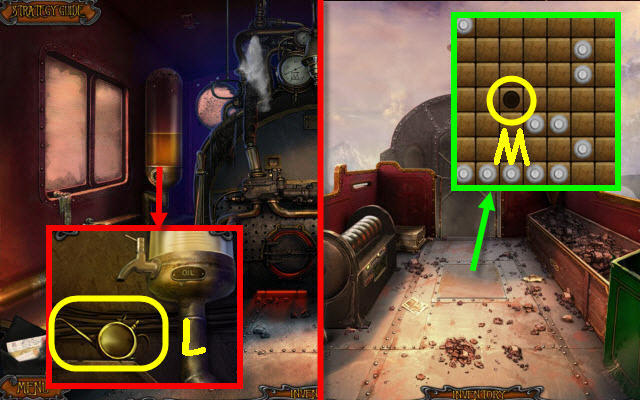
- Place the OILCAN on the container; place the EMPTY OILER by it. Turn the valve; take the OILER (L).
- Back out.
- Use the OILCAN on the panel; place the INDICATOR BULB in the slot to trigger a puzzle (M).
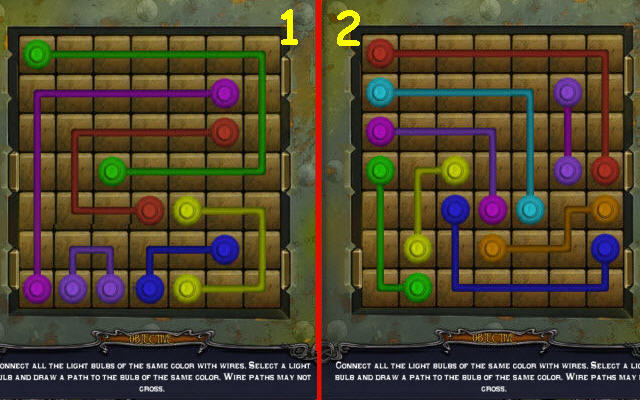
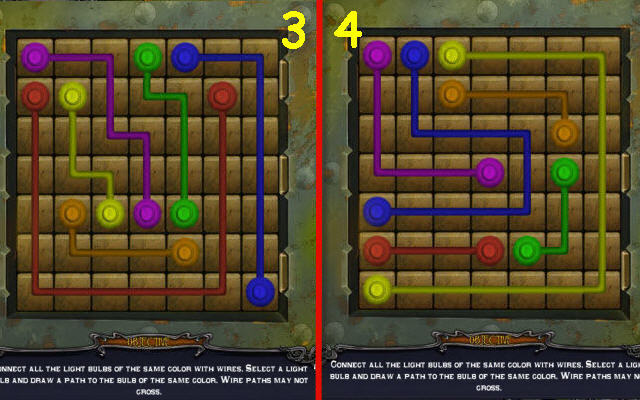
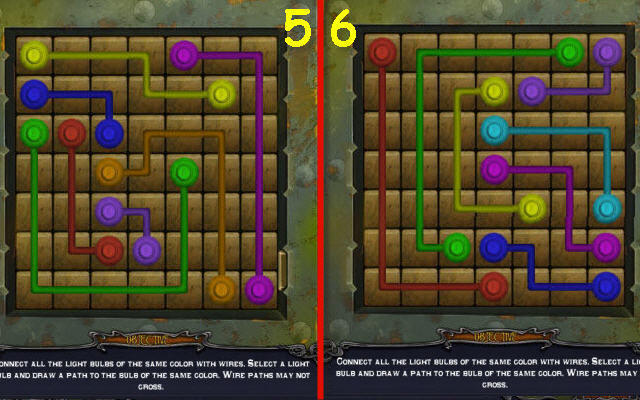
- Connect the same colored bulbs.
- See screenshots for solutions (1-6).
- Go down the hatch.
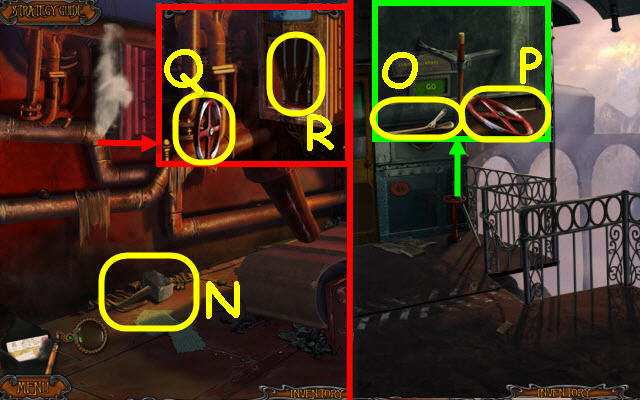
- Take the HAMMER (N).
- Go to Vestibule.
- Use the HAMMER on the handle; take the LEVER HANDLE (O).
- Turn the valve; take the VALVE (P).
- Go to Engine room.
- Place the VALVE on the stem; turn it (Q).
- Use the ELECTRICAL TAPE on each of the 3 wires (R).
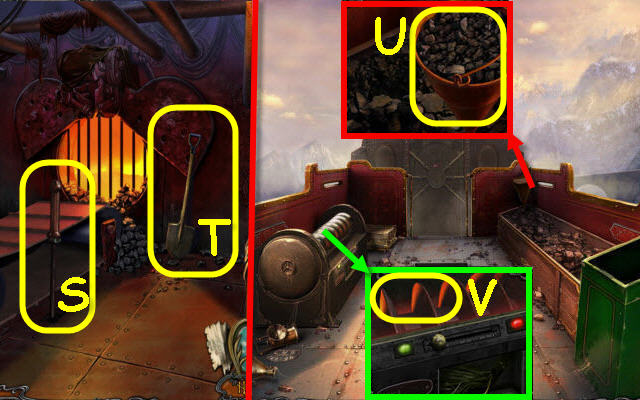
- Place the LEVER HANDLE by the conveyor; pull it (S).
- Take the SHOVEL (T).
- Back out.
- Use the SHOVEL on the coal 3x; take the COAL (U).
- Place the COAL in the grinder (V).
- Go down the hatch.
Chapter 5: Way to Rome
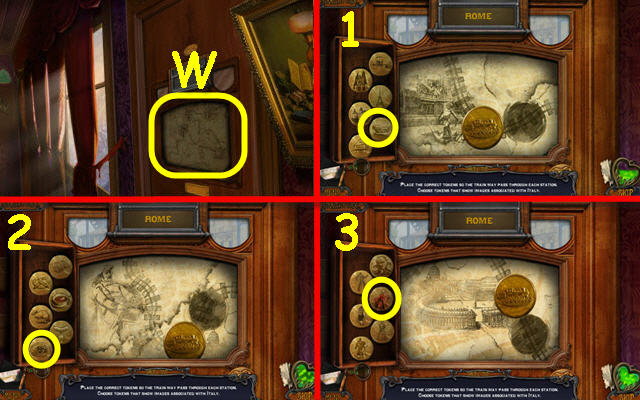
- Go to Vestibule; receive the 2nd ITALIAN FLAG BUTTON.
- Back out.
- Place the 2 ITALIAN FLAG BUTTONS in the slots to trigger a puzzle (W).
- Place the correct medallions to answer the riddles.
- Solution: Coliseum, spaghetti and cardinal (1-3).
- Go right.
Chapter 6: Rome
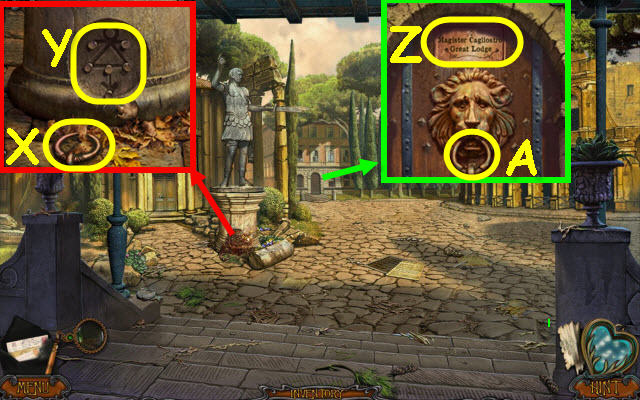
- Remove the leaves 3x; take the IRON RING (X) and push a button (Y).
- Use the monocle on the plaque (Z).
- Drag the pieces to complete the lion head. Place the IRON RING in its mouth; pull it (A).
- Enter the Great Lodge; go up the stairs.
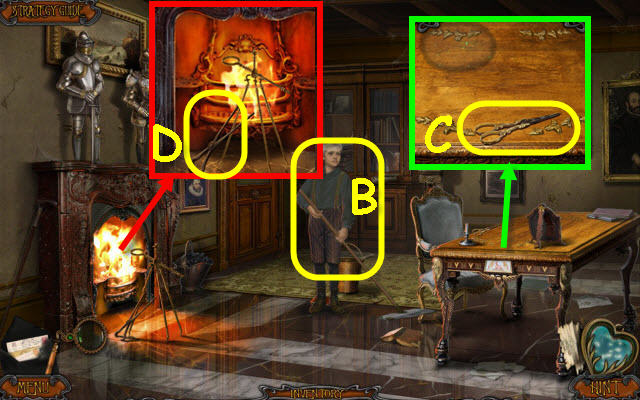
- Speak to the boy (B).
- Take the SCISSORS (C).
- Take the TONGS (D).
- Go to Rome square.
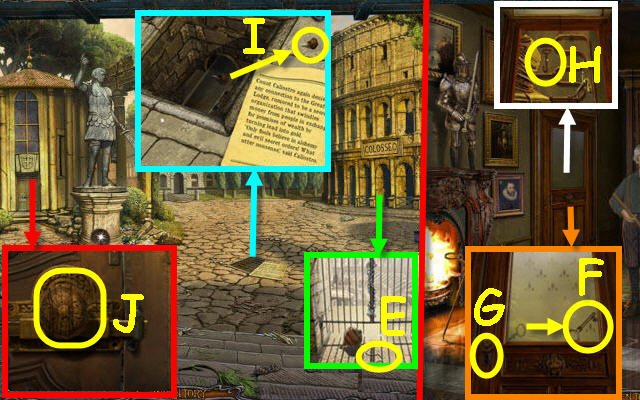
- Use the SCISSORS on the string; take the STRING NOOSE (E).
- Go to Upper lodge.
- Use the STRING NOOSE on the key. Select the key; take the SIDE ROOM KEY (F).
- Use the SIDE ROOM KEY in the lock (G); turn it.
- Take the HOOK (H).
- Go to Rome square.
- Select the knob and use the HOOK on the grate. Use the STRING NOOSE on the WOODEN HANDLE; take it (I).
- Place the WOODEN HANDLE in the hole; turn it and enter (J).
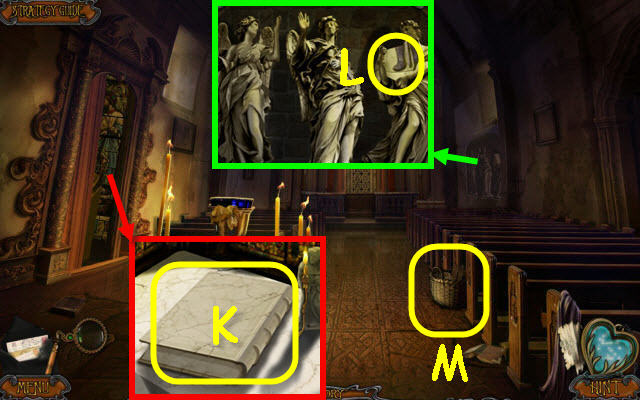
- Open the curtain; take the STONE BOOK (K).
- Take the COLUMN PIECE (L).
- Take the BASKET OF FOOD (M).
- Go to Upper lodge.
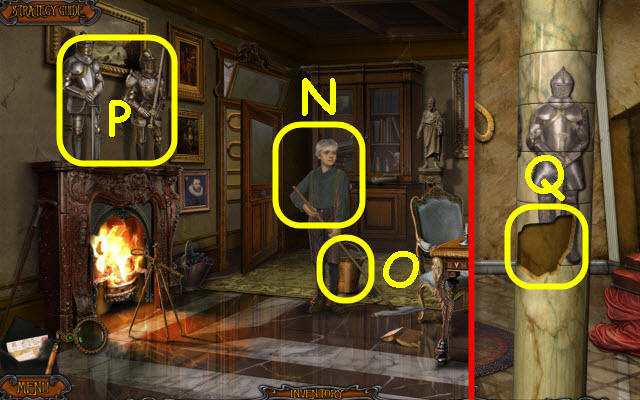
- Give the BASKET OF FOOD to the boy; receive a MONK CANDLESTICK (N).
- Use the MONOCLE on the boy.
- Take the BUCKET (O).
- Select the knights to get a clue (P).
- Back out.
- Place the COLUMN PIECE on the column to trigger a puzzle (Q).
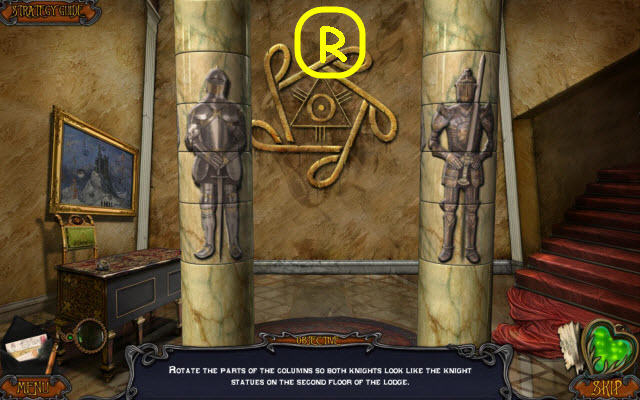
- Complete the knights.
- See screenshot for solution (R).
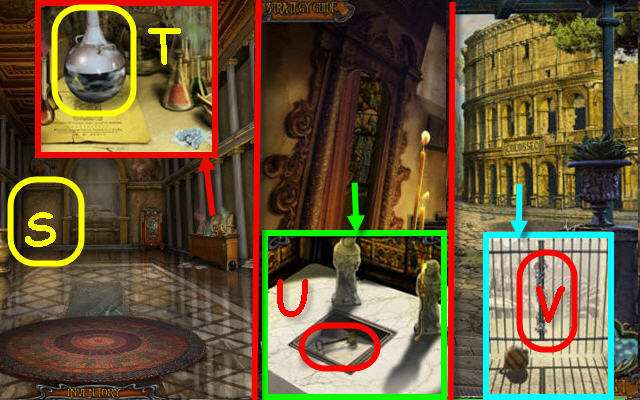
- Use the monocle in the corner (S).
- Tip the beaker; use the TONGS to get the LIQUID NITROGEN (T).
- Go to Church.
- Place the MONK CANDLESTICK on the table; take the X KEY (U).
- Back out.
- Use the LIQUID NITROGEN on the chain; open the gate (V).
- Enter the Coliseum.
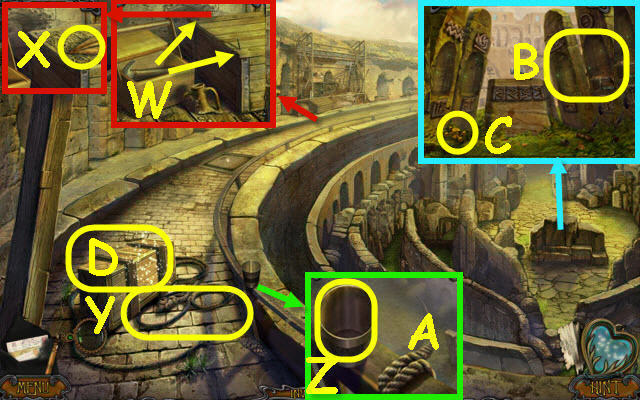
- Remove the cloth and open the toolbox; use the hammer on the 2 nails (W).
- Open the crate; take the SPEAR (X).
- Use the SCISSORS on the rope; take the ROPE (Y).
- Take the CRUCIBLE (Z) and place the ROPE in the groove (A).
- Use the monocle on a pillar (B).
- Take the VALVE (C).
- Examine the crate to access a HOP (D).
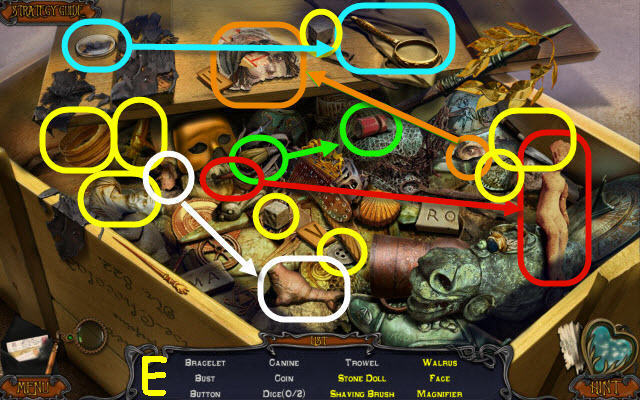
- Play the HOP.
- You receive a TROWEL (E).
- Go to Church.
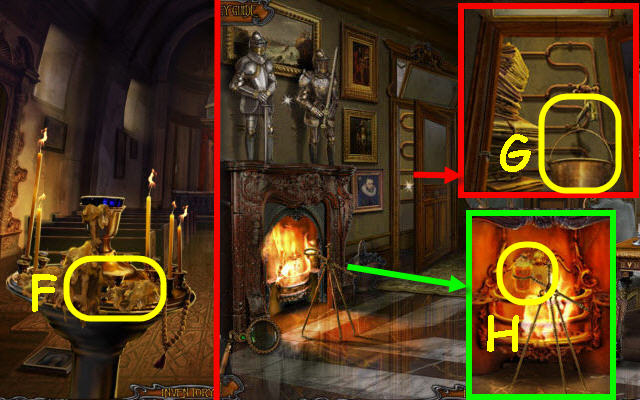
- Use the TROWEL to get WAX (F).
- Go to Upper lodge.
- Attach the VALVE on the stem; place the BUCKET underneath. Turn the valve; take the BUCKET OF WATER (G).
- Place the CRUCIBLE on the holder and the WAX in the crucible. Use the TONGS to get the MOLTEN WAX (H).
- Back out.
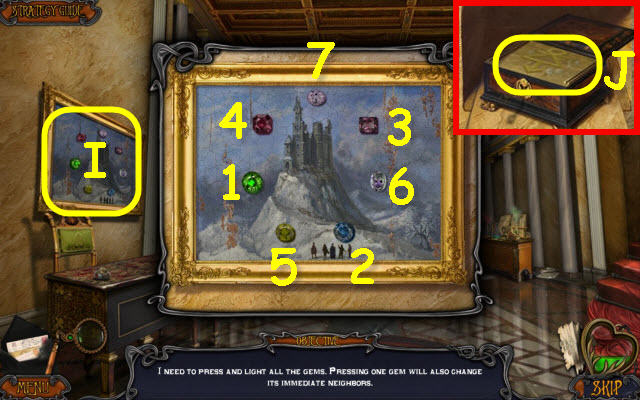
- Use the monocle on the painting; place the EMERALD on it to trigger a puzzle (I).
- Highlight all the jewels.
- Select in the order shown (1-7).
- Use the X KEY on the lock; turn it. Use the MOLTEN WAX and BUCKET OF WATER on the mold; take the RUNE MOLD (J).
- Back out.
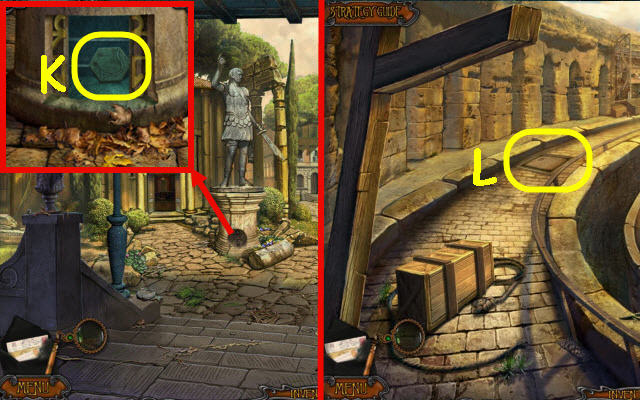
- Place the RUNE MOLD on the pedestal; take the PATTERN CHAINS (K).
- Go to the Coliseum.
- Place the PATTERN CHAINS in the recess to trigger a puzzle (L).
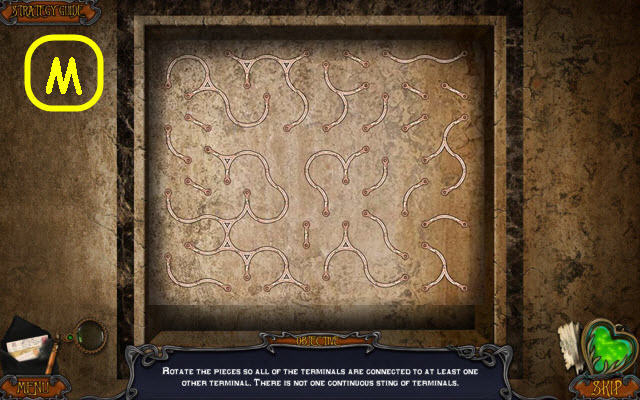
- Connect all the dots.
- See screenshot for solution (M).
- Take the BIRD STATUETTE.
- Examine the crate to access a HOP.
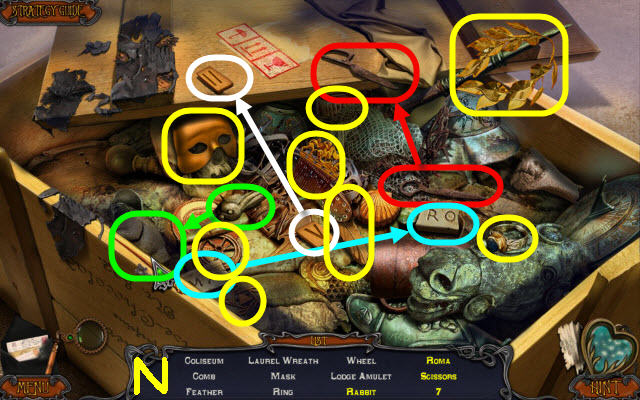
- Play the HOP.
- You receive a LODGE AMULET (N).
- Go to Upper lodge.
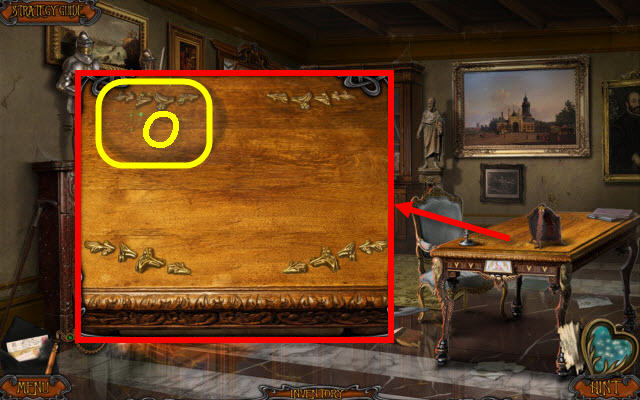
- Use the monocle on the spot (O).
- You will trigger a puzzle.
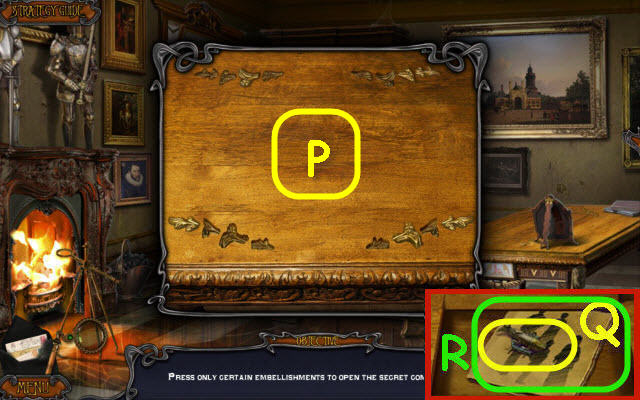
- Press the correct buttons as shown in your notes.
- See screenshot for solution (P).
- Place the LODGE AMULET in the slot; use the SCISSORS on the string. Take the FISH STATUETTE (Q) and BOOK PAGES (R).
- Select the runes paper to get a code.
- Go to the Coliseum.
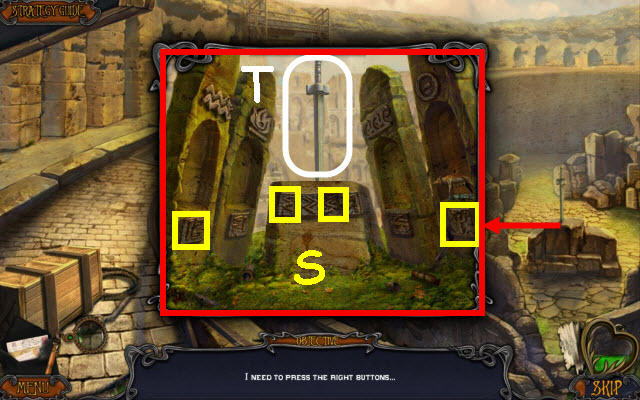
- Press the correct runes as shown in your notes.
- See screenshot for solution (S).
- Take the SWORD (T).
- Go to the Church.
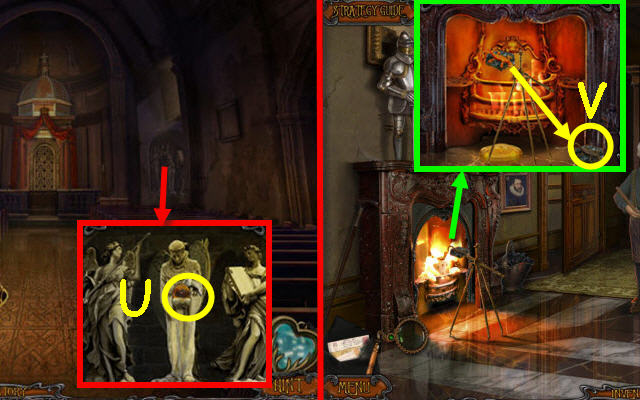
- Starting at the left, place the SPEAR, SWORD and STONE BOOK on the angels. Take the AMBER SPHERE (U).
- Go to Upper lodge.
- Place the AMBER SPHERE in the holder; use the TONGS to get the SALAMANDER STATUETTE (V).
- Go to the Coliseum.
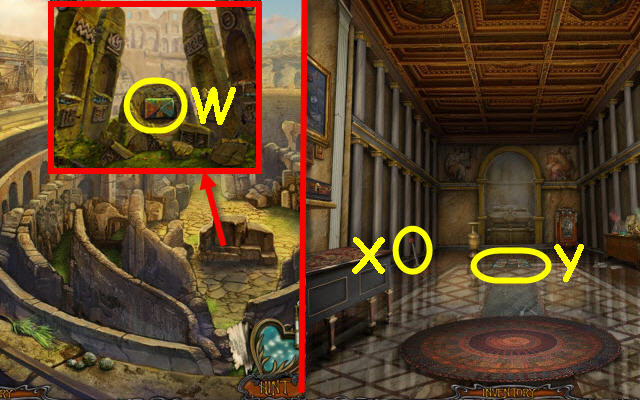
- Starting at the left, place the FISH STATUETTE, SALAMANDER STATUETTE and BIRD STATUETTE in the pillars. Take the MOSAICS (W).
- Go to Great lodge.
- Move the vase; pull the lever (X).
- Place the MOSAICS on the mosaic to trigger a puzzle (Y).
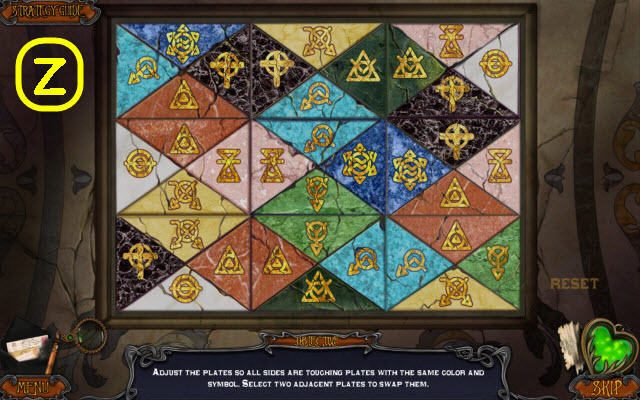
- Match the sides on the plates.
- See screenshot for solution (Z).
- Take the stone.
Chapter 7: Way to Germany
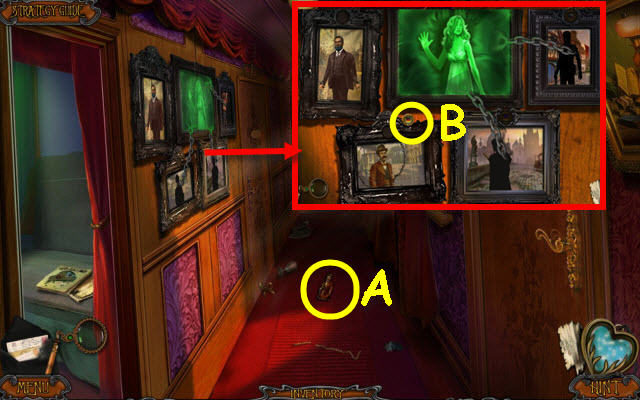
- Take the CAGLIOSTRO PORTRAIT (A).
- Place the CAGLIOSTRO PORTRAIT in the frame; take the GERMAN FLAG BUTTON (B).
- Back out.
- Receive a VESTIBULE KEY.
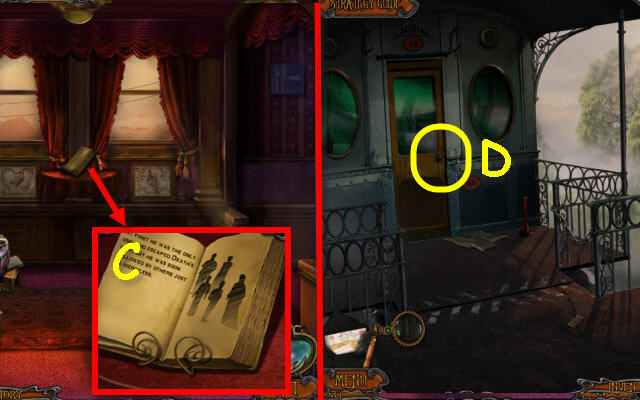
- Place the BOOK PAGES in the book and flip the pages 4x (C).
- Go to Vestibule.
- Use the VESTIBULE KEY on the lock; turn it and enter (D).
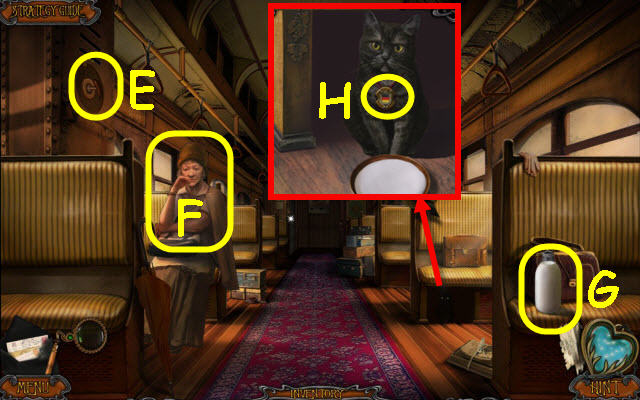
- Use the monocle on the cover; take it to receive a DISH and pull the knob (E).
- Speak to grandma (F).
- Take the MILK (G).
- Place the PLATE and MILK on the floor; take the 2nd GERMAN FLAG BUTTON (H).
- Go to Passenger car.
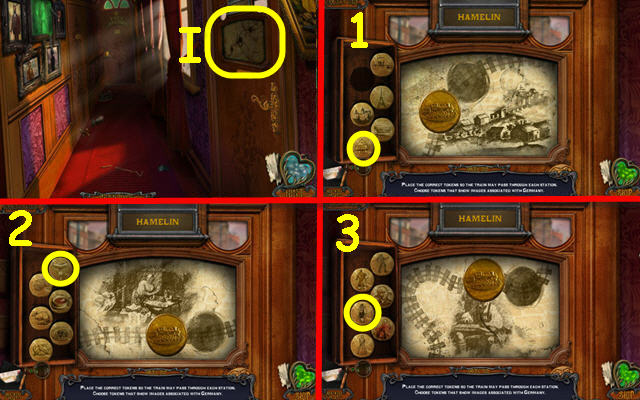
- Place the 2 GERMAN FLAG BUTTONS in the slots to trigger a puzzle (I).
- Place the correct medallions to answer the riddles.
- Solution: Burgermeister's house, sausage and Burgermeister (1-3).
- Go right.
Chapter 8: Hamelin
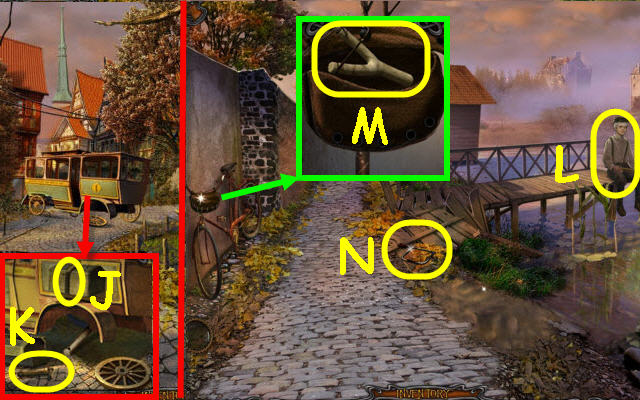
- Take the RUBBER BAND (J) and HAMMER (K).
- Go forward on the right.
- Speak to the boy (L).
- Open the pouch and pull up the slingshot. Place the RUBBER BAND on it; take the SLINGSHOT (M).
- Take the HACKSAW (N).
- Back out.
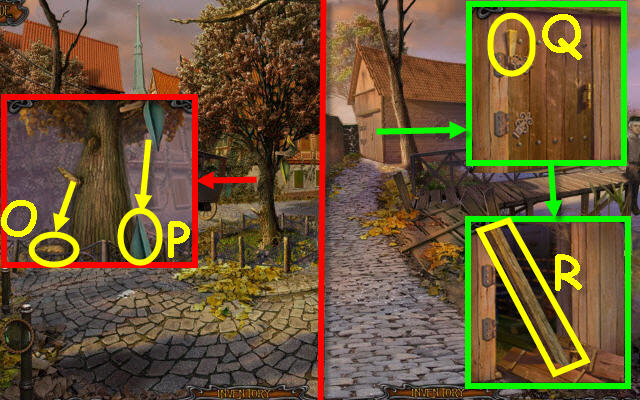
- Use the HACKSAW on the branch; take the WEDGE (O).
- Use the SLINGSHOT on the HAT; take the HAT (P) and read the note.
- Go to Embankment.
- Place the WEDGE on the hinge; use the HAMMER on it (Q).
- Take the BEAM (R); go forward.
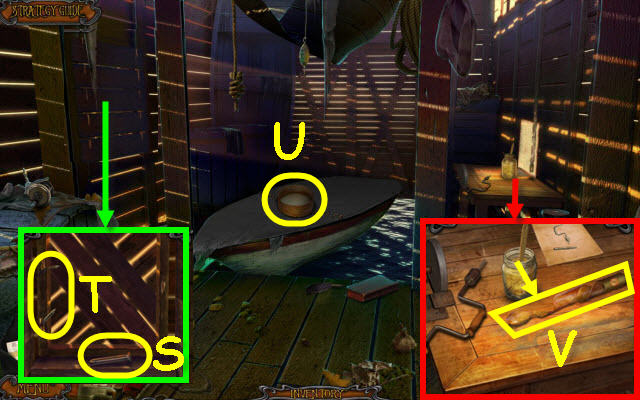
- Use the HACK SAW on the boards; take the METAL PIN (S) and use the HAMMER on the nails (T).
- Take the SIEVE (U).
- Pull down the flypaper and use the glue on it; take the INSECT TAPE (V).
- Go to Hamelin square.
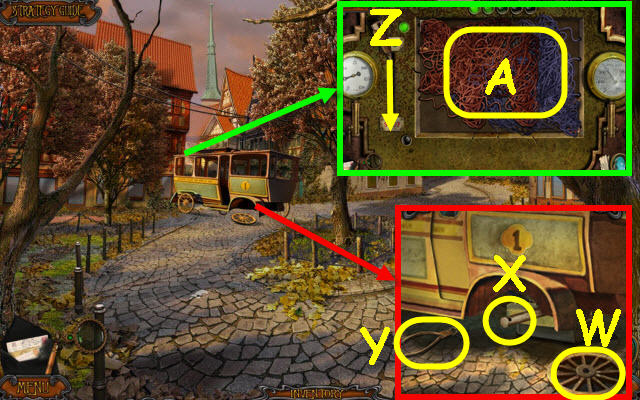
- Use the BEAM, wheel (W), METAL PIN and HAMMER on the axle (X).
- Take the NIPPERS (Y).
- Remove the panel; pull the lever down (Z) and use the NIPPERS on the wires twice (A) to trigger a puzzle.
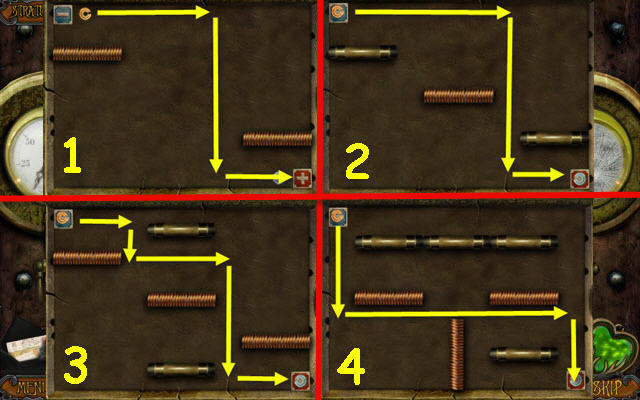
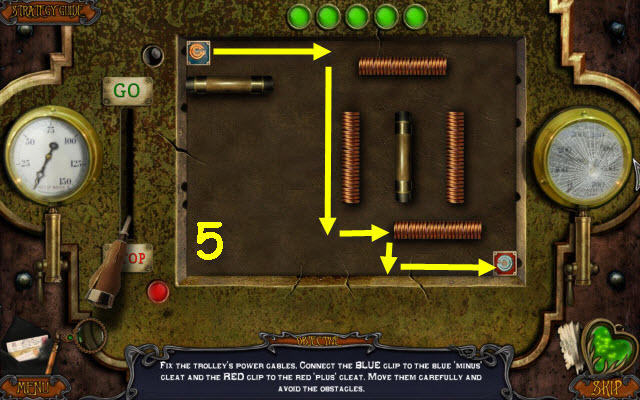
- Switch the red and blue chips.
- See screenshots for solution (1-5).
- Go forward on the left.
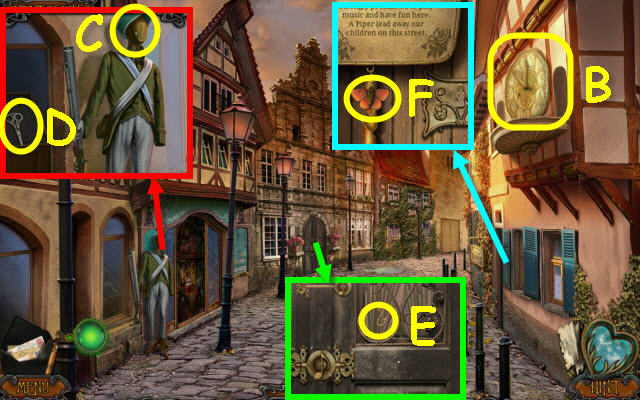
- Use the monocle on the clock (B).
- Use the monocle on the head and place the HAT on it (C).
- Open the door; take the SCISSORS (D).
- Use the NIPPERS to get the FISHING HOOK (E).
- Use the INSECT TAPE on the butterfly; take the FISHING BAIT (F).
- Go to Embankment.
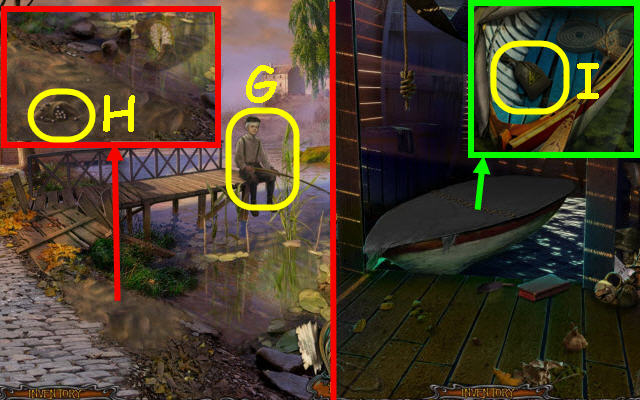
- Give the FISHING BAIT to the boy (G).
- Use the SIEVE on the sand; take the MUSKET BALLS (H).
- Go forward.
- Use the SCISSORS on the tarp and remove it. Drag the items; take the GUNPOWDER (I).
- Go to Hamelin street.
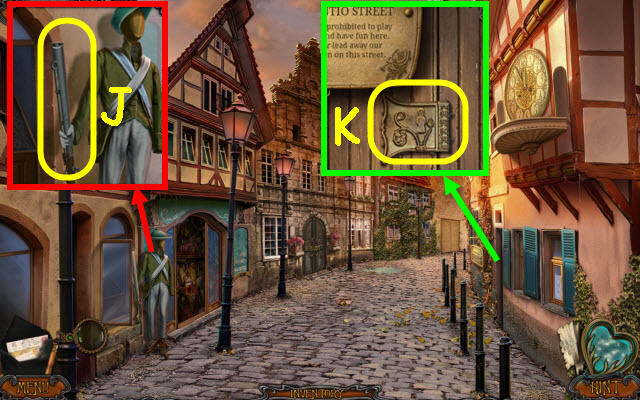
- Load the GUNPOWDER and MUSKET BALLS in the end of the musket; take the LOADED MUSKET (J).
- Use the LOADED MUSKET on the lock; remove it (K).
- Go right.
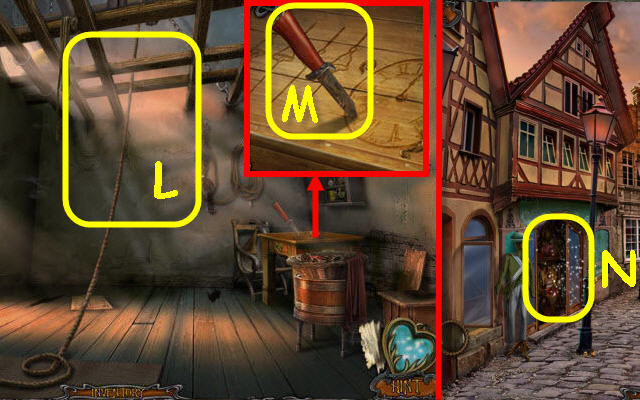
- Pull the rope (L).
- Take the DULL KNIFE (M).
- Go left.
- Examine the storefront to access a HOP (N).
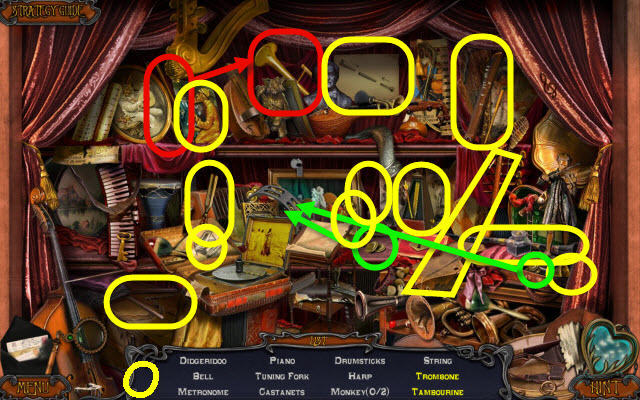
- Play the HOP.
- You receive a FISHING LINE (O).
- Go to Boat shed.
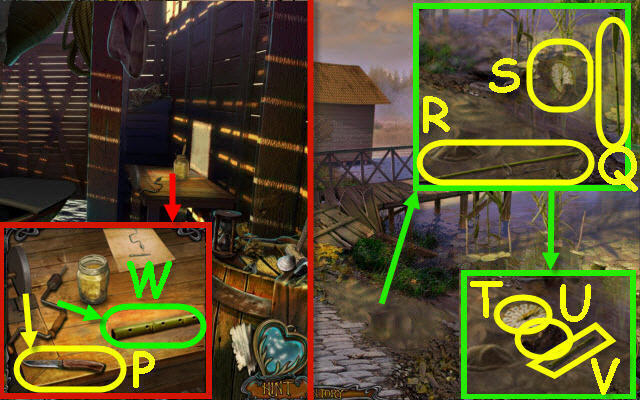
- Sharpen the DULL KNIFE on the grinder; take the SHARP KNIFE (P).
- Back out.
- Use the SHARP KNIFE on the reed (Q).
- Tie the FISHING LINE and FISHING HOOK on the reed; take the FISHING ROD (R).
- Use the FISHING ROD in the water twice; take the CLOCK FACE (T), OLD BOOT (U) and REED PIPE (V).
- Go forward.
- Place the REED PIPE on the table and use the drill on it; take the FLUTE BARREL (W).
- Go to Clock tower.
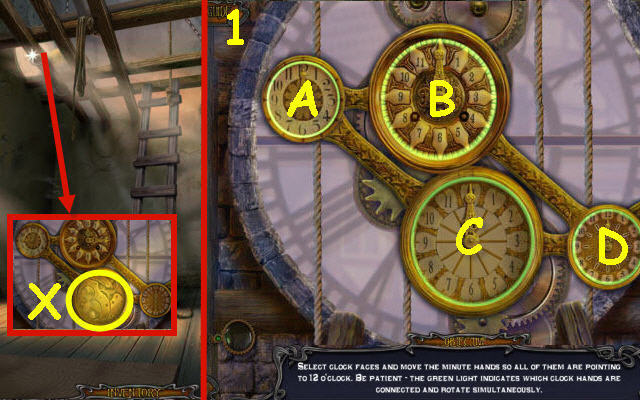
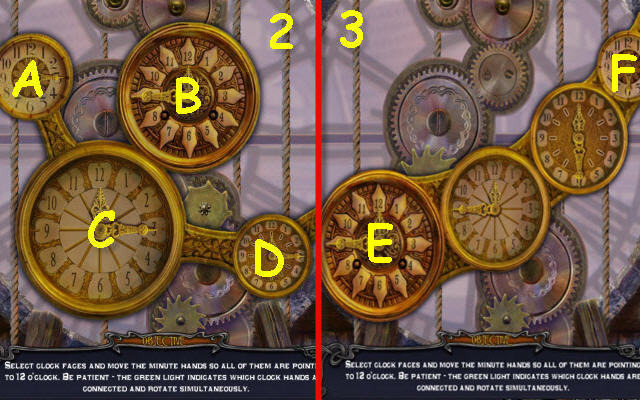
- Place the CLOCK FACE on the clock to trigger a puzzle (X).
- Solution 1st set: A clockwise to 12 and D counter clockwise to 12 (1).
- Second set: A clockwise to 12:30, D clockwise to 12:30, B counter clockwise to 12:30 and C clockwise to 12 (2).
- Third set: E counter clockwise to 12 and F counter clockwise to 12 (3).
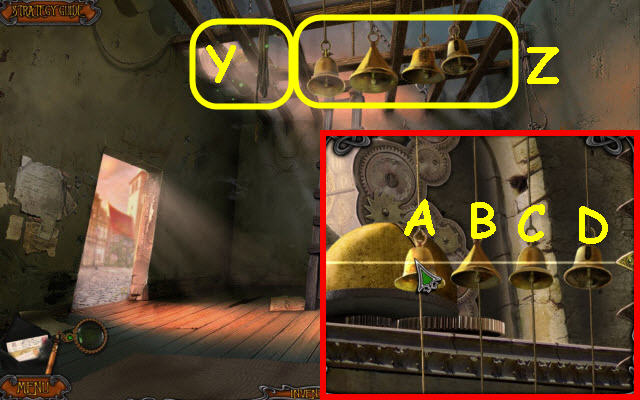
- Use the monocle on the rope (Y).
- Examine the bells to trigger a puzzle (Z).
- Solution: Pull A all the way down, pull B all the way down, pull C all the way down, and D all the way down.
- Pull A to the center. Pull C to the center. Pull D all the way up and Pull D to the center.
- Go left.
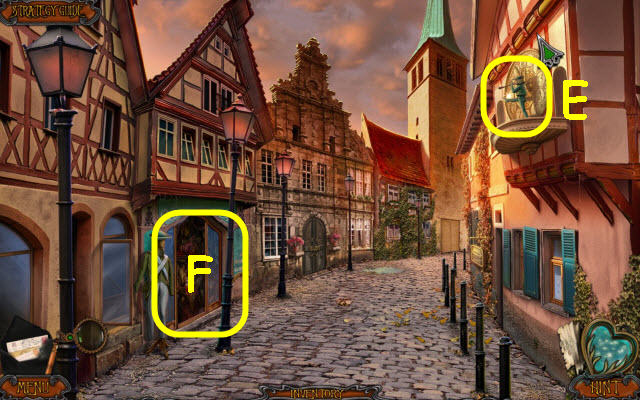
- Use the OLD BOOT on the statue (E).
- Examine the storefront to access a HOP (F).
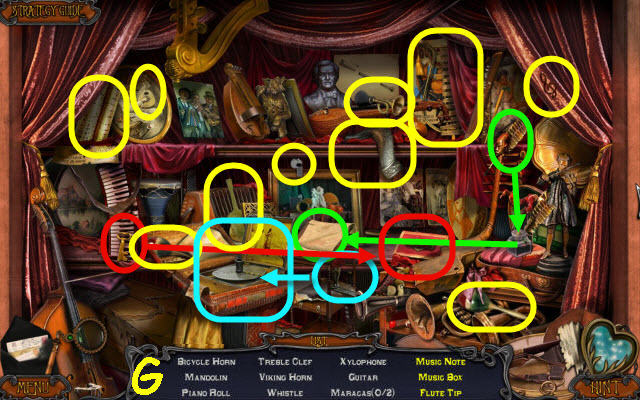
- Play the HOP.
- You receive a FLUTE TIP (G).
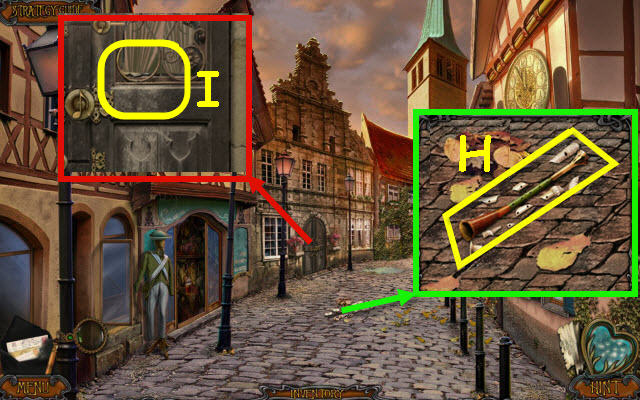
- Use the monocle on the pipe; place the FLUTE BARREL and FLUTE TIP on it. Take the LURING PIPE (H).
- Use the LURING PIPE on the door (I).
Chapter 9: Way to Eastern Europe
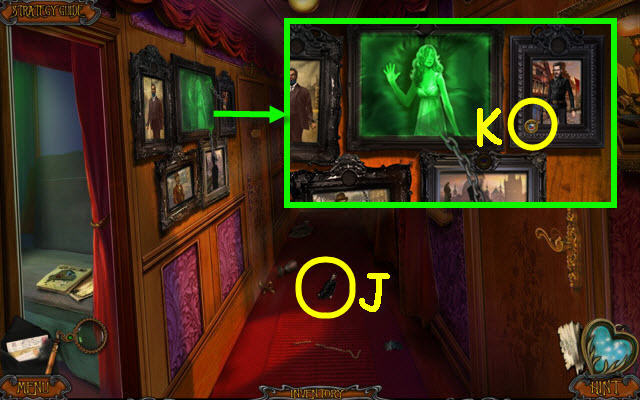
- Take the PIPER PORTRAIT (J).
- Place the PIPER PORTRAIT in the frame; take the CZECH FLAG BUTTON (K).
- Go to First-class car; go to Vestibule.
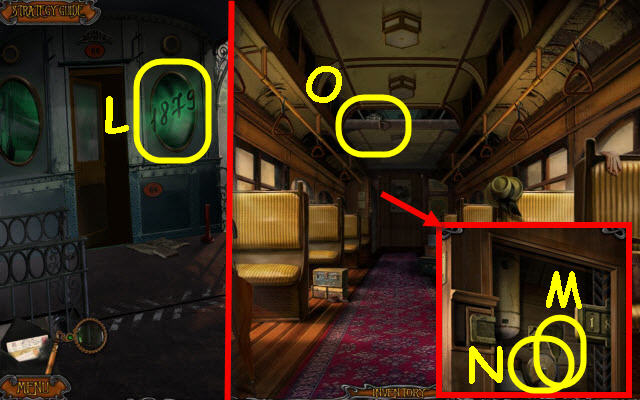
- Use the monocle on the window (L).
- Go forward.
- Enter the code 1879; take the BROOM (M) and turn the lever (N).
- Use the BROOM on the chain and pull (O).
- Go forward.
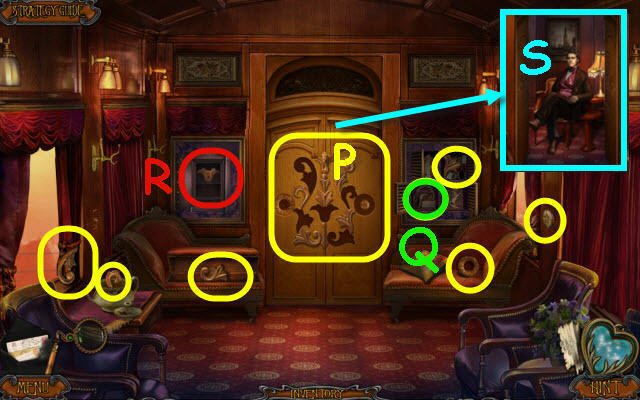
- Move the curtains, pillows, lids and doors blocking the items in yellow; drag them to the matching recesses in the door (P).
- Place the wheel (Q) on the compartment; move the last piece (R) to the door and open the door.
- Speak to Master Charon; receive the 2nd CZECH FLAG BUTTON (S).
- Go to Passenger car.
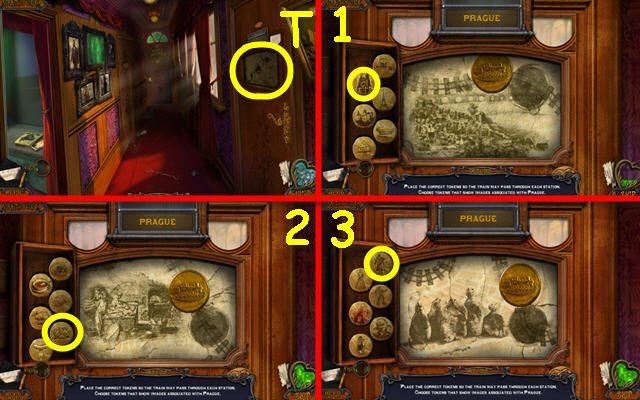
- Place the 2 CZECH FLAG BUTTONS in the slots to trigger a puzzle (T).
- Place the correct medallions to answer the riddles.
- Solution: Clock tower, pretzel and golem (1-3).
- Go right.
Chapter 10: Prague
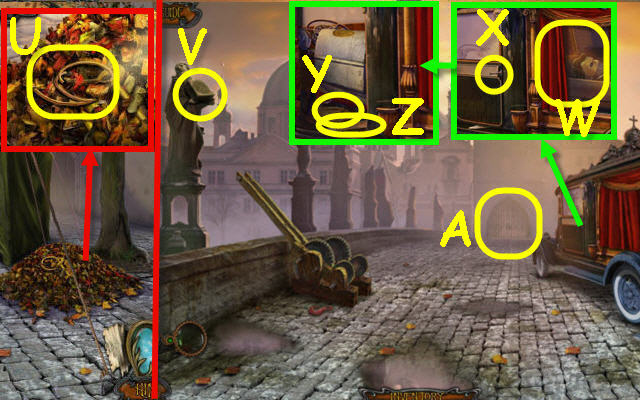
- Take the WIRE (U); move the leaves 3x to uncover a note.
- Go forward.
- Use the monocle on the book (V).
- Open the curtain (W); use the WIRE on the lock (X).
- Take the ROPE (Y) and WEDGE (Z).
- Use the WEDGE on the gate to trigger a puzzle (A).
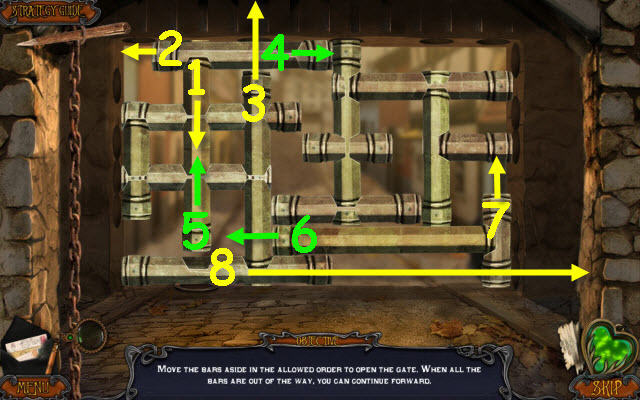
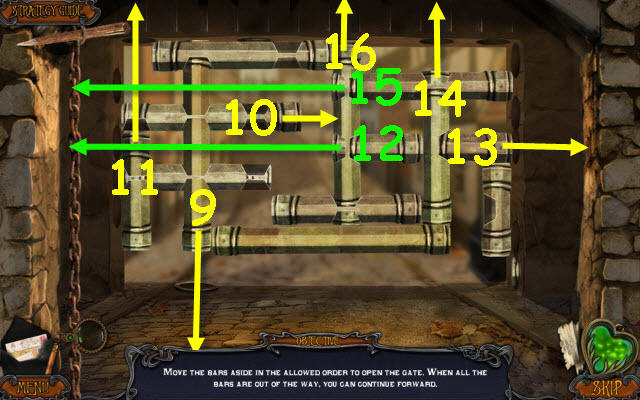
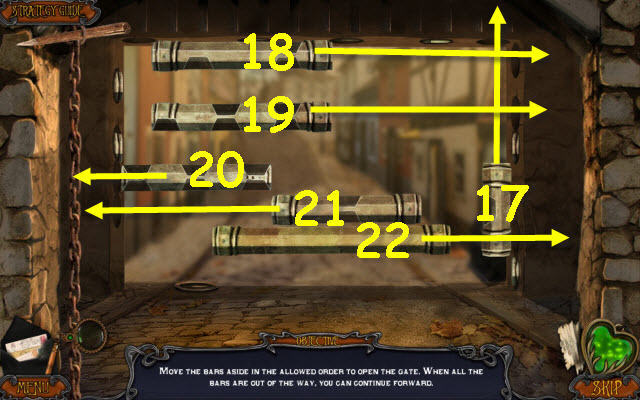
- Remove the pipes.
- See screenshots for solution (1-22).
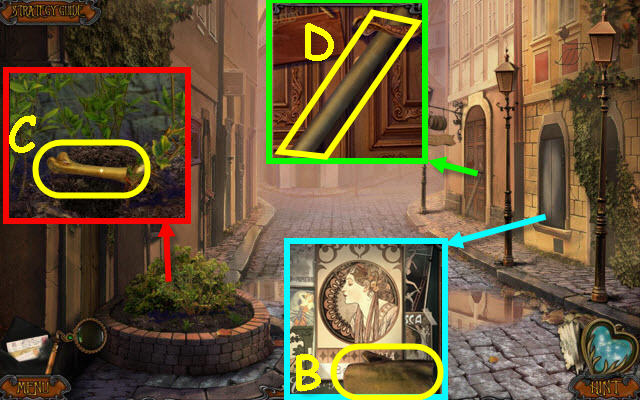
- Use the WIRE on the latch; take the OVEN MITT (B) and scroll through the posters.
- Use the OVEN MITT on the weeds; take the BONE (C).
- Take the STICK (D).
- Go to Station square.
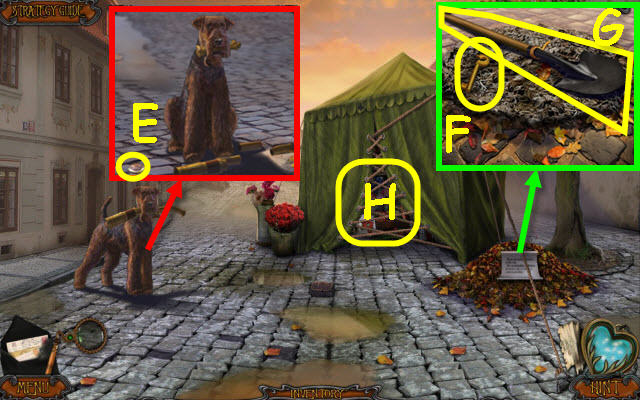
- Give the BONE to the dog; take the LENS (E).
- Use the LENS on the paper; take the BAR KEY (F).
- Place the STICK and WIRE on the shovel head; take the SHOVEL (G).
- Examine the tent to access a HOP (H).
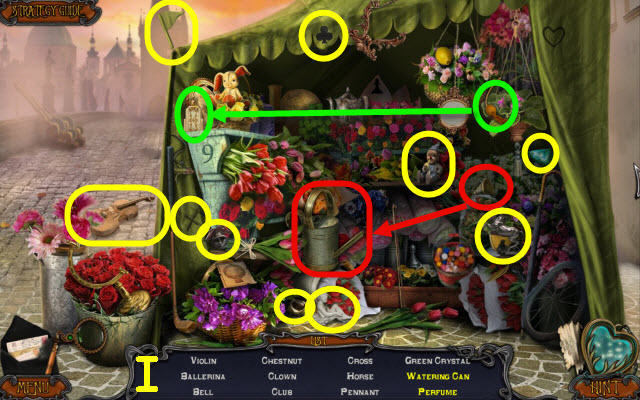
- Play the HOP.
- You receive a CRYSTAL (I).
- Go to Prague street.
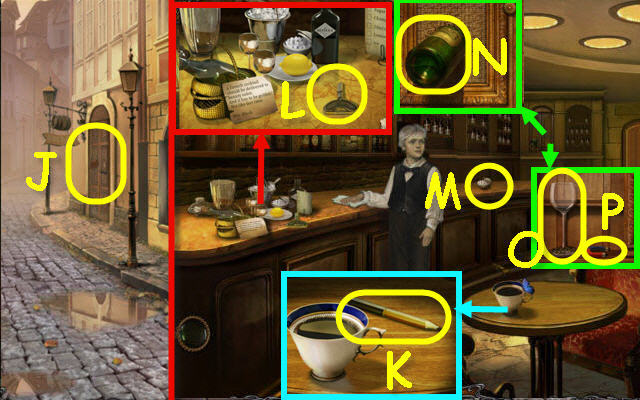
- Use the BAR KEY on the lock; turn it and enter (J).
- Take the PENCIL (K).
- Attempt to take the key; take the POSTBOX KEY (L).
- Take the SUGAR (M).
- Take the CHAMPAGNE (N).
- Open the cabinet; take the WINE GLASS (O) and MAGNET (P).
- Go to Station square.
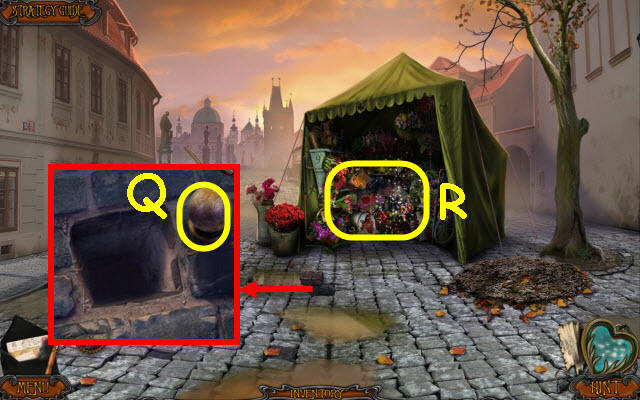
- Remove the brick; use the MAGNET in the hole and take the KITCHEN DOOR HANDLE (Q).
- Examine the tent to access a HOP (R).
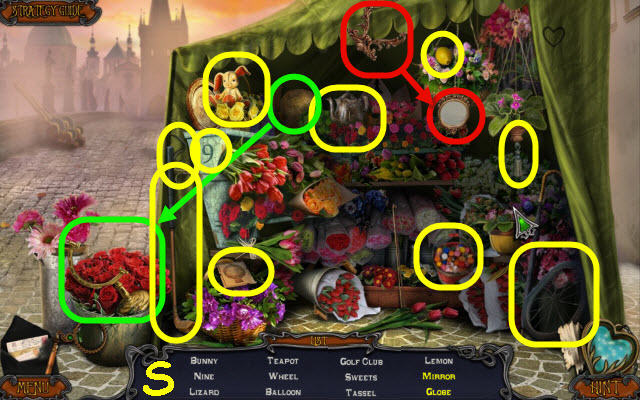
- Play the HOP.
- You receive a LEMON (S).
- Go to Prague street.
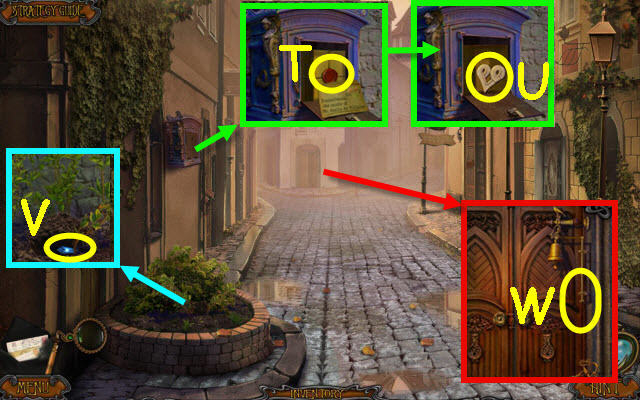
- Use the POSTBOX KEY on the mailbox; turn it. Read the letter, take the STRING (T) and BAS-RELIEF PART (U).
- Use the SHOVEL on the dirt; take the 2nd CRYSTAL (V).
- Ring the bell; use the STRING on it and pull (W).
- Go forward.
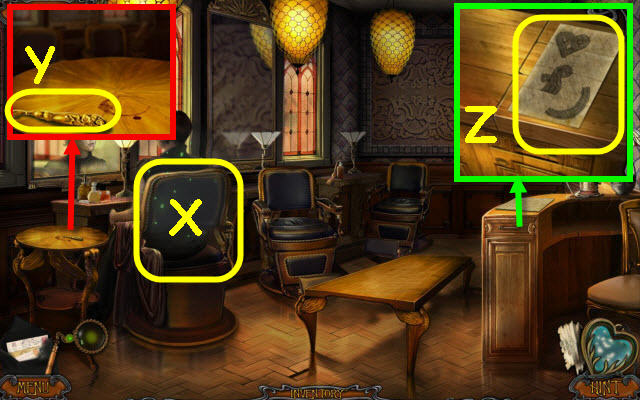
- Use the monocle on the chair (X).
- Take the MANICURE KNIFE (Y).
- Use the PENCIL on the note (Z).
- Go to Bar.
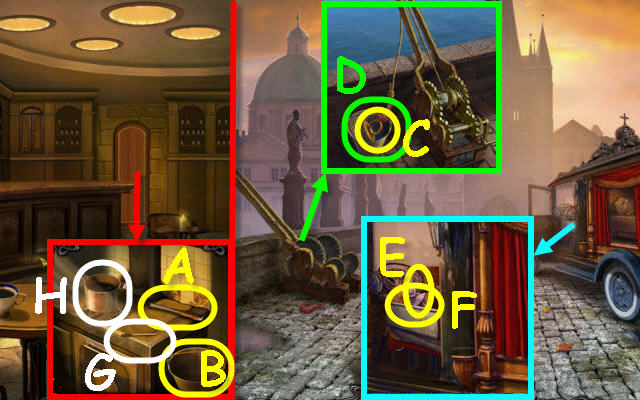
- Place the KITCHEN DOOR HANDLE on the door; take the CHISEL (A) and BUCKET (B).
- Go to Charles Bridge.
- Place the BUCKET and ROPE by the hook; select the winch. Take the RING HANDLE (C) and BUCKET OF WATER (D).
- Use the RING HANDLE in the indent; take the BALLERINA (E) and ONIONS (F).
- Go to Bar.
- Use the LENS on the match (G) and select it. Use the BUCKET OF WATER and ONIONS in the pot; use the OVEN MITT to take the GOLDEN DYE (H).
- Go to Beauty salon.
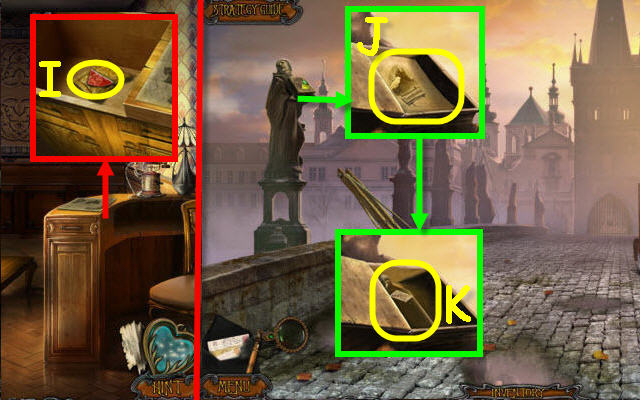
- Use the CHISEL on the counter; take the 3rd CRYSTAL (I).
- Go to Charles Bridge.
- Place the 3 CRYSTALS on the book; take the PAGES (J) and GIN BOTTLE (K).
- Go to the Beauty salon.
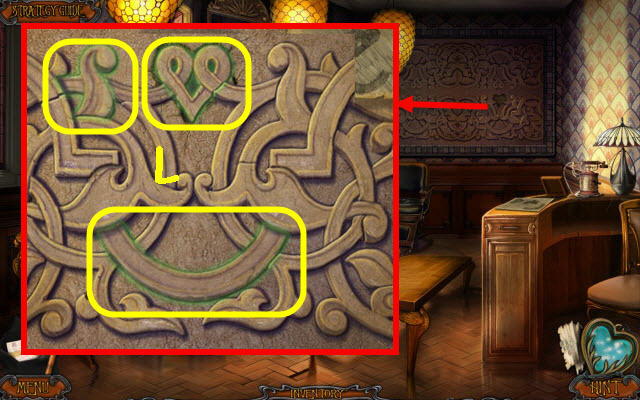
- Use the monocle and BAS-RELIEF PART on the relief; press in the 3 matching shapes from the code (L).
- You will trigger a puzzle.
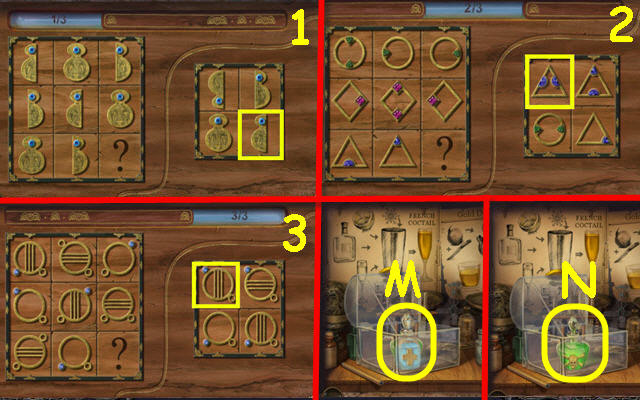
- Select the logical image to complete the sequences.
- See screenshot for solution (1-3).
- Open the container; take the ANTIDOTE (M) and POISON (N).
- Go to Bar.
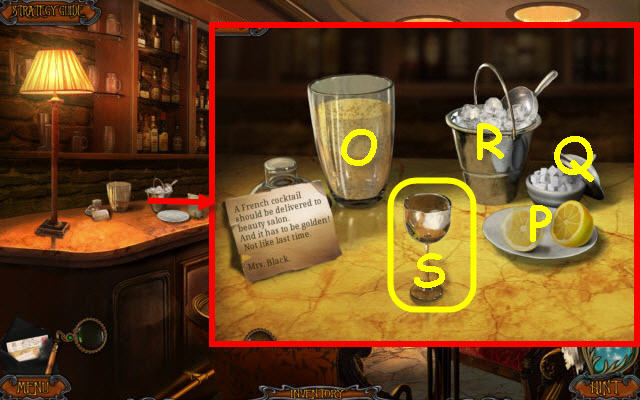
- Place the LEMON on the dish, the WINE GLASS, SUGAR on the counter and the GIN BOTTLE and CHAMPAGNE in the glass (O).
- Use the MANICURE KNIFE on the lemon (P); use the lemon on the glass (O).
- Place the sugar (Q) and ice (R) in the glass and select it.
- Add the POISON and GOLDEN DYE to the cocktail glass; take the POISONED COCKTAIL (S).
- Go to Beauty salon.
Chapter 11: Way to the Villain's Lair
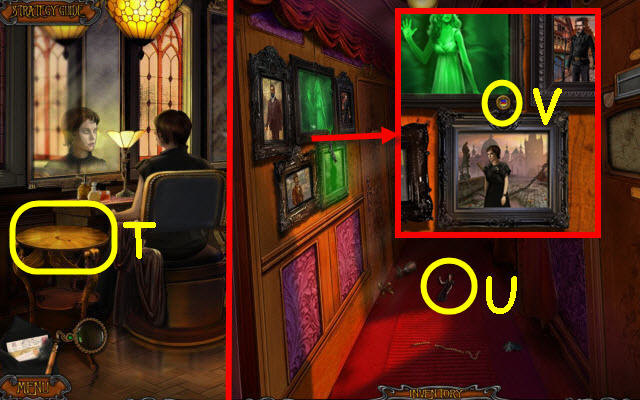
- Place the POISONED COCKTAIL on the table (T).
- Take the BLACK WIDOW PORTRAIT (U).
- Place the BLACK WIDOW PORTRAIT in the frame; take the TRANSYLVANIA FLAG BUTTON (V).
- Back out.
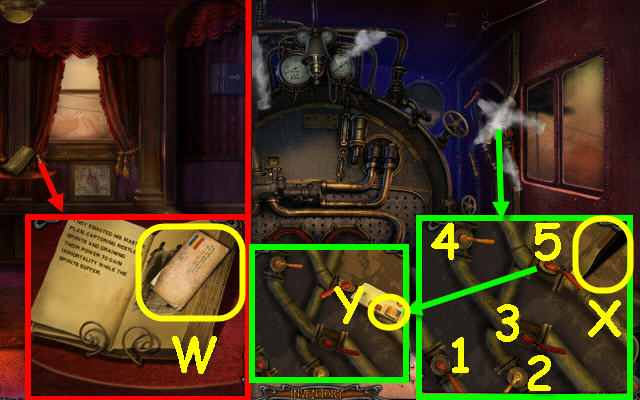
- Place the PAGES in the book; turn the page and take the LETTER (W).
- Go to Control room.
- Pull the levers in order (1-5); take the CHISEL (X).
- Use the LETTER on the 5th lever; move the lever and take the TRANSYLVANIA STAMP (Y).
- Go to Catering car.
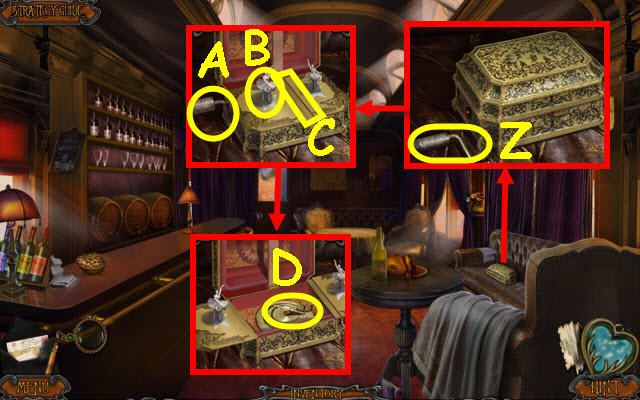
- Take the WINDING HANDLE (Z).
- Place the WINDING HANDLE in the slot; turn it (A).
- Place the BALLERINA in the slot (B); use the CHISEL on the crack (C).
- Take the TOOTHPICK (D).
- Receive a HORSESHOE.
- Go to Passenger car.
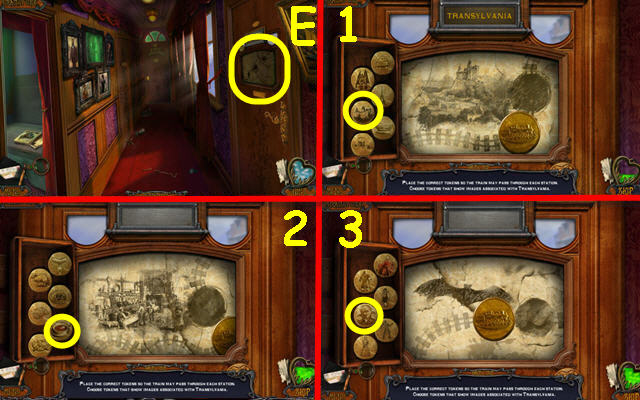
- Place the TRANSYLVANIA FLAG BUTTON in one slot; place the TOOTHPICK and TRANSYLVANIA STAMP on the other slot to trigger a puzzle (E).
- Place the correct medallions to answer the riddles.
- Solution: Vampire castle, borsch and vampire (1-3).
- Go right.
Chapter 12: Final Chapter
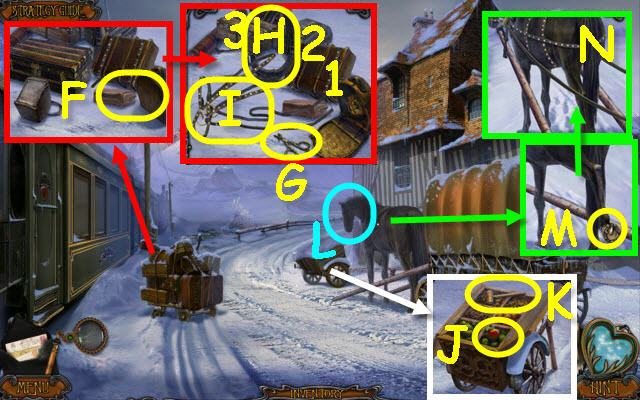
- Select the suitcases and zoom in and select the suitcases again (F).
- Use the scissors (G) on each of the straps (1-3); take the YOLK (H) and HARNESS (I).
- Remove the snow and open the cart; take the APPLE (J) and MALLET (K).
- Give the APPLE to the horse (L).
- Select the horse's leg and remove the horseshoe; receive NAILS (M).
- Use the HORSESHOE, NAILS and MALLET on the hoof. Place the YOKE and HARNESS on the horse (N).
- Select the horse.
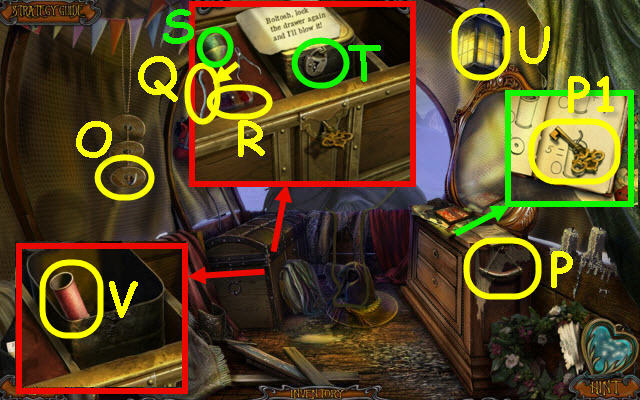
- Take the ROUND PLATE (O) and GUNPOWDER (P).
- Open the book; take the CHEST KEY (P1).
- Use the CHEST KEY on the chest. Use the clippers on the string; take the LONG FUSE (Q) and OIL BOTTLE (R).
- Use the funnel (S) and GUNPOWDER on the lock (T).
- Open the lantern; use the LONG FUSE on the flame and receive a BURNING FUSE (U).
- Use the BURNING FUSE on the lock (T).
- Take the FIRECRACKER CYLINDER (V).
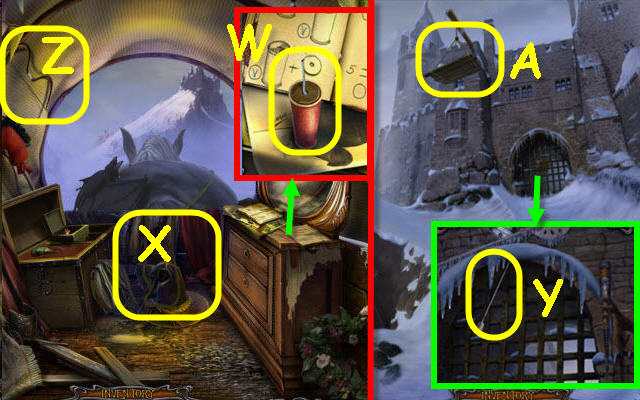
- Place the FIRECRACKER CYLINDER on the dresser. Place the GUNPOWDER, ROUND PLATE and BURNING FUSE in it; take the FIRECRACKER (W).
- Use the FIRECRACKER on the floor (X).
- Go forward.
- Take the ARROW (Y).
- Back out.
- Place the ARROW on the bow; take the BOW (Z).
- Go forward.
- Use the BOW on the platform (A).
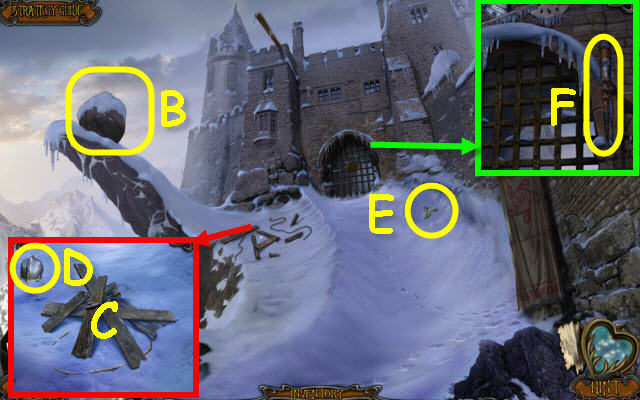
- Move the boulder (B).
- Examine the debris; gather all the boards (C) and take the HELMET (D).
- Use the HELMET on the snow to get a HELMET WITH SNOW; take the V SYMBOL (E).
- Place the V SYMBOL in the slot; take the TORCH (F).
- Back out.
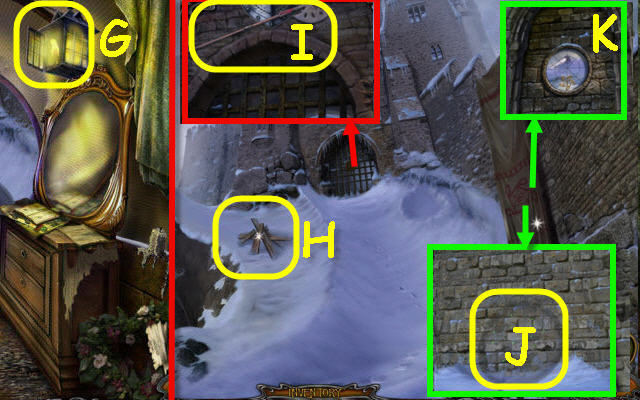
- Use the TORCH on the lantern; receive a BURNING TORCH (G).
- Go forward.
- Use the OIL BOTTLE, BURNING TORCH and HELMET WITH SNOW on the wood pile; receive BOILING WATER (H).
- Use the BOILING WATER on the arch; take the HALBERD (I).
- Remove the banner; use the monocle on the wall (J).
- Select the canvas and use the HALBERD on it; examine the image to trigger a puzzle (K).
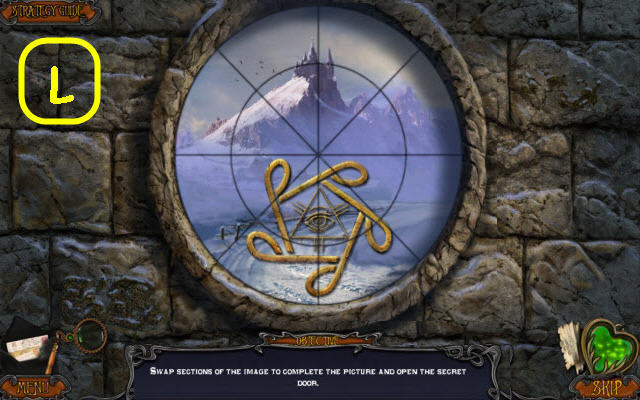
- Complete the image.
- See screenshot for solution (L).
- Use the BURNING TORCH on the passage.
- Examine the grate to access a HOP.
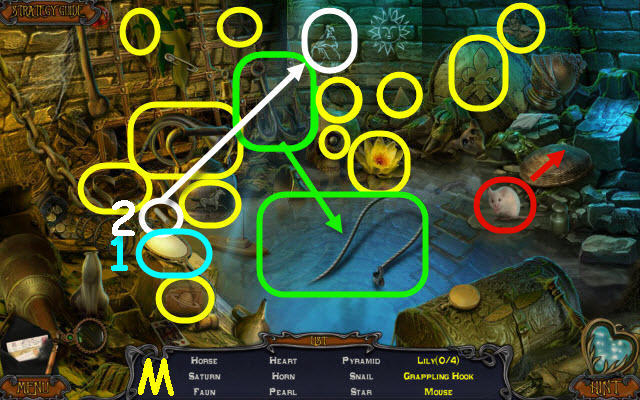
- Play the HOP.
- You receive a GRAPPLING HOOK (M).
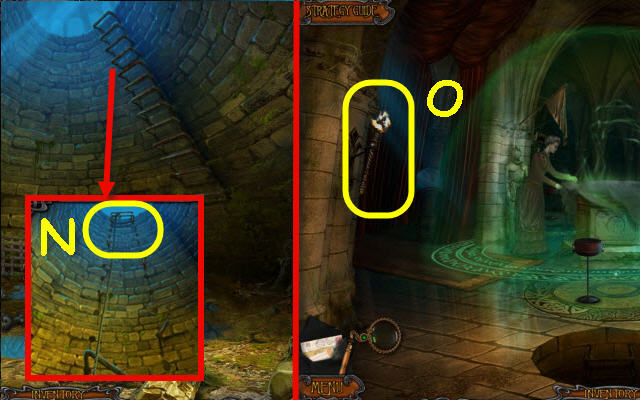
- Select the rungs twice; use the GRAPPLING HOOK on the top rung (N).
- Go up.
- Take the TORCHLIGHT (O).
- Back out.
- Select the grate to access a HOP.
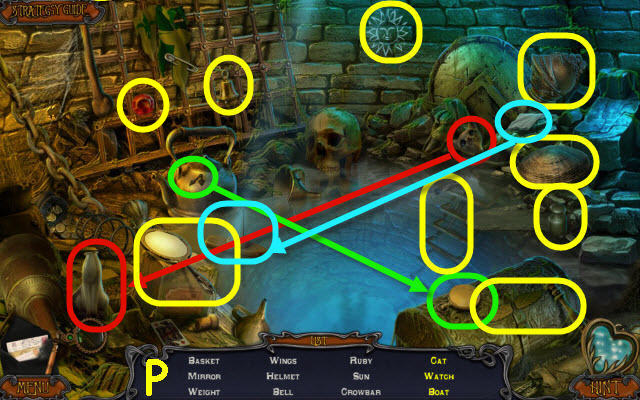
- Play the HOP.
- You receive a CROWBAR (P).
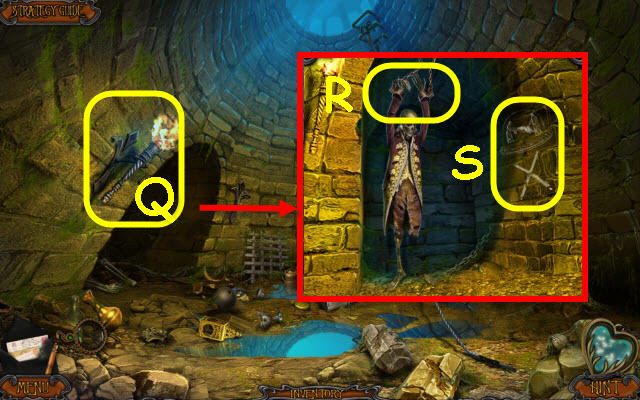
- Place the TORCHLIGHT in the holder (Q).
- Use the CROWBAR on the chains (R).
- Use the monocle on the wall; note the symbol (S).
- Go up.
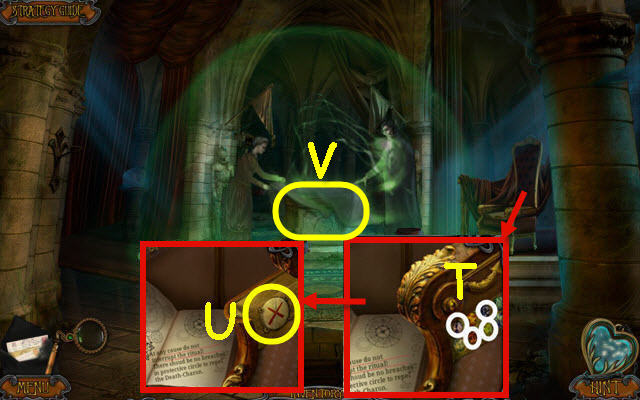
- Use the monocle on the gems; press the gems that lit up (T).
- Complete the X symbols (U).
- Select the altar to trigger a puzzle (V).
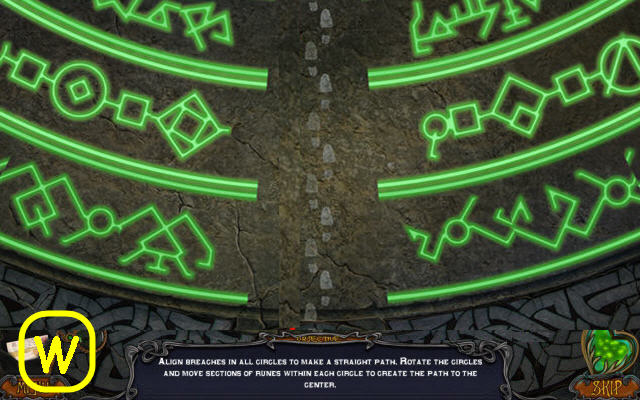
- Make a path.
- See screenshot for solution (W).
- Congratulations! You have successfully completed Haunted Train: Spirits of Charon.
Created at: 2014-02-09

