Walkthrough Menu
- General Tips
- Chapter 1: Cockpit Escape
- Chapter 2: Inside the Lighthouse
- Chapter 3: Underground
- Chapter 4: Abandoned Compound
- Chapter 5: Newtown
- Chapter 6: Neville's Mansion
- Awards
General Tips
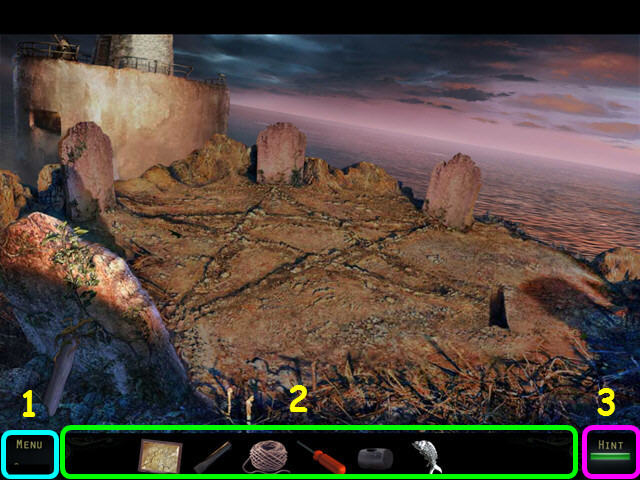
- This is the official guide for Haunting Mysteries: Island of Lost Souls Standard Edition!
- You will have the option of a mini-tutorial once you start the game.
- Hidden Object Scenes and mini-games are often randomized - your solution may vary.
- Hidden Object Scenes will be referred to as HOS in this guide.
- Items listed in yellow are hidden and require opening or moving an object.
- Use the buttons in the lower left corner to access the menu (1).
- Your inventory is in the bottom panel - select an item to use it in the game (2).
- Hints are unlimited, but you must wait for the hint meter to refill (3).
Chapter 1: Cockpit Escape
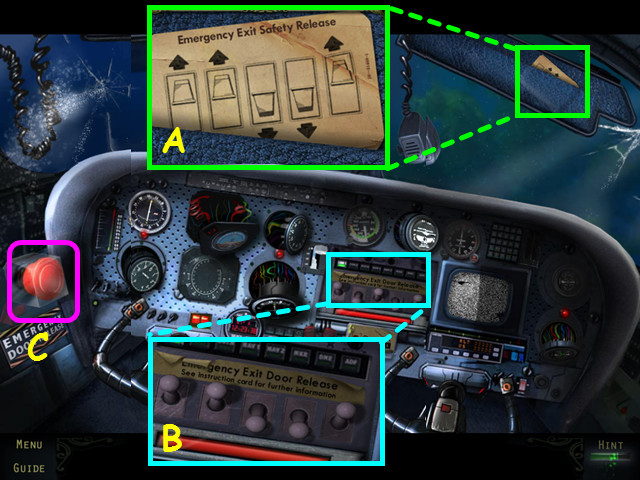
- Look at the visor, pull out the card, and read the Emergency Exit Safety Release code (A).
- Look at the control panel and move the levers to match the code on the card (B).
- Press the Emergency Door Release button (C).
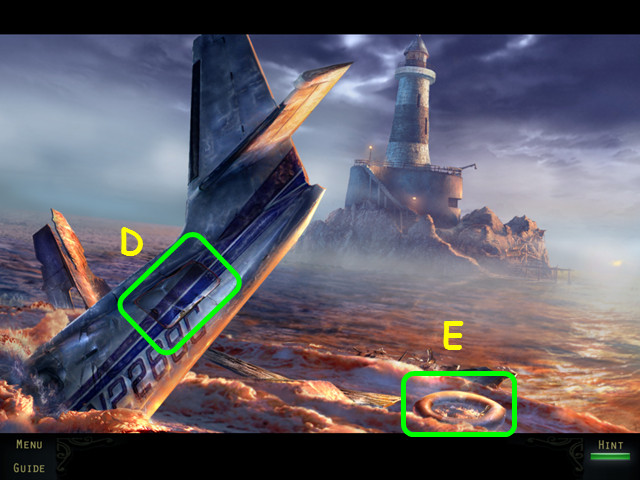
- Note the cargo door on the plane (D).
- Select the life ring for a HOS (E).
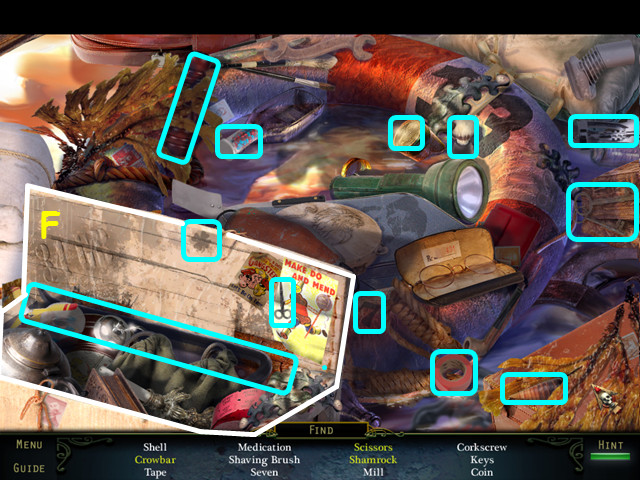
- Locate all the items on the list.
- Items listed in yellow are hidden and require opening or moving an object.
- Open the lid of the crate to reveal several items (F).
- You will earn the CROWBAR.
- Look at the cargo door on the plane.
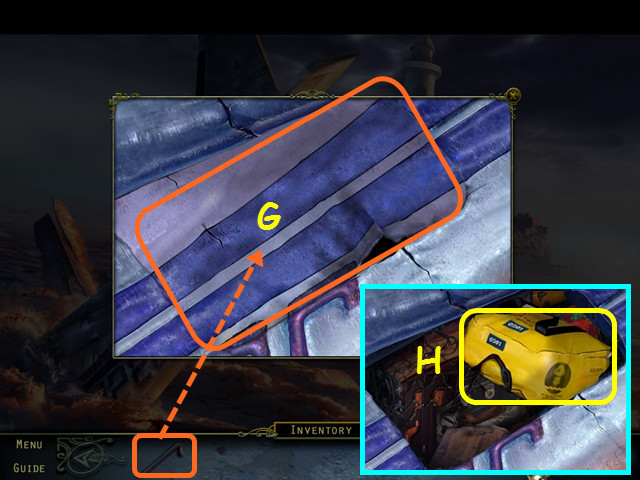
- Use the CROWBAR on the cargo door 3 times (G).
- Select the open cargo area for a HOS (H).

- Locate all the items on the list.
- You will earn the LIFE RAFT.
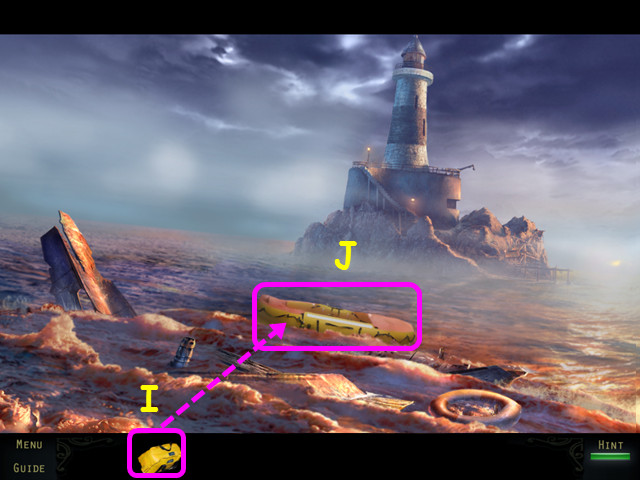
- After the main body of the plane sinks, place the LIFE RAFT in the ocean (I).
- Select the life raft to travel to the jetty (J).
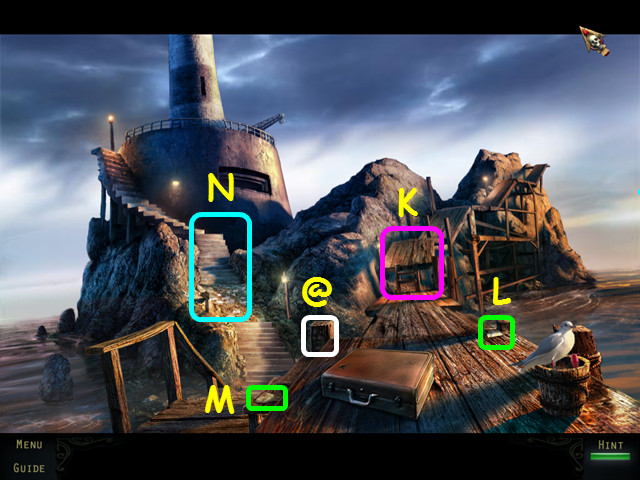
- Try to walk the wooden path on the right (K).
- Take the 1/8 PHOTO SCRAP (L) and the 2/8 PHOTO SCRAP (M).
- Find the 1/40 Haunted Souls (@).
- Take the left path towards the lighthouse (N).
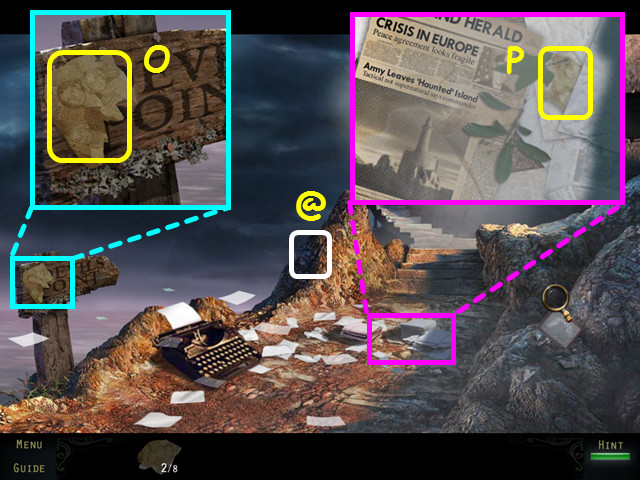
- Find the 2/40 Haunted Souls (@).
- Look at the sign and take the 3/8 PHOTO SCRAP (O).
- Look at the papers and take the 4/8 photo scrap (P).
- Walk forward up the steps.
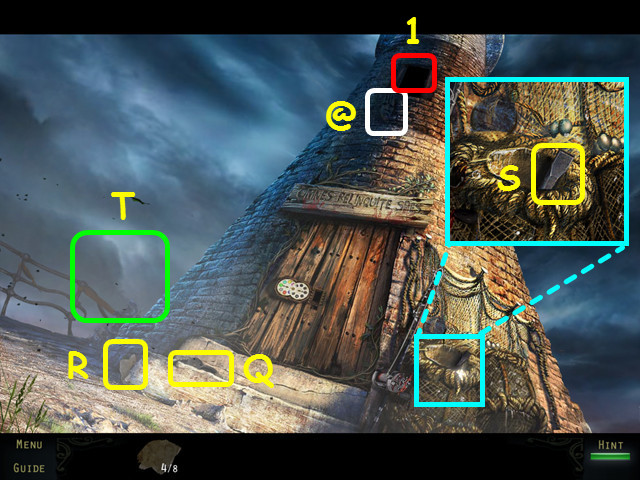
- Find the 3/40 Haunted Souls (@).
- Look for the man in the lighthouse (1).
- Take the TYPEWRITER RIBBON from the steps (Q).
- Take the 5/8 PHOTO SCRAP (R).
- Look at the nets and take the CHISEL (S).
- Walk behind the lighthouse (T).
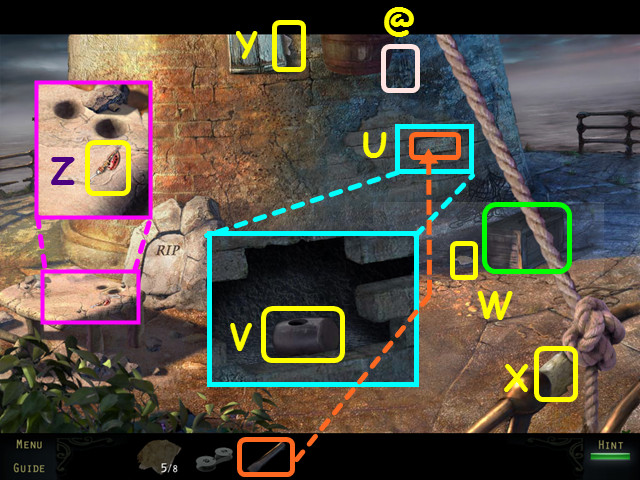
- Find the 4/40 Haunted Souls (@).
- Look at the wall and use the CHISEL 3 times on the loose brick (U).
- Take the HAMMER HEAD (V).
- Move the crate and take the 6/8 PHOTO SCRAP (W).
- Take the 7/8 PHOTO SCRAP (X), and the 8/8 PHOTO SCRAP (Y).
- Look at the table and take the FISHING TACKLE (Z).
- Return to the front of the lighthouse.
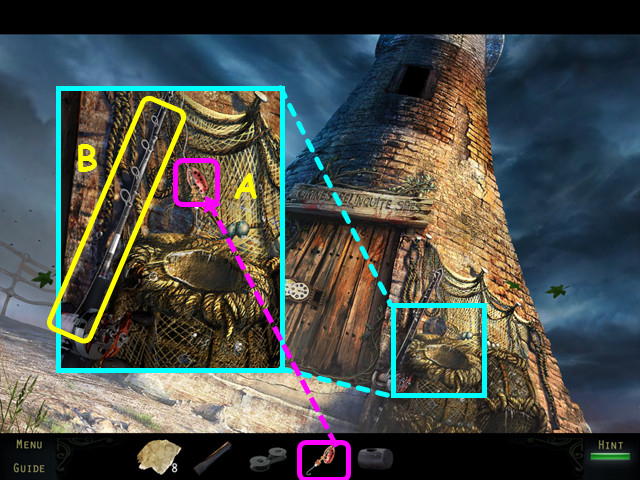
- Look at the netting and place the FISHING TACKLE on the line (A).
- Take the FISHING ROD (B).
- Walk down.
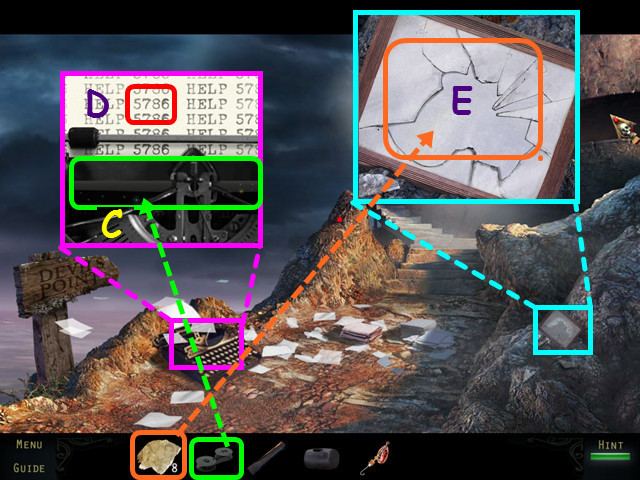
- Look at the typewriter and place the TYPEWRITER RIBBON near the keys (C).
- Note the number code – 5786 (D).
- Look at the picture frame and use the 8 PHOTO SCRAPS on it for a mini-game (E).
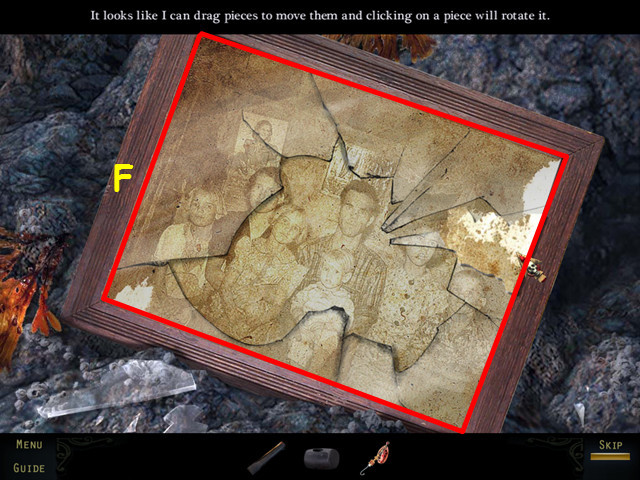
- Restore the photo by dragging the photo pieces into position.
- Select a photo piece to rotate it in place.
- Take the completed PHOTO (F).
- Walk down to the jetty area.
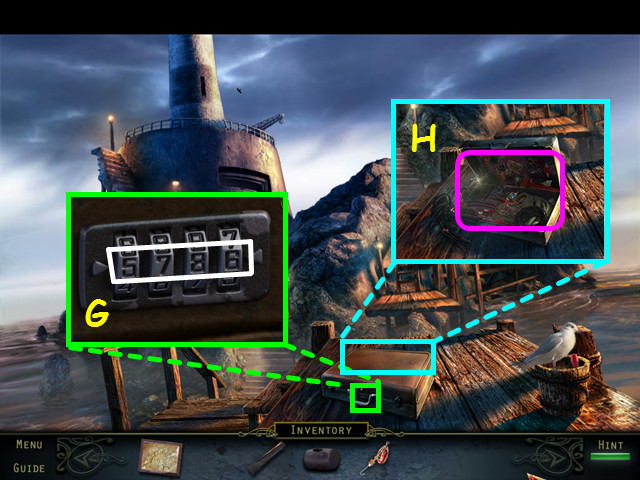
- Look at the briefcase and enter the code 5786 found on the typewriter (G).
- Select the open briefcase for a HOS (H).
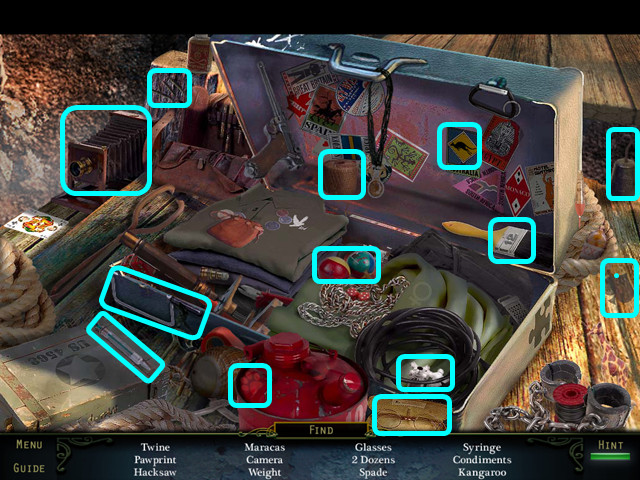
- Locate all the items on the list.
- You will earn the BALL OF TWINE.
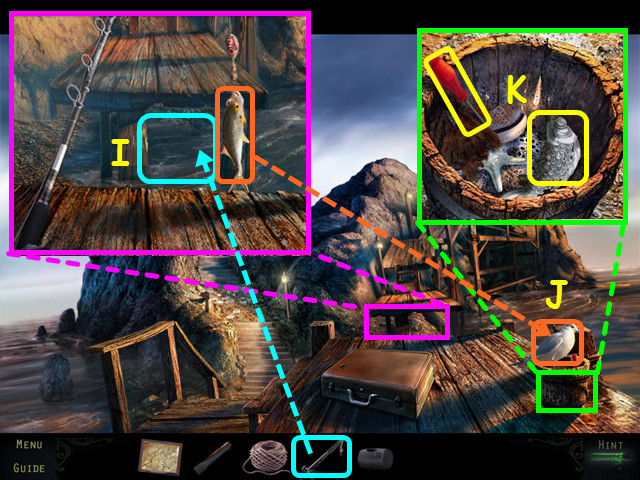
- Look at the hole in the walkway and use the FISHING ROD on the water (I).
- The HERRING will go automatically into your inventory.
- Give the HERRING to the seagull (J).
- Look in the bucket; take the SCREWDRIVER and the SILVER FISH (K).
- Return to the front of the lighthouse.
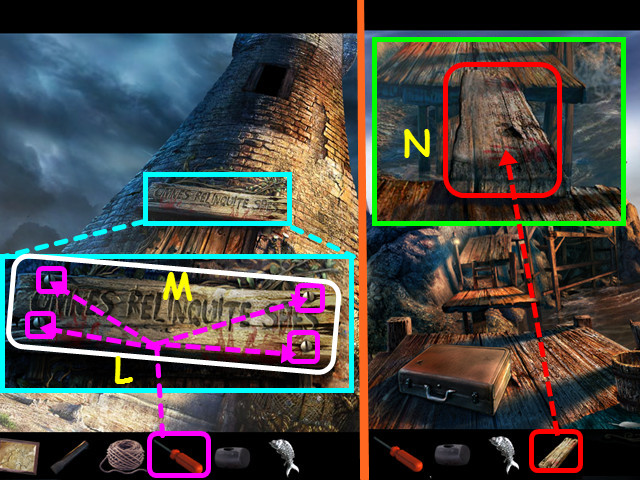
- Look at the sign over the door and use the SCREWDRIVER on the 4 screws (L).
- Take the PLANK (M).
- Return to the jetty.
- Look at the gap and place the PLANK over the divide (N).
- Walk forward on the right path to the graveyard.
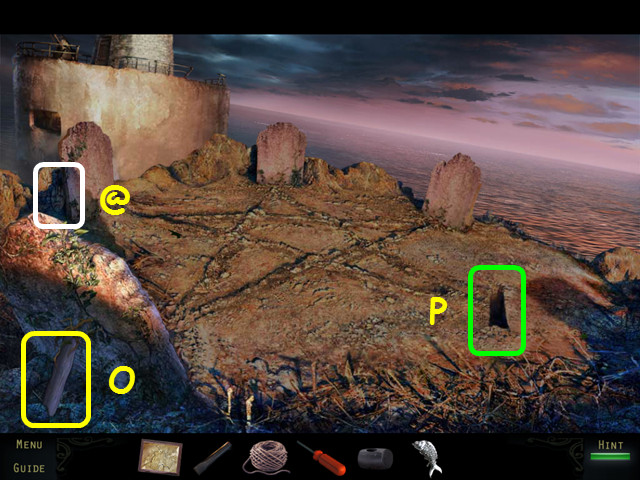
- Find the 5/40 Haunted Souls (@).
- Take the WOODEN HANDLE (O).
- Note the missing headstone (P).
- Return to the rear of the lighthouse.
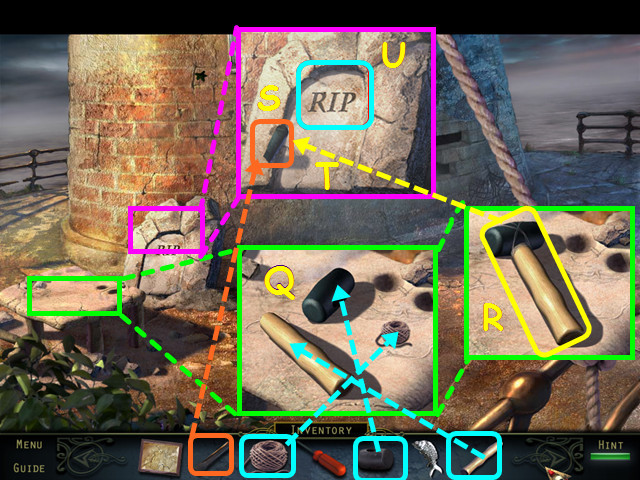
- Look at the table; place the WOODEN HANDLE, BALL OF TWINE, and HAMMER HEAD on top (Q).
- Take the HAMMER (R).
- Look at the unfinished gravestone and place the CHISEL on the stone (S).
- Use the HAMMER on the chisel 7 times as it chips away the stone (T).
- Take the GRAVE STONE (U).
- Return to the graveyard.
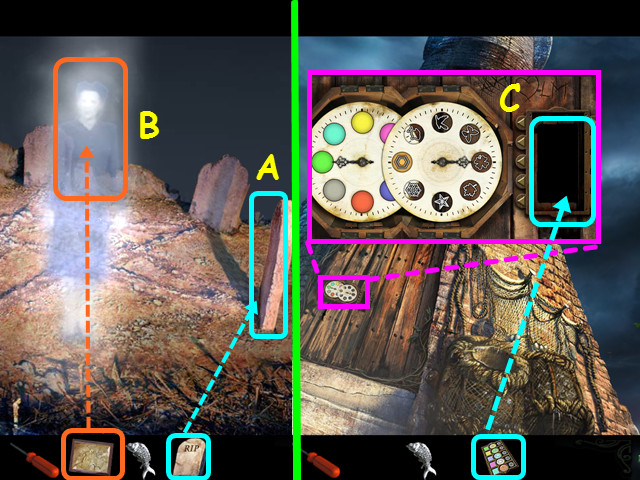
- Place the GRAVE STONE into the hole (A).
- Speak to the ghost, then give her the PHOTO (B).
- You will receive the PANEL.
- Return to the front of the lighthouse.
- Look at the door and place the panel into the control for a mini-game (C).
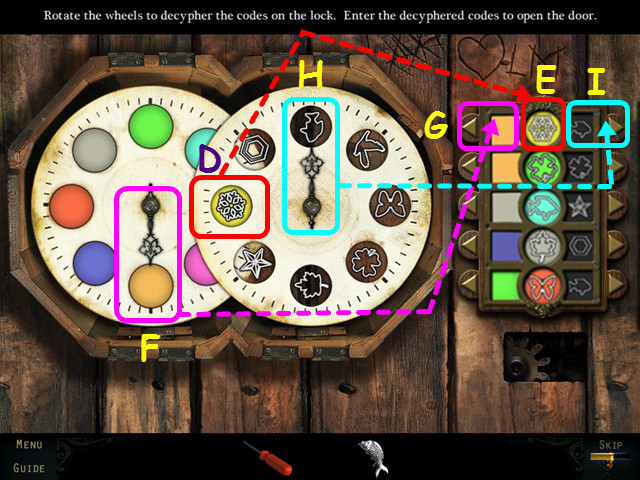
- Turn the dials so the center circle (D) has the same color and symbol as the center of the first row on the panel (E).
- Look at the color the arrow on the left dial points to (F), then change the color in the first row of the panel to match (G).
- Look at the symbol the arrow on the right dial points to (H), then change the color in the first row of the panel to match (I).
- Repeat this process for the next 4 rows of the panel.
- Enter the lighthouse.
Chapter 2: Inside the Lighthouse
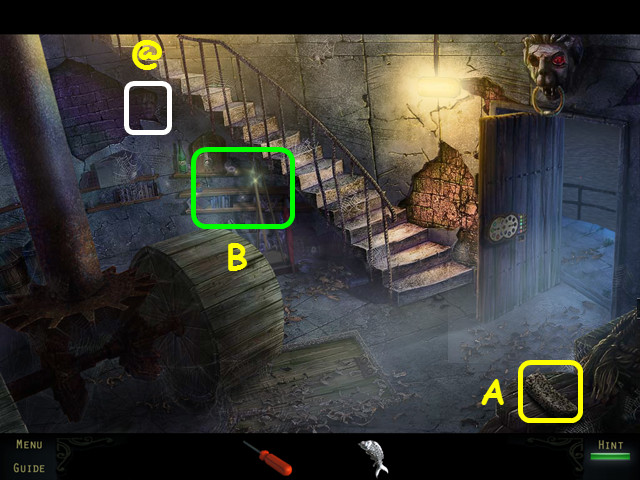
- Find the 6/40 Haunted Souls (@).
- Take the DRY SPONGE (A).
- Select the shelves under the stairs for a HOS (B).
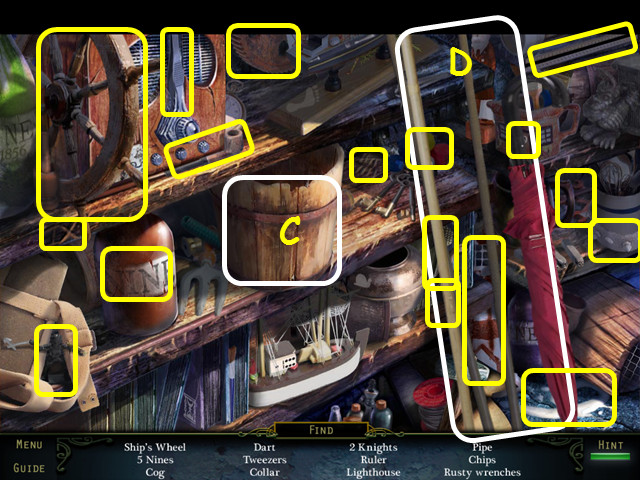
- Locate all the items on the list.
- Move the bucket back and forth to find the items behind it (C).
- Move the poles and umbrella (D).
- You will earn the ship's wheel.
- Walk up the stairs to the lighthouse tower.
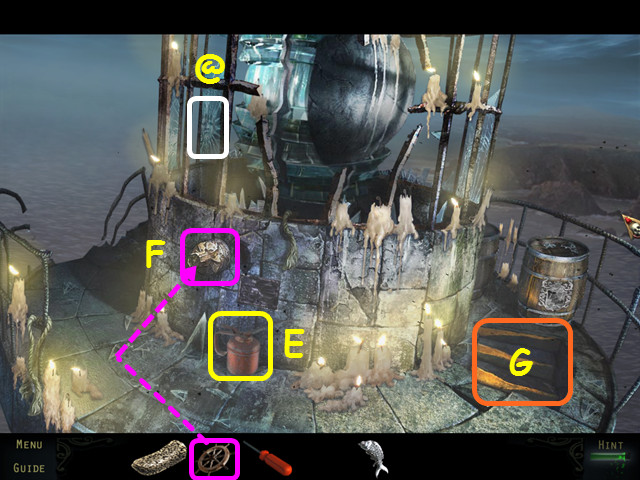
- Find the 7/40 Haunted Souls (@).
- Take the OIL CAN (E).
- Place the SHIP'S WHEEL on the spindle (F).
- Walk down the stairs (G).
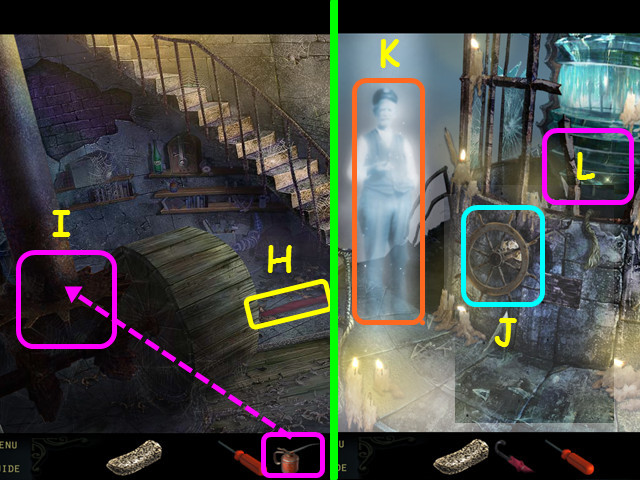
- Take the UMBRELLA (H).
- Use the OIL CAN on the rusty gears (I).
- Return up the stairs to the lighthouse tower.
- Turn the wheel to rotate the light (J).
- Talk to the keeper (K).
- Select the base of the light for a HOS (L).
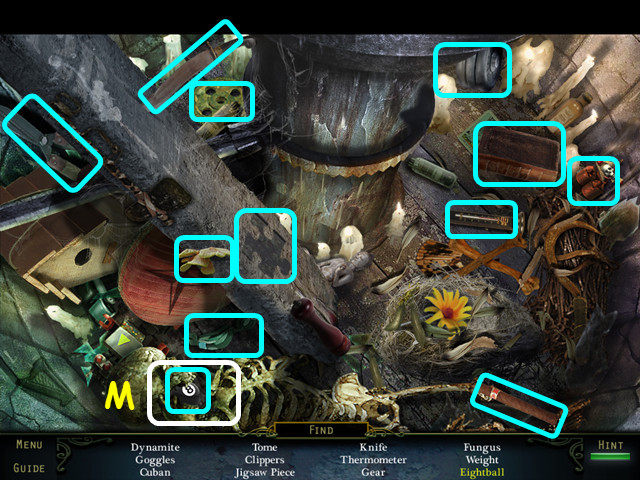
- Locate all the items on the list.
- Open the skull's jaw to find the eight-ball (M).
- You will earn the KNIFE.
- Exit the lighthouse and walk to the rear of the lighthouse.
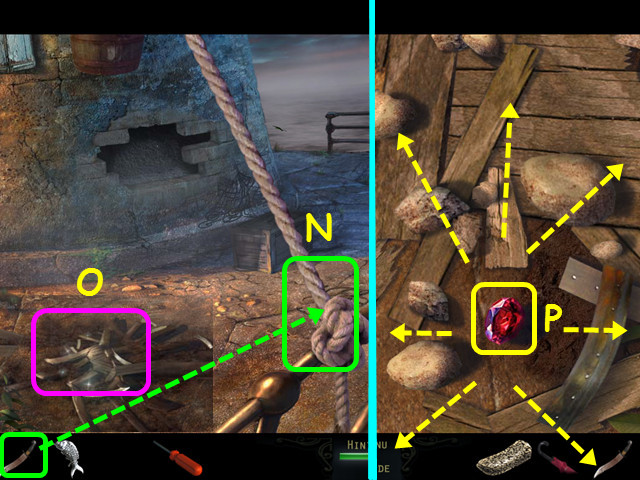
- Use the KNIFE to cut the rope (N).
- Look at the barrel debris (O).
- Drag rocks and barrel pieces aside to find the JEWEL (P).
- Return to the front of the lighthouse and go inside.
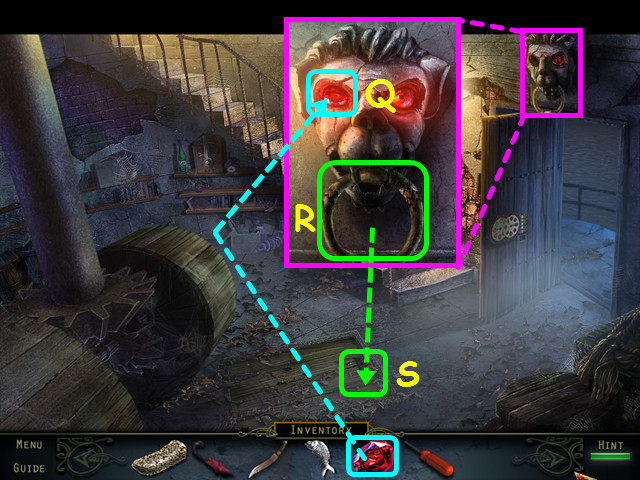
- Look at the gargoyle, place the JEWEL in the eye (Q), then take the METAL RING (R).
- Use the METAL RING on the trapdoor (S).
- Open the trapdoor and walk down to the tower basement.
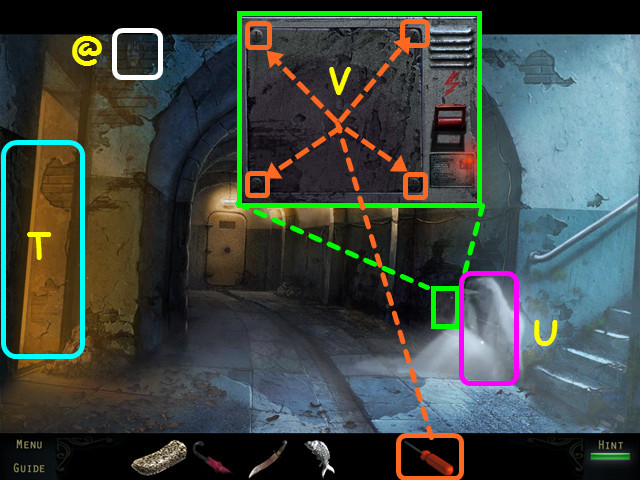
- Find the 8/40 Haunted Souls (@).
- Note the door to the tower bunker (T).
- Talk to Lillian (U).
- After Lord Neville's ghost leaves, look at the junction box and use the SCREWDRIVER to remove the 4 screws (V).
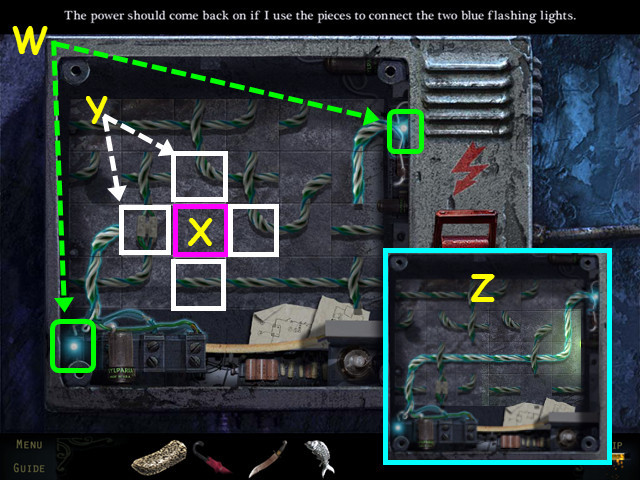
- Slide the wire pieces to connect the blue flashing lights (W).
- Wire pieces can only slide to an empty spot (X).
- The blinking white squares indicate the pieces that can be moved (Y).
- Our solution (Z) was to move the wires: up-right-down-down-left-left-up-up-left-left-down-right-up.
- This mini-game is randomized; your solution may vary.
- Walk left to the tower bunker.
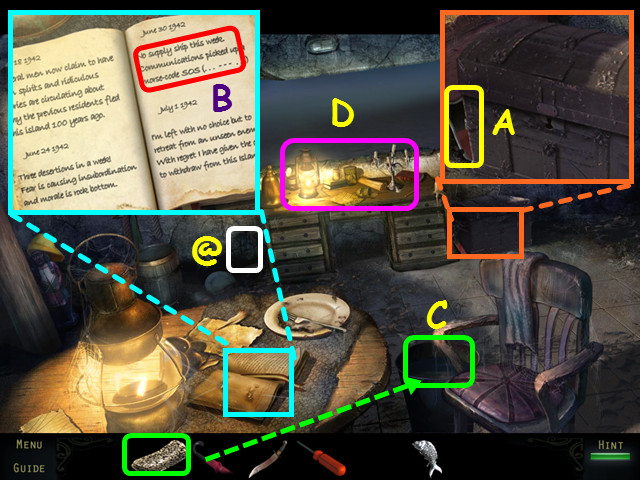
- Find the 9/40 Haunted Souls (@).
- Look at the chest and take the 1/2 SHIELD HALF (A).
- Look at the journal, turn the page and read about the SOS Signal (B).
- Use the DRY SPONGE in the bucket to get the WET SPONGE (C).
- Select the desk for a HOS (D).
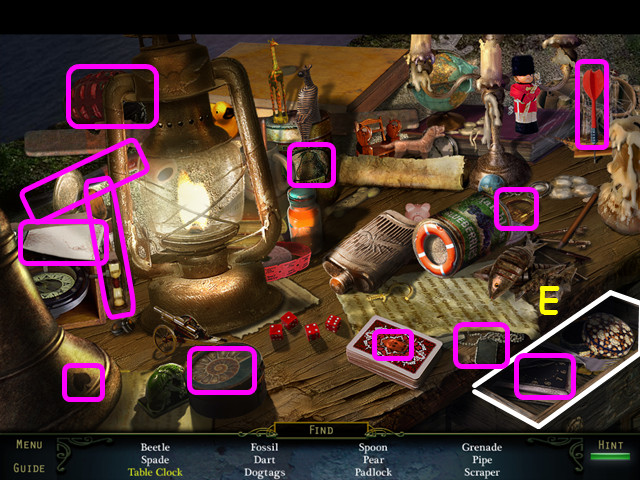
- Locate all the items on the list.
- Open the drawer to find the table clock (E).
- You will earn the SCRAPER.
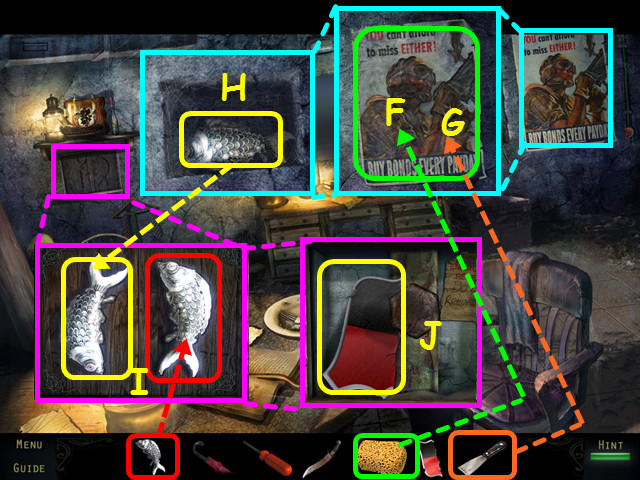
- Look at the poster and use the WET SPONGE on the paper (F).
- Use the SCRAPER on the poster 5 times to remove all the paper (G).
- Take the second SILVER FISH (H).
- Look at the cabinet and place the 2 SILVER FISH into the indentations (I).
- Take the second SHIELD HALF (J).
- Return to the main floor of the lighthouse and select the shelves under the stairs for a HOS.
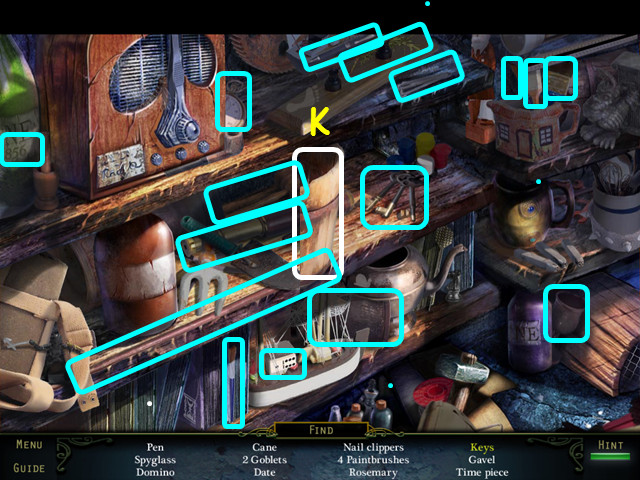
- Locate all the items on the list.
- Move the bucket to find the gavel and the keys (K).
- You will earn the SPYGLASS.
- Walk up the stairs.
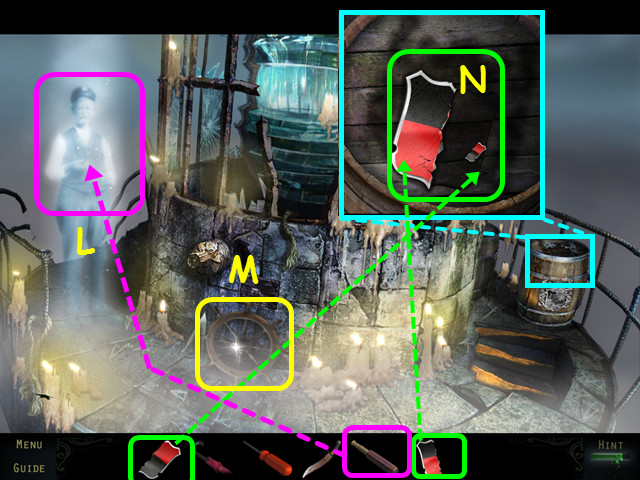
- Give the SPYGLASS to the keeper and he will give you the PUZZLE PIECE (L).
- Take the SHIP'S WHEEL (M).
- Look at the barrel and place the 2 SHIELD PIECES into the niche for a mini-game (N).
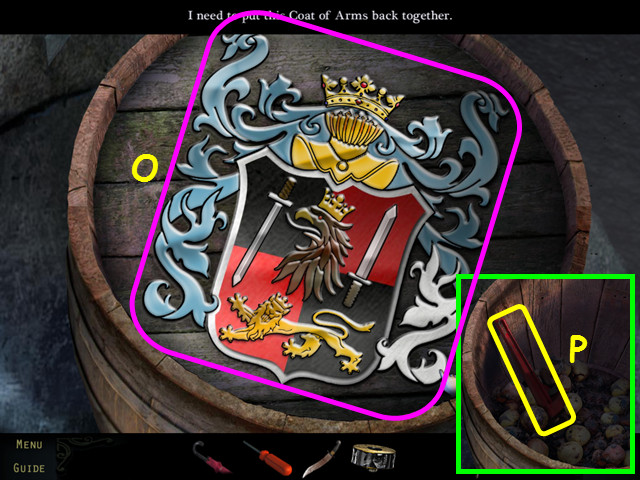
- Drag the pieces to fit into the outline and restore the crest (O).
- Take the WRENCH from inside the barrel (P).
- Return to the tower bunker.
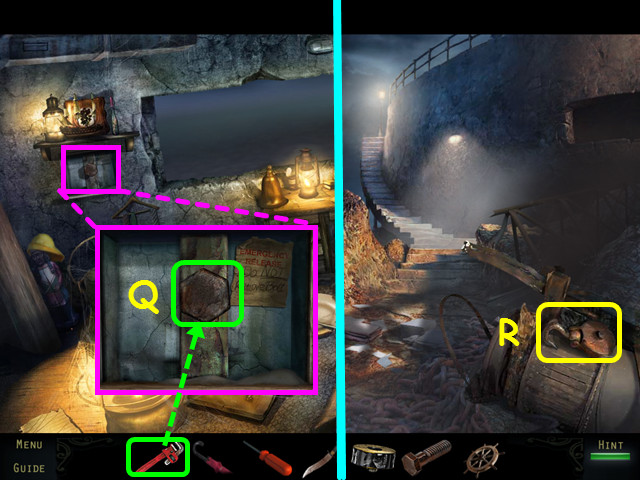
- Look at the cabinet and use the WRENCH to take the LARGE BOLT (Q).
- Exit the bunker and return to the area with the typewriter.
- Take the HEAVY DUTY HOOK (R).
- Return to the lighthouse basement and walk forward to the blast door.
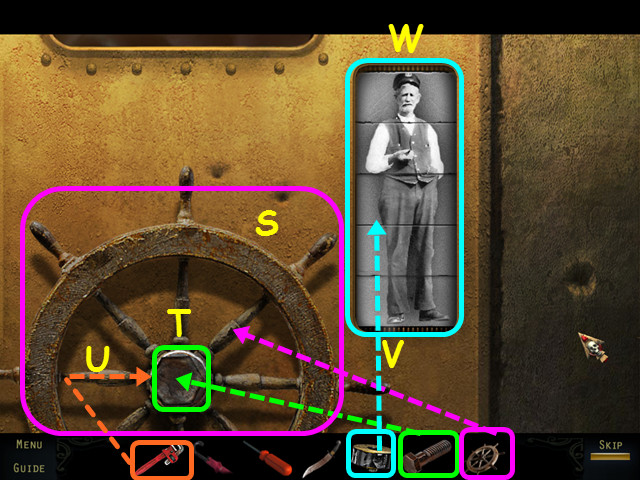
- Place the SHIP'S WHEEL (S) on the door, followed by the LARGE BOLT (T).
- Use the WRENCH on the large bolt (U).
- Turn the wheel.
- Place the PUZZLE PIECE into the opening (V).
- Turn the pieces to form a picture of the keeper (W).
Chapter 3: Underground
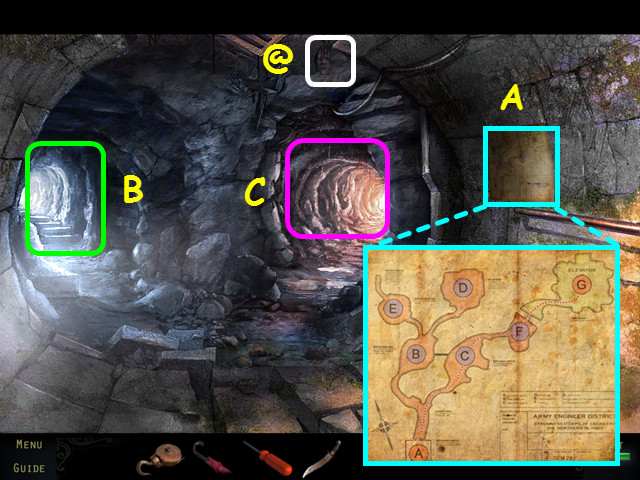
- Find the 10/40 Haunted Souls (@).
- Read the map (A).
- Note the path to Cave B (B).
- Walk right to Cave C (C).
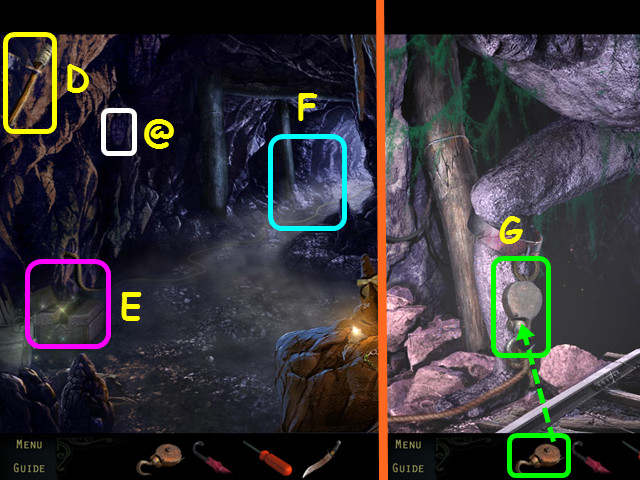
- Find the 11/40 Haunted Souls (@).
- Take the UNLIT TORCH (D).
- Note the toolbox (E).
- Walk forward to Cave F (F).
- Place the HEAVY DUTY HOOK on the ring (G).
- Walk down and select the toolbox for a HOS.
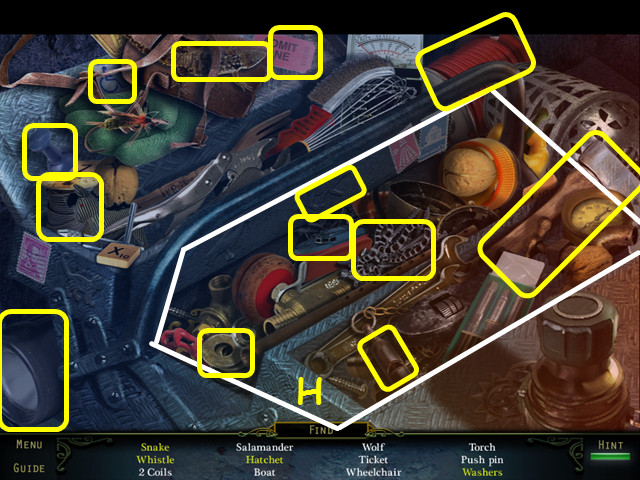
- Locate all the items on the list.
- Open the front section of the toolbox to make several items visible (H).
- You will earn the HATCHET.
- Walk down, then take the left path to Cave B.
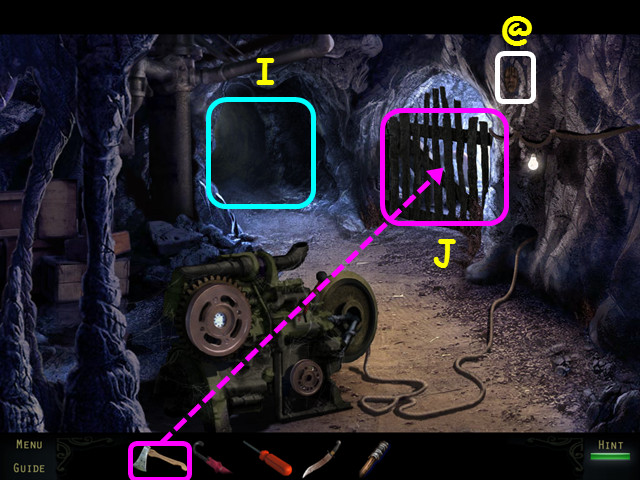
- Find the 12/40 Haunted Souls (@).
- Note the path to Cave E (I).
- Use the HATCHET on the gate (J).
- Walk through the gate to Cave D.
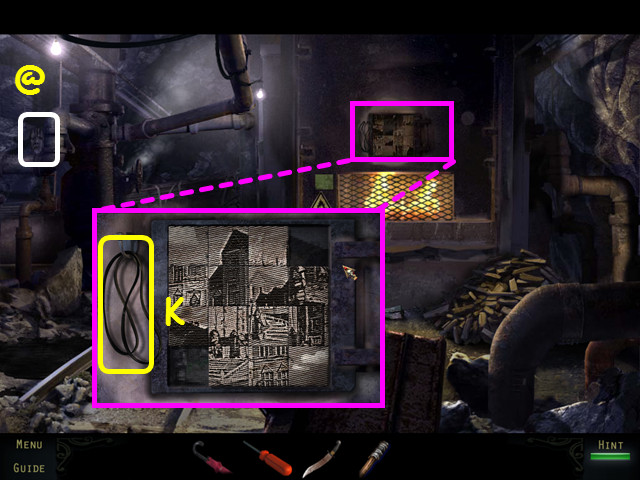
- Find the 13/40 Haunted Souls (@).
- Look at the furnace and take the MACHINE BELT (K).
- Walk down once.
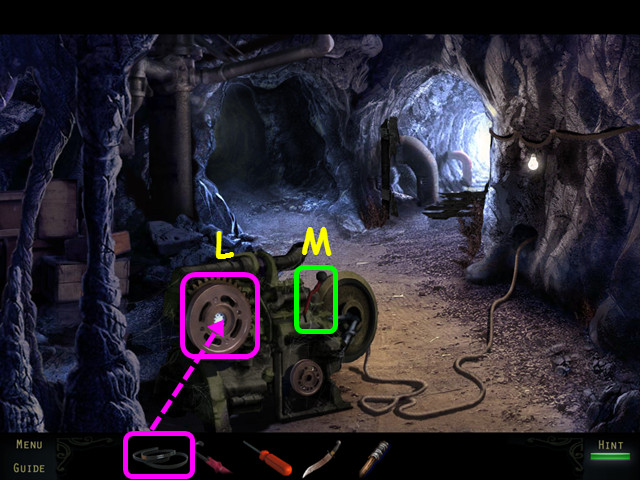
- Place the MACHINE BELT on the winch (L).
- Pull the lever (M).
- Return to Cave E.
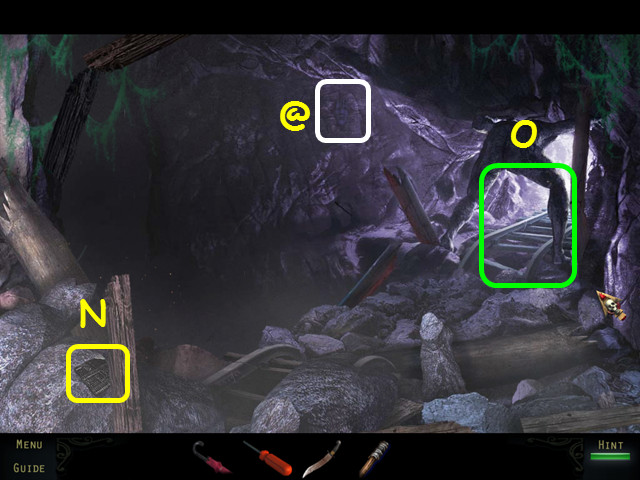
- Find the 14/40 Haunted Souls (@).
- Take the 1/2 PUZZLE PIECE (N).
- Walk forward to the cavern (O).
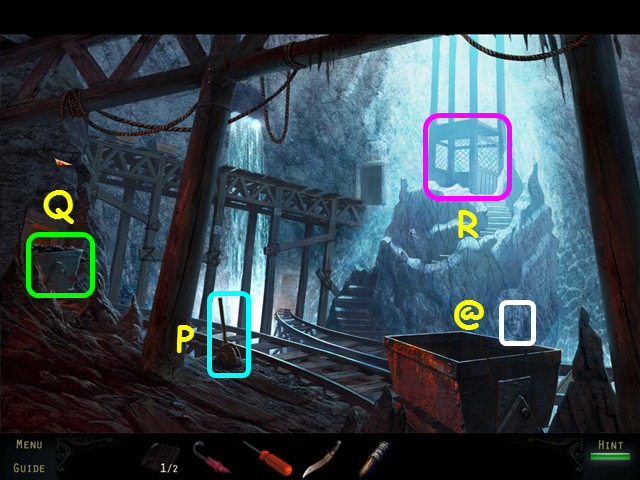
- Find the 15/40 Haunted Souls (@).
- Pull the lever (P).
- Look in the coal cart, but there is nothing you can use (Q).
- Walk to the elevator (R).
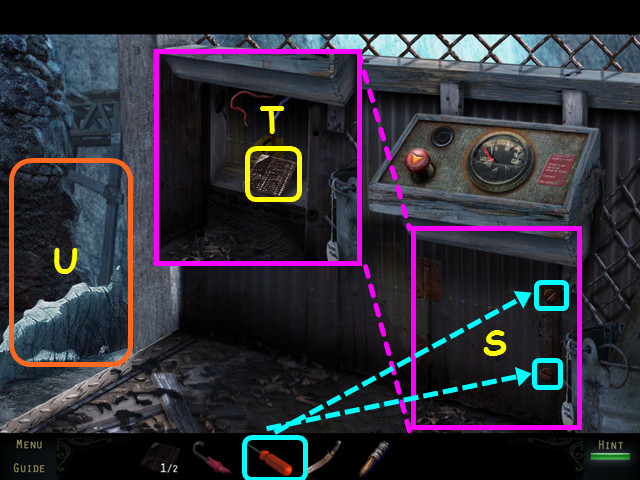
- Use the SCREWDRIVER to remove the 2 screws from the panel (S).
- Take the 2/2 PUZZLE PIECE (T).
- Walk left to exit the elevator (U).
- Return to Cave D and look at the furnace.
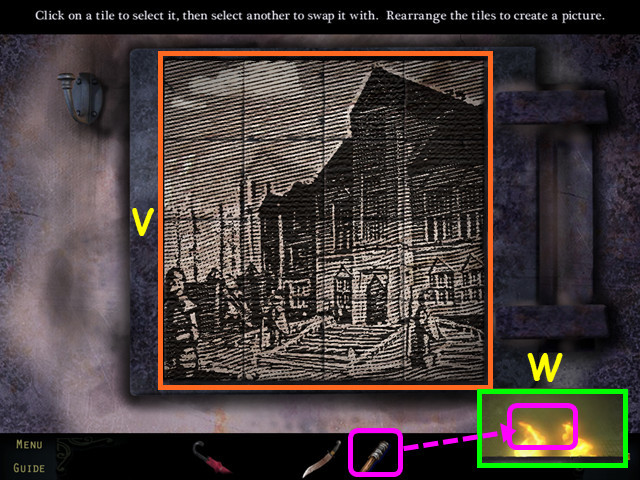
- Place the 2 PUZZLE PIECES on the grid to activate the mini-game.
- Restore the picture by swapping the tiles (V).
- Select 2 tiles to swap position.
- Use the UNLIT TORCH on the flames (W).
- Walk down, then enter Cave E on the left.
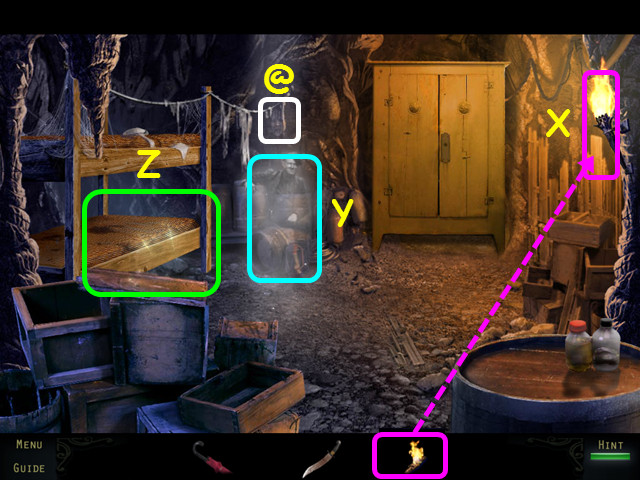
- Use the UNLIT TORCH on the wall torch (X).
- Talk to the miner (Y).
- Find the 16/40 Haunted Souls (@).
- Select the bunks for a HOS (Z).
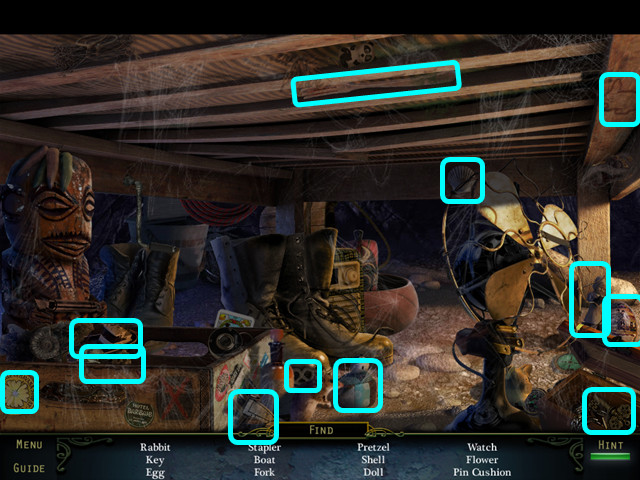
- Locate all the items on the list.
- You will earn the CHEST KEY.
- Walk down 3 times, then go left into the tower bunker.
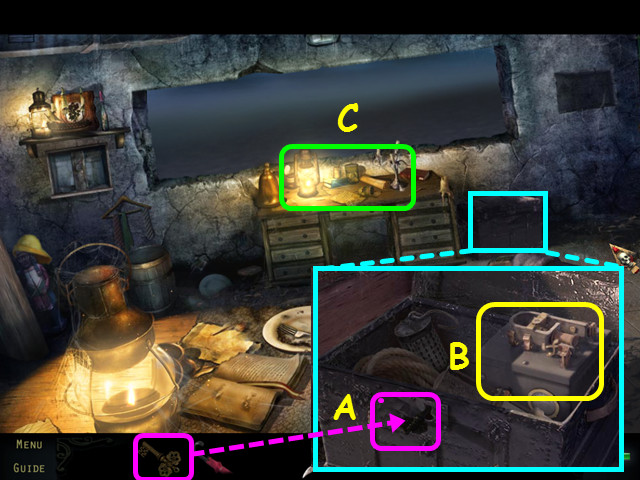
- Look at the chest and use the CHEST KEY on the lock (A).
- Take the BATTERY (B).
- Select the desk for a HOS (C).
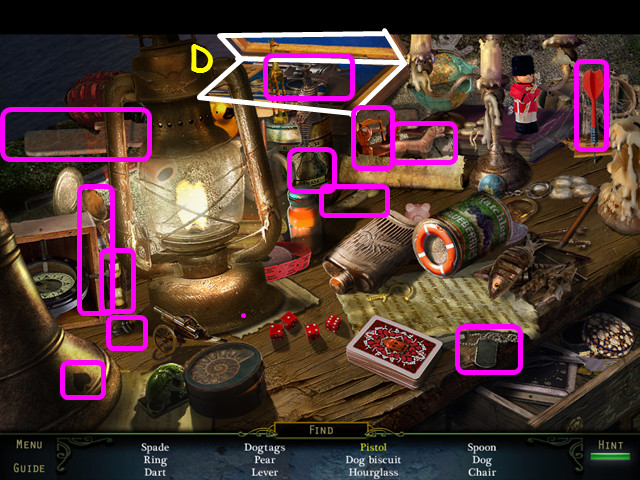
- Locate all the items on the list.
- Open the box to reveal the pistol (D).
- You will earn the RAIL LEVER.
- Return to Cave F cavern and the rail carts.
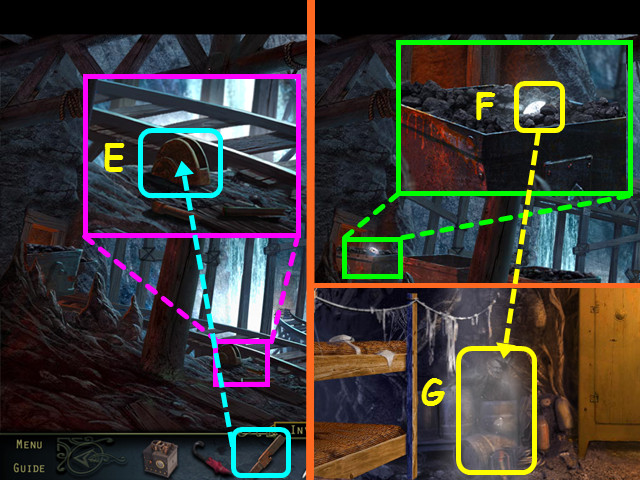
- Look at the switch and place the RAIL LEVER in the holder (E).
- Look in the far left cart and take the DIAMOND (F).
- Return to Cave E and give the DIAMOND to the miner (G).
- The miner will give you the BUTTON.
- Return to the elevator.
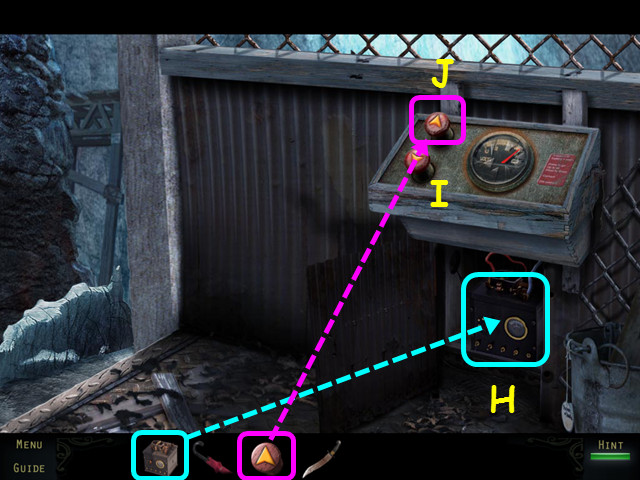
- Connect the BATTERY to the wires (H).
- Place the BUTTON on the panel (I).
- Press the up button (J).
- Once the elevator stops, exit to the left.
Chapter 4: Abandoned Compound
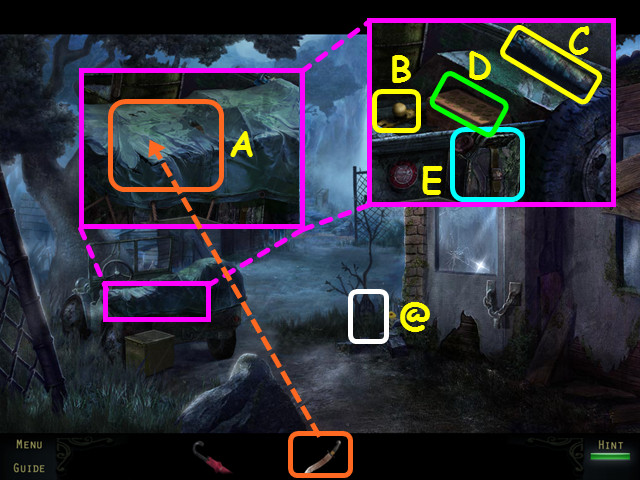
- Find the 17/40 Haunted Souls (@).
- Look at the jeep and use the KNIFE to cut open the tarp (A).
- Take the WARDROBE HANDLE (B) and the GAS CYLINDER (C).
- Note the wooden box (D).
- Note the gas can has fuel (E).
- Return to Cave E.
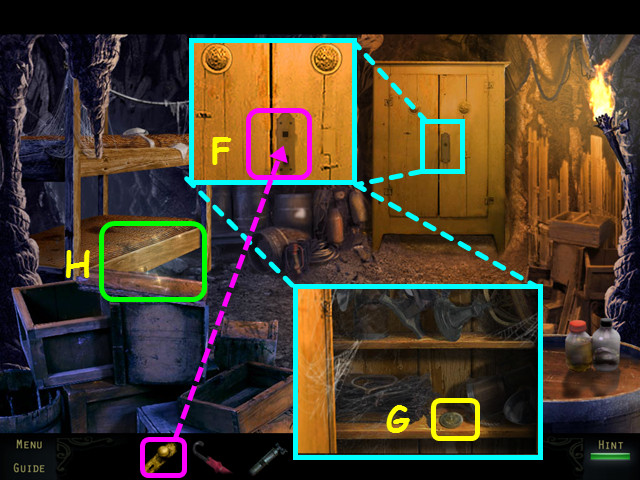
- Look at the wardrobe and place the WARDROBE HANDLE on the door (F).
- Take the BRASS COIN (G).
- Select the bunks for a HOS (H).
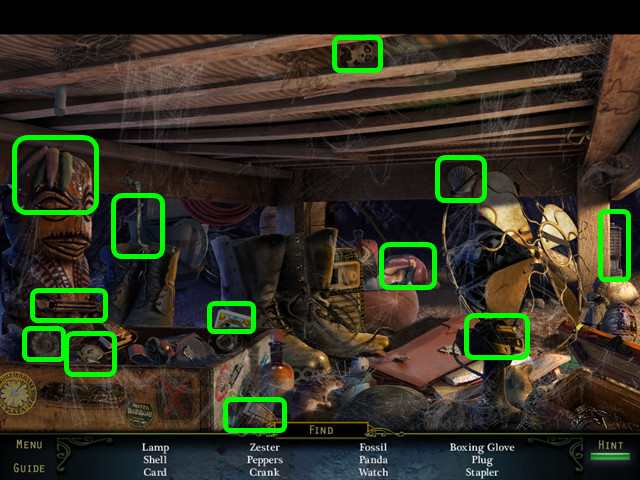
- Locate all the items on the list.
- You will earn the CRANK.
- Return to the jeep and look at the wooden box.
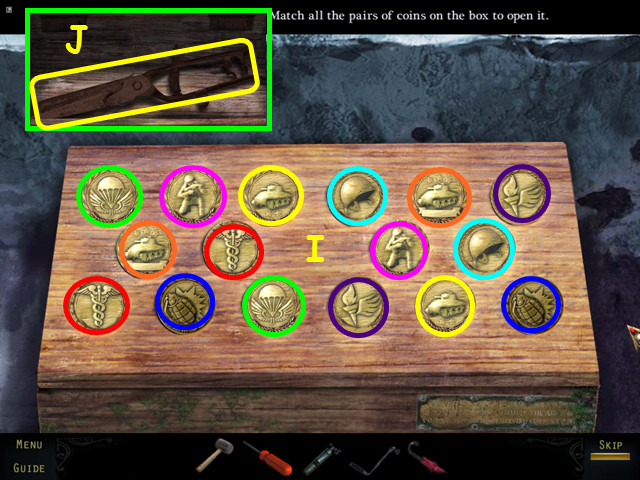
- Place the BRASS COIN in the empty circle to trigger a mini-game.
- Select matching pairs of coins to turn them over (I).
- Coins that do not match will turn back over.
- Take the SHEARS from the open box (J).
- Exit the jeep and walk forward.
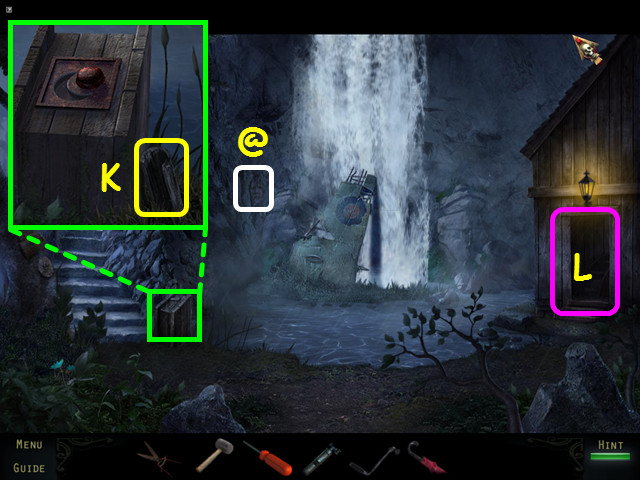
- Find the 18/40 Haunted Souls (@).
- Look at the control and take the first WOODEN PIPE (K).
- Note the mill entrance (L).
- Walk up the steps on the left.
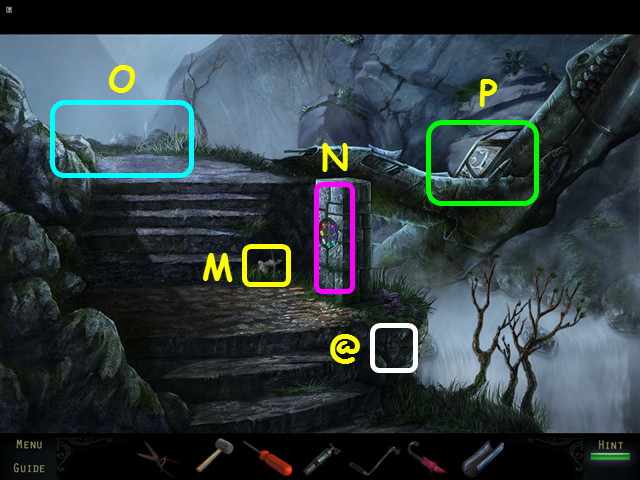
- Find the 19/40 Haunted Souls (@).
- Take the BALLERINA (M).
- Note the mini-game on the pillar (N).
- Note the path to the gate (O).
- Enter the cockpit of the plane (P).
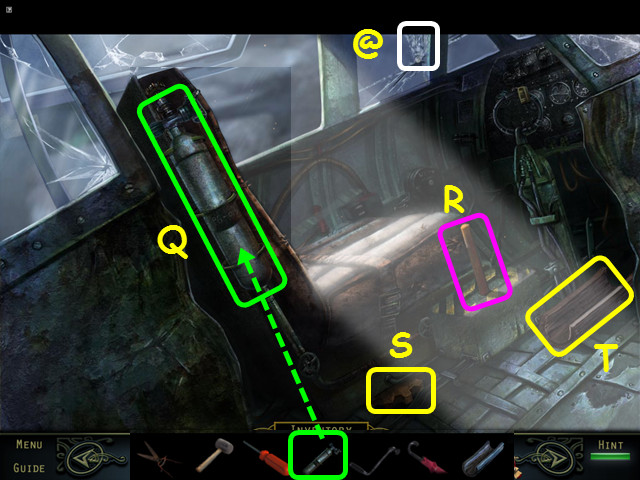
- Find the 20/40 Haunted Souls (@).
- Place the GAS CYLINDER on the chair (Q).
- Pull the lever (R).
- Take the first COG PIECE (S) and the second WOODEN PIPE (T).
- Exit the plane and walk forward to the gate.
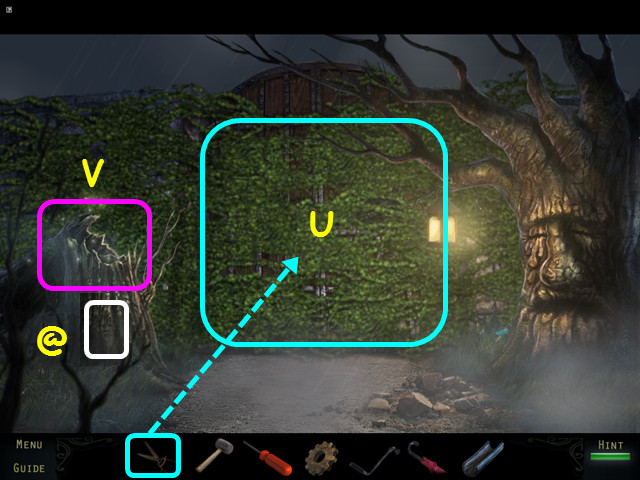
- Find the 21/40 Haunted Souls (@).
- Use the SHEARS on the gate until all the vines are gone (U).
- Select the rotting stump for a HOS (V).
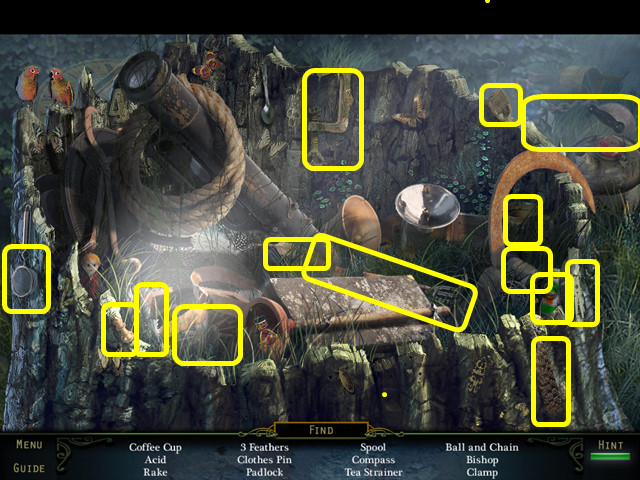
- Locate all the items on the list.
- You will earn the ACID.
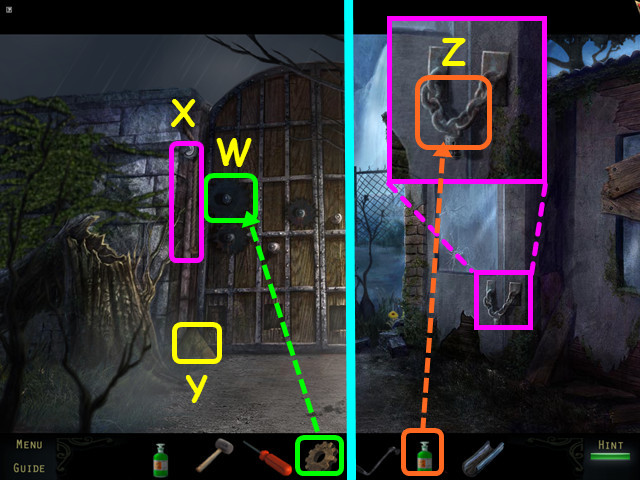
- Place the first COG PIECE on the gate (W).
- Pull the rope (X).
- Take the first STONE WEDGE (Y).
- Walk down 3 times to the compound.
- Look at the chained door and use the ACID on the lock (Z).
- Enter the door for a HOS.
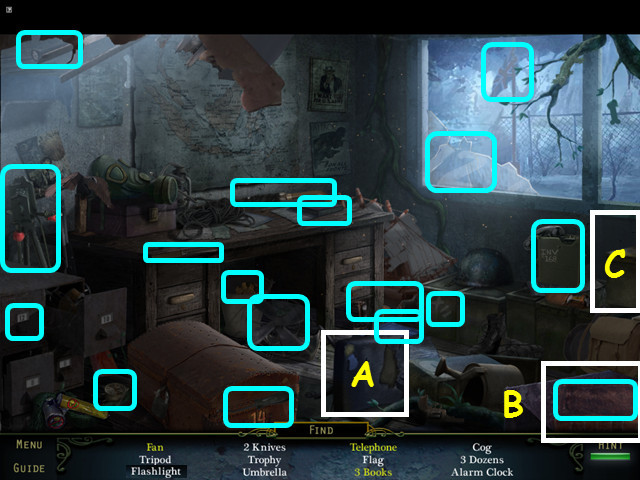
- Locate all the items on the list.
- Move the chair to find the fan (A).
- Move the papers to find the book (B).
- Move the boxes to find the telephone (C).
- You will earn the second COG PIECE.
- Return to the gate.
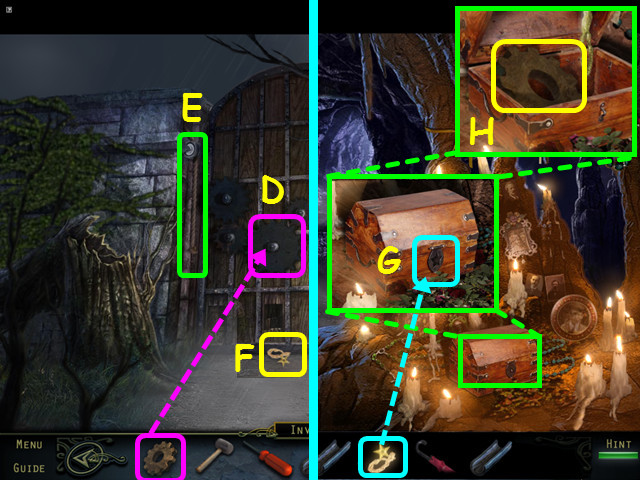
- Place the second COG PIECE on the gate (D).
- Pull the rope (E).
- Take the STAR-SHAPED NECKLACE (F).
- Return to Cave C.
- Look at the jewelry box and use the STAR-SHAPED NECKLACE on the lock (G).
- Take the third COG PIECE (H).
- Return to the gate.
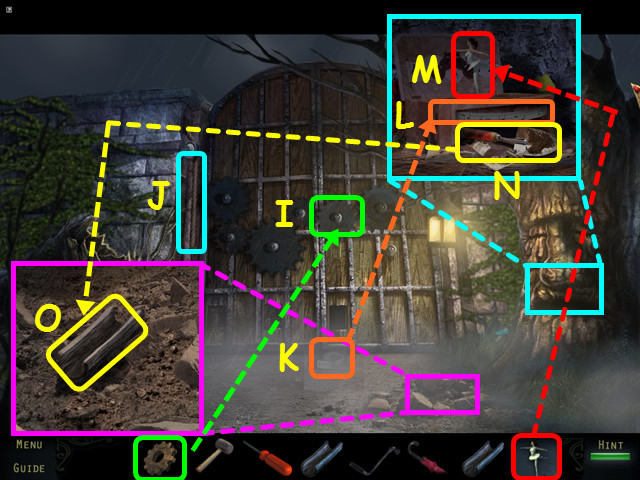
- Place the third COG PIECE on the gate (I).
- Pull the rope (J).
- Take the MUSIC REEL (K).
- Look inside the tree; place the MUSIC REEL (L) and the BALLERINA on the music box (M).
- Take the TROWEL (N).
- Look at the base of the tree; use the TROWEL 3 times to dig up the third WOODEN PIPE (O).
- Walk down twice, then enter the mill on the right.
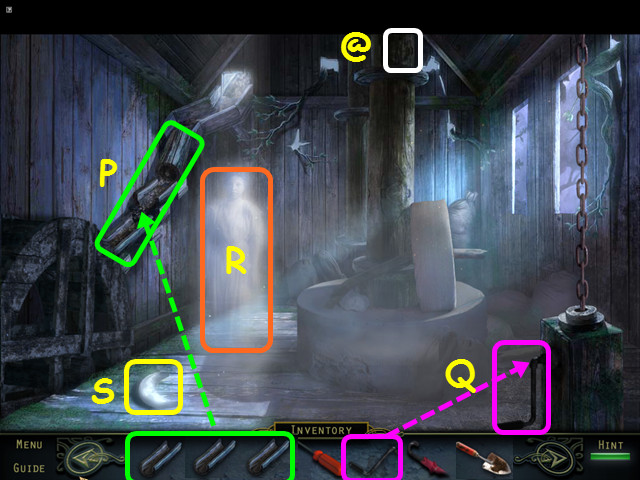
- Find the 22/40 Haunted Souls (@).
- Place the 3 WOODEN PIPES on the wall (P).
- Place the CRANK in the winch (Q).
- Speak to the ghost (R), then turn the crank.
- Take the CRESCENT MOON (S).
- Exit the mill.
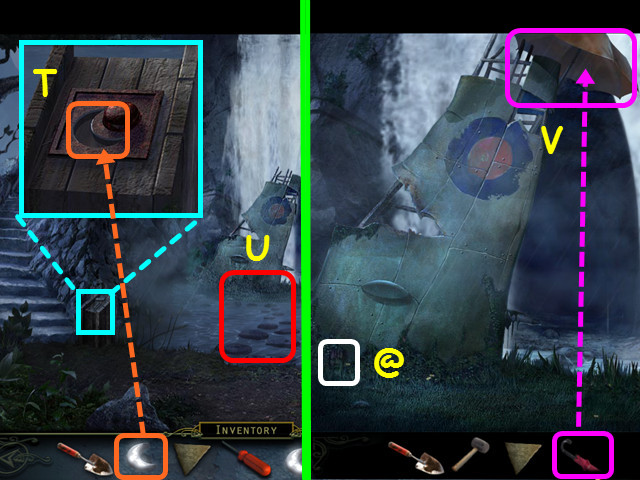
- Look at the control box and place the CRESCENT MOON in the niche (T).
- Walk to the small island (U).
- Find the 23/40 Haunted Souls (@).
- Use the UMBRELLA to block the water (V).
- Walk forward.
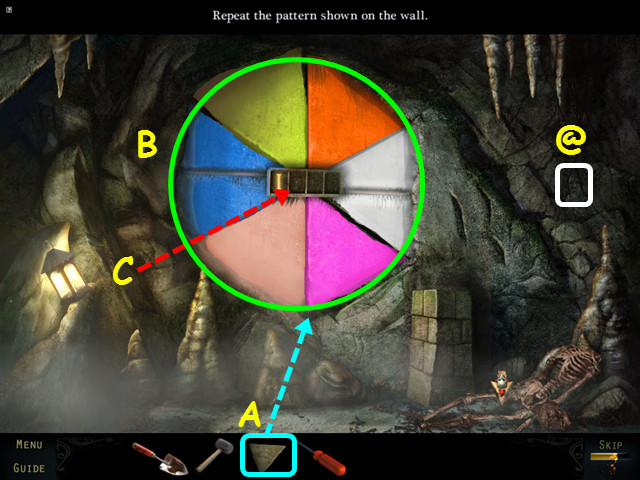
- Find the 24/40 Haunted Souls (@).
- Place the STONE WEDGE into the empty spot (A).
- Watch the wedges light up, then repeat the pattern (B).
- There are 4 sequences to complete (C).
- Our sequences were: yellow-pink-white, orange-pink-white-white, orange-yellow-pink-orange-pink, and blue-tan-tan-tan-tan-yellow.
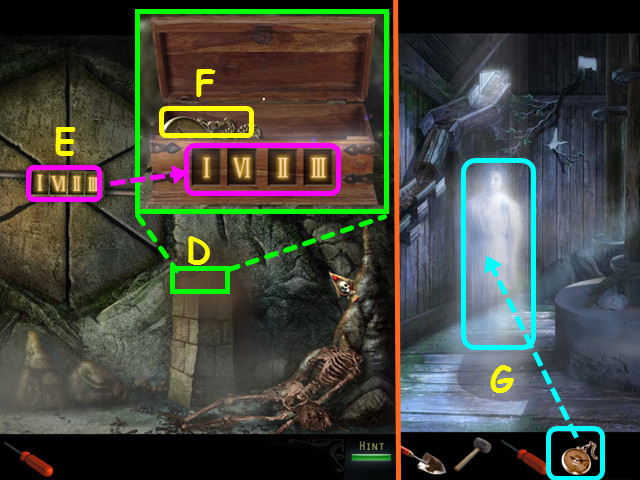
- Look at the box (D) and enter the code from the stone wedges (E).
- Take the ANTIQUE WATCH (F).
- Return to the mill.
- Give the ANTIQUE WATCH to the ghost (G) and you will receive the fourth COG PIECE.
- Return to the gate.
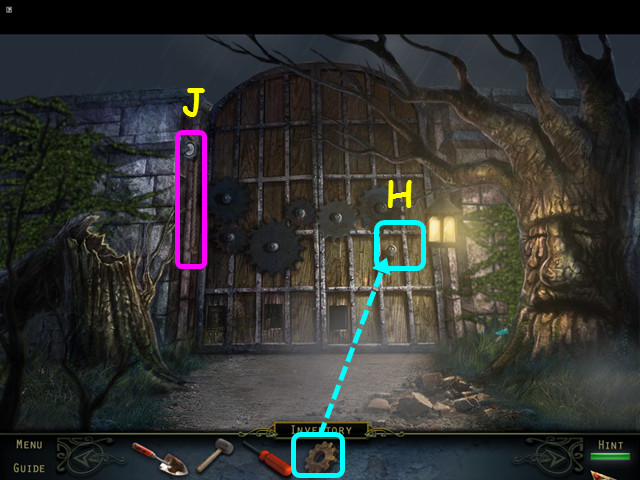
- Place the fourth COG PIECE on the gate (H).
- Pull the rope (J).
- Walk through the gates.
Chapter 5: Newtown
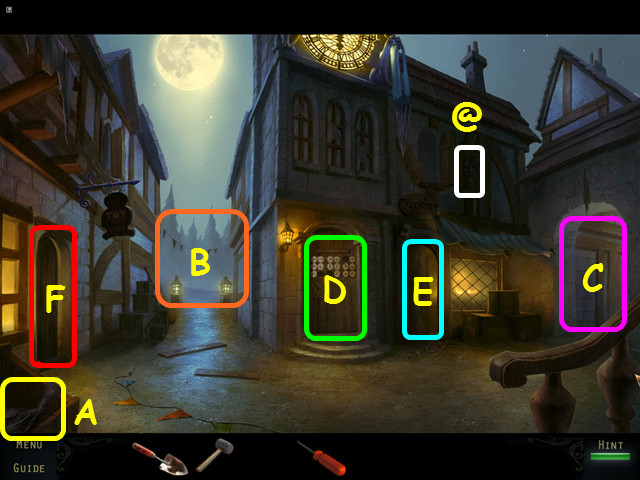
- Find the 25/40 Haunted Souls (@).
- Take the WATERING CAN (A).
- Note the path to the river (B), and the path to the street (C).
- Note the doors to the bell tower (D), and the florist (E).
- Enter the toy shop (F).
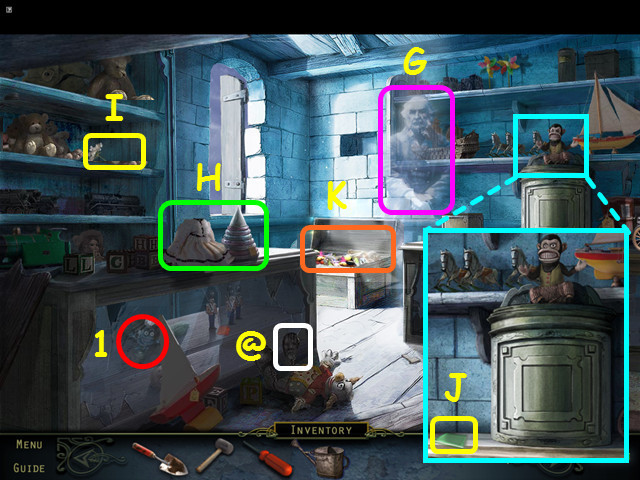
- Talk to the toymaker (G).
- Find the Fuzzy Bug (1).
- Find the 26/40 Haunted Souls (@).
- Note the doll repair area (H).
- Move the bears and take the 1/8 FLOWERS (I).
- Look at the monkey and take the 1/2 GLASS DIAMOND (J).
- Push the doll over in the lower right to find a blue square drawn in the lower left of a larger square.
- Select the trunk for a HOS (K).
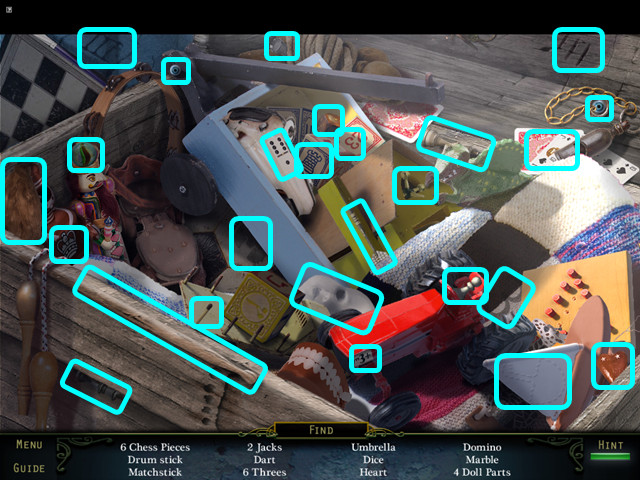
- Locate all the items on the list.
- You will earn the DOLL PARTS.
- Exit the toy shop, then enter the florist's shop.
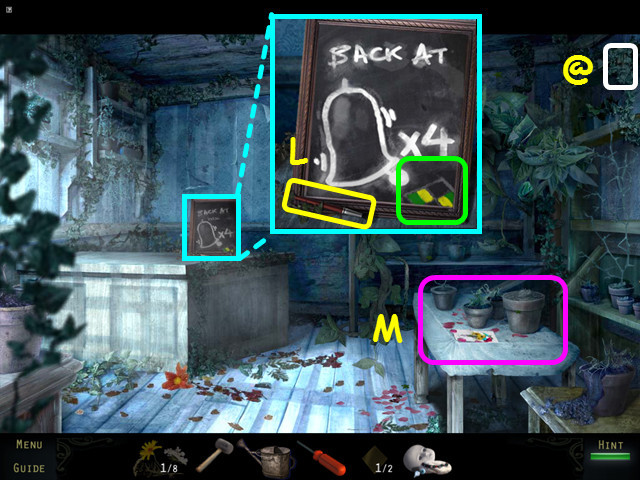
- Find the 27/40 Haunted Souls (@).
- Look at the sign and take the DRY PAINTBRUSH (L).
- Make note of the yellow and green squares on the sign.
- Note the bouquet table (M).
- Return to the toy shop and look at the doll repair table.
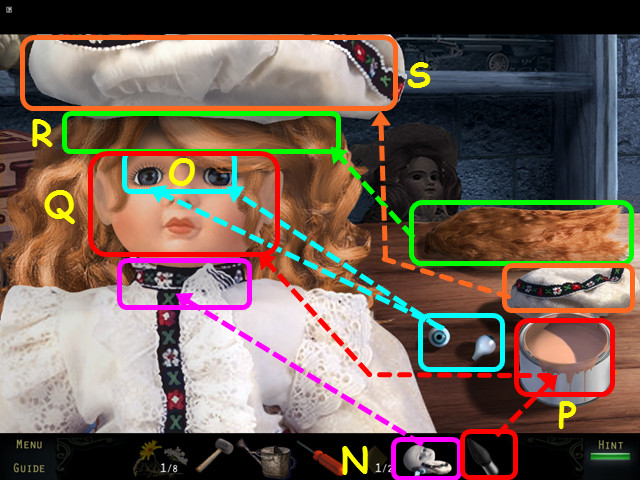
- Place the DOLL PARTS on the doll body (N).
- Place the 2 eyes into the doll head (O).
- Dip the DRY PAINTBRUSH into the paint (P).
- Drag the wet paintbrush across the doll's face until the paint covers it and the brush disappears (Q).
- Place the hair on the head (R).
- Place the hat on the hair (S).
- Take the DOLL and give it to the toymaker; he will give you the 1/3 CLOCK FACE.
- Exit the toy shop and walk right to the street.
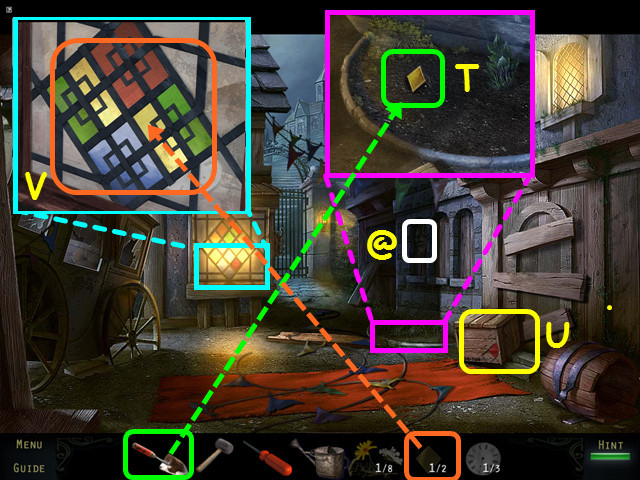
- Find the 28/40 Haunted Souls (@).
- Look at the flowerbed; use the TROWEL to dig up the 2/2 GLASS DIAMOND (T).
- Look at the crate to see the red square in the design (U).
- Look at the stained glass window and place the 2 GLASS DIAMONDS on the window for a mini-game (V).
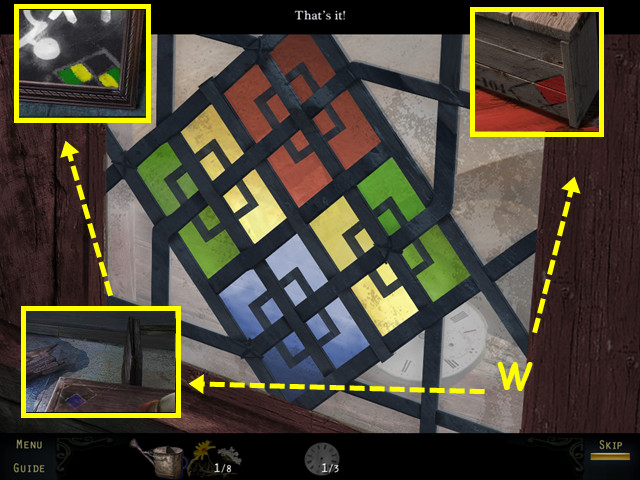
- Refer to the 3 locations that had drawings to determine proper pane placement (W).
- Select 2 panes to swap position.
- Take the 2/3 CLOCK FACE.
- Walk forward to the gate.
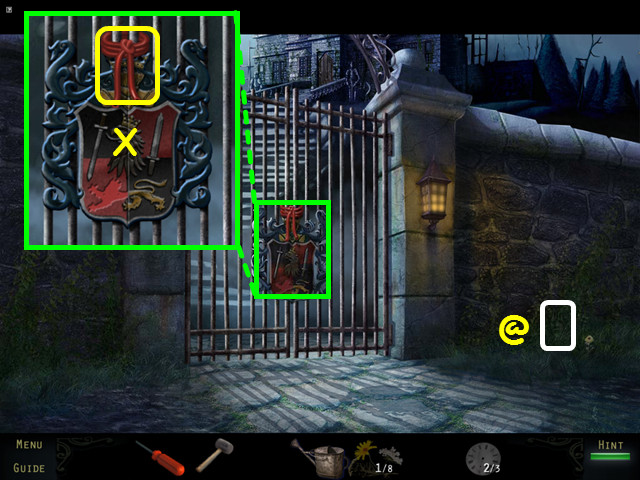
- Find the 29/40 Haunted Souls (@).
- Look at the gate and take the HOSE PIPE (X).
- Walk down 6 times to the compound.
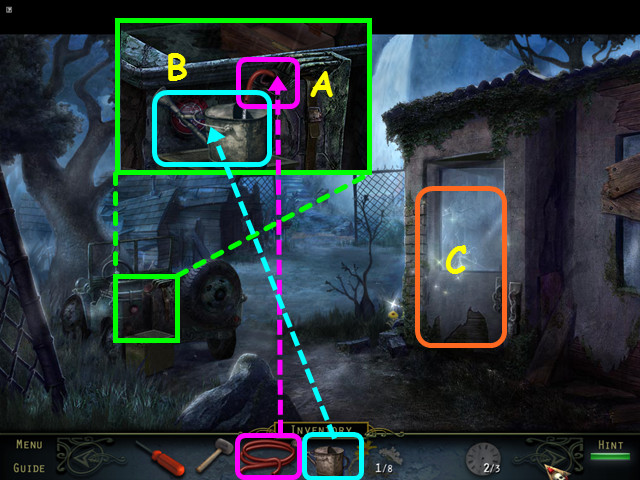
- Look at the jeep and place the HOSE PIPE into the gas can (A).
- Note – if you did not inspect the can earlier, you will need to remove the lid.
- Place the WATERING CAN to the left of the gas can (B).
- The GASOLINE will go automatically into your inventory.
- Select the guardhouse for a HOS (C).
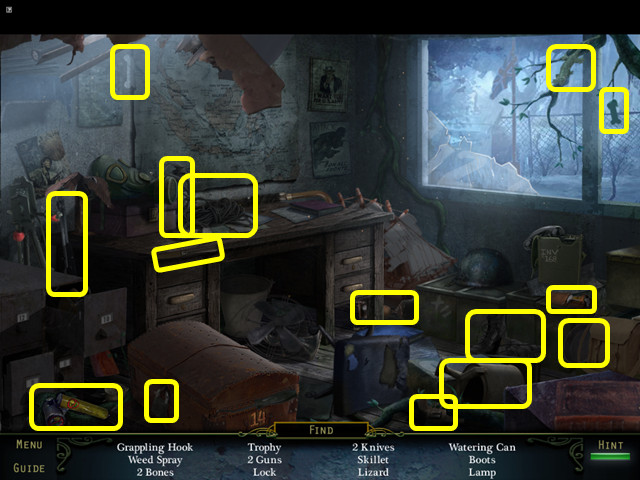
- Locate all the items on the list.
- You will earn the WEEDKILLER.
- Return to the florist's shop.
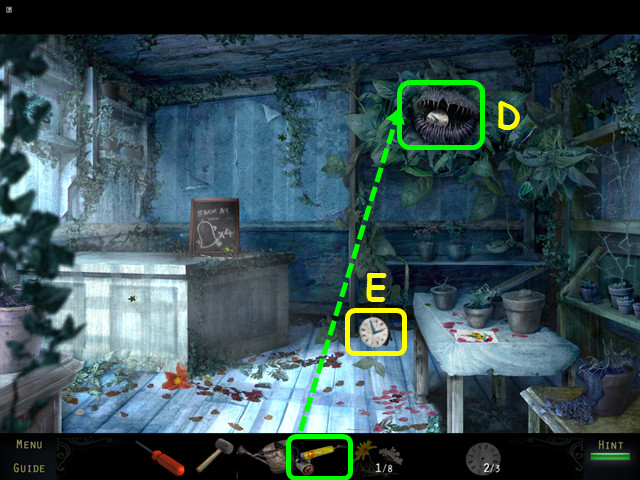
- Use the WEEDKILLER on the giant plant (D).
- Take the 3/3 CLOCK FACE (E).
- Exit the shop and look at the bell tower door for a mini-game.
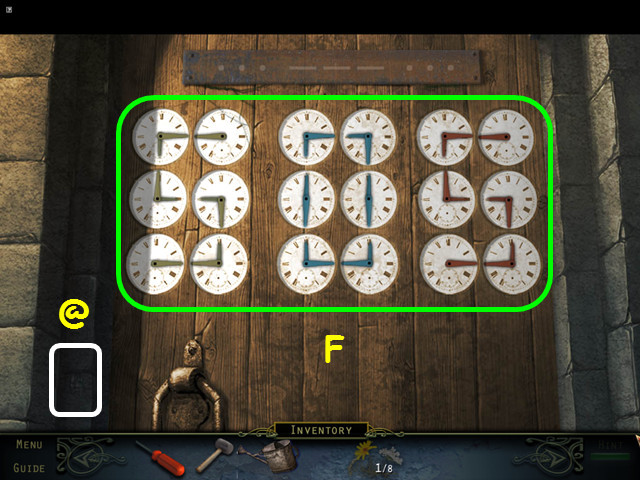
- Find the 30/40 Haunted Souls (@).
- Place the 3 CLOCK FACES on the door to trigger the mini-game.
- Move the hands on the faces so they spell SOS.
- See our solution here (F).
- Walk up the bell tower stairs.
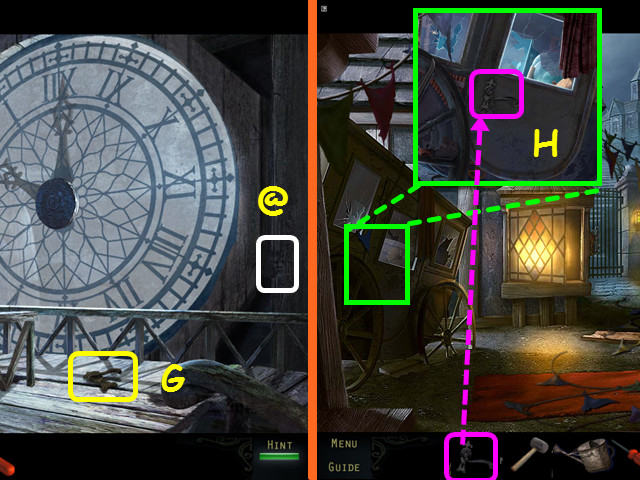
- Find the 31/40 Haunted Souls (@).
- Take the CARRIAGE HANDLE (G).
- Exit the tower and walk right to return to the street.
- Look at the carriage and place the CARRIAGE HANDLE on the door (H).
- Open the door for a HOS.
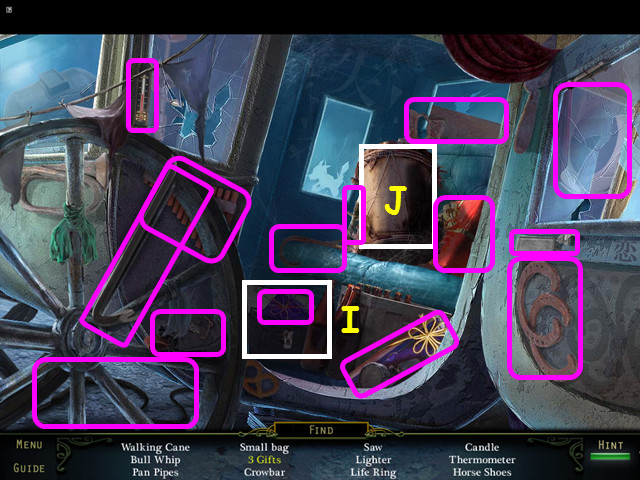
- Locate all the items on the list.
- Open the lunch box to find a gift (I).
- Move the drum to find a gift (J).
- You will earn the CROWBAR.
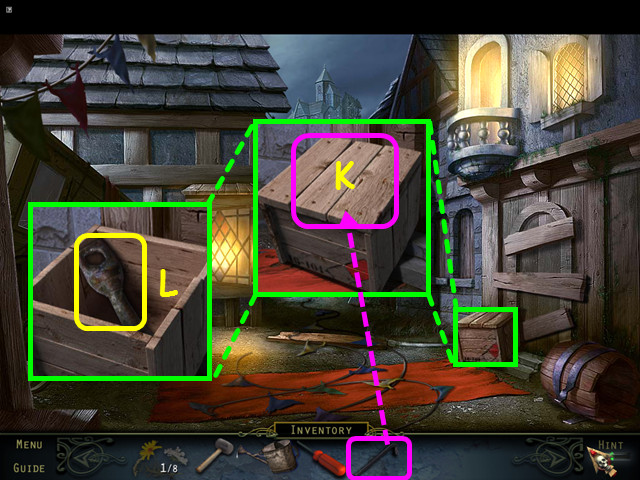
- Look at the crate and use the CROWBAR 3 times to open it (K).
- Take the CLAPPER (L).
- Return to the bell tower.
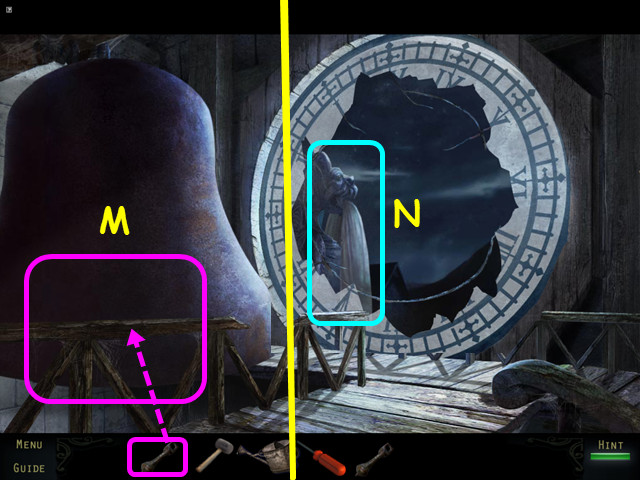
- Place the CLAPPER in the bell (M).
- Push the bell to ring it.
- After the bell falls, note the parachute (N).
- Exit the tower, then enter the florist's shop.
- Talk to the florist and she will give you the SCISSORS.
- Exit the shop and walk right.
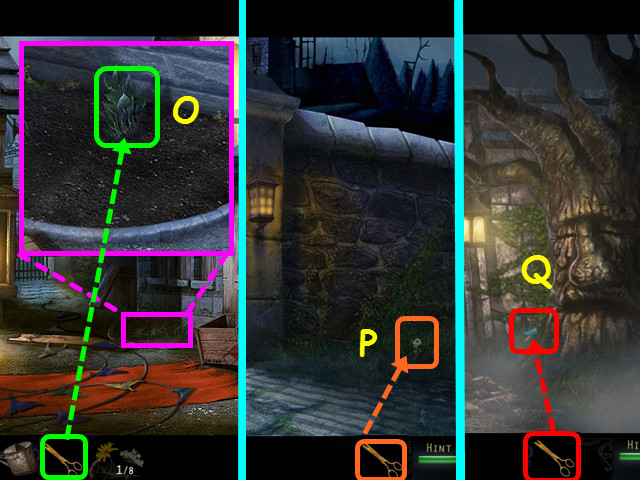
- Look at the flowerbed and use the SCISSORS to collect the 2/8 FLOWERS (O).
- Walk forward to the gate.
- Use the SCISSORS to collect the 3/8 FLOWERS (P).
- Walk down 3 times.
- Use the SCISSORS to collect 4/8 FLOWERS (Q).
- Walk down.
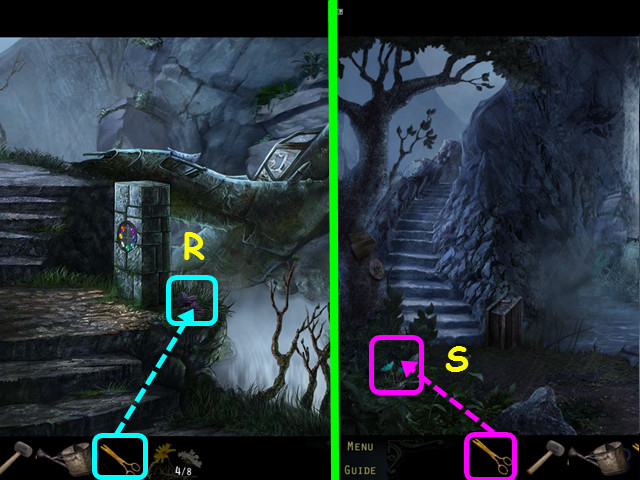
- Use the SCISSORS to collect the 5/8 FLOWERS (R).
- Walk down to the mill area.
- Use the SCISSORS to collect the 6/8 FLOWERS (S).
- Walk forward to the waterfall.
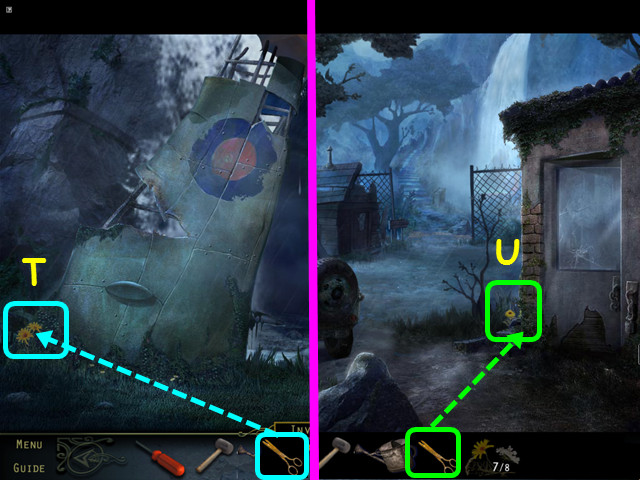
- Use the SCISSORS to collect the 7/8 FLOWERS (T).
- Walk down twice to the compound.
- Use the SCISSORS to collect the 8/8 FLOWERS (U).
- Return to the florist's shop and look at the bouquet table.
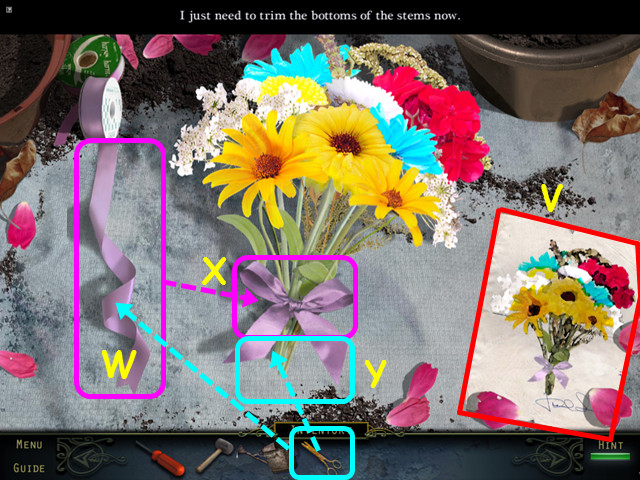
- Place the 8 FLOWERS on the table to trigger the mini-game.
- Drag the flowers into the outline to match the picture (V).
- Pull out the ribbon; use the SCISSORS to get the FLORISTRY RIBBON (W).
- Use the FLORISTRY RIBBON on the flowers (X).
- Use the SCISSORS to cut the stems (Y).
- Take the BOUQUET.
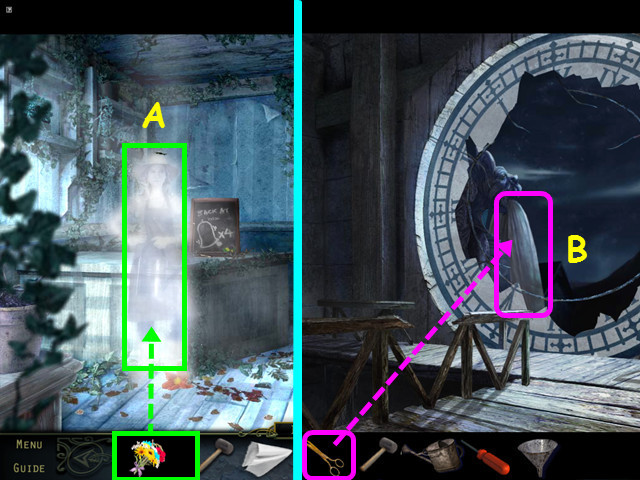
- Give the BOUQUET to the florist (A).
- Talk to her and she will give you the FUNNEL.
- Return to the bell tower.
- Use the SCISSORS on the parachute to get the SILK CLOTH (B).
- Exit the bell tower and walk forward to the river.
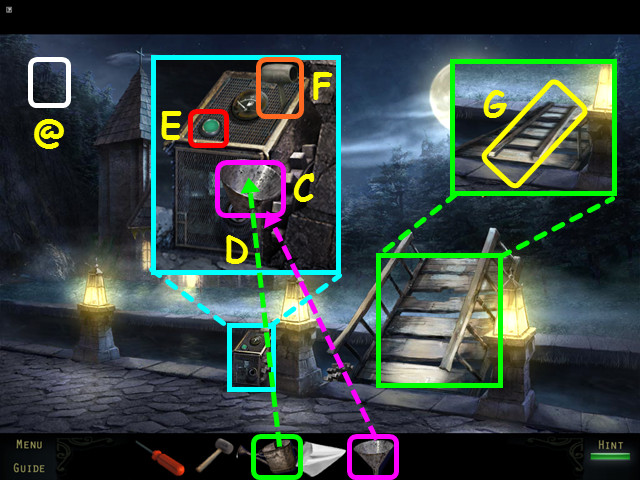
- Find the 32/40 Haunted Souls (@).
- Look at the engine and place the FUNNEL into the tank (C).
- Pour the GASOLINE into the funnel (D).
- Push the start button (E).
- Pull the lever to lower the bridge (F).
- Take the LADDER (G).
- Walk across the bridge.
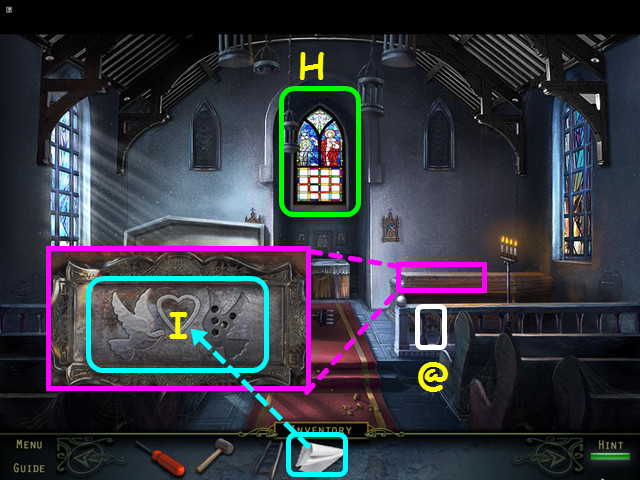
- Find the 33/40 Haunted Souls (@).
- Note the stained glass window (H).
- Look at the right coffin and use the SILK CLOTH to clean the plaque (I).
- Return to the street with the carriage.
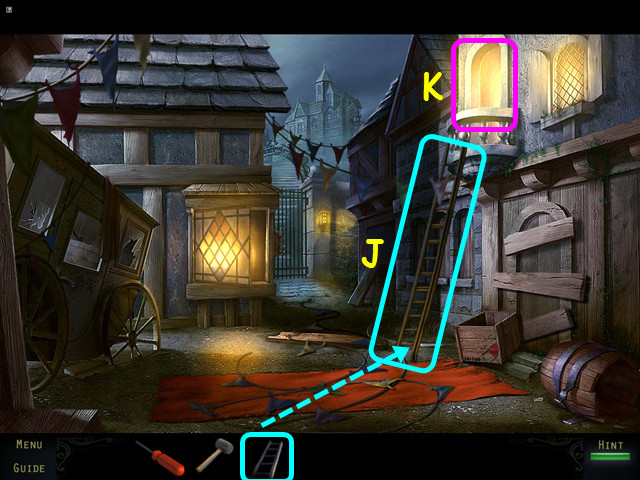
- Place the LADDER under the window (J).
- Enter the window to Lillian's bedroom (K).
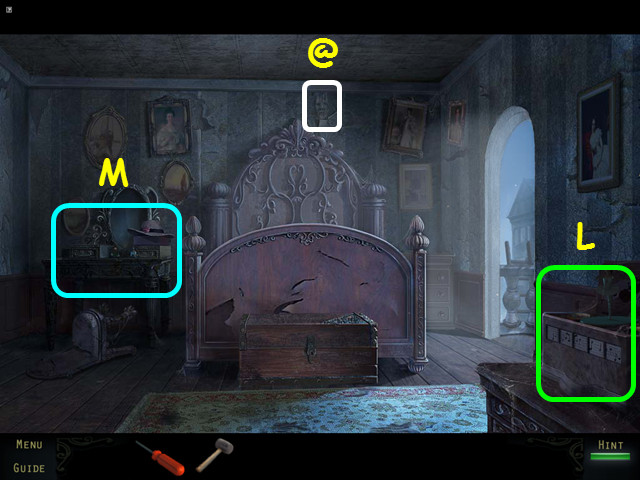
- Find the 34/40 Haunted Souls (@).
- Note the music box mini-game (L).
- Select the vanity for a HOS (M).
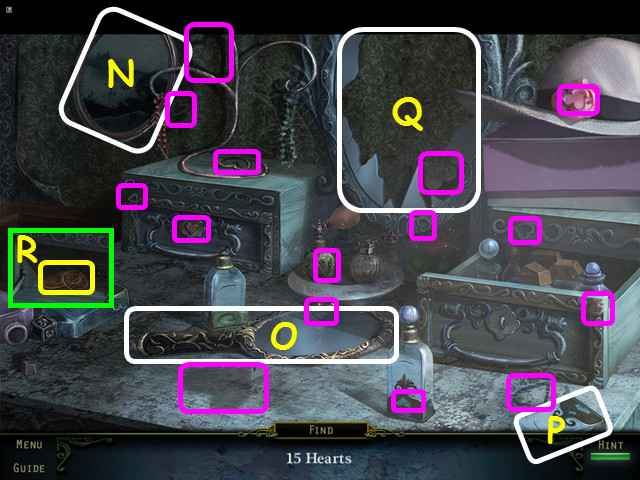
- Locate the 15 hearts marked in purple.
- Move the wall picture (N), hand mirror (O), and bottle (P) to find hearts.
- Break and remove the large mirror to find a heart (Q).
- Once the left drawer opens, take the TINY CYMBALS (R).
- Look at the music box mini-game.
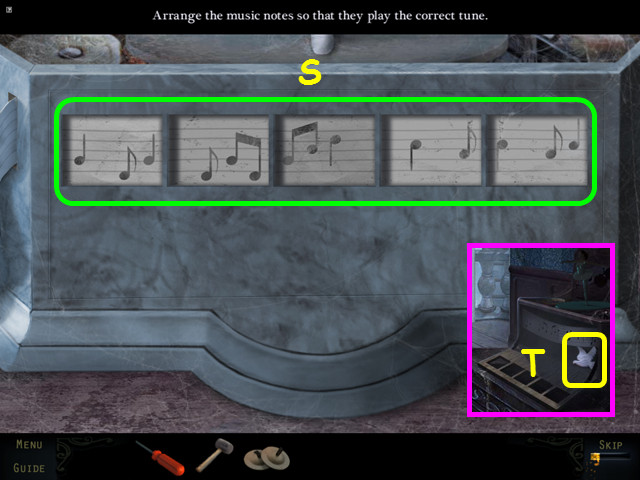
- Change each panel so that the notes light and you hear the tune as the bar passes (S).
- Take the DOVE once the music box opens (T).
- Return to the toyshop.
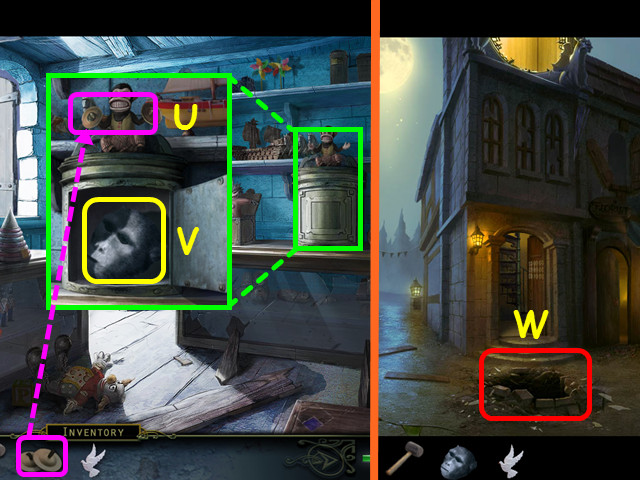
- Look at the monkey and give him the TINY CYMBALS (U).
- Take the MONKEY HEAD (V).
- Exit the toy shop and enter the hole in the ground (W).
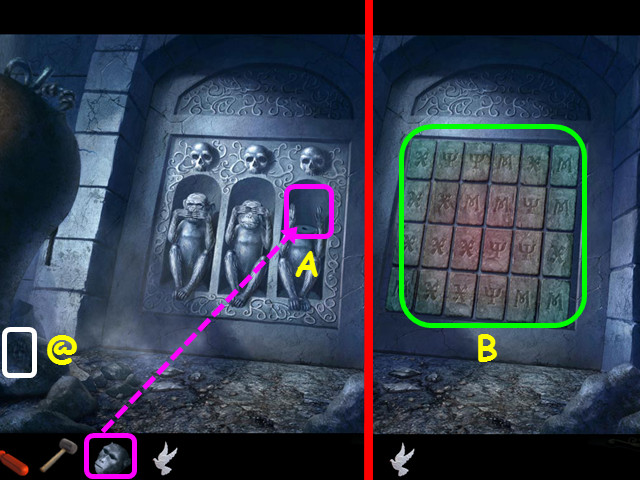
- Find the 35/40 Haunted Souls (@).
- Place the MONKEY HEAD on the headless monkey (A).
- Select the wall carving for a mini-game (B).
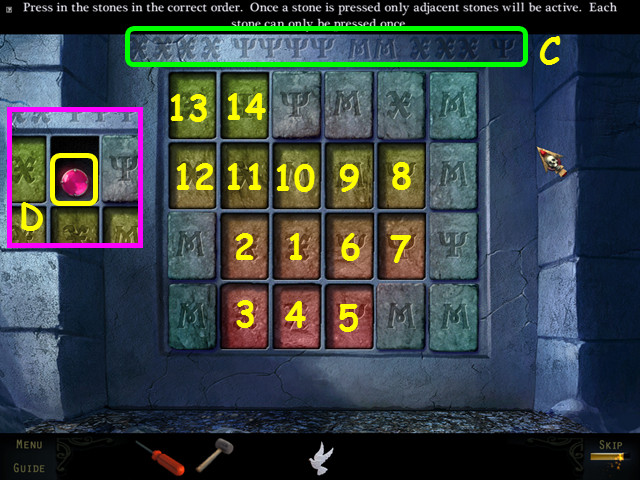
- Find a path through the tiles that follows the symbols carved at the top (C).
- Once a tile is used, you cannot reuse it.
- Press the tiles in numerical order (1-14).
- Take the PINK GEM (D).
- Walk down 3 times to the area with the plane.
- Look at the stone pillar for a mini-game.
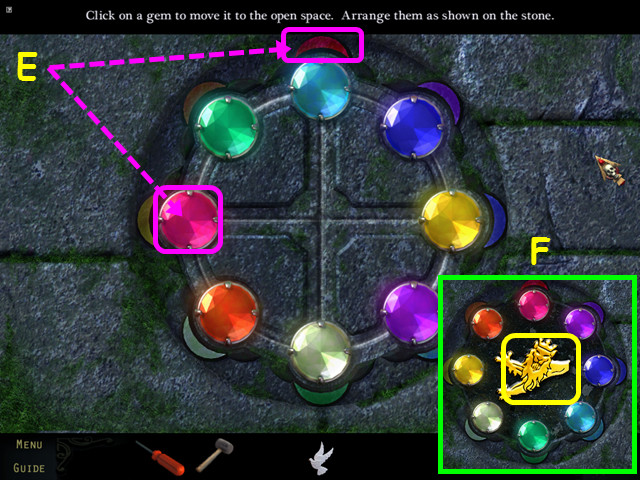
- Place the PINK GEM in the empty spot to trigger the mini-game.
- Move the gems so they are over the same color circles (E).
- Select a gem to move it to the adjacent empty position.
- Our solution was: aqua-green-pink-orange-white aqua-yellow-blue-green-pink-orange-yellow-aqua-purple-blue-aqua-purple-white-yellow-orange-pink-purple-aqua-green-purple-pink-orange-yellow-white-blue green-aqua-blue-green-aqua-blue.
- This mini-game is randomly generated – your solution may vary.
- Take the LION HEAD (F).
- Walk forward twice, walk right, then forward to the gate of Lord Neville.
Chapter 6: Neville's Mansion
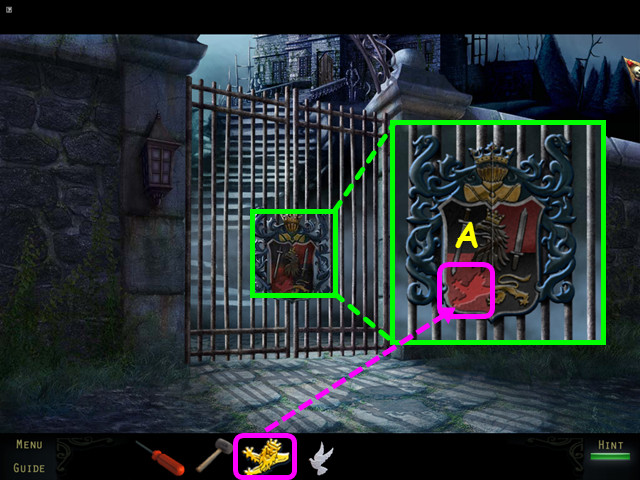
- Look at the gate and place the LION HEAD into the crest (A).
- Walk forward through the gate.
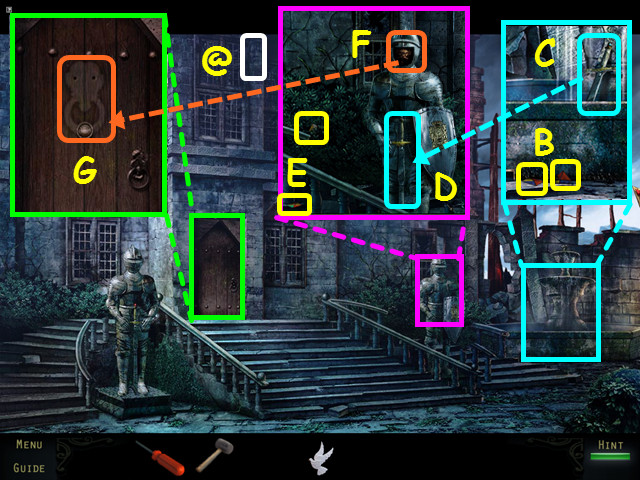
- Find the 36/40 Haunted Souls (@).
- Look at the fountain; take the 1/16 STAINED GLASS and the 2/16 STAINED GLASS (B).
- Take the SWORD (C).
- Look at the right knight and give him the SWORD (D).
- Take the 3/16 STAINED GLASS and the 4/16 STAINED GLASS (E).
- Take the DOOR KNOCKER from the helmet (F).
- Look at the front door, place the DOOR KNOCKER on the front, then use the knocker to open the door (G).
- Enter the mansion.
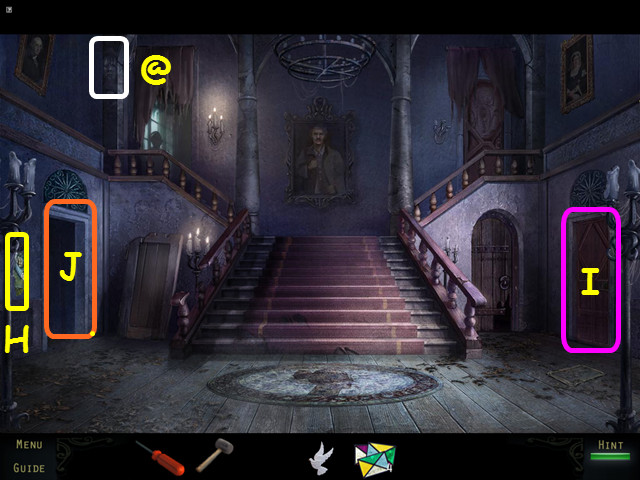
- Find the 37/40 Haunted Souls (@).
- Take the first TORN PAINTING SCRAP (H).
- Note the locked door on the right (I).
- Walk left to the drawing room (J).
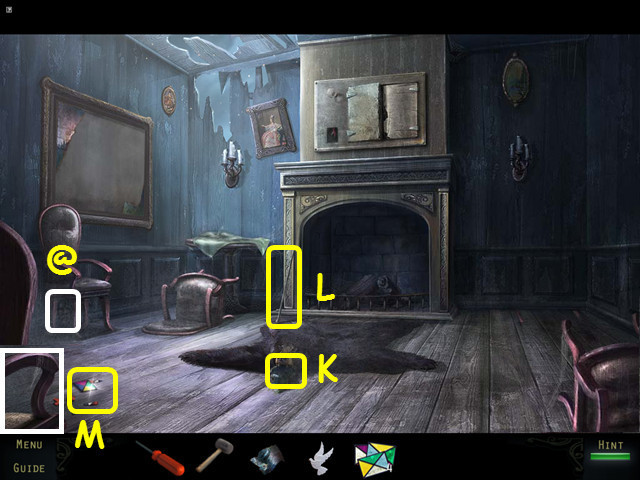
- Find the 38/40 Haunted Souls (@).
- Take the second TORN PAINTING SCRAP (K).
- Take the POKER (L).
- Move the chair and take the 5/16 STAINED GLASS (M).
- Exit the room.
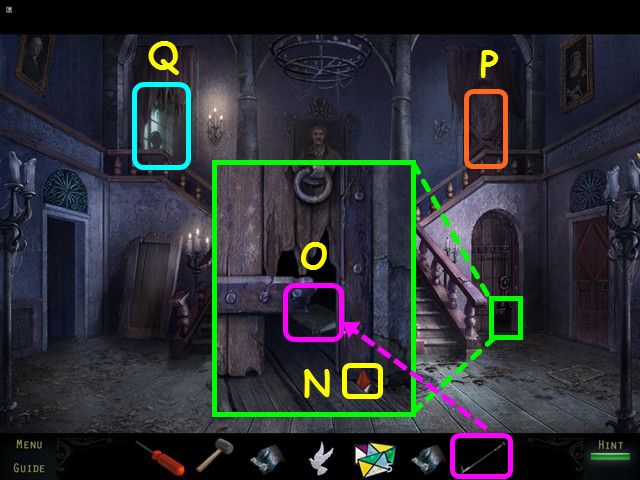
- Look at the hole in the door and take the 6/16 STAINED GLASS (N).
- Use the POKER to move it closer, then take the BOOK (O).
- Note the mini-game on the upper right door (P).
- Enter the upper left door to the library (Q).
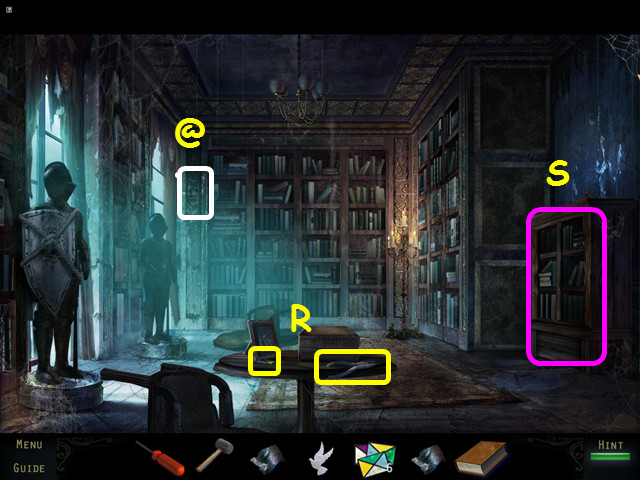
- Find the 39/40 Haunted Souls (@).
- Take the PLIERS and the 7/10 STAINED GLASS (R).
- Select the bookcase on the right for a mini-game (S).
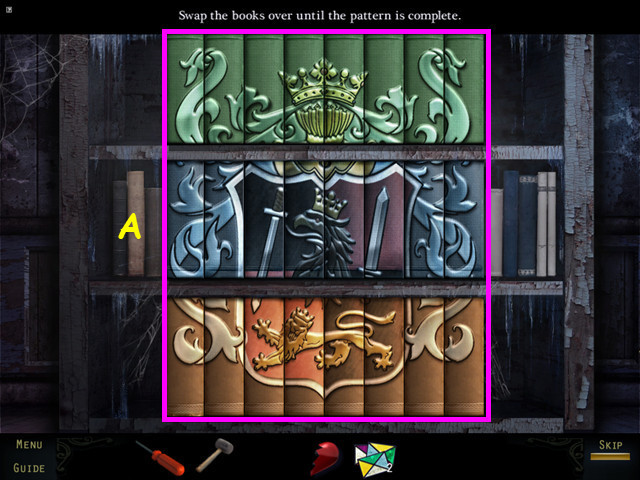
- Place the BOOK on the shelf to trigger the mini-game.
- Move the books to create the crest; select 2 books to swap positions.
- See the screenshot for the solution (A).
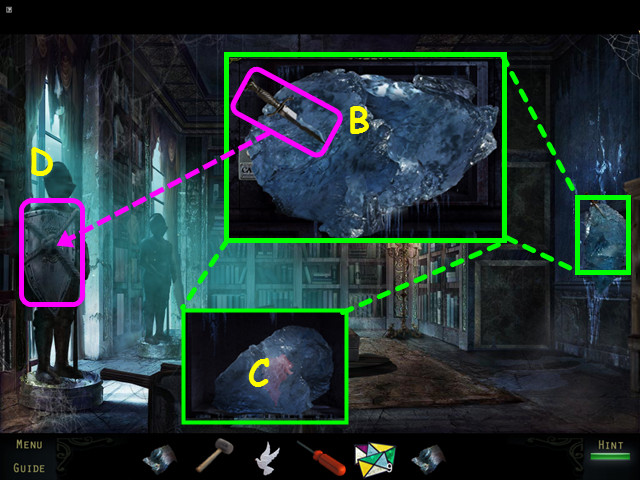
- Look at the dumbwaiter and take the DAGGER from the ice (B).
- You will have to grab it several times.
- Note the ice still left in the dumbwaiter (C).
- Use the DAGGER to cut the SHIELD from the knight (D).
- Exit the mansion.
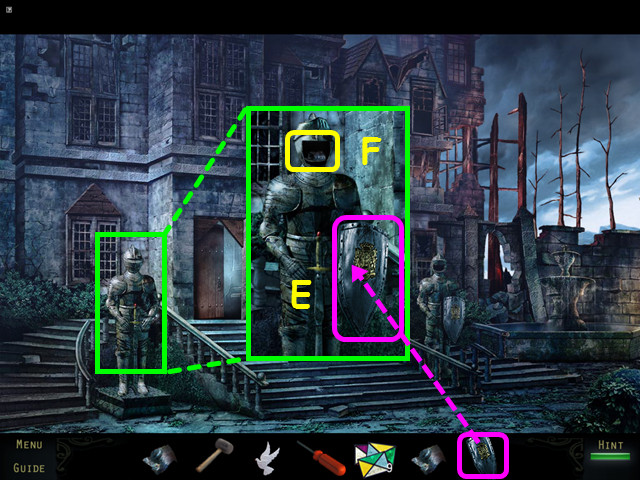
- Look at the left knight and give him the SHIELD (E).
- Take the third TORN PAINTING SCRAP (F).
- Re-enter the mansion, then go left to the drawing room.
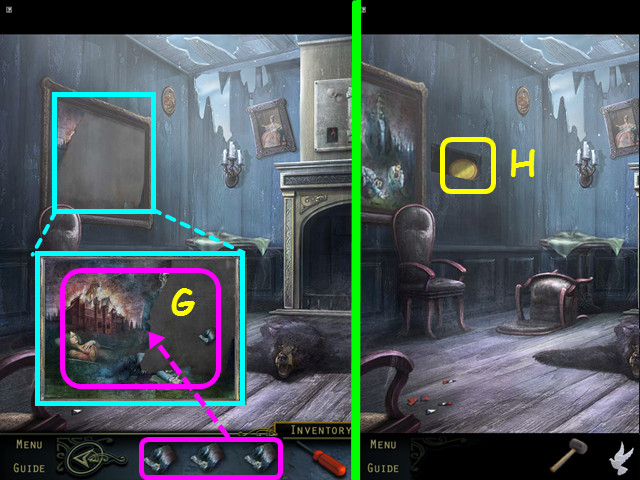
- Look at the painting and place the 3 TORN PAINTING SCRAPS into the frame (G).
- They will automatically snap into place.
- Take the GLOWING DISC (H).
- Exit the room and look at the upper right door for a mini-game.
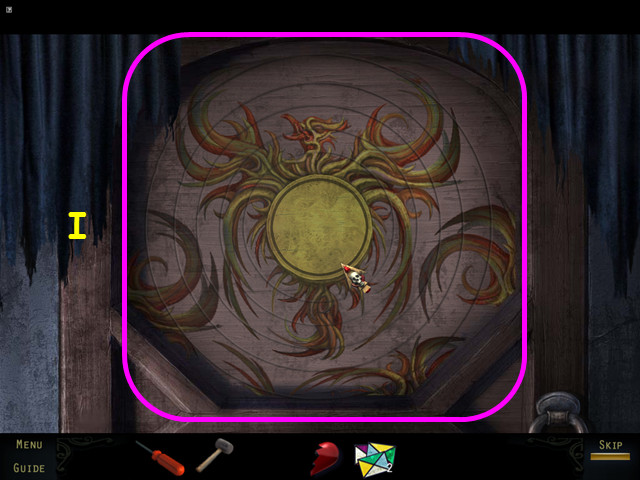
- Place the GLOWING DISC in the center of the door to trigger the mini-game.
- Drag the rings into position to complete the picture (I).
- Enter the bedroom.
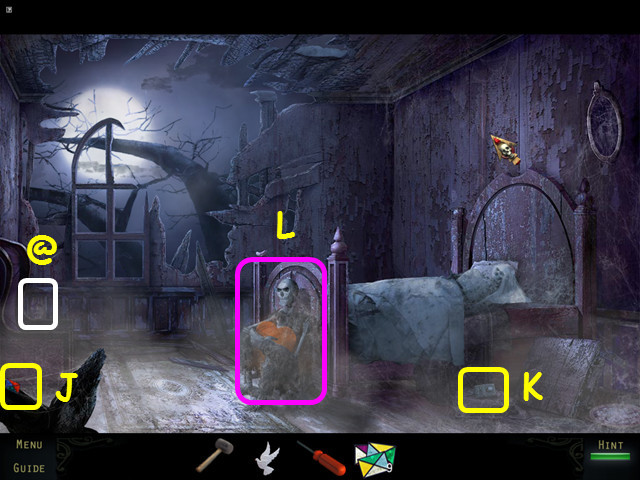
- Find the 40/40 Haunted Souls (@).
- Take the 8/16 STAINED GLASS (J).
- Take the CALL BUTTON (K).
- Note the corpse holding the large heart (L).
- Return to the drawing room.
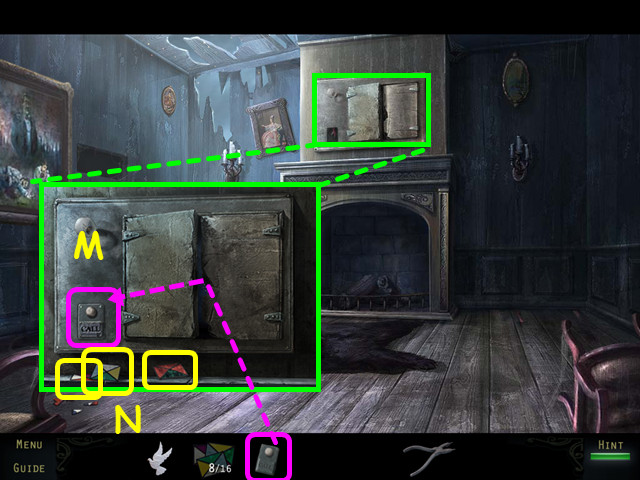
- Look at the dumbwaiter and place the CALL BUTTON on the wires (M).
- Press the call button.
- Take the 9/16, 10/16, and 11/16 STAINED GLASS (N).
- Return to the church.
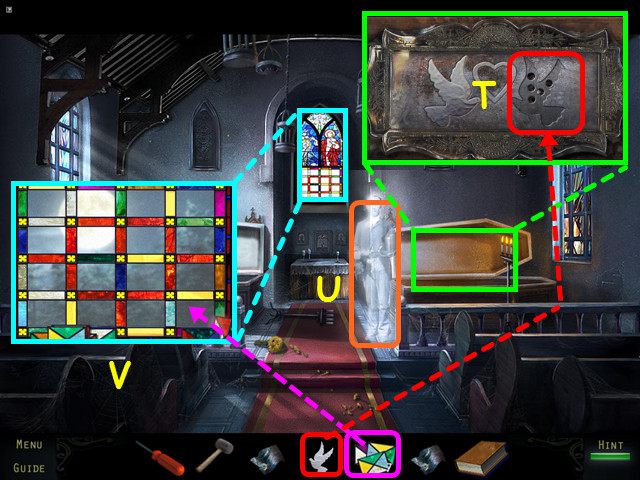
- Look at the right coffin and place the DOVE on the plaque (T).
- Talk to Lillian's groom and he will give you the first BROKEN HEART (U).
- Look at the stained glass window and take the 12/16, 13/16, 14/16, 15/16, and 16/16 STAINED GLASS.
- Use the 16 STAINED GLASS on the grid for a mini-game (V).
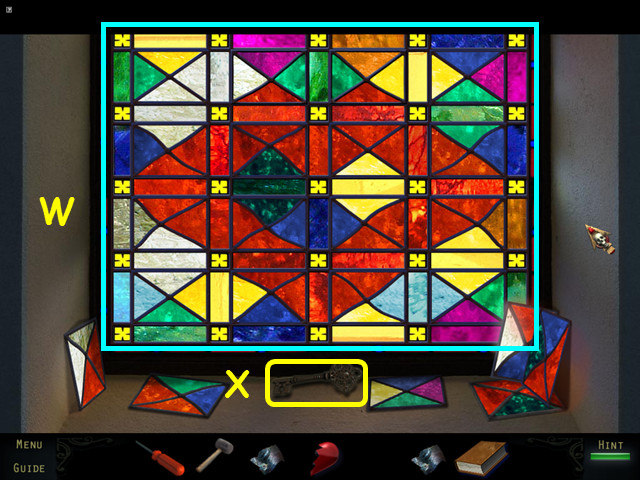
- Drag the stained glass pieces into position to complete the window (W).
- Select a piece to rotate it in place.
- Take the DOOR KEY (X).
- Return and enter the mansion.
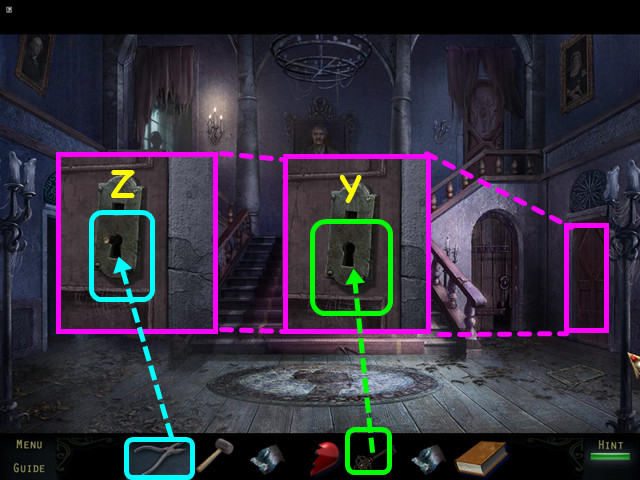
- Look at the door on the right and use the DOOR KEY in the lock (Y).
- Use the PLIERS on the broken key (Z).
- Walk right to enter dining room for a HOS.
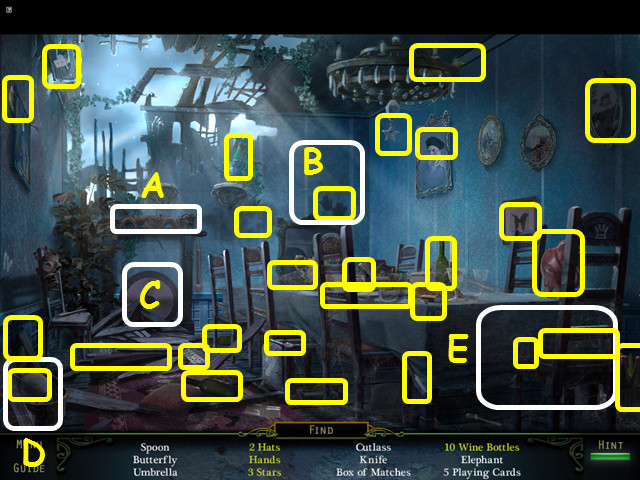
- Locate all the items on the list.
- Pet the dragon to make a star appear (A).
- Remove the painting to reveal the hands (B).
- Hit the gong to reveal a bottle (C).
- Open the hatbox for a hat (D).
- Move the chair to reveal a star and bottle (E).
- You will earn the MATCHES.
- Return to the drawing room.
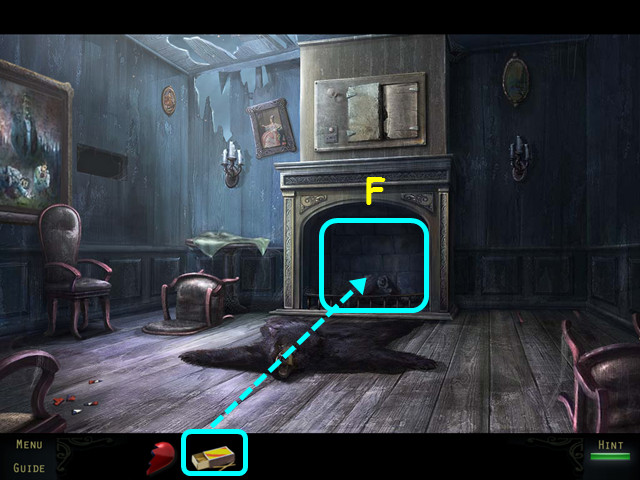
- Use the MATCHES to light the fireplace (F).
- You will see water dripping.
- Return to the library.
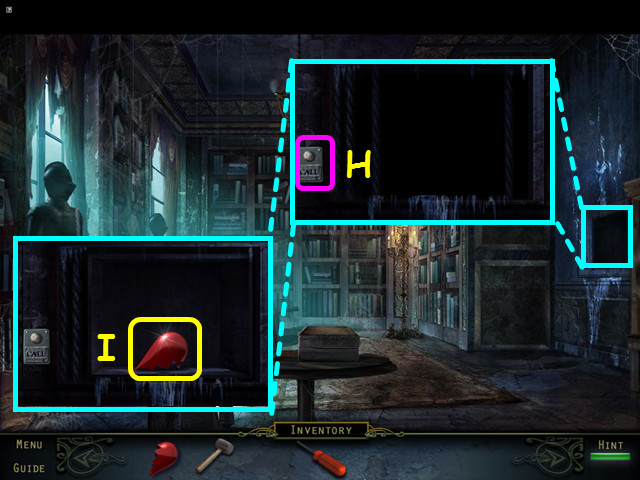
- Look at the dumb waiter and press the call button (H).
- Take the second BROKEN HEART (I).
- Walk to the bedroom.
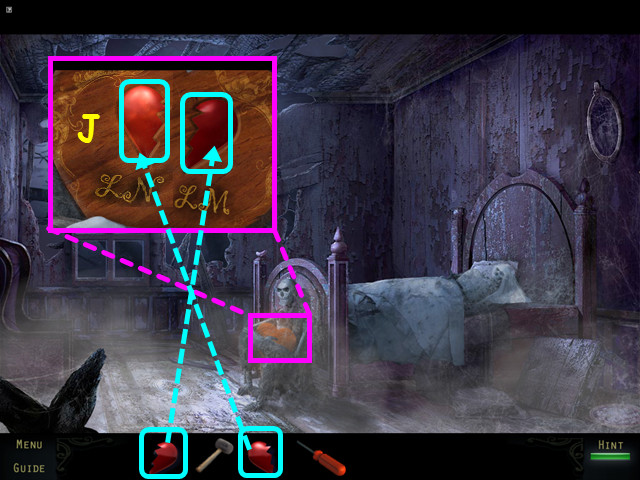
- Look at the corpse and place the 2 BROKEN HEARTS into the wooden plaque (J).
- This will trigger a mini-game.
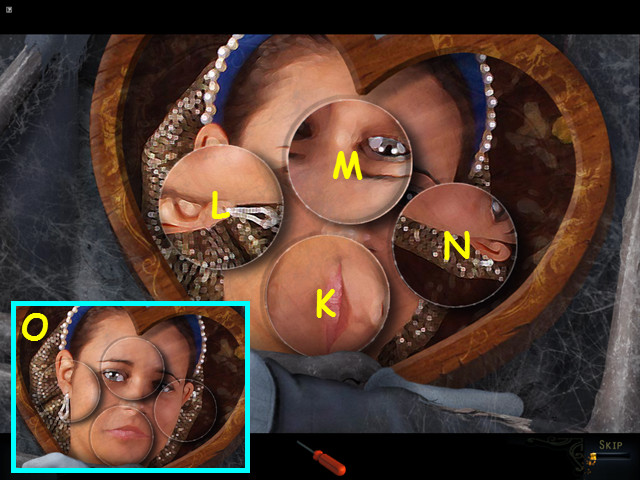
- Rotate the discs to restore the picture.
- Moving some discs will cause others to move.
- Rotate Kx2, Lx2, Mx2, and Nx2. This mini-game is randomly generated – your solution may vary.
- The final picture is of Lillian (O).
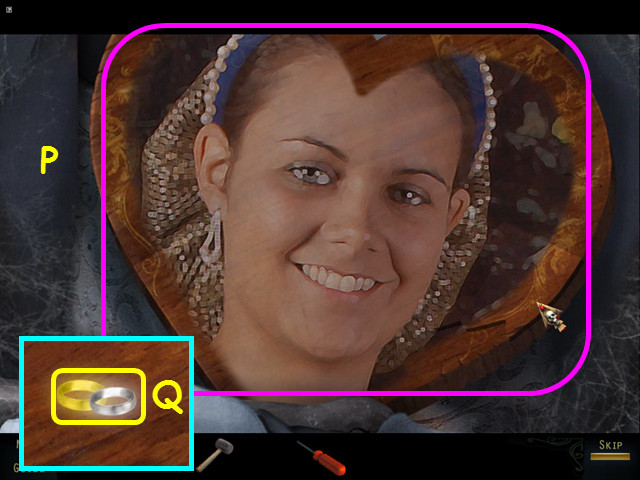
- Restore another picture of Lillian jigsaw-style (P).
- Drag pieces into position, then select to rotate in place.
- Take the WEDDING RINGS (Q).
- Travel to the church.
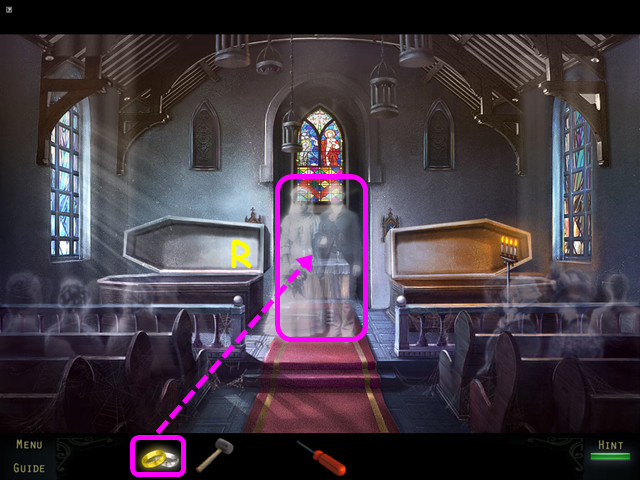
- Give the WEDDING RINGS to the bride and groom (R).
- Congratulations! You have completed Haunting Mysteries: Island of Lost Souls Standard Edition!
Awards
- Haunted Soul Rookie: Find 20 of the Haunted Souls.
- Haunted Soul Expert: Find all 40 of the Haunted Souls.
- I'm Feelin' Fuzzy: Find the Fuzzy Bug toy in the Toyshop cabinet.
- Who's Watching?: Select the man in the Lighthouse when he appears in the lighthouse window.
- Hurry, Hurry, Hurry: Complete any Hidden Object Scene in under 1 minute.
- I Need a Little Help: Use 3 hints in one Hidden Object Scene.
- Quick Fingered: Find 4 Hidden Object items in under 3 seconds.
- 7 Days a Week: Play the game every day of the week.
- Look No Hands!: Didn't get your hands dirty trying to pull out the brick at the rear of the Lighthouse; you instead used the screwdriver or chisel.
- Perfect Finish: Completed the game without skipping any mini-games.
- I know a Short-cut: Completed the game in less than 3 hours.
- Repaired the Photograph: Complete the photograph puzzle without skipping.
- Enter the Lighthouse: Complete the Lighthouse door puzzle without skipping.
- The Lights Are On: Complete the electricity box puzzle without skipping.
- Opened The Barrel: Complete the barrel puzzle without skipping.
- Another Route Out: Complete the Bunker door Puzzle without skipping.
- Opened the Furnace: Complete the Furnace Puzzle without skipping.
- Coin-Op: Complete the Jeep Puzzle box without skipping.
- Master Emerald: Complete the Compass Puzzle without Skipping.
- In Tune: Complete the Music Box Puzzle without Skipping.
- Perfect Synch: Complete the Waterfall Cave puzzle without Skipping.
- Open Sesame: Opened the town gate.
- Distress Signal?: Complete the Clock Tower Door Puzzle without skipping.
- Inn The Window: Complete the Inn Window Puzzle without Skipping.
- Flower Power: Complete the Wedding Bouquet puzzle without skipping.
- On the Right Path: Complete the Crypt wall puzzle without Skipping.
- Heart of Glass: Complete the Church Window puzzle without Skipping.
- Bookworm: Complete the library bookcase puzzle without Skipping.
- Phoenix Rising: Complete the phoenix door puzzle without Skipping.
- Heart Breaker: Complete the Heart Box Puzzle without Skipping.
- Together Again: Reunited Lillian with her true love.(unlocks in the church after handing over the rings).
- Awards Master: Unlocked every other award in The Island of Lost Souls.
Created at: 2012-06-20

