Walkthrough Menu
- General Tips
- Chapter 1: New York – Present Day
- Chapter 2: Devil’s Triangle
- Chapter 3: A Strange Meeting
- Chapter 4: Buried Secret
- Chapter 5: Showdown at Windy City
General Tips
- Hidden Expedition: Devil’s Triangle consists of 5 chapters.
- There are no timers in the game so you can play the game at your own leisure.
- There are several mini-games included within the game. Mini-games can be skipped using the hint button.
- There are no penalties for clicking randomly in the scene.
Logbook
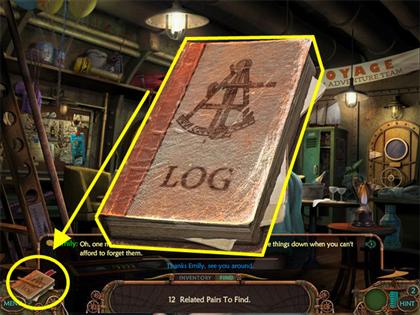
- Your Logbook is located in the lower left corner of each scene. It contains valuable information that can help you advance in the game.
- Each time something is added to the Logbook, you will either see a pencil writing on a page or the red tab flashing.
- There are 3 tabs in the Logbook once you open it, the Entries, The Objectives and the Character Files.
- The Objectives Tab gives the tasks that you need to accomplish in a particular section.
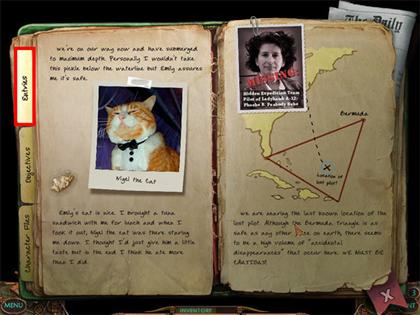
- Entries are added in the Logbook as you progress through the game. They give hints to help you advance in the game and fun tidbits about the story.
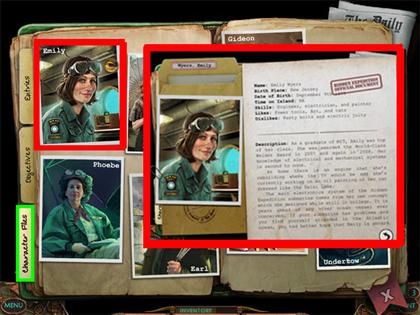
- The Character Files give you information about the main characters in the game. Click on a picture to read their bio.
- You can also click on the Newspaper in the upper right corner to see the headlines that were presented throughout the game.
Cursors & Icons
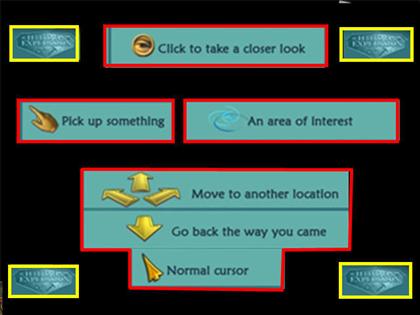
- Your cursor will change into Hand when you need to pick up an item.
- Whenever you see an Eye icon it means that you can take a closer look at an item.
- Small blue circles are areas of interest. Click on the area or use an inventory item to discover something else.
- The golden Navigational Arrows allow you to access different parts of the island.
Inventory Items
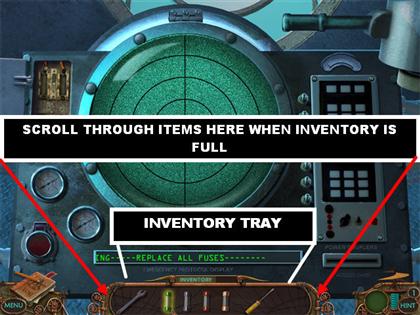
- You will pick up many inventory items along the way. Some will be used right away and others may not be used until later in the game.
- On the outside of your Inventory Tray there are areas that light up in blue; click on those areas to scroll through all available items.
- When you click on an inventory item, it will show up on your screen for a few seconds before it actually goes into inventory.
- Some inventory items need to be combined in order to be used. To combine items, place one item over the other. If the pieces are meant to be combined, they will merge as one.
- Make sure when combining items that you look for the yellow glow around the edges.
- In Hidden Object scenes, the Inventory Tray has 2 tabs, one that says “Inventory” and the other that says “Find”. These buttons allow you to toggle between the list of objects and your inventory items.
Hints for Hidden Object Scenes
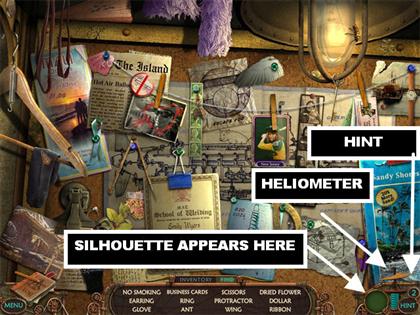
- There are several types of hints in the game. The Hint icon is in the lower right side of each scene.
- You can click on a name on the list and a silhouette of that item will appear in the lower right corner.
- You can use the silhouette hint as much as you like without having to wait for it to recharge.
- You can click on the hint and then click on a name on the list and the game will show you the exact location of the item you chose.
- You have unlimited hints in the game but you have to wait for the Heliometer to recharge before you can use it again.
Hints and Skips for Mini-games
- You can use your Hint icon to help you solve the mini-games and puzzles.
- The hint button works in a couple of different ways when it comes to puzzles and mini-games.
- In certain puzzles, the hint will solve part of the puzzle for you, by either making the first move or placing an item where it belongs.
- Depending on the puzzle, clicking on the hint more than once will solve the puzzle for you and allow you to skip it.
Chapter 1: NewYork - Present Day
Find the Drill
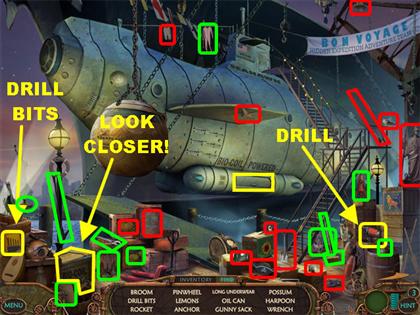
- Find all the items on the list. The list is random so everyone may not have the same items listed.
- The items highlighted in green are items on the list. The items highlighted in red are alternate items found while replaying the game.
- The items in yellow are the key items needed to solve the interactive parts of this scene.
- Pick up the box of Drill Bits in the lower left side.
- The Drill is on the lower right side, close to the crates, click on it and it will go into your inventory.
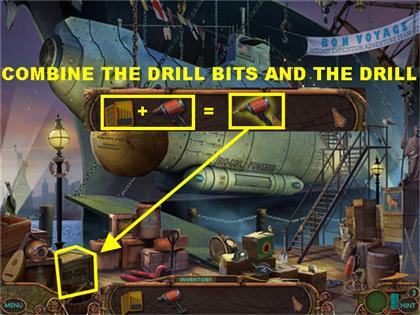
- Combine the Box of Drill Bits within your Inventory Tray to create a Drill that is ready to use.
- Click on the box marked “Bio-Coil” on the lower left for a closer view.
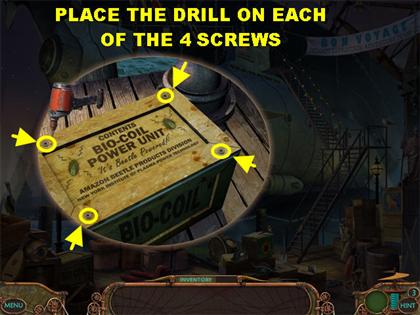
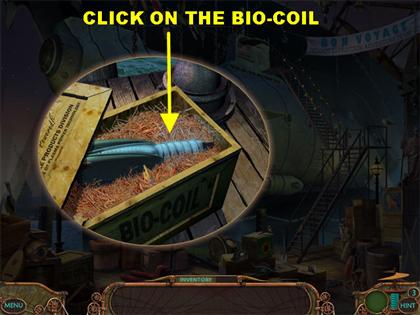
- Place the Drill on each of the 4 screws on the box to open it.
- Click on the Bio-Coil inside the crate and it will go into inventory.
- Click on the Bio-Hatch of the submarine and a compartment will open up.
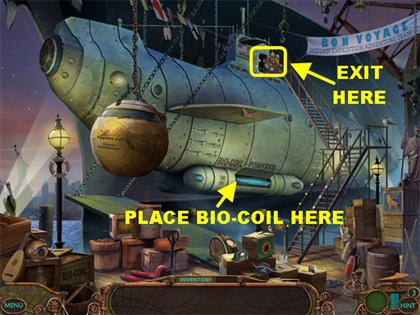
- Place the Bio-Coil in the compartment at the bottom of the submarine.
- The submarine door will open, click on the door in the upper center to enter the submarine and the Bio-Coil compartment will close.
Emily - Lounge
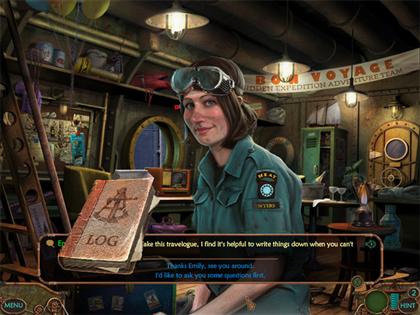
- When you first enter the scene Emily will greet you.
- Ask Emily what you need to do and her response will be:“For security, mission details are still classified. Before we can leave you need to set up the shortwave radio and tune to H.E. Headquarters to get our exact coordinates.”
- Click on:”Right. Let’s get this sub in the water!
- Emily will tell you about the Logbook at this point and prompt you to use it. The Logbook goes in the lower left side of the scene.
- You can choose to end the conversation at this point or you can keep asking Emily questions.
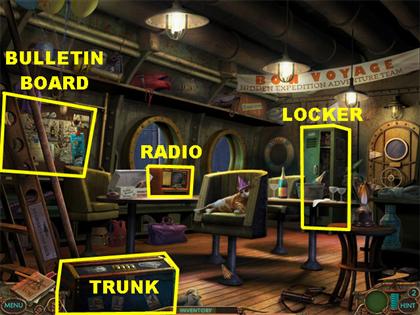
- Click on the Bulletin Board on the left to enter a Hidden Object scene.
Find Code for Trunk in Lounge - Lounge Bulletin Board
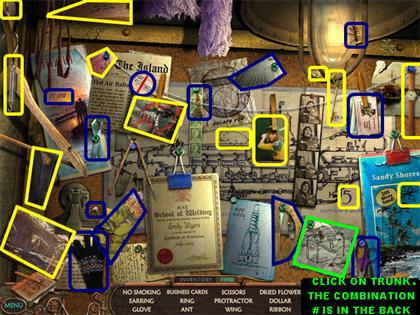
- Look for all the items on the list. The items in blue are items on our list. The items in yellow are items we found while replaying the game.
- After all the items have been found, you will be asked to find the Chest.
- Click on the Chest in the lower right and a set of numbers will appear briefly on the screen. Those numbers will be the code needed to open the blue trunk in the Lounge.
- The code will be added to your Logbook in the lower left.
Open the Blue Trunk /Electrical Cord - Lounge
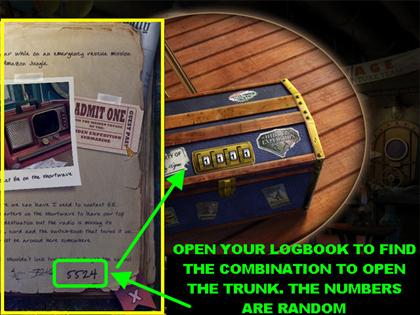
- Click on the Blue Trunk in the lower left side for a closer view.
- Enter the number you found on the Bulletin Board. You can open your Logbook to look for the number you were given.
- Click on the dials to change the numbers to the one that you were given in the Logbook.
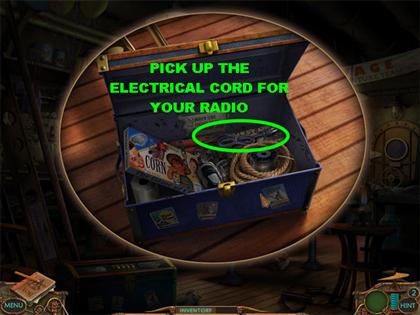
- Collect the Electrical Cord from the trunk. It will go into your inventory as the Electrical Cord that you need for your radio.
Find the Wire Hanger (Antenna) - Lounge
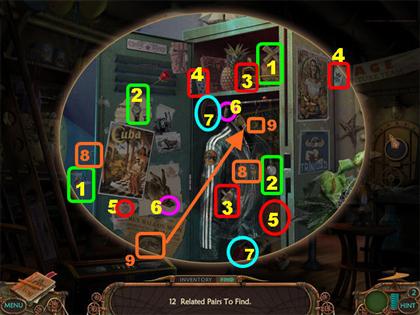
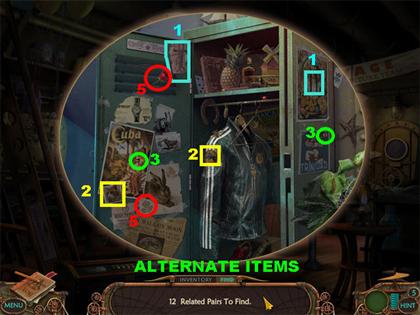
- Click on the green locker on the right for a closer view.
- Your goal in this scene is to find 12 pairs of related items. The items can be the same or they can have something in common.
- Click on an item to highlight it, click on the matching pair and both items will be taken off the list.
- If you’re stuck and can’t find something, use your hint. The hint will help you find either the first item or the pair to an item you’ve already highlighted.
- Keep in mind that the items needed are random.
- The screenshots show you several sets of items you may find during the game.
- Here is a list of the items we encountered while playing:2 Pigtails Half Moon & Full Moon 2 Basketballs 2 Rabbit Ears 2 Playing Cards Windmill and Pinwheel Stopwatch and Watch Horseshoe and Shoe Cat and Panther Starfish and Star 2 Wasps 2 Keys (One will go into inventory) Flask and a Liquor Bottle 2 Maracas 2 Roses 2 Pencils 2 Airplanes
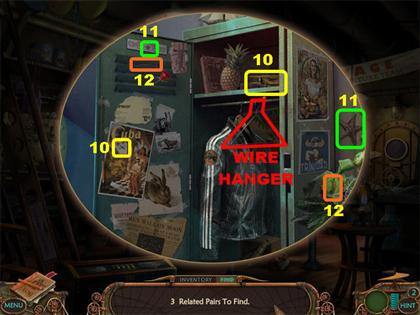
- Click on the Wire Hanger after all the items have been found. It will go into your inventory as the Antenna you need for your radio.
- The Key you found on the jacket in this scene will also go into your inventory.
- Go up the steps on the left to access the Observation Deck.
Pick up the Knob – Observation Deck
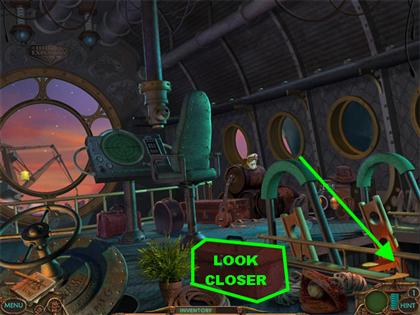
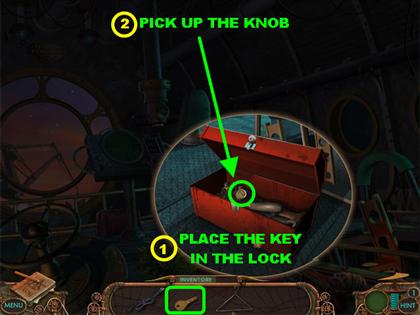
- Click on the red Toolbox close to the steps for a closer view.
- Grab the Key from inventory and place it on the lock.
- Grab the Knob inside the Toolbox. The pop-up window will automatically close after the Knob has been found.
- Go back downstairs to the Lounge.
Repair the Radio
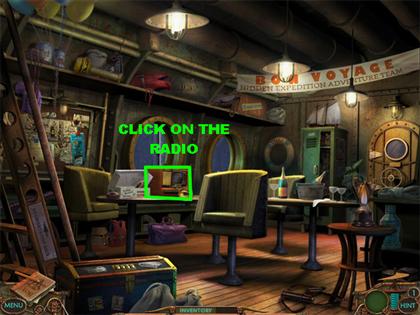
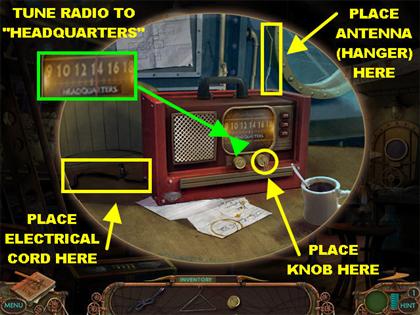
- Click on the Radio on the table for a closer view.
- Place the Knob next to the other Knob.
- Place the Wire Hanger on the top right side of the radio, where the Antenna belongs.
- Place the Electrical Cord on the lower left side of the radio.
- Click the Left Knob to turn the radio on.
- Click on the Right Knob to tune the radio.
- Click on the Right Knob lightly so you can tune the radio. Stop when you get to the station marked “HEADQUARTERS”. The station is somewhere near the middle of the dial, between 12 and 14.
- You will be taken to a brief cut scene and returned back to the Observation Deck. Emily will tell you that the Sonar has been fried.
Pick up Security Clearance Card on Sonar – Observation Deck
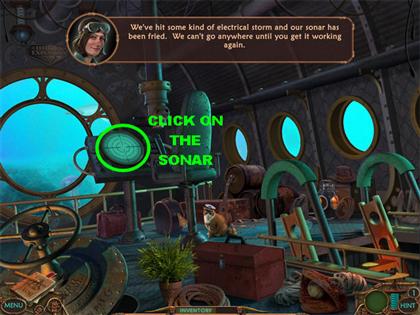
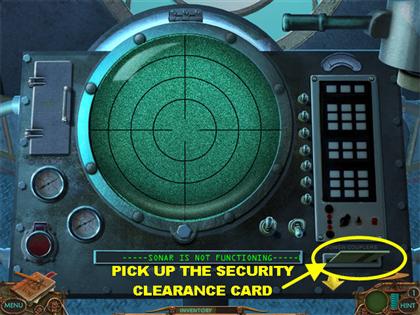
- Click on the Sonar Control in the back of the room for a closer view.
- Grab the Security Clearance Card located in the lower right corner to enter it into inventory.
- Exit out of that scene by placing your cursor downwards.
- Go back downstairs and click on the door in the back of the Lounge.
Use Security Clearance Card - Lounge
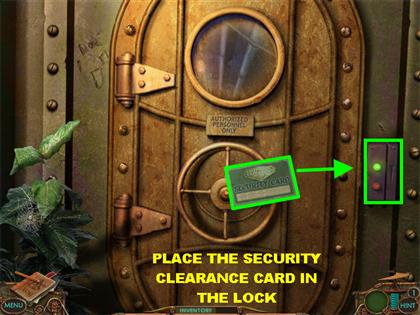
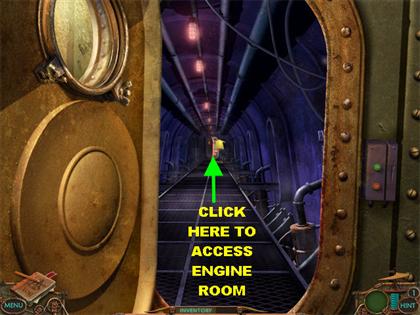
- Place the Security Clearance Card on the digital lock to unlock it.
- Go through the Corridor and enter through the door in the back.
Pick up Wrench & Fuses – Engine Room
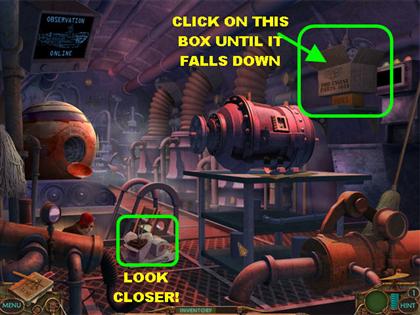
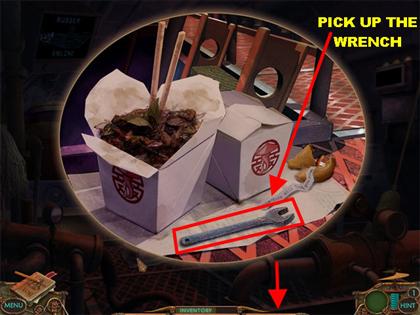
- Click on the Chinese food containers on the ground to open a new window.
- Pick up the Wrench in the pop-up window. The window will automatically close after the Wrench has been picked up.
- Click several times on the box marked “POD ENGINE PARTS 361A” located in the upper right side of the scene and the box will fall down.
- The fuses that were below the large box will automatically go into inventory.
- Go back to the Observation Deck by placing your cursor in the following manner:DOWN 2 TIMES UPPER LEFT
9 Engine Parts and 14 Bits of Pollution – Fish Scene
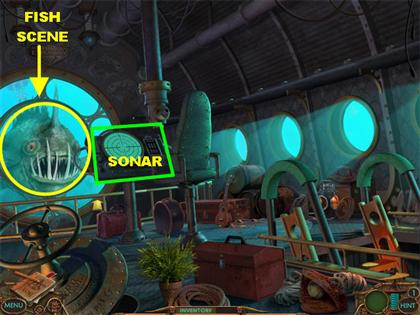
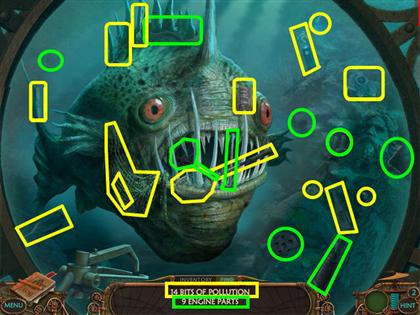
- Once you get upstairs you will see a large fish outside the window, click on the window for a closer view.
- Find the items on the list; you are asked to find 14 Bits of Pollution and 9 Engine Parts.
- The Engine Parts are highlighted in green and the Pollution Parts are highlighted in yellow.
Pick up Screwdriver
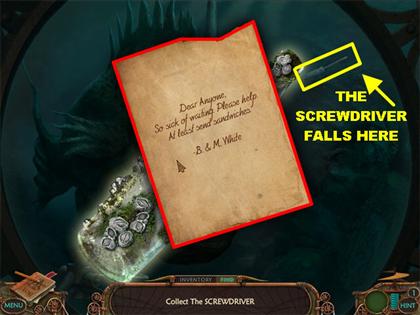
- Click on the net on the left side of the fish and a bottle will appear underneath.
- Click on the bottle and it will appear on your screen. Click on the bottle again to read the note inside of it.
- After all the items have been found, you will be asked to find the Screwdriver. The Screwdriver will fall down onto the rocks in the top right section of the screen.
Fix the Sonar – Observation Deck
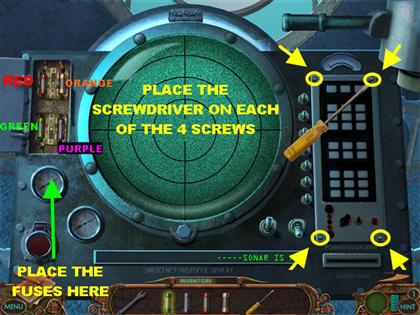
- Click on the Sonar Panel for a closer view.
- Click on the Fuse Box on the top left side of the scene to open up the panel.
- Click on the Fuses in the box and they will fall from the Fuse Box.
- Place the Fuses from your inventory in the matching spots for each fuse.
- The Red Fuse goes in the upper left slot.
- The Orange Fuse goes in the upper right slot.
- The Green Fuse goes in the lower left slot.
- The Purple Fuse goes in the lower right slot.
- Once you have replaced the fuses, you will have to engage the Sonar by solving the Power Coupler Puzzle.
- Place the tip of the Screwdriver on all 4 screws on the panel on the right to take the panel off.
Power Coupler Puzzle Instructions
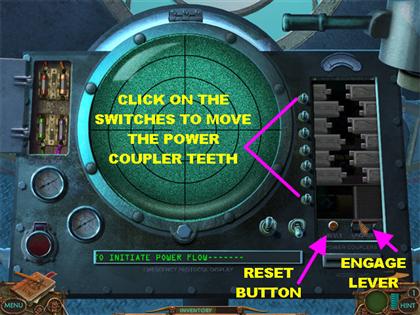
- Click on the switches next to the Power Coupler teeth to get them to move to the open slots. The goal is to line them up with the teeth that are facing them (short teeth match up with long teeth).
- To see if you’re correct, press the ENGAGE Switch on the lower right.
- If you want to reset the Couplers to their beginning state, press the small orange RESET button.
Power Coupler Puzzle Solution
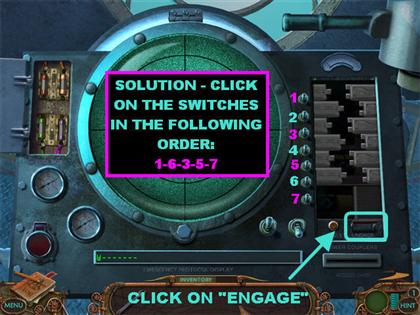
- For the solution I will number the switches from 1 to 7, from top to bottom. Click on the switches in the following order:1-6-3-5-7
- Click on the ENGAGE lever in the lower right and the cover will go back on.
Wrench Usage
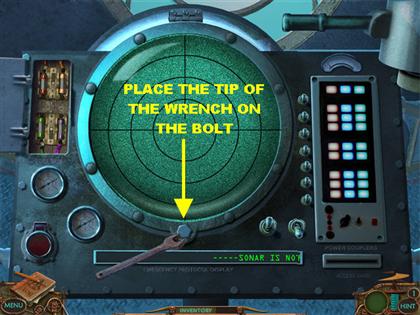
- Once you finish with the Power Coupler Puzzle, the Sonar Screen Puzzle will be activated.
- Use the Wrench to loosen the bolt at the bottom of the Sonar Cover. You have to place the lower part of the Wrench on the bolt, or it will not work.
Sonar Puzzle Instructions
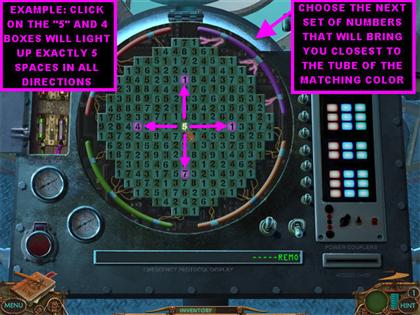
- You will see the purple number 5 flash in the middle of the Sonar screen.
- Your goal is to move the colored box towards the light tube of the corresponding color (red box to the red light tube etc.).
- The boxes move outwards in four equal distances, corresponding to the number on the box that you choose.
- If the box that you click on has a 5 on it, four boxes will move five spaces in all directions from where you click.
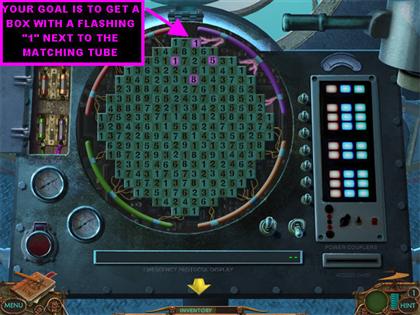
- You have to get the lit box to the outer edge boxes that have 1’s on them. Once you get it on the number 1 box, on the outer edge you are one click away.
- Repeat the same process for each color to activate the Sonar.
- Please look at the next set of screenshots for the solution.
Sonar Screen Puzzle
Purple Solution
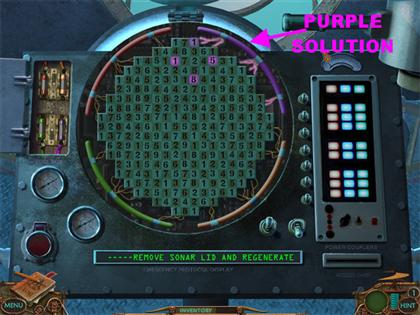
- Click on the numbers in the following order:Purple 5 1 ON TOP 4 6 1 3 1 – FLASHING ON RIGHT
Orange Solution
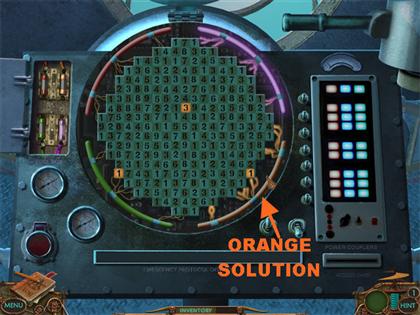
- Click on the numbers in the following order:5 7 1 - FLASHING ON RIGHT
Green Solution
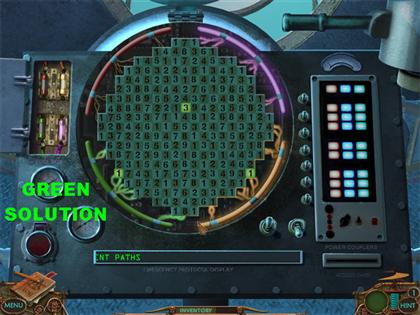
- Click on the numbers in the following order:5 7 1 – FLASHING ON LEFT
Red Solution
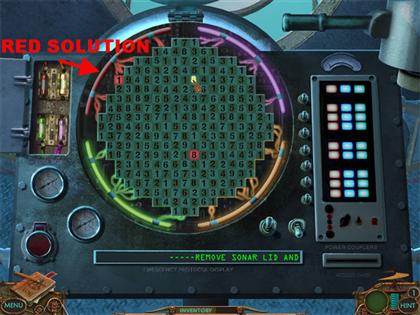
- Click on the numbers in the following order:5 1 – ON TOP 8 1 – FLASHING ON LEFT
- Once the Sonar Puzzle is complete, you will see the Pirate Attack on the sonar screen start to happen.
- When that quick cut scene is done, you will be automatically put into the Observation Deck where you will see a brief cut scene. Make your way down to the Engine Room again.
Escape Pod Engine
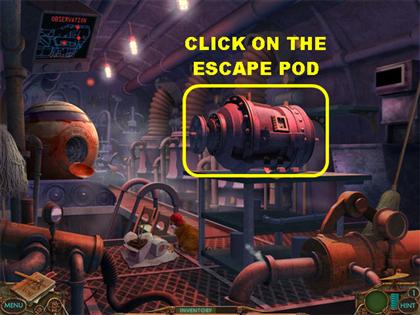
- Click on the Escape Pod Engine on the right side of the scene.
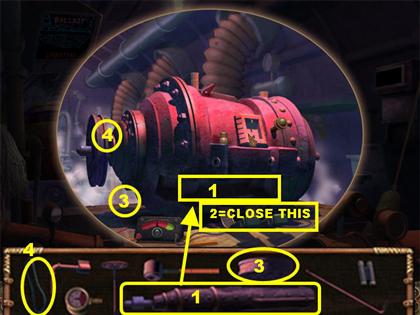
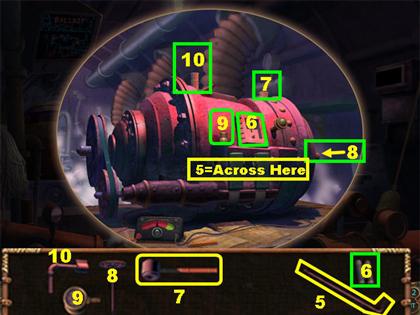
- Place the parts according to the screenshot provided. Some parts have to be installed in a particular order.
- If you placed a piece incorrectly, just click on it again to remove it.
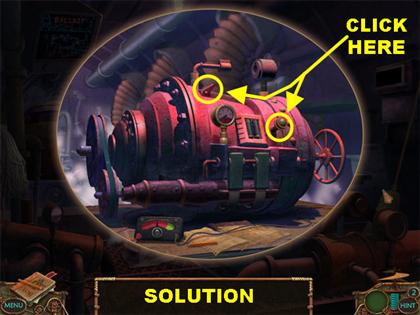
- Once everything has been assembled, click on the small red Switch on top of the Pod.
- Click on the Lever on the back right side of the Pod and the pop-up window will close by itself.
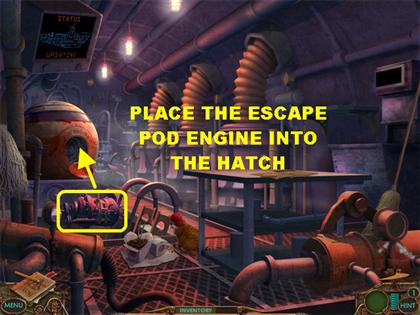
- The Escape Pod Engine will automatically go into inventory.
- Place the Escape Pod Engine into the open hatch in the back left side of the scene.
- Emily will wish you good luck. Click on your answer and you will be taken to your next location.
Chapter 2: Devil’s Triangle
Pick up Garden Shears
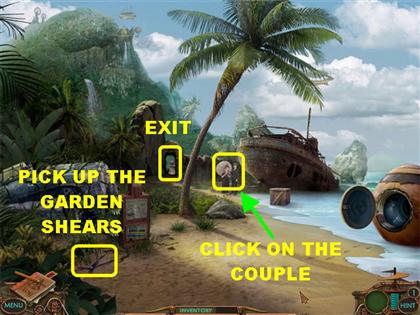
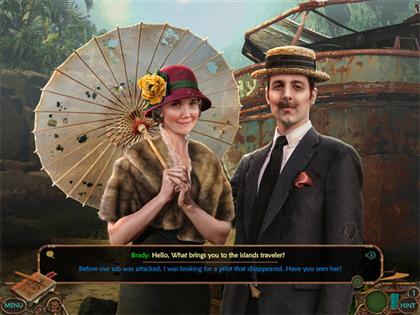
- Pick up the Garden Shears in the lower left side of the sand.
- Click on the couple in the back of the scene. Talk to them and listen to what they have to say.
- They will tell you that you need to speak to Gideon who lives up in the cliff.
- Brady asks you if you have a watch and Martha wants you to look for her dog Sally. Go through the rest of the dialogue.
- Click in the back of the scene to locate another spot on the island.
Pick up Dog Leash
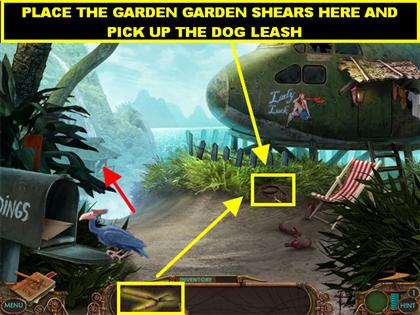
- Use the Garden Shears on the bushes underneath the plane and you will find the Dog Leash, pick it up.
- Go to the next scene by placing your cursor on the far left side of the scene.
Pick up Ladder
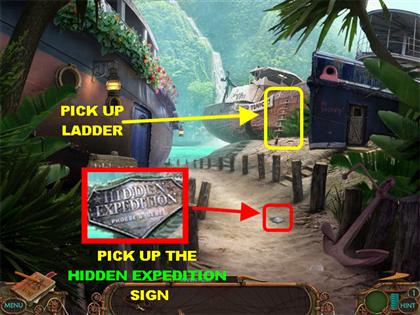
- Pick up the Ladder on the right side of the scene. It is leaning against the side of the red boat.
- Pick up the Hidden Expedition patch on the sand.
- Go back to the location you just left by placing your cursor at the bottom of the scene.
Ladder Placement
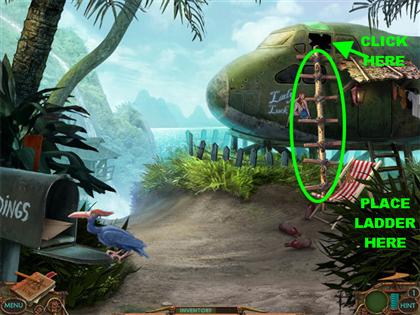
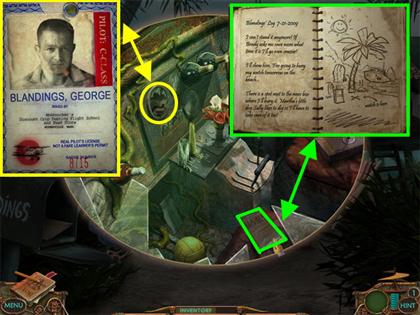
- Put the Ladder on the side of the green airplane.
- Click on the airplane’s broken window for a closer view of the cockpit.
- Click on the Sketch Book in the lower right side. It will show you the place in which the Watch is buried.
- Click on the badge on the top side of the pop-up window. It is a badge for George Blandings.
- Click on the badge to exit the cockpit.
- Go back to the next section by placing your cursor by the water in this scene and in the next scene as well.
Theater Area
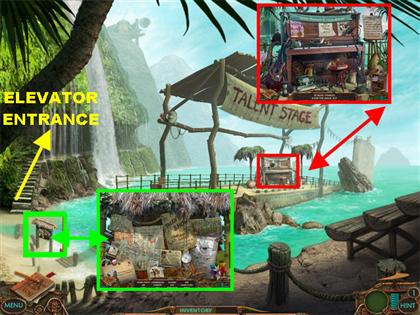
- There are 2 Hidden Object scenes by the Theater. One is on the piano of the Talent Stage and the other one is on the Bulletin Board on the left.
Pick up Blowtorch – Magic, Music Symbols, 10 Items for Friar
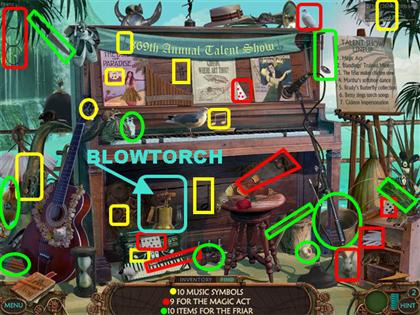
- Click on the piano on the Stage for a closer view.
- The Music Symbols are highlighted in Yellow in the screenshot.
- The 9 Magic Act Pieces will be in Red in the screenshot. Look for the Magic Rings, the Magic Wand, 3 Playing Cards, a Saw, a White Rabbit, a White Dove, and White Gloves.
- The 10 Items for the Friar are in Green in the screenshot. Look for a Celery Stalk, Carrots, a Chicken, a Cooking Pot, Garlic, Knife, Ladle, Pepper Mill, Salt Shaker, and a Wooden Spoon.
- The Blowtorch is in Light Blue. Pick up the Blowtorch in the lower left side of the piano after all the objects have been found.
9 Pieces of Paraphernalia for Dancing/ 10 for Mr. Blandings’ Act
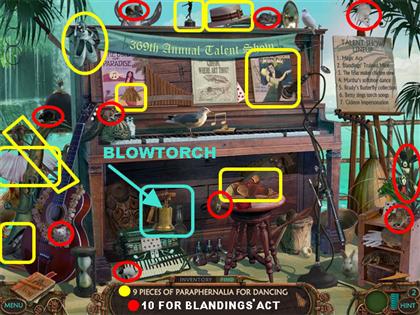
- This screenshot shows you the locations of the 9 pieces of paraphernalia for dancing. Look for Ballet Slippers, a Cane, Dancing Magazine, Dancing Shoes, Grass Skirt, Hat, Tap Shoes, a Trophy, and a Tutu. Highlighted in yellow.
- The screenshot also shows you the 10 mice for Mr. Blandings’ Act.
- The Blowtorch is in Light Blue. Pick up the Blowtorch in the lower left side of the piano.
Collect the Knob - Bulletin Board in the Theater Area
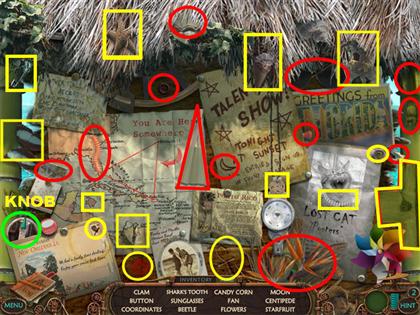
- Click on the Bulletin Board on the left for a closer view.
- Look for all the items on the list.
- The items marked in red are all the items on the list. The items in yellow are alternate items found while replaying the game.
- Pick up the Knob in the lower left corner of the scene after all the items from the list have been found.
- Go to the next area by placing your cursor on the steps located on the left side of the scene.
Pick up Shovel – Elevator Entrance
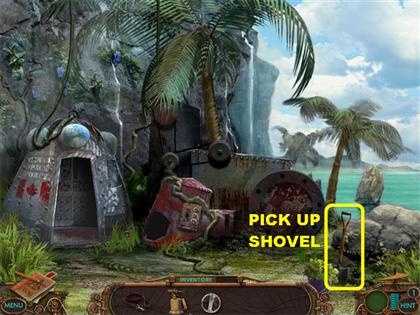
- Pick up the Shovel on the right side of the scene.
- Go back to Beach by placing your cursor at the bottom of the scene 4 times.
Use Shovel on the Beach/ Pick up Watch & Matchbox
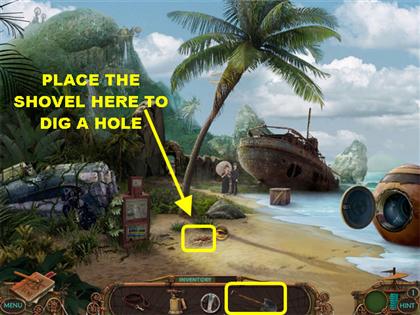
- Place the Shovel on the sand in the spot in front of the palm tree to dig a hole.
- Click on the hole for the Toolbox to appear.
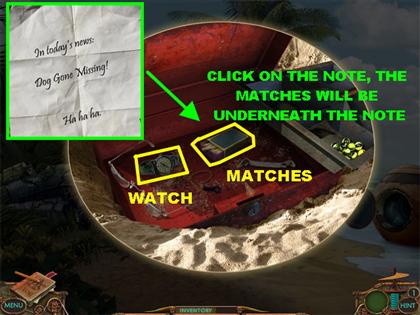
- Click on the Toolbox to open it.
- Click on the open Toolbox and the top tray will disappear.
- Click on the Note and it will appear on your screen.
- Pick up the Watch and the Matchbox.
Get Sally the Pug - Beach
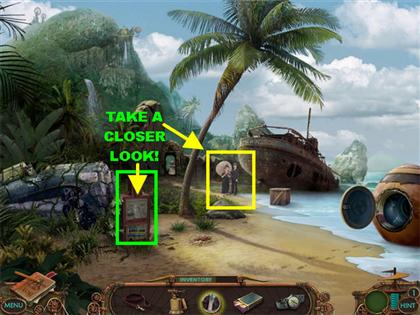
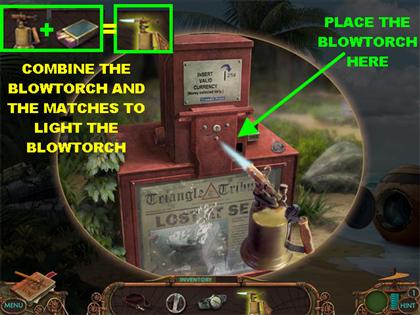
- Click on the Newspaper Dispenser on the beach for a closer look.
- From the Inventory Tray combine the Blowtorch and the Matchbox so you can have a Lit Blowtorch.
- Place the Lit Blowtorch on the handle of the Newspaper Dispenser. Inside the Newspaper Dispenser you will find a dog and a paper.
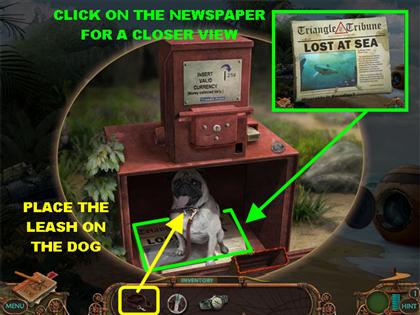
- Place the Dog Leash on Sally the dog.
- Click on the dog and it will go into inventory.
- Click on the Newspaper for a closer view.
- Click on the Newspaper again to return to the Beach scene.
Give Sally the Pug to Couple – Receive Key
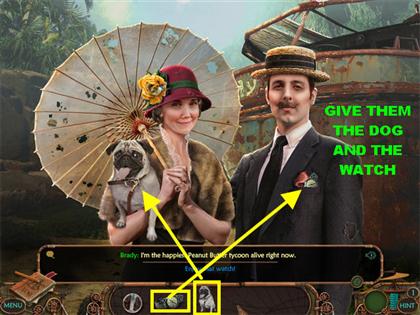
- Click on the couple on the beach for a closer view.
- Give the Watch and the Dog to the couple.
- Go through the dialogue in the scene.
- The Couple gives you a Key to their home which goes into your Inventory Tray.
- Go back to the next scene by placing your cursor on the back of the scene.
- From that scene, place your cursor on the left side of the scene, by the water.
Enter Blanding’s Home
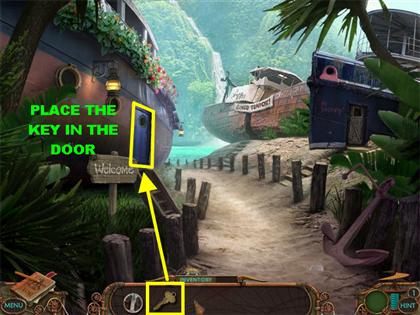
- Place your Key on the blue door on the left boat to enter the couple’s home.
Find 12 Related Pairs – Find Crowbar & Fortune Cookie
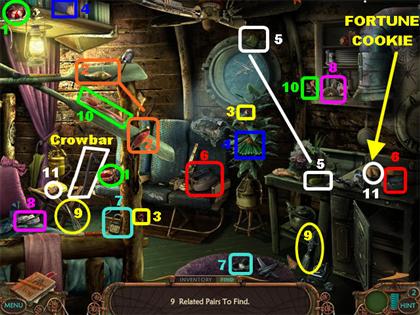
- Your goal in this scene is to find pairs of related items. The items can be the same or they can have something in common.
- Click on an item to highlight it, find the matching pair and both items will be taken off the list.
- If you’re stuck and can’t find something, use your hint. The hint will help you find either the first item or the pair to an item you’ve already highlighted.
- Keep in mind that the items needed are random. The screenshots show you the location of all the pairs needed in this scene.
- Look for matching sets of the following items:, Kettles, Gift Boxes, Cameras, Irons, Thimbles, Spoons, Knives, Glasses, Reflex Hammers, Padlocks, Ladybugs, Wooden Spoons, and Fishing Lures.
- Also look for these items:A Clock & Watch Green Pepper and Pepper Heart & Heart Playing Card The word “TIE” & a Bowtie Basket of Apples & Apple
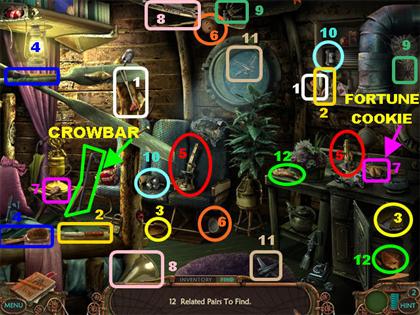
- Click on the oven door to open it. Click on the whole pie inside the oven and then click on the slice of pie on the floor.
- Click on the Whole Chicken inside the oven and then pick up the Chicken Leg on top of the stove.
- Pick up the Fortune Cookie on top of the stove. Click on the Chocolate Chip on the lower left side. The Fortune Cookie will go into inventory.
- Pick up the Crowbar leaning against the left side of the wall after all the items have been found in the scene.
- Go back to the Beach.
Use Crowbar to Obtain Belt - Beach
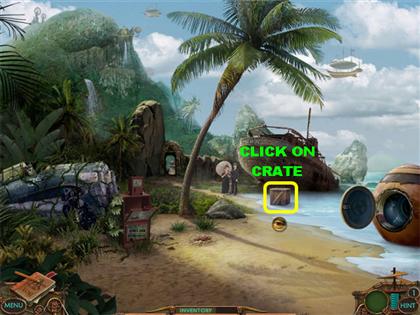
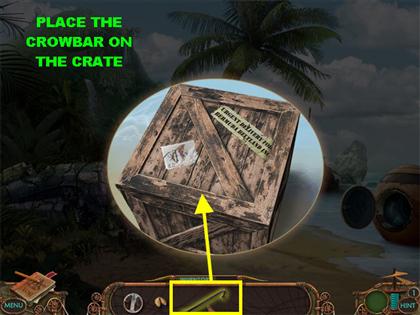
- Click on the Crate in the water for a closer view.
- Place the Crowbar on the Crate to open it.
- Click on the peanuts in the Crate until they all disappear.
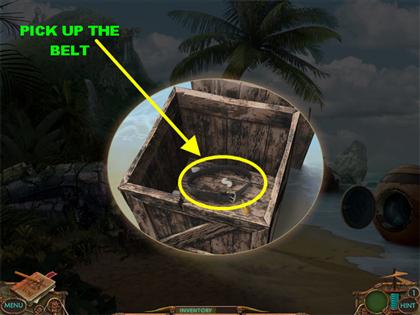
- Pick up the Belt that appears at the bottom of the crate.
- Place your cursor in the back of the scene.
Use Fortune Cookie
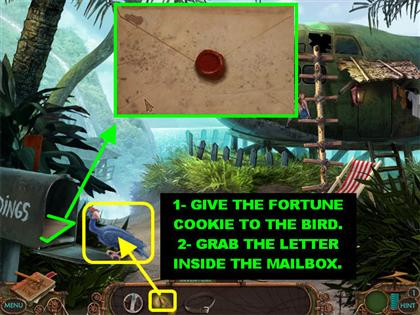
- Give the Fortune Cookie to the Bird in front of the mailbox.
- Once the Bird flies away, grab the Letter to trigger a mini-game.
Letter Puzzle
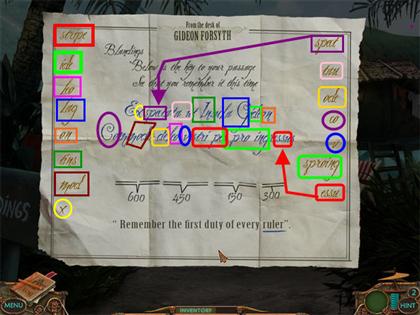
- There are words written in blue in the middle of the page and letters in gold on the right side and left sides of the page.
- Your goal is to grab the gold letters on the left or right side of the page and place the same letters amongst the words in blue.
- The solution for this puzzle is always the same but the group of letters you need to look for will appear in different spots each time.
- Once all the letters have been found, the remaining letters will appear inside the boxes at the bottom of the page.
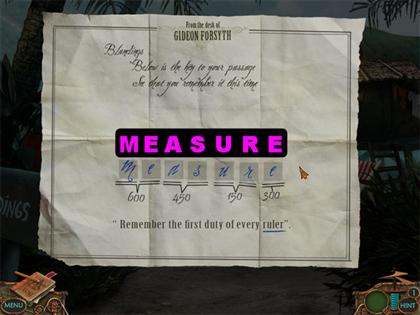
- Click on two letters and they will swap places.
- Rearrange the letters to form the word:”Measure”.
- The Letter will appear in your Journal after the puzzle has been completed.
- Go towards the Elevator by placing your cursor in the following manner:LOWER LEFT BY WATER BY STEPS
Elevator Puzzle
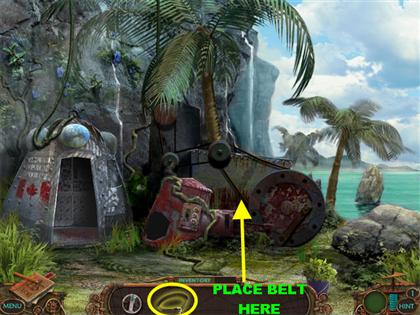
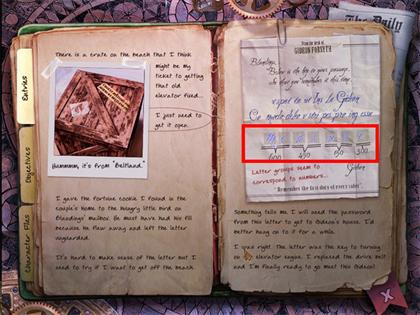
- Place the Belt on the large wheel of the Elevator’s Engine.
- Open your Logbook. Look at the numbers below the word “Measure”. You need those numbers to fix the elevator.
- Click on the Elevator for a closer view.
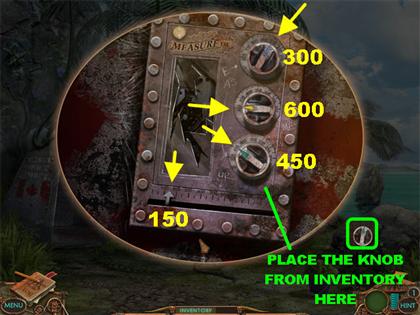
- Attach the Knob on the third dial.
- Your goal is to turn the Knobs to the numbers according the journal entry.
- Notice the etchings on the side of the panel. The numbers and letters correspond to the numbers you need to enter.
- The solution from top to bottom is as follows:
- Turn the top blue dial to 300, which is the letter “E” in the Logbook.
- Turn the yellow middle dial to 600, which are the letters “ME” in the Logbook.
- Turn the top bottom green dial to 450, which are the letters “AS” in the Logbook.
- Once all the dials are in place, slide the arrow at the bottom of the controls to “150”, which is the notch between the 100 and 200. This corresponds to the “UR” section in the Logbook.
- Once the elevator has been fixed, the pop-up window will automatically close.
- Click on the sparkly elevator on the left to access your next location.
Chapter 3: A Strange Meeting
Architect Approach
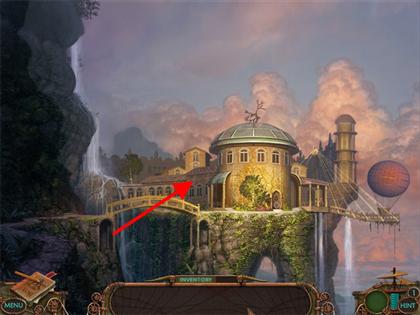
- Place your cursor over the bridge to arrive at Gideon’s front door.
Constellation Lock – Pick up Doorbell Crank
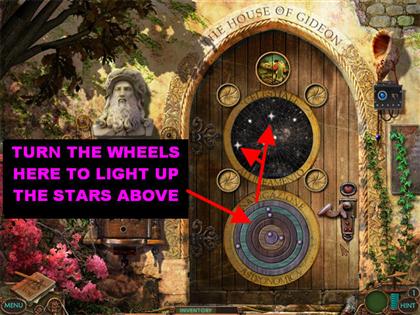
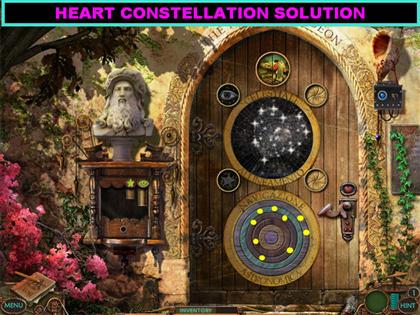
- Your goal in this puzzle is to click on the circles in the lower part of the door until you see all of the stars in the constellation light up.
- Keep turning all the circles in the puzzle until the form of the stars is revealed.
- You will have to duplicate four different patterns to pass this puzzle.
- Once all 4 puzzles have been solved the handle will appear above the door.
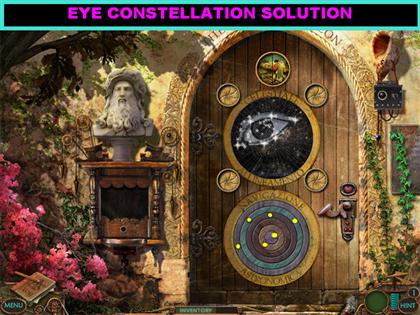
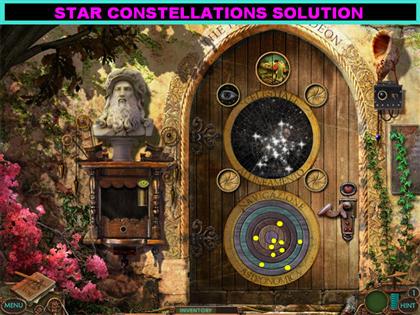
- The next set of screenshots show you the solutions for all 4 constellations.
Eye Constellation
Star Constellation
Heart Constellation
Crescent Moon Constellation
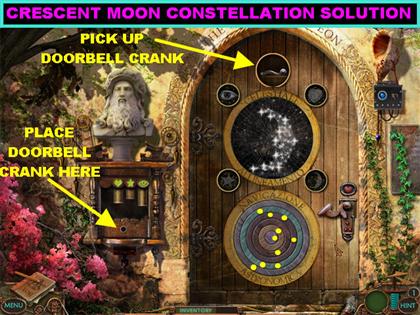
- Pick up the Doorbell Crank that appears above the door.
- Place the Doorbell Crank at the bottom of the large doorbell on the left.
- Click on the Crank and it will start spinning.
- The door will open; go through it to access the Atrium.
Pick up Octagon Stained Glass Piece - Atrium
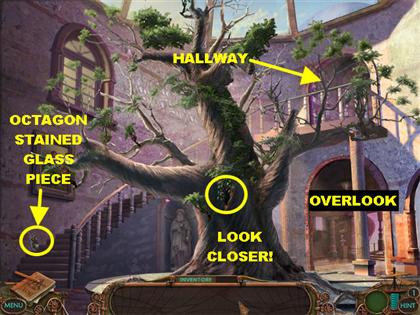
- You can click on the lower right to enter the Overlook.
- You can access the Hallway by clicking on the upper right.
- Pick up the Octagon Stained Glass piece in the lower left.
- Click in the center of the tree for a closer look to look for the list of items.
Pick up Blowgun - Tree Hole
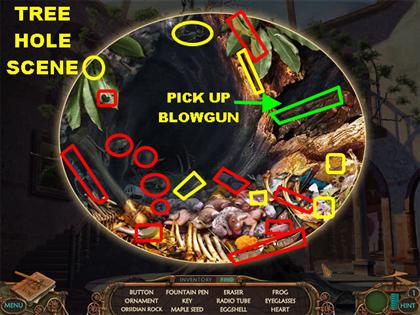
- Pick up the items from the list. The items in red are the items on list. The items in yellow are items we found in subsequent plays.
- Collect the Blowgun in the upper right after all the items have been collected.
- The window will automatically close once all the pieces have been found.
- Go to the Overlook by clicking on the lower right.
Pentagon Stained Glass Piece - Overlook
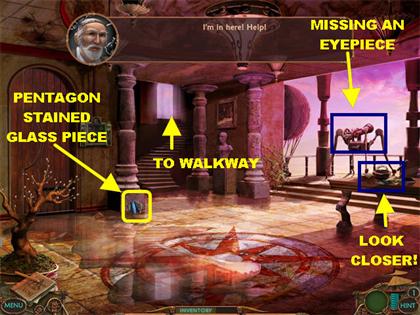
- Pick up the Pentagon Stained Glass piece at the bottom of the left column.
- Click on the Telescope on the right and you will receive the message that it needs an Eyepiece.
- Click on the desktop on the right for a closer view.
Square Stained Glass Piece – Desktop in Overlook
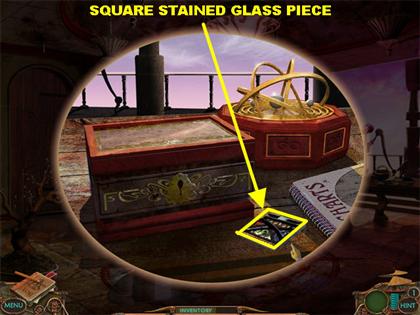
- Pick up the Square Stained Glass piece on the right.
- There is a locked box in the scene; you need to find a key to open it. You can come back to it later.
- Close the pop-up window.
- Click on the steps of the Overlook to reach the Walkway.
Collect Circle Stained Glass Piece
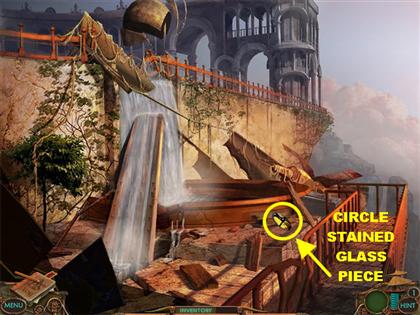
- Grab the Circle Stained Glass piece on the right.
- Click on the right for a closer view. You need a key for the apparatus; you can come back to this spot later.
- Go to the Hallway by placing your cursor in the following manner:DOWN 2X UPPER RIGHT
Triangle Stained Glass Piece & Key - Hallway
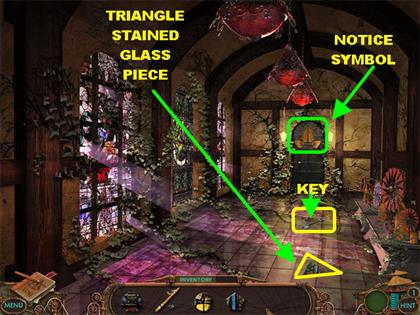
- Pick up the Triangle Stained Glass Piece and the Key on the floor.
- Make note of the symbol of the door in the back, you will need this for another puzzle.
- Go back to the Overlook by placing your cursor in the following manner:DOWN LOWER RIGHT
Overlook – Pick up Beaker
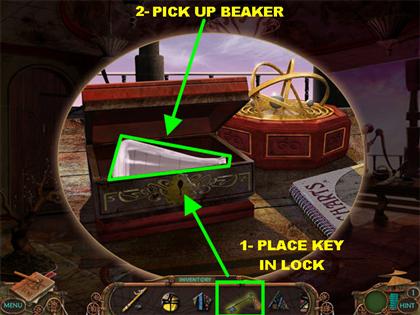
- Click on the desktop on the right for a closer view.
- Take the Key from inventory that you found in the Hallway and place it on the box.
- Pick up the Beaker inside the box.
- Close that pop-up window.
- Go back to the Hallway.
Hallway
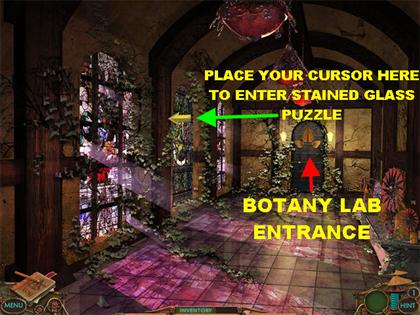
- Place your cursor on the middle window and the arrow will point to the left, click on the arrow to enter the Stained Glass Puzzle.
Stained Glass Window Puzzle/ Pick UP Star Stained Glass Piece
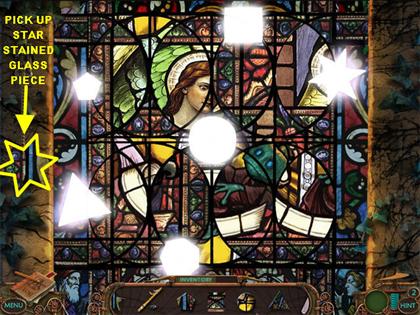
- Pick up the Star Stained Glass piece on the left.
- There are 6 circles in this puzzle, 3 on top and 3 at the bottom. When your cursor passes over a circle it will light up.
- Your goal is to rotate the circles until the white geometrical shapes are all aligned.
- Each time you get a white piece that is aligned, place the matching stained glass piece from inventory into the empty spaces.
- You can rotate the circles to line up all the geometrical shapes at once or you can do it one at a time.
- Please watch the video for a step-by-step solution for this puzzle.
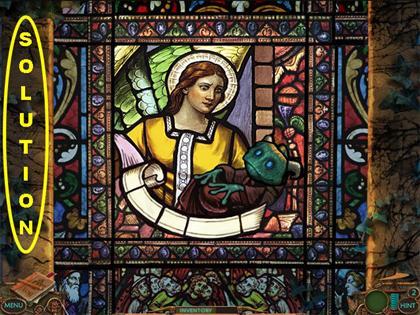
- Once all the shapes have been placed in the puzzle, you have to rearrange the circles to form the desired image.
- You can move different parts of the images within the circles.
- Click on the circles to rotate them until they look like the picture in the second screenshot.
- Once the puzzle has been completed, it will open up the door to the Botany Lab.
- Go to the Botany Lab.
- Please watch the video for a step-by-step solution for this puzzle.
Pick up Water Key & Knife - Botany Lab
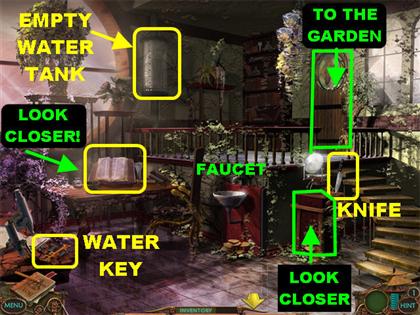
- Pick up the Water Key in the lower left.
- Pick up the Knife on the far right side, close to the top of the steps.
- Click on the faucet and you will notice a sign that says the water is not running.
- If you click on the water tank on the wall you will receive the message that it is empty.
Pick up Vial of Chemical X – Workshop Vignette
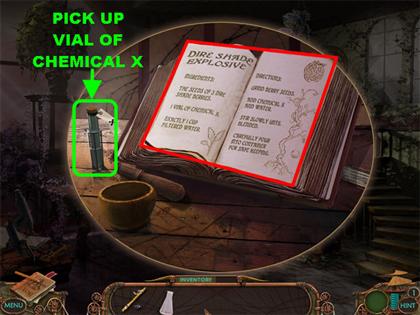
- Take a closer look at the open book on the table. It gives you a recipe for an explosive.
- It tells you that you need the seeds of 3 Dire Shade Berries, 1 Vile of Chemical X and exactly 1 Cup of Filtered Water.
- Pick up the Vile of Chemical X on the left side of the book. Close the window for now.
- Close the pop-up window.
Botany Lab Computer
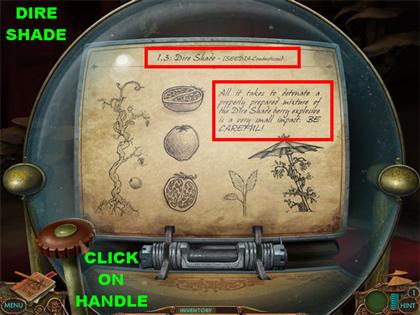
- Take a closer look at the old-fashioned computer on the right, close to the steps.
- Use the Handle on the left to flip through the cards.
- Stop and read the card entitled “1.3 Dire Shade”. It says:”All it takes to detonate a properly prepared mixture of the Dire Shade berry explosive is a very small impact. BE CAREFUL”
- Close the pop-up window.
- Go through the door in the back to access the Garden.
Pick up Measuring Cup & Berries - Garden
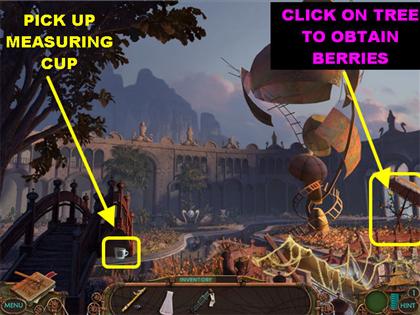
- Pick up the Empty Measuring Cup close to the bridge, on the lower left.
- Click on the small tree on the far right and the Berries will be added to your inventory.
- Go back to the Walkway by placing your cursor in the following manner:DOWN 3 TIMES LOWER RIGHT ON STEPS
Use Water Key – Walkway
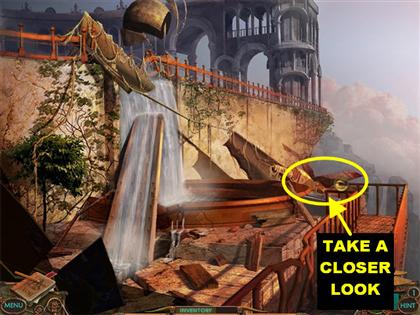
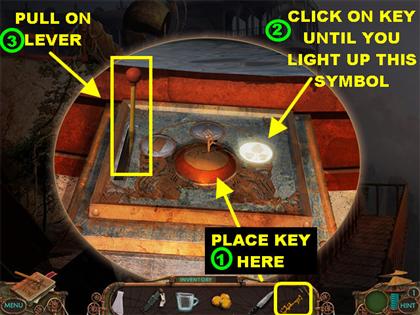
- Click on the right side of the scene for a closer look.
- Place the Water Key you found in the Botany Lab and place it on the Keyhole.
- Move the Key around to each symbol and it will light up.
- Match the symbol with the symbol on the Botany Lab door; you have to light up the last symbol.
- Pull the Lever. The water will drain and the window will disappear.
- The Water Filter Tank in the Botany Lab will now be full of filtered water.
- Go back to the Botany Lab by placing your cursor in the following manner:DOWN 2 TIMES UPPER RIGHT BOTANY LAB DOOR
Cup of Filtered Water
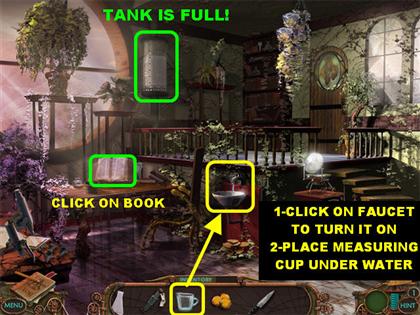
- The Water Tank on the side wall is full since you activated the water in the Walkway.
- Click on the Faucet to start the water running.
- Place the Measuring Cup under the Faucet to fill it with Filtered Water.
- Click on the faucet again to turn off the water.
Dire Shade Explosive - Botany Lab
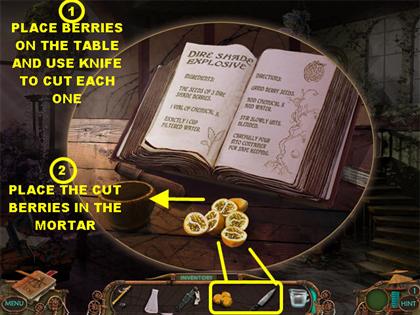
- Click on the book on the table for a closer view.
- Place the Berries on the table, in front of the book.
- Take the Knife and cut each Berry. The Berries will go into inventory.
- Drag the cut Berries to the Mortar.
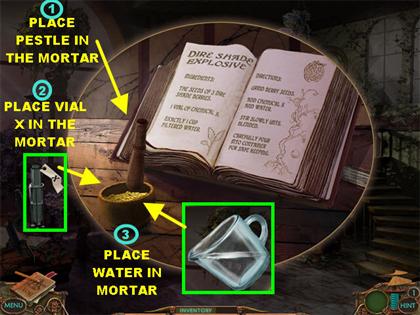
- Take the Pestle to grind the Berries until the Pestle goes back on the table.
- Place the Vial of Chemical X into the Mortar.
- Drag the Cup of Filtered Water into the Mortar.
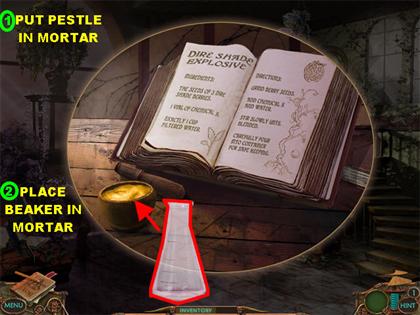
- Place the Pestle on the Mortar.
- Take the Beaker and place it on the Mortar and it will go into inventory full of the explosive.
- Go back to the Garden.
Garden
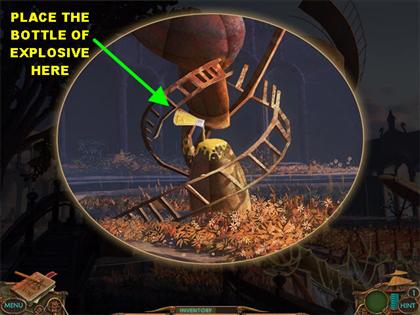
- Click on the metal structure on the right for a closer view.
- Take the Dire Shade Explosive and place it on the structure. The pop-up window will close automatically after the explosive has been applied.
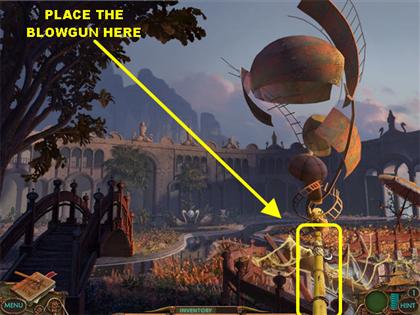
- Place the Blowgun at the bottom of the structure and click on it to make it shoot something at the structure to make it explode. This action will stop the water from flowing in the Walkway area.
- If you go back to the Walkway you will see the water is no longer flowing.
- Go back to the Overlook.
Library Door Lock
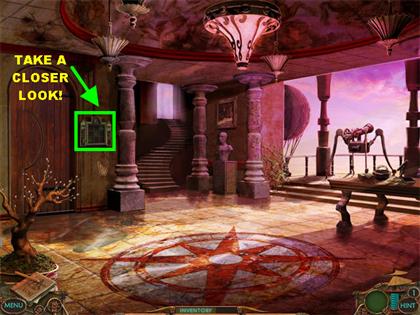
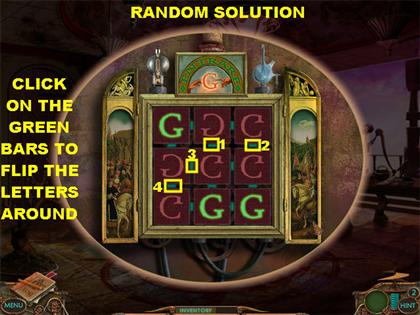
- Click on the lock to the right of the door with the letter “G” for a closer look.
- Click on the green bars to rotate the letters around.
- Your goal is to turn all the letters facing in the same direction.
- The vertical green bars flip the connecting tiles in a horizontal manner.
- The horizontal bars flip the connecting tiles in a vertical manner.
- You have a limited amount of moves in which to accomplish this goal. Each time you click on a green bar between the letters, one of the letters in the word “ENTRARE” will go dark.
- Please watch the video for a step-by-step solution for this puzzle.
Gideon’s Library
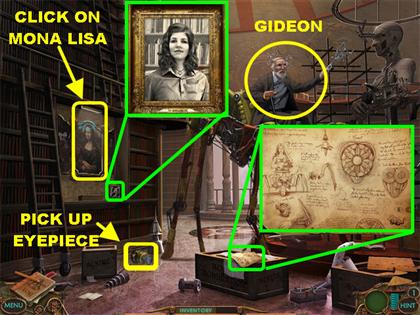
- Talk to Gideon, he tells you that his daughter Delia can help you get the Bio-Coil back; you can find her in his lab.
- Then he says to take the orbs from Mona and use them in the Garden to access the lab.
- Click on the sketch above the crate on the floor for a closer view.
- Pick up the Lens on the left side of the ground.
- Click on the picture of Delia for a closer view. It is below the Mona Lisa painting.
- Click on the Mona Lisa painting on the left for a closer view.
Mona Lisa Puzzle
- Your goal is to find all the animals or objects related to the theme in the circle.
- Only one circle will open at a time.
- The images you receive will be random. Please look at the next set of screenshots for all the possibilities you may run across while playing.
Bird Solution
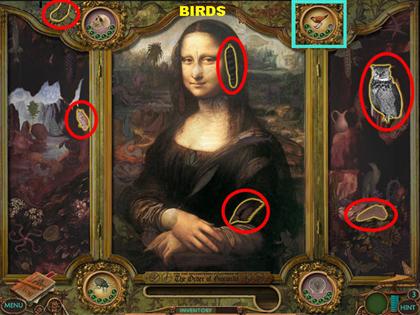
- Look for these items in this section:Birds Feathers Owls Eagles
Bug Solution
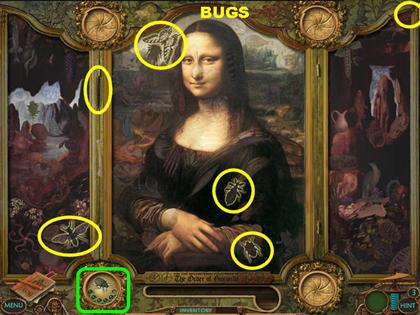
- Look for these items in this section:Spider Butterfly Bugs Moth Centipede
Cat Solution
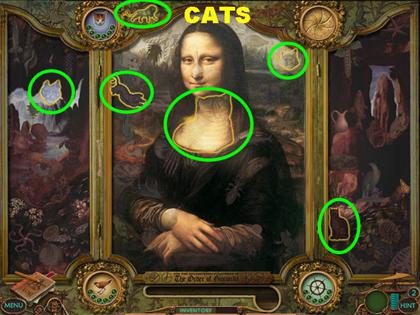
- Look for these items in this section:Cats Panthers Lion
Fish Solution
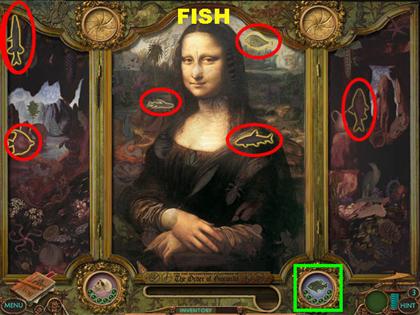
- Look for different kinds of fish in this section.
Frog Solution
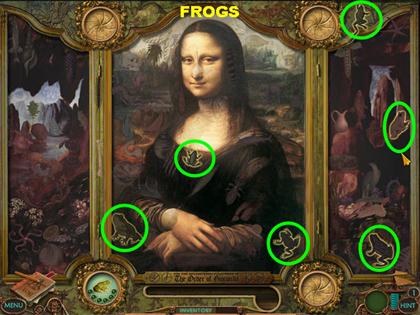
- You only have to look for assorted types of frogs in this section.
Shell Solution
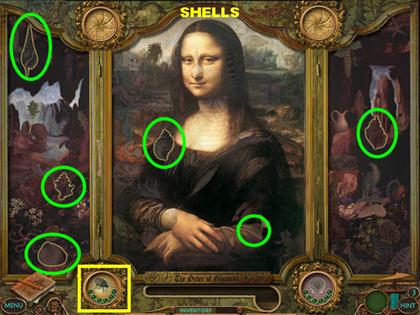
- Look for these items in this section:Assorted types of shells Snail
Ship’s Wheel Solution
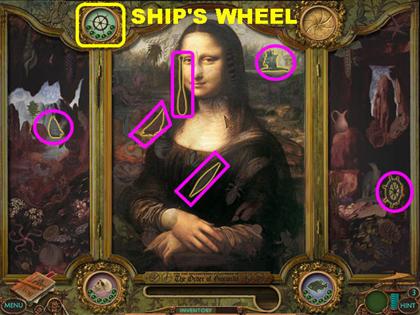
- Look for these items in this section:Sailboat Canoe Ship’s Wheel Oar Ship
Skull Solution
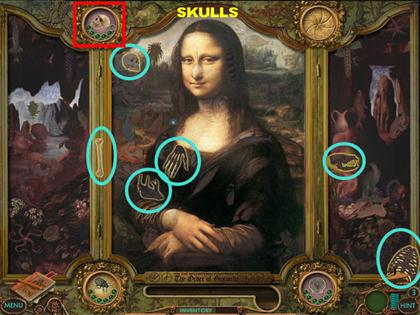
- Look for these items in this section:Skulls Bones Rib Cage Skeleton Hand Animal Skull Human skull
Symbols Puzzle
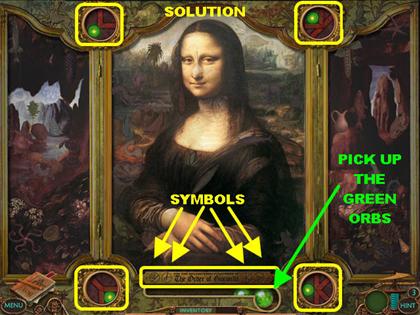
- Now that you’ve completed the first part of Mona Lisa’s Puzzle, you have to do one more step.
- Your goal is to turn the symbols in the same manner as the images in the plaque below the picture.
- Click on each of the 4 circles in the corner of the painting to rotate them to the desired image.
- Please look at the screenshot for the solution.
- Pick up the 2 Green Orbs at the bottom slot after all the symbols have been entered correctly.
- The painting close-up will close automatically after you pick up both orbs.
- Click on Gideon and ask him what to do with the orbs. He will tell you to give them to the 2 Fargoyles with open palms.
- Exit out of that scene and go back to the Overlook.
Overlook
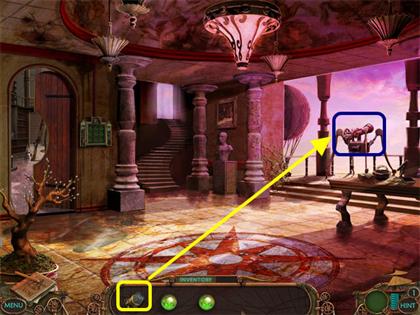
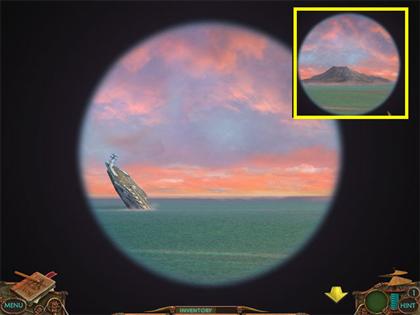
- Place the telescope lens in the telescope and you will see a sunken ship in the horizon.
- Exit out of that scene.
- Go to the Reflection Pool by placing your cursor in the following manner:DOWN UPPER RIGHT BOTANY LAB DOOR GARDEN DOOR END OF THE BRIDGE
Place the 2 Green Orbs - Reflection Pool
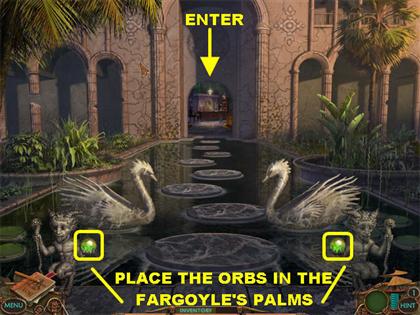
- Place the 2 Green Orbs in the hand of the Fargoyles.
- The door in the back will open and round stone steps will appear in the water.
- Click on the back of the scene to enter the Mad Scientist’s Lab.
Mad Scientist’s Lab
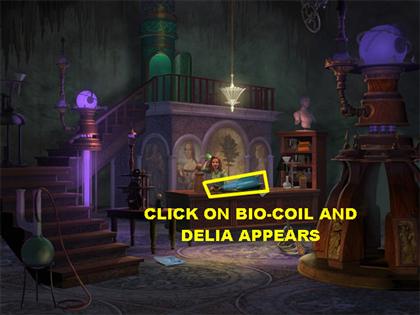
- Click on the Bio-Coil and Delia will come out from behind the counter and throw some sort of sleeping gas at you.
- The scene will go dark for a moment and when it reappears the Bio-Coil is gone.
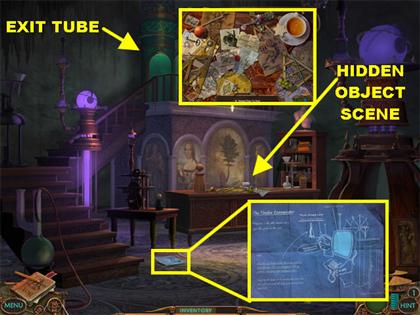
- Click on the Blueprint on the ground for a closer view.
- It is a Blueprint of the Timeline Communicator. The Blueprint goes in your Logbook.
- Click on the desk for a closer look.
Desk Hidden Object Scene
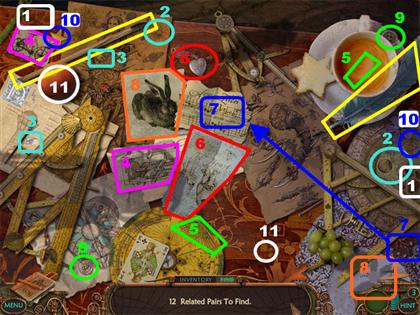
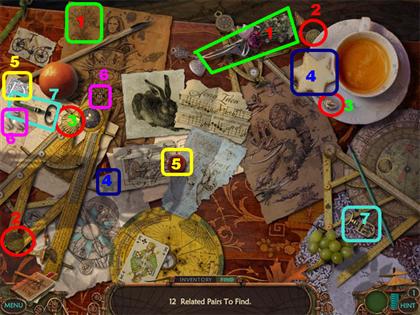
- You should look for the following related items in the scene:2 Rabbits 2 Nails 2 Oranges 2 Bouquets of Flowers 2 Sets of Stars 2 Buttons 2 Coins 2 Suns 2 Paws 2 Pencils Bicycle Sketch & Vehicle Sketch Music Sheet & Music Notes Pair of Hands Seal & Stamps Key and Keychain Heart Sketch & Heart Locket
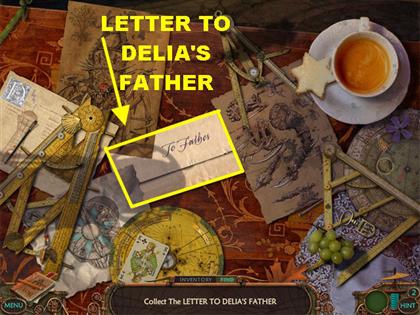
- Pick up the Letter to Delia’s Father in the center of the table after all the items on the list have been found.
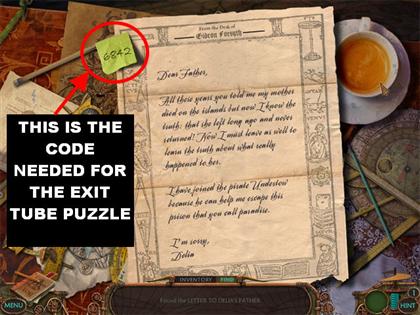
- Notice the numbers in the upper left corner of the opened letter. Those numbers vary with each game.
- Click on the Exit Tube above the steps to trigger a puzzle.
Exit Tube Puzzle
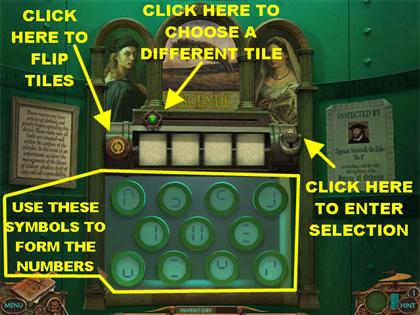
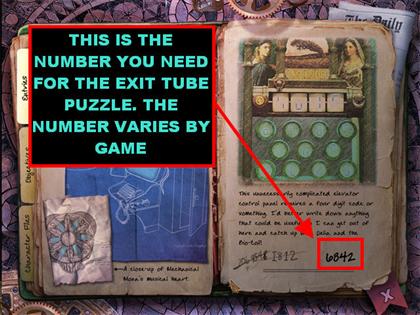
- Click on your journal to open it. Make note of the number at the bottom of the page. My number was 6842 but yours will be different.
- Your goal for this puzzle is to enter the number you received in the Letter to Delia’s Father into the tiles in the puzzle.
- You will not be able to enter the number as a whole unit, you have to find the 2 symbols that make up that digital image of the numbers.
- Click on a tile to select it. Then click on a symbol at the bottom of the puzzle. The symbol you clicked will be entered into the tile you selected.
- Use the double arrows on the left button to flip the tile so you can input the symbol that completes that particular number.
- Repeat the same procedure for the next 3 numbers.
- Once all the numbers have been placed correctly, click on the Knob on the right to enter your selections.
- If the numbers are correct, the Exit Tube will take you up to the Crystal Room.
- If it’s not correct, you will have to try again.
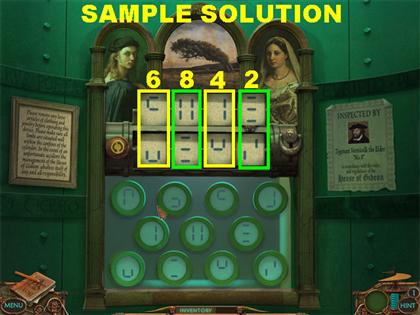
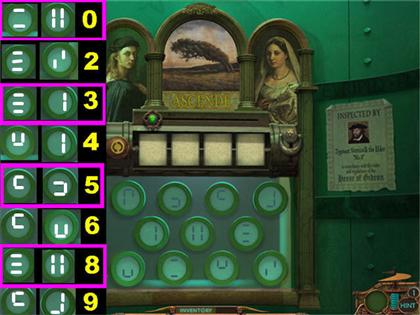
- Since the solution to this puzzle is random, we’ve provided a screenshot that shows you a sample solution.
- The other screenshot shows you all the possible number combinations for this puzzle.
Chapter 4: Buried Secret
Stone # 1/ Jetpack - Crystal Room
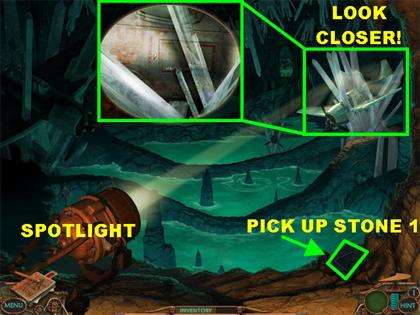
- Pick up Stone # 1 in the lower right and it will go into inventory.
- Click on the Spotlight on the left to turn it on.
- You can move the Spotlight around so you can see different areas of the cavern.
- Click on the Spotlight until it shines on the plane on the right.
- Click on that plane for a closer view.
- Click on the Jetpack Compartment and you will not be able to open it due to a large crystal blocking it.
- Close that pop-up window for now.
Find the Exit
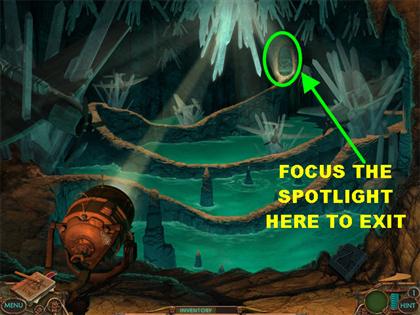
- Click on the spotlight until it shines on the exit shown in the screenshot.
- Go into the Cave by clicking on the exit.
Lost Pilot – Pick up Glass Jar
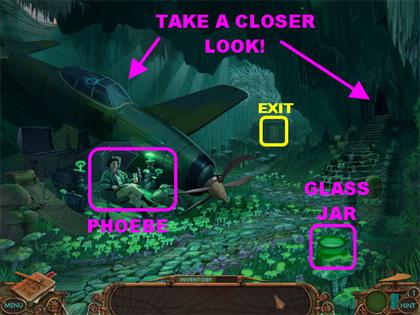
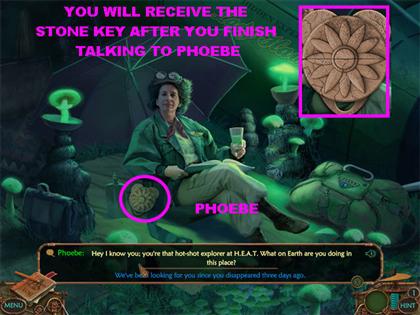
- When you enter the scene you will encounter Phoebe sitting by the plane.
- Pick up the Glass Jar on the lower right.
- Click on Phoebe to talk to her. She says she doesn’t feel like leaving at the time but she might leave later.
- Once you’re done talking to Phoebe, the Stone Key will go into your inventory.
Pick up Crystal Cutter - Cockpit
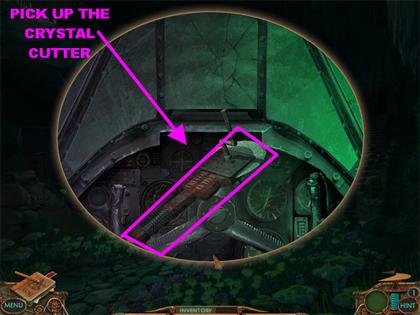
- Click on the Cockpit for a closer view.
- Pick up the Crystal Cutter and the window will close automatically.
- Click on the rocks on the right for a closer view. You need to move them but you cannot do so at this time. You can come back to this area later.
- Place your cursor downwards to go back to the previous scene.
Crystal Room – Jet Pack Frame
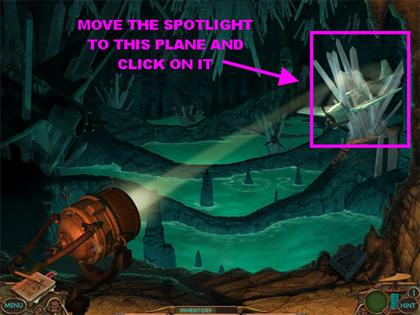
- Move the Spotlight to the plane on the right side of the scene.
- Click on the plane for a closer view.
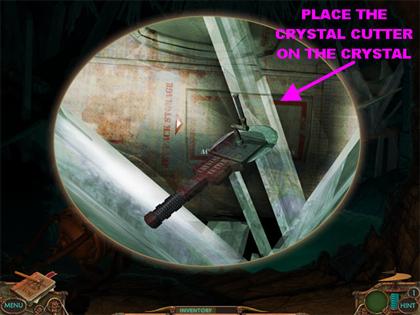
- Take the Crystal Cutter from inventory and place it on the crystal that is blocking the Jetpack Compartment.
- Click on the cover to open it.
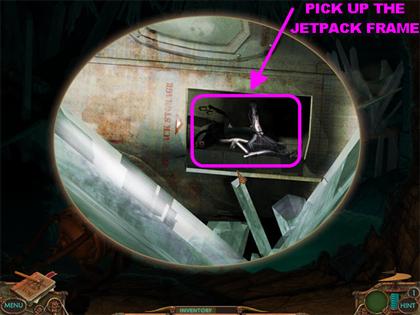
- Click inside the compartment and the Jetpack Frame will go into inventory. The pop-up window will close automatically.
- Move the Spotlight to highlight the Exit, click on it to enter it.
- Click on the back of the scene to enter the Tomb’s Exterior.
Use Stone Key - Tomb’s Exterior
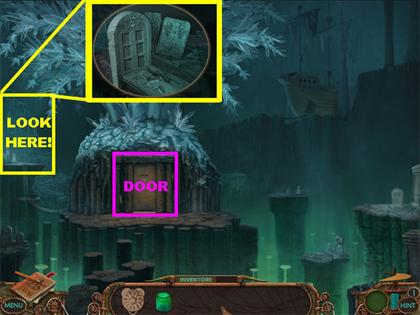
- Click on the left side of the scene and you will see a tombstone with some numbers carved into them. You need to pick up the Stones to place in this area. You can come back to it later.
- Click on the door in the center for a closer look.
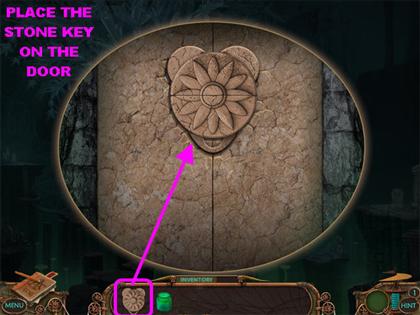
- Place the Stone Key on the door to open it, and go through it to access the Tomb’s Interior.
Pick up Scissors & Stone # 2 - Tomb Interior
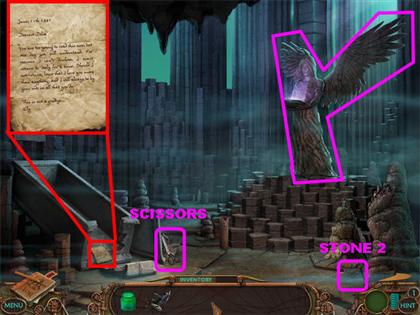
- Pick up Stone #2 in the lower right corner
- Pick up the Scissors in the lower left.
- Take a closer look at the paper on the lower left side of the scene.
- Click on the angel statue to enter a Hidden Object scene.
Pick up Crystal - Angel Hidden Object Scene
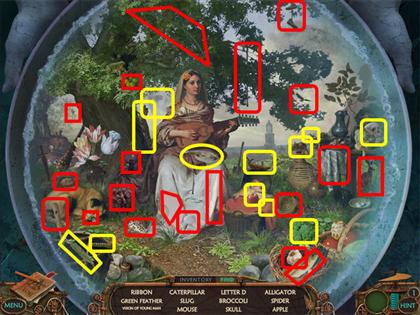
- Look for all the items on the list.
- The items in yellow are the items on the list and the items in red are alternate items we found while playing.
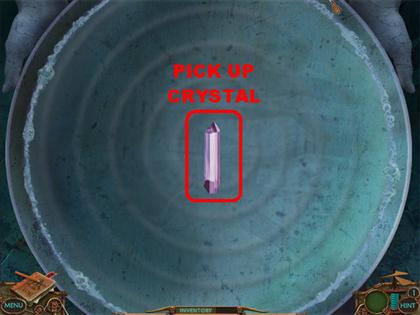
- Click on the Crystal in the middle of the screen to enter it into inventory.
Use Crystal
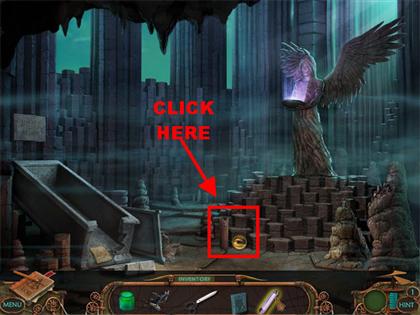
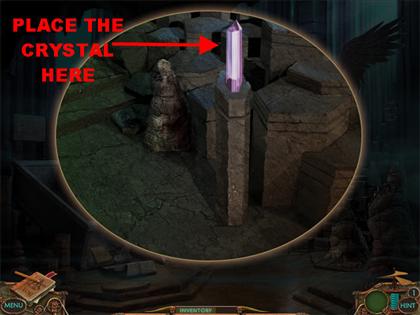
- Click on the left side of the base of the statue for a closer view.
- Place the Crystal on top of the long stone and the base of the statue will open up.
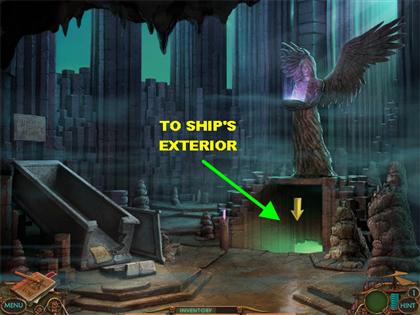
- Go to the Ship’s Exterior through the opening at the base of the statue.
Pick up Pickaxe - Ship’s Exterior
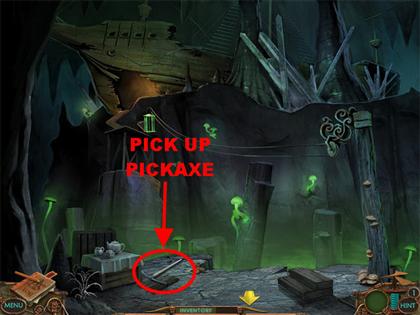
- Pick up the Pickaxe on the left side of the ground.
- Go back to the Lost Pilot scene by placing your arrow down 3 times.
Use Pickaxe & Scissors/ Pick up Grappling Hook - Lost Pilot Scene
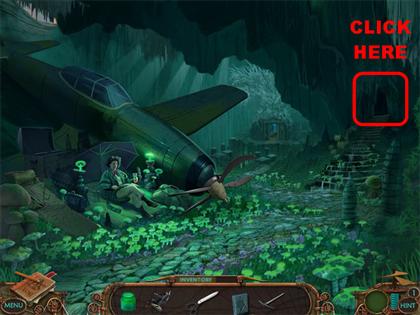
- Click on the rocks on the right.
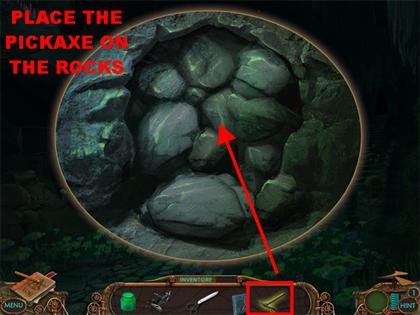
- Place the Pickaxe on the rocks to remove them and you will find a Silk Cocoon.
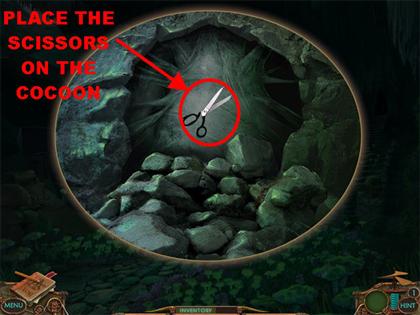
- Place the Scissors on the Cocoon to remove it.
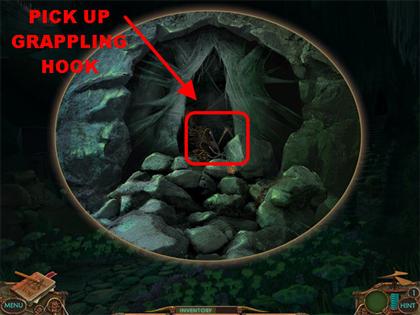
- Pick up the Grappling Hook.
- Go back to the Ship’s Exterior by following these steps:BACK OF THE SCENE DOOR BASE OF STATUE
Use Grappling Hook – Ship’s Exterior
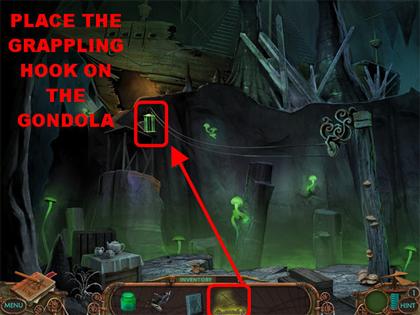
- Throw the Grappling Hook on the Gondola that’s on the upper left side of the chasm.
- The Gondola will come down the chasm; you will now have access to the Ship’s Interior.
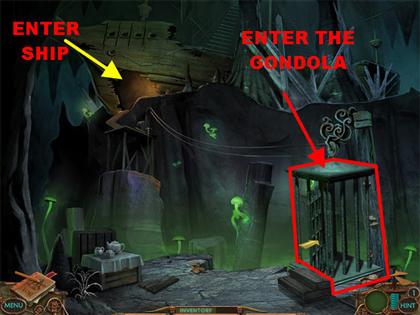
- Click on the Gondola to go inside the Ship. In future visits aboard the Ship you can also enter the Ship by going through the Ship’s door in the upper left side of the scene.
Collect Portrait Key – Ship’s Hallway
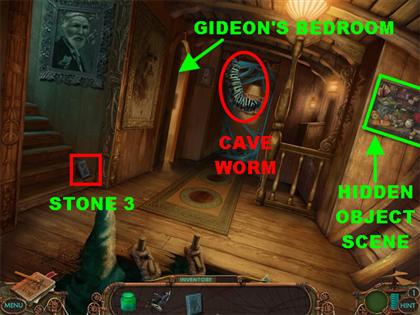
- There is a Cave Worm blocking the back of the Hallway. You can take care of it later.
- Pick up Stone # 3 on the left steps.
- Click on the right portrait to look for the list of hidden objects.
Pick up Portrait Key
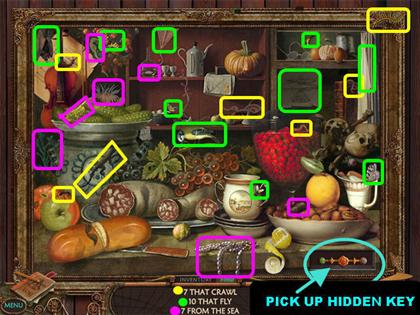
- This screenshot shows you the location of the “10 that fly”, “7 from the Sea” and “7 that Crawl”.
- These are the items you need to look for in the “10 that Fly”:Bat Bee Bird Butterfly (3) Fly Helicopter Sketch Kite Paper Plane
- These are the items you need to look for in the “7 from the Sea”:Fish Sea Anemone Sea Cucumber Sea Horse Sea Muscle Sea Pearls Seaweed
- These are the items you need to look for in the “7 that Crawl”:Ant Caterpillar Centipede (2) Lizard Snake Worm
Delia & 8 Found on Face
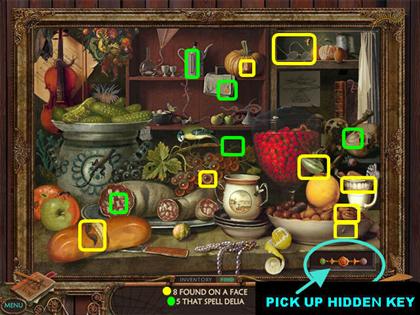
- This screenshot shows you the locations of the “5 that Spell Delia” and the “8 Found on a face”.
- These are the items you need to look for in the “5 that Spell Delia”.
- These are the items you need to look for in the “8 Found on a Face”.
- Click on the secret compartment in the lower right corner.
- Pick up the Hidden Key. This Key is for the Portrait in Gideon’s Bedroom.
- Let’s go to Gideon’s Bedroom.
Pick up Stone # 4 – Gideon’s Bedroom
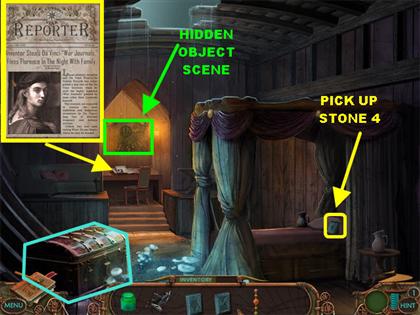
- Click on the left door in the Hallway (it’s barely open) to enter Gideon’s Bedroom.
- Click on the chest for a closer view. You cannot open it now, come back to it later.
- Click on the newspaper article in the back for a closer view. It’s an article about Da Vinci.
- Pick up Stone # 4 on the bed.
Pick up Flint – (Stone) Use Portrait Key - Gideon’s Bedroom
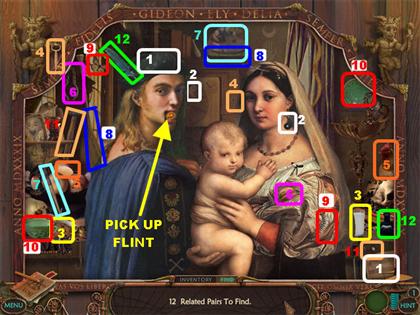
- Click on the back wall for a closer view.
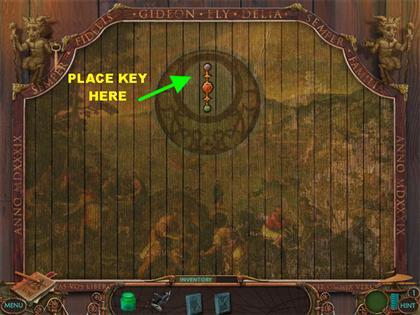
- Place the Portrait Key on the slot in the back of the wall and find the 12 related pairs.
- These are several possibilities of the items you need to find in this scene:Saucer and Cup Moon and Sun Mouse and Cheese Mortar and Pestle Ink and Quill Yin and Yang Milk and Cookies Nut and Nutcracker Music Sheet and Musical Notes Chicken and Egg Key and Keyhole Hammer and Nail Bee and Flower Fish and Fishbowl Comedy/ Tragedy Mask Caterpillar & Butterfly Bow and Arrow Needle and Thread Violin and Bow
- Pickup the Flint that appears in his mouth.
- Exit out of that scene.
- Go to the left steps to enter the Ship’s Deck.
Use Flint on Salamander - Pick up Stone # 5 - Ship’s Deck
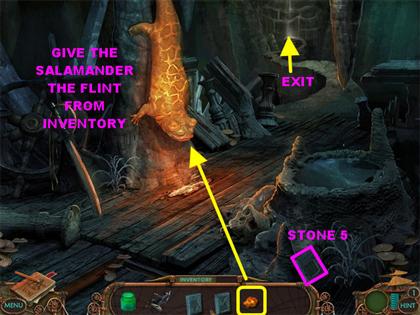
- Pick up Stone # 5 in the lower right corner.
- Give the Salamander the Flint you found in Gideon’s Bedroom and you will be able to go to the Exit in the back of the scene.
- Click in the back of the scene to access the Exit.
Fuel Tank and Stone # 6 - Exit
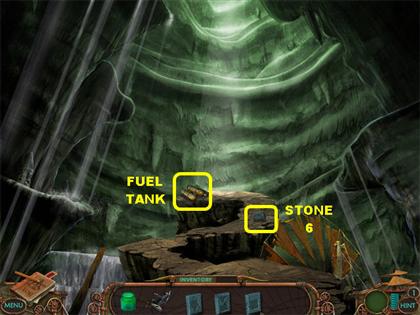
- Pick up Stone #6 on the rock path.
- Pick up the Fuel Tank on the left.
- Click downwards 5 times to go back to the Tomb’s Exterior.
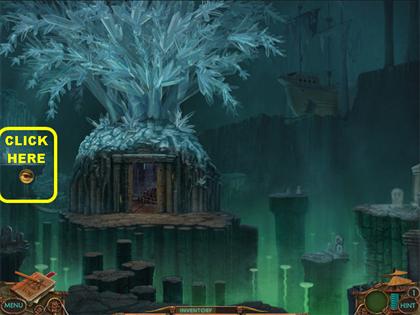
- Click on the left for a closer view.
Tomb’s Exterior – Place Stones on Tombstone
- Your goal is to place the 6 Stones that you collected along the way into the right spots on the Tombstone.
- If you haven’t collected all the Stones yet, here are their locations:Tomb Interior – Lower right corner. Crystal Room – Lower right corner. Ship’s Hallway – On the left steps. Gideon’s Bedroom - On the bed. Ship’s Deck – Lower right corner. Exit – On the rock path.
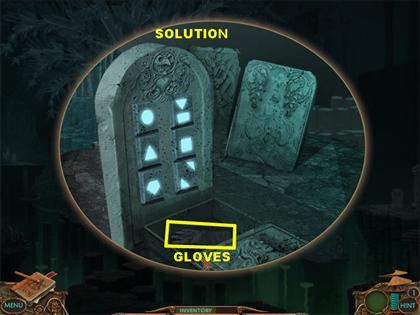
- Notice that each space on the Tombstone has a number. If you look closely at the Stones they each have a geometrical shape attached to them.
- Count the number of lines for each geometrical shape and place it on the appropriate slot.
- Each time a stone has been placed correctly it will light up.
- Place the Stones according to this chart_0= CIRCLE 7 = SQUARE & RECTANGLE 3= TRIANGLE 4= SQUARE 5 = PENTAGON 6= 2 TRIANGLES
- Once the puzzle has been done correctly, the cover on the ground will open; pick up the Glove that is inside.
- Go back to the Ship’s Deck by following these steps:DOOR STATUE BASE GONDOLA LEFT STEPS
Obtain Acid - Ship’s Deck
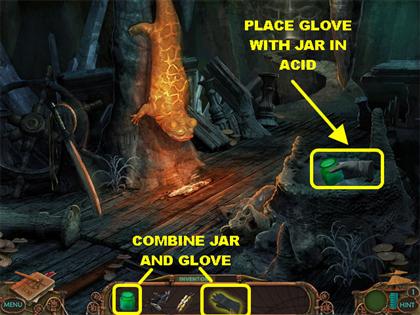
- From the Inventory Tray place the Glove over the Glass Jar and they will merge.
- Place the Glass Jar with Glove into the Acid and it will go back into inventory as a Jar of Acid.
- Go back to Gideon’s Bedroom.
Pick up Web-B-Gone – Gideon’s Bedroom
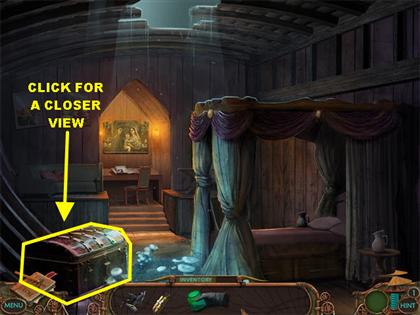
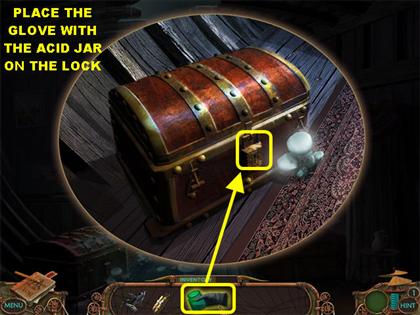
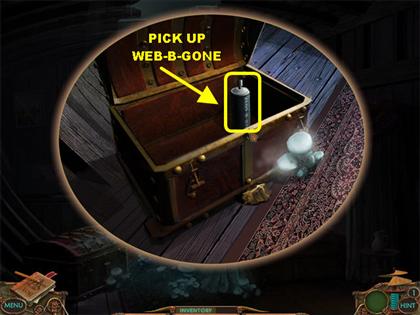
- Click on the chest for a closer view.
- Pour the Acid onto the lock to melt it.
- Pick up the Web-B-Gone from inside the chest.
- Go back to the Hallway.
Get Rid of Cave Worm
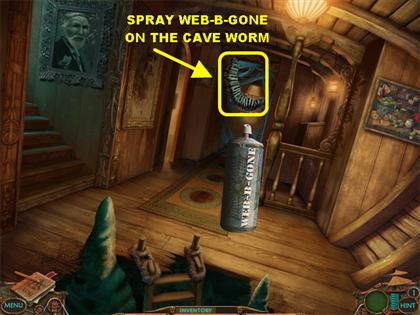
- Place the Web- B- Gone on the worm in the middle of the Hallway.
- The worm will be gone allowing you access to the portrait in the back. (If it doesn’t, exit the scene and come back to it).
- Click on the portrait in the back for a closer view.
Delia’s Wonderland Puzzle
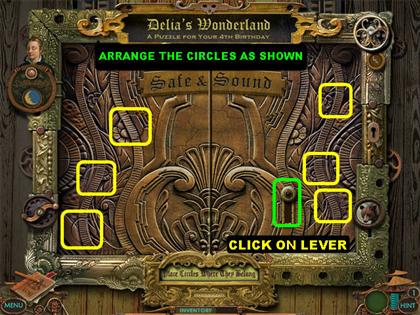
- Drag the pieces above the puzzle into one of the 6 holes in the body of the puzzle.
- Once all the pieces are in place click the lever to open the portrait.
- If the pieces are not correct, the portrait will not open. Reposition the pieces and try again.
Feed the Hungry Bear Puzzle
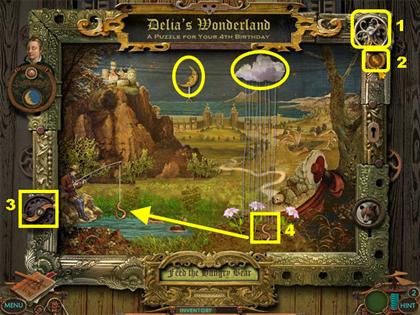
- Click on the wheel above the Lighting Bolt, in the top right side, to bring the cloud out. Keep clicking on the wheel until the cloud is over the mound of dirt in the lower right.
- Click on the lightning bolt symbol in the upper right side of the scene. This action will make it rain.
- After it rains some flowers will bloom and a worm will appear.
- Click on the wheel next to the Fisherman to bring the line up and expose the hook.
- Pick up the Worm and place it on the hook at the end of the fishing line. Place the tip of your cursor on the hook so the worm will stick.
- If you place the worm incorrectly, it will disappear and another worm will appear on the ground.
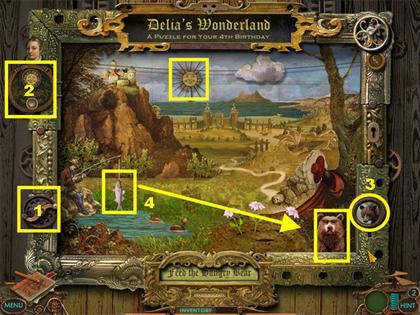
- Turn the wheel in the lower left to make the Fisherman drop the line.
- Click on the wheel in the lower left a second time to make the fish appear.
- Click on the Moon symbol in the upper left to turn it to day time.
- Click on the picture of the Bear on the lower right to make the Bear appear.
- Grab the fish and give it to the Bear. The Bear will disappear for a few seconds but will reappear with a Key in its mouth.
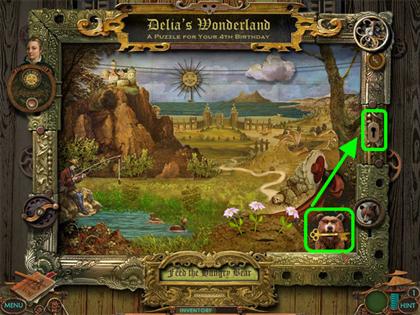
- Grab the Key that appears in the Bear’s mouth and place it on the lock on the right edge of the frame. A secret compartment will open up.
Pick up Jetpack Handle
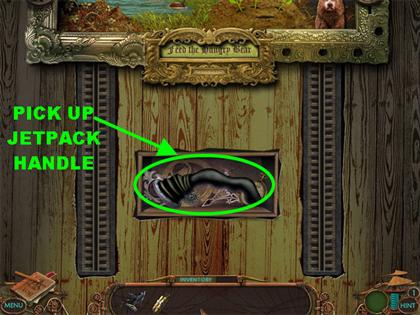
- Pick up the Jetpack Handle that appears in the secret compartment.
- Go back to the Exit by placing your cursor in the following manner:LEFT STEPS BACK
Assemble and Use Jetpack
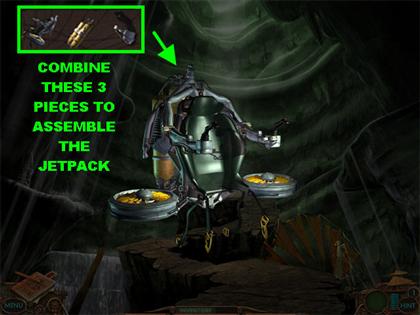
- From the Inventory Tray combine the Jetpack Frame, the Jetpack and the Fuel Tank. This action assembles the Jetpack.
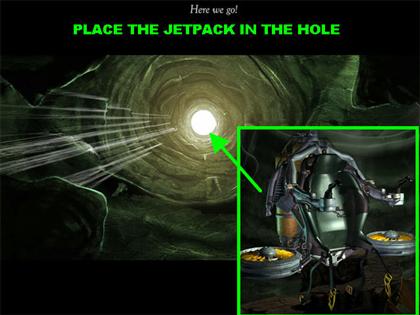
- Click on the hole in the ceiling for a closer view.
- Place the Jetpack on the hole to exit.
Chapter 5: Showdown at Windy City
City View – Shed’s Exterior (Pick up Cannonball #1)
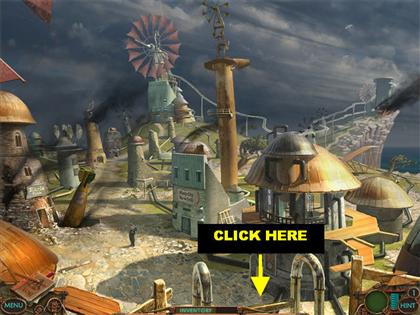
- When you first enter the scene you will see Delia flying through the air in the Jetpack.
- Click at the bottom of the scene to enter the Shed’s exterior.
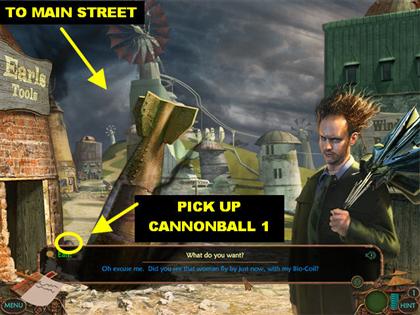
- Talk to the Earl and he tells you the only way to get to Delia’s house is by Tram Car and it happens to be without power at the moment.
- Ask him how to restore the power.
- He tells you to look at the main Power Station but you might want to disarm the bomb first.
- You can end the conversation or continue talking to Earl. Some of the things Earl has to say can be pretty funny.
- Pick up Cannonball #1 on the lower left. It’s in between the Shed and the Bomb.
- Click on the bomb for a closer view. You need to disarm it but you can’t do it at this time. You can come back to this area later.
- You can access Main Street by placing your cursor in the upper left side of the Shed’s Exterior.
Lockbox Puzzle - Main Street
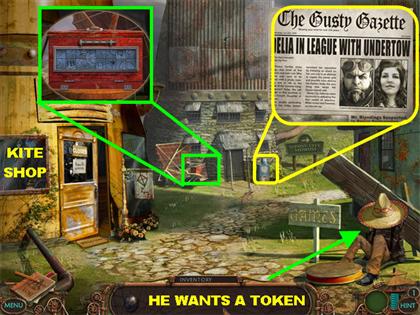
- Click on the Newspaper Dispenser for a closer look.
- Click on the man in the hat and he will tell you that you need a shiny Gold Token to play the game.
- Click on the Lockbox in the back of the scene for a closer view.
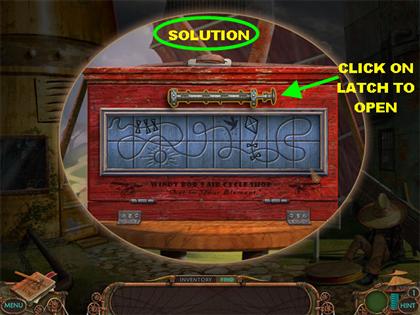
- To solve the puzzle, click on 2 pieces and they will swap places.
- If you get stuck and need help you can use a hint. The hint will show you which 2 pieces to swap.
- Please look at the screenshot for the solution.
- Click on the latch once the puzzle has been solved to open the Lockbox.
Pick up Multi-Tool – Lockbox Hidden Object Scene
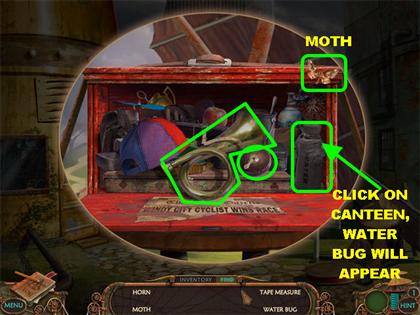
- In this Hidden Object scene only 4 items will show up at a time.
- Some of the items you pick up will go into your inventory. Use these items to unlock other items on your list.
- If you use a hint, it will use one of your inventory items where it’s needed and that inventory item will leave your inventory.
- To pick up the Water Bug, click on the canteen on the right and the Water Bug will come out of the top. Click on the Water Bug again to take it off your list.
- Click on the Hat and the Moth will fly into the upper right corner. Click on the Moth to take it off your list.
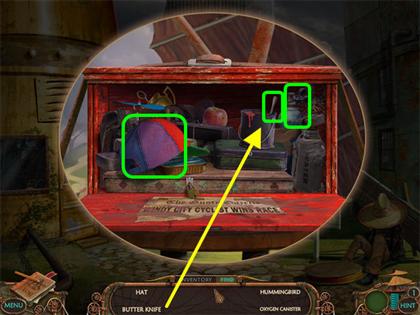
- Click on the Butter Knife in the upper right, inside the paint can and it will go into inventory.
- The Humming Bird is underneath the Hat.
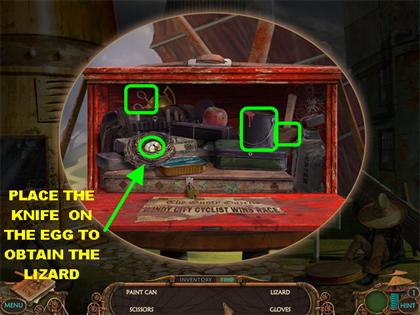
- Place the Butter Knife on the Egg in the Nest and the Lizard will come out of the egg, click on the Lizard to take it off your list.
- Pick up Scissors in the upper left.
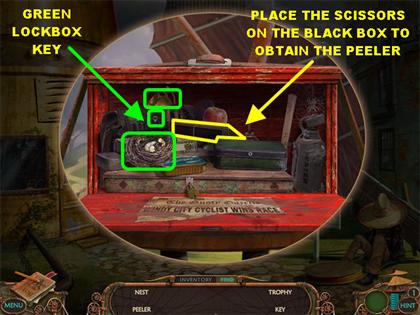
- Place the Scissors on the black box below the apple to open it. Pick up the Peeler inside.
- Pick up the Green Lockbox Key in the satchel and it will go into inventory.
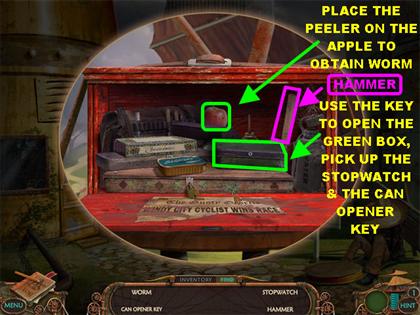
- Place the Peeler on the Apple for the Worm to appear. Click on the Worm to take it off your list.
- Use the Key to open the Green Lockbox. Pick up the Stopwatch and the Can Opener Key inside.
- Pick up Hammer on the right and it will go into inventory.
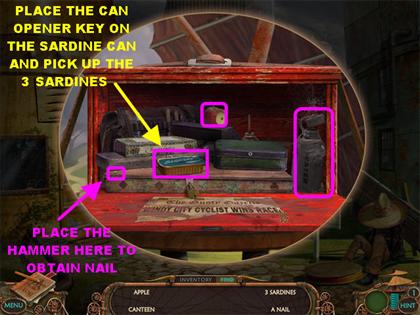
- Place the Can Opener Key on the Sardine Can to open it.
- Click on the 3 Sardines inside the can to take them off your list.
- Place the Hammer on the Nail in the lower left corner. The Nail will be taken off your list.
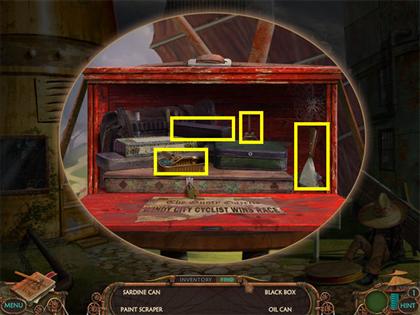
- Pick up the Paint Scraper on the right.
- Pick up the Oil Can on the right, behind the green box.
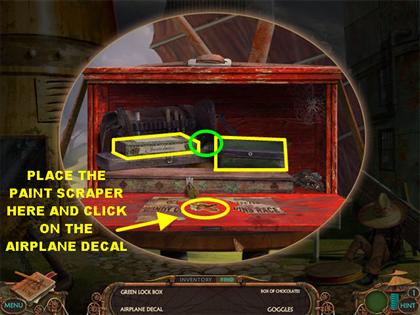
- Place the Paint Scraper on the bottom of the Lockbox and then click on the Airplane Decal in the same spot.
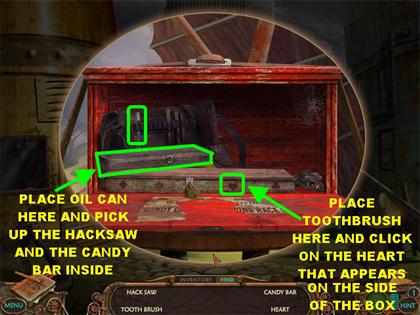
- Pick up Toothbrush on the satchel on the left.
- Place the Toothbrush on the right side of the long box and click on the heart that appears on it.
- Place the Oil Can on the box on the left and pick up the Hacksaw and the candy bar inside.
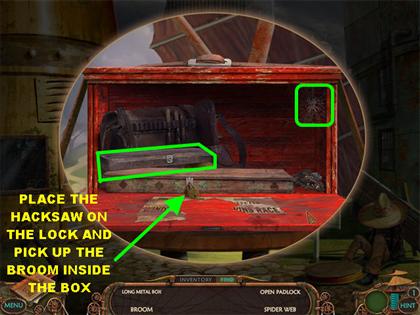
- Use the Hacksaw to open the Padlock on the large box and then click on the Open Padlock to eliminate it from the list.
- Pick up the Broom inside the box and it will go into inventory.
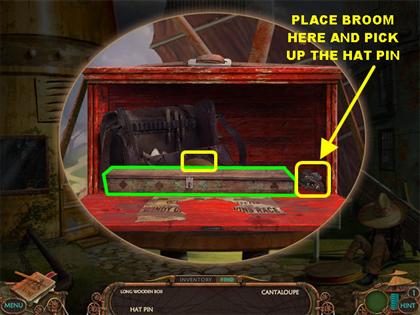
- Use the Broom to clean the junk in the lower right of the Lockbox. Pick up the Hat Pin that appears after all the junk has been cleared.
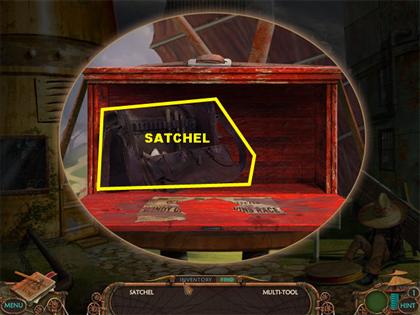
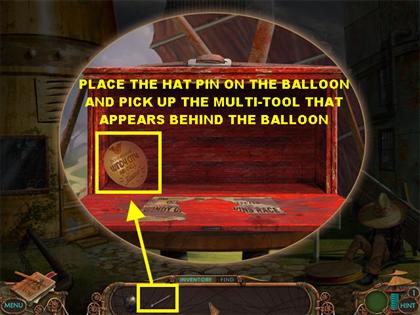
- Click on the Satchel to remove it. A balloon appears behind the Satchel.
- Pop the Balloon on the left with the Hat Pin. Pick up the Multi-tool that appears behind the balloon.
- Click on the upper right to reach the Museum’s Exterior.
Pick up Water Bucket - Museum’s Exterior
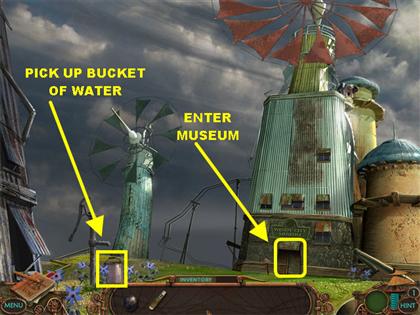
- Pick up the Water Bucket in the lower left, close to the flowers.
- Enter the Museum.
Windy City Museum Interior
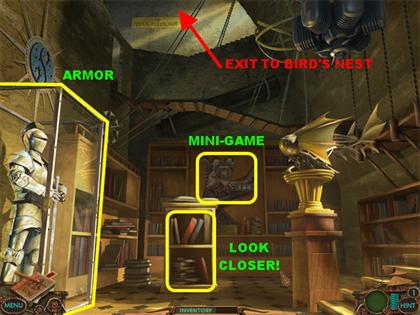
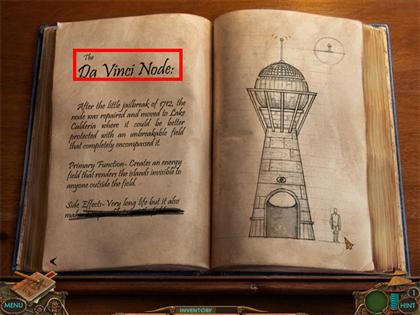
- Click on the bookshelf for a closer view. Flip the pages until you reach the one about the Da Vinci Node.
- Exit out of that view.
- Click on the Monkey on the back wall to trigger a mini-game.
Monkey Mini-game
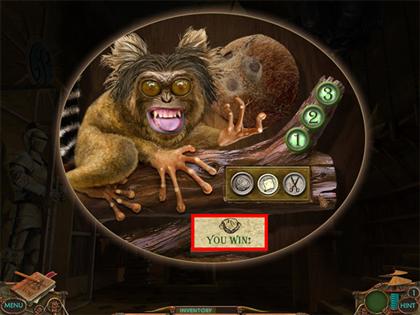
- Your goal is to beat the money at coconut, paper, scissors.
- Choose the coconut, the paper or the scissors by clicking on one of the round icons at the bottom of the branch.
- After you make your selection, the monkey will show you his.
- If you both choose the same items it will be a tie.
- If you win, a number from 1 to 3 will light up on the upper side of the branch.
- If you tie or lose a round, no numbers will light up.
- To win, paper has to wrap the coconut, the scissors have to cut the paper or the coconut has to break the scissors.
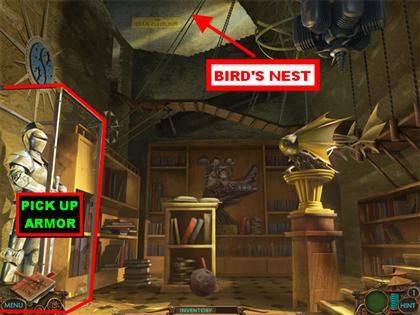
- Once you win the game, the monkey will throw a coconut at the glass case on the left and will shatter the glass.
- Click on the Armor to enter it into inventory.
Pick up Gold Token – Bird’s Nest
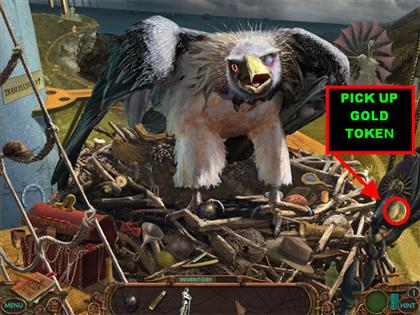
- Click on the hole in the ceiling to enter the Bird’s Nest.
- Pick up the Gold Token in the lower right corner.
- Go back to Main Street by placing your cursor downwards 3 times.
Use Gold Token
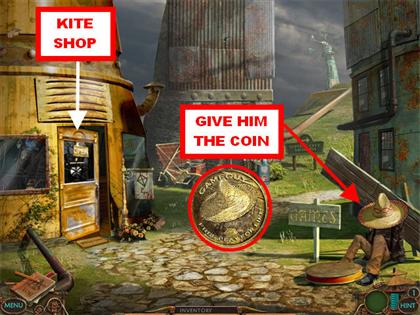
- Give the man in the Sombrero the Gold Token from inventory to trigger a mini-game.
Forgotten Chronicles Puzzle
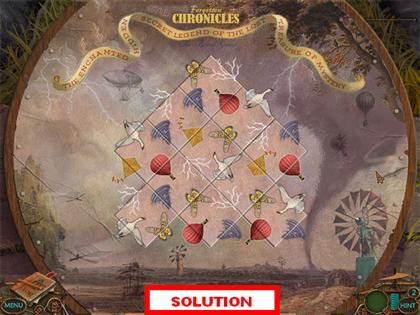
- Click on the pile of tiles on the left to start the game. The tiles will spread out across the board.
- Your goal is to place the tiles in the right spots.
- Click on a tile to rotate it.
- Click on a hint and the game will put a puzzle piece in the right spot for you.
- Please look at the screenshot for the solution.
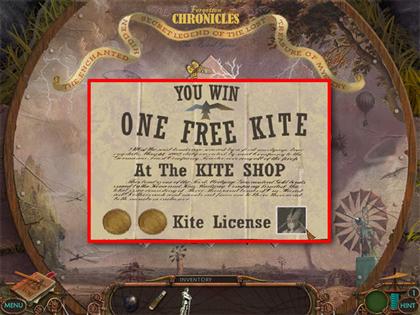
- After the puzzle has been solved you will receive a Flying Permit.
- Go to the Kite Shop by clicking on the door on the left.
Pick up Soccer Ball/ Kite Shop – Main Street
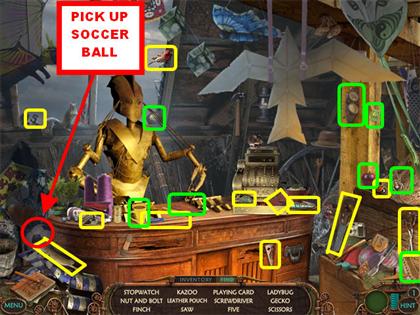
- Pick up all the items on the list. The items in yellow are items on the list. The items in green are items we found after replaying the game.
- Pick up the Soccer Ball in the lower left after all the items have been found.
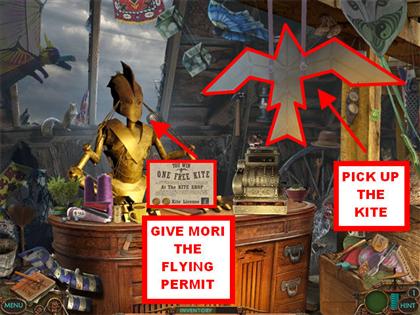
- Give your Flying Permit to Mori, the Kite Merchant, he tells you that the license entitles you to one free Big Bird brand kite.
- Click on the large white Big Bird kite on the upper right side of the scene.
- Once you receive the Kite, the Merchant tells you that you need the Big Bird brand string in order to fly it.
- Exit out of that scene and go the Shed by placing your cursor downwards once outside.
Open Bomb
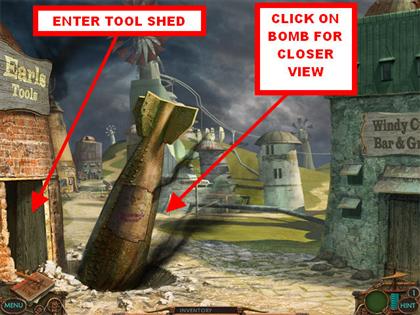
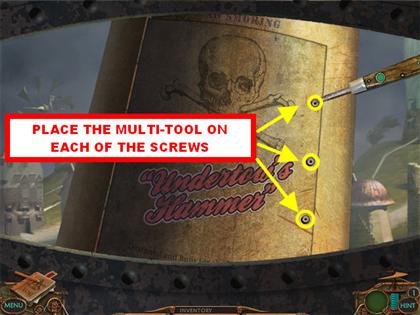
- Click on the Bomb for a closer view.
- Pick up the Multi-tool from inventory and it should have the Screwdriver tool attached to it.
- Place the tip of the screwdriver on each of the 3 screws so you can open the panel.
Bomb Puzzle
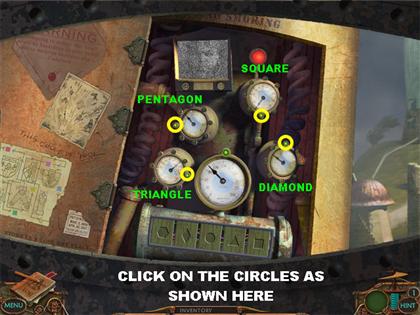
- Your goal is to click on the green round lights on each clock until all the doors open at the same exact time.
- Each clock corresponds with a particular door at the bottom of the bomb. Each door has a geometrical shape carved on it.
- Click on the green lights that correspond to each door to change the rhythm of the doors.
- Once you have a door going at the right rhythm move on to the next one until they are going at the same pace.
- Once all the doors have been aligned correctly, they will remain open, exposing the wires for the bomb.
- Please look at the screenshots for the solution.
Cut the Bomb Wires
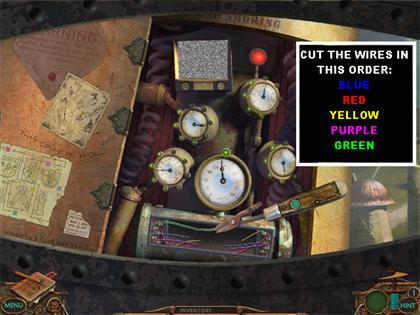
- Your next goal is to cut the wires in the correct order.
- To cut the wires look at the diagram on the lower left side of the panel. Pay attention to the colored blocks and their direction.
- When you click on the multi-tool this time it will have wire cutter attached to it. Use it to cut the wires.
- If you cut the wrong wire you will be taken to a cut scene of an explosion.
- Before you cut any of the wires make sure that the right one has been highlighted.
- Cut the wires in this order:BLUE RED YELLOW PURPLE GREEN
- You’ve successfully diffused the bomb. You no longer need the Armor, so it will disappear from your inventory.
- Click on the door on the left to enter the Tool Shed.
Shed Interior
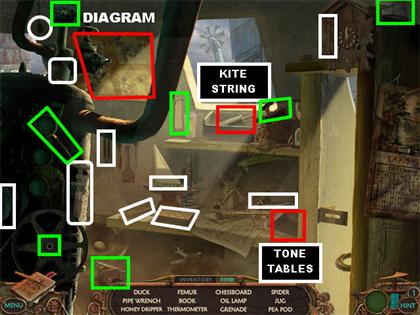
- Look for the items on the list. The items in white are the items on the list. The items in green are items we found while replaying the game.
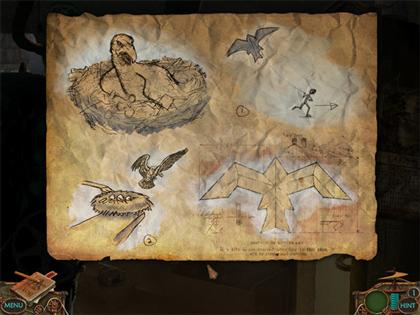
- Click on the diagram in the upper left for a closer look. It is a diagram of the Eagle and a Kite. When this diagram enters your Logbook, the date of July 23rd is noted. You need this information for a future puzzle.
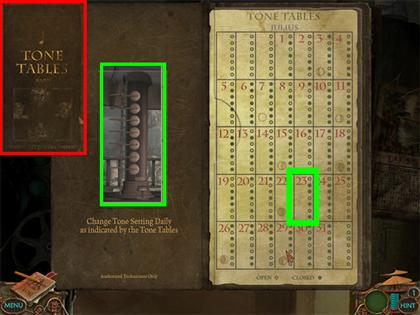
- Click on the Tone Tables in the lower right and it will appear on your screen.
- Click on it again to open it, you will see the Daily Tone Settings for the Reed Instrument in the Power Station.
- Pick up the Kite String on the top shelf.
- Exit that scene.
- Click on the small windmill on the upper left side of the scene.
- Click on the upper right to access the Museum’s Exterior.
Fly the Kite - Museum’s Exterior
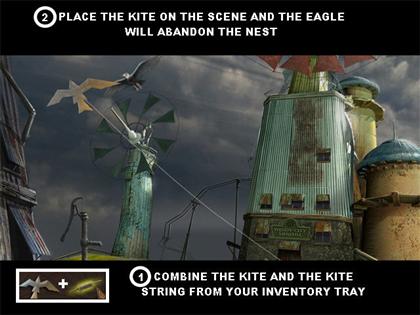
- From the Inventory Tray combine the Kite and the String.
- Place the Kite anywhere in the scene and the Eagle in the top right will fly away from the nest.
- Go inside the Museum and enter through the ceiling to access the Bird’s Nest.
Bird’s Nest
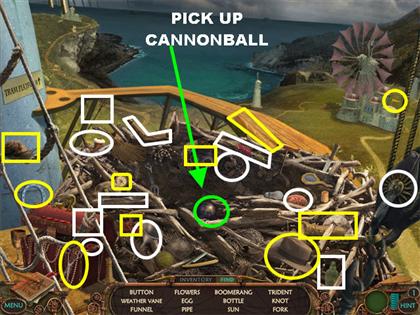
- Look for the items on the list. The items in white are the items on the list. The items in yellow are the items we found while replaying the game.
- Pick up Cannonball #2 in the center of the nest after all the items have been collected from the list.
- The way forward to the Tram is now clear.
- Go to the Power Station by placing your cursor in the following manner:DOWN 4 TIMES CENTER RIGHT EDGE DOOR
Reed Instrument Puzzle - Power Station
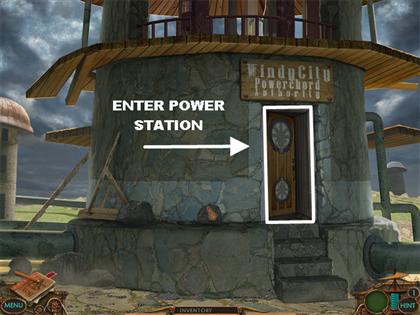
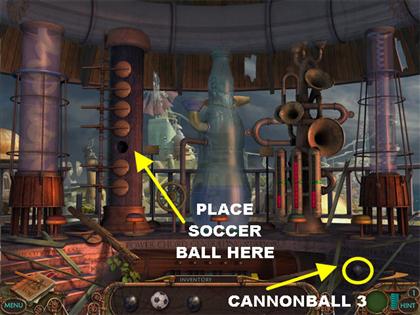
- Pick up Cannonball #3 on the right steps.
- There is a broken valve on the floor that cannot be fixed. There is a hole on the Reed Instrument that needs to be covered.
- Place the Soccer Ball on the Reed Instrument to the left of the large bottle.
- Click on the sign next to the Reed Instrument for a closer view. The sign states that you need to find the Tone Tables for the correct settings.
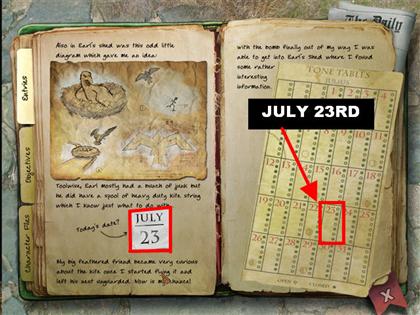
- Open your Logbook to the page that contains the Tone Tables.
- Look for the entry for July 23rd. Pay attention to the light and dark circles under that date.
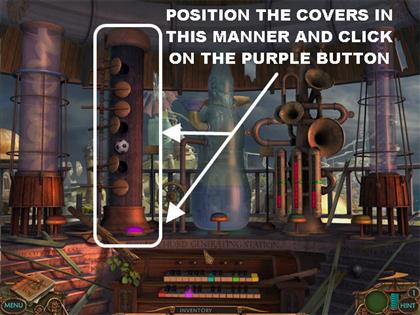
- You have to place the valves in the right positions.
- Click on a valve to open or close it.
- Position your valves on the Reed Instrument as follows:OPEN CLOSED CLOSED OPEN SOCCER BALL OPEN CLOSED
- Click on the Purple Button (second from the left) and it will light up and remain in the down position.
Low and Hi Frequency Puzzle
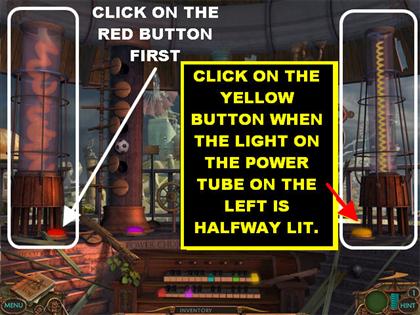
- The goal in this puzzle is to synchronize the low and high pitches of the generators so that each particle’s current reaches the blue bar at the same time thereby locking the correct pitches for both towers simultaneously.
- Click on either of the generators and you will see an animation that will rise up the curly tubes but at different speeds.
- Click on the Red Button on the left to activate the left generator.
- Click on the Yellow Button on the right as soon as the tube on the left is about halfway to the blue tube.
- If you’ve pressed the buttons at the right times, both blue tubes on top will stay lit. If it’s incorrect you will have to start over.
- Once everything has been done correctly, the Red and Yellow Buttons will be lit and will remain in the down position.
- Please watch the video for a step-by-step solution for this puzzle.
Coke Bottle Instrument
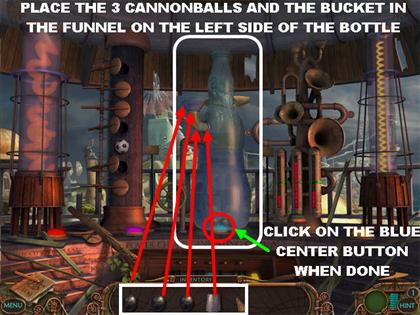
- For this next puzzle, you have to make sure that you have a Water Bucket and 3 Cannonballs.
- If you don’t have all the necessary items, you can find them in these locations:
- Water Bucket – Outside the Museum.
- Cannonball 1 - Shed’s Exterior - On the lower left. It’s in between the Shed and the Bomb.
- Cannonball 2 - Bird’s Nest scene, in the center of the nest. You can pick it up after all the items have been collected from the list.
- Cannonball 3 – On the steps inside the Power Station.
- Place the Water Bucket and the 3 Cannonballs into the large funnel on the left side of the glass bottle.
- Press the center button and it will light up and stay in the down position.
Brass Instrument Puzzle
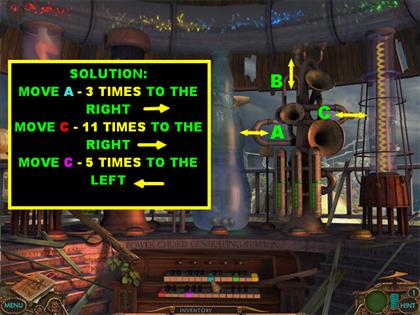
- Click on the sign next to the Brass Instrument for a closer view.
- Your goal in this puzzle is to place all the light arrays at the bottom of the instrument on the same level on the green line.
- There are 3 Tubes on the Brass Instrument, each Tube can move in 2 directions.
- The left and right Tubes can be moved to the left or to the right. The tube on top can be moved up or down.
- You will see a tiny gold arrow appear when you hover your mouse over each Tube. Do not click on the Tube until the arrow is facing the correct way.
- I will label the tubes, A, B, and C_A= LEFT TUBE B=TOP TUBE C= RIGHT TUBE
- Click on the tubes in the following order:A – 3 TIMES TO THE RIGHT C – 11 TIMES TO RIGHT C – 5 TIMES TO THE LEFT
- All the lights at the bottom of the instrument should turn green and sit at the same level.
- Click on the green button (4th from the left) and it will light up and stay in the down position.
Piano Puzzle
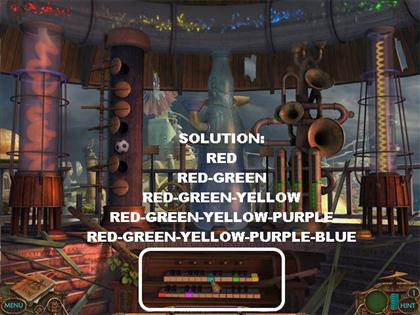
- Click on the Piano to activate the Simon Says type of puzzle after all the buttons are in the down position.
- Reproduce the colors you see on the buttons on the keys of the piano.
- If you fail you have to start the sequence over until you get it right.
- Here is the solution for this puzzle. Click on the piano keys in the following manner:Sequence 1 - RED Sequence 2 - RED – GREEN Sequence 3 - RED – GREEN- YELLOW Sequence 4 - RED – GREEN- YELLOW - PURPLE Sequence 5 - RED – GREEN- YELLOW – PURPLE – BLUE
- The power has now been restored.
- Go back to the Tram by placing your cursor in the following manner:DOWN LEFT UPPER LEFT UPPER RIGHT MUSEUM DOOR CEILING TOP LEFT
Tram Puzzle
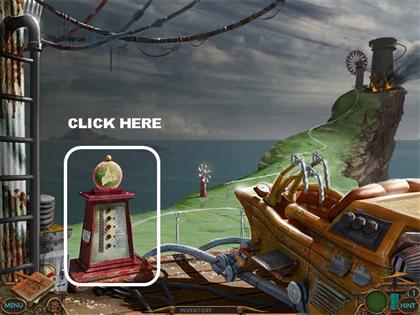
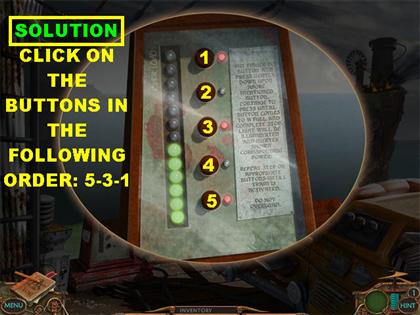
- Click on the Tram’s Controls on the left for a closer view.
- Your goal is to click on the right set of buttons that will start the Tram moving.
- From top to bottom, I will label the buttons from 1 to 5. Click on the buttons in the following manner:5-3-1
- The Tram will now take you to the Penthouse.
Penthouse
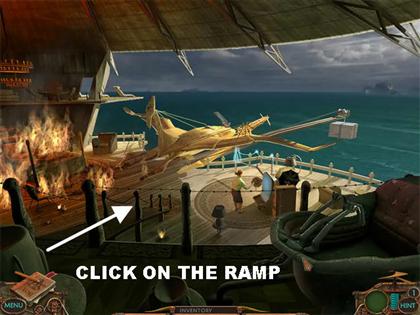
- Click on the ramp in the lower left.
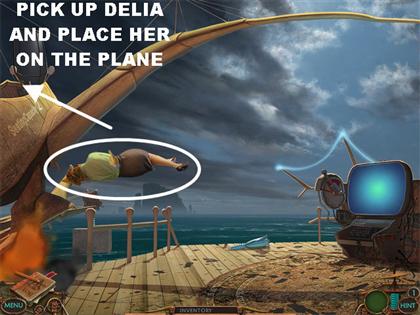
- You will see Delia in front of the monitor. Delia will fall to the ground.
- Grab Delia and place her in the Glider on the left.
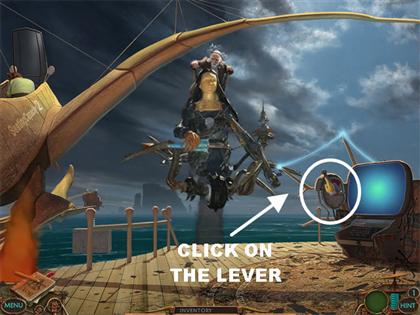
- Gideon will appear in the Golem which will pick up the Bio-Coil from the ground.
- Click on the Lever by the monitor and it will zap Gideon into the ocean.
- Click on the Glider and it will fly away with Delia
- You will be taken back to the scene with Delia still in the glider. Click on the scene and watch the glider fly away.
- Watch the ending scenes!
Created at: 2009-10-23

