

Walkthrough Menu
General Tips
- This is the official guide for Hidden Expedition: Neptune's Gift.
- This guide won't tell you when to zoom into a location; the screenshots show each zoom scene.
- Hidden-object puzzles are referred to as HOPs. Only the locations of the HOPs will be shown.
- Use the Map to fast travel to a location.
Chapter 1: Temple
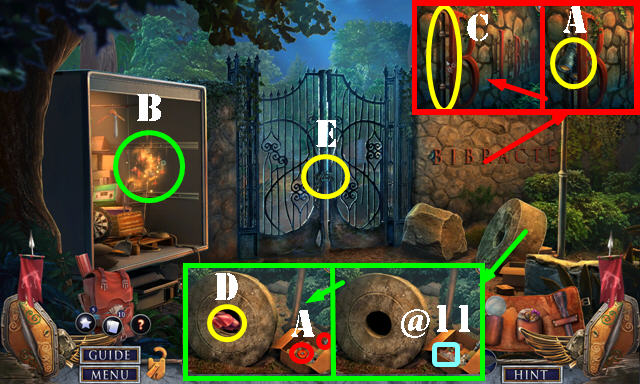
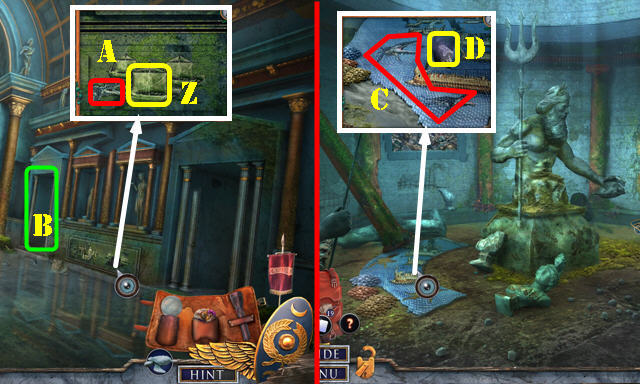
- Select tablet on scene.
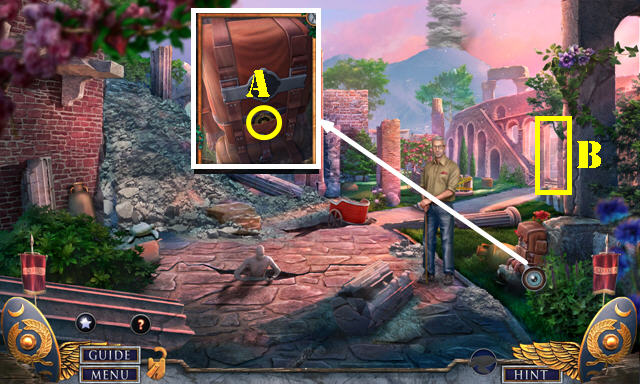
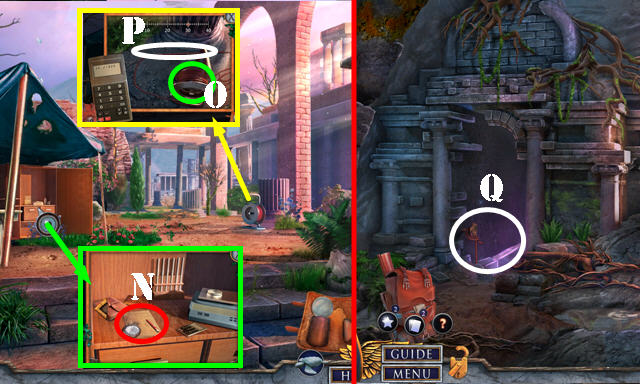
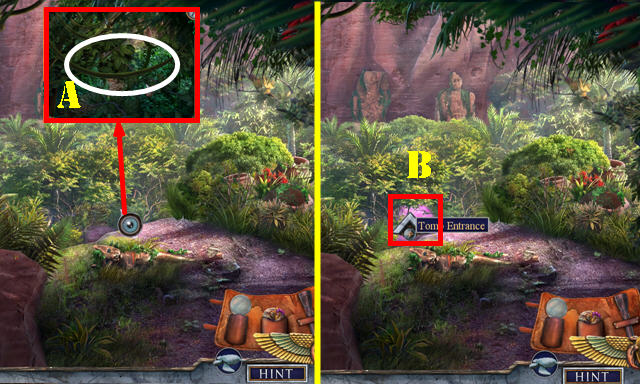
- Take INCOMPLETE BUCKLE (A).
- Go (B).
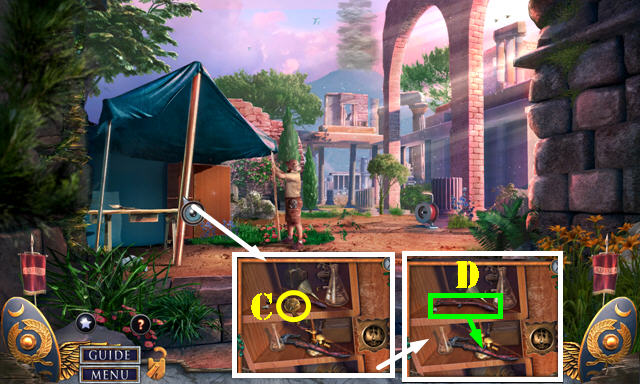
- Take BUCKLE ORNAMENT (C).
- Take handle and place it (D); receive WIRE CUTTER.
- Walk down.
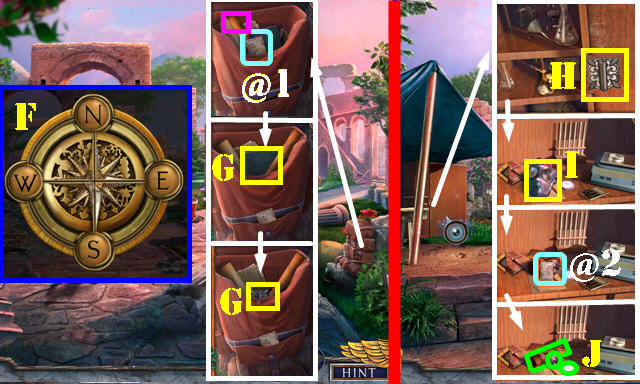
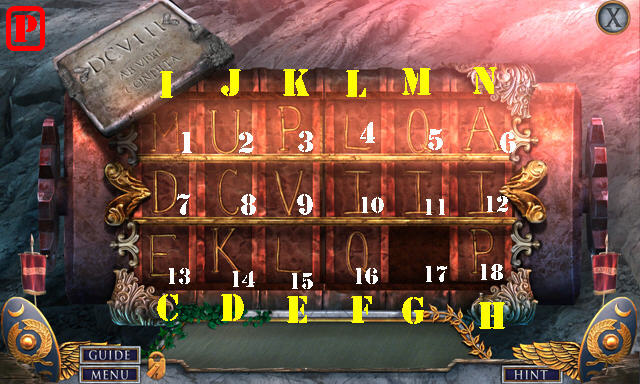
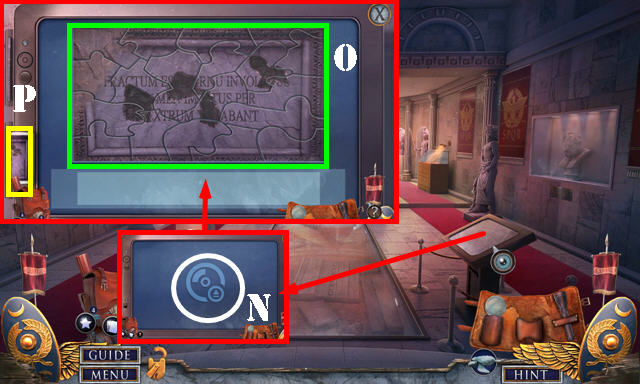
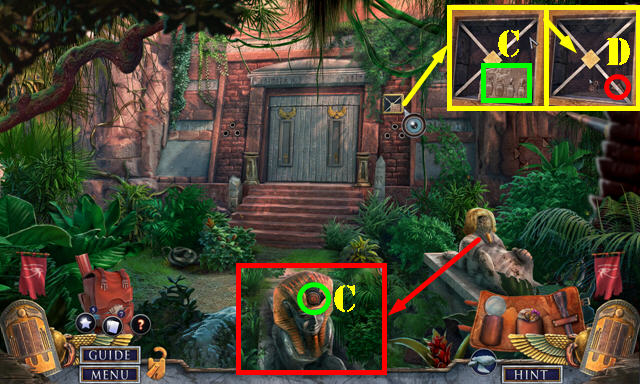
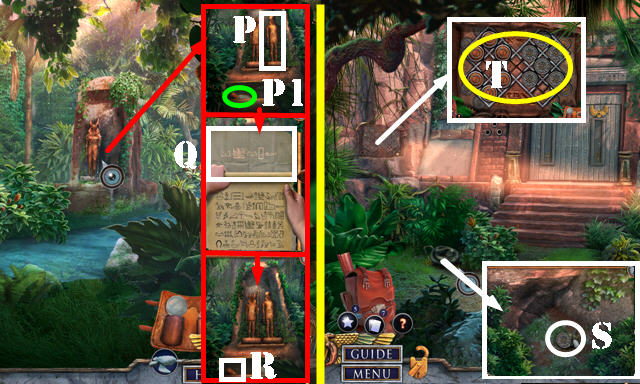
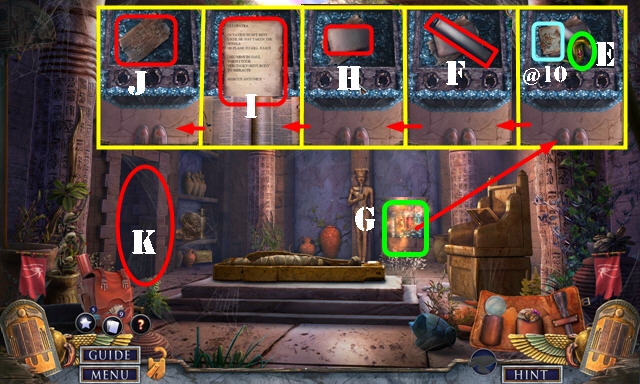
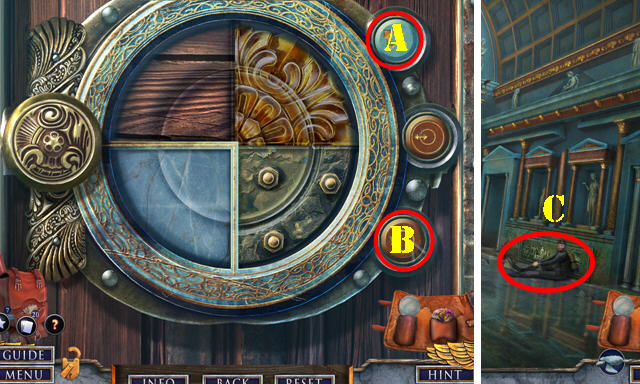
- BUCKLE ORNAMENT on INCOMPLETE BUCKLE; solution: W-S-N-E-W-S-E (F); receive BUCKLE.
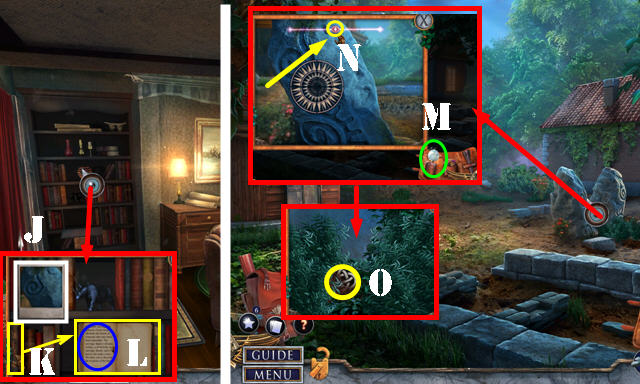
- Place BUCKLE and select; take Fact Card (@1).
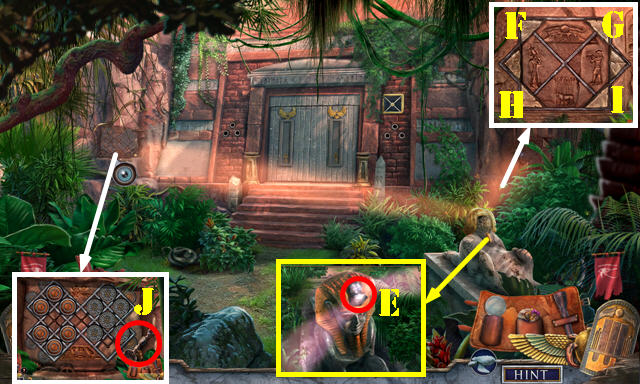
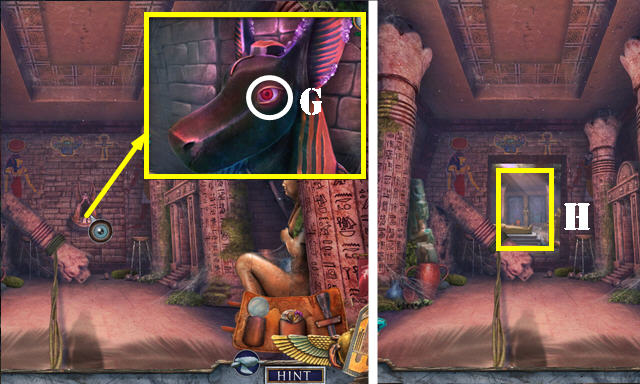
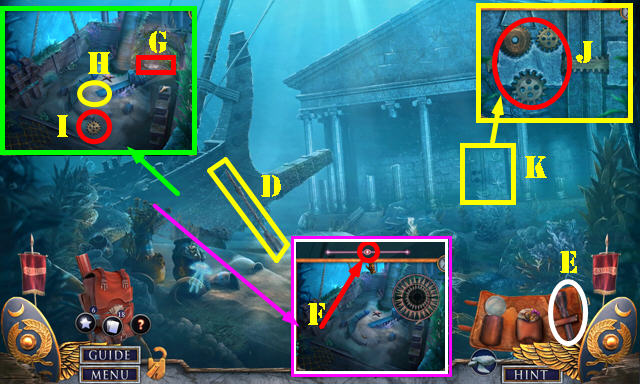
- Select map (purple); take LATIN DICTIONARY and TEST TUBE CREST (G).
- Go to Equipment Tent.
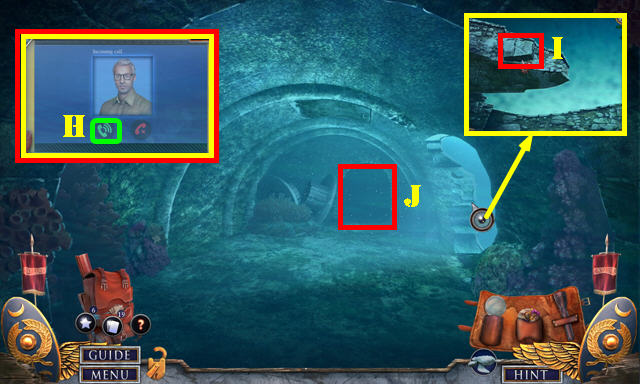
- Place TEST TUBE CREST and pan right (H).
- Take BROKEN MASK (I) and Fact Card (@2).
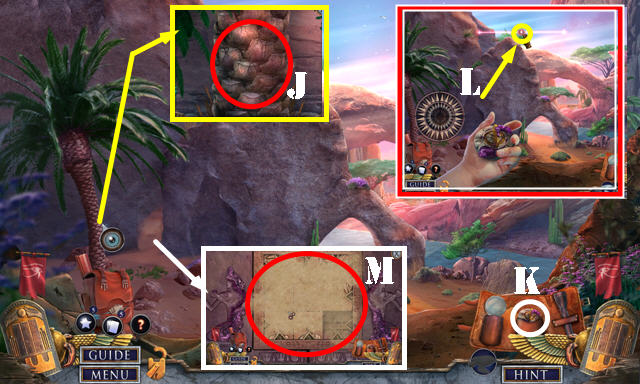
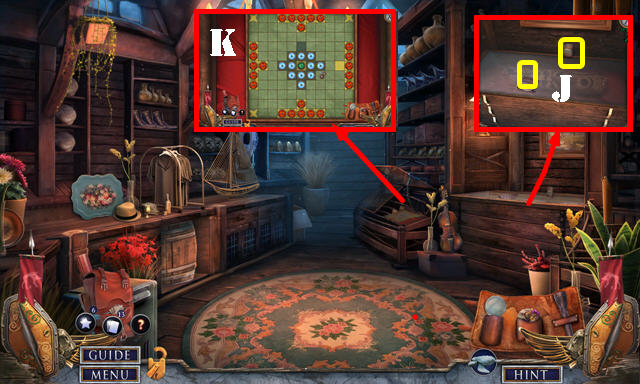
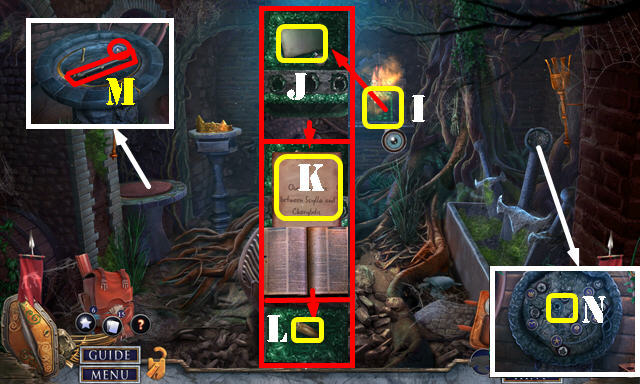
- Take FILTER CANISTER, Examination Kit, and STOPWATCH (J).
- Walk down.
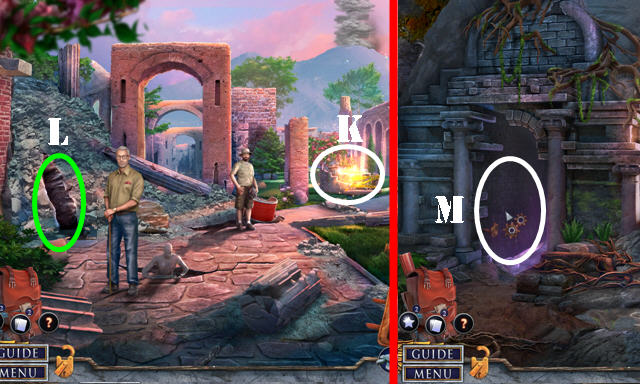
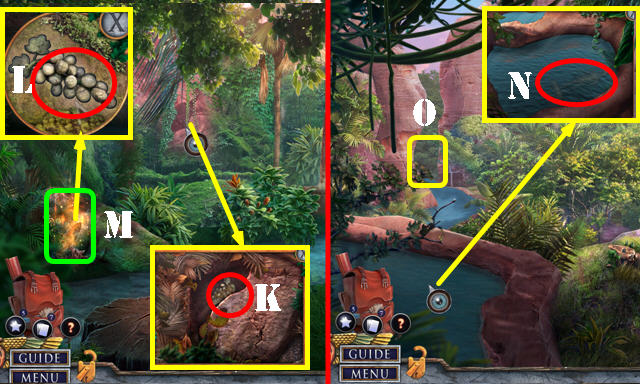
- Remove police tape (K). Play HOP; receive COIN.
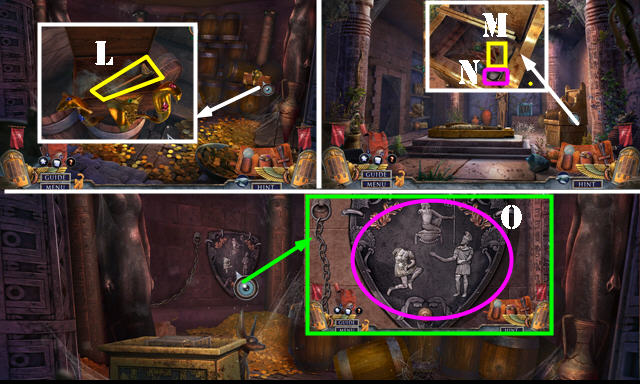
- Go (L).
- Use STOPWATCH and COIN (M); receive FALL TIME.
- Go to Equipment Tent.
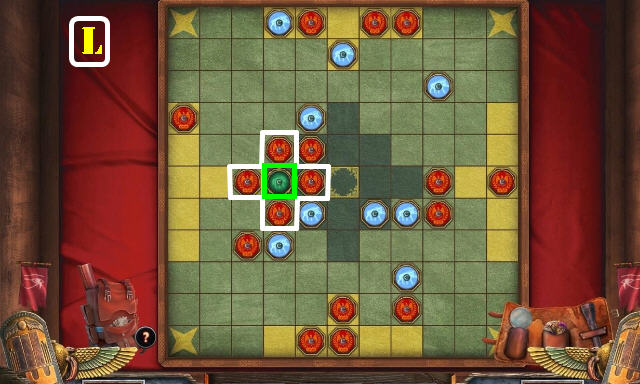
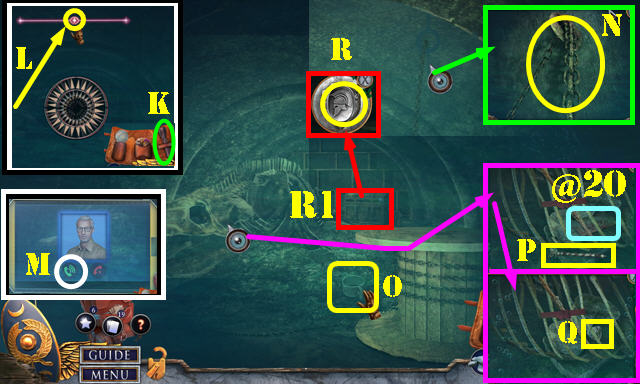
- Place FALL TIME and select (N). Select 3x; receive CABLE LENGTH.
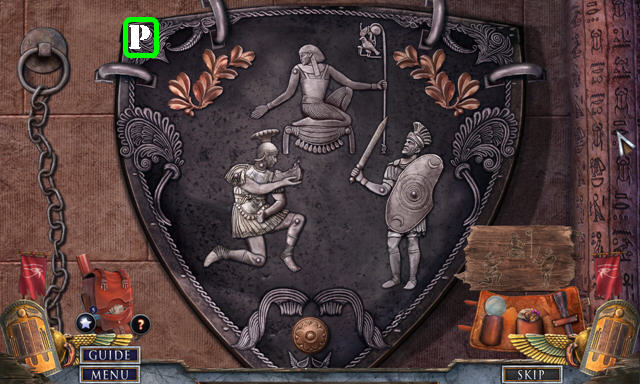
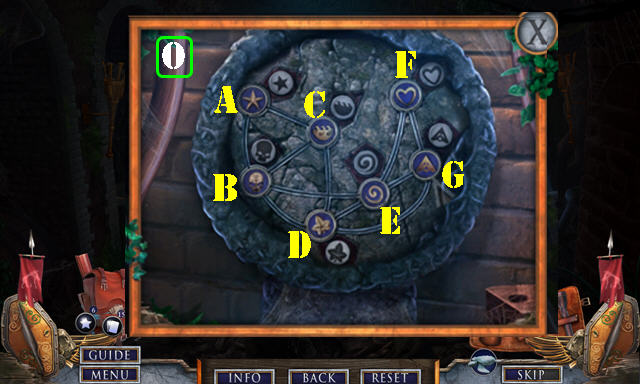
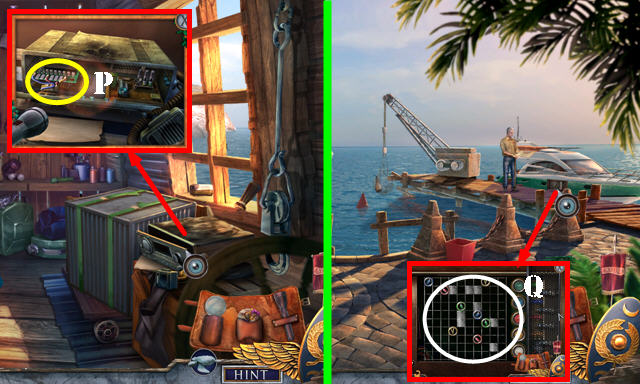
- Place CABLE LENGTH; select reel 3x (O). Use WIRE CUTTER (P); receive CABLE.
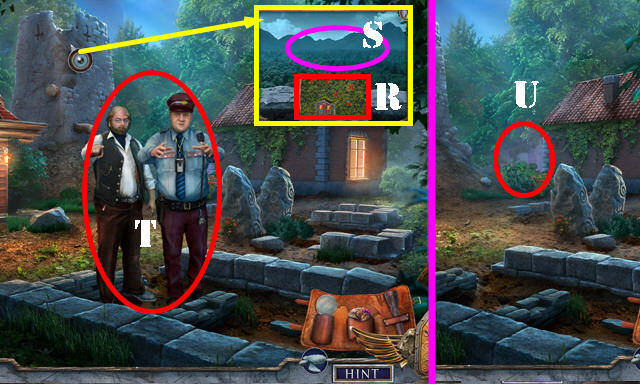
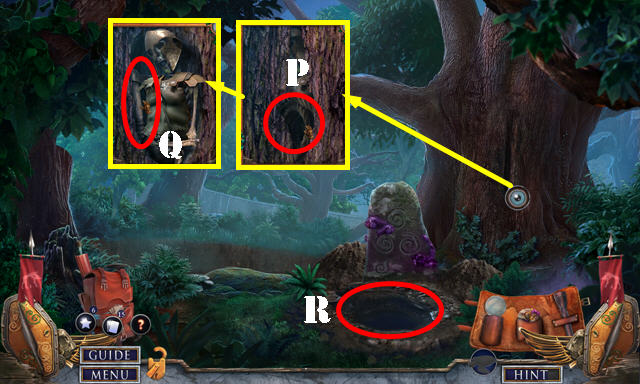
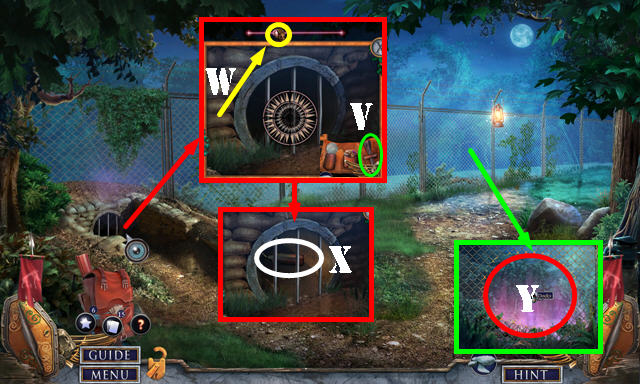
- Go to Temple Entrance.
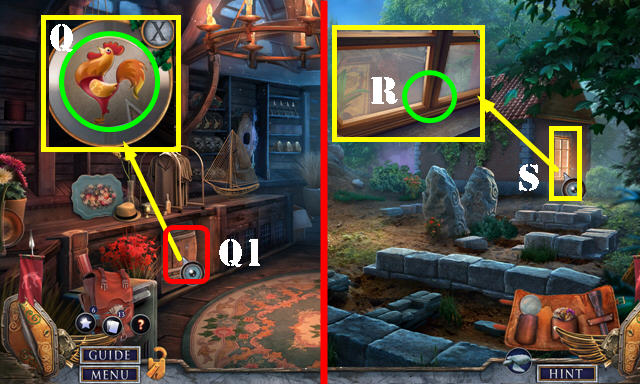
- Use CABLE and go (Q).
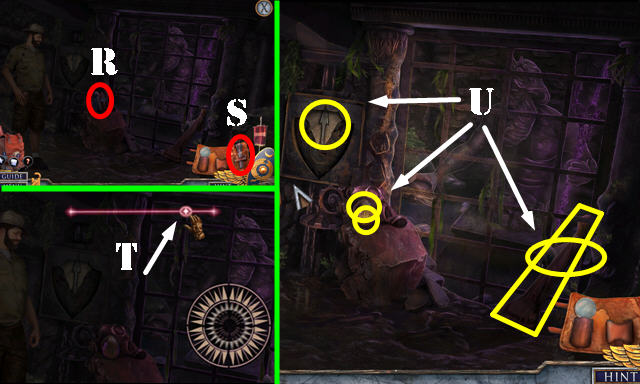
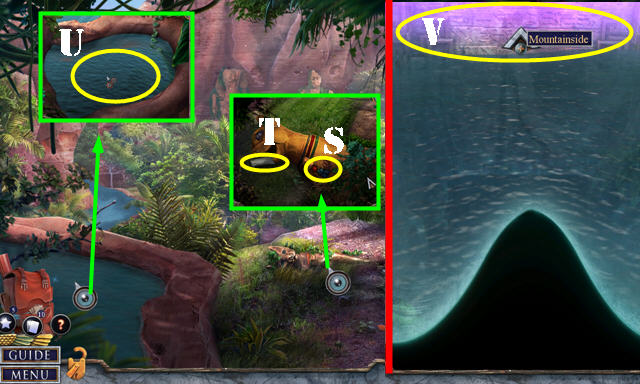
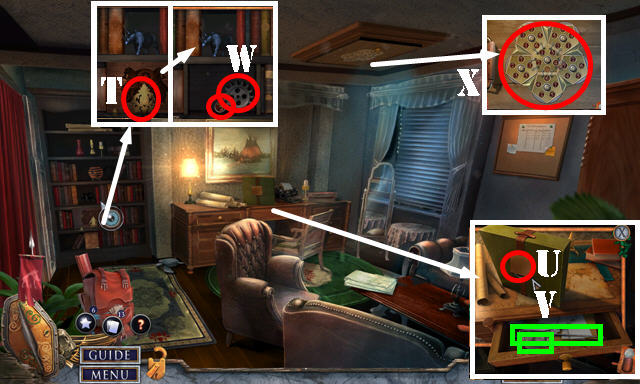
- Take flashlight (R).
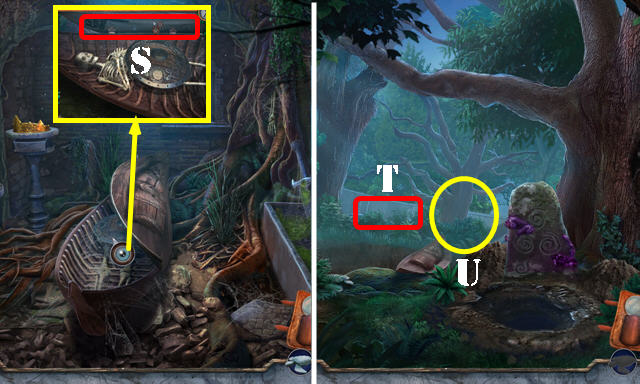
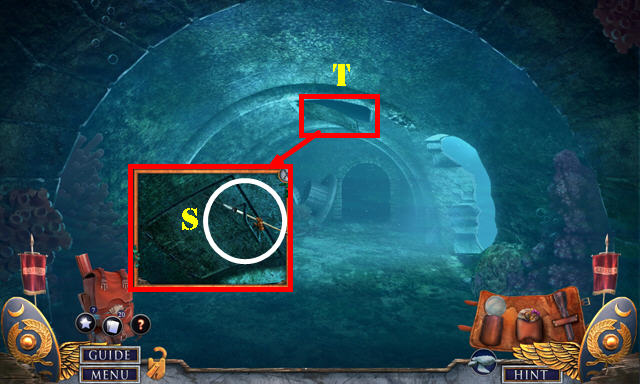
- Select flashlight (S).
- Slide button (T).
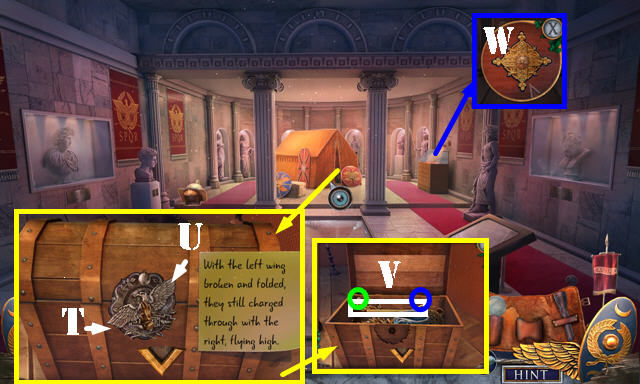
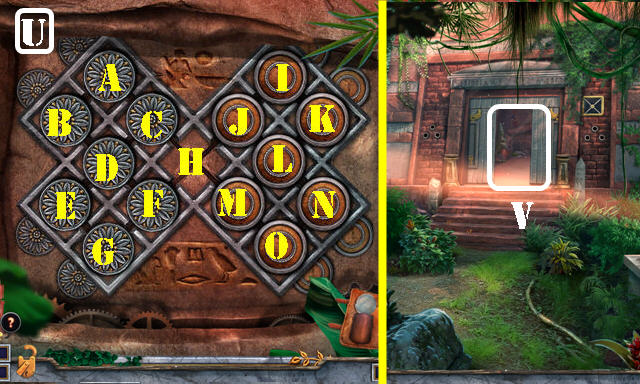
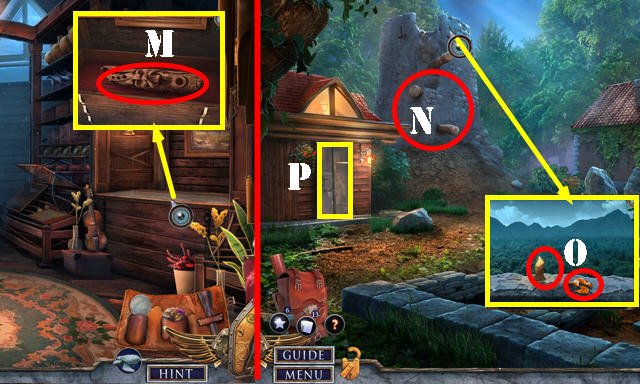
- Take COIN, LENS, TRIDENT EMBLEM 1/3, WOODEN POLE, and CAST CUTTER (U).
- Go to Pompeii.
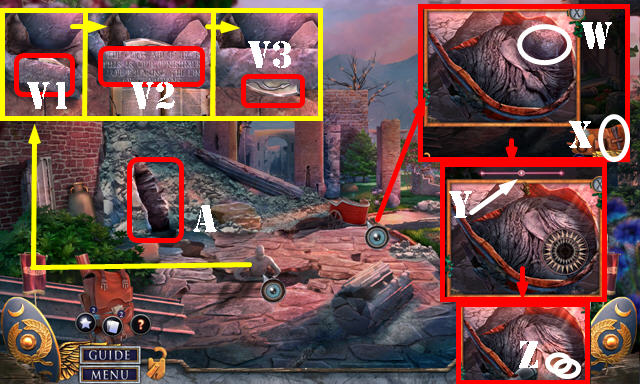
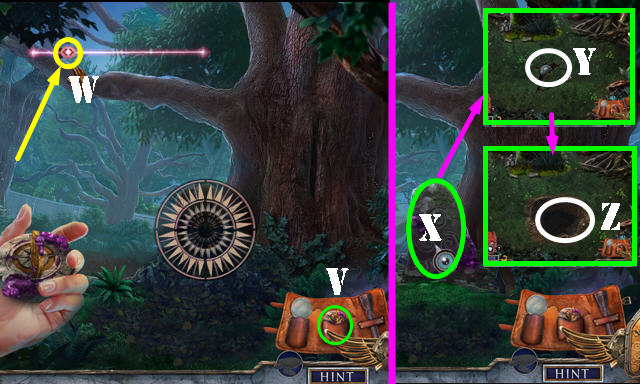
- Use CAST CUTTER and select (V1). Use LATIN DICTIONARY and select again (V2); take TRIDENT EMBLEM 2/3 (V3).
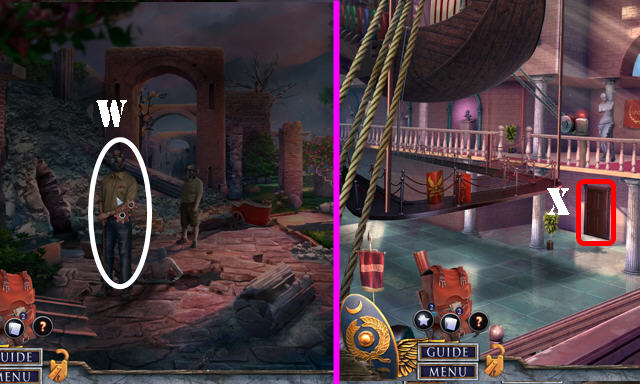
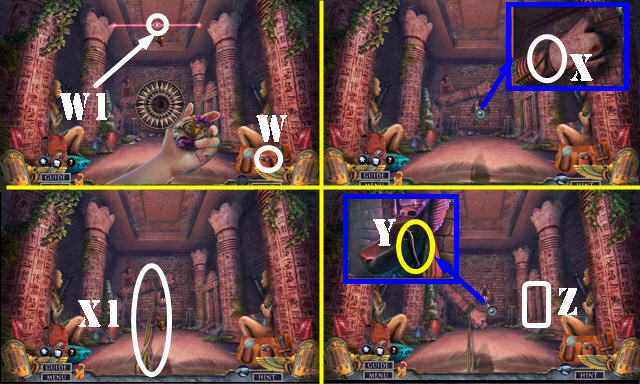
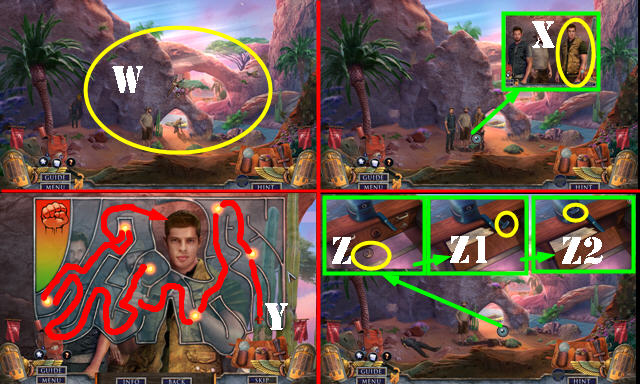
- Use WOODEN POLE and remove stone (W).
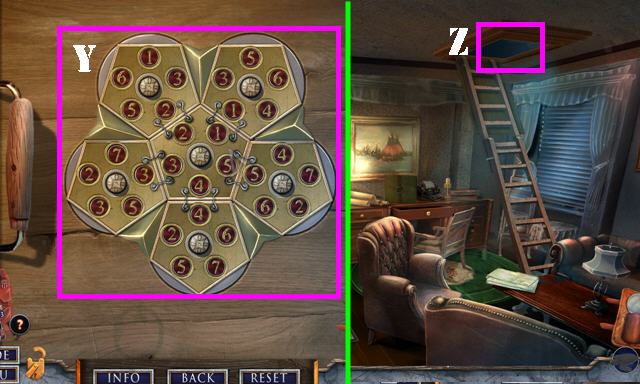
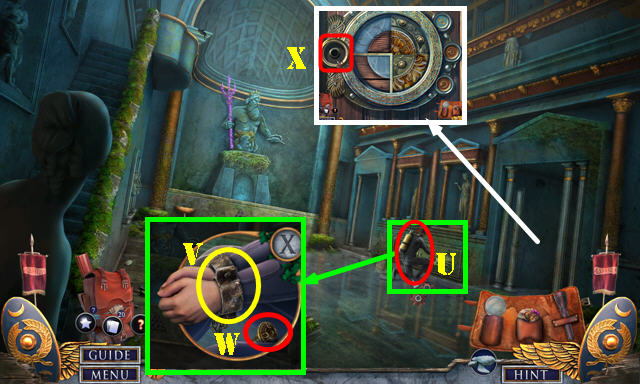
- Select flashlight (X). Slide button (Y).
- Take LEAVES 1/4 and CHARIOT PLAQUE (Z).
- Go (A).
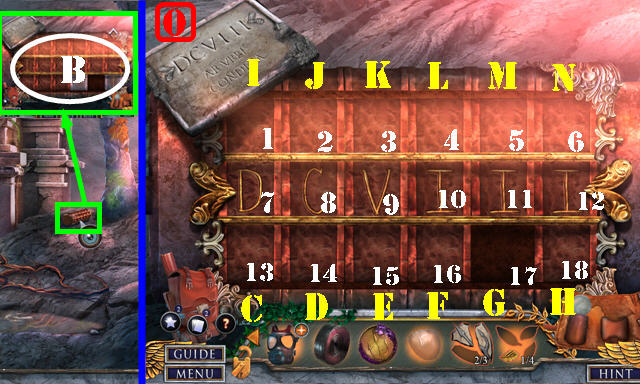
- Place CHARIOT PLAQUE (B).
- Easy solution and Hard Solution (O-P): (18 left)-(M)-(17 right)-(H)-(16, 15, and 14 right)-(J)- (7 right).
- (J)-(8 and 9 left)-(D)-(8 right)-(K)-(9 and 10 left)-(E)-(9, 8, and 7 right).
- (J)-(8 and 9 left)-(D)-(8 right)-(Ix3)-(7 right)-(C).
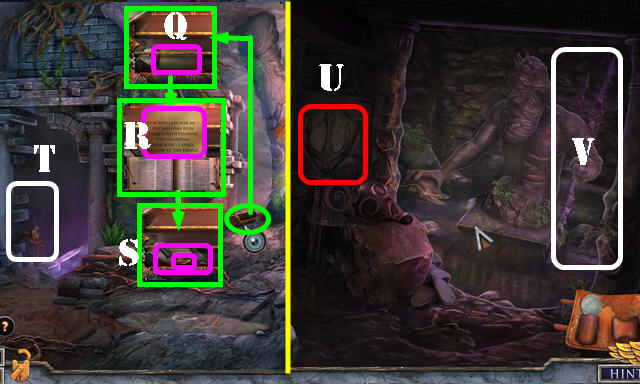
- Select note (Q); place LATIN DICTIONARY on it; select note (R). Take LEAVES 2/4 and TRIDENT EMBLEM 3/3 (S).
- Go (T).
- Place TRIDENT EMBLEM 3/3 (U).
- Take TRIDENT (V).
- Go to Pompeii.
- FILTER CANISTER and LENS on BROKEN MASK; receive GAS MASK.
- Use TRIDENT (W). Use GAS MASK on scene; receive INCOMPLETE TRIDENT.
- Go forward.
- Go (X).
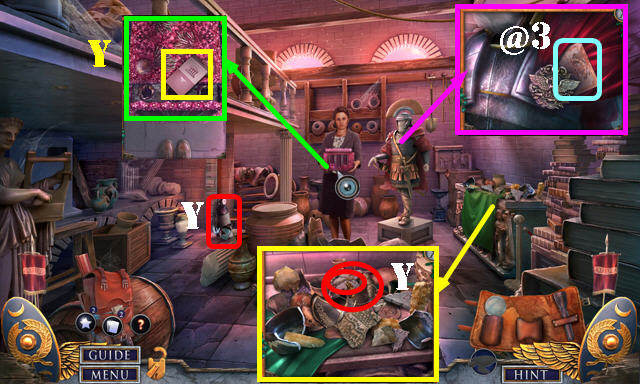
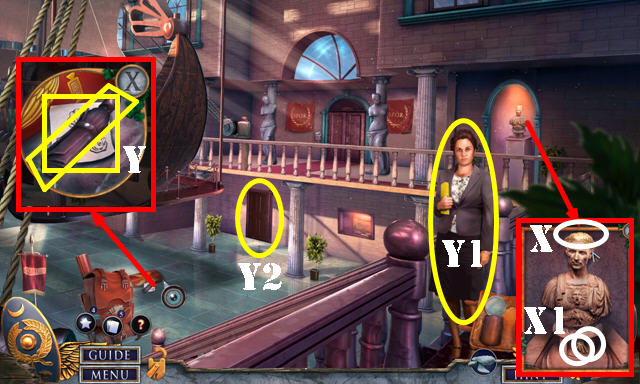
- Take MUSEUM CREDENTIALS, DIVING GEAR, VISOR PIN, and WIRE SAW (Y).
- Select cape; take Fact Card (@3).
- Walk down.
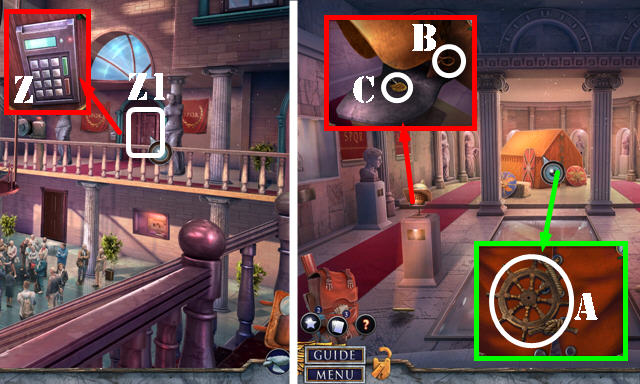
- Use MUSEUM CREDENTIALS (Z).
- Go (Z1).
- Take SHIP WHEEL (A).
- Use VISOR PIN (B); take LEAVES 3/4 and SHARP NEEDLE (C).
- Walk down.
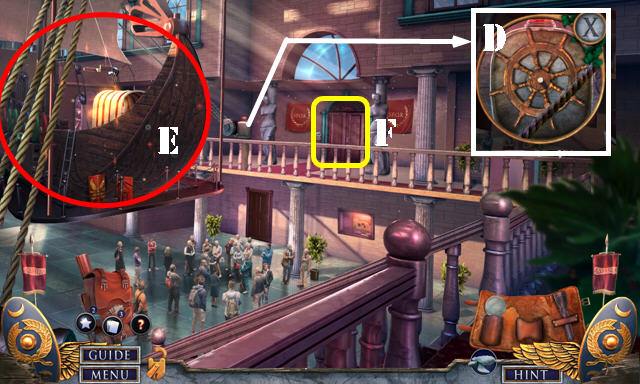
- Place SHIP WHEEL (D).
- Play HOP (E); receive SPEARHEAD.
- Go (F).
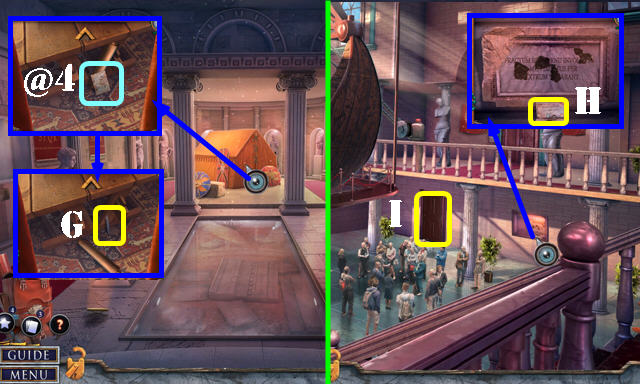
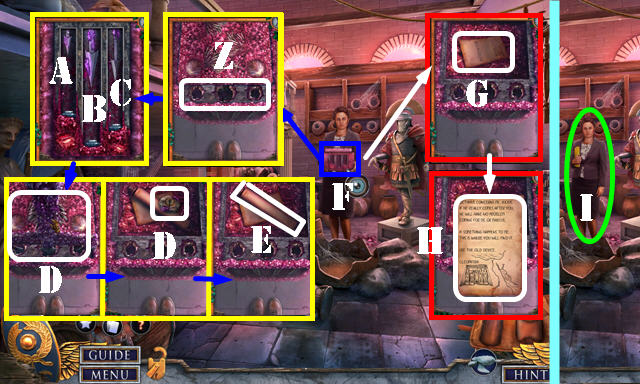
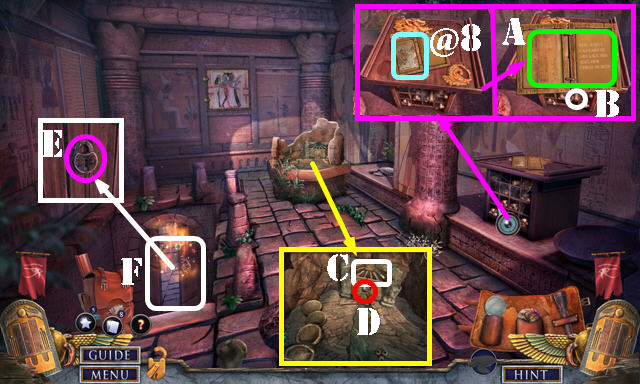
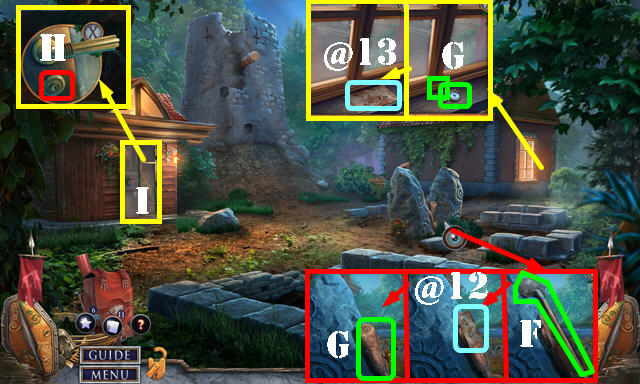
- Use SPEARHEAD; take Fact Card (@4). Look at map; take TWEEZERS (G).
- Walk down.
- Use TWEEZERS (H); receive ARTIFACT TAG.
- Go (I).
- Select box (J).
- Use SHARP NEEDLE (K); receive ROMAN EAGLE.
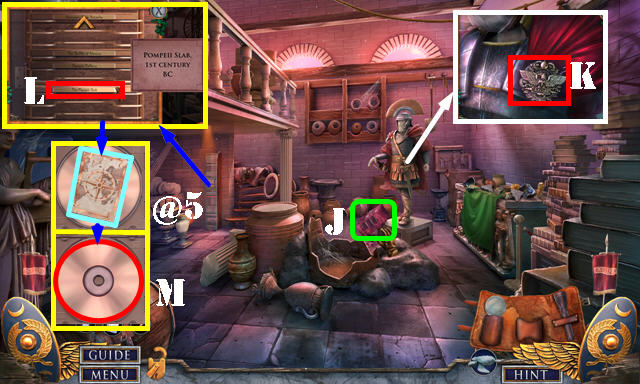
- Select glass. Place ARTIFACT TAG; pan down and select CD case (L).
- Take Fact Card (@5) and CD (M).
- Go to Roman Exhibit.
- Place CD and select twice (N).
- Solution (O).
- Take TOURIST PHOTO (P).
- Go to Artifact Storage.

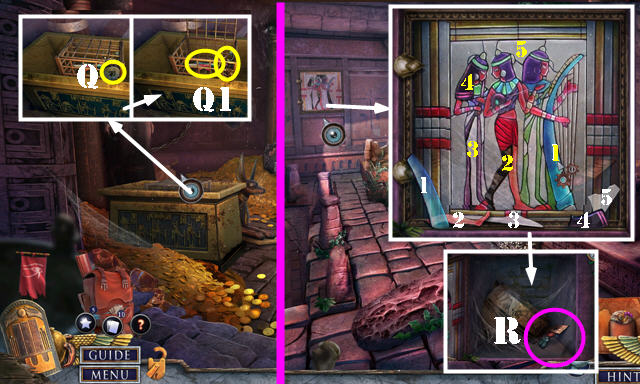
- Place TOURIST PHOTO and select 6x; take STONE FRAGMENTS 1/3-3/3 (Q).
- Walk down.
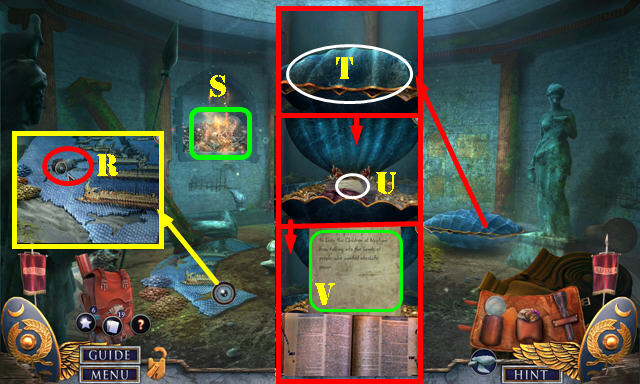
- Place STONE FRAGMENTS 3/3 and LATIN DICTIONARY (R); receive TRANSLATION.
- Go (S).
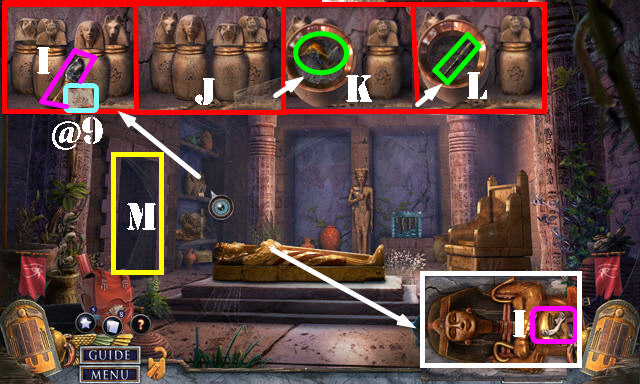
- Pan up; place ROMAN EAGLE and use TRANSLATION. Select (T-Ux3) to position wings as shown.
- Take HIEROGLYPHIC DICTIONARY, LEAVES 4/4 and GOLDEN EMBLEM (V).
- Place GOLDEN EMBLEM (W). Play HOP; receive BROKEN WREATH.
- Walk down.
- LEAVES 4/4 on BROKEN WREATH; receive GOLDEN WREATH.
- Place GOLDEN WREATH (X); take SUN EMBLEM and RED ORNAMENT (X1).
- RED ORNAMENT on INCOMPLETE TRIDENT; receive RED TRIDENT.
- Take UMBRELLA and DRAWING (Y).
- Give DRAWING (Y1).
- Go (Y2).
- Use RED TRIDENT (Z).
- Solution: Ax2-C-B.
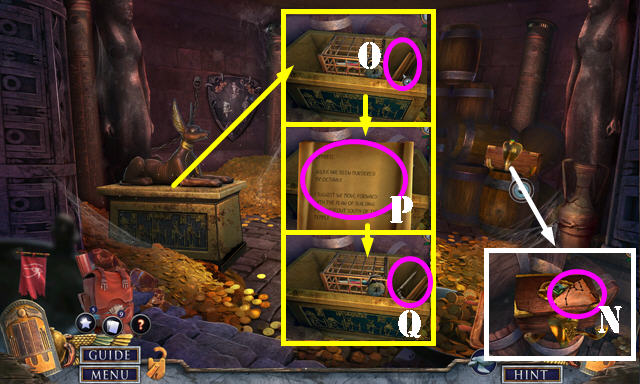
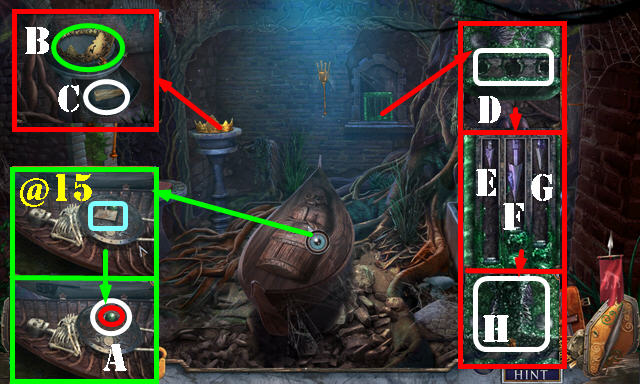
- Take TRIDENT and ANCIENT DEVICE (D).
- Select scroll (E).
- Play HOP (F); receive BLUE CROWN.
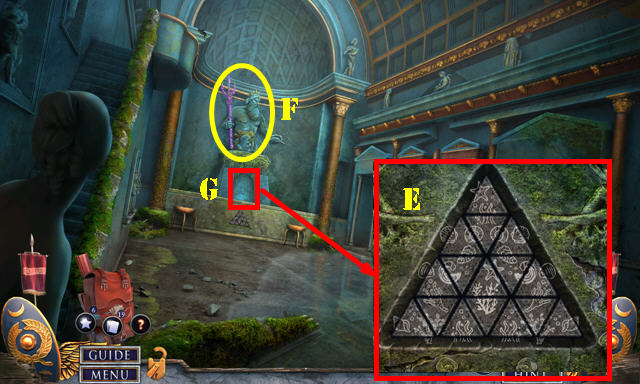
- Select note (G) and use HIEROGLYPHIC DICTIONARY. Take ORNAMENT LOCATION (H).
- Give ORNAMENT LOCATION (I).
- Use WIRE SAW (J); receive PALM BARK.
- COIN on ANCIENT DEVICE; Compass goes into Examination Kit.
- Select compass (K); slide button (L).
- Use PALM BARK and BLUE CROWN (M).

- Solution (N): (F-E-H-G-D-A-B-E-H-G-D-A-B-E-F-I-H).
- (G-D-E-F-I-H-G-D-E-H-G-D-E-H-I-F-C-B-E).
- Press button (O).
- Select flashlight (P). Slide button (Q).
Chapter 2: Oasis
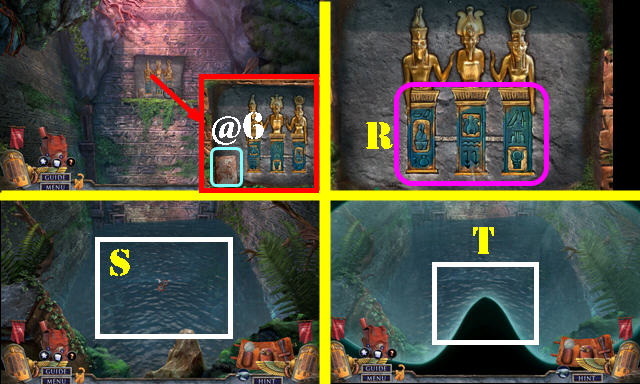
- Select cover; take Fact Card (@6).
- Switch bases (R).
- Use DIVING GEAR (S).
- Go (T).
- Select gear on scene and exit vignette; receive BROKEN GEAR.
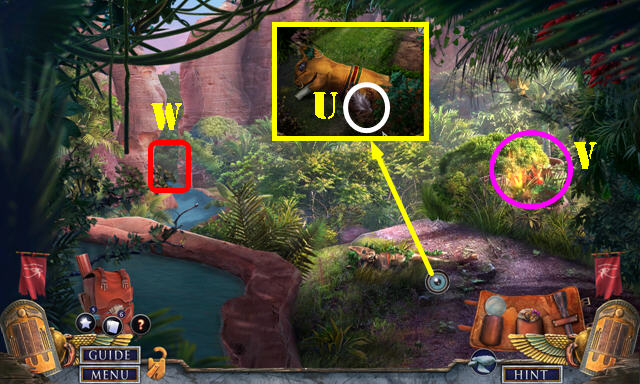
- Take FEATHER (U).
- Select leaves (V). Play HOP; receive HOE.
- Go (W).
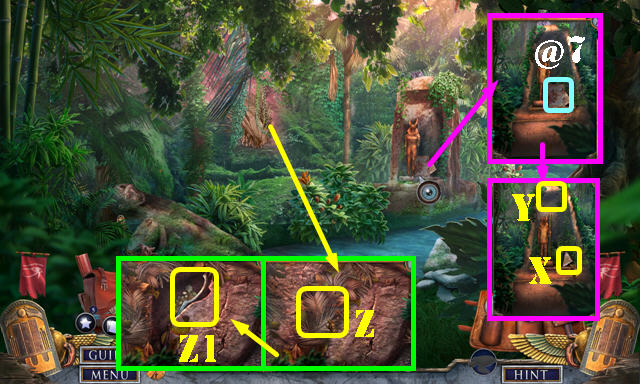
- Take Fact Card (@7) and TRIANGLE PINS 1/2 (X).
- Use UMBRELLA (Y); receive ELONGATED UMBRELLA and JEWEL.
- Select leaves and then use HOE (Z); receive HOE TOP.
- Take GUARD BLADE (Z1).
- Walk down.
- Use GUARD BLADE (A); receive VINES.
- Go (B).
- Try to go forward.
- Take MARBLE PIECE and COINS 1/2 (C).
- HOE TOP on ELONGATED UMBRELLA; receive IMPROVISED HOE.
- Use IMPROVISED HOE (D); receive BROKEN UMBRELLA. Take TRIANGLE PINS 2/2.
- Place JEWEL (E).
- Place TRIANGLE PINS 2/2. Solution: G-I-Hx2-G.
- Take SCOOP (J).
- Go to Oasis.
- Use SCOOP (K); receive GRAPE.
- Place GRAPE (L). Play HOP (M); receive CROOKED SCEPTER.
- Walk down.
- Use CROOKED SCEPTER (N); receive GOLDEN FIGURINE and BROKEN SCEPTER.
- Go (O).
- Place GOLDEN FIGURINE (P). Select note (P1) and use HIEROGLYPHIC DICTIONARY (Q); select note.
- Take KAWALA FLUTE (R).
- Go to Tomb Entrance.
- Use KAWALA FLUTE; take COINS 2/2 (S).
- Place COINS 2/2 (T).
- Solution (U): (F-H)-(J-F)-(H-J)-(I-H)-(K-I)-(M-K) -(C-M)-(A-C)-(H-A).
- (G-H)-(F-G)-(H-F)-(I-H)-(J-I)-(F-J)-(H-F)-(O-H)-(N-O)-(L-N).
- (J-L)-(N-J)-(L-N)-(M-L)-(C-M)-(D-C)-(F-D)-(B-F)-(D-B)-(E-D).
- (G-E)-(H-G)-(O-H)-(M-O)-(C-M)-(H-C)-(J-H)-(F-J)-(D-F)-(C-D).
- (H-C)-(M-H)-(K-M)-(L-K)-(J-L)-(H-J)-(M-H)-(L-M)-(J-L)-(F-J)-(H-F).
- Enter (V).
- Select compass (W). Slide button (W1).
- Use VINES (X).
- Pull vines (X1).
- Take PRUNING HOOK (Y).
- Go (Z).
- Remove cobwebs on scene 3x.
- Take Fact Card (@8).
- Select tablet; use HIEROGLYPHIC DICTIONARY and select (A). Select scroll (B).
- Place SUN EMBLEM (C); take METAL ORNAMENTS 1/4 (D).
- Use PRUNING HOOK (E). Play HOP (F); receive RED EYE.
- Walk down.
- Place RED EYE (G).
- Go (H).
- Take Fact Card (@9).
- Take FLINT and METAL ORNAMENTS 2/4 (I).
- Place MARBLE PIECE; solution (J).
- Take COBRA HEADS 1/2 (K).
- Use FEATHER; take STYLUS (L).
- Go (M).
- Take PARCHMENT PIECE (N).
- Use BROKEN SCEPTER; look at note (O).
- Use HIEROGLYPHIC DICTIONARY (P); select it and take METAL ORNAMENTS 3/4 (Q).
- Go to Scroll Storage.
- Place PARCHMENT PIECE (R). Select magnifier (S). Slide button (T).
- Select flashlight (U). Slide button (V).
- Use STYLUS (W).
- Take TABLET INSCRIPTION (X).
- Go to Tomb.

- Use TABLET INSCRIPTION; move stylus through pattern (Y). Take EYE AMULET (Y1).
- Place EYE AMULET (Z) and use STYLUS (Z1); receive BLUE ORNAMENT.
- BLUE ORNAMENT on TRIDENT; receive BLUE TRIDENT.
- Use BLUE TRIDENT (Z2). Solution Ax2-C-B. Take TRIDENT.
- Take COBRA HEADS 2/2 (E).
- Take Fact Card (@10).
- Select scroll (F).
- Play HOP (G); receive ROMAN COINS 1/2.
- Select note (H). Use LATIN DIRECTORY and select (I). Take GUARDIAN'S MOSAIC (J).
- Go (K).
- Place COBRA HEADS 2/2; take HOUND STICK (L).
- Walk down.
- Place HOUND STICK (M); take METAL ORNAMENTS 4/4 (N).
- Go to Treasury.
- Place GUARDIAN'S MOSAIC and METAL ORNAMENTS 4/4 (O).
- Swap pieces first and then select the pins to put them in position. Solution (P).
- Take STONE RELIC and KEY.
- Use KEY (Q); take EMPTY SLINGSHOT and GLASS FRAGMENTS (Q1).
- Go to Scroll Storage.
- Place GLASS FRAGMENTS and arrange (1-5).
- Take SMALL NECKLACE (R).
- Walk down twice.
- Place SMALL NECKLACE (S); take SMALL PIPE (T).
- SMALL PIPE on BROKEN GEAR; receive FIXED GEAR.
- Use FIXED GEAR (U).
- Go (V).
- STONE RELIC on EMPTY SLINGSHOT; receive SLINGSHOT.
- Use SLINGSHOT on scene (W).
- Use BROKEN UMBRELLA (X).
- Solution (Y).
- Select token (Z).
- Look at note; take STARTER HANDLE (Z1).
- Place STARTER HANDLE (Z2).
Chapter 3: Crossroads
- Take Fact Card (@11).
- Take BINOCULARS, PAWNS 1/2, and CAN OPENER (A).
- Open door; play HOP (B); receive FIREWORKS.
- Use CAN OPENER; take SIGN HOLDER (C).
- Use FIREWORKS and FLINT (D).
- Use SIGN HOLDER; open gate and go (E).
- Take SHOVEL (F).
- Take Fact Card (@12 and @13).
- Take LOGS 1/2, PAWNS 2/2, and SHOP KEY (G).
- Use SHOP KEY (H).
- Enter (I).
- Take NEEDLE and LIGHTER (J).
- Open; place PAWNS 2/2 (K).
- Solution is random. Screenshot shows one possible outcome (L).
- Look at note; take SAFETY PIN and SUCTION CUP.
- Use SUCTION CUP; take LOGS 2/2 (M).
- Walk down.
- Place LOGS 2/2 (N); take ROOSTER EMBLEM and CANDLES 1/4 (O).
- Go (P).
- Place ROOSTER EMBLEM (Q). Play HOP (Q1); receive SMALL HOOK.
- Walk down.
- Use SMALL HOOK (R).
- Enter (S).
- Take CROWN PIECE (T).
- Look at note (U).
- Use SAFETY PIN; take CAR JACK HANDLE and BOOK CREST (V).
- Place BOOK CREST; take MARBLE GEARS 1/3 and WOODEN TOKEN (W).
- Place WOODEN TOKEN (X).
- Solution (Y).
- Go (Z).
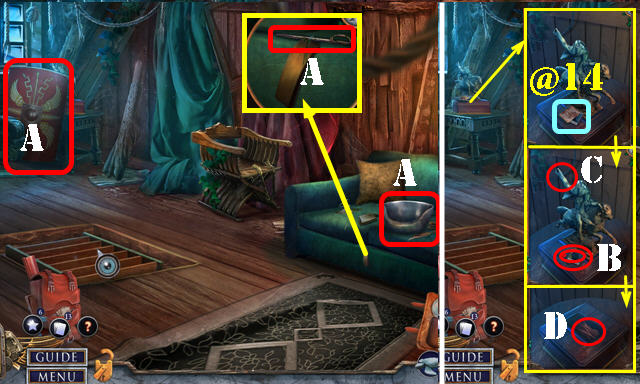
- Take ROMAN SHIELD, METAL POT, and MINIATURE SWORD (A).
- Take Fact Card (@14).
- Take STONE PHOTOGRAPH and CUSTODIAN'S LOG (B).
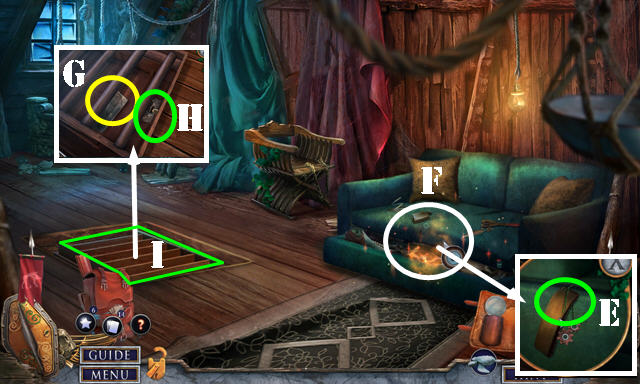
- Place MINIATURE SWORD (C). Use NEEDLE (D); receive NEEDLE AND THREAD.
- Use NEEDLE AND THREAD (E). Play HOP (F); receive BROKEN CAR JACK.
- CAR JACK HANDLE on BROKEN CAR JACK; receive CAR JACK.
- Use CAR JACK (G); receive SHARPENING STONE. Select mechanism (H) and go (I).
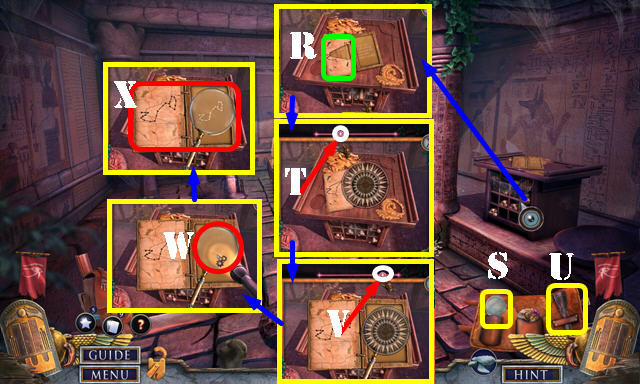
- Place STONE PHOTOGRAPH (J); open book (K) and take ARCHEOLOGY PAPER (L).
- Walk down.
- Open vignette and select magnifier (M). Slide button (N).
- Place ARCHEOLOGY PAPER and play HOP; receive DRUID INSCRIPTION. Take CELTIC KNOT (O).
- Go to House.

- Place CELTIC KNOT; take CANDLES 2/4 and SITES MAP (P).
- Place SITES MAP, DRUID INSCRIPTION, and CUSTODIAN'S LOG; take SITE LOCATION (Q).
- Walk down.
- Place SITE LOCATION (R) and use BINOCULARS (S).
- Use ROMAN SHIELD (T).
- Go (U).
- Select compass (V). Slide button (W).
- Select twice (X); take ROMAN COINS 2/2 (Y).
- Use SHOVEL (Z).
- Use ROMAN COINS 2/2; take Fact Card (@15).
- Take GREEN BALL and GREEN ORNAMENT (A).
- Place CROWN PIECE and select (B). Take CANDLES 3/4 (C).
- GREEN ORNAMENT on TRIDENT; receive GREEN TRIDENT.
- Place GREEN TRIDENT (D). Solution: E-Gx2-F. Take COMPLETE TRIDENT (H).
- Play HOP (I); receive MARBLE GEARS 2/3.
- Select note (J); use LATIN DICTIONARY and select (K). Take CANDLES 4/4 (L).
- CANDLES 4/4 and LIGHTER in METAL POT; receive WAX.
- Use WAX; take SMALL MACE and ORNATE BUTTON (M).
- Place ORNATE BUTTON (N).
- Solution (O): (D-B)-(B-A)-(B-C)-(B-E)-(G-D)-(G-F)-(E-G).
- Take BLUNT BLADE.
- Walk down.
- SHARPENING STONE on BLUNT BLADE; receive RITUAL BLADE.
- Use RITUAL BLADE; take ROPE (P).
- Use CAR JACK; take OLD AX (Q).
- Go (R).
- Use OLD AX (S); receive COFFIN COVER.
- Walk down.
- Use COFFIN COVER (T).
- Go (U).
- Open vignette and select flashlight (V); Slide button (W).
- Use SMALL MACE (X); receive BLOWTORCH.
- Use BLOWTORCH and go (Y).
Chapter 4: Docks

- Talk (A).
- Take SHELL and BUOYS 1/2 (B).
- Go (C).
- Remove sheet and play HOP (D); receive METAL HANDLE.
- Look at note; take WATERPROOF TABLET (E).
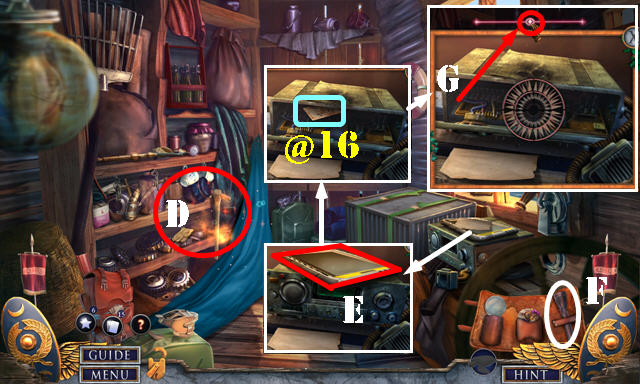
- Remove cover; take Fact Card (@16).
- Select flashlight (F). Slide button (G).
- Walk down.
- Use METAL HANDLE (H).
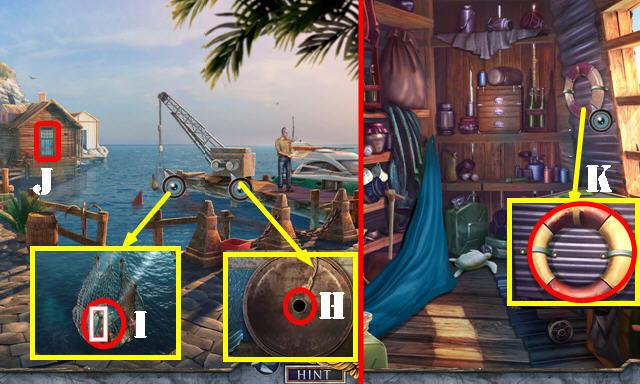
- Use SHELL; take BUOYS 2/2 and WRENCH (I).
- Go (J).
- Use WRENCH and place ROPE; take LIFE PRESERVER (K).
- Walk down.
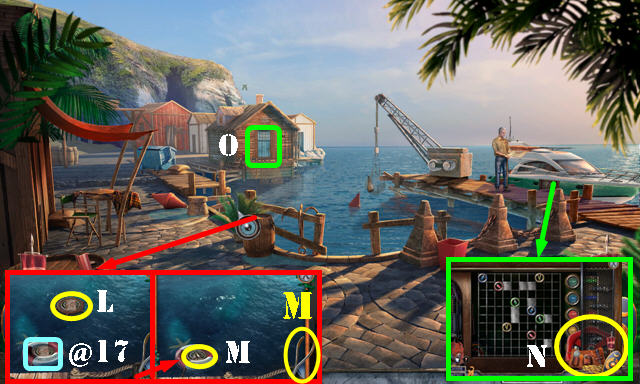
- Use LIFE PRESERVER (L); take Fact Card (@17).
- Take SAILS EMBLEM and WIRE CUTTERS (M).
- Place SAILS EMBLEM; take HANDLE (N).
- Go (O).
- Use WIRE CUTTERS; take CHIP and WIRES (P).
- Walk down.
- Place WIRES (Q).
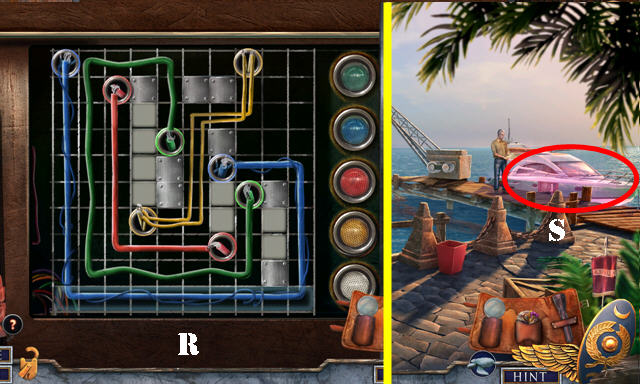
- Solution (R).
- Go (S).
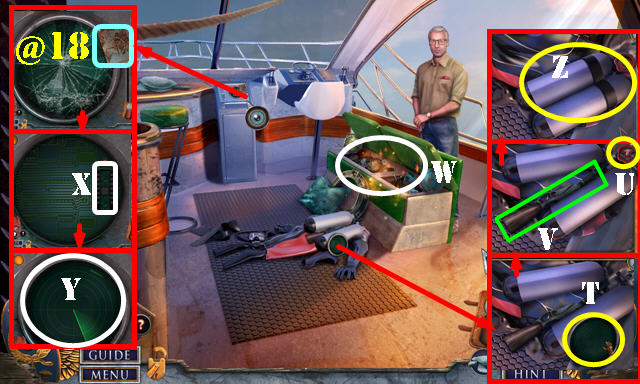
- Take Fact Card (@18).
- Take DISPLAY (T). Place HANDLE (U) and select tanks; take EMPTY HARPOON GUN (V).
- Use BUOYS 2/2; play HOP; receive TANK HOLDER (W).
- Remove cover; place CHIP (X) and DISPLAY (Y).
- Place TANK HOLDER (Z).
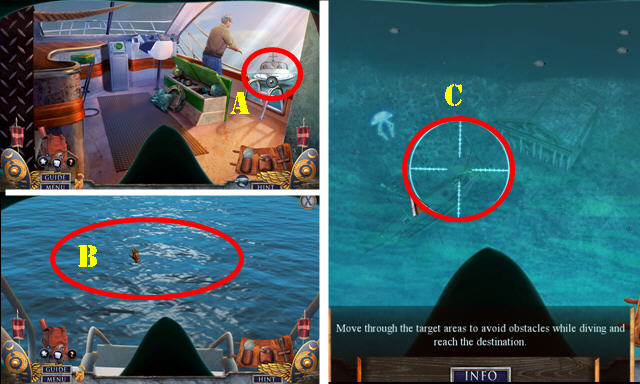
- Examine (A).
- Select (B).
- Solution is random (C).
- Take BROKEN OAR (D).
- Open vignette and select flashlight (E). Slide button (F). Take SENATOR (G).
- Use BROKEN OAR (H); receive CALCIFIED POLE.
- Take MARBLE GEARS 3/3 (I).
- Place MARBLE GEARS 3/3 (J).
- Enter (K).

- Take Fact Card (@19) and CREATURES 1/2 (L).
- Select scroll (M); use LATIN DICTIONARY and select.
- Place GREEN BALL; take HORSE HEAD (N).
- Place SENATOR (O); take FORCEPS (P).
- Go (Q).
- Take INCOMPLETE HORSE (R).
- Play HOP (S): receive PARADE SWORD.
- Use PARADE SWORD (T); receive BROKEN BLADE.
- Open shell; take CLOTH (U).
- Select note; use LATIN DICTIONARY and select (V).
- Walk down.

- Use BROKEN BLADE; take WHEEL SET (W).
- Go (X).
- HORSE HEAD and WHEEL SET on INCOMPLETE HORSE; receive WHEEL HORSE.
- Place WHEEL HORSE; take SHIP (Y).
- Walk down.
- Place SHIP (Z); take CREATURES 2/2 (A).
- Go (B).
- Place CREATURES 2/2 (C); take STONE DECORATION (D).
- Walk down.
- Place STONE DECORATION. Solution (E).
- Place COMPLETE TRIDENT (F).
- Try to go and then enter (G).
- Answer tablet on scene (H).
- Use FORCEPS (I); receive a BRICK.
- Go (J).
- Select flashlight (K); slide button (L).
- Use WATERPROOF TABLET on scene. Answer tablet (M).
- Use BRICK (N). Take RUSTY SHACKLES (O).
- Take ROMAN BATON (P).
- Use CLOTH and CALCIFIED POLE; select. Take Fact Card (@20) and SEAL RING (Q).
- Use SEAL RING (R). Play HOP (R1); receive SPEAR.
- Walk down.
- SPEAR on EMPTY HARPOON GUN; receive HARPOON GUN.
- Use HARPOON GUN and select (S).
- Go (T).
- Use ROMAN BATON and select (U).
- Place RUSTY SHACKLES (V). Take ORNATE KNOB (W).
- Place ORNATE BUTTON (X).
- Solution (Bx3-A-Bx3-A-B-A-B-A-B-A-Bx3).
- Use ROMAN BATON (C).
- Congratulations, you've completed Hidden Expedition: Neptune's Gift!
Created at: 2019-05-10