Walkthrough Menu
- General Tips
- Chapter 1: The Adventure Begins
- Chapter 2: Castle
- Chapter 3: Museum
- Chapter 4: The Hotel
- Chapter 5: Tavernier Estate
- Chapter 6: The Jungle
- Chapter 7: The Temple
General Tips
- This is the official guide for Hidden Expedition: Smithsonian Hope Diamond!
- This guide will not mention each time you have to zoom into a location; the screenshots will show each zoom scene.
- Hidden-object puzzles are referred to as HOPs in this guide. Items listed in red are hidden or require additional actions to locate.
- In HOPs, groups of items will be marked in the same color. Listed items will be marked in yellow and interactive items are color-coded.
- Mini-games and HOPs are sometimes randomized; your solution may vary.
- This guide will give step-by-step solutions for all puzzles which are not random. Please read the instructions in the game for each puzzle.
Chapter 1: The Adventure Begins
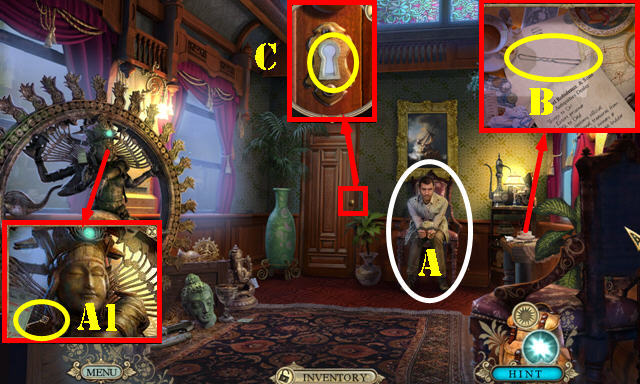
- Talk to Sam (A).
- Look at the Note; take the TRUNK KEY 1/4 (AA).
- Move the note and take the HAIRPIN (B).
- Use the HAIRPIN in the keyhole; Go through the door (C).
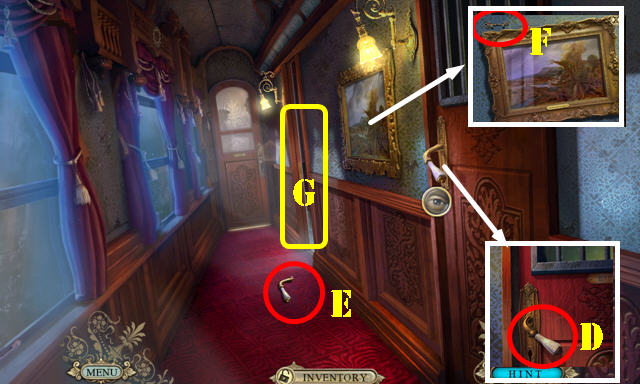
- Jiggle the HANDLE (D) and then take it (E).
- Tilt the picture and take the TRUNK KEY 2/4 (F).
- Enter the Train closet (G).
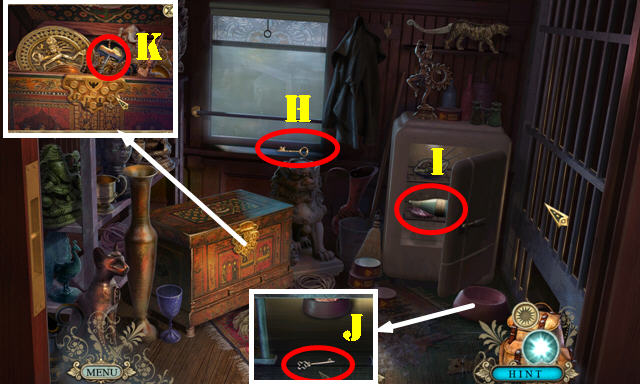
- Touch the blinds; take the TRUNK KEY 3/4 (H).
- Place the HANDLE on the safe; take the FULL WATER BOTTLE and STEAK (I).
- Place the STEAK in the bowl; take the TRUNK KEY 4/4 (J).
- Use the 4 TRUNK KEYS in the lock; take the CORKSCREW and HEXAGON PIECE (K).
- Return to the Train car.
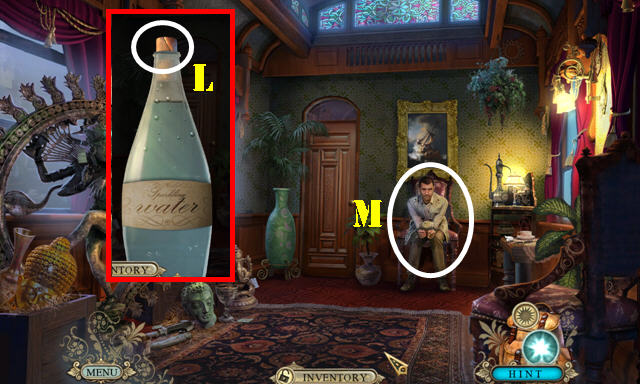
- Look at the FULL WATER BOTTLE; use the CORKSCREW on the cork (L).
- Give the FULL WATER BOTTLE to Sam (M).
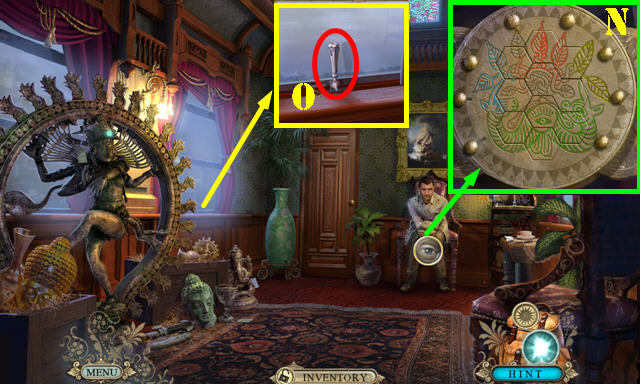
- Place the HEXAGON PIECE on the puzzle.
- Swap the piece to form the right image (N).
- Pull the handle (O); open the window and jump out of it.
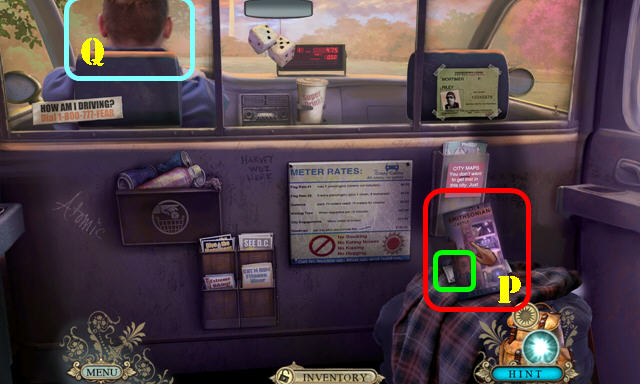
- Take the POSTCARD on the screen.
- Take the Map and the FIVE DOLLAR BILL below it (P).
- Give the FIVE DOLLAR BILL to the driver to receive a QUARTER (Q).
- Exit the cab.
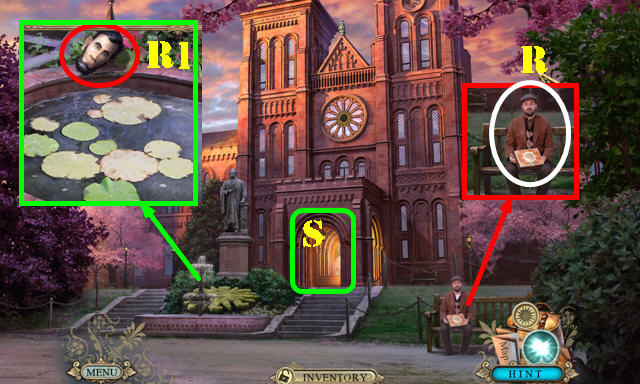
- Talk to the man (R).
- Take the BOBBLEHEAD 1/4 (R1).
- Go to the Castle doorway (S).
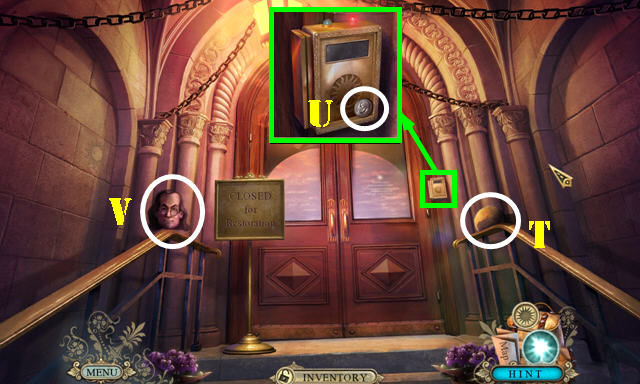
- Take the DRY SPONGE (T), DIME (U) and BOBBLEHEAD 2/4 (V).
- Walk down.
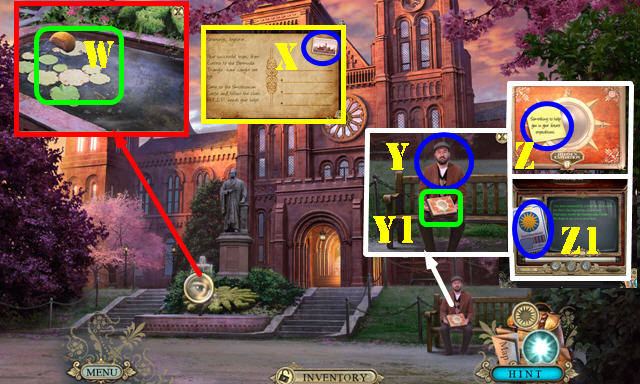
- Dip the DRY SPONGE in the water to get the WET SPONGE (W).
- Open the POSTCARD and flip it over; use the WET SPONGE on the stamp and take the POSTAGE STAMP (X).
- Give the POSTAGE STAMP to the man (Y); take the HELP BOX (Y1).
- Open the H.E.L.P. BOX; take the Note (Z) and then the KEY CARD (Z1).
- Return to the Castle doorway.
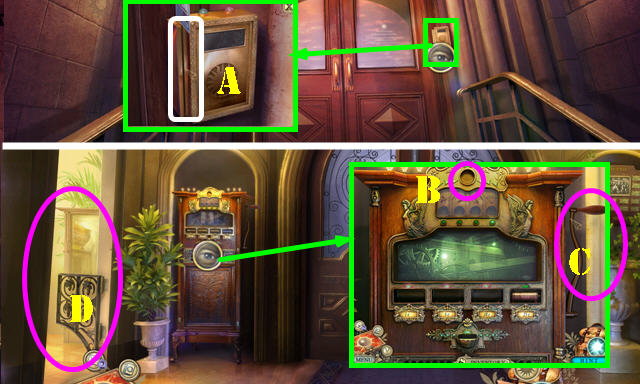
- Use the KEY CARD in the slot (A).
- Go through the door.
- Place the QUARTER in the slot (B) and pull the handle (C) to get the DIAMOND COIN.
- Go to the Crypt (D).
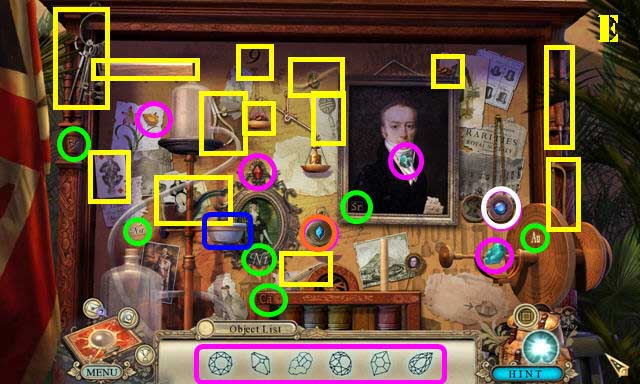
- Play the HOP (E).
- You receive a RULER.
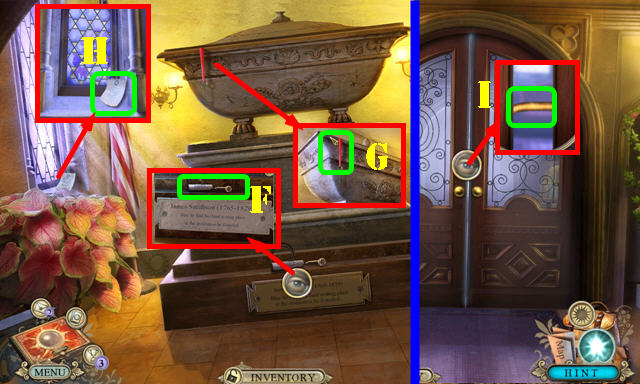
- Take the Newspaper and MICROPHONE (F).
- Take the SHOWCASE ROOM KEY (G).
- Grab the Note and the FIRE CYLINDER below it (H).
- Walk down.
- Use the RULER on the lock (I).
- Go to the Castle lobby.
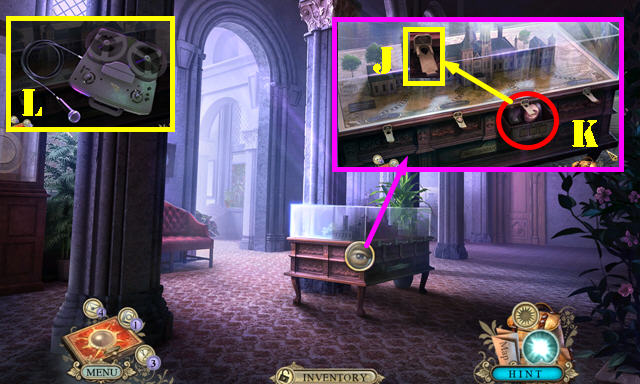
- Place the DIAMOND COIN in the slot (J); take the BOBBLEHEAD 3/4 and RECORDER (K).
- Open the RECORDER; place the MICROPHONE on it to get the RECORDER WITH MIC (L).
- Go to the Elevator hallway.
Chapter 2: Castle
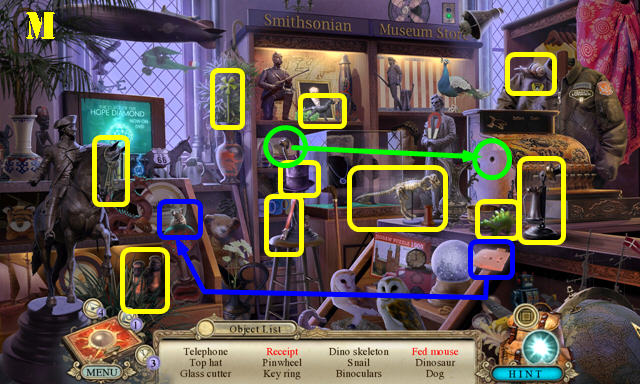
- Play the HOP (M).
- You receive the GLASS CUTTER.
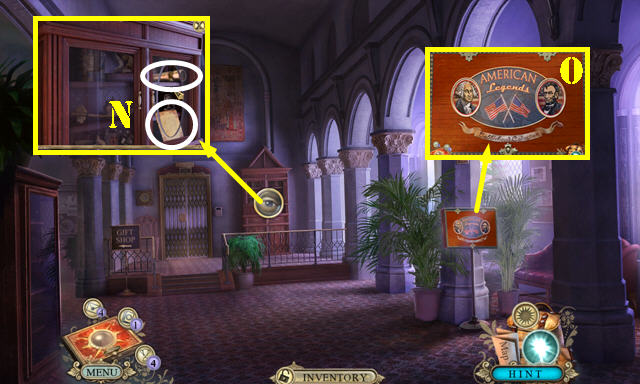
- Use the GLASS CUTTER on the glass; take the Note, BOBBLEHEAD 4/4 and SPYGLASS (N).
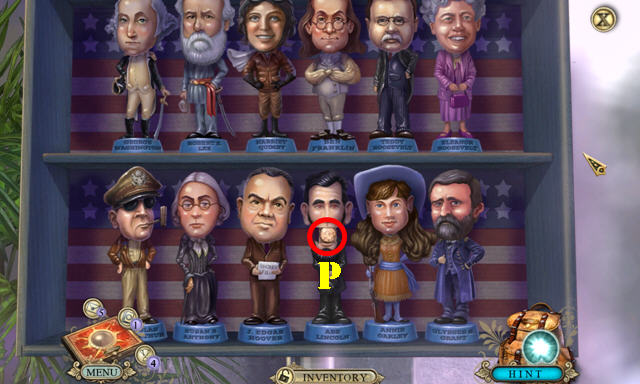
- Open the box (O) and place the 4 BOBBLEHEADS in it to activate a puzzle.
- Swap the bobbleheads as shown. Take the PENNY (P).
- Return to the Castle foyer.
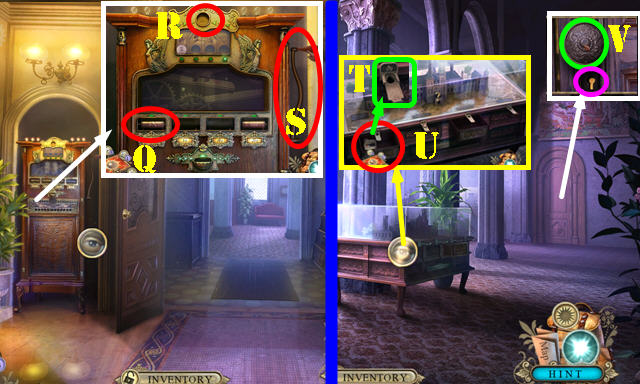
- Place the FIRE CYLINDER (Q) and the PENNY (R) in the slots.
- Pull the handle (S) to get the FIRE COIN.
- Return to the Castle lobby.
- Place the FIRE COIN in the slot (T); take the BATTERY 1/2, Note, and DOORKNOB (U).
- Place the DOORKNOB on the door (V); use the SHOWCASE ROOM KEY in the lock (purple).
- Go through the door.
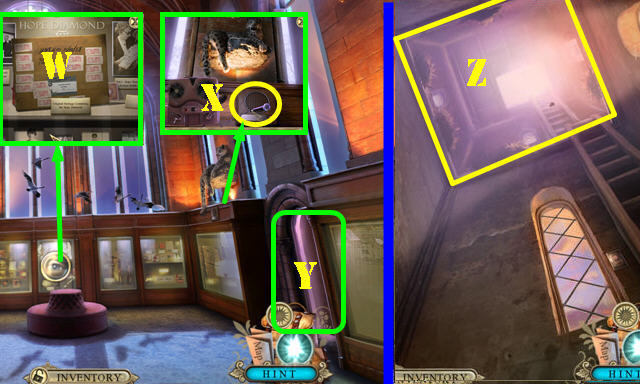
- Look at the package (W).
- Use the RECORDER WITH MIC on the speaker to get the RECORDED ROAR (X).
- Go to the Owl tower base (Y).
- Use the RECORDED ROAR on the owls. Go to the Owl tower top (Z).
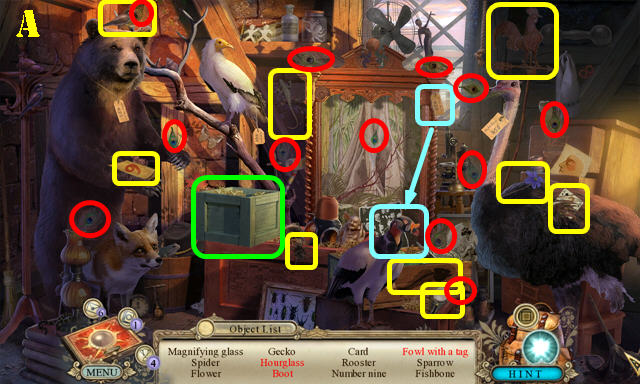
- Play the HOP (A).
- You receive the FEATHERS.
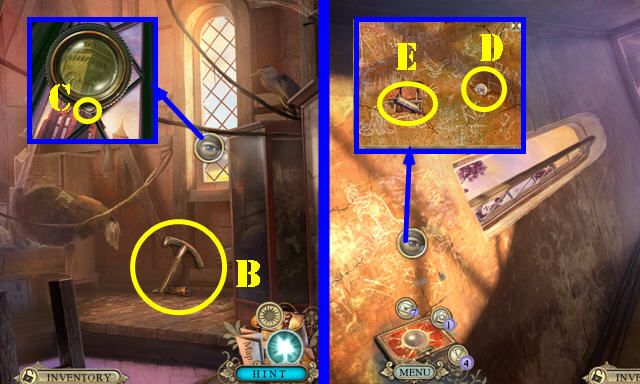
- Take the HAMMER AND CHISEL (B).
- Use the SPYGLASS on the window; turn the tab in the direction of the arrows to focus the image (C).
- Walk down.
- Take the NICKEL (D).
- Use the HAMMER AND CHISEL in the crack; take the SMITHSONIAN CYLINDER (E).
- Walk down.
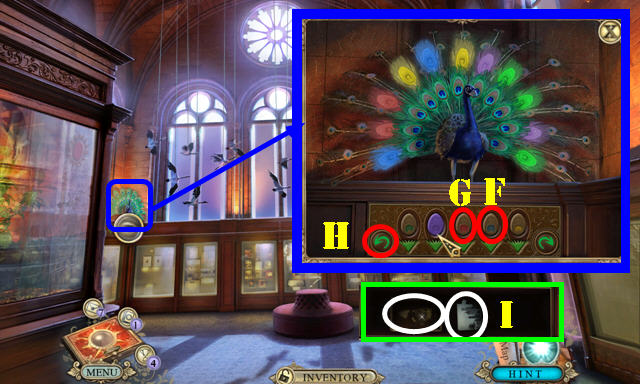
- Place the FEATHERS on the peacock to activate a puzzle.
- Use the buttons to rearrange the feathers.
- Solution: F, Hx4, G, Hx4.
- Take the Note and the ELEVATOR CARD 1/2 (I).
- Return to the Castle foyer.
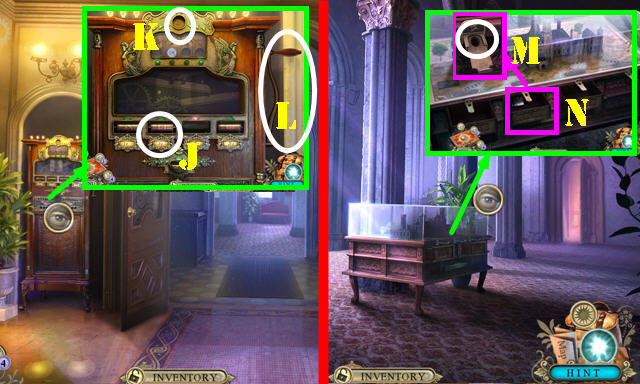
- Place the SMITHSONIAN CYLINDER (J) and the NICKEL (K) in the slots.
- Pull the handle (L) to get the SMITHSONIAN COIN.
- Return to the Castle lobby.
- Place the SMITHSONIAN COIN in the slot (M); take the ELEVATOR CARD 2/2 (N).
- Return to the Elevator hallway.
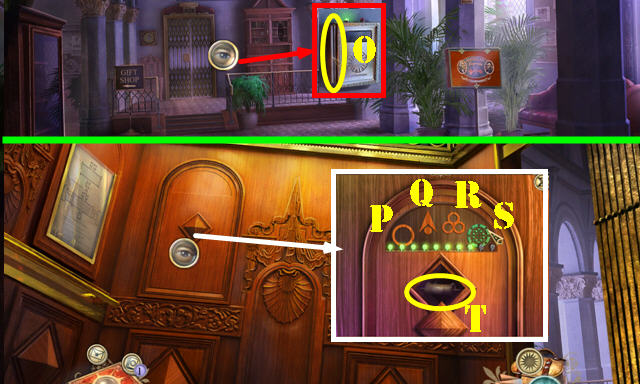
- Use the 2 ELEVATOR CARDS in the slot and enter the Elevator (O).
- Open the panel for a puzzle. Press the symbols in this order: Px1, Qx4, Rx3, and Sx2.
- Take the OWL CYLINDER (T).
- Return to the Castle foyer.
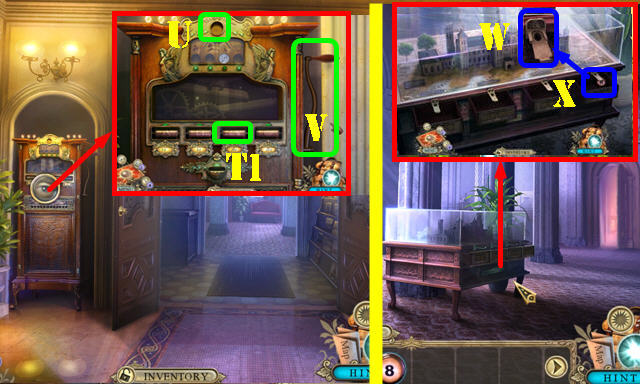
- Place the OWL CYLINDER (T1) and the DIME (U) in the slots.
- Pull the handle (V) to get the OWL COIN.
- Return to the Castle lobby.
- Place the OWL COIN in the slot (W); take the NUMBER 8 BUTTON (X).
- Return to the Elevator.
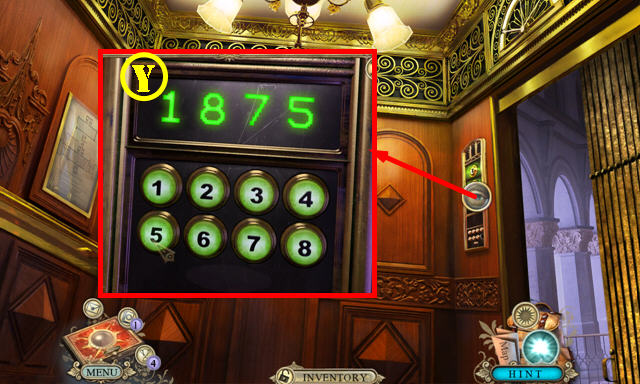
- Place the NUMBER 8 BUTTON in the slot. Press 1875 (Y).
- Exit the elevator to reach the Basement.
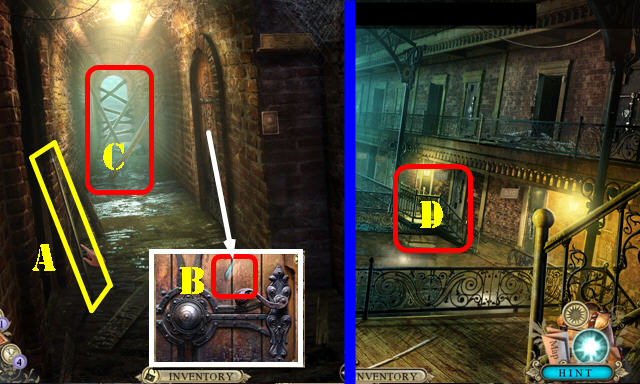
- Take the LONG STICK (A) and GLASS SHARD (B).
- Select the boards 4 times (C); go forward to the Sewer.
- Go to the Sewer hallway (D).
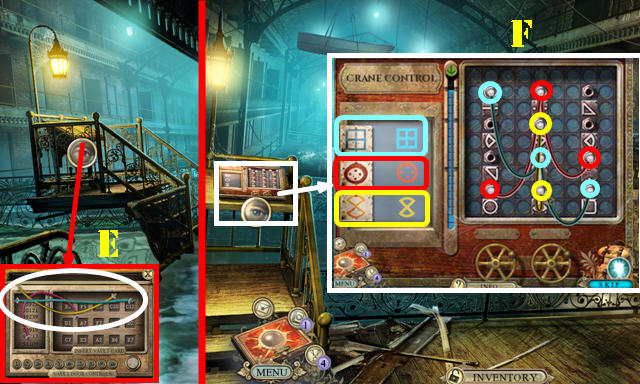
- Take the WIRES (E).
- Walk down.
- Place the WIRES on the mechanism to activate a puzzle.
- Place the wires in the correct sockets to form the images on the left. Solution (F).
- Return to the Sewer hallway.
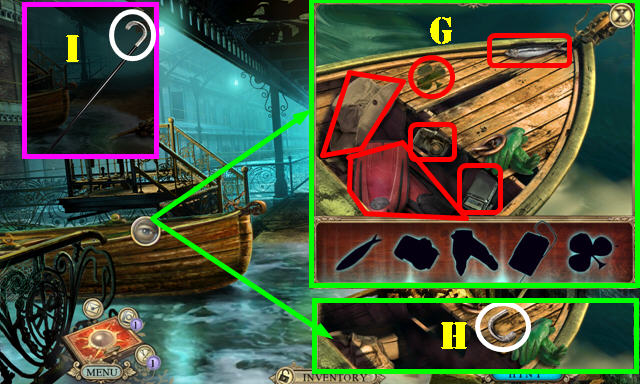
- Play the HOP (G).
- Take the HOOK (H).
- Open the LONG STICK and attach the HOOK to it to acquire the LONG HOOK (I).
- Walk down twice.
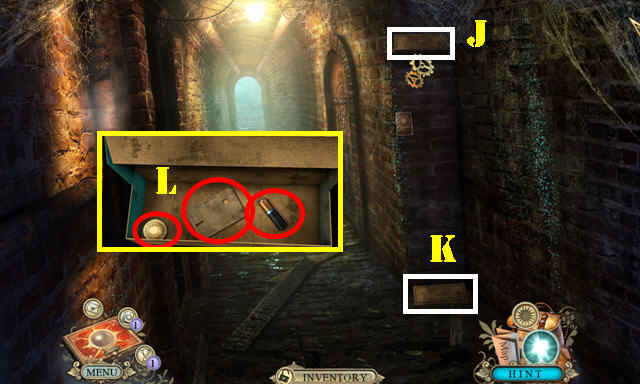
- Use the LONG HOOK on the BOX (J) and then take it (K).
- Open the BOX and cut the 3 ropes with the GLASS SHARD; take the BATTERY 2/2, SMITHSONIAN COIN, and the VAULT CARD (L).
- Return to the Sewer hallway.
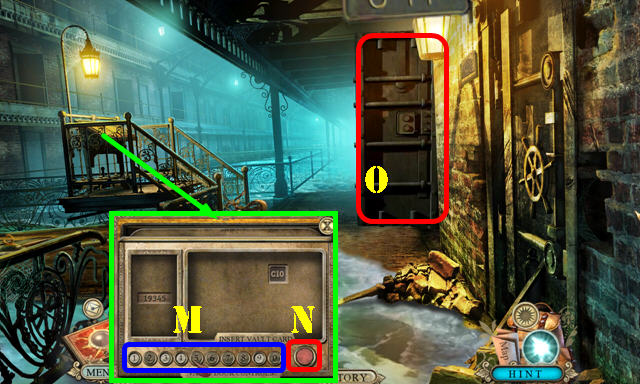
- Place the VAULT CARD on the mechanism.
- Enter 19345 (M) and press the button (N).
- Go through the door (O).
Chapter 3: Museum
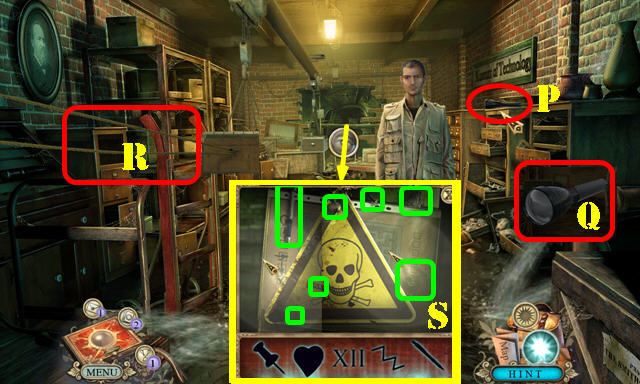
- Take the FLASHLIGHT EMPTY (P).
- Open the FLASHLIGHT EMPTY and place the 2 BATTERIES in it to get the FLASHLIGHT (Q).
- Cut the wires with the SHARD (R).
- Use the FLASHLIGHT on the sign and look for the HOP items (S).
- Zoom into the map to activate a puzzle.
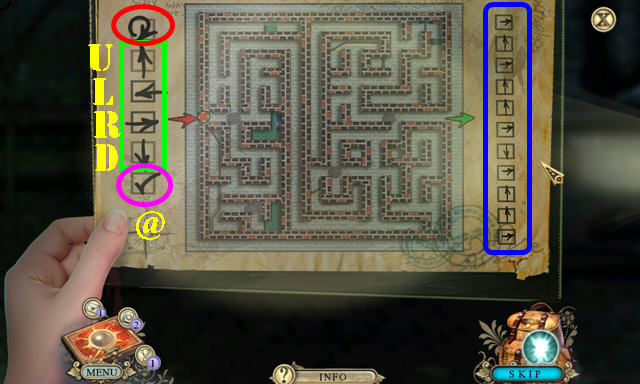
- Use the arrows (green) to map out the right path for the maze. Your selections will appear in the boxes (blue). You can undo your moves here (red).
- Enter: R, Ux2, R, D, R, Ux2, R, U, R and press the checkmark (@).
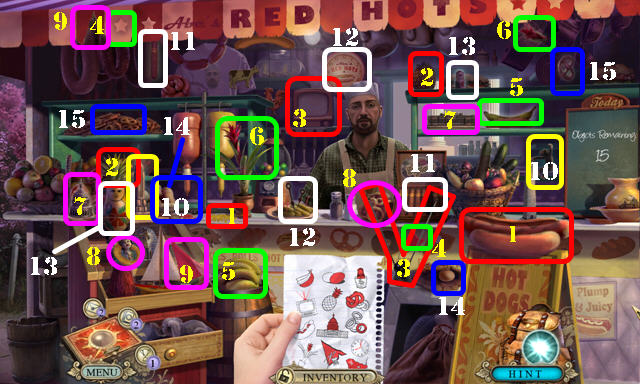
- Zoom into the hot dog stand on the left.
- Give the SMITHSONIAN COIN to the vendor.
- Place the items where they belong (1-15).
- Take the SMITHSONIAN ENTRANCE CARD from the vendor.
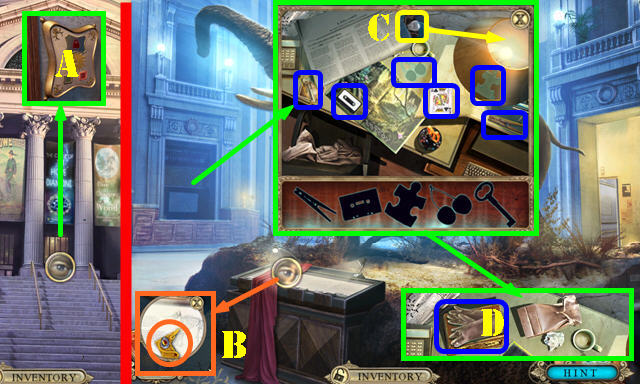
- Place the SMITHSONIAN ENTRANCE CARD on the lock (A).
- Enter the Museum lobby.
- Move the cloth; take the PUZZLE PIECE (B).
- Place the bulb (C) on the lamp to activate a HOP.
- Take the GARDEN GLOVES (D).
- Go to the Elevator.
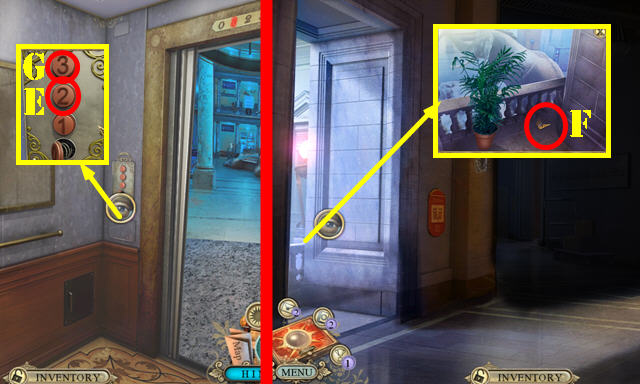
- Press the 2 button (E). Exit the elevator.
- Move the flowerpot; take the PUZZLE PIECE (F).
- Walk down.
- Press the 3 button (G).
- Exit the Elevator.
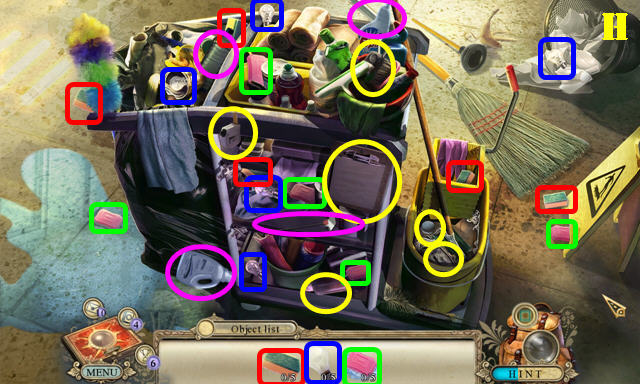
- Play the HOP (H).
- Take the GLASS SPRAY PIECES (purple).
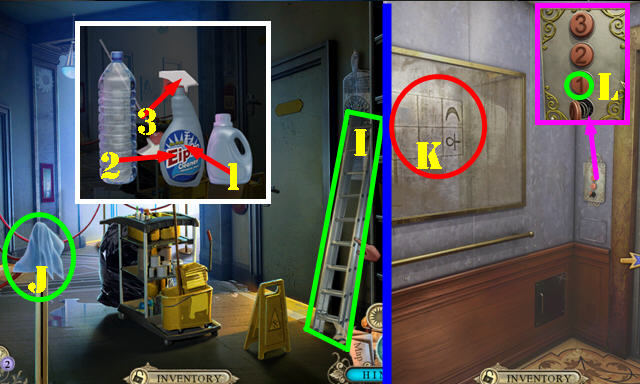
- Take the LADDER (I) and the RAG (J).
- Open the GLASS SPRAY PIECES. Pour the bottles (1 and 2) into the main one and then add the trigger (3) to acquire the GLASS SPRAY.
- Walk down.
- Use the GLASS SPRAY on the window. Wipe the glass with the RAG (K).
- Press the 1 button (L) and exit the Elevator.
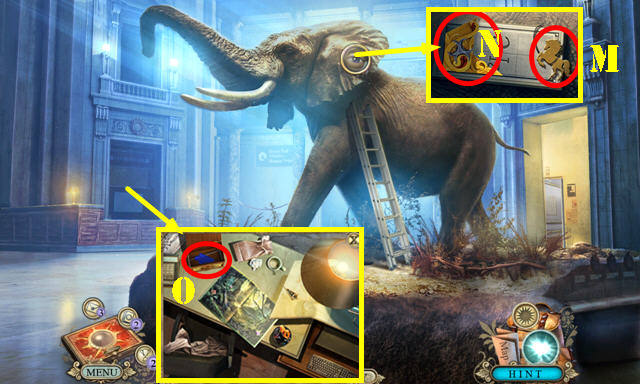
- Place the LADDER on the elephant. Take the HORSE (M). Move the ear and take the PUZZLE PIECE (N).
- Place the HORSE on the box; take the GLASS PUZZLE PIECE 1/5 and HEY KEY (O).
- Return to the Office hallway.
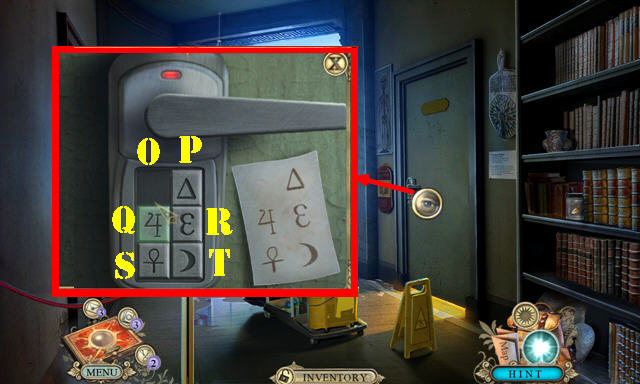
- Touch the buttons to arrange the symbols as shown on the clue.
- Solution: T, R, Q, O, P, R, Q, O.
- Go through the door.
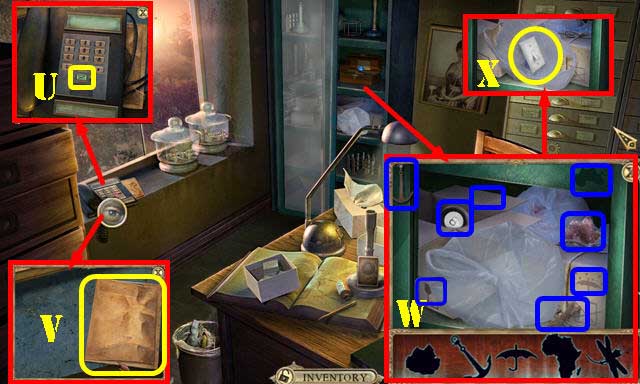
- Press the voicemail button (U). Touch the phone; take the FOLDER (V).
- Open the glass door; play the HOP (W).
- Tear the bag; take the LIGHT SWITCH (X) and the SIX GEMS 1/6 below it.
- Return to the Second floor hallway.
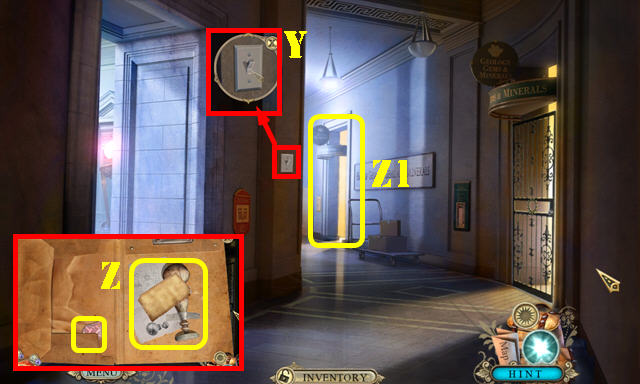
- Place the LIGHT SWITCH on the wall and flip it (Y).
- Open the FOLDER; take the SIX GEMS 2/6, Note, and GEM DISPLAY KEY (Z).
- Go to the Gem Room (Z1).
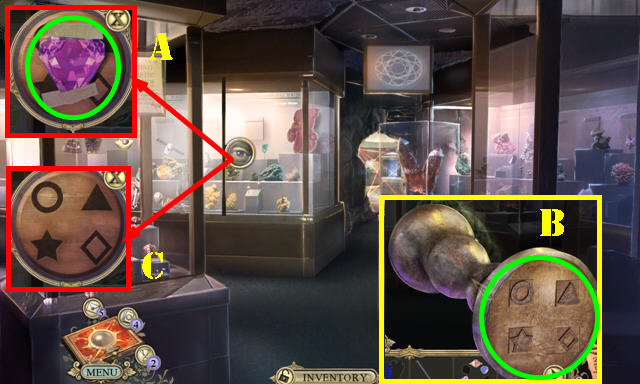
- Remove the 2 pieces of tape; take the SIX GEMS 3/6 (A).
- Open the GEM DISPLAY KEY. Swap the symbols as shown (B) to receive the CORRECT GEM DISPLAY KEY.
- Place the CORRECT GEM DISPLAY KEY on the lock (C) to activate a HOP.
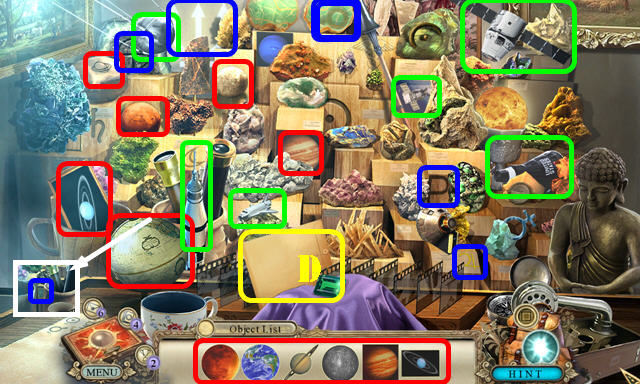
- Play the HOP.
- Take the ENVELOPE (D).
- Return to the Elevator.
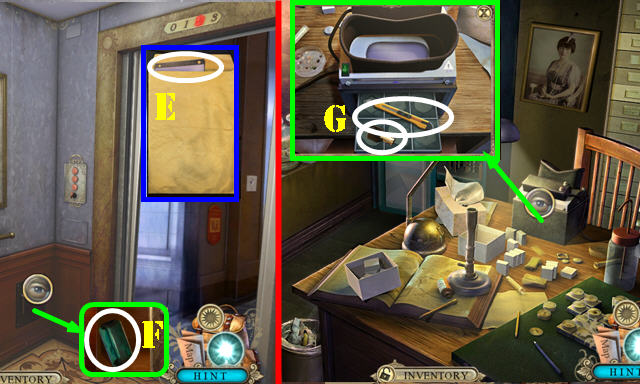
- Open the envelope; take the UV VIEWER (E).
- Use the HEY KEY in the lock; take the SIX GEMS 4/6 (F).
- Return to Dr. Post's Office.
- Place the UV VIEWER on the device; take the BOX KEY and SCALPEL (G).
- Return to the Second floor hallway.
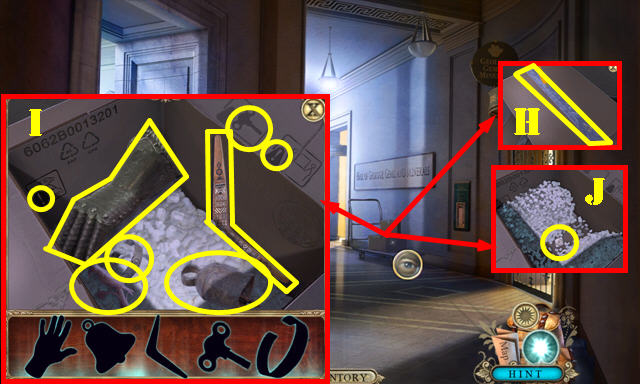
- Use the SCALPEL on the box (H); play the HOP (I).
- Move the peanuts out of the way; take the SIX GEMS 5/6 (J).
- Return to the Natural History Museum.
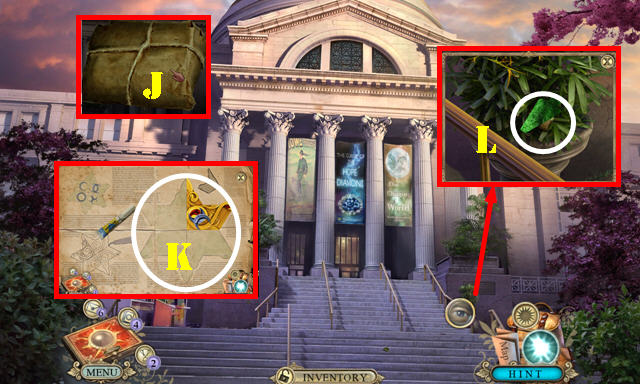
- Use the GARDEN GLOVES on the leaves; take the GLASS PUZZLE PIECE 2/5 and the PUZZLE PIECE (L).
- Open the PUZZLE PIECE (J) and place the three PUZZLE PIECES on it to activate a puzzle (K).
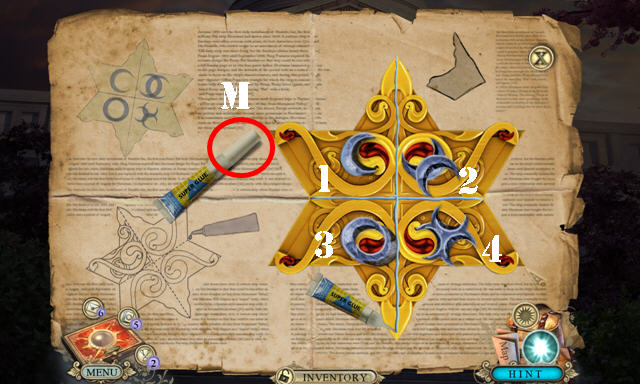
- Swap the parts in this order: 4, 3, 4.
- Remove the cap on the glue and then use the glue (M) on the puzzle piece; take the PUZZLE PIECE.
- Return to the Gem room and go forward to the Hope Diamond room.
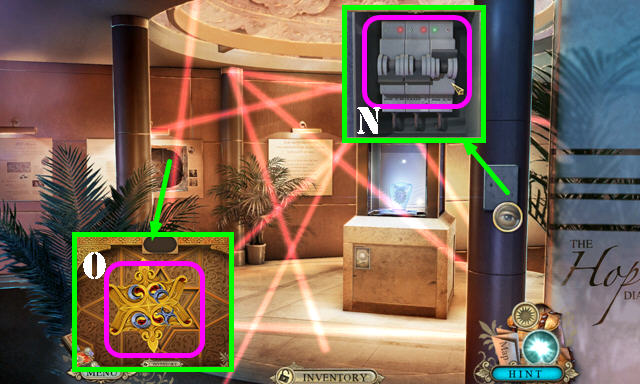
- Use the BOX KEY on the lock; pull all three switches (N).
- Place the PUZZLE PIECE on the board to activate a puzzle (O).
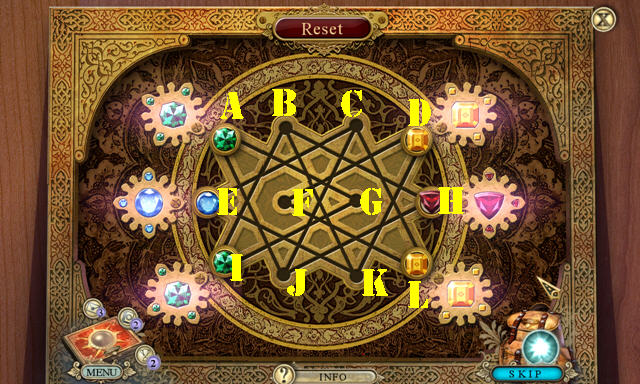
- Place the gems in their matching spots.
- Solution: L-F, I-B, B-H, G-A, K-B, B-I, D-K, K-E, F-D, C-L. Take the NECKLACE.
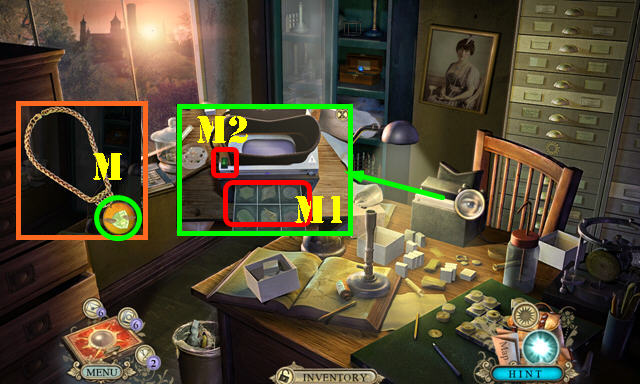
- Return to Dr. Post's Office.
- Open the NECKLACE; push the two clasps aside and take the SIX GEM 6/6 (M).
- Place the SIX GEMS in the slots (M1) and press the button (M2) to activate a puzzle.
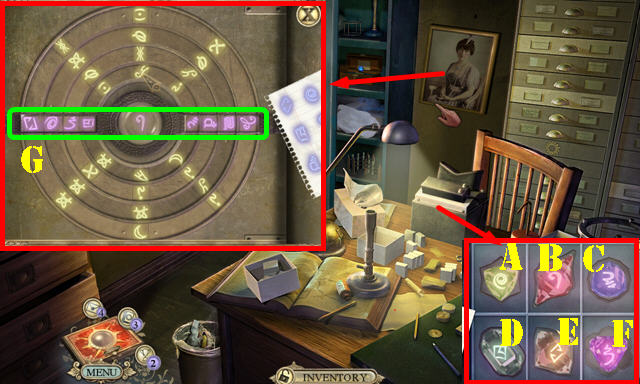
- Flip the gems to find all the symbols: Dx2, F, E, A, D, B, E, D, F, A, C, B, F, C, E.
- Touch the picture and zoom into the puzzle.
- Rotate the symbols into place as shown (G).
- Take the TEMPLE ENTRANCE CODE 1/3.
Chapter 4: The Hotel
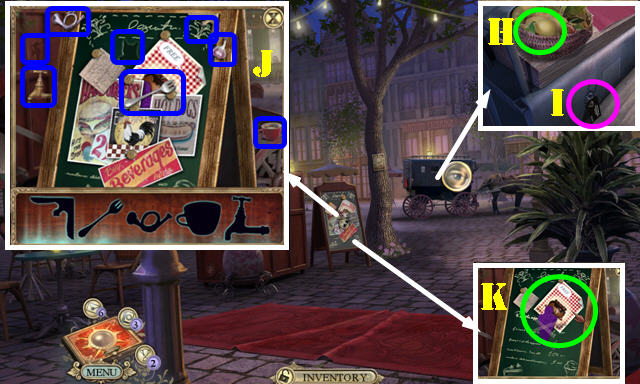
- Remove the cloth; take the LEMON (H).
- Grab the card (I).
- Play the HOP (J).
- Remove the papers. Take the POSTER and the GLASS PUZZLE PIECE 3/5 (K).
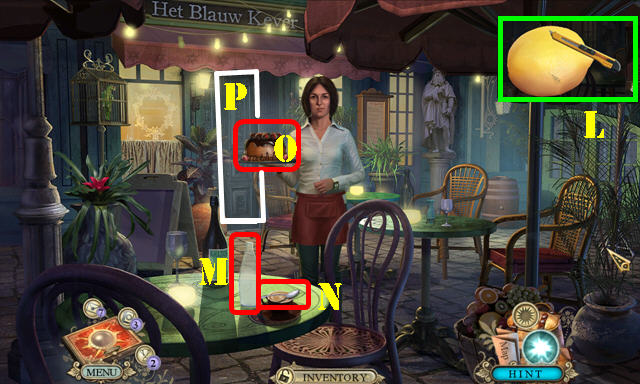
- Go to the Cafe on the left.
- Open the LEMON; use the SCALPEL on it and take the LEMON HALF (L).
- Take the WATER BOTTLE (M) and CAKE SPOON (N).
- Give the POSTER to the server. Take the CAKE (O) to receive the PAPER.
- Enter the Hotel (P).
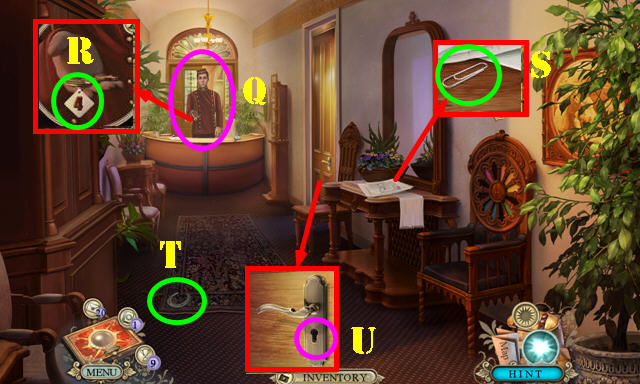
- Give the CAKE to the bellhop (Q); take the ROOM KEY (R).
- Move the papers and take the PAPER CLIP (S).
- Take the HORSESHOE 1/2 (T).
- Place the ROOM KEY in the lock; turn the key and go through the door (U).
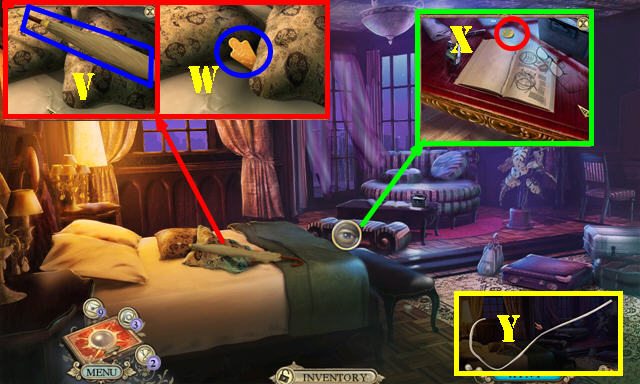
- Take the UMBRELLA (V). Move the pillow; take the GLASS PUZZLE PIECE 4/5 (W).
- Take the CRACKER (X).
- Open the PAPER CLIP; touch it three times and take the SMALL HOOK (Y).
- Return to the Café.
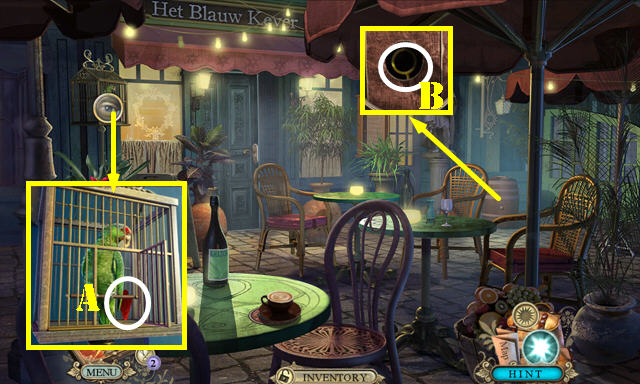
- Open the cage and give the CRACKER to the parrot. Take the GLASS PUZZLE PIECE 5/5 (A).
- Pull the cork out; use the SMALL HOOK to get the GOLDEN MAGNIFYING GLASS (B).
- Return to the Hotel.
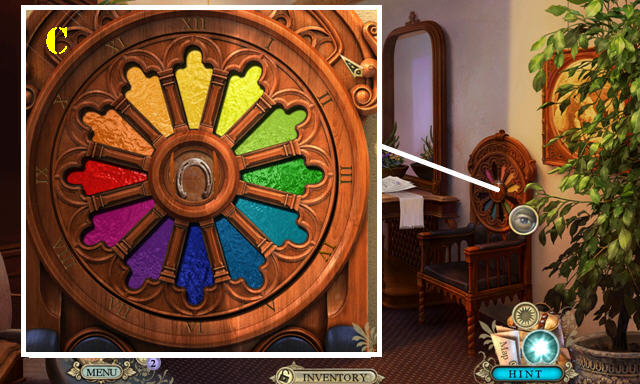
- Place the 5 GLASS PUZZLE PIECES in the slots to activate a puzzle.
- Swap the pieces as shown (C).
- Take the HORSESHOE 2/2.
- Return to Town square.
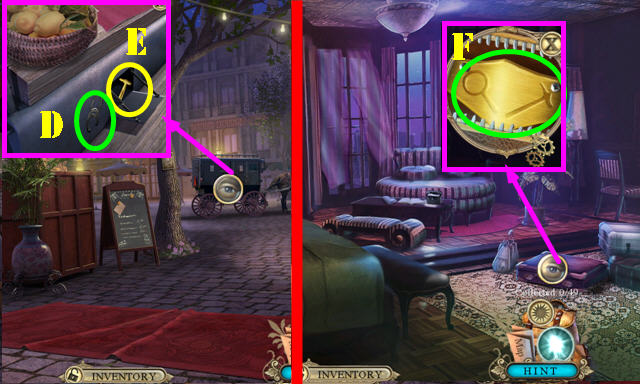
- Place the 2 HORSESHOES in the slot (D); take the PLATE HAMMER (E).
- Return to the Hotel room.
- Place the SMALL HOOK on the zipper; put the GOLDEN MAGNIFYING GLASS and the PLATE HAMMER in the slots to activate a HOP (F).
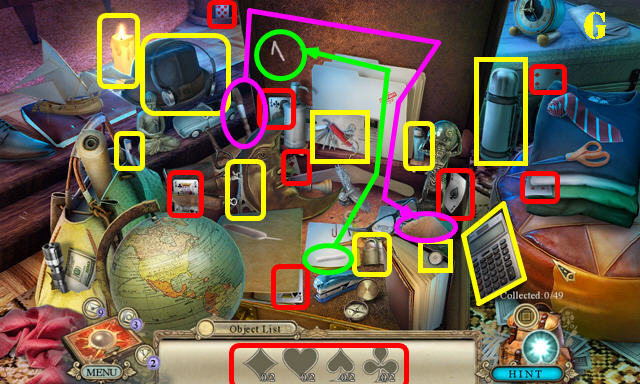
- Play the HOP (G).
- You receive the CANDLE.
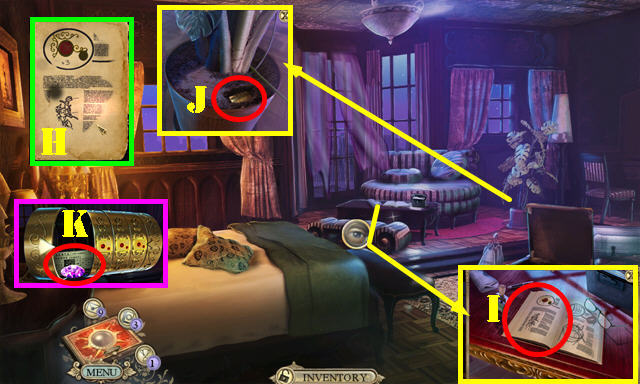
- Open the PAPER; use the LEMON HALF on it. Pass the CANDLE through the paper to reveal all the images and receive the JOURNAL PAGE (H).
- Place the JOURNAL PAGE on the journal and touch it for a clue (I).
- Use the WATER BOTTLE on the soil and then use the CAKE SPOON on it; take the SMALL CYLINDER (J).
- Open the SMALL CYLINDER and rotate the barrels until they all have rubies; take the AMETHYST and the Note (K).
Chapter 5: Tavernier Estate
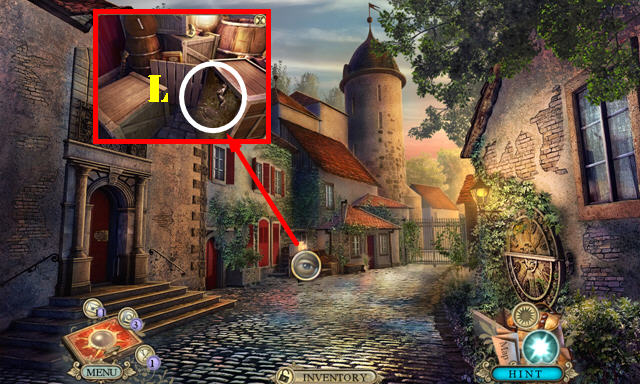
- Cut the ropes with the SCALPEL. Move the crates aside and take the HORSE FIGURINE (L).
- Zoom into the crates for a HOP.
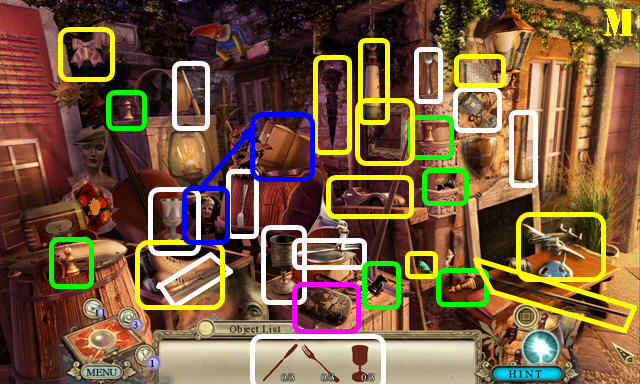
- Play the HOP (M).
- You receive the EMERALD.
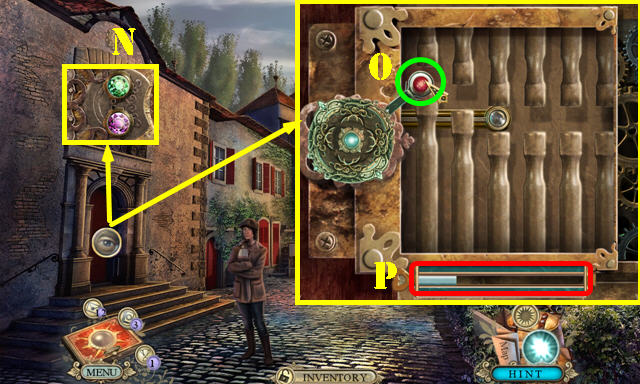
- Talk to the agent.
- Place the EMERALD and the AMETHYST on the door to activate a puzzle (N).
- Use the lever (O) to move up and down so you can pass through all the obstacles. You will pass the game once the bar (P) is full. The solution is random.
- Go through the door.
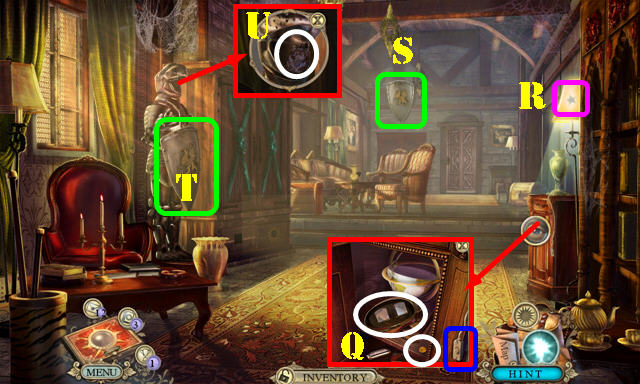
- Open the cabinet door; take the COIN and the STEREOSCOPE (Q). Flip the switch (blue).
- Touch the lamp to get the SMALL METAL STAR 1/2 (R).
- Use the UMBRELLA to get the STATUE SHIELD (S).
- Place the STATUE SHIELD on the armor (T); take the LION HEAD (U).
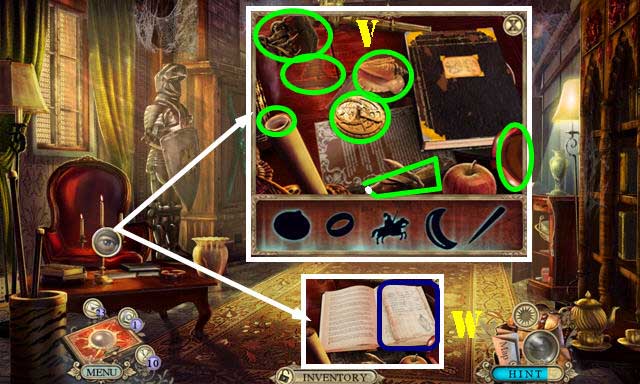
- Play the HOP (V).
- Take the Note (W) and move the book.
- Go through the door.
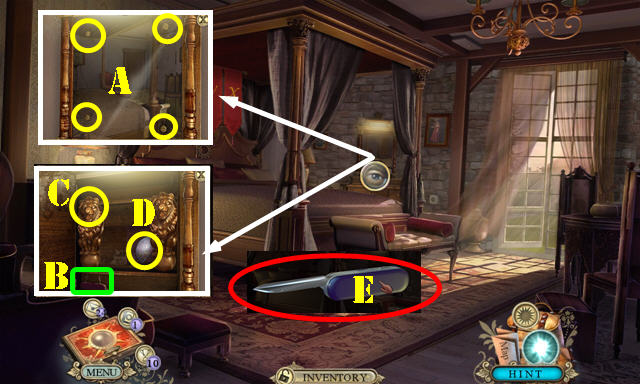
- Remove the four screws with the COIN (A).
- Take the MULTI-TOOL (B).
- Place the LION HEAD on the statue (C); take the GLOBE HALF (D).
- Open the MULTI-TOOL; pull out the blade and take the POCKETKNIFE (E).
- Walk down.
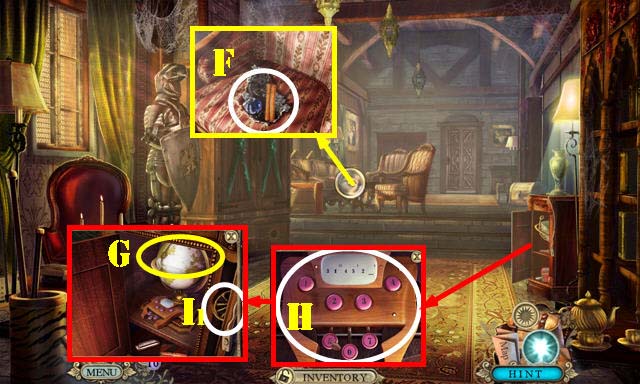
- Use the POCKETKNIFE on the chair; take the DRAWER HANDLE and the Note (F).
- Place the GLOBE HALF on the globe (G).
- Select 314525 (H); take the SMALL WHEEL 1/2 (I).
- Return to the Aubonne bedroom.
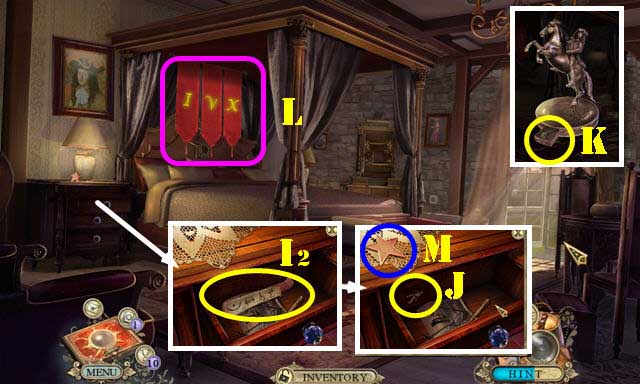
- Place the DRAWER HANDLE on the drawer and open it; take the BELT and TEMPLE ENTRANCE CODE 2/3 (I).
- Place the POCKETKNIFE on the square; remove it and take the HORSE RIDER FIGURINE (J).
- Open the HORSE FIGURINE and place the HORSE RIDER FIGURINE on it; take the SMALL BRONZE KEY (K).
- Touch the flags in this order: X, I, V (L).
- Take the SMALL METAL STAR 2/2 (M).
- Walk down.
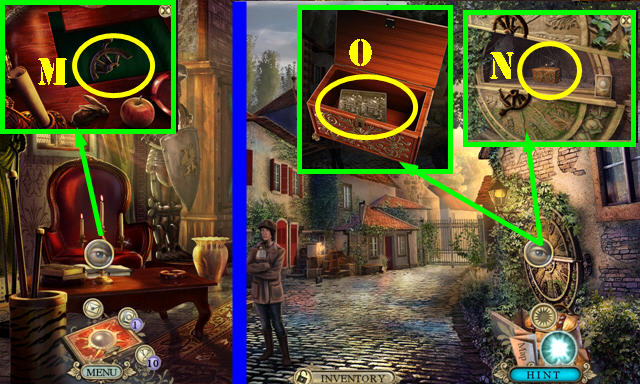
- Place the 2 SMALL METAL STARS in the slots. Take the SMALL WHEEL 2/2 (M).
- Walk down.
- Place the 2 SMALL WHEELS on the carving; turn them and take the ORNATE BOX (N).
- Open the ORNATE BOX and use the SMALL BRONZE KEY in the lock. Take the OLD PHOTO (O) and flip it over. Take the DIAMOND SHARD 1/3.
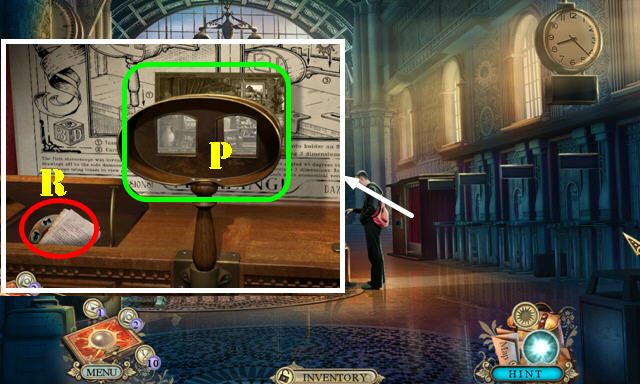
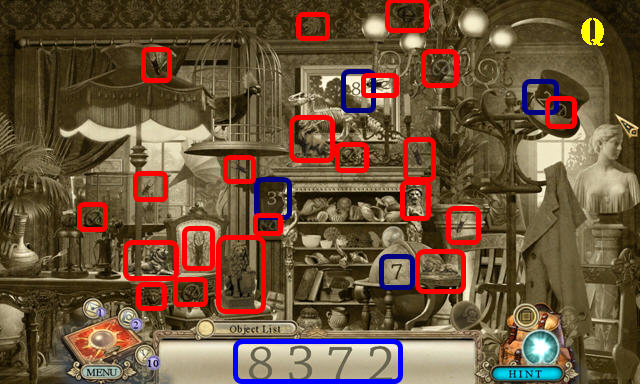
- Enter the Stereoscope Booth. Place the STEREOSCOPE on it and then use the OLD PHOTO on it to activate a HOP (P).
- Play the HOP (Q).
- Take the Note and the ROUND PIECE (R).
- Talk to the agent.
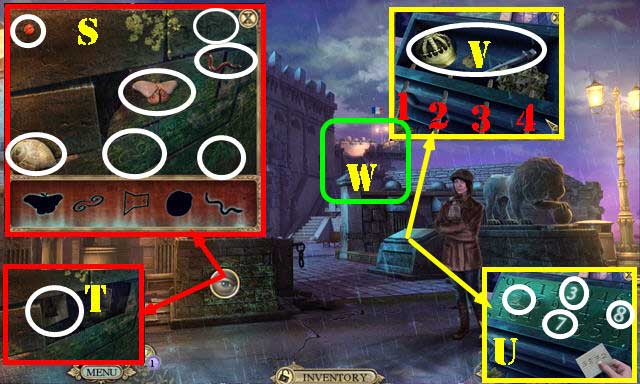
- Play the HOP (S).
- Take the Note (T).
- Select 3872 (U). Touch the bars in this order: 1, 3, 2, 4. Take the SMALL CROWN and the WRENCH (V).
- Go to the Fort inside (W).
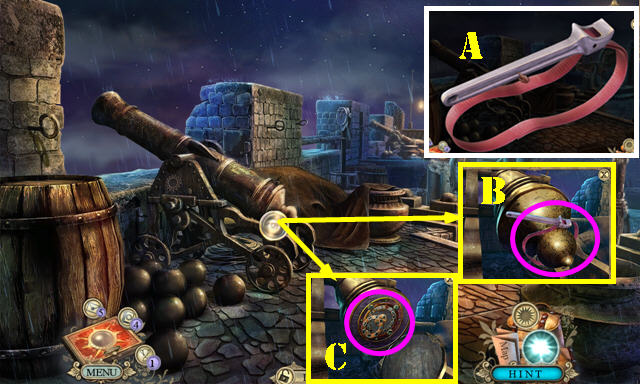
- Open the WRENCH; place the SMALL BELT on it and take the BELT WRENCH (A).
- Use the BELT WRENCH on the cannon (B); move the latch and place the ROUND PIECE on it (C).
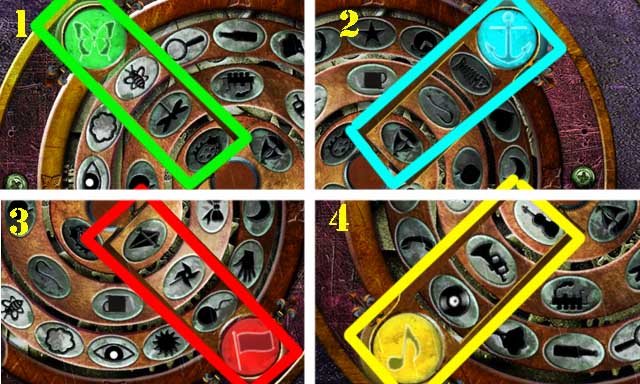
- Rotate the wheels to place the items that belong with the highlighted piece in the same line.
- Solutions (1-4).
- Take the BELL CLAPPER.
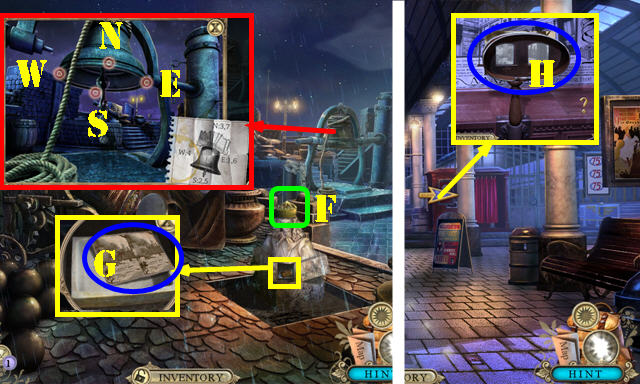
- Place the BELL CLAPPER on the bell. Press the bell buttons in the right order: E, S, N, W, S, E, and N.
- Place the SMALL CROWN on the statue (F); take the TOULON PHOTO and the DIAMOND SHARD 2/3 below it (G).
- Walk down for a cut scene.
- Enter the Stereoscope Booth. Place the TOULON PHOTO on the viewer to activate a HOP (H).
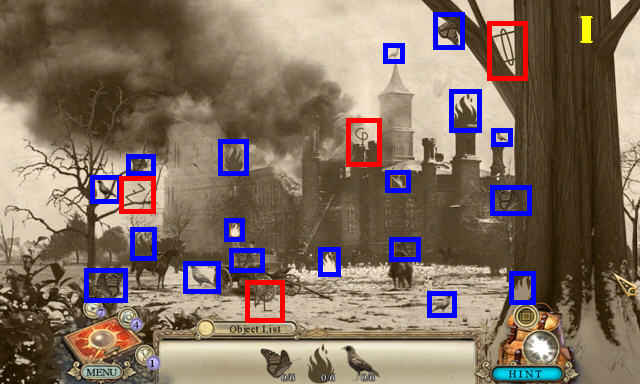
- Play the HOP (I).
- You receive TEMPLE ENTRANCE CODE 3/3.
- Exit the booth to be automatically transported to the jungle.
Chapter 6: The Jungle
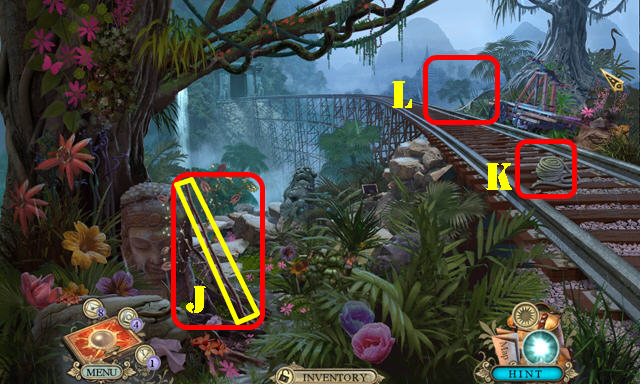
- Remove the small branches; take the LONG WOODEN ROD (J).
- Take the ROPE (K).
- Go to the Tunnel Entrance (L).
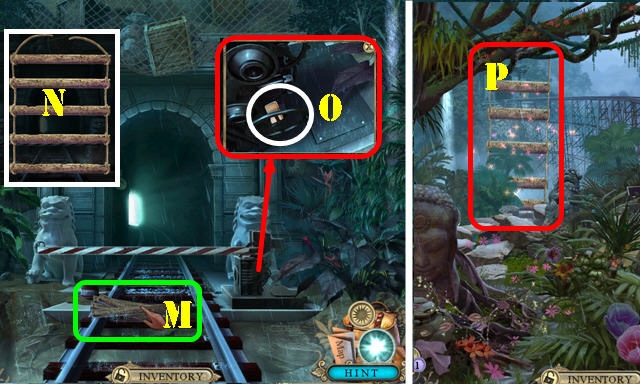
- Take the WOODEN BOARDS (M). Open them and put the ROPE on them to get the ROPE LADDER (N).
- Take the LIGHTER (O).
- Walk down.
- Place the ROPE LADDER on the tree to activate a HOP (P).
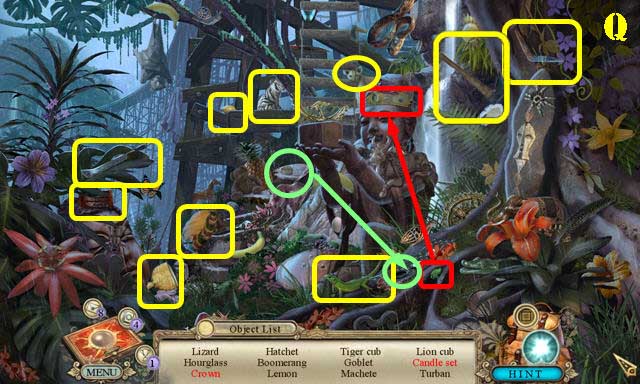
- Play the HOP (Q).
- You receive the MACHETE.
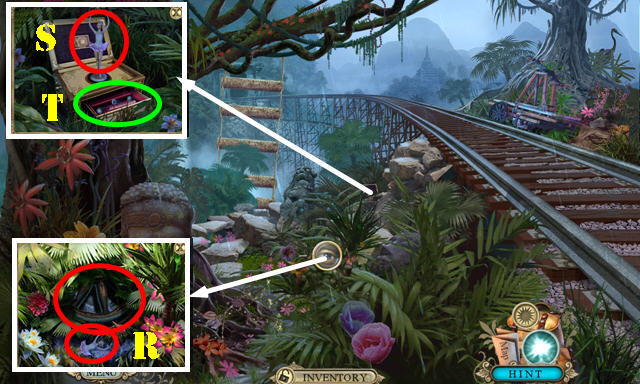
- Use the MACHETE on the plants three times; take the HANDCAR WHEELS and the BALLERINA (R). You receive the MACHETE PLUS.
- Move the branches out of the way; place the BALLERINA on the box (S); take the FLUTE and the BOLTS 1/4, 2/4, and 3/4 (T).
- Return to the Tunnel entrance.
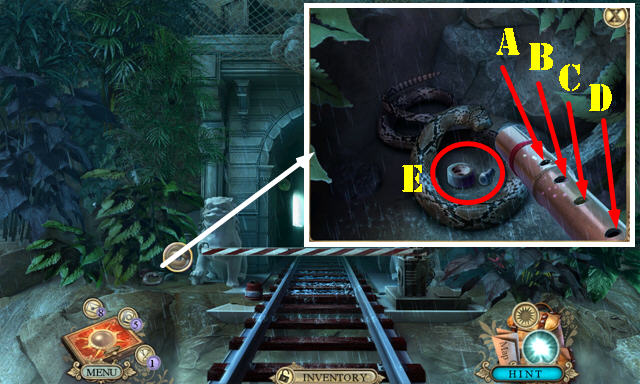
- Use the FLUTE on the snake to activate a puzzle. Repeat the sequence on the flute.
- Round 1: D, B, C.
- Round 2: B, A, C, D.
- Round 3: D, B, A, C, A.
- Round 4: C, Bx2, A, D, C.
- Take the DUCT TAPE and the 4/4 BOLTS (E).
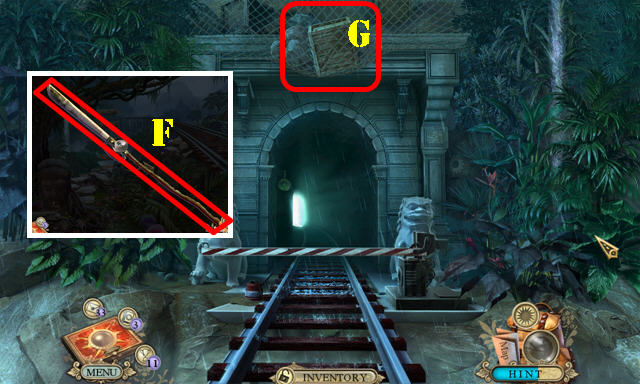
- Open the MACHETE PLUS; place the LONG WOODEN ROD on it; attach the DUCT TAPE to it to get the SPEAR (F).
- Use the SPEAR on the net (G) to activate a HOP.
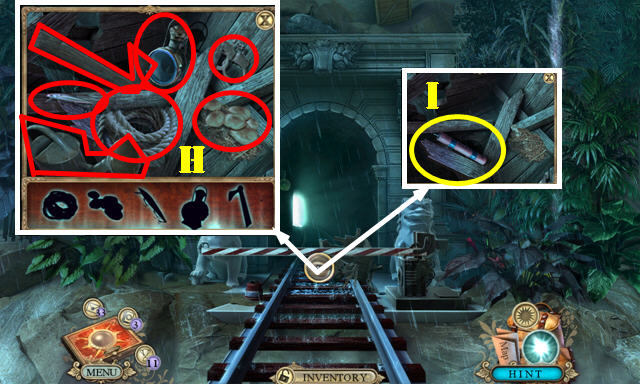
- Play the HOP (H).
- Take the SMALL STICK OF DYNAMITE (I).
- Walk down.
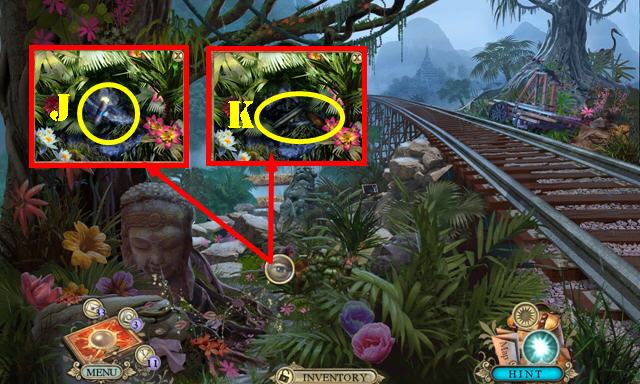
- Put down the SMALL STICK OF DYNAMITE; use the LIGHTER on it (J). This activates a HOP.
- Take the LEVER (K).
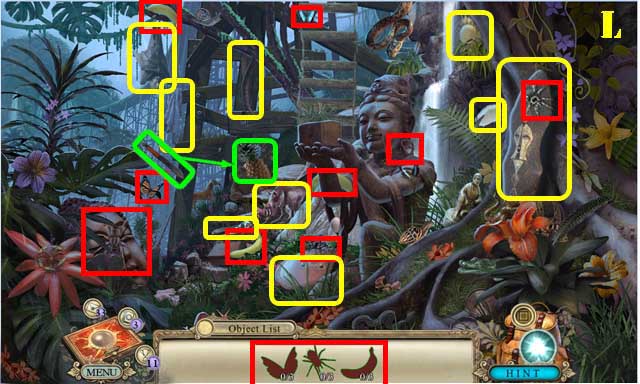
- Play the HOP (L).
- You receive the CRESCENT WRENCH.
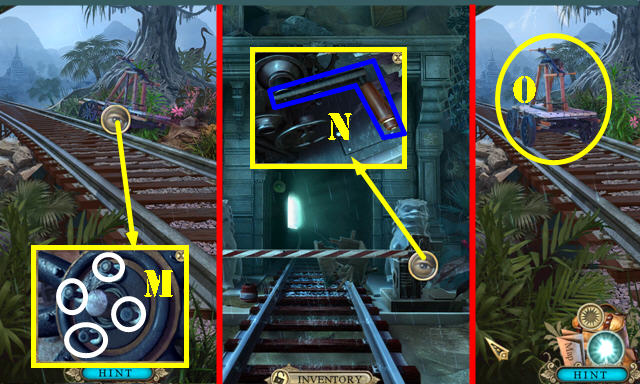
- Place the HANDCAR WHEELS on the handcar and the 4 BOLTS on the wheel. Use the CRESCENT WRENCH on the 4 bolts (M).
- Touch the handcar.
- Return to the Tunnel entrance.
- Place the LEVER on the mechanism and pull it (N).
- Walk down.
- Push the handcar (O).
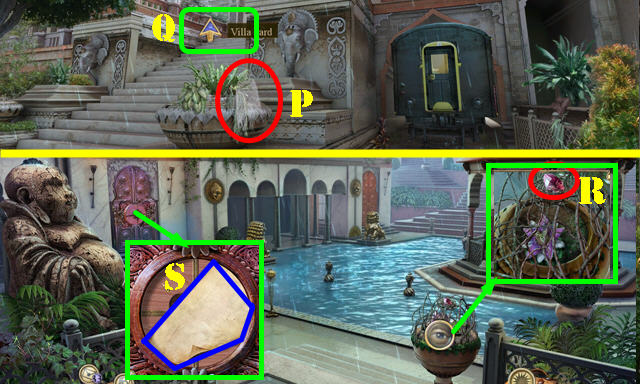
- Take the NET (P).
- Go forward (Q).
- Take the PINK JEWEL 1/2 (R) and the CHARCOAL PAPER (S).
- Go forward.
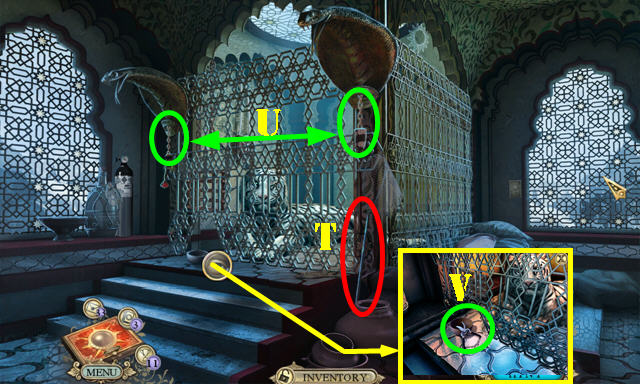
- Take the LONG STICK (T).
- Pull both chains (U); take the DULL VINEYARD SHEARS and WATER BOWL (V).
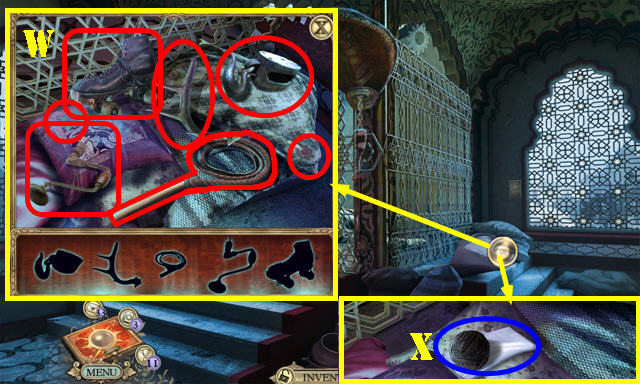
- Play the HOP (W).
- Take the YARN BALL and the PILLOWCASE (X).
- Walk down.
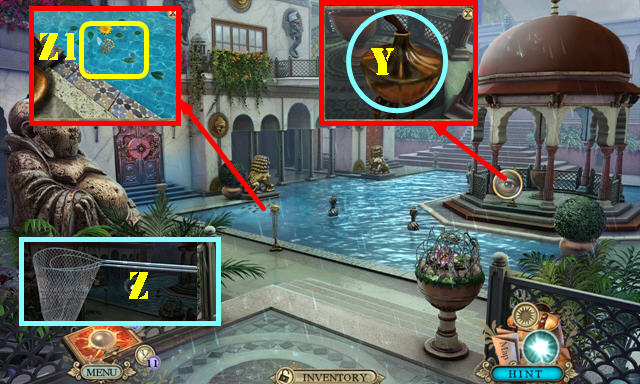
- Wipe the pot with the PILLOWCASE to get the OILY RAG (Y).
- Open the LONG STICK; place the NET and then the YARN BALL on it to get the LANDING NET (Z).
- Use the LANDING NET to get the PINK JEWEL 2/2 (Z1).
- Walk down.
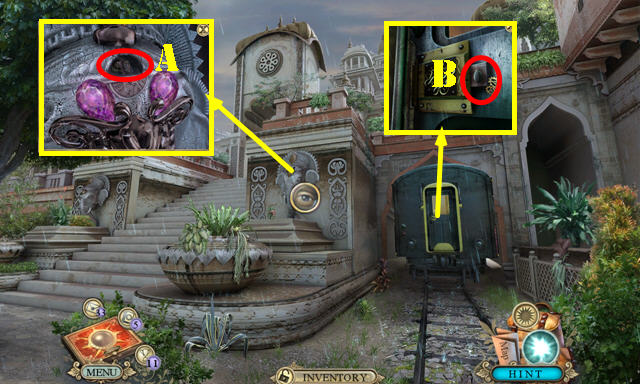
- Place the 2 PINK JEWELS in the slots; open the cover; take the MATCHES and DOOR PUZZLE PIECE (A).
- Use the OILY RAG on the latch and slide it to activate a HOP (B).
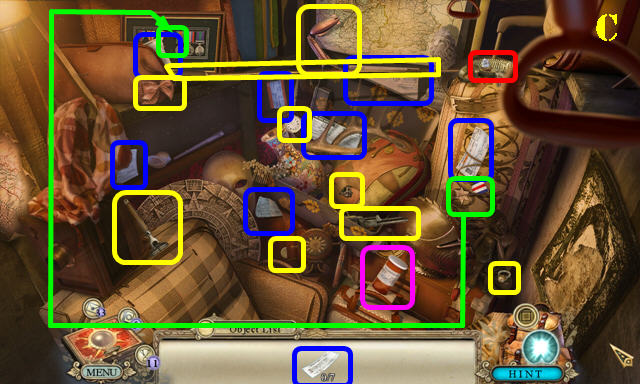
- Play the HOP (C).
- You receive the FISHING ROD.
- Go forward.
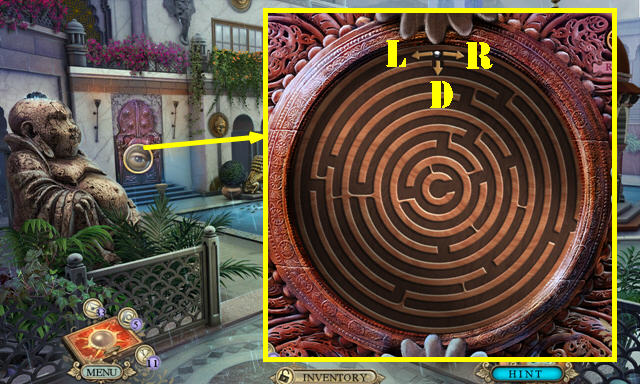
- Place the DOOR PUZZLE PIECE on the door to activate a puzzle.
- Guide the ball to the center of the maze.
- Solution: L, D, L, D, R, D, R, D, R, D, R, D, L, D, L, D.
- Go through the door.
- Talk to Sam.
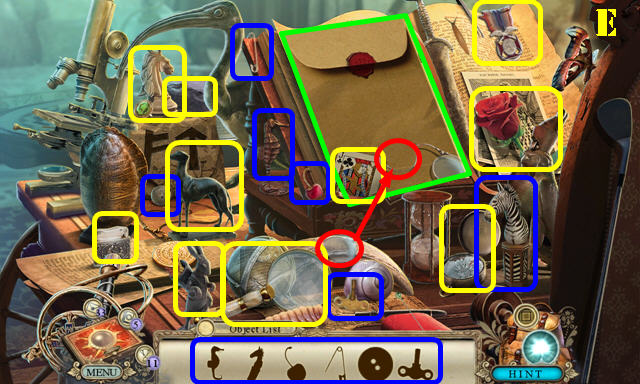
- Play the HOP (E).
- You receive the FLINT STONE.
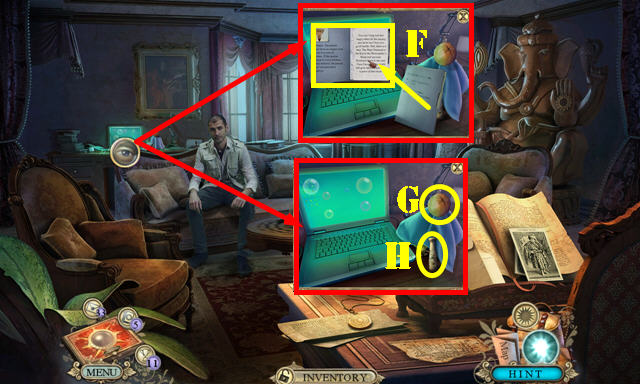
- Look at the folder; open it and read its contents (F).
- Take the ORANGE (G) and PAPERWEIGHT (H). Remove the cloth.
- Walk down.
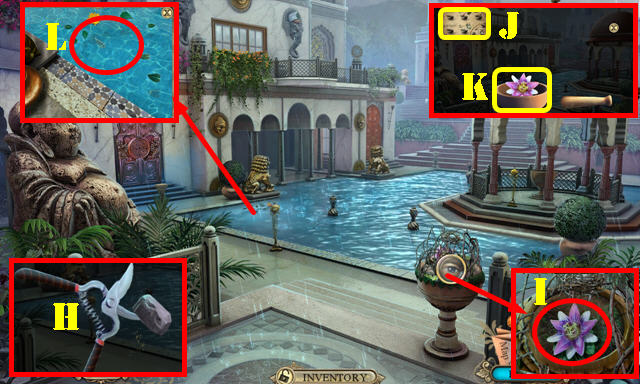
- Open the DULL VINEYARD SHEARS; use the FLINT STONE on it to get the VINEYARD SHEARS (H).
- Use the VINEYARD SHEARS twice on the vines; take the PASSION FLOWER (I).
- Open the PAPERWEIGHT; remove the string and look at the recipe (J).
- Place the WATER BOWL on the screen. Put the PASSION FLOWER in the bowl and touch the bowl to use the paperweight as a pestle. Get the SLEEPING POWDER (K).
- Dip the SLEEPING POWDER in the water to get the WATER WITH SLEEPING POWDER (L).
- Return to the Tiger's cage.
Chapter 7: The Temple
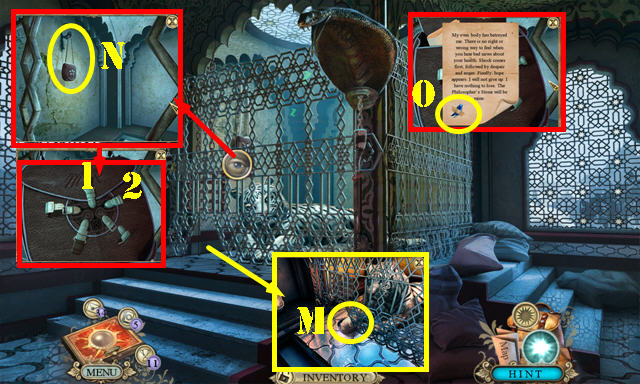
- Put down the WATER WITH SLEEPING POWDER (M).
- Use the FISHING ROD to get the satchel (N).
- Press buckles 1 and 2.
- Open the note; take the DIAMOND SHARD 3/3 (O).
- Return to the Study.
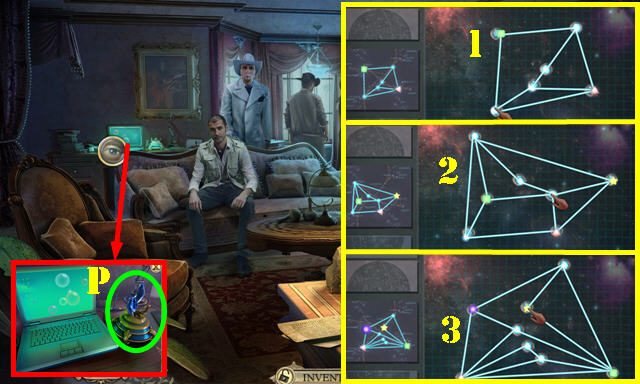
- Place the 3 DIAMOND SHARDS on the lamp to activate a puzzle (P).
- Place the stars on the right spots; pay close attention to where the colored pieces are located.
- Solution (1-3).
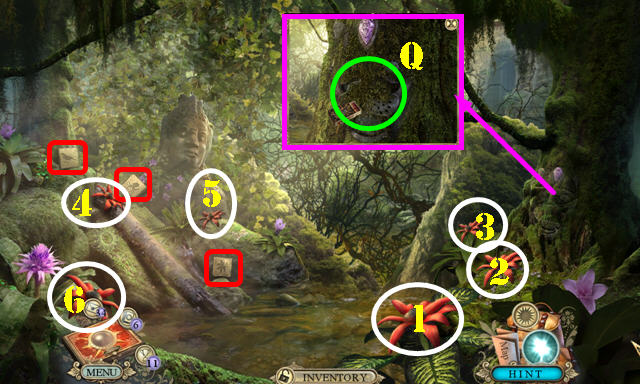
- Take the STONE TABLET 1/6, 2/6, and 3/6 (red).
- Press the flowers in order (1-6).
- Use the MATCHES on the moss (Q) and place the 3 TEMPLE ENTRANCE CODES to activate a puzzle.
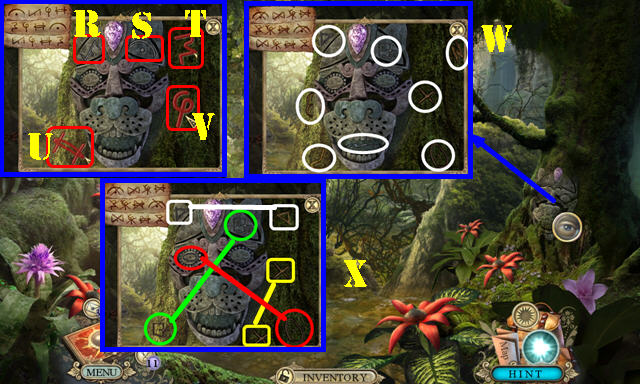
- Round One: Press the symbols in the right order: S, R, V, U, T, V, U, S, R, V, U, and T.
- Round Two: Find the 8 symbols in the scene (W).
- Round Three: Find the 4 matching pairs (X).
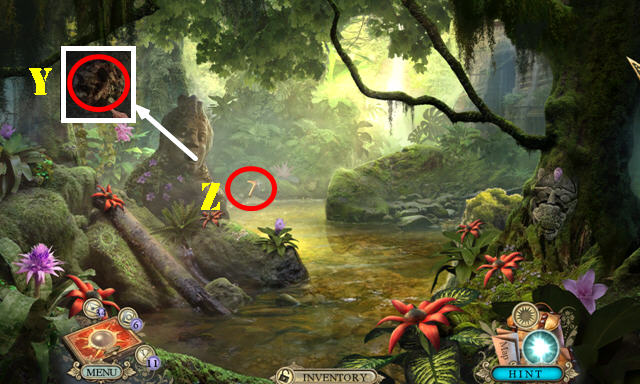
- Touch the button (Y).
- Talk to the man.
- Take the BOOMERANG (Z).
- Go forward.
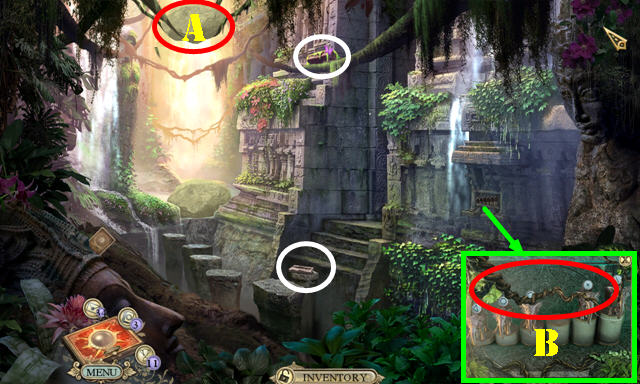
- Use the BOOMERANG on the rock (A).
- Take the STONE TABLET 4/6 and 5/6 (white).
- Use the VINEYARD SHEARS to get the VINES (B).
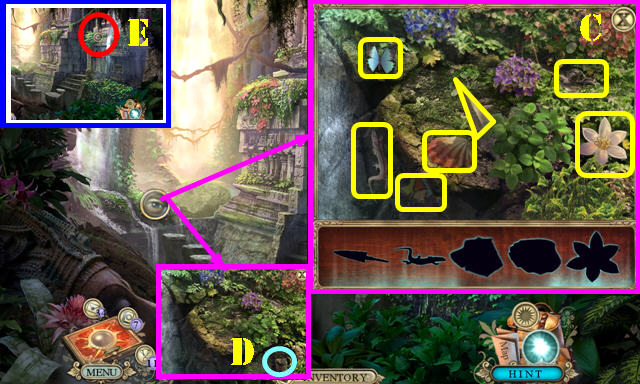
- Play the HOP (C).
- Take the STONE TABLET 6/6 (D).
- Place the 6 STONE TABLETS on the wall to activate a puzzle (E).
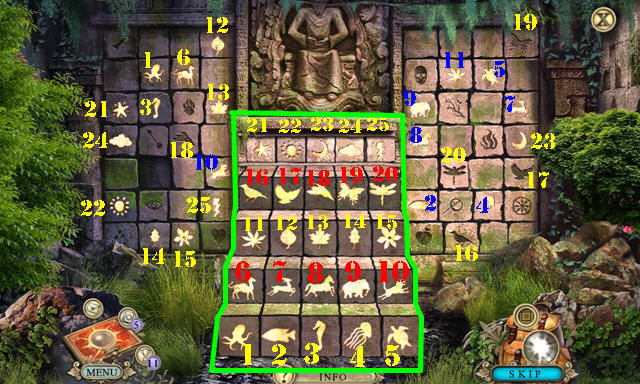
- Press the symbols in the same order they appear on the steps.
- Solution: 1-25. You will have to move items out of the way to find all the symbols.
- Go forward.
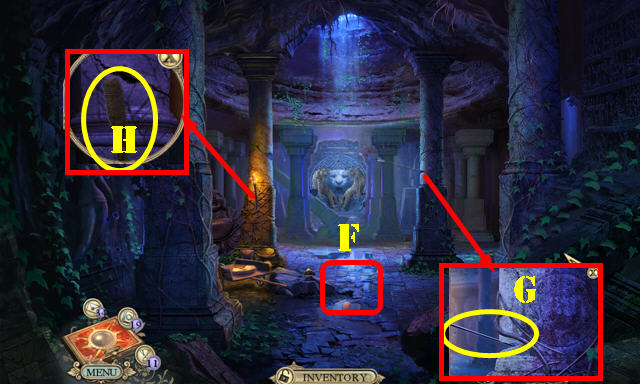
- Throw the ORANGE on the ground (F).
- Take the ARROW (G).
- Use the MATCHES on the torch (H) to activate a HOP.
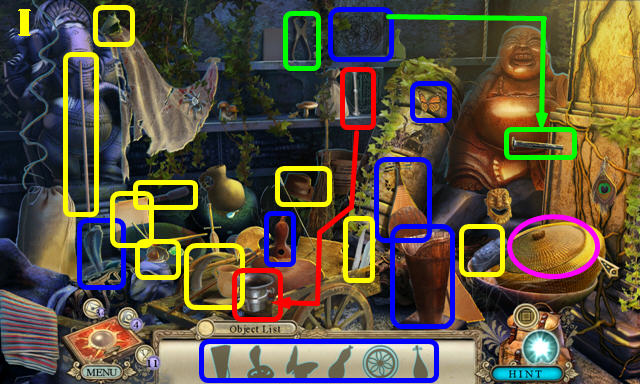
- Play the HOP (I).
- You receive the CHARCOAL.
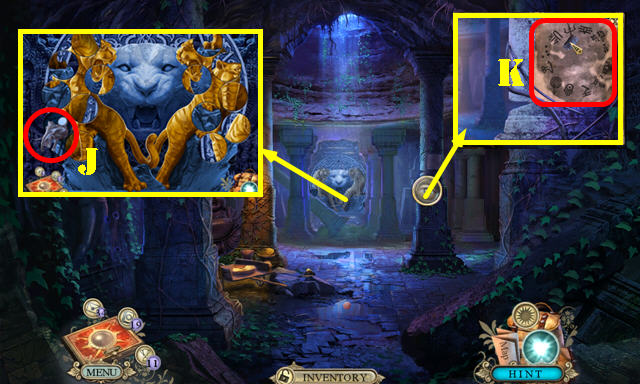
- Take the ELEPHANT FIGURE (J).
- Place the CHARCOAL PAPER on the wall (K). Rub the CHARCOAL on the paper to get the PAPER WITH CODE.
- Walk down.
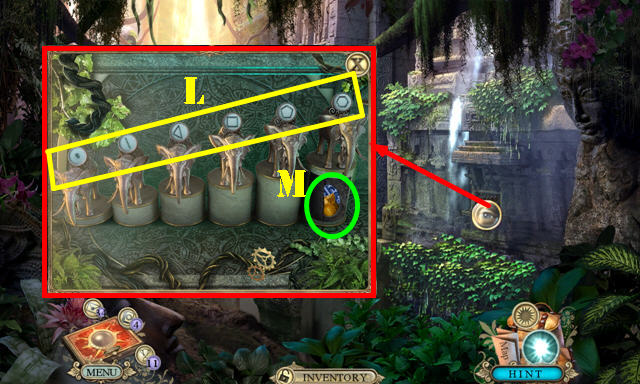
- Place the ELEPHANT FIGURE on the stand to activate a puzzle.
- Swap the symbols as shown (L). Use the ARROW to get the STONE DISC (M).
- Return to the Temple interior.
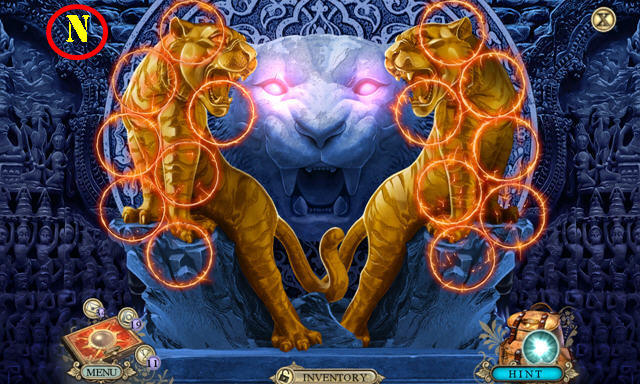
- Place the STONE DISC on the statue on the back wall to activate a puzzle.
- Swap the discs as shown (N).
- Go forward.
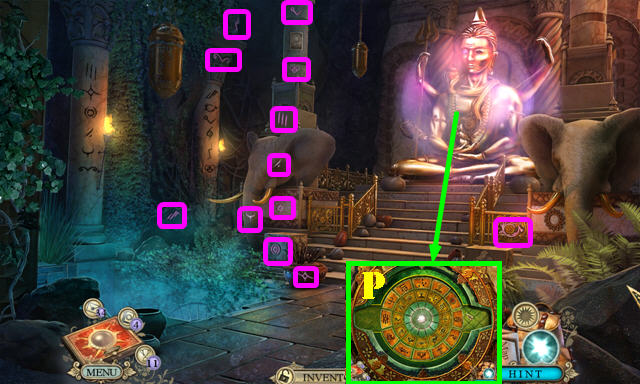
- Find all the symbols in the scene (purple).
- Place the PAPER WITH CODE to activate a puzzle (P).
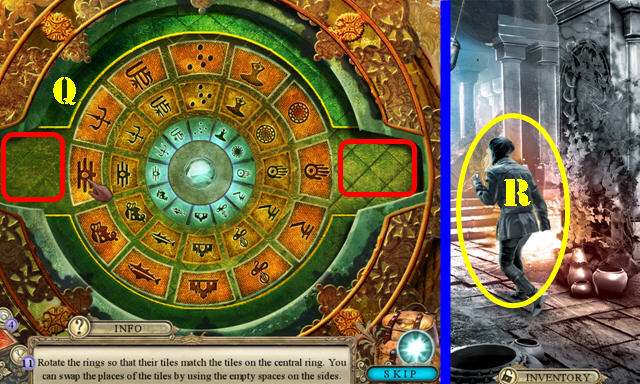
- Rotate the rings into place (Q). Use the spaces on the side to place the pieces out of the way (red).
- Use the VINES on the lady (R).
- Congratulations, you have completed Hidden Expedition: Smithsonian Hope Diamond.
Created at: 2014-01-17

