

Walkthrough Menu
General Tips
- This is the official guide for Hidden Expedition: The Altar of Lies.
- This guide won't tell you when to zoom into a location; the screenshots show each zoom scene.
- Hidden-object puzzles are referred to as HOPs. Only the locations of the HOPs will be shown.
- Use the Map to fast travel to a location.
Chapter 1: Ruins
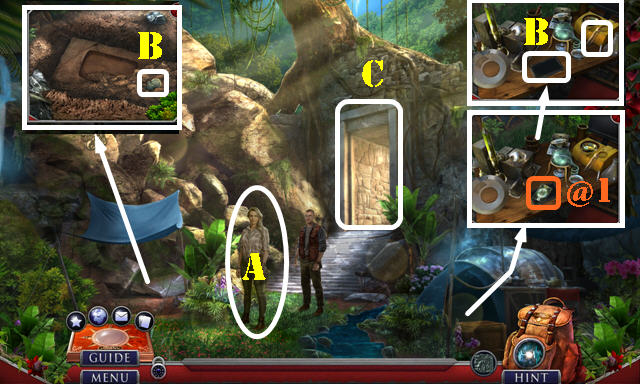
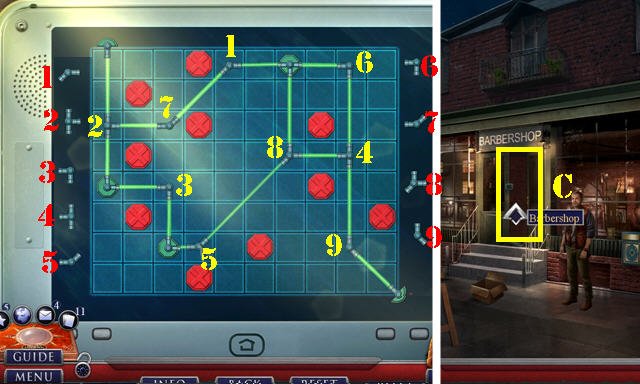
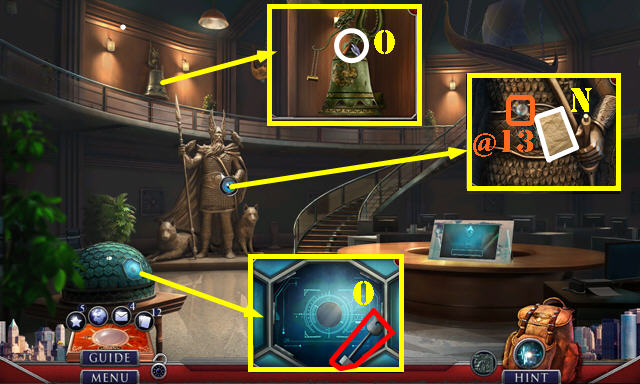
- Talk (A).
- Take Fact Card (@1).
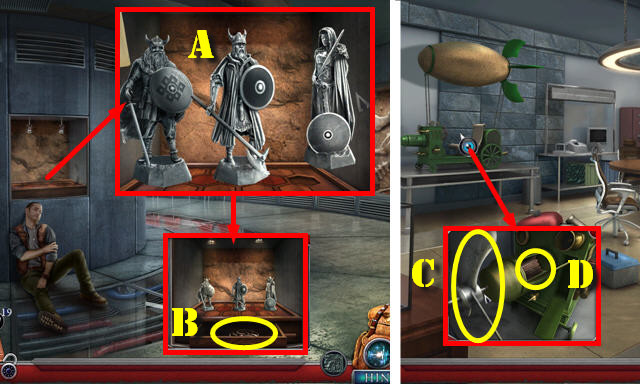
- Take ANCIENT STONE DECORATION, SAMPLE TUBE, and SCANNER (B).
- Go (C).
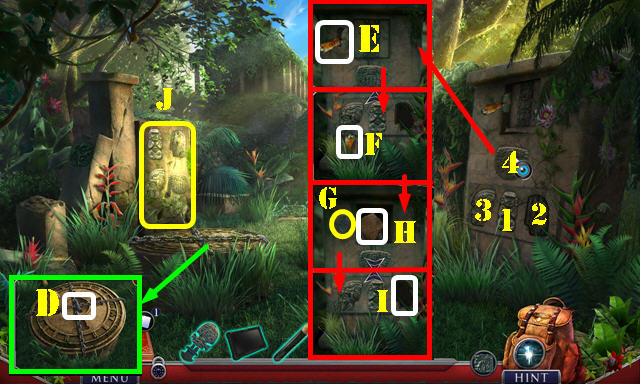
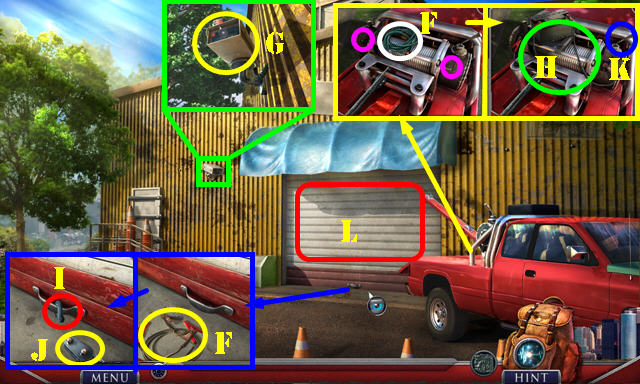
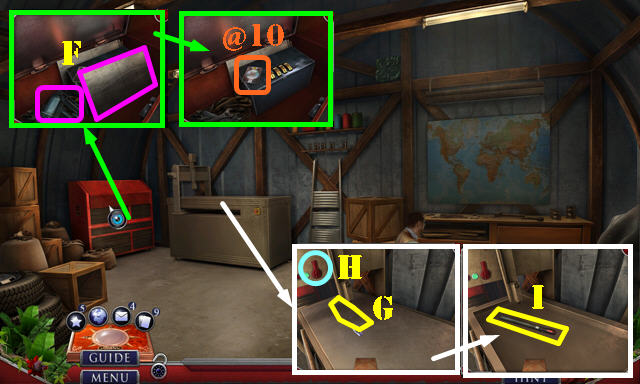
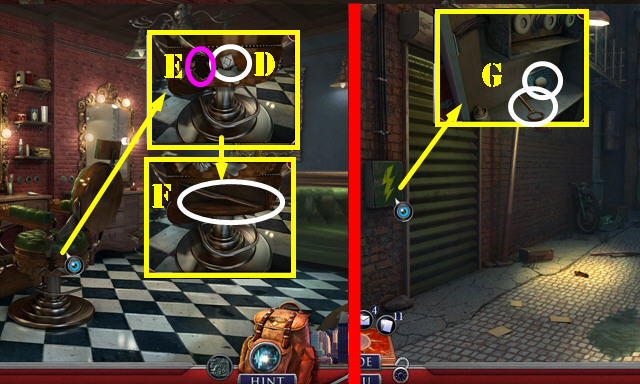
- Look at note; take WINCH BLOCK (D).
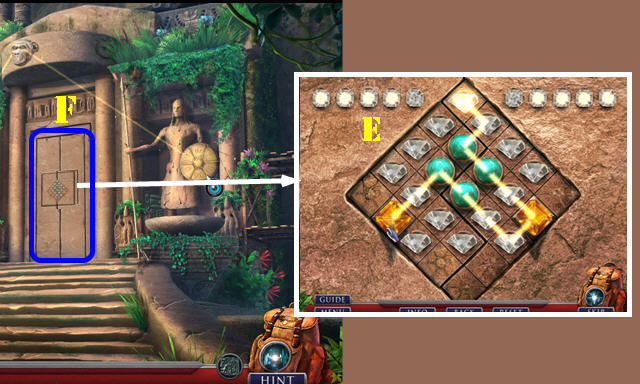
- Select scraper (E); take SCRAPER (F).
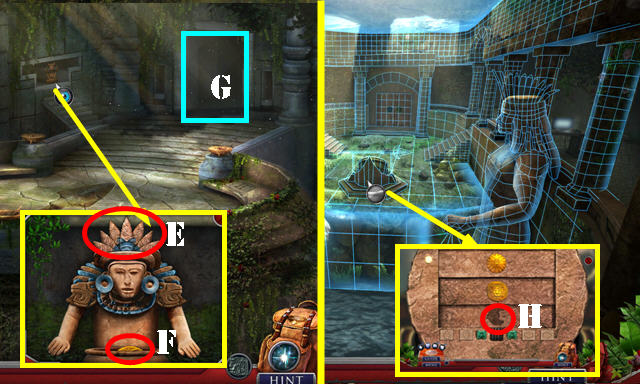
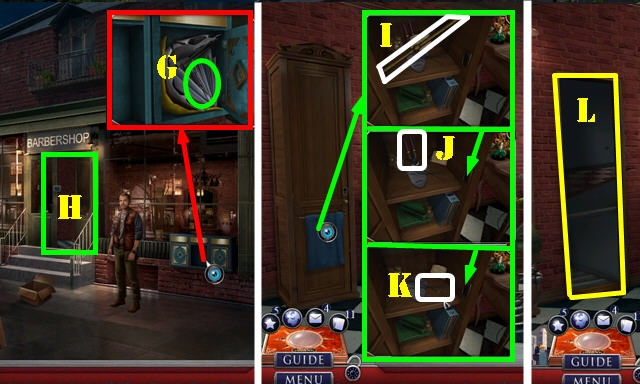
- Pan up; place ANCIENT STONE DECORATION (G); take TABLET PIECES 1/2 and STONE TILE (H).
- Pan down; place STONE TILE (I).
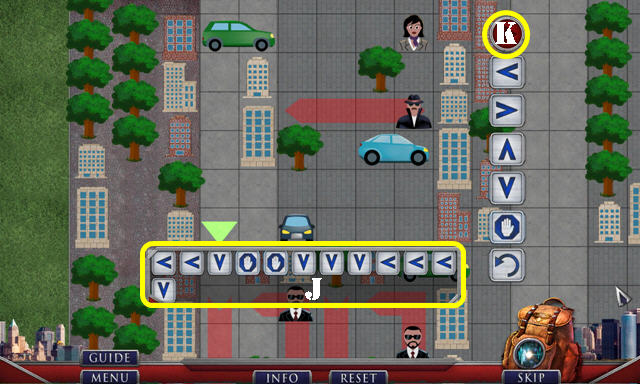
- Use SCRAPER (J).
- Select 1-4. Play HOP; receive DENSE LIQUID.
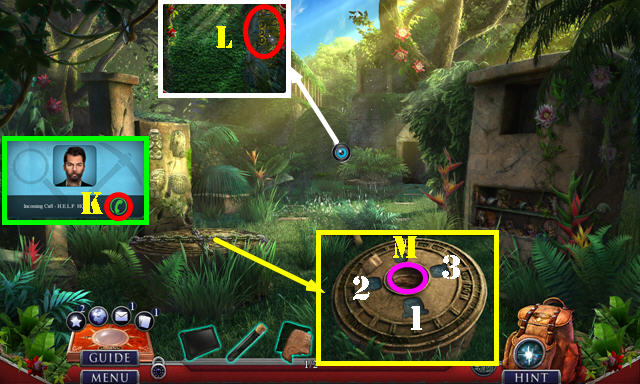
- Answer phone (K) on scene.
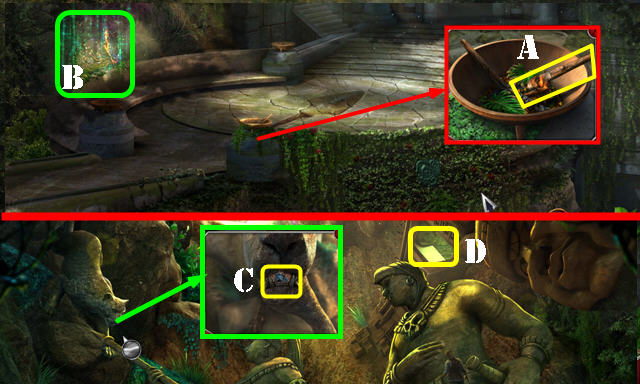
- Select vine; use SAMPLE TUBE (L); receive PAINT SAMPLE.
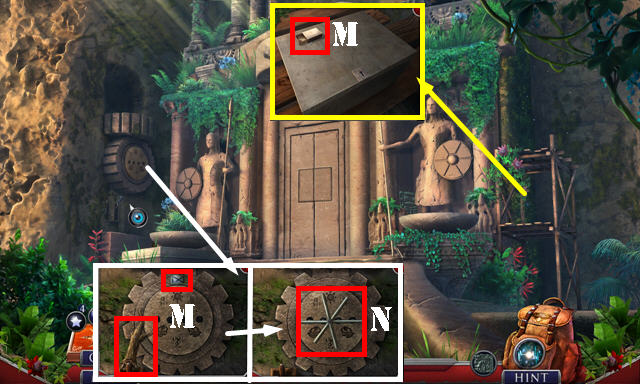
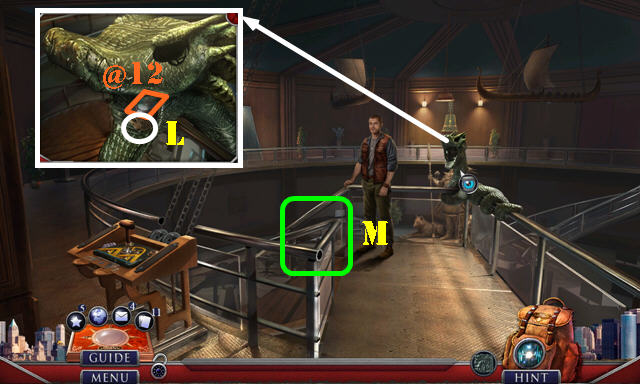
- Use DENSE LIQUID; select 1-3; take TABLET PIECES 2/2 (M).
- Walk down.
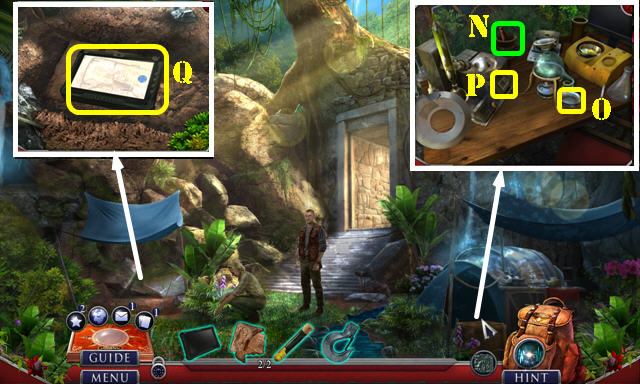
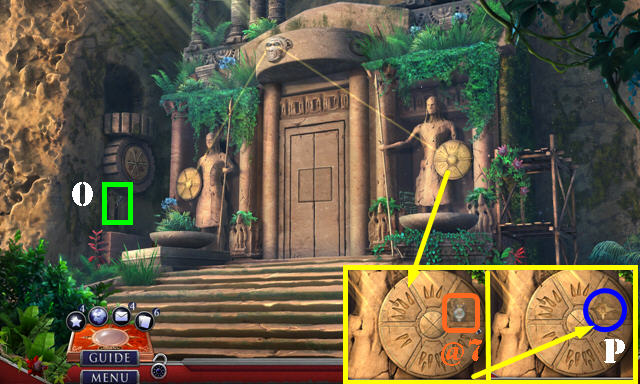
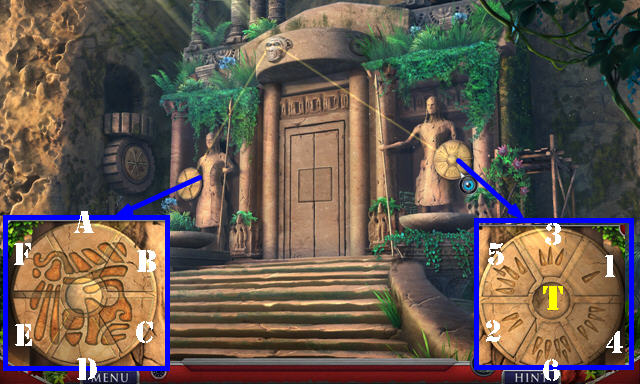
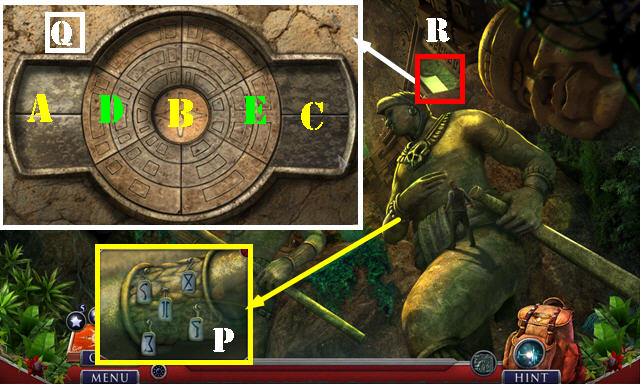
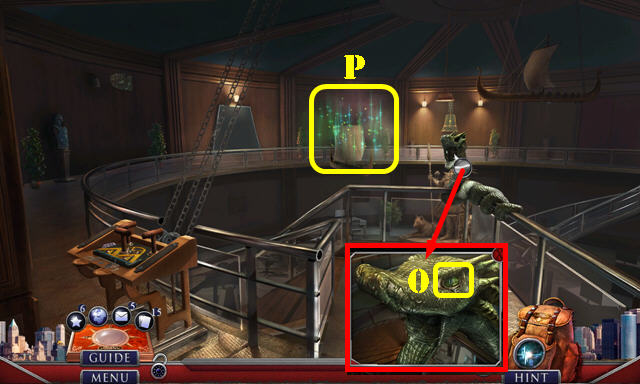
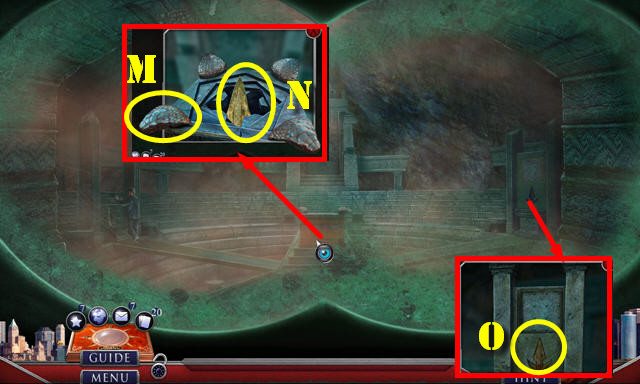
- Place PAINT SAMPLE and select mortar (N). Select bowl (O); take CARBON DATING (P).
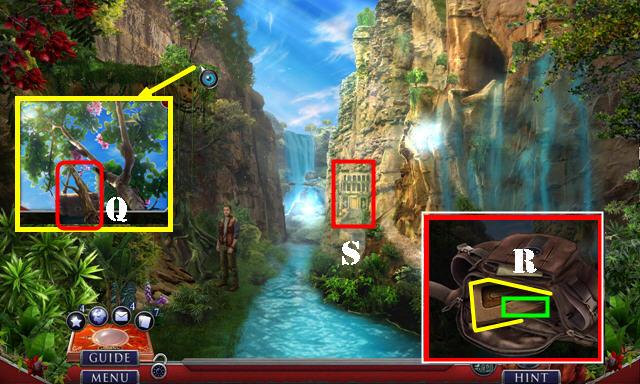
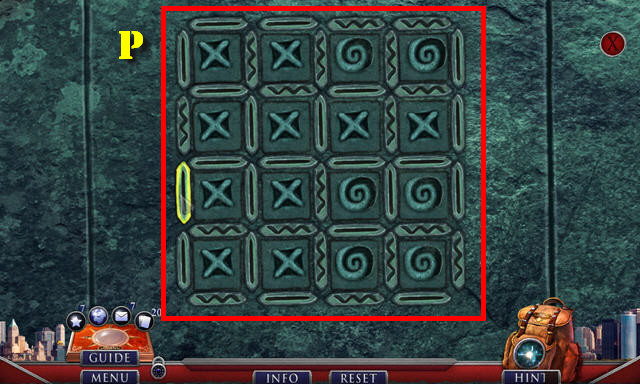
- Select dirt; place TABLET PIECES 2/2 and use SCANNER (Q); receive TRANSLATOR.
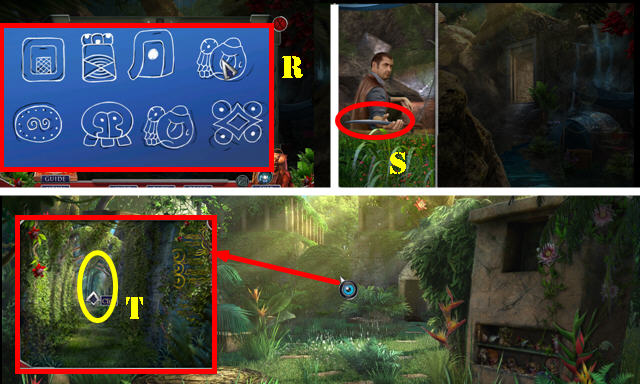
- CARBON DATING on TRANSLATOR. Solution (R).
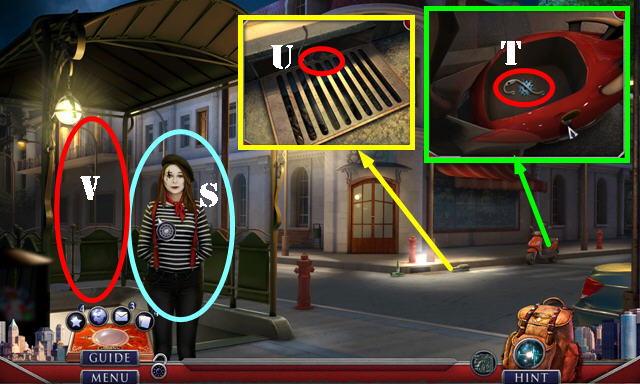
- Take MACHETE (S).
- Move forward. Go to Ruins.
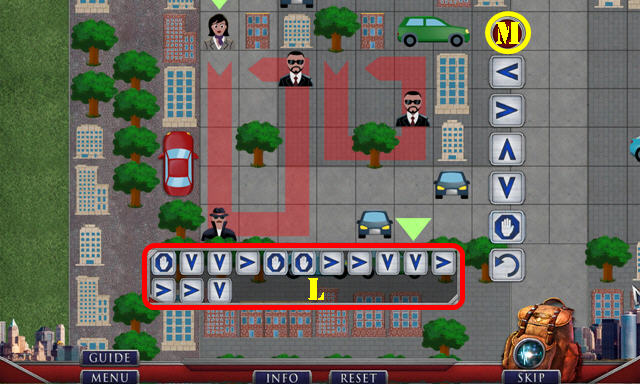
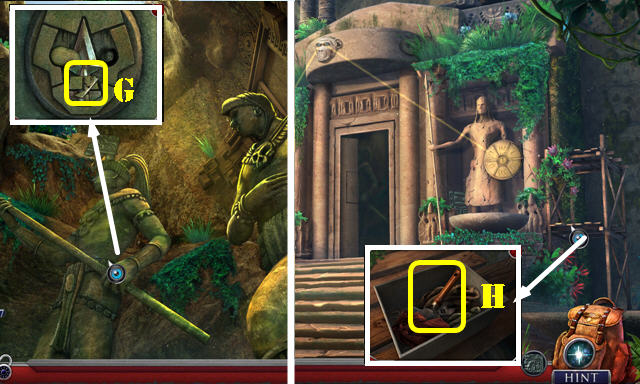
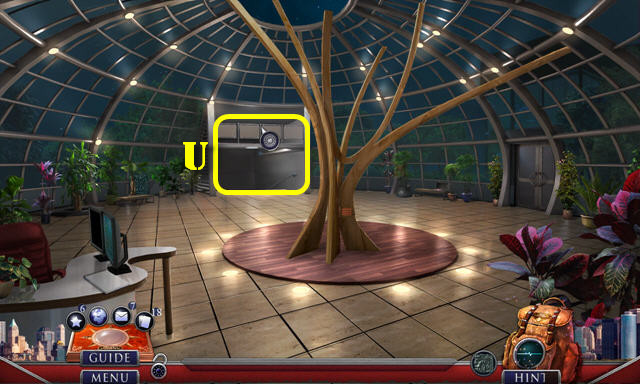
- Use MACHETE and go (T).
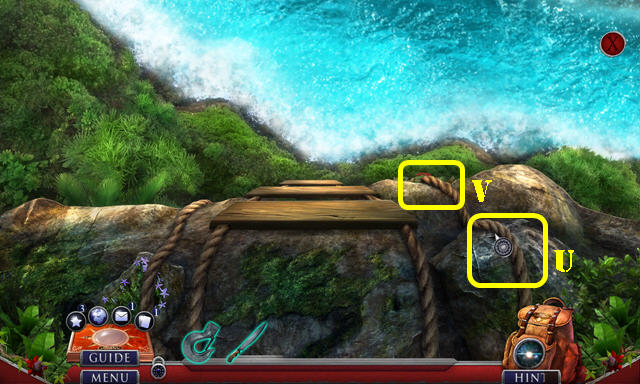
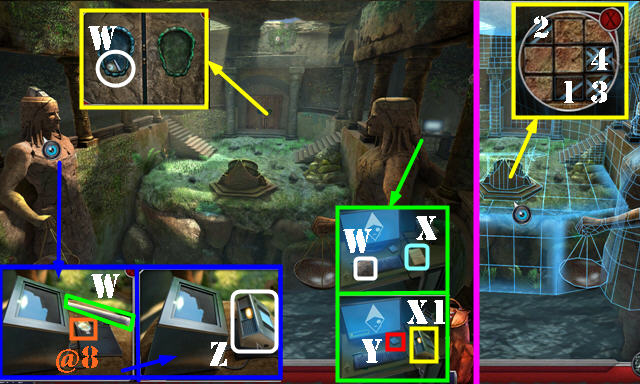
- Use MACHETE (U); take PARACHUTE (V).
- Use PARACHUTE on scene.
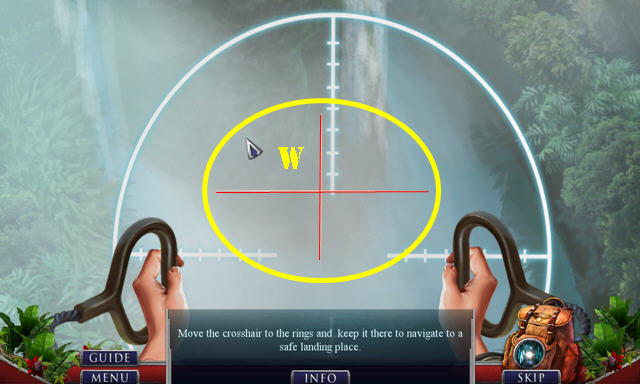
- Solution is random (W).
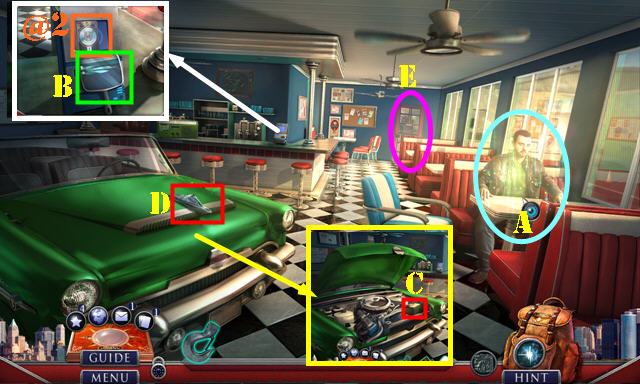
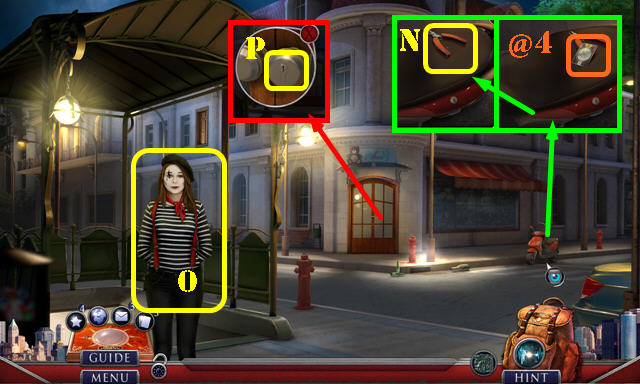
- Play HOP (A); receive PHOTO.
- Take Fact Card (@2) and MIRROR (B).
- Open hood; take CAR BATTERY (C); take HOOD ORNAMENT (D).
- Go (E).
- Take HOSE and JUMPER CABLES (F).
- Use HOOD ORNAMENT (G); receive WIRE CONNECTOR.
- Select both covers (purple); place CAR BATTERY and JUMPER CABLES (H).
- Place WINCH BLOCK (I); attach cable (J).
- Pull lever (K).
- Enter (L).
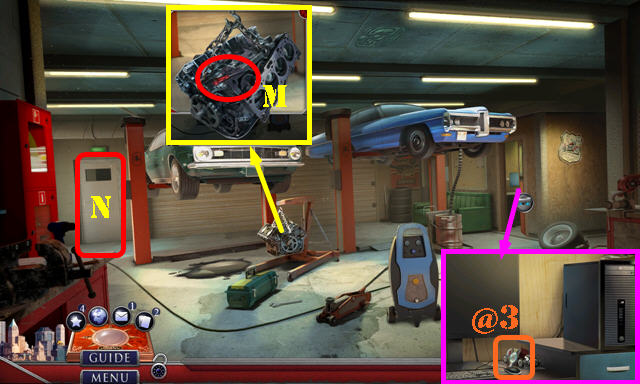
- Take Fact Card (@3).
- Take AWL (M).
- Go (N).
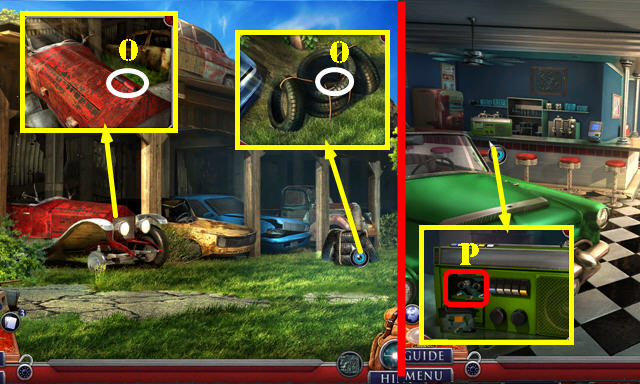
- Take NOZZLE and BROKEN SPRAYER (O).
- Return to Diner.
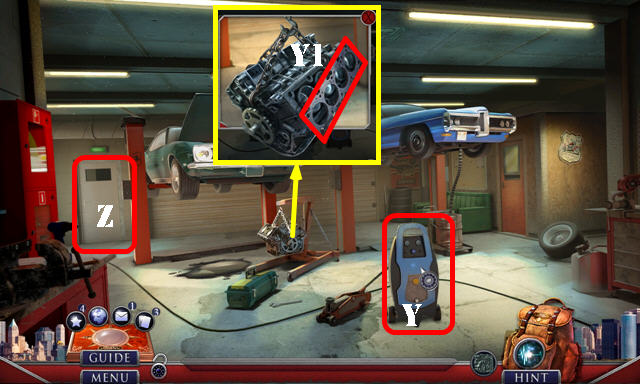
- Use AWL; take ELECTRIC MOTOR (P).
- Return to Auto Shop.
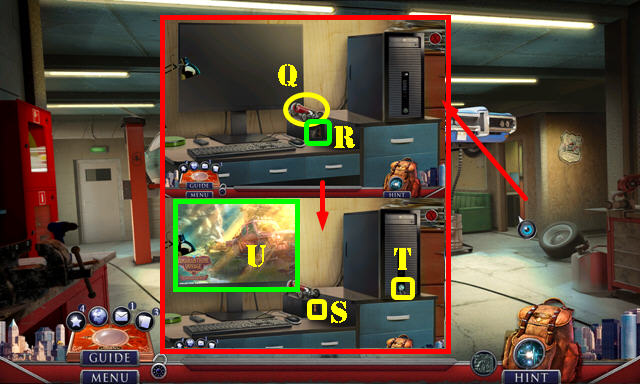
- Place ELECTRIC MOTOR (Q); take DEGREASER (R).
- Press two buttons (S-T).
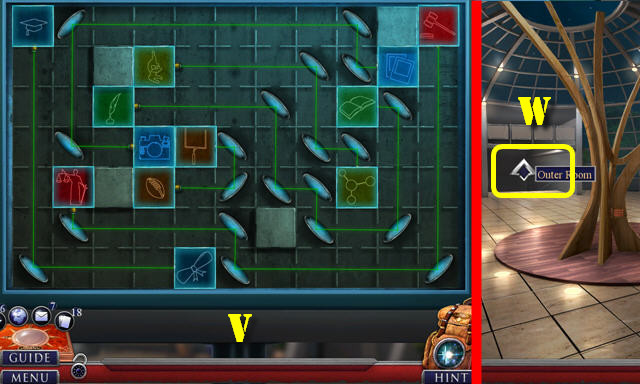
- Select screen twice and select Decipher (U).
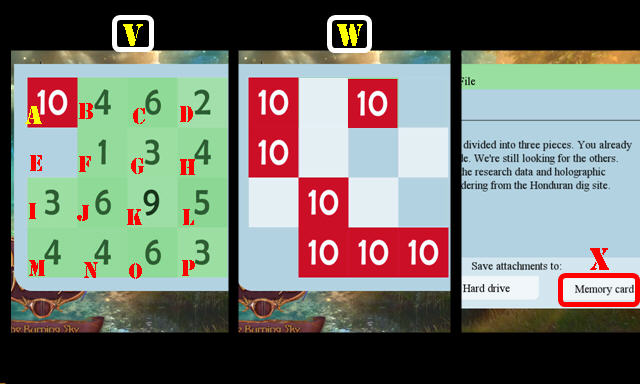
- Solution (V): (N-O)-(H-G)-(L-P)-(D-P)-(J-N)-(M-N)-(F-J)-(K-J)-(G-E)-(I-E)-(B-C).
- Solved Image (W).
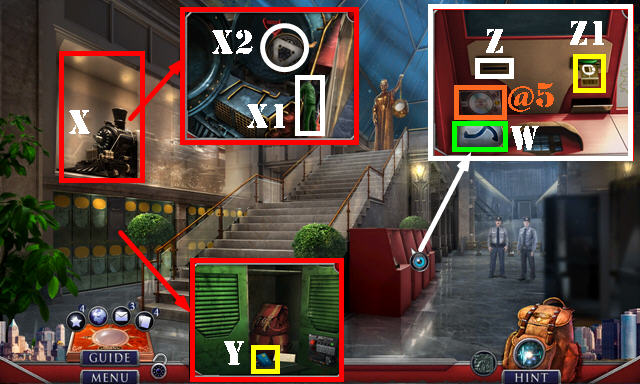
- Select Memory Card on screen (X).
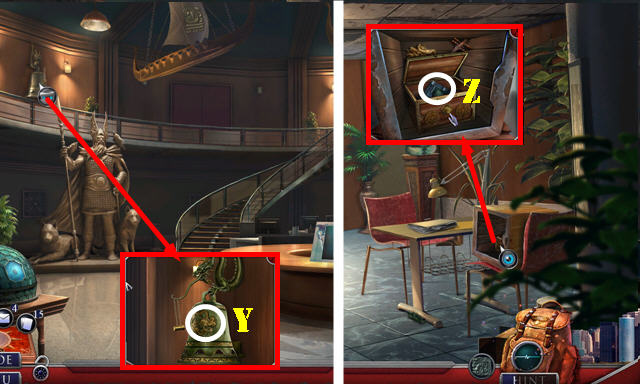
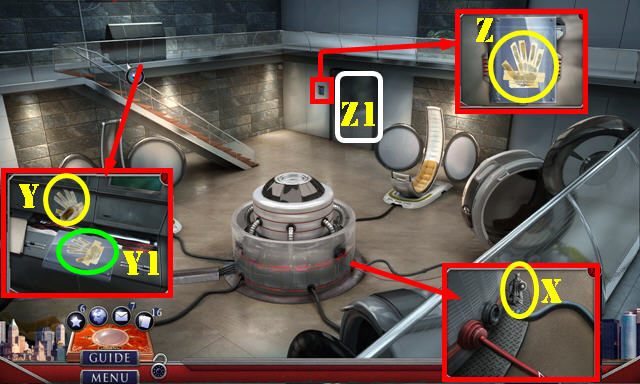
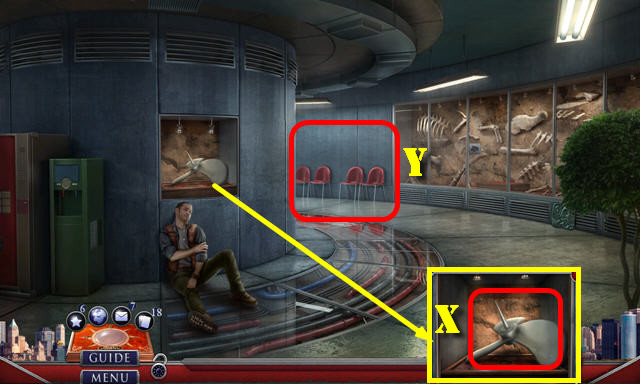
- NOZZLE and HOSE on BROKEN SPRAYER; receive SPRAYER GUN.
- Use SPRAYER GUN (Y).
- Use DEGREASER; take METAL GASKET (Y1).
- Go (Z).
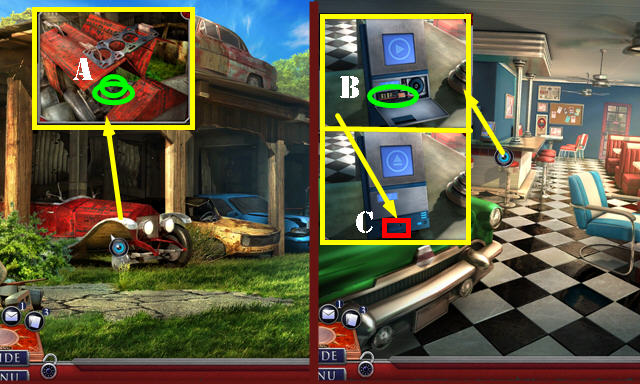
- Use METAL GASKET; take COG and WIRES (A).
- Go to Diner.
- Open cover; place WIRES and WIRE CONNECTOR (B); take MEMORY CARD (C).
- Go to Auto Shop.
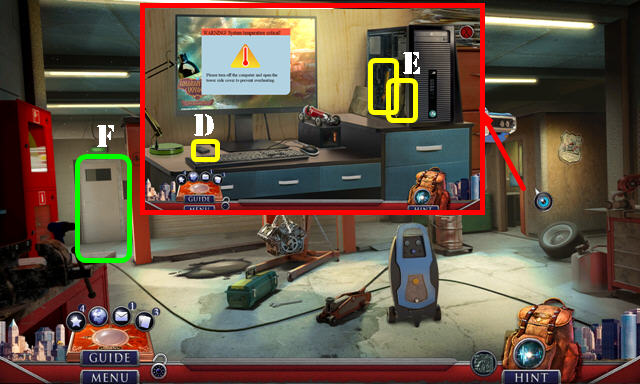
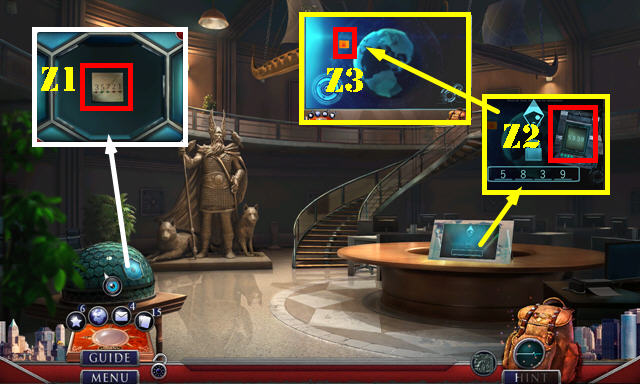
- Use MEMORY CARD; take RESEARCH DATA (D).
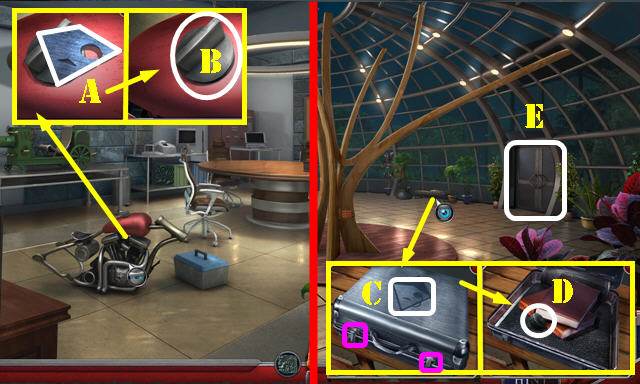
- Open panel and look at note: take LORD SPEARHEAD and UTILITY KNIFE (E).
- Answer phone on scene.
- Go (F).

- Use UTILITY KNIFE (G).
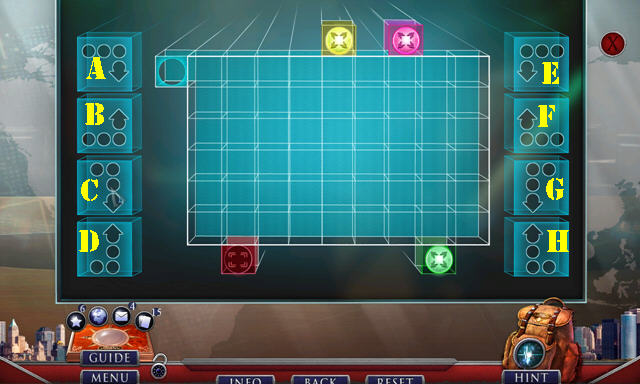
- Select tires 5x (H).
- Play puzzle (I).
- Solution (J); press play (K).
- Solution two (L); press play (M).
- Answer phone on scene.
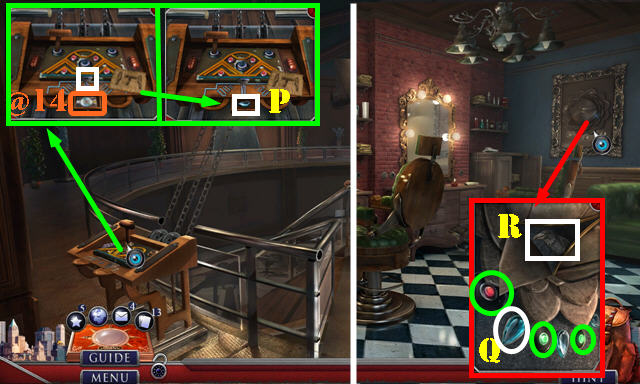
- Take Fact Card (@4).
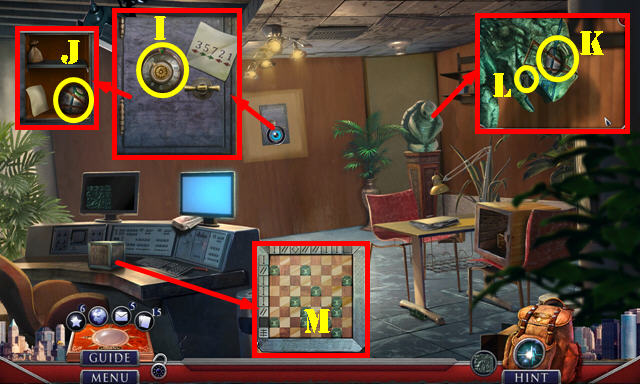
- Take WIRE CUTTERS (N).
- Try to go (O); receive HAIRPIN.
- Use HAIRPIN (P).
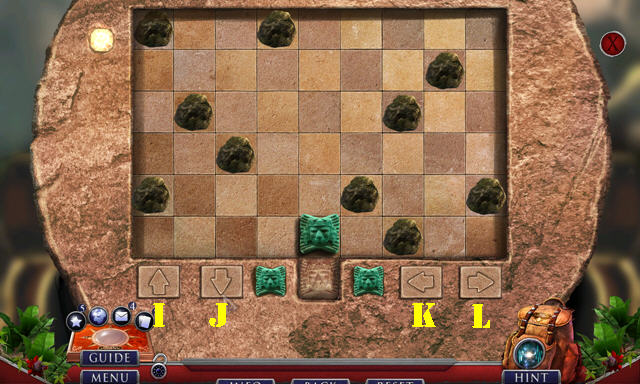
- Play HOP (Q). HOP solution: place car on board and rotate tracks as shown (purple).
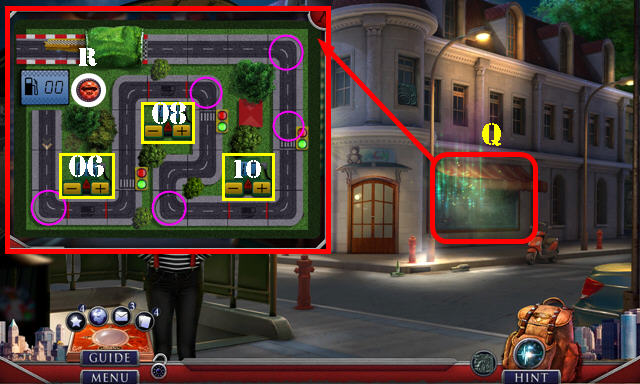
- Press (R); change numbers to 06.
- Press (R); change numbers to 08.
- Press (R); change numbers to 10 and press (R).
- Receive HEART.
- Give HEART (S); receive SCOOTER KEY.
- Use SCOOTER KEY and select; take HOOK and BAG SIGIL (T).
- Use HOOK; take ENGINE OPERATOR (U).
- Go (V).
- Take Fact Card (@5) and BEAD 1/3 (W).
- Open glass (X) and place ENGINE OPERATOR (X1).
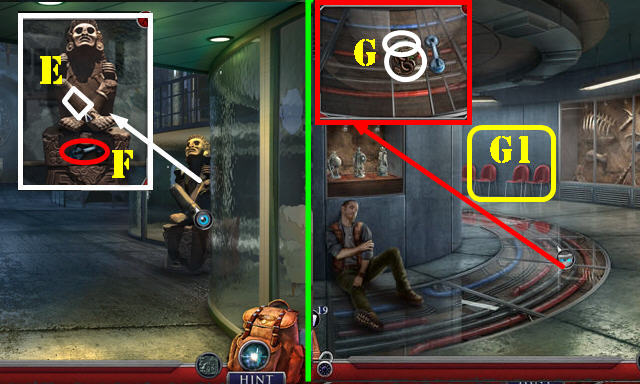
- Open compartment; take BROKEN CLOCK MECHANISM and SOLAR KEY (X2).
- Select locker; place MIRROR and use WIRE CUTTERS. Open locker; look at note and take CREDIT CARD (Y).
- Insert CREDIT CARD (Z); take TICKET (Z1).
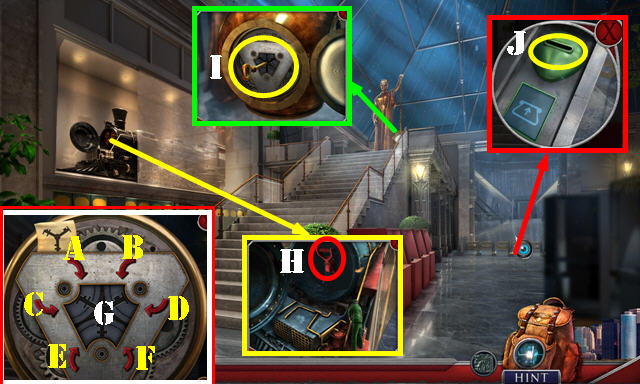
- COG on BROKEN CLOCK MECHANISM. Solution: Ax2-Bx2-F-G. Receive CLOCK MECHANISM.
- Pull lever (H).
- Open glass; place CLOCK MECHANISM and select key (I).
- Use TICKET (J).
Chapter 2: Ravine
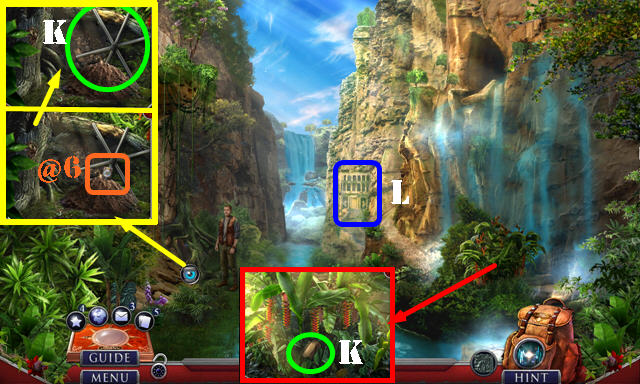
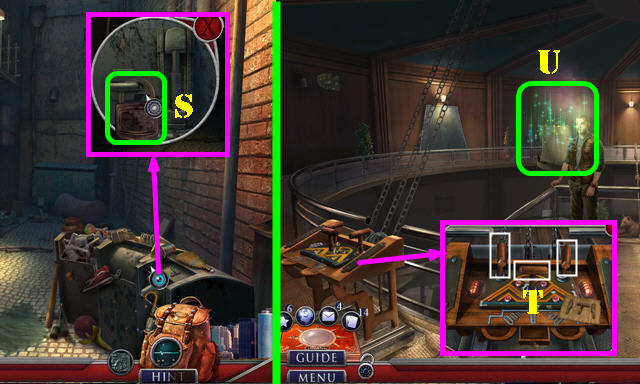
- Take Fact Card (@6).
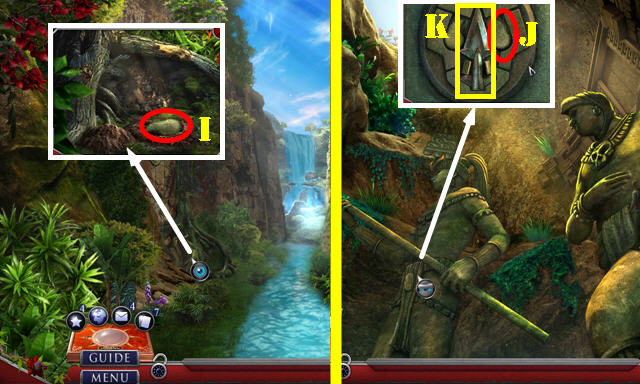
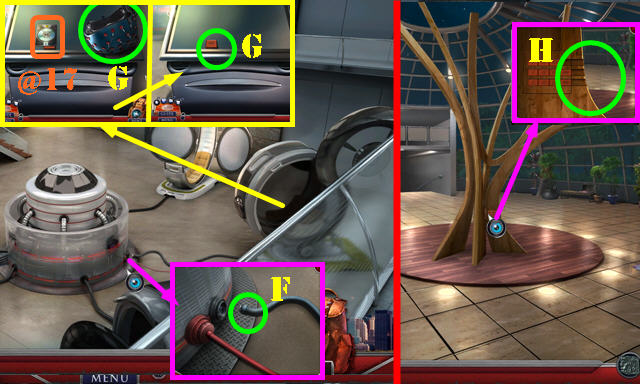
- Take STEEL BRUSH and SUN ROD (K).
- Go (L).
- Answer phone on scene.
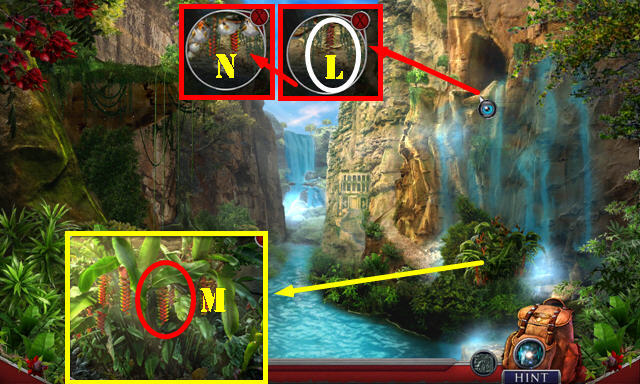
- Take BEAD 2/3, BRANCH, and MATCHES (M).
- Place SUN ROD (N).
- Pull lever 3x (O).
- Take Fact Card (@7).
- Use STEEL BRUSH; take LOCK CENTERPIECE (P).
- Walk down.
- Use BRANCH; take SUPPLY BAG (Q).
- Place BAG SIGIL on SUPPLY BAG. Look at note; take WIRE and SHIELD TILE (R).
- Go (S).
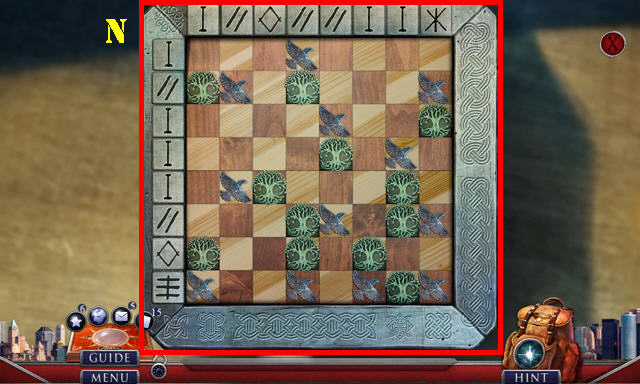
- Place SHIELD TILE; select 1-6. Use SOLAR KEY (T).
- Solution: (A-B)-(F-B)-(F-C)-(E-D)-(D-C).
- Play puzzle. Solution (E).
- Go (F).
- Take PULL HANDLE 1/2 (G).
- Walk down.
- Use WIRE; take TROWEL (H).
- Walk down.
- Use TROWEL; take BUCKLE PIECE (I).
- Go to Garden of Worship.
- Use BUCKLE PIECE (J); take SPEARHEAD (K).
- Go to Ravine.
- Select Heliconia (L).
- Use SPEARHEAD; take HELICONIA (M).
- Place HELICONIA (N). Play HOP; receive BEAD 3/3.
- Go to Garden of Worship.
- Place BEAD 3/3 (P).
- Place LOCK CENTERPIECE. Solution (Q): B-Ex2-Bx4-Dx2-Bx3-Cx2-Bx4-Ex2-Bx3-A.
- Bx4-Cx2-Bx3-E-Bx2-C-B-D-Ex2-Bx3-A-C-Bx3-A-Bx5.
- D-Bx4-A-Bx4-D-Bx3-E-B-D-Bx2-Ax2-B-Cx2.
- Go (R).

- Take BENT POLE (S); select area.
- Look at note; take MAZE TILE (T).
- Take PROJECTOR (U).
- Go (V).
- Take Fact Card (@8).
- Take NEON BULB, RAG, and CAMERA (W).
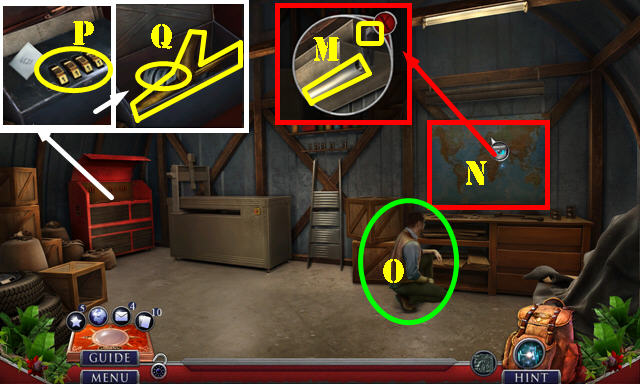
- Look at note (X). Place PROJECTOR (X1) and RESEARCH DATA (Y); take PROJECTOR.
- Place PROJECTOR (Z).
- Select tiles 1-4.
- Walk down.
- Place RAG and use MATCHES; take BURNING TORCH (A).
- Use BURNING TORCH (B). Play HOP; receive HAMMER.
- Walk down.
- Use HAMMER; take FEATHER TIARA (C).
- Go (D).
- Place FEATHER TIARA (E); open container and take RELIC (F).
- Go (G).
- Place RELIC (H).
- Solution: L-I-L-J-K-I-K-J-K-I-L-J-I-K-I-L-I-K-J.
- Look at note; take PULL HANDLE 2/2.
- Walk down.
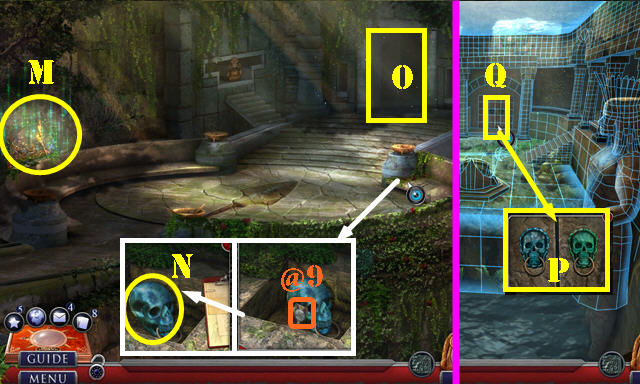
- Play HOP (M); receive JADE SKULL.
- Place PULL HANDLE 2/2; take Fact Card (@9) and CRYSTAL SKULL (N).
- Go (O).
- Place JADE SKULL and CRYSTAL SKULL (P).
- Go (Q).
- Take BATTERY (R).
- Use BENT POLE; go (S).
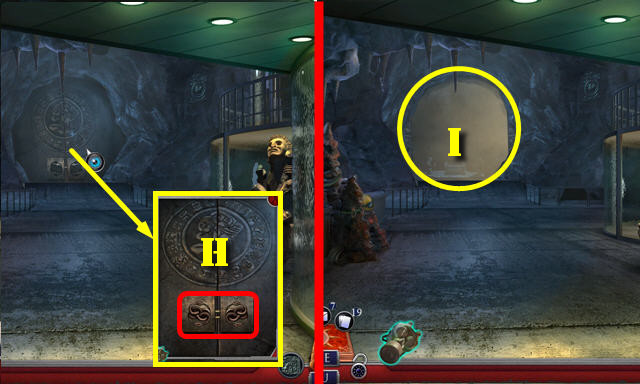
- Look at envelope; take NAILS (T).
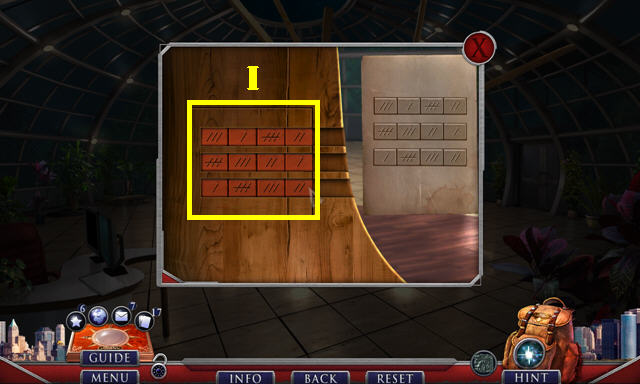
- Place MAZE TILE (U).
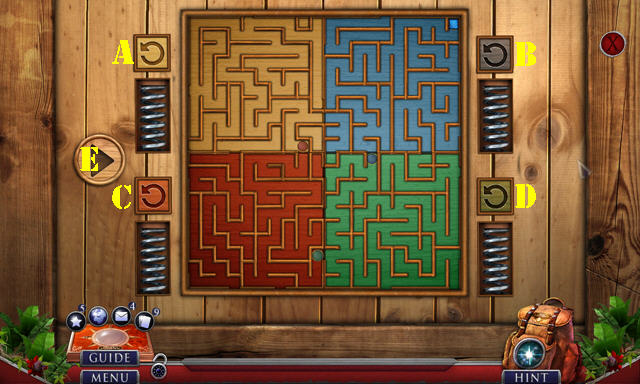
- Solution; select A-B-C-D until each quadrant (brown, blue, red, and green) looks like the image in the screenshot. Once all are aligned, press (E) to solve.
- Look at note; take WRENCH EMBLEM.
- Place WRENCH EMBLEM; take PROPELLER TEMPLATE and NAIL GUN (F).
- Take Fact Card (@10).
- Place PROPELLER TEMPLATE (G); flip lever (H). Remove template; take PROPELLER TIP (G).
- Remove cover; take FILE (I).
- Walk down.
- Use FILE on lock; take SWITCH (J).
- NAILS and BATTERY in NAIL GUN; receive LOADED NAIL GUN.
- Remove broken tip; place PROPELLER TIP and use LOADED NAIL GUN (K).
- Go (L).
- Place NEON BULB and SWITCH (M); select switch.
- Play HOP (N); receive CODE.
- Give PHOTO (O).
- Place CODE; enter 4628 (P).
- Take LORD SPEAR PART and MACHINE CYLINDER (Q).
- Walk down.
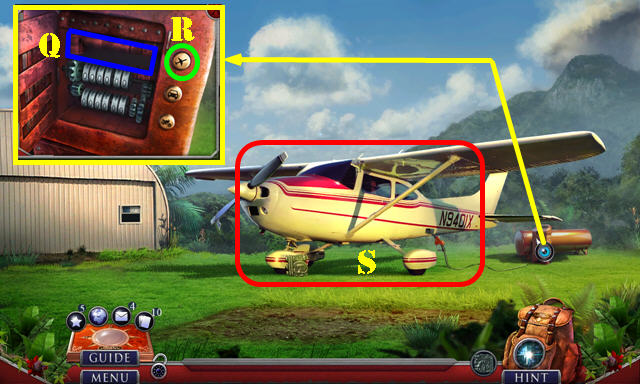
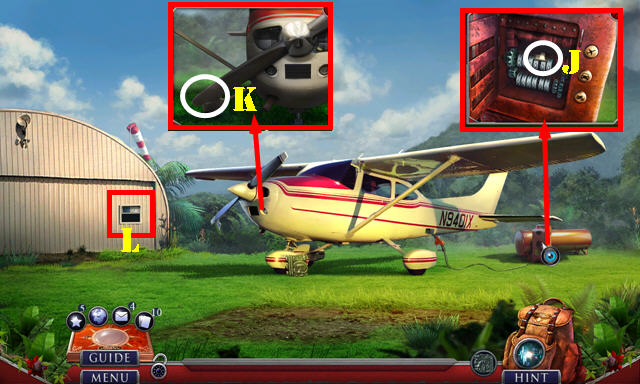
- Place MACHINE CYLINDER (Q). Press button (R).
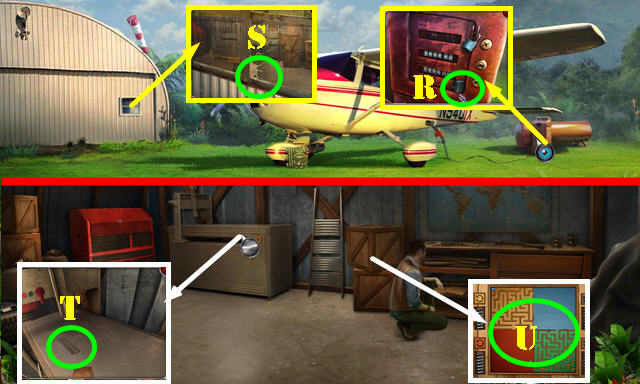
- Select plane (S).
Chapter 3: Barbershop
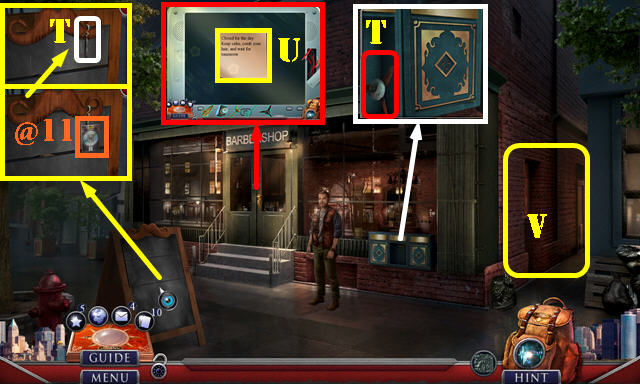
- Take Fact Card (@11).
- Take PROPELLER and DRONE HOOK (T).
- Remove note (U).
- Go (V).
- Take BROKEN DRONE and CHAIR DECORATION (W).
- Walk down.
- PROPELLER, CAMERA, and DRONE HOOK on BROKEN DRONE; take DRONE.
- Use DRONE (X); open box and take COMB (X1).
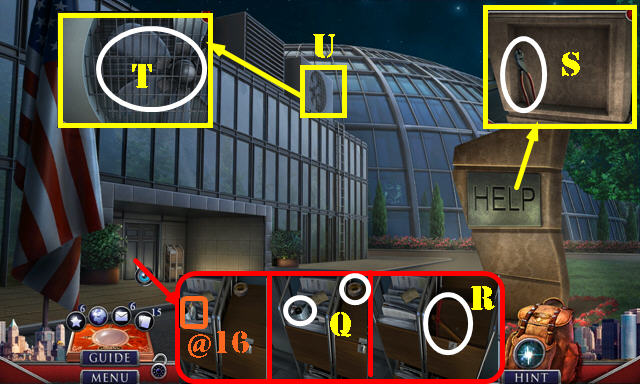
- Use COMB; look at note and take TELESCOPIC POLE (Y).
- Go (Z).
- Use TELESCOPIC POLE (A); receive INSULATION TAPE.
- Walk down.
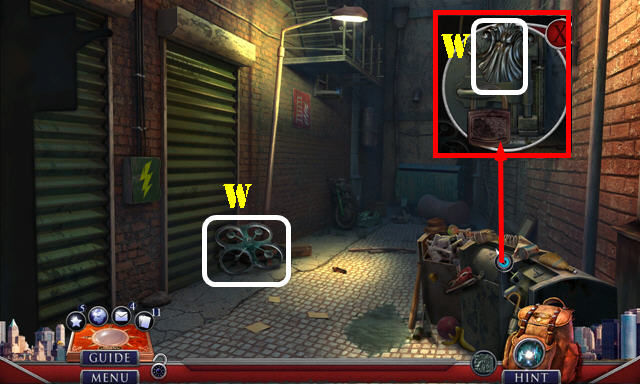
- Use INSULATION TAPE (B).
- Solution (1-9).
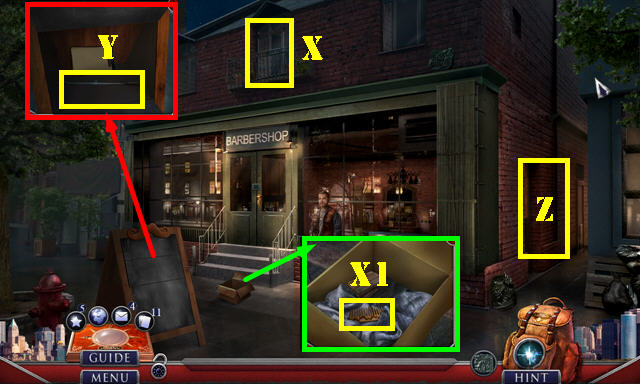
- Enter (C).
- Take RUNES 1/2 (D).
- Place CHAIR DECORATION (E); take SAW (F).
- Go to Dead End.
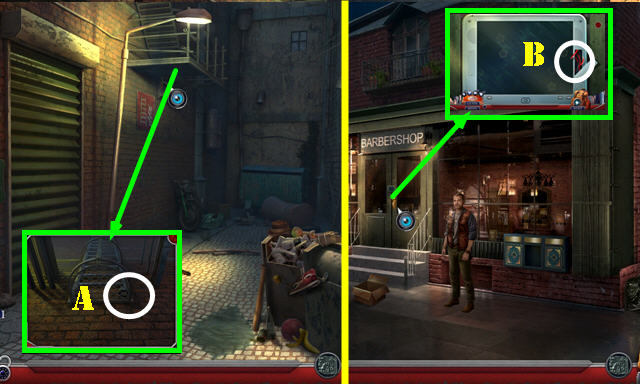
- Use SAW; take MAILBOX ORNAMENT and CABINET KEY (G).
- Walk down.
- Place MAILBOX ORNAMENT; take SCISSORS EMBLEM (G).
- Enter (H).
- Use CABINET KEY; take LORD SPEAR BASE (I).
- Look at note; take PLIERS (J).
- Place SCISSORS EMBLEM (K).
- Go (L).
- Take Fact Card (@12) and BRONZE WOLF (L).
- LORD SPEAR PART and LORD SPEARHEAD on LORD SPEAR BASE; receive LORD SPEAR.
- Go (M).
- Take Fact Card (@13).
- Look at note (N).
- Take PULLEY HANDLE 1/2 and PULLEY KEY (O).
- Walk down.
- Place PULLEY KEY; take Fact Card (@14) and SAPPHIRE (P).
- Walk down.
- Place SAPPHIRE (Q); select buttons (green); take SILVER RAVEN (R).
- Go to Dead End.
- Use PLIERS (S). Play HOP; receive PULLEY HANDLE 2/2.
- Go to Gallery.
- Place PULLEY HANDLE 2/2 and select each one (T).
- Play HOP (U); receive TRIANGLE TRINKET.
- Go to Main Room.

- Place TRIANGLE TRINKET; take ODIN'S ADORNMENT (V).
- Walk down.
- SILVER RAVEN and BRONZE WOLF on ODIN'S ADORNMENT.
- Place ODIN'S ADORNMENT; select 1-4.
- Go (W).
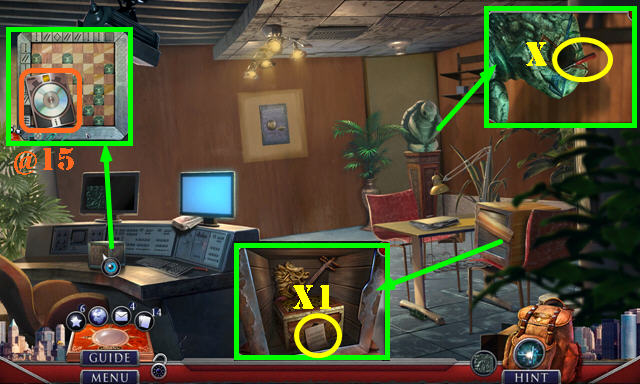
- Take Fact Card (@15).
- Take SCREWDRIVER (X).
- Use PLIERS and select board; take SLAT SKETCH (X1).
- Go to Main Room.
- Use SCREWDRIVER; take DRAGON HEAD EMBLEM (Y).
- Go to Storage.
- Place DRAGON HEAD EMBLEM; take H.E.L.P. CARD and PASSWORD BREAKER (Z).
- Go to Main Room.
- Place H.E.L.P. CARD; take SAFE COMBINATION (Z1).
- Use PASSWORD BREAKER (Z2); select lock icon (Z3).
- Yellow Token: A-C-Dx2.
- Pink Token: Ax2-B-D.
- Red Token: A-G-A-G.
- Green Token: C-A-C-D-A-C.
- Select JPG icon on screen; receive SHIELD CLUE.
- Answer phone on scene.
- Go to Storage.
- Select picture; place SAFE COMBINATION. Move counterclockwise to 3, clockwise to 5, clockwise to 7, counterclockwise to 2, and counterclockwise to 1 (I).
- Look at note; take TURTLE EYE (J).
- Place TURTLE EYE (K); take RUNES 2/2 (L).
- Place RUNES 2/2 (M).
- Solution (N).
- Take EMERALD EYE.
- Walk down.
- Place EMERALD EYE (O).
- Play HOP (P); receive SCROLL CASE.
- Open SCROLL CASE; take SERVICE KEY and look at note.
Chapter 4: H.E.L.P. HQ
- Answer phone on scene.
- Look at note; take Fact Card (@16).
- Take EMPTY SMOKE MACHINE and TAPE (Q).
- Use SERVICE KEY; take PICKAXE (R).
- Use PICKAXE; take BOLT CUTTERS (S).
- Use BOLT CUTTERS (T); enter (U).
- Answer phone on scene.
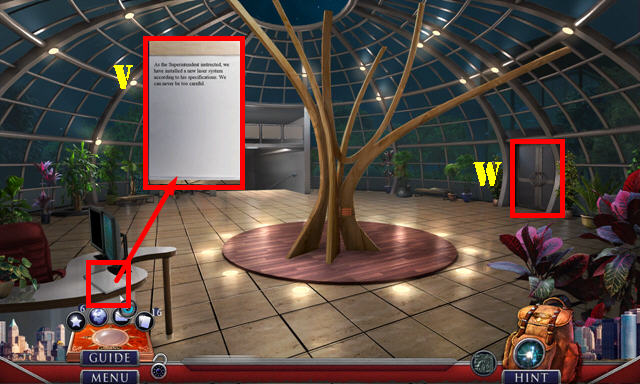
- Look at note (V).
- Go (W).
- Take NORDIC FIGURINE 1/3 (X).
- Look at note. Use TAPE (Y); move it to printer (Y1); receive HANDPRINT.
- Use HANDPRINT (Z); go (Z1).
- Take BRIEFCASE EMBLEM (A); remove cap (B).
- Go to Grand Hall.
- Place BRIEFCASE EMBLEM (C); open both latches (purple); take CABLE TIP (D).
- Go (E).
- Place CABLE TIP (F).
- Take Fact Card (@17).
- Take INCOMPLETE VR HEADSET and WOODEN TILE (G).
- Walk down.
- Place WOODEN TILE and SLAT SKETCH (H).
- Solution (I).
- Take AVIATOR EMBLEM.
- Go to Research and Development.
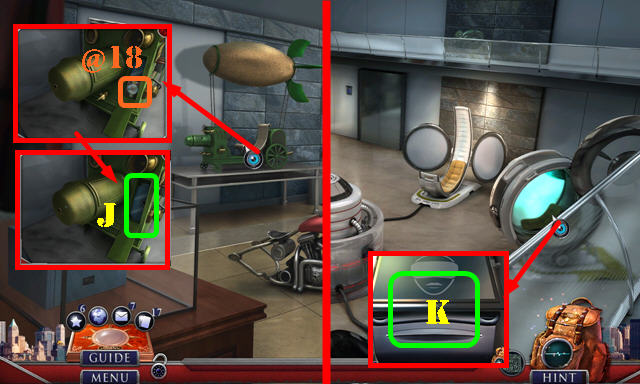
- Place AVIATOR EMBLEM; take Fact Card (@18) and LENSES (J).
- Walk down.
- LENSES on INCOMPLETE VR HEADSET; receive VR HEADSET.
- Place VR HEADSET (K).
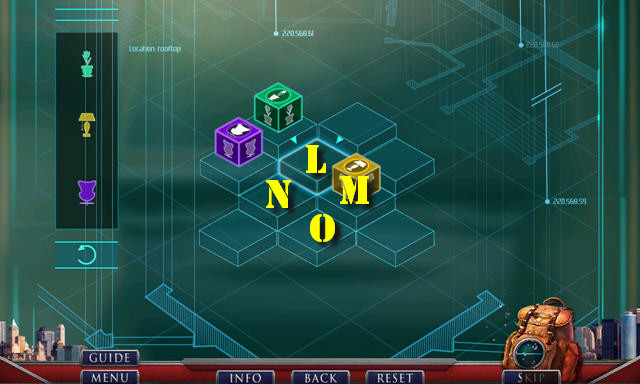
- Solution: L-M-N-O.
- Open drawer; take CROWBAR and NORDIC FIGURINE 2/3.
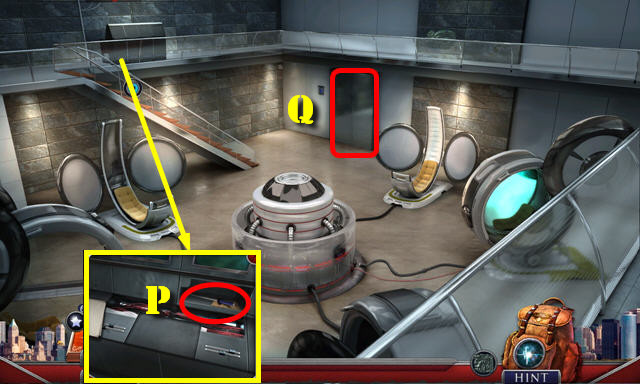
- Use CROWBAR; take MAGNETIC ROD (P).
- Go (Q).
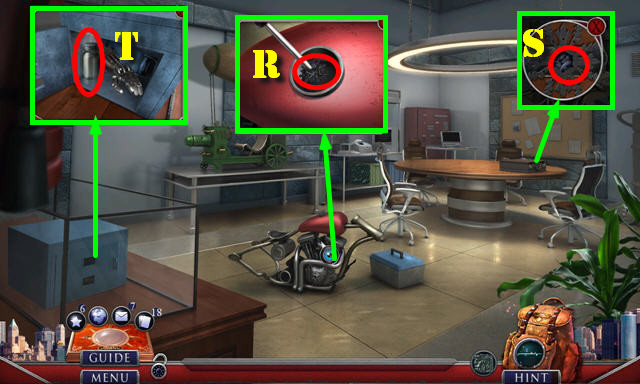
- Use MAGNETIC ROD; take AGENT'S BADGE (R).
- Place AGENT'S BADGE (S). Play HOP; receive PROTECTIVE GLOVE.
- Open door; use PROTECTIVE GLOVE and take LIQUID NITROGEN (T).
- Go to Grand Hall.
- Remove top on EMPTY SMOKE MACHINE and pour LIQUID NITROGEN; select button; receive SMOKE MACHINE.
- Use SMOKE MACHINE; play puzzle (U).
- Solution (V).
- Go (W).
- Open compartment; take MODEL PROPELLER (X).
- Go (Y).
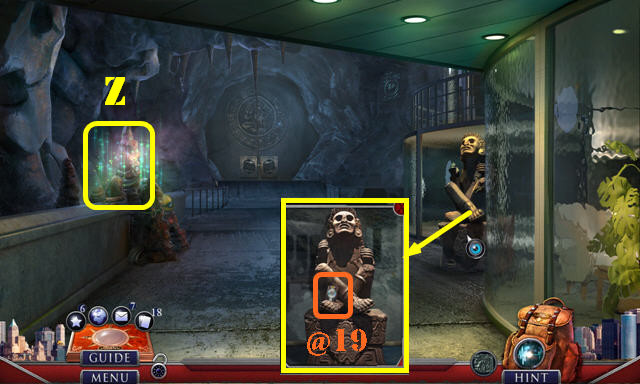
- Take Fact Card (@19).
- Play HOP (Z); receive NORDIC FIGURINE 3/3.
- Walk down.
- Place NORDIC FIGURINE 3/3 and SHIELD CLUE; swap figurines as shown (A).
- Take OUROBOROS 1/2 (B).
- Go to Research and Development.
- Place MODEL PROPELLER (C); take ALTAR PLATE (D).
- Go to Cave Passageway.
- Place ALTAR PLATE (E); take FLOOR HANDLE (F).
- Walk down.
- Place FLOOR HANDLE; take OUROBOROS 2/2 and GAS MASK (G).
- Go (G1).
- Place OUROBOROS 2/2 (H).
- Go (I).
- Use GAS MASK on scene.
- Take JAGUAR EMBLEM (J).
- Go to Outer Room.
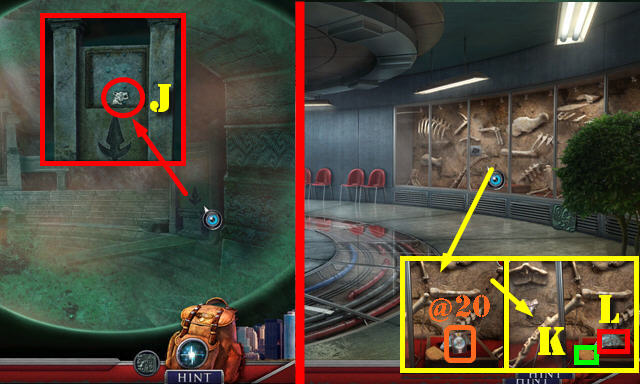
- Place JAGUAR EMBLEM; take Fact Card (@20).
- Look at note (K) take SNAKE SKULL (L).
- Go to Cave Depths.
- Place SNAKE SKULL (M); take LORD SPEAR (N).
- Place LORD SPEAR (O).
- Solution is random (P).
- Congratulations, you've completed Hidden Expedition: The Altar of Lies!
Created at: 2018-08-19