

Walkthrough Menu
- General Tips
- Chapter 1: Campsite
- Chapter 2: Garden Overlook
- Chapter 3: Seville
- Chapter 4: The Ship
- Chapter 5: Turtle Research Lab
- Chapter 6: Socotra Island
General Tips
- This is the official guide for Hidden Expedition: The Fountain of Youth.
- This guide will not tell you when you have to zoom into a location; the screenshots will show each zoom scene.
- Hidden-object puzzles are referred to as HOPs. This guide will not show screenshots of the HOPs, however, it will mention when an HOP is available and the inventory item you'll collect from it.
- Use the Map to fast travel to a location.
Chapter 1: Campsite
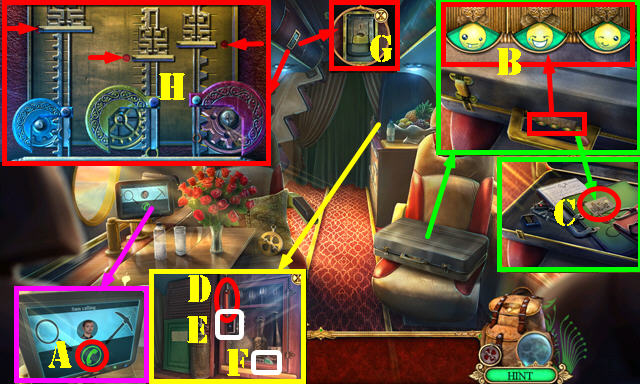
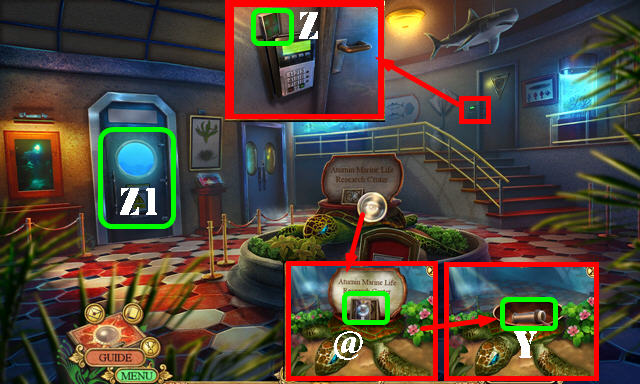
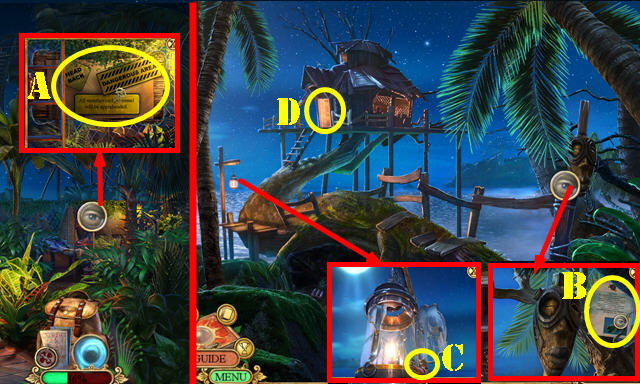
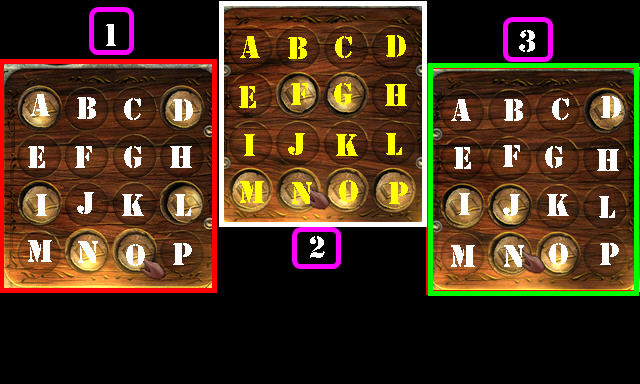
- Answer the call (A). Note the symbols.
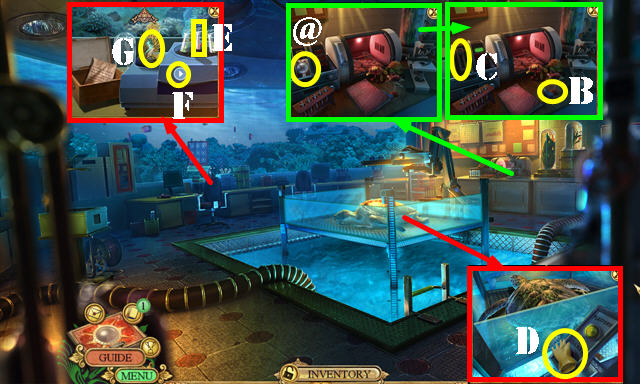
- Enter the code (B). Take the MINIBAR KEYCARD (C).
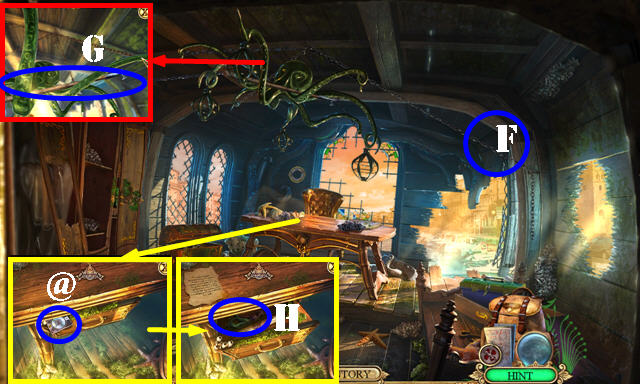
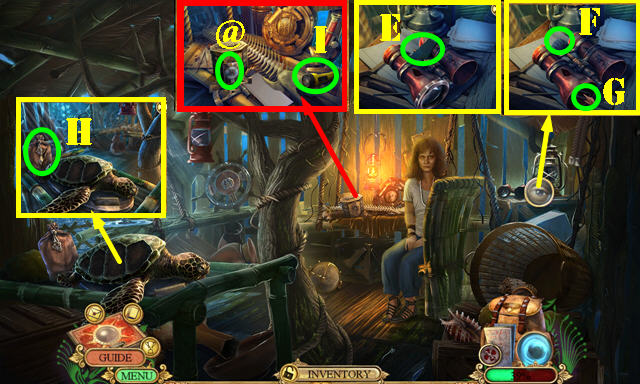
- Take the BOTTLE OPENER (D). Use the MINIBAR KEYCARD (E); take the STEWARD'S KEY (F).
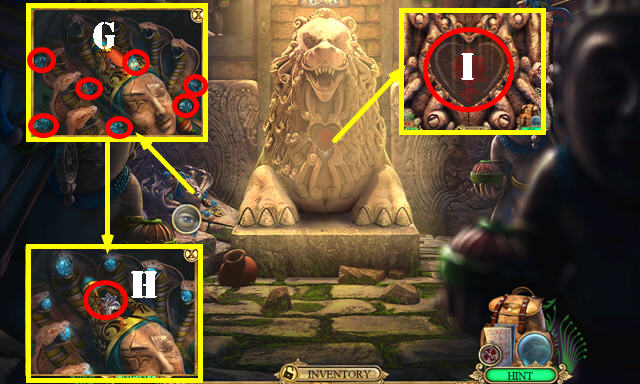
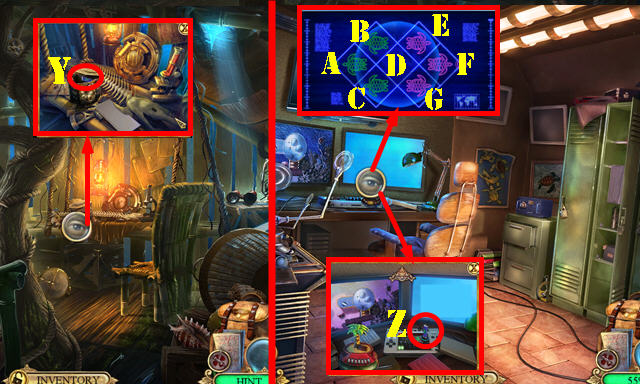
- Use the STEWARD'S KEY (G); select it for an HOP; play it to get the H.E.L.P. BOX. HOP puzzle solution (H).
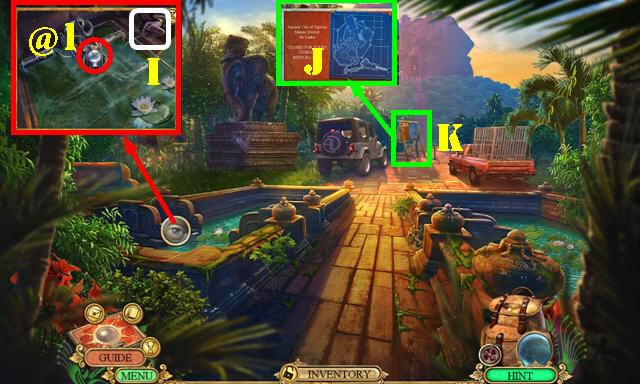
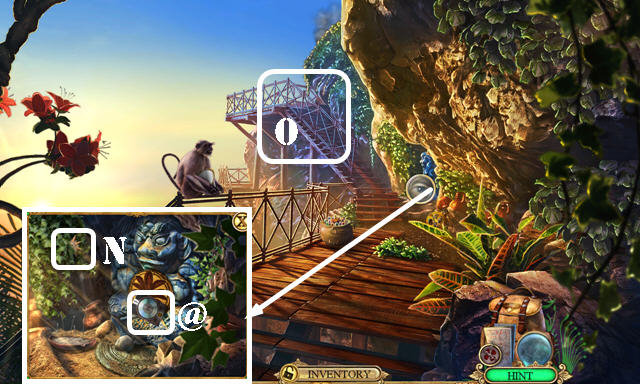
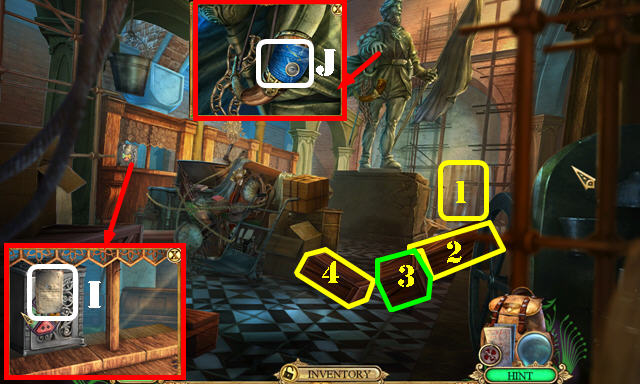
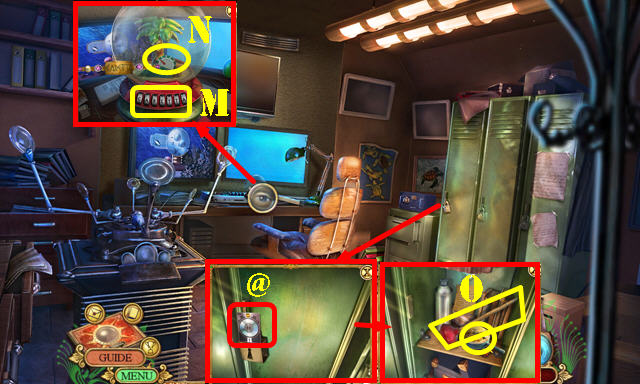
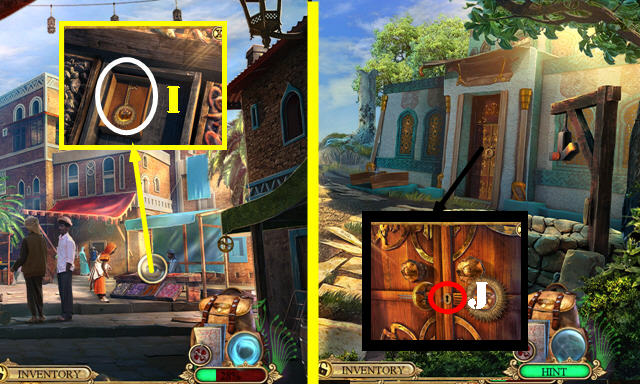
- Take the Fact Card (@) and ANIMAL ORNAMENTS 1/3 (I).
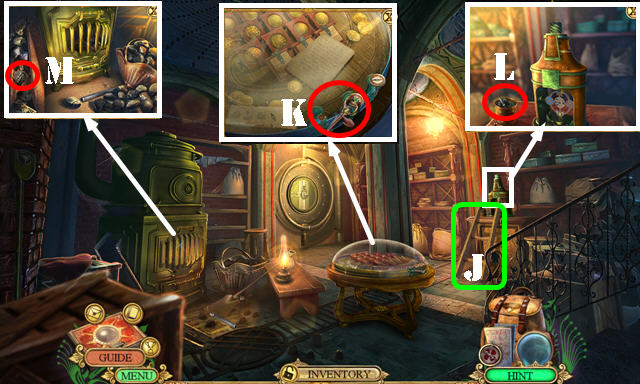
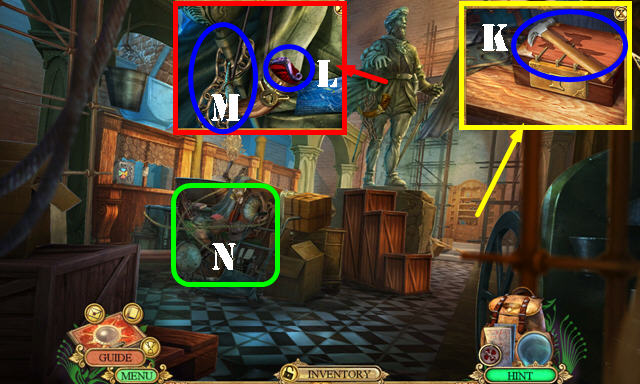
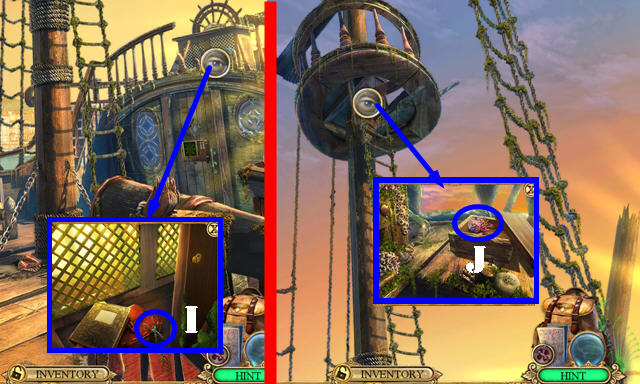
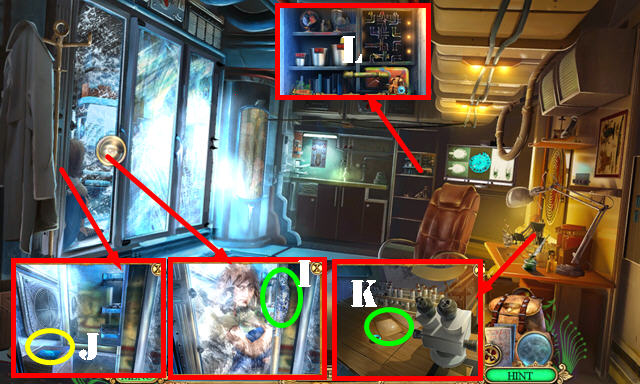
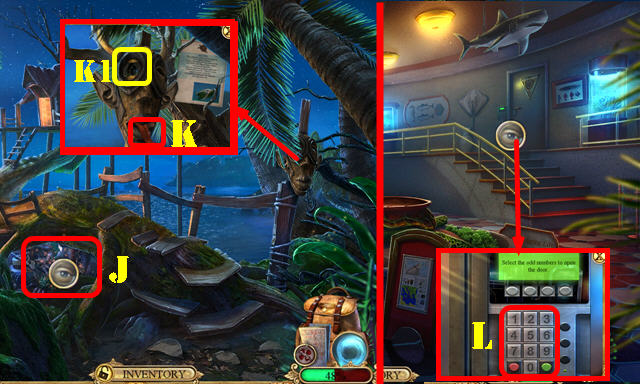
- Look at the sign (J); move the easel (K); go forward.
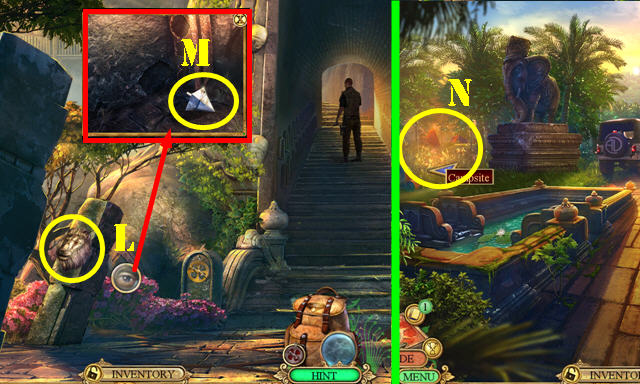
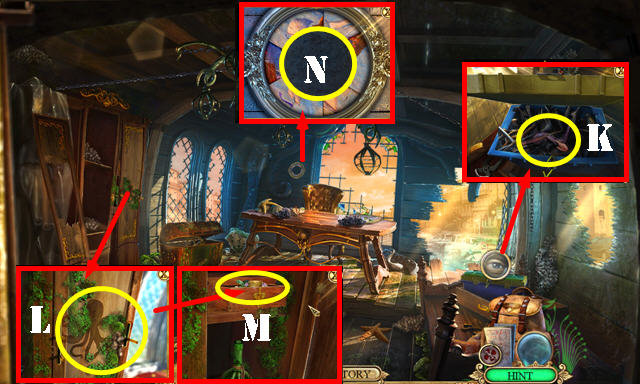
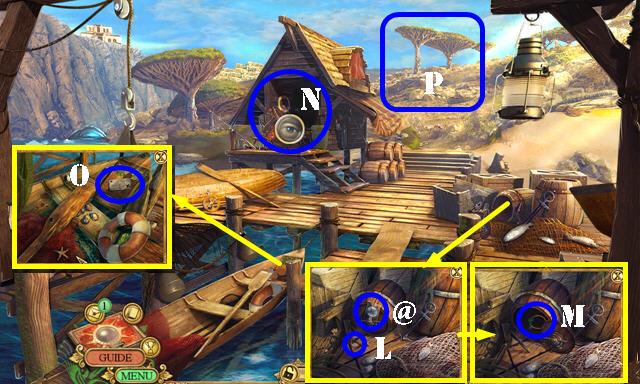
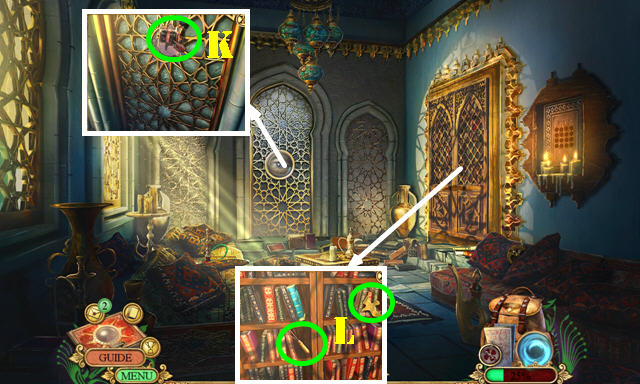
- Take the ANIMAL ORNAMENTS 2/3 (L) and GLASS PRISM (M).
- Walk down and go left to the Campsite (N).
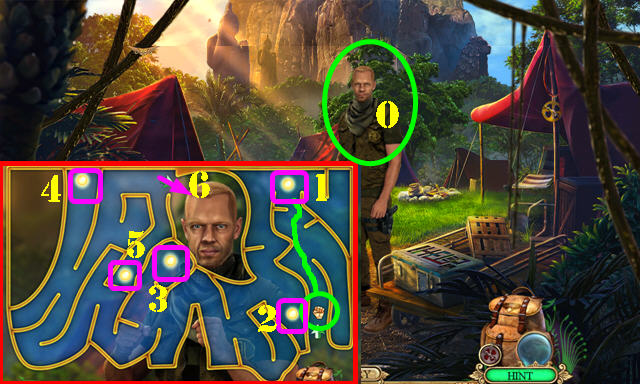
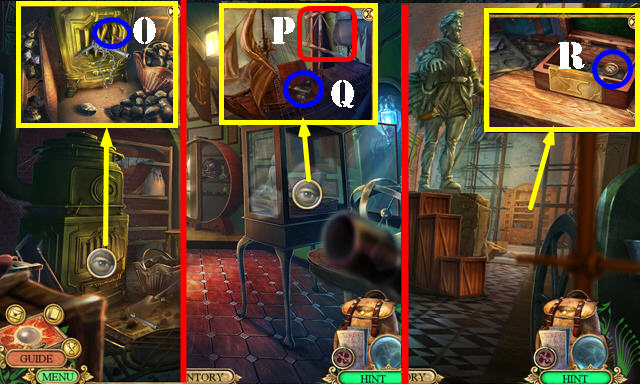
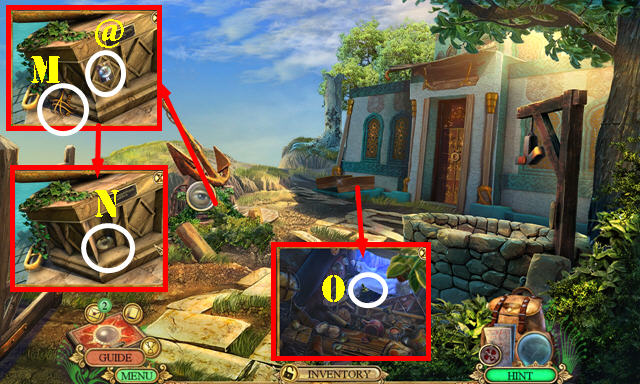
- Talk to the man (O). Pick heads or tails, yes, and yes for a puzzle.
- Solution 1-6.
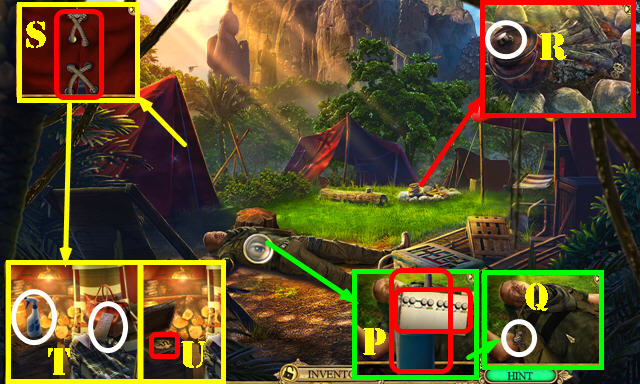
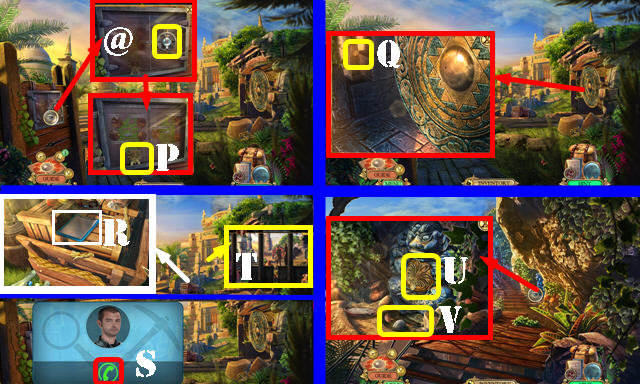
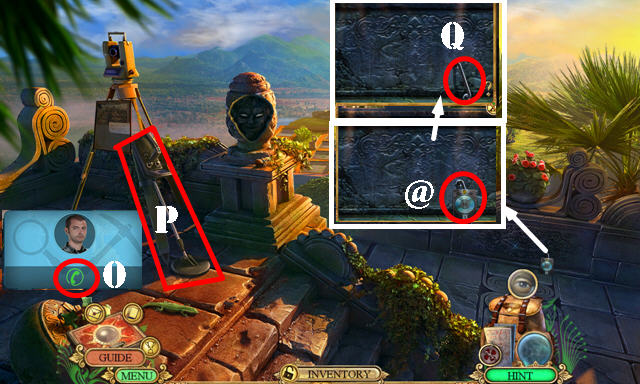
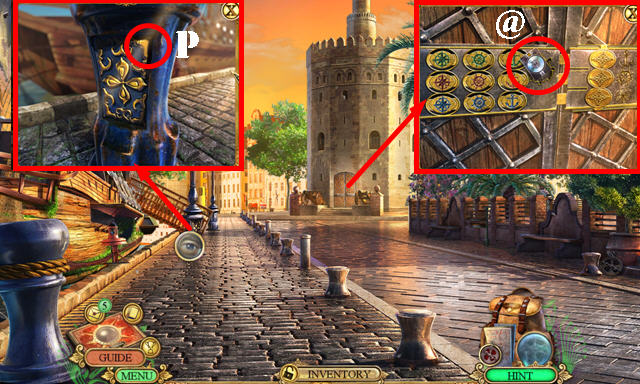
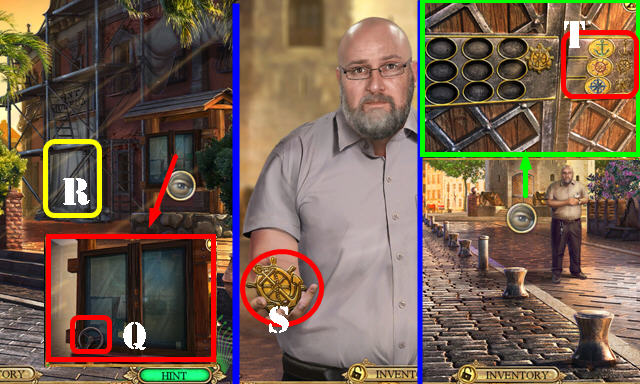
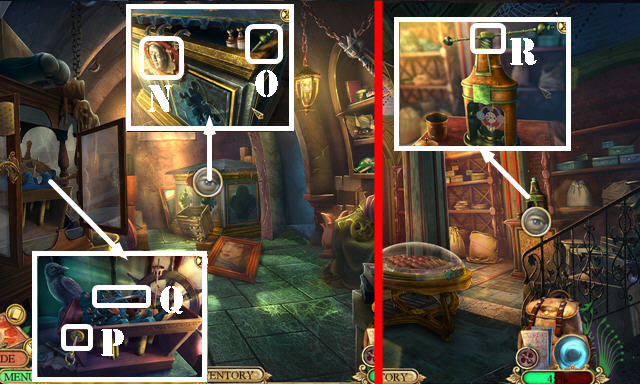
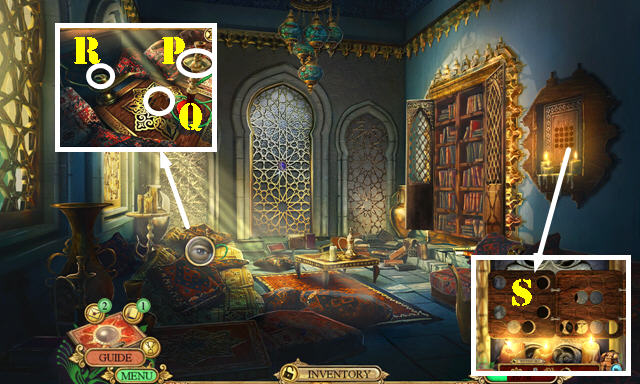
- Open the vest; look at the walkie-talkie; take the CODE and WALKIE-TALKIE (P).
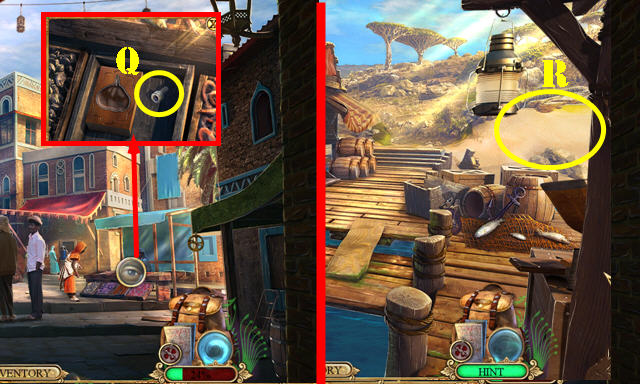
- Select the pocket; take the ANIMAL ORNAMENTS 3/3 (Q).
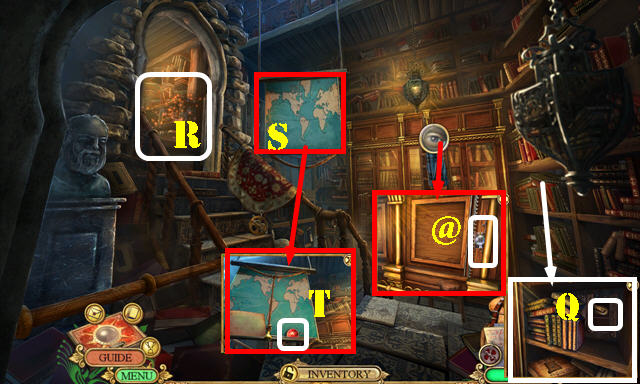
- Take the DIAL (R).
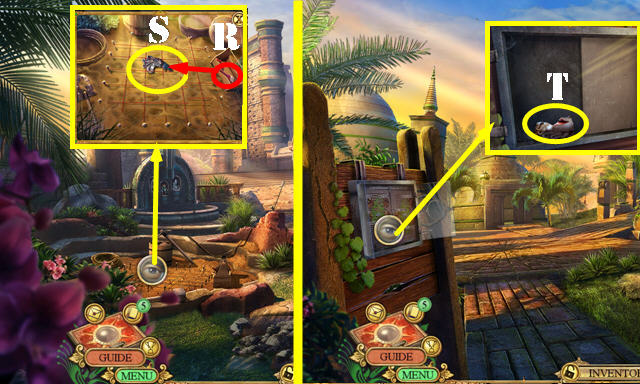
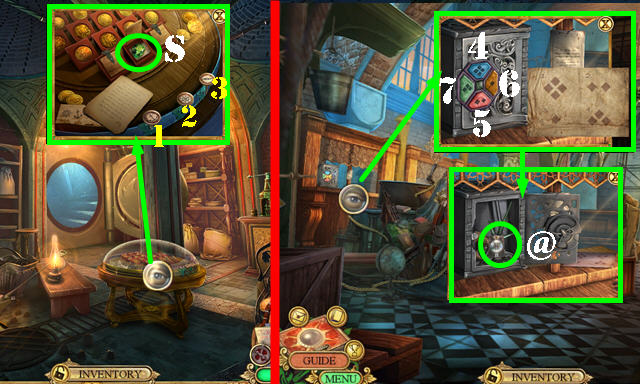
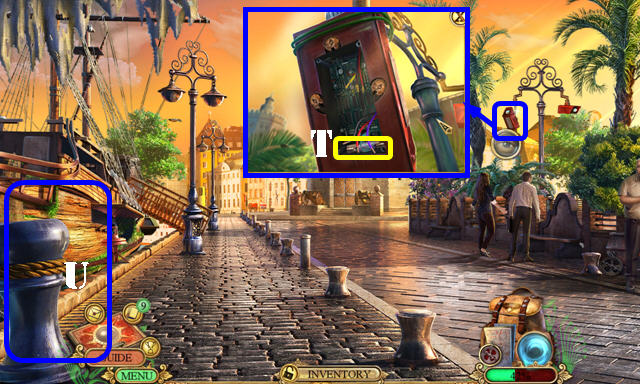
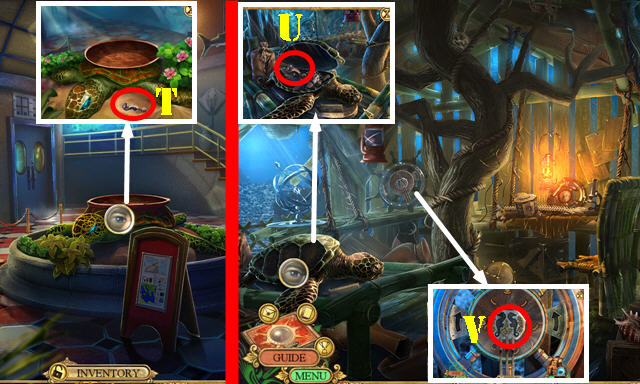
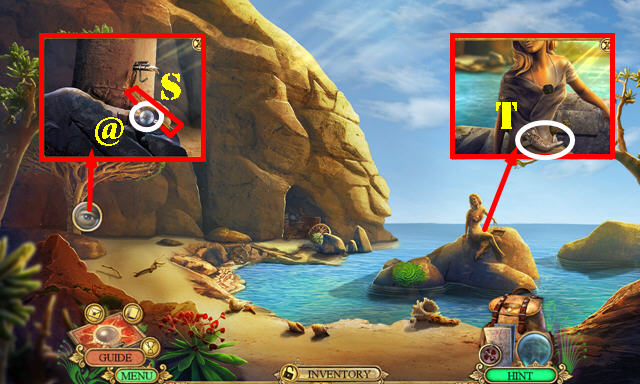
- Select the rope 7x (make sure you arrow up) (S). Take the RESIN THINNER and Map (T).
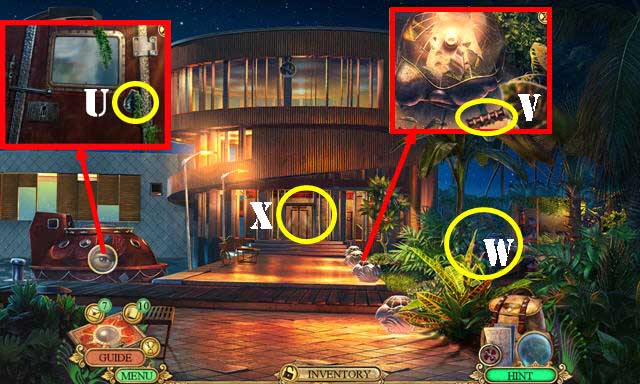
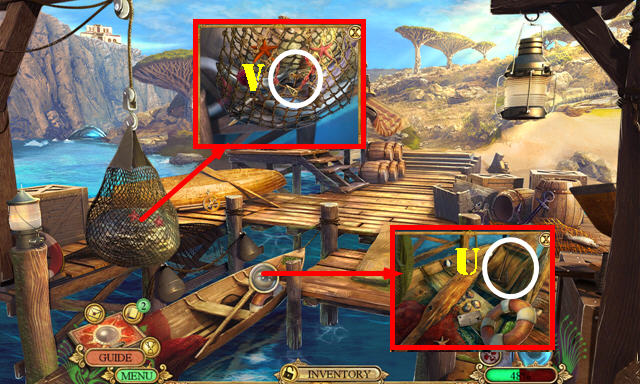
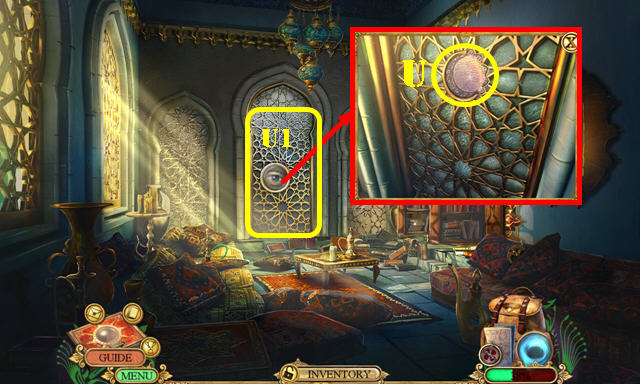
- Use the BOTTLE OPENER; take the KEY MECHANISM 1/2 (U).
- Walk down.
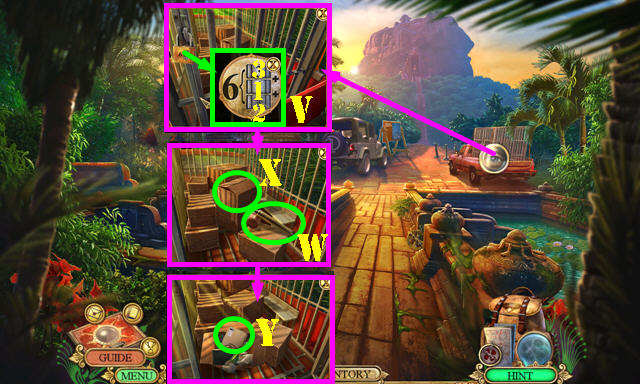
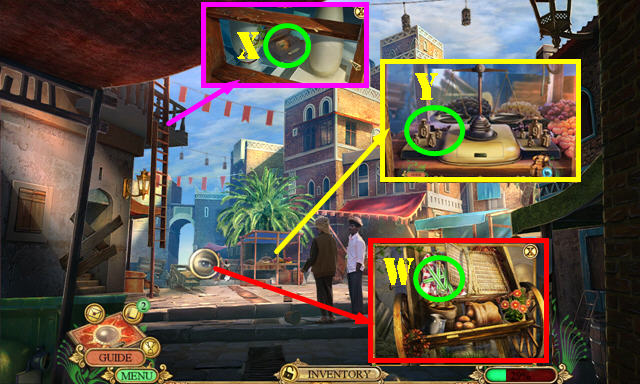
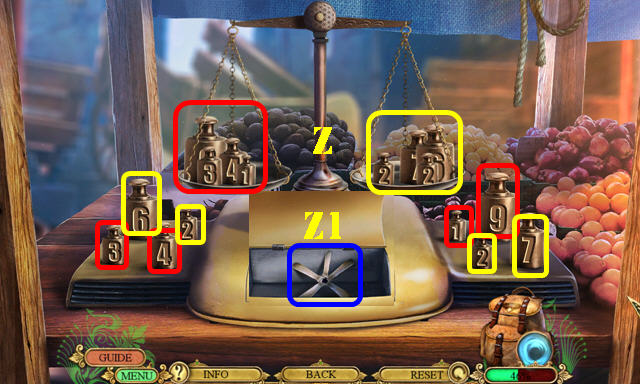
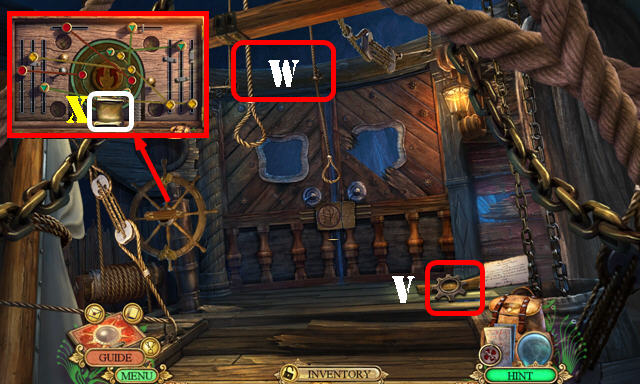
- Place the DIAL; enter 312 (V). Take the BUG REPELLANT (W). Select the box (X); take the A.D. FOLDER (Y).
- Open the A.D. FOLDER; select it and take the KEY RING (inventory).
- Return to the Campsite.
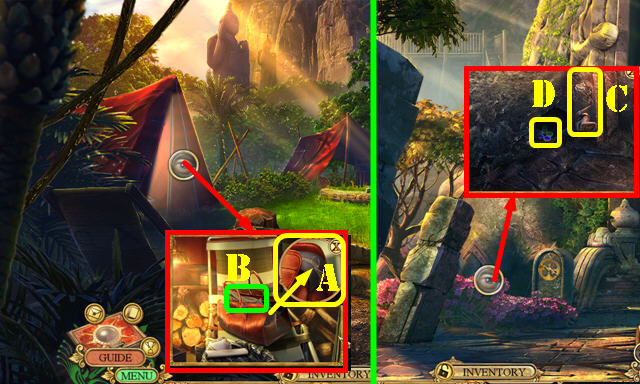
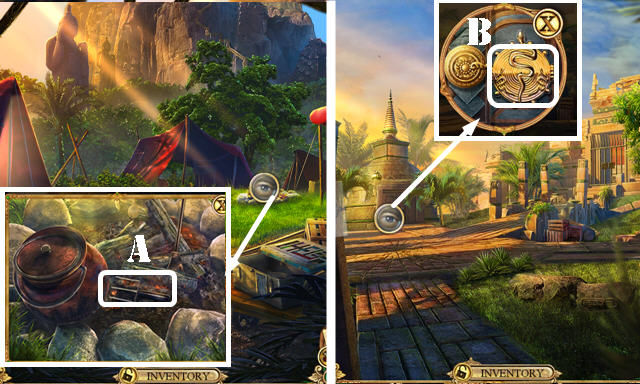
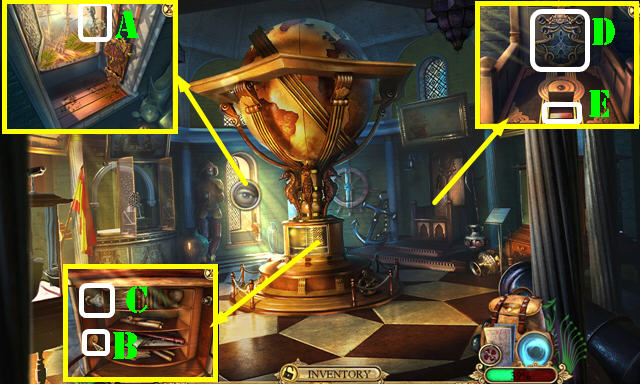
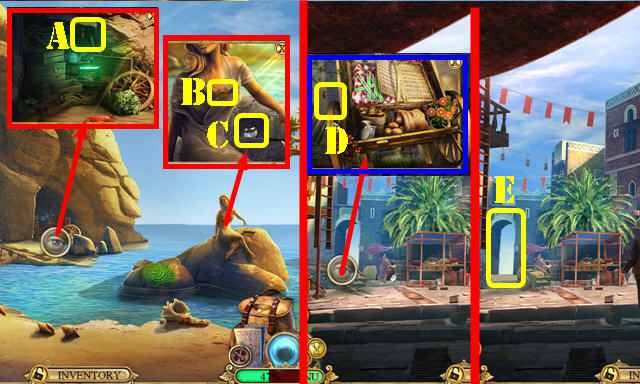
- Use the KEYRING (A); look at the scroll and take the ROPE (B).
- Select the ROPE twice (inventory).
- Return to the Lion Staircase.
- Place the 3 ORNAMENTS (C); take the BOX LOCK PIECE (D).
- Go up.
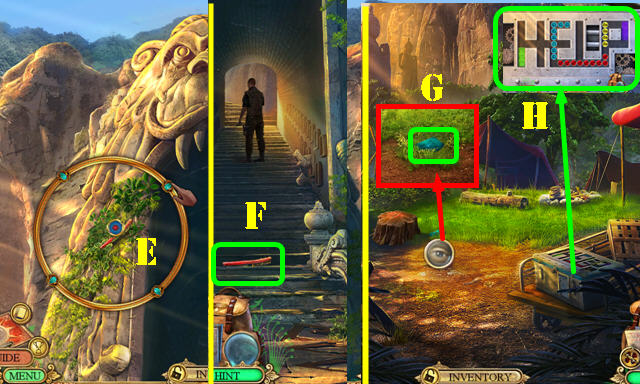
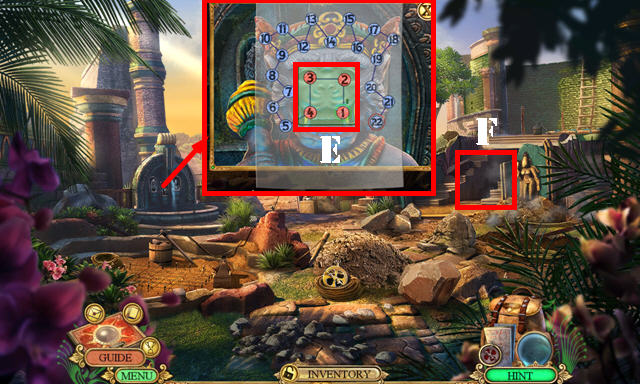
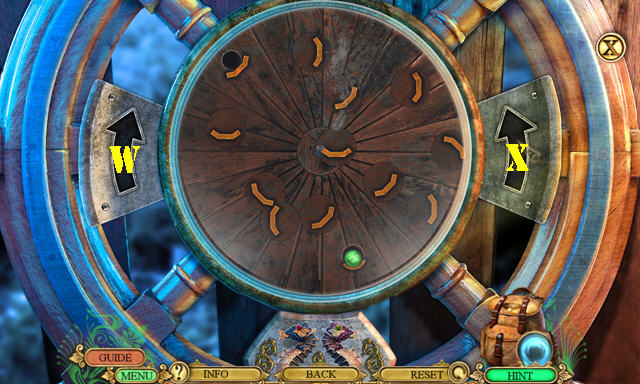
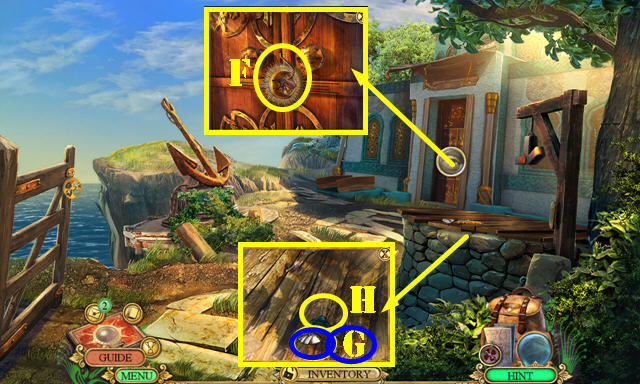
- Place the ROPE; align the dots on the ring as shown and then bring all the spheres together (E). Take the WIRE BRUSH (F).
- Return to the Campsite.
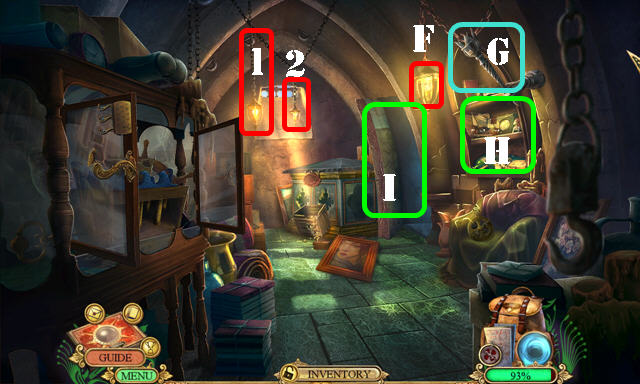
- Select the grass; take the FREQUENCY LIST (G).
- Place the BOX LOCK PIECE for a puzzle (H).
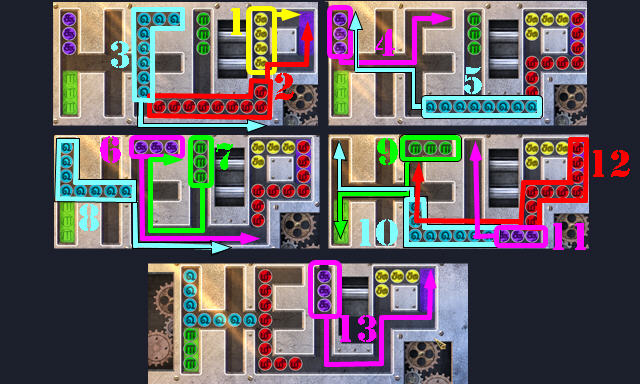
- Solution (1-13).
- Take the PISTON.
- Go to the Lion Staircase.

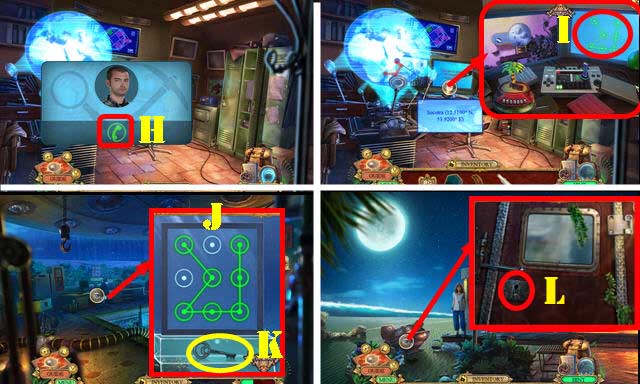
- Use the WALKIE-TALKIE (I). Place the FREQUENCY LIST; use the dial to change it to 72 (J).
- Take the Fact Card (@), VALVE and SMALL STONES (K). Use the RESIN THINNER; take the STEEL ARM (L).
- Go to the Staircase Lookout (M).
- Take the Fact Card (@).
- Use the BUG REPELLANT; take the COMPASS ROSE (N).
- Go to the City Entrance (O).
- Take the Fact Card (@).
- Place the COMPASS ROSE; take the BRONZE FLOWER (P).
- Select the vine; use the WIRE BRUSH and take the OLD NAIL (Q).
- Look at the clipboard (R).
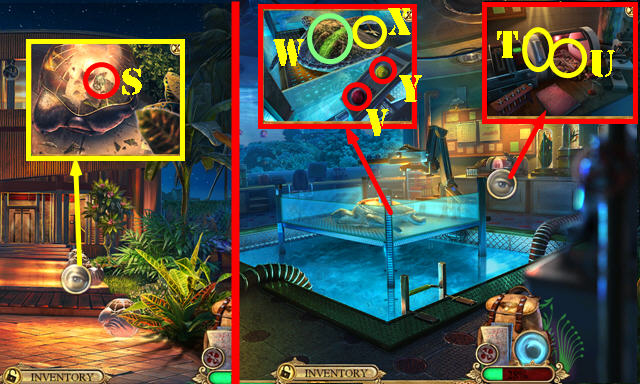
- Answer the call (S); select Dana Creed.
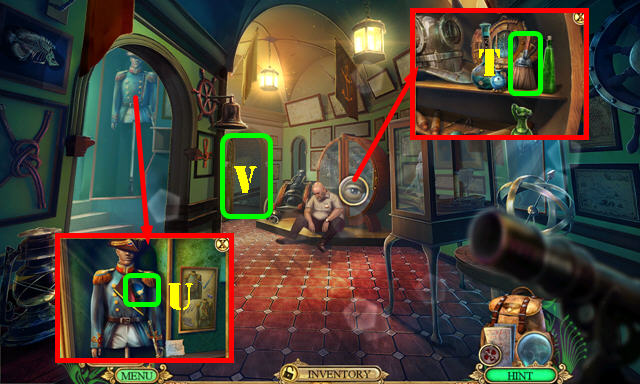
- Look at the gate (T).
- Walk down.
- Place the BRONZE FLOWER (U); press it and take the GONG MALLET (V).
- Go to the City Entrance.

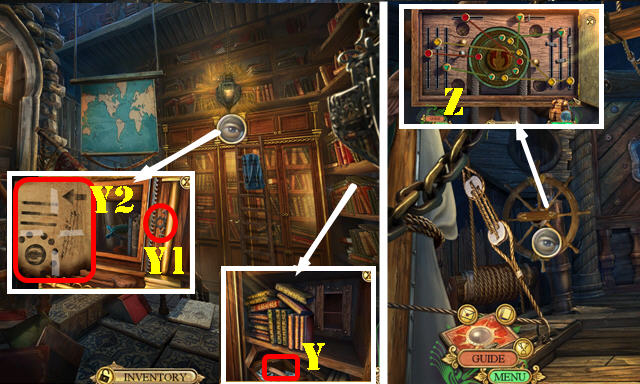
- Use the GONG MALLET (W). Move the tile; take the ENTANGLED SNAKES EMBLEM and CLAY NOSE (X).
- Return to the Temple Approach.
- Place the PISTON (Y) and VALVE (Y1). Take the KEY MECHANISM 2/2 (Z).
- Return to the Campsite.
- Use the STEEL ARM; take the GRILL FORK (A).
- Return to the City Entrance.
- Place the 2 KEY MECHANISMS (B) and select them for an HOP; play it to get the ELASTIC BAND.
- Select the GRILL FORK; place the SMALL STONES and ELASTIC BAND; select the elastic band and one small stone to get the SLINGSHOT (inventory).
- Return to the Lion Staircase and Go up.
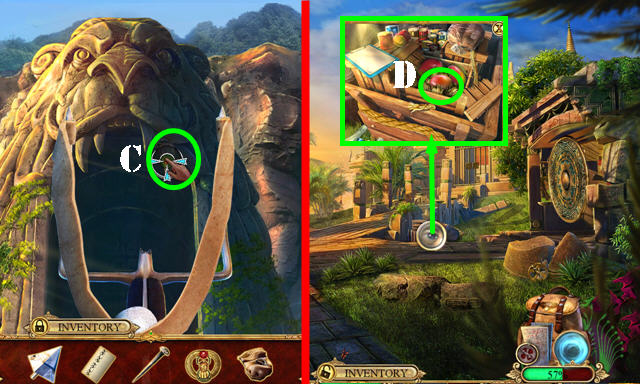
- Use the SLINGSHOT; aim and shoot (C) to get the STONE TOOTH.
- Return to the City Entrance.
- Use the STONE TOOTH; select the crate; take the FRUIT (D).
- Walk down.

- Give the FRUIT (E) to get the MIRROR.
- Return to the City Entrance.
- Place the MIRROR and CODE and unfold it for a puzzle (F).
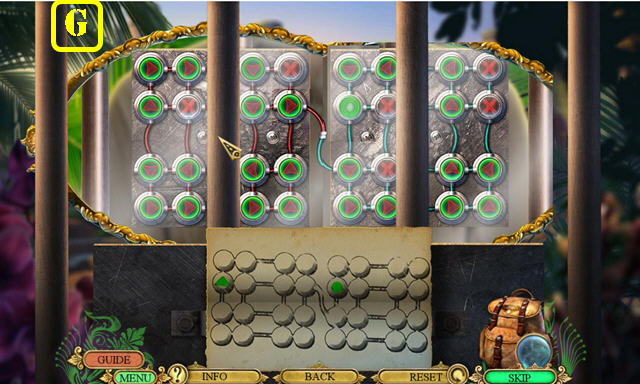
- Solution (G).
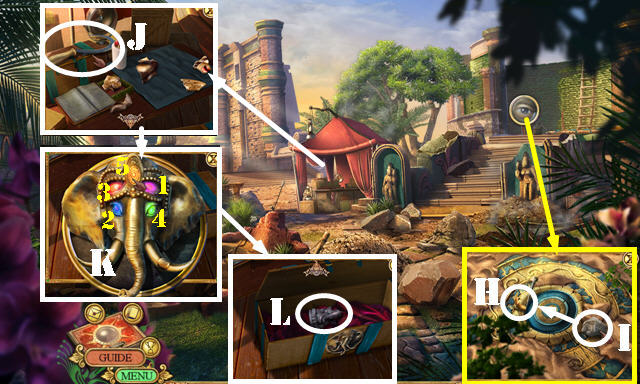
- Place the OLD NAIL (H); use the stone (I) on it and take the GOLDEN TUSK.
- Look at the journal and take the SICKLE (J). Arrow down; place the GOLDEN TUSK (K); select 1-5.
- Take the ELEPHANT FIGURE (L). Arrow up.
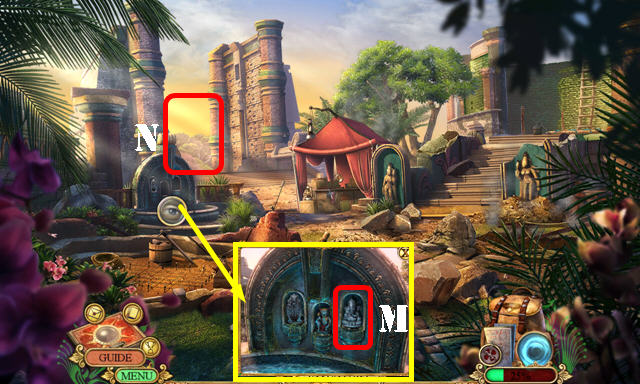
- Place the ELEPHANT FIGURE (M).
- Go to the Garden Overlook (N).
Chapter 2: Garden Overlook
- Answer the call (O).
- Take the METAL DETECTOR (P).
- Take the Fact Card (@) and SMALL HANDLE (Q).
- Walk down.
- Use the METAL DETECTOR on the marked spot and select it, then use the brush (R); take the SILVER HEART 1/3 (S).
- Walk down.
- Place the SMALL HANDLE; take the CLAY CHIN (T).
- Go to the City Center.
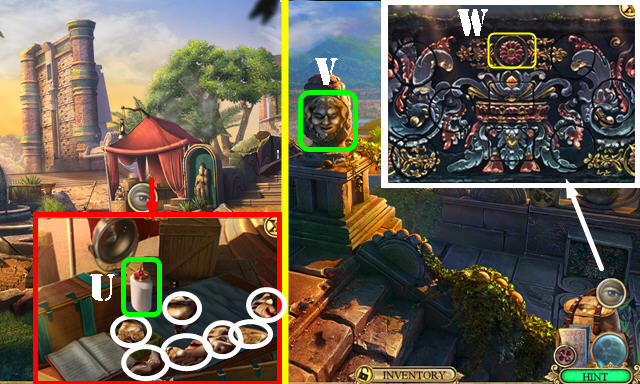
- Put down the CLAY NOSE and CLAY CHIN. Select the 7 pieces (white) and use the glue (U); take the CLAY FACE.
- Go to the Garden Overlook.
- Place the CLAY FACE (V); rotate the circles as shown (W) and touch the 3 squares in the center. Take the TERRACOTTA TILE (W) and SILVER HEART 2/3.
- Return to the Lion Staircase.

- Use the SICKLE (A) for an HOP; play it to get the LOTUS CANDLE.
- Place the GLASS PRISM on the LOTUS CANDLE (inventory).
- Go to the Staircase Lookout.
- Place the LOTUS CANDLE for a puzzle (B).
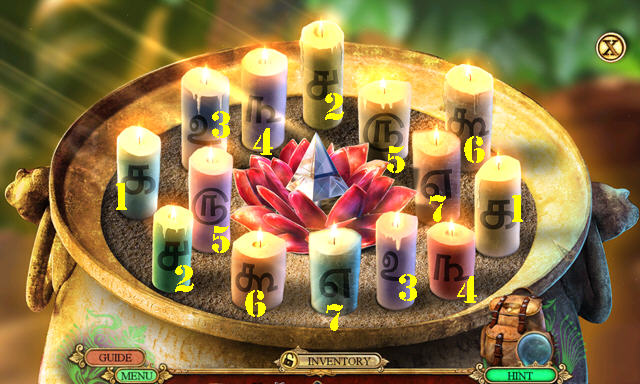
- Solution (1-7).
- Take the SURVEYOR LENS.
- Return to the Garden Overlook.
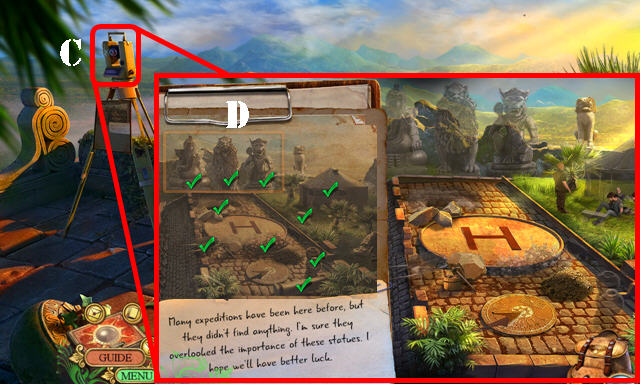
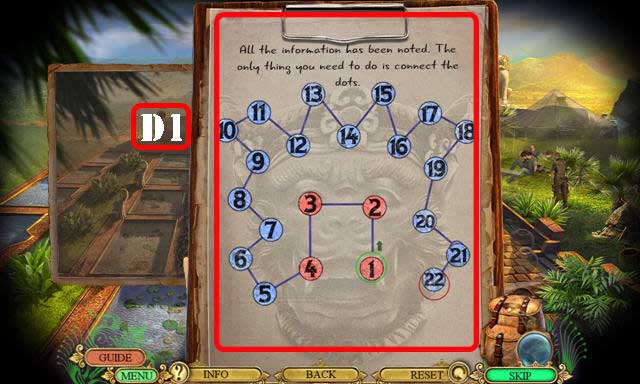
- Place the SURVEYOR LENS and zoom in and select the note for a puzzle (C).
- Find the differences (D).
- Solution (D1). Take the MONKEY DRAWING.
- Walk down.
- Select the monkey and place the MONKEY DRAWING; select 1-4 (E) to get the ANCIENT CROWN.
- Go to the Secluded Chamber (F).
- Select the 7 stones (G); take the SILVER HEART 3/3 (H).
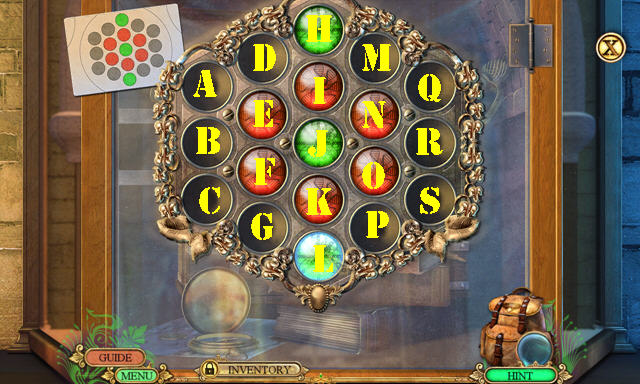
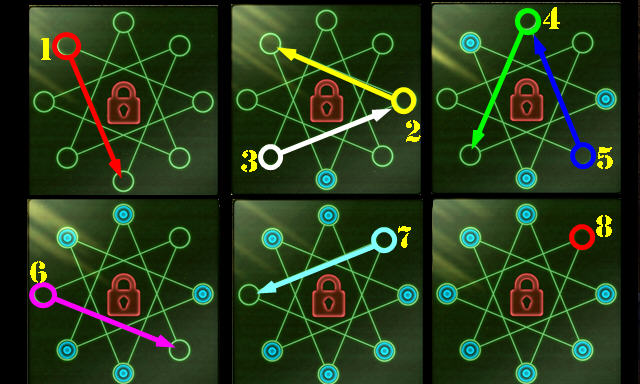
- Place the 3 SILVER HEARTS (I) for a puzzle.
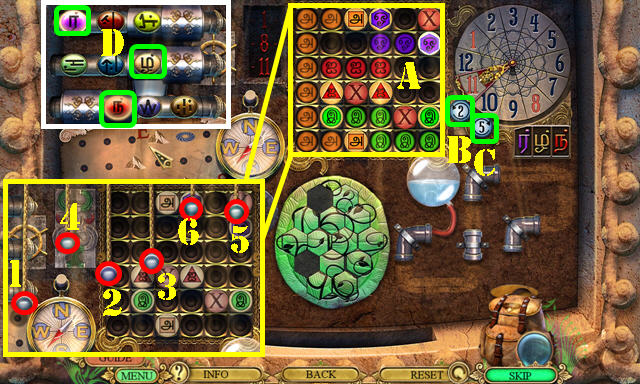
- Select 1-6.
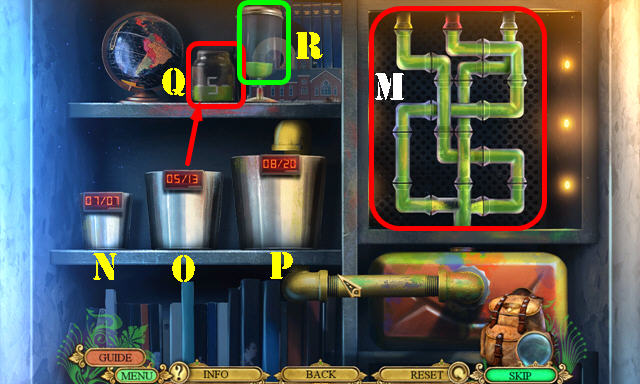
- Create the paths shown (A).
- Select Bx2-C-Bx5-C-B-C.
- Expose the correct symbols and select them (D).
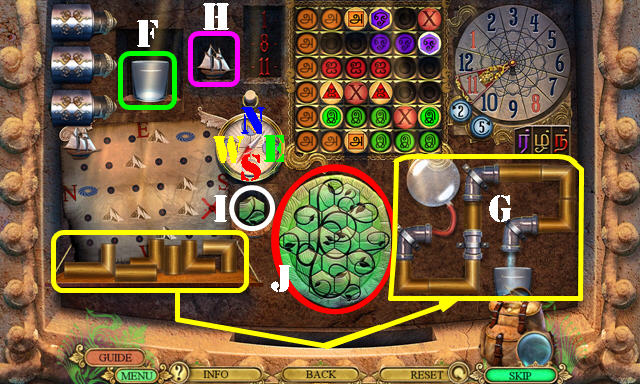
- Select the glass (F). Assemble the pipes (G). Select the ship (H).
- Select: W-S-W-Sx2-E-Sx2-Wx2.
- Select the tiles (I). Swap as shown (J).
- Take the ANCIENT PLAQUE.
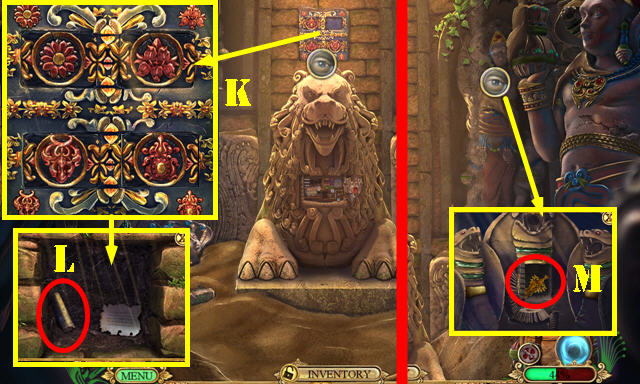
- Select anywhere on the scene. Place the TERRACOTTA TILE and arrange as shown (K).
- Read the note; take the MECHANISM PART (L).
- Select the lion; place the ANCIENT CROWN and the ENTANGLED SNAKES EMBLEM; take the ANCIENT PENDANT (M).
- Play the automatic HOP to get the OCTOPUS BODY.
- Go forward to the Temple Approach.
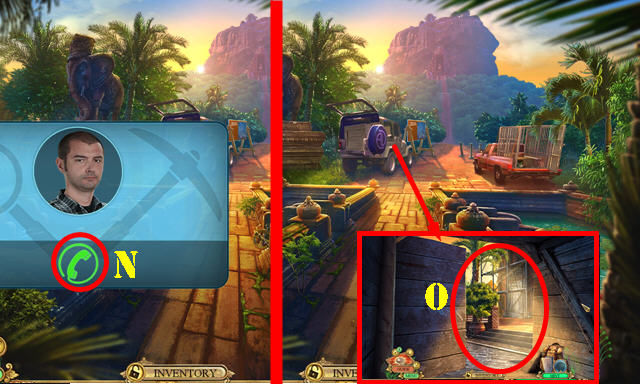
- Answer the phone (N).
- Open the door and go forward to the Riverbank (O).
Chapter 3: Seville
- Take the Fact Card (@) and METAL DECORATION (P).
- Go right.
- Take the CRANK (Q).
- Select the scaffolding for a HOP (R); play it to get the WOODEN DECORATION.
- Take the MUSEUM DOOR EMBLEM (S).
- Place the MUSEUM DOOR EMBLEM; slide the pieces as shown to match the symbols (T).
- Enter the Museum.
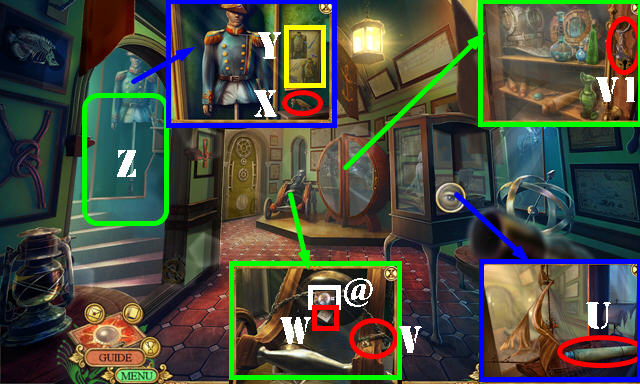
- Open the case; look at the scroll (U).
- Take the Fact Card (@), CABINET KEY PART (V) and ANVIL 1/3 (V1).
- Place the CRANK; take the DISPLAY BOX ACCESS CARD (W).
- Take the METAL BIRD (X). Look at the clue (Y).
- Go to Magellan's Chamber (Z).
- Take the Fact Card (@).
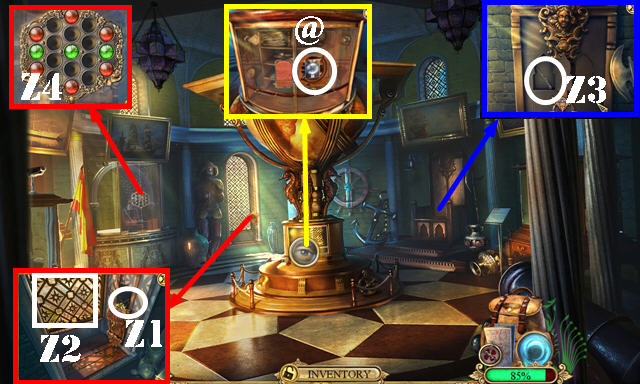
- Place the WOODEN DECORATION; take the FLEUR DE LIS 1/3 (Z1). Open the window (Z2).
- Use the METAL DECORATION; take the BUTTON HOOK (Z3).
- Place the DISPLAY BOX ACCESS CARD for a puzzle (Z4).
- Solution: S-Px2-A-Dx2-J-I-K-J-Fx5-Nx5-H-L.
- Look at the book; take the CABINET KEY PART and NAILS.
- Combine the 2 CABINET KEY PARTS to create the CABINET KEY (inventory).
- Walk down.
- Use the CABINET KEY; move two bottles and take the SMALL BROOM (T).
- Use the BUTTON HOOK; look at the note and take the GLOBE (U).
- Go to the Museum Cellar (V).

- Take the SPANISH INSIGNIA (W) and FLEUR DE LIS 2/3 (W1).
- Use the SMALL BROOM; select matching pairs (X); take the WOODEN BOARD (X1).
- Place the METAL BIRD and pull the handle; take the MECHANICAL REACHER (Y). Place the MECHANISM PART (Z).
- Return to Magellan's Chamber.
- Use the MECHANICAL REACHER to get the OLD TORCH (A).
- Place the GLOBE and select it; press the lock (B) and take the LIGHTBULB (C).
- Arrow down. Place the SPANISH INSIGNIA (D); take the MAGNET (E).
- Return to the Museum Cellar.
- Select lights 1-2; place the LIGHTBULB (F).
- Place the OLD TORCH (G); select it.
- Play the HOP (H) to get the MAST WITH SAIL.
- Go to the Mint Cellar (I).
- Take the BROKEN LADDER (J) and WIND UP KEY (K).
- Open the lid; take the FLEUR DE LIS 3/3 (L).
- Select the stones; use the MAGNET to get the METAL PORTRAIT (M).
- Walk down.
- Place the METAL PORTRAIT (N); look at the scroll and take the COINING PRESS WINDER (O).
- Use the WIND UP KEY (P); take the HAND SAW (Q).
- Go to the Mint Cellar.
- Use the COINING PRESS WINDER (R) for a puzzle.
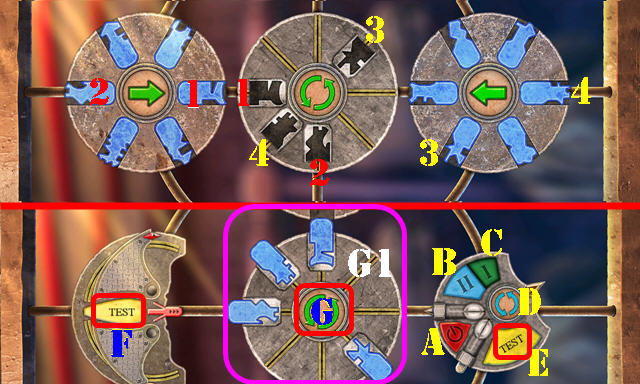
- Insert the symbols into the right slots (1-4).
- Solution: G-B-A-Gx2-C-D-A-G-B-A-D-G-C-A-Gx2-E-F.
- Take the MINT DOOR KEY (G1).
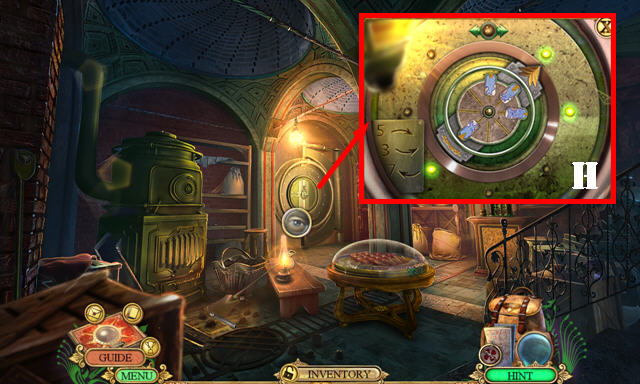
- Place the MINT DOOR KEY and select it (H). Rotate 5 spaces clockwise, 3 counterclockwise and 7 clockwise (Do not stop at each space, just stop the dial on the next number).
- Enter the Mint.
- Select the 4 items (1-4).
- Look at the two notes (I-J).
- Take the HAMMER (K).
- Place the 3 FLEUR DE LIS; take the LEFT TENTACLE (L). Take the CHAIN (M).
- Use the HAND SAW (N) for a HOP; play it to get the WOODEN FEATHERS.
- Place the WOODEN BOARD and NAILS on the BROKEN LADDER. Use the HAMMER on the nails to get the IMPROVISED BRIDGE (inventory).
- Walk down.
- Place the CHAIN; select it twice; place the pipe on it and take the ANVIL 2/3 (O).
- Return to the Museum.
- Place the MAST WITH SAIL (P): take the ANVIL 3/3 (Q).
- Return to the Mint.
- Place the 3 ANVILS; select the lock and take the SYMBOL DIAL (R).
- Walk down.
- Place the SYMBOL DIAL; select 2-1-2-3-1. Read the note. Open the box; take the DIAMOND (S) and COIN BANK CODE.
- Go to the Mint.
- Place the COIN BANK CODE; select 4-7; take the Fact Card (@) and SMALL TRIDENT.
- Return to the Riverbank.
Chapter 4: The Ship
- Use the SMALL TRIDENT and select cover; select wires four times; take the FUSE (T).
- Go left (U).
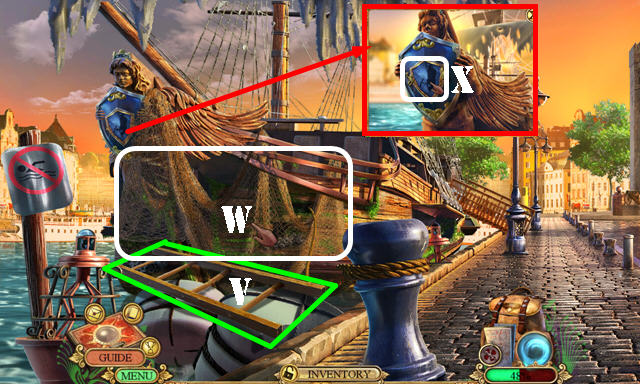
- Place the IMPROVISED BRIDGE (V) and select the net (W).
- Place the WOODEN FEATHERS; take the EMPTY SHIELD WITH BANNER (X).
- Go right twice.
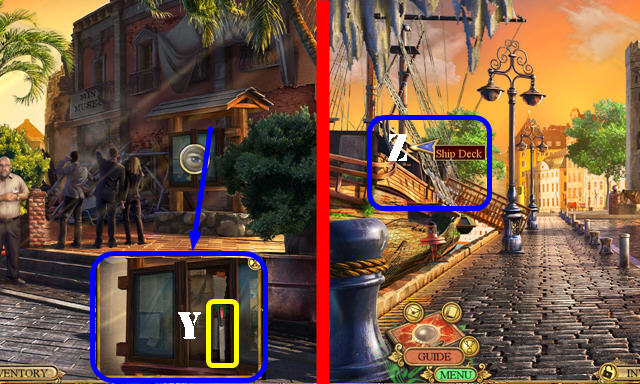
- Use the DIAMOND; open the latch and look at the note. Take the FILE (Y).
- Go left and enter the Ship Deck (Z).
- Take the PEG LEG (A) and SANDPAPER (B).
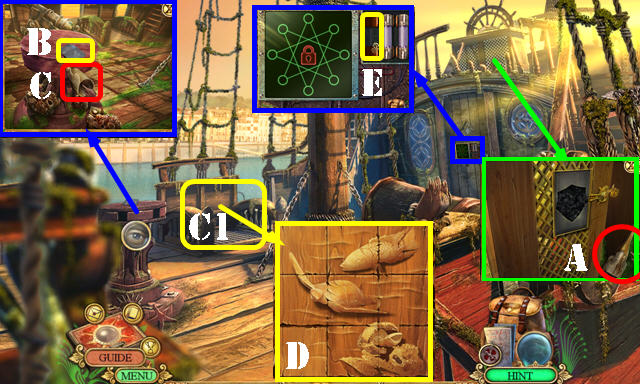
- Use the PEG LEG (C) and select it for an HOP (C1); play it to get the ETCHED STONE 1/3. HOP puzzle solution (D).
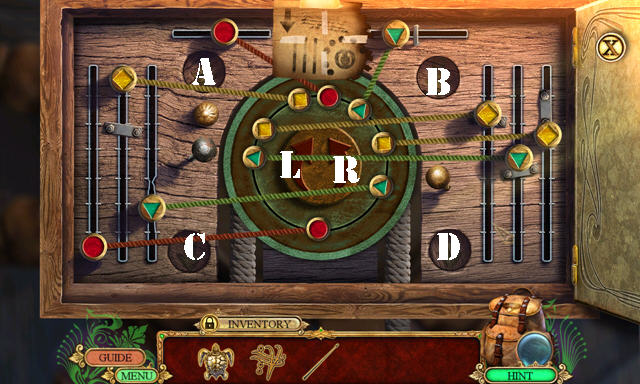
- Place the FUSE (E) for a puzzle.
- Solution (1-8).
- Enter the Captain's Quarters.
- Use the FILE (F).
- Take the Fact Card (@) and BOAT HOOK (G). Use the BOAT HOOK; look at the note and take TWO TAILED MERMAID (H). Arrow up.
- Place the TWO TAILED MERMAID on the EMPTY SHIELD WITH BANNER to get the SHIPS INSIGNIA (inventory).
- Walk down.
- Place the SHIPS INSIGNIA; open the door and take the SCISSORS (I).
- Go up.
- Use the BOAT HOOK; take the CORAL PIECE and PICTURE PART (J).
- Return to the Captain's Quarters.
- Use the SCISSORS; take the LOCKPICK PIECE and RIGHT TENTACLE (K).
- Place the LEFT TENTACLE and RIGHT TENTACLE on the OCTOPUS BODY to get the OCTOPUS (inventory).
- Place the OCTOPUS (L); place the ANCIENT PENDANT; take the CARETTA BRACELET and ETCHED STONE 2/3 (M).
- Place the PICTURE PART for a puzzle (N).
- Rotate the rounds parts as shown (O).
- Swap the pieces in numerical order 1-4.
- Take the ETCHED STONE 3/3.
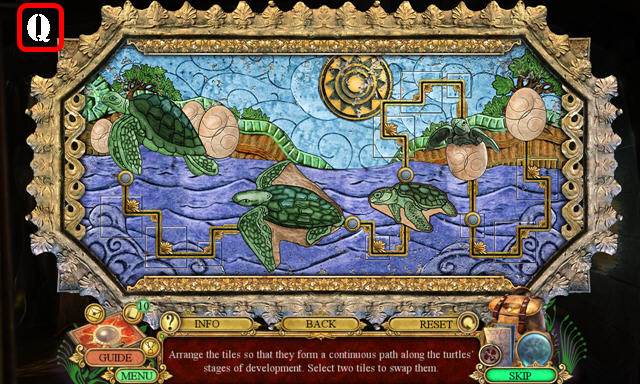
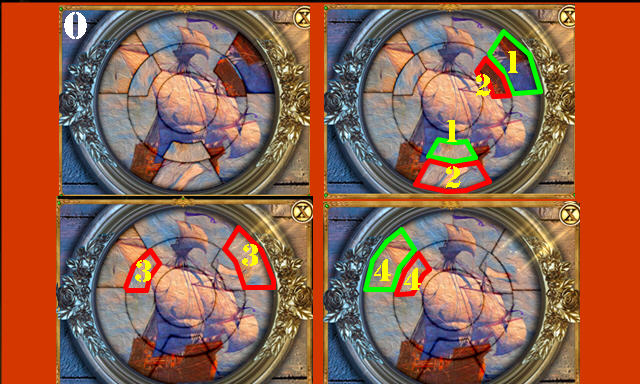
- Place the 3 ETCHED STONES (P) for a puzzle.
- Solution (Q).
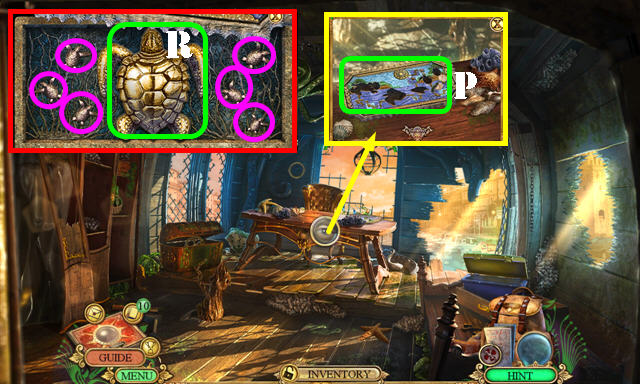
- Select all the small turtles (purple), and then select the large one (R) to get the TURTLE FIGURINE.
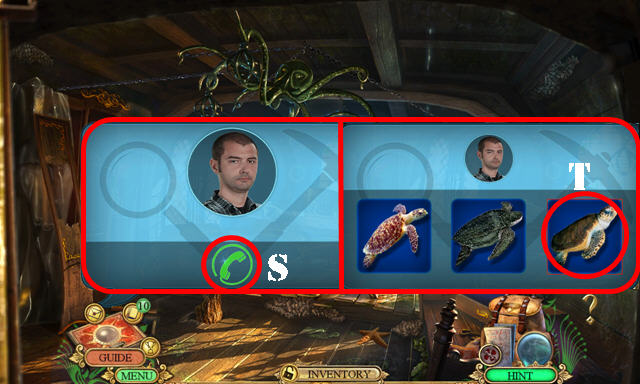
- Answer the call (S). Pick the third turtle (T).
Chapter 5: Turtle Research Lab
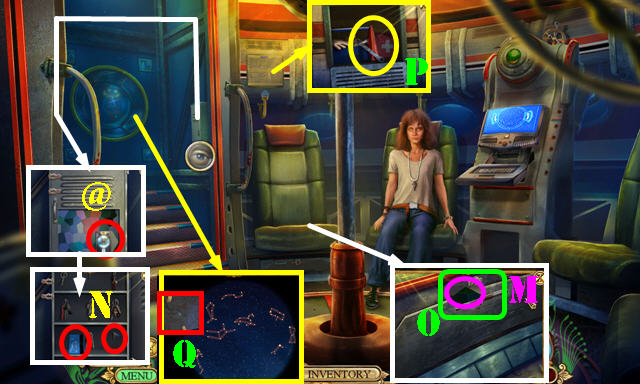
- Take the SHELL PIECES 1/4 (U) and PLATFORM SWITCH (V).
- Play the HOP (W) to get the ATURNIN LOGO.
- Go to the Central Corridor (X).
- Take the Fact Card (@). Place the ATURNIN LOGO; take the TUBING (Y).
- Take the MATCHES (Z).
- Enter the Turtle Research Lab (Z1).
- Take the Fact Card (@).
- Look at the journal; take the COLD STORAGE KEY (B).
- Place the PLATFORM SWITCH (C) and pull it.
- Take the GLOVES (D).
- Read the note; place the CORAL PIECE (E); press the button (F). Lift the cover and take the SHELL PIECES 2/4 (G). Arrow up.
- Walk down.

- Use the COLD STORAGE KEY (H).
- Go through the door.
- Select anywhere on the scene twice.
- Use the MATCHES (I). You receive the TURTLE TAGGER from Simone.
- Take the INCUBATOR CARD (J).
- Read the note (K).
- Play the puzzle (L).
- Rotate the pipes as shown (M).
- Select (P-O)-(O-N)-(N-P)-(O-N)-(P-O)-(O-N)-(N-P)-(O-N). Pour O-Q.
- Take the ISOTOPIC PAINT CARTRIDGE (R).
- Return to the Marine Outpost Entrance.
- Use the GLOVES to get the GLASS PIECE (S).
- Return to the Turtle Research Lab.
- Swipe the INCUBATOR CARD (T); take the WOODEN EARS (U).
- Use the ISOTOPIC PAINT CARTRIDGE on the TURTLE TAGGER to get the FULL TURTLE TAGGER (inventory).
- Press the button (V); use the FULL TURTLE TAGGER (W). Press the button (Y). Take the WIRE CUTTERS (X).
- Return to the Marine Outpost Entrance.
- Use the WIRE CUTTERS twice (A). Go to Simone's Secret Outpost.
- Look at the note (B).
- Use the SANDPAPER; take the FOCUS WHEEL (C).
- Enter the Secret Research Post (D).
- Take the HEXAGON 1/3 (E). Place the FOCUS WHEEL (F); take the BINOCULAR LENS and PAPERCLIP (G).
- Use the GLASS PIECE; take the WOODEN HORNS (H).
- Take the Fact Card (@); look at the note and take the FLASHLIGHT (I).
- Use the PAPERCLIP on the LOCKPICK PIECE to get the LOCKER OPENER (inventory).
- Walk down.
- Use the FLASHLIGHT for an HOP (J); play it to get the MONITORING AREA CODE.
- Place the WOODEN EARS and WOODEN HORNS; take the STURDY WOODEN TONGUE (K). Take the SHELL PIECES 3/4 (K1).
- Return to the Central Corridor.
- Use the MONITORING AREA CODE. Enter 13579 (L).
- Go through the door.
- Select the globe and place the CARETTA BRACELET on it. Spell out caretta (M).
- Take the HEXAGON 2/3 and REGULATOR KNOB (N).
- Take the Fact Card (@). Use the LOCKER OPENER on the lock; read the note; take the PLUNGER and TABLE MECHANISM PART (O).
- Return to the Cold Storage.

- Use the PLUNGER; take the SPOON (P).
- Place the REGULATOR KNOB (Q) for an HOP; play it to get the MECHANISM LEVER. HOP puzzle solution (R).
- Place the MECHANISM LEVER on the TABLE MECHANISM PART to get the TABLE MECHANISM (inventory).
- Use the TABLE MECHANISM; take the SMALL TUBE and SHELL PIECES 4/4 (S).
- Use the BINOCULAR LENS and SMALL TUBE on the TUBING to get the IMPROVISED SPYGLASS (inventory).
- Walk down.
- Use the SPOON; take the SEAHORSES 1/2 (T).
- Return to the Secret Research Post.
- Place the 4 SHELL PIECES; take the SEAHORSES 2/2 (U).
- Place the 2 SEAHORSES (V) for a puzzle.
- Solution: W-Xx2-W-X.
- Take the METAL FLOWER.
- Place the METAL FLOWER; take the USB STICK (Y).
- Return to the Monitoring Area.
- Use the USB STICK (Z) for a puzzle.
- Solution: B-G-D-E-C-A-B-D-G-F-E-D-C-A-B-G-D.
- Answer the call (H).
- Select the screen for a clue (I).
- Go to the Turtle Research Lab.
- Solve the puzzle (J). Take the POD KEY (K).
- Return to the Marine Outpost Entrance.
- Use the POD KEY (L); turn it and enter the Tsunami Pod.
- Take the Fact Card (@).
- Take the HEXAGON 3/3 (M).
- Place the 3 HEXAGONS; take the TERMINAL ACTIVATOR CARD and KEY HOOK (N).
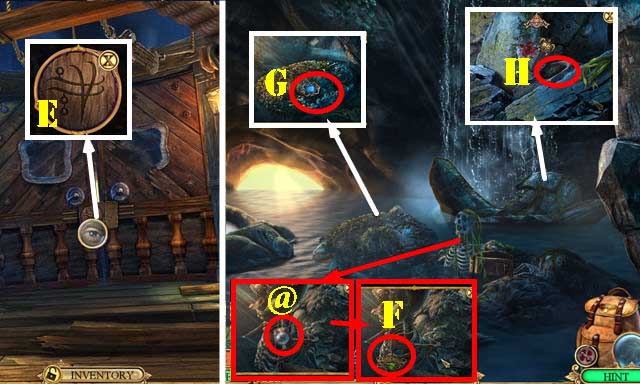
- Use the STURDY WOODEN TONGUE; try to open the latch. Use the KEY HOOK (O) for a HOP; play it to get the VENTILATION KEY.
- Use the VENTILATION KEY; take the BOX WRENCH and OLD CLOTH (P).
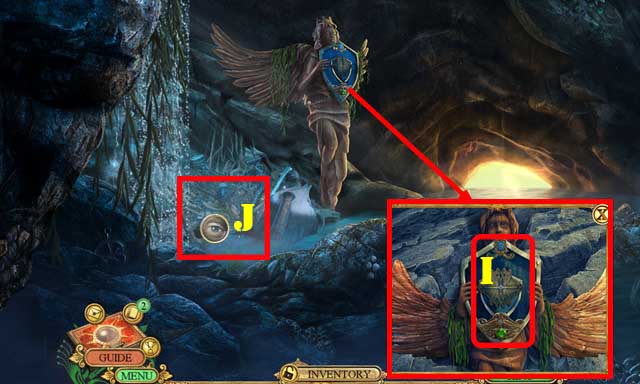
- Use the OLD CLOTH and IMPROVISED SPYGLASS. Select all the constellations; take the STAR PATTERN (Q).
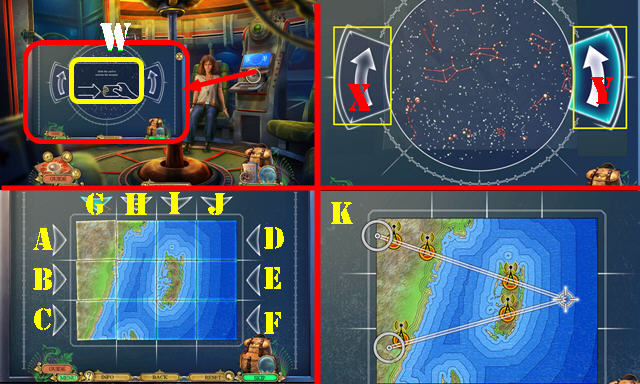
- Use the TERMINAL ACTIVATOR CARD (W) and place the STAR PATTERN for a puzzle.
- Use the arrows (X-Y) to rotate the image as shown.
- Select: Ex2-F-H-Gx3.
- Solution (K).
- Answer the call (not pictured).
Chapter 6: Socotra Island
- Take the Fact Card (@) and SILVER FRUIT 1/3 (L). Use the BOX WRENCH; take the DOOR RING (M).
- Select the curtain (N) for a HOP; play it to get the NAIL CLIPPER.
- Look at the note (O).
- Go to Hadibu Market (P).
- Use the NAIL CLIPPER; take the BOLT (Q).
- Walk down; go right to the Beach (R).
- Take the Fact Card (@) and CROCHET NEEDLE (S).
- Take the FISH EMBLEM (T).
- Walk down.
- Place the FISH EMBLEM; take the PICKAXE and CORKSCREW (U).
- Use the CROCHET NEEDLE 3x; take the WINDING KEY and WEIGHT (V).
- Return to Hadibu Market.
- Use the CORKSCREW to get the GLOW STICK (W).
- Use the WINDING KEY; take the BRONZE BROOCH (X).
- Place the WEIGHT (Y) for a puzzle.
- Solution (Z).
- Take the SCREW BLADE (Z1).
- Return to the Beach.
- Place the GLOW STICK; use the PICKAXE to get the OIL (A).
- Place the BRONZE BROOCH (B); take the SILVER FRUIT 2/3 (C).
- Return to Hadibu Market.
- Use the OIL (D).
- Go to the European Market Memorial (E).
- Answer the call (not pictured).
- Take the FISHING HOOK (F).
- Take the SILVER FRUIT 3/3 and CARVED TILE (G).
- Place the DOOR RING (H) for a HOP; play it to get the MEDICAL SPREADER.
- Walk down.
- Place the 3 SILVER FRUITS (I); take the MEMORIAL ENTRANCE KEY (J).
- Go to the European Naval Memorial.
- Use the MEMORIAL ENTRANCE KEY (J). Go through the door.
- Take the HAND SPOOL (K).
- Place the CARVED TILE; look at the book; take the HAND WEEDER and METAL SEAGULL (L).
- Walk down.
- Use the HAND WEEDER; take the Fact Card (@) and INTRICATE SYMBOL (M).
- Place the METAL SEAGULL; take the HOOKAH RING (N).
- Place the FISHING HOOK on the HAND SPOOL to get the FISHING DROP LINE (inventory).
- Use the FISHING DROP LINE; take the LANTERN HANDLE (O).
- Go to the Naval Memorial Inside.
- Use the HOOKAH RING (P); take the WOODEN BOOK (Q).
- Place the LANTERN HANDLE; take the CRESCENT MOON 1/3 (R).
- Place the WOODEN BOOK for a puzzle (S).
- Solution one: (N-J)-(O-K)-(J-E)-(K-H)-(F-B)-(G-C)-(I-F)-(L-G)-(E-A)-(H-D)-(B-E)-(G-J)-(E-I)- (J-G)-(C-H)-(F-K)-(H-L)-(G-J)-(J-N)-(K-O).
- Solution two: (N-J)-(O-K)-(I-E)-(A-F)-(D-G)-(E-I)-(K-N)-(I-M)-(N-O)-(J-K)-(L-P)-(K-N).
- Solution three: (M-I)-(N-K)-(O-L)-(L-H)-(F-C)-(C-D)-(H-L)-(G-J)-(L-O)-(K-N).
- Enter the Old Library.
- Take the Fact Card (@).
- Place the SCREW BLADE and BOLT on the MEDICAL SPREADER to get the COMPLETE MEDICAL SPREADER (inventory).
- Remove the books; use the COMPLETE MEDICAL SPREADER; take the PULLEY (Q).
- Play the HOP (R) to get the CRESCENT MOON 2/3.
- Pull down the map (S); look at the note; take the METAL POINTER and CRESCENT MOON 3/3 (T).
- Walk down.
- Place the 3 CRESCENT MOONS (U).
- Enter the Antique Elevator (U1).
- Select the three ropes and the two long chains on the scene (not pictured).
- Look at the note; take the COGWHEEL (V).
- Use the PULLEY (W).
- Take the GOLDEN SCROLL (X).
- Return to the Old Library.
- Place the GOLDEN SCROLL; take the ADHESIVE TAPE (Y).
- Place the COG (Y1); select the four scraps of paper; use the ADHESIVE TAPE and take the ELEVATOR CODE (Y2).
- Return to the Antique Elevator.
- Place the ELEVATOR CODE for a puzzle (Z).
- Solution one: Rx5-L.
- Solution two: C-D-Bx2.
- Place the INTRICATE SYMBOL (E).
- Go forward to the Fountain of Youth.
- Take the Fact Card (@).
- Use the METAL POINTER; take the SHIELD DECORATION PIECE (F).
- Remove the moss 3x; take the SHIELD DECORATION PIECE (G).
- Arrow down. Place the TURTLE FIGURINE; take the SHIELD DECORATION PIECE (H).
- Go left.
- Place the 3 SHIELD DECORATION PIECES (I).
- Play the HOP (J) to get the SWORD.
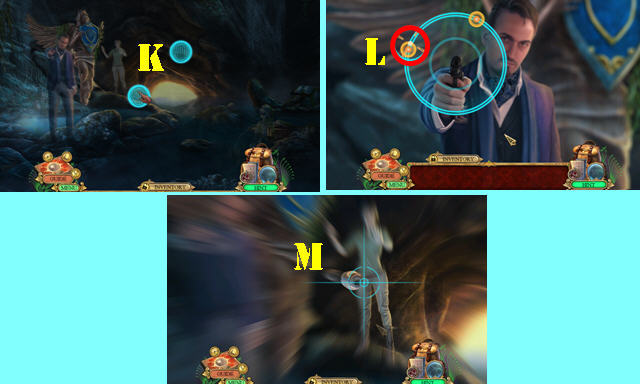
- Move the dots until everything is in focus (K).
- Use the SWORD (L). Select the dots when the dot is in the circle.
- Hit the bullet once it reaches the middle of the target (M).
- Congratulations, you've completed Hidden Expedition: The Fountain of Youth!
Created at: 2016-02-05