

Walkthrough Menu
- General Tips
- Chapter 1: Docks
- Chapter 2: Ship
- Chapter 3: El Jefe Club
- Chapter 4: The Factory
- Chapter 5: Submarine
- Chapter 6: Waterfalls
General Tips
- This is the official guide for Hidden Expedition: The Lost Paradise.
- This guide will not tell you when you have to zoom into a location; the screenshots will show each zoom scene.
- Hidden-object puzzles are referred to as HOPs. This guide will not show screenshots of the HOPs, however, it will mention when an HOP is available and the inventory item you'll collect from it.
- Use the Map to fast travel to a location.
Chapter 1: Docks
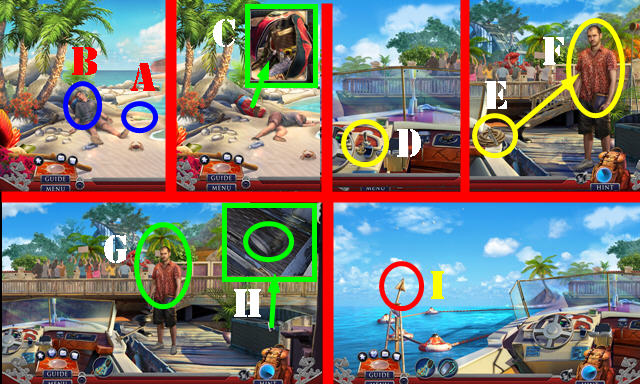
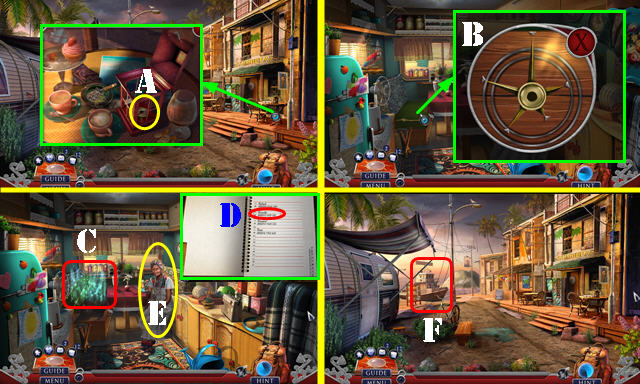
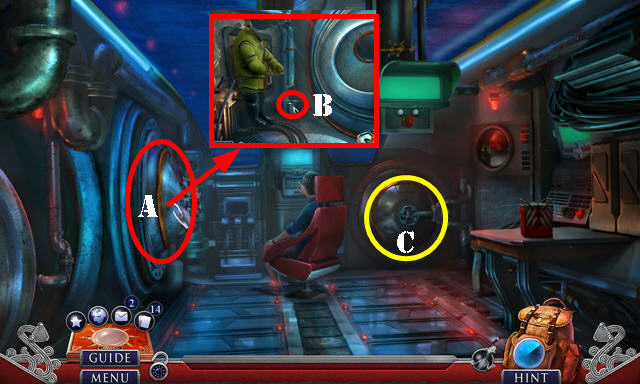
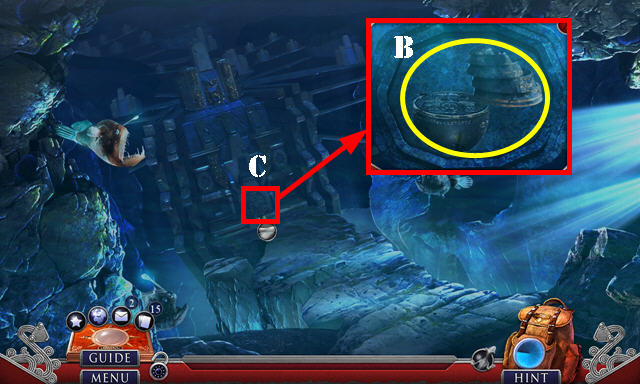
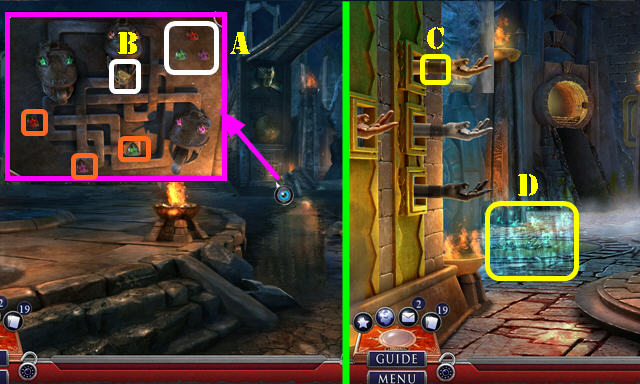
- Take the WATER BOTTLE (A).
- Use the WATER BOTTLE (B).
- Open the backpack (C); select three times.
- Take the SPEEDBOAT KEY (D).
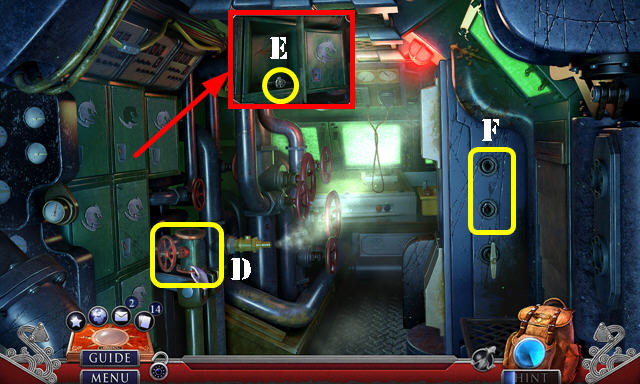
- Give the hooked rope (E) to Sam (F).
- Slide right. Talk to Sam (G).
- Take the DIVING GOGGLES (H).
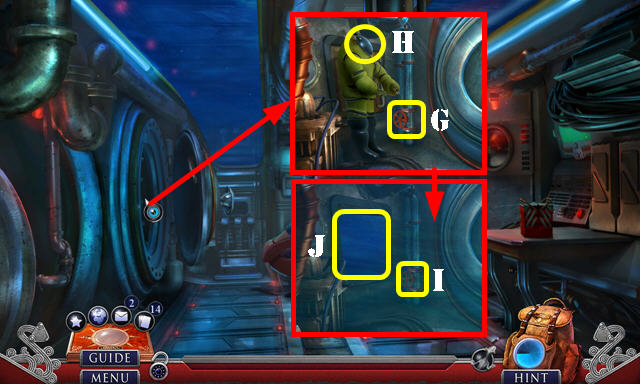
- Slide left; take the BUOY TIP (I).
- Slide right; use the BUOY TIP, select twice and take the FISHING ROD (J).
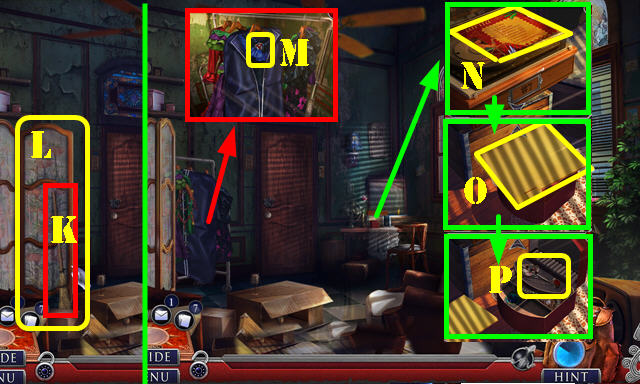
- Select 3x; receive the BROKEN SOLAR CELL (K).
- Use the BROKEN SOLAR CELL on the FISHING ROD; select twice.
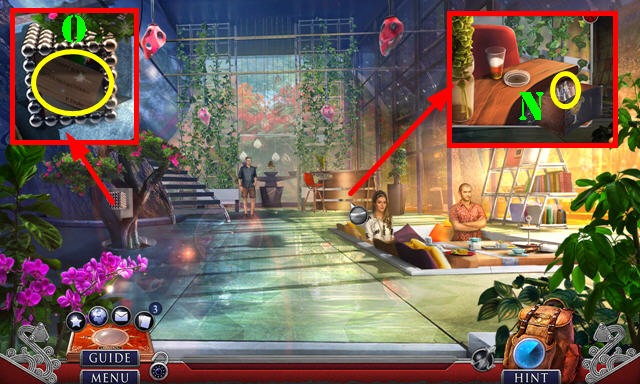
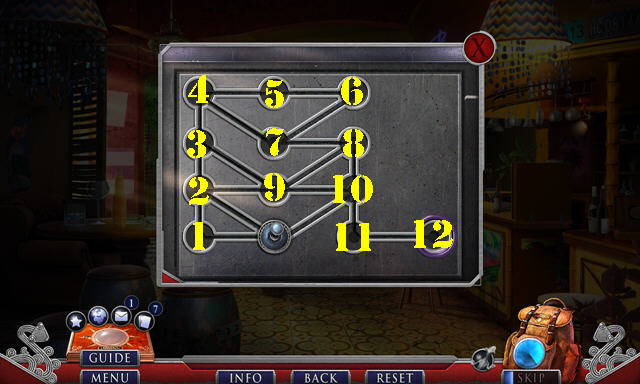
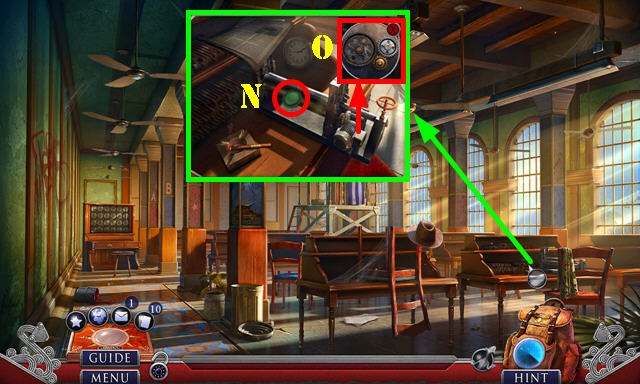
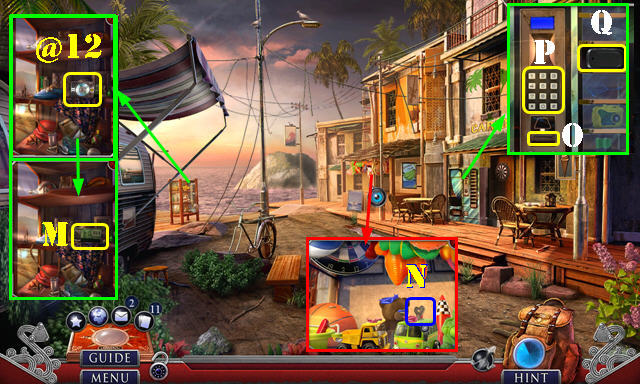
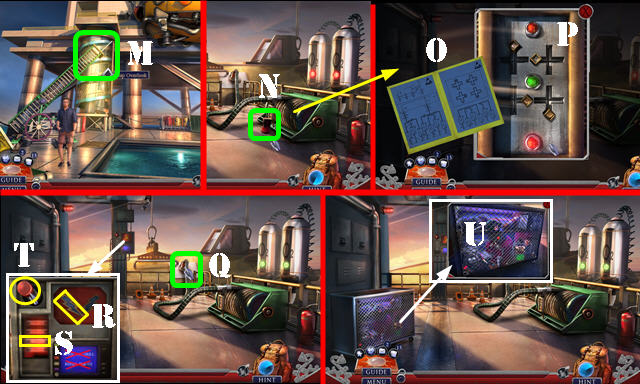
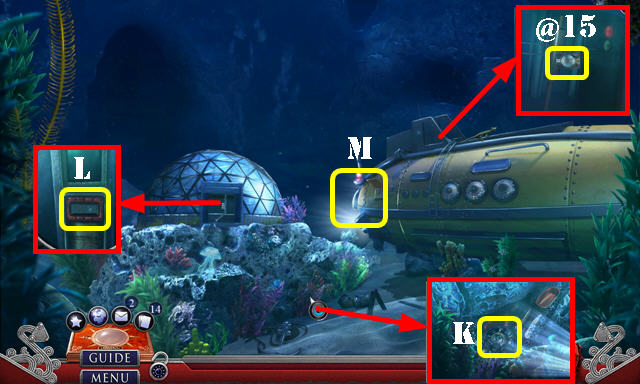
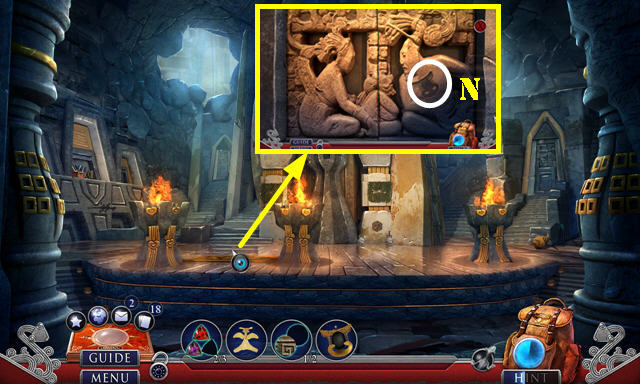
- Slide left. Use the FISHING ROD (L); take the Fact Card (@1); select the sphere and take the SOLAR CELLS (M).
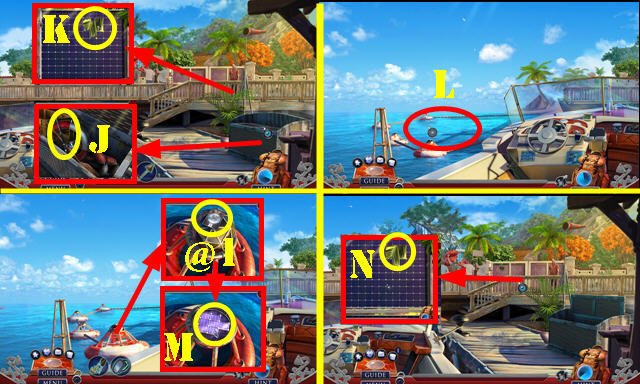
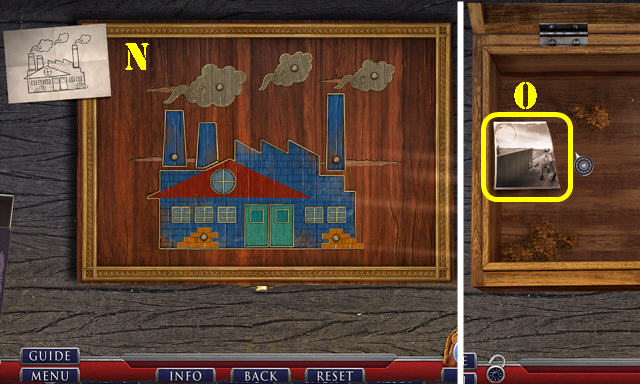
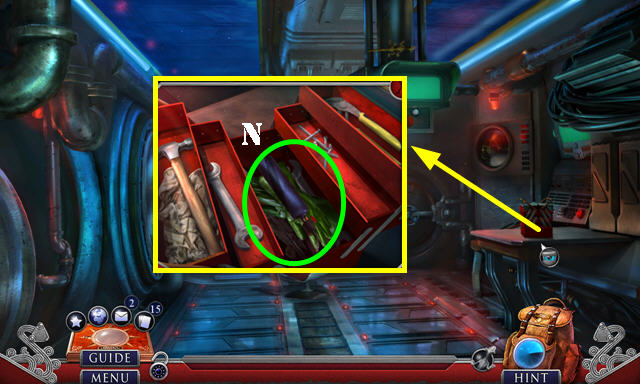
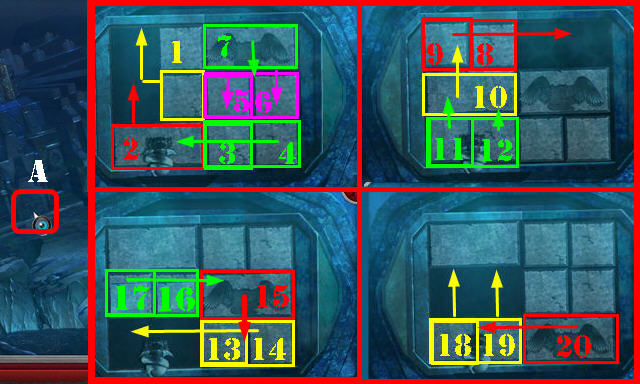
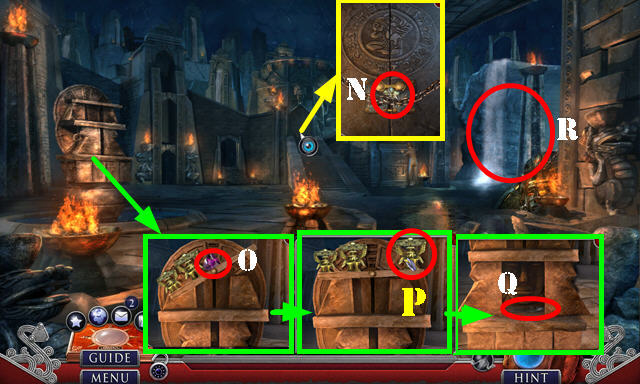
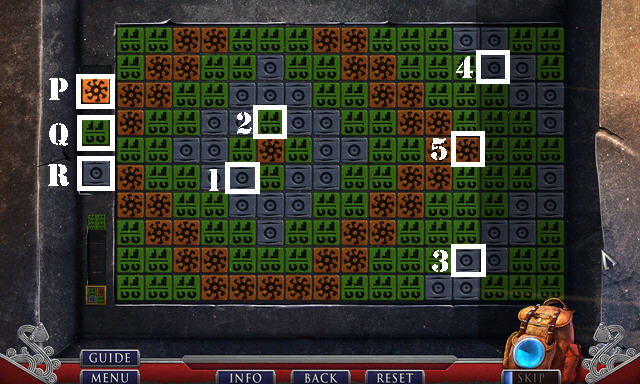
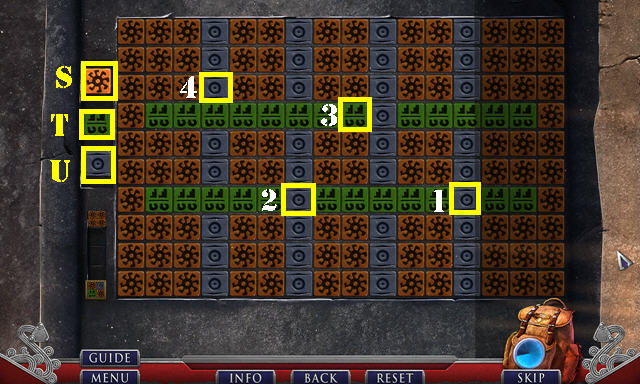
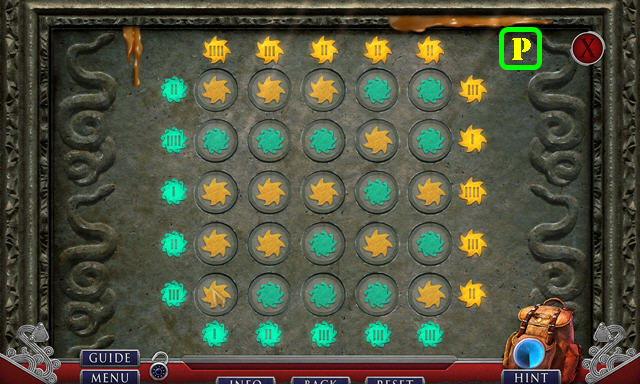
- Slide right. Place the SOLAR CELLS for a puzzle (N).
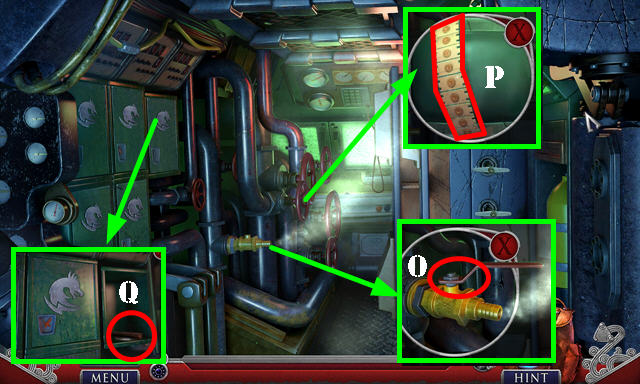
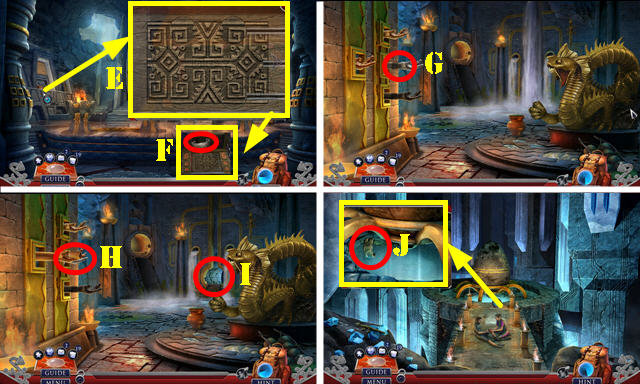
- Solution (O). Arrange the tiles as shown, then press each power button (orange).
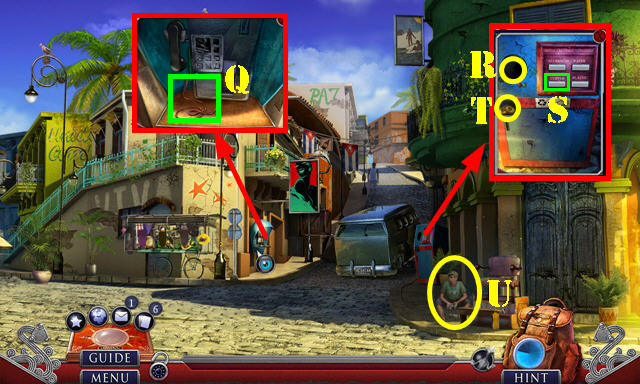
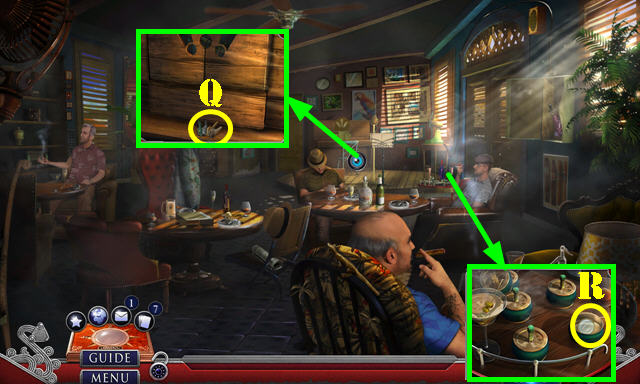
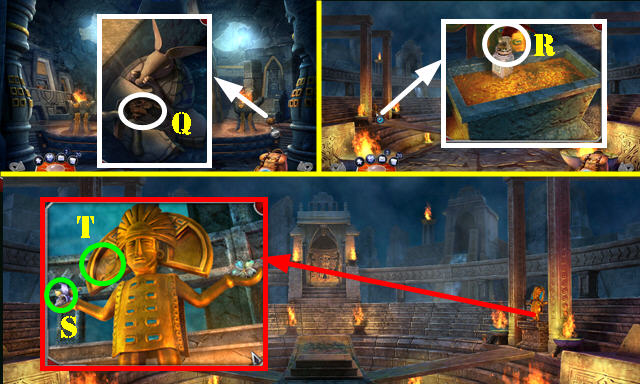
- Press the buzzer (Q).
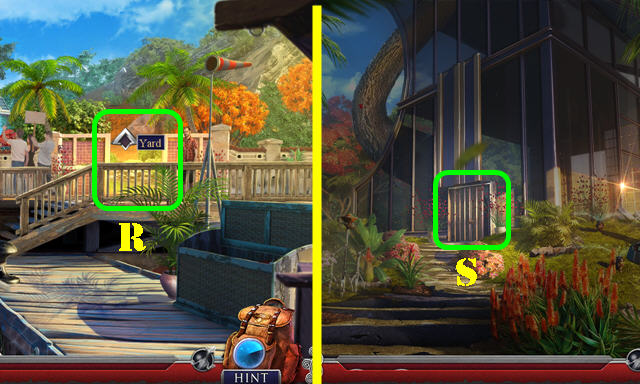
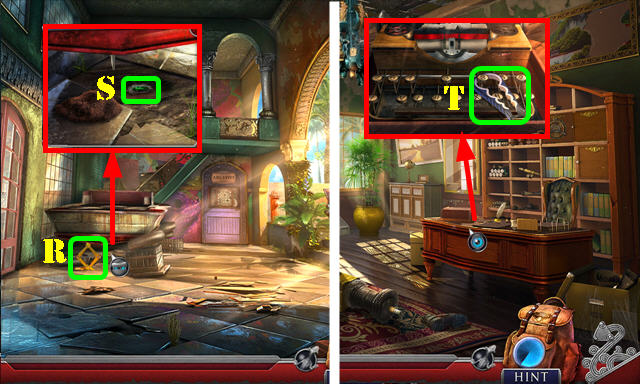
- Go to the Yard (R).
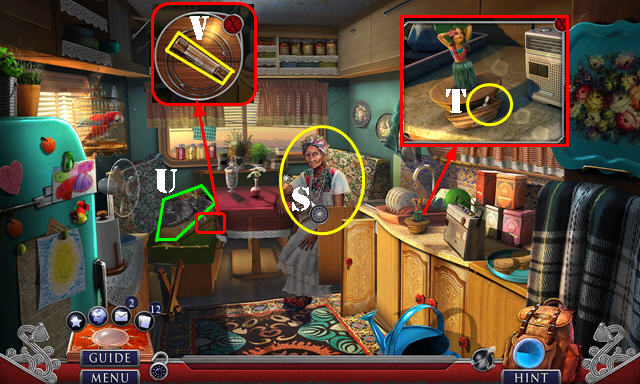
- Go to the Living Room (S).
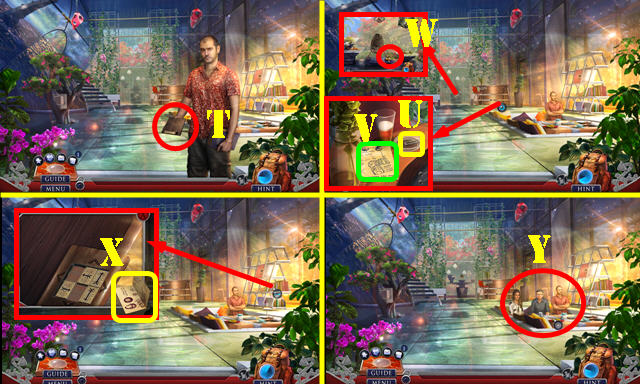
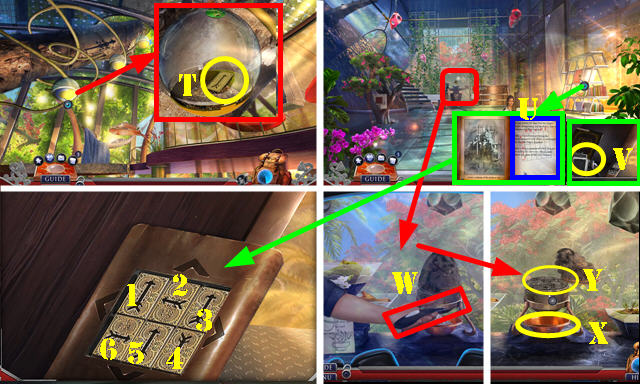
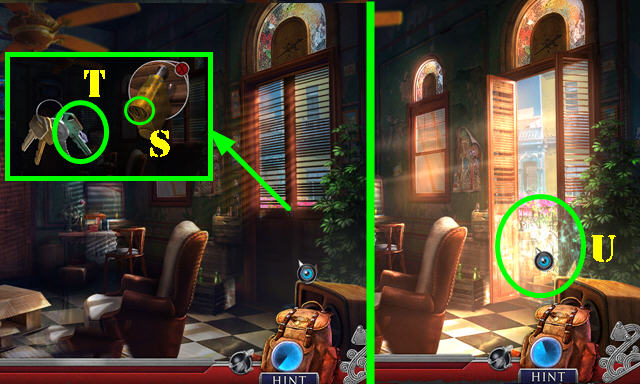
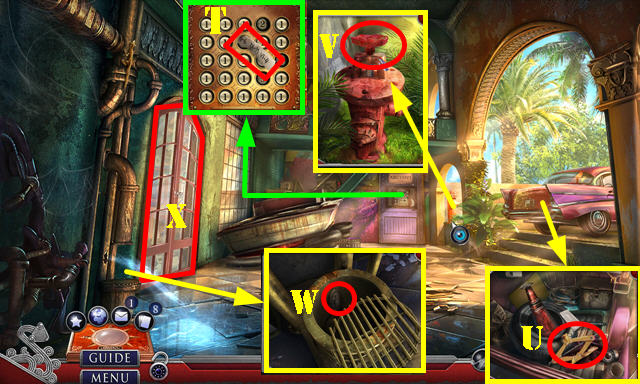
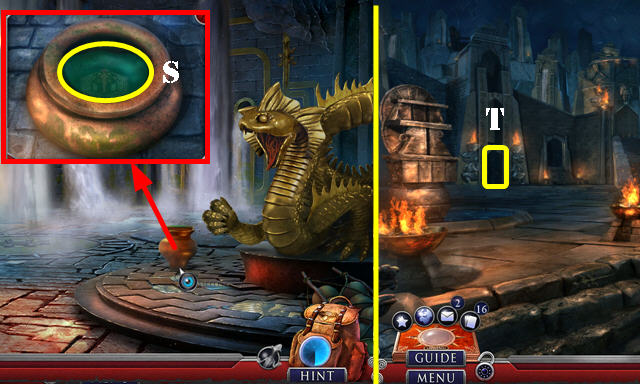
- Take DRAKE'S RESEARCH 1/3 (T).
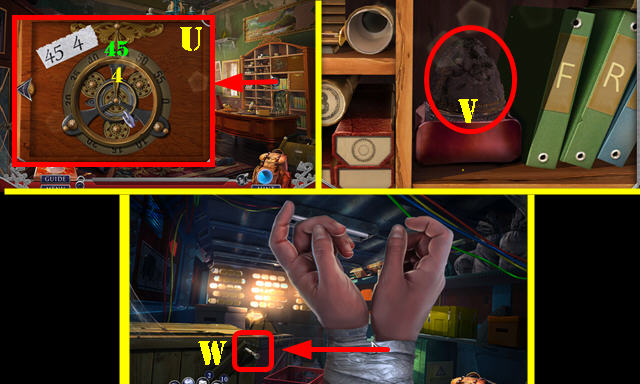
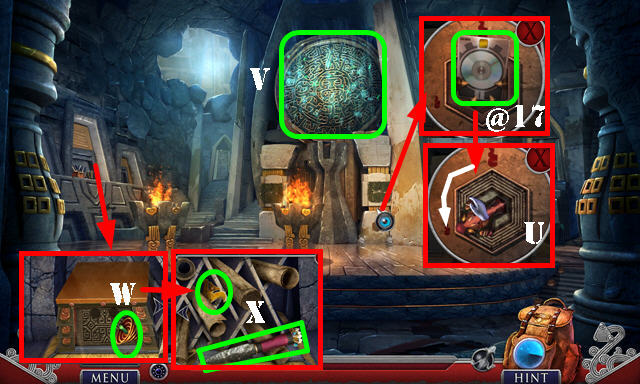
- Take the PAPER CLIPS 1/2 (U). Move the glass; take DRAKE'S RESEARCH 2/3 (V).
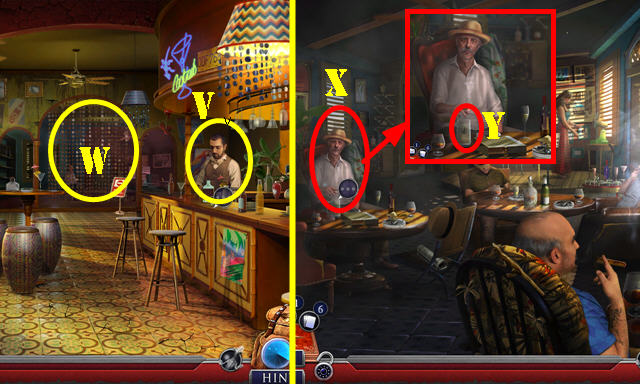
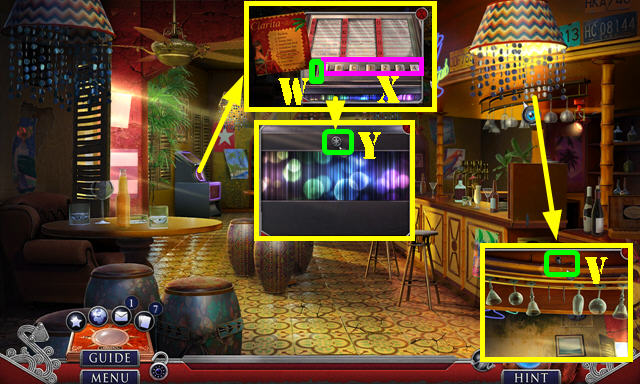
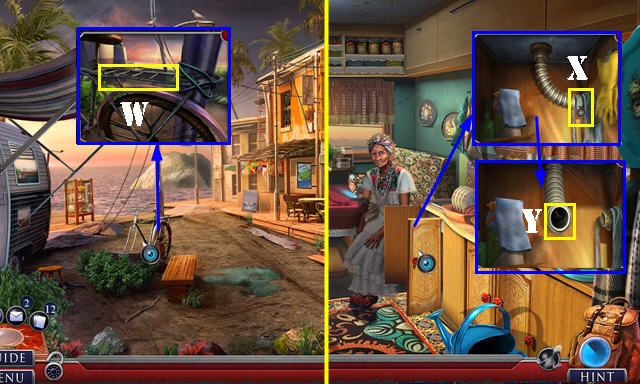
- Select the glass doors; take the GOLDEN BUD (W).
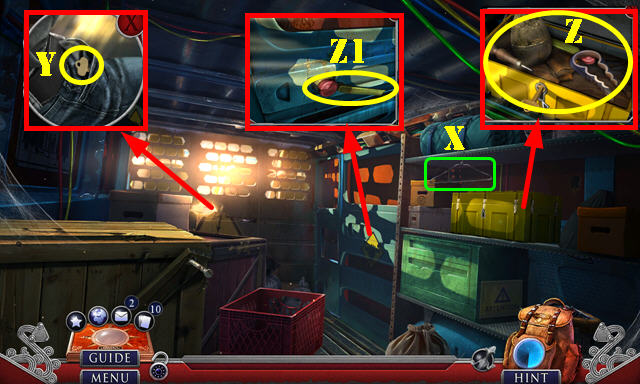
- Take DRAKE'S RESEARCH 3/3 (X).
- Give DRAKE'S RESEARCH 3/3 (Y); play the HOP to get the ANCIENT RIDDLE.
- Walk down.
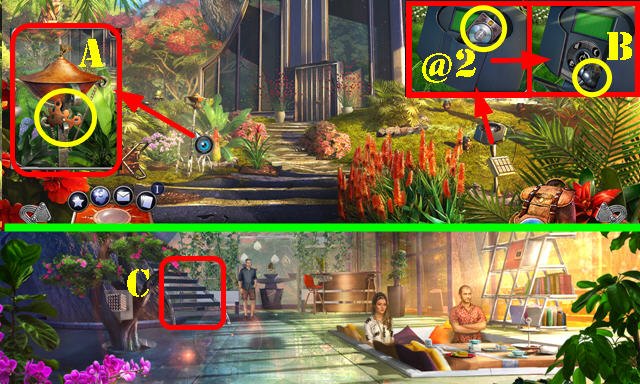
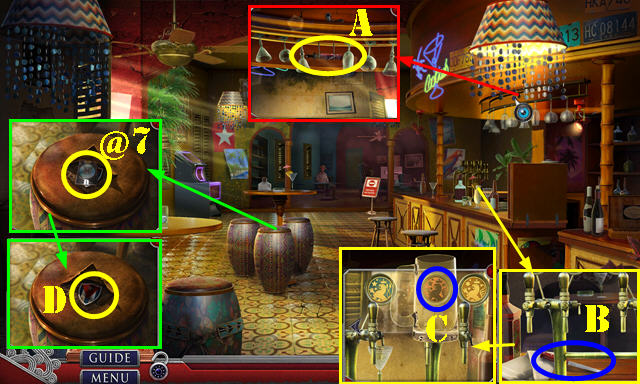
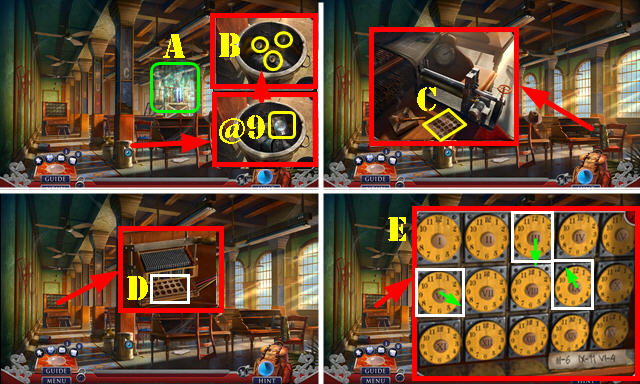
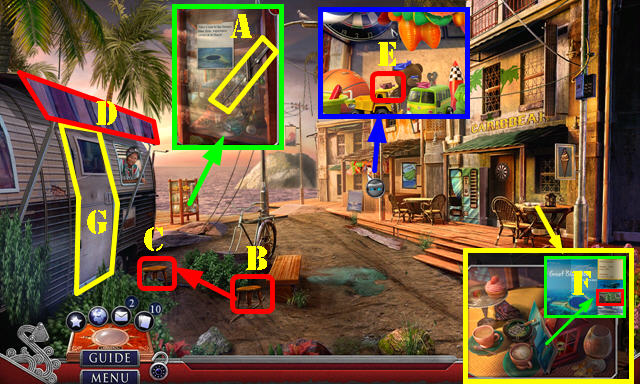
- Take the SNOWFLAKE MEDALLION 1/2 (A).
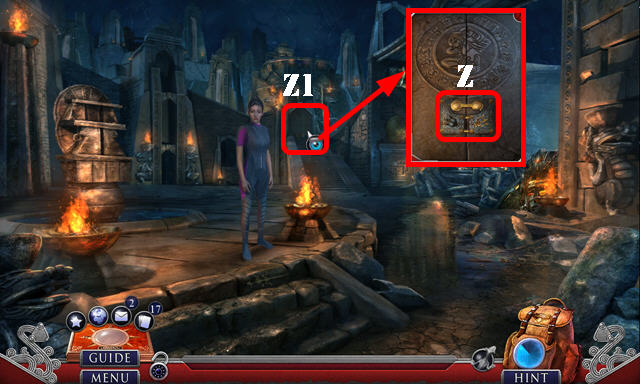
- Take the Fact Card (@2); select the compartment and take the PLATINUM BUD (B).
- Return to the Living Room and go to the Sky Parlor (C).
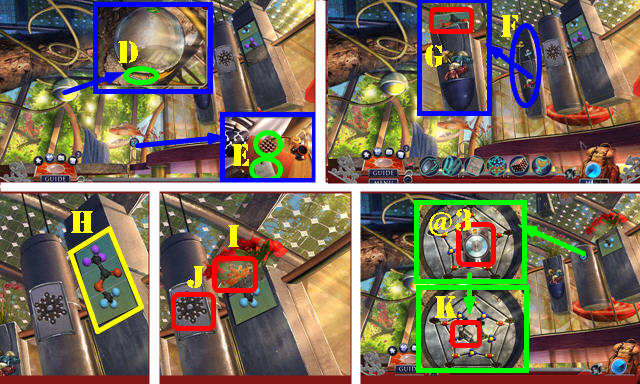
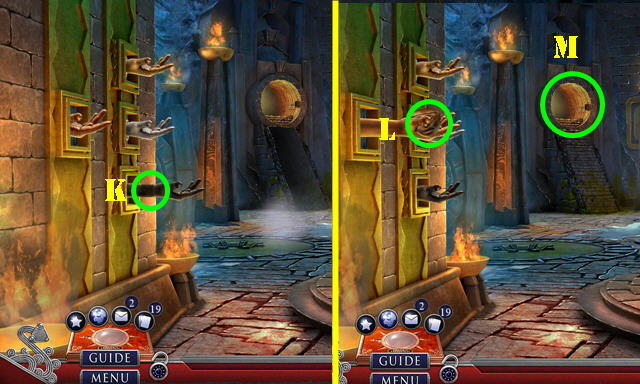
- Take the COCKTAIL EMBLEM (D).
- Look at the note; take the METALLIC CUBE (E).
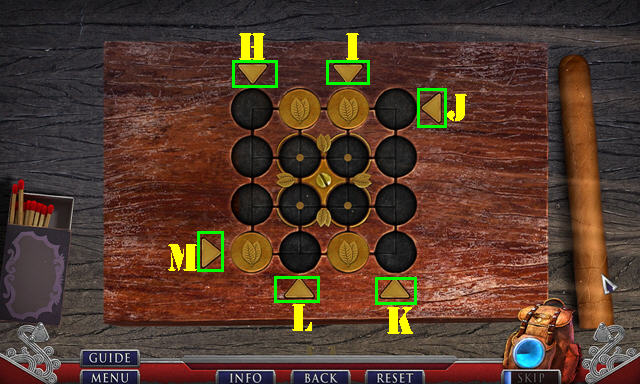
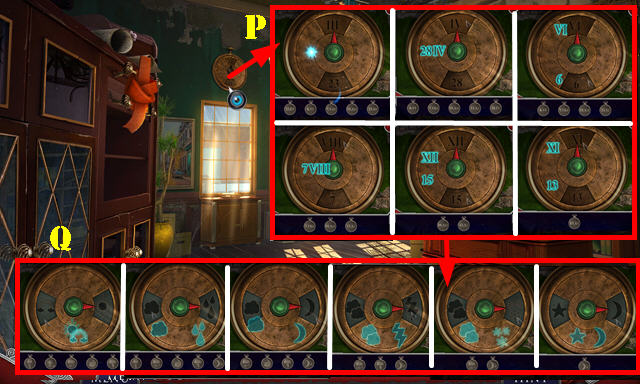
- Place the PLATINUM BUD and the GOLDEN BUD (F); select them and take the MOSAIC PLATE (G).
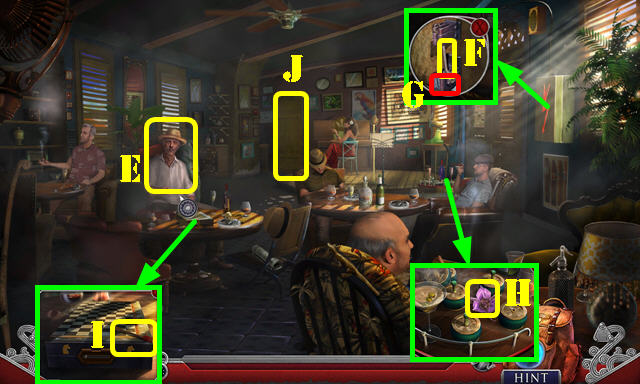
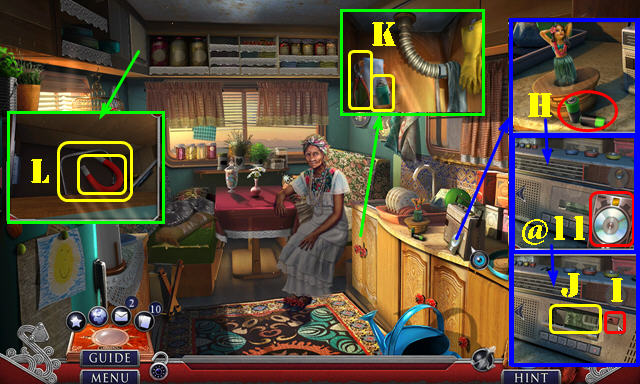
- Place the MOSAIC PLATE and arrange as shown (H); take the SNOWFLAKE MEDALLION 2/2 (I).
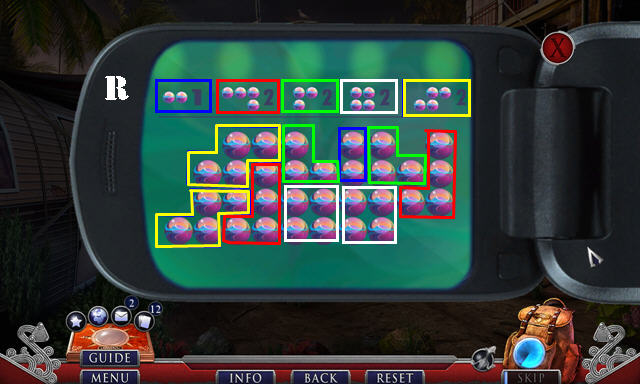
- Place the SNOWFLAKE MEDALLION 2/2 and select it (J); Take the Fact Card (@3) and PAPER CLIPS 2/2 for a puzzle (K).
- Solution: F-Ax3-C-Hx4-Ix2-Dx4-C-Kx2-Gx2 (L).
- Take the FIRE-ICE SAMPLE (M).
- Walk down.
- Place the COCKTAIL EMBLEM; take the GLASS CUTTER (N).
- Select the cube; place the METALLIC CUBE and take the SPRINKLER MANUAL (O).
- Walk down.
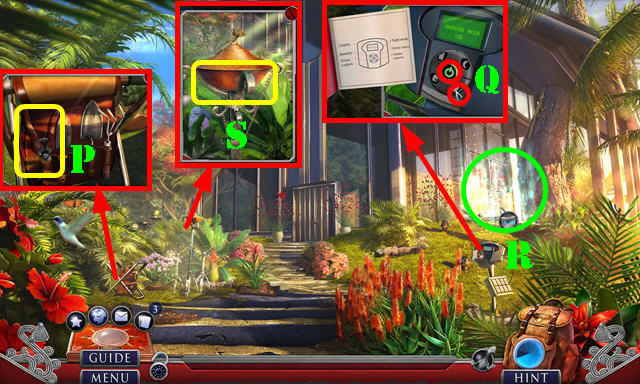
- Use the PAPER CLIPS 2/2 and select each one; take the GARDEN SHEARS (P).
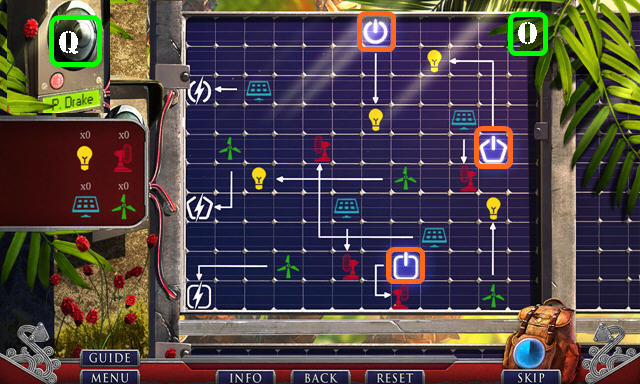
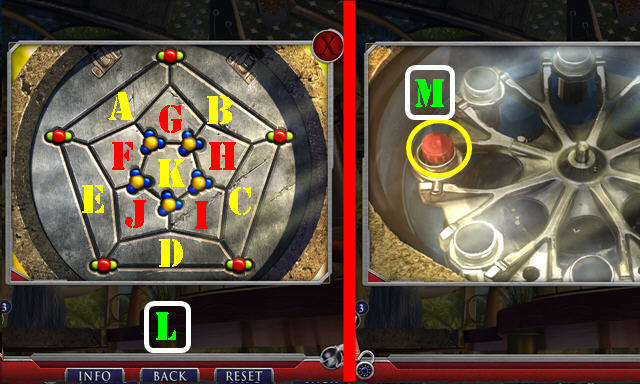
- Place the SPRINKLER MANUAL and select it; select the garden control and power button (Q).
- Play the HOP (R) to get the ARROW TILES 1/2.
- Use the GARDEN SHEARS; take the COPPER BOWL (S).
- Go to the Sky Parlor.
- Use the GLASS CUTTER; take the ARROW TILES 2/2 (T).
- Walk down.
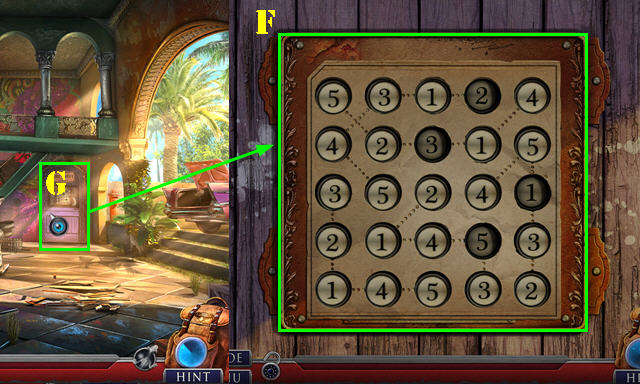
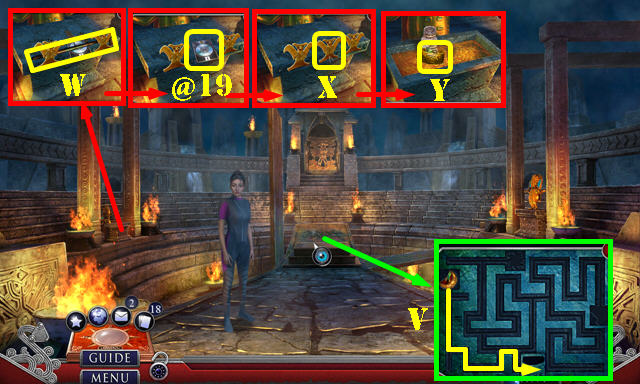
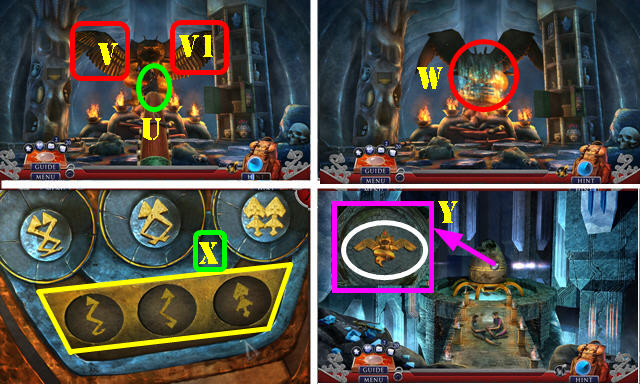
- Place the ARROW TILES 2/2; SELECT 1-6. Open the book; take the TRACING PAPER (U). Take the SELFIE STICK (V).
- Place the ANCIENT RIDDLE, FIRE-ICE SAMPLE, and COPPER BOWL. Put on the DIVING GOGGLES. Take the lighter (W) and use it on the burner (X). Use the SELFIE STICK (Y); receive the SELFIE STICK WITH PHOTOS.
- Walk down.
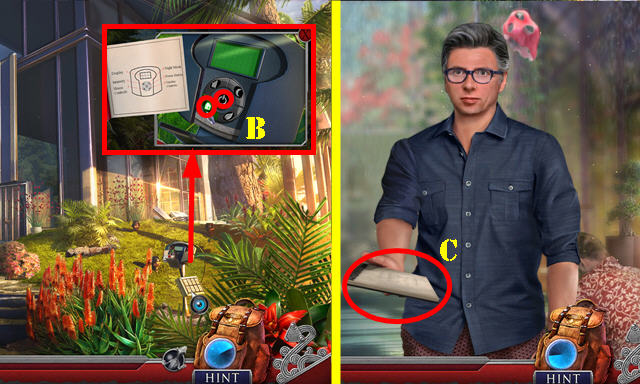
- Select the House Controls and power button (B).
- Go to the Living Room.
- Take the NOTEBOOK (C).
- Go to the Sky Parlor.
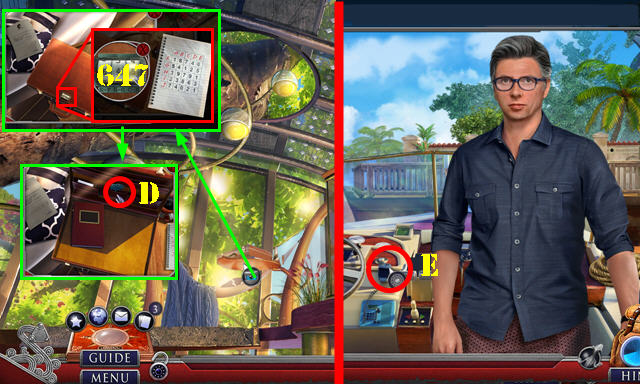
- Use the NOTEBOOK and TRACING PAPER. Enter 647. Take the HANGAR KEY (D).
- Walk down and then go to the Docks.
- Use the SPEEDBOAT KEY (E).
Chapter 2: Ship
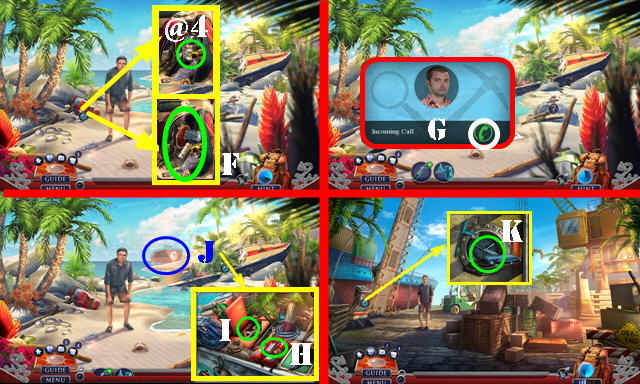
- Take the Fact Card (@4). Take the SELFIE STICK and move the bottle; take the HANGAR KEY (F).
- Answer the phone (G).
- Remove the leaves; take the SHARPENING STONE (H). Open the bench; take the HANDLE (I).
- Select the SELFIE STICK; receive the DAMAGED SELFIE STICK; select the camera; receive the CAMERA WITH PHOTOS.
- Go to the Industrial Docks (J).
- Use the HANGAR KEY for a puzzle (K).
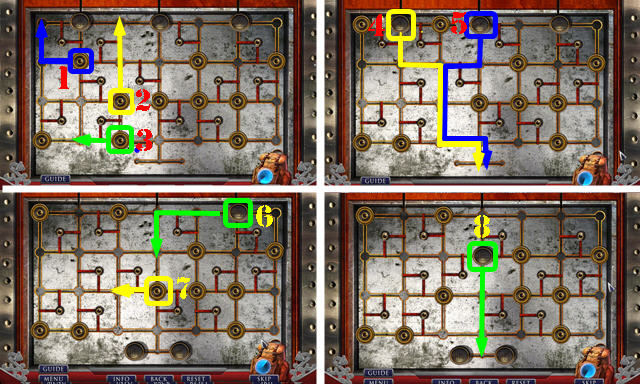
- Solution 1-8.
- Enter Drake's Ship on the left.
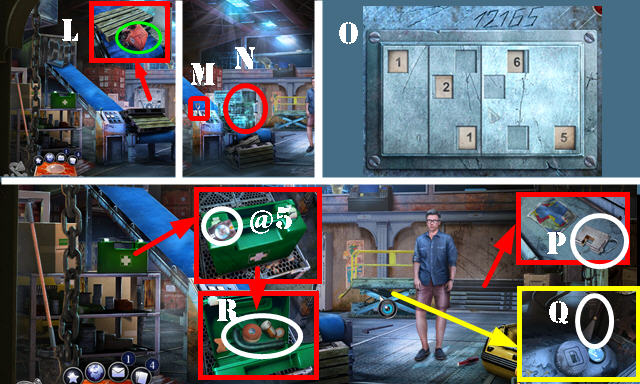
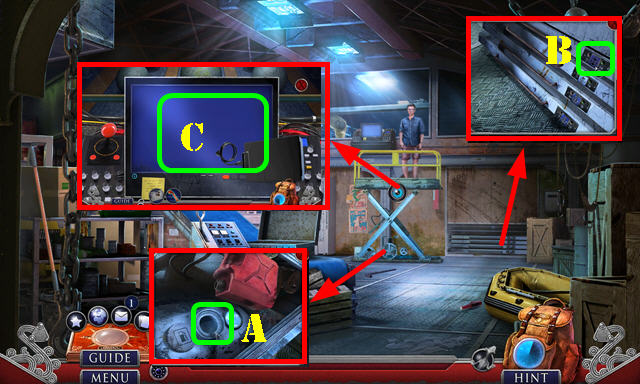
- Select the crates twice; take the EMPTY CANISTER (L).
- Select the lever; place the HANDLE (M). Play the HOP (N) to get the CRANE CONTROLLER. HOP puzzle solution (O).
- Open the drawer and look at the note; take the PADLOCK and FISHING HOOK (P).
- Take the SCRAPER (Q).
- Take the Fact Card (@5); use the SCRAPER and the SHARPENING STONE; take the HOSE and MEDICAL TAPE (R).
- Place the FISHING HOOK and MEDICAL TAPE on the DAMAGED SELFIE STICK; receive the HOOKED POLE.
- Walk down.
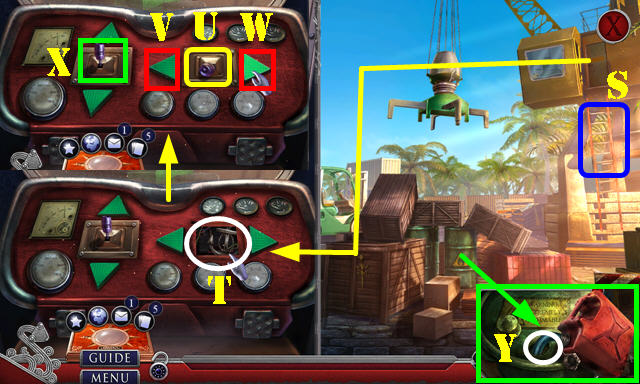
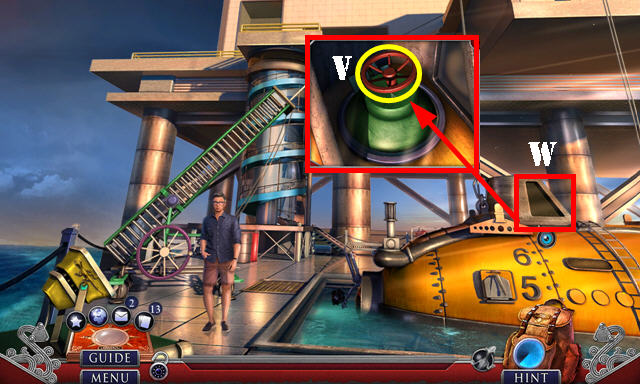
- Use the HOOKED POLE (S).
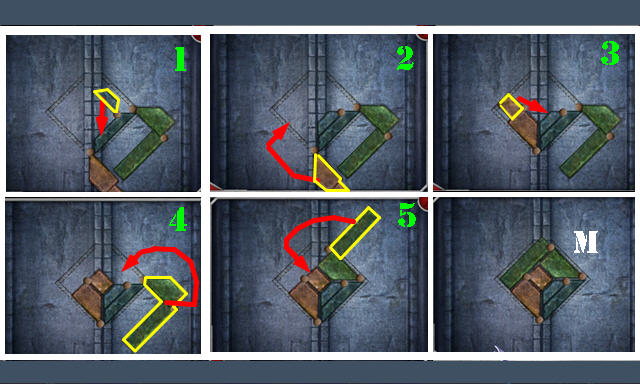
- Take the ANCHOR EMBLEM (T). Place the CRANE CONTROLLER (U). Select W-X-V-X-V-X.
- Remove the cap; place the HOSE and the EMPTY CANISTER (Y); receive the FUEL CANISTER.
- Return to Drake's Ship.
- Remove the cap; use the FUEL CANISTER (A).
- Place the ANCHOR EMBLEM (B) and look at the note; take the RATCHET BELT and USB CABLE.
- Use the CAMERA WITH PHOTOS and USB CABLE (C) for a puzzle.
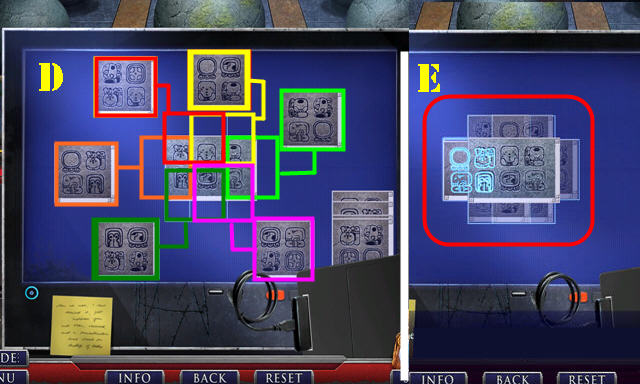
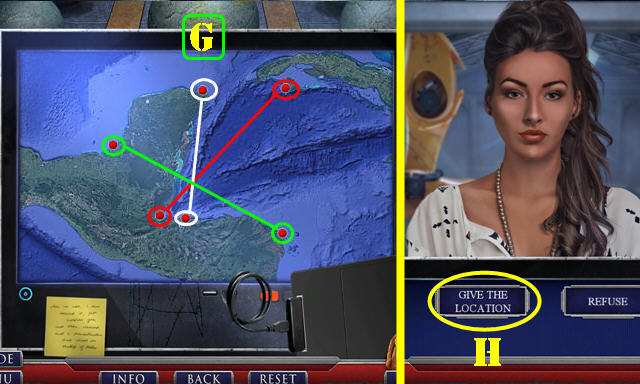
- Solution one (D). Solved puzzle (E).
- Solution two (F).
- Solution three (G).
- Select: 'Give the Location' (H).
Chapter 3: El Jefe Club
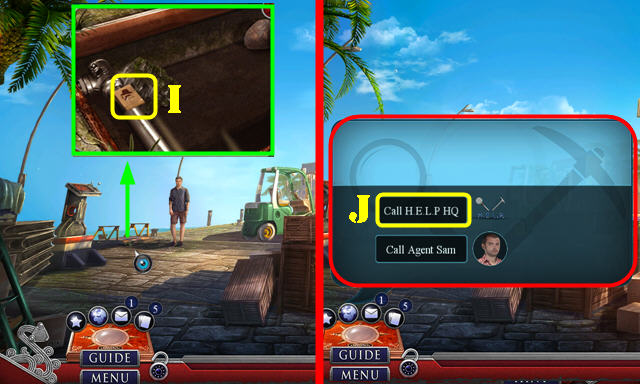
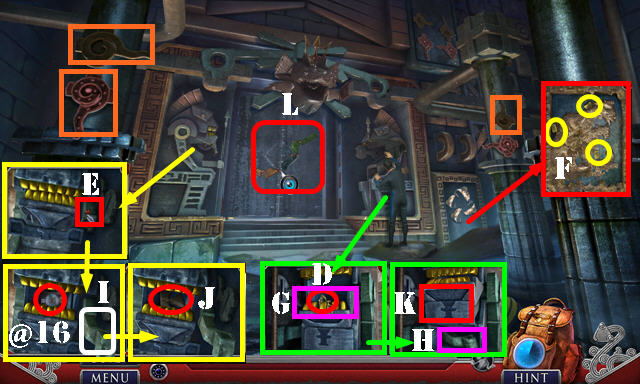
- Use the RATCHET BELT; take the CLUB MATCHBOX (I).
- Select 'Call H.E.L.P HQ' (J).
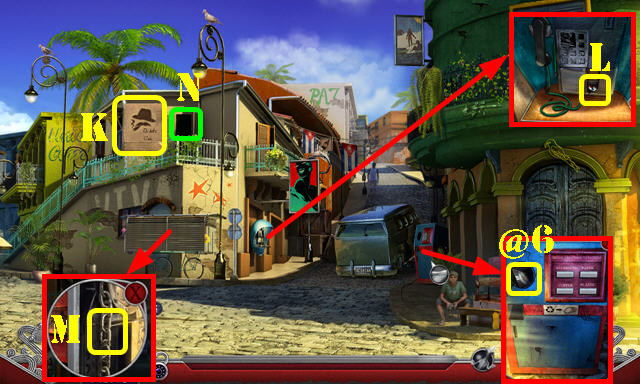
- Place the CLUB MATCHBOX (K).
- Take the Fact Card (@6).
- Lift the cover; take the FLAG CRESTS 1/4 (L).
- Use the PADLOCK (M); play the HOP to get the JUKEBOX COIN.
- Go to El Jefe Club (N).
- Select the note; take the CIGAR CUTTER (O).
- Take the CHEST (P).
- Walk down.
- Use the CIGAR CUTTER; take the COPPER WIRE (Q).
- Place the COPPER WIRE (R) and select the copper button (S); take the PESOS (T).
- Give the PESOS (U).
- Go to El Jefe Club.
- Talk to the bartender (V).
- Go to the Cigar Room (W).
- Talk to Hector (X); take the BEER MUG (Y).
- Walk down.
- Take the POWER SWITCH (A) and KNIFE (B).
- Place the BEER MUG; pan right twice and place as shown (C) to receive HECTOR'S CERVEZA.
- Use the KNIFE; take the Fact Card (@7) and FLAG CRESTS 2/4 (D).
- Go to the Cigar Room.
- Give HECTOR'S CERVEZA (E).
- Open the case; take the BOX WRENCH (F) and place the POWER SWITCH (G).
- Take the MARIPOSA EMBLEM (H) and NEEDLE (I).
- Go to the Backroom. (J).
- Take the BROOM (K).
- Select the partition (L) and move the clothes. Use the KNIFE; take the FLAG CRESTS 3/4 (M).
- Take the RECORD SLEEVE (N). Look down and then look at the folder (O).
- Place the MARIPOSA EMBLEM; take the BROOCH (P).
- Walk down.
- Select the music sheets 3x; take the KEYS (Q).
- Use the BROOCH and look at the note; take the HYGROMETER LENS (R).
- Go to the Backroom.
- Select the area 3x and use the KEYS (S). Select the green key (T).
- Play the HOP to get the QUEEN PIECE (U).
- Walk down twice.
- Use the BROOM; receive the SERVICE KEY (V).
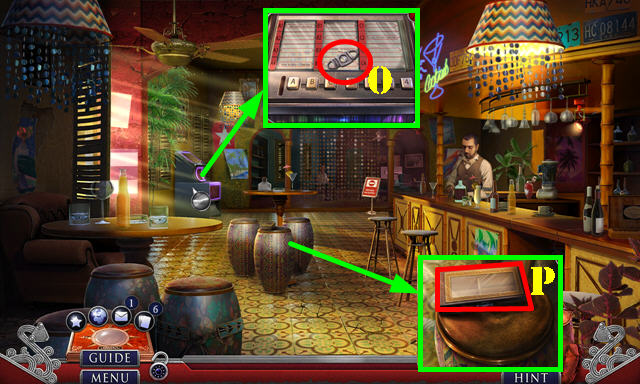
- Insert the JUKEBOX COIN (W). Place the RECORD SLEEVE; select B3 (X). Use the SERVICE KEY for a puzzle (Y).
- Solution 1-12; take the RECORD.
- Return to the Backroom.

- Look up and open the case; place the NEEDLE and RECORD (A); take the POSTCARD HALF and KNIGHT PIECE (B).
- Walk down.
- Select the case and place the QUEEN PIECE (C). Select the case; place the KNIGHT PIECE (D). Take the Fact Card (@8) and BROKEN HYGROMETER (E).
- Place the HYGROMETER LENS on the BROKEN HYGROMETER; take the DECORATIVE HYGROMETER.
- Place the DECORATIVE HYGROMETER on the CHEST; take the FLAG CRESTS 4/4.
- Go to the Backroom.
- Place the FLAG CRESTS 4/4 (F); take the WIRE SCRUBBER and read the note for a puzzle (G).
- Solution: M-I-Kx3-J-I-Hx3-L-M-L.
- Select the diagram for another puzzle. Solution (N).
- Place the POSTCARD HALF on the other half; take the POSTCARD (O).
- Return to the Street.
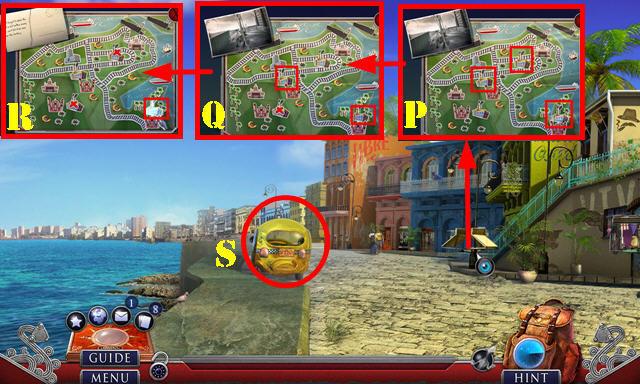
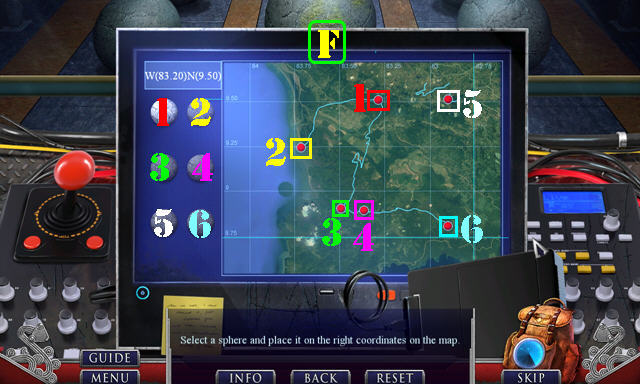
- Pan left. Place the POSTCARD; select the locations shown (P-Q-R).
- Go to the Factory (S).
Chapter 4: The Factory
- Take the CODE (T).
- Open the trunk, look at the note and take the BROKEN CAR JACK (U).
- Use the BOX WRENCH and lift the top; select the valve (V).
- Remove the grate; take the GEARS 1/2 (W).
- Enter the Factory (X).
- Play the HOP (A) to get the CALENDAR.
- Use the WIRE SCRUBBER; take the Fact Card (@9).
- Remove three items; take the TYPEWRITER BUTTONS 1/3, TYPEWRITER BUTTONS 2/3, and TYPEWRITER BUTTONS 3/3 (B).
- Looks at the newspaper; take the PUNCH CARD (C).
- Place the PUNCH CARD (D); select the glass and place the CODE. Set the three clocks as shown (E). Select the machine and take the PERFORATED PUNCH CARD (D).
- Walk down.
- Place the PERFORATED PUNCH CARD for a puzzle. Solution (F).
- Enter the Archive (G).
- Select the rug; take the SHOVEL (H).
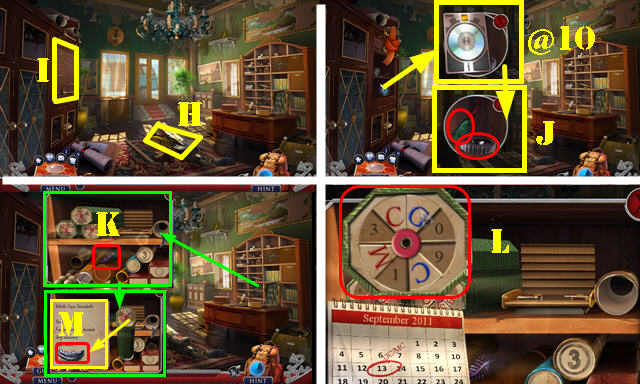
- Use the RATCHET BELT (I); take the Fact Card (@10). Take the CRUMPLED DIAL, and GEARS 2/2 (J).
- Take the METAL FEATHERS 1/3 (K).
- Place the CALENDAR and arrange as shown (L).
- Select the top and look at the note; take the METAL FEATHERS 2/3 (M).
- Return to the Factory.
- Place the CRUMPLED DIAL (N) and GEARS 2/2 (O); receive the DIAL.
- Return to the Archive.
- Place the DIAL for a puzzle. Set the dials as shown (P-Q).
- Take the CRANK.
- Walk down.
- Place the CRANK on the BROKEN CAR JACK; receive the CAR JACK.
- Use the CAR JACK (R); select the tiles 3x. Use the SHOVEL; take the METAL FEATHERS 3/3 (S).
- Go to the Archive.
- Place the METAL FEATHERS 3/3; select each feather and take the JAR OPENER (T). Place the TYPEWRITER BUTTONS 3/3 for a puzzle.
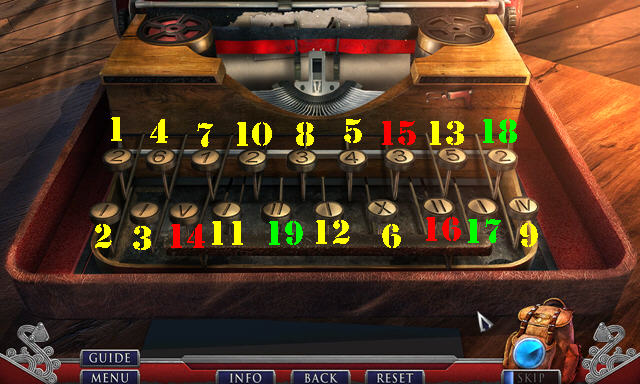
- Solution (1-19).
- Take the CODE SCRAP.
- Answer the phone on the scene.
- Pan right. Place the CODE SCRAP for a puzzle. Solution (U).
- Try to touch the artifact (V).
- Place the hands over the nail (W).
- Take the HANGER (X).
- Use the HANGER (Y); receive the TOOLBOX KEY.
- Use the TOOLBOX KEY; take the JAR OPENER, AWL, DIQUIS ARTIFACT, and SPARE HANDLE (Z).
- Place the SPARE HANDLE (Z1).
- Take the SAW BLADE (A).
- Place the stool (B) here (C). Select the awning twice (D).
- Pop three balloons; take the EJECT BUTTON (E).
- Take the GIFT VOUCHERS 1/3 (F).
- Enter the Trailer (G).
- Take the BATTERIES (H). Pan right. Take the Fact Card (@11). Place the EJECT BUTTON and press it (I); take the GIFT VOUCHERS 2/3 (J).
- Open the cabinet; take the LUBRICANT and PLIERS (K).
- Use the AWL; take the MAGNET and SAW FRAME (L).
- Walk down.
- Use the LUBRICANT; take the Fact Card (@12) and GIFT VOUCHERS 3/3 (M).
- Use the PLIERS (N); receive the WINDER.
- Use the GIFT VOUCHERS 3/3 (O); select 105 (P); take the PHONE (Q).
- Select the PHONE twice for a puzzle. Solution (R).
- Take the PHONE.
- Go to the Trailer.
- Give the PHONE (S).
- Pan left. Use the WINDER; take the BUTTERFLY SCREW (T).
- Remove three pillows (U); take the FUSE (V).
- Place the SAW BLADE and BUTTERFLY SCREW on the SAW FRAME; receive the HACKSAW.
- Walk down.
- Use the HACKSAW (W); receive the METAL ROD.
- Go to the Trailer.
- Use the JAR OPENER (X) and METAL ROD (Y); receive the PALM TREE EMBLEM.
- Walk down.
- Use the PALM TREE EMBLEM; take the STAR HANDLE (A).
- Enter the Trailer.
- Place the STAR HANDLE and rotate as shown (B). Play the HOP (C) to get the PHONE BOOK.
- Open the PHONE BOOK, select 'R' and 'Ricardo' (D).
- Give the PHONE BOOK (E).
- Walk down and go to the Great Blue Hole (F).
Chapter 5: Submarine
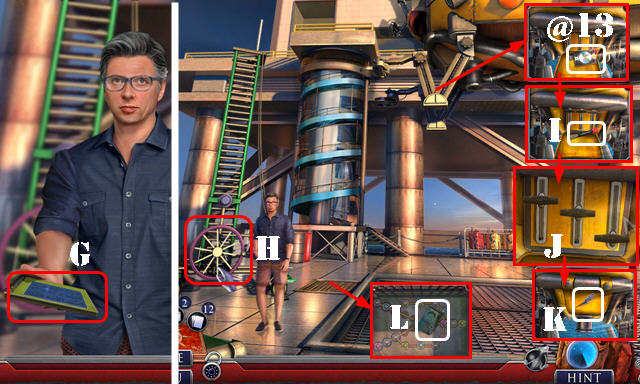
- Take the TUNING MANUAL (G).
- Select the wheel (H).
- Take the Fact Card (@13) and SCREWDRIVER (I).
- Drag the handles over the red marks (J). Take the LIGHTNING EMBLEM (K).
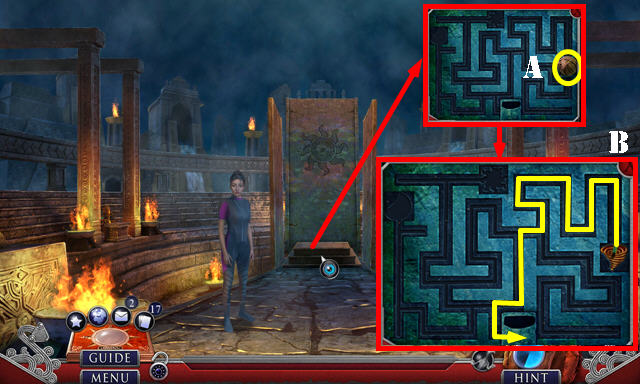
- Lift the grate; take the DOME KEY CARD (L) and place the MAGNET for a puzzle.
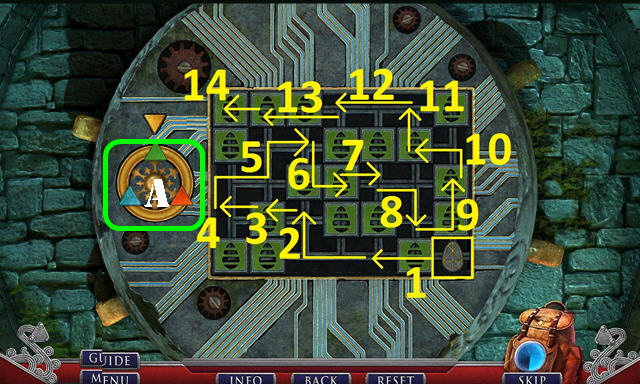
- Solution 1-16.
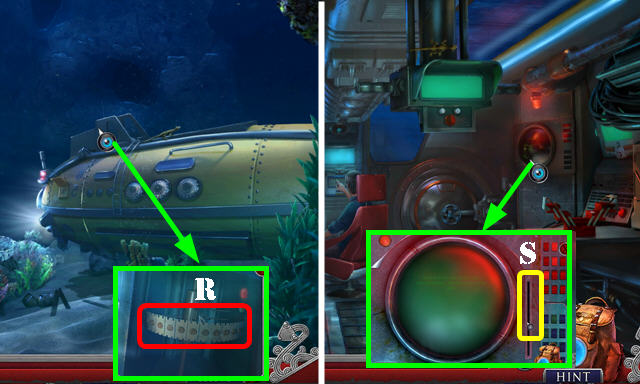
- Go to the Ship Overlook (M).
- Take the FLASHLIGHT (N).
- Open the COMPARTMENT on the FLASHLIGHT and insert the BATTERIES.
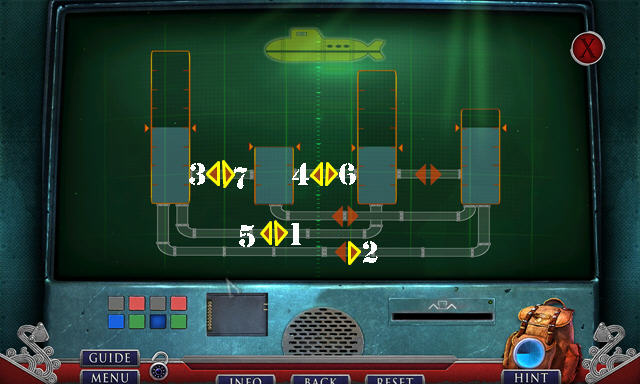
- Place the TUNING MANUAL and select twice (O). Set the switches as shown (P).
- Select the hose (Q).
- Place the LIGHTNING EMBLEM (R) and FUSE (S). Press the button (T).
- Use the SCREWDRIVER (U); play the HOP to get the VALVE.
- Walk down.
- Place the VALVE (V).
- Go to the Bridge (W).
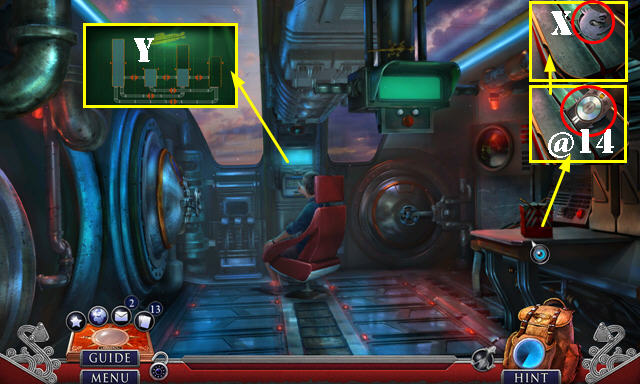
- Take the Fact Card (@14) and DRAKE'S LOGO (X).
- Play the puzzle (Y).
- Solution: 1-7.
- Open the door (A). Take the IRON HANDLES 1/2 (B).
- Go to the Cabin (C).
- Take the SHUT-OFF VALVE (D).
- Place DRAKE'S LOGO; take the NAUTILUS EMBLEM 1/2 and the IRON HANDLES 2/2 (E).
- Place the IRON HANDLES 2/2 (F); play the HOP to get the PROTECTIVE GLASS.
- Walk down.
- Place the SHUT-OFF VALVE (G).
- Place the PROTECTIVE GLASS and select it (H).
- Select the valve (I).
- Go to the Ocean (J).
- Use the FLASHLIGHT; take the NAUTILUS EMBLEM 2/2 (K).
- Open the door; take the Fact Card (@15).
- Use the DOME KEY CARD (L); play the HOP to get the SUCTION CUPS.
- Go to the Bridge (M).
- Place the NAUTILUS EMBLEM 2/2 and select it; take the BLOWTORCH, PROTECTIVE GLOVES, and SPIGOT (N).
- Go to the Cabin.
- Place the SPIGOT and select it (O).
- Look at the note; take the SONAR SENSOR (P).
- Use the SUCTION CUPS; take the DYNAMITE and INSTALLATION DISC (Q).
- Return to the Ocean.
- Place the SONAR SENSOR (R).
- Go to the Bridge.
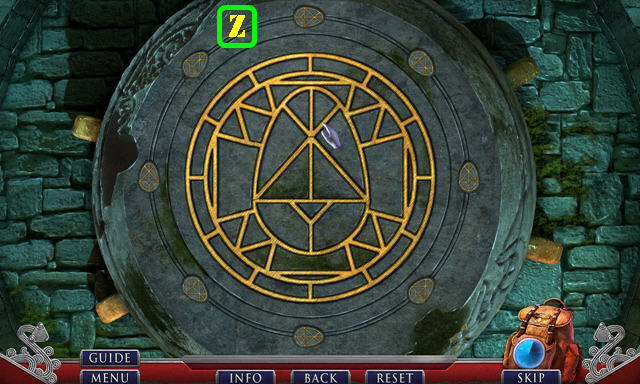
- Insert the INSTALLATION DISC for a puzzle (S).
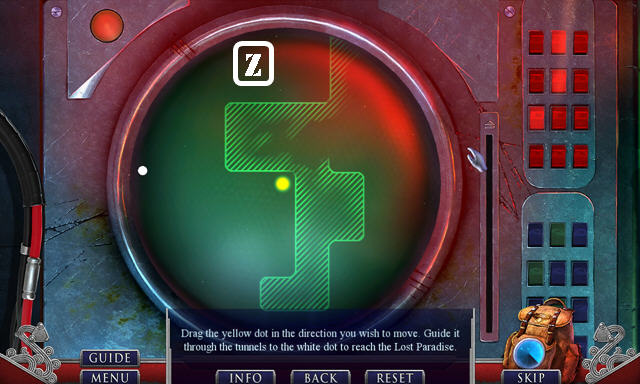
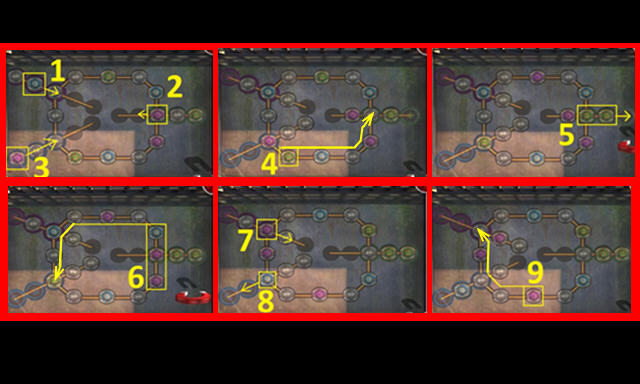
- Go in the direction shown until you hit a wall. If there is a 'T' stop at the first turn for that side, if there is a 'TT' stop at the second turn.
- Solution (Z): Left-Down-Left-Down-Left-Up-Right-Up-Left.
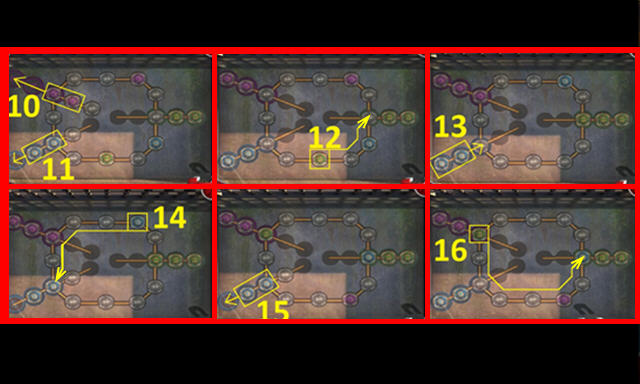
- Up-Right-Up-T-Left-Down-TT-Left-Down-T-Left-Down-Left-T-Up-Right.
- Up-Right-Up-Left-Up-T-Left-Down-Right-Down-Left-T.
- Down-Left-T-Down-Left-T-Up-Left-Up-T-Left-Up-Left.
- Play the puzzle (A).
- Solution 1-20.
- Place the DIQUIS ARTIFACT (B).
- Go to the City Gate (C).
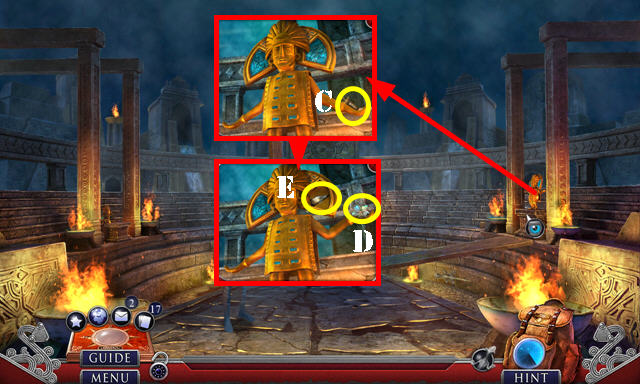
- Select the three handles (orange).
- Take the GOLDEN STATUETTE (D) and GEMS 1/3 (E).
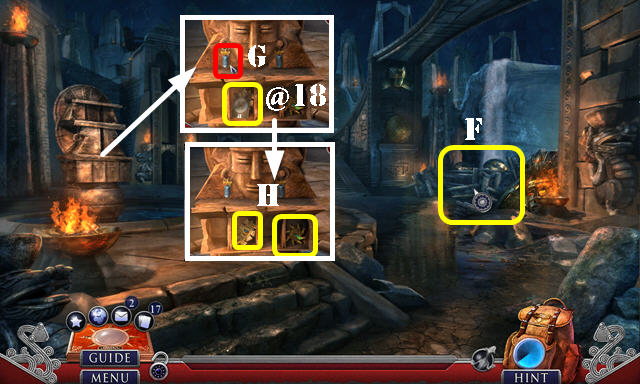
- Take the GOLDEN TEETH 1/3, GOLDEN TEETH 2/3, and GOLDEN TEETH 3/3 (F).
- Place the GOLDEN TEETH 3/3 (G); take the KEEPER'S HAND (H).
- Place the KEEPER'S HAND (I); take the Fact Card (@16) and MECHANISM PART (J).
- Place the MECHANISM PART (K).
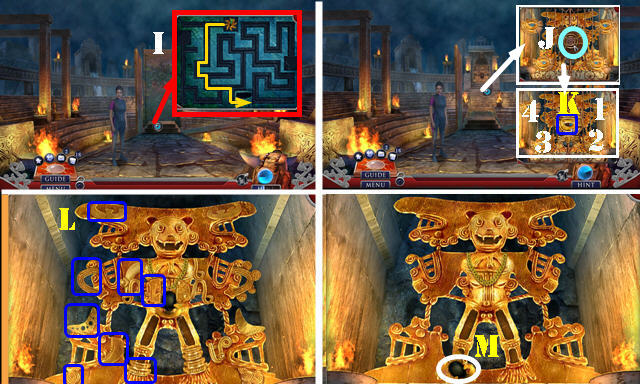
- Play the puzzle (L).
- Solution (1-5). Solved image (M).
- Go forward to the Skyway.
- Take the PLUMERIA OFFERING (N).
- Take the GEMS 2/3 (O). Place the GOLDEN STATUETTE; slide it to the right (P); take the TONGS (Q).
- Go to the Waterfalls (R).
Chapter 6: Waterfalls
- Open the lid; use the PROTECTIVE GLOVES; receive the FIRE SWITCH (S).
- Walk down and go to the City Archives (T).
- Take the Fact Card (@17). Place the FIRE SWITCH and rotate as shown (U).
- Play the HOP (V) to get the FISH SIGIL.
- Select the scrolls twice; use the TONGS to get the WIND CREST (W). Pan right; take the OBSIDIAN DAGGER and ANCIENT EMBLEM (X).
- Walk down twice.

- Use the OBSIDIAN DAGGER and place the FISH SIGIL. Select 1-5.
- Take the TRIDENT ORNAMENT (Y).
- Go to the Skyway.
- Use the BLOWTORCH. Place the TRIDENT ORNAMENT and select the latch (Z).
- Go to the Amphitheater (Z1).
- Take the YARN (A).
- Place the WIND CREST for a puzzle. Solution (B).
- Take the INCENSE EARRING (C). Place the PLUMERIA OFFERING (D); take the CITRUS JUICE (E).
- Use the YARN and CITRUS JUICE on the DYNAMITE.
- Walk down.
- Place the DYNAMITE (F).
- Place the INCENSE EARRING (G). Take the Fact Card (@18). Take the EYE ADORNMENT and SUN CREST (H).
- Go to the Amphitheater.
- Place the SUN CREST for a puzzle. Solution (I).
- Take the BAS-RELIEF PART 1/2 (J). Place the EYE ADORNMENT (K); select 1-4 for a puzzle.
- Solution (L).
- Take the BASALT PENDANT (M).
- Return to the City Archives.
- Place the BASALT PENDANT for a puzzle (N).
- Solution one: (Q-1)-(P-2)-(Q-3)-(Q-4)-(Q-5).
- Solution two: (T-1)-(T-2)-(U-3)-(S-4).
- Take the GLUE and MOON CREST.
- Return to the Amphitheater.
- Place the MOON CREST for a puzzle. Solution (V).
- Take the SMOKING PIPE (W) and Fact Card (@19).
- Use the GLUE and place the ANCIENT EMBLEM (X); take the GOLD BRACELET, GEMS 3/3 and BAS-RELIEF PART 2/2 (Y). Walk down.
- Place the GEMS 3/3 (A). Place the gems as shown (orange); take the WORLD TREE TOKEN 1/2 (B).
- Go to the Waterfalls.
- Place the GOLD BRACELET (C).
- Play the HOP (D) to get the GOLDEN CROWN.
- Go to the City Archives.
- Pan left. Place the BAS-RELIEF PART 2/2; rotate as shown (E).
- Take the SILVER BRACELET (F).
- Return to the Waterfalls.
- Place the SILVER BRACELET (G); take the POUCH (H).
- Open the POUCH; take the WORLD TREE TOKEN 2/2.
- Go to the Machine Room (I).
- Take the OBSIDIAN BRACELET (J).
- Walk down.
- Place the OBSIDIAN BRACELET (K); take the CEREMONIAL HEADDRESS (L).
- Go to the Sanctuary (M).
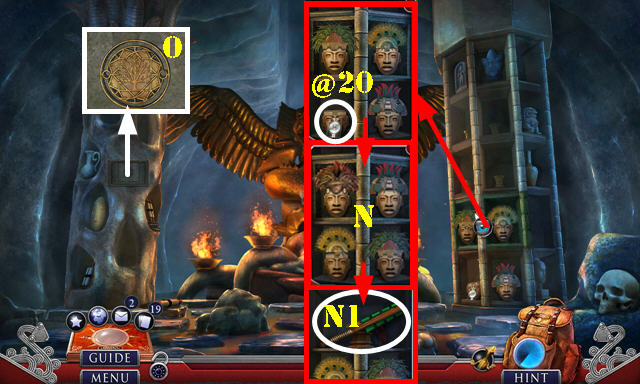
- Take the Fact Card (@20). Place the CEREMONIAL HEADDRESS and swap as shown (N); take the DART and CLUB (N1).
- Place the WORLD TREE TOKEN 2/2 for a puzzle (O).
- Solution (P). Take the ORCHID OFFERING.
- Return to the City Archives.
- Use the CLUB; take the FISH-BIRD (Q).
- Return to the Amphitheater.
- Remove the cork and dip the DART to get the SOPORIFIC DART (R).
- Place the ORCHID OFFERING (S); take the GOLDEN WINGS 1/2 (T).
- Remove the top of the SMOKING PIPE and place the SOPORIFIC DART in it; receive the BLOWGUN.
- Return to the Sanctuary.
- Use the BLOWGUN (U).
- Select the two wings (V-V1).
- Play the HOP (W) to get the GOLDEN WINGS 2/2. HOP puzzle solution (X).
- Return to the Machine Room.
- Place the GOLDEN CROWN and GOLDEN WINGS 2/2 on the FISH-BIRD; take the FISH-BIRD GOD STATUETTE.
- Select the cover. Place the FISH-BIRD GOD STATUETTE for a puzzle (Y).
- Solution one (Z).
- Solution two: A-1-Ax2-2-Ax2-3-Ax2-4-Ax2-5-A-6-A-7-A-8.
- Ax2-9-Ax2-10-A-11-A-12-Ax2-13-Ax2-14.
- Congratulations, you've completed Hidden Expedition: The Lost Paradise!
Created at: 2017-01-20