Walkthrough Menu
- General Tips
- Episode 1: Globetrotting
- Episode 2: Blue Meanie
- Episode 3: Skull and Bones
- Episode 4: Crashed
- Episode 5: Under the Big Top
General Tips
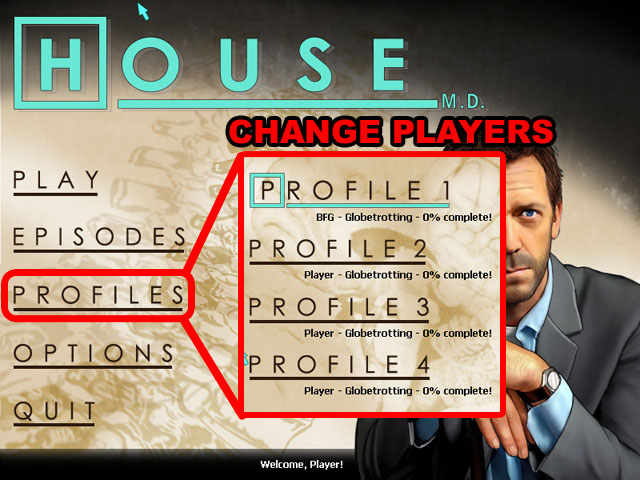
- You can check the episodes that you have completed so far from the episodes tab.
- You can change players from the profile tab. Four player slots are available at the same time in this game.
- The profile tab will tell you how far you are in the current episode as well.
- You can adjust the volume, set full screen, or see the credits and cast in the options menu.
Episode 1: Globetrotting
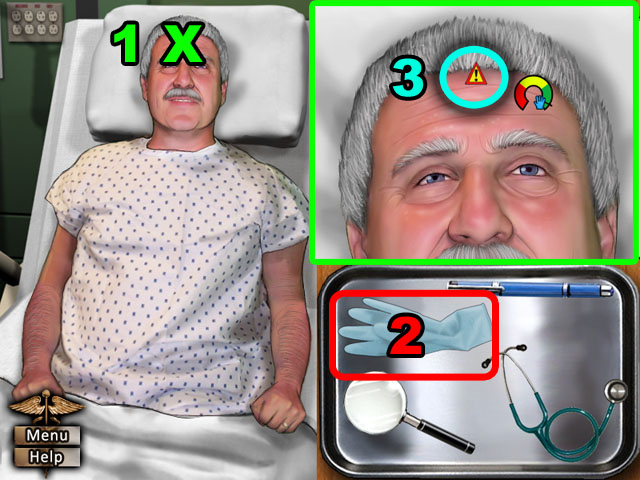
- After watching the first cut scene, examine the patient for any signs of illness.
- Choose a specific area to examine by clicking on the patient then use the tools in the bottom right corner.
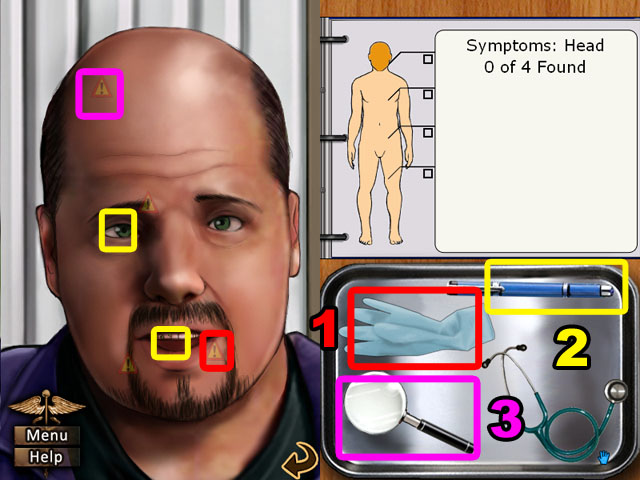
- Click on the patient’s head highlighted in red in the screenshot.
- Use the glove in the box in the bottom right corner.
- When in the larger zoomed in screen you will only be able to pick up tools that can be used on the patient. So if you don’t know what to do next try all of the different tools.
- Click and hold the left mouse button on the exclamation mark in his forehead for few seconds until the meter goes to all the way to the edge.
- If you can find the right spot click around the area until you get it.
- Put the grove back onto the silver tray by clicking there again.
- Return to the previous screen with the patient’s whole body by clicking the arrow in the bottom side of the middle.
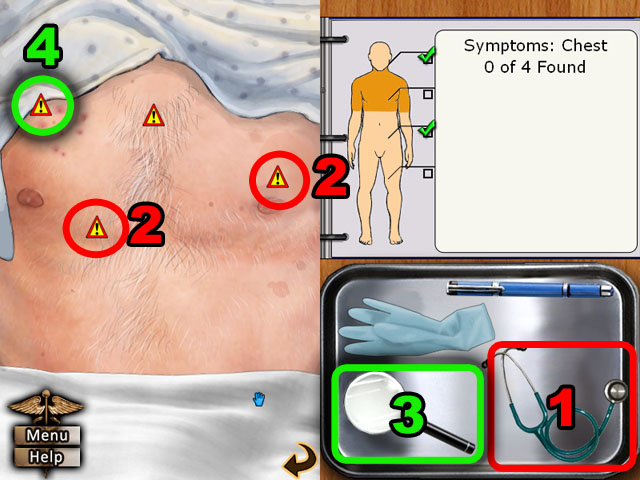
- Click on the middle of the patient’s chest to continue.
- Pick up and use the stethoscope from the tray in the bottom right corner (1).
- When you pick up an item, only the spots where you can use it will be highlighted.
- Click and hold for few seconds in two spots highlighted in red (2).
- You will then need to select a question to ask him. There is always only one correct question out of the three and you will only be able to continue when you have guessed it.
- Choose “Sudden Collapse” in the middle of the list.
- Use the magnify glass from the tray in the bottom right corner (3).
- Click and hold for few seconds in the spot highlighted in green (4).
- Put the magnify glass back onto the silver tray.
- Return to the last screen by clicking the back arrow.
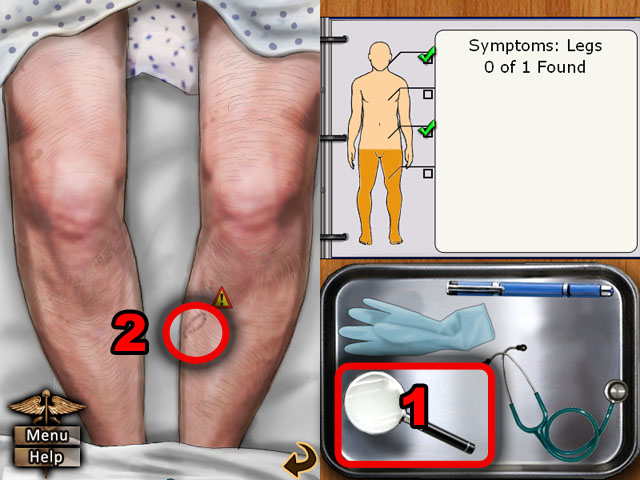
- Click at the bottom of the patient near the sheet to look at his feet.
- Use the magnify glass on the scar (1).
- Click on the spot circled in red and hold for few seconds (2).
- In the conversation bar in the bottom choose “Malaysia”.
- Return to the last screen by clicking the back arrow.
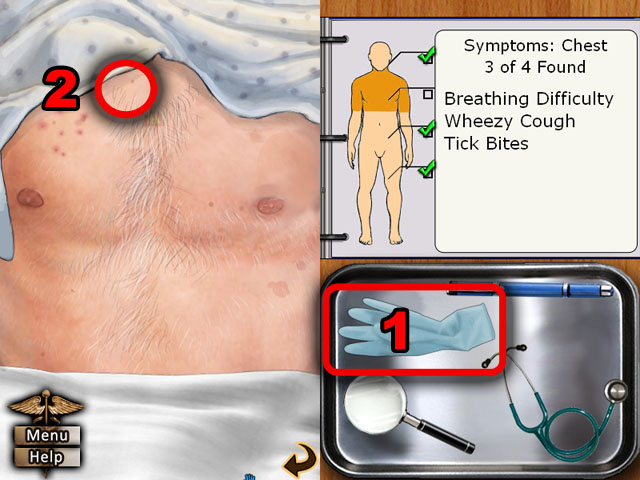
- Click the chest again to zoom in.
- Use the glove from the silver tray (1).
- Click the upper side of the chest circled in red in the screenshot and hold for few seconds (2).
- In the conversation bar in the bottom select “Recent Diet”.
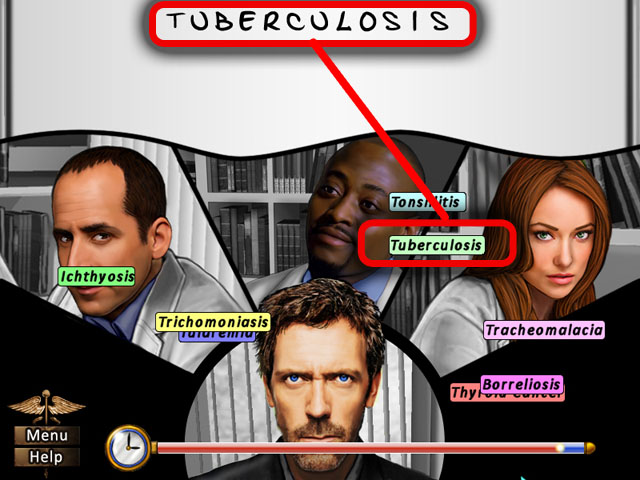
- Find the possible diagnosis that matches the word slowly appearing on the whiteboard letter by letter.
- You have to click correct words before the timer is out and the word is spelled out.
- Click the word TUBERCULOSIS in light green.
- The next word is AVIAN FLU in pink.
- The next word is MALARIA in peach.
- The next word is DENGUE FEVER in vivid light blue.
- The next word is TYPHOID FEVER in light blue.
- The last word is PENICILLIUM MARNEFFEI in light yellow.
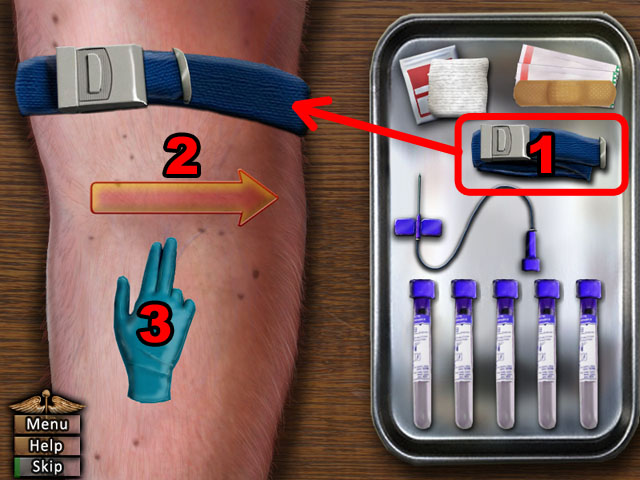
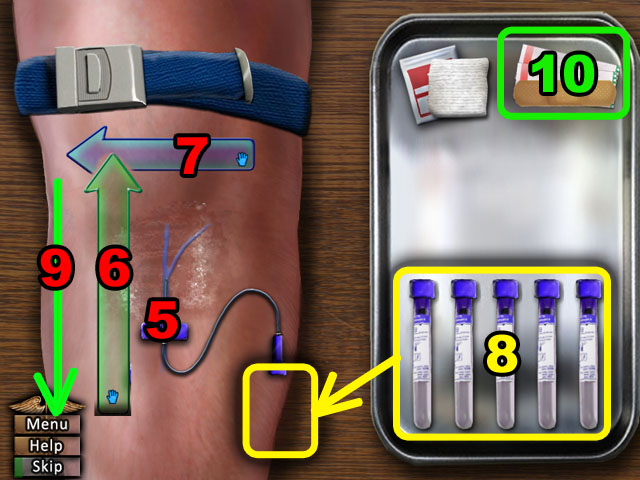
- Click on the tourniquet and drag to the upper arm (1).
- Wrap it around the arm by sliding your cursor from left to right on the arrow (2). You only need to click the arrow not the actual tourniquet.
- Make the veins easier to see by clicking on to forearm a few times (3).
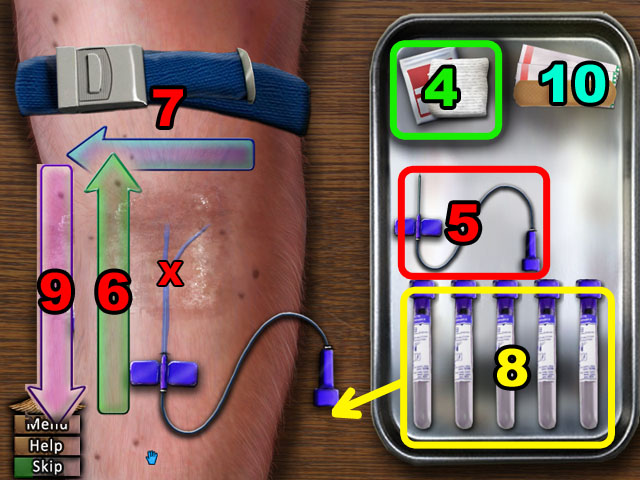
- Click on the alcohol swab and drag it around the vein until finished (4).
- Place the butterfly needle on top of the arm and insert the X mark on the vein (5).
- Insert the needle by clicking on the slider and sliding it in the direction of the arrow (6).
- Remove the tourniquet in the direction of the arrow (7).
- Pick up an empty vial and insert it into the end of the butterfly needle tube (8). Do this five times, waiting for the vial to fill with blood each time.
- Remove the butterfly needle in the direction of the arrow (9).
- Click on the bandage and drag it on to the X mark in the screenshot (10).
- Slide the bandage in the direction of the arrow.
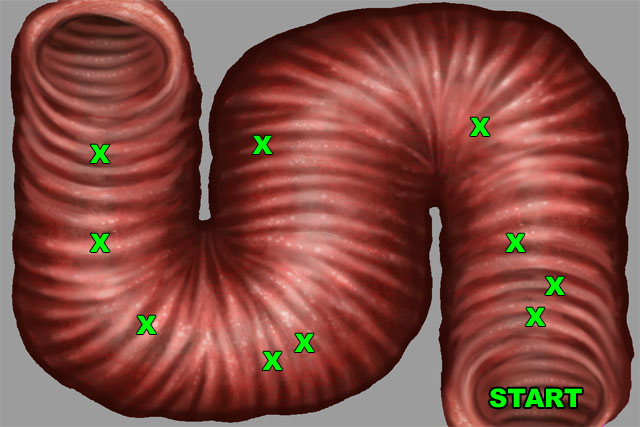
- Move the scope around the lungs with the arrow keys or by clicking the arrows on the screen.
- If you go too far in a direction you will hear a gulping sound, go in the other direction to avoid getting penalties.
- Biopsy any round objects that stick out from the back of the lungs by clicking the middle biopsy button or by pressing the space bar.
- Start your search from the bottom right of the lung and continue to the spots marked in the screenshot to biopsy them.
- If you click the biopsy button in the wrong place you will hear a painful noise and will lose more points.
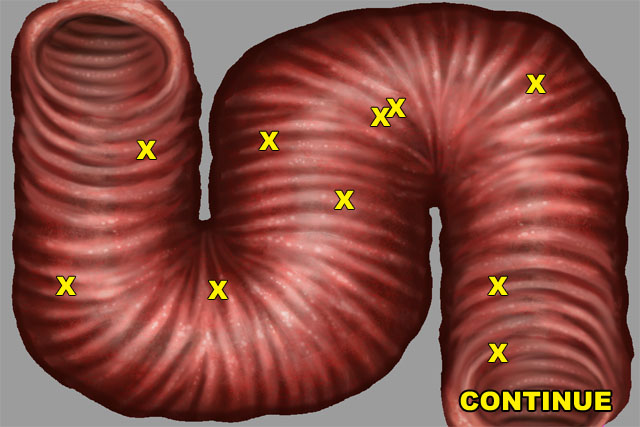
- Continue your search from the bottom right of the next lung section and continue to the spots marked in the screenshot to biopsy them.
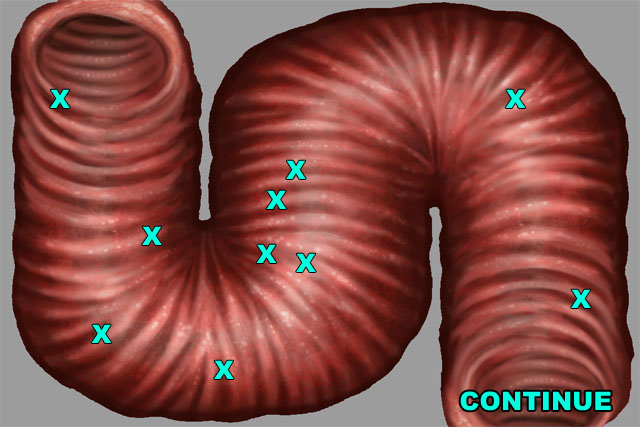
- Finish your search from the bottom right of the next lung section and continue to the spots marked in the screenshot to biopsy them.
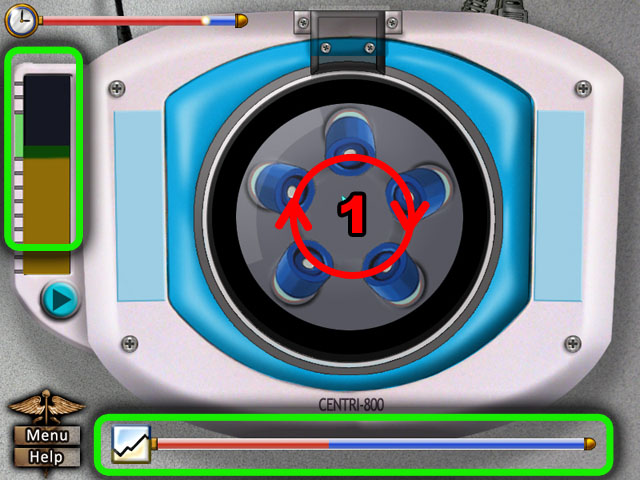
- Click on the test tube rack in the middle and circle your cursor on it clockwise to getting it spinning.
- On the left side of the screen is a bar that tells you how fast it is spinning, keep the bar in the green for as long as you can to finish the mini-game.
- Spin the tubes as fast as you can at first and then stop spinning once you get in the green. If it starts to dip down again, start spinning until you are back in the green.
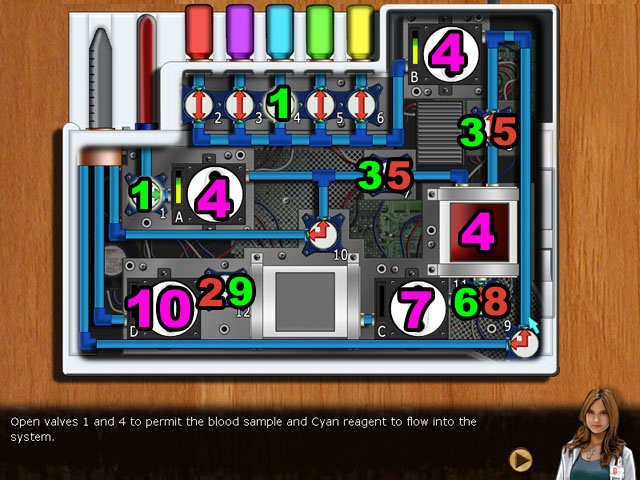
- Follow the instructions at the bottom of the screen to analyze the blood. Make sure not to miss any instructions because they won’t be repeated.
- If you get stuck wait for time to run out.
- First, click valve 1 and 4 to open them (1).
- Then click valve 12 to close it (2) and open valves 7 and 8 (3).
- Next you will need to get wheel A and B spinning into the green, just like with the test tubes (4).
- Click on the wheels and spin them with the mouse. If your cursor goes outside the wheel, it will stop being spun by your movements.
- You need to get both wheels spinning at the same time to move the blood to the next chamber.
- Next close the 7 and 8 valves and open the 9 valve (6).
- Spin the wheel C in the same way as the other two filling the next chamber (7). Close valve 9 behind it when finished (8).
- Finally open valve 12 and spin wheel D to fill the container at the end with blood (9, 10).
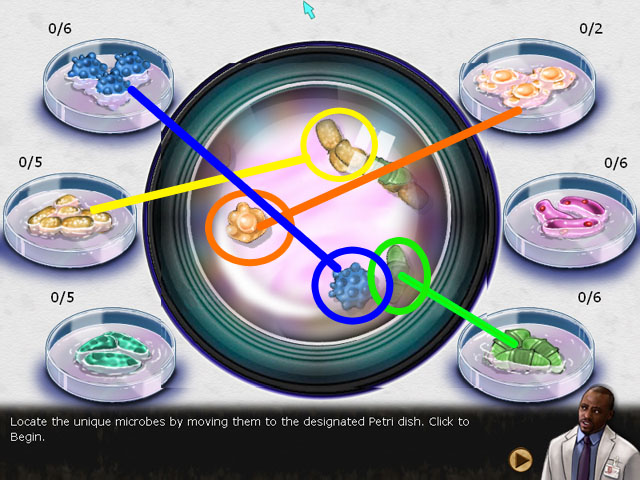
- Grab the bacteria as they move across the Petri dish and put them with the matching bacteria in the other Petri dishes.
- The bacteria will move out of your view sometimes. Just wait until they come back into view to collect them.
- There are numbers written beside each bacteria dish that tell you how many you have to collect and how many you have left to collect.
- Next you will have to interrogate someone, pick the correct subject to continue to the next line of questioning.
- The correct subjects to ask about are “Diagnosis”, “Exotic Diseases”, “Secret”, “Work Conditions”, “Vaccinations”, and “Malaysia” in that order.
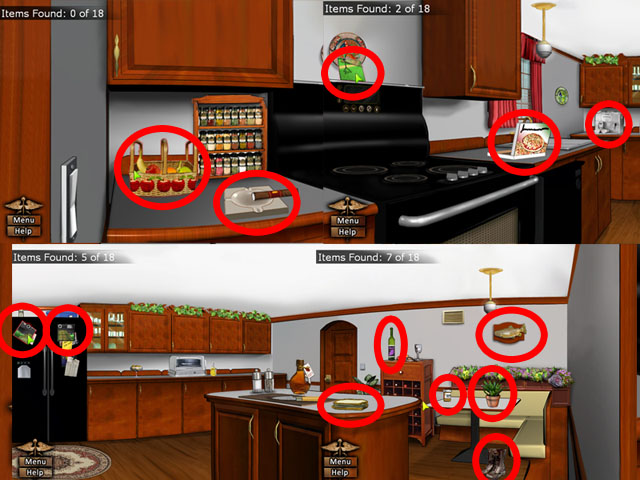
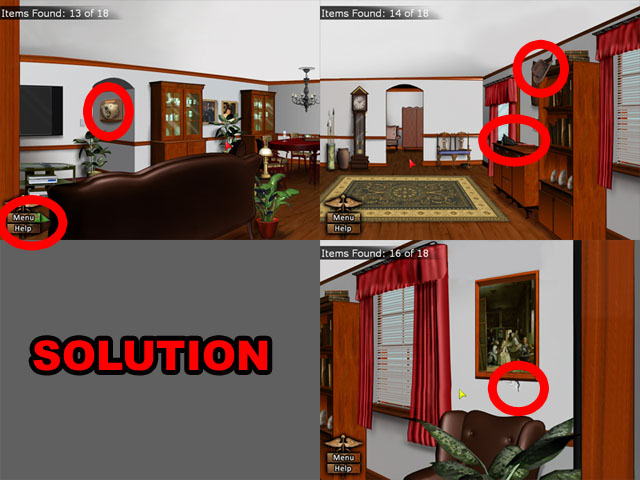
- Find the 18 clues scattered around the patient’s house.
- Look for things that could be causing his condition, like a cigar or alcohol or anything that someone would be allergic to.
- Move the cursor to the left or the right of the screen to scroll around the area.
- You will hear a small buzzer when your mouse goes over a clue.
- See the screenshots for the locations of all the items.

- Put the 4 pictures together into a larger image.
- Drag and place the 4 pieces of the picture into the correct corner and click the top right corner to rotate the pieces.
- See the screenshot for the final solution.
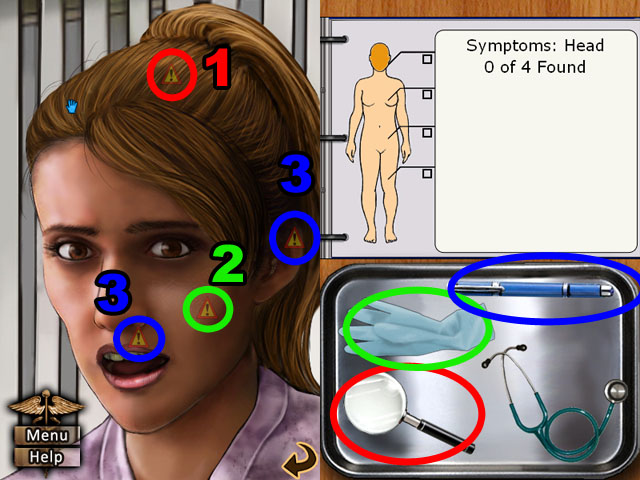
- First click on the patient’s face and use the magnifying glass on her hair (1).
- You will need to ask her a question then, choose “Hair Products”.
- Next use the glove on her cheek (2) and the pen light on her ear and mouth (3).
- Ask her about her “Recent Diet” and then click the back button to stop examining her head.
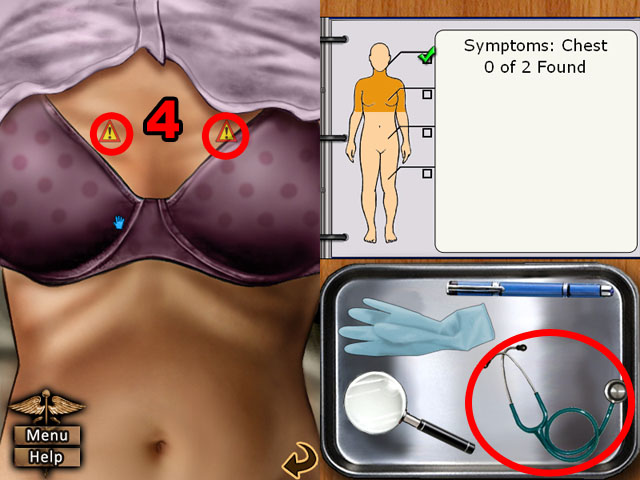
- Click on her upper body next.
- Use the stethoscope 2 times on her chest (4).
- Ask her then about her “Sexual Activity”.
- Return to her full body and click her stomach.
- Use the magnifying glass on her stomach, return to the main view, and click her legs.
- Use the magnifying glass again on her legs.
- Finally ask her about “Regularity” to finish this patient.
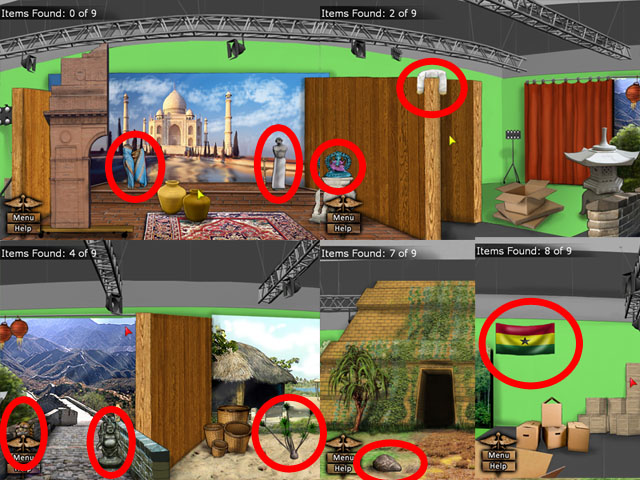
- Find the 9 clues scattered around the set.
- Look for things that could be causing his condition, like anything from a foreign country.
- Move the cursor to the left or the right of the screen to scroll around the area.
- You will hear a small buzzer when your mouse goes over a clue.
- See the screenshot for the locations of all the items.
- Next click the mouse a drag it back and forth over the statue base to reveal the words “Made in New Jersey”.
- Interrogate the secretary with the following conversation choices in this order: “Soundstage”, “Henry’s Age”, “Fake Adventure”, “Production Costs”, “Foreign Travel”, and “Insurance”.
- Return to Henry’s bedside and ask him about the following topics: “Lies”, “Fake Trip”, “Secrets”, “Dishonesty”, “Lifestyle”, “Whole truth”.
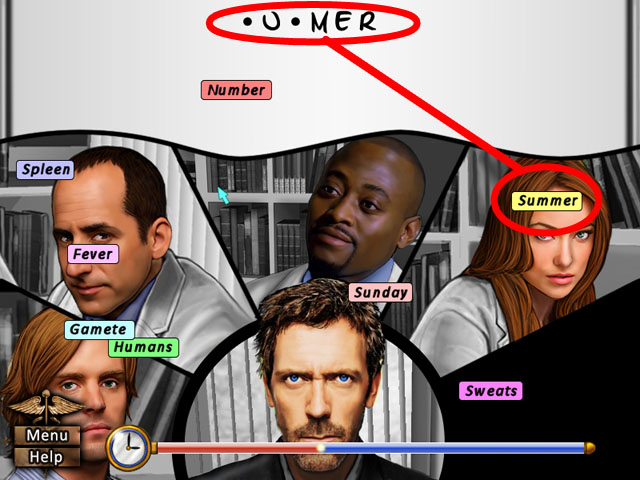
- Find the possible diagnosis that matches the word slowly appearing on the whiteboard letter by letter.
- You have to click correct words before the timer is out and the word is spelled out.
- Click the word CAT SCRATCH DISEASE first.
- The next word is HERPES SIMPLEX VIRUS.
- The next word is MENINGOCOCCEMIA.
- The next word is BABESIOSIS.
- The next word is LYME DISEASE.
- The next word is SUMMER.
- The last word is BULLSEYE.
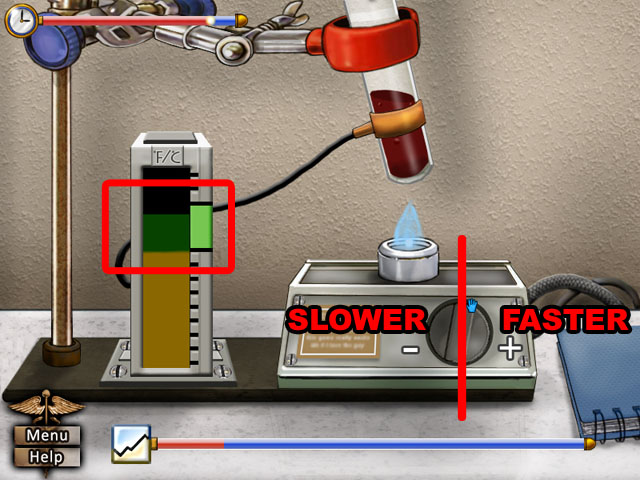
- Turn on the burner hotter or colder in order to raise the temperature of the gauge to the green area.
- Turn the knob on the right toward the minus sign to turn down the heat and toward the plus sign to turn it up.
- Keep the temperature in the green but as close as you can to the top of the green. If it’s too close to the yellow you may fail.
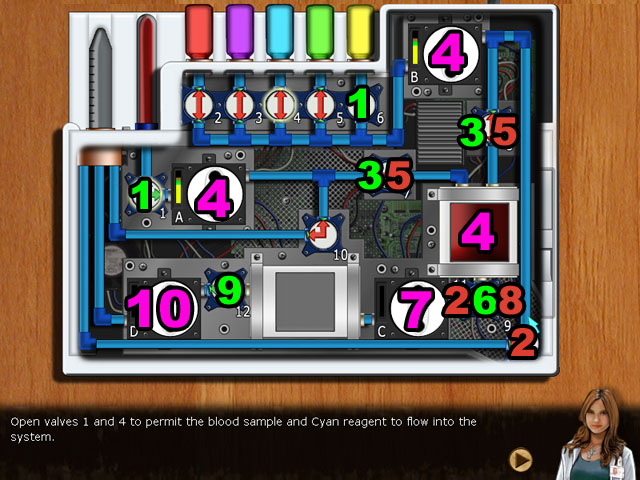
- Follow the instructions at the bottom of the screen to analyze the blood. Make sure not to miss any instructions because they won’t be repeated.
- If you get stuck wait for time to run out.
- First, click valve 1 and 6to open them (1).
- Then click valves 11 and 9 to close them (2) and open valves 7 and 8 (3).
- Next you will need to get wheel A and B spinning into the green, just like with the test tubes (4).
- Click on the wheels and spin them with the mouse. If your cursor goes outside the wheel, it will stop being spun by your movements.
- You need to get both wheels spinning at the same time to move the blood to the next chamber.
- Next close the 7 and 8 valves and open the 9 valve (6).
- Spin the wheel C in the same way as the other two filling the next chamber (7). Close valve 9 behind it when finished (8).
- Finally open valve 12 and spin wheel D to fill the container at the end with blood (9, 10).
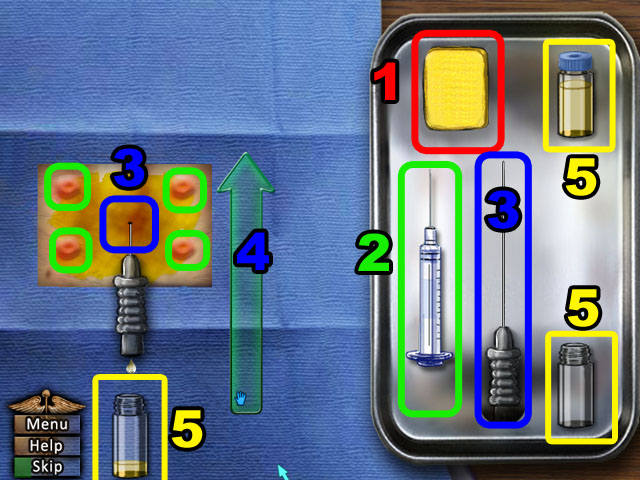
- Swab the infected area with the sponge by dragging it over the square until finished (1).
- Next, line up the tip of the left syringe onto each of the four spots indicated and click to inject in that area (2).
- Next get the right syringe and click it on the middle of the patch of skin (3).
- Drag your mouse up the arrow to insert it (4).
- Then place one of the vials underneath the syringe before it drips on the floor (5). You will have to fill all three containers.
- Be very fast when switching containers, because if you miss any fluid you will fail this mini-game.
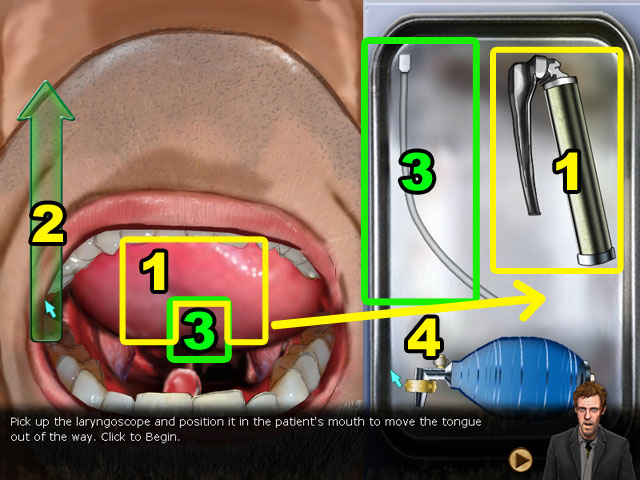
- Click the laryngoscope in the mouth and click and drag on the arrow to insert it (1,2).
- Insert the tube into the space beside the laryngoscope and then remove the laryngoscope and put it back on the tray (3, 4).
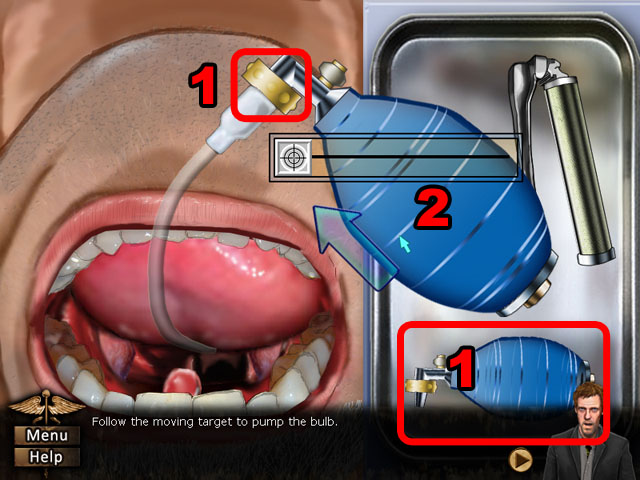
- Add the ball pump to the end of the hose (1) and a target track will appear.
- With your mouse keep the light target in line with the darker target without going outside the track.
- Going outside the track will cause your target to disappear.
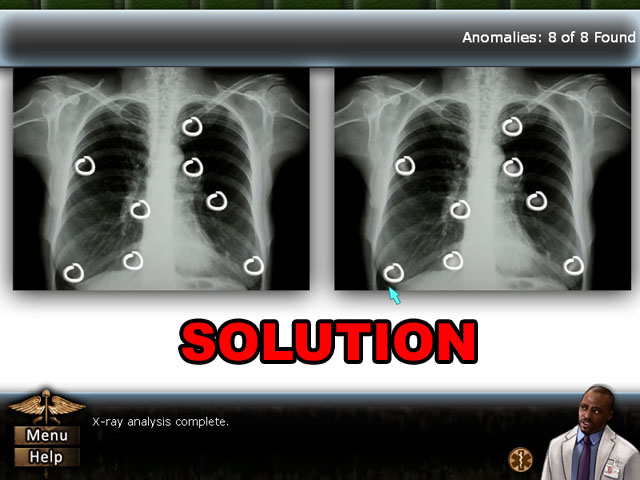
- Find the 8 anomalies in the x-rays to continue.
- The anomalies will look like little white balls and will only appear on the x-ray to the right side.
- See the screenshot for the position of all the anomalies.
- You will then need to ask him more questions. Pick the conversation topics: “Family”, “Friends”, “Gwen”, “Suspicious”, “Bite Marks”, and “Animal Bites”.
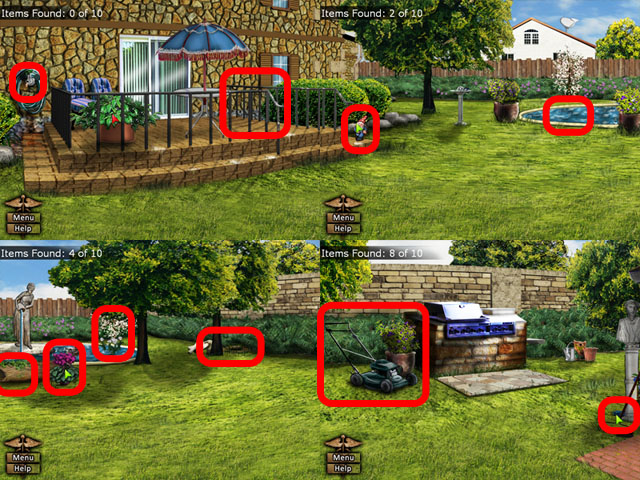
- Find the 10 clues scattered around the patient’s lawn.
- Look for things that could be causing his condition.
- Move the cursor to the left or the right of the screen to scroll around the area.
- You will hear a small buzzer when your mouse goes over a clue, also the cursor will turn yellow when you are close.
- See the screenshot for the locations of all the items.
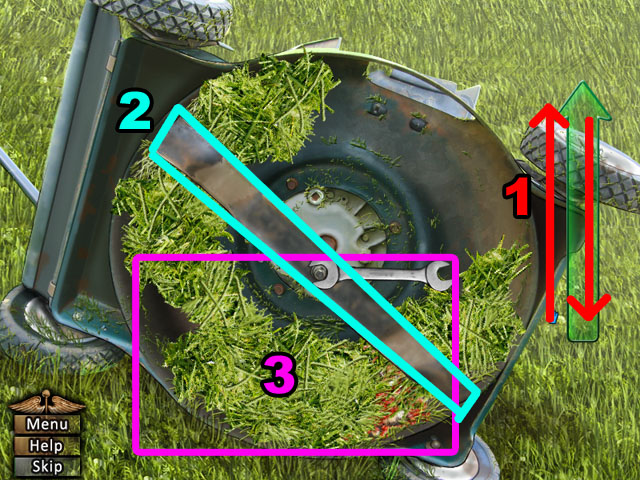
- Click and drag the cursor up and then down on the arrows multiple times to loosen the bolt at the top (1).
- Click the metal piece at the bottom and drag it to the side to remove it (2).
- Drag the grass clumps off the lawnmower until you can see the dead rabbit at the bottom (3). Click on the rabbit to continue.
- After some cut scenes you will need to talk to the gardener. Ask him the following subjects in this order: “Self Diagnosis”, “Henry’s House”, “Recent Work”, “See Henry”, “Henry”, and “Symptoms”.
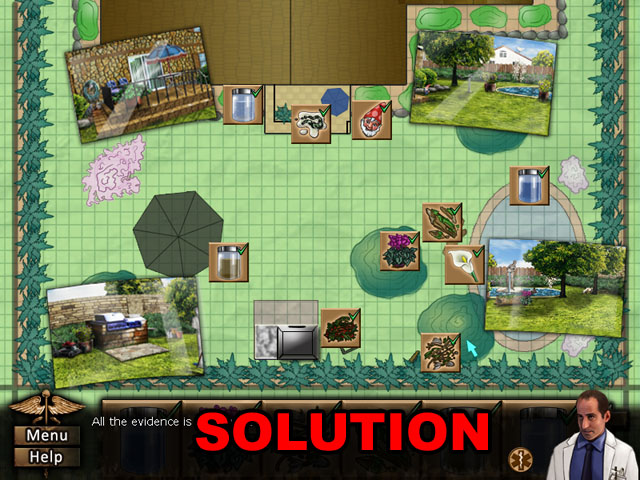
- Place the tiles representing the evidence you collected in the last scene on the correct spot on the map.
- When you choose the correct location the tile will snap in place and have a green check mark on it.
- You will need to scroll to the right to see all of the tiles.
- Look in the pictures for help if you can’t remember where a tile goes.
- See the screenshot for the final solution.
- Next is the burner mini-game. Turn on the burner hotter or colder in order to raise the temperature of the gauge to the green area.
- Turn the knob on the right toward the minus sign to turn down the heat and toward the plus sign to turn it up.
- Keep the temperature in the green but as close as you can to the top of the green. If it’s too close to the yellow you may fail.
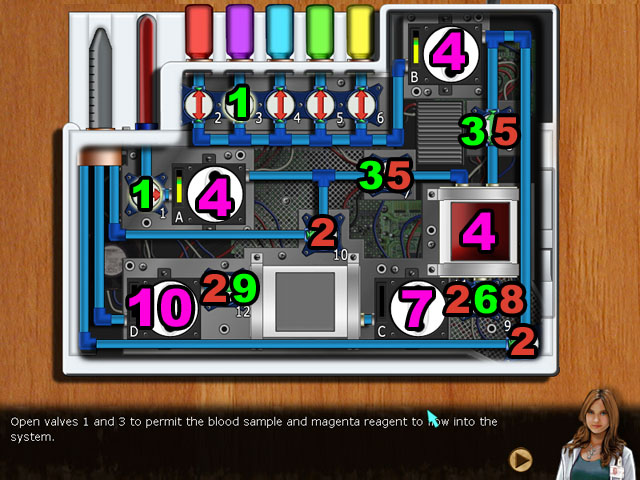
- Follow the instructions at the bottom of the screen to analyze the blood. Make sure not to miss any instructions because they won’t be repeated.
- If you get stuck wait for time to run out.
- First, click valve 1 and 3 to open them (1).
- Then click valves 9, 10, 11, and 12 to close them (2) and open valves 7 and 8 (3).
- Next you will need to get wheel A and B spinning into the green, just like with the test tubes (4).
- Click on the wheels and spin them with the mouse. If your cursor goes outside the wheel, it will stop being spun by your movements.
- You need to get both wheels spinning at the same time to move the blood to the next chamber.
- Next close the 7 and 8 valves and open the 9 valve (6).
- Spin the wheel C in the same way as the other two filling the next chamber (7). Close valve 9 behind it when finished (8).
- Finally open valve 12 and spin wheel D to fill the container at the end with blood (9, 10).
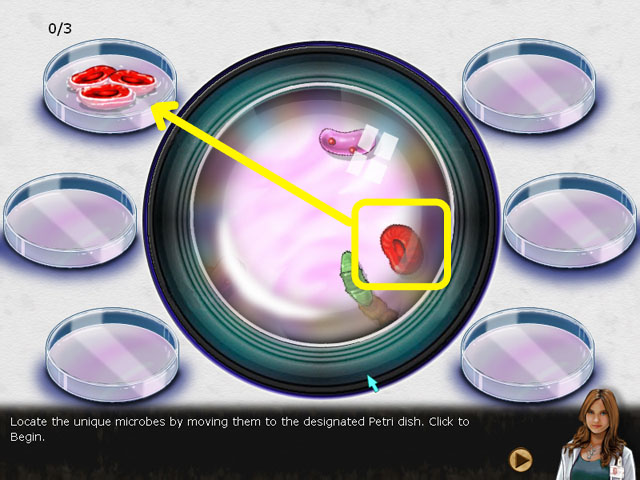
- Grab the bacteria as they move across the Petri dish and put them with the matching bacteria in the other Petri dishes.
- The bacteria will move out of your view sometimes. Just wait until they come back into view to collect them.
- There are numbers written beside each bacteria dish that tell you how many you have to collect and how many you have left to collect. This time there will only be 3 red microbes for you to collect.
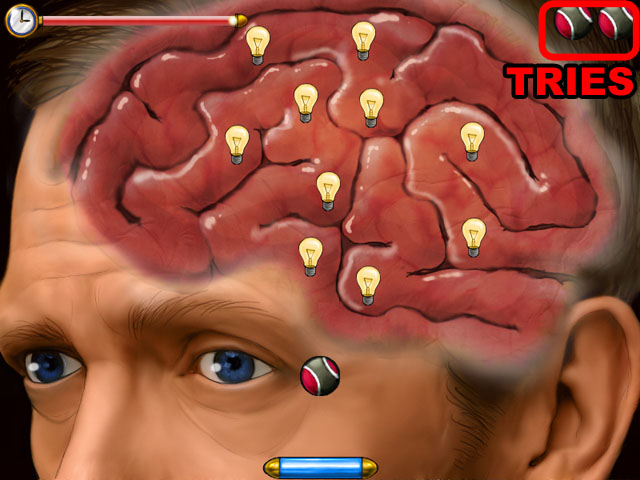
- Bounce the ball off of the platform and into the light bulbs in House’s brain.
- Each bounce will cause the ball to move faster and faster.
- If the ball goes below the platform on the bottom of the screen, you will lose a ball in the top left corner and start over.
- Once all of the light bulbs are destroyed or all of you tries have been used up, the mini-game is over.
Episode 2: Blue Meanie
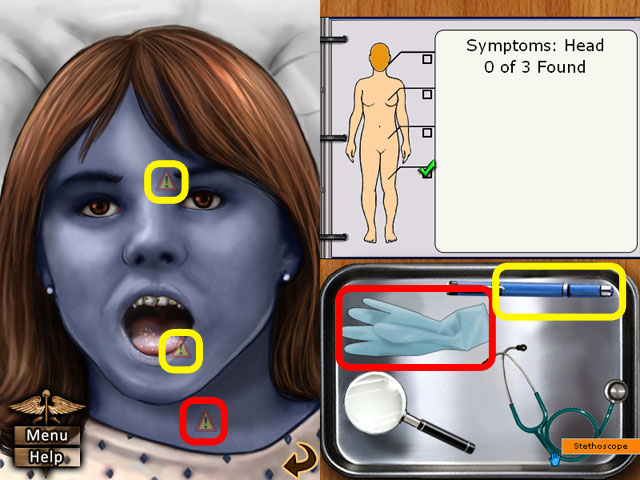
- Click on the blue woman’s face to start investigating.
- Use the gloves to investigate her neck.
- Use the light to investigate her eye and mouth, and then click the back button to return to the full view.
- Click on her upper body to investigate that next.
- Use the magnifying glass on the right side of her stomach, and then click the back button.
- Click on her lower body to investigate her stomach more.
- Use the glove on the left side of her stomach to finish the checkup.
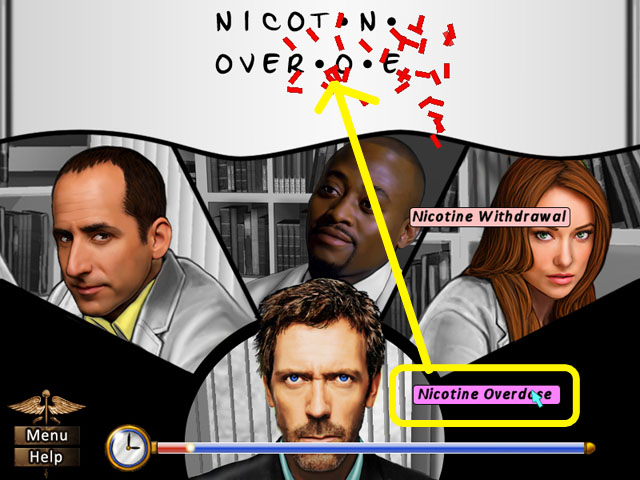
- Find the possible diagnosis that matches the word slowly appearing on the whiteboard letter by letter.
- You have to click correct words before the timer is out and the word is spelled out.
- Click the word ACROCYANOSIS first.
- The next word is AGRYRIA.
- The next word is PULMONARY EDEMA.
- The next word is AORTIC ANEURYSM.
- The next word is NICOTINE OVERDOSE.
- The last word is METHEMOGLOBINEMIA.
- Next you will need to spin the test tubes again.
- Click on the test tube rack in the middle and circle your cursor on it clockwise to getting it spinning.
- On the left side of the screen is a bar that tells you how fast it is spinning, keep the bar in the green for as long as you can to finish the mini-game.
- Spin the tubes as fast as you can at first and then stop spinning once you get in the green. If it starts to dip down again, start spinning until you are back in the green.
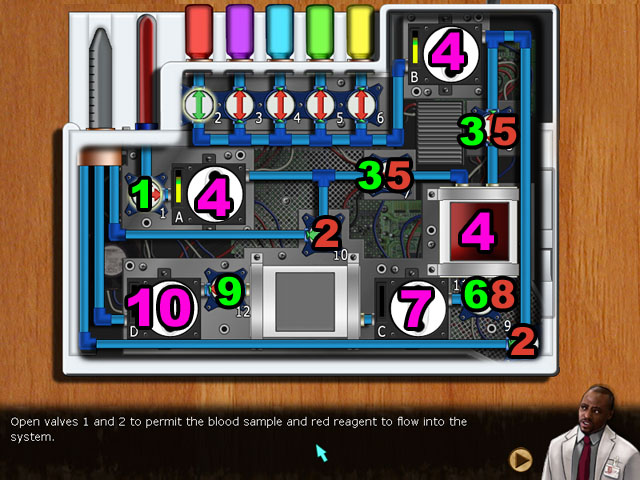
- Follow the instructions at the bottom of the screen to analyze the blood. Make sure not to miss any instructions because they won’t be repeated.
- If you get stuck wait for time to run out.
- First, click valve 1 to open it (1).
- Then click valves 9 and10 to close them (2) and open valves 7 and 8 (3).
- Next you will need to get wheel A and B spinning into the green, just like with the test tubes (4).
- Click on the wheels and spin them with the mouse. If your cursor goes outside the wheel, it will stop being spun by your movements.
- You need to get both wheels spinning at the same time to move the blood to the next chamber.
- Next close the 7 and 8 valves and open the 9 valve (6).
- Spin the wheel C in the same way as the other two filling the next chamber (7). Close valve 9 behind it when finished (8).
- Finally open valve 12 and spin wheel D to fill the container at the end with blood (9, 10).
- After finishing the blood test talk to the patient about the following topics: “Recent Diet”, “Drugs”, “Home”, “Restaurant”, “Getting High”, and “Alcohol”.
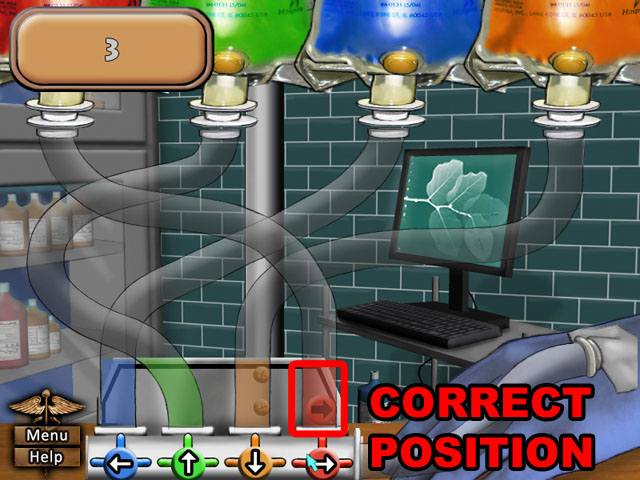
- Colored circles will come from the bags at the top of the screen in this mini-game.
- Click the arrow or press the arrow on your keyboard when the circle is at the very bottom of the tube, inside the colored area.
- At first you will only need to click one of two buttons, but there will be two more rounds both adding another color until you have to watch for all 4 colors.
- See the screenshot for the correct position of the circle to click.
- Investigate the next patient for signs of illness.
- Click on his head to start the investigation.
- First, use the gloves around the man’s mouth (1).
- Then use the light to look in his eyes and mouth (2).
- Ask the patient about the following topic: “Work Conditions”.
- Use the magnifying glass on the top of his head (3) and then ask him about the following topic: “Frequency”.
- Return to the zoomed out view and then click on his upper body.
- Use the stethoscope on the left side of his chest and then back out.
- Click on his stomach and use the glove to investigate.
- You will need to talk to him again. Ask him about “Cramps” and then back out of his stomach view and go to his legs.
- Use the rubber gloves on his ankle and then ask him about “Queasiness” to finish your check up.
- Talk to the people that work with the chef and ask them about: “Behavior”, “Awkwardness”, “Bathroom Time”, “Nose”, “Alcoholism”, and “Recent Drinking”.
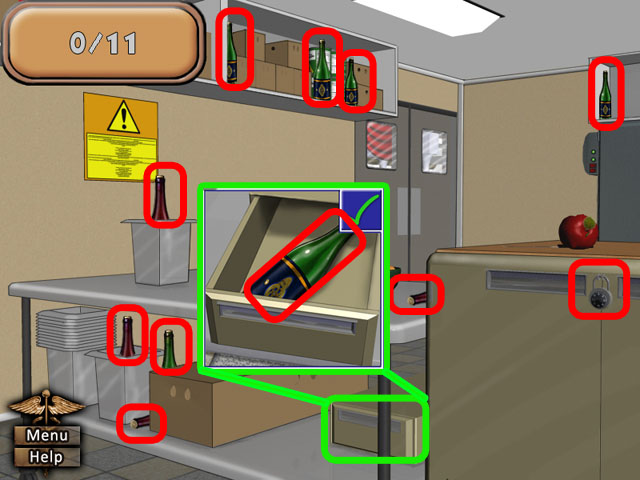
- Find the 11 clues scattered around the kitchen.
- Look for things that could be causing her substance abuse problem, like anything related to drugs or alcohol.
- Each time you find an item it will be circled.
- If you are having trouble finding the items, move the cursor around and look for it to change when you are over one.
- See the screenshot for the locations of all the items.
- Next click the mouse a drag it back and forth over the statue base to reveal the words “Made in New Jersey”.
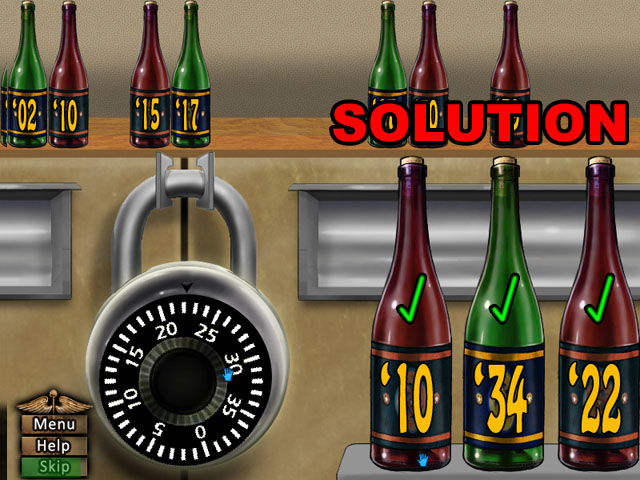
- Put the correct wine bottles in the correct order and click on the lock to put in the combination.
- Each bottle has a year on it, which will be one part in the combination.
- Each time you try three bottles it will tell you how many are correct with a green checkmark.
- Bottles that are incorrect will show a red arrow telling you whether they are too low or too high.
- Put bottles back on the shelf and try new bottles until you find the 3 numbers needed to open the lock.
- The correct combination is ’10, ’34, ’22 from left to right.
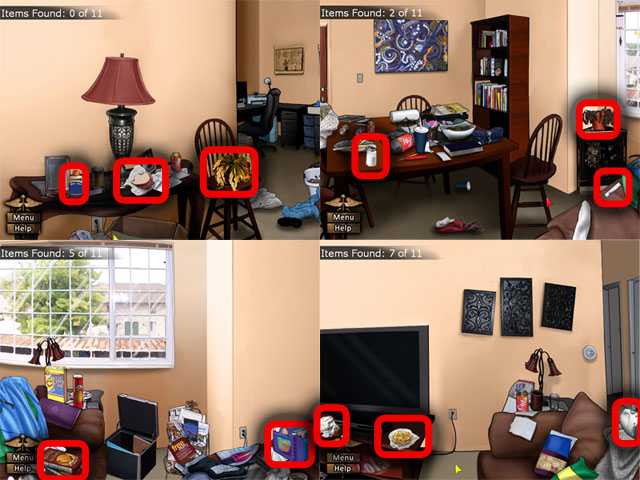
- Find the 11 clues scattered around the patient’s house.
- Look for things that could be causing his condition. Look for food items and other sources of bacteria.
- Move the cursor to the left or the right of the screen to scroll around the area.
- You will hear a small buzzer when your mouse goes over a clue, also the cursor will turn yellow when you are close.
- See the screenshot for the locations of all the items.
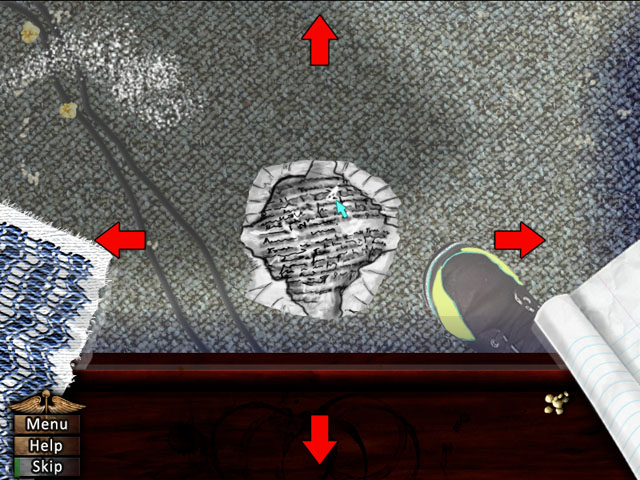
- Drag the ball of paper in the directions indicated with the red arrows to smooth it out.
- You will need to drag it in all four directions before you can start dragging it again.
- Once it the red arrows have disappeared you will have finished this mini-game.
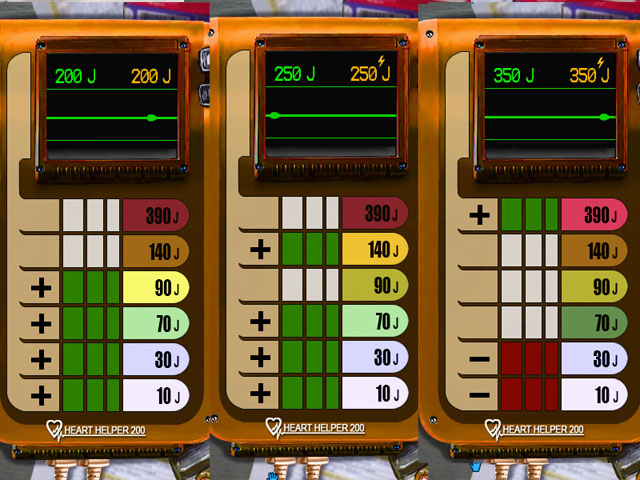
- Get the defibrillator to the correct voltage 3 times to complete this mini-game.
- Click on any of the voltage’s to add them together and try to get the target voltage.
- Click the voltage again to minus it from the current total.
- The 3 answers are: 90+70+30+10 = 200, 140+70+30+10 = 250, and 390 – 30 – 10 = 350.
- Next you will need to spin the test tubes again.
- Click on the test tube rack in the middle and circle your cursor on it clockwise to getting it spinning.
- On the left side of the screen is a bar that tells you how fast it is spinning, keep the bar in the green for as long as you can to finish the mini-game.
- Spin the tubes as fast as you can at first and then stop spinning once you get in the green. If it starts to dip down again, start spinning until you are back in the green.
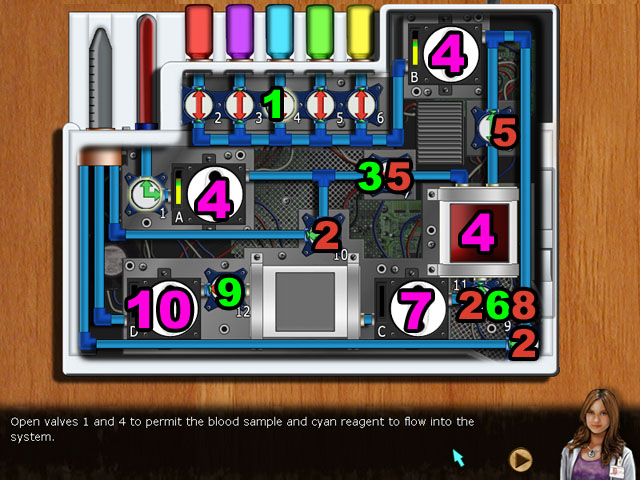
- Follow the instructions at the bottom of the screen to analyze the blood. Make sure not to miss any instructions because they won’t be repeated.
- If you get stuck wait for time to run out.
- First, click valve 4 to open it (1).
- Then click valves 9, 10, and 11 to close them (2) and open valve 7 (3).
- Next you will need to get wheel A and B spinning into the green, just like with the test tubes (4).
- Click on the wheels and spin them with the mouse. If your cursor goes outside the wheel, it will stop being spun by your movements.
- You need to get both wheels spinning at the same time to move the blood to the next chamber.
- Next close the 7 and 8 valves and open the 9 valve (6).
- Spin the wheel C in the same way as the other two filling the next chamber (7). Close valve 9 behind it when finished (8).
- Finally open valve 12 and spin wheel D to fill the container at the end with blood (9, 10).
- In the next scene grab the bacteria as they move across the Petri dish and put them with the matching bacteria in the other Petri dishes.
- The bacteria will move out of your view sometimes. Just wait until they come back into view to collect them.
- There are numbers written beside each bacteria dish that tell you how many you have to collect and how many you have left to collect. This time there will be a full count of all the different microbes to fill.
- Ask her about the following topics: “Issues”, “Depression”, “Suicide Note”, “Dirt”, “Stain” and “Molasses” .
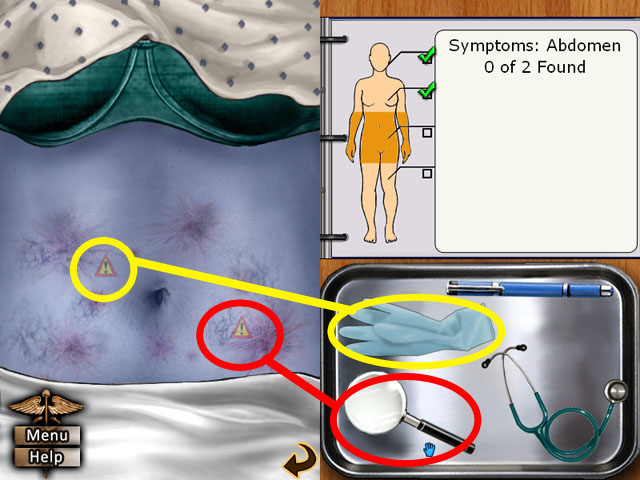
- Investigate the chef by giving her a checkup.
- First click on her head and use the light on her eye.
- Back out of this scene and go to her upper body.
- Check her heartbeat with the stethoscope and back out of this scene.
- Then click on her stomach and use the gloves on the left side and the magnifying glass on the right side as shown in the screenshot.
- Back out of this scene and go to her legs.
- Lastly use the magnifying glass to check on her upper leg and you will have finished the checkup.
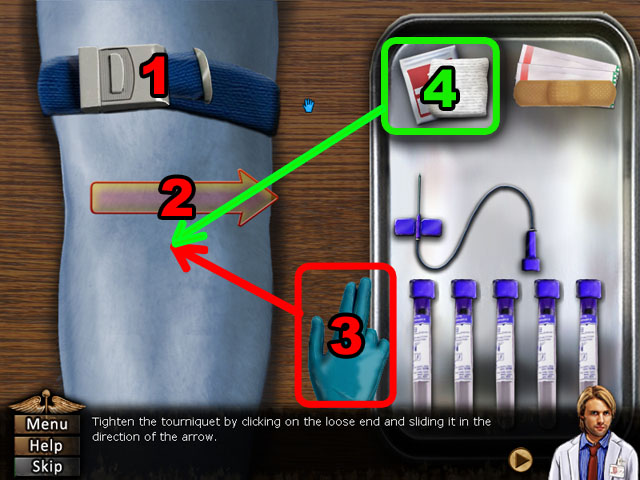
- Click on the tourniquet and drag to the upper arm (1).
- Wrap it around the arm by sliding your cursor from left to right on the arrow (2). You only need to click the arrow not the actual tourniquet.
- Make the veins easier to see by clicking on to forearm a few times (3).
- Click on the alcohol swab and drag it around the vein until finished (4).
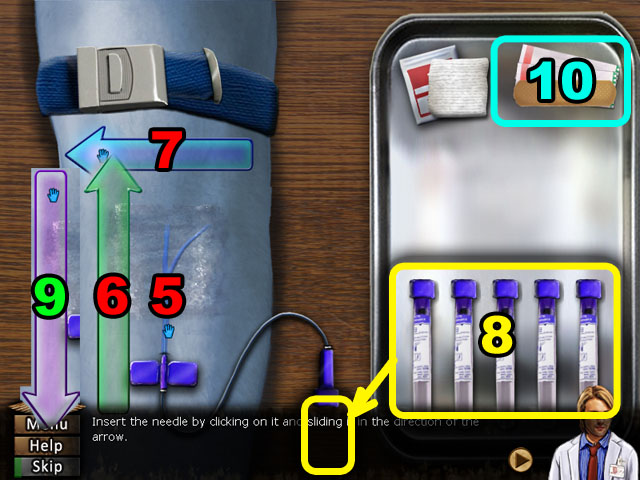
- Place the butterfly needle on top of the arm and insert the X mark on the vein (5).
- Insert the needle by clicking on the slider and sliding it in the direction of the arrow (6).
- Remove the tourniquet in the direction of the arrow (7).
- Pick up an empty vial and insert it into the end of the butterfly needle tube (8). Do this five times, waiting for the vial to fill with blood each time.
- Remove the butterfly needle in the direction of the arrow (9).
- Click on the bandage and drag it on to the X mark in the screenshot (10).
- Slide the bandage in the direction of the arrow.
- Ask him about the following topics: “Friendship”, “Sex”, “Employees”, “STDs”, “Current Habits”, and “Current Feelings”.
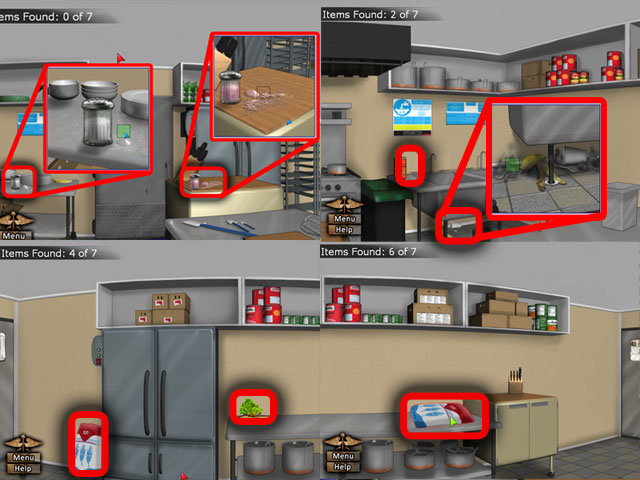
- Find the 7 clues scattered around the patient’s kitchen.
- Look for things that could be causing his condition. Look for food items and other sources of bacteria.
- Move the cursor to the left or the right of the screen to scroll around the area.
- You will hear a small buzzer when your mouse goes over a clue, also the cursor will turn yellow when you are close.
- See the screenshot for the locations of all the items.
- Click and hold for few seconds on the green square in the pink salt, the salt and the trash to collect them.
- Next you will need to spin the test tubes again.
- Click on the test tube rack in the middle and circle your cursor on it clockwise to getting it spinning.
- On the left side of the screen is a bar that tells you how fast it is spinning, keep the bar in the green for as long as you can to finish the mini-game.
- Spin the tubes as fast as you can at first and then stop spinning once you get in the green. If it starts to dip down again, start spinning until you are back in the green.
- Next do the burner mini-game. Turn on the burner hotter or colder in order to raise the temperature of the gauge to the green area.
- Turn the knob on the right toward the minus sign to turn down the heat and toward the plus sign to turn it up.
- Keep the temperature in the green but as close as you can to the top of the green. If it’s too close to the yellow you may fail.
- Lastly do the microbe hunt mini-game. Grab the bacteria as they move across the Petri dish and put them with the matching bacteria in the other Petri dishes.
- The bacteria will move out of your view sometimes. Just wait until they come back into view to collect them.
- There are numbers written beside each bacteria dish that tell you how many you have to collect and how many you have left to collect. This time there will be a full count of all the different microbes to fill.
- Ask him about the following topics: “Curing Salt”, “Lunch”, “Alibi”, “Undyed”, “Management”, and “Permanent Promotion”.
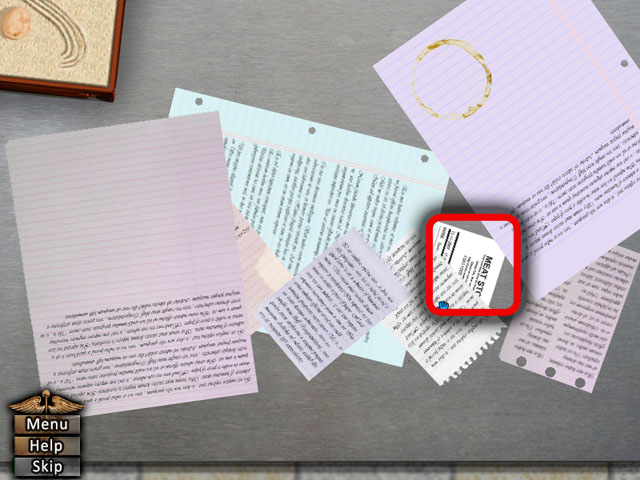
- Click and drag the papers away from the middle of the screen.
- You are looking for a receipt underneath all of them.
- Find the receipt as shown in the screenshot and click it to continue.
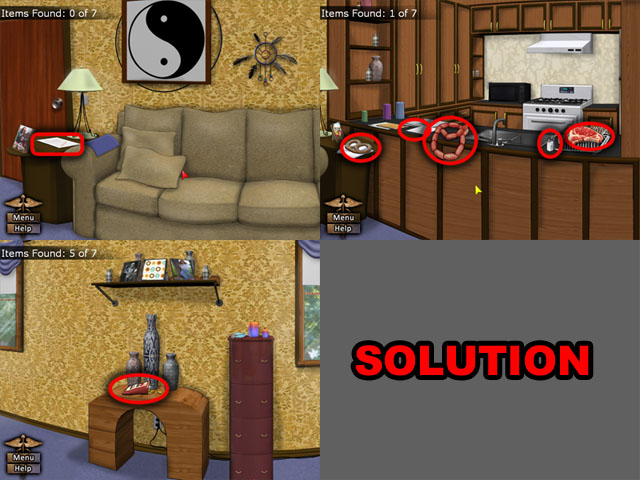
- Find the 7 clues scattered around the Claire’s apartment to help the diagnosis of the patient.
- Look for things that could be causing her condition. Look for food items and other sources of bacteria.
- Move the cursor to the left or the right of the screen to scroll around the area.
- You will hear a small buzzer when your mouse goes over a clue, also the cursor will turn yellow when you are close.
- See the screenshot for the locations of all the items.

- Find 8 differences between the signature of the rental agreement and the signature on the receipt.
- Click on the receipt to find the differences.
- See the screenshot for the solution.

- Compare the signatures by dragging the letters from one signature to the letters of the other.
- This should prove that the Russell actually signed for the meat shop.
- The letters “e”, “a” and “l” are the same in both signatures.
- See the screenshot for the solution.
Episode 3: Skull & Bones
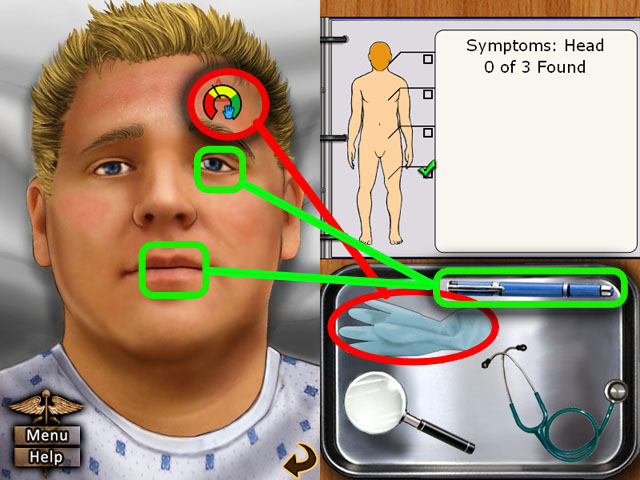
- Perform a checkup on the next patient.
- First click his head and use the gloves to feel his forehead.
- You will then be taken to a conversation, ask him about the “Routines”.
- Then use the light on his eye and ask him about the “Recent Issues”.
- Then use the light on his mouth and ask him about the “Family” and “Conditions”.
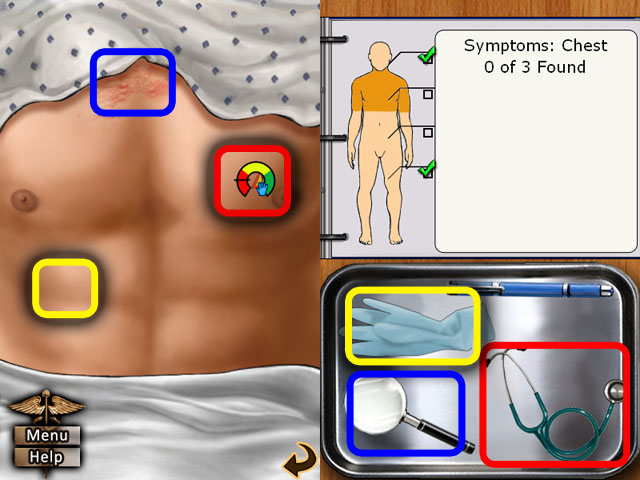
- Back out of the head scene and go to the chest.
- Check his heartbeat with the stethoscope and ask him about the “Paralysis”.
- Next use the glove on his abdomen and ask him about “Arms”.
- Then use the magnifying glass to inspect the rash at the top of his chest.
- Ask him about “Other Illnesses” and “Parents”.
- Back out of this scene and investigate his stomach. Use the stethoscope on his abdomen.
- Finally ask him about “Liquid Refreshments” and “Before Drinking”.
- In the next mini-game find the possible diagnosis that matches the word slowly appearing on the whiteboard letter by letter.
- You have to click correct words before the timer is out and the word is spelled out.
- Click the word LEAD POISONING first.
- The next word is DISULFIRAM OVERDOSE.
- The next word is PARESIS.
- The next word is BOTULISM.
- The next word is GUILLAIN-BARRE SYNDROME.
- The last word is HEXACARBON NEUROPATHY.
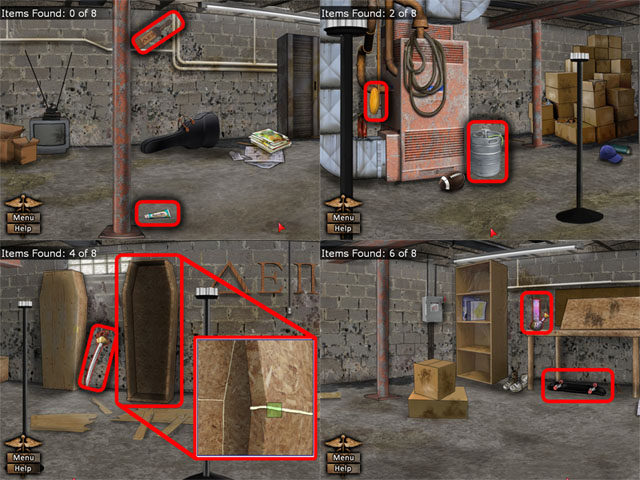
- Find the 8 clues scattered around Trevor’s basement.
- Look for things that could be causing his condition, like drugs or other suspicious items.
- Move the cursor to the left or the right of the screen to scroll around the area.
- You will hear a small buzzer when your mouse goes over a clue, also the cursor will turn yellow when you are close.
- See the screenshot for the locations of all the items.
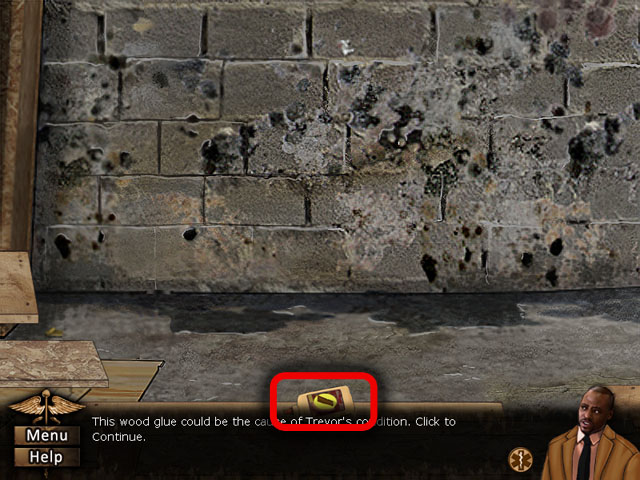
- Click and slide the wooden pieces off to the side to find the yellow wood glue.
- See the screenshot for what it looks like.
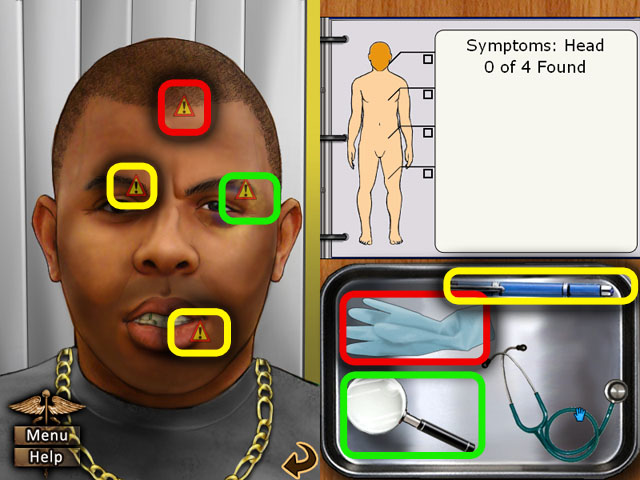
- Perform a check on the next new patient.
- Click on his head to investigate symptoms on his face.
- Use the glove to check to top of his head, and then ask him about “Frequency”.
- Next use the light on his eye and mouth and the magnifying glass on his left eye.
- Back out of this scene and check his upper body.
- Use the stethoscope to check his breathing and then ask him about his “Eyes”.
- Back out and go to the stomach area and check his stomach with your stethoscope as well. Ask him about “Wins”.
- Finally go to his leg area and use the glove on his upper thigh.
- After this is done ask him about “Headaches”.
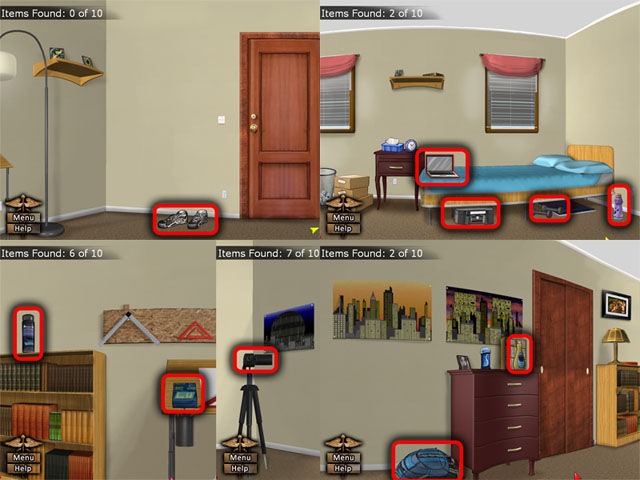
- Find the 10 clues scattered around the patient’s apartment.
- Look for things that could be causing his condition, like anything that could cause headaches.
- Move the cursor to the left or the right of the screen to scroll around the area.
- You will hear a small buzzer when your mouse goes over a clue, also the cursor will turn yellow when you are close.
- See the screenshot for the locations of all the items.
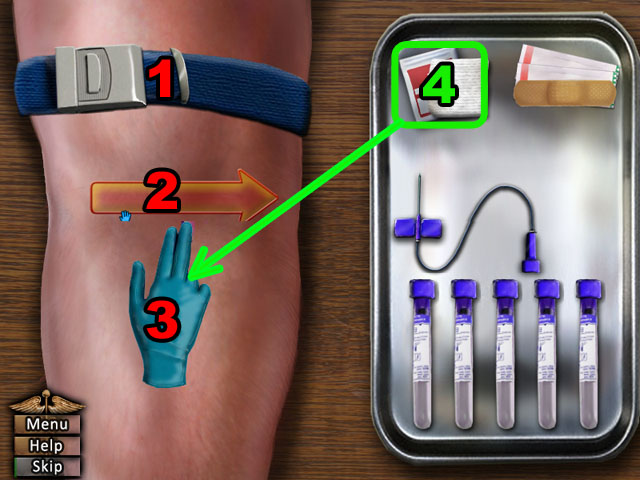
- Click on the tourniquet and drag to the upper arm (1).
- Wrap it around the arm by sliding your cursor from left to right on the arrow (2). You only need to click the arrow not the actual tourniquet.
- Make the veins easier to see by clicking on to forearm a few times (3).
- Click on the alcohol swab and drag it around the vein until finished (4).
- Place the butterfly needle on top of the arm and insert the X mark on the vein (5).
- Insert the needle by clicking on the slider and sliding it in the direction of the arrow (6).
- Remove the tourniquet in the direction of the arrow (7).
- Pick up an empty vial and insert it into the end of the butterfly needle tube (8). Do this five times, waiting for the vial to fill with blood each time.
- Remove the butterfly needle in the direction of the arrow (9).
- Click on the bandage and drag it on to the X mark in the screenshot (10).
- Slide the bandage in the direction of the arrow.
- Ask the patient about: “Diet”, “Juice”, “Pills”, “Emily”, “Lingerie” and “Initiation”.
- Take blood again following the steps above.
- In the next mini-game colored circles will come from the bags at the top of the screen.
- Click the arrow or press the arrow on your keyboard when the circle is at the very bottom of the tube, inside the colored area.
- At first you will only need to click one of two buttons, but there will be two more rounds both adding another color until you have to watch for all 4 colors.
- Take blood one more time following the steps above.
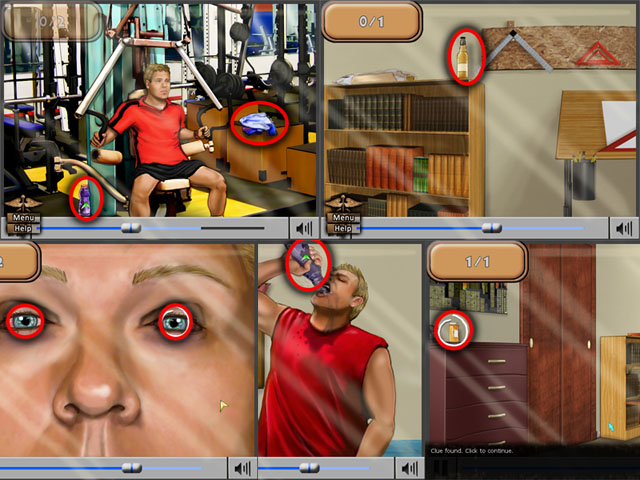
- Find the 7 clues in the 5 photographs of Trevor.
- Each picture will have 1 or 2 clues you need to find before time runs out.
- If you are getting stuck move your mouse around and look for the cursor to change.
- See the screenshot for the locations of all the items.
- In the next mini-game find the possible diagnosis that matches the word slowly appearing on the whiteboard letter by letter.
- You have to click correct words before the timer is out and the word is spelled out.
- Click the word AMYOTROPHIC LATERALSCLEROSIS first.
- The next word is RAMSAY HUNT SYNDROME.
- The next word is VELOPHARYNGEAL INCOMPETENCE.
- The next word is ACOUSTIC NEUROMA.
- The last word is MYASTHENIA GRAVIS.
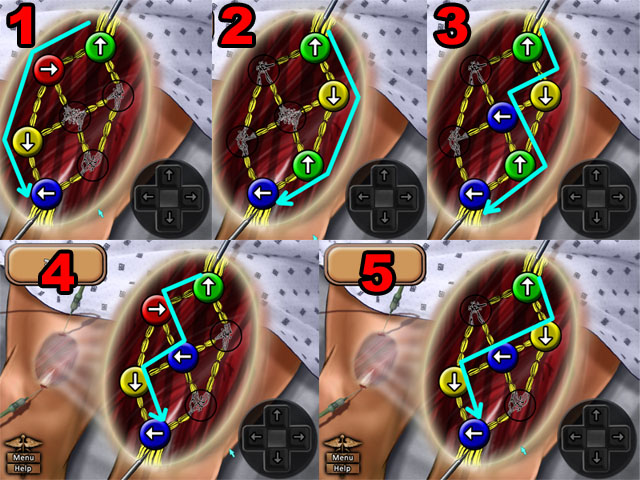
- Repeat the pattern on the muscles by either pressing the buttons in the bottom right corner or use the keyboard arrows.
- There are 5 patterns you need to finish to complete the mini-game.
- The patterns are: UP, RIGHT, DOWN, LEFT – UP, DOWN, UP, RIGHT – UP, DOWN, LEFT, UP, LEFT – UP, RIGHT, LEFT, DOWN, LEFT –UP, DOWN, LEFT, DOWN, LEFT.
- See the screenshot for the solutions as well.
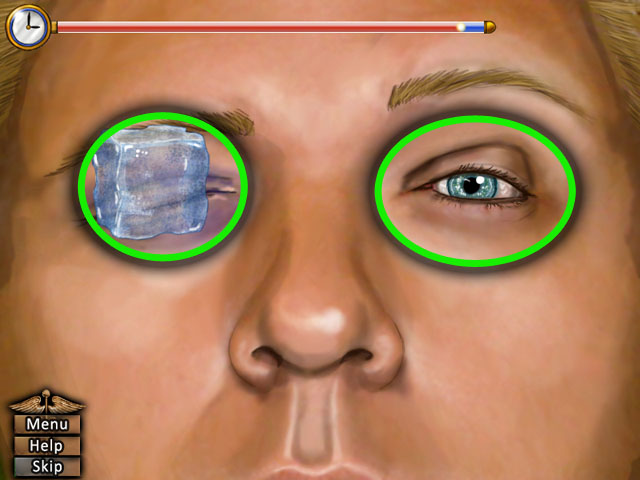
- Your cursor will turn into ice in this scene.
- Rub the ice on the left and right eye circled in green to finish the procedure.
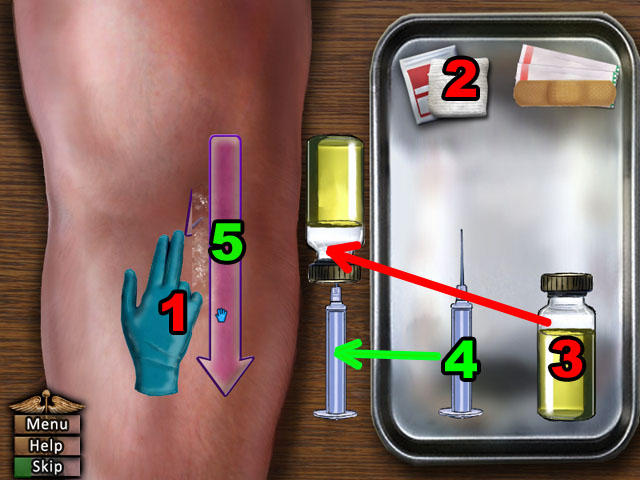
- Inject Tensilon for further testing following these steps.
- Press the gloved hand multiple times against the skin to see the vein (1).
- Rub the cotton swab solution on the area (2).
- Put the Tensilon to the right of the leg and take some with the syringe (3,4).
- Take the Tensilon into the syringe by sliding the mouse down on the pink arrow (5).
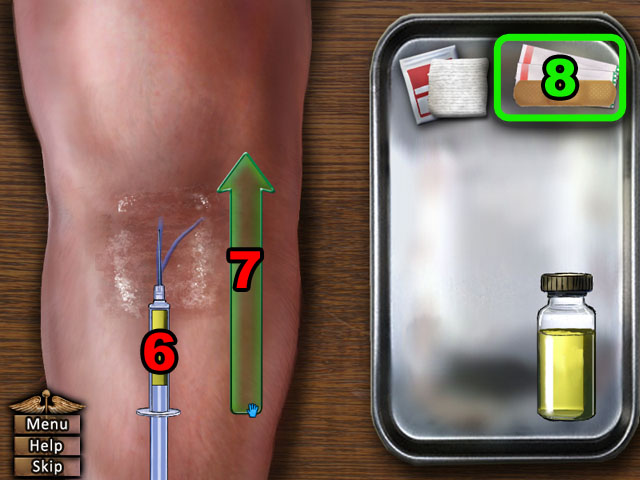
- Next take the syringe and put it in the vein that you uncovered before (6).
- Slide the mouse up on the green arrow to inject it (7).
- Put the syringe back and place the band aid on the vein (8).
- Slide the arrow to the right to finish putting the band aid on.
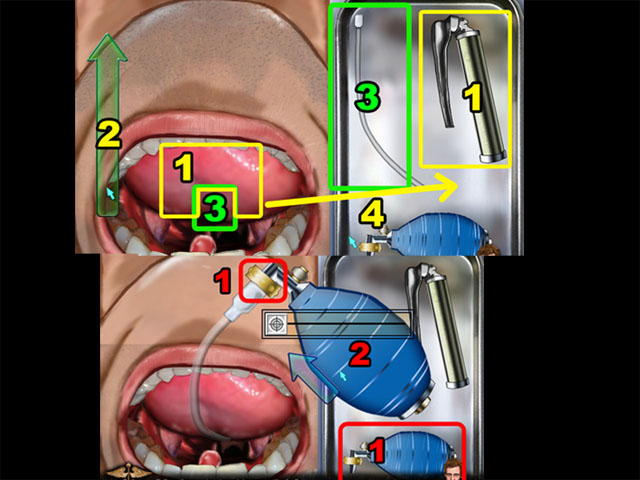
- Click the laryngoscope in the mouth and click and drag on the arrow to insert it (1,2).
- Insert the tube into the space beside the laryngoscope and then remove the laryngoscope and put it back on the tray (3, 4).
- Add the ball pump to the end of the hose (1) and a target track will appear.
- With your mouse keep the light target in line with the darker target without going outside the track (2).
- Going outside the track will cause your target to disappear.
- Ask the woman about the following: “Past”, “Dating”, “Exclusivity”, “Codependence”, “Confusion”, and “Eating Disorders”.
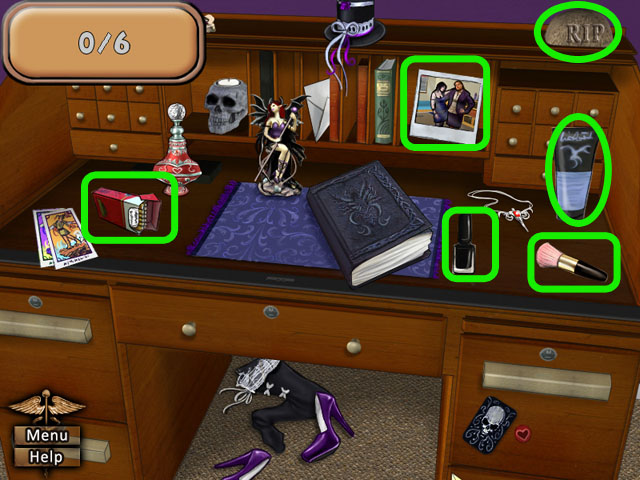
- Find the 6 clues scattered around her desk.
- If you can’t find what you’re looking for, move the mouse around until the cursor changes to a different color.
- See the screenshot for the locations of all the items.
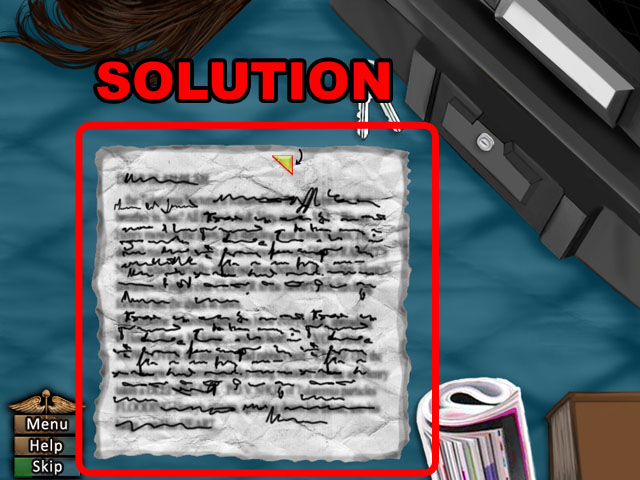
- The next puzzle is a jigsaw puzzle that you need to put together, to receive the full note.
- You can move the pieces around by clicking on them and rotate them by click on the yellow arrow in the top corner.
- The places that the pieces go into are lightly outlined below on the desk.
- See the screenshot for the final solution.
- Ask Trevor’s friend about the following subjects: “Allison”, “Photo”, “Chick”, “Affair”, and “Emily”.
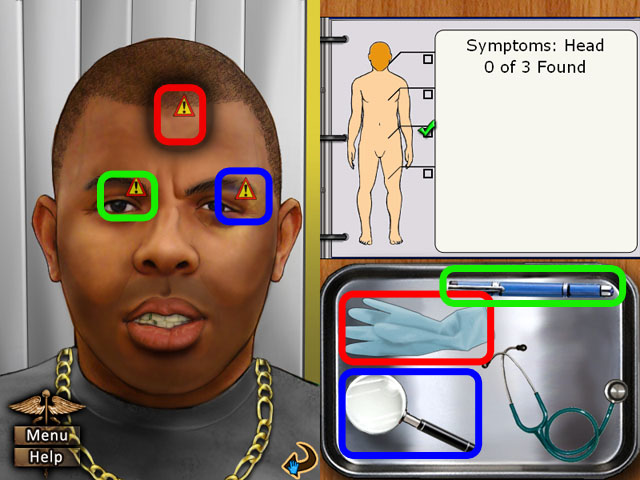
- Continue your second checkup on the patient with the headaches.
- Click on his head first to investigate.
- Click on the light to check his right eye, then the magnifying glass to inspect his left eye.
- Click on the gloves to inspect his forehead.
- After this ask him about the “Bite”.
- Return to the previous screen and go to his upper body.
- Click the stethoscope and listen to his breathing, then ask him about his “Eyes”.
- Next go to his legs and use the gloves to investigate his upper calf. Ask him about his “Wife”.
- Return to the younger woman and ask her about the following subjects: “Photo”, “Allison”, “Persona”, “Comfort”, “Pretending”, and “Key”.

- Find Trevor’s favorite magazines by removing the fashion magazines from the pile.
- Click and drag the magazines to the bottom to get rid of them.
- Look at the screenshot to see what magazines should be left.

- Next remove the health magazines.
- Then remove the weight lifting magazines, which should leave only the “Jock Games”.
- Ask Trevor about the following: “Arms”, “Cross-dressing”, “Underwear”, “Lingerie”, “Differing”, and “Stores”.
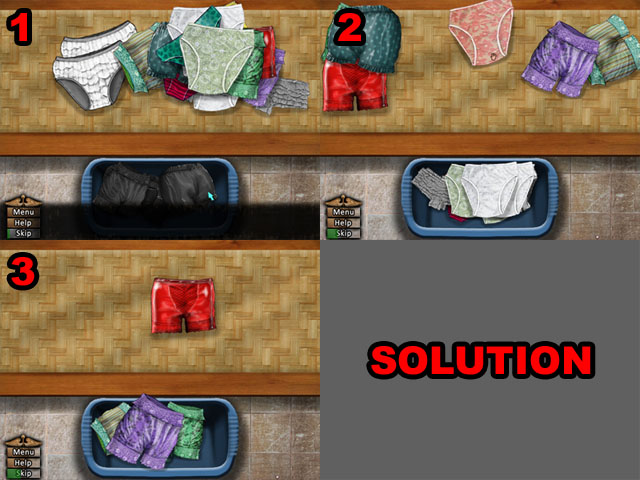
- Through a process of elimination find the underwear that Trevor described.
- First remove the black panties.
- Remove the any underwear that is not and older style with the short legs.
- Remove the silky panties that are not made out of latex to leave only the red pair left.
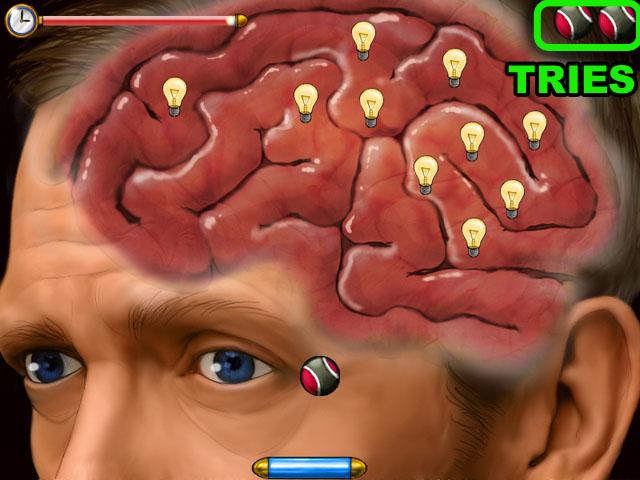
- Bounce the ball off of the platform and into the light bulbs in House’s brain.
- Each bounce will cause the ball to move faster and faster.
- If the ball goes below the platform on the bottom of the screen, you will lose a ball in the top left corner and start over.
- Once all of the light bulbs are destroyed or all of you tries have been used up, the mini-game is over.
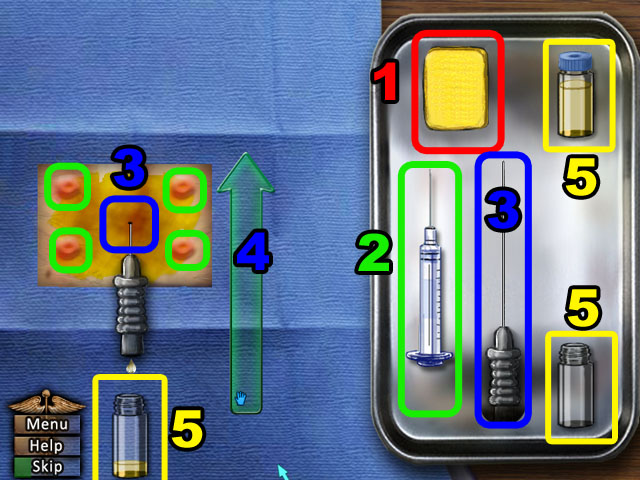
- Swab the infected area with the sponge by dragging it over the square until finished (1).
- Next, line up the tip of the left syringe onto each of the four spots indicated and click to inject in that area (2).
- Next get the right syringe and click it on the middle of the patch of skin (3).
- Drag your mouse up the arrow to insert it (4).
- Then place one of the vials underneath the syringe before it drips on the floor (5). You will have to fill all three containers.
- Be very fast when switching containers, because if you miss any fluid you will fail this mini-game.
Episode 4: Crashed
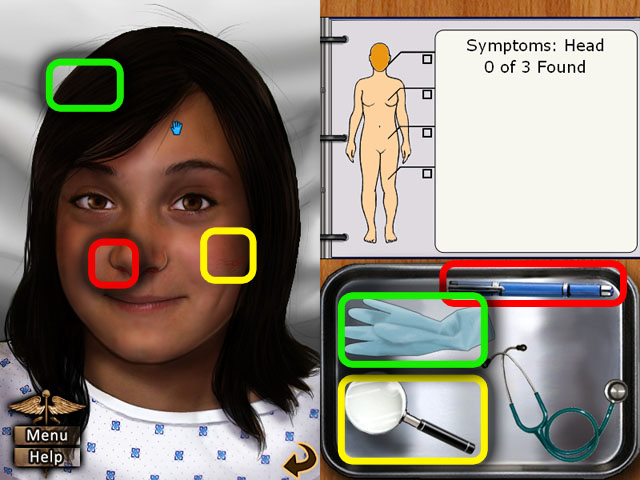
- Perform a checkup on the new patient – the gymnast.
- Click on her head to look for symptoms there.
- Use the glove on her hair and the light on her nose.
- Use the magnifying glass on her cheek and then back out of this scene.
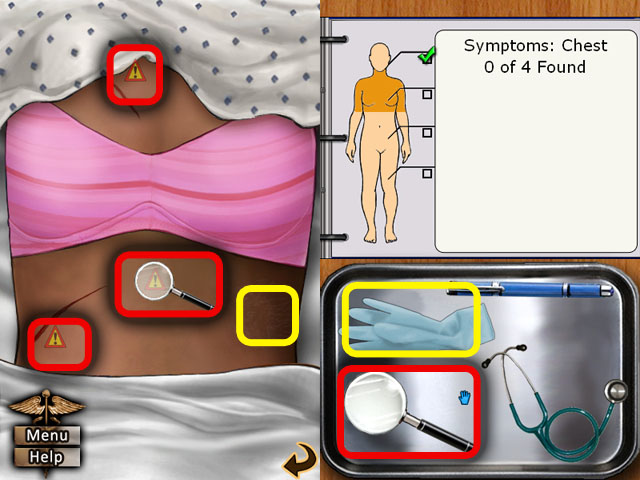
- Next click on her upper body to research more symptoms there.
- Use the magnifying glass on the two scars and the middle of her abdomen.
- Use the gloves on the right side of her body and then back out of this scene.
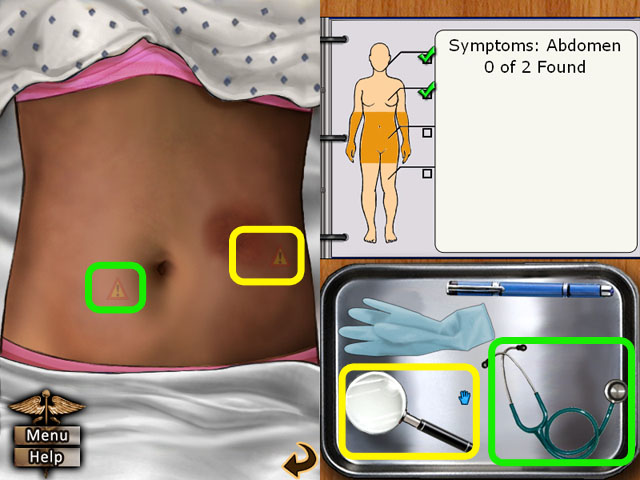
- Next click on her stomach to research more symptoms there.
- Use the magnifying glass on the right side of her stomach, and use the stethoscope to listen to the other side.
- Talk to her about the following topics: “Athletics” and “Bruises”.
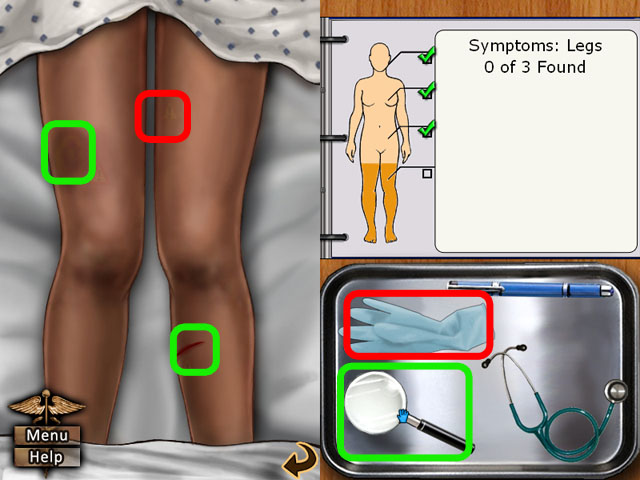
- Lastly back out of her stomach and go to her legs.
- Use the magnifying glass on the cut on her shin and the bruise on her upper leg.
- Use the gloves on the upper part of her left leg.
- Talk to her about: “Eating”, “Diet”, “Health”, and “Weight”.
- In the next mini-game find the possible diagnosis that matches the word slowly appearing on the whiteboard letter by letter.
- You have to click correct words before the timer is out and the word is spelled out.
- Click the word THROMBOLYTOPENIA first.
- The next word is GLANZMANN’S DISEASE.
- The next word is VITAMIN K DEFICIENCY.
- The next word is LUPUS ANTICOAGULANT.
- The next word is HEMOPHILIA.
- The last word is DISSEMINATED INTRAVASCULAR COAGULATION.
- Then take blood her blood following previous steps.
- Lastly in the next mini-game colored circles will come from the bags at the top of the screen.
- Click the arrow or press the arrow on your keyboard when the circle is at the very bottom of the tube, inside the colored area.
- At first you will only need to click one of two buttons, but there will be two more rounds both adding another color until you have to watch for all 4 colors.
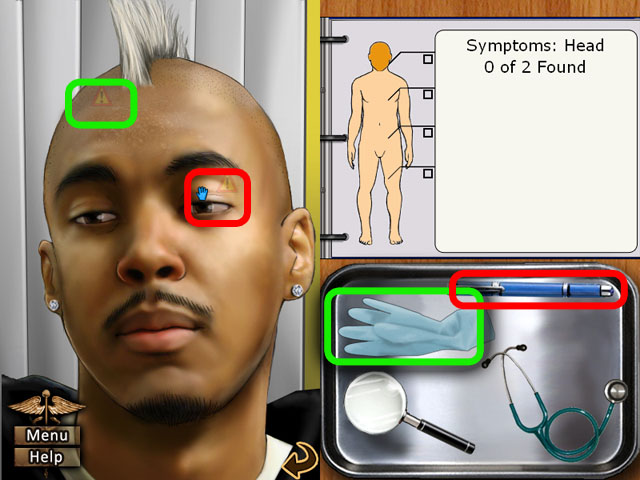
- Perform a check on the next new patient.
- Click his head to investigate that first. Then use the glove on his forehead.
- Ask him about the following subject: “Sweat”.
- Next, use the light on his eye and back out of this area.
- Research his chest next and use the stethoscope on his heart-rate.
- Ask him about his “Diet” and return to check his lower body.
- Click on his hands with the magnifying glass and then ask him about his “Hands”.
- Finally go to his legs and use the gloves on his ankle.
- Ask him about the subject: “Stress”.
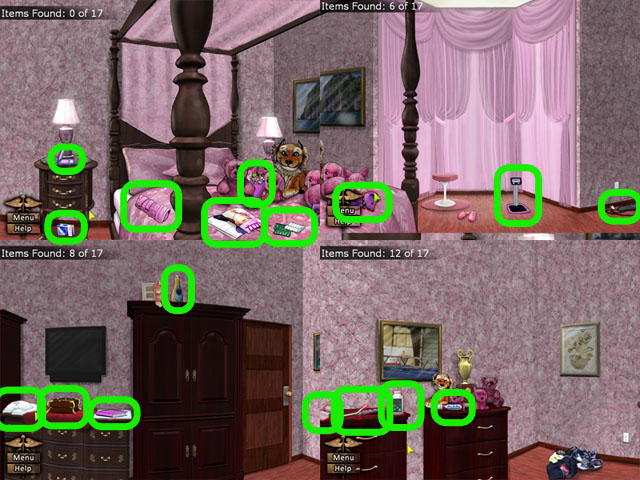
- Find the 17 clues scattered around the girl’s room.
- Look for things that could be causing his condition, like anything that could cause injuries or any medicine or drugs.
- Move the cursor to the left or the right of the screen to scroll around the area.
- You will hear a small buzzer when your mouse goes over a clue, also the cursor will turn yellow when you are close.
- See the screenshot for the locations of all the items.

- Solve the puzzle box by rearranging the pieces and making a picture of a flower.
- You can either click a square near the missing square to slide it into that new position or click one square then another to switch their positions.
- See the screenshot for the final solution.
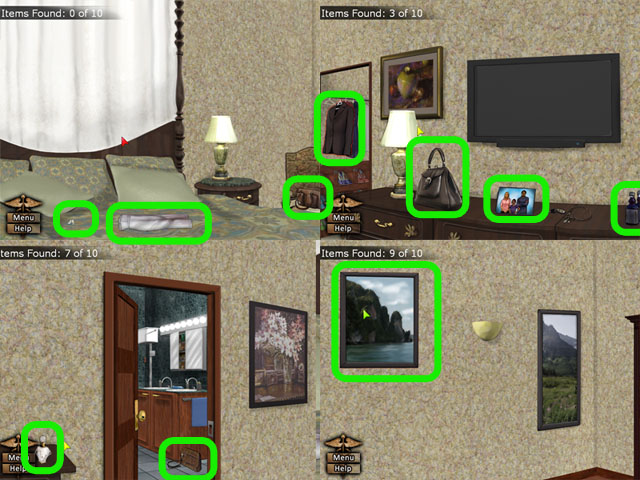
- Find the 10 clues scattered around the girl’s parent’s room.
- Move the cursor to the left or the right of the screen to scroll around the area.
- You will hear a small buzzer when your mouse goes over a clue, also the cursor will turn yellow when you are close.
- See the screenshot for the locations of all the items.
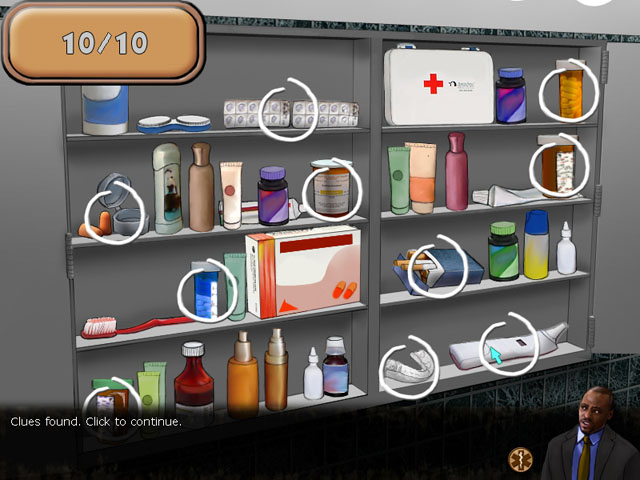
- Find the 10 clues in the medicine cabinet.
- If you can’t find what you’re looking for, move the mouse around until the cursor changes to a different color.
- See the screenshot for the locations of all the items.
- Next talk to her trainer and ask him about the following: “Weight”, “Issues”, “Symptoms”, “Performance”, “Bleeding”, and “Family”.
- In the next mini-game find the possible diagnosis that matches the word slowly appearing on the whiteboard letter by letter.
- You have to click correct words before the timer is out and the word is spelled out.
- Click the word LEUKEMIA first.
- The next word is WALDENSTROM”S MACROGLOBULINEMIA.
- The next word is ASPIRIN OVERDOSE.
- The last word is HYPOTHYROIDISM.
- Then take blood her blood following previous steps.
- Use the centrifuge to separate out the blood components, making sure to keep it high and in the green.
- Use the Bunsen burner also making sure to keep the temperature high and in the green with the dial.
- Lastly do the microbe hunt mini-game. Grab the bacteria as they move across the Petri dish and put them with the matching bacteria in the other Petri dishes.
- Talk to the patient’s friend about the following subjects: “Dates”, “Party”, “Drugs”, “Pills”, “Dieting”, and “Bruising”.
- Talk to the patient about: “Bruises”, “Effects”, “Pill Sources”, “Motive”, “Why”, and “Useful”.
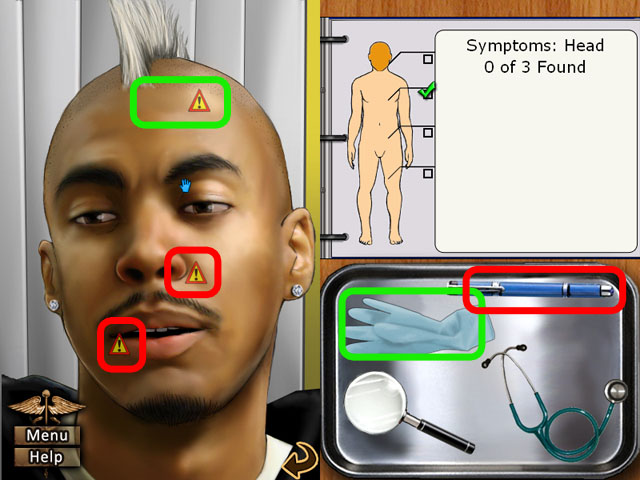
- Perform a second checkup on the famous rapper.
- Click on his head first and investigate his forehead with the gloves.
- You will then talk to him. Ask him about “Doctors”.
- Then use the light on his nose and mouth, and talk to him about “Drugs”.
- Back out of this scene and go to his lower body, to check on his hands.
- Use your magnifying glass on his hands and then ask him about “MRI”.
- Last, back out of that scene and zoom into his legs.
- Use the magnifying glass on his feet and then ask him about his “History”.
- Go talk to the gymnast’s mother about the following topics: “Marriage”, “Home Life”, “Gifts”, “Pills”, “Vitamins”, and “Depression”.
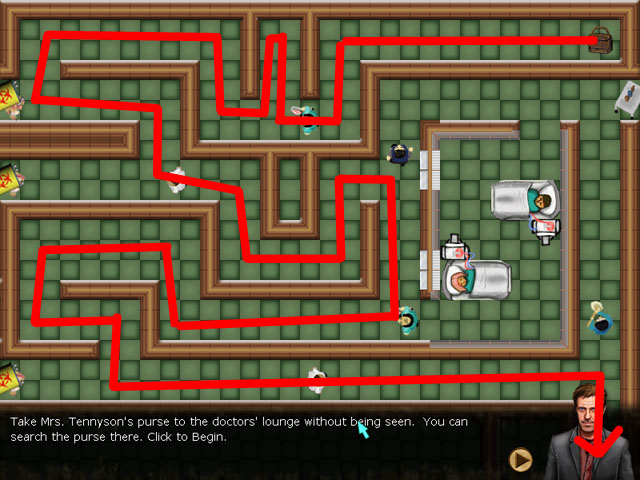
- Click on the bag in the top right corner and drag it through the maze without touching any of the people walking around.
- If you try to drag it though a wall, it will stop dragging.
- Use the spots where you know that no doctors will be coming to rest.
- Follow the path in the screenshot for the solution.
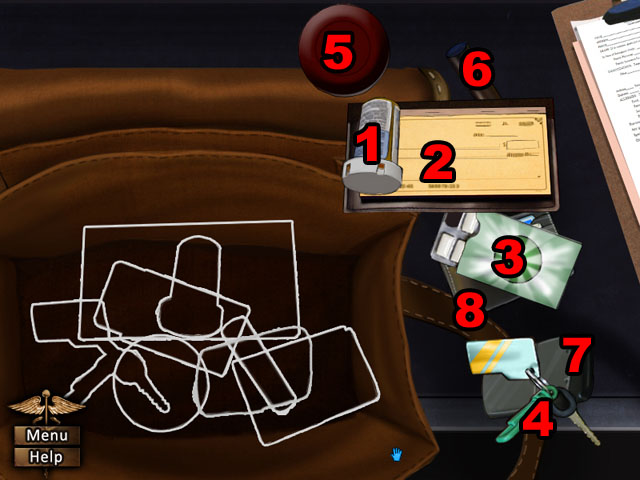
- Remove all of the items from the bag noting there positions so that you can put them back in order.
- You are looking for the perception at the bottom of the bag. Once you find it you will need to put everything back.
- The correct order is: PILLS, CHECKBOOK, GUM, KEYS, ROUND CASE, LIPSTICK, PHONE, and WALLET.
- Use the outlines to guide you on where to place each item and see the screenshot for the order.
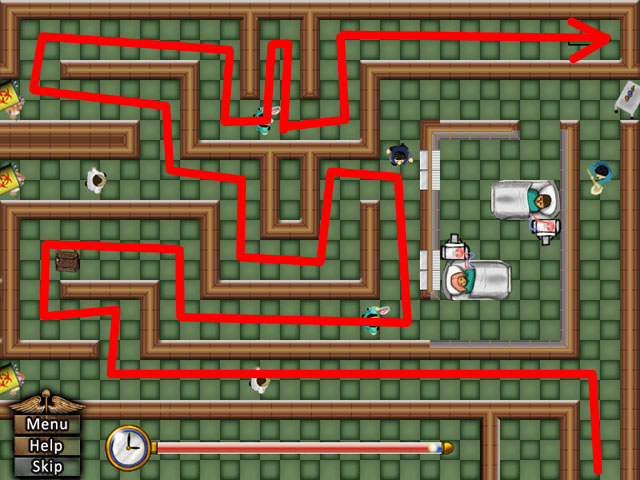
- Click on the bag in the top right corner and drag it through the maze without touching any of the people walking around. This is the exact opposite of the first maze.
- If you try to drag it though a wall, it will stop dragging.
- Use the spots where you know that no doctors will be coming to rest.
- Follow the path in the screenshot for the solution.
- After finishing that, use the centrifuge to separate out the blood components of this sample for testing in the centrifuge mini-game.
- Then adjust the temperature dial of the burner to increase the intensity of the flame in the sample warming mini-game.
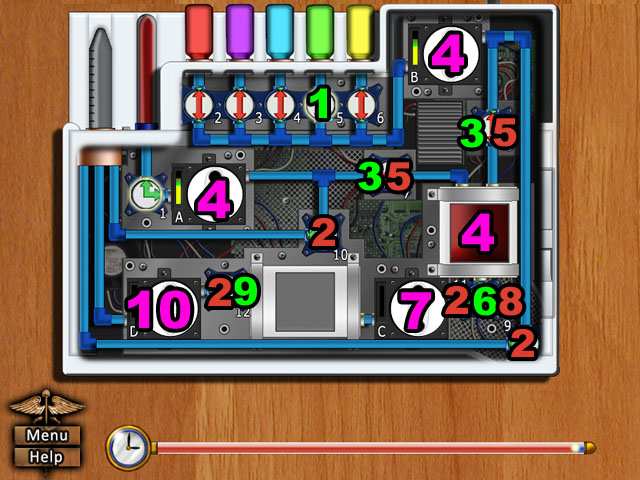
- Follow the instructions at the bottom of the screen to analyze the blood. Make sure not to miss any instructions because they won’t be repeated.
- If you get stuck wait for time to run out.
- First, click valve 5 to open it (1).
- Then click valve 9, 10, 11, and 12 to close them (2) and open valves 7 and 8 (3).
- Next you will need to get wheel A and B spinning into the green, just like with the test tubes (4).
- Click on the wheels and spin them with the mouse. If your cursor goes outside the wheel, it will stop being spun by your movements.
- You need to get both wheels spinning at the same time to move the blood to the next chamber.
- Next close the 7 and 8 valves and open the 9 valve (6).
- Spin the wheel C in the same way as the other two filling the next chamber (7). Close valve 9 behind it when finished (8).
- Finally open valve 12 and spin wheel D to fill the container at the end with blood (9, 10).
- Afterwards ask the patient about the following: “Motivation”, “Depression”, “Problems”, “Mom”, “Hitting”, and “Physical Abuse”.
- In the last mini-game of this chapter find the possible diagnosis that matches the word slowly appearing on the whiteboard letter by letter.
- You have to click correct words before the timer is out and the word is spelled out.
- Click the word PULMONARY EMBOLI first.
- The next word is HYPOGLYCEMIA.
- The next word is ANAPHYLACTIC SHOCK.
- The next word is MASTOCYTOSIS.
- The next word is MYOCARDIAL INFARCTION.
- The last word is OBLITERATIVE BRONCHIOLITIS.
Episode 5: Under the Big Top
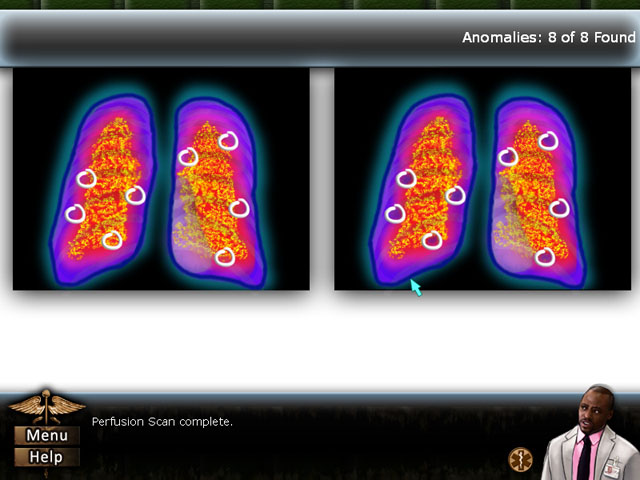
- Find the 8 anomalies in the Perfusion Scan to continue.
- The anomalies will look like little dark patches and will only appear on the picture to the right side.
- See the screenshot for the position of all the anomalies.
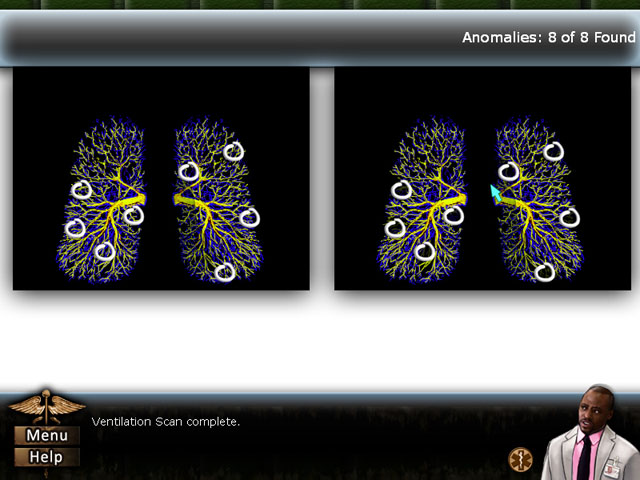
- Find the 8 anomalies in the Ventilation Scan to continue.
- The anomalies will look like dark patches and will only appear on the picture to the right side.
- See the screenshot for the position of all the anomalies.
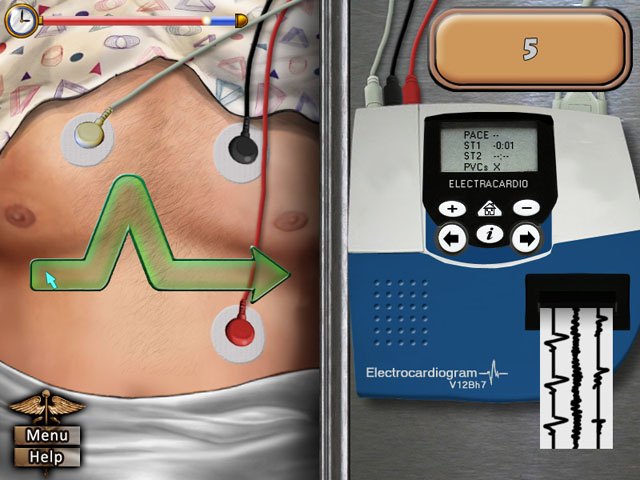
- Next is the ECG scan mini-game.
- Three different types of arrows will appear above the patient’s chest.
- Use the mouse to click on one side and drag down the path of the arrow to the finish.
- If you go outside of the path of the arrow you will fail this heartbeat.
- Make it through all of the arrows to finish this game successfully.
- The next mini-game is the Spirometry Test.
- Just like when giving medicine to a patient you have colored circles coming from the top of the screen and you need to click to correct button when they get to the colored area at the bottom.
- In this test you will do first 1 and then 2 and then 3 different colored circles at the same time.
- You can use the arrow keys or click the correct colored button to play this game.
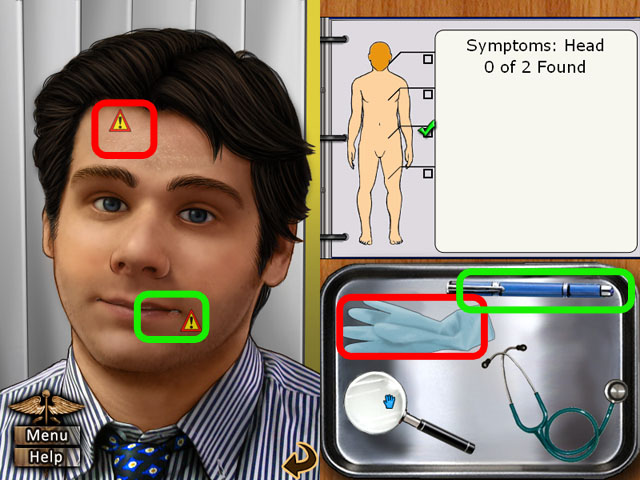
- Perform a checkup on the next new patient.
- Click on his head to zoom in and use the glove on his forehead and the light on his mouth.
- Back out of this scene and go to the upper body.
- Use the stethoscope to check his heart rate.
- Then talk to him about his “Activities”.
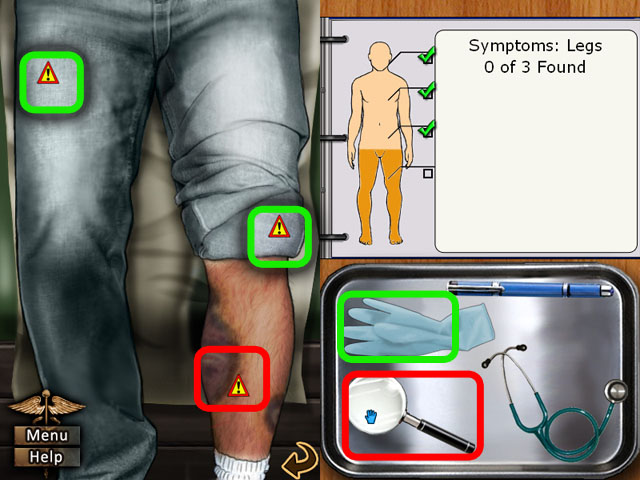
- Next examine his legs, and use the magnifying glass on his bruises.
- He will then talk to you about his “Age”.
- Use the gloves on his knee and upper leg.
- Finally ask him about “Stiffness Severity” and “Timing”.
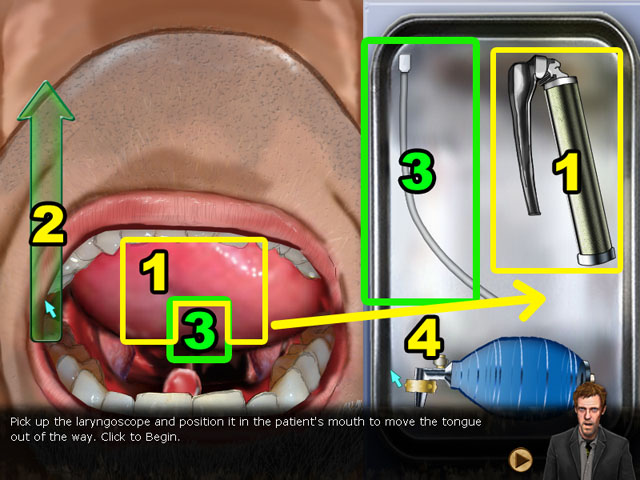
- Click the laryngoscope in the mouth and click and drag on the arrow to insert it (1,2).
- Insert the tube into the space beside the laryngoscope and then remove the laryngoscope and put it back on the tray (3, 4).
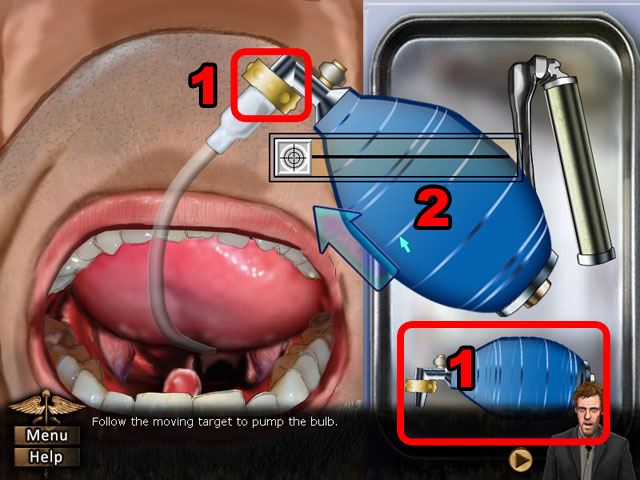
- Add the ball pump to the end of the hose (1) and a target track will appear.
- With your mouse keep the light target in line with the darker target without going outside the track.
- Going outside the track will cause your target to disappear.
- Talk to the patient about the following subjects: “History”, “Stressing”, “Other Influences”, “Routine”, “Medication”, and “Nervousness”.
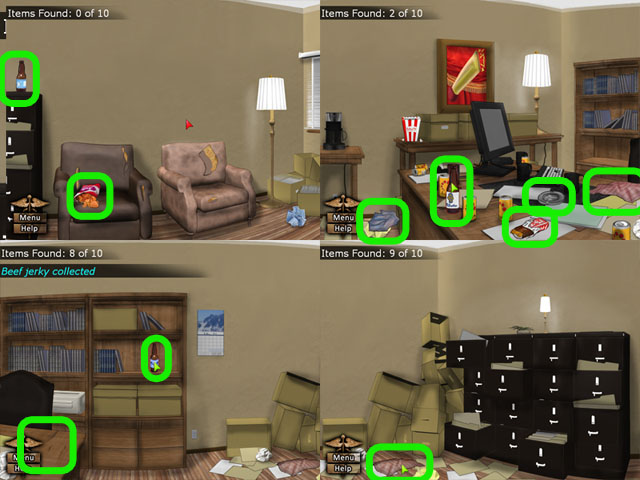
- Find the 10 clues scattered around Ritchie’s attic.
- Move the cursor to the left or the right of the screen to scroll around the area.
- You will hear a small buzzer when your mouse goes over a clue, also the cursor will turn yellow when you are close.
- See the screenshot for the locations of all the items.
- Next ask Ritchie about: “Ashes”, “Office”, “Cigarettes”, “Smoking”, “Junk Food”, and “Drugs”.
- Move on to his friend the clown and ask about the following: “Ritchie’s Breathing”, “Marijuana”, “Getting High”, “Other Drugs”, “Frequency”, and “Reaction”.
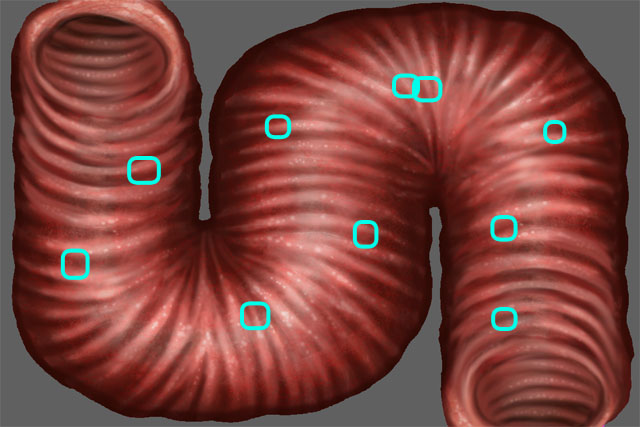
- Move the scope around the lungs with the arrow keys or by clicking the arrows on the screen.
- If you go too far in a direction you will hear a gulping sound, go in the other direction to avoid getting penalties.
- Biopsy any round objects that stick out from the back of the lungs by clicking the middle biopsy button or by pressing the space bar.
- Start your search from the bottom right of the lung and continue to the spots marked in the screenshot to biopsy them.
- If you click the biopsy button in the wrong place you will hear a painful noise and will lose more points.
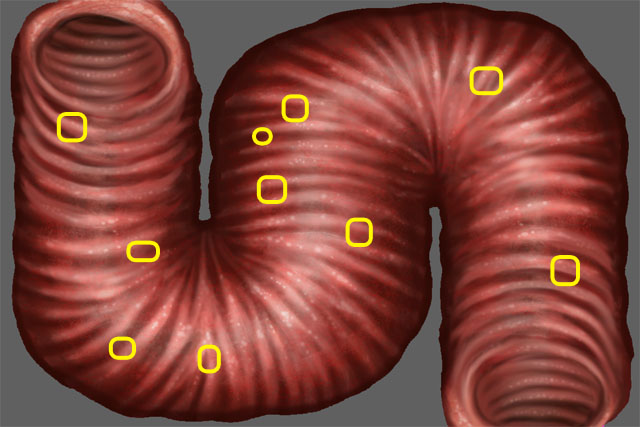
- Continue your search from the bottom right of the next lung section and continue to the spots marked in the screenshot to biopsy them.
- Then do the word search mini-game to find the possible diagnosis that matches the word slowly appearing on the whiteboard letter by letter.
- You have to click correct words before the timer is out and the word is spelled out.
- Click the word ASTHMA first.
- The next word is CARDIAC ARRHYTHMIA.
- The next word is INVASIVE PULMONARY ASPERGILLOSIS.
- The last word is ANAPHYLACTIC SHOCK.
- Next play the medication mini-game.
- Click the arrow or press the arrow on your keyboard when the circle is at the very bottom of the tube, inside the colored area.
- At first you will only need to click one of two buttons, but there will be two more rounds both adding another color until you have to watch for all 4 colors.
- Ask the patient’s wife about the following topics: “Allergy Reaction,” “Latex,” “Pollens,” “Triggers,” “Support,” and “Smoking habit.”
- Perform a second checkup on the man with the bruises.
- Click on his head and use the light on his eye.
- Ask him about his “Skin” and then back out of the head scene.
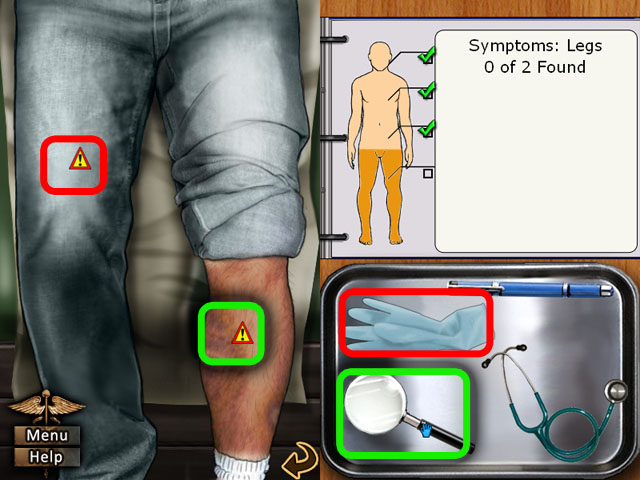
- Continue the checkup by zooming in on his legs.
- Use the magnifying glass on his shin and then ask him about a “Bite”.
- Next use the glove on his upper leg and ask him about “Movement” and “Pain”.
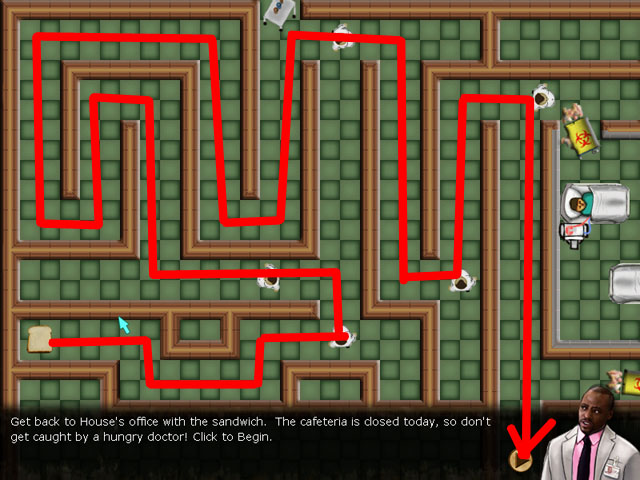
- Click on the sandwich in the bottom left corner and drag it through the maze without touching any of the people walking around.
- If you try to drag it though a wall, it will stop dragging.
- Use the spots where you know that no doctors will be coming to rest.
- Follow the path in the screenshot for the solution.
- Talk to Ritchie one more time about the following subjects: “Recent Foods”, “Food Types”, “Jam”, “Source”, “Ingredients”, and “Specific Fruits”.
- Call the jam company and ask about: “Jam Ingredients”, “Urgency”, “Consequences”, “Total”, “Divulge Recipe”, and “Almost”.
- Congratulations! You've completed House, M.D!
Created at: 2011-01-20

