

Walkthrough Menu
- General Tips
- Chapter 1: Day 1
- Chapter 2: Night 1
- Chapter 3: Day 2
- Chapter 4: Night 2
- Chapter 5: Day/Night 3
General Tips
- This is the official guide for Immortal Love: Bitter Awakening.
- This guide won't tell you when to zoom into a location; the screenshots show each zoom scene.
- Hidden-object puzzles are referred to as HOPs. Only the locations of the HOPs will be shown.
- Use the Map to fast travel to a location.
Chapter 1: Day 1
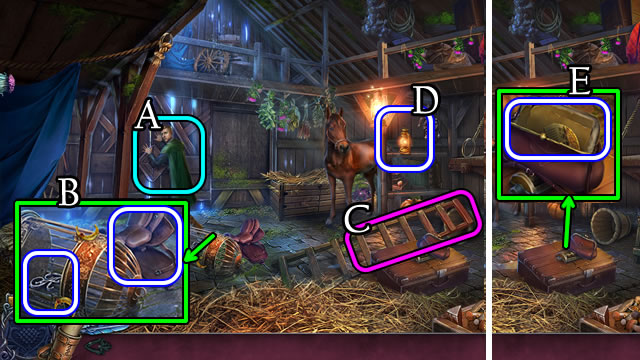
- Speak to character (A); unlatch, open cage; take MONOGRAM A and SADDLE (B).
- Select (C); take LAMP (D).
- Open purse; take document and CODE (E).
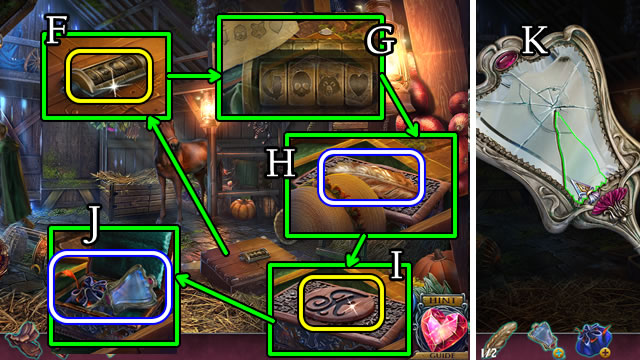
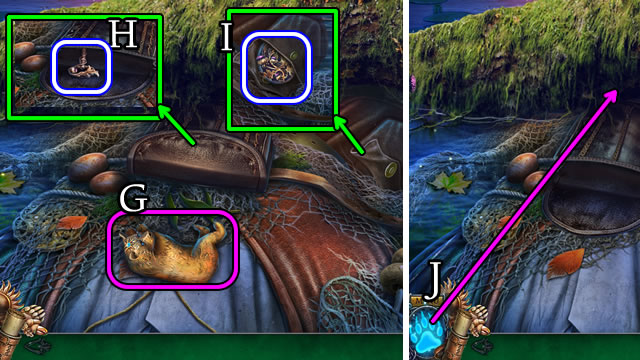
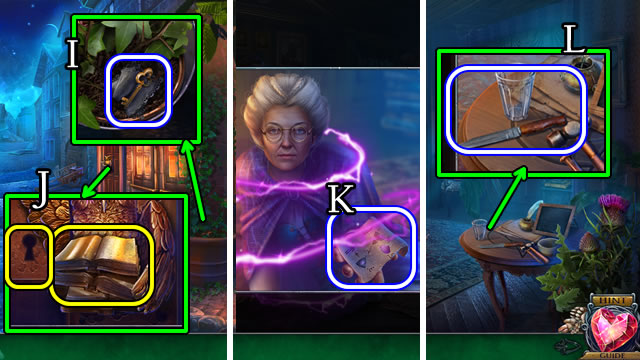
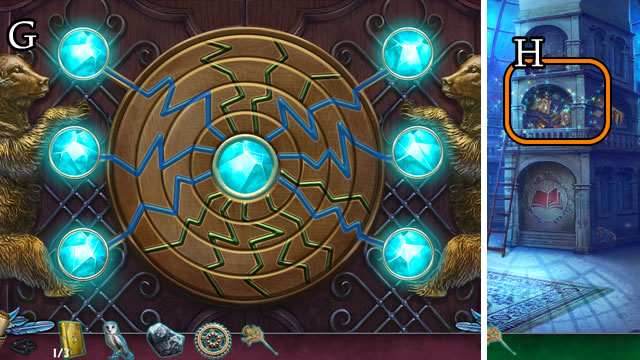
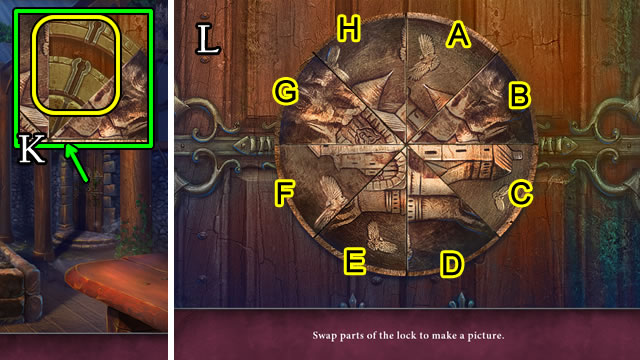
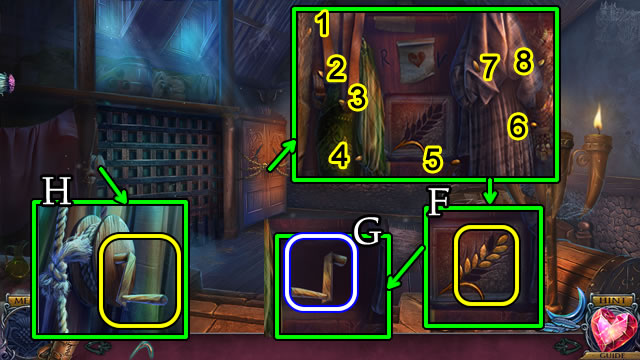
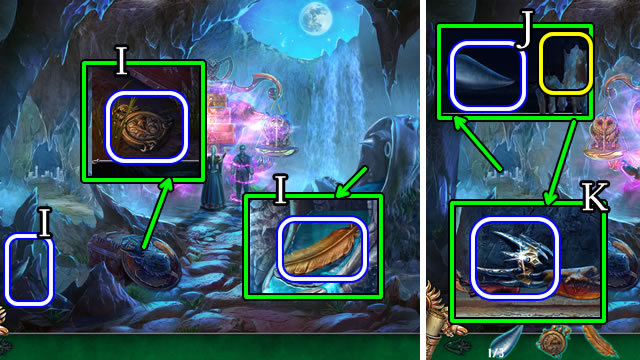
- Place CODE (F); solution (G); uncover, take 1/2 METAL FEATHER (H); place MONOGRAM A (I); take CRACKED MIRROR and POUCH (J).
- CRACKED MIRROR; solution (K); open back of mirror; take KNIFE and UNFINISHED PORTRAIT.
- KNIFE on POUCH for BELT; uncover and use sedative on cubes for SUGAR WITH SEDATIVE.
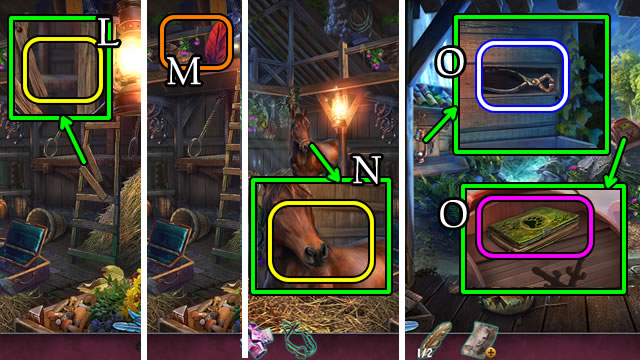
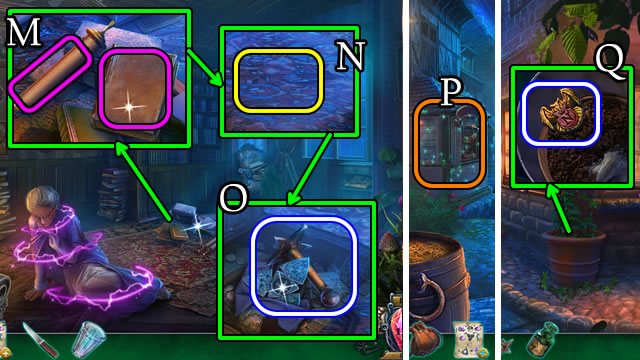
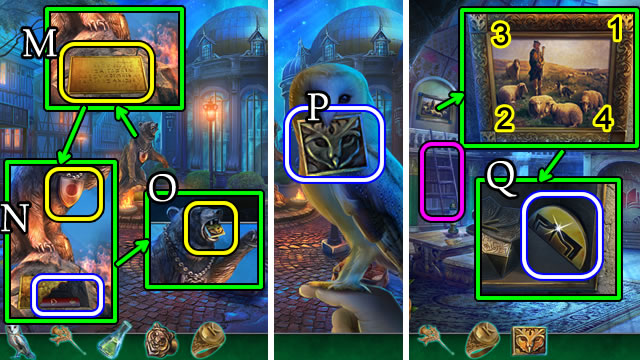
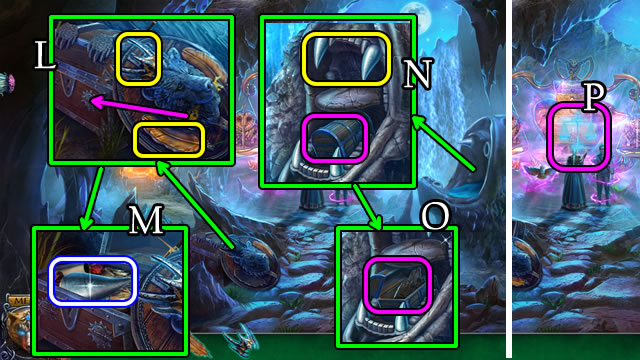
- Select ladder; use BELT (L) for HOP (M). Place LAMP to play HOP; receive BRIDLE.
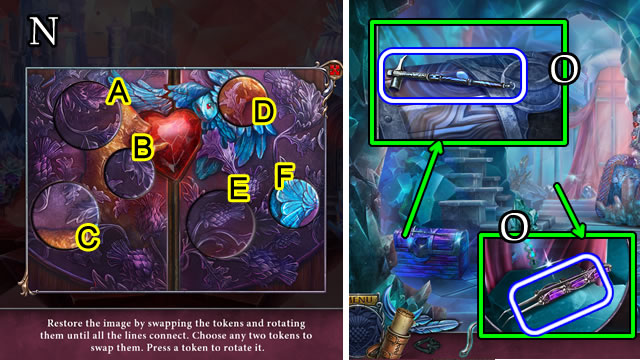
- Give SUGAR WITH SEDATIVE; place SADDLE, BRIDLE (N).
- Go forward.
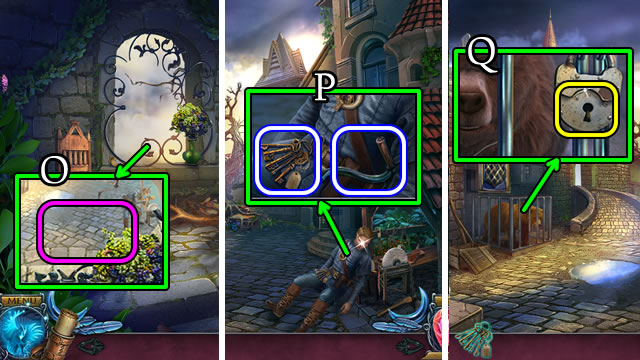
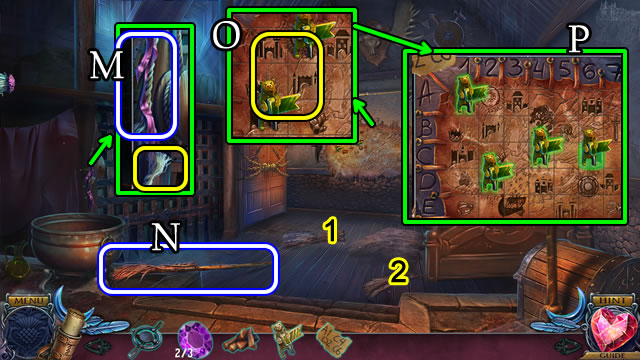
- Uncover; take WIRE CUTTERS; book (O).
- Go forward.
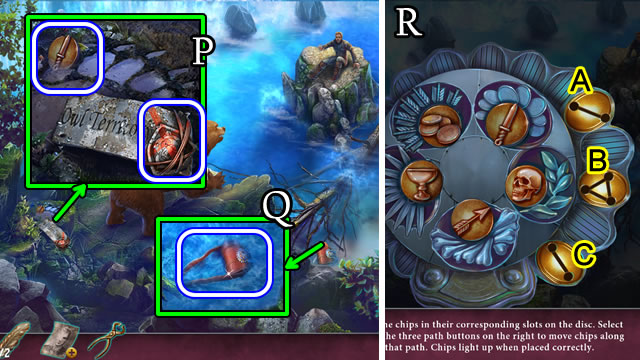
- Take CHIP; use WIRE CUTTERS for WIRE (P).
- WIRE for LONG HOOK.
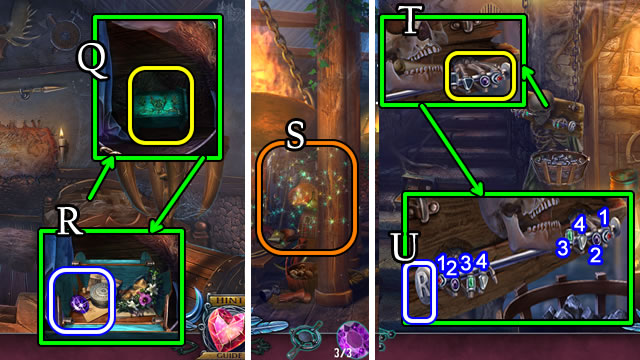
- Use LONG HOOK for VANCE'S BAG (Q).
- CHIP on VANCE'S BAG.
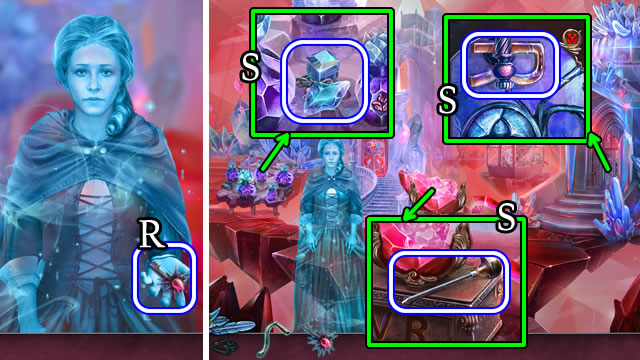
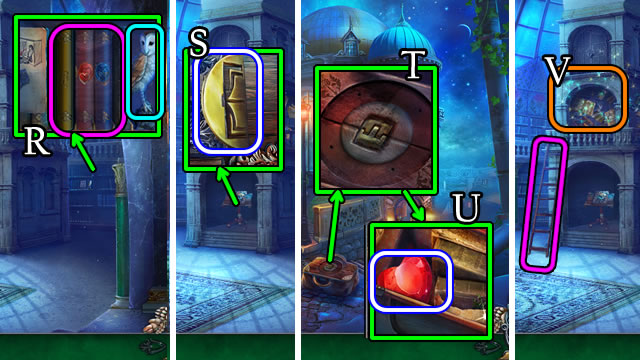
- Solution (R). C-Bx2-C-A-C.
- Uncover; take 2/2 METAL FEATHERS.
- Go down.
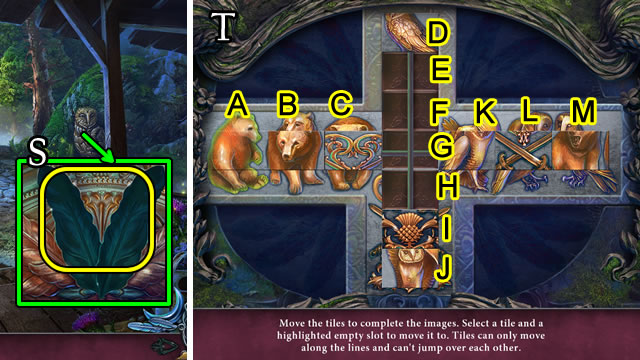
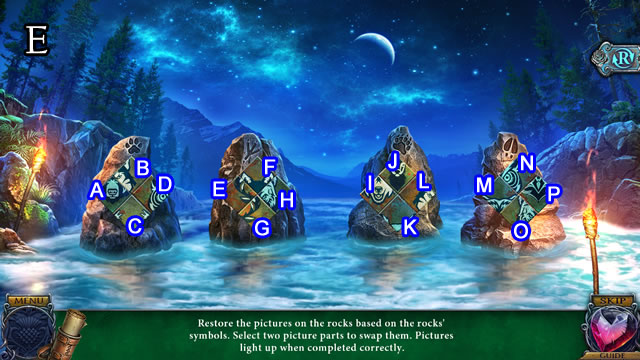
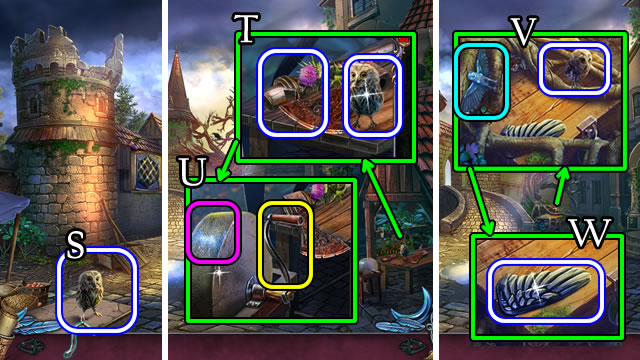
- Place 2/2 METAL FEATHERS (S).
- Solution (T). (C-H)-(K-E)-(L-F)-(M-C)-(H-M)-(F-L)-(I-K)-(J-F)-( K-J)-(L-I)-(C-H).
- (B-K)-(H-B)-(K-C)-(M-H)-(F-M)-(E-L)-(D-K)-(H-D)-(K-H)-(L-E)-(M-F)-(H-M).
- (F-H)-(E-L)-(H-K)-D-H).
- Take EYE; LOCKPICK.
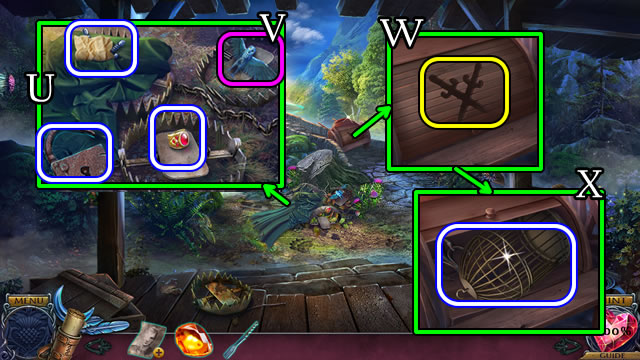
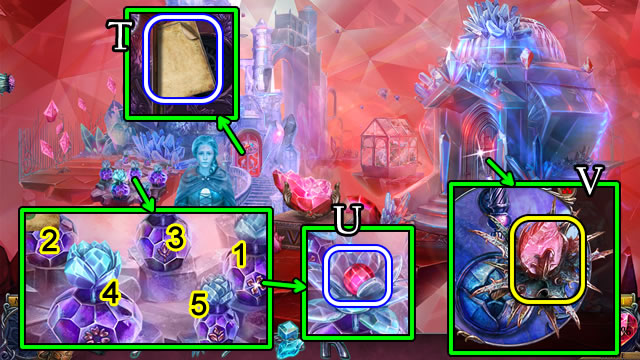
- Use LOCKPICK; take note, ALISON'S RING, WAGON ORNAMENT (U). Take (V).
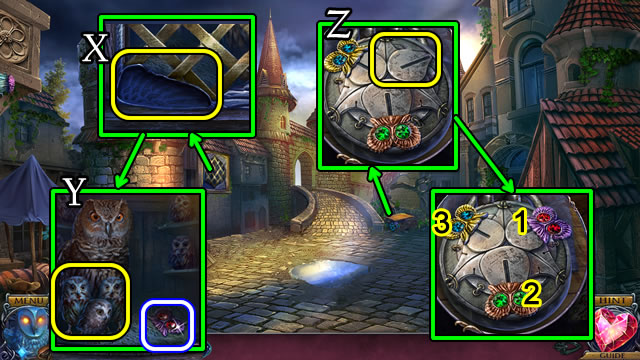
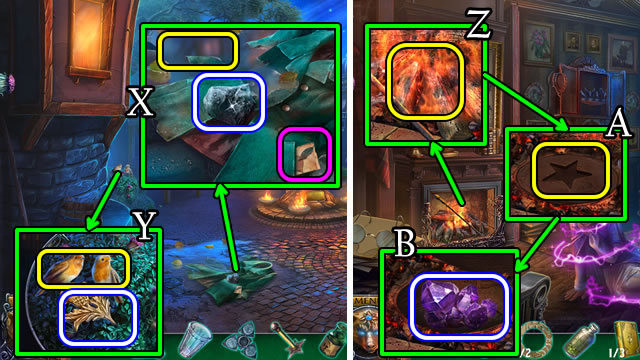
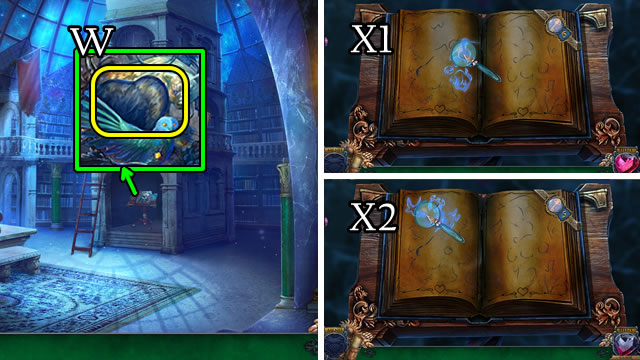
- Place WAGON ORNAMENT (W); take CAGE, GRAPPLING HOOK (X).
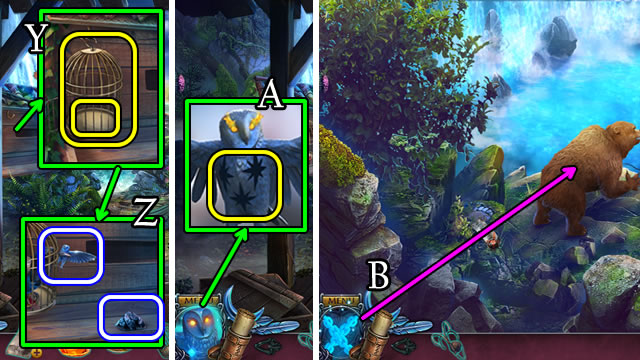
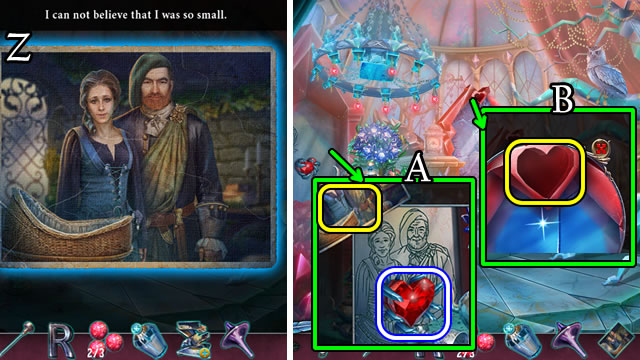
- Place CAGE; place ALISON'S RING (Y); take CHARCOAL; BROKEN MEDALLION (Z).
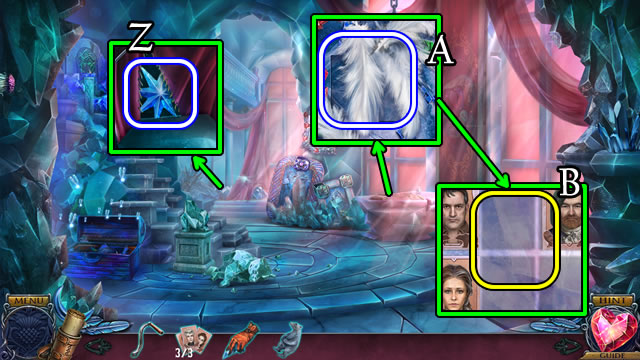
- CHARCOAL on UNFINISHED PORTRAIT; select; receive MEMORY STAR.
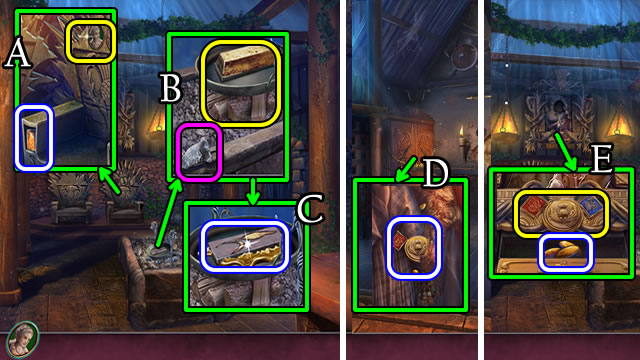
- EYE on BROKEN MEDALLION for desktop Owl. MEMORY STAR on Owl (A) for Owl Defense.
- Go forward.
- Use Owl Defense (B).
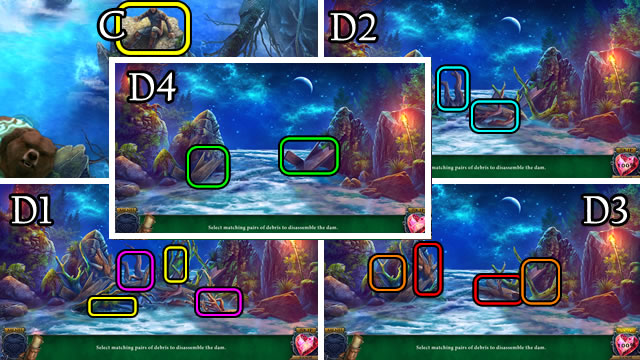
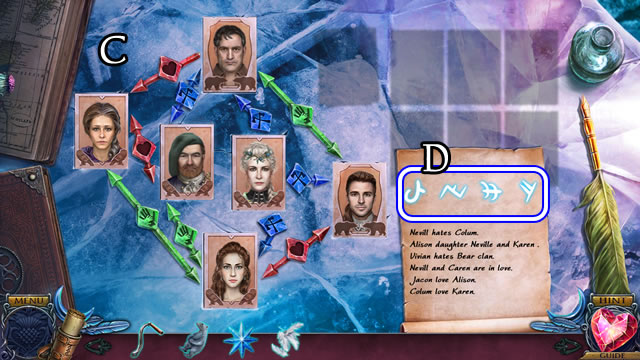
- Use GRAPPLING HOOK (C); speak to character.
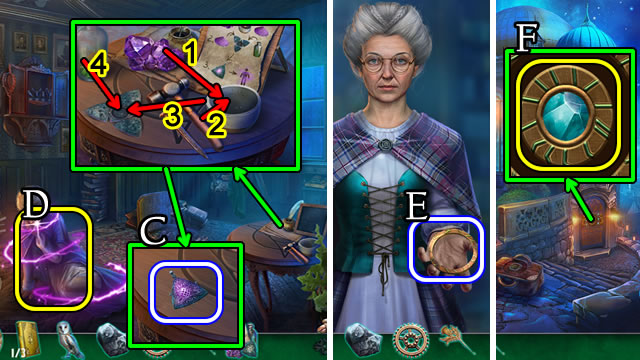
- Solution (D1-D4).
- Solution (E):(B-D)-(B-F)-(A-L)-(I-C)-(H-N)-(E-F)-(K-F)-(G-P)-(L-K)-(N-L)-(M-J)-(O-I)-(M-N)-(N-O).
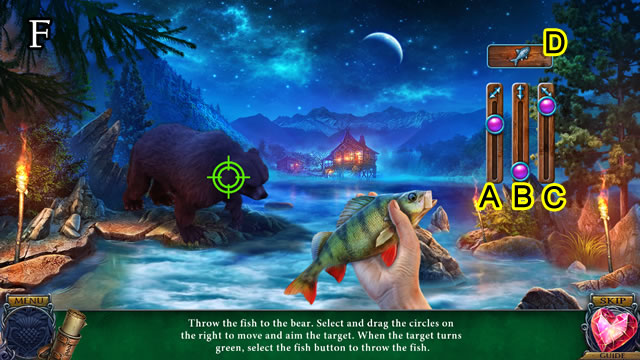
- Solution (F). Position A-C as shown; select D.
Chapter 2: Night 1
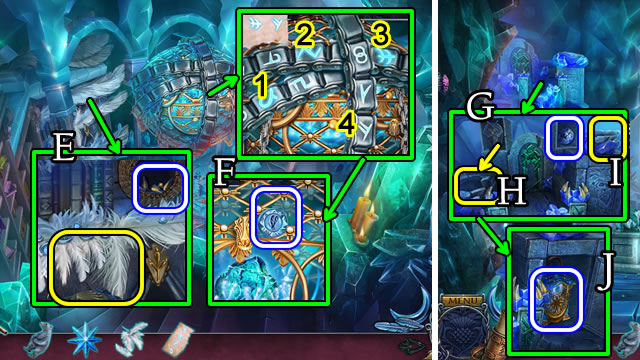
- Select scene; select (G); uncover, take THISTLE KEY (H). Open, take THISTLE MEDALLION (I).
- THISTLE KEY on THISTLE MEDALLION; take note; receive MEMORY STAR.
- MEMORY STAR on Bear for Bear Strength.
- Use Bear Strength (J).
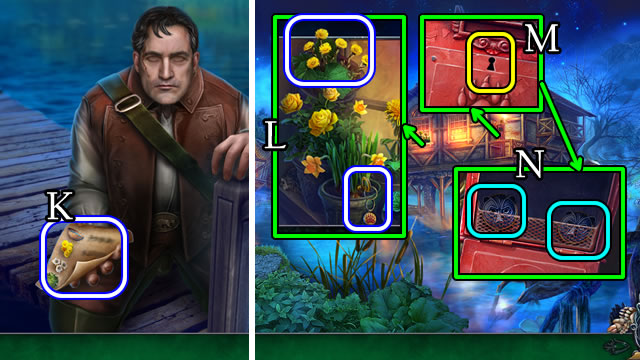
- Speak to character; take INGREDIENTS LIST (K).
- Take POST KEY, DANDELIONS (L).
- Place, select POST KEY (M); open envelope, take note; select (N).
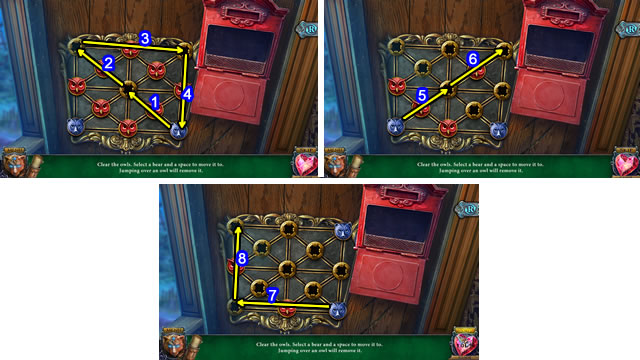
- Solution. 1-8.
- Go forward.
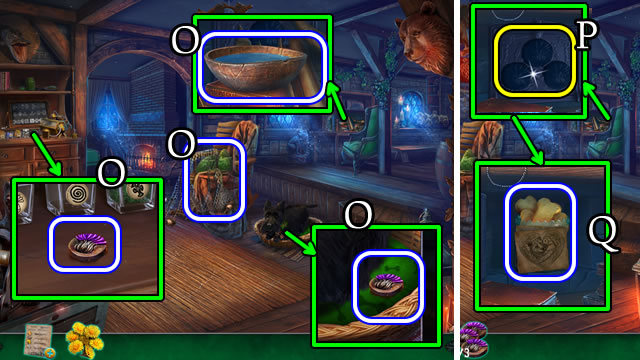
- Take TORN FISHNET; WATER; 1/3 THISTLE ORNAMENT; 2/3 THISTLE ORNAMENTS (O).
- TORN FISHNET for 3/3 THISTLE ORNAMENT.
- Uncover, place 3/3 THISTLE ORNAMENTS (P); take note, DOG BISCUITS (Q).
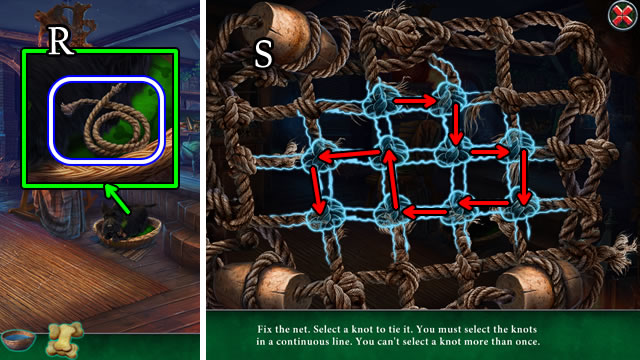
- Give DOG BISCUITS; take ROPE (R).
- ROPE on TORN FISHNET.
- Solution (S).
- Take FISHNET.
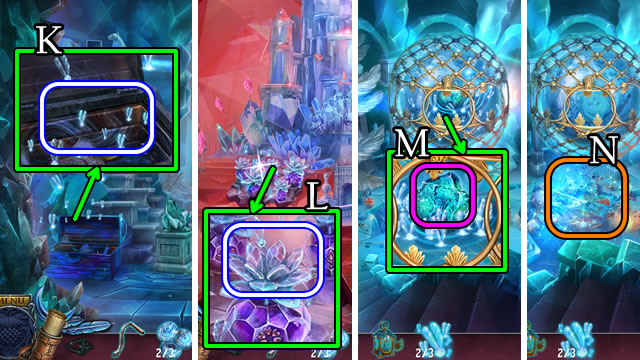
- Go down.
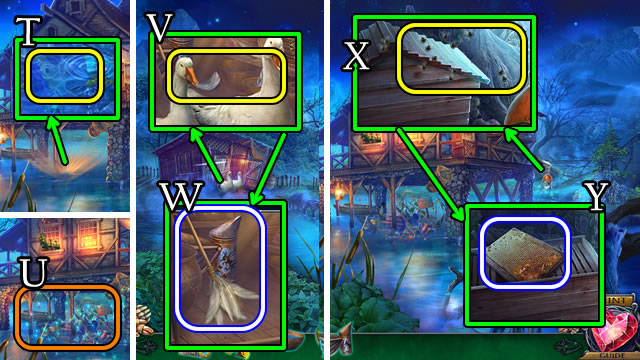
- Use FISHNET (T) for HOP (U); receive DUCKWEED.
- Give DUCKWEED (V); select feathers; take DUSTER; BEE SMOKER (W).
- Select hive; use BEE SMOKER (X); open; take HONEY (Y).
- Go forward.
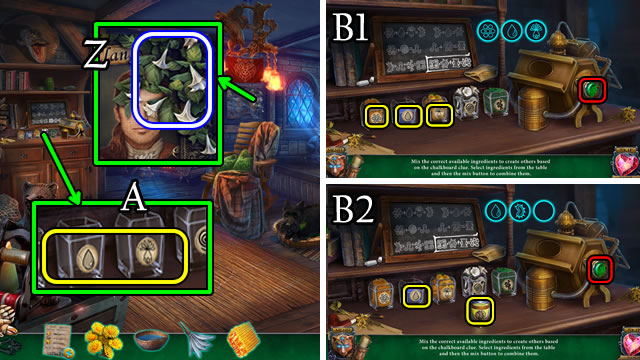
- Use DUSTER; take HONEYSUCKLE (Z).
- DANDELIONS, WATER, HONEY and HONEYSUCKLE on INGREDIENTS LIST, select for INGREDIENTS.
- Place INGREDIENTS (A).
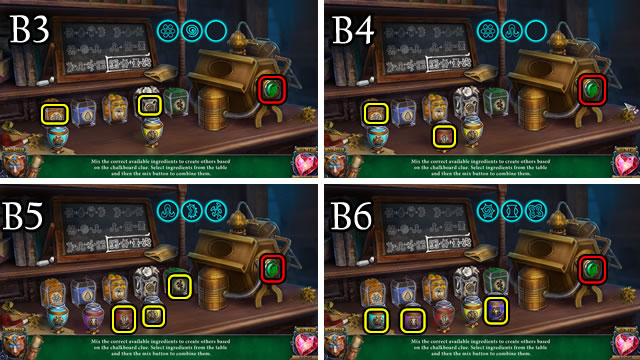
- Solution (B1-B6).
- Take MEDICINE.
- Go down.
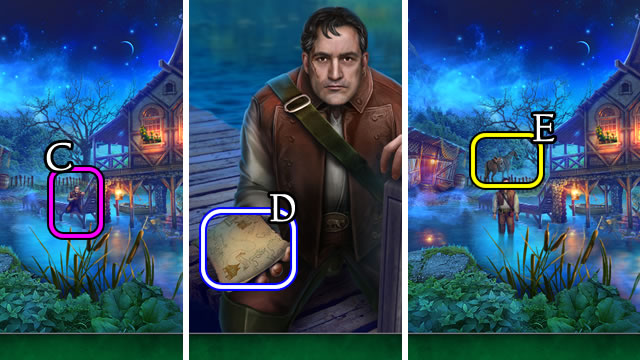
- Give MEDICINE (C); speak to character; take MAP (D).
- Place MAP (E).
Chapter 3: Day 2
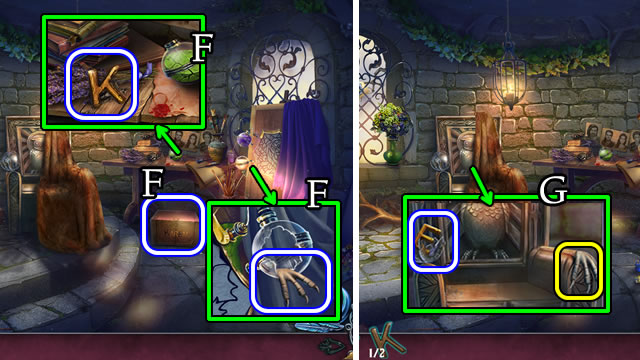
- Take MOM'S CHEST; 1/2 LETTER K; OWL CLAW (F).
- Uncover; place OWL CLAW; take 2/2 LETTERS (G).
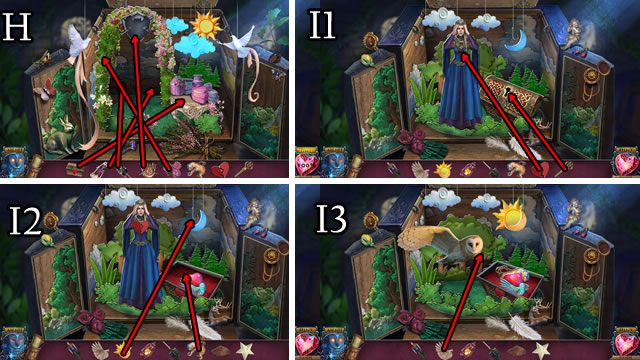
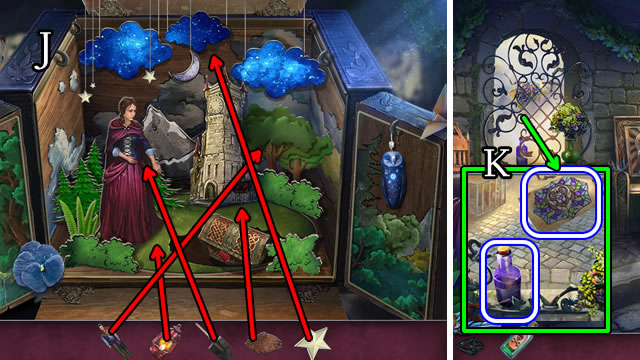
- 2/2 LETTERS on MOM'S CHEST; solution (H); read note; solution (I1-I3); read note; solution (J); take ACID.
- Use ACID; take SKETCH, OIL (K).
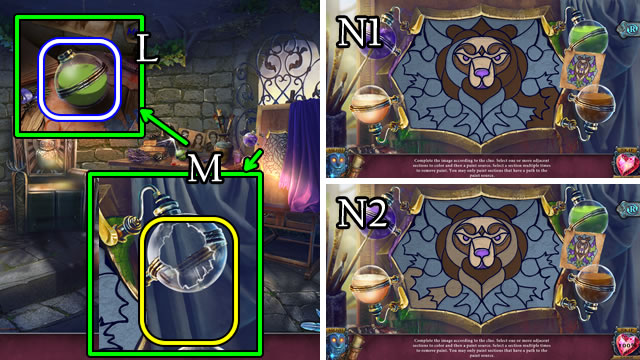
- Use OIL; take GREEN PAINT (L).
- Place GREEN PAINT, SKETCH (M).
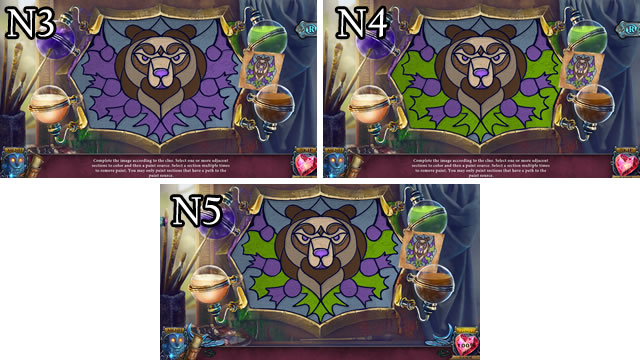
- Solution (N1-N5).
- Select sketch; receive MEMORY STAR.
- Place MEMORY STAR on Owl; receive Owl Attack.
- Use Owl Attack (O).
- Take LEVER; CAGE KEY (P).
- Place, select CAGE KEY (Q); remove lock; select bear.
- Speak to character; take KAREN'S KEY (R).
- Take CHISEL; CHANDELIER PART; METAL R (S).
- Take VASE CLUE (T); place VASE CLUE; select 1-5; take 1/3 GEM (U).
- Use KAREN'S KEY (V).
- Go right.
- Take GLUE (W); select 1-7; take TORN PICTURE.
- Take note, 2/3 GEMS (X).
- Place CHANDELIER PART; take CRYSTAL TOP (Y).
- TORN PICTURE; solution (Z); take PICTURE.
- Place PICTURE, CHISEL; take CRYSTAL HEART (A).
- Place CRYSTAL HEART (B).
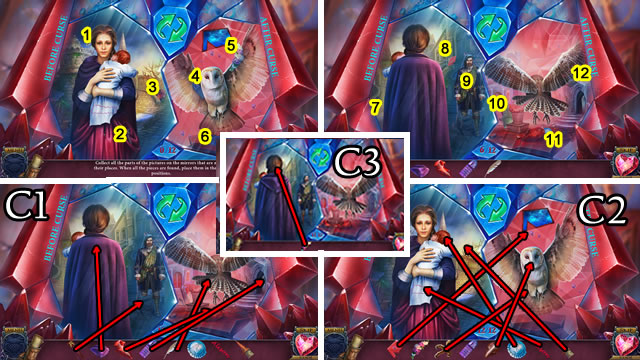
- Solution (1-12); (C1-C3).
- Take DIARY KEY.
- Go down.
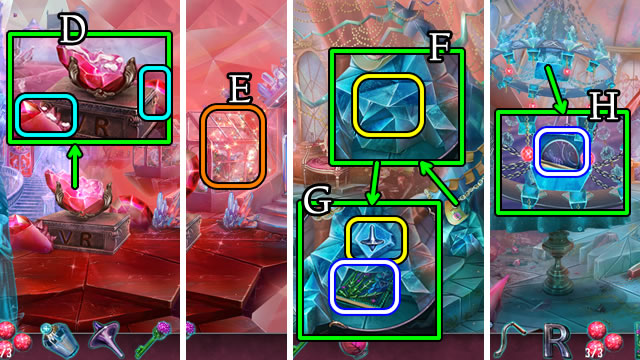
- Use GLUE, select pieces (D); play HOP (E); receive STRANGE LIQUID.
- Go right.
- Use STRANGE LIQUID (F); place CRYSTAL TOP; take KAREN'S DIARY (G).
- DIARY KEY on KAREN'S DIARY; take 3/3 GEMS, note.
- Place 3/3 GEMS; take note, 1/3 DOOR PART (H).
- Go down.
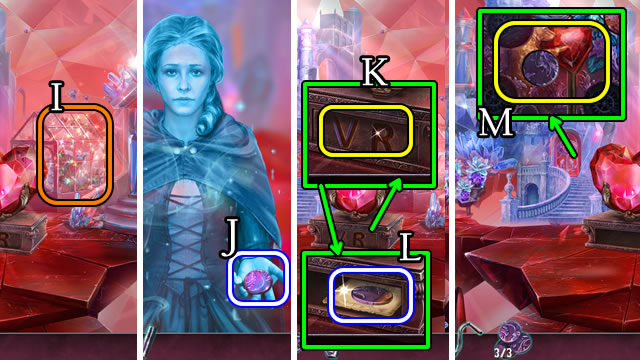
- Play HOP (I) for METAL V.
- Give KAREN'S DIARY; speak to character; take 2/3 DOOR PARTS (J).
- Place METAL V, METAL R (K); take note, 3/3 DOOR PARTS (L).
- Place 3/3 DOOR PARTS (M).
- Solution (N). (D-F)-(F-B)-(A-C)-(C-E); rotate each part into position.
- Go forward.
- Take HAMMER; TWEEZERS (O).
- Go down stairs.
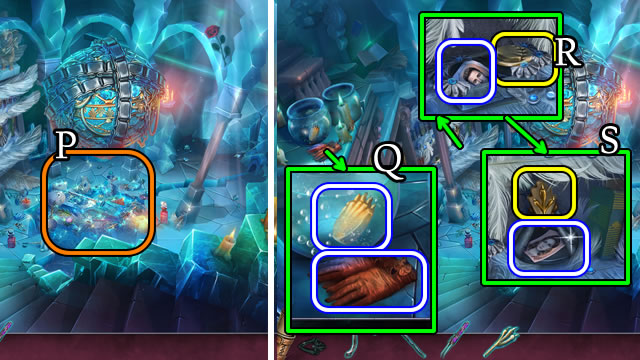
- Play HOP (P) for OWL CLAW.
- Take GLOVES; use TWEEZERS for BEAR PAW (Q).
- Place BEAR PAW, take 1/3 JACOB'S PORTRAIT (R); place OWL CLAW, take 2/3 PORTRAITS (S); select books.
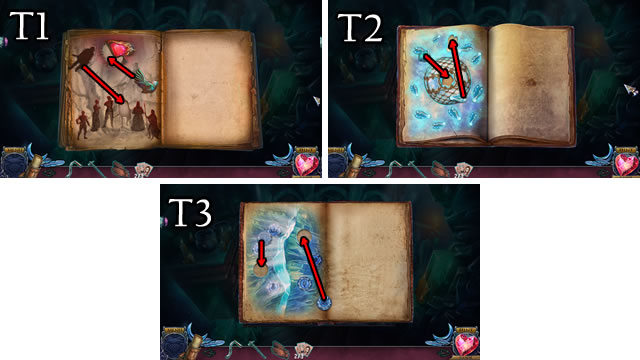
- Solutions (T1-T3).
- Go down.
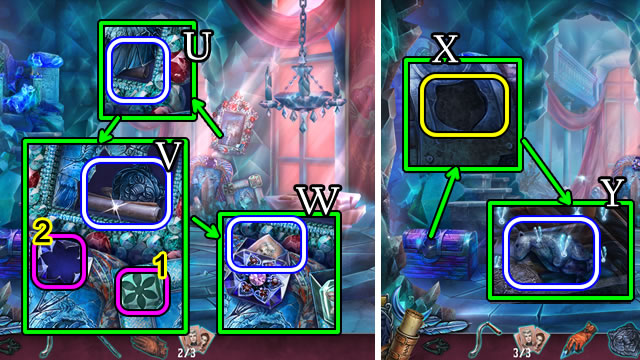
- Use GLOVES (U); receive GLASS SHARD.
- Use HAMMER; take scroll, BEAR EMBLEM; (V) place flower emblem (1); take, place flower emblem (2); take 3/3 PORTRAITS (W).
- Place BEAR EMBLEM (X); take BEAR STATUETTE (Y).
- Use GLASS SHARD; take CRYSTAL STAR (Z).
- Take FEATHERS (A); place 3/3 PORTRAITS (B).
- Solution (C).
- Take ANCIENT SYMBOLS (D).
- Go down stairs.
- Place FEATHERS; take CLAWS (E).
- Place ANCIENT SYMBOLS; select 1-4; uncover; take 1/3 CRYSTAL KEY (F).
- Go down.
- Place CLAWS; take 2/3 CRYSTAL KEYS (G); place owl (H), BEAR STATUETTE. (I) Take LANTERN (J).
- CRYSTAL STAR on LANTERN; take MAGIC STONE, note, LANTERN.
- Use LANTERN; take 1/3 FIREFLIES (K).
- Go down.
- Place LANTERN for 2/3 FIREFLIES (L).
- Go forward, then down stairs.
- Select (M) for HOP; use LANTERN to play HOP (N); receive 3/3 FIREFLIES.

- Place MAGIC STONE; 3/3 FIREFLIES (O).
- Speak to character; take LETTER (P); 3/3 CRYSTAL KEYS (Q).
- Place 3/3 CRYSTAL KEYS; solution (R).
- Speak to character; give LETTER; speak to character.
- Take 1/3 OWLET (S).
- Take 2/3 OWLET; select axe parts (T); place LEVER; place axe (U); receive AXE.
- Take Owl; 3/3 OWLETS (V); use AXE; take WING (W).
- Place WING (X); place 3/3 OWLETS; take LOCK PART (Y).
- Place LOCK PART (Z); select 1-3; take note, book.
Chapter 4: Night 2
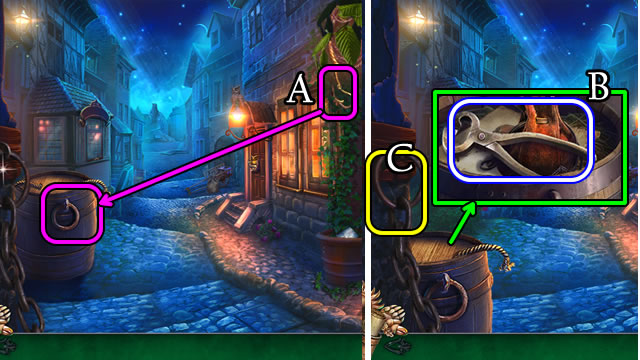
- Use hook (A).
- Open barrel; take note, SEEDS, NIPPERS (B).
- Use NIPPERS (C).
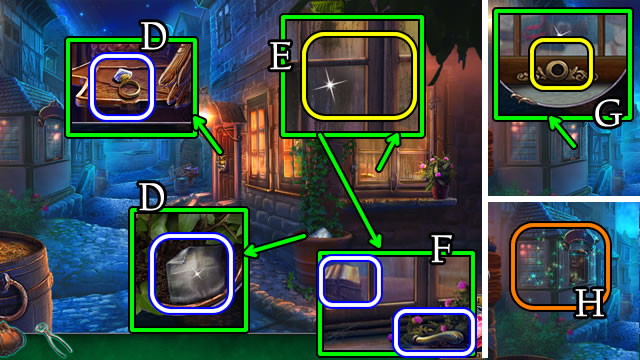
- Take DIAMOND RING; RAG (D).
- Use RAG (E); take HANDLE; use DIAMOND RING; take GOLD BOOKS (F).
- Use HANDLE (G) for HOP (H); receive SHOVEL.
- Use SHOVEL; take SIBYL'S KEY (I).
- Place GOLD BOOKS; take note; use SIBYL'S KEY (J).
- Go right.
- Speak to character; take RECIPE (K).
- Take KNIFE; CUP (L).
- Take note; book (M); uncover; use KNIFE (N); open, take EMPTY AMULET, LEVER (O).
- Go down.
- Play HOP (P); receive MEDICINE.
- Use KNIFE; take OWL EMBLEM (Q).
- Go right.

- Place OWL EMBLEM (R); take 1/2 LOCK RING (S); solution (T); take MYSTERIOUS POTION (U).
- Go down, then forward.
- Speak to character; take 1/3 BOOK (V); ALISON and Bear (W).
- Take STONE; use CUP for WATER; take note for COGWHEEL (X).
- Give SEEDS; take HAIRPIN (Y).
- Go down, then right.
- Use WATER (Z); uncover, place LEVER (A); take AMETHYST (B).
- EMPTY AMULET, MYSTERIOUS POTION, AMETHYST on RECIPE for INGREDIENTS.
- Place INGREDIENTS; select 1-4; take MAGIC-ABSORBING AMULET. (C)).
- Use MAGIC-ABSORBING AMULET; give MEDICINE (D).
- Speak to character; take 2/2 LOCK RINGS (E).
- Go down, then forward.
- Place 2/2 LOCK RINGS (F).
- Solution (G).
- Play HOP (H) for BOOK.

- Take ACID (I).
- Take note, open bear; place COGWHEEL (J); take BEAR EMBLEM; use STONE (K); take SIGNET RING (L).
- Go down.
- Use ACID (M); take 3/3 BOOKS; place BEAR EMBLEM (N); use ALISON (O); take FRAME BUTTON (P).
- Go forward.
- Select ladder; place FRAME BUTTON; select 1-4; take BOOK CLUE, use HAIRPIN; take 1/2 SUITCASE PART (Q).
- Place 3/3 BOOKS, BOOK CLUE; solution (R).
- Take 2/2 SUITCASE PART (S).
- Go down.
- Place 2/2 SUITCASE PARTS (T); take note, HEART (U).
- Go forward.
- Select ladder; play HOP (V); receive SCROLL.
- SIGNET RING on SCROLL; select; receive MEMORY STAR.
- Place MEMORY STAR on Bear; receive BEAR SIGHT.
- Place HEART (W).
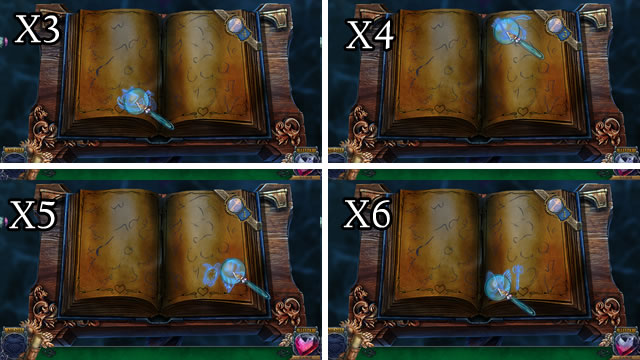
- Use BEAR SIGHT; solution (X1-X6).
Chapter 5: Day/Night 3
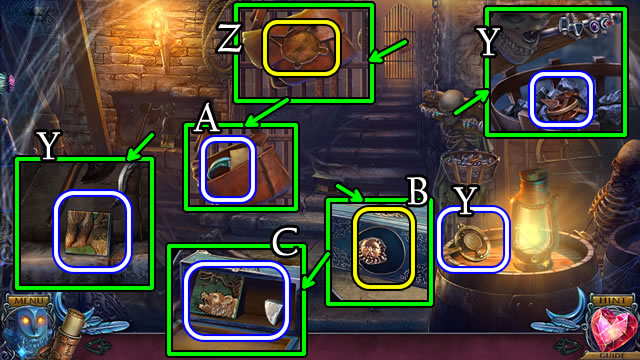
- Take BEAR TRAP; TOOL EMBLEM; 1/2 BEAR TILE (Y).
- Place TOOL EMBLEM (Z); take note, MOON (A).
- Place MOON (B); take 2/2 BEAR TILES, 1/3 GEMSTONE (C).
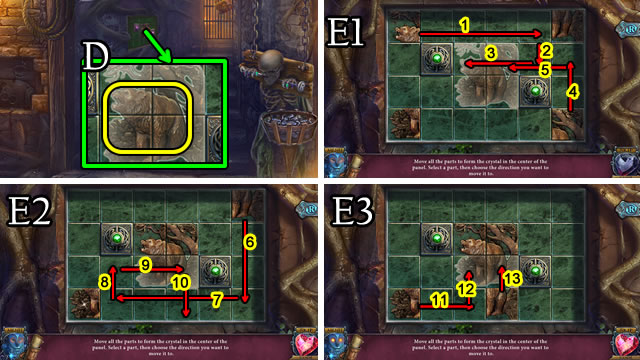
- Place 2/2 BEAR TILES (D).
- Solution (E1-E3). 1-13.
- Take note, receive MEMORY STAR.
- Place MEMORY STAR on Owl; receive Owl Agility.
- Use Owl Agility (F).
- Go forward.
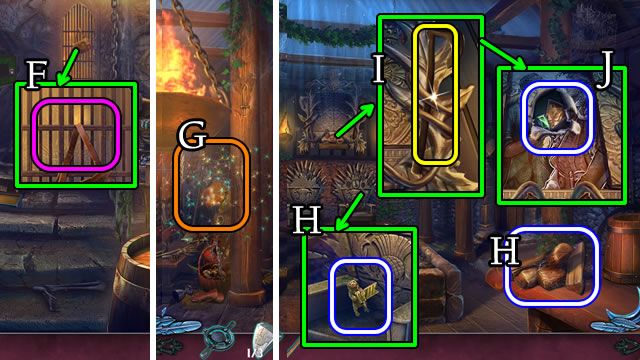
- Play HOP (G); receive GOLDEN AXE.
- Take FIREWOOD; METAL BEAR (H).
- Place GOLDEN AXE (I); uncover; take LOCK PIECE, 2/3 GEMSTONES (J).
- Take MAP CODE, note; place LOCK PIECE (K).
- Solution (L). (A-B)-(A-E)-(A-C)-(G-H)-(F-H)-(D-F).
- Go forward.
- Take RIBBON; select rope (M).
- Select 1-2; use RIBBON take BROOM (N).
- Place METAL BEAR, MAP CODE (O); solution (P); take THISTLE DECORATION.
- Use BROOM, select; place THISTLE DECORATION (Q); take 3/3 GEMSTONES (R).
- Go down.
- Play HOP (S) for FLAIL.
- Go down.
- Select skull, take note; place 3/3 GEMSTONES (T); select 1-4; take SIGNET (U).
- Go forward.

- Place SIGNET (V); take REDCLIFF'S PICTURE (W).
- Place REDCLIFF'S PICTURE; take DAGGER (X).
- Go down.
- Place BEAR TRAP, FLAIL and DAGGER (Y); take VIVIAN'S PICTURE (Z).
- Go forward.
- Place VIVIAN'S PICTURE; take GOLD BAR (A).
- Uncover, place FIREWOOD, GOLD BAR; use flint and steel (B); take WHEAT (C).
- Go forward.
- Place WHEAT; take CREST (D).
- Go down.
- Place CREST; take GRAIN (E).
- Go forward.
- Select 1-8; place GRAIN (F); take GATE LEVER (G).
- Place, select GATE LEVER (H).
- Take 1/3 FANG; LIGHTER; GOLDEN FEATHER (I).
- Take 2/3 FANGS; use LIGHTER (J); take CROWN (K).
- Place GOLDEN FEATHER, CROWN; take, use key (L); take 3/3 FANGS (M).
- Place, select 3/3 FANGS (N); select (O); receive MEMORY STAR.
- Place MEMORY STAR on Bear; receive Bear Wisdom.
- Use Bear Wisdom (P).
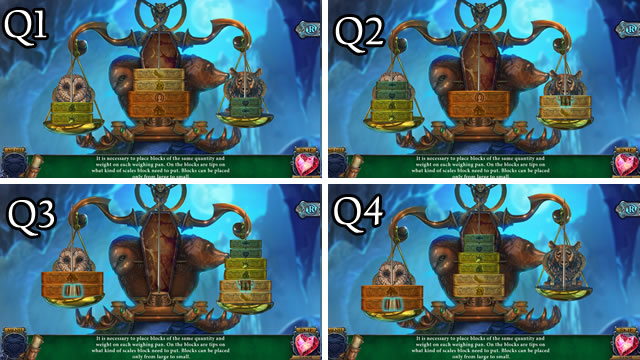
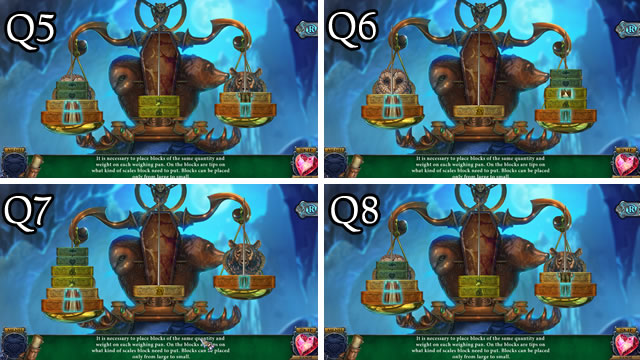
- Solution (Q1-Q4).
- Solution (Q5-Q8).
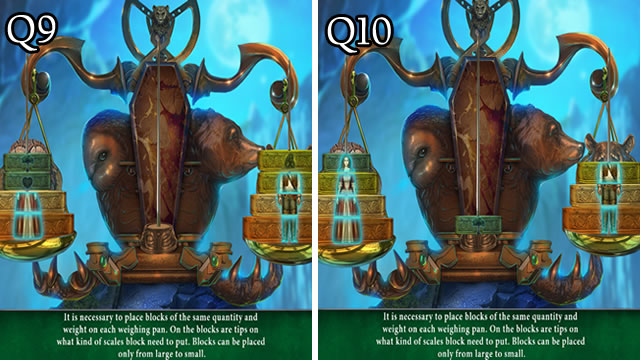
- Solution (Q9-Q10).
- Congratulations, you have completed playing Immortal Love: Bitter Awakening.
Created at: 2019-05-31