

Walkthrough Menu
- General Tips
- Chapter 1: Escape
- Chapter 2: Returning Home
- Chapter 3: The Camp
- Chapter 4: Chasing D'Morten
- Chapter 5: The Castle
- Chapter 6: Finding Angelica
General Tips
- This is the official guide for Immortal Love: Letter from the Past!
- This guide does not mention each time you have to zoom into a location; the screenshots show each zoom scene.
- Hidden-object puzzles are referred to as HOPs. This guide does not show screenshots of the HOPs, however, it is mentioned when a HOP is available and the inventory item collected.
- This guide gives solutions for all puzzles that are not random. Please read the instructions in the game for each puzzle.
Chapter 1: Escape
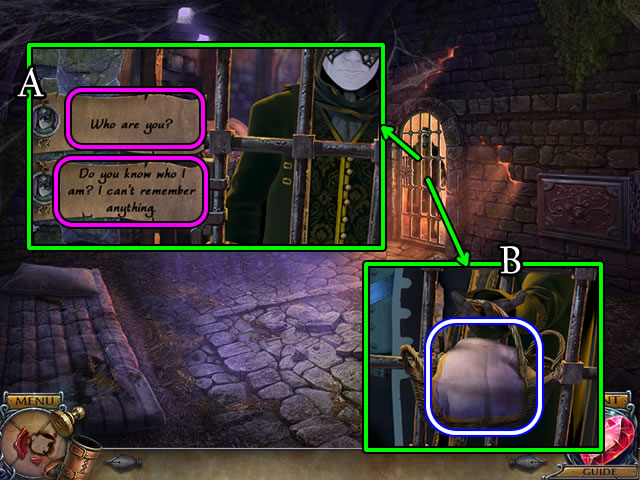
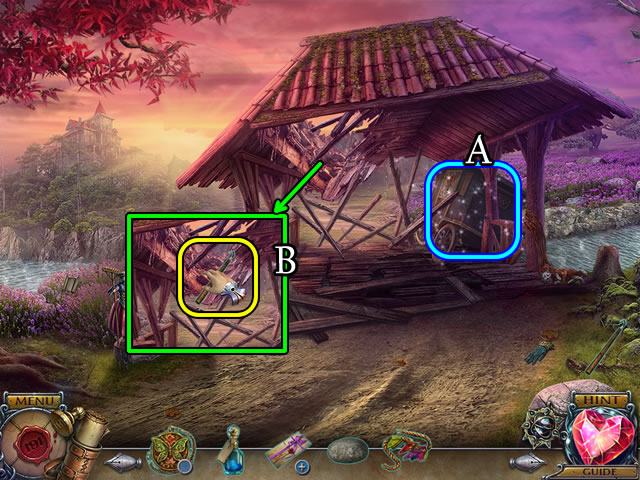
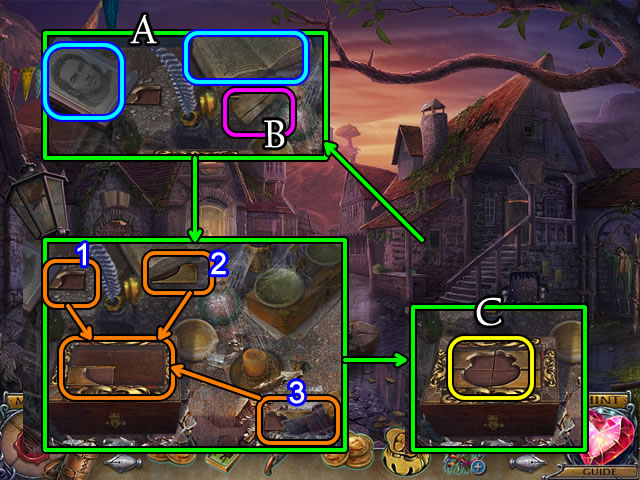
- Speak to the man (A); take the BASKET (B).
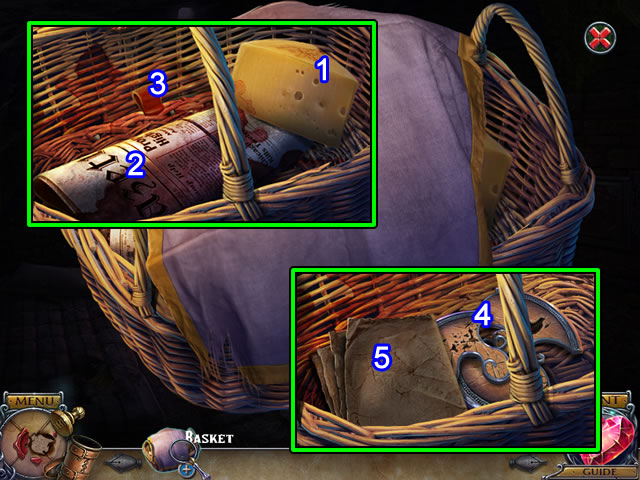
- Select the BASKET (Inventory), uncover, remove the bottle and take the CHEESE (1), PORTRAIT PARTS (2) and note. Select (3). Take the STENCIL PARTS (4) and SECRET MESSAGE (5).
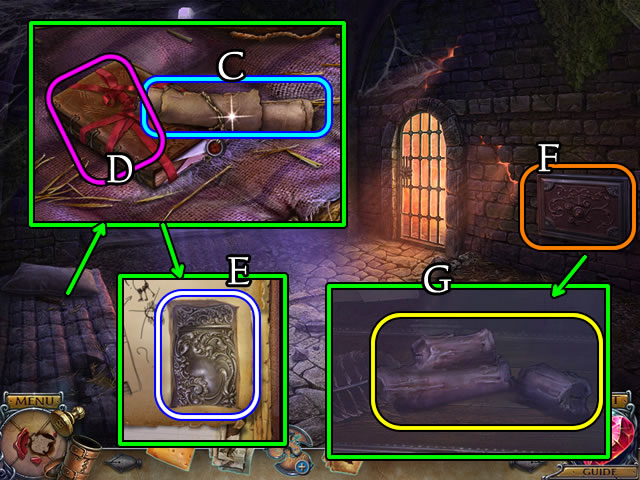
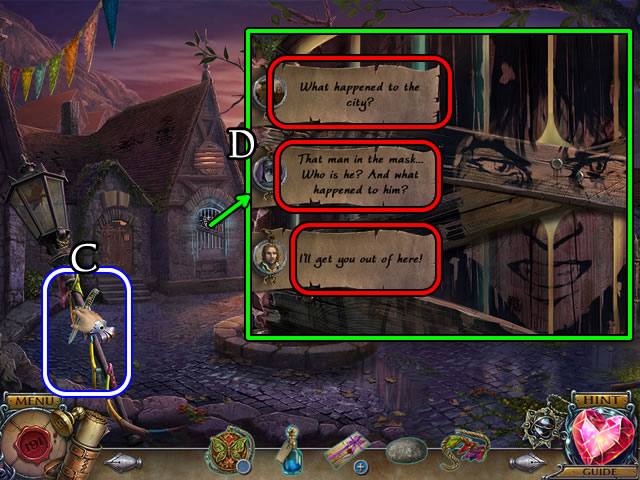
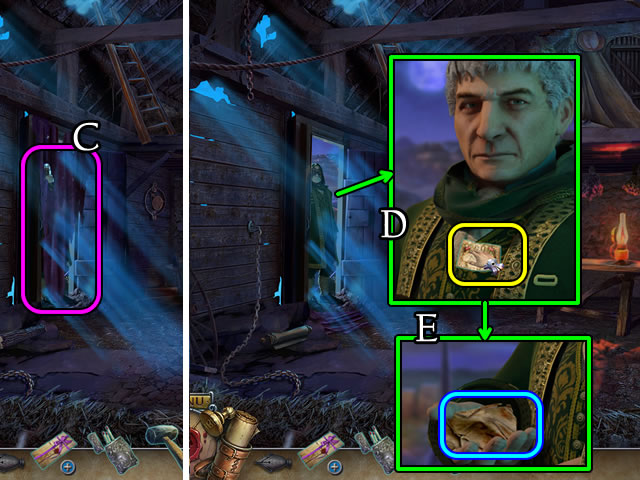
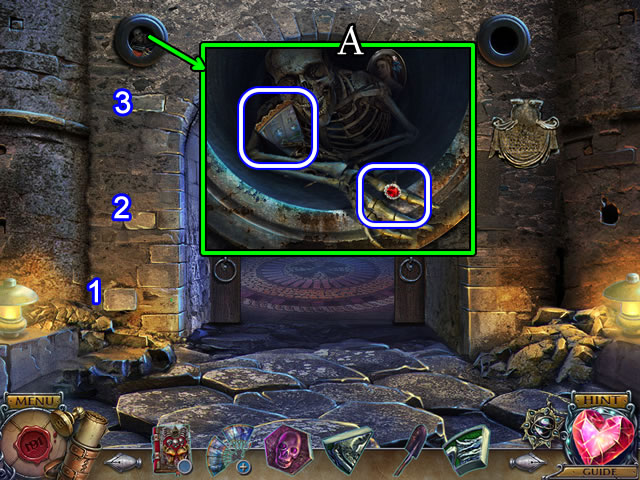
- Uncover to find the Map (C). Unwrap and open the diary (D). Turn the page; take the MATCHES (E).
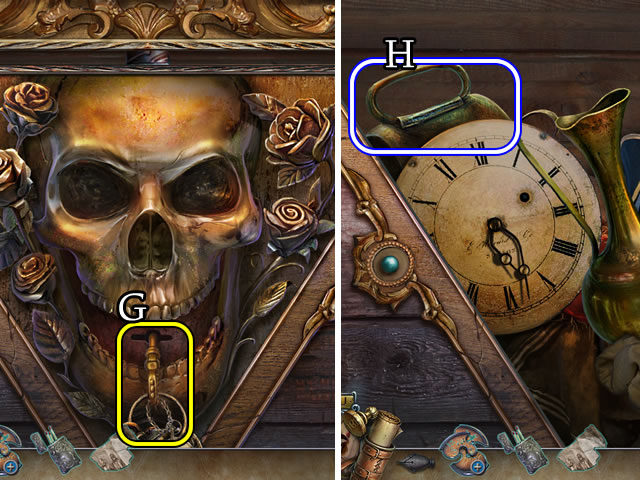
- Select (F). Select the candles (G); use the MATCHES.
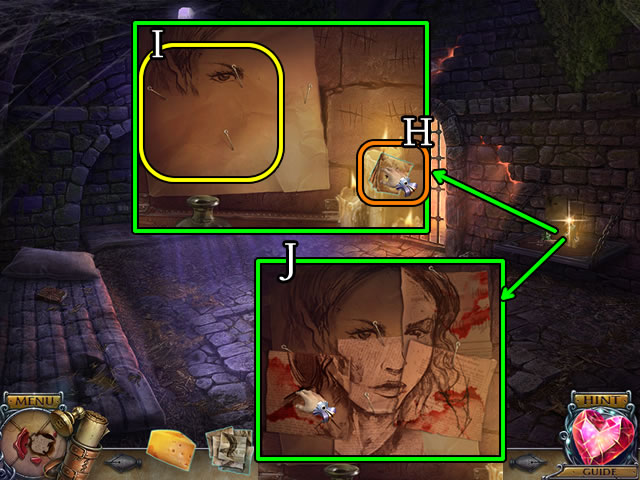
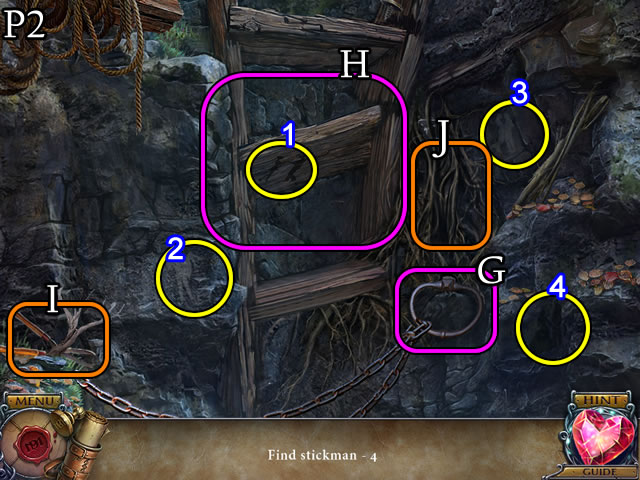
- Place the SECRET MESSAGE over the candle (H). Take the message.
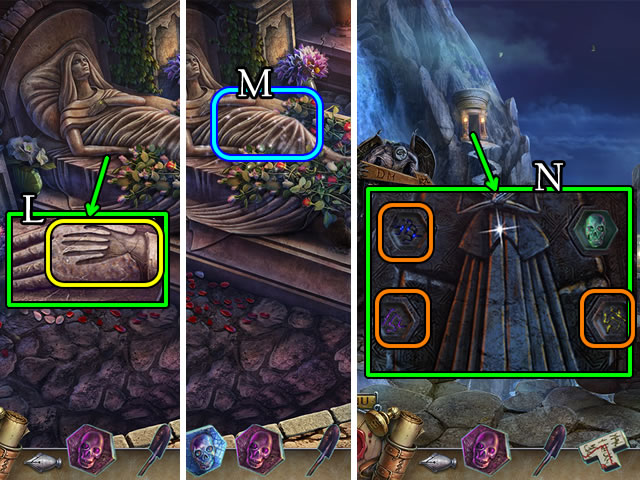
- Place the PORTRAIT PARTS (I).
- Solution (J).
- Select the image.
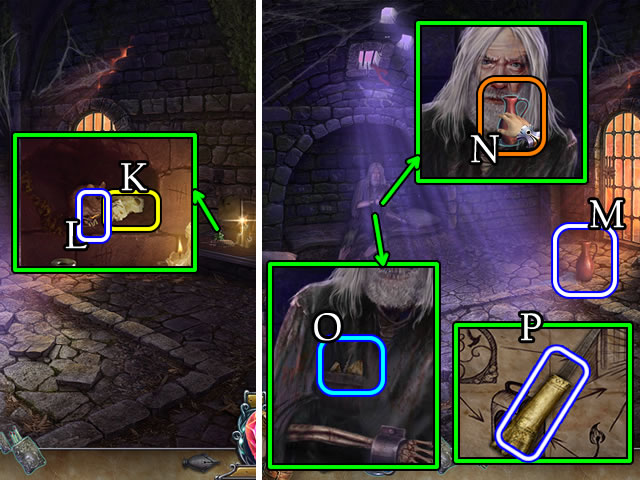
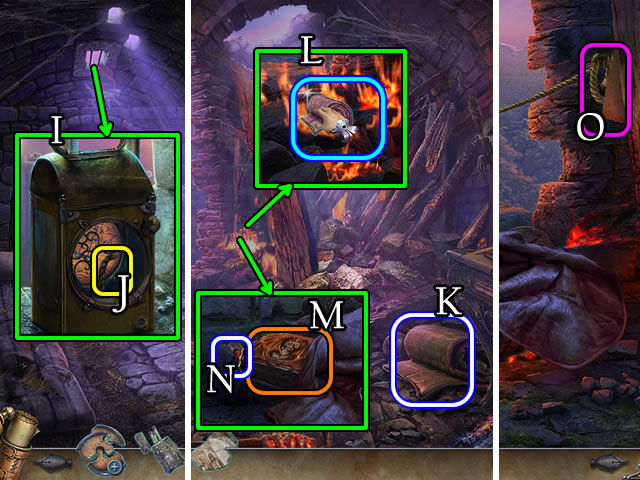
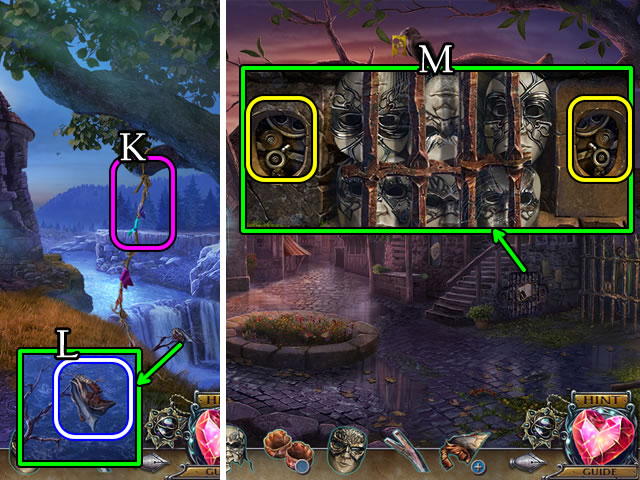
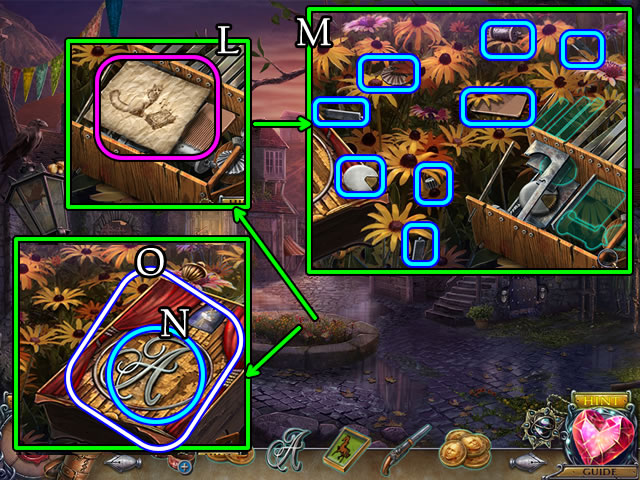
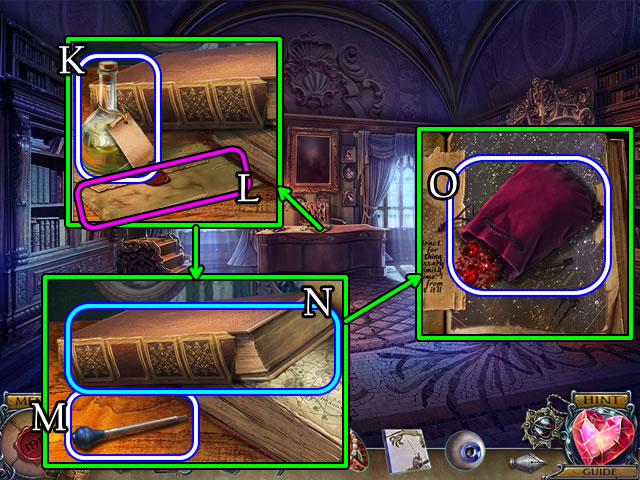
- Place the CHEESE (K), take the KEY PART (L).
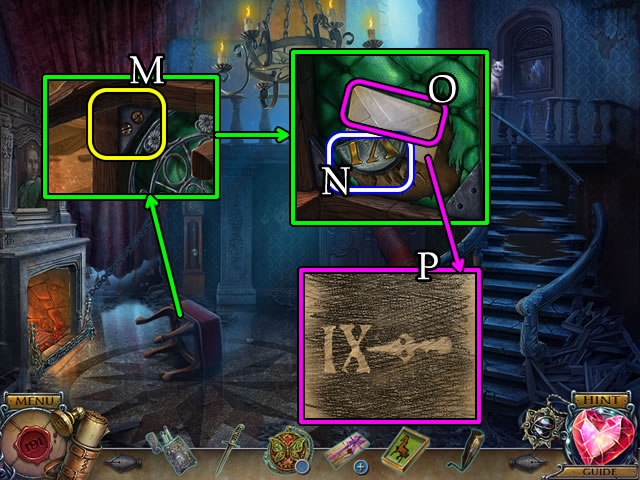
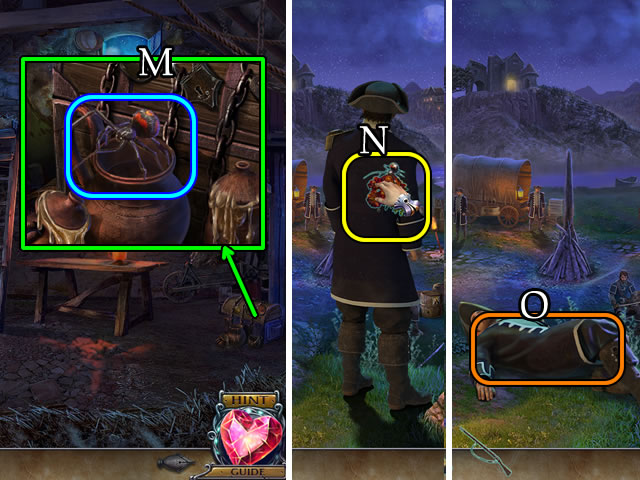
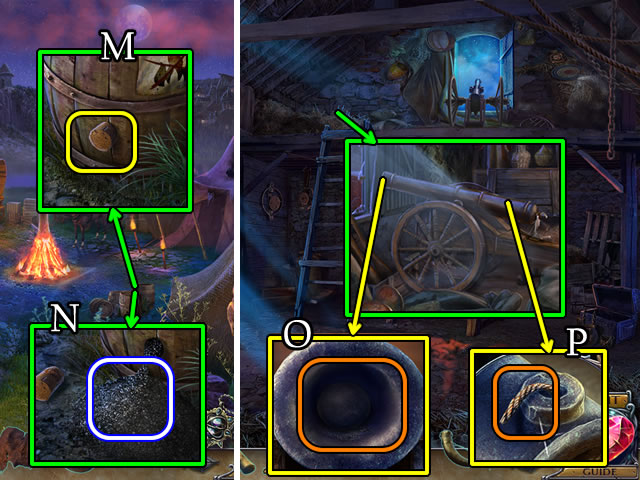
- Grab the JUG OF WATER (M).
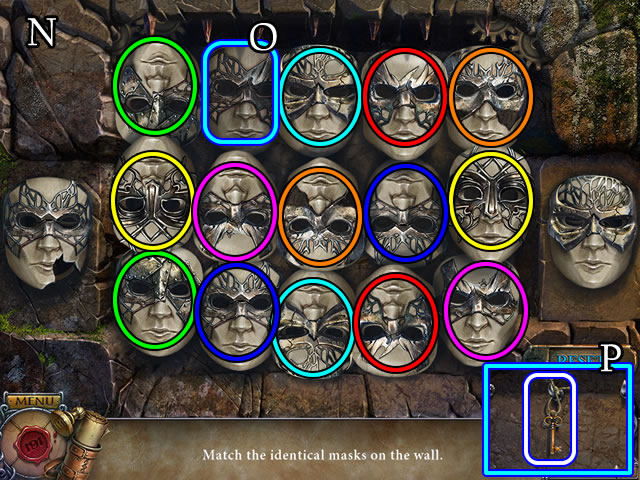
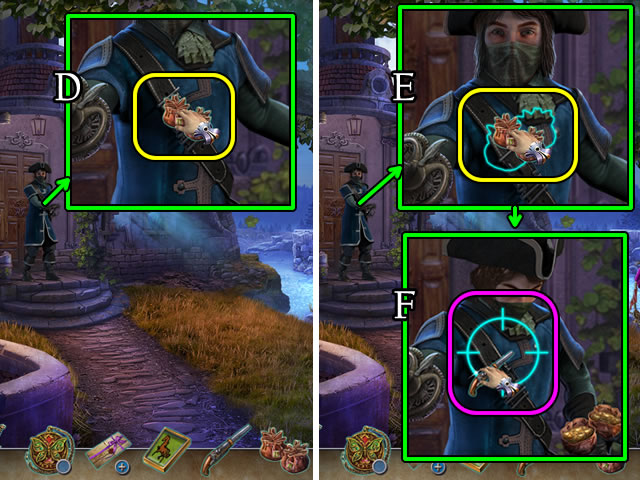
- Speak to the man. Give the JUG OF WATER (N).
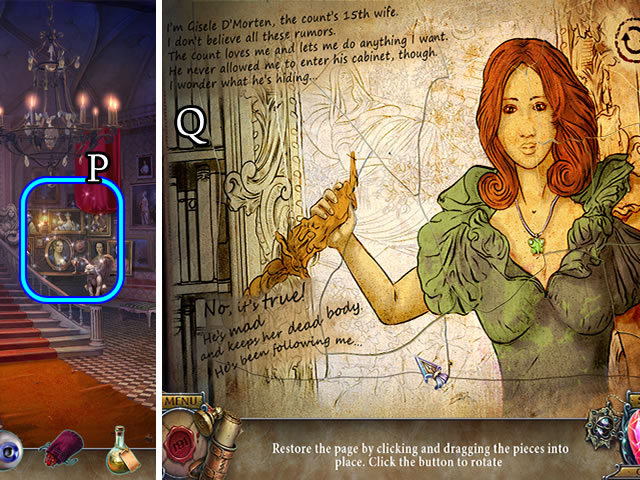
- Take the paper (O). Open and take the PICKLOCK (P) and diagram.
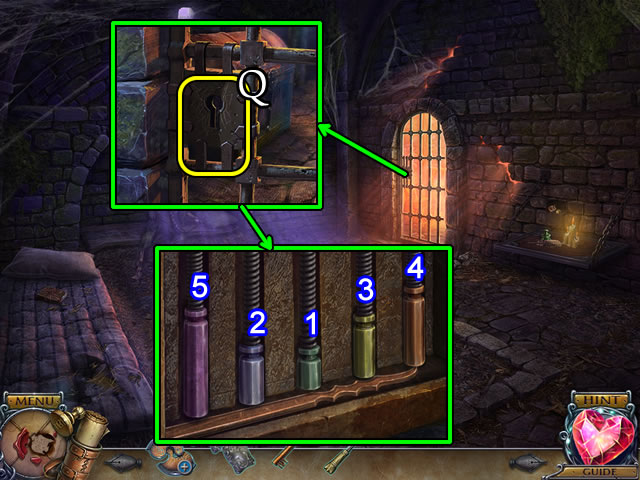
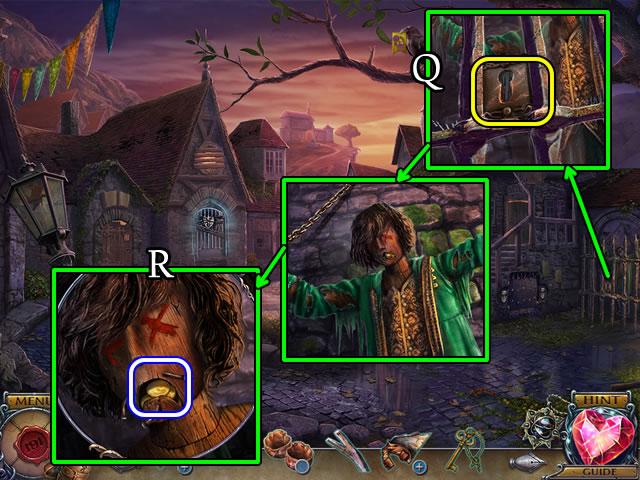
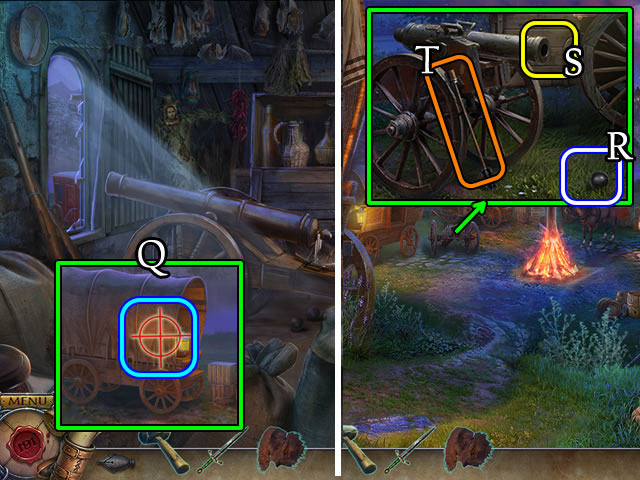
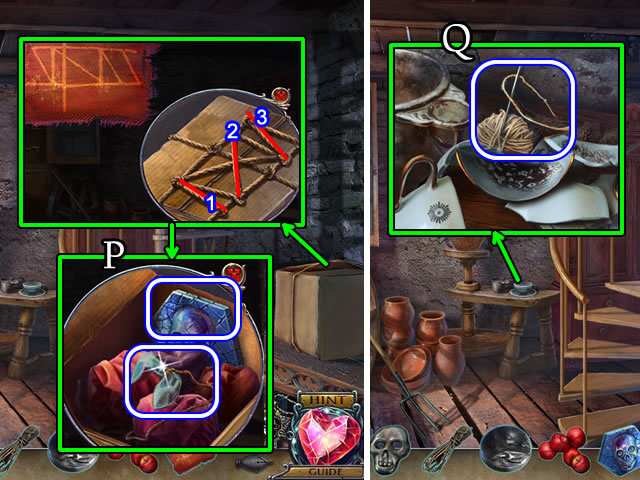
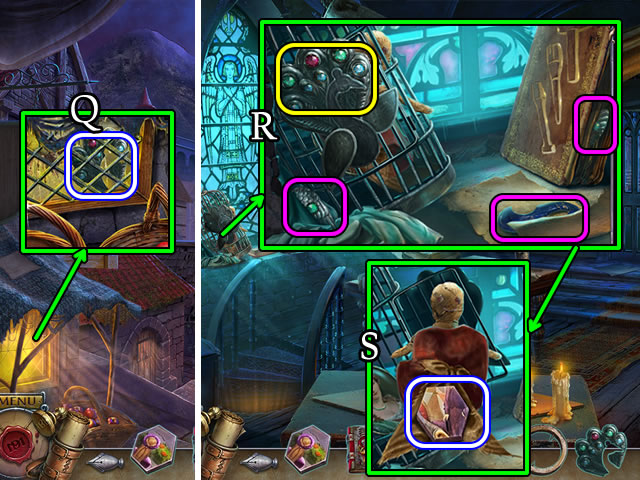
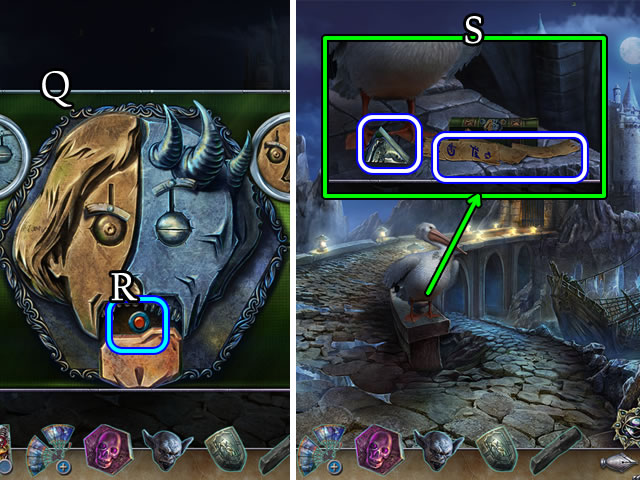
- Use the PICKLOCK (Q).
- Solution 1-2-3-4-5.
- Walk forward.
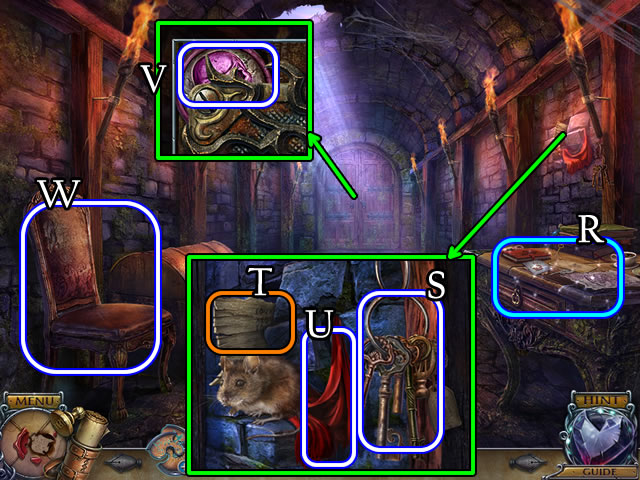
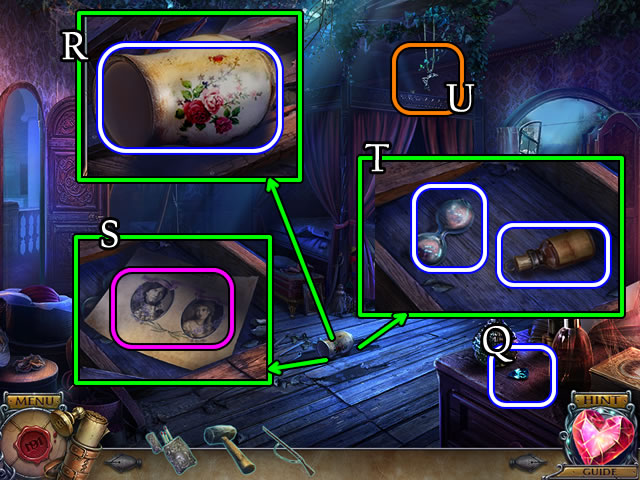
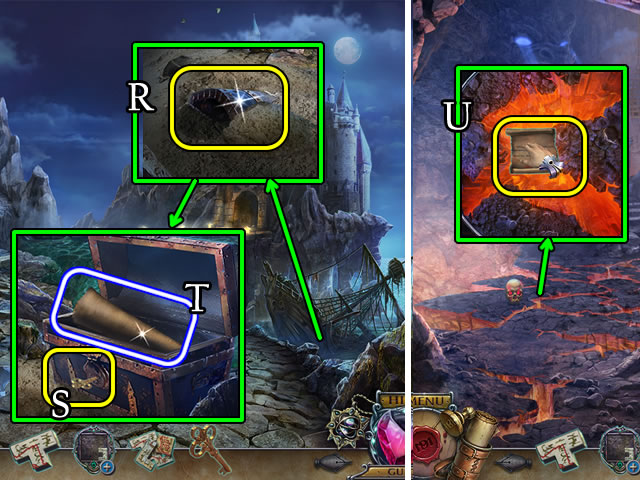
- Play the HOP (R) for LETTERS.
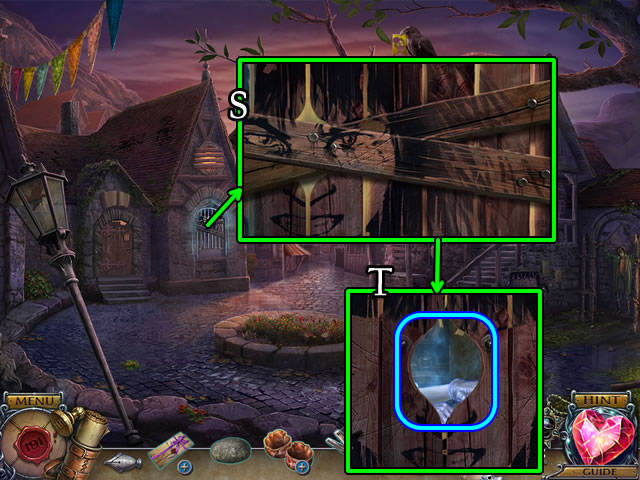
- Take the KEYS (S), touch the mouse, examine the board (T) and take the RAG (U).
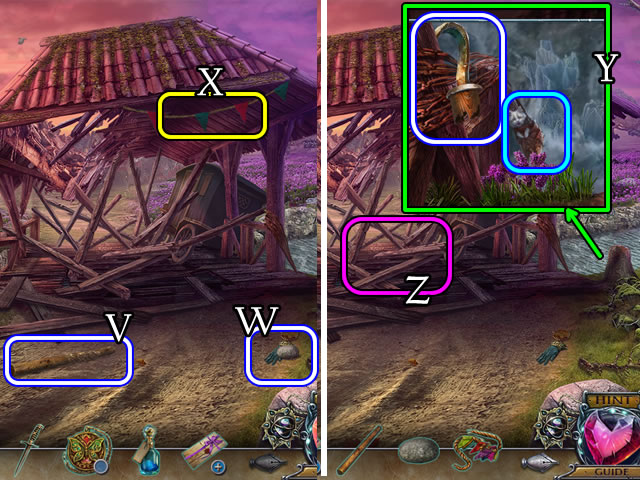
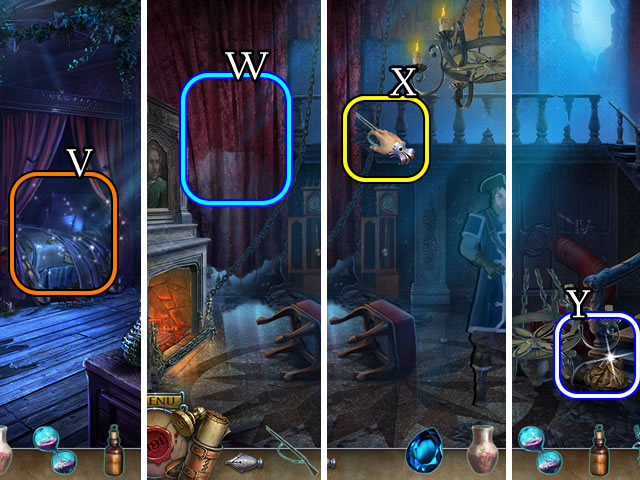
- Take the SKULL TOKEN (V).
- Take the CHAIR (W).
- Walk down.
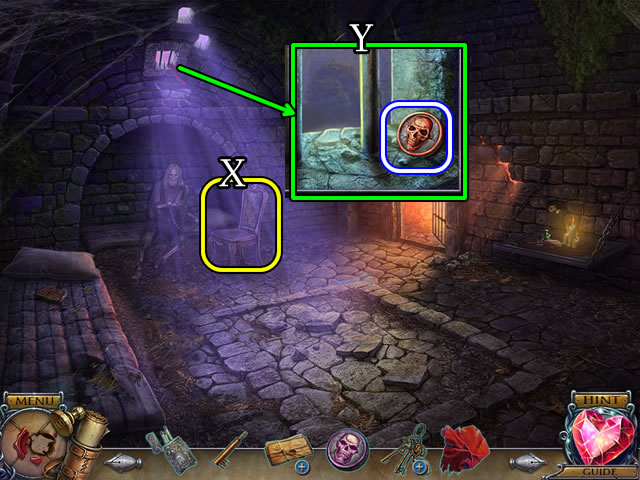
- Place the CHAIR (X). Take the SKULL TOKEN (Y).
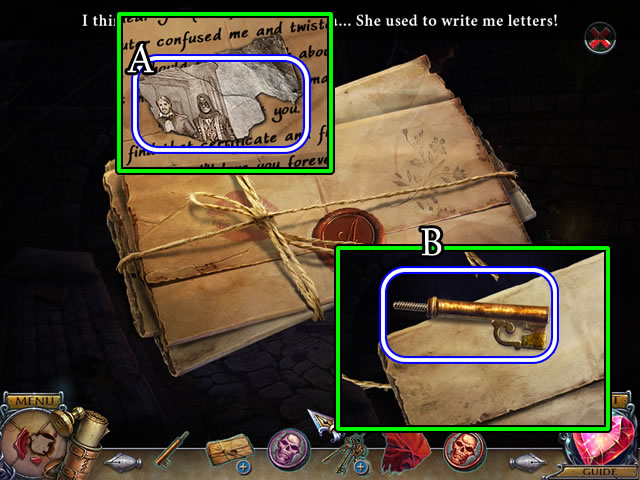
- Untie the LETTERS (Inventory), open and take the SCRAP (A). Read the letter, take the KEY PART (B).
- Combine the KEYS and 2 KEY PARTS (Inventory).
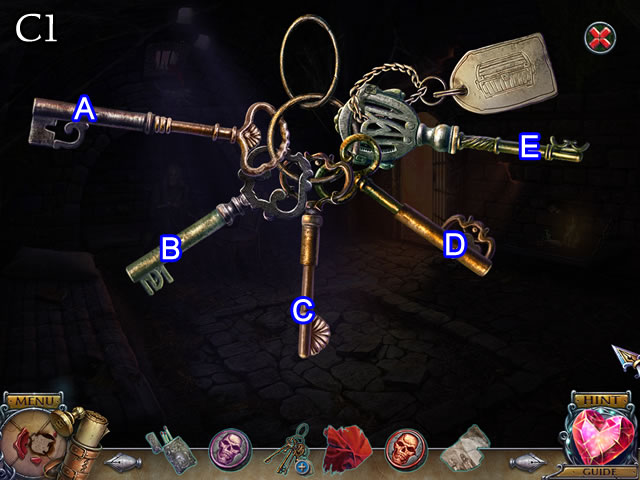
- Solution (C1). (A-C)-(B-C)-(D-C)-(D-E).
- Take the JAIL KEYS.
- Walk forward.
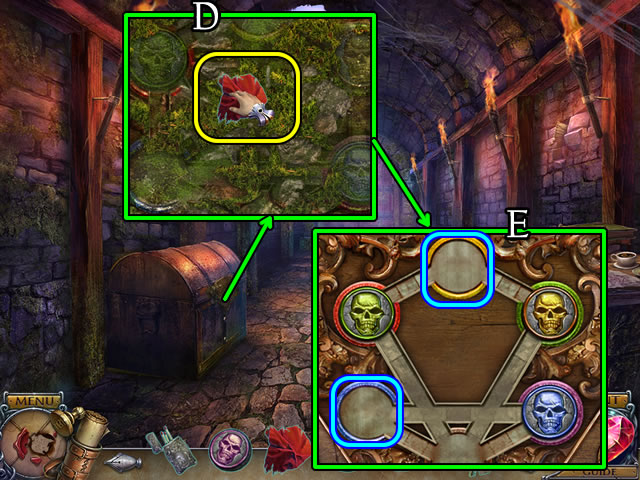
- Use the RAG (D). Place 2 SKULL TOKENS (E).
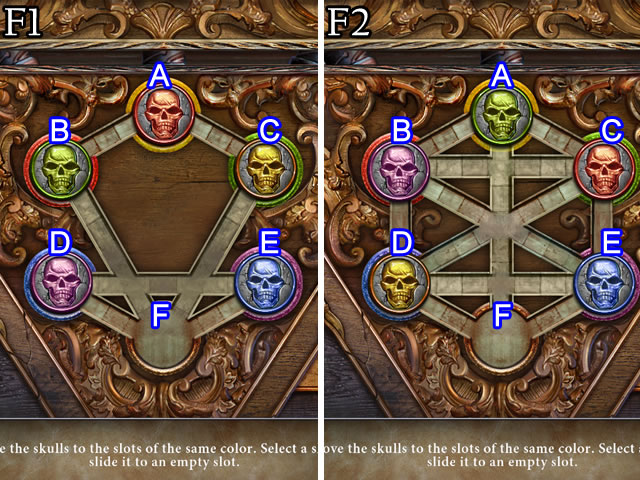
- Solution (F1). D-E-F-B-A-C-F.
- Solution (F2). D-B-E-D-B-C-A-F.
- Place and select the JAIL KEYS (G).
- Uncover and take the LANTERN (H). Take the diagram.
- Walk down.
- Combine the STENCIL parts (Inventory) for a STENCIL.
- Place the LANTERN and STENCIL (I). Use the MATCHES (J).
- Walk forward.
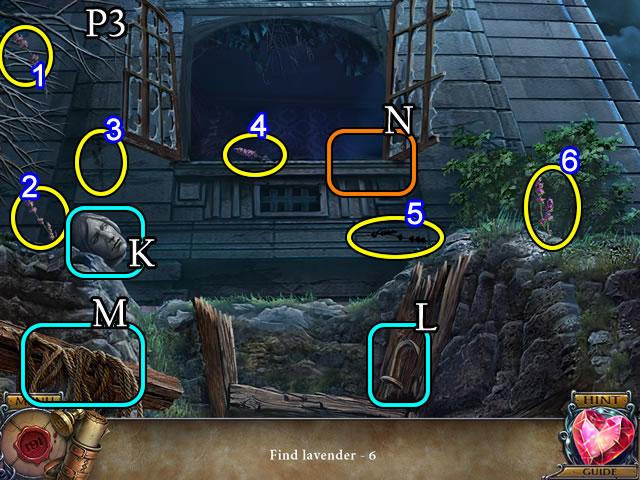
- Take the BLANKET (K).
- Place the BLANKET (L).
- Take the Box (M). Select and take the BROKEN CANE (N).
- Take the note (O).
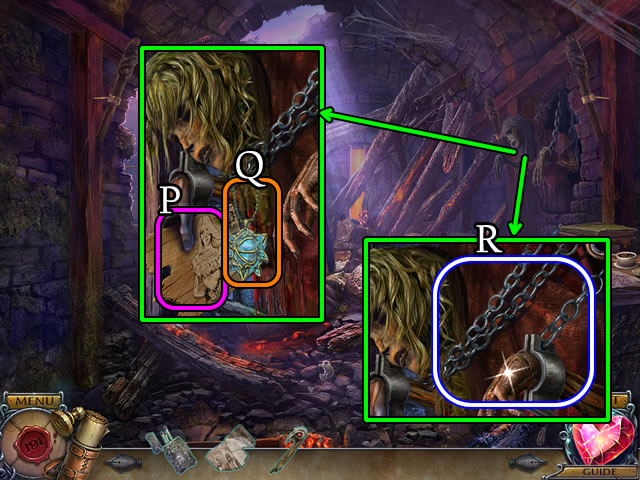
- Take the note (P). Use the BROKEN CANE to take the Amulet (Q).
- Take the FETTERS (R).
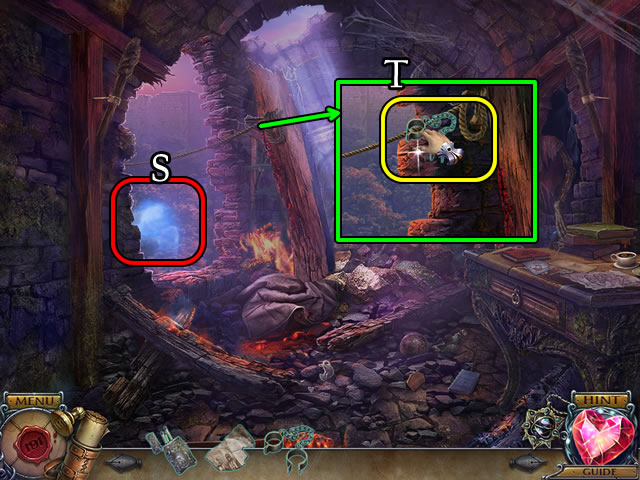
- Select (S).
- Use the FETTERS (T).
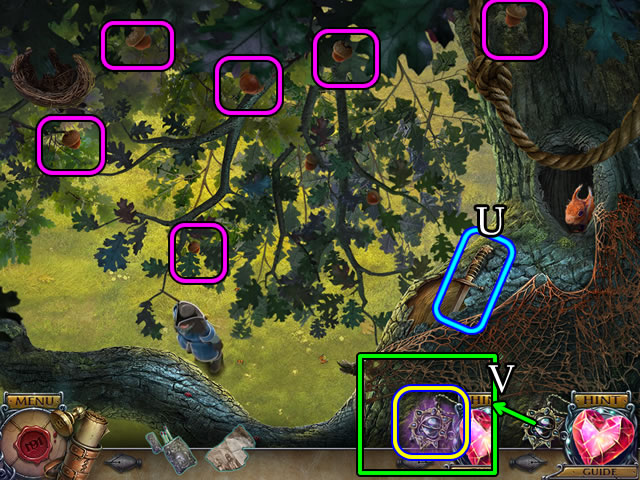
- Attempt to take the knife (U).
- Take the acorns (pink).
- Select and touch the glowing Amulet (V).
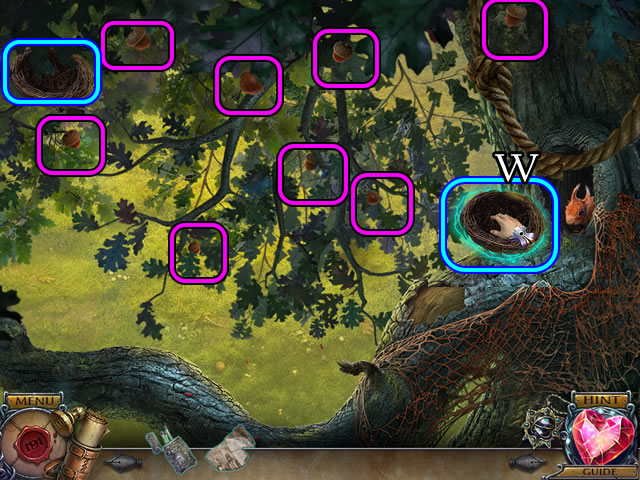
- Place the nest (W).
- Gather the acorns (pink).
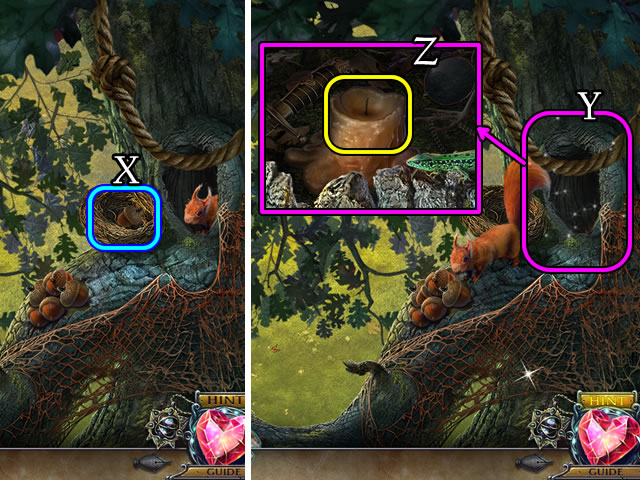
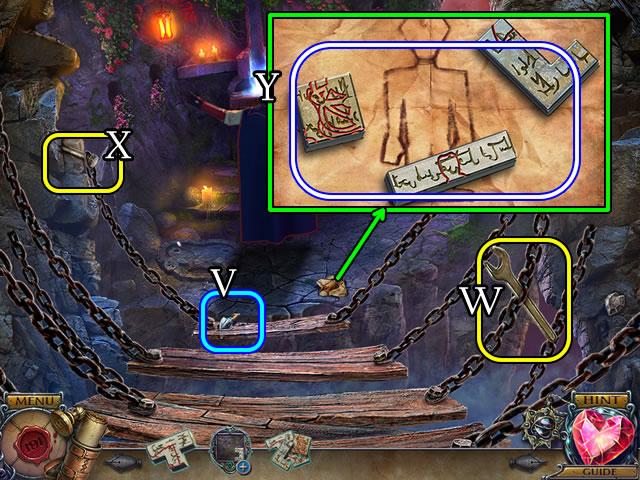
- Select the acorn (X).
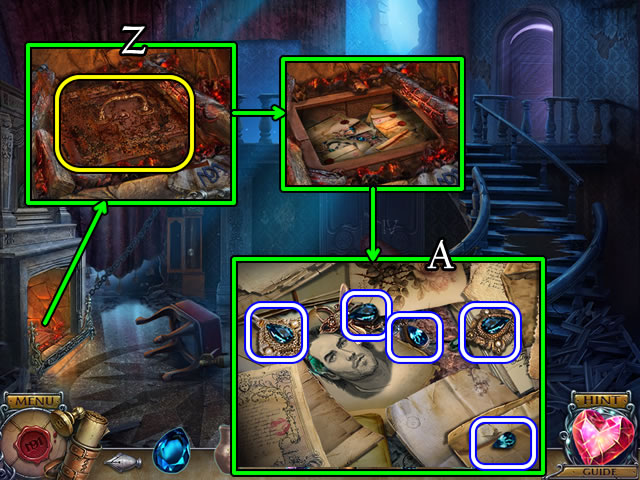
- Illuminate the HOP (Y) with the MATCHES (Z). Receive a KNIFE.
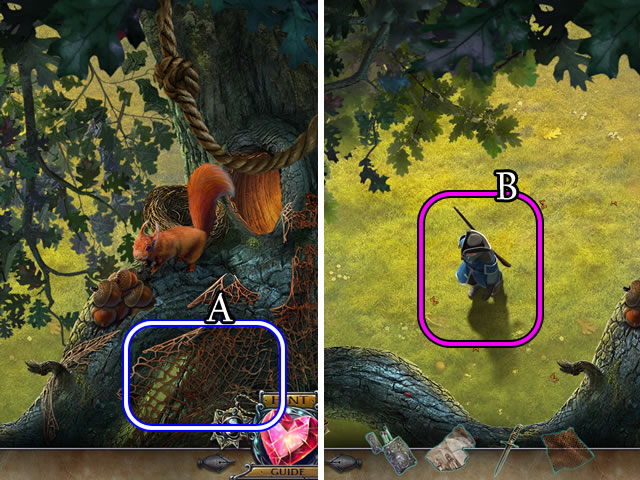
- Use the KNIFE 3x. Take the NET (A).
- Move the branches; use the NET (B).
- Walk forward.
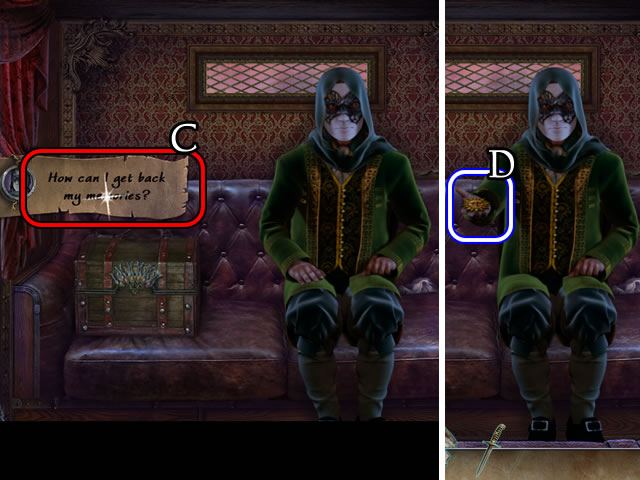
- Speak to the man (C).
- Take the SUN MEDAL (D).
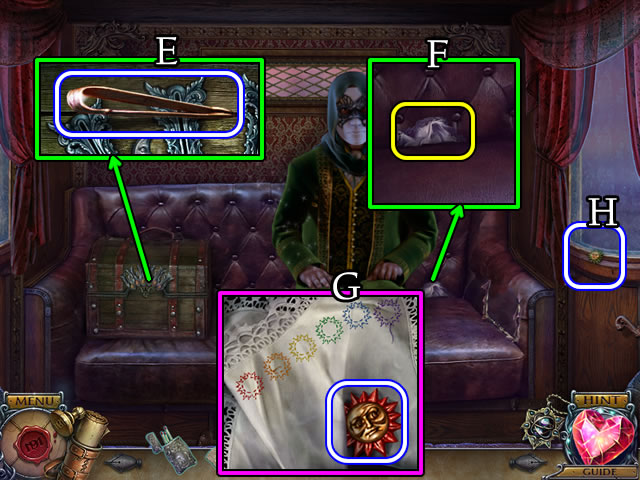
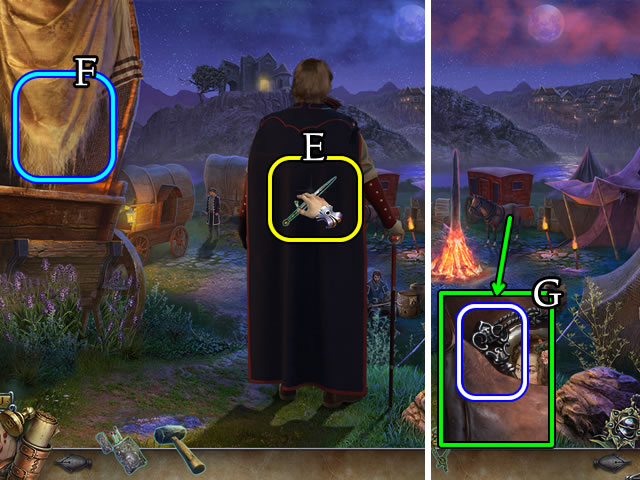
- Take (E), then use the TONGS (F).
- Take the SUN MEDAL; note the pattern (G).
- Grab the SUN MEDAL (H).
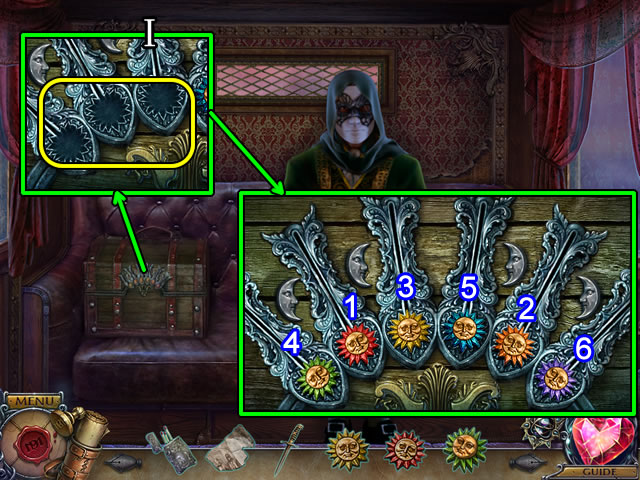
- Place the 3 SUN MEDALS (I).
- Select 1-2-3-4-5-6.
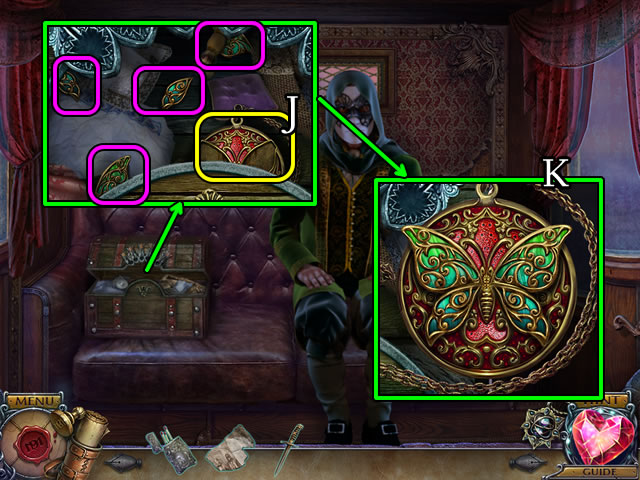
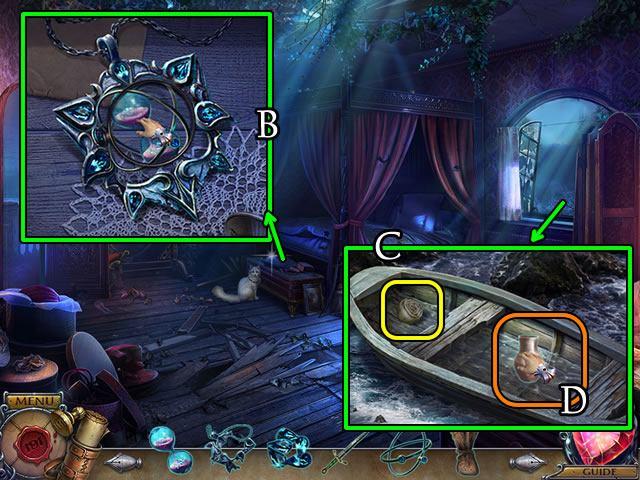
- Select the locket (J) and place the wings (pink).
- Take ANGELICA'S LOCKET (K).
- Select ANGELICA'S LOCKET (Inventory) to examine the photos.
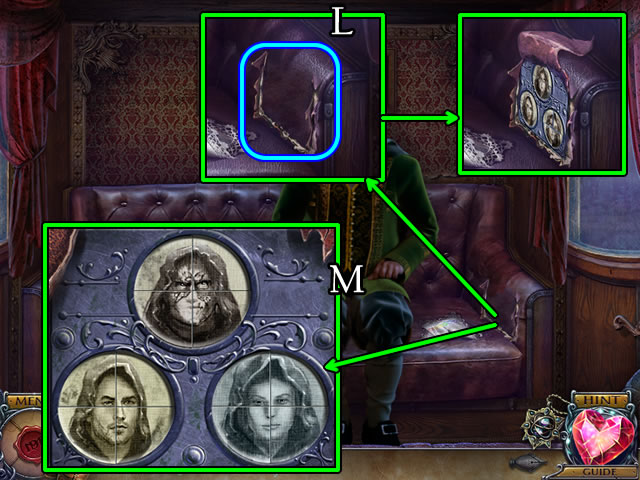
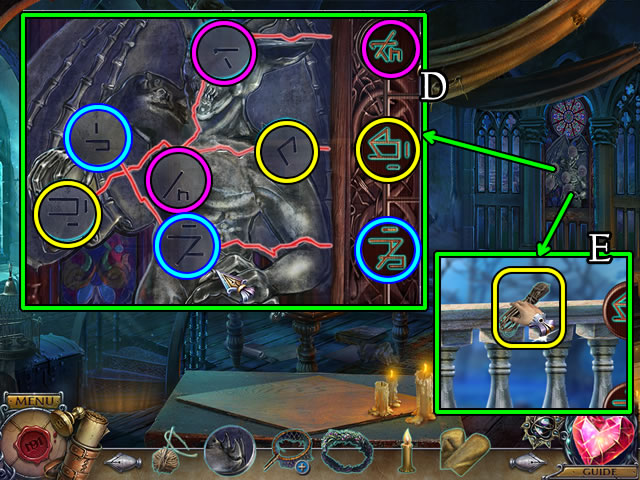
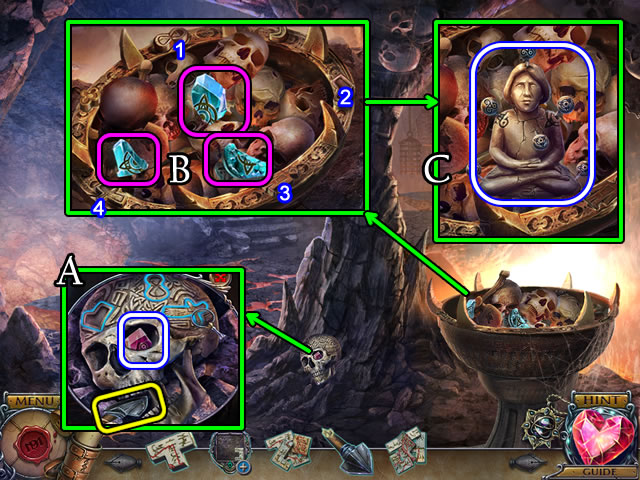
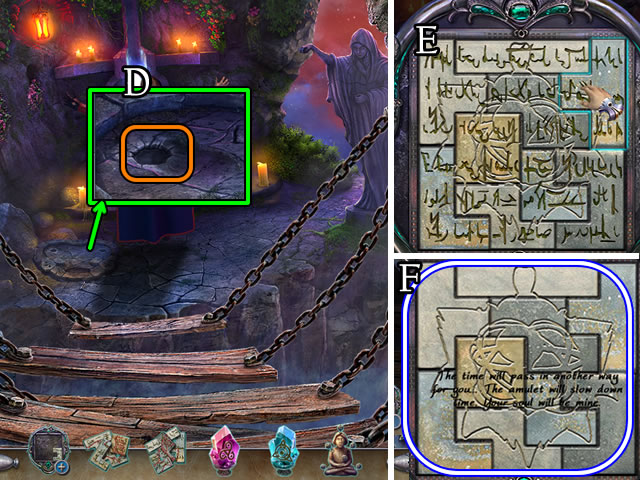
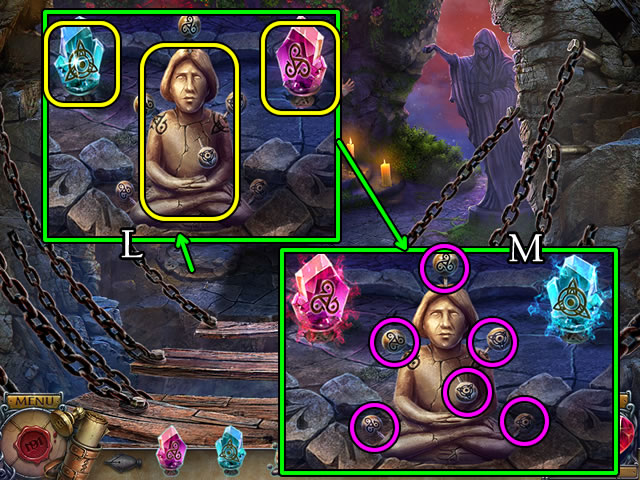
- Select (L).
- Solution (M).
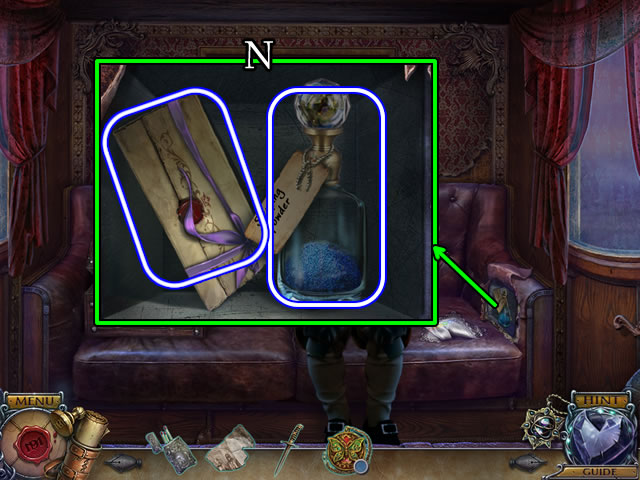
- Take the SLEEPING POWER and LETTER (N).
Chapter 2: Returning Home
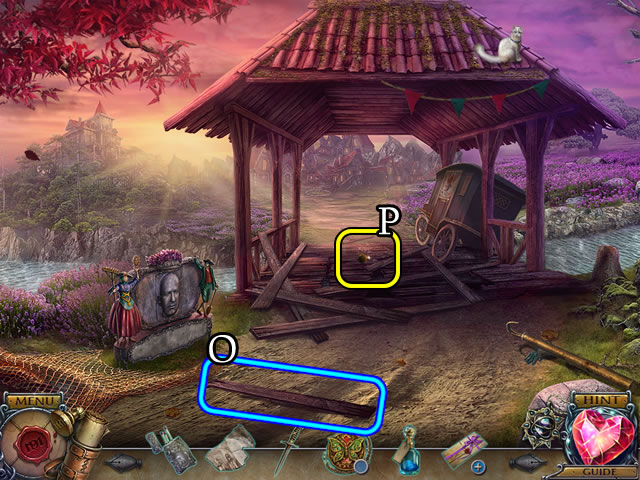
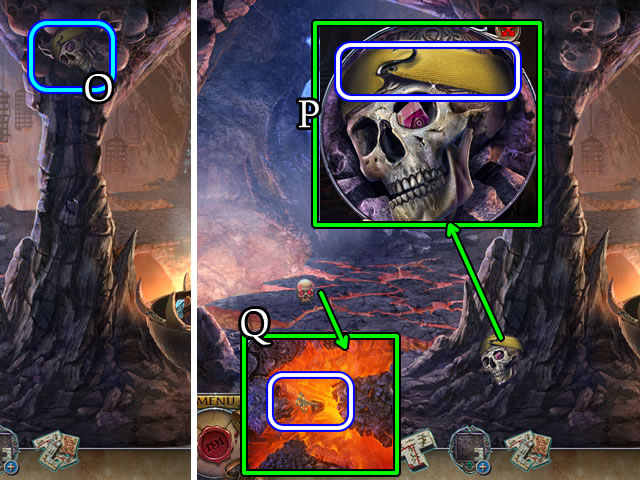
- Select (O) and place (P) the board.
- Select and touch the Amulet.
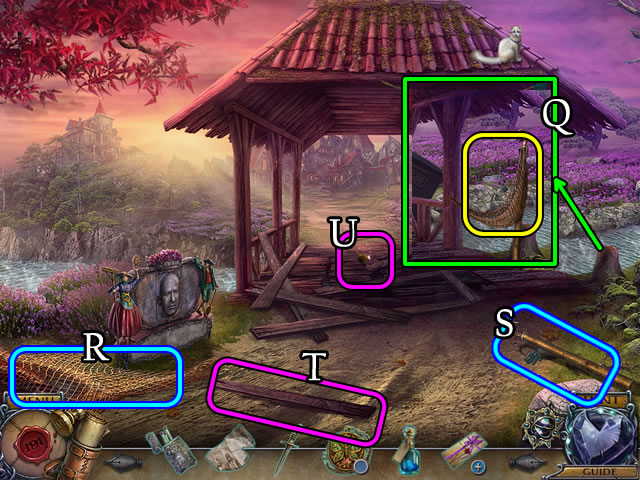
- Place (Q) the net (R) and hook (S).
- Select (T) and place (U) the board.
- Take the STICK (V) and STONE (W).
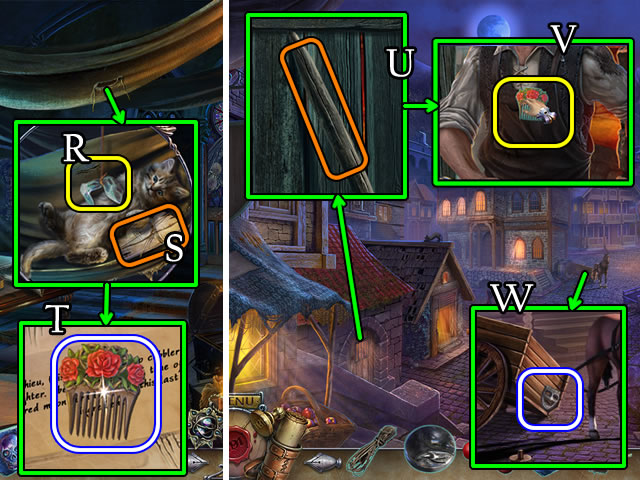
- Use the KNIFE (X); receive a PIECE OF ROPE.
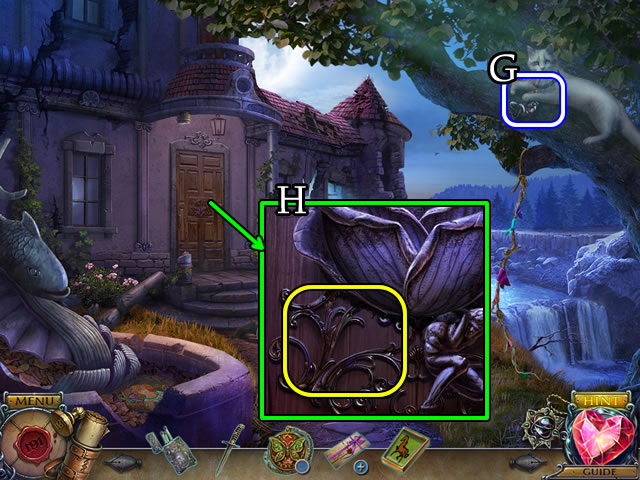
- Take the BROKEN HOOK and grab the cat (Y).
- Combine the BROKEN HOOK and STICK for a HOOK (Inventory).
- Use the HOOK (Z).
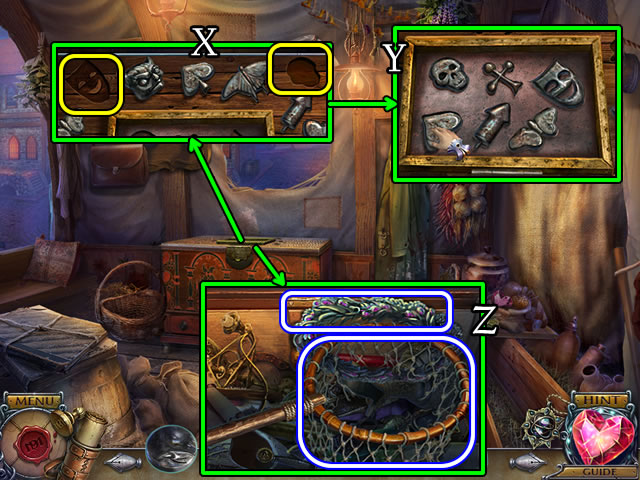
- Play the HOP (A); receive a MASK.
- Use the HOOK (B).
- Walk forward.
- Use the KNIFE for a PIECE OF ROPE (C).
- Speak to the person (D); receive a SCRAP.
- Walk forward.

- Put, then place both SCRAPS (E). Take the drawing.
- Speak to the soldier (F).
- Take the BAGS (G).
- Take the PIECE OF ROPE (H).
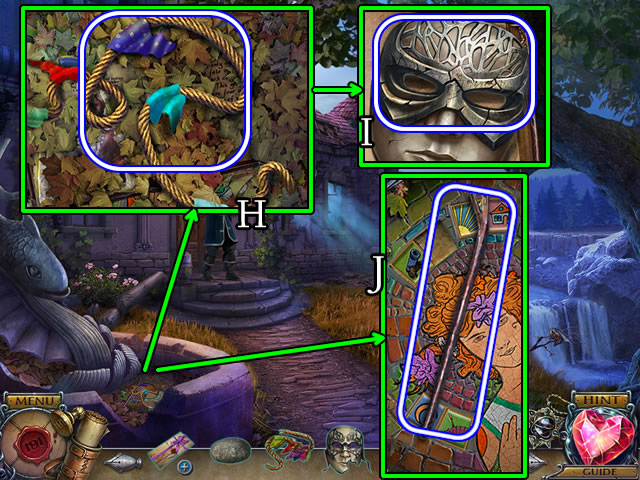
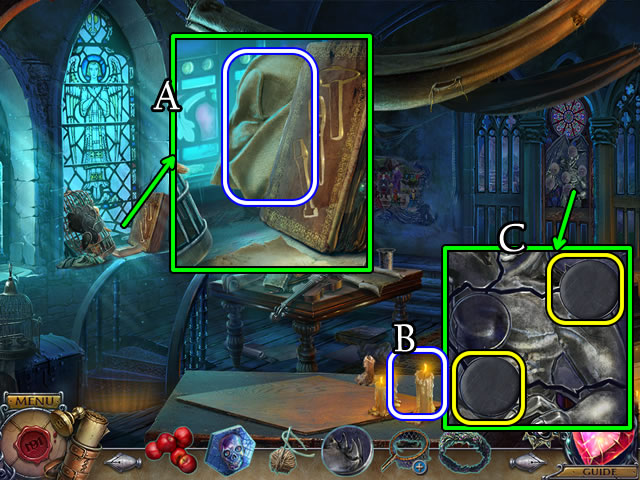
- Uncover and select the book. Read the note. Turn the pages 3x. Take the MASK (I).
- Take the CROWBAR (J).
- Attach 3 PIECES OF ROPE (K). Take the COAT (L).
- Walk down.
- Take the note. Place the 2 MASKS (M).
- Solution (N).
- Select the mask (O); take the GATE KEY (P).
- Use the GATE KEY (Q).
- Select each nail. Take the GOLD COINS (R).
- Use the CROWBAR (S) and select (T).
- Select (U).
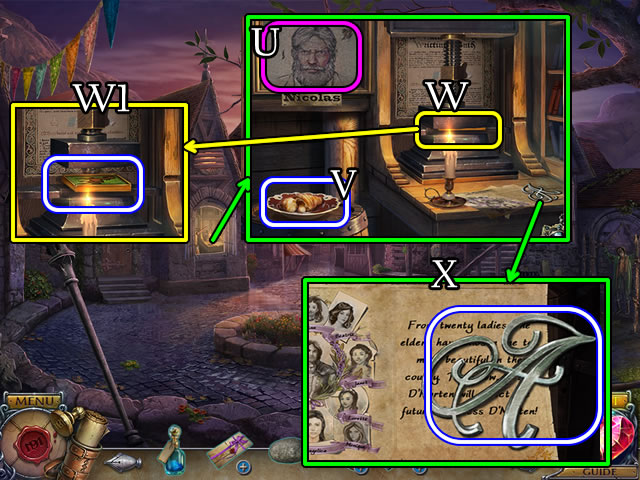
- Grab the CROISSANT (V).
- Use the CROWBAR (W). Take the MOSAIC TILE (W1).
- Take the MUSIC BOX KEY; read the note (X).
- Select the COAT (Inventory). Open the pocket for a BULLET CAPSULE. Use the KNIFE for a CHIP.
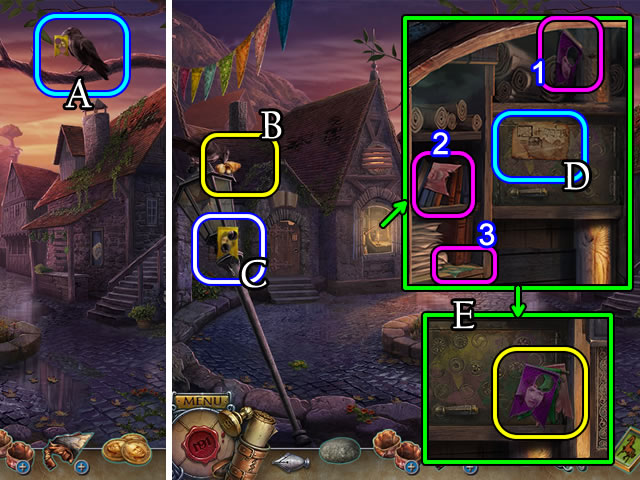
- Touch the bird (A).
- Give the CROISSANT (B). Take the FLAG (C).
- Take the instructions (D).
- Select the flags 1-2-3 Place the FLAG (E).
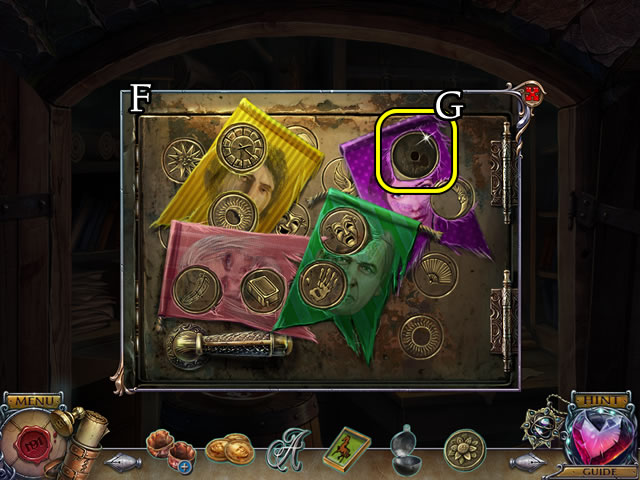
- Solution (F).
- Place the CHIP (G). Touch the chips in the flags.
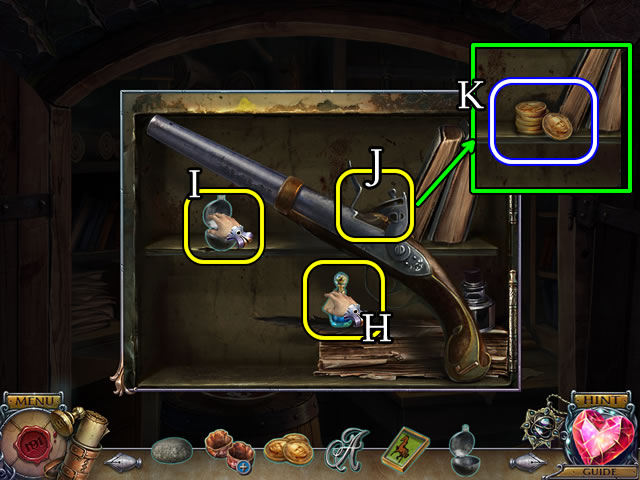
- Place the SLEEPING POWER (H) and BULLET CAPSULE (I). Uncork the powder and place it in the bullet capsule. Close the capsule and put it in the gun (J). Take the LOADED PISTOL.
- Take the GOLD COINS (K).
- Take the paper and select the music box (L).
- Replace the parts (M).
- Place the cover. Place the MUSIC BOX KEY (N).
- Take the MUSIC BOX (O).
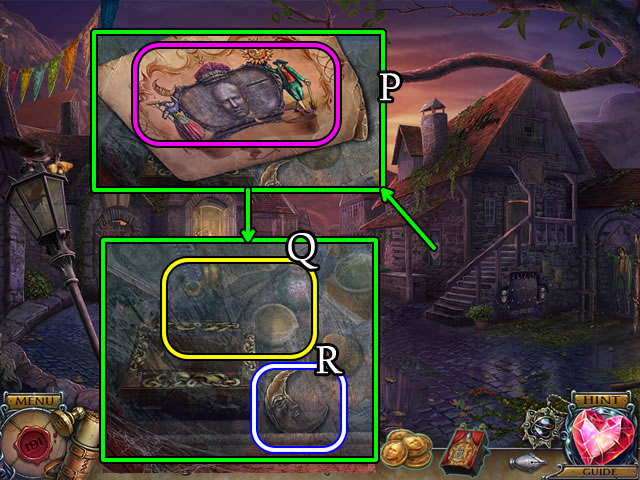
- Take the paper (P).
- Use the STONE (Q); take the MOON FIGURINE (R).
- Walk down.
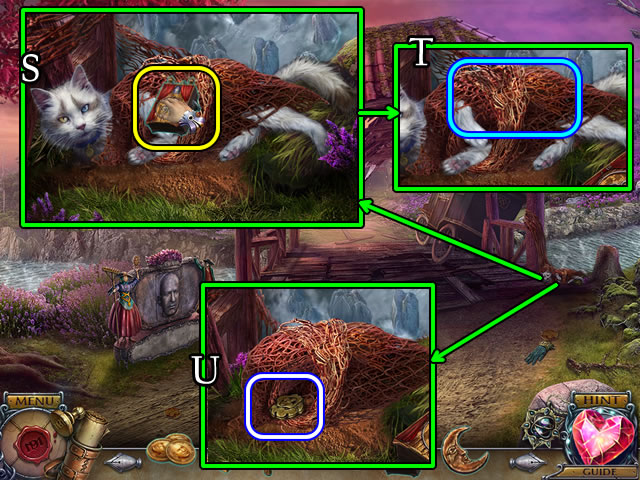
- Touch the cat. Place the MUSIC BOX (S).
- Use the KNIFE (T).
- Take the GOLDEN ORNAMENT (U).
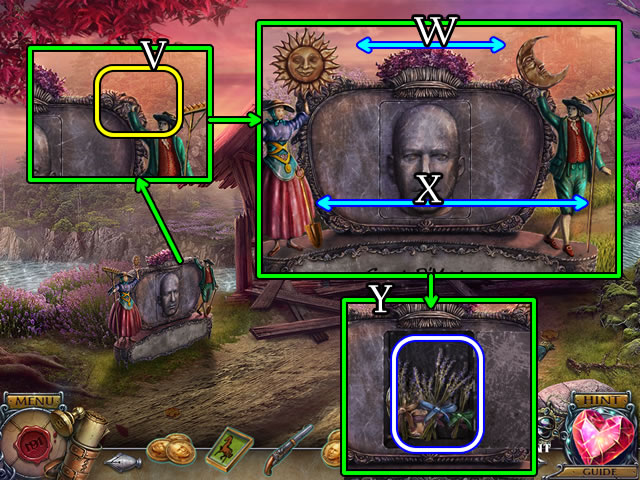
- Place the MOON FIGURINE (V).
- Swap the sun and moon (W) and shovel and rake (X).
- Take the BOUQUET OF WISHES (Y).
- Walk forward.
- Touch the book and picture (A). Read the paper (B).
- Place the parts (1-2-3).
- Place the GOLDEN ORNAMENT (C). Take the GOLD COINS.
- Select the BOUQUET OF WISHES (Inventory) and read each wish to uncover a GOLD COIN.
- Combine the BAGS and 4 GOLD COINS for BAGS OF GOLD (Inventory).
- Walk forward.
- Give the BAGS OF GOLD (D).
- Select and touch the Amulet.
- Give the BAGS OF GOLD (E).
- Use the LOADED PISTOL (F).
- Take (G), then place the DECORATIVE FIGURINE (H).
- Walk forward.
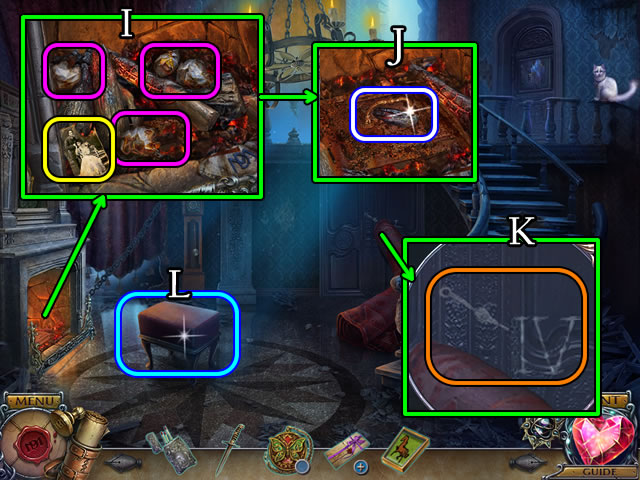
- Take the notes and photo (I).
- Uncover and take the FIREBRAND (J).
- Select the carpet; note the clue (K).
- Select the stool (L).
- Use the KNIFE (M).
- Take the DIAL PIECE (N).
- Select (O).
- Use the FIREBRAND (P).

- Place the DIAL PIECE (Q).
- Solution (R).
- Take the MOSAIC TILE (S).
- Walk down.

- Place the 2 MOSAIC TILES (T).
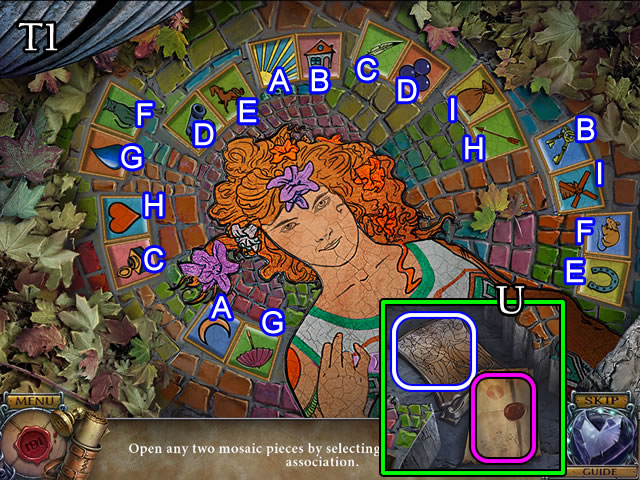
- Solution (T1).
- Read the note; take the ORNATE PLATE (U).
- Open the LETTER (Inventory) for a MARRIAGE CERTIFICATE.
- Walk forward.
- Place the ORNATE PLATE (V).
- Solution (W). 1-2-3-4.
- Walk forward.
Chapter 3: The Camp
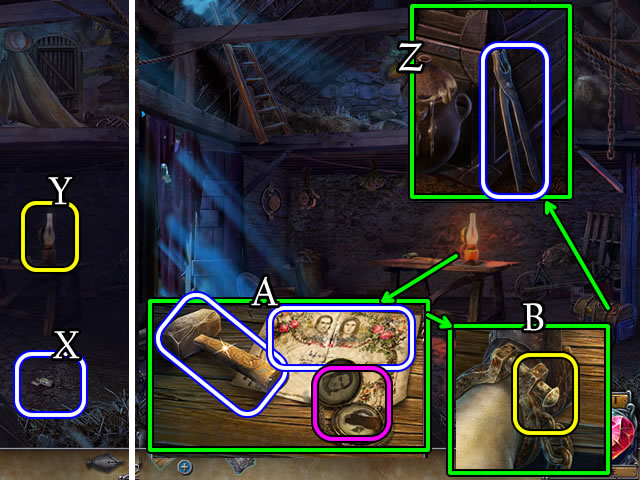
- Grab (X) then use the MATCHES (Y).
- Take the VISE GRIP (Z).
- Take the HAMMER, locket and MARRIAGE CERTIFICATE (A).
- Use the VISE GRIP (B).
- Select (C).
- Give the MARRIAGE CERTIFICATE (D).
- Take the letter and diagram (E).
- Walk left.
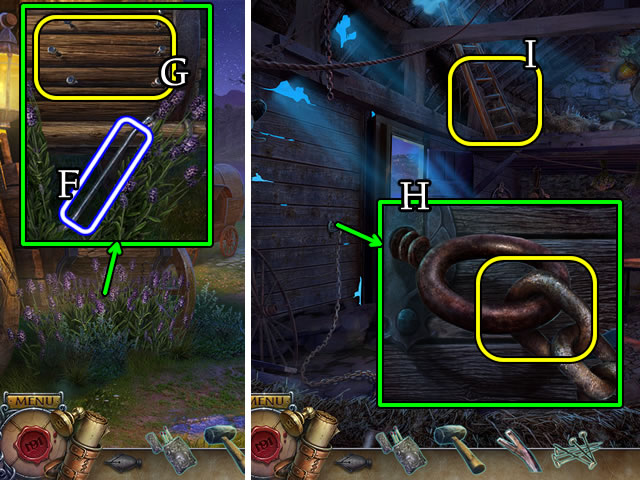
- Uncover and take the CROWBAR (F).
- Use the CROWBAR (G); receive NAILS.
- Use the CROWBAR; receive a CHAIN (H).
- Place the CHAIN (I).

- Take the BROKEN LADDER and BOARDS (J).
- Combine the BROKEN LADDER, BOARDS, NAILS and HAMMER for a LADDER (Inventory).
- Place the LADDER (K) to play a HOP (L). Receive MARIGOLDS.
- Lift the middle jar lid. Place the MARIGOLDS; receive a MARIGOLDS WITH SPIDER (M).
- Walk left.
- Place the MARIGOLDS WITH SPIDER (N). Receive a RIFLE.
- Select (O).
- Walk forward.
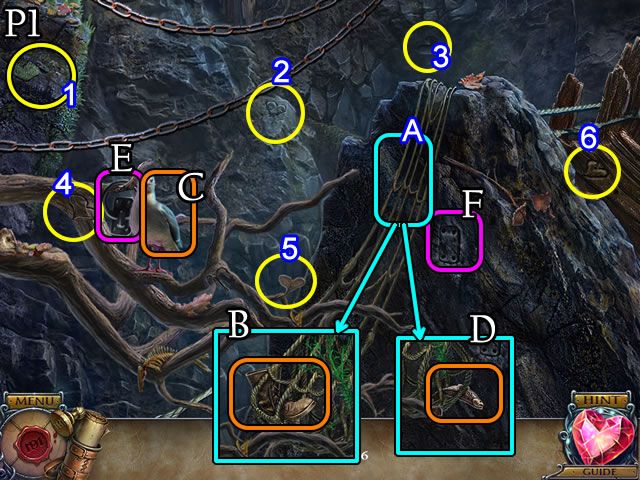
- Solution (P1). Select 1-6. Grab (A); place the boot on (C). Grab (A); place the fish on (C). Take (E) and place on (F).
- Solution (P2). Select 1-4. Grab (G), then (H). Use (I) on (J).
- Solution (P3). Select 1-6. Use (K) on (L). Attach (L) to (M) and place on (N).
- Walk forward.
- Grab the BLUE CRYSTAL (Q).
- Take the JUG (R). Uncover and take the note (S). Take the PURPLE CRYSTAL and OXIDIZER (T).
- Pull (U).
- Play the HOP (V). Receive the BROKEN AMULET OF TIME.
- Walk left.
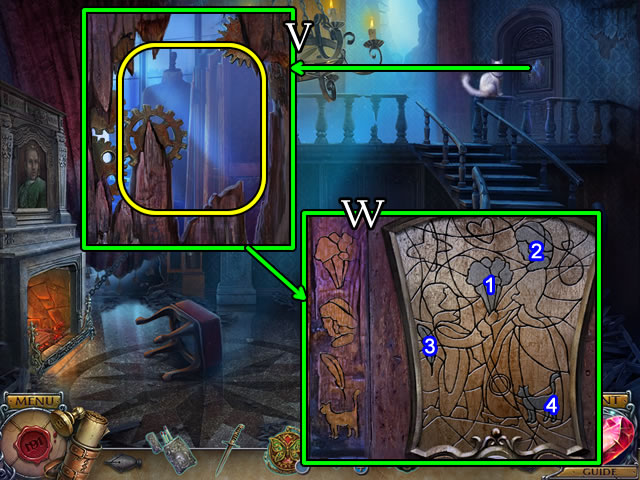
- Select the curtain (W).
- Use the RIFLE (X).
- Take the BUNDLE (Y).
- Use the OXIDIZER (Z).
- Open, uncover and take the GLOWING CRYSTALS (A).
- Walk forward.
- Select the BUNDLE (Inventory). Take the KNIFE and AMULET PART. Combine the rope and burlap for a STOPPER.
- Place the BROKEN AMULET OF TIME; AMULET PART; BLUE, PURPLE and GLOWING CRYSTALS. Combine the parts (B).
- Place the STOPPER (C). Use the JUG (D).
- Use the KNIFE (E).
- Select and touch the Amulet.
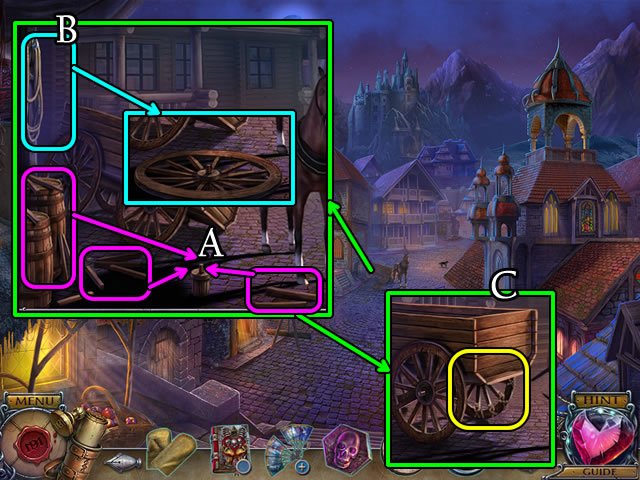
- Look in the wagon (F).
- Open the bag and move the papers; take the KEY (G).
- Walk down.
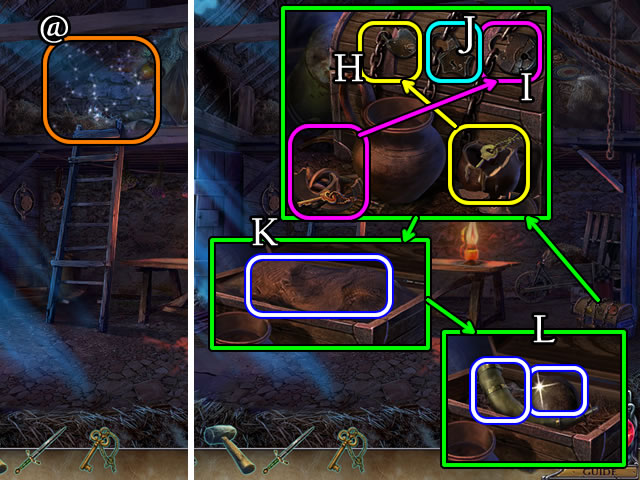
- Play the HOP (@) to place the cannon.
- Use the HAMMER on both jars. Take and place the keys (H-I). Use the KEY (J).
- Take the RAG (K), CANNONBALL and GUNPOWDER FLASK (L).
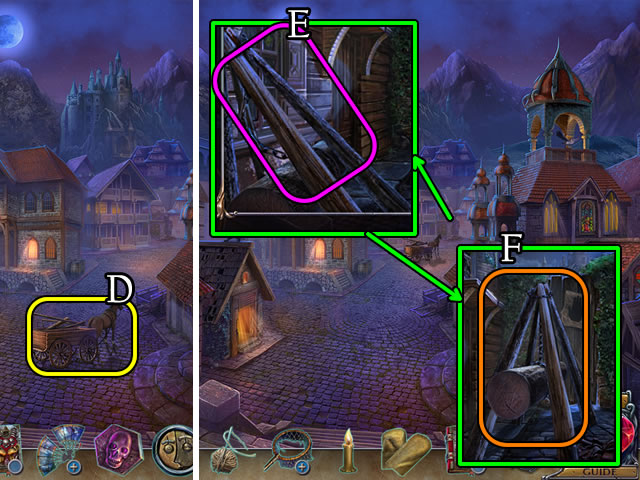
- Walk left.
- Use the KNIFE (M). Place the GUNPOWDER FLASK (N); receive GUNPOWDER.
- Walk down.
- Place the GUNPOWDER and CANNONBALL (O). Use the MATCHES (P).
- Select the cannon.
- Touch the cross-hairs (Q).
- Select and touch the Amulet.
- Walk down and left.
- Take the CANNONBALL (R). Place the RAG (S), use the ramrod (T) on the rag.
- Walk down.
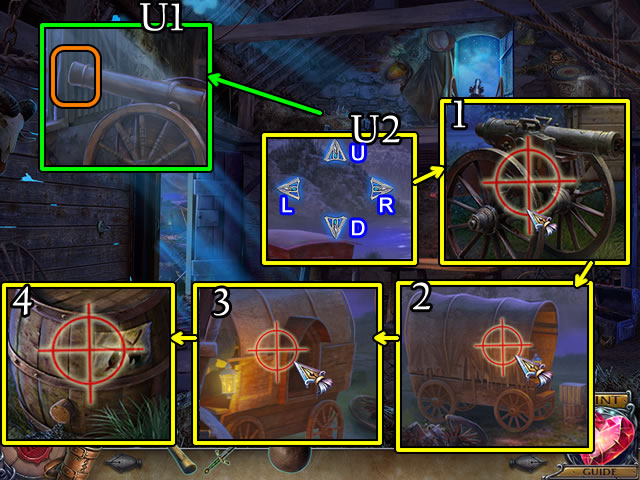
- Place the CANNONBALL (U1).
- Position (U2) and fire the cannon (1) Lx2, (2) Ux3, (3) Lx3, (4) Dx5-Rx10.
- Walk left.
Chapter 4: Chasing D'Morten
- Use the KNIFE (V) to receive a SKULL CHIP.
- Open (W), take the notes and CHISEL (X).
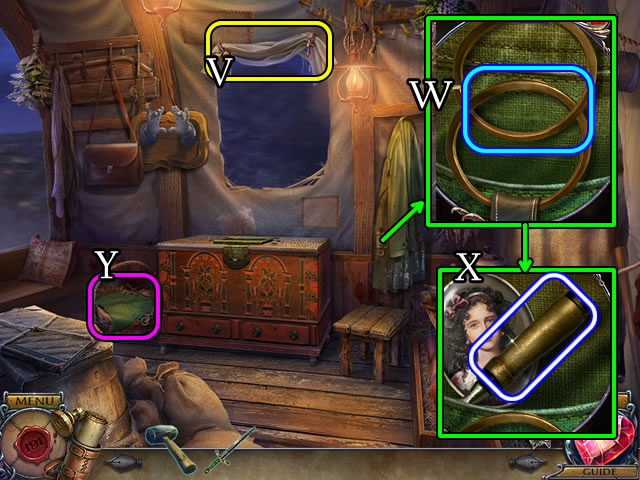
- Lift the cloth (Y). Take the ROPE.
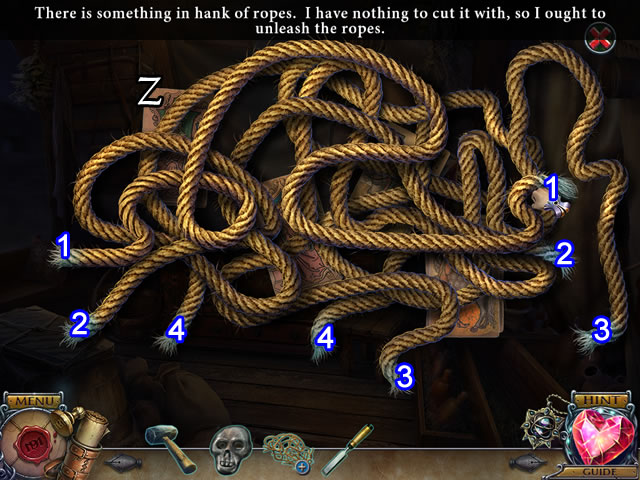
- Select the ROPE (Inventory) and remove (Z) each pair (1-4). Take the DECK OF CARDS.
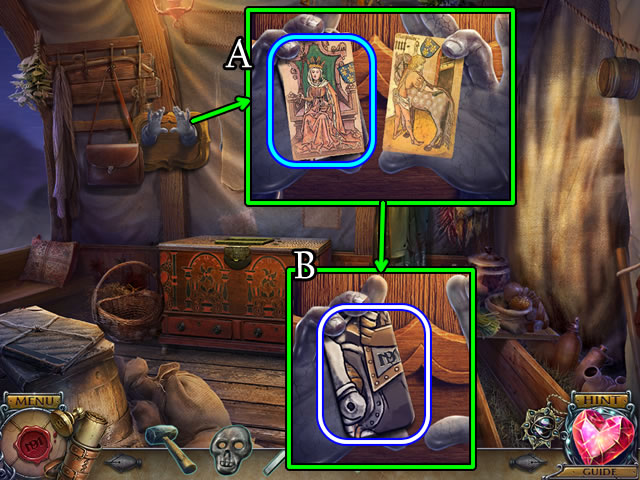
- Place the DECK OF CARDS. Select a deck to find its pair (A). Take the DOOR TOKEN (B).
- Lift the curtain.
- Walk forward.
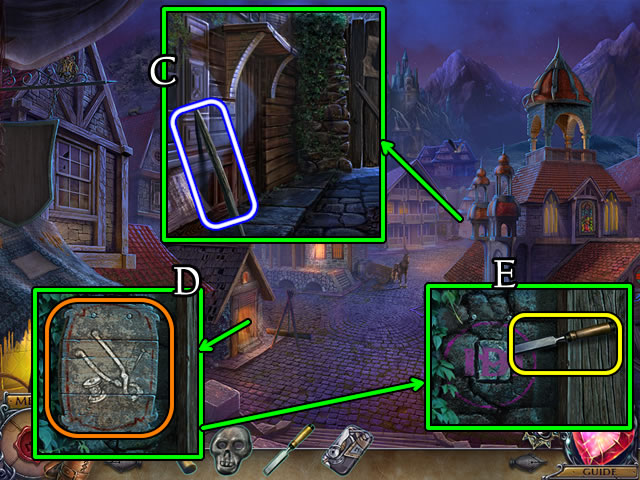
- Take the PLANK (C).
- Remove (D), then use the CHISEL and HAMMER (E).
- Select and touch the Amulet.
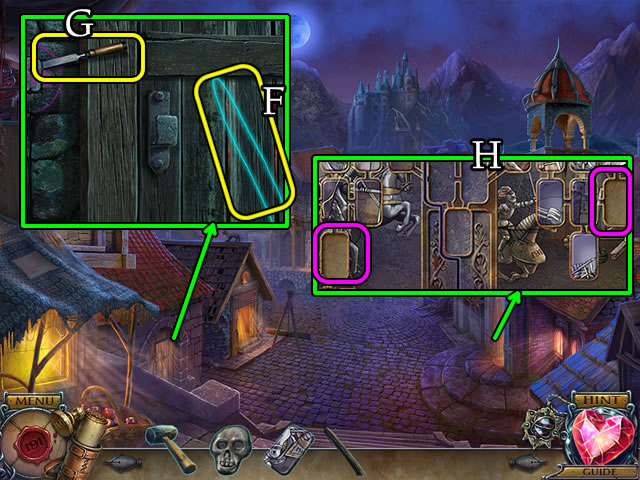
- Place the PLANK (F). Use the HAMMER (G). Take the DOOR TOKEN.
- Place the 2 DOOR TOKENS (H).
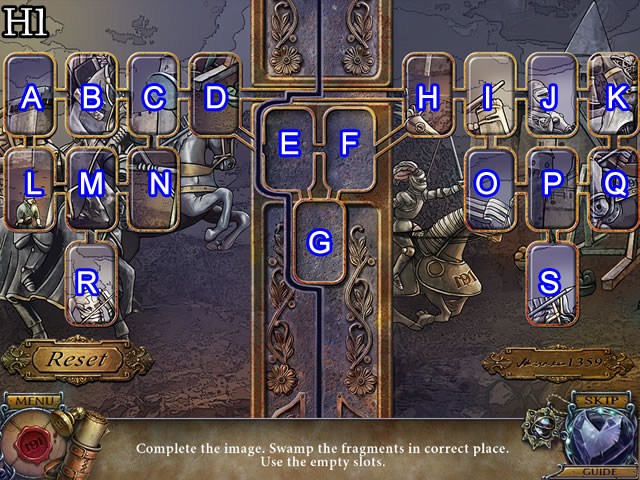
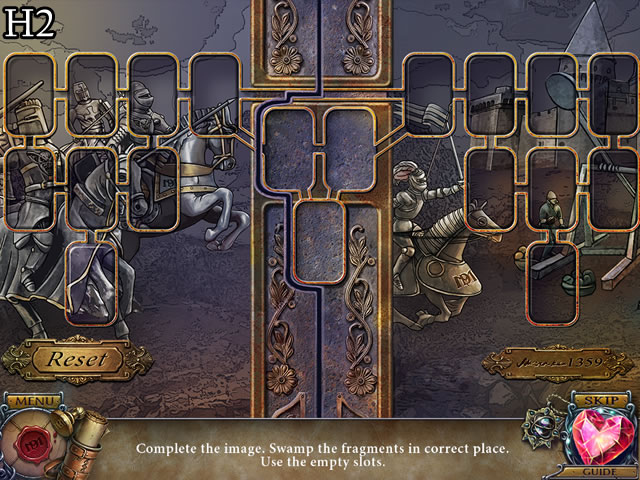
- Solution (H1). (H-F)-(I-G)-(O-H)-(F-O)-(D-F)-(C-E)-(J-C)-(E-J)-(B-E)-(A-I)-(P-A)- (S-D)-(F-S)-(A-F)-(L-P)-(K-L)-(F-K)-(Q-F)-(N-Q)-(F-N)-(G-A)- (M-F)-(E-M)-(R-B)-(F-R).
- Solution (H2).
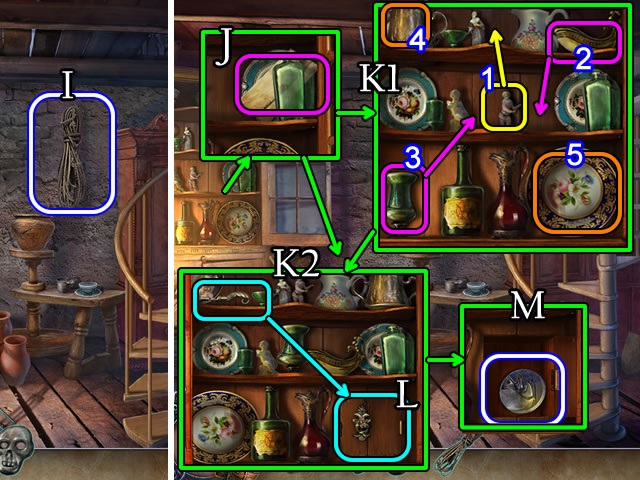
- Grab the ROPE (I).
- Take the note (J). Arrange the pieces (K1-K2). Move (1-3); select (4,5).
- Place and select the handle (L).
- Read the note. Take the DEMONIC TOKEN (M).
- Walk down.
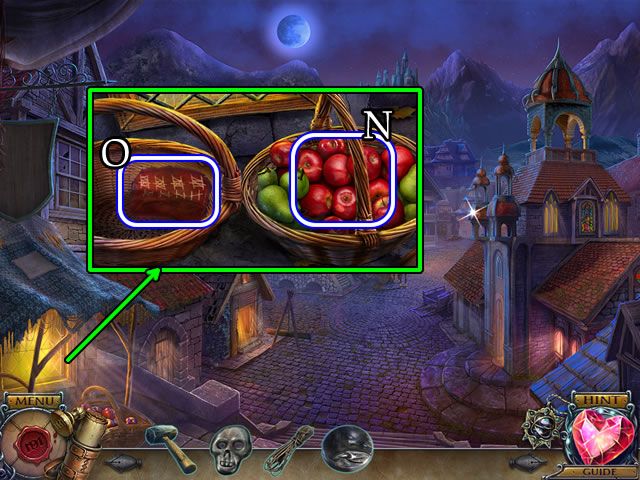
- Take the APPLES (N).
- Uncover and take the CODE (O).
- Walk right.
- Place the CODE. Select 1-2-3.
- Open and take the SKULL EMBLEM and CAT TOY (P).
- Select the cup 2x. Take the NEEDLE AND THREAD (Q).
- Walk forward.
- Place the CAT TOY (R).
- Open (S); take the DAUGHTER'S COMB and note (T).
- Walk down 2x.
- Remove the plank (U).
- Give the DAUGHTER'S COMB (V) receive a DEMONIC TOKEN.
- Take the COMEDY CHIP (W).
- Walk down.
- Place the SKULL and COMEDY CHIPS (X). Put the chips (Y).
- Take the BROKEN NET and STONE WREATH (Z).
- Walk forward, right and forward.
- Take the MITTENS (A) and CANDLE (B).
- Place the 2 DEMONIC TOKENS (C).
- Solution (D).
- Place the ROPE (E).
- Play the HOP (F). Receive a MOSAIC TILE.
- Touch (G).

- Touch (H).
- Place the STONE WREATH (I). Take the BOOK OF TRUTH (J).
- Play the HOP (K) for a BROKEN FAN.
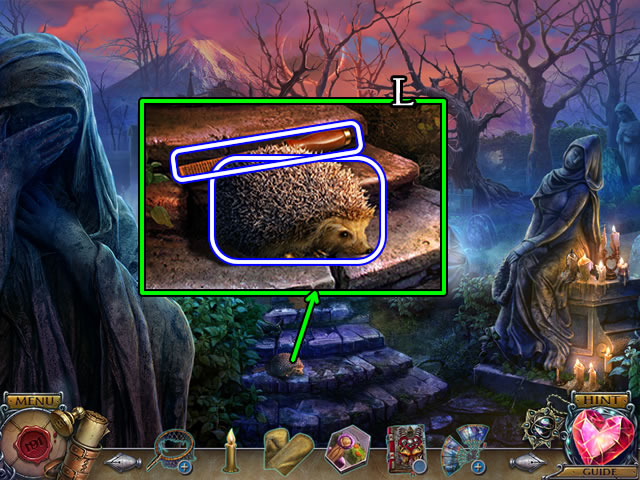
- Use the MITTENS to take the HEDGEHOG. Take the FILE (L).
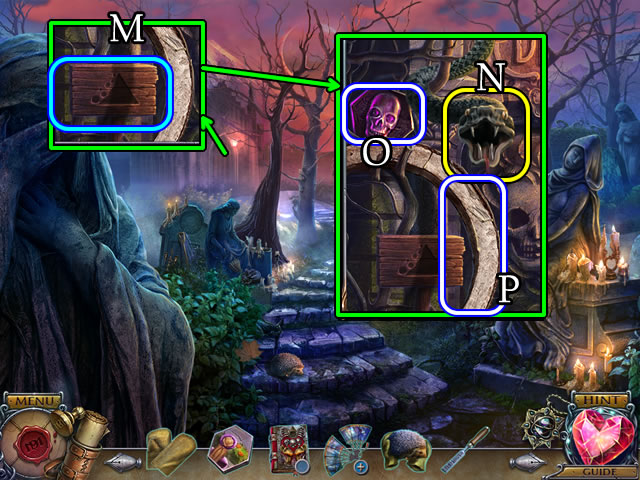
- Touch (M).
- Place the HEDGEHOG (N). Take the SKULL EMBLEM (O) and WHEEL RIM (P).
- Walk down 3x.
- Use the FILE. Take the PEACOCK TAIL (Q).
- Walk right and forward.
- Place the PEACOCK TAIL (R) and parts (pink).
- Select the doll, take the MOSAIC TILE (S).
- Use the HAMMER (T).
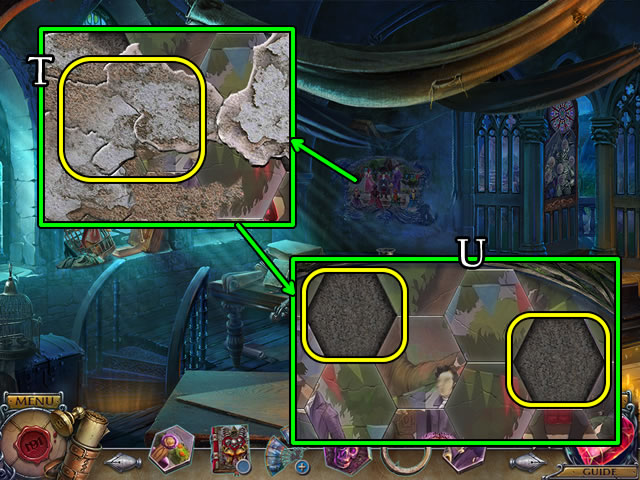
- Place 2 MOSAIC TILES (U).
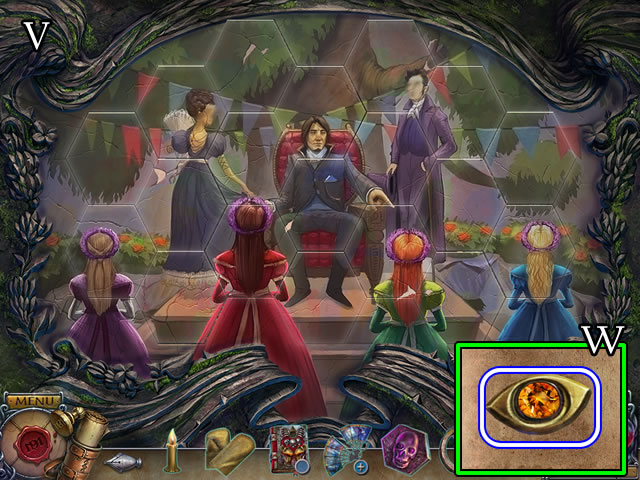
- Solution (V).
- Select the book; take the BOOK EMBLEM (W).
- Select the BOOK OF TRUTH (Inventory). Use the BOOK EMBLEM. Open the book.
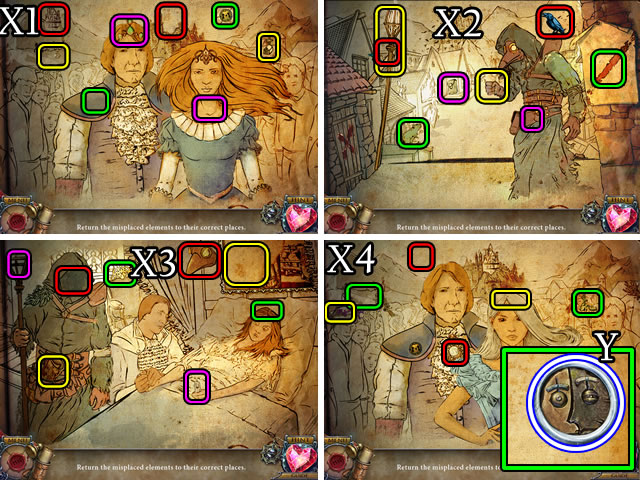
- Solution (X1-X4).
- Take the TUBE PART (Y).
- Walk down 2x.
- Assemble the wheel spokes, WHEEL RIM (A) and attach the rope (B). Select and place the wheel (C).
- Select the wagon 2x.
- Place the APPLES (D). Select the wagon.
- Select (E). Select (F) 2x. Walk forward.
Chapter 5: The Castle

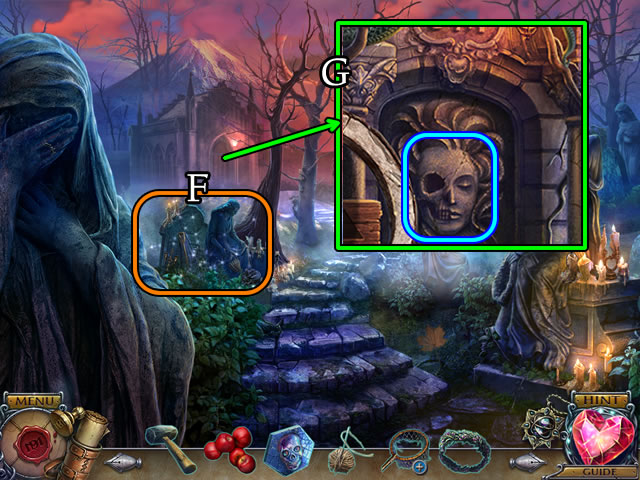
- Take the VEIL and GARGOYLE HEAD (G).
- Place the CANDLE (H). Use the MITTENS (I). Move the stone (J).
- Attempt to enter the cave.
- Take the SHIELD (K).
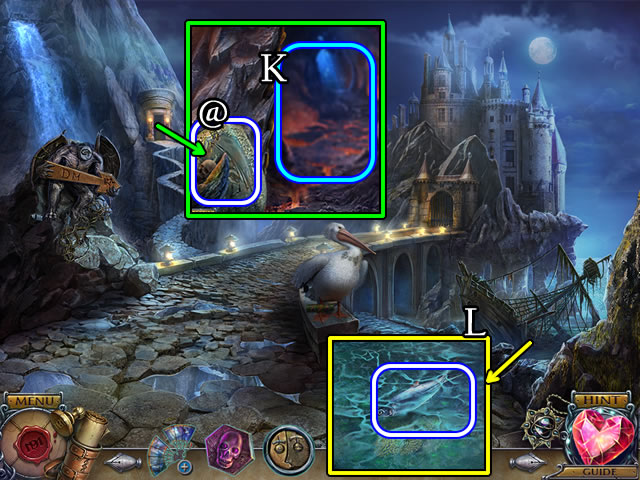
- Combine the BROKEN NET, VEIL and NEEDLE AND THREAD for a NET (Inventory).
- Use the NET; receive a FISH (L).
- Take the CHARCOAL (M).
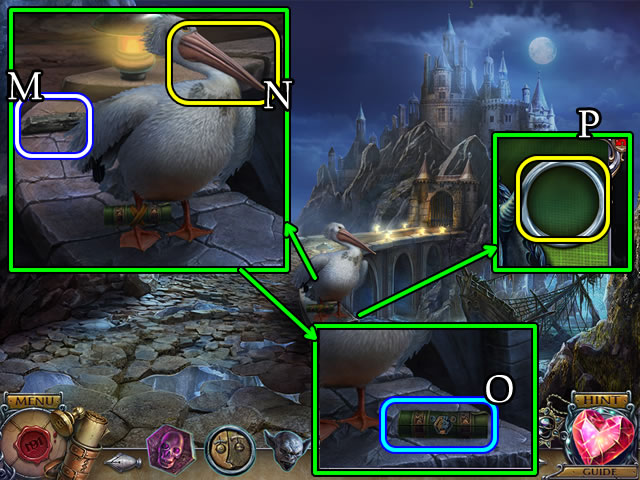
- Give the FISH (N).
- Take and select the tube (O). Place the TUBE PART (P).
- Solution (Q).
- Select (R).
- Take the DOOR FRAGMENT and PAPER (S).
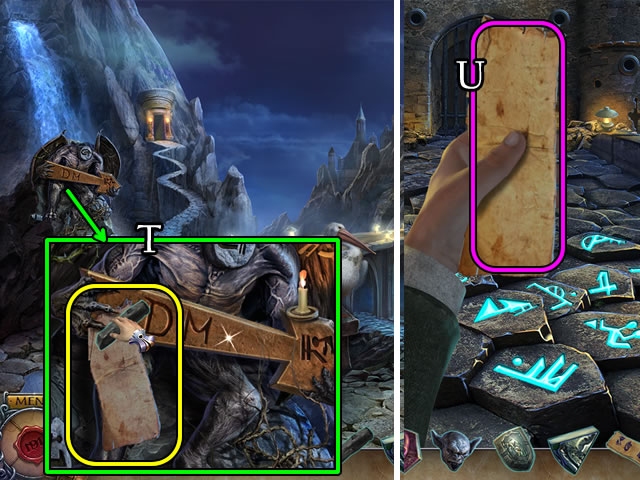
- Place the PAPER and CHARCOAL (T). Receive SYMBOLS.
- Walk forward 2x.
- Place the SYMBOLS (U).
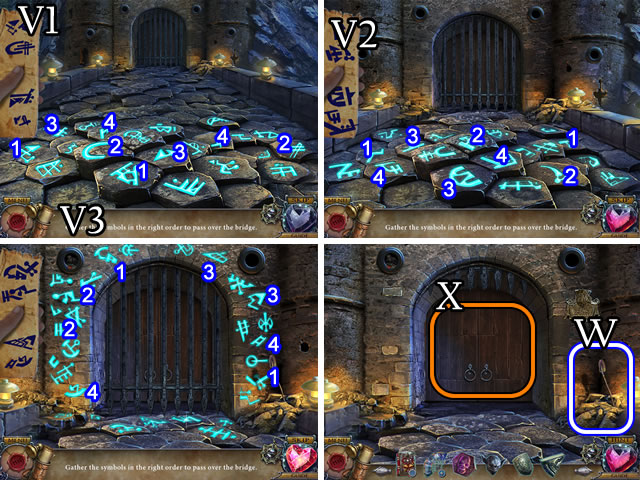
- Solution (V1-V3).
- Take the SHOVEL (W).
- Select the doors (X).
- Walk forward.
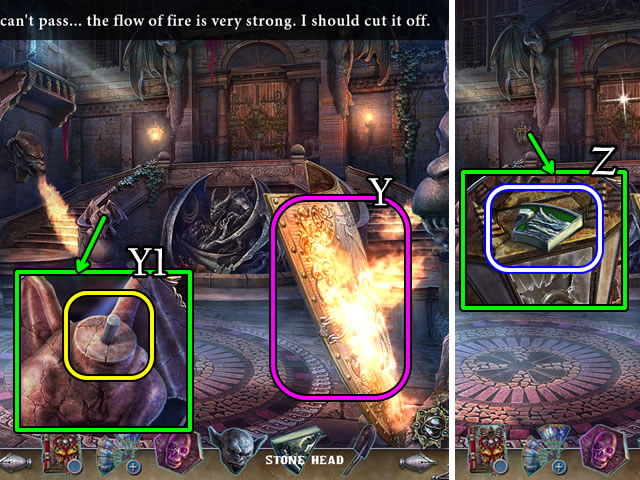
- Place the SHIELD (Y) and GARGOYLE HEAD (Y1).
- Take the DOOR FRAGMENT (Z).
- Walk down.
- Select 1-2-3.
- Take the RUBY RING and FAN PART (A).
- Select the BROKEN FAN (Inventory). Use the MITTENS. Attach the FAN PART.
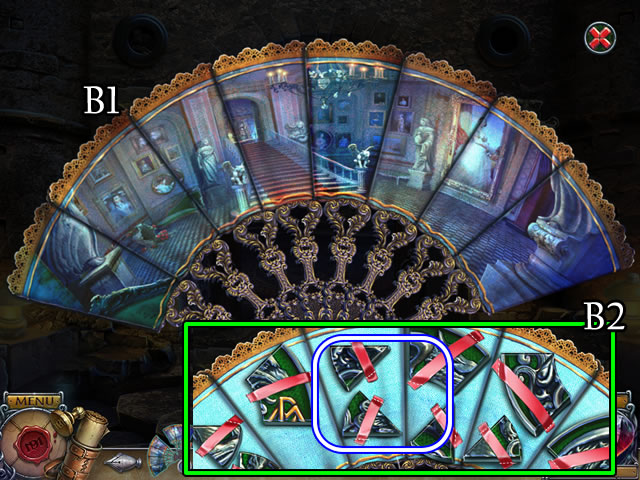
- Solution (B1).
- Take the DOOR FRAGMENTS (B2).
- Walk forward.
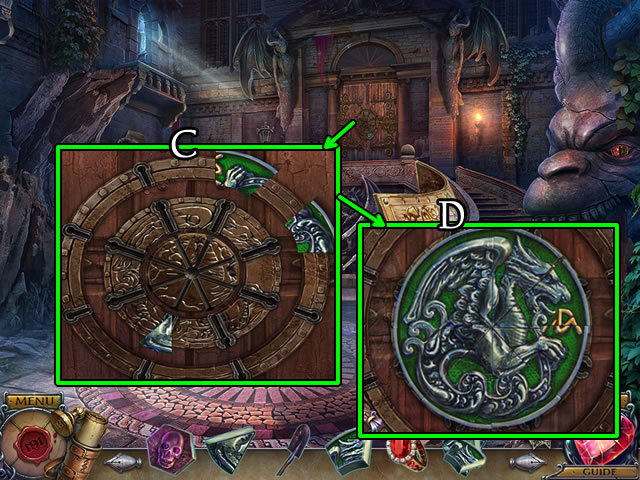
- Place the 3 DOOR FRAGMENTS (C).
- Solution (D).
- Walk forward.
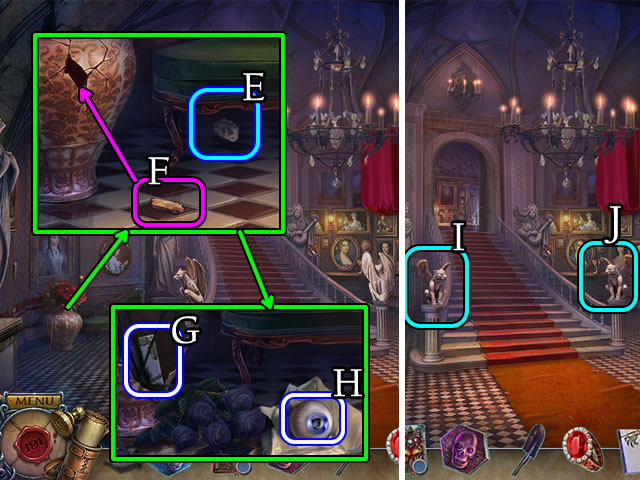
- Select (E). Place (F).
- Take the FLOOR TILE (G).
- Take the note and FAKE EYE (H).
- Position the gargoyles (I-J).
- Walk forward.
- Take the TURPENTINE (K). Move (L).
- Take the DROPPER (M). Select the book (N); turn the page, select the amulet diagram. Turn the page; take the RUBY SAND (O).
- Walk down.
- Play the HOP (P). Receive STORY PIECES.
- Combine the BOOK OF TRUTH and STORY PIECES (Inventory).
- Solution (Q). Take the SOLUTION.
- Walk down.
- Open. Use the DROPPER; receive DROPPER WITH OIL (R).
- Walk forward 2x.
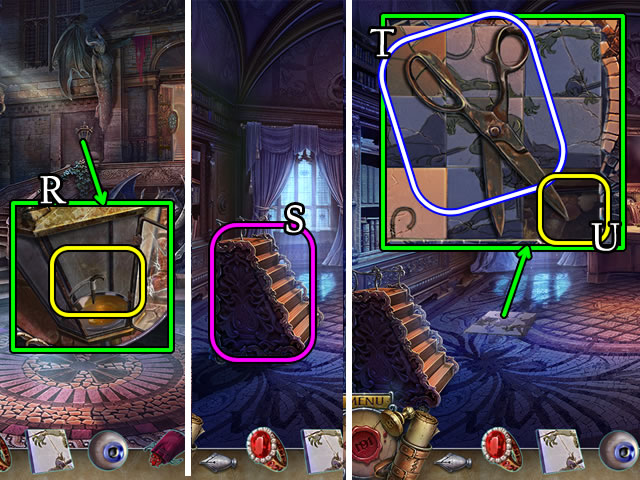
- Touch (S).
- Use the DROPPER WITH OIL; take the SCISSORS (T).
- Place the FLOOR TILE (U).
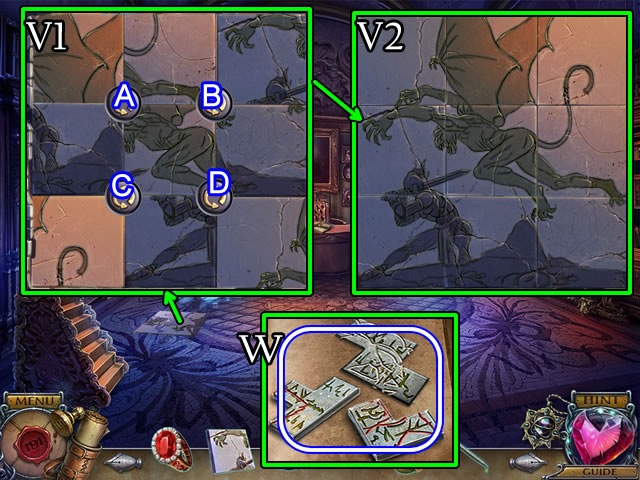
- Solution (V1-V2). D-Cx2-Bx2-A.
- Select the book. Turn the page. Take the SPELL FRAGMENT (W).
- Place the SOLUTION (X).
- Select (X1).
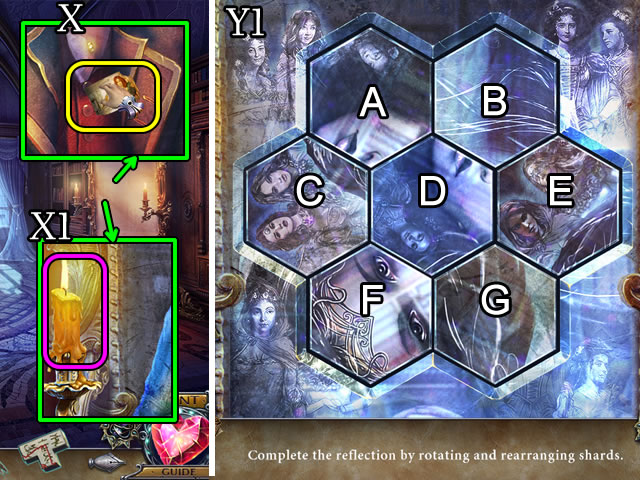
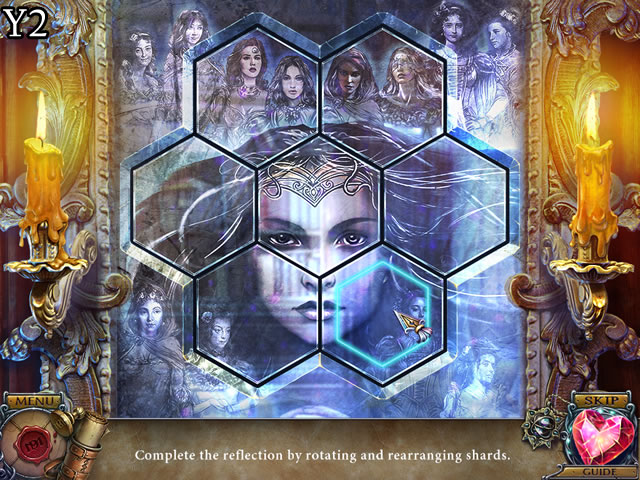
- Solution (Y1-Y2). Swap (A-C)-(C-F)-(B-E)-(D-G)-(C-D). Rotate Ax2-B-Cx4-Dx2-Ex3-Fx4-Gx4.
- Walk left.
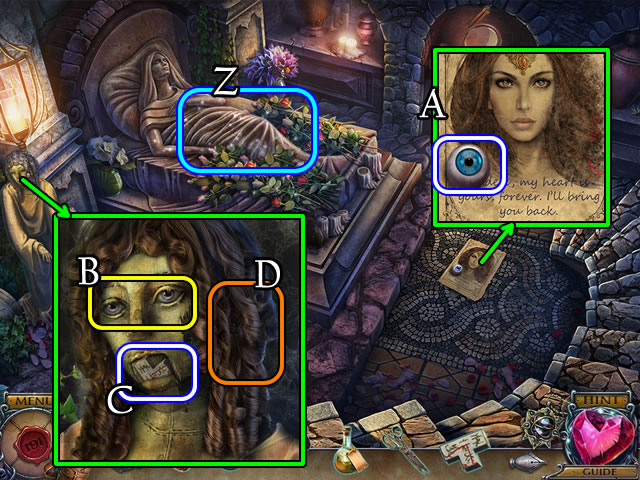
- Play the HOP (Z); receive a BROKEN AMULET.
- Take the FAKE EYE and note (A).
- Place 2 FAKE EYES (B). Take the SPELL FRAGMENT (C).
- Use the SCISSORS; receive a LOCK OF HAIR (D).
- Walk down 2x.

- Play the HOP (E). Receive a BROKEN HEART.
- Walk forward and right.
- Place the BROKEN HEART (1) and RUBY RING (2). Select (3) the lens 2x. Place (1), (2) under (3). Light the candle with the lit candle (4). Put then place the RUBY SAND (5) under (3). Take the STAR (6).
- Walk down 2x.
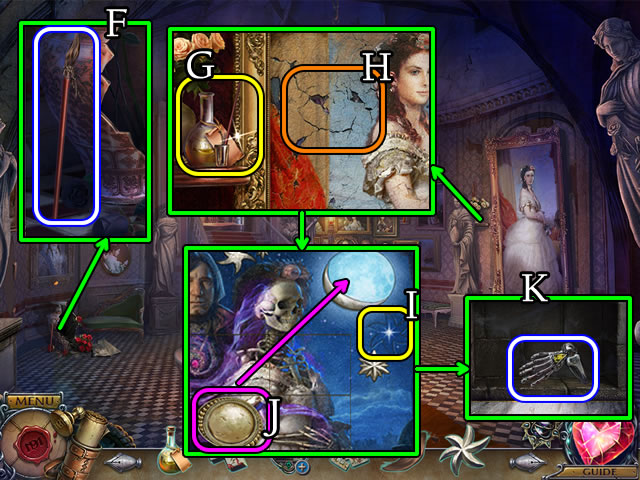
- Place the LOCK OF HAIR. Take the IMPROVISED BRUSH (F).
- Place the TURPENTINE and IMPROVISED BRUSH (G). Dip the brush in the turpentine and place on the canvas (H).
- Place the STAR (I). Move the moon part (J).
- Take the STONE DECORATION (K).
- Walk forward and right.
- Place the STONE DECORATION (L).
- Play the HOP (M). Receive a SKULL EMBLEM.
- Walk down 5x.
- Place the 3 SKULL EMBLEMS (N).
- Walk forward.
Chapter 6: Finding Angelica
- Select (O). Take the RIBBON WITH HOOK (P).
- Use the RIBBON WITH HOOK to get a CHEST KEY (Q).
- Walk down.
- Use the SHOVEL 3x (R).
- Use the CHEST KEY (S). Take the MYSTIC SCROLL (T).
- Walk left.
- Place the MYSTIC SCROLL (U). Take the scroll.
- Walk right.
- Grab the arrowhead (V).
- Select and touch the Amulet.
- Place (W) on (X). Take the ARROWHEAD (V).
- Take the SPELL FRAGMENTS; note the symbol (Y).
- Walk down.
- Touch the skull; note the symbols. Use the ARROWHEAD. Take the PINK CRYSTAL (A).
- Uncover, assemble and take a BLUE CRYSTAL (B). Touch the symbols (1-4).
- Take D'MORTEN'S STATUETTE (C).
- Walk right.
- Attempt to place the PINK CRYSTAL (D).
- Select and touch the Amulet.
- Combine the BROKEN AMULET and SPELL FRAGMENTS (Inventory).
- Solution (E).
- Take the AMULET OF TIME REVERSAL (F).
- Select the Amulet. Attach the AMULET OF TIME REVERSAL (G). Received a CHARGED AMULET OF TIME.
- Place the CHARGED AMULET OF TIME (H).
- Place the PINK and BLUE CRYSTALS and D'MORTEN'S STATUETTE (L). Touch both crystals.
- Remove the pins (M).
- Take D'MORTEN'S AMULET (N).
- Walk down.
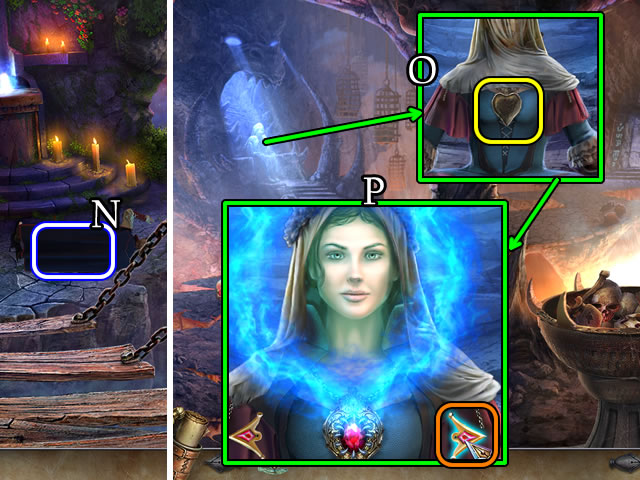
- Place D'MORTEN'S AMULET (O). Select the woman.
- Scroll right 3x (P).
- Congratulations. You have completed playing Immortal Love: Letter from the Past.
Created at: 2016-01-08