

Walkthrough Menu
- General Tips
- Chapter 1: Reunion
- Chapter 2: Siege
- Chapter 3: Prison Train
- Chapter 4: Lair
- Chapter 5: Mines
- Chapter 6: The Ancient
General Tips
- This is the official guide for Immortal Love: The Price of a Miracle.
- This guide will not mention when you have to zoom into a location; screenshots will show each zoom scene.
- The screenshots will show where to play Hidden-Object Puzzles (HOP).
- This guide will give step-by-step solutions for all puzzles that are not random. Read the instructions in the game for each puzzle.
- Inventory items marked with a blue + sign need to be combined with other items.
Chapter 1: Reunion
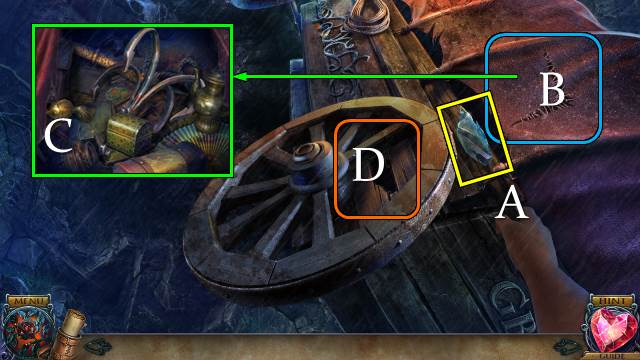
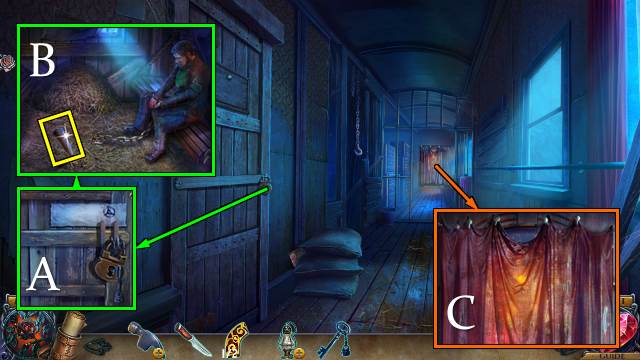
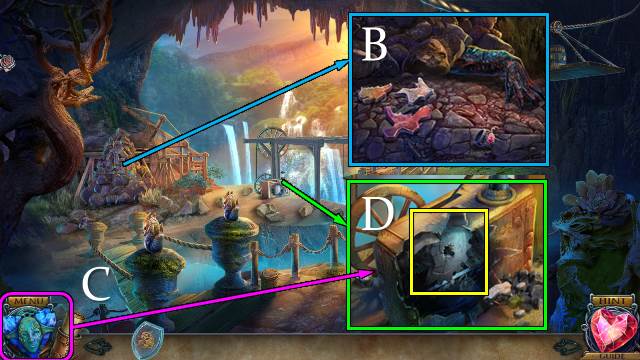
- Grab the wheel.
- Take the GLASS SHARD (A); use it on the canvas (B).
- Move the items; take the HOOK and STICK (C).
- Place the STICK (D).
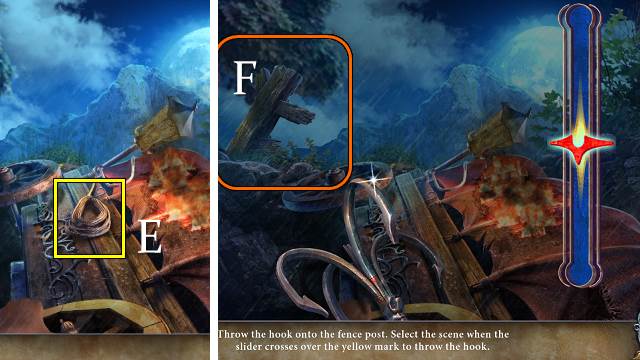
- Take the ROPE (E).
- Attach the ROPE to the HOOK; take the HOOK WITH ROPE.
- Throw the HOOK WITH ROPE (F); throw when the bar is in the light area.

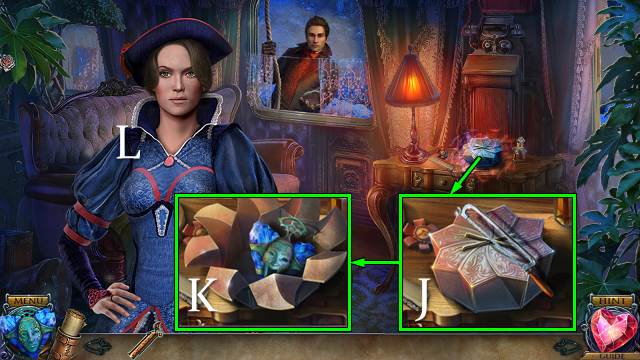
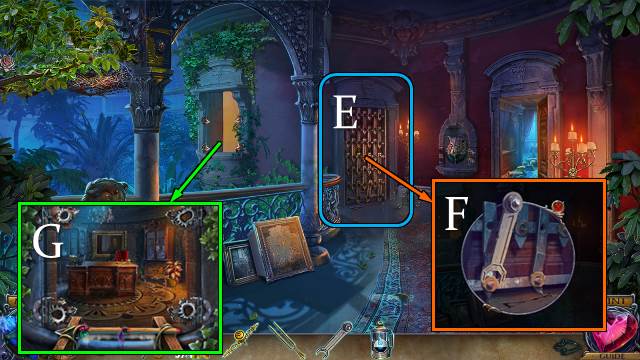
- Talk to Conrad (G).
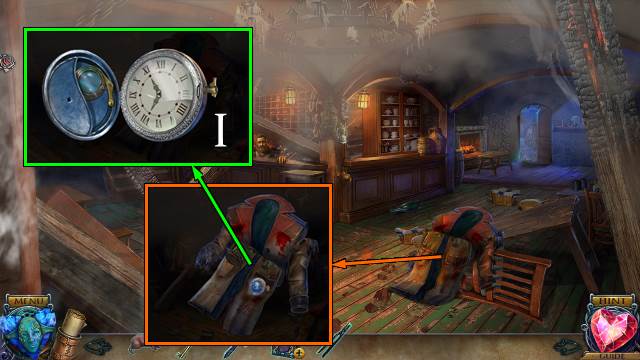
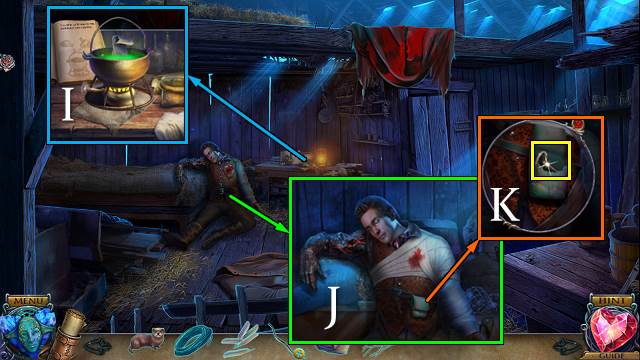
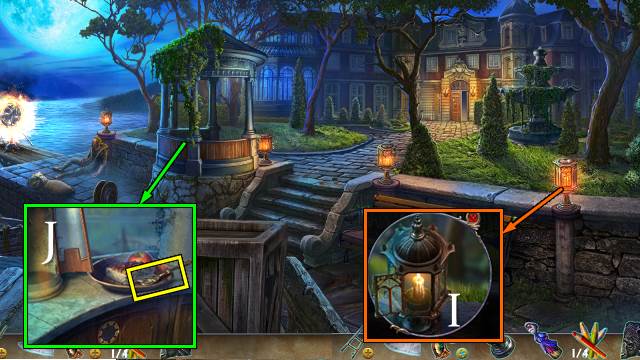
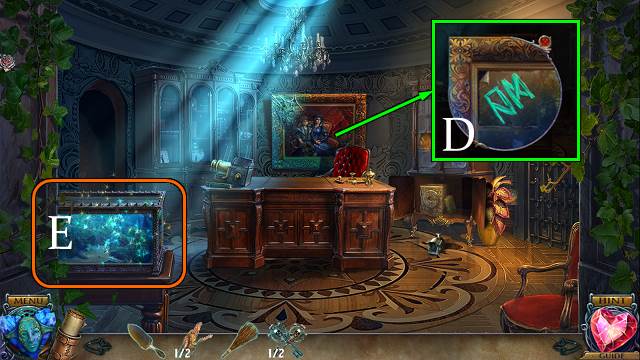
- Interact with Father; take the four tokens (H).
- Take and open the pouch and take the two tokens (I).
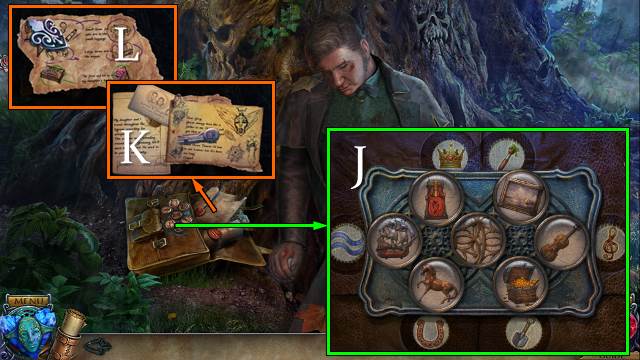
- Move the tokens to match the symbols (J).
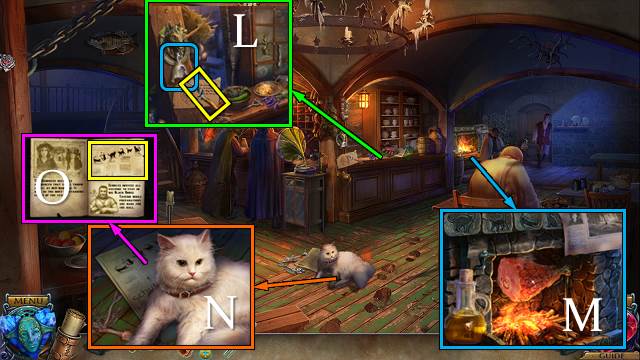
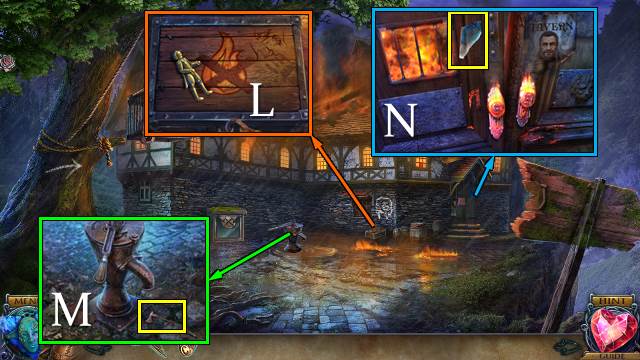
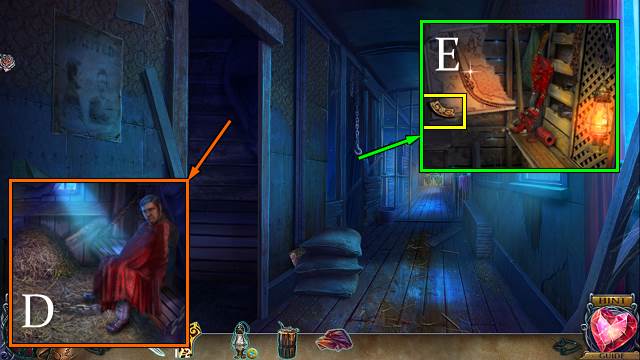
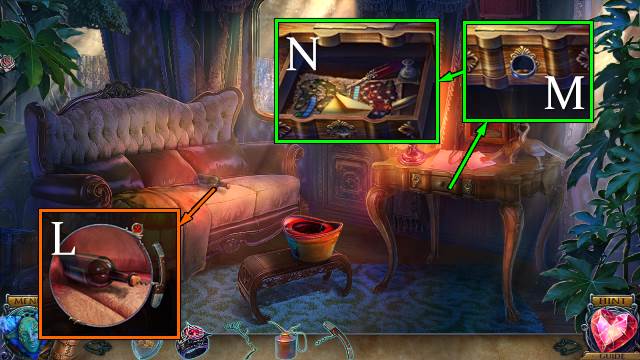
- Read the notes and take BAG KEY 1/2 (K) and AID KIT DECORATION 1/3 (L).
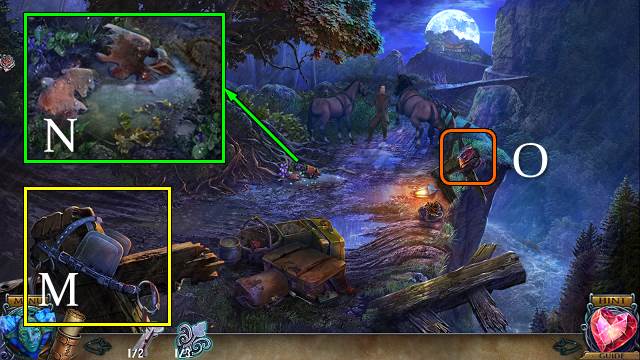
- Take the BLINDERS (M).
- Select the two mask pieces and combine them; take AID KIT DECORATION 2/3 underneath them (N).
- Try to take the bag (O).
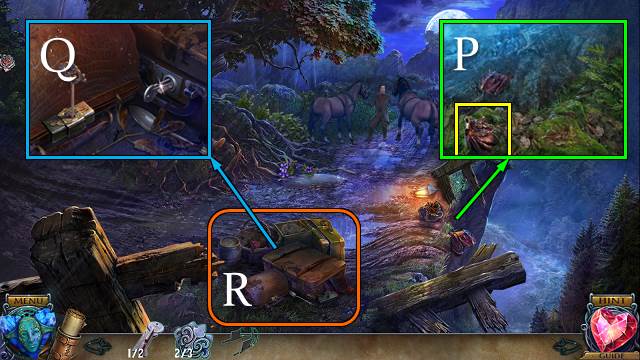
- Take the POUCH (P).
- Open the POUCH, move the items and take BAG KEY 2/2.
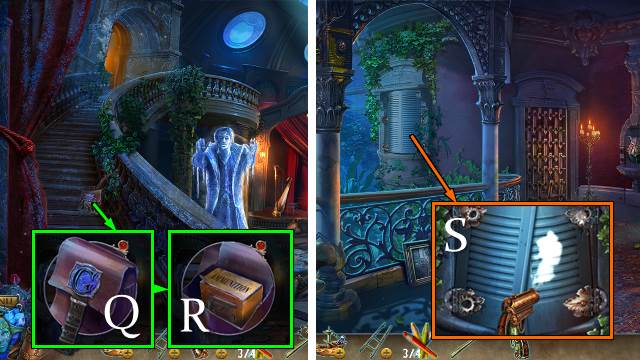
- Place and turn the BAG KEYS (Q).
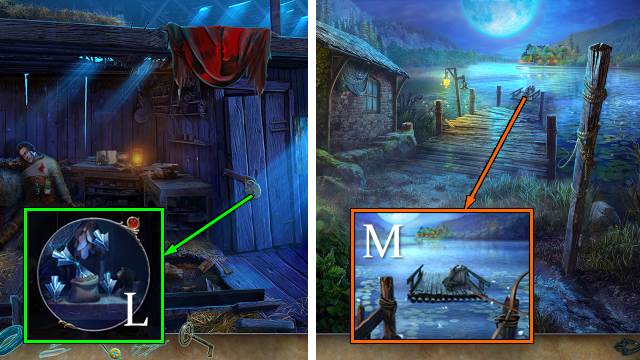
- Play the HOP. Receive a WALKING STICK (R).
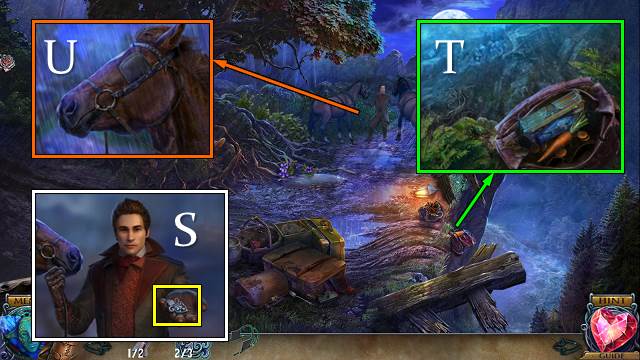
- Talk to Conrad (S).
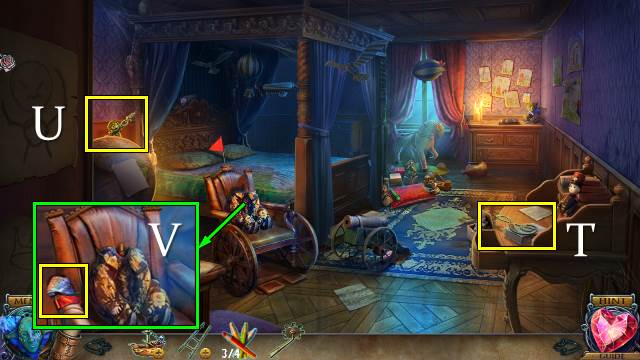
- Take the bag with the WALKING STICK; take the CARROT, MONEY and FIRST AID KIT (T).
- Offer the CARROT. Place the BLINDERS (U).
- Take AID KIT DECORATION 3/3 (S).
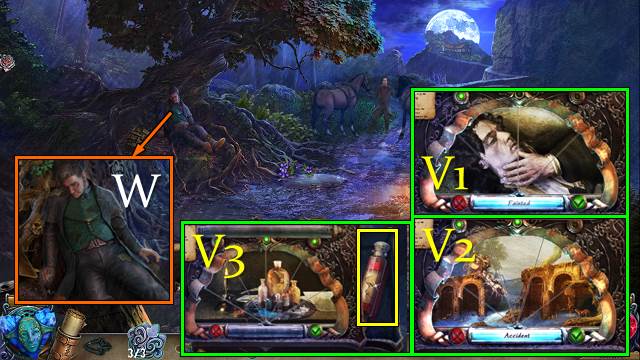
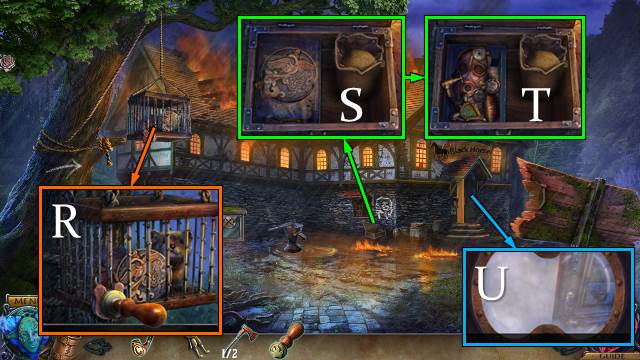
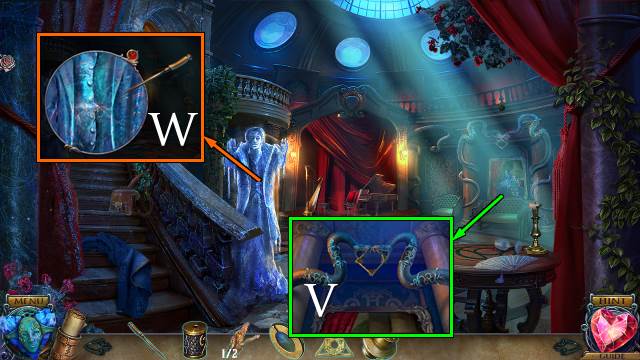
- Place the AID KIT DECORATION on the FIRST AID KIT for a mini-game (V1-3).
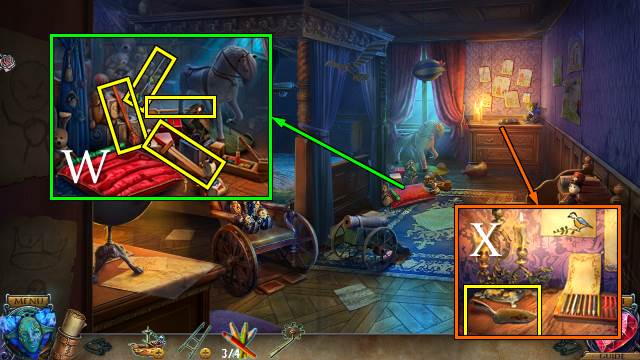
- Take the AMMONIA (V3).
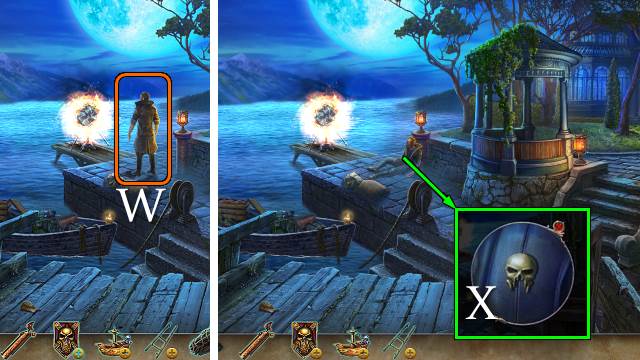
- Use the AMMONIA (W).
- Receive CONRAD'S LETTER.
- Go forward.
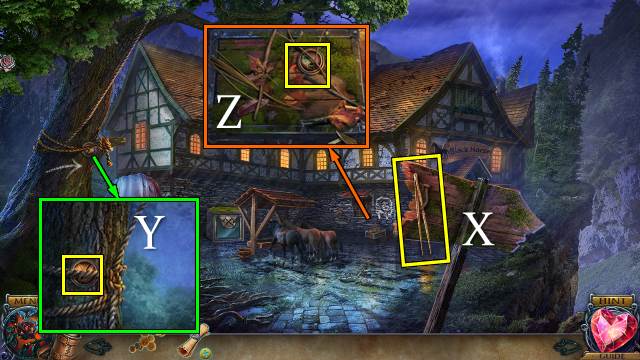
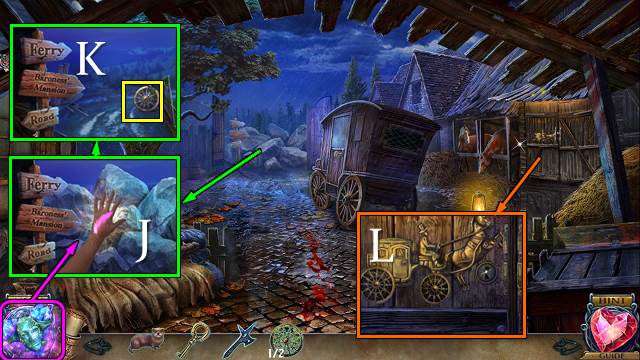
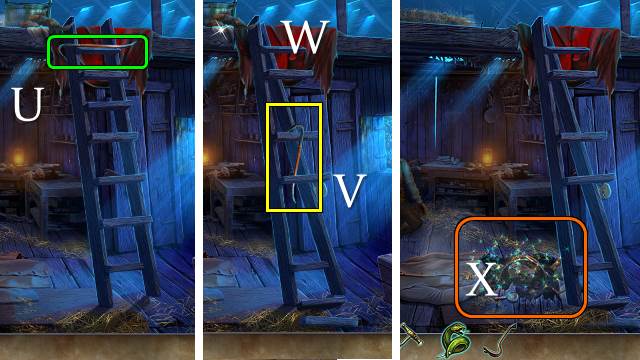
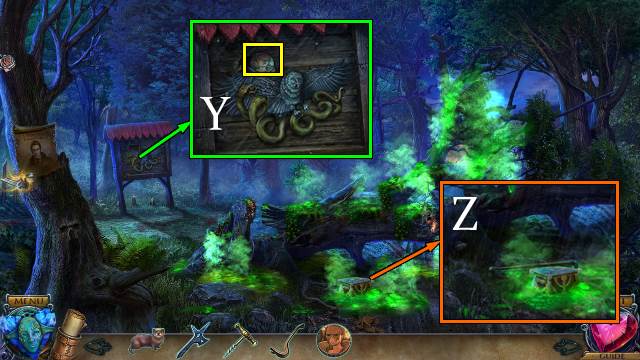
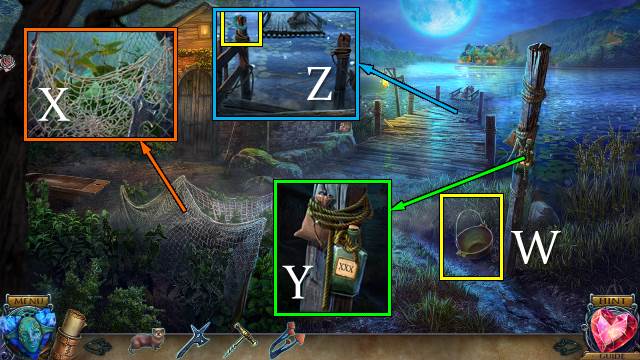
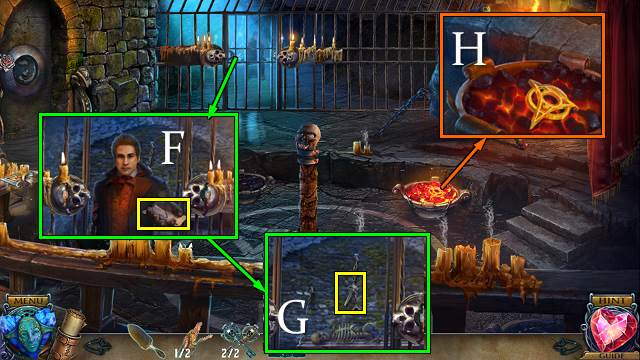
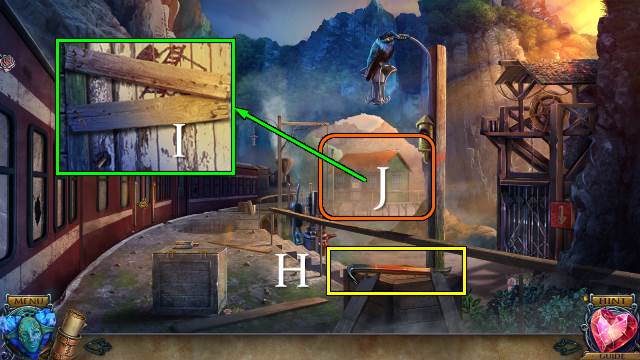
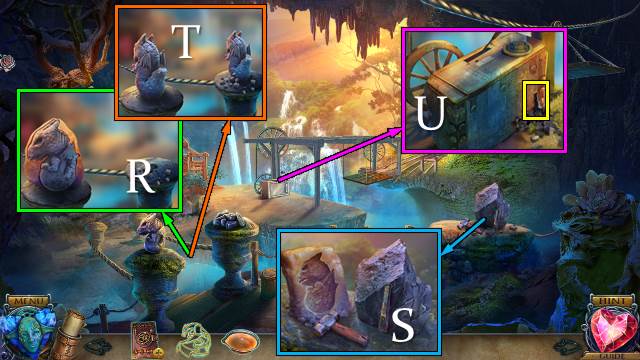
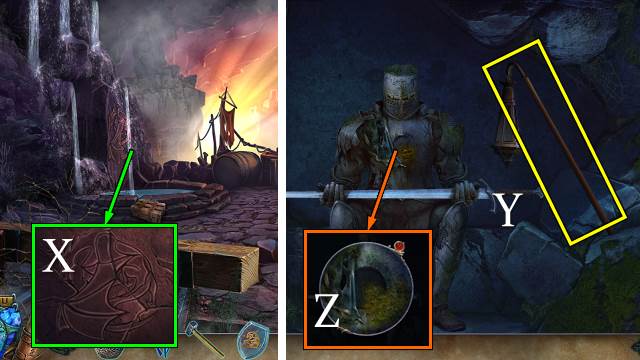
- Turn the sign; take the TWEEZERS (X).
- Take TOKEN 1/2. Release the rope (Y).
- Take TOKEN 2/2 (Z).
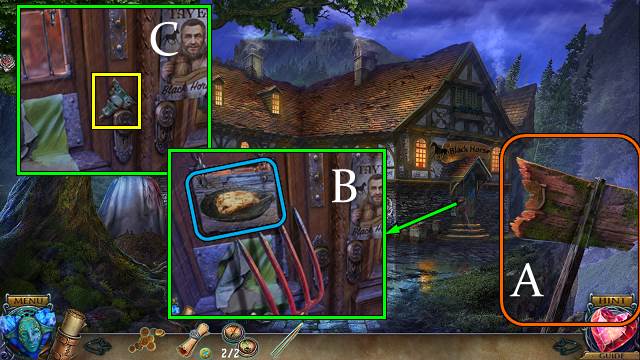
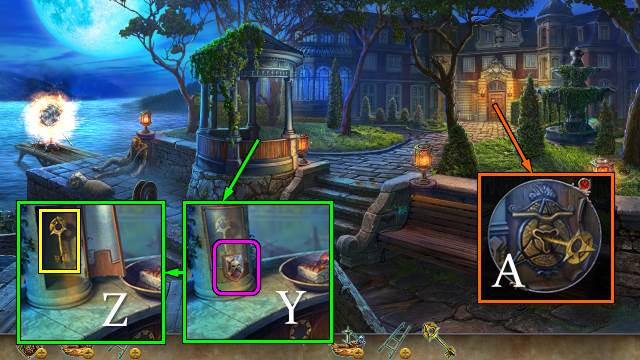
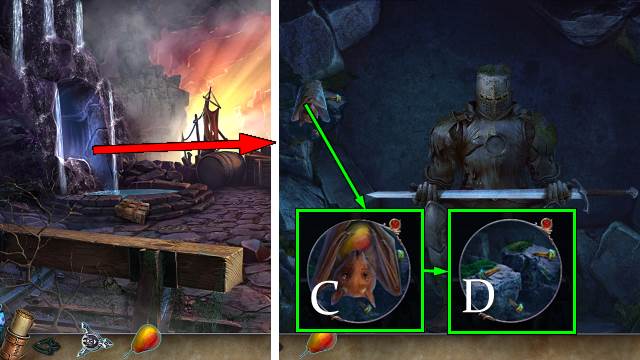
- Move the sign (A).
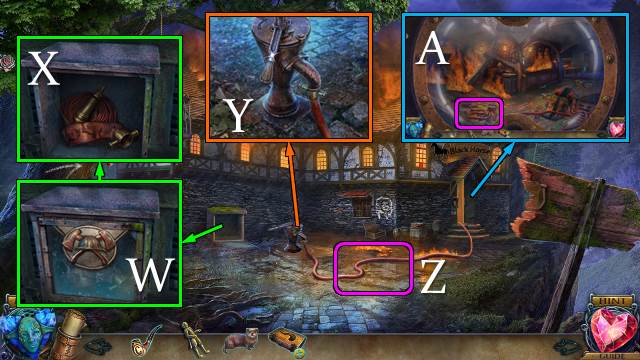
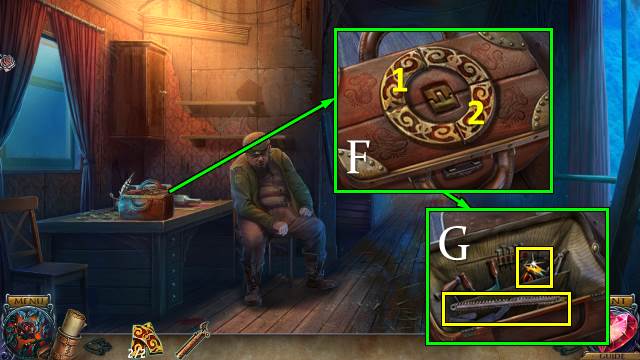
- Take the PITCHFORK (B). Move the board. Take the CRYPTEX PART (C).
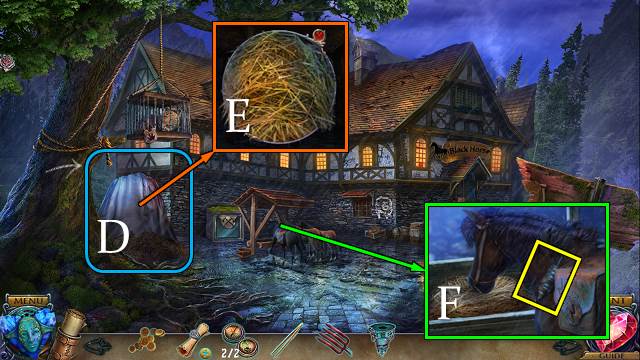
- Remove the tarp (D).
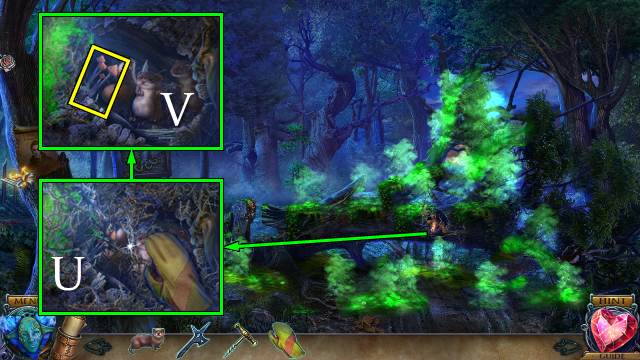
- Take some HAY with the PITCHFORK (E).
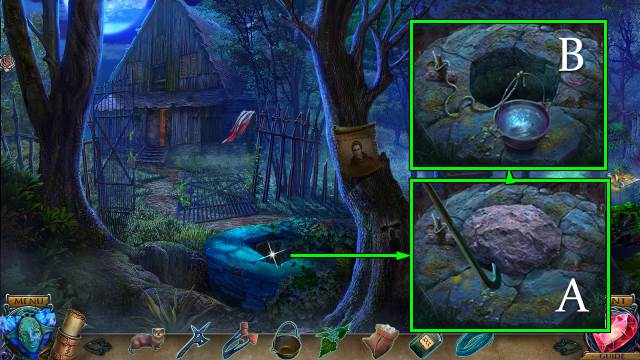
- Touch the horse; offer the HAY. Take the CRYPTEX (F).
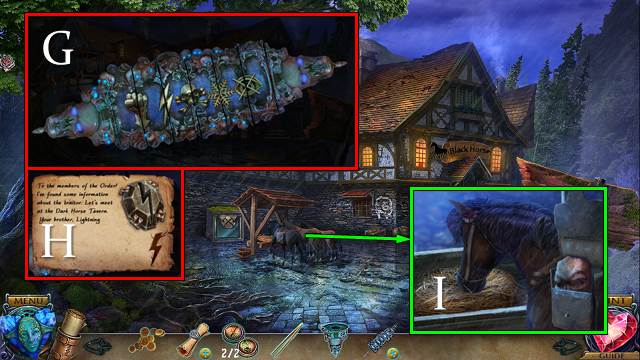
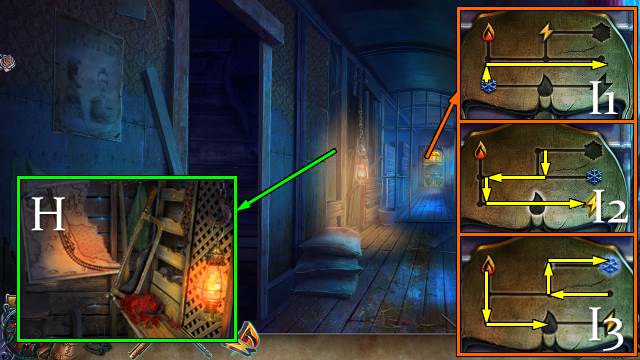
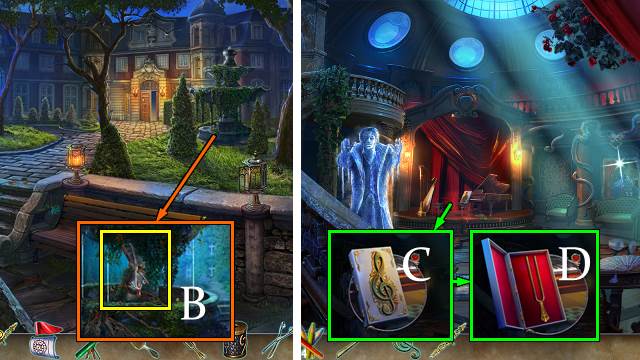
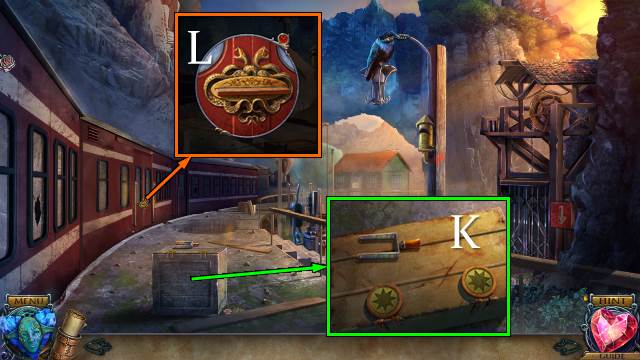
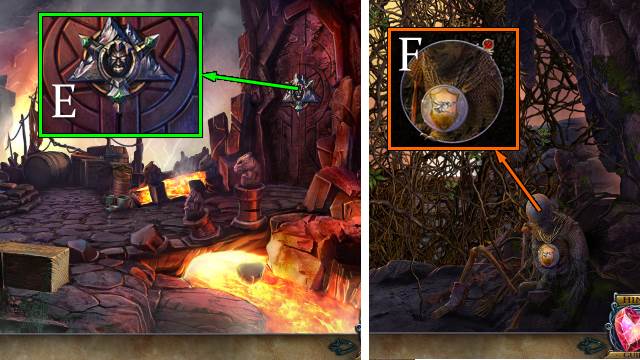
- Combine the CRYPTEX PART with the CRYPTEX and play the mini-game (G). Read the notes and take the LIGHTNING SYMBOL (H).
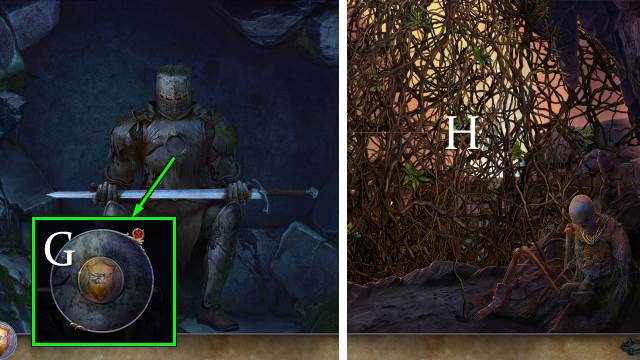
- Place the LIGHTNING SYMBOL; remove the mask and take the KNOCKING CODE (I).
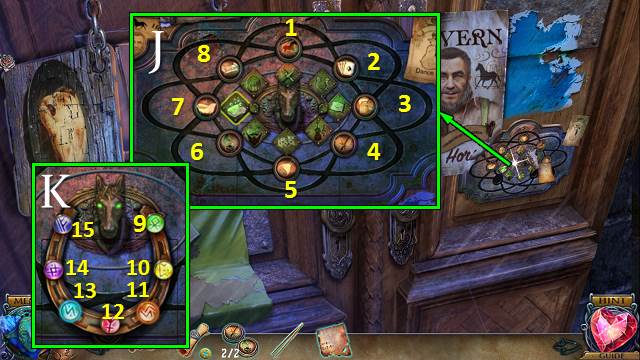
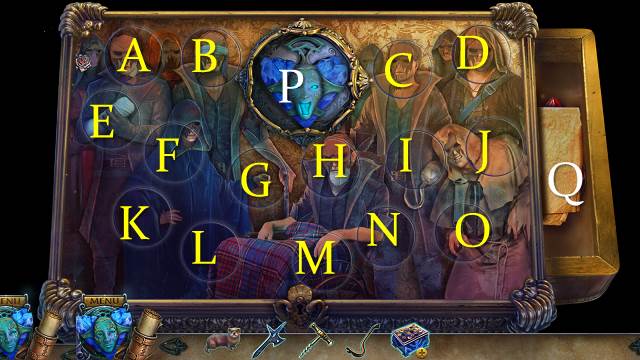
- Go to the door, read the note and place the TOKENS for a mini-game (J).
- Solution: 4-2-3-3-8-2-2-8.
- Take the knocker and place the KNOCKING CODE. Select 9-14-10-12-15-13-11 (K).
- Go forward.
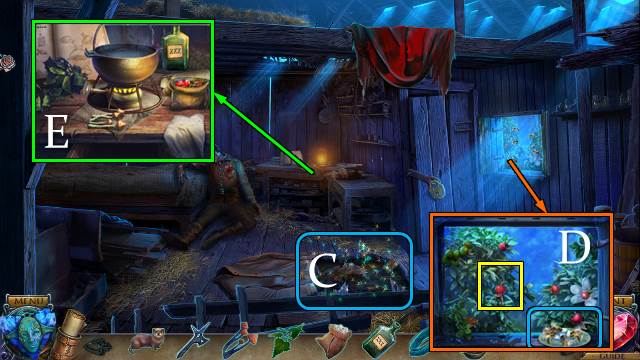
- Take the FORK (L). Remove the broken bell.
- Take the OIL. Read the paper. Take some MEAT with the FORK (M).
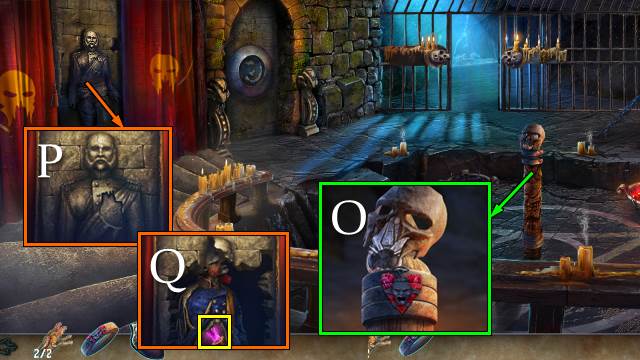
- Touch the cat and give her the MEAT (N). Pick up the paper and take the CAT CODE (O).
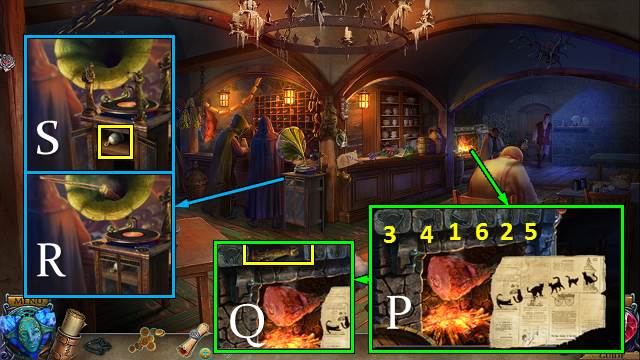
- Place the CAT CODE and push the tiles in the indicated order (P). Take the MUSICIAN FIGURINE (Q).
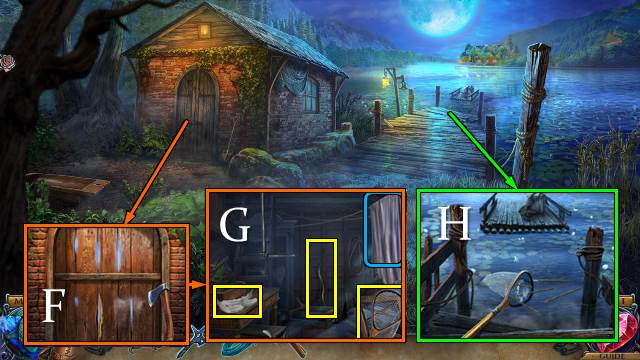
- Listen to the conversation. Turn the horn and take the figurine with the TWEEZERS (R). Place the MUSICIAN FIGURINE. Take the BELL (S).

- Remove the ring from CONRAD'S LETTER; take CONRAD'S RING and CONRAD'S LETTER.
- Go to the bar and place and ring the BELL (T).
- Talk to the barman.
- Show CONRAD'S LETTER.
- Play the HOP.
- Take the ROOM KEY (U).
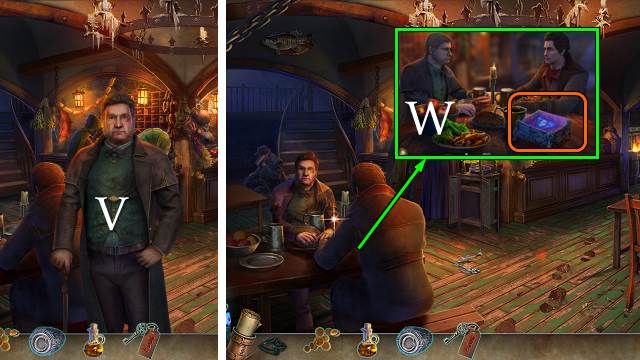
- Talk to Father (V).
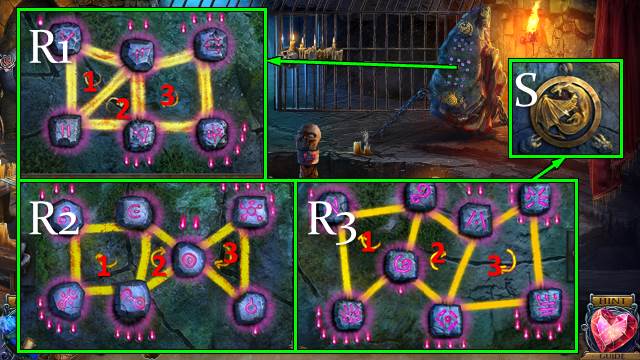
- Talk to Father and Conrad. Give Conrad the MONEY. Play the mini-game (W).
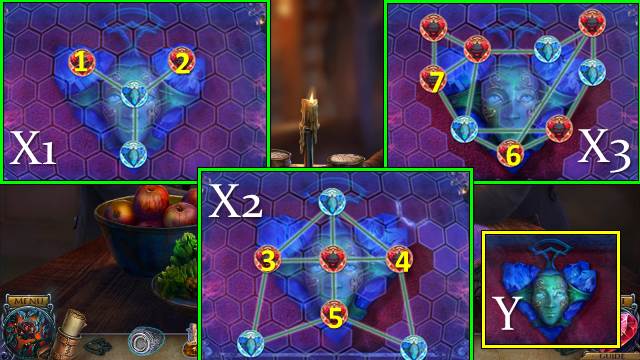
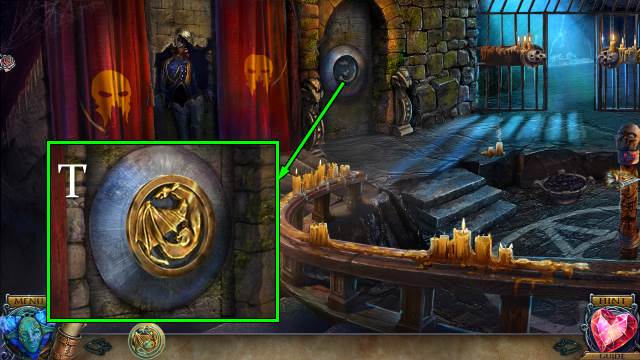
- Solution (X1-3).
- Take the ARTIFACT (Y).
Chapter 2: Siege
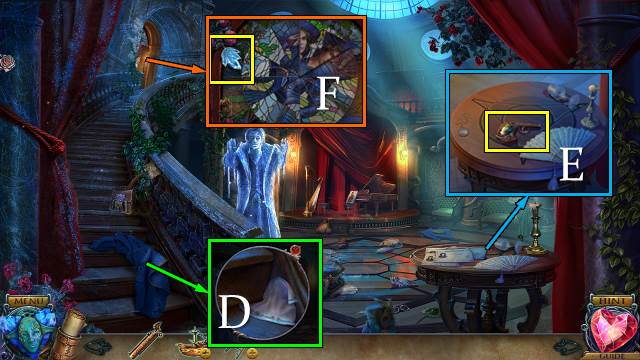
- Open the curtains.
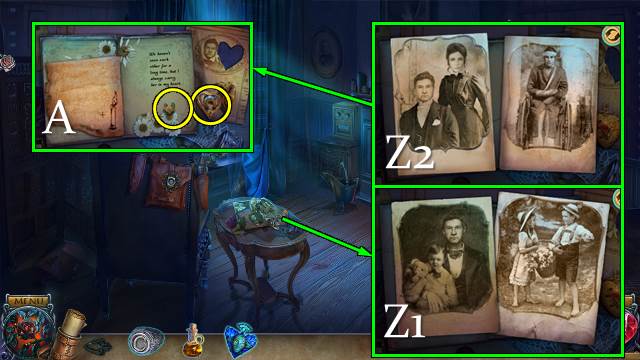
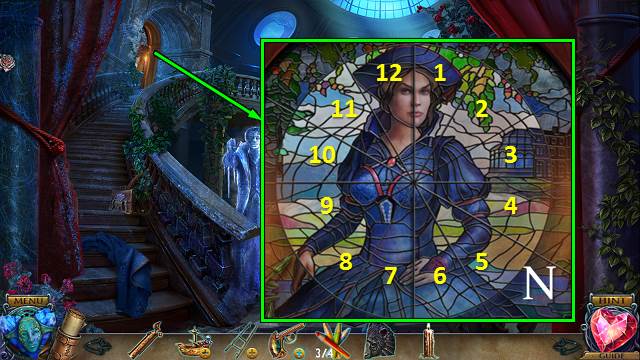
- Complete the jigsaws (Z1-2).
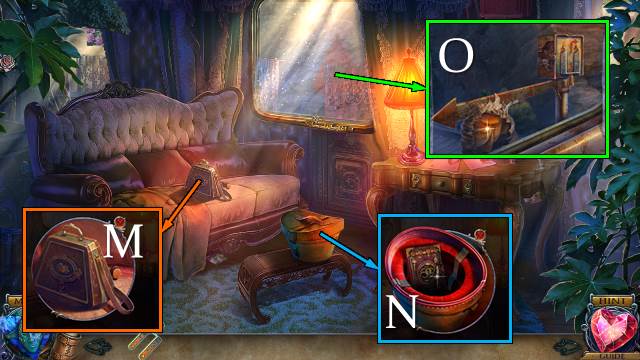
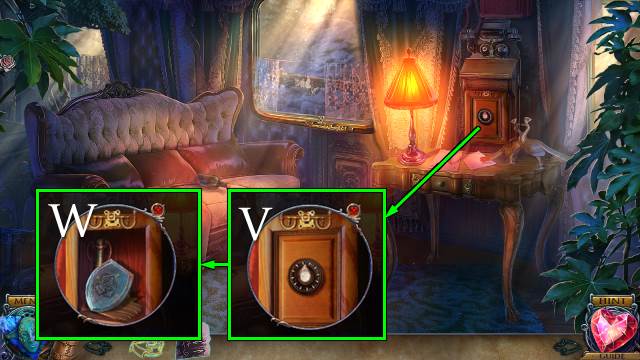
- Turn the page and open the locket; take METAL BUTTONS 1-2/7 (A).

- Take the SMOKING PIPE and CANDLE. Move the flowers and boot and take METAL BUTTONS 3-5/7 (B).
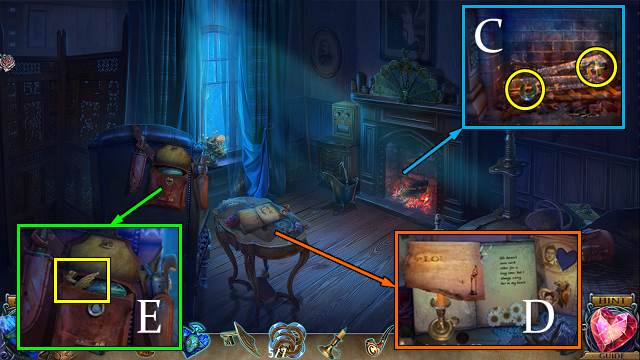
- Take the poster and light the CANDLE; receive a LIT CANDLE. Take METAL BUTTONS 6-7/7 (C).
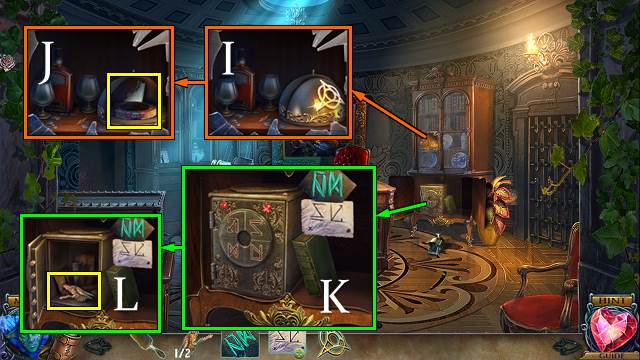
- Use the LIT CANDLE; take the CASKET CODE (D).
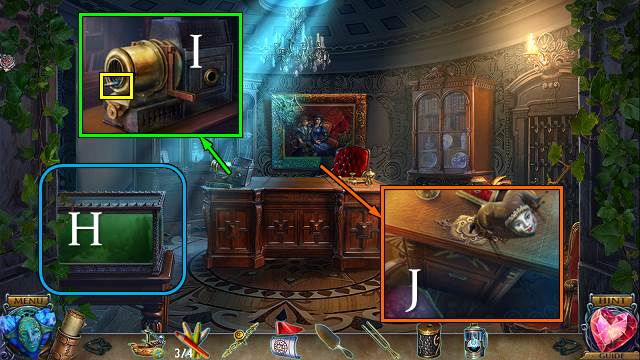
- Use CONRAD'S RING. Take the FIN-SHAPED BUTTON (E).
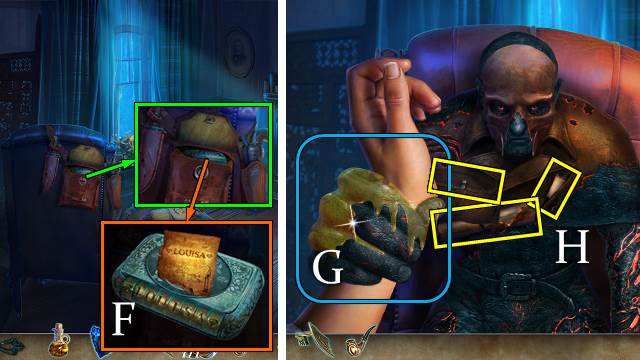
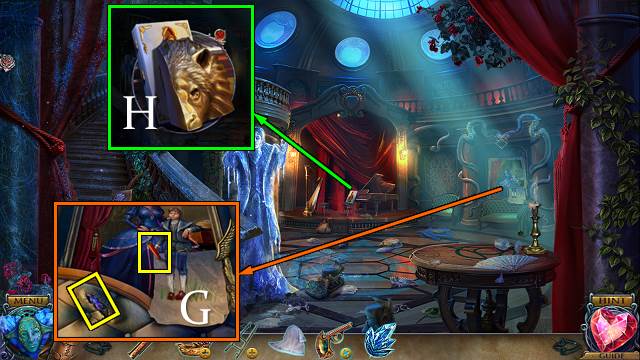
- Place the METAL BUTTONS and CASKET CODE; enter the code and take the ARTIFACT (F).
- Use the OIL (G).
- Open the pocket, read the notes and take the BRASS KNUCKLES and ARTIFACT PIECE (H).
- Combine the ARTIFACT and ARTIFACT PIECE.
- Use the BRASS KNUCKLES (I).
- Use the Lightning (J).
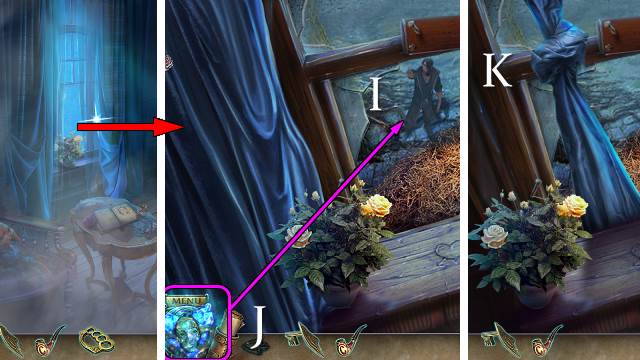
- Tie up the curtains (K).
- Go forward.
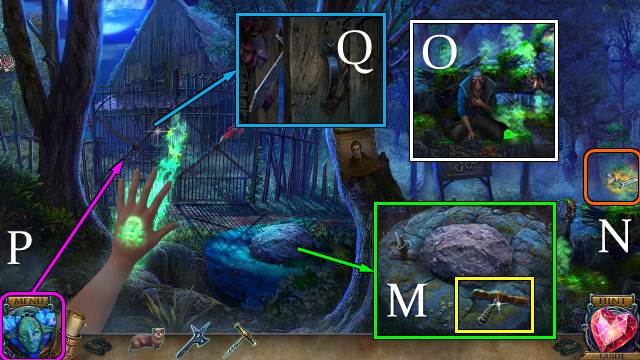
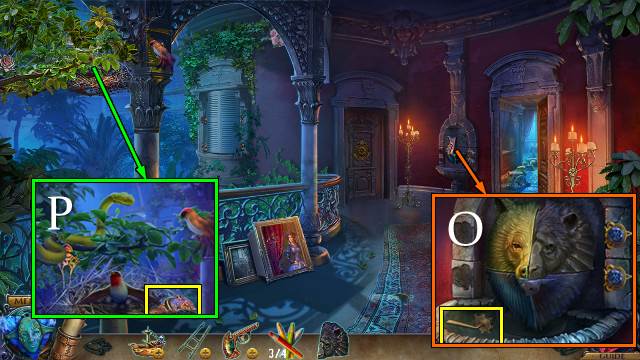
- Move the branches.
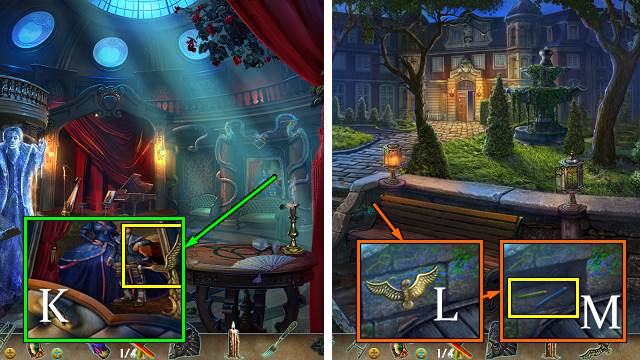
- Move the twigs and take the MUSICIAN FIGURINE (L).
- Pull the lever; take AXE FIGURINE 1/2 (M).
- Touch the door. Take the SHARD (N).

- Use the FIN-SHAPED KEY and open the chest. Use the SHARD on the bag and take some SAND with the spade (O).
- Use the SAND and open the door (P).
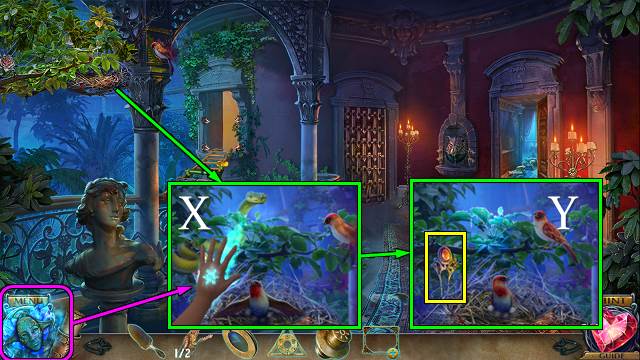
- Open your hand and take the PAW SEAL (Q).
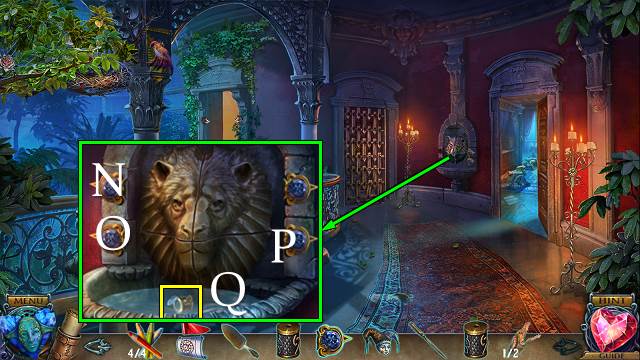
- Place the PAW SEAL; take the PHOENIX TOKEN and WEASEL (R).
- Place the PHOENIX TOKEN (S). Read the note and take the UNDONE GAS MASK (T).
- Restore the UNDONE GAS MASK and take the GAS MASK.
- Use the GAS MASK (U).

- Open the pockets; take AXE FIGURINE 2/2 and CONRAD'S BOX (V).
- Walk down.
- Place the AXE FIGURINES (W), open the box and take the HOSE (X).
- Attach the HOSE and pull the lever (Y).
- Move the hose (Z).
- Go forward.
- Use the hose (A).

- Move the beams. Take the STABLE KEY (B).
- Place the SMOKING PIPE on CONRAD'S BOX; open the box, Move the items and take the LOCKPICK.
- Place the MUSICIAN FIGURINE. Use the LOCKPICK (C).
- Go right.

- Take the HATCHET and note (D).
- Use the WEASEL; select the crows one by one (E). Take the CARRIAGE KEY (F).
- Place and turn the CARRIAGE KEY (G).
- Play the HOP. Receive CONRAD'S DIARY.
- Turn over the sign and take the NIPPERS (H).
- Walk down.
- Break the key. Use the NIPPERS; take the DIARY LENS (I).
- Place the DIARY LENS on CONRAD'S DIARY; select the three lenses. Open the clasp and open the diary; take WHEEL FIGURINE 1/2.
- Go right.
- Use Telekinesis (J). Take WHEEL FIGURINE 2/2 (K).
- Place the WHEEL FIGURINES and STABLE KEY. Open the door (L).
- Take the CORKSCREW (M).
- Scroll right (N).
- Talk to the man (O).
- Back out and scroll left.
- Use the Acid (P).
- Use the HATCHET (Q).
- Go forward.
- Play the mini-game (R).
- Interact with Conrad (S).
- Take the METAL SNAKE (T).
- Move (U) and then take the CROWBAR (V).
- Release the WEASEL (W).
- Play the HOP. Receive the TOKEN (X).
- Walk down.
- Scroll right.
- Remove the posters. Place the METAL SNAKE and take the TOKEN (Y).
- Take the BANDIT'S BOX with the CROWBAR (Z).
- Scroll left and go forward.
- Place the two TOKENS on the BANDIT'S BOX for a mini-game.
- Solution: (L-N)-(I-J)-(G-J)-(B-E)-(C-G)-P-(B-M)-(C-O)-(F-H)
- (B-F)-(A-K)-P-(C-N)-(B-G)-P-(A-B)-(C-D)-P-(B-E)-(B-C).
- Take the note and ANTI-ACID ANTIDOTE (Q).

- Use the ANTI-ACID ANTIDOTE (R).
- Select either Save Conrad or Save Greg.
- Take the DRAWER HANDLE (S).
- Place the DRAWER HANDLE. Take the MITTEN and book (T).
- Walk down and scroll right.
- Use the MITTEN (U). Release the WEASEL; take the MUSHROOMS (V).
- Go right.
- Take the POT (W).
- Use the HATCHET; receive some MINT (X).
- Use the CORKSCREW and take the SUGAR and ALCOHOL (Y).
- Take the FISHING LINE (Z).
- Walk down and scroll left.
- Use the CROWBAR (A); use the POT and take the WATER (B).
- Go forward.
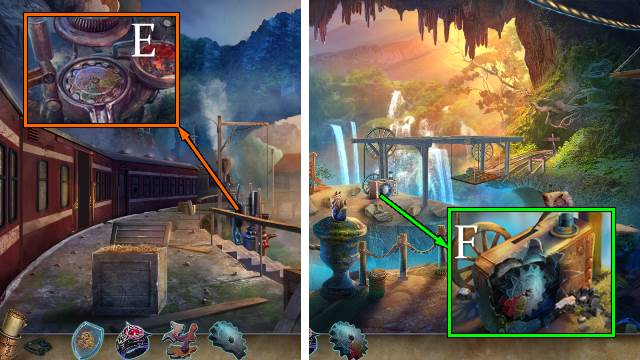
- Play the HOP. Receive an AXE (C).
- Place the SUGAR; take the WILD ROSES (D).
- Place the WATER, light the fire, and place the MINT, ALCOHOL, MUSHROOMS and WILD ROSES. Add all ingredients to the pot (E).
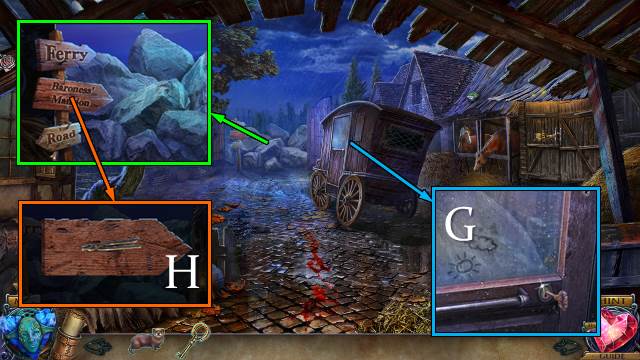
- Go to the Ferry.
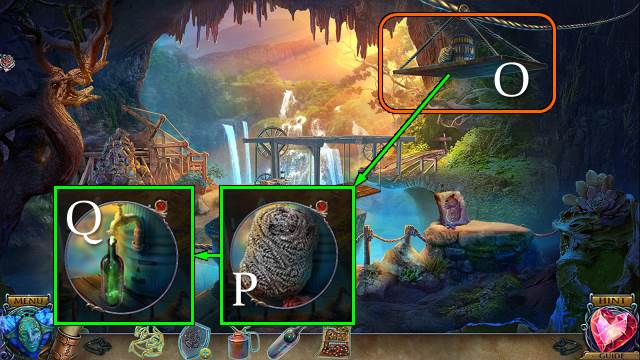
- Use the AXE (F).
- Take the SCOOP and release the WEASEL. Take the FEATHERS and OLD BOW. Move the sheet and make a BANDAGE with the HATCHET (G).
- Collect the ARROW SHAFTS with the SCOOP (H).
- Go to the Hut.
- Put the BANDAGE in the pot; receive the HEALING BANDAGES (I).
- Use the HEALING BANDAGES (J).
- Take the CLOSET KEY (K).
- Use the CLOSET KEY. Move the items and take the five ARROW HEADS (L).
- Go to the Ferry.
- Combine the FISHING LINE, FEATHERS, ARROW SHAFTS and ARROW HEADS with the OLD BOW. Put the heads and feathers on the shafts and line on the bow. Take the BOW AND ARROW.
- Use the BOW AND ARROW (M).
Chapter 3: Prison Train
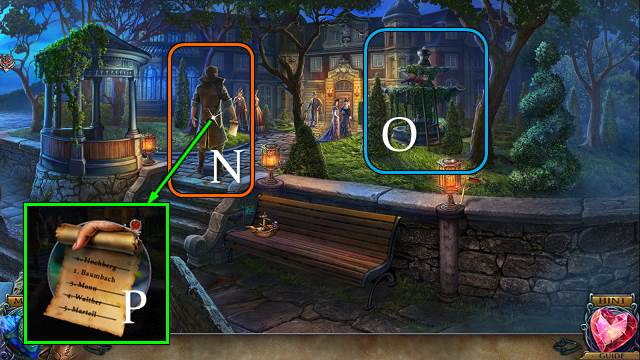
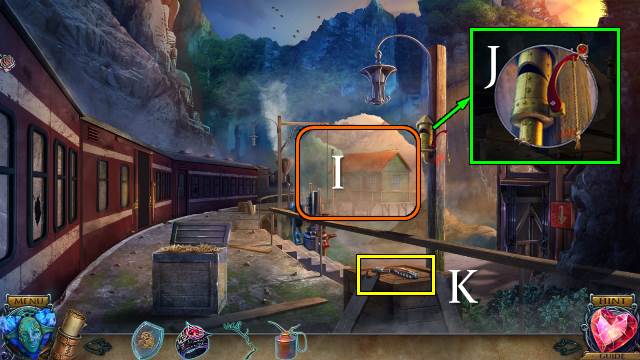
- Talk to the doorman (N).
- Release the WEASEL (O).
- Check the guest list (P).
- Play the HOP; receive a COIN (Q).
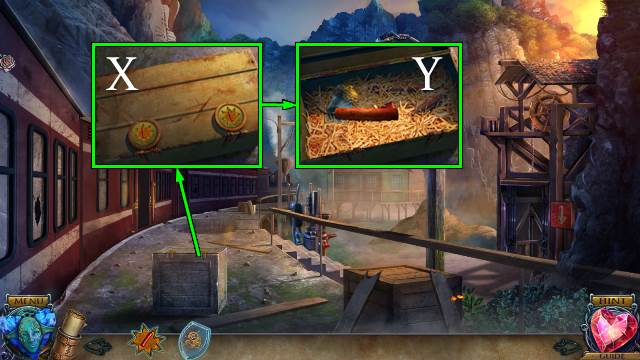
- Pull the handle (R).
- Take the note and HAMMER HEAD (S).
- Use the COIN for a mini-game (T).
- Solution 1 (U).
- Solution 2 (V).
- Go forward.
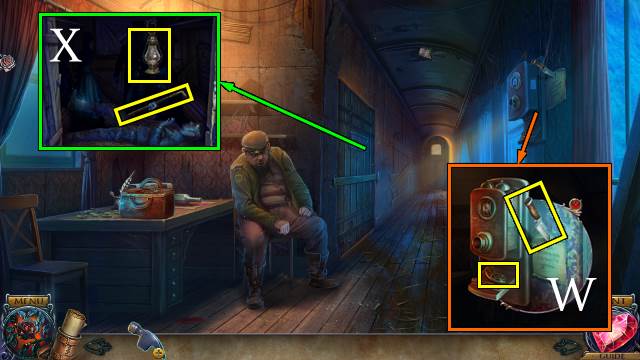
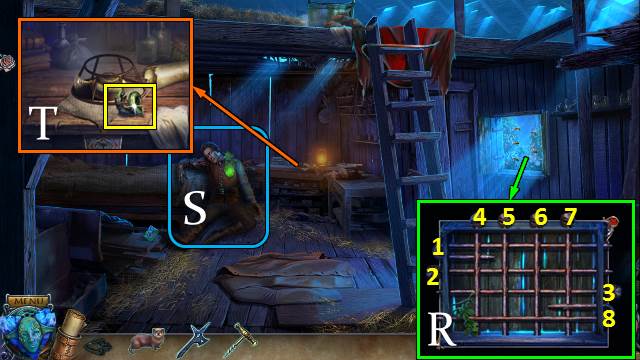
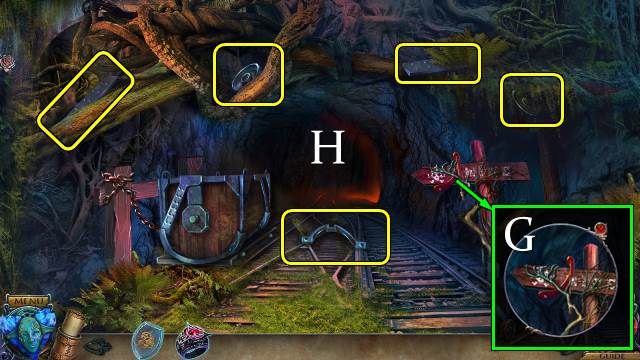
- Take the KNIFE and TOOLBOX LOCK PART 1/2 (W).
- Open the door; take the CANE and EMPTY LANTERN (X).
- Walk down.
- Use the CANE. Take the OIL and WIRE (Y).
- Walk forward.
- Untangle the WIRE into a HOOK.
- Take the CELL KEY with the HOOK (Z).
- Go forward.
- Open the door with the CELL KEY (A). Take the HAMMER HANDLE (B).
- Combine the HAMMER HEAD and HAMMER HANDLE; take the HAMMER.
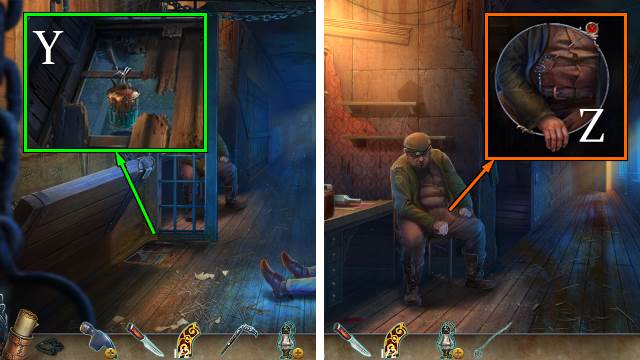
- Take the WARM BLANKET with the HAMMER (C).
- Use the WARM BLANKET. Talk to Father. Receive the LIGHTER (D).
- Put the OIL in the EMPTY LANTERN and use the LIGHTER. Take the LANTERN.
- Place the LANTERN. Take TOOLBOX LOCK PART 2/2. Use the KNIFE (E).
- Walk down.
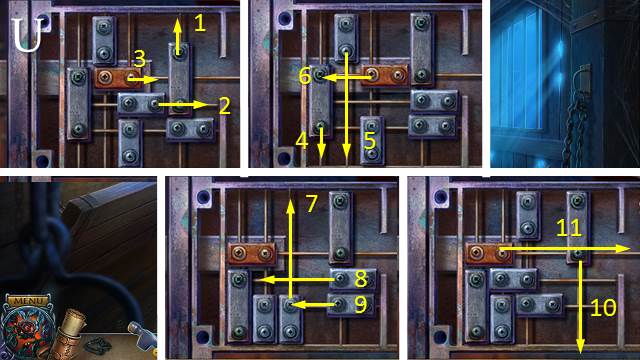
- Place the TOOLBOX LOCK PARTS for a mini-game (F).
- Open the box and take the SAW BLADE and DOOR KNOBS (G).
- Go forward.
- Place the SAW BLADE and take the SAW (H).
- Place the DOOR KNOBS for a mini-game (I1-3).
- Go forward.
- Use the SAW (J); take the ARTIFACT (K).
- Interact with the Baroness (L).
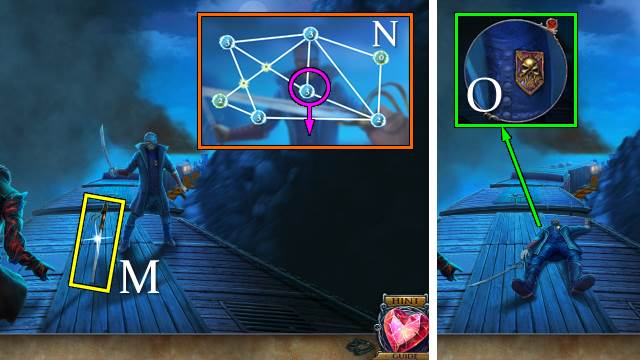
- Take the RAPIER (M).
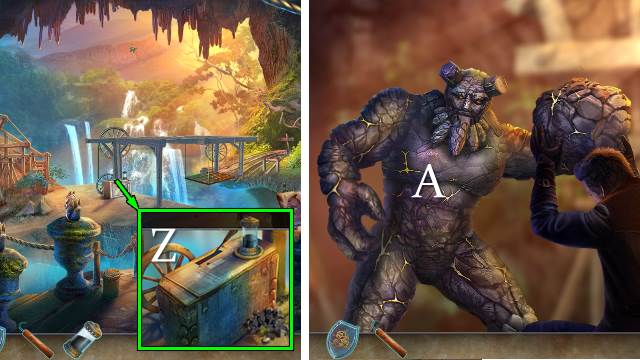
- Use the RAPIER on the masked man for a mini-game (N).
- Take the BROKEN BADGE (O).
Chapter 4: Lair
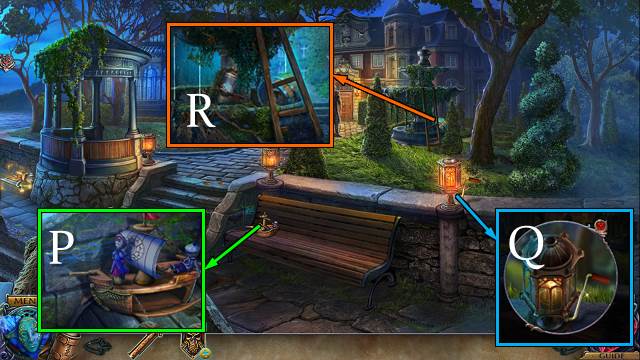
- Take the SHIP (P).
- Take the WINCH HANDLE (Q).
- Take the BROKEN LADDER (R).
- Scroll left.
- Take the BIG NET (S).
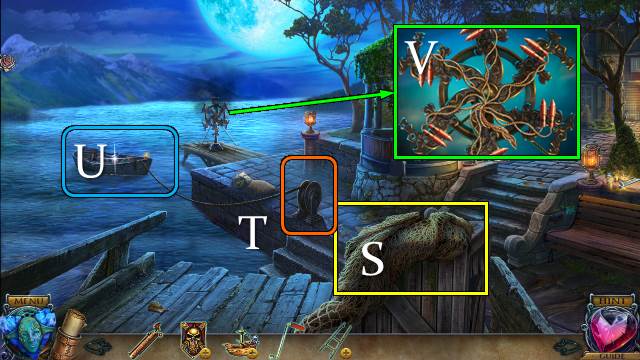
- Place the WINCH HANDLE (T).
- Play the HOP; receive the FIREWORKS (U).
- Place the FIRWORKS; use the LIGHTER (V).
- Throw the BIG NET (W).
- Take the GUARD'S BADGE PART (X).
- Turn over the BROKEN BADGE and place the GUARD'S BADGE PART. Take the GUARD'S BADGE.
- Place the GUARD'S BADGE (Y); take the CASTLE KEY (Z).
- Scroll right.
- Use the CASTLE KEY (A).
- Open the door and go forward.

- You receive a TRAY.
- Walk down.
- Place the TRAY; receive a FULL BUCKET (B).
- Go forward.
- Use the FULL BUCKET (C).
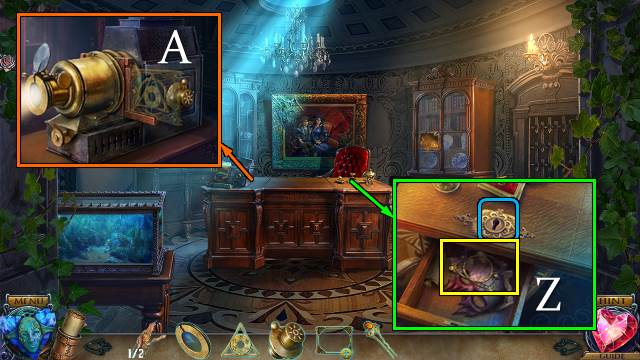
- Move the coat and take the HANDKERCHIEF (D).
- Move the papers and take the PISTOL HANDLE (E).
- Take the FROZEN LEAF (F).
- Take RED PENCIL 1/4. Use the FROZEN LEAF and take the STREET LIGHT KNOB and BARONESS DOLL (G).
- Take the STATUE PART (H).
- Walk down.
- Place the STREET LIGHT KNOB; take the CANDLE (I).
- Scroll left.
- Use the HANDKERCHIEF and take the FORK (J).
- Scroll right and go forward.
- Take the WING with the FORK (K).
- Place the WING and BARONESS DOLL on the SHIP; receive the HAWK LOCK.
- Walk down.
- Place the HAWK LOCK (L); take PENCILS 2-3/4 (M).
- Go forward.
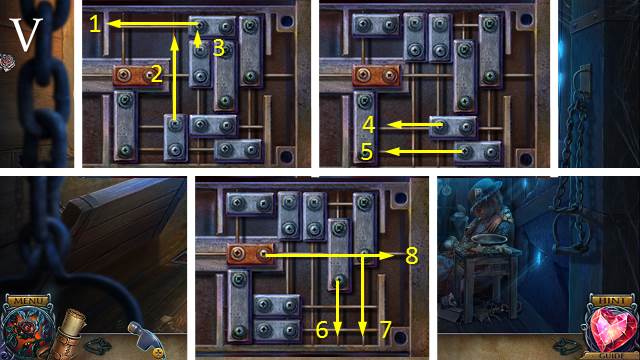
- Place the CANDLE for a mini-game (N).
- Solution: (5-10)-(3-7)-(5-11).
- Go left.
- Place the STATUE PART; take the HANDLE (O).
- Take the BAG BADGE (P).
- Walk down.
- Place the BAG BADGE (Q); take the BULLETS (R).
- Combine the PISTOL HANDLE and LIGHTER; place the BULLETS. Take the PISTOL.
- Go left.
- Use the PISTOL (S).
- Go right.
- Take the BRONZE CLEF (T).
- Take the COMMODE KNOB (U).
- Take the SAILS AND FLAG (V).
- Place the toys on the cushion and take the LONG TOYS (W).
- Take the TROWEL (X).
- Walk down three times and scroll left.

- Play the HOP; receive the SNAKE STATUE PART (Y).
- Place the HANDLE (Z); take the GARDEN SCISSORS and WRENCH (A).
- Scroll right.
- Take some VINES with the GARDEN SCISSORS. Take the WATER CLEANER (B).
- Go forward.
- Place the BRONZE CLEF (C); take the TUNING FORK (D).
- Go forward.
- Drop the grate (E).
- Take the METAL BAR with the WRENCH (F).
- Combine the LONG TOYS, METAL BAR and VINES with the BROKEN LADDER. Take the LADDER.
- Place the LADDER; go forward (G).
- Use the WATER CLEANER. Play the HOP; receive a GOLDEN ARROW (H).
- Take PENCIL 4/4 (I).
- Take the DOLL HEAD (J).

- Use the TUNING FORK; take the ICE PICK (K).
- Place the COMMODE KNOB (L); open the doors and take the SNAKE STATUE PART and DRAGON HEAD 1/2 (M).
- Walk down.
- Place the SAILS AND FLAG on the SHIP; take the GOLDEN ARROW.
- Place the two GOLDEN ARROWS. Select Nx3-Ox1-Px1. Take the PROJECTOR LENS (Q).
- Go right.
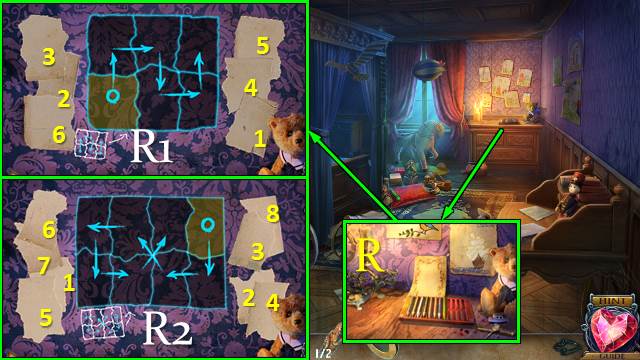
- Place the PENCILS (R) for a mini-game (R1-2).

- Solution continued (S).
- Take the PART OF A SLIDE (T).
- Place the DOLL HEAD; take the PROJECTOR TUMBLER (U).
- Walk down twice.
- Place the two SNAKE STATUE PARTS; take the SLIDE FRAME (V).
- Use the ICE PICK (W).
- Go forward.
- Use the Ice (X). Take the HAIRPIN (Y).
- Go left.
- Use the HAIRPIN. Read the notes and take the PART OF A SLIDE (Z).
- Combine the two PARTS OF A SLIDE with the SLIDE FRAME and restore the slide. Take the GOLDEN SLIDE.
- Place the PROJECTOR LENS and PROJECTOR TUMBLER and turn the tumbler. Place the GOLDEN SLIDE (A).
- Go left and scroll right.
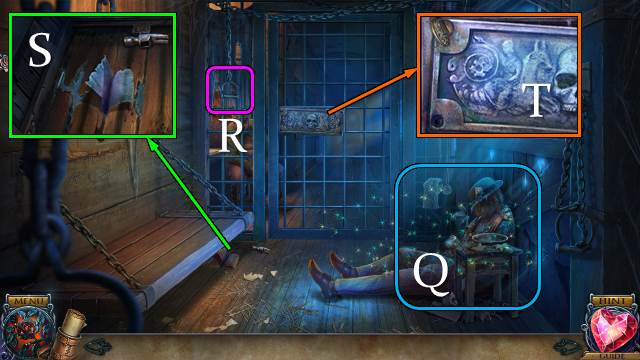
- Take the BROOM (B).
- Take SKELETON KEY 1/2 (C).
- Walk down.
- Use the BROOM; take the CODE ON A PICTURE (D).
- Play the HOP; receive SKELETON KEY 2/2 (E).
- Go left.
- Place the SKELETON KEYS. Take the CODE PAPER (F).
- Take the OLD BONE (G).
- Take the ORDER EMBLEM with the OLD BONE (H).
- Walk down.
- Place the ORDER EMBLEM (I). Take the WOODEN RING and PICTURE FRAME PARTS (J).
- Combine the CODE ON A PICTURE with the CODE PAPER.
- Place the CODE PAPER and enter the code rotated 180 degrees(K). Take DRAGON HEAD 2/2 (L).
- Walk down.
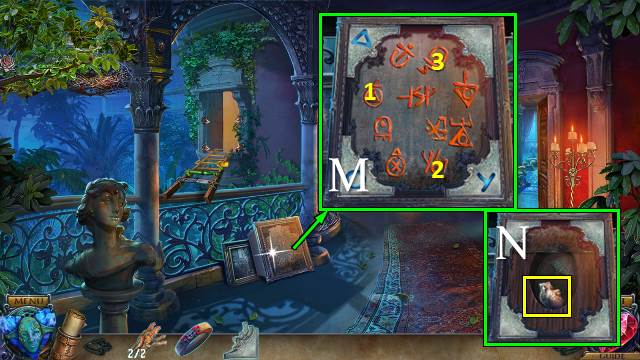
- Use the TROWEL and place the PICTURE FRAME PARTS; find the runes that combine the symbols around the outside (M). Take the STONE HEART (N).
- Go left twice.
- Place the WOODEN RING. Turn the rings until the heart is front. Take the BLADE (O).
- Scroll left.
- Place the STONE HEART (P). Use the BLADE and take the CRYSTAL KEY (Q).
- Scroll right.
- Place the DRAGON HEADS and CRYSTAL KEY for a mini-game.
- Solution 1 (R1): 1-1-2-3-2-3-1-1.
- Solution 2 (R2): 2-1-2-3-3-2.
- Solution 3 (R3): 3-3-1-1-2-1-2.
- Take the DRAGON EMBLEM (S).
- Scroll left.
- Place the DRAGON EMBLEM (T).
- Go forward for a mini-game.
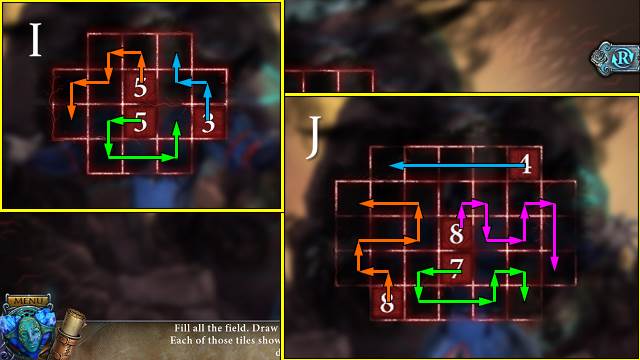
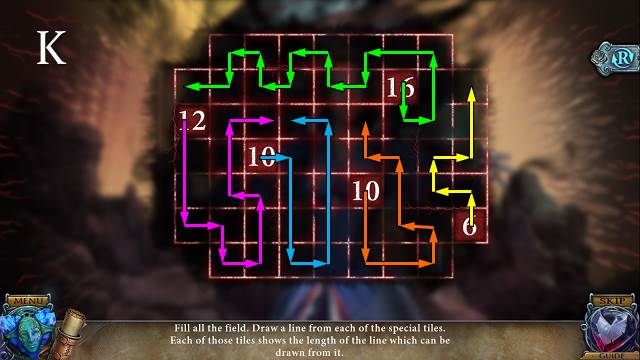
- Solution: (U1-U2)-(V1-V2)-(4xW1-W2)-(X1-X2)-(Y1-Y2)-(Z1-Z2)-(A1-A2)-(B1-B2)
- (C1-C2)-(D1-D2)-(E1-E2)-(F1-F2)-(G1-G2).
Chapter 5: Mines
- Take the CROWBAR (H).
- Take the calendar and use the CROWBAR (I).
- Play the HOP; receive the TRAIN KEY (J).
- Take the RAIL LEVER (K).
- Use the TRAIN KEY (L).
- Go left.
- Take the PURSE (M).
- Remove the lid and hat and take the DIARY (N).
- Open the PURSE and take the DIARY KEY.
- Open the DIARY with the DIARY KEY, turn the pages and take the DYNAMITE KEY and GOLDEN DRAGON.
- Open the window, remove the broken lever and place the RAIL LEVER. Pull the lever and take the BEE NEST (O).
- Walk down and go right.
- Take the TONGS (P).
- Walk down.
- Place the BEE NEST and take the HOT WAX with the TONGS (Q).
- Go right.
- Break the statue. Use the HOT WAX and take the WAX MOLD (R).
- Place the WAX MOLD and use the chisel. Take the DRAGON STATUETTE (S).
- Place the DRAGON STATUETTE and turn both statuettes (T).
- Take the CHARCOAL (U).
- Walk down and left.
- Use the CHARCOAL on the DIARY. Take the SAFE CODE.
- Place the SAFE CODE (V). Take the CRYSTAL SHIELD and the DYNAMITE KEY behind it (W).
- Walk down.
- Place the two DYNAMITE KEYS (X). Take the DYNAMITE and OIL CANISTER (Y).
- Go right.
- Remove and replace the OIL CANISTER (Z).
- Throw the DYNAMITE (A).
- Take the SILVER RING and SCRAP METAL. Touch Conrad's arm (B).
- Use Stone Grip (C).
- Take the BROKEN WHEEL (D).
- Walk down.
- Place the BROKEN WHEEL and SCRAP METAL. Pull the lever. Take the SPARE WHEEL (E).
- Go right.
- Place the SPARE WHEEL and pull the lever (F).
- Go forward.
- Take the OLD BRANCH and WHISTLE PART (G).
- Find all pieces of the cart (H).
- Go to the Train Station.
- Play the HOP. Receive an OILER (I).
- Place the WHISTLE PART and pull the rope (J).
- Take the POCKET KNIFE (K).
- Go left.
- Open the POCKET KNIFE and take the CORKSCREW.
- Use the CORKSCREW. Take the EMPTY BOTTLE (L).
- Use the SILVER RING (M). Take the MINE MAP (N).
- Walk down and right.
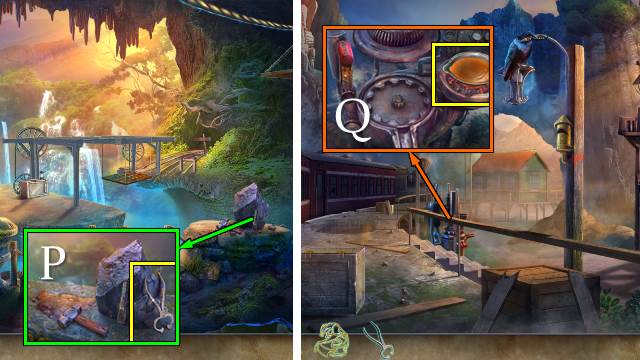
- Use the OLD BRANCH (O).
- Take the METAL SPONGE (P). Remove the cloth and place the EMPTY BOTTLE to get some ACID (Q).
- Go forward.
- Use the OILER (R).
- Use the ACID (S).
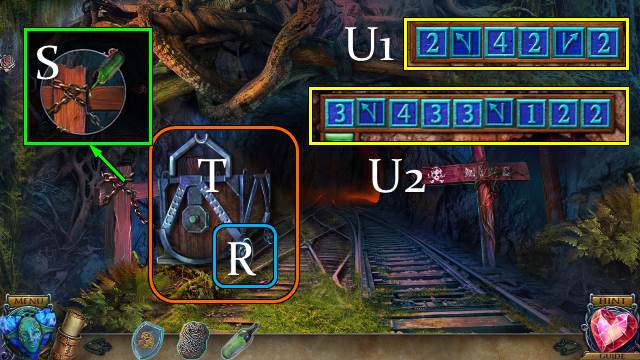
- Place the MINE MAP for a mini-game (T).
- Solutions (U1-2).
Chapter 6: The Ancient
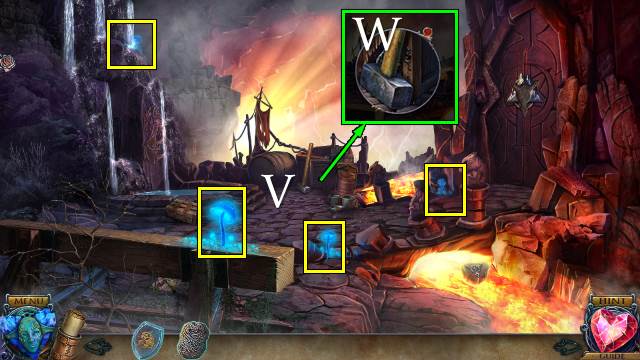
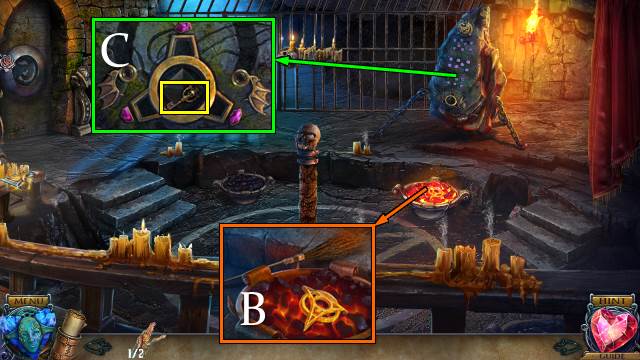
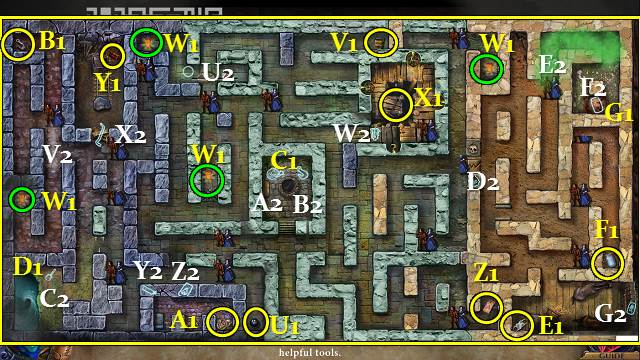
- Collect the four GLOWING MUSHROOMS and combine them (V).
- Take the SLEDGEHAMMER (W).
- Place the GOLDEN DRAGON on the CRYSTAL SHIELD.
- Place the CRYSTAL SHIELD; use the SLEDGEHAMMER (X).
- Place the GLOWING MUSHROOMS.
- Take the HOOK (Y).
- Use the METAL SPONGE. Receive an OLD RAG (Z).

- Use the OLD RAG. Take the PEAR (A).
- Take the KNIGHT'S CREST with the HOOK (B).
- Offer the PEAR (C). Take the METAL PINS (D).
- Place the KNIGHT'S CREST and METAL PINS (E).
- Go right.
- Take the KNIGHT'S PENDANT (F).
- Walk down.
- Place the KNIGHT'S PENDANT (G) and play the HOP. Receive the SILVER SWORD.
- Go right.
- Use the SILVER SWORD (H).
- Play the mini-game.
- Solution 1 (I).
- Solution 2 (J).
- Solution 3 (K).
- Congratulations, you've completed Immortal Love: The Price of a Miracle.
Created at: 2017-01-06