Walkthrough Menu
- General Tips
- Chapter 1: The Ranch
- Chapter 2: Oxford
- Chapter 3: The Apartments
- Chapter 4: The Bridge and Park
- Chapter 5: The School
- Chapter 6: The House and Station
General Tips
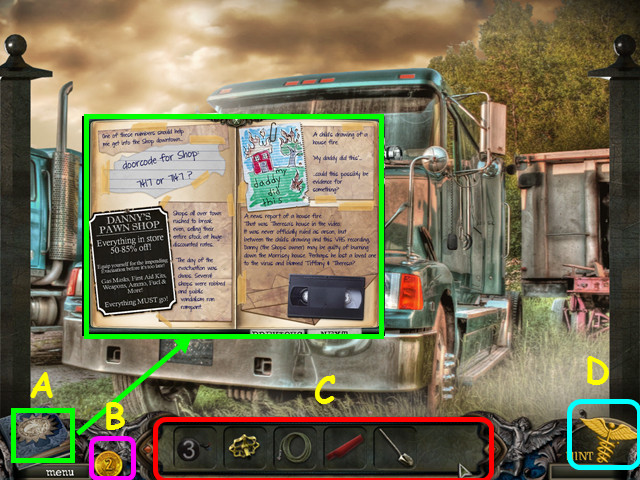
- Read your Journal for important clues that you have found and a reference map (A).
- Coins you find throughout the game will collect here (B).
- Your inventory (C) is located in the lower panel – move your cursor down to reveal your inventory.
- Hints are unlimited, but you must wait for the meter to refill (D).
- Hidden Object Scenes and mini-games are often randomized - your solution may vary.
- Hidden Object Scenes will be referred to as HOS in this walkthrough.
Chapter 1: The Ranch
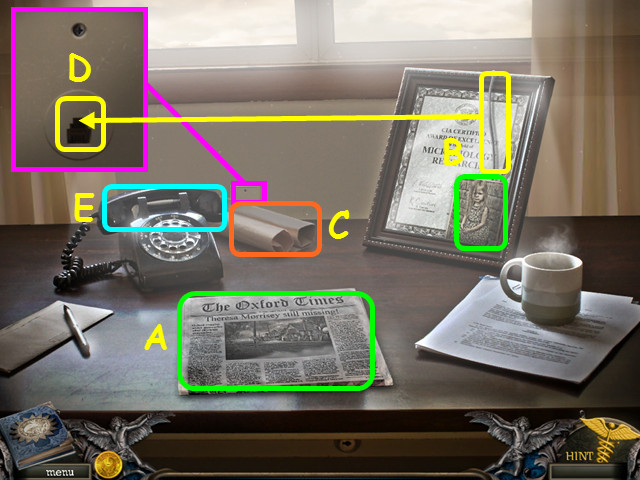
- Read the newspaper (A).
- Take the photo and the PHONE CORD (B).
- Take the map (C).
- Look at the outlet and use the PHONE CORD in the hole (D).
- Answer the phone (E).
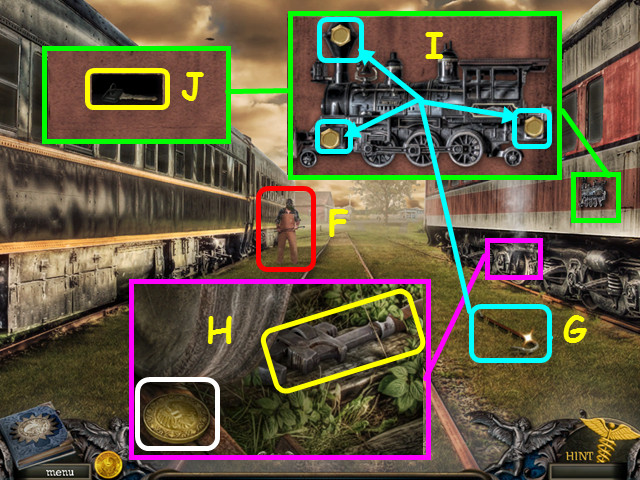
- Talk to the man in the mask (F).
- Take the CROWBAR (G).
- Look at the right train's wheel; take the 1/28 COINS and the WRENCH (H).
- Look at the TRAIN EMBLEM and use the WRENCH on the 3 bolts to remove it (I).
- Take the TRACTOR KEY (J).
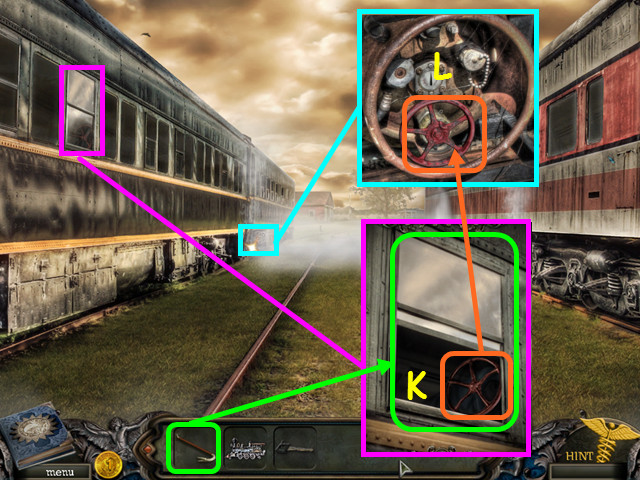
- Look at the window on the left train, use the CROWBAR to open the window, then take the VALVE WHEEL (K).
- Look at the steam leak; place the VALVE WHEEL on the tank, then turn the wheel (L).
- Walk forward, then go left to the shed.
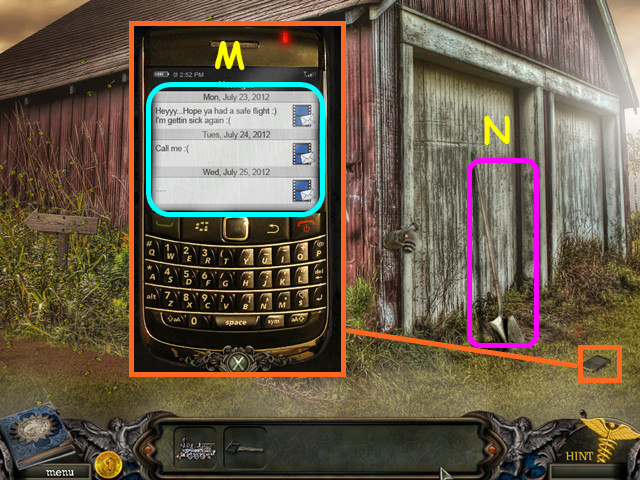
- Take the cell phone and listen to the 3 messages (M).
- Take the SHOVEL (N).
- Walk down.
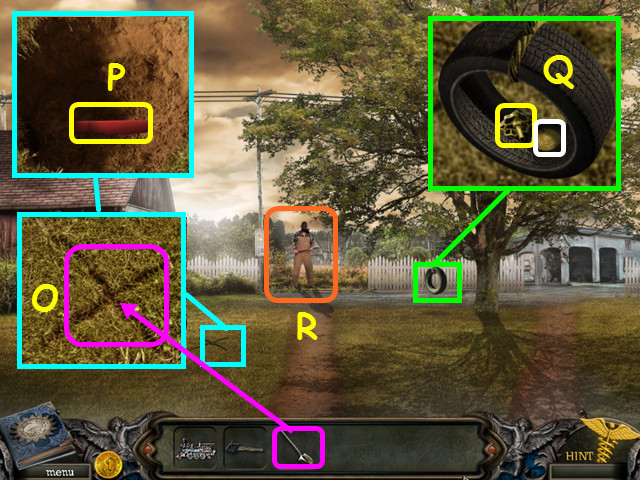
- Look at the 'X' and use the SHOVEL (O) 4 times to dig up the MAILBOX FLAG (P).
- Look at the tire swing; take the 2/28 COIN and the FAUCET HANDLE (Q).
- Talk to the masked man (R).
- Walk to the right.
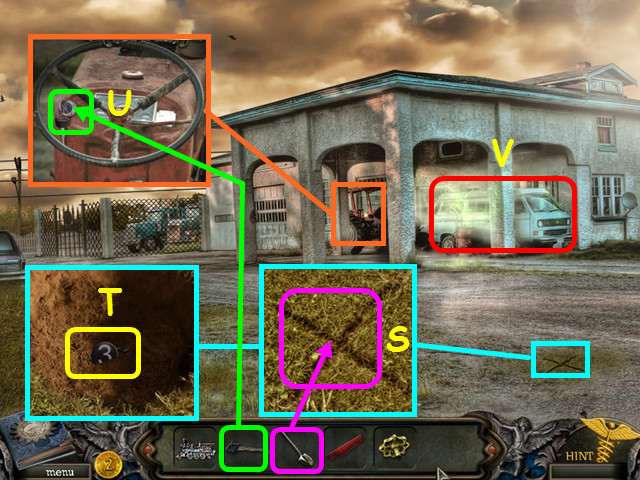
- Look at the 'X' and use the SHOVEL (S) 4 times to dig up the 3 BUTTON (T).
- Look at the tractor; use the TRACTOR KEY on the ignition and turn the key (U).
- Select the van for a HOS (V).
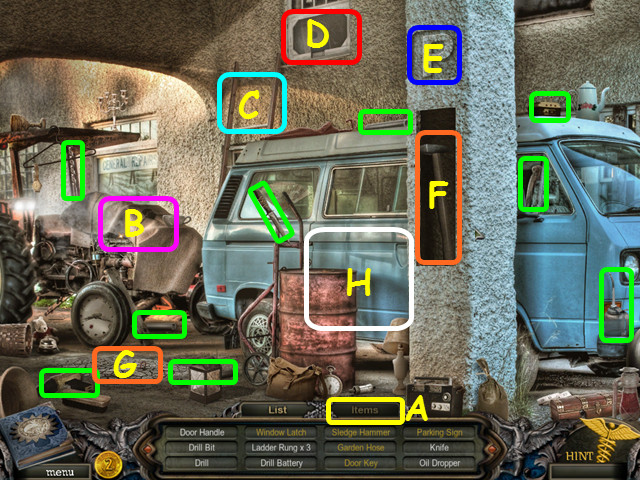
- Locate all the items listed in white; items in yellow are hidden or require additional interaction.
- Items you find will be used inside the HOS; select the Items Tab to see usable items (A).
- Look at the tractor and use the KNIFE to cut the burlap, then take the WINDOW LATCH (B).
- Use the 3 LADDER RUNGS on the ladder (C).
- Use the WINDOW LATCH on the window; open the window and take the PARKING SIGN (D).
- Place the PARKING SIGN on the post (E).
- Take the SLEDGE HAMMER from the post (F).
- Use the SLEDGE HAMMER on the concrete then take the DOOR KEY (G).
- Look at the barrel and use the DRILL on the 'X' then place the OIL DROPPER (EMPTY) on the leak to get get the OIL DROPPER (FULL) (H).
- Place the DOOR HANDLE on the van door, use the OIL DROPPER (FULL) on the handle, then use the DOOR KEY to open the door.
- Take the GARDEN HOSE.
- Walk forward.
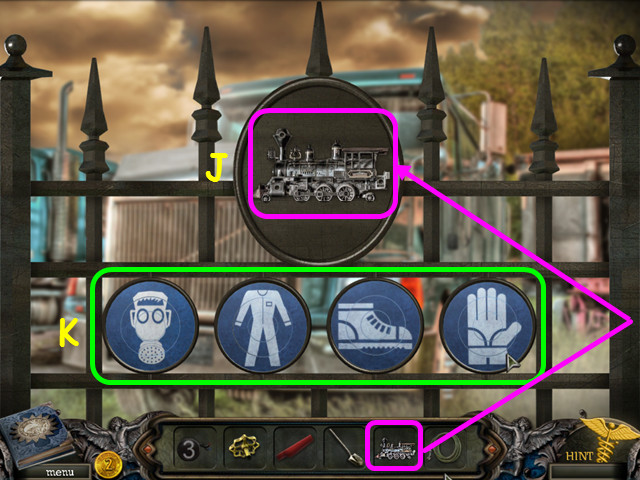
- Place the TRAIN EMBLEM on the gate for a mini-game (J).
- Rotate the 2 outer rings on each disc to form a symbol (K).
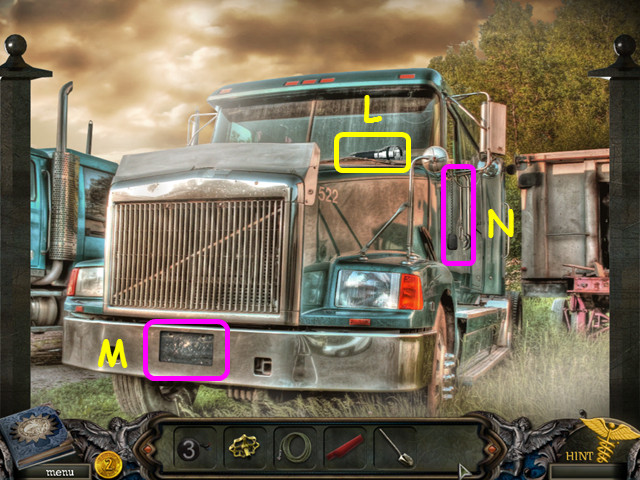
- Take the FLASHLIGHT (L).
- Note the missing plate (M) and the CB radio mike (N).
- Walk down twice then walk to the left.
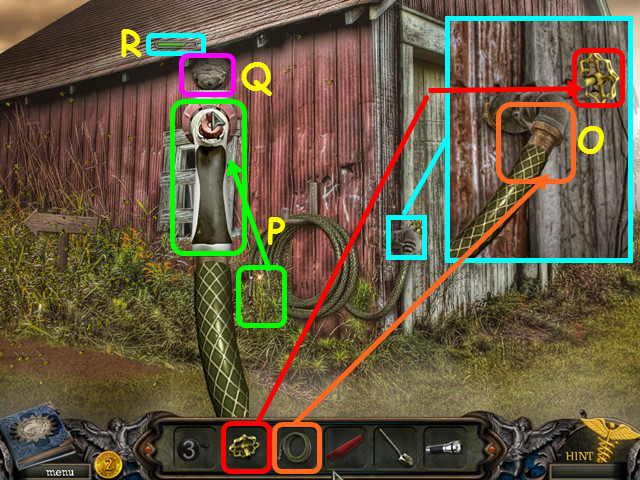
- Look at the spigot; attach the GARDEN HOSE and the FAUCET HANDLE, then turn the faucet handle to run the water (O).
- Take the sprayer end of the hose (P) and aim it at the hornet's nest (Q).
- Continue spraying until the meter (R) runs out and the nest falls.
- Walk to the left.
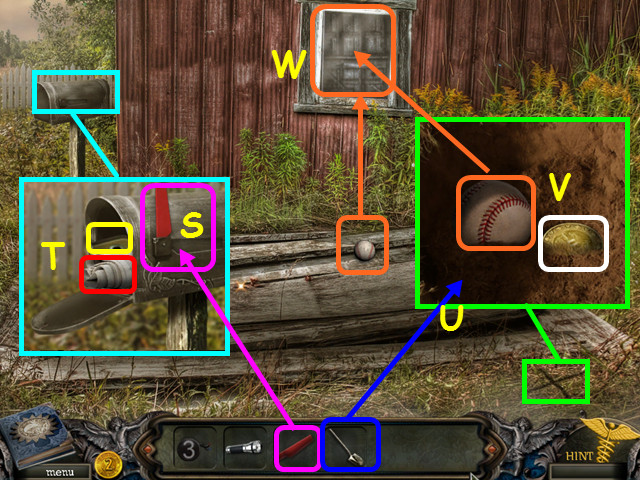
- Look at the mailbox and attach the MAILBOX FLAG; raise the flag and open the door (S).
- Take the article and the LETTER P (T).
- Look at the 'X' and use the SHOVEL (U) 4 times to dig up the BASEBALL and the 3/28 COIN (V).
- Throw the BASEBALL at the window; pick up the baseball again and throw it at the window a second time (W).
- Enter the window.
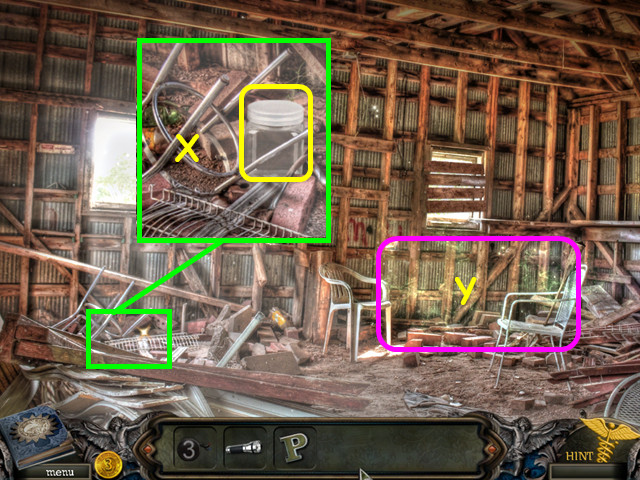
- Look at the junk pile and take the PLASTIC JAR (X).
- Select the area by the chairs for a HOS (Y).
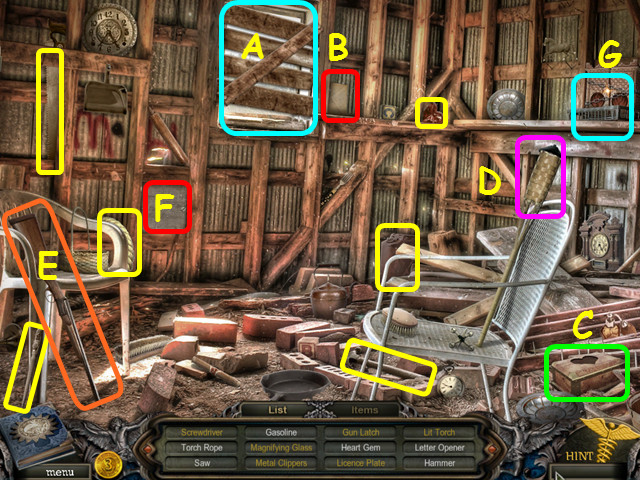
- Locate all the items listed.
- Look at the window and use the HAMMER to remove the 2 nails on the diagonal board (A). Next, use the SAW to remove the remaining boards.
- Use the LETTER OPENER on the letter and take the MAGNIFYING GLASS (B).
- Place the HEART GEM on the box, then take the GUN LATCH (C).
- Place the TORCH ROPE on the torch, pour the GASOLINE on the rope, then use the MAGNIFYING GLASS to light the torch; take the LIT TORCH (D).
- Use the GUN LATCH on the rifle, then take the SCREWDRIVER (E).
- Look at the wood board; use the SCREWDRIVER on the 2 screws, then take the METAL CLIPPERS (F).
- Look at the cabinet and use the METAL CLIPPERS on the chains, then use the LIT TORCH on the flame symbols (G).
- Once the cabinet opens, take the LICENSE PLATE.
- Walk down twice.
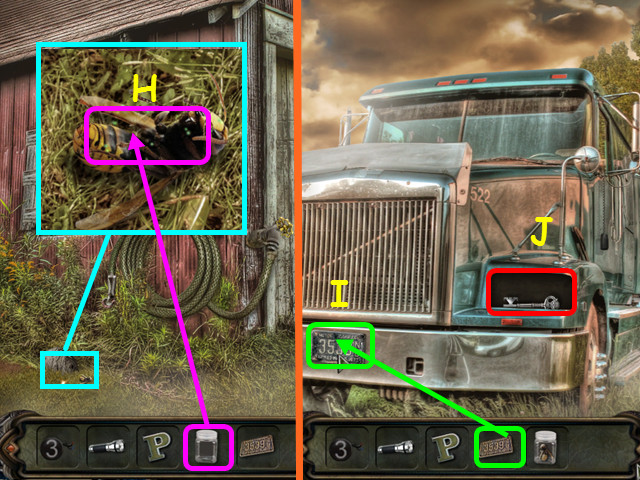
- Look at the ground and use the PLASTIC JAR to collect the HORNET SAMPLE (H).
- Walk down, right, then forward.
- Put the LICENSE PLATE on the front of the truck (I).
- Take the BUNKER KEY (J).
- Walk down twice, then go to the left twice.
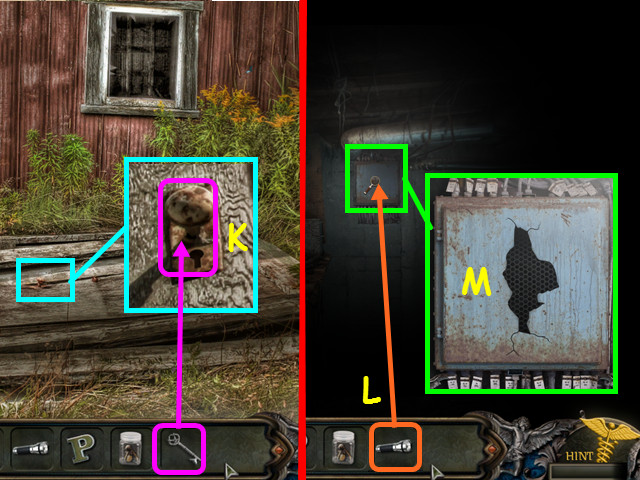
- Look at the bunker door and use the BUNKER KEY in the lock (K), then enter the door.
- Use the FLASHLIGHT anywhere on the darkness to turn it on (L).
- Look at the breaker box and remove the cover for a mini-game (M).
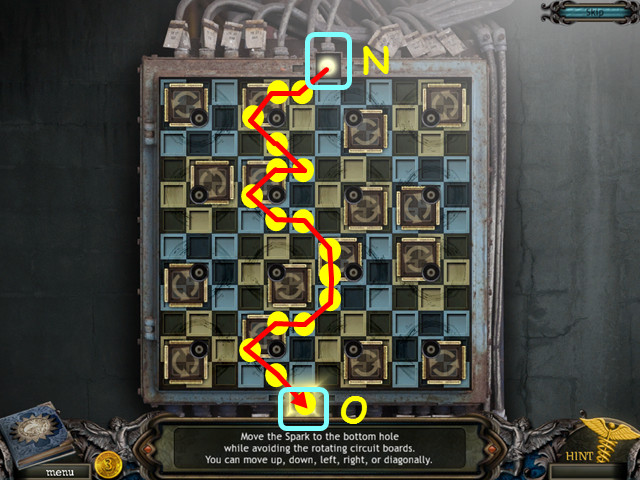
- Move the spark from the top (N) to the bottom (O) while avoiding the rotating pieces.
- Move the spark to the spaces indicated.
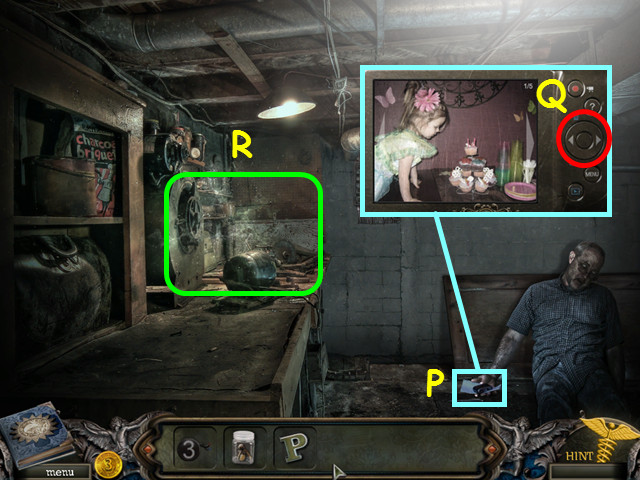
- Take the note and camera from Mr. Morrisey's hand (P).
- Press the arrows to scroll though the photos (Q).
- Select the workbench area for a HOS (R).
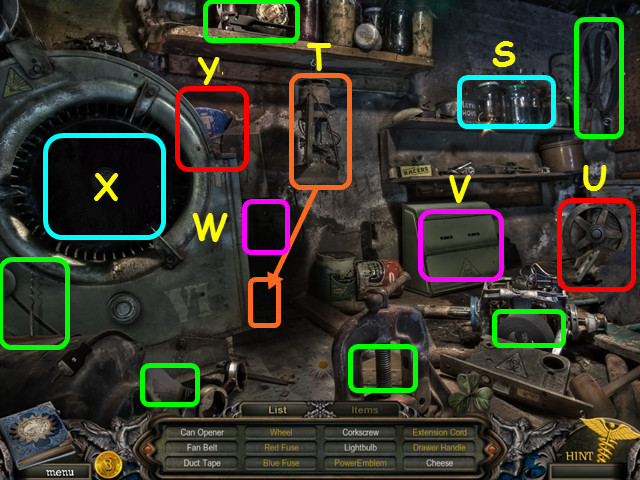
- Locate all the items on the list.
- Look at the jars; use the CORKSCREW to remove the cork from the bottle, then take the RED FUSE (S). In the same area, use the CAN OPENER on the coffee can, then take the BLUE FUSE.
- Place the LIGHT BULB in the lantern (T) then take the DRAWER HANDLE from below.
- Give the CHEESE to the rat, then take the WHEEL (U).
- Use the DRAWER HANDLE on the drawer; open the drawer and take the EXTENSION CORD (V).
- Plug the EXTENSION CORD in the outlet below the lantern, then use the DUCT TAPE to repair the short (W).
- Look at the machine and place the WHEEL and the FAN BELT inside (X).
- Look at the side of the machine, place the RED FUSE and the BLUE FUSE in the sockets, push the button, the take the POWER EMBLEM (Y).
- Walk down 3 times.
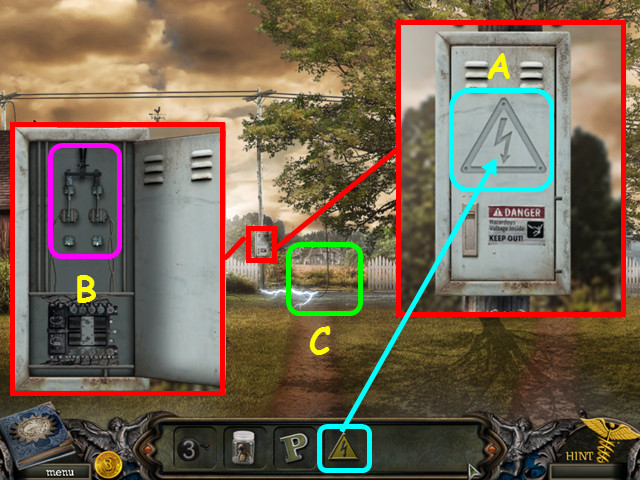
- Look at the circuit box, place the POWER EMBLEM on the front, then open the cover (A).
- Pull down the switch (B).
- Walk forward (C).
Chapter 2: Oxford
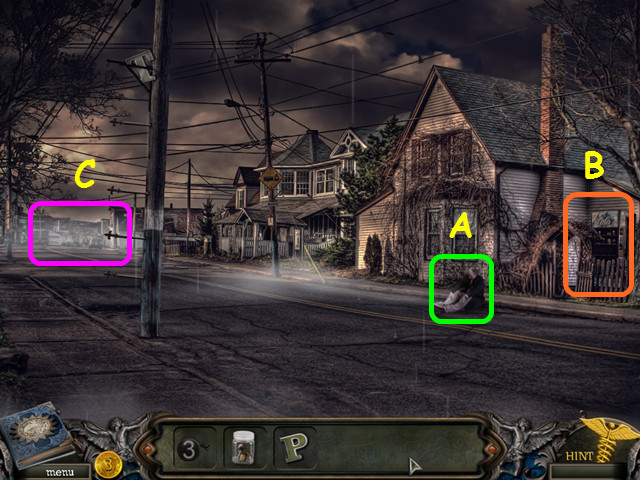
- Talk to the man on the street to learn he will help you in return for some food (A).
- Note the vending machine (B).
- Walk forward up the street (C).
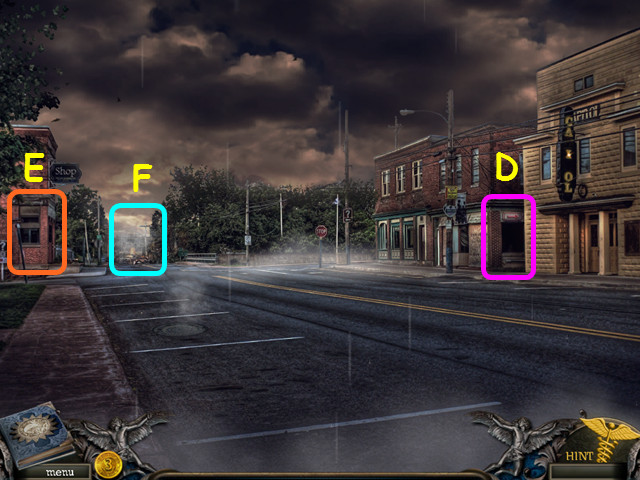
- Note the alley (D).
- Note the pawn shop (E).
- Walk forward (F).
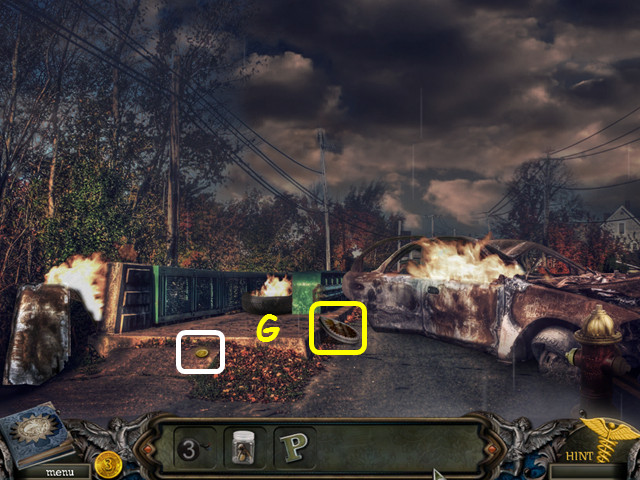
- Take the 4/28 COIN and the first STAINED GLASS (G).
- Walk down twice and look at the vending machine on the right.
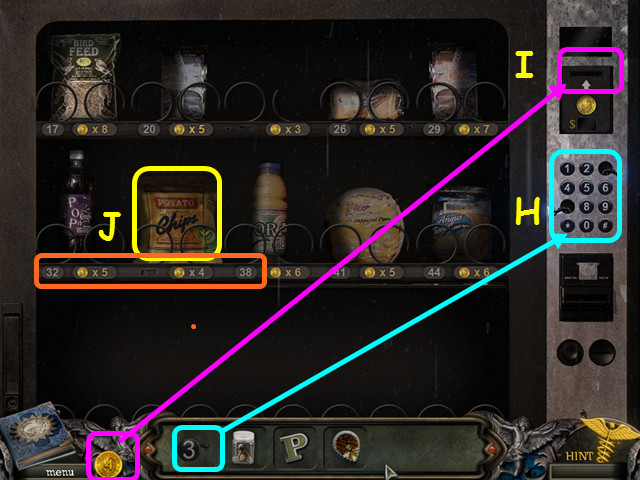
- Place the 3 BUTTON in the panel (H).
- Drop 4 COINS into the coin slot (I).
- Since the numbers for each item are 3 apart, enter 35 into the keypad to get the CHIPS (J).
- Walk down and give the CHIPS to the man on the street, who will give you two possible combinations for the pawn shop.
- Walk forward, then go to the pawn shop entrance on the left.
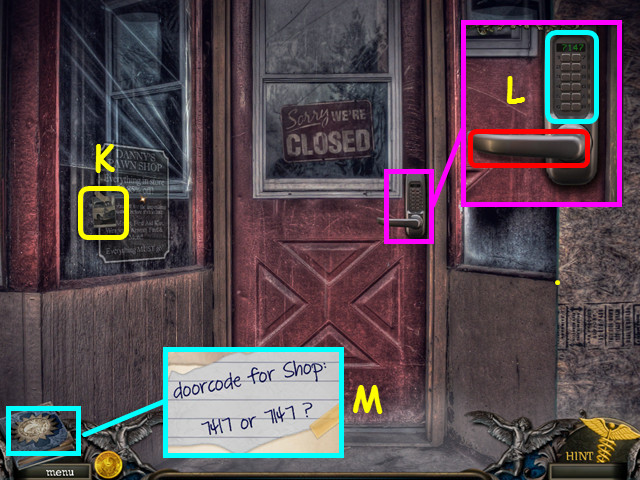
- Look at the sign and take the 1/5 CAR PHOTO (K).
- Look at the keypad, enter 7147, then turn the handle (L).
- Refer to the journal for the possible entry codes (M).
- Walk forward to enter the pawn shop for a HOS.
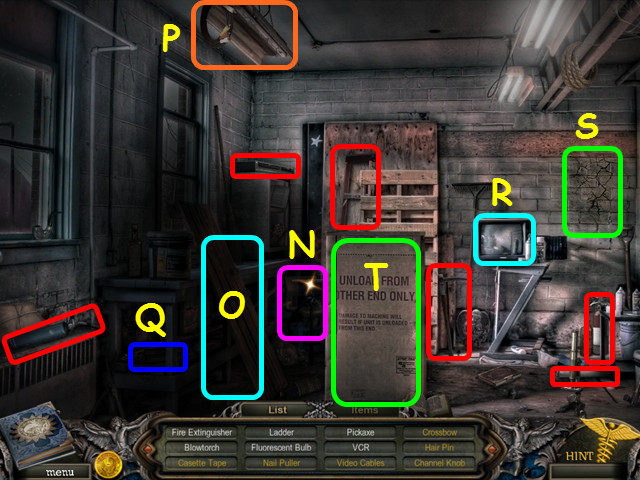
- Locate all the listed items.
- Look at the school desk and use the BLOWTORCH on the drawing (N).
- Use the FIRE EXTINGUISHER on the flames, then take the CHANNEL KNOB.
- Place the LADDER in front of the workbench (O).
- Take the VIDEO CABLES, then insert the FLUORESCENT BULB (P).
- Now that there is light, take the CASSETTE TAPE (Q).
- Look at the TV; place the VCR on top and attach the VIDEO CABLES (R).
- Place the CHANNEL KNOB on the TV and the CASSETTE TAPE in the VCR.
- After the cut-scene, take the HAIR PIN.
- Use the PICKAXE on the wall, then look inside (S).
- Use the HAIR PIN to open the toolbox and take the NAIL PULLER.
- Use the NAIL PULLER on the crate; look inside and take the CROSSBOW (T).
- Walk down and select the store window on the right side of the street for a HOS.
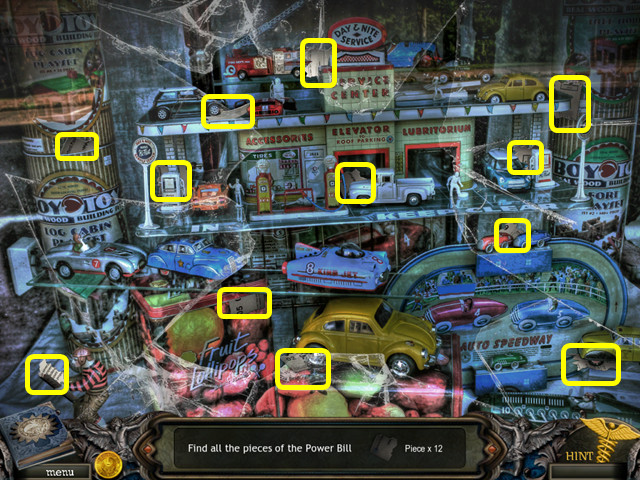
- Locate the 12 pieces of the power bill.
- This will trigger a mini-game.
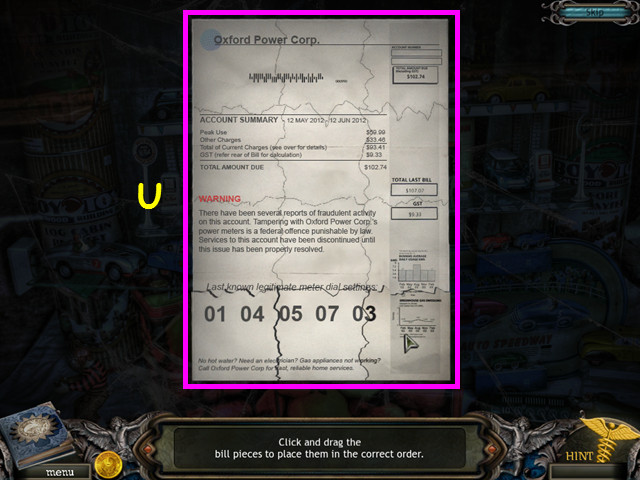
- Restore the power bill by placing the pieces in the correct positions.
- Drag a piece to the correct position and release.
- Take the POWER BILL (U).
- Walk right into the alley.
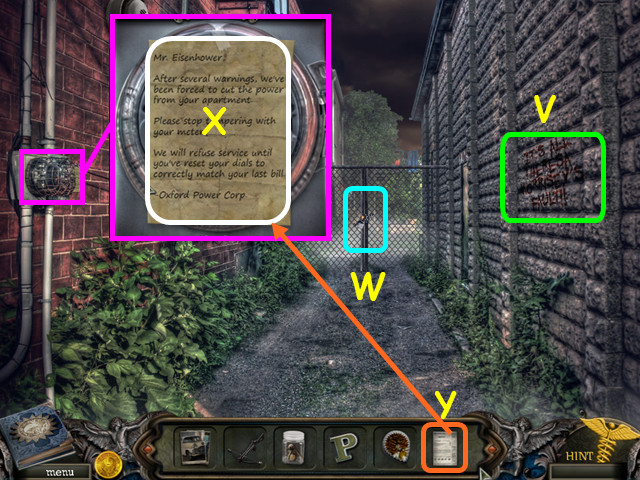
- Read the message on the wall (V).
- Note the locked gate (W).
- Look at the meter and read the note (X).
- Use the POWER BILL on the meter for a mini-game (Y).
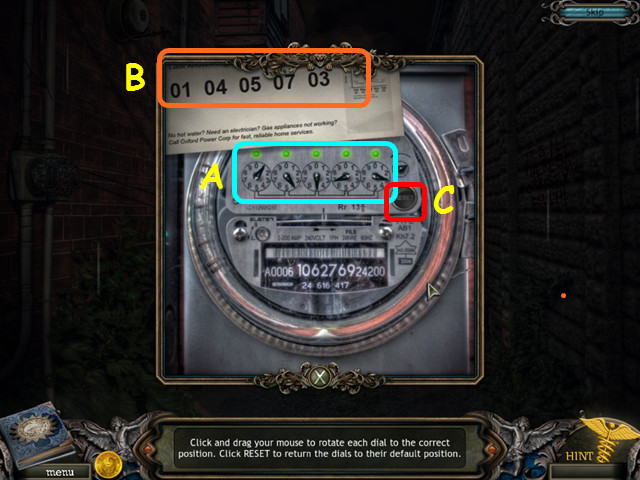
- Set the dials (A) to match the number on the power bill (B).
- Move the needles to set the number; moving one needle will cause another to move as well.
- Move the rightmost dial to '9', then set the numbers 1-4-5-7 from the bill going left to right.
- Turning the 4th dial to 7 will move the needle on the rightmost dial to 3.
- Press the reset button if you make a mistake (C).
- Take the LADDER POLE that falls into the alley.
- Walk down twice.
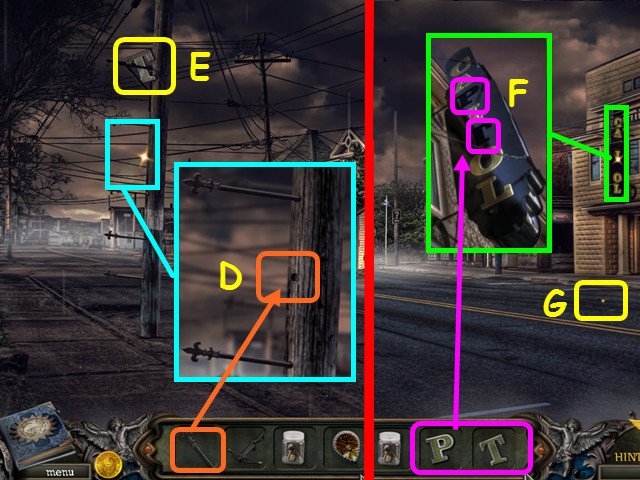
- Look at the power pole and place the LADDER POLE in the hole (D).
- Take the LETTER T (E).
- Walk forward.
- Look at the sign; replace the LETTER T and the LETTER P (F).
- Take the GATE KEY (G).
- Walk down the alley; look at the gate and use the GATE KEY in the lock.
Chapter 3: The Apartments
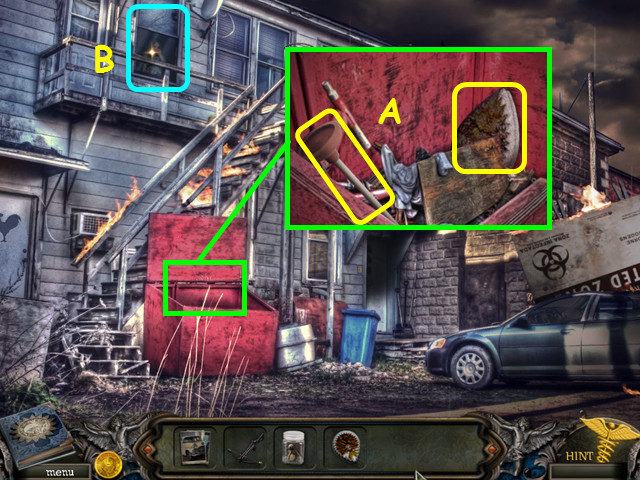
- Look in the dumpster; take the PLUNGER and the second STAINED GLASS (A).
- Look at the window (B).
- Walk to the left.
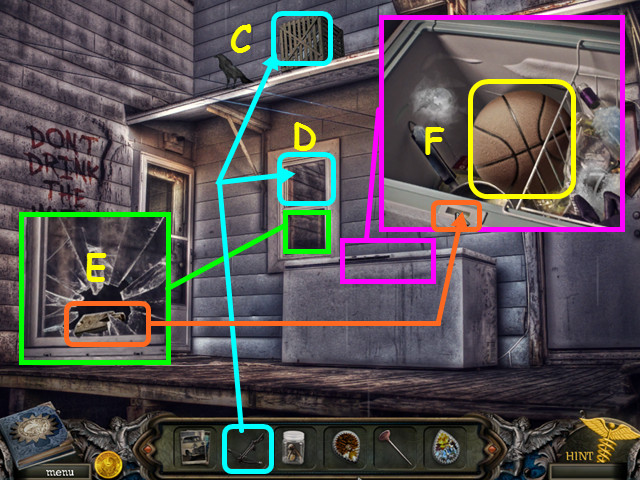
- Use the CROSSBOW on the crate (C) and the window (D).
- Look inside the broken window and take the FREEZER KEY (E).
- Look at the freezer and use the FREEZER KEY on the lock, then take the BASKETBALL (F).
- Walk down.
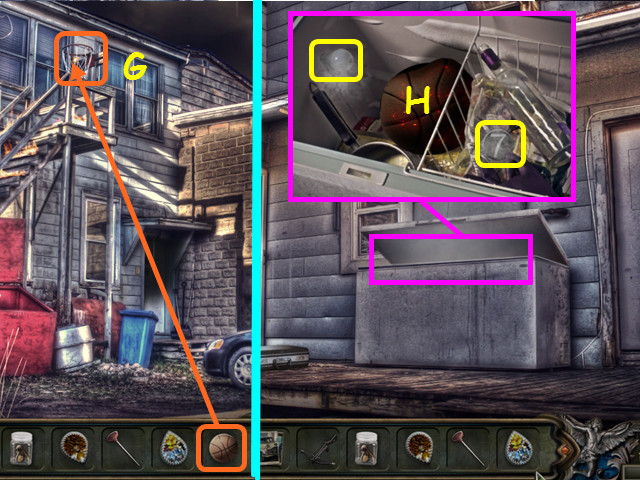
- Use the BASKETBALL on the hoop (G).
- Walk to the left.
- Look in the freezer; take the LIGHT BULB and the 7 BUTTON (H).
- Walk down.
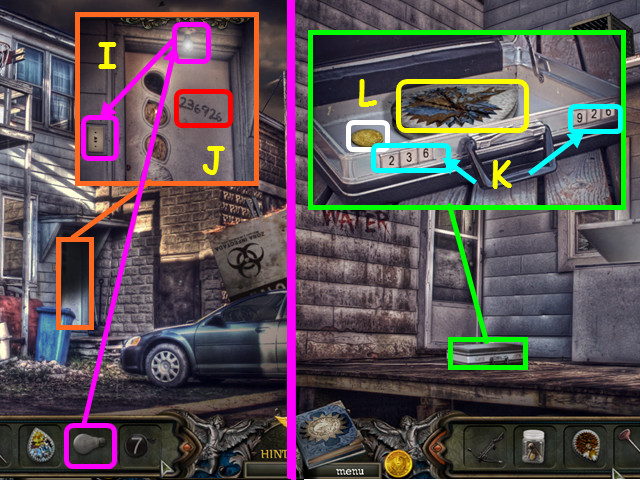
- Look at the doorway, place the LIGHT BULB in the socket and flip the switch (I).
- Note the numbers on the door (J).
- Walk to the left.
- Look at the briefcase and enter the code - 236-926 (K).
- Take the 5/28 COIN and the third STAINED GLASS (L).
- Walk down again.
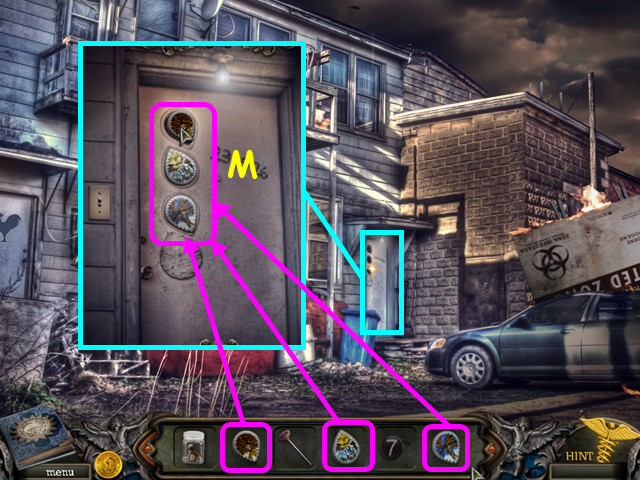
- Look at the door and place the 3 pieces of STAINED GLASS in the holes (M).
- Enter the door.
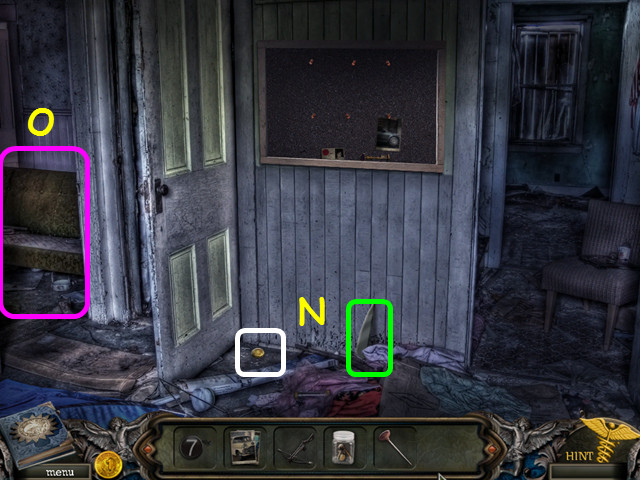
- Take the 6/28 COIN and the 1/6 MIRROR PIECE (N).
- Walk left for a HOS (O).
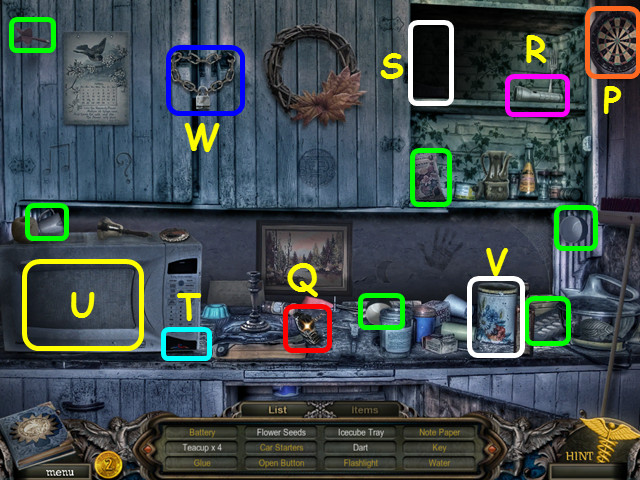
- Locate all the items on the list.
- Use the DART on the dartboard; take the NOTE PAPER (P).
- Look at the watch, use the NOTE PAPER on the dial, then take the BATTERY (Q).
- Put the BATTERY in the flashlight; take the FLASHLIGHT (R).
- Use the FLASHLIGHT on the dark corner, then take the OPEN BUTTON (S).
- Place the OPEN BUTTON on the microwave (T).
- Place the ICE CUBE TRAY in the microwave, then take the WATER (U).
- Place the FLOWER SEEDS into the can, use the WATER in the can then take the KEY (V).
- Use the KEY on the lock (W).
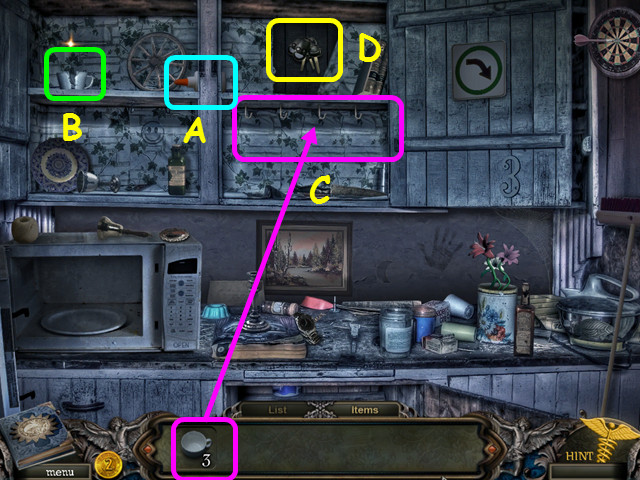
- Take the GLUE (A).
- Look at the cup, use the GLUE on the crack, push the pieces together and take the 4th TEACUP (B).
- Hang the 4 TEACUPS from the hooks (C).
- Take the CAR KEYS (D).
- Walk up the stairs on the right.
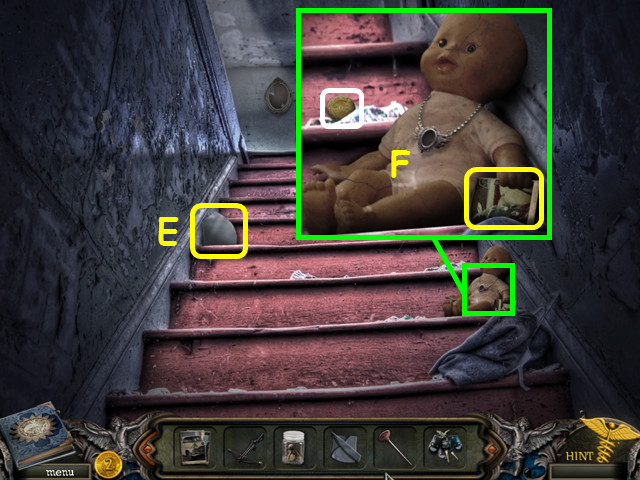
- Take the 2/6 MIRROR PIECE (E).
- Look at the doll and take the 2/5 CAR PHOTO and the 7/28 COIN (F).
- Continue up the stairs, then enter the room on the right.
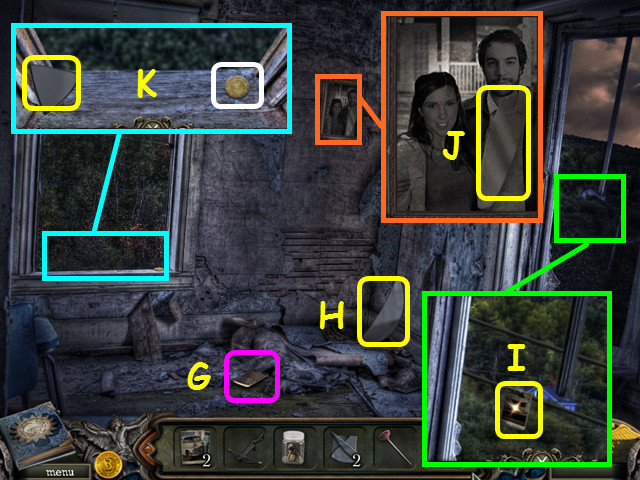
- Take the phone and listen to the message (G).
- Take the 3/6 MIRROR PIECE (H).
- Look out the right window and the take the 3/5 CAR PHOTO (I).
- Look at the photo and take the 4/6 MIRROR PIECE (J).
- Look at the left window; take the 5/6 MIRROR PIECE and the 8/28 COIN (K).
- Walk down, then go into the room on the left.
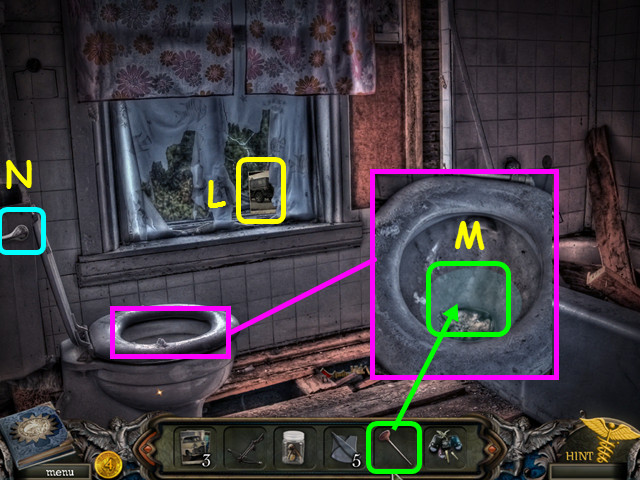
- Take the 4/5 CAR PHOTO (L).
- Look at the toilet and use the PLUNGER on the clog (M).
- Flush the toilet (N).
- Walk down once.
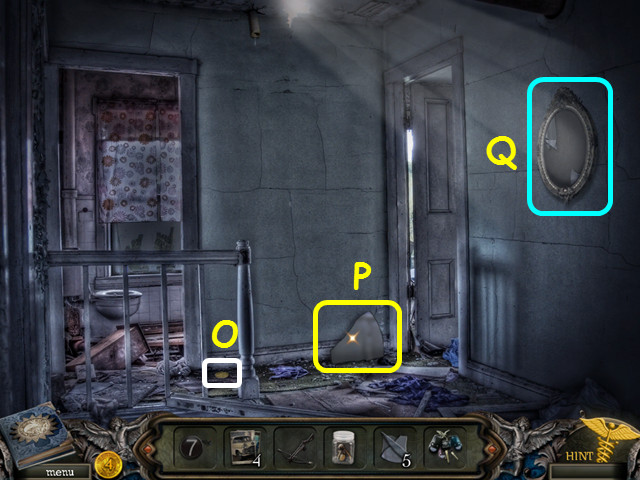
- Take the 9/28 COIN (O).
- Take the 6/6 MIRROR PIECE (P).
- Look at the mirror and place the 6 MIRROR PIECES on it for a mini-game (Q).
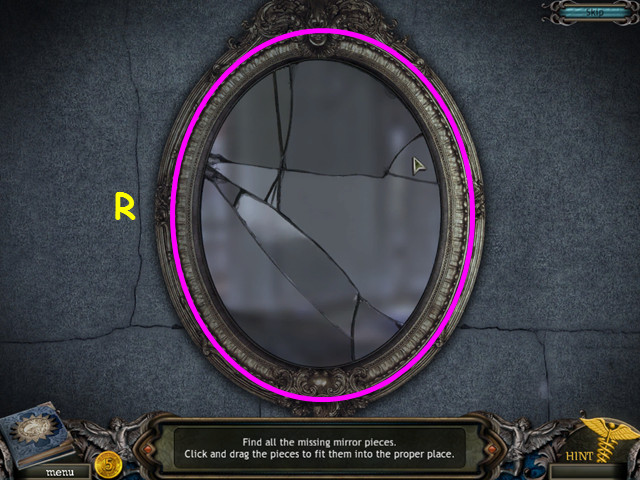
- Place the mirror pieces back into the frame to restore the mirror.
- Please see the screenshot for the solution (R).
- Walk down twice.
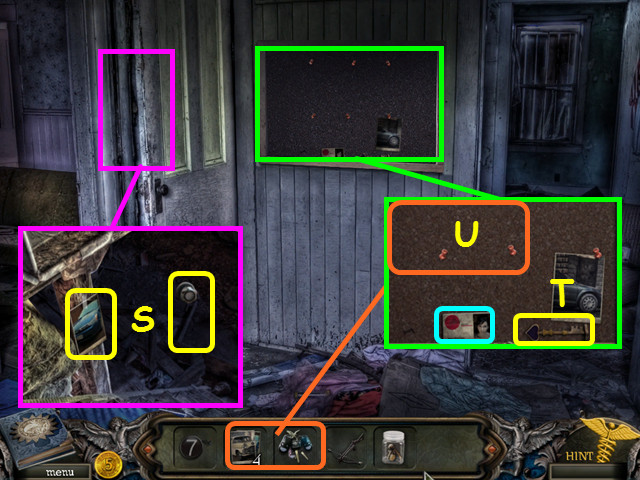
- Look inside the door; take the 5/5 CAR PHOTO and the SHOWER HANDLE (S).
- Look at the bulletin board; take the ID card and the SPADE KEY (T).
- Place the 5 CAR PHOTOS, followed by the CAR KEYS onto the bulletin board for a mini-game (U).
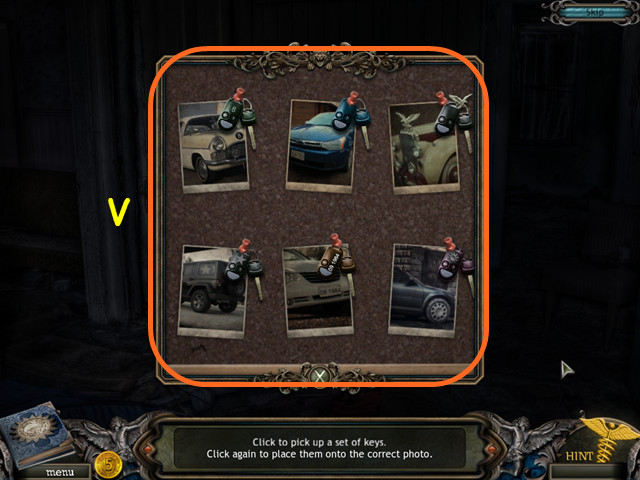
- Match the keys with the car photos (V).
- Each key has a feature such as color or symbol in common with a car.
- Select 2 keys to swap positions.
- You will earn the CAR STARTER.
- Walk down.
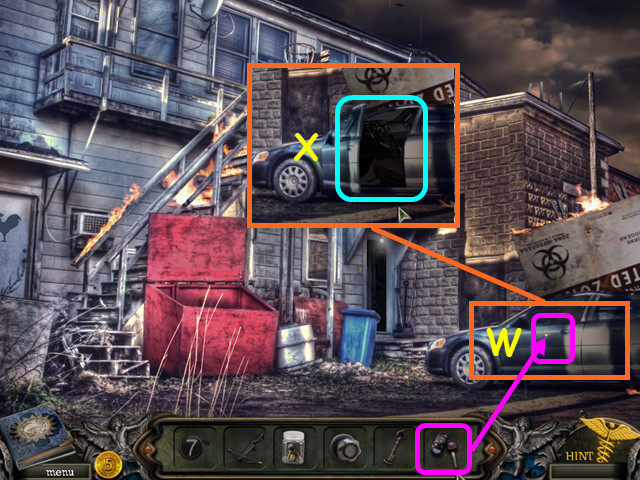
- Use the CAR STARTER on the car (W).
- Go through the car door (X).
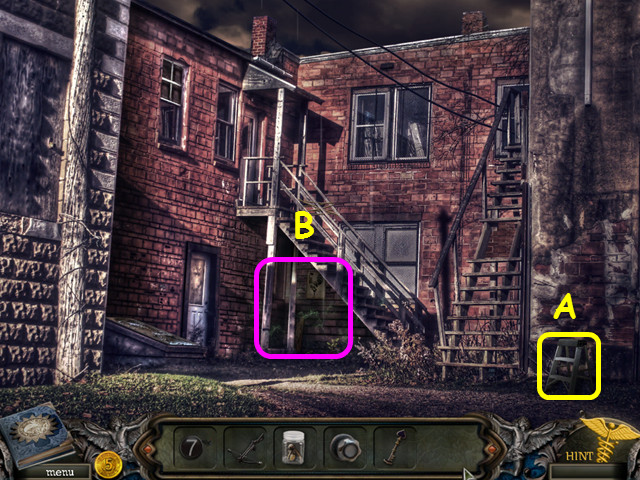
- Take the STEPLADDER (A).
- Select the area beneath the left stairs for a HOS (B).
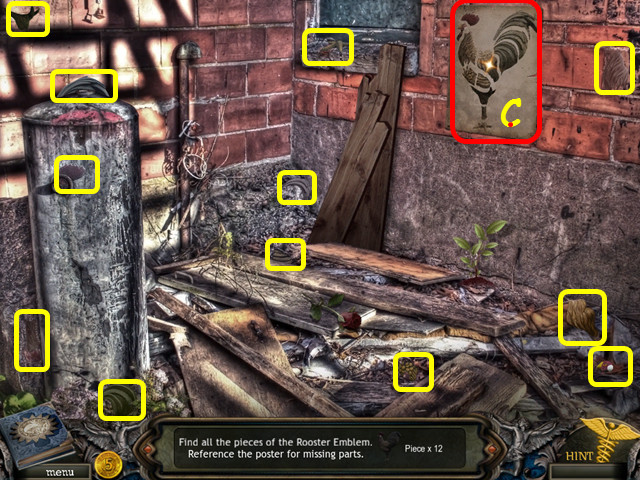
- Locate the 12 pieces of the rooster emblem.
- Refer to the poster on the wall for the missing parts (C).
- You will earn the ROOSTER EMBLEM.
- Walk down, then go to the left.
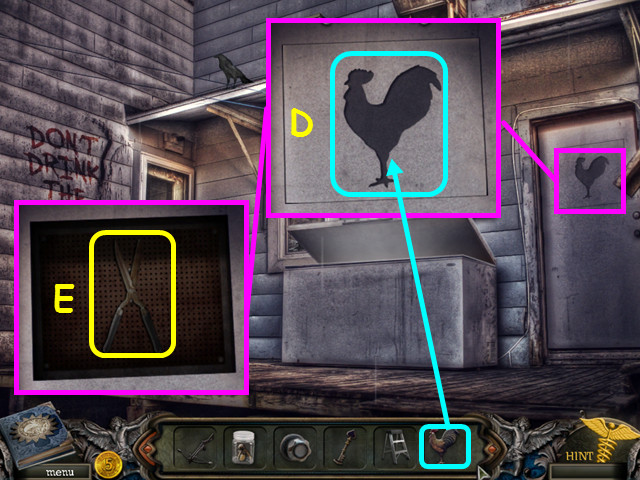
- Look at the right door and place the ROOSTER EMBLEM in the indentation (D).
- Take the SHEARS (E).
- Walk down, then to the right.
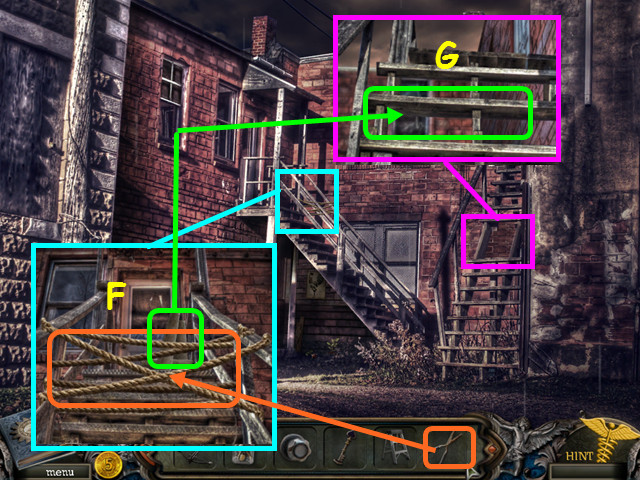
- Look at the left stairs; use the SHEARS to cut the ROPE, then take the WOOD PLANKS (F).
- Look at the right stairs; use the WOOD PLANKS to repair the hole (G).
- Walk up the right stairs.
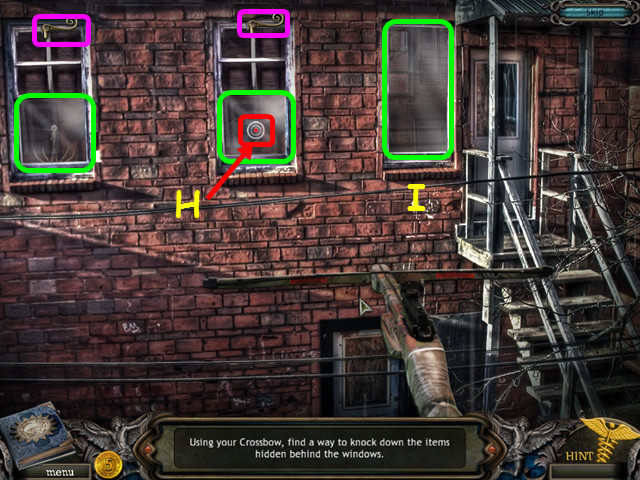
- Using the target symbol to aim (H), shoot each of the 3 windows twice (green).
- Shoot the 2 latches (pink) next.
- Note the right window is a blocked entrance (I).
- If you did not break the right window, it will break later for you.
- Walk down.
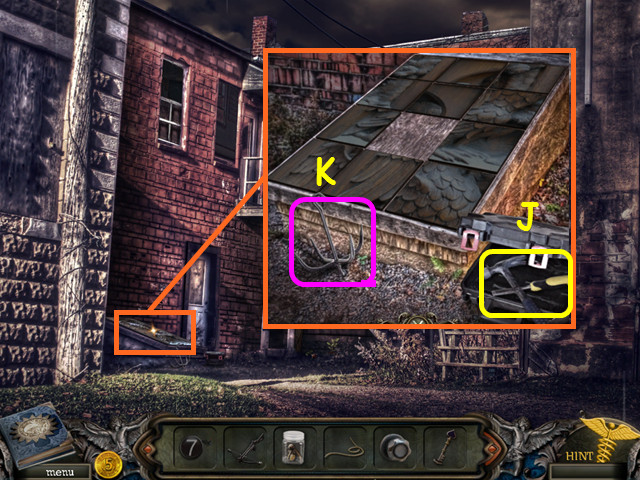
- Look at the storm cellar doors and take the HAMMER AND CHISEL (J).
- Take the hook and it will combine with the rope to become the GRAPPLING HOOK (K).
- Walk up the right stairs; use the GRAPPLING HOOK on the right window, then go forward.
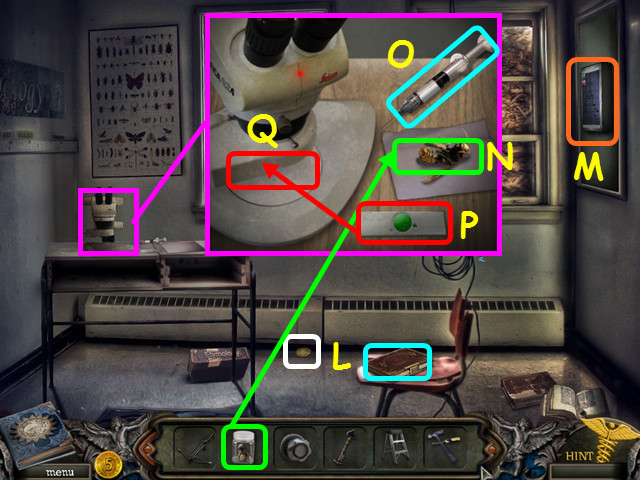
- Take the 10/28 COIN and the diary (L).
- Note the wall safe (M).
- Look at the microscope and place the HORNET SAMPLE on the tissue (N).
- Use the syringe (O) on the hornet, then on the slide (P).
- Place the slide under the microscope for a mini-game (Q).
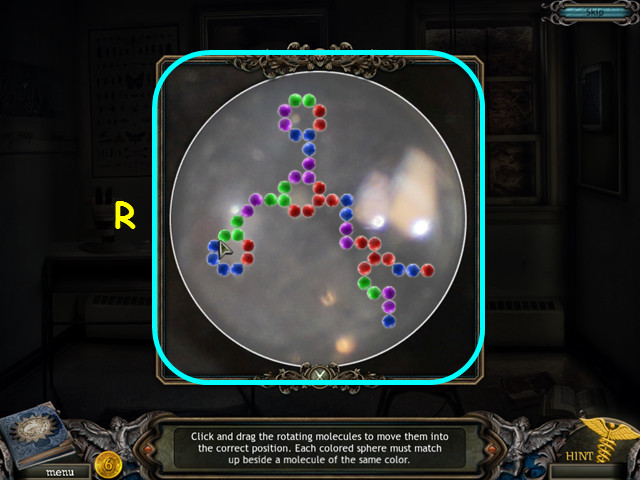
- Place the revolving molecule pairs into the gene grid (R).
- Select a revolving pair to see the orientation, then place it into the grid.
- You will earn the GENE PATTERN.
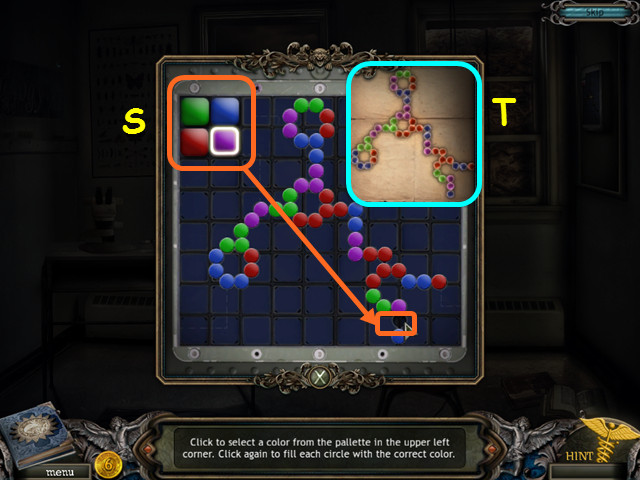
- Look at the safe and place the GENE PATTERN on it for a mini-game.
- Select a color from the palette in the upper left (S).
- Fill in the dots to recreate the gene pattern (T).
- Take the HEART KEY from the safe once it opens.
- Walk down 3 times, enter the apartment, go up the stairs on the right, then up the stairs.
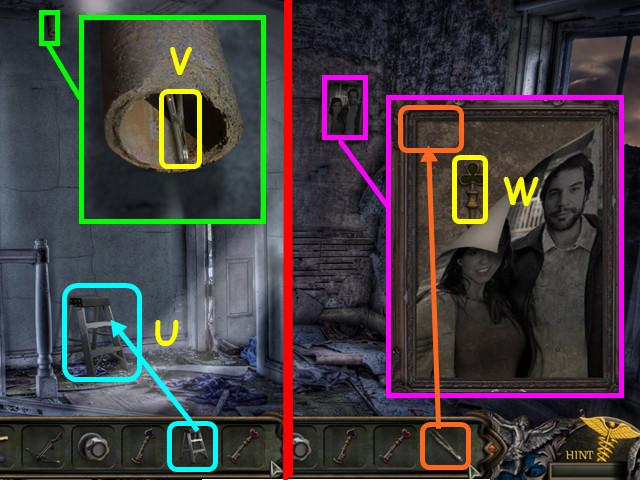
- Place the STEPLADDER on the floor (U).
- Look at the pipe and take the TWEEZERS (V).
- Walk to the right.
- Look at the picture and use the TWEEZERS to peel back the upper left corner of the photo then take the CLUB KEY (W).
- Walk down, then enter the room on the left.
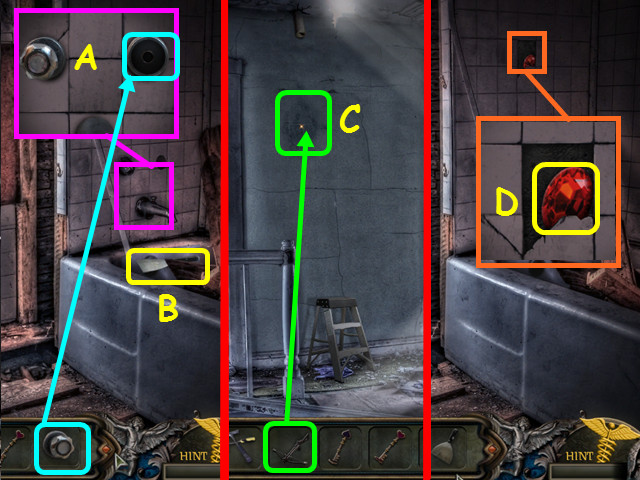
- Look at the faucet and place the SHOWER HANDLE in the hole (A).
- After the cut-scene, take the PAINT SCRAPPER (B).
- Walk down.
- Use the CROSSBOW on the water stain (C).
- Re-enter the bathroom on the left.
- Look at the broken tile and take the RED GEM (D).
- Walk down 3 times.
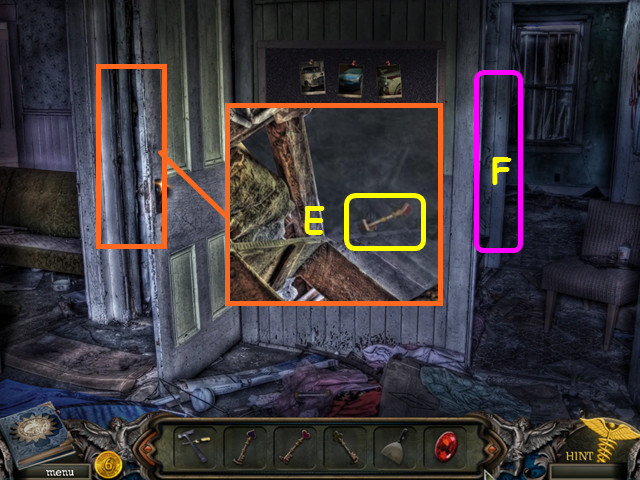
- Look in the basement and take the DIAMOND KEY (E).
- Return to the stairs (F).
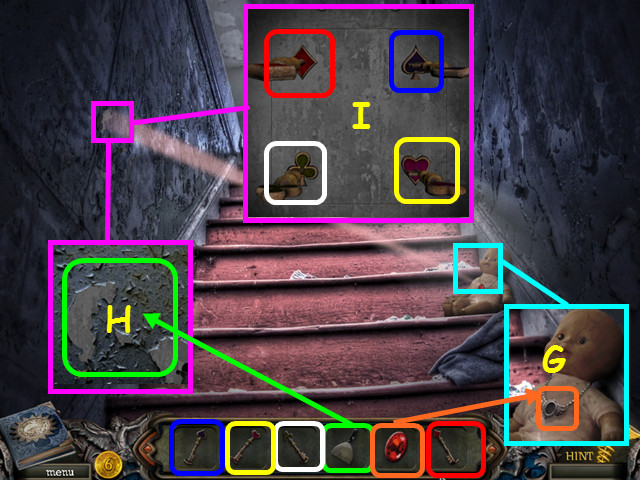
- Look at the doll and place the RED GEM in the necklace (G).
- Look at the spot on the wall where the light hits and use the PAINT SCRAPER 4 times to reveal a safe (H).
- Place the DIAMOND KEY, SPADE KEY, HEART KEY, and the CLUB KEY in the keyholes and remove the cover (I).
- Take the TILE PIECE from inside the safe.
- Walk down twice, go to the right and look at the storm cellar for a mini-game.
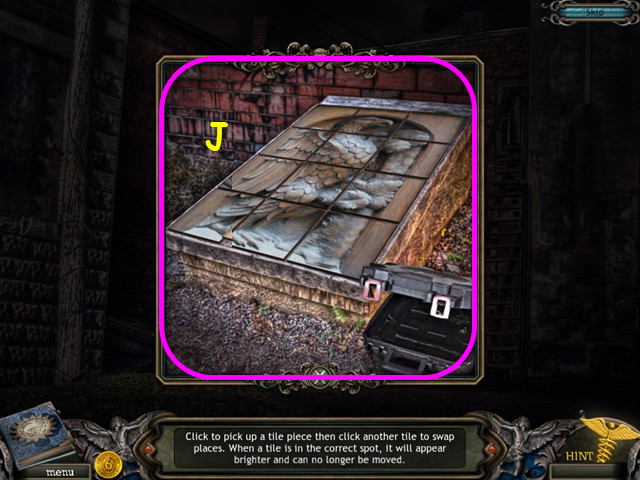
- Place the TILE PIECE in the grid to trigger the mini-game.
- Restore the carving by moving the tiles to the correct position (J).
- Select 2 pieces to swap positions.
- Take the FIRE HOSE once the door opens.
- Walk down twice.
Chapter 4: The Bridge and Park
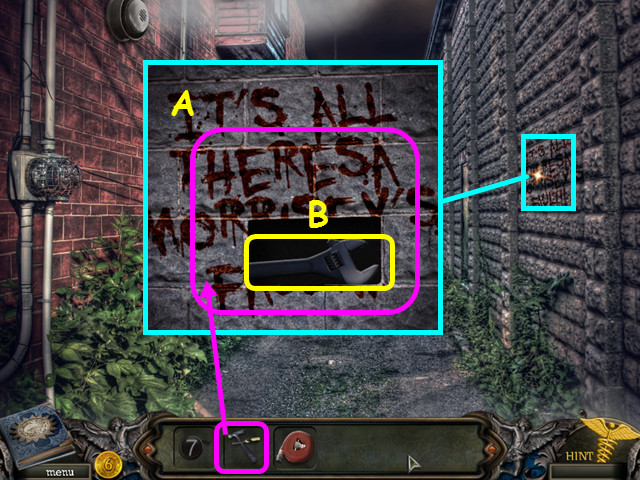
- Look at the graffiti and use the HAMMER AND CHISEL on the wall (A).
- Take the BIG WRENCH (B).
- Walk down, then go forward.
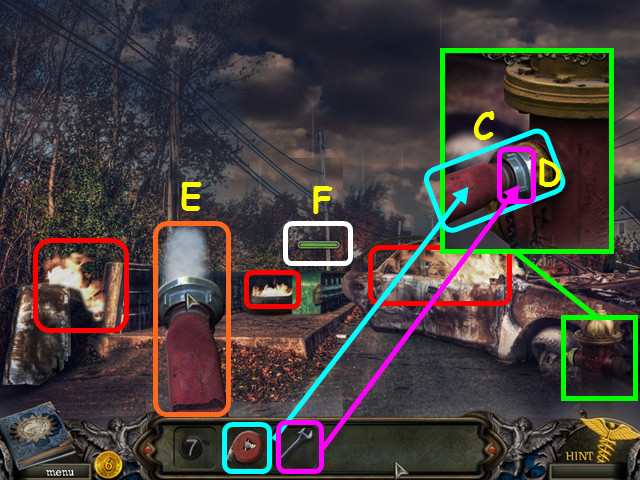
- Look at the hydrant and place the FIRE HOSE on the connector (C).
- Use the BIG WRENCH on the hose to trigger a mini-game (D).
- Aim the hose (E) at each of the 3 fires (RED) until they are out.
- Each fire will have a meter showing your progress (F).
- Walk forward across the bridge.
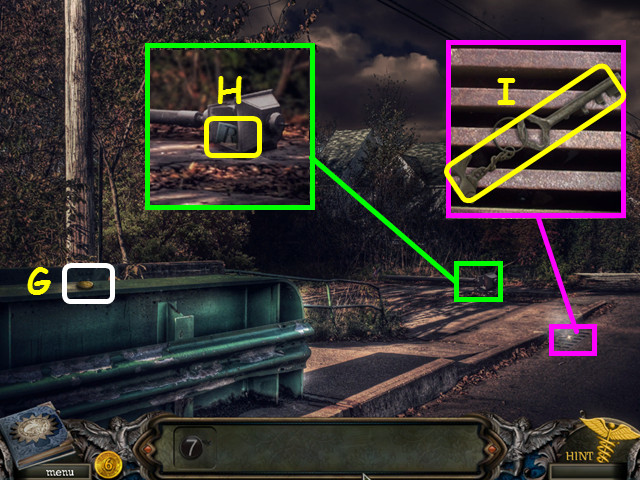
- Take the 11/28 COIN (G).
- Look at the fallen light and take the MANHOLE R (H).
- Look at the drain and take the TACKLE-BOX KEY (I).
- Walk down.
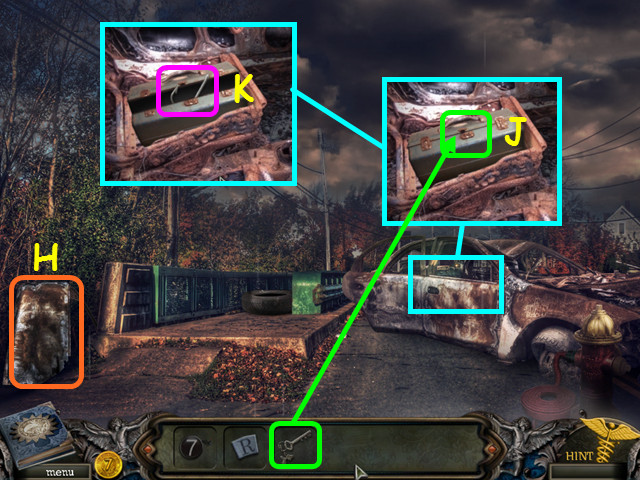
- Look inside the car and use the TACKLE-BOX KEY on the tackle-box (J).
- Take the HOOK (K).
- Move the piece of metal, then go down the path it hid (L).
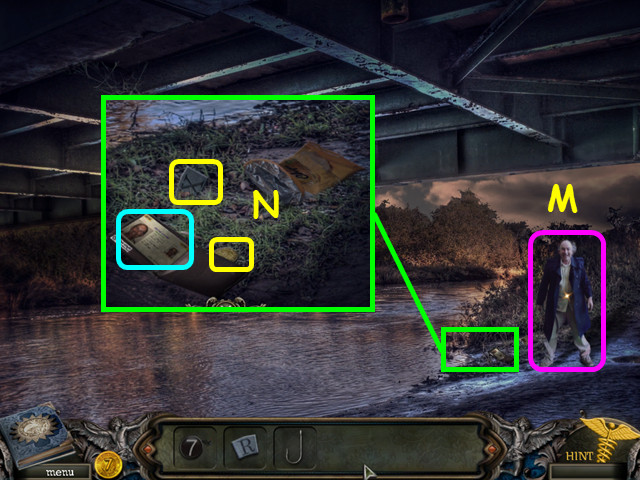
- Talk to the man to learn you will need birdseed (M).
- Look at the shore; take the 12/28 COIN, the MANHOLE X, and look at the license (N).
- Walk down twice.
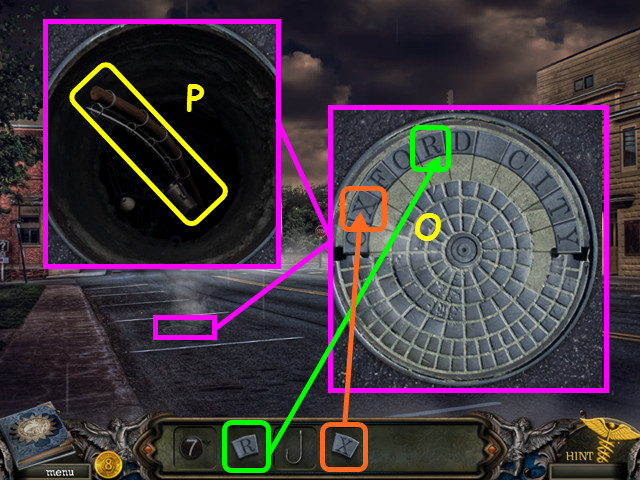
- Look at the manhole; place the MANHOLE X and the MANHOLE R into the lid (O).
- Remove the lid and take the FISHING ROD (P).
- Walk down, then go right to the vending machine.
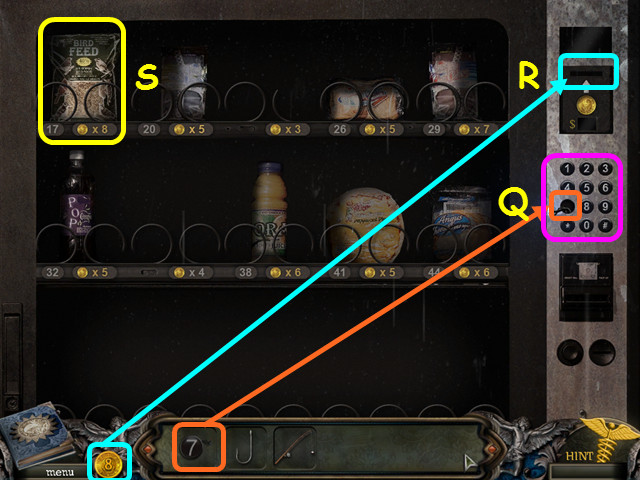
- Place the 7 BUTTON into the keypad (Q).
- Put 8 COINS into the slot (R).
- Enter 17 on the keypad to get the BIRDSEED (S).
- Walk down, go forward twice, then go left to the area under the bridge.
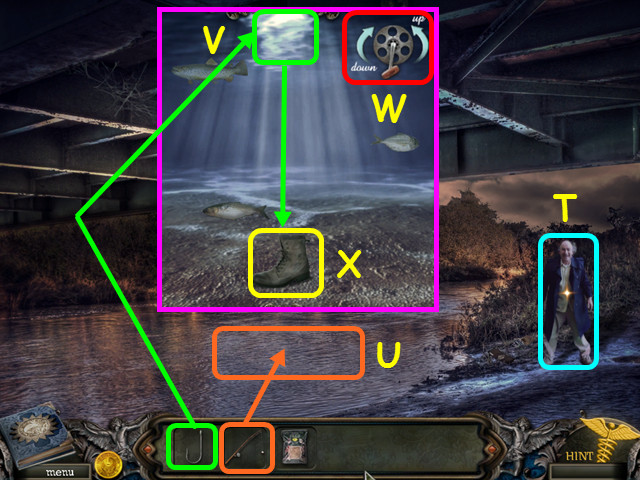
- Talk to the man to learn he wants his boot (T).
- Use the FISHING ROD on the water (U).
- Place the HOOK above the fish (V).
- Drag the reel (W) around to lower the hook to get the boot (X).
- Raise the boot while avoiding the fish; you will earn the BOOT.
- Give the BOOT to the man and he will give you the LANTERN (UNLIT).
- Walk down twice, go right, then go forward.
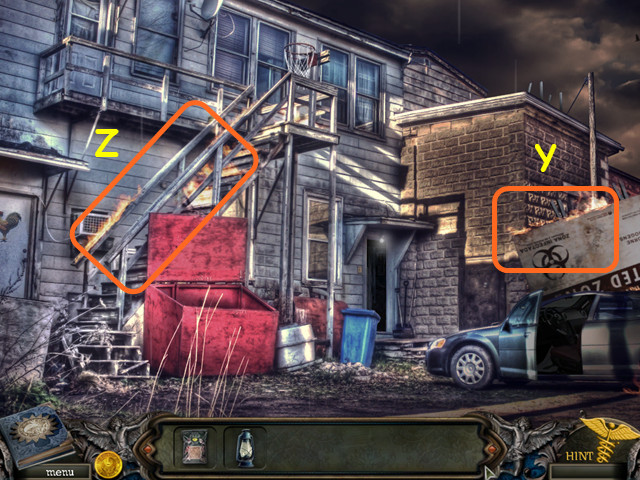
- Use the LANTERN (UNLIT) on the burning sign (Y) or the burning stairs (Z) to get the LANTERN (LIT).
- Walk down twice, then go forward twice.
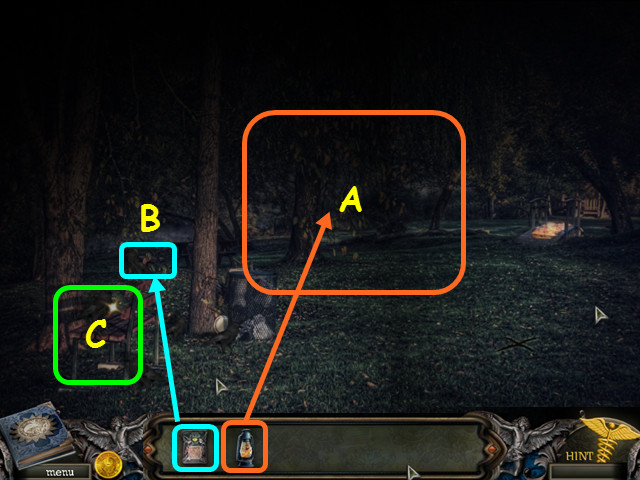
- Use the LANTERN (LIT) anywhere on the darkness (A).
- Give the BIRDSEED to the birds (B).
- Select the park bench for a HOS (C).
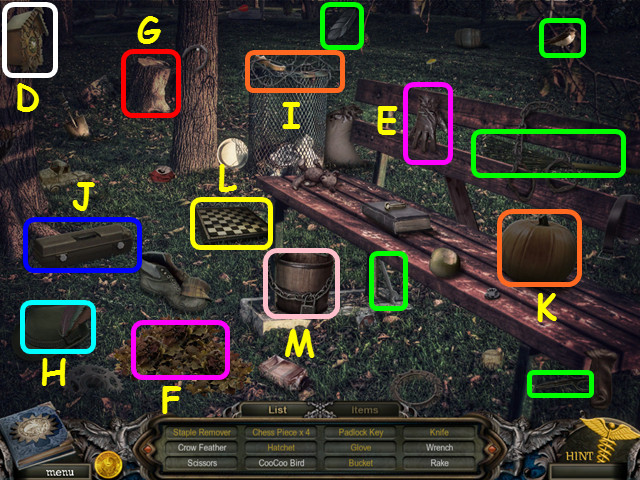
- Locate all the items on the list.
- Place the COOCOO BIRD in the clock to get the STAPLE REMOVER (D).
- Use the STAPLE REMOVER to get the GLOVE (E).
- Use the RAKE on the leaves to find the HATCHET (F).
- Use the HATCHET on the stump to get the first CHESS PIECE (G).
- Use the CROW FEATHER on the hat to get a second CHESS PIECE (H).
- Use the GLOVE on the wire to find the third CHESS PIECE (I).
- Look at the toolbox and use the WRENCH on the 2 bolts (J).
- Inside the toolbox, use the SCISSORS to open the package containing the KNIFE.
- Use the KNIFE on the pumpkin to find the fourth CHESS PIECE (K).
- Place the 4 CHESS PIECES on the board to find the PADLOCK KEY (L).
- Use the PADLOCK KEY on the chain, then take the BUCKET (M).
- Walk forward on the right towards the burning bridge.
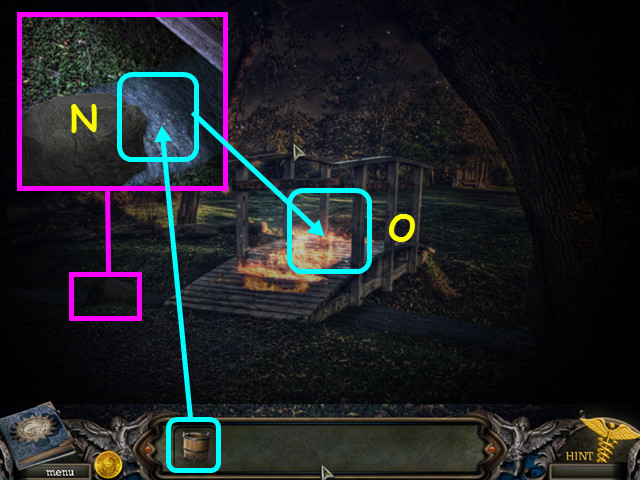
- Look at the boulder; use the BUCKET on the stream to get the BUCKET OF WATER (N).
- Use the BUCKET OF WATER on the flames (O).
- Walk forward.
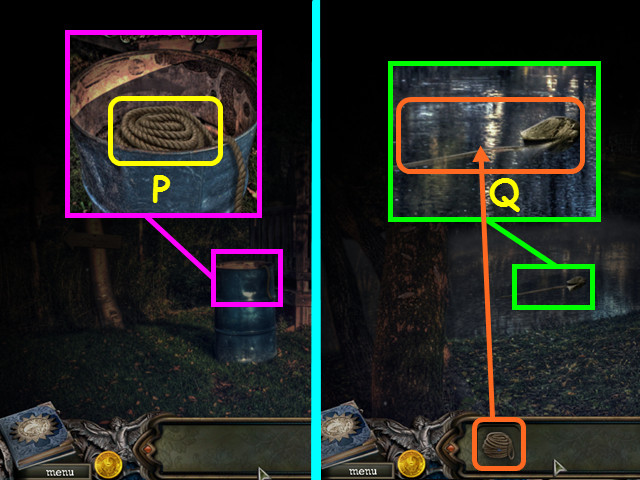
- Look in the barrel and take the LASSO (P).
- Walk to the left.
- Look at the water and use the LASSO to capture the SHOVEL (Q).
- Walk down 3 times.
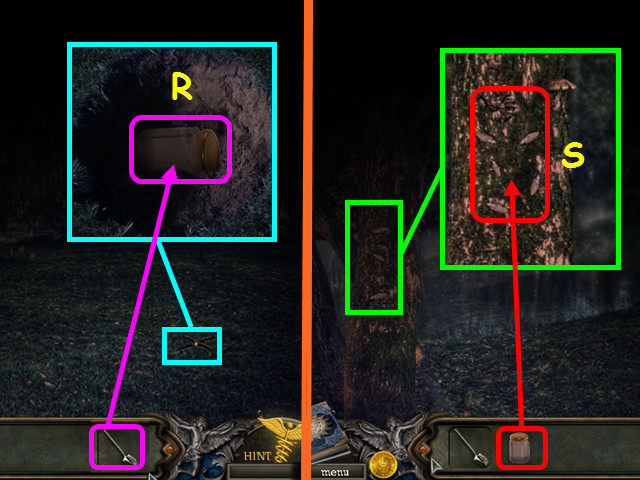
- Look at the 'X'; use the SHOVEL 4 times to reveal the GLASS JAR (R).
- Walk forward twice, then go left to the river.
- Look at the tree and use the GLASS JAR on the insects to make the JAR OF INSECTS (S).
- Walk down twice.
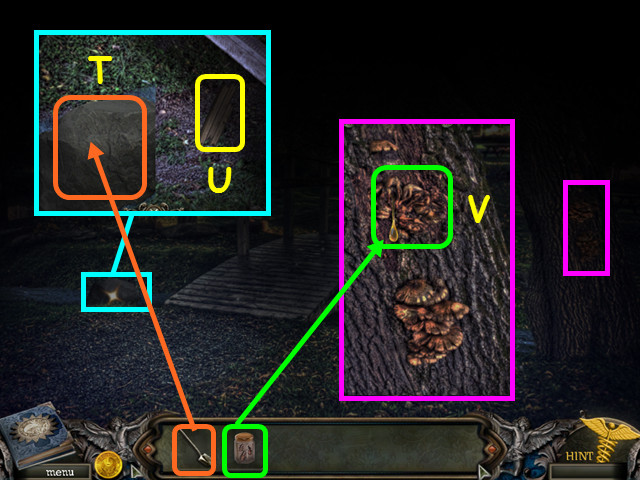
- Look at the boulder and use the SHOVEL to tip it over (T).
- Take the 1/5 BOAT PIECE (U).
- Look at the tree and use the JAR OF INSECTS on the fungus (V).
- The GLASS JAR will go back into your inventory; use it where the fungus was to get the TREE SAP.
- Walk forward.
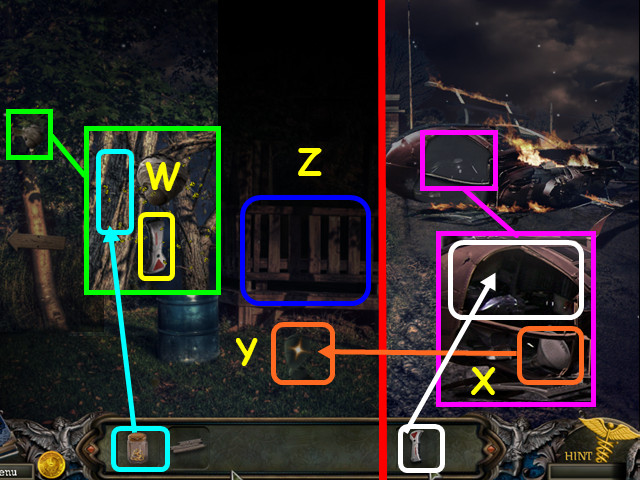
- Look at the beehive; use the TREE SAP on the tree to distract the bees, then take the GLASS BREAKER (W).
- Walk to the right.
- Look at the helicopter; use the GLASS BREAKER on the windshield and then take the FLOODLIGHT (X).
- Walk down.
- Look at the lamp and place the FLOODLIGHT inside (Y).
- Select the gazebo for a HOS (Z).
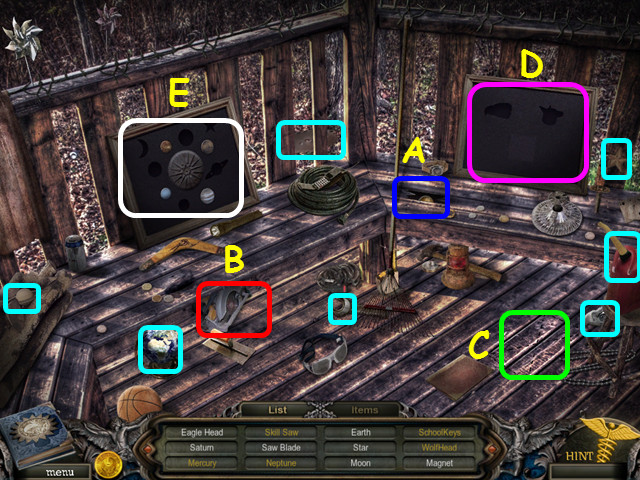
- Locate all the items on the list.
- Use the MAGNET on the hole to retrieve the MERCURY (A).
- Place the SAW BLADE in the SKILL SAW, the pick it up (B).
- Look at the 'X'; Use the SKILL SAW on the boards, then take the WOLF HEAD (C).
- Look at the frame on the right; place the WOLF HEAD and the EAGLE HEAD in the indentations, then take NEPTUNE (D).
- Look at the frame on the left; place NEPTUNE, EARTH, MERCURY, SATURN, the MOON, and a STAR into the corresponding indentations (E).
- Remove the center cover and take the SCHOOL KEY.
- Walk to the right.
- Look at the school door and use the SCHOOL KEY on the lock.
- Enter the school.
Chapter 5: The School
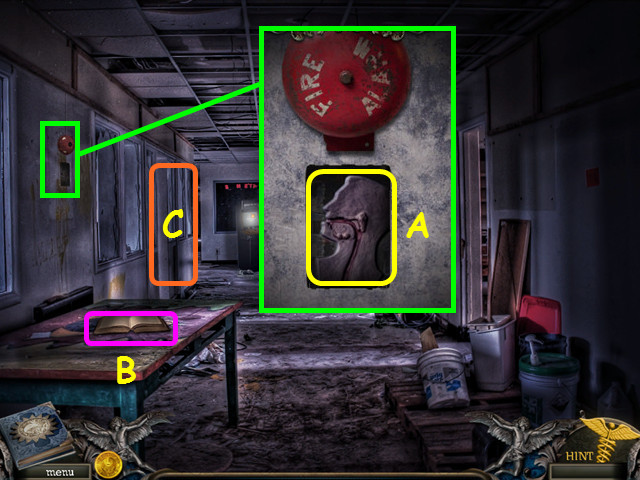
- After the cut-scene, walk to the left.
- Look at the fire alarm and take the HEAD DIAGRAM (A).
- Read the yearbook (B).
- Walk to the left (C).
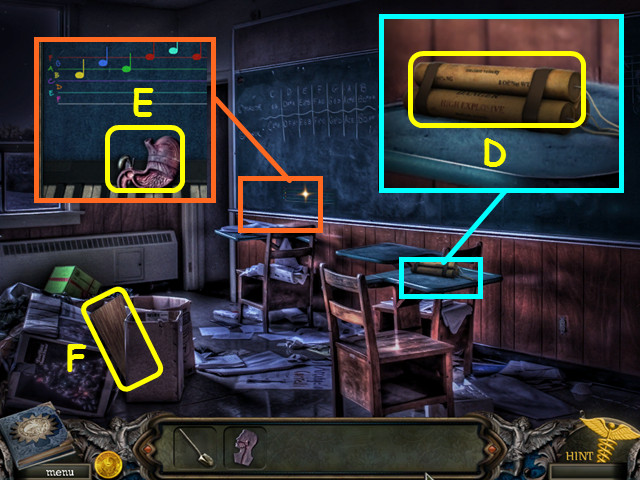
- Look at the desk and take the DYNAMITE (D).
- Take the 2/5 BOAT PIECE (E).
- Look at the lower left part of the blackboard and take the STOMACH DIAGRAM (F).
- Walk down, then go right.
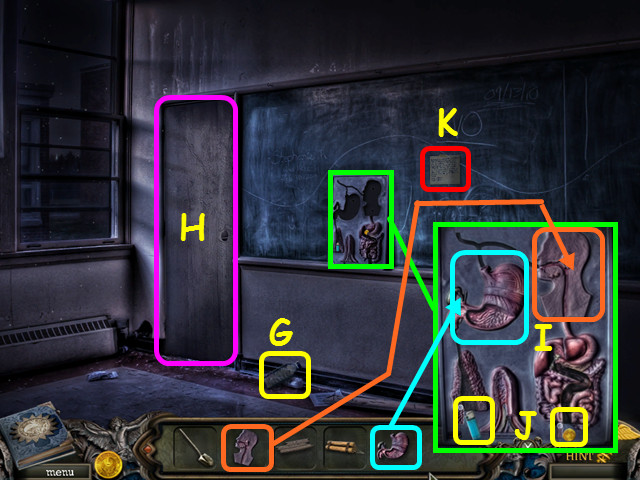
- Take the WATER BOTTLE (G).
- Note the door missing the knob (H).
- Look at the model; place the STOMACH DIAGRAM and the HEAD DIAGRAM in the indentations (I).
- Take the LIGHTER and the 13/28 COIN (J).
- Read the note on the chalkboard (K).
- Walk down twice.
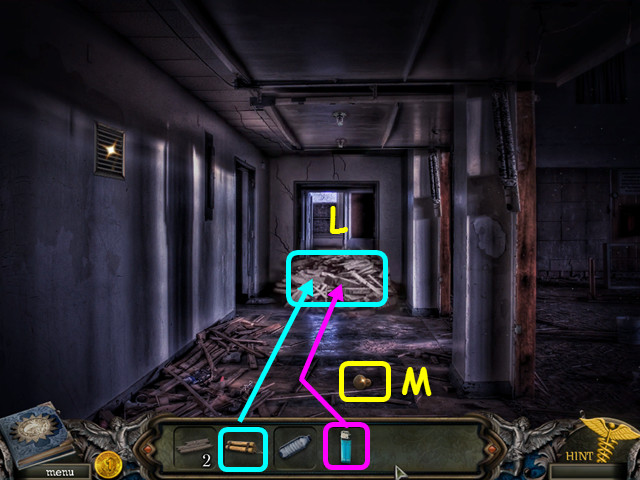
- Place the DYNAMITE on the rubble blocking the door, then use the LIGHTER on the dynamite (L).
- Take the DOOR KNOB (M).
- Walk left, then go right.
- Look at the door and place the DOOR KNOB in the hole.
- Select the door for a HOS.
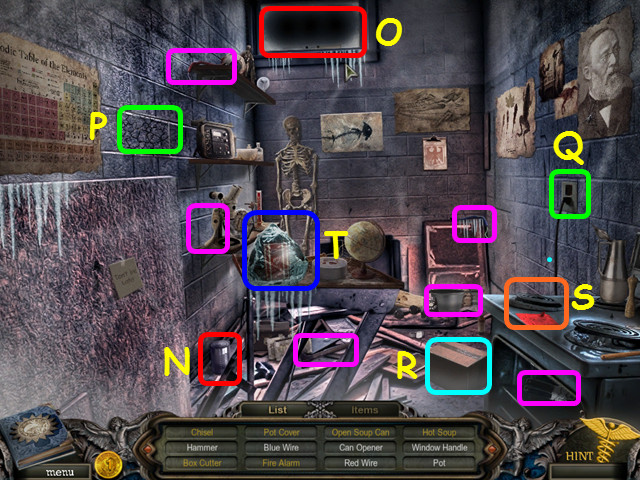
- Locate all the items on the list.
- Use the CAN OPENER on the can, then take the open can (N).
- Use the WINDOW HANDLE on the window; open it and take the CHISEL (O).
- Stick the CHISEL in the brick, then use the HAMMER on the chisel. Take the BOX CUTTER from inside the brick (P).
- Look at the outlet and attach the BLUE WIRE and the RED WIRE (Q).
- Use the BOX CUTTER to open the box, then take the POT COVER (R).
- Place the POT on the burner, pour the OPEN SOUP CAN into the pot, then place the POT COVER on the pot (S).
- Remove the pot cover and take the HOT SOUP.
- Pour the HOT SOUP on the ice, then take the FIRE ALARM (T).
- Walk down once.
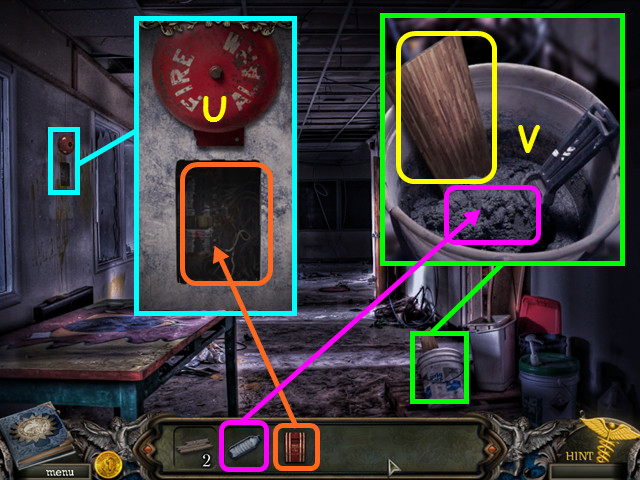
- Look at the fire alarm bell on the wall and add the FIRE ALARM, then pull the switch (U).
- Look in the bucket; pour the WATER BOTTLE on the plaster then take the 3/5 BOAT PIECE (V).
- Walk down. After the cut-scene, walk forward.
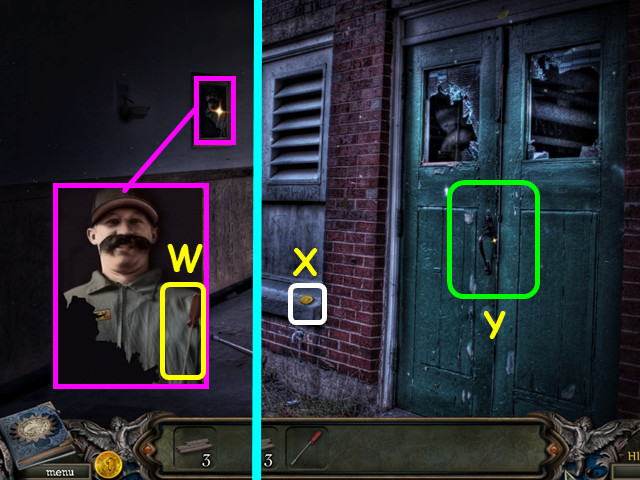
- Look at the photo and take the SCREWDRIVER (W).
- Walk forward.
- Take the 14/28 COIN (X).
- Note the locked doors to the power room (Y).
- Walk down twice.
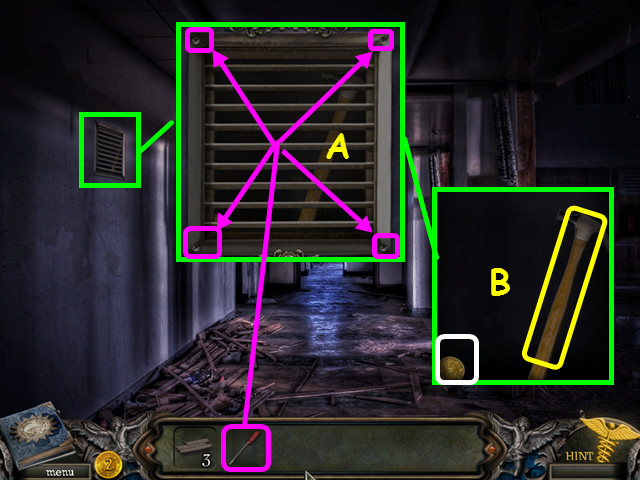
- Look at the vent and use the SCREWDRIVER on the 4 screws (A).
- Take the 15/28 COIN and the HAMMER (B).
- Walk forward.
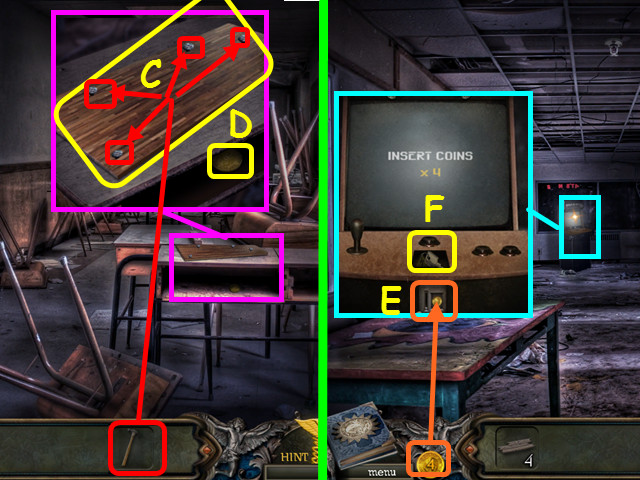
- Look at the desk and use the HAMMER to remove the nails (C).
- Take the 4/5 BOAT PIECE and the 16/28 COIN (D).
- Walk down, then go to the left.
- Look at the video game and place 4 COINS into the slot (E).
- Take the POWER ROOM KEYS (F).
- Walk down, then go forward twice.
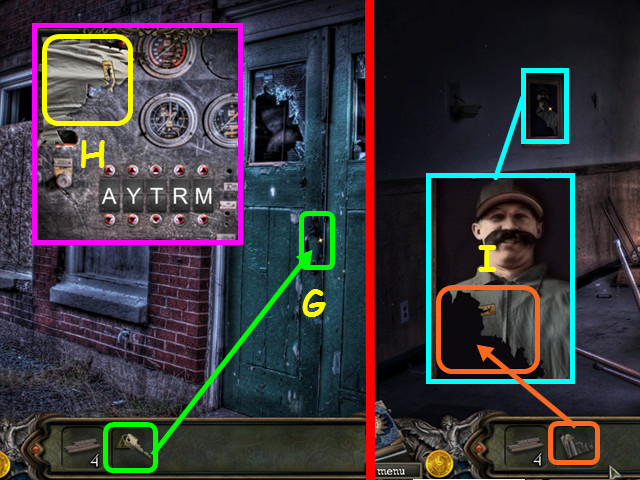
- Look at the door and use the POWER ROOM KEYS in the lock (G).
- Look inside and take the PHOTO PIECE (H).
- Walk down.
- Look at the frame and place the PHOTO PIECE inside to learn the name is Marty (I).
- Walk forward and look inside the power room.
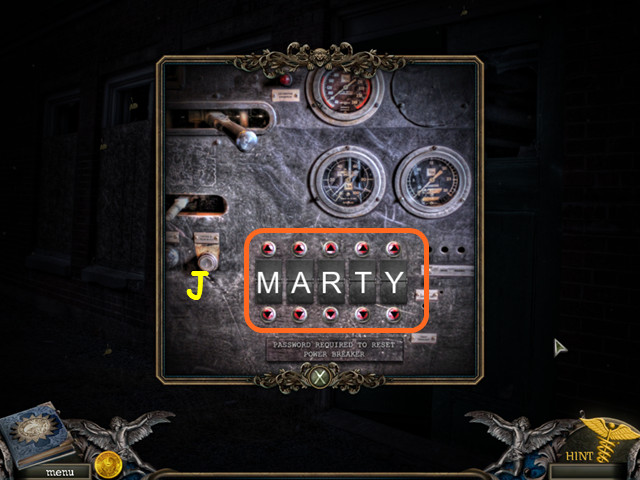
- Change the letters on the control to read M-A-R-T-Y (J).
- Walk down twice, the walk to the right.
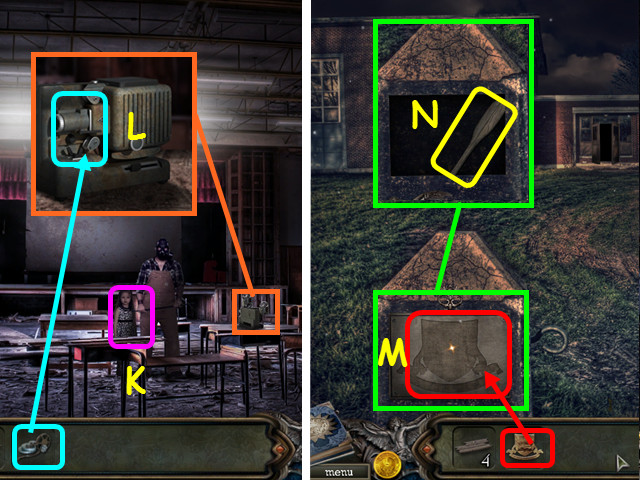
- Talk to the little girl and she will give you the FILM REEL (K).
- Look at the projector and load the FILM REEL (L).
- You will earn the SCHOOL EMBLEM.
- Walk down twice.
- Look at the sign and place the SCHOOL EMBLEM into the indentation (M).
- Take the 5/5 BOAT PIECE (N).
- Walk down, then go to the left.
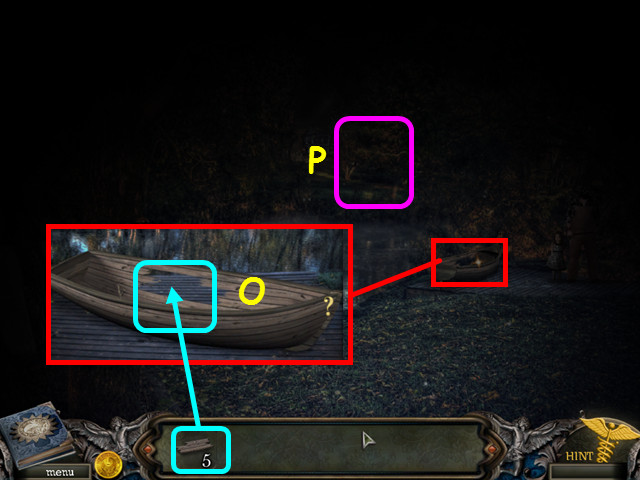
- Look at the boat and place the 5 BOAT PIECES inside (O).
- Select the boat again to move it to the water, then go forward across the river (P).
Chapter 6: The House and Station
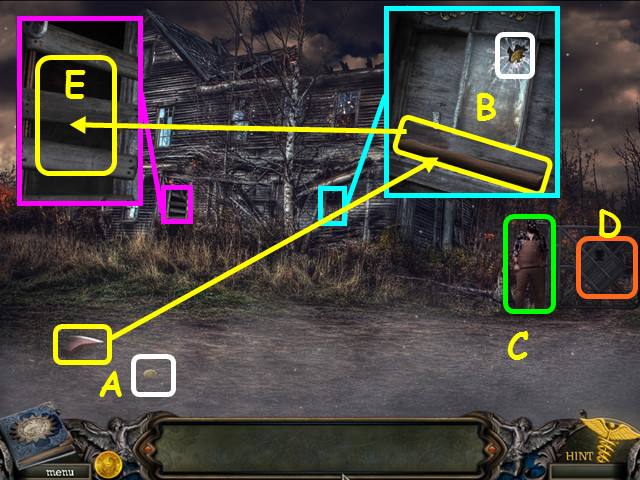
- Take the 17/28 COIN and the AXE HEAD (A).
- Look in the right window; take the 18/28 COIN and the axe handle (B).
- The axe handle will combine with the axe head to make the AXE.
- Talk to the masked man (C).
- Note the gate with the missing crest (D).
- Look at the boarded-up window and use the AXE 4 times on the boards (E).
- Look inside that window for a HOS.
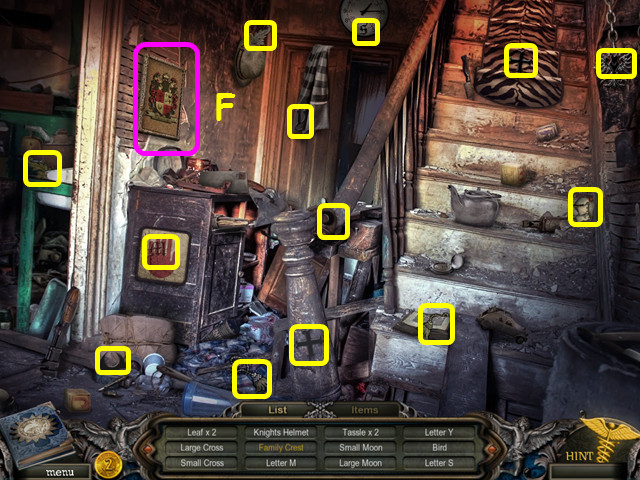
- Locate all the items on the list.
- Look at the family crest on the wall and place all the items you just collected into the crest (F).
- Take the FAMILY CREST.
- Look at the gate on the right of the house and place the FAMILY CREST into the indentation.
- Walk forward.
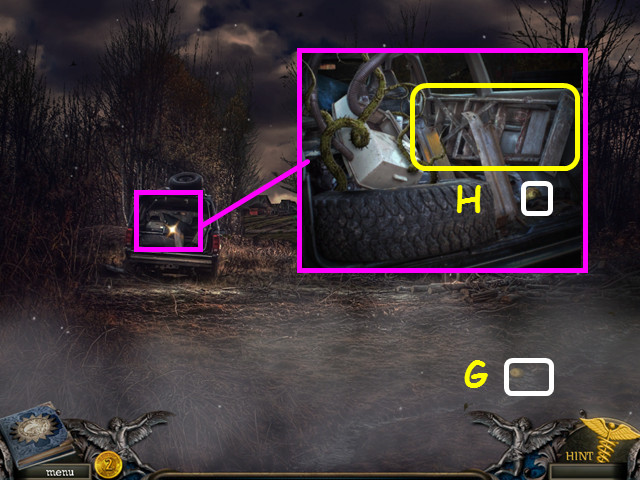
- Take the 19/28 COIN (G).
- Look inside the van; take the 20/28 coin and the LADDER (H).
- Walk down once.
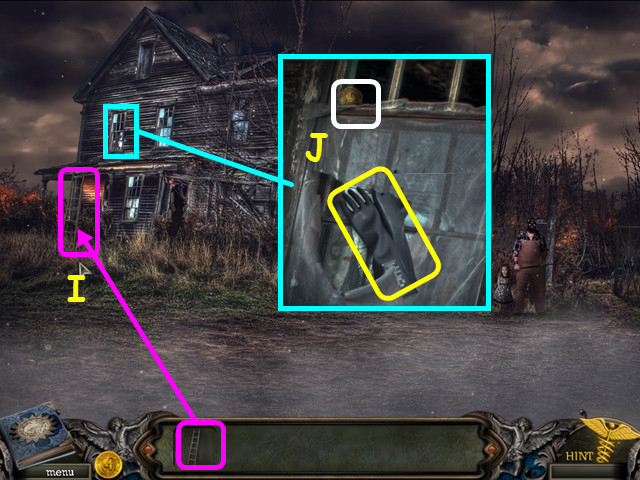
- Place the LADDER at the left end of the house (I).
- Look in the window; take the 21/28 COIN and the RUBBER GLOVES (J).
- Walk forward twice.
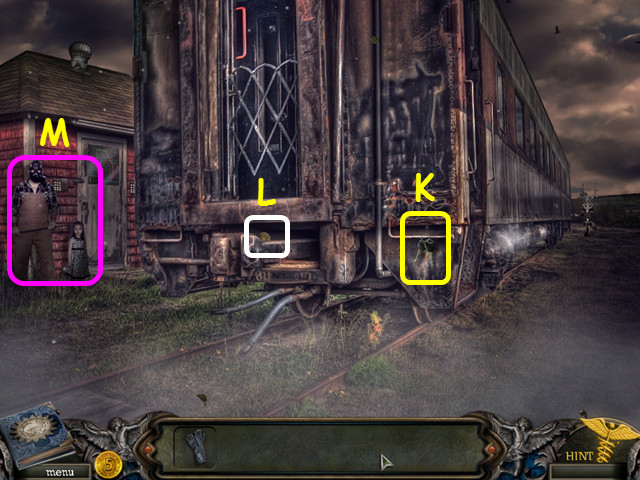
- Take the TRUCK KEYS (K).
- Take the 22/28 COIN (L).
- Talk to the masked man to learn you need a key card (M).
- Walk down.
- Talk to him again to learn about the short cut to the station.
- Walk down.
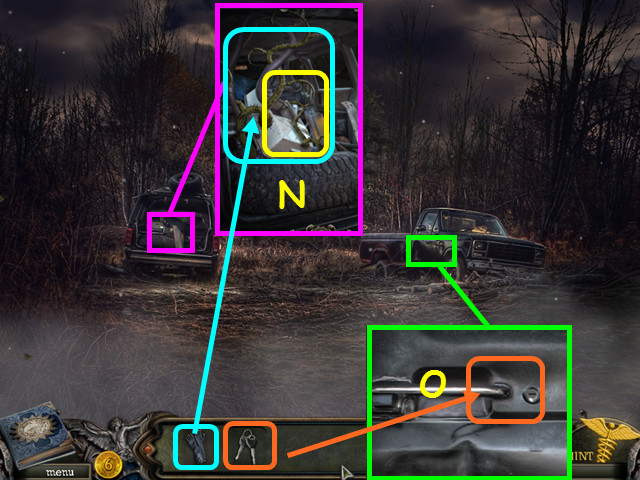
- Look inside the van on the left and use the GLOVES to remove the vines, then take the VACUUM (N).
- Look at the truck on the right and use the TRUCK KEYS on the lock (O).
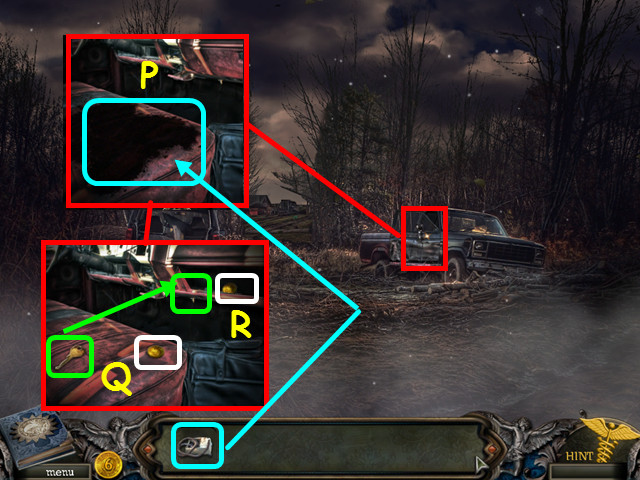
- Use the VACUUM on the debris (P).
- Take the 23/28 COIN and the GLOVE BOX KEY (Q).
- Use the GLOVE BOX KEY on the lock, then take the 24/28 COIN (R).
- Walk forward, right, forward, go left twice, then enter the bunker.
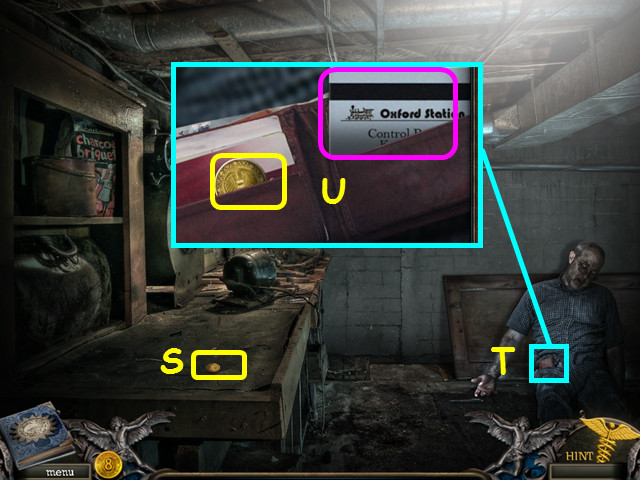
- Take the 25/28 COIN off the workbench (S).
- Examine the body, then look at the wallet (T).
- Take the 26/28 COIN and the KEY CARD (U).
- Walk down twice.
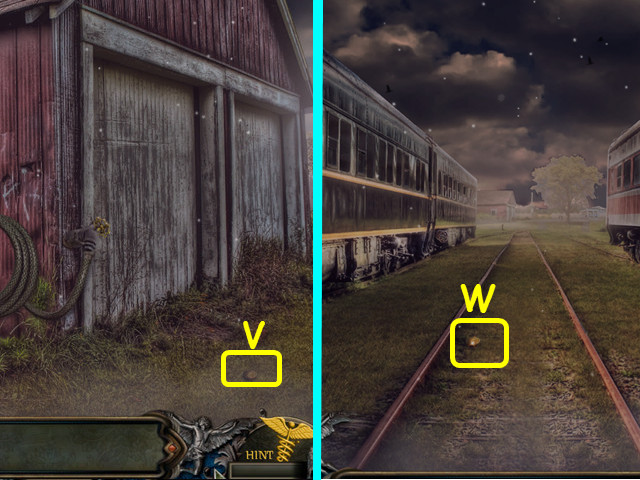
- Take the 27/28 COIN (V).
- Walk down twice.
- After the cut-scene, take the 28/28 COIN (W).
- Walk down.
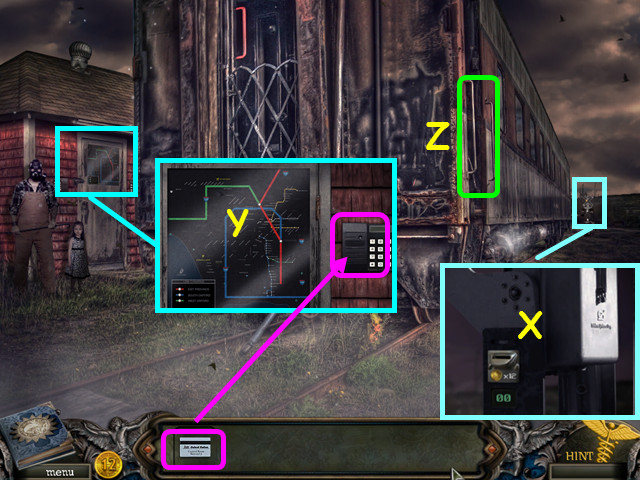
- Look at the toll arm and place 12 coins in the slot (X).
- Look at the shed and slide the KEY CARD in the reader (Y).
- Try to enter the shed for a cut scene.
- Board the train (Z).
- Congratulations, you have completed Infected: The Twin Vaccine Standard Edition!
Created at: 2012-07-28

