Walkthrough Menu
General Tips
- From the main menu you can change players, play the game, see the help screen and adjust some options.
- In the options menu you can adjust the volume, mute all sounds, and toggle full screen.
- In the bottom left corner of the screen is the task button and the case button.
- The case button shows all of the evidence you have collected so far. This is mostly just for the story.
- The task button when clicked will tell you what you need to do next.
- To the right side of the screen is a hit button that will glow green when you have a hint available. As you play the hints will slowly recharge.
- Below the hint button is the map button. The map will let you travel around an area quickly. Some parts of a chapter can only be gotten to with the map.
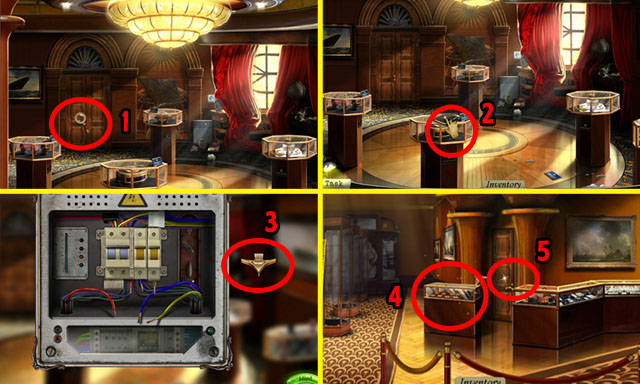
- There are 4 different types of cursors, show in the screenshot.
- The magnifying cursor tells you there is something that you can look closer at (1).
- The hand cursor tells you that there is something here to pick up (2). It may be and INVENTORY ITEM or just a piece of evidence to move the story forward.
- The arrow cursor shows that you can move to a new area or move back (3).
- There are groups of small sparkles that show a Hidden Object Scene (4) and single sparkles that show when something can be looked at or taken (5).
- If you cannot finish an area, try going to another place on the map. Sometimes there are tools in the other locations to help you.
- The hint button will help you skip some puzzles if you let it charge long enough.
- Some of the hidden objects are randomized and some of the puzzle solutions are randomized as well. You may have different answers in your play through, so the way to solve the puzzle is also explained.
- Anything that you have to move, or items that you get from a Hidden Object Scene will not be randomized.
Chapter 1: The Museum
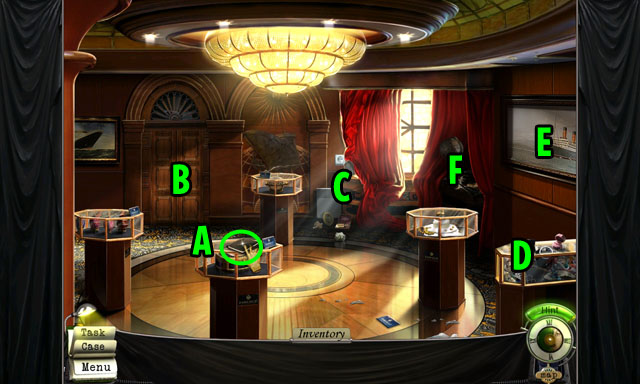
- Before starting the game, you must collect the journal on the closest podium (A).
- There is a door to the left missing a doorknob (B).
- Towards the middle of the scene there is a Hidden Object Scene by the curtains (C).
- On the broken podium to the right is another Hidden Object Scene (D).
- Click on the painting of the ship to reveal a hidden power box (E).
- To the right of the window is another scene with a broken lamp (F).
- Enter the Hidden Object Scene on the right (D).
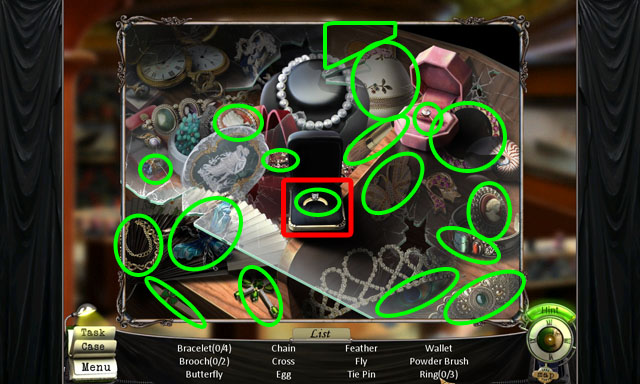
- Collect all of the hidden objects in the scene and you will receive a POWDER BRUSH in your inventory.
- When an object’s name is highlighted in yellow, it means you need to do something in the scene before you can collect that object.
- To collect one of the rings you need to first open the ring box highlighted in red.
- Enter the Hidden Object Scene near the curtains (C).
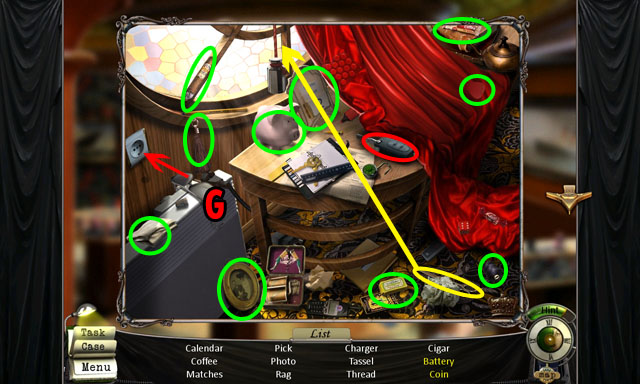
- Collect all of the hidden objects in the scene and you will receive a CIGAR in your evidence book.
- To collect the battery you first need to open the back of the car key circled in red.
- To collect the coin you must click and drag the scissors at the bottom right of the screen and use it on the string at the top left of the screen.
- The coin will be inside broken piggy bank.
- After finding all of the objects and reading the evidence book, go back to the scene.
- Plug in the power cord on top of the heater by clicking on it (G).
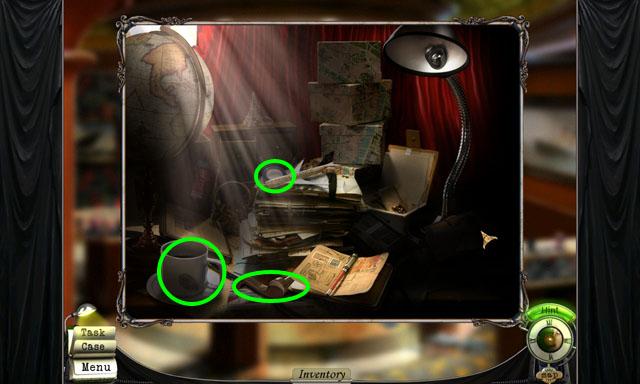
- Click on the globe near the right side of the window (F).
- Collect the DOOR HANDLE at the bottom of the scene and it will go in your inventory.
- Click on the coffee mug to collect a finger print for you case book.
- Collect the TAPE in the middle of the scene.
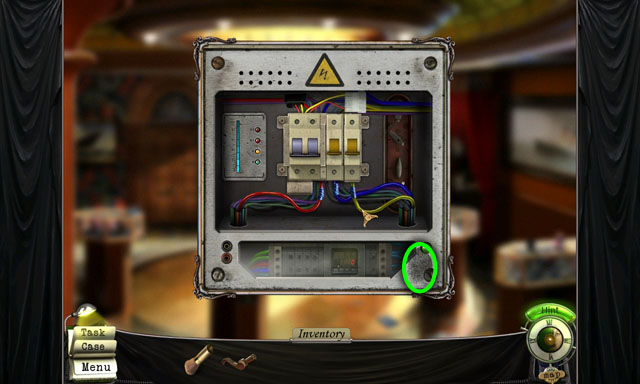
- Inspect the power box behind the painting (E).
- Click on the colored wires and connect them to the same colored wires that have been cut off.
- Use the TAPE on each wire to fix them.
- Flip the switches to turn the power on.
- Click on the finger print circled in green to collect it for your evidence.
- Go to the door at the left side of the room (B) and add the DOOR KNOB. Go through the door.
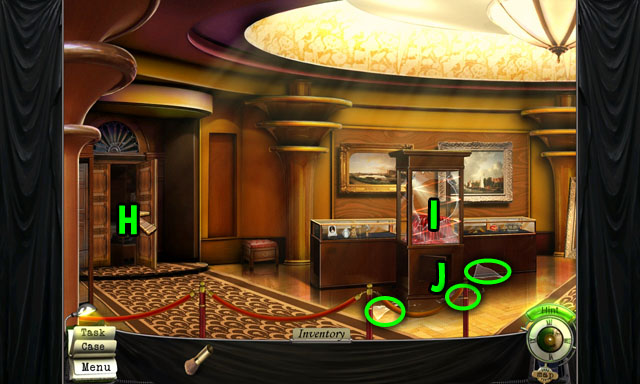
- This room is twice the size as the room before and you can move your mouse to the left or right to see the other side of the room. You can also click the mouse and hold to drag the view as well.
- When scrolled to the very left of the screen, you can see the exit to the previous room on the left (H).
- In the middle there is broken display (I) click on it to look inside. There is a security system activated so you cannot investigate further.
- Back in the main scene underneath the case behind the door is a power puzzle (J).
- Pick up the GLASS PIECES on the ground circled in green and enter to the power puzzle (J).
- This mini-game has you put the green and red circles in the green and red holders at the bottom of the screen.
- The holder at the bottom and the place the circles come from are switched, so you will need to find a way to move them across the scene.
- Move the rows of squares by pressing the green arrows.
- If there is no square below the circle, it will fall down to the next level.
- If the level above has no square and the level above that has a the red and blue magnet tile, the circle will go up on level and stick to the magnet.
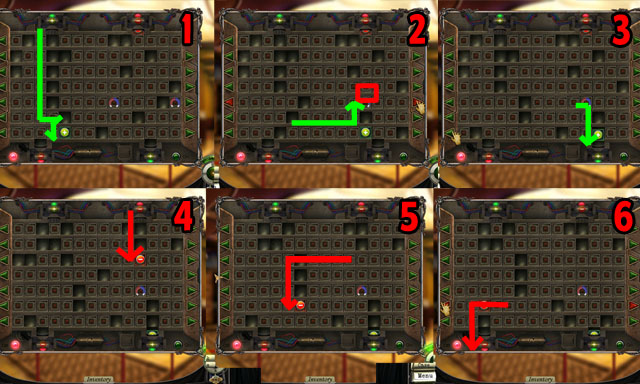
- First, get the green circle to the very bottom, making sure to move the bottom layer all the way to the left so that the green circle can go as far as possible to the right (1).
- Next move the green circle as far as you can to the right, then use the magnet to draw it up one level (2).
- Lastly, move the current level to the right and the bottom level to the left so that the green circle can fall into the green holder (3).
- To get the red circle, firstly move the top three rows so that it can fall down to the 3rd row. (4).
- Next, move the next four rows so that the red circle can drop down to the second to last row (5).
- Lastly, move the bottom two rows so that the red circle can fall into the holder (6).
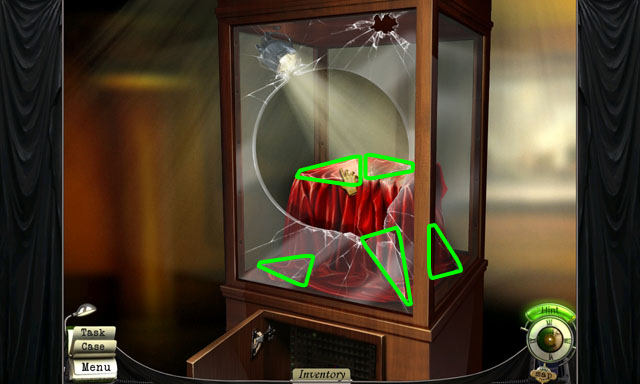
- After finishing the mini-game click the broken case to look inside again (I).
- Now the security system is powered down, and you can collect the 5 PIECES OF GLASS here.
- Exit the case.
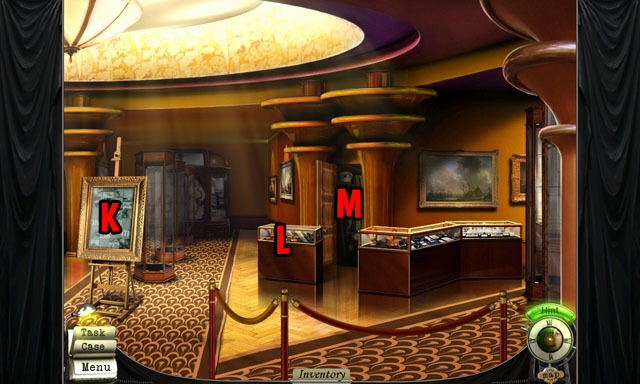
- You can get to the right side of the scene by dragging the mouse, or clicking on the arrow at the right of the screen.
- On the very right part of the scene is a poster on the left that you can’t open yet (K).
- In the middle is another case you can investigate (L).
- Through the door in the back is a Hidden Object Scene (M).
- Open the door and enter the Hidden Object Scene.
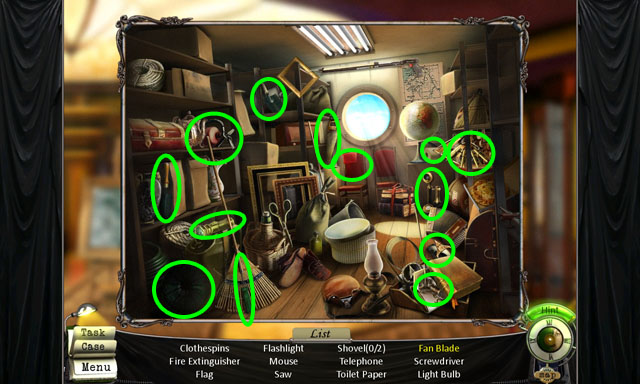
- Collect all of the hidden objects in the scene and you will receive a SCREWDRIVER and the LIGHT BULB in your inventory.
- The fan blade is inside the fan in the bottom left corner, circled in green.
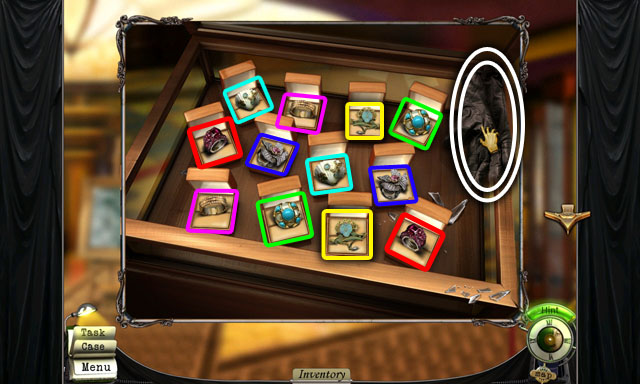
- After finishing the Hidden Object Scene, click on the case to the left of the door (L).
- Inside the case there are 12 small jewelry boxes that are all closed.
- If you click on one box and then another and the jewelry inside matches, the boxes will stay open.
- If the 2 boxes do not match, the first box will close when the second opens.
- See the screenshot for all the matching pairs.
- After finding all the matching pairs click on the gloves to the right to collect them as evidence.
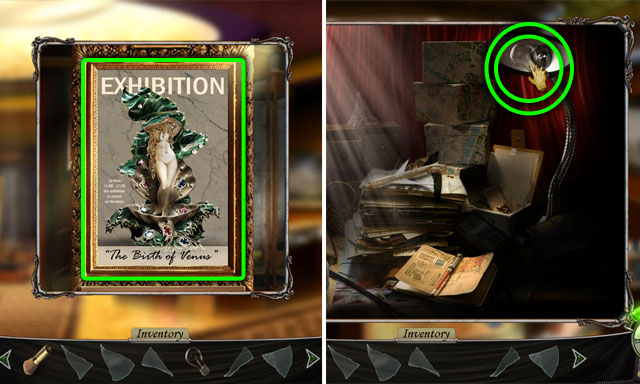
- Click on the poster to investigate (K).
- Use the SCREWDRIVER from your inventory to open the glass.
- Now you can start this mini-game.
- Click on box and then another beside it to switch their places.
- You cannot switch diagonally, only up, down, left and right.
- The word “EXHIBITION” is at the top and “The Birth of Venus” is at the bottom. Use these tiles to help you solve the puzzle.
- See the screenshot for the completed poster.
- Click the poster to collect it.
- After finishing this game return to the first room through the door to the very left of this double scene (H).
- Click on the scene with the lamp (F) and use the LIGHT BULB on the broken lamp.
- Click on the glass pieces to start the next mini-game.
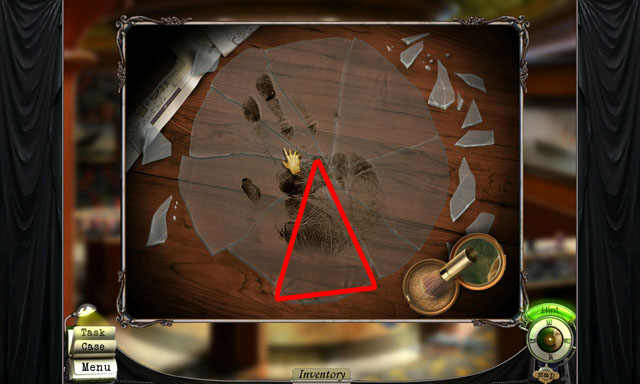
- Rearrange all of the glass shards to their original position in the window to finish this puzzle.
- The shard at the very bottom highlighted in red doesn’t move, and that is the one that you need to match the rest to.
- Click a shard to pick it up and click again to put it down.
- Right click when you have a shard to rotate it.
- When the shard is in the correct place, you cannot move it anymore.
- After completing the puzzle like in the screen shot, click the brush and use it on the finger prints.
Chapter 2: Palermo
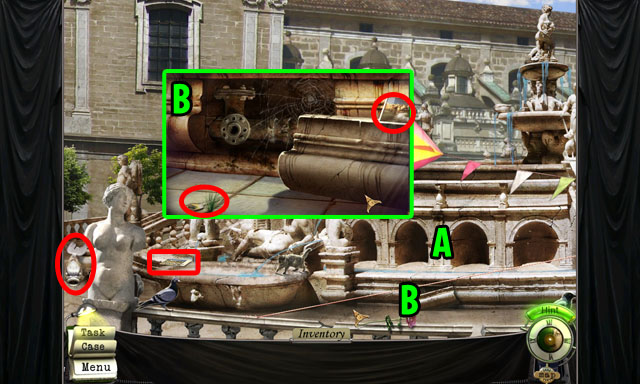
- This first scene is another double width scene and you can move your mouse to the left or right to see the other side of the fountain. You can also click the mouse and hold to drag the view as well.
- When scrolled to the very left of the screen, you can see a POSTCARD on the fountain to the left circled in red. Collect it.
- There is also a FISH STATUE to the very left circled in red for you to collect.
- In the fountain, with 5 dark arches, you can put the sculptures that you find (A).
- Below that is a broken piece of the fountain that is missing a valve (B). Enter this area and collect the KEY and the POSTCARD.
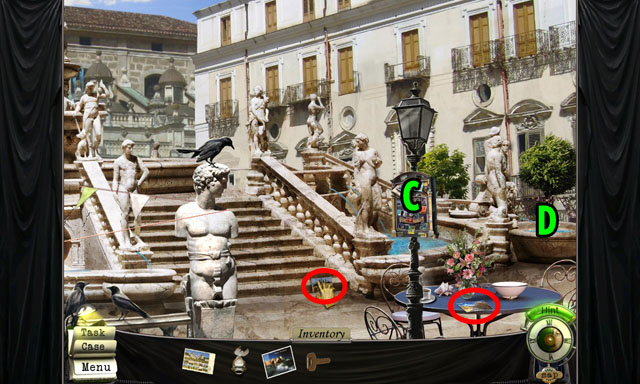
- Scroll the view all the way to the right by clicking at the side of the screen or clicking anywhere and dragging.
- Collect the two POSTCARDS circled in red.
- The postbox is where you will use all the POSTCARDS once you have collected them (C), but you still need more.
- There is a Hidden Object Scene to the right of the screen (D). Click on it to enter.
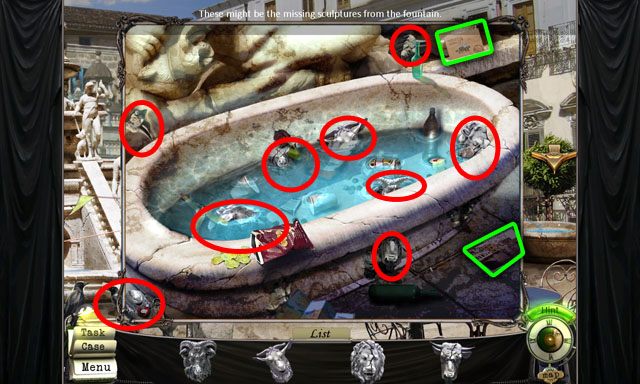
- Collect all of the hidden objects in the scene and you will receive 4 SCULPTURES in your inventory.
- The hidden objects in the scene are pieces of the inventory items that you are looking for.
- As you find the pieces, they will be removed from the list below.
- After finishing the scene, pick up the two postcards circled in green and go to the postbox in the previous scene (C).
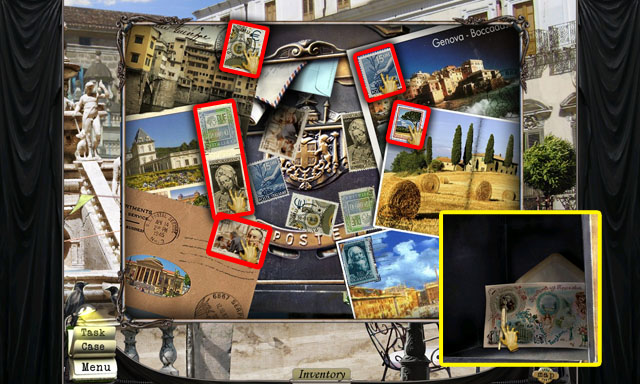
- When you enter this scene the POSTCARDS in your inventory will automatically be added to the background.
- Match the stamps to the postcards by putting them in the correct position.
- The shape of the stamp should match the shape of the square that it goes in.
- Left click the stamp to pick it up and left click again to place it.
- Right click the stamp to spin it. Some of the stamps are upside down. Look for clues like the Euro sign or a sky to help you flip them the right way.
- See the screenshot for the solution.
- After solving the puzzle, use the KEY from your inventory on the lock.
- Click the letters inside the box to remove them until you find the TWEEZERS.
- Collect the TWEEZERS and exit the scene.
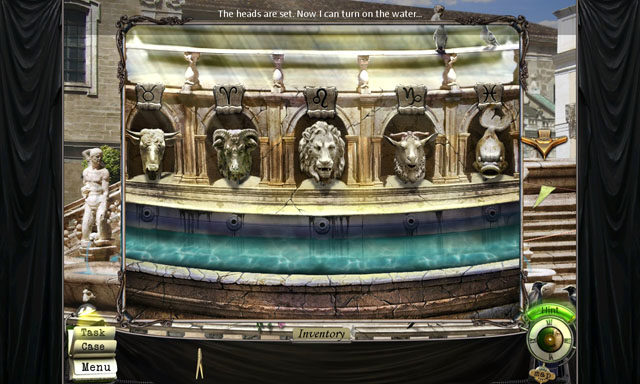
- Move all the way to the left in the main scene and go to the fountain (A).
- Inside the fountain, place all of the statues under the symbols that match their astrological sign.
- The correct order is: Bull, Ram, Lion, Goat, Fish.
- Click on the map button, below the hint button to travel to a new place.
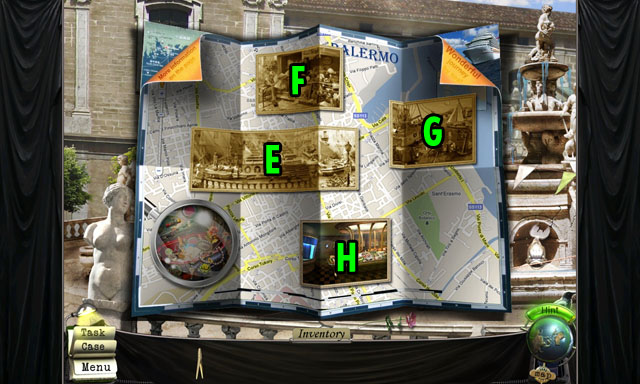
- This is the map for this area.
- The fountain is in the middle (E).
- Above it is the small shop (F).
- To the right are the docks (G).
- Below the fountain is the market (H). Go to the market next.
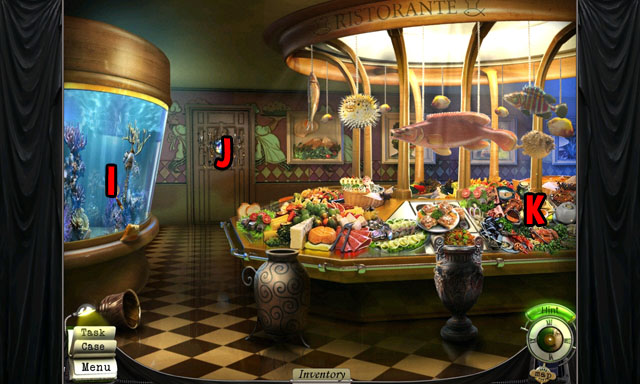
- Clicking on the left side of the scene will show you the aquarium. You can’t do anything there yet (I).
- The door in the back is locked with a puzzle (J).
- There is a Hidden Object Scene to the right (K).
- Enter the Hidden Object Scene.
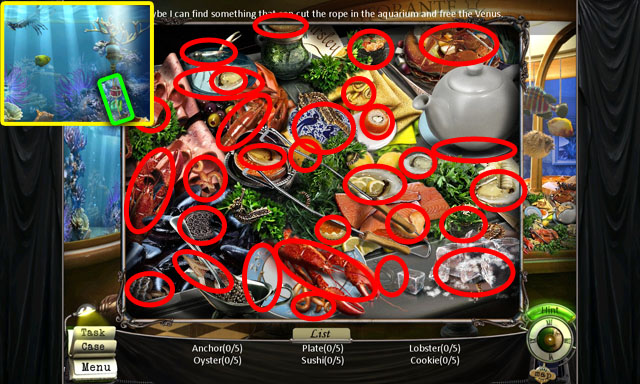
- Collect all of the hidden objects in the scene and you will receive the LOBSTER in your inventory.
- Use the LOBSTER on the aquarium (I).
- Click the line to the right for few times to move the LOBSTER. Then the LOBSTER will cut the line. Collect the FOUNTAIN PIECE.
- Click on the door in the back to start the next mini-game (J).
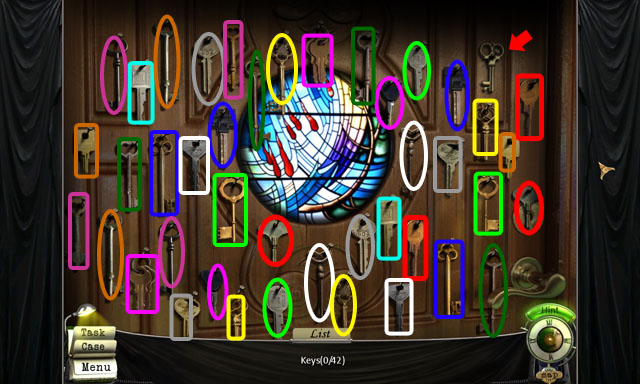
- Collect all of the matching keys to find the one key that doesn’t have a pair.
- The pairs of keys are circled in similar colors and shapes in the screenshot.
- Use the final single KEY on the lock and then click the handle to open the door.
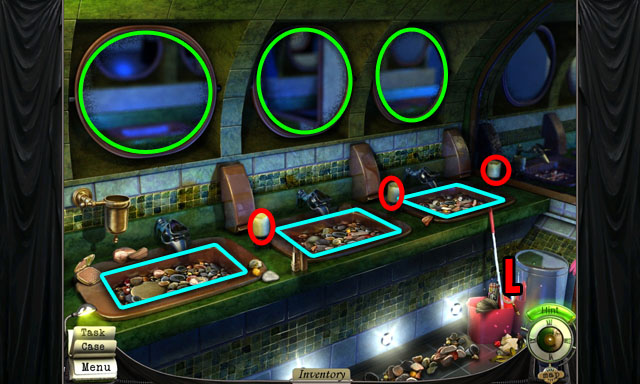
- This room has three basins for you to search, highlighted in blue, but it is too dark to look in there at the beginning.
- Click on the three mirrors circled in green to turn them towards the basins.
- Now you just need something to light the candles circled in red.
- Enter the Hidden Object Scene in the bottom corner (L).
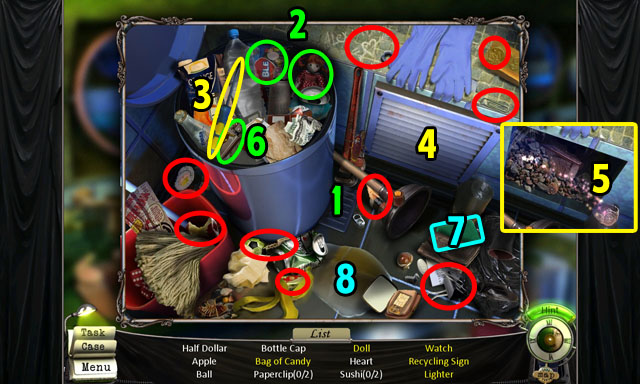
- Collect all of the hidden objects in the scene and you will receive the LIGHTER in your inventory.
- Many things in the scene cannot be found without first opening or interacting with an object.
- Click the foot pedal (1) to open the trash can (2). Collect the doll and bag of candy in the can.
- Use the screwdriver in the can (3) on the grate (4) to open it.
- Collect the watch from behind the grate (5).
- Collect the lighter (6) in the trash can.
- Use the sponge (7) on the water spot (8) to collect the recycling sign.
- After finishing the scene, use the LIGHTER on the candles in the previous scene.
- Enter the basins from left to right to investigate further.
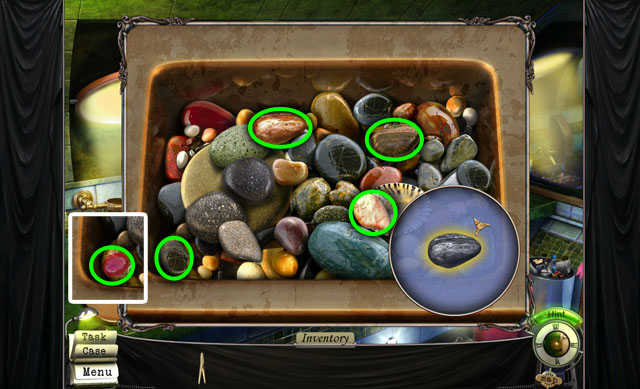
- Find the rocks shown in the bottom right corner of the screen until you find the gem stone.
- The picture of the rock will be in black and white, but the rock may have a different color. This making them a little harder to find.
- Concentrate on finding something with the same shape.
- After finishing this scene go to the middle basin.
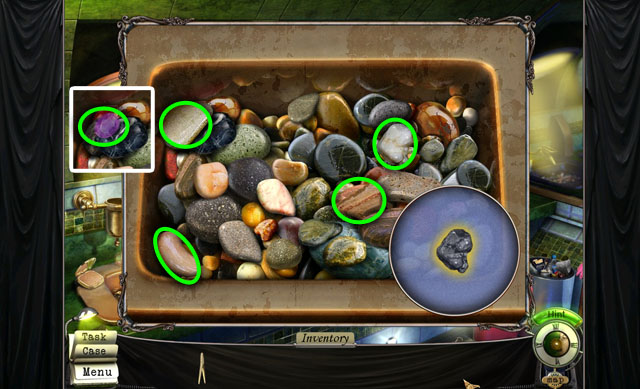
- Find the rocks shown in the bottom middle of the screen until you find the gem stone.
- After finishing this scene go to the right basin.
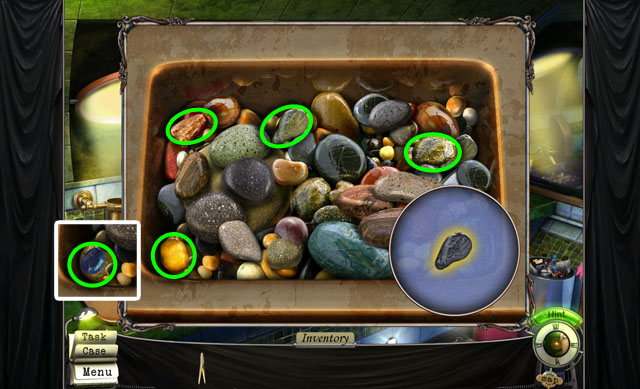
- Find the rocks shown in the bottom left corner of the screen until you find the gem stone.
- After finding all of the gems, this area is finished.
- Use your map to go to the docks (G).
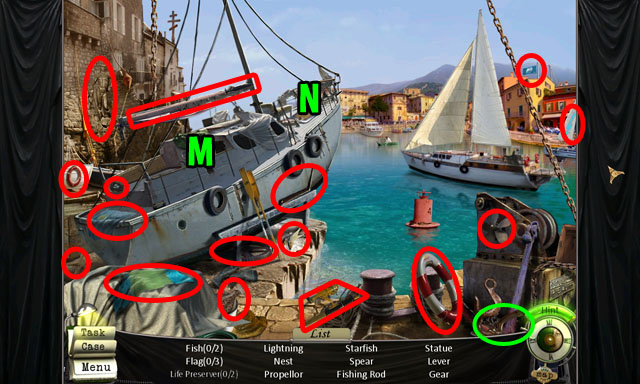
- When you first enter this scene it will be a hidden object scene.
- Collect all of the hidden objects in the scene and you will receive a WHEEL and a HANDLE in your inventory.
- There is another Hidden Object t Scene inside the boat (M) and a locked door at the front of the boat (N).
- Collect the PIECE OF VALVE circled in green in the bottom right corner.
- Go inside the Hidden Object Scene (M).
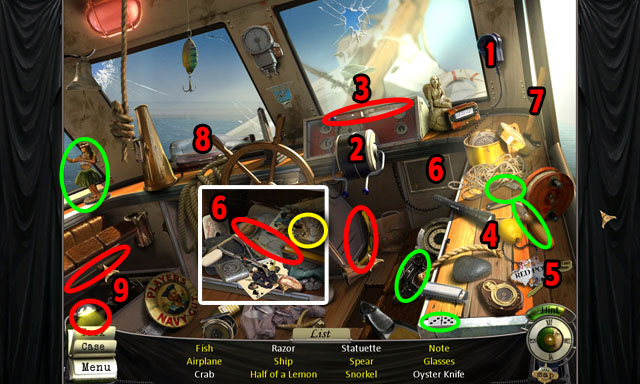
- Collect all of the hidden objects in the scene and you will receive an OYSTER KNIFE in your inventory.
- There are many hidden objects that you cannot collect without interacting with something. These are in yellow text at the bottom.
- Click on the radio (1) to collect the note.
- Click on the accelerator (2) to collect the snorkel.
- Use the knife (3) to cut the lemon in two (4) and collect the half of a lemon.
- Use the key (5) on the lock (6) and collect the glasses and oyster circled in yellow on the inside of the locked box.
- Use the hammer (7) on the ship (8) and collect it.
- Open the seat (9) to collect the airplane, fish and spear.
- After the Hidden Object Scene is finished, go back to the locked box (6) and take the piece of the statue for evidence. It looks like a shell.
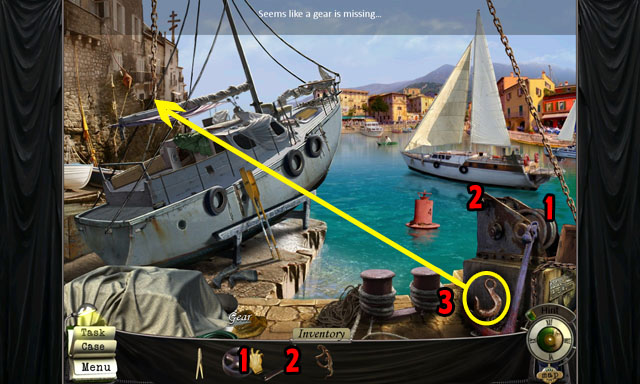
- Return to the previous scene and use the GEAR on the machine to the right (1).
- Use the LEVER on the machine as well (2) and then pull the lever.
- A chain will drop down from the ceiling.
- Take the HOOK (3) and use it on the chain.
- Pull the lever again to make the chain go up and reveal another Hidden Object Scene.
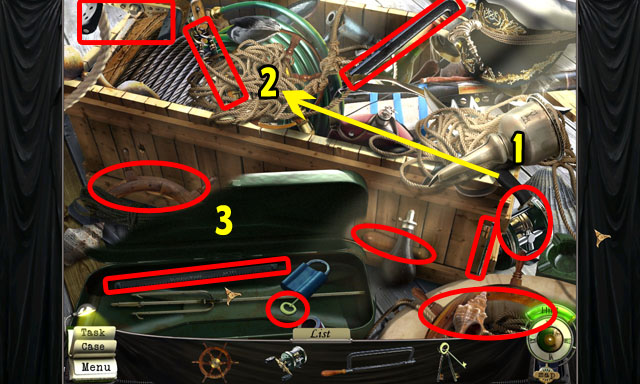
- Collect all of the hidden objects in the scene and you will receive a SAW in your inventory.
- Use the knife (1) to cut the rope (2) and collect the last piece of the wheel.
- Open the green lid (3) and take the last piece of the fishing rod from this case.
- Collect the key by clicking on the lock and key and then taking the key. In the docks scene, go to the hatch at the front of the boat (N).
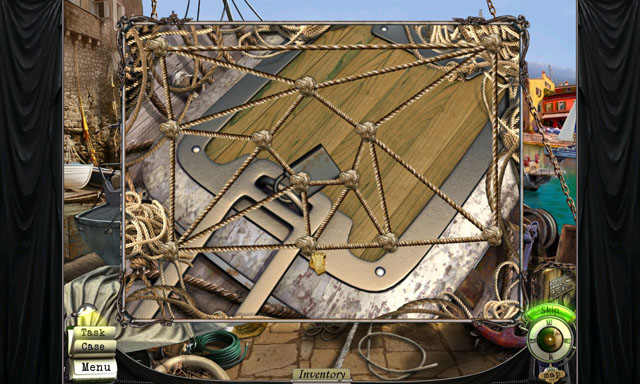
- This mini game has you rearrange the rope so that none of the lines are overlapping each other.
- If a line overlaps another, it will turn red.
- Grab the knots by clicking and then drop them again by clicking.
- Try to put the knots with the least connections on the outside.
- Then start moving knots into a position where none of its lines are overlapping another, and then move to the next knot.
- The screenshot has the beginning and ending points of the dots numbered.
- Rearrange the knots following the numbers to finish the puzzle.
- Then use the HAXSAW on the lock.
- Use the OYSTER KNIFE on the oyster and collect the jewels.
- Also collect the PIECE OF VALVE.
- Next go to the small gallery (F).
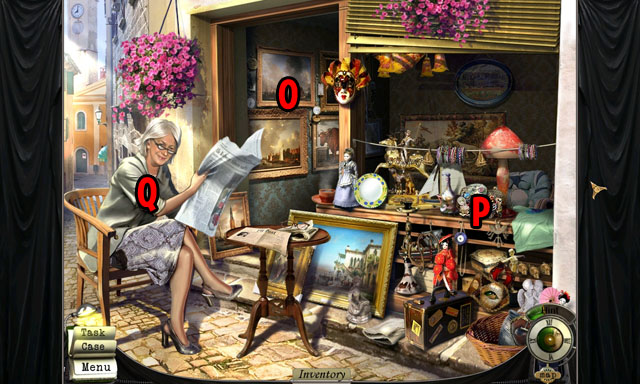
- First click on the paintings on the back wall (O).
- There is also a Hidden Object Scene here later (P), but you cannot get to it now.
- The shop keeper is in the scene as well, sitting on the left (Q).
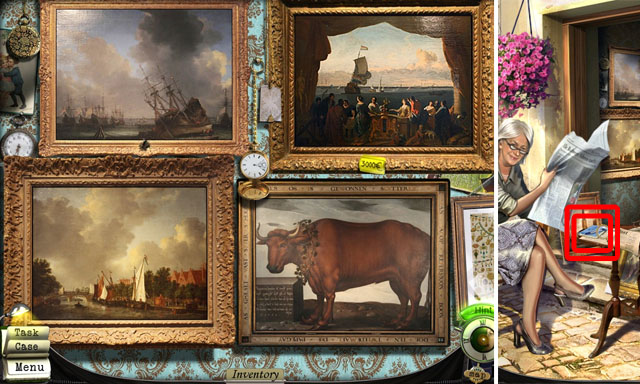
- Rearrange the pieces of the four paintings until they have been put together correctly.
- Start by trying to put together one painting, the painting of the bull first, because it is easy to tell what parts belong to the bull.
- Many of the painting pieces are in the correct location, but in the wrong painting at first.
- It doesn’t matter which panting you create where, as long as all 4 paintings are correct in the end.
- The paintings with the large skies in them have different colors. Use this to help you separate them out.
- See the final solution in the screen shot.
- This will open up a safe behind the upper right painting. Click on the safe. Ask the shop keeper about this painting (Q).
- She will give you a notebook highlighted in red with the answer. It is on the table in front of here.
- Click on the notebook to investigate further.
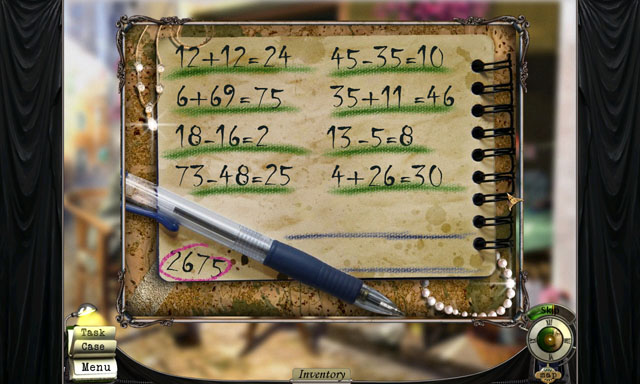
- This mini-game has you figure out the missing numbers in the equations.
- Click and drag the numbers from the bottom right corner to the “00”s in the equations.
- There will be a few numbers left over.
- See the screenshot for the answers.
- You will receive the combo for the lock 2675. Collect the number.
- Return to the lock and enter the combination.
- Click on the PIECE OF VALVE to take it, and it will tell you to ask the shop keeper first.
- Return to the shop keeper (Q) and ask about the PIECE OF VALVE.
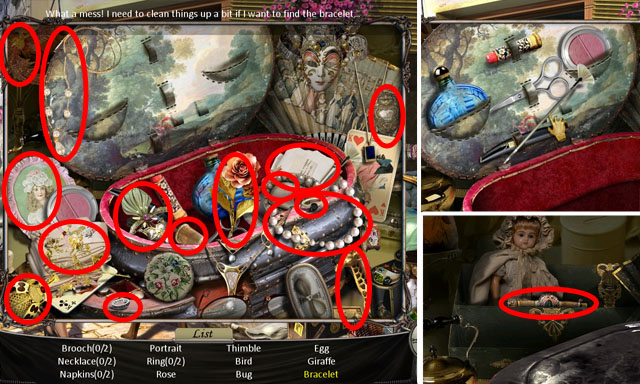
- Click on the Hidden Object Scene (P).
- Collect all of the hidden objects in the scene and you will receive BRACELET in your inventory.
- Give the BRACELET to the store keeper (Q).
- Return to the safe (O).
- Get the PIECE OF VALVE from the safe.
- Return to the fountain area with your map (E).
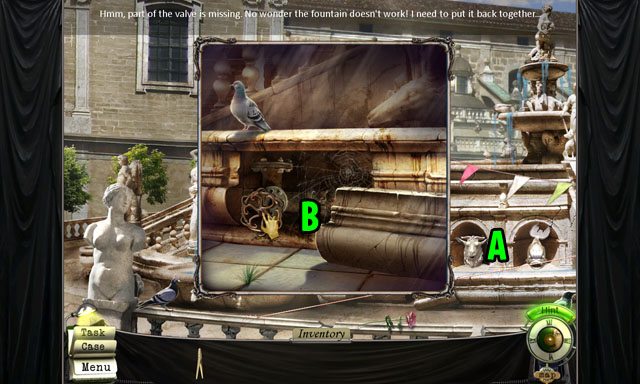
- Use the FOUNTAIN VALVE on the missing hole underneath the fountain (B).
- Investigate the fountain (A) and use the tweezers to get the last gem from plugging the hole in the mouth of the goat statue.
Chapter 3: The Liner
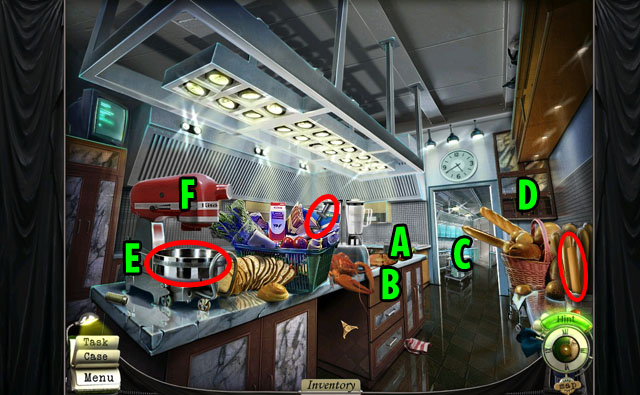
- First you must cook a pizza for the ship’s cook.
- In the middle of the screen is a place for you to make the pizza (A) once you have the ingredients.
- Below that is a shelf that you can search (B).
- To the right of that is a doorway to the other half of the kitchen (C).
- To the right of the doorway is a cupboard with a Hidden Object Scene (D).
- To the left of the mixer (E) is a control panel for when you are ready to use the mixer (F). You can click on this to find out what you have to do next.
- Collect the BOWL, DOUGH HOOK, and the ROLLING PIN circled in red.
- Inspect the shelf (B).
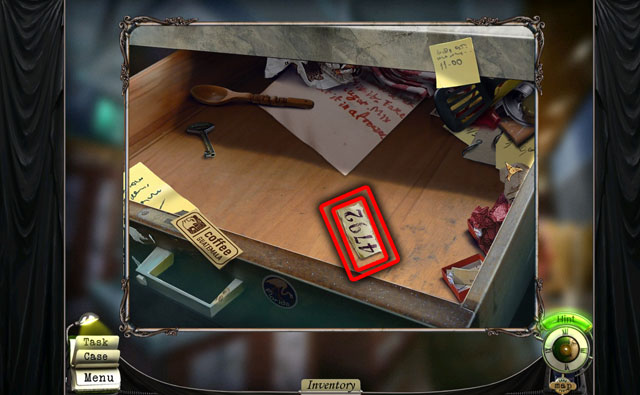
- Move all of the papers out of the way until you can find a small paper with four numbers on it.
- This is the combination to the refrigerator: 4792.
- Click on the cupboard to the right of the door (D).
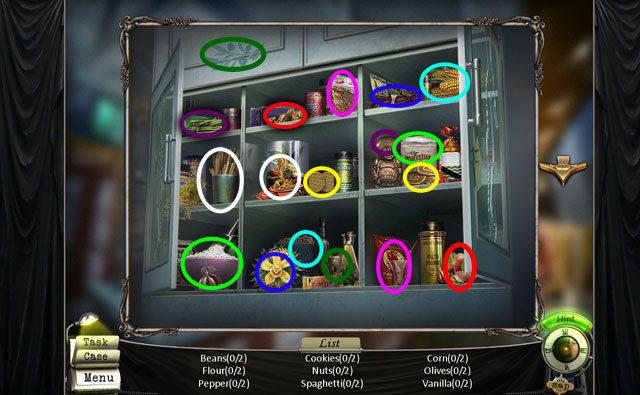
- Open the doors by clicking on them.
- Collect all of the hidden objects in the scene and you will receive some FLOUR in your inventory.
- The hidden objects in the scene are all matching pairs.
- You need to click on one object and then its matching object to remove them.
- The objects are not exact matches, but fit in the same category.
- The different objects are circled in different colors and styles.
- Go in the next room (C).
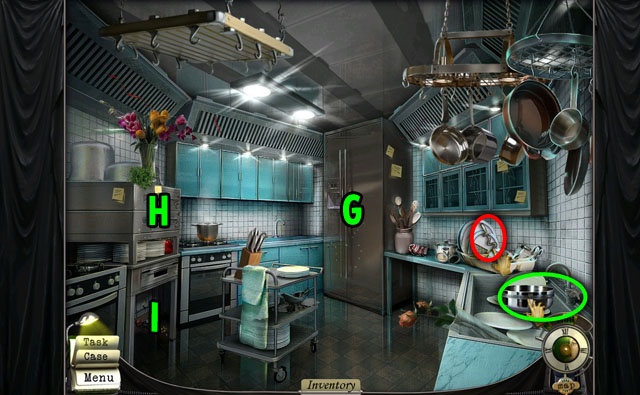
- This room has a refrigerator in the back (G) that you need a password to open.
- There is an oven to the left (H) for cooking the pizza.
- Click under the oven and drag the plug to the outlet to power the oven (I).
- Use the BOWL on the faucet to the right and then click the faucet to fill it with WATER.
- Collect the BEATER circled in red.
- Click on the refrigerator door and enter the password: 4792.
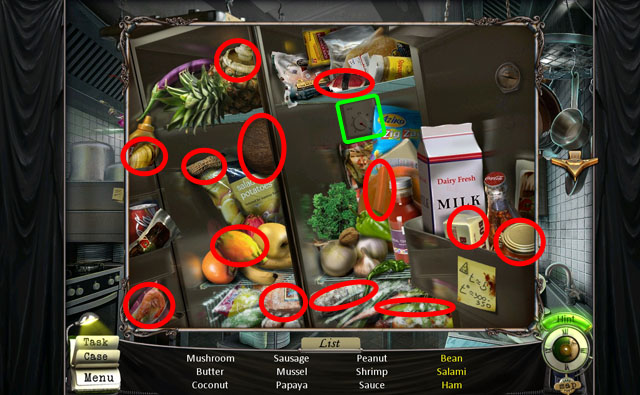
- Collect all of the hidden objects in the scene and you will receive the SALAMI, PIZZA SAUCE, and HAM in your inventory.
- Collect the note on the door circled in red. This is the recipe for cooking the pizza.
- Click the temperature in the back (1) so that you can collect the frozen food items as well: bean, salami, and ham.
- Return to the previous room.
- Add the BEATERS and then the BOWL OF WATER to the mixer (E).
- Then add the FLOUR to the bowl.
- Click on the side of the mixer (F) to set the speed so you can mix the dough.
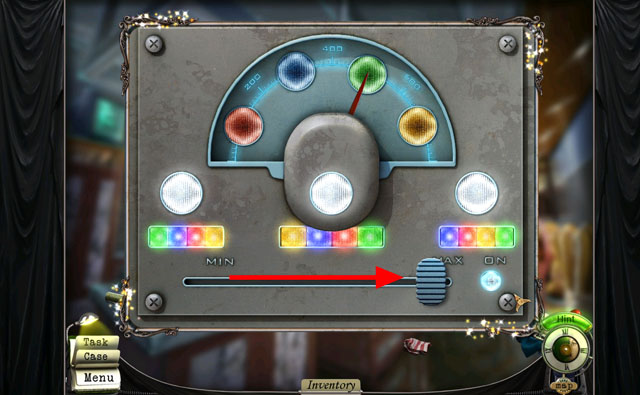
- The point of the mini-game is to find the combination of lights that solves the puzzle.
- Click on number, and then another. If the two lights are the first two numbers of the combination they will stay lit. If the two lights are in the wrong order or the wrong lights the first light will go out.
- Once you find the first two numbers test one of the other numbers. If all the lights go out the 3rd number was incorrect, try the first two numbers again and a different number.
- Once you have found the correct 1st, 2nd and 3rd number, click on the only one left to finish the puzzle.
- You need to do this puzzle 3 times to unlock the mixer.
- The first combination is green, blue, red, and yellow.
- The second combination is yellow, blue, red, and green.
- The third combination is blue, red, yellow, and green.
- Once finished the “On” button will light up. Slide the slider to the “MAX” position to make the dough.
- Collect the DOUGH.
- Click on the area to make a pizza (A).
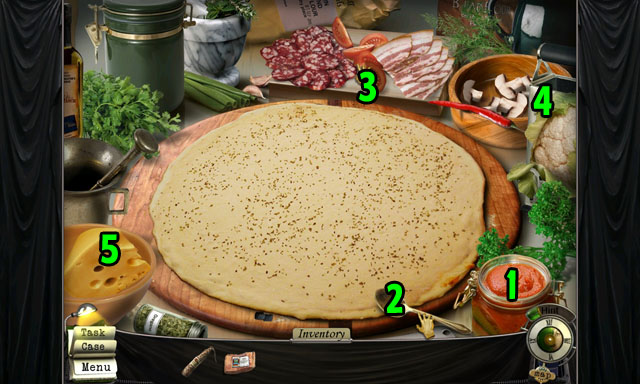
- Use the DOUGH on board.
- Use the ROLLER on the DOUGH two times.
- Use the SAUCE on the right corner of the screen (1).
- Click the spoon and use it on the sauce (2).
- To add the sauce to the dough you must click and drag the pattern shown in the dough.
- Follow the spiral exactly how it is drawn by the stars. Do this action three times to finish the sauce.
- Place the SALAMI and the HAM to the left and right of the tomatoes (3).
- Click on the salami, tomatoes, ham and mushrooms in any order and add them to the pizza.
- When you click on one of the ingredients it will show all the places you need to put them. Click on each spot until the ingredient disappears from your mouse.
- Lastly click on the cheese grater in the right corner (4) and then use the cheese on it (5) by dragging it up and down on the grater. Make sure to drag it all the way down past the bottom of the grater or no cheese will come out.
- There is a percentage sign that goes up when you are doing it right.
- Take the PIZZA.
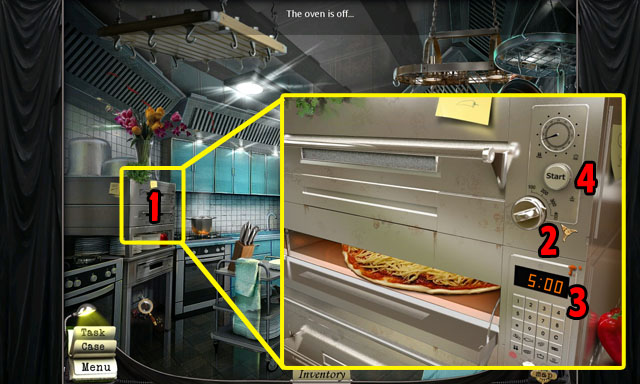
- Return to the oven in the other side of the kitchen (H).
- Open the door and put the pizza in the oven (1). Close the door.
- Set the temperature to between 300 and 350 with the dial at the top (2).
- Set the time to 5:00 (3). If you mess up, click the “C” key and type it in again.
- Press the start button to finish this area (4).
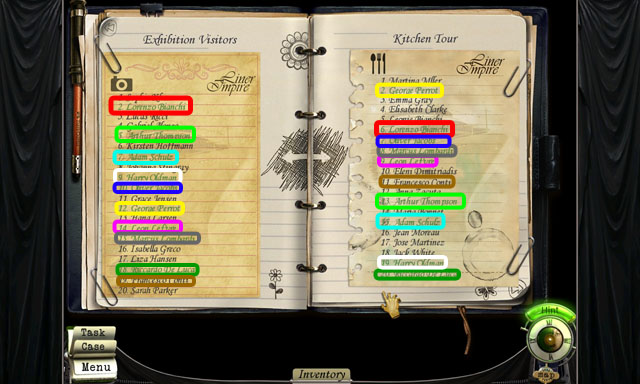
- Click the names on the left and then on the right that match.
- Not all of the names will match.
- The scene will finish once all the names that match have been found.
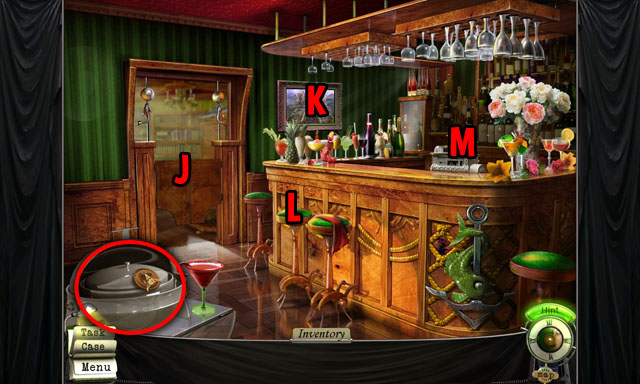
- Click the serving dish on the left and collect the coin circled in red.
- You can move to the other room through the door in the back (J).
- There is a painting puzzle to rearrange to the right of the door (K).
- In front of the bar there is one stool that you can inspect (L), you cannot do anything with it yet.
- There is a Hidden Object Scene near the cash register (M). Enter the scene.
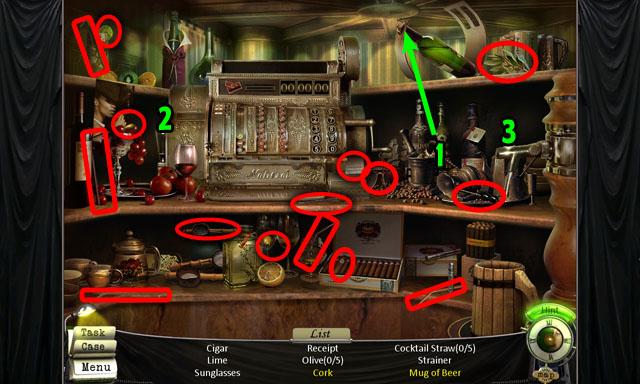
- Collect all of the hidden objects in the scene.
- To get the cork you will need to click the corkscrew (1) and use it on the bottle.
- To get the mug of beer, first grab the handle at the left of the scene (2) and add it to the beer tap.
- Click on the handle (3) to put the beer in the mug.
- Collect the mug (4).
- After finishing the scene, exit it and go to the painting (K).
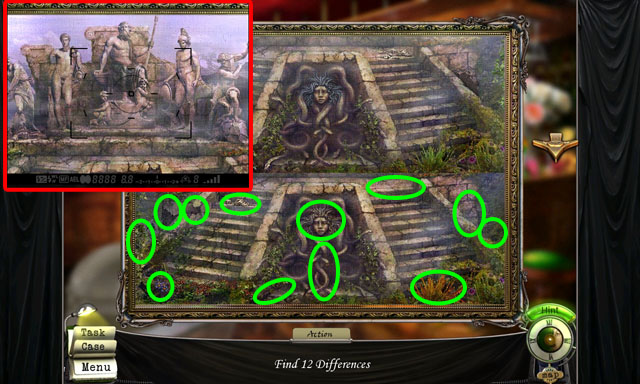
- Find all of the differences between the top and the bottom pictures.
- Some things are missing, some are new, and some things have different colors.
- You can click on the bottom or the top image.
- After finding all of the differences click to take a picture of the gods at the top of the painting.
- Make sure that there is none of the frame in the picture, or else you will not be able to take it.
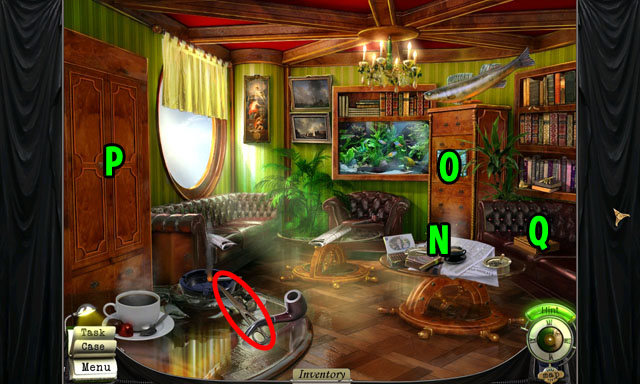
- Enter the door in the back to go to the next scene (J).
- In this scene there is a Hidden Object Scene on the table (N).
- Above the table are some drawers with a puzzle on it (O).
- On the left side of the screen is a cabinet (P) that you can investigate as well, but you need a key to open it.
- On the couch to the very right is a strange box (Q).
- Take the scissors circled in red on the closer table.
- Enter the Hidden Object Scene on the middle table (N).
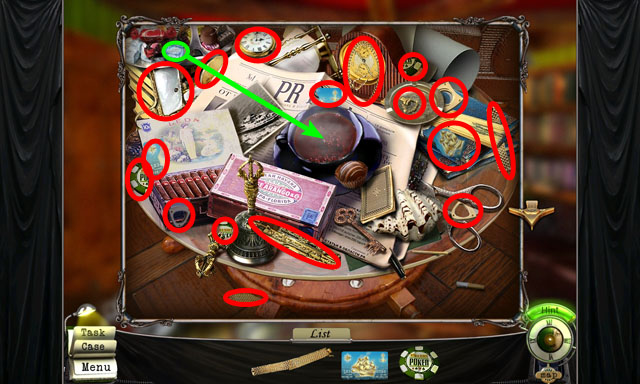
- Collect all of the hidden objects in the scene and you will receive an ID CARD in your inventory.
- Use the ice cube highlighted in green on the coffee to be able to find all of the hidden objects.
- Click on the drawers with the puzzle (0) to start the next mini-game.
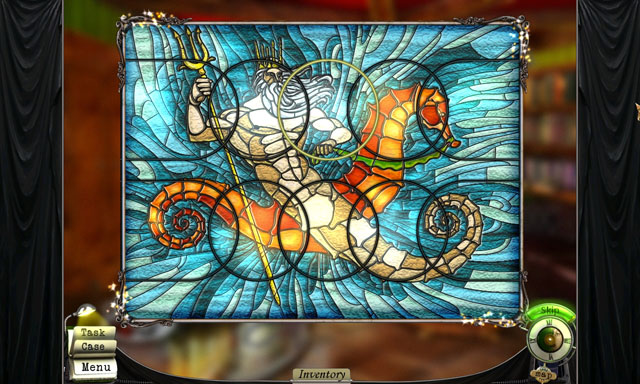
- This mini-game is a different type of slider puzzle.
- The object is to get the stained glass image put together correctly.
- You can only rotate the circles to move the pieces. This will exchange the pieces on the edges.
- By rotating the circles and then rotating the circles at the edges you can mix up four different edges of the circle.
- The top and the bottom are completely separate from each other.
- The best idea is to complete the middle and two opposite sides of each circle and keep them that way, switching only the two sides that are incorrect.
- The shortest answer is for the top row to click the left circle 3 times and the middle circle 2 times.
- For the bottom row click the middle circle 3 times and the right circle 2 times.
- Once you finish the puzzle a new scene will be open.
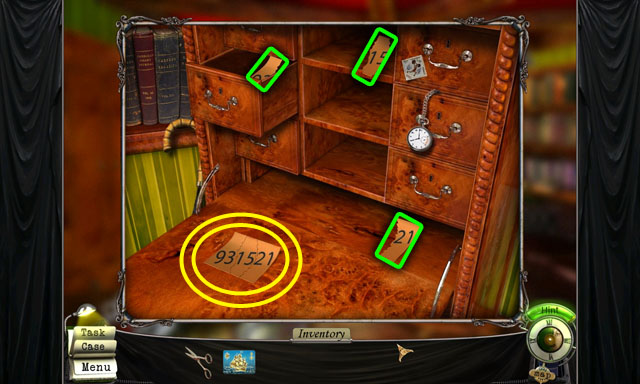
- Move all of the objects out of the way in the scene until you uncover the three pieces of the note.
- One piece is in the junk at the bottom.
- The next piece is hidden in the top middle open shelf.
- The last one is hidden in the middle left drawer.
- Click the note to get the password to the cash register in your evidence list.
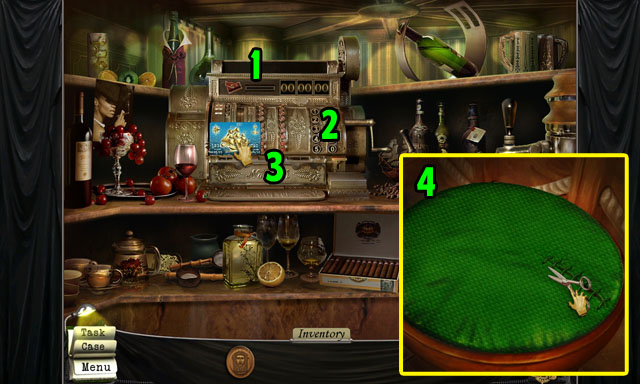
- Return to the cash register (M) scene in the other room.
- Use the ID CARD on the register’s slot (1).
- Type in the code that you got from the drawers (2) on the cash register: 931521.
- Collect the KEY from the drawer that opens up (3).
- Investigate the stool (L) in front of the bar in the previous scene.
- Use the SCISSORS on the stitching and collect the COIN (4).
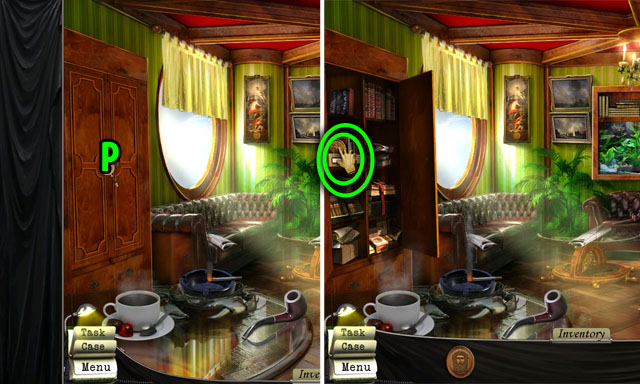
- Return to the other room and click on the cabinet to the left of the scene (P).
- Use the KEY on the lock.
- Take the COIN from inside the cabinet.
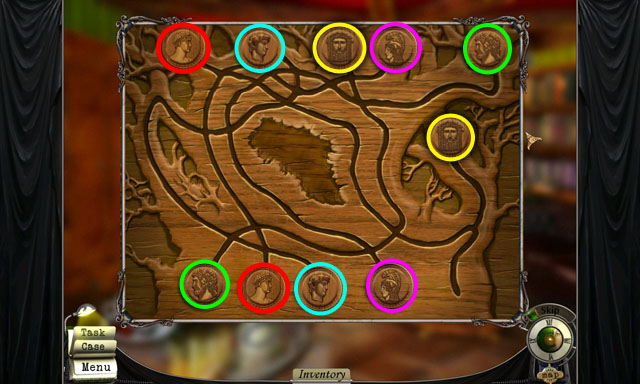
- Look at the strange box on the couch (Q).
- Any COINS from your inventory will automatically be used on the box.
- Click on a coin and then click on an arrow to move the coin in that direction.
- Get all of the coins to the top of the puzzle by moving them this way.
- The order from left to right should be the same order as in the picture you took before from the painting.
- See the screenshot for the correct order.
- Inside the box, take the note with the names on it.
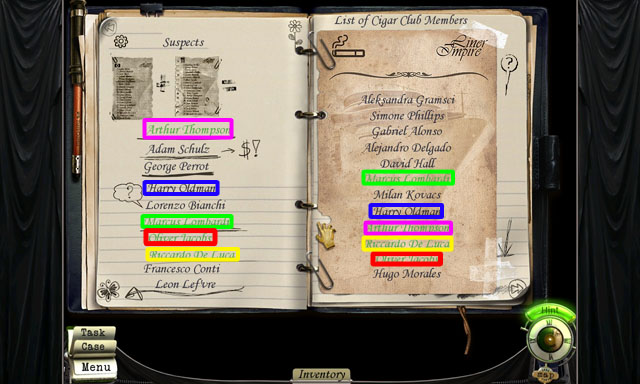
- Click the names on the left and then on the right that match.
- Not all of the names will match.
- The scene will finish once all the names that match have been found.
Chapter 4: Crete
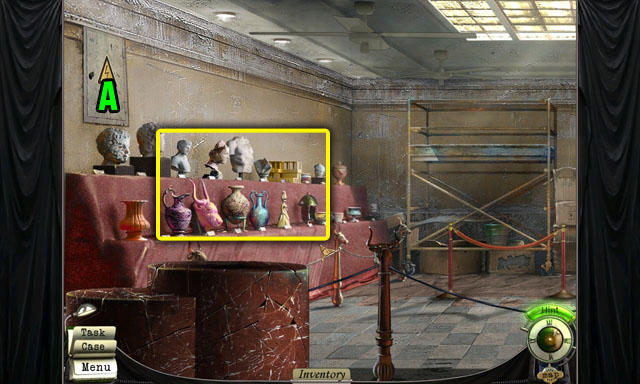
- The first scene you enter is a wide scene inside an old museum.
- To the very left is a power box (A) that you cannot open yet.
- Click on the objects highlighted in yellow on the shelf.
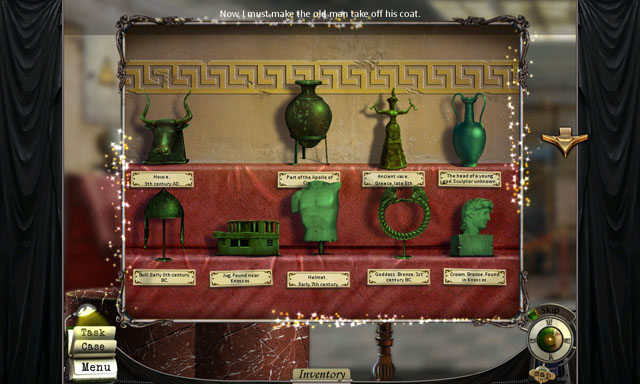
- Rearrange all of the objects on the shelf so that none of them are in the correct place.
- Use the one space to set objects there while you are rearranging.
- Any objects that are in the wrong place are highlighted in green.
- When all of the objects are highlighted in green, the mini-game is complete.
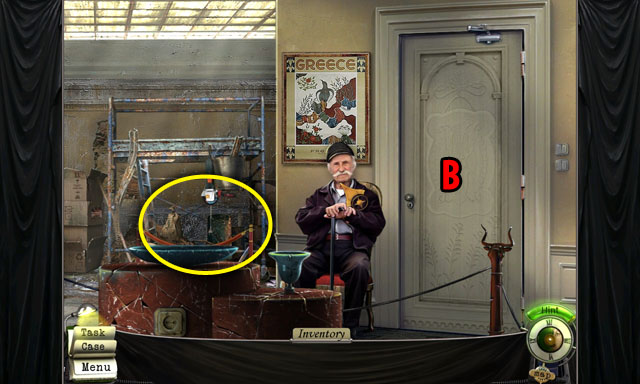
- Return to the original scene and go all the way to the right by clicking the arrow at the right of the screen or clicking anywhere and dragging to the left.
- In the middle of the screen is a guard and to his right is a door that you need to get through later (B).
- Click to the left of the guard to enter the next Hidden Object Scene.
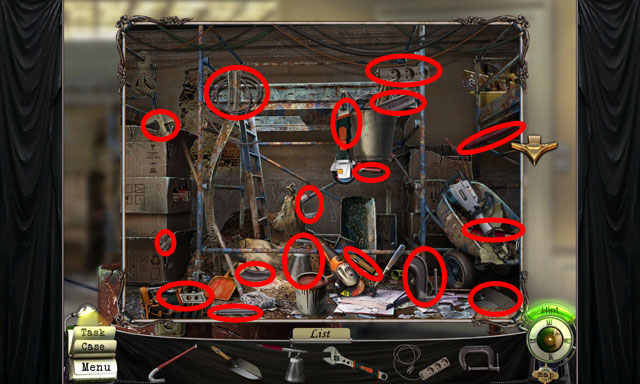
- Collect all of the hidden objects in the scene and you will receive a CROWBAR in your inventory.
- Click the map at the bottom right corner of the screen to travel to the next area.
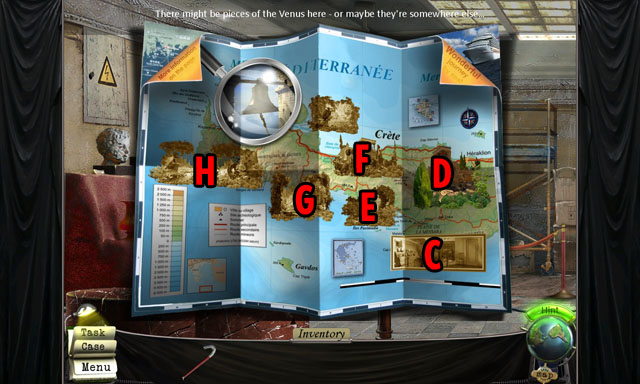
- Many of the areas are connected on the island of Crete, but it is easier to use the map to get between them.
- The museum is in the bottom right corner (C).
- Above it and to the left of that scene are the archeological dig sites (D).
- Below that is the stairs (E).
- Above is the scene with a small pond of water and the large vulture (F).
- To the left of that is the old church (G) and to the very left of the map is the river scene (H).
- First go to the right side of the archeological dig site (D).
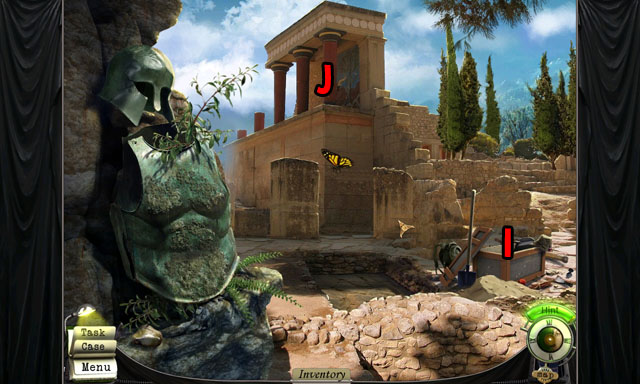
- After entering this scene you will see a Hidden Object Scene at the right in the crate (I).
- Another Hidden Object Scene is at the top of the ruins (J). You can go directly to this scene using the map as well.
- In the middle of the scene is a dig site that you cannot do anything with yet.
- Enter the Hidden Object Scene near the crate (I).
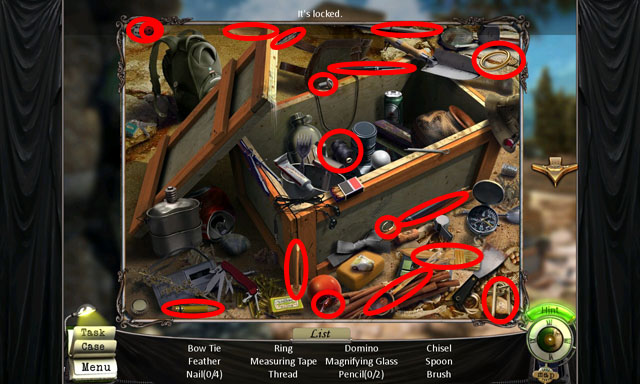
- Collect all of the hidden objects in the scene and you will receive a BRUSH in your inventory.
- Go to the Hidden Object Scene above the ruins (J).
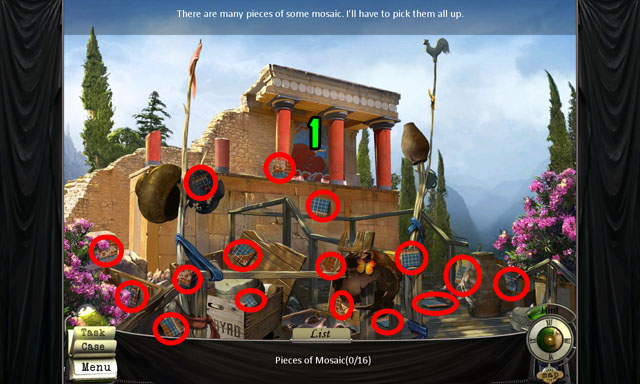
- Collect all of the mosaic pieces in the scene to open up the mosaic mini-game between the red columns (1).
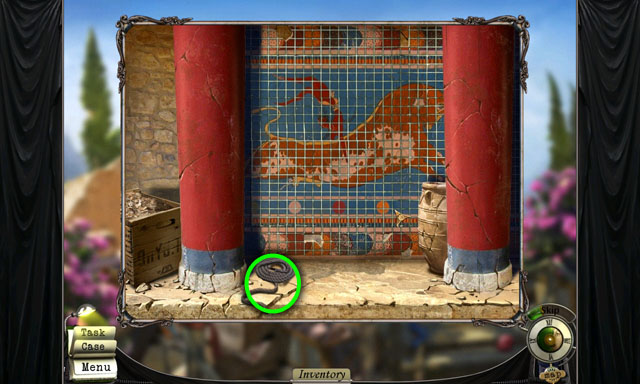
- When you first enter this scene the mosaic will be all together, but it will quickly rearrange itself.
- Click on a mosaic tile to move it into the space and rearrange them to the correct image that you saw at the beginning.
- Use the borders at the top and the bottom to help you.
- See the complete image in the screenshot.
- After finishing the image collect the ROPE at the bottom of the screen.
- Click on the crate at the bottom of the screen to try to find some tools.
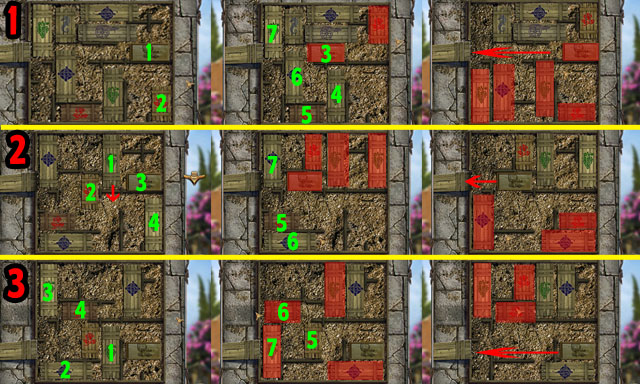
- This mini-game has you moving crates around so that you can get the crate of tools out onto the ramp.
- You must complete the puzzle three times to get the tools.
- Vertical boxes can only move up and down, while horizontal tiles can only move left and right.
- The boxes cannot move over each other, but they can move over the wooden bars.
- Follow the steps in the images to finish the puzzles.
- Take the PLIERS from the box you receive.
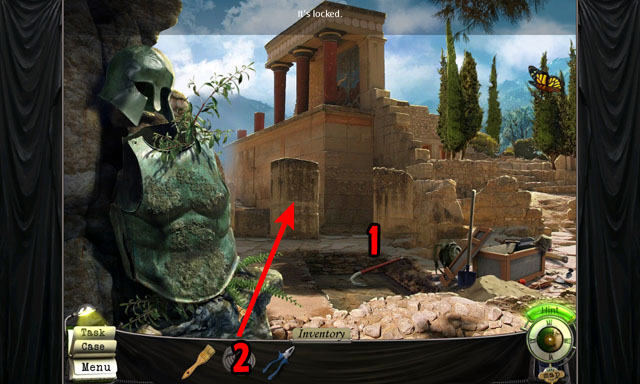
- Return to the previous scene and use the CROWBAR on the archeological dig site to open up a hole (1).
- Then use the ROPE to be able to climb down (2).
- Click the arrow button to climb down.
- In the next scene click on the fresco at the right to start the next puzzle.
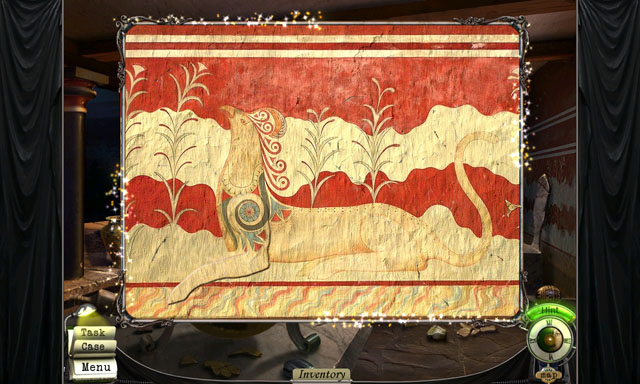
- Put together the fresco to finish this puzzle.
- The pieces of the fresco can be picked up and placed with the left mouse button.
- You can rotate the pieces with the right mouse button.
- When a piece is in the correct spot it will snap in place and you cannot pick it up again.
- The puzzle is difficult to put together, but you can use a few things to help you.
- There is a red line at the bottom of the fresco that you should try to put together first.
- Then you can try to work on the animal in the middle.
- See the screenshot for the completed puzzle.
- Sometimes you need to pick up a piece and place it a few times to make sure it is in the correct place.
- After finishing the puzzle click on the arm to open the door to the left of the fresco.
- Enter the door and take the DISC and the green cloth.
- Click on the map and go to the stairs scene (E).
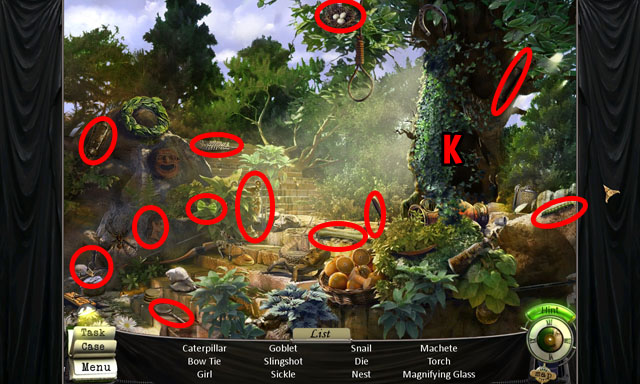
- Collect all of the hidden objects in the scene and you will receive a MAGNIFYING GLASS, TORCH, and MACHETE in your inventory.
- Use the MACHETE to remove all of the leaves from the tree (K). You can look inside this tree right now, but you need some light to be able to see anything.
- Use the map to go to the church scene (G).
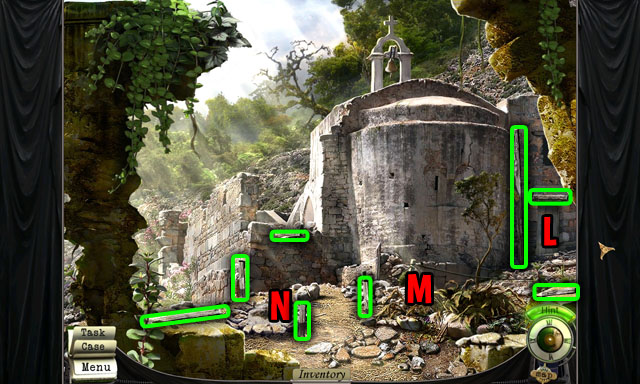
- There is a door to the left in this scene that is currently locked (L).
- There are some tomato plants on the right side of the scene (M) and a fire pit to the left (N).
- Collect all of the ladder pieces here circled in green to construct a ladder on the side of the church.
- Go to the pond scene (F).
- Click on the vulture in the bottom left corner.
- Return to the church scene (G).
- Click on the bell at the top of the ladder and click it again to ring it.
- This will get rid of the large vulture in the pond scene.
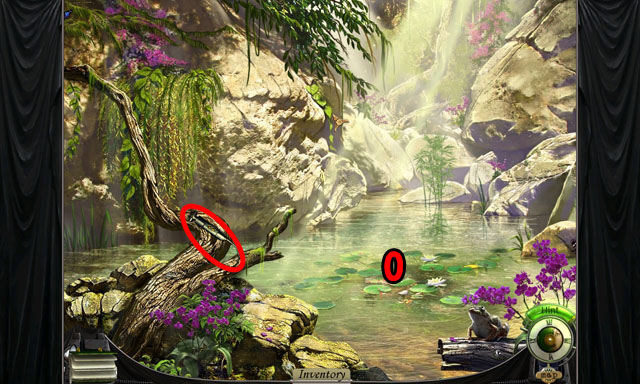
- Collect the STRANGE KEY where the vulture used to be standing.
- The pond in the middle here (O) is where you can get water later.
- Return to the church and click on the door (L).
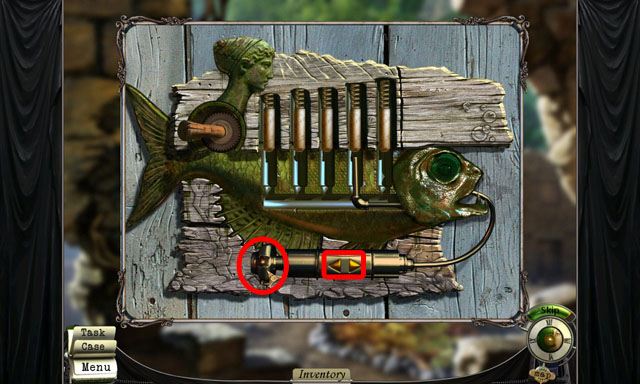
- Use the STRANGE KEY on the door lock with the fish.
- Click the arrows to move the hammer around inside the lock.
- Click the plunger at the end of the key to make the hammer push in the selected weight inside the lock.
- Like some of the other puzzle, this puzzle is about finding the correct order through trial and error.
- If you move one weight and then another, the first will come back down if they aren’t in the correct order.
- As before you must find the first two in the order before finding the rest.
- The correct order is 5, 2, 3, 1, and 4 in this play through, but solution is randomized so it may be different in yours.
- Go through the door once it has opened.
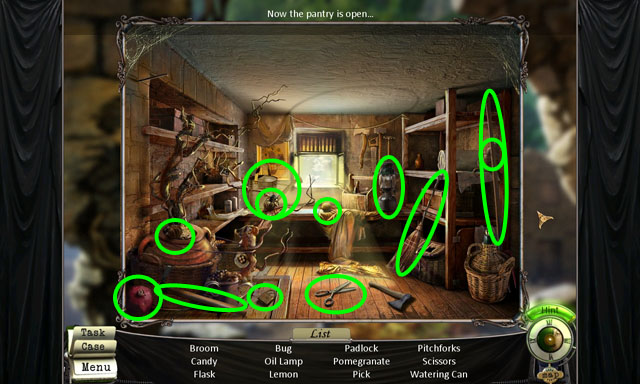
- Collect all of the hidden objects in the scene and you will receive a WATERING CAN in your inventory.
- Go to the small pond (F) and use the WATERING CAN on the pond (O).
- Then return to the church and use the WATERING CAN on the tomato plants (M).
- Click on the tomato plants to start a Hidden Object Scene.
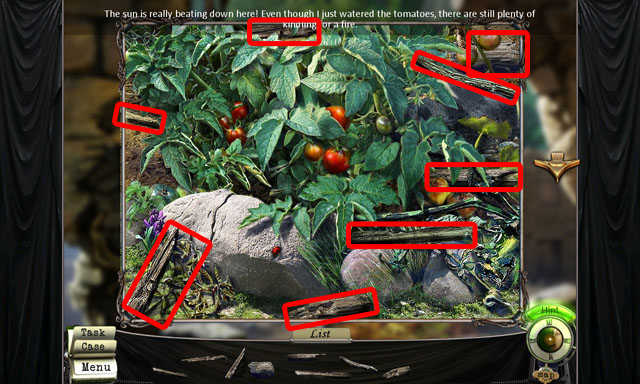
- Collect all of the hidden objects in the scene and you will receive WOOD in your inventory.
- Place the WOOD on the campfire (N) and then use the MAGNIFYING GLASS on the pile of wood.
- Once the fire has been started, use the TORCH on it to light the torch.
- You will receive a LIT TORCH.
- Go to the tree in the stairs scene (K) and use the LIT TORCH on the scene. Collect the second ZODIAC DISK.
- Return to the old museum (C) and click on the power box to the very left (A).
- Use the PLIERS on the box to open it.
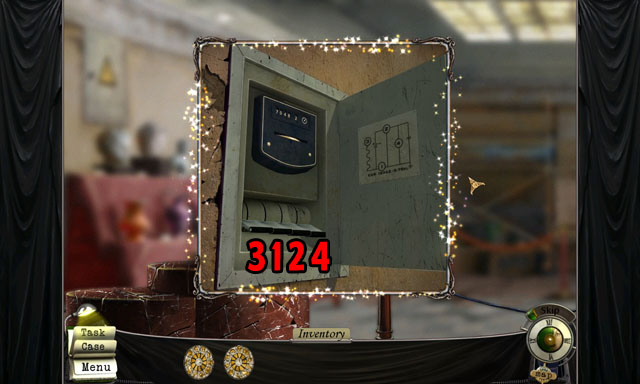
- Click on the switches in the correct order to turn off the fans.
- Click on a switch, and then another. If the two switches are the first two switches of the combination they will stay down. If the two switches are in the wrong order or the wrong switches the first switch will come back up.
- Once you find the first two switches test one of the other switches. If all the switches come back up the 3rd switch was incorrect, try the first two switches again and a different switch.
- Once you have found the correct 1st, 2nd and 3rd switch, click on the only one left to finish the puzzle.
- The correct order is 3, 2, 1, and 4.
- Talk with the security guard at the very right side of the screen.
- The security guard will then leave his chair.
- Grab the KEYS from his jacket (B) and use them on the door.
- Go through the door.
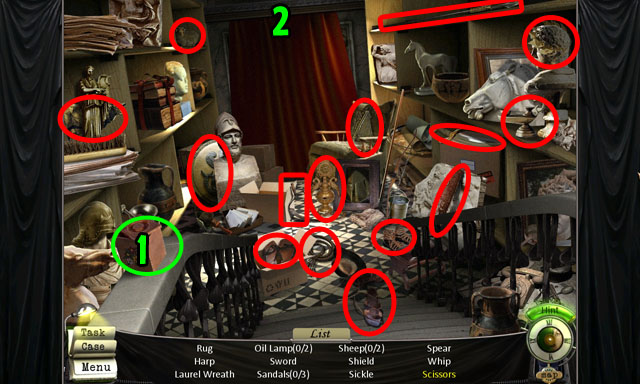
- Collect all of the hidden objects in the scene and you will receive SCISSORS in your inventory.
- The scissors are inside a red box to the left (1).
- After finishing the scene use the SCISSORS on the very top of the curtain (2).
- Click the wall to get a closer look.
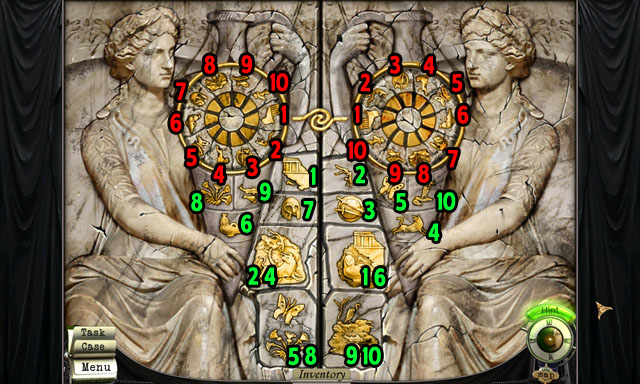
- Use the DISKS from your inventory on holes in the wall. They only fit one way so if it goes back in your inventory, try the other hole.
- First match up the symbols on the disks so that the object in the middle is pointing to the same symbol.
- Then click that symbol in the area below. The symbols below are a little more detailed than the ones on the disks.
- After finding the first symbol click each disk to rotate it once and then find the next symbol.
- Continue like this until you have found all of the single symbols at the bottom.
- The four symbols at the very bottom use two different symbols each.
- Rotate the disks until there is one of each symbol facing towards the middle that matches and then select the image at the bottom.
- Refer to the numbers to see what symbol should be in the middle of the disks so that you can press that same numbered image at the bottom.
- After clicking and selecting all of the images at the bottom the mini-game will be complete.
- Take the Venus statue that appears in the middle of the scene.
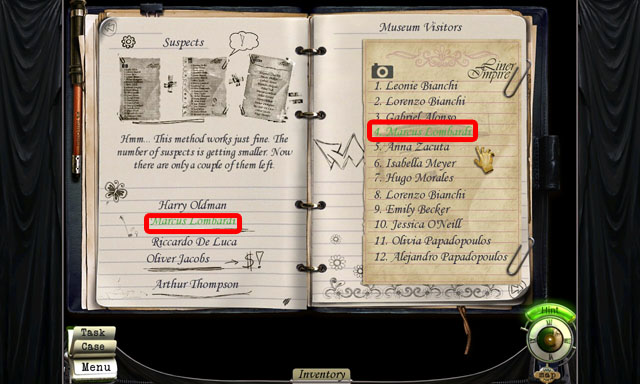
- Click the name on the left and then on the right that matches.
- Only one name will match: Marcus Lombardi.
- Congratulations, you have completed Inside Tales: The Stolen Venus 2!
Created at: 2011-03-20

