

Walkthrough Menu
General Tips
- This is the official guide for Labyrinths of the World: Fool's Gold.
- This guide won't tell you when to zoom into a location; the screenshots show each zoom scene.
- Hidden-object puzzles are referred to as HOPs. Only the locations of the HOPs will be shown.
- Use the Map to fast travel to a location.
Chapter 1: Leprechauns
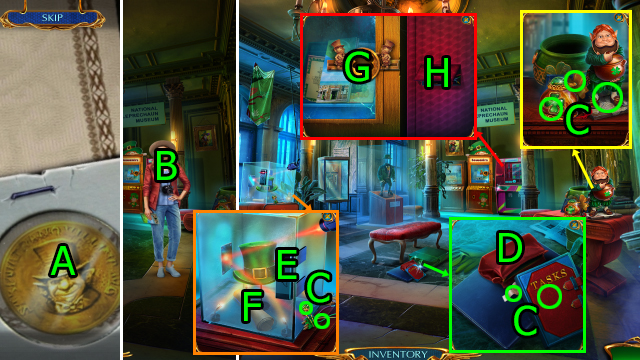
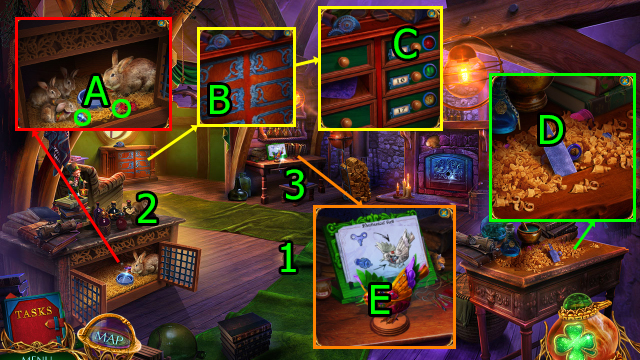
- Press (A); get LEPRECHAUN'S COIN.
- Press and use LEPRECHAUN'S COIN on (B).
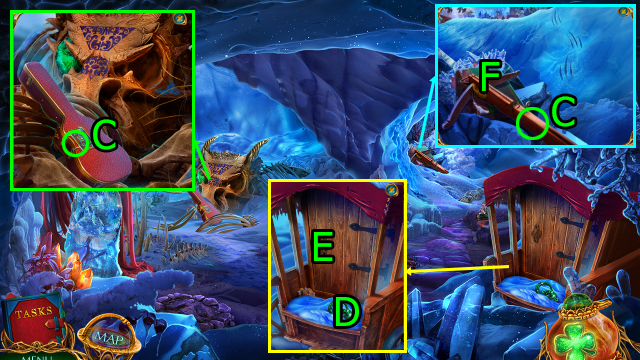
- Get Tasks, ELECTRICAL TAPE, Hint, BROKEN LEPRECHAUN FIGURINE, GUIDE'S BADGE, HAIRPIN, and PLUG (C).
- Press (Dx2).
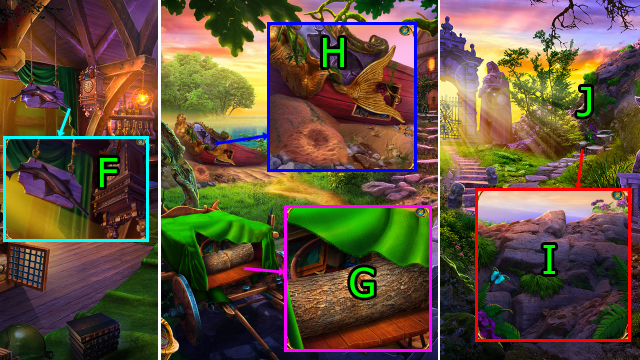
- Use GUIDE'S BADGE on (E) and press (F); get CLOVER EMBLEM.
- Use CLOVER EMBLEM and press (Gx3); get MUSEUM FLYER.
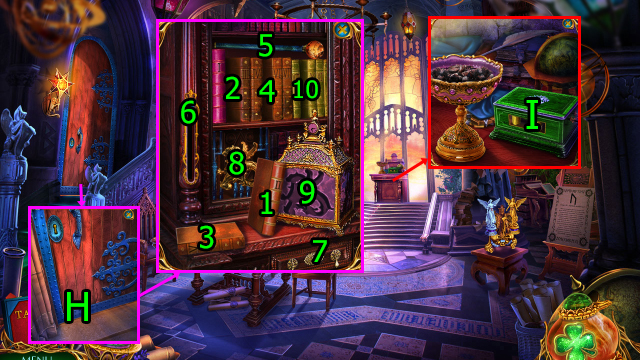
- Press and use PLUG and ELECTRICAL TAPE on (H).
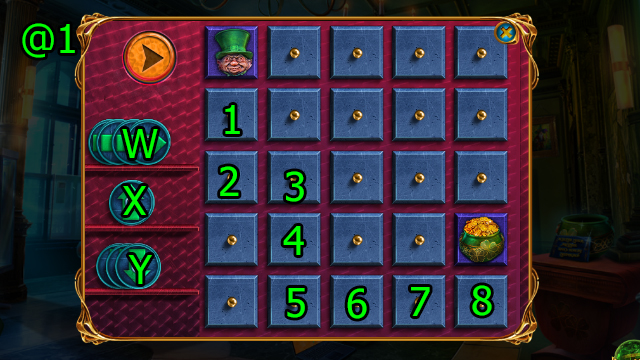
- Easy Solution (@1): Press (Y-1)-(W-2)-(Y-3)-(Y-4)-(W-5)-(W-6)-(W-7)-(X-8).
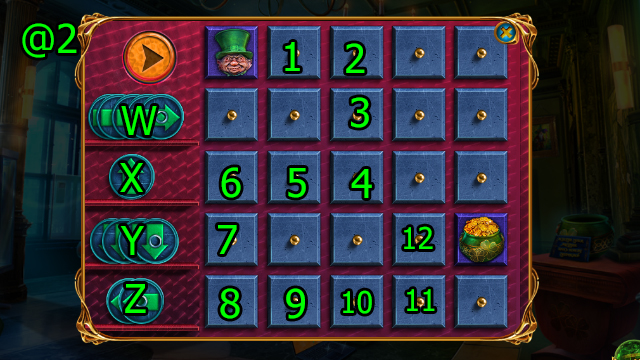
- Hard Solution (@2): Press (W-1)-(Y-2)-(Y-3)-(Z-4)-(Z-5)-(Y-6)-(Y-7)-(W-8)-(W-9)-(W-10)-(W-12).
- Get MATCHES and LEPRECHAUN'S BEARD.
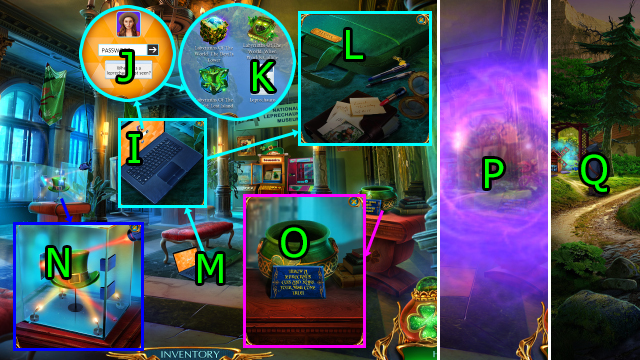
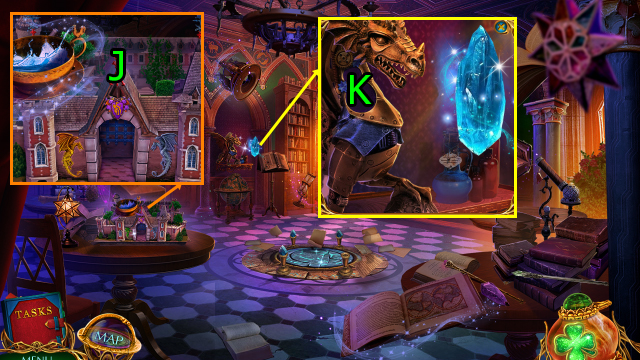
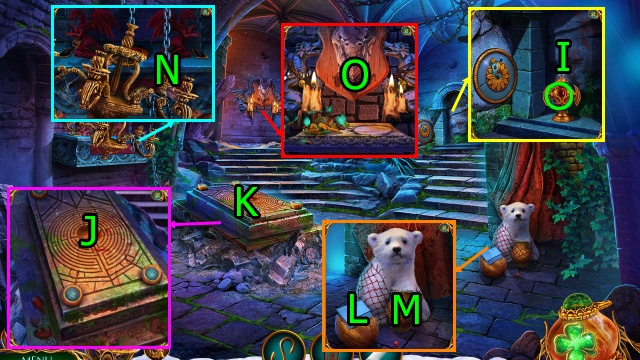
- Press (I) and (J); use MUSEUM FLYER on (J).
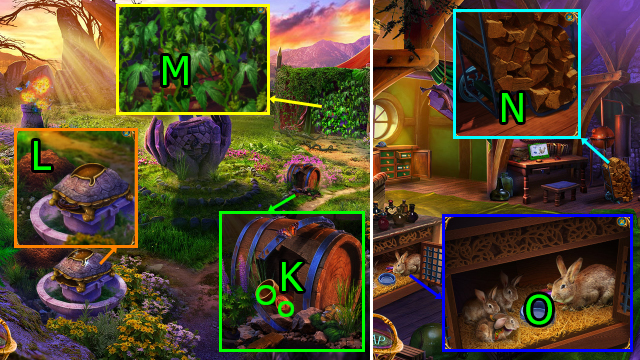
- Press (Kx2); press (L).
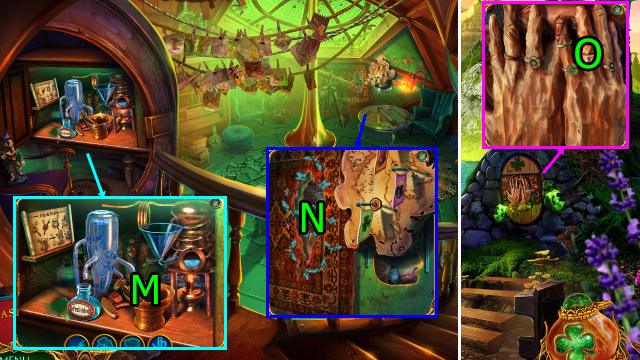
- Solve HOP (M); get COMPACT DISC.
- Use COMPACT DISC on (N); get TOP HAT.
- LEPRECHAUN'S BEARD and TOP HAT on BROKEN LEPRECHAUN FIGURINE; get WOODEN CLOG, BEADS, and LEPRECHAUN'S COIN.
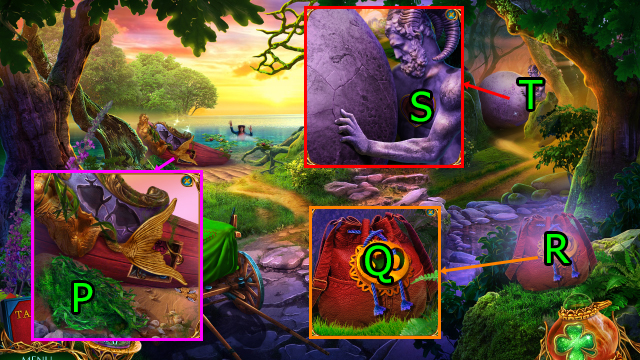
- Use LEPRECHAUN'S COIN on (O).
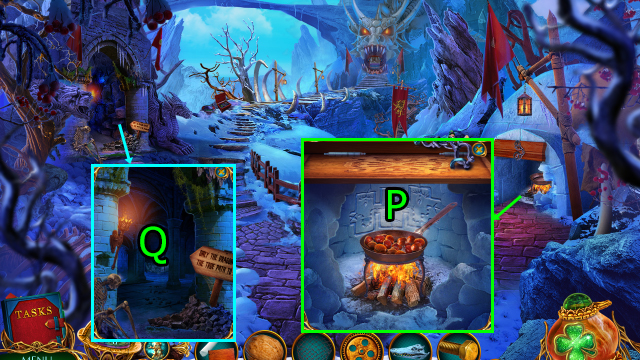
- Press (P).
- Press (Q).
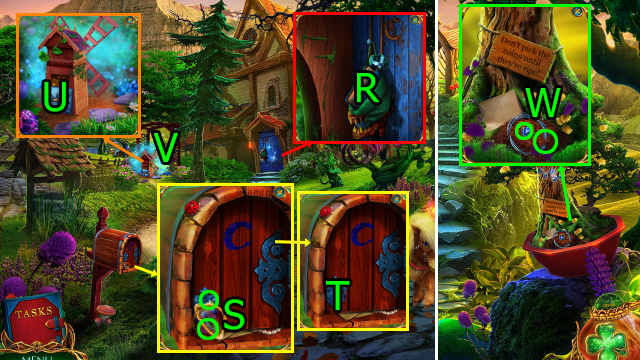
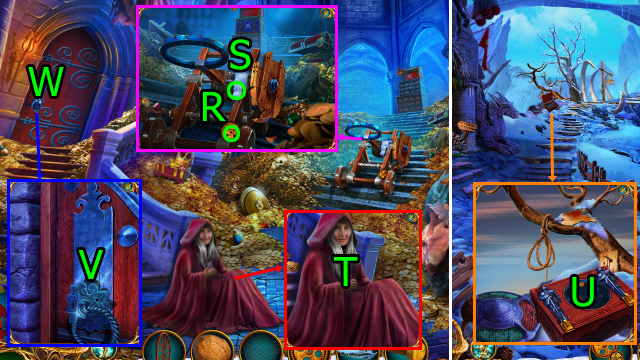
- Press (Rx2); get UNLIT TORCH.
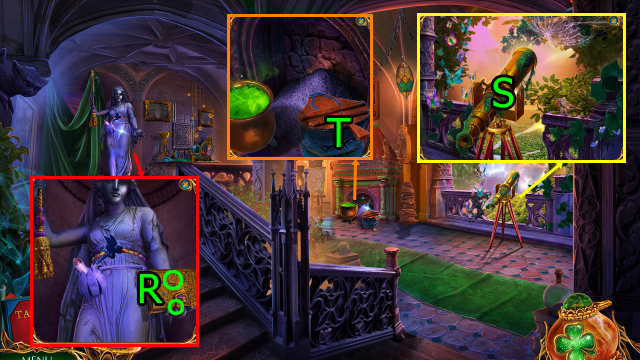
- Get Map and STUD EARRING (S).
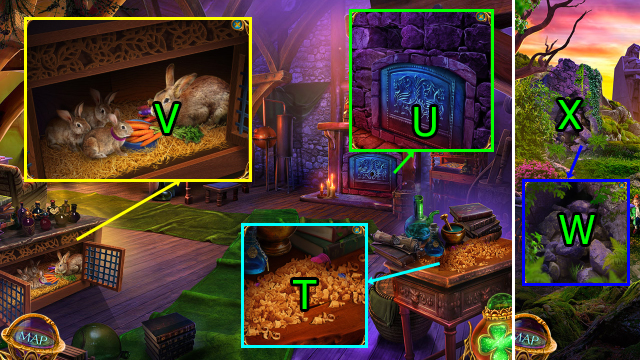
- Use HAIRPIN on (T), get WHISKEY; solve HOP, get DRAGONFLY AMULET.
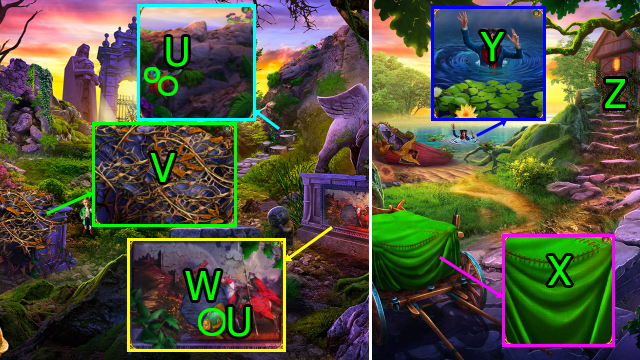
- Use DRAGONFLY AMULET on (U).
- Go (V).
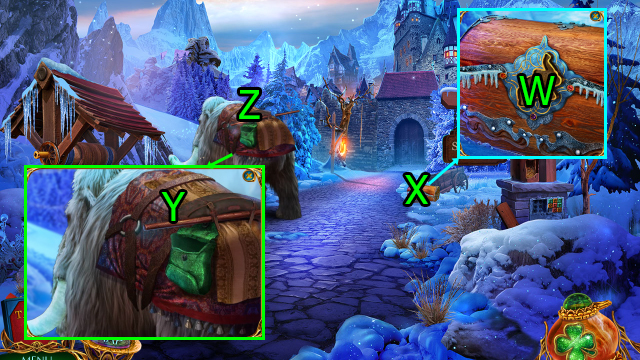
- Get CRYSTAL INLAY (1/3) and STRINGS (1/3) (W).
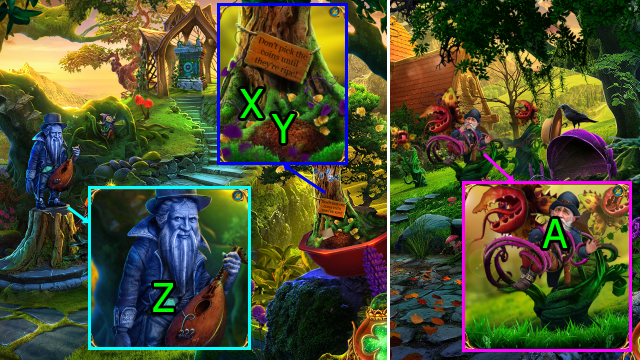
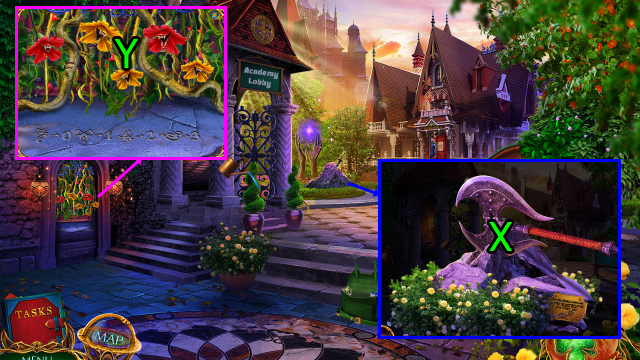
- Press (Xx2); use WOODEN CLOG on (Y), get AWL.
- Use AWL on (Z); get FLAX TOW.
- MATCHES, FLAX TOW, and WHISKEY on UNLIT TORCH; get LIT TORCH.
- Go Outside Clurichaun's House.
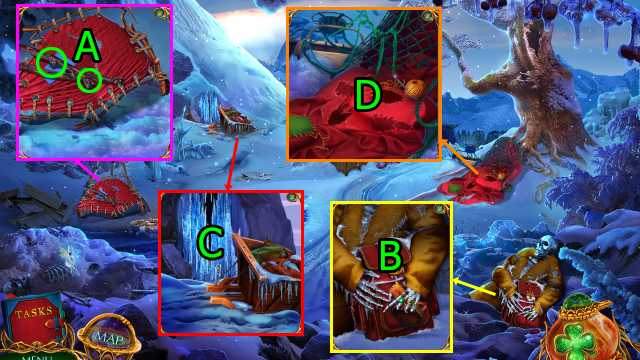
- Use LIT TORCH on (A).
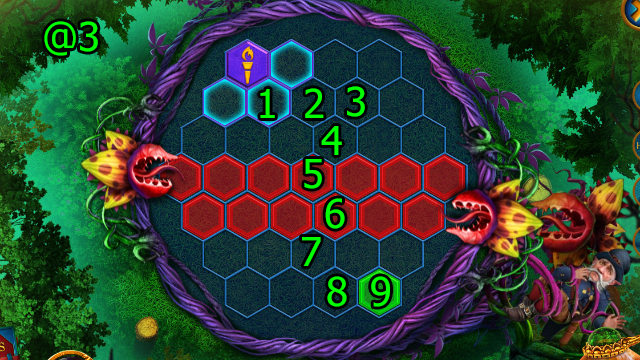

- Easy Solution (@3): Press (1-2-3-4-5-6-7-8-9).
- Hard Solution (@4): Press (1-2-3-4-5-6-7-8).
- Get EYE AMULET.

- Use EYE AMULET on (B).
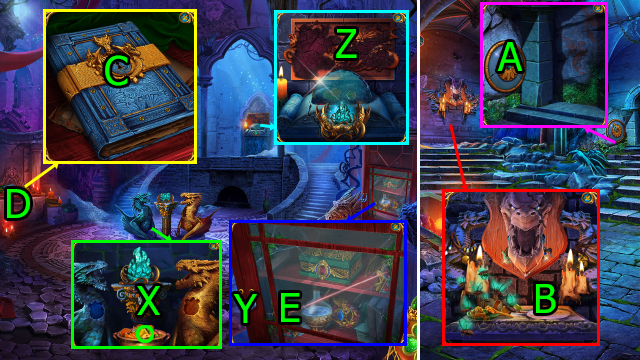
- Go (C).
- Press (Dx2); get CRYSTAL INLAY (2/3).
- Use BEADS on (E); get STRINGS (2/3) and APPLE.
- Press (F); get BUTTON.
- Press (Gx3) and use STUD EARRING on (H); press (Ix4), get ALESSA'S SMARTPHONE.
- Go Outside Clurichaun's House.
- Use APPLE on (J); get WOOD BOARDS.
- Go Leprechaun Garden.
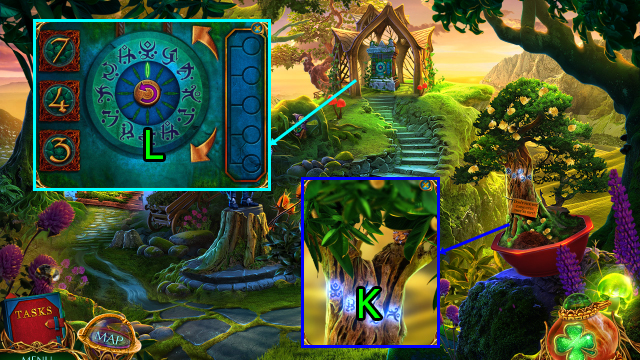
- Use ALESSA'S SMARTPHONE on (K); get SYMBOL COMBINATION.
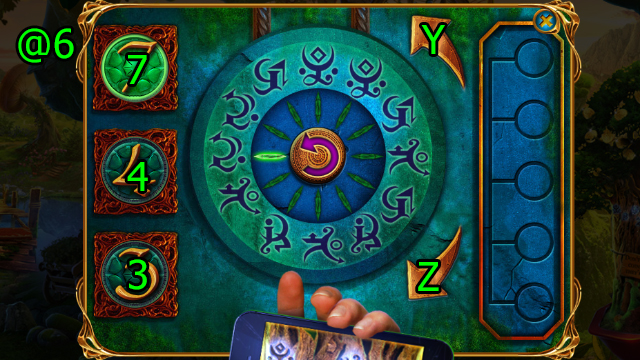
- Use SYMBOL COMBINATION on (L).
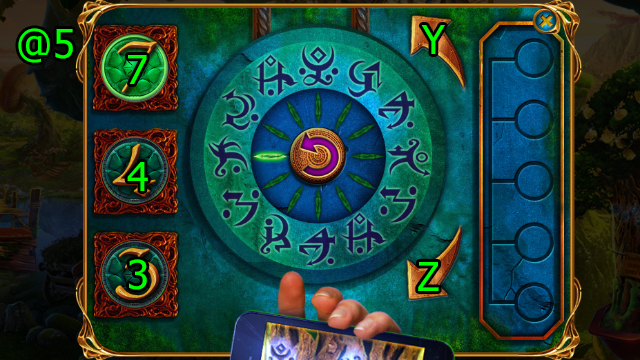
- Easy Solution (@5): Press (3-Z)-(7-Z)-(4-Y)-(7-Z)-(3-Z).
- Hard Solution (@6): Press (3-Z)-(7-Z)-(4-Y)-(7-Z)-(4-Z).
- Get STRINGS (3/3) and PIPE.
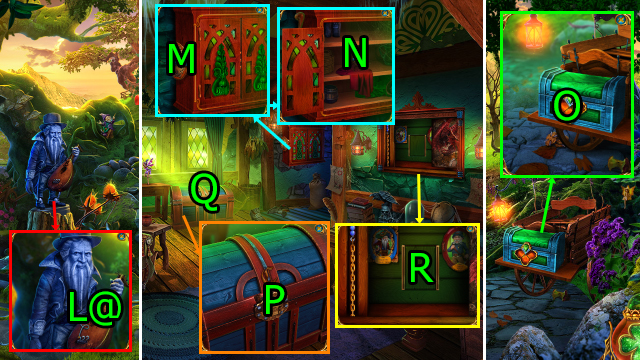
- Use STRINGS (3/3) on (L@); get TWEEZERS and LASSO.
- Go Clurichaun's House.
- Use PIPE on (M); get HEAVY FIGURINE.
- Use TWEEZERS on (N); get CRYSTAL INLAY (3/3).
- Go Outside Clurichaun's House.
- Use CRYSTAL INLAY (3/3) on (O); get GEAR and BOAR FANG.
- Go Clurichaun's House.
- Use BOAR FANG and HEAVY FIGURINE on (P).
- Solve HOP (Q); get CLURICHAUN'S PORTRAIT.
- Use CLURICHAUN'S PORTRAIT on (R); get PRUNERS and HAMMER AND NAILS.
- Go Leprechaun Garden.
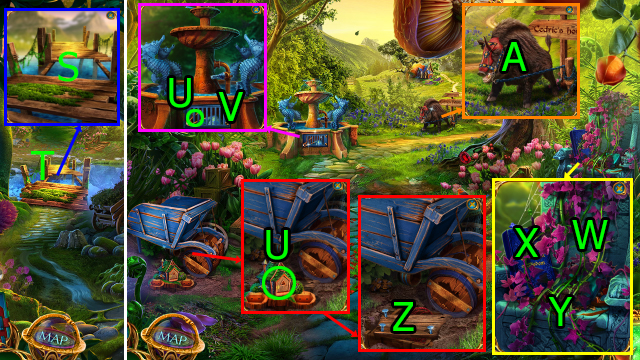
- Use WOOD BOARDS and HAMMER AND NAILS on (S).
- Go (T).
- Get WIRE and MONEYBOX (U).
- Use BUTTON on (V); get HANDKERCHIEF.
- Use PRUNERS on (W); get LOCKED CASE.
- Press (Xx3).
- Use HANDKERCHIEF on (Y); get BARRETTE.
- Use BARRETTE on (Z); get NET.
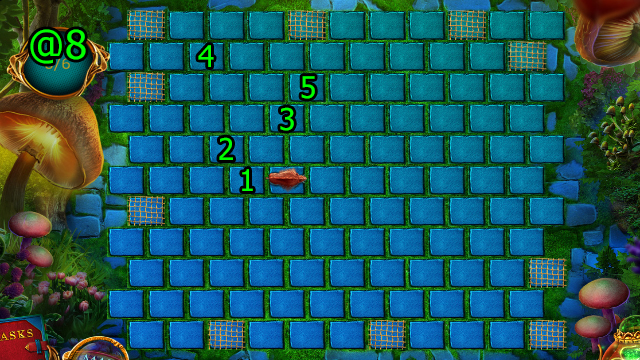
- Use NET on (A).
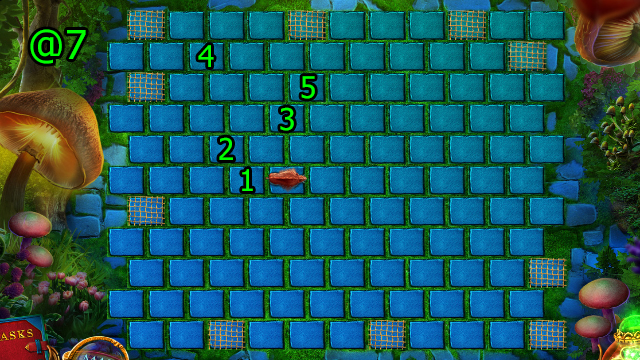
- Easy Solution (@7): Press (1-2-3-4-5).
- Hard Solution (@8): Press (1-2-3-4-5).
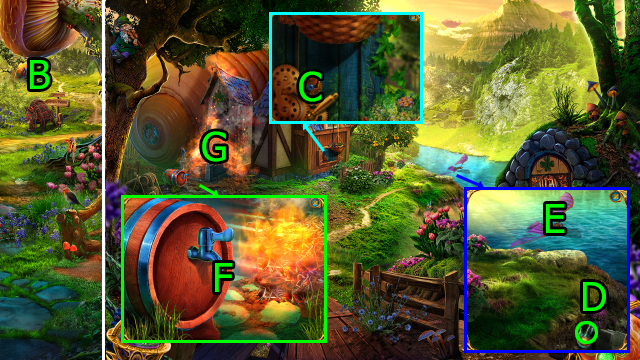
- Go (B).
- Press and use GEAR on (C); solve HOP, get HOSE.
- Get VINEGAR (D).
- Use LASSO and press (E); get CLAMP.
- Use HOSE and CLAMP and press (F).
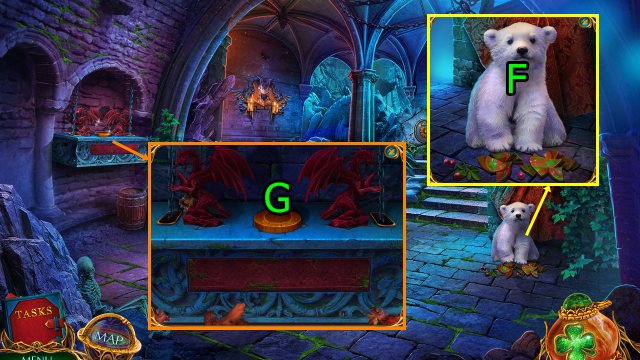
- Go (G); get HORSESHOE.
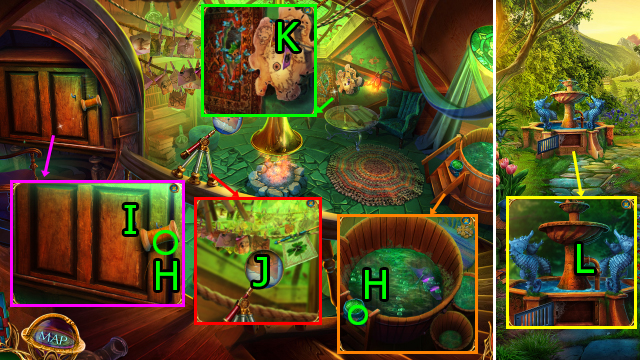
- Get THREAD (1/2) and MAGIC SALT (H).
- Use HORSESHOE on (I); get SPONGE.
- SPONGE and WIRE on LOCKED CASE; get NUT and BINOCULARS.
- Press and use BINOCULARS on (J); solve HOP, get FLAG PIN.
- Use FLAG PIN on (K); get CEDRIC FIGURINE, ONION, and VALVE HANDLE.
- Go Golden Path.
- Use VALVE HANDLE and NUT on (L); get WILHELM FIGURINE and FILE.
- CEDRIC FIGURINE and WILHELM FIGURINE on MONEYBOX; get GOLDEN CLOVER.
- Go Cedric's House.
- Use VINEGAR, MAGIC SALT, ONION, and GOLDEN CLOVER and press (Mx2); get REPELLENT.
- Use REPELLENT on (N); get COMB and RING.
- Go Outside Cedric's House.
- Use RING on (O).
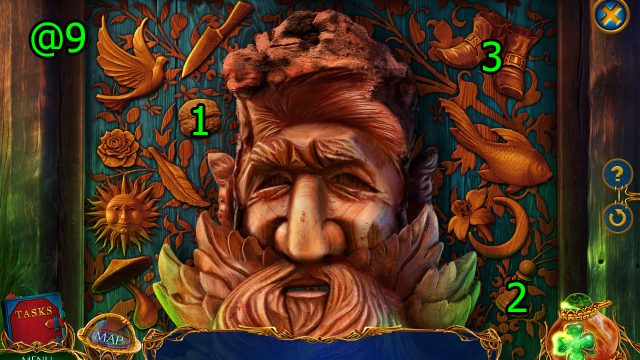
- Solution (@9): Press (1-2-3).
- Get BARREL.
- Go Golden Path.
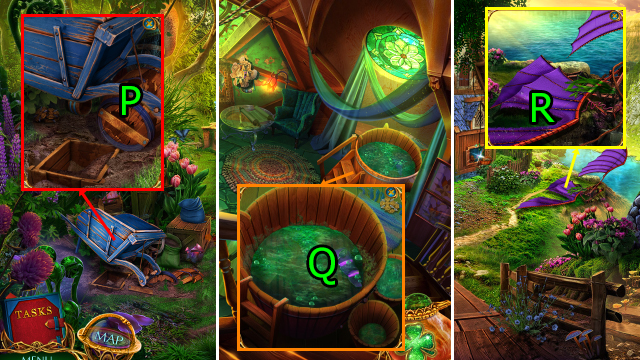
- Press and use BARREL on (P); get NEEDLE AND THREAD (2/2) and LADLE.
- Go Cedric's House.
- Use LADLE on (Q); get SILVER SPOON and CLOTH.
- Go Outside Cedric's House.
- Use NEEDLE AND THREAD (2/2) and CLOTH on (R).
- Get BAKED HAM, MIRROR, STAFF TOP, and HAWK IN CAGE (S).
- BAKED HAM and FILE on HAWK IN CAGE; get HAWK.
- Use HAWK on (T).
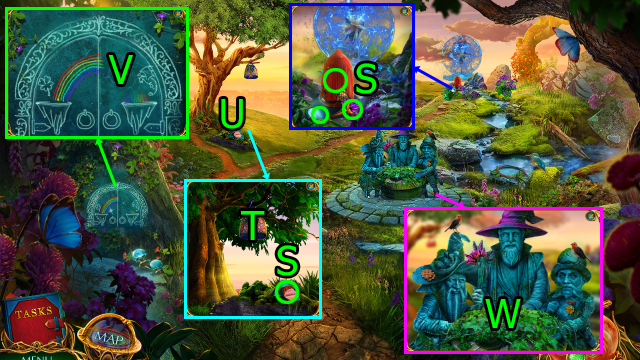
- Solve HOP (U); get RAINBOW CHALK.
- Use RAINBOW CHALK on (V); get GOBLET and WILHELM'S MEDAL.
- Use COMB on (W); get WATER.
- Press (Wx2); get PINCERS.
- Use GOBLET on (X); get MAGICAL CRYSTAL.
- Use MAGICAL CRYSTAL on (Y); get MERLIN'S HAT.
- Use WILHELM'S MEDAL, STAFF TOP, and MERLIN'S HAT on (X).
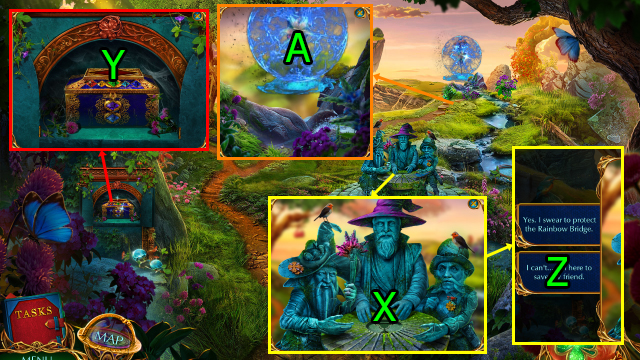
- Press (Z); get SWORD OF TRUTH.
- Use SWORD OF TRUTH on (A).
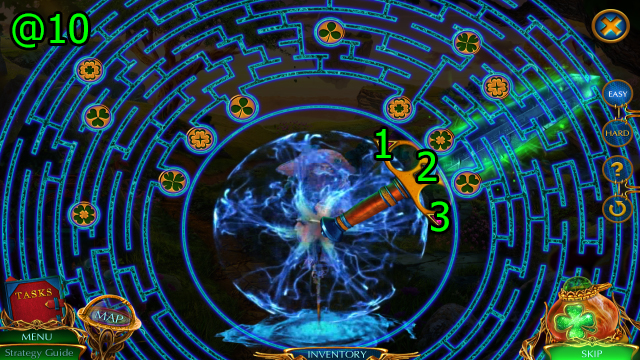
- Easy Solution (@10): Press (2-1x3-2-3x3-2-1-2-1-2-1-2-3-2-3-2).
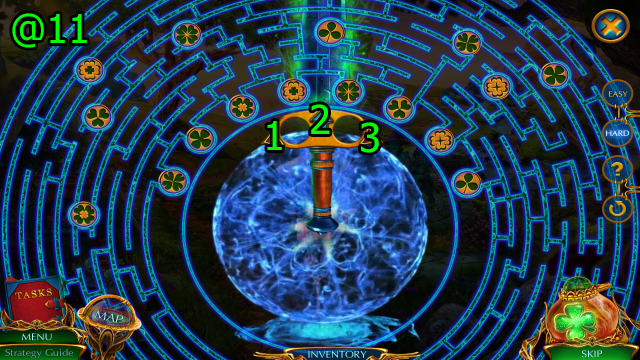
- Hard Solution (@11): Press (3x2-2-1x5-2-3x5-2-1x4-2-3x2-2-1x2-2-3-2)-(3x4-2-1-2-1x3-2-1-2-3x4-2-1-2-1x3-2).
Chapter 2: Wizards
- Get RUNIC STONES (1/2) and FEATHER BROOM (B).
- Use SILVER SPOON on (C); get GROUND COAL.
- Use GROUND COAL and FEATHER BROOM on (D).
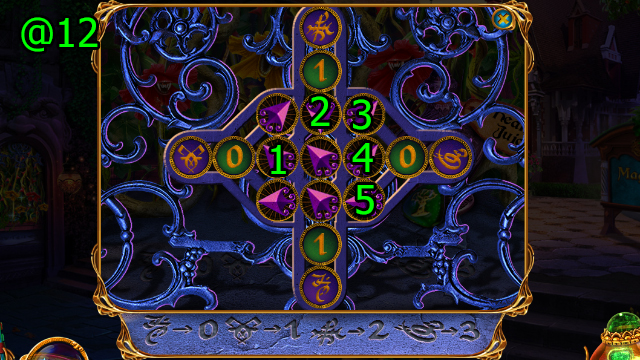
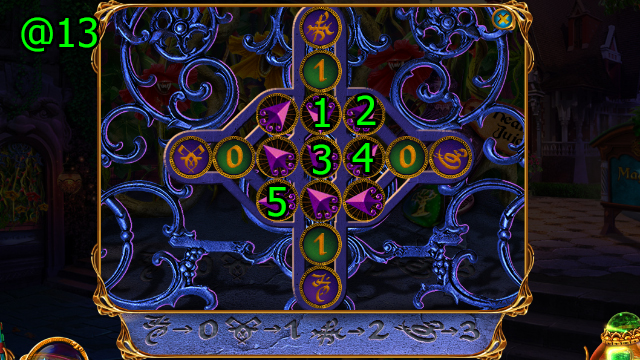
- Easy Solution (@12): Press (1x7-2x4-3x2-4-5x3).
- Hard Solution (@13): Press (5x7-2x2-4-3x2-1x6).
- Get RUNIC STONES (2/2) and EMPTY FLASK.
- Use RUNIC STONES (2/2) on (E); get ANTIDOTE RECIPE, LONG PIPE, and NEEDLE AND THREAD.
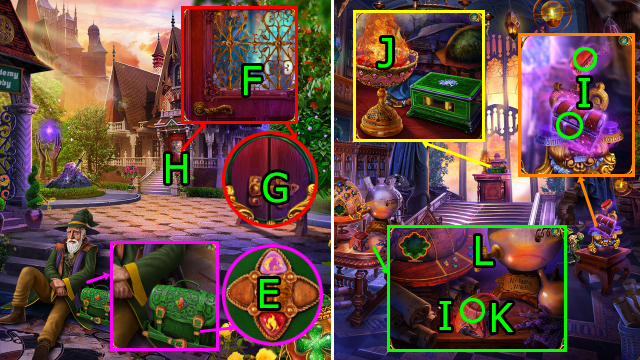
- Use MIRROR on (F); use LONG PIPE on (G).
- Go (H).
- Get POUCH, MONSTER CHEST and BRUSH (I).
- Use WATER and PINCERS on (J); get BONE and MEDAL.
- BONE on MONSTER CHEST; get SLINGSHOT and VALVE.
- Use EMPTY FLASK on (K), use VALVE on (L); get HEALING JUICE.
- Go Academy of Wizards Garden.
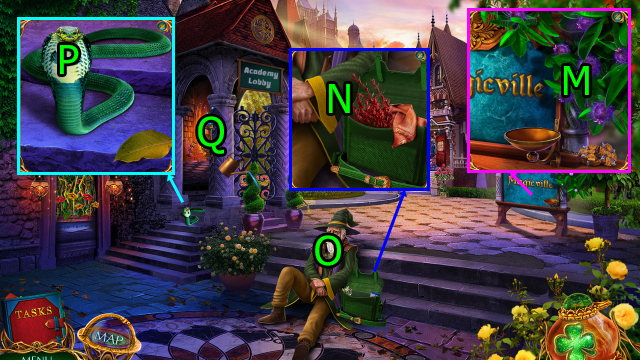
- Use POUCH on (M); get HEALING BERRIES.
- HEALING BERRIES and HEALING JUICE on ANTIDOTE RECIPE; get ANTIDOTE.
- Use ANTIDOTE on (N).
- Solve HOP (O); get MAGIC FLUTE.
- Use MAGIC FLUTE on (P).
- Go (Q).
- Get MERLIN'S LOCKED DIARY and CHESTNUT (R).
- Press and use SLINGSHOT and CHESTNUT on (S); get NEEDLE AND THREAD, STRONG MAGIC WEB, and ALKONOST FIGURINE.
- Use NEEDLE AND THREAD on (T); get SHAWL and OVEN FORK PART.
- Use MEDAL on (T); get SIRIN FIGURINE.
- Go Ancient Runes Classroom.
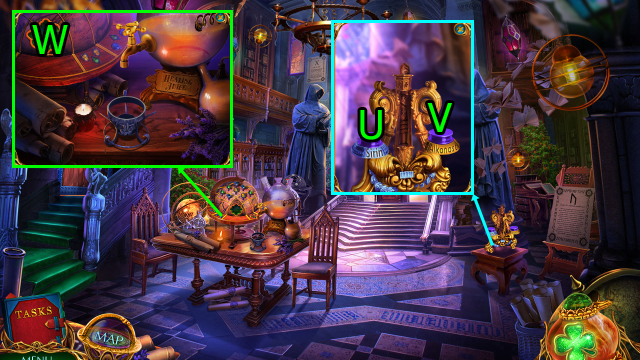
- Use SIRIN FIGURINE on (U), use ALKONOST FIGURINE on (V); get MERLIN'S MAGIC WAND.
- BRUSH and MERLIN'S MAGIC WAND on MERLIN'S LOCKED DIARY; get GLOBE GEM.
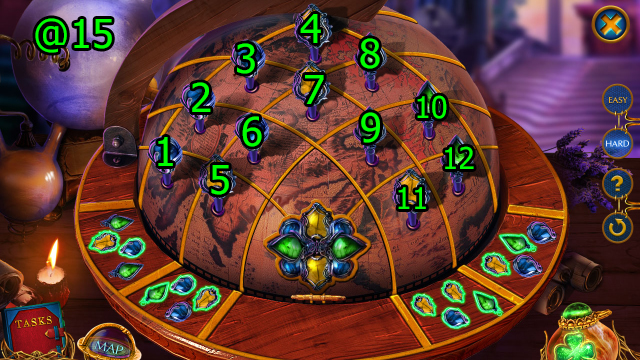
- Use GLOBE GEM on (W).
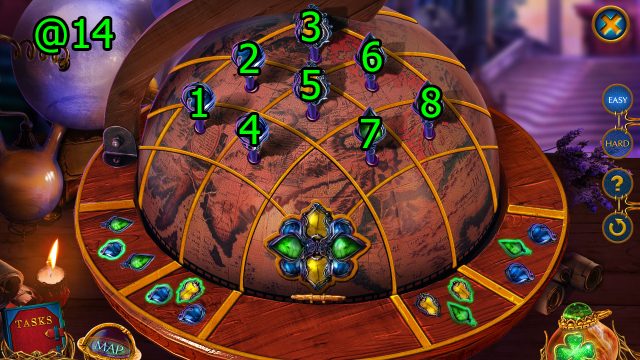
- Easy Solution (@14): Press (2-6)-(3-7)-(1-3).
- Hard Solution (@15): Press (3-9)-(7-9)-(2-10)-(6-8).
- Get MAGIC GLOVES.
- Go Academy of Wizards Garden.
- Use MAGIC GLOVES on (X); get AX.
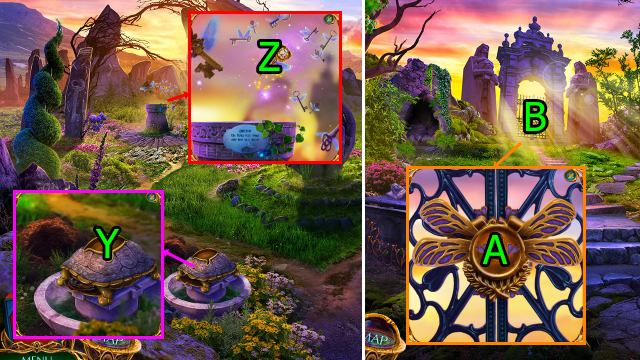
- Use AX on (Y); get DRAGON DETAIL, GEARS (1/2), and PICTURE.
- Go Academy Lobby.
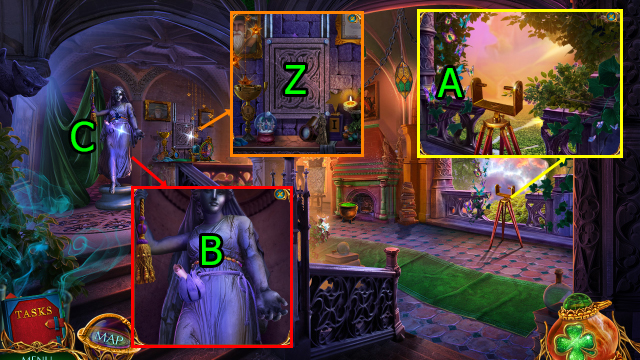
- Use PICTURE on (Z); get MAGNIFYING GLASS, STICK, and CLURICHAUN'S EXPULSION ORDER.
- OVEN FORK PART and STRONG MAGIC WEB on STICK; get SCOOP NET.
- Use SCOOP NET on (A); solve HOP, get PIXIE.
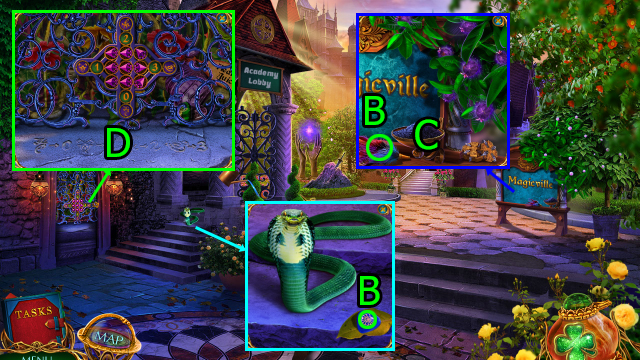
- Use PIXIE on (B).
- Go (C).
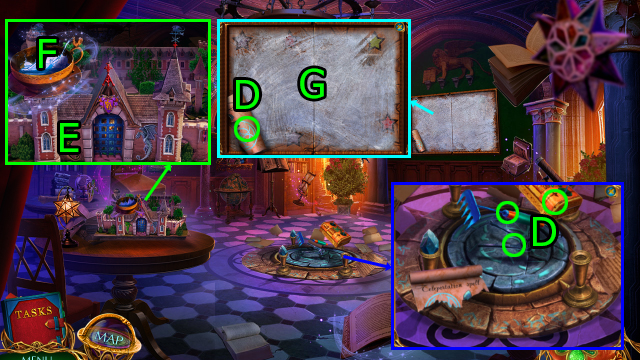
- Get RAKE, MERLIN'S BOX, PINCERS, and PORTAL SPELL PART (D).
- Use DRAGON DETAIL on (E); get WIZARD'S FIGURINE.
- Use SHAWL on (F); get WET SHAWL.
- Use WET SHAWL and MAGNIFYING GLASS on (G).
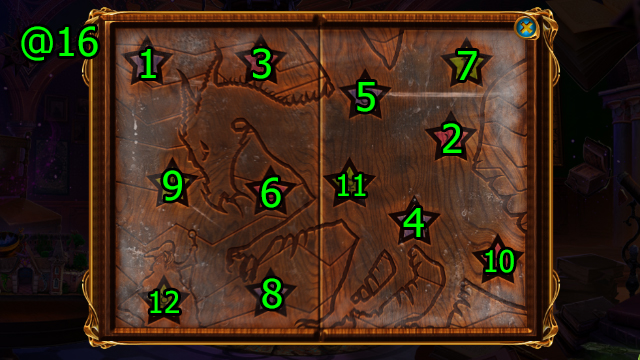
- Solution (@16): Press (1-2)-(3-4)-(5-6)-(7-8)-(9-10)-(11-12).
- Get MAGICIAN FIGURINE.
- WIZARD'S FIGURINE and MAGICIAN FIGURINE on MERLIN'S BOX; get QUILL and SPICE SCOOP.
- Go Ancient Runes Classroom.
- Use CLURICHAUN'S EXPULSION ORDER and QUILL on (H); press (Hx2).
- Drag (1-2)-(3-4)-(5-6)-(7-8)-(8-9)-(9-10); get LOCKED BAG and MUSIC ROLL.
- Use MUSIC ROLL on (I); get MATCHES and WEATHER VANE.
- Go Levitation Classroom.
- Use WEATHER VANE on (J); get GEARS (2/2) and PIN.
- PINCERS and PIN on LOCKED BAG; get BRUSH WITH PAINT.
- Use GEARS (2/2) on (K).
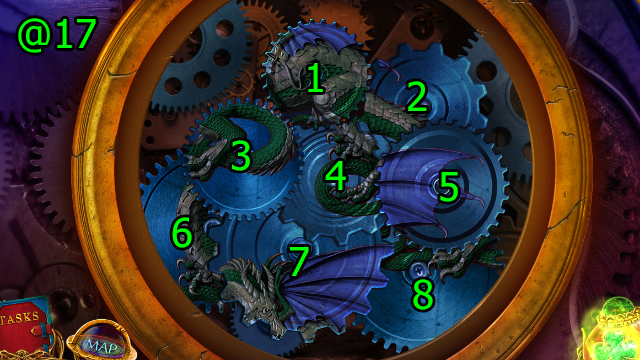

- Easy Solution (@17): Press (4-6)-(3-4)-(4-8)-(4-7)-(4-1)-(2-5).
- Hard Solution (@18): Press (4x5-6)-(4x7-3)-(4x5-8)-(4x8-7)-(4x7-1)-(4x8)-(2x8-5)-(2x5).
- Get GOLDEN GOBLET.
- Go Academy Lobby.
- Use GOLDEN GOBLET on (L); get MAGIC CRYSTAL.
- Go Levitation Classroom.
- Use PORTAL SPELL PART, BRUSH WITH PAINT, and MAGIC CRYSTAL on (M).
- Go (N).
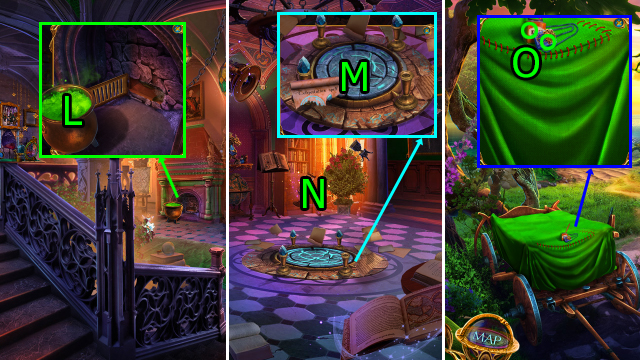
- Get PENDANT and RESIN (O).
- Use RAKE on (P); get CADUL'S SCARF.
- Use SPICE SCOOP on (P); get PENDANT GEMS.
- PENDANT GEMS on PENDANT; get FAUN AMULET, RING HANDLE, and SCREW (1/2).
- Use FAUN AMULET on (Q).
- Solve HOP (R); get FAUN'S HEART.
- Use FAUN'S HEART on (S).
- Go (T).
- Get FISH EMBLEMS (1/2), FUEL, and SHAWL (U).
- Use FUEL and MATCHES on (V); get FRESCO PIECE.
- Use RESIN and FRESCO PIECE on (W); get LANCE TIP.
- Go Woods of Fauns.
- Use LANCE TIP and press (Xx3); get TURTLE SHELL, SCISSORS, and SCARF.
- SHAWL and SCARF on CADUL'S SCARF; get KNOTTED SCARVES.
- Use KNOTTED SCARVES on (Y).
- Go (Z).
- Press (1-2-3).
- Get SCREWS (2/2) and NUMBER TAG (A).
- Use RING HANDLE on (B); get HANDLE.
- Use NUMBER TAG on (C); get SMALL MOTOR.
- Use HANDLE and SCREWS (2/2) on (D); get CHISEL and WINDING KEY.
- Press and use SMALL MOTOR and WINDING KEY on (E).
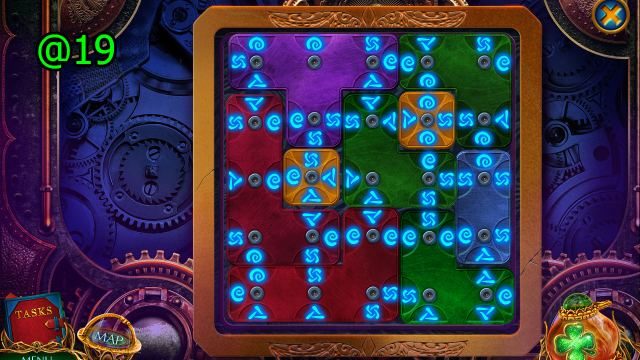
- Easy Solution (@19).
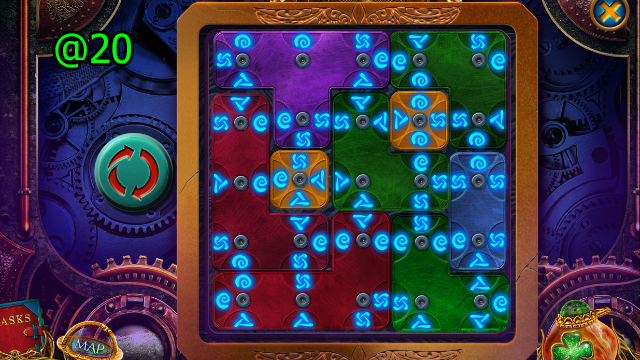
- Hard Solution (@20).
- Get MECHANICAL BIRD.
- Use MECHANICAL BIRD on (F); get SAW.
- Go Woods of Fauns.
- Use SAW on (G); get FISH EMBLEMS (2/2), WOODEN HOOP, and HAMMER.
- Use FISH EMBLEMS (2/2) on (H); get DAMAGED SHIELD and METAL PEGS.
- Go Royal Cemetery.
- Use METAL PEGS and HAMMER on (I).
- Go (J).
- Get HORN and WOODEN BASE (K).
- Use TURTLE SHELL on (L); get CLAMP and SHIELD DECORATION (1/2).
- Use SCISSORS and press (Mx5); get WOODEN SPOKES.
- WOODEN HOOP, CLAMP, CHISEL, and WOODEN SPOKES on WOODEN BASE; get WHEEL.
- Go Faun's House.
- Use WHEEL on (N); get CARROTS.
- Use CARROTS on (O); get WINGS INLAY.
- Go Flying Keys Valley.

- Use WINGS INLAY on (P).
- Solve HOP (Q); get THUNDERCLOUD IN JAR.
- Use THUNDERCLOUD IN JAR on (R); get SHIELD DECORATIONS (2/2), BROKEN SEWING MACHINE, and SALTPETER.
- SHIELD DECORATIONS (2/2) on DAMAGED SHIELD; get KING ARTHUR'S SHIELD.
- Go Woods of Fauns.
- Use KING ARTHUR'S SHIELD and press (Sx2); get SCREWS and PLUME.
- Go Faun's House.
- Use PLUME on (T); get CORK, LIGHTER, and EMPTY TUBE.
- Use CORK on (U); get RABBIT and SHOELACE.
- Use HORN on (U); get GUN POWDER.
- Use RABBIT on (V); get SCREWDRIVER, TRACING PAPER, and TORN GLOVE.
- SALTPETER, GUNPOWDER, and SHOELACE on EMPTY TUBE; get DYNAMITE.
- Go Royal Cemetery.
- Use DYNAMITE and LIGHTER on (W).
- Go (X).
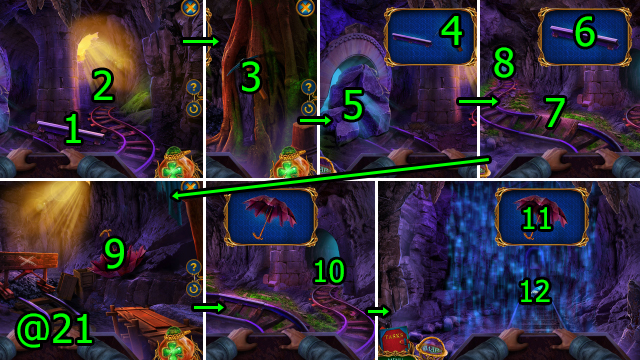
- Solution (@21): Press (1-2-3)-(down)-(4-5x2)-(6-7-8-9)-(down)-(10-11-12).
- Get EMERALD TURTLE.
- Go Flying Keys Valley.
- Use EMERALD TURTLE on (Y); get PENCIL and SEWING MACHINE HANDLE.
- TORN GLOVE and SEWING MACHINE HANDLE on BROKEN SEWING MACHINE; get GLOVE.
- Use GLOVE on (Z); get FLYING KEY.
- Go Royal Cemetery.
- Use FLYING KEY on (A).
- Go (B).
Chapter 3: Dragons
- Get LOCKED GUITAR CASE and CROSSBOW (C).
- Drag (D-E); use SCREWS and SCREWDRIVER on (E), get CAN OPENER and TUNING FORK AND HAMMER (1/2).
- Press (Fx2); use TRACING PAPER and PENCIL on (F), get COMBINATION.
- COMBINATION on LOCKED GUITAR CASE.
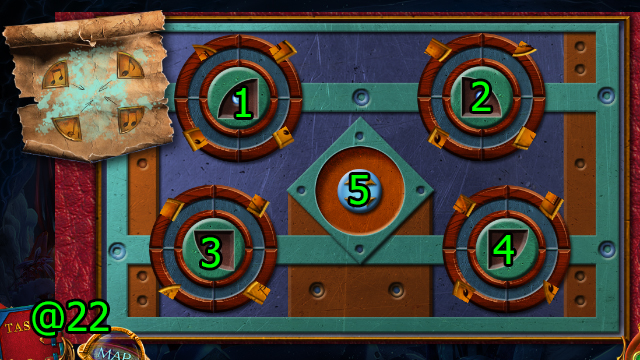
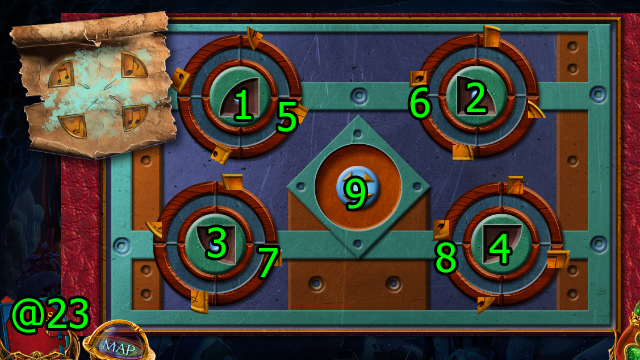
- Easy Solution (@22): Press (1x5)-(2x4)-(3x4)-(4x4)-(5).
- Hard Solution (@23): Press (1x5)-(5x4)-(2x4)-(6x4)-(3x4)-(7x4)-(4x4)-(8x4)-(9).
- Get TUNING FORK AND HAMMER (2/2), BELT, and FIRST AID KIT.
- Use TUNING FORK AND HAMMER (2/2) on (G); get DRAGON'S EYE.
- Use DRAGON'S EYE on (H).
- Solve HOP (I); get MOUNTAIN CLIMBING EQUIPMENT.
- Use MOUNTAIN CLIMBING EQUIPMENT on (J).
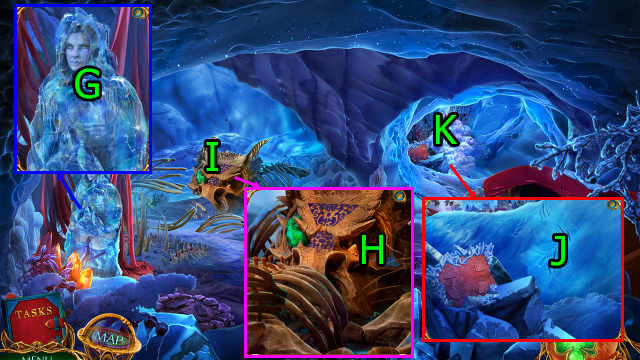
- Go (K).
- Get BURNING KEROSENE LAMP (L).
- Press (M); get WELL HANDLE.
- Use WELL HANDLE on (N); get ROPE.
- Use BURNING KEROSENE LAMP and CAN OPENER on (O); get FIBULA and GRAPPLING HOOK.
- ROPE and GRAPPLING HOOK on CROSSBOW; get CROSSBOW WITH GRAPPLING HOOK.
- Use CROSSBOW WITH GRAPPLING HOOK on (P).

- Solution (@24): Press (1x8).
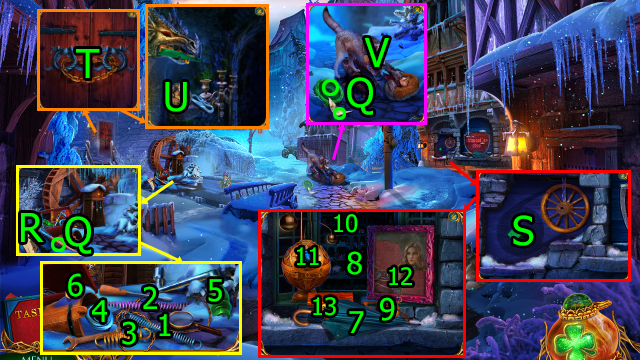
- Get INSTRUCTION PART, WHEEL, and RUSTY SHOVEL (Q).
- Use INSTRUCTION PART on (R); press (1-2-3-4-5-6), get SQUIRREL.
- Use WHEEL, BELT, and SQUIRREL on (S).
- Drag (7-8), press (8), drag (9-10), press (11), drag (12-13); get PATCH (1/4) and TRAP.
- Use TRAP on (T).
- Press (Ux4); get DOG WHISTLE and BROKEN DRAGON FIGURINE.
- Use DOG WHISTLE and FIRST AID KIT on (V); get MAMMOTH EMBLEM.
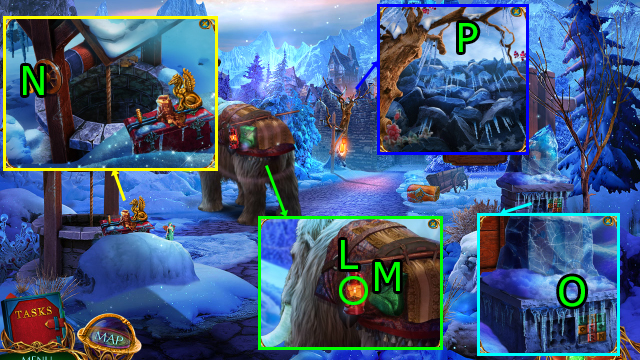
- Go Mountain Slope.
- Use MAMMOTH EMBLEM on (W).
- Solve HOP (X), get MAMMOTH SADDLE.
- Use MAMMOTH SADDLE on (Y).
- Go (Z).
- Get PATCH (2/4) and STICKS (A).
- Use FIBULA on (B); get PATCH (3/4), DRAGON FIGURINE PART, and OIL CAN.
- OIL CAN on RUSTY SHOVEL; get SHOVEL.
- Use SHOVEL on (C); get PATCH (4/4) and RUNIC BUTTONS.
- Use PATCH (4/4) and press (D).
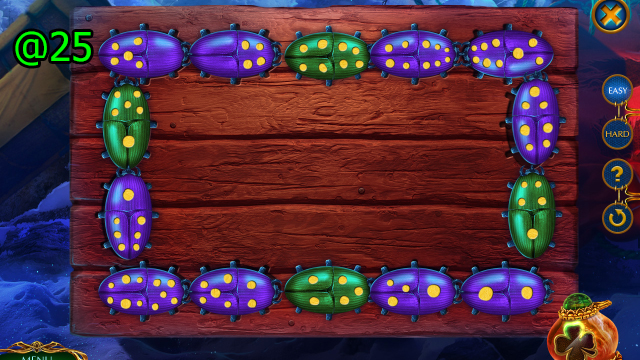
- Easy Solution (@25).
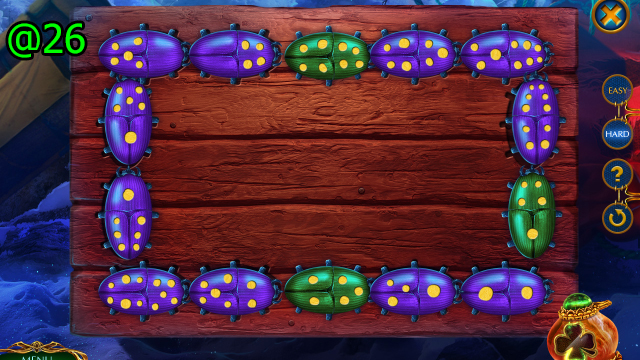
- Hard Solution (@26).
- Get DRAGON'S EMERALD EYE.
- Go Mountain Slope.
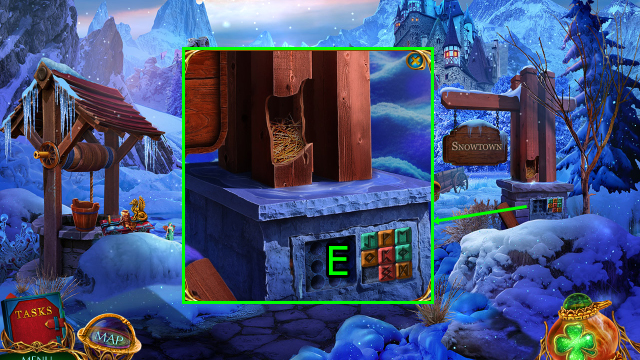
- Use RUNIC BUTTONS on (E).

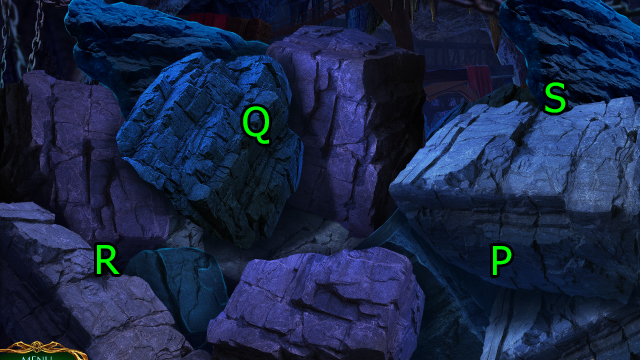
- Easy Solution (@27): Press (6-3-2-5-4-1-2)-(5-6-9-8-5-2-3)-(6-9-8-5-2-3-6)-(9-8-5-4-7-8-5-6-9).
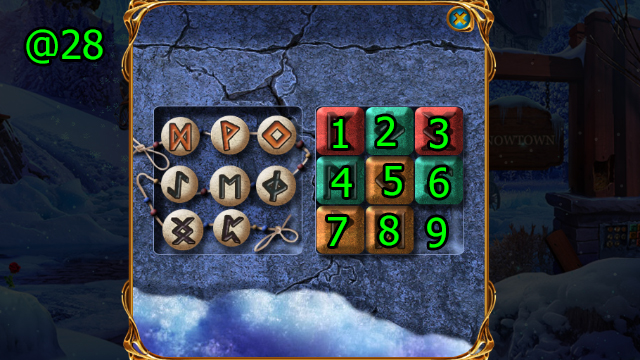
- Hard Solution (@28): Press (6-3-2-1-4-5-2)-(1-4-7-8-5-2-1)-(4-7-8-9-6-3-2)-(1-4-7-8-9-6-5)-(4-7-8-5-6-9).
- Get LEAD COINS and CANDLES (1/3).
- Go Snowtown.
- Use DRAGON'S EMERALD EYE on (F); get PLANE and DRAGON FIGURINE PART.
- DRAGON FIGURINE PART and DRAGON FIGURINE PART on BROKEN DRAGON FIGURINE; get DRAGON FIGURINE.
- PLANE on STICKS; get REFINED STICKS.
- Go Mountain Slope.
- Use DRAGON FIGURINE on (G); get SCRAPER, GRINDSTONE, and RING.
- Go Mountain Top.
- Use RING on (H); get STONE BOWL and CANDLES (2/3).
- Use GRINDSTONE on (I); get CANDLES (3/3) and TWINE.
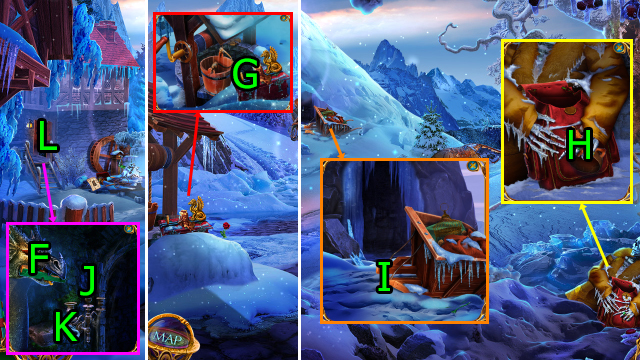
- Go Snowtown.
- Use CANDLES (3/3) on (J); drag (K-J).
- Solve HOP (L); get MECHANICAL MOUSE.
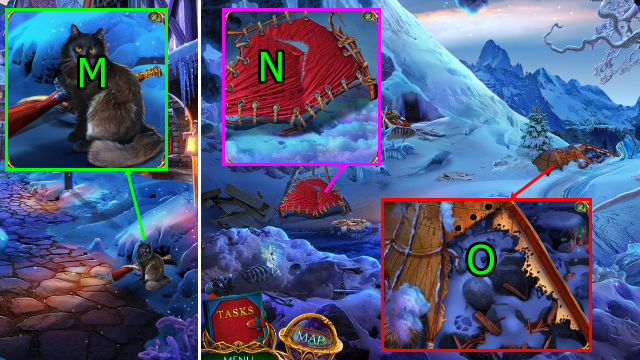
- Use MECHANICAL MOUSE on (M); get TEA STRAINER, UNLOADED RIFLE, and SHARP DAGGER.
- Go Mountain Top.
- Use SHARP DAGGER on (N); get THICK CLOTH.
- Use THICK CLOTH, REFINED STICKS, and TWINE on (O).
- Press (P); get Tasks.
- Press (Q); get Hint.
- Press (R); get Inventory.
- Press (P); get Map.
- Press (S).

- Get ROUND SHIELD and SHACKLES (T).
- Use SCRAPER on (U); get THICK TOWEL.
- Use STONE BOWL on (V), drag (W-V); use LEAD COINS and THICK TOWEL on (V), get MELTED LEAD.
- Use MELTED LEAD on (X); get BULLET and SHEATH.
- Use SHEATH on (Y).
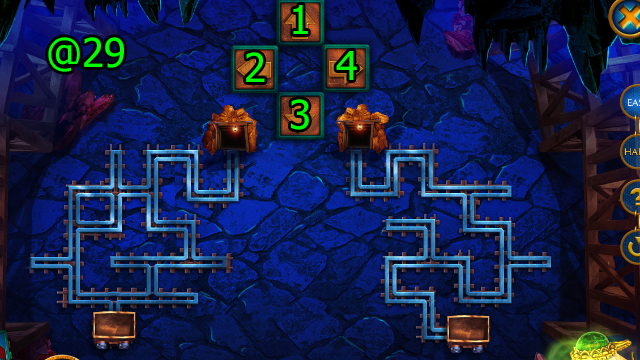
- Easy Solution (@29): Press (1-2-1-2-1-4x2)-(1-4-3-4-1x2-2-1-2-1-2)-(3-2-1-4x2-1-4-3-4-1).
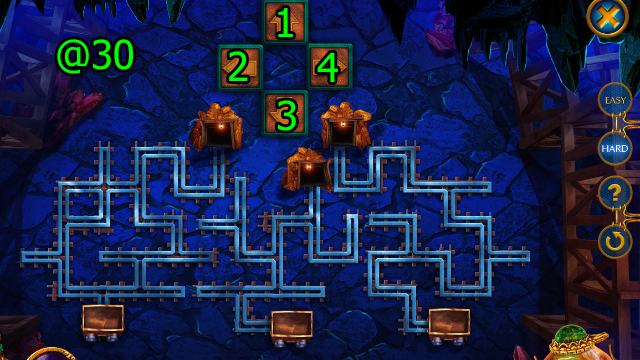
- Hard Solution (@30): Press (1-2-1-2-1-4x2)-(1-4-3-4-1x2-2-1-2-1-2)-(3-2-1-4x2-1-4)-(3-4-1-3x2-4-1-4-1).
- Get GUNPOWDER and SHOVEL.
- Use SHOVEL on (Z); get HELMET and RIFLE BRUSH.
- BULLET, GUNPOWDER, and RIFLE BRUSH on UNLOADED RIFLE; get LOADED RIFLE.
- Use LOADED RIFLE on (A).
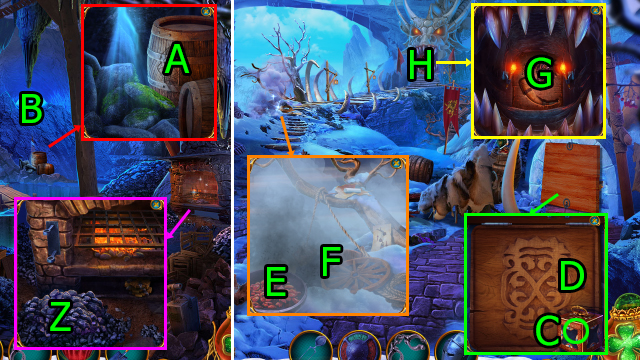
- Go (B).
- Get DAMAGED BOX (C).
- Use SHACKLES and TEA STRAINER on (D); get S-SHAPED HOOK and BOX AMULET (1/2).
- Use ROUND SHIELD on (E); get WOODEN WHEEL and CHALK (1/2).
- Press and use HELMET on (F); get BOX AMULET (2/2).
- BOX AMULET (2/2) on DAMAGED BOX; get HORN.
- Use HORN on (G).
- Go (H).
- Get DRAGON'S BLOOD (I).
- Use DRAGON'S BLOOD on (J).
- Solve HOP (K); get MACE.
- Press (Lx2); get GIANT NUT and NET.
- Use MACE on (M); get DAMAGED BEADS.
- Use S-SHAPED HOOK on (N); get GEARS (1/2) and SKULL CHARMS.
- SKULL CHARMS on DAMAGED BEADS; get BEAD WITH SKULLS.
- Use BEAD WITH SKULLS on (O); get CHALK (2/2), CROCODILE JAWS, and BOLT.
- Go Near Dragon's Cave.
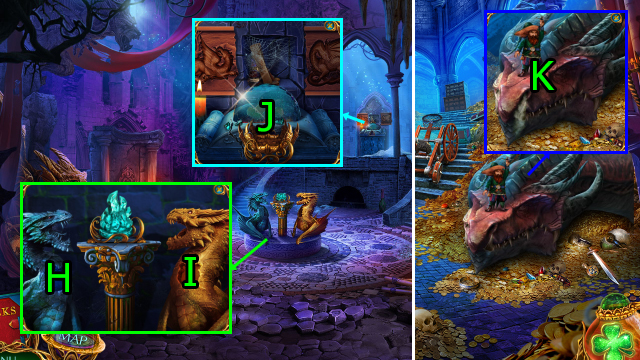
- Use CHALK (2/2) on (P); get TREASURY MAP.
- Use TREASURY MAP on (Q).
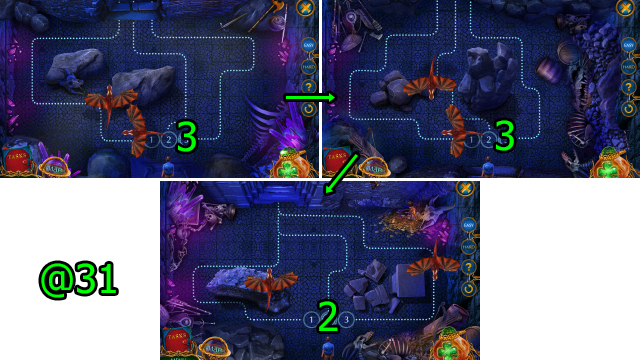
- Easy Solution (@31): Press (3)-(3)-(2) when dragons are arranged as pictured.
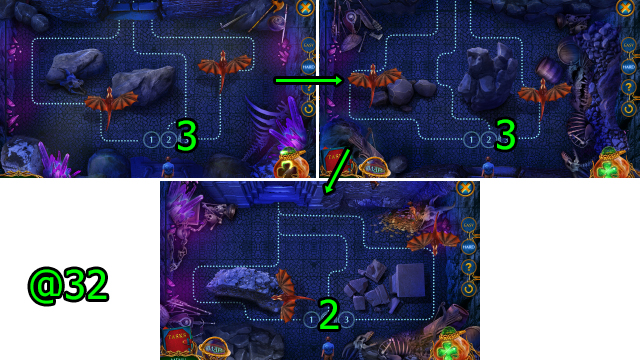
- Hard Solution (@32): Press (3)-(3)-(2) when dragons are arranged as pictured.
- Get GEARS (2/2) and BANDAGE (R).
- Press and use NET, WOODEN WHEEL, and GIANT NUT on (S); get PYTHIA'S CANE.
- Use BANDAGE and PYTHIA'S CAVE on (T); get HANDLE WITH SCREWS.
- Go Near Dragon's Cave.
- Use GEARS (2/2) on (U); get DRAGON MUSIC SHEET and BRUSH.
- Use DRAGON MUSIC SHEET; get BUTTON.
- Go Treasury.
- Press and use HANDLE WITH SCREWS and BUTTON on (V).
- Go (W).
- Get FRUIT (X).
- Use CROCODILE JAWS on (Y); get WATER and BROKEN FIERY HEART.
- Use WATER and BRUSH on (Z); get HANDLE.
- Go Dragon's Sanctuary.
- Use HANDLE and BOLT on (A); get LOCKPICK SET.
- Use FRUIT on (B); get RESIN.
- Go Catacombs.
- Use LOCKPICK SET on (C).
- Solve HOP (D); get MAGIC CRYSTAL.
- Use MAGIC CRYSTAL on (E); get BUNCH OF BERRIES and FIERY HEART PIECE.
- Go Dragon's Sanctuary.
- Use BUNCH OF BERRIES on (F); get URN.
- Use URN on (G); get ICY HEART and FIERY HEART PART.
- RESIN, FIERY HEART PIECE, and FIERY HEART PART on BROKEN FIERY HEART; get FIERY HEART.
- Go Catacombs.
- Use ICY HEART on (H), use FIERY HEART on (I); get FIRE EMBLEM.
- Press and use FIRE EMBLEM on (J); get ENCHANTED DRUM.
- Go Treasury.
- Use ENCHANTED DRUM on (K).
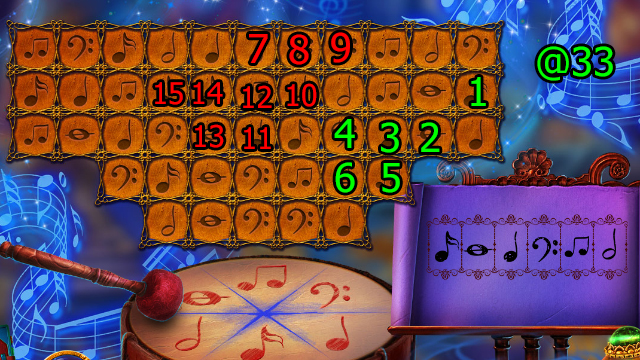
- Easy Solution (@33): Press (1-2-3-4-5-6)-(7-8-9-10-11-12-13-14-15).
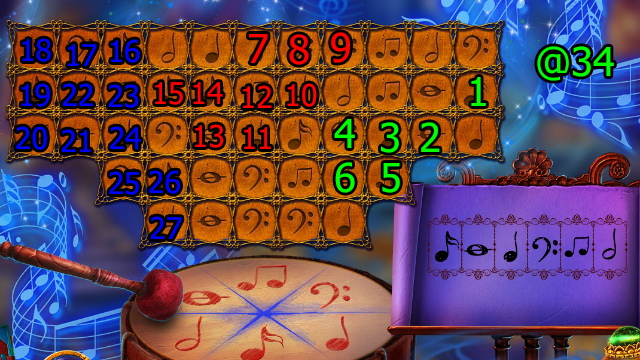
- Hard Solution (@34): Press (1-2-3-4-5-6)-(7-8-9-10-11-12-13-14-15)-(16-17-18-19-20-21-22-23-24-25-26-27).
- Congratulations! You've completed Labyrinths of the World: Fool's Gold!
Created at: 2019-09-06