

Walkthrough Menu
- General Tips
- Chapter 1: Margaret's Campsite
- Chapter 2: The Village Road
- Chapter 3: The Truth Tree
- Chapter 4: Stonehenge
- Chapter 5: Torwald's House
- Chapter 6: The Well
- Chapter 7: The Gathering Circle
General Tips
- This is the official guide for Labyrinths of the World: Stonehenge Legends.
- This guide will not mention each time you have to zoom into a location; the screenshots will show each zoom scene.
- Hidden-object puzzles are referred to as HOPs. This guide will not show HOP solutions. It will identify the location of the HOP and the inventory item acquired.
- This guide will show solutions for non-random puzzles. Please read the in-game instructions for each puzzle.
- In this game, you will sometimes have to select the new scene to trigger dialog, cut-scenes, or tasks prior to interacting with the scene.
Chapter 1: Margaret's Campsite
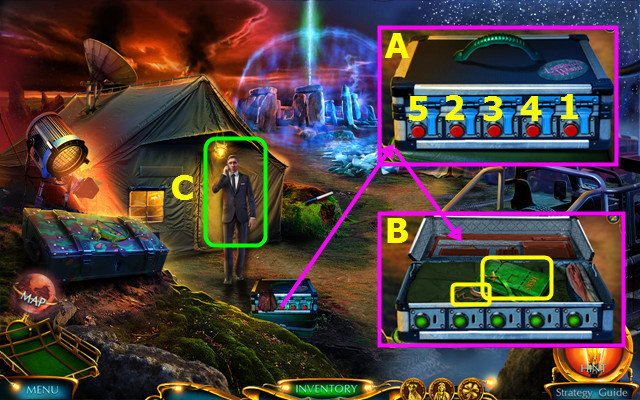
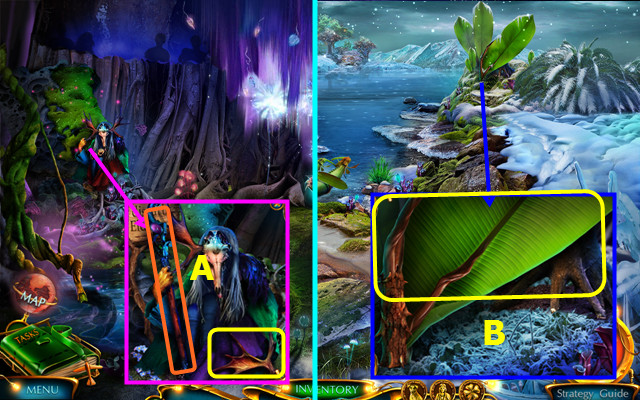
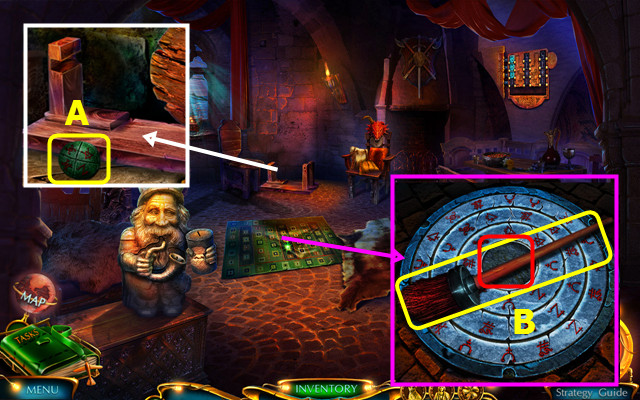
- Take the gloves; select 1-2-3-4-5 for the easy solution and 2-3-1 for the hard solution (A).
- Take the TASKS JOURNAL and ID AMULET (B).
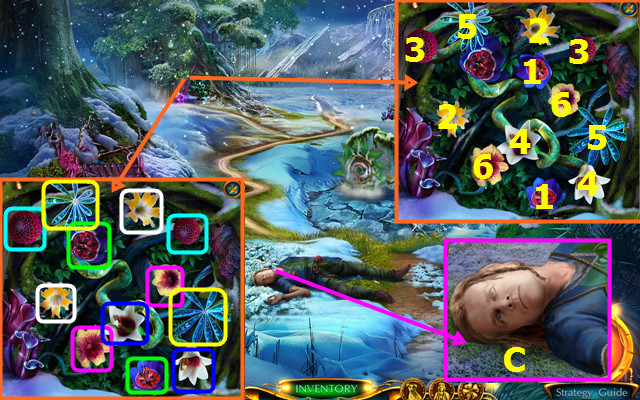
- Talk to David; show the ID AMULET (C).
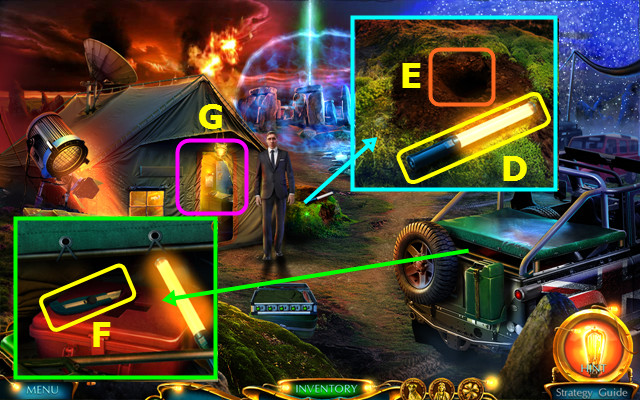
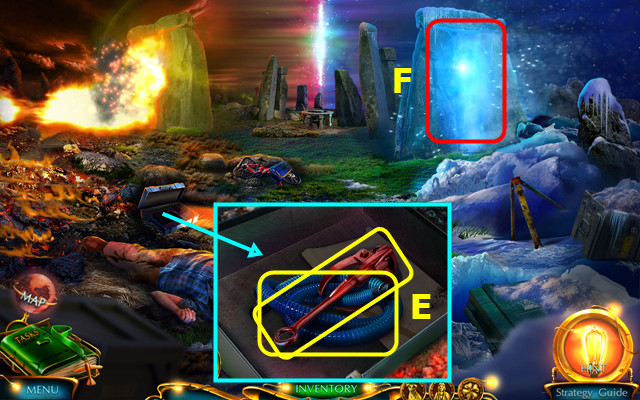
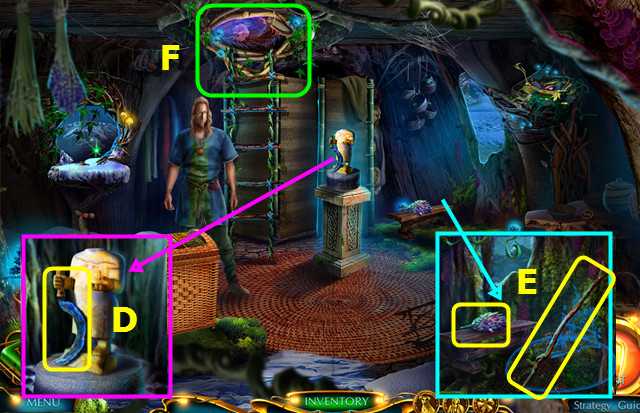
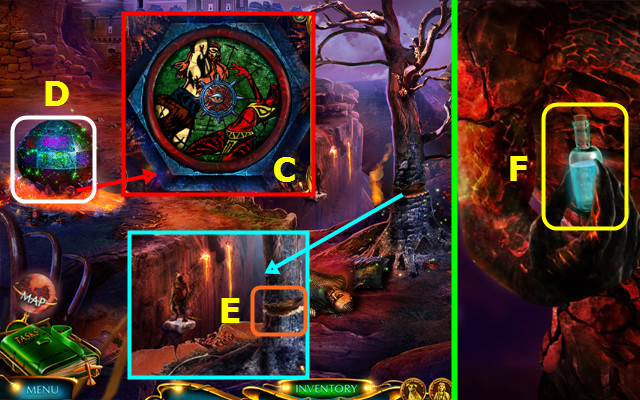
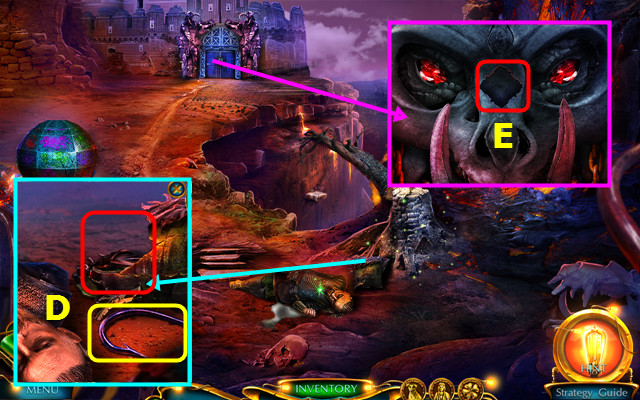
- Turn on and take the LIGHT WAND (D).
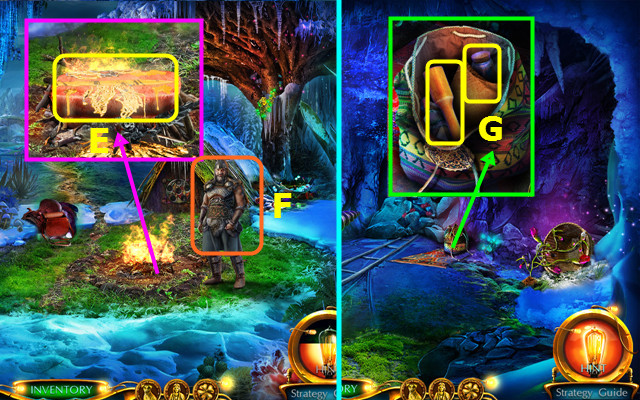
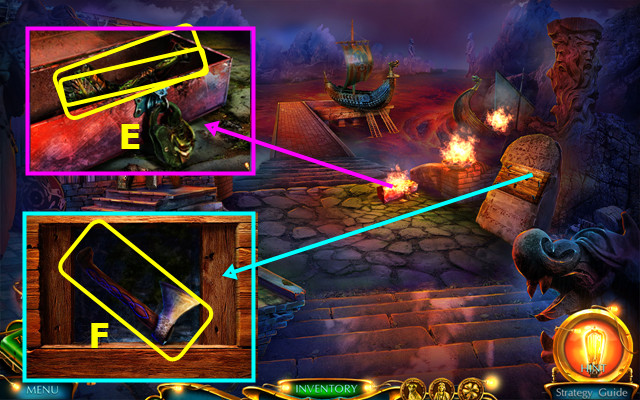
- Touch the hole, and then the mole (E).
- Use the LIGHT WAND; take the BOX CUTTER (F).
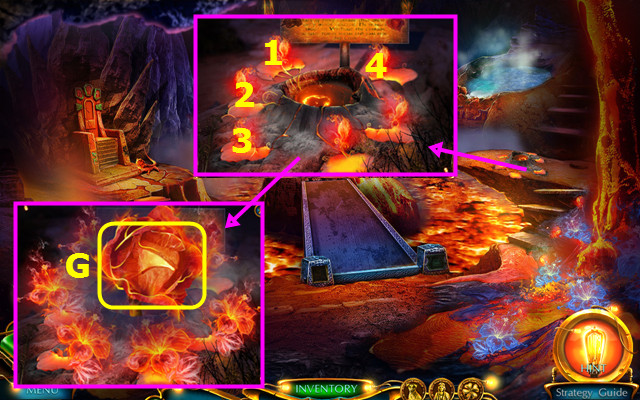
- Enter the Survey Tent (G).
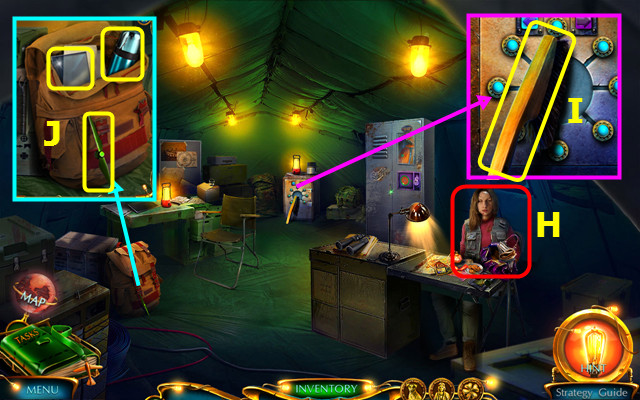
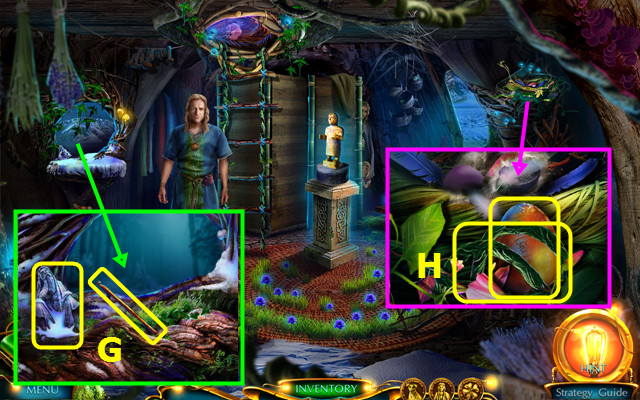
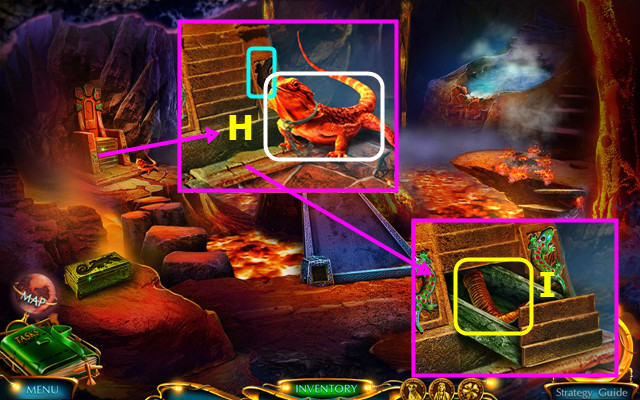
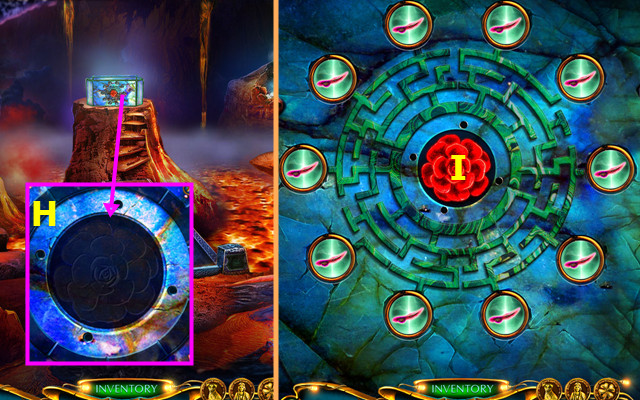
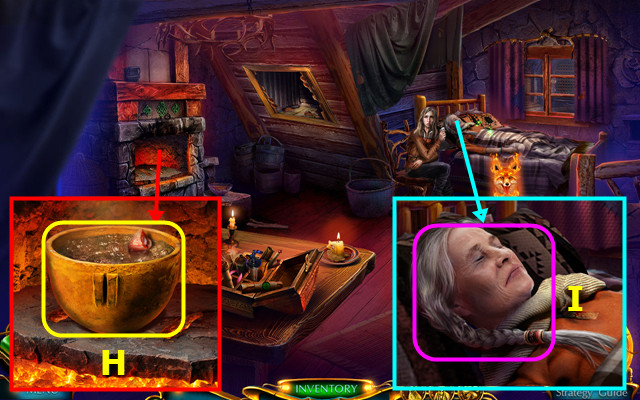
- Talk to Margaret; play the HOP and take the BROKEN MAGNETIC DEVICE (H).
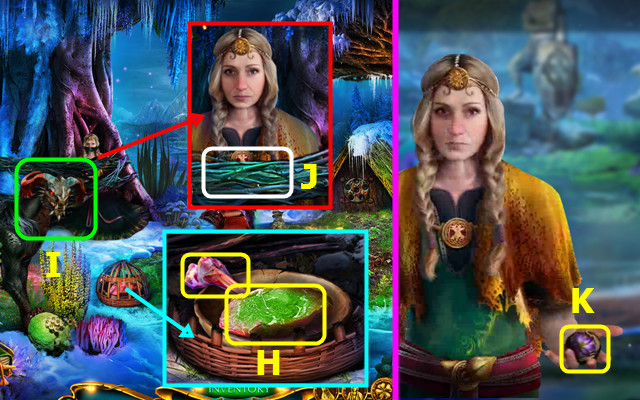
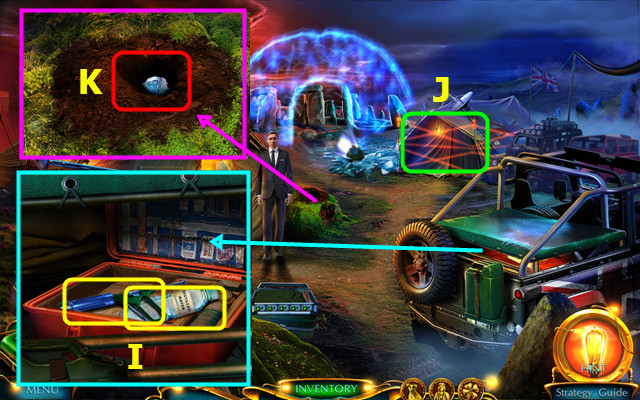
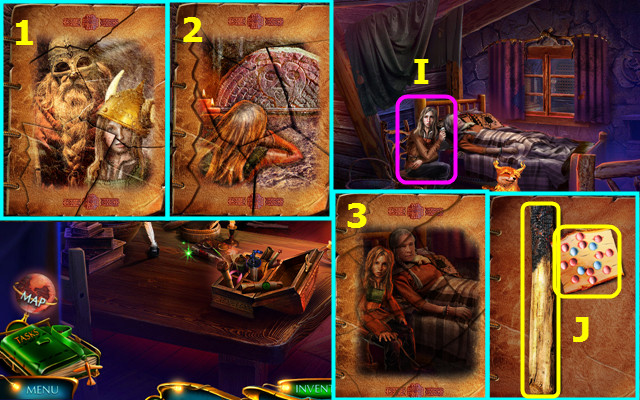
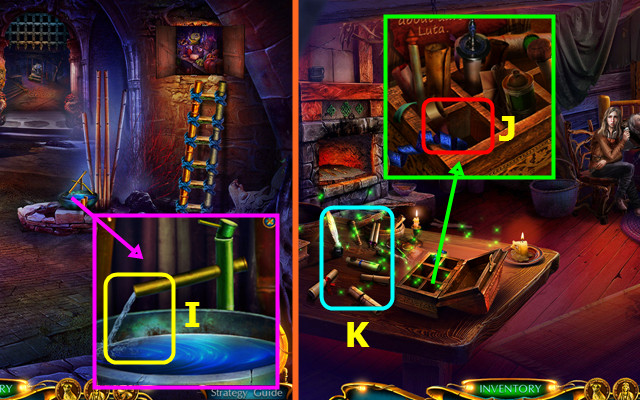
- Take the BRUSH (I).
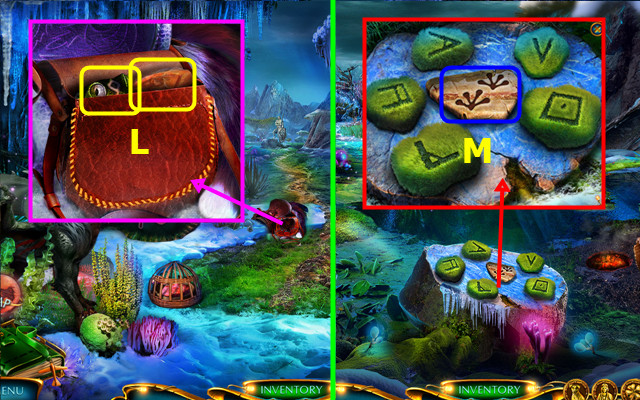
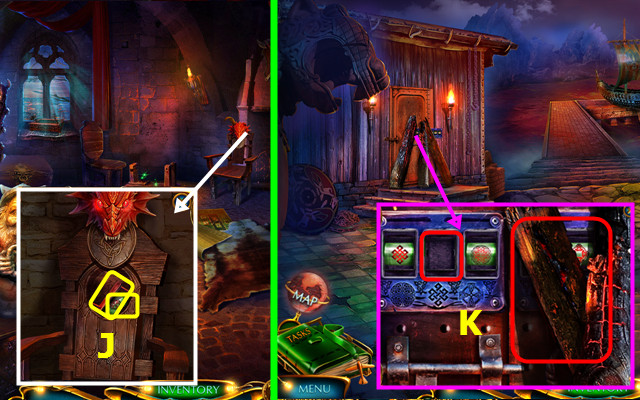
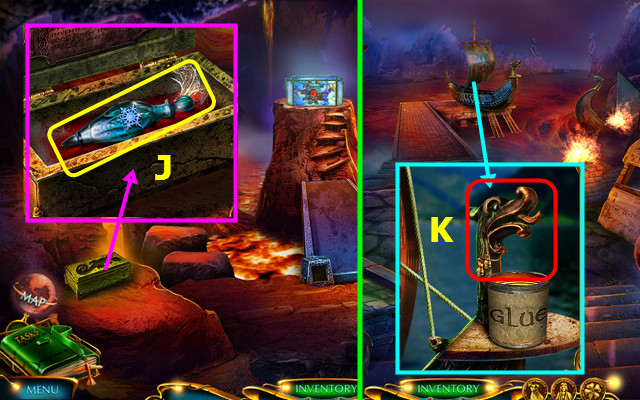
- Take the 1/2 PROPELLER; open the backpack and use the BOX CUTTER. Read the note; take the GLASS SCREEN and HOT WATER (J).
- Remove the lid from the HOT WATER (inventory).
- Remove the cracked screen from the BROKEN MAGNETIC DEVICE and add the GLASS SCREEN (inventory).
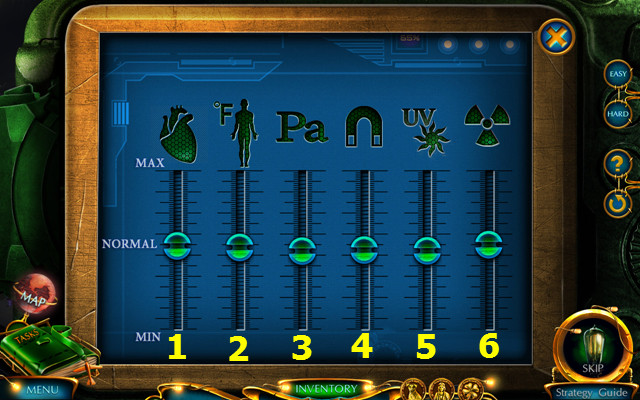
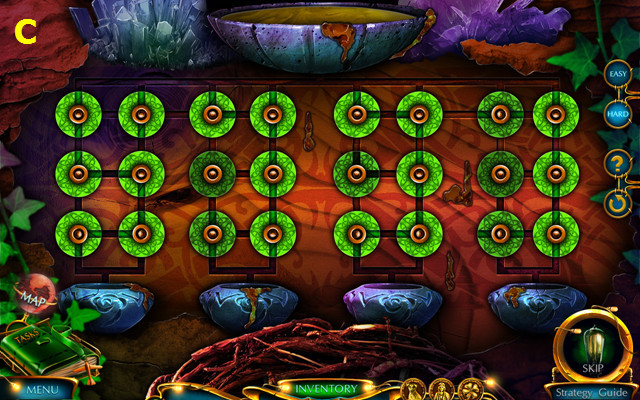
- Easy solution: move the sliders to the green position in order 5-3-6-1-4-2.
- Hard solution: move 5 to green-slide 1 down and then up until 3 and 4 are on green-slide 6 up until 1 and 6 are on green.
- You now have the MAGNETIC DEVICE.
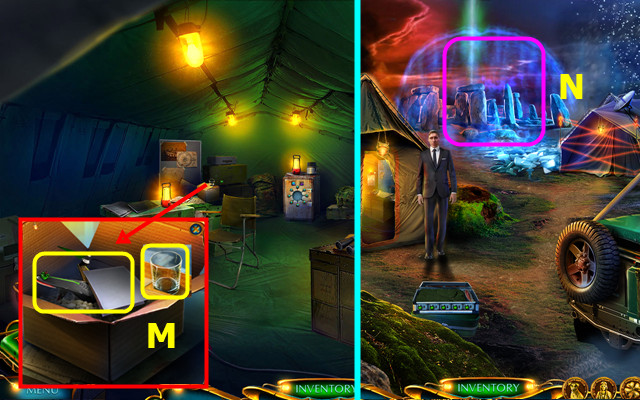
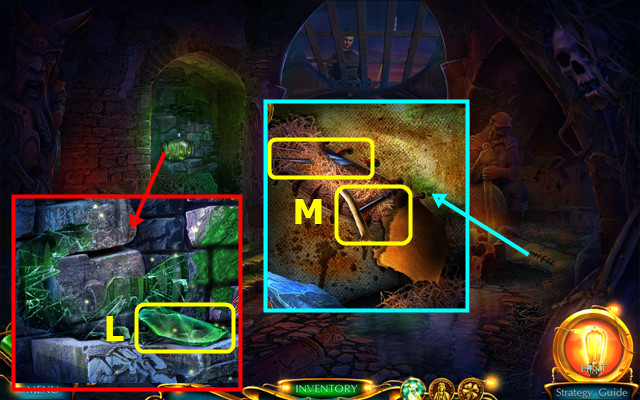
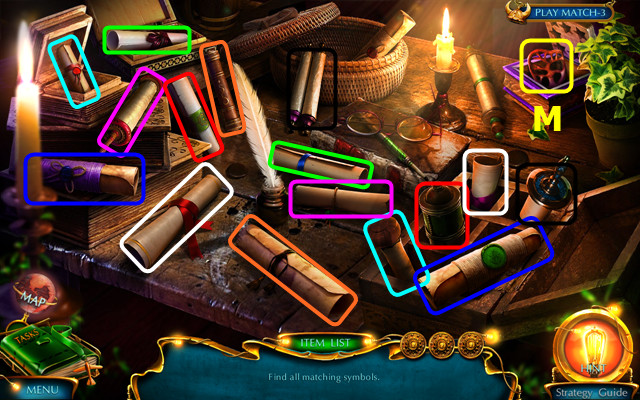
- Take the GLASS and open the box; take the BROKEN DRONE (M).
- Walk down.
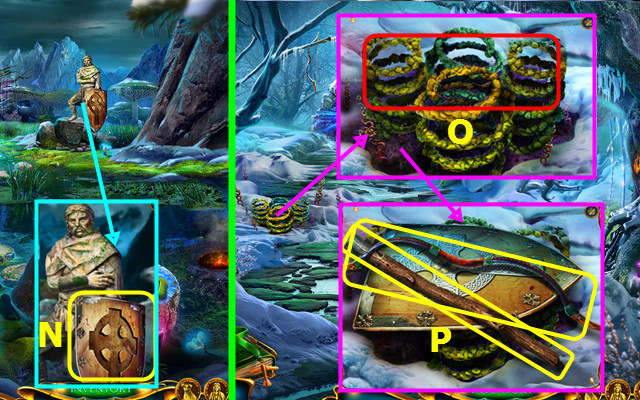
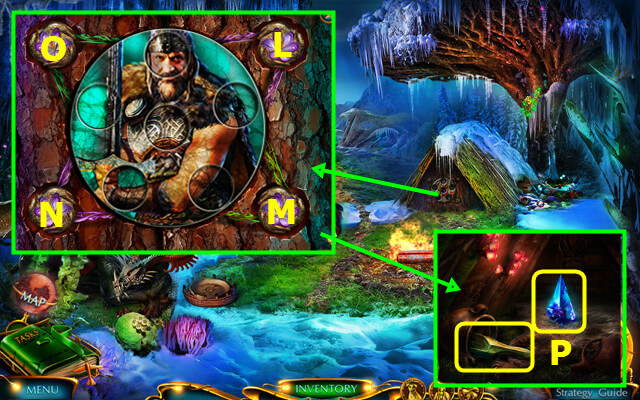
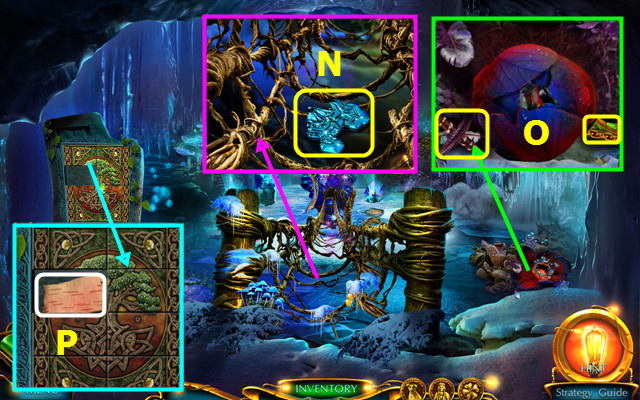
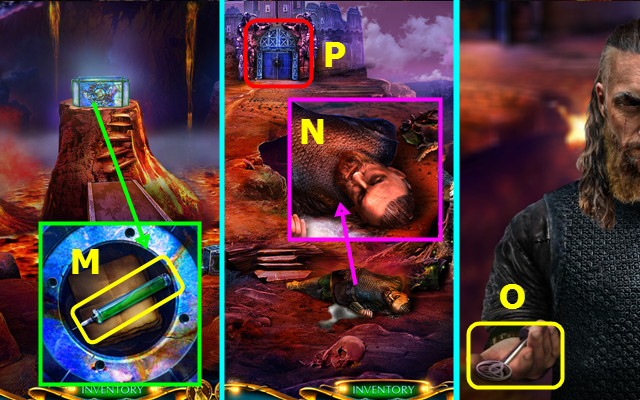
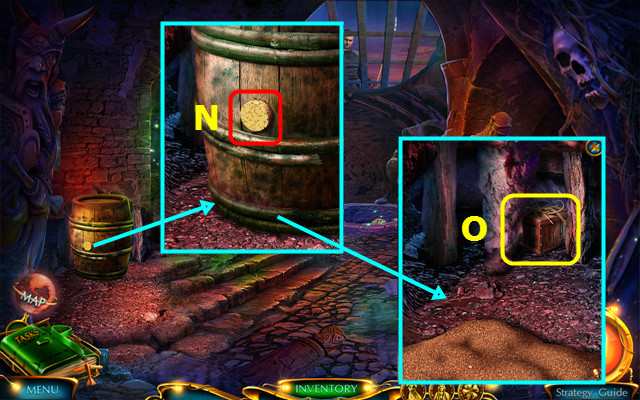
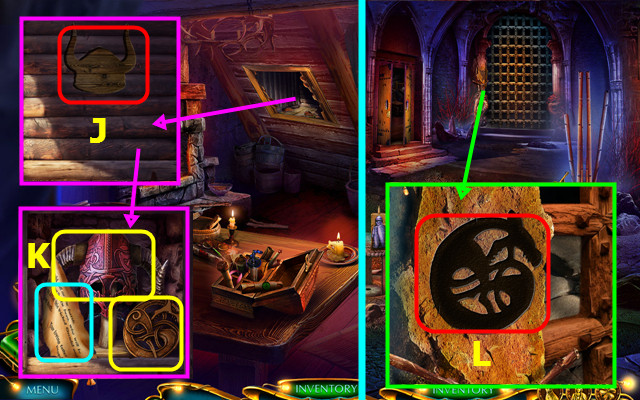
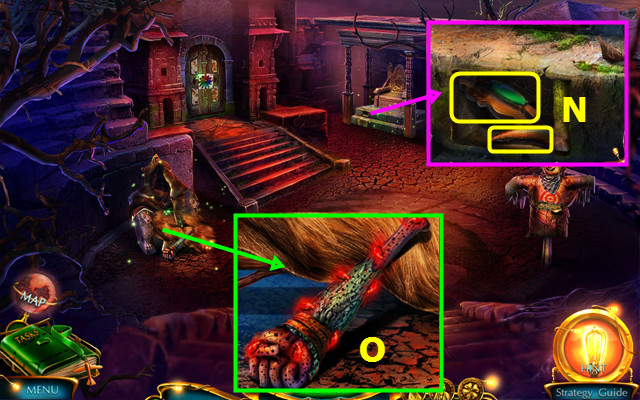
- Use the MAGNETIC DEVICE (N).
- Walk forward.

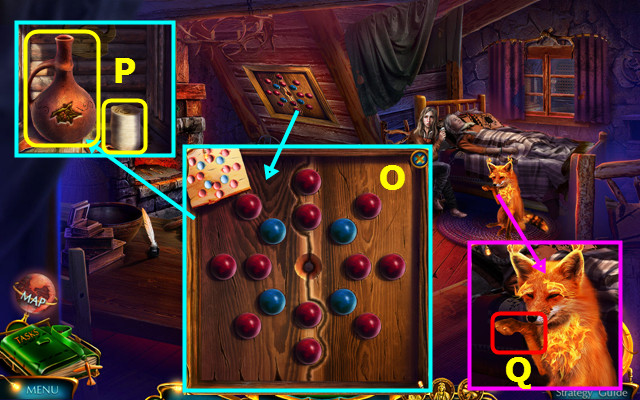
- Take the FLASHLIGHT. Take and open the wallet; read the note and take the SUITCASE CODE (O).
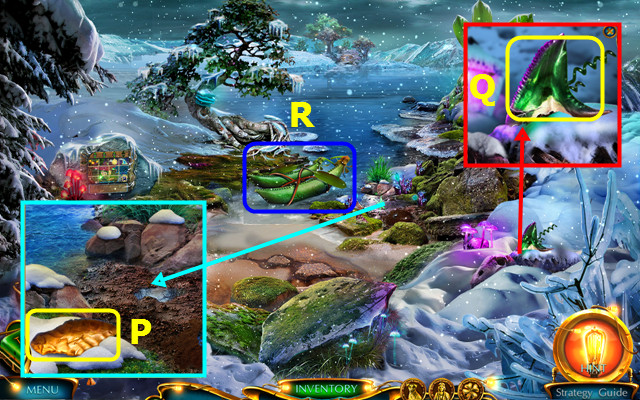
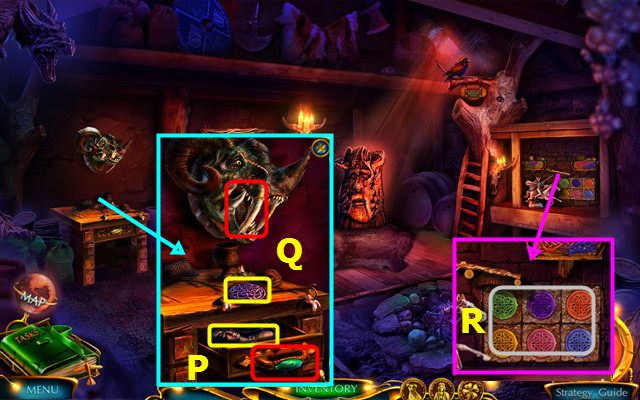
- Use the HOT WATER; take the 2/2 PROPELLER (P).
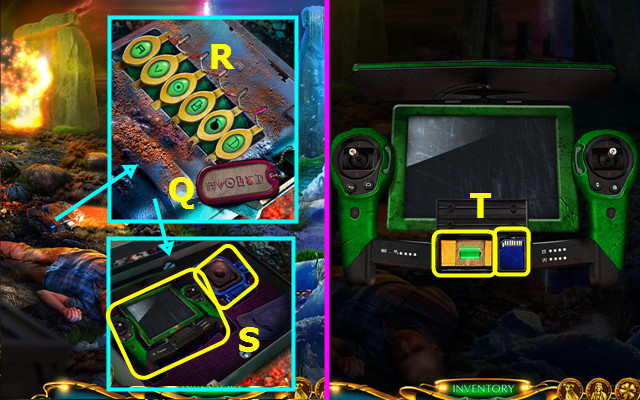
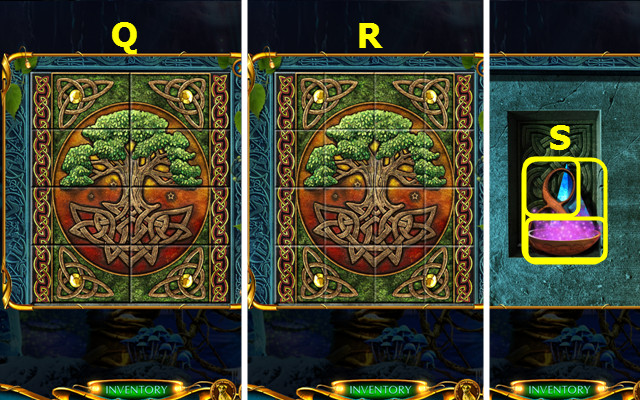
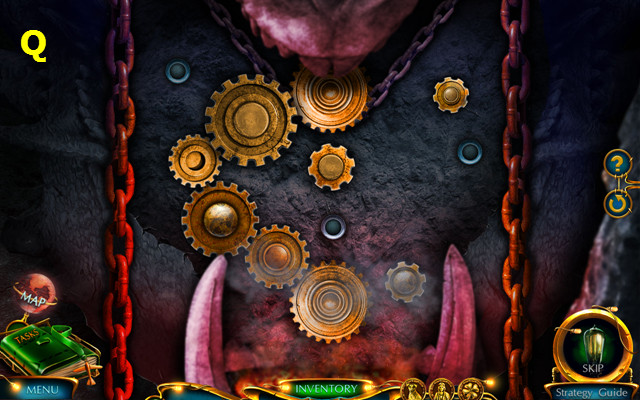
- Use the BRUSH and place the SUITCASE CODE (Q).
- Swap the buttons to match the code (R).
- Take the CONTROL CONSOLE and ATTACHABLE CAMERA (S).
- Combine the BROKEN DRONE, 2 PROPELLERS, ATTACHABLE CAMERA, and CONTROL CONSOLE (inventory).
- Take the BATTERY and DRONE MEMORY CARD (T).
- Walk down.
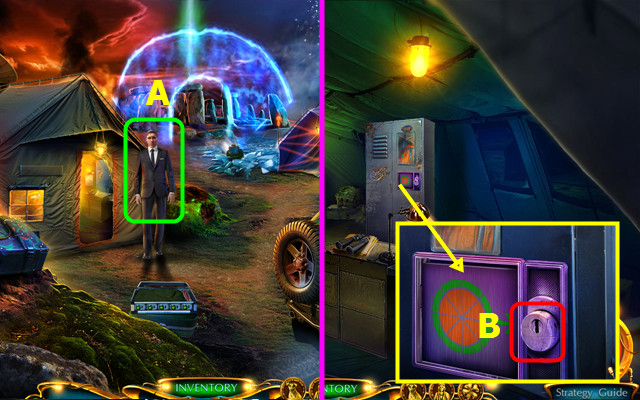
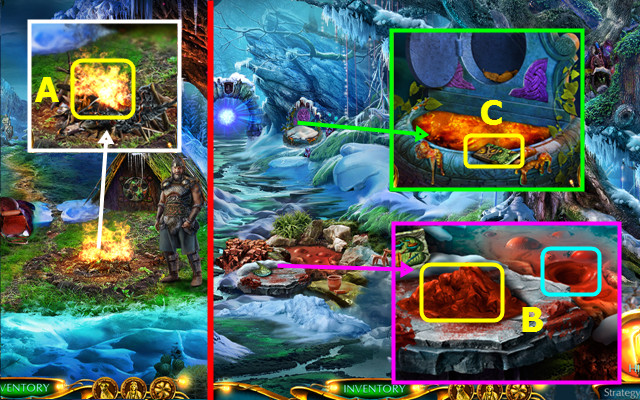
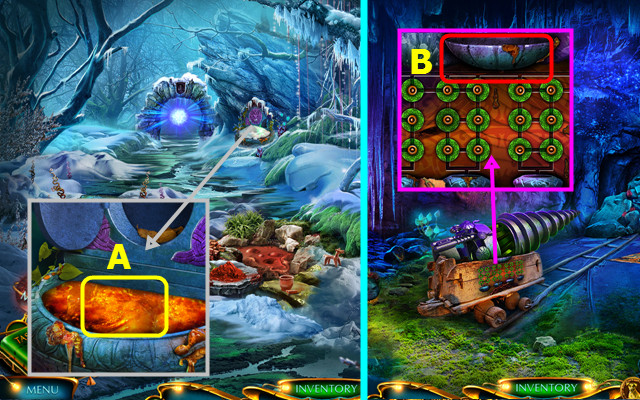
- Give David the DRONE MEMORY CARD; take the LOCKER KEY (A).
- Enter the Survey Tent.
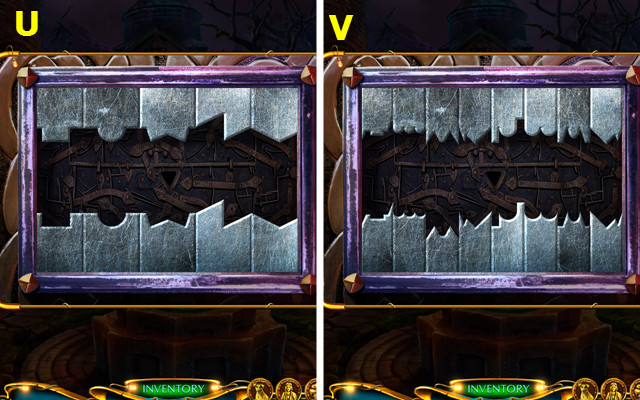
- Use the LOCKER KEY (B).
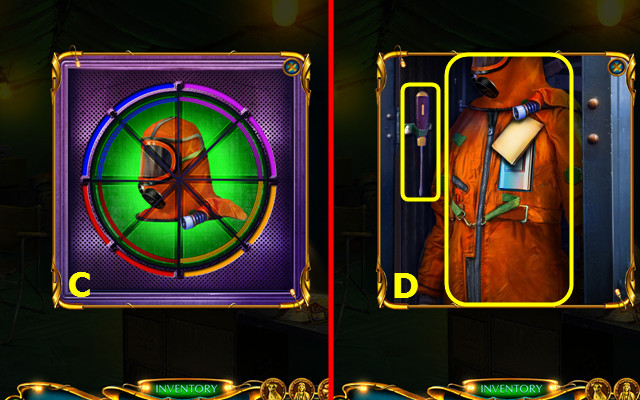
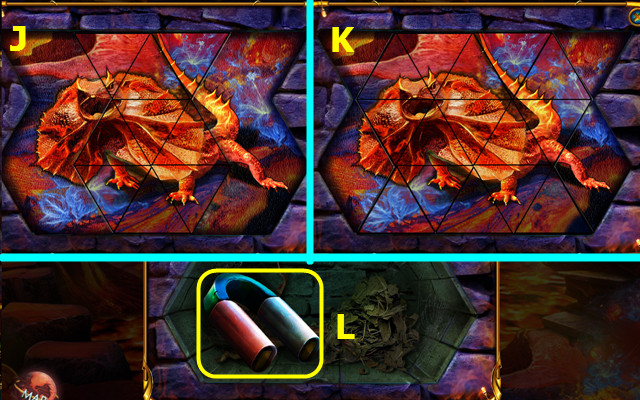
- Restore the image (C).
- Take the THERMO-SUIT and SCREWDRIVER (D).
- Walk down and forward.
- Use the SCREWDRIVER; take the HOOK and BREATHING TUBE (E).
- Read the instructions; add the BATTERY and BREATHING TUBE to the THERMO-SUIT (inventory).
- Enter the Icy Portal (F).
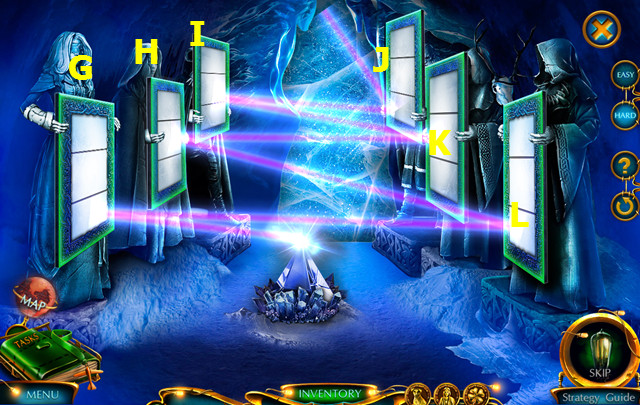
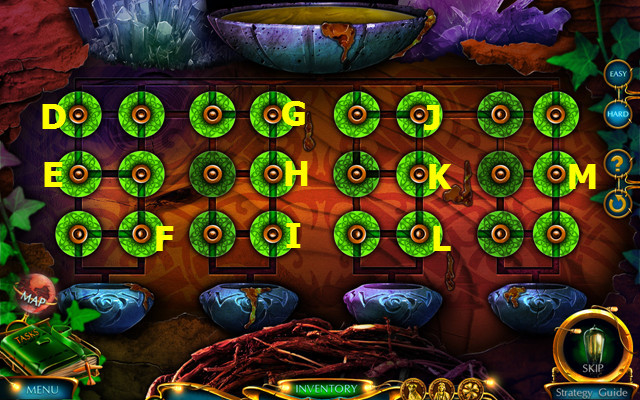
- Easy solution: Gx3-I-Lx3-H-J.
- Hard solution: K-Gx2-Ix3-H-J-I.
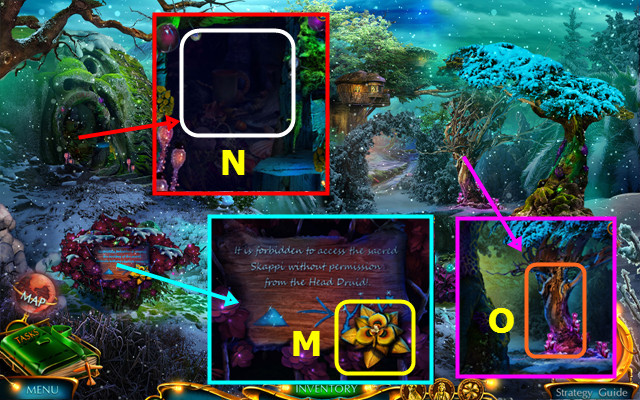
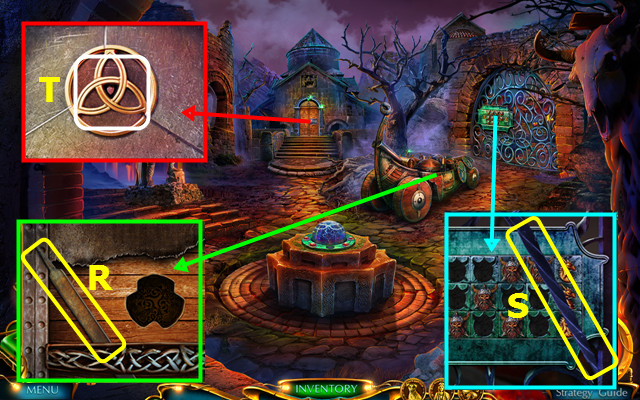
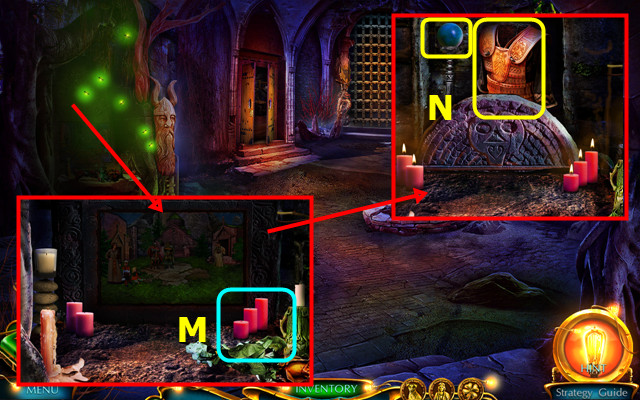
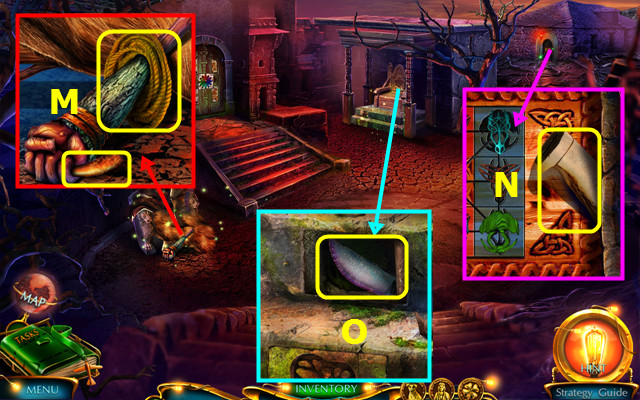
- Take the FLOWER and remove the sign (M).
- Use the FLASHLIGHT; play the HOP to earn the VINE (N).
- Open the HOOK and add the VINE to make the GRAPPLING HOOK (inventory).
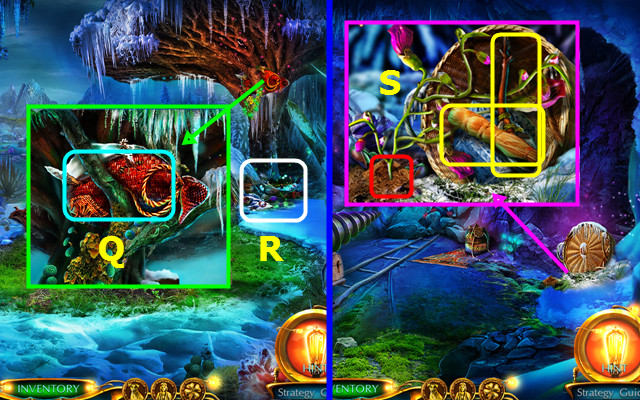
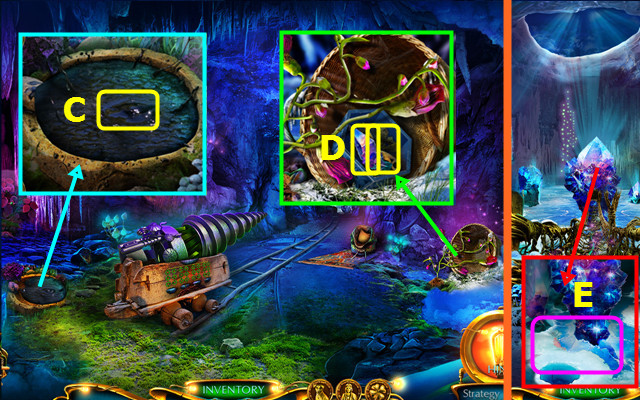
- Use the GRAPPLING HOOK (O).

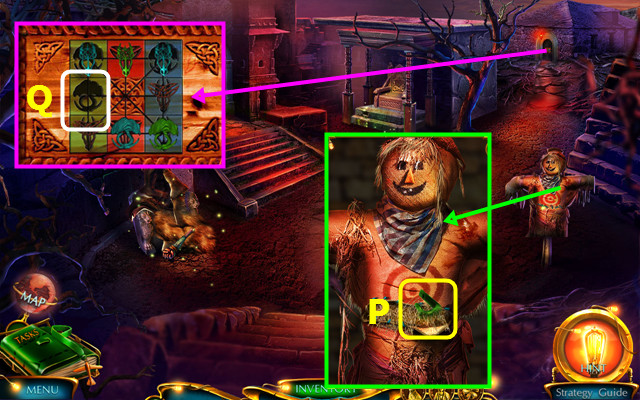
- Take the CRITTER; use the GLASS to take a GLASS OF WATER (P).
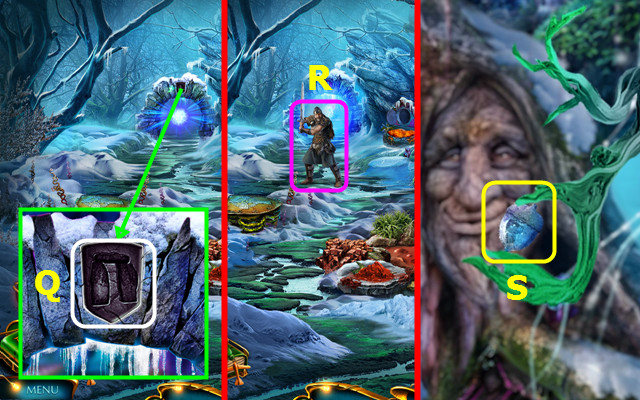
- Select the entrance, and then talk to Brigitta; take the GUIDING POWER (Q).
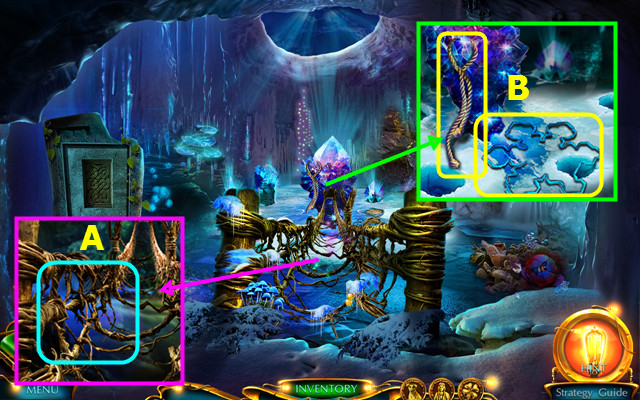
- Take the ROPE (R).
- Take the TORN NET (S).
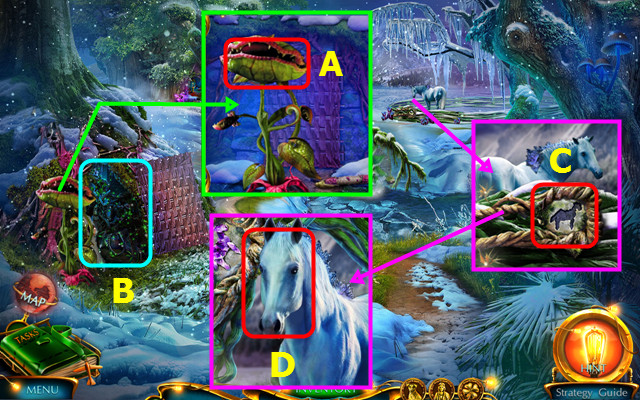
- Try to walk to the right; walk down.
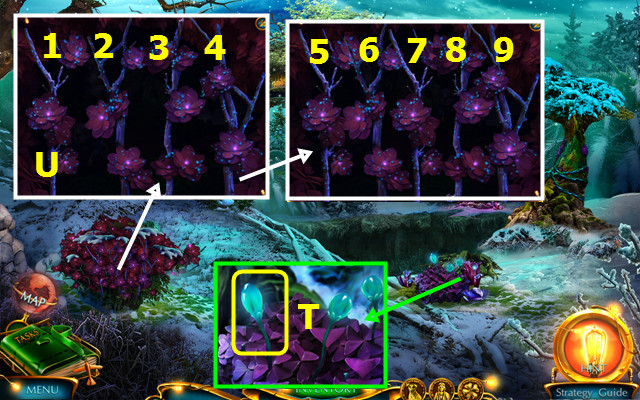
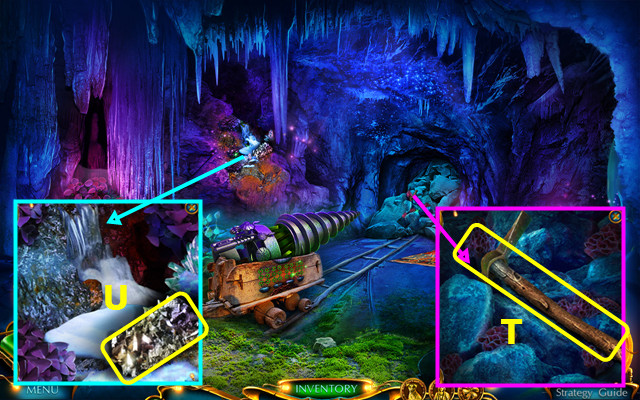
- Try to take a flower; use the GLASS OF WATER to take the GLOWING FLOWER (T).
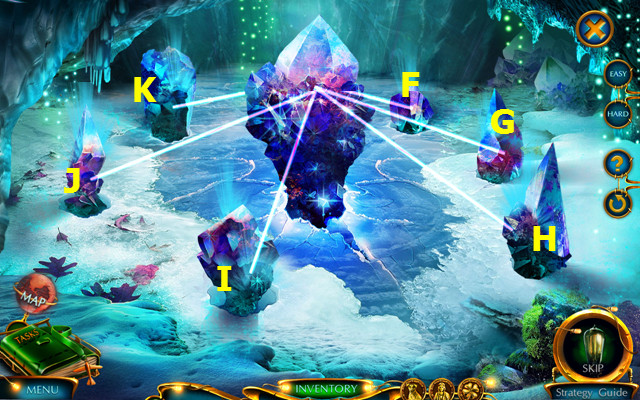
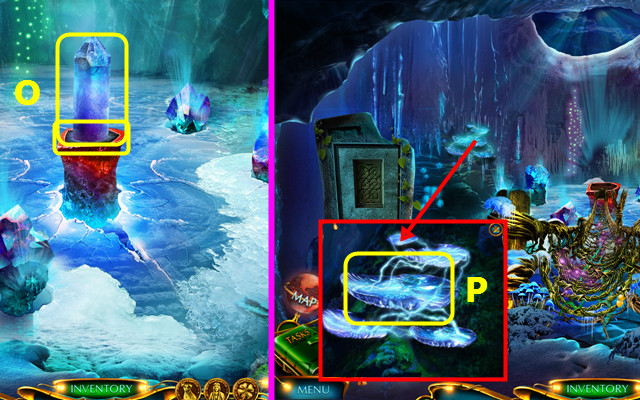
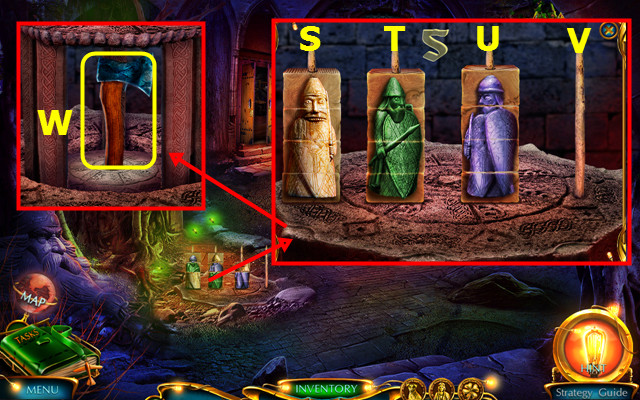
- Use the GUIDING POWDER (U).
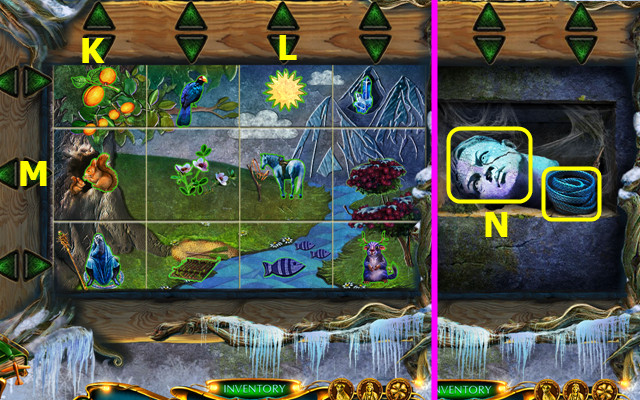
- Easy solution; select 4-4-3-3-1-1.
- Hard solution: select 9-9-8-8-7-7-5.
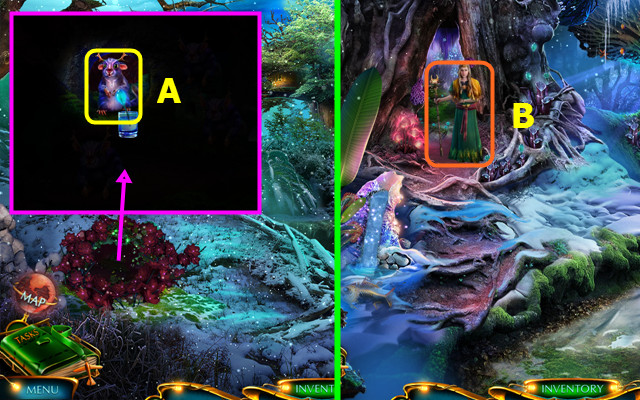
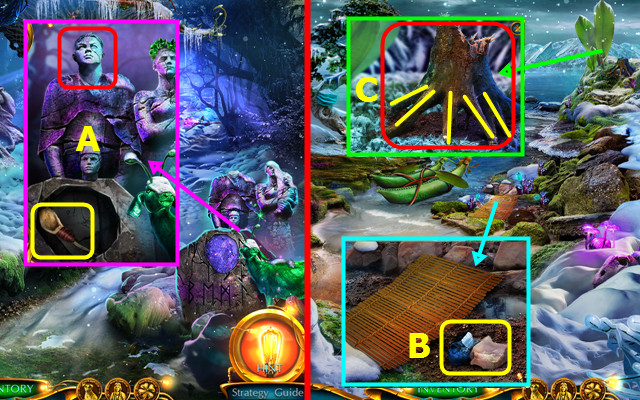
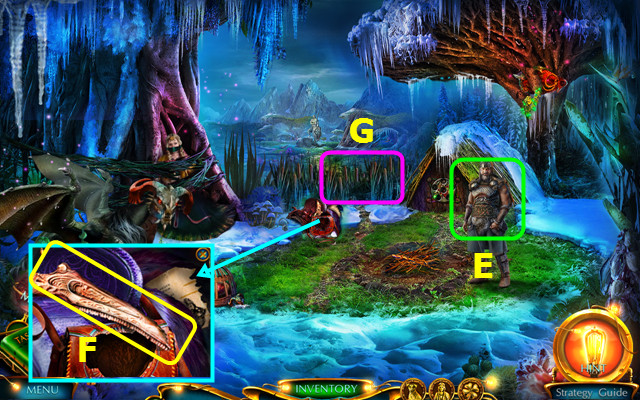
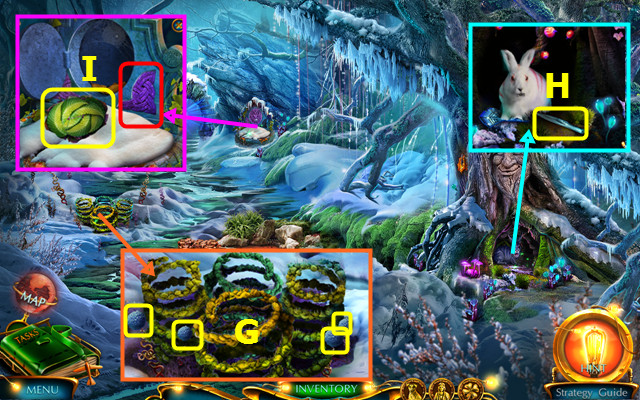
- Use the GLOWING FLOWER; select and take the SKAPPI (A).
- Go forward.
- Give the SKAPPI (B).
- Walk left.
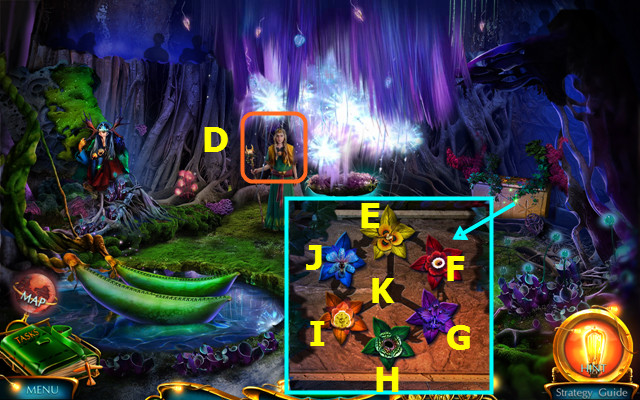
- Talk to Brigitta; play the HOP to earn the WEAVING AMULET (D).
- Use the WEAVING AMULET on the TORN NET to make the REPAIRED NET (inventory).
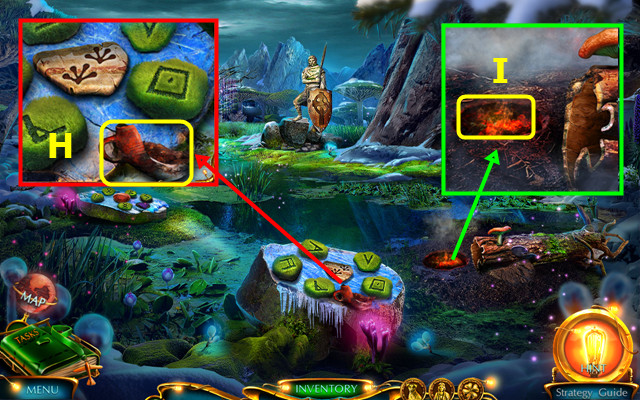
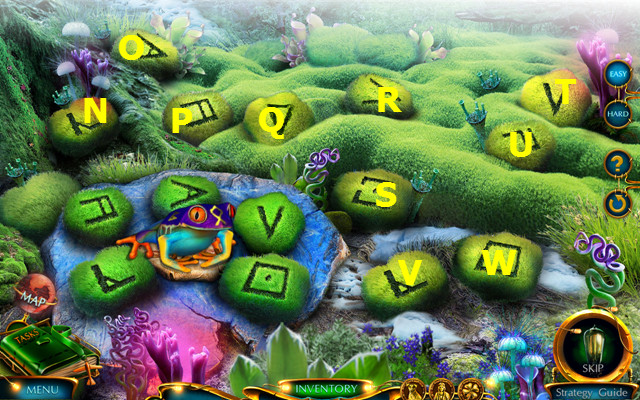
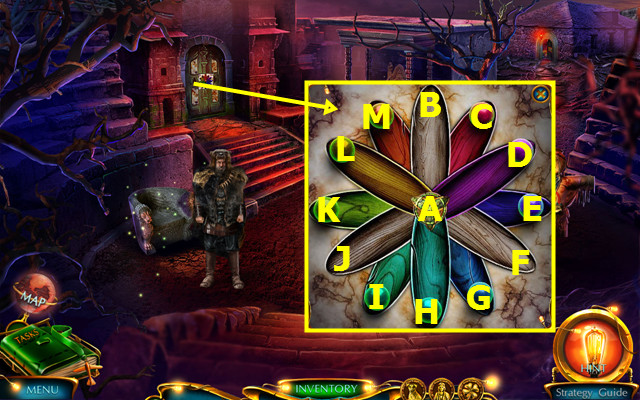
- Place the FLOWER; easy solution is J-I-K-F-G-H-I-K.
- Hard solution: I-J-E-F-G-H-I-K-E-J-I-K.
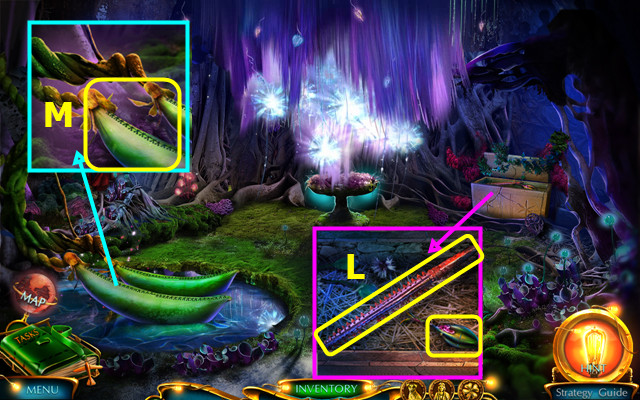
- Take the SAW and ORGANIC GLUE (L).
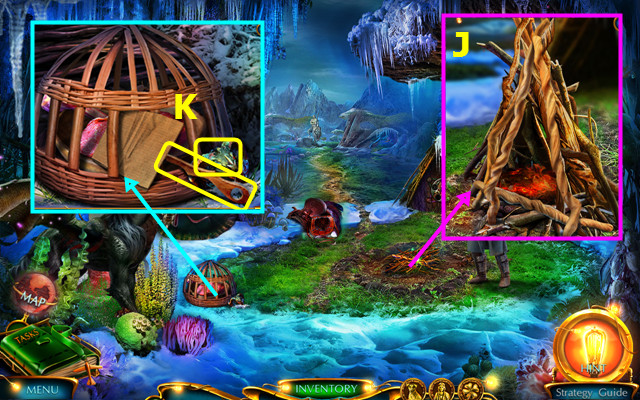
- Use the SAW; take the FLOATING PODS (M).
- Walk down.
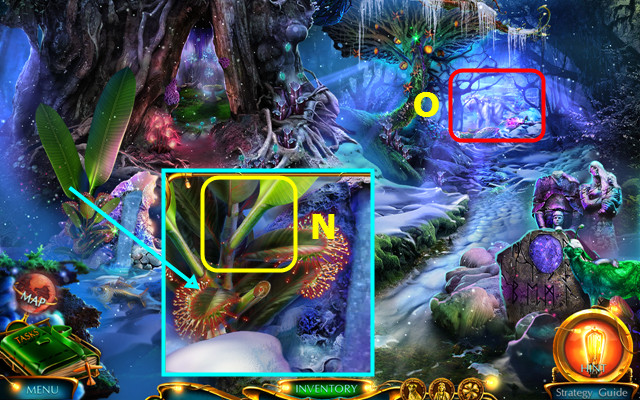
- Use the SAW to take the BIG LEAVES (N).
- Combine the FLOATING PODS, ROPE, and BIG LEAVES to make the RAFT (inventory).
- Use the REPAIRED NET (O).

- This mini-game is randomly generated.
- One possible solution (1-3).
- Walk to the right.
- Take the SHARP ARROWHEAD (P).
- Use the CRITTER; take the FIN CORKSCREW (Q).
- Use the RAFT (R).
- Go forward.
Chapter 2: The Village Road
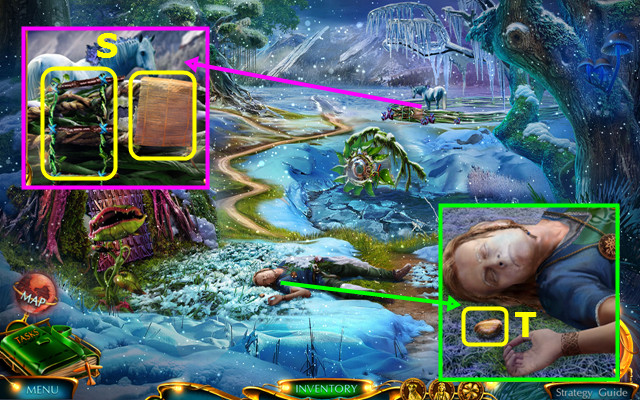
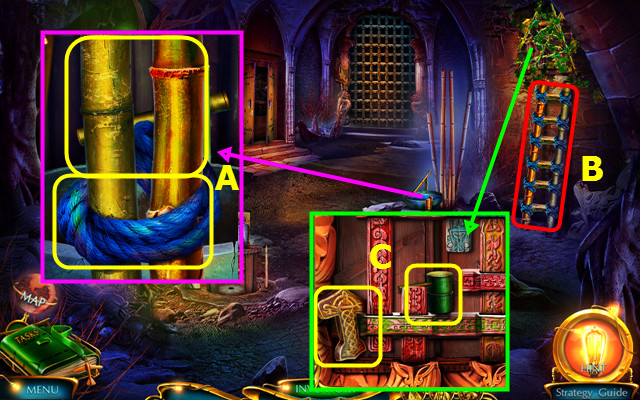
- Take the ROPE LADDER and MAT (S).
- Take the STONE (T).
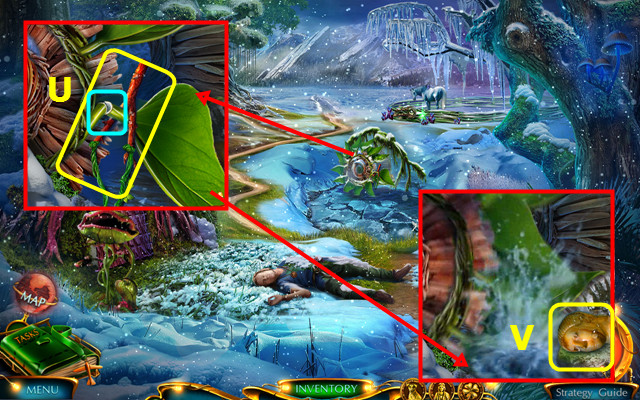
- Take the SLINGSHOT and use the ORGANIC GLUE (U).
- Combine the SLINGSHOT and STONE to make the LOADED SLINGSHOT (inventory).
- Take the HEAD (V).
- Walk down 2x.
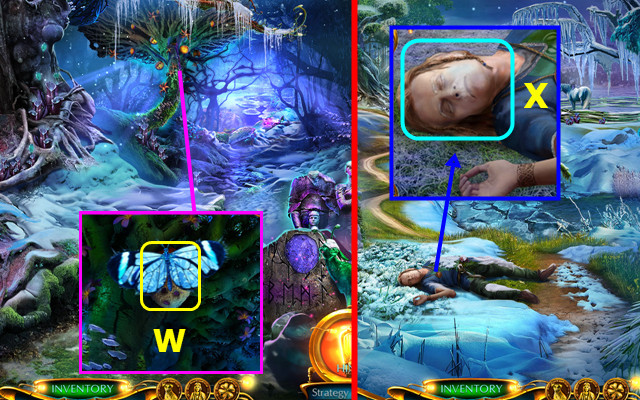
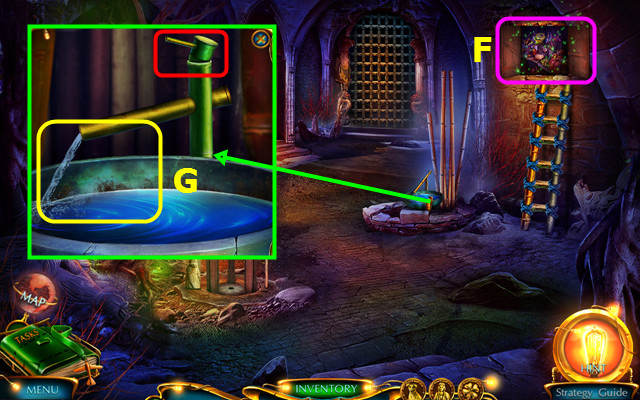
- Move the butterfly; use the LOADED SLINGSHOT to take the COCONUT (W).
- Use the FIN CORKSCREW on the COCONUT to make the JUICY COCONUT (inventory).
- Walk forward 2x.
- Use the JUICY COCONUT; take the ELDER'S SCEPTER (X).
- Walk down 2x; go left.
- Place the ELDER'S SCEPTER; take the ANTLER (A).
- Use the SHARP ARROWHEAD on the ANTLER to make the BONE AXE (inventory).
- Walk down and right.
- Use the BONE AXE to take the STRETCHER (B).
- Go forward.
- Use the STRETCHER; take the DOOR HANDLE (C).
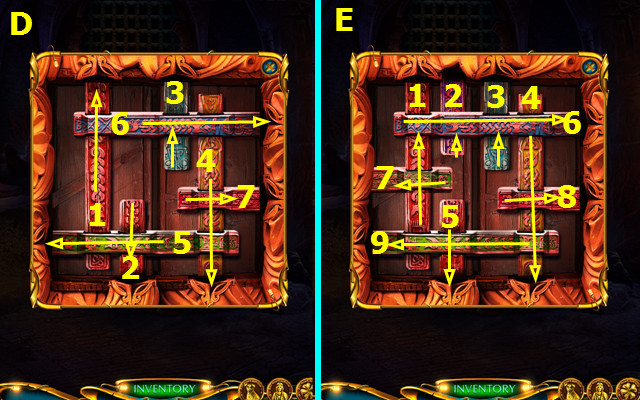
- Place the DOOR HANDLE; select the pairs (color-coded) for the easy solution.
- Hard solution: select pairs in order (1-6).
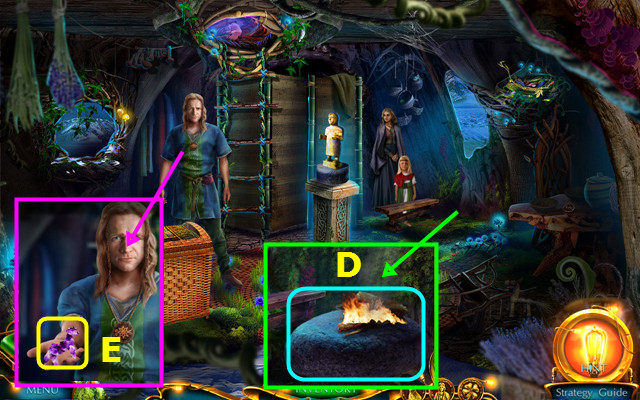
- Enter the Druid's Tree House.
- Place the HEAD to earn the SICKLE (D).
- Take the BROOM and STICK (E).
- Place the ROPE LADDER; play the HOP to earn the KNIFE (F).
- Use the BROOM; take the DRUID FIGURINE and CROCHET HOOK (G).
- Use the CROCHET HOOK to take the ROPE; take the WAX EGG (H).
- Tie the ROPE to make a LASSO (inventory).
- Walk down 2x.

- Place the MAT; use the SICKLE to take the GRASS (I).
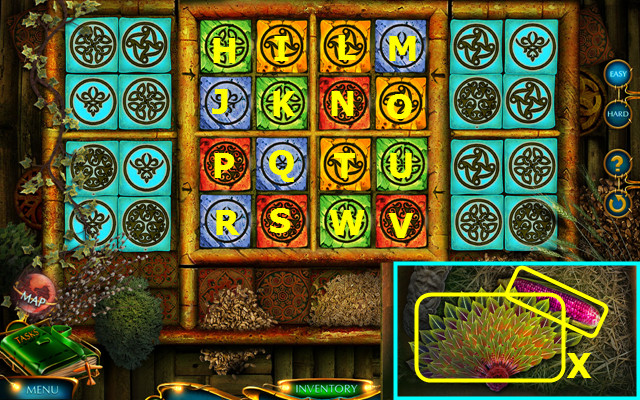
- Place the DRUID FIGURINE (J).
- Easy solution: Mx3-Kx1.
- Hard solution: L-K-M.
- Take the LACE and HEAD (N).
- Walk down.
- Place the HEAD and earn the STONE PLATE; take the SHOVEL (A).
- Walk right.
- Use the SHOVEL; take the FLINT (B).
- Use the LASSO, and then use the KNIFE 5x to take the FIREWOOD (C).
- Go forward 2x.
- Use the STONE PLATE, FIREWOOD, and FLINT (D).
- Take the HORSE CRYSTAL (E).

- Place the WAX EGG; take the MOSAIC PIECE (F).
- Select; place the MOSAIC PIECE (G).
- Easy solution: (I-K)-(K-J)-(T-U)-(V-W)-(I-K)-(P-Q)-(R-S)-(L-M)-(L-N).
- Hard solution: (I-H)-(J-H)-(R-P)-(T-U)-(V-W)-(L-M)-(P-R)-(K-J)-(N-O)-(K-J).
- Take the FAN and PURPLE CORN (X).
- Walk down.
- Use the PURPLE CORN (A).
- Play the HOP; earn the BRIDLE (B).
- Place the HORSE CRYSTAL (C).
- Use the GRASS and BRIDLE (D).
- Talk to Taranis; take the SWORD SKETCH (E).
- Read the note and take the BONE DAGGER (F).
- Combine the BONE DAGGER, STICK, and LACE to make the SCYTHE (inventory).
- Use the SCYTHE (G).
- Walk forward.
- Take the BROKEN POT (H).
- Use the BROKEN POT to take the HOT COALS (I).
- Walk down.
- Select the wood pieces 10x to make a teepee; place the HOT COALS and use the FAN (J).
- Read the note; take the 1st TONGS PART and DRAKORSIS INSIGNIA (K).
- Place the DRAKORSIS INSIGNIA; take the STONE FROG and ROCK (L).
- Go forward.
- Place the STONE FROG (M).
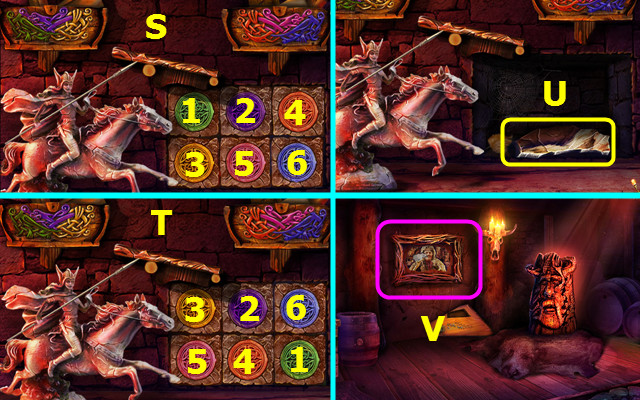
- Easy solution: select P-T-W, T-V-W-P, O-V-T-P-W.
- Hard solution; select O-V-T-P-W, T-O-V-W-P-V, P-O-W-V-T-P-W.
- Take the 2nd TONGS PART and ORNAMENT (A).
- Take the POLE (B).
- Combine the 2 TONGS PARTS, POLE, and ROCK to make the WOODEN TONGS (inventory).
- Go forward.
Chapter 3: The Truth Tree
- Talk to the Tree of Truth (C).
- Use the WOODEN TONGS to take the ARROW (D).
- Play the HOP; earn the LEAF WITH RECIPE (E).
- Take the 1/4 SNOWFLAKE PIECES (F); place the SWORD SKETCH.
- Take the 3 BLUE MOSS (G).
- Take the KNIFE (H).
- Place the ORNAMENT; take the MEDICAL SUPPLIES (I).
- Open the MEDICAL SUPPLIES and take the SPOOL OF THREAD (inventory).
- Walk down.
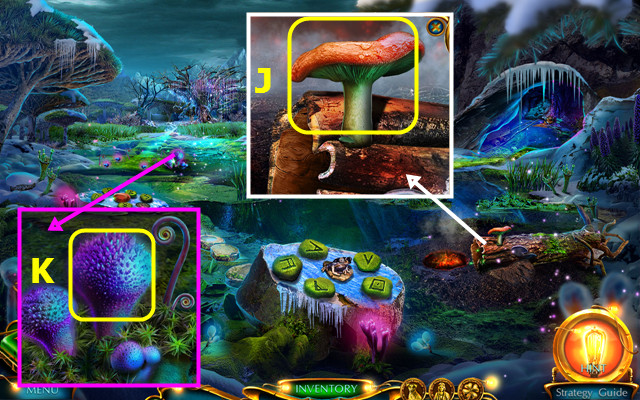
- Use the KNIFE to take the FUNGUS (J).
- Select a mushroom; use the SPOOL OF THREAD to take the MUSHROOM BOMB (K).
- Go forward.
- Use the MUSHROOM BOMB; take the 2/4 SNOWFLAKE PIECES and LIANA VINE (L).
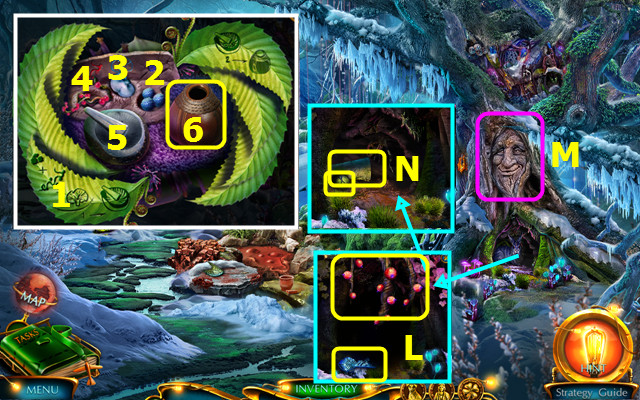
- Combine the MEDICAL SUPPLIES, LEAF WITH RECIPE (1), 3 BLUE MOSS (2), FUNGUS (3), and LIANA VINE (4). Place the 3 ingredients in the mortar (5) and use the pestle. Pour the mortar into the calabash (6). Take the HEALING POTION (inventory).
- Use the HEALING POTION (M).
- Take the WARRIOR'S BRACELET and MOSSY STONE (N).
- Walk down.
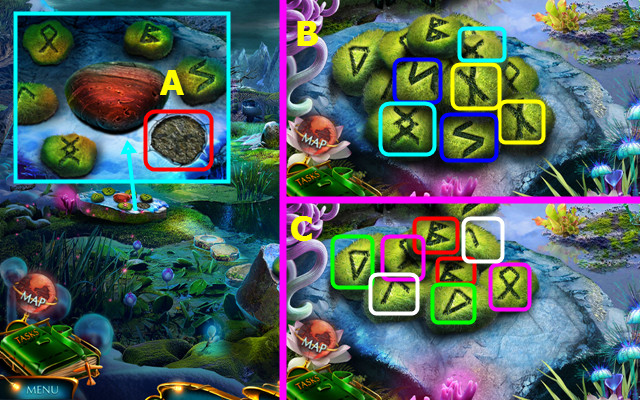
- Place the MOSSY STONE (A).
- Easy solution: select color-coded pairs (B-C).
- Hard solution: select color-coded pairs (D-F).
- Place the WARRIOR'S BRACELET to earn the STONE SWORD; take the CLAY POT (G).
- Walk right.
- Use the CLAY POT to take the POT WITH WATER (H).
- Take the 3/4 SNOWFLAKE PIECES and read the note (I).
- Take the CUP and STRING (J).
- Take the CANE (K).
- Use the CANE to take the CELTIC CROSS (L).
- Place the CUP and select the 10 berries; take the SLEEPBERRIES (M).
- Walk down.
- Place the CELTIC CROSS to earn the SHIELD (N).
- Go forward.
- Place the SHIELD (O).
- Take the BOW and PICKAXE HANDLE (P).
- Combine the BOW, ARROW, and STRING to make the BOW WITH STRING (inventory).
- Walk down 2x.
- Use the BOW WITH STRING (Q).
- Play the HOP; earn the SEED (R).
- Go forward and right.
- Place the SEED; take the BRUSH and SCOOP (S).
- Place the PICKAXE HANDLE; take the PICKAXE (T).
- Use the PICKAXE to take the PYRITE (U).
- Walk down 2x.
- Use the BRUSH to make the TORCH (A).
- Walk forward 2x.
- Use the SCOOP. Use the STONE SWORD to make the SWORD MOLD (B).
- Use the TORCH; take the 1/2 PUZZLE PIECE (C).
- Walk down 2x.
- Use the SWORD MOLD, PYRITE, and POT WITH WATER to make the SWORD (E).
- Give the SWORD; earn the AMULET (F).
- Go forward and right.
- Place the AMULET; take the PESTLE, PLANT-RUST POWDER, and read the note (G).
- Use the PESTLE on the SLEEPBERRIES to make the SLEEPBERRY JUICE(inventory).
- Walk down 2x.
- Use the TORCH and SLEEPYBERRY JUICE; take the SLEEPY MEAT and BONE (H).
- Give the SLEEPY MEAT (I).
- Talk to Brigitta; use the PLANT-RUST POWDER (J).
- Take the TOKEN (K).
- Remove the fur and place the TOKEN (L).
- Easy solution: Lx2-Mx2-Nx2.
- Hard solution: Mx2-L-Ox2-Nx2.
- Take the SCOOP and 1/3 ICE CRYSTAL PARTS (P).
- Go forward 2x.
- Use the SCOOP to take the SCOOP WITH TAR (A).
- Walk down and right.
- Use the SCOOP WITH TAR (B).
- Easy solution (C).
- Hard solution: G-Lx3-K-Jx2-M-H-Fx2-Ex3-D-I-F.
- Walk forward.
- Take the 4/4 SNOWFLAKE PIECES (N).
- Use the BONE; take the FEATHERS and 2/2 PUZZLE PIECES (O).
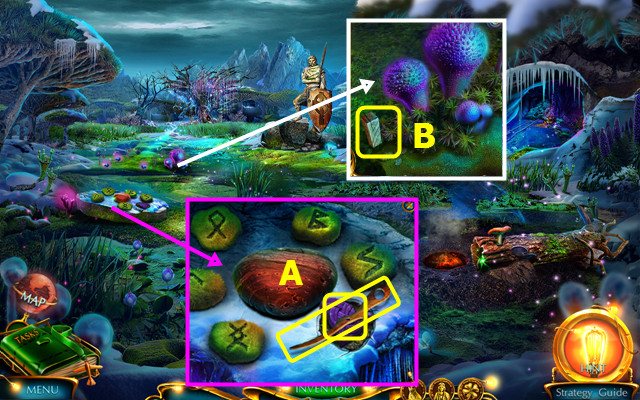
- Read the note and place the 2 PUZZLE PIECES (P).
- Easy solution (Q).
- Hard solution (R).
- Take the 2/3 ICE CRYSTAL PARTS, QUICKENING POWDER, and INFINITY SIGN (S).
- Use the QUICKENING POWDER (A).
- Take the SHOELACE; read the note and take the AMULET (B).
- Combine the FEATHERS and SHOELACE to make the FEATHER BRUSH (inventory).
- Walk down.
- Use the FEATHER BRUSH to take the BRUSH WITH RESIN (C).
- Combine the AMULET, 4 SNOWFLAKE PIECES, and BRUSH WITH RESIN to make the CASKET KEY (inventory).
- Place the CASKET KEY; take the 3/3 ICE CRYSTAL PARTS and SCISSORS (D).
- Walk forward.
- Place the 3 ICE CRYSTAL PARTS (E).
- Easy solution: select G-H-I-K-J-G-F.
- Hard solution: select G-H-I-K-J-G-F.
- Take the ICE CRYSTAL and PORTAL KEY (O).
- Use the SCISSORS to take the LIGHTNING MUSHROOM (P).
- Walk down 2x; go forward.
- Place the PORTAL KEY (Q).
- Try to walk forward.
- Use the LIGHTNING MUSHROOM (R).
- Take the ACORN (S).
Chapter 4: Stonehenge
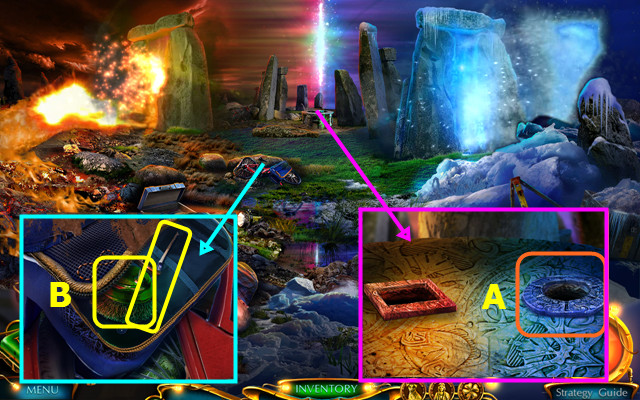
- Place the ICE CRYSTAL (A).
- Use the INFINITY SIGN; take the ARCHEOLOGY BRUSH and LOCKPICK (B).
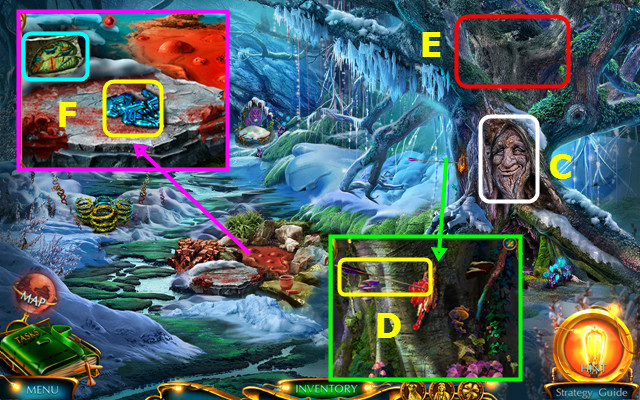
- Walk down.
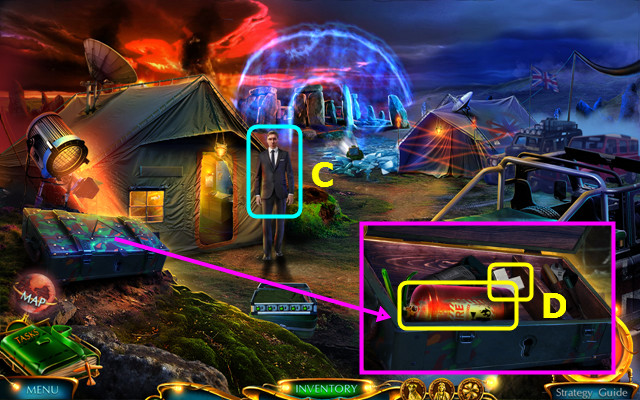
- Talk to David; take the SAFE KNOB (C).
- Use the LOCKPICK; take the EXTINGUISHER and WHITE CROSS (D).
- Enter the Survey Tent.
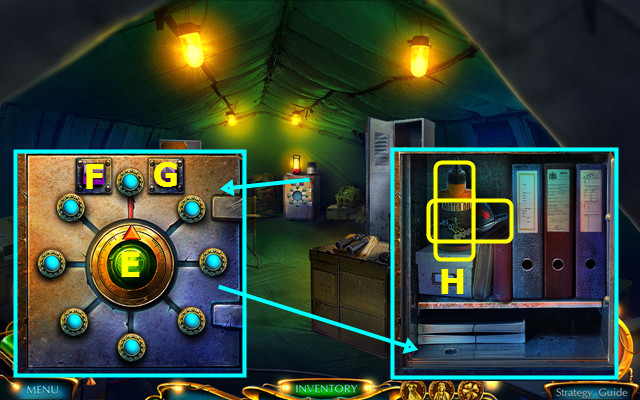
- Place the SAFE KNOB (E).
- Select F-G-G-F-F-F-G-G.
- Take the OIL and LASER CUT-OFF SWITCH (H).
- Walk down.
- Place the WHITE CROSS; take the INJECTION GUN and DISTILLED WATER (I).
- Use the LASER CUT-OFF SWITCH; play the HOP to earn the THERMO REGULATOR (J).
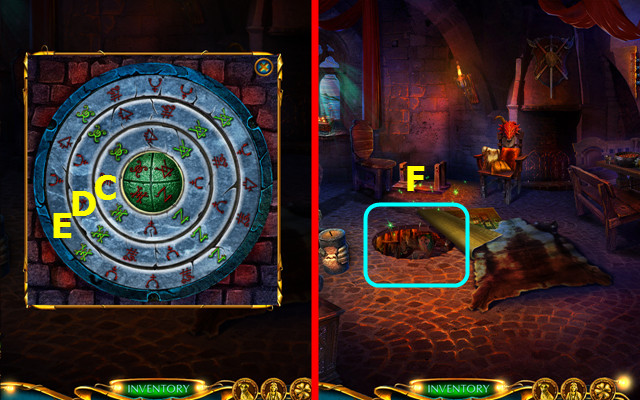
- Place and bury the ACORN; use the DISTILLED WATER (K).
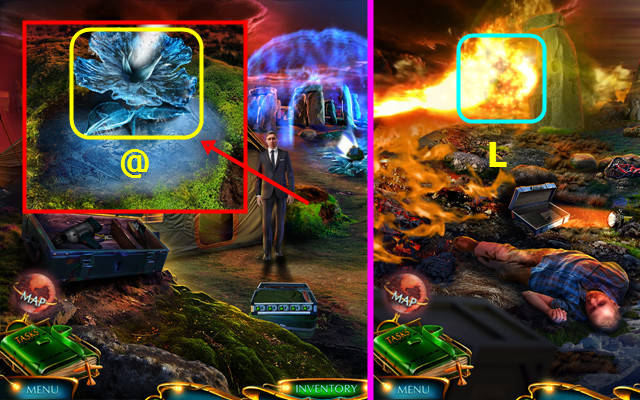
- Use the THERMO REGULATOR on each pink petal; take the ICE FLOWER (@).
- Go forward.
- Use the ICE FLOWER (L).
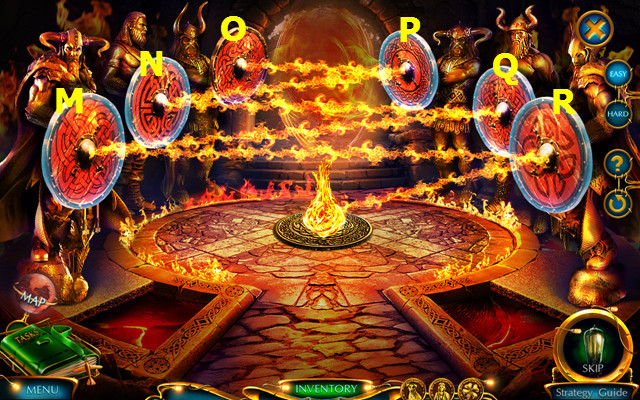
- Easy solution: Rx2-Mx3-Q-Ox2-P.
- Hard solution: Rx2-Ox4-Mx3-Q-N-Q-Mx2.
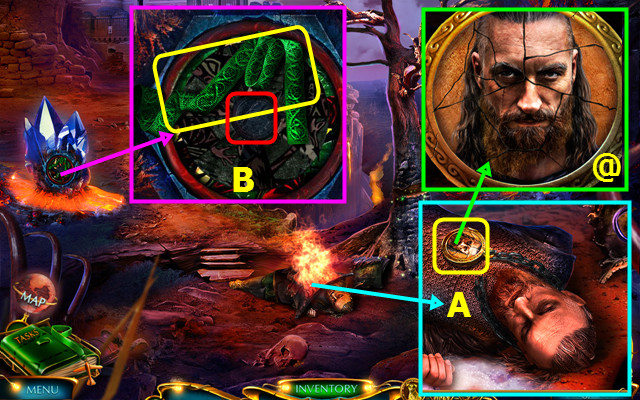
- Use the EXTINGUISHER; remove the shield and take the WARRIOR'S LOCKET (A).
- Select the image on the WARRIOR'S LOCKET and restore the picture (@). Open it and take the EYE CHARM (inventory).
- Take the BELT and place the EYE CHARM (B).
- Solution (C).
- Play the HOP; earn the AXE (D).
- Use the AXE (E).
- Take the potion (F).
- Walk right.
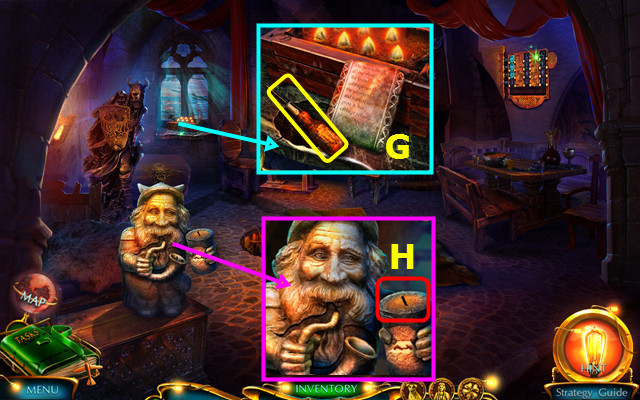
- Take the TONGS and use the ARCHEOLOGY BRUSH (G).
- Take the TILE and read the sign (H).
- Use the TONGS to take the COIN; place the TILE (I).
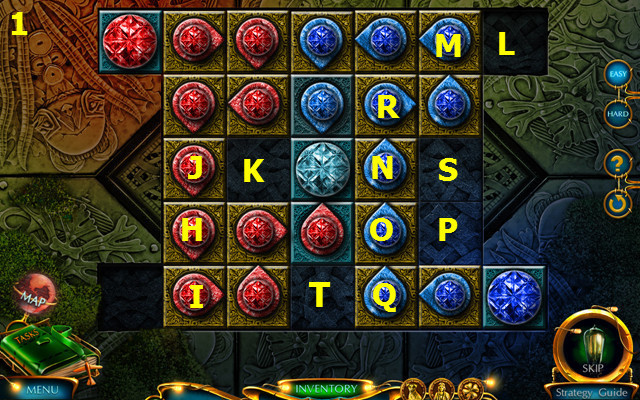
- Easy solution: Q-P-M-N-Q-R-O-L-K-J-M-N.
- Hard solution: Q-S-N-P-S-Q-M-P-N-M-Q-N-R-S-.
- Q-O-Tx2-R-L-T-O-K-L-J-K-M-J-N-M.
- Take the RUBY and FLAIL (U).
- Take the STICK (A).
- Take the WRENCH (B).
- Take the 1/2 TILE (C).
- Walk down.
- Use the FLAIL; take the HOOK (D).
- Add the STICK and BELT to the HOOK (inventory).
- Place the RUBY (E).
- Use the OIL (F).
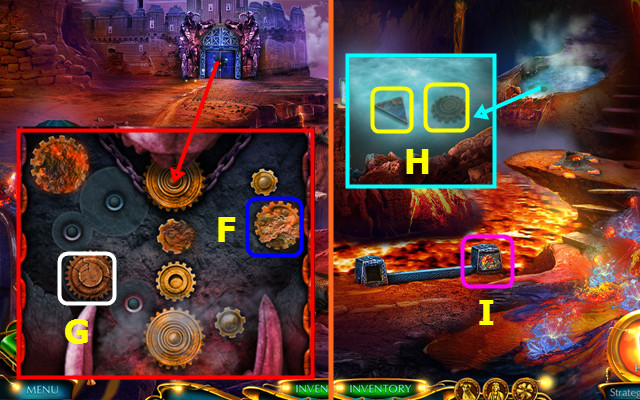
- Remove the broken gear (G).
- Walk right.
- Use the HOOK; take the 2/2 TILE and COGWHEEL (H).
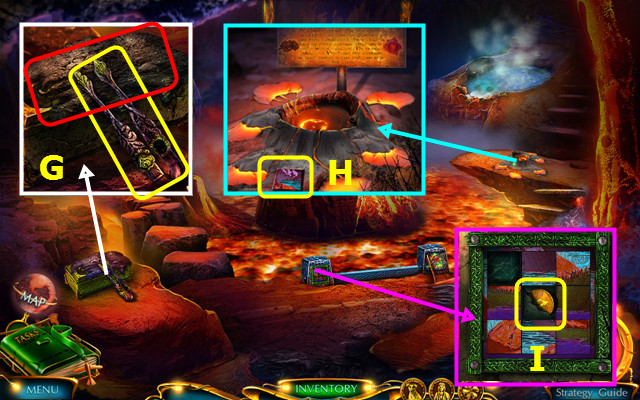
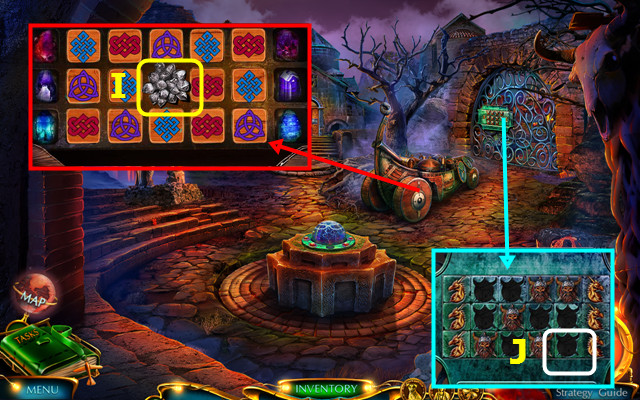
- Select (I).
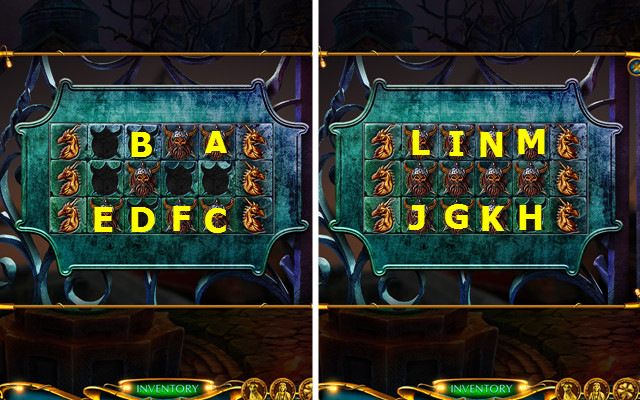
- Place the 2 TILES; easy solution (J).
- Hard solution (K).
- Take the MAGNET (L).
- Use the WRENCH; take the LIFE ELIXIR and read the note (M).
- Combine the INJECTION GUN and LIFE ELIXIR to make the LOADED INJECTION GUN (inventory).
- Walk down.
- Use the LOADED INJECTION GUN (N).
- Take the KEY (O).
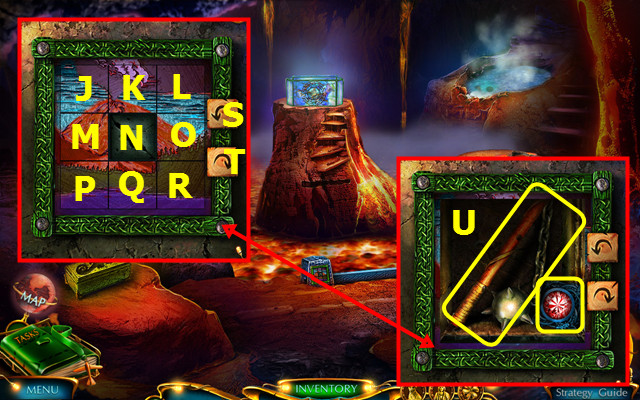
- Select (P).
- Place the COGWHEEL; restore the gears (Q).
- Walk forward.
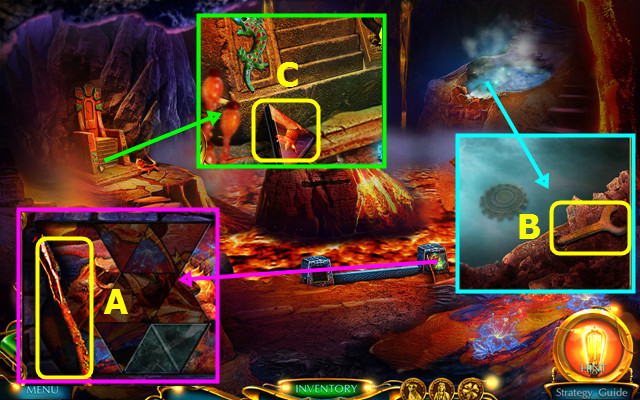
- Take the FILE (R).
- Use the FILE to take the IRON ROD (S).
- Use the KEY (T).
- Easy solution (U).
- Hard solution (V).
- Walk forward.
Chapter 5: Torwald's House
- Take the CENTER (A).
- Move the rug; take the BRUSH and place the CENTER (B).
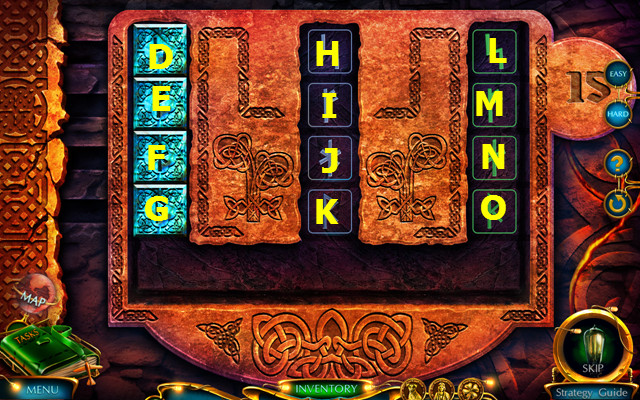
- For the easy mode select Cx1-Dx7-Ex7; for the hard mode select Cx1-Dx7-Ex7.
- Play the HOP; earn the CAR EMBLEM (F).
- Take the SCREWDRIVER and read the note (G).
- Use the COIN to earn the VIKING TOKEN (H).
- Walk down.
- Place the CAR EMBLEM; take the UNCHARGED CRYSTAL (I).
- Place the VIKING TOKEN (J).
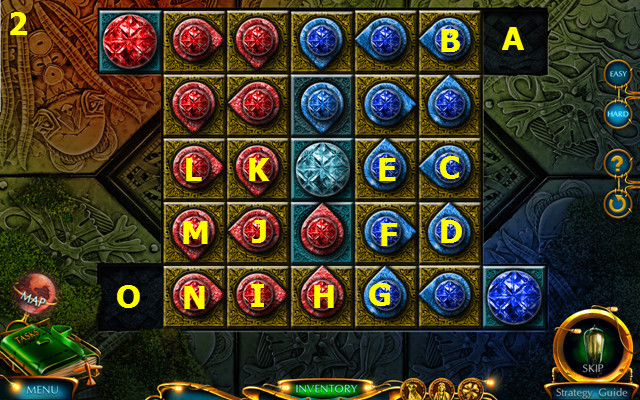
- Easy solution: (A-B)-(C-D)-(E-F)-(B-D)-(F-E).
- Hard solution: (G-H)-(I-G)-(J-K)-(L-J)-(H-G)-(J-K)-(M-H)-(H-G)-(N-K)-(K-J).
- Walk right.

- Use the SCREWDRIVER to take the SHOVEL (O).
- Take the DRAGON EYE (P).
- Use the BRUSH to make the BRUSH WITH GLUE (Q).
- Walk down and forward.
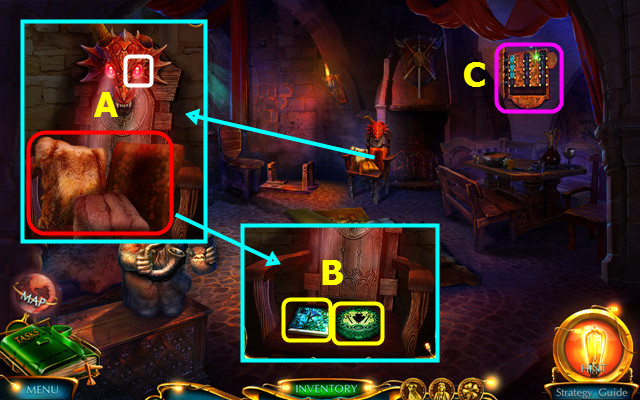
- Place the DRAGON EYE and remove the pillows (A).
- Take the RUNE and SNUFFBOX (B).
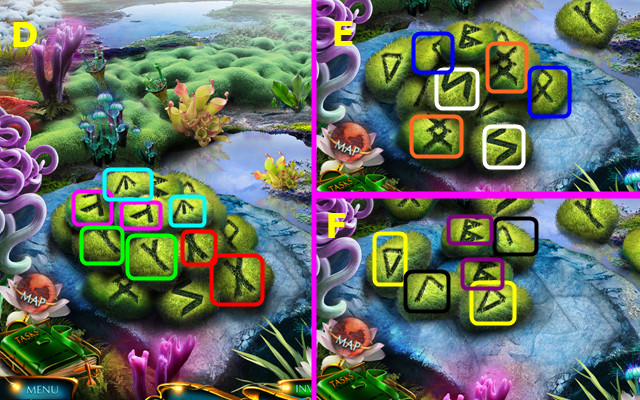
- Select (C).
- Place the RUNE (G).
- Move the runes: (G-K)-(F-N)-(K-O)-(E-I)-(O-G)-(N-J)-(G-K)-.
- (D-L)-(K-O)-(J-F)-(O-G)-(I-M)-(G-K)-(F-N)-(K-O).
- Take THOR'S HAMMER and the VIKING'S HEAD.
- Combine the SNUFFBOX and VIKING'S HEAD; take the LEATHER PATCH and SNUFFBOX (inventory).
- Place the SNUFFBOX and select the 7 seeds; earn the FIERY SEEDS (A).
- Walk down.
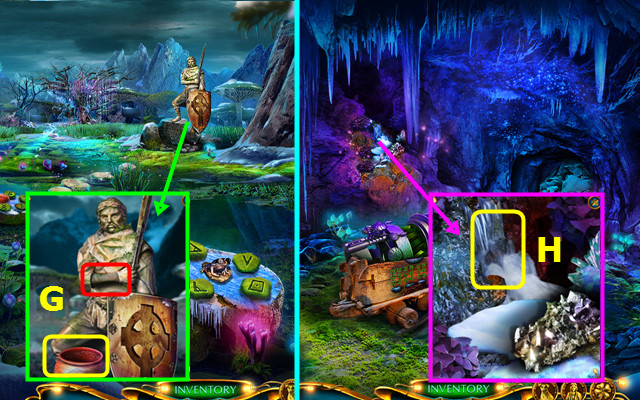
- Place THOR'S HAMMER and earn the SHIELD; take the LIZARD INLAY (B).
- Walk right.
- Use the BRUSH WITH GLUE and LEATHER PATCH; take the BUCKET (C).
- Walk down and forward.
- Use the BUCKET and SHOVEL to take the SOIL (D).
- Walk down and right.
- Use the SOIL and IRON ROD; take the HAMMER and CROWBAR (E).
- Use the CROWBAR; take the AXE (F).
- Walk down 2x; go right.
- Place the FIERY SEEDS; select 1-4.
- Take the CABBAGE (G).
- Use the CABBAGE and place the LIZARD INLAY (H).
- Take the DRAGON'S HORN (I).
- Walk down and go forward 2x.
- Place the DRAGON'S HORN; take the LEVER and LOCK CYLINDER (J).
- Walk down and right.
- Use the AXE and place the LOCK CYLINDER (K).
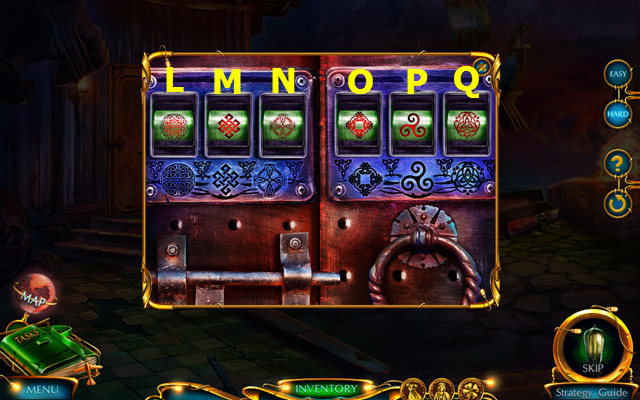
- Easy solution: change the dials to match the symbols below.
- Hard solution: Mx2-Nx2-O-Q.
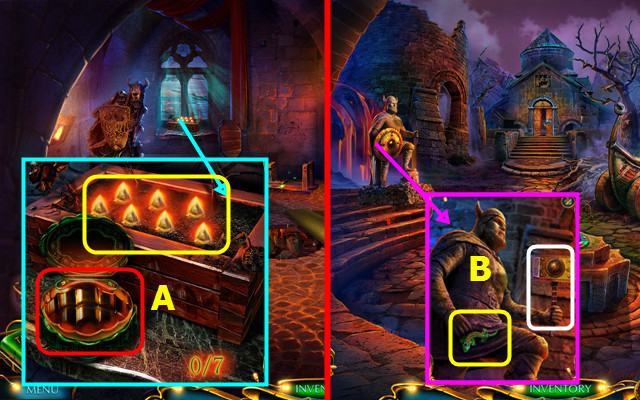
- Play the HOP; earn the BLOW TORCH (A).
- Combine the SHIELD and BLOWTORCH to make the WHEEL (inventory).
- Walk down and forward.
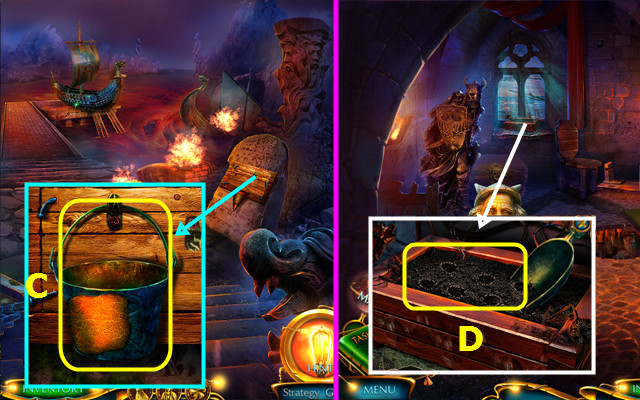
- Remove the broken wheel and place the MAGNET, LEVER, WHEEL, and UNCHARGED CRYSTAL; take the CHARGED CRYSTAL (B).
- Walk down.
- Place the CHARGED CRYSTAL (C).
- Restore the symbols (D).
- Take the MAGNELION KEY (E).
- Place the MAGNELION KEY (F).
- Swap the symbols as shown; you earn the MAGNELION (G).
- Walk down and right.
- Place the MAGNELION (H).
- Swap the maze pieces as shown (I).
- You earn the LIZARD INLAY.
- Place the LIZARD INLAY; take the FREEZING ELIXIR (J).
- Walk down, forward, and right.
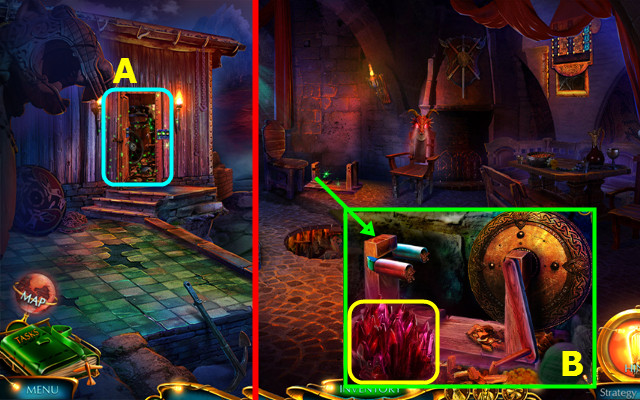
- Use the FREEZING ELIXIR (K).
Chapter 6: The Well
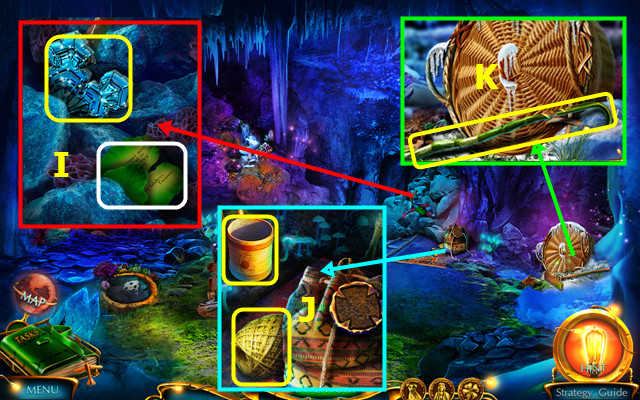
- Use the HAMMER; take the GLASS SHARD (L).
- Use the GLASS SHARD; take the TWEEZERS and CORKSCREW (M).
- Use the CORKSCREW (N).
- Take the PRESENT (O).
- Open the PRESENT. Read the note; take LUTA'S KEY and SPHERE (inventory).
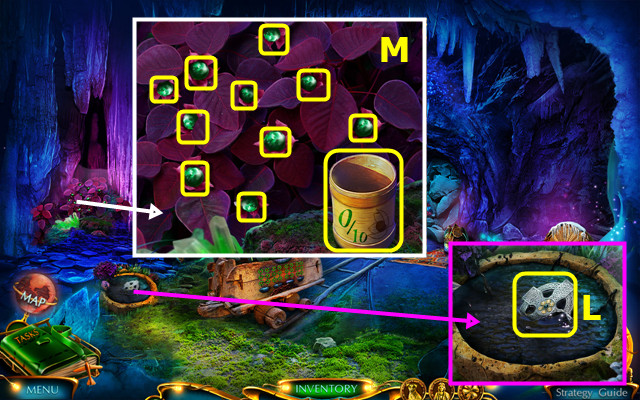
- Take the SPONGE (P).
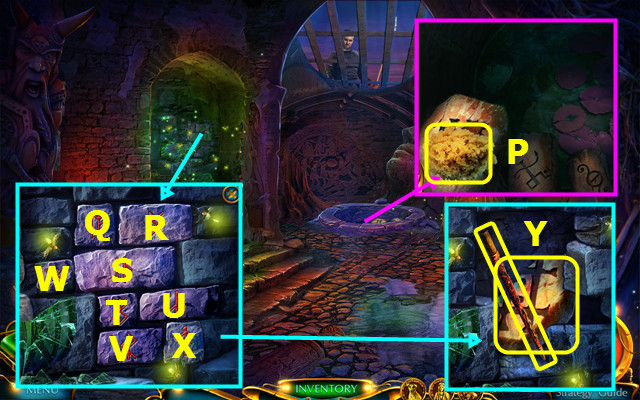
- Use the SPONGE; easy solution: Q-S-R-T-V-U.
- Hard solution: X-Q-S-W-R-T-V-U.
- Take the HOLLOW TUBE and STAIR PIECE (Y).
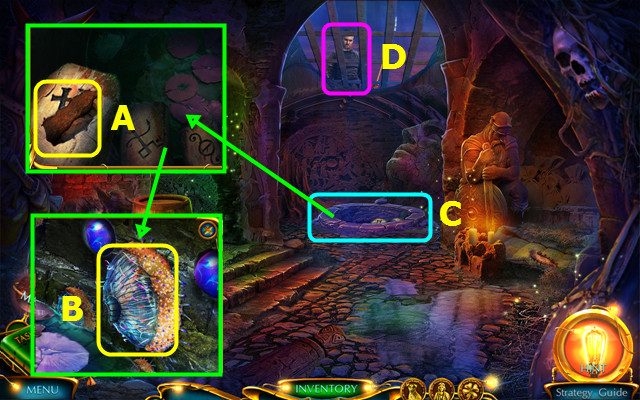
- Place the STAIR PIECE (A).
- Take the STICKY SEAWEED and place the SPHERE (B).
- Play the HOP; earn the POISON SPIKE (C).
- Combine the HOLLOW TUBE and POISON SPIKE to make the POISONED BLOWGUN (inventory).
- Use the POISONED BLOWGUN (D).
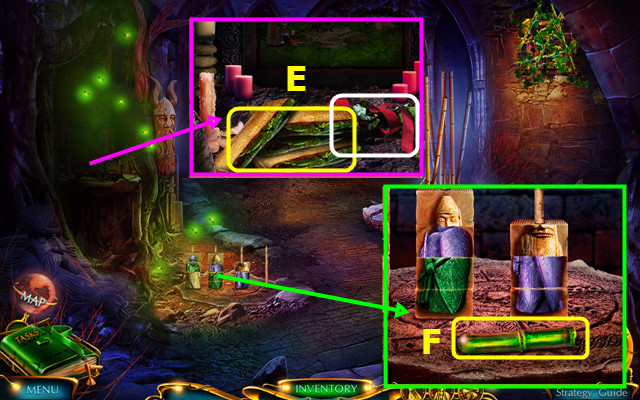
- Take the BOARDS and read the ribbon (E).
- Take the STICK (F).
- Combine the STICK and STICKY SEAWEED to make the STICKY STICK (inventory).
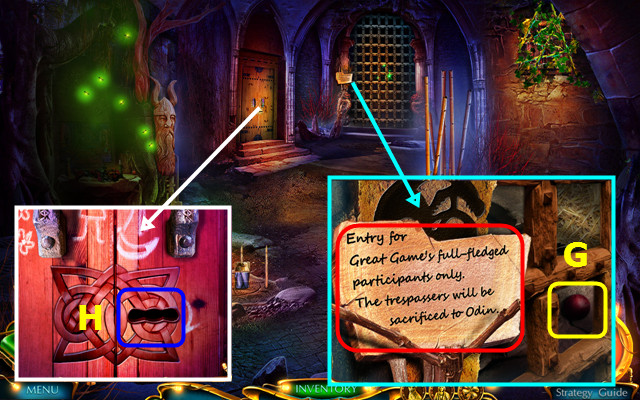
- Read the note and use the STICKY STICK to take the 1/2 BALL (G).
- Use LUTA'S KEY (H).
- Walk left.
- Talk to Luta; take LUTA'S DIARY (I).
- Open LUTA'S DIARY (inventory); restore the images (1-3).
- Take the CODE and SPLINTER (J).
- Take the POT; use the SPLINTER to make the BURNING SPLINTER (K).
- Use the TWEEZERS (L).
- Walk down.
- Use the BURNING SPLINTER; play the HOP (M).
- Take the 2/2 BALLS and the 1/2 HELMET (N).
- Go left.
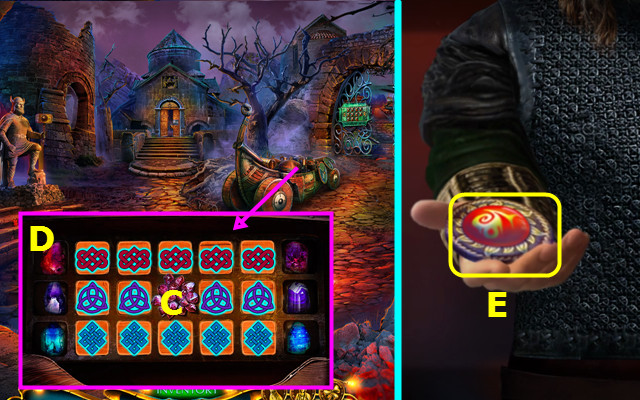
- Place the CODE and 2 BALLS on the board.
- Solution (O).
- Take the HERBICIDE and BANDAGE (P).
- Use the BANDAGE; take the STATUE'S HEAD (Q).
- Walk down.
- Place the STATUE'S HEAD (U).
- Solution: SV-UV-TV-TU-ST-UT-US-TU-VS-VT-VU.
- Take the AXE (W).
- Take the ROPE; use the AXE to take the INCOMPLETE LADDER (A).
- Combine the INCOMPLETE LADDER, BOARDS, and ROPE to make the LADDER (inventory).
- Place the LADDER (B).
- Use the HERBICIDE; take the THRONE INLAY and FOUNTAIN LEVER (C).
- Easy solution: 1-7 (D).
- Hard solution: 1-9 (E).
- Play the HOP; earn the HAM (F).
- Place the FOUNTAIN LEVER; use the POT to take the WATER (G).
- Walk left.
- Place the WATER and HAM; take the SOUP (H).
- Use the SOUP; take the HELMET (I).
- Place the HELMET (J).
- Read the note; take the 2/2 HELMET and the GATHERING CIRCLE PASS (K).
- Walk down.
- Place the GATHERING CIRCLE PASS (L).
Chapter 7: The Gathering Circle
- Take the ROPE and 1/2 FANG (M).
- Take the HANDLE (N).
- Place the THRONE INLAY; take the BLADE and TILE (O).
- Combine the BLADE, HANDLE, and ROPE to make the OBSIDIAN KNIFE (inventory).
- Use the OBSIDIAN KNIFE; take the BIRD WHISTLE (P).
- Place the TILE (Q).
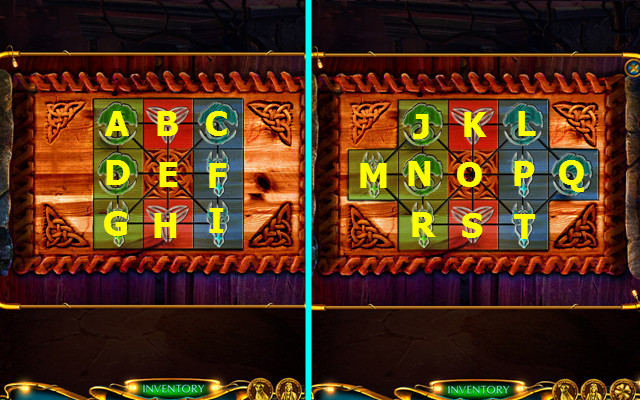
- Easy solution: B-A-D-E-I-H-G-D-E-.
- B-C-F-I-E-B-C-F-E.
- Hard solution: R-S-T-P-L-O-J-N-M-R-S-O-N-R-.
- S-T-P-L-O-K-L-P-T-S-R-O-S-T-P-O-K-L-O.
- Walk forward.
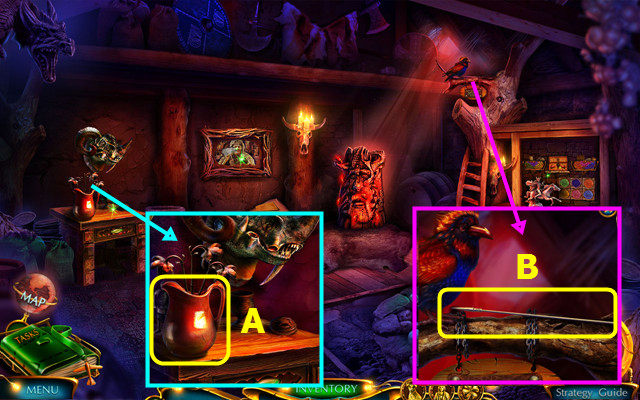
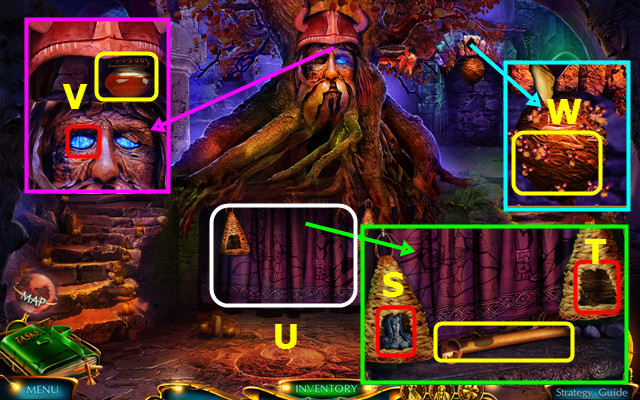
- Remove the flowers; take the PITCHER (A).
- Take the SPEAR (B).
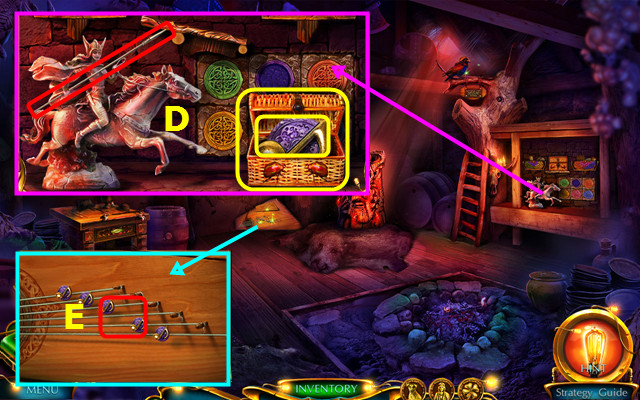
- Place the SPEAR and take the NOTE; close and take the CASKET (D).
- Place the NOTE (E).
- Arrange the notes as shown; press (F).
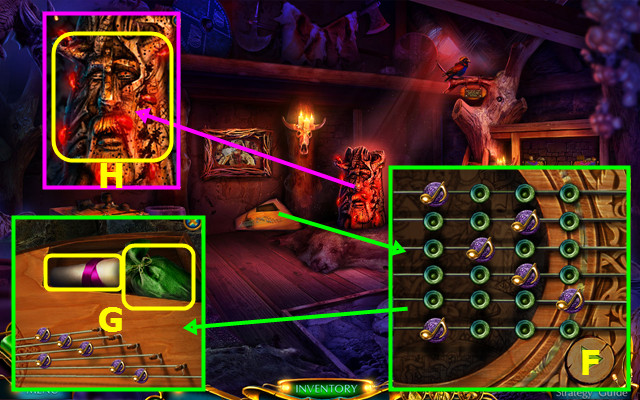
- Take the PAINT PIGMENT and SCROLL (G).
- Use the CASKET to take the CASKET WITH FIRE BEETLES (H).
- Walk down 2x.
- Use the PITCHER to take the WATER (I).
- Walk left.
- Place the SCROLL (J).
- Select (K).
- Select the matching pairs (color-coded).
- Take the THRONE INLAY (M).
- Walk down and forward.
- Place the THRONE INLAY; take the 2/2 FANG and DRAWER HANDLE (N).
- Place the CASKET WITH FIRE BEETLES (O).
- Go forward.
- Place the DRAWER HANDLE; take the 1st WEIGHT (P).
- Place the 2 FANGS; take the CHIP (Q).
- Place the CHIP (R).
- Easy solution: 1-6 (S).
- Hard solution: 1-6 (T).
- Take the PIECE OF PORTRAIT (U).
- Select (V).
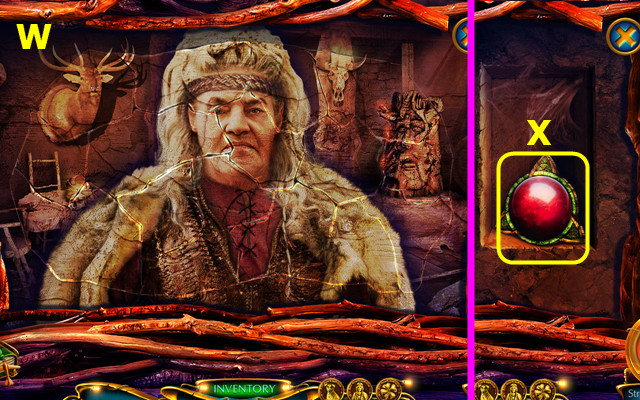
- Place the PIECE OF PORTRAIT; restore the portrait (W).
- Take ODIN'S TRIANGLE (X).
- Walk down.
- Place the ODIN'S TRIANGLE (A).
- Solution: Lx2-Ix2-M-Fx2-Ix2-Cx2-Ex2-Lx2-Cx2-.
- Dx2-Gx2-Hx2-D-Jx2-Lx2-Bx2-Hx2.
- Walk left.

- Use the BIRD WHISTLE to take the CROW (N).
- Walk down and forward.
- Place the CROW to earn the FEATHER (O).
- Walk down and left.

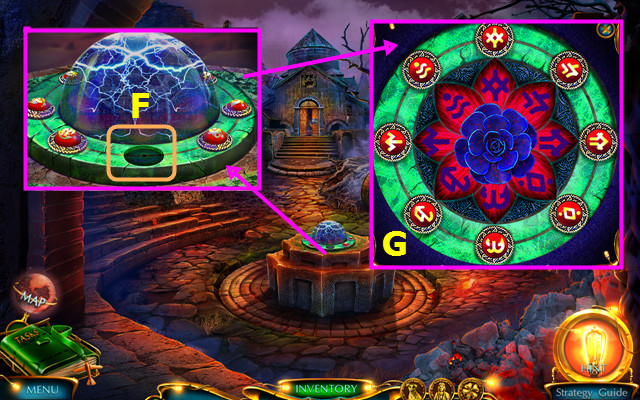
- Place the WATER, PAINT PIGMENT, and FEATHER (P).
- Move red runes into the marked positions (Q).
- Take the 2nd WEIGHT and CODE (R).
- Place the 1st WEIGHT; take the LEVER (S).
- Place the 2nd WEIGHT (T).
- Play the HOP; earn ODIN'S EYE (U).
- Place ODIN'S EYE; take the POETIC HONEY (V).
- Use the POETIC HONEY to take the JAR WITH BEES (W).
- Walk down.
- Use the JAR WITH BEES (A).
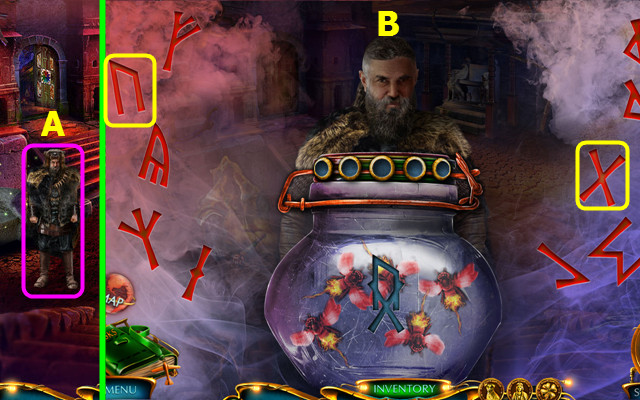
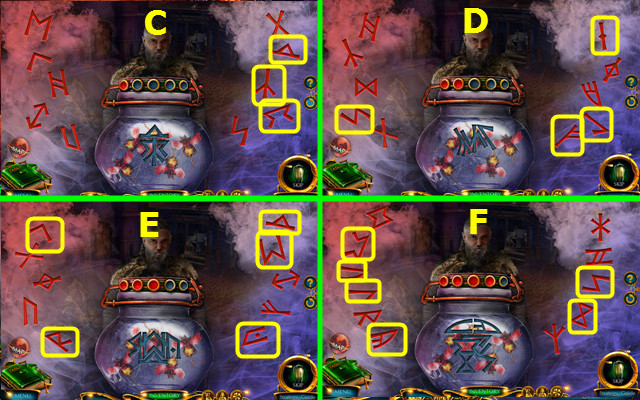
- Select the runes (B-F).

- Easy solution: Gx3-H-I-J-Kx3-L-K-Mx2.
- Hard solution: X-Nx4-O-Px2-Q-N-P-Rx4-.
- Sx5-Tx3-Ux2-Vx2-Wx3-Tx2.

- Take the CRYSTAL (A).
- Walk left.
- Place the CODE (B).
- Place the LEVER (C).
- Change the runes to match the code (D).
- Place the CRYSTAL; take the FIRE CRYSTAL and PORTAL AMULET (E).
- Place the PORTAL AMULET (F).
- Walk forward.
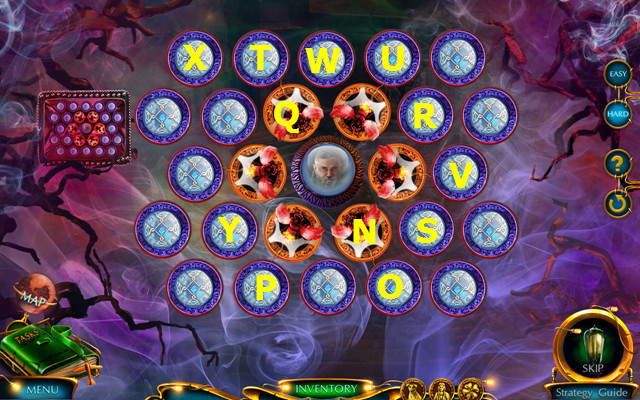
- Place the FIRE CRYSTAL (G).
- Easy solution 1: (H-I)-(J-H)-(K-J)-(L-M)-(N-O)-(O-P)-(Q-O)-(O-N)-(N-R)-(S-N)-(P-O)-(T-Q).
- Hard solution 2: (A-B)-(C-D)-(E-C)-(F-E)-(G-F)-(H-G)-(I-H)-(J-I)-(K-J)-(L-K)-(M-L)-(N-M)-(O-N).
- Congratulations! You have completed Labyrinths of the World: Stonehenge Legends!
Created at: 2016-09-04