

Walkthrough Menu
- General Tips
- Chapter 1: Village of Sorrow's Well
- Chapter 2: Banshee
- Chapter 3: Griffin
- Chapter 4: Castle
- Chapter 5: Tower
- Chapter 6: Hydra
- Chapter 7: Ice Giants
- Chapter 8: Dryad
- Chapter 9: Dark Lord
General Tips
- This is the official guide for League of Light: Dark Omens.
- Select Options to adjust Music, Sound and Ambient Volume. You may also adjust Gamma, Full Screen, and Custom Cursors.
- You may choose between Casual, Advanced and Hardcore.
- Hidden-object puzzles are referred to as HOPs in this guide. Items listed in yellow are hidden, or they require additional actions to locate. Interactive items in HOPs are color-coded.
- Puzzles may be skipped after a short wait.
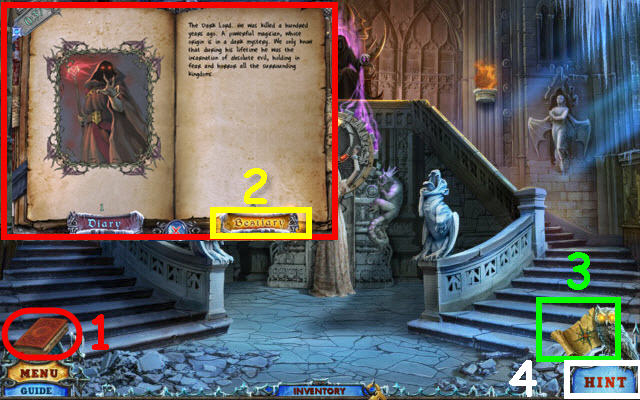
- Open your diary (1) to view your story updates and stored clues. Select the Bestiary tab (2) to read about the different creatures.
- Select the Map (3) to see what locations have tasks to complete. You can also fast travel to any location by selecting the desired area on the map.
- You may select the Hint button (4) for help in game play or HOP areas.
Chapter 1: Village of Sorrow's Well
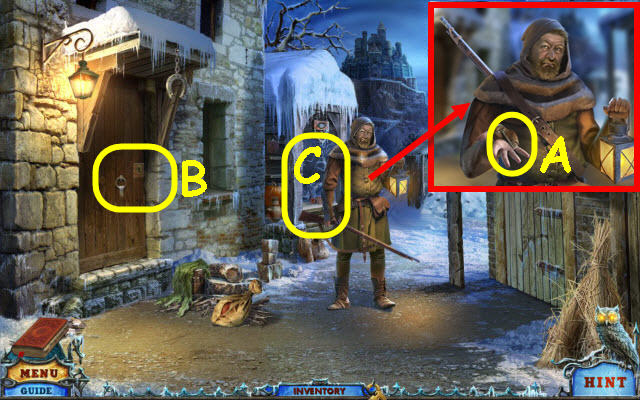
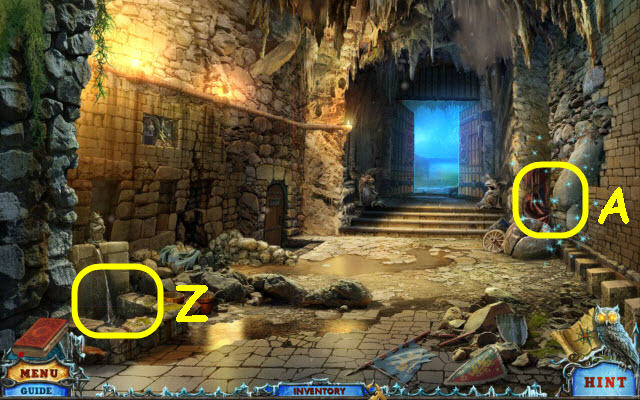
- Speak to Elton; take the KEY (A).
- Examine the door and use the KEY on the lock (B); enter the building.
- Speak with Elton to trigger a HOP.
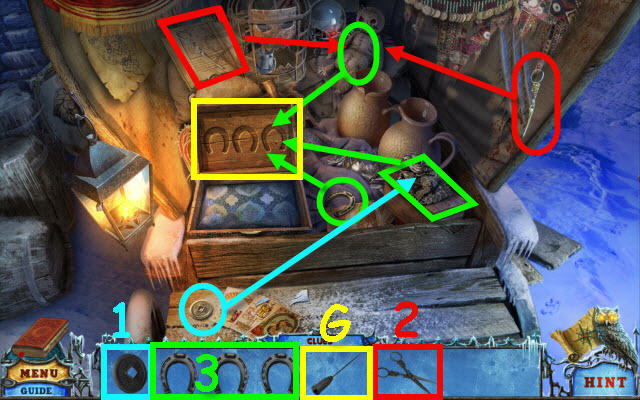
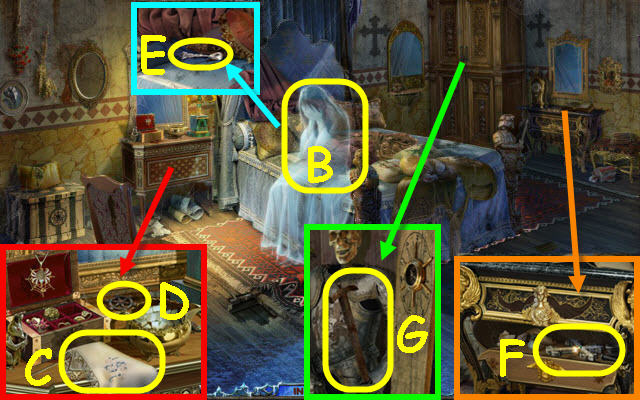
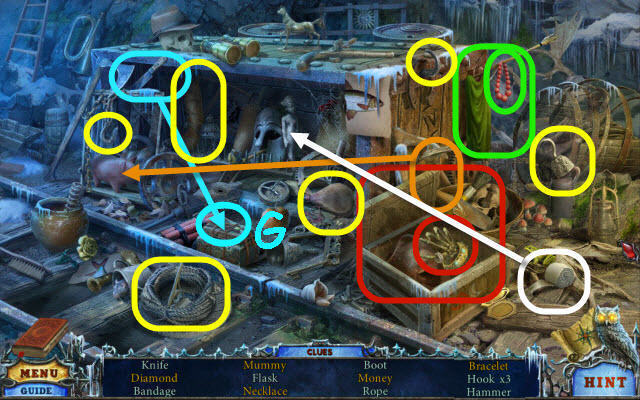
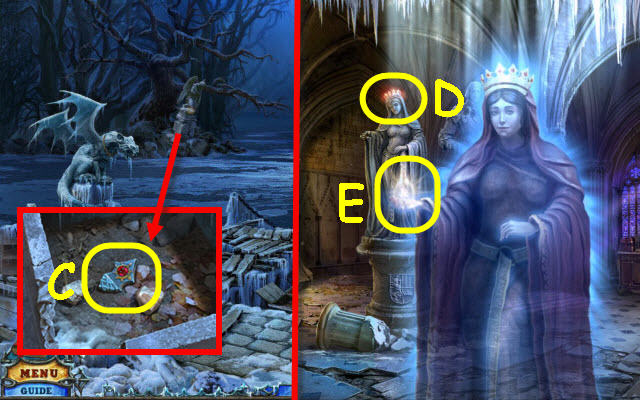
- Examine the stall to access a HOP (C).
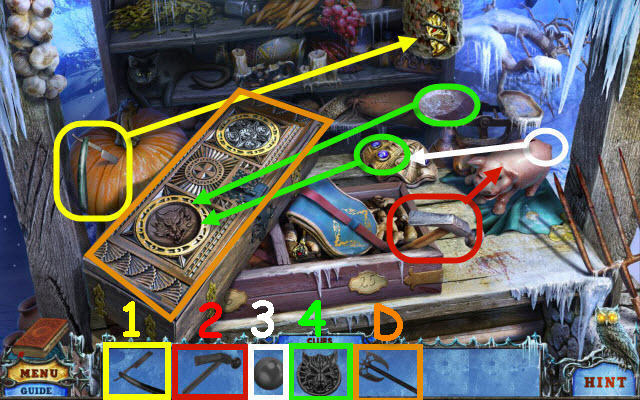
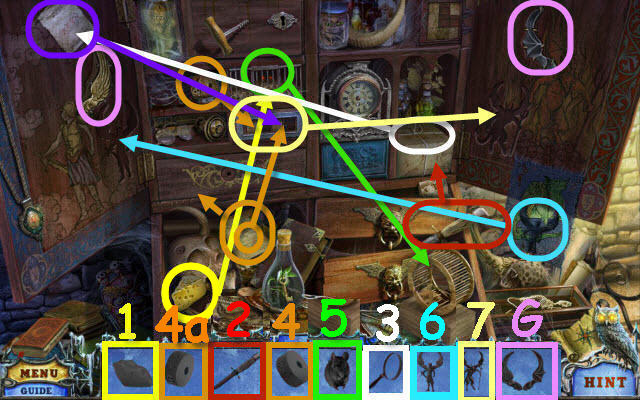
- Play the HOP.
- Find and use the items in the order numbered in the find list.
- You will receive the AXE (D).
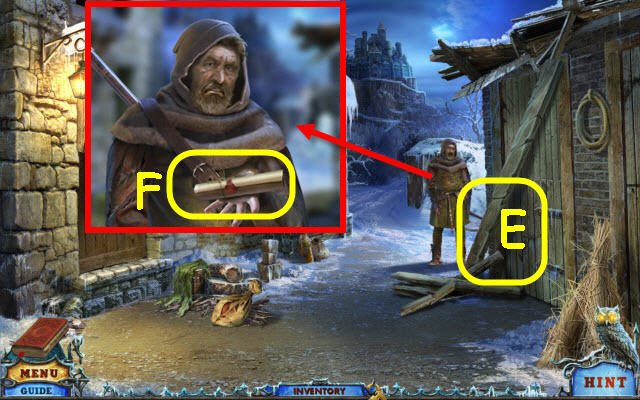
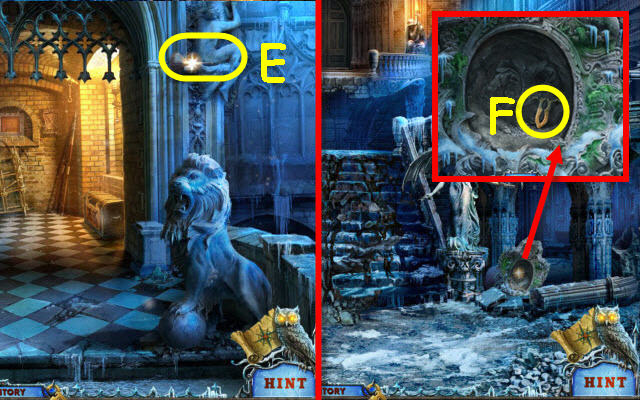
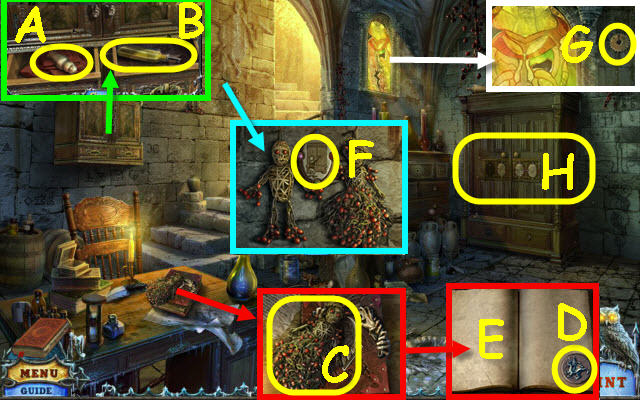
- Examine the board and use the AXE on it (E).
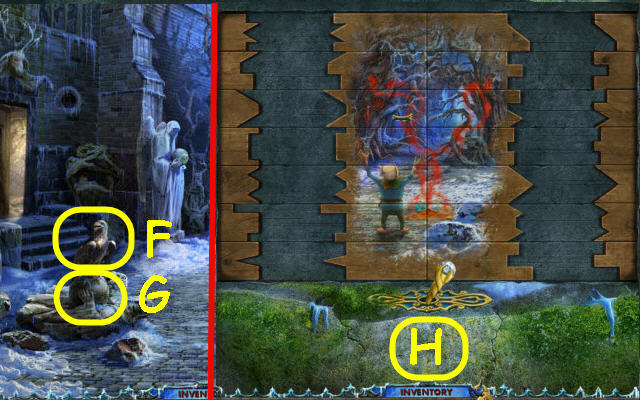
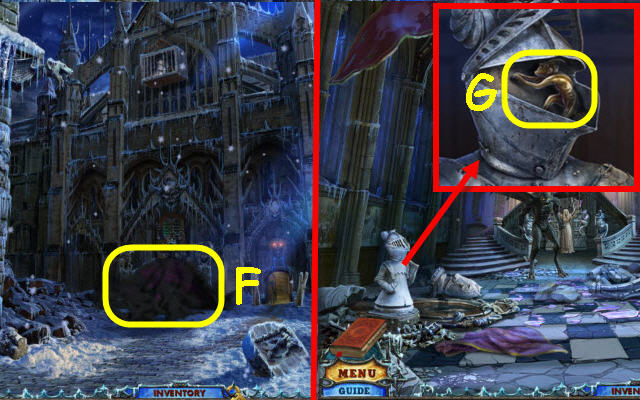
- Speak to Elton; take the map (F). The map will now be added to the bottom right above the hint button.
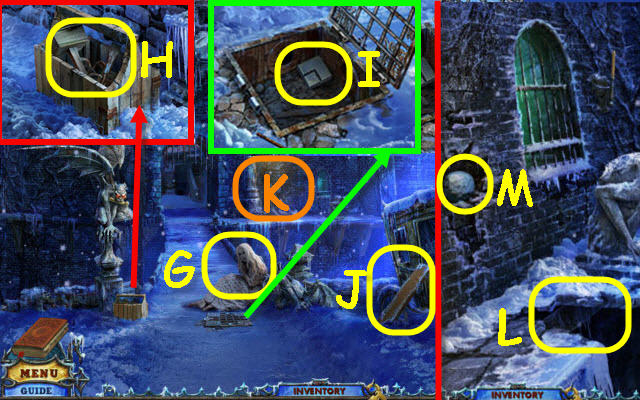
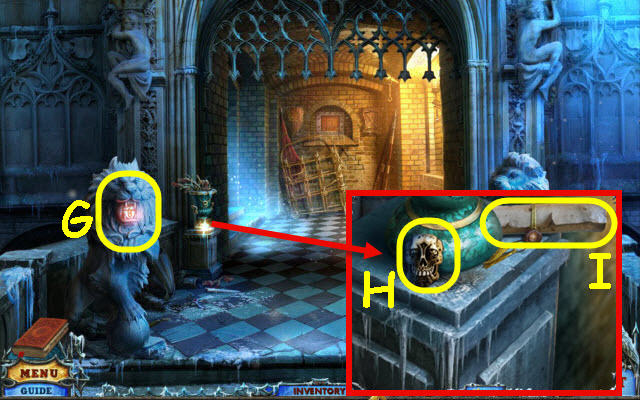
- Speak to Penelope (G).
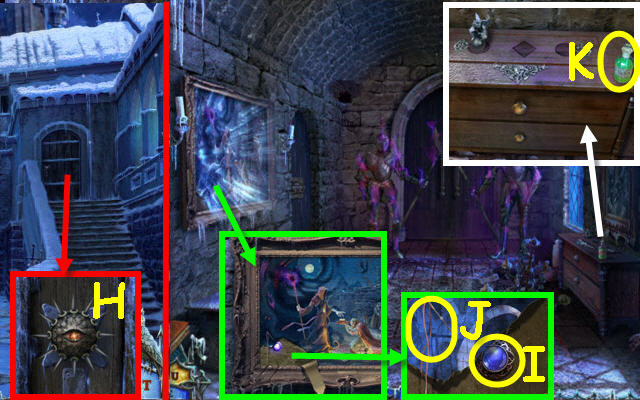
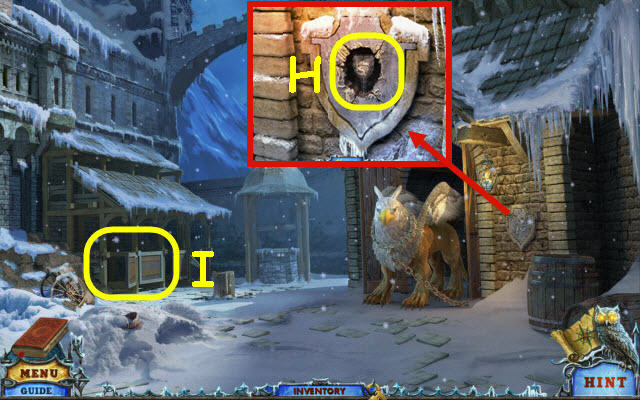
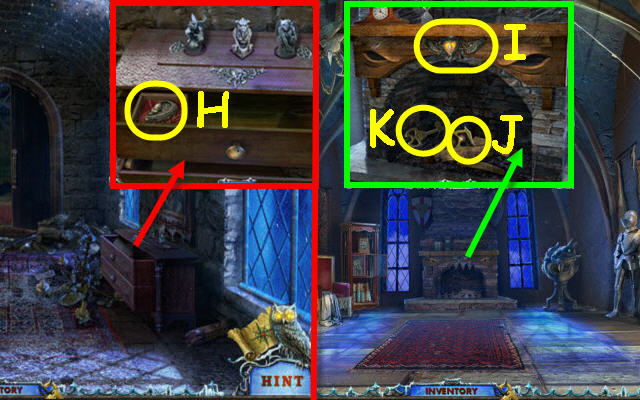
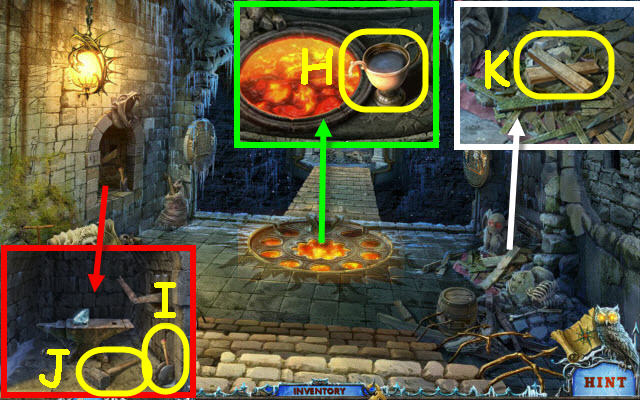
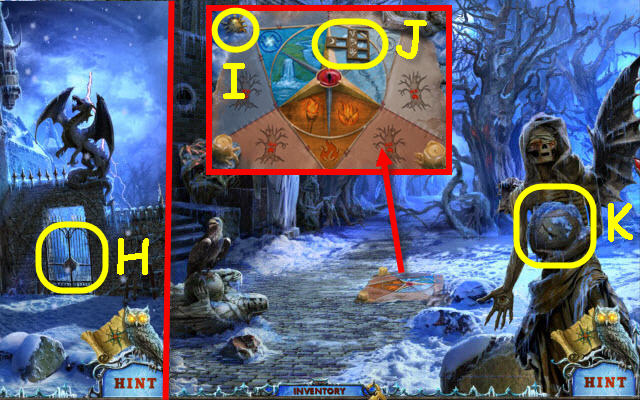
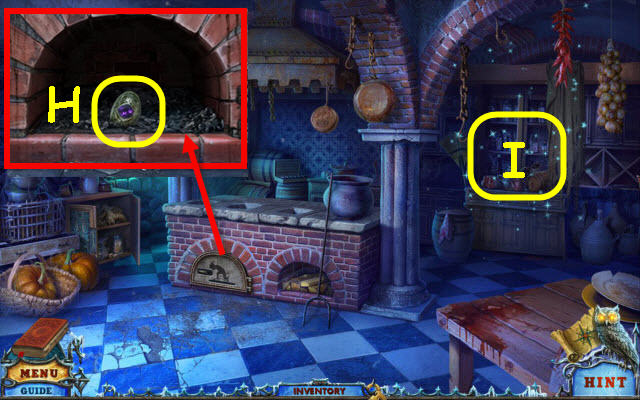
- Examine the toolbox; take the MALLET AND CHISEL (H).
- Examine the grate and use the MALLET AND CHISEL on it. Open the grate; take the PUZZLE PART 1/2 (I).
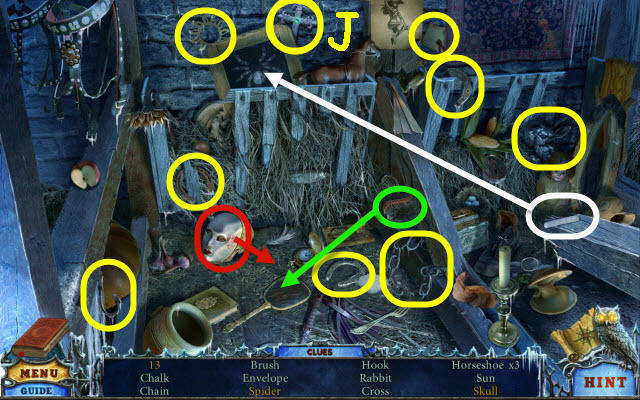
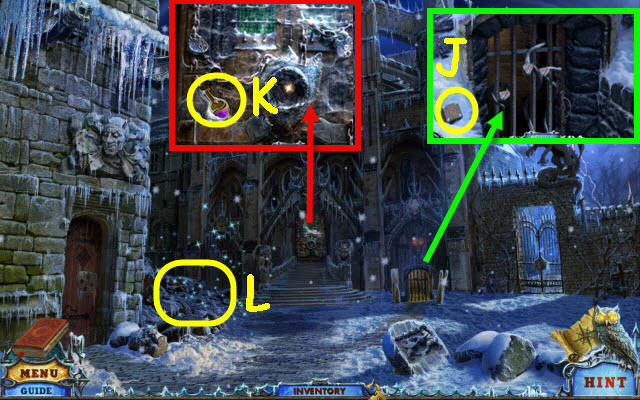
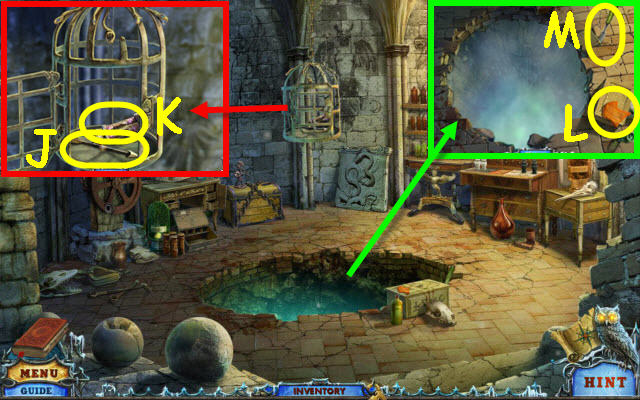
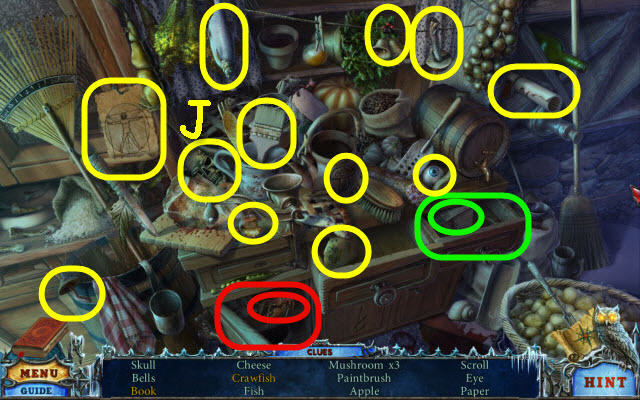
- Take the BOARD (J).
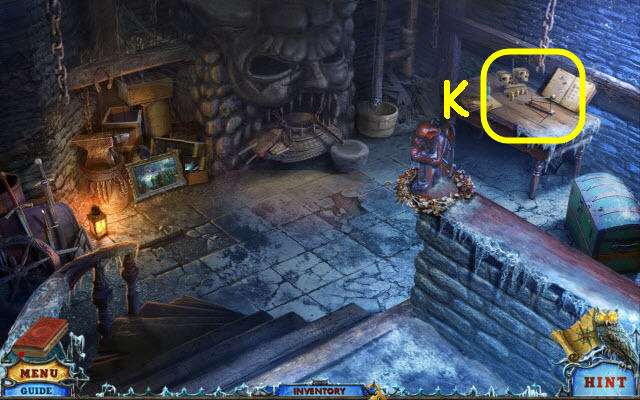
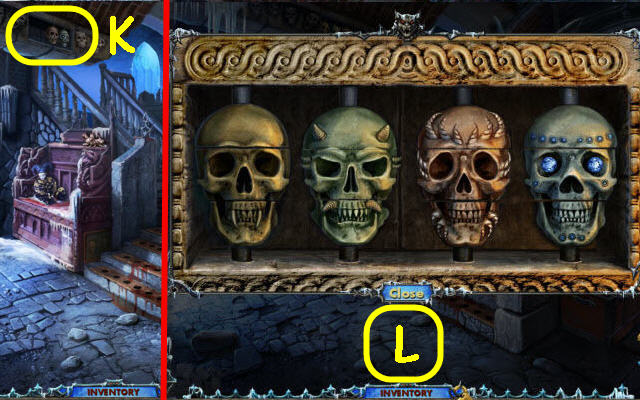
- Go right on the ledge (K).
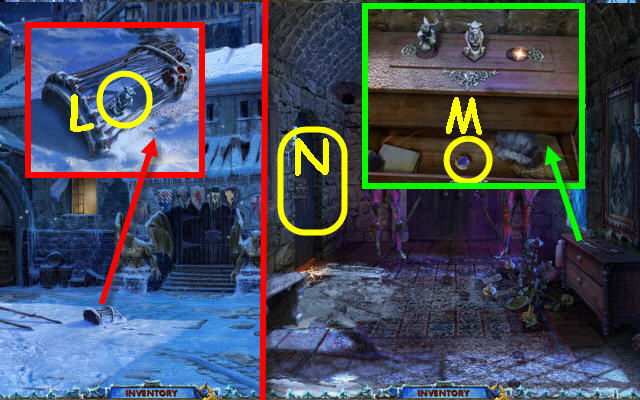
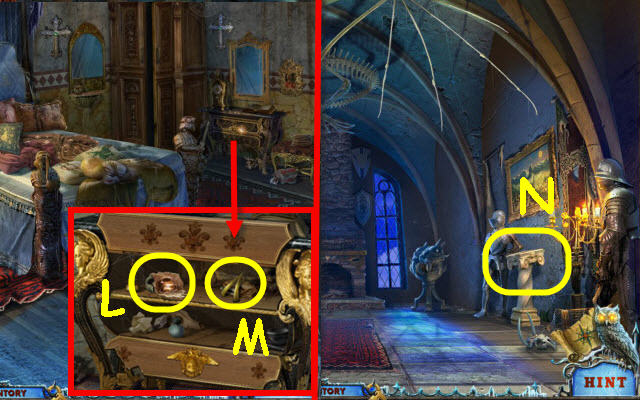
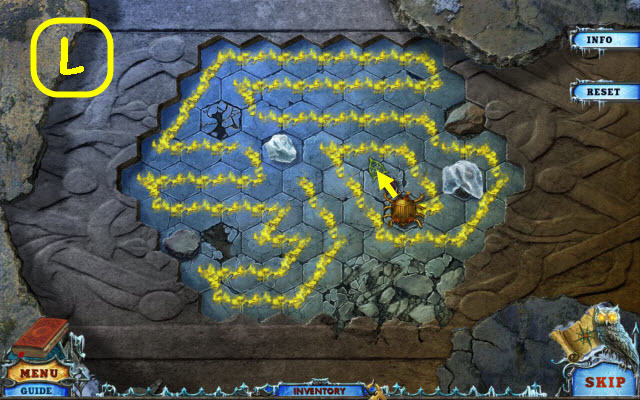
- Select anywhere in the scene and then place the BOARD on the gap (L).
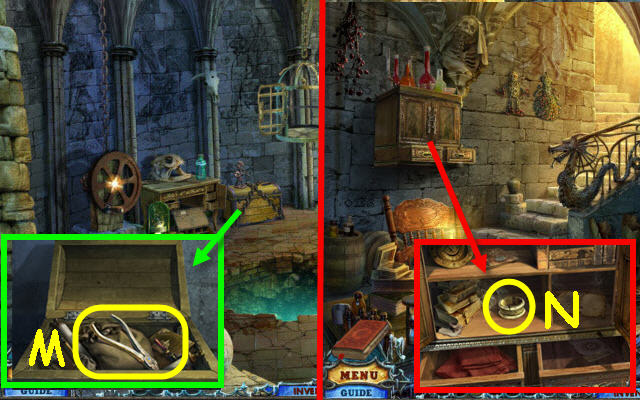
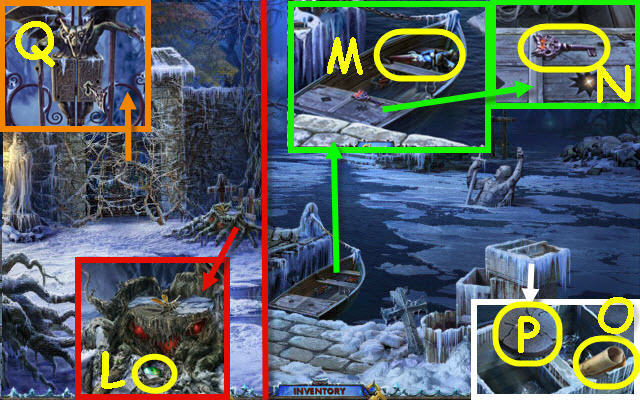
- Take the CANNONBALL (M).
- Back out.
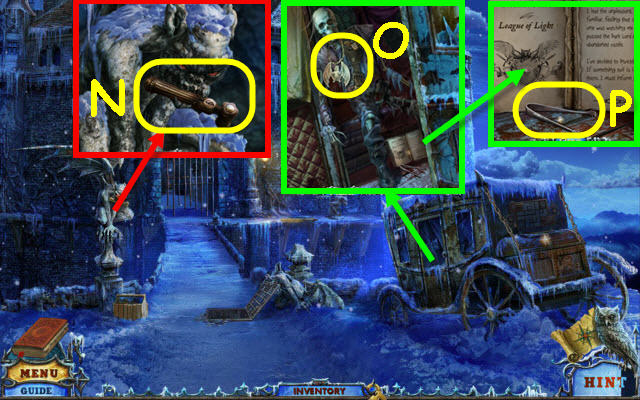
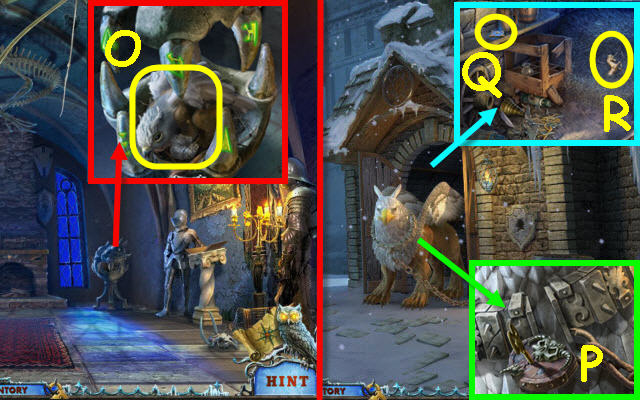
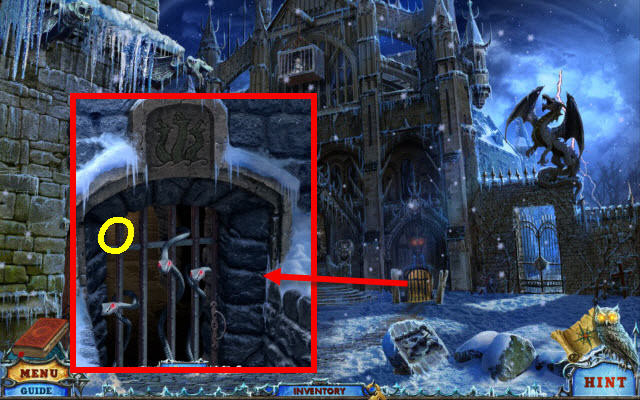
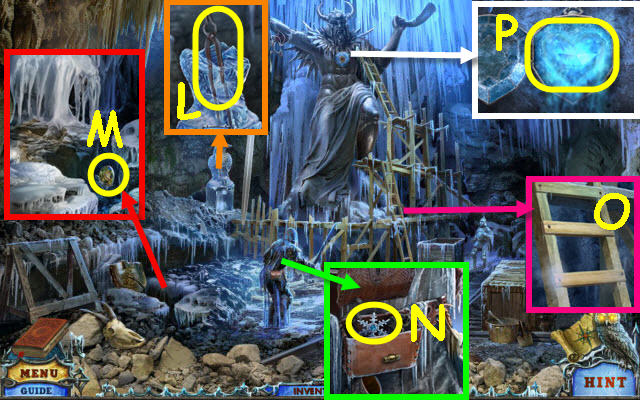
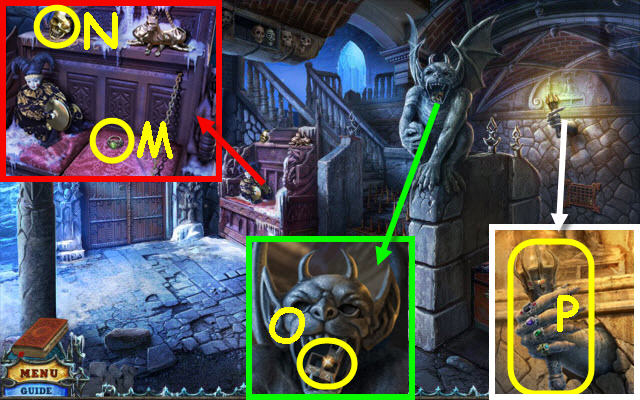
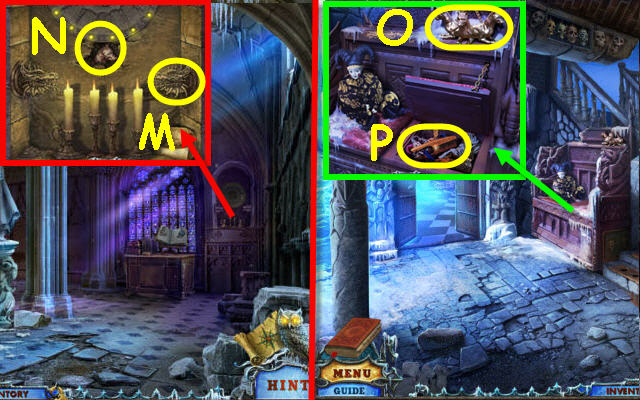
- Examine the gargoyle and use the CANNONBALL on it; take the HANDLE (N).
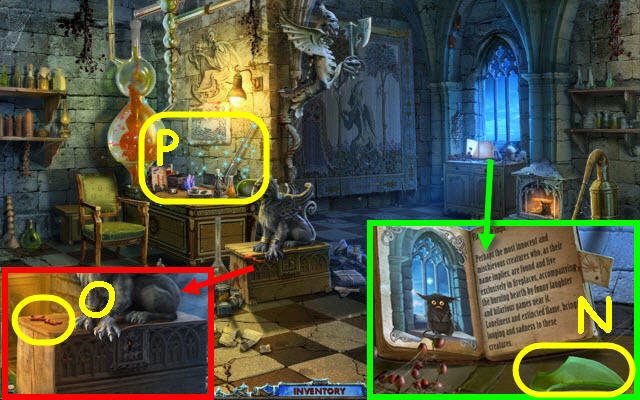
- Examine the carriage door and place the HANDLE on it; pull the handle. Take the BAT (O).
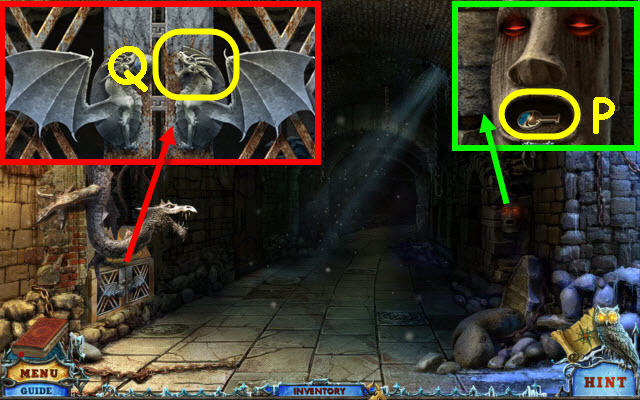
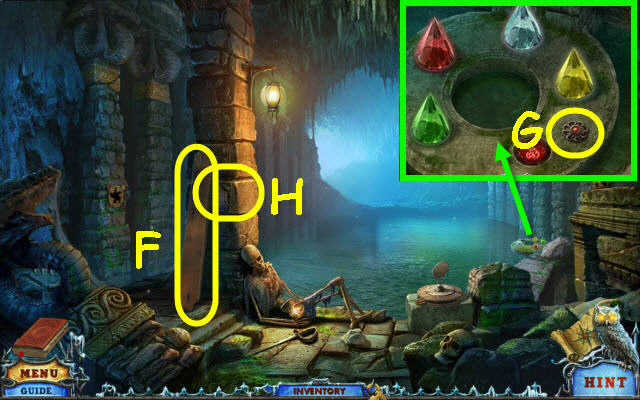
- Zoom into the book; take the TONGS (P).
- Go right on the ledge.

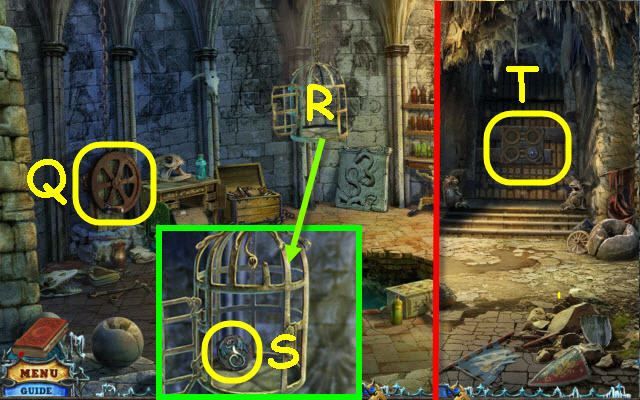
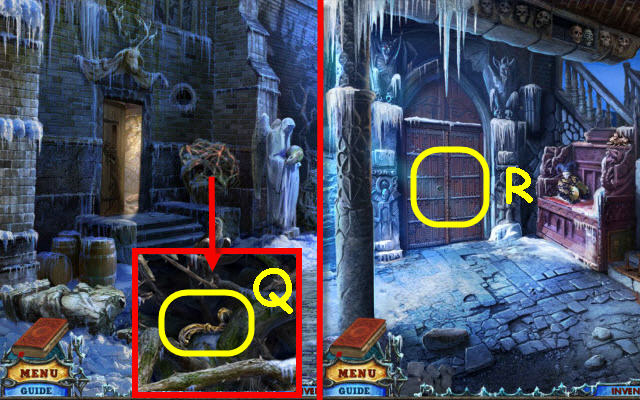
- Examine the drain spout and use the TONGS to get the PUZZLE PART 2/2 (Q).
- Back out.
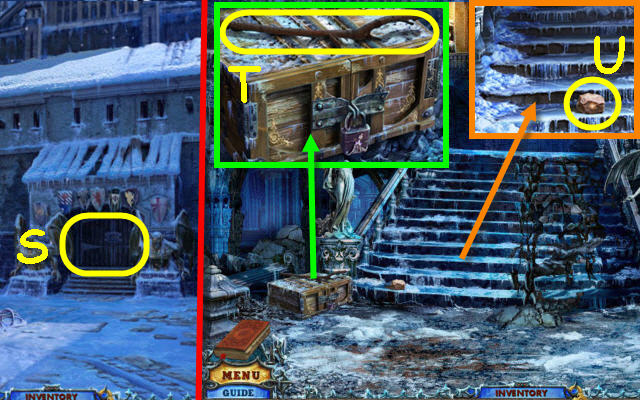
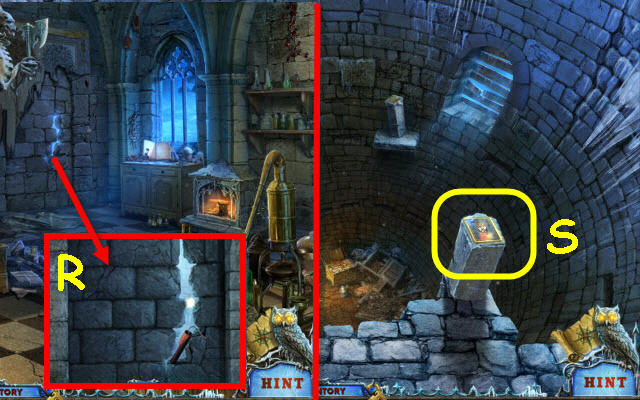
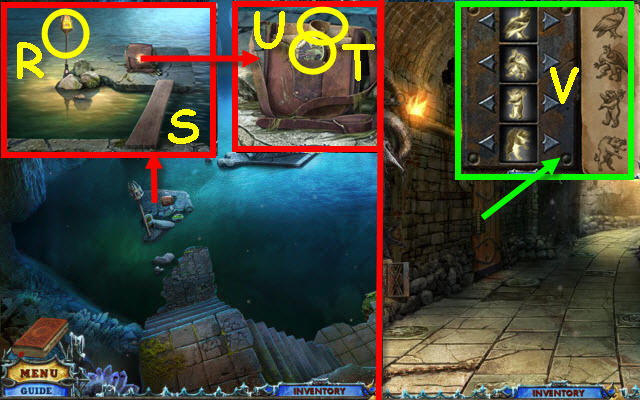
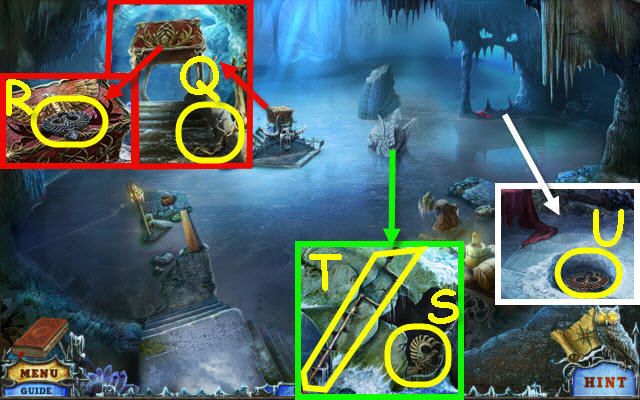
- Examine the trunk and place the 2 PUZZLE PARTS on it to trigger a puzzle (R).
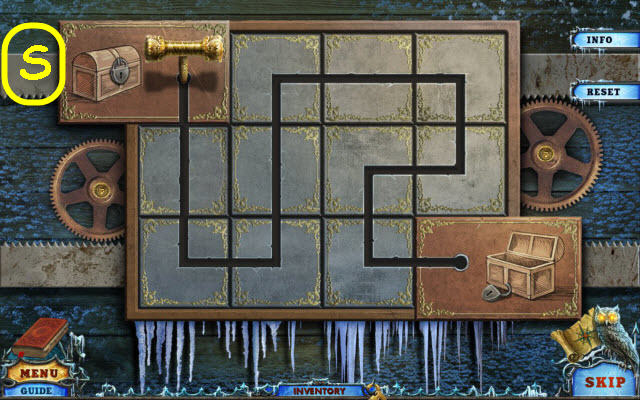
- Turn the squares to slide the handle to the open trunk.
- See screenshot for solution (S).
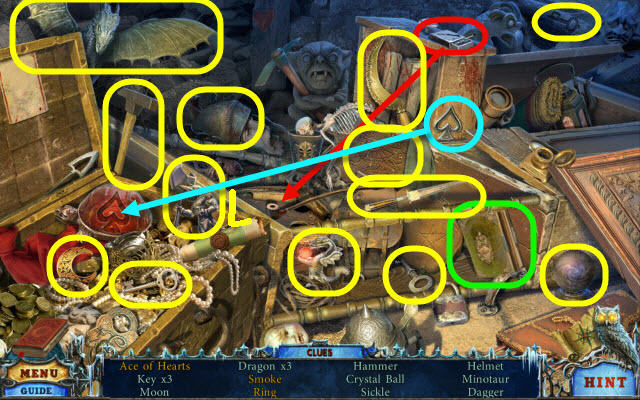
- Examine the opened trunk to access a HOP.
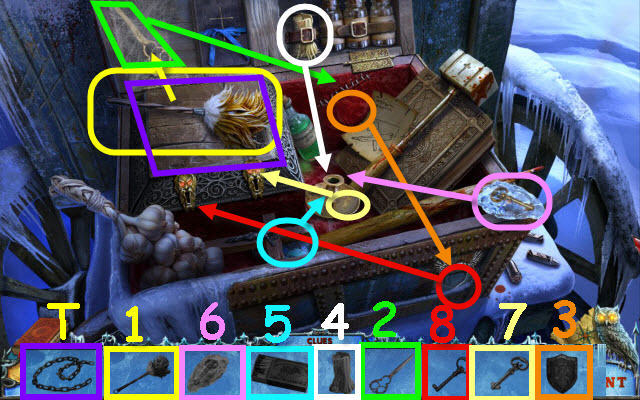
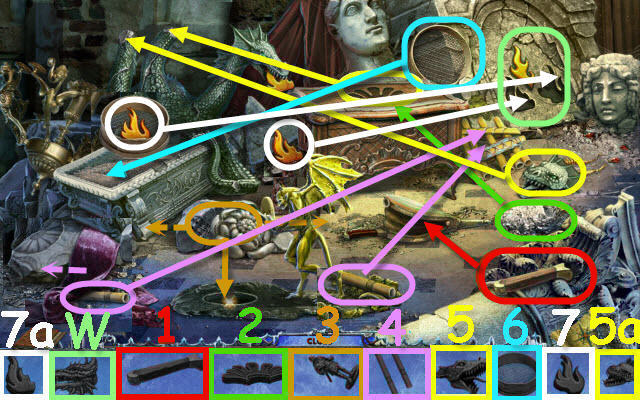
- Play the HOP.
- Find and use the items in the order numbered in the find list.
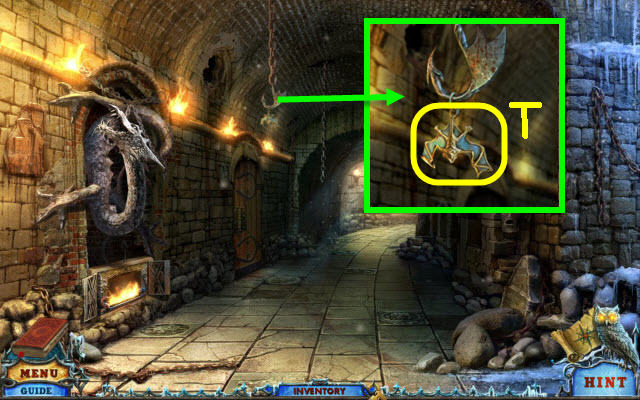
- You will receive the CHAIN (T).
- Go right on the ledge.
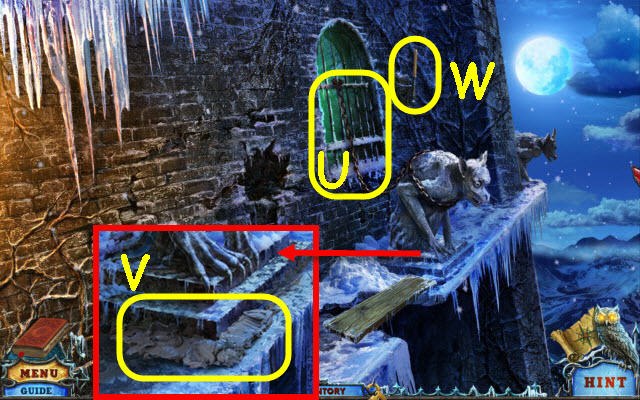
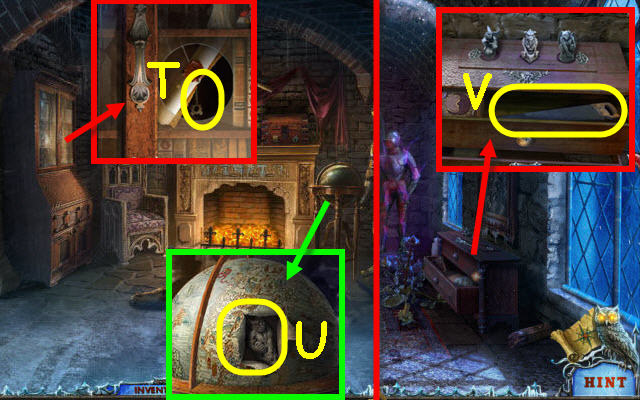
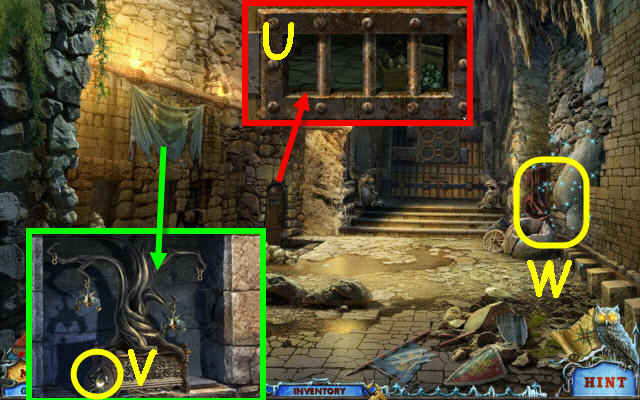
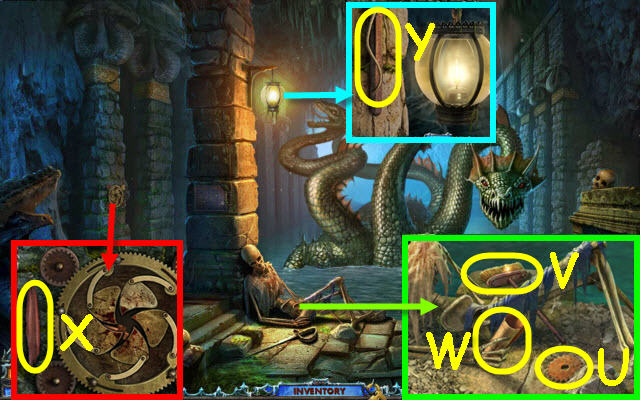
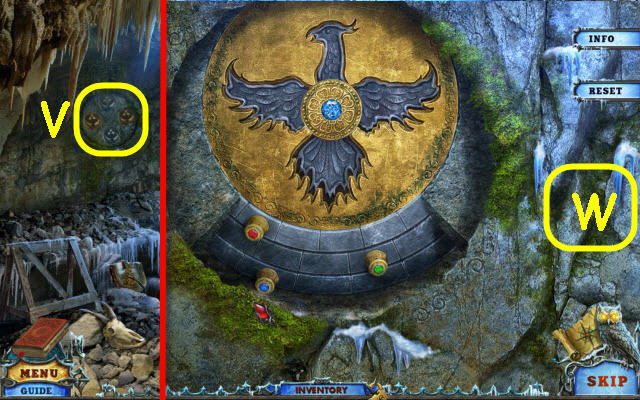
- Place the CHAIN on the window bars (U).
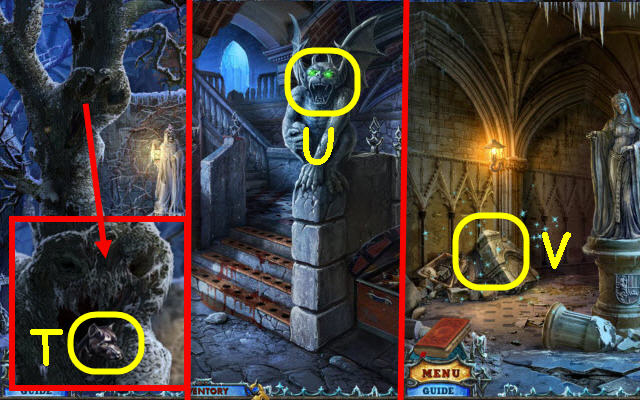
- Examine the gargoyle; use the MALLET AND CHISEL on the cement (V).
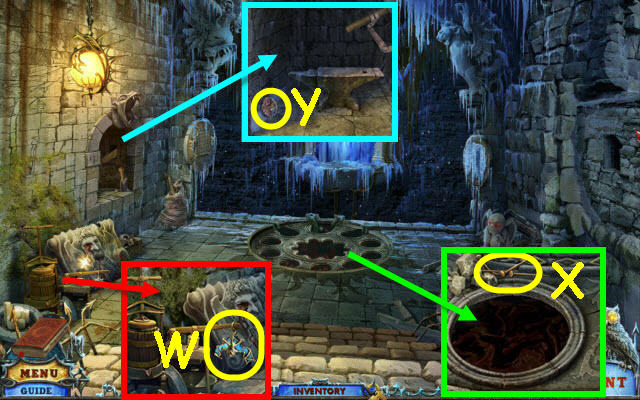
- Push the gargoyle; take the STICK 1/2 (W).
- Go through the window.
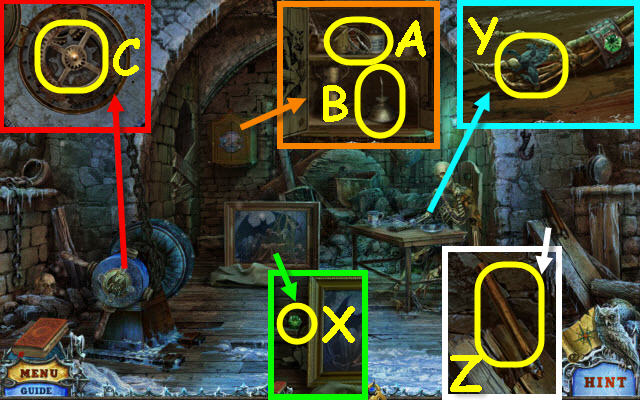
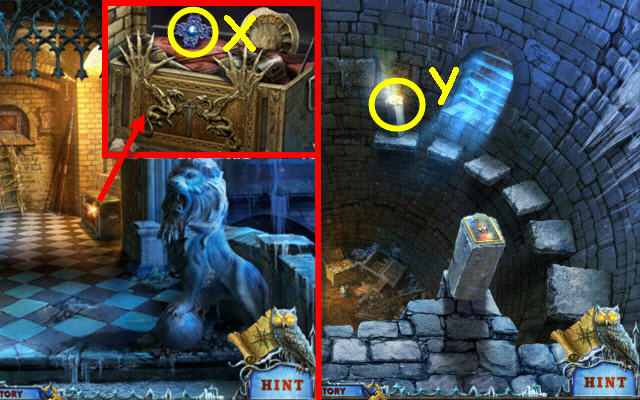
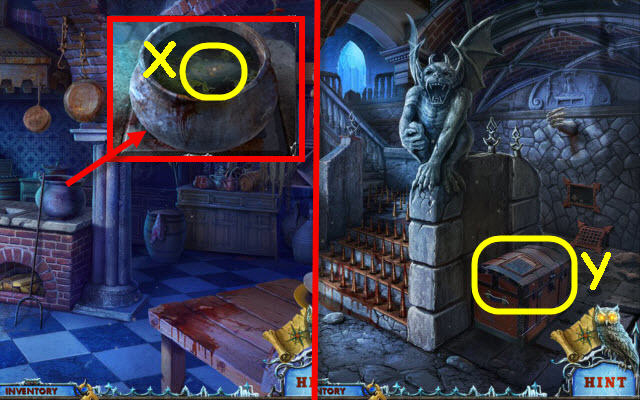
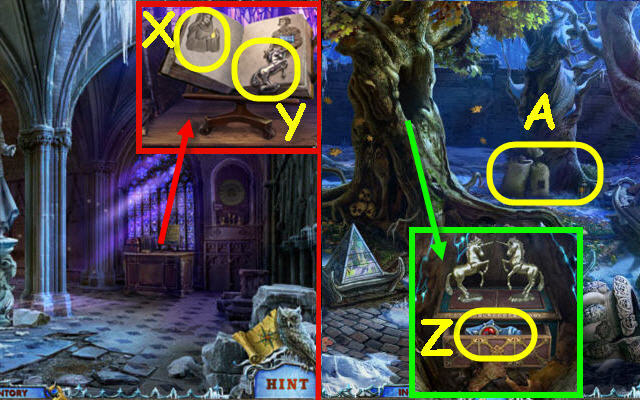
- Remove the cloth and examine the painting; take the GEM (X).
- Examine the table and place the GEM in the bracelet; take the GRIFFIN (Y).
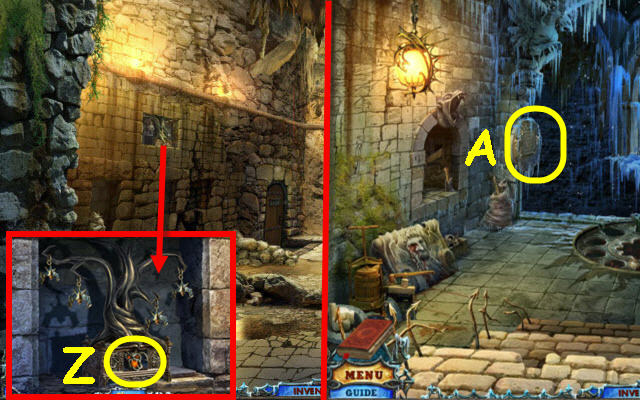
- Examine the beam; take the STICK 2/2 (Z).
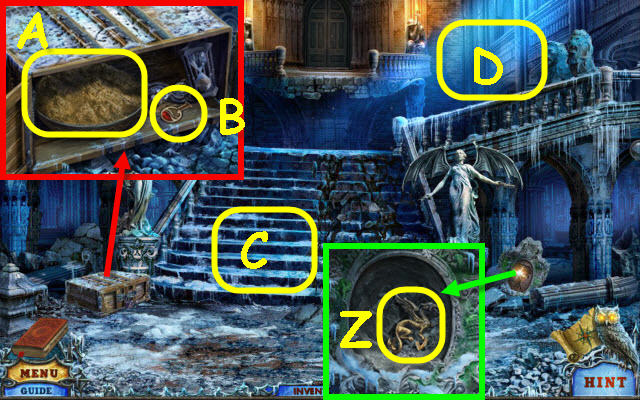
- Examine the cabinet and place the GRIFFIN on it; take the SILVER ITEMS 1/5 (A) and OILER (B).
- Examine the winch and place the BAT on it; use the OILER on the gears (C).
- Place the 2 STICKS on the winch and turn the wheel.
- Go forward.
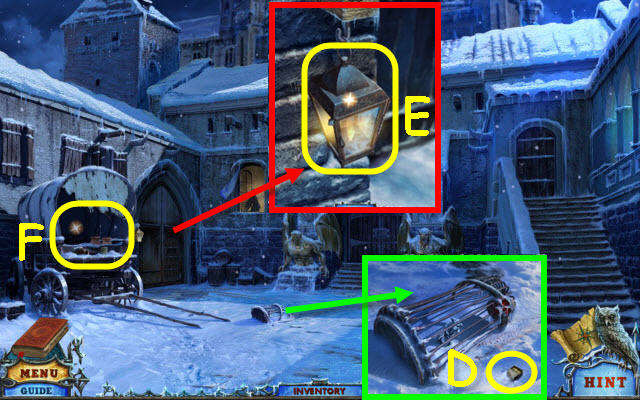
- Examine the cage; take the MATCHES (D).
- Examine the door and zoom into the lantern; open the lantern door. Use the MATCHES on the wick; take the LANTERN (E).
- Use the LANTERN on the carriage (F).
- Examine the carriage to access a HOP.
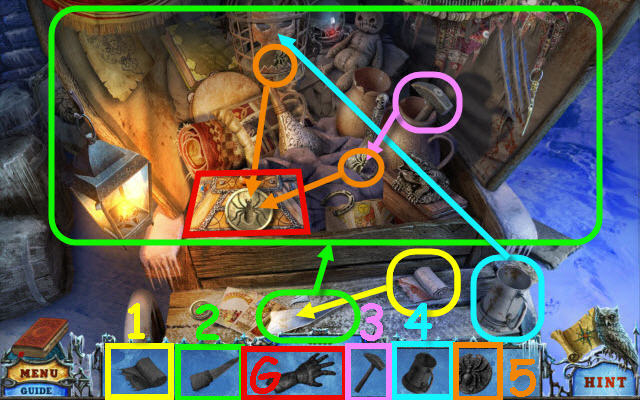
- Play the HOP.
- Find and use the items in the order numbered in the find list.
- You will receive the GAUNTLET (G).
- Examine the door and use the GAUNTLET on the handle (H).
- Enter through the newly-opened door.
- Examine the painting and peel back the corner. Zoom into the corner; take the BLUE GEM 1/2 (I) and NEEDLE (J).
- Examine the chest of drawers; take the ACID (K).
- Back out.
- Examine the cage and use the ACID on it; take the GARGOYLE (L).
- Go up the stairs.
- Examine the chest of drawers and place the GARGOYLE on it; take the BLUE GEM 2/2 (M).
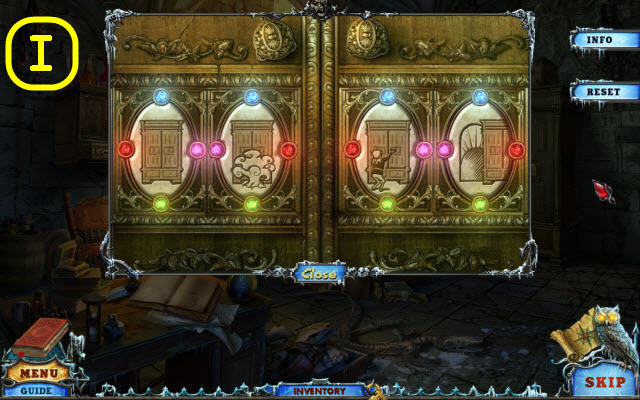
- Examine the door and place the 2 BLUE GEMS on it to trigger a puzzle (N).

- Jump the gems to remove them.
- To solve the puzzle, move the gems as follows: B to D, J to B, L to J, D to L, I to K, L to J, A to C, C to K, K to I, and I to A.
- Go through the newly-opened door.
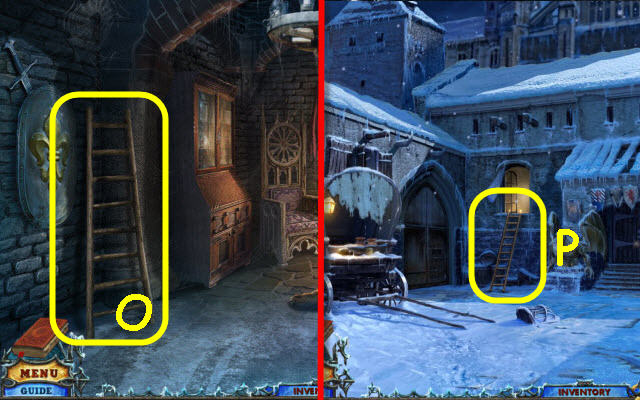
- Take the LADDER (O).
- Back out twice.
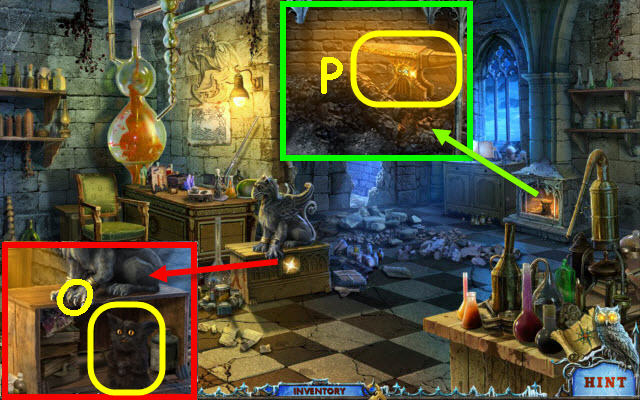
- Place the LADDER under the window (P).
- Go up the ladder through the window.
Chapter 2: Banshee
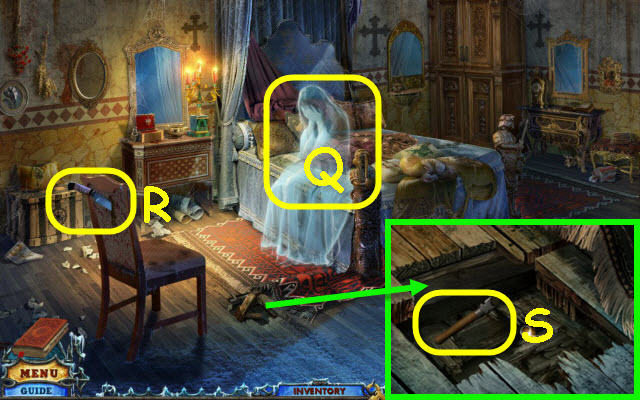
- Attempt to speak to the banshee (Q).
- Take the KNIFE (R).
- Examine the hole in the floor and move the two boards; take the GLASS CUTTER (S).
- Back out; go up the stairs on the right and then through the door on the left.
- Examine the cabinet and use the GLASS CUTTER on the glass; take the 2nd bestiary scroll and the KEY (T).
- Examine the globe and turn it. Use the KNIFE on the X; take the GARGOYLE (U).
- Back out.
- Examine the chest of drawers and place the GARGOYLE on it; take the SAW (V).
- Back out.
- Examine the left door; use the SAW on it (W).
- Go left through the newly-opened door.
- Take the SNOW SHOVEL (X).
- Examine the fountain; take the RUBY EYE (Y).
- Examine the statue; take the LEATHER FACE 1/2 (Z).
- Examine the cloth and move it; read the note and take the SILVER IDENTIFIER (A).
- Attempt to go up the path on the left.
- Back out; go up the stairs and through the left door.
- Examine the bear and place the RUBY EYE in the socket; take the 2nd KEY (B).
- Examine the chest and use the 2 KEYS in the locks; take the HOOK (C).
- Back out twice and go up the ladder.
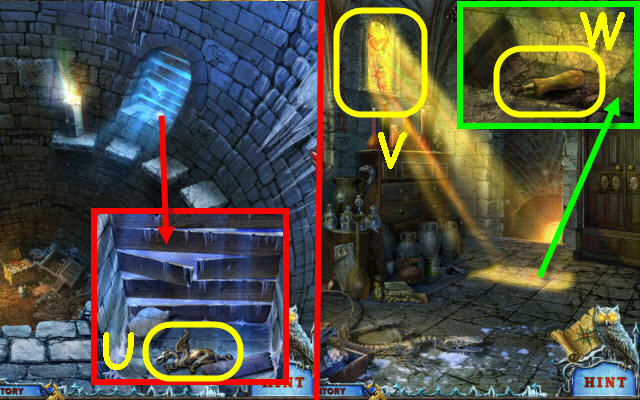
- Examine the hole in the floor; use the HOOK to get the SWORD PENDANT (D).
- Back out and go left.
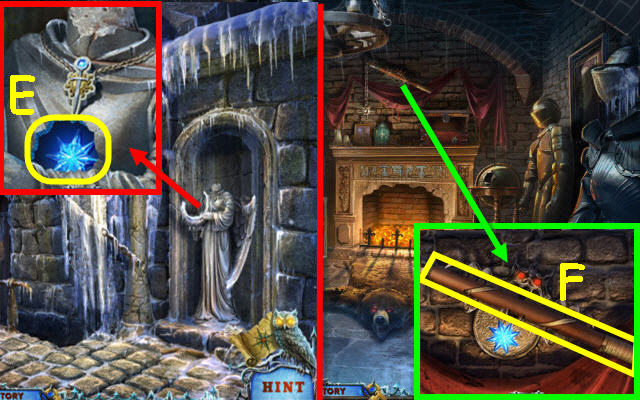
- Examine the statue and place the SWORD PENDANT on the necklace; take the BLUE STAR (E).
- Back out; go up the stairs and through the left door.
- Examine the flail and place the BLUE STAR on the lock; take the FLAIL (F).
- Back out twice.
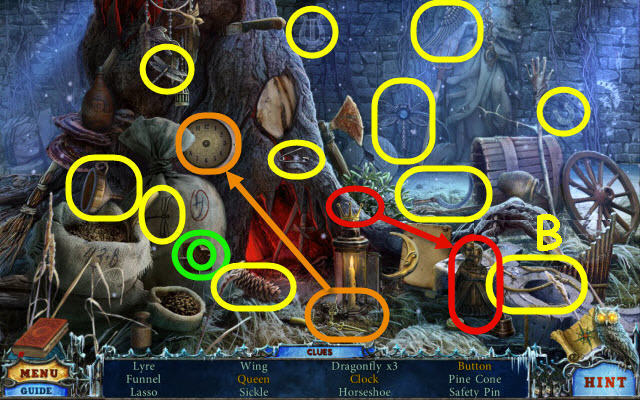
- Examine the wagon to access a HOP.
- Play the HOP.
- Find and use the items in the order numbered in the find list.
- You will receive the ICE PICK (G).
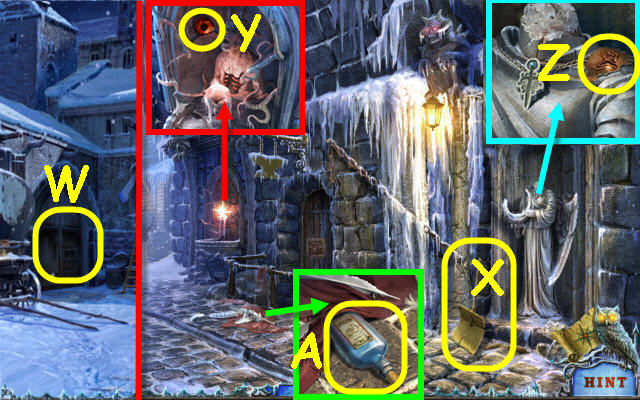
- Go left.
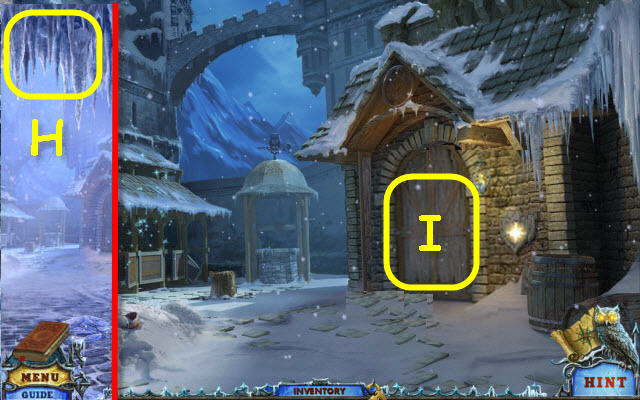
- Use the FLAIL on the icicles (H).
- Go up the path on the left.
- Select the door two times (I).
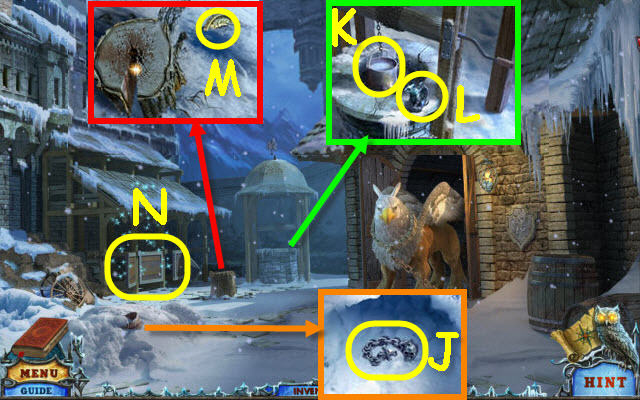
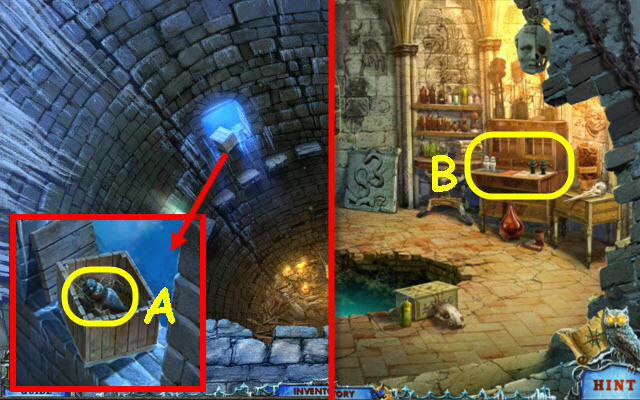
- Examine the snow pile and use the SNOW SHOVEL on it; take the SILVER ITEMS 2/5 (J).
- Examine the well; use the ICE PICK on the icy handle and turn it. Take the ICE BUCKET (K) and the SILVER ITEMS 3/5 (L).
- Examine the stump; take the HEART HALF (M).
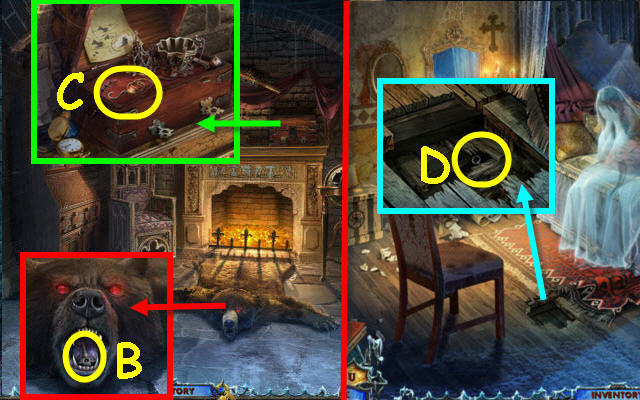
- Open the stall door to trigger a HOP (N).
- Examine the opened stall to access a HOP.
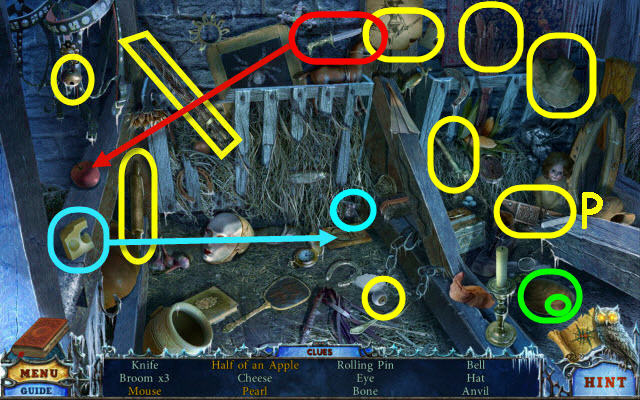
- Play the HOP.
- You will receive the ANVIL (P).
- Back out.
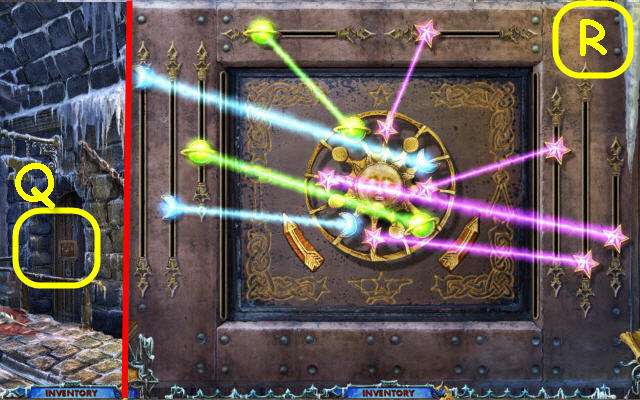
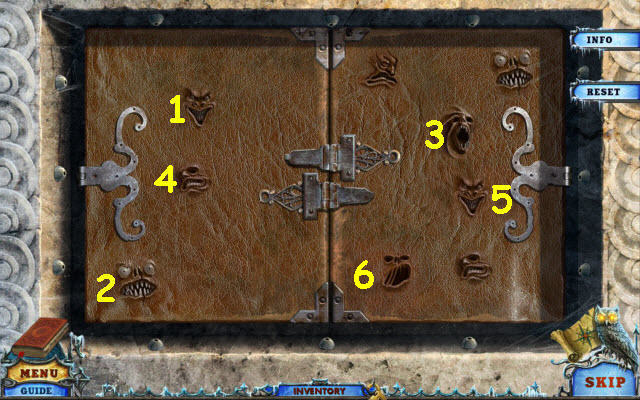
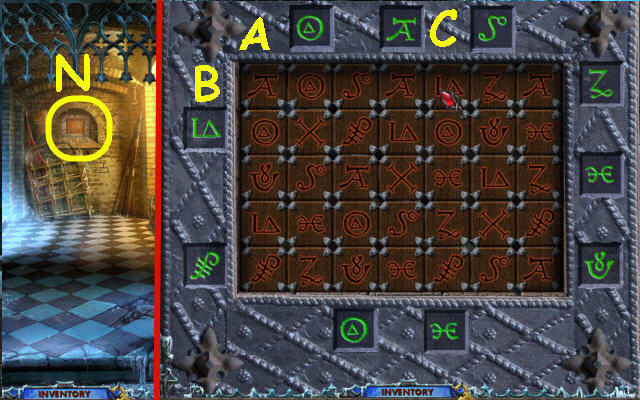
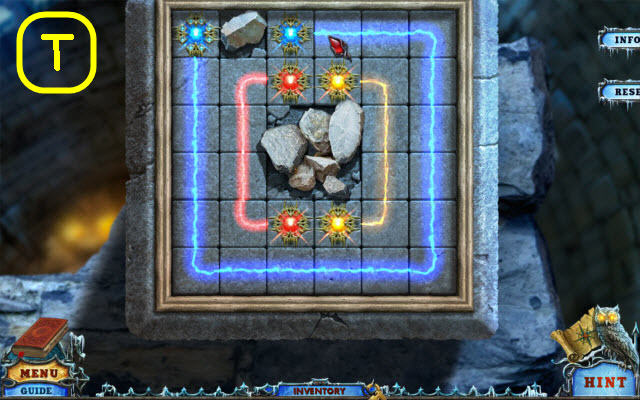
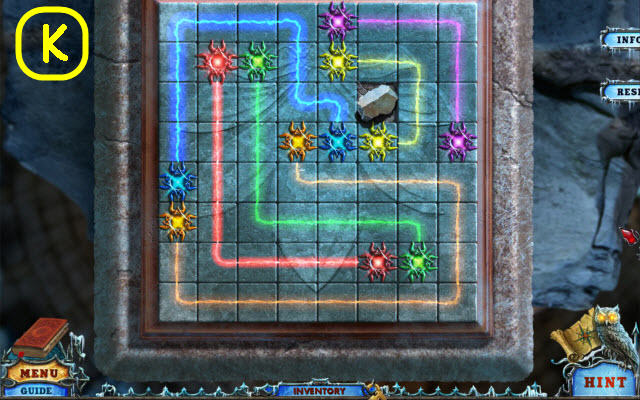
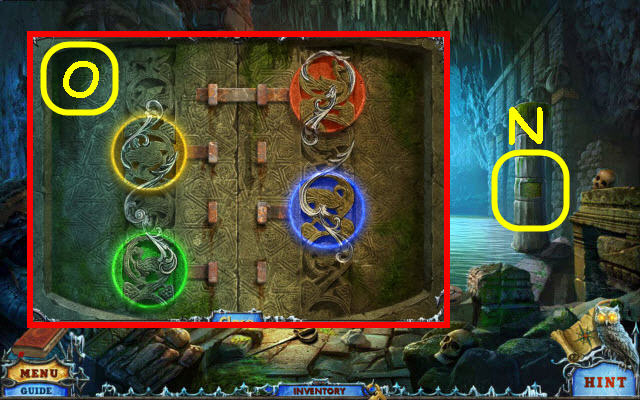
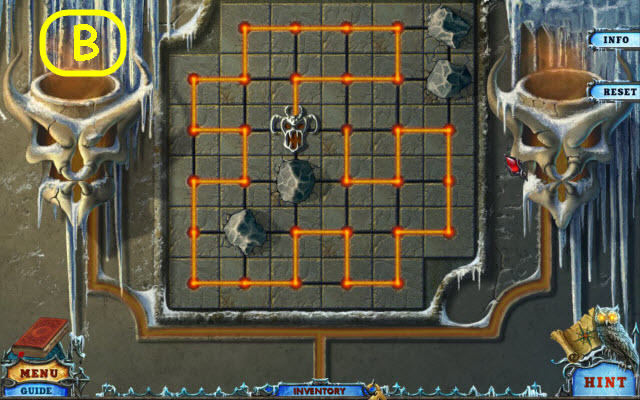
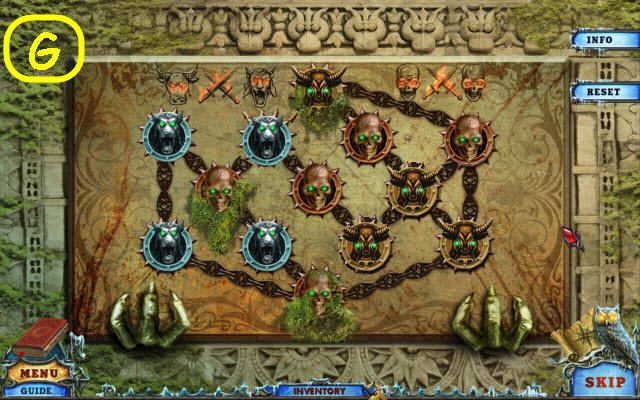
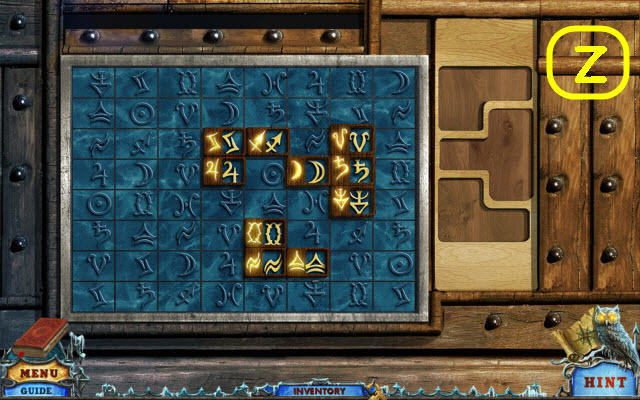
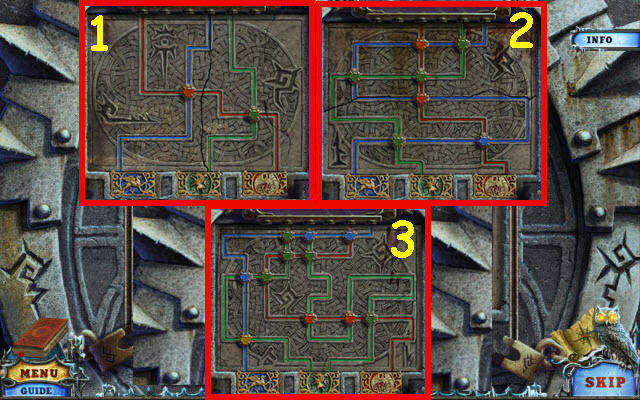
- Examine the door and place the ANVIL on it to trigger a puzzle (Q).
- Line up all the matching symbols with no intersecting lines to light them up.
- See screenshot for positions (R).
- Enter the newly-opened armory.
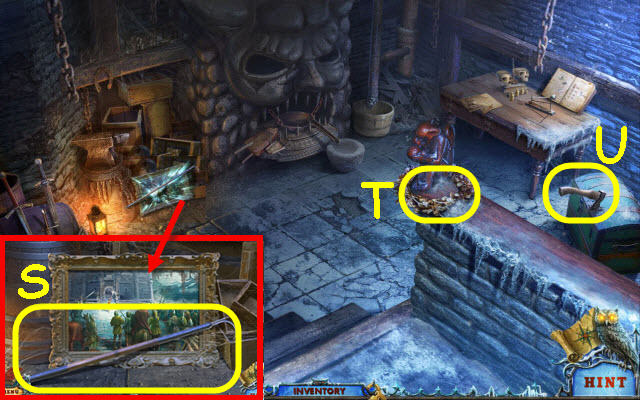
- Examine the painting; take the HOOK (S).
- Take the MISTLETOE (T) and AXE (U).
- Back out and go up the left.
- Examine the emblem and use the HOOK on it to get the EAGLE EMBLEM (V).
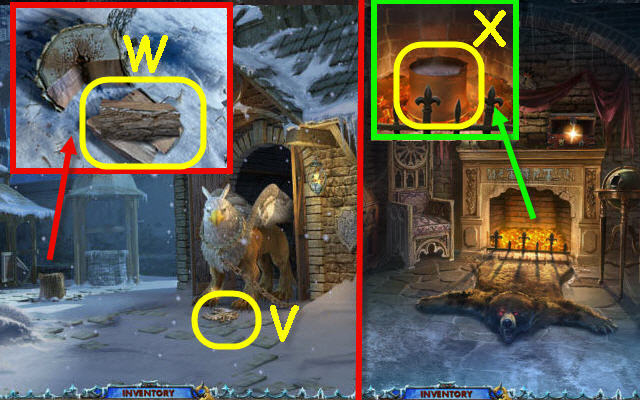
- Examine the stump and use the AXE on it; take the FIREWOOD (W).
- Back out twice; go up the stairs and into the room on the left.
- Examine the fireplace and place the ICE BUCKET in it; take the BUCKET OF WATER (X).
- Back out twice and go left.
- Examine the fountain and use the BUCKET OF WATER on it; take the TONGS (Y).
- Back out; go up the stairs and then left.
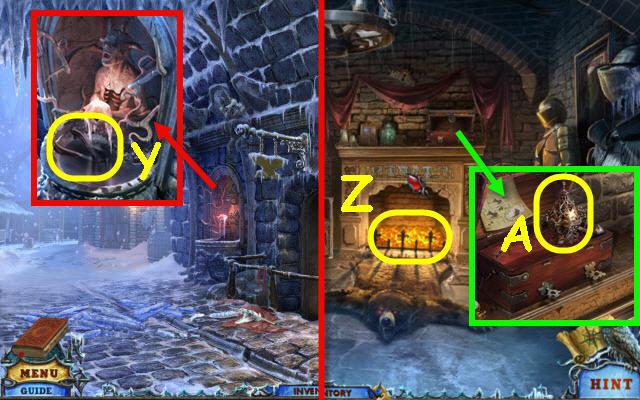
- Examine the fireplace and use the TONGS in it to get COAL (Z).
- Examine the chest and place the COAL and then the MISTLETOE in the censer; take the CENSER (A).
- Back out twice and go up the ladder.
- Use the CENSER on the banshee (B).
- Examine the left dresser; take the SHAWL (C) and VALVE (D).
- Examine the pillows and move them; take the SILVER ITEMS 4/5 (E).
- Examine the right dresser and open the bottom panel; take the CROSS (F).
- Examine the armoire and open it; take the HAMMER (G).
- Back out and go to the left twice.
- Examine the crest and use the HAMMER on it; take the SILVER ITEMS 5/5 (H).
- Examine the stalls to access a HOP (I).
- Play the HOP.
- You will receive the 2nd CROSS (J).
- Back out and enter the armory.
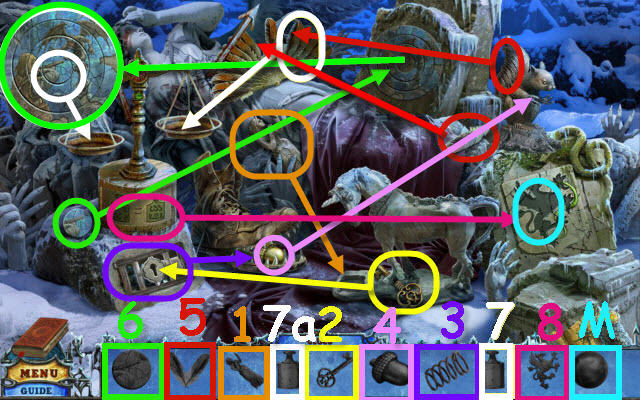
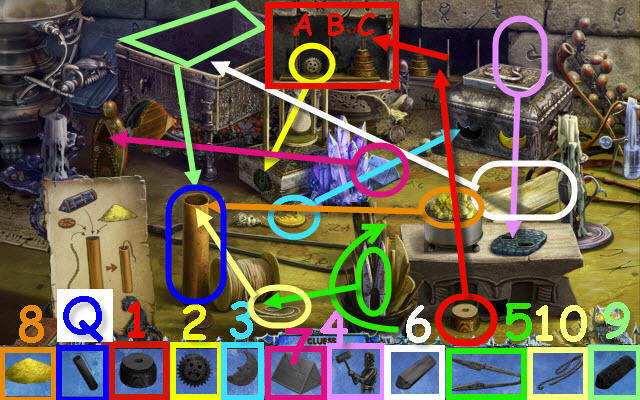
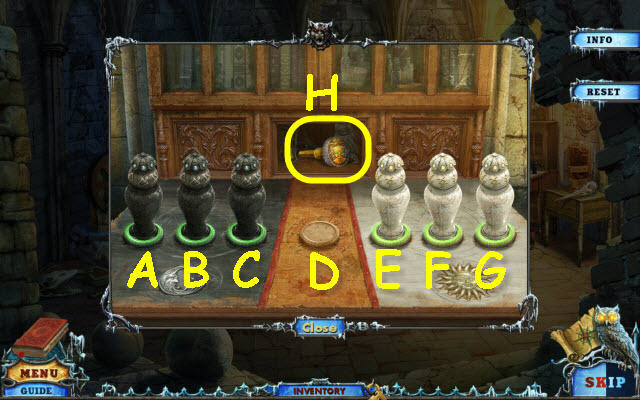
- Examine the table and place the SILVER IDENTIFIER and the 5 SILVER ITEMS on it (K).
- You will trigger a puzzle.
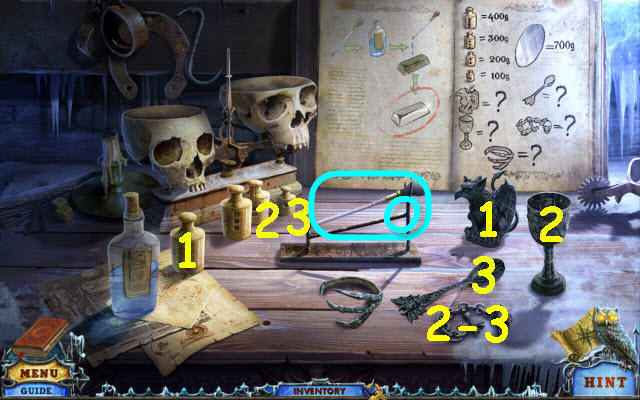
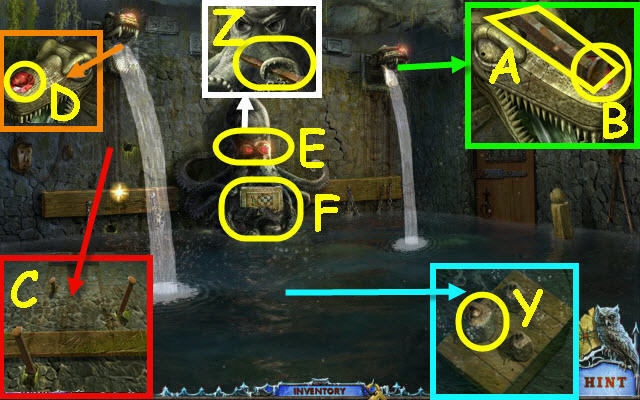
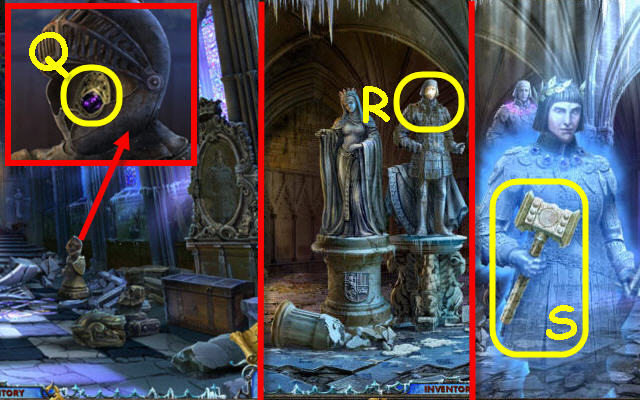
- Select the dropper (O) twice to fill it and use it on the items.
- Place the silver items and weights on the skull scales to get the weight of each. See screenshot for matching weights and items.
- You will earn PURE SILVER ITEMS.
- Back out of close-up.
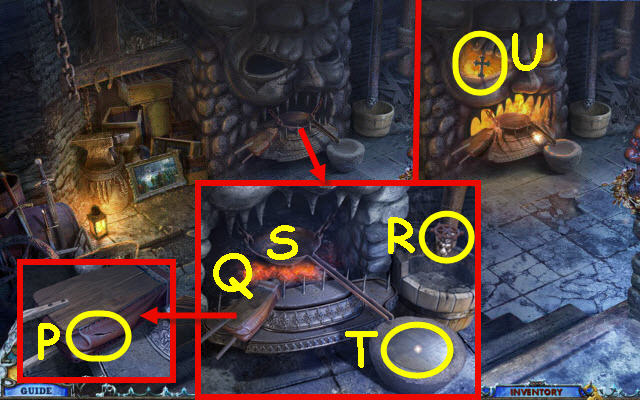
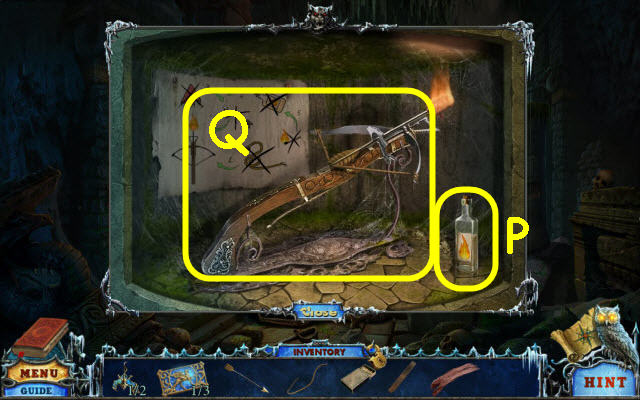
- Examine the furnace and zoom into the bellows. Take the 3rd bestiary scroll and use the NEEDLE on the bellows (P).
- Place the FIREWOOD under the pan and light with the MATCHES (Q).
- Place the VALVE on the stem; turn the VALVE (R).
- Place the PURE SILVER ITEMS in the pans (S) and use the bellows.
- Use the TONGS on the melted silver; take the MIRROR (T).
- Examine the eye; take the 3rd CROSS (U).
- Back out twice and go up the ladder.
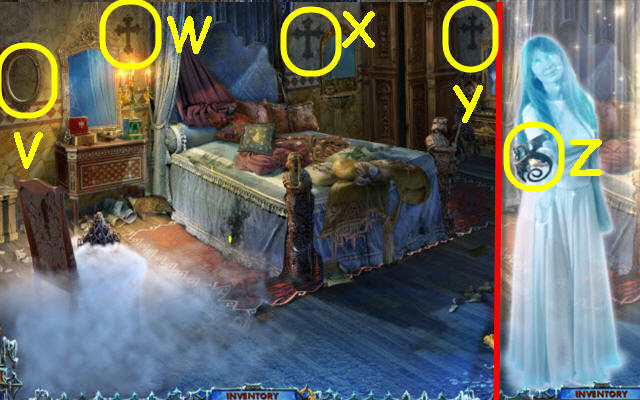
- Place the MIRROR in the frame (V).
- Examine the 3 cross outlines and place one of the 3 CROSSES on each (W-X-Y).
- Take the DRAGON (Z).
- Back out and go up the stairs.
Chapter 3: Griffin
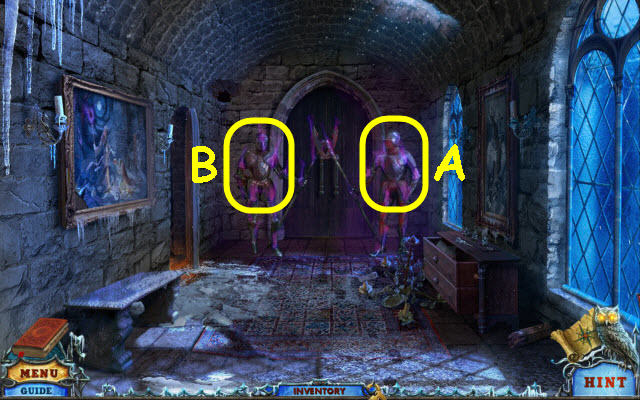
- Examine the guard on the right and place the EAGLE EMBLEM on it (A).
- Examine the guard on the left and place the DRAGON on it (B).
- Go forward.

- Examine the painting; take the FEATHER (C).
- Examine the curio cabinet; take the RUNE 1/4 (D) and MOON (E).
- Examine the desk (F) and place the FEATHER in the slot to trigger a HOP.
- Examine the desk to access a HOP.
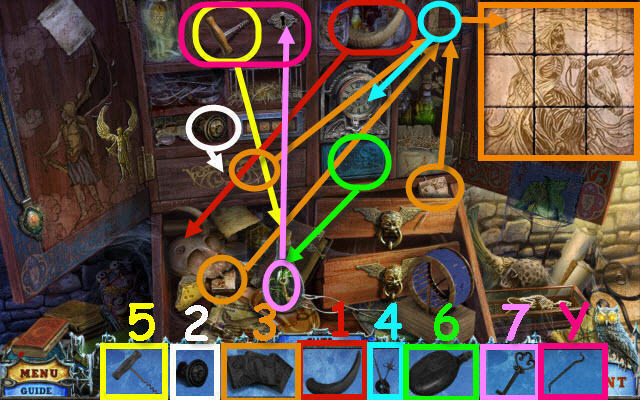
- Play the HOP.
- Find and use the items in the order numbered in the find list.
- To solve the puzzle (4), rotate the tumblers to match the clue from the magnifier (3). From left: skull, triangle, beaker and diamond.
- You will receive the WINGS (G).
- Back out.
- Examine the chest of drawers and place the MOON on the book; take the 2nd HEART HALF (H).
- Go forward.
- Examine the fireplace and zoom into the wings; place the 2 HEART HALVES in the center (I).
- Take the RUNE 2/4 (J) and GRIFFIN KEY (K).
- Back out twice and go up the ladder.
- Examine the dresser and place the WINGS on the top drawer; take the LEATHER FACE 2/2 (L) and RUNE 3/4 (M).
- Back out; go up the stairs and then go forward.
- Examine the bookstand and place the 2 LEATHER FACES on the book to trigger a puzzle (N).
- Select the faces as they appear.
- To solve the puzzle, select the faces in the order marked (1-6).
- You will receive the 4th bestiary scroll.
- Take the RUNE 4/4.
- Examine the cage and use the 4 RUNES on the teeth. Place the SHAWL on the griffin's leg; take the GRIFFIN HATCHLING (O).
- Back out twice and then go left twice.
- Give the GRIFFIN HATCHLING to the griffin. Examine the griffin; open the lock and place the GRIFFIN KEY in it (P).
- Examine the barn and knock over the bell; take the PHOENIX RUNE 1/3 (Q) and the UNICORN (R).
- Back out twice.
- Examine the door and place the UNICORN on the lock (S).
- Go forward.
- Examine the trunk; take the STICK (T).
- Examine the stairs; take the STONE (U).
- Back out and go left twice.

- Examine the barn and use the STICK on the glass; take the SIGN PART (V).
- Back out twice; go up the stairs and then forward.
- Examine the curio cabinet and use the STONE on the glass; take the 2nd SIGN PART (W).
- Examine the desk to access a HOP (X).
- Play the HOP.
- Find and use the items in the order numbered in the find list.
- To solve the puzzle (4), see inset on screenshot for solution.
- You will receive the CROWBAR (Y).
- Back out twice and go forward.
- Examine the stone and place the 2 SIGN PARTS in the recess; take the CHIMERA 1/2 (Z).
- Examine the trunk and use the CROWBAR on the lock; take the SAND (A) and RED FLASK (B).
- Examine the stairs and place the SAND on the ice (C).
- Go up on the right (D).
- Examine the ledge; take the DUSTER (E).
- Back out.
- Examine the stone and use the DUSTER on it; take the TONGUE SYMBOL (F).
- Go up on the right and attempt to go forward.
- Examine the lion on the left and place the TONGUE SYMBOL on its tongue (G).
- Examine the vase; take the SKULL (H) and the 5th bestiary scroll (I).
- Go left through the arch.
- Examine the smaller gated doorway; take the RUNE (J).
- Examine the castle door; take the PURPLE FLASK (K).
- Examine the boulders to access a HOP (L).
- Play the HOP.
- Find and use the items in the order numbered in the find list.
- To solve the puzzle (6), select the dials to rotate them. They will automatically stop when correct.
- You will receive the STONE SPHERE (M).
- Back out.
- Examine the rune board and place the RUNE on it to trigger a puzzle (N).
- Move the columns and rows so that one matching rune is in line with an outside rune.
- To solve the puzzle, move the following: Column C down 2 runes, A up 1 rune, and row B right 3 runes.
- Take the FLUTE.
- Go left.
- Examine the smaller gated doorway and use the FLUTE on the snakes (O).
- Go forward through the newly-opened doorway.
Chapter 4: Castle
- Examine the face; take the BLUE FLASK (P).
- Examine the dragon doors and place the STONE SPHERE in the right dragon's mouth to trigger a puzzle (Q).
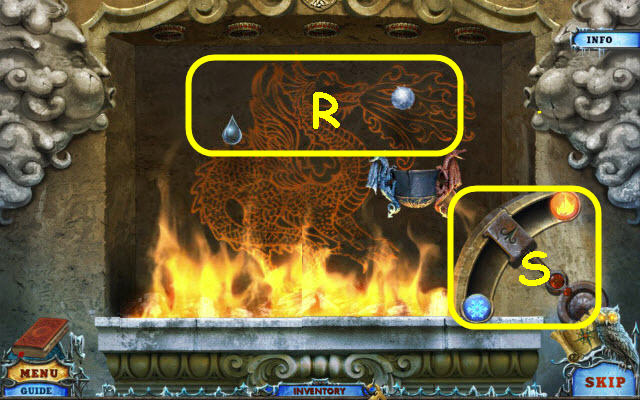
- Catch the snowballs and raindrops (R).
- The meter will rise up with each fireball you successfully miss (S).
- Examine the hook; take the BAT 1/2 (T).
- Go forward.
- Examine the door and open the panel; move your cursor around to look inside the room (U).
- Remove the cloth and examine the cubby; take the HYDRA COIN (V).
- Examine the far right corner to access a HOP (W).

- Play the HOP.
- You will receive the SWORD (X).

- Examine the fountain and use the SWORD on the drain; take the GREEN FLASK (Y).
- Back out twice.
- Examine the left door and place the GREEN, BLUE, RED and PURPLE FLASK on the lock (Z).
- Go left through the newly-opened door.
- Examine the cabinet and open the bottom two drawers. Take the JAR (A) and OIL (B).
- Examine the book; take the DOLL (C).
- Place the SKULL on the book cover; take the GRIFFIN COIN (D) and then examine the left page of the book (E).
- Examine the doll and place the DOLL next to it; take the WOODEN TOKEN (F).
- Examine the window; take the GEAR 1/3 (G).
- Examine the armoire and place the WOODEN TOKEN on it to trigger a puzzle (H).
- Arrange the plates in chronological order.
- See screenshot for solution (I).
- Go down through the newly-opened passage.
- Examine the cage and use the OIL on the lock. Open the cage door; take the ARROW (J) and scroll (K).
- Examine the pit; take the STAINED GLASS 1/3 (L) and CHISEL (M).
- Back out and go up the stairs.
- Examine the book and select the left page to get the 6th bestiary scroll; take the STAINED GLASS 2/3 (N).
- Examine the trunk; take the STAINED GLASS 3/3 (O).
- Examine the table to access a HOP (P).
- Play the HOP.
- Find and use the items in the order numbered in the find list.
- Place the disk (1) on the spindle to trigger a puzzle.
- Move the disks from the left to the right spindle.
- Labeling the 3 spindles from left to right A, B, and C, move the top weight in the stack in the following order: A-B, B-C, A-B, C-B, B-A, B-C, A-B, B-C, A-B, C-B, B-A, C-B, A-B, B-C, B-A, C-B, B-A, B-C, A-B, B-C, A-B, C-B and B-A.
- B-C, A-B, B-C, A-B, C-B, B-A, C-B, A-B, B-C, B-A, C-B, B-A, C-B, A-B, B-C, A-B, C-B, B-A , B-C, A-B, B-C, B-A, C-B, B-A, C-B, A-B, B-C and B-A.
- C-B, B-A, B-C, A-B, B-C, A-B, C-B, B-A, B-C, A-B, B-C, A-B, C-B, B-A, C-B, A-B, B-C, B-A, C-B, B-A, B-C, A-B, B-C, A-B, C-B, B-A, B-C, A-B and B-C.
- You will receive the DYNAMITE (Q).
- Remove the tapestry and examine the wall. Place the DYNAMITE in the crack and use the MATCHES on the dynamite (R).
- Go through the hole in the wall.
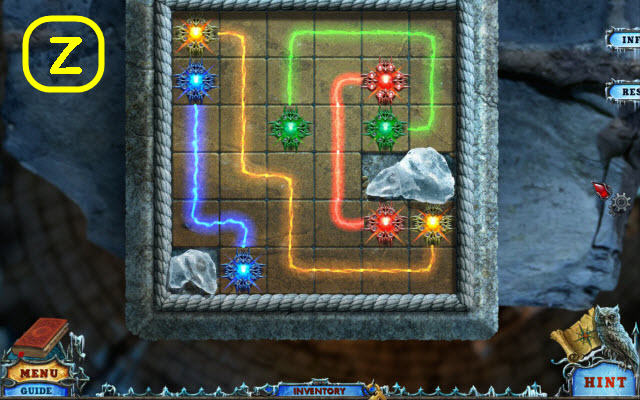
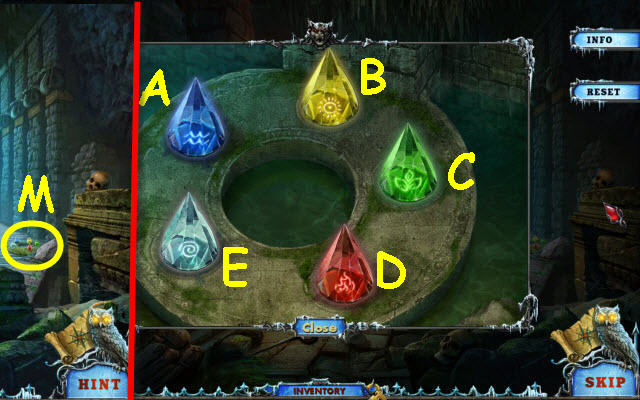
- Examine the pedestal to trigger a puzzle (S).
- Connect the matching colored gems.
- See screenshot for solution (T).
Chapter 5: Tower
- Examine the window and move the board and rock; take the CHIMERA 2/2 (U).
- Back out twice.
- Examine the window and place the 3 STAINED GLASS on it (V).
- Examine the floor and use the CHISEL on the stone; take the HANDLE (W).
- Back out twice.
- Examine the chest and place the 2 CHIMERAS on the front panel; take the BLUE STAR (X).
- Go left two times and then up the stairs. Go through the hole in the wall.
- Examine the second pedestal and place the BLUE STAR on it to trigger a puzzle (Y).
- Connect the matching colored gems.
- See screenshot for solution (Z).
- Examine the crate and use the CHISEL on it. Remove the straw three times; take the 2nd JAR (A).
- Back out twice and go forward down the passage.
- Examine the hutch and place the 2 JARS on it to trigger a puzzle (B).
- Switch the white and black jars.
- To solve the puzzle, select the following jars: C, E, F, D, B, A, C, E, G, F, D, B, C, E and D.
- Take the 2nd HANDLE (H).
- Back out.

- Examine the chest of drawers and place the round HANDLE on the drawer; take the TURQUOISE STAR (I).
- Go up the stairs and through the wall.
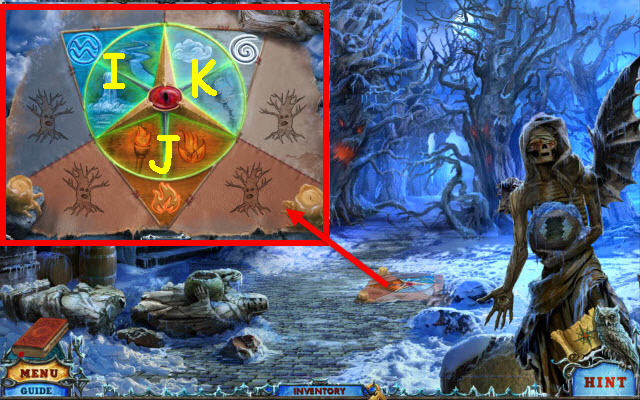
- Examine the third pedestal and place the TURQUOISE STAR on it to trigger a puzzle (J).
- Connect the matching colored gems.
- See screenshot for solution (K).
- Examine the bottom of the tower to access a HOP.
- Play the HOP.
- You will receive the MINOTAUR (L).
- Back out twice and go forward down the passage.
- Examine the trunk and place the MINOTAUR on it; take the NIPPERS (M).
- Back out.
- Examine the cabinet and use the NIPPERS on the wire. Open the doors; take the BRACELET (N).
- Go up the stairs.
- Examine the chest and put the BRACELET on the griffin; take the IMP (O).
- Examine the fireplace and place the IMP in it; take the ANVIL (P).
- Back out and go forward down the passage.
- Examine the winch and place the HANDLE on it (Q).
- Examine the cage and place the ANVIL in it (R).
- Turn the winch handle and examine the cage. Open the cage; take the DRAGON EMBLEM (S).
- Back out twice and go forward twice through the small gated doorway.
- Examine the door and place the DRAGON EMBLEM, HYDRA COIN and GRIFFIN COIN on the lock (T).
- Go forward.
Chapter 6: Hydra
- Examine the skeleton and move the stone. Take the GEAR 2/3 (U), the BRUSH (V) and the 7th bestiary scroll (W).
- Examine the mechanism; take the RAG (X).
- Examine the lantern; take the BOWSTRING (Y).
- Back out.
- Examine the fountain and use the BRUSH on the water; receive a WET BRUSH (Z).
- Examine the far right wall to access a HOP (A).

- Play the HOP to receive the GEAR 3/3 (B).
- Go forward.

- Examine the mechanism and place the 3 GEARS on it; take the HANDLE (C).
- Examine the mirror and use the WET BRUSH on it (D).
- Place the HANDLE in the slot and slide it (E).
- Take the PLANK (F).
- Examine the stone disk; take the STONE FLOWER (G).
- Examine the pillar and place the STONE FLOWER on it to trigger a puzzle (H).

- Connect the colored gems with the matching colored dots.
- See screenshot for solution (I).
- Go forward.
- Select anywhere in the scene.
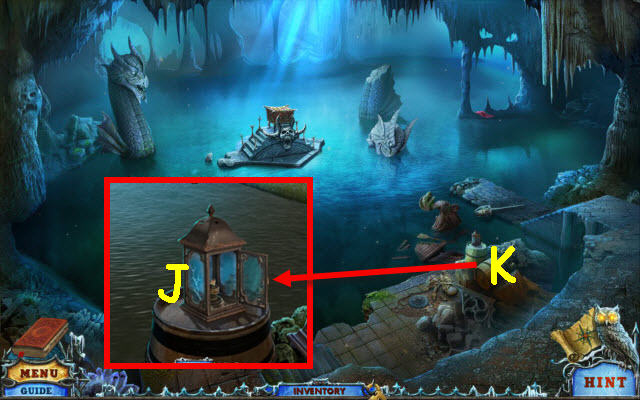
- Examine the barrels; open the lantern and use the MATCHES on it to trigger a HOP (J).
- Examine the barrels to access a HOP (K).
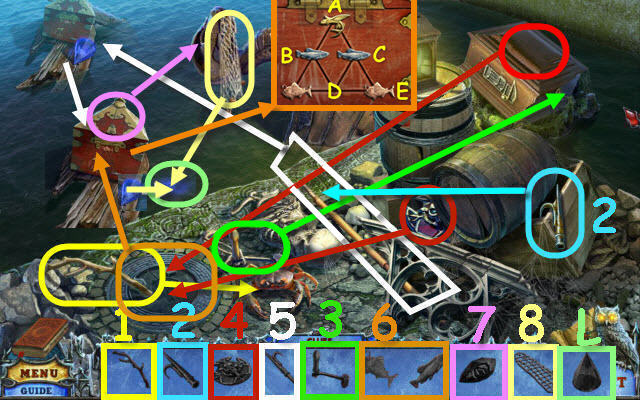
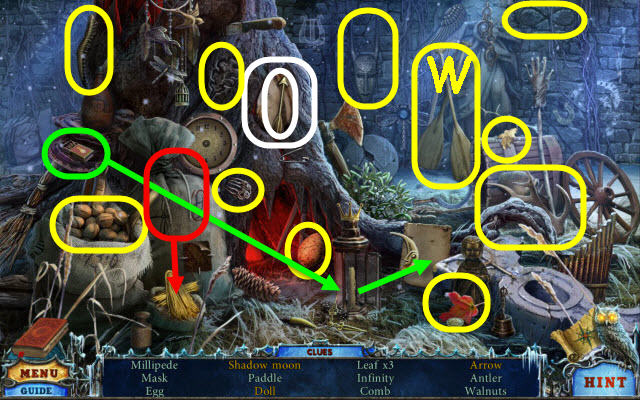
- Play the HOP.
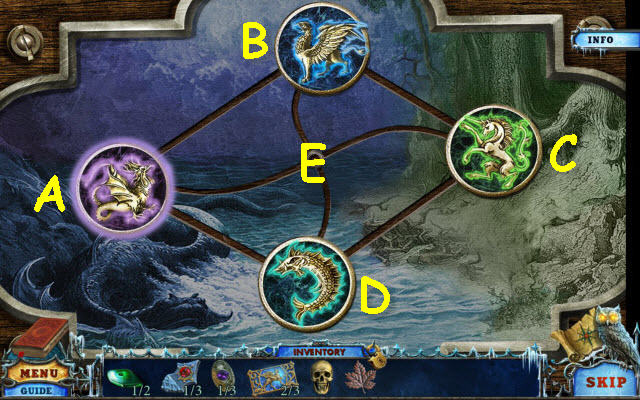
- Find and use the items in the order numbered in the find list.
- To solve the fish puzzle (6), select the following fish: C, A, B, D, C, E and D.
- You will receive the BLUE CRYSTAL (L).
- Back out.
- Examine the stone disk and place the BLUE CRYSTAL on the empty slot to trigger a puzzle (M).
- To solve the puzzle, switch the following: A to D, E to B and B to C.
- Examine the pillar and use the WET BRUSH on it (N).
- Turn the disks to complete the pattern.
- See screenshot for solution (O).
- In this order; place the BOWSTRING, ARROW, RAG, lighter fluid (P) and MATCHES on the crossbow.
- Take the FLAMING CROSSBOW (Q).
- Go forward.
- Examine the torch and use the FLAMING CROSSBOW on it (R).
- Place the PLANK across the gap (S).
- Examine the satchel and open it; take the LOCK TOKEN 1/3 (T) and CODE (U).
- Back out three times.
- Examine the door and place the CODE on it; rotate the tumblers to match the code (V).
- Go through the newly-opened door.
- Examine the churn; take the BAT 2/2 (W).
- Examine the lava pit; take the NAILS (X).
- Examine the alcove; take the 8th bestiary scroll and LOCK TOKEN 2/3 (Y).
- Back out and go forward.
- Examine the recess and place the 2 BATS on the tree; take the SKULL (Z).
- Back out and go left through the door.
- Examine the left stone disk and place the SKULL on it to trigger a puzzle (A).
- Guide the skull through all the points.
- See screenshot for solution (B).

- Examine the right stone disk and then zoom in to trigger a puzzle (C).
- Guide the skull through all the points.
- See screenshot for solution (D).
- Go forward.
Chapter 7: Ice Giants
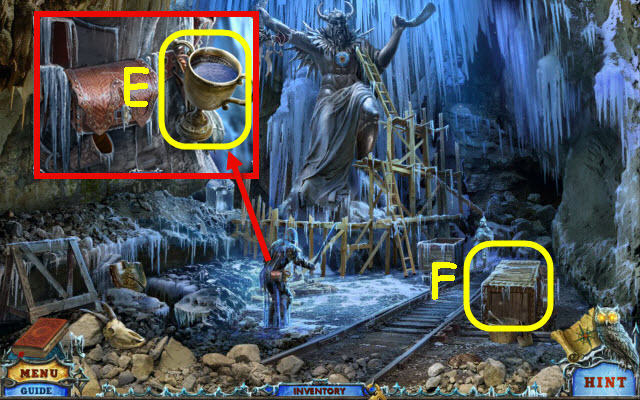
- Examine the frozen man; take the CUP OF ICE (E).
- Examine the crate to access a HOP (F).
- Play the HOP to receive the DIAMOND (G).
- Back out.
- Examine the lava ring and place the CUP OF ICE on it; take the CUP OF WATER (H).
- Examine the alcove and place the DIAMOND on the anvil. Pull the lever (I); take the HAMMER (J).
- Examine the debris and move the broken boards; take the BOARDS (K).
- Go forward.
- Examine the ice sculpture and use the HAMMER on it; take the TONGS (L).
- Examine the crack; use the TONGS to get the LOCK TOKEN 3/3 (M).
- Examine the frozen man and use the CUP OF WATER on the satchel latch. Open the latch; take the SNOWFLAKE (N).
- Examine the broken ladder and use the BOARDS, NAILS and HAMMER on it (O).
- Examine the medallion and place the SNOWFLAKE on it; take the FROZEN HEART (P).
- Back out twice and then go forward three times.
- Use the FROZEN HEART anywhere in the scene.
- Examine the stairs; take the DRILL WITHOUT A BIT (Q).
- Examine the chest; take the PHOENIX 1/3 (R).
- Examine the hydra head and use the HAMMER on the hole; take the PHOENIX 2/3 (S).
- Place the DRILL WITHOUT A BIT on the bit; take the ICE DRILL (T).
- Examine the cloth; use the ICE DRILL on the ice and take the PHOENIX 3/3 (U).
- Back out three times; go left through the door and then forward.
- Examine the disk and place the 3 PHOENIX in the slots to trigger a puzzle (V).
- Slide the rings on the bottom to complete the phoenix.
- See screenshot for solution (W).
- Take the PHOENIX RUNE 2/3 and FEATHERS.
- Back out twice and go forward three times.
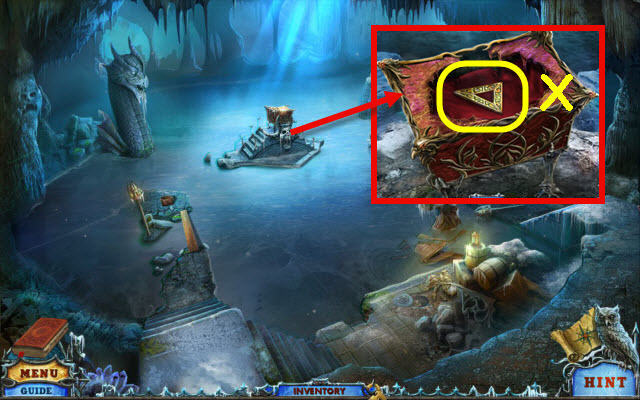
- Examine the stairs; zoom into the chest and place the FEATHERS on it. Take the note and triangle key (X).
- Neither of the items collected will remain in inventory.
- Examine the water; take the STONE (Y).
- Examine the octopus; take the SPIKES 1/2 (Z).
- Examine the right fountain head; take the SPIKES 2/2 (A) and RED DIAMOND 1/2 (B).
- Examine the wall under the left fountain head and place the 2 SPIKES in the holes; use the STONE on them (C).
- Examine the left fountain head; take the RED DIAMOND 2/2 (D).
- Examine the octopus; place the 2 RED DIAMONDS in the eye sockets (E).
- Examine the board to trigger a puzzle (F).
- Swap the heads to light all the eyes green.
- See screenshot for solution (G).
- Take the KEY.
- Go right and then back out twice.
- Examine the gate and place the 3 LOCK TOKENS on it. Use the KEY on the lock (H).
- Go right through the newly opened gate.
- Examine the diagram; take the GOLD BEETLE (I) and SIGN FRAMES 1/3 (J).
- Examine the statue and select the broken stone. Place the GOLD BEETLE on it to trigger a puzzle (K).
- Choose a path to cover all the tiles with the beetle.
- See screenshot for solution (L).
- Take the WATER EMBLEM and VIOLET RING.
- Go through the door on the left.
- Examine the settee; take the GREEN RING (M) and SKULL (N).
- Examine the gargoyle; take the SIGN FRAMES 2/3 (O).
- Examine the torch and place the GREEN RING and VIOLET RING on the fingers; take the TORCH (P).
- Back out.
- Examine the brambles and use the torch on it; take the HANDLE (Q).
- Go left through the door.
- Examine the door and place the HANDLE on it; pull the handle (R).
- Go through the newly-opened door.
- Examine the oven; take the FAN (S).
- Take the BLUNT KNIFE (T).
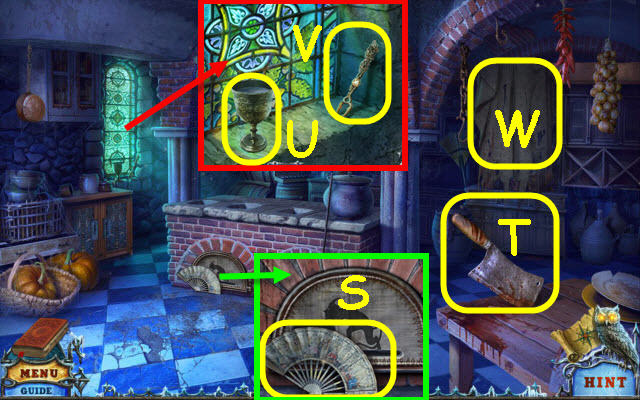
- Examine the window; take the GOBLET (U) and FORK (V).
- Remove the cloth and examine the cupboard to access a HOP (W).
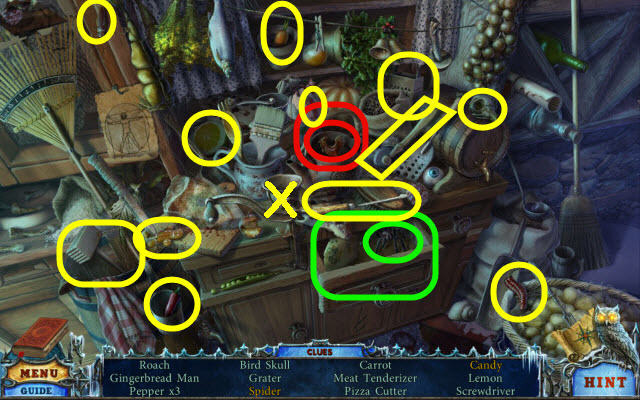
- Play the HOP.
- You will receive the SCREWDRIVER (X).
- Back out.
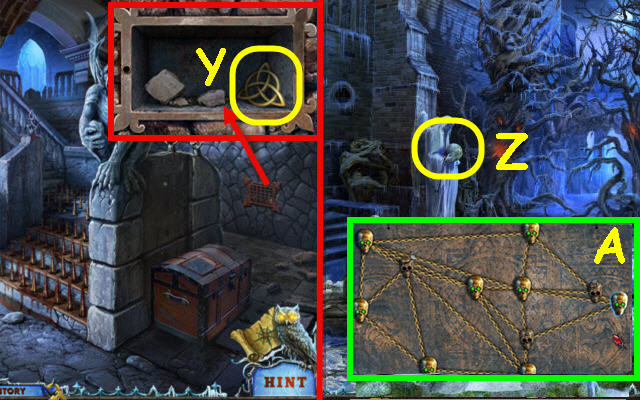
- Examine the grate and use the SCREWDRIVER on it; take the TRINITY SYMBOL (Y).
- Back out.
- Examine the angel statue and place the TRINITY SYMBOL in the center to trigger a puzzle (Z).
- Untangle the lines so that none cross.
- See screenshot for one solution (A).
- Take the FIRE SIGN and 2nd FORK.
- Go left twice to the kitchen.
Chapter 8: Dryads
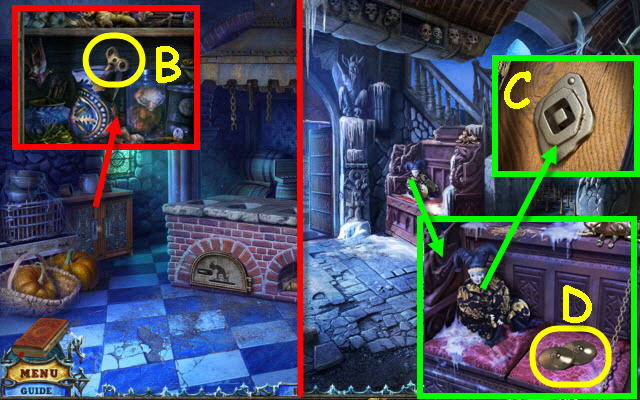
- Examine the cabinet and place the 2 FORKS on the doors; take the KEY (B).
- Back out.
- Examine the settee and zoom into the doll. Place the KEY in the slot (C); take the CYMBALS (E).
- Back out.
- Use the CYMBALS on the bird (F).
- Examine the statue to trigger a puzzle (G).
- Swap the outer wood panel to match the inner panels.
- See screenshot for solution (H).
- Take the AIR SIGN and SCREW.
- Examine the board and place the WATER EMBLEM in its matching slot and use the GOBLET on the emblem (I).
- Place the FIRE SIGN in its matching slot and use the TORCH on the sign (J).
- Place the AIR SIGN in its matching slot and use the FAN on the sign (K).
- Go forward.
- Examine the crosses; take the GARGOYLE EYE 1/2 (L).
- Go up the path on the right.
- Examine the boat; take the GNOME (M).
- Examine the compartment; take the KEY (N).
- Examine the crates; take the 9th bestiary scroll (O).
- Use the BLUNT KNIFE on the grindstone (P) to receive a SHARP KNIFE.
- Back out.
- Examine the gate and use the SHARP KNIFE on the brambles. Use the KEY on the lock and turn it (Q).
- Go forward.
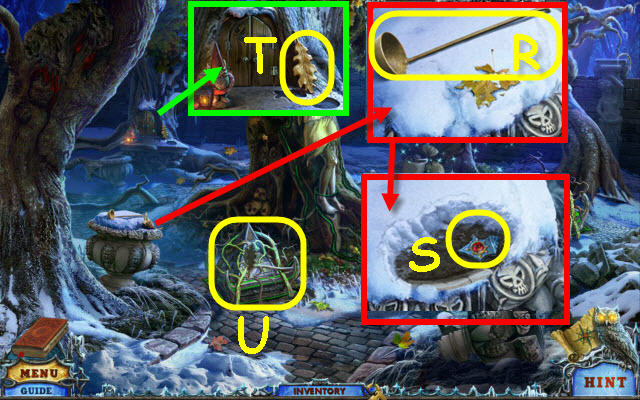
- Examine the vase; take the LADLE (R).
- Dig three times in the snow; take the CROWN PIECE 1/3 (S).
- Examine the tree house; take the OAK LEAF (T).
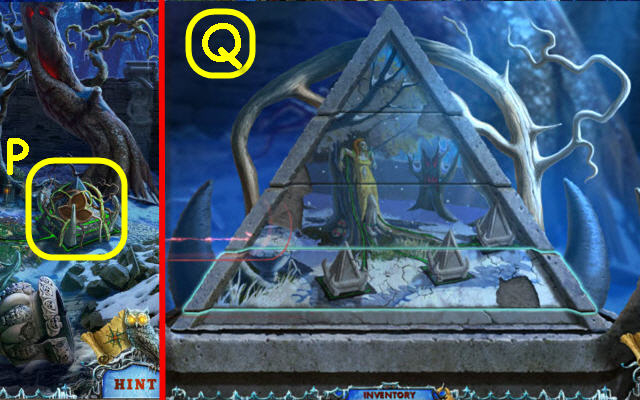
- Examine the left pyramid and place the OAK LEAF on it to trigger a puzzle (U).
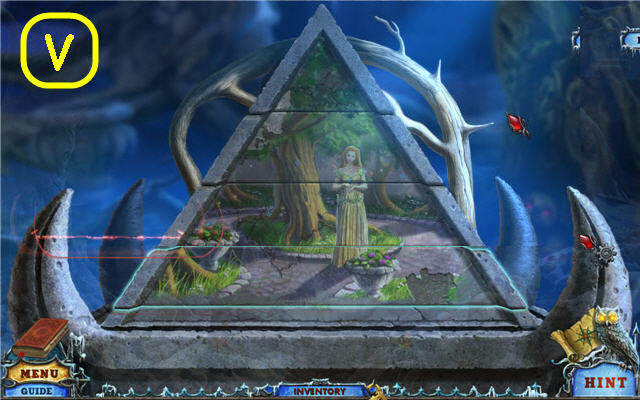
- Scroll through the pyramid sections to complete the picture.
- See screenshot for solution (V).
- Examine the tree to the right of the Dryad to access a HOP.
- Play the HOP.
- You will receive the OARS (W).
- Back out twice and then go left twice into the kitchen.
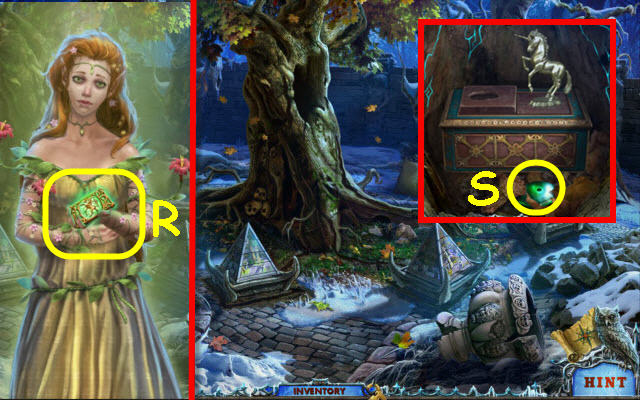
- Examine the kettle and remove the lid; use the LADLE to get the SIGN FRAMES 3/3 (X).
- Back out.
- Examine the trunk and place the 3 SIGN FRAMES on the lid to trigger a puzzle (Y).
- Place the frames to match the symbols.
- See screenshot for solution (Z).
- Examine the opened trunk and take the HANDLE.
- Back out; go forward and then go up the path on the right.
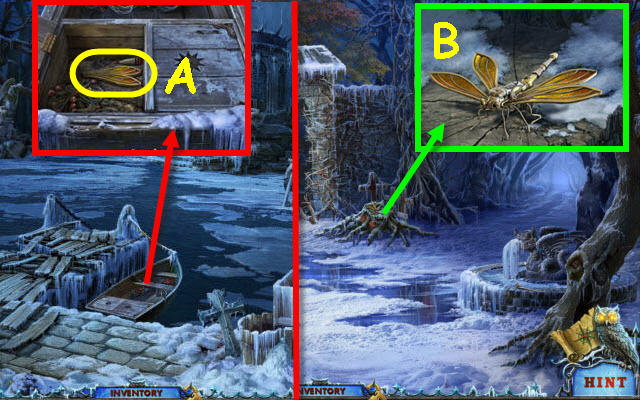
- Examine the boat and zoom into the compartment; use the HANDLE on the left lid. Open the lid; take the DRAGONFLY WINGS (A).
- Back out.
- Examine the crosses and zoom into the dragonfly. Place the DRAGONFLY WINGS on it; take the DRAGONFLY (B).
- Go up the path on the right.
- Examine the boat and place the OARS in it (A1).
- Use the DRAGONFLY on the stone monster (B1).
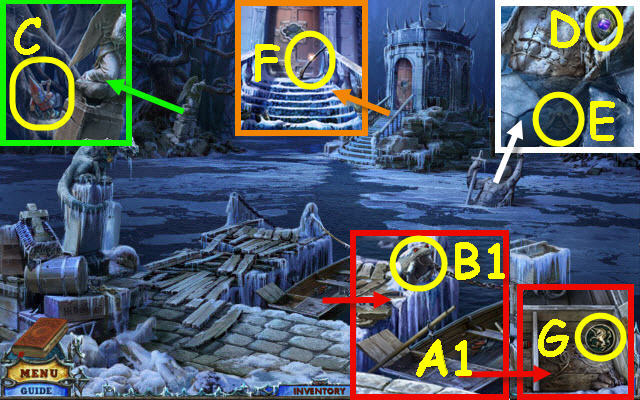
- Examine the angel statue; take the 2nd GNOME (C).
- Examine the statue in the water; take the NECKLACE PART 1/3 (D).
- Use the LADLE to get the HANDLE (E).
- Examine the stairs; take the WRENCH HALF (F).
- Examine the boat; zoom into the compartment and place the HANDLE on the lid. Open the lid and take the UNICORN COIN (G).
- Back out.
- Examine the fountain and place the WRENCH HALF and SCREW on the wrench half. Use the SCREWDRIVER on the screw; take the BOLT CUTTERS (H).
- Go forward.
- Examine the tree house and place the 2 GNOMES on the stoop; take the DIADEM (I).
- Back out.
- Examine the statue and place the DIADEM on its head; take the MAPLE LEAF (J).
- Go up the path on the right.
- Examine the gargoyle; use the BOLT CUTTERS to get the GRIFFIN COIN (K).
- Examine the door and zoom into the door panel. Place the UNICORN COIN and GRIFFIN COIN on it to trigger a puzzle (L).
- Slide the tokens to their appropriate surroundings.
- To solve the puzzle, select the following: D, C, E, B, A and E.
- Examine the opened door to access a HOP.
- Play the HOP.
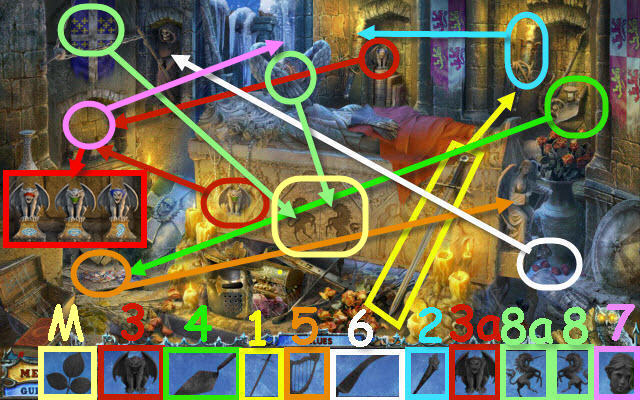
- Find and use the items in the order numbered in the find list.
- Place the gargoyles 3 and 3a in the alcove to trigger a puzzle. To solve the puzzle, arrange the gargoyles from left as follows: red, green and blue.
- You will receive the POISON IVY (M).
- Back out and then go forward.

- Examine the center pyramid and place the MAPLE LEAF on it to trigger a puzzle (N).
- Scroll through the pyramid sections to complete the picture.
- See screenshot for solution (O).
- Examine the right pyramid and place the POISON IVY on it to trigger a puzzle (P).
- Scroll through the pyramid sections to complete the picture.
- See screenshot for solution (Q).
- Take the PHOENIX RUNE 3/3 (R).
- Examine the tree hollow and move the leaves; take the GARGOYLE EYE 2/2 (S).
- Back out.
Chapter 9: Dark Lord
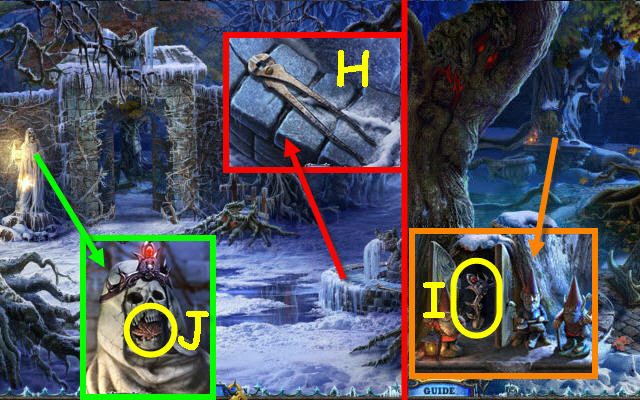
- Examine the tree; take the DOG HEAD (T).
- Back out and enter the building.
- Examine the gargoyle and place the 2 GARGOYLE EYES in the sockets (U).
- Go up the stairs.
- Examine the debris to access a HOP (V).
- Play the HOP.
- Find and use the items in the order numbered in the find list.
- To solve the puzzle (2), smack any figure that pops up that does not wear a crown.
- You will receive the DRAGON HEAD (W).
- Examine the table and open the book; select the left page to get the 10th bestiary scroll (X) and take the UNICORN STATUETTE (Y).
- Back out twice and go forward twice to the Dryad tree.
- Examine the tree hollow and place the UNICORN STATUETTE in the left slot; take the CROWN PIECE 2/3 (Z).
- Examine the tree to access a HOP (A).
- Play the HOP.
- You will receive the LASSO (B).
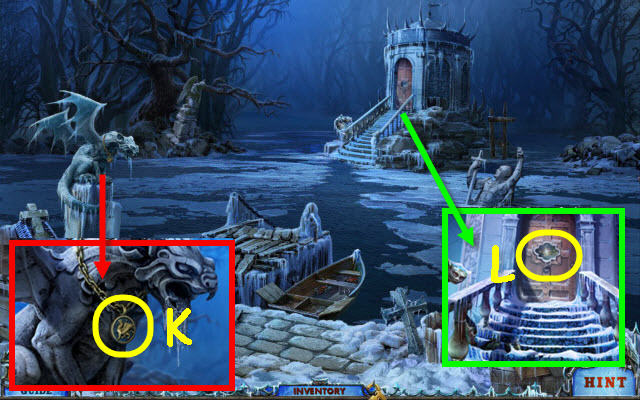
- Back out and go up the path on the right.
- Examine the angel statue and use the LASSO on it. Zoom into the statue base; take the CROWN PIECE 3/3 (C).
- Back out twice, enter the building and go up the stairs.
- Examine the left statue and place the 3 CROWN PIECES on her head (D).
- Take the VIAL OF LIGHT (E).
- Back out three times.
- Use the VIAL OF LIGHT on the smoke (F).
- Go forward into the newly- opened castle.
- Examine the left armor and open the face guard; take the DEVIL (G).
- Back out and go through the gate on the right. Enter the building and go left into the kitchen.
- Examine the furnace and place the DEVIL on the door; take the NECKLACE PART 2/3 (H).
- Examine the cupboard to access a HOP (I).
- Play the HOP.
- You will receive the 2nd SKULL (J).
- Back out.
- Examine the skulls and place the 2 SKULLS on the spindles to trigger a puzzle (K).
- Rotate the skull sections to complete each skull.
- See screenshot for solution (L).
- Take the CANDLES.
- Go up the stairs.
- Examine the alcove and place the DRAGON HEAD on the right (M).
- Place the CANDLES in the holders; take the 2nd DOG HEAD (N).
- Back out.
- Examine the settee and place the 2 DOG HEADS on the dogs (O); take the BRUSH (P).
- Back out twice and enter the castle.
- Examine the armor on the right and use the BRUSH on the face guard. Lift the face guard; take the NECKLACE PART 3/3 (Q).
- Back out and go through the gate on the right. Enter the building and go up the stairs.
- Examine the statue on the right and place the 3 NECKLACE PARTS in the slots (R).
- Take the HAMMER OF JUSTICE (S).
- Back out three times and enter the castle.
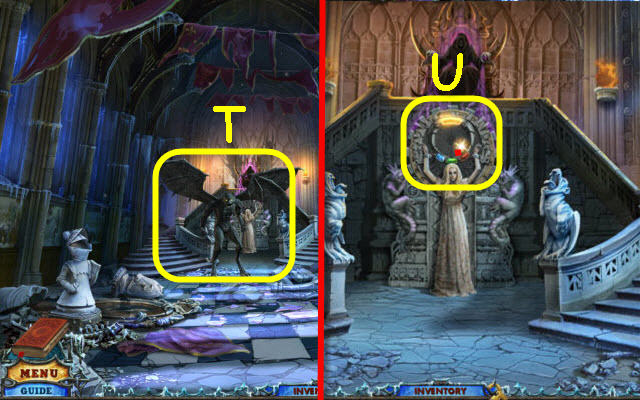
- Use the HAMMER OF JUSTICE on the beast (T).
- Go forward.
- Examine the ring above Penny and place the 3 PHOENIX RUNE STONES on the bottom to trigger a puzzle (U).
- Select the runes in the correct order.
- See screenshot for solution (V).
- Set 1: Green, after it hits the green energy button push red, after red energy button is clears push blue.
- Set 2: Green, wait until the green is all the way to the top then push blue, when the blue is approaching the blue energy button immediately select the red.
- Set 3: Green, when the left green beam approaches the third bend immediately select the blue so that the green and blue arrive at the yellow button together.
- Congratulations, you have completed League of Light: Dark Omens.
Created at: 2013-08-23