

Walkthrough Menu
- General Tips
- Chapter 1: Valley of the Keepers
- Chapter 2: Dwarf Dungeons
- Chapter 3: Frozen Mountains
- Chapter 4: The Temple
- Chapter 5: Darkwoods
- Chapter 6: The Museum
General Tips
- This is the official guide for Lost Lands: Ice Spell.
- This guide won't tell you when to zoom into a location; the screenshots show each zoom scene.
- Hidden-object puzzles are referred to as HOPs. Only the locations of the HOPs will be shown.
- Use the Map to fast travel to a location.
Chapter 1: Valley of the Keepers
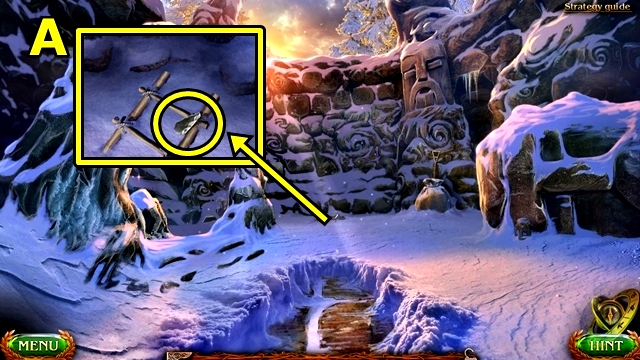
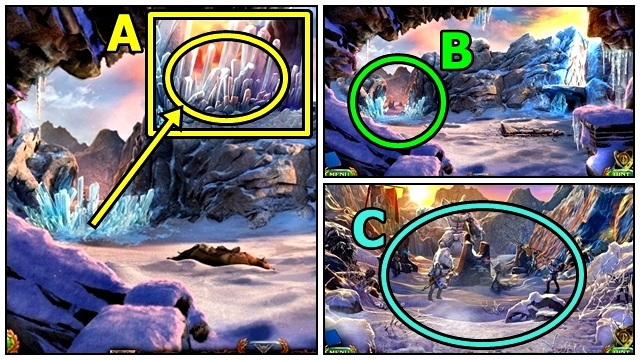
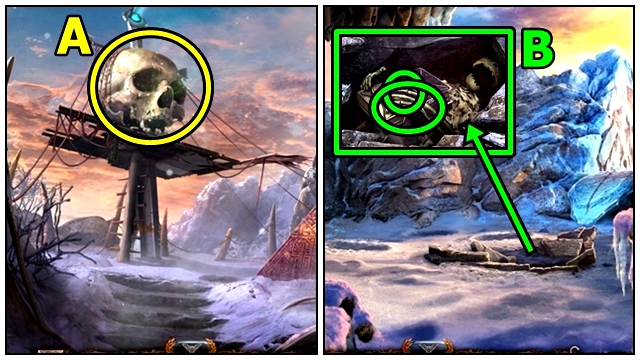
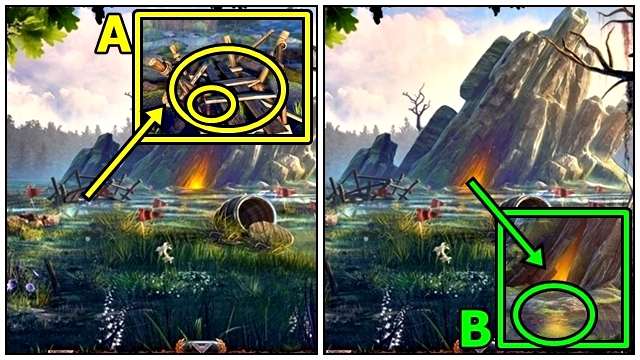
- Take SHARP STONE (A).
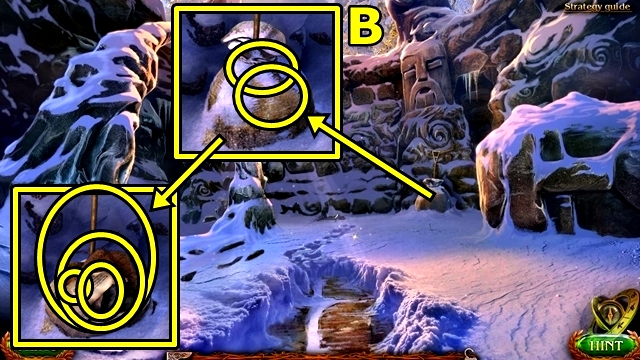
- Use SHARP STONE (B); open bag. Read note; take KEY TO MAARON'S HUT, bearskin cape and SHOVEL.

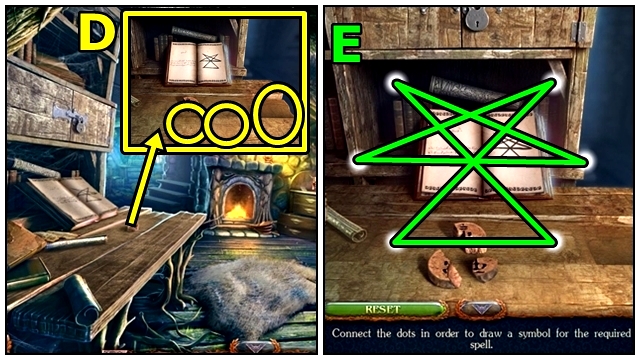
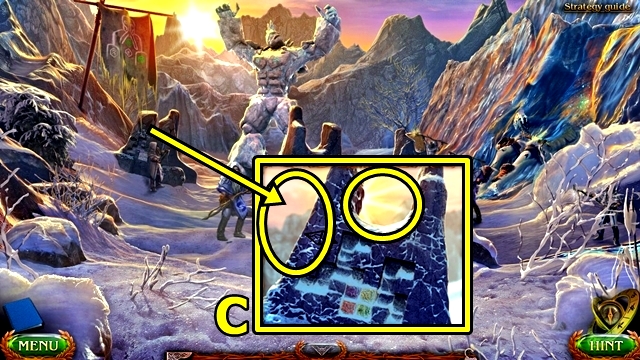
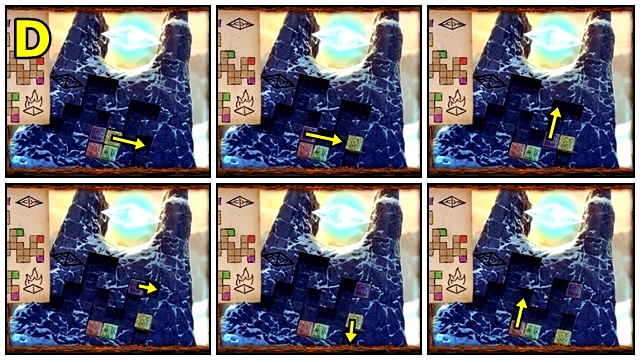
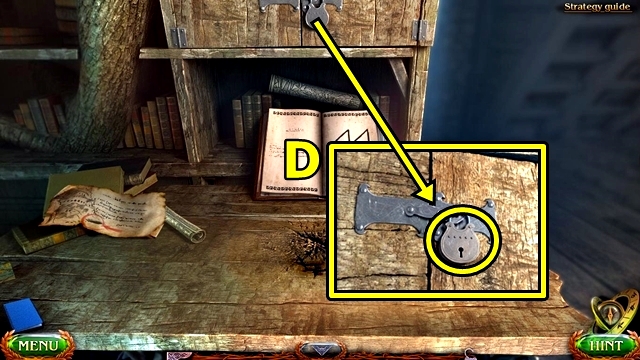
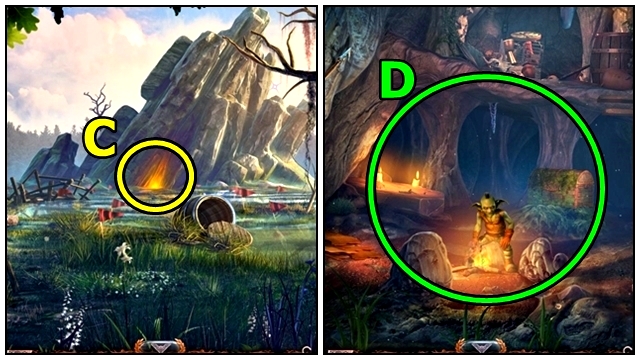
- Use SHOVEL (C).
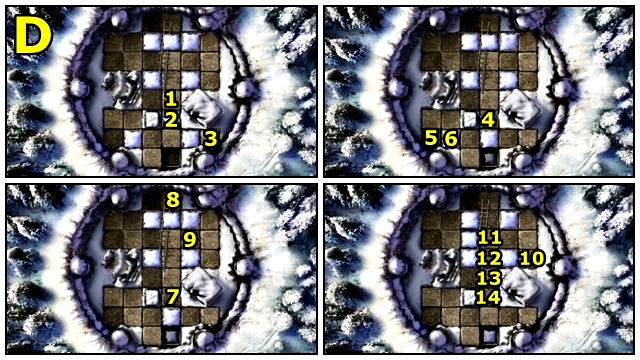
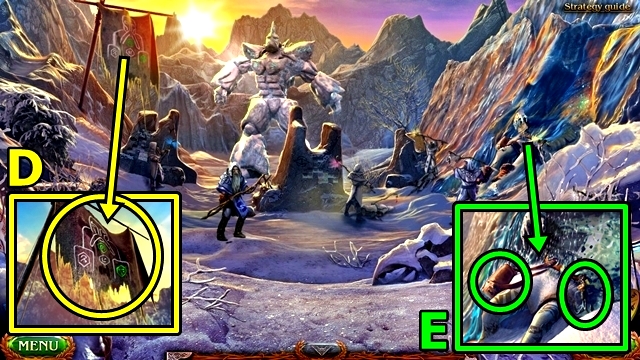
- Solution: (D).
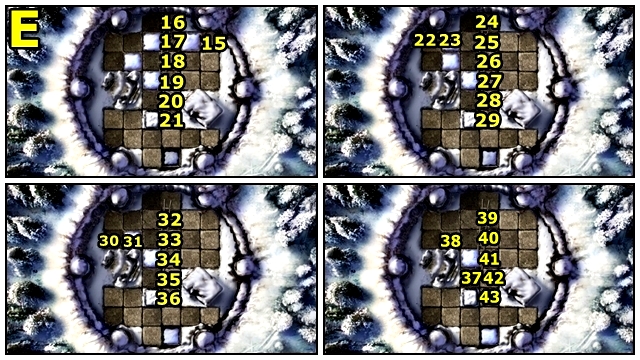
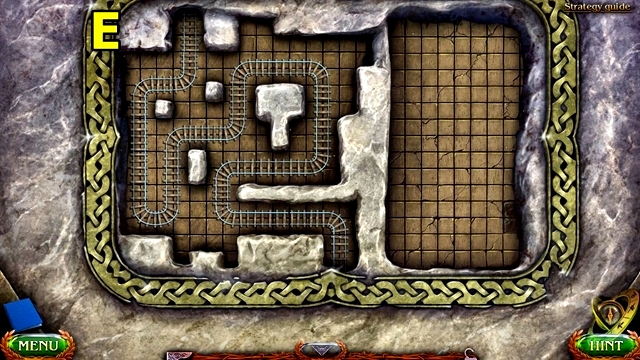
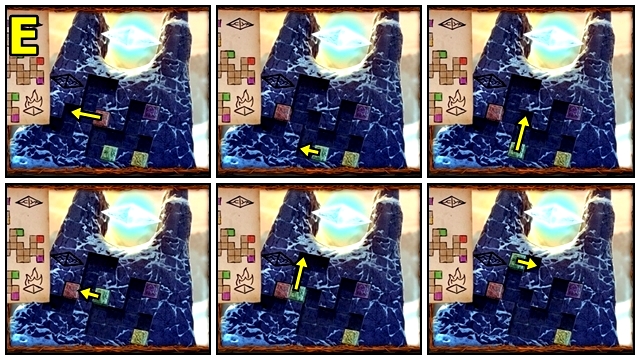
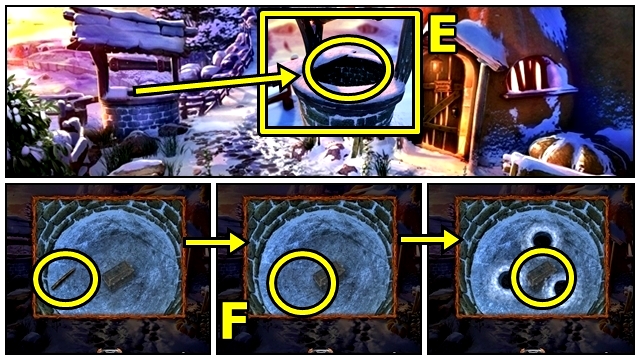
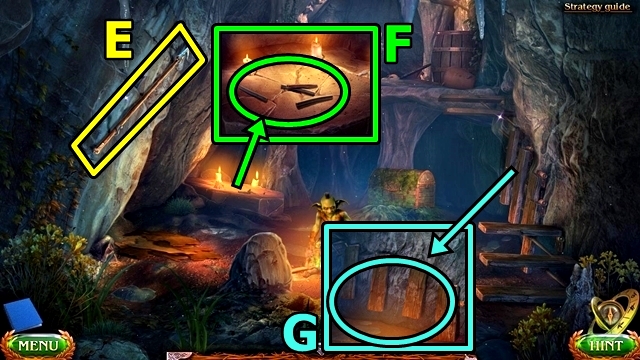
- Solution: (E).
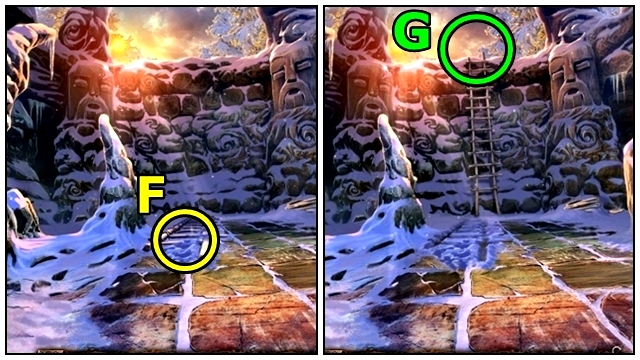
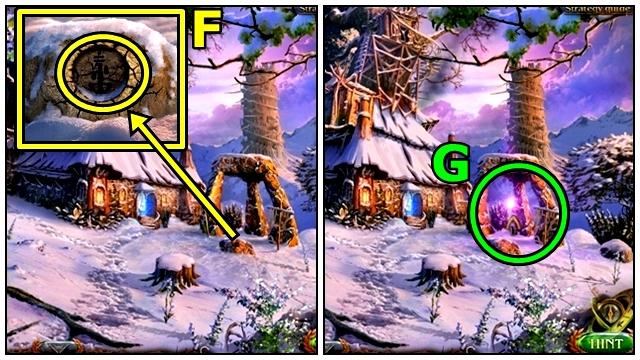
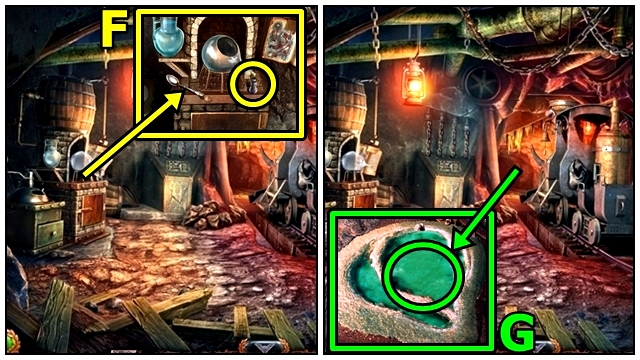
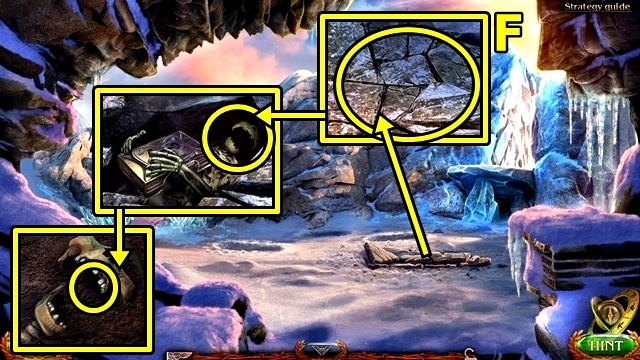
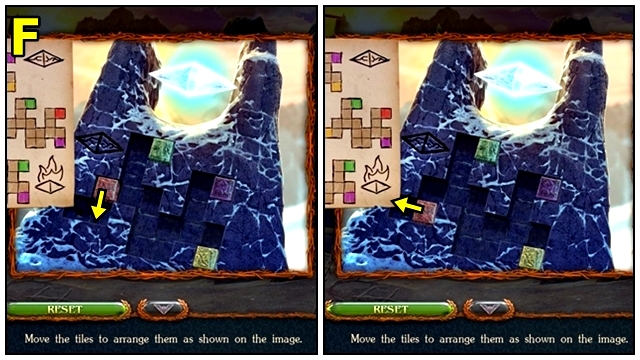
- Raise ladder (F).
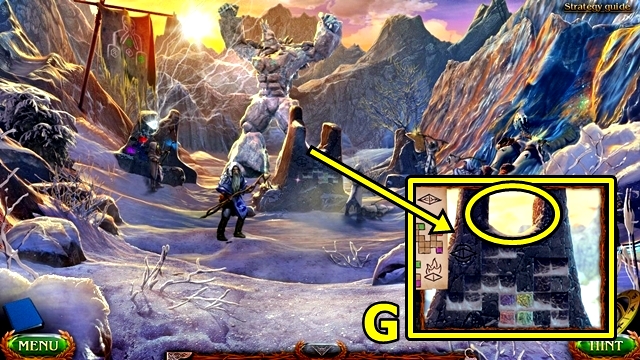
- Go (G).
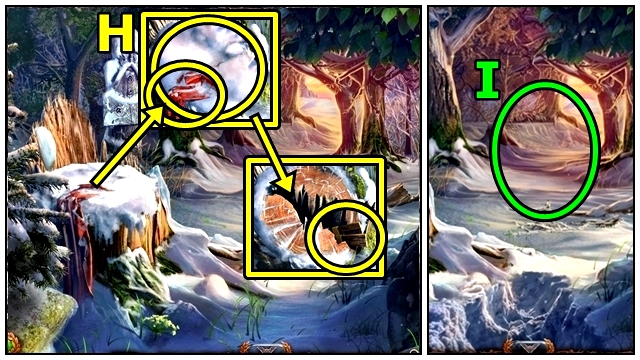
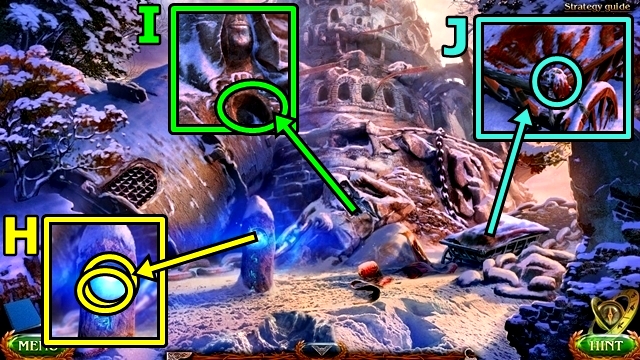
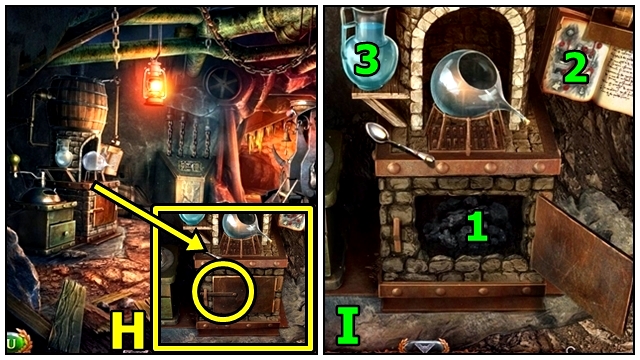
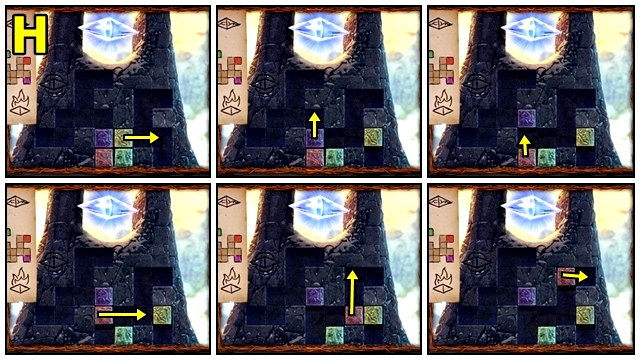
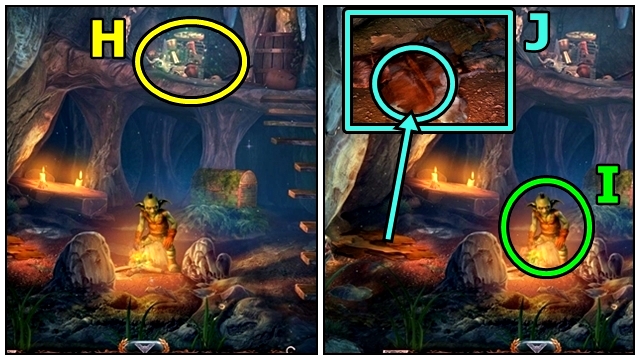
- Take RAG (H). Remove snow and sticks; take SNOWSHOES.
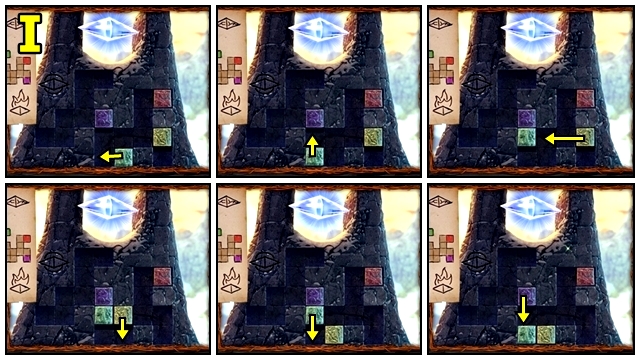
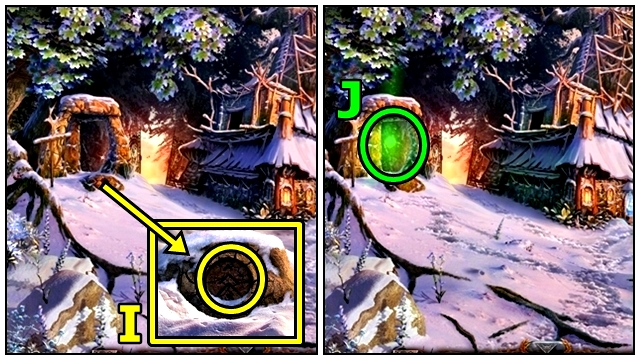
- Use SNOWSHOES (I).
- Move forward.
- Move forward.
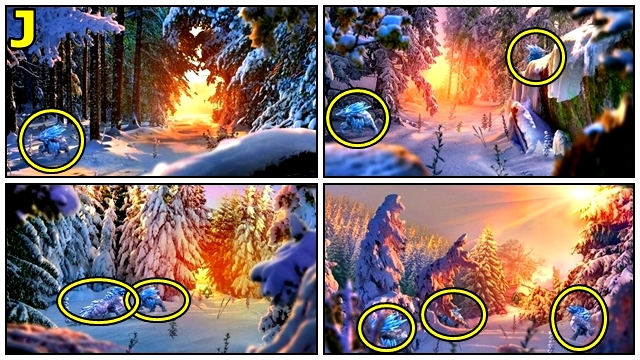
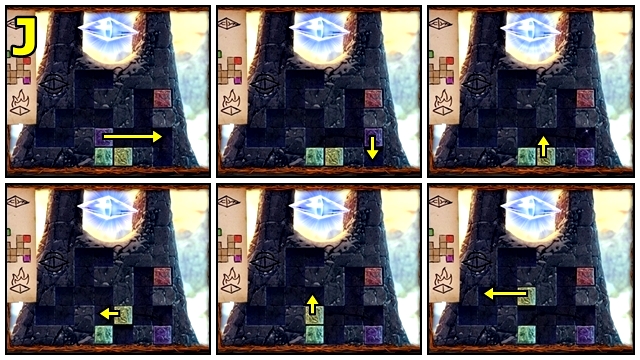
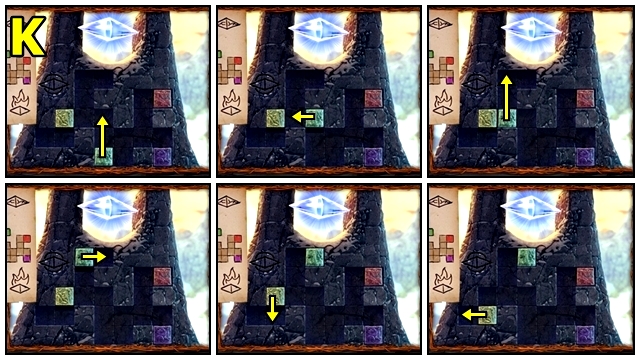
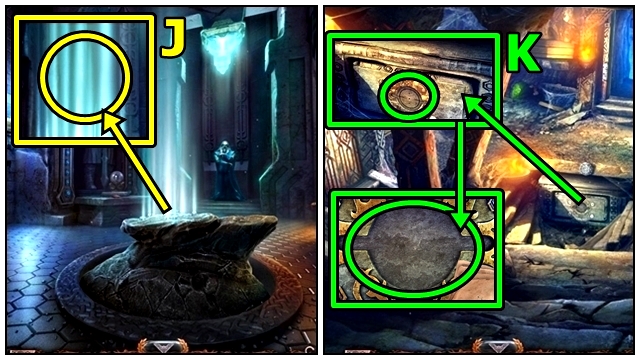
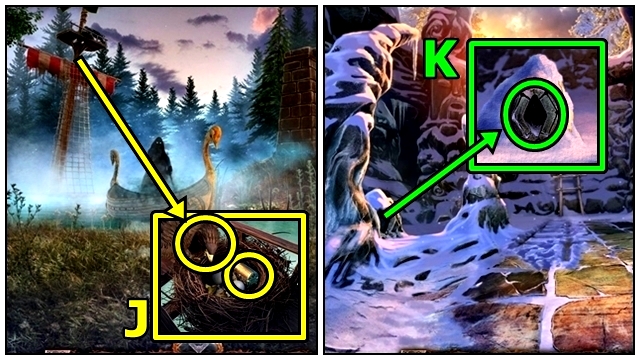
- Solution: (J).

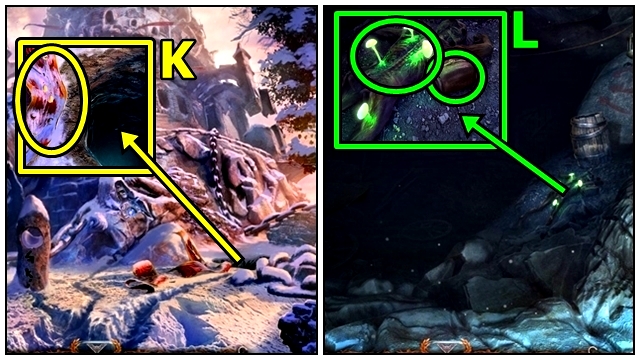
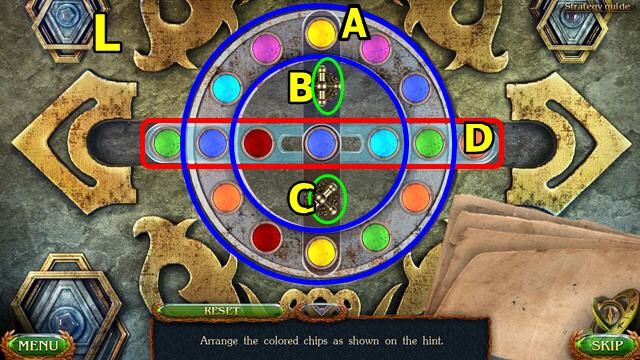
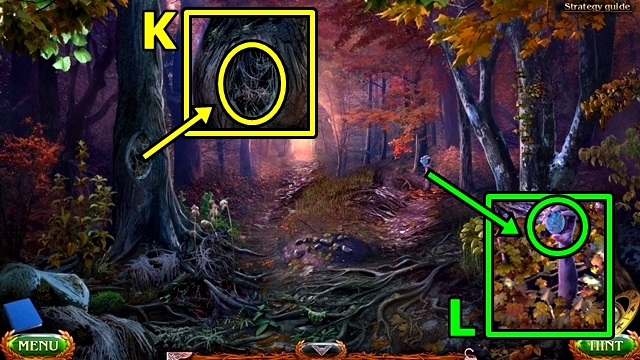
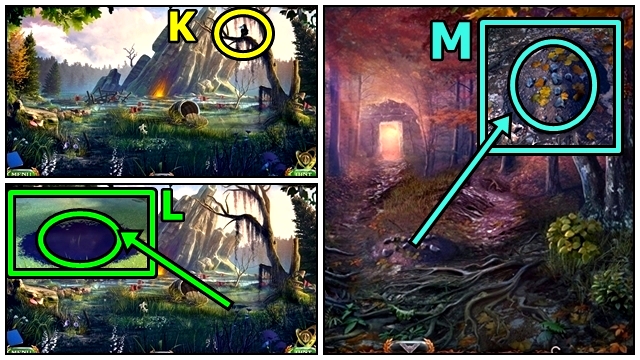
- Take CLUB (K).
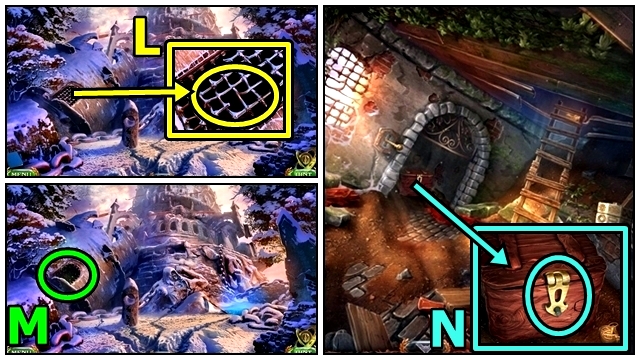
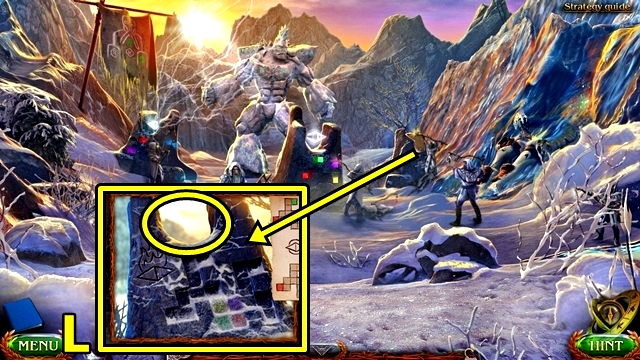
- Insert KEY TO MAARON'S HUT (L).
- Enter.
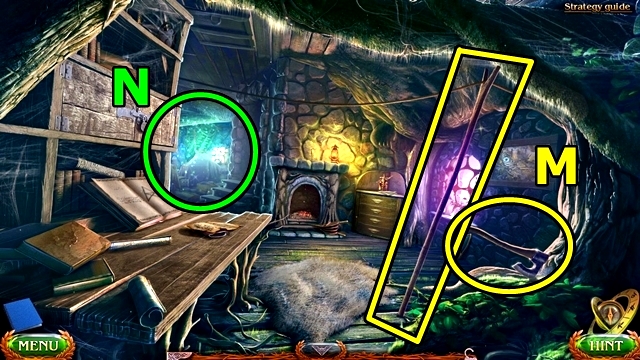
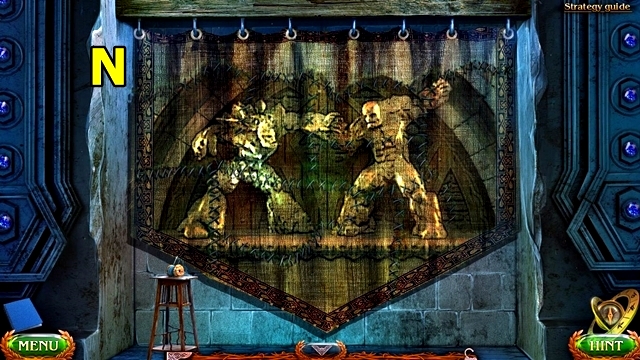
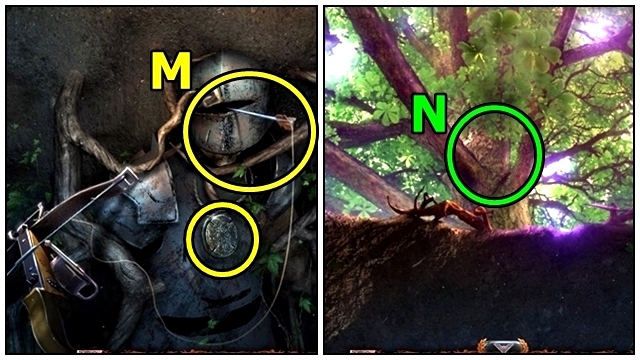
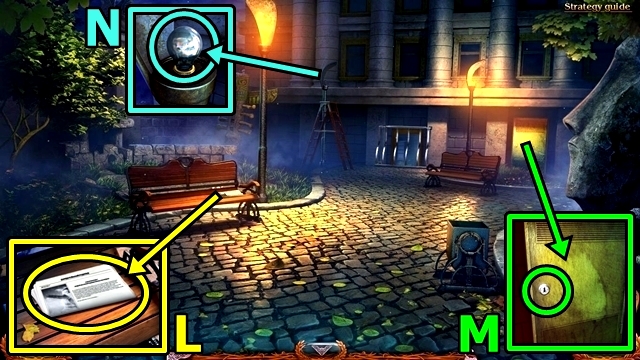
- Take AXE (M) and WOODEN POLE.
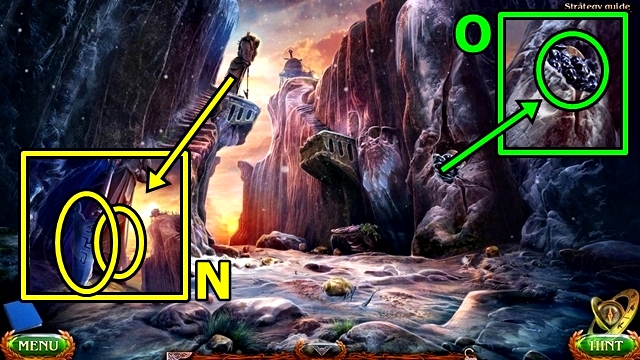
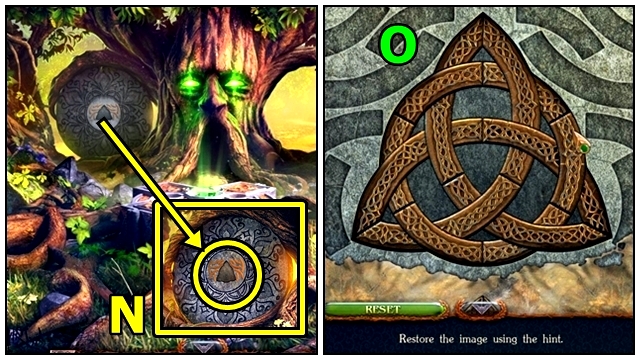
- Play HOP (N); receive MAGIC WAND.
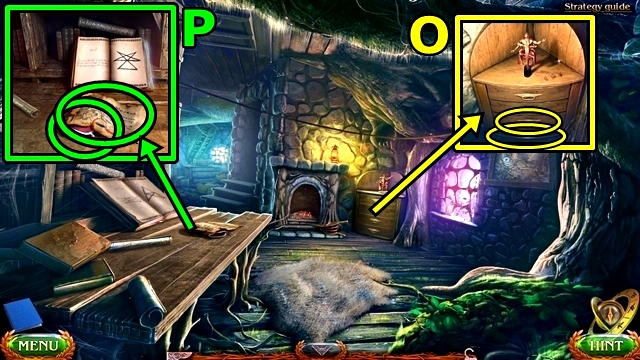
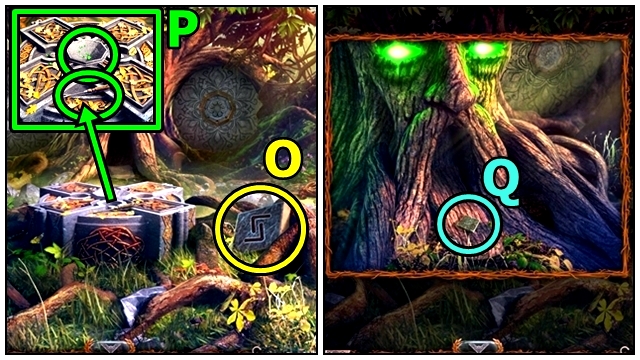
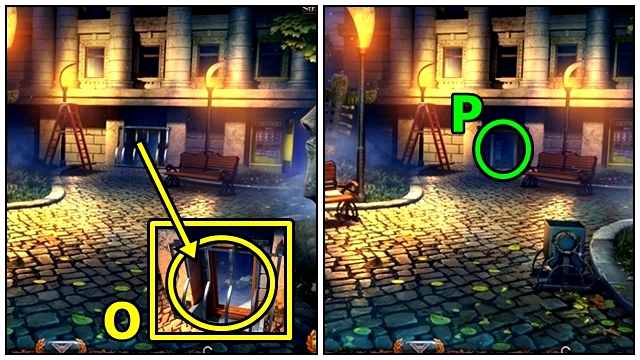
- Open drawers (O); move items; take SACK OF COINS.
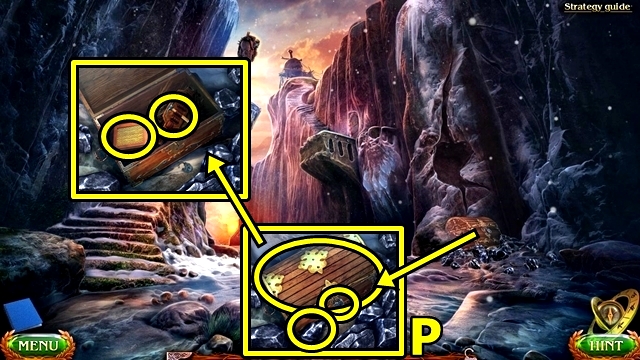
- Read note (P). Take MITTEN; receive BOOK OF SPELLS.
- Return to Forest Path.
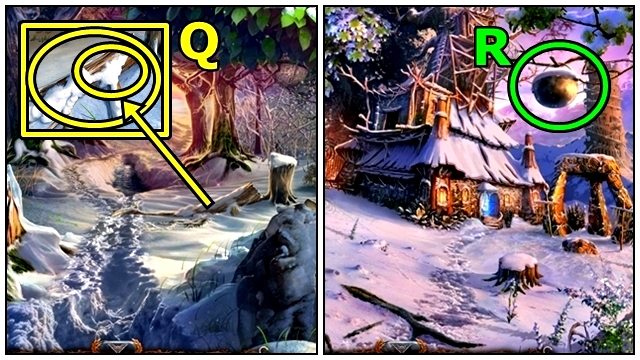
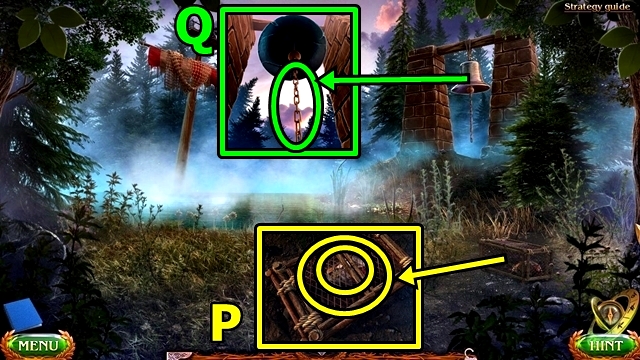
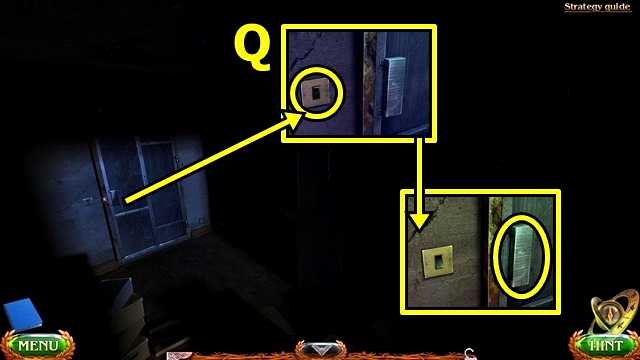
- Remove snow (Q); use AXE; take SPLINTERS.
- Move forward.
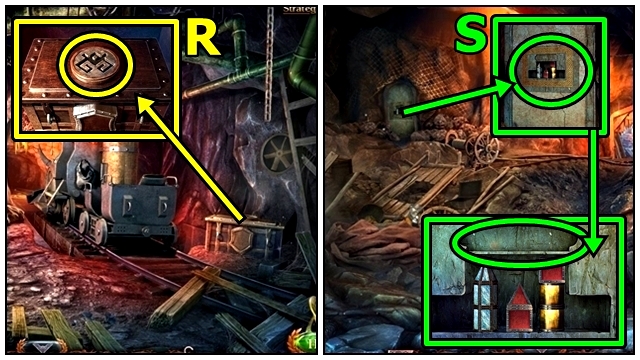
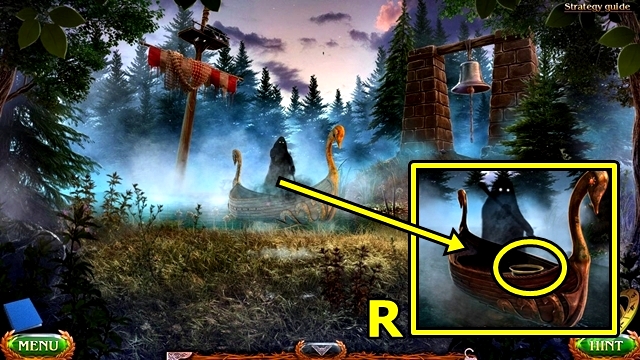
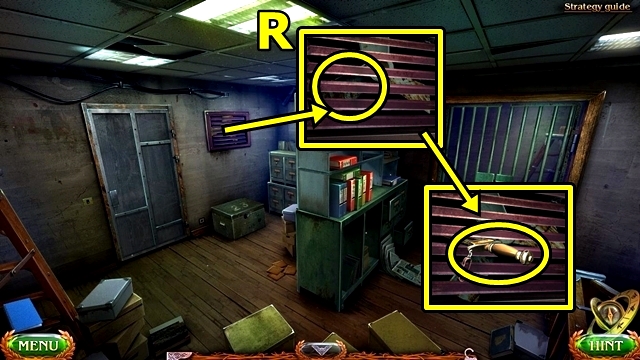
- Use WOODEN POLE (R); receive CAULDRON OF SNOW.
- Enter Maaron's Hut.
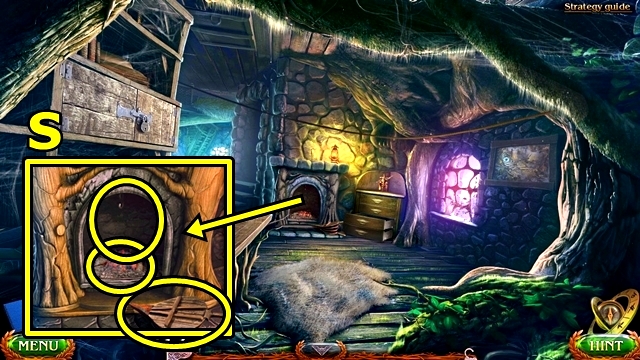
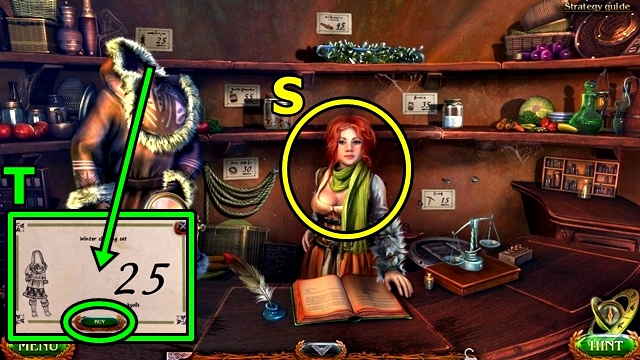
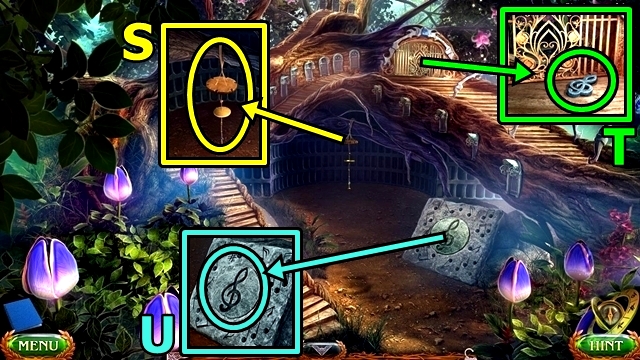
- Place CAULDRON OF SNOW (S); place SPLINTERS; press bellows. Use MITTEN; receive CAULDRON OF HOT WATER.
- Return to Forest Path.
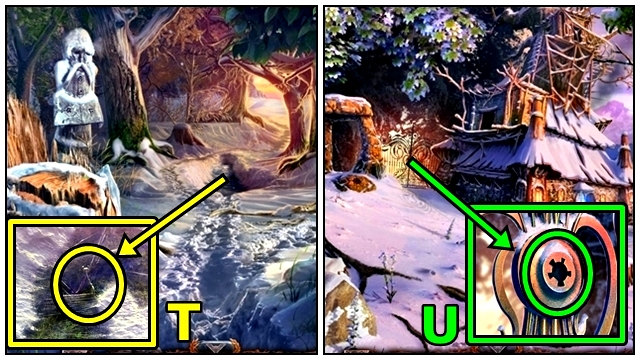
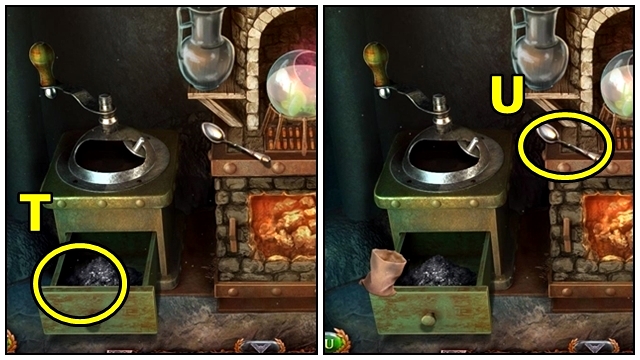
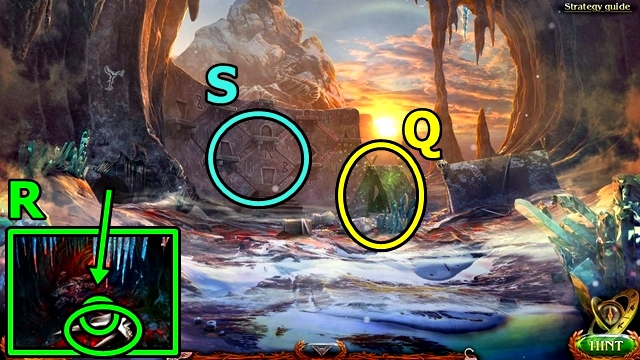
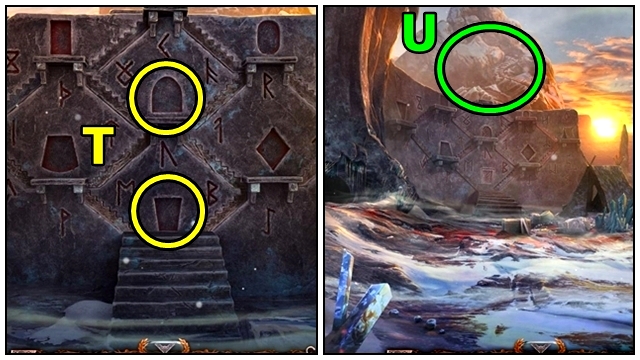
- Pour CAULDRON OF HOT WATER (T); take KEY.
- Move forward.
- Insert KEY (U).
- Enter gates.
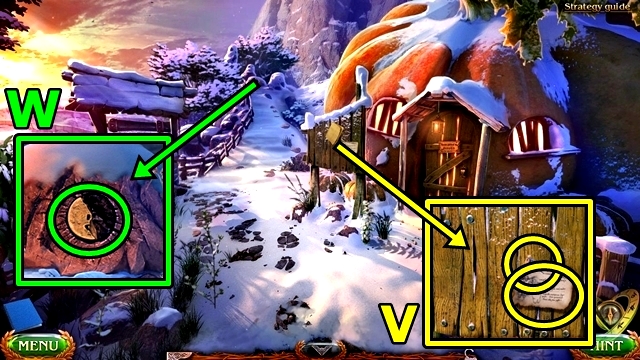
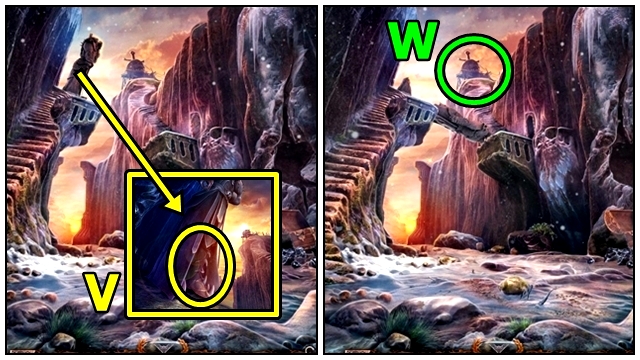
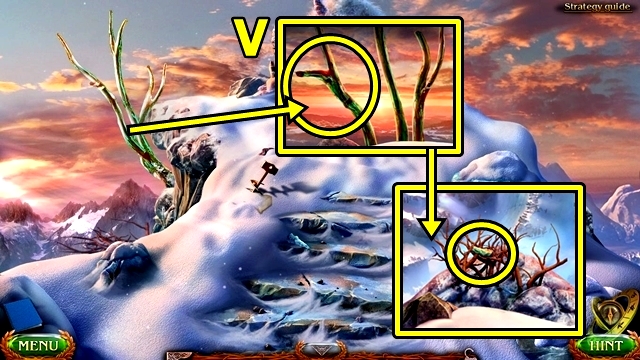
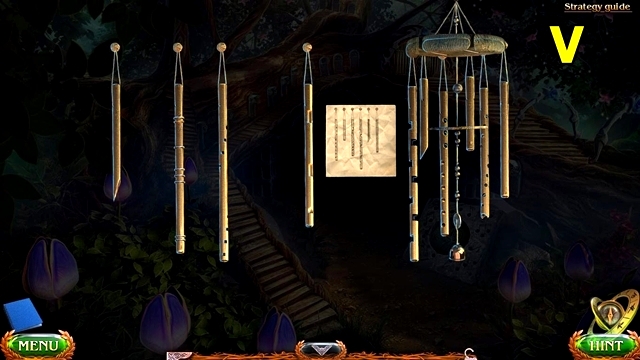
- Read note (V); take AWL.
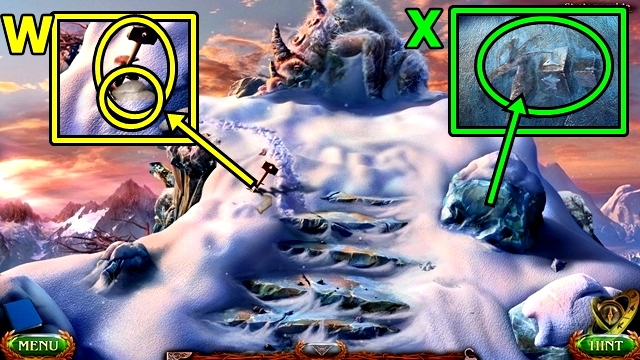
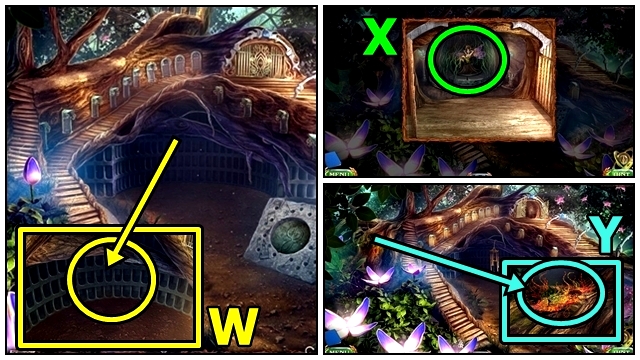
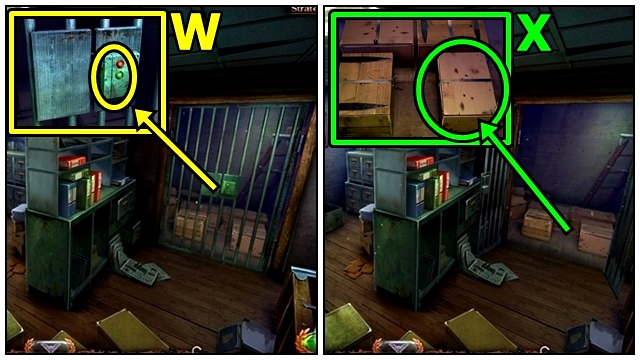
- Take RUNE STONE SHARD (W).
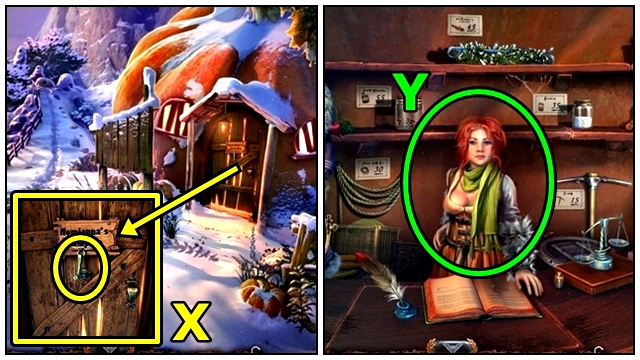
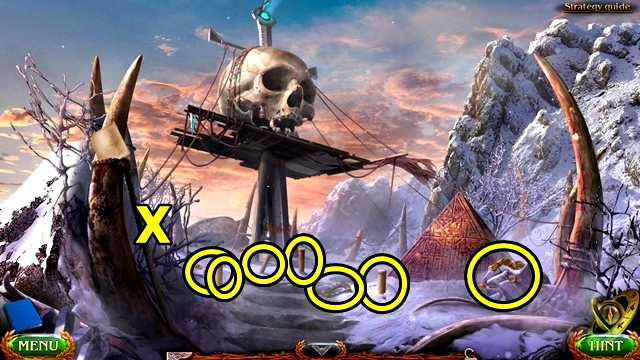
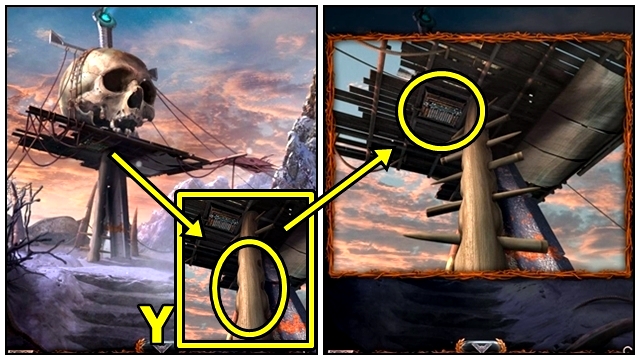
- Knock (X).
- Enter Nomianna's Pumpkin.
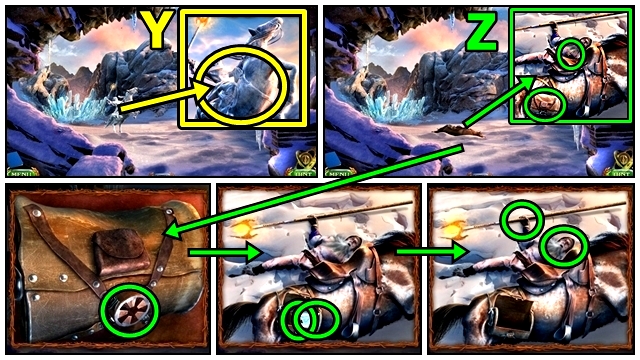
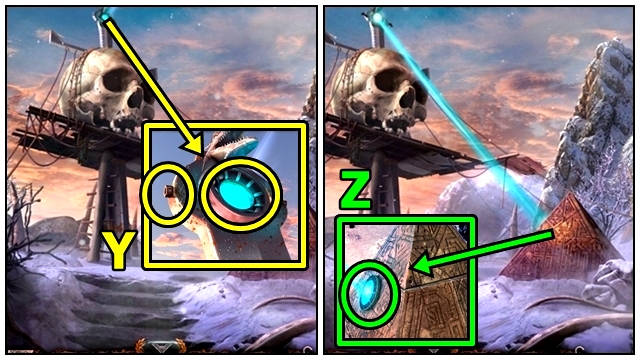
- Talk (Y). Receive MAARON'S CRYPTEX.
- Return to Maaron's Hut.
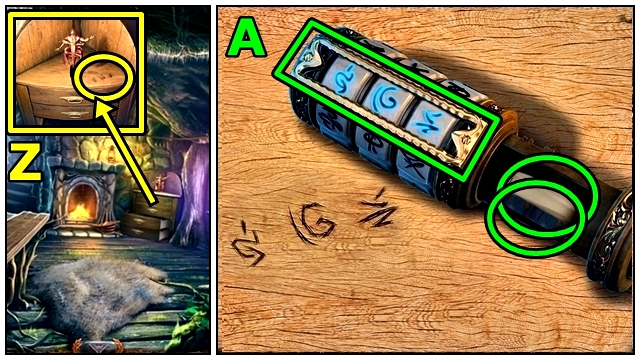
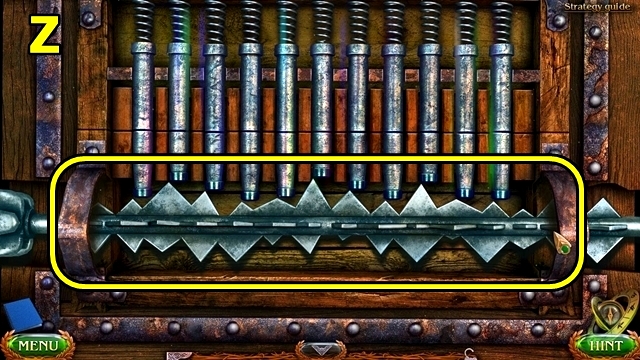
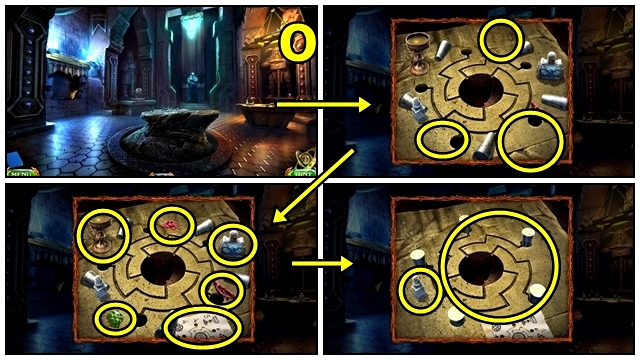
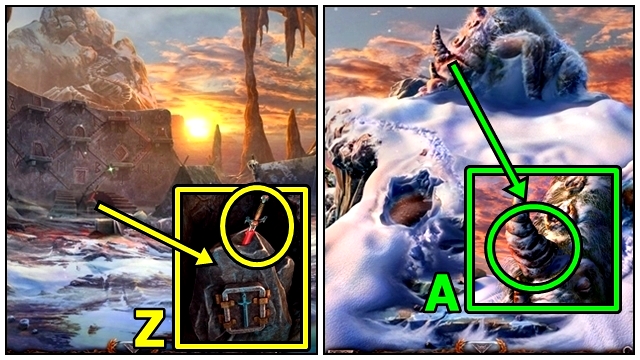
- Add MAARON'S CRYPTEX (Z).
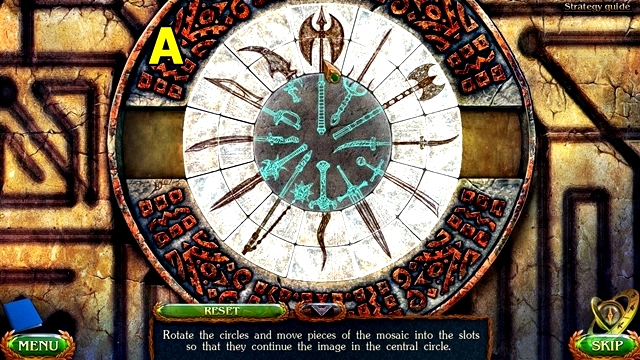
- Solution: (A). Take MECHANISM PIECE and STATUE DRAWING.
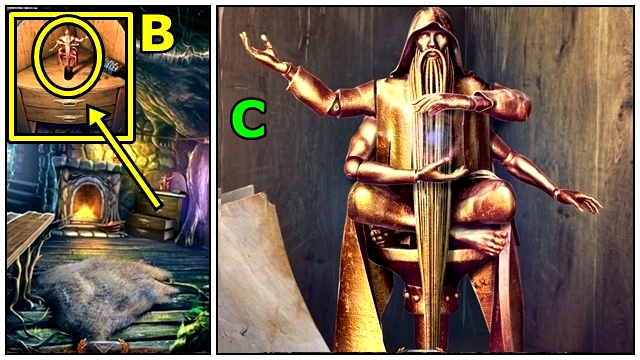
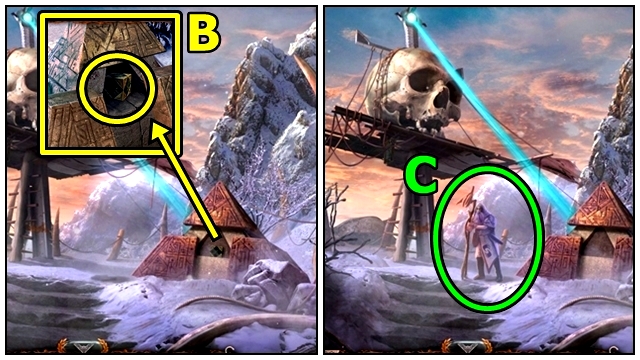
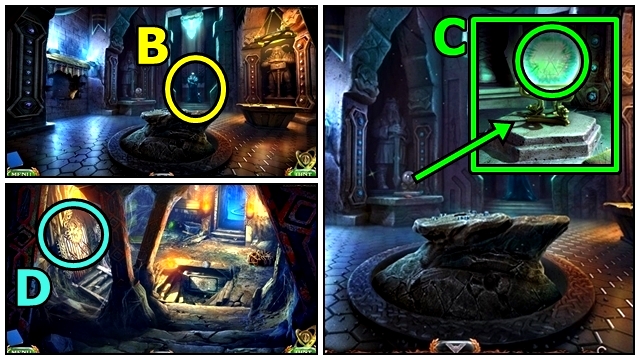
- Place STATUE DRAWING (B).
- Solution: (C). Move items; take RUNE STONE SHARD.
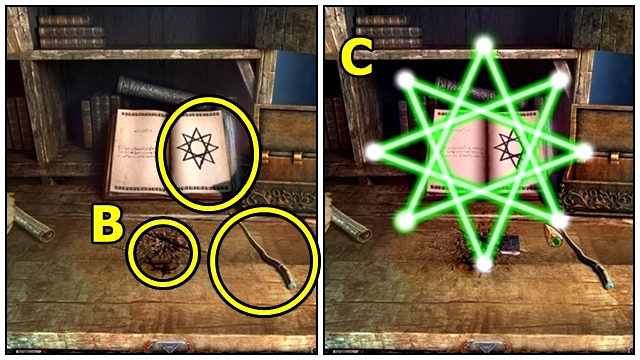
- Add RUNE STONE SHARDS (D) and MAGIC WAND. Turn to Mend Spell.
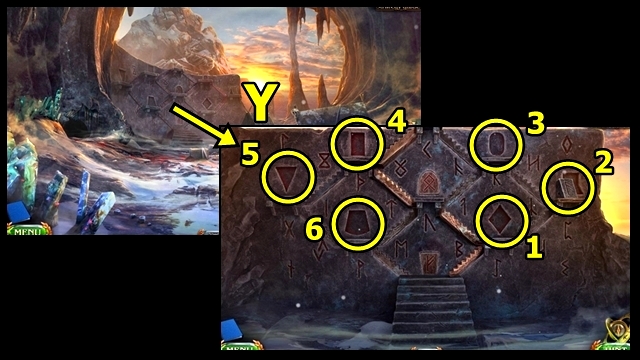
- Solution: (E). Take RUNE STONE.
- Go to Forest Edge.
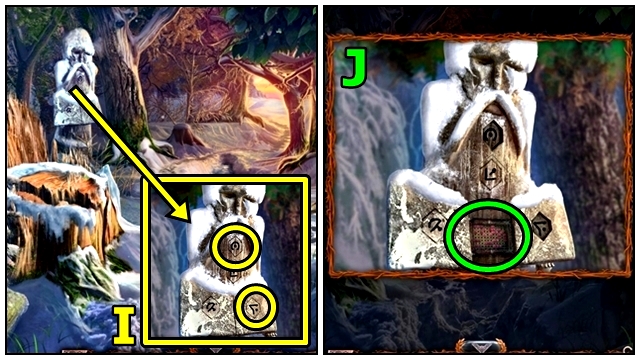
- Add RUNE STONE (F).
- Go (G).
Chapter 2: Dwarf Dungeons
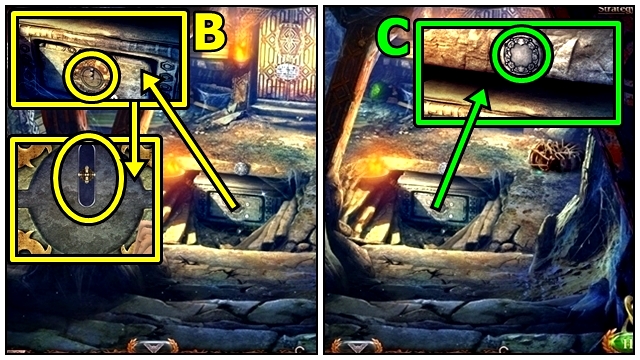
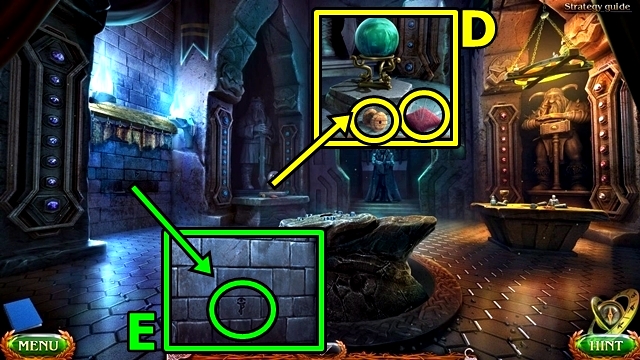
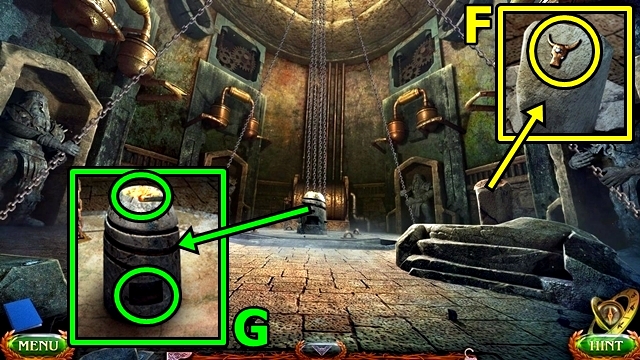
- Remove snow (H); take ENERGY ORB.
- Add ENERGY ORB (I); take FLASK OF ESSENCE.
- Use AWL (J).
- Lower cloth (K).
- Take GLOWING MUSHROOMS (L). Open bag; remove, open sack; take KYOLLS.
- Return to Halfling Village; enter Nomianna's Pumpkin.
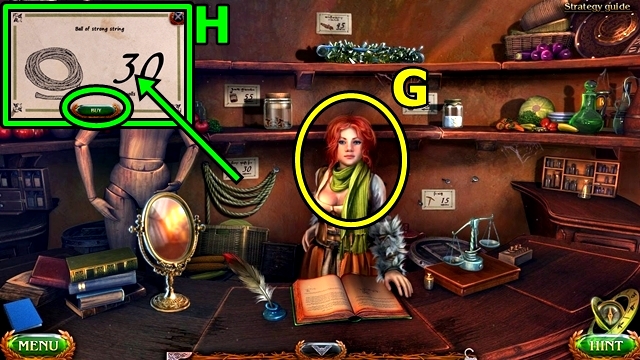
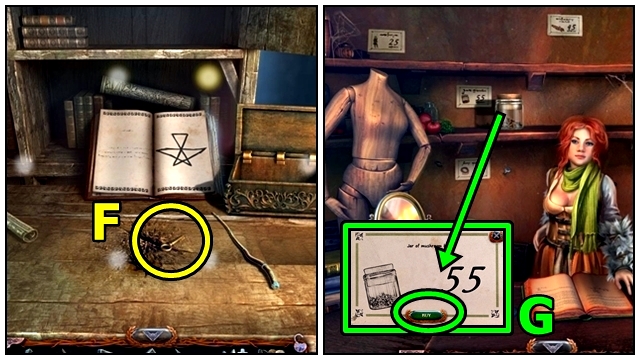
- Open SACK OF COINS; take KYOLLS.
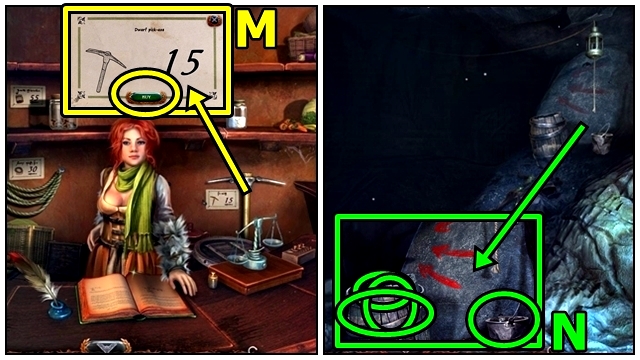
- Buy (M); receive PICKAXE.
- Return to Catacombs.
- Remove rings (N); break barrel; use PICKAXE. Take TAR.
- Return to Maaron's Hut.
- RAG on CLUB; receive HALF-FINISHED TORCH.
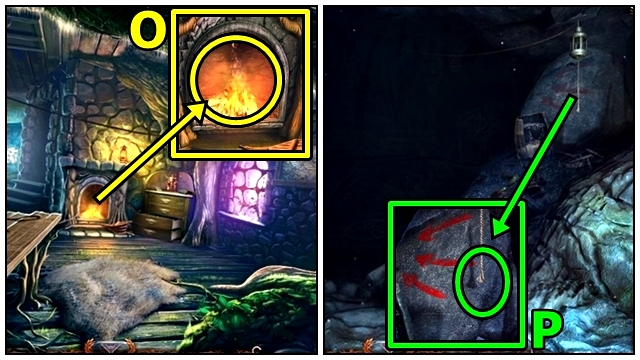
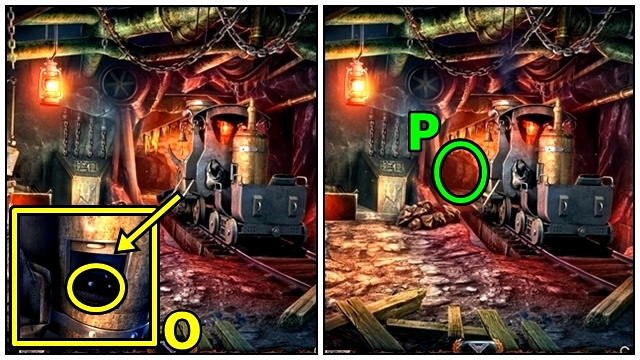
- Add TAR (O); then HALF-FINISHED TORCH. Receive TORCH.
- Return to Catacombs.
- Use TORCH (P).
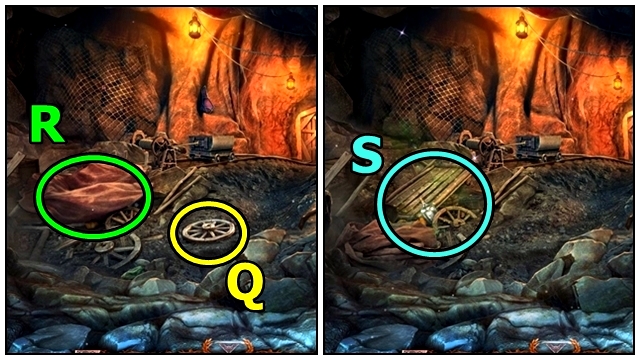
- Take CART WHEEL (Q).
- Remove cloth (R).
- Play HOP (S); receive NOMIANNA'S BOX.
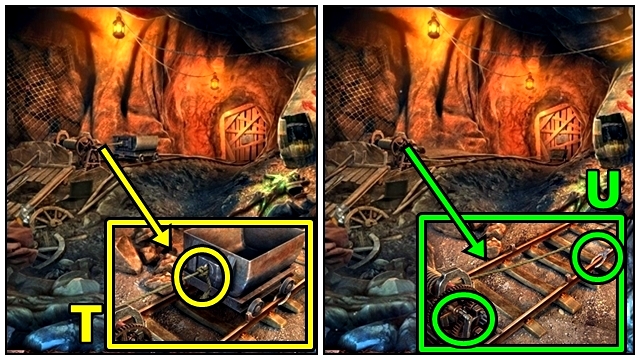
- Untie (T).
- Take CUTTING PLIERS (U). Add CART WHEEL. Press wheel.
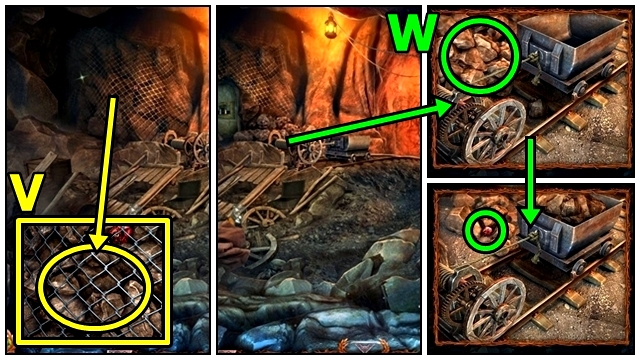
- Use CUTTING PLIERS (V).
- Add rocks (W); take CRIMSON STONE.
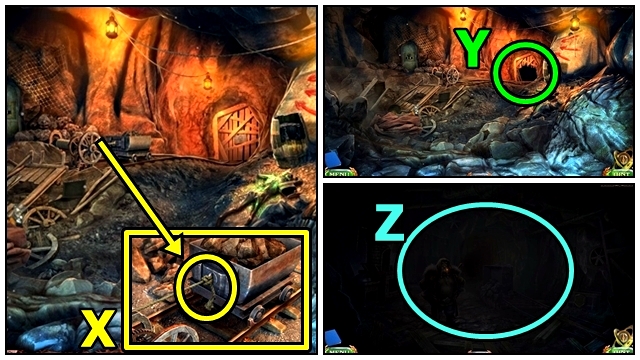
- Untie (X).
- Go (Y).
- Examine (Z). Receive KYOLLS.
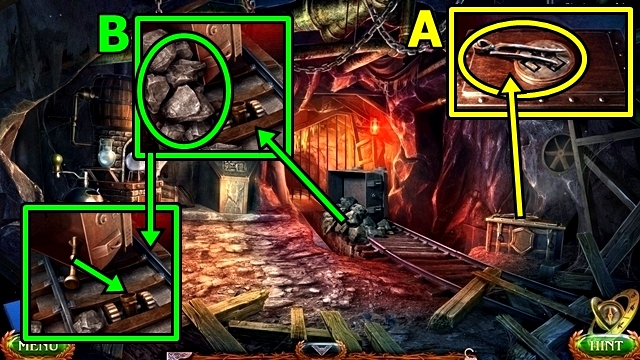
- Take BLACKSMITH'S TONGS (A).
- Move rocks (B). Move lever.
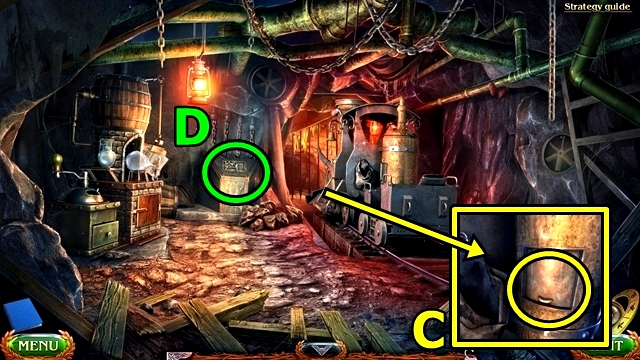
- Lift (C).
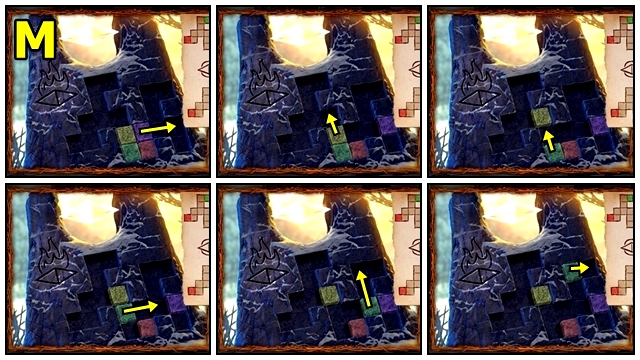
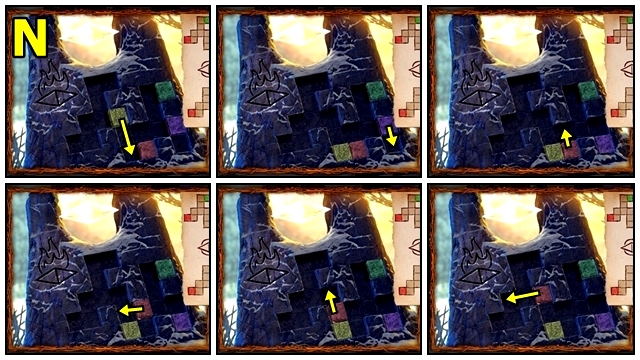
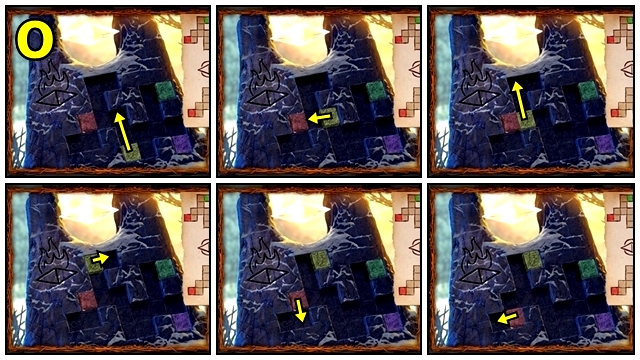
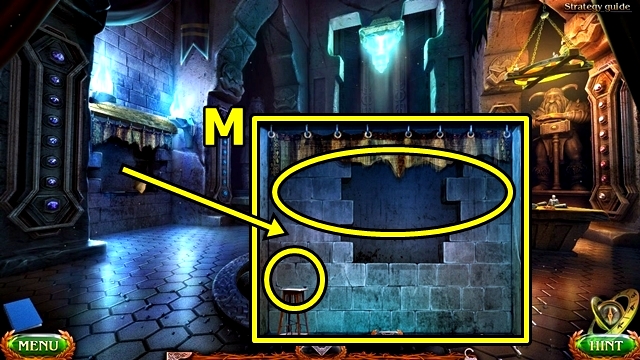
- Play mini-game (D).
- Solution: (E).
- Take EMPTY FLASK (F).
- Use EMPTY FLASK (G); receive CAVE TEARS.
- Remove rope from FLASK OF ESSENCE; read note; receive BASILISK VENOM.
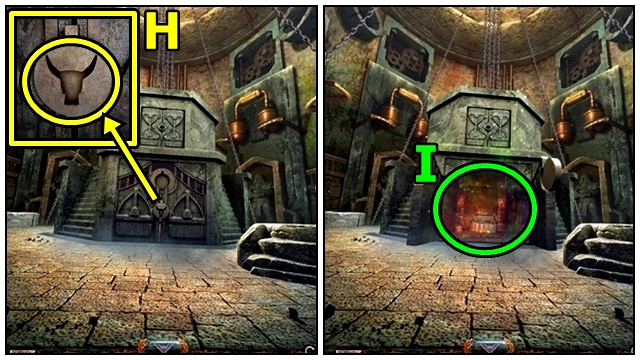
- Open (H).
- 1-Use TORCH (I); 2-read; 3-pour.
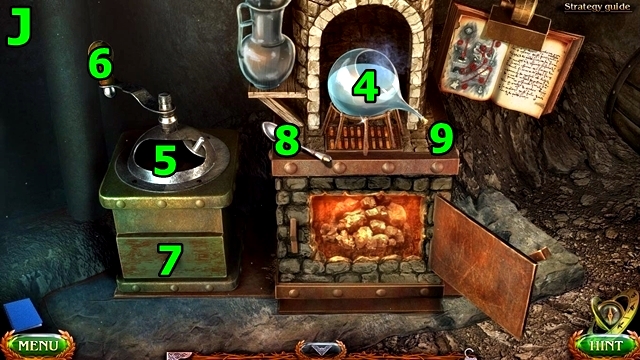
- 4-Add GLOWING MUSHROOMS (J); 5-add CRIMSON STONE; 6-grind; 7-open; 8-scoop; 9-place CAVE TEARS.
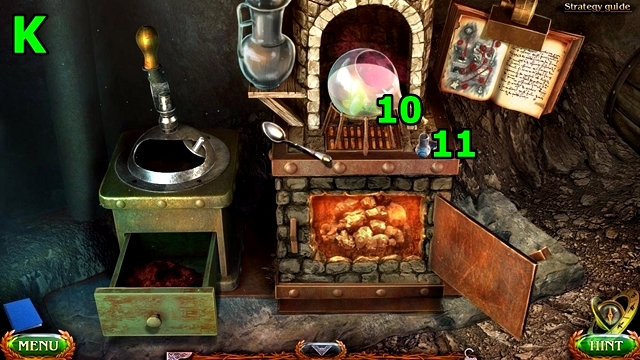
- 10-uncork (K); 11-add BASILISK VENOM. Take OMNIVOROUS ACID.
- Return to Stronghold Ruins.
- Pour OMNIVOROUS ACID (L).
- Play HOP (M).
- Open (N); take HEATONITE.
- Return to Folnur's Dwelling.
- Add HEATONITE (O); use TORCH.
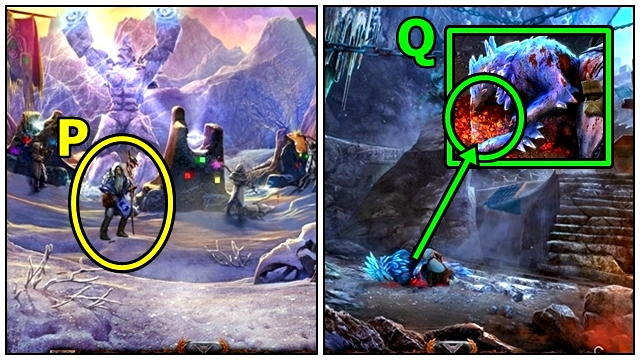
- Go (P).
- Take MECHANISM PIECE (Q).
- Take DAGGER (R). Open; take KYOLLS and MECHANISM PIECE.
- Return to Halfling Village; enter Nomianna's Pumpkin.
- Offer NOMIANNA'S BOX (S); receive KYOLLS.
- Buy (T); receive winter clothing set.
- Return to Cave End.
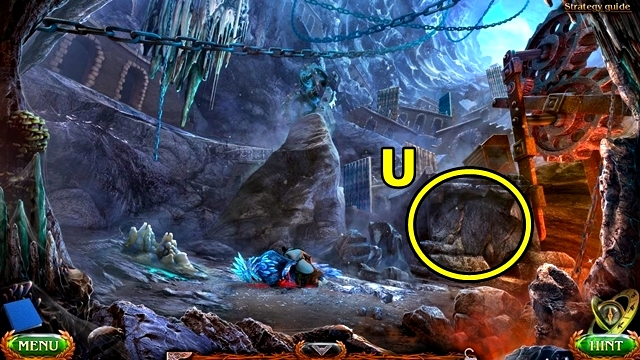
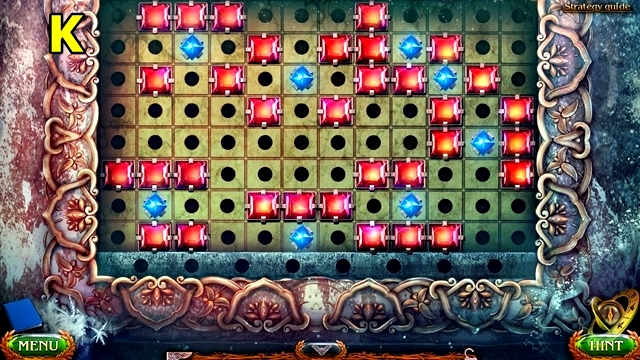
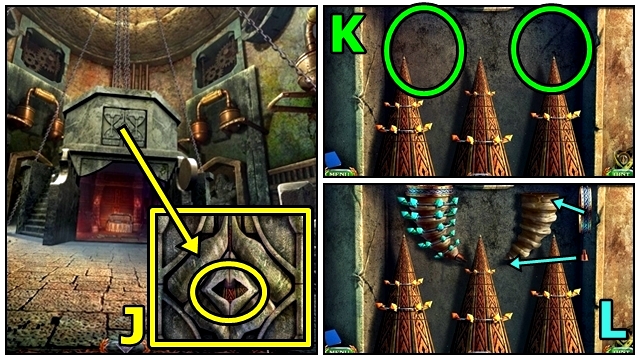
- Play mini-game (U).
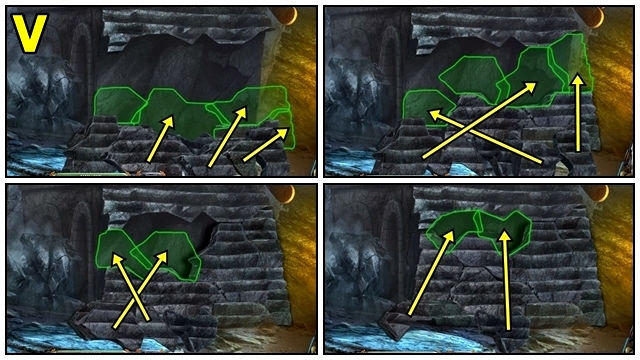
- Solution: (V).
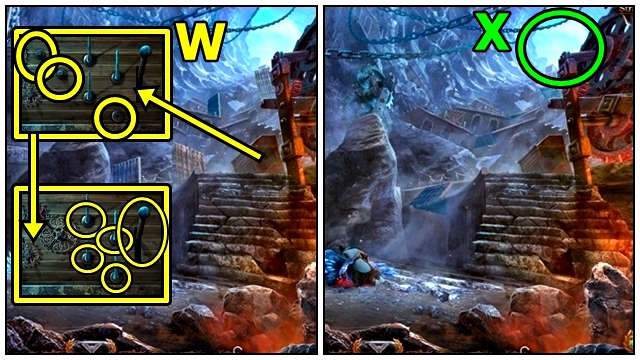
- Add MECHANISM PIECES (W). Adjust all handles; pull lever.
- Go (X).
Chapter 3: Frozen Mountains
- Use TORCH (Y).
- Take KEY (Z). Insert KEY; take LIGHTNING ELEMENT and FLASK OF RUM. Offer FLASK OF RUM; take CHARGED STAFF.
- Use CHARGED STAFF (A).
- Go (B).
- Examine (C). Receive FLAMES ELEMENT.
- Examine (D).
- Open (E); take SULFUR. Use DAGGER; receive HOOK.
- Move down.
- Remove (F). Use BLACKSMITH'S TONGS; receive GIANT'S TOOTH.
- Return to Halfling Village, enter Nomianna's Pumpkin.
- Offer GIANT'S TOOTH (G); receive KYOLLS.
- Buy (H); receive ROPE.
- Return to Forest Path.
- Solution: (I).
- Play mini-game (J).
- Solution: (K). Take PART.
- Return to Exit to the Mountains.
- HOOK on ROPE; attach; receive HOOK ON ROPE.
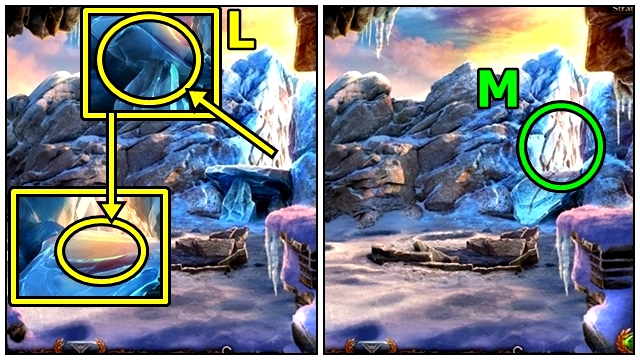
- Remove (L). Use HOOK ON ROPE.
- Go (M).
- Take HALBERD (N); examine statue. Receive CANNONBALL.
- Use HALBERD (O).
- Take COAL (P). Touch lock. Open; take HAMMER; open; take SMALL SACK and KYOLLS.
- Return to Halfling Village, enter Nomianna's Pumpkin.
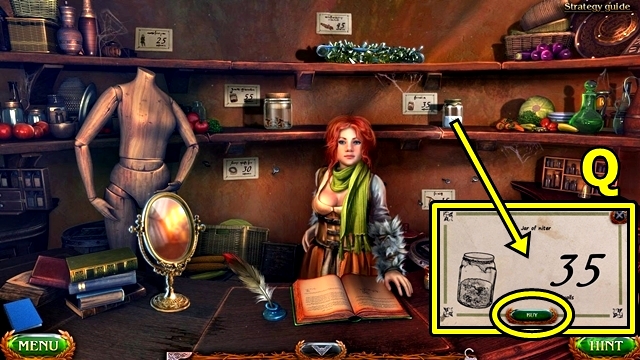
- Buy (Q); receive NITER. Receive MITTENS.
- Go to Folnur's Dwelling.
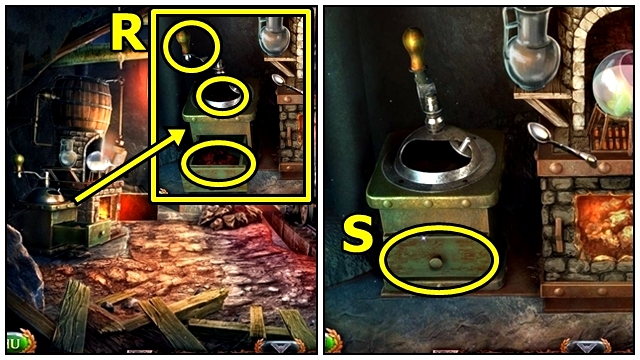
- Add COAL (R); close; grind.
- Open (S).
- Add SMALL SACK (T).
- Use spoon (U); receive COAL.
- Return to Gorge.
- Remove instructions from CANNONBALL; add SULFUR; remove cap; empty flask; add sulfur to cannonball. Add NITER; remove lid; empty jar; add niter to cannonball. Add COAL; open and empty sack; add both piles of coal to cannonball. Receive BOMB.
- Add BOMB (V); use TORCH.
- Go (W).
- Take FANGS 4/4 (X), BOOK PART and KYOLLS.
- Add FANGS (Y); use HAMMER. Play mini-game.
- Solution: Rotate key twice; adjust (Z).
- Play HOP (A); receive DOME ELEMENT.
- Return to Exit to the Mountains.
- BOOK PART on PART; receive KEY.
- Move (B); add KEY; take HINT.
- Go left.
- Add LIGHTNING ELEMENT (C) and HINT.
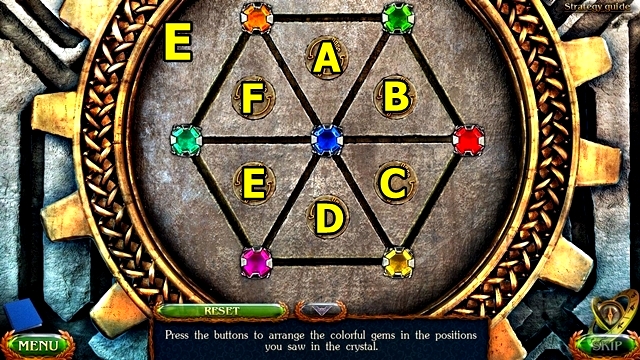
- Solution: (D).
- Solution: (E).
- Solution: (F).
- Add DOME ELEMENT (G).
- Solution: (H).
- Solution: (I).
- Solution: (J).
- Solution: (K).
- Add FLAMES ELEMENT (L).
- Solution: (M).
- Solution: (N).
- Solution: (O).
- Talk (P). Receive PIECE OF FOLNUR'S CHEST and FIRE SCEPTER.
- Return to Cave End.
- Use HAMMER (Q); receive FROST WOLF BLOOD.
- Move down.
- Insert PIECE OF FOLNUR'S CHEST (R). Take KEY PART, HINT PLATE and KYOLLS.
- Move down.
- Add HINT PLATE (S).
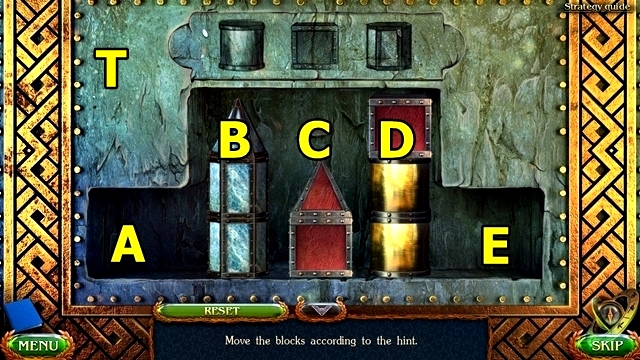
- Solution: (C-A)-(D-C)-(A-C)-(B-A)-(D-E)-(B-D)-(B-D)-(E-B)-(D-B)-(D-B)-(D-E)-(B-D)-(B-D)-(A-D)-(E-B) (T).
Chapter 4: The Temple
- Go (U).
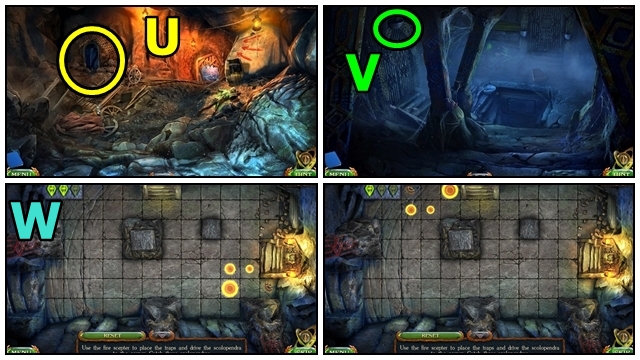
- Use FIRE SCEPTER (V).
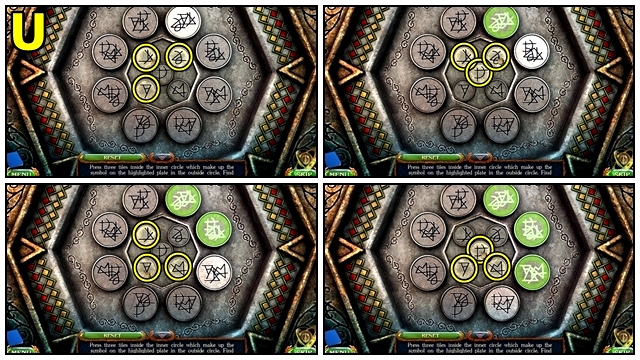
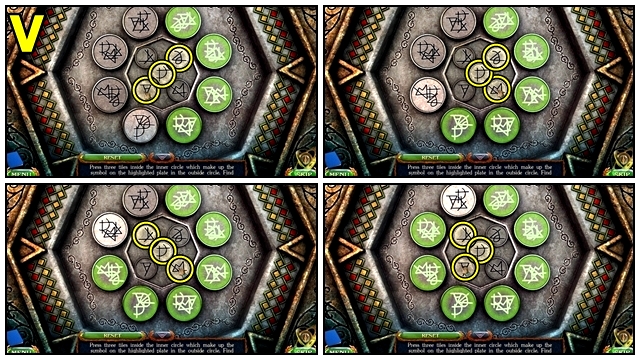
- Solution: Puzzle is random; screenshot shows possible solution (W).
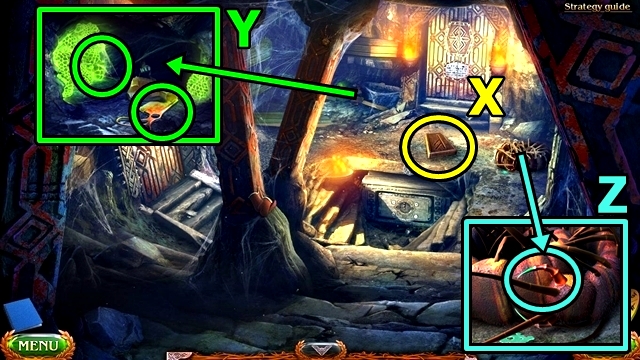
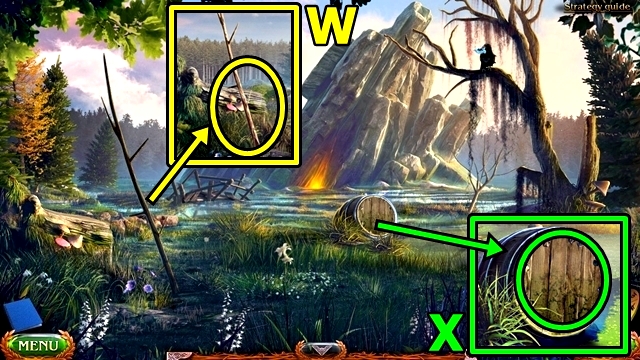
- Take RUNE (X).
- Take HANDSAW (Y). Use DAGGER; receive SCOLOPENDRA EGGS.
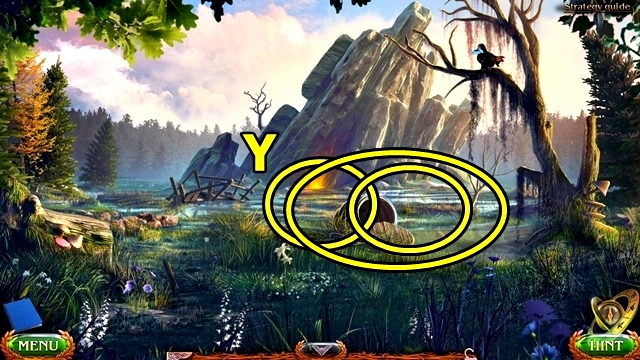
- Use HANDSAW (Z); receive SCOLOPENDRA STINGER.

- Pull (A). Use SCOLOPENDRA STINGER; take BAG.
- Take KEY PART (B).
- Open BAG; take KYOLLS and PATTERN PART. Receive EMPTY BAG.
- Insert PATTERN PART (C).
- Move forward.
- Take SPOOL (D) and NEEDLE.
- Press (E); read note; take POWDER OF PROPHECY and KYOLLS.
- Add POWDER OF PROPHECY (F). Receive KEY BASE.
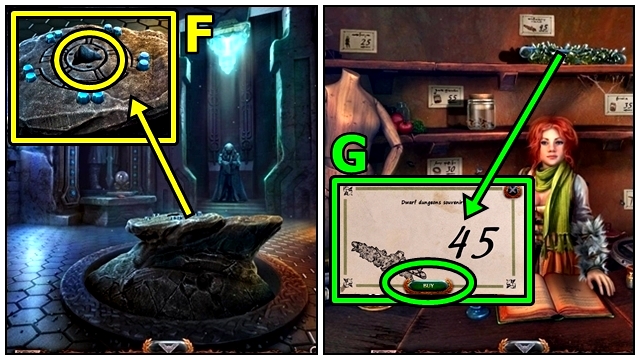
- Return to Halfling Village; enter Nomianna's Pumpkin.
- Buy (G); receive DWARVES' SOUVENIR.
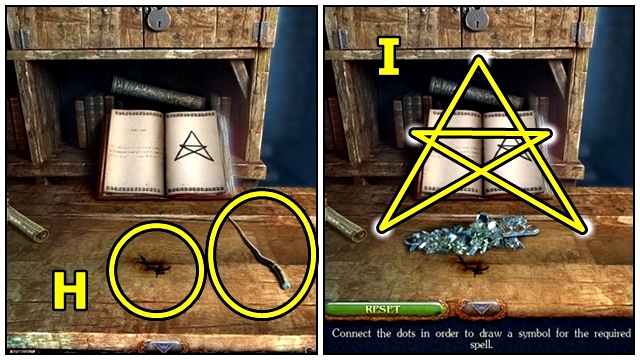
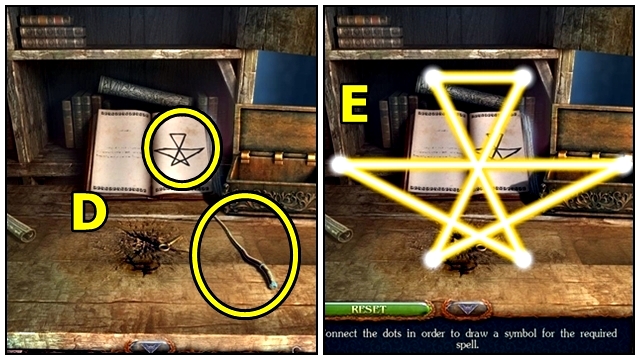
- Open BOOK OF SPELLS.
- Place DWARVES' SOUVENIR (H); use magic wand. Turn to Destruction Spell.
- Solution: (I). Take KEY PART.
- Return to Temple.
- Add KEY BASE (J) and KEY PARTS. Take SARCOPHAGUS PART.
- Move down.
- Examine (K); add SARCOPHAGUS PART.
- Rotate (A) either clockwise (CW) or counter-clockwise (CCW). Drag (D) either left or right).
- Solution: (D-right)-(A-CCWx4)-(D-left)-(A-CCW)-(D-left)-(C).
- (A-CWx3)-(C)-(A-CCWx3)-(D-right)-(B).
- (A-CCWx3)-(B)-(A-CWx2)-(B)-(A-CCWx4)-(B).
- (A-CWx3)-(B)-(A-CCWx3)-(B)-(A-CWx2)-(B).
- (A-CWx2)-(C)-(A-CWx2)-(C).
- (A-CCW)-(C)-(A-CWx3)-(C)-(A-CW) (L).
- Take TAPESTRY FRAGMENT.
- Move forward.
- SPOOL on MITTENS; then DAGGER; add NEEDLE; receive THREAD AND NEEDLE.
- Add THREAD AND NEEDLE (M) and TAPESTRY FRAGMENT.
- Solution: (N). Receive COLD BLOOD ELIXIR RECIPE.
- Add COLD BLOOD ELIXIR RECIPE (O), then SCOLOPENDRA EGGS and FROST WOLF BLOOD. Add all ingredients; use HAMMER. Fill vial; receive COLD BLOOD ELIXIR.
- Return to Gorge.

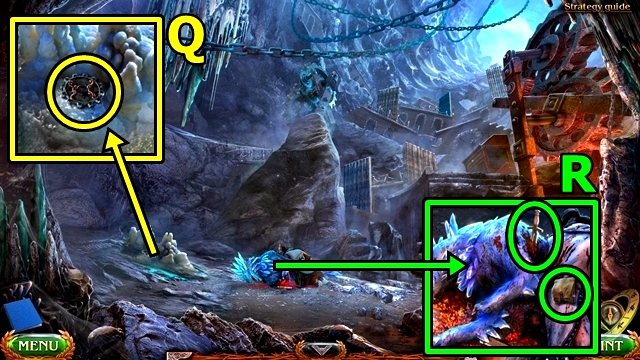
- Use COLD BLOOD ELIXIR (P).
- Play HOP (Q); receive RUNE.
- Move (R); take PROJECTOR SEAL 1/2.
- Go (S).
- Add RUNES (T).
- Move down.
- Go (U).
- Use HAMMER (V). Use EMPTY BAG; receive CHARCOAL CRYSTAL.
- Remove (W); take DRILL.
- Use FIRE SCEPTER (X); take PROJECTOR SEAL 2/2.
- Return to Giant's Site.
- Adjust (Y); add PROJECTOR SEALS.
- Examine (Z).
- Solution: (A).
- Take PUZZLE CUBE (B).
- Talk (C). Receive KEY.
- Open BOOK OF SPELLS.
- Insert KEY (D); take PLANK ON ROPE.
- Return to Halfling Village.
- Add PLANK ON ROPE (E). Take STICK.
- STICK on DRILL.
- Use DRILL (F), then HAMMER. Take CASKET.

- Open BOOK OF SPELLS.
- Open CASKET; take KYOLLS. Receive MAARON'S CASKET.
- Place MAARON'S CHEST (G); open; use magic wand. Turn to Revelation Spell.
- Solution: (H). Take RUNE STONE.
- Return to Forest Edge.
- Insert RUNE STONE (I).
- Go (J).
Chapter 5: Darkwoods
- Use DAGGER (K); take CONES.
- Examine (L).
- Take CROSSBOW (M) and KEY PART.
- Move up.
- Use CROSSBOW (N).
- Move up.
- Move forward.
- Take RUNE (O).
- Take NAIL PULLER (P). Add CHARCOAL CRYSTAL.
- Take KEY PART (Q).
- Return to Gorge.
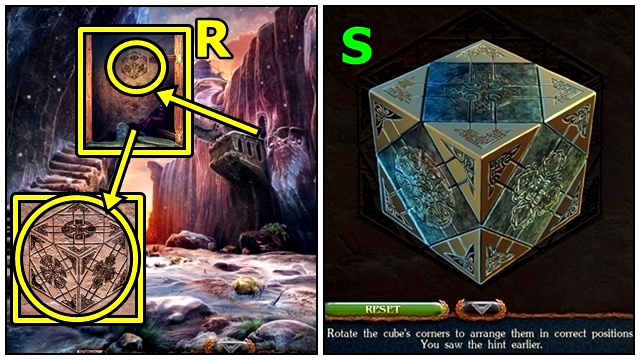
- Examine (R).
- KEY PARTS on PUZZLE CUBE.
- Solution: (S). Take FRAGMENT.
- Return to Ancient Ontus.
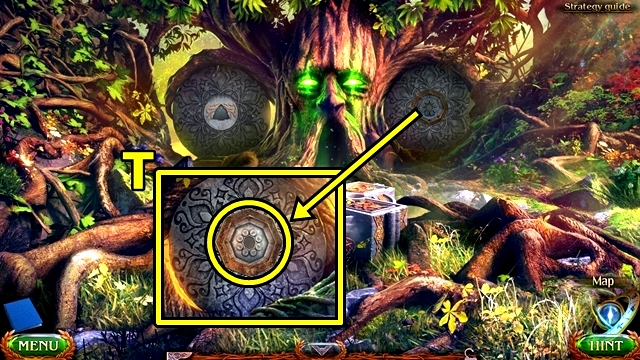
- Press (T).
- Solution: (U).
- Solution: (V). Take right path.
- Use DAGGER (W); take POLE.
- Use NAIL PULLER (X); receive NAILS. Take RED FLAGS.
- Place POLE (Y) and RED FLAGS. Examine.
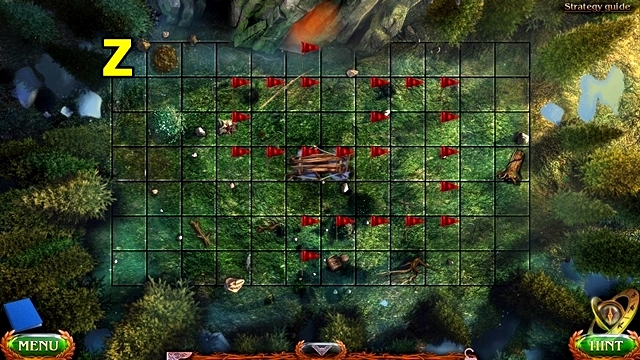
- Solution: (Z).
- Take PLANKS (A) and RUNE.
- Sort PLANKS; add NAILS; use HAMMER; receive TEMPORARY BRIDGE.
- Lay TEMPORARY BRIDGE (B). Examine.
- Go (C).
- Examine (D).
- Take PIKE POLE (E).
- Take RODS (F).
- Add RODS (G).
- Play HOP (H); receive KRICKAR'S BELT.
- Offer KRICKAR'S BELT (I). Receive DRAWING.
- Move (J); take GARDEN TROWEL.
- Move down.
- Throw CONES (K).
- Use PIKE POLE (L); receive MEDALLION.
- Return to Forest Thicket.
- Use GARDEN TROWEL (M). Lift; take KYOLLS.
- Move forward.
- Add DRAWING (N).
- Solution: (O). Take left path.
- Open (P); take NOTE.
- Pull (Q).
- Offer KYOLLS (R).
- Move forward.
- Take DEVICE BASE (S).
- Take TREBLE CLEF (T).
- Add TREBLE CLEF (U); take SET OF PIPES.
- DEVICE BASE and SET OF PIPES to NOTE.
- Solution: (V). Receive WIND CHIME.
- Add WIND CHIME (W).
- Talk (X). Receive TINY FAIRY BOOK.
- Examine (Y).
- Move down.

- Use PIKE POLE (Z). Take MEDALLION HANDLE.
- Return to Goblin Cave.
- MEDALLION HANDLE on MEDALLION; receive KEY.
- Remove (A); insert KEY; open. Take LEATHER BAG.
- Open LEATHER BAG pockets; take MAGNIFYING GLASS, KYOLLS and TWEEZERS.
- Open BOOK OF SPELLS.
- Place TINY FAIRY BOOK (B); use magic wand. Turn to Enlarge Spell.
- Solution: (C). Open book; read note; remove key.
- Turn spell book to Reduction Spell (D). Use magic wand.
- Solution: (E).
- Use MAGNIFYING GLASS (F) and TWEEZERS; receive SMALL KEY.
- Return to Halfling Village; enter Nomianna's Pumpkin.
- Buy (G); receive BUGS.
- Return to Fairy Glade.
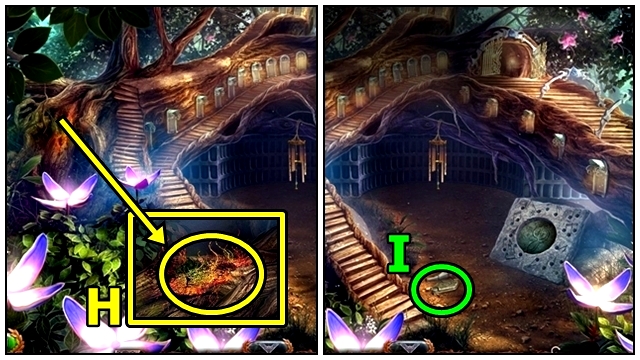
- Use BUGS (H).
- Take PORTAL ACTIVATOR (I). Receive SLEEPY FLOWER.
- Move down.
- Use SLEEPY FLOWER (J). Take CHEST.
- Return to Ancient Portal.
- MAGNIFYING GLASS on CHEST; use SMALL KEY; receive CHEST OF DUST.
- Insert PORTAL ACTIVATOR (K), then CHEST OF DUST.
- Enter portal.
Chapter 6: The Museum
- Read (L); take PAPERCLIP.
- Use PAPERCLIP (M); take LIGHT BULB and CROWBAR.
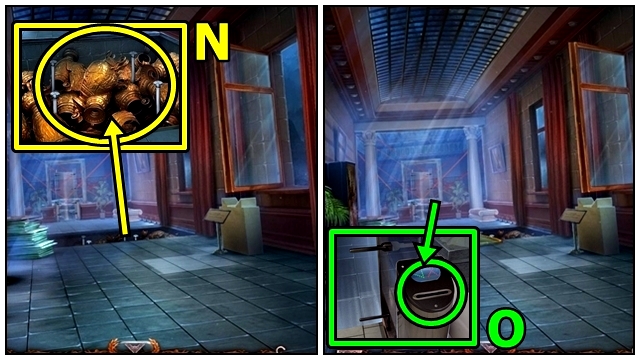
- Add LIGHT BULB (N).
- Use CROWBAR (O).
- Go (P).
- Press (Q). Try to open.
- Insert DAGGER (R). Examine.

- Solution: (S).
- Go left.
- Break (T).
- Take RUNE (U).
- Move (V); take KEY. Examine.
- Insert KEY (W); pull handle.
- Enter.
- Break (X).
- Move (Y).
- Pull (Z).
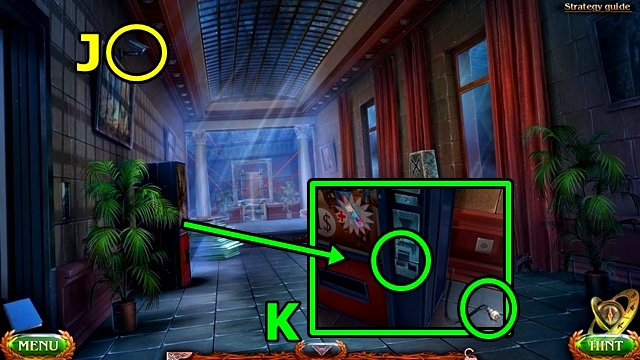
- Play HOP (A); receive NOTE WITH CODE.
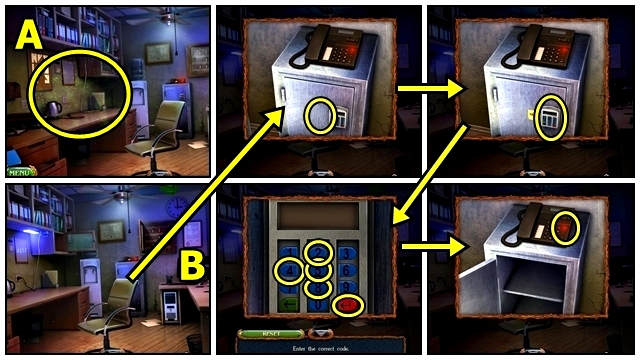
- Place NOTE WITH CODE (B). Enter 4-8-5-2. Take DOLLAR BILL and MINT CANDY. Press Play.

- Open (C); take KEY NUMBERED 23.
- Return to Archives.
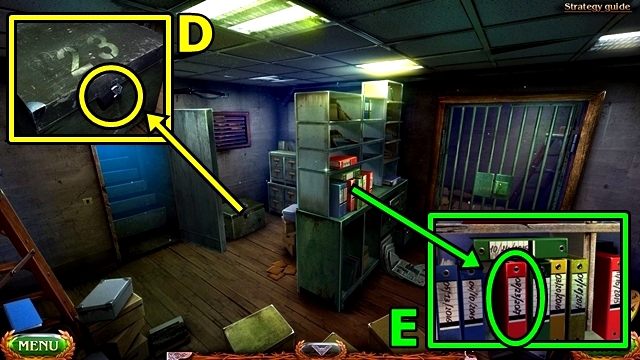
- Insert KEY NUMBERED 23 (D); take FUSES.
- Take FILE (E).
- Move down.
- Tip (F). Take TICKET.
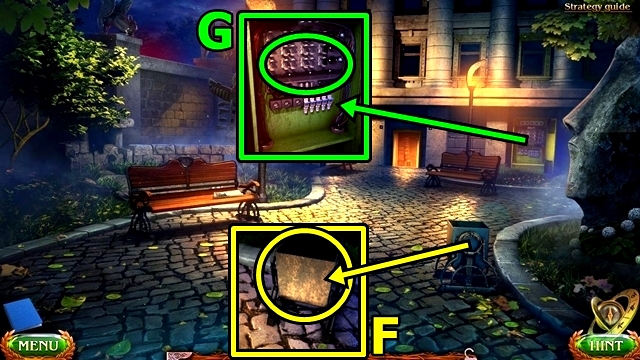
- Add FUSES (G).
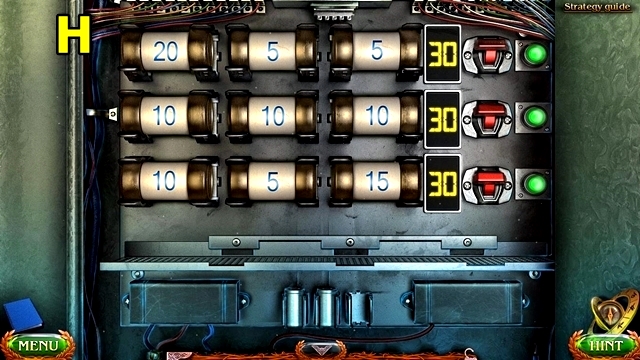
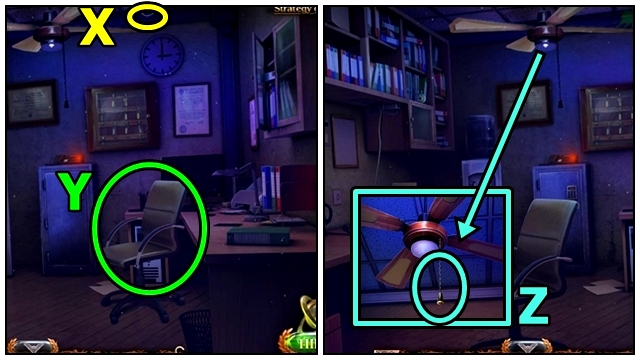
- Solution: Place fuses; flip switches (H).
- Return to First Floor.
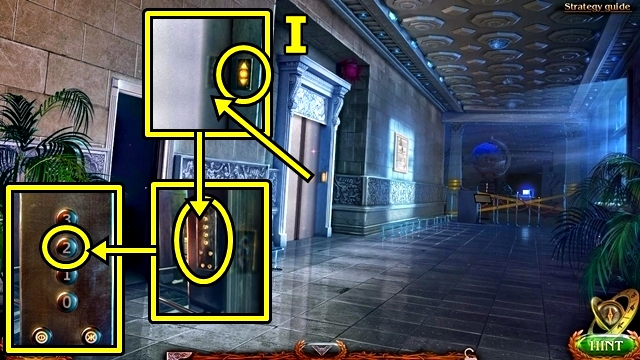
- Press (I), press 2.
- Break (J).
- Insert (K). Insert DOLLAR BILL. Take DOLLAR BILL. Smooth DOLLAR BILL. Insert SMOOTH DOLLAR BILL. Take SODA.

- Remove chewing gum from SODA; add and unwrap MINT CANDY. Remove cap; unwrap and wad gum; place gum in cap; place mint in cap; replace cap. Receive SWEET BOMB.
- Take RUNE (L). Try to open. Move curtain; use HAMMER. Open; climb out.
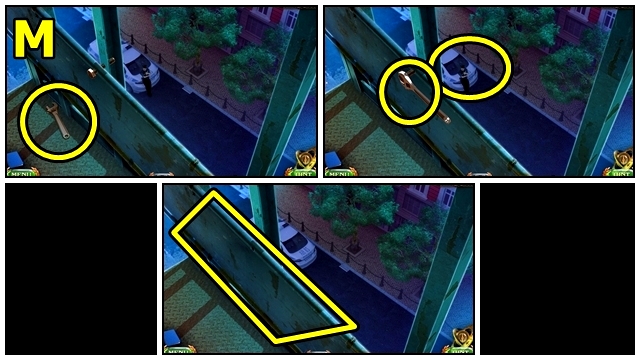
- Pick up wrench (M). Throw SWEET BOMB. Use wrench; take BOARD.
- Place BOARD (N).
- Insert TICKET (O).
- Move forward.

- Examine (P).
- Solution: This puzzle is random (Q).
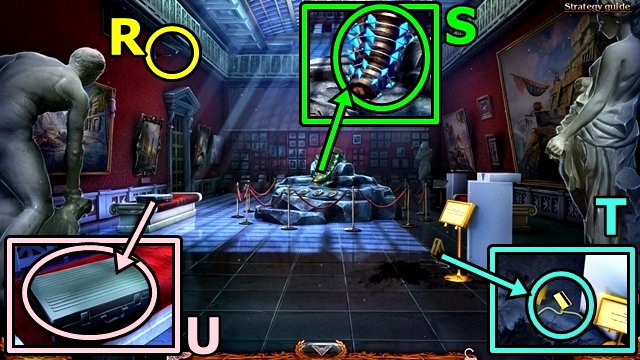
- Break (R).
- Take HORN OF FROST (S).
- Take KEY CARD (T).
- Open (U). Take FORENSIC SET.
- Return to Security Room.

- Open FILE; read; take CD.
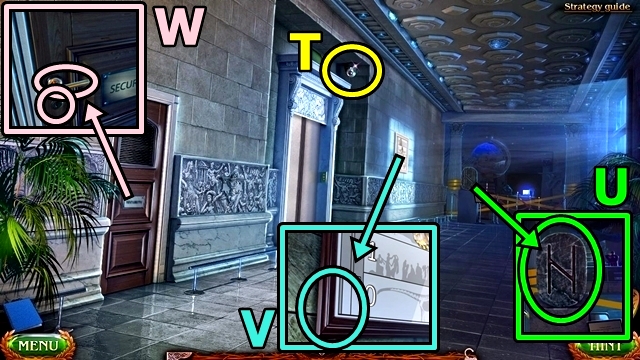
- Press (V). Use FORENSIC SET. Press 9-4-3-ENTER. Open; remove CD; insert CD; close.
- Return to Archives.
- Insert KEY CARD (W).
- Open (X); clear; take RUNE.
- Return to Wall of First Birth.
- Add RUNE (Y); take and add remaining RUNES.
- Take PHANTOM BLADE (Z).
- Move up.
- Use PHANTOM BLADE (A); receive HORN.
- Return to Temple.
- Talk (B).
- Examine (C).
- Move down.
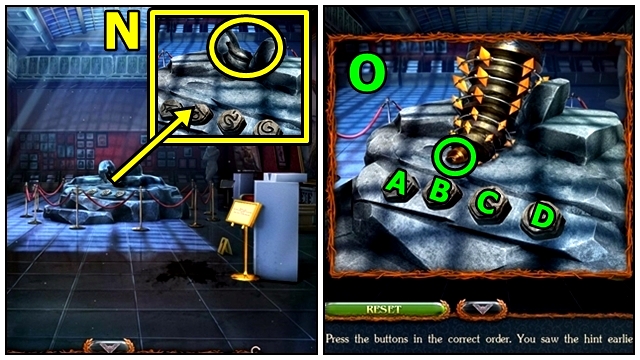
- Play mini-game (D).
- Solution: C-Ax2-Ex2 (E).
- Enter.
- Take KEY (F).
- Add FIRE SCEPTER (G), then KYOLLS.
- Insert KEY (H).
- Play HOP (I); receive CRYSTALS.
- Add CRYSTALS (J).
- Add HORN OF FROST (K) and HORN.
- Assemble horn (L).
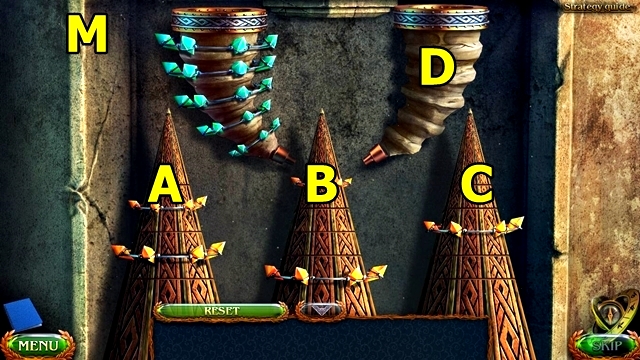
- Solution: (B-C)-(B-D)-(A-B)-(A-D)-(C-A)-(C-D)-(B-D)-(A-D) (M). Take HORN OF FIRE.
- Return to Exhibition Hall.
- Insert HORN OF FIRE (N).
- Solution: A-D-C-B (O). Press Horn.
- Congratulations! You've completed Lost Lands: Ice Spell.
Created at: 2017-10-11