
Walkthrough Menu
- General Tips
- Chapter 1- The Nightingale
- Chapter 2 - Peking Opera Show
- Chapter 3 - Acrobatic Destruction Show
- Chapter 4 - The Velvet Diva Show
- Chapter 5 - Magician HOG-DINI Show
- Chapter 6 - Nightingale's Masterpiece Show
General Tips
- This is an Interactive Hidden Object Game.
- Click on Options (1) to adjust the Volume, System Cursor and Screen Size.
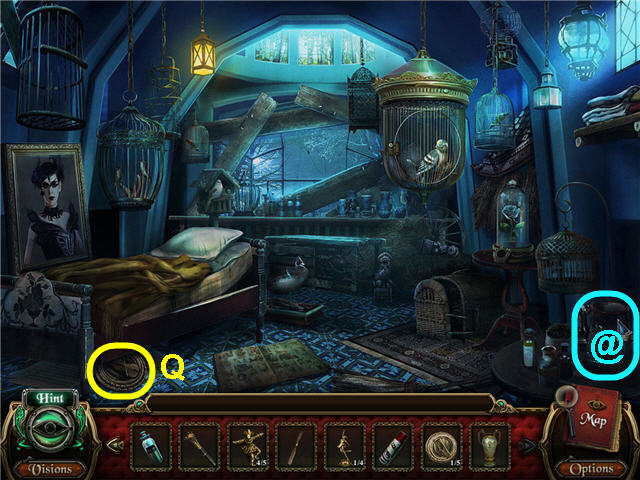
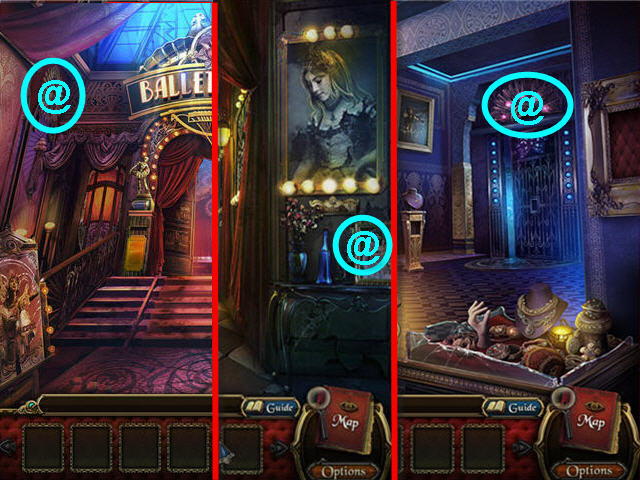
- There are 20 Macabre Items (morphing items) to find to increase the speed of your hint refills; these will be circled in cyan and marked with the '@' symbol in the screenshots.
- The Macabre Items will appear in a room after a series of actions have been completed first; you may not find the item until you have been in a room for a few times.
- You can interact with the bugs and the animals in the scenes.
- A hand cursor means you can pick up the item.
- A magnifying glass cursor signifies an area you can inspect closer.
- All inventory items are circled in yellow in the screenshots.
- The cursor will freeze as a penalty for excessive random clicking.
- Drag an inventory item to the hint button to see where that item can be used.
- Puzzles may be skipped. Skipping a puzzle will disable the hint button for 5 minutes.
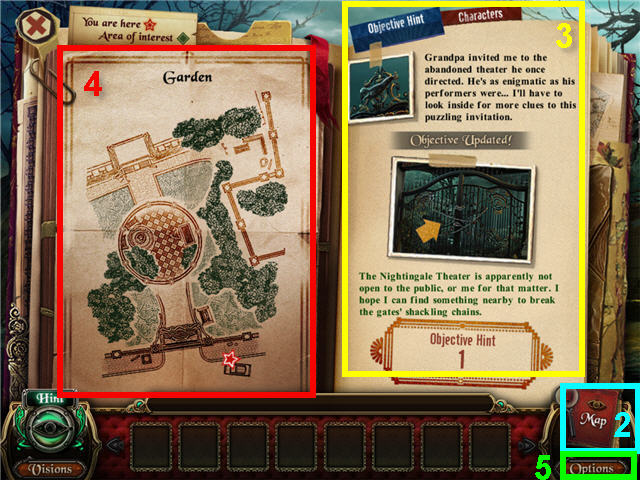
- Click on the map (2) to access the Map, Objective Hints, and Tasks.
- An exclamation point on the map means there is a new entry. You current objective will be listed along with a little hint (3).
- The Map (4) will show your current location and areas of interest.
- Click on Options (5) on the bottom right to exit the game.
Chapter 1- The Nightingale
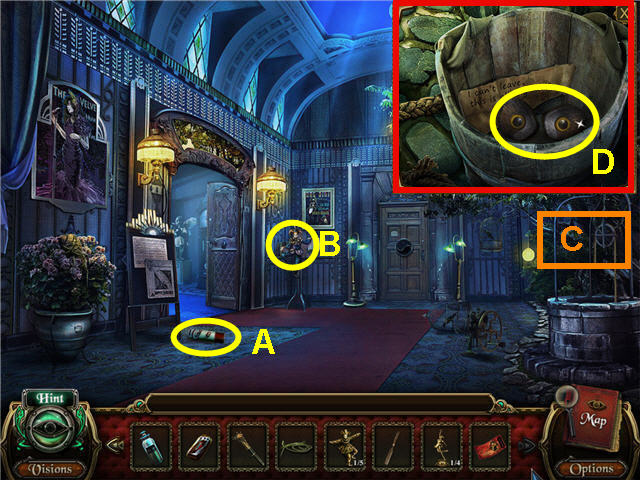
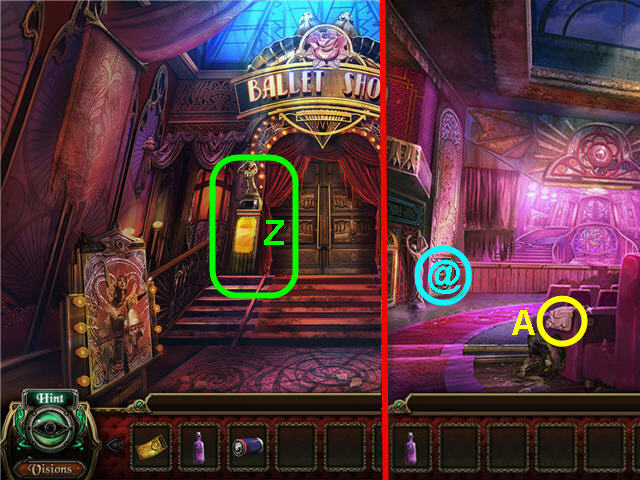
- Click on the apparition and head to the left.
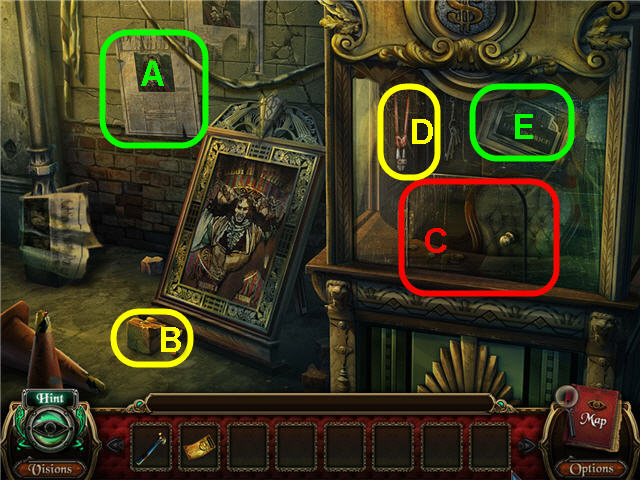
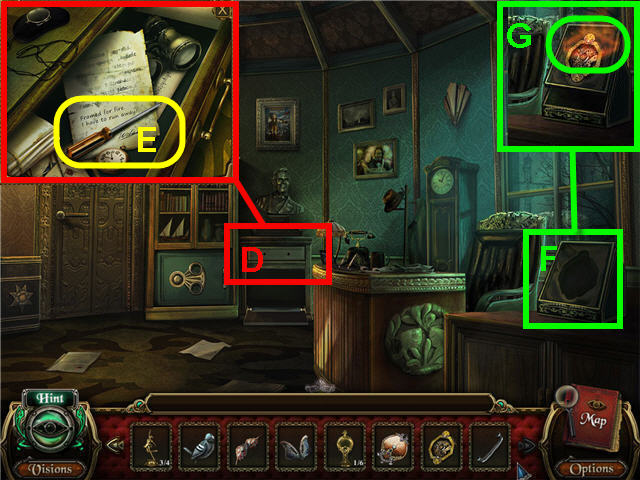
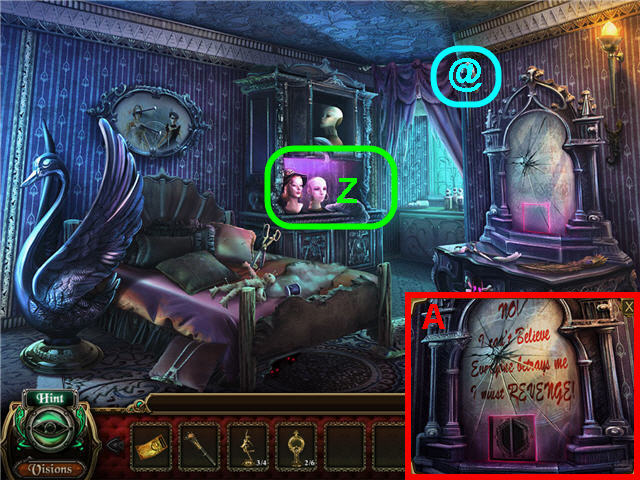
- Examine the notice (A) to get a character update.
- Take the BROKEN BRICK (B) and use it on the glass (C); take the BOLT CUTTER (D) and click on the sign (E).
- Back out.
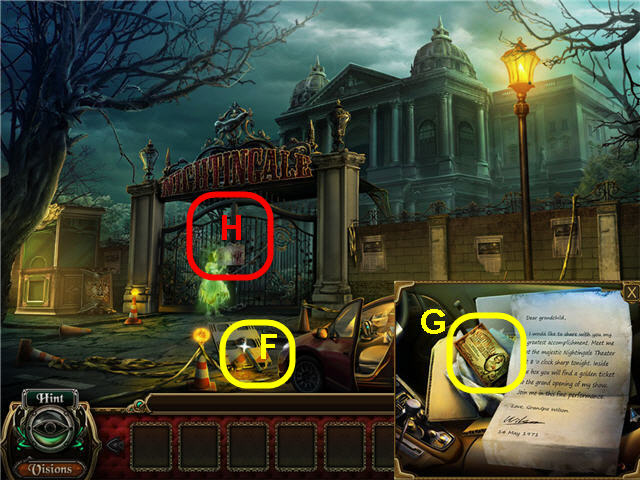
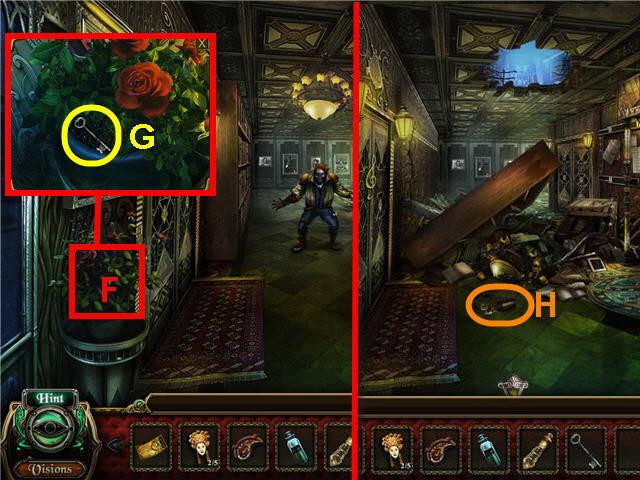
- Take the HAMMER (F).
- Examine the car; take the GOLDEN TICKET – NIGHTINGALE'S MASTERPIECE SHOW (G).
- Examine the gates (H); use the HAMMER on the lock and the BOLT CUTTER on the chain.
- Head through the gates and click on the fountain to access a Hidden Object Scene.
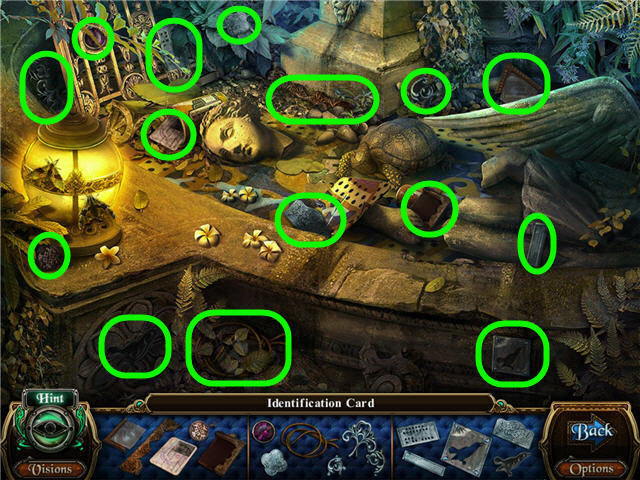
- Find the fragmented pieces and get an ACCESS CARD.
- Head forward and then to the right.
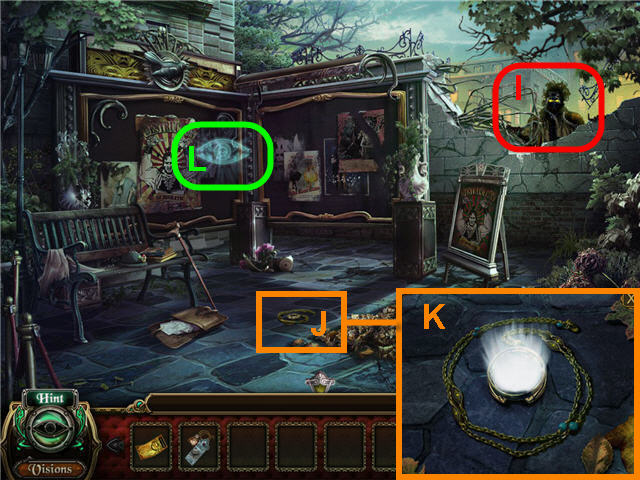
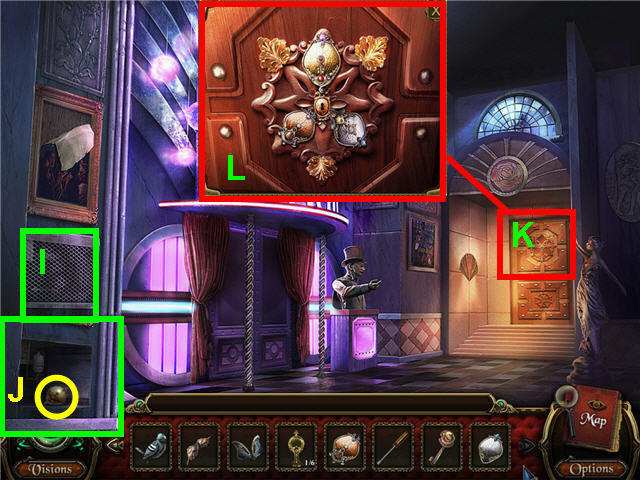
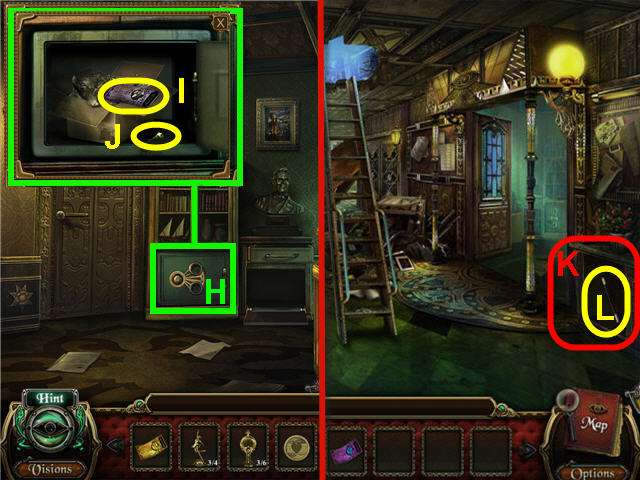
- Examine the large figure (I).
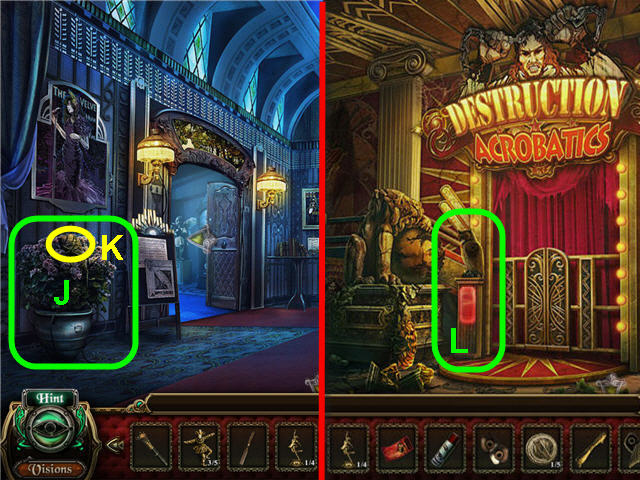
- Examine the monocle (J); click on it (K).
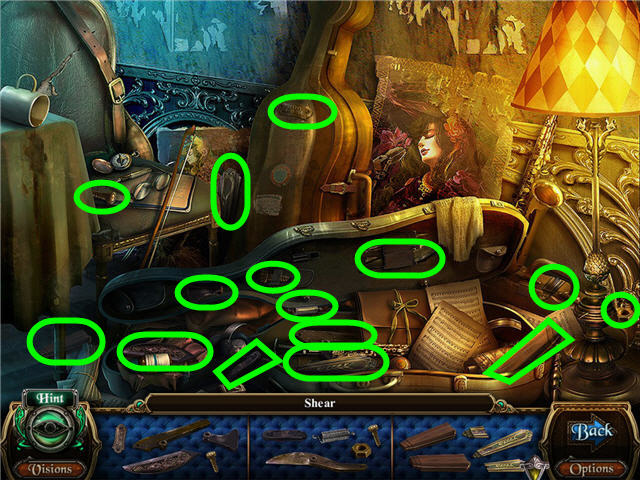
- Click on the eye (L) to access a Hidden Object Scene.
- Find the fragmented pieces and take the SHOVEL.
- Back out.
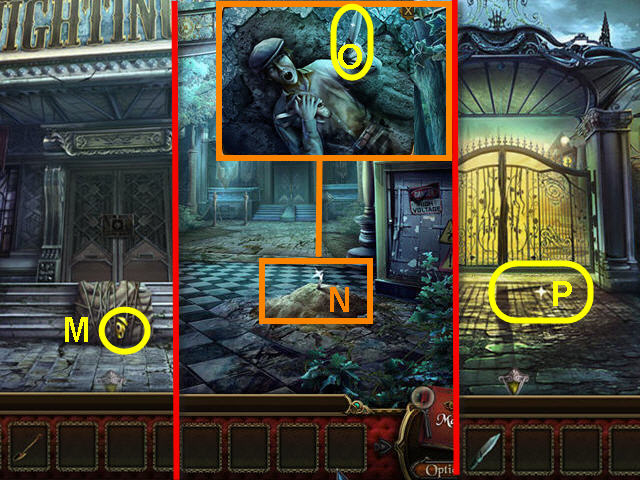
- Examine the sack and take the ELECTRICAL TAPE (M).
- Back out.
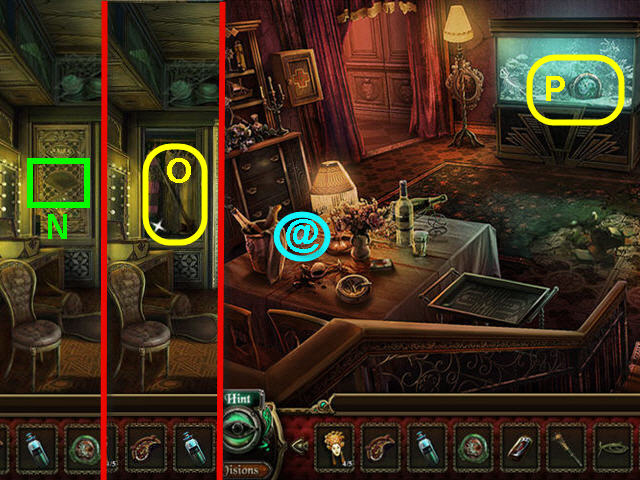
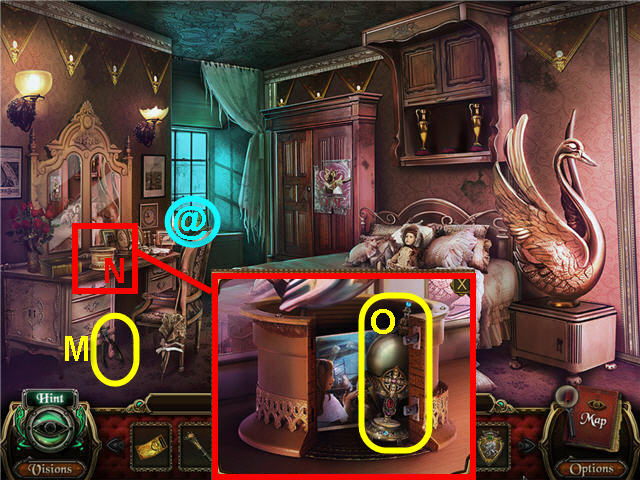
- Use the SHOVEL on the dirt (N) and take the SHARP KNIFE (O).
- Back out.
- Click on the gate; take the METAL ROD (P).
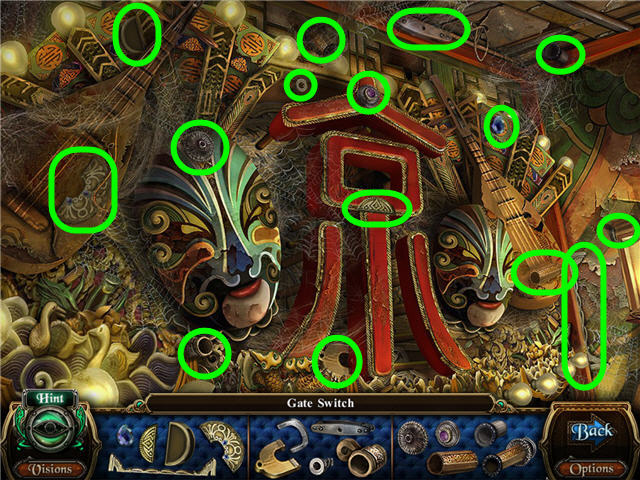
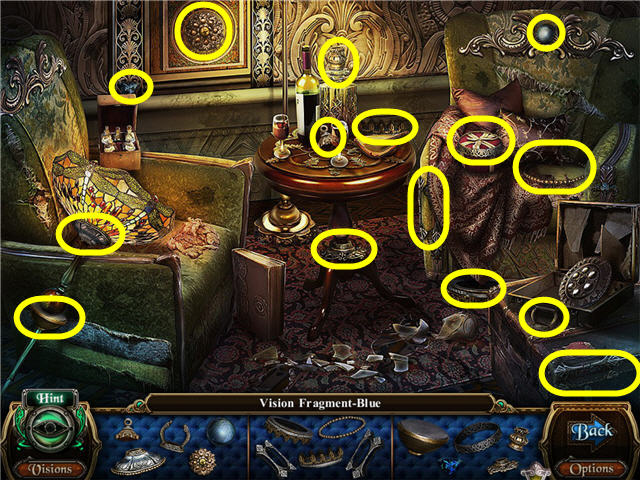
- Examine the brochure rack on the left to access a Hidden Object Scene.
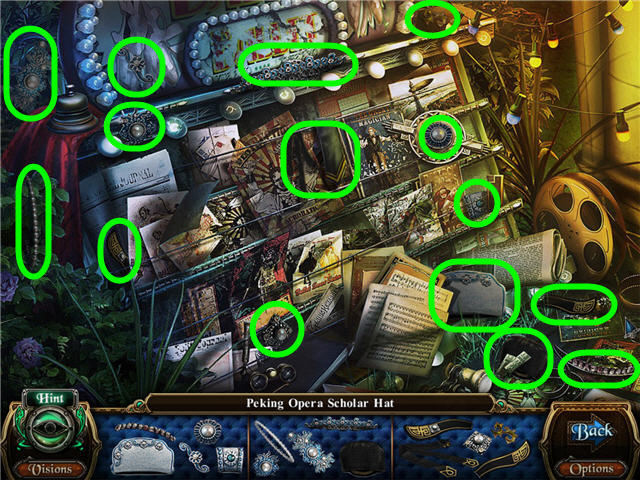
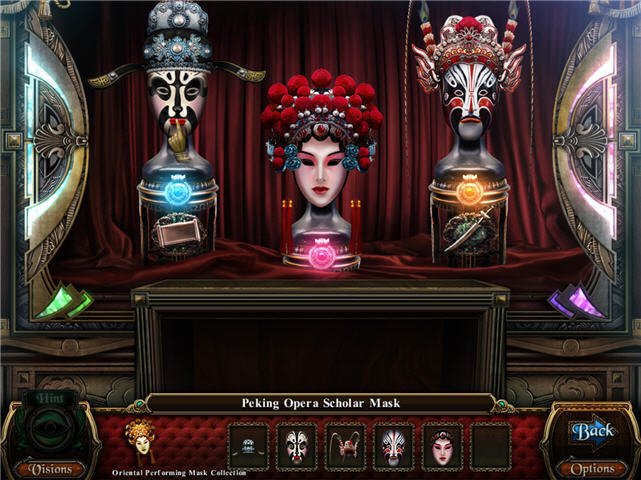
- Find the fragmented pieces and get an ORIENTAL PERFORMING MASK COLLECTION (1 of 5).
- Back out.
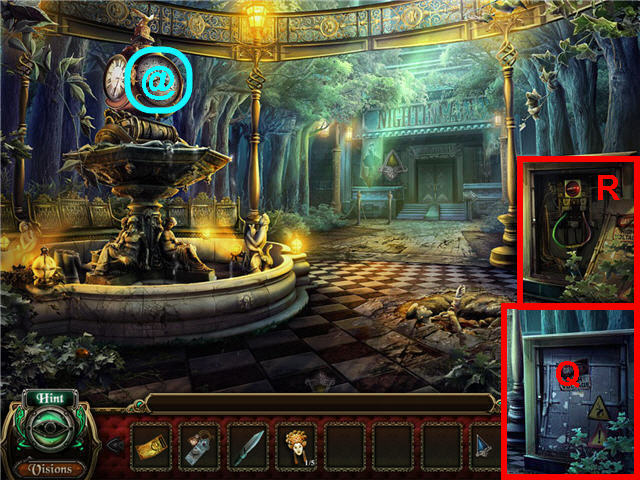
- Use the METAL ROD on the generator (Q); use the ELECTRICAL TAPE on the wires (R).
- Click on the MACABRE ITEM 1 of 20 (@).
- Head forward.
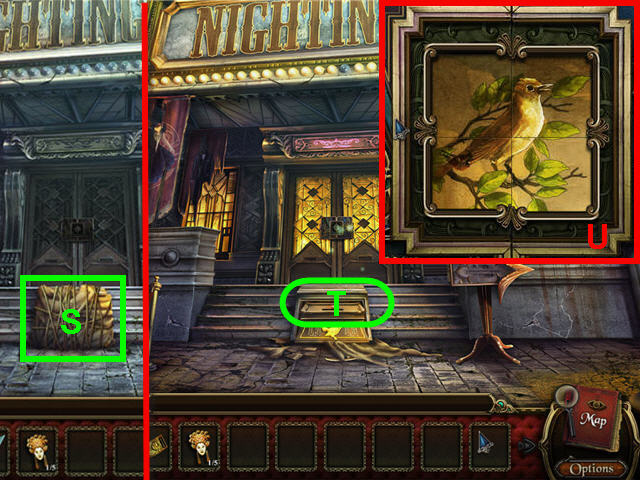
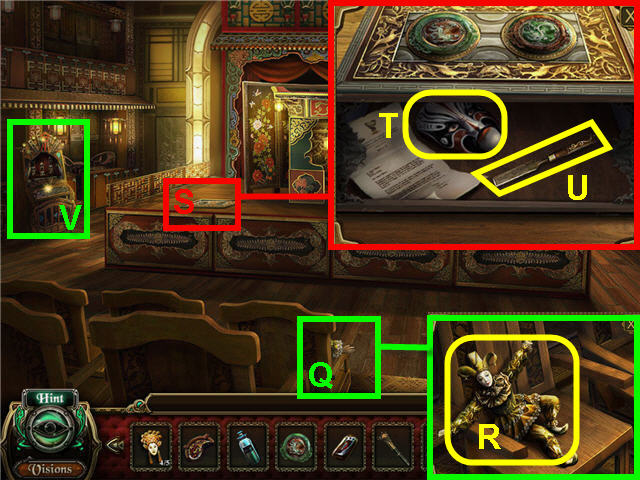
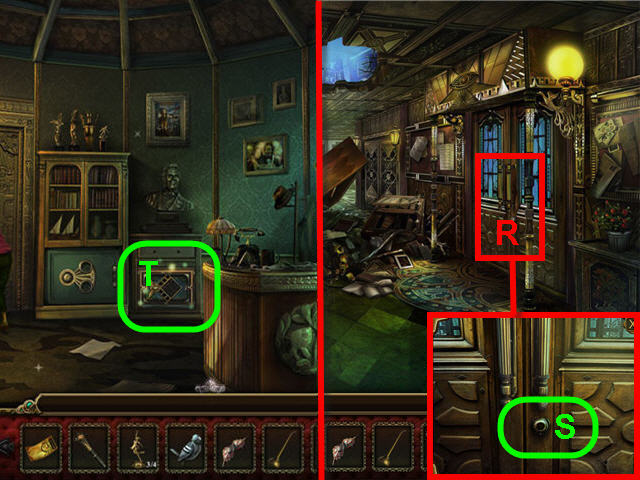
- Examine the gunny sack (S); use the SHARP KNIFE on the twine and use the ACCESS CARD on the slot (T).
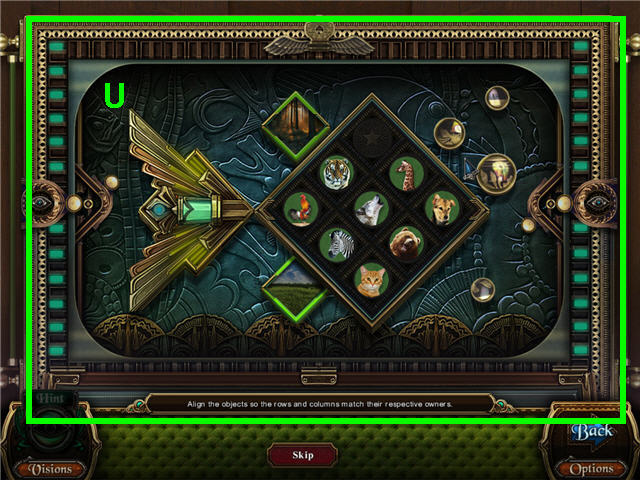
- Examine the door to trigger a puzzle.
- Click on the panels to find the 4 panels that can be matched to complete a picture.
- See screenshot for solution (U).
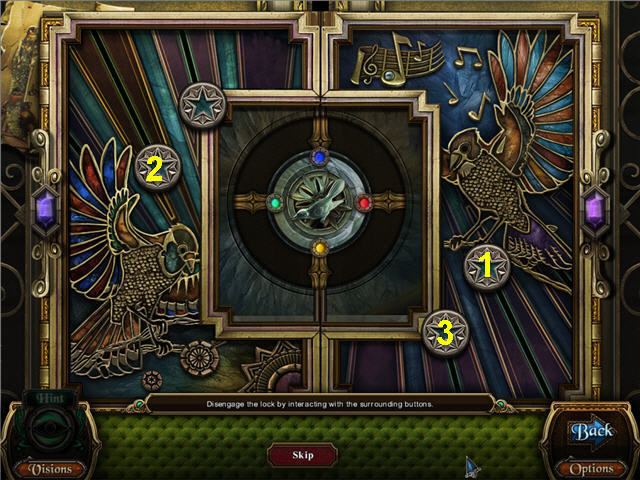
- Click on the star button to light up the 4 lights in the center.
- Each button lights up or turns off 2 or more lights.
- Click on the buttons in the order shown in the screenshot to solve the puzzle.
- Back out of the close-up, head right and click on the bench to trigger a Hidden Object Scene.
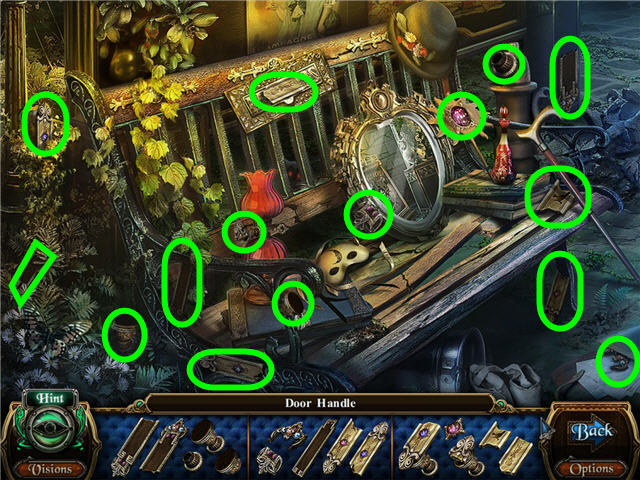
- Find the fragmented pieces and get DOOR HANDLES.
- Back out and take a closer look at the door; place the DOOR HANDLES on the door and enter.

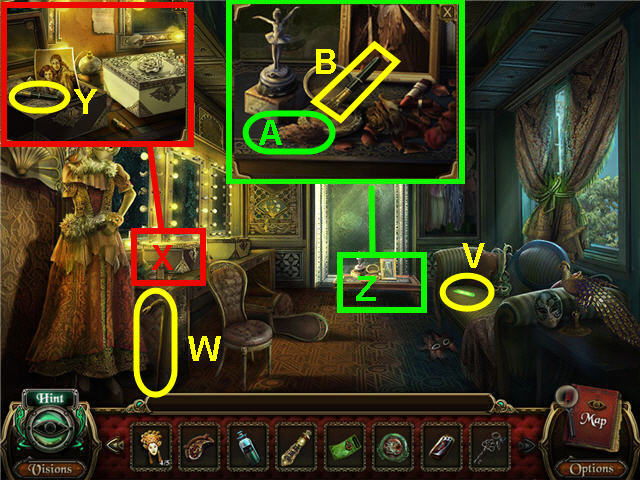
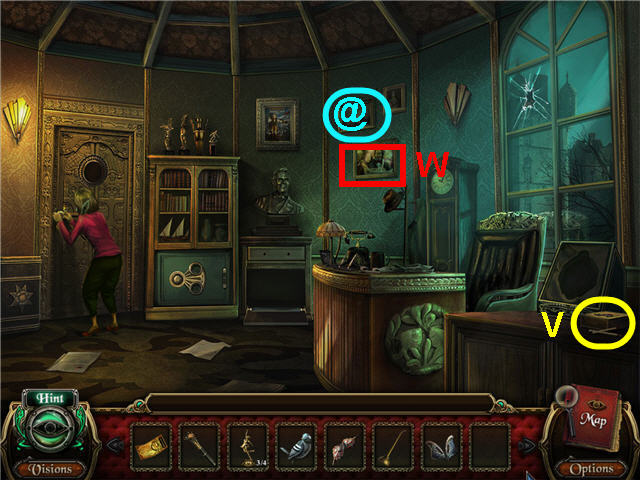
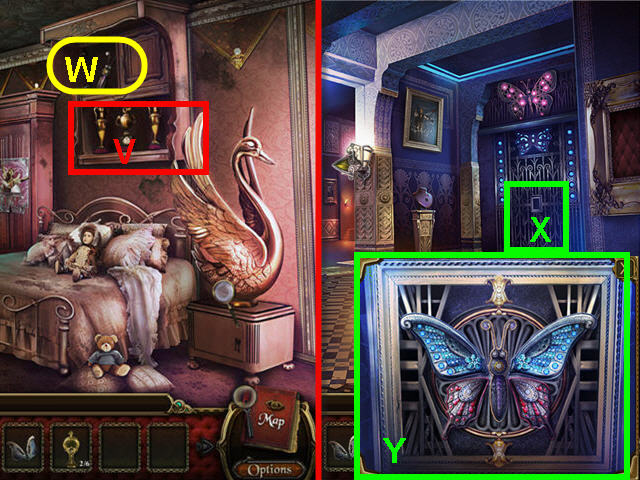
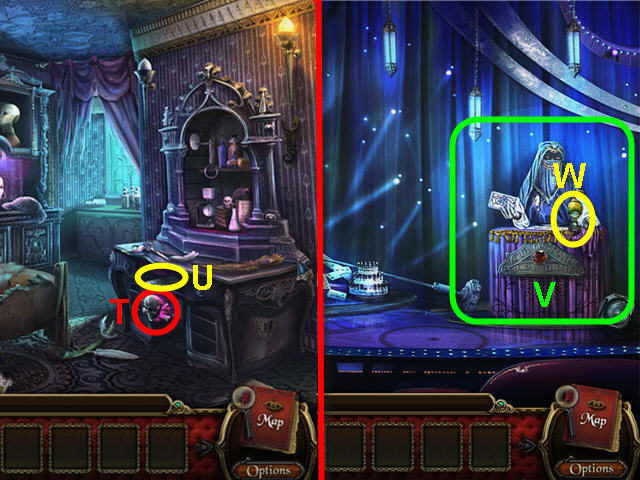
- Pick up the GRAMOPHONE CRANK (V).
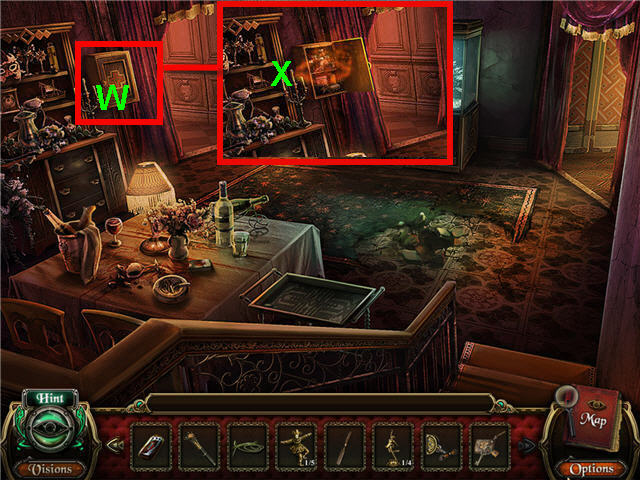
- Head straight and take the BIRD EMBLEM HALF (W).
- Back out and head up the right staircase.
- Head into the room on the left and click on the table to access a Hidden Object Scene.

- Find the fragmented pieces.
- Get a NAME PLAQUE.
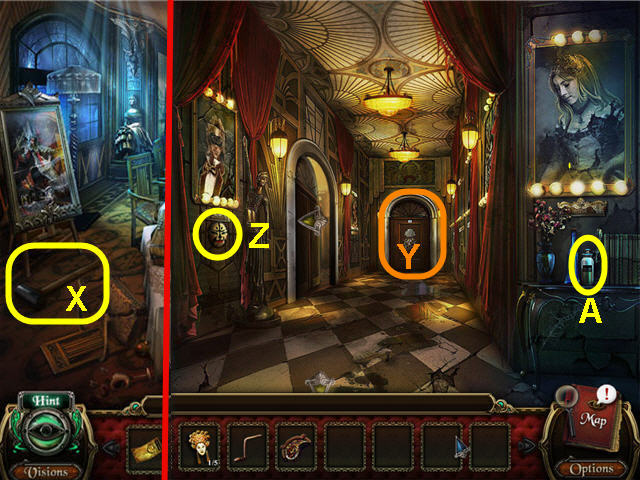
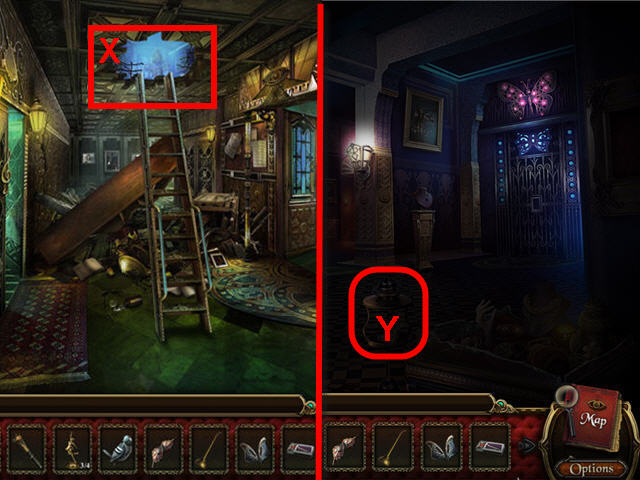
- Take the SLEDGEHAMMER (X).
- Back out.
- Examine the door (Y).
- Take the ORIENTAL PERFORMING MASK COLLECTION 2 of 5 (Z).
- Take the RUST REMOVER (A).
- Back out.
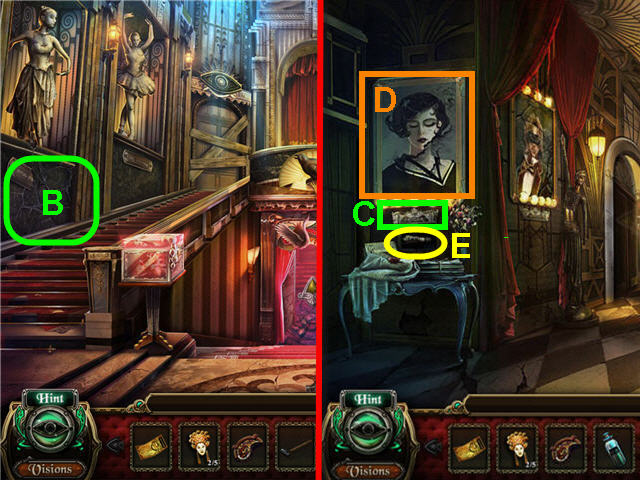
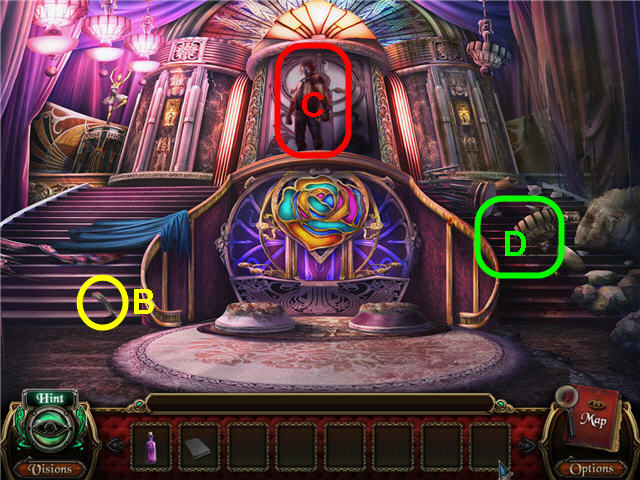
- Use the SLEDGEHAMMER on the wall (B); take the SEVERED PORTRAIT PIECE.
- Head up the right staircase.
- Place the NAME PLAQUE under the portrait (C).
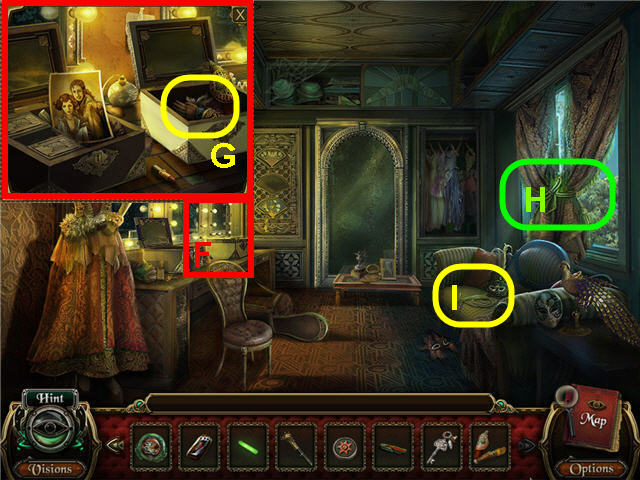
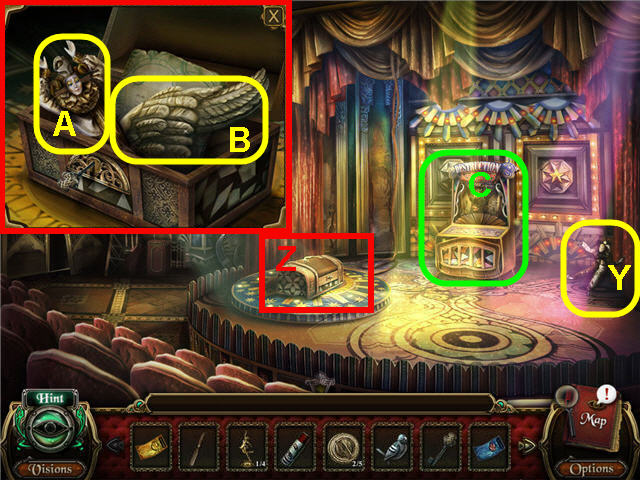
- Place the SEVERED PORTRAIT PIECE on the portrait (D) and take the PERFUME VIAL (E).
- Back out and head up the left staircase.
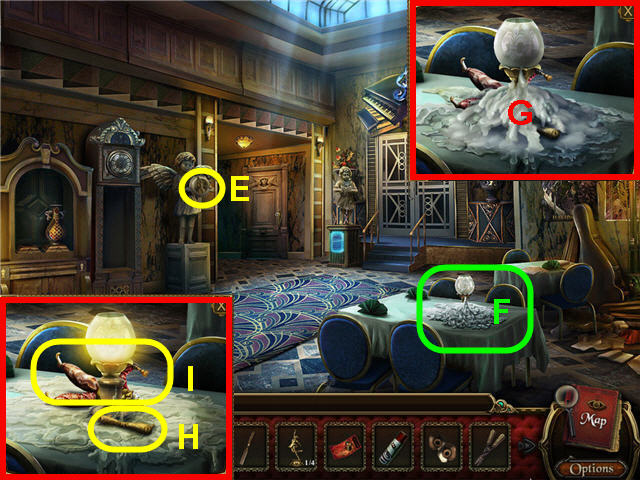
- Examine the flowers (F); take the CRYSTAL BOX KEY (G).
- Try and back out.
- Click on the pills (H) and back out.
Chapter 2 – Peking Opera Show
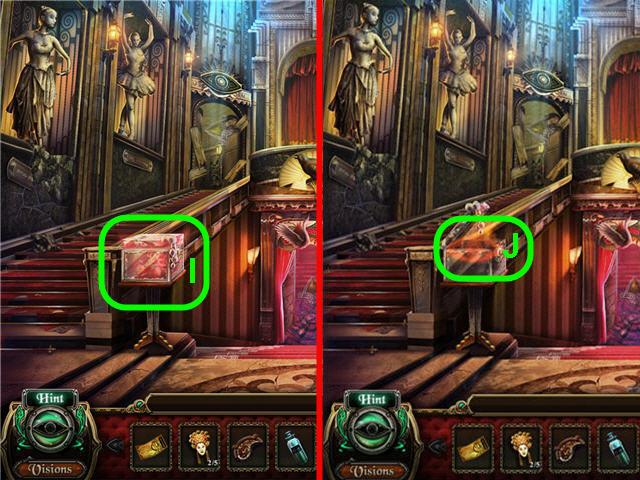
- Use the CRYSTAL BOX KEY on the crystal box (I).
- Click on the eye (J) to trigger a puzzle.

- Arrange the pictures in the correct in order to make the flowers grow.
- Pull the cords (1) in between each picture to switch the order of the pictures; pull the far right cord (K) when complete. See screenshot (2) for solution.
- Solution: planter, dirt, seeds, sun, water. Pull the cords in this order: 4, 1, 2, 3, 1, 2, 1.
- Get the GREEN TICKET – PEKING OPERA SHOW.
- Click on the headless ballerina statue on the right to access a Hidden Object Scene. .

- Find the fragmented pieces and get a GRAMOPHONE SPEAKER.
- Head up the right staircase and into the left room.
- Click on the table to access a Hidden Object Scene.
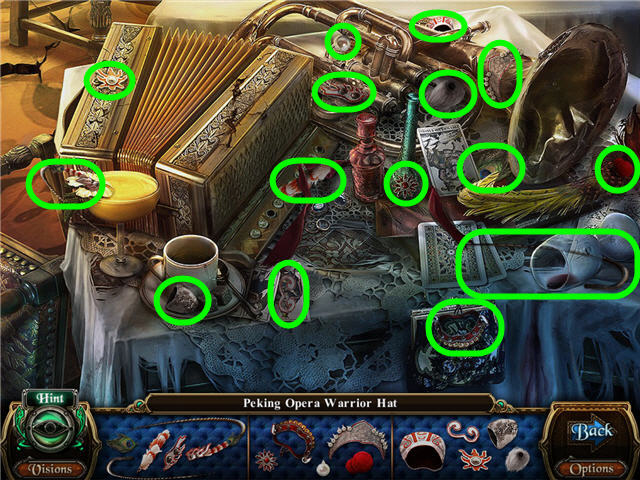
- Find the fragmented pieces.
- Get an ORIENTAL PERFORMING MASK COLLECTION 3 OF 5.
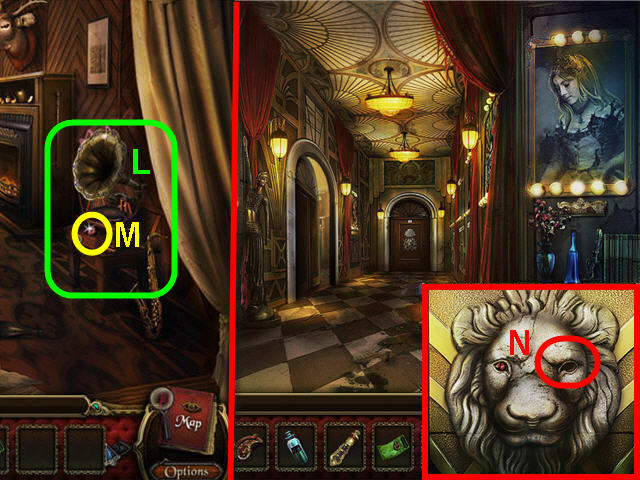
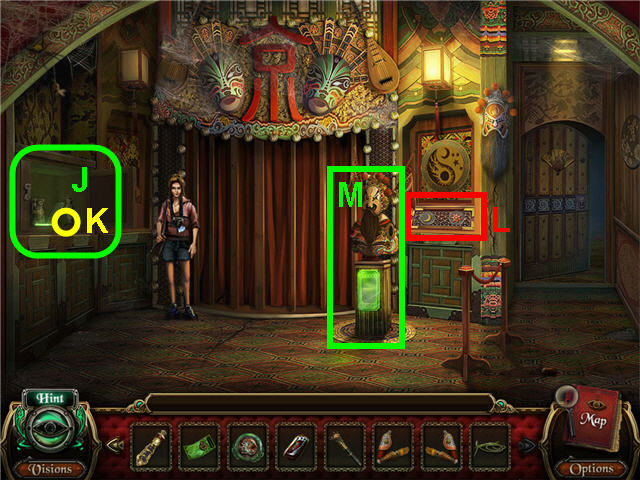
- Place the GRAMOPHONE CRANK and GRAMOPHONE SPEAKER on the gramophone (L).
- Take the RUBY (M) and back out.
- Examine the door; place the RUBY in the eye socket (N).
- Click on the opened center to trigger a puzzle.
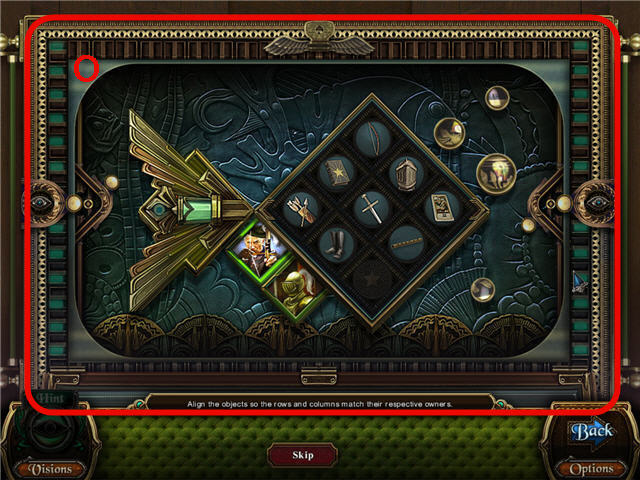
- The goal is to arrange the correct objects in the column that belongs with the archer and the knight.
- Click on any object that is next to the empty space to move it to that space.
- The order is not important, just that they are in the correct row. See screenshot (O) for solution.
- Head straight.
- Click on the hutch on the far left to access a Hidden Object Scene.
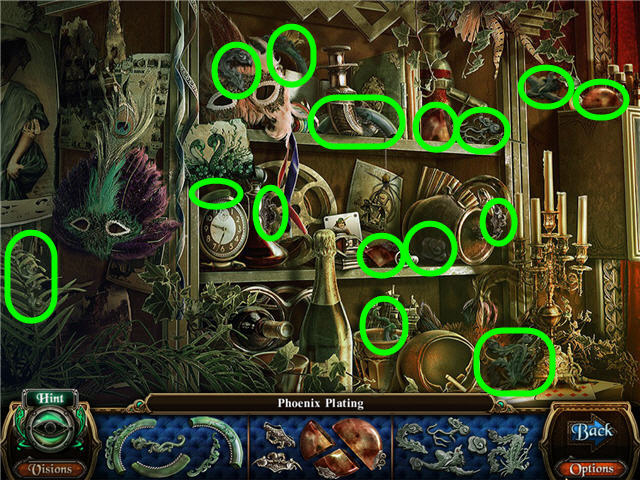
- Find the fragmented pieces.
- Get a PHOENIX PLATE.
- Take the ORIENTAL PERFORMING MASK COLLECTION 4 OF 5 (P).
- Examine the table; take the LIGHTER (Q).
- Head right and take the PICKAXE (R).
- Back out and use the PICKAXE on the floor (S); take the BLACK-TINTED KEY (T).
- Head left.
- Speak to the girl.
- Click on the eye (U) to access a Hidden Object Scene.
- Find the fragmented pieces and take the POWDER ROOM KEY.
- Back out and head right.
- Use the POWDER ROOM KEY on the door on the right and enter.
- Take the LIGHT STICK (V) and the LONG CROWBAR (W).
- Examine the black box (X); use the BLACK-TINTED KEY on the box; take the UNPOWDERED BRUSH (Y) and click on the picture.
- Examine the table (Z); click on the ballerina and use the UNPOWDERED BRUSH on the powder (A) and take the POWDER BRUSH (B).
- Back out two times and head left.
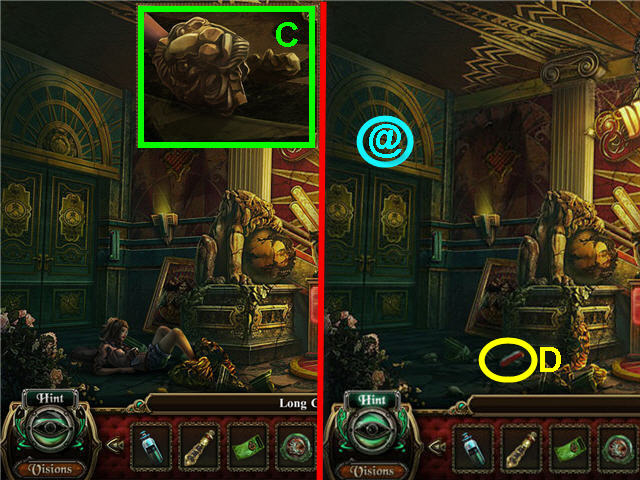
- Examine the girl's foot; use the LONG CROWBAR on the debris (C).
- Talk to the girl and get a SUN EMBLEM.
- Take the ROPE-CUTTING KNIFE (D).
- Click on the MACABRE ITEM 2 of 20 (@).
- Back out and head right.
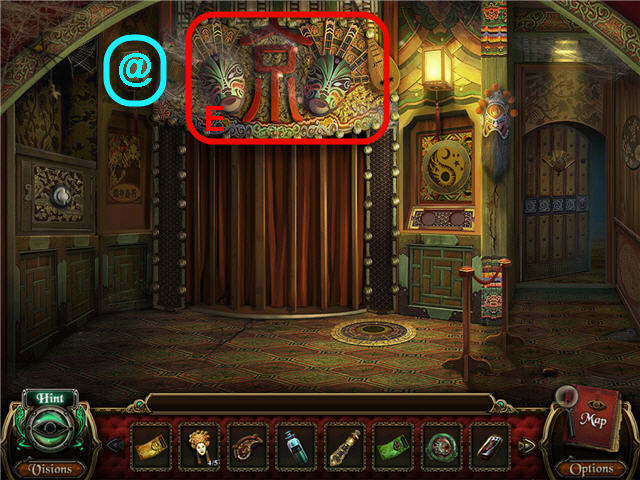
- Click on the MACABRE ITEM 3 of 20 (@).
- Examine the masks (E) to access a Hidden Object Scene.
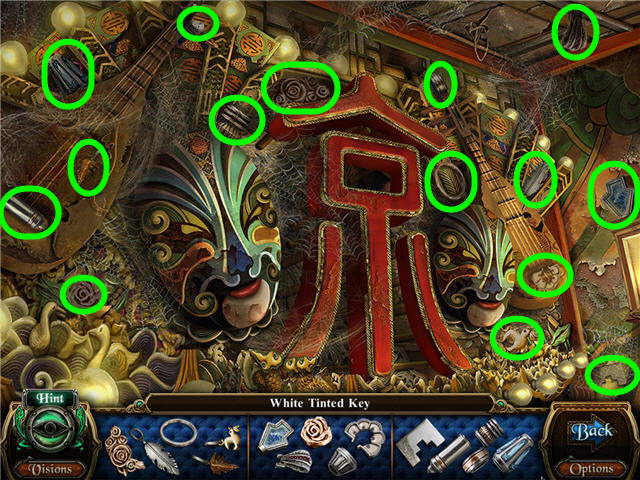
- Find the fragmented pieces and get a WHITE-TINTED KEY.
- Head right.
- Examine the mannequin on the left to access a Hidden Object Scene.
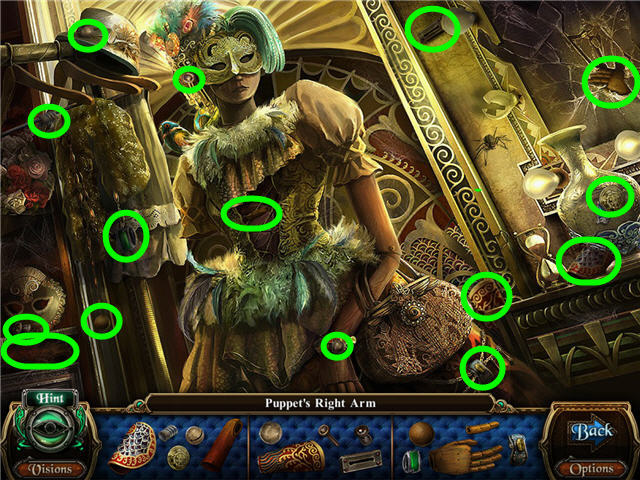
- Find the fragmented pieces.
- Get a PUPPET'S RIGHT ARM.
- Examine the white box (F); use the WHITE-TINTED KEY on the box.
- Take the PUPPET'S LEFT ARM (G).
- Use the ROPE-CUTTING KNIFE on the curtains (H); take the ROPE (I).
- Look out the window and click on the man.
- Back out.
- Talk to the girl.
- Use the LIGHT STICK on the safe (J); take the MOON EMBLEM (K).
- Use the SUN EMBLEM and MOON EMBLEM on the sockets (L).
- Place the PUPPET'S RIGHT ARM and PUPPET'S LEFT ARM on the ticket taker (M).
- Examine the ticket taker pedestal and use the GREEN TICKET – PEKING OPERA SHOW.
- Head straight and click on the stage to access a Hidden Object Scene.
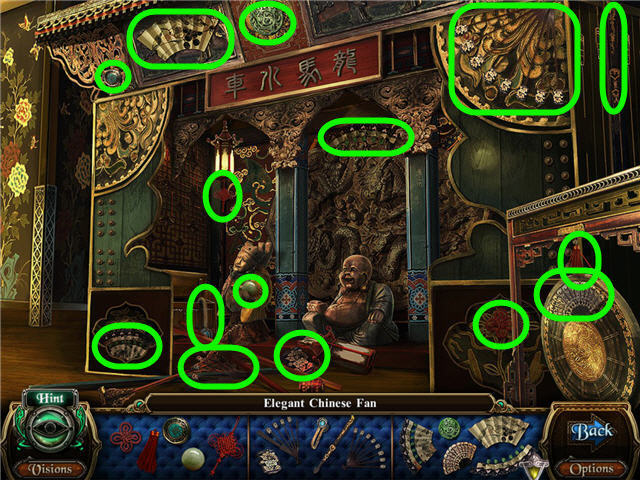
- Find the fragmented pieces and get an ELEGANT CHINESE FAN.
- Back out and head right.
Chapter 3 – Acrobatic Destruction Show
- Place the ELEGANT CHINESE FAN on the slot (N); take the FISHING ROD (O).
- Back out two times.
- Use the FISHING ROD on the aquarium to get a DRAGON PLATE (P).
- Click on the MACABRE ITEM 4 of 20 (@).
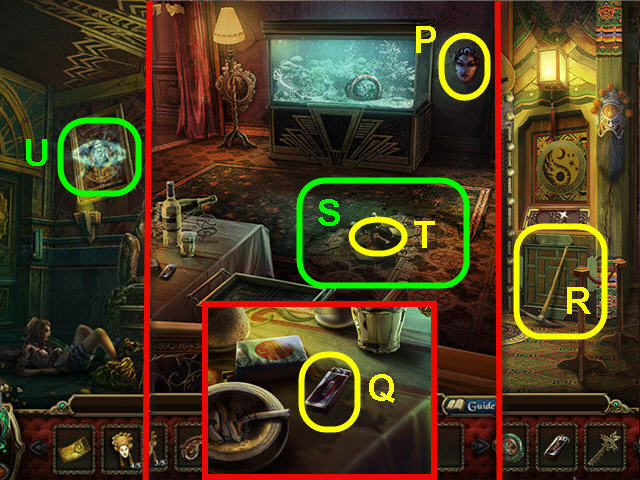
- Head right and forward.
- Examine the chair (Q); take the CLOWN DOLL COLLECTION 1 OF 5 (R).
- Examine the stage floor (S); place the PHOENIX PLATE on the left and the DRAGON PLATE on the right.
- Take the ORIENTAL PERFORMING MASK COLLECTION 5 OF 5 (T), and the SMALL CHISEL (U); click on the note.
- Examine the display (V) to trigger a puzzle.
- Arrange the masks and headdresses to match the base. See screenshot for solution.
- Take the DANCING FIGURINE COLLECTION 1 OF 4.
- Back out and take a closer look at the masks above the stage entrance to access a Hidden Object Scene.
- Find the fragmented pieces and get a DOOR SWITCH.
- Back out and take a closer look at the hutch on the left to access a Hidden Object Scene.
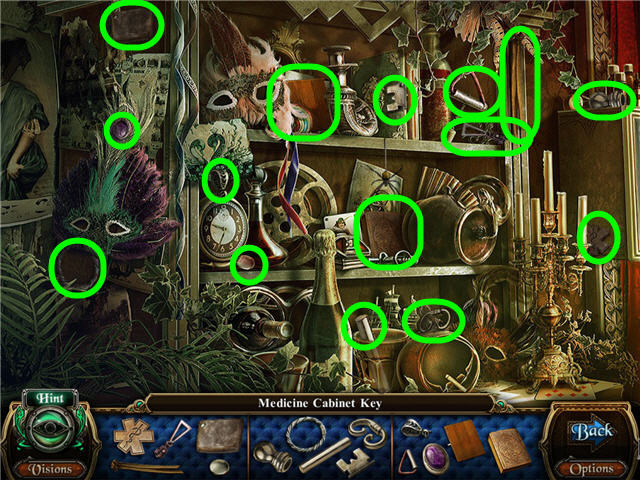
- Find the fragmented pieces.
- Get a MEDICINE CABINET KEY.
- Use the MEDICINE CABINET KEY on the medicine cabinet (W).
- Click on the eye (X) to trigger a puzzle.
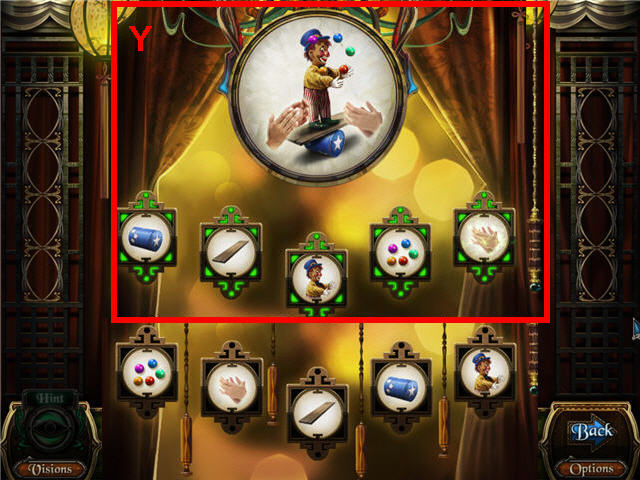
- Arrange the pictures to complete the circus performance.
- Solution: roller, board, clown, balls, applause. Pull the cords in this order: 3, 1, 2, 4, 3, 1, 4.
- See screenshot (Y) for solution.
- Get a RED TICKET – ACROBATIC DESTRUCTION SHOW.
- Head left.
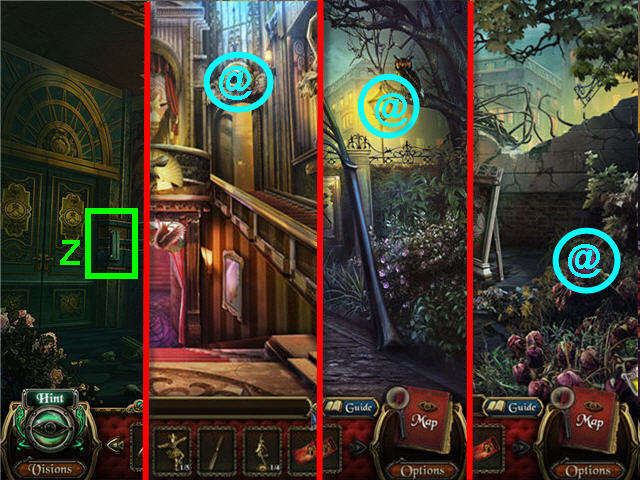
- Use the DOOR SWITCH on the slot (Z).
- Back out 3 times and click on the MACABRE ITEM 5 OF 20 (@).
- Back out 3 times and click on the MACABRE ITEM 6 of 20 (@).
- Back out, head forward, go right and click on the MACABRE ITEM 7 of 20 (@).
- Back out, go forward, head up the right staircase, forward, and left twice.
- Take the PESTICIDE (A) and the CLOWN DOLL COLLECTION 2 OF 5 (B).
- Use the ROPE on the pulley (C) and take a closer look at the bucket in the well; take the OWL EYE (D).
- Head left and take a closer look at the right table to access a Hidden Object Scene.
- Find the fragmented pieces.
- Get the GARDEN SHEARS.
- Take the MUSIC INSTRUMENTS COLLECTION 1 OF 5 (E).
- Examine the table (F); use the LIGHTER on the wax (G).
- Take the CHEST HANDLE (H) and the CLOWN DOLL COLLECTION 3 OF 5 (I).
- Back out.
- Use the GARDEN SHEARS on the plant (J); take the OWL WINGS (K).
- Back out.
- Place the OWL EYE and OWL WINGS on the ticket taker (L).
- Examine the ticket taker and place the RED TICKET – ACROBATIC DESTRUCTION SHOW in the slot.
- Head straight and take a closer look at the left side of room to access a Hidden Object Scene.
- Find the fragmented pieces and get a STRONGMAN EMBLEM HALF.
- Back out; talk to the mayor and head left.

- Examine the door (M); place the STRONGMAN EMBLEM HALF and BIRD EMBLEM HALF on the lock (N).
- Examine the lock to trigger a puzzle.
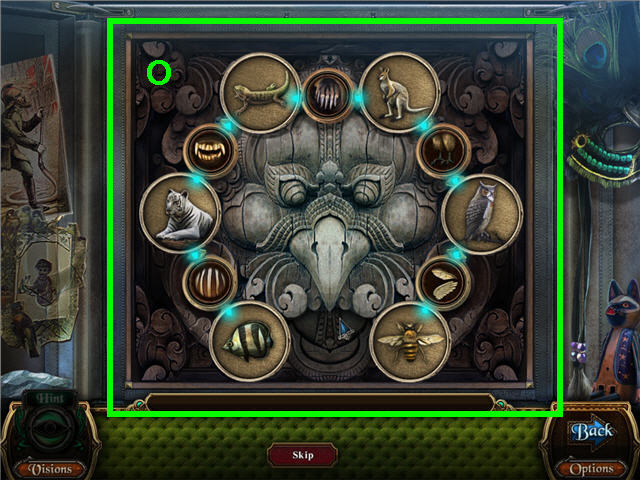
- Arrange the animals on the larger disks according to their characteristics on the smaller disks.
- Click on a smaller disk to switch the connecting larger disks. See screenshot for solution (O).
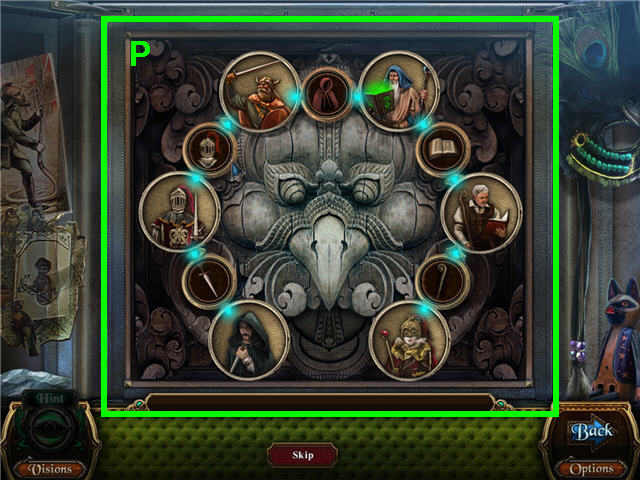
- Arrange the characters on the larger disks according to their characteristics on the smaller disks.
- See screenshot for solution (P).
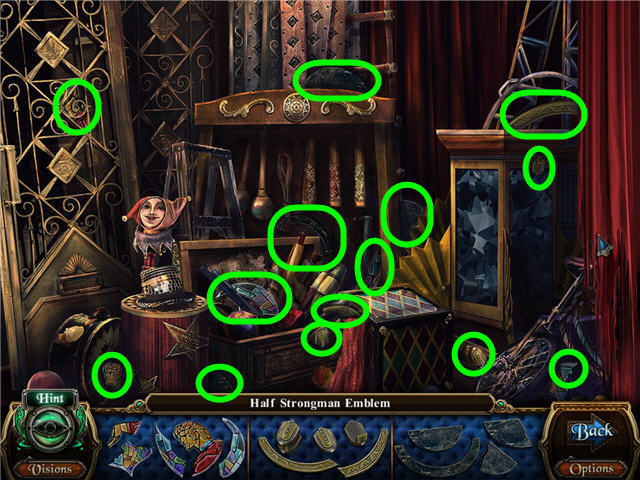
- Head straight and take a closer look at the window to access a Hidden Object Scene.
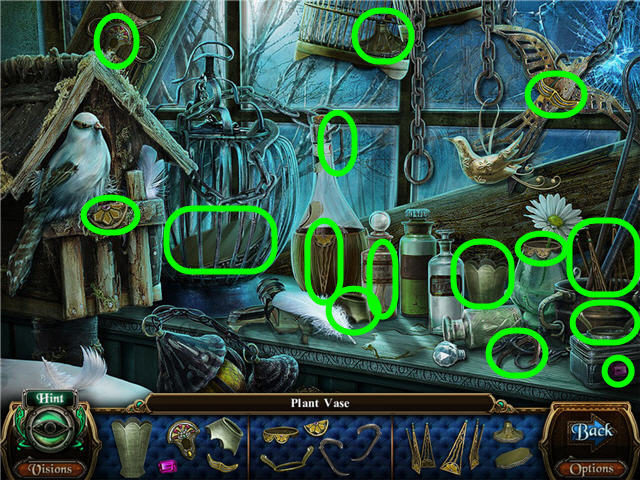
- Find the fragmented pieces.
- Get a PLANT VASE.
- Move the blanket and take the MUSIC INSTRUMENT COLLECTION 2 OF 5 (Q).
- Click on the MACABRE ITEM 8 OF 20 (@).
- Back out, head left and take a closer look at the table on the right to access a Hidden Object Scene.
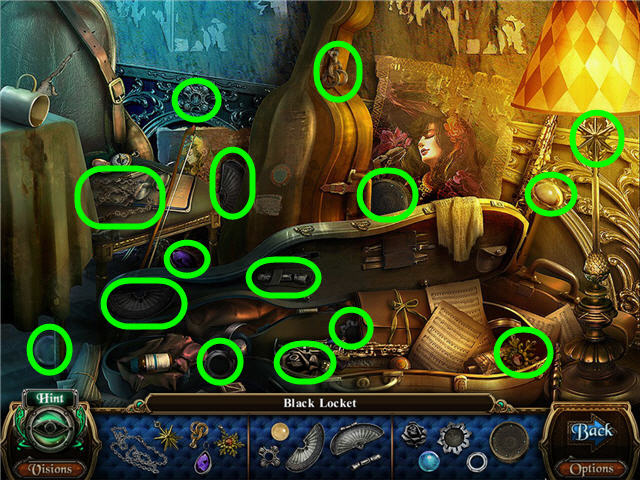
- Find the fragmented pieces.
- Get a BLACK LOCKET.
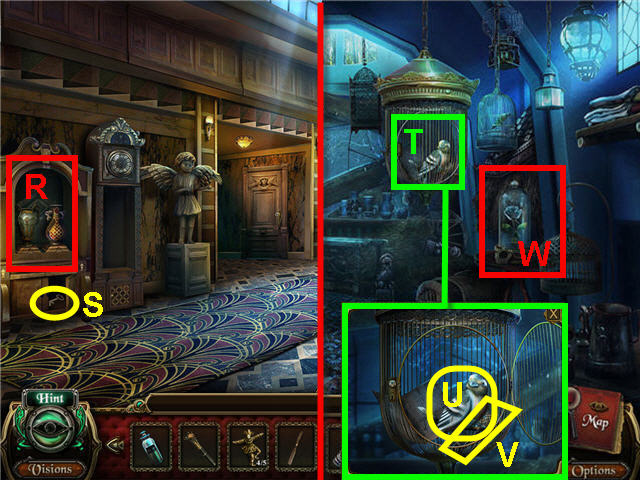
- Place the PLANT VASE in the alcove(R) and take the KEY (S).
- Back out and head straight.
- Take a closer look and use the BIRDCAGE KEY on the birdcage (T); take a closer look again and take the BIRD FIGURINE (U), the CHEST KEY (V) and click on the note.
- Use the BLACK LOCKET on the glass case (W); click on the eye.
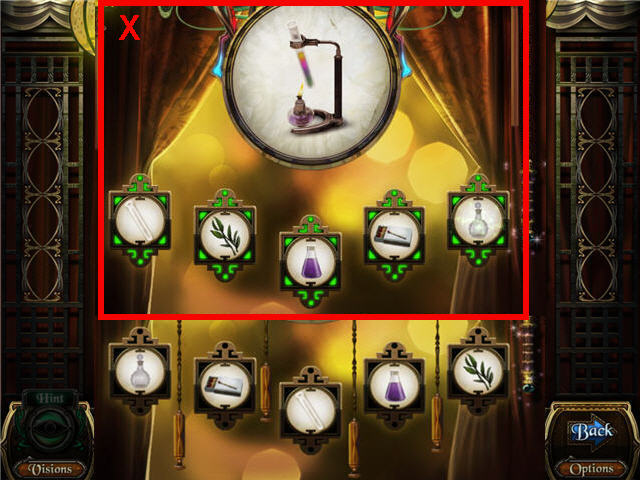
- Arrange the pictures to complete the actions to create a potion.
- Solution: test tube, plant, purple liquid, matches, decanter. Pull the cords in this order: 1, 3, 2, 4, 3, 1, 2, 1, 3, 4. See screenshot (X) for solution.
- Get a BLUE TICKET – THE VELVET DIVA SHOW.
- Back out two times and head forward.
Chapter 4 – The Velvet Diva Show
- Take the CLOWN DOLL COLLECTION 4 OF 5 (Y).
- Take a closer look and place the CHEST HANDLE and use the CHEST KEY on the chest (Z).
- Take the CLOWN DOLL COLLECTION 5 OF 5 (A), the LEFT ANGEL WING (B), and click on the letter.
- Examine the display case (C) to trigger a puzzle.
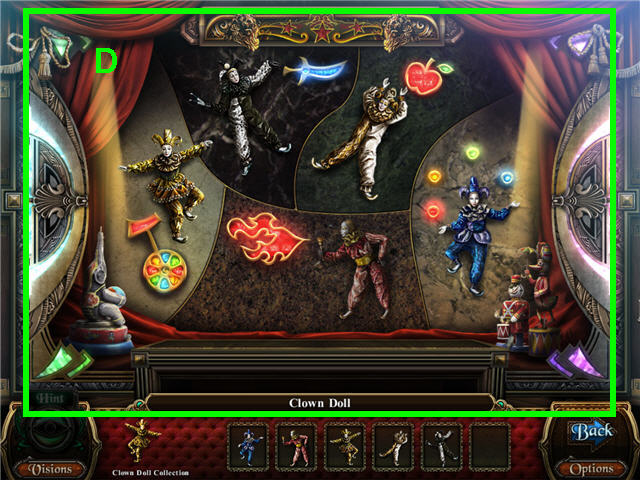
- Arrange the clowns according to the activities portrayed.
- Click on any two clowns to switch them. See screenshot (D) for solution.
- Take the DANCING FIGURINE COLLECTION 2 OF 4.
- Back out, head left, and go straight.
- Examine the window to access a Hidden Object Scene.
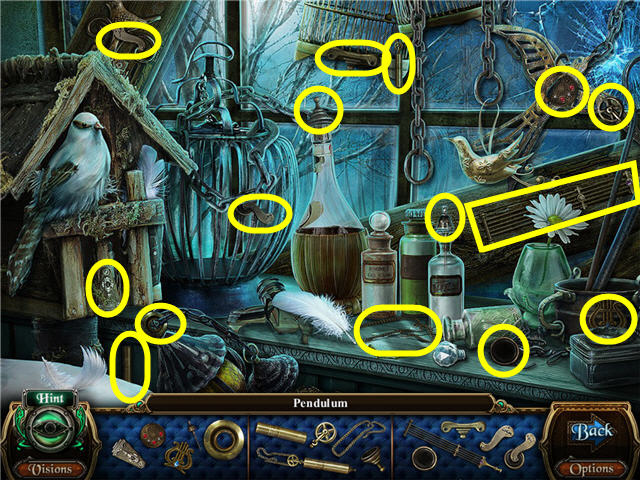
- Find the fragmented pieces and get a PENDULUM.
- Back out and head left.
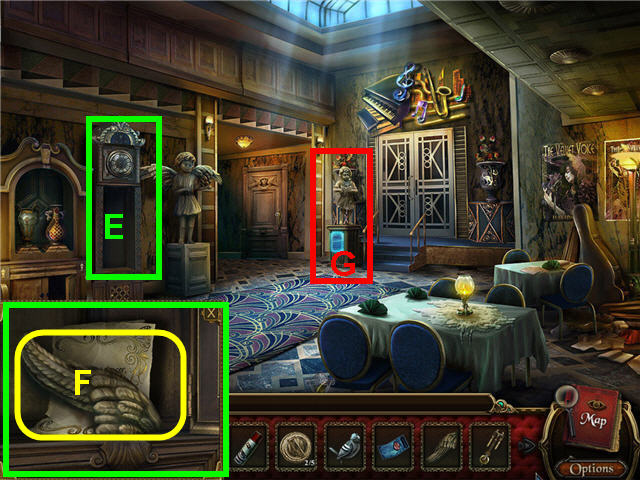
- Place the PENDULUM on the clock (E); take the RIGHT ANGEL WING (F) and click on the note.
- Place the LEFT ANGEL WING and the RIGHT ANGEL WING on the ticket taker (G).
- Examine the ticket taker and place the BLUE TICKET – THE VELVET DIVA SHOW in the slot.
- Head forward.
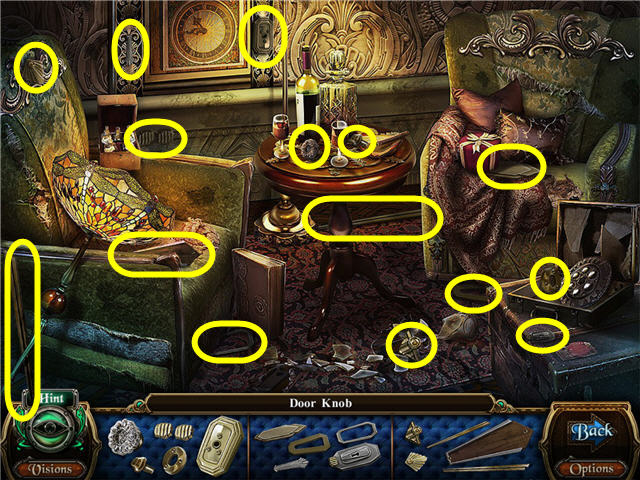
- Examine the chair on the left to access a Hidden Object Scene.
- Find the fragmented pieces.
- Get a DOOR KNOB.
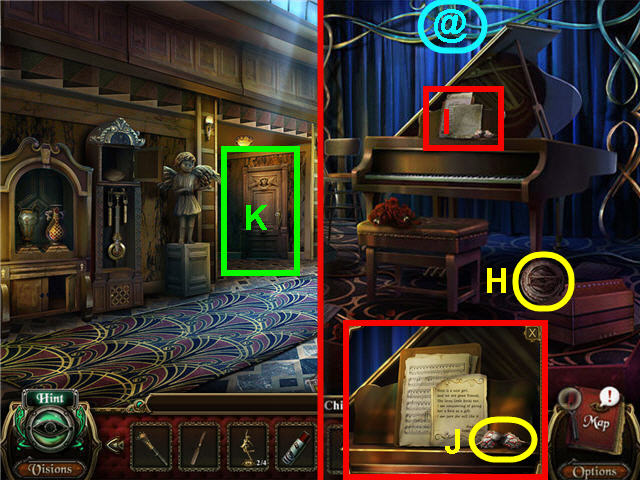
- Click on the MACABRE ITEM 9 OF 20 (@).
- Take the MUSIC INSTRUMENT COLLECTION 3 OF 5 (H).
- Examine the sheet music (I); take the RUBY BUTTERFLY WING (J) and click on the note.
- Back out.
- Use the DOOR KNOB on the door (K) and enter.
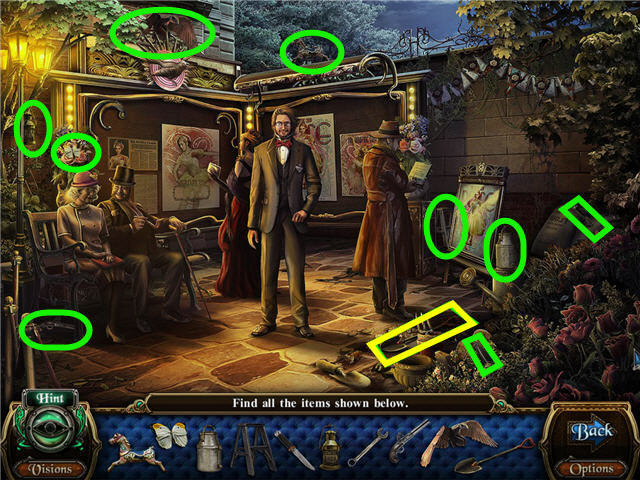
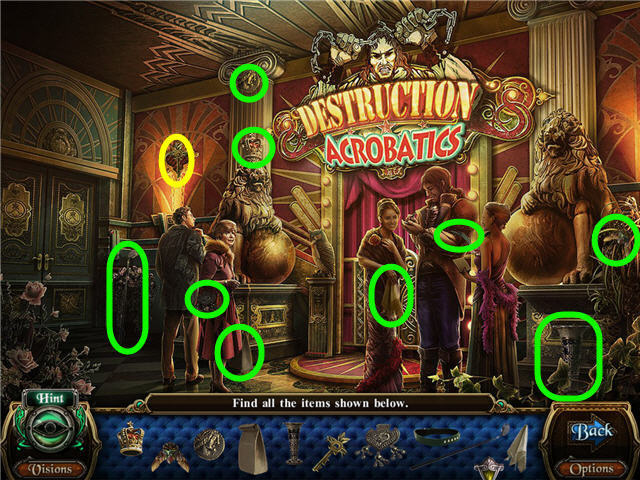
- Click on the eye to the right of the stairs to access a Hidden Object Scene.
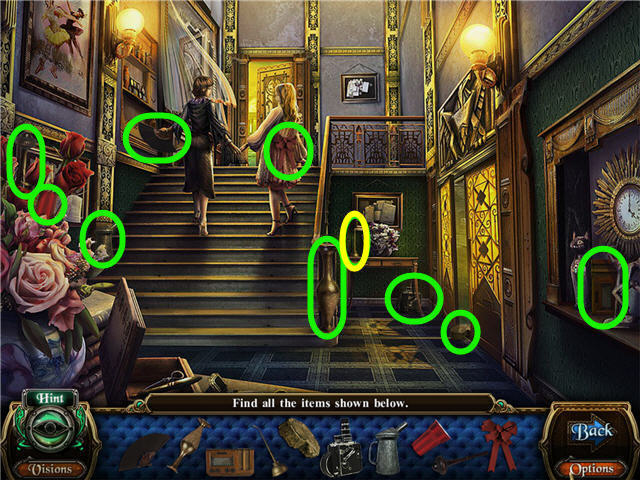
- Find the items shown.
- Take the OIL CAN.
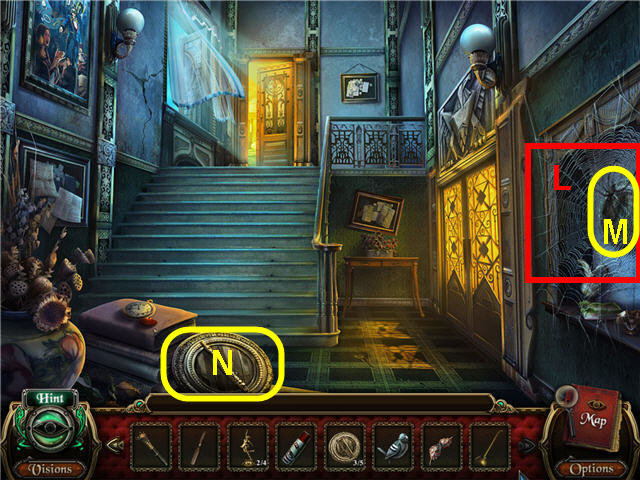
- Use the PESTICIDE on the spider (L); take the MUSIC INSTRUMENTS COLLECTION 4 OF 5 (M).
- Take the MUSIC INSTRUMENTS COLLECTION 5 OF 5 (N).
- Head up the stairs and straight into the music room.
- Examine the music display case to trigger a puzzle.
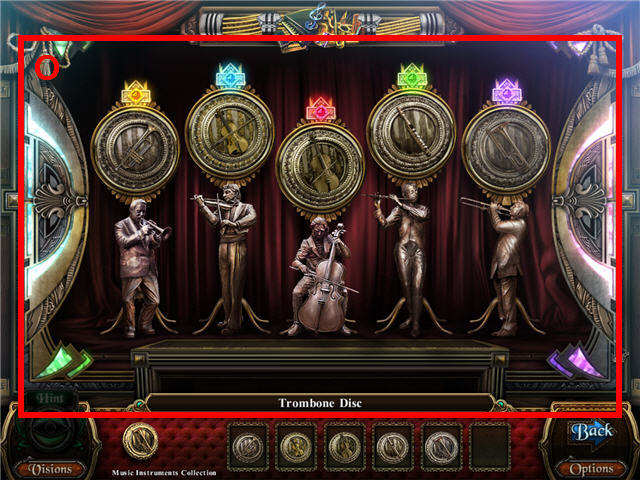
- Arrange the disks so that the correct instrument is located above the correct musician. See screenshot (O) for solution.
- Take the DANCING FIGURINE COLLECTION 3 OF 4.
- Examine the chair on the left to access a Hidden Object Scene.
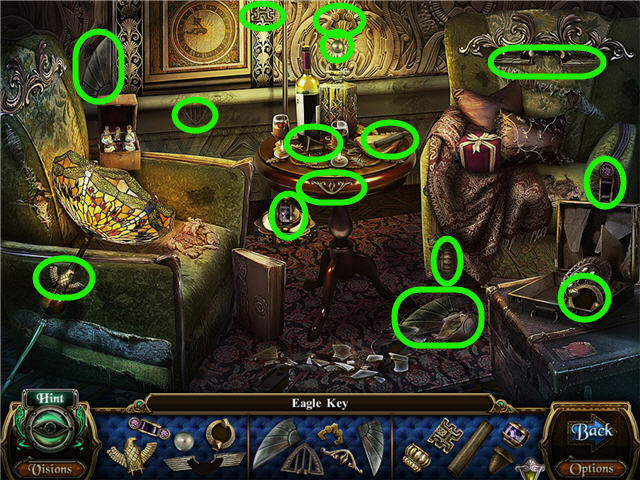
- Find the pieces and get an EAGLE KEY.
- Back out and head into the left doorway.
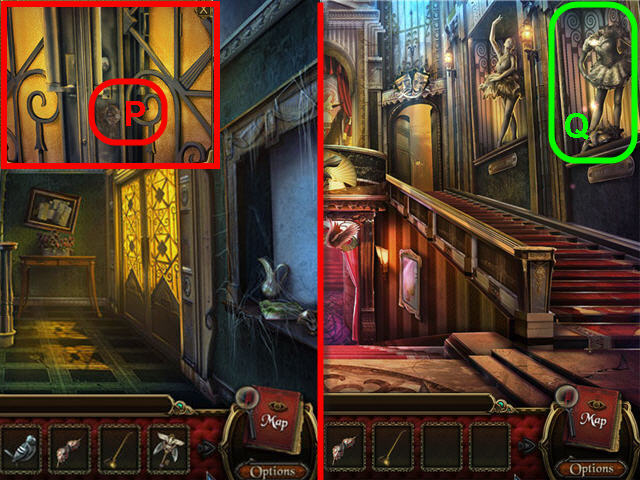
- Examine the door; use the RUST REMOVER and EAGLE KEY on the lock (P).
- Enter through the newly-opened door and back out once.
- Examine the headless ballerina (Q) to access a Hidden Object Scene.
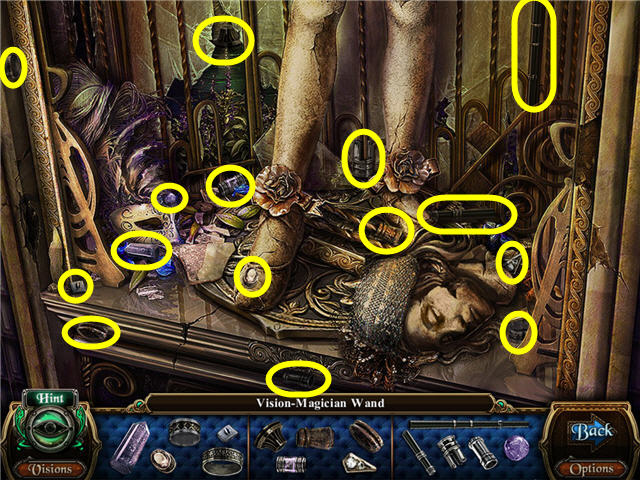
- Find the pieces and get a VISION-MAGICIAN WAND.
- Head up the left staircase.
- Examine the door (R) and use the SMALL CHISEL and the VISION-MAGICIAN WAND on the lock (S).
- Head right through the doors.
- Talk to the mayor.
- Examine the pedestal (T) beneath the bust to trigger a puzzle.
- Arrange the animals in the correct row or column matching their habitat.
- See screenshot (U) for solution.
- Take the SAPPHIRE BUTTERFLY WING.
- Click on the MACABRE ITEM 10 OF 20 (@).
- Take the BOX OF MATCHES (V).
- Click on the photo (W) and the note on the floor.
- Examine the desk to access a Hidden Object Scene.
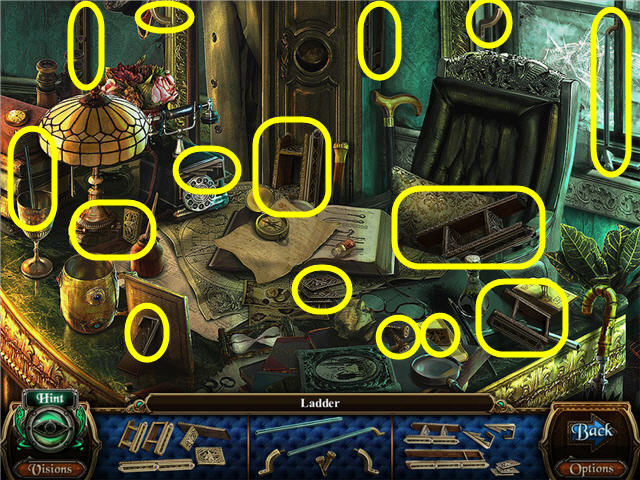
- Find the pieces and get a LADDER.
- Back out.
- Use the LADDER on the hole (X) in the ceiling and head up.
- Use the OIL CAN and the BOX OF MATCHES on the lamp (Y).
- Take the CRYSTAL BALL COLLECTION 1 OF 6 (Z).
- Take the COPPER PETAL (A).
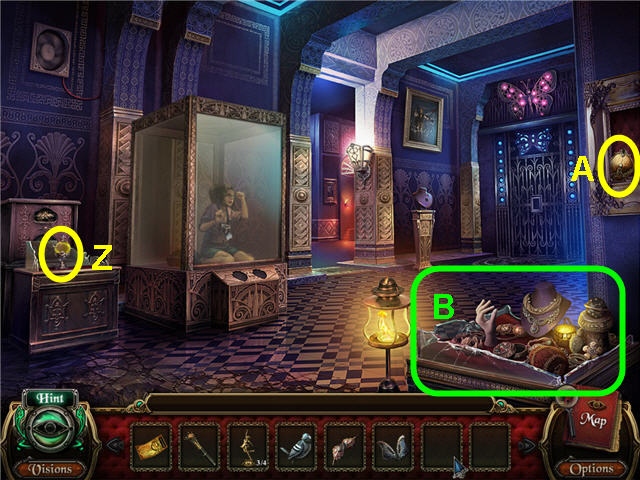
- Head left and back out if there is no hidden object scene in the display case on the lower right.
- Examine the display case (B) to access a Hidden Object Scene.
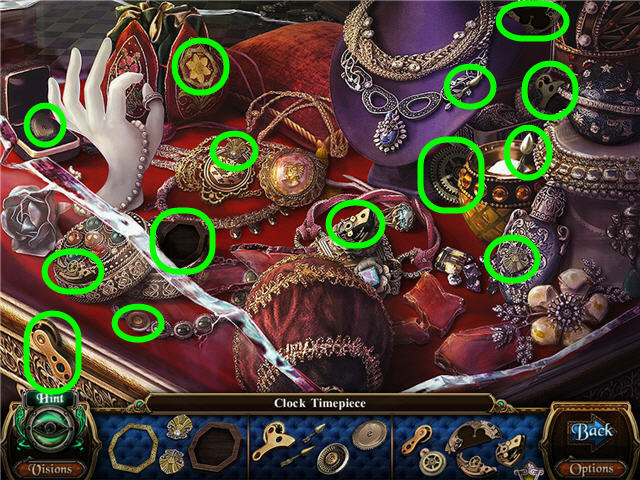
- Find the pieces and get a CLOCK TIMEPIECE.
- Head into the left room.
Chapter 5 – Magician HOG-DINI Show
- Take the DRAWER HANDLE (C).
- Back out two times and head right.
- Place the DRAWER HANDLE on the drawer (D); open the drawer and take the SCREWDRIVER (E) and click on the note.
- Place the CLOCK TIMEPIECE on the box (F).
- Click on the eye (G) to trigger a puzzle.
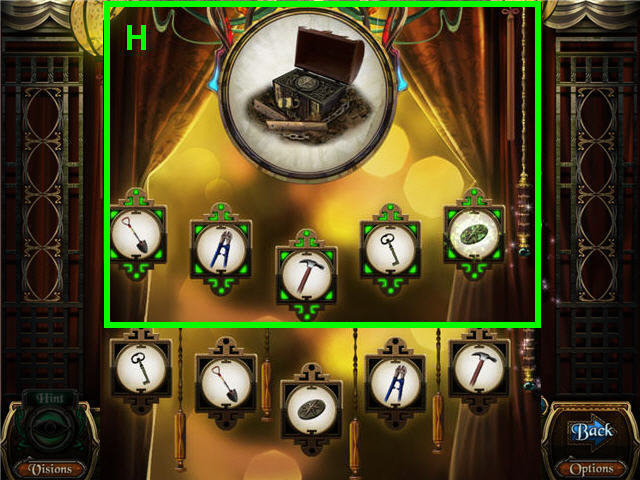
- Arrange the pictures to complete the actions completed in the game to discover and unlock the treasure chest.
- Solution: shovel, bolt cutter, hammer, key, sun emblem. Pull the cords in this order: 3, 1, 2, 3, 1, 4, 3. See screenshot (H) for solution.
- Get a WHITE ROSE KEY.
- Examine the desk to access a Hidden Object Scene.
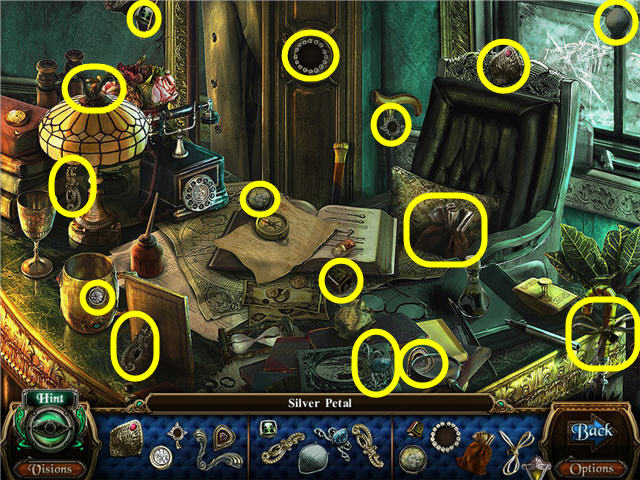
- Find the pieces and get a SILVER PETAL.
- Back out, head up and left.
- Use the SCREWDRIVER on the grate (I); take the GOLD PETAL (J).
- Examine the door (K); place the COPPER PETAL, the SILVER PETAL and the GOLD PETAL on the lock (L); use the WHITE ROSE KEY on the keyhole.
- Head through the newly-opened door.
- Examine the bed to access a Hidden Object Scene.
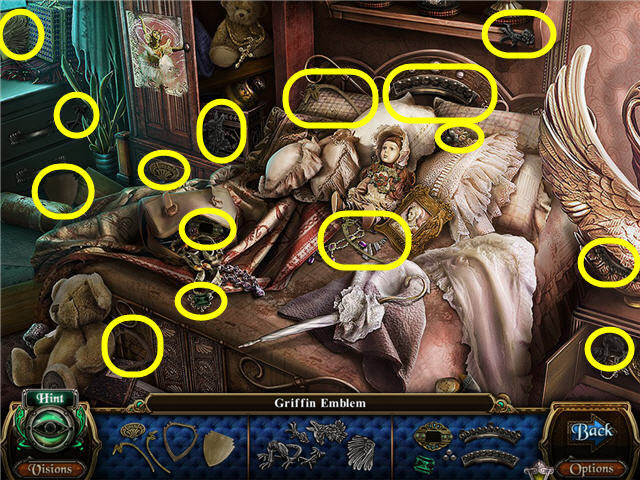
- Find the fragmented pieces.
- Get a GRIFFIN EMBLEM.
- Take the WIRE CUTTER (M).
- Click on the MACABRE ITEM 11 OF 20 (@).
- Place the BIRD FIGURINE on the music box (N); take a closer look and take the CRYSTAL BALL COLLECTION 2 OF 6 (O).
- Back out two times.
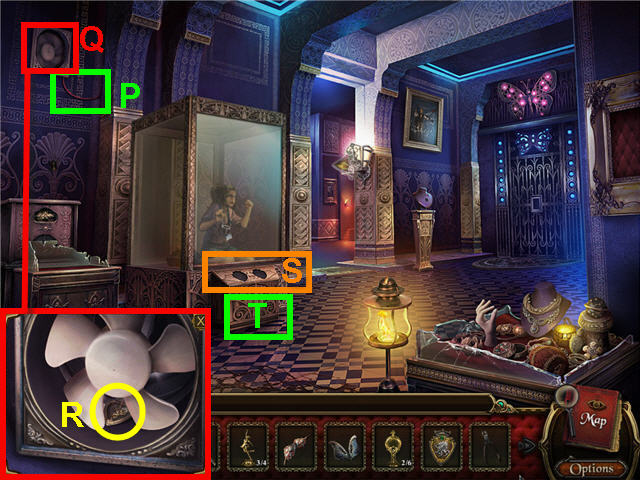
- Use the WIRE CUTTER on the wire (P).
- Examine the fan (Q); take the MANTICORE EMBLEM (R).
- Place the MANTICORE EMBLEM and the GRIFFIN EMBLEM on the slots (S).
- Examine the bottom panel (T) to trigger a puzzle.
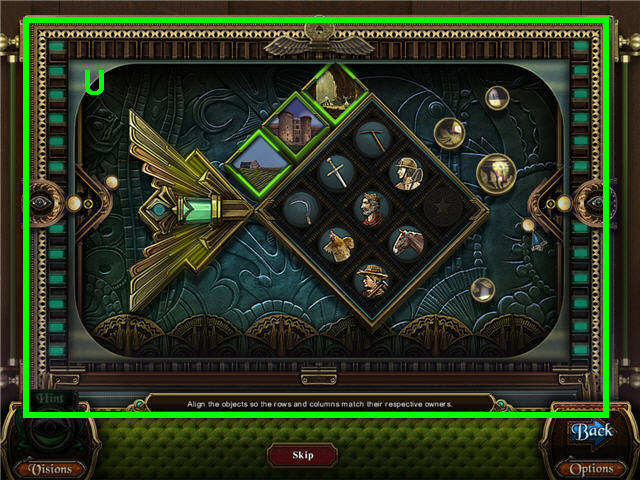
- Arrange the objects so that they appear in the column with the same theme. See screenshot (U) for solution.
- Talk to the girl.
- Click on the broken display case in the lower right to access a Hidden Object Scene.
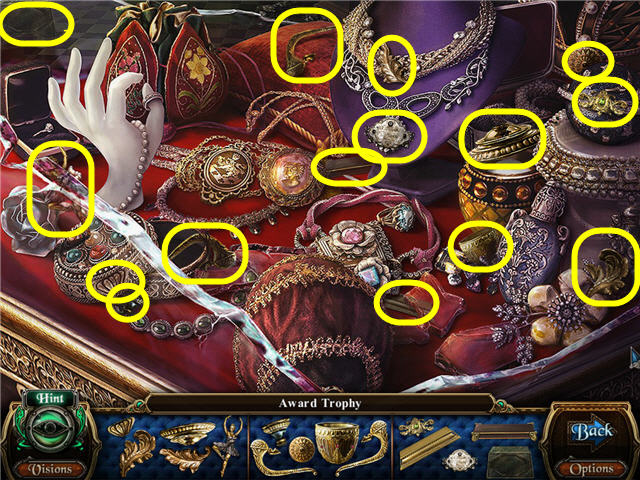
- Find the pieces and get an AWARD TROPHY.
- Head left and through the right door.
- Place the AWARD TROPHY on the shelf (V); take the BUTTERFLY BODY (W).
- Back out two times.
- Examine the gates (X); place the RUBY BUTTERFLY WINGS, SAPPHIRE BUTTERFLY WINGS and BUTTERFLY BODY on the lock (Y).
- Enter through the newly opened gates.
- Click on the MACABRE ITEM 12 of 20 (@).
- Click on the mannequins (Z).
- Take a closer look and use the POWDER BRUSH on the mirror (A).
- Examine the bed to access a Hidden Object Scene.
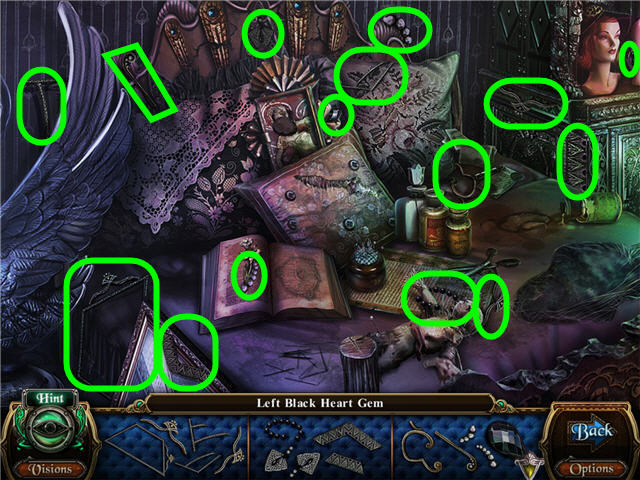
- Find the fragmented pieces and get a LEFT BLACK HEART GEM.
- Back out, head left and forward.
- Examine the bed to access a Hidden Object Scene.
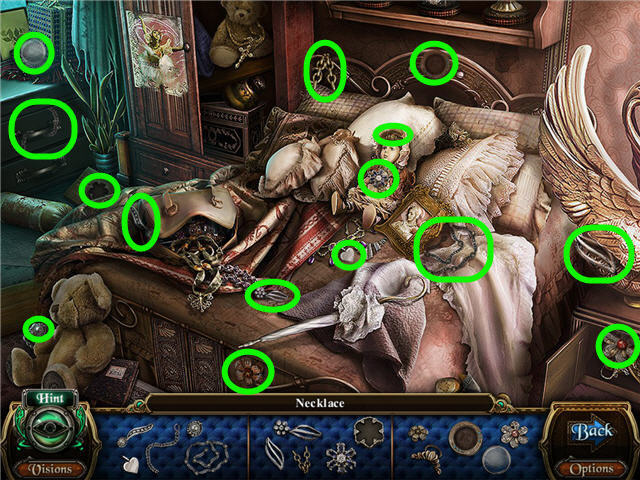
- Find the fragmented pieces and get a NECKLACE.
- Back out two times.
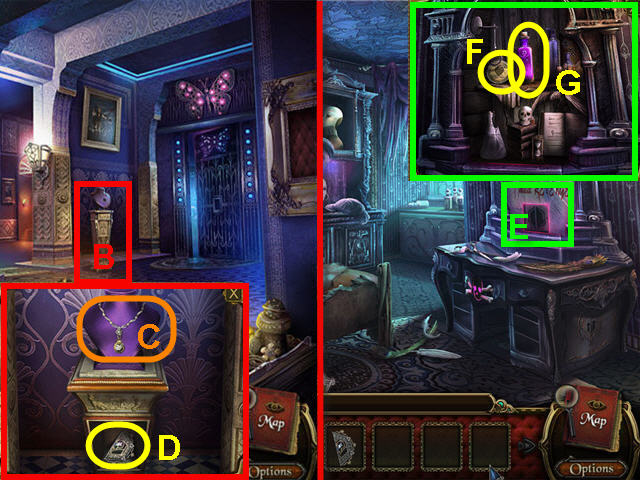
- Examine the pedestal (B); place the NECKLACE on the bust (C) and take the RIGHT BLACK HEART GEM (D).
- Head straight.
- Examine the mirror (E); place the RIGHT BLACK HEART GEM and LEFT BLACK HEART GEM in the slots; take the HEART COIN (F) and POISON BOTTLE (G).
- Back out, head left and go straight.
- Click on the eye on the wardrobe to access a Hidden Object Scene.
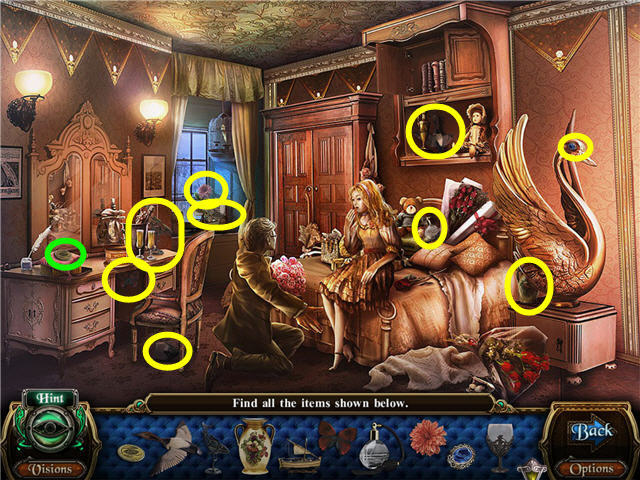
- Find the items shown and take the EYE COIN.
- Back out three times and head right.
- Examine the desk to access a Hidden Object Scene.
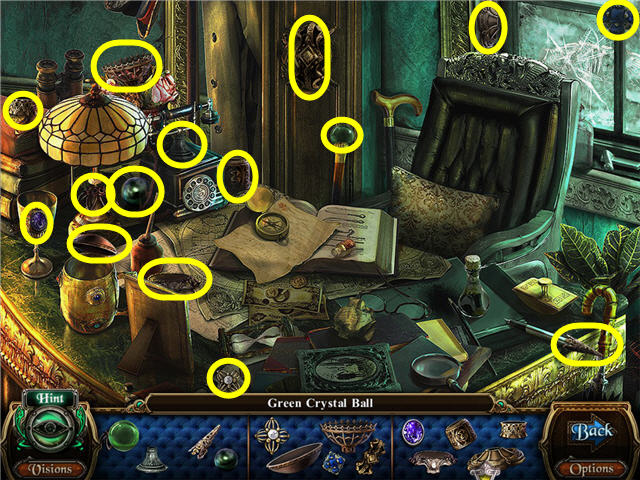
- Find the fragmented pieces.
- Get a CRYSTAL BALL COLLECTION 3 OF 6.
- Examine the safe (H); use the HEART COIN and the EYE COIN on the slots and take the PURPLE TICKET – MAGICIAN HOG-DINI SHOW (I) and the CABINET KEY (J).
- Back out.
- Use the CABINET KEY on the cabinet (K); take the MAGIC WAND (L).
- Head up and left.
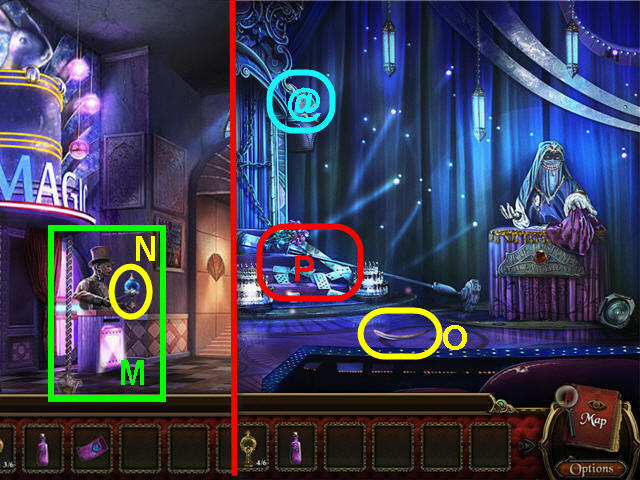
- Place the MAGIC WAND on the ticket taker (M); take the CRYSTAL BALL COLLECTION 4 OF 6 (N).
- Examine the ticket taker; place the PURPLE TICKET – MAGICIAN HOG-DINI SHOW in the slot.
- Head left into the newly-opened doors.
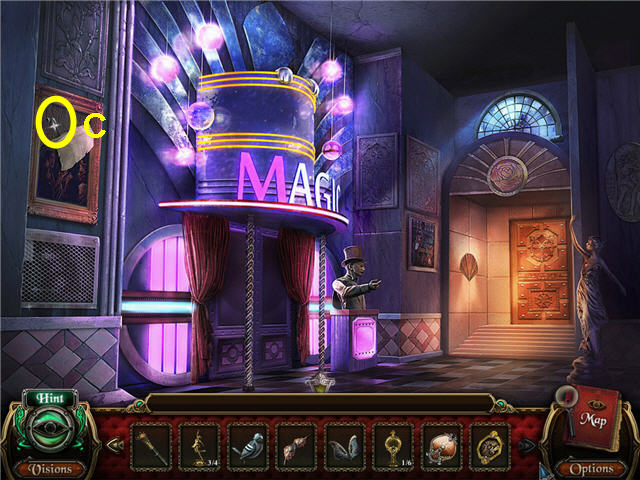
- Take the SWAN FEATHER (O).
- Click on the MACABRE ITEM 13 OF 20 (@).
- Examine the stairs (P) to access a Hidden Object Scene.
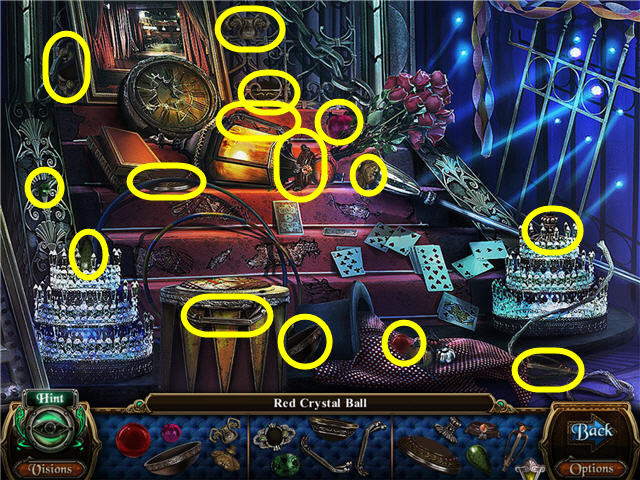
- Find the fragmented pieces and get a CRYSTAL BALL COLLECTION 5 OF 6.
- Back out four times, up the right staircase and head left.
- Click on the MACABRE ITEM 14 OF 20 (@).
- Back out, head straight, right and straight.
- Click on the MACABRE ITEM 15 OF 20 (@).
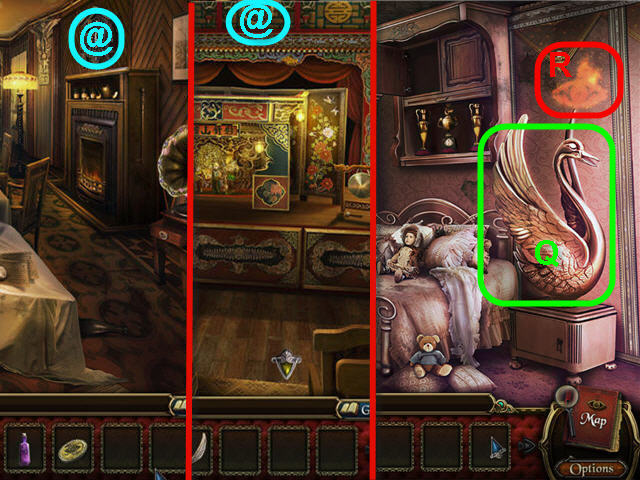
- Back out four times, up the left staircase, up the ladder, left and straight.
- Place the SWAN FEATHER on the swan (Q).
- Click on the eye (R) to trigger a puzzle.
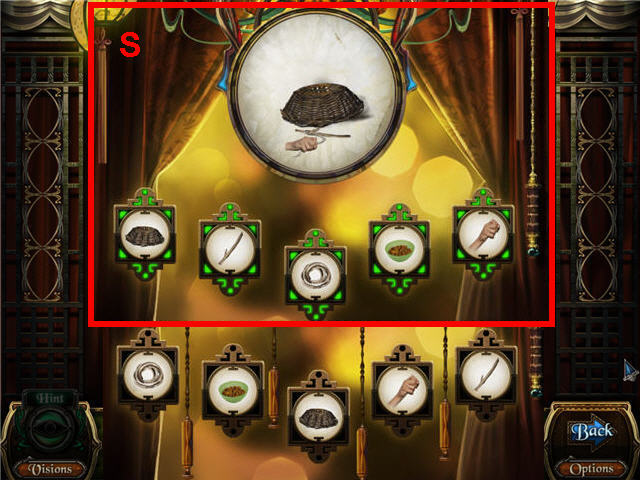
- Arrange the pictures in the correct order to capture the bird.
- Solution: basket, stick, rope, bowl, hand. Pull the cords in this order: 2, 3, 4. See screenshot (S) for solution.
- Back out two times and head straight.
- Place the SKULL GEM on the skull slot (T); take the TAROT CARD (U).
- Back out, head left two times.
- Place the TAROT CARD on the fortune teller (V); take the CRYSTAL BALL COLLECTION 6 OF 6 (W).
- Examine the crystal ball display on the left to trigger a puzzle.
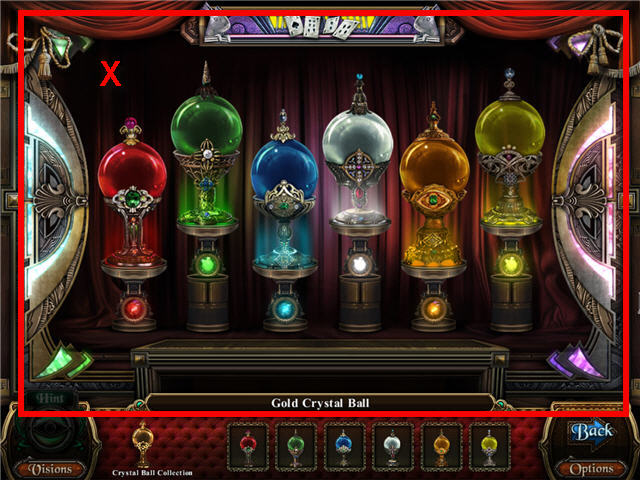
- Arrange the crystals to match the colors of the gem on the base.
- Solution: red, green, blue, white, orange, yellow. See screenshot (X) for solution.
- Take the DANCING FIGURINE COLLECTION 4 OF 4.
- Back out four times and head straight.
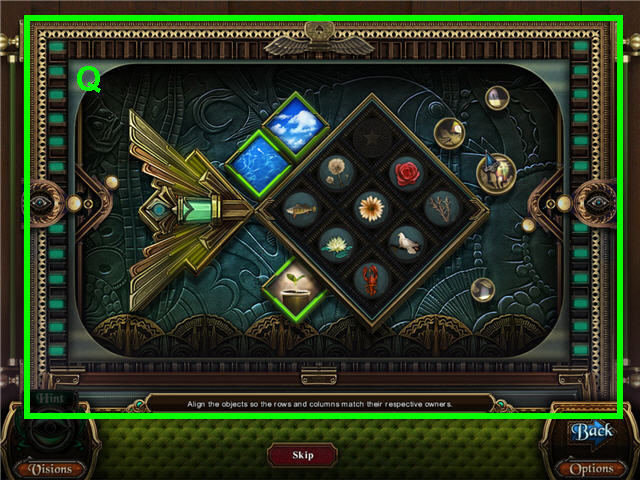
- Examine the dance display on the right to trigger a puzzle.
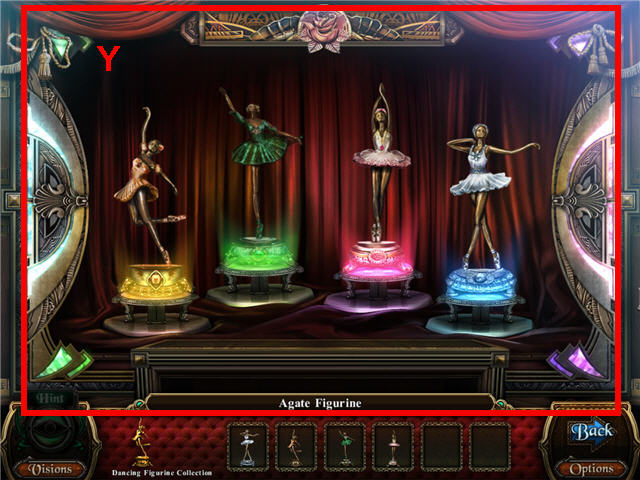
- Arrange the ballerinas to match the colors of the base.
- Solution: yellow, green, pink, and blue. See screenshot (Y) for solution.
- Take the BATTERY.
Chapter 6 – Nightingale's Masterpiece Show
- Place the BATTERY and the GOLDEN TICKET – NIGHTINGALE'S MASTERPIECE SHOW on the ticket taker (Z).
- Head straight.
- Take the SAND PAPER (A).
- Head straight and then back out.
- Click on the MACABRE ITEM 16 OF 20 (@).
- Head straight.
- Take the BOX CUTTER (B).
- Use the POISON BOTTLE on Andreas (C).
- Examine the right staircase (D) to access a Hidden Object Scene.
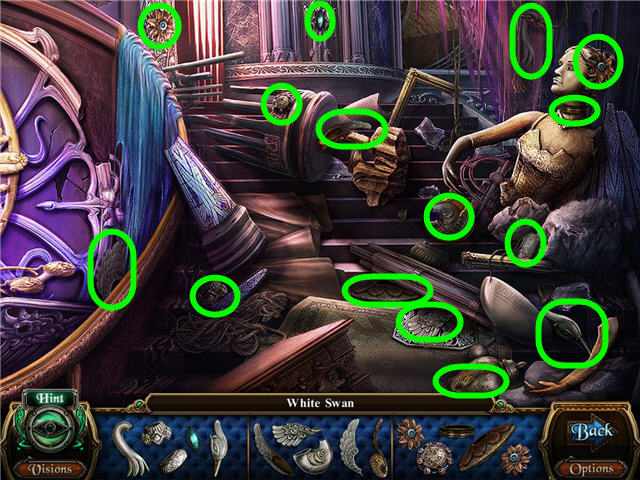
- Find the fragmented pieces and get a WHITE SWAN.
- Back out.

- Use the BOX CUTTER on the seat (E); take the WATER HANDLE (F).
- Back out twice, up left staircase, up ladder, left.
- Click on the MACABRE ITEM 17 OF 20 (@).
- Head left.
- Examine the stairs to access a Hidden Object Scene.
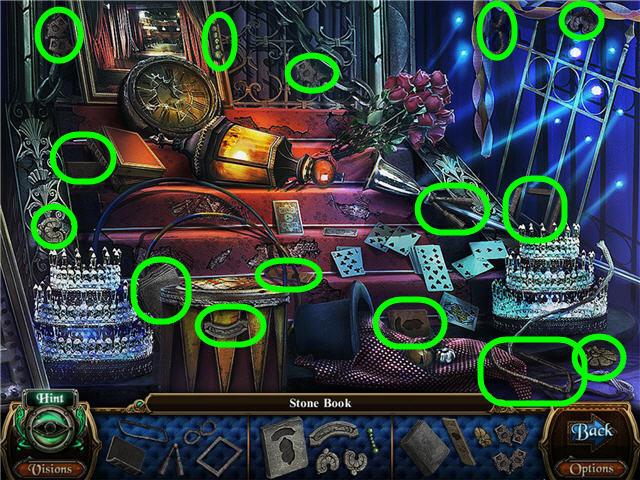
- Find the fragmented pieces and get a STONE BOOK.
- Back out two times, head into the butterfly doorway.
- Examine the bed to access a Hidden Object Scene.
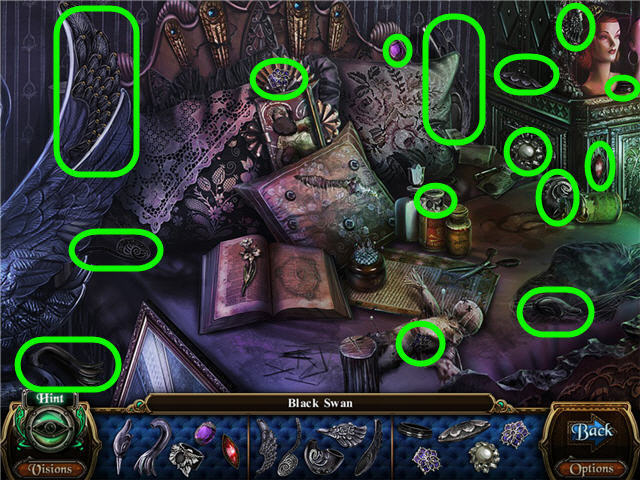
- Find the fragmented pieces and get a BLACK SWAN.
- Back out three times, straight three times.
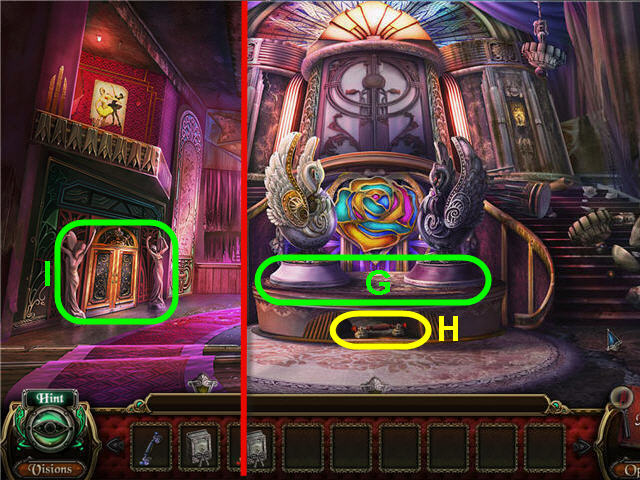
- Use the SAND PAPER on the pedestals (G).
- Place the WHITE SWAN on the left pedestal and the BLACK SWAN on the right; take the FIRE HANDLE (H) and click on the note.
- Back out.
- Take a closer look and place the WATER HANDLE and FIRE HANDLE on the door (I).
- Head straight and take a closer look at the right staircase to access a Hidden Object Scene. .
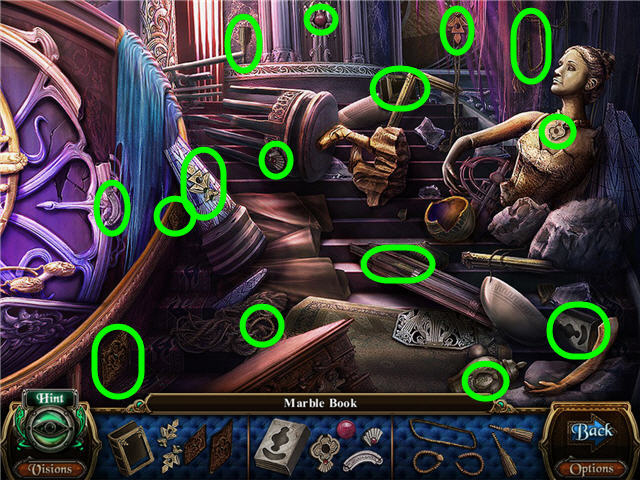
- Find the fragmented pieces and get a MARBLE BOOK.
- Back out and head left.
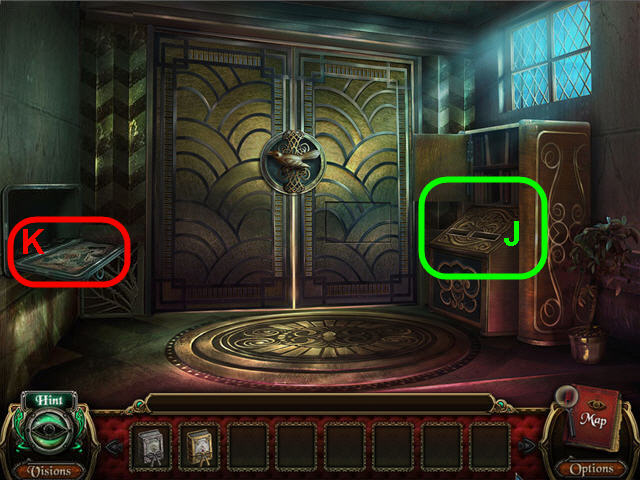
- Place the STONE BOOK and MARBLE BOOK in the repository (J).
- Examine the map (K).
- Back out five times.
- Examine the fountain to access a Hidden Object Scene.
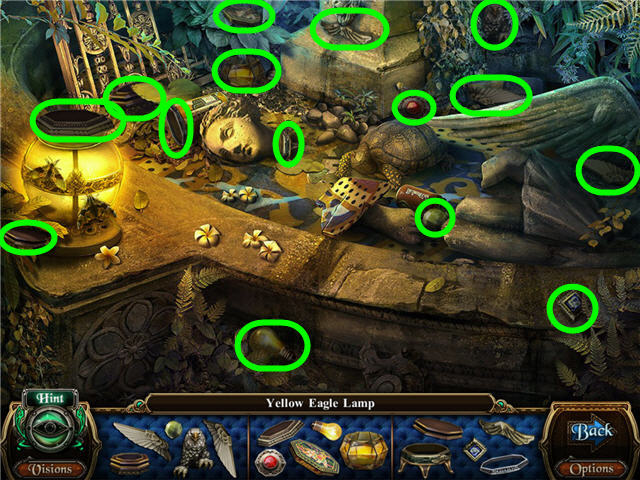
- Find the fragmented pieces and get a YELLOW EAGLE LAMP.
- Back out.
- Examine the brochure rack to access a Hidden Object Scene.
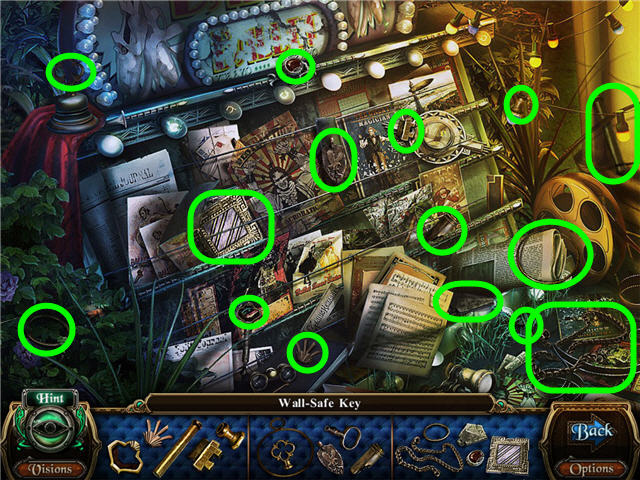
- Find the fragmented pieces and get a WALL-SAFE KEY.
- Back out, head forward and go right.
- Examine the bench to access a Hidden Object Scene.
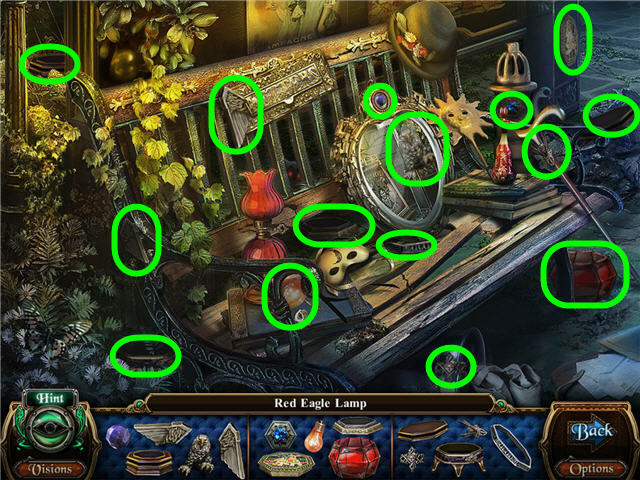
- Find the fragmented pieces and get a RED EAGLE LAMP.
- Back out.
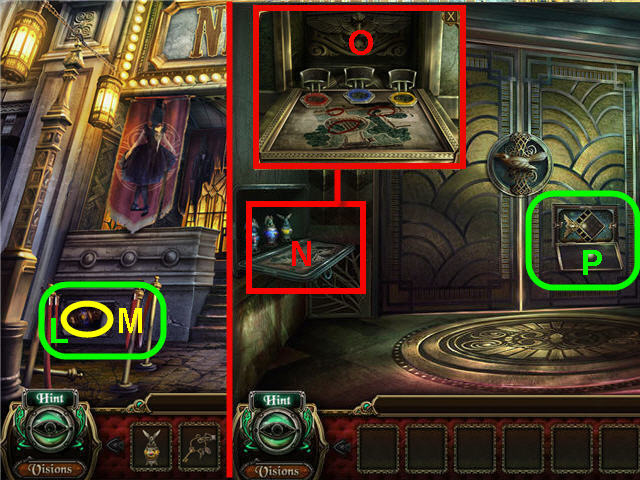
- Use the WALL-SAFE KEY on the safe (L); take the BLUE EAGLE LAMP (M).
- Head forward three times and go left.
- Examine the map (N) and place the YELLOW EAGLE LAMP, RED EAGLE LAMP, and BLUE EAGLE LAMP in the slots (O).
- Examine the door panel (P) to trigger a puzzle.
- Arrange the objects so that they appear in the column or row with the same theme. See screenshot (Q) for solution.
- Head straight.
- Back out three times.
- Click on the MACABRE ITEM 18 OF 20 (@).
- Back out, up the right staircase.
- Click on the MACABRE ITEM 19 OF 20 (@).
- Back out, head up the left staircase, head up the ladder.
- Click on the MACABRE ITEM 20 OF 20 (@).
- Back out two times, up the right staircase, straight, right and straight.
- Examine the stage to access a Hidden Object Scene.
- Find the fragmented pieces and get a GREEEN VISION FRAGMENT.
- Back out two times, head left and straight.
- Examine the left door to access a Hidden Object Scene.
- Find the fragmented pieces and get a PINK VISION FRAGMENT.
- Back out; head left two times and straight.
- Examine the left chair to access a Hidden Object Scene.
- Find the fragmented pieces and get a BLUE VISION FRAGMENT.
- Back out six times, head up the left staircase, up the ladder and left two times.
- Examine the stairs to access a Hidden Object Scene.

- Find the fragmented pieces and get a PURPLE VISION FRAGMENT.
- Back out four times, head straight three times.
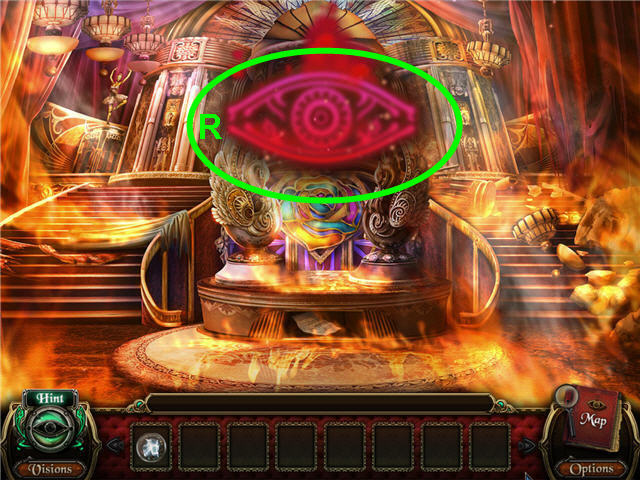
- Click on the eye (R).
- Get the NIGHT OF THE FIRE VISIONS.
- Back out, head left and up the stairs.
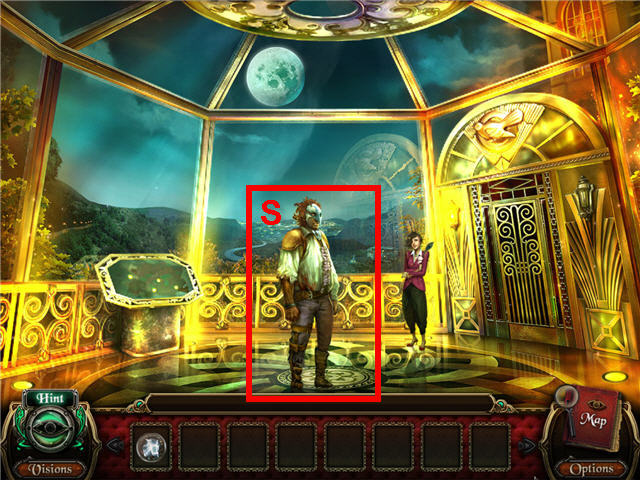
- Give the NIGHT OF THE FIRE VISIONS to Andreas (S).
- Congratulations! You have completed Macabre Mysteries Curse of the Nightingale Standard Edition!
Created at: 2011-08-26