

Walkthrough Menu
- General Tips
- Chapter 1: The Bridge
- Chapter 2: The Town
- Chapter 3: The Theater
- Chapter 4: Maestro Park
- Chapter 5: Underground
- Chapter 6: The Workshop
- Chapter 7: The Mansion
- Chapter 8: The Attic
- Chapter 9: Emily’s House
- Chapter 10: The Maestro
General Tips
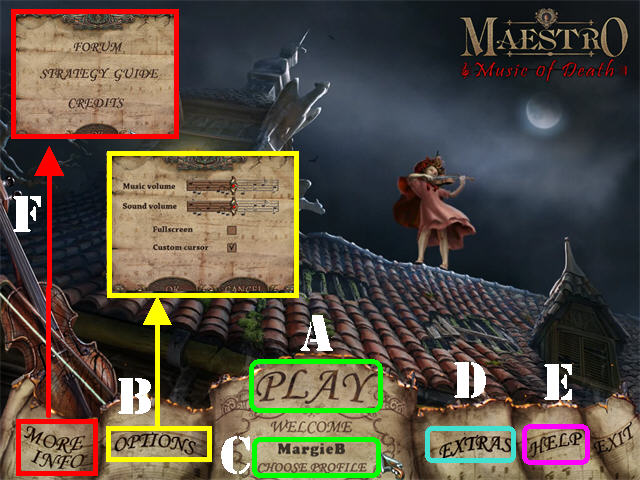
- Click on “PLAY” (A) to access the main chapters in the game.
- The “OPTIONS” (B) button allows you to adjust the screen, music, cursor, and sound.
- The “CHOOSE PROFILE” button (C) can be used to add or delete a new player.
- The “EXTRAS” (D) button grants you access to the Bonus Content after you complete the game.
- Click on the “HELP” (E) button to view general tips for playing the game.
- Click on the “MORE INFO” (F) button to access the built-in Strategy Guide and the Big Fish Games forum for this game.
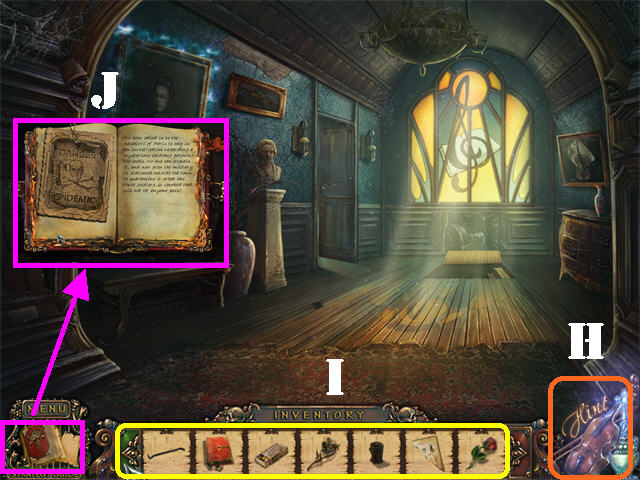
- Click on the Magnifying Glass Icon, when it appears, to take a closer look at a section, or to read information regarding the game.
- Items written in black and red in search scenes are hidden; you must open or click on something to make the hidden items appear.
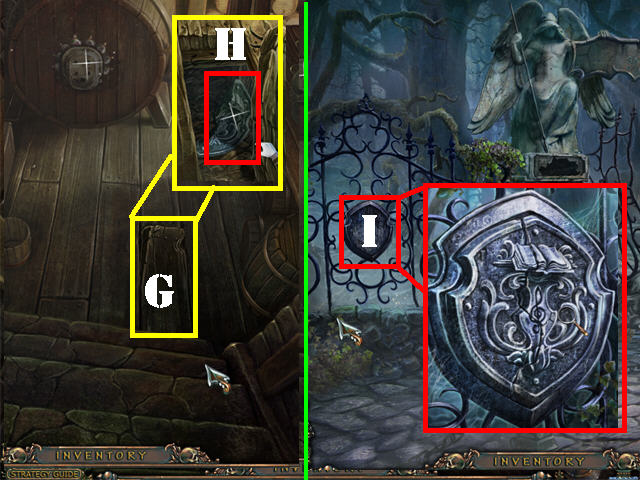
- To access the built-in guide, click on the “STRATEGY GUIDE” (G) button in the lower left corner of each scene.
- The Hint (H) button is in the lower right corner of each scene.
- You have unlimited Hints in the Hidden Object Scenes and in regular scenes, but you must wait for them to recharge between uses.
- A cluster of sparkly music notes indicates a Hidden Object Scene which will grant an inventory item upon completion.
- Pass your mouse over the bottom of the scene to access your Inventory Tray (I).
- Inventory items will appear at the bottom of the scene. Use the arrows in your inventory tray to scroll through all the items you’ve collected.
- The Journal (J) is in the lower left; read it to find clues and read part of the story.
- To use an inventory item, select it and drag it to the desired location; click it into the spot in which you want it used.
- You can skip a puzzle once the “SKIP” button fills. The “SKIP” button only appears in puzzle sections; it is located in the lower right corner.
Chapter 1: The Bridge
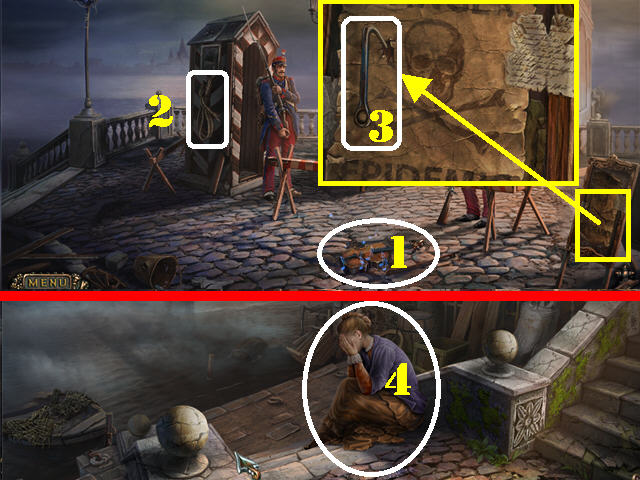
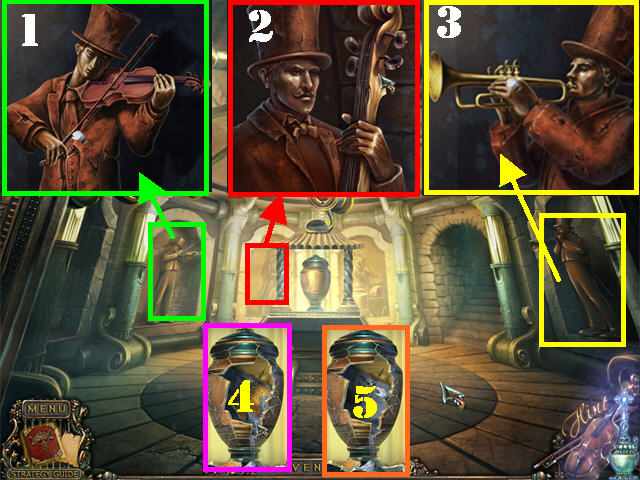
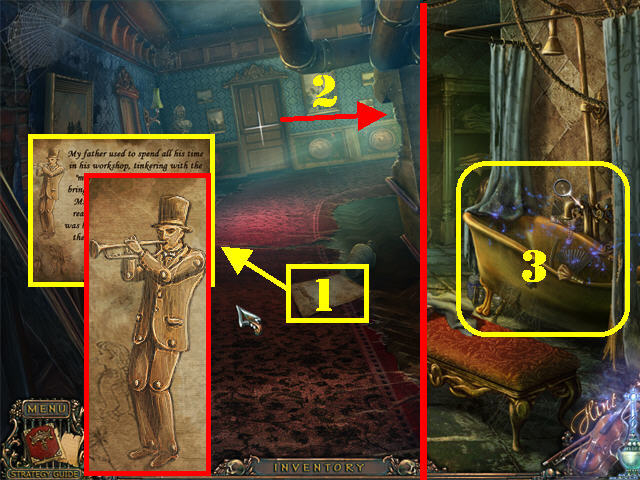
- Click on the VIOLIN (1) on the ground. From this point forward, the Violin will act as your Hint.
- Grab the ROPE (2) on the side of the hut.
- Examine the board on the right.
- Attach the ROPE to the hook (3) to create the HOOK.
- Head left.
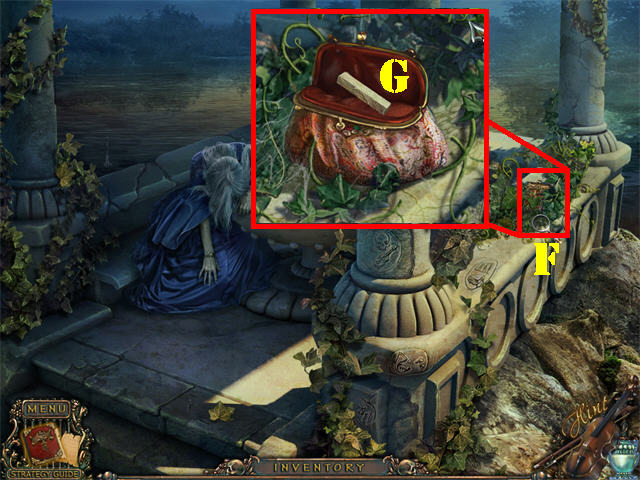
- Click on the WOMAN (4) and she will hand you MEDALLION 1/3.
- Play the Hidden Object Scene.
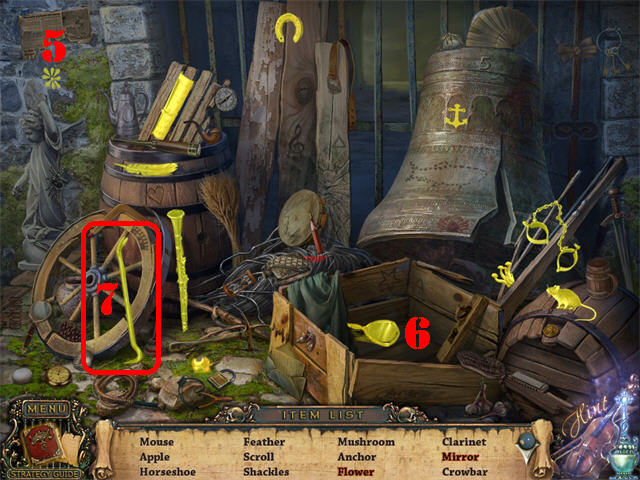
- Remove the paper in the upper left; click on the FLOWER (5).
- Remove the cloth in the crate; take the MIRROR (6).
- The CROWBAR (7) will be added to inventory.
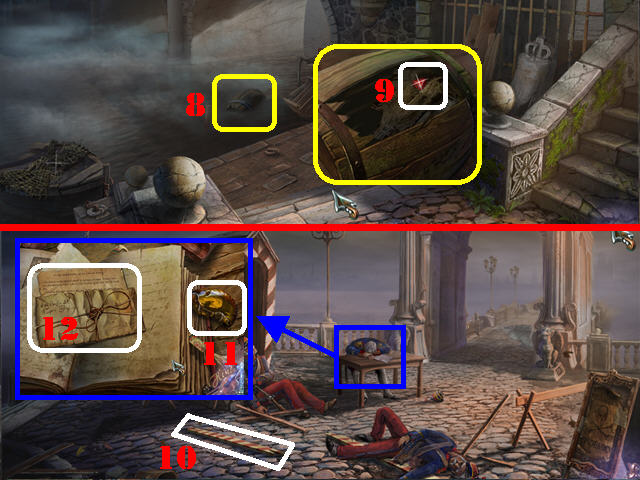
- Place the HOOK on the BARREL in the water (8) to pull it to the ground.
- Examine the barrel; break it with the CROWBAR.
- Take the RUBY (9) in the barrel.
- Go up the steps.
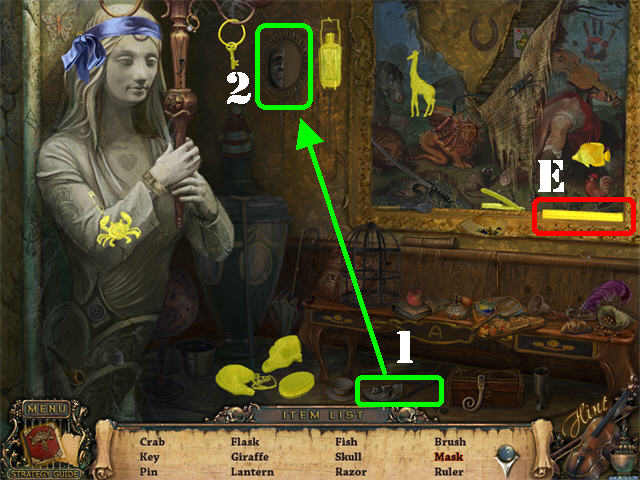
- Grab the BOARD (10) on the ground.
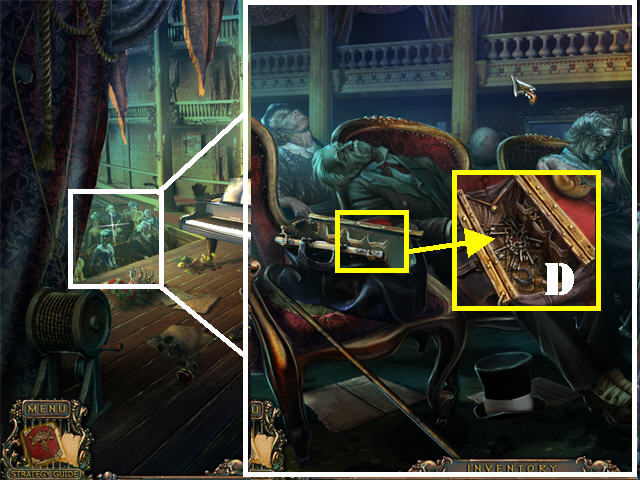
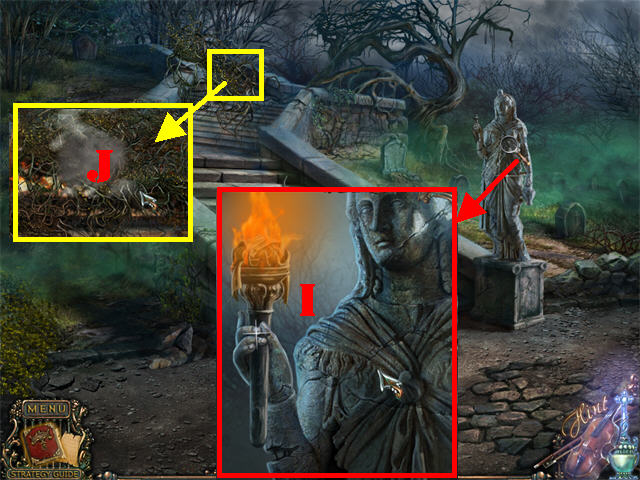
- Zoom into the man slumped over the table; take the MEDALLION FRAGMENT (11).
- Read the NOTE (12) on the table.
- Exit the zoom scene and head forward.
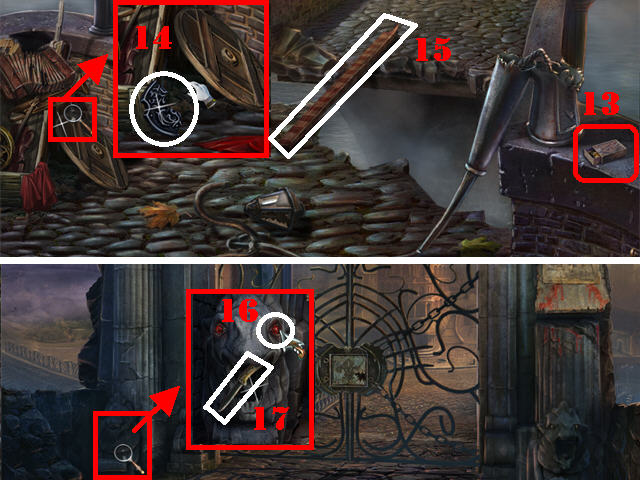
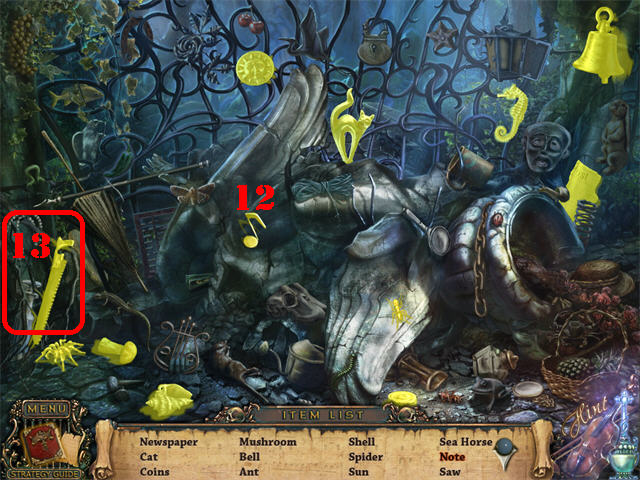
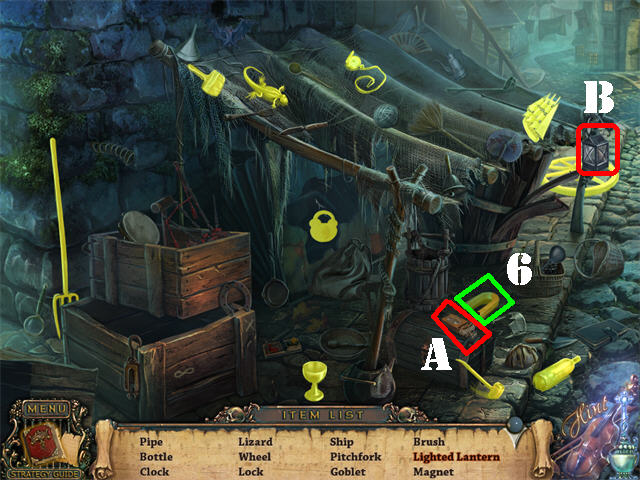
- Take the MATCHES (13) on the right.
- Examine the junk on the left; remove the cloth and take the SHIELD FRAGMENT (14).
- Place the BOARD on the gap and head forward (15).
- Zoom into the monster in the lower left.
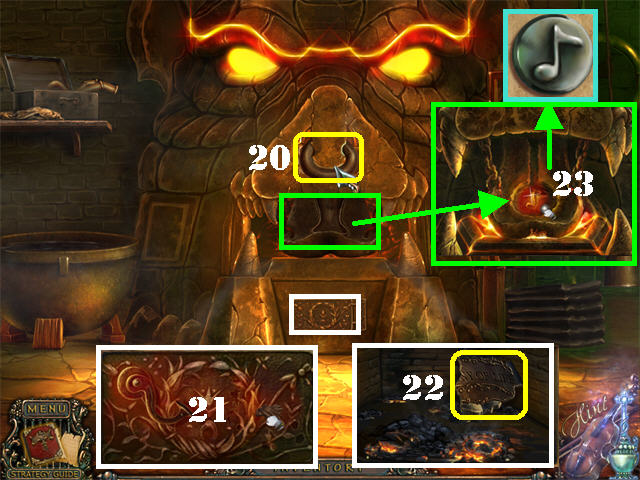
- Place the RUBY in the empty eye socket (16); take the KNIFE (17) from its mouth.
- Click down twice and head left.
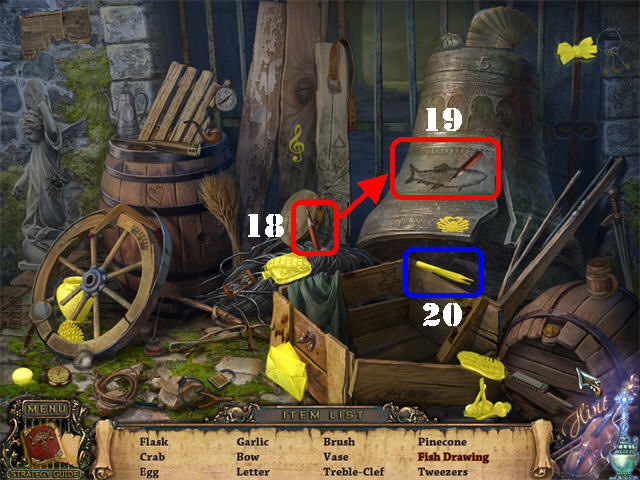
- Play the Hidden Object Scene.
- Grab the PENCIL (18) and place it on the fish outline; click on the FISH DRAWING (19) after the pencil has stopped drawing.
- The TWEEZERS (20) will be added to inventory.
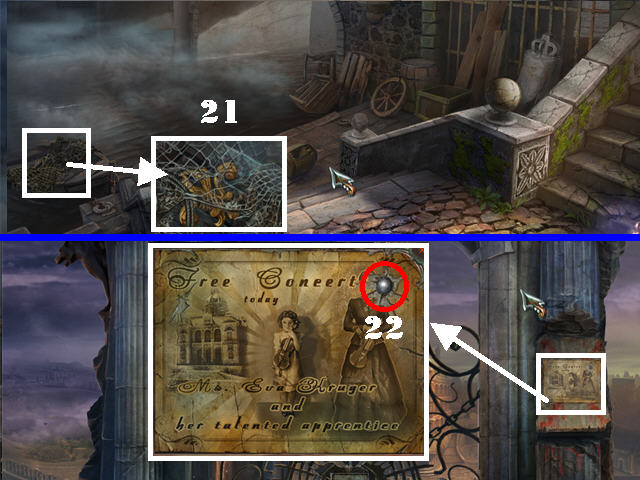
- Zoom into the net in the water; cut the net with the KNIFE and take the FLEUR-DE-LIS (21).
- Return to the gate.
- Zoom into the sign on the right; take the SILVER BULLET (22) with the TWEEZERS.
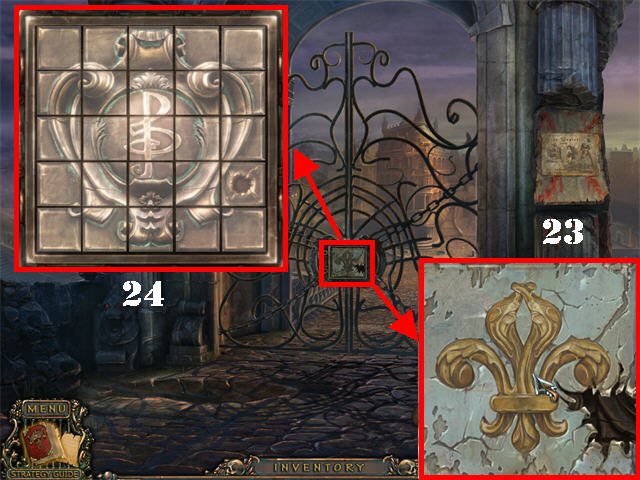
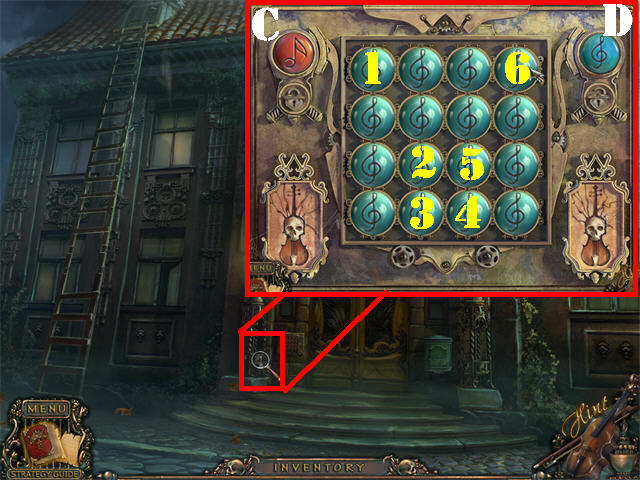
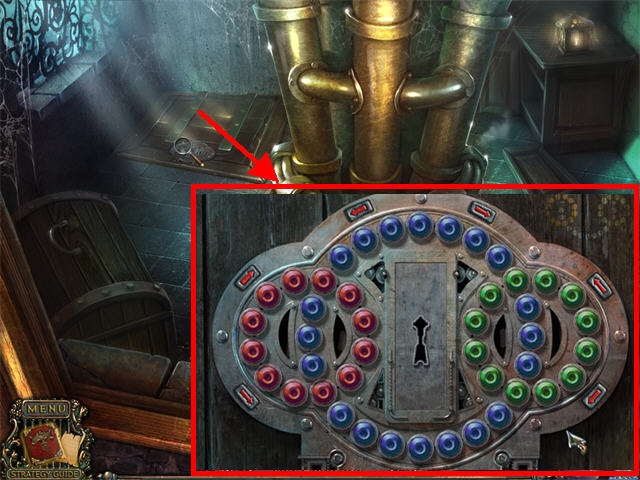
- Zoom into the gate; place the FLEUR-DE-LIS in the recess to activate a puzzle (23).
- Click on any 2 tiles to swap their positions.
- The piece in the middle cannot be moved; use that as a guide.
- Correct pieces will lock in place.
- Please look at the screenshot for the solution (24).
- Go through the gate.
Chapter 2: The Town
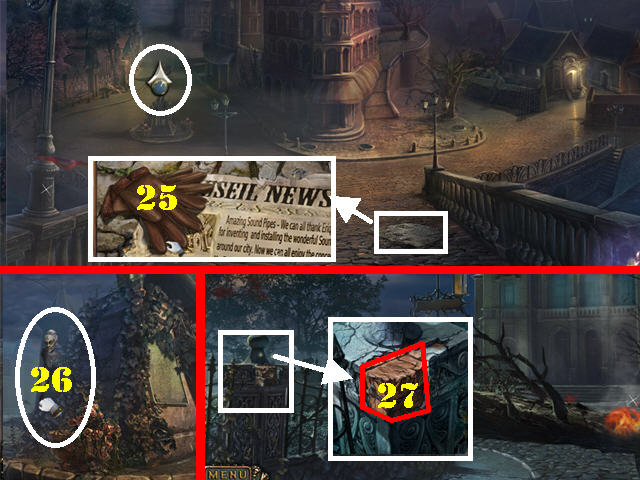
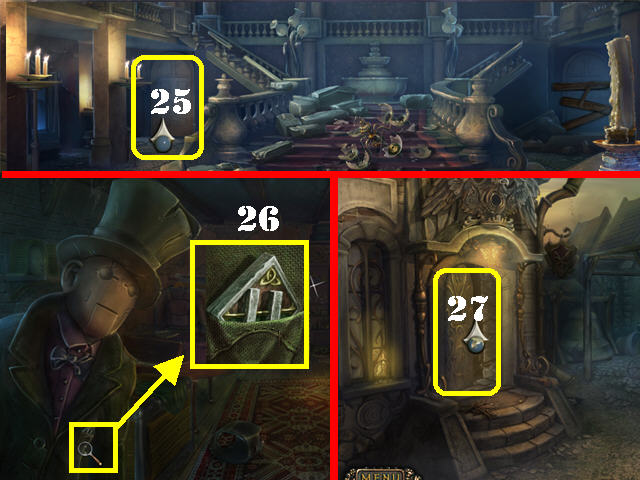
- Zoom into the paper on the ground; take the GLOVES (25).
- Head towards the left.
- Click on the old lady (26).
- Go forward.
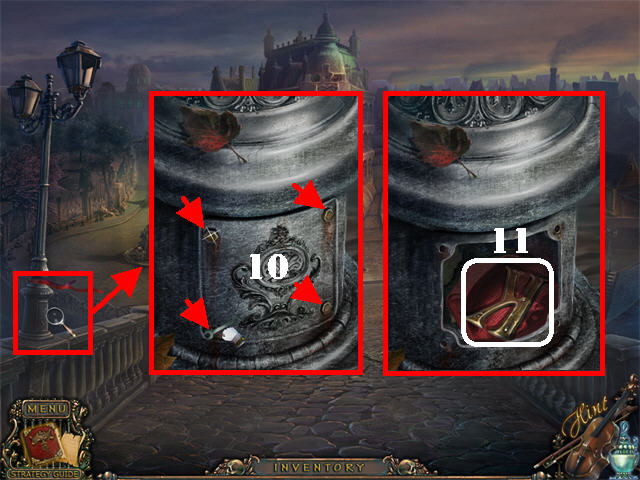
- Zoom into the left post; take the BRICK (27).
- Click down and head left.
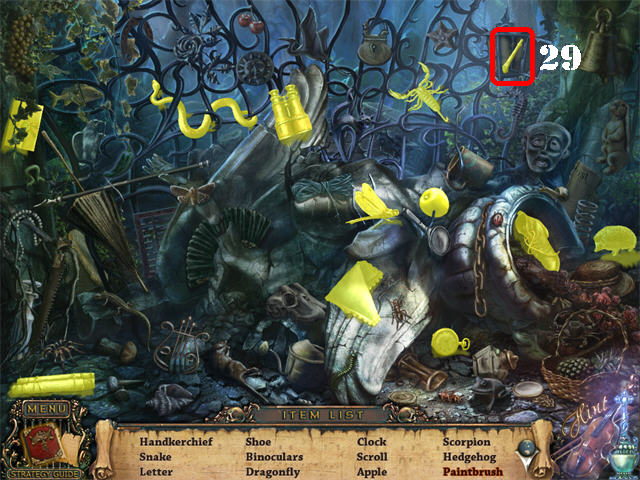
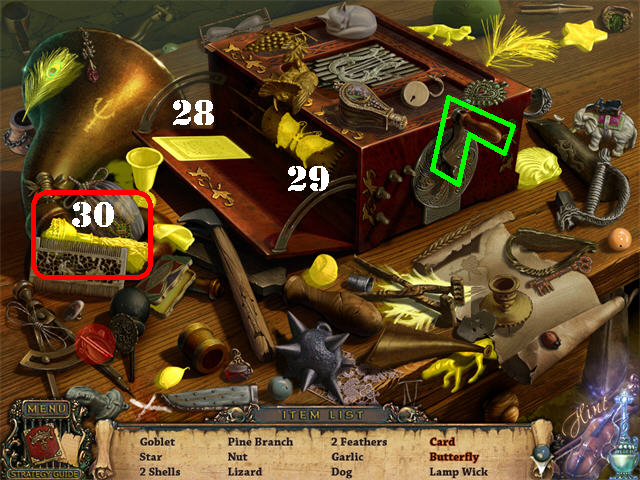
- Play the Hidden Object Scene.
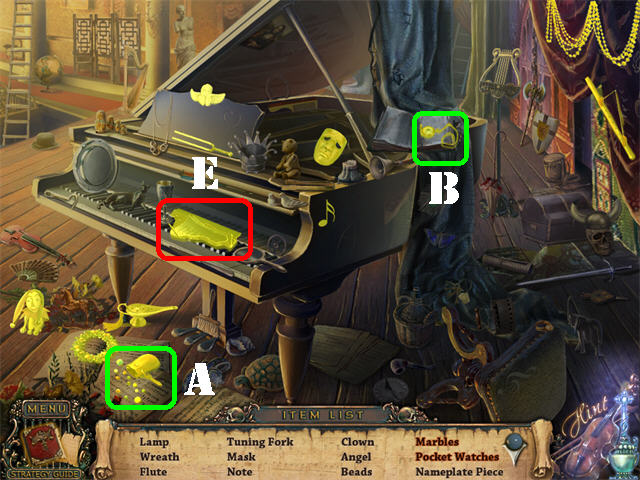
- Open the LAMP; take the PAINTBRUSH (29).
- The PAINTBRUSH will be added to inventory.
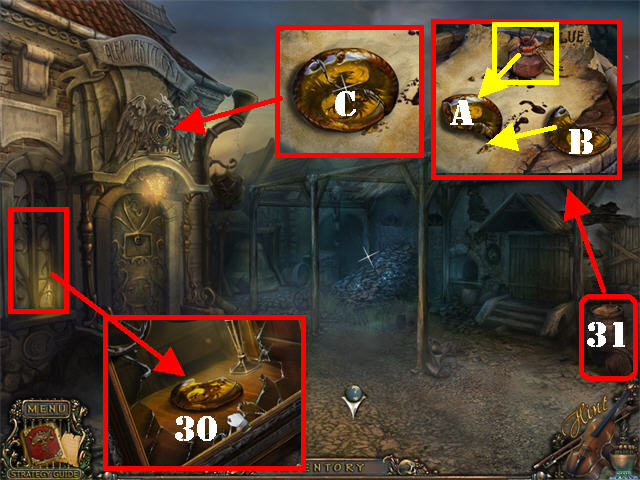
- Click down twice and head right.
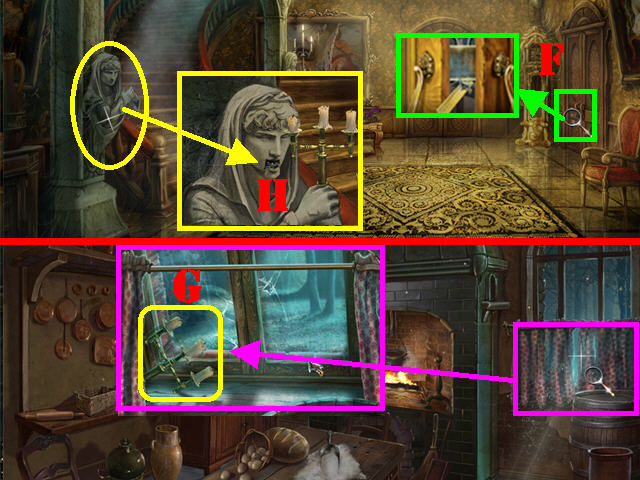
- Examine the left window; break it with the BRICK twice and take the MEDALLION FRAGMENT (30).
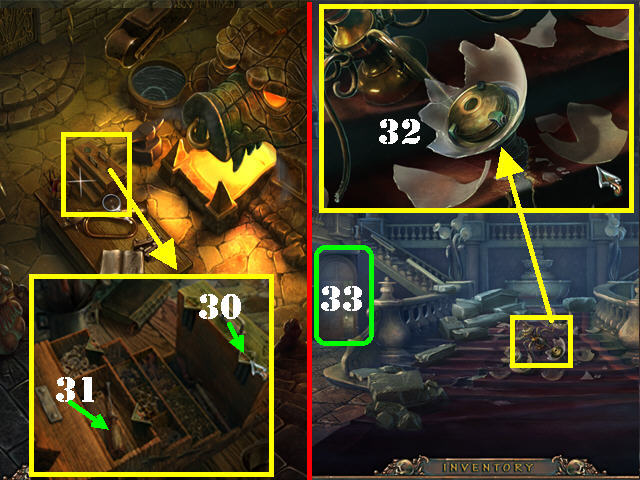
- Examine the barrel on right (31).
- Place the PAINTBRUSH in the glue bottle.
- Put the 2 MEDALLION FRAGMENTS on the barrel.
- Drag the PAINTBRUSH to the first medallion fragment (A).
- Drag the second medallion fragment to the one with the glue (B).
- Take the fixed MEDALLION (C).
- Zoom into the phoenix figure above the door.
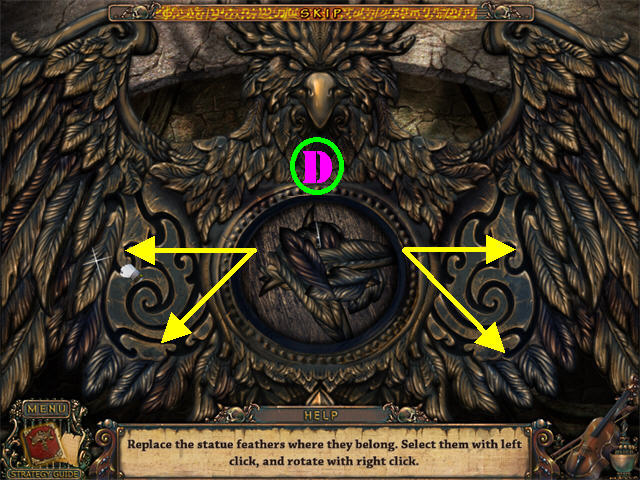
- Place the MEDALLION in the recess to activate a puzzle.
- Drag the feathers to the correct spots on the statue.
- Right-click on a feather to rotate it.
- Please look at the screenshot for the solution (D).
- Go into the door.
- Play the Hidden Object Scene.
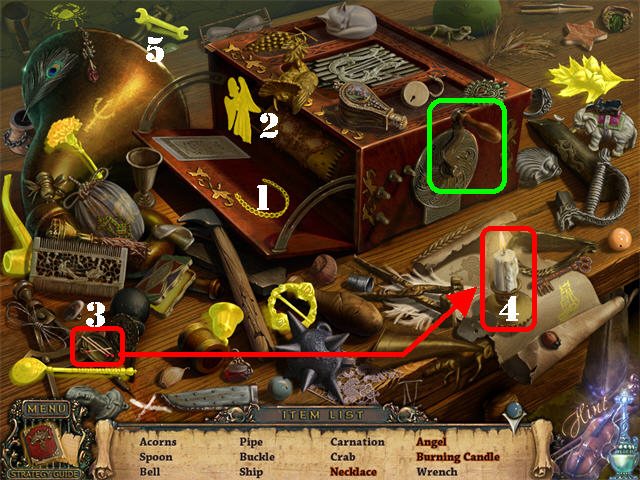
- Turn the handle marked in green to open the box; take the NECKLACE (1) and the ANGEL (2).
- Drag the MATCH (3) to the CANDLE (4) and take the BURNING CANDLE.
- The WRENCH (5) will be added to inventory.
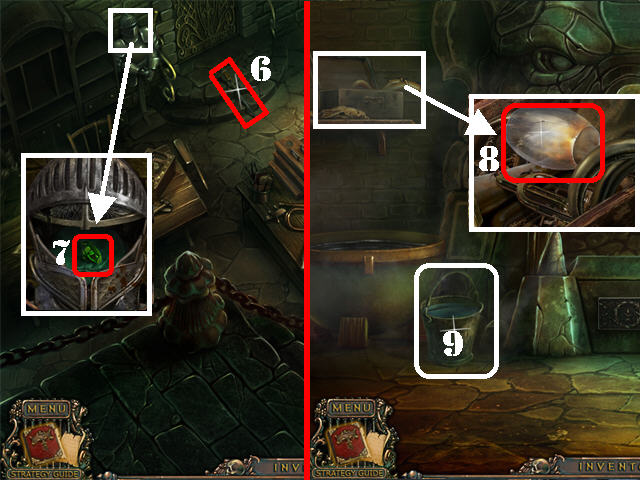
- Grab the POKER (6) in the upper left.
- Zoom into the armor; open the helmet and take the EMERALD (7).
- Examine the furnace.
- Zoom into the toolbox in the upper left; take the LAMPSHADE (8).
- Grab the BUCKET OF WATER (9) on the ground.
- Click down 3 times.
- Examine the bottom of the left post.
- Remove the 4 bolts with the WRENCH (10); take the LETTER K (11).
- Head left twice.
- Play the Hidden Object Scene.
- Click on the fan in the center; take the NOTE (12).
- The SAW (13) will be added to inventory.
- Click down and head forward.
- Throw the BUCKET OF WATER (14) on the fire.
- The EMPTY BUCKET will be automatically entered into inventory.
- Cut the log with the SAW (15).
- Proceed forward.
- Zoom into the base of the left statue.
- Place the EMERALD in the cavity; take EYE 1/2 (16).
- Click down and head right.
- Click on the old lady.
- Play the Hidden Object Scene.
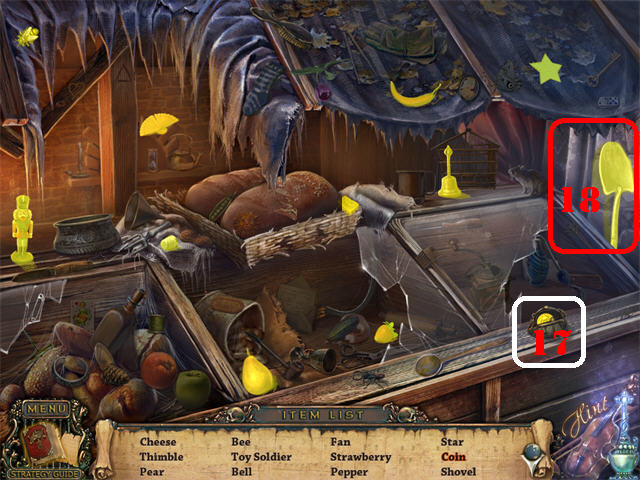
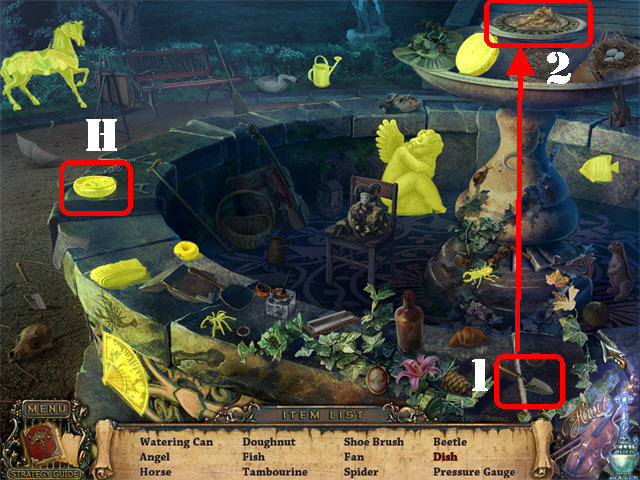
- Open the coin purse; take the COIN (17).
- The SHOVEL (18) will be added to inventory.
- Click down 3 times and head right.
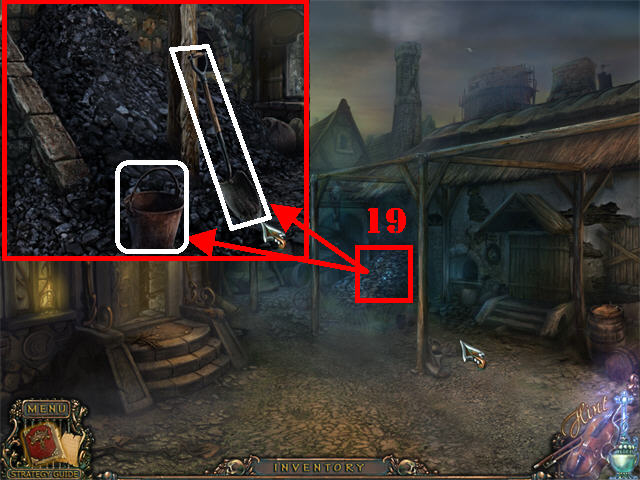
- Examine the pile of coal (19).
- Place the EMPTY BUCKET and the SHOVEL on the ground.
- Click on the SHOVEL to fill the bucket and automatically obtain the BUCKET WITH COAL.
- Go into the left door.
- Zoom into the furnace.
- Pull the RING on the nose (20) in the upper center.
- Zoom into the bottom of the furnace; open it with the GLOVES (21).
- Grab the NAMEPLATE PIECE 1/4 (22) using the POKER.
- Put the BUCKET WITH COAL into the furnace.
- Zoom into the mouth; place the SILVER BULLET in to create the SILVER NOTE (23).

- Click down 3 times, head left, and forward twice.
- Zoom into the gate; place the SILVER NOTE on the gate to activate the puzzle.
- Drag the notes up or down until they are in the right position.
- Once all the notes are in place, click on the Lever (24) on the upper right to check your results.
- Green notes are correct, red ones are incorrect and yellow ones should be placed one space up or one space down from its current position.
- Please look at the screenshot for the solution.
- Click on the door.
Chapter 3: The Theater
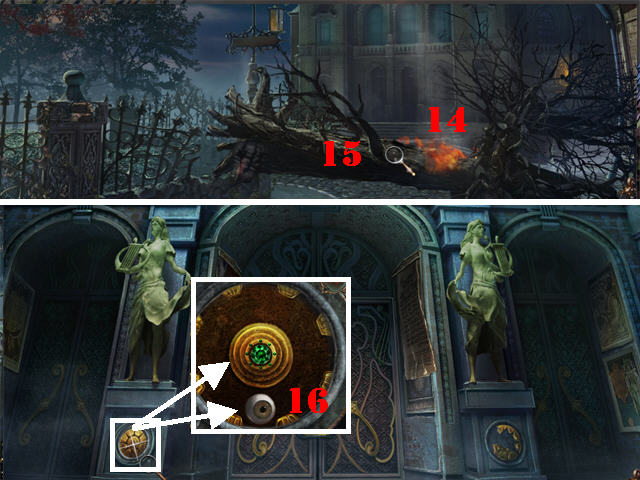
- Go into the door to access the Theater after the old lady disappears.
- Head left in the theater (25).
- Examine the puppet’s pocket; take the ORNATE BUTTON (26).
- Click down 5 times, head right and go into the left door (27).
- Play the Hidden Object Scene on left.
- Click on the handle marked in green to open the box; take the CARD (28) and the BUTTERFLY (29).
- The LAMP WICK (30) will be added to inventory.
- Zoom into the toolbox on the center table.
- Place the ORANATE BUTTON in the right slot (30).
- Grab the SCREWDRIVER inside the toolbox (31).
- Return to the Theater.
- Zoom into the broken chandelier on the steps.
- Remove the screws with the SCREWDRIVER; take the OIL RESERVOIR (32).
- Head left (33).
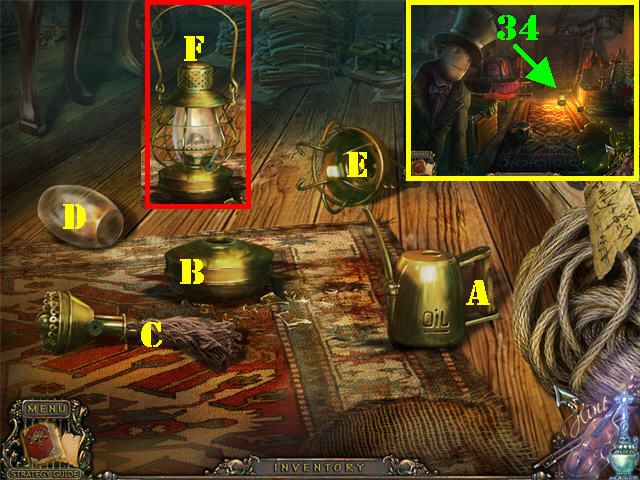
- Zoom into the far edge of the carpet (34).
- Place the LAMP WICK, LAMPSHADE, and OIL RESERVOIR on the carpet.
- Drag the OIL (A) to the OIL RESERVOIR (B).
- Drag the LAMP WICK (C) to the OIL RESERVOIR.
- Place the LAMPSHADE (D) over the wick.
- Put the COVER (E) over the lamp.
- Light the lamp with the MATCHES (F).
- Reconstructing the lamp triggers a Hidden Object Scene.
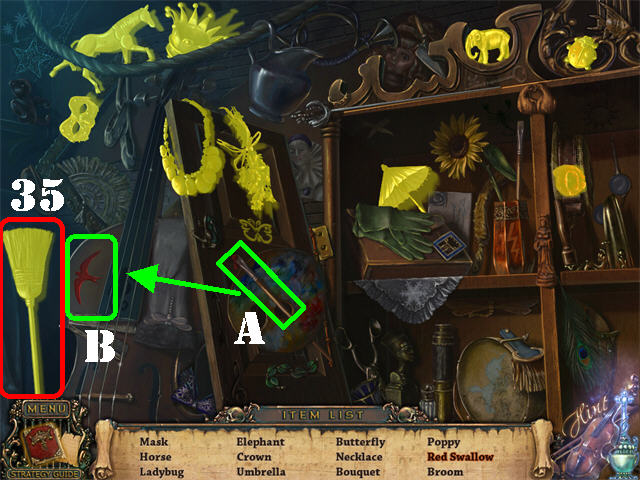
- Play the search scene.
- Take the BRUSH from the palette (A) and place your cursor directly on the SWALLOW (B) to obtain the RED SWALLOW.
- The BROOM (35) will be added to inventory.
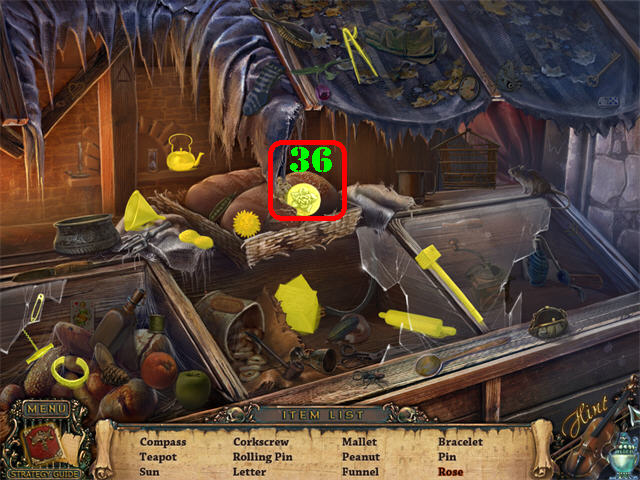
- Click down 3 times, head right by the fallen tree.
- Play the Hidden Object Scene on left.
- Click on the bread; take the ROSE (36).
- The ROSE will be added to inventory.
- Focus on the pile of leaves ahead (37).
- Remove the leaves with the BROOM twice.
- Take the HANDLE (38).
- Zoom out of the leaves.
- Examine the board on the right wall; place the HANDLE (39) in the slot.
- Click on the HANDLE to move the paper; take the EYE 2/2 (40).
- Return to the Theater and enter the lower left door.
- Play the Hidden Object Scene in the back.
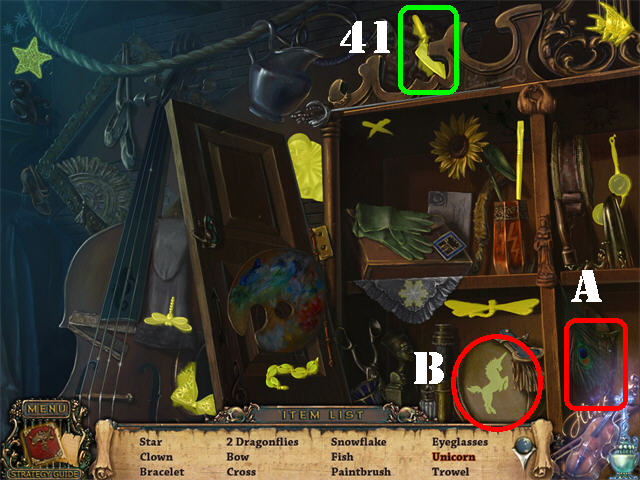
- Clean the DRUM (B) with the FEATHER (A); click on the UNICORN.
- The TROWEL (41) will be added to inventory.
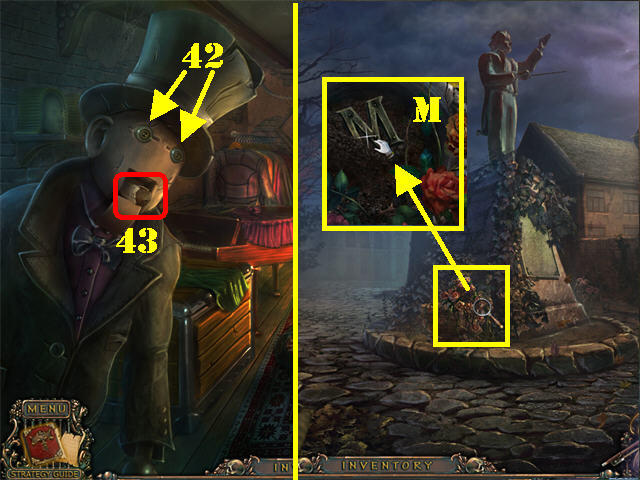
- Place the 2 EYES into the puppet’s eye sockets (42).
- Take the SHEET MUSIC (43) from its mouth.
- Click down 4 times.
- Examine the pot below the statue.
- Place the TROWEL in the dirt twice; take the LETTER M (M).
- Head left.
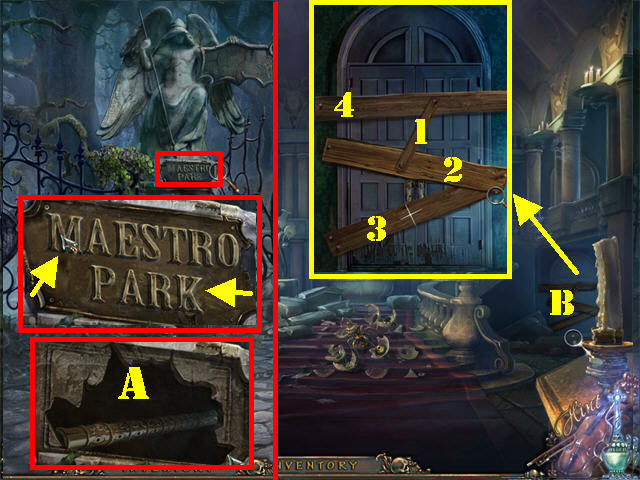
- Zoom into the base of the first statue.
- Place the LETTER M and the LETTER K on the sign.
- Grab the FLUTE (A).
- Return to the Theater.
- Examine the boarded door on right; use the CROWBAR to break the 4 boards starting with the one on top (B).
- Go through the door to access the backstage.
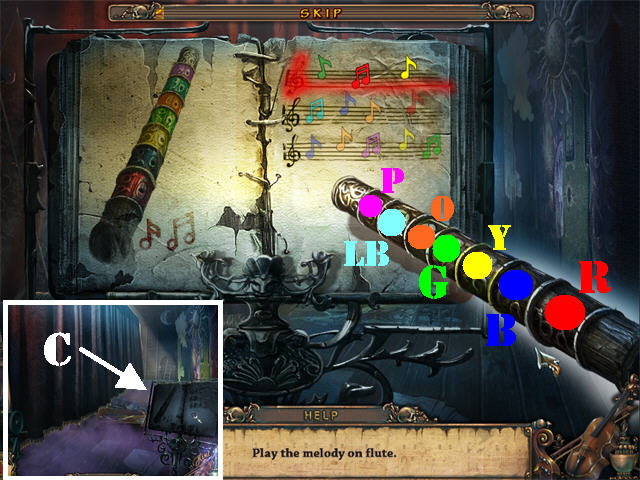
- Zoom into the music stand (C).
- Place the MUSIC SHEET on the stand.
- Put the FLUTE anywhere in the scene to activate the puzzle.
- Play the flute in the order shown on the sheet music.
- You have to play the notes in the order shown on the sheet and in some cases you have to play the same note twice.
- The solution is: G, R, R, Y, LB, LB, B, O, R, B, O, P, P, Y, G, G.
- The curtains will rise after the puzzle has been solved.
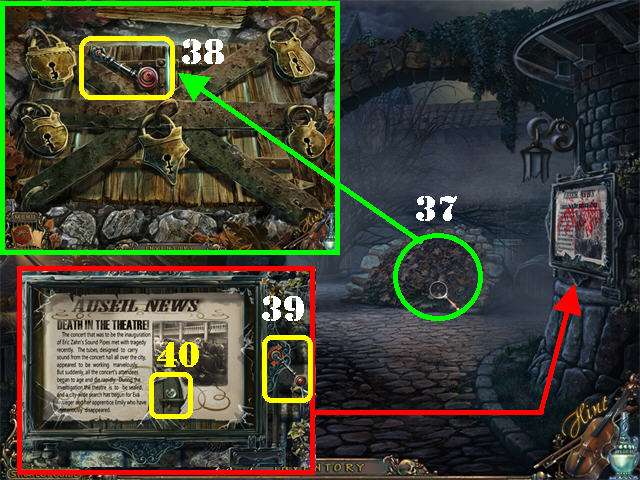
- Zoom into the people in the audience.
- Examine the left chair; take the KEYS (D).
- Click down.
- Play the search scene backstage.
- Open the POUCH (A); take the MARBLES.
- Open the BOOK (B); take the POCKET WATCH.
- The NAMEPLATE PIECE 2/4 (E) will be added to inventory.
- Exit the Theater, head right.
- Zoom into the forward area.
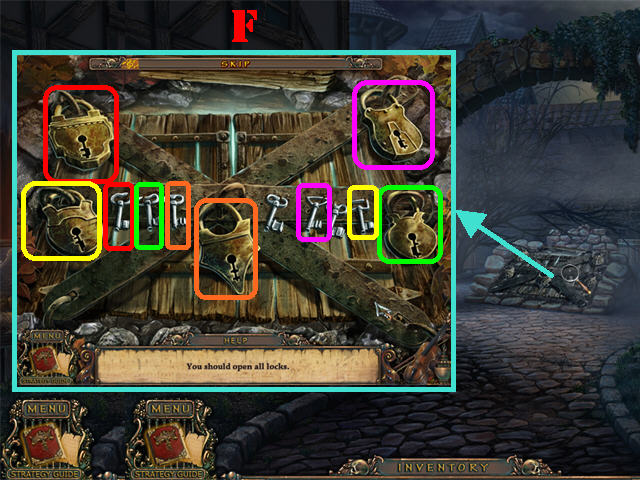
- Place the KEYS on the locks to activate a puzzle.
- Put the keys into the right keyholes as shown in the screenshot (F).
- Open the door and go down the steps.
- Examine the loose floorboard; remove it with the CROWBAR (G).
- Take the SHIELD FRAGMENT 2/2 (H).
- Click down 3 times and head left.
- Zoom into the left gate; place the 2 SHIELD FRAGMENTS into the cavity (I).
- Go through the gate.
Chapter 4: Maestro Park
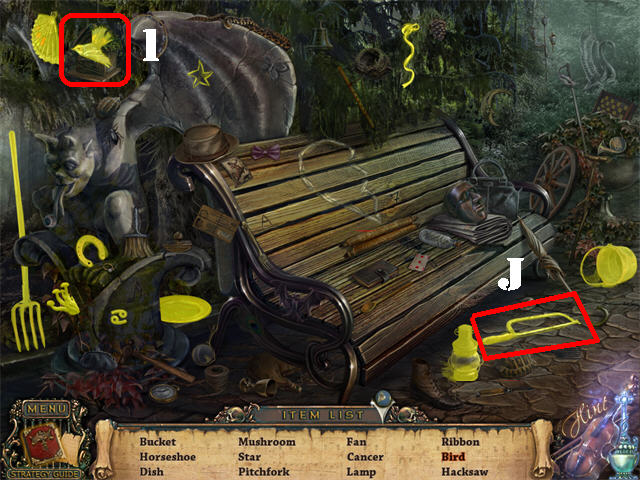
- Head towards the right.
- Play the Hidden Object Scene.
- Click on the BIRDHOUSE and then on the SONGBIRD (1).
- The HACKSAW (J) will be added to inventory.

- Click down and then click on the steps behind the fountain.
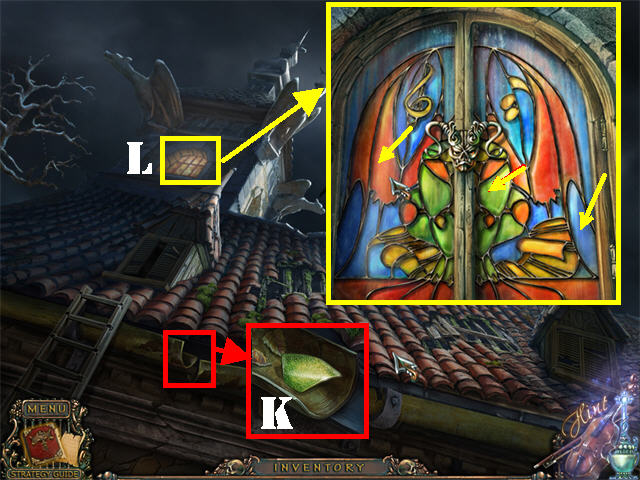
- Zoom into the grave on right; take the VIOLIN (K).
- Examine the grate on left; place the HACKSAW on the bars and take the BRUSH (L).
- Click down 3 times, go forward, right, and then into the hatch.
- Zoom into the left area; clean the cobwebs with the BRUSH 3 times.
- Take the SUN (M).
- Click down 3 times, head left twice, and forward.
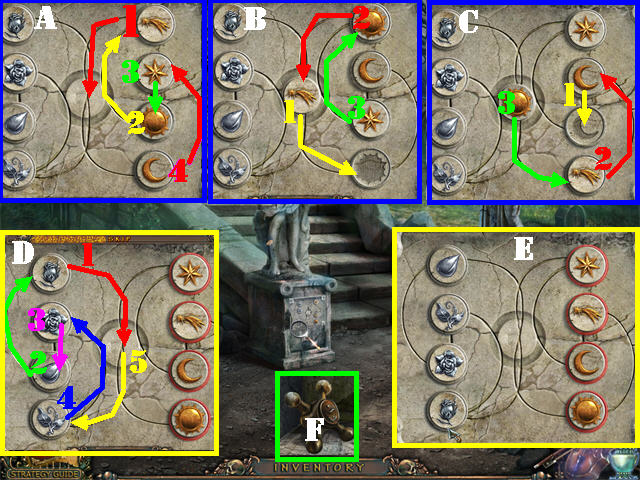
- Zoom into the base of the broken statue.
- Place the ROSE and the SUN into the empty slots to activate a puzzle.
- Use the grooves to slide the pieces around until they land on top of their matching silhouette.
- Please look at the screenshots for the solution (E).
- Take the VALVE (F) after the puzzle has been solved.
- Click down.
- Zoom into the lower left area; place the VALVE on the tap (G).
- Turn the valve to activate a search scene by the fountain.
- Look for the items on the list.
- Drag the DAGGER (1) next to the stone close to the key; take the KEY (2).
- The TORCH HEAD (H) will be added to inventory.
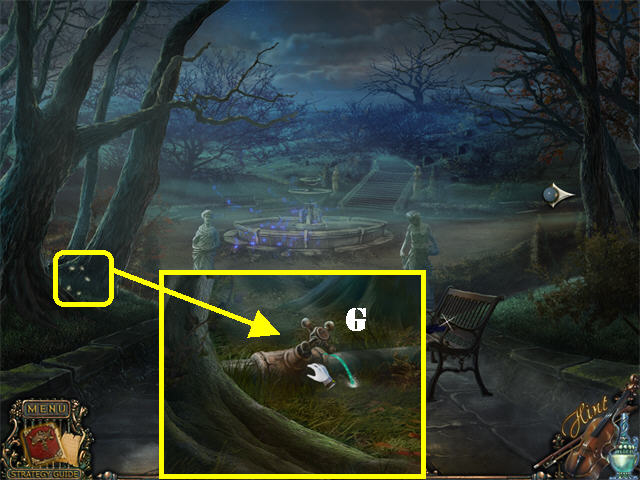
- Go forward.
- Examine the large statue; place the TORCH HEAD in the raised hand.
- Put the MATCHES on the torch.
- Take the TORCH (I).
- Examine the vines above the steps; light them with the TORCH (J).
- The way is now clear, go up the steps.
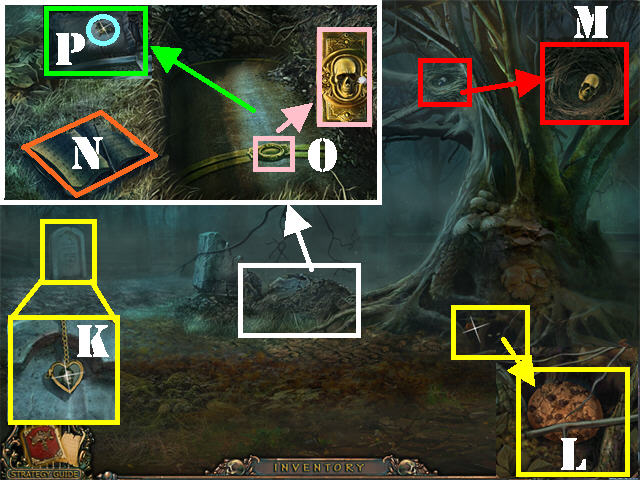
- Examine the grave on left; take MEDALLION 2/3 (K).
- Zoom into the base of the tree; take the COOKIE (L).
- Examine the nest in the upper right; take the SKULL (M).
- Look closer at the open grave; take the NAMEPLATE PIECE 3/4 (N).
- Zoom into the coffin; place the SKULL in the empty slot (O).
- Open the casket; examine the pillow and take the PIANO (P).
- Return to the Park.
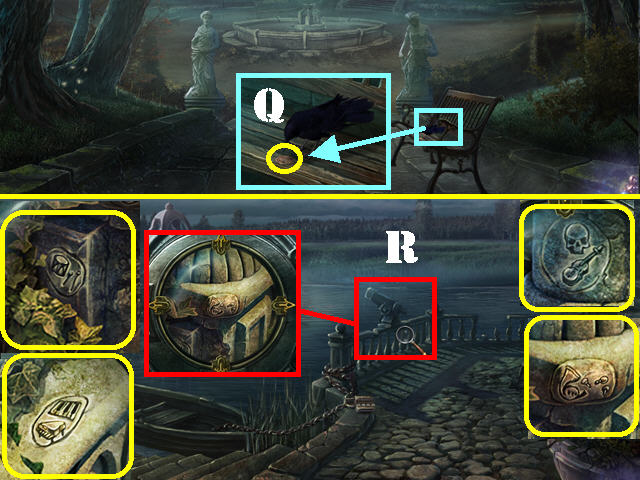
- Zoom into the bench.
- Click on the CROW.
- Give the COOKIE to the crow and take the COIN (Q) once it flies away.
- Head right.
- Examine the telescope; insert the COIN in the slot to activate it (R).
- Note the symbols etched into the stones; these are clues for a puzzle. Each musical instrument has an item next to it: Drum: Drumsticks; Horn: Buttons; Piano: Keyboard; Violin: Skull.
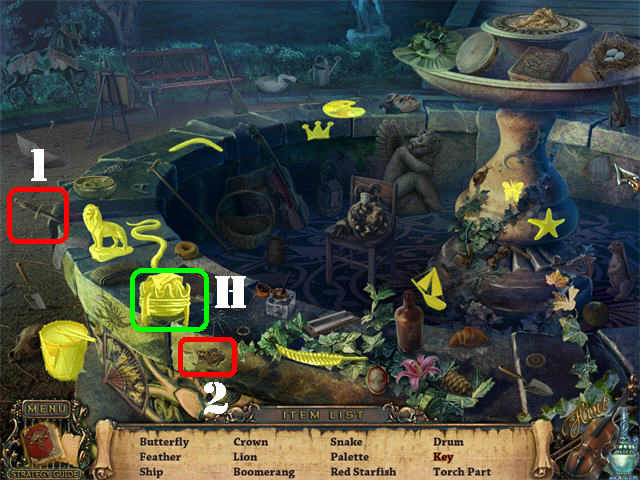
- Viewing the telescope activates a search scene.
- Find all the items on the list.
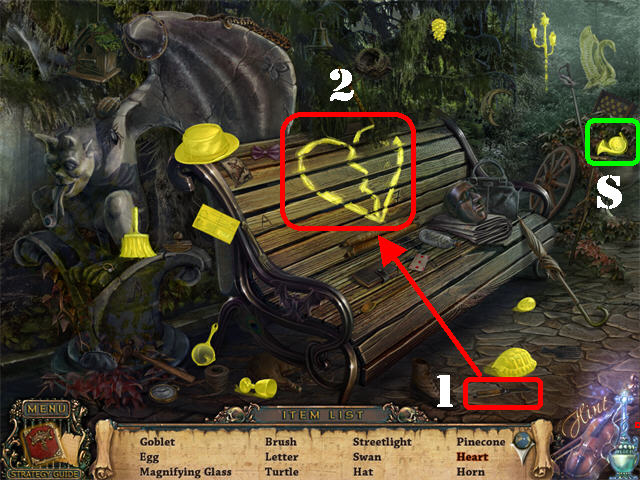
- Drag the KNIFE (1) on the ground to the half-carved heart (2) on the bench; take the HEART.
- The HORN (S) will be added to inventory.
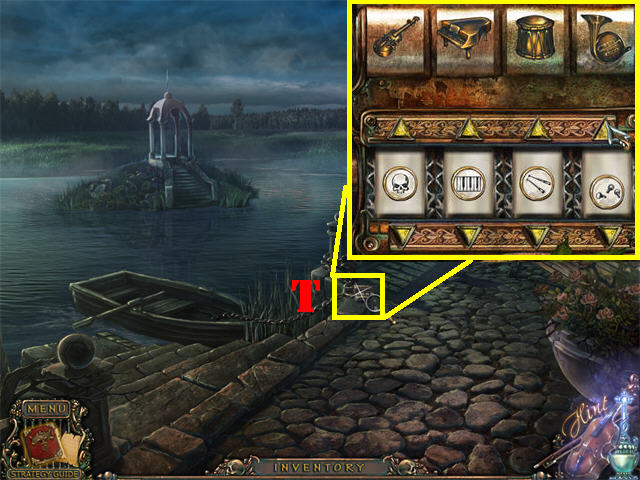
- Examine the lock attached to the chain by the boat (T).
- Place the VIOLIN, PIANO, and HORN in their matching slots.
- Use the arrows below each musical instrument to enter the same type of symbols you saw in the telescope: Violin: Skull; Piano: Keyboard; Drum: Drumsticks; Horn: Buttons.
Chapter 5: Underground
- Click on the boat to reach the Island.
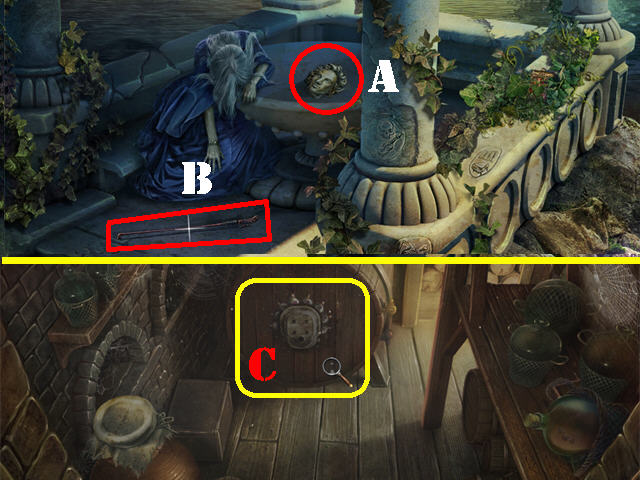
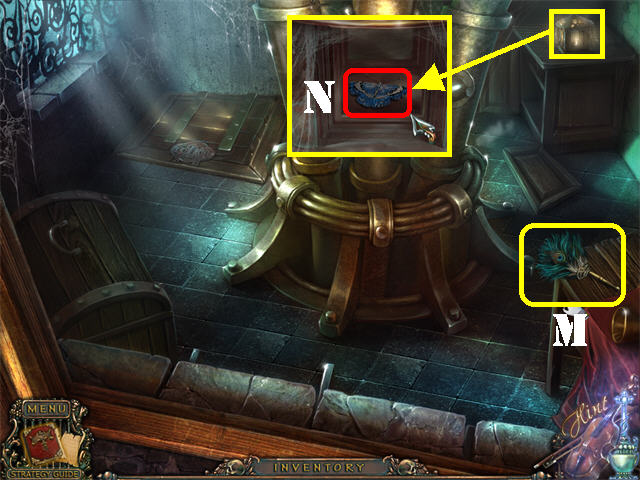
- Take the MASK in the center (A).
- Take The FIDDLESTICK (B) on the ground.
- Click down 4 times, head forward, right, and go into the hatch.
- Examine the wine barrel (C) in the back; place the MASK in the center to activate a puzzle.
- Click on any 2 symbols to swap their positions so the process of making music from beginning to end is showcased.
- The solution is as follows (D):
- The first slot belongs to the Music Note; the idea has been formed.
- The second slot belongs to the Music Sheet; need to write the song down.
- The third slot belongs to the Music Stand; you need a place to put your Music Sheet.
- The fourth slot belongs to the Violin; an instrument is needed for playing the song.
- The fifth slot belongs to the Violinist; he will play the song.
- The sixth slot belongs to the Stage which is needed to perform the song in a concert.
- The seventh slot belongs to the flowers; after the performance the musician receives some flowers.
- Go through the barrel and head left.
- Play the Hidden Object Scene.
- Remove the cloth on right; take the SHEARS (E).
- The SHEARS will be added to inventory.
- Take the boat back to the Island.
- Examine the poisoned ivy on right; cut it with the SHEARS (F).
- Open the coin purse; take the CHALK (G).
- Return to the Park.
- Play the Hidden Object Scene by the fountain.
- Drag the HAND SPADE (1) to the dirt pile above the dish; take the DISH (2).
- The PRESSURE GAUGE (H) will be added to inventory.
- Click down twice, forward, right, go through the hatch, through the barrel and turn left to reach the boiler room.
- Play the Hidden Object Scene.
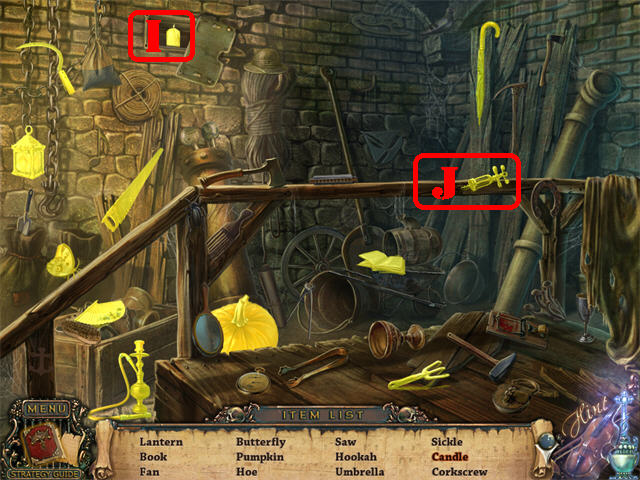
- Remove the metal plate in the upper left; take the CANDLE (I).
- The CORKSCREW (J) will be added to inventory.
- Click down twice.
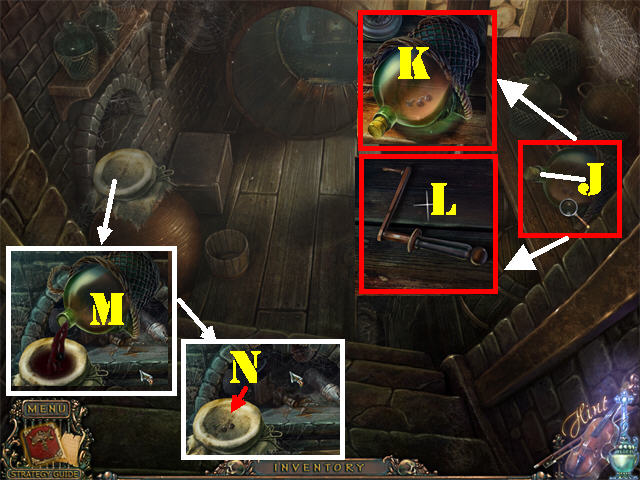
- Zoom into the wine bottle in the upper right; place the CORKSCREW on the cork (J).
- Take the WINE BOTTLE (K) and the HANDLE (L).
- Examine the area on left; pour the WINE BOTTLE in the strainer (M).
- Take the TRUMPET VALVES (N).
- Go forward.
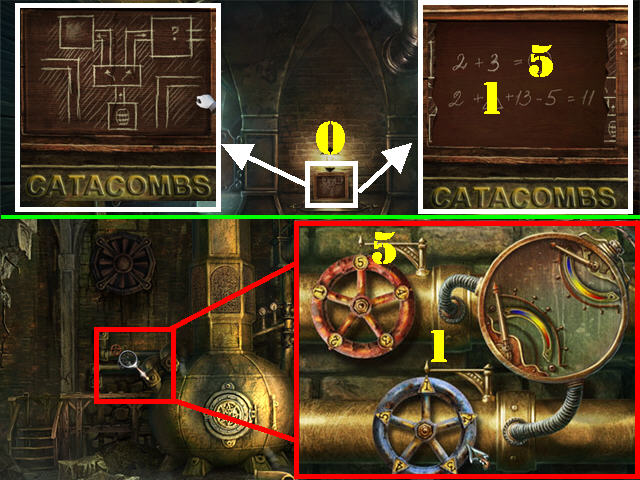
- Zoom into the board straight ahead; click on the 2 doors to open them (O).
- Place the CHALK on the board to reveal a formula.
- 2 plus 3 equals circle, the circle represents the sum of 2 and 3 which is 5.
- 2 plus triangle plus 13 minus 5 equals 11. The triangle should be replaced by the number 1 so the equation is equal to 11.
- Head left.
- Examine the valves on left; place the PRESSURE GAUGE over the pipes.
- To solve the puzzle move the blue valve to 5 and the red valve to 1 (the solution from the chalkboard).
- The pressure in the sewers has now been stabilized.

- Click down and head right to access the Tomb.
- Zoom into the organ grinder on right; place the HANDLE in the hand to unlock the door (P).
- Go through the door.
Chapter 6: The Workshop
- Go up the steps to reach the street.
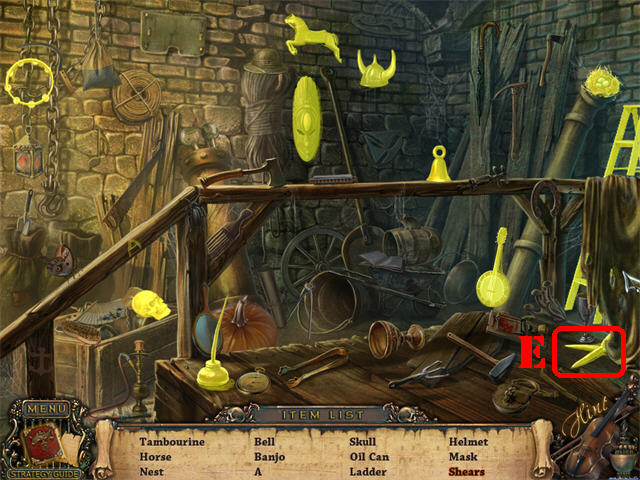
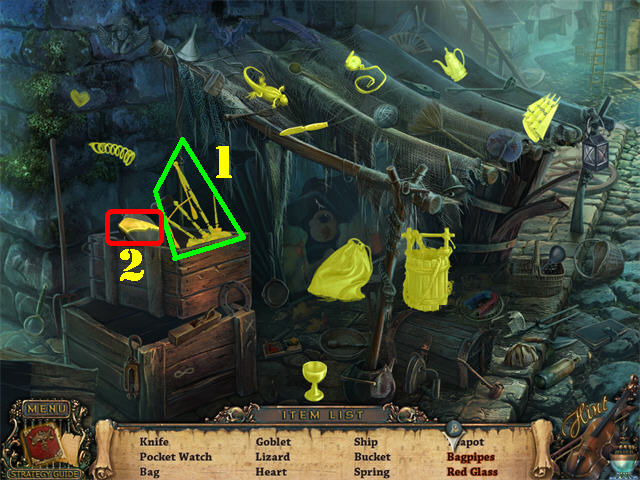
- Play the search scene on left.
- Remove the crate on left; take the BAGPIPES (1) and the RED GLASS (2).
- The RED GLASS will be added to inventory.
- Examine the crate in the lower right; break it with the CROWBAR.
- Take the BOARDS (R).
- Take the DOOR KNOCKER PIECE 1/2 (S).
- Proceed forward twice.
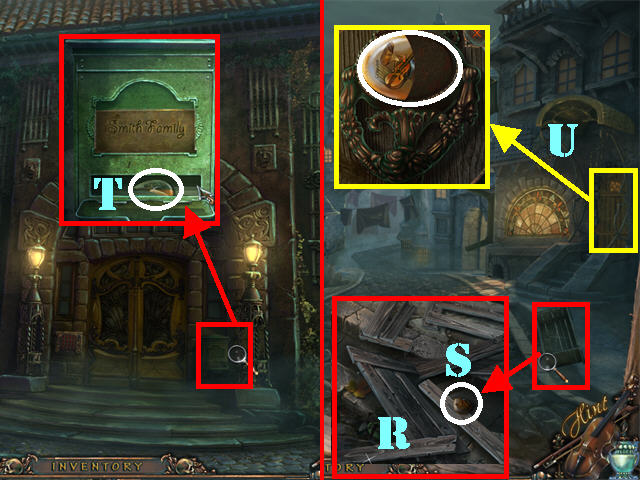
- Examine the mailbox in the lower right.
- Open the lid; take the DOOR KNOCKER PIECE 2/2 (T).
- Click down twice.
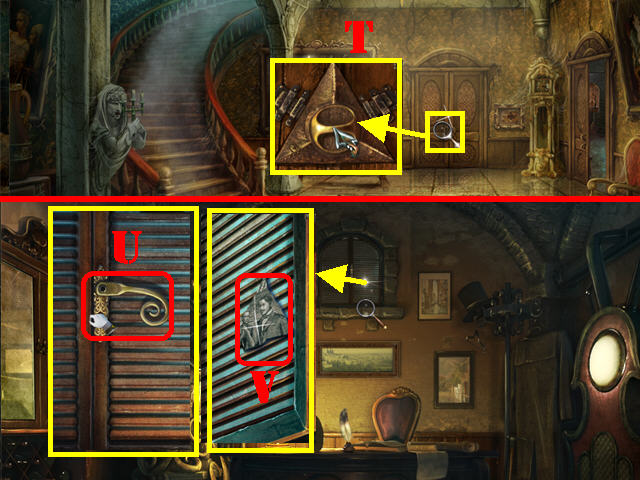
- Zoom into the shop door on the right (U).
- Place the 2 DOOR KNOCKER PIECES in to the slot.
- Enter the workshop.
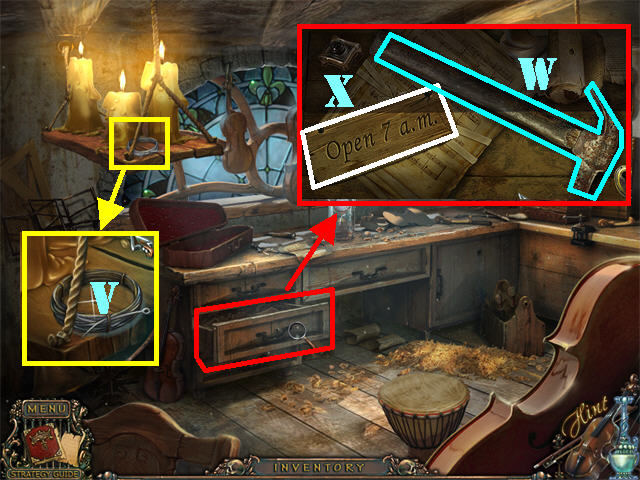
- Examine the shelf in the upper left; take the CELLO STRINGS (V).
- Open the drawer in the lower left, look inside, and take the HAMMER (W).
- Note the sign that states: “Open 7 a.m.” (X).
- Click down 3 times to return to the Tomb.
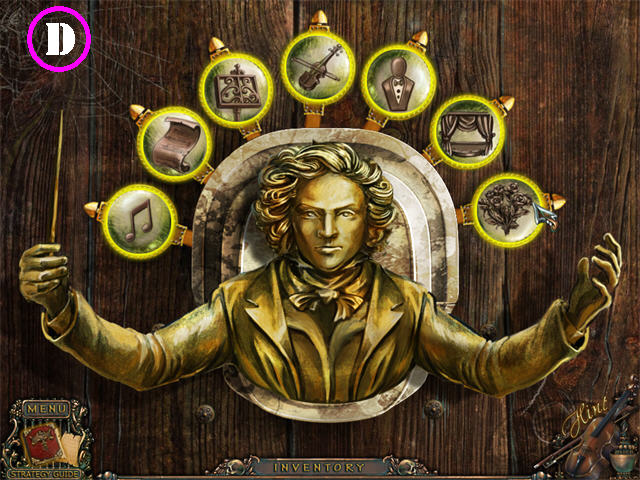
- Zoom into the violinist on left; give him the FIDDLESTICK (1).
- Examine the cellist in the back; place the CELLO STRINGS (2) on the cello.
- Zoom into the trumpeter on right; give him the TRUMPET VALVES (3).
- A pedestal will appear in the center of the floor after all the musicians have been given all the items.
- Zoom into the pedestal.
- Break the vase with the HAMMER 3 times.
- Take the NAMEPLATE PIECE 4/4 (4) and the CLOCK HANDS (5) inside the broken vase.
- Return to the street outside the workshop.
- Drag the MATCHES (A) in the lower right over to the LANTERN (B) in the upper right; click on the LIT LANTERN.
- Play the Hidden Object Scene to obtain the MAGNET (6).
- Go into the workshop on the right.
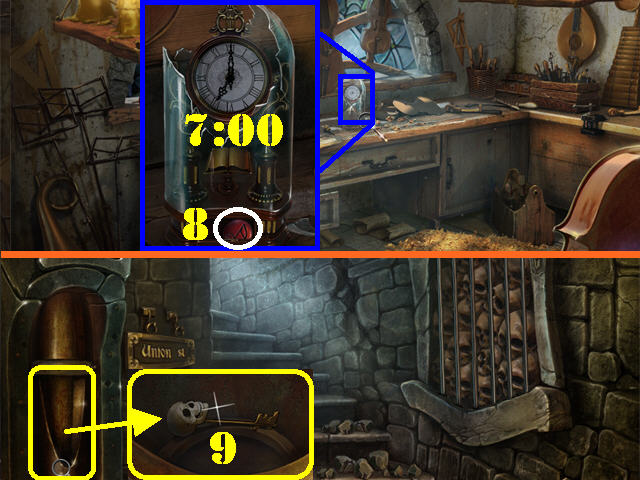
- Zoom into the clock; place the CLOCK HANDS on the clock.
- Inside the drawer in the lower left it had a sign that said the shop opens at 7 a.m.
- Set the clock hands to 7; take NOTE (8) at the bottom of the clock.
- Click down twice.
- Examine the pipe on left.
- Place the MAGNET in the pipe to retrieve the KEY (9).
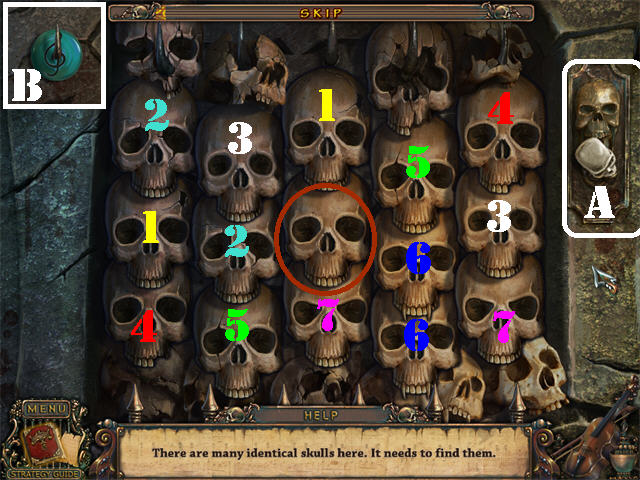
- Zoom into the bars on right; place the KEY in the lock (A) in the upper right.
- Click on the KEY to lower the bars and activate the puzzle.
- Click on 2 matching skulls to eliminate them.
- Please look at the screenshot for the solution.
- Take the TREBLE CLEF (B) after the puzzle has been solved.
- Go forward 3 times to reach the Mansion.
Chapter 7: The Mansion
- Zoom into the lower left side of the front door.
- Place the NOTE and the TREBLE CLEF into the empty slots to activate a puzzle.
- The red (C) note in the upper left has the locked sign below it. The blue treble clef (D) in the upper right has the unlocked lock below it.
- Your goal is to change the notes all blue by clicking on the right pieces.
- Please follow directions in screenshot to solve the puzzle.
- Go through the door.
- Play the Hidden Object Scene.
- Drag the HALF MASK (1) on the ground to the other HALF MASK (2) on the wall; take the MASK.
- The RULER (E) will be added to inventory.
- Examine the door on the right; slide the RULER in between the gap (F).
- Enter the Kitchen on right.
- Zoom into the curtains.
- Click on the curtains twice; take the CANDLESTICK (G).
- Click down.
- Zoom into the statue on the left pillar; place the CANDLESTICK in its hand to open its mouth.
- Take the NAILS (H) from the statue’s mouth.
- Go outside.
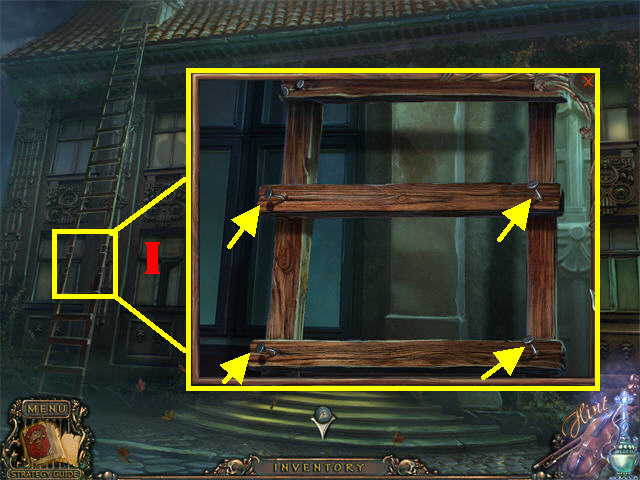
- Zoom into the ladder on left (I).
- Place the BOARDS and NAILS on the broken ladder.
- Use the HAMMER on the 4 nails.

- Go up the ladder.
- Play the Hidden Object Scene.
- Cut the BAG (1) with the SCISSORS (2); take the BLUE GLASS (J).
- The BLUE GLASS (J) will be added to inventory.
- Examine the gap in the gutter; take the GREEN GLASS (K).
- Zoom into the window above (L).
- Place the GREEN, BLUE, and RED STAINED GLASS into the empty slots.
- Click on the handle and go into the Attic.
Chapter 8: The Attic
- Take the FEATHER DUSTER (M) in the lower right.
- Examine the lamp in the far right.
- Break the glass with your cursor; take the MOTH (N).
- Return to the Kitchen inside the Mansion.
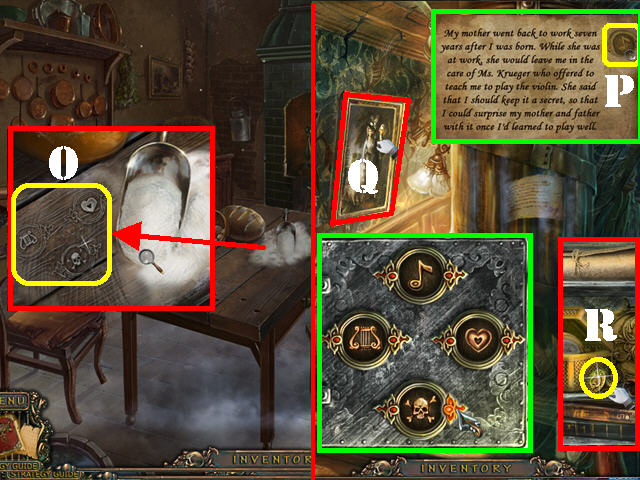
- Zoom into the flour pile on the table.
- Remove the flour with the FEATHER DUSTER to reveal part of the code for the safe (O).
- Click down and go up the steps.
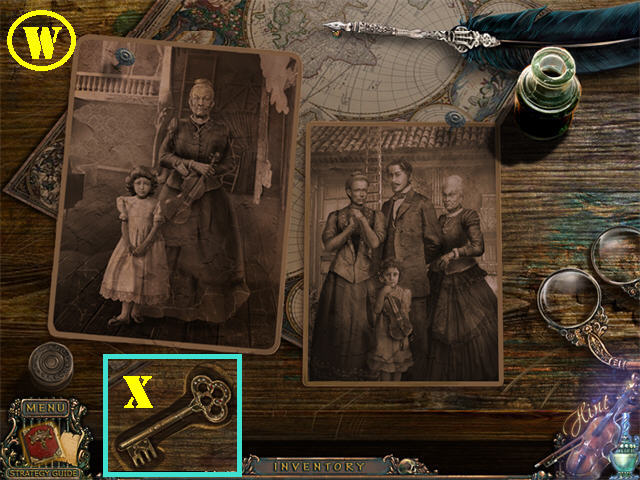
- Examine the NOTE on the right; this will give you the final coded needed to open the safe since a NOTE (P) is shown in the upper right.
- Remove the framed picture on the upper left to reveal a safe (Q).
- Use the arrows on the left and right of each symbol to change the image.
- Use the code found in the kitchen along with the one on the note to solve the puzzle.
- Please look at the screenshot for the solution.
- Take the SIGNET RING (R) inside the safe.
- Click down.
- Play the Hidden Object Scene.
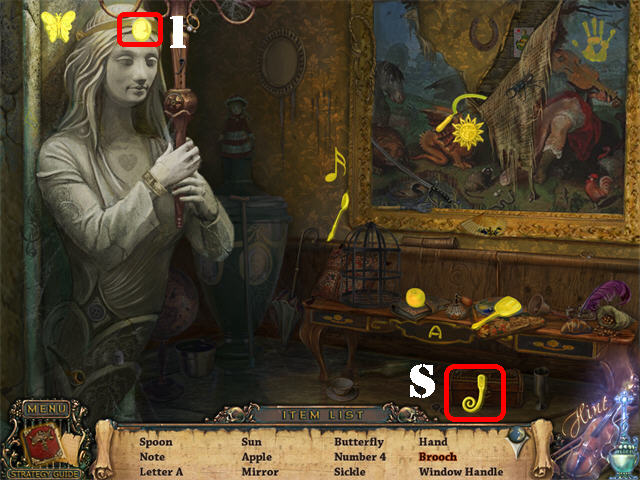
- Remove the BLUE HEADBAND on the statue; take the BROOCH (1).
- The WINDOW HANDLE (S) will be added to inventory.
- Zoom into the back door (T).
- Place the SIGNET RING into the lock; go into the office.
- Examine the top window; place the WINDOW HANDLE on the window (U).
- Click on the HANDLE to unlock the shutter; take the PHOTO PIECE (V).
- Zoom into the desk to trigger a puzzle.
- Place the PHOTO PIECE on the desk to activate the puzzle.
- Left click on a piece to pick it up. Right-click on a piece to rotate it.
- You have to reassemble 2 pictures as show in the screenshot (W).
- Take the KEY (X) after the puzzle has been solved.
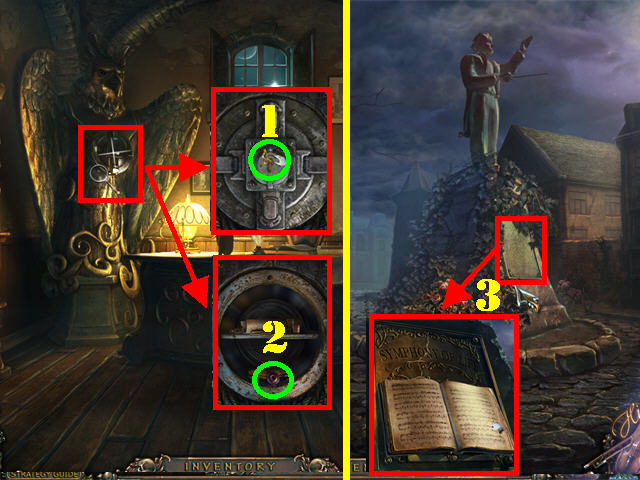
- Examine the large statue; place the KEY in the lock (1).
- Turn the key twice to unlock the safe; take the red BUTTON (2).
- Return to the large statue outside the Park (click down until you get there).
- Zoom into the base of the statue.
- Remove the vines with the KNIFE 3 times.
- Place the 4 NAMEPLATE PIECES into the correct slots.
- Take the SYMPHONY OF LIFE (3).
- Return to the roof in the Mansion.
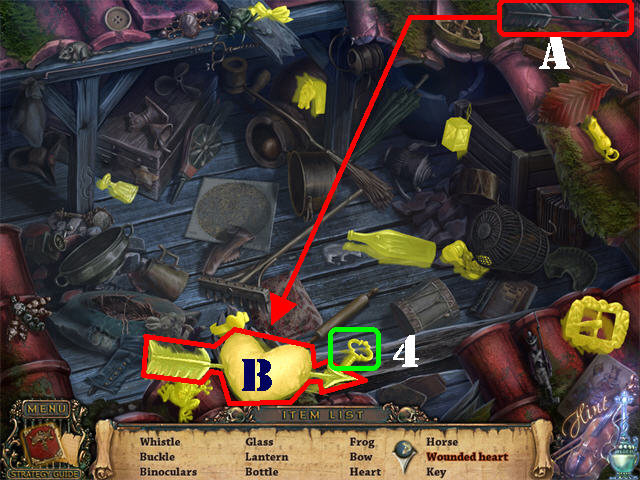
- Play the Hidden Object Scene.
- Drag the ARROW (A) in the upper right to the HEART (B) in the lower center; take the WOUNDED HEART.
- The KEY (4) will be added to inventory.
- Go to the Attic.
- Zoom into the trapdoor on left.
- Place the BUTTON on the puzzle to activate it.
- Click on the arrows to rotate the rings until they form the image in the upper right corner of the scene.
- Click on the Reset Button to start over.
- The solution to the puzzle is random.
- Place the KEY in the keyhole in the center of the puzzle.
- Turn the key once to open the trapdoor; go into the trapdoor.
Chapter 9: Emily’s House
- Look at the NOTE (1) on the ground. Pay attention to the musician’s pose, you will need it to solve a puzzle.
- There are 2 rights you can make in this scene; head to the far right to access a bathroom (2).
- Open the curtain over the bathtub to trigger a Hidden Object Scene (3).
- Find all the items on the list.
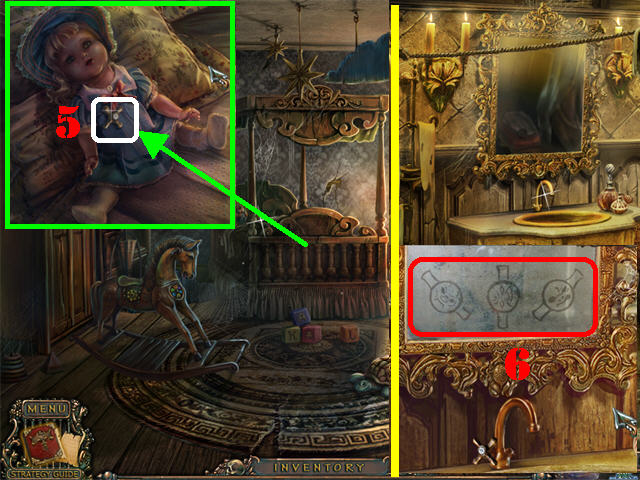
- Drag the RED THREAD (A) to the STARFISH (B) on the towel; take the RED STARFISH.
- The DOLL HEAD (4) will be added to inventory.
- Click down, open the door in the back and go into the child’s bedroom.
- Examine the bed; place the DOLL HEAD on the headless doll.
- Take the VALVE from the doll (5).
- Return to the Bathroom.
- Open the curtain over the sink to reveal a mirror.
- Zoom into the sink; place the VALVE on the faucet so the hot water from the tap can fog up the mirror.
- Note the images on the mirror (6).
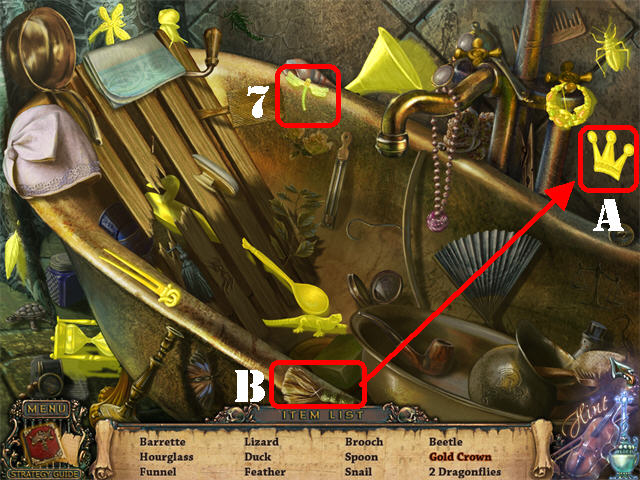
- Play the Hidden Object Scene.
- Clean the CROWN (A) with the BRUSH (B); click on the GOLD CROWN.
- The DRAGONFLY (7) will be added to inventory.
- Click down to return to the hallway.
- Examine the left door.
- Move the 3 locks so they resemble the positions in the fogged bathroom mirror (8).
- Go into the bedroom.
- Zoom into the vanity; take the SWITCH (9).
- Play the Hidden Object Scene.
- Move the large tarp on the right; take the RIBBON and the PIN marked in green.
- The BUTTERFLY (10) will be added to inventory.
- Click down twice.
- Open the chest in the lower left.
- Place the MOTH, BUTTERFLY, and DRAGONFLY into their matching slots (11).
- Take the LADDER (12).
- Go back into the trapdoor.
- Head towards the lower right (13).
- Place the LADDER in the hole and go in (14).
- Play the Hidden Object Scene.
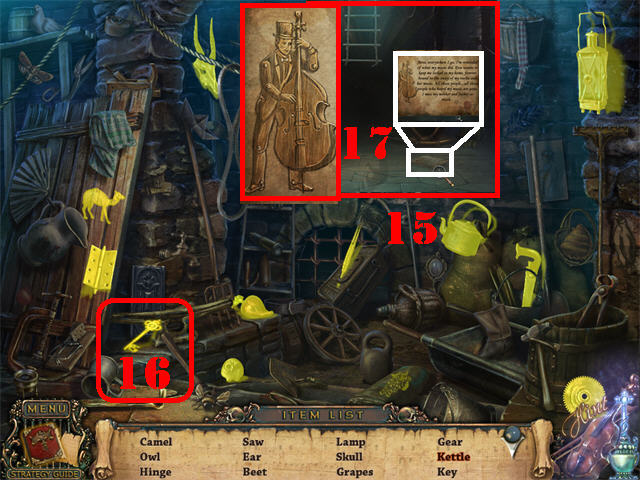
- Click on the BUCKET and take the KETTLE (15).
- The KEY (16) will be added to inventory.
- Look at the NOTE (17) on the ground. Notice the position of the bass player, you will need that to solve a puzzle.
- Return to the Bedroom.
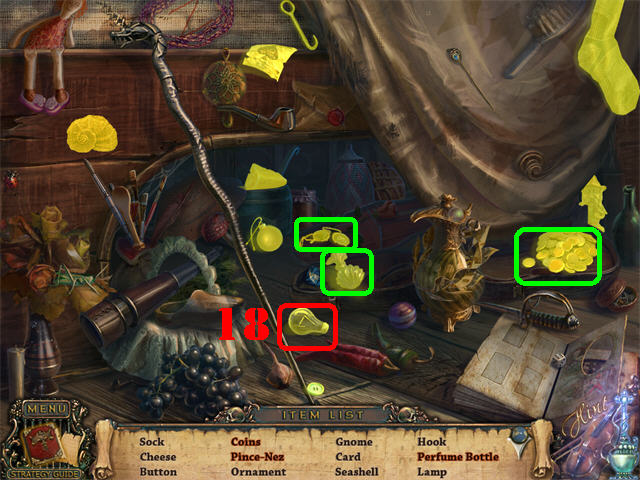
- Play the Hidden Object Scene.
- Open the violin case; take the COINS, PINCE-NEZ and the PERFUME BOTTLE marked in green.
- The LIGHT BULB (18) will be added to inventory.
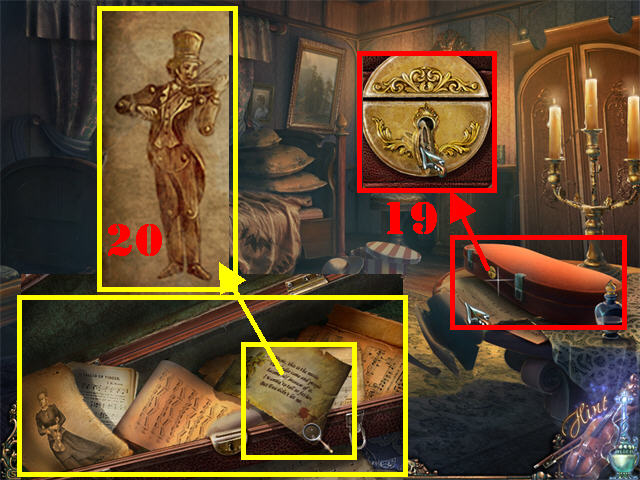
- Zoom into the violin case on right; open it with the KEY (19).
- Zoom into the case; note the position of the joints for the violin player (20).
- Return to the child’s bedroom.
- Zoom into the desk by the window.
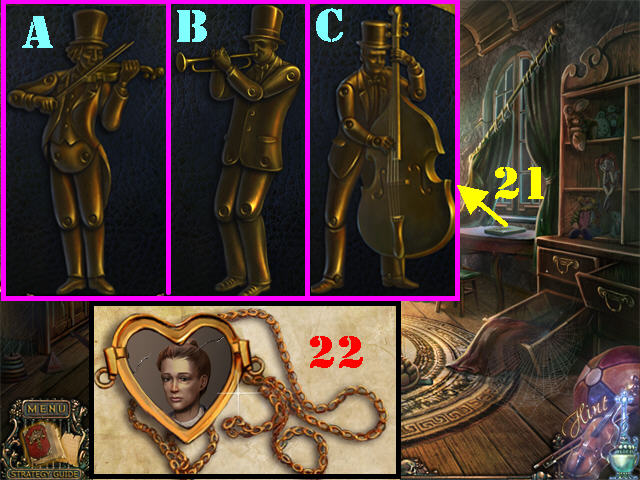
- Position the joints of the violin player by clicking on the little balls attached to each limb. This puzzle will not activate until you have found all 3 sketches.
- You can right-click on a joint to reverse its position.
- You have to solve 3 puzzles to beat the game.
- Please look at the screenshot for the 3 solutions (21).
- Take the MEDALLION 3/3 (22) after the puzzle has been solved.
Chapter 10: The Maestro
- Return to the Dungeon by clicking down, heading right and going down the rope ladder.
- Play the Hidden Object Scene.
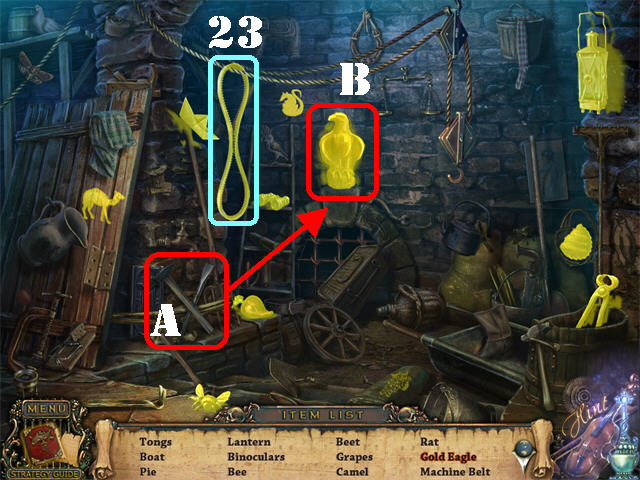
- Drag the HAMMER AND CHISEL (A) to the partially-carved EAGLE (B); take to the GOLD EAGLE.
- The MACHINE BELT (23) will be added to inventory.
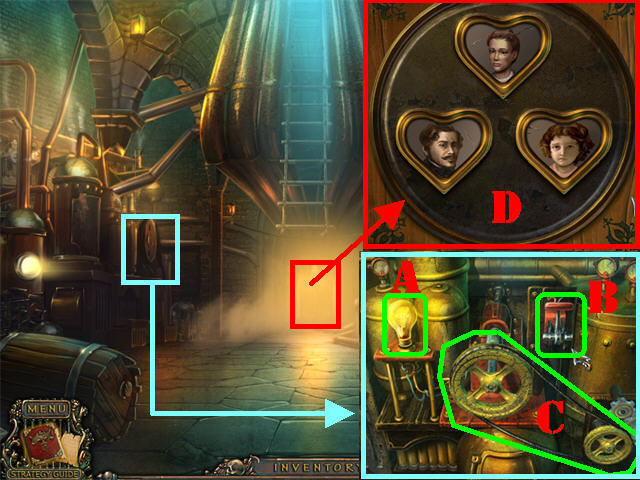
- Examine the mechanism on left.
- Place the LIGHT BULB (A), SWITCH (B), and the MACHINE BELT (C) into the correct positions.
- Click on the SWITCH to activate the mechanism.
- Click on the area below the ladder.
- Place the 3 MEDALLIONS into the slots to activate a puzzle (D).
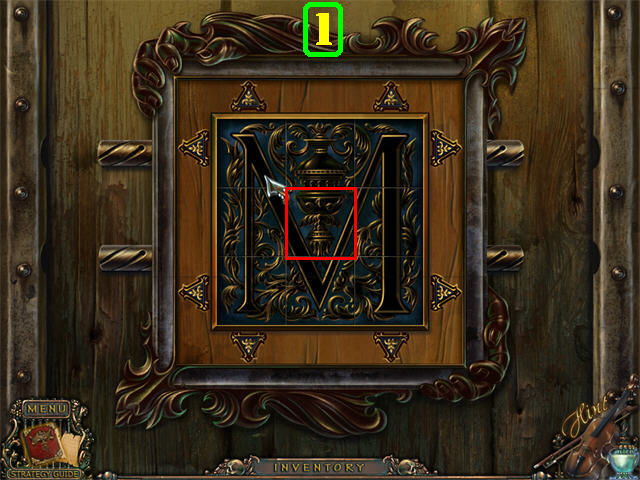
- Use the arrows to switch the images in the puzzle.
- The solution to this puzzle is random; please look at the screenshot for the final solution.
- Proceed forward after the puzzle has been solved.
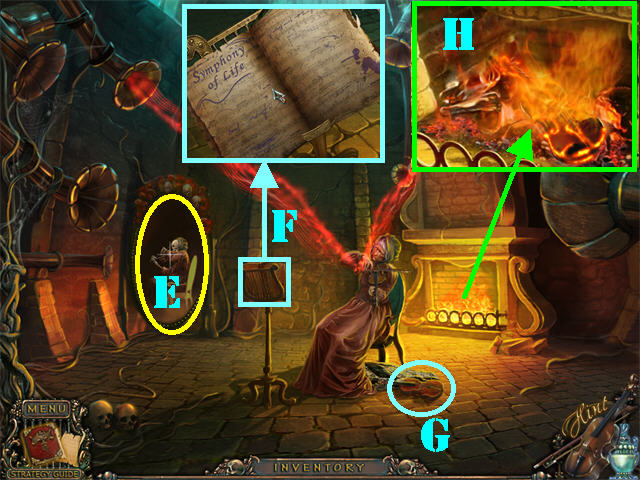
- Zoom into the left mirror; break it with the CROWBAR ( E).
- Examine the music stand; place the SYMPHONY OF LIFE on the stand (F).
- Grab the VIOLIN (G) on the ground.
- Zoom into the fireplace; put the VIOLIN into the fireplace (H).
- Congratulations! You have completed Maestro: Music of Death!
Created at: 2011-03-26