

Walkthrough Menu
- General Tips
- Chapter 1: Where Am I?
- Chapter 2: Into the Maze
- Chapter 3: Dream Haven
- Chapter 4: the First Sleeper
General Tips
- This is the official guide for Maze: Subject 360.
- This guide will not mention each time you have to zoom into a location; the screenshots will show each zoom scene.
- Hidden-object puzzles are referred to as HOPs. This guide will not show HOP solutions. It will identify the location of the HOP and the inventory item acquired.
- This guide will show solutions for non-random puzzles. Please read the in-game instructions for each puzzle.
Chapter 1: Where Am I?
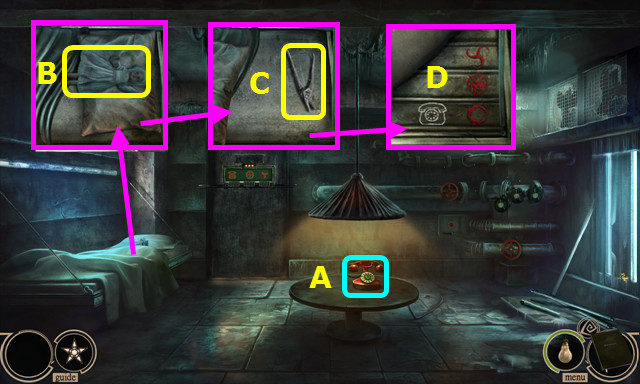
- Select (A).
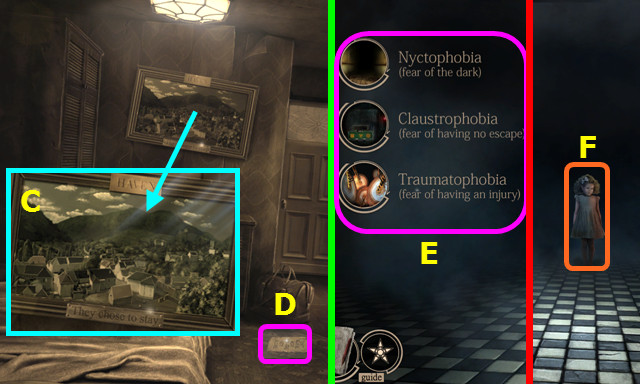
- Move the blanket; take the DOLL (B).
- Move the pillow; take the WIRE CUTTERS (C).
- Move the mattress; look at the code (D).
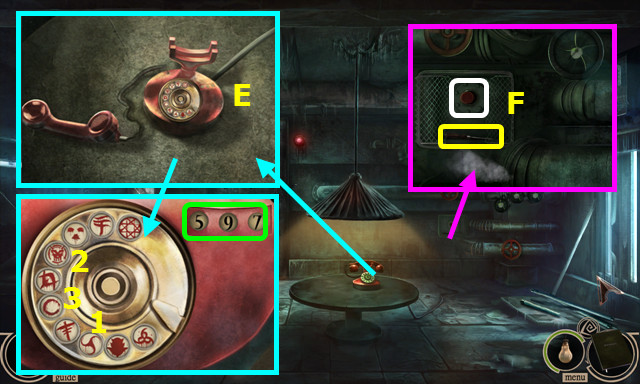
- Remove the receiver; touch the dial (E).
- Select 1-3; note the code 5-9-7.
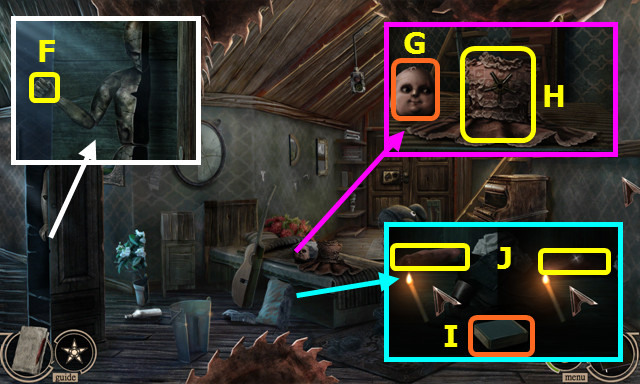
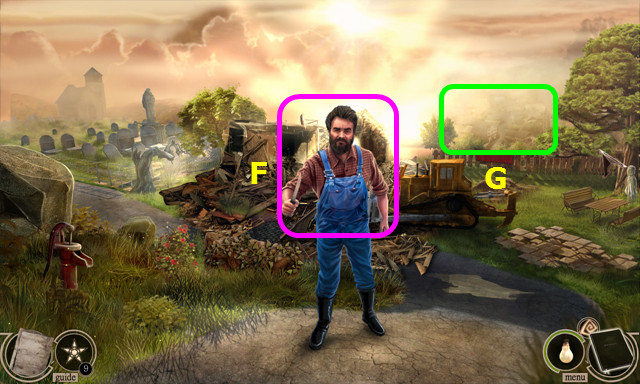
- Use the WIRE CUTTERS; take the SCREWDRIVER and push the button (F).
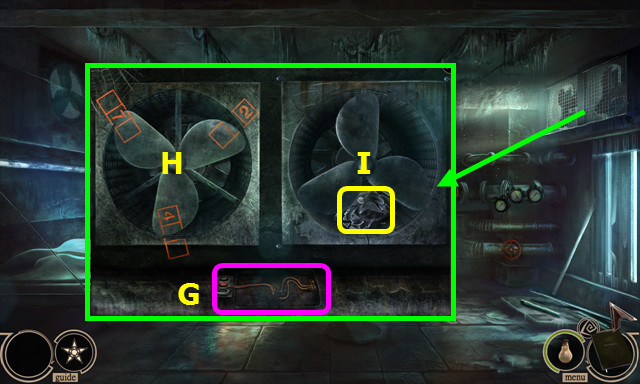
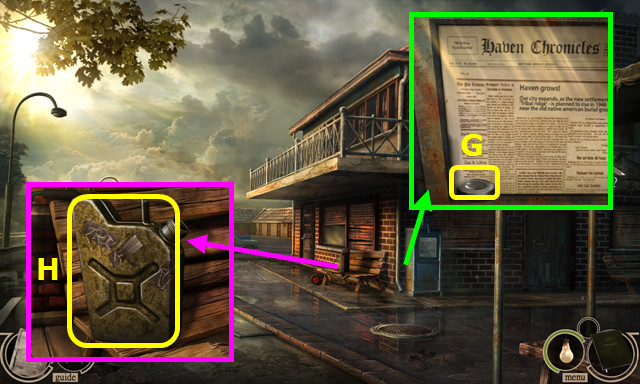
- Use the SCREWDRIVER, and then the WIRE CUTTERS (G).
- Use the SCREWDRIVER; rotate the blades as shown and note code 4-7-2 (H).
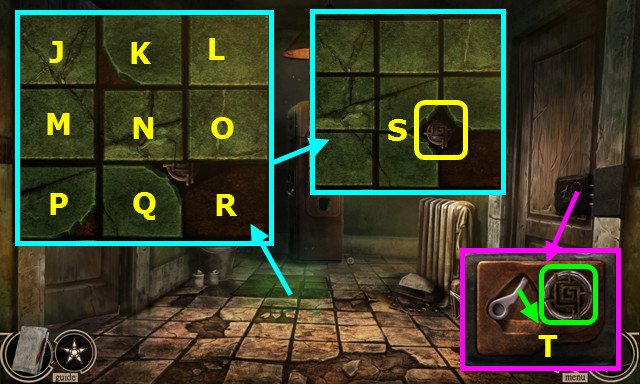
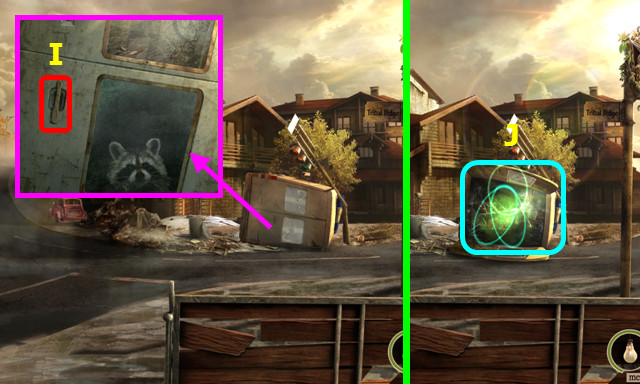
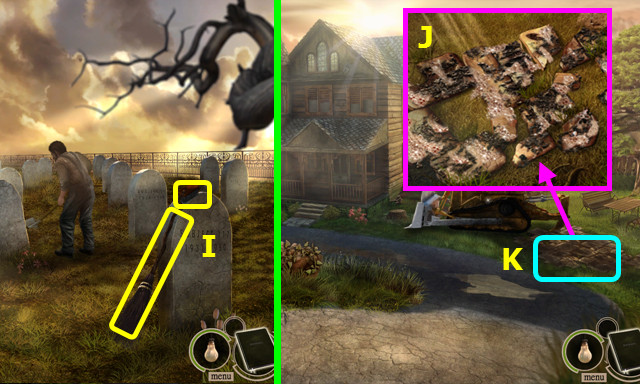
- Use the SCREWDRIVER, remove the grill, turn the blades, and take the WRINKLED PAPER (I).
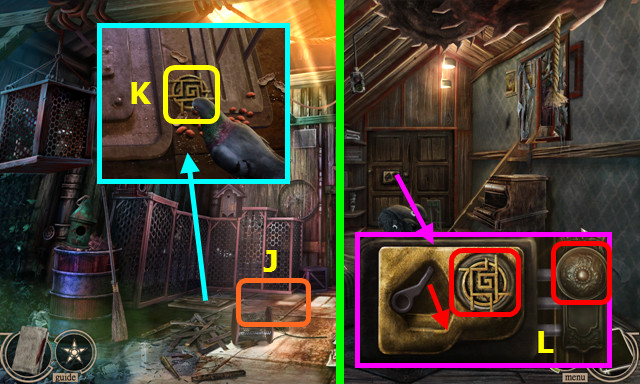
- Open the WRINKLED PAPER to find the VALVE and BLANK PAPER (inventory).
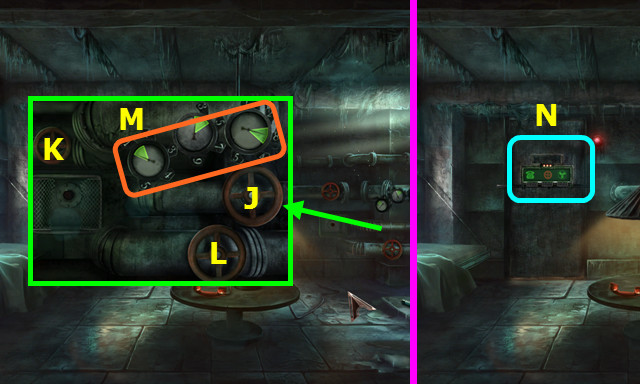
- Place the VALVE (J).
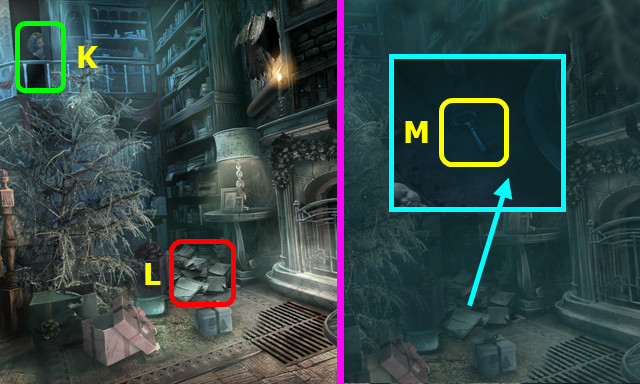
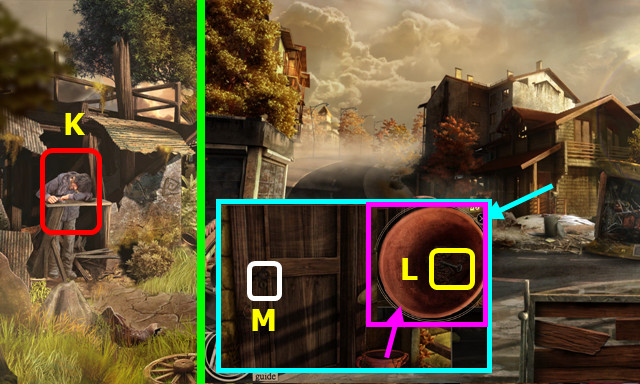
- Turn Kx6, Lx2.
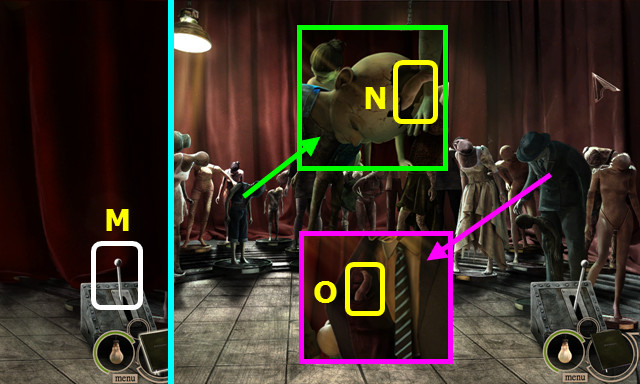
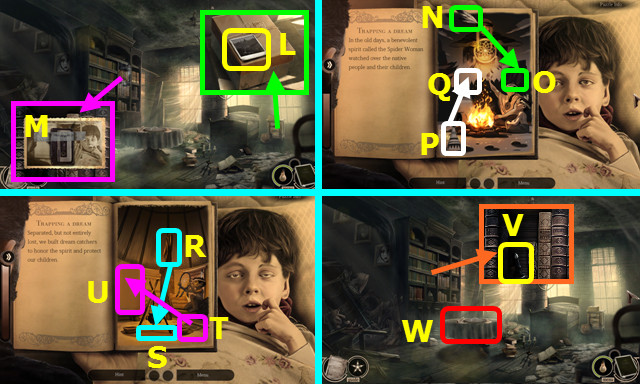
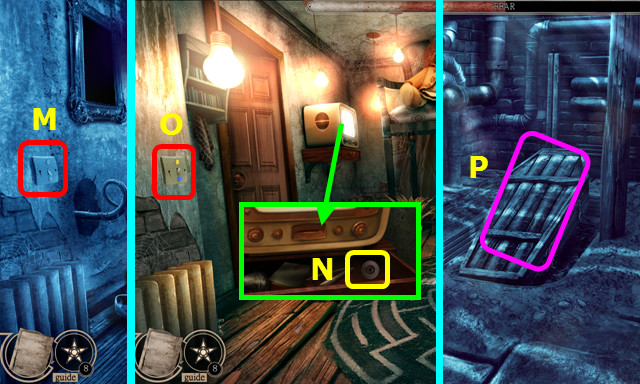
- Note code 1-3-8 (M).
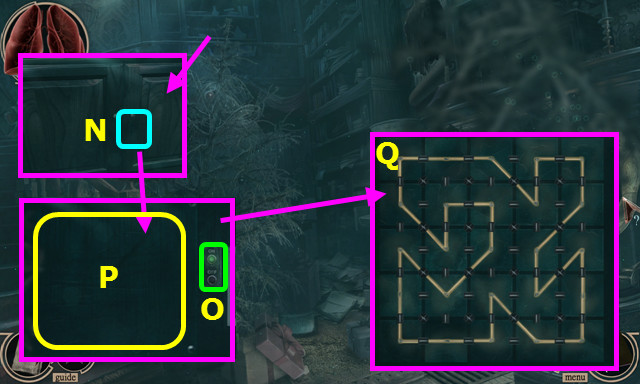
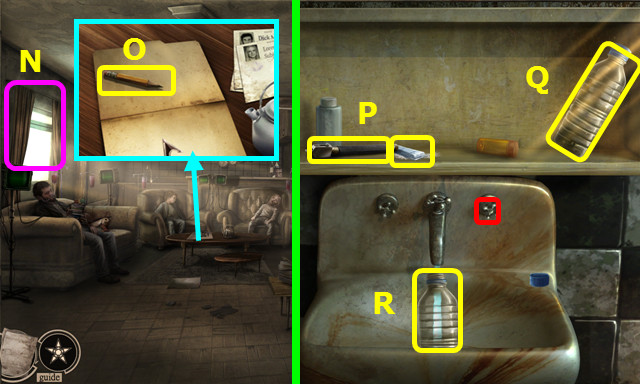
- Select (N).
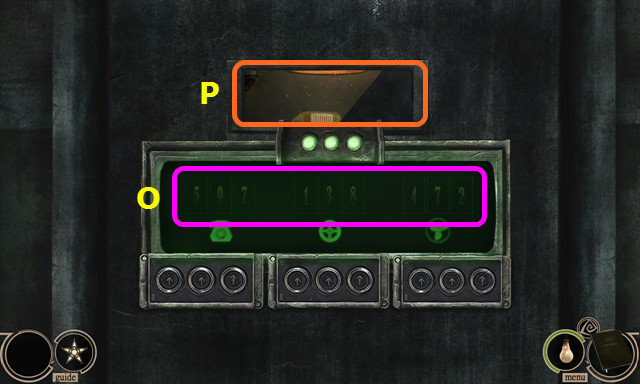
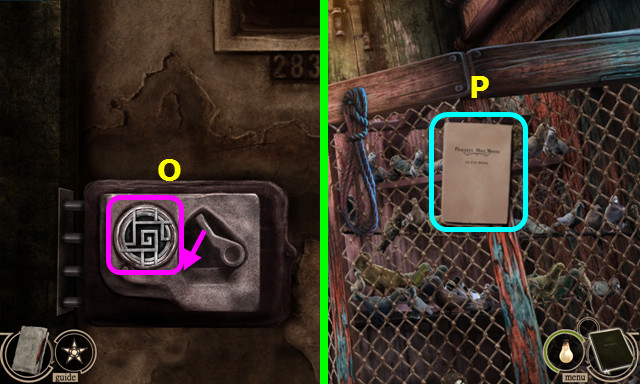
- Enter the 3 codes (O).
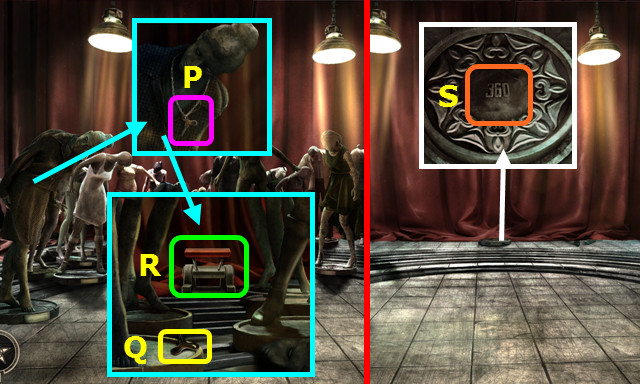
- Select the peephole (P).
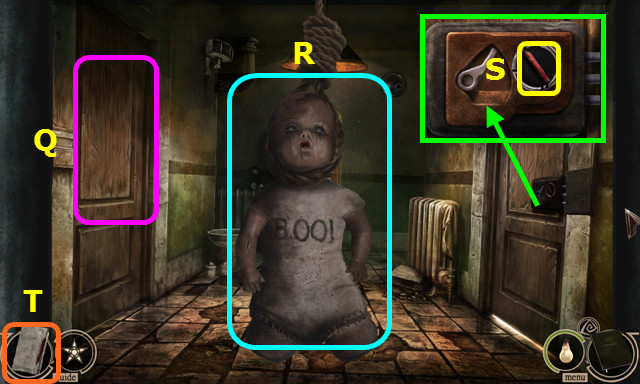
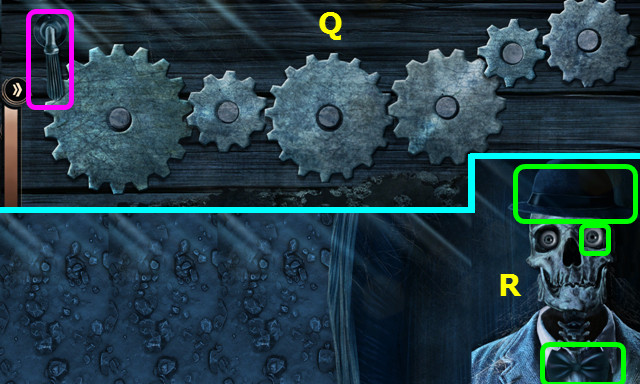
- Select the door (Q).
- Move the hanging doll (R).
- Take the PENCIL (S).
- The BLANK PAPER and PENCIL will form the MAP (T).

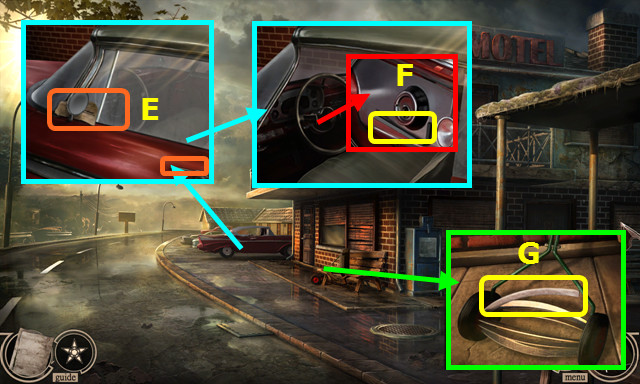
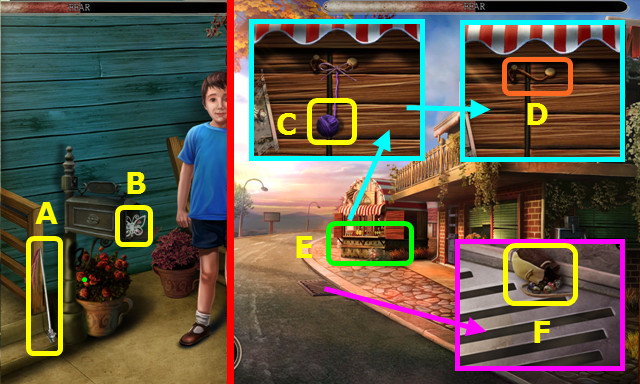
- Take the METAL TUBE (A).
- Take the BULLET CASING (B).
- Select the METAL TUBE; take the SPRING (inventory).
- Select and touch the car (C).
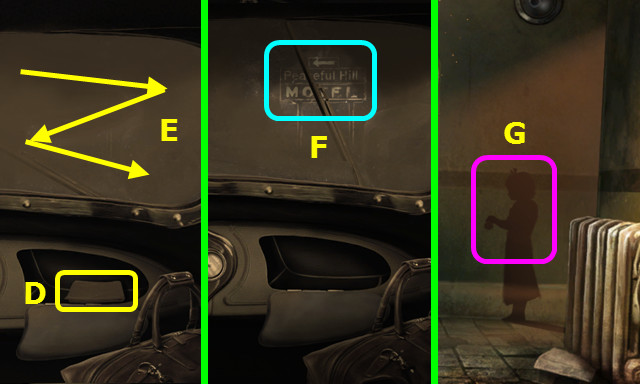
- Open the glovebox, take the rag (D), and drag it on the windshield (E).
- Select (F).
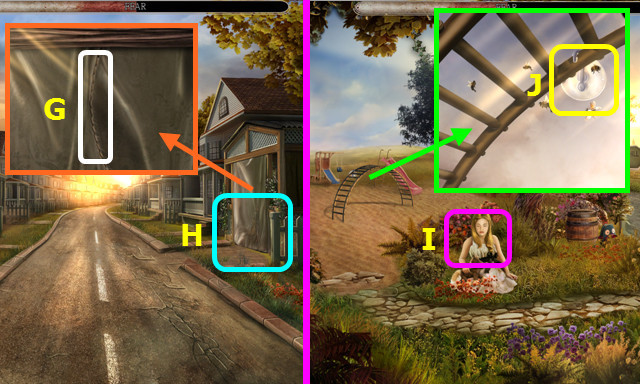
- Select (G).
- Walk to the left.
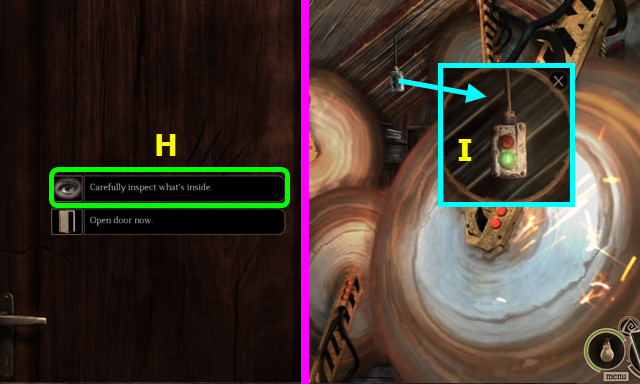
- Select the door; select (H).
- Select the scene; look at the control box (I).
- Walk down.
- Select Q-P-M-N-K-L-O-N-Q-R.
- Take the BRONZE TOKEN (S).
- Place the BRONZE TOKEN: turn the lever (T).
- Walk right.
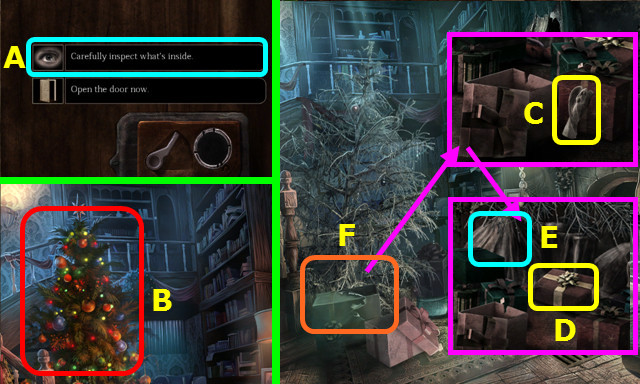
- Select the door; select (A).
- Select the Christmas tree (B).
- Move the lid; take the 1/2 CERAMIC FIGURINES (C).
- Move 2 gifts; take the RED PRESENT (D).
- Select the tree skirt (E).
- Play the HOP; earn the GREEN PRESENT (F).
- Open the GREEN PRESENT; take the 2/2 CERAMIC FIGURINE (inventory).
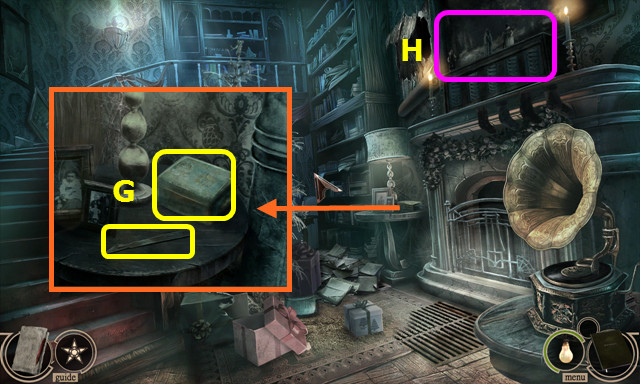
- Take the SCALPEL and BOX OF FIREWORKS (G).
- Open the BOX OF FIREWORKS; touch the 2 firecrackers and take the GUNPOWDER (inventory).
- Combine the RED PRESENT and SCALPEL; take the RUBBER PELLET (inventory).
- Combine the BULLET CASING, GUNPOWDER, and RUBBER PELLET to make the BULLET (inventory).
- Select (H).
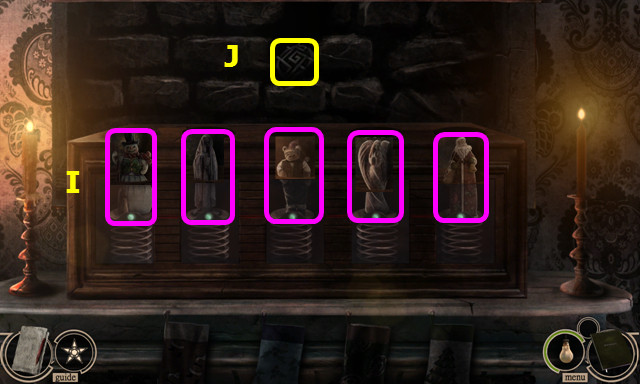
- Place the 2 CERAMIC FIGURINES; swap as shown (I).
- Take the SILVER TOKEN (J).
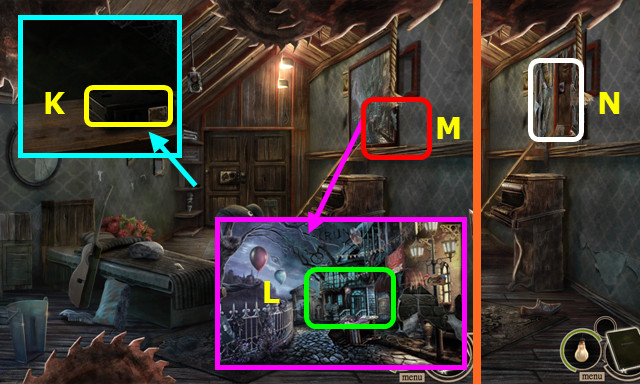
- Select (K).
- Select (L).
- Take the CABINET KEY (M).
- Use the CABINET KEY; open the door (N).
- Zoom in and press the button (O).
- Use the SCREWDRIVER; remove the panel (P).
- Solution (Q).
- Walk down.

- Select the Right Hallway (A).
- Select the wall (B).
- Select (C).
- Combine the REVOLVER and BULLET to make the REVOLVER (inventory).
- Walk down and left.
- Use the REVOLVER (D).
- Select the door; take the MATCHES (F).
- Select (G); take the MECHANICAL DOLL (H).
- Place the MATCHES; select a match (I).
- Move the items; take the RIGHT MECHANICAL DOLL ARM and the LEFT MECHANICAL DOLL ARM (J).
- Take additional matches as needed.
- Take the POWER UNIT (K).
- Touch the painting 2x; use the SCALPEL (L).
- Play the HOP; earn the DIAMOND TOKEN HALF (M).
- Select (N); walk right.
- Place the SILVER TOKEN; pull the lever (O).
- Select and read the guest book (P).
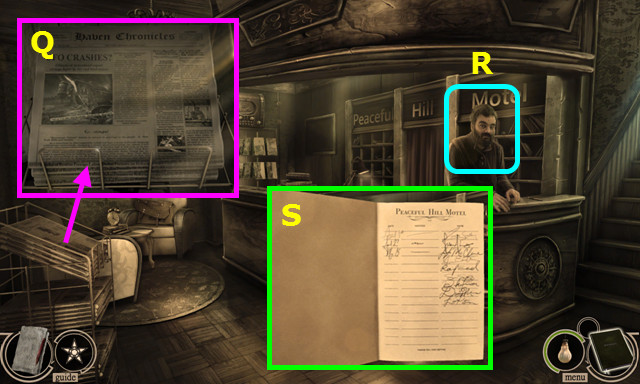
- Look at the newspaper (Q).
- Talk to Tom (R).
- Sign the guest book (S).
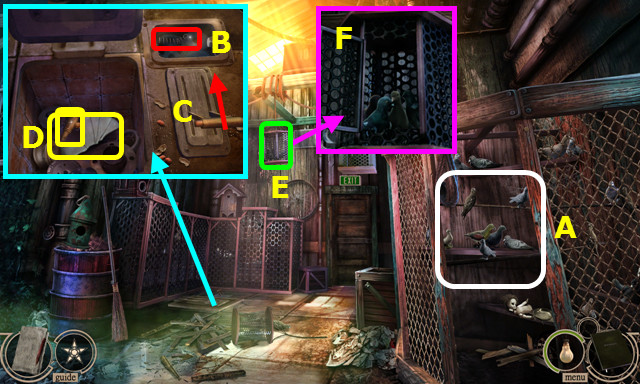
- Use the WIRE CUTTERS; play the HOP to earn the NUMBER-ENGRAVED PLATE (A).
- Remove the old spring; place the SPRING (B).
- Flip the lever (C).
- Move the items; take the MIRROR HALF and PIGEON WHISTLE (D).
- Use the PIGEON WHISTLE (E).
- Open the cage (F).
- Walk down.
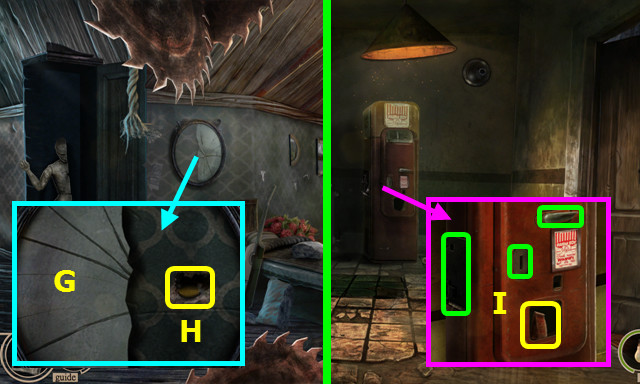
- Place and select the MIRROR HALF (G).
- Take the COIN (H).
- Walk down.
- Place the POWER UNIT and COIN; pull the lever and take the BAG OF PEANUTS (I).
- Go left and right.
- Use the BAG OF PEANUTS (J); take the GOLD TOKEN (K).
- Walk down.
- Place the GOLD TOKEN, switch the lever, and turn the knob (L).
- Go forward.
- Pull the lever (M).
- Remove the hat; take the LEFT MECHANICAL DOLL LEG (N).
- Open the jacket; take the RIGHT MECHANICAL DOLL LEG (O).
- Touch the chain (P); take the WINDING KEY (Q).
- Combine the MECHANICAL DOLL, LEFT MECHANICAL DOLL LEG, RIGHT MECHANICAL DOLL LEG, RIGHT MECHANICAL DOLL ARM, LEFT MECHANICAL DOLL ARM, and WINDING KEY to make the WIND-UP DOLL (inventory).
- Use the WIND-UP DOLL (R).
- Place the NUMBER-ENGRAVED PLATE (S).

- Play the HOP; earn the PART OF DIAMOND TOKEN (T).
- Combine the DIAMOND TOKEN HALF and PART OF DIAMOND TOKEN to make the DIAMOND TOKEN (inventory).
- Place the BRONZE TOKEN, SILVER TOKEN, GOLD TOKEN, and DIAMOND TOKEN; turn the knob (U).
- Go forward.
Chapter 2: Into the Maze
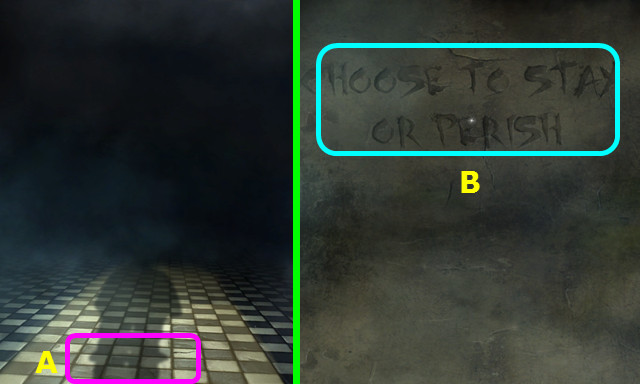
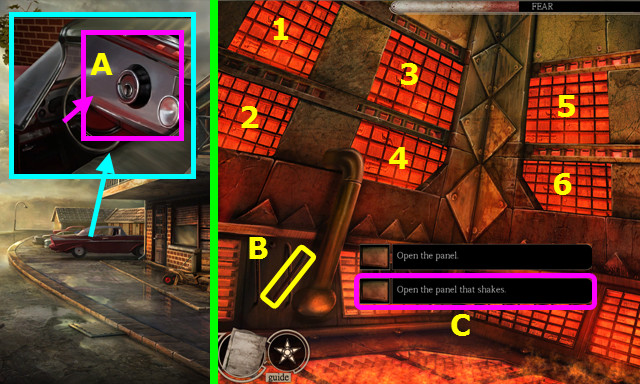
- Try to walk down (A).
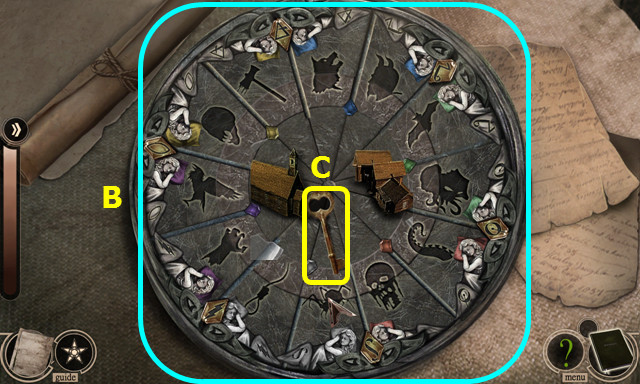
- Select (B).
- Select (C).
- Read the note (D).
- Turn right.
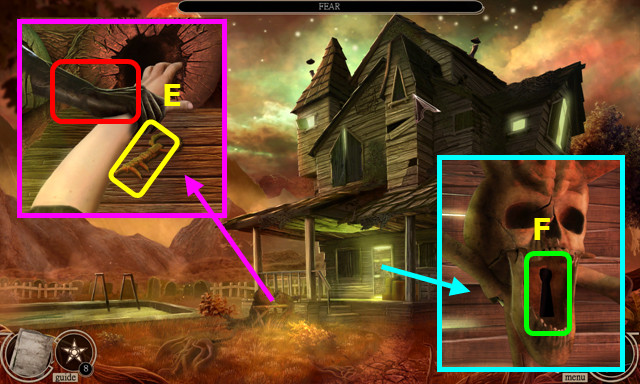
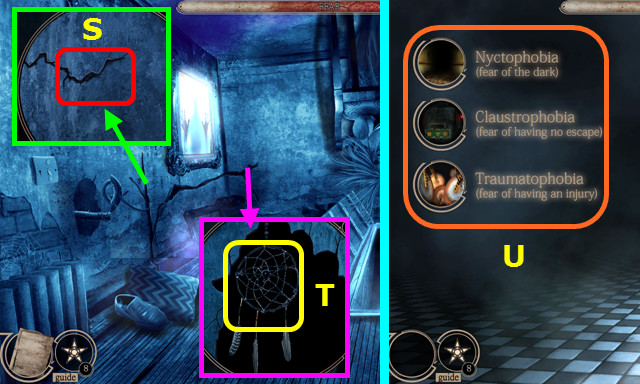
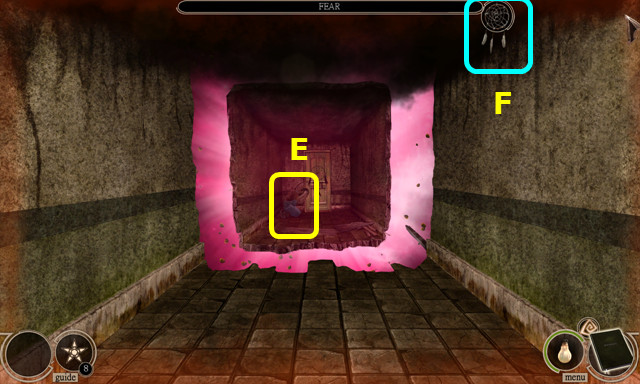
- Select a fear (E).
- Give the DOLL (F).
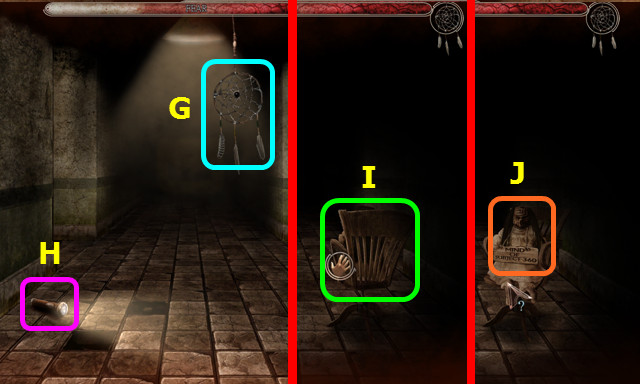
- Select the dreamcatcher (G).
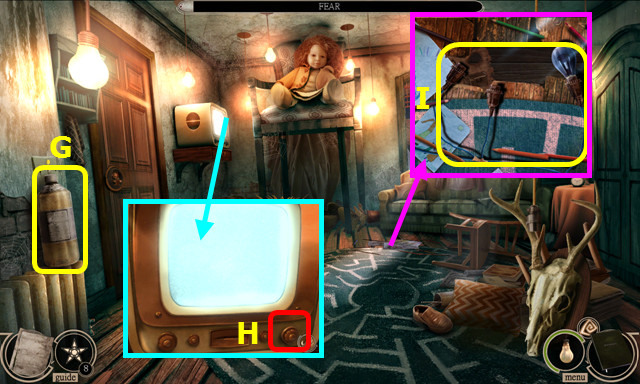
- Select the flashlight (H).
- Select the chair (I).
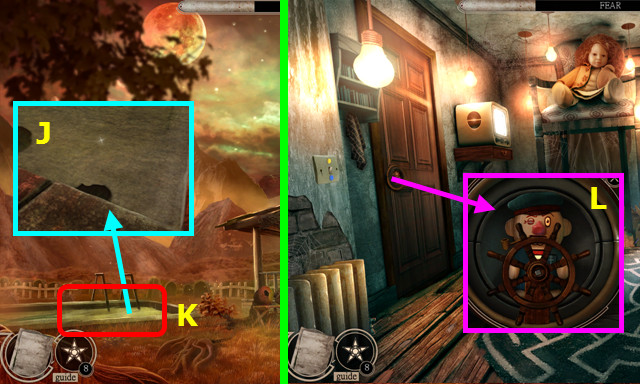
- Select (J).
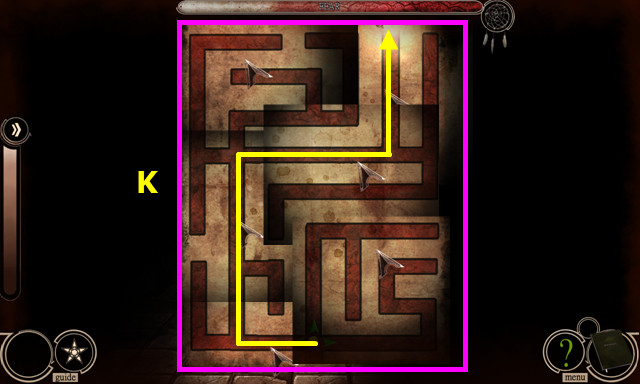
- Solution (K).
- Select the map.
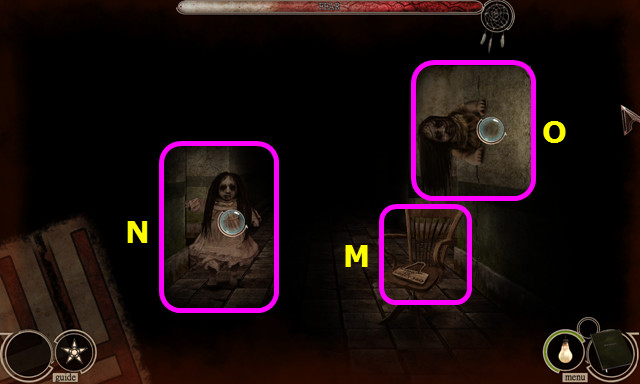
- Look at the chair (M).
- Select (N).
- Select (O).
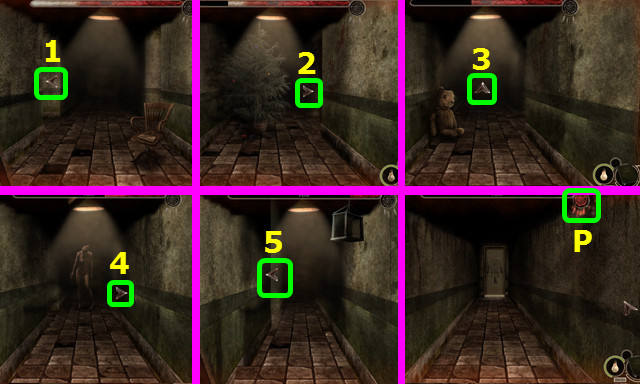
- Go left-right-forward-right-left (1-5).
- Select (P).
- Go forward.
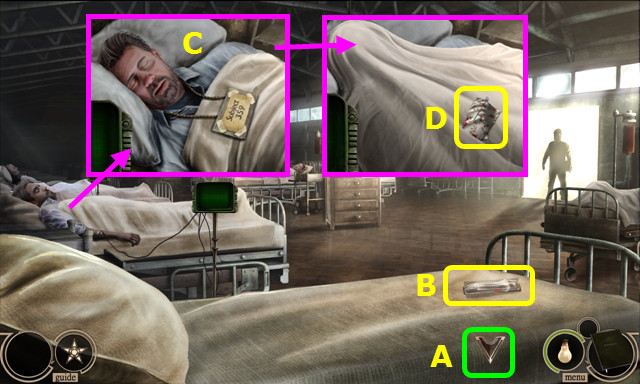
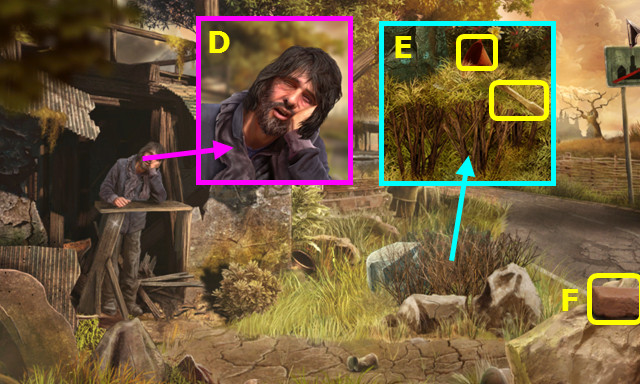
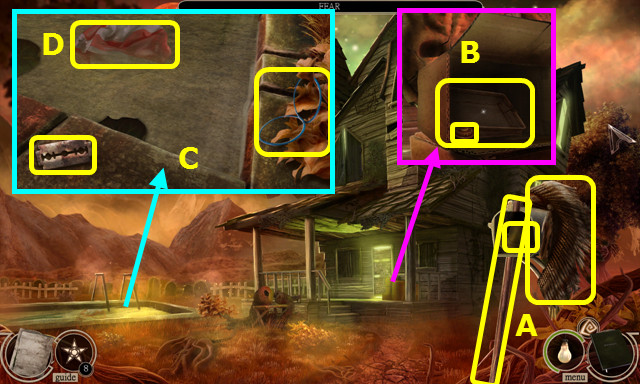
- Duck down (A).
- Take the SYRINGE (B).
- Touch the man 3x (C).
- Pull up the blanket; take the HANDKERCHIEF (D).
- Take the HAIRPIN from the HANDKERCHIEF (inventory).
- Bend the HAIRPIN 2x to make the IMPROVISED LOCKPICK (inventory).
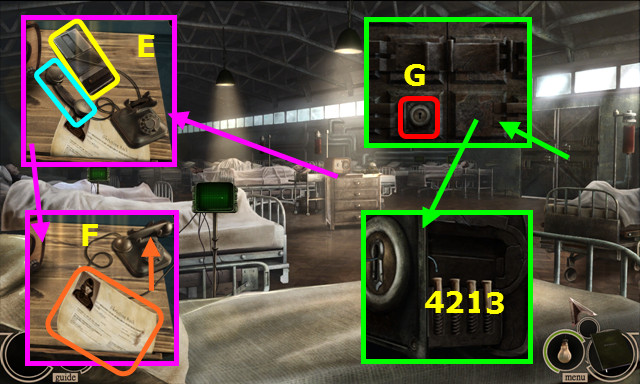
- Select the receiver; take the DICTAPHONE (E).
- Move the phone; pull and read the record (F).
- Use the IMPROVISED LOCKPICK (G).
- Select 1-4.
- Walk forward.
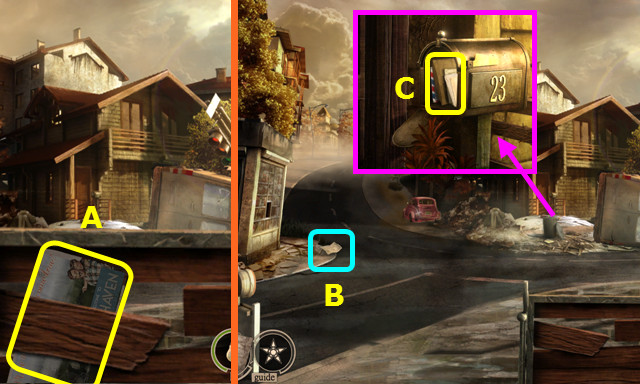
- Take the MAP (A).
- Go forward.
- Read the newspaper (B).
- Open the mailbox; pull and take the MAIL (C).
- Sort and open the MAIL; take the 1/3 INVESTIGATION CLUE (inventory).
- Walk right.
- Read the clipping; open the door (E).
- Take the ALLEN WRENCH (F).
- Take the MOWER BLADE (G).
- Walk down 2x.
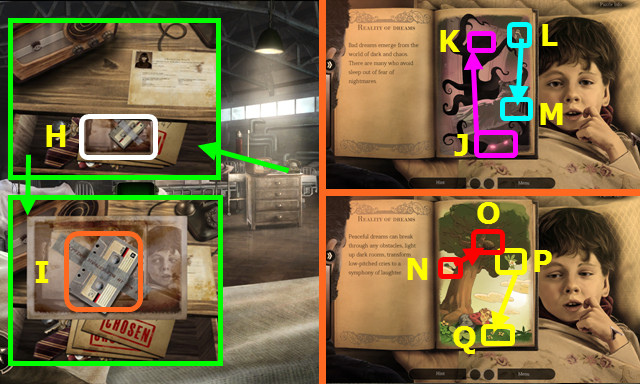
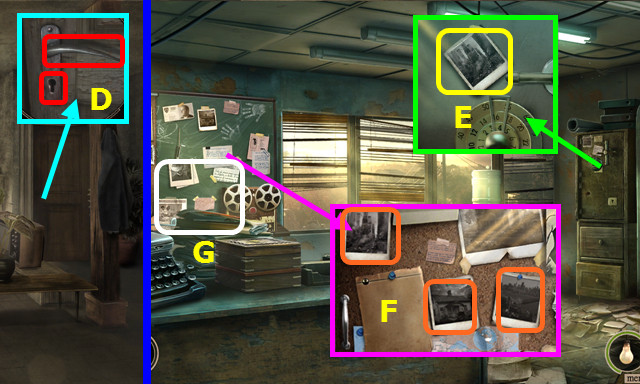
- Use the ALLEN WRENCH; select (H).
- Use the DICTAPHONE (I).
- Move J-K, L-M, N-O, P-Q.

- Select (R); take the 1/2 SLEEPER FIGURINE (S).
- Move the 3 folders; take the NECKTIE (T).
- Move the last folder; take the PILE OF KEYS (U).
- Combine the MOWER BLADE and NECKTIE to make the IMPROVISED MACHETE (inventory).
- Sort the PILE OF KEYS; take the CAR KEYS (inventory).
- Go forward and right.
- Use the CAR KEYS (A).
- Take the crowbar (B).
- Select 1-6.
- Select (C).
- Talk to Howard; slap him 2x (D).
- Use the IMPROVISED MACHETE 3x; take the DOOR HANDLE and FUNNEL (E).
- Take the BRICK (F).
- Walk down.
- Drag the HANDKERCHIEF to clean the glass; use the BRICK and take the DUCT TAPE (G).
- Use the DUCT TAPE; take the GAS CANISTER (H).
- Walk down.
- Use the DOOR HANDLE (I).
- Play the HOP; earn the ADRENALINE BOTTLE (J).
- Combine the SYRINGE and ADRENALINE BOTTLE to make the ADRENALINE SYRINGE (inventory).
- Go right and forward.
- Use the ADRENALINE SYRINGE (K).
- Walk down 2x.
- Move the plant; take the DETECTIVE'S HOUSE KEY (L).
- Use the DETECTIVE'S HOUSE KEY and open the door (M).
- Walk forward.
- Open the curtains (N).
- Go through the file; take the PENCIL (O).
- Walk right.
- Open both doors; take the BROKEN GLASS CUTTER and DRY ICE (P).
- Move the items; take the EMPTY BOTTLE (Q).
- Place the EMPTY BOTTLE, turn on the tap, and take the BOTTLE OF WATER (R).
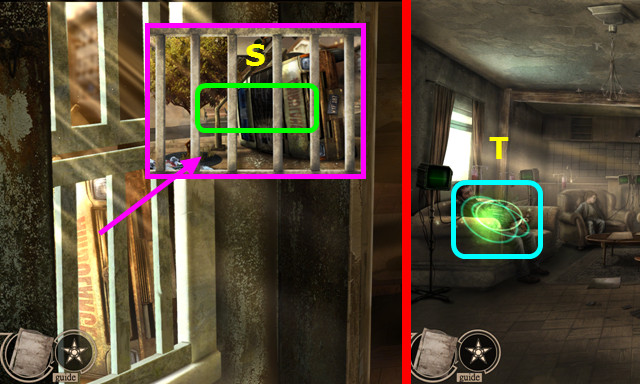
- Combine the BOTTLE OF WATER and DRY ICE to make the DRY ICE BOMB (inventory).
- Use the DRY ICE BOMB (S).
- Go forward.
- Play the HOP; earn the DETECTIVE'S NOTEBOOK (T).
- Combine the DETECTIVE'S NOTEBOOK and PENCIL to find the hotwire instructions (inventory).
- Walk down.
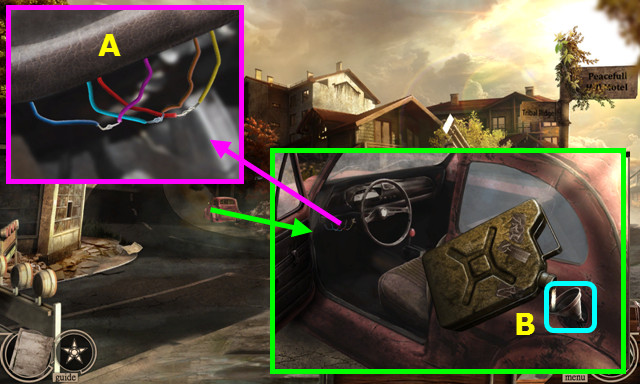
- Open the door; connect the wires as shown (A).
- Remove the cap, use the FUNNEL and GAS CANISTER; remove the funnel and replace the cap (B).
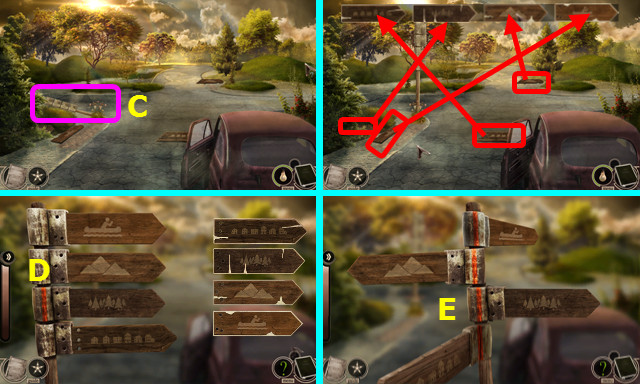
- Select (C).
- Select the 4 signs and place as shown (red).
- Place the signs as shown (D).
- Rotate the signs as shown (E).
- Go left.
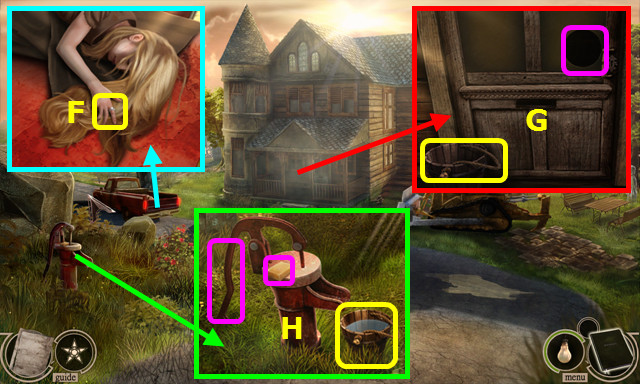
- Open the tailgate, open the blanket, and take the DIAMOND RING (F).
- Remove the DIAMOND from the DIAMOND RING (inventory).
- Combine the BROKEN GLASS CUTTER and DIAMOND to make the GLASS CUTTER (inventory).
- Take the BUCKET; use the GLASS CUTTER, push the glass, and open the door (G).
- Place the BUCKET, select the pump handle 2x, select the soap, and take the BUCKET OF SOAPY WATER (H).
- Walk left.
- Take the BROOM and CLEANING BRUSH (I).
- Walk down.
- Use the BUCKET OF SOAPY WATER and CLEANING BRUSH (J).
- Play the HOP; earn the 2/2 SLEEPER FIGURINE (K).
- Go forward.
- Read the notes; take the 2/3 INVESTIGATION CLUE (L).
- Use the BROOM; move the items and use the DICTAPHONE (M).
- Move N-O, P-Q, R-S, T-U.
- Select the photo; take the HAMMER (V).
- Select (W).

- Place the 2 SLEEPER FIGURINES on the board.
- Solution (A).
- Solution (B).
- Take the DETECTIVE'S OFFICE KEY (C).
- Walk down 2x; go forward.
- Use the DETECTIVE'S OFFICE KEY; turn the handle (D).
- Walk forward.
- Read the note; take the 3/3 INVESTIGATION CLUE (E).
- Place the 3 INVESTIGATION CLUES (F).
- Play the HOP; earn the TIN BOX (G).
- Combine the TIN BOX and HAMMER; move the items and take the CAFFEINE PILLS (inventory).
- Walk down 2x; go right and forward.
Chapter 3: Dream Haven
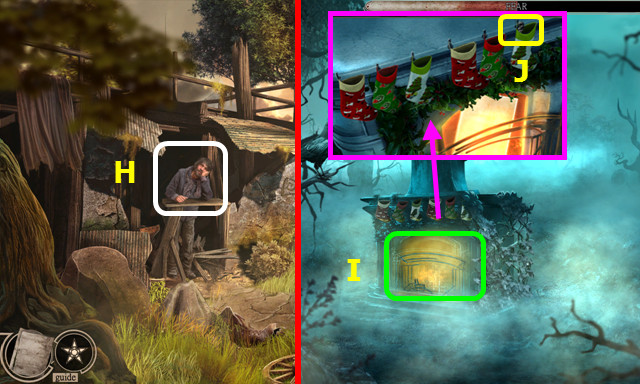
- Talk to Howard; use the CAFFEINE PILLS (H).
- Walk forward.
- Play the HOP (I).
- Select each of the stockings; locate the CLOSET HANDLE (J).
- Walk down.

- Use the CLOSET HANDLE; move the dolls and take the RECORD (K).
- Walk forward 2x.
- Select (L).
- Touch (M).
- Take the BROKEN TONGS (N).
- Place the RECORD and take the FORK (O).
- Walk down 2x.
- Use the FORK 3x; take the TONG PART (P).
- Combine the BROKEN TONGS and TONG PART to make the TONGS (inventory).
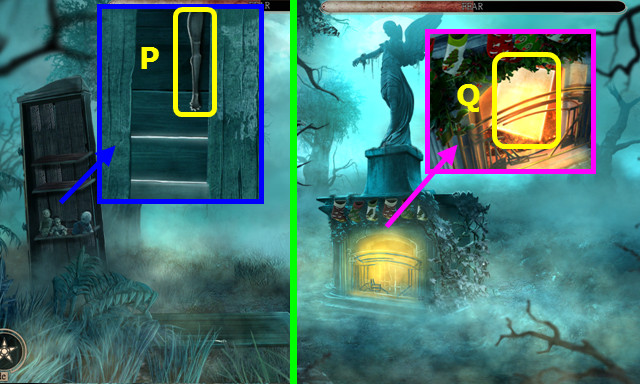
- Walk forward.
- Use the TONGS to take the BURNING PLATE (Q).
- Walk forward.
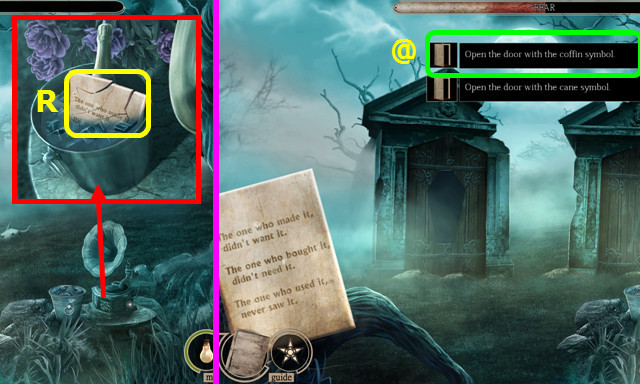
- Place the BURNING PLATE; take the BROKEN PLATE (R).
- Restore the BROKEN PLATE (inventory).
- Select (@).
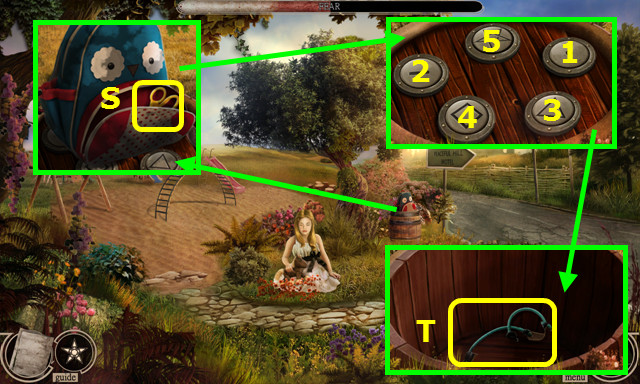
- Open the zipper; take the KID SCISSORS (S).
- Remove the backpack; select 1-5.
- Take the SLING (T).
- Walk right, down, and forward.
- Take the BUTTERFLY STAFF HANDLE (A).
- Open the mailbox; take the BUTTERFLY TOP (B).
- Combine the BUTTERFLY STAFF HANDLE and BUTTERFLY TOP to make the BUTTERFLY STAFF (inventory).
- Walk down and right.
- Take the BALL OF TWINE (C); use the BUTTERFLY STAFF (D).
- Play the HOP; earn the HORSE BALLOON (E).
- Take the MARBLES (F).
- Walk forward 2x.
- Use the KID SCISSORS (G).
- Play the HOP; earn the WASP SPRAY (H).
- Walk down.
- Talk to the girl; use the HORSE BALLOON (I).
- Use the WASP SPRAY; take the VACUUM HOOK (J).
- Go right and down.
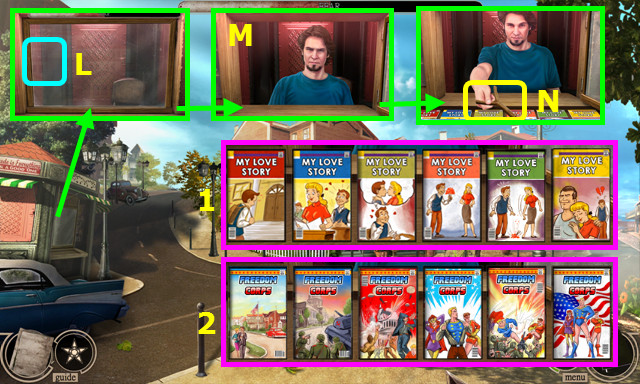
- Use the VACUUM HOOK (L).
- Talk to the man (M).
- Arrange the comic sets (1-2).
- Take the SLINGSHOT (N).
- Combine the SLINGSHOT, SLING, and MARBLES to make the LOADED SLINGSHOT (inventory).
- Walk right and forward.
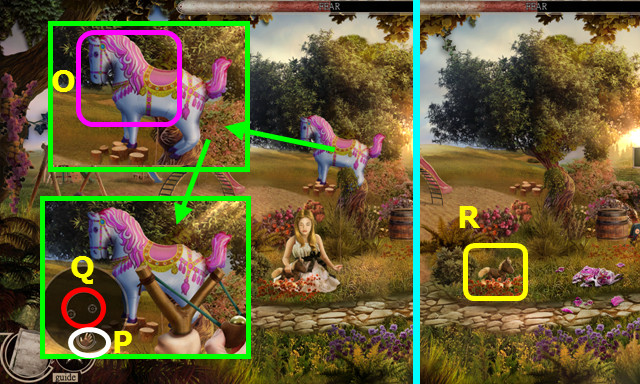
- Use the LOADED SLINGSHOT (O).
- Select (P) when the crosshair is in (Q) 2x.
- Take STANLEY (R).
- Walk right, down, and forward.
- Give STANLEY (S).
- Take the ENCHANTED CHALK (T).
- Use the ENCHANTED CHALK, open the door, and go forward (U).
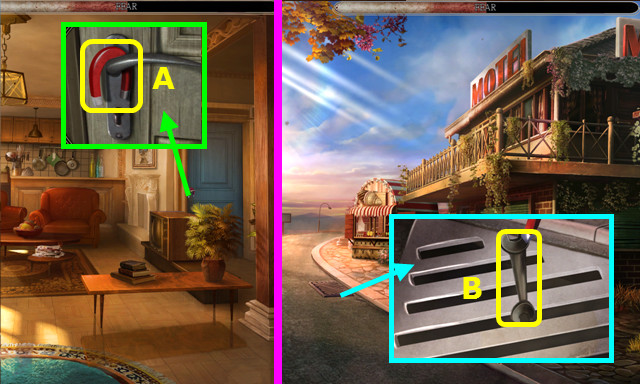
- Take the MAGNET and turn the handle (A).
- Combine the BALL OF TWINE and MAGNET to make the TWINE WITH MAGNET (inventory).
- Walk forward. After the cut-scene, walk right.
- Use the TWINE WITH MAGNET; take the WRENCH (B).
- Go forward.
- Use the WRENCH; take the 6 METAL BARS (C).
- Walk right, down, and forward.
- Use the ENCHANTED CHALK (D).
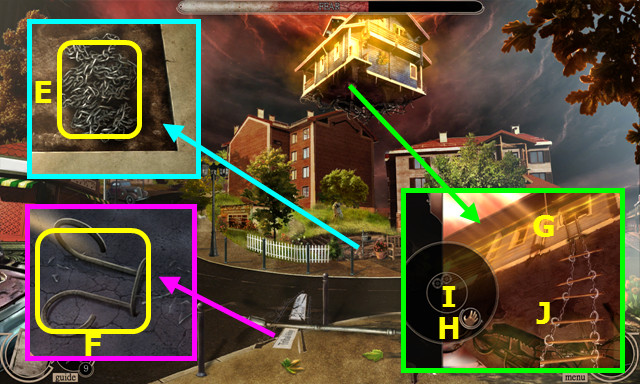
- Take the CHAIN (E).
- Take the METAL HOOK (F).
- Combine the METAL HOOK and CHAIN to make the GRAPPLING CHAINS (inventory).
- Use the GRAPPLING CHAINS (G).
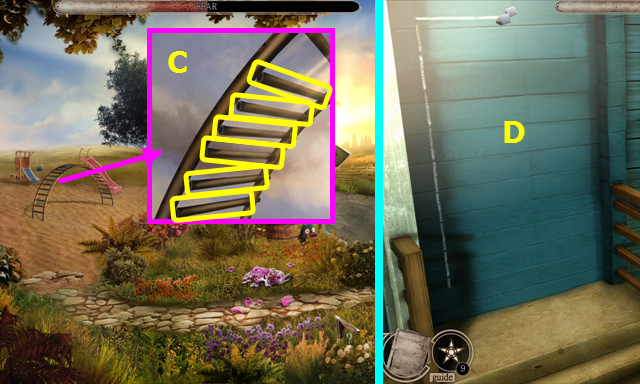
- Select (H) 2x when the crosshair is in the center of (I).
- Add the 6 METAL BARS (J).
- Go up the ladder and try to go forward.
- Play the HOP; earn the DOOR HANDLE.

- Use the DOOR HANDLE; go forward (K).
- Take the FLASHLIGHT (L).
- Use the FLASHLIGHT; note the combination 5-2-12 (M).

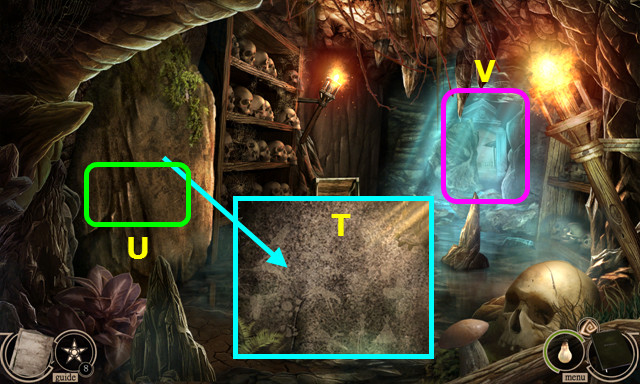
- Select the dreamcatcher (A).
- Take the lamp (B), select the rock (C), and use it on the glass (D).
- Select the maze map (E).

- Solution (F).
- Select the map.
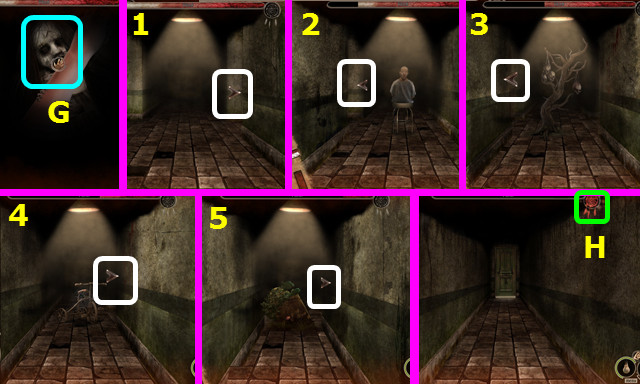
- Hit the doll 3x (G).
- Go right-left-left-right-right (1-5).
- Select the dreamcatcher (H).
- Go forward.
- Walk down 2x; go forward 2x.
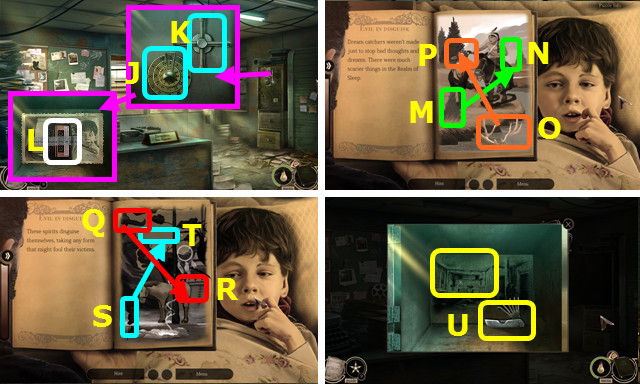
- Select the dial 3x (J); turn the handle (K).
- Read the notes; use the DICTAPHONE (L).
- Move M-N, O-P, Q-R, S-T.
- Take the LOCKPICK SET and photo (U).
- Walk down.
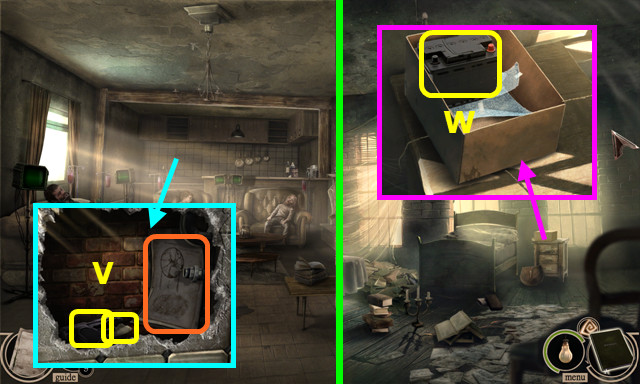
- Use the HAMMER 3x; take the LOADED GUN, TILE SHARD, and read the notes (V).
- Walk down, left, and forward.
- Use the TILE SHARD, open the box, and take the BULLDOZER BATTERY (W).
- Walk down.
- Use the LOCKPICK SET (A).
- Open the panel; place the BULLDOZER BATTERY and connect the leads (B).
- Use the LOCKPICK KIT again.
- Restore the 4 items (C).
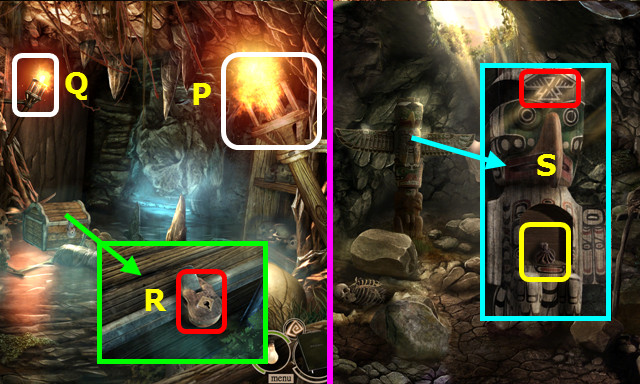
- Place and push the totem (D).
- Play the HOP; earn the SHAMAN'S DREAMCATCHER (E).
- Use the LOADED GUN (F).
- Select (G).
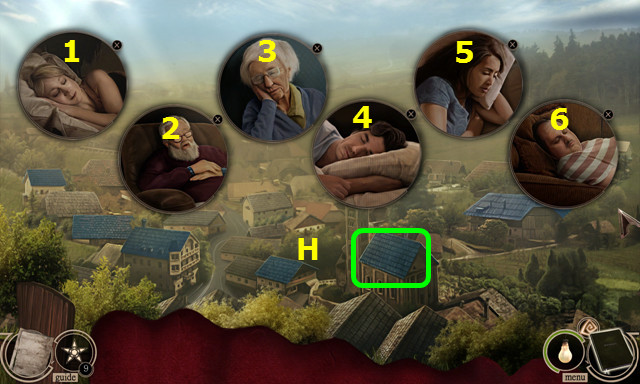
- Select a home (H).
- Use the SHAMAN'S DREAMCATCHER on each person (1-6).
Chapter 4: The First Sleeper
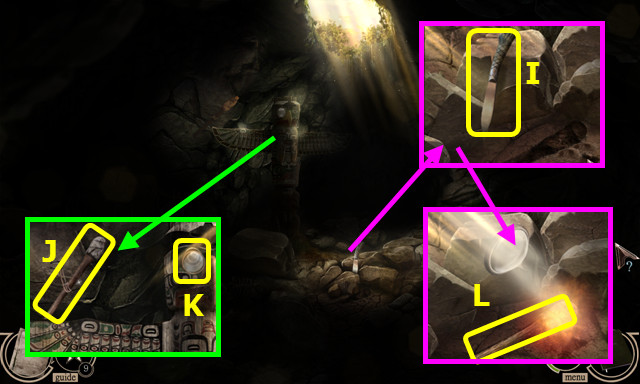
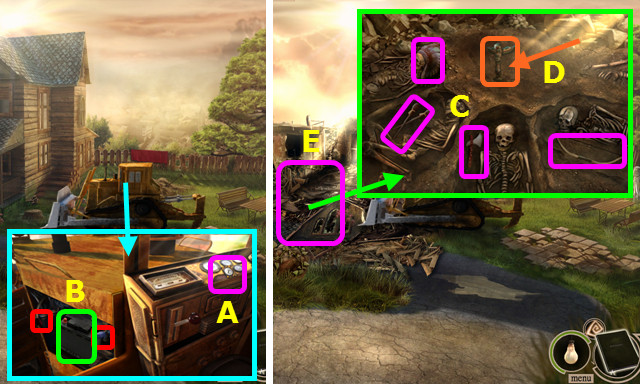
- Move the 3 rocks; take the NATIVE BLADE (I).
- Use the NATIVE BLADE to take the TORCH (J).
- Take the MAGNIFYING GLASS (K).
- Use the TORCH and MAGNIFYING GLASS; take the lit torch (L).
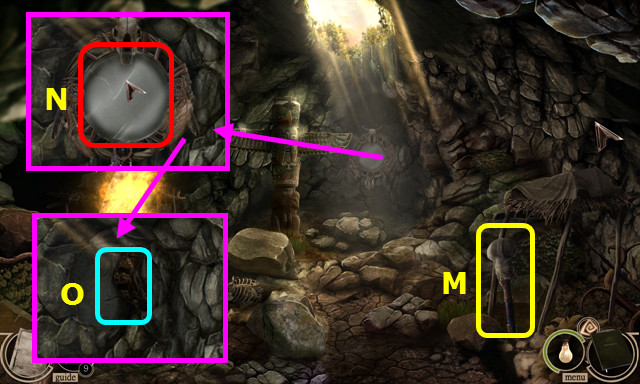
- Take the TOMAHAWK (M).
- Restore the mirror pieces (N).
- Use the TOMAHAWK (O).
- Go forward.
- Select (P) and (Q).
- Use the TOMAHAWK and open the lid; play the HOP to earn the 6 NATIVE SYMBOL PARTS (R).
- Restore the NATIVE SYMBOL PARTS to make the NATIVE SYMBOL (inventory).
- Walk down.
- Place the NATIVE SYMBOL; take the BAG OF POWDER (S).
- Walk forward.
- Use the BAG OF POWDER (T).
- Play the HOP; earn the PICKAXE (U).
- Use the PICKAXE (V).
- Go forward.
- Take the NATIVE HEADDRESS and NET HANDLE; open the mailbox and take the DAD'S HAT (A).
- Take 5 FEATHERS from the NATIVE HEADDRESS (inventory).
- Open the box; take the NET BASKET and TELEVISION KNOB (B).
- Remove the box.
- Take the RAZOR BLADE and ELASTIC BAND (C).
- Combine the NET HANDLE, NET BASKET, and ELASTIC BAND to make the NET (inventory).
- Use the NET; take the DEFLATED BALL (D).
- Combine the DEFLATED BALL and RAZOR BLADE; take the NATIVE DOLL (inventory).
- Combine the NATIVE DOLL and 5 FEATHERS to make the CHIEF DOLL (inventory).
- Place the CHIEF DOLL; select the arm 3x and take the BONE KEY (E).
- Use the BONE KEY (F).
- Go forward.
- Take the POOL CLEANER (G).
- Place and turn the TELEVISION KNOB (H).
- Move the drawings; take the ULTRAVIOLET LIGHT RIG (I).
- Walk down.
- Use the POOL CLEANER (J).
- Play the HOP; earn the MINIATURE SHIP WHEEL (K).
- Go forward.
- Place and turn the MINIATURE SHIP WHEEL (L).
- Walk left.
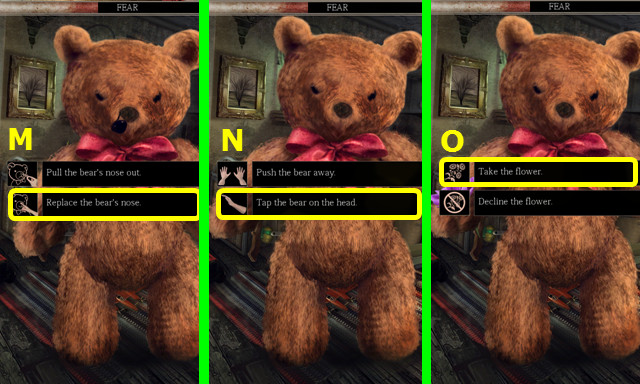
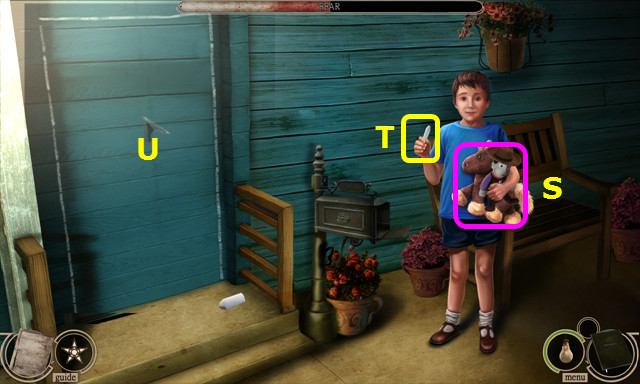
- Select the bear; choose (M).
- Select the bear; choose (N).
- Select the bear; choose (O).
- Take the TOY FISHING ROD (P).
- Take the VACUUM CLEANER HOSE (Q).
- Take the TOY HOOK; use the RAZOR, move feathers 2x, and take the 1/2 ULTRAVIOLET LIGHTBULB (R).
- Combine the TOY FISHING ROD and HOOK to make the TOY FISHING ROD (inventory).
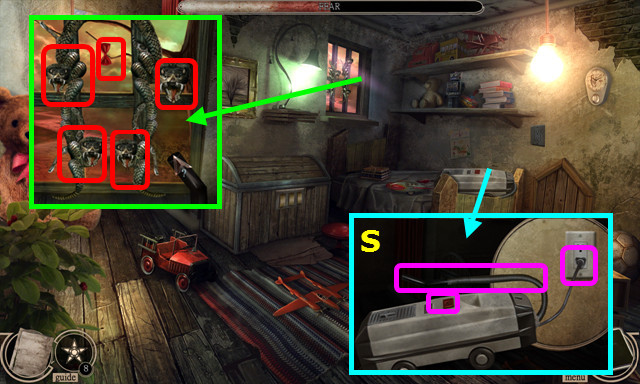
- Place the VACUUM CLEANER HOSE, plug in the cord, and push the button (S).
- Use the vacuum in 5 places (red); you earn the VACUUM CLEANER.
- Open the VACUUM CLEANER; take DAD'S BOWTIE (inventory).
- Walk down.
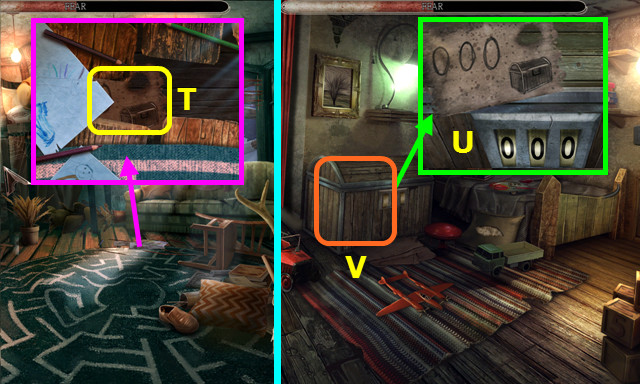
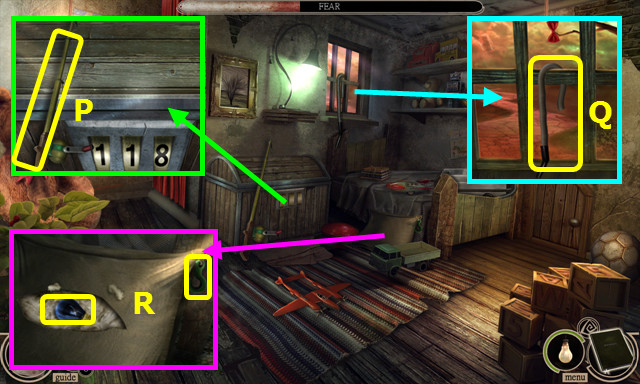
- Use the TOY FISHING ROD to take the code (T).
- Walk left.
- Change the code to 0-0-0; open the chest (U).
- Play the HOP; earn the 2/2 ULTRAVIOLET LIGHTBULB (V).
- Combine the ULTRAVIOLET LIGHT RIG and 2 ULTRAVIOLET LIGHTBULBS to make the ULTRAVIOLET LIGHT RIG (inventory).
- Walk down.
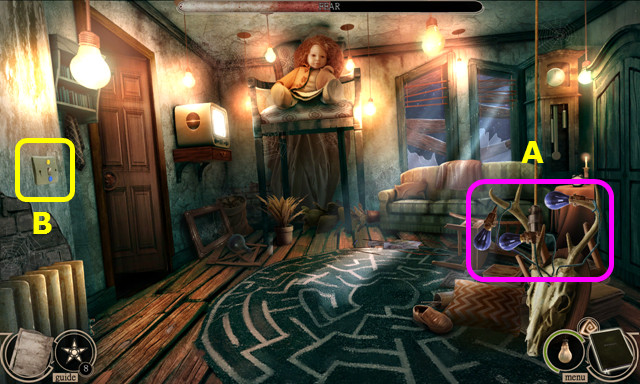
- Place the ULTRAVIOLET LIGHT RIG (A).
- Select (B).
- Go forward.
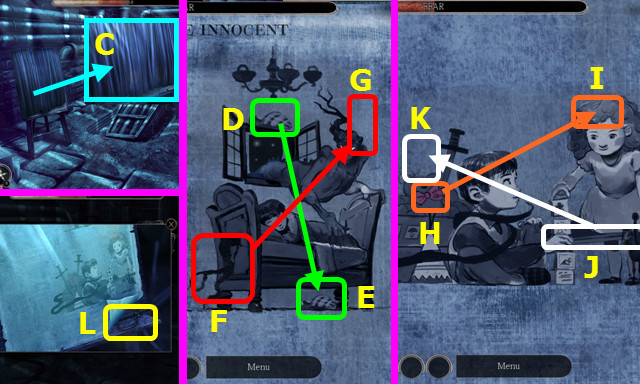
- Remove the curtain; select the picture (C).
- D-E, F-G, H-I, J-K.
- Lift the corner; take the DRAWER HANDLE (L).
- Walk down.
- Select (M).
- Use the DRAWER HANDLE; open the drawer and take the GLASS EYE (N).
- Select (O).
- Walk forward.
- Select (P).
- Place the gears as shown, pull the handle (Q).
- Place the DAD'S HAT, DAD'S TIE, and GLASS EYE (R).
- Walk down.
- Select the crack (S).
- Select the crack; select the dreamcatcher (T).
- Enter the hole in the wall.
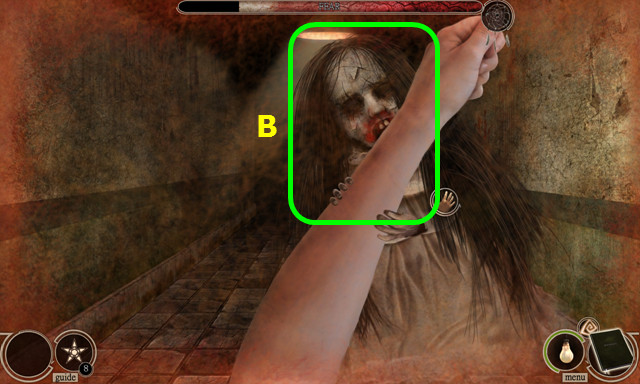
- Select a fear (U).
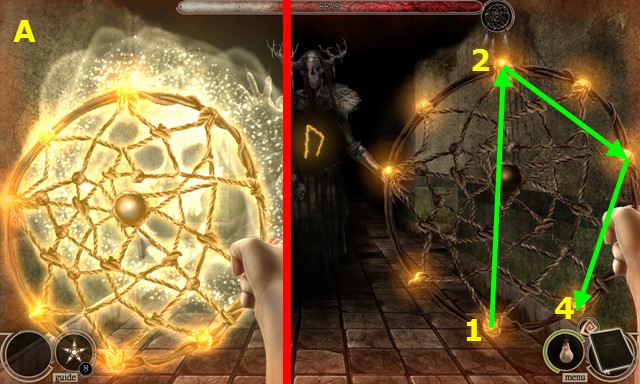
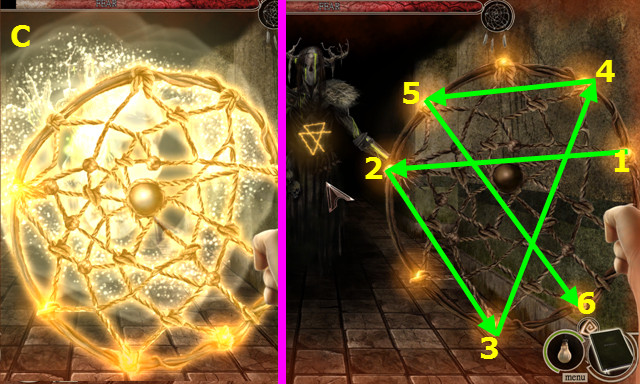
- Use the dreamcatcher to capture 4 consecutive light blasts (A).
- Select 1-4.
- Walk right and forward.
- Hit the doll 3x (B).
- Walk right.
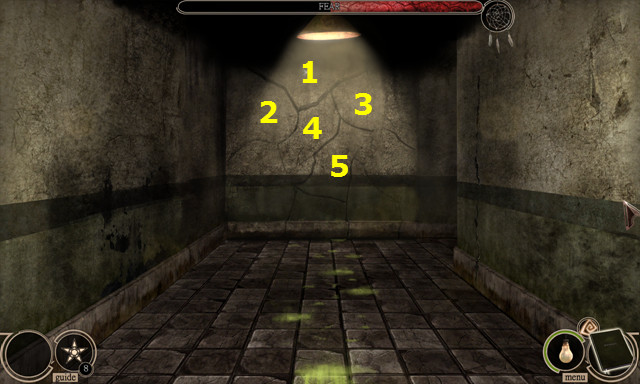
- Use the dreamcatcher to capture 6 consecutive light blasts (C).
- Select 1-6.
- Walk left and right.
- Select 1-5.
- Go forward.
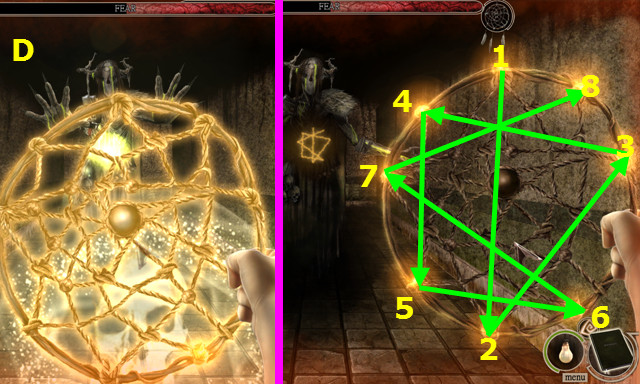
- Use the dreamcatcher to capture 8 consecutive light blasts (D).
- Select 1-8.
- Talk to Tom (E).
- Select the dreamcatcher (F).
- Go forward.
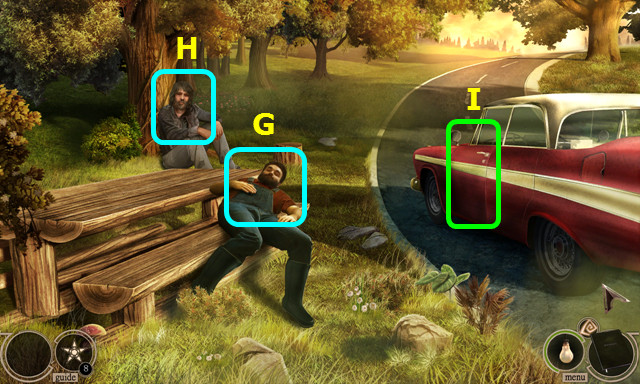
- Talk to Tom (G).
- Talk to Howard (H).
- Open the car door and enter the car (I).
- Congratulations! You have completed Maze: Subject 360!
Created at: 2015-08-30