Walkthrough Menu
- General Tips
- Chapter 1: Return to Rocksville
- Chapter 2: The Hiding Places
- Chapter 3: The Castle
- Chapter 4: The Shore
- Chapter 5: The Study
General Tips
- This is the official guide for Midnight Calling: Anabel.
- This guide will not mention each time you have to zoom into a location; the screenshots will show each zoom scene.
- Hidden-object puzzles are referred to as HOPs. This guide will not show HOP solutions. It will identify the location of the HOP and the inventory item acquired.
- This guide will show solutions for non-random puzzles. Please read the in-game instructions for each puzzle.
- In this game, you will often have to select the new scene to trigger dialog, cut-scenes, or tasks prior to interacting with the scene.
Chapter 1: Return to Rocksville
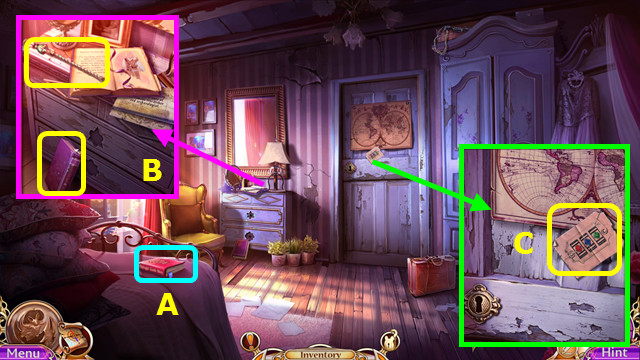
- Open and read the book (A).
- Take the BATON and the 1st BOOK; read the journal and paper (B).
- Take the LOCK CODE (C).
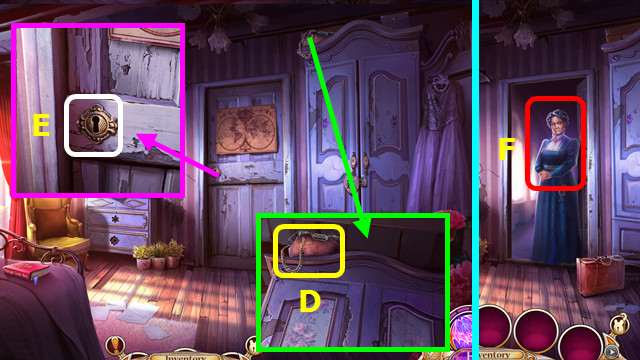
- Use the BATON to take the BAG (D).
- Combine the BAG and LOCK CODE; find the HAIRPIN (inventory).
- Use the HAIR PIN (E).
- Talk to the Headmistress (F).
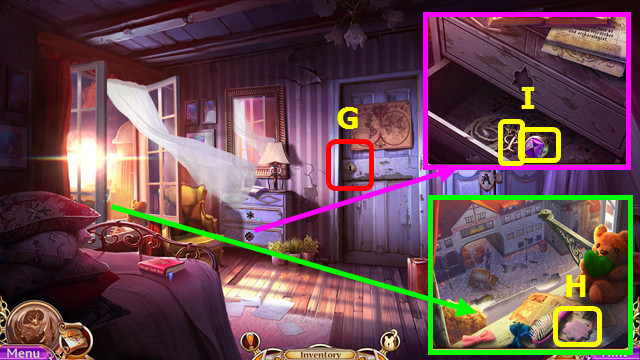
- Try the door (G).
- Take the HANDLE(H).
- Place the HANDLE; take the CUFF LINK and ORNATE MONOGRAM (I).
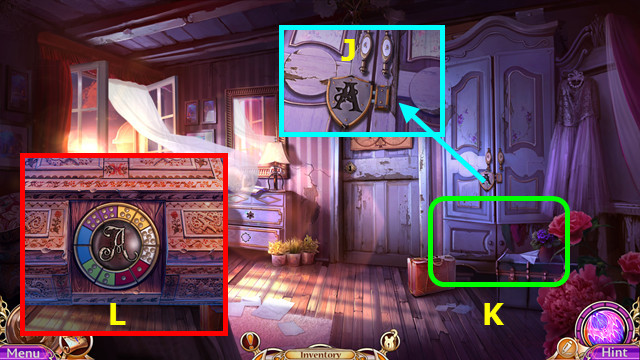
- Place the ORNATE MONOGRAM (J).
- Play the HOP; earn the DELICATE BOX (K).
- Look at the DELICATE BOX (inventory) and restore the lock (L). Take the HANDLE and ANABEL'S BOX.
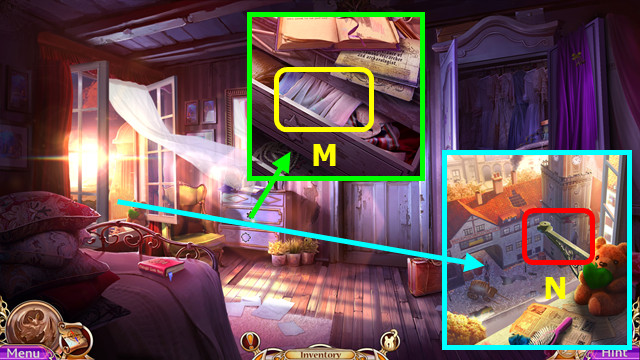
- Place the HANDLE; take the BEDSHEETS (M).
- Tie the BEDSHEETS together to make the TIED BEDSHEETS (inventory).
- Use the TIED BEDSHEETS (N).
- Go left.
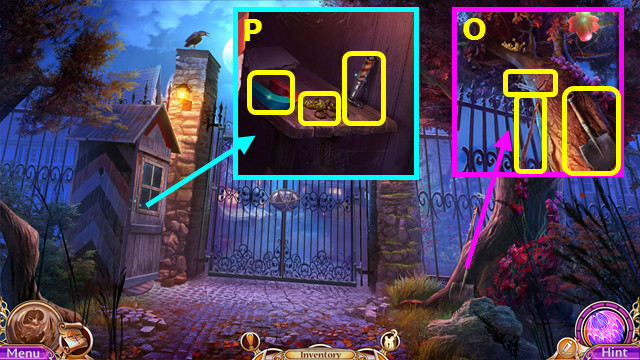
- Take the STICK, DAGGER BLADE, and SHOVEL (O).
- Use the STICK; take the MAGNET, 1st TOWN GATES PIECE, and DAGGER HANDLE (P).
- Combine the DAGGER BLADE and DAGGER HANDLE to make the DAGGER (inventory).
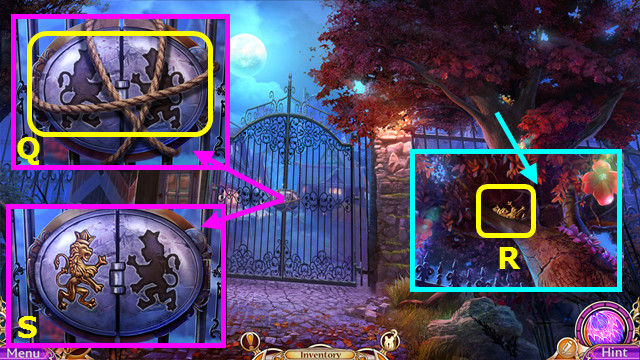
- Use the DAGGER to take the ROPE (Q).
- Combine the MAGNET, STICK, and ROPE to make the MAGNET ON STICK (inventory).
- Use the MAGNET on STICK to take the 2nd TOWN GATES PIECE (R).
- Place the 2 TOWN GATES PIECES (S).
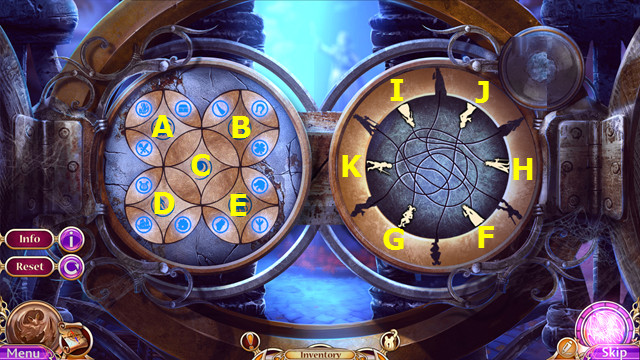
- Select: Ax2-D-Ex2-C-B-C-A-D-E-C-A-D-Bx2-Cx2-Bx2-D.
- Rotate counter-clockwise as shown; select the figure (F).
- Continuing this method, rotate-G-rotate-H-rotate-I-J-K.
- Walk forward.
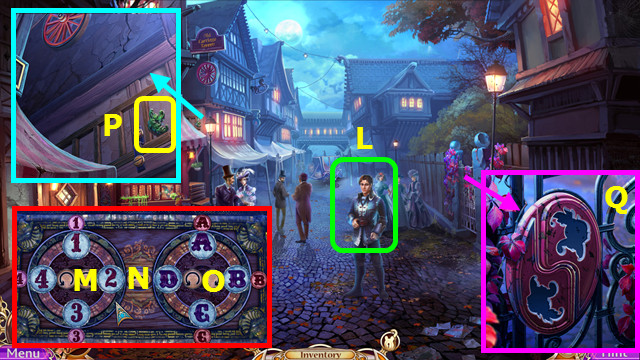
- Talk to Calum (L).
- Select M-O-N-Mx3-O-N-Mx2-Ox3; look at the photo and take the 1/2 LEAF.
- Take the 2/2 LEAF (P).
- Move the vines 2x; place the 2 LEAVES (Q).
- Walk right.
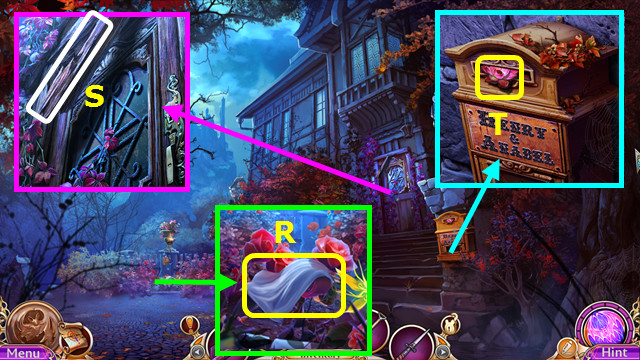
- Take the HANDKERCHIEF (R).
- Move the beam; earn the 1/2 PRECIOUS FLOWER (S).
- Take the 2/2 PRECIOUS FLOWER (T).
- Walk down.
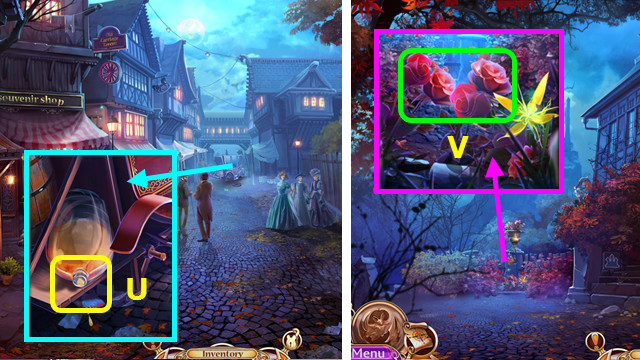
- Use the HANDKERCHIEF to make the OILY HANDKERCHIEF (U).
- Walk right.
- Use the DAGGER and SHOVEL (V).
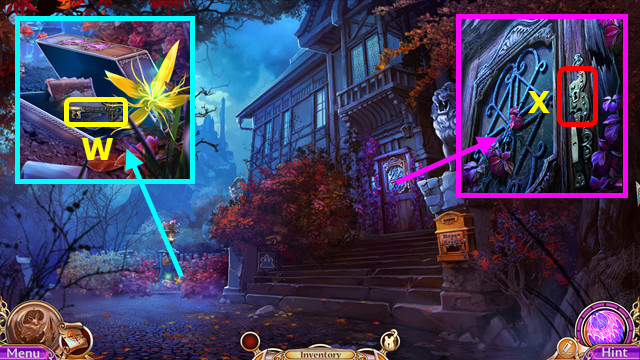
- Use the OILY HANDKERCHIEF and 2 PRECIOUS FLOWERS; take the HOUSE KEY and view the pictures (W).
- Use the HOUSE KEY (X).
- Walk forward.
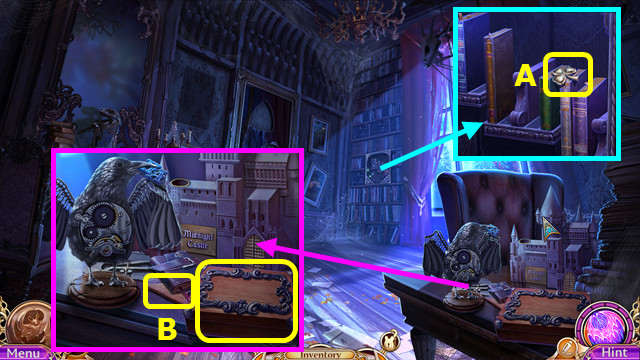
- Take the 1st CLOVER(A).
- Take the ALCHEMIST'S KIT and POSTBOX AMULET (B).
- Open the ALCHEMIST'S KIT and read the notes; take the TWEEZERS and FLASK (inventory).
- Walk down.
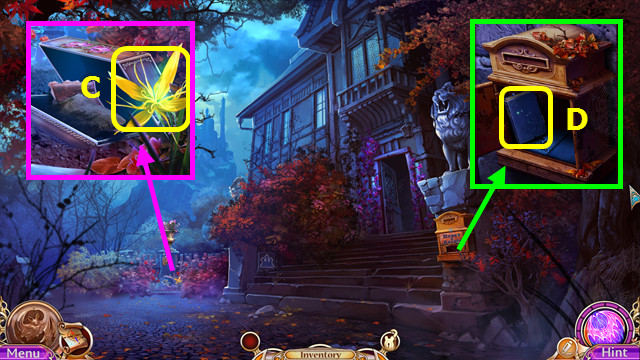
- Use the TWEEZERS to take the 1st PETAL (C).
- Place the POSTBOX AMULET; take the 2nd BOOK (D).
- Walk down.
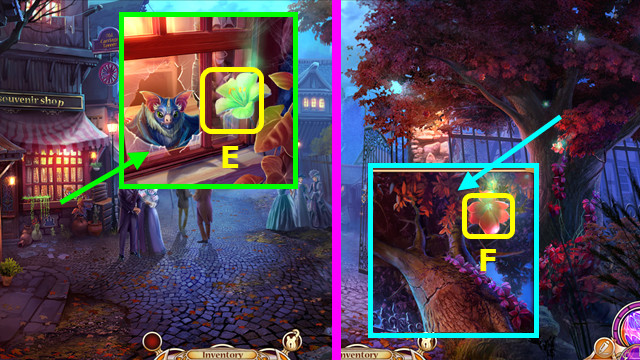
- Use the TWEEZERS to take the 2nd PETAL (E).
- Walk down.
- Use the TWEEZERS to take the 3rd PETAL (F).
- Add the 3 PETALS to the ALCHEMIST'S KIT; take the SLEEPING POTION (inventory).
- Walk forward.
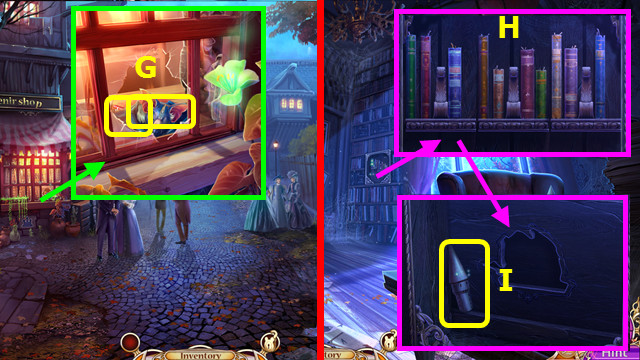
- Use the SLEEPING POTION; take the SLEEPING FAMILIAR and 3rd BOOK (G).
- Walk right and forward.
- Place the 3 BOOKS; arrange as shown (H).
- Take the CASTLE TOWER (I).
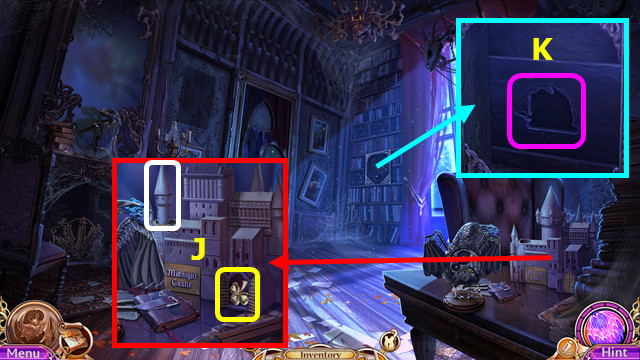
- Place the CASTLE TOWER; take the 2nd CLOVER (J).
- Combine ANABEL'S BOX and 2 CLOVERS; take the QUEENLY MEDALLION and SAFE FRAGMENT (inventory).
- Place the SAFE FRAGMENT (K).
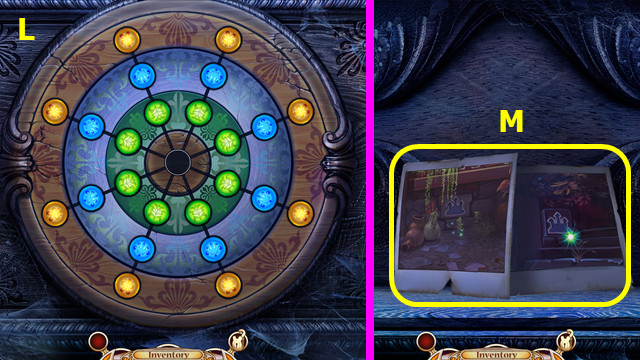
- Solution (L); this mini-game is randomly generated.
- Take the 2 HIDING PLACE IMAGES (M).
- Walk down.
Chapter 2: The Hiding Places
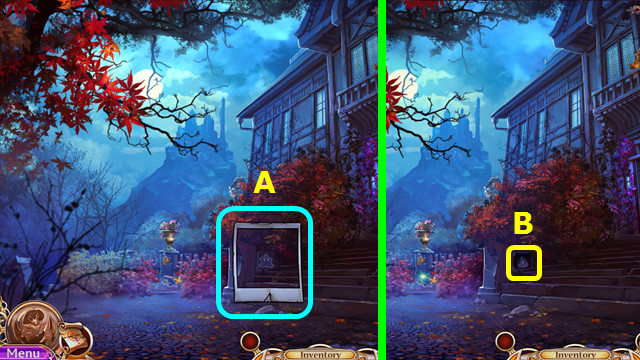
- Use the 1st HIDING PLACE IMAGE (A).
- Take the 1st PICTURE FRAGMENT (B).
- Walk down.
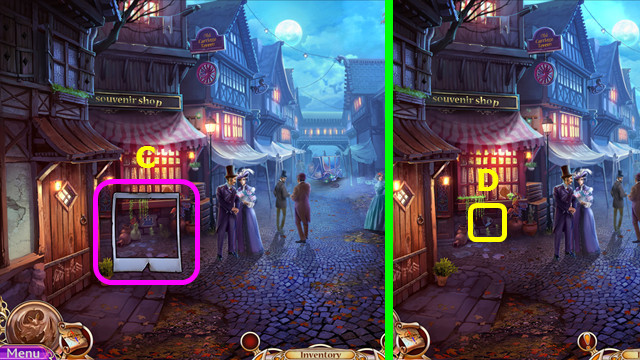
- Use the 2nd HIDING PLACE IMAGE (C).
- Take the 2nd PICTURE FRAGMENT (D).
- Walk right and forward.
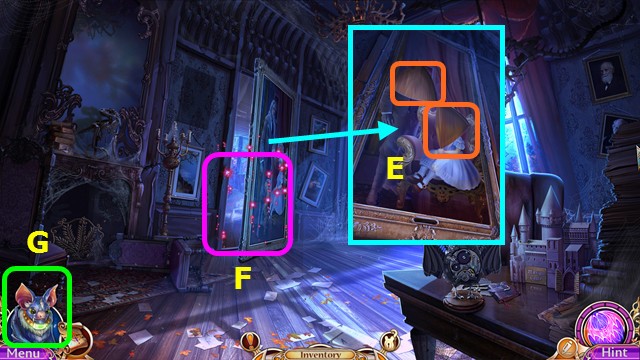
- Place the 2 PICTURE FRAGMENTS (E).
- Play the HOP; earn the PARCEL (F).
- Open the PARCEL; take the MUSEUM NAMEPLATE, MAGIC COLLAR, and read the journal (inventory).
- Combine the SLEEPING FAMILIAR and MAGIC COLLAR to make the FAMILIAR (inventory).
- The FAMILIAR is now on the menu bar (G).
- Walk down 2x.
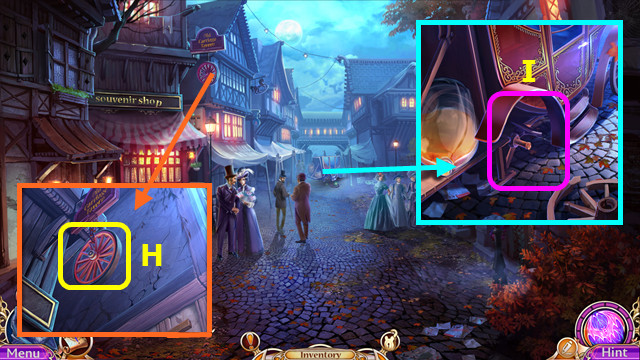
- Use the FAMILIAR; take the WHEEL (H).
- Place the WHEEL (I).
- Go forward.
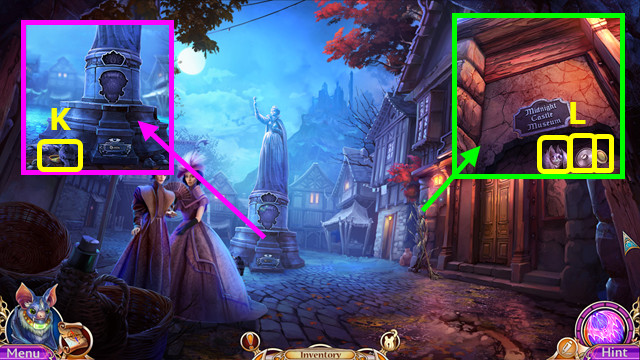
- Take the RING (K).
- Place the MUSEUM NAMEPLATE; take the 1st CLOCK FIGURINE, 1st GEAR, and COIN (L).
- Walk down.
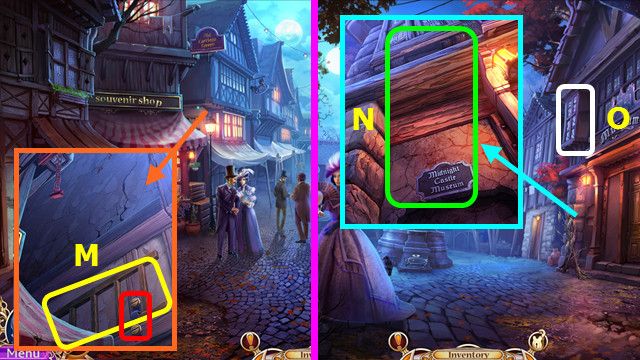
- Use the COIN; take the LADDER (M).
- Walk forward.
- Place the LADDER (N).
- Enter (O).
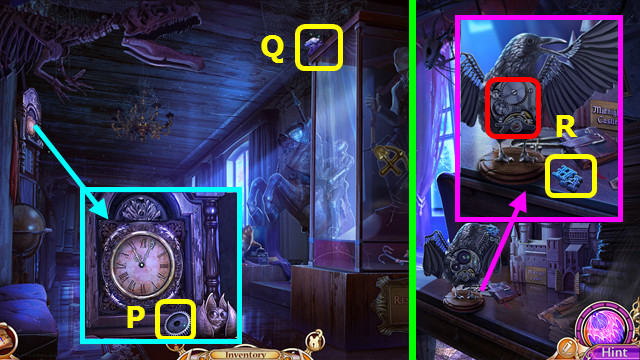
- Take the 2nd GEAR (P).
- Use the FAMILIAR to take the 2nd CLOCK FIGURINE (Q).
- Return to the House.
- Place the 2 GEARS; take the POSTBOX MONOGRAM (R).
- Walk down.
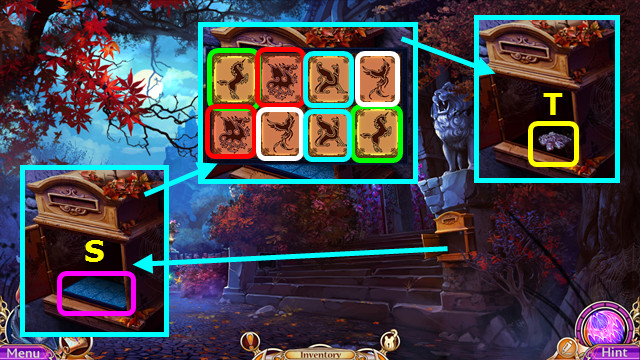
- Place the POSTBOX MONOGRAM; select (S).
- Select pairs (color-coded).
- Take the 3rd CLOCK FIGURINE (T).
- Return to the Museum.
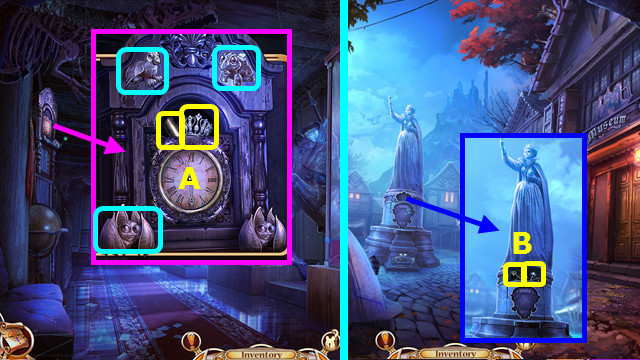
- Place the 3 CLOCK FIGURINES; take the CYLINDER and CREST ELEMENT (A).
- Walk down.
- Place the CREST ELEMENT; take the EXPLORER SYMBOL and HANDLE (B).
- Go right.
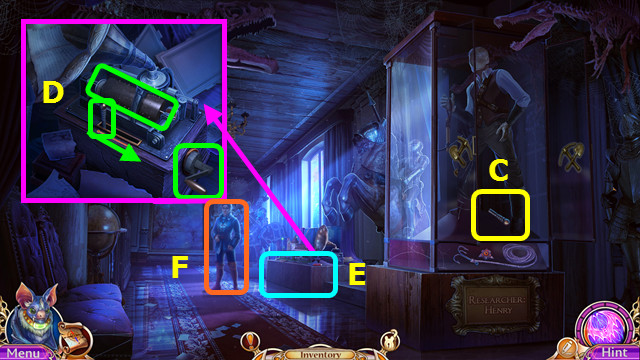
- Place the EXPLORER SYMBOL; take the LEVER (C).
- Place the CYLINDER, HANDLE, and LEVER; move the lever and turn the handle (D).
- Play the HOP (E).
- Talk to Calum (F).
- Go forward.
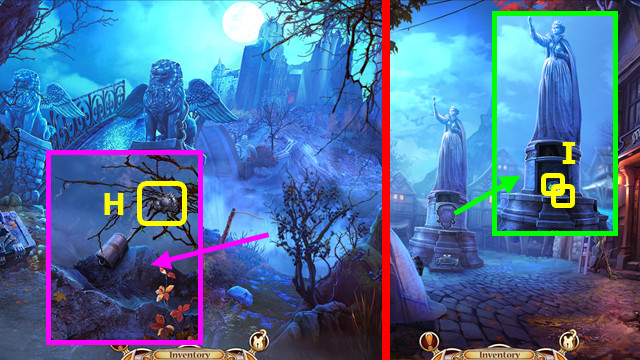
- Use the FAMILIAR; take the CREST ELEMENT (H).
- Walk down 2x.
- Place the CREST ELEMENT; take the DIAMOND and FATHER'S AMULET (I).
- Combine the RING and DIAMOND to make the DIAMOND RING (inventory).
- Go right.
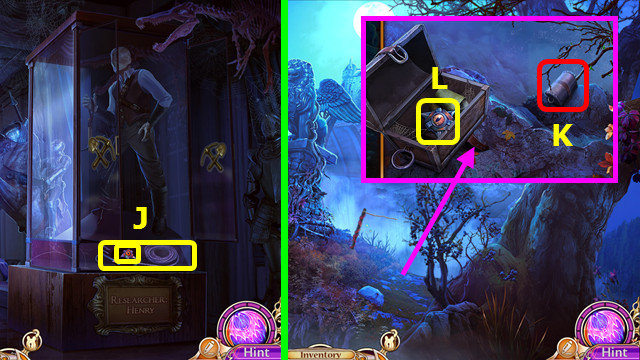
- Use the DIAMOND RING; take the 1/2 WOLF EYE and GRAPPLING HOOK (J).
- Go forward.
- Use the GRAPPLING HOOK (K).
- Open the chest; take the 2/2 WOLF EYE (L).
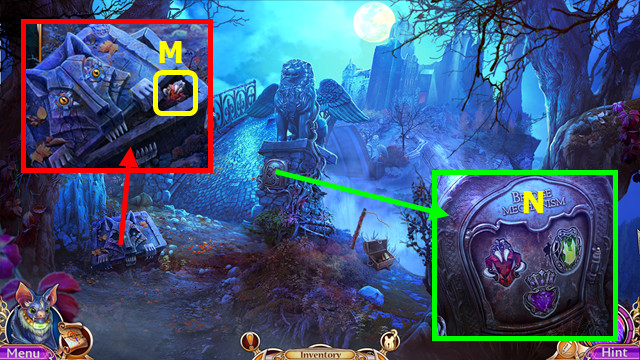
- Place the 2 WOLF EYES; take the CHAMBERLAIN'S SYMBOL (M).
- Place the QUEENLY MEDALLION, CHAMBERLAIN'S SYMBOL, and FATHER'S AMULET (N).
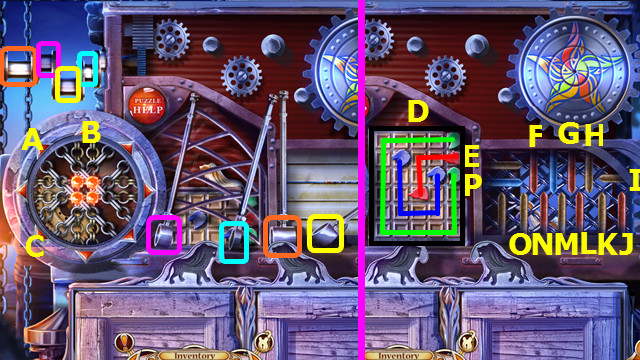
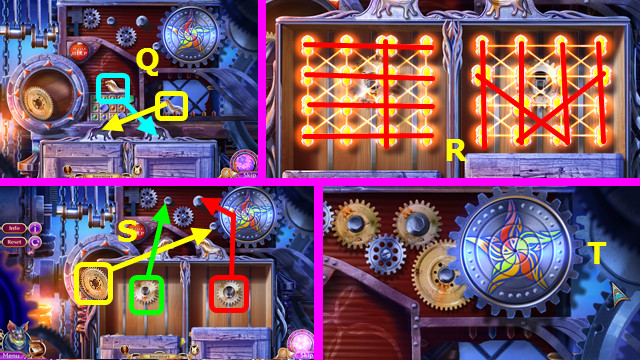
- Select A-B-A-Cx2.
- Move the crankshafts (color-coded).
- Connect the heads as shown (D).
- Select E-F-G-H-I-J-K-L-M-O-N-P-E-G-H-E-M.
- Move the 2 lions (Q).
- Select the red lines (R).
- Move the 3 gears (S).
- Restore the pinwheel (T).
- Go forward.
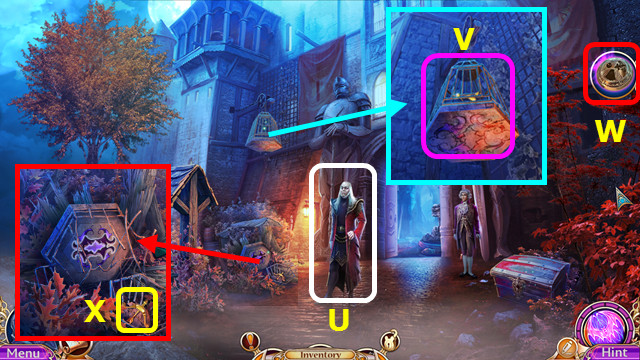
- Talk to the Chamberlain; earn the MYSTERIOUS BOX (U).
- Combine the MYSTERIOUS BOX and QUEENLY MEDALLION (inventory).
- The MYSTERIOUS BOX is now on the right (W).
- Use the FAMILIAR (V).
- Take the GARGOYLE FRAGMENT (X).
- Walk forward.
Chapter 3: The Castle
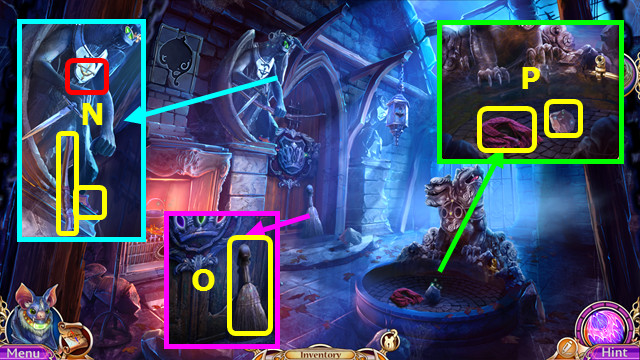
- Take the 1st CAGE'S DECORATION; place the GARGOYLE FRAGMENT and take the BOW (N).
- Take the BROOM (O).
- Take the SCARF and STONE (P).
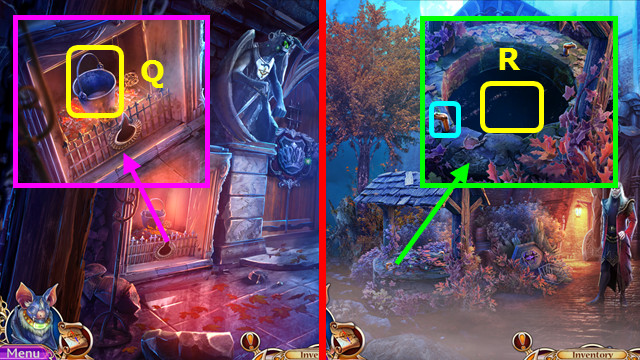
- Use the SCARF to take the POT (Q).
- Walk down.
- Use the STONE; use the POT to take the WATER (R).
- Go forward.
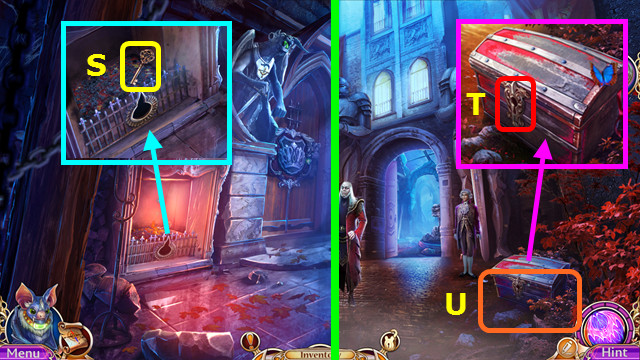
- Use the WATER and BROOM; take the CHEST KEY (S).
- Walk down.
- Use the CHEST KEY (T).
- Play the HOP; earn the GARGOYLE HORN (U).
- Go forward.
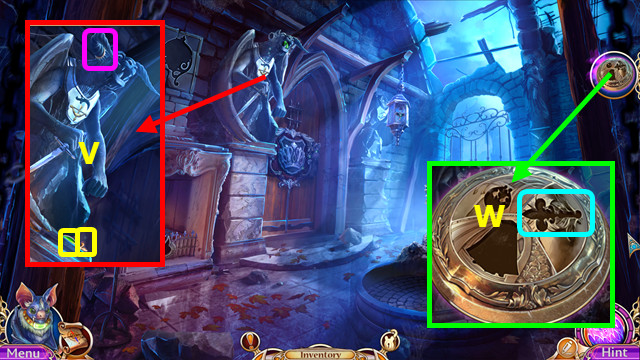
- Place the GARGOYLE HORN; take the 1st OVAL GEM and MYSTERIOUS BOX ELEMENT (V).
- Place the MYSTERIOUS BOX ELEMENT (W).
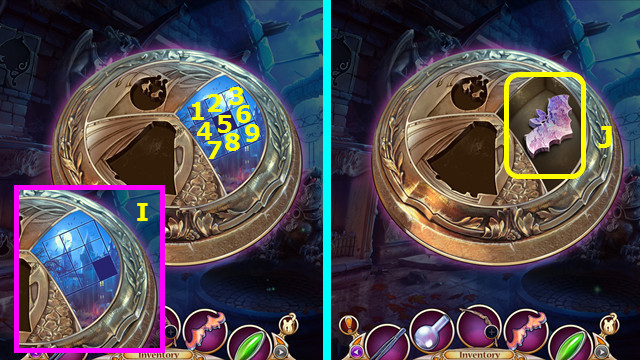
- Select 8-7-4-1-2-3-6-9.
- Final solution (I).
- Take the LANTERN EMBLEM (J).
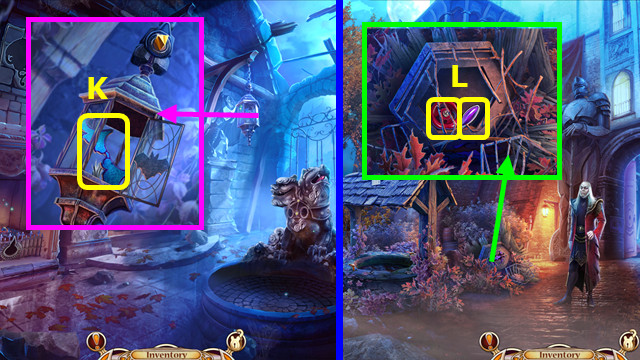
- Place the LANTERN EMBLEM; take the 2nd CAGE'S DECORATION (K).
- Walk down.
- Place the 2 CAGE'S DECORATIONS; take the 2nd OVAL GEM and VALVE (L).
- Go forward.
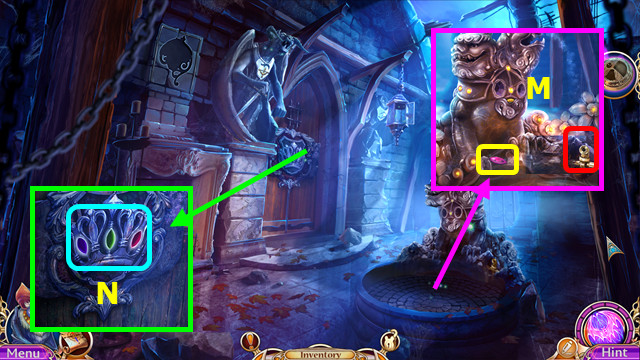
- Use the VALVE; take the 3rd OVAL GEM (M).
- Place the 3 OVAL GEMS (N).
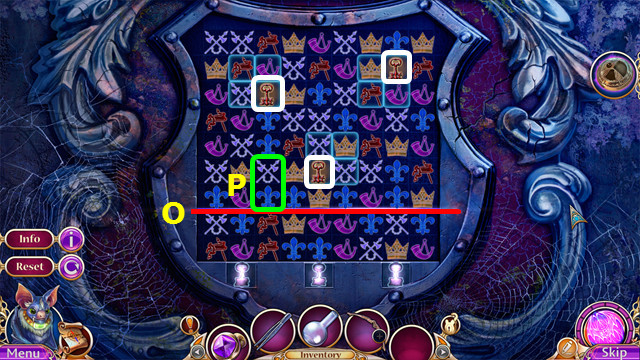
- Play the match-3 mini-game; move the 3 keys (white) below the line (O).
- Swap gems to make chains of 3 or more (P).
- Walk left.
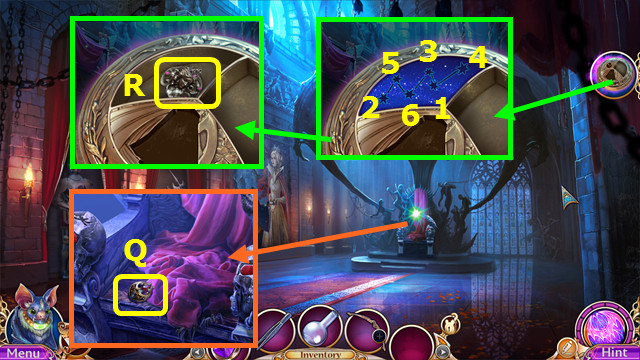
- Take the MYSTERIOUS BOX ELEMENT (Q).
- Place the MYSTERIOUS BOX ELEMENT; select 1-6. The sequence is randomly generated; you solution may vary.
- Take the WALL AMULET (R).
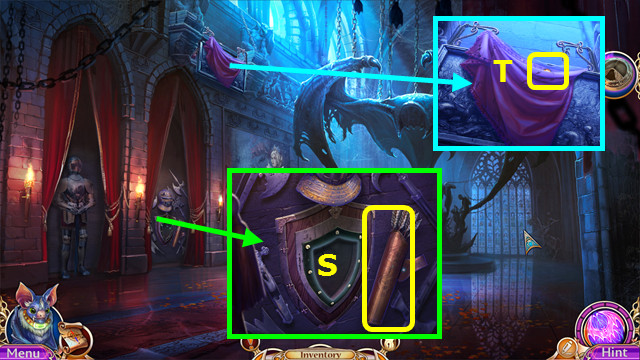
- Take the QUIVER (S).
- Use the FAMILIAR; earn the 1/2 STONE (T).
- Walk down.
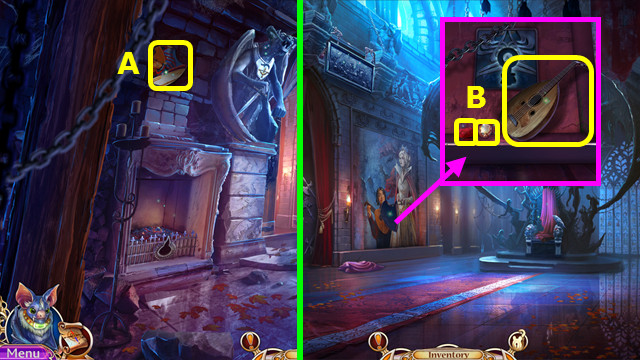
- Place the WALL AMULET; take the FRESCO FRAGMENT (A).
- Walk left.
- Place the FRESCO FRAGMENT; take the 2/2 STONE, RED GEM, and LUTE (B).
- Walk down.
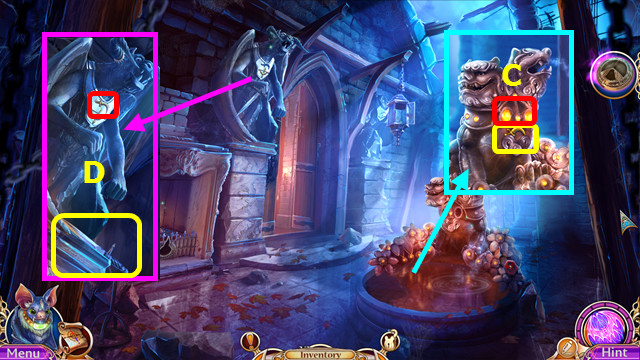
- Place the 2 STONES; take the GARGOYLE PART (C).
- Place the GARGOYLE PART; take the DAGGER (D).
- Combine the LUTE and DAGGER to find the STRING (inventory).
- Combine the BOW, STRING, and QUIVER to make the BOW WITH ARROWS (inventory).
- Walk left.
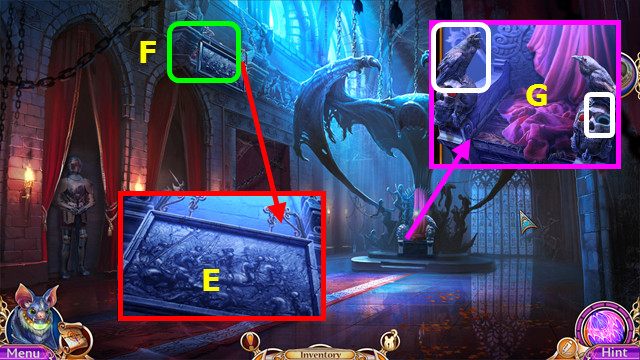
- Use the BOW WITH ARROWS (E).
- Play the HOP; earn the STONE RAVEN (F).
- Place the STONE RAVEN and RED GEM (G).
- Go forward.
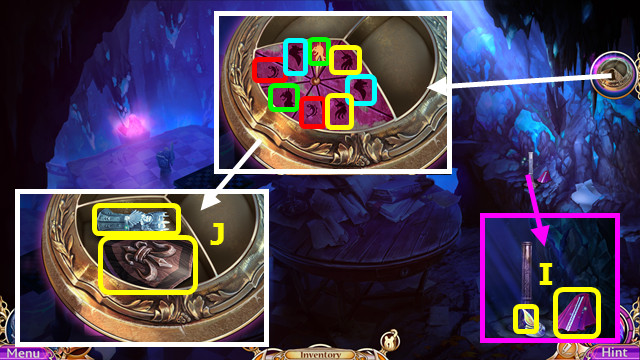
- Take the MYSTERIOUS BOX ELEMENT and FIREPLACE AMULET (I).
- Place the MYSTERIOUS BOX ELEMENT; select the matching symbols (color-coded).
- Take the COAT OF ARMS and the 1st CHESS PIECE (J).
- Walk down.
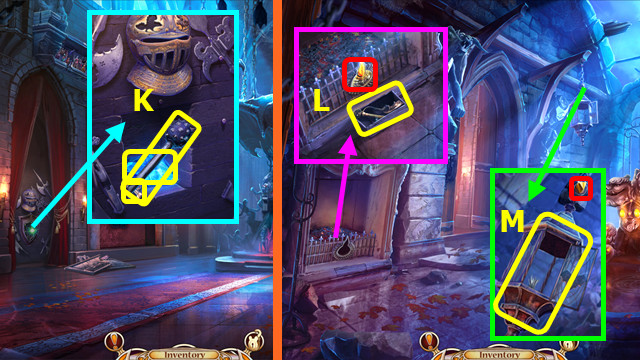
- Place the COAT OF ARMS; take the MACE, CRYSTAL, and TRIHEDRON (K).
- Walk down.
- Place the FIREPLACE AMULET; take the TINDERBOX (L).
- Use the TRIHEDRON to take the LANTERN (M).
- Combine the LANTERN and TINDERBOX to make the LIT LANTERN (inventory).
- Walk left and forward.
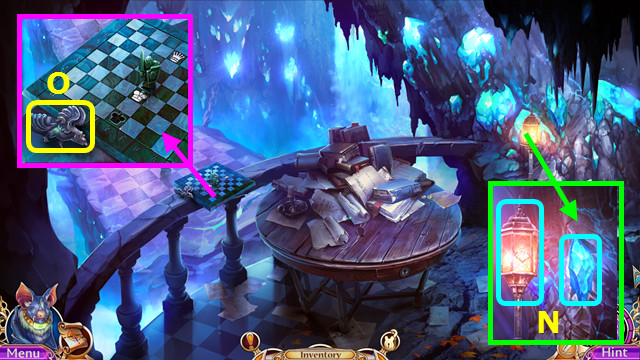
- Place the LIT LANTERN and CRYSTAL (N).
- Take the HELMET DECORATION (O).
- Walk down.
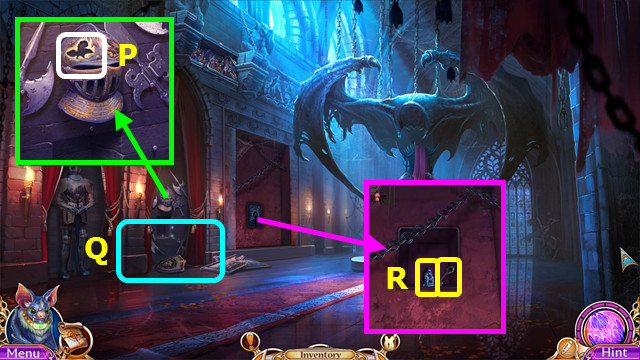
- Place the HELMET DECORATION (P).
- Play the HOP; earn the KEY EMBLEM (Q).
- Place the KEY EMBLEM; take the 2nd CHESS PIECE and DESK KEY (R).
- Walk forward.
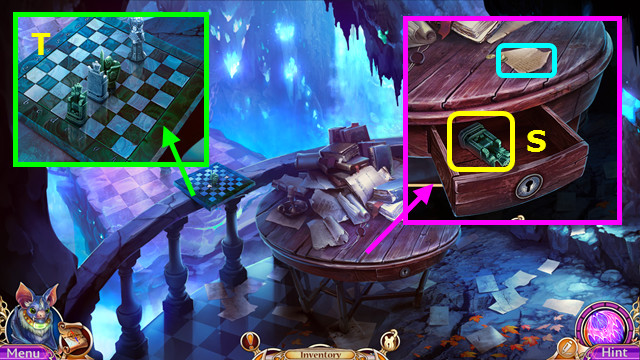
- Read the note and use the DESK KEY; take the 3rd CHESS PIECE (S).
- Place the 3 CHESS PIECES (T).
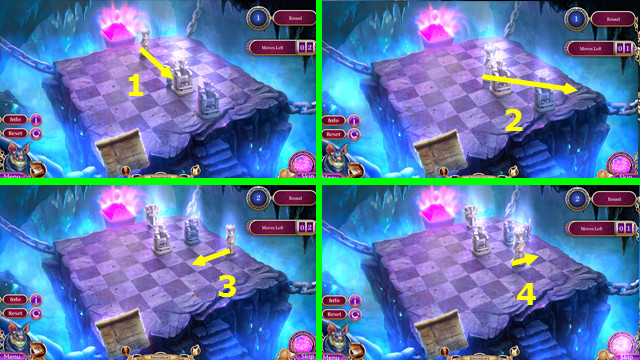
- Level 1 solution: 1-2.
- Level 2 solution: 3-4.
Chapter 4: The Shore
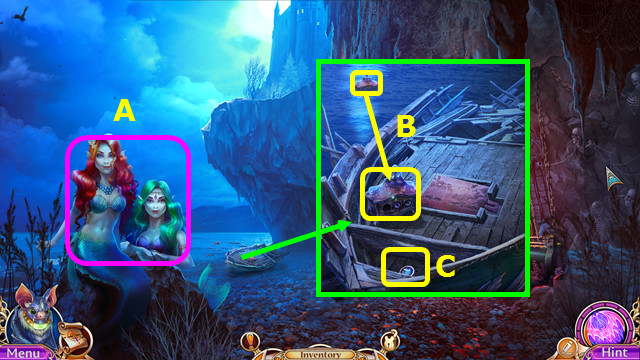
- Talk to the Mermaids (A).
- Use the FAMILIAR; take the SMALL CHEST (B).
- Use the MACE; take the DRAGON TOKEN (C).
- Combine the SMALL CHEST and DRAGON TOKEN; press the tokens left-right-center and take the AWL (inventory).
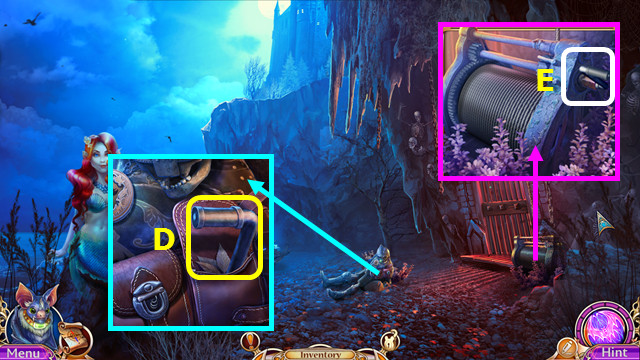
- Use the AWL; take the MECHANISM HANDLE (D).
- Use the MECHANISM HANDLE (E).
- Walk right.
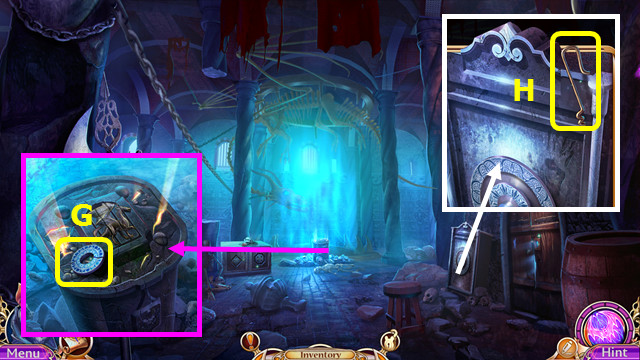
- Take the 1st SAFE ELEMENT (G).
- Take the LOCKPICK (H).
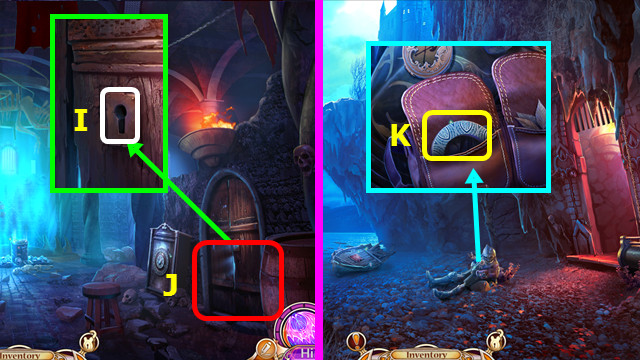
- Use the LOCKPICK (I).
- Play the HOP; earn the BUTTON (J).
- Walk down.
- Place the BUTTON; take the 2nd SAFE ELEMENT (K).
- Walk right.
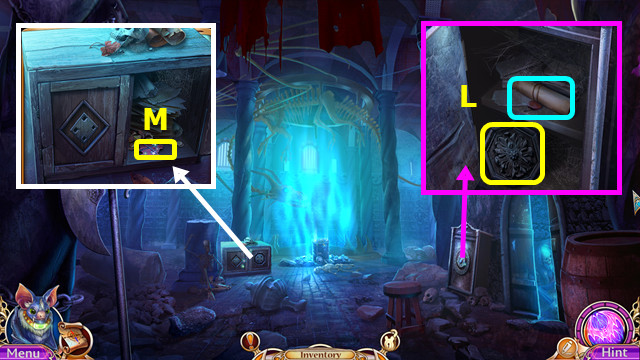
- Place the 2 SAFE ELEMENTS; take the OCTAGON ELEMENT and read the scroll (L).
- Place the OCTAGON ELEMENT; take the GUARDIAN BADGE (M).
- Walk down.
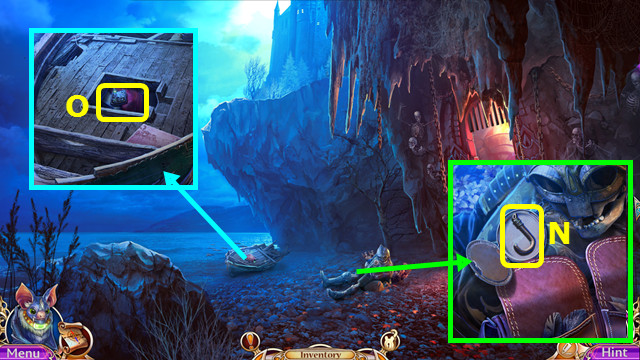
- Place the GUARDIAN BADGE; take the HOOK (N).
- Use the HOOK; take the DIAMOND ELEMENT (O).
- Walk right.
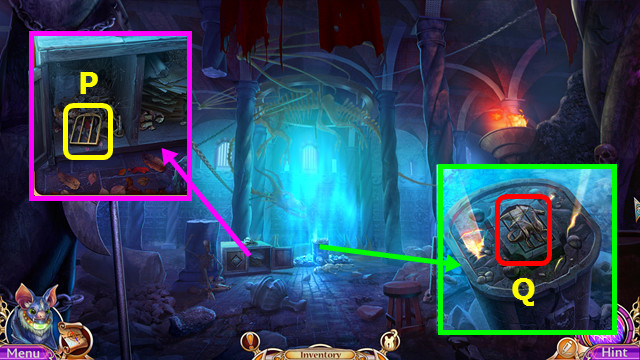
- Place the DIAMOND ELEMENT; take the GRATE (P).
- Place the GRATE (Q).
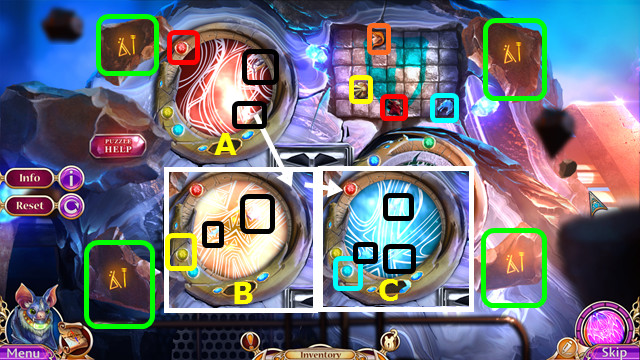
- Rotate the rocks and change the runes as shown (green).
- Select blue-orange x4-blue x5-yellow x3-red x2-yellow x2-red x2.
- Select the red gem; take the pieces (A).
- Select the yellow gem; take the pieces (B).
- Select the blue gem; take the pieces (C).
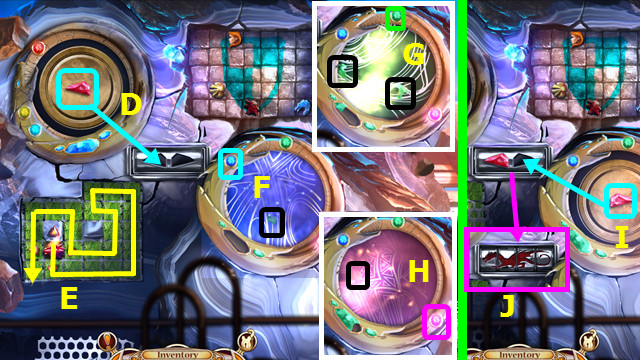
- Move the stone (D).
- Slide the piece along the path (E).
- Select the blue gem; take the piece (F).
- Select the green gem; take the pieces (G).
- Select the pink gem; take the piece (H).
- Move the stone (I).
- Restore the dragon (J).
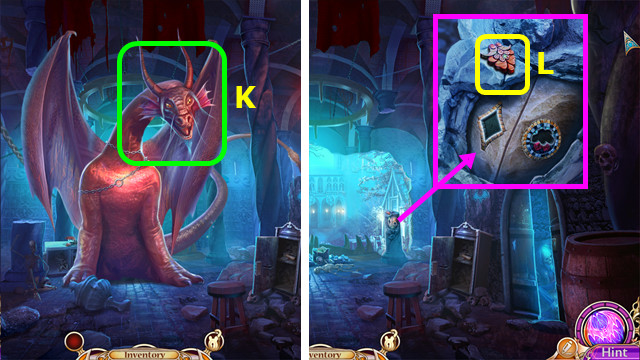
- Talk to the Dragon (K).
- Take the 1st HERBALIST AMULET (L).
- Go forward.
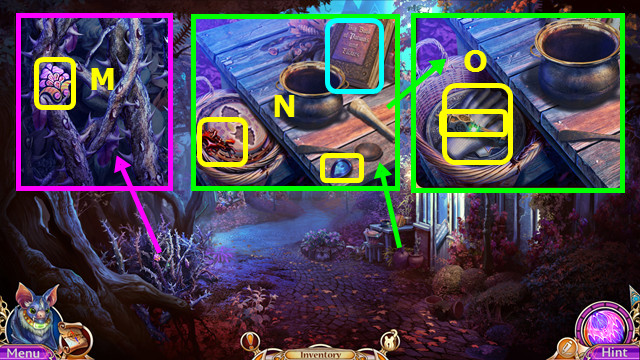
- Take the 2nd HERBALIST AMULET (M).
- Take the KNIGHT SYMBOL and the 1st ELEMENTS SYMBOL; read the book (N).
- Place the 2 HERBALIST AMULETS; take the GREENHOUSE HANDLE and GLOVE (O).
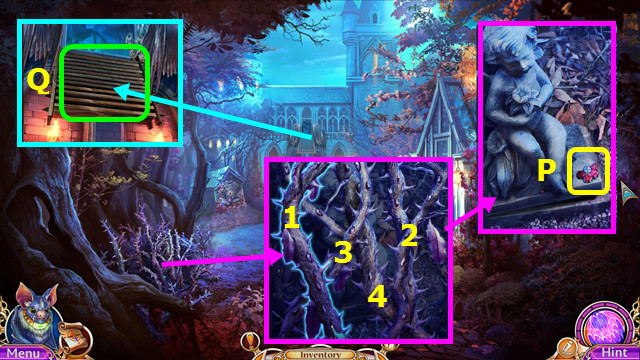
- Use the GLOVE; select 1-4.
- Take the MOSAIC FLOWER FRAGMENT (P).
- Use the FAMILIAR (Q).
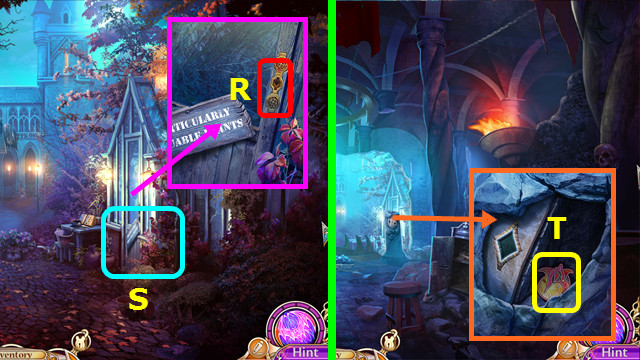
- Use the GREENHOUSE HANDLE (R).
- Play the HOP; earn the SCARLET BUD (S).
- Walk down.
- Place the MOSAIC FLOWER FRAGMENT; take the HERBALIST EMBLEM (T).
- Go forward.
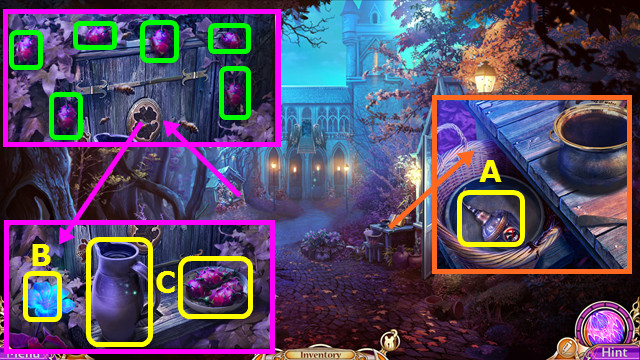
- Place the HERBALIST EMBLEM; take the BEE REPELLENT (A).
- Use the BEE REPELLENT; select the 6 crimson fruit (green).
- Use the TWEEZERS to take the 1st PETAL (B).
- Take the JUG and CRIMSON FRUIT (C).
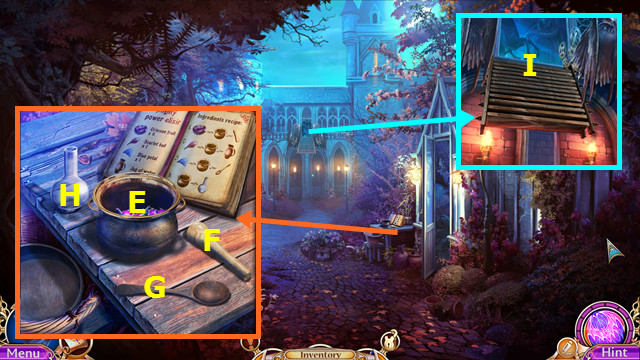
- Place the CRIMSON FRUIT (E); use (F) on (E).
- Use the SCARLET BUD and JUG (E).
- Use the PETAL (E); use (G) on (E).
- Place the VIAL (H); use (E) on (H).
- Take the STRENGTH POTION (H).
- Use the STRENGTH POTION on the FAMILIAR (inventory).
- Use the FAMILIAR (I).
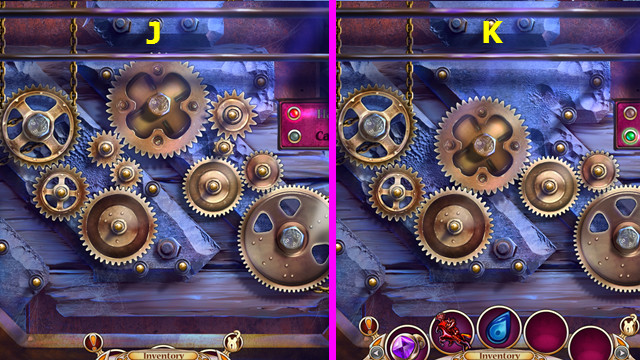
- Hard solution (J).
- Casual solution (K).
- Go forward.
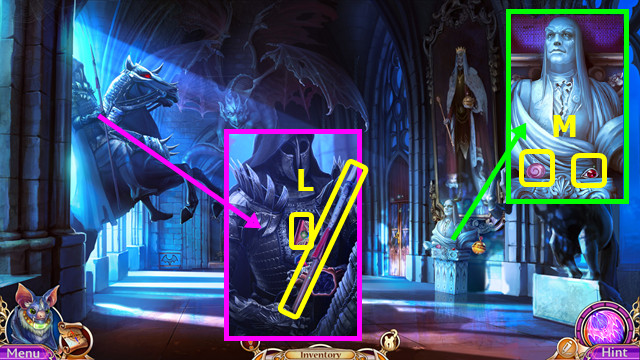
- Place the KNIGHT SYMBOL; take the PURSE and SPEAR (L).
- Take the 2nd ELEMENTS SYMBOL and 1st CHAMBERLAIN'S AMULET FRAGMENT (M).
- Walk down.
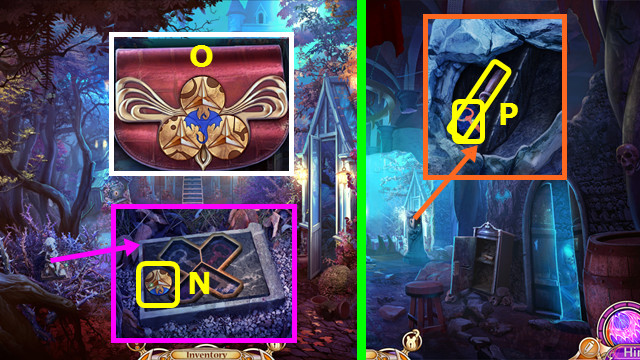
- Use the SPEAR; take the PURSE ELEMENT (N).
- Combine the PURSE and PURSE ELEMENT; restore the elements (O), and take the MOSAIC FLOWER FRAGMENT.
- Walk down.
- Place the MOSAIC FLOWER FRAGMENT; take the CHISEL and 1st AMULET KEY (P).
- Go forward.
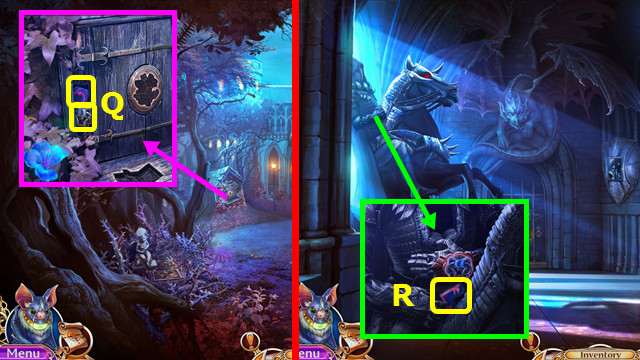
- Use the CHISEL; take the 2nd AMULET KEY and SCARY AMULET (Q).
- Go forward.
- Place the SCARY AMULET; take the 3rd AMULET KEY (R).
- Walk down.
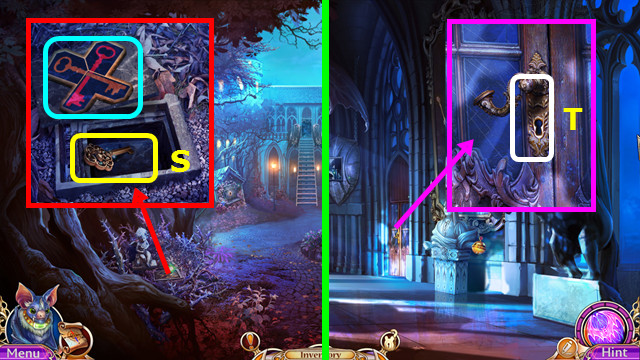
- Place the 3 AMULET KEYS; take the BALCONY KEY (S).
- Go forward.
- Use the BALCONY KEY (T).
- Walk right.
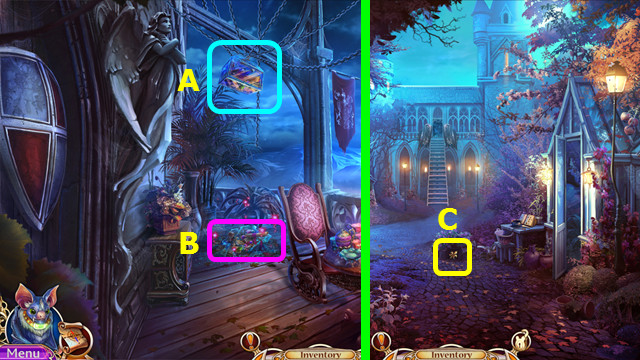
- Use the FAMILIAR (A).
- Play the HOP; earn the ENVELOPE (B).
- Open the ENVELOPE; take the 3 HIDING PLACE IMAGES (inventory).
- Walk down 2x.
- Use the 1st HIDING PLACE IMAGE; take the 1st CHAMBERLAIN'S SYMBOL (C).
- Walk down.
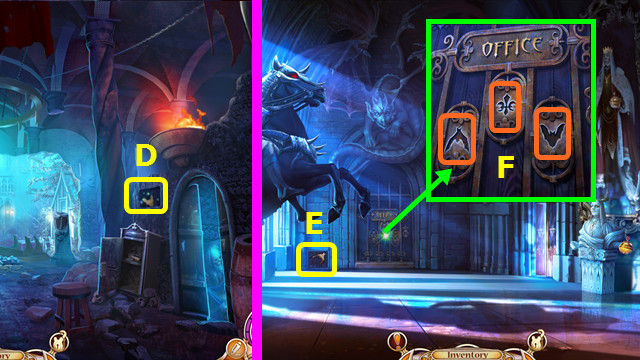
- Use the 2nd HIDING PLACE IMAGE; take the 2nd CHAMBERLAIN'S SYMBOL (D).
- Go forward 2x.
- Use the 3rd HIDING PLACE IMAGE; take the 3rd CHAMBERLAIN'S SYMBOL (E).
- Place the 3 CHAMBERLAIN'S SYMBOLS (F).
- Go forward.
Chapter 5: The Study
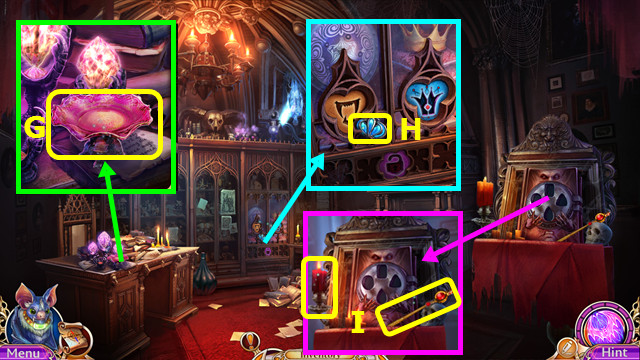
- Take the PLATE and read the note (G).
- Take the CHAMBERLAIN'S TOKEN (H).
- Take the SCEPTER and CANDLE (I).
- Walk down and right.
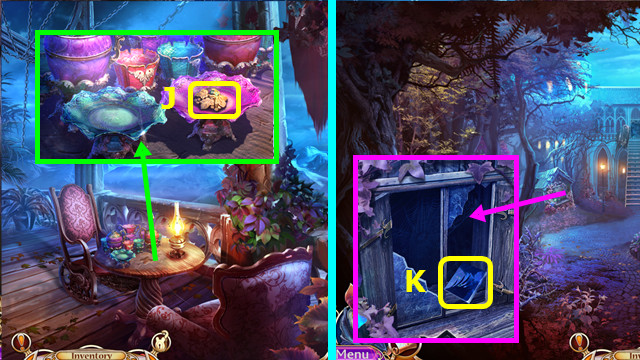
- Place the PLATE; take the AGRICULTURE SYMBOL (J).
- Walk down 2x.
- Place the AGRICULTURE SYMBOL; take the SHIELD ELEMENT (K).
- Go forward.
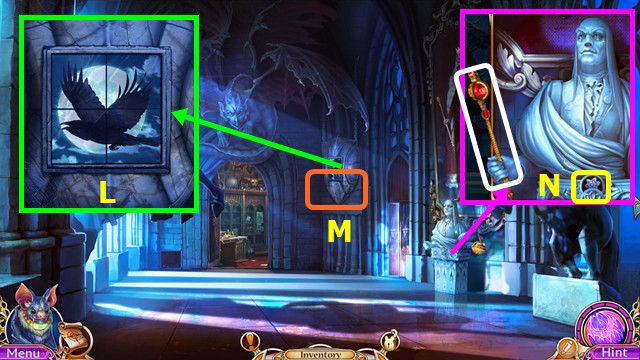
- Place the SHIELD ELEMENT; restore the picture (L).
- Play the HOP; earn the BOTTLE TOPPER (M).
- Place the SCEPTER; take the CABINET BUTTON (N).
- Walk right.
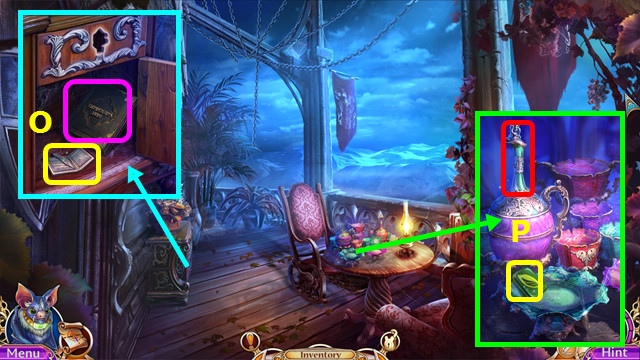
- Place the CABINET BUTTON; read the diary and take the BOOK SYMBOL (O).
- Place the BOTTLE TOPPER; take the 3rd ELEMENTS SYMBOL (P).
- Walk down 2x.
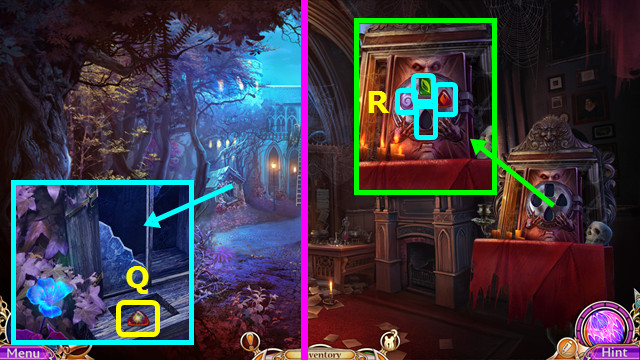
- Place the BOOK SYMBOL; take the 4th ELEMENTS SYMBOL (Q).
- Go forward 2x.
- Place the 4 ELEMENTS SYMBOLS (R).
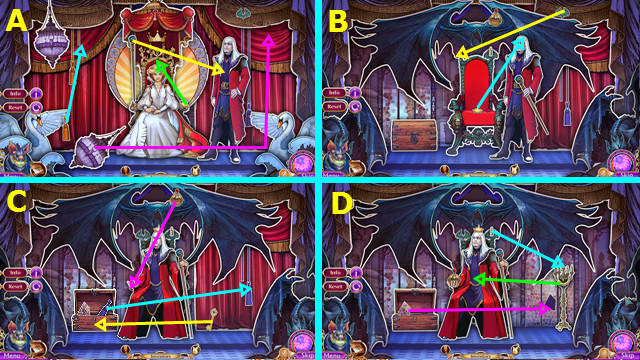
- Restore the images (A-D).
- Drag and drop into place.
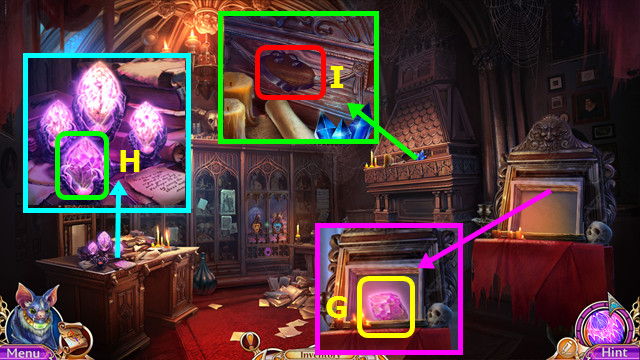
- Take the CRYSTAL (G).
- Place the CRYSTAL (H).
- Place the CHAMBERLAIN'S TOKEN (I).
- Walk right.
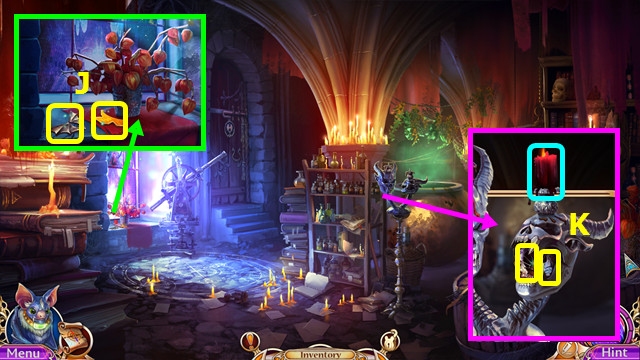
- Take the 2nd CHAMBERLAIN'S AMULET FRAGMENT and 1st CROWN SYMBOL (J).
- Place the CANDLE; take the CABINET BUTTON and CHAMBERLAIN'S AMULET BASE (K).
- Walk down 2x; go right.
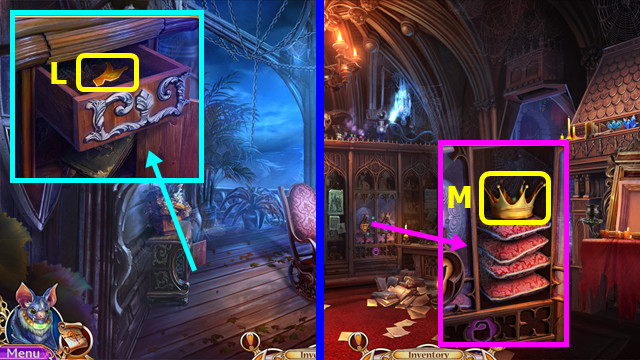
- Place the CABINET BUTTON; take the 2nd CROWN SYMBOL (L).
- Walk down and forward.
- Place the 2 CROWN SYMBOLS; take the CROWN (M).
- Walk down.
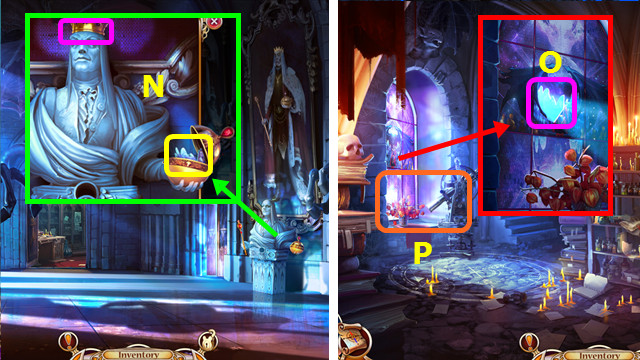
- Place the CROWN; take the GLASS SHARD (N).
- Go forward and right.
- Place the GLASS SHARD (O).
- Play the HOP; earn the FANG AMULET (P).
- Walk down.
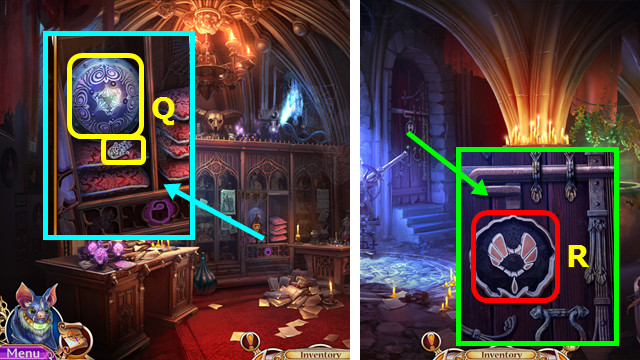
- Place the FANG AMULET; take the 3rd CHAMBERLAIN'S AMULET FRAGMENT and MIRROR SHIELD (Q).
- Combine the CHAMBERLAIN'S AMULET BASE and the 3 CHAMBERLAIN AMULET FRAGMENTS to make the CHAMBERLAIN'S AMULET (inventory).
- Walk right.
- Use the CHAMBERLAIN AMULET (R).
- Walk left.
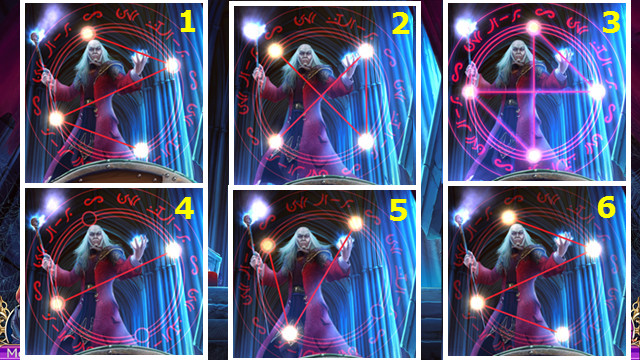
- Use the MIRROR SHIELD.
- Recreate the patterns 1-3 for the hard level.
- Recreate the patterns 4-6 for the casual level.
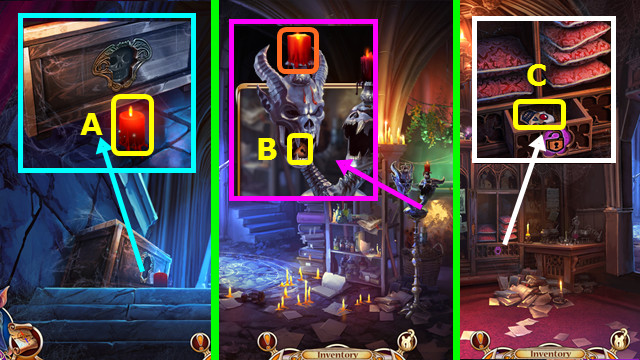
- Take the CANDLE (A).
- Walk down.
- Place the CANDLE; take the LOCK SYMBOL (B).
- Walk down.
- Place the LOCK SYMBOL; take the SKULL SYMBOL (C).
- Go right and left.
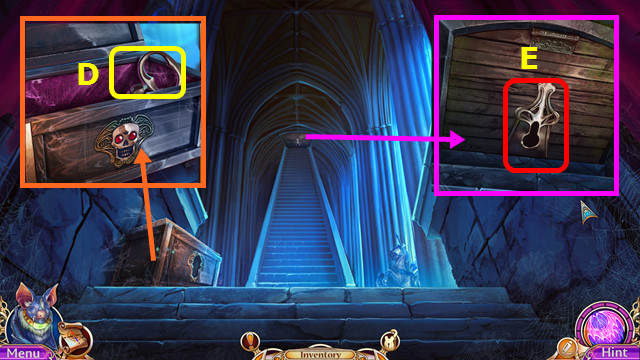
- Place the SKULL SYMBOL; take the ATTIC KEY (D).
- Use the ATTIC DOOR KEY (E).
- Go forward.
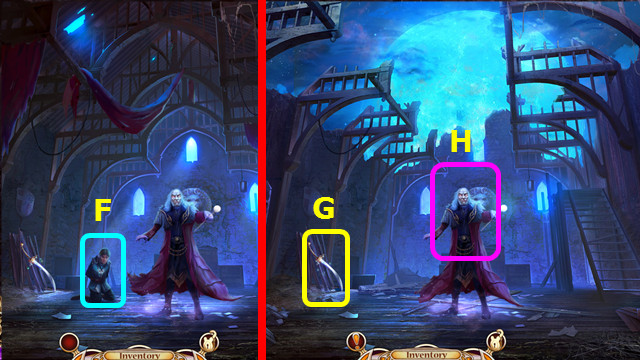
- Select Calum (F).
- Take the HOLY FLAME SWORD (G).
- Use the HOLY FLAME SWORD (H).
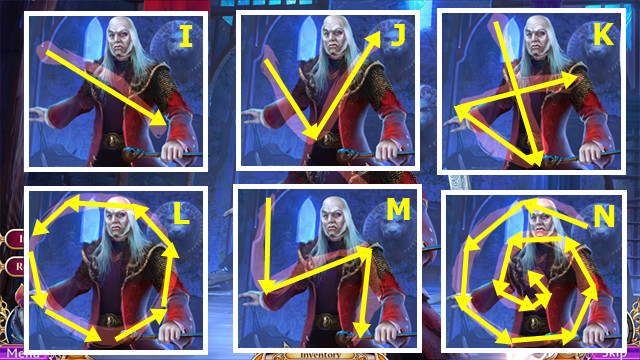
- Trace the images I-J-K for casual level.
- Trace the images K-L-M-N for hard level.
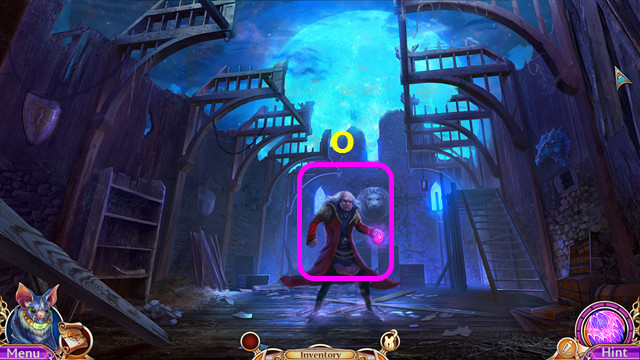
- Use the FAMILIAR (O).
- Congratulations! You have completed Midnight Calling: Anabel!
Created at: 2015-10-16

