Walkthrough Menu
General Tips
- From the main menu you can adjust the sound volume, music volume, turn off full screen, mute all sounds, or turn off the custom cursor.
- When playing the game, items in red need a certain task to be completed before they can be collected.
- Items in blue can only be collected when the screen is in a specific position as shown in the screenshots.
- Get to your inventory by clicking on the briefcase to the left.
- Click the camera to get a hint and find rolls of film to get more hints.
- Some objects need to be zoomed in to find them.
- Most puzzles can be skipped after a few minutes.
Chapter 1
City of Vernida the Mayor’s Office-1
- Find the items that are listed in the bottom of the screen.
- Moving the cursor to the left or the right will scroll the scene. Some objects can only be found on the left or the right of the scene.
- Sometimes you have to perform a specific action before collecting an item. These items will be colored red.
- You can use the hint button with the camera icon in the bottom right corner of the screen. It takes 20 seconds to use the hint button again after you use it once.
- When you place your cursor on an object, it will be highlighted sometimes. You will then have to investigate other objects before collecting it.
- Some items are inventory items. You can use inventory items by clicking the briefcase icon in the bottom left corner of the screen.
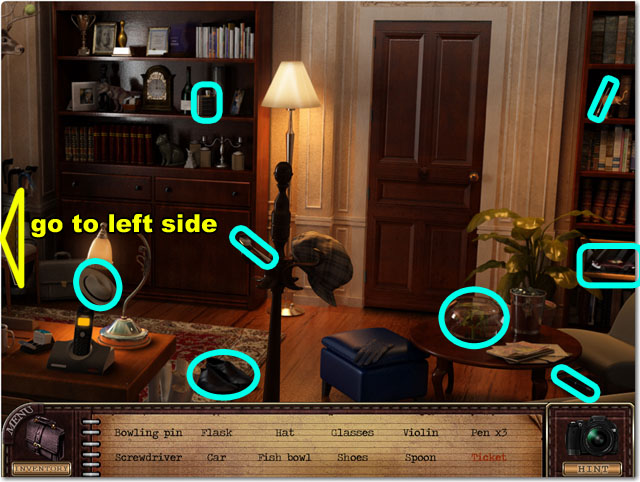
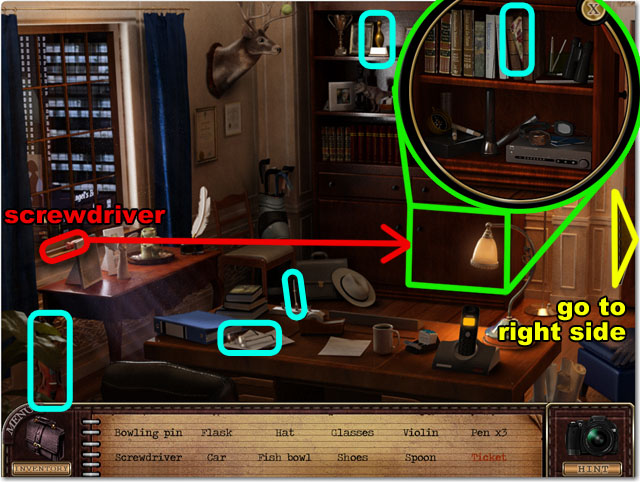
- Find the 12 hidden objects listed on the bottom side of screen, in any order, circled in light blue in the image.
- Find the SCREWDRIVER in the left side of the screen, highlighted in red in the image. It will then go to the inventory automatically.
- Open the inventory item window from the bottom left corner and click the SCREWDRIVER. Place the SCREWDRIVER on the wooden shelf in the middle of the screen to open the desk and get the last object.
City of Vernida the Mayor’s Office-2
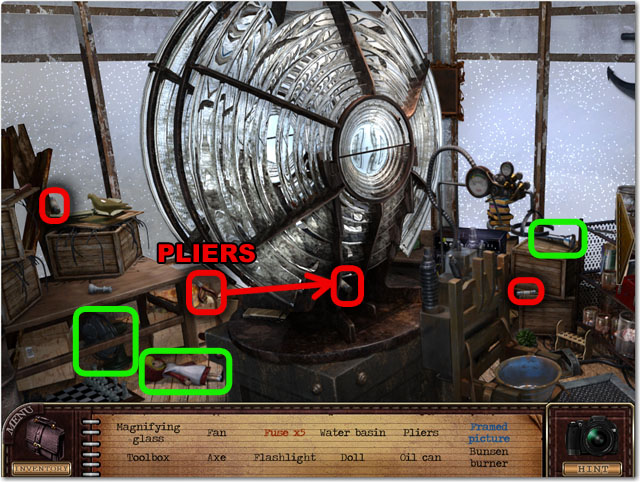
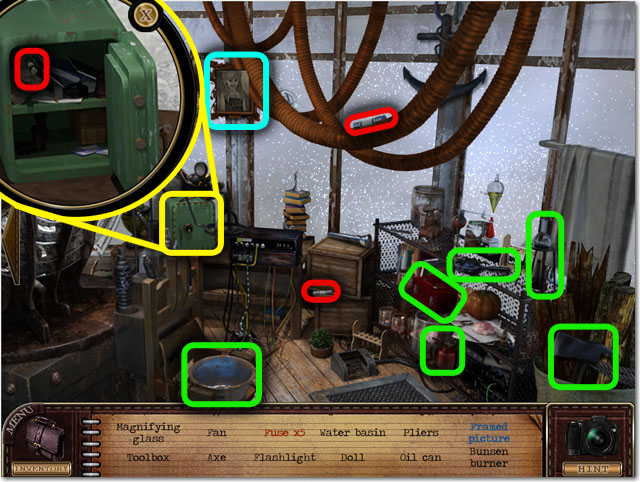
- Find the 12 hidden objects listed at the bottom side of screen, in any order, circled in green in the image.
- You need to scroll the screen all the way to right to collect the framed picture in the upper side.
- Find the PLIERS in the left side of the screen.
- Click the FUSE in the middle of the screen. You will then see it is stuck inside of the light.
- Open the inventory item window from the bottom left corner and click the PLIERS. Place the PLIERS on the fuse in the middle of the screen to collect it.
- Shift the screen to the right and click the green power box. There is a FUSE in the box.
- Find 5 FUSES highlighted in red in the screenshots.
- Use the hint button in the bottom right corner if you cannot find the object that you are looking for.
Mini-game: Fuse Puzzle
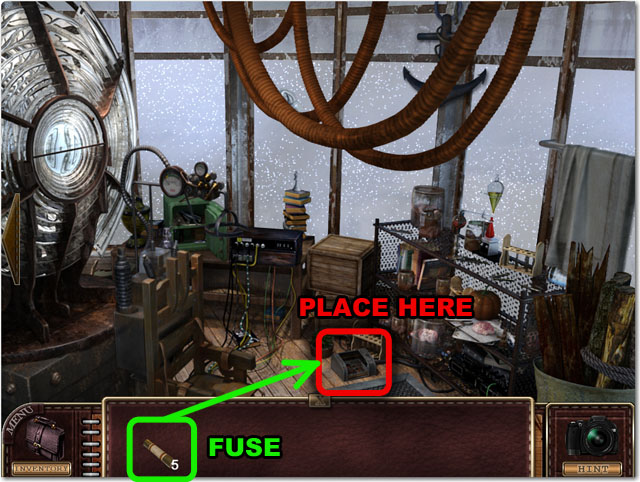
- Open the inventory and click the FUSES.
- Drag to the place in the bottom side to start the fuse puzzle.
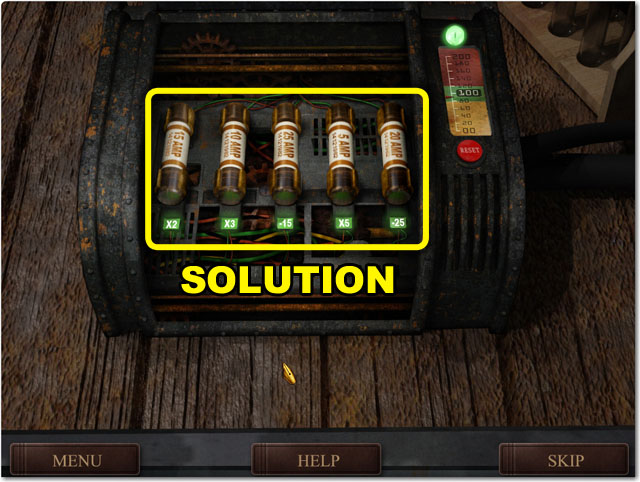
- You can skip the puzzle after 30 seconds. There is skip button in the bottom right corner.
- Each fuse has different amperages and each slot modifies this amperage by some value, like x2 or -15.
- Place the fuses in the correct order so that the total amps equal somewhere between 80 and 120.
- The correct order of the fuses is 15 AMP, 10 AMP, 25 AMP, 5 AMP and 20 AMP from the left to the right.
News Room
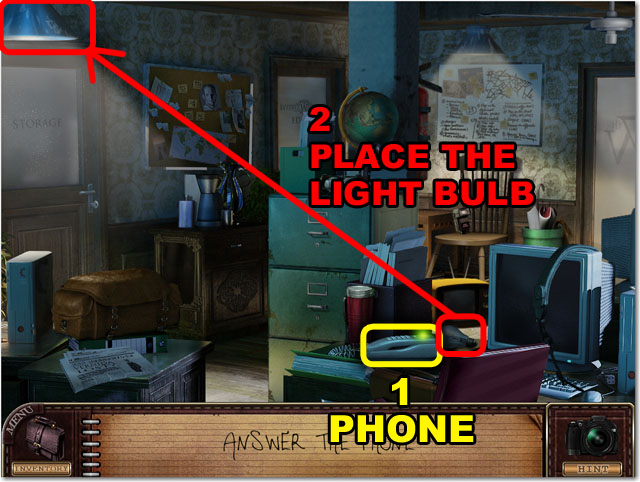
- Click the phone in the bottom side of the screen.
- Find the LIGHT BULB next to the phone and open the inventory to use it.
- Drag the LIGHT BULB onto the lamp shade in the upper left corner.
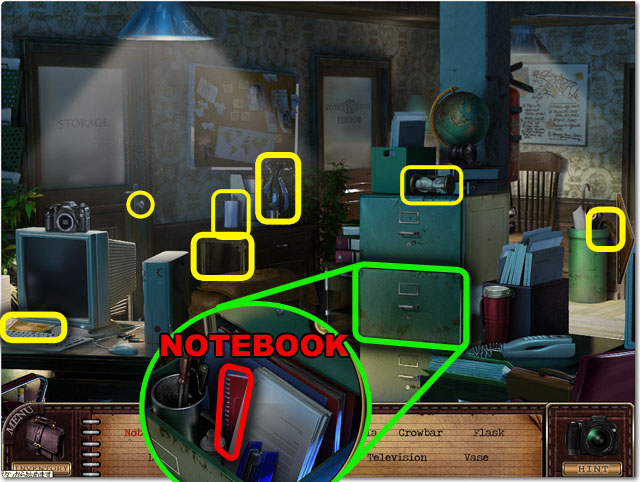
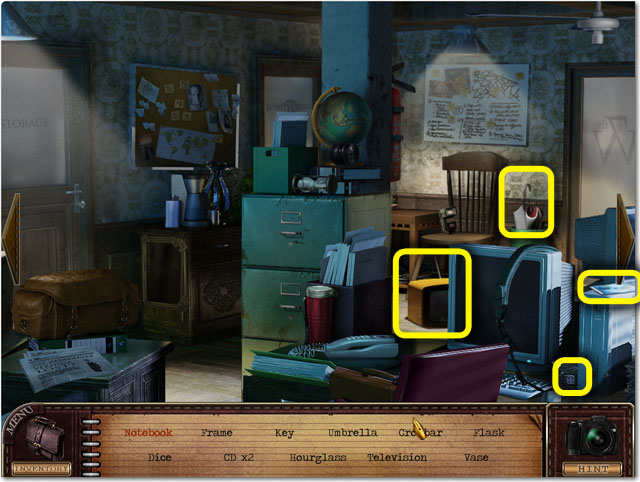
- Find 11 objects in the scene, circled in yellow in the image.
- Pan the scene from left to right to find all of the objects.
- Click on the green second drawer from the top to zoom in. Click it again and then find the notebook inside it.
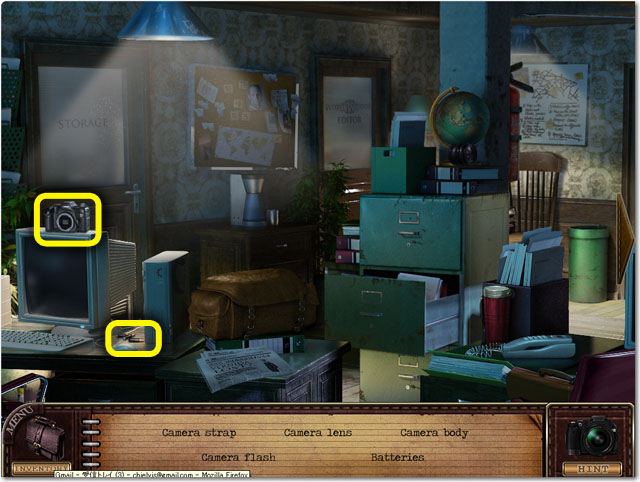
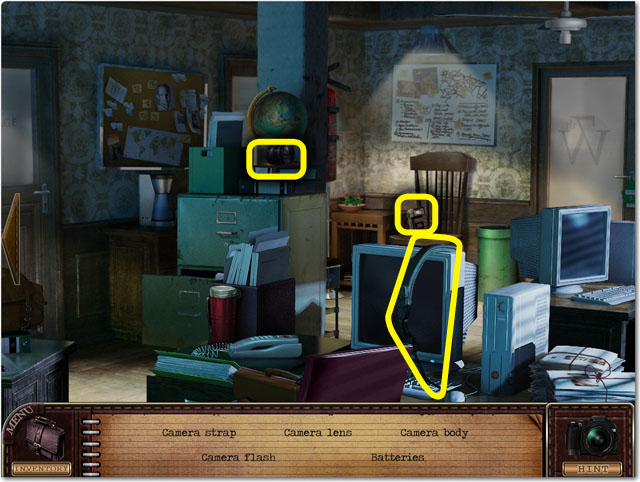
- After finding all 11 objects, answer the phone again, when it starts blinking.
- Find 5 objects that are related to cameras, circled in yellow in the image.
Vernida City Hall
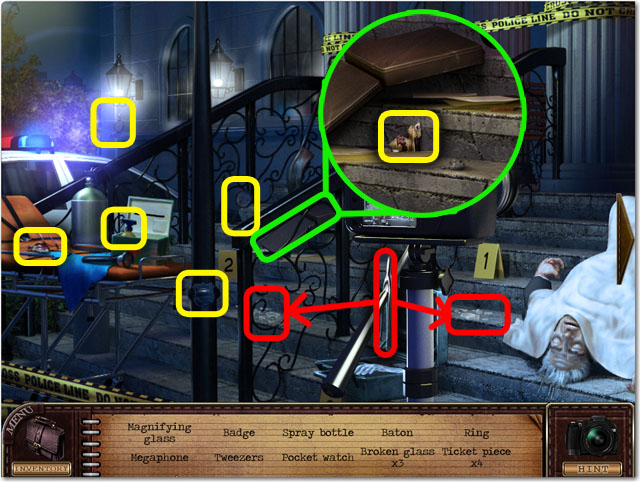
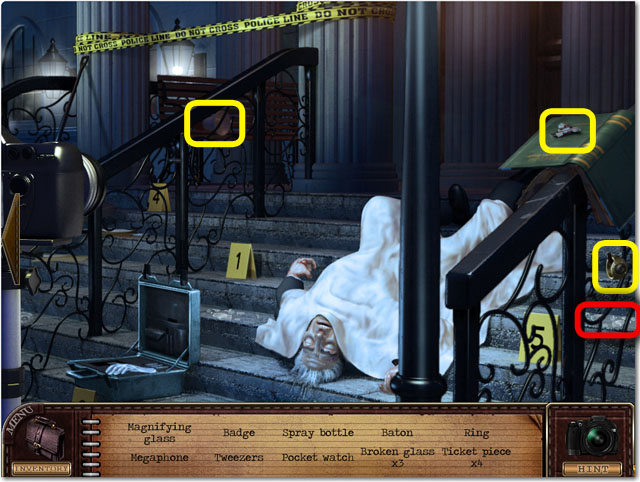
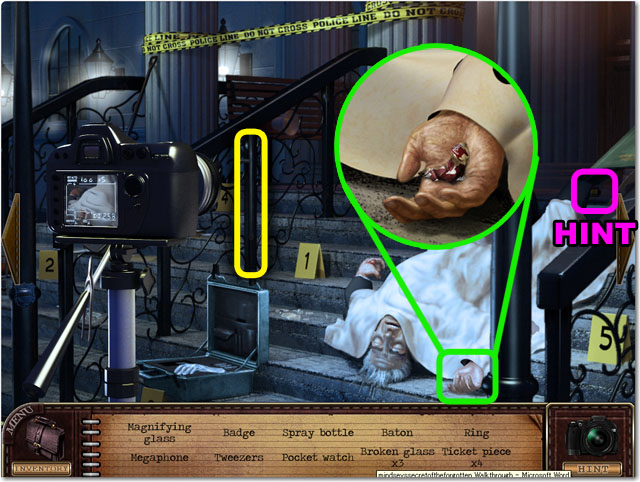
- Find 10 items in the screen, circled in yellow in the screenshots.
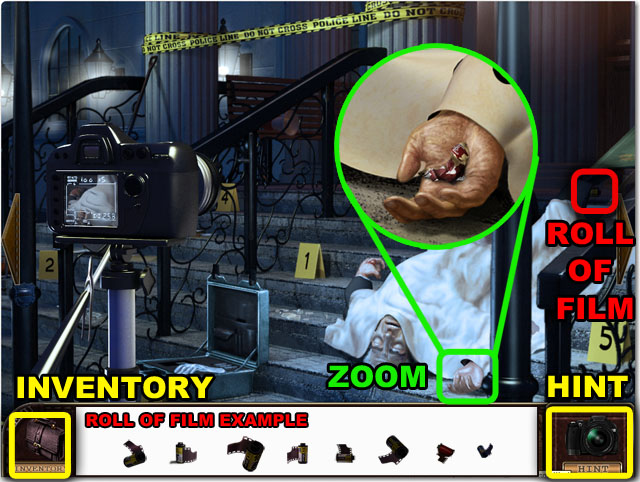
- There are two zoom locations, briefcase and the dead man’s hand, both highlighted in green.
- Find the TWEEZERS first, circled in red, and use them to collect the three broken glass pieces also circled in red.
- You can find the rolled film under the man’s right foot to charge the hint meter instantly. If you have a charged hint already, you will then get extra hint.
Office of the Mayor
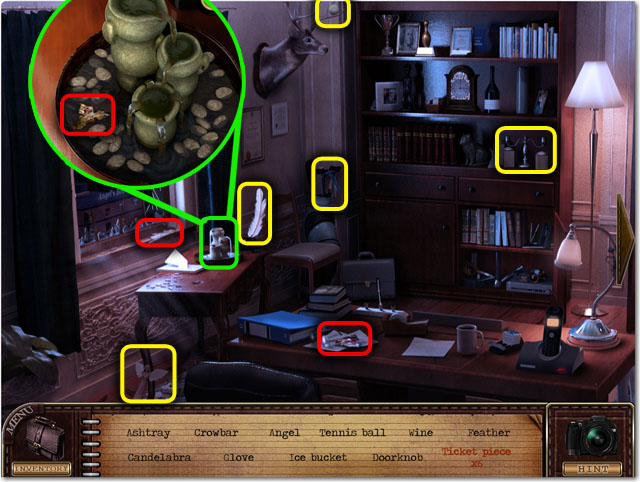
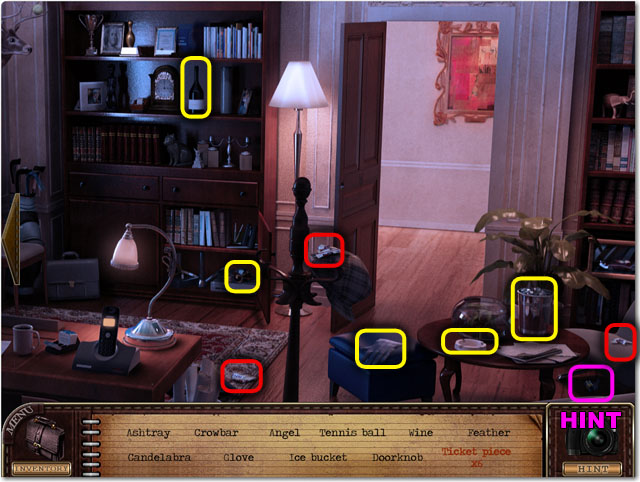
- Find 10 items in the scene, circled in yellow in the screenshot.
- There is one zoom location on the coffee table near the window.
- Find 6 TICKET PIECES circled in red.
Chapter 2
Newsroom
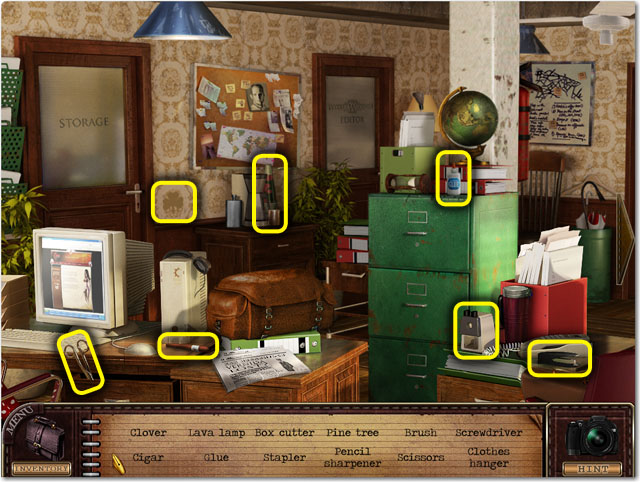
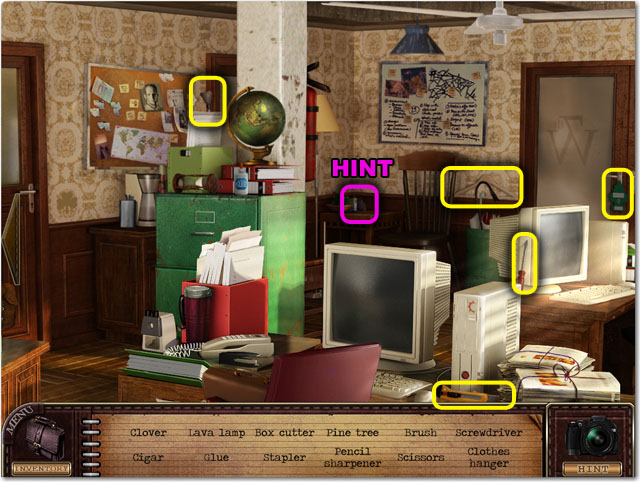
- Find 12 items in the scene, circled in yellow in the screenshot.
- There is a roll of film in the back corner or the room, which will give you another hint or fill you meter.
- After you find all the objects you will be taken to the ticket jigsaw puzzle.
Mini-game: Jigsaw Puzzle
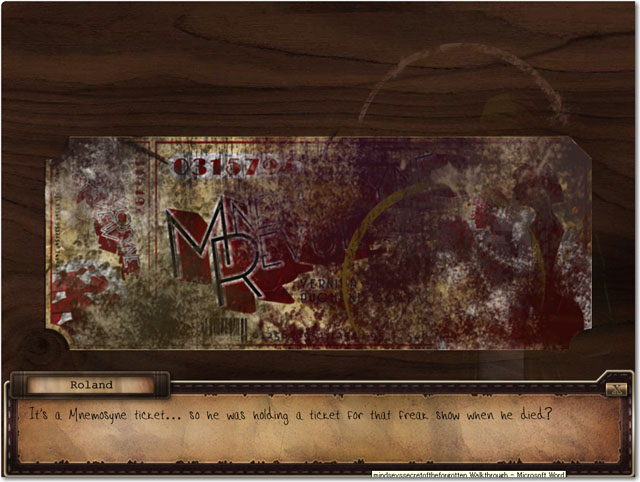
- After a minute, you can skip the puzzle by clicking skip button in the bottom right corner.
- Put the pieces together like a jigsaw puzzle in any spot on the table.
- The pieces do not need to be rotated.
- When the pieces are in the correct place the will connect and you won’t be able to remove them.
- See the screenshot for the completed ticket.
Mini-game: 10 Differences
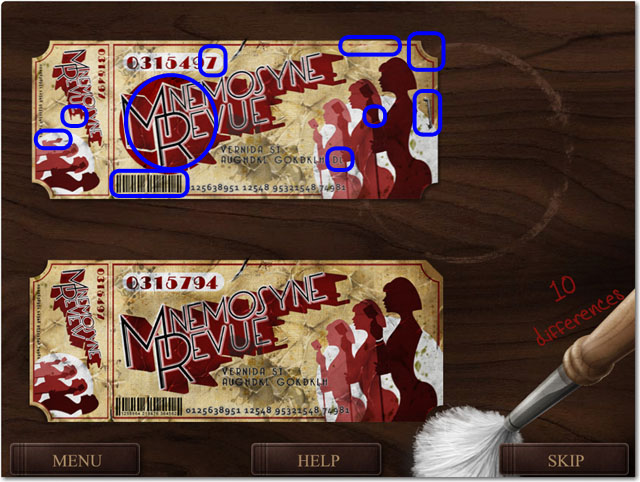
- After a minute, you can skip the puzzle by clicking the skip button in the bottom right corner.
- Click the four times to clean up the ticket with the brush.
- Find 10 differences between two tickets, circled in blue in the screenshot.
Editor’s Room
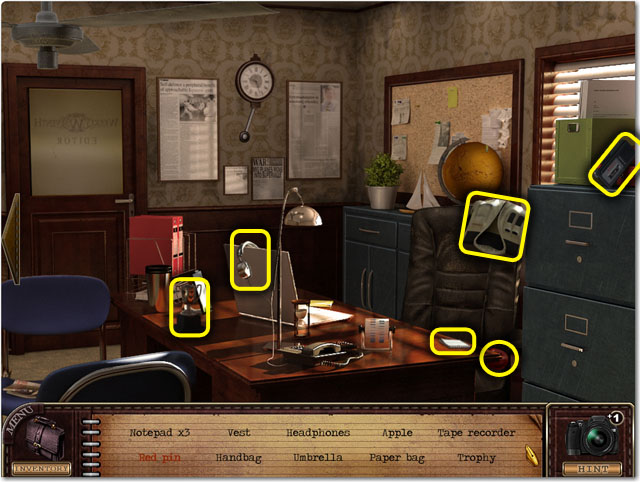
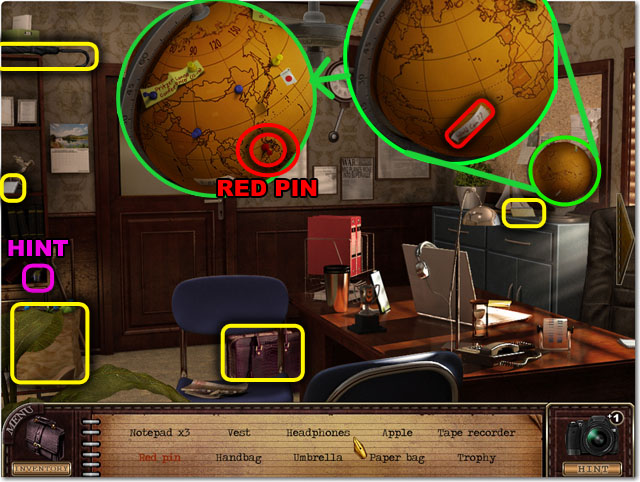
- Find 11 items in the scene, circled in yellow in the image.
- There is one zoom location, the globe, in the right side of the scene.
- Click on the piece of paper to turn the globe and collect the RED PIN.
- There is a roll of film in the left side of the scene circled in purple, which will give you another hint or fill you meter.
Subway Station 4
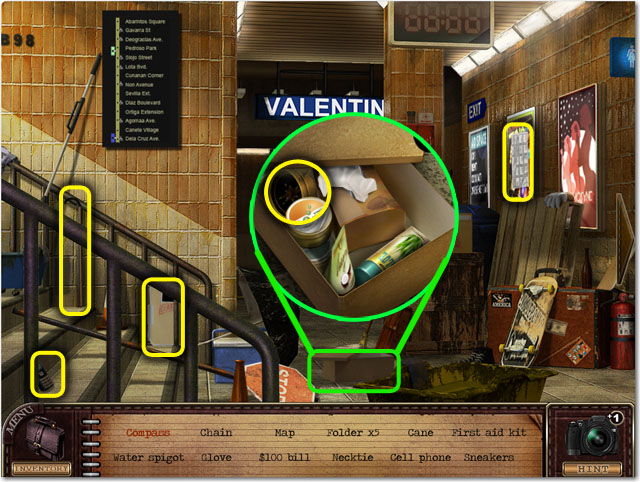
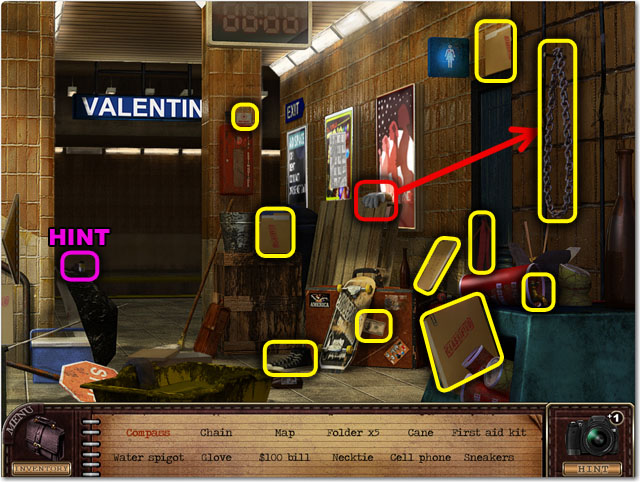
- Find 16 items in the screen circled in yellow in the screenshot.
- Find the GLOVE in the right side of the screen and it will then become an inventory item.
- Use the GLOVE to collect the chain on the right wall.
- There is a roll of film in the middle of the scene circled in purple, which will give you another hint or fill you meter.
Subway Station 4- Restroom
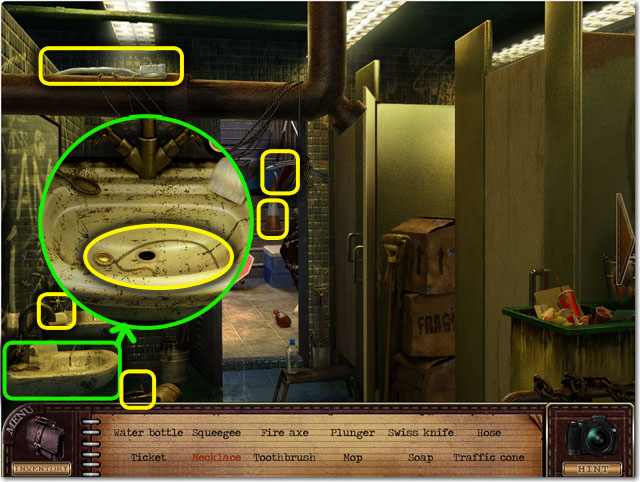
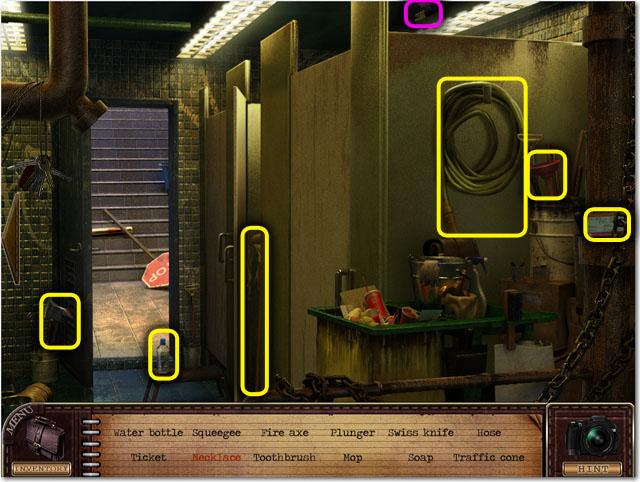
- Find 11 items in the scene circled in yellow in the screenshot.
- There is one zoom location, the sink, in the left side of the scene. Click the NECKLACE in the zoom location.
- There is a roll of film in the middle of the scene circled in purple, which will give you another hint or fill you meter.
Leonard’s Lab
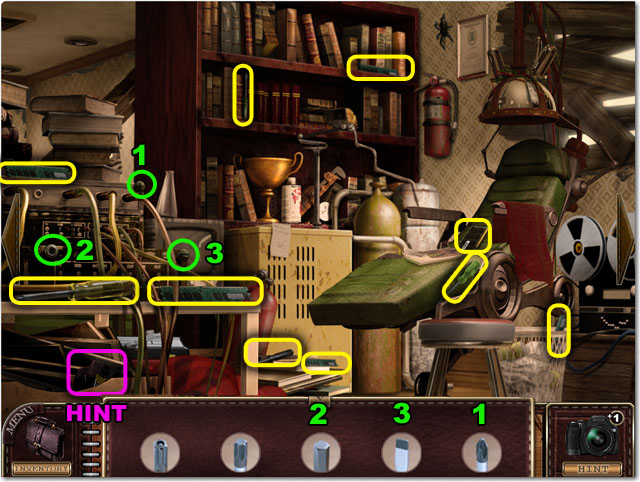
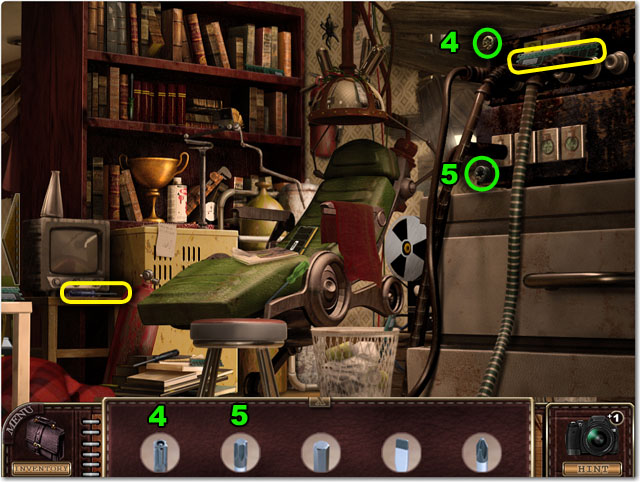
- Find 8 memory chips in the scene circled in yellow in the screenshot.
- Next find 5 different types of SCREWDRIVERS, also circled in yellow.
- After finding all five SCREWDRIVERS, click on 5 SCREWS to zoom in.
- Drag the correct SCREWDRIVERS on to the right SCREWS by matching the shapes.
- There is a roll of film in the middle of the scene circled in purple, which will give you another hint or fill you meter.
Mini-game: Fixing Monitor
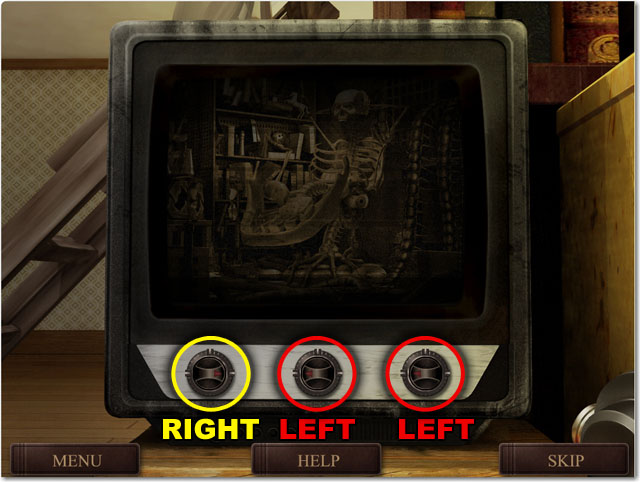
- Turning the knobs will show or hide different parts of the monitor.
- Turn all three knobs in either direction to show the entire monitor.
- One correct solution is as follows: left knob to the right, the middle knob to the left, the right knob also to the left.
- The solution of the puzzle may be randomized.
The Demented Apartment
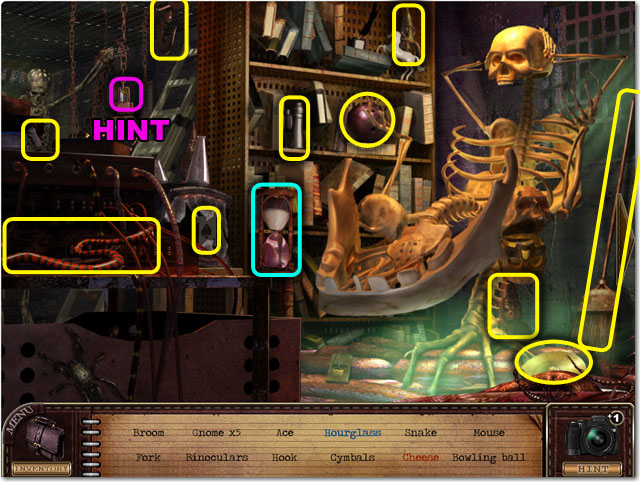
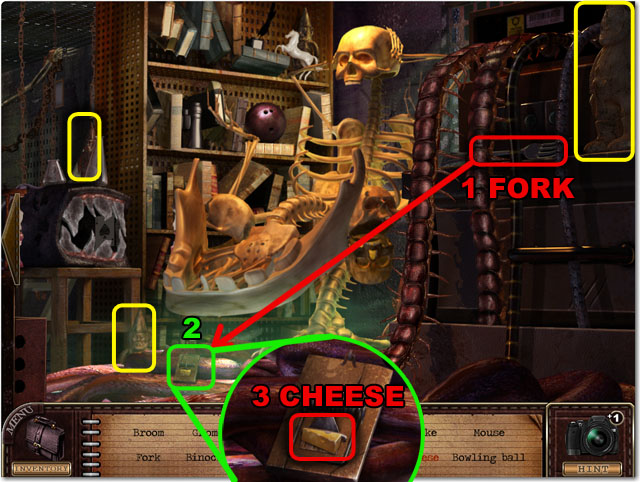
- Find the 12 hidden objects listed at the bottom side of screen, in any order, circled in yellow, blue or red in the image.
- You need to scroll the screen all the way to the left to collect the hourglass in the middle.
- There is a roll of film in the upper right corner of the scene circled in purple, which will give you another hint or fill you meter.
- Find the FORK in the right side of the screen and use it on the mousetrap in the right side of the scene to spring the trap.
- Click the mousetrap to zoom in and collect the cheese.
- Use the hint button in the bottom right corner if you cannot find the object that you are looking for.
The Doll Room
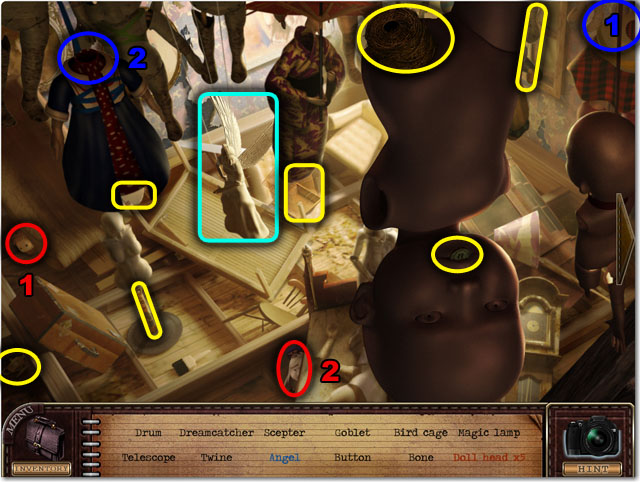
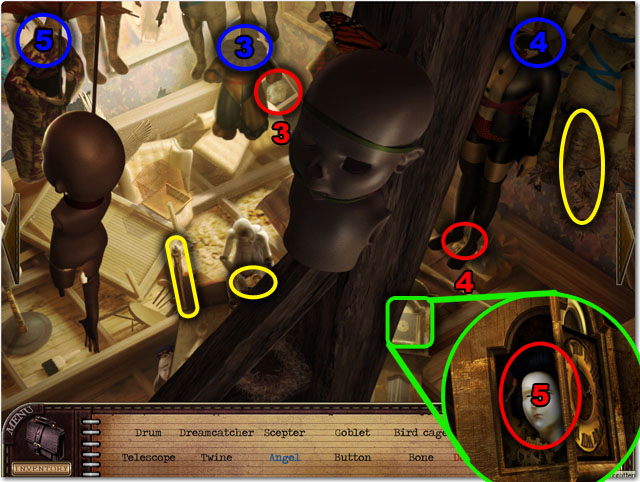
- Find the 12 hidden objects listed at the bottom side of screen, in any order, circled in yellow, blue or red in the image.
- You need to scroll the screen all the way to the left to collect the angel in the middle.
- Find 5 DOLL HEADS circled in red in the screenshot.
- Click the wall clock in the right side of the scene to zoom in to find a DOLL HEAD.
- Open the inventory item window from the bottom left corner and click the DOLL HEADS. Place the DOLL HEADS on each doll body by following each numbers.
- Use the hint button in the bottom right corner if you cannot find the object that you are looking for.
Abandoned Lighthouse
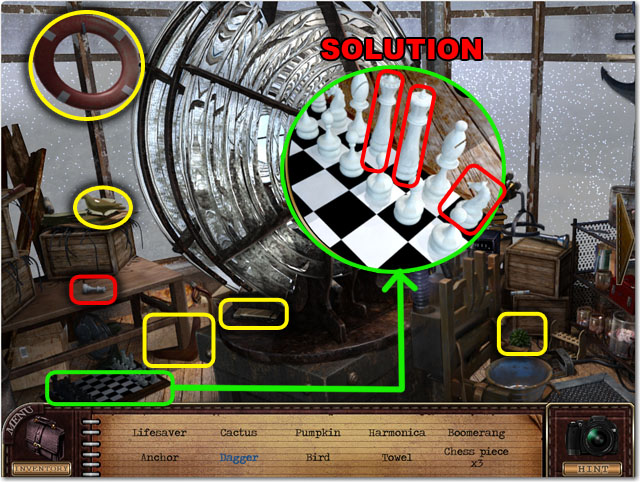
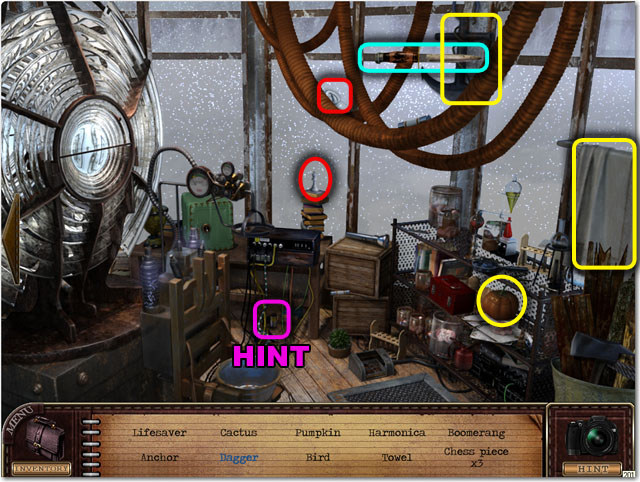
- Find the 10 hidden objects listed at the bottom side of screen, in any order, circled in yellow, blue or red in the image.
- You need to scroll the screen to right side of the screen to collect the dagger.
- There is a roll of film in the right side of the scene circled in purple.
- Find three CHESS PIECES circled in red in the screenshot.
- After finding all three CHESS PIECES, click the chess board in the bottom left corner of the scene to zoom in.
- Open the inventory item window from the bottom left corner and click the CHESS PIECES. Place the CHESS PIECES on the chess board. The correct order is Queen, King and Knight from left.
- Use the hint button in the bottom right corner if you cannot find the object that you are looking for.
News Room
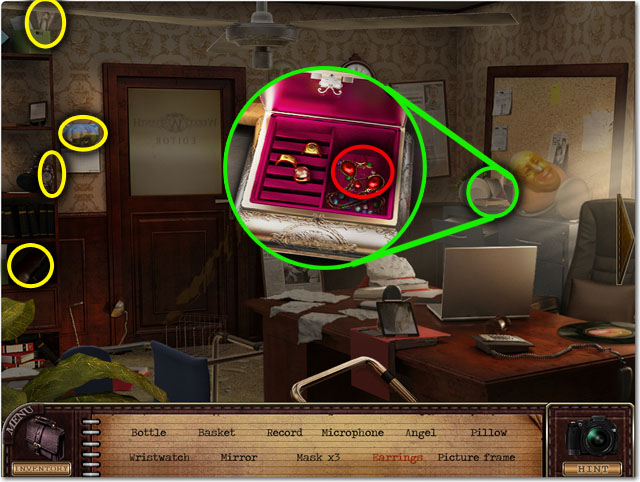
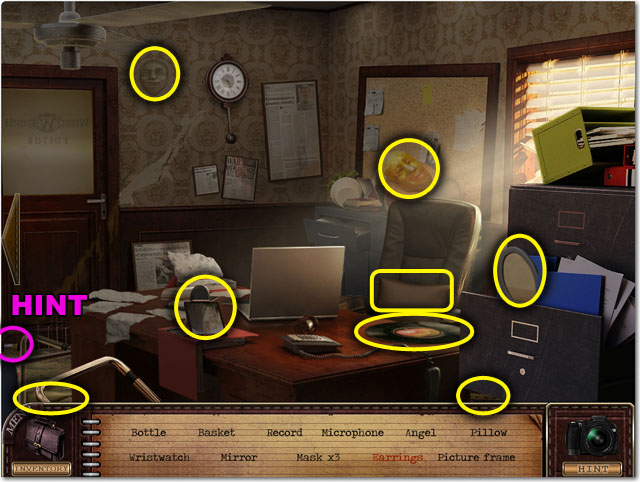
- Find the 11 hidden objects listed at the bottom side of screen, in any order, circled in yellow or red in the image.
- There is a roll of film near the front door circled in purple.
- Click the jewelry box on the steel shelf in the middle of the scene to zoom in.
- Find the red earrings in the jewelry box.
- Use the hint button in the bottom right corner if you cannot find the object that you are looking for.
Chapter 3
Vernida Central Park
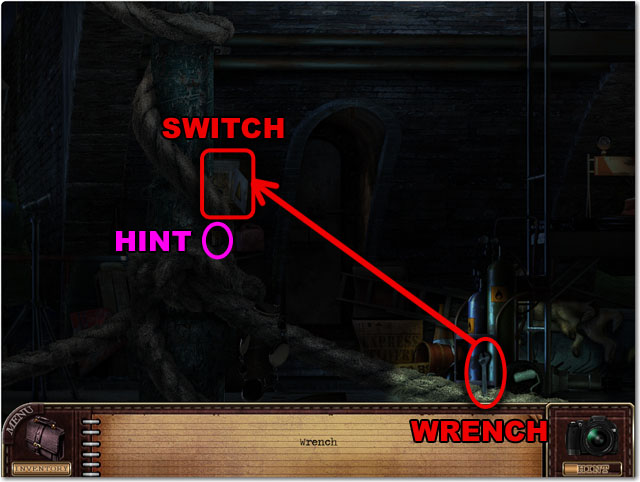
- Find the WRENCH in the right side of the scene.
- Open the inventory and click the WRENCH. Drag it to the switch highlighted in red in the screenshot.
- There is a roll of film under the switch circled in purple.
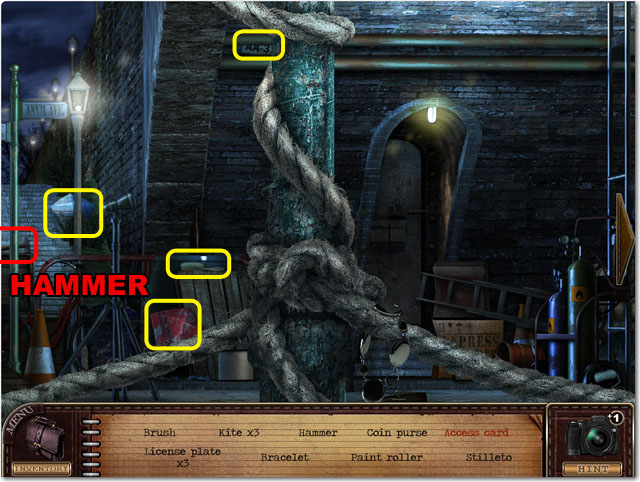
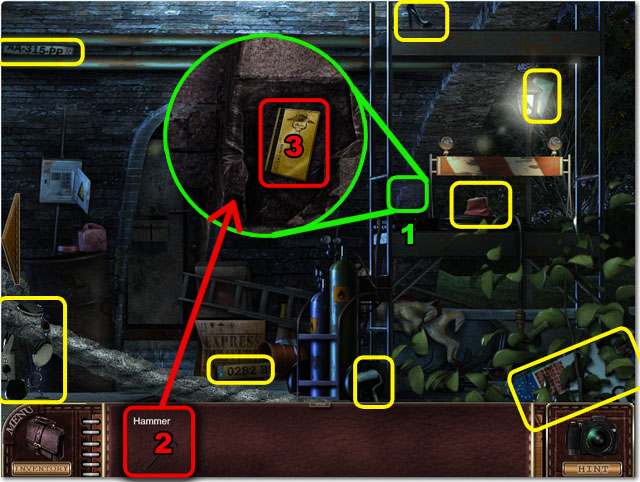
- Find the 9 hidden objects listed at the bottom side of screen, in any order, circled in yellow or red in the image.
- Find the HAMMER in the left side of the scene highlighted in red.
- Click the piece of bricks highlighted in green in right side of the scene to zoom in.
- Open the inventory item window from the bottom left corner and click the HAMMER. Place the HAMMER on the zoom location that you found before in right side of the screen to collect the ACCESS CARD.
- When you click the ACCESS CARD from the inventory, the lock will be then highlighted in purple.
- Drag the ACCESS CARD to the lock on the door to start the mini-game.
- Use the hint button in the bottom right corner if you cannot find the object that you are looking for.
Mini-game: Symbols
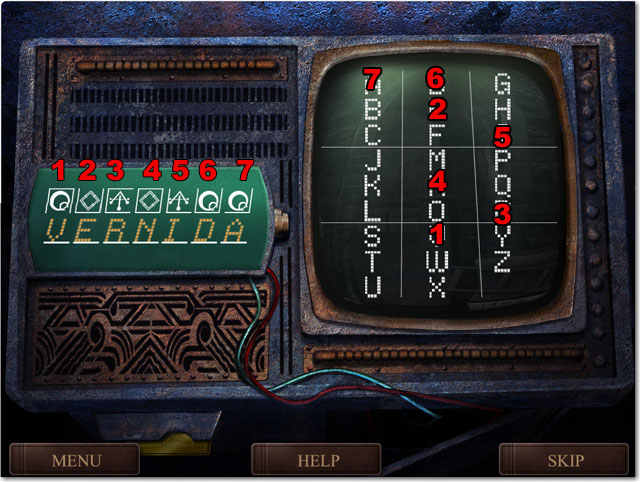
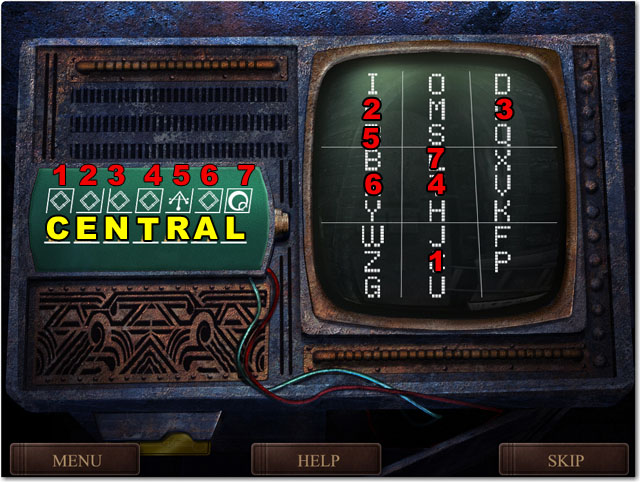
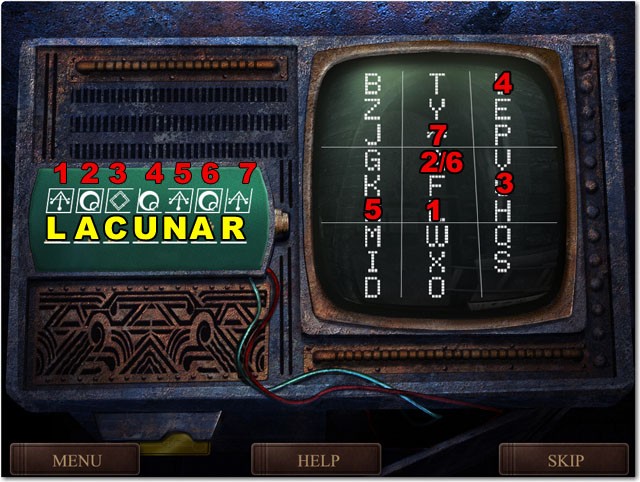
- The point of this game is to fill in the blank on the left side with letters on the right side and make a word.
- When you put your cursor over the letters on the left you will show you the correct symbol.
- The lines around letter should match with the lines around the symbol to the left.
- There are three letters already given to you when you start, and the letters given are random.
- The first code is VERNIDA. In order to fill out the code, click each word by following this order; V is in the bottom of the middle, E is in the middle of the top part, R is in the bottom of the middle right side, N is in the center, I is in the bottom of the upper right corner, D is in the top of the upper middle and A is in the top of the upper left corner.
- The second code is CENTRAL. In order to fill out the code, click each word by following this order; C is in the middle of the bottom side, E is in the middle of the upper left corner, N is in the middle of the upper right corner, T is in the center, R is in the bottom of the upper left corner, A is in the middle of the left side and L is in the top of the middle.
- The last code is LACUNAR. In order to fill out the code, click each word by following this order; L is in the bottom of the center part, A is in the top of the center, C is in the middle of the right side, U is in the top of the upper right corner, N is in the bottom of the left side, A is in the top of the center and R is in the bottom of the top side.
- After 1 and half minutes, you can skip the puzzle by clicking the skip button in the bottom side.
- The order may be different when you play the game.
The Sunken Subway
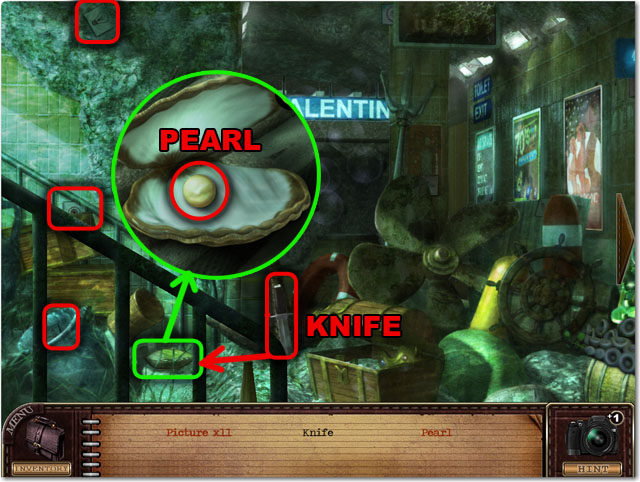
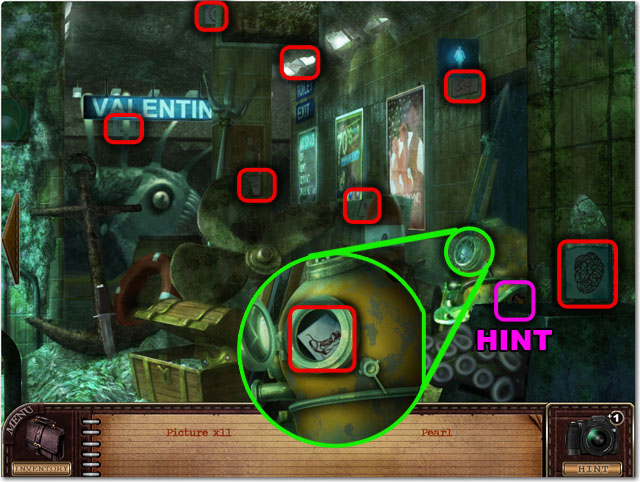
- Find 11 PICTURES highlighted in red in the screen.
- There is KNIFE highlighted in red in the left side of the scene.
- Click the cell beside the KNIFE to zoom in.
- Open the inventory item window from the bottom left corner and click the KNIFE. Place the sell on the zoom location that you found before in left side of the screen to collect the PEAL.
- Click the window of the yellow cylinder to zoom in. You will see the picture in the cylinder. Click it to collect.
- There is a roll of film under the cylinder circled in purple.
- Use the hint button in the bottom right corner if you cannot find the object that you are looking for.
Mini-game: Symbols
- This mini-game is a classic memory game.
- Click on any piece of paper to turn it over, and then click on another to try to find a match.
- If you find a match the two pieces of paper will disappear, but if you do not they will flip back over.
- After 1 and half minutes, you can skip the puzzle by clicking the skip button in the bottom side.
Chapter 4
Abandoned Lighthouse
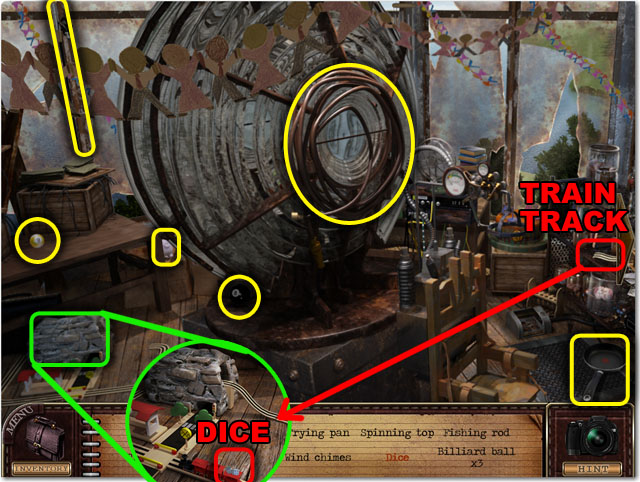
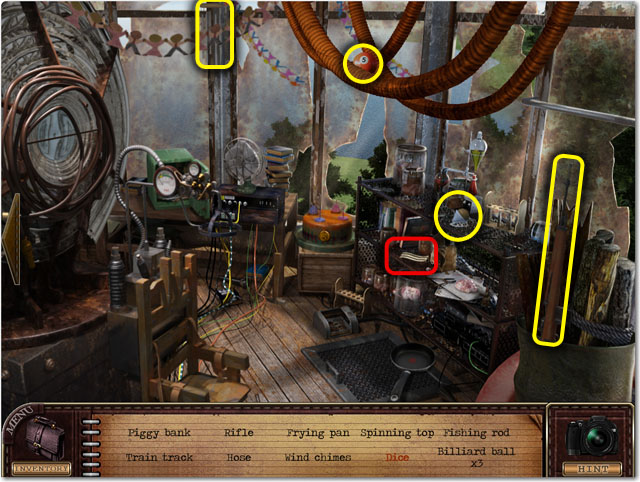
- Find the 10 hidden objects listed at the bottom side of screen, in any order, circled in yellow or red in the image.
- Find the TRAIN TRACK in the shelf in the right side of the scene highlighted in red.
- Click the toy train tail highlighted in green in the bottom left corner of the scene to zoom in.
- Open the inventory item window from the bottom left corner and click the TRAIN TRACK. Place the TRAIN TRACK on the zoom location that you found before. The toy train will then carry the dice. Click them to collect.
- Use the hint button in the bottom right corner if you cannot find the object that you are looking for.
Mini-game: Rings
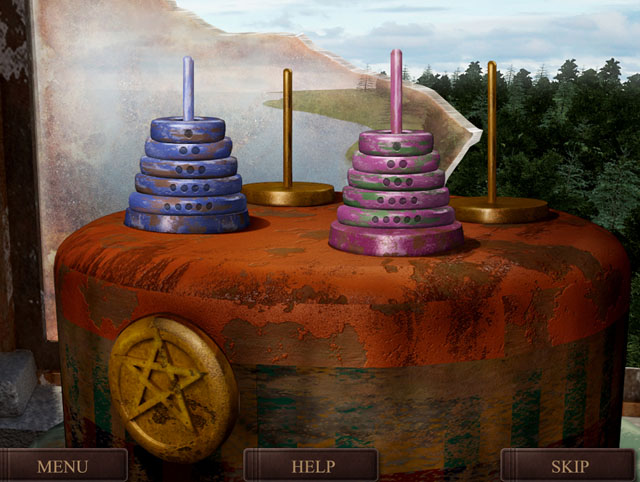
- The object of this game is to move the blue ring stack to the blue pole and the pink ring stack to the pink pole.
- You need to move the blue rings all to the blue pole before you can start working on the pink rings.
- A larger ring cannot stack on a smaller ring. You can tell the different sizes by counting the dots on the front.
- First stack the 2 dot ring and the 1 dot ring on the empty stand that is not the goal; you will have to move the 1 dot ring to the blue goal stand first and then put it on top of the 2 dot ring in its new position.
- Next place the 3 dot ring on the goal stand, and move the two other smaller rings on top of it; move the 1 dot ring back to the original stand then move the 2 dot then the 1 dot ring on top of it.
- Next place the 4 dot ring on the stand opposite of the goal stand. Place the 1 dot ring above the 4 dot ring and the two dot ring on the original pile, and then move the 1 dot ring to the top of the 3 dot ring.
- Next place the 3 dot ring on the 4 dot ring and stack the 2 and 1 dot rings above that by moving the 1 dot to the blue stack first.
- Next place the 5 dot ring on the blue goal stand. Place the 1 dot ring on the original stand and the 2 dot ring above the 5 dot ring, and then place the 1 dot ring above that. Move the 3 dot ring to the original stand and stack the 2 and 1 dot rings on them as before.
- Lastly place the 4 dot ring above the 5 dot ring in the goal stand. Place the 1 dot ring above them and the 2 dot ring on the empty stand, then put the 1 dot ring above that. Move the 3 dot ring to the goal stand then stack the 2 and 1 dot rings on them as before.
- Do the same motions for the pink rings.
- See the screenshot for the final solution.
- After 2 minutes, you can skip the puzzle by clicking the skip button in the bottom side.
The Mnemosyne Cathedral
- Shift the screen all the way to top. You will then see one of the portraits highlighted in the left side. Click it to enter.
The Steps of Torment
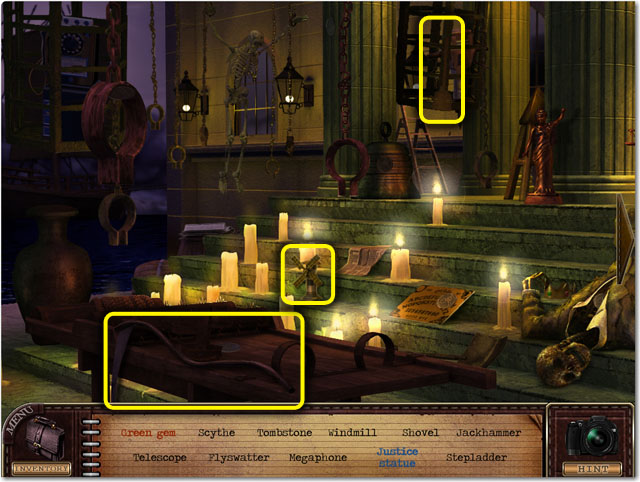
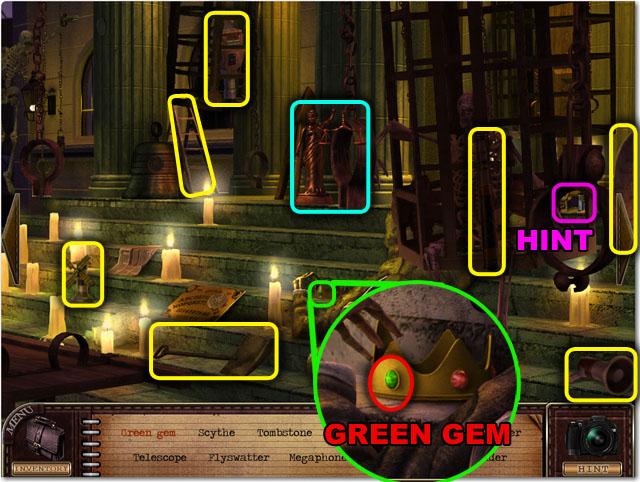
- Find the 11 hidden objects listed at the bottom side of screen, in any order, circled in yellow, blue or red in the image.
- There is a roll of film in right side of the screen circled in purple. When you shift the screen to all the way to right, you can’t see the roll of the film.
- Click the crown highlighted in green in the bottom right corner of the scene to zoom in.
- Collect the GREEN GEM in the crown highlighted in red in the screenshot.
- Shift the screen until the figure has the scale in its hand. That is justice statue highlighted in blue in the screenshot.
- Open the inventory item window from the bottom left corner and click the TRAIN TRACK. Place the TRAIN TRACK on the zoom location that you found before. The toy train will then carry the dice. Click it to collect.
- Use the hint button in the bottom right corner if you cannot find the object that you are looking for.
- After finding all the items, you should fix the phone in the upper left corner.
- When you open the inventory, the phone will be then highlighted in purple.
- Click the GREEN GEM and drag it to the phone.
Mini-game: Circuits
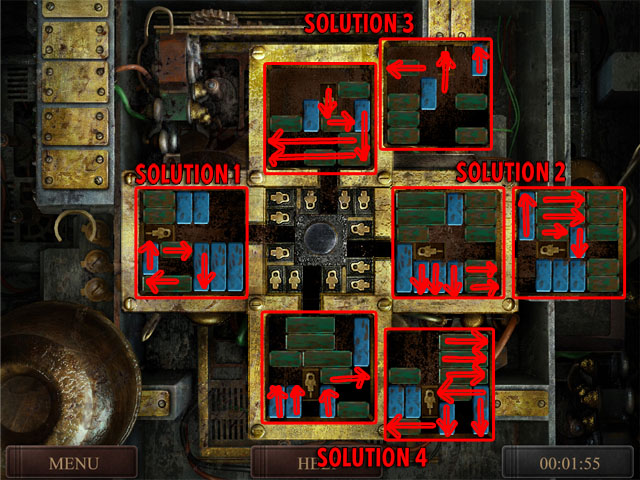
- Move the fuses into place in the four directions to solve this puzzle.
- The wooden pieces must be moved out of the way, but they can only be moved lengthwise.
- See the screenshot for the solutions, some have multiple steps.
- After two minutes, you can skip the puzzle by clicking the skip button in the bottom right corner.
The Steps of Torment
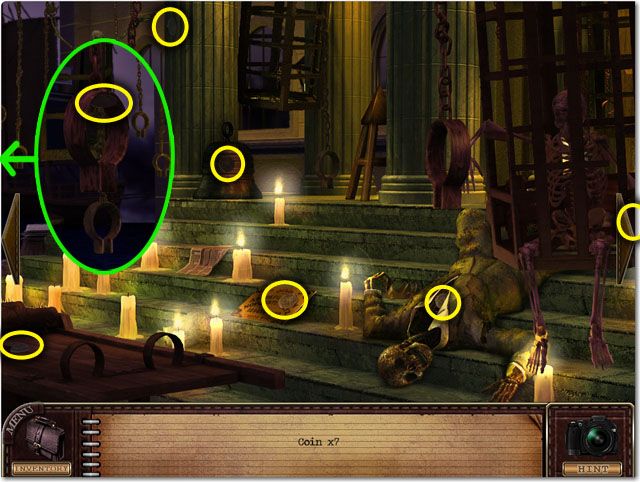
- Find 7 coins hidden through the scene.
- There is zoom location in the left side of the screen.
The Mnemosyne Cathedral
- Shift the screen all the way to top. You will then see one of the portraits highlighted in the right side. Click it to enter.
The Old Vernida
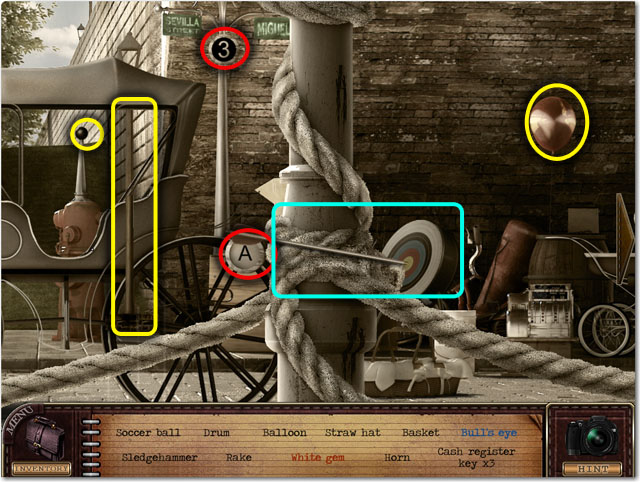
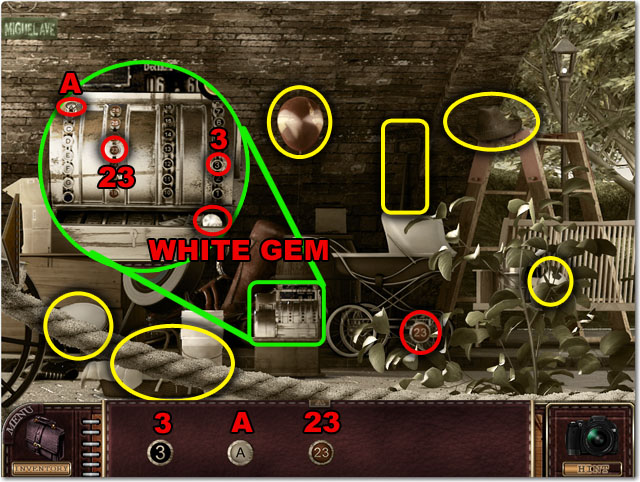
- Find the 11 hidden objects listed at the bottom side of screen, in any order, circled in yellow, blue or red in the image.
- Find the CASH REGISTER KEYS highlighted in red in the screenshot.
- After finding all the three CASH REGISTER KEYS, 3, A and 23, and click the cash register highlighted in green in the right side of the scene to zoom in.
- Open the inventory item window from the bottom left corner and click the CASH REGISTER KEYS. Place the CASH REGISTER KEYS to the missing places by following the screenshot. The drawer will then open and you can collect the WHITE GEM.
- Shift the screen until the arrow points the target in the middle of the screen. That is the Bull’s Eye highlighted in blue in the screenshot.
- Use the hint button in the bottom right corner if you cannot find the object that you are looking for.
Mini-game: Symbols
- This mini-game is a classic memory game.
- Click on any piece of paper to turn it over, and then click on another to try to find a match.
- If you find a match the two pieces of paper will disappear, but if you do not they will flip back over.
- After 1 and half minutes, you can skip the puzzle by clicking the skip button in the bottom side.
The Mnemosyne Cathedral
- Shift the screen all the way to top. You will then see one of the portraits highlighted in purple in the middle of the windows. Click it to enter.
The Pipes
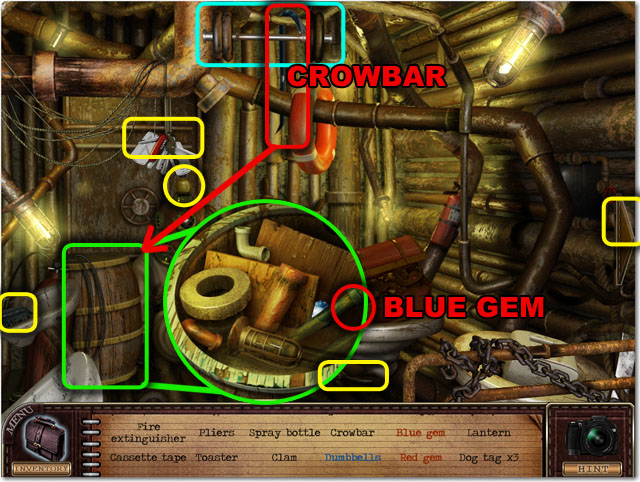
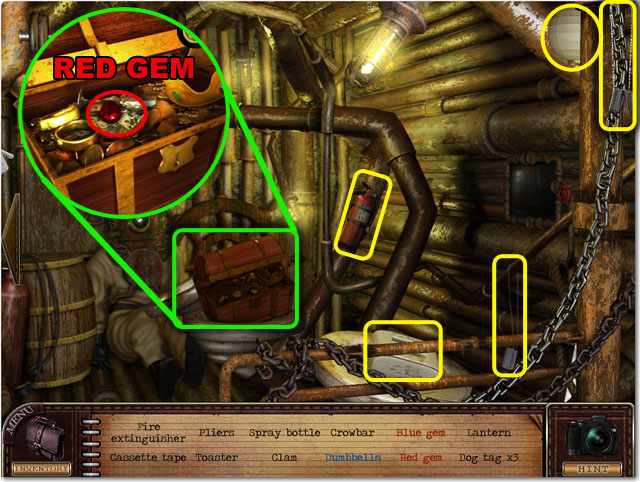
- Find the 12 hidden objects listed at the bottom side of screen, in any order, circled in yellow, blue or red in the image.
- Find the CROWBAR in the upper side of the screen highlighted in red in the screenshot.
- Open the inventory item window and click the CROWBAR. Place the CROWBAR to the barrel in the bottom left corner to zoom in.
- Find the BLUE GEM highlighted in red in the barrel.
- Click the treasure box highlighted in green in the right side to zoom in.
- Find the RED GEM circled in red in the treasure box.
- Shift the screen until the shape completes to the Dumbbells in the upper left corner.
- Use the hint button in the bottom right corner if you cannot find the object that you are looking for.
Mini-game: Display
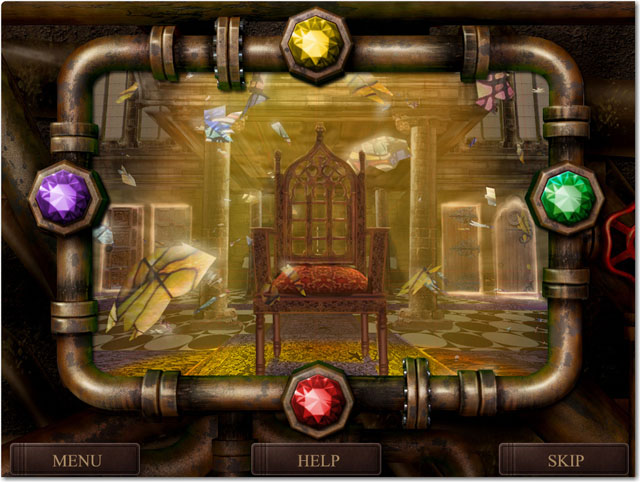
- Refer to the image for the solution.
The Mnemosyne Cathedral
- Shift the screen all the way to down. You will then see the throne highlighted in purple. Click it to start the puzzle.
Mini-game: Rings
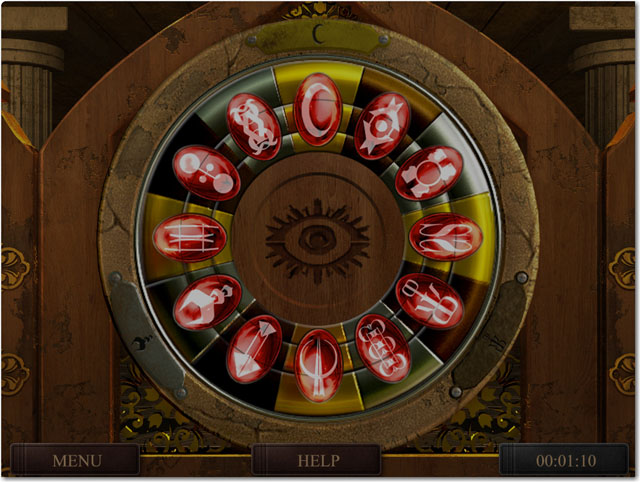
- The rings on the throne are split into three parts, clicking on each part will rotate differently.
- Clicking on the outside ring will rotated the inside and outside rings in one direction and the middle ring in the other direction.
- Clicking the ring in the middle will rotate the inner rings in the same direction.
- Clicking the ring in the center will rotate the center ring in one direction and the inside in the other direction.
- To solve the puzzle, you must match the three rings and to the symbols on the outside of the ring.
- First click the outside ring until it matches with the symbols on the throne.
- Then click the inside ring until the center two rings match up.
- Then click the middle ring to match it with the outside circle.
- After two minutes, you can skip the puzzle by clicking the skip button in the bottom right corner of the screen.
The Mnemosyne Cathedral
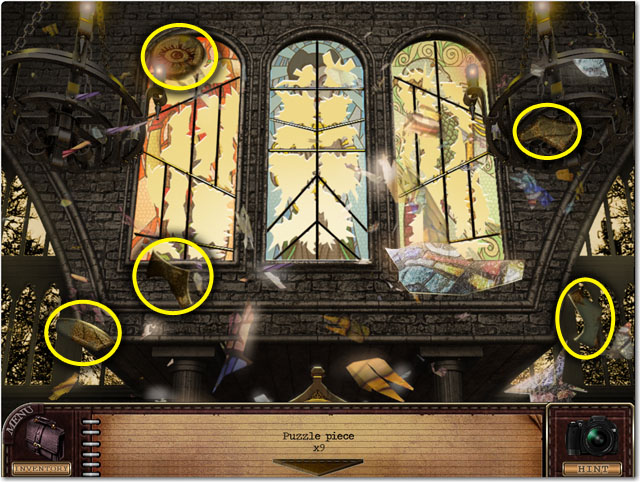
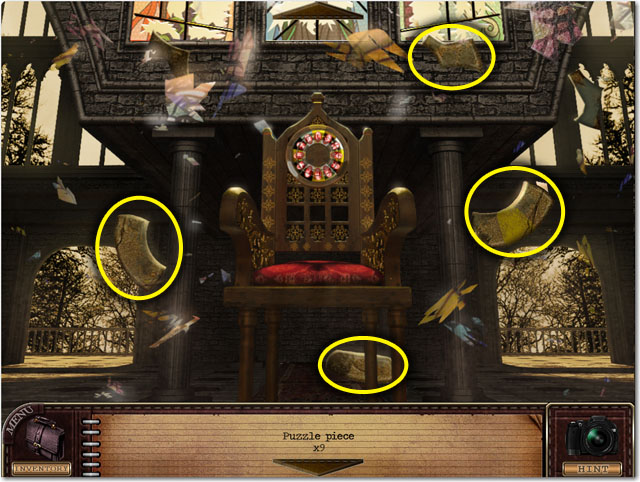
- Find nine puzzle pieces circled in yellow in the screenshot.
- This time, you should shift your screen from up to down to find all of the pieces.
Mini-game: Jigsaw Puzzle
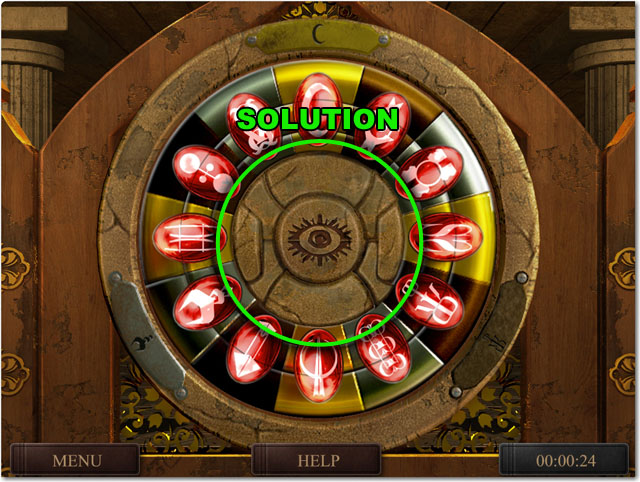
- Click the throne highlighted in purple to start the puzzle.
- Assemble the puzzle pieces to finish the puzzle.
- Refer to the screenshot for the solution.
Created at: 2010-04-07

