Walkthrough Menu
- General Tips
- Part 1: Introduction
- Part 2: Magic Island
- Part 3: Ghost Apprentice
- Part 4: Fire and Lightning Door
- Part 5: The Lightning Stairs
- Part 6: The Temple
General Tips
- You can change players by clicking on the player name at the bottom of the main menu.
- Click the options menu to adjust the different sound volumes, toggle full screen, or mute all sounds. You can also watch the credits from here.
- When starting the game you will be given two options: normal mode or advanced mode.
- Advanced mode has a longer recharge time for hints and skipping, doesn’t highlight areas with sparkles, and has less information on the map.
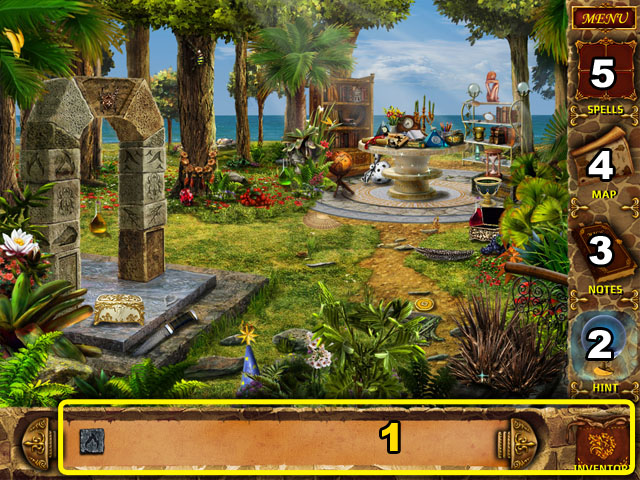
- The inventory of the game is at the bottom. This is also where the lists for hidden objects will appear (1).
- Above the inventory on the right side is the hint button (2). This will slowly recharge after you use it and doubles as the skip button during mini-games.
- Above the hint button is your notebook (3). If you are stuck, you can look in your notebook for clues. Some puzzle answers can only be found in your notebook.
- Above you notebook is the map (4). In normal mode this will show you tasks that you haven’t done along with all the places you have been. Places you haven’t been yet will be covered in clouds.
- Above the map are your spells (5). Once you have a spell you can use it as many times as you want.
Part 1: Introduction
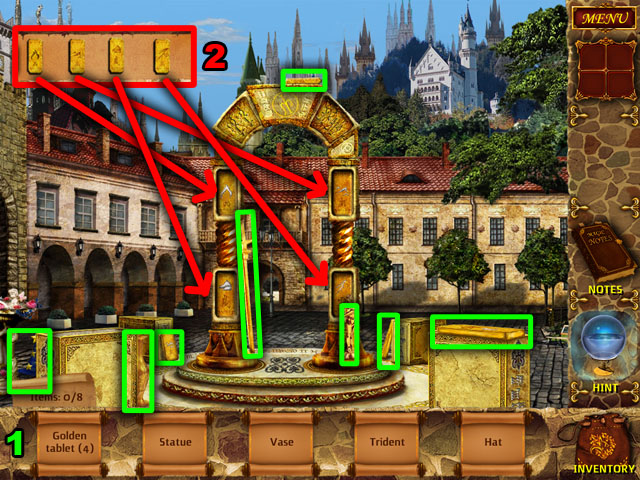
- When you start the game you will need to find some items before you are ready to take the Wizard’s Exam.
- Find the hidden objects listed at the bottom of the screen in the scrolls (1). They are circled in green in the screenshot.
- As you find the objects the scrolls will disappear.
- Take the 4 golden tablets that you found and place them in the correct locations on the arch (2).
- Match the symbols on the tables with those on the arch.
- Click on the middle of the arch to go to the next area.
Part 2: Magic Island
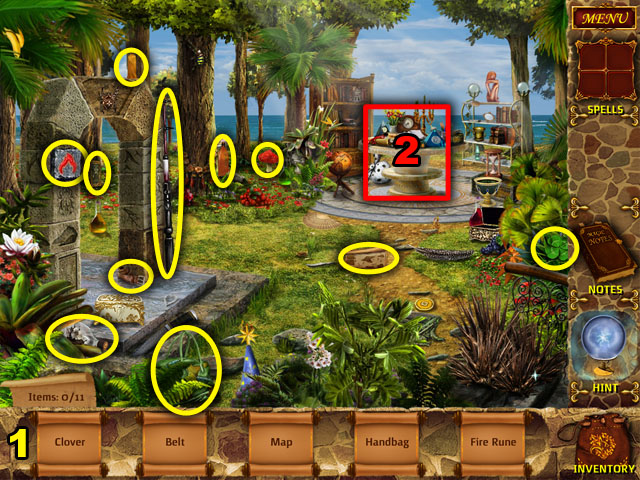
- Once you travel to the next scene, you will need to find more objects.
- Find the hidden objects listed at the bottom of the screen in the scrolls (1). They are circled in yellow in the screenshot.
- These objects may be randomized in your walkthrough.
- This time when you find an object the scroll will be replaced by another object.
- You cannot find an object that isn’t shown in a scroll yet.
- After you find all of the objects, you will receive the FIRE RUNE.
- Move to the table circled in red (2).
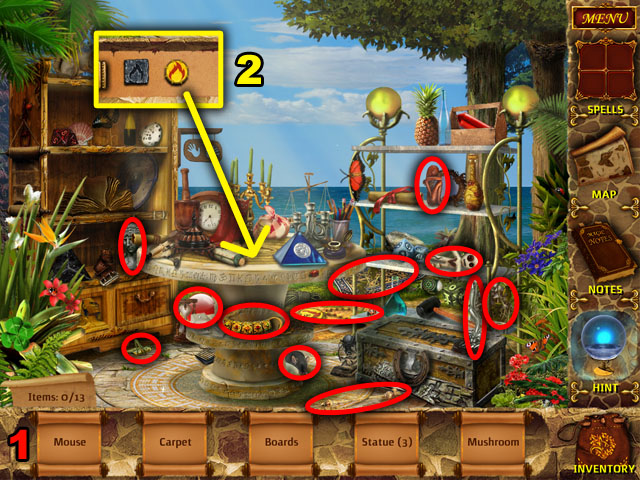
- Find the hidden objects listed at the bottom of the screen in the scrolls (1). They are circled in red in the screenshot.
- After finding all of the objects you will receive the FIRE TALISMAN. Use it on the middle of the table (2).
- The table will then clear, click on it again to start a mini-game.
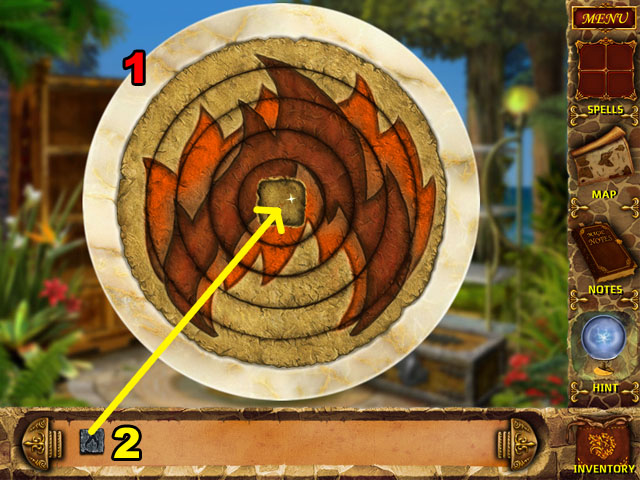
- Click and hold the rings to spin them around to the correct position.
- The final image should be that of the fire rune that you used to clear the table.
- The outside ring does not move.
- Each ring will turn a lighter color and lock in place when it is in the correct position.
- See the screenshot for the correct solution (1).
- Use the FIRE RUNE on the middle of the table (2) and you will receive the fire spell in your inventory panel on the right.
- You can use this spell on places in the world as many times as you want.
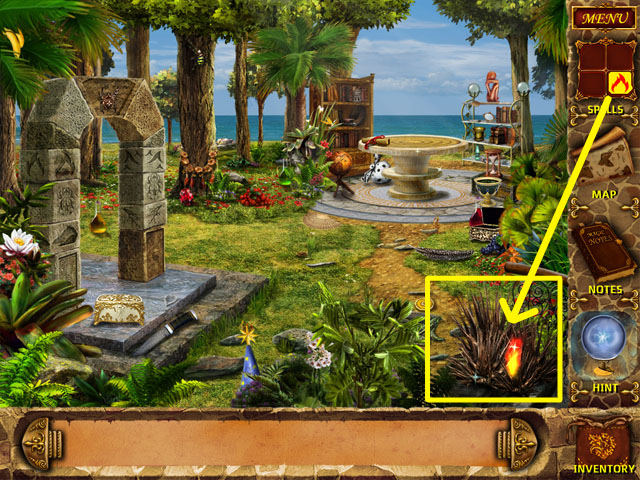
- Return to the previous screen.
- Use the fire magic from the right side of your inventory menu on the bush in the bottom right corner.
- Click in the area after the bush has been cleared to travel to the next scene.
Part 3: Ghost Apprentice
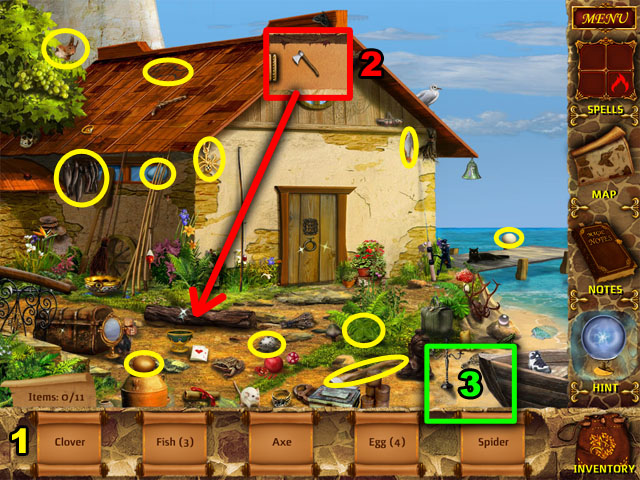
- Find the 11 hidden objects listed at the bottom of the screen in the scrolls (1). They are circled in yellow in the screenshot.
- After finding all of the objects you will receive the AXE.
- Use the AXE on the log in the middle of the scene and then take the FIREWOOD that you make from it.
- Click near the bottom right corner of the screen to go to the next location (3).
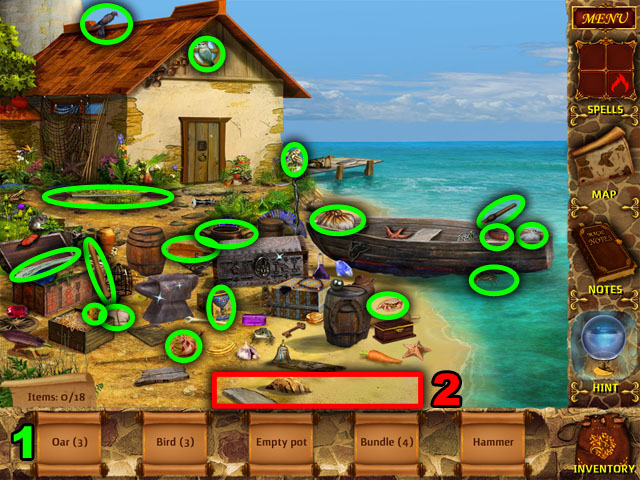
- Find the 18 hidden objects listed at the bottom of the screen in the scrolls (1). They are circled in yellow in the screenshot.
- After finding the objects you will receive the HAMMER, the EMPTY POT, and the OAR.
- Click at the bottom of the scene to move to the next location.
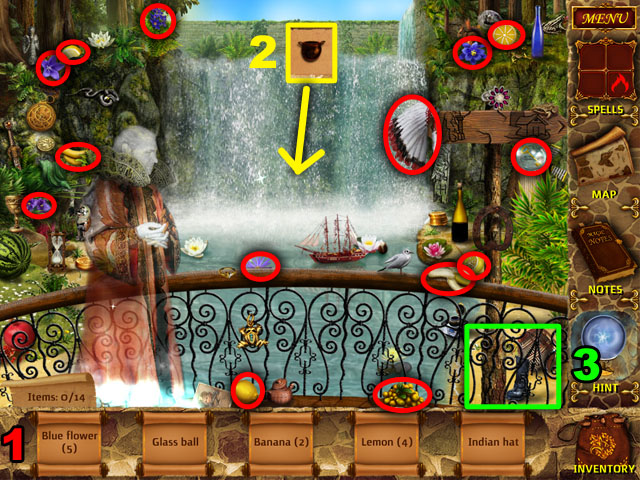
- You will see the ghost of a previous applicant in the next scene; he won’t let you travel to the next scene.
- Find the 14 hidden objects listed at the bottom of the screen in the scrolls (1). They are circled in red in the screenshot.
- After finding all the objects you will receive a GLASS BALL with a key in it.
- Use the EMPTY POT on the waterfall to fill it with water (2).
- Return to the previous scene by clicking in the bottom corner (3).
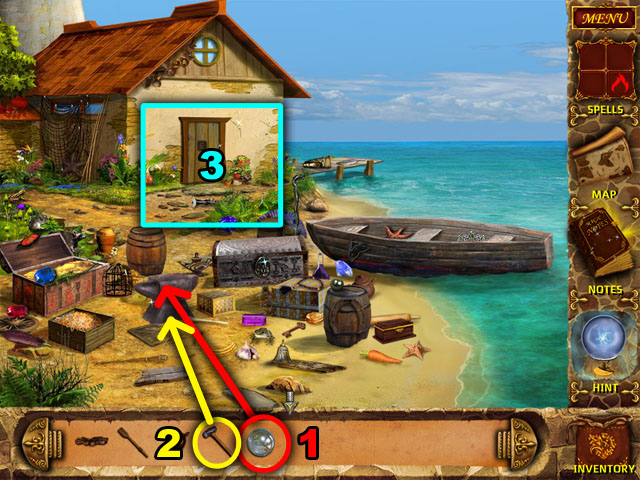
- Place the GLASS BALL on the anvil in the center of the scene (1).
- Use the HAMMER from your inventory on the anvil to destroy the ball and retrieve a KEY (2).
- Take the KEY from the anvil and go back to the house (3).
- Use the KEY on the door to the house and then click it again to enter.
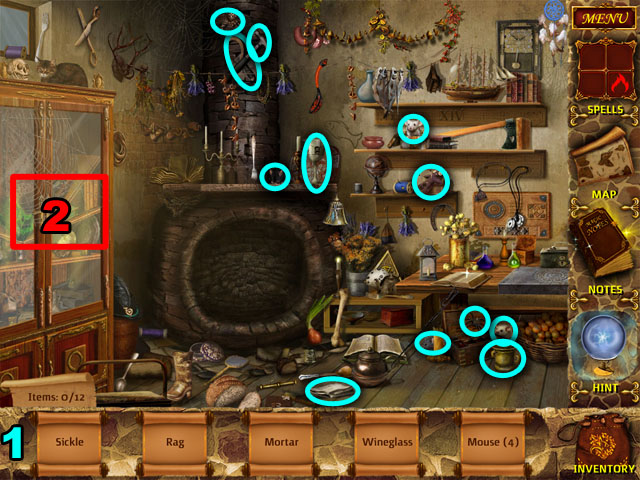
- Find the 12 hidden objects listed at the bottom of the screen in the scrolls (1). They are circled in blue in the screenshot.
- After finding all of the hidden objects you will receive a RAG.
- Click on the cabinet to the left to start another mini-game (2).
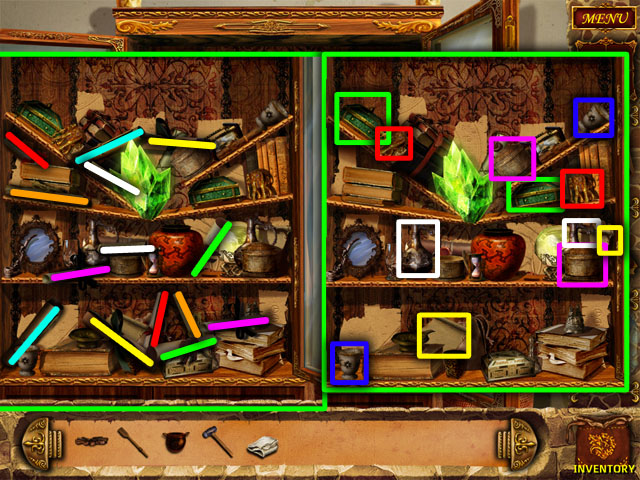
- Find all of the objects in the cabinet that match each other.
- Click on one object and it will start to shake, find the other object to remove both objects from the scene.
- Get rid of the scrolls first; matches are shown on the left side of the screenshot. Then get rid of the other objects as shown in the right side of the screenshot.
- These items are not randomized.
- After finding all of the matching objects, you will receive the directions for making an acid potion.
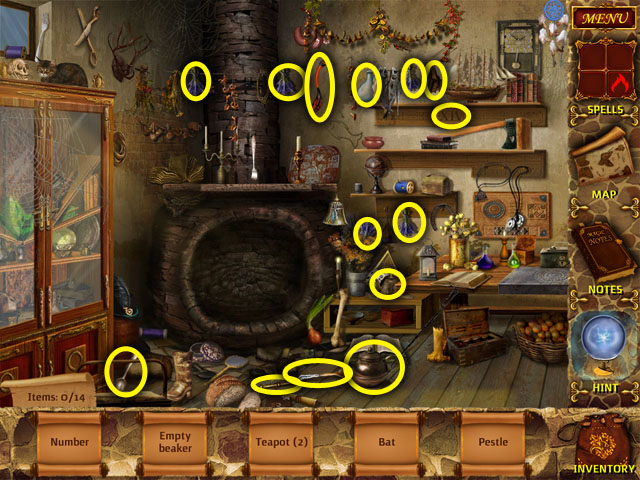
- Find the 14 hidden objects listed at the bottom of the screen in the scrolls (1). They are circled in yellow in the screenshot.
- After finding all of the objects you will receive an EMPTY BEAKER.
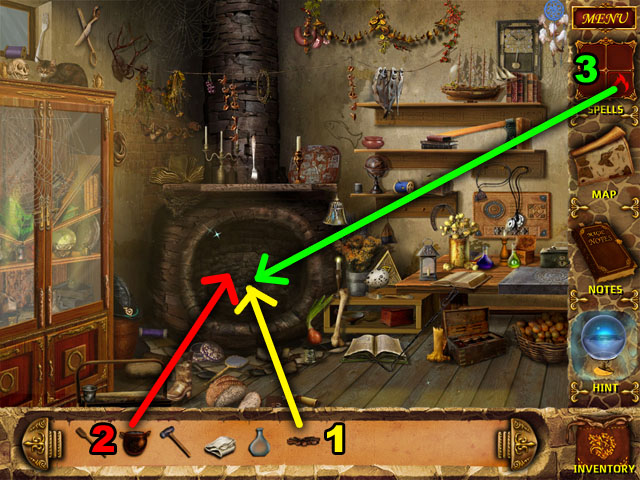
- Use the FIREWOOD from your inventory on the hearth.
- Use the POT OF WATER on the firewood in the hearth.
- Cast the fire spell from the inventory at the top left of the screen on the hearth.
- Click on the hearth to start adding ingredients.
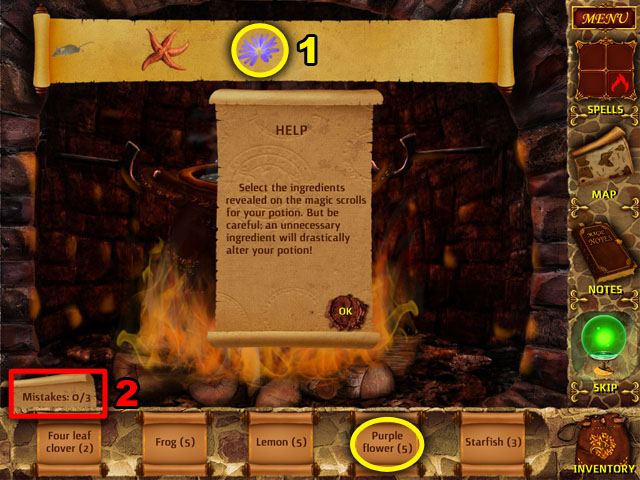
- This mini-game has you finding objects as they move across the top of the screen (1).
- The objects you need to find are listed at the bottom of the screen in scrolls.
- You can only make 3 mistakes as you click on objects at the top of the screen. These mistakes are tracked at the bottom of the screen.
- When you are done, use the EMPTY FLASK from your inventory on the pot to gain the ACID POTION.
- Exit the house and return to the boat scene by clicking at the bottom of the screen.
- Use the ACID POTION on the chest in the middle of the screen to look inside it.
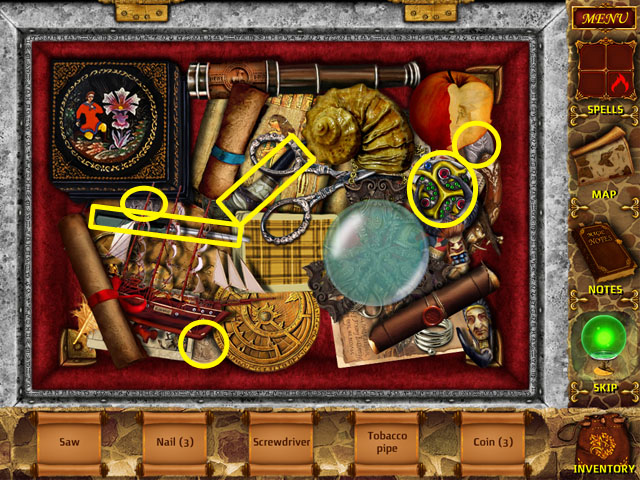
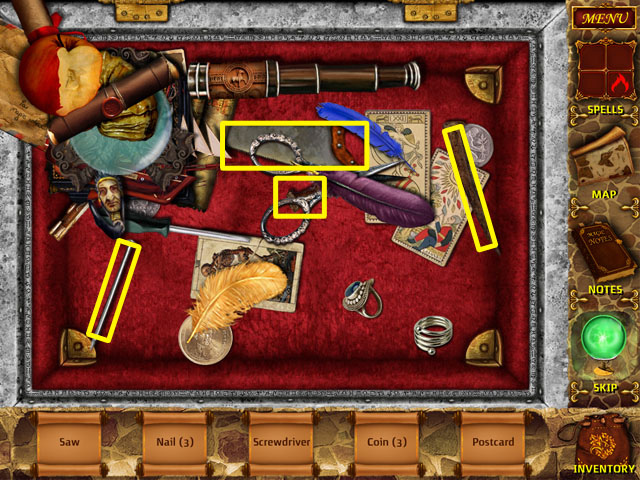
- Find hidden objects listed at the bottom of the screen, in any order, circled in yellow in the image.
- Move the objects around by clicking on them. You can find more hidden objects underneath them, circled in yellow in the second screenshot.
- After you find all of the objects, you will receive the SAW and the MEDALLION.
- You will be taken back to the boat scene. Exit to the bottom of the screen and give the ghost the MEDALLION you just found.
- You will receive a scroll in your inventory. This will be important later.
- Fill the EMPTY POT with water by clicking it on the waterfall.
- Exit this screen to the left.
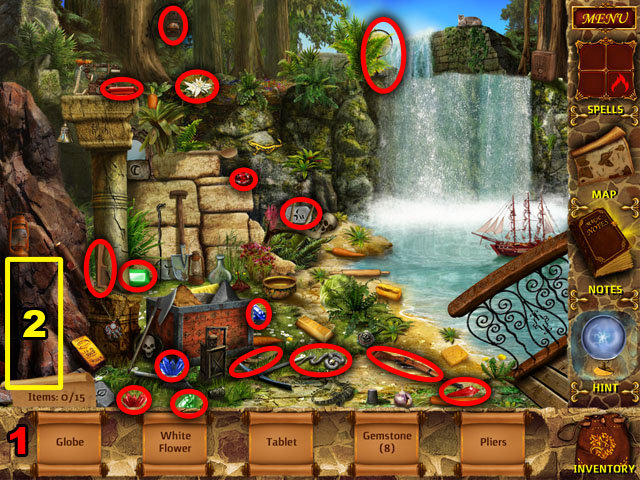
- Find the 15 hidden objects listed at the bottom of the screen in the scrolls (1). They are circled in red in the screenshot.
- After you find all of the objects, you will receive PLIERS.
- Exit this scene to the left (2), into the cave.
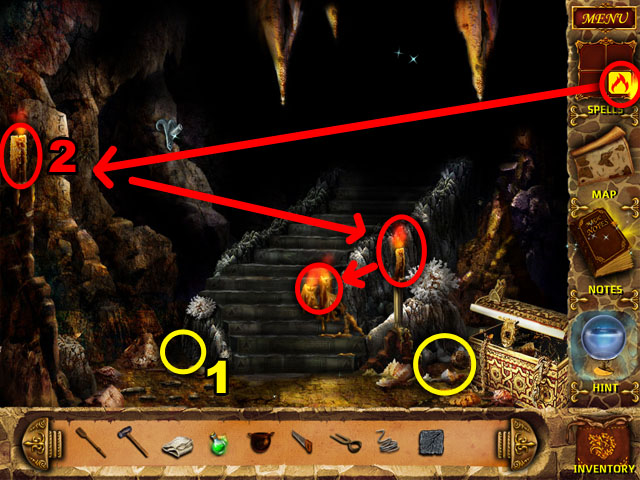
- Find the LIGHTNING RUNE and the WIRE on the ground (1).
- Use the fire spell from your spell book to set the candle to the left of the screen on fire (2).
- After lighting the first candle you will see another candle, light that with the fire spell as well.
- Light the third visible candle after that. You will need to make a torch at the workbench in the cabin to continue.
- Return to the cabin.
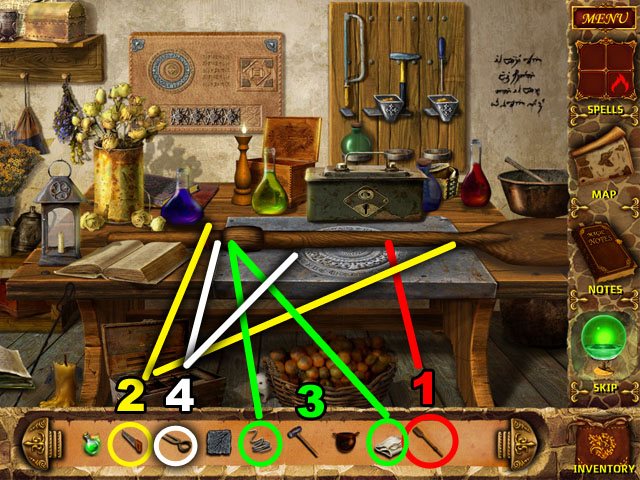
- Click on the bench in the cabin to begin putting together the torch.
- Place the OAR on the bench.
- Use the SAW on the oar two times, to cut off the top and bottom (2).
- Use the RAG on the left side of the torch and then the WIRE to attach it (3).
- Use the PLIERS on the wire to pinch off the ends (4).
- Each time the place where you need to interact will be highlighted in red.
- Take the TORCH and return to the cave.
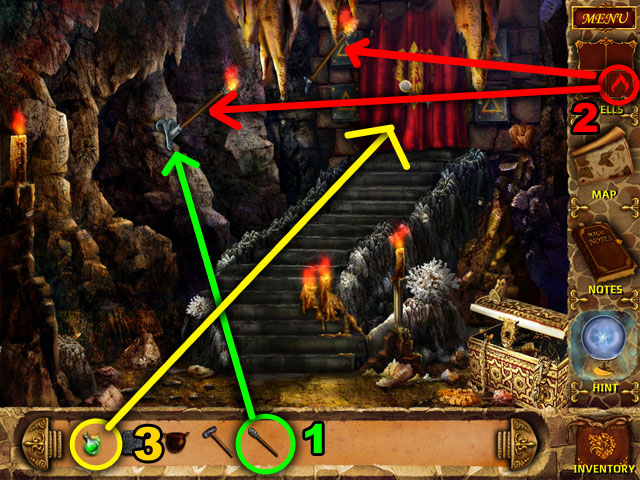
- Use the TORCH from you inventory on the holder to the left (1).
- Light the torch with a fire spell from the left side of the inventory (2).
- After you light the torch another torch will be visible. Light this as well with a fire spell.
- Click on the curtain to open the door.
- Use the ACID POTION on the lock on the door.
- Click the door again to go through it.
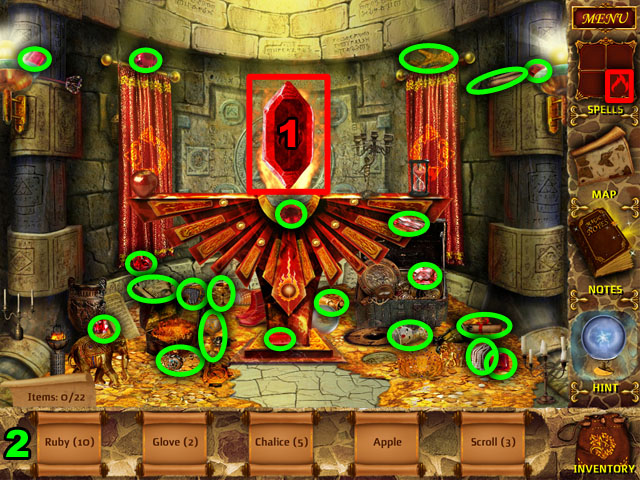
- Use the fire spell on the large crystal in the middle of the screen to light the room (1).
- Find the 22 hidden objects listed at the bottom of the screen in the scrolls (2). They are circled in green in the screenshot.
- After finding all of the objects, you will receive chain mail GLOVES.
- Exit this room and go to the previous room. Go to the left to enter the lightning room.
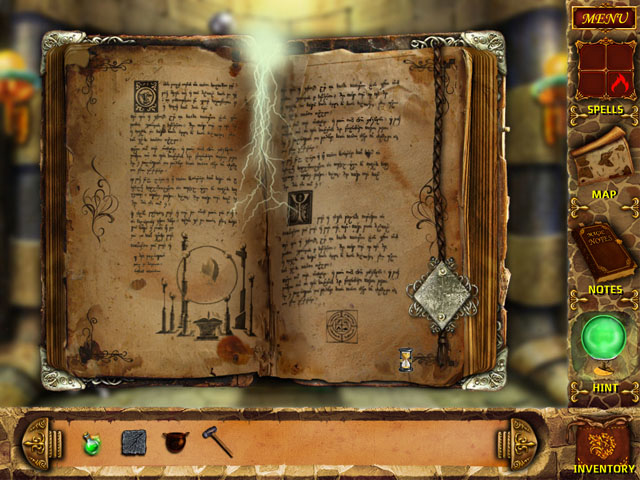
- Use the GLOVES on the book in the middle of the room to enter the next mini game.
- In this mini-game you must rearrange the squares until you have completed the book pages.
- Click on one square and then another to switch their places. Only squares next to each other can switch places.
- Once a square is in the correct position it will become lighter. It will not be locked though. Be careful, it is possible to move it out of the correct position!
- See the screenshot for the correct solution.
- After finishing the mini-game you will need to find more hidden objects.
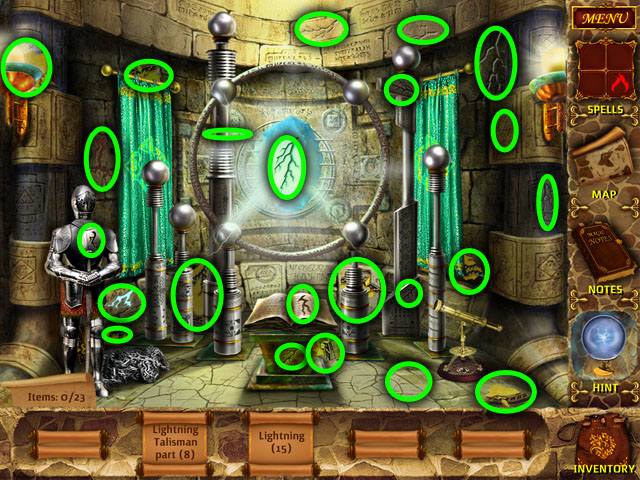
- Find the 23 hidden objects listed at the bottom of the screen in the scrolls. They are circled in green in the screenshot.
- After finding all of the pieces of the talisman, you will need to put it together.
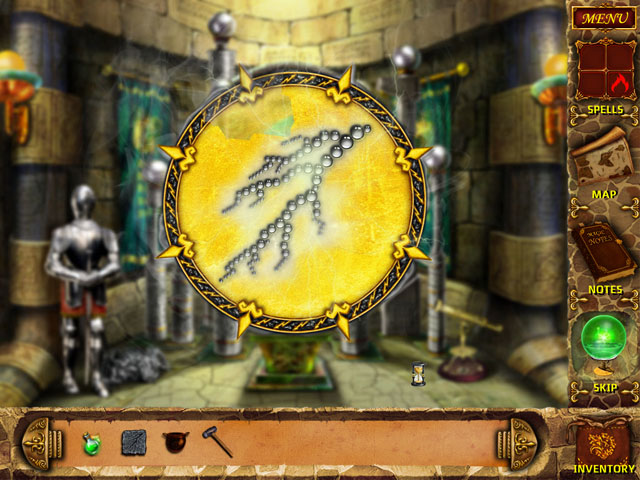
- Drag the pieces from your inventory to the correct places on the circle.
- See the screenshot for the solution.
- After you finish the puzzle you will receive the LIGHTNING TALISMAN.
- Return to the table that you received the fire spell from. It is back in the beginning scene of this area.
- Place the LIGHTNING TALISMAN on the table.
- Click the table to play a spell learning mini-game.
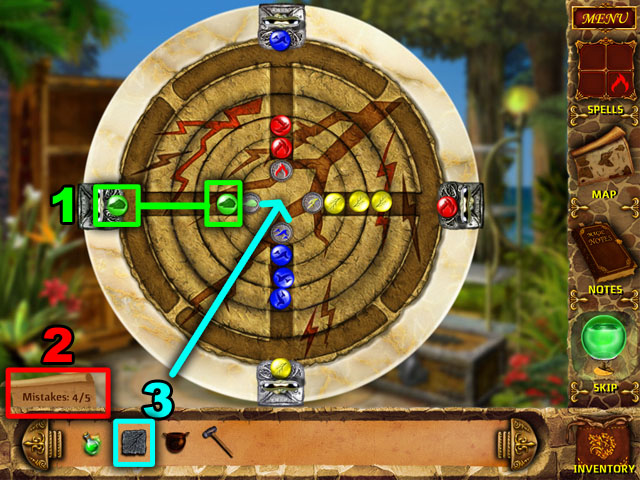
- In this game you will wait until the table stops spinning and then select the correct colored ball on the outside to add to the balls in the center (1).
- Once you have 4 of each color in the center, you will receive the lightning spell.
- Every time you add a ball to a column of the wrong color, your number of mistakes will go up (2). You can only make 5 mistakes!
- Each time it stops, there is only one correct column.
- After finishing the puzzle, click the LIGHTNING RUNE and add it to the middle of the table to learn the spell.
- Return to the locked door in the furthermost room. This is the same room from which you took the lightning talisman.
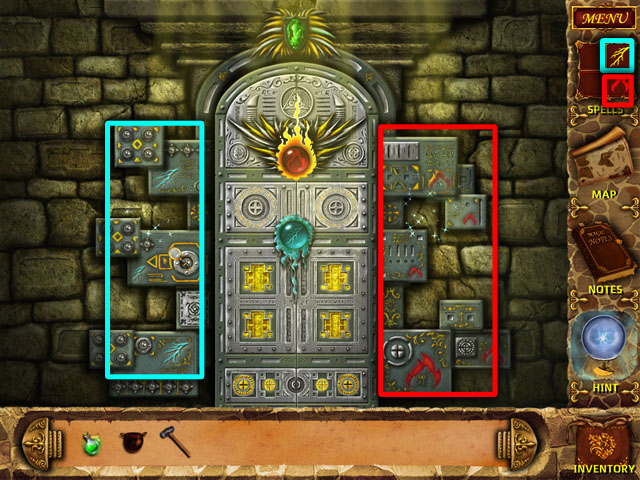
- Click on the door and then cast the fire spell on the right side of the door and the lightning spell on the left side.
- Click the left side to start the lightning mini-game.
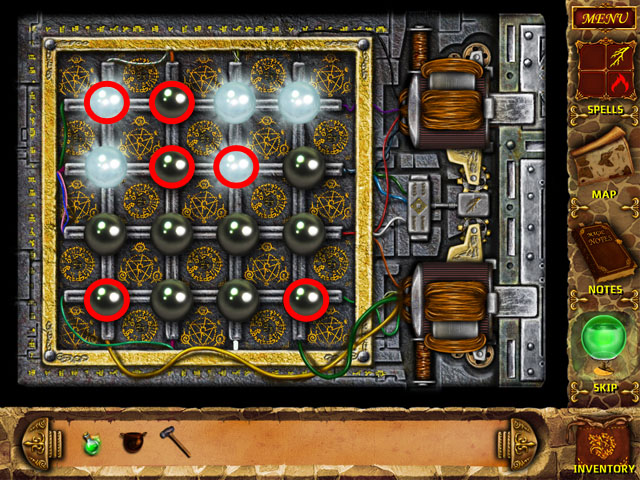
- Turn on all of the lights to win this mini-game.
- Each light that you click will switch the state of that light and the lights above, below, left, and right of it.
- If the lights are off, they will turn on; if they are on, they will turn off.
- You never need to click any light more than once.
- Click all of the lights circled in red in the screenshot to finish the puzzle.
- This is only an example. The puzzle layout may be different in your walkthrough.
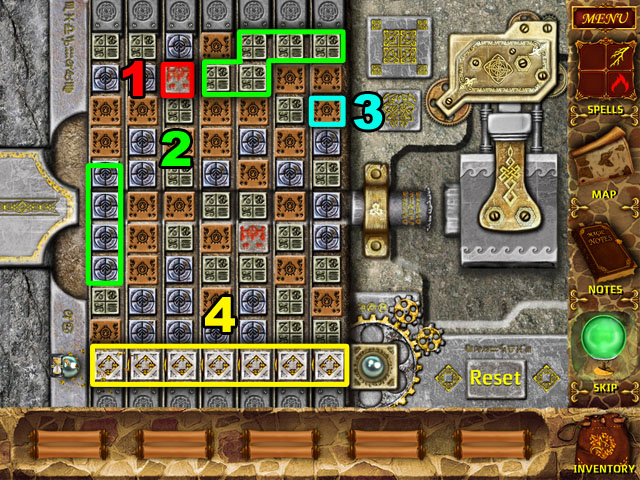
- Return to the door and click on the right side to start the fire mini-game.
- If you click the fire rune, many tiles around it will be destroyed (1).
- If you click tile groups of three or more, circled in green, they will be removed (2).
- The brown tiles are wood. If you click one it will be removed. Even if there is a large group of wooden tiles, only one will be removed (3).
- Put all of the yellow tiles in a row at the very bottom to win the mini-game (4).
- Click the door to go to the next scene.
Part 4: Fire and Lightning Door
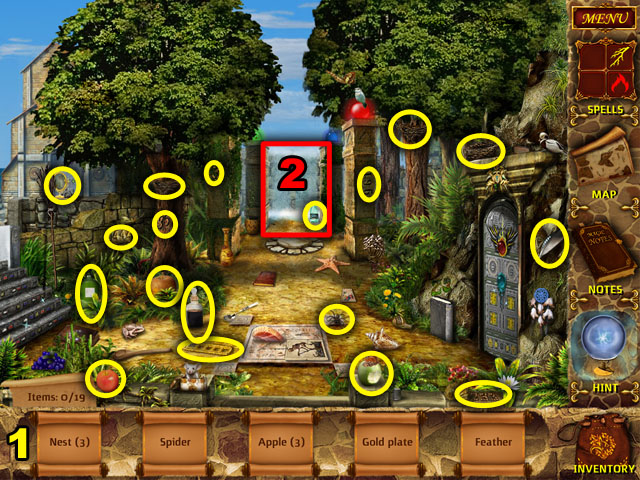
- Find the 19 hidden objects listed at the bottom of the screen in the scrolls (1). They are circled in yellow in the screenshot.
- After finding all of the objects you will receive a GOLD PLATE.
- Click on the waterfall in the middle of the screen to go to the next location (2).
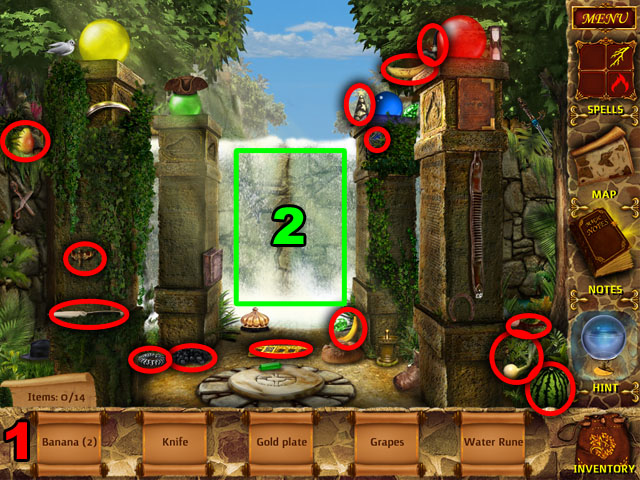
- Find the 14 hidden objects listed at the bottom of the screen in the scrolls (1). They are circled in red in the screenshot.
- After finding all of the objects you will receive a GOLD PLATE and a WATER RUNE.
- Click on the waterfall in the middle of the screen again to go to the next location (2).
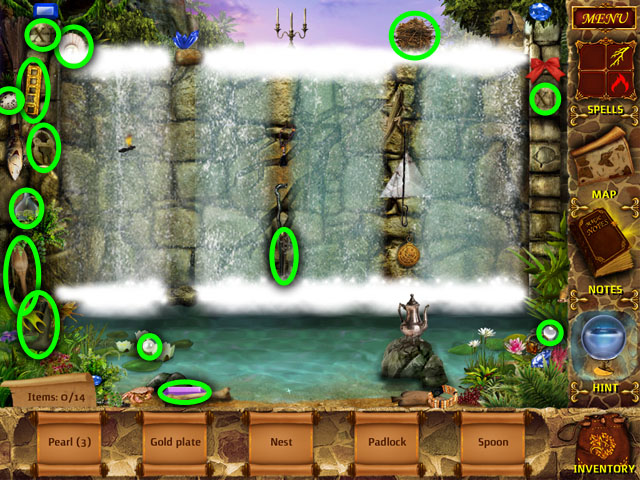
- Find the 14 hidden objects listed at the bottom of the screen in the scrolls (1). They are circled in green in the screenshot.
- After finding all of the objects you will receive a GOLD PLATE.
- If you click on the waterfall you can see a lightning symbol behind it, but there is nothing you can do there, yet.
- Go back two scenes and then go down again.
- In this new scene, click on the bottom left corner of the screen.
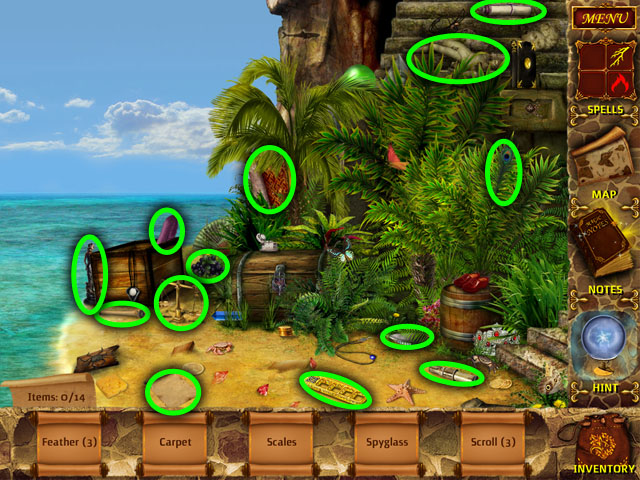
- Find the 14 hidden objects listed at the bottom of the screen in the scrolls (1). They are circled in green in the screenshot.
- After finding all of the objects you will receive a GOLD PLATE.
- Return to the previous scene and click on the area to the right to go to a new hidden object scene.
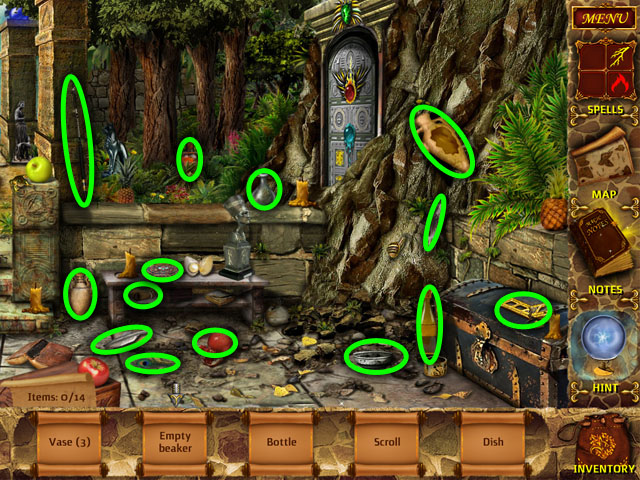
- Find the 14 hidden objects listed at the bottom of the screen in the scrolls (1). They are circled in green in the screenshot.
- After finding all of the objects, you will receive a GOLD PLATE and a BEAKER.
- Return to the previous scene, click to go up, and then back through the fire and lightning door.
- Once inside the room, click on the area to the left.
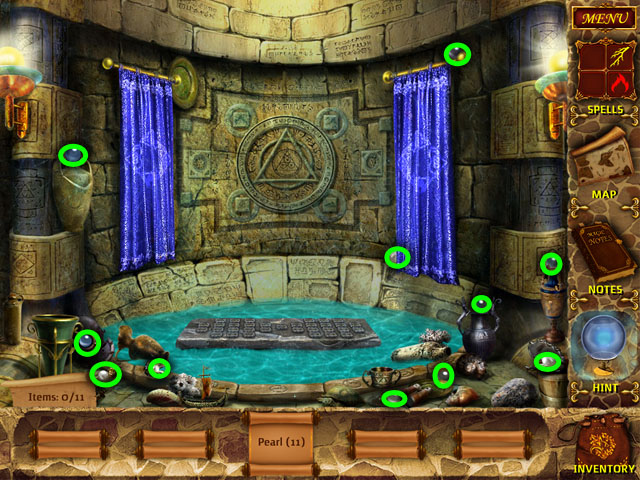
- Find the 11 pearls hidden around the scene. They are circled in green in the screenshot.
- The locations of the pearls are not randomized.
- Click on the tiles in the middle of the screen to play the water rune mini-game.
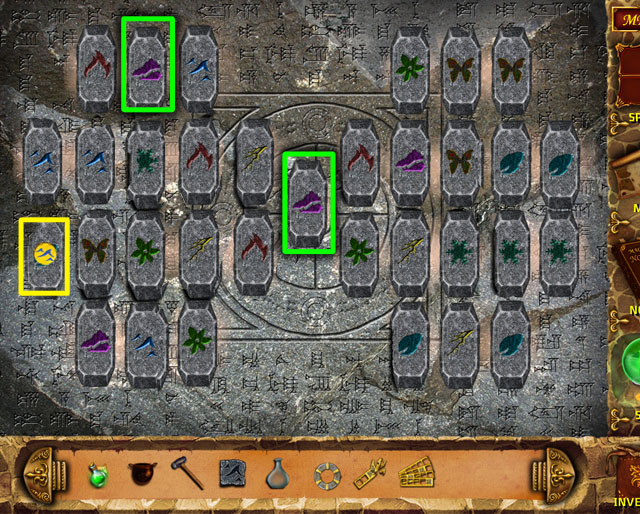
- This mini-game is a simple game of memory.
- Click on one tile and then another, searching for matches.
- Matched tiles will be taken off the board, while non-matching tiles will turn back over.
- See the screenshot for the images on all the tiles.
- The locations of the tiles are not randomized.
- One of the tiles has no match, this is the water talisman.
- Once all of the tiles are eliminated, you will be given a WATER TALISMAN.
- Return to the table in the first scene and use the WATER TALISMAN on it.
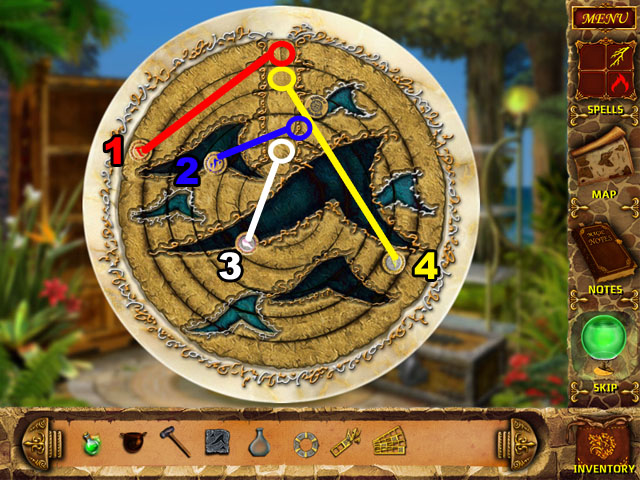
- You will need to play a mini-game in order to learn the water spell.
- Move all of the runes around the rings and line them up at the top.
- When you move the fire rune at the top, clockwise, the lightning rune will move in the opposite direction. Move it first to the top of the table (1).
- Next, move the water rune to the right of the top of the table (2).
- Next move the air rune to the top position (3). When the air rune is moved, the water rune will also move into the top position.
- If these two runes aren’t in position, move them, alternating water and air, until they are.
- Lastly, move the lightning rune to the top position; the earth rune below it will also move into place (4).
- Put the WATER RUNE in the middle of the table to get the water spell.
- Walk back towards the fire and lightning door; you will need to do another hidden object hunt at the boat scene.
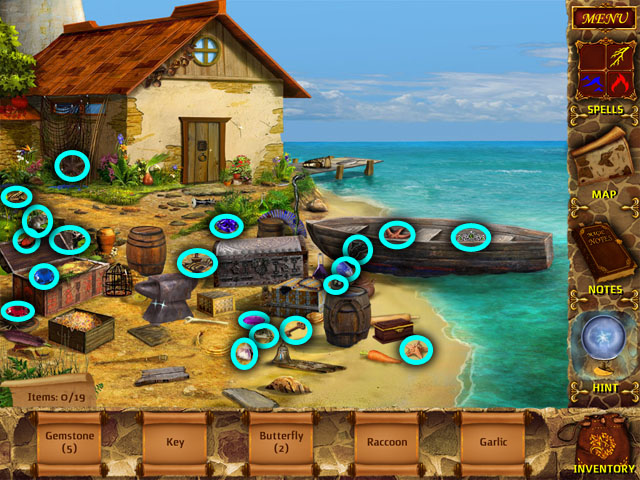
- Find the 19 hidden objects listed at the bottom of the screen in the scrolls. They are circled in blue in the screenshot.
- After finding all the objects, you will receive an OLD KEY.
- Go back through the fire and lightning door and then click at the bottom of the screen to go down.
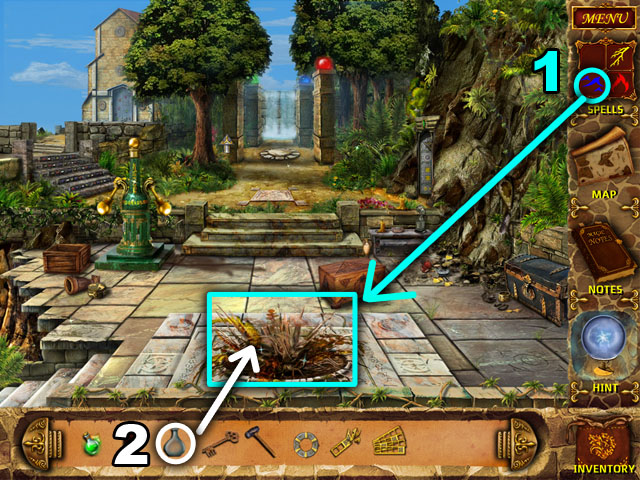
- Use the water spell from the right side of the inventory on the dried up bush in the middle of the screen (1).
- Use the glass bottle on the bush to collect the JUICE (2).
- Leave the scene and return to the cabin with the workbench.
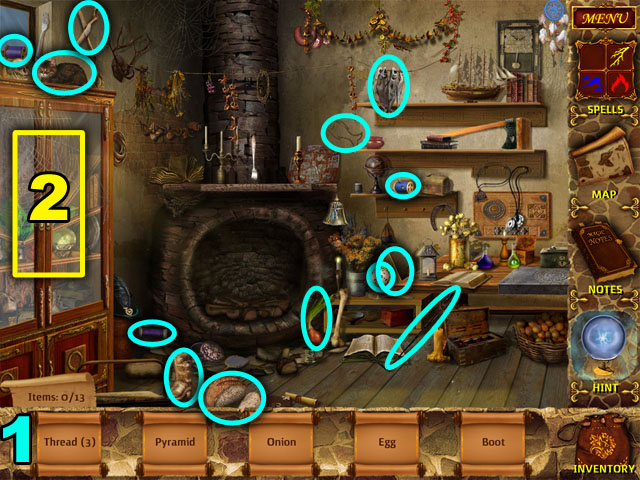
- When you enter the cabin you will need to find the 14 hidden objects listed at the bottom of the screen in the scrolls (1). They are circled in blue in the screenshot.
- After finding all of the hidden objects you will receive a PYRAMID.
- Click on the cabinet to the left (2).
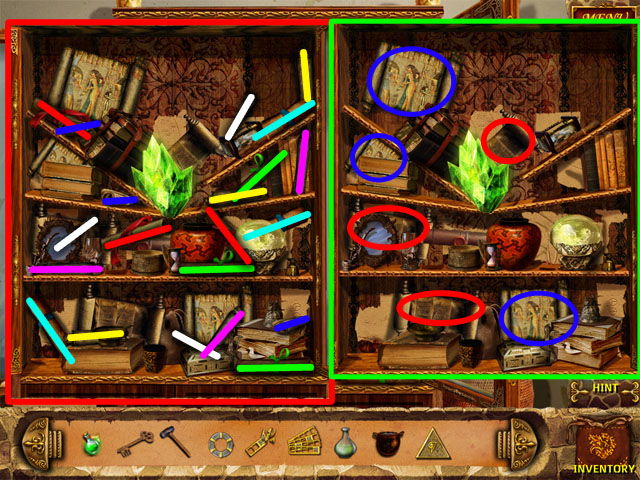
- Find all of the objects in the cabinet that match each other.
- Click on one object and it will start to shake, find the other object to remove it from the scene.
- Each object is one of a set of three objects.
- Get rid of the scrolls first, matches shown on the left side of the screenshot. Then get rid of the other objects as shown in the right side of the screenshot.
- These items are not randomized.
- After finding all of the matching objects, you will receive the directions for making a glue potion.
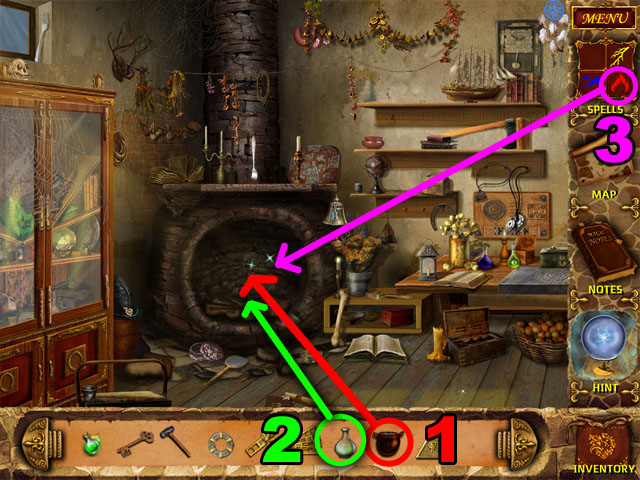
- Exit the cabinet scene and start to create the glue potion in the fireplace.
- Use the POT WITH WATER on the fireplace first (1).
- Then add the GLUE to the pot (2).
- Lastly use the fire spell on the wood at the bottom of the pot (3).
- Click the pot to enter a potion making mini-game.
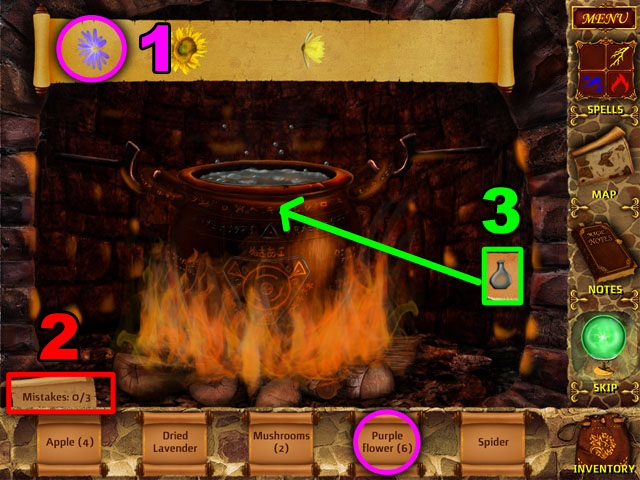
- This mini-game has you finding objects as they move across the top of the screen (1).
- The objects you need to find are listed at the bottom of the screen in scrolls.
- You can only make 3 mistakes as you click on objects at the top of the screen. These mistakes are tracked at the bottom of the screen (2).
- When you are done, use the EMPTY FLASK from your inventory on the pot to gain the GLUE POTION (3).
- Exit the house and then return to the boat scene by clicking at the bottom of the screen.
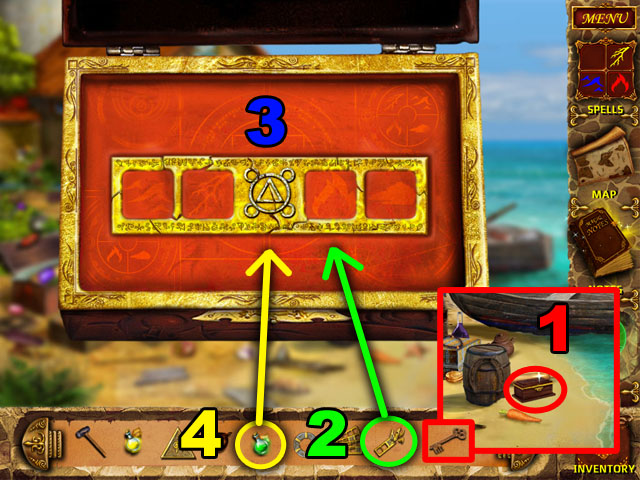
- Use the old key to open the small box on the right side of the screen under the boat (1).
- Use the BROKEN GOLD PLATE on the box (2).
- The plate is in many pieces. You will need to put them in the correct positions (3).
- When a piece is correctly positioned, it will snap into place.
- See the screenshot for the correct solution.
- Use the GLUE POTION from your inventory on the plate.
- Take the fixed GOLD PLATE.
- Leave the boat scene through the bottom of the screen and go back through the fire and lightning door.
- Once outside you will see a staircase to your left that has lightning on it (1).
- Click on it to go to a new mini-game.
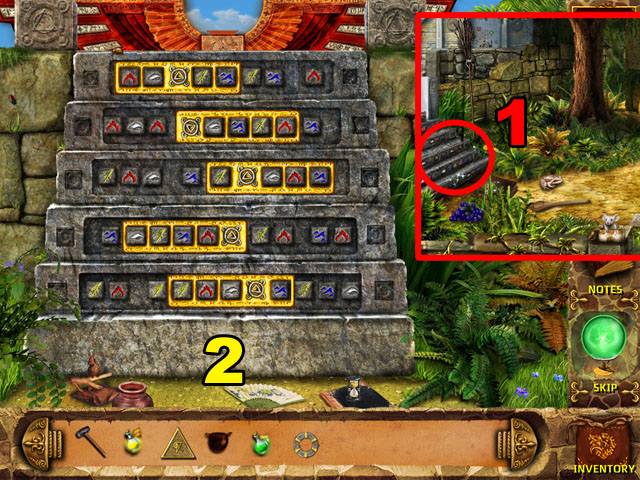
- Place all the GOLD PLATES in the correct spots.
- Each plate will fit on the stairs such that all of the empty squares will have four different runes on the inside.
- Some of the plates will fit in multiple spots correctly. You will hear a noise when you have placed a plate correctly.
- See the screenshot for the correct solution (2).
Part 5: The Lightning Stairs
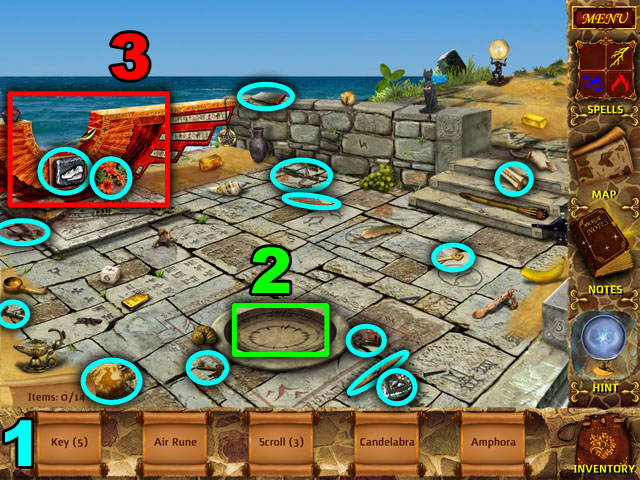
- Find the 14 hidden objects listed at the bottom of the screen in the scrolls. They are circled in blue in the screenshot (1).
- After finding all the objects you will receive a WATER RUNE.
- There is a hole at the bottom of the screen (2). You can’t do anything with this yet.
- Click on the altar to the left for a closer look (3). You can’t do anything with this altar yet either.
- Return to the previous scene and go up twice to the waterfall. You will notice that it doesn’t have water flowing over it anymore.
- Use the lightning spell on the empty waterfall. It will show you a picture of a gem on the altar in the previous scene.
- Travel down three times and to the left to return to the beach scene.
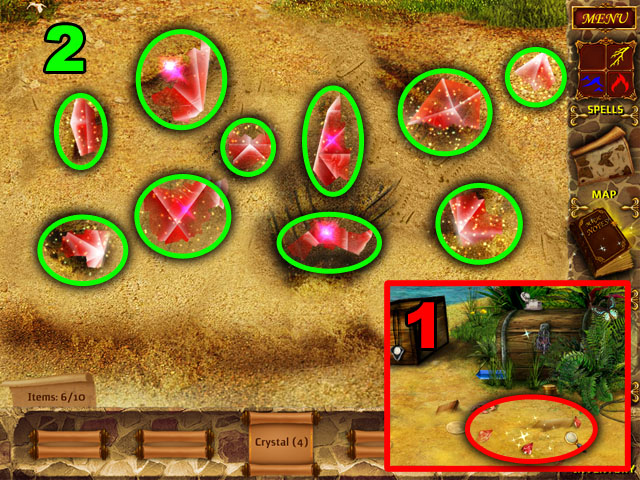
- Click on the red gem pieces at the bottom of the screen (1).
- In this mini-game you need to click the sand to remove it and search for the 10 hidden gem pieces (2).
- If you click too many times, water will wash over the scene, replacing the sand.
- If you click on the gem directly, you will cut yourself and the water will wash back the sand.
- Return to the altar at the top of the lightning stairs.
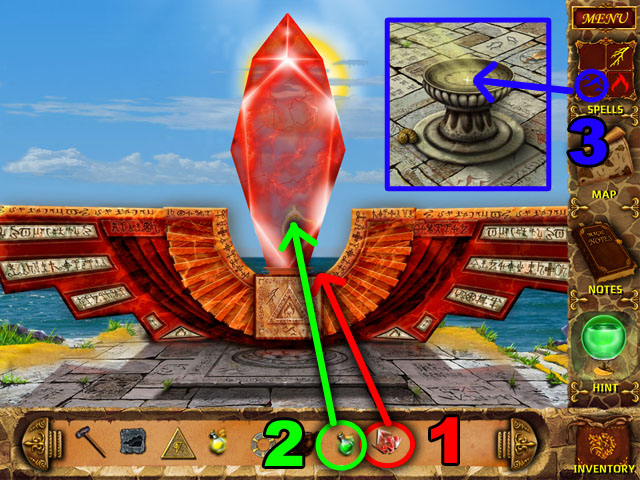
- Use the GEM PIECES on the altar (1) and then put the pieces together, from the bottom to the top.
- If you try to put a piece in the correct place, but there are no other pieces below it, it will not stay in place.
- See the screenshot for the final image.
- Use the GLUE POTION on the crystal.
- Exit the altar scene and you will see a raised basin in the middle of the screen.
- Use the water spell on the basin to reveal the wind talisman (3).
- You will now need to find all of the pieces of the wind talisman to put it together.
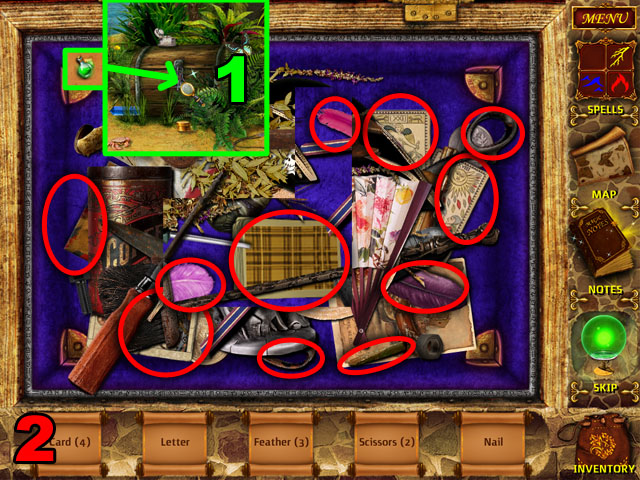
- Return to the beach and use the ACID POTION on the chest in the background (1).
- Click on the chest to open it.
- Find hidden objects listed at the bottom of the screen, in any order, circled in red in the image (2).
- Move the objects around by clicking on them. You will need to move some objects out of the way to find all of the hidden objects.
- After you find all of the objects, you will receive the BROKEN SCISSORS.
- Travel back through the fire and lightning door, to the room where you got the lightning and water talismans.
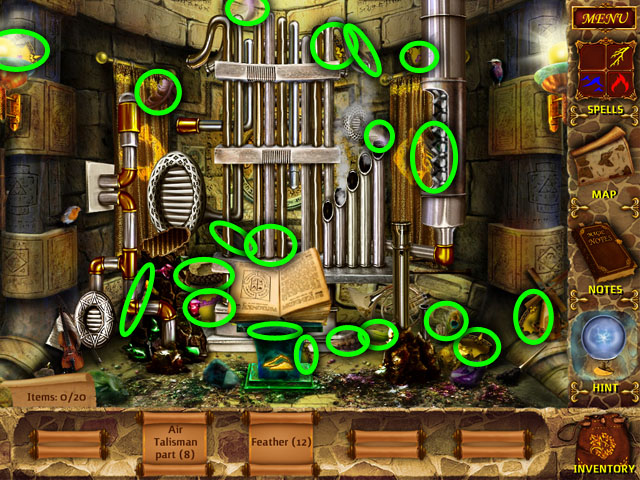
- Click at the right of the screen to go to the wind talisman scene.
- Find the 20 hidden objects listed at the bottom of the screen in the scrolls. They are circled in green in the screenshot.
- After finding all of the objects you will be given the WIND TALISMAN PIECES.
- Go back through the fire and lightning door and up the lightning stairs.
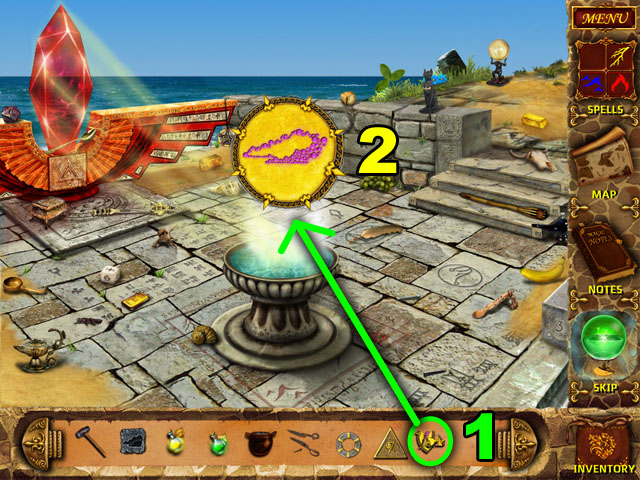
- Use the WIND TALISMAN PIECES on the glowing image in the middle of the screen (1).
- Drag the pieces around and place them in the image to recreate the talisman.
- You will only be able to attach pieces to other pieces. You will have to place the second piece beside the first piece and build that way.
- See the screenshot for the completed talisman (2).
- After finishing the TALISMAN you will receive it in your inventory.
- Return to the round table in the first scene on this island, where you learned the 3 other spells.
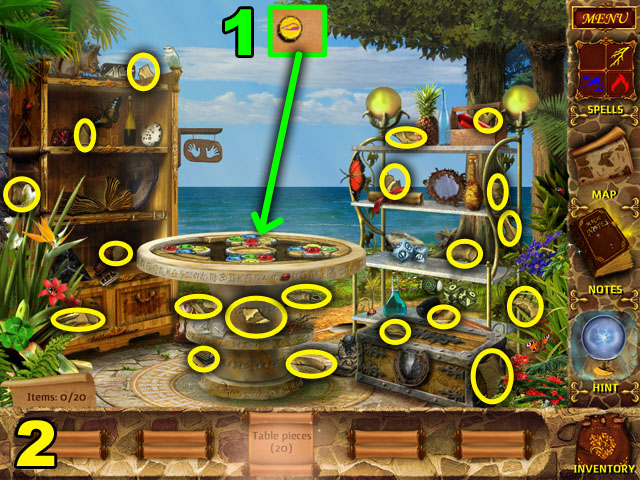
- When you first enter the scene with the round table you will need to use the WIND TALISMAN on the center of the table (1).
- Find 20 hidden table pieces scattered around the screen (2). They are circled in yellow in the screenshot.
- After finding all the pieces, you will receive them in your inventory. Click on the table to start the next mini-game.
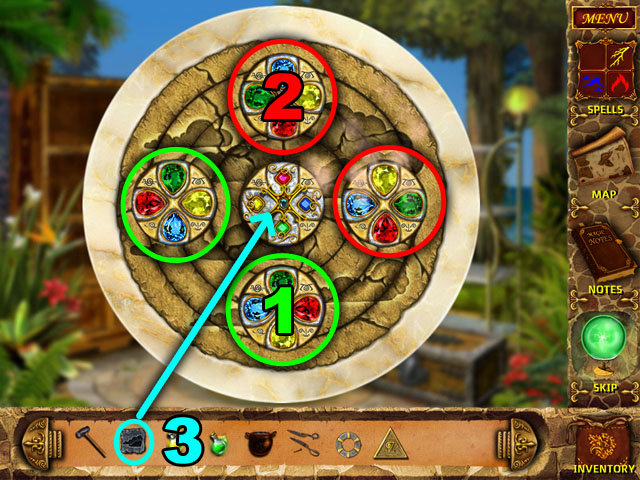
- Use the TABLE PIECES on the table and then arrange them to match the image in the screenshot.
- After the pieces have all be placing the correct order, you will need to turn the 4 jeweled disks to the correct positions.
- The jewels on the disks must match the jewels on the other disks to the left, right, top, and bottom.
- For example, if there is a red jewel at the top of the middle disk, there needs to be a red jewel at the bottom of the top disk.
- The disks circled in green (1) rotate at the same time when you click the bottom disk, but in the opposite direction.
- The disks circled in red (2) rotate at the same time when you click the top disk, but in the opposite direction.
- Click the disks marked 1 and 2 until all of the gems match.
- Place the WIND RUNE in the middle of the table.
- Go to the right once and then down once to get to the boat scene again.
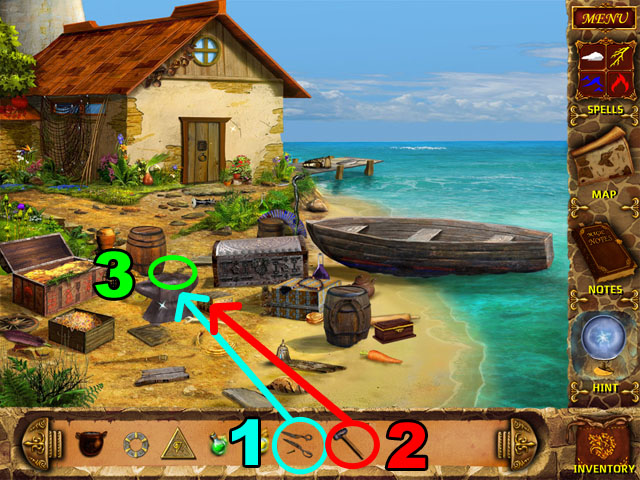
- When in the boat scene use the BROKEN SCISSORS on the anvil in the middle of the screen (1).
- Use the HAMMER on the scissors and the anvil.
- Take the newly fixed SCISSORS and put them in your inventory.
- Travel down one more time to the waterfall scene.
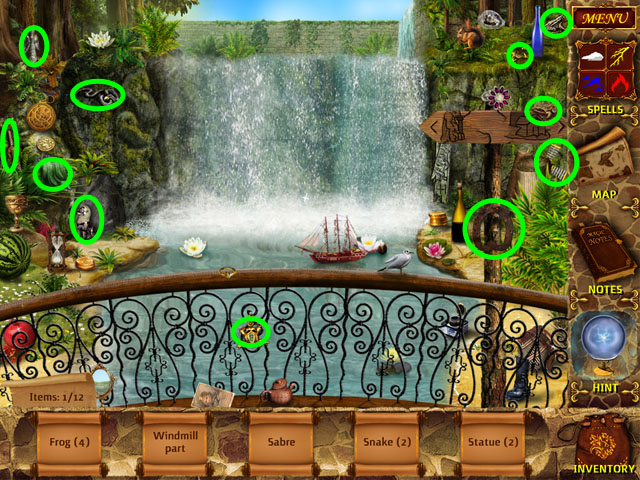
- Find the 12 hidden objects listed at the bottom of the screen in the scrolls. They are circled in green in the screenshot.
- After finding all of the objects you will receive the MILL PART.
- Fill your EMPTY POT with water on the waterfall again, you will need this later.
- Keep going to the left and up the stairs to the fire and lightning door.
- When you get there, you will meet a magician that tells you to create an oil potion before leaving this area.
- Go back and then to the left, on the way to the alchemist’s house.
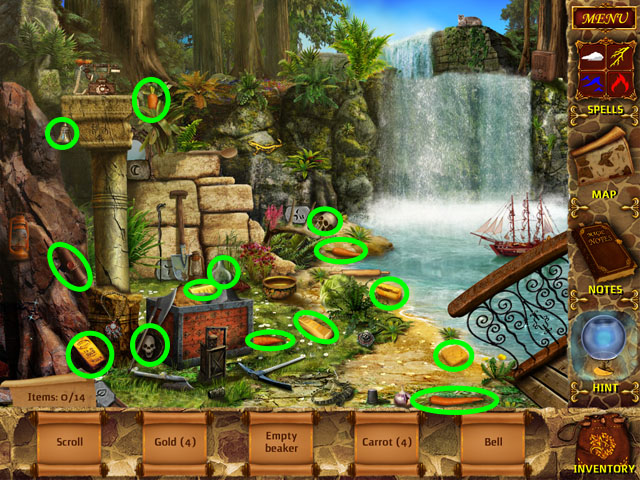
- Find the 14 hidden objects listed at the bottom of the screen in the scrolls. They are circled in green in the screenshot.
- After finding all of the objects you will receive an EMPTY BEAKER.
- Continue to the right and up towards the house.
- Once inside the house, click on the cabinet to the left to find another recipe.
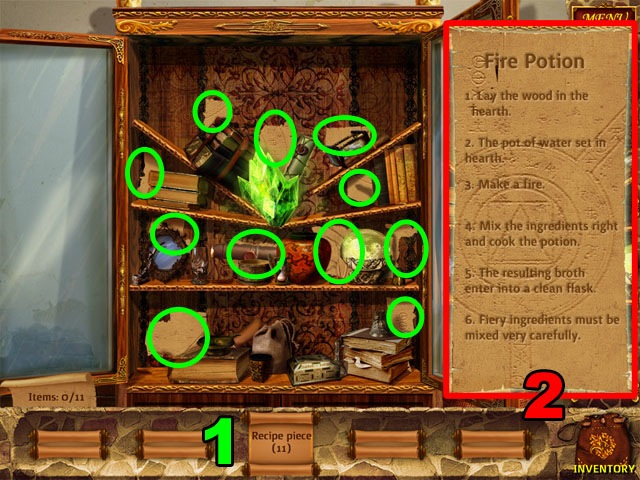
- Find the 11 hidden pieces of parchment in the cabinet (1). They are circled in green in the screenshot.
- After finding all of the pieces, drag them to the correct places to put together the recipe shown in the screenshot (2).
- When a piece is in the correct place it will be locked and you won’t be able to move it anymore.
- Exit this scene and use the POT OF WATER on the fireplace.
- Use the fire spell on the pot of water and then click on it to start the potion making mini-game.
- This mini-game has you finding objects as they move across the top of the screen.
- The objects you need to find are listed at the bottom of the screen in scrolls.
- You can only make 3 mistakes as you click on objects at the top of the screen. These mistakes are tracked at the bottom of the screen.
- After finishing the mini-game, click the pot to get the OIL POTION.
- Travel back to the fire and lightning door and use the OIL POTION on the magician.
- Go through the door and over the lightning stairs. In this scene, go to the right to get to a new scene.
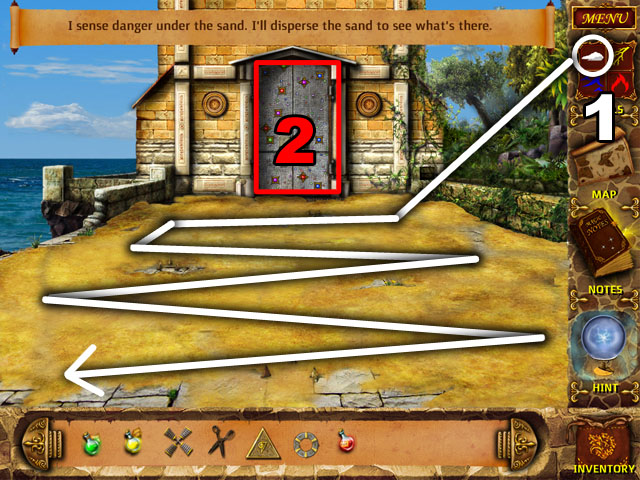
- Use the wind spell from the right side of your inventory.
- Your cursor will become the wind spell and blow away any sand that you put it over.
- Drag the cursor across all of the sand on the screen. The spell will stop when you have cleared away everything (1).
- Click on the door at the top of the screen to move closer (2).
- You will need to find another ring to open this door.
- Return to the scene with the fern by going back once, to the right once, and down once.
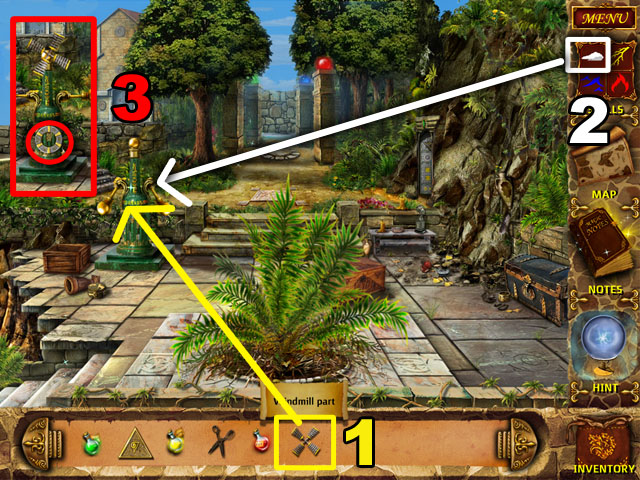
- Use the MILL PART on the strange device on the left side of the screen (1).
- Cast the wind spell on the strange device to start it spinning (2).
- Take the RING that appears below the machine.
- Go up twice to find the next ring.
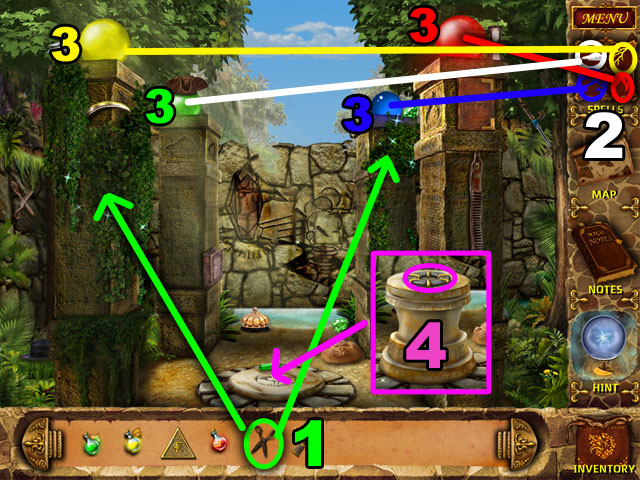
- Use the SCISSORS on the hedges that cover the pillars (1).
- Each pillar has a different color sphere at the top and an emblem with an element symbol.
- Use the spells that match the element symbols and colors of the pillars (2).
- The pillars will then light up (3). Click the pillars 3 times, in the order in which they light up, and another pillar will come up from the ground in the middle of the scene.
- Each pattern of lights will be longer than the next: first 3, then 4, and at last 5.
- Take the ring from this pillar (4) and return to the door.
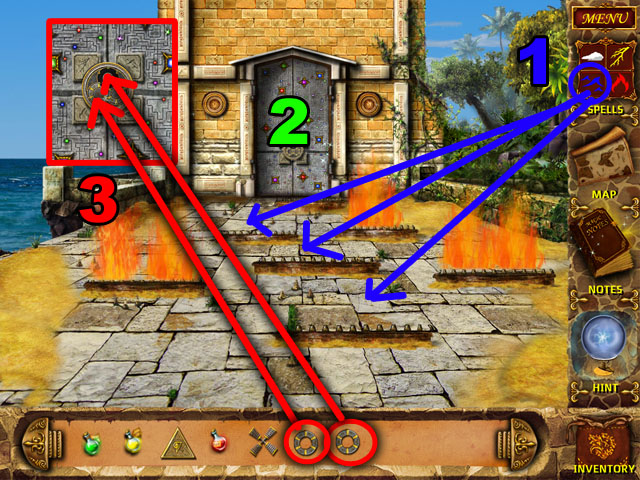
- The door will be blocked by fire when you get back.
- Use the water spell on the fires to move them to a different location.
- Most times clicking on a fire will move it back and forth between two different places.
- Move the fires around until you clear a path down the middle of the screen, as in the screenshot (1).
- Click on the door (2) and add the two rings from your inventory to the middle of it (3).
- Click on the door to start a mini-game.
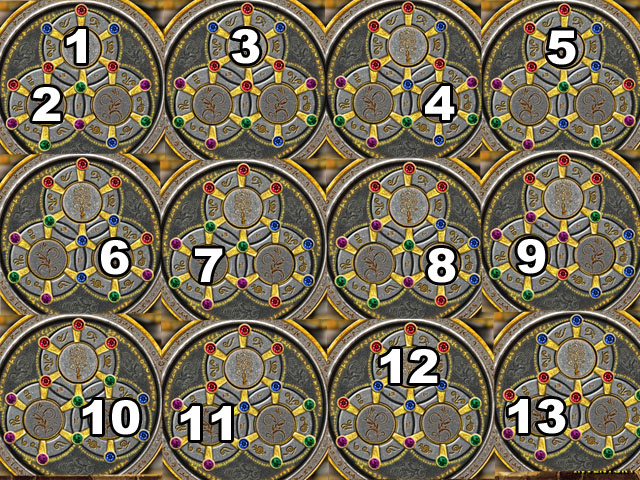
- The goal of this mini-game is to put the red symbols in the middle, the purple to the left, the blue at the top, and the green to the right.
- Clicking any ring will rotate that ring once clockwise.
- You will need to start by getting the different colors with three symbols each: blue, green, and purple together.
- Try to get them on to the correct rings, and move them to the outside of the rings.
- See the screenshot for step by step instructions. Click each of the rings in order until the puzzle matches the screenshot.
- You can back out of the scene and return to it at any time to reset the puzzle.
- Once you are finished, enter the door to go to the next area.
Part 6: The Temple
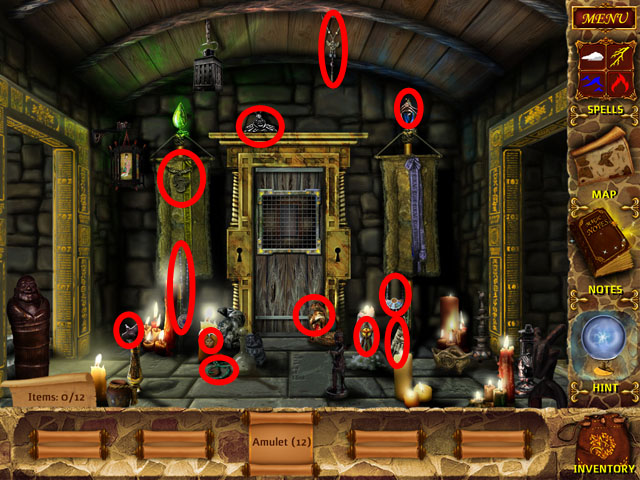
- Find the 12 hidden objects listed at the bottom of the screen in the scrolls. They are circled in red in the screenshot.
- After finding the items you will realize that you need to search out two keys to open the lock in front of you.
- Click on the doorway to the right to go to the next room.
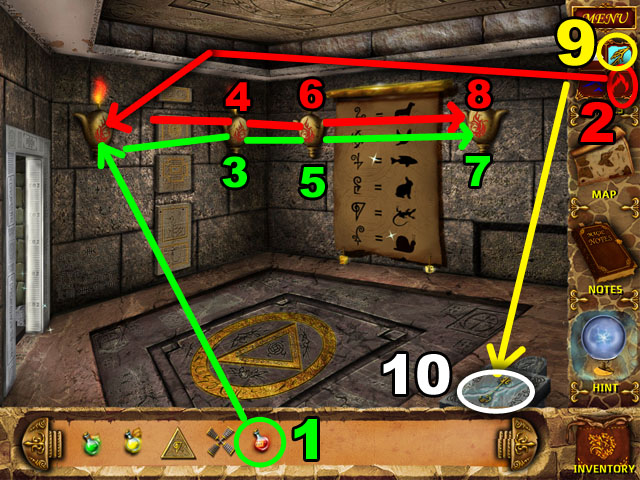
- When you enter this room it will be dark except for one torch on the left.
- Use the OIL POTION on the torch (1) and then cast a fire spell on it (2) to light up the next torch.
- Repeat these actions three more times for the next three torches (3-8).
- Once the room is lit, use the lightning spell on the altar in the bottom right side of the screen (9).
- A key will appear; take it and exit to the left (10).
- Before leaving you may want to check the large parchment on the wall. You will need these symbols later, but they will be written in your journal.
- In the previous room go to the left passageway.
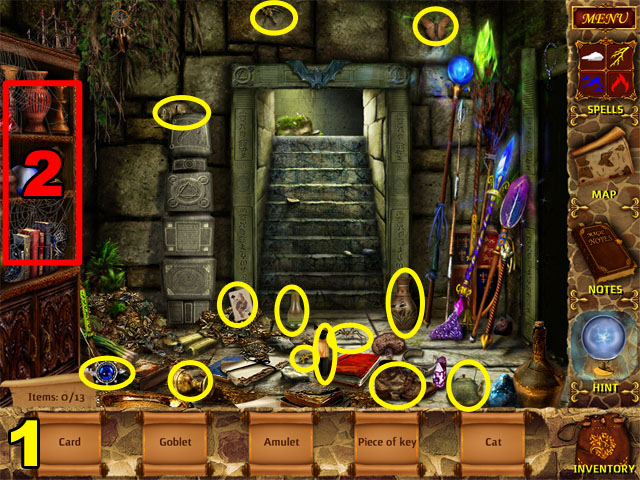
- Find the 13 hidden objects listed at the bottom of the screen in the scrolls. They are circled in yellow in the screenshot (1).
- After finding all of the objects you will receive a KEY PIECE.
- Click on the cabinet to the left of the scene (2).
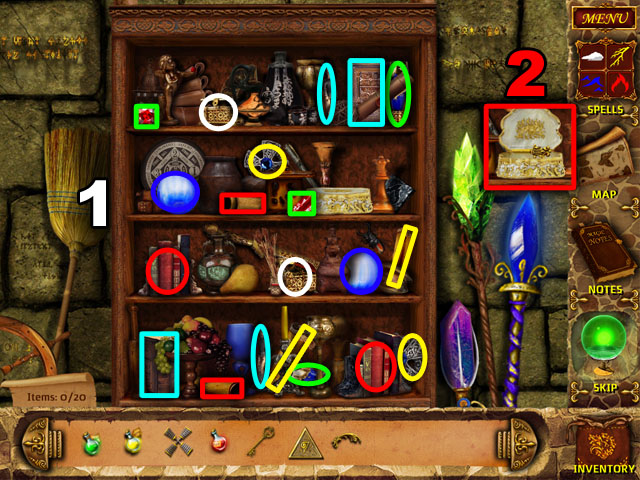
- Find the 10 pairs of hidden objects in this scene.
- They are marked with the same color and shape markings in the screenshot (1).
- After finding all 20 objects, a small box will open and you will receive another KEY PIECE.
- Exit this scene and click on the space to the right of the cabinet.
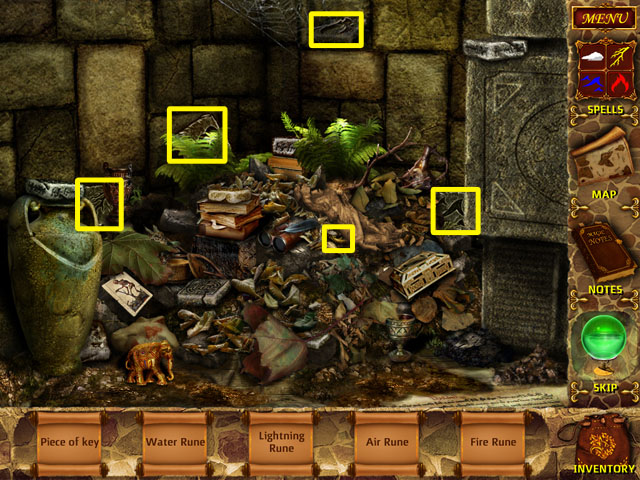
- Find the 4 MAGIC RUNES and the KEY PIECE in the scene, circled in yellow in the screenshot.
- You may have to click and move some objects around to find the objects that you are looking for.
- After finding all of the objects you will be taken back to the previous screen.
- Travel up through the stairs.
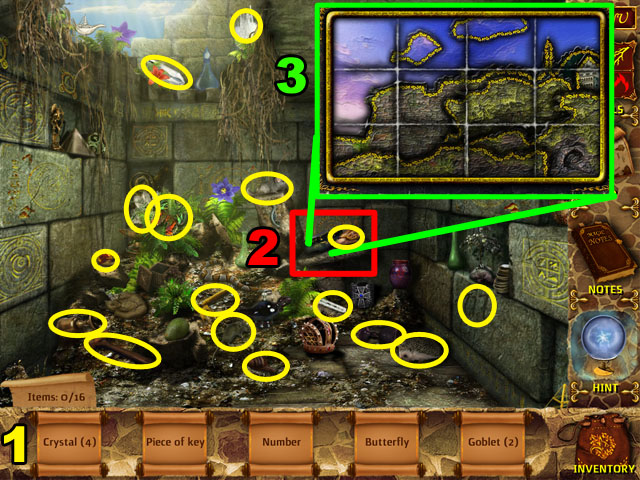
- Find the 16 hidden objects listed at the bottom of the screen in the scrolls (1). They are circled in yellow in the screenshot.
- After finding all of the pieces you will receive another KEY PIECE.
- Click on the puzzle in the middle of the screen, circled in red in the screenshot (2).
- Rearrange the pieces of the puzzle to make a map (3).
- Click on one piece and then another one beside it to change their places.
- Use the blue border on the top to help you get started.
- See the screenshot for the final solution.
- Once you finish the puzzle, you will receive the last KEY PIECE.
- Go back and to the right to enter the room with the locked door.
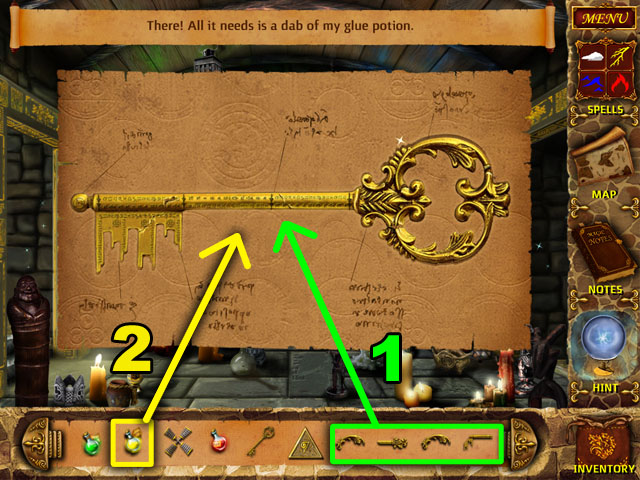
- When you enter the room, you will be given a template to put the key back together.
- Use the pieces from your inventory on the key template.
- If you put the piece in the correct place it will stay. If not, it will return to your inventory (1).
- See the screenshot for the completed key.
- After putting the key together, use the GLUE POTION on it and you will receive it in your inventory.
- Take that KEY and the other KEY in your inventory and use them on the two locks to the left and right of the door.
- Click on the door to start the next puzzle.
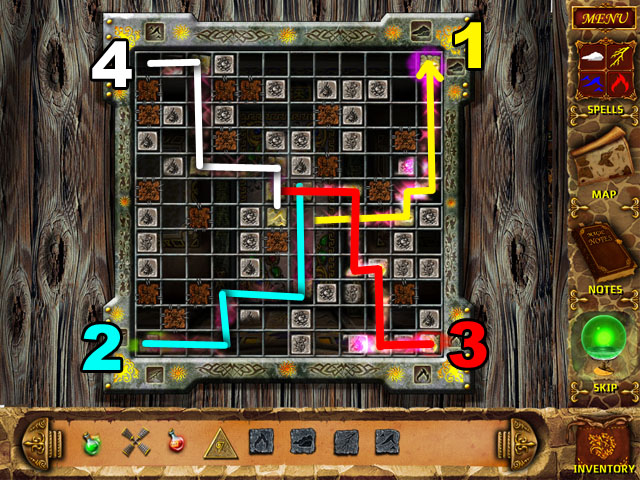
- Get the 4 runes to the corners of the puzzle that match each rune.
- The runes can move in any direction: up, down, left or right; but once clicked, they will continue in a direction until they hit another rune.
- The grey runes will move one space in any direction if you click them.
- The brown runes do not move.
- The grey runes will move on their own every 3 turns.
- Start with the wind rune and move it up to the top right corner, then move the lightning rune to the bottom left corner.
- Move the fire rune to the bottom right corner and the water rune to the top left.
- See the screenshot for a possible solution. The locations of the grey and brown runes are randomized every time.
- If you get stuck, you can leave the puzzle and come back to reset it.
- As long as you don’t get a rune stuck near a brown rune, the puzzle is very easy. Just move the grey runes out of the way if you can’t move forward.
- After finish the puzzle, you will be brought to a new room.
- Use the ACID POTION on the lock in the right corner and go through that door.
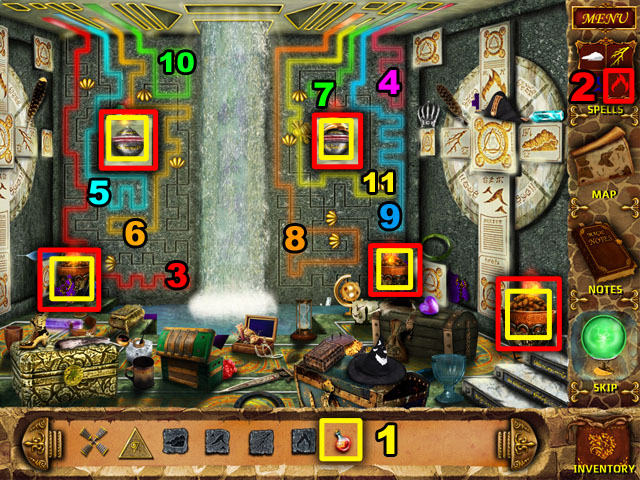
- This room will start out dark, with only the rightmost part of the screen visible.
- From the right to the left light the torches one by one by using the OIL POTION and then a fire spell (1, 2).
- Once you light one torch you will be able to see the next torch and light that one.
- After lighting all of the torches, you will see a glowing line come down from the ceiling.
- Find the flower that connects to the glowing line and click it. Another glowing line will become visible.
- Repeat this step 9 times (3-11), alternating from left to right, until the waterfall disappears.
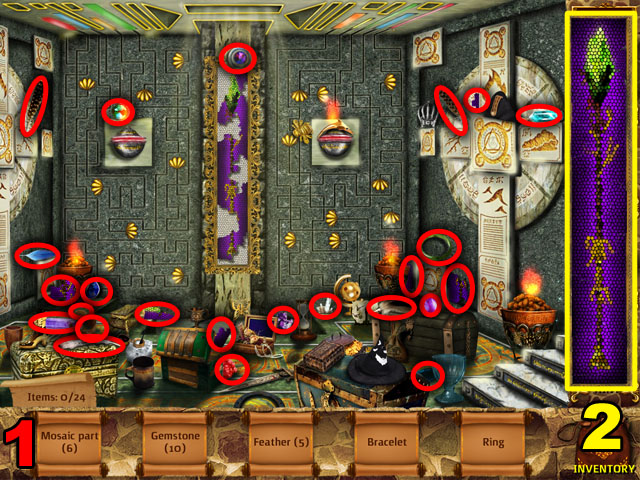
- Find the 24 hidden objects listed at the bottom of the screen in the scrolls (1). They are circled in red in the screenshot.
- After finding all of the objects, you will receive the MOSAIC PARTS in your inventory.
- Put the MOSAIC PARTS into the correct places in the mosaic (2).
- If you try to put a part in the wrong place, it will go back to your inventory.
- After finishing the mosaic the same way as the screenshot, click at the right of the screen to return to the previous scene.
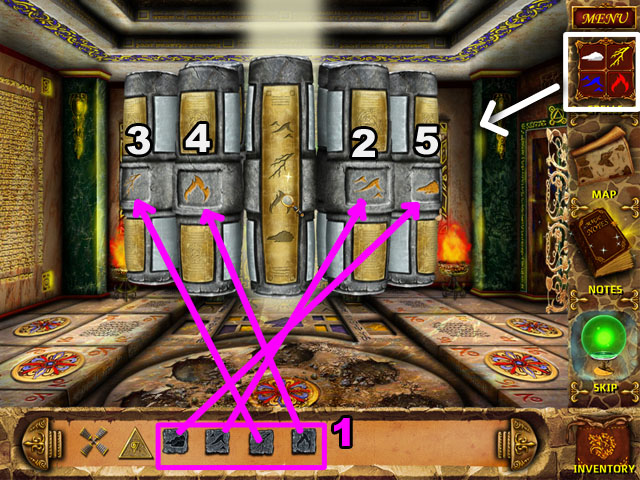
- The scene will have changed and 4 pillars will be in the middle, where the doorway used to be.
- Put the RUNES from your inventory in the correct places on the outside 4 columns (1).
- The middle column will show you the order in which to use magic on the columns to open the door.
- Cast a water spell on the water rune; lightning spell on the lightning rune; fire spell on the fire rune; and wind spell on the wind rune. The door will open (2-5).
- Go through the door.
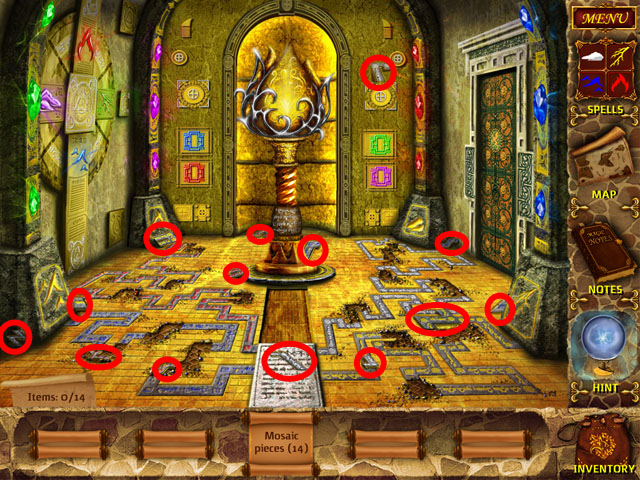
- When you enter the room there will be sand on the floor.
- Use the wind spell on the floor until there is no sand left.
- Find the 14 hidden mosaic pieces on the floor and walls. They are circled in red in the screenshot.
- After finding all of the objects, the MOSAIC PIECES will spread out above the scene.
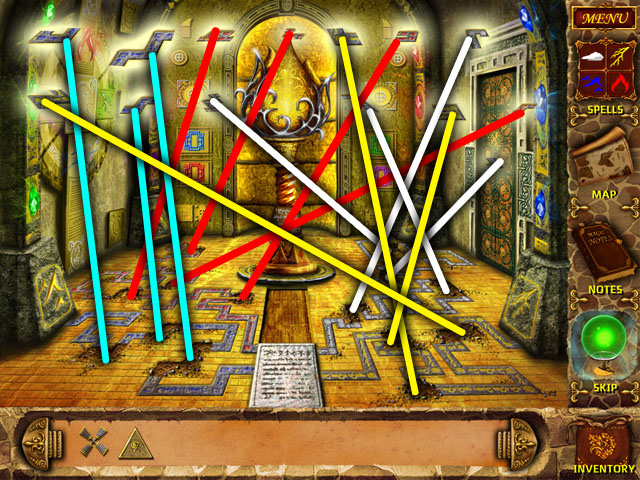
- Place the mosaic pieces back on the floor where they belong.
- If you put a piece in the wrong place, it will go back into the space above the floor.
- The smaller pieces are from places farther away from you; the bigger pieces are from places closer.
- You can also match the color of the pieces to the color of the patterns on the floor.
- See the screenshot for a guide to each pieces location.
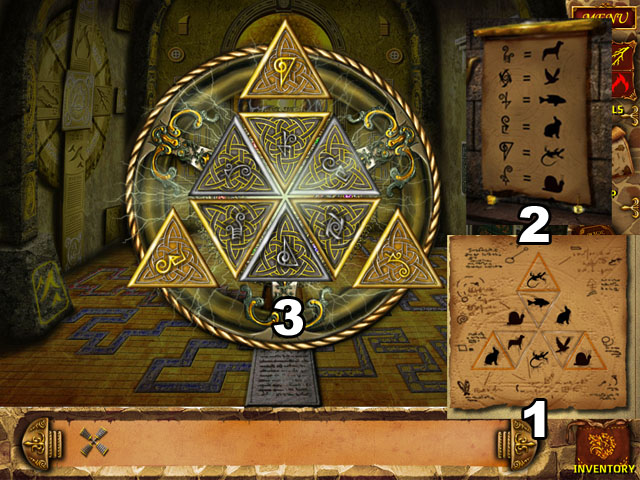
- When the mosaic is in place, the flower in the middle of the room will open to reveal a pyramid of triangles.
- Add the TRIANGLE PIECE from your inventory to the top of the pyramid and then click it to open the next mini-game.
- Put all of the triangles in the correct positions to solve this puzzle.
- You can move the triangles by clicking the center to rotate all of the center triangles clockwise.
- You can also click on the three triangles outside the center six to swap them with the closest triangle on the inside.
- Look through your journal for clues on solving the puzzle.
- In one part of your journal you will find the correct layout of the puzzle. But the shapes of the icons are animals instead of runes (1).
- Find the animal/rune key in another part of your journal (2).
- Use these two documents to solve the puzzle as shown in the screenshot (3).
- First, get the three outer triangle pieces in the correct location.
- Then, rotate the middle until a few pieces line up with the solution.
- To move the pieces in the middle, swap one of the outside pieces with the one you want to move, then rotate to the other piece you want to swap it with, and exchange places from inside to outside. Then rotate the center again until you find the correct outside piece and swap it back to the outside.
- Do this until all the pieces are in the correct locations.
- After you win this mini-game, get the triangular AMULET.
- Exit the scene and go to the right.
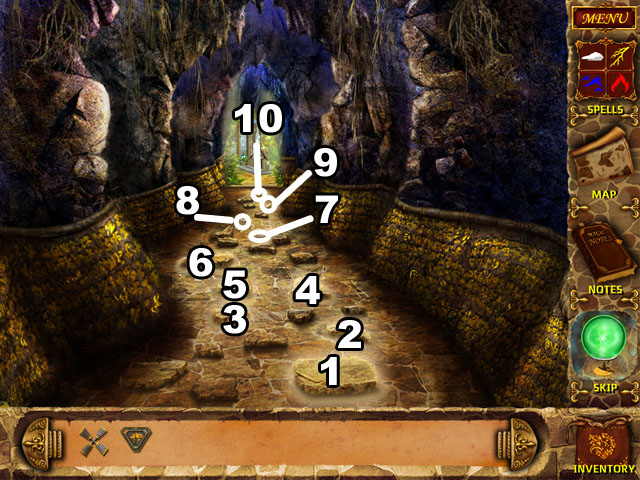
- Click the rocks on the ground into the correct pattern to open a path.
- If you make a mistake, you will have to start over from the beginning.
- See the screenshot for the correct order.
- Click on the doorway in the middle to return to the archway.
- Click at the left to inspect the arch.
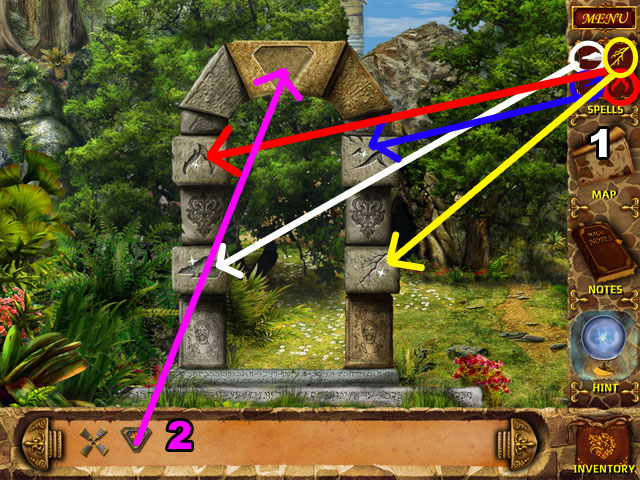
- Cast all four spells on the correct runes on the side of the arch (1).
- Use the AMULET at the top of the arch to win the game.
Created at: 2010-10-16

