Walkthrough Menu
General Tips
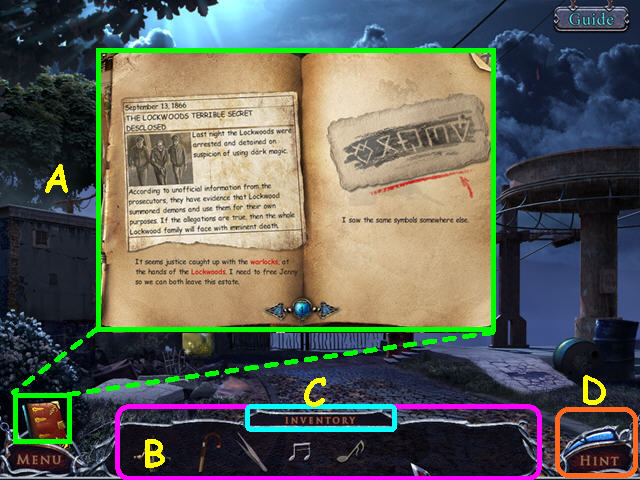
- Hidden Object Scenes and mini-games are often randomized - your solution may vary.
- Hidden Object Scenes will be referred to as HOS in this walkthrough.
- Inside the journal you will find the clues and diary pages you have found (A).
- Your inventory is in the bottom panel- click on an item to select it for use (B).
- Move your mouse to the left or right over the inventory panel to scroll.
- The inventory will auto-hide when not in use; move your mouse over the 'Inventory' sign to reveal the panel (C).
- Hints are unlimited, but you must wait for the hint meter to recharge (D).
Chapter 1: The Manor Grounds
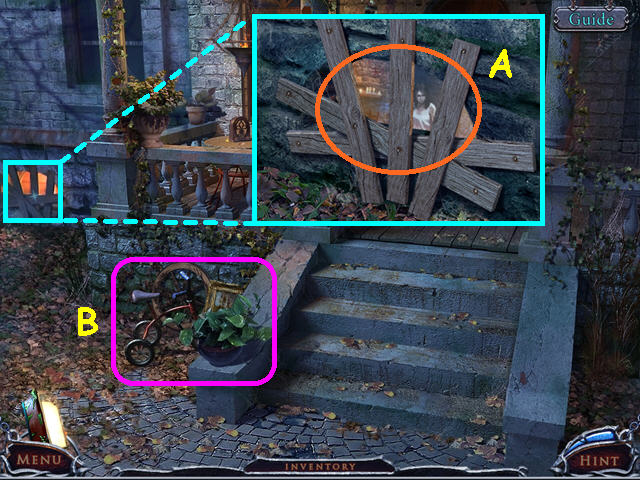
- You will have the option of some interactive help.
- Look at the basement window, then click on the window (A).
- Select the area for a HOS (B).
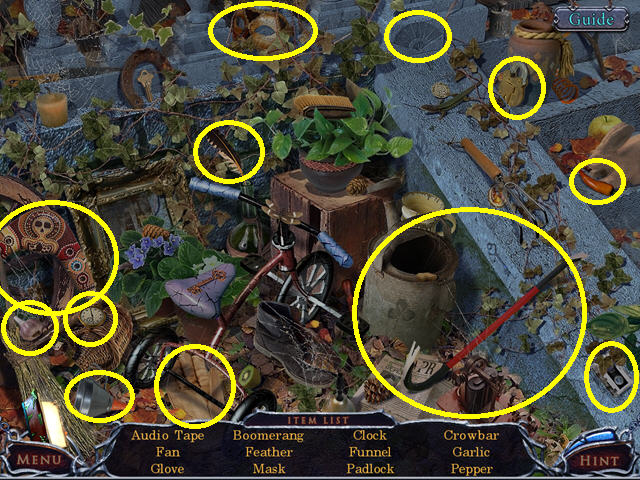
- Locate all the items on the list.
- You will earn the CROWBAR.
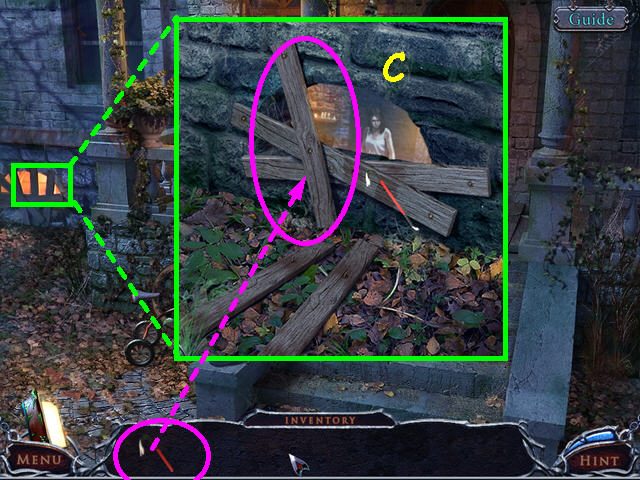
- Look at the basement window and use the CROWBAR 3 times on the boards (C).
- Enter the window, then click anywhere for a cut-scene.
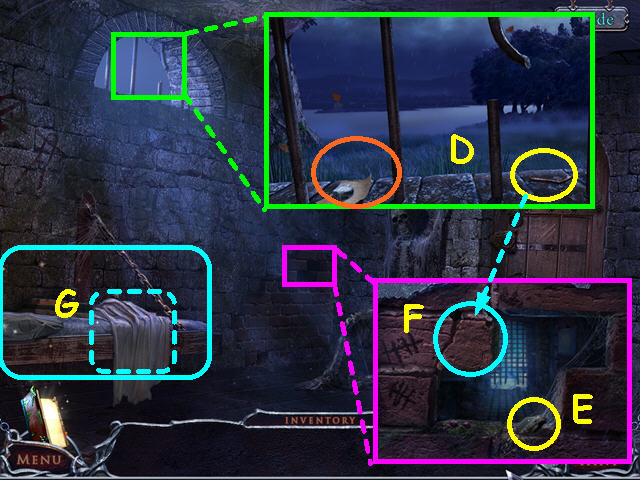
- Look at the window; take the diary page and the NAIL (D).
- Look at the hole in the bricks and take the COAL (E).
- Use the NAIL 3 times on the mortar at the top of the broken brick to make it fall, then take the BRICK (F).
- Pull the blanket on the cot, then select the cot for a HOS (G).
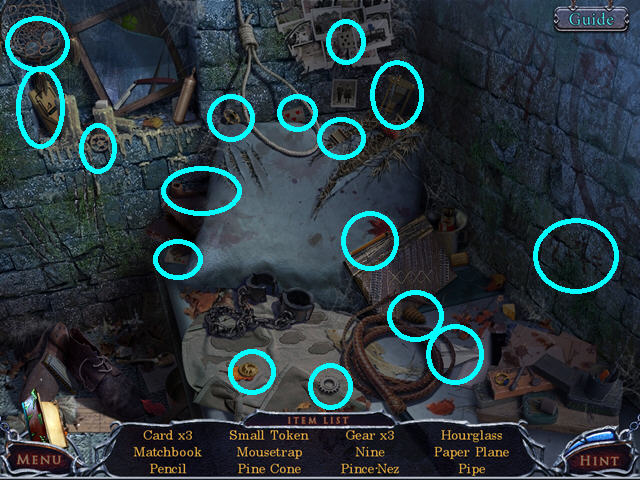
- Locate all the items on the list.
- You will earn the SMALL TOKEN.
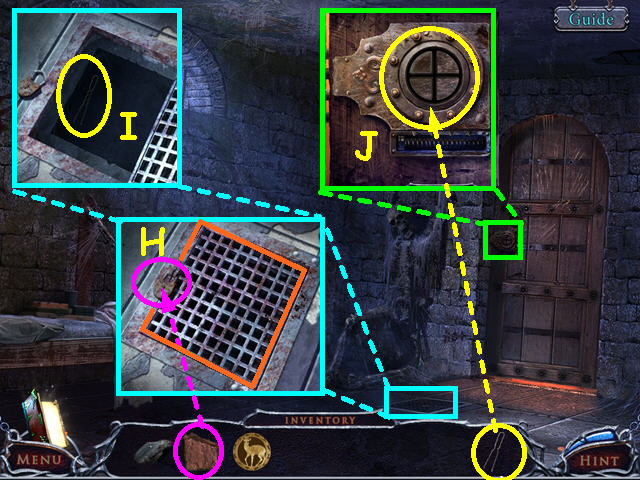
- Look at the grate in the floor and use the BRICK to break the lock (H).
- Click on the grate to open it and take the HAIR PIN (I).
- Look at the lock on the door and use the HAIR PIN for a mini-game (J).
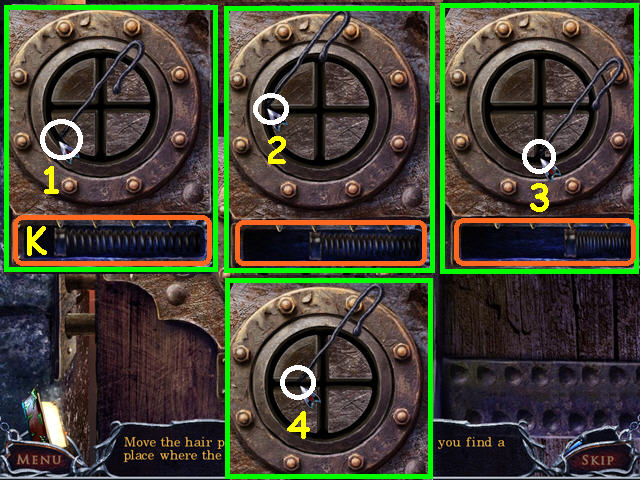
- Move the hair pin around the grooves in the lock until you find a spot where it shakes, then click the mouse.
- You will need to do this 4 times – the bolt will move to the right each time you are correct (K).
- Our solution is shown (1-4).
- This and many of the mini-games are randomly generated – your solution may vary.
- Walk forward.
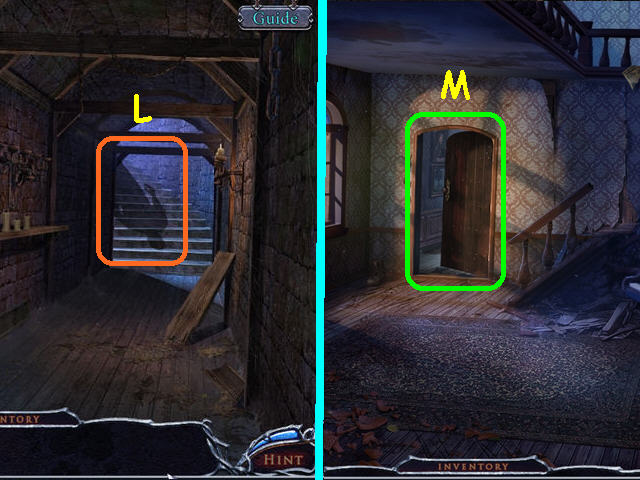
- Click on the shadow for a cut-scene (L).
- Walk up the stairs.
- Walk forward, into the office (M).
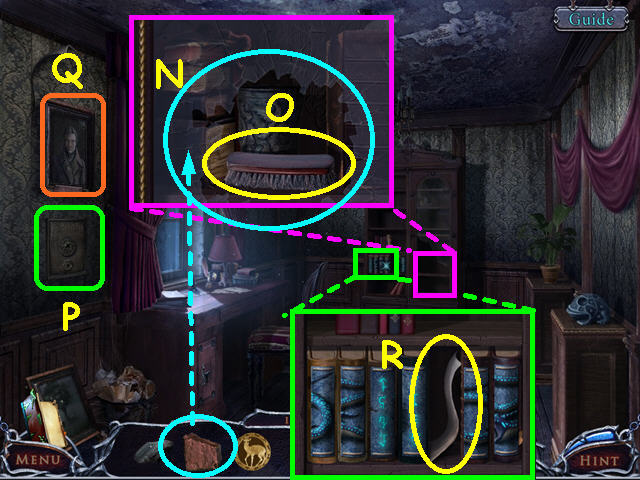
- Look at the cabinet and use the BRICK 3 times on the glass (N).
- Take the SCRUB BRUSH (O).
- Click on the lower painting to remove it from the wall (P).
- Look at the Lockwood ancestor portrait (Q).
- Look at the bookshelf and take the PIECE of PAPER (R).
- Walk down twice to return to the basement hall.
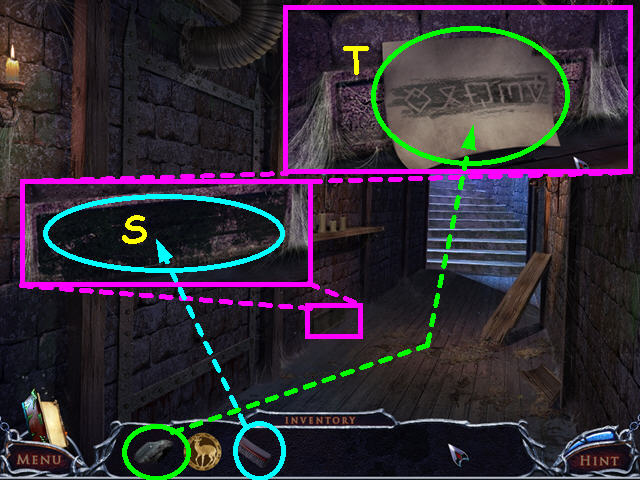
- Look at the stone plate and use the SCRUB BRUSH 3 times to clean away the grime (S).
- Place the PIECE of PAPER on the stone, then use the COAL 3 times to make a rubbing (T).
- Take the PAPER with SYMBOLS, then walk forward.
- Look at the piano.
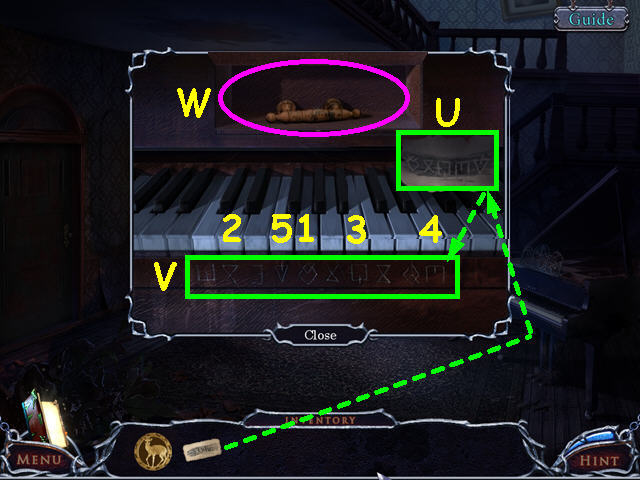
- Place the PAPER with SYMBOLS on the piano (U).
- Play the keys that have the same symbols as the paper (V).
- Press the keys in numerical order (1-5).
- Take the DRAWER HANDLE (W).
- Walk forward to the office.
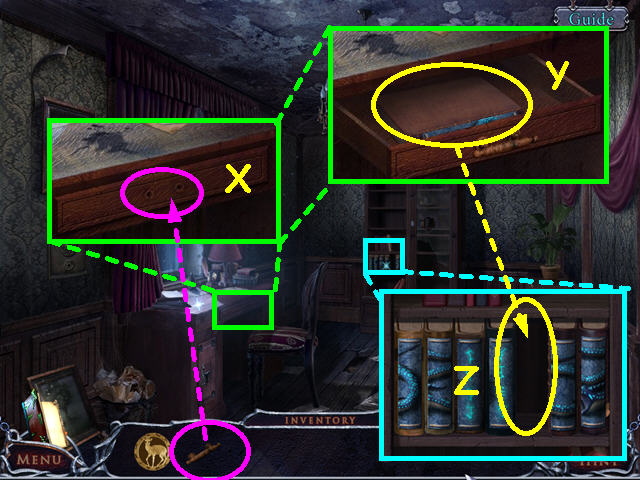
- Look at the desk and place the DRAWER HANDLE on the drawer (X).
- Click on the handle to open the drawer and take the OLD BOOK (Y).
- Look at the bookcase and place the OLD BOOK on the shelf for a mini-game (Z).
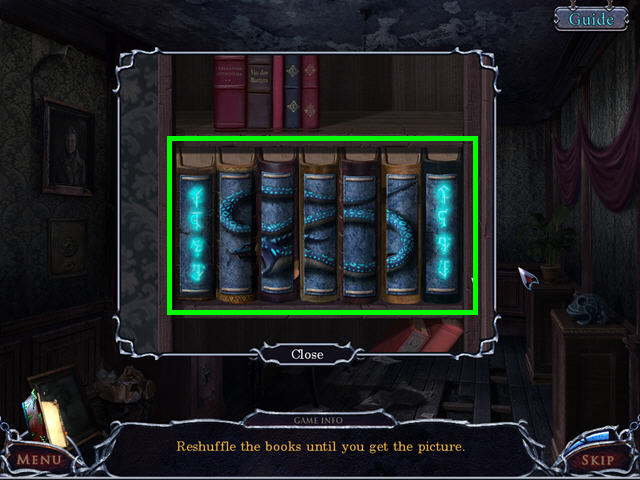
- Restore the picture on the book spines.
- Click on 2 books to swap positions.
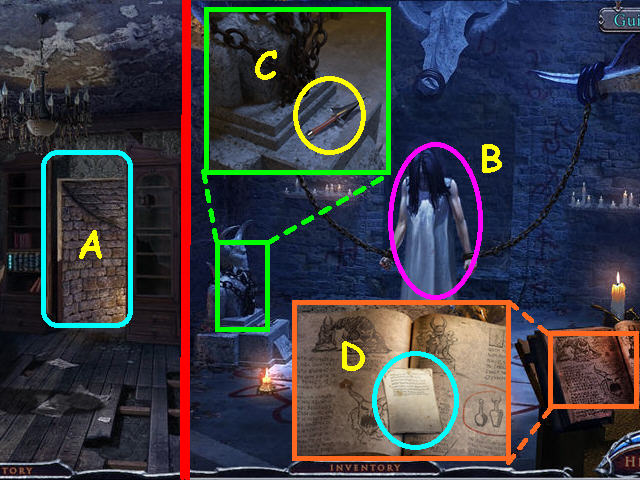
- Walk forward into the secret chamber (A).
- Talk to Jenny to learn the magic vessel is in the green house (B).
- Look at the statue and take the RITUAL KNIFE (C).
- Look at the ritual book and take the diary page (D).
- Walk down to exit the chamber.
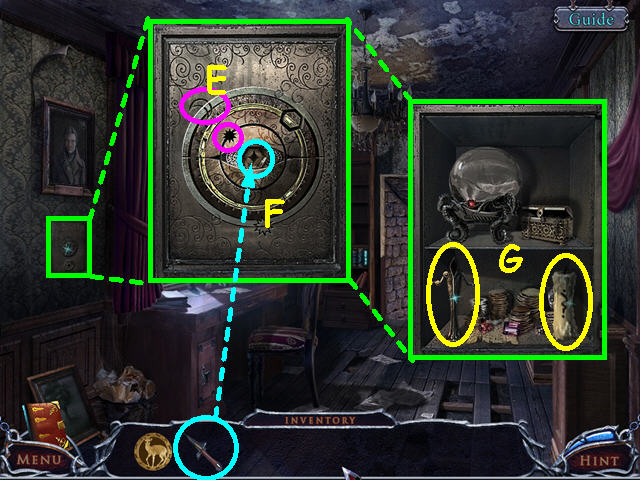
- Look at the safe and turn the dials to align the symbols (E).
- Place the RITUAL KNIFE in the center of the safe (F).
- Take the 1/2 STATUETTE and the CANDLE (G).
- Walk down twice then look at the candles on the left for a mini-game.
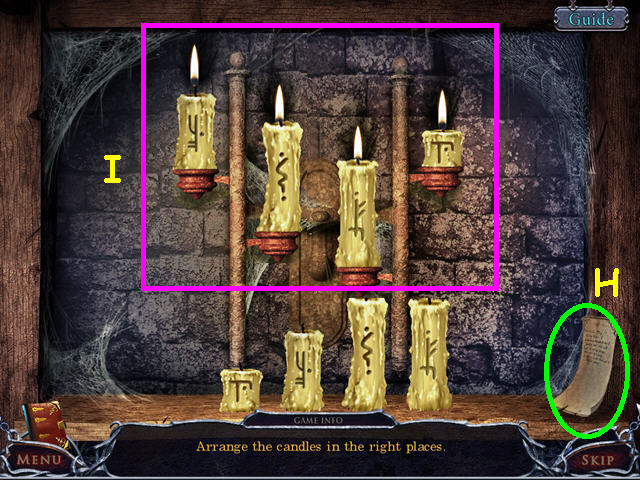
- Place the candle on the shelf to trigger the mini-game.
- Take the diary page (H).
- Place the candles in the holders so that the flames match the soot marks on the wall (I).
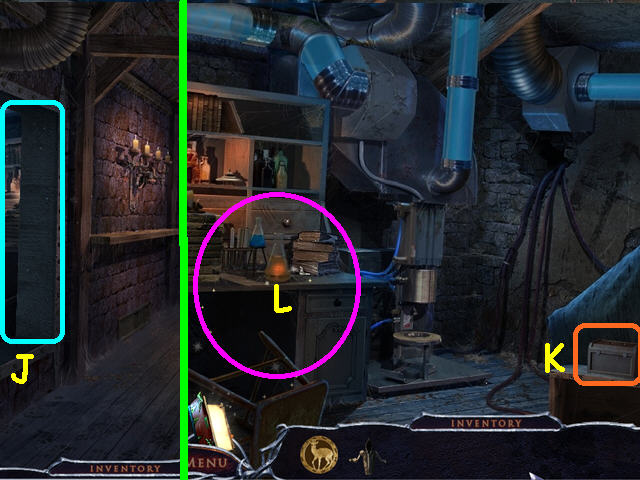
- Walk left into the secret lab (J).
- Note the box (K).
- Select the desk for a HOS (L).
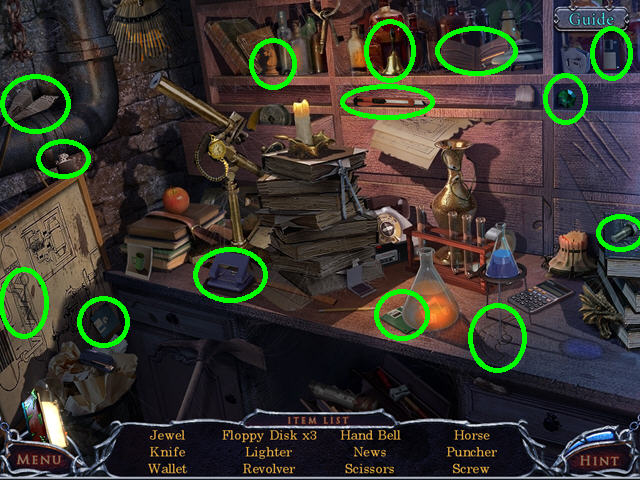
- Locate all the items on the list.
- You will earn the JEWEL.
- Exit and return to the office.
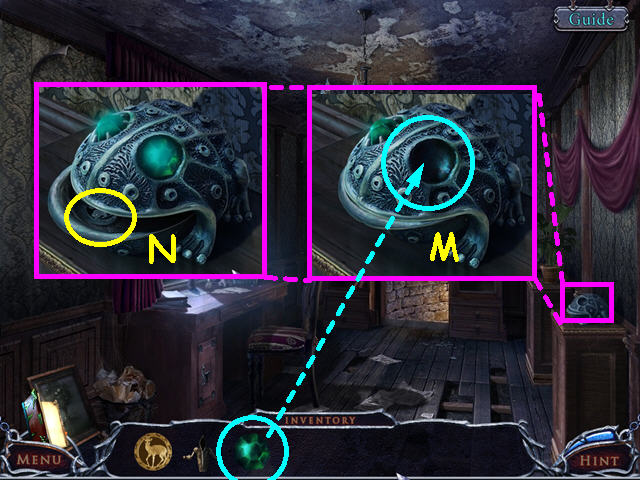
- Look at the frog and place the JEWEL into the eye (M).
- Take the LARGE TOKEN (N).
- Exit and return to the lab.
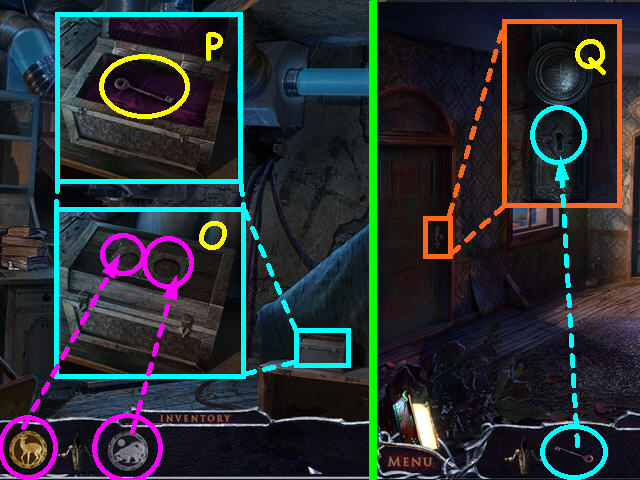
- Look at the box, use the SMALL TOKEN on the left circle, and the LARGE TOKEN on the right circle (O).
- Take the MAIN ENTRANCE KEY (P).
- Exit the lab and walk forward.
- Look at the front door and use the MAIN ENTRANCE KEY on the lock (Q).
- Exit through the front door.
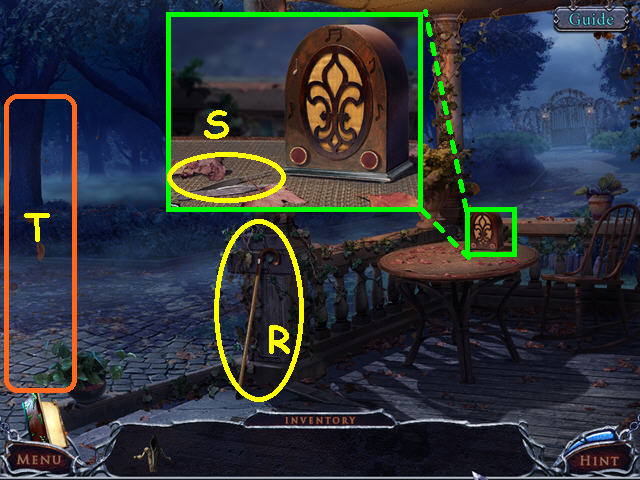
- Take the CANE (R).
- Look at the table and take the TWEEZERS (S).
- Walk to the left (T).
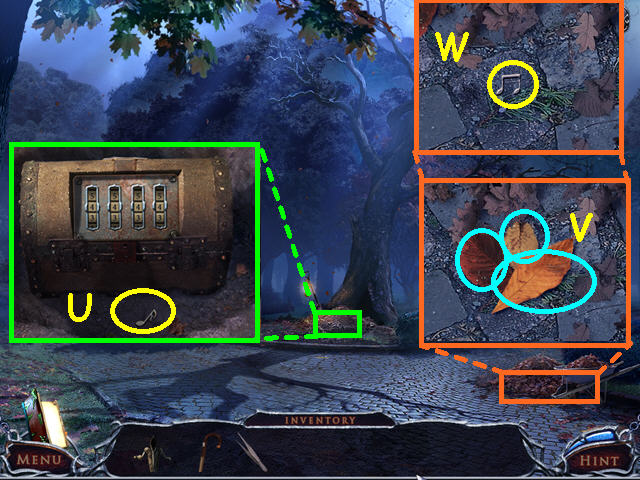
- Look in the hole and take 1/4 MUSICAL NOTE (U).
- Look at the leaves and move the 3 leaves out of the way (V).
- Take the 2/4 MUSICAL NOTE (W).
- Walk on the right path.
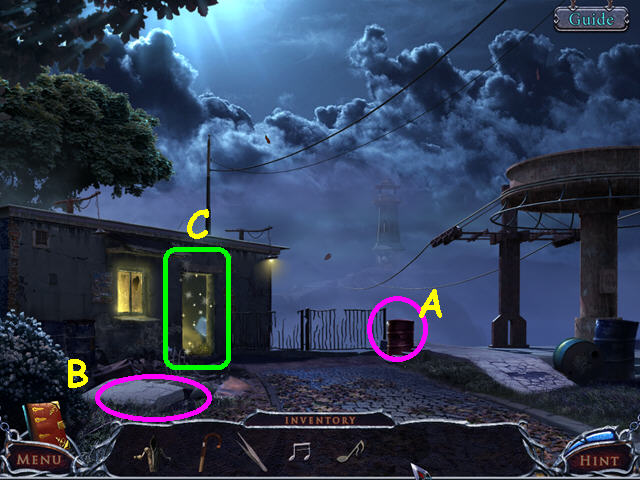
- Note the steel drum (A).
- Note the iron rods in the concrete (B).
- Click on the door to the building, then select it again for a HOS (C).
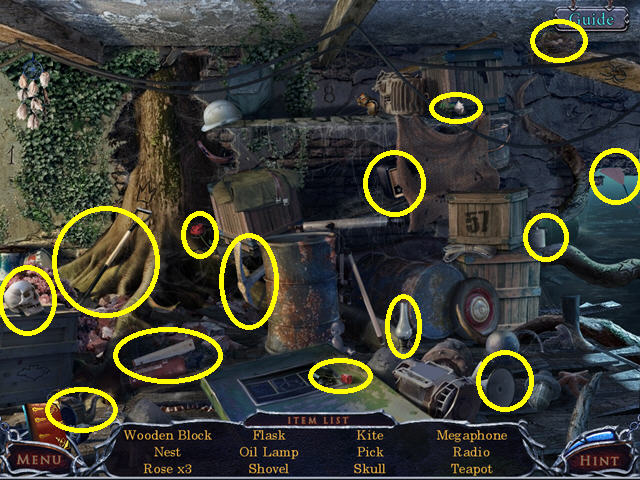
- Locate all the items on the list.
- You will earn the 1/2 LADDER STEP.
- Walk down to exit the scene, then go to the left.
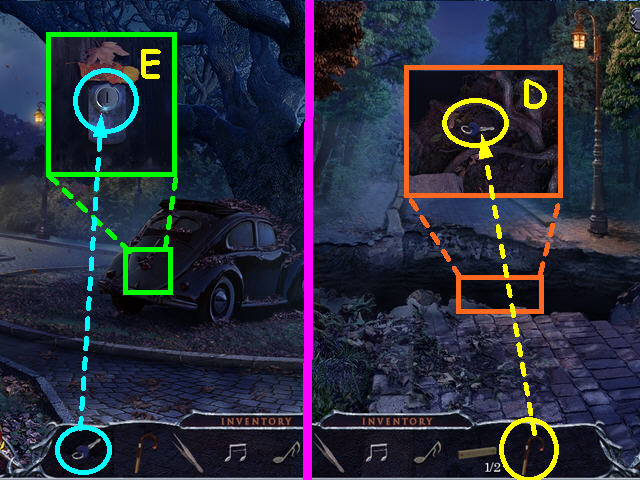
- Walk to the left of the car.
- Look in the ravine and use the CANE to get the CAR KEY (D).
- Return to the car, look at the trunk and use the key on the lock (E).
- Select the trunk of the car for a HOS.
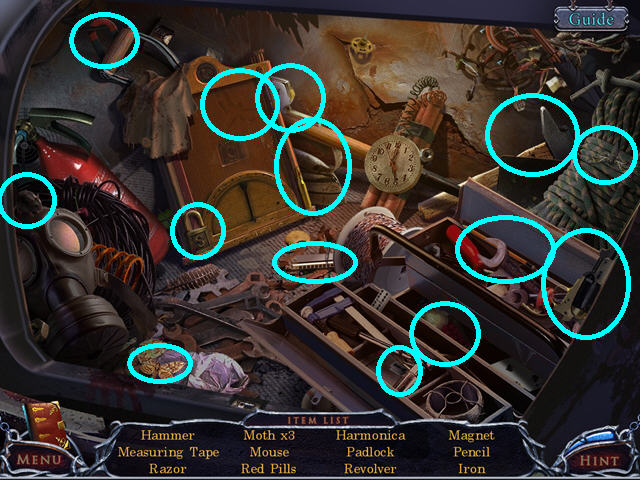
- Locate all the items on the list.
- You will earn the HAMMER.
- Enter the gate to the right of the car.
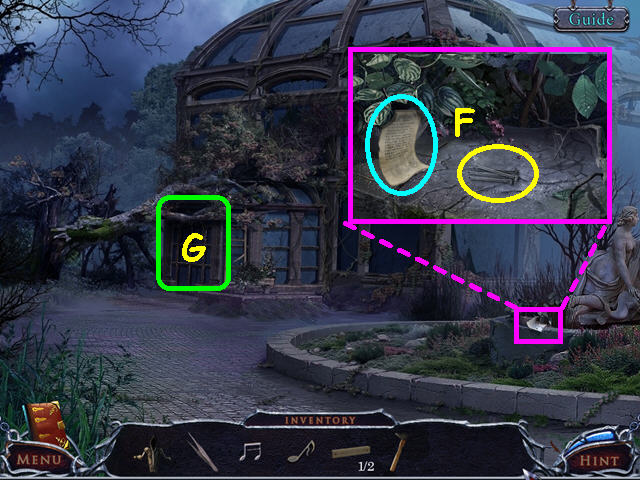
- Look near the statue; take the diary page and the NAILS (F).
- Walk forward to the entrance (G).
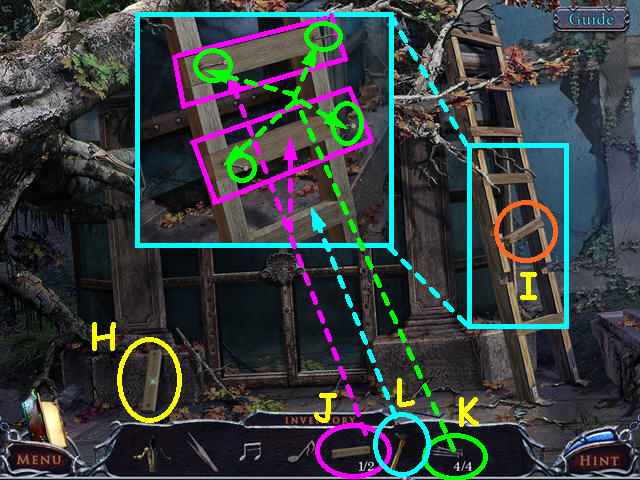
- Take the 2/2 LADDER STEP (H).
- Try to go up the ladder to remove the broken step (I).
- Look at the ladder and place the 2 LADDER STEPS into the grooves (J).
- Place 1 of the 4 NAILS on each end of the 2 steps (K).
- Use the HAMMER 3 times on each nail (L).
- Climb up the ladder.
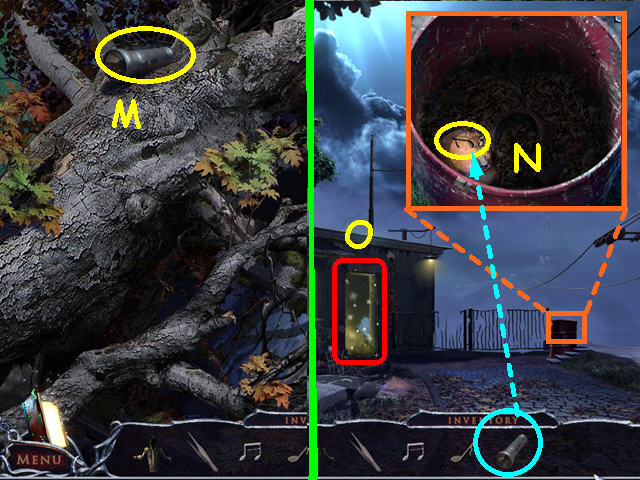
- Take the FLASHLIGHT (M).
- Walk down 4 times, then walk to the right.
- Look at the steel drum then use the FLASHLIGHT to find the 3/4 MUSICAL NOTE (N).
- Select the door of the building for a HOS (O).
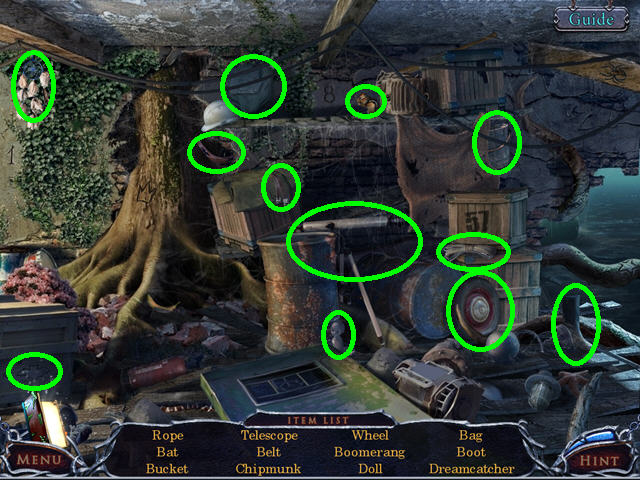
- Locate all the items on the list.
- You will earn the ROPE.
- Return to the greenhouse and climb up the ladder.
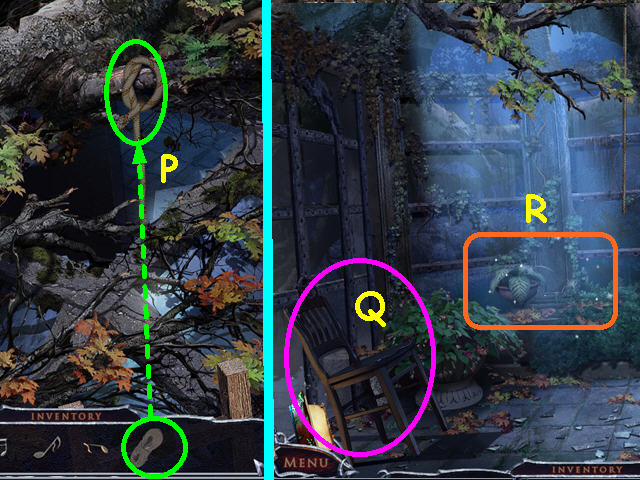
- Tie the ROPE on the branch (P).
- Climb down the rope.
- Remove the chair and open the door (Q).
- Select the planter area for a HOS (R).
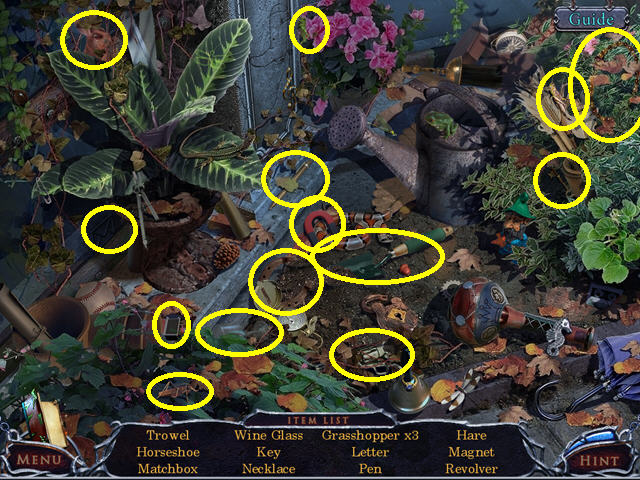
- Locate all the items on the list.
- You will earn the TROWEL.
- Walk to the right.
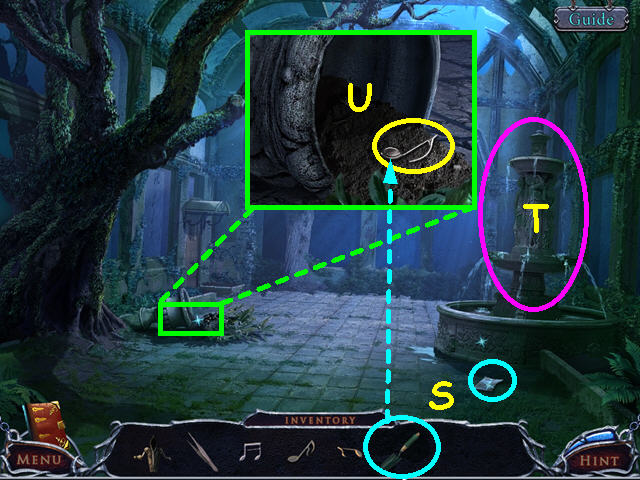
- Take the diary page (S).
- Look at the fountain and a panel will open at the base (T).
- Look at the overturned urn then use the TROWEL 4 times to find 4/4 MUSICAL NOTE (U).
- Return to the front porch of the house.
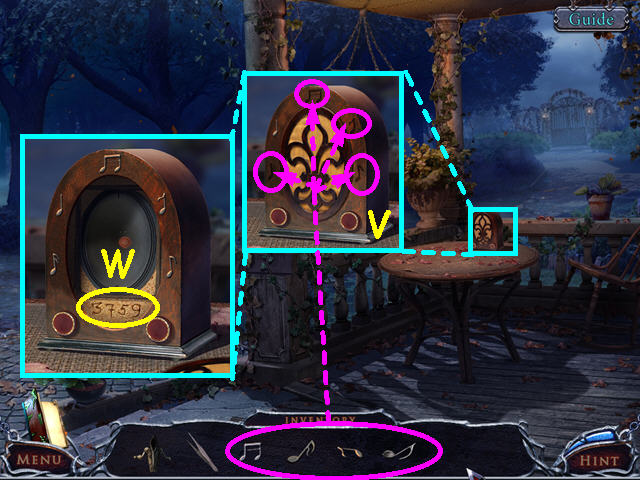
- Look at the radio and place the 4 MUSICAL NOTES into the matching niches (V).
- Note the code that is uncovered (W).
- Walk to the right.
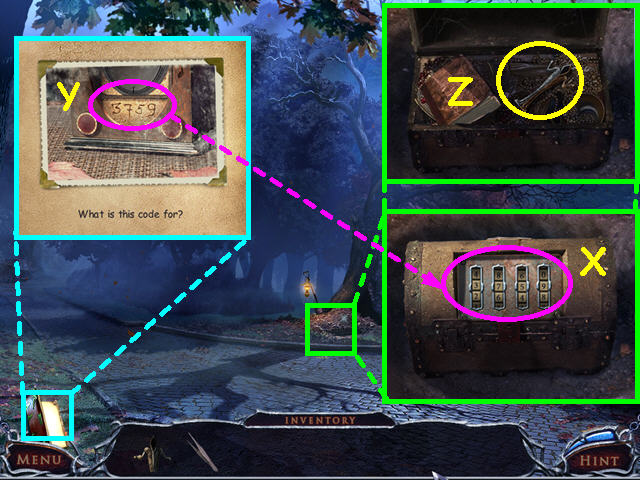
- Look in the hole and enter the code from the radio (X).
- You can refer to your diary (Y).
- Take the 2/2 STATUETTE (Z).
- Return to the greenhouse, go inside, then walk to the right.
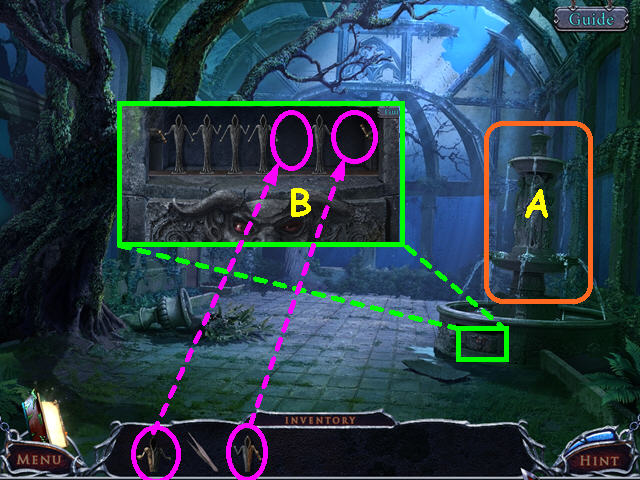
- Click on the fountain to reveal a hidden compartment if you did not do this earlier (A).
- Look in the compartment and place the 2 STATUETTES on the shelf for a mini-game (B).
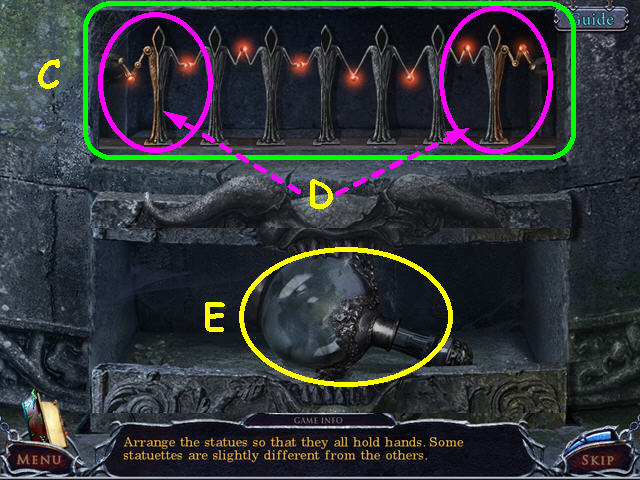
- Move the statuettes so that they are all connected by the hands (C).
- Click on 2 statuettes to swap positions.
- The hands will light when connected.
- Note that 2 statuettes are two-toned and have hinged arms- they belong on the ends (D).
- Take the MYSTERY VESSEL from the opening (E).
- Return to Jenny in the secret chamber in the manor.
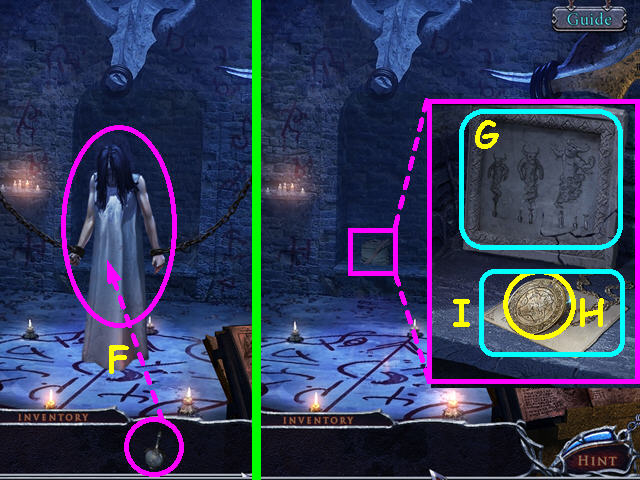
- Give the MYSTERY VESSEL to Jenny (F).
- Once the demon disappears, look at the bench, then look at the small mural (G).
- Take the MEDALLION and the PEARL that is under the medallion (H).
- Read the diary page (I).
- Exit the manor and select the porch steps for a HOS.
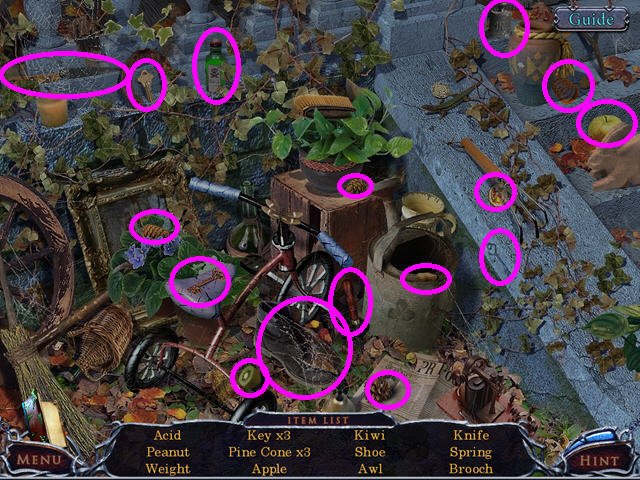
- Locate all the items on the list.
- You will earn the ACID.
- Walk left, then right to the cable-way area.
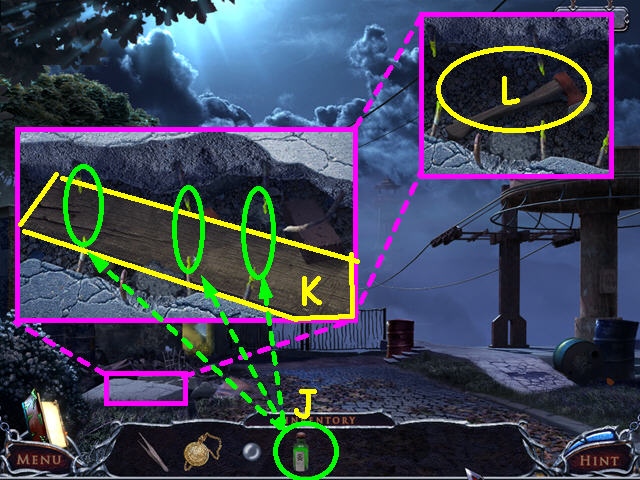
- Look at the broken concrete and use the ACID 3 times on the iron rods (J).
- Take the WOODEN PLANK (K) and the AXE that is underneath (L).
- Walk down, then left and select the trunk of the car for a HOS.
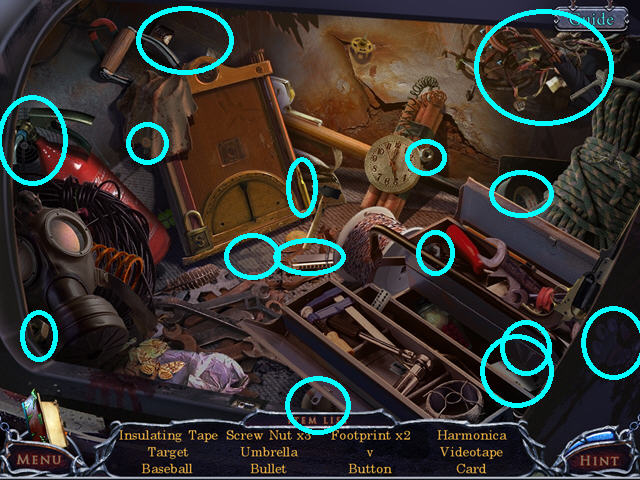
- Locate all the items on the list.
- You will earn the INSULATING TAPE.
- Walk to the left.
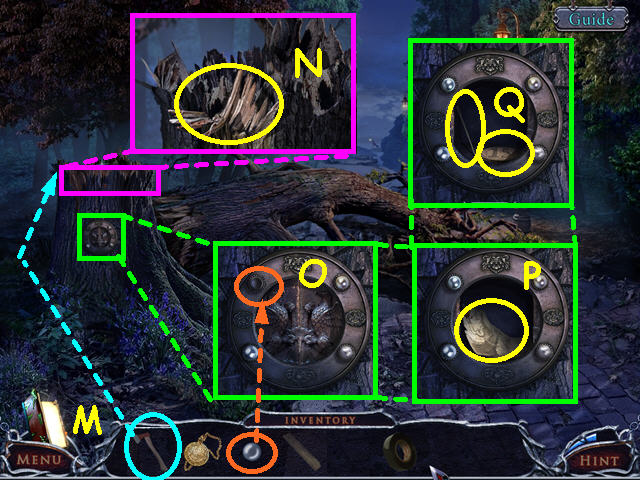
- Use the AXE to cut down the tree (M).
- Look at the stump and take the WOOD CHIPS (N).
- Look at the safe and replace the missing PEARL (O).
- Take the MAP (P).
- Take the 15 CENT coin and the NEEDLE (Q).
- Walk forward.
Chapter 2: Lighthouse Island
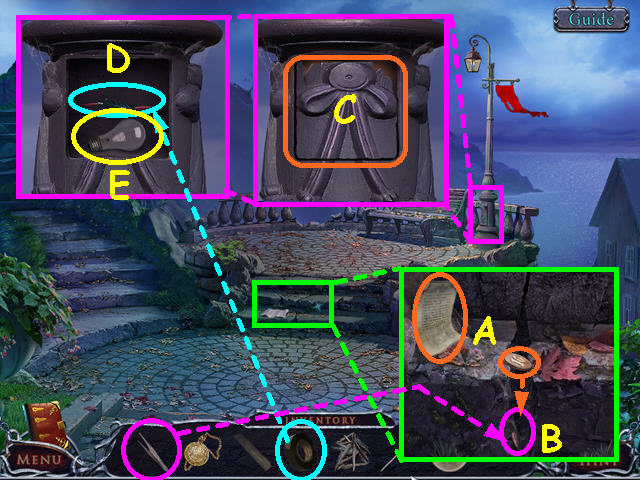
- Look at the steps and take the smoker instructions and try to take the 10 cent coin (A).
- Use the TWEEZERS to retrieve the 10 CENT coin (B).
- Look at the base of the light pole and open the cover (C).
- Use the INSULATING TAPE on the wires (D).
- Take the LIGHT BULB (E).
- Walk to the right.
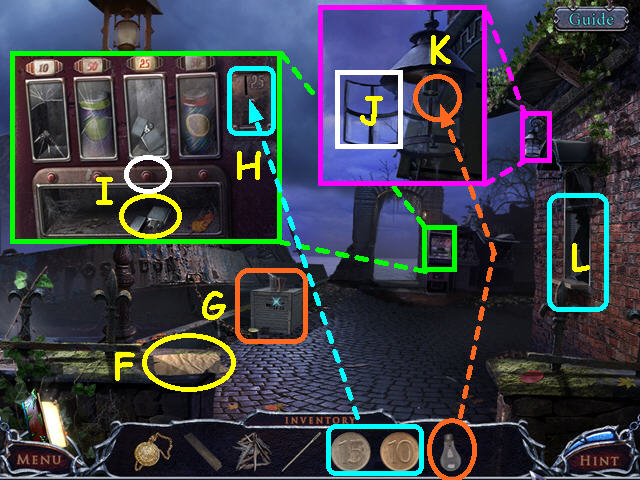
- Take the PAPER (F).
- Note the crate (G).
- Look at the vending machine and use the 10 CENT and 15 CENT coins on the slot (H).
- Press the button, then take the LIGHTER (I).
- Look at the lamp and open the door (J).
- Use the LIGHT BULB on the lamp (K).
- Select the broken window for a HOS (L).
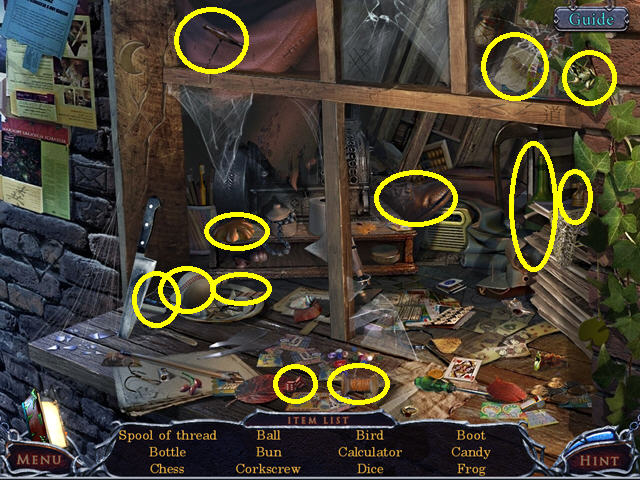
- Locate all the items on the list.
- You will earn the SPOOL of THREAD which will combine with the NEEDLE to become NEEDLE with THREAD.
- Look at the crate.
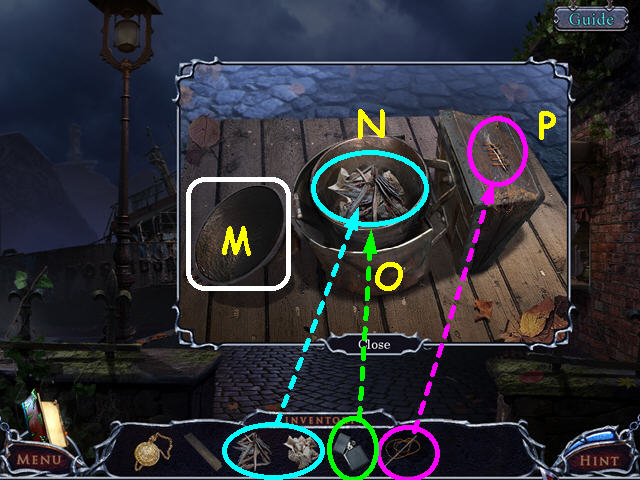
- Open the lid on the smoker (M).
- Place the PAPER, then the WOOD CHIPS inside (N).
- Use the LIGHTER to light the chips (O).
- Use the NEEDLE and THREAD to repair the hole (P).
- Close the lid and pump the smoker twice.
- Take the BEE SMOKER then walk down once.
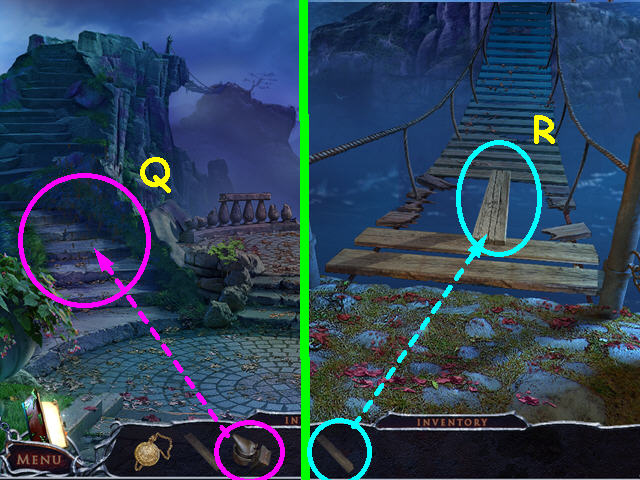
- Use the BEE SMOKER on the swarm of bees 3 times, then walk up the steps (Q).
- Place the WOOD PLANK over the hole in the bridge and walk forward (R).
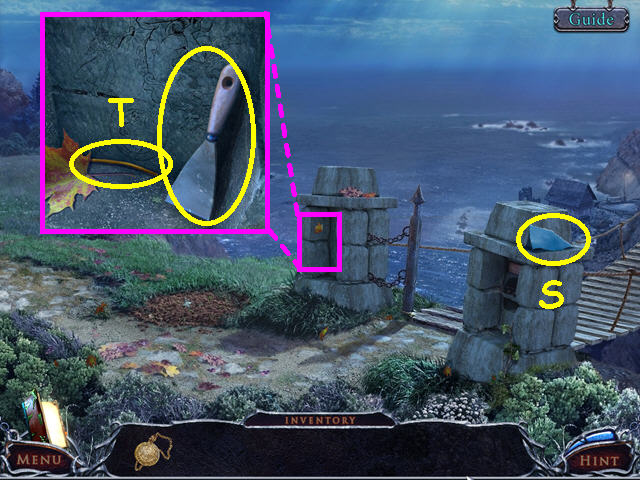
- Take the 1/6 MIRROR SHARD (S).
- Look in the left column and take the SCRAPER and the 1/3 ELECTRICAL WIRE (T).
- Walk to the left.
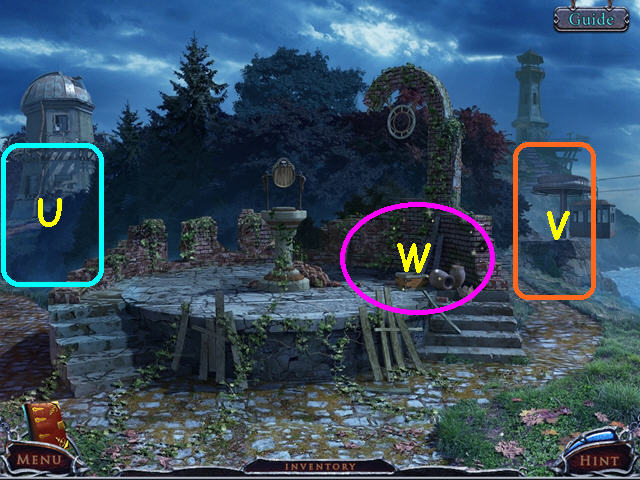
- Note the path to the observatory (U).
- Note the path to the lighthouse (V).
- Select the area by the partial arch for a HOS (W).
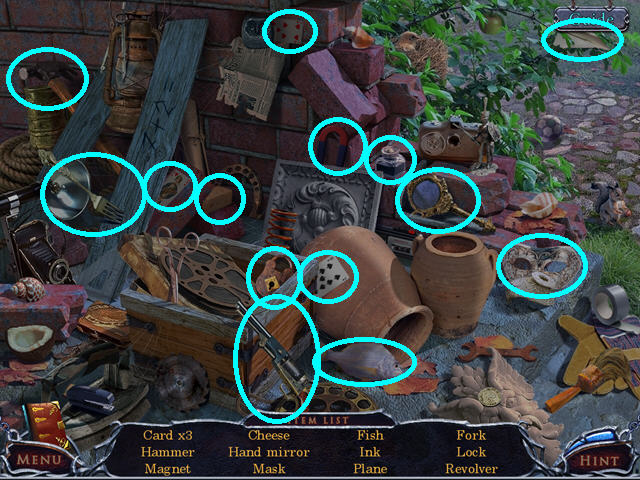
- Locate all the items on the list.
- You will earn the CHEESE.
- Take the right path towards the light house.
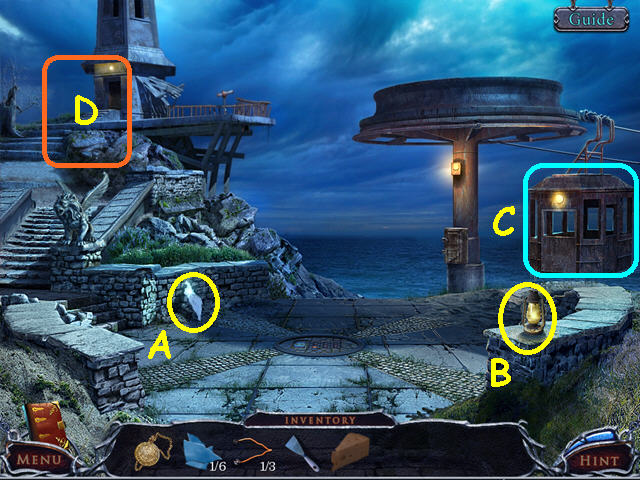
- Take the 2/6 MIRROR SHARD (A).
- Take the LAMP (B).
- Note the cable car (C).
- Walk up towards the lighthouse (D).
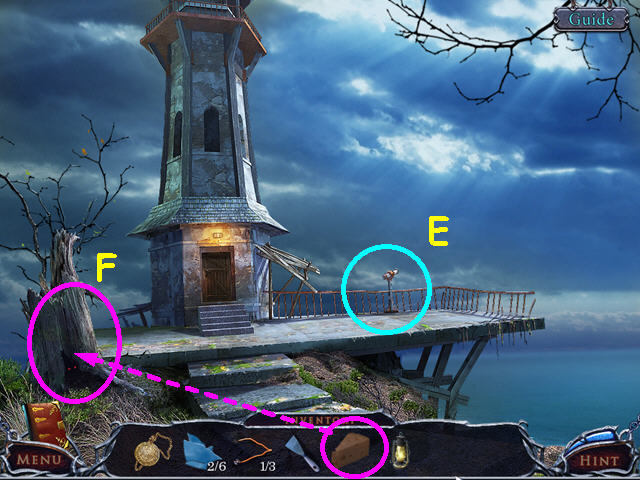
- Note the telescope (E).
- Use the CHEESE on the stump (F).
- Select the stump for a HOS.
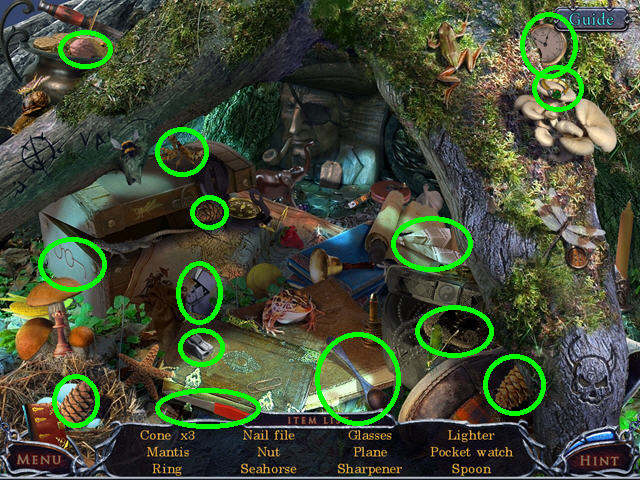
- Locate all the items on the list.
- You will earn the NAIL FILE.
- Walk down twice, then go left to the observatory.
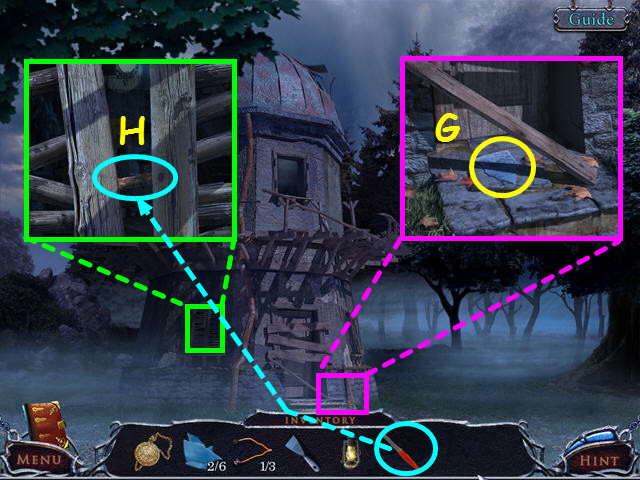
- Look near the front steps and take the 3/6 MIRROR SHARD (G).
- Look at the shutters and use the NAIL FILE to open the latch (H).
- Enter the observatory through the window.
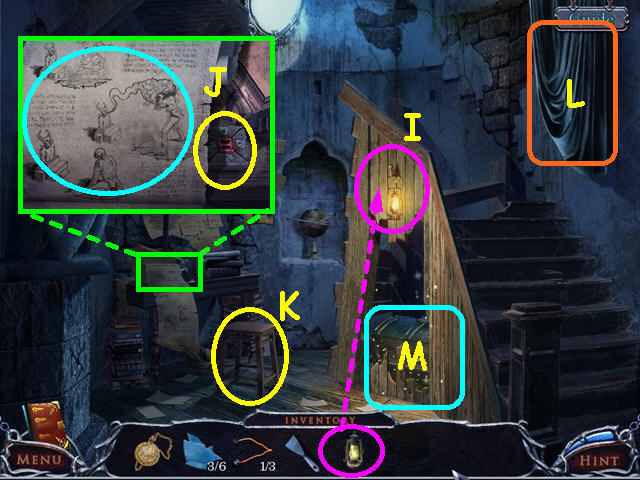
- Hang the LAMP on the hook (I).
- Look at the desk and read the parchment and take the ZODIAC TILE (J).
- Take the STOOL (K).
- Pull the drape off the mirror (L).
- Select the chest under the lamp for a HOS (M).
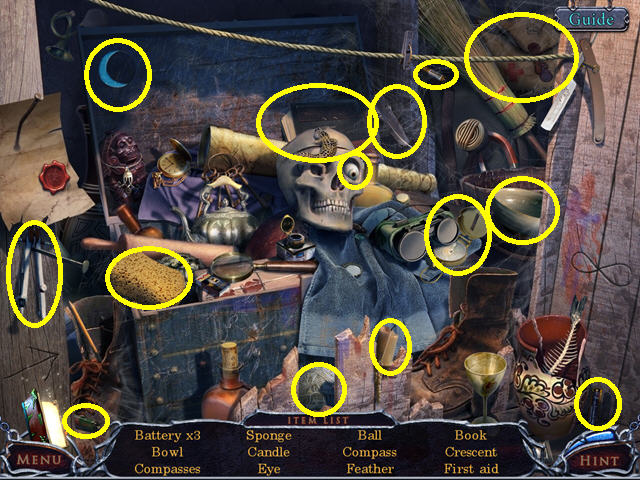
- Locate all the items on the list.
- You will earn the SPONGE.
- Walk down twice, go to the right, then enter the cable car.
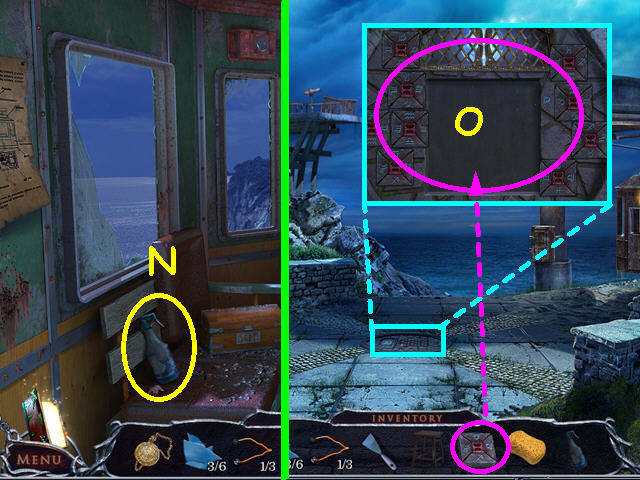
- Take the WINDOW CLEANER (N).
- Exit the cable car.
- Select the circle in the center of the walkway and use the ZODIAC TILE on the circle for a min-game (O).
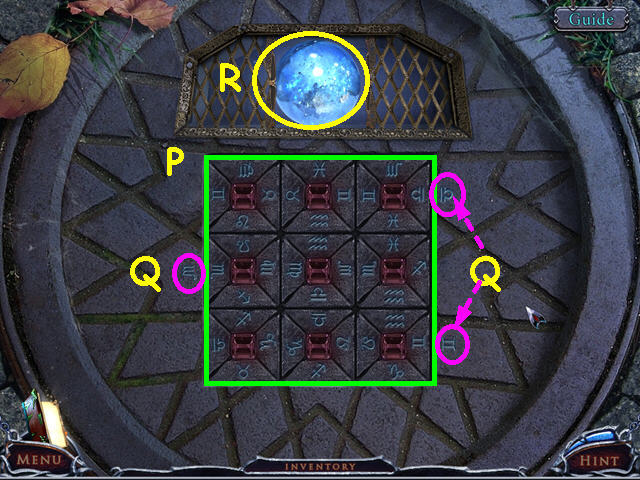
- Place the squares into the center so that all the symbols touch a matching symbol (P).
- Note the 3 symbols on the outside to get you started (Q).
- Take the BLUE SPHERE from the opening (R).
- Walk up to the lighthouse and look at the telescope.
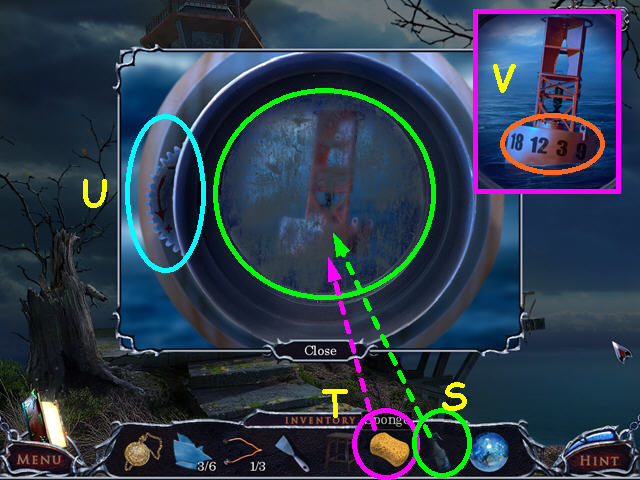
- Use the WINDOW CLEANER 3 times on the lens (S).
- Use the SPONGE 3 times to clean the lens (T).
- Click on the focus dial to make the image clear (U).
- Note the code on the buoy (V).
- Return to the cable car.
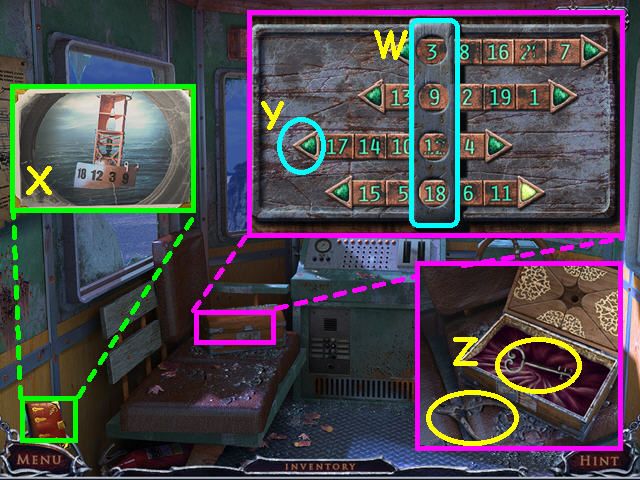
- Look at the box on the bench for a mini-game.
- Using the code from the buoy, slide the bars so the correct numbers are in the circles (W).
- You can refer to the code in your journal (X).
- Note that the numbers are not in any order.
- Click on the arrows to move the bars (Y).
- Take the PLIERS and the LIGHTHOUSE KEY (Z).
- Walk to the lighthouse, look at the door and use the LIGHTHOUSE KEY in the lock.
- Enter the lighthouse.
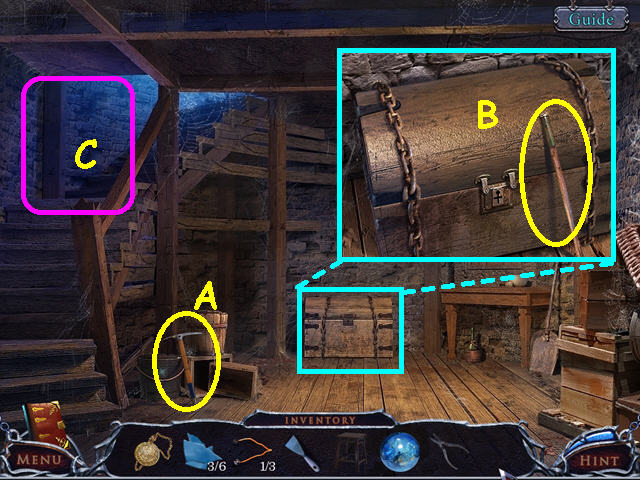
- Take the PICKAXE (A).
- Look at the chest and take the WOODEN STICK (B).
- Walk up the stairs (C).
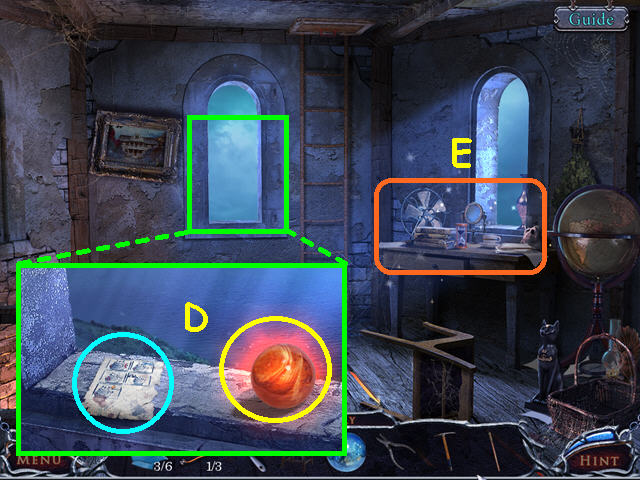
- Look out the window; take the lamp instructions and the YELLOW SPHERE (D).
- Select the desk for a HOS (E).
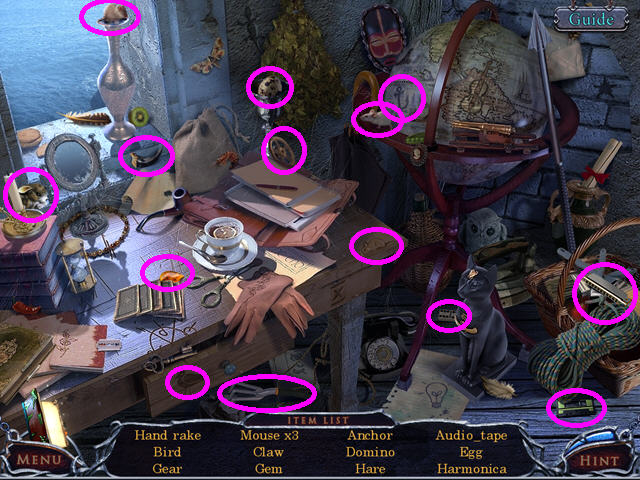
- Locate all the items on the list.
- You will earn the HAND RAKE.
- Exit the lighthouse and select the stump for a HOS.
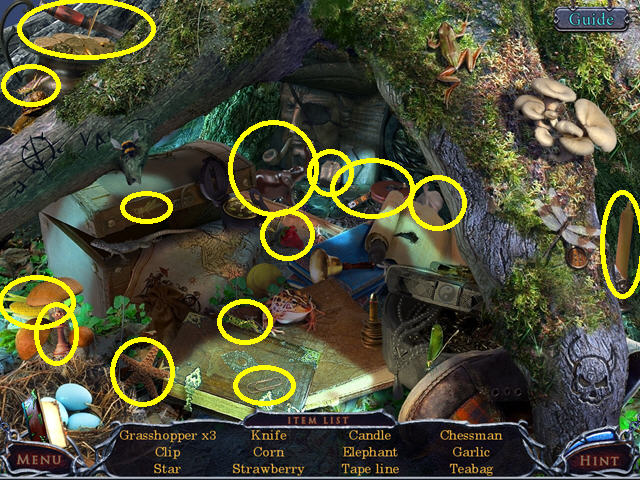
- Locate all the items on the list.
- You will earn the KNIFE.
- Walk down twice.
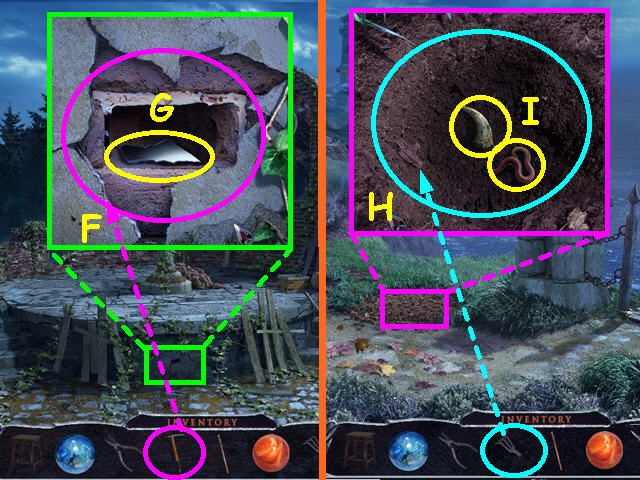
- Look at the base of the platform and use the PICKAXE 3 times to remove the plaster (F).
- Take the 4/6 MIRROR SHARD (G).
- Walk down to the bridge area.
- Look at the mound of dirt and use the HAND RAKE 3 times (H).
- Take the WORM and the CLAW (I).
- Return to the front of the observatory.
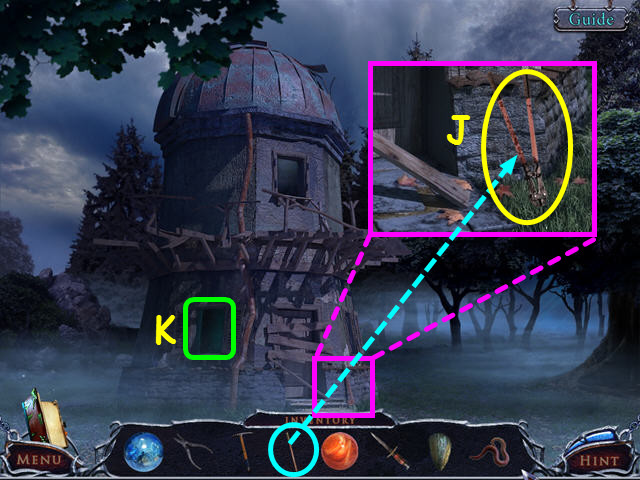
- Look near the front steps and use the WOODEN STICK on the broken wire cutters (J).
- Take the WIRE CUTTERS.
- Enter the observatory through the window (K).
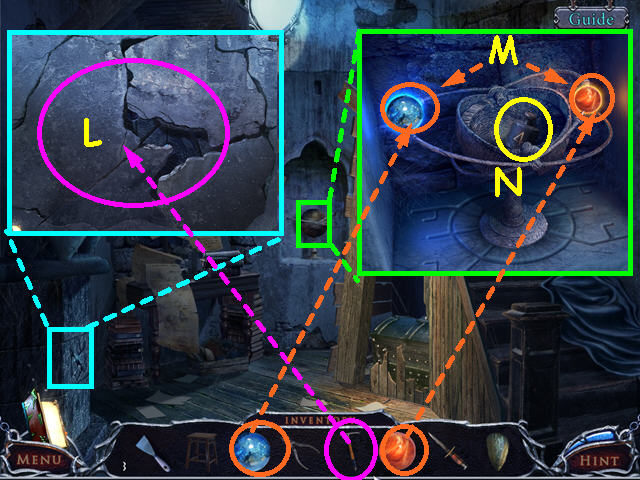
- Look at the area beneath the gargoyle and use the PICKAXE 4 times to clear away the plaster (L).
- Exit the close-up – you cannot complete this mini-game now.
- Look at the globe and place the BLUE SPHERE and the YELLOW SPHERE into the outer rings (M).
- Take the 4 Kg WEIGHT from inside the globe (N).
- Walk down twice, then walk to the right.
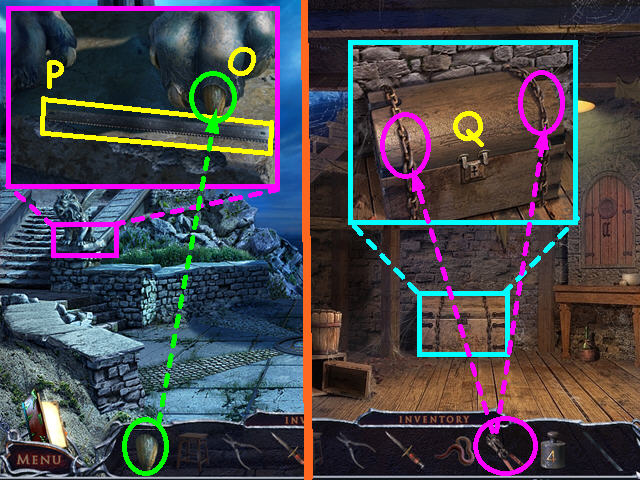
- Look at the gargoyle and replace the CLAW (O).
- Take the HACKSAW BLADE (P).
- Return to the lighthouse and go inside.
- Look at the chest and use the WIRE CUTTERS on the 2 chains (Q).
- Walk up the stairs.
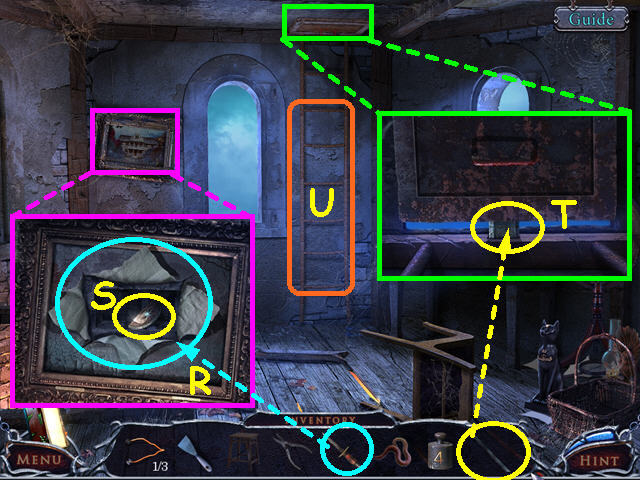
- Look at the painting and use the KNIFE on it twice (R).
- Click on the cuts to open it up and take the 1/2 FIRE EMBLEM FRAGMENT (S).
- Look at the overhead hatch and use the HACKSAW BLADE on the latch 3 times (T).
- Climb up the ladder (U).
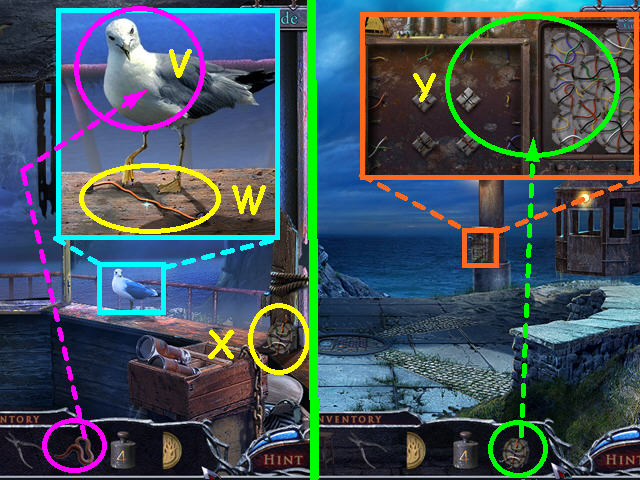
- Look at the seagull and give him the WORM (V).
- Take the 2/3 ELECTRICAL WIRE (W).
- Take the CIRCUIT CHIP (X).
- Exit the lighthouse and walk down once.
- Look at the control box and use the CIRCUIT CHIP to trigger a mini-game (Y).
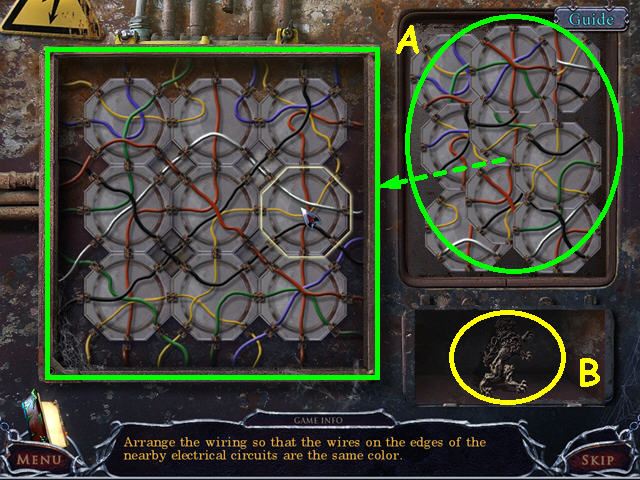
- Place the chips into the grid so all the colored wires match (A).
- Take the LION INSIGNIA (B).
- Enter the cable car.
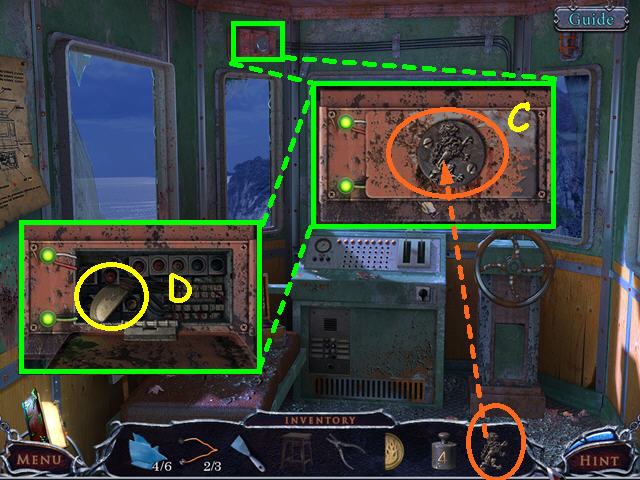
- Look at the overhead control box and place the LION INSIGNIA into the outline (C).
- Click on the box to open it, then take the 2/2 FIRE EMBLEM FRAGMENT (D).
- Walk down twice and select the area by the arch for a HOS.
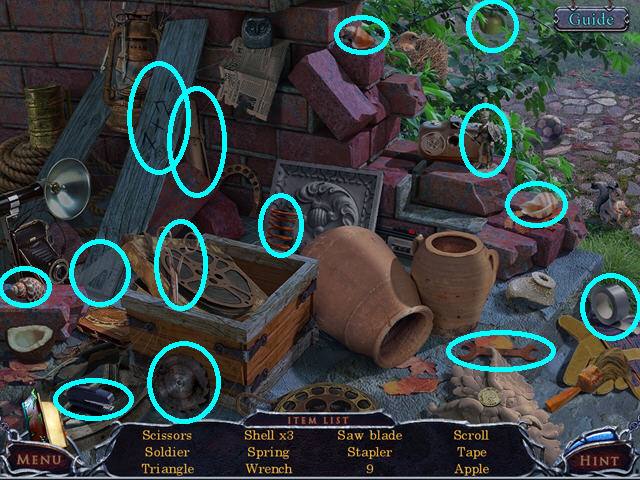
- Locate all the items on the list.
- You will earn the SCISSORS.
- Return to the lighthouse and go inside.
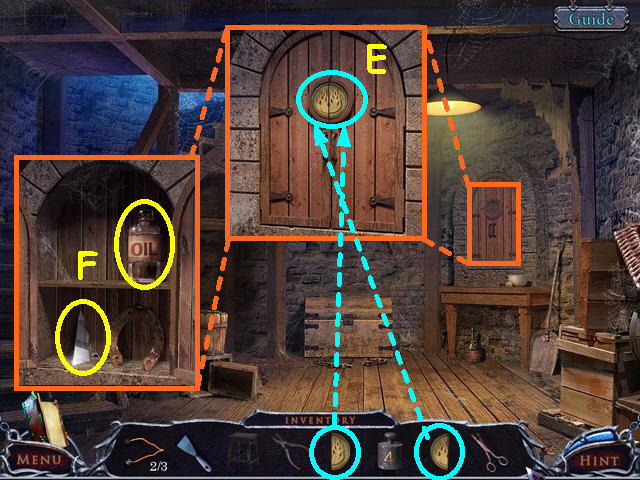
- Look at the cabinet and place the 2 FIRE EMBLEM FRAGMENTS into the circle (E).
- Open the cabinet and take the 5/6 MIRROR SHARD and the OIL (F).
- Walk upstairs and select the desk for a HOS.
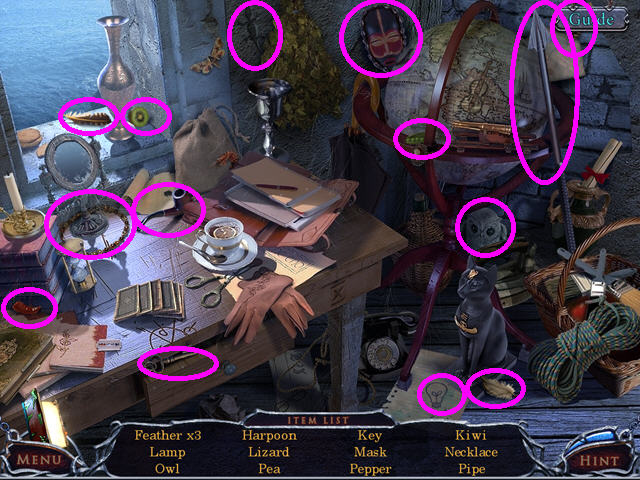
- Locate all the items on the list.
- You will earn the HARPOON.
- Climb up the ladder.
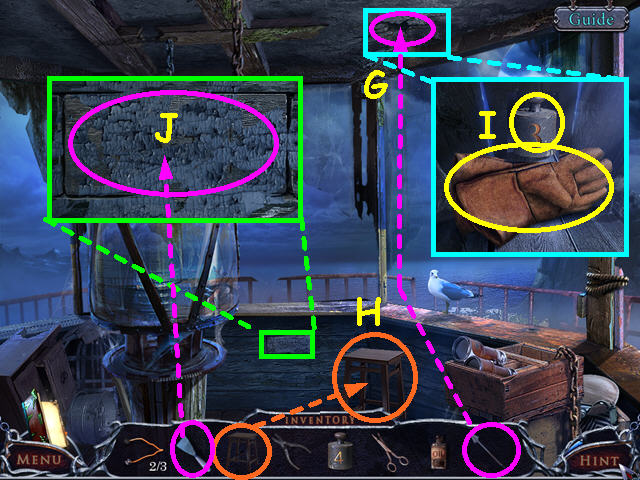
- Use the HARPOON on the hole in the ceiling 2 times (G).
- Place the STOOL on the floor (H).
- Look inside the hole and take the GLOVES and the 3 Kg WEIGHT (I).
- Look at the block of wood and use the SCRAPER 3 times to remove the paint (J).
- Exit the lighthouse and return to the bridge area.
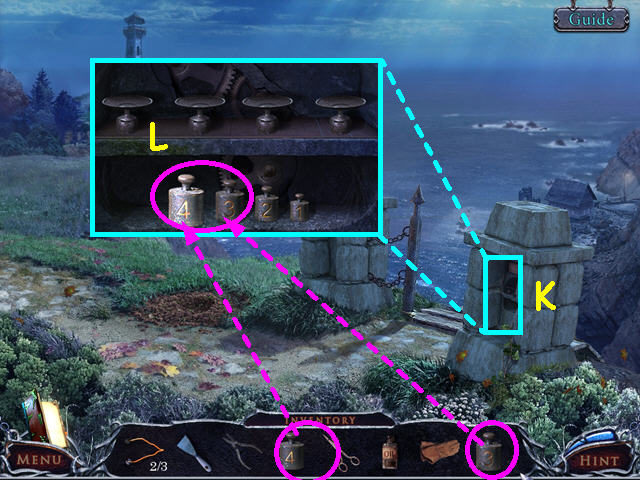
- Look at the right pillar (K).
- Place the 4 Kg WEIGHT and the 3 Kg WEIGHT on the shelf to trigger a mini-game (L).
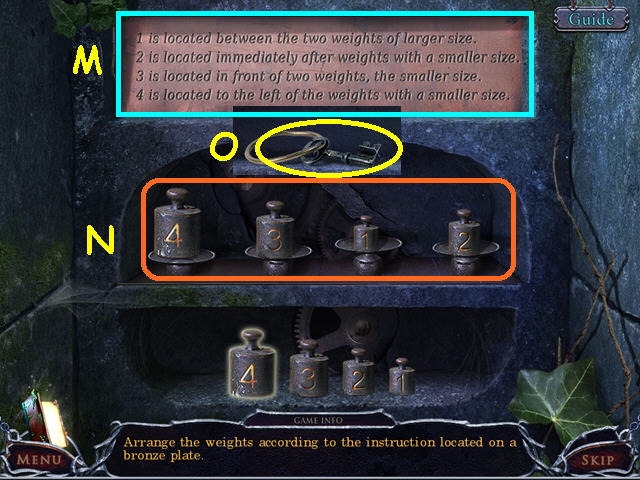
- Using the clues (M) place the weights in the correct position (N).
- Take the CHEST KEY that was hidden under the clues (O).
- Return to the observatory and enter through the window.
- Select the chest under the lamp for a HOS.
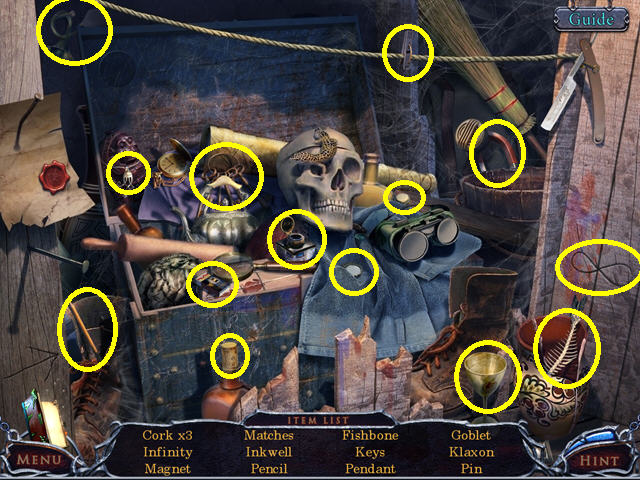
- Locate all the items on the list.
- You will earn the MATCHES.
- Walk to the lighthouse and go inside.
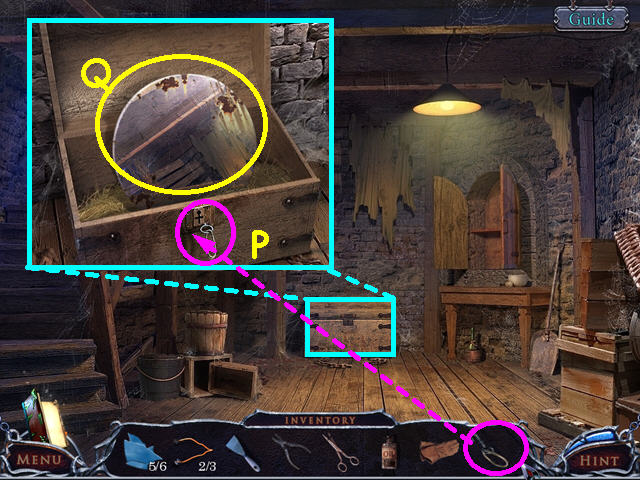
- Look at the chest and use the CHEST KEY on the lock (P).
- Click to open the lid and take the MIRROR (Q).
- Walk upstairs, then take the ladder to the lamp area.
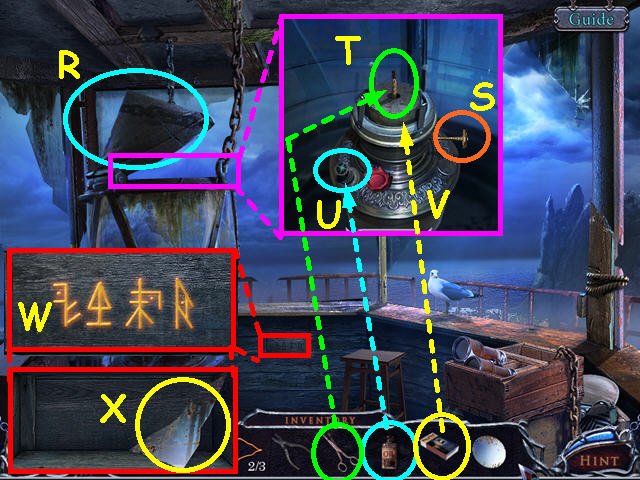
- Open the top of the lamp (R).
- Look inside the lamp and click the knob to raise the wick (S).
- Use the SCISSORS to trim the wick (T).
- Click on the red cap, then pour the OIL into the lamp (U).
- Use the MATCHES on the wick to light the lamp (V).
- Look at the block of wood to see the illuminated runes (W).
- Click on the panel and take the 6/6 MIRROR SHARD (X).
- Exit the lighthouse, then walk down twice.
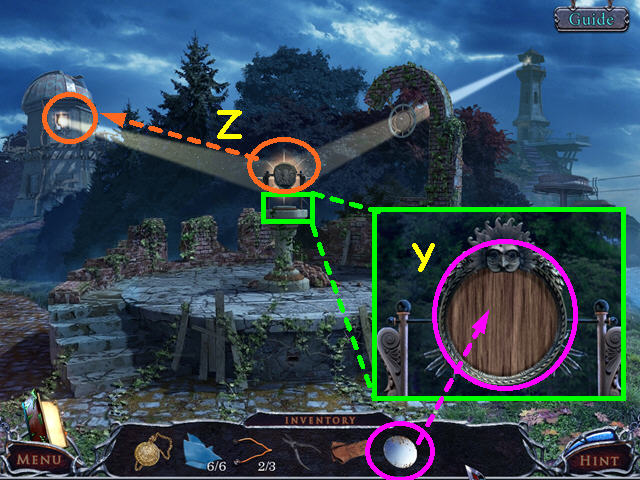
- Look at the pedestal on the platform and place the MIRROR into the holder (Y).
- Click on the mirror so the beam points to the observatory (Z).
- Walk to the observatory and go inside.
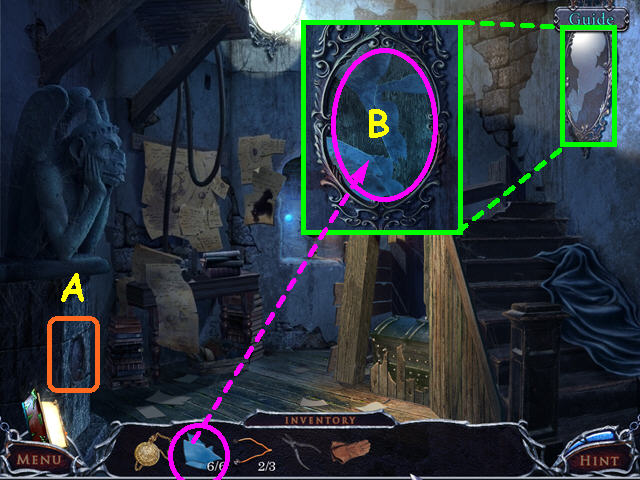
- Note the area under the gargoyle (A).
- Look at the mirror and use the 6 MIRROR SHARDS on the mirror for a mini-game (B).
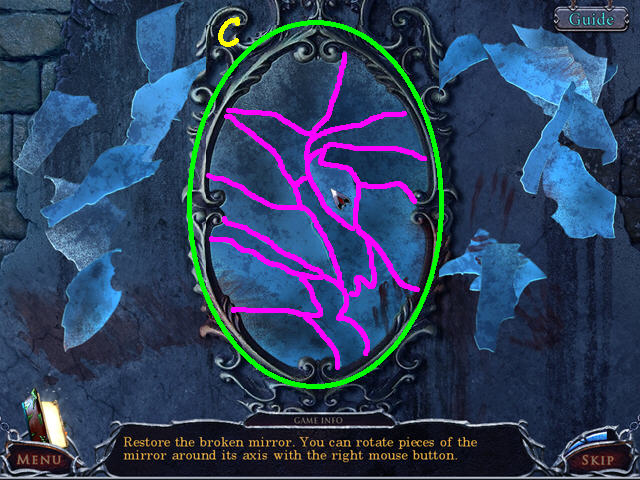
- Restore the broken mirror by placing all the pieces inside the frame (C).
- Left-click to pick up a piece, right-click to rotate, then left-click again to place.
- Pieces will darken slightly and lock in place when correct.
- Look at the area beneath the gargoyle for a mini-game.
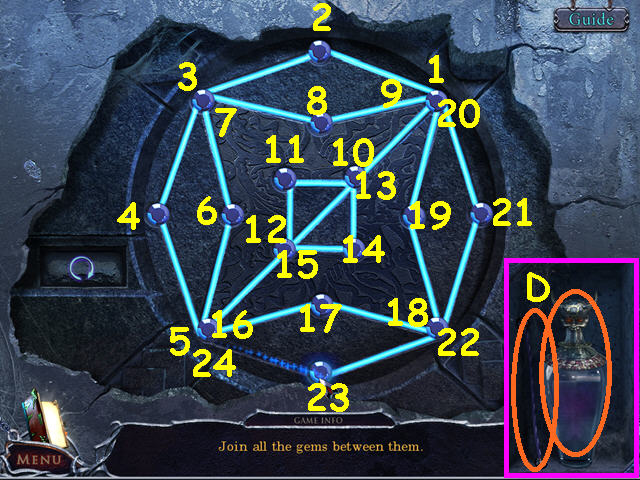
- Connect all the gems and pathways in one continuous line.
- Click on a gem, then click on the next one to start the path.
- Continue until all the paths have been traveled without duplication.
- Press the gems in numerical order (1-24).
- Take the 3/3 ELECTRICAL WIRE and the SECOND VESSEL (D).
- Travel to the cable car.
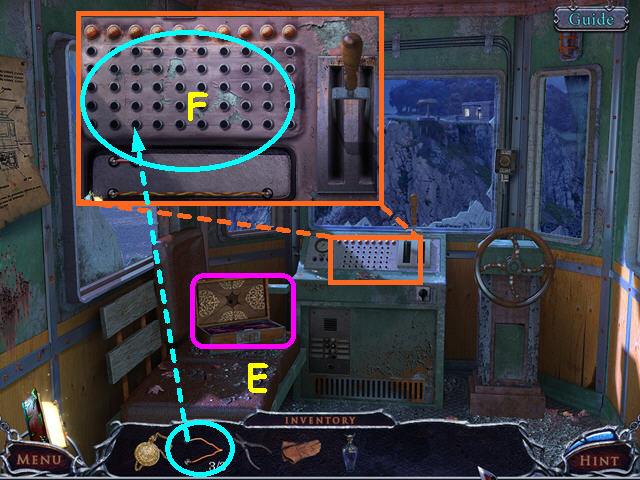
- Note the open box on the seat (E).
- Look at the console and use the 3 ELECTRICAL WIRES for a mini-game (F).
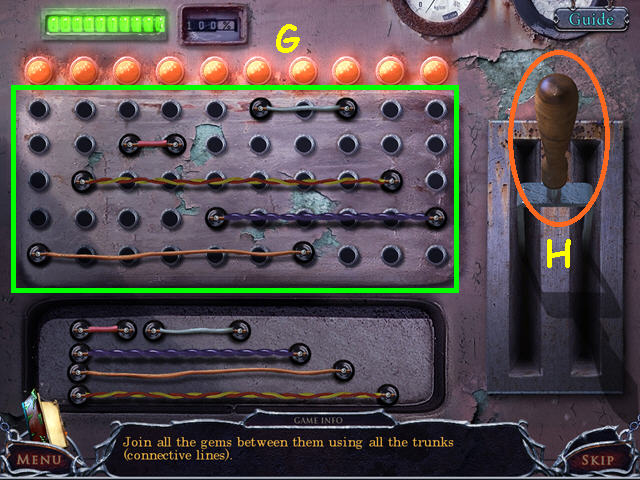
- Place the cables so that there is one connector under each light (G).
- Pull the lever (H).
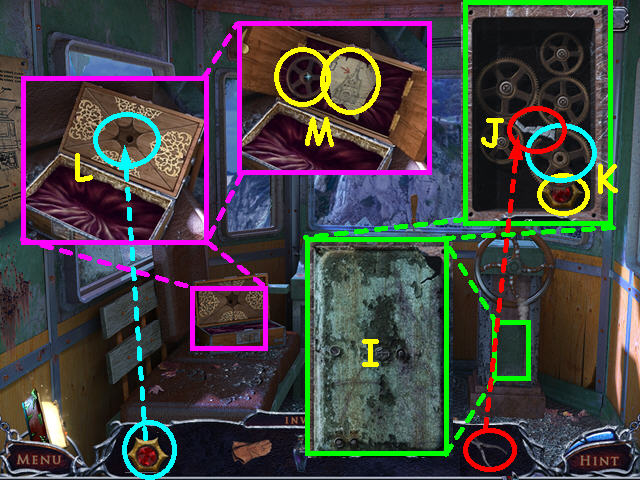
- Look at the panel under the wheel and click to it to open (I).
- Use the PLIERS to remove the piece jamming the gears (J).
- Remove the broken gear and take the STAR INSIGNIA (K).
- Look at the box on the bench and place the STAR INSIGNIA into the niche (L).
- Take the map piece and the GEAR (M).
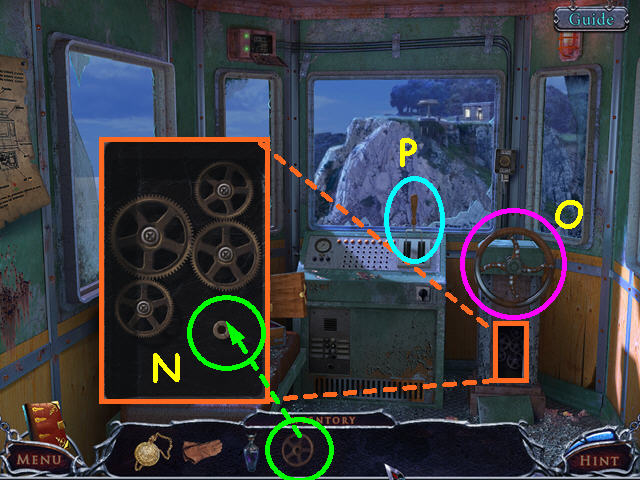
- Look at the gearbox under the wheel and place the GEAR inside (N).
- Click on the wheel (O).
- Pull the lever (P).
- Walk down twice, then go forward to the cemetery gate.
Chapter 3: The Cemetery
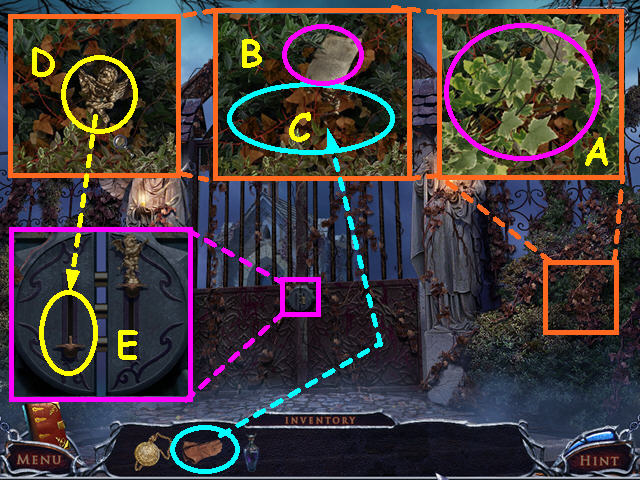
- Look at the bushes on the right and click 3 times to remove the green growth (A).
- Take the diary page (B).
- Use the GLOVES on the sharp growth 3 times (C).
- Take the ANGEL (D).
- Look at the gate lock and place the ANGEL on the left (E).
- Enter the cemetery.
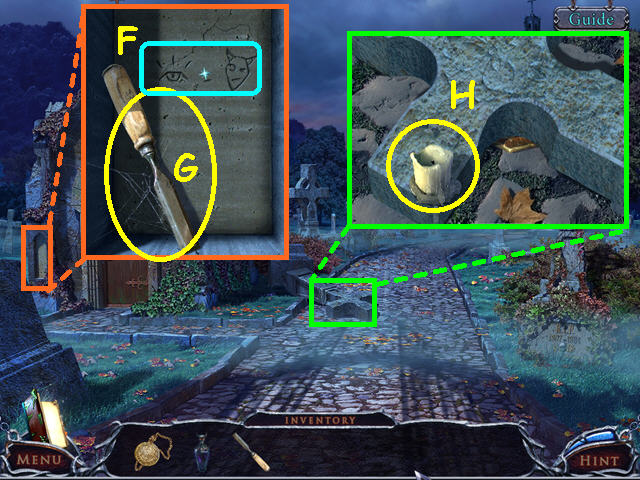
- Look at the alcove on the crypt and note the symbols (F).
- Take the CHISEL (G).
- Look at the fallen cross and take the 1/5 CANDLE (H).
- Walk forward.
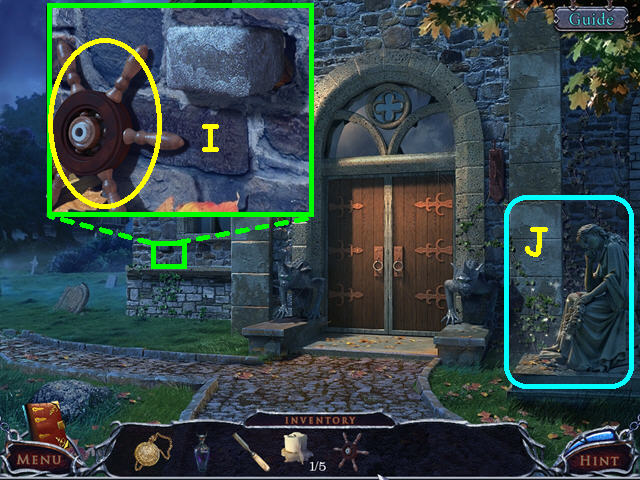
- Look by the window and take the LEVER (I).
- Select the statue for a HOS (J).
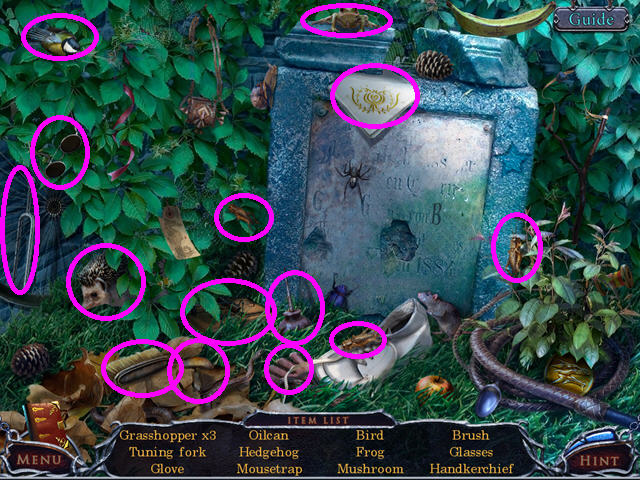
- Locate all the items on the list.
- You will earn the OIL CAN.
- Walk to the left.
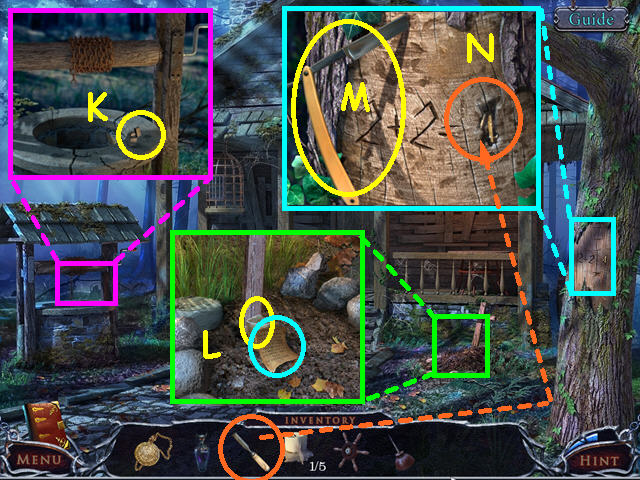
- Look at the well and take the LIGHTER (K).
- Look at the grave, take the diary page and the 2/5 CANDLE (L).
- Look at the tree and take the RAZOR (M).
- Use the CHISEL 3 times to get the 1/2 GRAVESTONE DIGIT (N).
- Return to the front of the church.
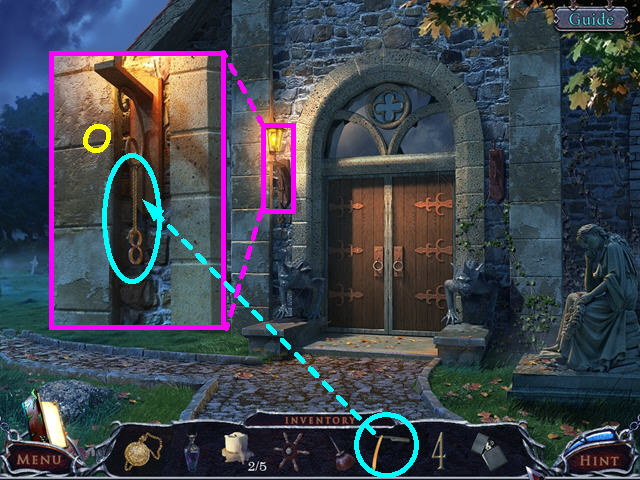
- Look at the lamp sconce and use the RAZOR on the string 3 times to get the 2/2 GRAVESTONE DIGIT (O).
- Walk down.
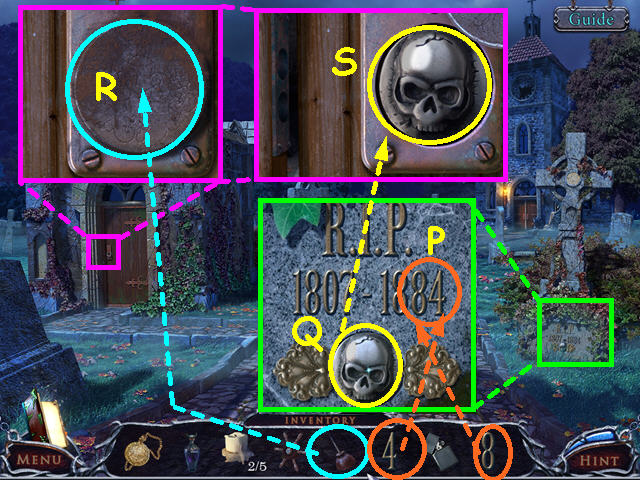
- Look at the headstone and replace the 2 GRAVESTONE DIGITS (P).
- Take the SKULL COIN (Q).
- Look at the crypt door and use the OIL CAN 3 times on the circle (R).
- Click on the circle to move it open and place the SKULL COIN inside (S).
- Enter the crypt.
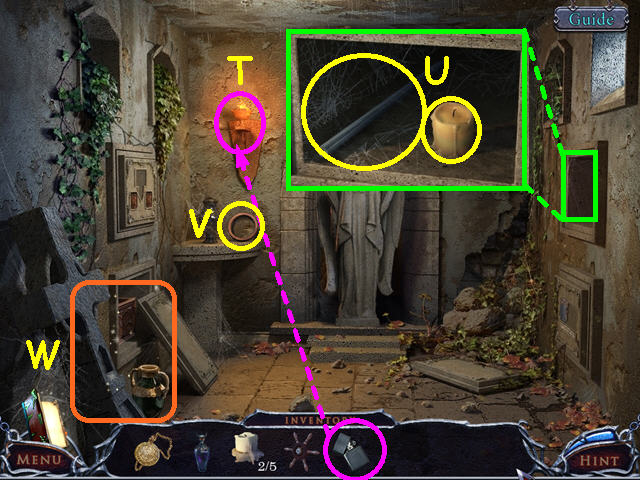
- Use the LIGHTER to light the lamp (T).
- Look in the alcove and take the 3/5 CANDLE and the METAL POLE (U).
- Take the WOODEN CIRCLE (V).
- Select the lower left area for a HOS (W).
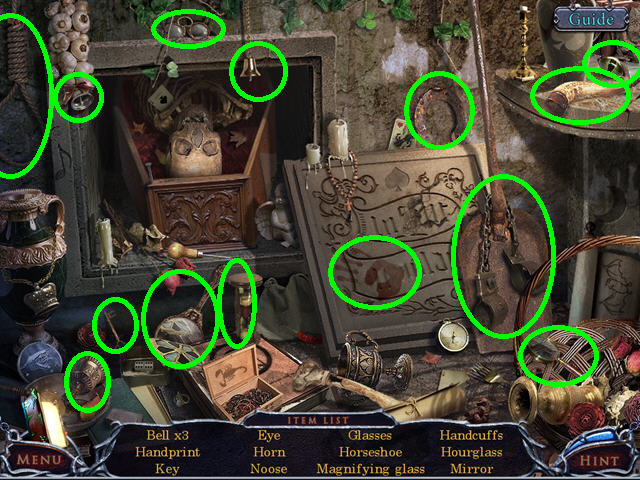
- Locate all the items on the list.
- You will earn the EYE.
- Exit the crypt.
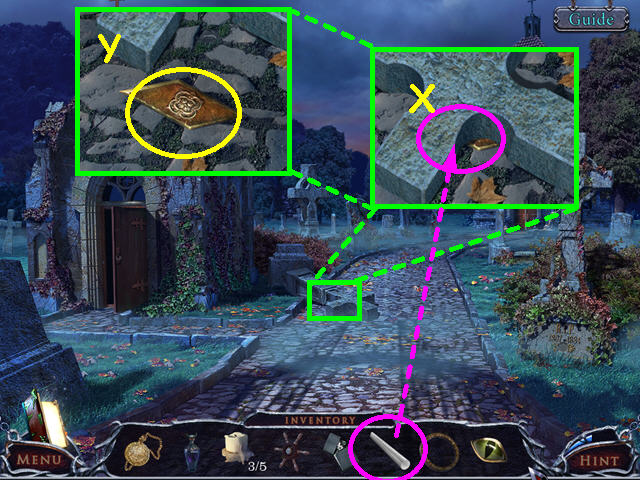
- Look at the fallen cross and use the METAL POLE to move the cross (X).
- Take the 1/3 BRONZE PLATE (Y).
- Walk forward.
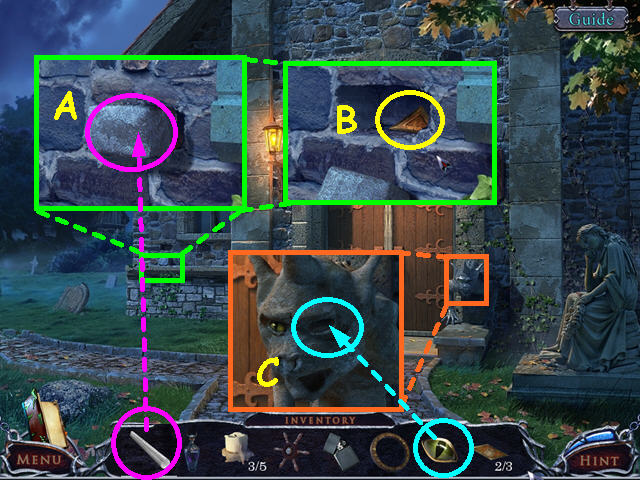
- Look under the window and use the METAL POLE to loosen the brick (A).
- Pull the brick out and take the 2/3 BRONZE PLATE (B).
- Look at the right gargoyle and replace the EYE (C).
- Enter the church.
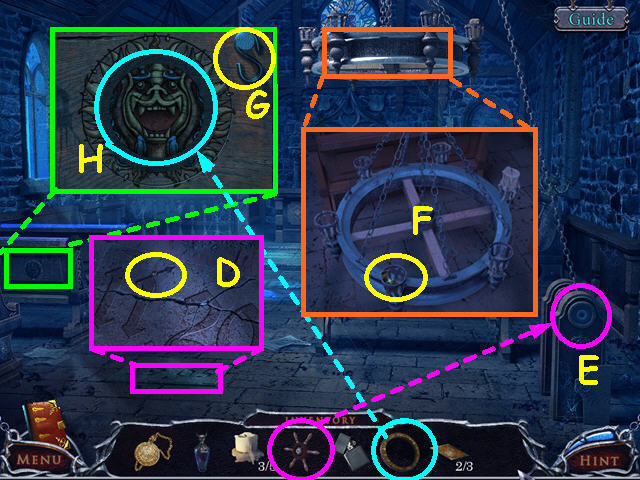
- Look at the stone plate and take the 1/2 HOUR HAND (D).
- Place the LEVER on the winch then click the lever to lower the chandelier (E).
- After it lowers, look at the chandelier and take the CHESS PIECE (F).
- Look at the back of the pew and take the HOOK (G).
- Place the WOODEN RING into the picture for a mini-game (H).
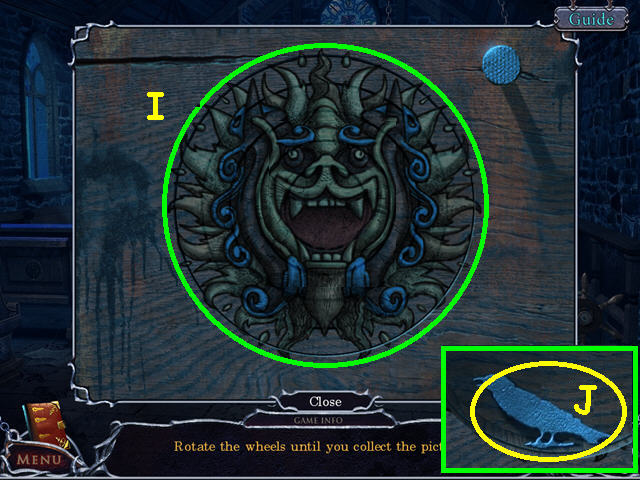
- Restore the picture by rotating the rings (I).
- Click on each ring to move it to the desired point.
- Take the BIRD KEY that is hidden behind the picture (J).
- Return to the front of the cabin.
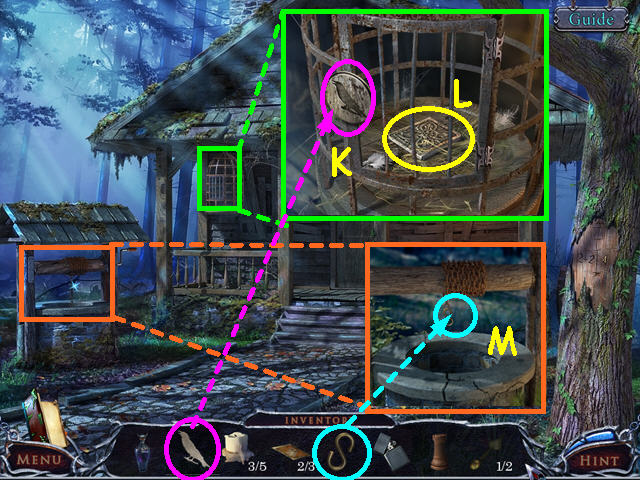
- Look at the birdcage and use the BIRD KEY on the lock (K).
- Take the 3/3 BRONZE PLATE (L).
- Look at the well and place the HOOK on the chain (M).
- Return to the crypt and go inside.
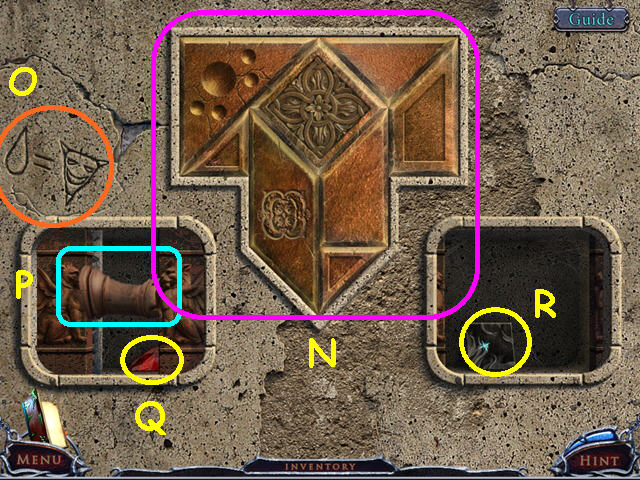
- Look at the center panel on the left for a mini-game.
- Place the 3 BRONZE PLATES onto the wall to trigger a mini-game.
- Place all the bronze plates into the outline (N).
- Note the symbols (O).
- Place the CHESS PIECE into the left niche to hold open the doors (P).
- Take the AMULET (Q).
- Take the 1/4 STONE TABLET (R).
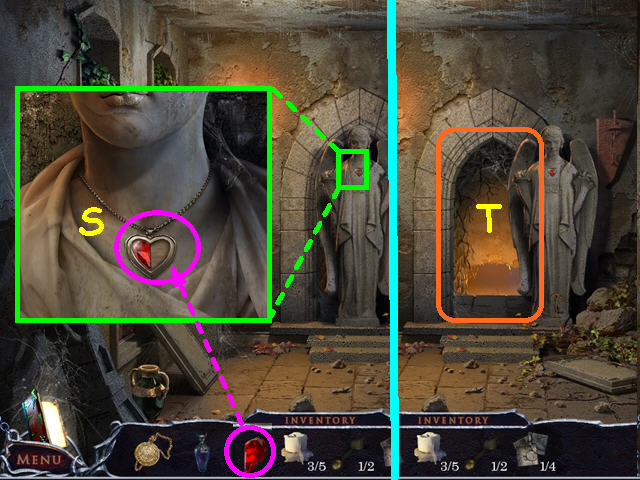
- Look at the statue and place the AMULET into the heart (S).
- Walk forward into the passageway (T).
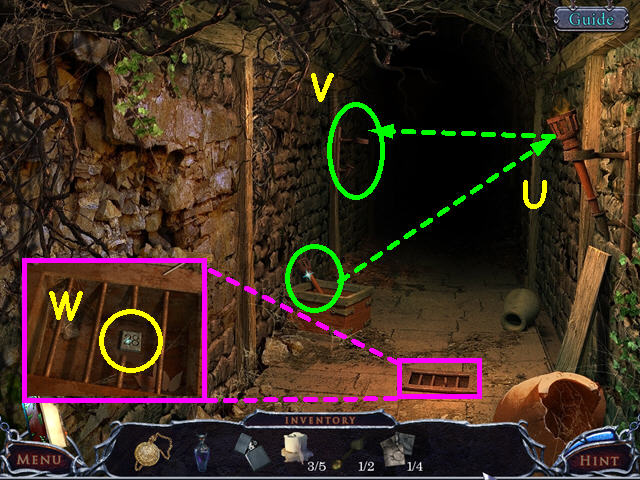
- Take the TORCH from the crate and use it on the wall torch to get the LIT TORCH (U).
- Place the LIT TORCH into the left holder (V).
- Look in the grate and take the 1/3 NUMERICAL STONE (W).
- Walk forward.
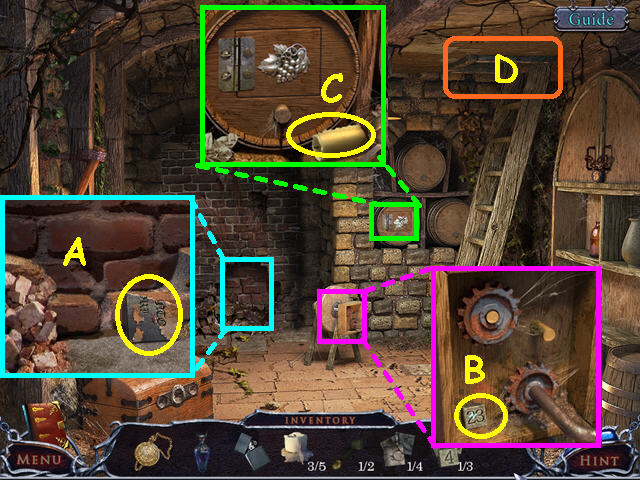
- Look at the bricks and take the PLATE FRAGMENT (A).
- Look at the sharpener and take the 2/3 NUMERICAL STONE (B).
- Look at the wine cask and take the 4/5 CANDLE (C).
- Note the hatch (D).
- Walk down twice.
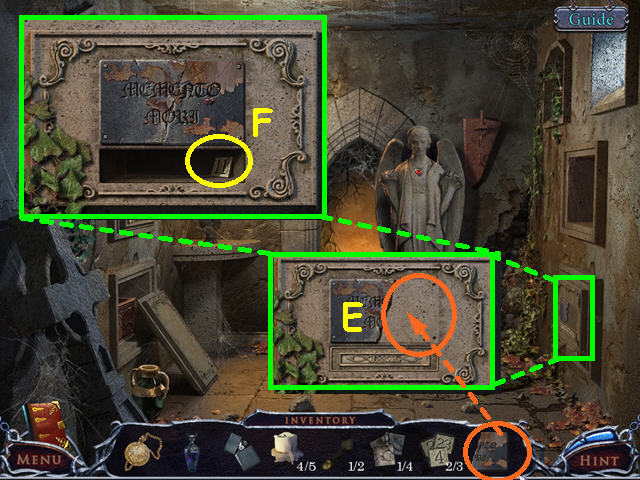
- Look at the lower wall crypt on the right and place the PLATE FRAGMENT onto the face (E).
- Take the 3/3 NUMERICAL STONE (F).
- Walk forward twice and look at the hatch for a mini-game.
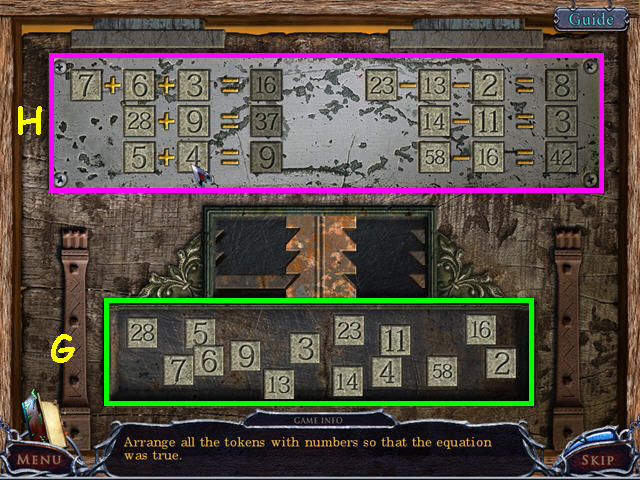
- Place the 3 NUMERICAL STONES into the bottom section to trigger the mini-game (G).
- Place the digits in the top section so that all equations are true (H).
- Climb up the ladder through the hatch.
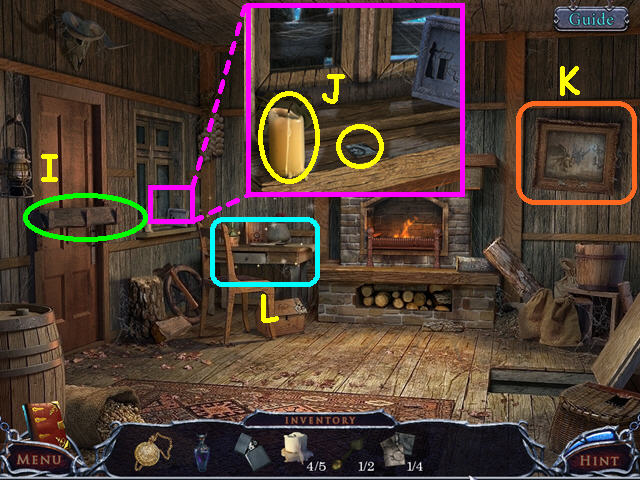
- Remove the lock bar and open the door (I).
- Look at the windowsill, take the 5/5 CANDLE and the 2/4 STONE TABLETS (J).
- Note the painting on the right (K).
- Select the table for a HOS (L).
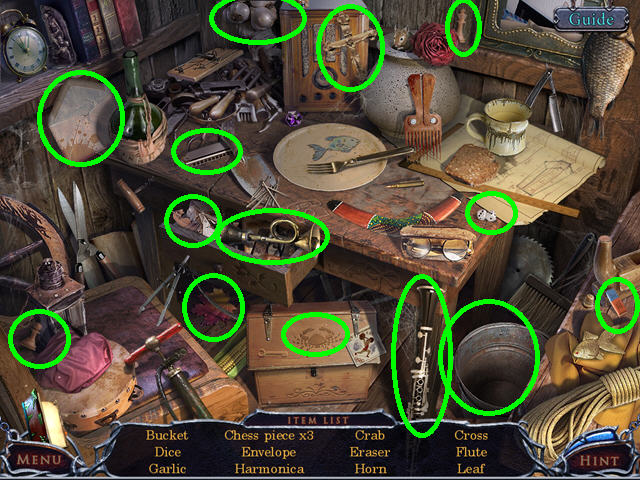
- Locate all the items on the list.
- You will earn the BUCKET.
- Select the painting for a mini-game.
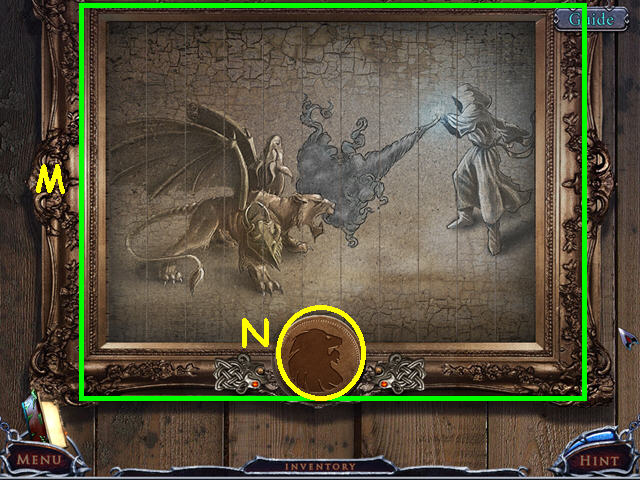
- Restore the painting by swapping strips (M).
- Click on two strips to swap position.
- Take the LION COIN (N).
- Walk left to exit the cabin.
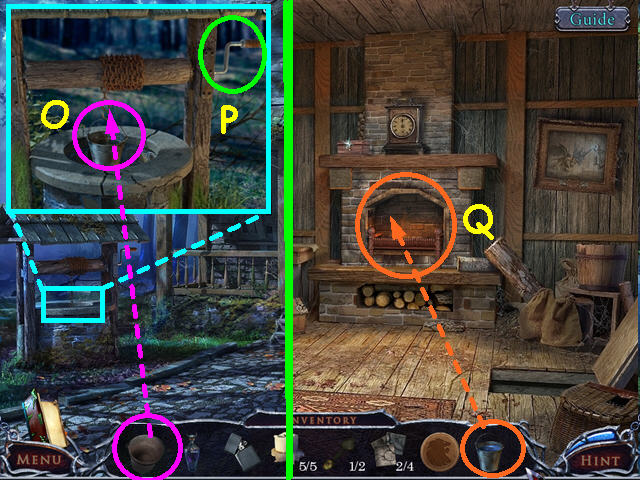
- Look at the well and hang the BUCKET on the hook (O).
- Click on the handle to lower the bucket (P).
- Once you hear it reach the bottom, click the handle again.
- Take the BUCKET with WATER.
- Enter the cabin.
- Use the BUCKET with WATER on the fireplace (Q).
- Walk to the front of the church and select the statue for a HOS.
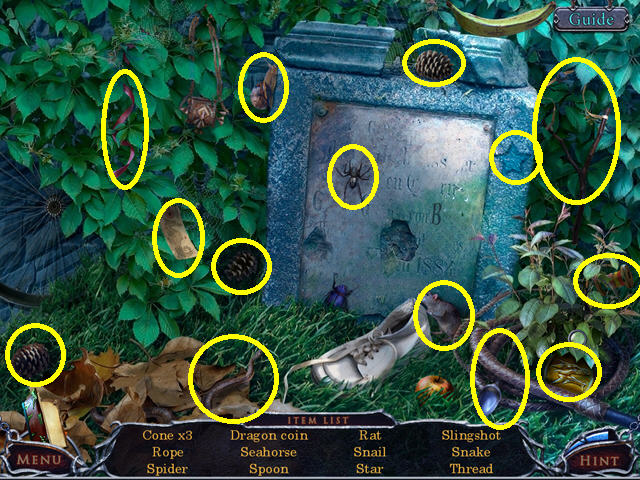
- Locate all the items on the list.
- You will earn the DRAGON COIN.
- Enter the church.
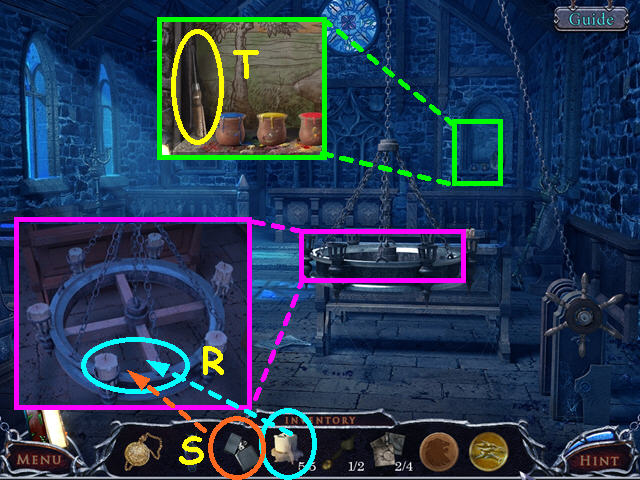
- Look at the chandelier and place the 5 CANDLES into the holders (R).
- Use the LIGHTER to light the candles (S).
- Look at the right alcove and take the SCREWDRIVER (T).
- Return to the crypt, go inside and select the lower left area for a HOS.
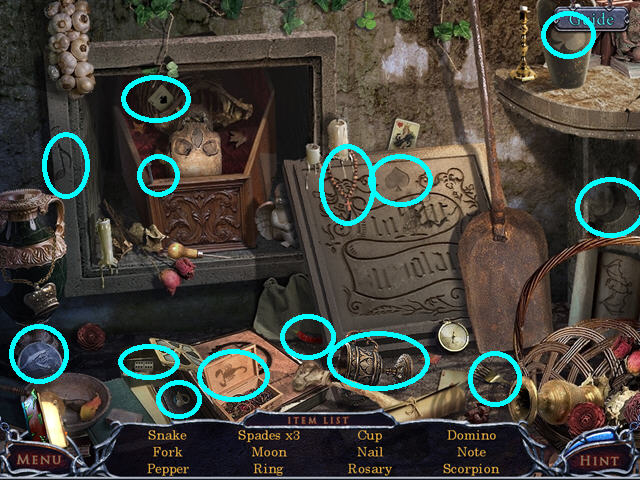
- Locate all the items on the list.
- You will earn the SNAKE COIN.
- Walk forward twice.
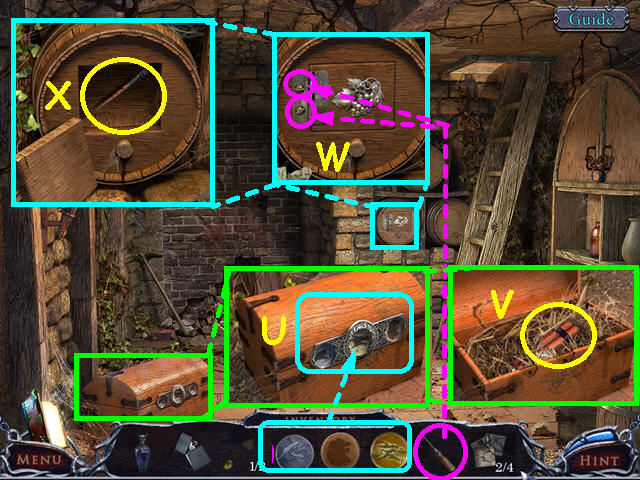
- Look at the chest and place the SNAKE, LION, and DRAGON COINS into the lock (U).
- Take the TNT (V).
- Look at the wine cask and use the SCREWDRIVER on the 2 screws (W).
- Take the BRUSH (X).
- Return to the church and go inside.
- Select the back right alcove for a mini-game.
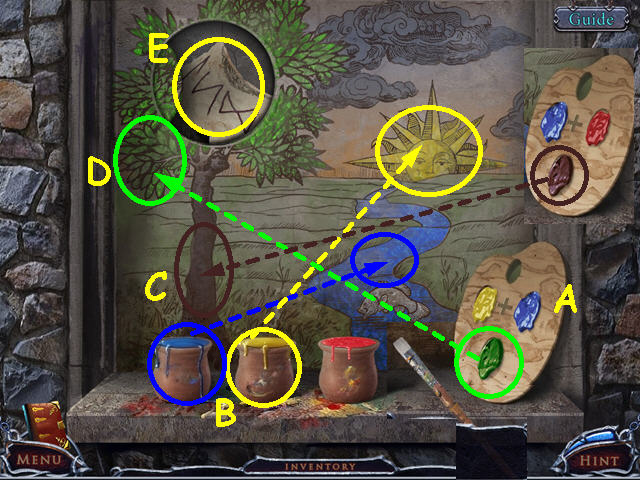
- Use the BRUSH to grab paint from the jars.
- Mix paints on the palette by putting 2 paints at the top (A).
- Paint the sun yellow and the river blue (B).
- Mix blue and red to make brown and paint the tree trunk (C).
- Mix yellow and blue to make green and paint the leaves on the tree (D).
- Take the runes code from the hole in the tree (E).
- Return to the crypt, go inside and walk forward once.
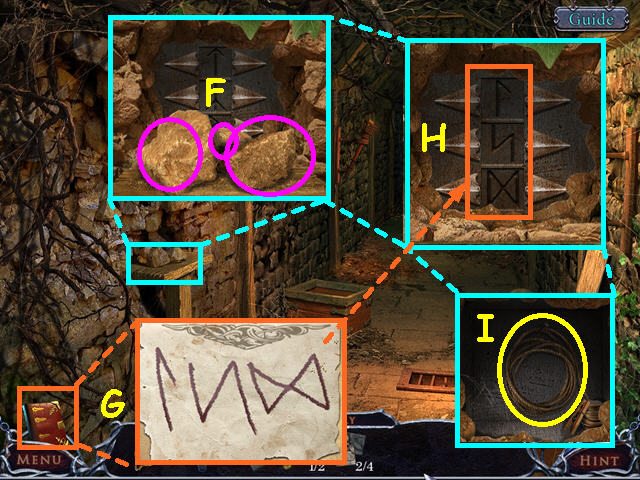
- Look at the shelf on the left and remove the 3 rocks (F).
- Refer to the code in the journal (G).
- Use the arrows to enter the code (H).
- Take the FUSE (I).
- Walk forward.
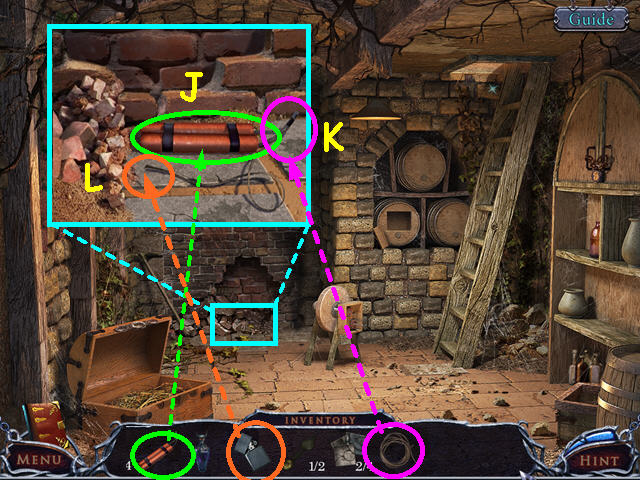
- Look at the base of the bricks and place the TNT on the ground (J).
- Use the FUSE on the TNT (K).
- Use the lighter to light the fuse (L).
- Walk forward twice.
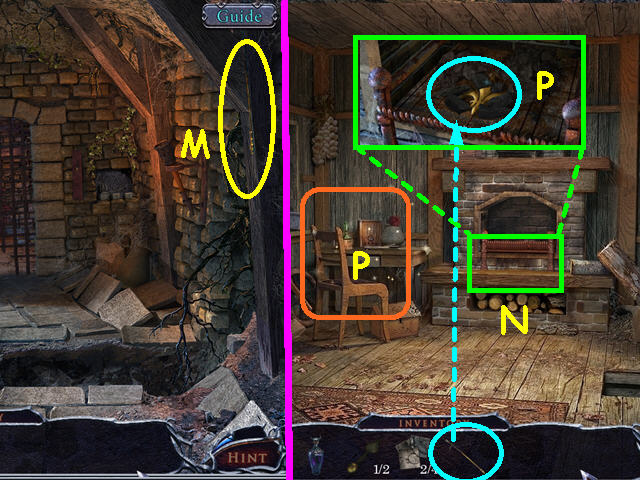
- After the floor caves in, take the POKER (M).
- Return to the cabin and look at the fireplace (N).
- Use the poker to move the embers 3 times (O).
- Take the FLEUR-DE-LIS (P).
- Select the desk for a HOS (Q).
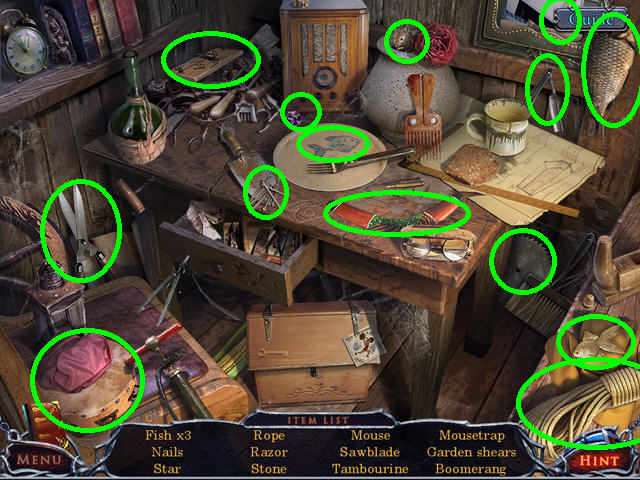
- Locate all the items on the list.
- You will earn the ROPE.
- Walk to the church and go inside.
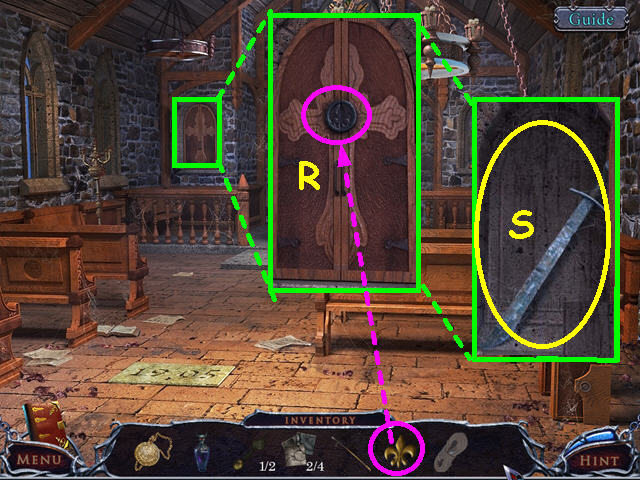
- Look at the left alcove and use the FLEUR-DE-LIS on the lock (R).
- Take the BLUNT SWORD (S).
- Return to the crypt, enter then walk forward 3 times.
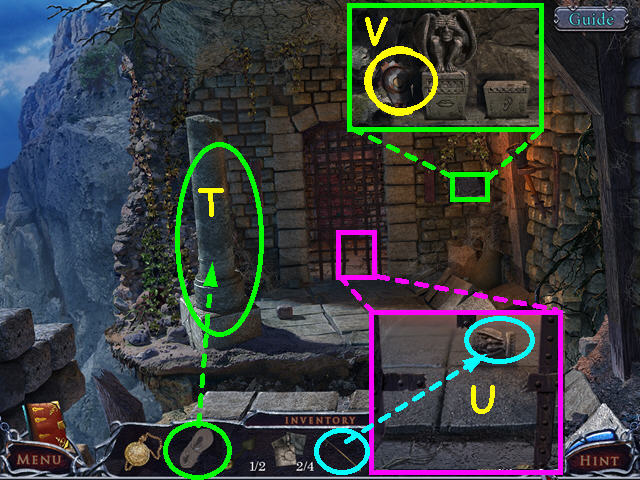
- Use the ROPE to pull down the pillar (T).
- Look at the base of the gate and use the POKER to get 1/2 GARGOYLES (U).
- Look at the controls and take the GEAR (V).
- Walk down to exit the scene.
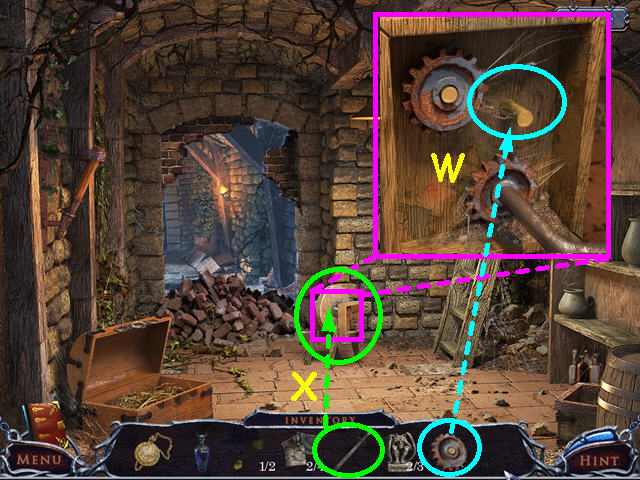
- Look at the grinder and place the GEAR inside (W).
- Use the BLUNT SWORD on the grinder to become the SHARP SWORD (X).
- Walk forward.
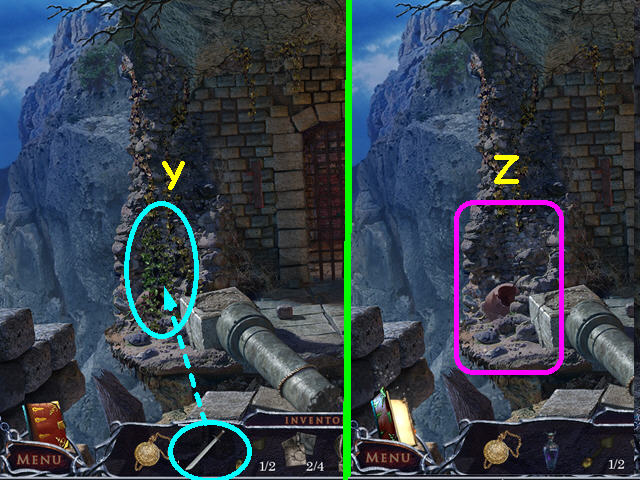
- Use the SHARP SWORD on the growth 3 times (Y).
- Select the area for a HOS (Z).
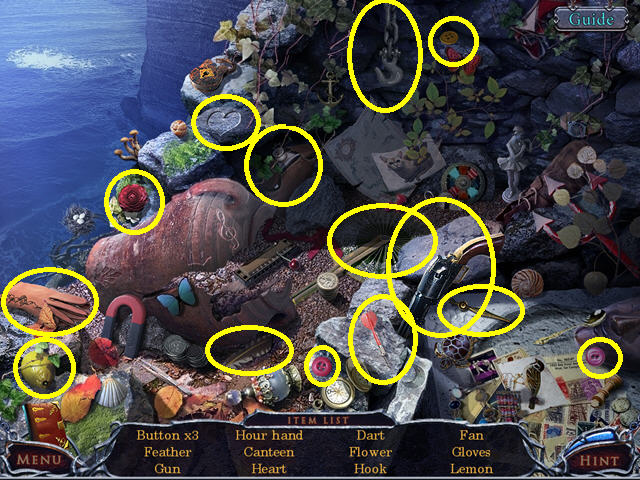
- Locate all the items on the list.
- You will earn the 2/2 HOUR HAND.
- Walk to the cabin.
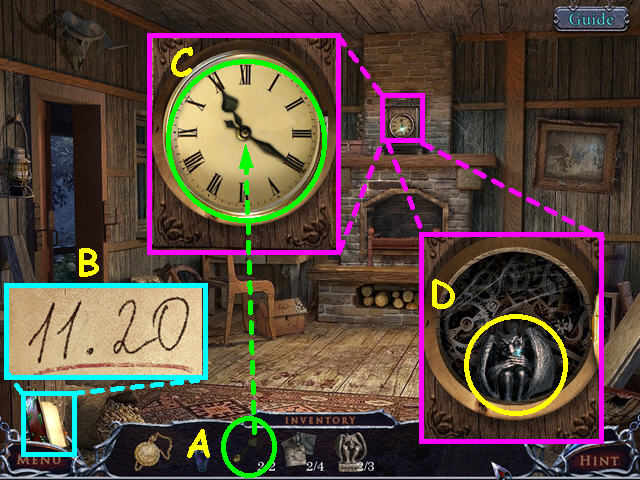
- Look at the clock and place the 2 HOUR HANDS on the face (A).
- Refer to your journal for the clue (B).
- Set the clock to 11:20 (C).
- Take the 2/2 GARGOYLE from inside the clock (D).
- Climb down the hatch, then walk forward.
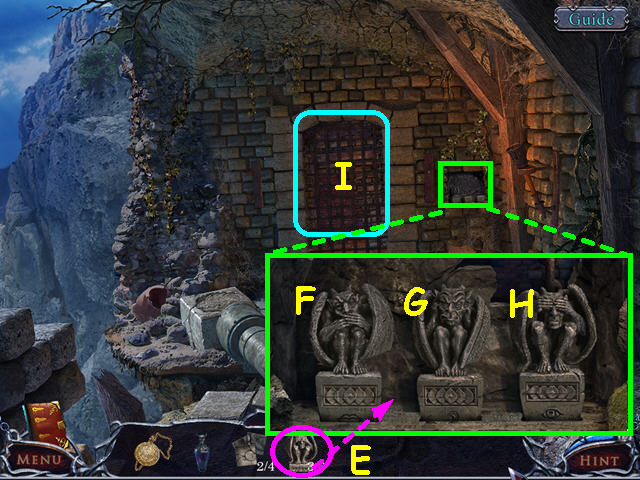
- Look at the control and place the 2 GARGOYLES on the pedestals (E).
- Move the gargoyle hiding his mouth to the left pedestal (F).
- The gargoyle covering his ears needs to be in the center (G).
- Place the gargoyle hiding his eyes on the right pedestal (H).
- Walk forward through the gate (I).
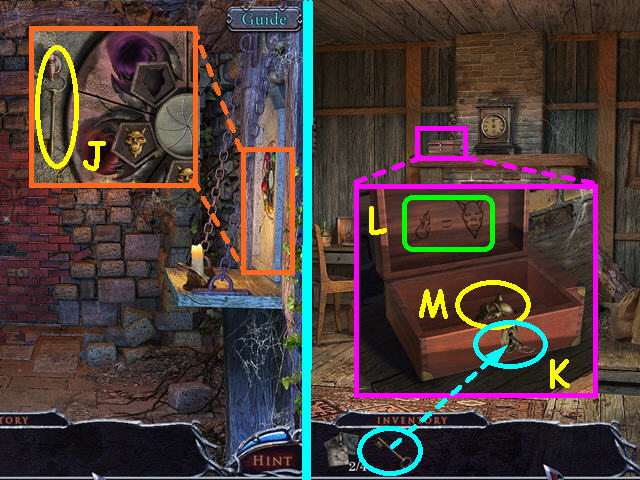
- Look at the mini-game on the right and take the KEY (J).
- Return to the cabin.
- Look at the box and use the KEY on the lock (K).
- Click on the key to open the box.
- Note the symbols (L).
- Take the FACE BUTTON (M).
- Climb down the hatch, walk forward then select the area at the base of the fallen pillar for a HOS.
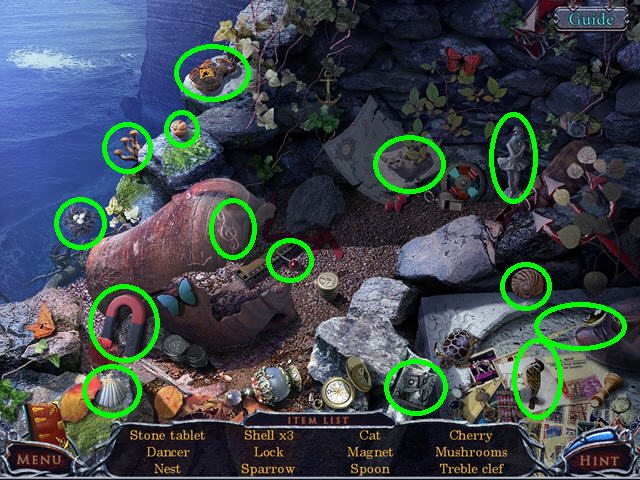
- Locate all the items on the list.
- You will earn the 3/4 STONE TABLET.
- Walk forward and select the right wall for a mini-game.
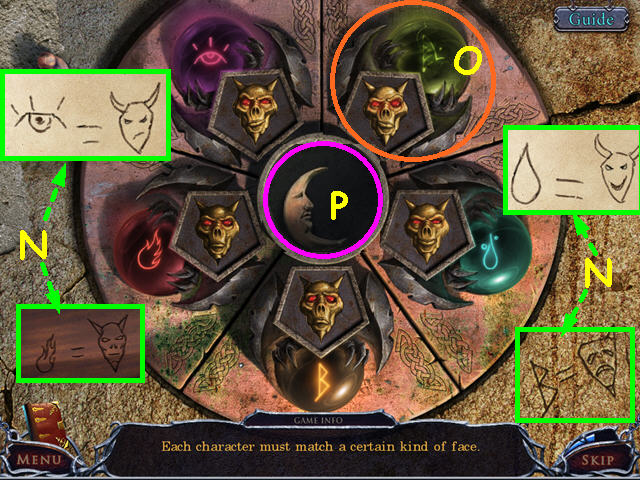
- Place the FACE BUTTON into the empty spot to trigger the mini-game.
- Refer to the clues in your journal and on the mini-game (N).
- Click on each face to make it match the clues.
- The outer symbols will stop blinking when correct.
- For the face that does not have a clue, select the face that is not on any other (O).
- Take the MOON from the center (P).
- Walk down twice.
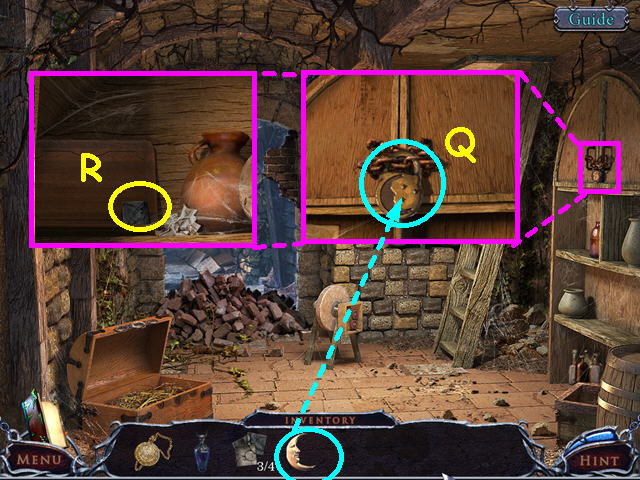
- Look at the cabinet and use the MOON on the lock (Q).
- Click on the cabinet doors to open them and take the 4/4 STONE TABLET (R).
- Walk forward twice and select the left wall for a mini-game.
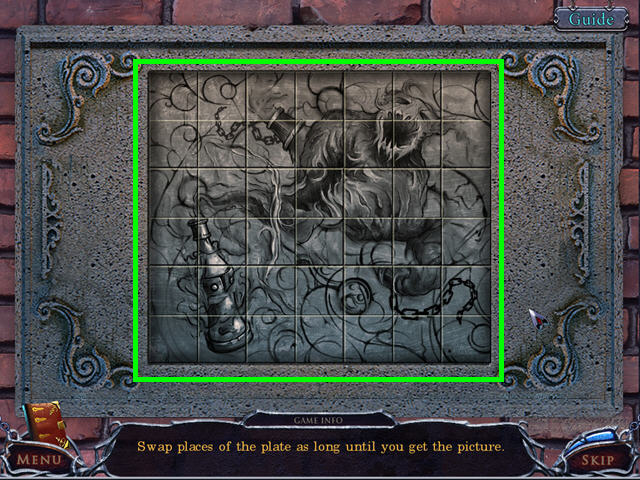
- Place the 4 STONE TABLETS into the grid to activate the mini-game.
- Restore the picture by swapping tiles.
- Click on 2 tiles to swap position.
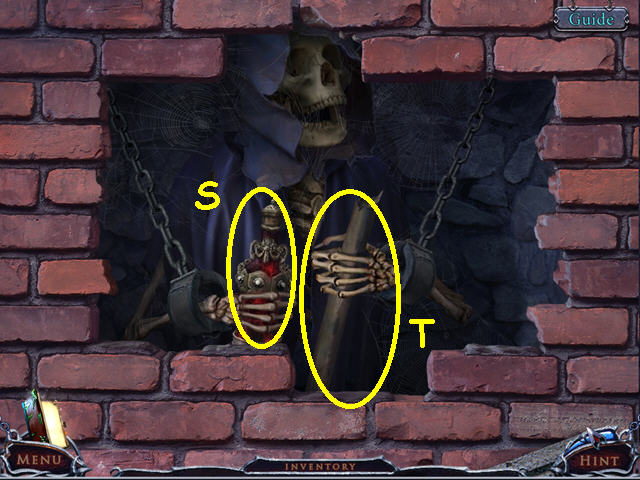
- Take the THIRD VESSEL from the skeleton (S).
- Take the STICK (T).
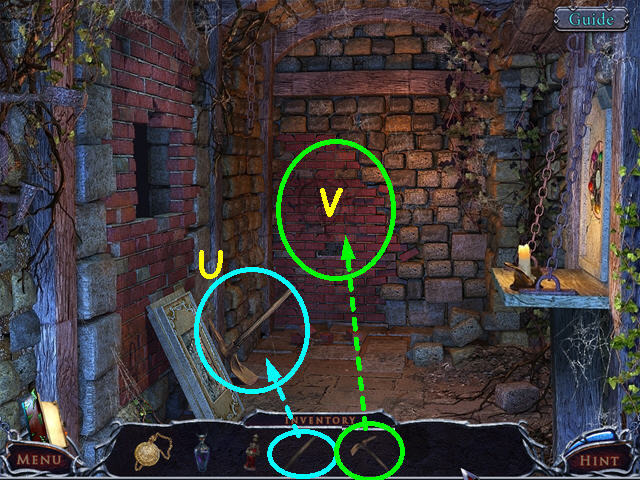
- Use the STICK on the pick head, then take the PICKAXE (U).
- Use the PICKAXE on the brick wall several times (V).
- Walk forward to find yourself back in the dungeon cell.
- Walk forward 4 times to return to the secret ritual chamber.
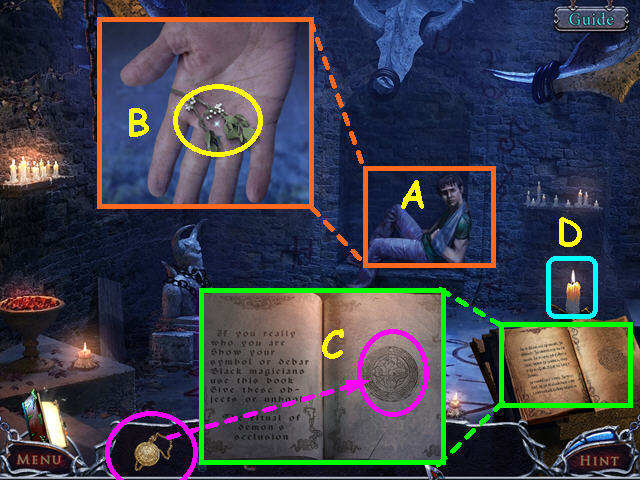
- Talk to John (A).
- After he passes out, look at John, click on his hand to open it and take the MISTLETOE (B).
- Look at the ritual book and place the MEDALLION on the symbol (C).
- Click on the candle to put the book in darkness (D).
- Exit the book close-up.
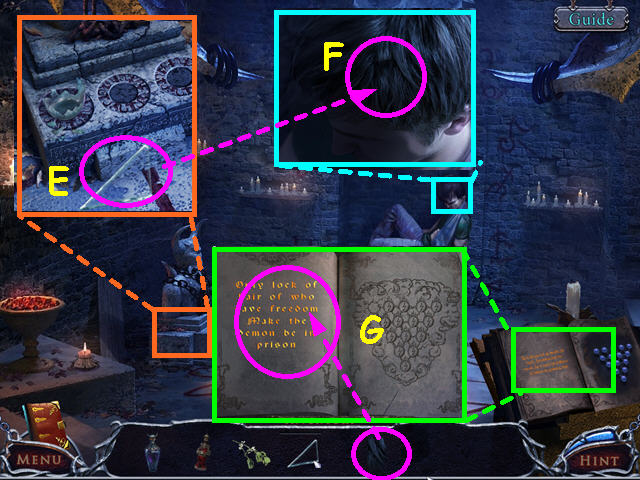
- Look at the base of the statue and take the GLASS SHARD (E).
- Look at John's head and use the GLASS SHARD to take HAIR (F).
- Look at the ritual book and place HAIR on the page for a mini-game (G).
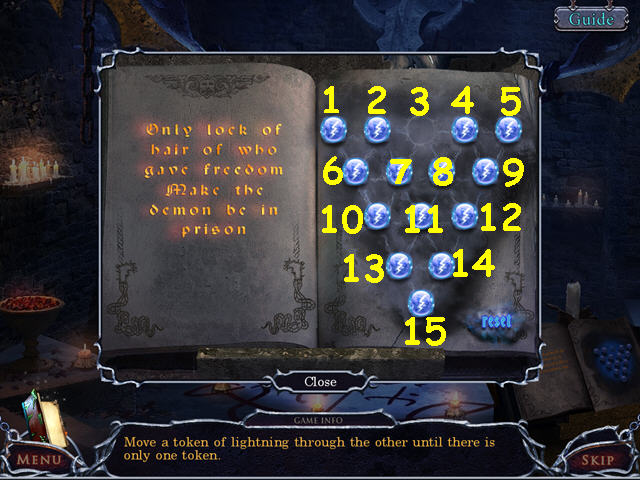
- Remove the balls by jumping until there is only one.
- Number the locations 1-15 going across and down.
- Make the following moves: 10-3, 1-10, 3-1, 13-6, 1-10, 12-3, 15-12, 9-14, 14-7, 4-2, 10-3, 2-4, 5-3.
- Exit the close-up of the book.
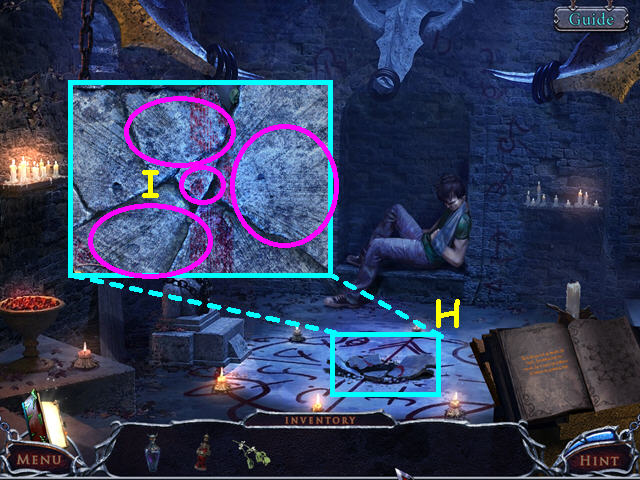
- Look in the hole in the floor (H).
- Remove the concrete pieces for a mini-game (I).
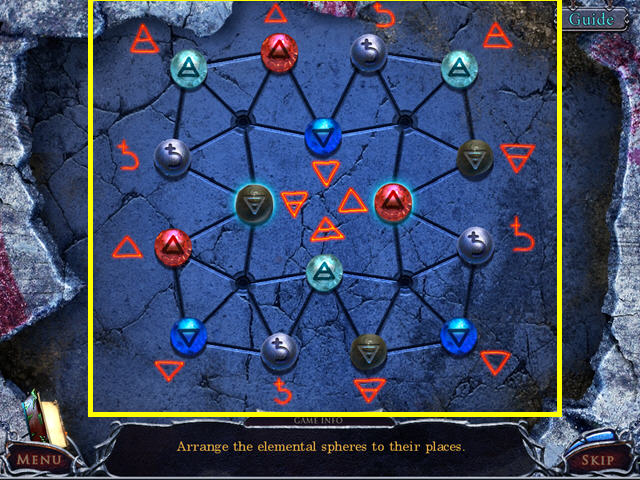
- Move the marbles so that the symbols on the marbles match the symbols they are near.
- Click on a marble, then click on an adjacent spot to move.
- The symbols on the concrete will light when a marble is correct.
- Exit the ritual book close-up.
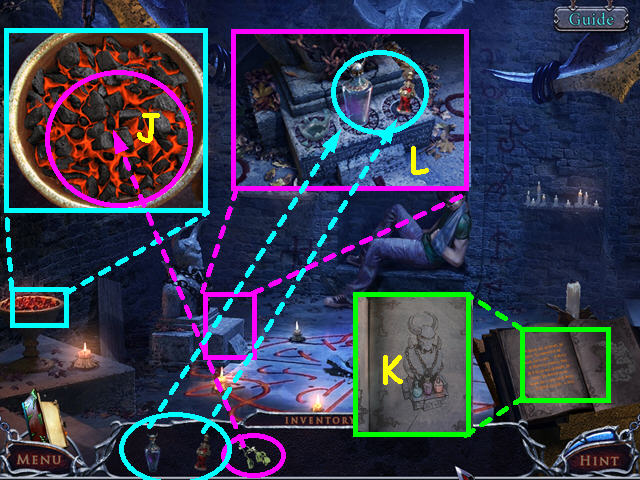
- Look at the brazier and add the MISTLETOE (J).
- Look at the ritual book to learn you must place the vessels (K).
- Look at the base of the statue and place the SECOND and THIRD VESSELS in the circles (L).
- Congratulations! You have completed Mystery of the Ancients: Lockwood Manor Standard Edition!
Created at: 2011-10-19

