Walkthrough Menu
- General Tips
- Chapter 1: Price's Estate
- Chapter 2: Arlene
- Chapter 3: The Cemetery
- Chapter 4: Dead Island
- Chapter 5: The Abandoned Farm
- Chapter 6: The Sawmill
General Tips
- This is the official guide for Mystery of the Ancients: Mud Water Creek.
- This guide will not show when you have to zoom into a location; the screenshots will show each zoom scene.
- Hidden-object puzzles are referred to as HOPs. This guide will not show screenshots of the HOPs, however, it will mention when an HOP is available and the inventory item you'll collect from it.
- Use the Map to fast travel to a location.
Chapter 1: Price's Estate
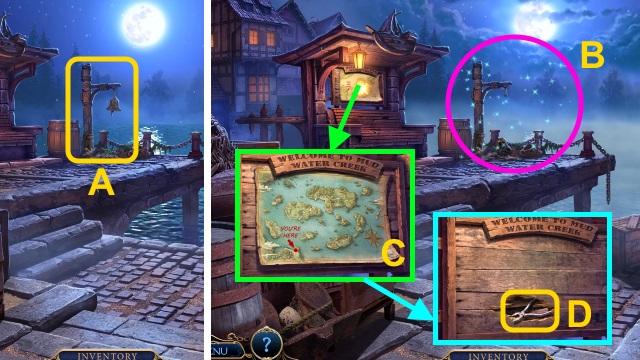
- Examine the bell (A).
- Play the HOP (B); receive the BROKEN BELL.
- Take the MAP (C).
- Take the PLIERS (D).
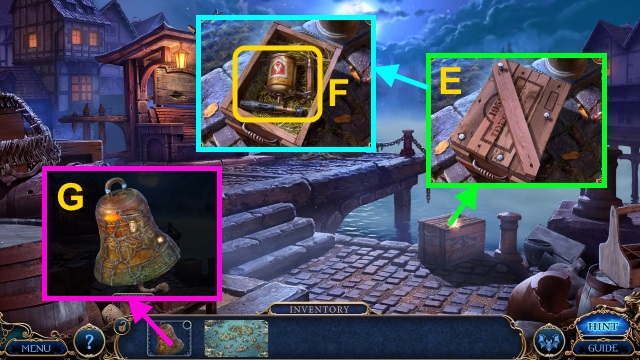
- Use the PLIERS (E).
- Take the BLOWTORCH (F).
- Combine the BROKEN BELL and BLOWTORCH (G); take the BELL.
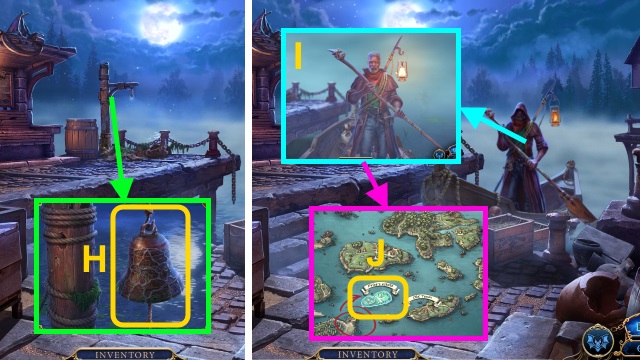
- Place the BELL; ring it (H).
- Use the MAP (I); select Price's Estate (J).
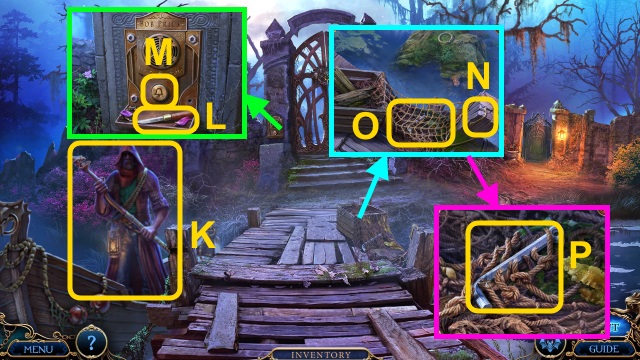
- Talk to the man (K); receive the Token.
- Take the KNIFE (L); press the button (M).
- Take the FISHING HOOK (N); examine the net (O).
- Use the KNIFE; take the ALLEN WRENCH (P).
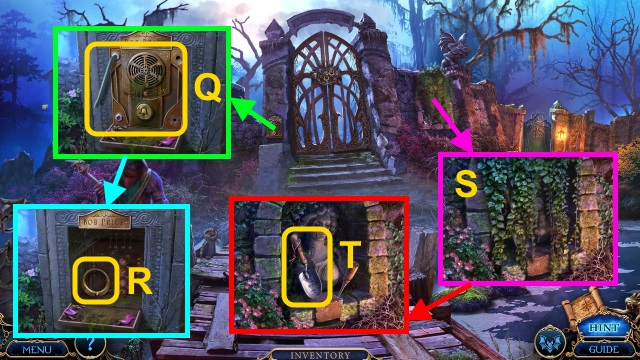
- Use the ALLEN WRENCH (Q).
- Take the GOLDEN RING (1/3) (R).
- Use the KNIFE (S).
- Take the SMALL SHOVEL (T).
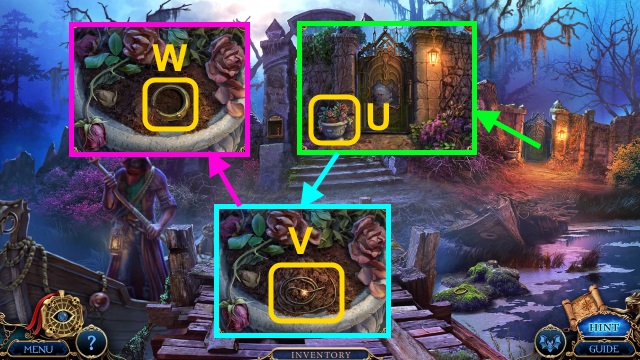
- Examine the pot (U).
- Take the THREAD (V).
- Use the SMALL SHOVEL; take the GOLDEN RING (2/3) (W).
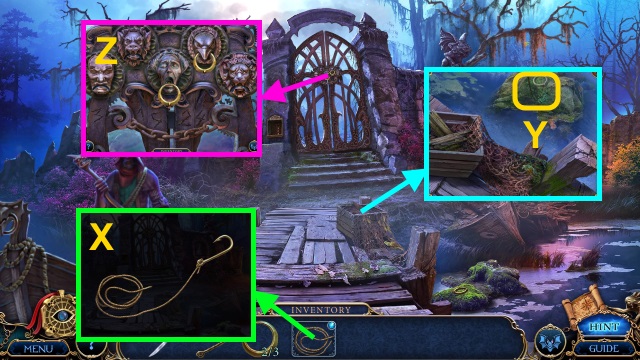
- Combine the THREAD and FISHING HOOK; take the THREAD WITH HOOK (X).
- Use the THREAD WITH HOOK (Y); receive the GOLDEN RING (3/3).
- Place the GOLDEN RING (3/3) for a mini-game (Z).
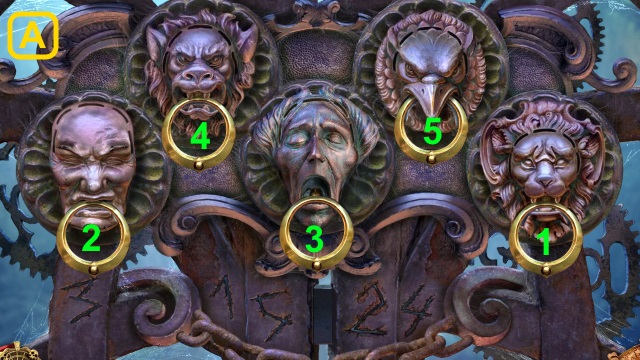
- Solution (A).
- Walk forward.
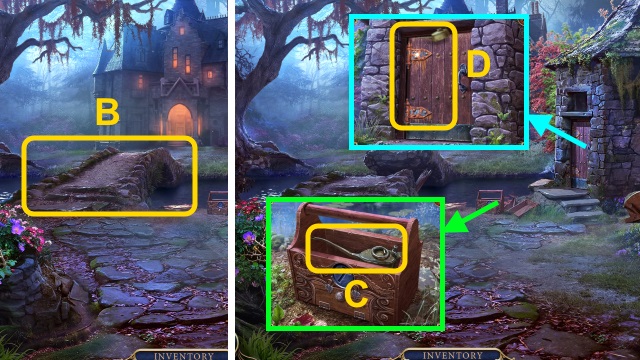
- Examine the bridge (B).
- Take the OILER (C).
- Use the OILER; open the door (D).
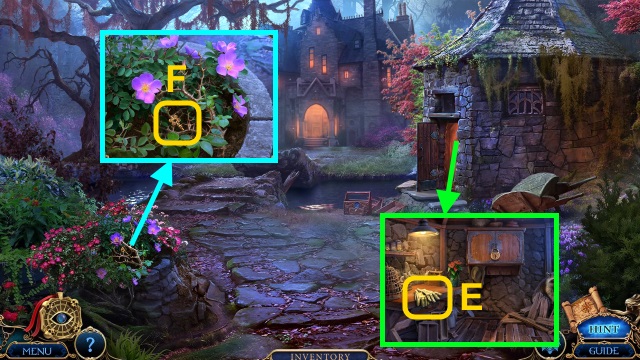
- Take the GARDENING GLOVES (E).
- Use the GARDENING GLOVES (F); receive the CUPBOARD KEY.
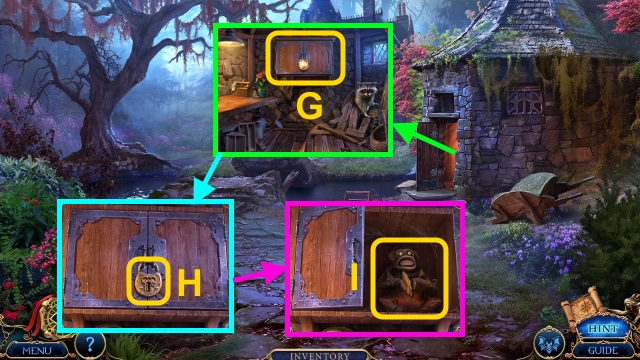
- Examine the cupboard (G).
- Use the CUPBOARD KEY (H).
- Take the TOY MONKEY (I).
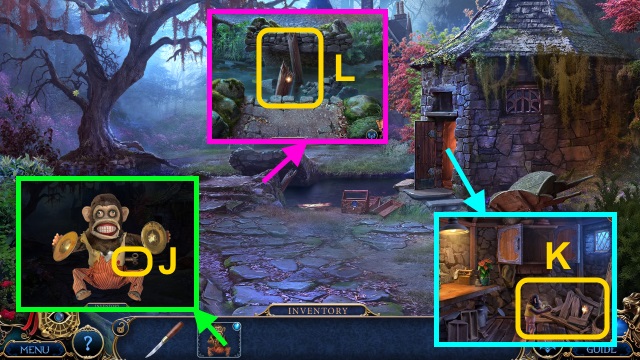
- Examine the TOY MONKEY; use the winding key (J).
- Receive the WOUND MONKEY.
- Use the WOUND MONKEY; take the BOARDS (K).
- Use the BOARDS for a mini-game (L).
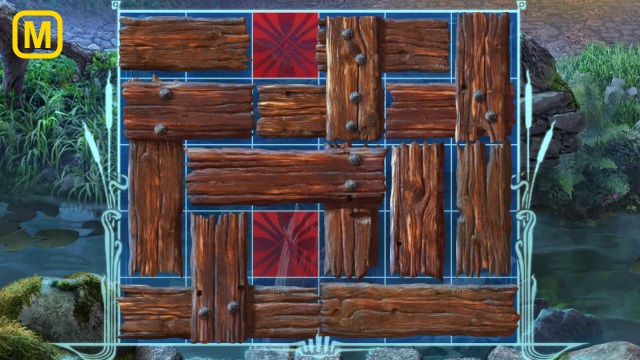
- Solution (M).
- Walk forward.
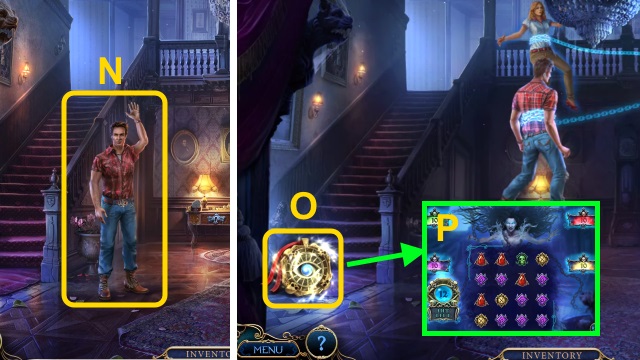
- Talk to Bob (N).
- Use the Token for a mini-game (O).
- Solution is random (P).
Chapter 2: Arlene
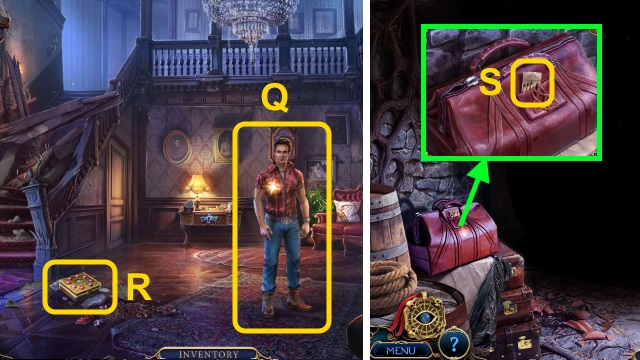
- Talk to Bob (Q).
- Take the JEWELRY BOX (R).
- Walk left.
- Take the MATCHES (S).
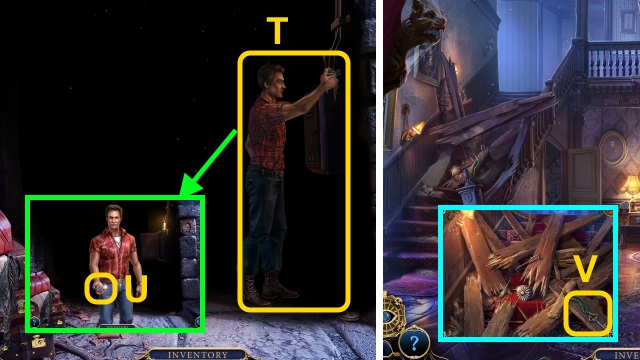
- Give the MATCHES (T).
- Take the TOOL BOX TOKEN (U).
- Walk right.
- Take the DESK KEY (V).
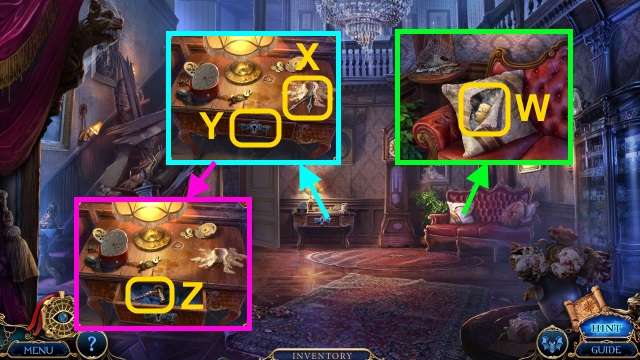
- Use the KNIFE; take the HEAD TILE (W).
- Use the MATCHES; take the CLOCK HANDS (X).
- Use the DESK KEY (Y); open the drawer.
- Take the CORKSCREW (Z).
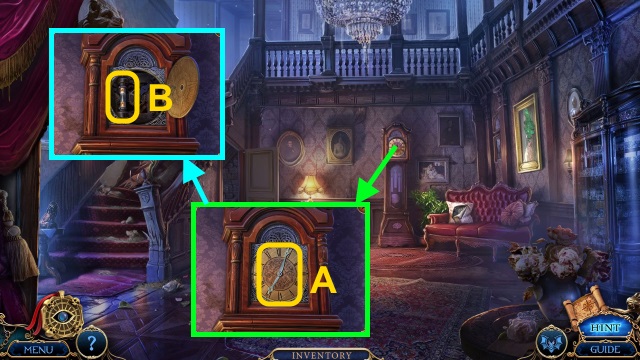
- Place the CLOCK HANDS (A).
- Take the FUSE (1/3) (B).
- Walk down.
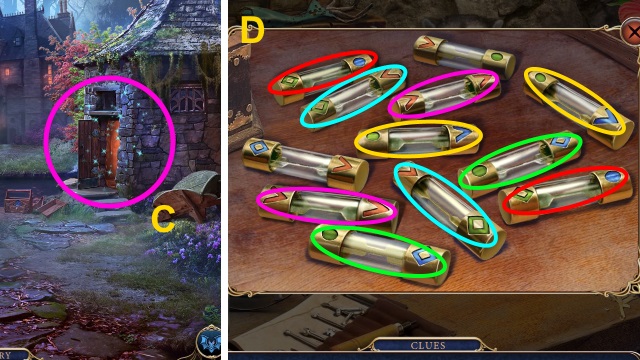
- Play the HOP (C); mini-game solution (D).
- Receive the FUSE (3/3).
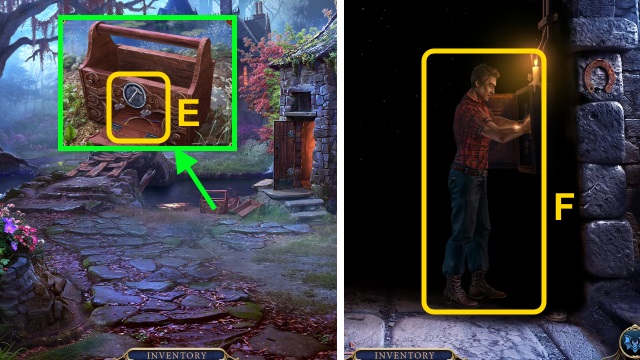
- Place the TOOL BOX TOKEN; take the WIRES (E).
- Walk forward, then left.
- Give the FUSE (3/3) (F).
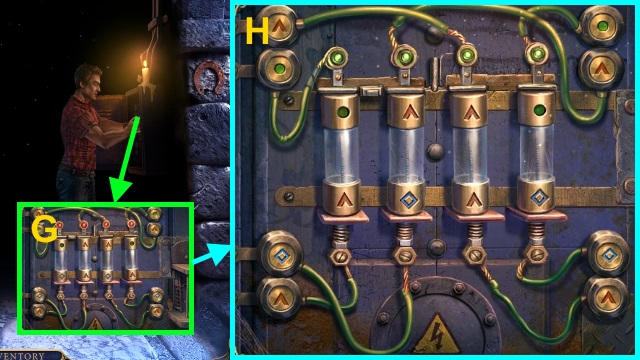
- Place the fuses and WIRES (G).
- Arrange the fuses (H).
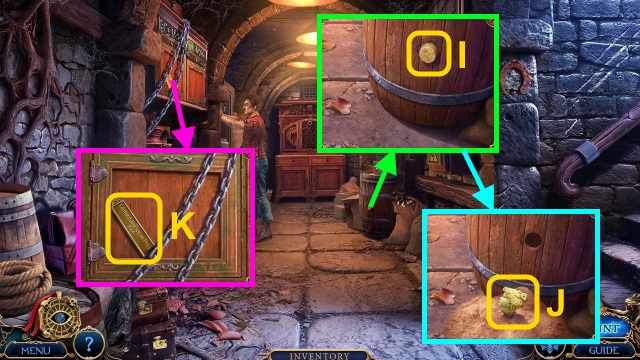
- Use the CORKSCREW (I); take the HEAD TILE (J).
- Take the NAMEPLATE (K).
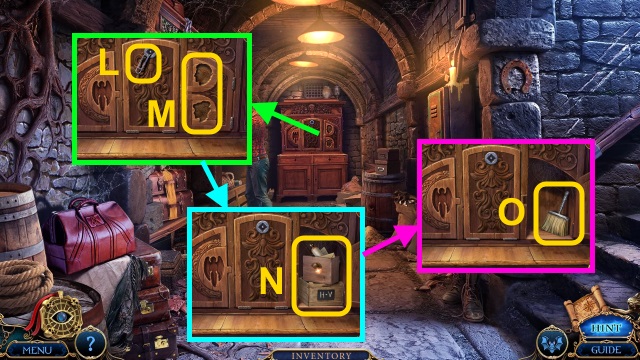
- Take the PAPER CLIP (L); place the 2 HEADS TILES (M).
- Open the cupboard; move the boxes (N).
- Take the BRUSH (O).
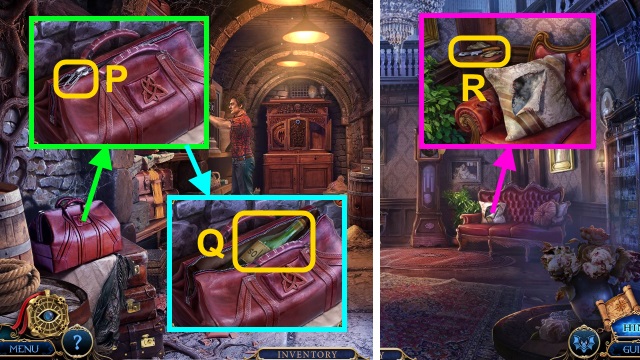
- Use the PAPER CLIP (P); unzip the bag.
- Take the SOLVENT (Q).
- Walk right.
- Use the BRUSH; take the BROKEN BOLT CUTTER (R).
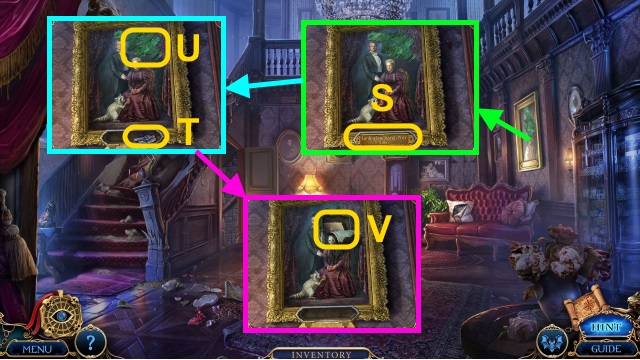
- Place the NAMEPLATE; examine it (S).
- Take the ANGEL EMBLEM (T); use the SOLVENT (U).
- Examine the painting; take the JEWELRY CODE (V).
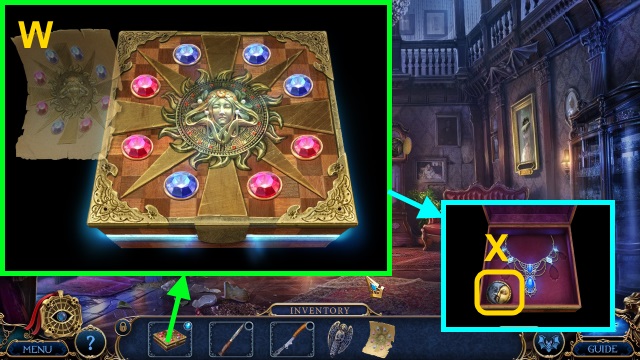
- Examine the JEWELRY BOX; arrange the gems (W).
- Take the LUNAR SOLAR TOKEN (1/2) (X).
- Walk left.
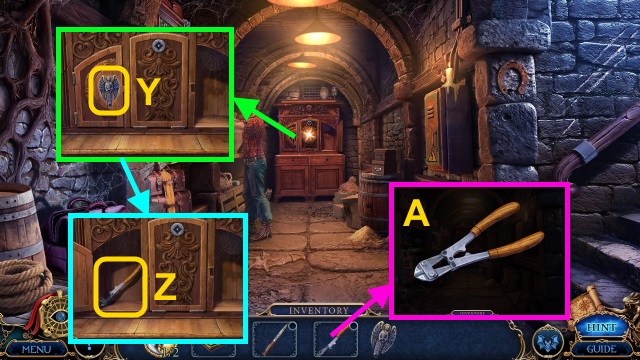
- Place the ANGEL EMBLEM (Y); open the cupboard.
- Move the boxes; take the BOLT CUTTER HALF (Z).
- Combine the BROKEN BOLT CUTTER and BOLT CUTTER HALF (A); take the BOLT CUTTER.
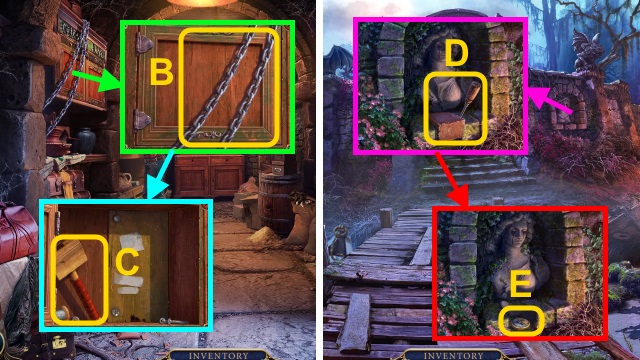
- Use the BOLT CUTTER (B); open the cupboard.
- Take the WOODEN MALLET (C).
- Go to the Main Gate.
- Use the WOODEN MALLET (D); receive the SCREWDRIVER.
- Take the LUNAR SOLAR TOKEN (2/2) (E).
- Go to the Basement.
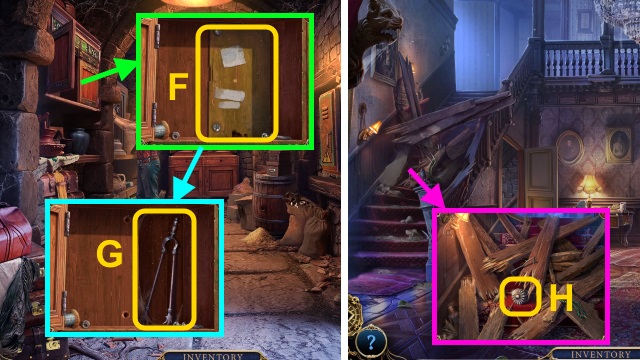
- Use the SCREWDRIVER (F); take the TONGS (G).
- Walk right.
- Use the TONGS (H); receive the CABINET HANDLE.
- Walk left.
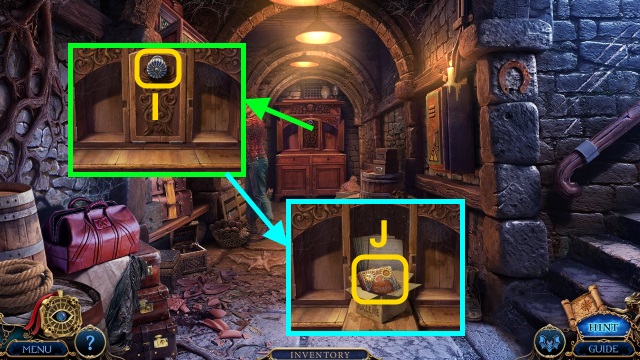
- Place the CABINET HANDLE (I); open the door.
- Move the boxes; take ARLENE'S DIARY (J).
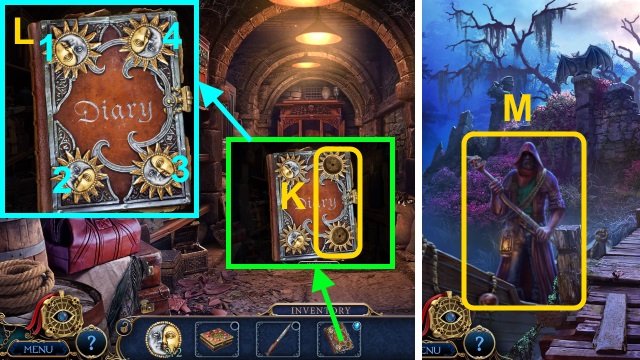
- Combine the LUNAR SOLAR TOKEN (2/2) and ARLENE'S DIARY (K).
- Turn the suns (L); read the diary. Play the HOP; receive the PHOTO.
- Go to the Main Gate.
- Give the PHOTO (M).
- Go to Old Town.
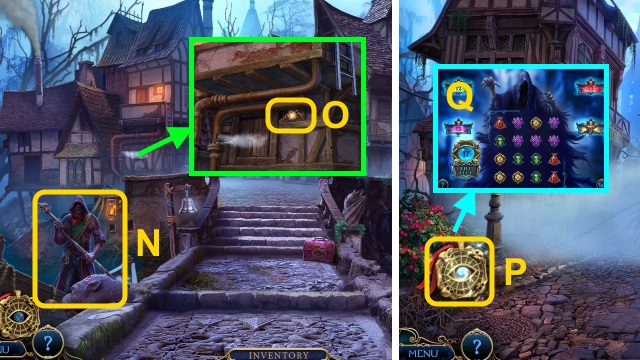
- Talk to the man (N).
- Take the CADUCEUS (O).
- Walk forward.
- Use the Token for a mini-game (P); solution is random (Q).
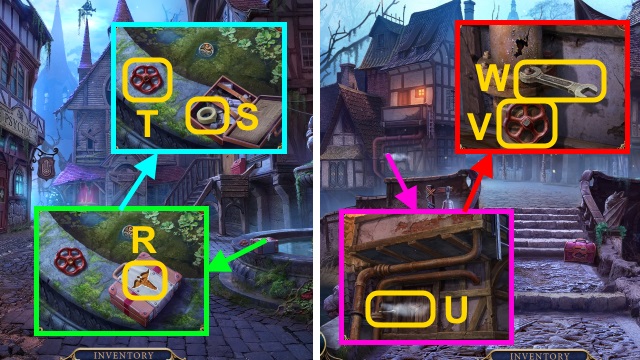
- Place the CADUCEUS (R); open the case.
- Take the MEDICAL TAPE (S) and VALVE (T).
- Walk down.
- Examine the wrench (U).
- Use the VALVE (V); take the WRENCH (W).
- Walk forward.
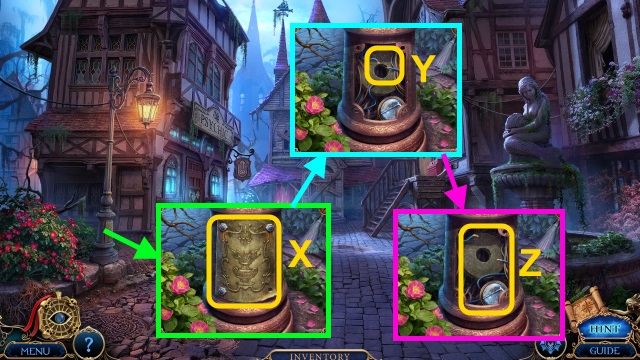
- Use the WRENCH (X).
- Use the MEDICAL TAPE (Y); move the wires.
- Take the GRINDSTONE and CANE TOKEN (Z).
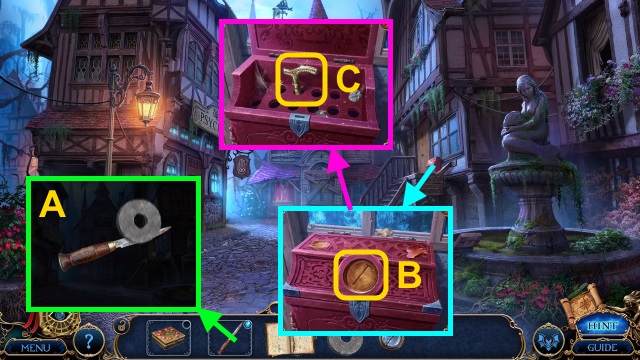
- Combine the BLUNT KNIFE and GRINDSTONE (A); take the KNIFE.
- Place the CANE TOKEN (B); take the CANE (C).
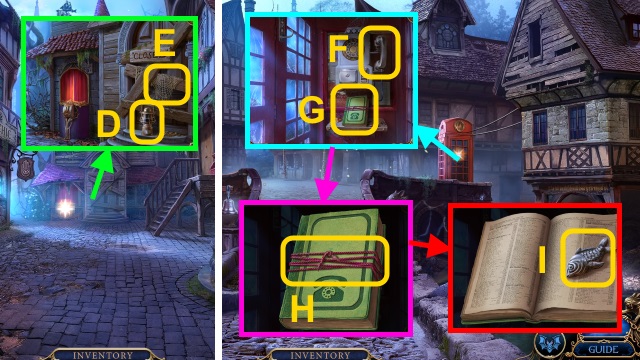
- Take the LAMP (D).
- Use the KNIFE (E); receive the NET.
- Walk down.
- Examine the phone (F); examine the phonebook (G).
- Use the KNIFE (H); open the book.
- Take the FISH EMBLEM (I).
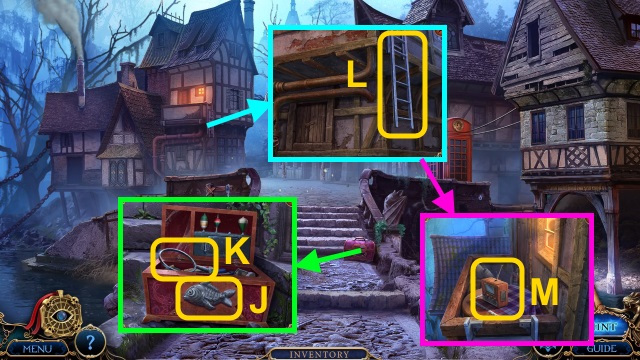
- Place the FISH EMBLEM (J); take the NET RIM (K).
- Use the CANE; examine the ladder (L).
- Take the RADIO (M).
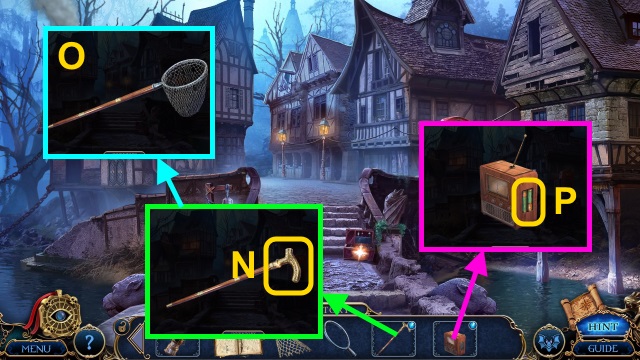
- Examine the CANE; unscrew the top (N).
- Use the NET RIM and NET; take the FISHING NET (O).
- Examine the RADIO; open it. Take the BATTERIES (P).
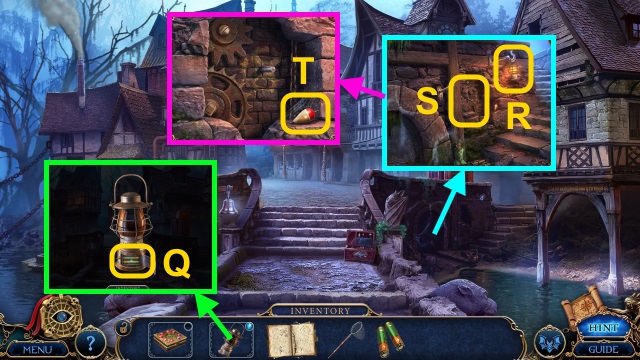
- Open the LAMP; remove the batteries. Place the BATTERIES (Q); take the LIT LAMP.
- Place the LIT LAMP (R); examine the gears (S).
- Take the BOBBER (T).
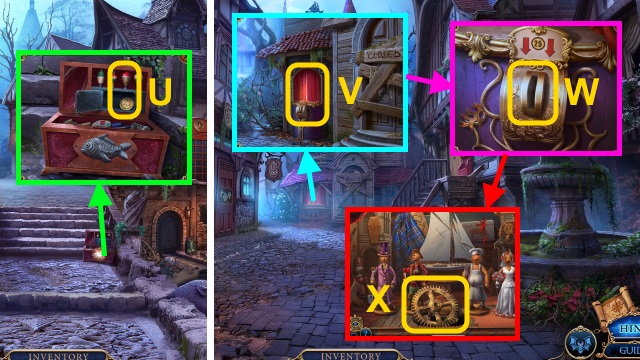
- Place the BOBBER; take the COIN (U).
- Walk forward.
- Examine the slot (V); place the COIN (W).
- Examine the stage; take the GEAR (X).
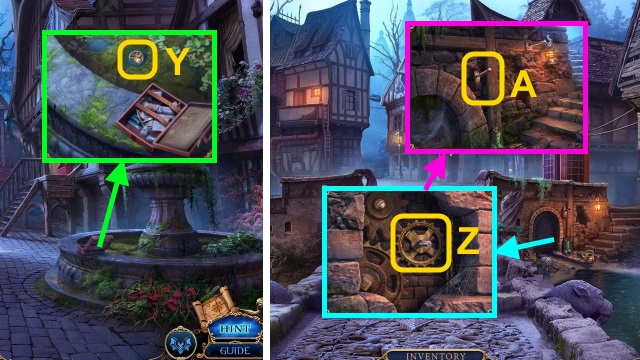
- Use the FISHING NET; receive the CHIME TOKEN (Y).
- Walk down.
- Place the GEAR (Z); pull the lever (A).
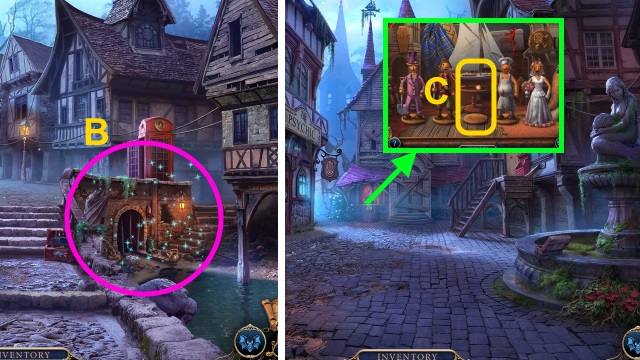
- Play the HOP; receive the DOLL (B).
- Walk forward.
- Place the DOLL for a mini-game (C).

- Solution (D).
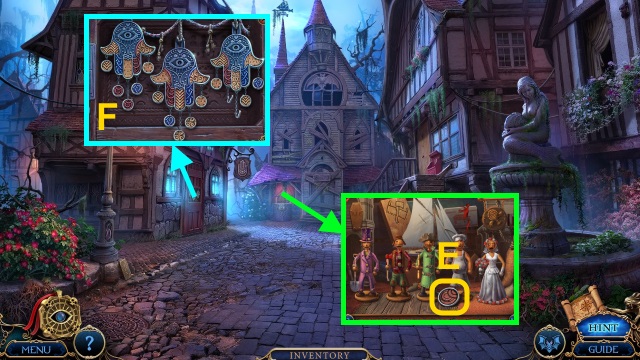
- Take the CHIME TOKEN (E).
- Place the 2 CHIME TOKENS for a mini-game (F).
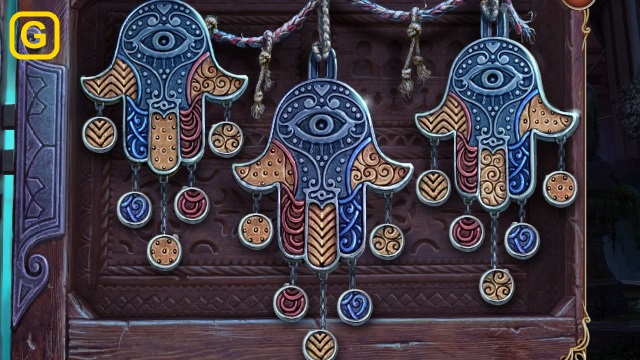
- Solution (G).
- Walk left.
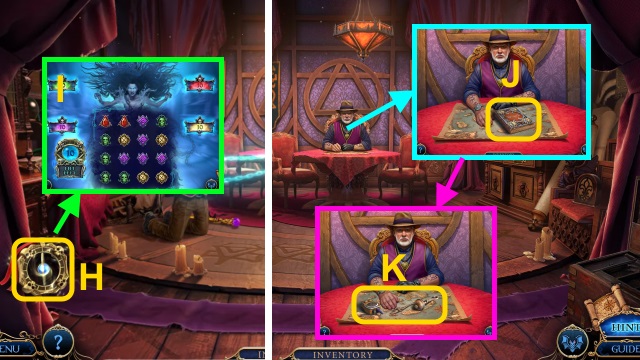
- Use the Token for a mini-game (H); solution is random (I).
- Talk to Ford; examine the diary (J). Play the HOP; receive the CEMETERY CLUE and SHADOWY EMBLEM.
- Take the Radio and BELL CHIME (K).
- Go to the Dock.
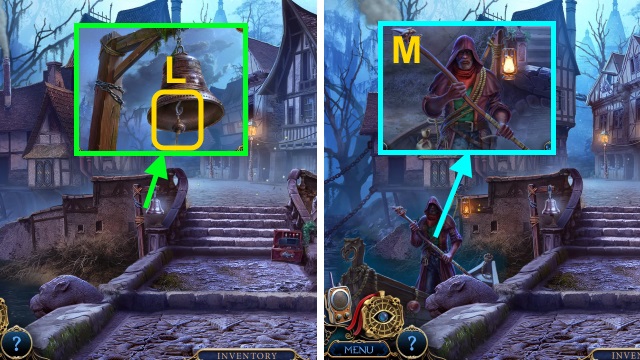
- Place the BELL CHIME; ring it (L).
- Talk to the man (M).
- Go to the Price's Estate.
Chapter 3: The Cemetery
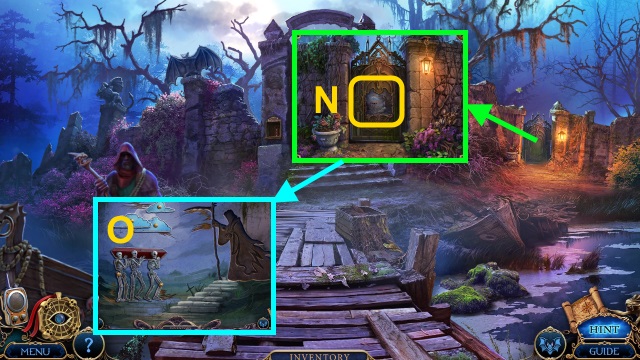
- Examine the gate (N); place the SHADOWY EMBLEM for a mini-game (O).
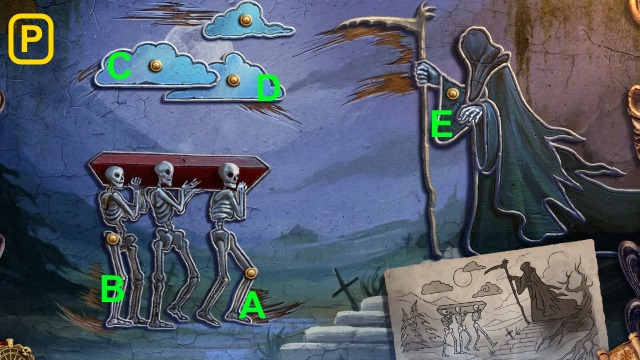
- Solution (P): Ax2-Bx2-C-D-E.
- Go forward.
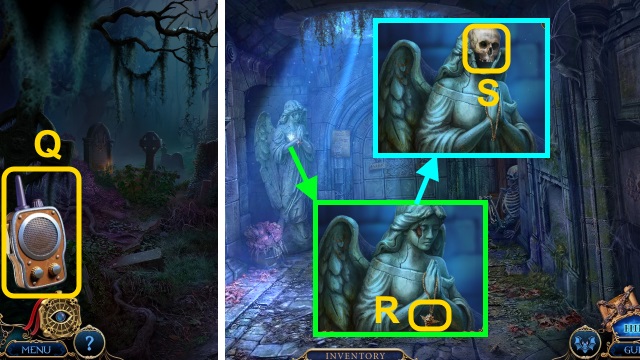
- Examine the Radio (Q).
- Try to walk forward.
- Take the COFFIN KEY (R).
- Take the SKULL (S).
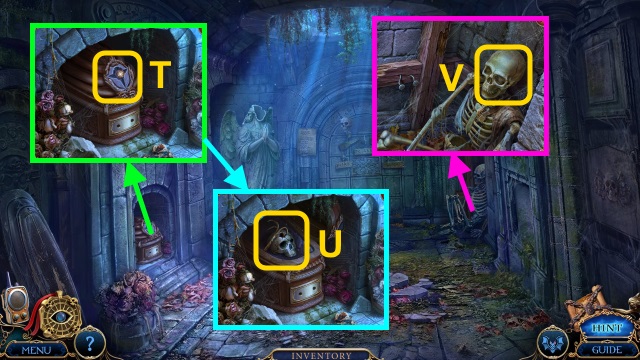
- Place the COFFIN KEY (T); examine it.
- Take the HOOK and SKULL (U).
- Take the SKULL (V).
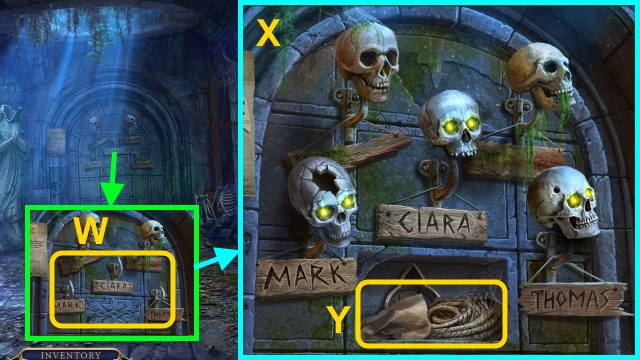
- Place the 3 SKULLS (W); arrange them (X).
- Read the note; take the ROPE (Y).
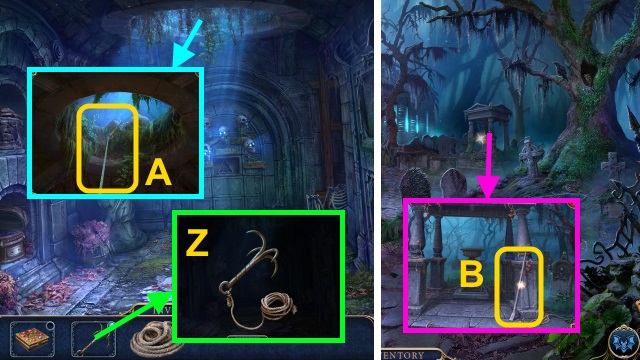
- Combine the HOOK and ROPE (Z); take the GRAPPLING HOOK.
- Use the GRAPPLING HOOK (A).
- Go up.
- Take the CROWBAR (B).
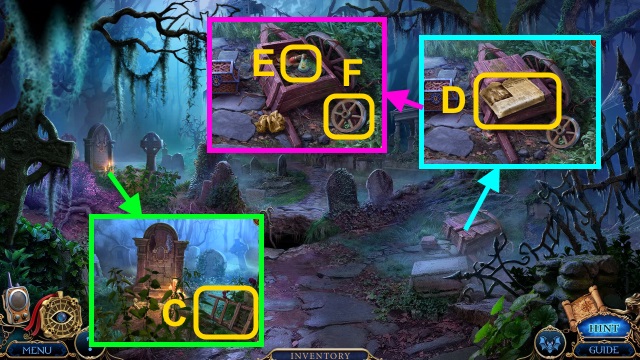
- Take the BROKEN LADDER (C).
- Read the newspaper (D); use the CROWBAR.
- Take the FERTILIZER (E) and WHEEL (F).
- Walk down, then forward.
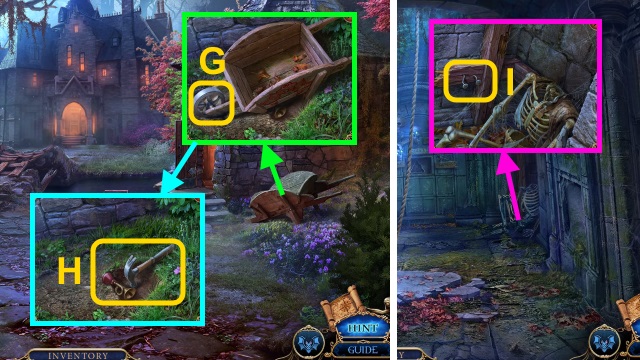
- Place the WHEEL (G); move the wheelbarrow.
- Take the HORN and HAMMER (H).
- Go to the Crypt.
- Use the HAMMER; receive the NAILS (I).
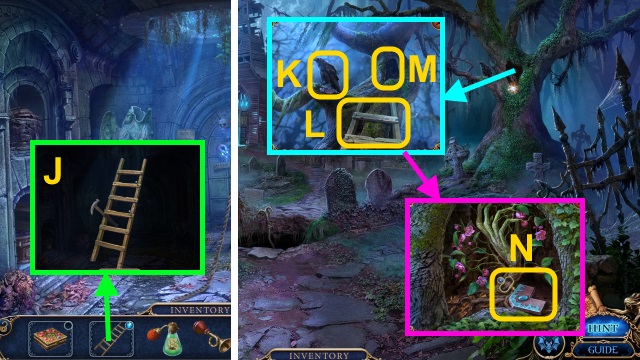
- Examine the BROKEN LADDER; adjust the rungs. Use the NAILS and HAMMER (J).
- Take the LADDER.
- Go up.
- Use the HORN (K); receive the ANGEL WING.
- Use the LADDER (L); examine the hollow (M).
- Use the FERTILIZER; take the PEDESTAL PART and CHEST KEY (N).
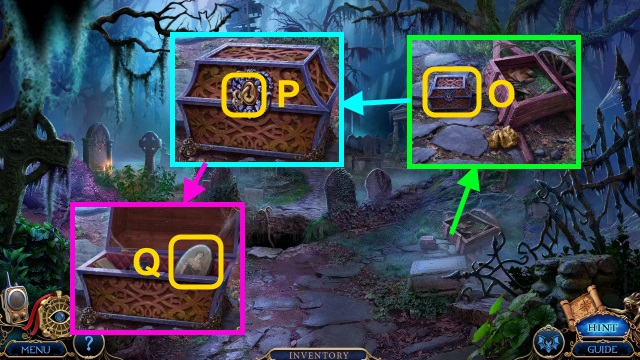
- Examine the box (O); use the CHEST KEY (P).
- Take the PORTRAIT (Q).
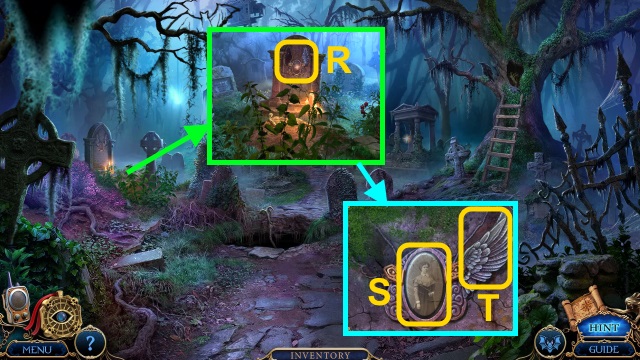
- Examine the tombstone (R); place the PORTRAIT (S).
- Take the ANGEL WING (T).
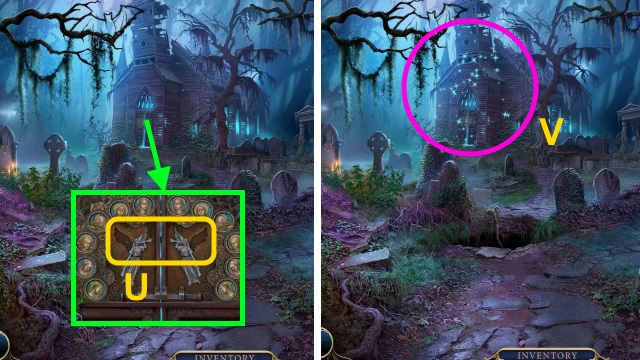
- Place the 2 ANGEL WINGS (U).
- Play the HOP (V); play the mini-game.
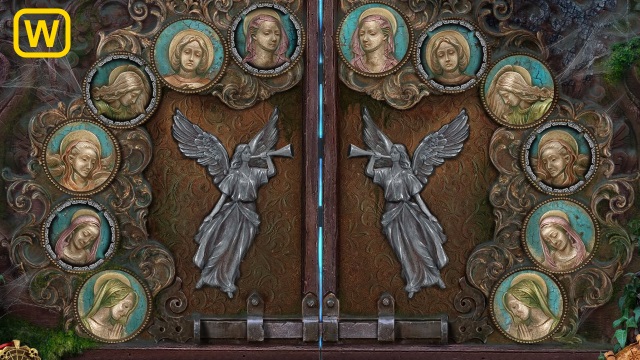
- Solution (W).
- Walk forward.
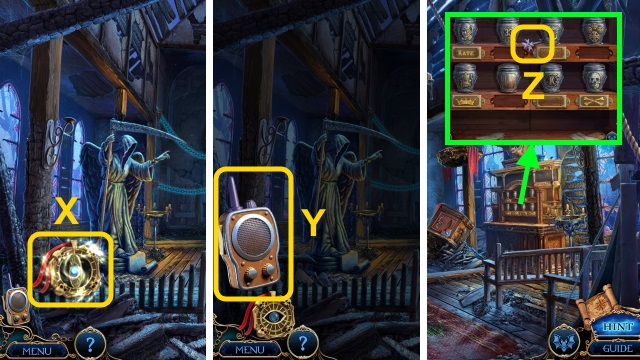
- Use the Token (X).
- Use the Radio (Y).
- Take the CROSS KEY (Z).
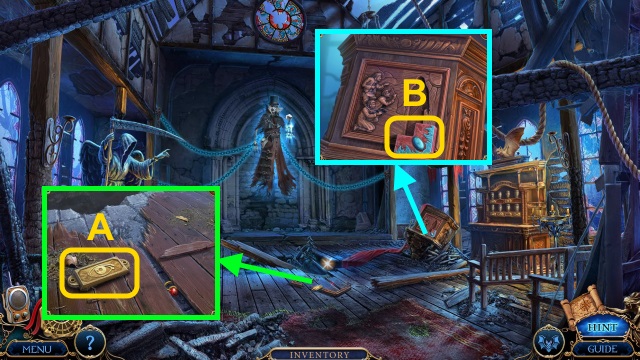
- Take the GOLDEN PLATE (A).
- Take the PEDESTAL PART (B).
- Walk down.
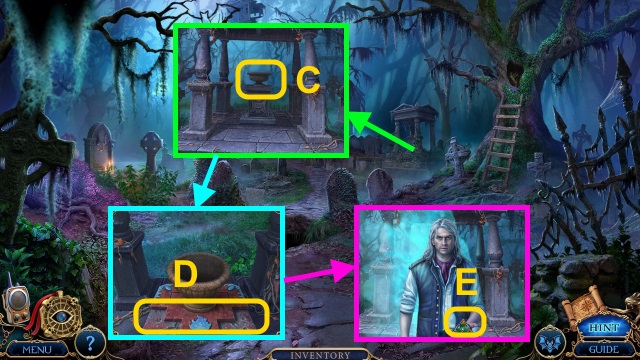
- Examine the urn (C); place the 2 PEDESTAL PARTS (D).
- Take the PRISMATIC INSIGNIA (E).
- Go to the Crypt.
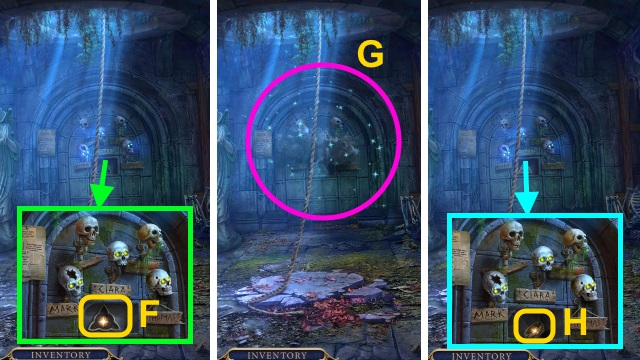
- Place the PRISMATIC INSIGNIA (F).
- Play the HOP (G).
- Take the ORNATE BRACELET (H).
- Go up, then forward.
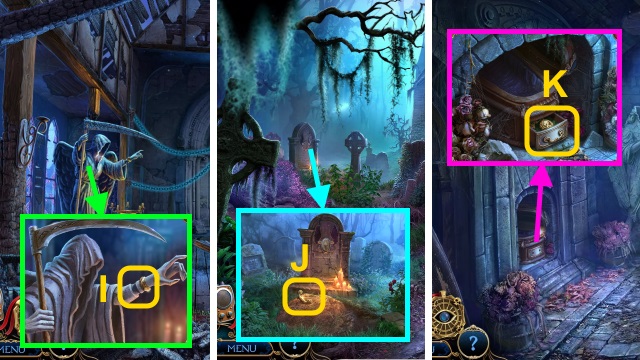
- Place the ORNATE BRACELET (I); receive the SCYTHE.
- Walk down.
- Use the SCYTHE; take the COFFIN HANDLE (J).
- Go to the Crypt.
- Place the COFFIN HANDLE; pull it. Take the CURSED MEDALLION (K).
- Go up.
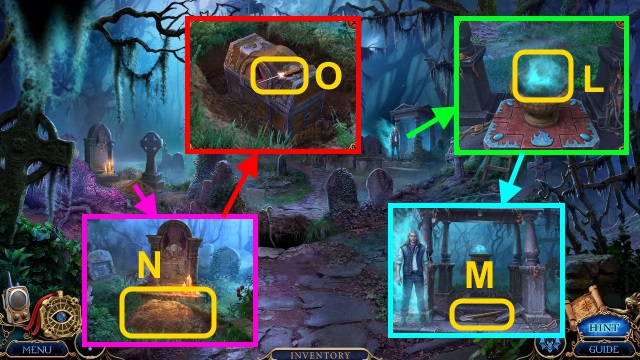
- Place the CURSED MEDALLION (L); take the SHOVEL (M).
- Examine the grave; use the SHOVEL (N).
- Take the AWL (O).
- Walk forward.
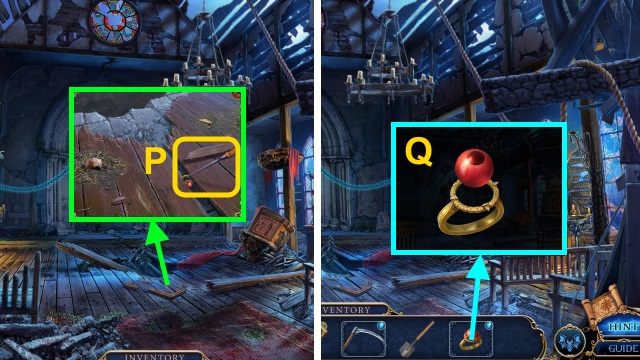
- Use the AWL (P); receive the GEMSTONE RING.
- Examine the GEMSTONE RING (Q); take the EVIL EYE.
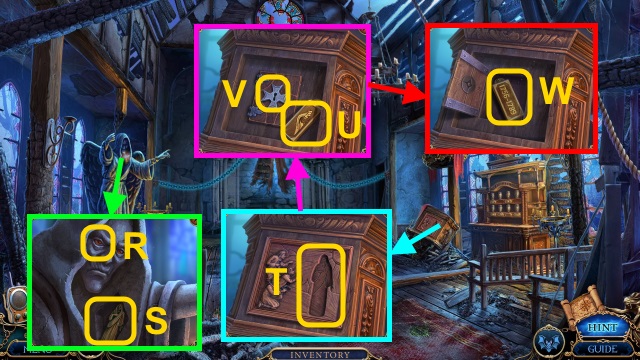
- Examine the statue; place the EVIL EYE (R).
- Take the MONK FIGURINE (S).
- Place the MONK FIGURINE (T); remove the cover.
- Take the GOLDEN PLATE (U); use the CROSS KEY (V).
- Take the GOLDEN PLATE (W).
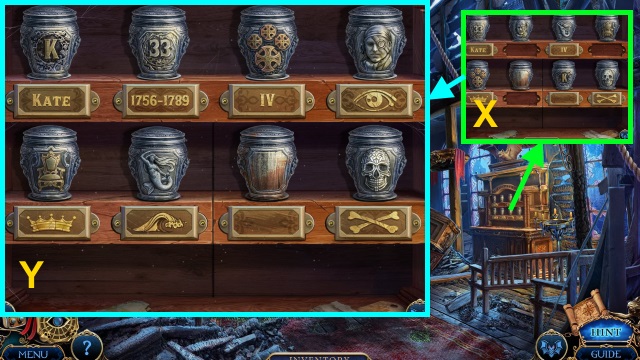
- Place the 3 GOLDEN PLATES for a mini-game (X).
- Solution (Y).
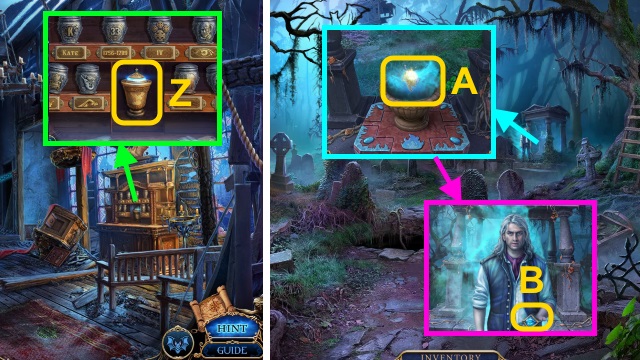
- Take the MAGIC POWDER (Z).
- Walk down.
- Use the MAGIC POWDER (A).
- Take the MYSTICAL DIAMOND (B).
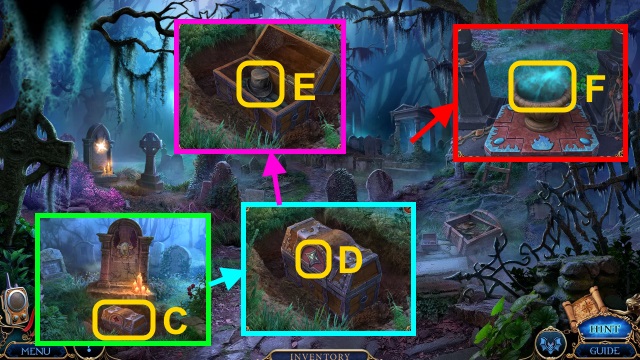
- Examine the chest (C); place the MYSTICAL DIAMOND (D).
- Open the chest; take the UNDERTAKER'S HAT (E).
- Place the UNDERTAKER'S HAT (F).
- Walk forward.
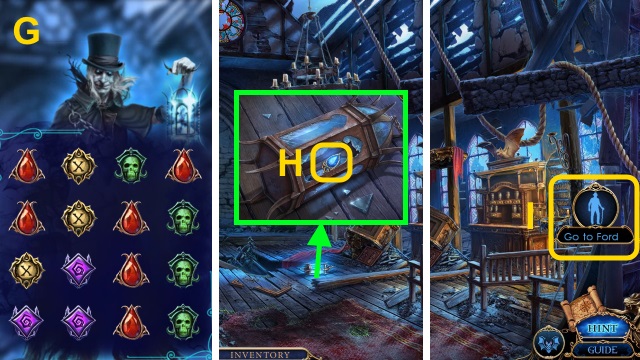
- Play the mini-game; solution is random (G).
- Take the Necklace Bead (H).
- Select 'Go to Ford' (I).
Chapter 4: Dead Island
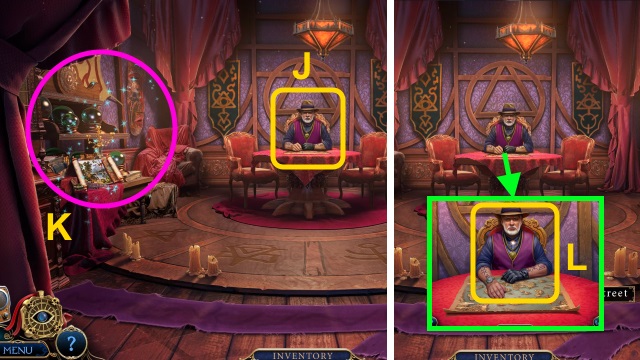
- Talk to Ford (J).
- Play the HOP; receive the BLACK CRYSTAL (K).
- Give the BLACK CRYSTAL for a mini-game (L).
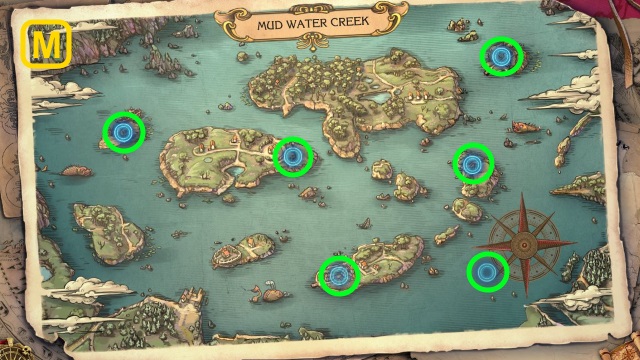
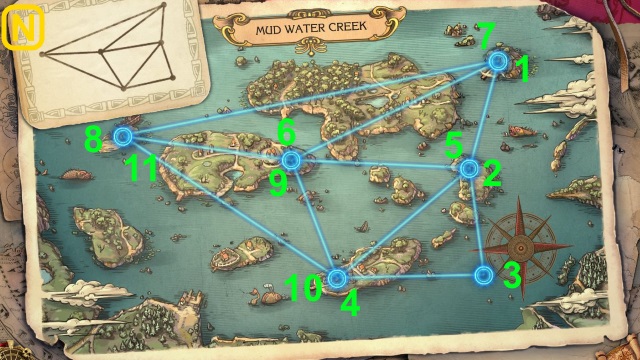
- Solution (M-N).
- Go to the Dock.
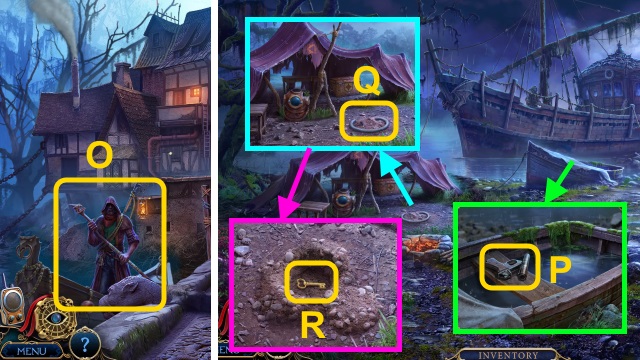
- Talk to the man (O).
- Go to Dead Island.
- Take the UNLOADED FLARE GUN (P).
- Examine the hose (Q); take the HOSE.
- Use the SHOVEL; take the CHEST KEY (R).
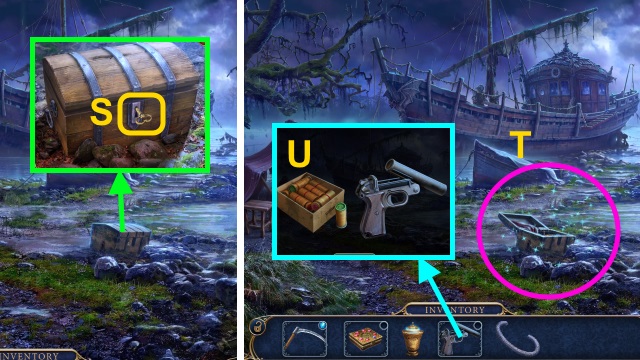
- Use the CHEST KEY (S).
- Play the HOP; receive the SIGNAL FLARES (T).
- Combine the UNLOADED FLARE GUN and SIGNAL FLARES (U); take the LOADED FLARE GUN.
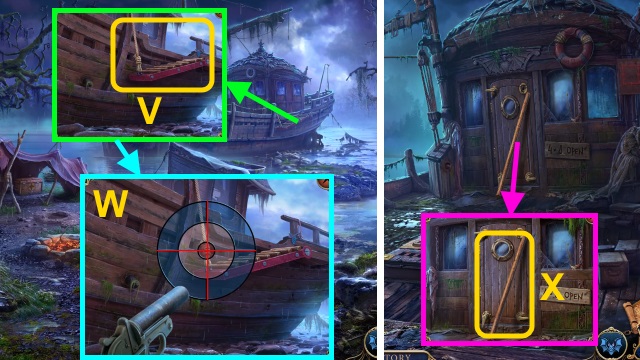
- Use the LOADED FLARE GUN for a mini-game (V).
- Hit the target (W).
- Walk forward.
- Take the LONG STICK (X).
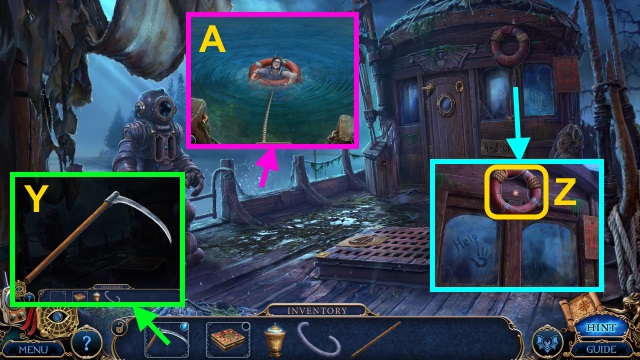
- Examine the BROKEN SCYTHE; remove the handle. Place the LONG STICK; take the SCYTHE (Y).
- Use the SCYTHE; receive the LIFEBUOY (Z).
- Use the LIFEBUOY (A).
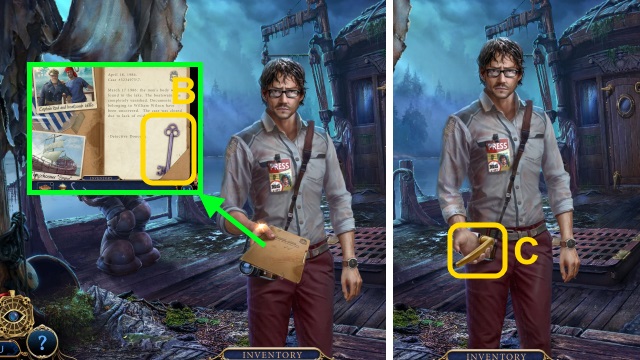
- Examine the folder; take the COMPARTMENT KEY (B).
- Take the CABIN HANDLE (C).
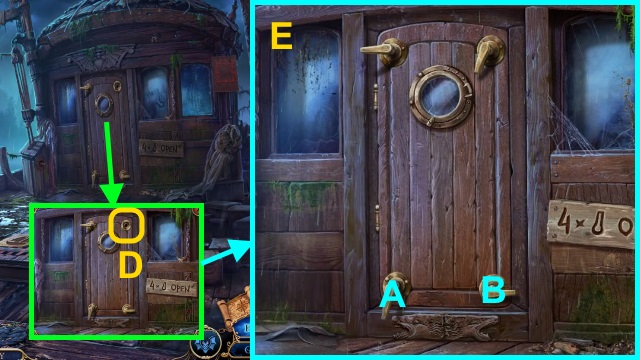
- Place the CABIN HANDLE for a mini-game (D).
- Solution (E): Ax2-Bx3.
- Open the door.
- Walk forward.
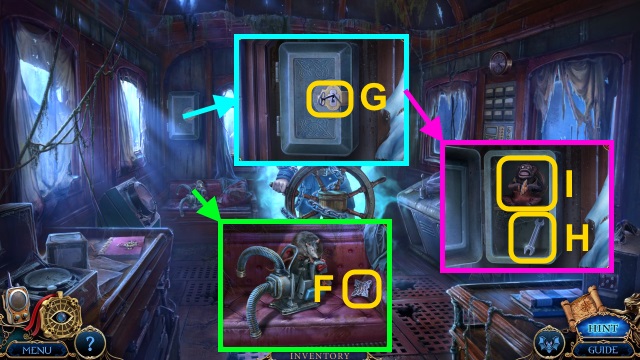
- Take the CHEST TILE (F).
- Use the COMPARTMENT KEY (G).
- Take the WRENCH (H); examine the monkey (I).
- Walk down twice.
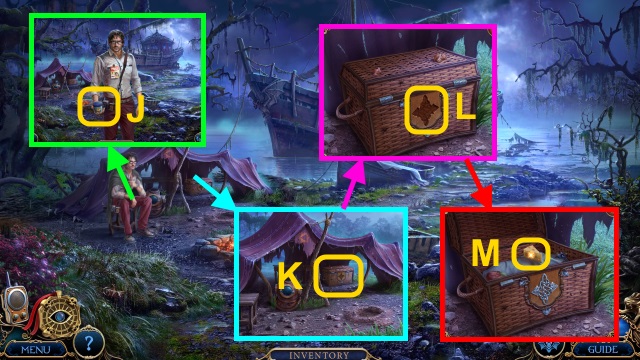
- Talk to the man; take the FISH FOOD (J).
- Examine the chest (K).
- Place the CHEST TILE (L); open the chest.
- Take the CHEESE (M).
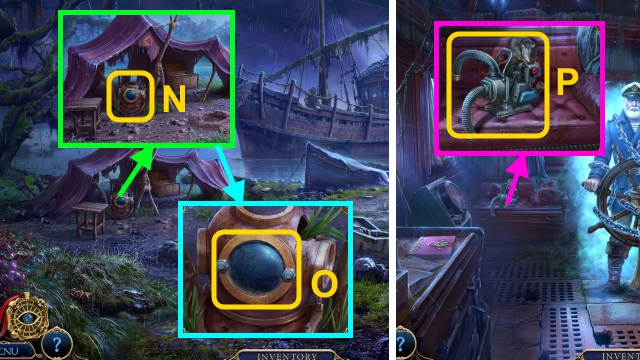
- Examine the helmet (N).
- Use the WRENCH; take the GLASS PLATE (O).
- Walk forward, then right.
- Give the CHEESE; take the WATER PUMP (P).
- Walk down twice.
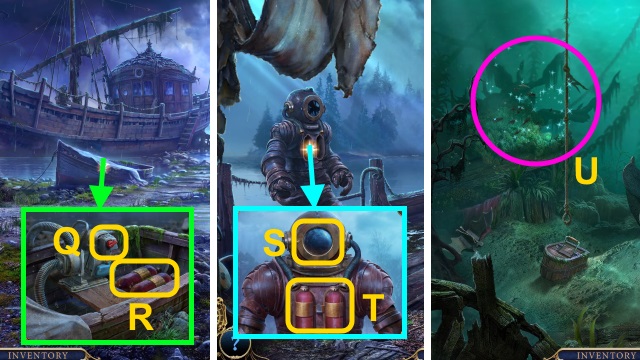
- Place the WATER PUMP; flip the switch (Q).
- Take the OXYGEN TANKS (R).
- Walk forward.
- Remove the glass; place the GLASS PLATE (S) and OXYGEN TANKS (T).
- Go left.
- Use the FISH FOOD; play the HOP. Receive the WINCH HANDLE.
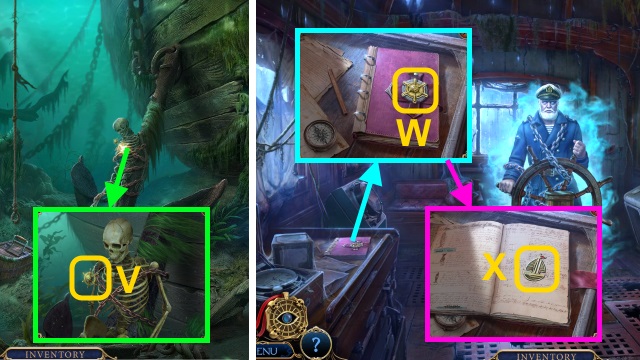
- Take the CAPTAIN'S AMULET (V).
- Go up, then right.
- Place the CAPTAIN'S AMULET (W); open the book.
- Take the SHIP EMBLEM (X).
- Walk down.
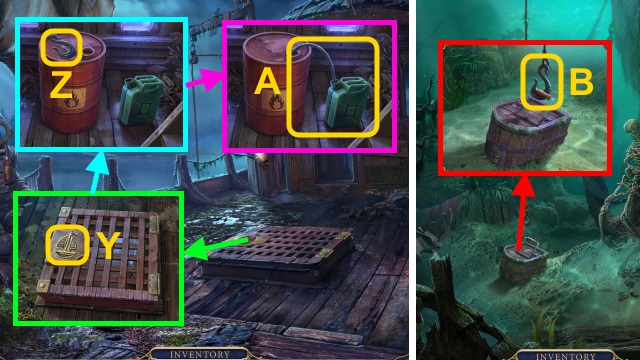
- Place the SHIP EMBLEM (Y). Open the door; examine the stairs.
- Take the HOOK (Z).
- Place the HOSE; take the FILLED JERRYCAN (A).
- Go left.
- Place the HOOK (B).
- Go up.
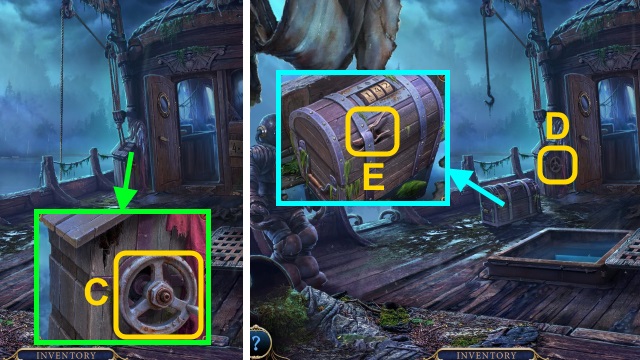
- Place the WINCH HANDLE (C).
- Turn the handle (D).
- Take the PRUNERS (E).
- Go left.
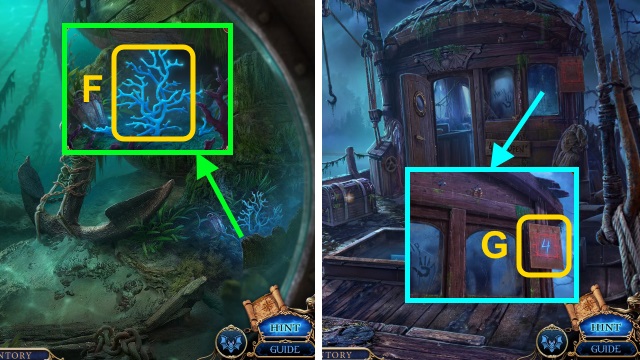
- Use the PRUNERS (F); receive the GLOWING CORAL BRANCH.
- Go up.
- Use the GLOWING CORAL BRANCH (G).
- Walk down.
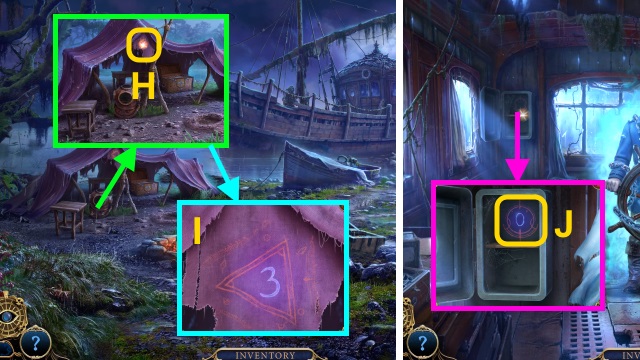
- Examine the tent (H).
- Use the GLOWING CORAL BRANCH (I).
- Walk forward, then right.
- Use the GLOWING CORAL BRANCH (J).
- Walk down.
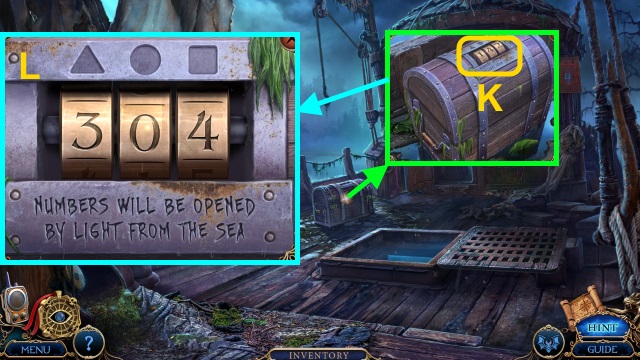
- Examine the chest (K).
- Enter the code (L).
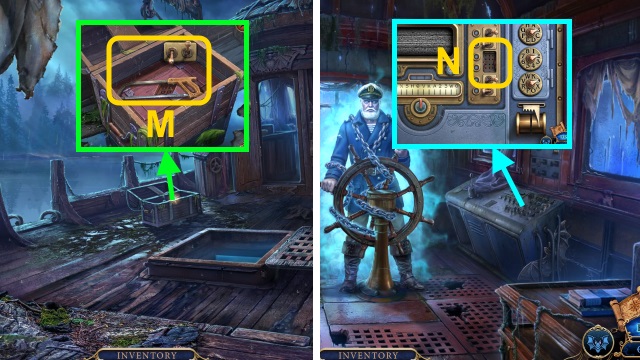
- Take the HACKSAW and SWITCHES (M).
- Walk right.
- Place the SWITCHES for a mini-game (N).
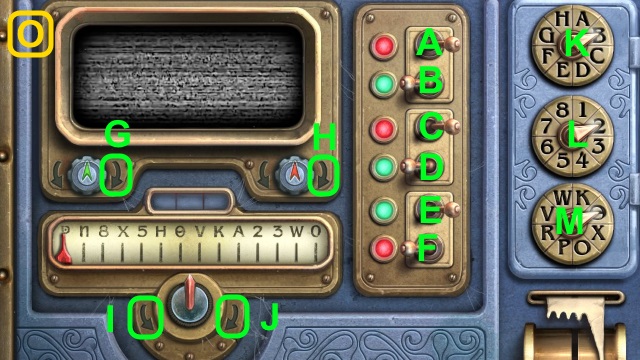
- Solution (O): E-C-F-D-A-C-Gx5-Hx10-Ix13-Ix10-Jx8-Kx6-Mx2.
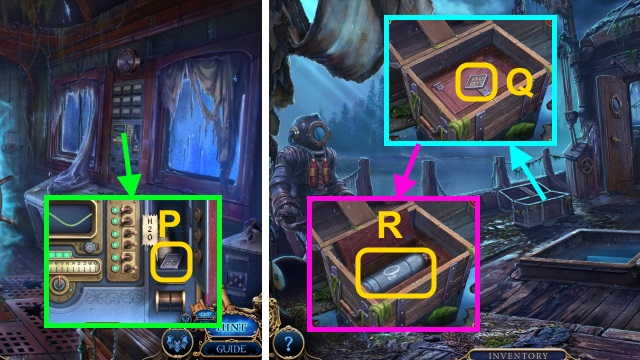
- Take the CAPTAIN'S TILE (P).
- Walk down.
- Place the CAPTAIN'S TILE (Q); examine it.
- Take the OXYGEN TANK (R).
- Go left.
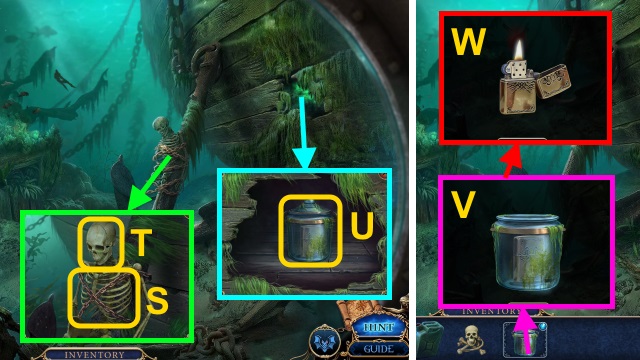
- Use the HACKSAW (S); take the CAPTAIN'S REMAINS (T).
- Use the OXYGEN TANK; take the JAR (U).
- Open the JAR (V); examine the lighter.
- Take the LIGHTER (W).
- Go up, then down.
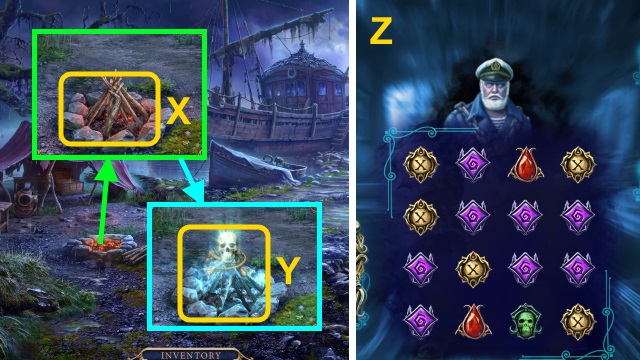
- Place the sticks; use the FILLED JERRYCAN and LIGHTER (X).
- Use the MAGIC POWDER and CAPTAIN'S REMAINS (Y).
- Walk forward, then right.
- Play the mini-game; solution is random (Z).
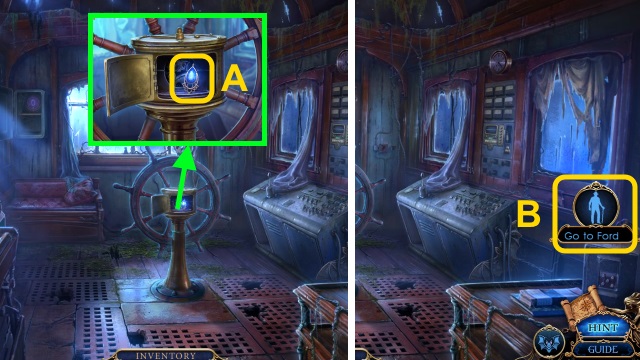
- Take the Necklace Bead (A).
- Go to Ford (B).
Chapter 5: The Abandoned Farm
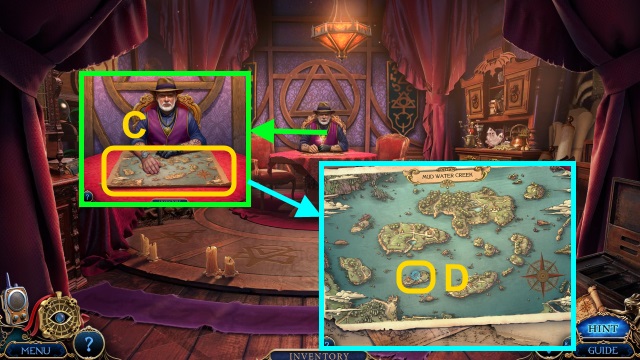
- Talk to Ford; examine the map (C).
- Examine the map (D).
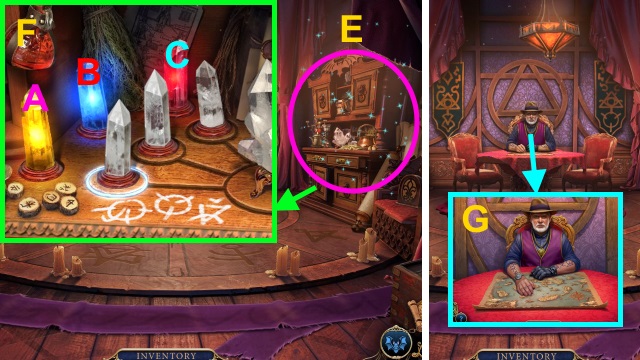
- Play the HOP; receive the BLACK CRYSTAL (E).
- HOP mini-game solution (F): B-C-A-C-A-B.
- Give the BLACK CRYSTAL for a mini-game (G).
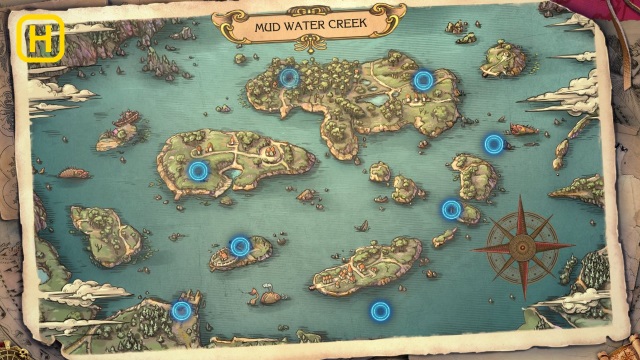
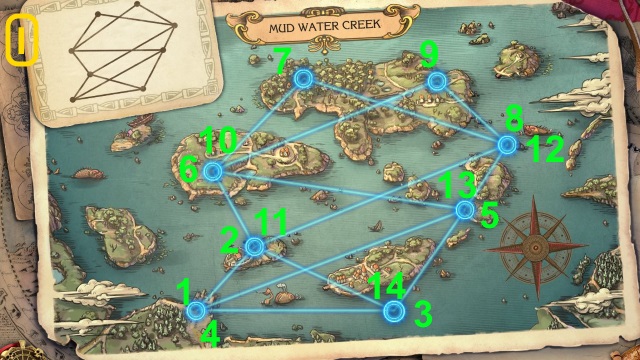
- Solution (H-I).
- Go to the Docks.
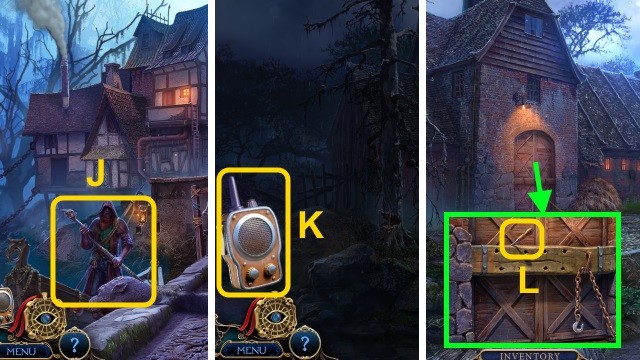
- Talk to the man (J).
- Go to the Abandoned Farm.
- Use the Radio (K).
- Take the SCREWDRIVER (L).
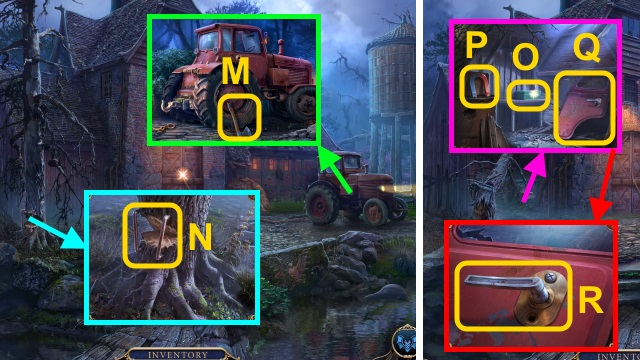
- Take the AXE (M).
- Use the SCREWDRIVER (N); receive the BRACKET (2/4). Use the AXE.
- Take the TRACTOR BOX (O) and MAGNET (P); examine the door (Q).
- Use the SCREWDRIVER; take the TRACTOR HANDLE (R).
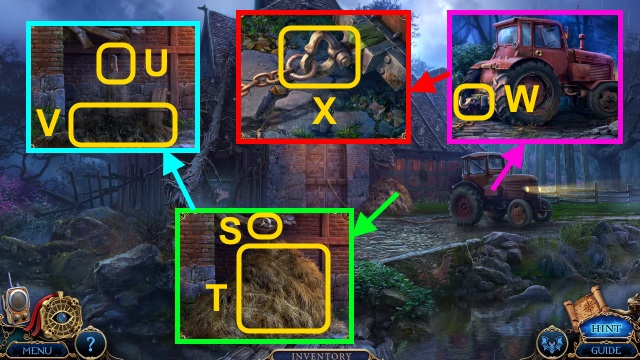
- Examine the hook (S); use the LIGHTER (T).
- Take the BRACKET (3/4) (U).
- Use the MAGNET (V); receive the TRACTOR HOOK.
- Examine the hook (W).
- Use the TRACTOR HOOK; place the bolt (X).
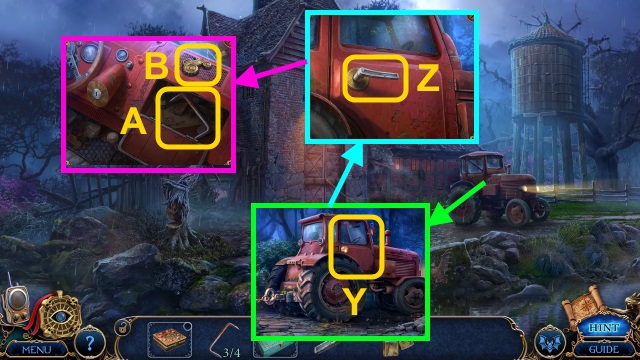
- Examine the door (Y); use the TRACTOR HANDLE. Examine the tractor (Z).
- Open the compartment; take the BRACKET (4/4) (A) and TRACTOR EMBLEM (B).
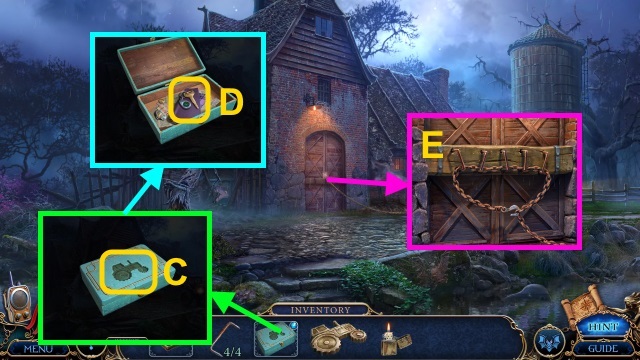
- Combine the box and TRACTOR EMBLEM (C); take the TRACTOR KEY (D).
- Place the BRACKET (4/4); fasten the chain (E).
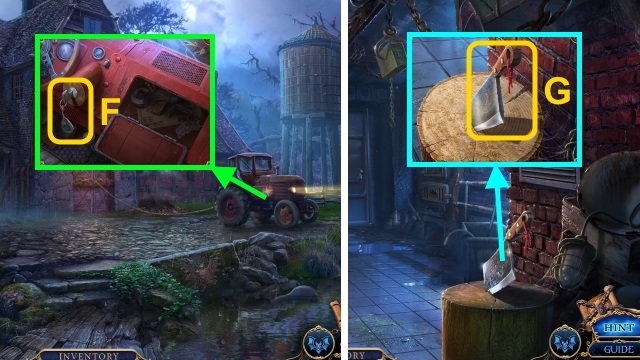
- Use the TRACTOR KEY (F).
- Walk forward.
- Examine the knife (G).
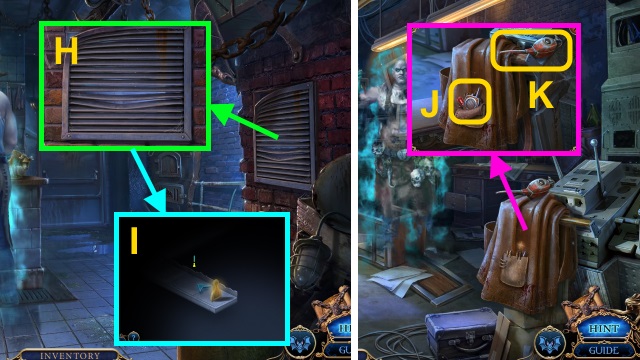
- Remove the grate; go forward for a mini-game (H).
- Solution (I): forward-left-forward-right-forward.
- Examine the pocket; take the Radio, MARKER (J), and OILER (K).
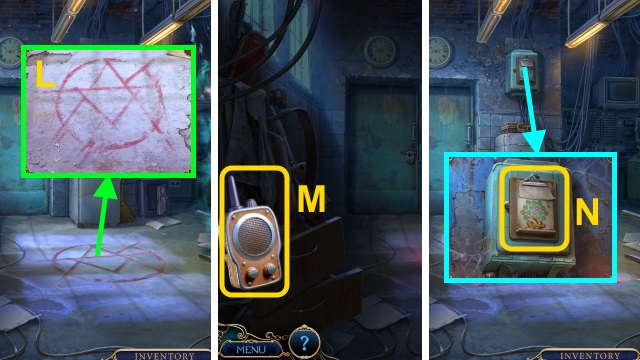
- Use the MARKER (L).
- Use the Radio (M).
- Take the CLIPBOARD (N).
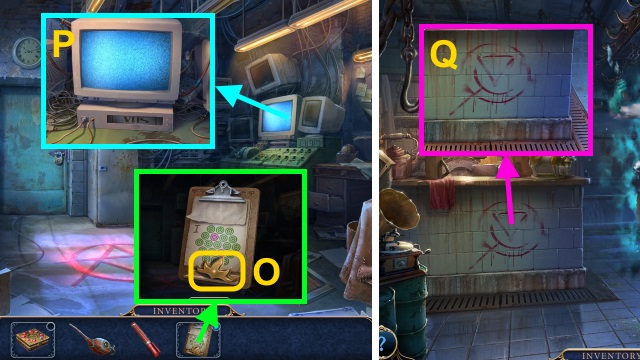
- Examine the CLIPBOARD; take the FIRE EMBLEM (O).
- Examine the screen (P).
- Walk down.
- Use the MARKER (Q).
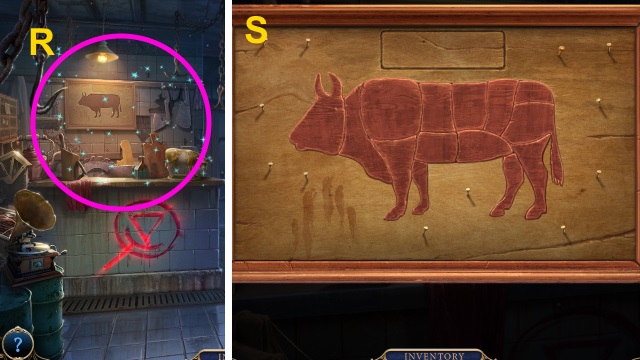
- Play the HOP; receive the LIGHTER (R).
- HOP mini-game solution (S).
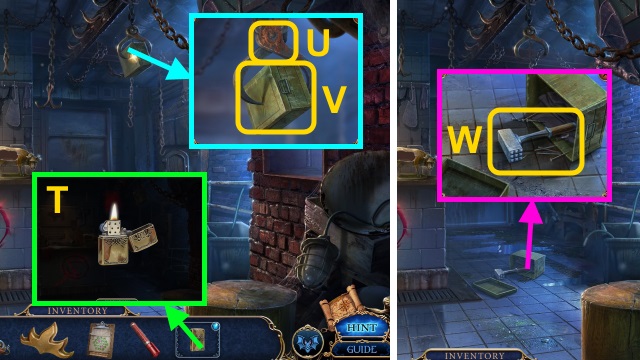
- Light the LIGHTER; take the LIGHTER (T).
- Use the OILER (U); examine the box (V).
- Take the MEAT HAMMER (W).
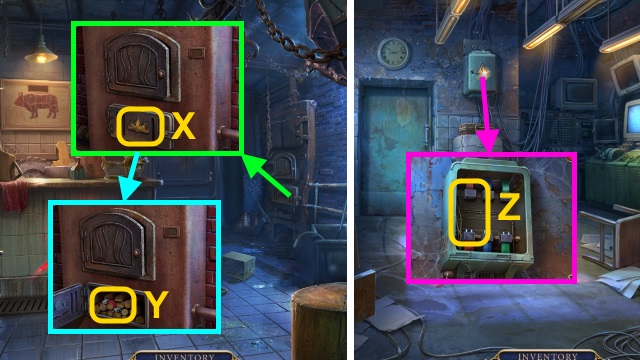
- Place the FIRE EMBLEM (X); open the door.
- Take the RED WIRE (Y).
- Go right.
- Remove the cover; place the RED WIRE (Z).
- Walk down, then forward.
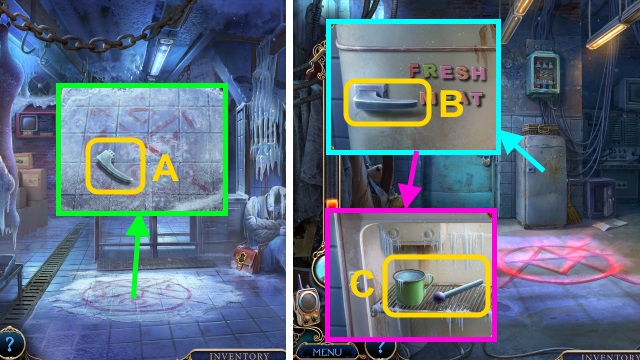
- Take the REFRIGERATOR HANDLE (A).
- Go down, then right.
- Place the REFRIGERATOR HANDLE (B); open the door.
- Take the PRESS LEVER and MUG OF FROZEN WATER (C).
- Walk down.
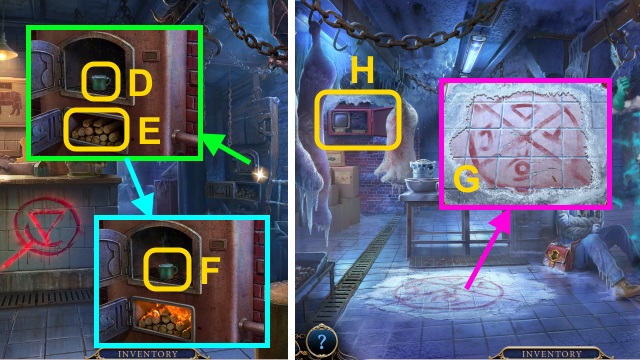
- Open the door; place the MUG OF FROZEN WATER (D).
- Use the LIGHTER (E).
- Take the MUG OF STEAMING WATER (F).
- Walk forward.
- Pour the MUG OF STEAMING WATER; use the MARKER (G).
- Examine the screen for a mini-game (H).
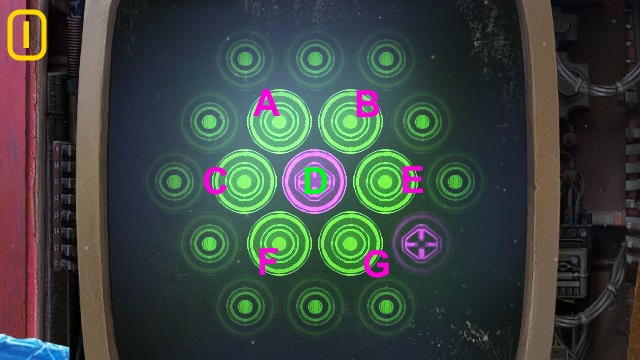
- Solution (I): (B-E)-(D-Bx2-D-E)-(F-A-Dx5-F-Ex5-G).
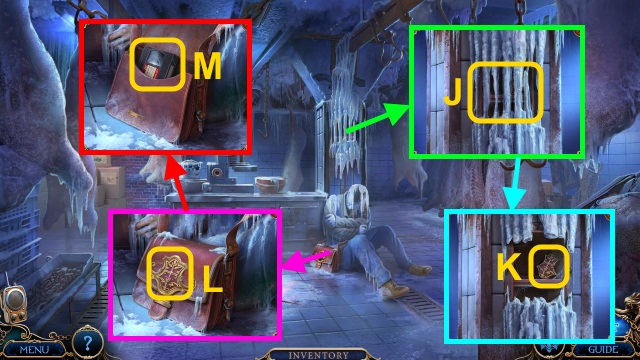
- Use the MEAT HAMMER (J).
- Take the BAG EMBLEM (K).
- Place the BAG EMBLEM (L); open the bag.
- Take the VIDEOTAPE (M).
- Walk down, then right.
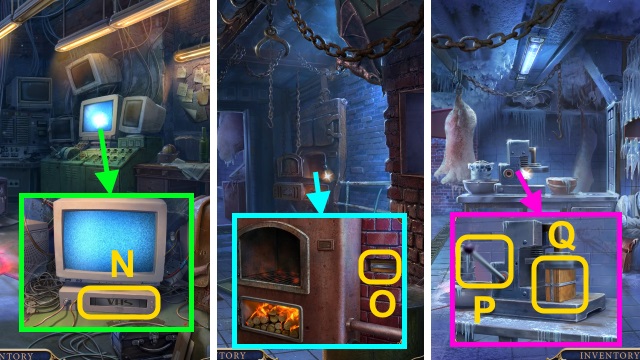
- Place the VIDEOTAPE (N).
- Walk down.
- Remove the brick; take the IMPENETRABLE BOX (O).
- Walk forward.
- Place the PRESS LEVER (P) and IMPENETRABLE BOX (Q).
- Pull the lever; receive the BLUE WIRE.
- Walk down, then right.
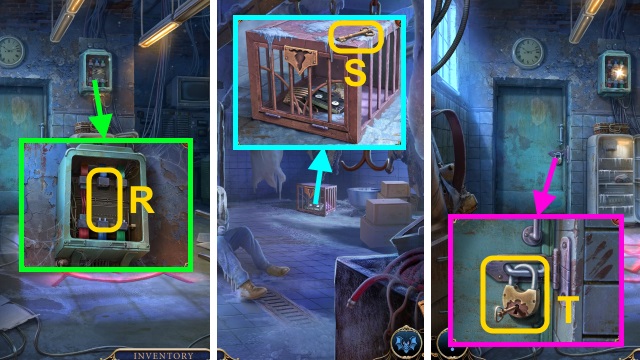
- Place the BLUE WIRE (R).
- Walk down, then forward.
- Take the PADLOCK KEY (S).
- Walk down, then right.
- Use the PADLOCK KEY (T).
- Walk forward.
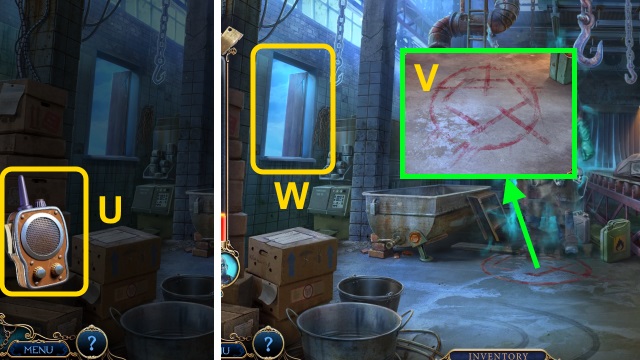
- Examine the radio (U).
- Use the MARKER (V).
- Examine the window (W).
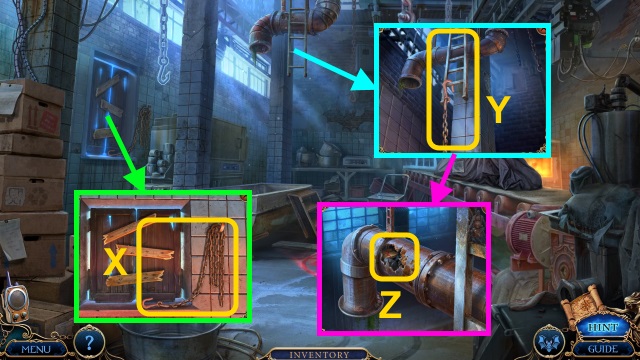
- Take the CHAIN WITH HOOK (X).
- Use the CHAIN WITH HOOK; examine the ladder (Y).
- Use the MEAT HAMMER (Z).
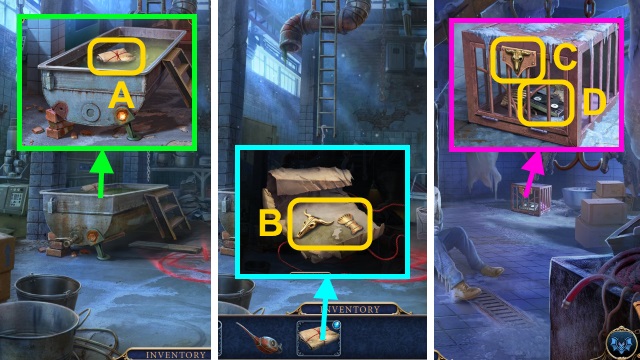
- Take the PACKAGE (A).
- Open the PACKAGE; take the SKULL TILE and SHELL TILE (B).
- Go to the Freezer.
- Place the SKULL TILE (C). Open the cage; take the VIDEOTAPE (D).
- Walk down, then right.
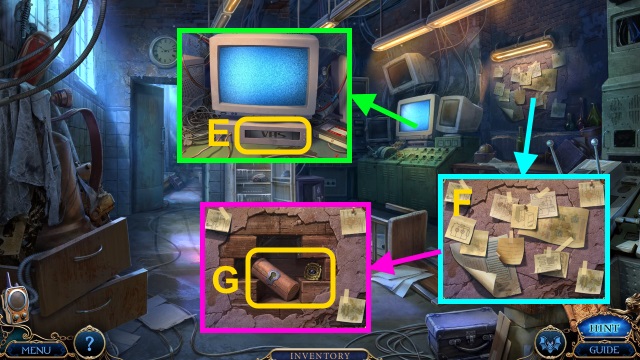
- Place the VIDEOTAPE (E).
- Move the notes (F); examine the wall.
- Remove the bricks; take the Token and WOODEN CYLINDER (G).
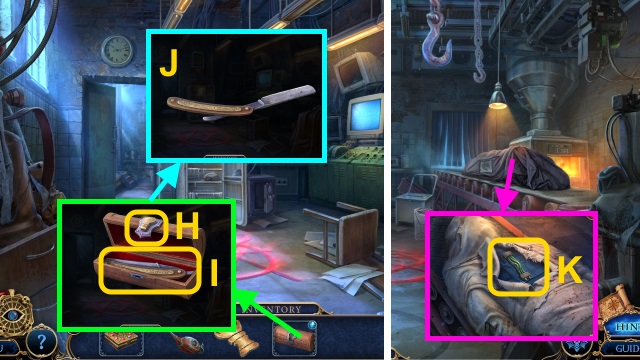
- Combine the WOODEN CYLINDER and SHELL TILE (H); examine the razor (I).
- Take the RAZOR (J).
- Walk forward.
- Use the RAZOR; take the GREEN WIRE (K).
- Walk down.
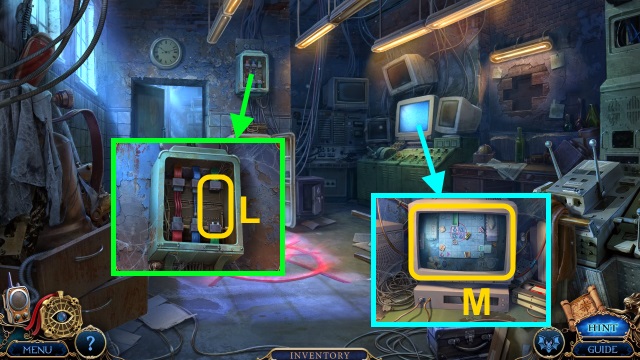
- Place the GREEN WIRE (L).
- Examine the screen for a mini-game (M).
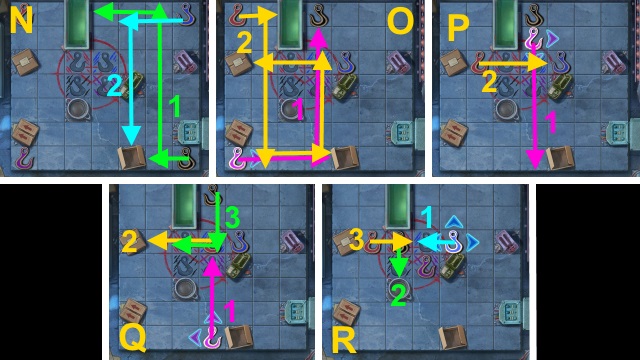
- Solution (N-R).
- Walk forward.
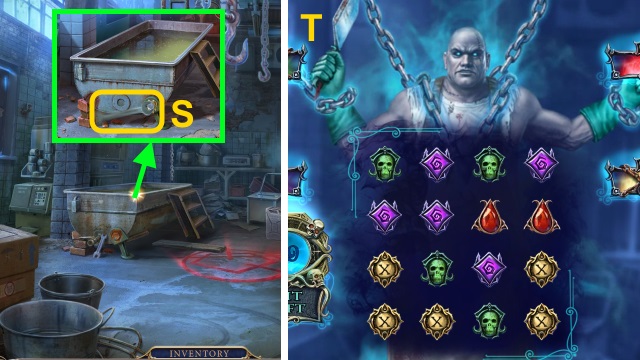
- Use the OILER; use the wrench for a mini-game (S).
- Solution is random (T).
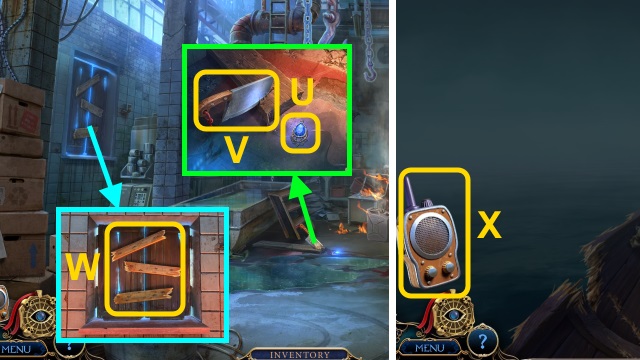
- Take the Necklace Bead (U) and CLEAVER (V).
- Use the CLEAVER (W).
- Use the Radio (X).
- Go forward; go to the Sawmill.
Chapter 6: The Sawmill
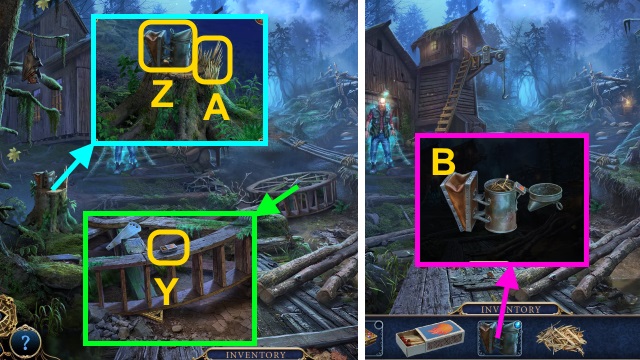
- Take the MATCHES (Y).
- Take the BEE SMOKER (Z) and WOOD CHIPS (A).
- Open the BEE SMOKER; use the WOOD CHIPS and MATCHES (B). Take the FILLED BEE SMOKER.
- Walk forward.
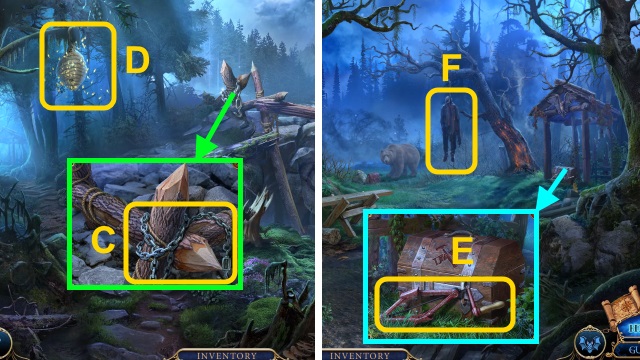
- Take the CHAIN WITH HOOK (C).
- Use the FILLED BEE SMOKER (D).
- Walk left.
- Take the JACK (E).
- Examine the mannequin (F).
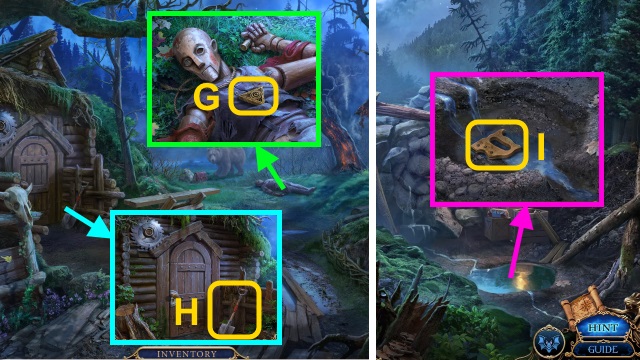
- Take the TRIANGLE TILE (G).
- Take the SHOVEL (H).
- Walk down.
- Use the SHOVEL; take the SAW HANDLE (I).
- Walk down.
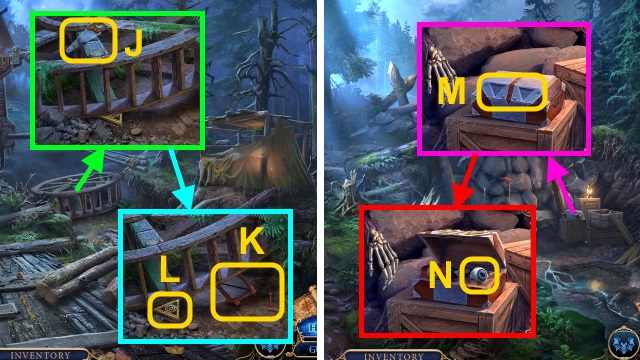
- Place the SAW HANDLE; take the SAW (J).
- Use the JACK (K); take the TRIANGLE TILE (L).
- Walk forward.
- Place the 2 TRIANGLE TILES (M).
- Take the EYE (N).
- Walk left.
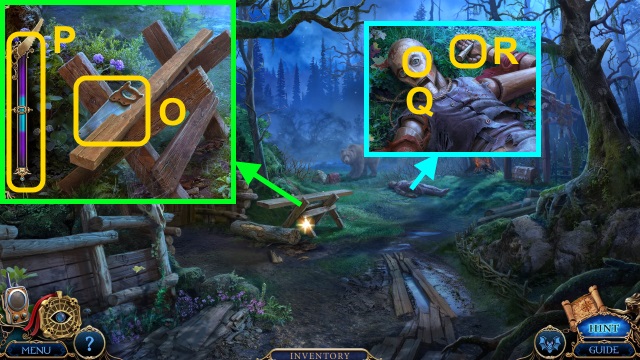
- Use the SAW for a mini-game (O).
- Solution (P): stop the indicator inside the blue section of the meter 3x.
- Receive the BOARDS.
- Place the EYE (Q); take the LATCH (R).
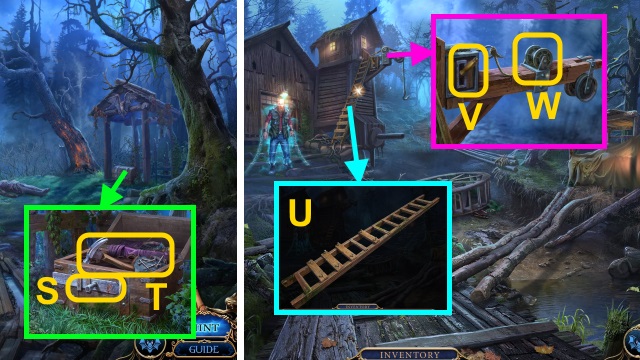
- Place the LATCH (S); open the box.
- Take the HAMMER and NAILS (T).
- Walk down twice.
- Move the board; place the BOARDS and NAILS (U). Use the HAMMER.
- Pull the lever; place the CHAIN WITH HOOK (V). Pull the lever.
- Walk left.
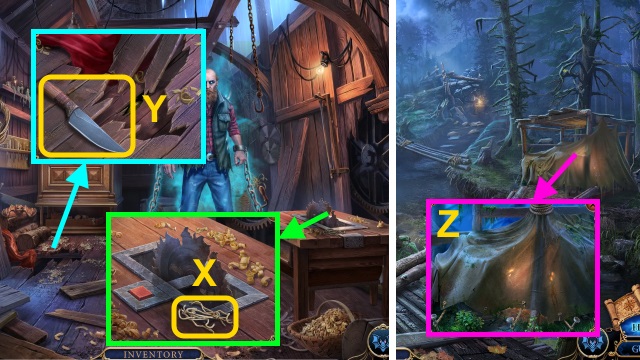
- Take the WICKS (X).
- Take the KNIFE (Y).
- Walk down.
- Use the KNIFE (Z); move the tarp.
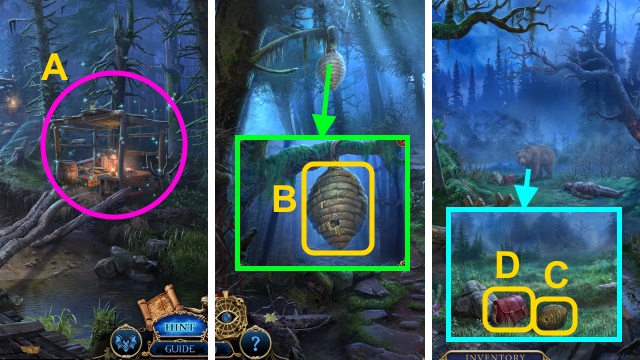
- Play the HOP; receive the TREE EMBLEM (A).
- Walk forward.
- Use the KNIFE (B); receive the HIVE.
- Walk left.
- Use the HIVE (C); take the EXPLOSIVES BAG (D).
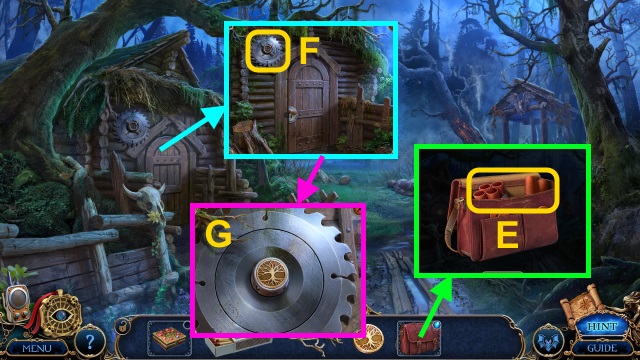
- Open the EXPLOSIVES BAG; take the DYNAMITE TUBES (E).
- Examine the saw (F).
- Place the TREE EMBLEM; take the CIRCULAR BLADE (G).
- Walk down twice, then left.
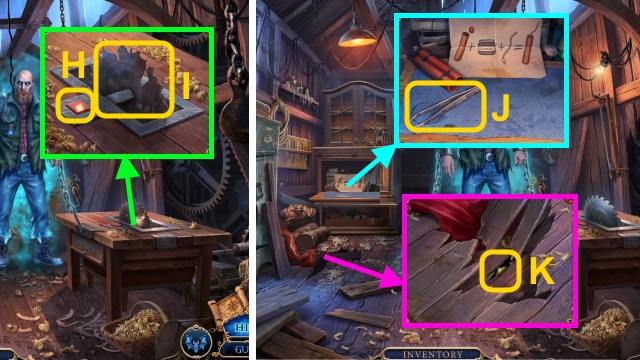
- Press the button (H). Remove the blade (I); place the CIRCULAR BLADE.
- Take the TWEEZERS (J).
- Use the TWEEZERS (K); receive the LOCKER BUTTON.
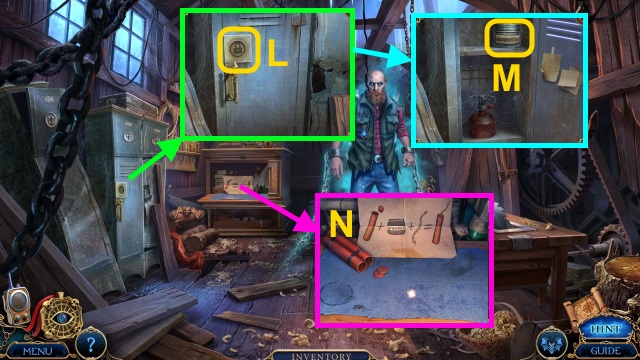
- Place the LOCKER BUTTON (L).
- Take the GUNPOWDER (M).
- Place the DYNAMITE TUBES, WICKS, and GUNPOWDER (N).
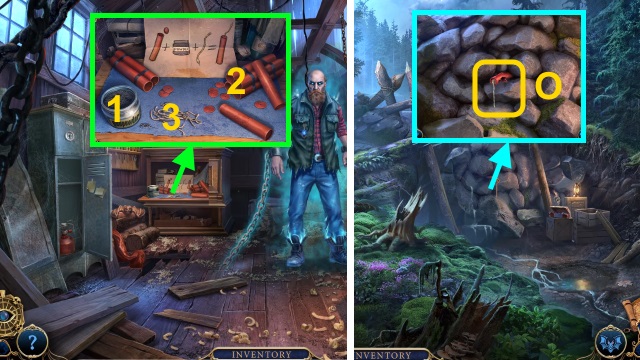
- Examine the powder, tubes, then wicks (1-3); take the DYNAMITE.
- Walk down, then forward.
- Remove the dynamite (O); place the DYNAMITE for a mini-game.
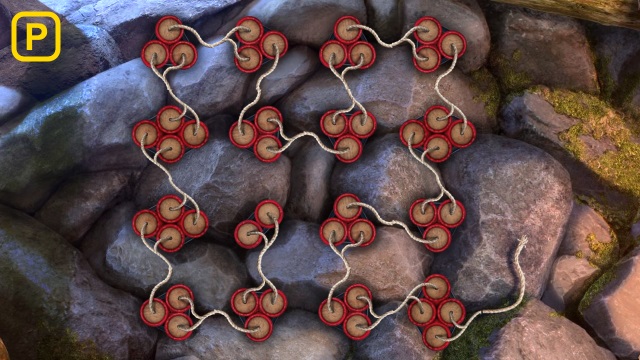
- Solution (P).
- Use the MATCHES.
- Walk down.
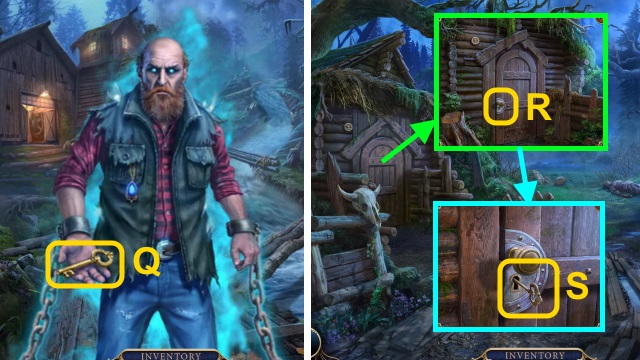
- Take the GATEHOUSE KEY (Q).
- Walk forward, then left.
- Examine the door (R); use the GATEHOUSE KEY (S).
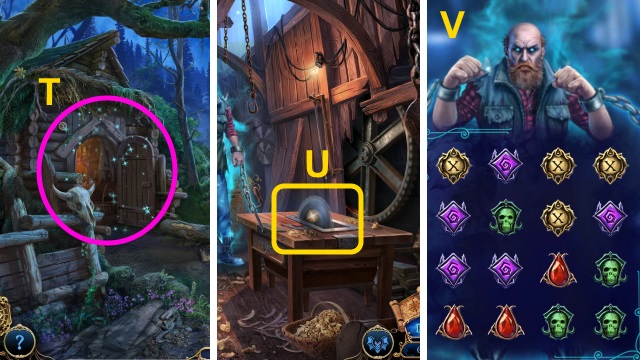
- Play the HOP; receive the AXE (T).
- Go to the Sawmill.
- Use the AXE for a mini-game (U).
- Solution is random (V).
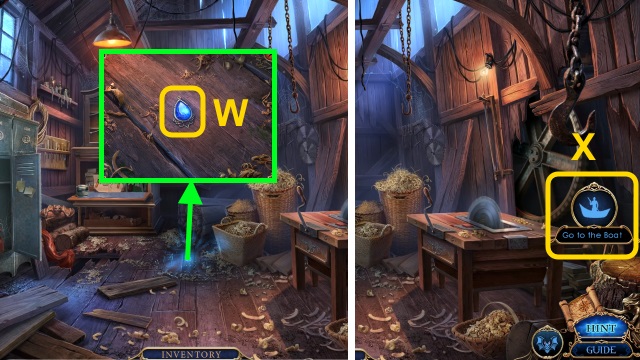
- Take the Necklace Bead (W).
- Select 'Go to the Boat' (X); go to the island.
- Select 'No; select 'Stay.'
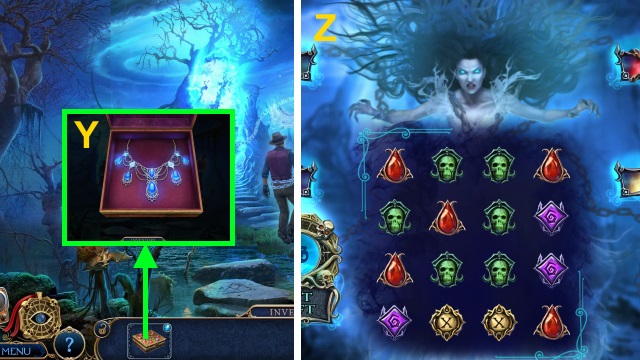
- Open the JEWELRY BOX; examine the beads for a mini-game (Y).
- Solution is random (Z).
- Congratulations! You have completed Mystery of the Ancients: Mud Water Creek.
Created at: 2016-05-13

