Walkthrough Menu
- General Tips
- Chapter 1: The Abandoned Town
- Chapter 2: The Mansion
- Chapter 3: The Backwoods
- Chapter 4: The Cabin in the Wood
- Chapter 5: The Secret Passage
- Chapter 6: The Ruins
- Chapter 7: The Guardian's Castle
- Chapter 8: The Ancient Crypt
- Chapter 9: The Castle Courtyard
- Chapter 10: The Main Hall
- Chapter 11: The Dungeon
General Tips
- This is the official guide for Mystery of the Ancients: Three Guardians.
- This guide will not mention each time you have to zoom into a location; the screenshots will show each zoom scene.
- We will use the acronym HOP for Hidden-object puzzles. Interactive items will be color-coded and some will be numbered; please follow the numbers in sequence.
- Use the map to travel to a location.
Chapter 1: The Abandoned Town
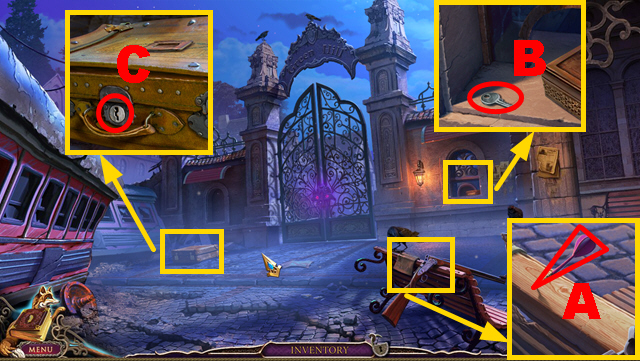
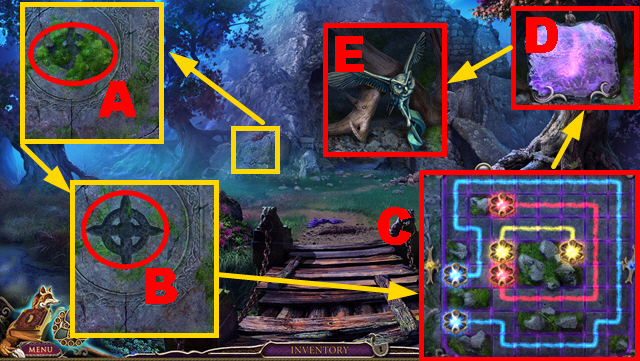
- Take the DART (A).
- Take the SUITCASE KEY (B).
- Put the SUITCASE KEY into the lock (C).
- Play the HOP.
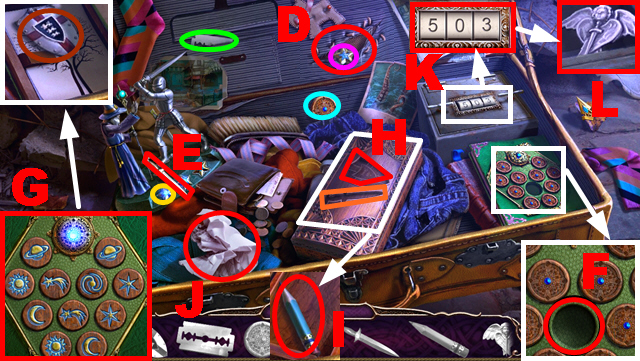
- Use the razor (green) to cut the seam (D).
- Place the star (purple) on the niche (yellow).
- Place the sword (E) on the slot (orange).
- Place the wooden token (blue) on the niche (F).
- Solution: (G).
- Put the shield (brown) into the slot (H).
- Use the pencil (I) to write on the paper (J).
- Enter the code '261' (K).
- Take the ANGEL (L).
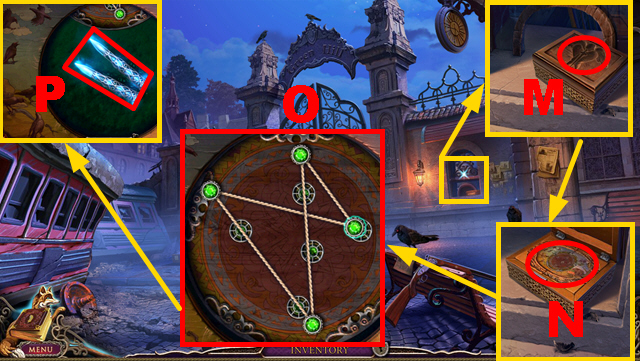
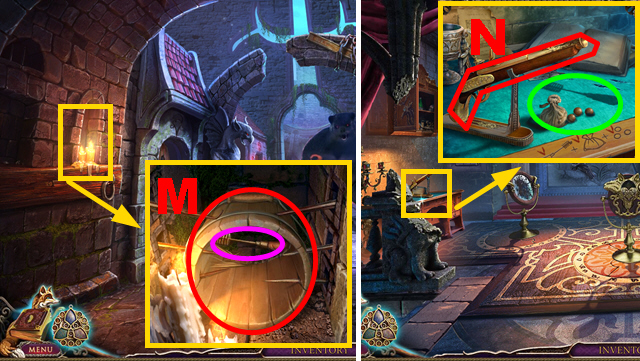
- Place the ANGEL on the box (M); play the mini-game (N).
- Solution: (O).
- Take the SILVER BULLETS (P).
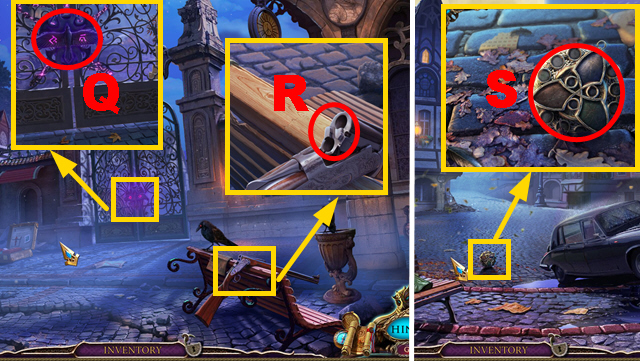
- Put the SILVER BULLETS into the rifle (R) to acquire the RIFLE.
- Shoot the RIFLE (Q).
- Move forward.
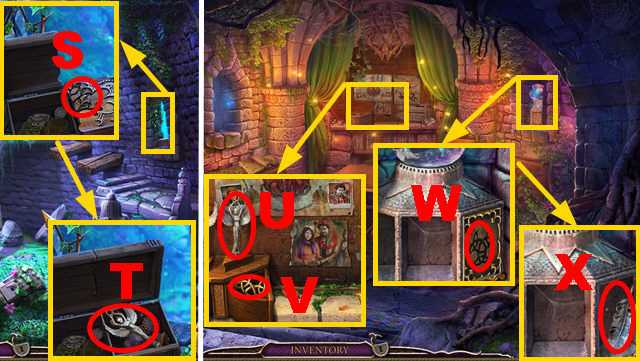
- Take the amulet (S).
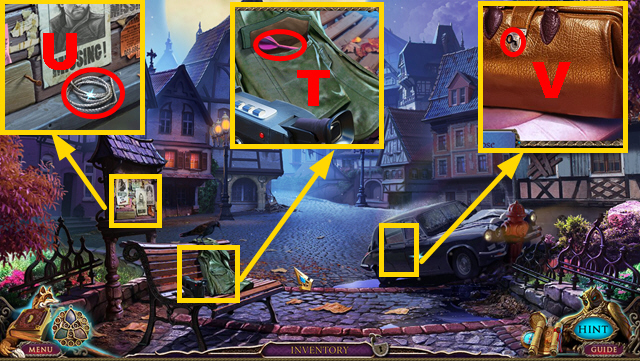
- Open the pocket; take the DART (T).
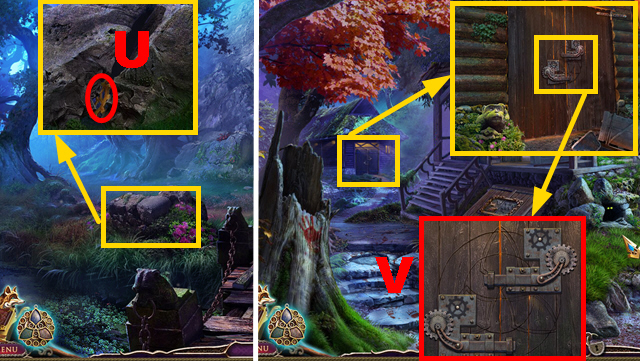
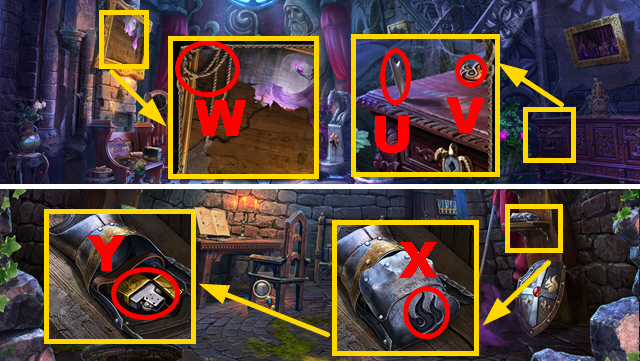
- Take the ROPE (U).
- Open the car; attempt to take the key (V).
- Move forward.
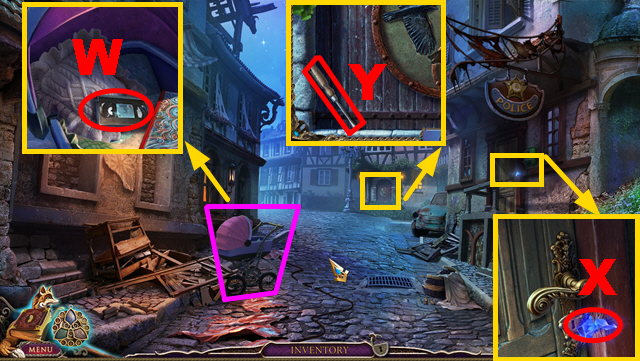
- Touch the buggy (purple); take the VIDEOTAPE (W).
- Take the amulet piece (X).
- Take the SCREWDRIVER (Y).
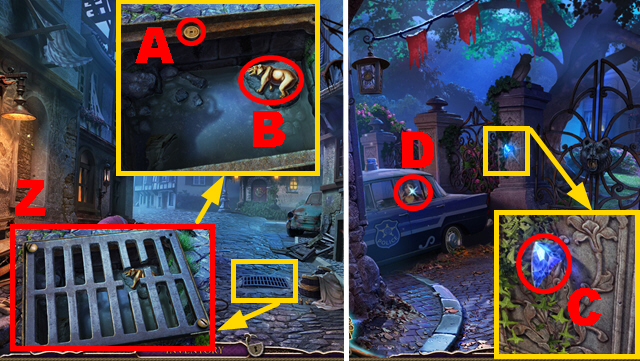
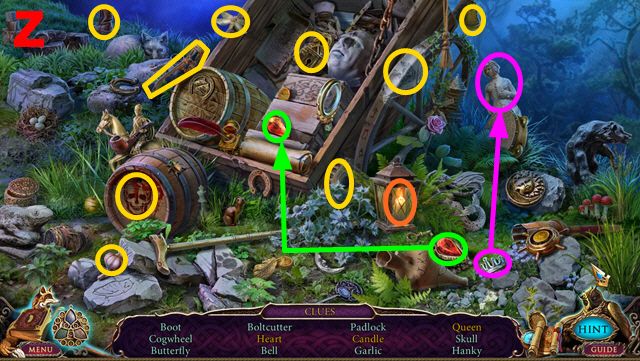
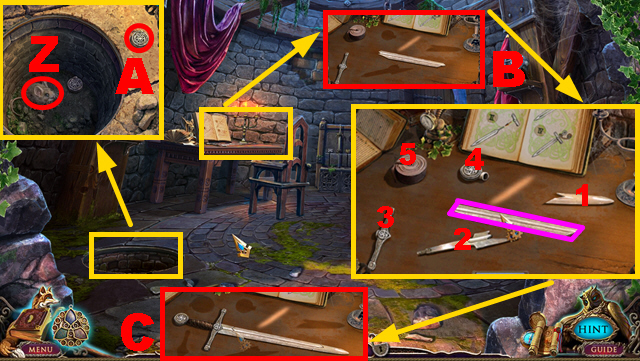
- Use the SCREWDRIVER (Z).
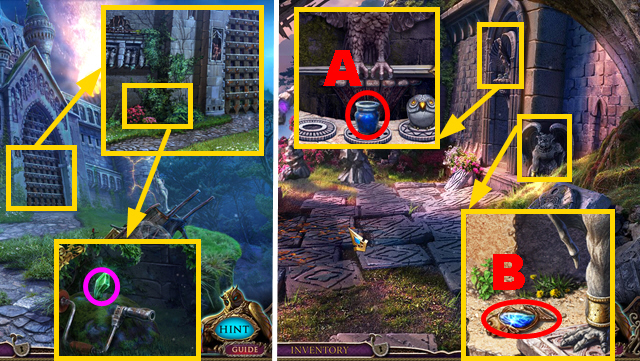
- Attempt to take the coin (A); take the BEAR (B).
- Move forward.
- Take the amulet piece (C).
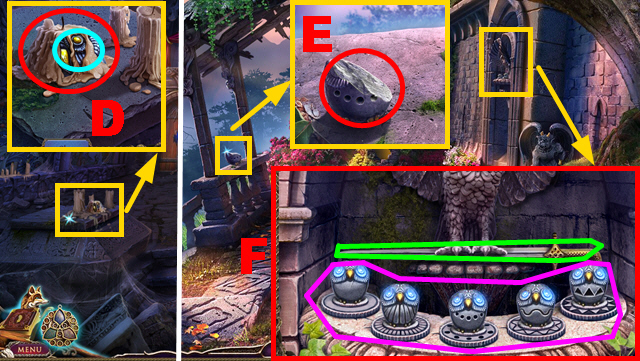
- Inspect the window (D).
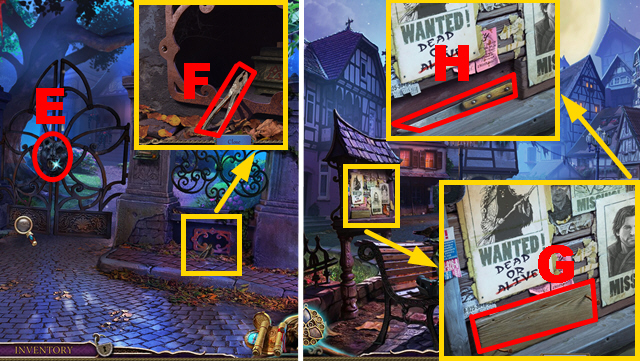
- Inspect the gate (E).
- Take the PLIERS (F).
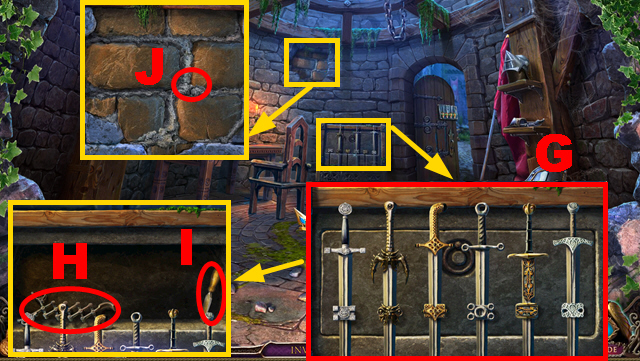
- Walk down twice.
- Use the PLIERS (G); take the KNIFE (H).
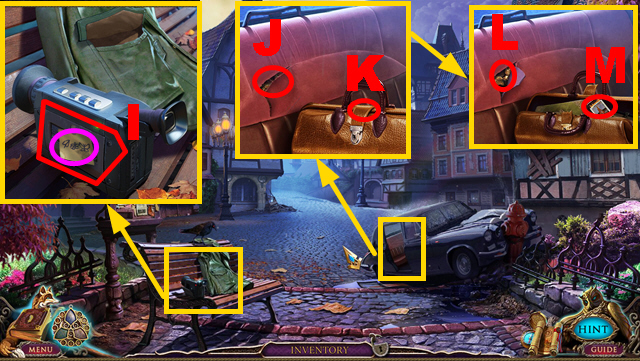
- Put the VIDEOTAPE into the camera (I); take the CODE (purple).
- Tear the cover (J); use the KNIFE (K).
- Take the OWL (L) and MATCHES (M).
- Move forward twice.
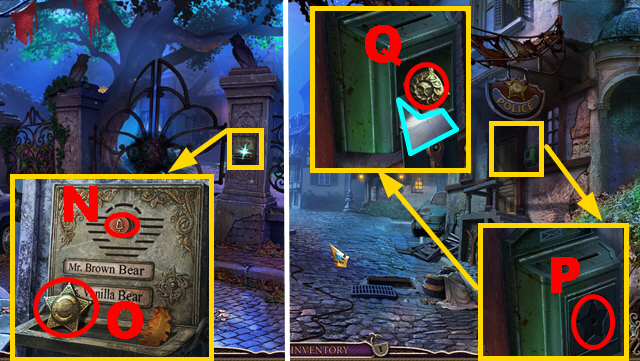
- Push the button (N); take the SHERIFF'S BADGE (O).
- Walk down.
- Place the SHERIFF'S BADGE on the mailbox (P); take the SUN KEY (Q) and note (blue).
- Move forward.
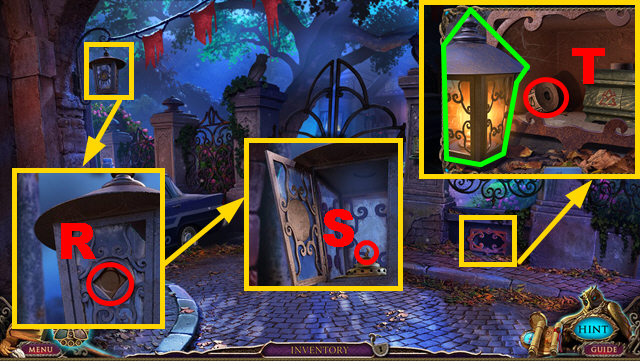
- Place the SUN KEY on the lantern (R); use the MATCHES (S) to receive the LANTERN.
- Put down the LANTERN (green); take the LOCK DISC (T).
- Walk down.
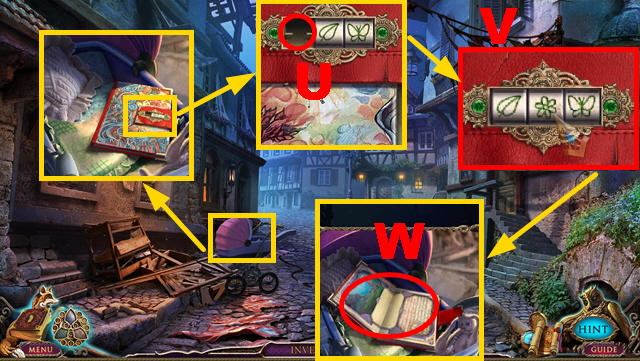
- Put the LOCK DISC into the niche (U).
- Adjust the symbols correctly (V).
- Play the mini-game (W).
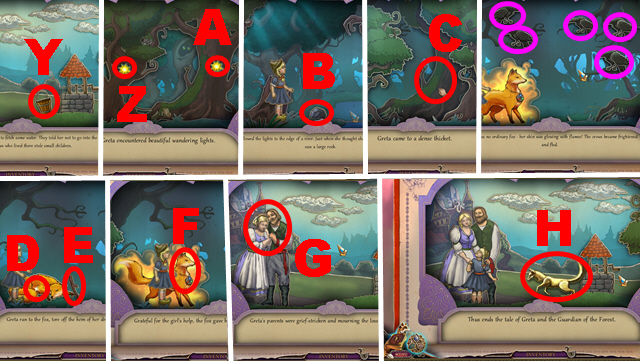
- Take the bucket (Y); catch the light (Z).
- Catch the light (A); throw the stone (B).
- Touch the tree (C); chase away 5 crows (purple).
- Patch the fox (D); take the branch (E).
- Touch the fox (F); return to the parents (G).
- Take the FOX (H).
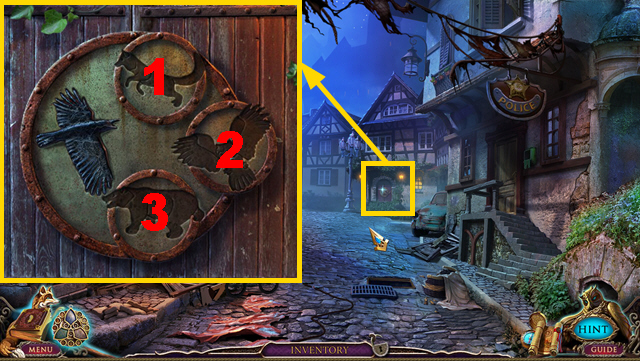
- Place the FOX (1), OWL (2), and BEAR (3) on the door.
- Play the HOP.
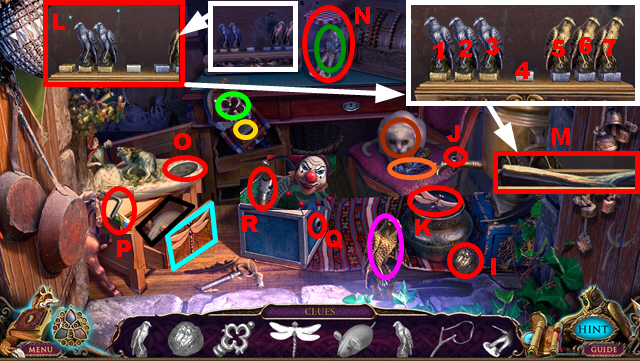
- Put the nut (I) into the nutcracker (yellow).
- Connect the tap handle (light green) to the faucet (J).
- Place the dragonfly (K) on the box (blue).
- Give the mouse (black) to the cat (brown).
- Place the golden bird (purple) and silver bird (orange) on the stand (L).
- Solution: 2, 3, 5, 4, 6, 5, 4, 2, 3, 5, 7, 6, 4, 3, 1, 2, 4, 5, 3, 4.
- Shoot the slingshot (M) at the jar (N).
- Place the hunter (dark green) on the niche (O).
- Connect the handle (P) to the box (Q).
- Take the GLASS CUTTER (R).
- Move forward.
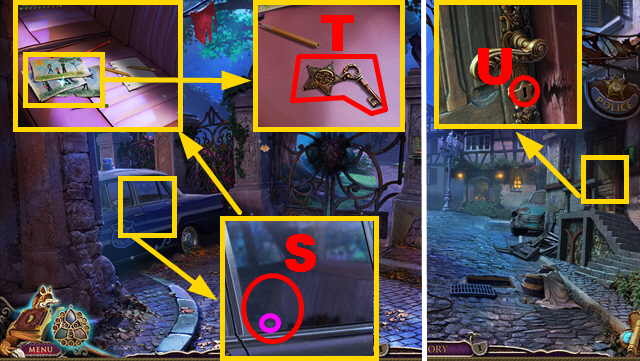
- Use the GLASS CUTTER (S); pull the lock (purple).
- Remove 3 drawings; take the SHERIFF'S KEY (T).
- Walk down.
- Insert the SHERIFF'S KEY into the lock (U).
- Turn right.
- Play the HOP.
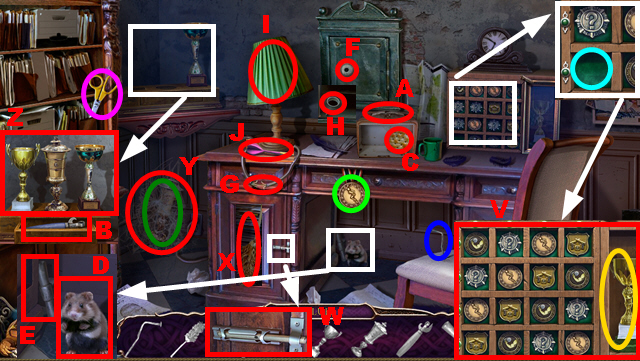
- Use the scissors (purple) to collect the medal (light green).
- Put the medal on the board (light blue).
- Solution: (V).
- Use the nail (dark blue) to move the hinge (W).
- Use the duster (X) to remove the cobwebs (Y).
- Put 2 trophies (yellow) and (dark green) on the stand (Z).
- Open the bag (A) with the opener (B).
- Give the cracker (C) to the animal (D).
- Place the handle (E) on the safe (F).
- Repair the wire (G) with the electrical tape (H).
- Touch the lamp (I).
- Take the DART (J).
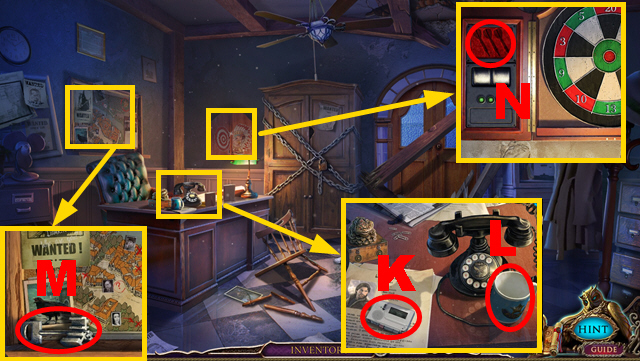
- Listen to the tape (K); take the CUP (L).
- Take the MILITARY KEY (M).
- Open the cupboard; put down 3 DARTS (N).
- Play the mini-game.
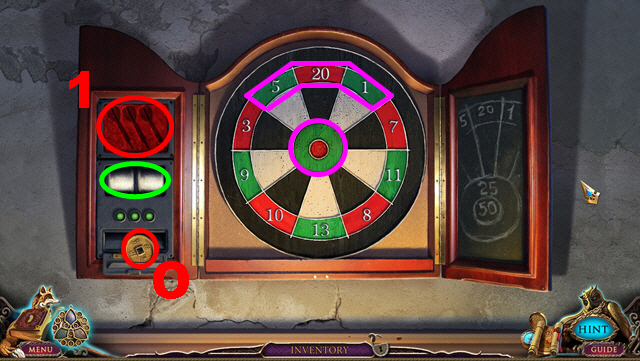
- To solve this puzzle, accumulate the points displayed on the panel (green).
- Throw the darts (1) at the purple sections.
- The required number of points is randomized.
- Take the COIN (O).
- Walk down.
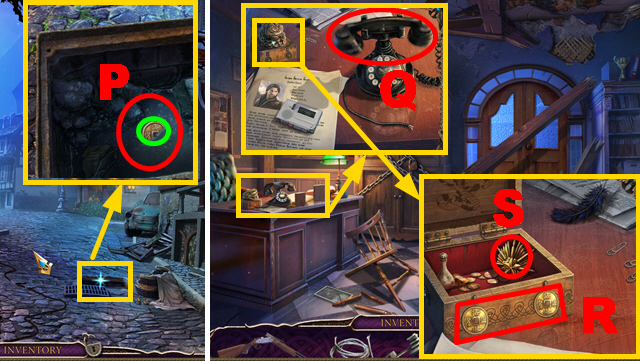
- Put the CUP into the water (P); take the COIN (green).
- Turn right.
- Pick up the phone (Q).
- Place 2 COINS on the slots (R); take the MILITARY INSIGNIA (S).
- Walk down, turn left.
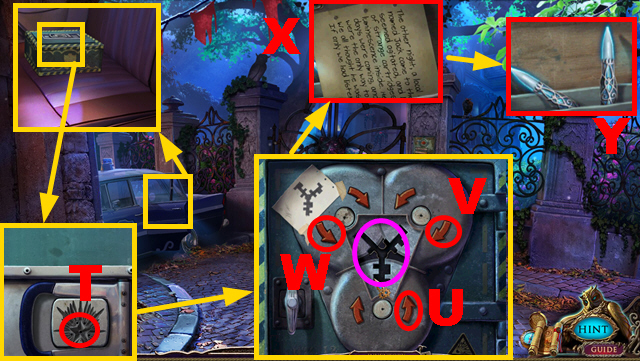
- Place the MILITARY INSIGNIA on the lock (T); press it.
- Play the mini-game.
- Solution: U x2, V x5, W x2.
- Insert the MILITARY KEY into the lock (purple).
- Grab the note (X); take the SILVER BULLETS (Y).
Chapter 2: The Mansion
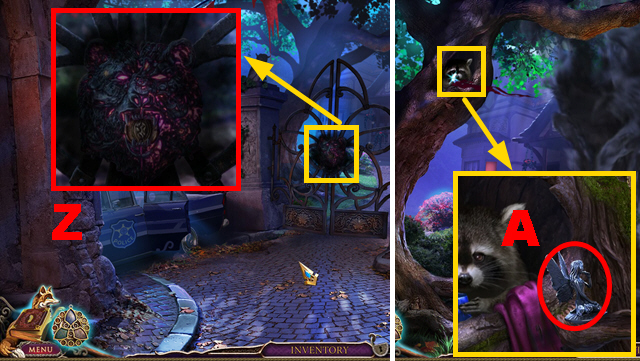
- Shoot the RIFLE (Z).
- Move forward.
- Take the FAIRY STATUETTE (A).
- Walk down.
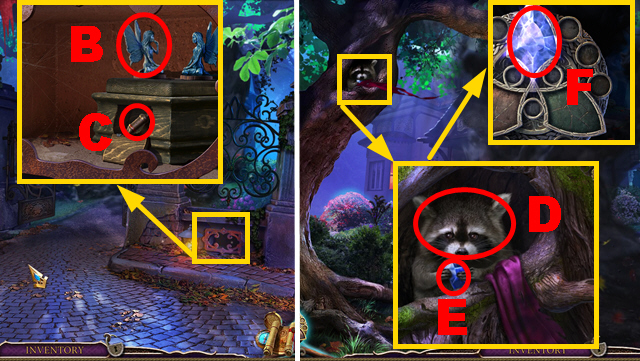
- Place the FAIRY STATUETTE on the box (B); take the WHISTLE (C).
- Move forward.
- Blow the WHISTLE (D); take the amulet piece (E).
- Press the blue gem (F).
- Play the mini-game.
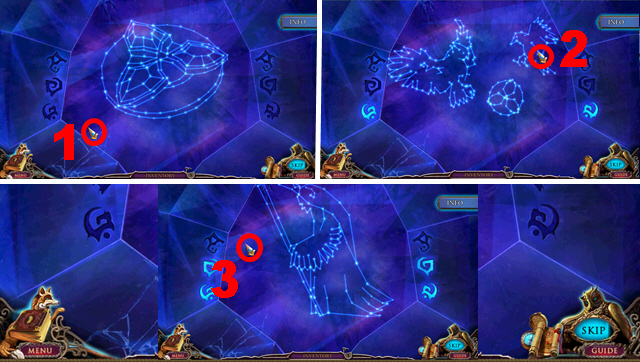
- Solution: 1-3.
- Turn right.
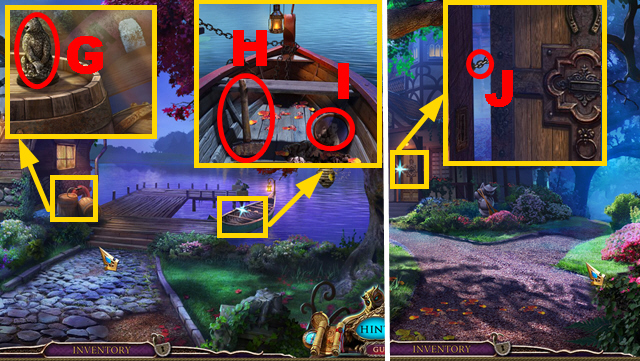
- Take the BEAR (G).
- Take the SLEDGEHAMMER (H) and PHOTO OF YOUNG STEPHEN (I).
- Walk down.
- Hit the chain with the SLEDGEHAMMER (J).
- Turn left.
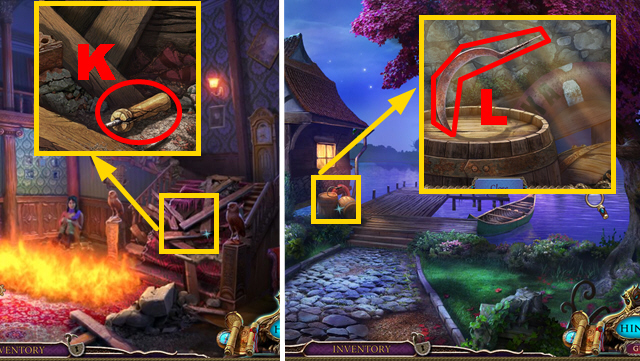
- Remove 3 planks; take the HANDLE (K).
- Walk down, turn right.
- Connect the HANDLE and ROPE to the sickle (L); take the SICKLE.
- Walk down.
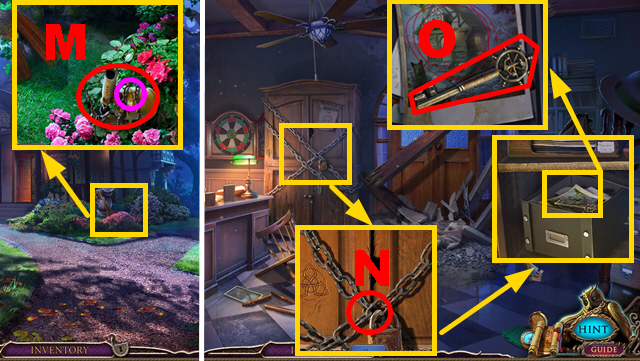
- Remove thorns with the SICKLE (M); take the BLOWTORCH (purple).
- Walk down twice, turn right.
- Remove the chain with the BLOWTORCH (N).
- Open the box; take the BOATHOUSE KEY (O).
- Go to the Boathouse.
- Activate the amulet; press the blue gem.
- Play the mini-game.
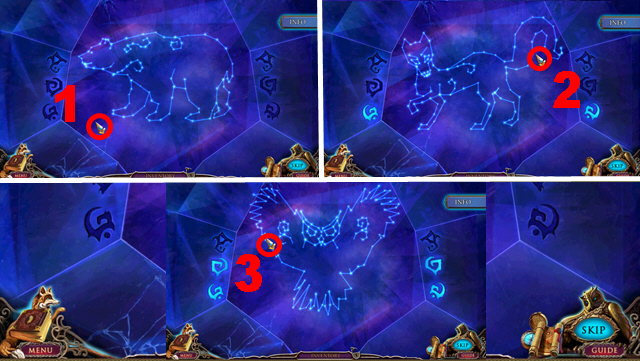
- Solution: 1-3.
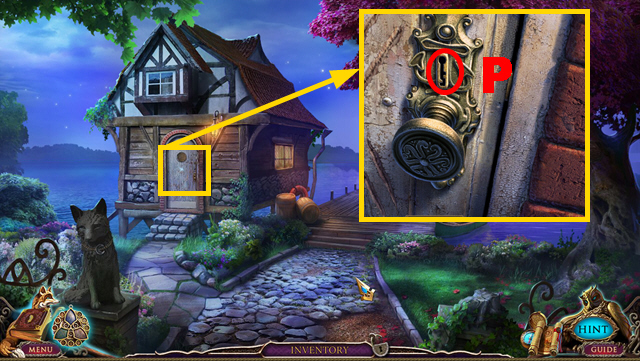
- Insert the BOATHOUSE KEY into the lock (P).
- Play the HOP.
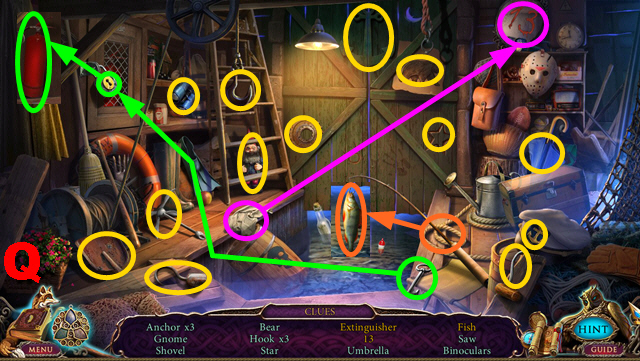
- You receive the FIRE EXTINGUISHER (Q).
- Walk down, turn left.
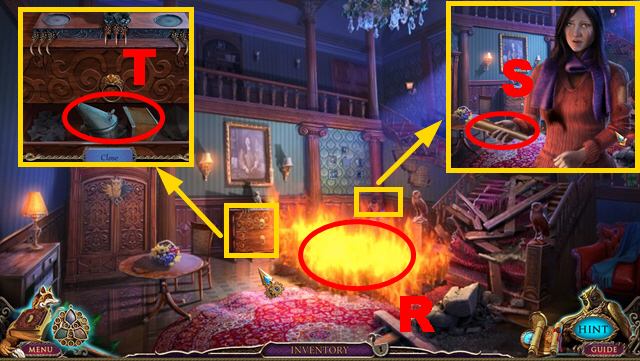
- Blow out the fire with the FIRE EXTINGUISHER (R).
- Take the note (S).
- Open the drawer; take the SMOKER (T).
- Walk down, turn right.
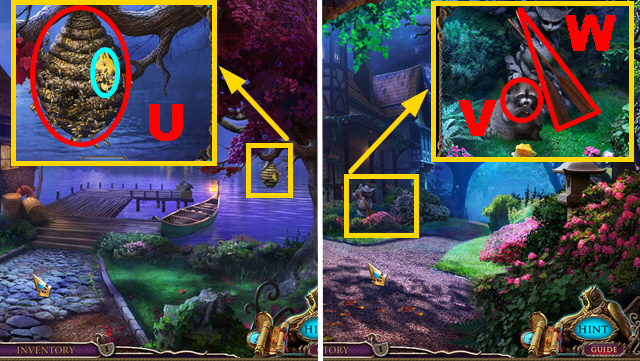
- Blow the SMOKER (U); take the HONEYCOMB (blue).
- Walk down.
- Give the HONEYCOMB to the animal (V); take the PADDLES (W).
- Turn right.
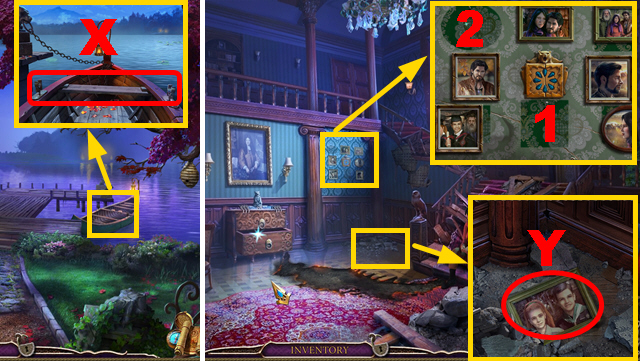
- Put down the PADDLES (X).
- Walk down, turn left.
- Remove the debris; take the PHOTO OF STEPHEN AT CAMP (Y).
- Put down the PHOTOS OF YOUNG STEPHEN (1) and STEPHEN AT CAMP (2).
- Play the mini-game.
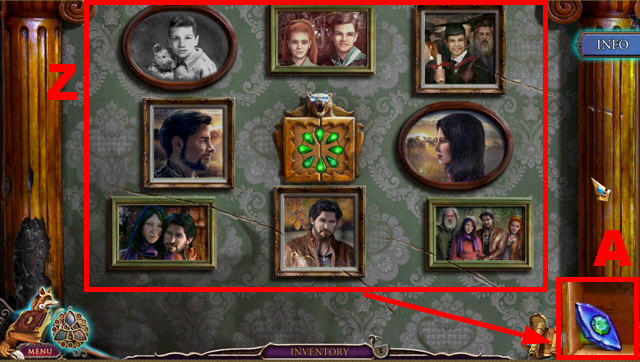
- Solution: (Z).
- Take the BEAR EYE (A).
- Walk down, turn right.
Chapter 3: The Backwoods
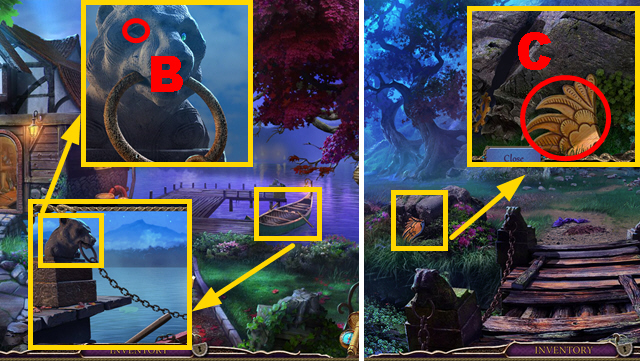
- Place the BEAR EYE on the bust (B).
- Move forward.
- Take the WING (C).
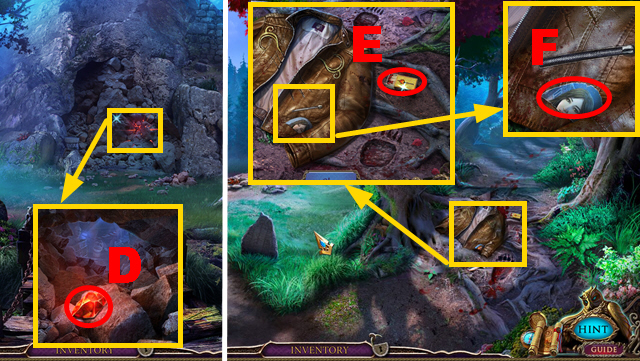
- Remove stones; take the amulet piece (D).
- Turn left.
- Take the MATCHES (E) and TORN PHOTO (F).
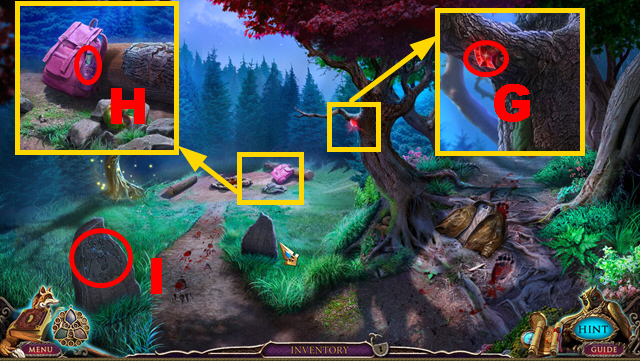
- Take the amulet piece (G).
- Open the pocket; take the BOTTLE (H).
- Play the mini-game (I).
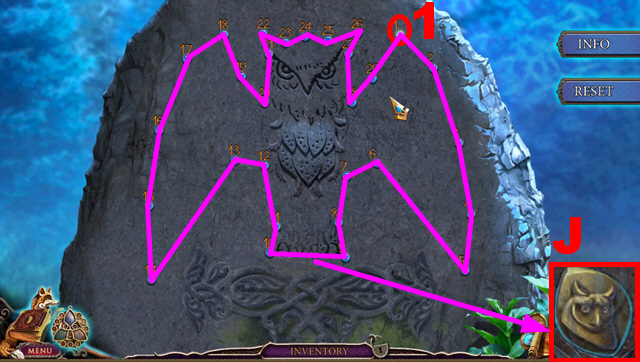
- Connect the gems according to the purple line; begin and end at gem (1).
- Take the amulet piece (J).
- Try to turn right.
- Activate the amulet; press the blue gem.
- Play the mini-game.
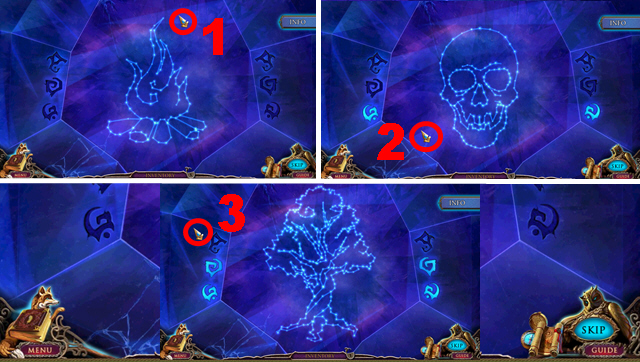
- Solution: 1-3.
- Turn right.
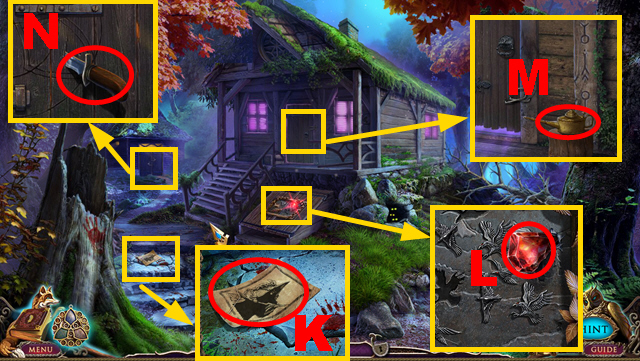
- Take the WANTED POSTER (K).
- Take the amulet piece (L).
- Take the OILCAN (M).
- Take the KNIFE (N).
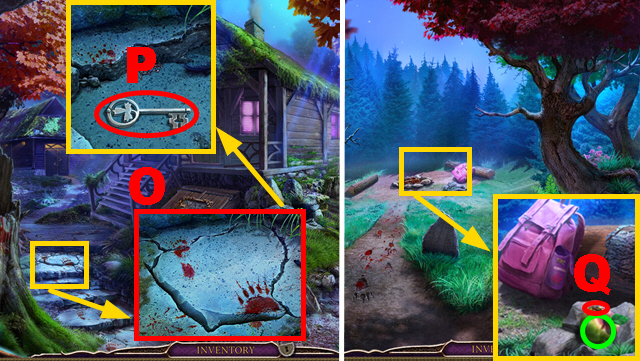
- Remove the stone with the KNIFE (O); take the KEY (P).
- Walk down.
- Chase away the bee with the WANTED POSTER (Q); take the APPLE (green).
- Turn right.
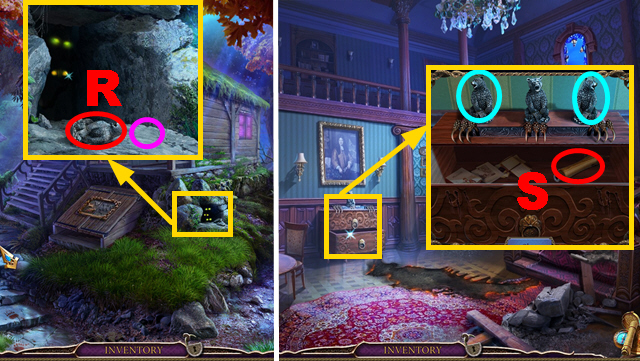
- Put down the APPLE (purple); take the BEAR (R).
- Walk down four times, turn left.
- Put 2 BEARS on the slots (blue).
- Open the drawer; take the HANDLE (S).
- Walk down, turn right, move forward three times.
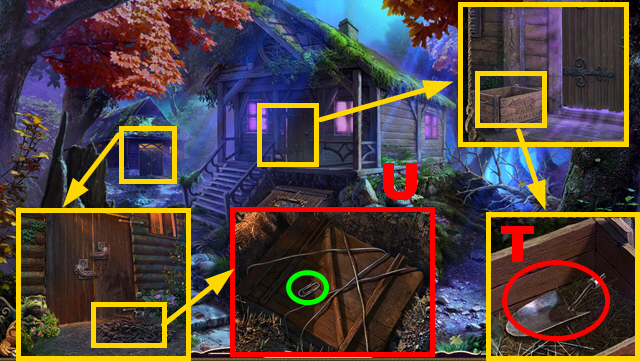
- Connect the HANDLE to the spade (T); take the SPADE.
- Dig through the soil with the SPADE (U); take the CLIP (green).
- Walk down.
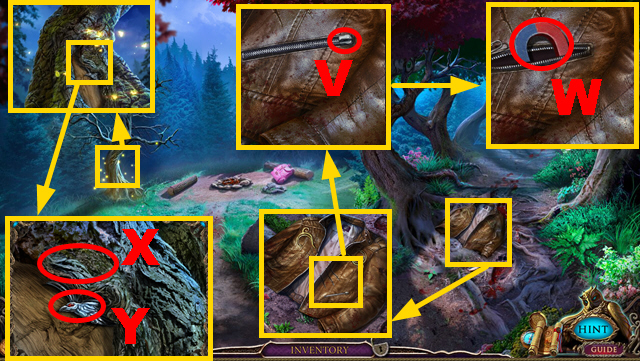
- Connect the clip to the jacket (V); pull it.
- Take the MAGNET (W).
- Remove the bark with the KNIFE (X) to acquire the CROW (Y).
- Turn right.
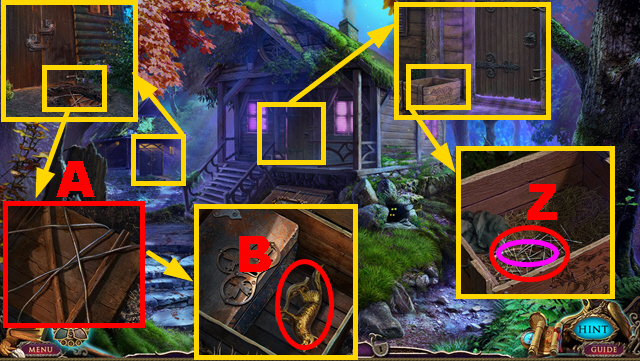
- Remove the needles with the MAGNET (Z); take the PLIERS (purple).
- Cut the wire with the PLIERS (A).
- Open the crate; take the FOX (B).
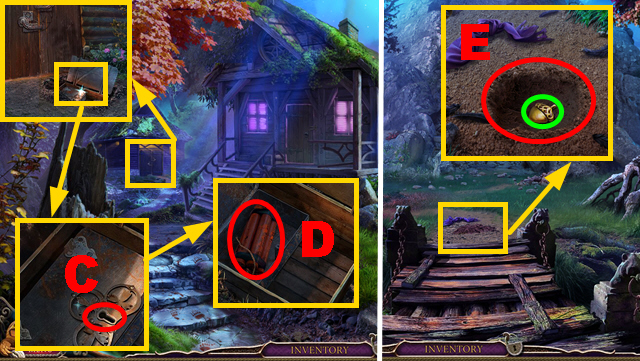
- Insert the KEY into the lock (C); take the DYNAMITE (D).
- Walk down twice.
- Dig through the soil with the SPADE (E); take the ACORN (green).
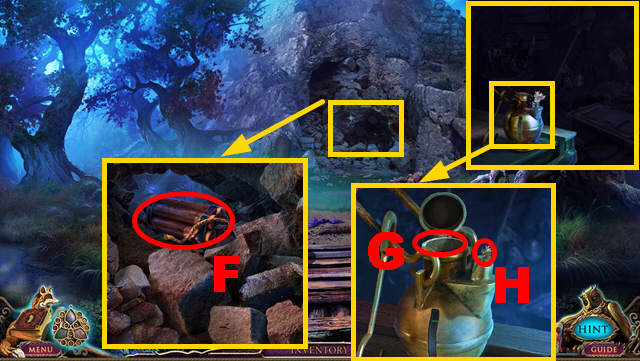
- Put down the DYNAMITE (F); light it with the MATCHES.
- Open the lantern; pour the OILCAN into it (G).
- Light it with the MATCHES (H).
- Play the HOP.
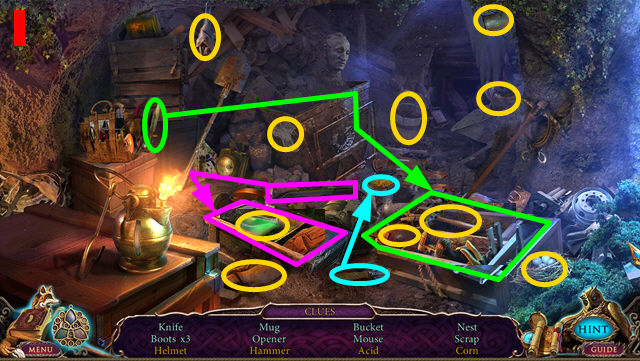
- You receive the ACID (I).
- Move forward twice.
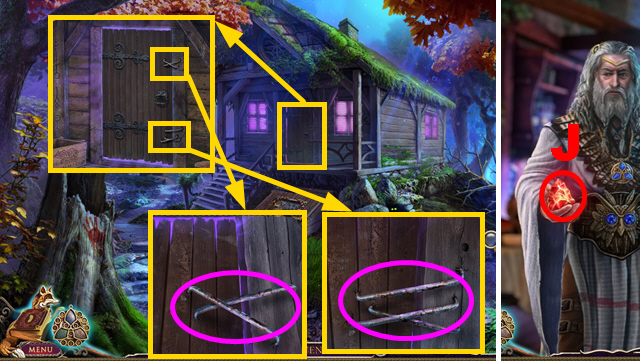
- Pour the ACID over the metal bars (purple).
- Open the door.
- Move forward.
- Take the amulet piece (J).
Chapter 4: The Cabin in the Woods
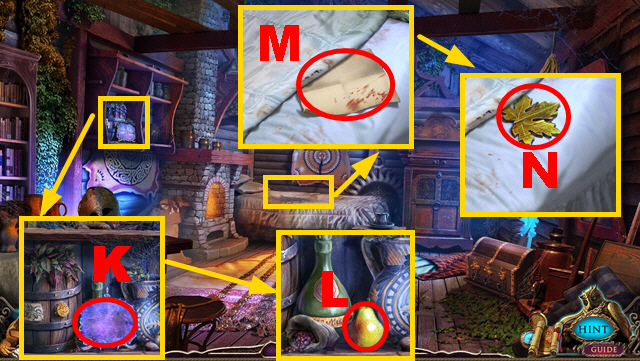
- Inspect the stone (K); take the PEAR (L).
- Remove the blanket; take the note (M) and LEAF 1/3 (N).
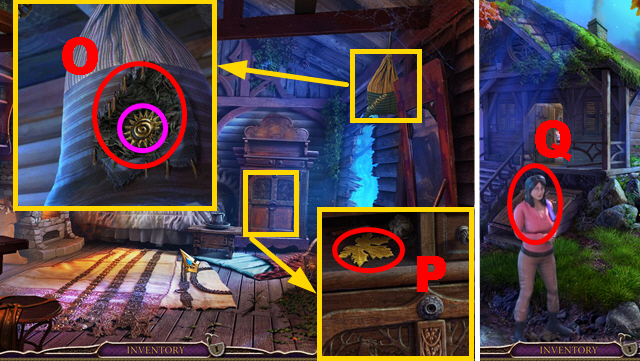
- Cut the seam with the KNIFE (O); take SUN 1/2 (purple).
- Open the drawer; take LEAF 2/3 (P).
- Walk down.
- Talk to the woman (Q).
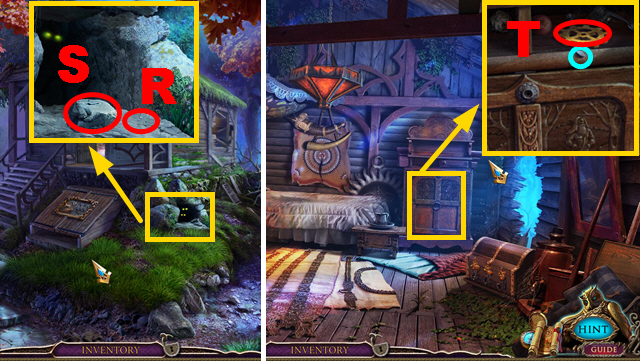
- Put down the PEAR (R); take the STONE BLOCK (S).
- Move forward.
- Hit the nail with the STONE BLOCK (blue).
- Open the drawer; take GEAR 1/2 (T).
- Walk down three times.
- Collect GEAR 2/2 with the MAGNET (U).
- Move forward twice.
- Place 2 GEARS on the door (V).
- Turn left.
- Play the HOP.
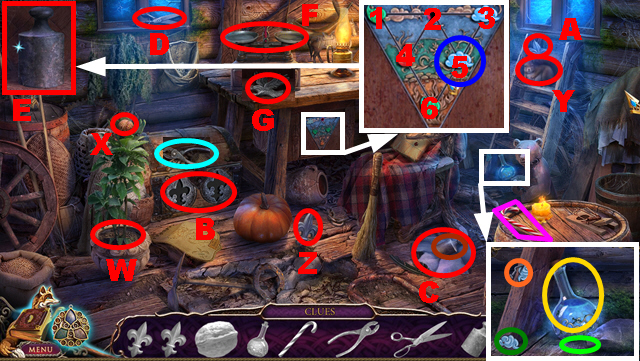
- Put the candy cane (purple) on the floor (light green).
- Pour the bottle (yellow) over the plant (W).
- Give the nut (X) to the squirrel (Y).
- Place 2 fleurs-de-lis (Z) and (A) on the chest (B).
- Remove the nail (orange) with the pliers (light blue).
- Put the puzzle part (dark green) on the board (dark blue).
- Solution: 3, 5, 2, 4, 1, 2, 5, 6, 4, 1, 2, 5, 6, 4, 2.
- Cut the package (C) with the scissors (D).
- Put 2 weights (brown) and (E) on the scale (F).
- Take the CROW (G).
- Walk down four times, turn left.
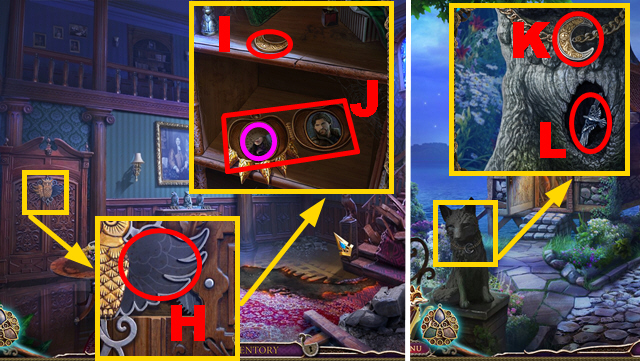
- Place the WING on the niche (H); take the MOON (I).
- Put down the TORN PHOTO (purple).
- Close the locket; take the LOCKET (J).
- Walk down, turn right.
- Place the MOON on the statue (K); take the CROW (L).
- Move forward three times.
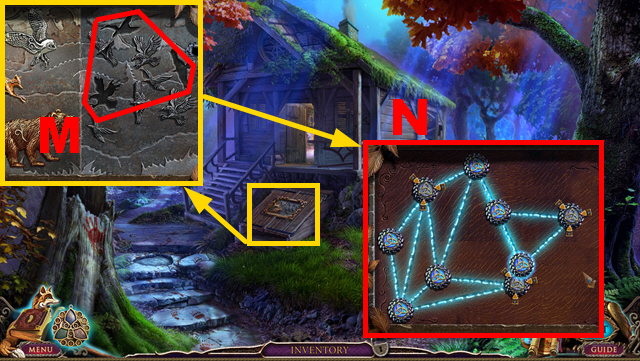
- Place 3 CROWS on the slots (M).
- Play the mini-game.
- Solution: (N).
- Enter the Cellar.
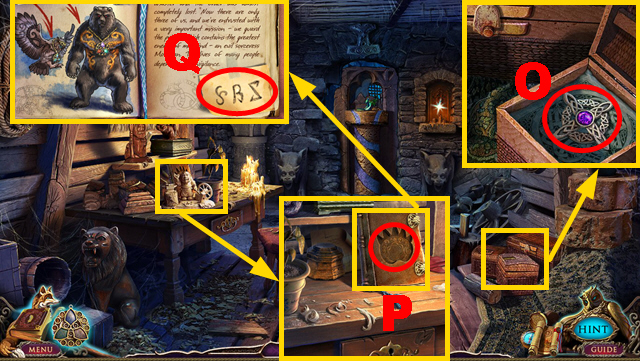
- Open the box; take the AMULET (O).
- Place the LOCKET on the book (P).
- Open the book; take the NOTE WITH CODE (Q).
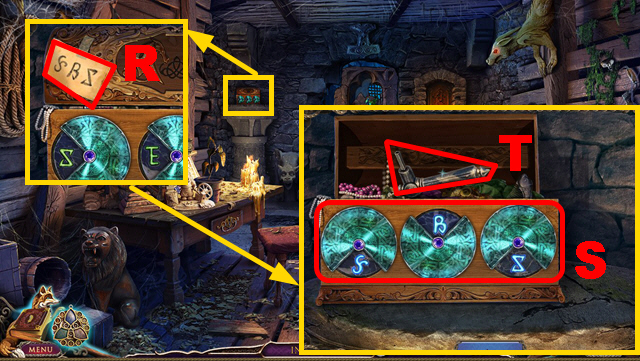
- Place the NOTE WITH CODE on the box (R).
- Enter the correct code (S); take the HANDLE (T).
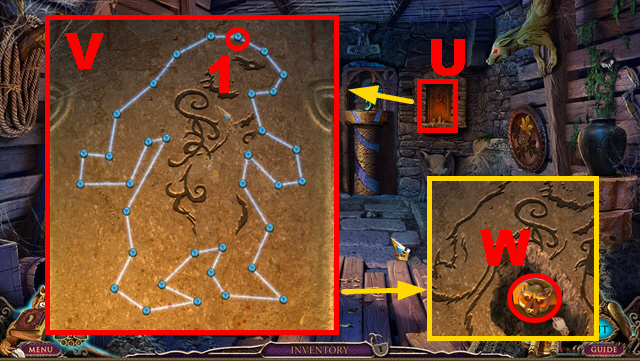
- Play the mini-game (U).
- Solution: (V).
- Begin and end at gem (1).
- Take the amulet piece (W).
- Walk down, enter the cabin.
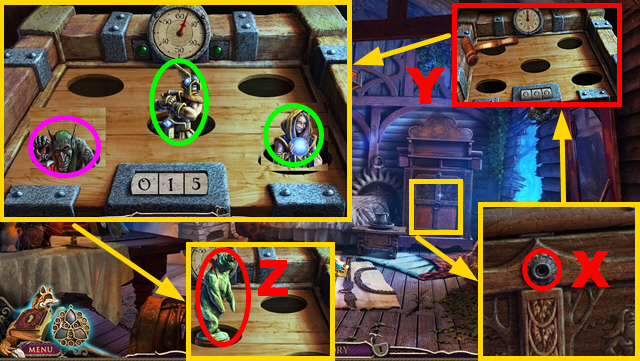
- Connect the HANDLE to the cabinet (X); open it.
- Play the mini-game (Y).
- Grab the hammer.
- Hit 15 trolls (purple); avoid other figurines (green).
- Take the BEAR (Z).
- Walk down three times.
- Remove the moss with the KNIFE (A); place the AMULET on the niche (B).
- Play the mini-game.
- Solution: (C).
- Inspect the stone (D); take the OWL (E).
- Go to the Cellar.
Chapter 5: The Secret Passage
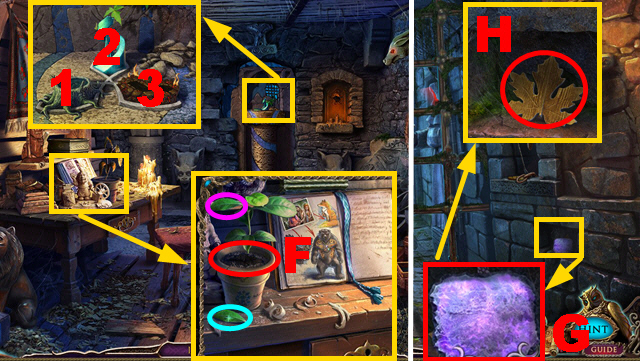
- Pour the BOTTLE over the plant (F).
- Attempt to take the leaf (purple); take the LEAF (blue).
- Put down the BEAR (1), OWL (2), and FOX (3).
- Move forward.
- Inspect the stone (G); take LEAF 3/3 (H).
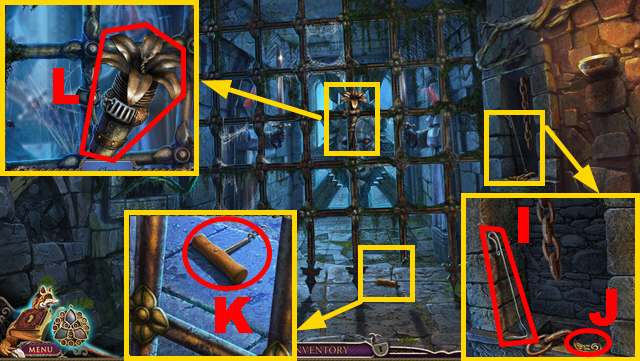
- Take the FIRE IRON (I) and MOON 1/2 (J).
- Collect the CORKSCREW with the FIRE IRON (K).
- Light the torch with the MATCHES (L); take the TORCH.
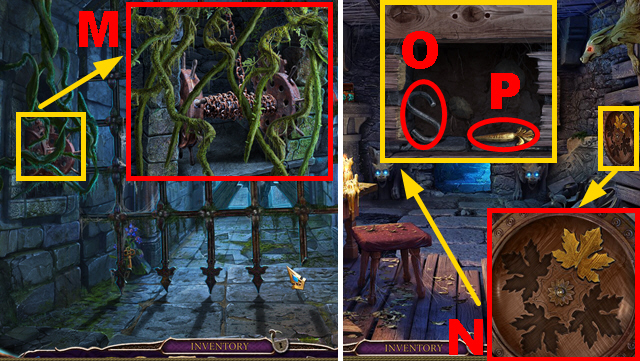
- Burn the vine with the TORCH (M).
- Walk down.
- Place 3 LEAVES on the niches (N); take the S HOOK (O) and CARROT (P).
- Move forward.
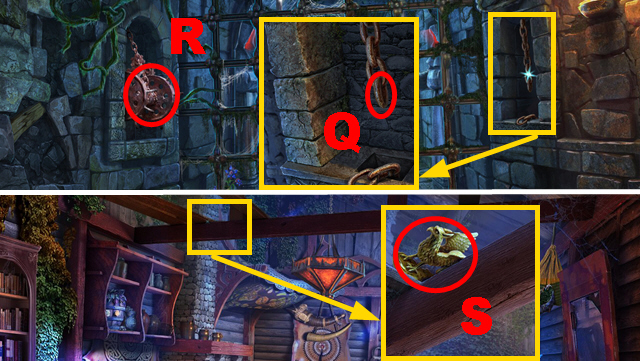
- Connect the S HOOK to the chain (Q).
- Activate the mechanism (R).
- Walk down twice, enter the cabin.
- Collect the GOLD GRIFFIN with the FIRE IRON (S).
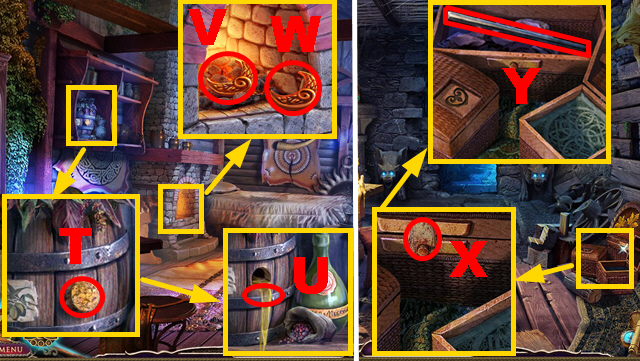
- Remove the cork with the CORKSCREW (T).
- Put down the EMPTY OILCAN (U) to acquire the OILCAN.
- Pull the moon with the FIRE IRON (V).
- Pour the BOTTLE over the moon (W); take MOON 2/2.
- Go to the Cellar.
- Pour the OILCAN over the lock (X).
- Open the box; take the ROD (Y).
- Move forward.
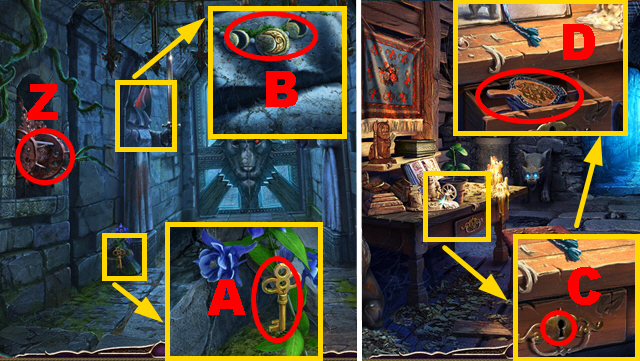
- Connect the ROD to the mechanism (Z).
- Take the KEY (A).
- Place 2 MOONS on the slots (B).
- Walk down.
- Insert the KEY into the lock (C); take the BELLOWS (D).
- Walk down, enter the cabin.
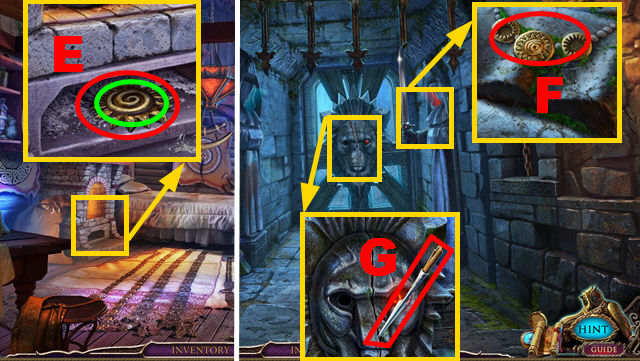
- Blow the BELLOWS (E); take SUN 2/2 (green).
- Go to the Cellar, move forward.
- Place 2 SUNS on the slots (F).
- Take the LANCE (G).
- Walk down.
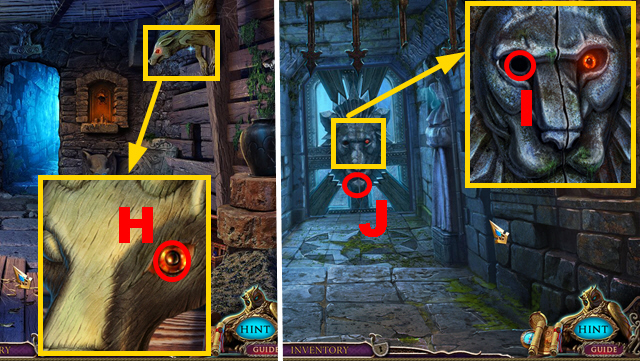
- Collect the LION EYE with the LANCE (H).
- Move forward.
- Put the LION EYE into the niche (I).
- Play the mini-game (J).
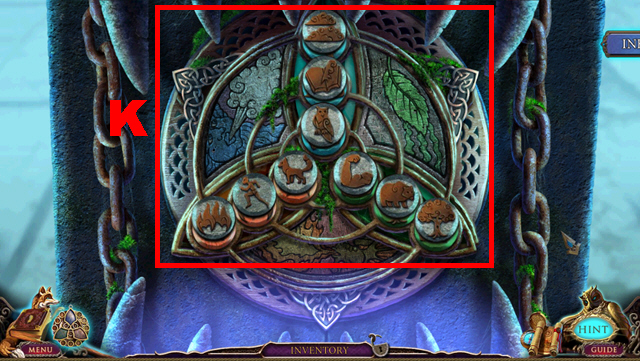
- Solution: (K).
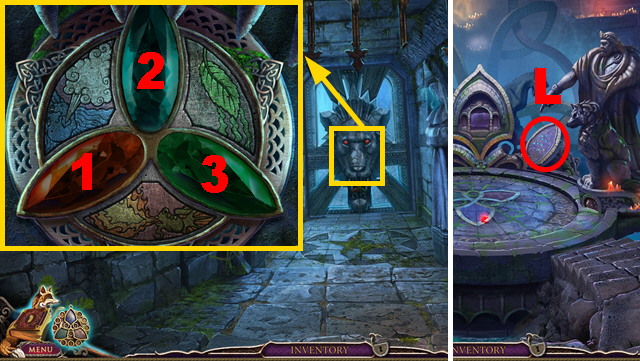
- Put the MATCHES on gem (1), BELLOWS on gem (2), and LEAF on gem (3).
- Move forward.
- Play the mini-game (L).
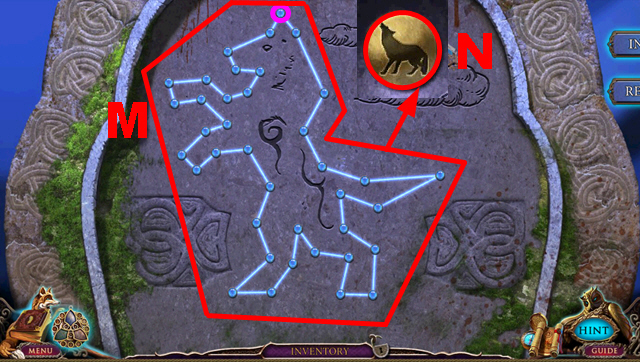
- Solution: (M).
- Begin and end at gem (purple).
- Take the amulet piece (N).
- Play the HOP.
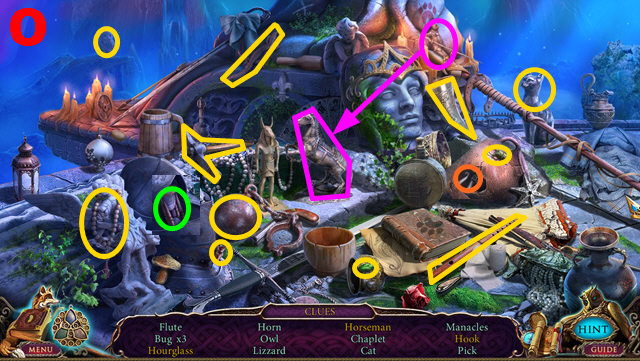
- You receive the PICK (O).
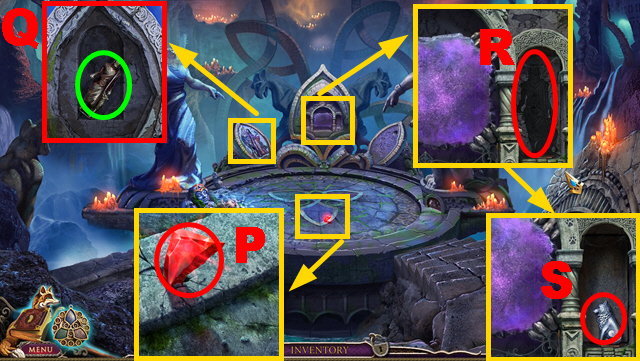
- Take the amulet piece (P).
- Break the mural with the PICK (Q); take the STATUE OF OLMO (green).
- Put down the STATUE OF OLMO (R); take the WOLF (S).
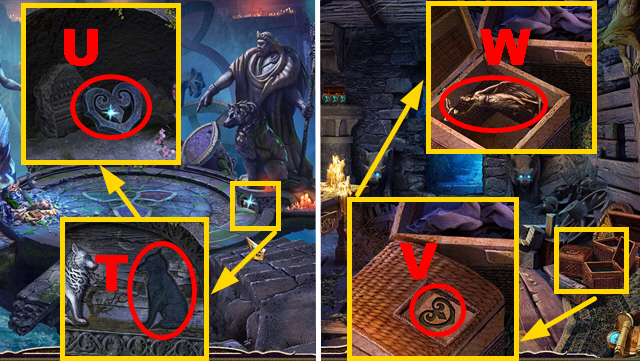
- Place the WOLF on the slot (T); take the STONE HEART (U).
- Walk down twice.
- Put the STONE HEART on the niche (V).
- Open the chest; take the STATUE OF MORRIGAN (W).
- Move forward twice.
- Play the HOP.
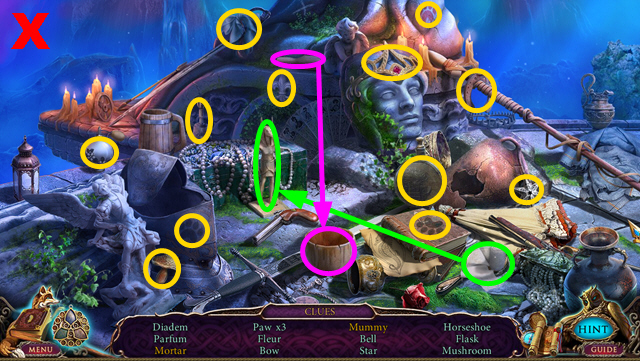
- You receive the MUSHROOM (X).
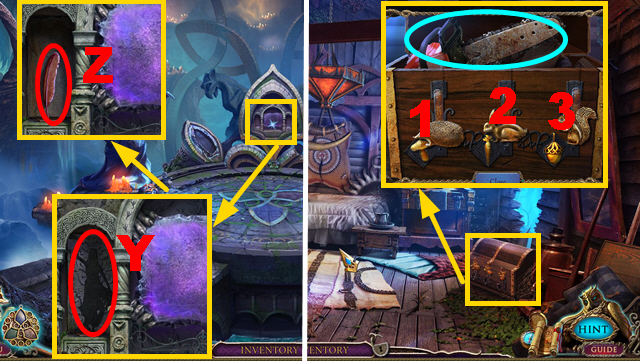
- Put down the STATUE OF MORRIGAN (Y); take the BRONZE FEATHER (Z).
- Walk down three times, enter the cabin.
- Insert the MUSHROOM (1), CARROT (2), and ACORN (3) into the slots; take the CHAINSAW (blue).
- Walk down.
Chapter 6: The Ruins
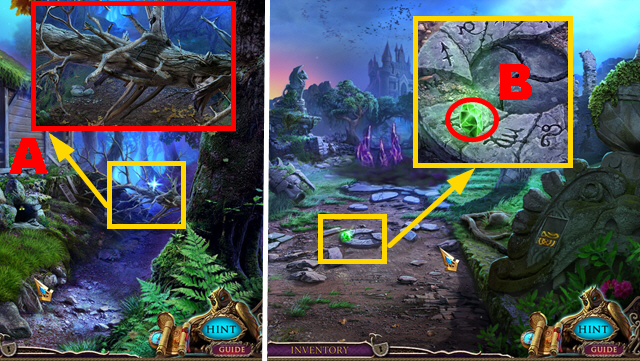
- Remove the trunk with the CHAINSAW (A).
- Turn right.
- Take the amulet piece (B).
- Activate the amulet; press the blue gem.
- Play the mini-game.
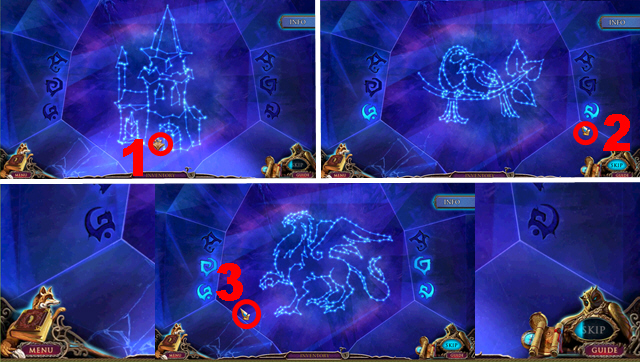
- Solution: 1-3.
- Walk down three times.
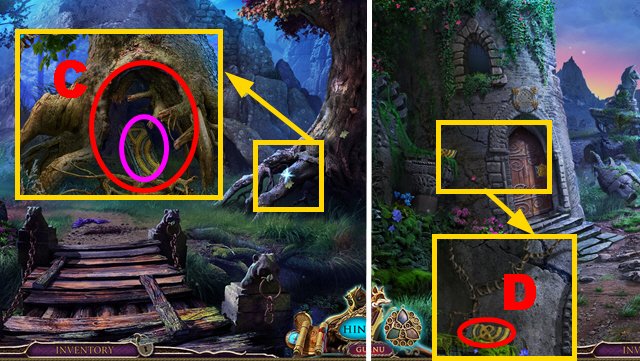
- Remove the roots with the CHAINSAW (C); take the STONE TILE (purple).
- Move forward twice, turn right.
- Take the STONE TILE (D).
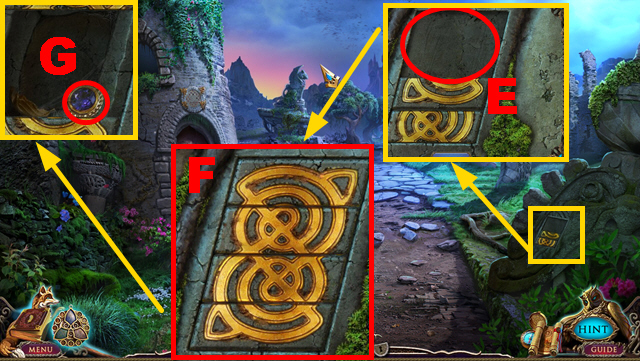
- Put 2 STONE TILES into the niche (E).
- Assemble the stone tiles correctly (F); take ROUND GEM 1/3 (G).
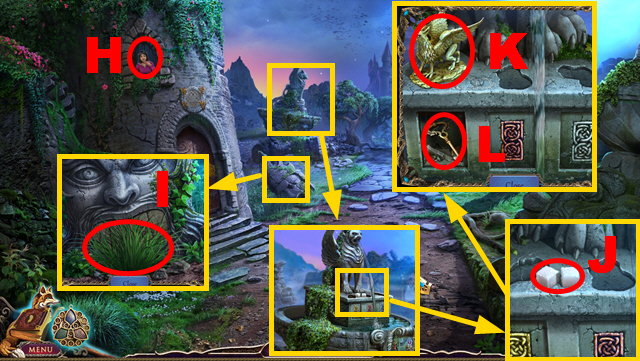
- Inspect the window (H) to acquire the RED CHALK.
- Remove the grass (I) twice.
- Take the SUGAR (J).
- Put down the GOLD GRIFFIN (K); take the TOWER KEY (L).
- Move forward.
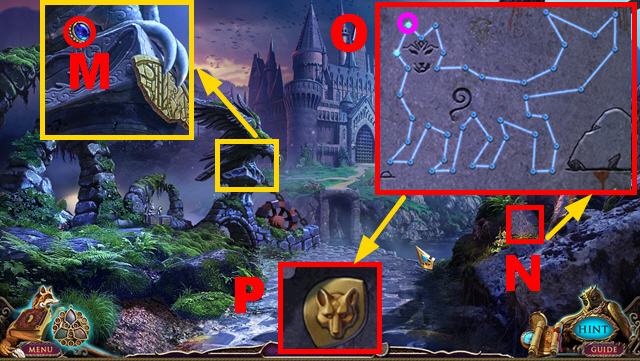
- Take ROUND GEM 2/3 (M).
- Play the mini-game (N).
- Solution: (O).
- Begin and end at gem (purple).
- Take the amulet piece (P).
- Walk down twice.
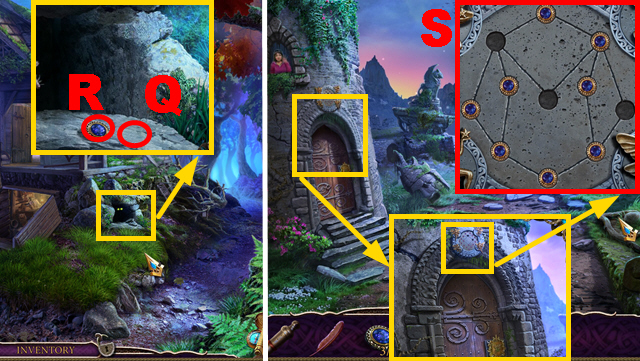
- Put down the SUGAR (Q); take ROUND GEM 3/3 (R).
- Turn right.
- Put down 3 ROUND GEMS (S).
- Play the mini-game.
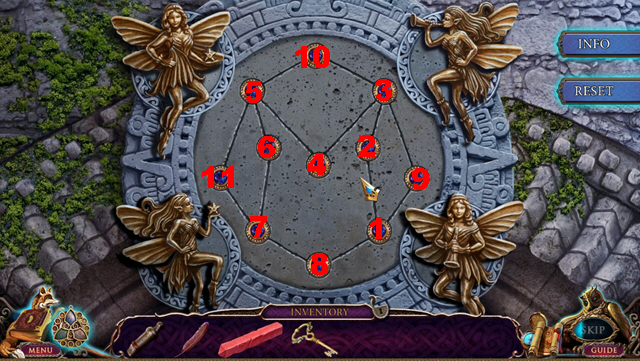
- Solution: 1-8, 1, 9, 3, 10, 5, 11, 7.
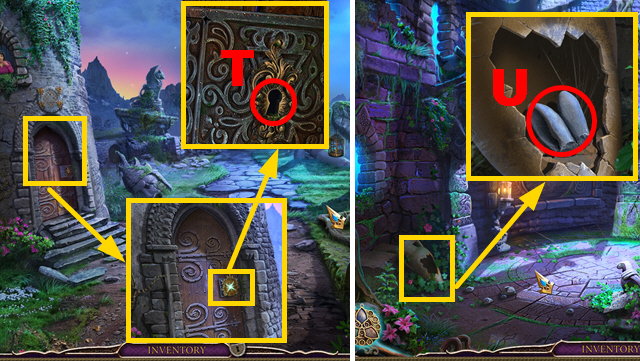
- Insert the TOWER KEY into the lock (T).
- Turn left.
- Take the RABBIT EARS (U).
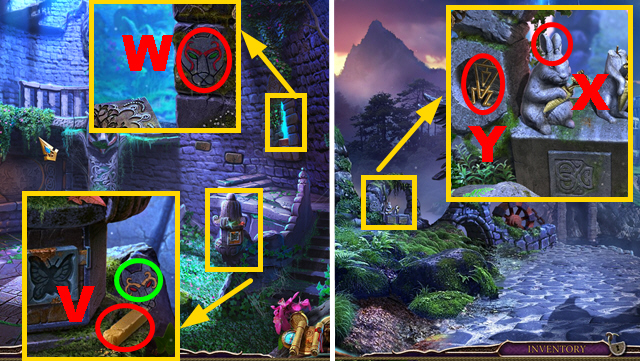
- Take the YELLOW CHALK (V); inspect the drawing (green).
- Inspect the drawing (W).
- Walk down, move forward.
- Connect the RABBIT EARS to the statue (X); take the GOLDEN RUNE (Y).
- Walk down.
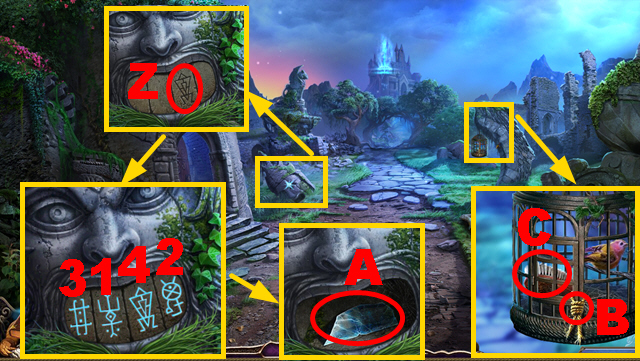
- Place the GOLDEN RUNE on the niche (Z).
- Activate the runes in numerical order 1-4; take the GLASS (A).
- Cut the rope with the GLASS (B); take the BRUSH (C).
- Turn left.
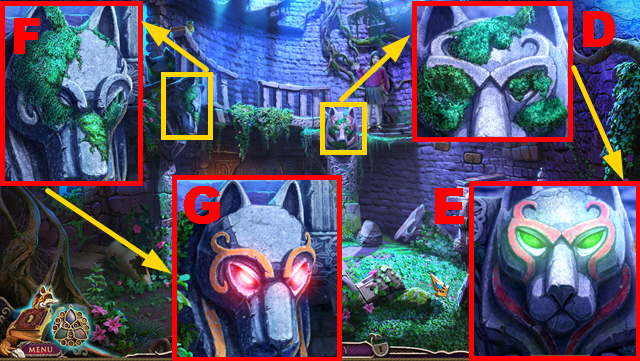
- Remove the moss with the BRUSH (D).
- Color the wolf with the RED CHALK; choose the correct eye color (E).
- Remove the moss with the BRUSH (F).
- Color the wolf with the YELLOW CHALK; choose the correct eye color (G).
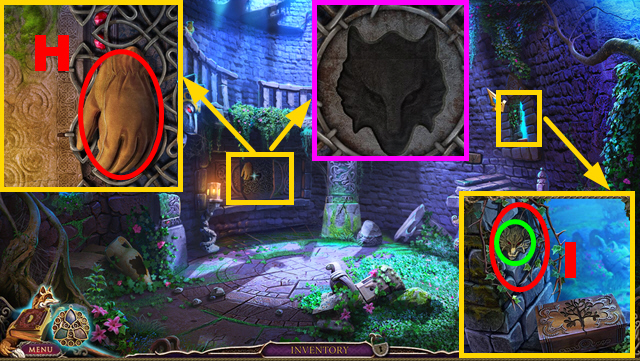
- Take the GLOVE (H).
- Remove the branches with the GLOVE (I); take the WOLF'S HEAD (green).
- Place the WOLF'S HEAD on the niche (purple).
- Play the mini-game.
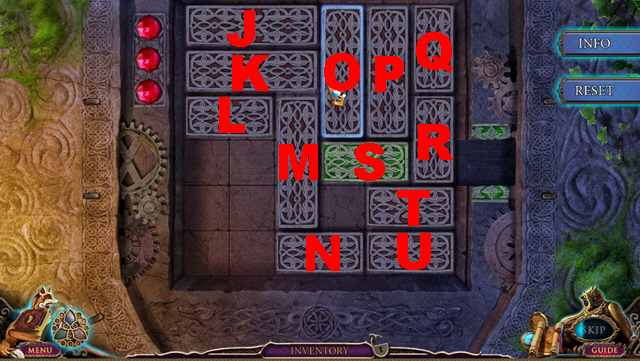
- Solution: N left x2, U left x2, T left, R down x2, S right x2.
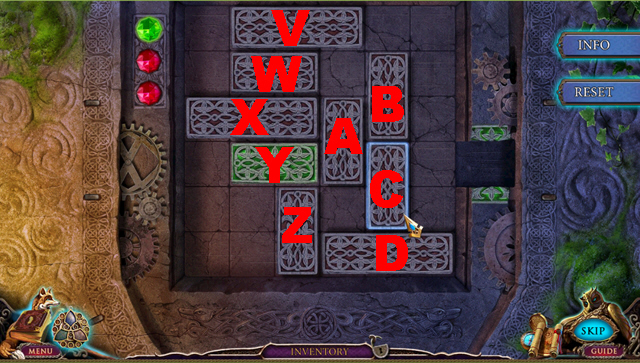
- Solution: Y left, Z up, D left x3, A down x2, C down, B down, W right, B up x2, X right x3, W left x2, Z up x2, Y right x5.
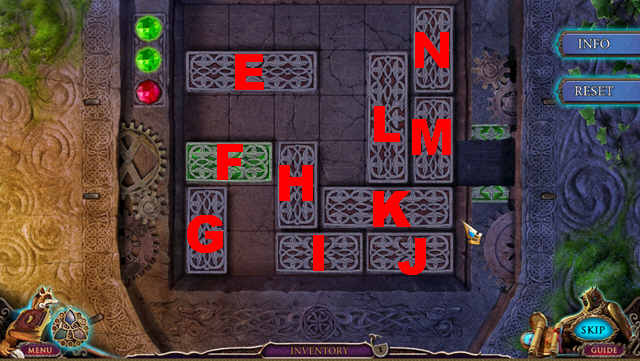
- Solution: I left, J left, H up, K left x2, M down x2, L up, K right, M up x2, J right, K left, M down, J left, M down, L down x2, E right x2, N down x2, E right, H up x2, F right x2, G up x2, I left, K left, J left, L down, G up, F left x2, H down x2, E left x2.
- N up x2, L up x3, J right, M up x2, K right x3, H down x2, F right, G down, E left, F right x2, H up x2, K left, J left, M down x2, F right x2.
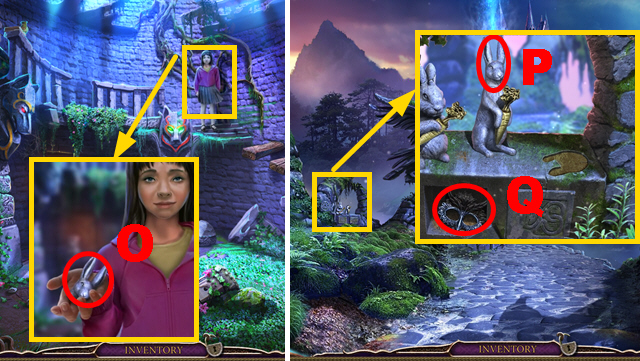
- Take the RABBIT HEAD (O).
- Walk down, move forward.
- Connect the RABBIT HEAD to the statue (P); take the OWL MASK (Q).
- Walk down, turn left.
- Play the HOP.
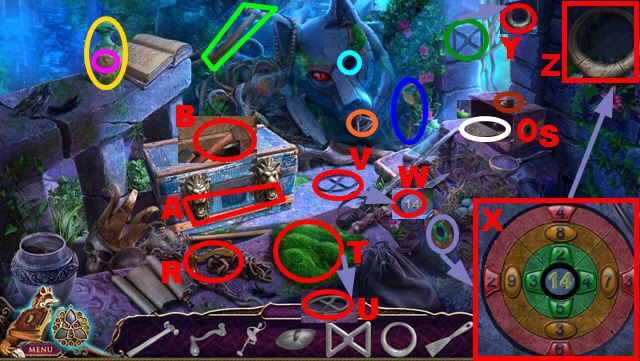
- Use the hammer (light green) to break the jug (yellow).
- Insert the red eye (purple) into the slot (light blue).
- Place the rune x (orange) on the niche (dark green).
- Connect the handle (R) to the box (S).
- Connect the ballerina (dark blue) to the box (brown).
- Use the scraper (white) to remove the moss (T).
- Insert the rune O (U) into the slot (V).
- Place the numbered token (W) on the niche (black).
- Solution: (X).
- Place 2 rings (Y) and (Z) on the chest (A).
- Take the AXE (B).
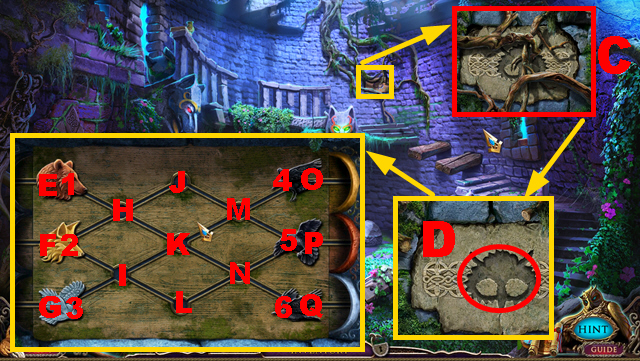
- Remove the roots with the AXE (C); place the OWL MASK on the niche (D).
- Play the mini-game.
- Solution: 1-L, 2-I, 4-E, 5-J, 2-F, 1-I, 6-M, 1-Q, 2-L, 5-H, 6-J, 2-P, 3-L, 5-F, 3-N, 6-H, 2-O, 3-L, 1-P, 3-Q, 6-G.
- Numbers refer to animal tokens, letters to fields.
- Go downstairs.
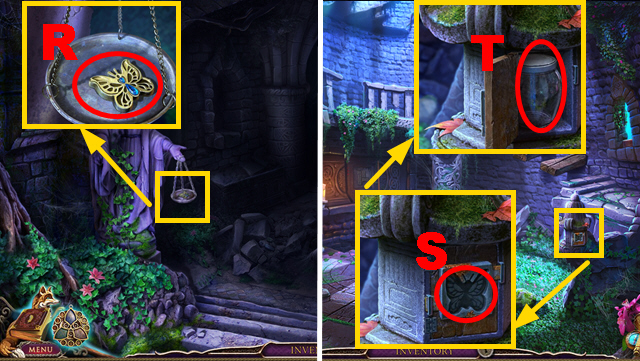
- Take the BUTTERFLY (R).
- Walk down.
- Place the BUTTERFLY on the niche (S); take the EMPTY JAR (T).
- Walk down three times.
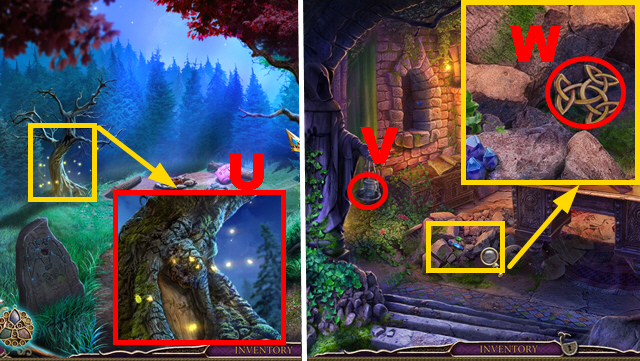
- Collect the fireflies with the EMPTY JAR (U).
- Go to the Tower, go downstairs.
- Put down the JAR OF FIREFLIES (V).
- Remove 3 stones; take the RUNIC TOKEN (W).
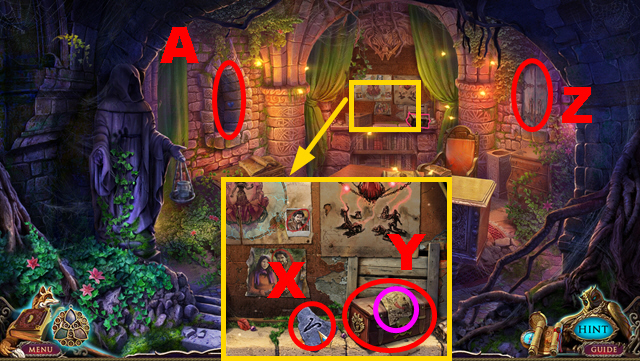
- Move aside the curtain; take ZODIAC STONE 1/3 (X).
- Take the note (purple) and POISON POTION SET (Y).
- Open the compartment (Z).
- Play the mini-game (A).
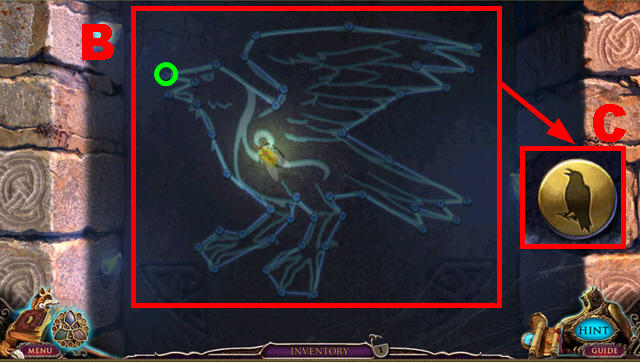
- Solution: (B).
- Start and end at gem (green).
- Take the amulet piece (C).
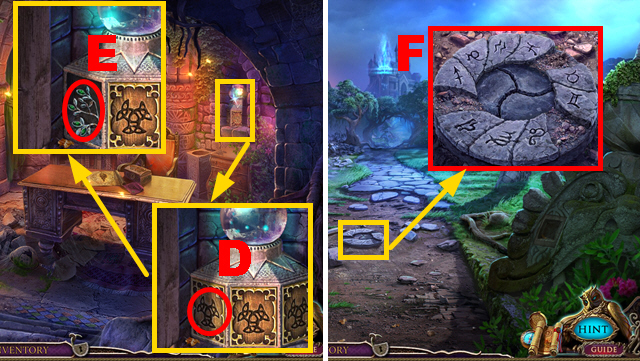
- Place the RUNIC TOKEN on the niche (D); take the LEFT TREE HALF (E).
- Walk down twice.
- Remove the dirt with the BRUSH (F).
- Turn left.
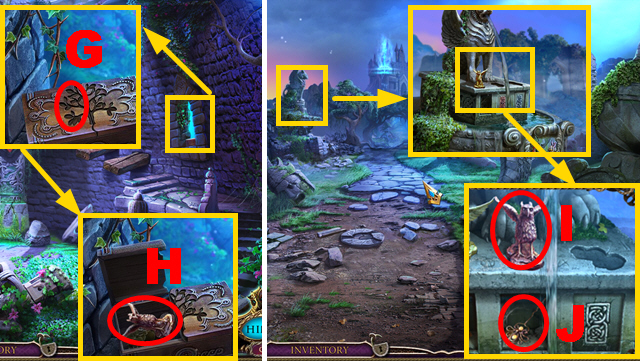
- Place the LEFT TREE HALF on the box (G); take the BRONZE GRIFFIN (H).
- Walk down.
- Place the BRONZE GRIFFIN on the slot (I); take the ORNATE PIN (J).
- Turn left, go downstairs.
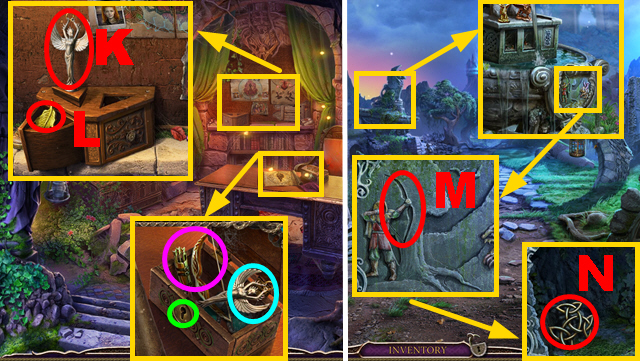
- Insert the ORNATE PIN into the lock (green); take the WINGED STATUETTE (blue) and ARCHER'S GEAR (purple).
- Put down the WINGED STATUETTE (K); take the GOLDEN FEATHER (L).
- Walk down twice.
- Place the ARCHER'S GEAR on the mural (M); take the RUNIC TOKEN (N).
- Turn left, go downstairs.
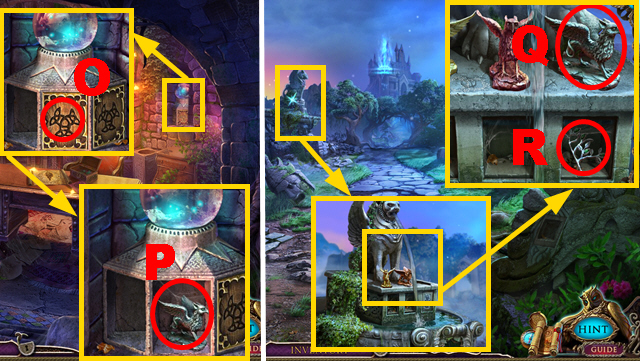
- Place the RUNIC TOKEN on the niche (O); take the SILVER GRIFFIN (P).
- Walk down twice.
- Place the SILVER GRIFFIN on the slot (Q); take the RIGHT TREE HALF (R).
- Turn left.
- Place the RIGHT TREE HALF on the box (S); take the WINGED STATUETTE (T).
- Go downstairs.
- Place the WINGED STATUETTE on the slot (U); take the RUNIC TOKEN (V).
- Put the RUNIC TOKEN into the niche (W); take the SILVER FEATHER (X).
- Walk down twice, move forward.
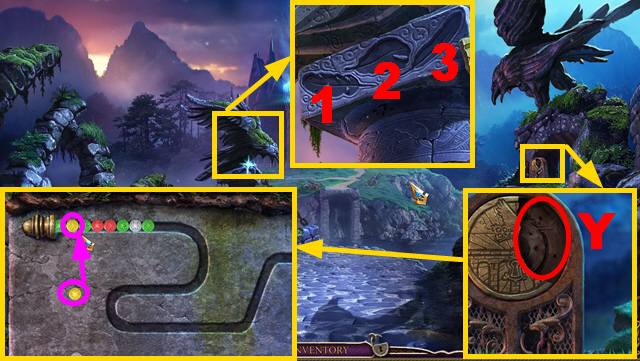
- Put down the SILVER FEATHER (1), GOLDEN FEATHER (2), and BRONZE FEATHER (3) to acquire the STONE DISK FRAGMENT.
- Place the STONE DISK FRAGMENT on the niche (Y).
- Play the mini-game.
- To solve the puzzle, shoot colored balls at balls of the same color (purple) until all of them are removed.
- Move forward.
- Play the HOP.
Chapter 7: The Guardian's Castle
- You receive the BOLT CUTTERS (Z).
- Remove the leaves twice; take the amulet piece (purple).
- Turn left.
- Take the BLUE PAINT (A).
- Take the FISH (B).
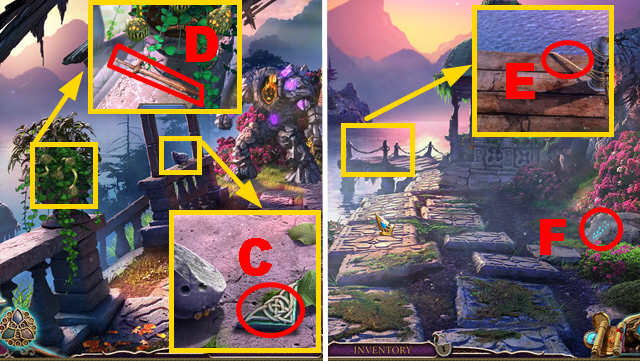
- Take the TRIANGLE KEY (C).
- Take the ANGEL SWORD (D).
- Turn left.
- Pull the rope (E).
- Play the mini-game (F).
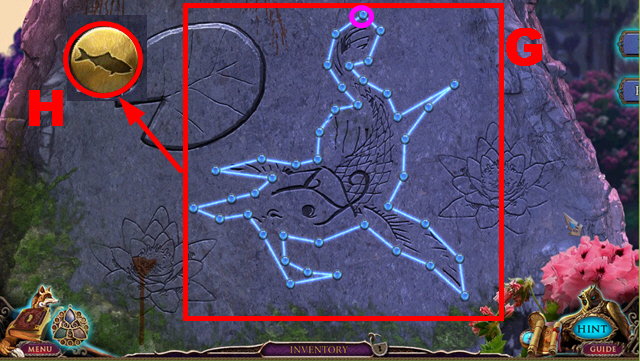
- Solution: (G).
- Start and end at gem (purple).
- Take the amulet piece (H).
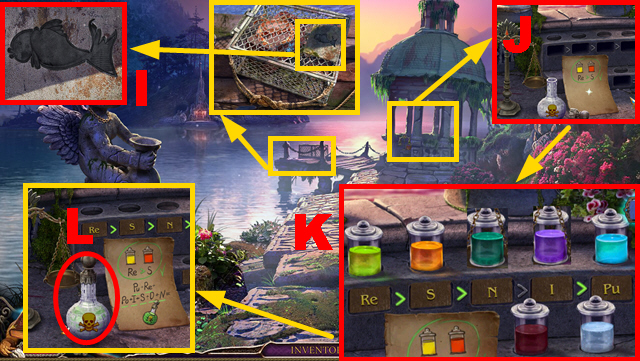
- Place the FISH on the slot (I); open the cage.
- Put down the POISON POTION SET (J).
- Play the mini-game.
- Solution: (K).
- Take the POISON POTION (L).
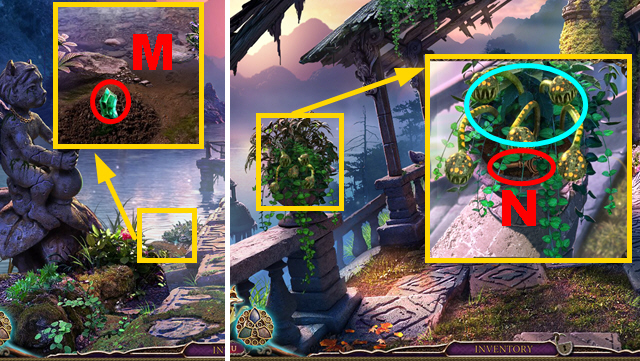
- Take the amulet piece (M).
- Walk down.
- Pour the POISON POTION over the plant (blue).
- Remove the leaves; take the BRONZE FISH KEY (N).
- Walk down twice.
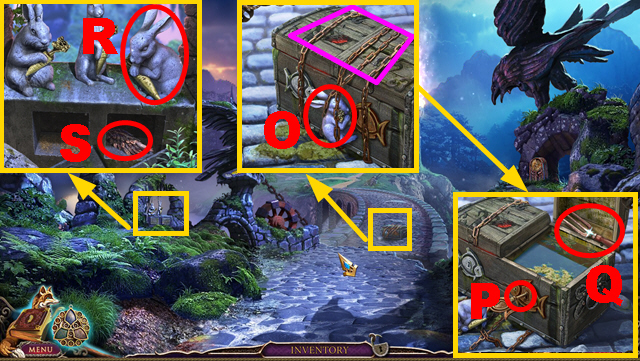
- Remove the chain with the BOLT CUTTERS (purple); take the RABBIT (O).
- Insert the BRONZE FISH KEY into the lock (P); take the HAND RAKE (Q).
- Put down the RABBIT (R); take the ANGEL WING (S).
- Move forward, turn left twice.
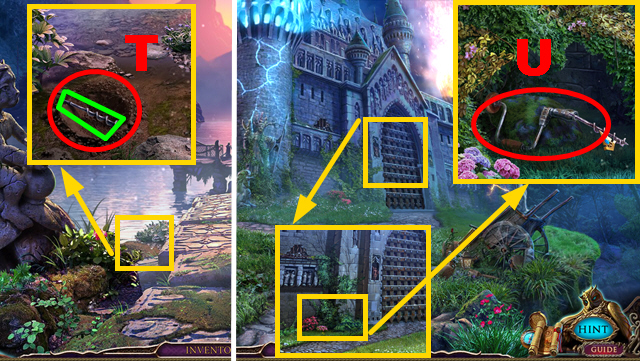
- Dig through the soil with the HAND RAKE (T); take the DRILL BIT (green).
- Walk down twice.
- Connect the DRILL BIT to the handle (U); take the DRILL.
- Walk down.
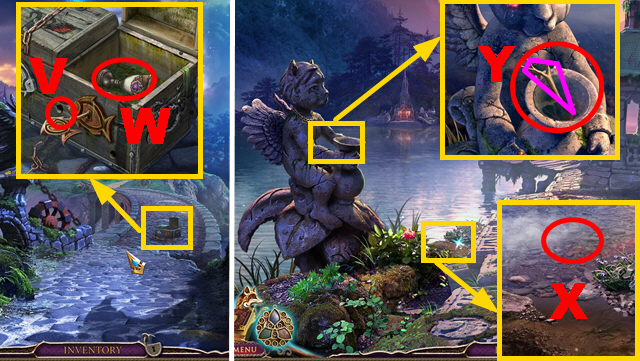
- Use the DRILL (V); take the GOBLET (W).
- Move forward, turn left twice.
- Put the GOBLET into the water (X) to acquire the WATER.
- Pour the WATER into the jug (Y); take the STICK (purple).
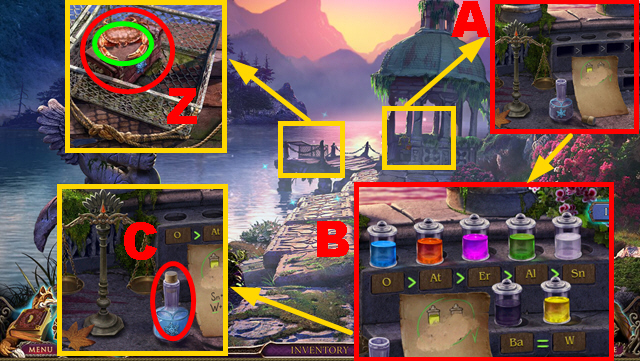
- Remove the crab with the STICK (green); take the FROST POTION SET (Z).
- Put down the FROST POTION SET (A).
- Play the mini-game.
- Solution: (B).
- Take the FROST POTION (C).
Chapter 8: The Ancient Crypt
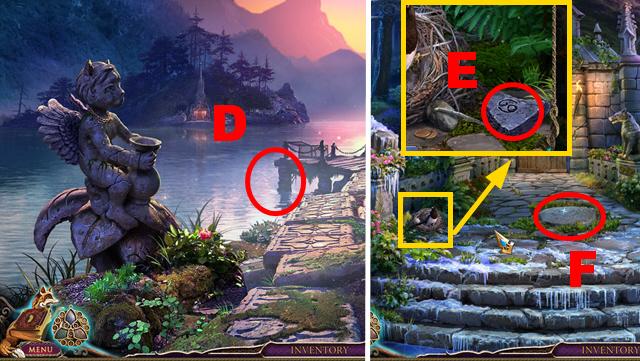
- Throw the FROST POTION (D).
- Move forward.
- Take ZODIAC STONE 2/3 (E).
- Play the mini-game (F).
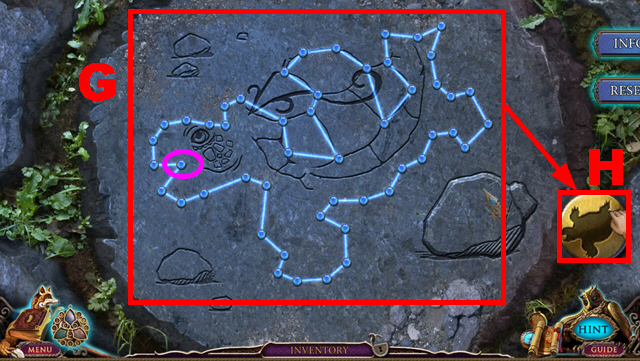
- Solution: (G).
- Start and end at gem (purple).
- Take the amulet piece (H).
- Play the HOP.
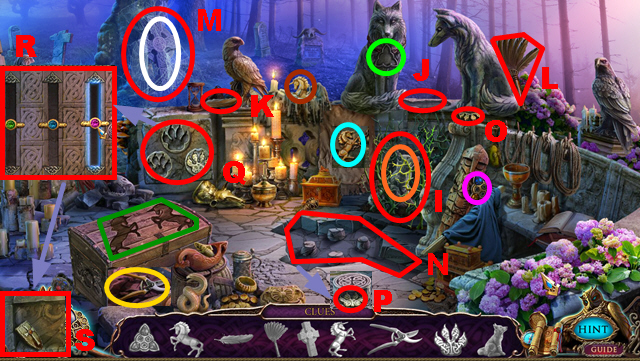
- Place the amulet (purple) on the statue (light green).
- Place 2 unicorns (brown) and (light blue) on the chest (dark green).
- Cut the plant (I) with the pruning shears (yellow).
- Place the fox pup (orange) on the niche (J).
- Put the feather (K) on the feather duster (L).
- Remove the cobwebs (M) with the feather duster.
- Place the cross (white) on the niche (N).
- Put 2 paws (O) and (P) into the slots (Q).
- Solution: (R).
- Take the KNIGHT'S SHIELD (S).
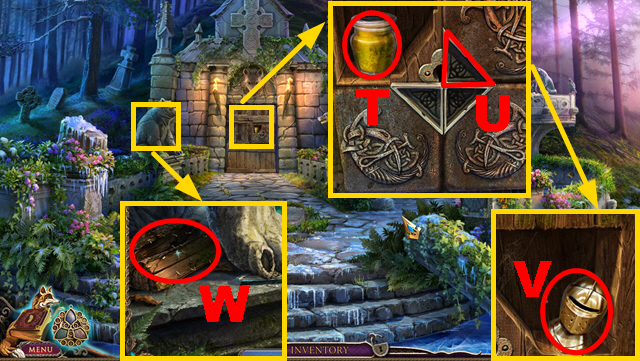
- Take the YELLOW PAINT (T).
- Put down the TRIANGLE KEY (U); take the KNIGHT'S HELMET (V).
- Hold down the STICK (W) to acquire the STICK WITH TERMITES.
- Walk down three times.
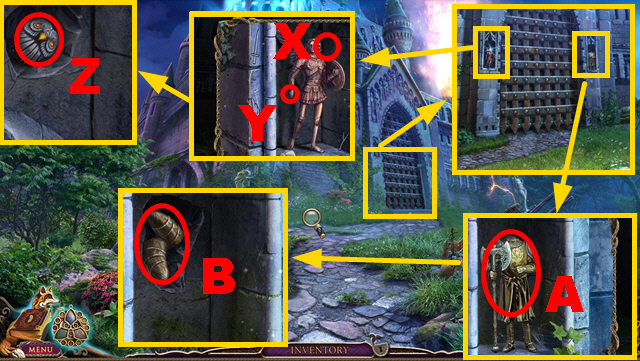
- Put down the ANGEL WING (X) and ANGEL SWORD (Y); take OWLET 1/3 (Z).
- Put down the KNIGHT'S HELMET and KNIGHT'S SHIELD (A); take the HORNS (B).
- Turn left.
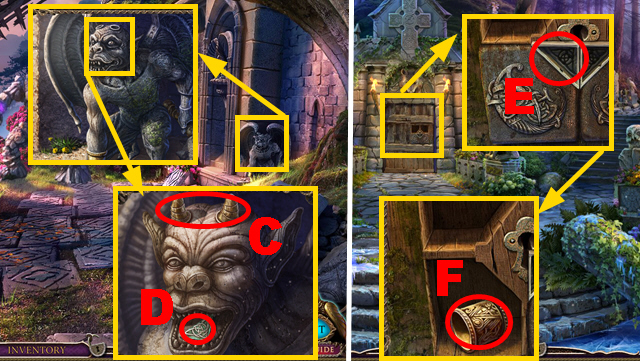
- Connect the HORNS to the statue (C); take the TRIANGLE KEY (D).
- Turn left, move forward.
- Place the TRIANGLE KEY on the niche (E); take the BRACER (F).
- Walk down twice.
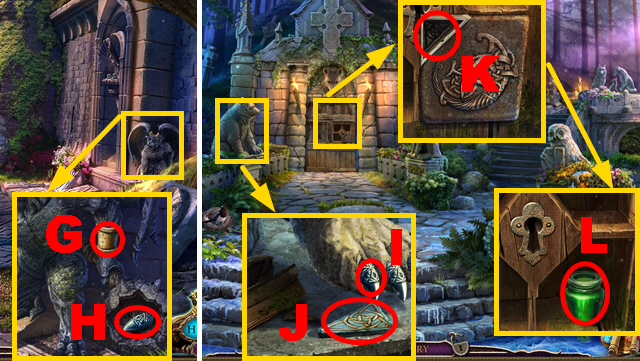
- Put down the BRACER (G); take the BEAR CLAW (H).
- Turn left, move forward.
- Place the BEAR CLAW on the statue (I); take the TRIANGLE KEY (J).
- Insert the TRIANGLE KEY into the slot (K); take the GREEN PAINT (L).
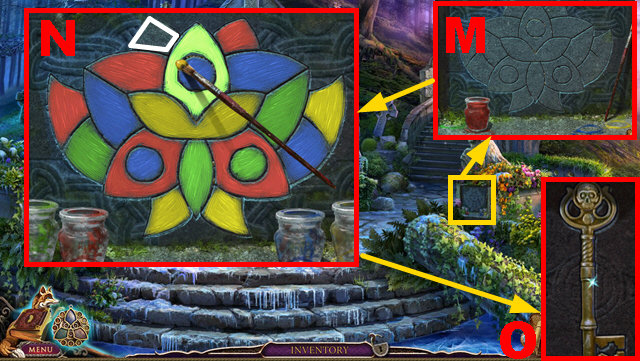
- Put down the GREEN, YELLOW, and BLUE PAINT (M).
- Play the mini-game.
- Solution: (N).
- Paint the remaining part (white) yellow.
- Take the CRYPT KEY (O).
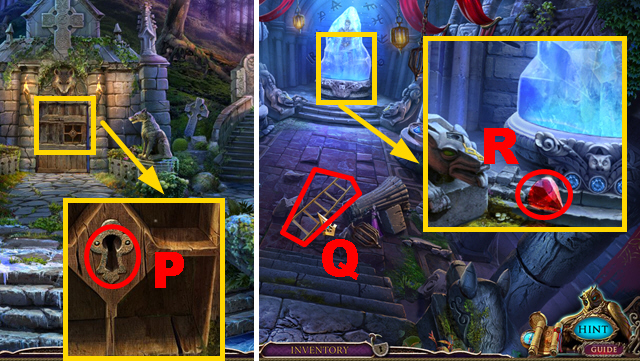
- Insert the CRYPT KEY into the lock (P).
- Move forward.
- Take the LADDER (Q).
- Take the RED CRYSTAL (R).
- Play the HOP.
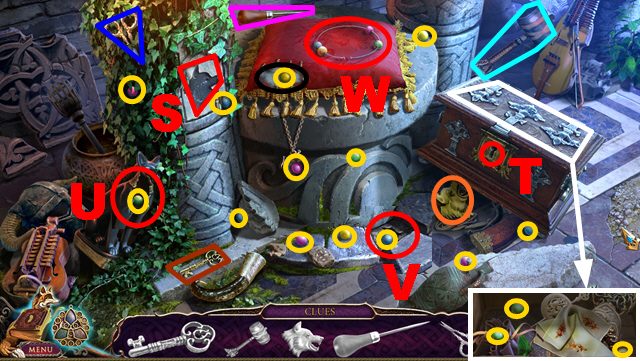
- Place the wolf (orange) on the slot (S).
- Insert the key (brown) into the lock (T).
- Use the hammer (light blue) to break the statue (U).
- Use the scissors (dark blue) to cut the seam (black).
- Use the awl (purple) to remove the stone (V).
- Collect the beads (yellow); put them on the necklace (W).
- Take the NECKLACE.
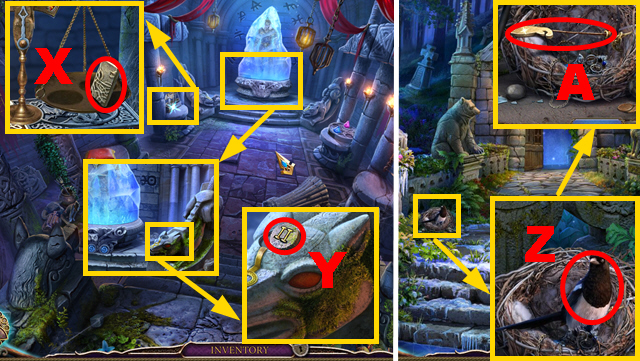
- Take the WOLF PLATE 1/2 (X).
- Take ROMAN NUMERAL 1/3 (Y).
- Walk down.
- Give the NECKLACE to the bird (Z); take the SHADOW PIN (A).
- Move forward.
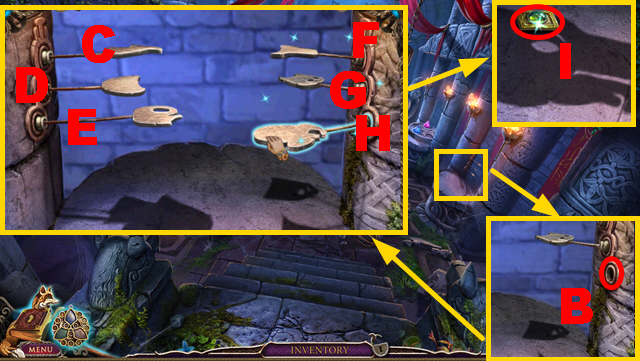
- Connect the SHADOW PIN to the column (B).
- Solution: C, E, G, F.
- Take the RHOMBOID GEM (I).
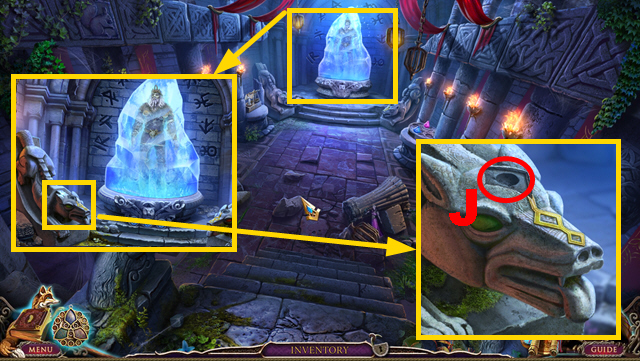
- Place the RHOMBOID GEM on the statue (J).
- Walk down four times.
- Play the HOP.
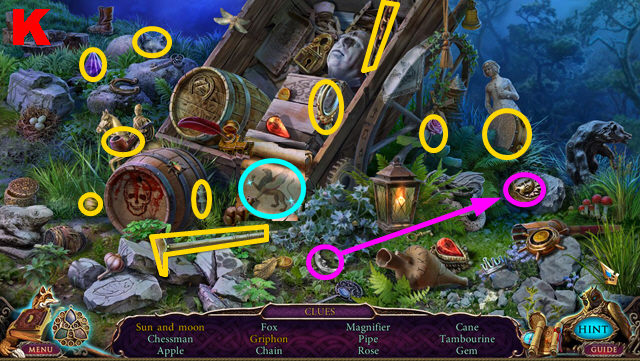
- You receive the PURPLE CRYSTAL (K).
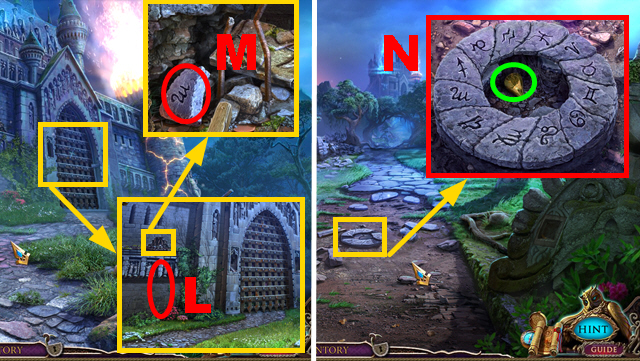
- Put down the LADDER (L); take ZODIAC STONE 3/3 (M).
- Walk down twice.
- Put down 3 ZODIAC STONES (N); take the YELLOW CRYSTAL (green).
- Go to the Crypt.
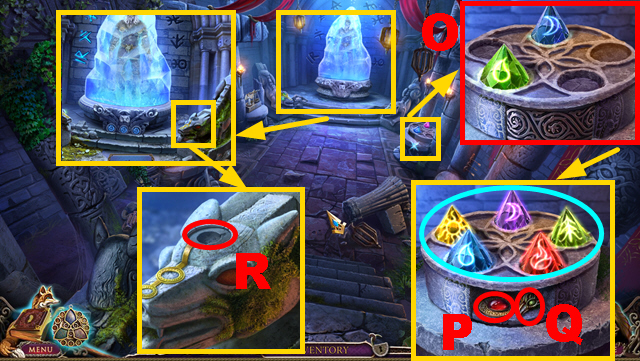
- Put down the RED, YELLOW, and PURPLE CRYSTAL (O).
- Apply the correct color to each crystal (blue); take the OVAL GEM (P) and CROW HEAD (Q).
- Place the OVAL GEM on the statue (R).
- Play the mini-game.
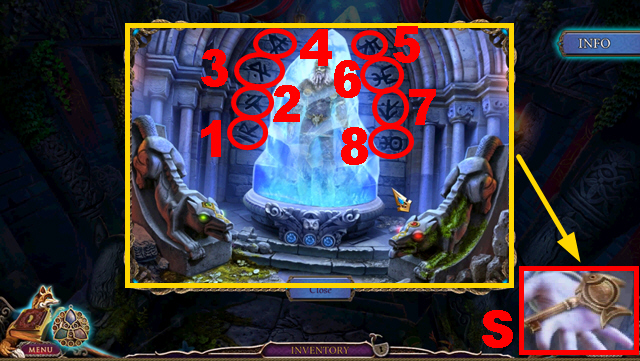
- Solution: 1, 4, 6, 8, 2, 5, 4, 6, 8, 3, 1, 7, 5, 8, 6.
- Take the SILVER FISH KEY (S).
- Walk down five times.
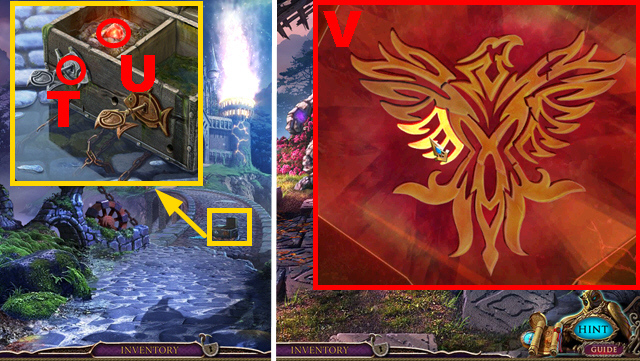
- Insert the SILVER FISH KEY into the lock (T); take the amulet piece (U).
- Move forward, turn left.
- Activate the amulet; press the red gem.
- Play the mini-game.
- Solution: (V).
- Move forward.
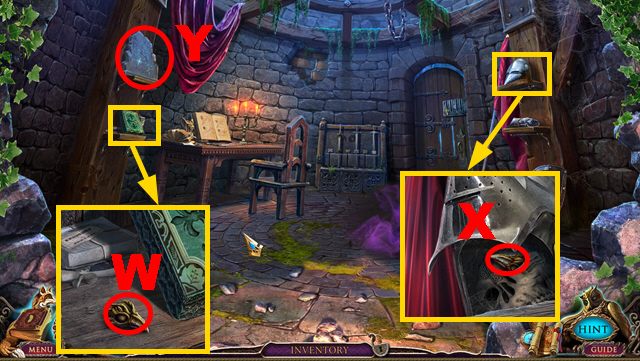
- Take CROW HEAD 2/3 (W).
- Open the helmet; take CROW HEAD 3/3 (X).
- Play the mini-game (Y).
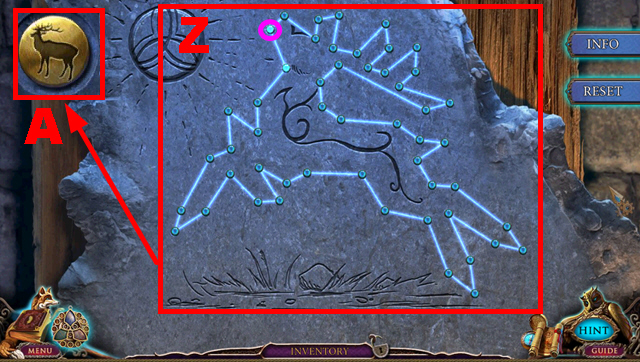
- Solution: (Z).
- Begin and end at gem (purple).
- Take the amulet piece (A).
Chapter 9: The Castle Courtyard
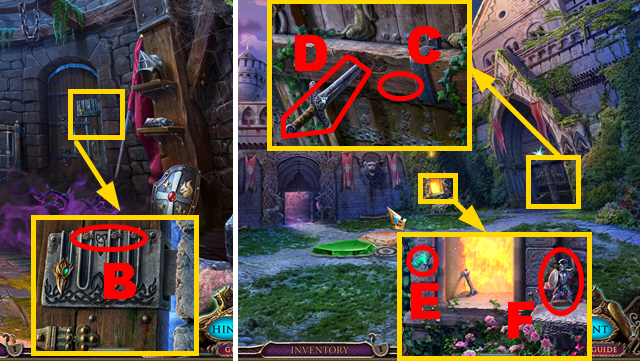
- Connect 3 CROW HEADS to the door (B); pull them.
- Move forward.
- Use the STICK WITH TERMITES (C); take the SWORD (D).
- Take the amulet piece (E) and WARRIOR (F).
- Play the HOP.
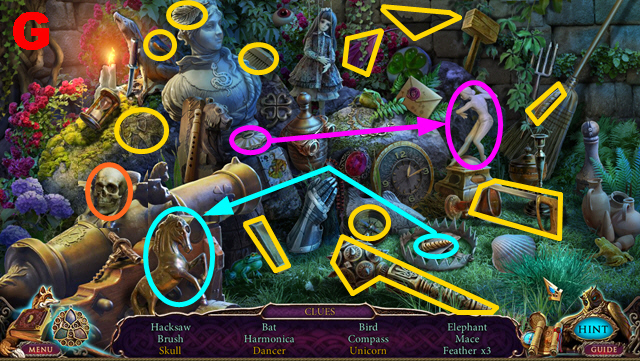
- You receive the HACKSAW (G).
- Move forward.
- Activate the amulet; press the red gem.
- Play the mini-game.
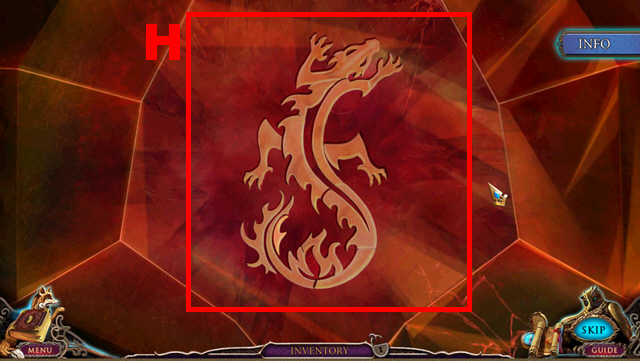
- Solution: (H).
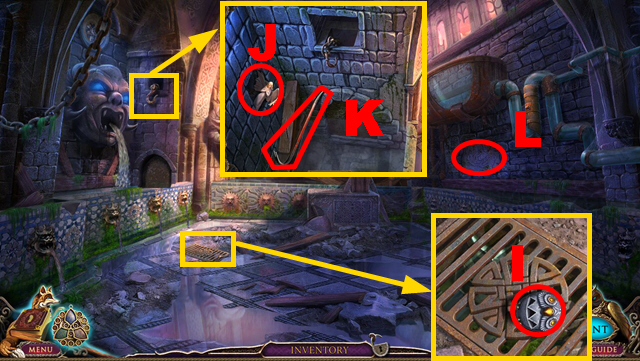
- Take OWLET 2/3 (I).
- Take the ANGEL (J) and CROWBAR (K).
- Play the mini-game (L).
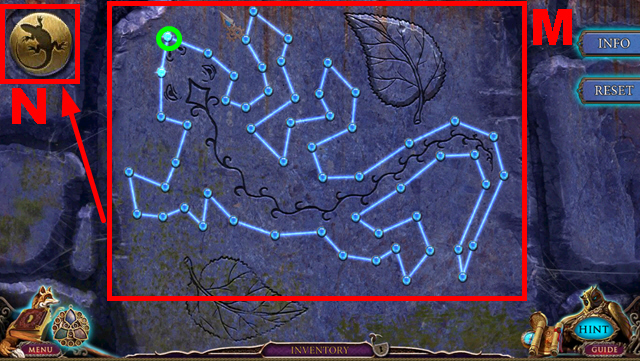
- Solution: (M).
- Begin and end at gem (green).
- Take the amulet piece (N).
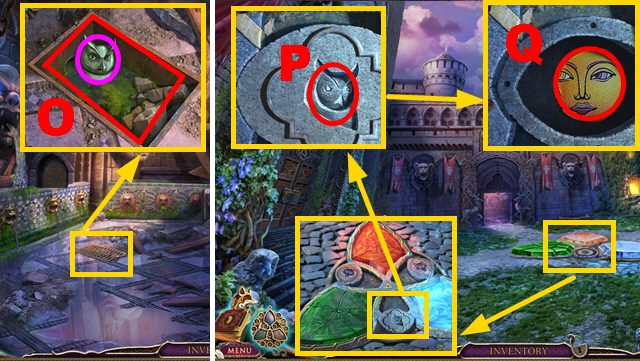
- Use the CROWBAR (O); take the LARGE OWL HEAD (purple).
- Walk down.
- Place the LARGE OWL HEAD on the niche (P); press it.
- Take the SUN (Q).
- Walk down three times.
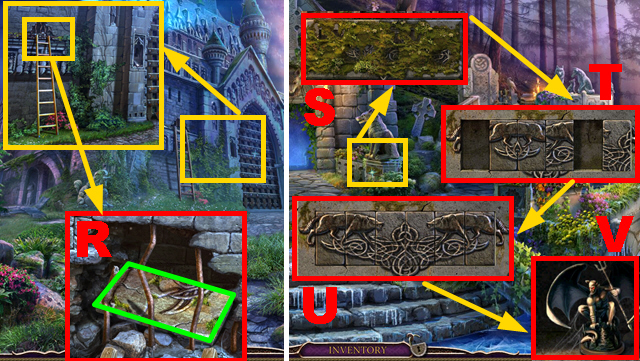
- Use the HACKSAW (R); take WOLF PLATE 2/2 (green).
- Turn left twice, move forward.
- Remove the moss with the BRUSH (S); put down 2 WOLF PLATES (T).
- Create the picture (U); take the DEMON (V).
- Move forward.
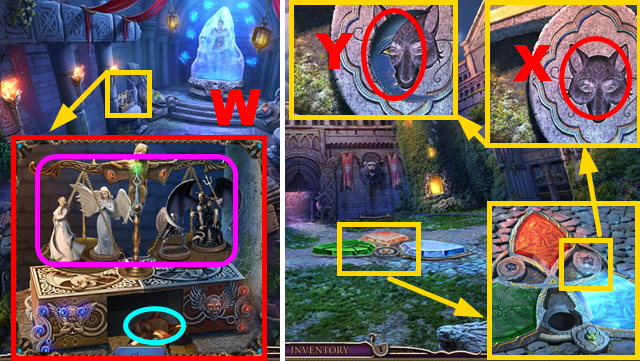
- Put down the WARRIOR, DEMON, and ANGEL (W).
- Arrange the figurines correctly (purple); take the FOX (blue).
- Walk down three times, turn right twice.
- Place the FOX on the niche (X); press it.
- Take the MOON (Y).
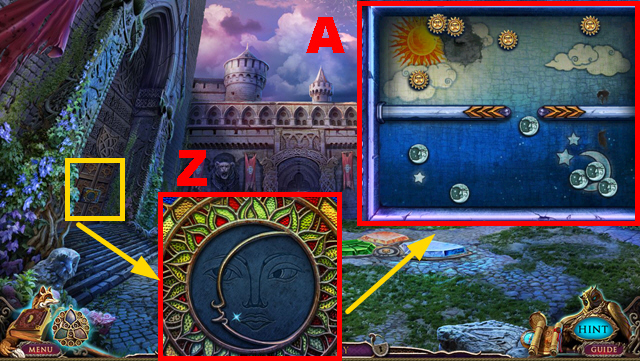
- Place the MOON and SUN on the niche (Z).
- Play the mini-game.
- Solution: (A).
- Turn left.
Chapter 10: The Main Hall
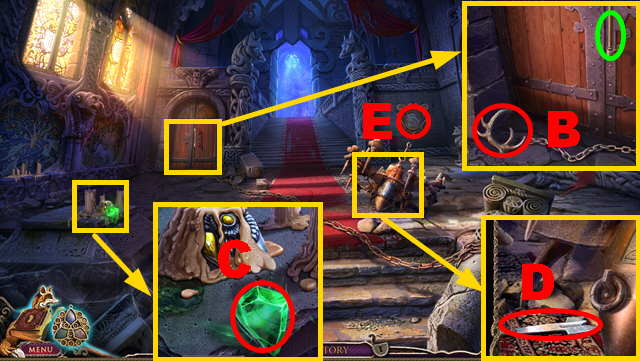
- Take the RIGHT HORN (B); open the door (green).
- Take the amulet piece (C).
- Take the BLADE PART (D).
- Play the mini-game (E).
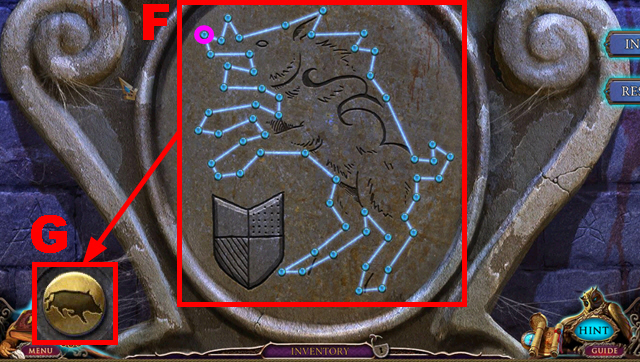
- Solution: (F).
- Start and end at gem (purple).
- Take the amulet piece (G).
- Move forward, walk down, turn right.
- Play the HOP.
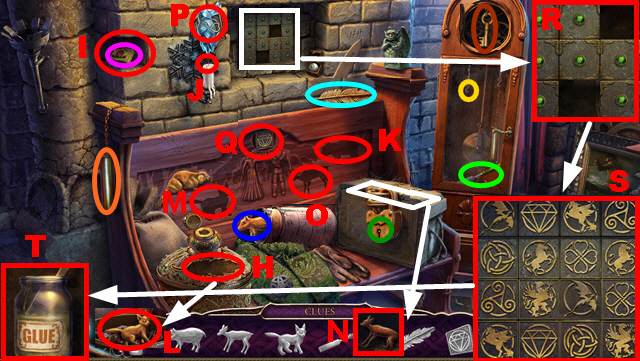
- Connect the weight (orange) to the clock (yellow).
- Insert the key (brown) into the lock (dark green).
- Use the chisel (light green) to remove the stone (I).
- Place the feather (light blue) on the slot (H).
- Use the matches (purple) to light the candle (J).
- Put the boar (dark blue) into the niche (K).
- Put the bobcat (L) into the niche (M).
- Put the deer (N) into the niche (O).
- Place 2 stone tokens (P) and (Q) on the board (R).
- Solution: (S).
- Take the GLUE (T).
- Take the BLADE FRAGMENT (U) and FIRE SYMBOL (V).
- Take the ROPE (W).
- Walk down three times.
- Place the FIRE SYMBOL on the niche (X); open the gauntlet.
- Take the LIGHTER (Y).
- Throw the ROPE (Z); take the POMMEL (A).
- Put down the BLADE PART, BLADE FRAGMENT, and POMMEL (B).
- Connect the sword pieces to the central part (purple) in numerical order 1-5.
- Take the SWORD (C).
- Move forward, turn left.
- Melt the wax with the LIGHTER (D); take the OWLET HALF (blue).
- Walk down three times.
- Apply the GLUE and OWLET HALF to the figurine (E); take OWLET 3/3.
- Put down 3 OWLETS (F).
- Arrange them correctly (purple); take the SWORD (green).
- Turn right.
- Put down 3 SWORDS; arrange them correctly (G).
- Take the BLACKSMITH TONGS (H) and CHISEL (I).
- Insert the CHISEL into the wall (J).
- Turn right.
- Play the HOP.
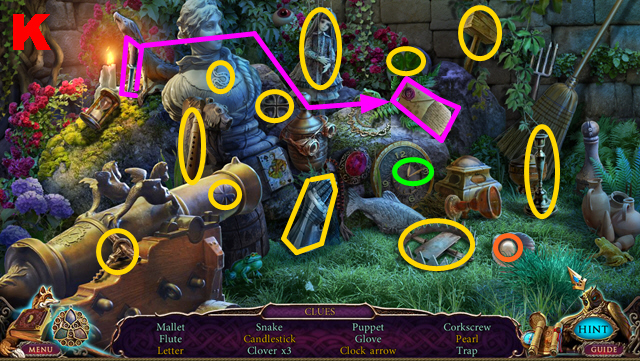
- You receive the MALLET (K).
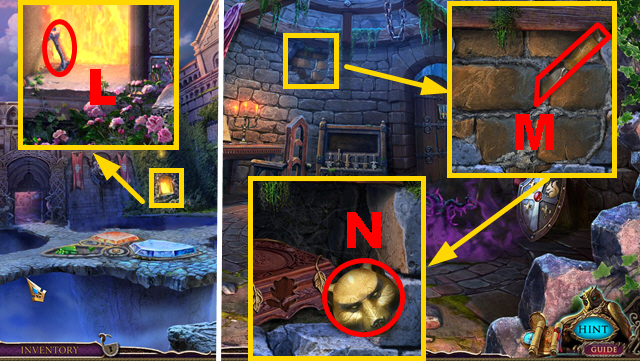
- Collect BONE 1/2 (L) with the BLACKSMITH TONGS.
- Walk down.
- Hit the chisel with the MALLET (M); take the BEAR (N).
- Move forward.
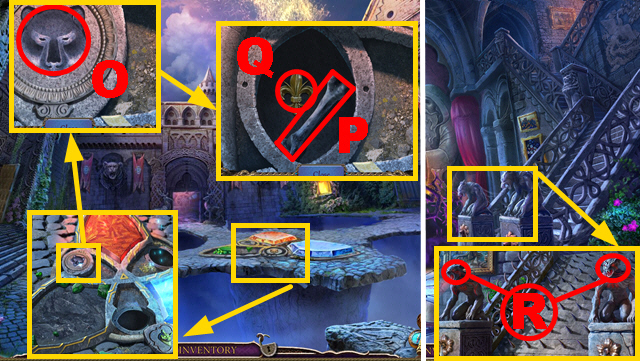
- Place the BEAR on the niche (O); press it.
- Take BONE 2/2 (P) and FLEUR-DE-LIS 1/3 (Q).
- Turn left, turn right.
- Try to turn right.
- Place 2 BONES on the statues (R).
- Turn right.
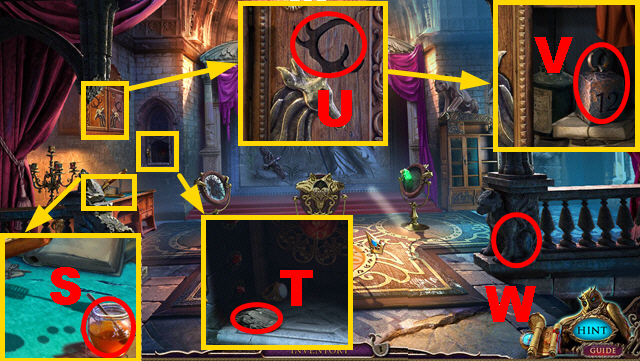
- Take the HONEY (S).
- Take the CHARCOAL (T).
- Place the RIGHT HORN on the cupboard (U); take the WEIGHT (V).
- Play the mini-game (W).
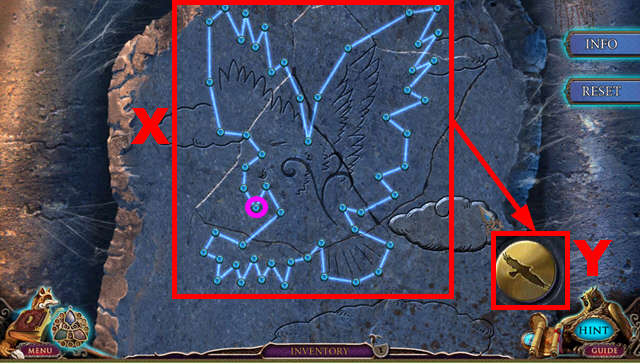
- Solution: (X).
- Start and end at gem (purple).
- Take the amulet piece (Y).
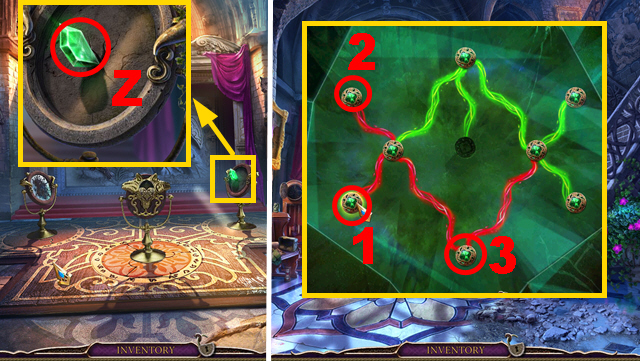
- Take the amulet piece (Z).
- Walk down.
- Activate the amulet; press the green gem.
- Solution: 1-3.
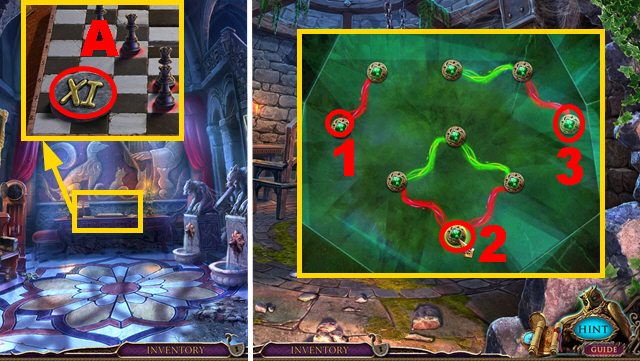
- Take ROMAN NUMERAL 2/3 (A).
- Walk down three times.
- Activate the amulet; press the green gem.
- Solution: 1-3.
- Move forward, turn left, move forward.
- Activate the amulet; press the green gem.
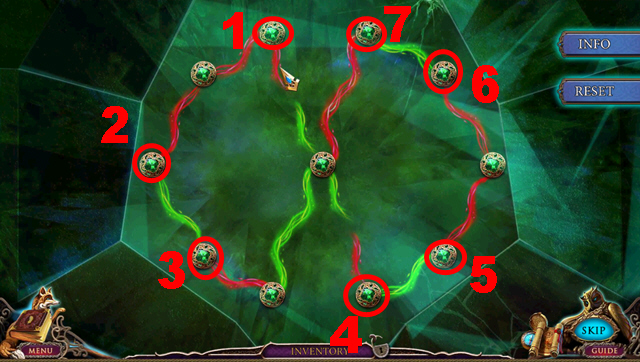
- Solution: 1-7.
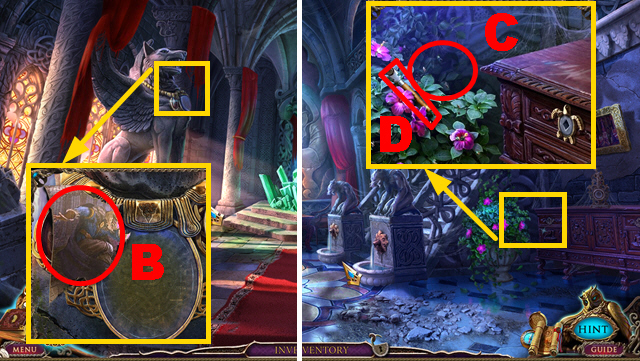
- Take the CANVAS FRAGMENT (B).
- Walk down, turn right.
- Put down the HONEY (C); take the GLASS CUTTER (D).
- Turn right.
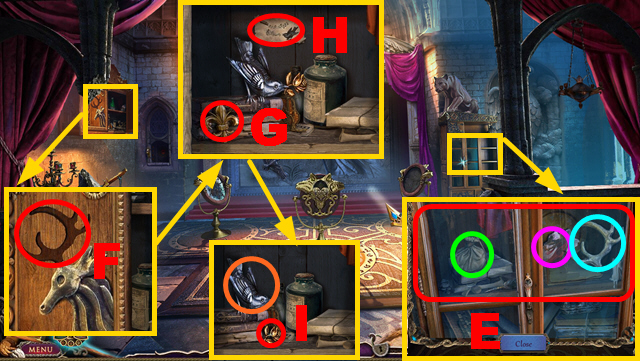
- Use the GLASS CUTTER (E); take the POUCH (green), CANVAS FRAGMENT (purple), and LEFT HORN (blue).
- Place the LEFT HORN on the cupboard (F).
- Take FLEUR-DE-LIS 2/3 (G); inspect the note (H).
- Blow the WHISTLE (orange); take the ROSE (I).
- Walk down four times.
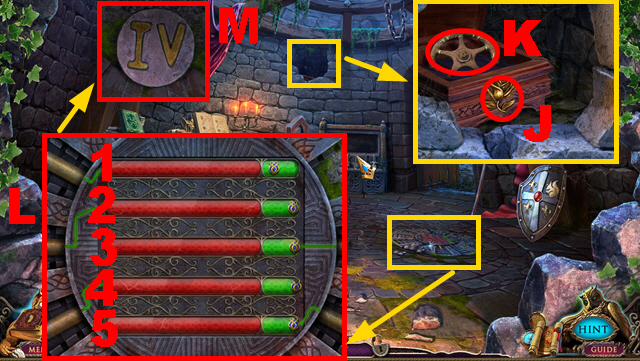
- Place the ROSE on the box (J); take the VALVE (K).
- Play the mini-game.
- Solution (L): 1, 3, 2, 4, 5.
- Take ROMAN NUMERAL 3/3 (M).
- Walk down.
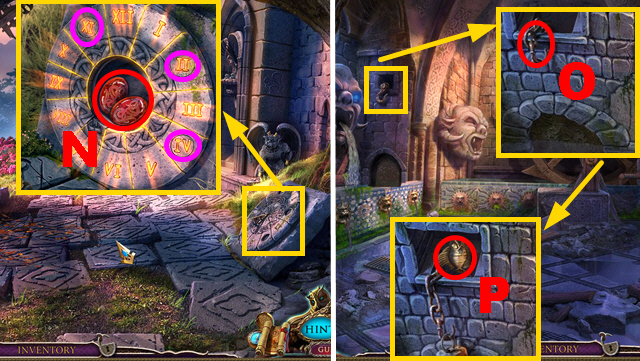
- Place 3 ROMAN NUMERALS into the correct spots (purple); take the RED STONES (N).
- Turn right, move forward twice.
- Connect the WEIGHT to the hook (O); take the BIG FISH (P).
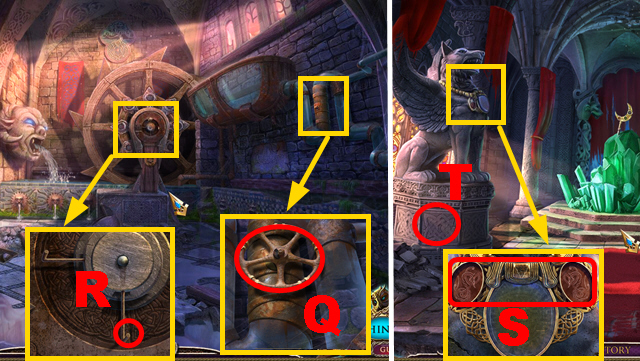
- Place the VALVE on the pipe (Q).
- Put down the BIG FISH (R).
- Walk down, turn left, move forward.
- Place the RED STONES on the niches (S).
- Play the mini-game (T).
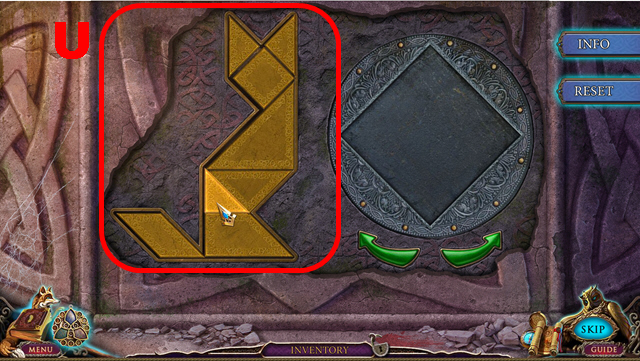
- Solution: (U).
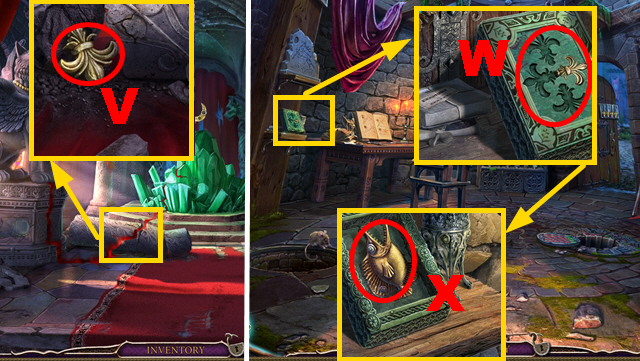
- Take FLEUR-DE-LIS 3/3 (V).
- Walk down three times.
- Place 3 FLEURS-DE-LIS on the box (W); take the MIDDLE FISH (X).
- Move forward twice.
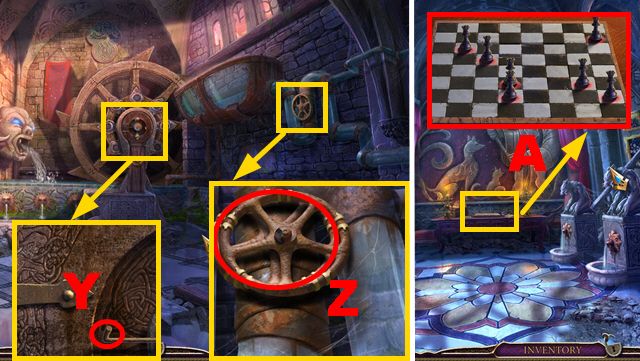
- Put down the MIDDLE FISH (Y).
- Rotate the VALVE (Z) to acquire the CHESS QUEEN.
- Walk down, turn left, turn right.
- Put down the CHESS QUEEN (A).
- Play the mini-game.
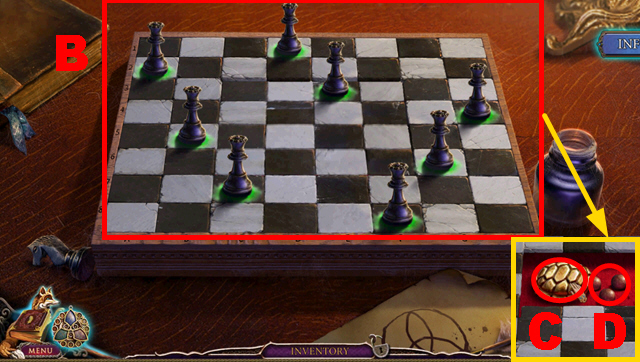
- Solution: (B).
- Take the TURTLE SHELL (C) and BULLETS (D).
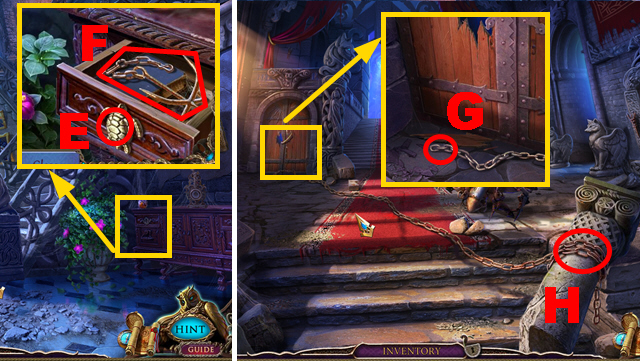
- Place the TURTLE SHELL on the drawer (E); take the HOOK (F).
- Walk down.
- Connect the HOOK to the chain (G); push the hook.
- Use the CROWBAR (H).
- Turn left.
Chapter 11: The Dungeon
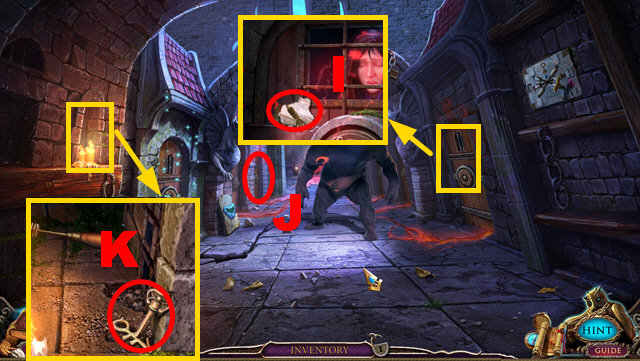
- Take the CANVAS FRAGMENT (I).
- Inspect the cells (J).
- Take the CHANDELIER KEY (K).
- Play the HOP.
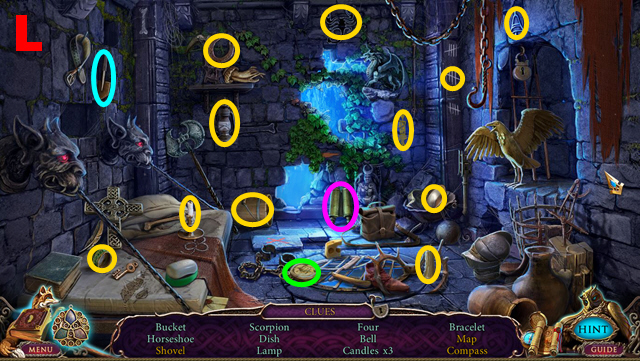
- You receive the BUCKET (L).
- Put the BUCKET into the compartment (M); take the BRUSH (purple).
- Walk down, turn right twice.
- Put down the BRUSH, POUCH, and BULLETS (green).
- Use the BRUSH, POUCH, and BULLETS on the pistol (N); take the PISTOL.
- Walk down twice.
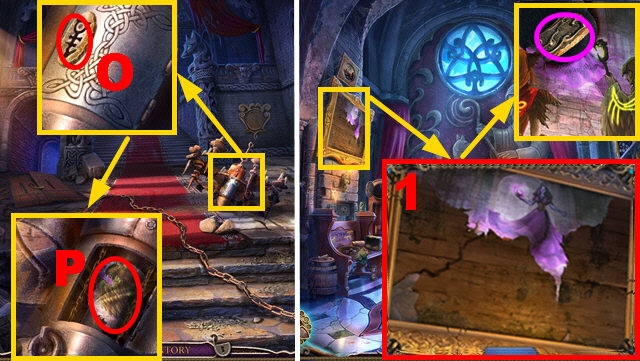
- Insert the CHANDELIER KEY into the lock (O); take the CANVAS FRAGMENT (P).
- Turn right.
- Place 4 CANVAS FRAGMENTS on the painting (1); take the FRAGMENT (purple).
- Walk down, turn left.
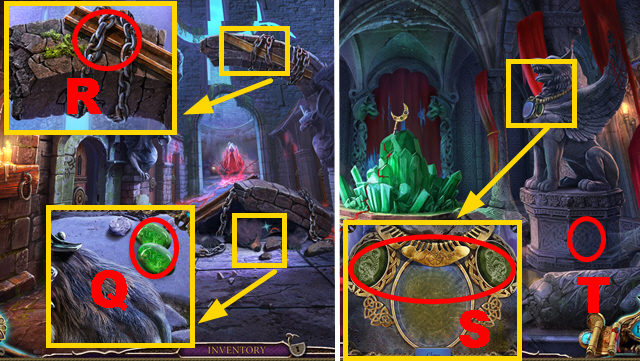
- Shoot the PISTOL (R).
- Take the GREEN WOLF CRYSTAL (Q).
- Walk down, move forward.
- Put down the GREEN WOLF CRYSTAL (S).
- Play the mini-game (T).
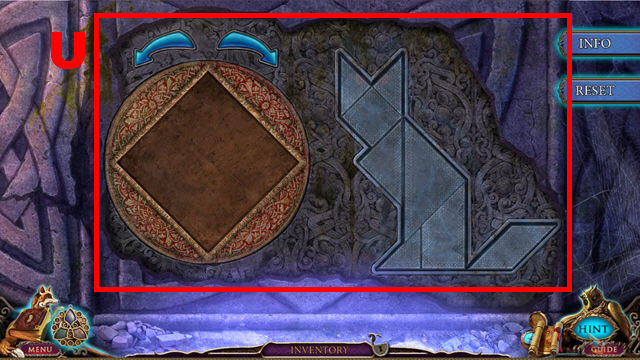
- Solution: (U).
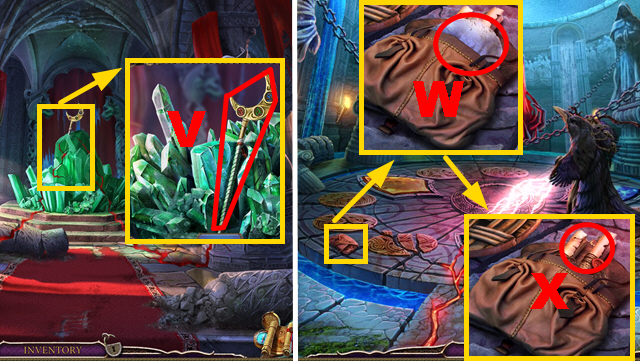
- Take the STAFF (V).
- Walk down, turn left, move forward.
- Open the bag; take the MIRROR (W).
- Read 2 scrolls (X).
- Walk down twice, turn right twice.
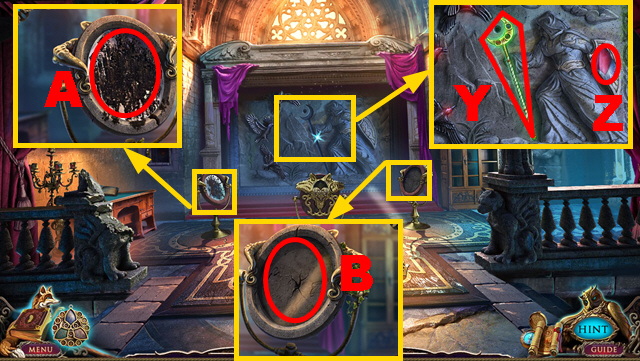
- Place the STAFF on the niche (Y); take the HANDKERCHIEF (Z).
- Use the HANDKERCHIEF (A).
- Put down the MIRROR (B).
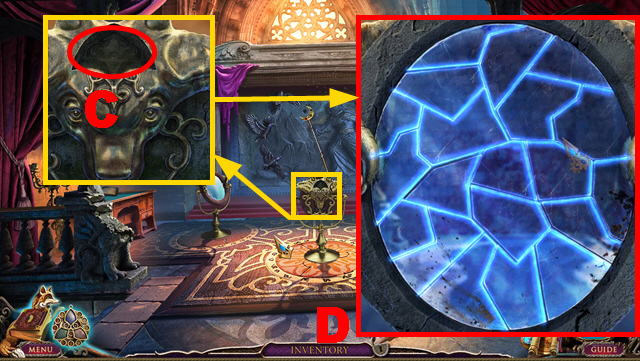
- Place the FRAGMENT on the niche (C).
- Play the mini-game.
- Solution: (D).
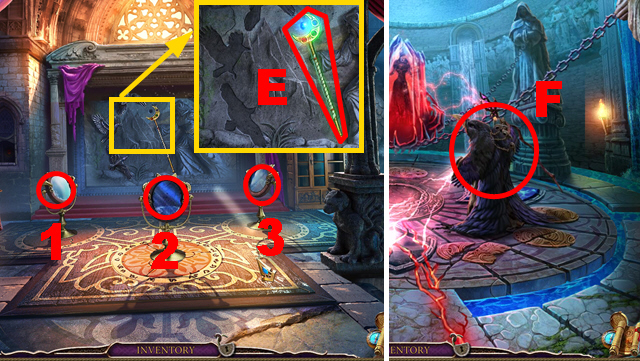
- Turn mirror (1) twice, mirror (2) twice, and mirror (3) twice.
- Take the MAGIC STAFF (E).
- Walk down twice, turn left, move forward.
- Use the MAGIC STAFF (F).
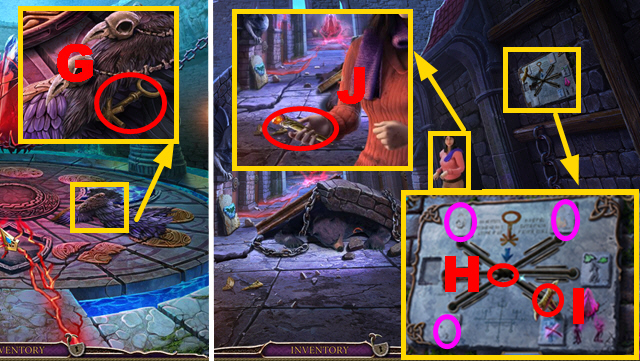
- Move the cape; take the PRISON KEY (G).
- Walk down.
- Insert the PRISON KEY into the niche (H); restore the pictures with the CHARCOAL (purple).
- Move the lever (I).
- Take the LASER LEVER (J).
- Walk down, turn right twice.
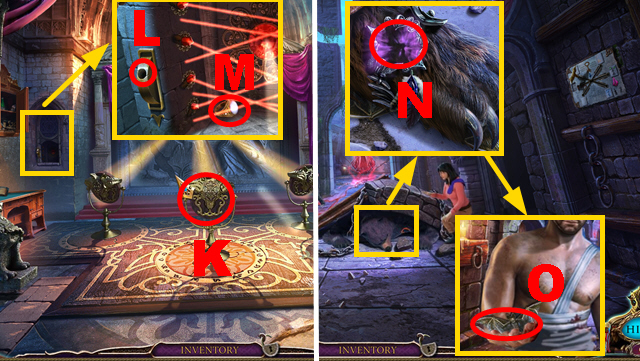
- Turn the mirror (K) three times.
- Insert the LASER LEVER into the slot (L); pull it.
- Take the RING OF LIGHT (M).
- Walk down twice, turn left.
- Use the RING OF LIGHT to remove the curse (N); take the BAT (O).
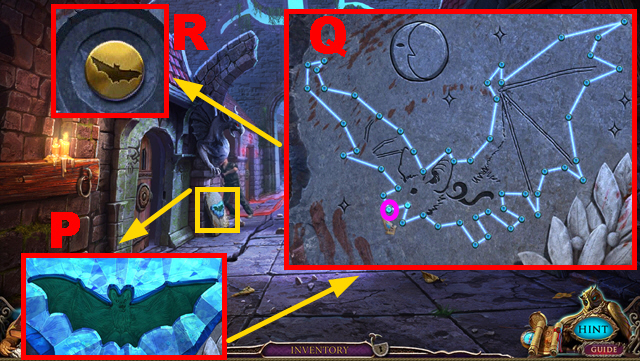
- Place the BAT on the niche (P).
- Play the mini-game.
- Solution: (Q).
- Begin and end at gem (purple).
- Take the amulet piece (R).
- Congratulations, you have completed Mystery of the Ancients: Three Guardians.
Created at: 2014-02-28

