Walkthrough Menu
Introduction
General Tips
- There are several Puzzles in the game which can be skipped once the Skip button is fully charged.
- If you need to read the instructions for a Puzzle, click on the Help button in the upper left corner.
- Click on the Hint button in the lower right to receive item-finding assistance from a fairy! The Hint will not tell you where to place an inventory item though.
- If there are no more items to find in a scene, the Hint will guide to another location.
- Each scene contains 10 Diamonds. Find all the Diamonds to unlock screensavers. You will get a notification each time a screensaver has been unlocked.
- The counter in the lower right side displays the number of Diamonds left in each scene. This information can also be found on the map screen.
- The items written in gray can be found by zooming into other areas. Once that hidden area has been opened, the writing will turn black.
Map
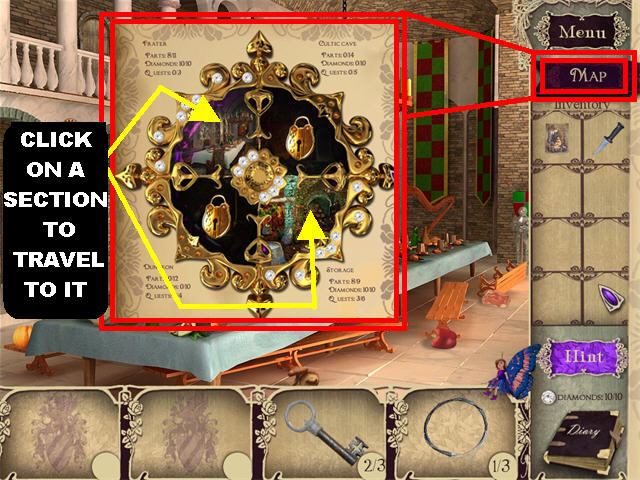
- Click on the Map button in the upper right to view all available locations.
- Click on a Map section to travel to that location.
- The Map screen shows you how many quests need to be completed, how many diamonds have been found, and the amount of fragmented items left to find.
- The sections on the Map with golden locks attached to them will be revealed after certain tasks have been completed.
Chapter 1
The Garden
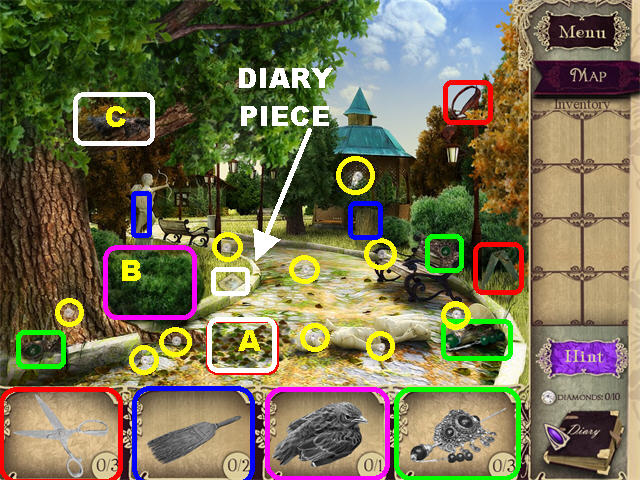
- The 10 DIAMONDS are circled in yellow.
- Pick up all the fragmented items in the scene.
- Place the BROOM on the LEAVES (A) to zoom into that section. Drag your cursor around the leaves to reveal the last GARDEN SHEARS fragment.
- Cut the BUSHES (B) on the left with the GARDEN SHEARS to add the BLUEBIRD to your inventory.
- Place the BLUEBIRD on the NEST (C) in the upper left.
- April will appear in the lower right corner from now on; click on her to obtain Hints.
- Pick up A PIECE OF LILLIAN’S DIARY on the left side of the ground.
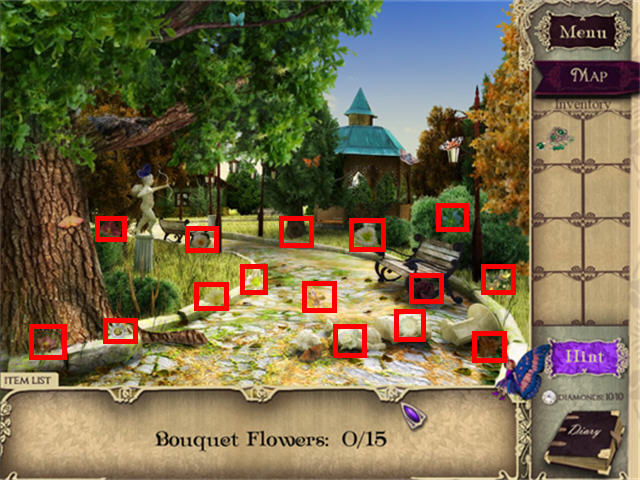
- Pick up the 10 BOUQUET FLOWERS marked in red.
- Click at the bottom of the scene to move to the next location.
Lillian’s Chamber
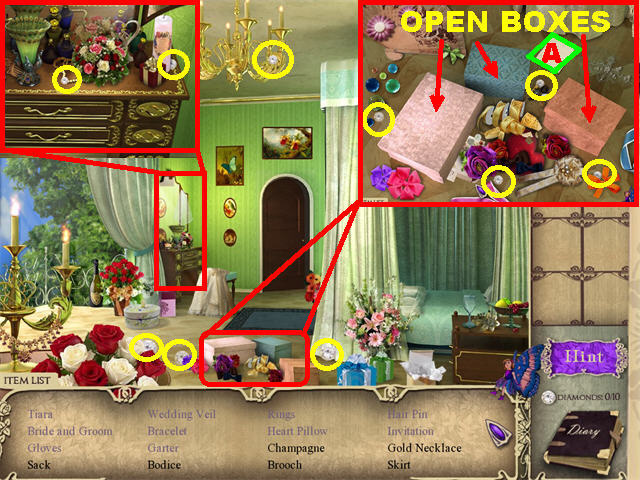
- There are several hidden areas in this scene. Move your cursor around the scene, clicking on the glowing areas to view them.
- The 10 DIAMONDS are circled in yellow.
- Pick up the rest of the items on the list.
- Make sure to open the boxes on the ground (once you’ve zoomed in) to find items on your list.
- Pick up the DIARY PAGE (A) in the close-up view of the boxes.
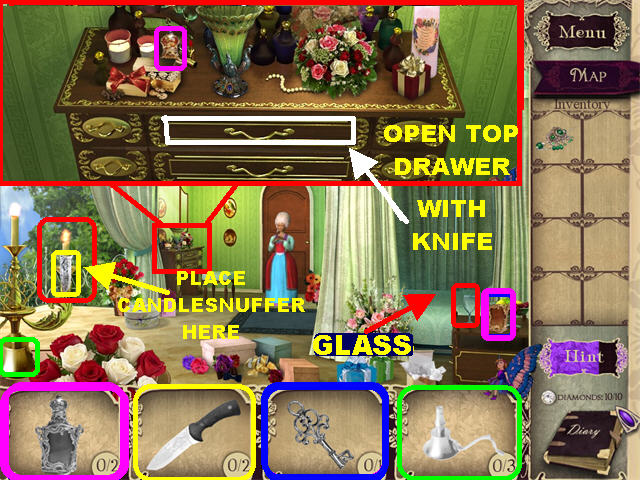
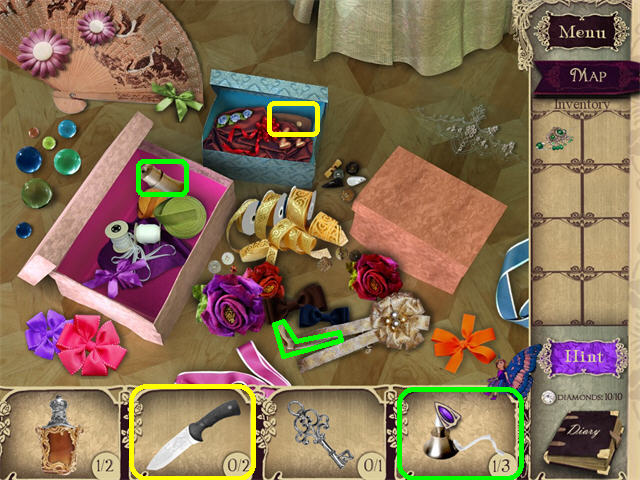
- Pick up all the fragmented items in the scene.
- Place the CANDLESNUFFER on the CANDLE on the left to extinguish the fire and complete the KNIFE.
- Zoom into the dresser on the left; pick up the last FLASK fragment.
- Open the TOP DRAWER with the KNIFE to trigger a puzzle.
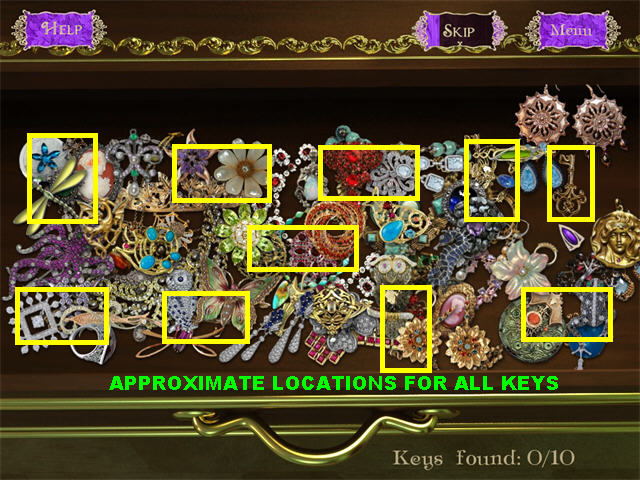
- Run your cursor over the gems, clicking on the 10 KEYS as you find them.
- Once that puzzle is solved another will appear.
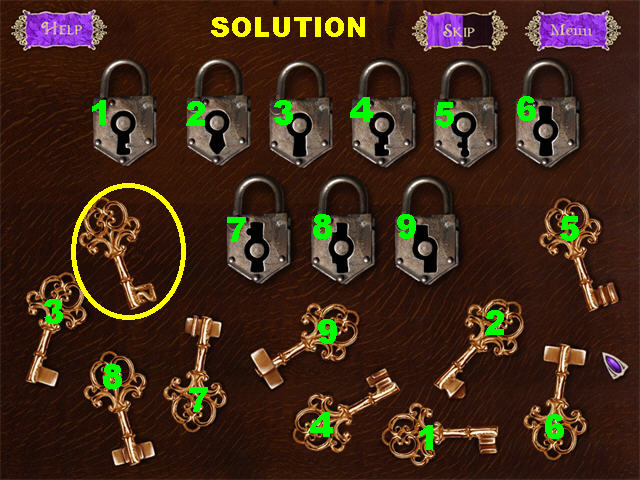
- Place the keys into the correct locks. The last key without a match is the key you need.
- The KEY will be added to inventory.
- Pour the FLASK contents into the GLASS in the lower right to create the POTION.
- Give the POTION to the lady by the door.
- Open the door with the DOOR KEY to return to the Garden. Go to the Cottage on the left.
The Cottage
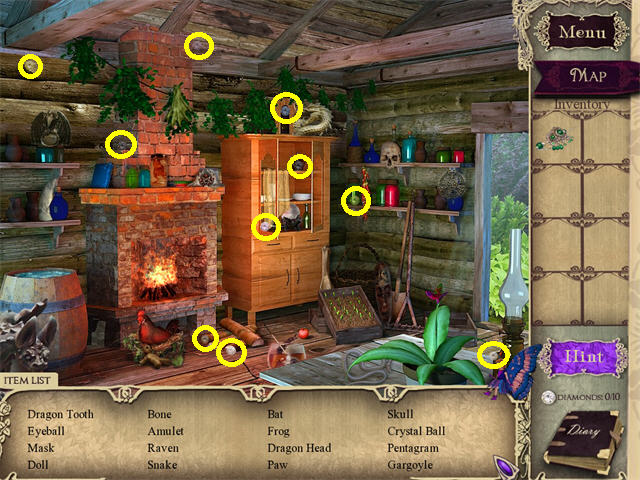
- The 10 DIAMONDS are circled in yellow.
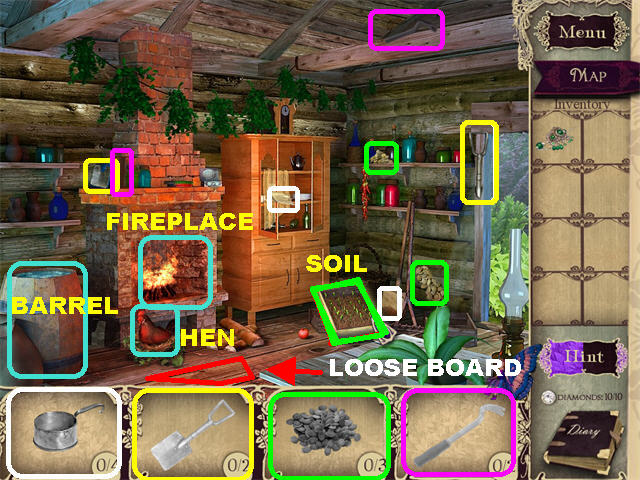
- Pick up all the fragmented items in the scene.
- Dig up the SOIL in the lower right with the TROWEL to obtain the last SEED fragment.
- Give the SEEDS to the HEN to add a piece of the EMPTY LADLE to inventory.
- Pry open the LOOSE BOARD in the lower left with the CROWBAR to obtain the last EMPTY LADLE fragment.
- Place the EMPTY LADLE on the barrel on the left.
- Place the FULL LADLE in the fireplace.
- Use the HAIRPIN to unlock the BOX in the fireplace and obtain a DIARY PAGE.
Chapter 2
Christian’s Parlor
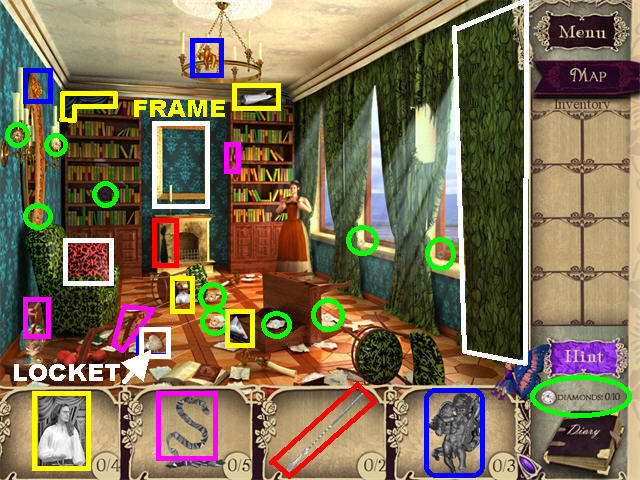
- The 10 DIAMONDS are circled in green.
- Pick up all the fragmented items in the scene.
- Place the PORTRAIT on the FRAME in the back wall to trigger a puzzle.
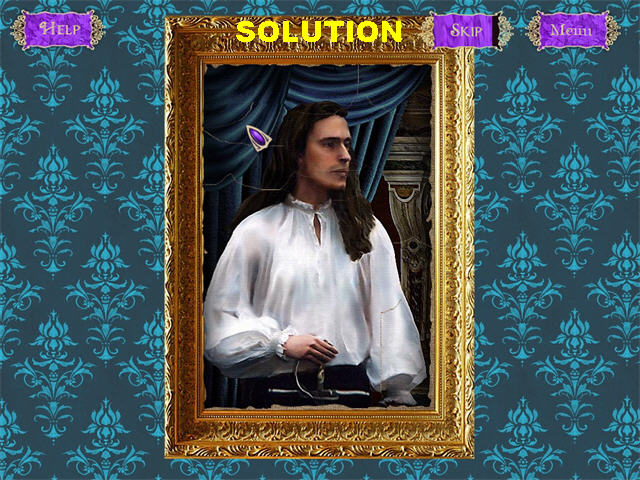
- Reconstruct the painting by dragging the pieces into the correct spots.
- Correct pieces will lock into place.
- A RIBBON fragment will be added to inventory after the puzzle has been solved.
- This is all you can find for now; click at the bottom of the scene for the next location.
Christian’s Chamber
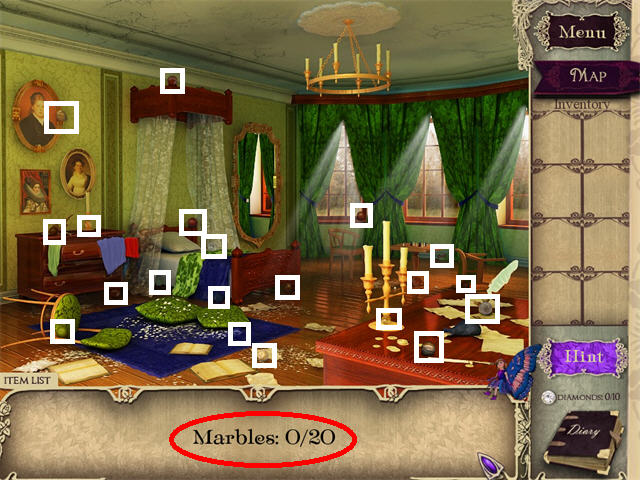
- The MARBLES are marked in white. You cannot pick up the Diamonds in this scene at the moment.
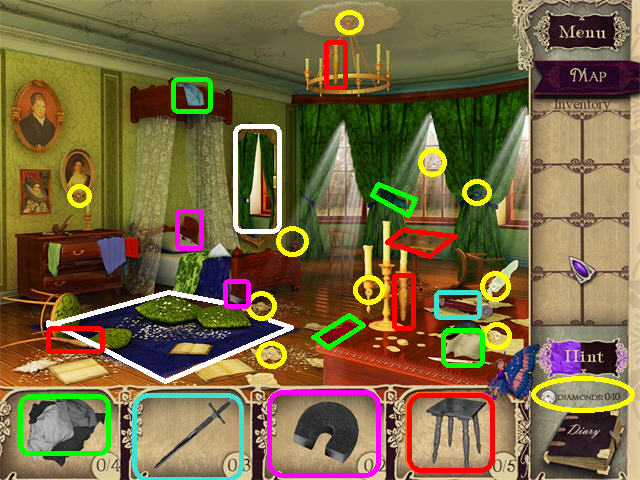
- Look for all the fragmented items in the scene.
- The 10 DIAMONDS are circled in yellow.
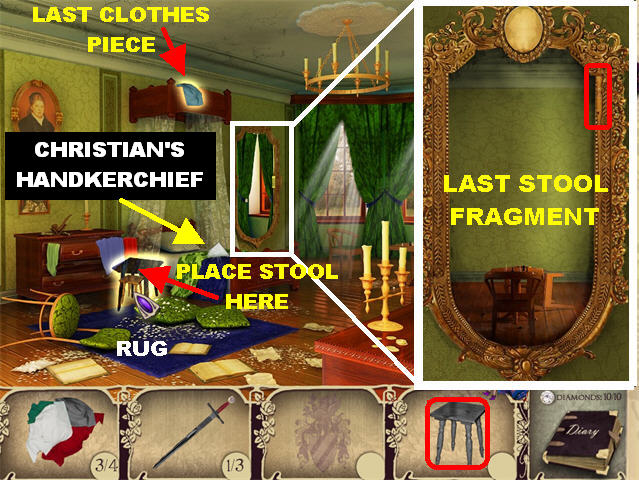
- Zoom into the MIRROR on the wall and pick up the last STOOL fragment in the upper right side of the frame.
- Place the STOOL in front of the dresser to obtain the last fragment of the CLOTHES PILE.
- Place the MAGNET on the BLUE RUG to obtain a fragment of the SWORD.
- Pick up CHRISTIAN’S HANDKERCHIEF from the bed.
- Place the CLOTHES PILE in the drawer on the left to complete the SWORD.
- Go left to return to Christian’s Parlor.
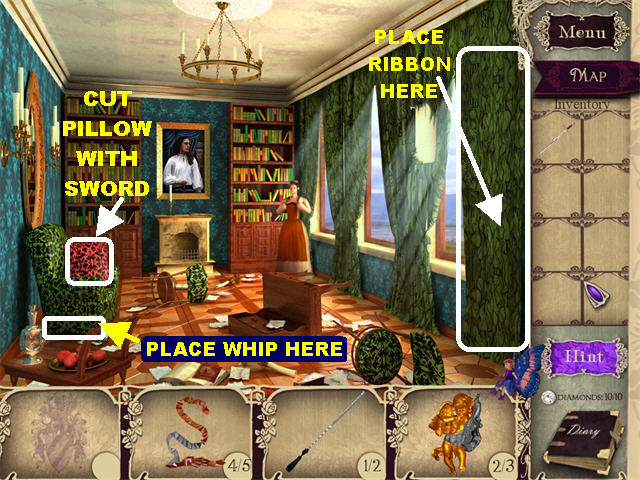
- Cut the PILLOW on the armchair with the SWORD to find the last RIBBON FRAGMENT.
- Tie up the RIGHT CURTAIN with the RIBBON to obtain the last WHIP fragment.
- Place the WHIP below the ARMCHAIR on the left to obtain the last GOLDEN ANGEL fragment.
- Go down to return to Christian’s Chamber.
Sequence Puzzle
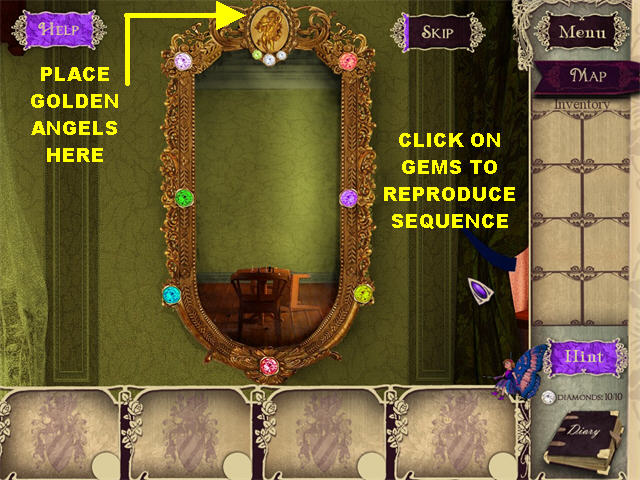
- Zoom into the MIRROR on the right and place the GOLDEN ANGEL in the top center to trigger a puzzle.
- Look at the sequence in which the gems light up; click on the gems around the frame in the same order.
- Repeat three sequences to beat the game.
- Go through the mirror.
Secret Room
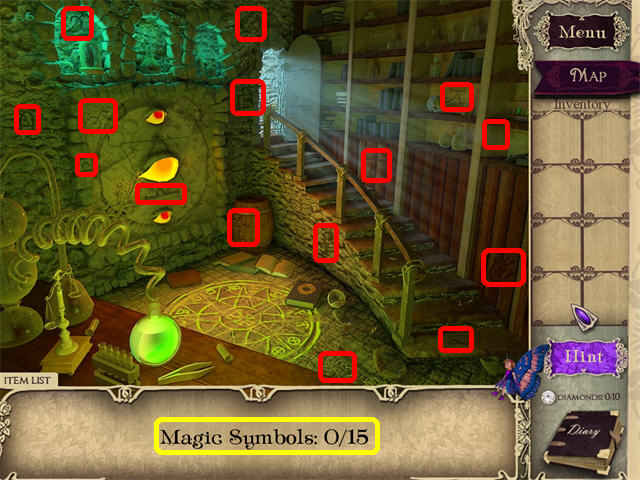
- You cannot pick up DIAMONDS at this time.
- Pick up the 15 MAGIC SYMBOLS marked in red.
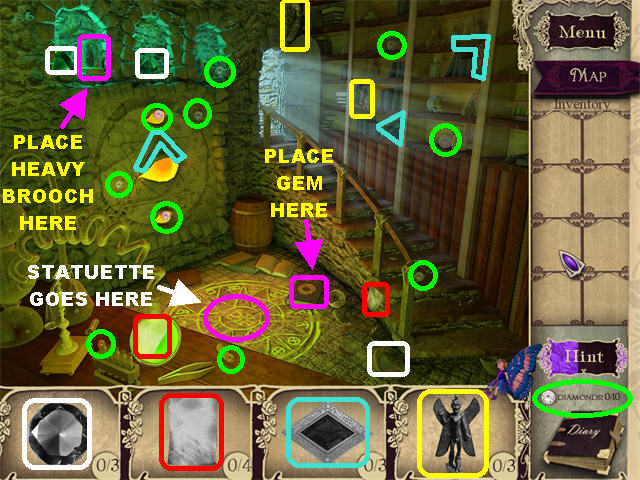
- Pick up the 10 DIAMONDS circled in green.
- Pick up the fragmented items in the scene.
- Place the GEM on the BOOK next to the diagram on the ground to receive a fragment of CHRISTIAN’S NOTE.
- Place the HEAVY BROOCH on the JAR in the upper left to receive the last STATUETTE fragment.
- Place the STATUETTE on the ground to trigger a puzzle.
Stone Puzzle
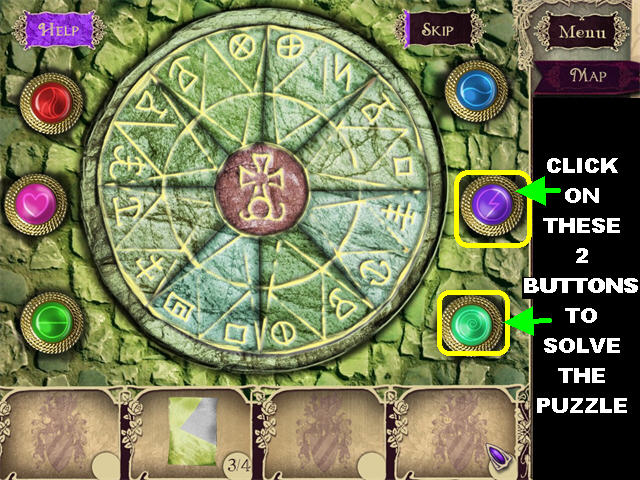
- Press on the Buttons in the right order to solve the puzzle.
- Click on the two bottom buttons on the right side (numbers 5 and 6).
- You will receive the last fragment of CHRISTIAN’S NOTE after completing the puzzle.
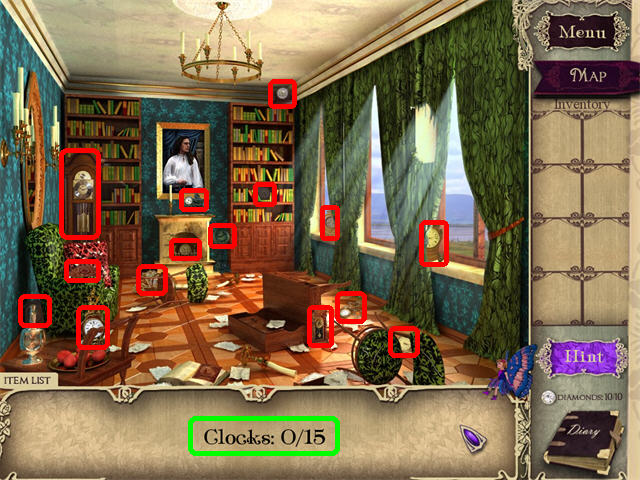
- You are automatically returned to Christian’s Parlor.
- Click on the Maid and the Witch will place a spell.
- Pick up the 15 CLOCKS marked in red to break the spell.
- You will be transported back to the Castle.
Chapter 3
Lillian’s Chamber
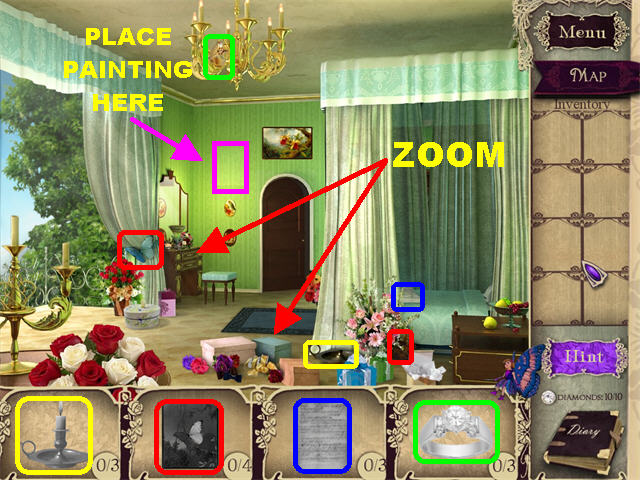
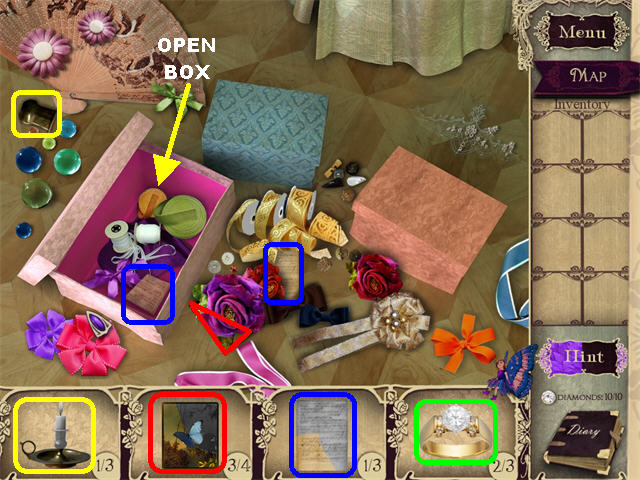
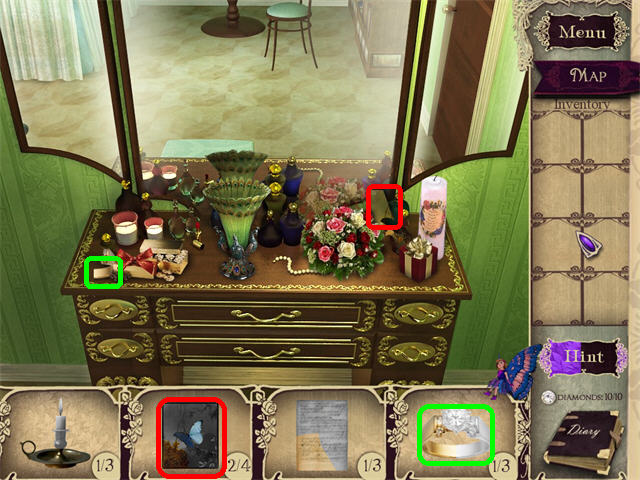
- You don’t have to find the DIAMONDS in this scene (you found them previously).
- Pick up all the fragmented items in the scene.
- Zoom into the BOXES on the floor; pick up the fragmented items.
- Zoom into the DRESSER on the left; pick up the fragmented items.
- Place the PAINTING on the spot in the back wall to light up the candles in the lower left.
- Go through the back door.
Garden
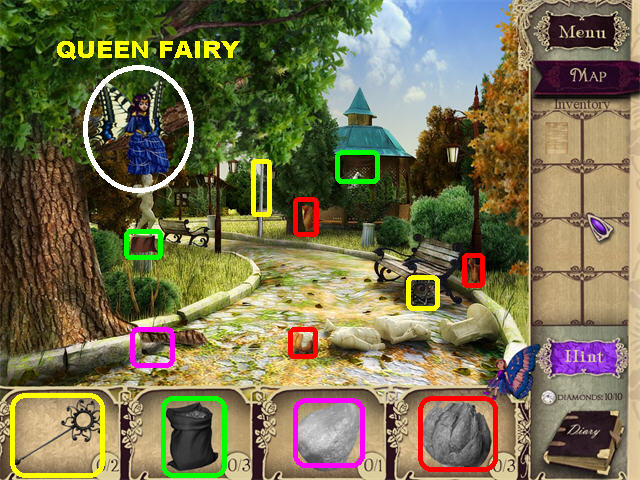
- Pick up all the fragmented items.
- Give the MAGIC WAND to the Queen Fairy to receive the last fragment of the GROWING POWDER.
- Go back to the Cottage.
The Cottage
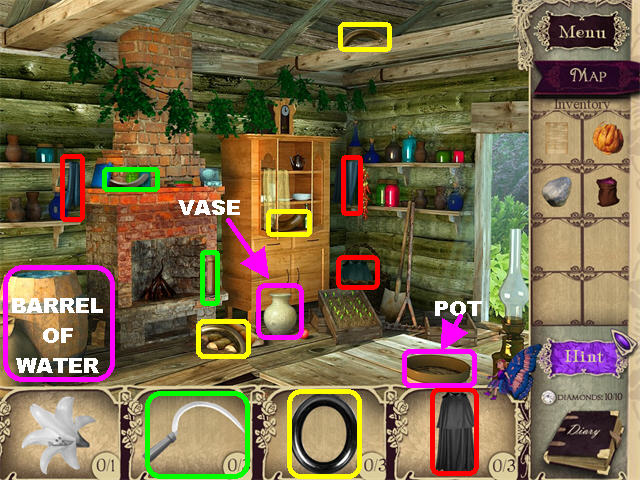
- Pick up the fragmented items in the scene.
- Place the LILY BULB and the GROWING POWDER in the pot in the lower right corner.
- The LILY is added to your inventory.
- Break the VASE with the STONE to obtain the last SICKLE fragment.
- Place the LILY in the BARREL OF WATER on the left.
- Go right; then down.
Lillian’s Chambers
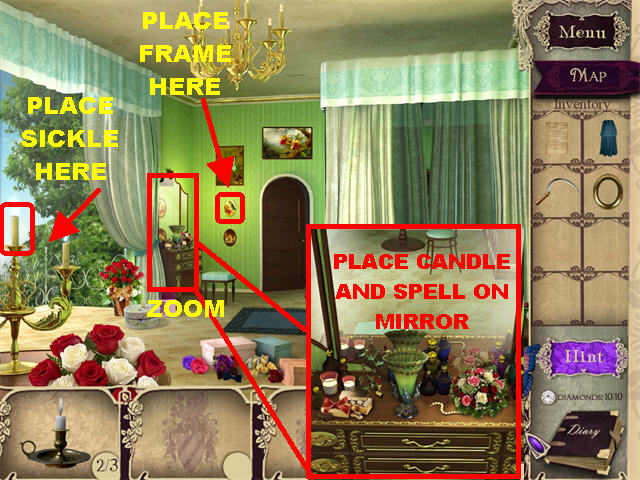
- Cut the CANDLE on the left, with the SICKLE, to obtain the last CANDLE fragment.
- Place the FRAME around the small oval painting on the back wall to obtain the last RING fragment.
- Zoom into the dresser on the left.
- Place the CANDLE and the SPELL on the mirror; the MYSTERIOUS SPELL will be added to inventory.
- Go back to the Cottage.
- Place the MYSTERIOUS SPELL and the CLOAK in the BARREL OF WATER in the lower left.
Chapter 4
The Drawing Room
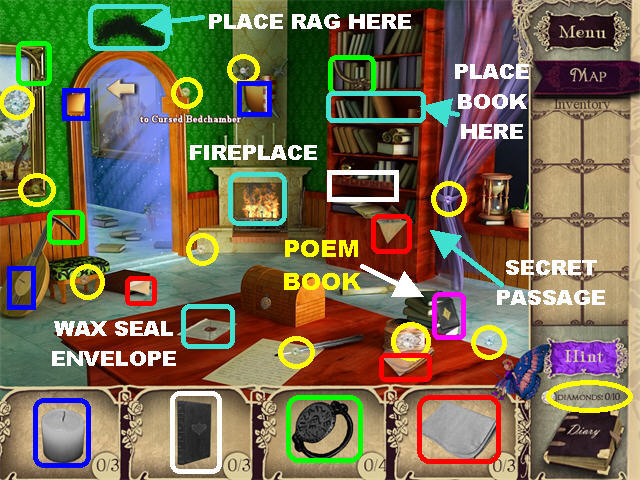
- The 10 DIAMONDS are circled in yellow.
- Pick up CHRISTIAN’S POEM BOOK, marked in magenta, in the lower right corner.
- Clean the SOOT above the doorway with the CLEANING RAG to obtain a BOOK fragment.
- Light the CANDLE in the FIREPLACE.
- Open the ENVELOPE WITH WAX SEAL with the LIT CANDLE to obtain the last BOOK FRAGMENT.
- Place the BOOK on the BOOKCASE SHELF to discover the secret passage to the Witch’s Lair.
- Go through the back door to enter the Cursed Bedchamber.
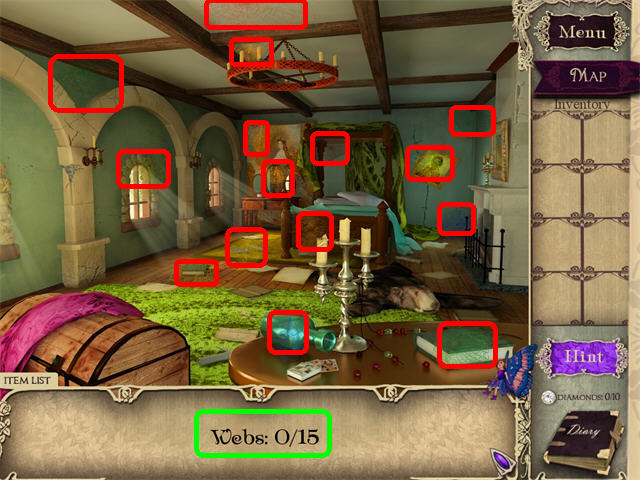
- Pick up the 15 WEBS marked in red.
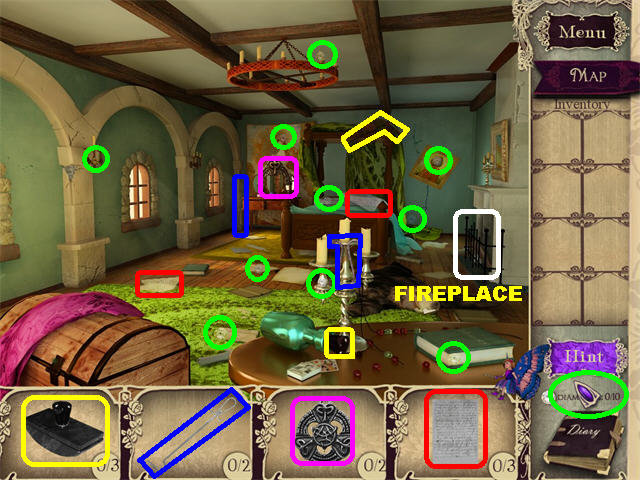
- The DIAMONDS are circled in green.
- Pick up all the fragmented items.
- Place the POKER in the FIREPLACE to receive the last PAPERWEIGHT fragment.
- Go to the Witch’s Lair behind the bookcase in the Drawing Room.
Witch’s Lair
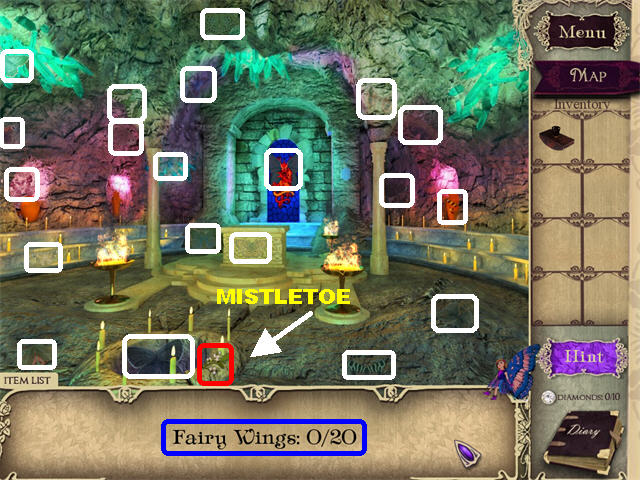
- Pick up the MISLETOE in the lower center.
- Pick up the 20 FAIRY WINGS marked in white.
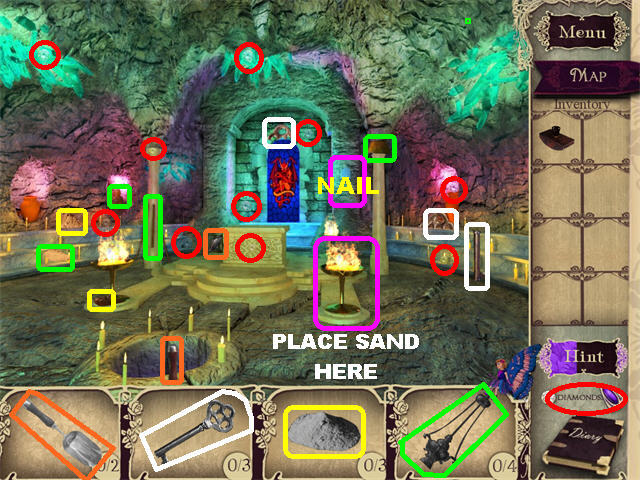
- Pick up the 10 DIAMONDS circled in red.
- Pick up all the fragmented items in the scene.
- Extinguish the FIRE on the right with the SAND to obtain the last CENSER fragment.
- Hang the CENSER on the NAIL in the back of the scene to rid the place of evil magic.
- Go back to the Drawing Room.
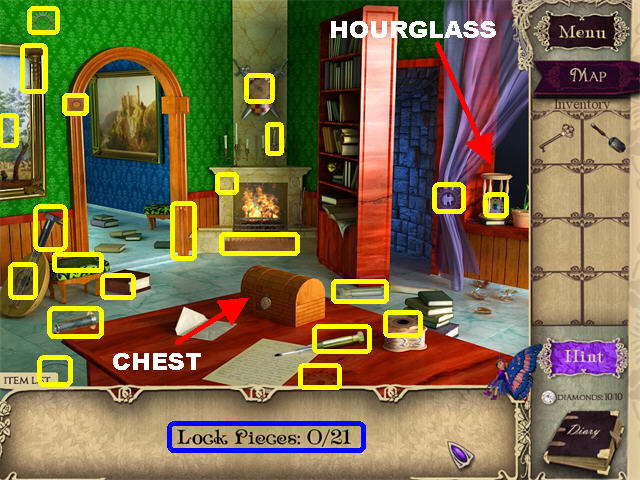
- Place the PAPERWEIGHT on the HOURGLASS to obtain the last RING fragment.
- Place the RING on the CHEST to break the lock.
- Collect 21 LOCK PIECES marked in yellow.
Gear Puzzle
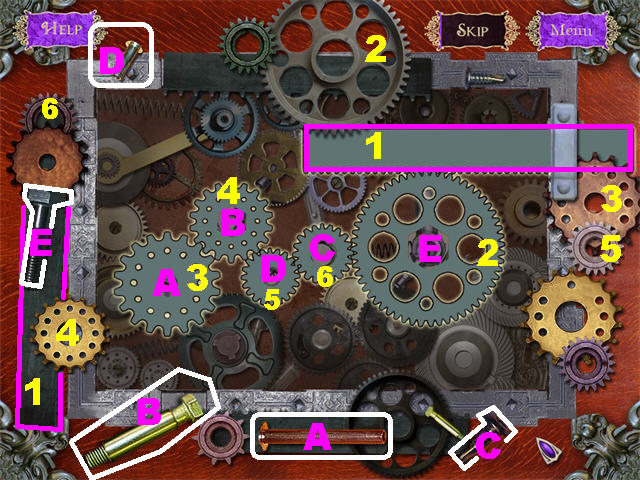
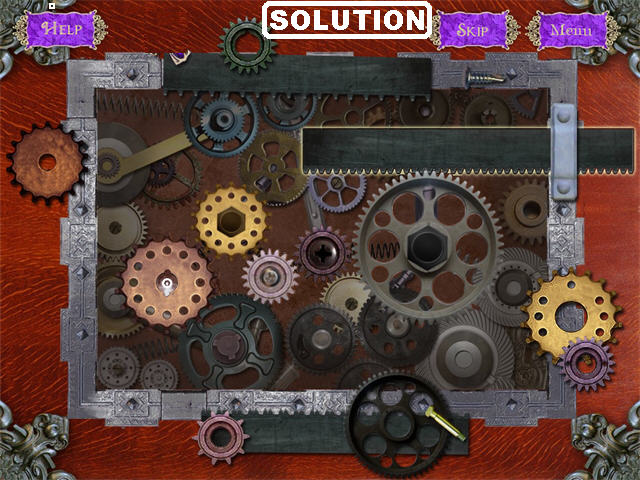
- Click on the scene after all the pieces have been collected to trigger a puzzle.
- Place all the GEAR pieces into the correct slots.
- Click on the pieces to attach them to your cursor; click the spot in which you want to place it (look for the glow around the item before you click it in place).
- Some pieces will automatically rotate when placed in the correct spot.
- The SCREWS belong in the center of the gears.
- Not all pieces will be used.
- Click on the DIARY PAGE inside the box.
- Go to the Cursed Chamber.
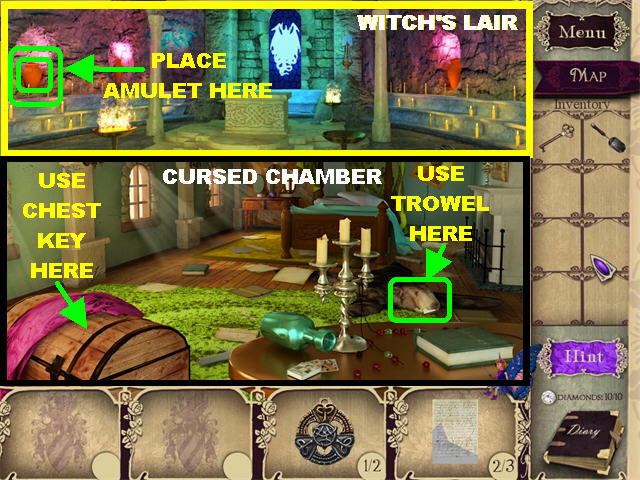
- Open the CHEST with the CHEST KEY to obtain the last AMULET fragment.
- Place the TROWEL on the bear’s head, in the lower right, to obtain the last fragment of the DIARY PAGE.
- Go back to the Witch’s Lair.
- Place the AMULET on the JAR on the left to trigger a puzzle.
Fairy Wings Puzzle
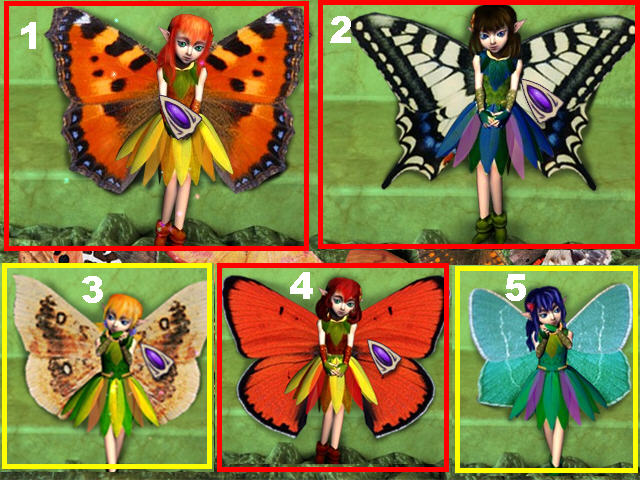
- Find the set of wings that belong to each of the Fairies.
- Move your mouse around the wings to sort through them. Pick up the correct wing and attach it to the Fairy once you see the wing silhouette glow.
Chapter 5
Castle Hall
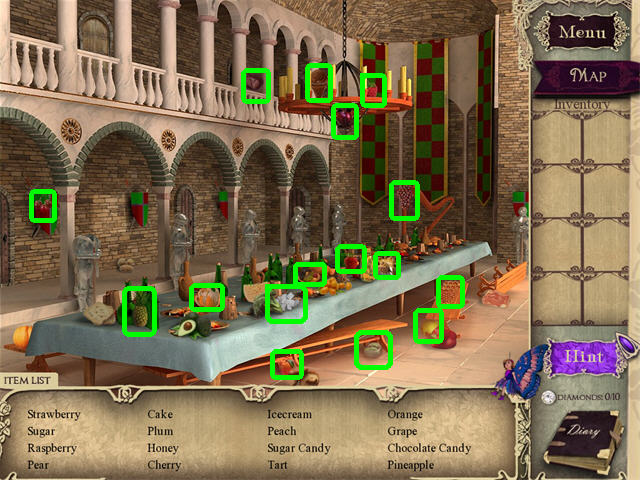
- Pick up all the food items on the list.
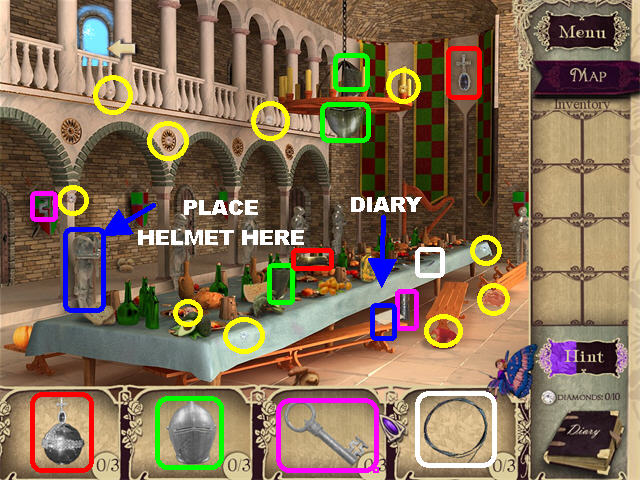
- The 10 DIAMONDS are circled in yellow.
- Pick up the fragmented items in the scene.
- Pick up the DIARY PAGE on the first bench.
- Place the HELMET on the HEADLESS KNIGHT on the left to obtain the last ORNAMENT fragment.
- Click on the door in the upper left.
The Observatory
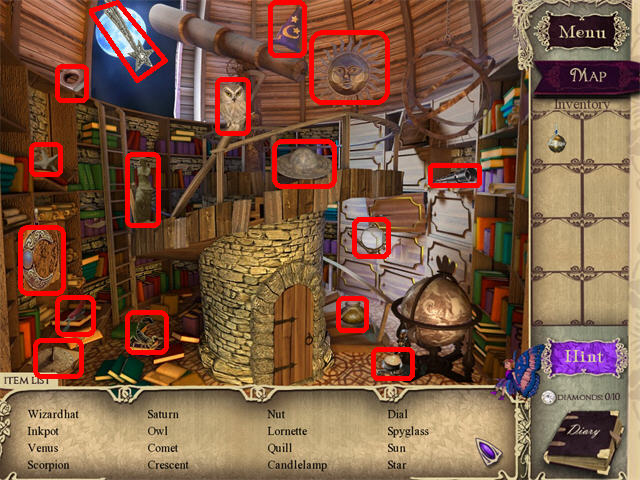
- Pick up all the items on the list.
- You do not have to find diamonds in this section.
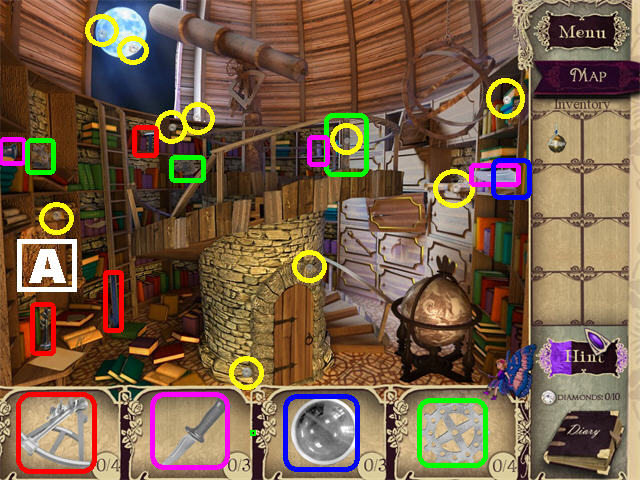
- The 10 DIAMONDS are circled in yellow.
- Pick up the fragmented items in the scene.
- Click on the SKETCH (A) on the lower left to trigger a puzzle.
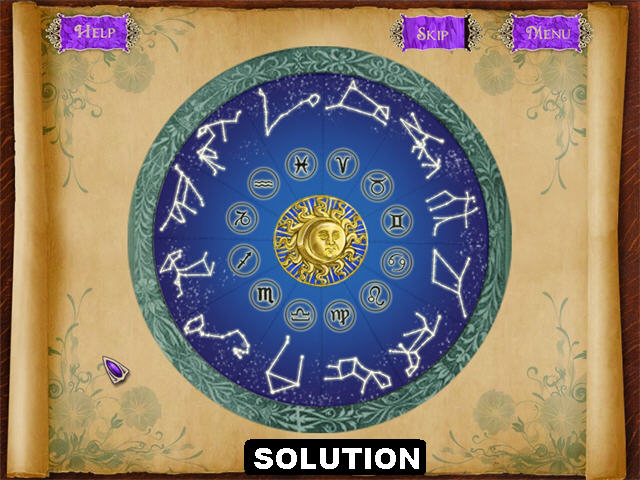
- Place the Zodiac Constellations in their corresponding spots.
- Correct pieces will lock in place.
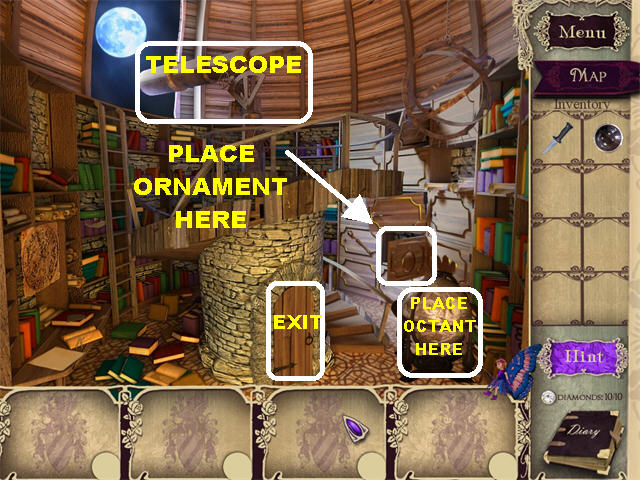
- The last GEAR fragment will be added to inventory after the puzzle has been solved.
- Place the GEAR on the TELESCOPE to obtain a fragment of the LENS.
- Open the DRAWER on the right with the ORNAMENT to obtain the last OCTANT piece.
- Place the OCTANT on the GLOBE in the lower right to obtain the last LENS fragment.
- Go back to the Library.
Library
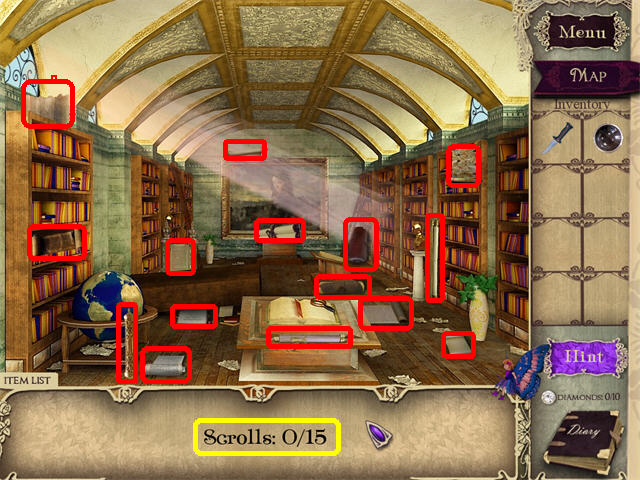
- Find the 15 SCROLLS marked in red.
- You cannot find DIAMONDS in this section.
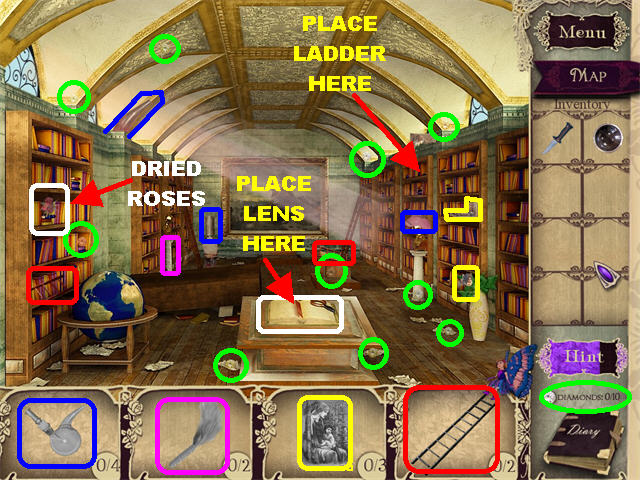
- The DIAMONDS are circled in green.
- Pick up the fragmented items in the scene.
- Click on the DRIED ROSES on the third shelf of the leftmost bookcase.
- Place the LADDER on the center bookcase on the right side to obtain the last TAPESTRY fragment.
- Place the LENS on the MAGNIFYING GLASS in the lower center.
- Exit on the right.
Castle Hall
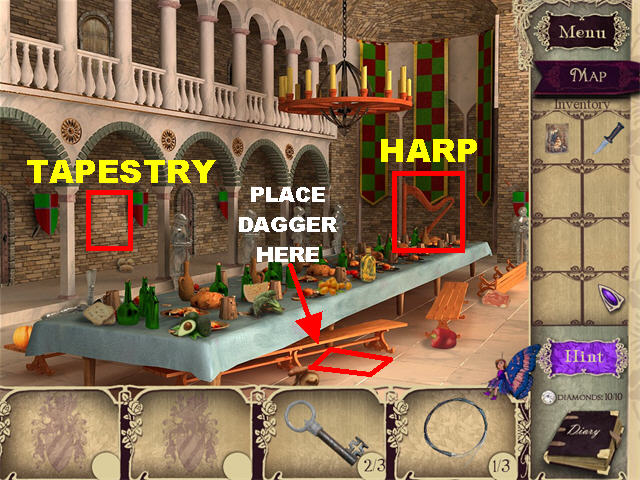
- Place the TAPESTRY on the left side of the wall to obtain a fragment of the STRINGS.
- Remove the STONE on the ground with the DAGGER to receive the last STRINGS fragment.
- Zoom into the HARP on the right.
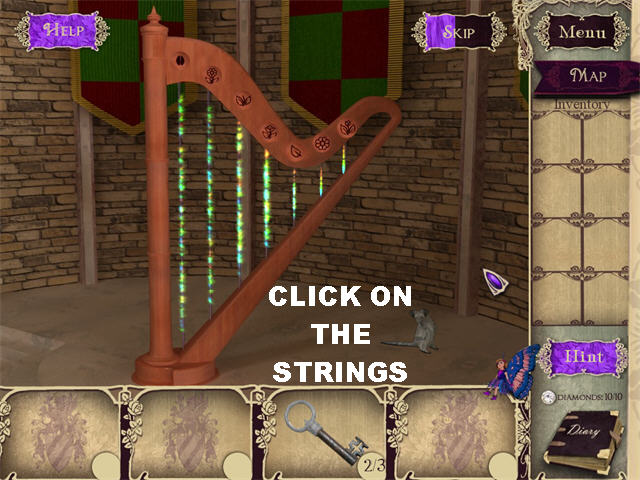
- Place the STRINGS on the Harp to trigger a puzzle.
- Repeat the sequence shown by clicking on the harp strings.
- Only correct strings will light up when touched.
- The solutions for this puzzle are random.
- The last KEY fragment will be added to inventory after the puzzle has been solved.
- Return to the Library.
Library & Observatory
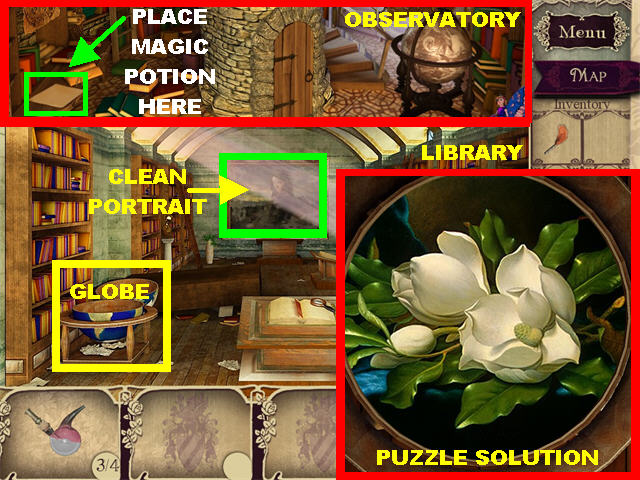
- Place the KEY on the GLOBE in the lower left to trigger a puzzle.
- Rotate the discs until the image is restored.
- Start from the center and work your way out.
- Correct pieces will lock in place.
- The last FEATHER DUSTER fragment will appear after the puzzle has been solved.
- Clean the large PORTRAIT with the FEATHER DUSTER to complete the MAGIC POTION.
- Go back to the Observatory.
- Place the MAGIC POTION on the LETTER WITH INVISBLE INK in the lower left corner.
Chapter 6
Dining Hall
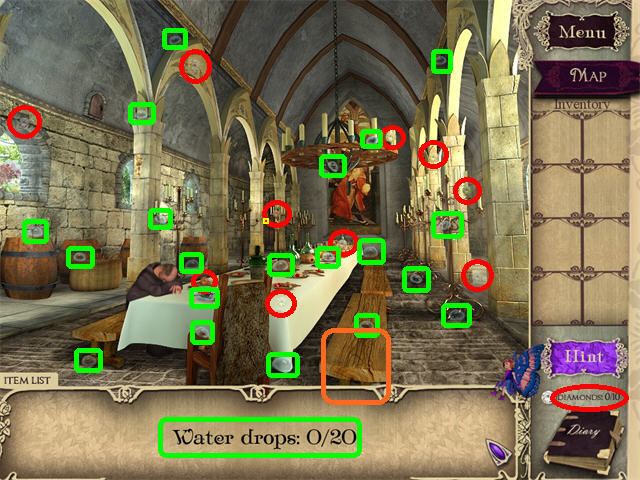
- Pick up the 20 WATER DROPS marked in green.
- Pick up the 10 DIAMONDS circled in red.
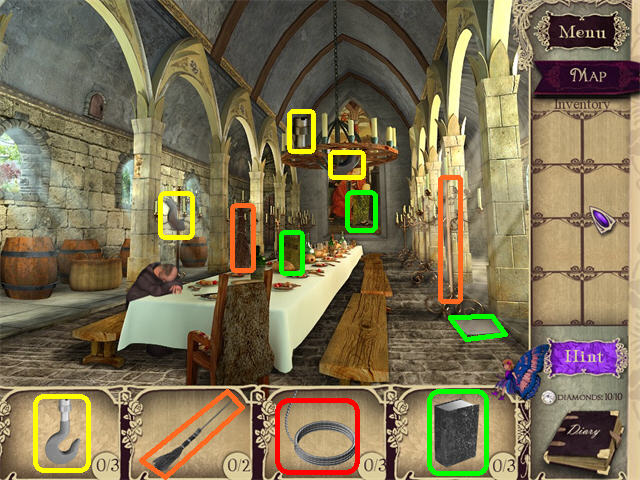
- Pick up the fragmented items in the scene.
- You will not pick up any ROPE pieces at this time.
- Go right.
Cellar
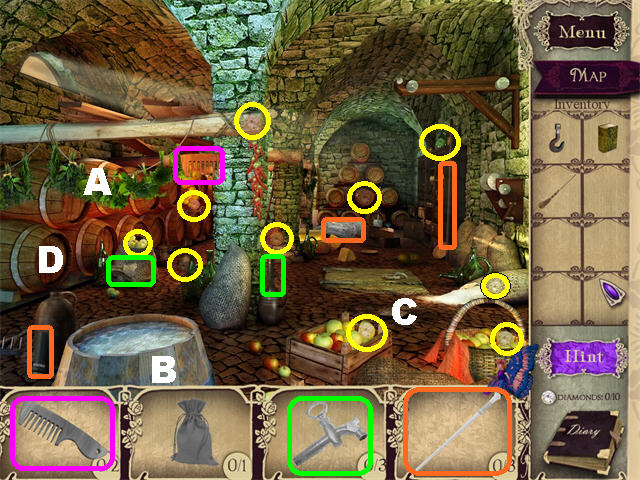
- The 10 DIAMONDS are circled in yellow.
- Pick up the fragmented items.
- Place the POTION BOOK on the HERBS (A) hanging on the left to add them to inventory.
- Place the HERBS in the BARREL (B) in the lower left to add the POTION to your inventory.
- Sweep the GARBAGE PILE (C) on the right with the BROOM to obtain the last OPENER fragment.
- Place the OPENER on the LOOSE BARREL TOP (D) on the left to obtain the last COMB fragment.
- A chest appears in the center of the scene. The Philosopher’s Stone is missing from the necklace.
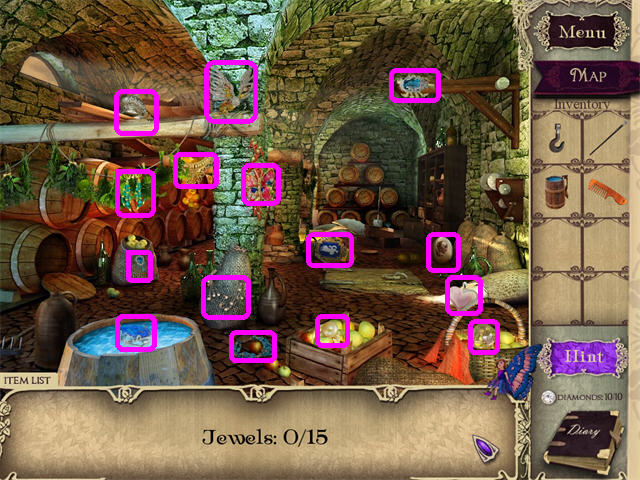
- Pick up the 15 JEWELS marked in magenta.
- Go back to the Dining Hall.
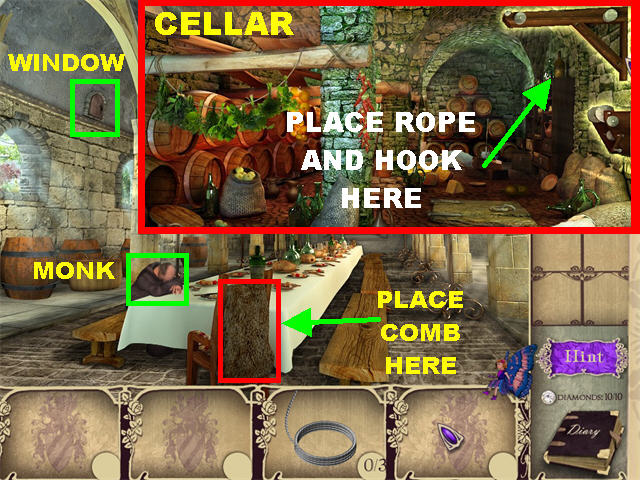
- Talk to the Monk.
- Untangle the PELT behind the chair in the lower center with the COMB to obtain a ROPE fragment.
- Give the POTION to the MONK at the table to obtain another ROPE fragment.
- Place the SHAFT on the WINDOW in the upper left to obtain the last ROPE fragment.
- Go back to the Cellar.
- Place the ROPE and the HOOK on the PULLEY in the upper right to open the trapdoor to the Dungeon.
- Go to the Dungeon.
- You will be transported back to Castle Hall.
Chapter 7
Castle Hall
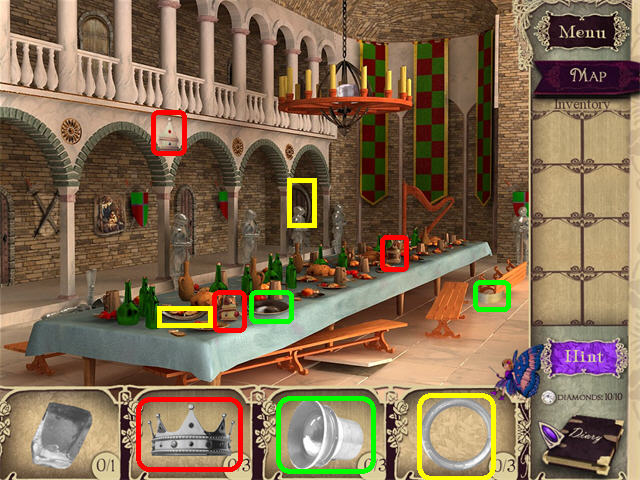
- Look for the fragmented items in the scene.
- The CROWN will be added to inventory at the end of your search.
- Go to the Observatory.
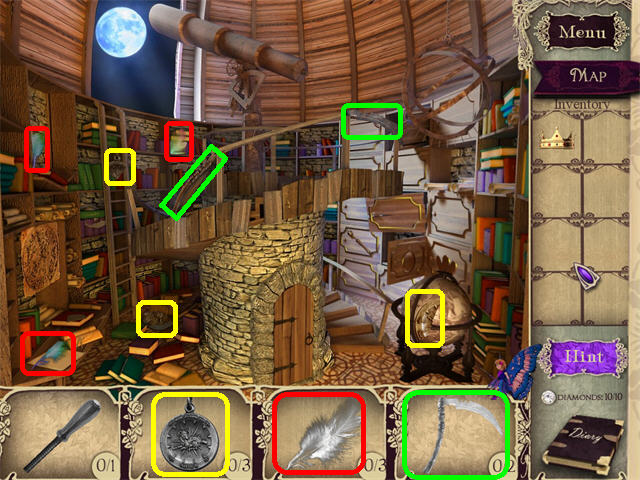
- Pick up all the fragmented items in the scene.
- The FEATHER, SCYTHE, and MEDALLION will be added to your inventory.
- Go to the Library.
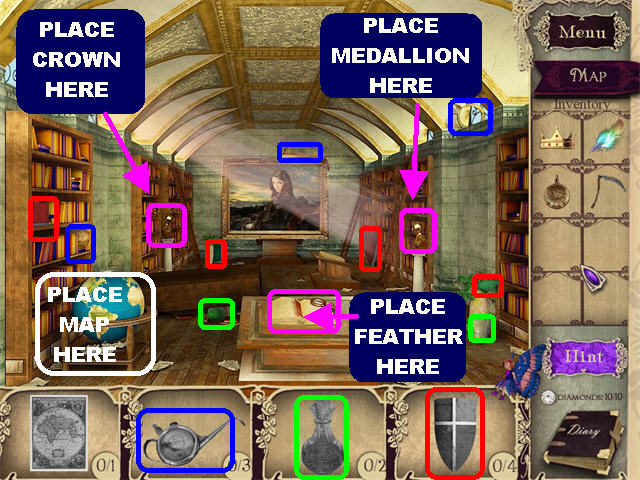
- Pick up all the fragmented items from the scene.
- The OILER, POTION, and SHIELD will be added to inventory.
- Place the CROWN on the LEFT GOLD BUST.
- Give the MEDALLION to the RIGHT GOLD BUST.
- Place the FEATHER on the BOOK in the lower center to obtain the MAP.
- Place the MAP on the GLOBE in the lower left for the missing bookcase on the right to appear.
- Go back to Castle Hall.
Castle Hall, Library & Observatory
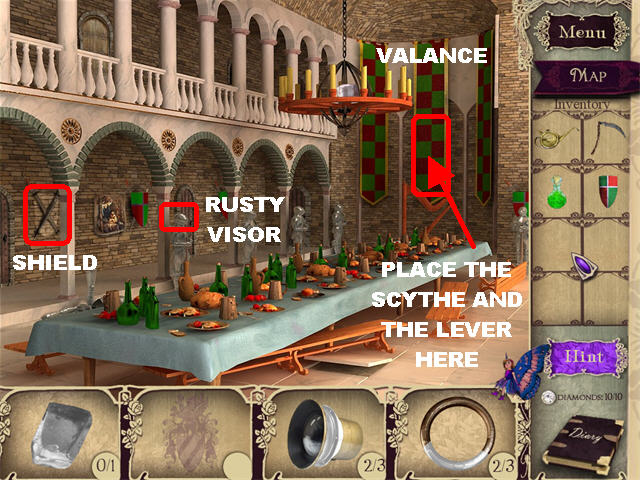
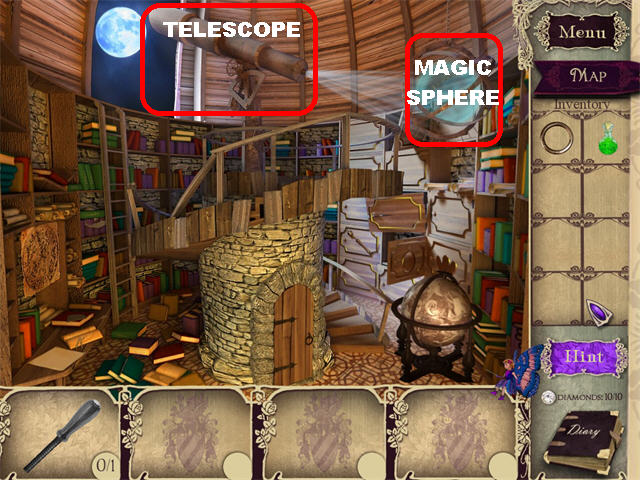
- Place the SHIELD on the left side of the wall to obtain the last RING fragment.
- Place the OILER on the RUSTY VISOR, on the knight on the left, to obtain the last LENS fragment.
- Cut the VALANCE on the right with the SCYTHE.
- Go to the Observatory.
- Place the LENS on the TELESCOPE and beam of light will shine on the right SPHERE.
- Place the RING and the POTION on the MAGIC SPHERE in the upper right to obtain the LEVER.
- Go back to Castle Hall.
- Place the LEVER on the right side of the wall to obtain the CRYSTAL.
- Go to the Observatory.
- Place the CRYSTAL on the MAGIC SPHERE in the upper right to obtain the CHARGED CRYSTAL.
- Go to the Library.
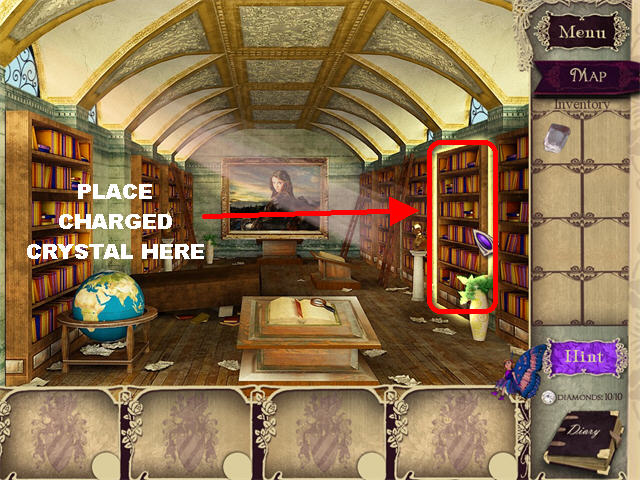
- Place the CHARGED CRYSTAL on the bookcase on the right.
Chapter 8
Christian’s Parlor
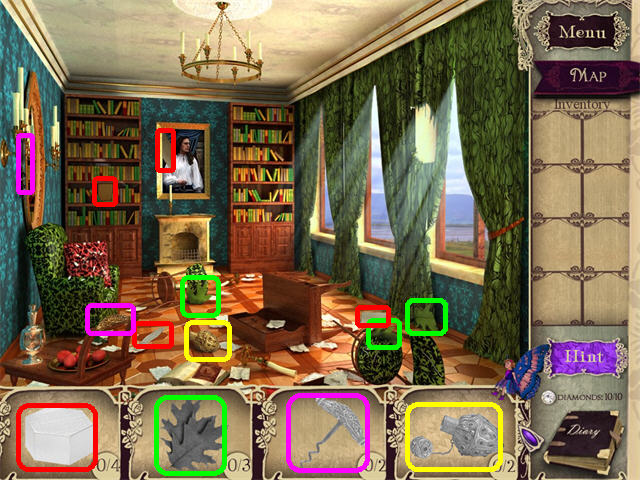
- Pick up all the fragmented items in the scene.
- The ½ oz. WEIGHT, LEAVES, and CORKSCREW will be added to inventory.
- Go to Christian’s Chamber.
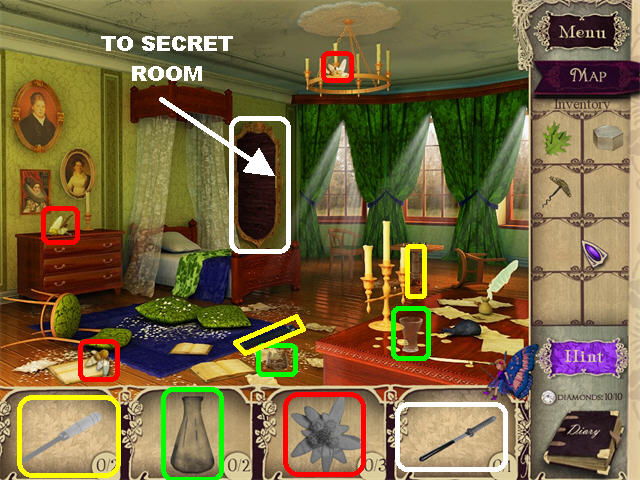
- Pick up all the fragmented items in the scene.
- The MEASURING GLASS, EDELWEISS, and CHISEL will be added to inventory.
- Go through the mirror to the Secret Room.
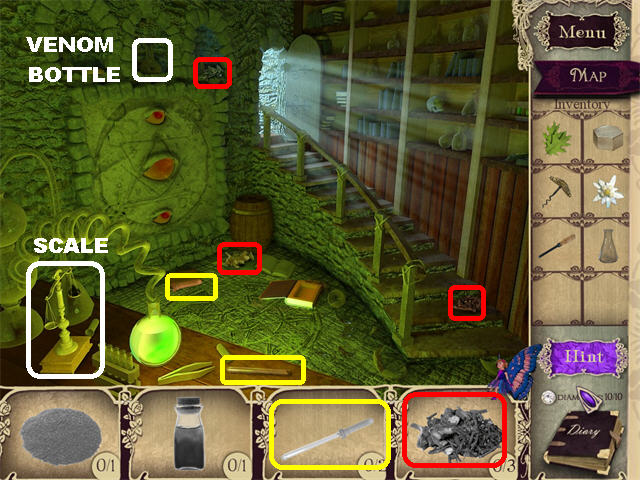
- Pick up all the fragmented items in the scene.
- The PIPETTE and MANDRAKE ROOT will be added to inventory.
- Place the ½ oz. WEIGHT on the SCALE in the lower left to obtain the ASH.
- Use the CORKSCREW on the CORKED BOTTLE WITH SNAKE VENOM in the upper left to obtain the SNAKE VENOM.
- Go to Christian’s Parlor.
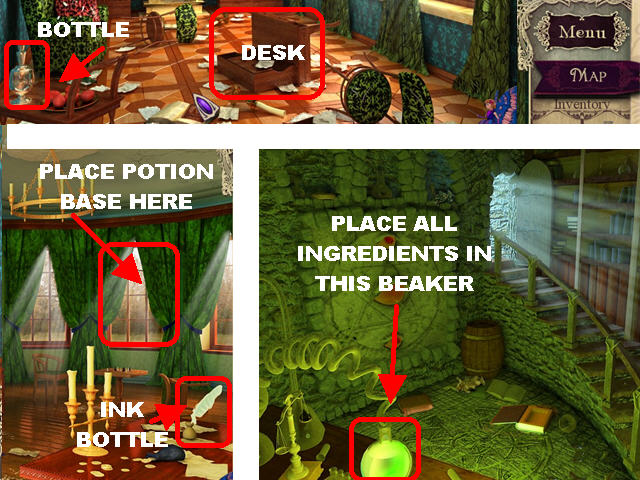
- Use the MEASURING GLASS on the BOTTLE in the lower left to obtain the POTION BASE.
- Use the CHISEL on the DESK to obtain the last BOTTLE fragment.
- Go to Christian’s Chamber.
- Place the PIPETTE on the INK BOTTLE in the lower right to obtain the INK.
- Place the POTION BASE in the center window to obtain the SUN TINCTURE.
- Go to the Secret Room.
- Place the LEAVES, EDELWEISS, MANDRAKE ROOT, SUN TINCTURE, INK, SNAKE VENOM, ASH, and BOTTLE in the BEAKER in the lower left.
- The EARL’S POTION will be added to inventory.
- You are transported back to the Dungeon.
The Dungeon
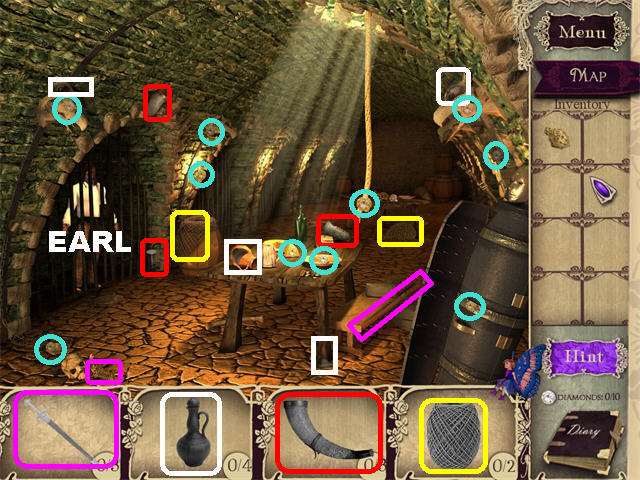
- The 10 DIAMONDS are circled in light blue.
- Pick up all the fragmented items in the scene.
- The TWINE, HORN, and JUG will be added to inventory.
- Give the POTION to EARL CHRISTIAN.
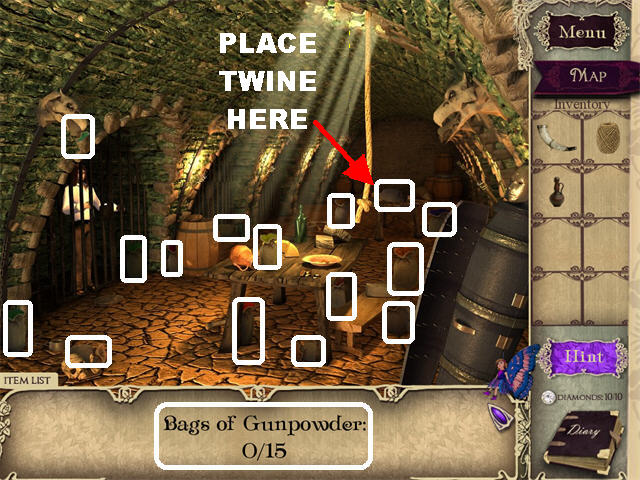
- Pick up the 15 BAGS OF GUNPOWDER marked in white.
- Place the TWINE on the GUNPOWDER in the back table.
- Go to the CULTIC CAVE in the back of the scene.
Cultic Cave
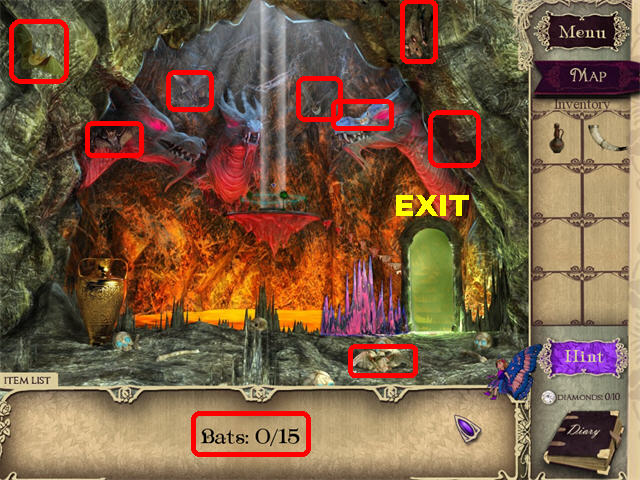
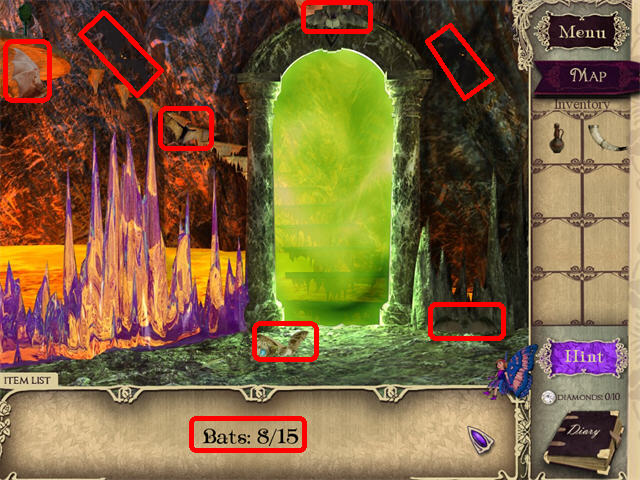
- You cannot find the DIAMONDS at this time.
- Find the first BATS (marked in red in this scene) and go through the door on the right.
- Find the rest of the BATS in this section.
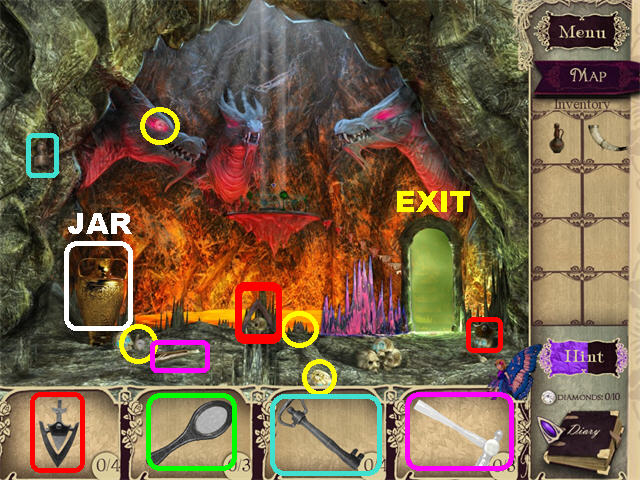
- Pick up the DIAMONDS circled in yellow.
- Place the JUG on the JAR in the lower left to obtain a fragment of the AMULET.
- Go through the entryway on the right.
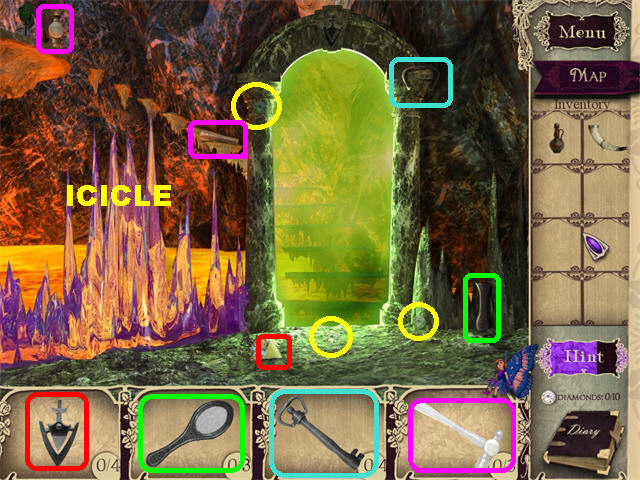
- Pick up the 3 DIAMONDS circled in yellow.
- Break the ICICLE on the left with the HAMMER to obtain a GLASS fragment.
- Unlock the entryway with the AMULET. Go through the entryway.
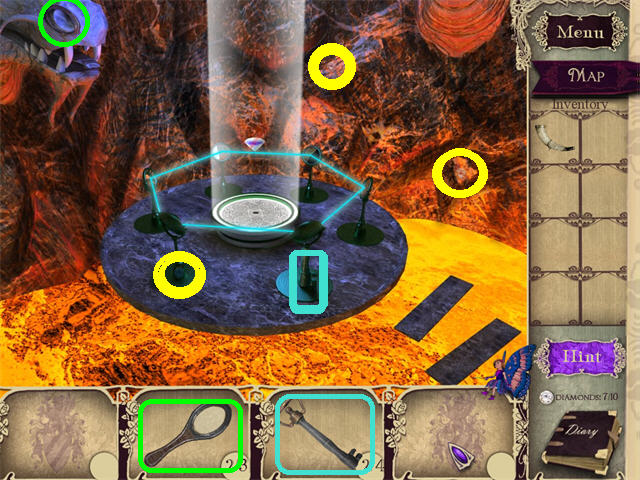
- Pick up the DIAMONDS circled in yellow.
- Pick up the last GLASS fragment in the upper left.
- Place the GLASS on the beam of light in the center.
- Pick up the CELL KEY fragment marked in light blue.
- Go back to the Dungeon.
Cave & Dungeon
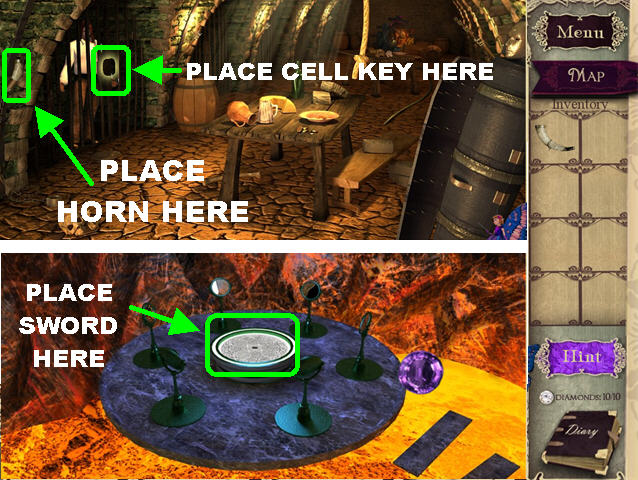
- Place the HORN on the left side of the CELL to complete the SWORD.
- Go back to the Cave.
- Place the SWORD in the center of the mechanism to complete the CELL KEY.
- Go back to the Dungeon.
- Place the CELL KEY on the LOCK on the bars to free Earl Christian.
- You are transported back to the Cursed Bedchamber .
Cursed Bedchamber
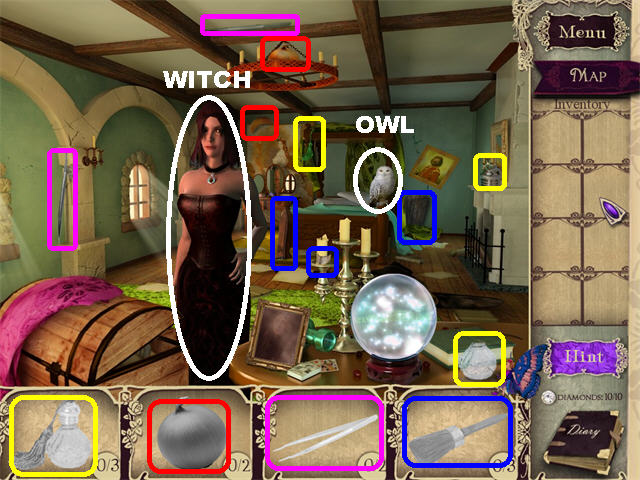
- Pluck a FEATHER from the OWL with the TWEEZERS.
- DUST the FRAMED PORTRAIT on the table to make the Witch sigh. Give the BOTTLE to the Witch to capture that emotion.
- Give the ONION to the Witch to make her cry. Give her the SIGH BOTTLE to capture that emotion.
- Tickle the Witch with the FEATHER to make her laugh. Give her the BOTTLE to capture that emotion.
- Place the EMOTIONS on the CRYSTAL BALL.
- Congratulations! You Have Completed Mystery of the Earl!
Created at: 2010-10-23

