

Walkthrough Menu
- General Tips
- Chapter 1: The Publishing House
- Chapter 2: The Hallway
- Chapter 3: Morgan's Office
- Chapter 4: The Square
- Chapter 5: Outside Marcus' House
- Chapter 6: The Basement
General Tips
- This is the official guide for Mystery Tales: The Hangman Returns.
- Hidden-object puzzles are referred to as HOPs. This guide will not show screenshots of the HOPs, however, it will mention when an HOP is available and the inventory item you'll collect from it.
- This guide will not mention each time you have to zoom into a location; the screenshots will show each zoom scene.
Chapter 1: The Publishing House
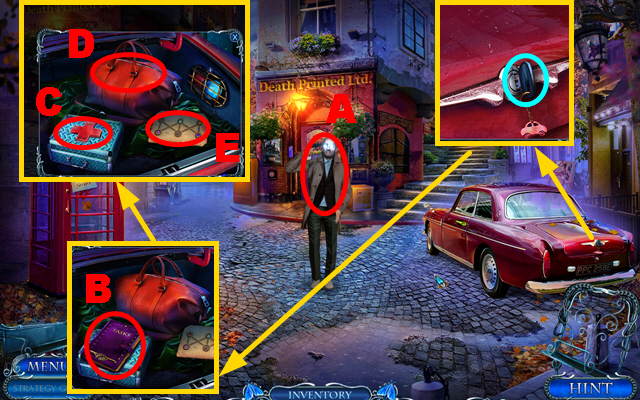
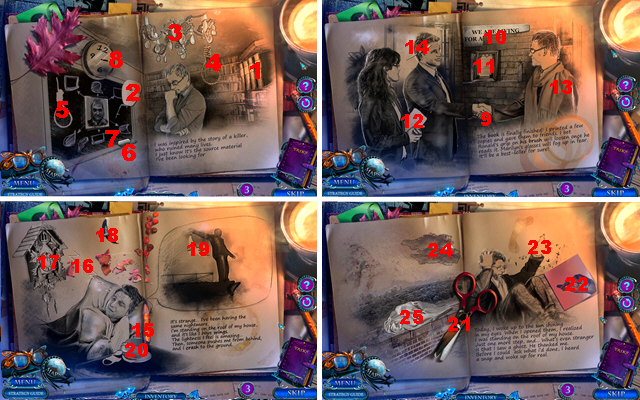
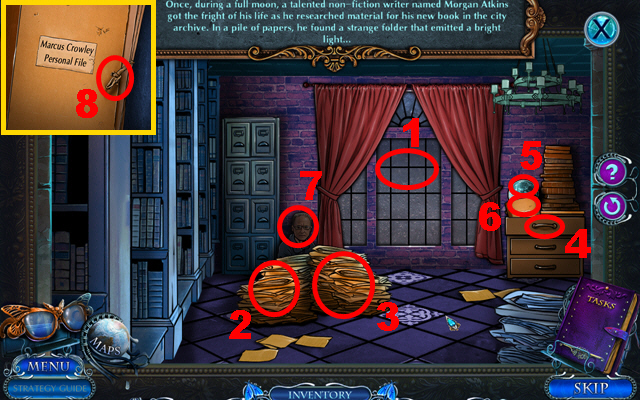
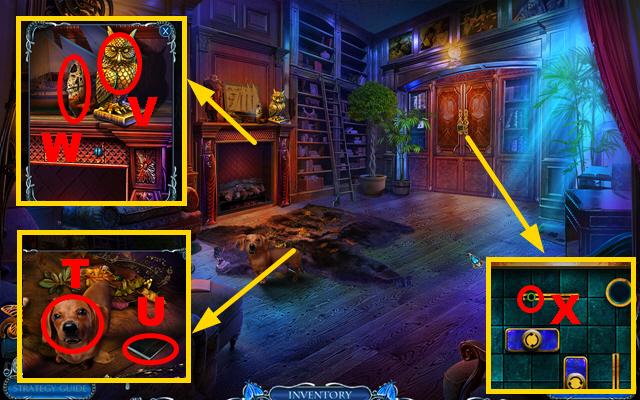
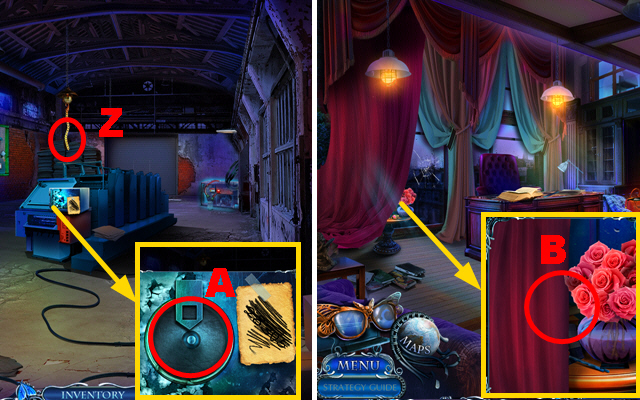
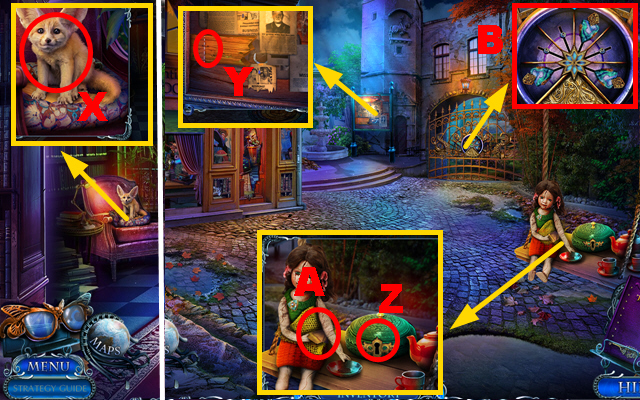
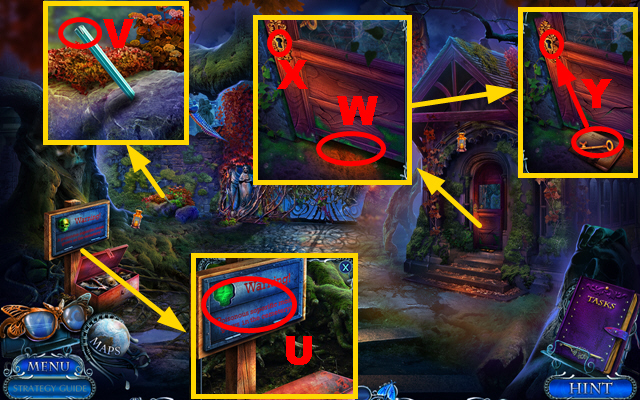
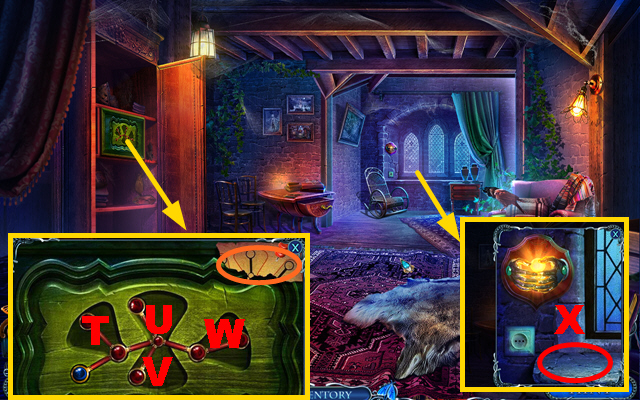
- Select Stephen twice (A).
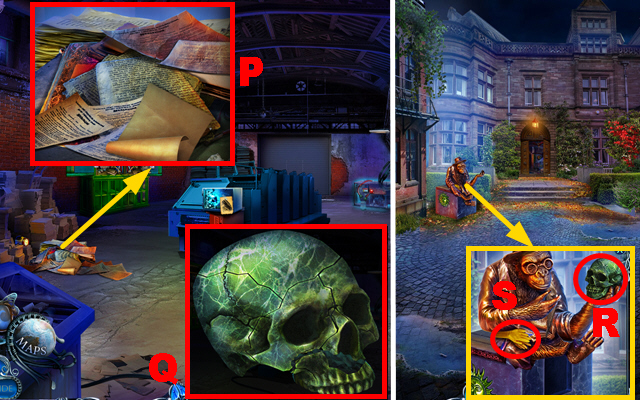
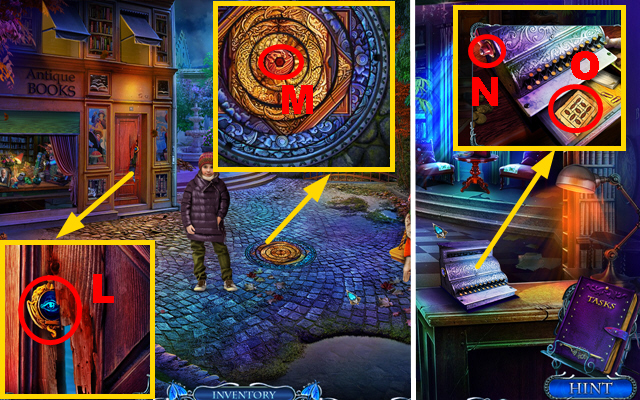
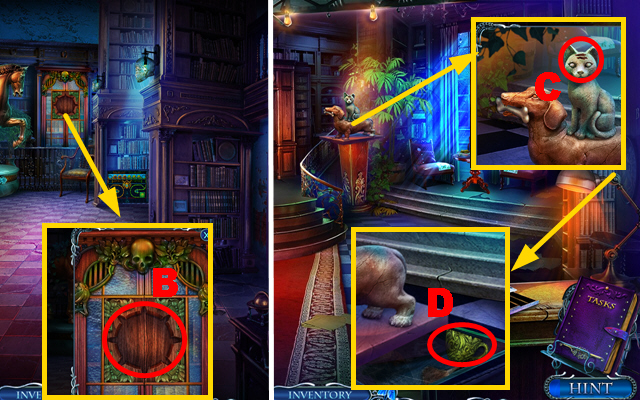
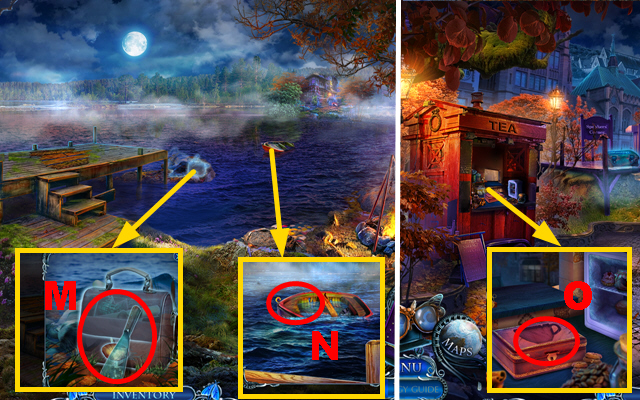
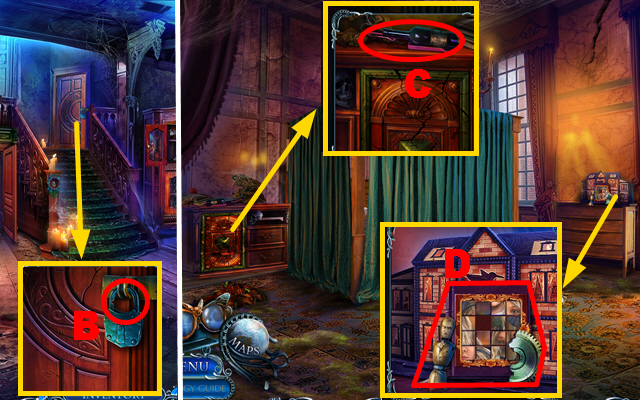
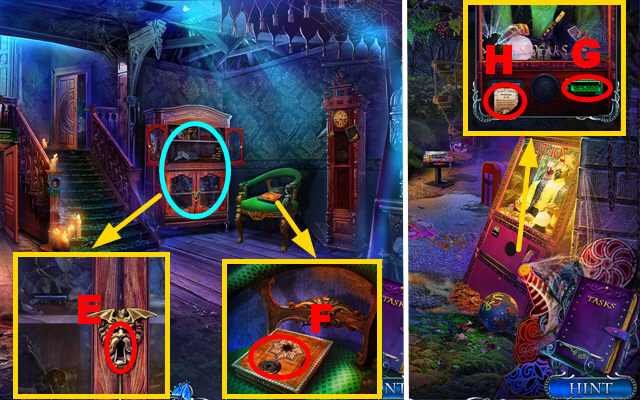
- Turn the key (blue); take the diary (B) and collect 3 notes and a card from it.
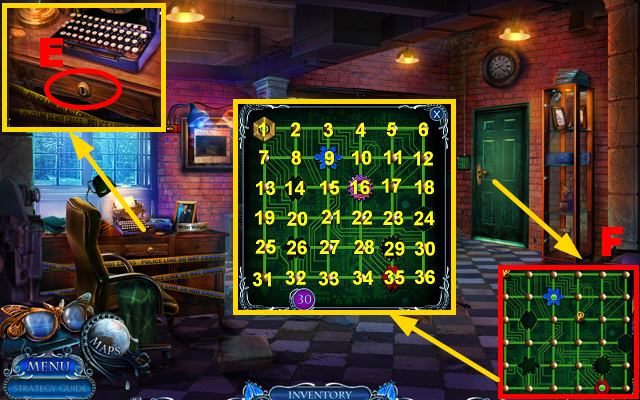
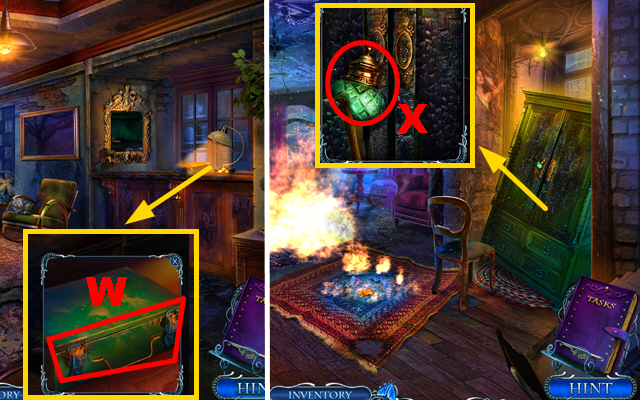
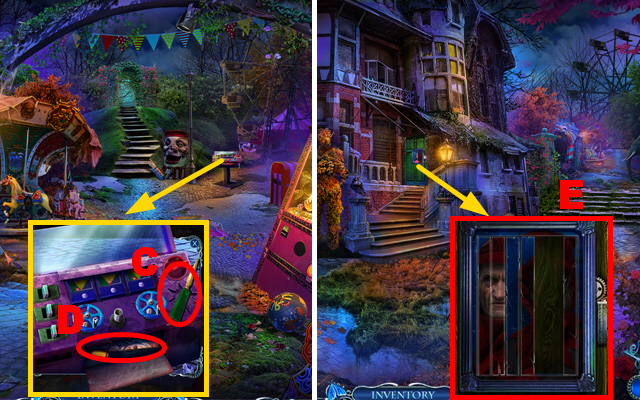
- Open the kit and take the TOURNIQUET (C), open the bag and take the CLUTCH (D), and take the GLOVE COMPARTMENT HINT (E).
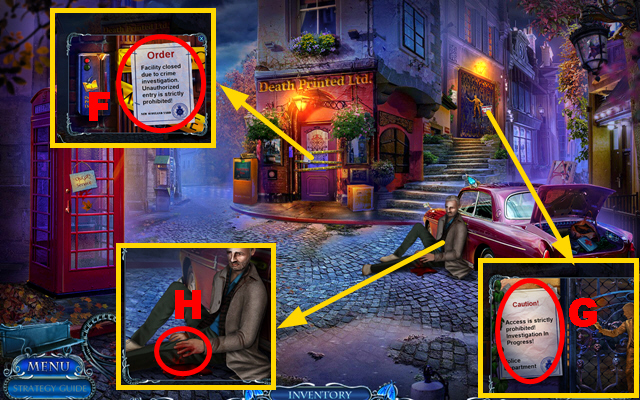
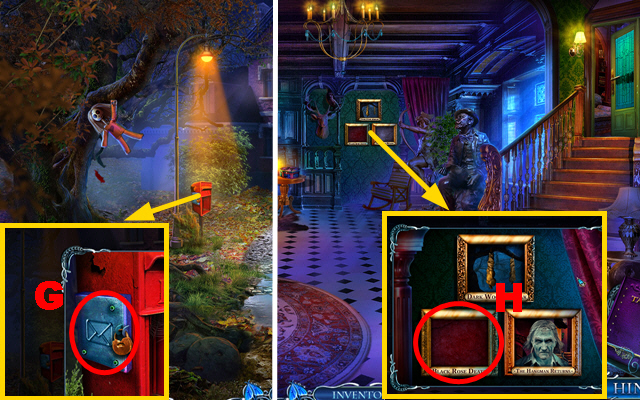
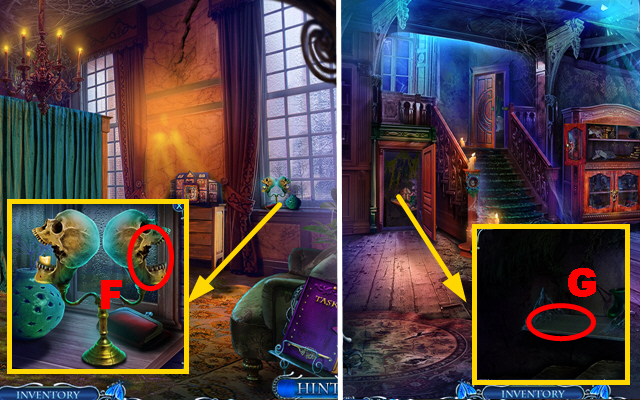
- Remove the note and tape (F).
- Remove the note (G).
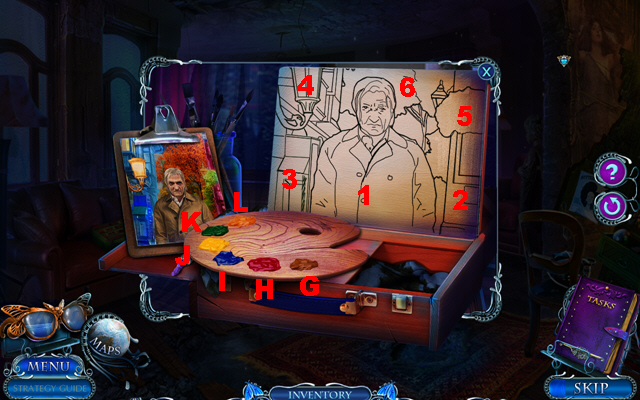
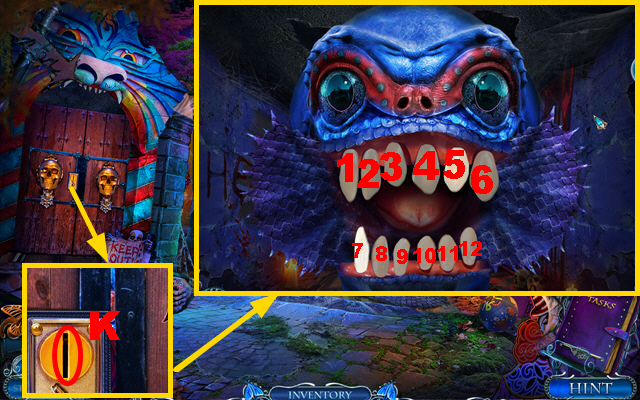
- Use the TOURNIQUET and take the KNIFE (H).
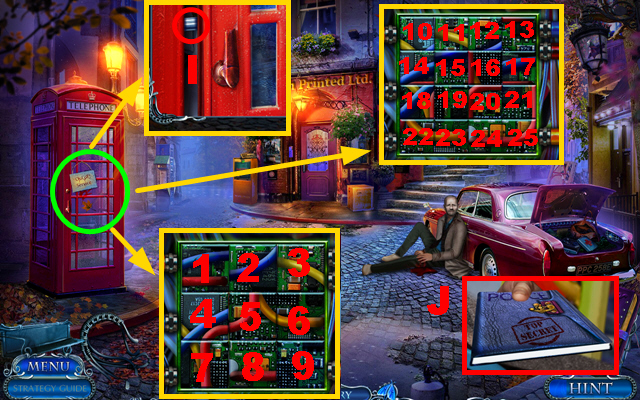
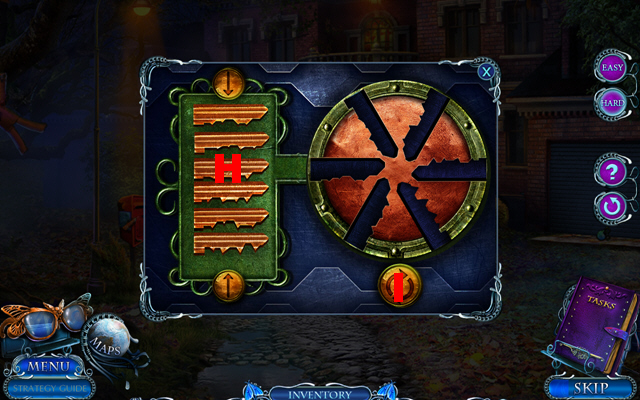
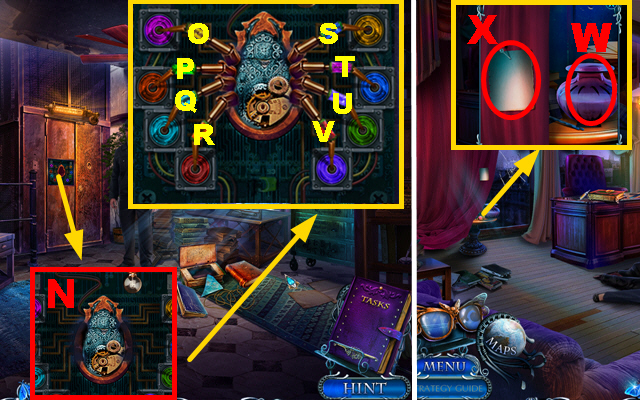
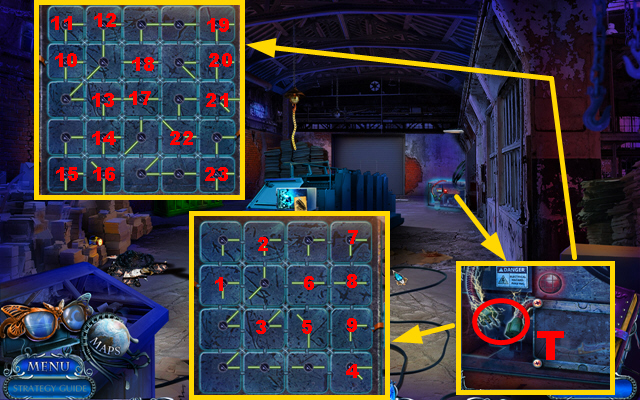
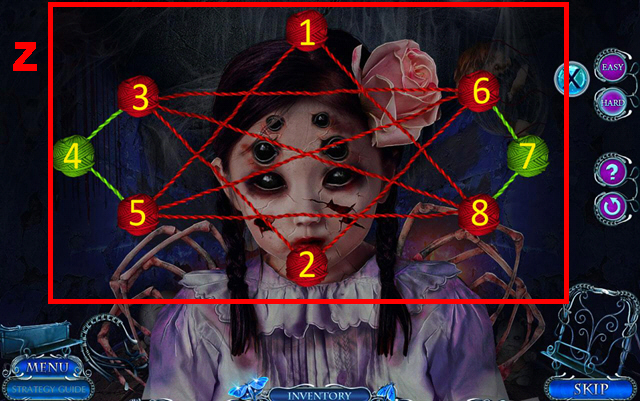
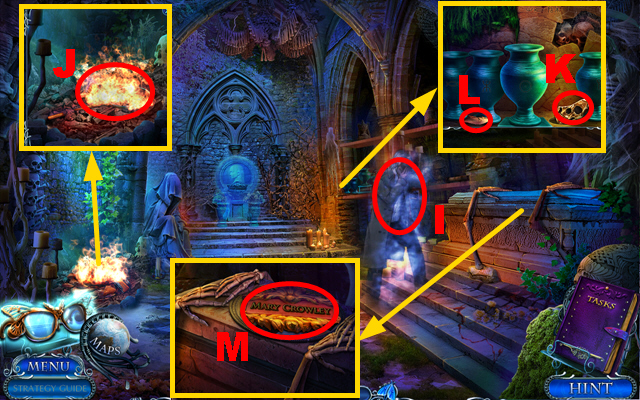
- Use the KNIFE (I) and play the HOP (green). Play the mini-game.
- Easy solution: (8-7)-(5-8)-(4-2)-(1-3)-(6-9).
- Hard solution: (17-13)-(14-12)-(18-15)-(20-16)-(21-19)-(25-23)-(24-22)-(11-10).
- Take the CASE FILE (J).

- Place the GLOVECOMPARTMENT HINT (K). Play the mini-game.
- Easy solution: 1-3-2-6-4-3-2-6-5-3-2-6.
- Hard solution: 1-2-3-6-4-5-3-6-4-5-3-6-1-2-3-6-4-5-3-6-4-5-3-6.
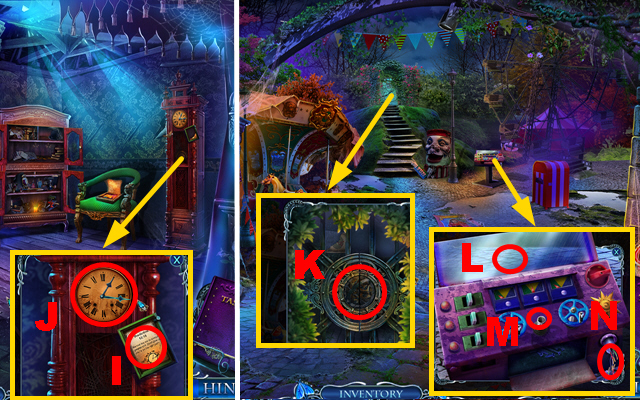
- Take the map, CLUTCH TOKEN, and BULLETS.
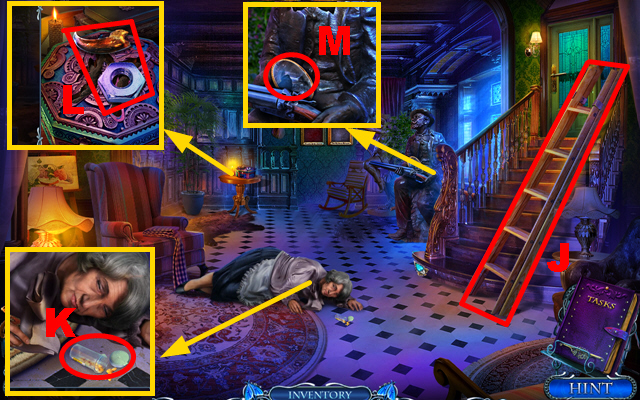
- Take the COIN (L).

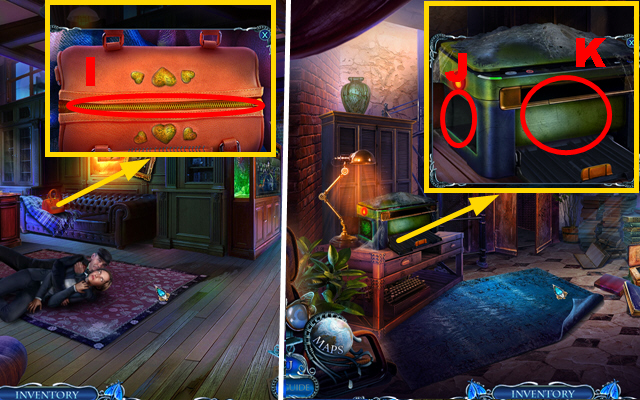
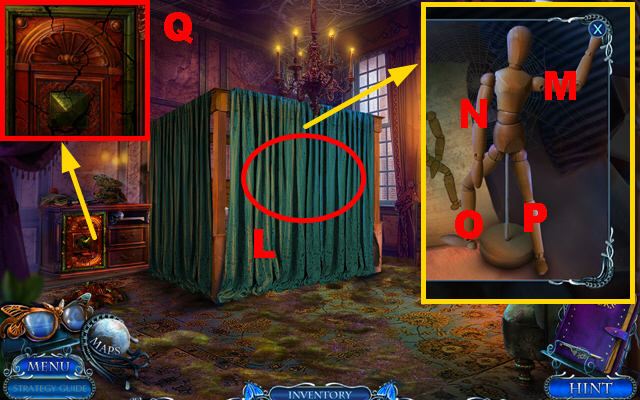
- Place the CLUTCH TOKEN on the CLUTCH. Play the mini-game.
- Easy solution: Ox2-Nx2-Mx2-N-Ox2-Nx2-Ox3.
- Hard solution: Ox2-Nx2-Mx2-Nx3-Ox2-Nx2-O-Nx2.
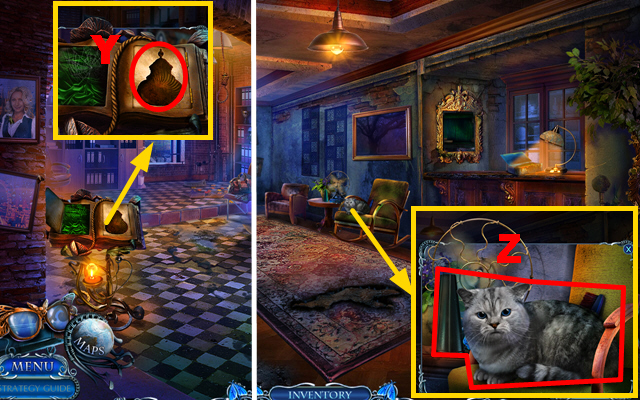
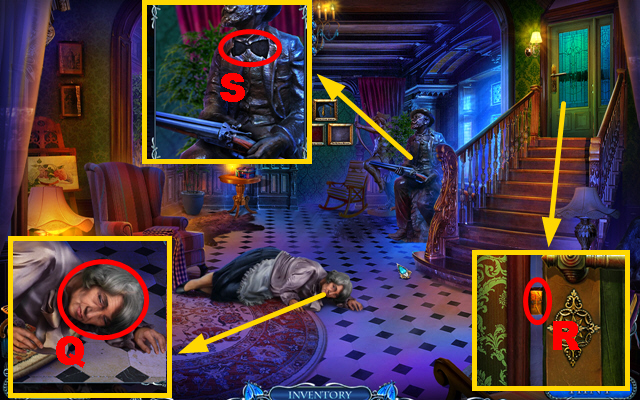
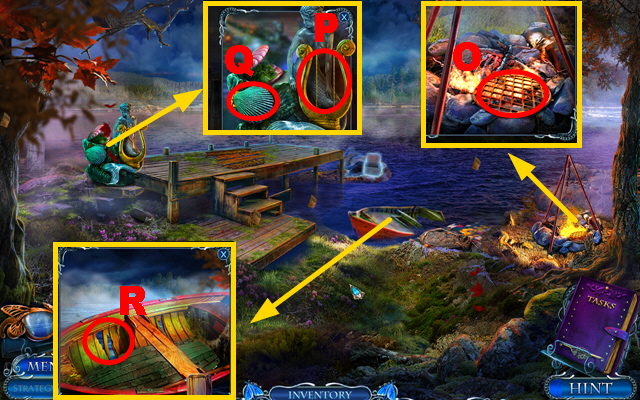
- Take the note and glasses.
- Use the glasses (Q).
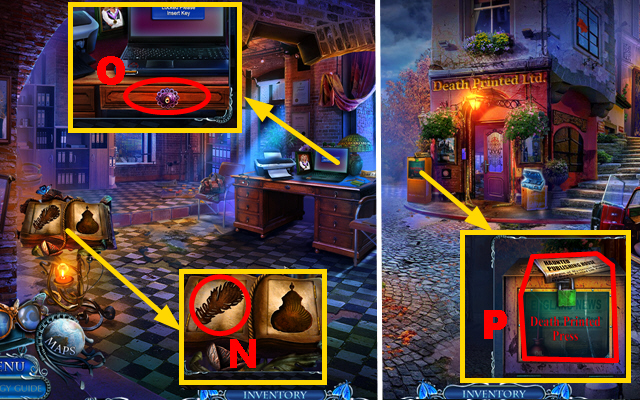
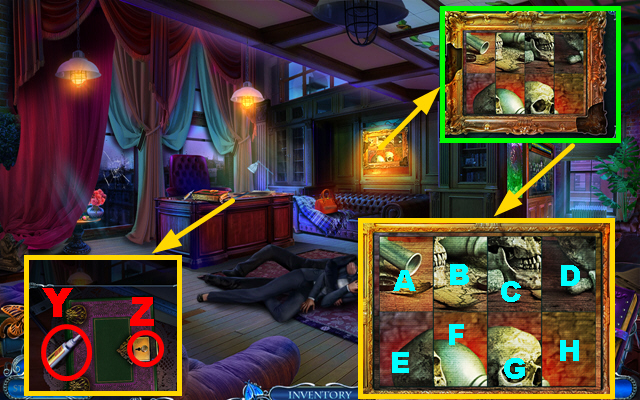
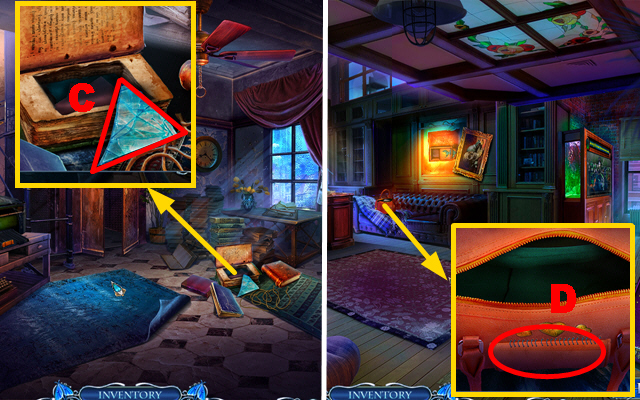
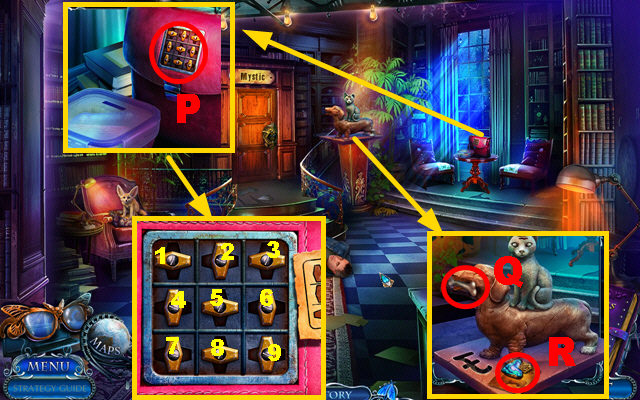
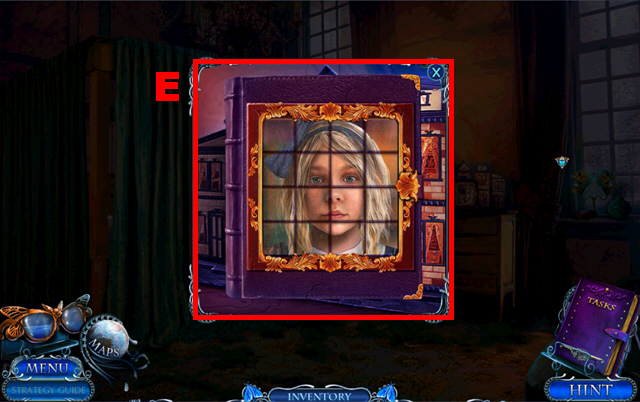
- Open the CASE FILE; take the note, MANUSCRIPT 1/4, 3 files, and KEY CARD.
- Insert the KEY CARD (P).
- Go forward.
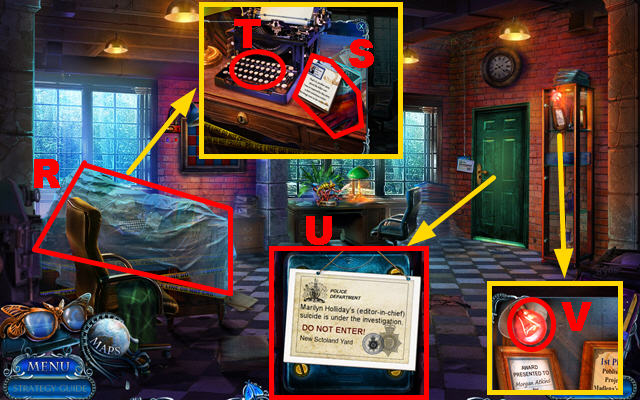
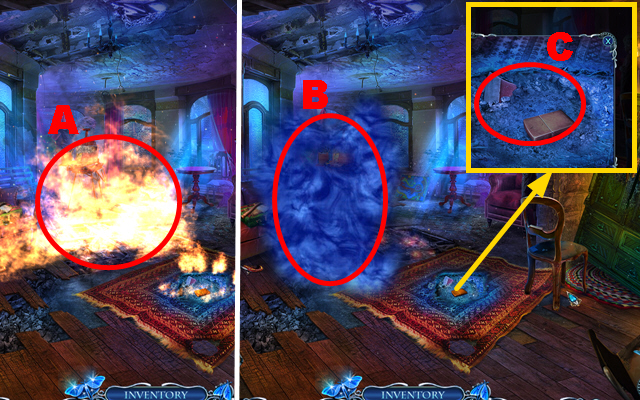
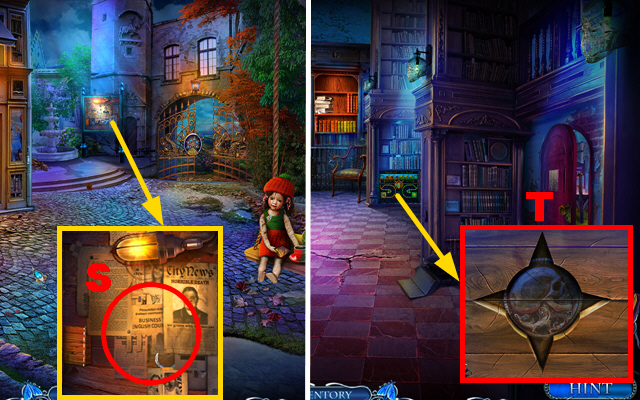
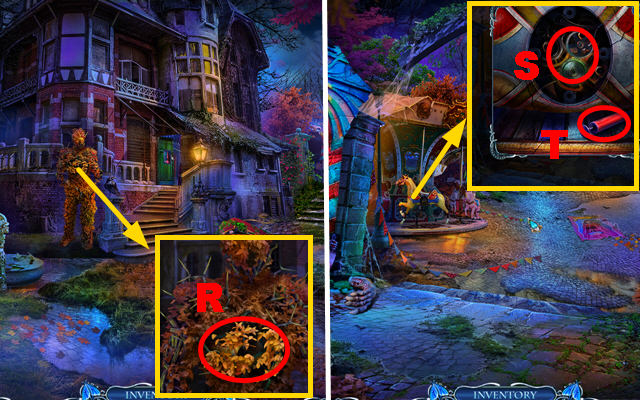
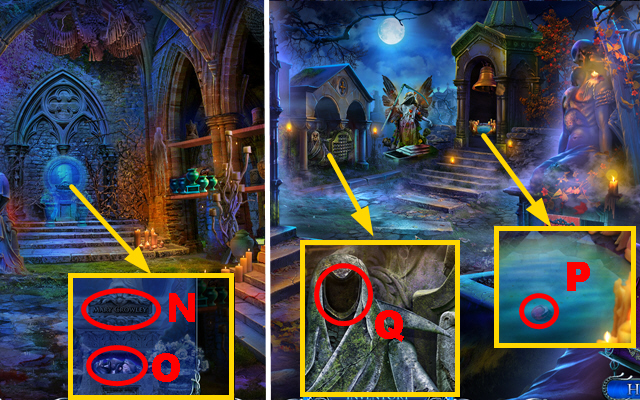
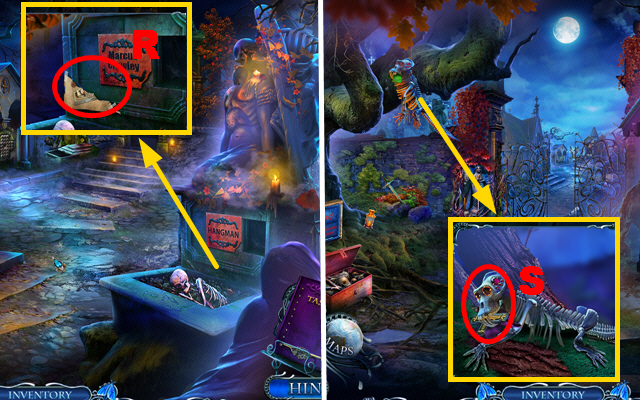
- Remove the cover (R).
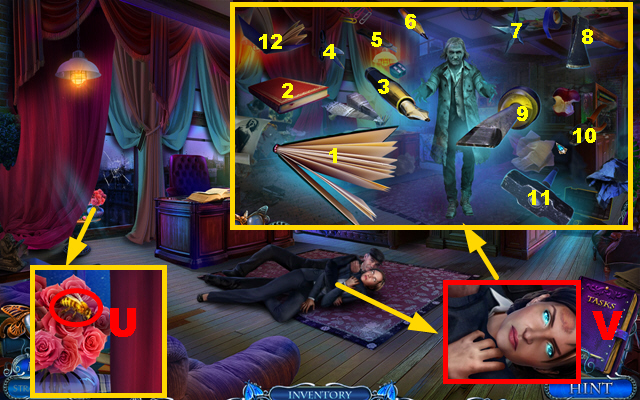
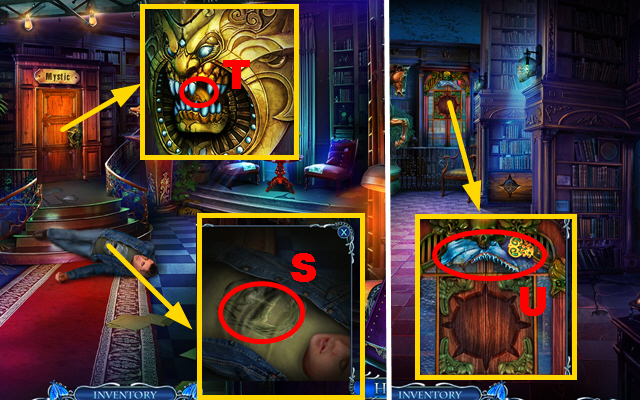
- Take the note and GLOVES (S); activate the typewriter (T).
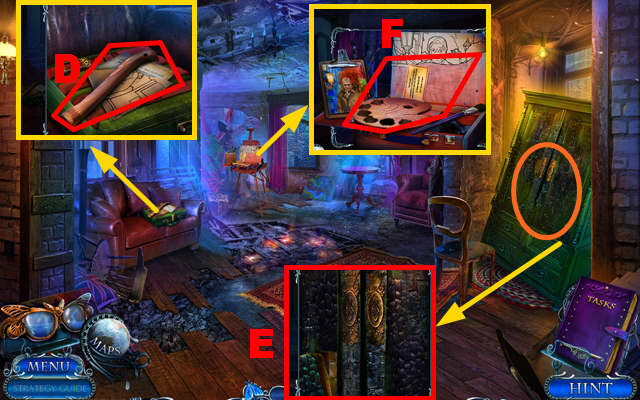
- Take the note and use the COIN (U).
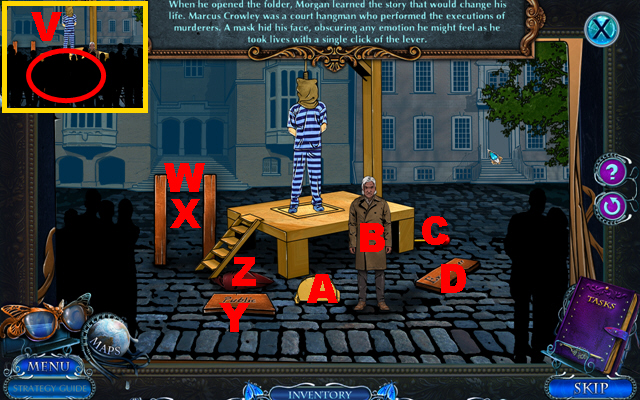
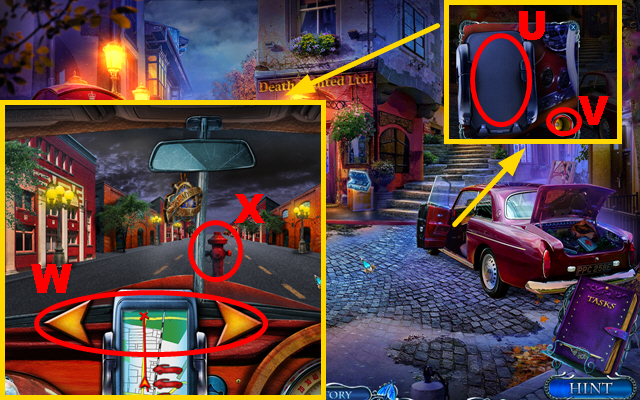
- Use the GLOVES to collect COLORED BULB 1/2 (V).
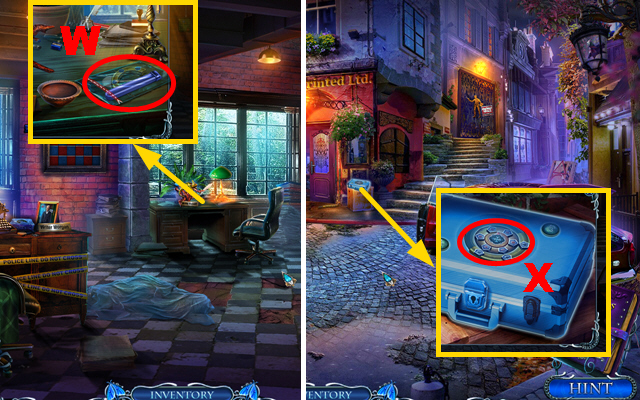
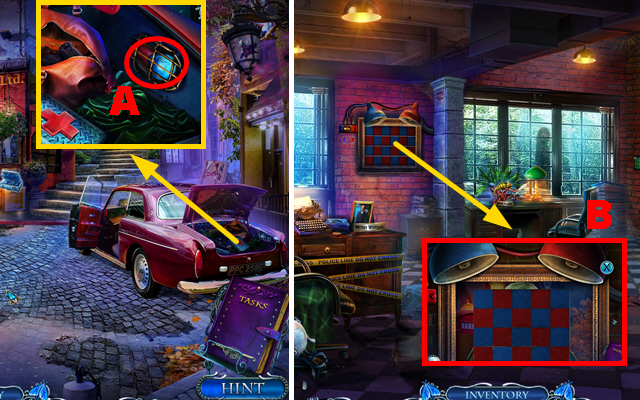
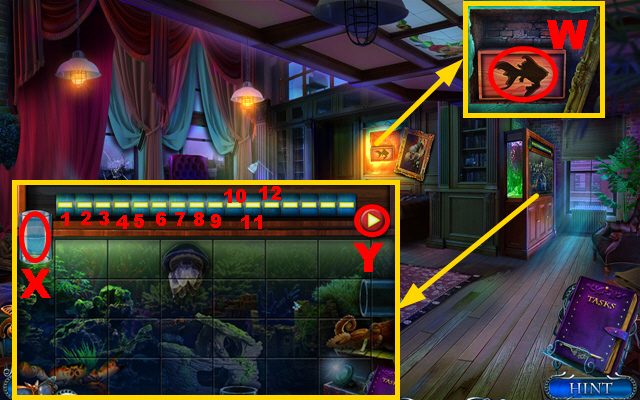
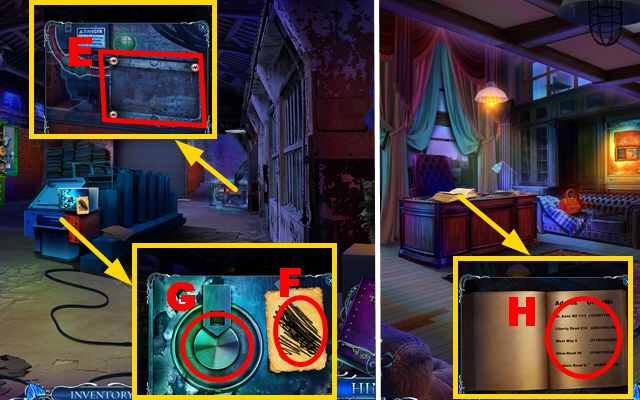
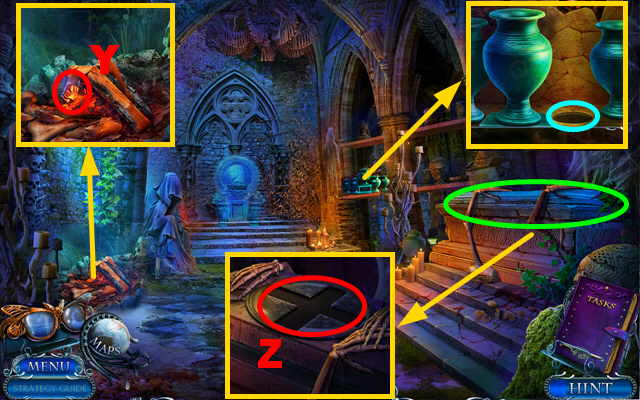
- Take the EVIDENCE PACK (W).
- Use the KNIFE to open the EVIDENCE PACK; take the CASE DETAIL and UV LAMP.
- Go back.
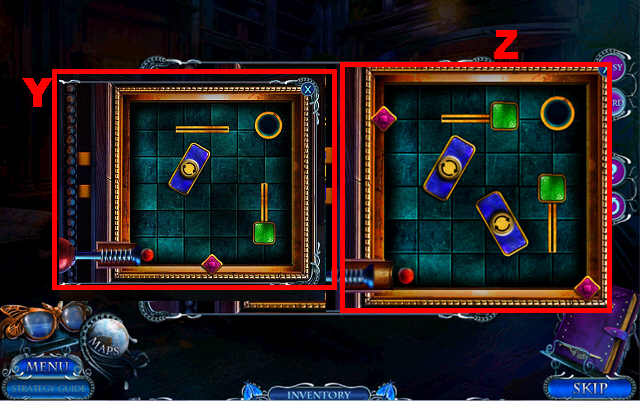
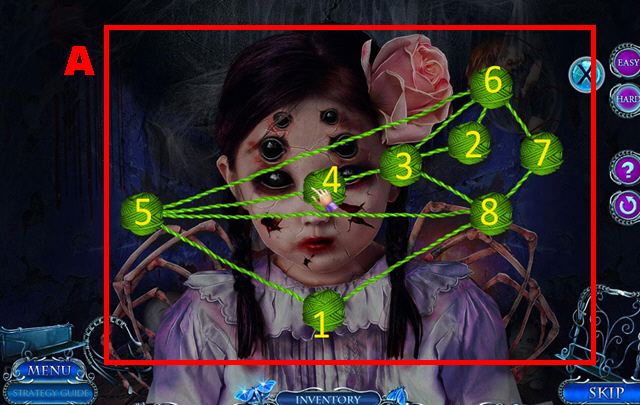
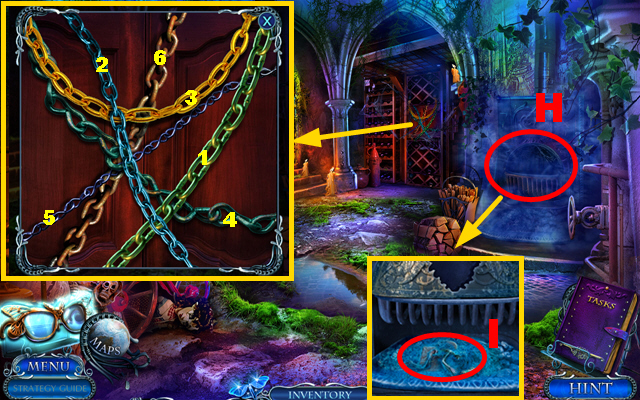
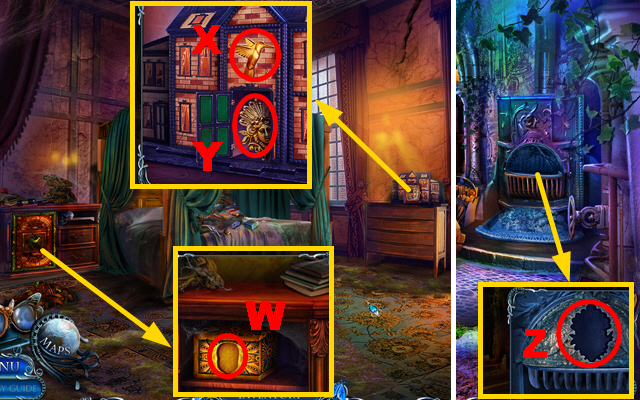
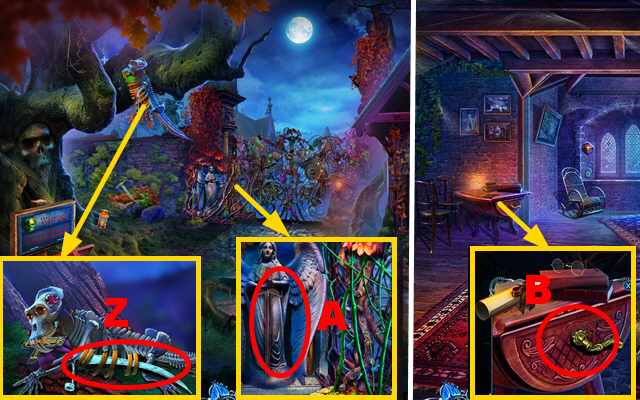
- Place the CASE DETAIL (X). Play the mini-game.
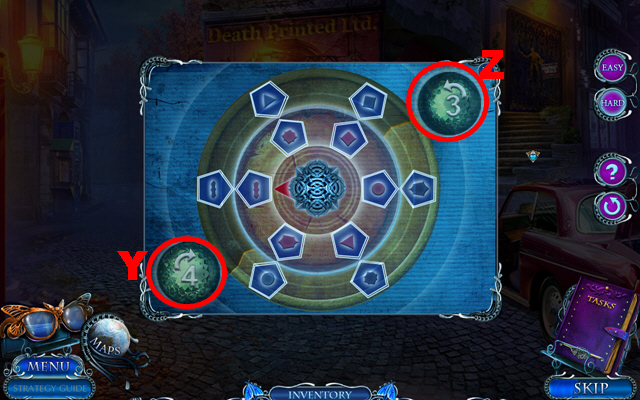
- Easy solution: Yx2-Z-Y-Zx2-Y-Zx2.
- Hard solution: Y-Z-Yx2.
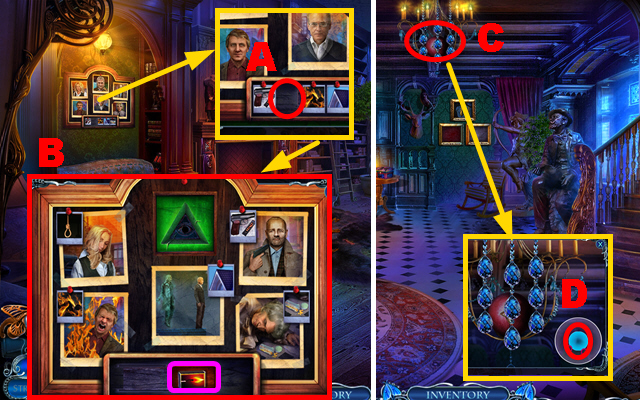
- Take the PLIERS and GEAR 1/2.
- Use the PLIERS and take COLORED BULB 2/2 (A).
- Go forward.
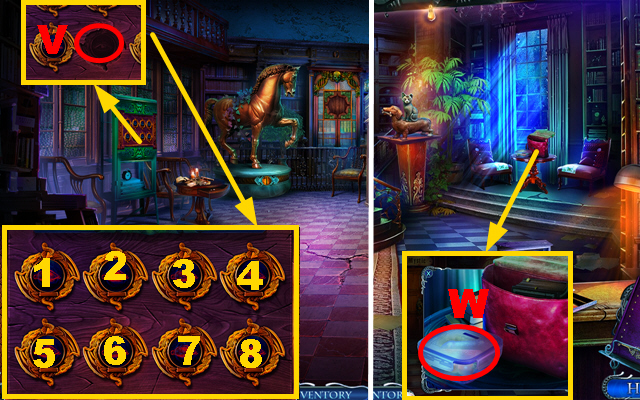
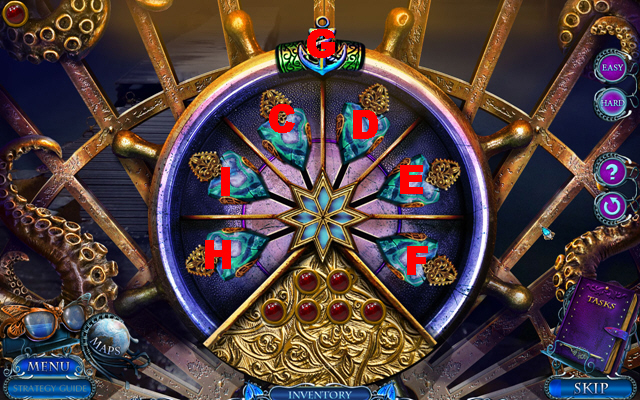
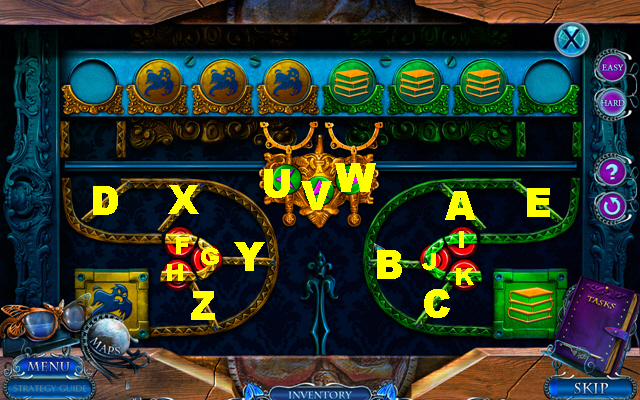
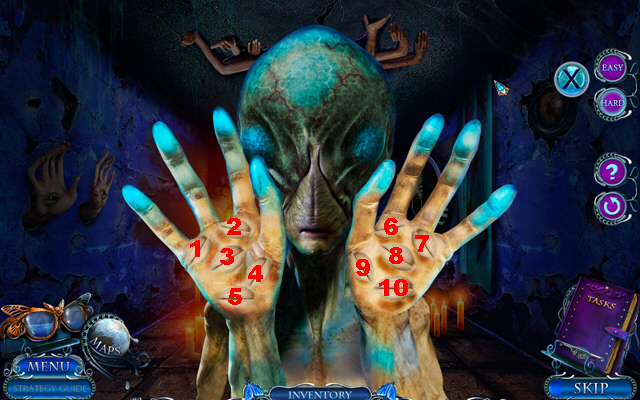
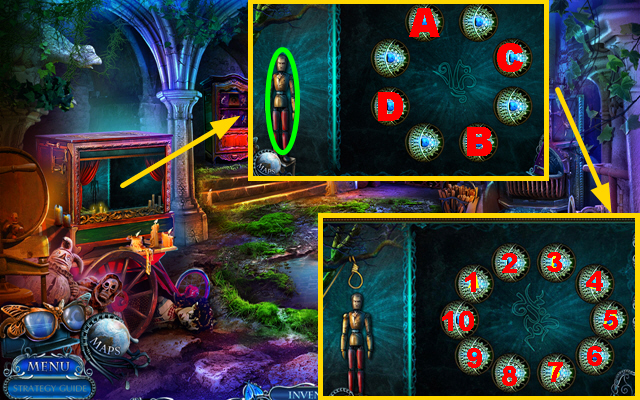
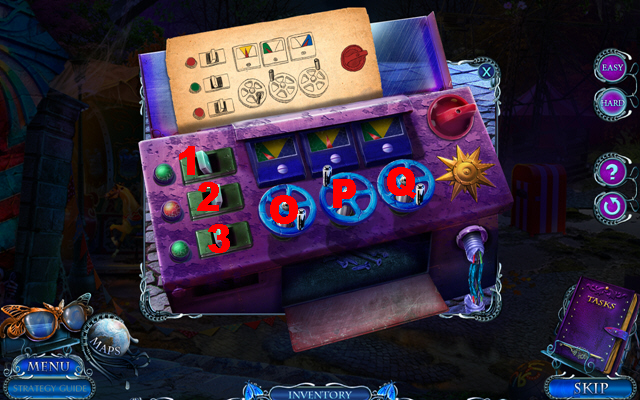
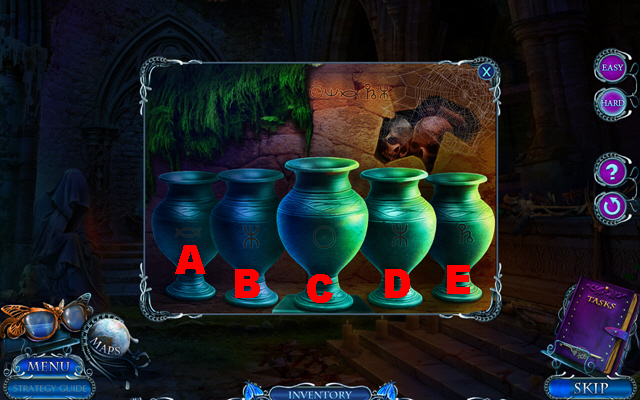
- Place 2 COLORED BULBS (B). Play the mini-game.
- Easy solution (C): (6-3)-(1-2)-(8-7)-(12-11)-(16-17)-(18-19)-(14-9)-(4-13)-21-(4-12)-(6-2)-(6-4)-(18-16)-(18-14)-(4-18)-(6-8).
- Hard solution (D): (6-3)-(8-7)-(14-9)-(4-13)-(12-11)-(18-19)-(16-17)-(1-15)-(20-5)-(2-1)-21-(14-4)-(12-8)-(14-12)-(6-2)-(14-6)-(16-14)-(18-16)-(18-20)-(18-10).
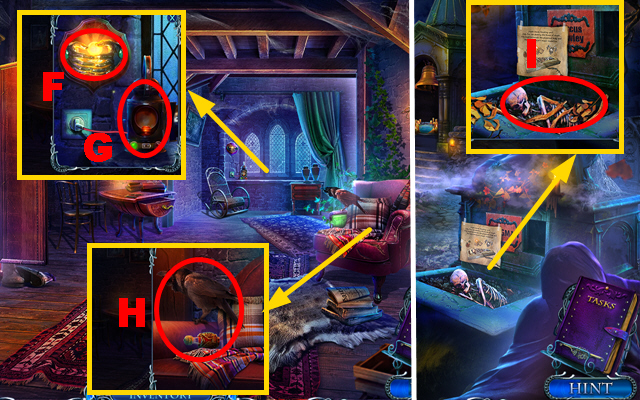
- Take the note and DESK KEY.
- Insert the DESK KEY, take GEAR 2/2, and grab the book (E).
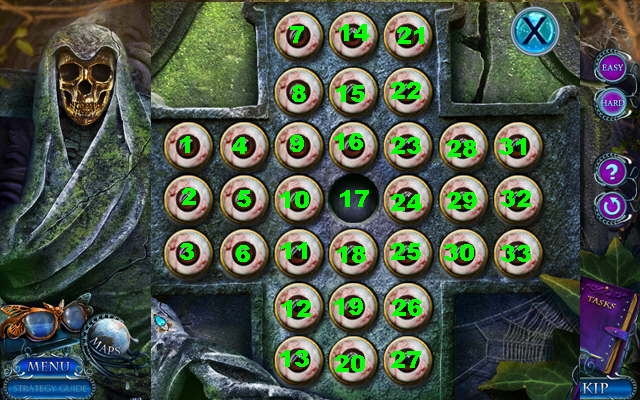
- Place 2 GEARS (F). Play the mini-game.
- Solution: 9-8-7-13-19-25-26-1-2-3-4-5-6-12-18-24-16-17-23-29-35-34-28-22-21-15-14.
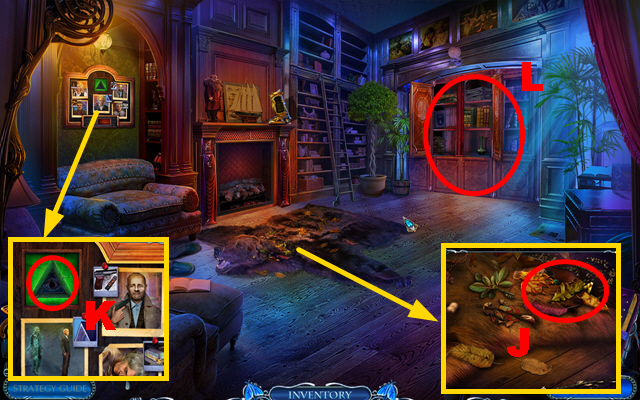
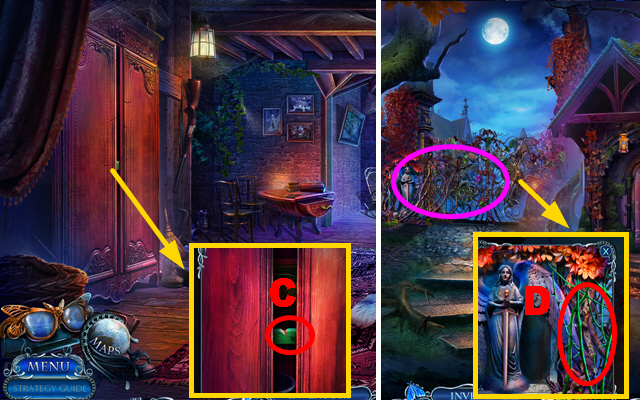
- Enter Marilyn's Office.
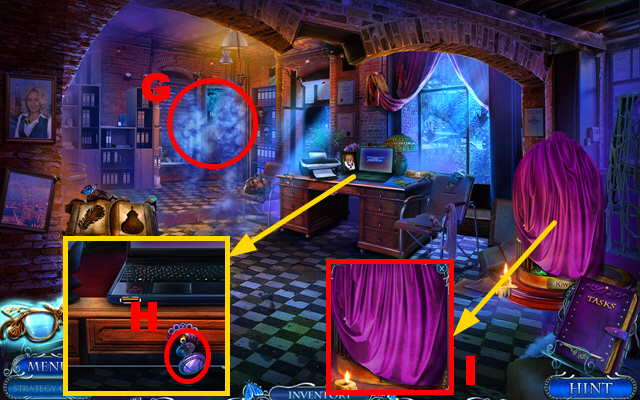
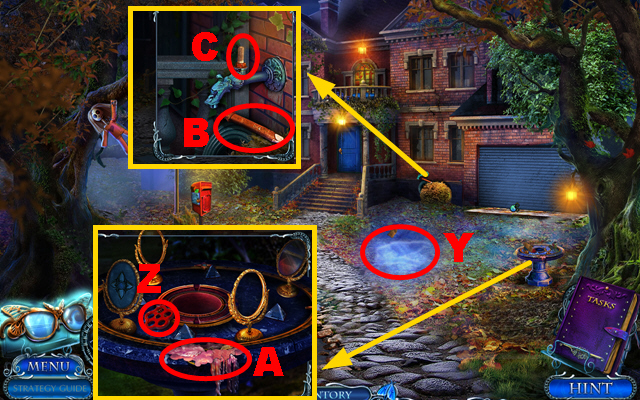
- Use the glasses (G).
- Remove the knob (H).
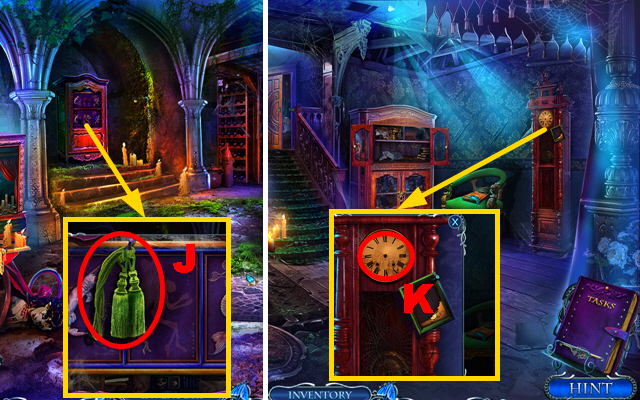
- Take the THICK CLOTH (I).
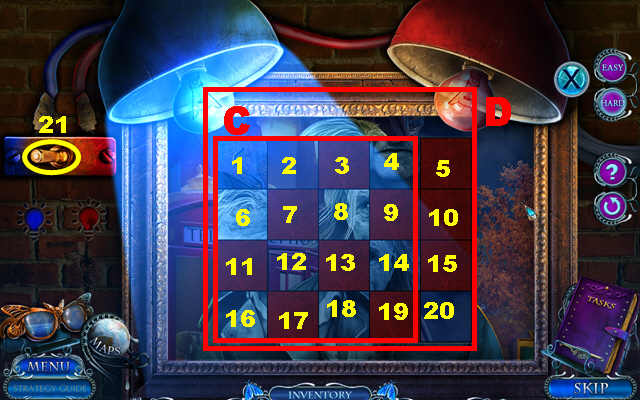
- Take the note and place the UV LAMP (J). Play the mini-game.
- Easy solution: 1-5.
- Hard solution: 6-14.
- Take MANUSCRIPT 2/4 and the CASSETTE TAPE.
- Go back.
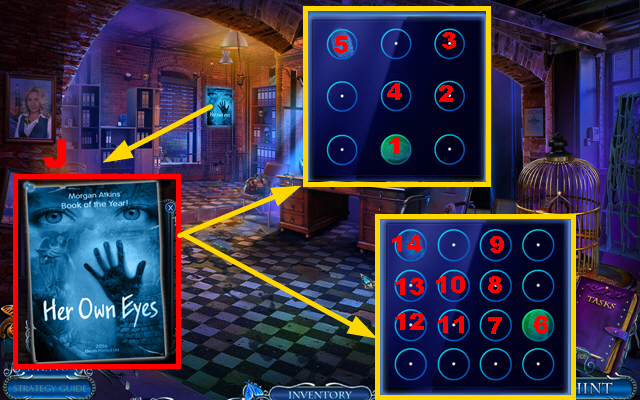
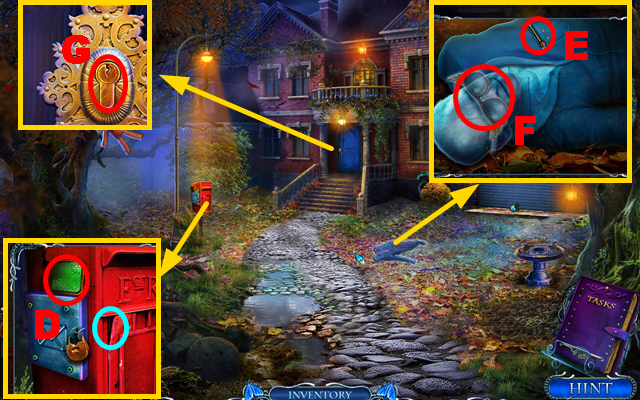
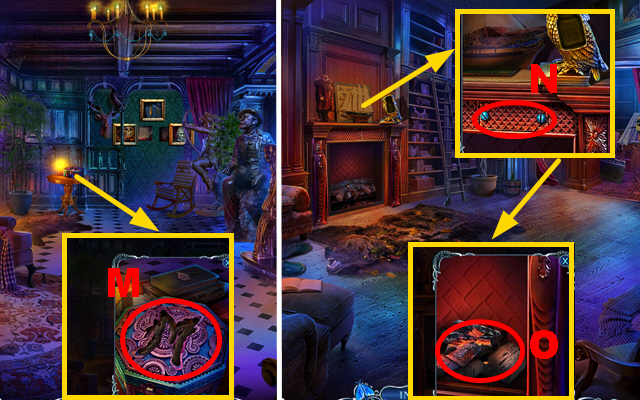
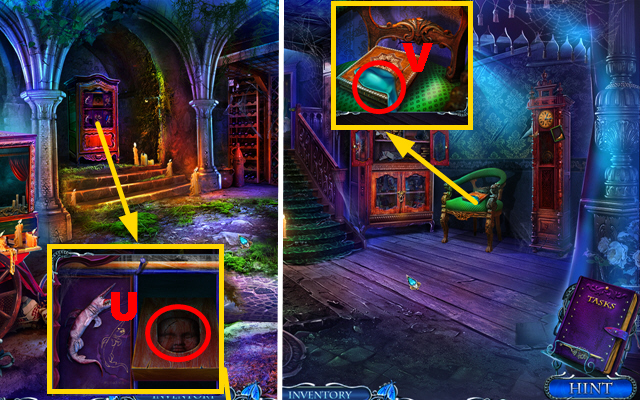
- Use the THICK CLOTH and take MORGAN'S DIARY (K).
- Open MORGAN'S DIARY.
- Play the mini-game.
- Solution: 1-(1-2)-3-(4-5)-6-(7-8)-9-(9-10)-11-(11-12)-13-(13-14)-(15-16)-17-(18-19)-20-(21-22)-(22-23)-24-25.
- Take the CHAMELEON INLAY.

- Insert the CHAMELEON INLAY and take the CHAMELEON FOOD (L).
- Use the CHAMELEON FOOD and take the QUILL INLAY (M).
- Go forward.
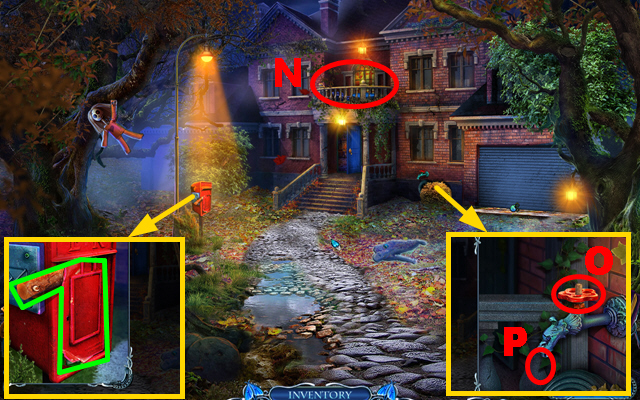
- Place the QUILL INLAY and take the CORKSCREW (N).
- Use the CORKSCREW, take the WINDOW CLEANER, EMPTY REVOLVER, and note (O).
- Open the EMPTY REVOLVER, put the BULLETS into it, and receive the LOADED REVOLVER.
- Go back twice.
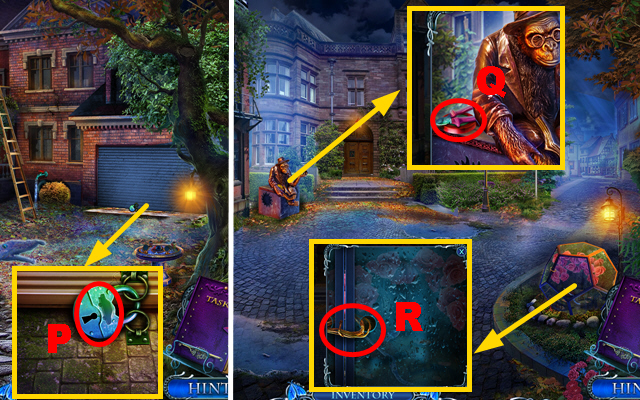
- Take the note, use the LOADED REVOLVER, take the OILER, newspaper, and EMPTY TAPE PLAYER (P).
- Open the EMPTY TAPE PLAYER, put the CASSETTE TAPE into it, and receive MARILYN'S VOICE.
- Go forward twice.
- Use MARILYN'S VOICE and take the FLASH DRIVE (Q).
- Insert the FLASH DRIVE (R); take the FIGURINE CLUE (S).
- Go back twice.
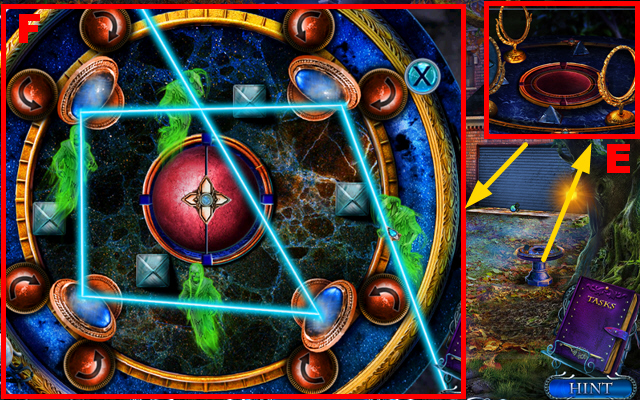
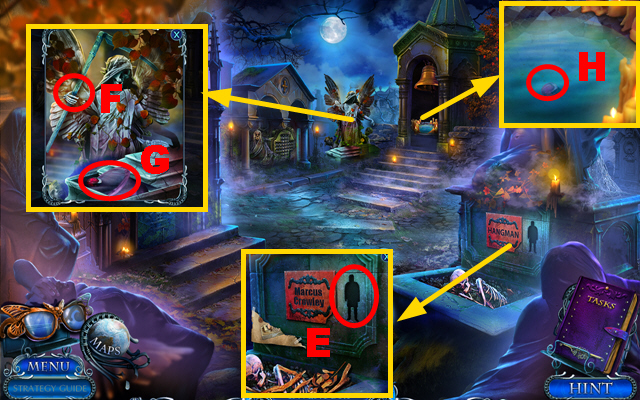
- Place the FIGURINE CLUE (purple). Play the mini-game.
- Easy solution: T-U-V-Wx2.
- Hard solution: Wx2-U-V-T-W.
- Enter the Hallway.
Chapter 2: The Hallway
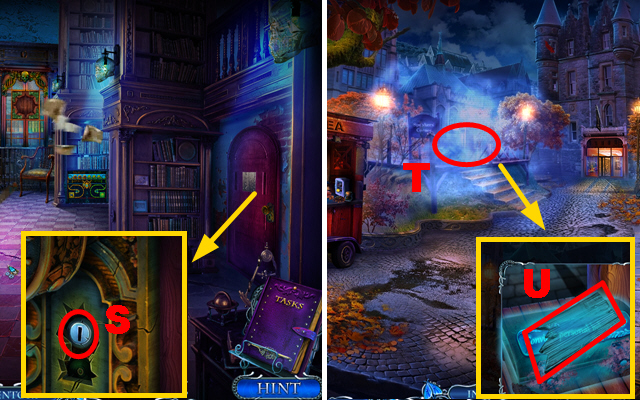
- Remove the tape, take the note, and use the LOADED REVOLVER (T).
- Use the WINDOW CLEANER (U).
- Play the mini-game.
- Solution part 1: 1-2-3-4-(6-7)-(5-1)-8.
- Solution part 2: V-(Y-W)-(D-X)-(Z-B)-(C-A).
- Solution part 3: (G-E)-(H-F)-(I-M)-(J-K)-(K-L).
- Solution part 4: (N-R)-(O-S)-(P-T)-(Q-U)-V.
- Take the BROKEN FIRE EXTINGUISHER.
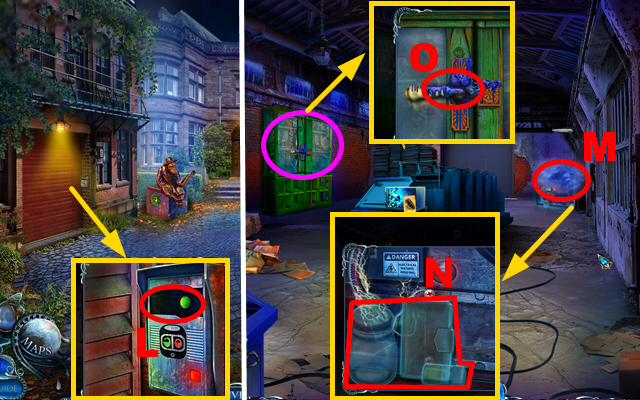
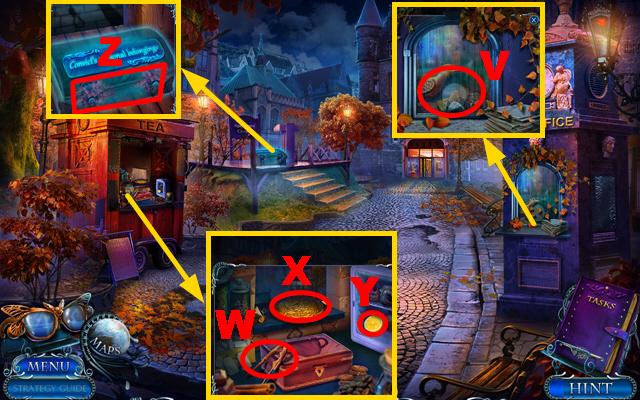
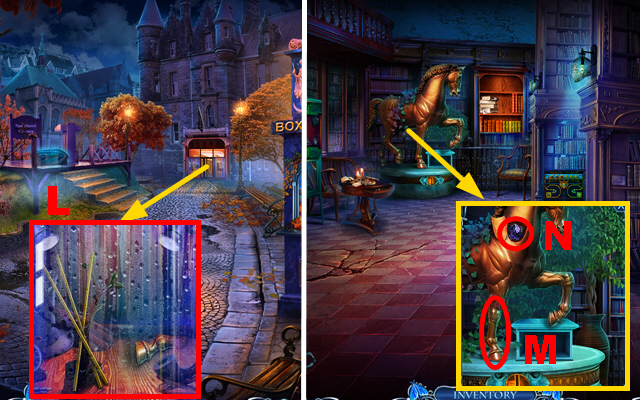
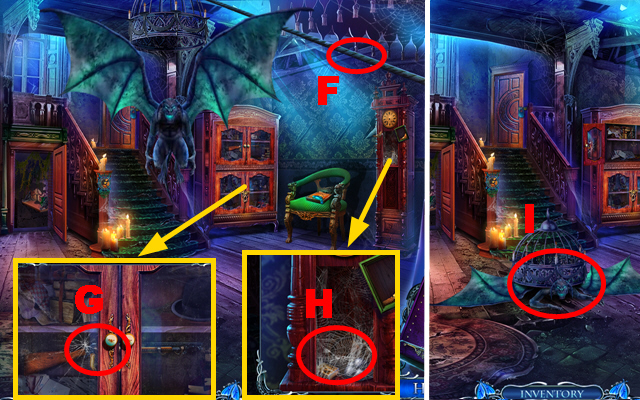
- Use the OILER, take the HOSE, and PICTURE PART 1/2 (W).
- Go forward.
- Take the INKWELL INLAY (X).
- Go to Marilyn's Office.
- Place the INKWELL INLAY and take the CALMING TINCTURE (Y).
- Go to the Hallway.
- Use the CALMING TINCTURE, take the NOZZLE, CHARGER, and BRUSH (Z).
- Place the HOSE and NOZZLE on the BROKEN FIRE EXTINGUISHER; receive the FIRE EXTINGUISHER.
- Go forward.
- Use the FIRE EXTINGUISHER (A) and glasses (B).
- Take the LIGHTER, use the BRUSH, and take the AXE HEAD (C).
- Take the AXE HANDLE, PICTURE PART 2/2, and note (D).
- Place the AXE HEAD on the AXE HANDLE; receive the AXE.
- Use the AXE (E) and play the HOP (orange); receive the PAINTS.
- Take MORGAN'S ADDRESS, place 2 PICTURE PARTS, and the PAINTS (F).
- Play the mini-game.
- Solution: (G-1)-(H-2)-(I-3)-(J-4)-(K-5)-(L-6).
- Take the PICTURE.
- Go back.

- Place the PICTURE (M); take the BUCKLE (N).
- Go forward.
- Place the BUCKLE (O).

- Play the mini-game.
- Easy solution: (P-1)-(Q-2).
- Hard solution: (T-3)-(S-4)-(R-5).
- Take the GLASS, MANUSCRIPT 3/4, and GPS.
- Place MORGAN'S ADDRESS on the GPS; receive the DEAD GPS.
- Go back twice.
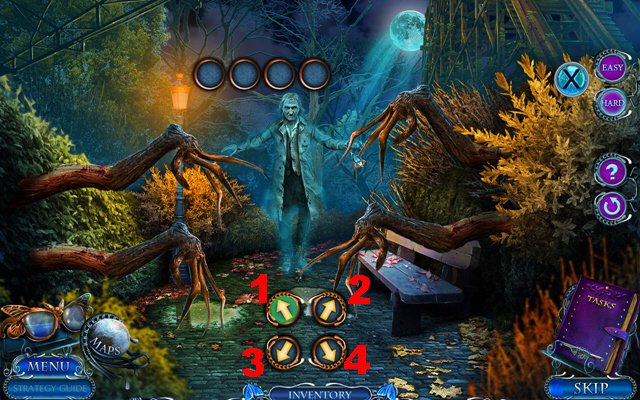
- Place the DEAD GPS (U) and CHARGER (V). Play the mini-game.
- Solution: Select the arrows (W) to avoid obstacles (X).
- Use the glasses (Y).
- Take the VALVE (Z); use the LIGHTER and take the KEYCHAIN (A).
- Take the STAKE (B) and place the VALVE (C).
- Take the GREEN TOKEN (D); place the STAKE (blue).
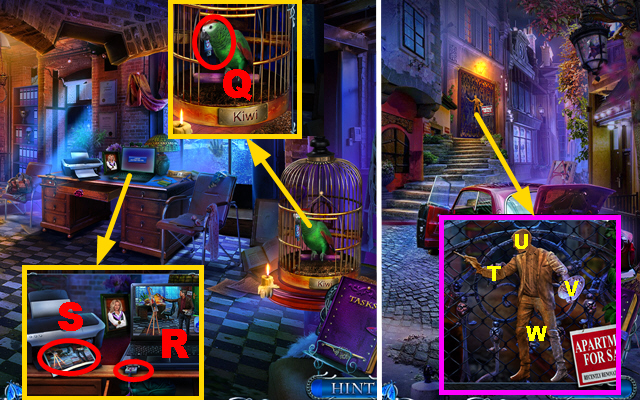
- Place the KEYCHAIN, take the note, HOUSE KEY, and DETOX PILL (E); take the SUNGLASSES (F).
- Insert the HOUSE KEY (G).
- Play the mini-game.
- Easy solution: Ix3-H-Ix3-H-Ix3-H-Ix3-H.
- Hard solution: I-H-Ix2-H-Ix2-H-Ix5-H-Ix2-H-Ix2-H.
- Go forward.
- Take the LADDER (J).
- Remove the pills (K).
- Take the NUT and CLAW (L).
- Take MIRROR 1/2 (M).
- Go back.
- Use the LADDER and play the HOP (N); receive the HAMMER.
- Place the NUT (O), use the GLASS (P), and receive the GLASS OF WATER.
- Use the HAMMER, take the BOW TIE, and PACKAGE (green).
- Pour the DETOX PILL into the GLASS OF WATER; receive the DETOX MEDICATION.
- Use the CLAW to open the PACKAGE, remove the paper, take the SAW BLADE, RUBBER DUCK, and SHELLS.
- Go forward.
- Give the DETOX MEDICATION (Q); take the LETTER.
- Open the LETTER; take the note.
- Use the SAW BLADE (R).
- Place the BOW TIE (S); receive the UNLOADED GUN.
- Enter Morgan's Office.
Chapter 3: Morgan's Office
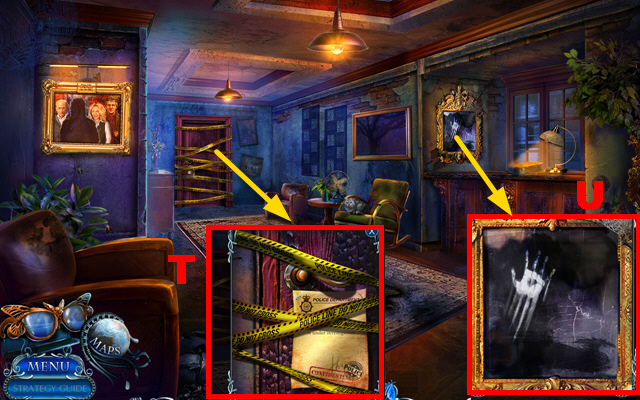
- Give the RUBBER DUCK (T) and take the NOOSE PHOTO (U).
- Put the SHELLS into the UNLOADED GUN; receive the LOADED GUN.
- Place the SUNGLASSES and take the ACID (V); take the TORN PHOTO (W).
- Place the GREEN TOKEN (X).
- Play the mini-game.
- Easy solution: (Y).
- Hard solution: (Z).
- Take MIRROR 2/2 and the PHOTO PIECE.
- Place the NOOSE PHOTO (A).
- Assemble the photos correctly (B); take the MATCHES (purple).
- Go back.
- Use the LOADED GUN (C). Play the mini-game.
- Solution: Select the area (D) when it is marked in green nine times.
- Take the MOON INLAY.
- Go back.
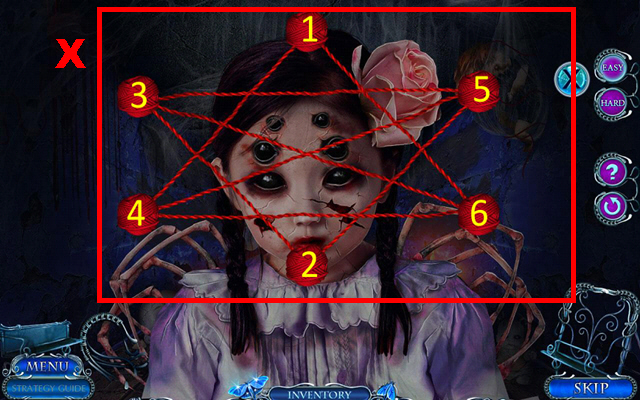
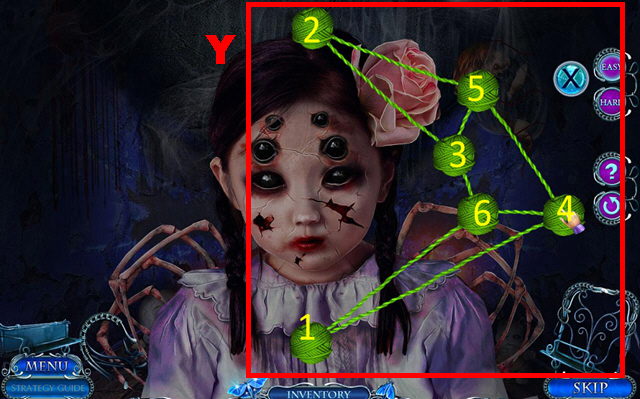
- Place the MOON INLAY and 2 MIRRORS (E). Play the mini-game.
- Solution: (F).
- Take the TRIANGULAR KEY.
- Use the ACID and take the TAPE (G).
- Place the PHOTO PIECE and TAPE on the TORN PHOTO; receive the PHOTO.
- Go forward.
- Place the PHOTO (H); take the BRUSH and COMB.
- Go upstairs.
- Use the COMB (J); receive the LETTER 'M'.
- Insert the TRIANGULAR KEY (K) and play the HOP (L); receive MANUSCRIPT 4/4.
- Go back.
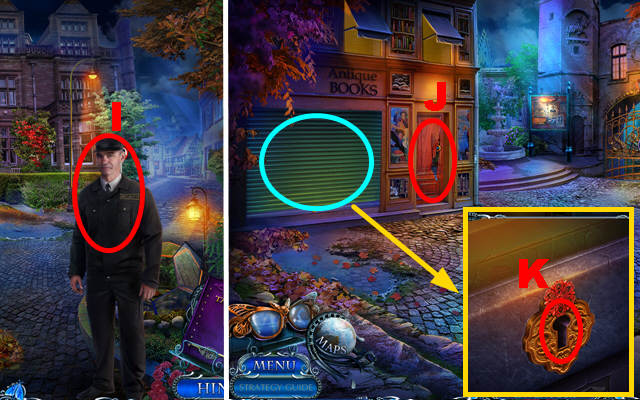
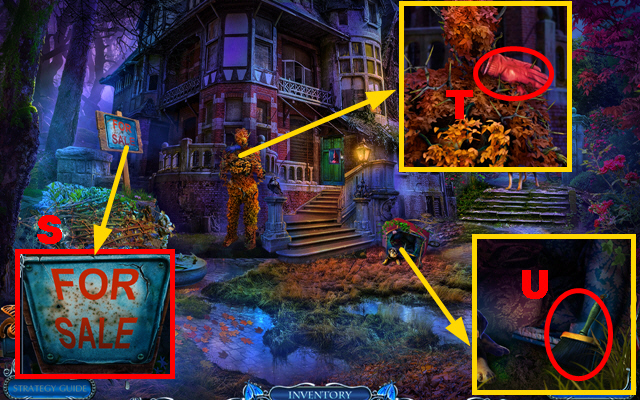
- Place the LETTER 'M', take the HERBICIDE, SCREWDRIVER, and PUBLISHING HOUSE ADDRESS (M).
- Go forward.
- Use the SCREWDRIVER and take the FUEL (N); use 4 MANUSCRIPTS, the FUEL, and MATCHES (O).
- Take the GARAGE KEY.
- Go back twice.
- Insert the GARAGE KEY (P).
- Go to the Printing House Exterior.
- Take the NIPPERS and INSULATION TAPE (Q).
- Use the NIPPERS, receive the WIRE, and take the BROKEN PRUNER (R).
- Use the HERBICIDE, take the STICK, and FRAME FRAGMENT (S).
- Apply the INSULATION TAPE (T). Play the mini-game.
- Easy solution: U-Z-W-X.
- Hard solution: U-V-W-X-W-X-W-X-W-X-Y.
- Go forward.
- Use the BRUSH and take the BOLT (A); open the compartment (B).
- Place the BOLT on the BROKEN PRUNER; receive the PRUNER.
- Use the PRUNER, move 2 books, take the SUN INLAY, move a book, open a book, and take the GOLDEN KEY (C).
- Remove the cover (D).
- Go back.
- Insert the SUN INLAY (E); take the FRAME FRAGMENT and HOOK (F).
- Place the HOOK and WIRE on the STICK; receive the HOOKED STICK.
- Use the PRUNER (G); receive the BOUQUET.
- Go forward.
- Use the HOOKED STICK (H); receive the COCOON DECORATION.
- Place the COCOON DECORATION (I). Play the mini-game.
- Easy solution: (L-11-6-7)-(Purple-9-4-5-12-13-19-20)-(J-1-16-17).
- Hard solution: (L-7)-(Purple-9-6-11-19-20)-(M-18-14-15-2-3-8-K)-(J-17).
- Take the METAL SPIDER.
- Place the METAL SPIDER (N). Play the mini-game.
- Easy solution: (O-T)-(S-T)-(P-U)-(P-V)-(P-R).
- Hard solution: (S-T)-(S-O)-(P-V).
- Enter Hayley's Office.
- Place the BOUQUET (W); take the PAPER (X).
- Take the GLUE (Y); insert the GOLDEN KEY (Z).
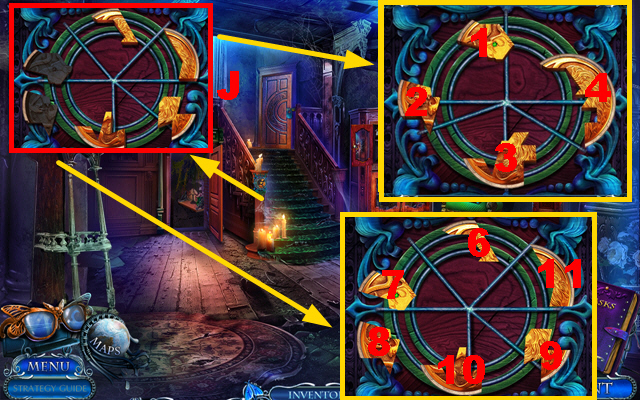
- Place 2 FRAME FRAGMENTS (green). Play the mini-game.
- Easy solution: (F-G)-(G-H)-(C-B)-(E-F)-(D-C)-(C-B)-(B-A)-(B-C)-(C-D).
- Hard solution: (F-G)-(G-H)-(H-D)-(H-G)-(G-F)-(F-E)-(F-B)-(A-B)-(B-C)-(C-G)-(G-H)-(C-G)-(C-D)-(F-B)-(G-C)-(B-C)-(C-G).
- Take the SKULL FRAGMENT and ZIPPER.
- Place the ZIPPER, take the GATE REMOTE, and TONER (I).
- Go back.
- Place the TONER (J), PAPER, and take the PAPER PLANE SCHEMATIC (K).
- Go back.
- Use the GATE REMOTE (L).
- Enter the Pressroom.
- Use the glasses (M); take the JAR, note, and NAIL POLISH REMOVER (N).
- Apply the NAIL POLISH REMOVER (O) and play the HOP (purple); receive the BLOWTORCH.
- Use the BLOWTORCH, take the SNAKE CHARM, and SKULL FRAGMENT (P).
- Combine 2 SKULL FRAGMENTS, assemble it correctly (Q), apply the GLUE to it, and receive the SKULL.
- Go back.
- Place the SKULL (R); take the RUBBER GLOVES and PROPELLER (S).
- Go left.
- Use the RUBBER GLOVES (T). Play the mini-game.
- Easy solution: 1-1-2-3-3-4-4-5-5-6-7-8-9-9-9.
- Hard solution: 10-10-12-13-14-14-15-15-15-16-17-18-19-20-20-21-21-22-22-22-23-23.
- Take the MOTOR.
- Go to Hayley's Office.
- Use the JAR to collect the BEE (U).
- Use the BEE (V).
- Collect items 1-12.
- Take the FISH INLAY.
- Place the FISH INLAY, take the RUBBER BANDS, and FISH (W).
- Use the FISH (X). Play the mini-game.
- Easy solution: 1-2-2-3-3-4-4-5-6-7-8-8-9-10-11-Y.
- Hard solution: 1-2-2-3-3-5-6-7-7-9-10-11-11-12-Y.
- Receive the DIAL.
- Select the PAPER PLANE SCHEMATIC 7 times, place the MOTOR, PROPELLER, RUBBER BANDS on it, and receive the PAPER PLANE.
- Go to the Pressroom.
- Use the PAPER PLANE (Z); receive the CHAIN.
- Place the CHAIN on the SNAKE CHARM; receive the SNAKE BRACELET.
- Place the DIAL (A).
- Go to Hayley's Office.
- Place the SNAKE BRACELET, take the BARRETTE, and SHAWL (B).
- Go back.
- Use the SHAWL to collect the SHARP GLASS (C).
- Go forward.
- Use the SHARP GLASS, take the HEX ROD, and NAIL FILE (D).
- Go to the Pressroom.
- Use the NAIL FILE, take the ERASER, and PLIERS (E).
- Apply the ERASER (F); enter the code '28305', take the CRANK, and RECEIPT (G).
- Go to Hayley's Office.
- Place the RECEIPT (H); receive the STORE ADDRESS.
- Go back twice.
Chapter 4: The Square
- Give the STORE ADDRESS (I).
- Inspect the door (J).
- Insert the BARRETTE (K) and play the HOP (blue); receive the PICKAXE.
- Take the EYE CHIP and use the PICKAXE (L).
- Use the HEX ROD, PLIERS, and take the METAL BEADS (M).
- Go forward.
- Place the CRANK (N); take the LOCK COMBINATION (O).
- Place the LOCK COMBINATION (P). Play the mini-game.
- Easy solution: 1-2-3-7-8-9.
- Hard solution: 1-4-8-5-7-6-5.
- Take the BONE, ADRENALINE, and TWEEZERS.
- Place the BONE (Q); take STONE DECORATION 1/3 (R).
- Use the ADRENALINE (S); take the FANG.
- Place the FANG (T).
- Go forward.
- Take the SHARK JAW, use the TWEEZERS, and receive the RED KEY (U).
- Place the EYE CHIP (V). Play the mini-game.
- Easy solution: 6-7-4-6-1-3-1-5.
- Hard solution: 8-7-6-5-3-1-8-6-2.
- Take the FORK and STONE BOWL.
- Go back.
- Use the FORK, take the SAUSAGE, and BOTTLE OF WATER (W).
- Give the SAUSAGE, take the CUP, TAIL, and STONE DECORATION 2/3 (X).
- Go back.
- Use the SHARK JAW (Y); receive the WOODEN PLANK 1/2.
- Insert the GREEN KEY, take the SCREWDRIVER, and STONE DECORATION 3/3 (Z); place the CUP (A).
- Place 3 STONE DECORATIONS (B).
- Play the mini-game.
- Easy solution: (G-C)-(G-I)-(G-H)-(G-E).
- Hard solution: (G-C)-(G-I)-(G-C)-(G-F)-(G-D)-(G-E)-(G-I)-(G-H)-(G-C)-(G-D)-(G-E)-(G-F)-(G-E).
- Enter the Pier.

- Use the glasses (J).
- Place the STONE BOWL, METAL BEADS (K), and use the tongs (L) on it; receive the MELTED METAL.
- Place the TAIL (M); take the HAT and SUN INLAY (N).
- Go back.

- Place the HAT (O); take the NET (P).
- Enter the Bookstore.
- Use the MELTED METAL, BOTTLE OF WATER, and take the POUND INLAY (Q).
- Insert the POUND INLAY, take the SUCTION CUP, and MOON INLAY (R).
- Go forward.
- Use the SCREWDRIVER (S).
- Go right.
- Use the glasses (T); take WOODEN PLANK 2/2 (U).
- Place the SUCTION CUP, take the RAVEN FIGURINE, and ROCKS (V).
- Take the NUTCRACKER (W), MANHOLE TOKEN (X), and LEMON (Y).
- Place the ROCKS on the NET; receive the THROWING NET.
- Use the LEMON, take the WIND ROSE INLAY, CAN OPENER, and PICTURE PART 1/2 (Z).
- Go back.

- Use the THROWING NET (A).
- Collect pairs 1-6; take the BROKEN AMULET.
- Place the MOON INLAY and SUN INLAY on the BROKEN AMULET; receive the SUN AND MOON AMULET.
- Insert the SUN AND MOON AMULET, take the LASSO, and STAMP KEY (B).
- Go back.
- Place the RAVEN FIGURINE (C); take the CUP INLAY (D).
- Go back.
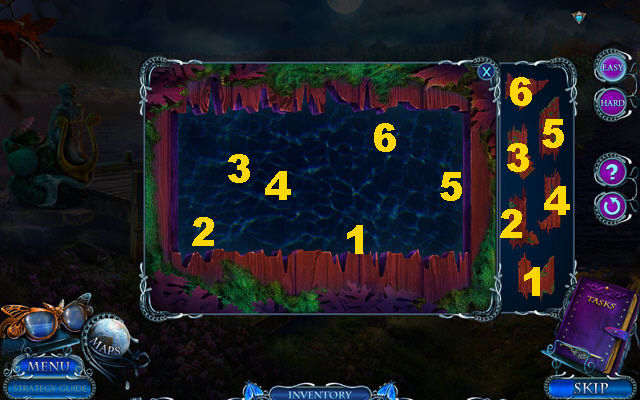
- Place the MANHOLE TOKEN (E). Play the mini-game.
- Easy solution: Fx6-Gx7-Hx4-Gx4-Ix6-Jx4-Fx4-Kx7.
- Hard solution: Fx6-Gx7-Hx4-Fx4-Ix7-F-Jx7-Kx4-Gx4-Ix4-Fx4.
- Take the KEY FRAGMENT.
- Go to the Pier.
- Place 2 WOODEN PLANKS (L).
- Play the mini-game.
- Easy solution: 1-6.
- Hard solution: 7-14.
- Take the DULL SCRAPER, use the NUTCRACKER, take the note, and PICTURE PART 2/2 (M).
- Throw the LASSO, take the EMPTY BUCKET, and CLAW (N).
- Go to the Main Square.
- Insert the CUP INLAY and take the COIN (O).
- Go back.

- Use the COIN (P); take the GRINDSTONE and CRYSTAL RING (Q).
- Apply the GRINDSTONE to the DULL SCRAPER; receive the SCRAPER.
- Go back.
- Use the CLAW and take the STAMP PART (R).
- Place the KEY FRAGMENT and STAMP PART on the STAMP KEY.
- Go back.
- Use the SCRAPER and take the HORSE LEG (S).
- Go to the Mystery Section.
- Insert the STAMP KEY (T).
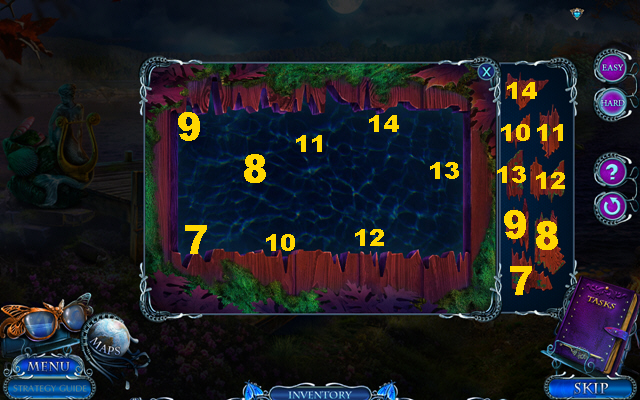
- Play the mini-game.
- Easy solution: X-Y-Zx2-X-C-Wx2-V-W-V-Ux3-V-W-V-Ux3-V-W-V-W-V-Ux3-V.
- Hard solution: Zx2-Xx2-Gx2-Fx4-Hx4-Ex2-Cx2-Jx4-Wx2-V-W-V-Ux3-V-W-V-Ux3-V-W-V-W-V-Ux3-V.
- Take the UNSOLVED MAP.
- Place 2 PICTURE PARTS on the UNSOLVED MAP; receive the LAKE MAP.
- Go right.
- Use the CRYSTAL RING, take the LYRE STRINGS, and HOOK (L).
- Go back.
- Place the HORSE LEG (M); take the RESIN (N).
- Put the RESIN into the EMPTY BUCKET; receive the BUCKET OF RESIN.
- Go to the Pier.
- Place the BUCKET OF RESIN (O); receive the HEATED RESIN.
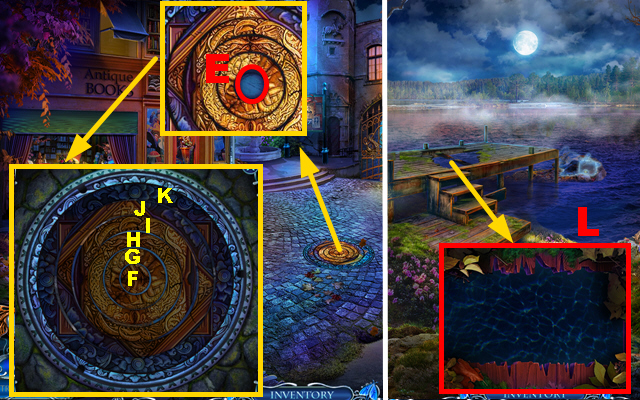
- Place the LYRE STRINGS (P); take the BRUSH (Q).
- Use the HEATED RESIN, BRUSH, and LAKE MAP (R).
Chapter 5: Outside Marcus' House
- Use the CAN OPENER, take the WRENCH, and PICTURE PART 1/3 (S).
- Take the GLOVE (T) and BRUSH (U).
- Use the GLOVE (V) and play the HOP (purple); receive the BASKET.
- Use the BASKET to collect the PUPPY (W); take the SCISSORS (X).
- Give the PUPPY (Y).
- Go forward.
- Use the HOOK to collect the SEAL FRAGMENT (Z).
- Use the SCISSORS (A) and WRENCH (B); take the ROCK, PICTURE PART 2/3, and GUNPOWDER.
- Take the LETTER OPENER and place the WIND ROSE INLAY (C); take the SHELL CASE and PICTURE PART 3/3 (D).
- Go back.
- Place 3 PICTURE PARTS (E).
- Play the mini-game.
- Easy solution: 5-7-6-5-2-4-1-3.
- Hard solution: 7-6-3-2.
- Go forward.
- Use the LETTER OPENER (F).
- Use the ROCK, HOOK, take the EMPTY GUN, and PICTURE FRAGMENT (G).
- Use the BRUSH, take the MATCHES, and SHRAPNEL (H).
- Put the GUNPOWDER and SHRAPNEL into the SHELL CASE, close it, and receive the BULLET.
- Put the BULLET into the EMPTY GUN; receive the LOADED GUN.
- Shoot the LOADED GUN (I).
- Place the SEAL FRAGMENT (J). Play the mini-game.
- Easy solution: 1-4.
- Hard solution: 6-11.
- Take the SKULL TOKEN.
- Go to the Abandoned Amusement Park.
- Insert the SKULL TOKEN (K). Play the mini-game.
- Easy solution: (8-9)-(9-10)-(10-11)-(11-12)-(1-2)-(2-6)-(2-3)-(3-4).
- Hard solution: (12-11)-(10-9)-(10-8)-(11-7)-(2-1)-(2-6)-(4-2)-(3-4).
- Play the mini-game.
- Easy solution: 1-3-2-9-10-8.
- Hard solution: 5-1-4-9-3-7.
- Play the mini-game.
- Easy solution: (X-Y).
- Hard solution: (Z-A).
- Take the NIPPERS.
- Go to Marcus' House.
- Use the NIPPERS (B).
- Enter the Bedroom.
- Take the WINE and SCOOP (C).
- Take the BROKEN PUPPET, COGWHEEL 1/2, pull the book, and place the PICTURE FRAGMENT on it (D).
- Play the mini-game.
- Solution: (E).
- Open the book and take the CANDLE.
- Place the CANDLE and use the MATCHES (F); receive the CANDLESTICK.
- Go back.
- Place the CANDLESTICK (G).
- Enter the Basement.
Chapter 6: The Basement
- Use the glasses (H).
- Use the SCOOP, take the CREATURE INLAY, note, and COGWHEEL 2/2 (I). Play the mini-game.
- Solution: 1-6.
- Take the GRINDSTONE.
- Take the CURTAIN TIES, place the CREATURE INLAY, and take the CLOCK HANDS (J).
- Go back.
- Place the CLOCK HANDS (K).
- Enter the Bedroom.
- Use the CURTAIN TIES and play the HOP (L). Play the mini-game.
- Easy solution: Ox2-M-Px2-Nx2.
- Hard solution: Ox2-Px2-Nx2-Mx6.
- Receive the MACE.
- Use the MACE, take the RUSTY PRUNER, and DRY PLASTER (Q).
- Apply the GRINDSTONE to the RUSTY PRUNER; receive the PRUNER.
- Go back twice.
- Use the PRUNER, take the BIRD INLAY, and ARMS (R).
- Go right.
- Place 2 COGWHEELS (S); take the PUMP (T).
- Go to the Basement.
- Use the DRY PLASTER, WINE, and take the FACE INLAY (U).
- Go back.
- Use the PUMP (V); receive the CONTROL PANEL MANUAL.
- Enter the Bedroom.
- Insert the FACE INLAY, take the FORTUNE TELLER CARD, and LEGS (W).
- Place the ARMS and LEGS on the BROKEN PUPPET; receive the PUPPET.
- Insert the BIRD INLAY (X); take the HEAD INLAY (Y).
- Go to the Basement.
- Place the HEAD INLAY, take the SWORD HANDLE, COAL, and GOLDEN KEY (Z).
- Place the PUPPET (green). Play the mini-game.
- Easy solution: (A-B-C-D)-(6-9-8-2-3)-(1-7-4-5-3)-(8-1-7-4-5)-(1-7-4-5-10).
- Hard solution: (1-7-4-5-10)-(6-8-9-2-3)-(1-7-5-4-3)-(1-8-7-4-5)-(7-5-4-1-10).
- Take the SPHERE.
- Go back.
- Insert the GOLDEN KEY (E) and play the HOP (blue); receive the MANUAL DRILL.
- Use the MANUAL DRILL, take the SKULL INLAY, INSULATION TAPE, and NEWSPAPER (F).
- Go to the Abandoned Amusement Park.
- Insert the FORTUNE TELLER CARD (G); take the FORTUNE (H).
- Go to Marcus' House.
- Place the FORTUNE (I); enter the correct time (1:15) and take the VALVE, CLIPPERS, and CORKSCREW (J).
- Go to the Abandoned Amusement Park.
- Place the SPHERE (K).
- Place the CONTROL PANEL MANUAL (L), VALVE (M), and INSULATION TAPE (N).
- Play the mini-game.
- Easy solution: Qx2-O-3-2.
- Hard solution: O-P-Q-O-P-Qx2-3-2.
- Go to the Basement.

- Use the CORKSCREW (R); receive the LABYRINTH MAP.
- Go to the Abandoned Amusement Park.
- Place the LABYRINTH MAP, COAL, and take the LABYRINTH MAP (T).
- Place the LABYRINTH MAP (S).
- Play the mini-game.
- Easy solution: (2-4-1-3)-(3-2-4-1-4).
- Hard solution: (2-4-1-3)-(3-2-4-1-4)-(1-3-1-4-2-3).
- Go forward.
- Place the SKULL INLAY and take the WIRE (U).
- Use the SWORD HANDLE to collect the SWORD (V).
- Place the NEWSPAPER (W) and WIRE (X); insert the key into the lock (Y).
- Use the CLIPPERS and take the SCYTHE (Z).
- Place the SWORD, take the SHARP SPINE, and CANDLE (A).
- Enter the Shed.
- Use the CANDLE, take the MARCUS FIGURINE, FAN, and HERBICIDE (B).
- Use the SHARP SPINE and take the BOWL (C).
- Go back.
- Use the HERBICIDE (D) and play the HOP (purple).
- Go forward.
- Insert the MARCUS FIGURINE and take BROKEN SKULL 1/2 (E).
- Place the SCYTHE (F); take the NET and RUBY EYE 1/2 (G).
- Use the BOWL to collect the WATER (H).
- Use the glasses (I).
- Pour the WATER and take the BROKEN SCOOP NET (J).
- Place the NET on the BROKEN SCOOP NET; receive the SCOOP NET.
- Use the FAN, take BROKEN SKULL 2/2 (K), and the LOCK CLUE (L).
- Take the NAMEPLATE (M).
- Place the NAMEPLATE (N); take the BOOK DECORATION (O).
- Go back.
- Use the SCOOP NET to collect RUBY EYE 2/2 (P).
- Place 2 BROKEN SKULLS (Q).
- Play the mini-game.
- Easy solution: (15-17)-(18-16)-(5-17)-(16-18)-(19-17)-(24-10)-(22-24)-(29-17)-(10-24)-(25-23)-(28-16)-(6-18)-(8-10)-(12-24)-(4-18)-(26-10)-(10-22)-(30-16)-(22-10).
- Hard solution: (15-17)-(4-16)-(7-9)-(17-15)-(14-16)-(16-4)-(1-9)-(28-16)-(21-23)-(16-28)-(31-23)-(29-17)-(26-24)-(23-25)-(10-24)-(24-26)-(27-25)-(19-29)-(32-24)-(33-25)-(12-10)-(9-11)-(24-26)-(26-10)-(10-12)-(13-11)-(5-19)-(20-18)-(3-11)-(18-6)-(2-12).
- Take the NECRONOMICON.
- Place the BOOK DECORATION on the NECRONOMICON, turn a page, and take the SPELL.
- Place the SPELL (R).
- Go back.
- Place 2 RUBY EYES, take the CROSS, and RAG (S).
- Enter the Shed.
- Place the LOCK CLUE (orange). Play the mini-game.
- Easy solution: T-V-U-W.
- Hard solution: Tx2-Vx2-Wx3-Ux2.
- Take the DEAD LANTERN and MAGNET.
- Place the DEAD LANTERN (X).
- Go to the Crypt.
- Use the MAGNET to collect the LIGHTER (Y).
- Place the CROSS (Z) and play the HOP (green); receive the URN.
- Place the URN (blue).
- Play the mini-game.
- Easy solution: Ax3-Bx2-Cx2-Dx4-E.
- Hard solution: Cx2-Dx2-Ex4-Ax4-D-Bx4.
- Take the SCREWDRIVER.
- Go to the Shed.
- Use the SCREWDRIVER and RAG (F) to receive the LIGHT BULB; place the LIGHT BULB and take the LANTERN (G).
- Use the LANTERN and take the OIL (H).
- Go to the Cemetery.
- Use the OIL and LIGHTER (I).
- Play the mini-game.
- Solution: Use the fire chips (orange) to dominate the field (J); this puzzle is randomized.
- Congratulations! You have completed Mystery Tales: The Hangman Returns.
Created at: 2017-02-24