Walkthrough Menu
- General Tips
- Chapter 1: The Old Bridge Area
- Chapter 2: The Crossroads Area
- Chapter 3: The Ladder Area
- Chapter 4: The Workroom Area
- Chapter 5: The Alchemist
General Tips
- This is the official guide for Mystery Tales: The Lost Hope.
- This guide will not mention each time you have to zoom into a location; the screenshots will identify each location.
- Hidden-object puzzles are referred to as HOPs in this guide. Items listed in blue are hidden or they require additional actions to locate. Interactive items in HOPs are color-coded.
- Mini-games and HOPs are sometimes randomized; your solution may vary.
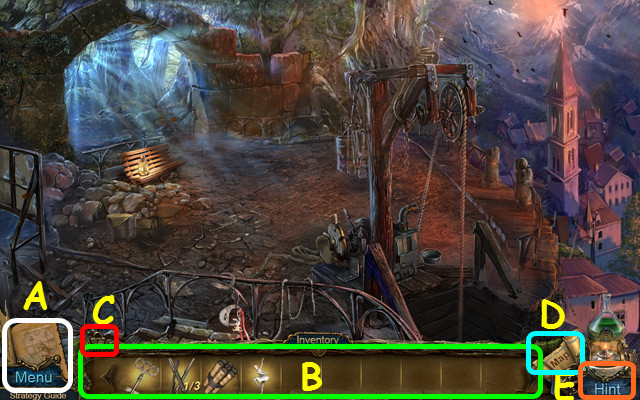
- Select the journal to read clues and notes (A).
- Move your mouse down to open the inventory panel; hover over an item in your inventory to see its name (B).
- Select the lock to keep the inventory panel open (C).
- Use your map to see where actions are available and quickly travel (D).
- Select the hint button for a hint (E).
Chapter 1: The Old Bridge Area
- You have the option of an interactive tutorial.
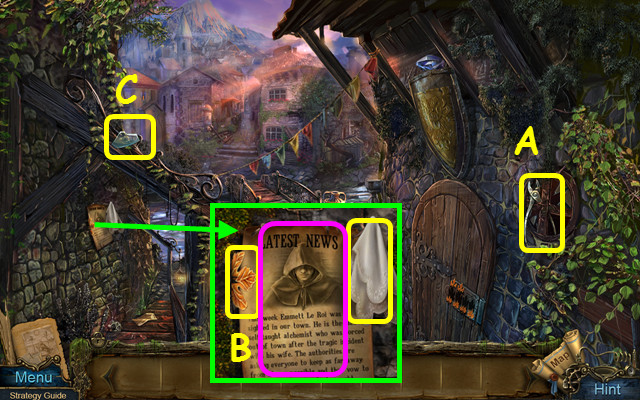
- Take the PLIERS (A).
- Read the news, take the HANDKERCHIEF, and use the PLIERS to take the 1/2 LEAF (B).
- Use the HANDKERCHIEF to take the GLASS (C).
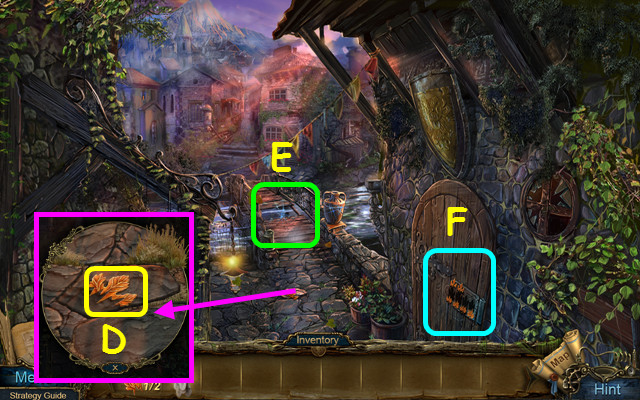
- Take the 2/2 LEAF (D).
- Note the bridge (E).
- Select the door (F).
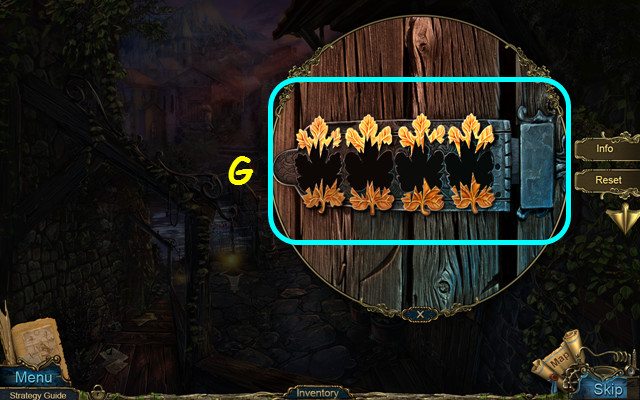
- Place the 2 LEAVES on the door lock.
- Swap the top pieces to match the outlines (G).
- Select 2 pieces to swap positions.
- Enter the door to the Guardian Post.
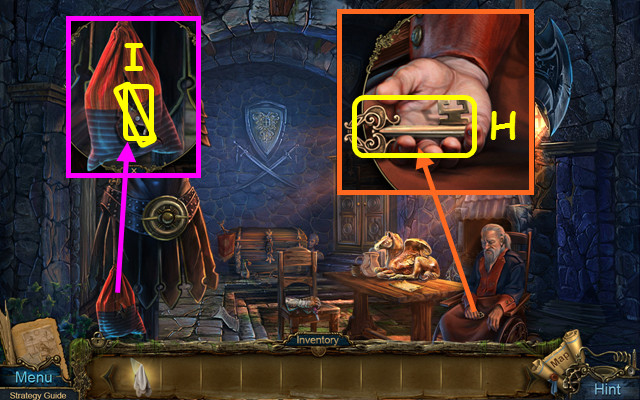
- Take the TRUNK KEY (H).
- Use the GLASS to make a hole; take the TONGS and the MALLET (I).
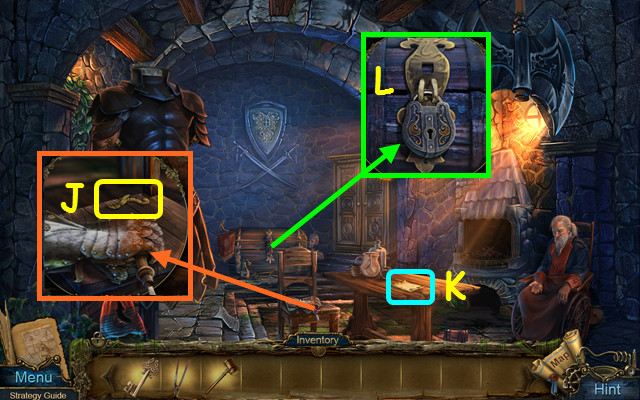
- Take the 1/3 PUZZLE PIECE (J).
- Read the memo (K).
- Use the TRUNK KEY on the lock; select the trunk (L).
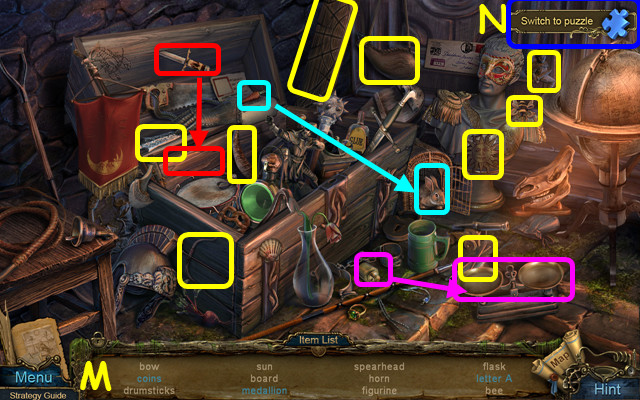
- Play the HOP to earn the BOARD (M).
- You can play a jigsaw puzzle instead of the HOP by selecting the icon in the upper right corner (N).
- Walk down and select the bridge.
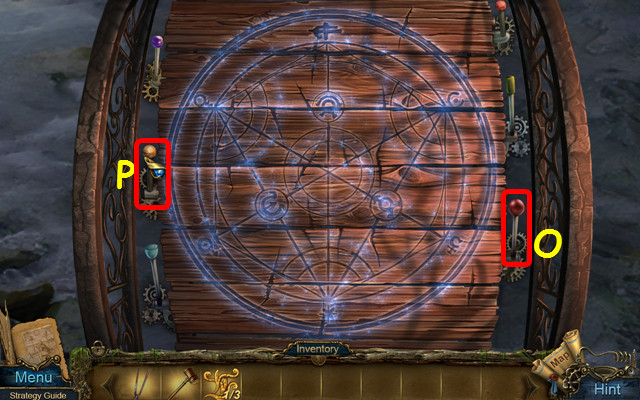
- Place the BOARD in the opening.
- Use the levers to remove the hazards from the bridge.
- Press the levers Ox3 and Px5.
- Walk forward to the Lane.
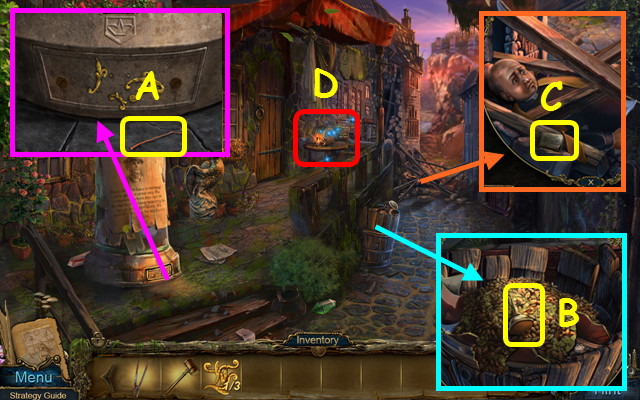
- Take the HOOK (A).
- Use the MALLET to break the pitcher; take the OILCAN (B).
- Take the MATCHES (C).
- Select the table (D).
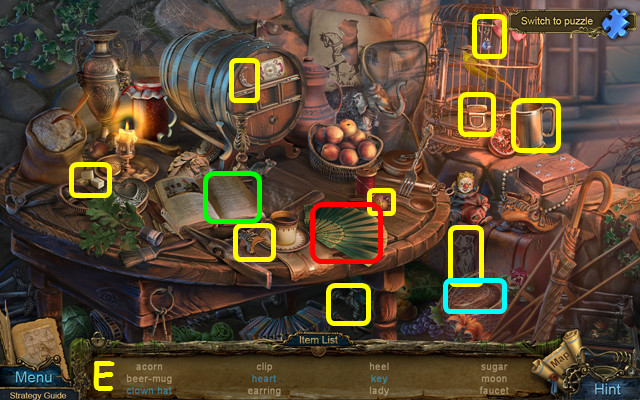
- Play the HOP to earn the CLIP (E).
- Walk down and enter the Guardian Post.
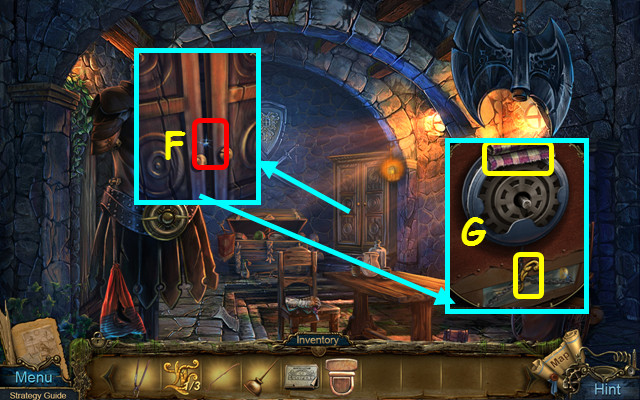
- Use the HOOK on the latch (F).
- Take the MAT and the 2/3 PUZZLE PIECE (G).
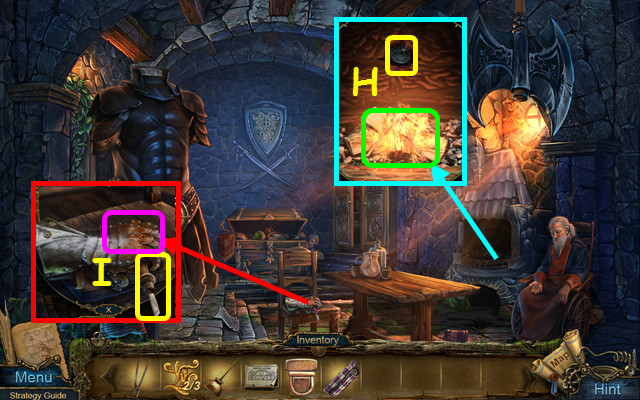
- Use the MATCHES to start the fire; use the TONGS to take the 1/3 CHIP (H).
- Use the OILCAN on the gauntlet; take the CHISEL (I).
- Walk down.
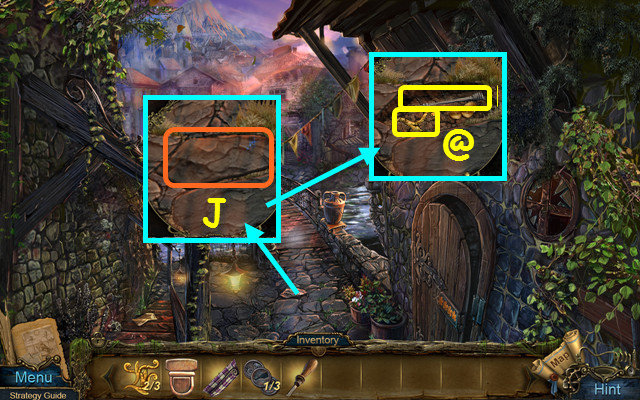
- Use the CHISEL to remove the stone (J).
- Take the 3/3 PUZZLE PIECE, and the PENCIL (@).
- Walk forward.
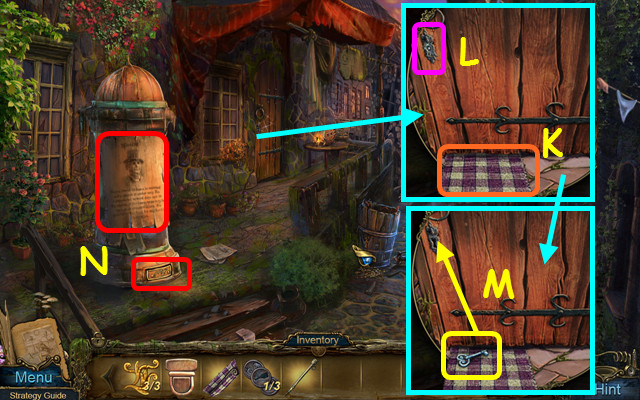
- Place the MAT under the door (K) and use the PENCIL in the lock (L).
- Take the TAVERN KEY and use it in the lock (M).
- Read the notice, and then select the base of the post (N).
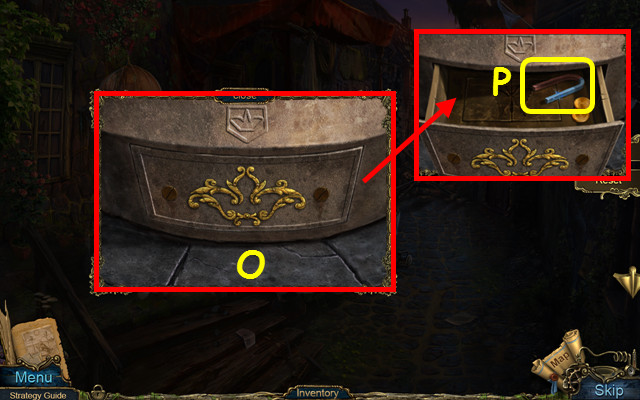
- Place the 3 PUZZLE PIECES on the panel.
- Rotate the pieces to form a crown (O).
- Take the MAGNET (P).
- Enter the Tavern on the left.
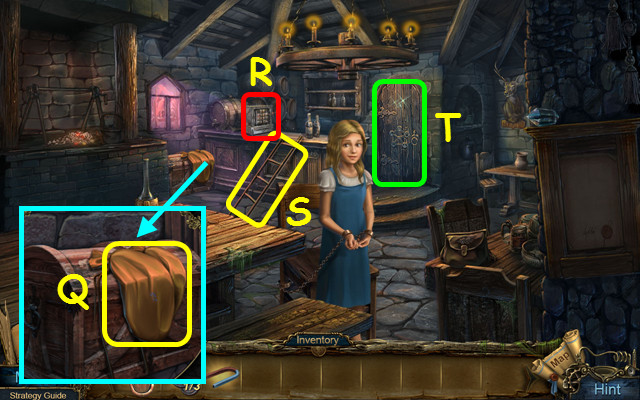
- Take the BALLOONS (Q).
- Note the cash register mini-game on the bar (R).
- Take the LADDER (S).
- Note the door to the Kitchen (T).
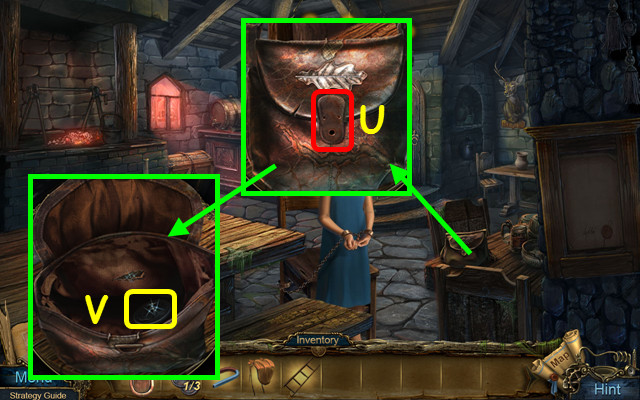
- Place the CLIP on the bag (U).
- Take the 2/3 CHIP (V).
- Walk down.
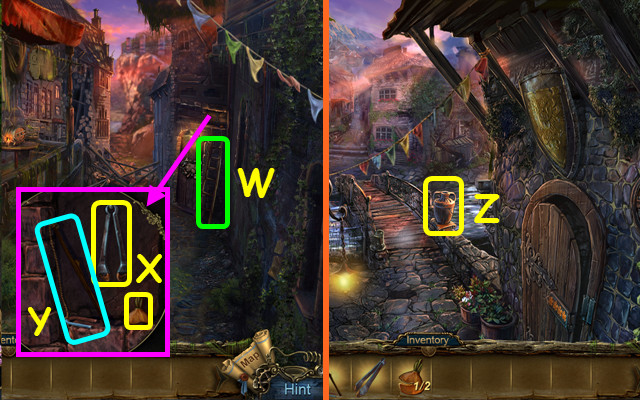
- Place the LADDER on the wall (W).
- Take the PINCERS and the 1/2 ONION (X).
- Place the MAGNET on the rope; take the MAGNET ROPE (Y).
- Walk down.
- Use the MAGNET ROPE on the vase to get the 3/3 CHIP (Z).
- Walk forward, enter the Tavern, and select the door to the Kitchen.
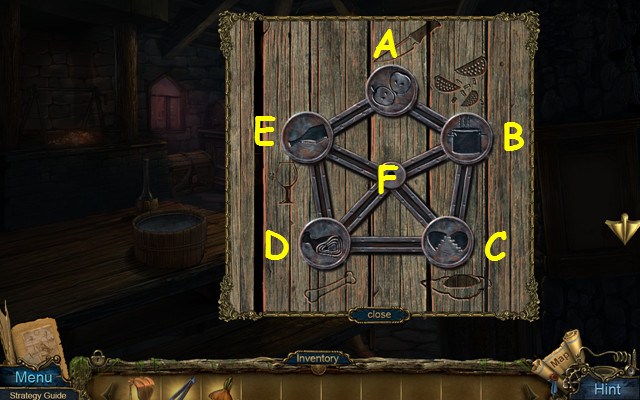
- Place the 3 CHIPS on the door.
- Move the chips to match the carvings on the door.
- Select B, A, E, F, D, C, B, and F.
- Enter the Kitchen.
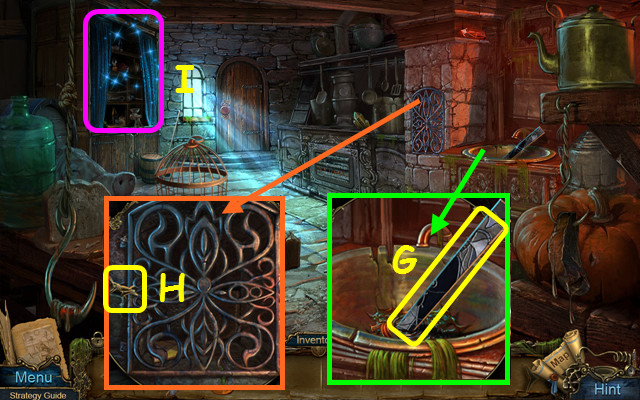
- Use the PINCERS to take the DIRTY STRIP (G).
- Take the GRASSHOPPER (H).
- Open the curtains and select the shelves (I).
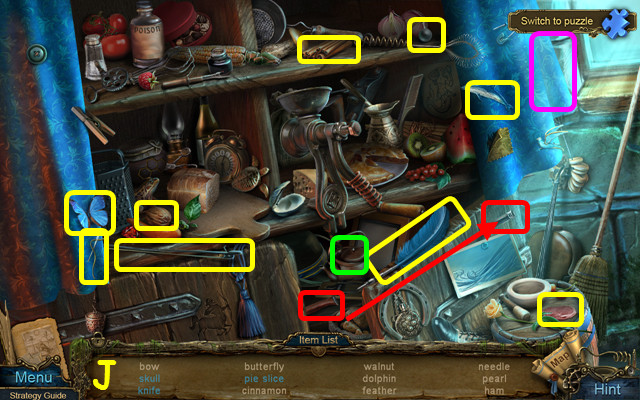
- Play the HOP to earn the WALNUT (J).
- Remember, you may play the jigsaw in place of the HOP by selecting the puzzle piece icon.
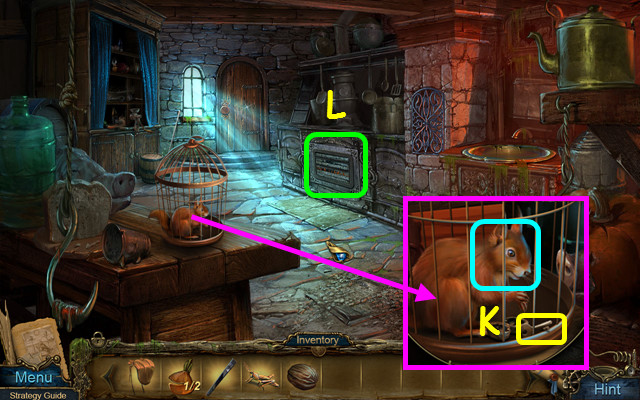
- Give the WALNUT to the squirrel; take the HANDCUFFS KEY (K).
- Note the oven (L).
- Walk down.
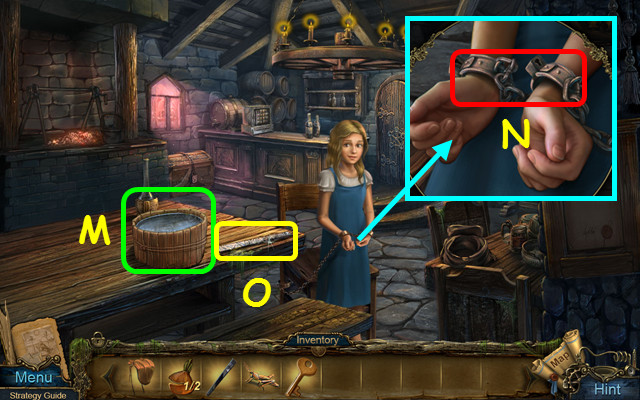
- Use the DIRTY STRIP on the tub of water to get the 1/2 OVEN STRIP (M).
- Use the HANDCUFFS KEY on the handcuffs (N).
- Take the 2/2 OVEN STRIP (O).
- Walk forward and select the oven.
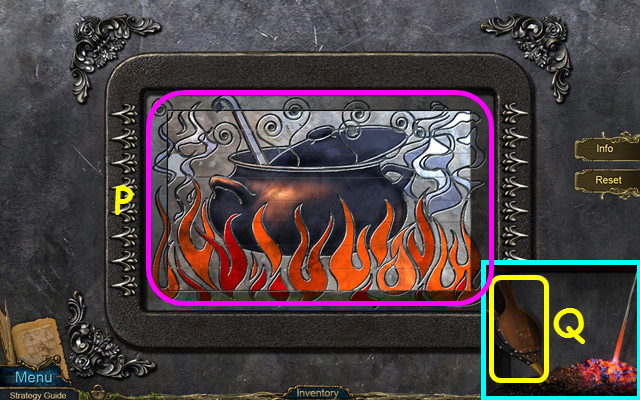
- Place the 2 OVEN STRIPS in the frame.
- Drag the strips to form the picture (P).
- Take the BELLOWS (Q).
- Walk down twice.
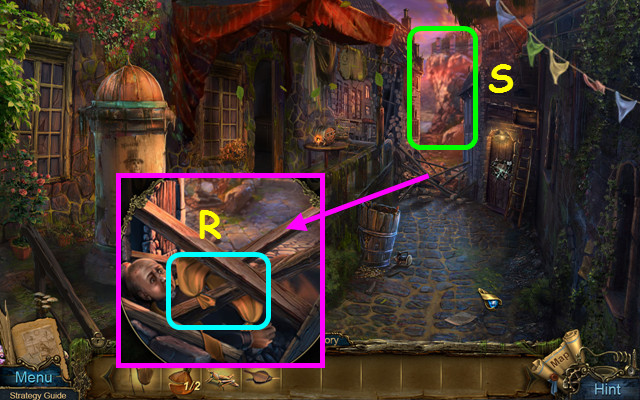
- Place the BALLOONS under the beams; use the BELLOWS on the balloons (R).
- Walk forward to the Crossroads (S).
Chapter 2: The Crossroads Area
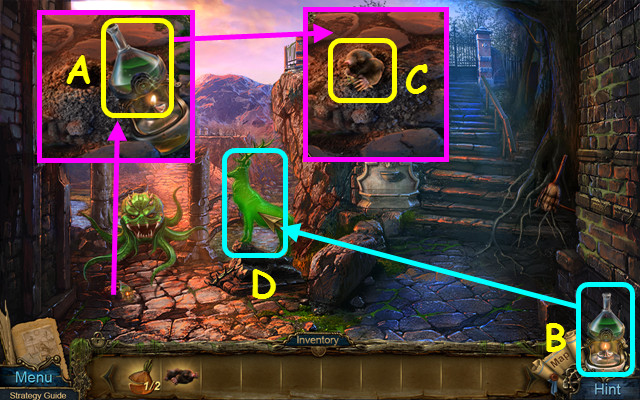
- Take the CRUCIBLE (A). It will now sit on the right side of your menu bar (B).
- Use the GRASSHOPPER on the hole; take the MOLE (C).
- Use the CRUCIBLE on the deer (D).
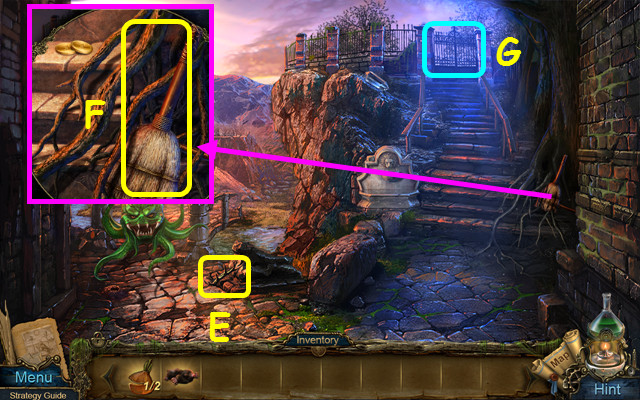
- Take the HORN (E).
- Take the BROOM (F).
- Note the Cemetery gate (G).
- Walk down, enter the Tavern, and go forward to the Kitchen.
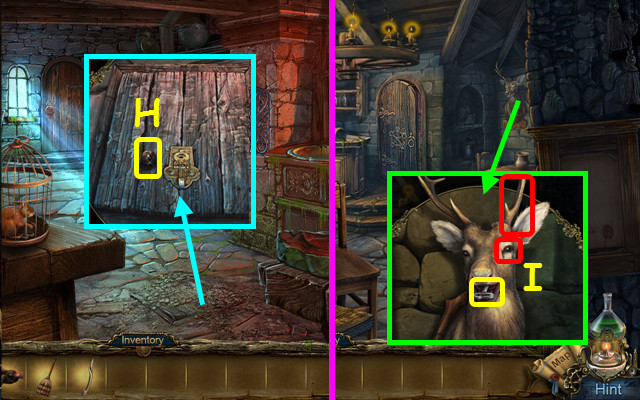
- Use the BROOM to remove the dirt; take the EYE (H).
- Walk down.
- Place the HORN and the EYE on the deer; take the CEMETERY KEY (I).
- Walk down and forward.
- Use the CEMETERY KEY on the lock and walk forward.
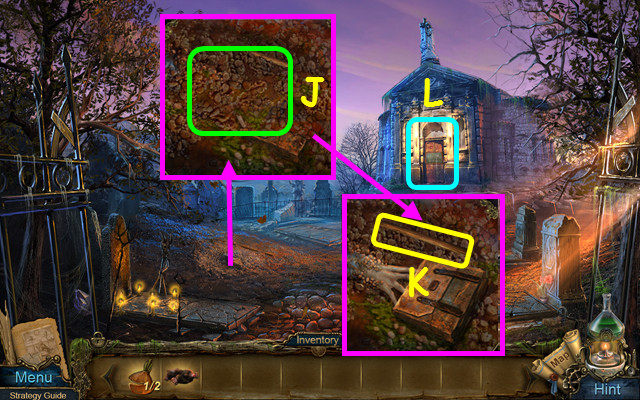
- Use the MOLE on the soil (J).
- Take the STICK (K).
- Note the mini-game on the door (L).
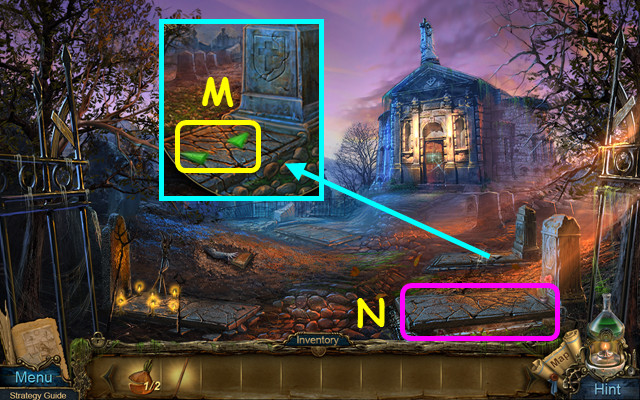
- Use the CRUCIBLE on the green spikes; take the GOLDEN SPIKES (M).
- Move the slab and select the grave (N).
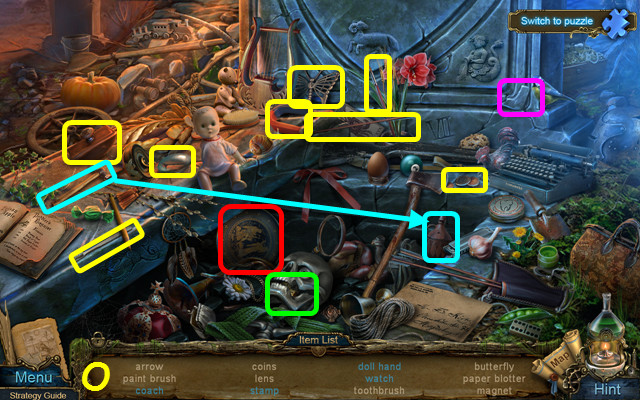
- Play the HOP to earn the BUTTERFLY (O).
- Walk down twice.
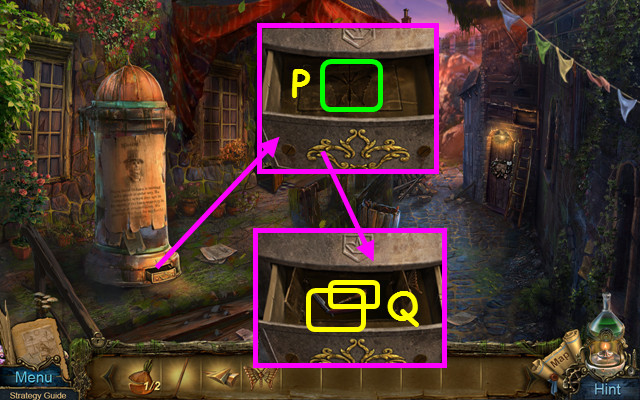
- Place the BUTTERFLY in the drawer (P).
- Take the RAZOR and the 1st SCREWDRIVER (Q).
- Walk forward twice.
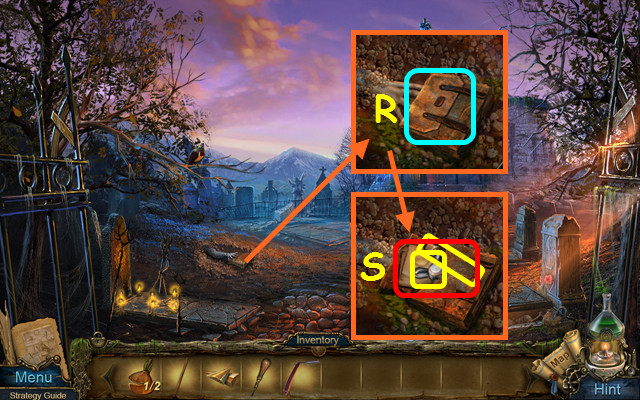
- Use the RAZOR on the case (R).
- Take the VALVE, the 2nd SCREWDRIVER, and read the note (S).
- Walk down 3 times and enter the Guardian Post.
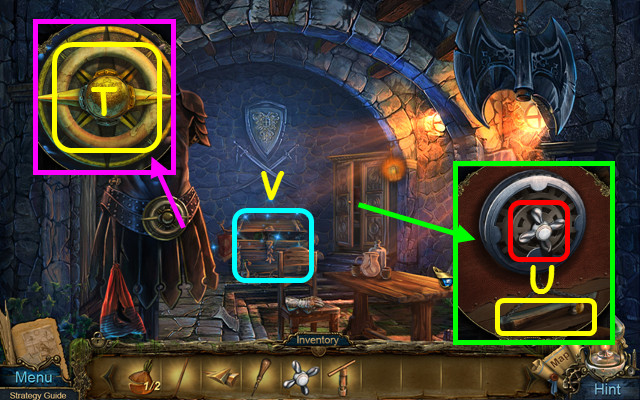
- Place the GOLDEN SPIKES on the buckle; take the RING (T).
- Place the VALVE on the gears; take the HAMMER (U).
- Select the chest (V).
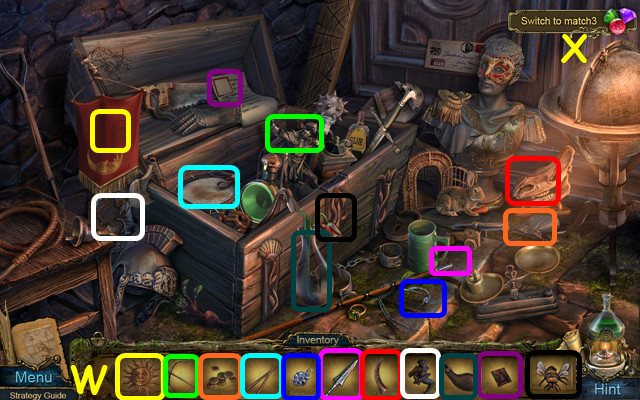
- Play the HOP to earn the GLUE (W).
- You may play a match 3 game instead of this HOP by selecting the upper right icon (X).
- Return to the Kitchen.
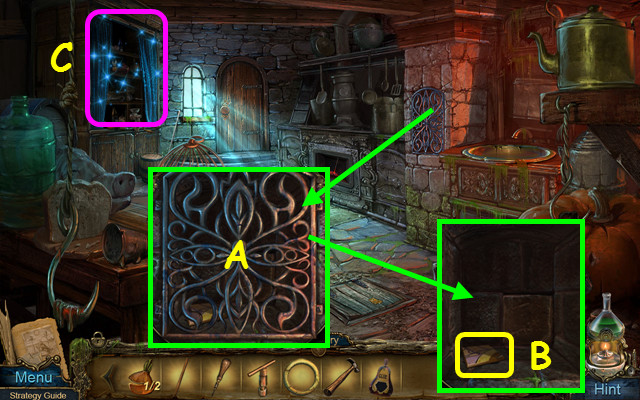
- Use the 1st SCREWDRIVER to remove the grate (A).
- Take the 1/3 CASH REGISTER PARTS (B).
- Select the shelves (C).
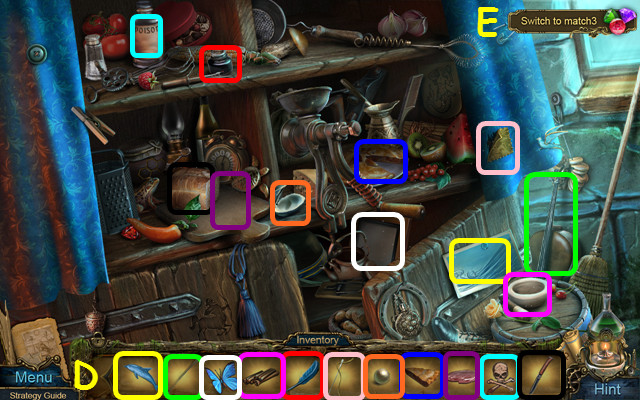
- Play the HOP to earn the BOLT (D).
- You may play a match 3 game in place of the HOP (E).
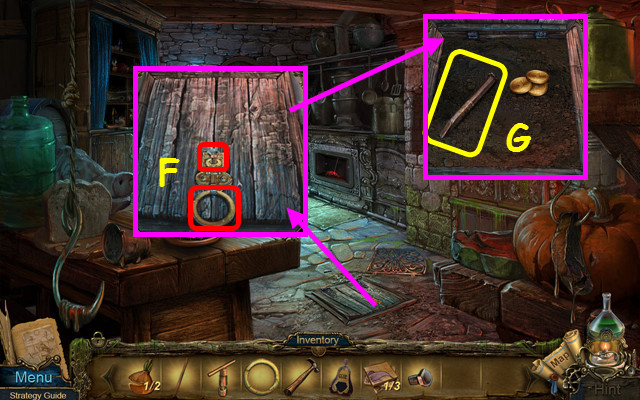
- Place the RING and the BOLT on the trapdoor; use the 2nd SCREWDRIVER on the bolt (F).
- Take the CHISEL (G).
- Walk down.
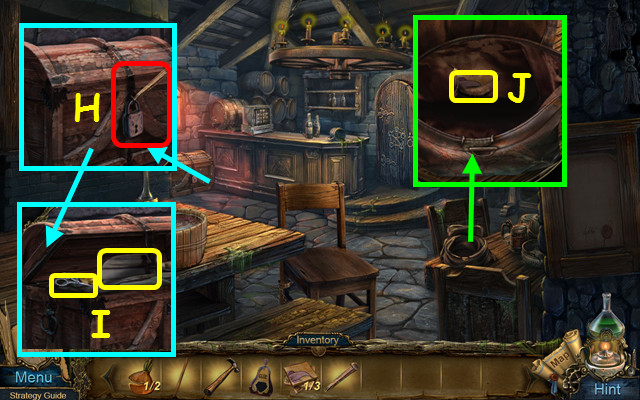
- Use the CHISEL, and then the HAMMER on the lock (H).
- Take the SCISSORS and the SCOOP (I).
- Use the SCISSORS on the hole; take the 2/3 CASH REGISTER PART (J).
- Walk down.
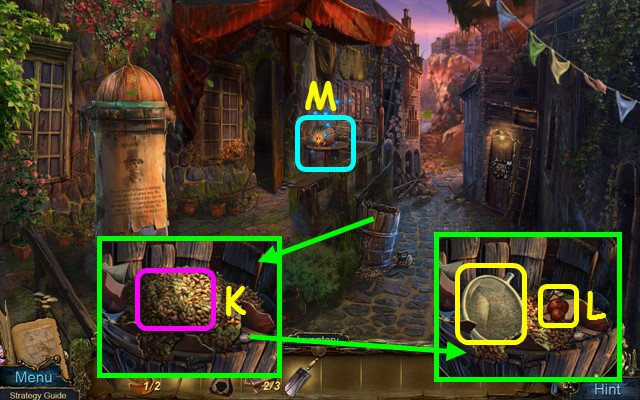
- Use the SCOOP to remove the grain (K).
- Take the 3/3 CASH REGISTER PART and use the STICK on the mesh to take the 1st NET (L).
- Select the table (M).
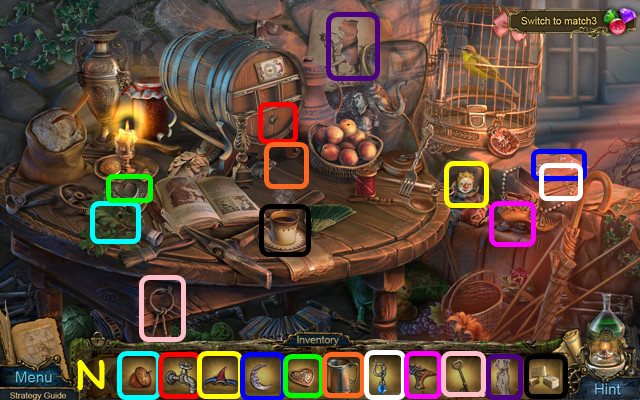
- Play the HOP to earn the CARD (N).
- Walk left to the Tavern and select the cash register.
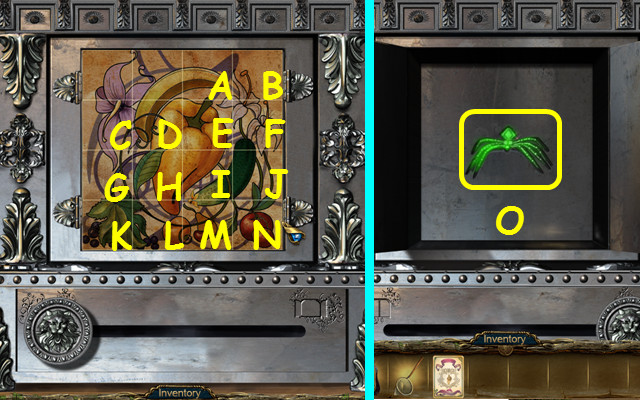
- Place the 3 CASH REGISTER PARTS on the grid.
- Select the pieces to restore the picture; adjacent pieces may also move at the same time.
- Select Ax3, Bx1, Cx3, Dx3, Ex2, Fx3, Gx1, Hx2, Ix2, Jx1, Kx2, Lx1, Mx2, and Nx2.
- Use the CRUCIBLE on the green spider; take the 2nd NET (O).
- Walk down and forward.
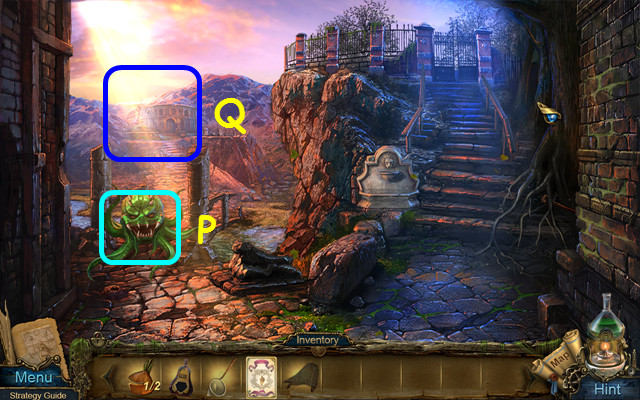
- Use the 2nd NET on the beast (P).
- Walk left to the Amphitheater (Q).
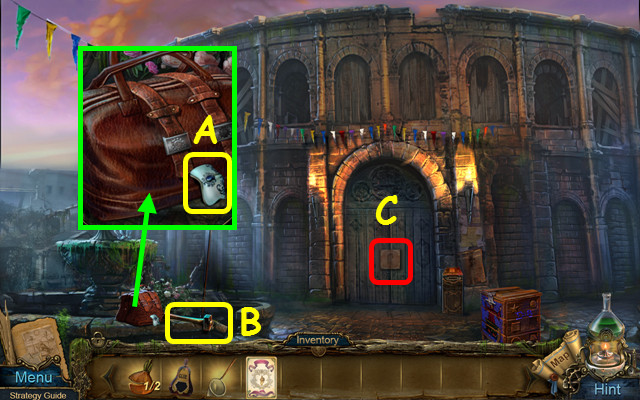
- Take the 1/2 MASK FRAGMENTS (A).
- Take the SLEDGE HAMMER (B).
- Note the lock on the door (C).
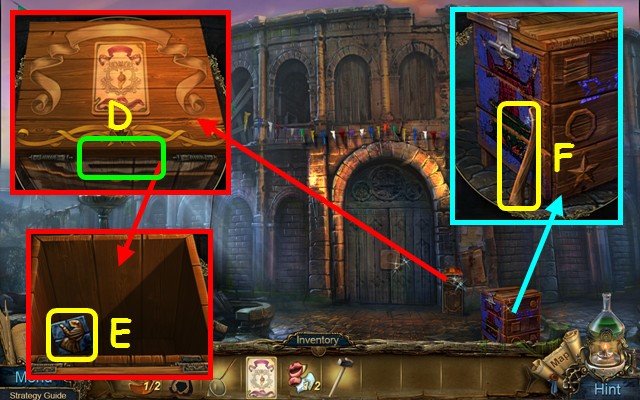
- Use the CARD on the opening (D).
- Take the PRIEST (E).
- Take the AXE HANDLE (F).
- Walk down, go forward to the cemetery, and select the door.
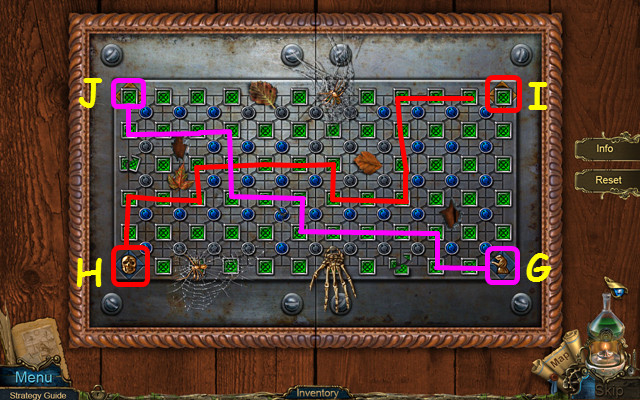
- Place the PRIEST on the grid (G).
- Move the skull (H) to the upper right corner (I), and move the priest to the upper left corner (J).
- Press the buttons move the tiles.
- Walk forward to the Crypt.
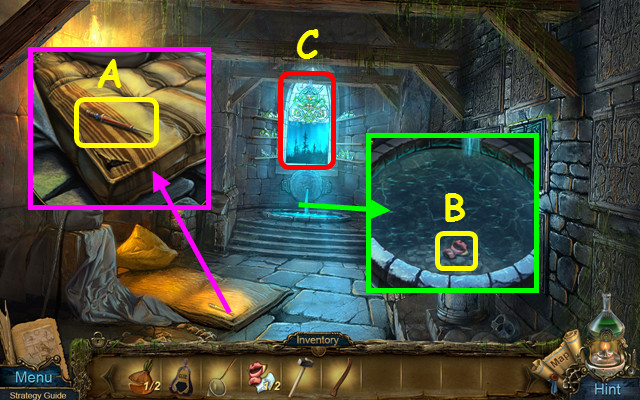
- Take the HOOK (A).
- Use the 1st NET to take the 2/2 MASK FRAGMENT (B).
- Note the stained glass window (C).
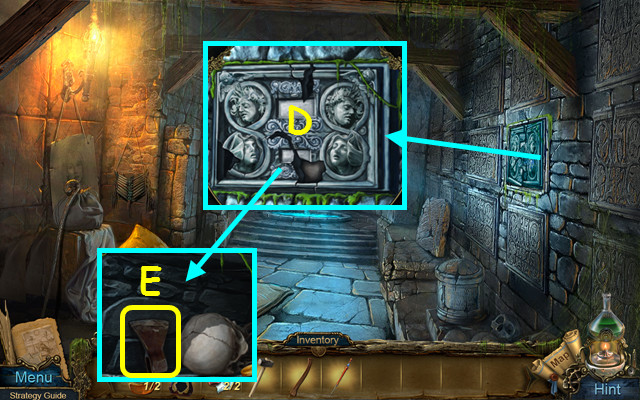
- Use the SLEDGE HAMMER on the panel (D).
- Use the AXE HANDLE on the head to make the AXE (E).
- Walk down twice.
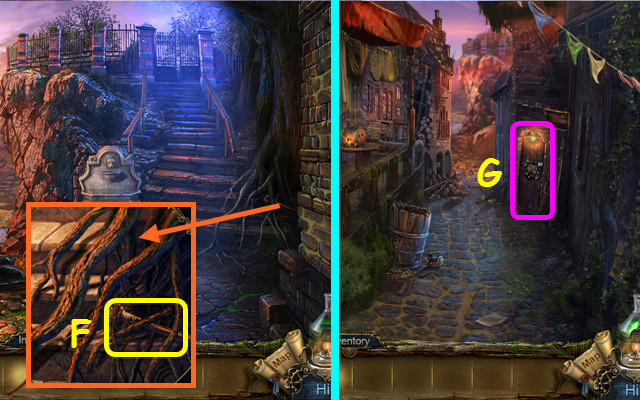
- Use the AXE to take the LEVER (F).
- Walk down.
- Select the door (G).
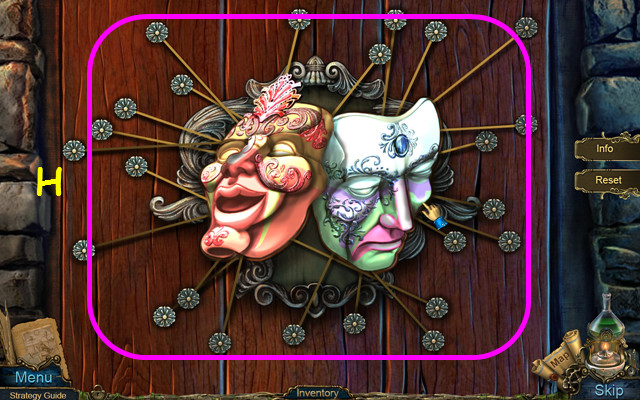
- Place the 2 MASK FRAGMENTS on the board.
- Restore the masks by sliding the pieces into the frame (H).
- Enter the Workroom.
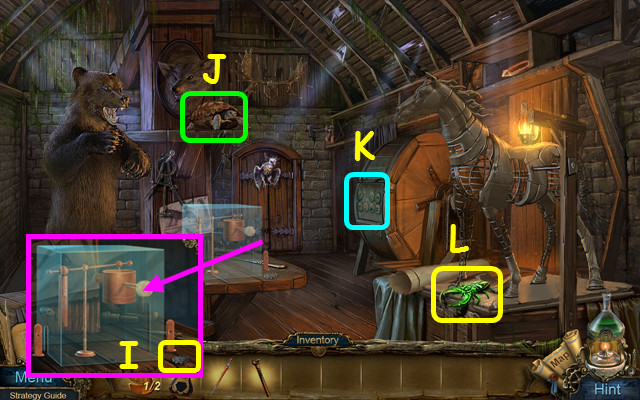
- Take the SUN (I).
- Note the turtle (J).
- Note the tokens (K).
- Use the CRUCIBLE on the green bug; take the WIRE CUTTER (L).
- Walk down, forward, and left.
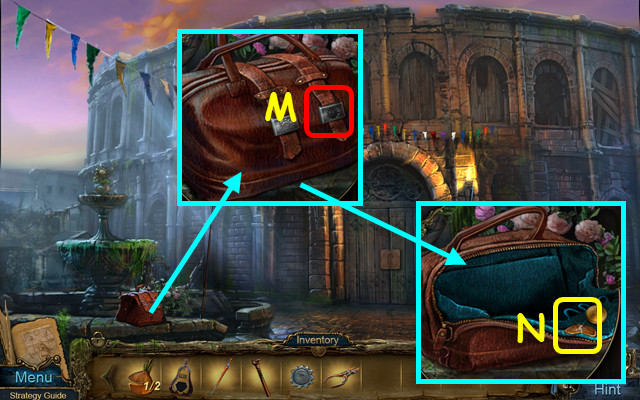
- Place the SUN in the strap (M).
- Take the 2/2 ONION (N).
- Travel to the Kitchen.
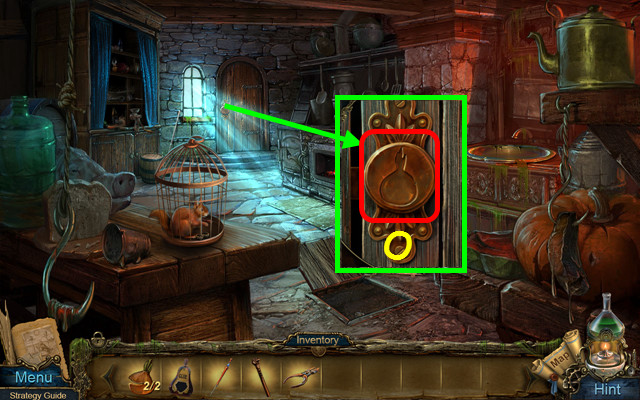
- Place the ONION into the lock (O).
- Walk forward to the Enclosed Court.
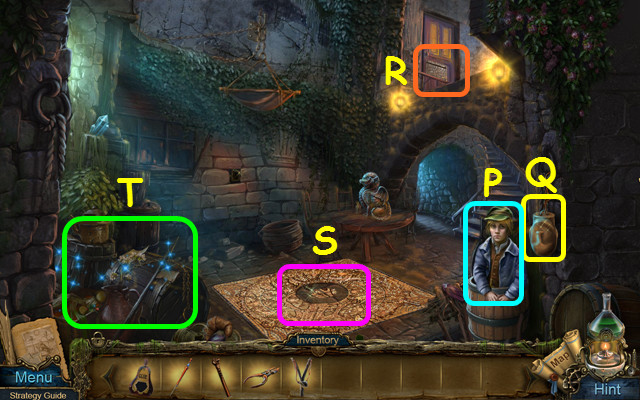
- Billy will give you the SLINGSHOT (P).
- Use the WIRE CUTTER to take the HEAD (Q).
- Note the door mini-game (R).
- Note the floor mini-game (S).
- Select the barrels (T).
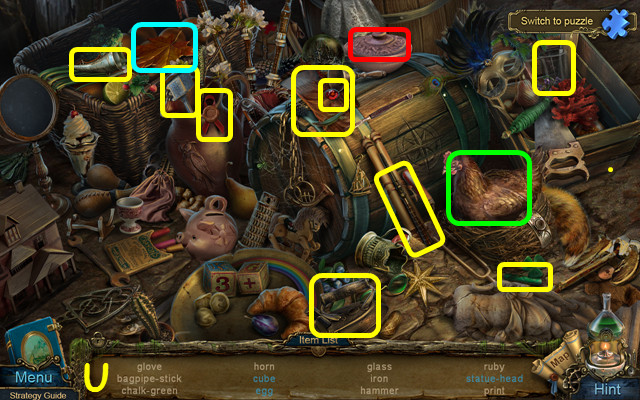
- Play the HOP to earn the GLOVE (U).
- Walk down.
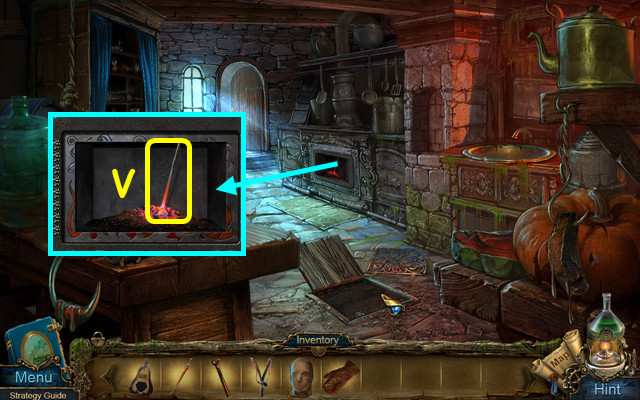
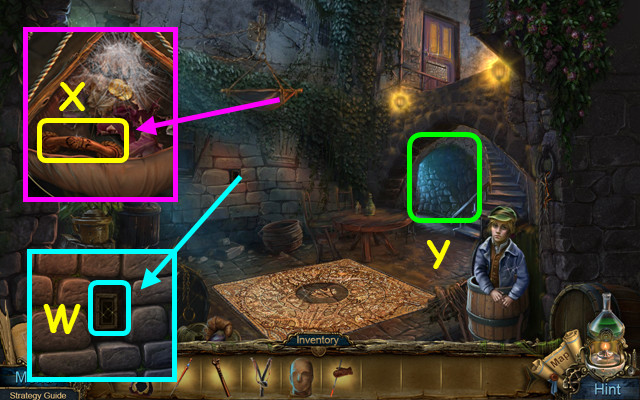
- Use the GLOVE to take the HOT LEVER (V).
- Walk forward.
- Use the LEVER in the slot (W).
- Take the HANDLE (X).
- Walk forward to the Ladder (Y).
Chapter 3: The Ladder Area
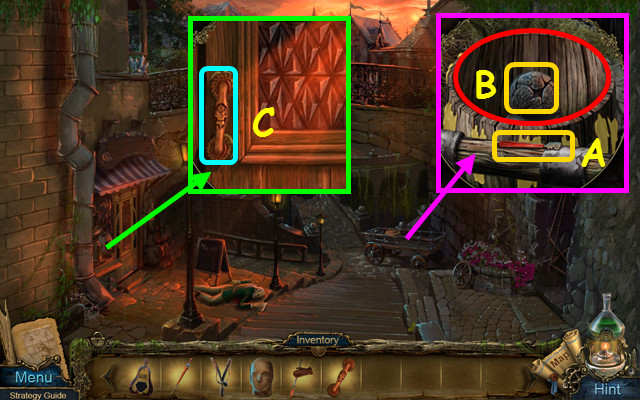
- Take the GLASSCUTTER (A).
- Use the HOT LEVER on the barrel lid; take the BALL (B).
- Use the GLUE, and then the HANDLE on the door (C).
- Walk left into the Store.
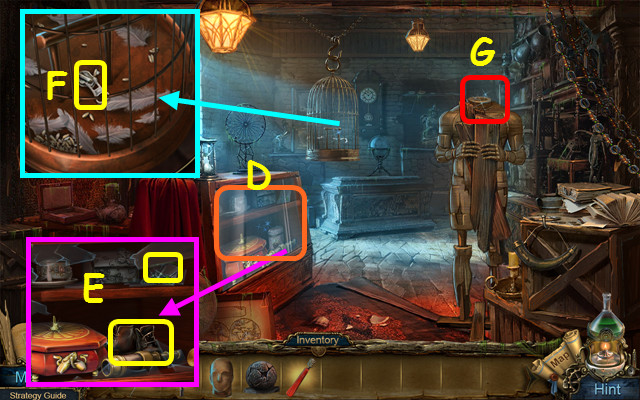
- Use the SLINGSHOT on the display case (D).
- Take the 1/2 GLASS PARTS and the BOOTS (E).
- Use the HOOK to take the ZIPPER PULL (F).
- Place the HEAD on the dummy to get the BOARDS (G).
- Walk down.
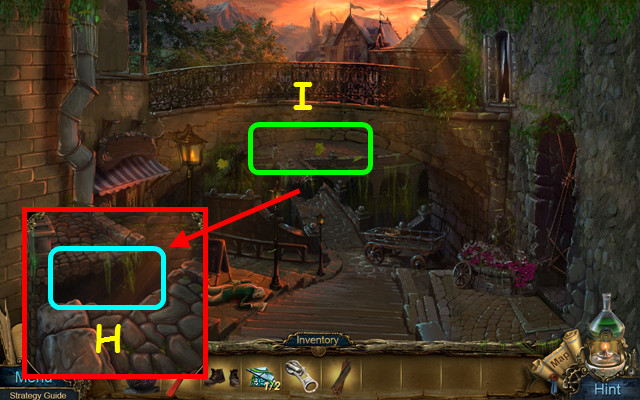
- Place the BOARDS on the bridge (H).
- Walk forward to the Square (I).
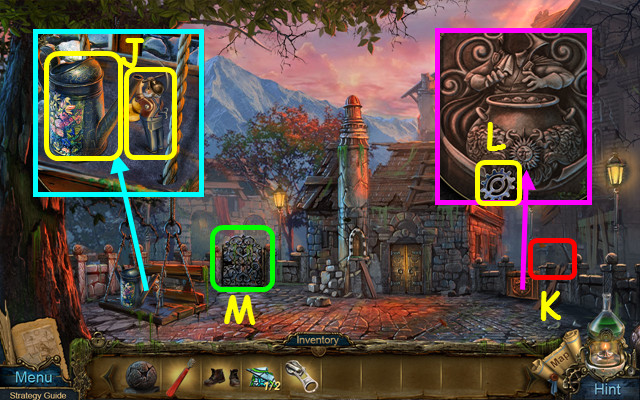
- Take the EMPTY WATERING CAN and the MINER (J).
- Place the BALL on the fencepost (K).
- Take the 1/3 GEAR (L).
- Note the gate (M).
- Walk down twice.
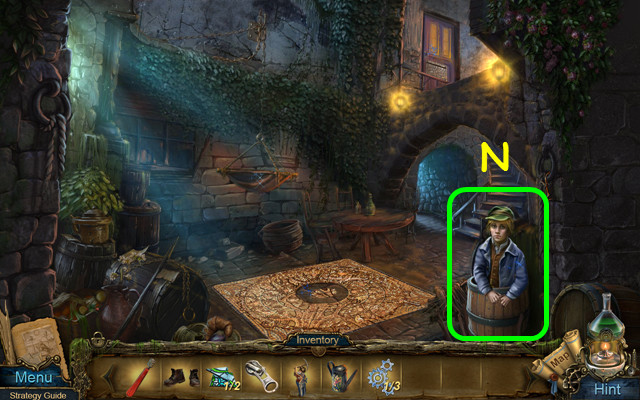
- Give the BOOTS to Billy (N).
- You will earn the THREE-CORNERED KEY.
- Walk forward twice and use the THREE-CORNERED KEY on the gate lock.
- Select the gate.
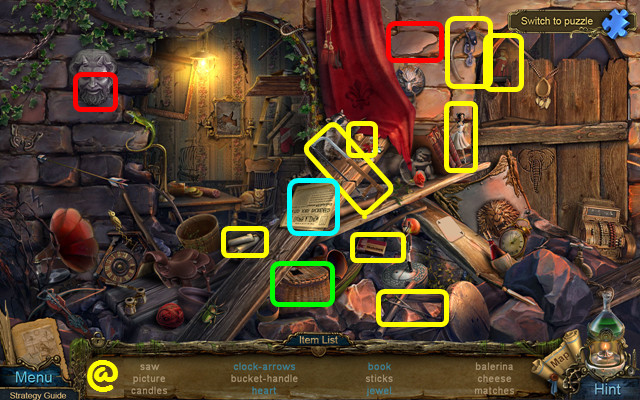
- Play the HOP to earn the SAW (@).
- Travel to the Cemetery.
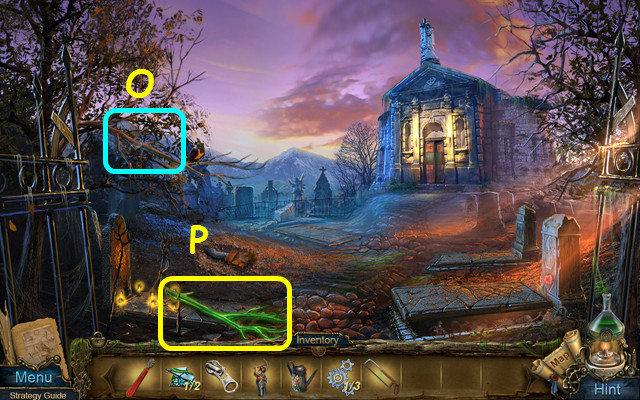
- Use the SAW on the tree branch (O).
- Use the CRUCIBLE on the green branch; take the PERCH (P).
- Walk down twice and enter the Workroom on the right.
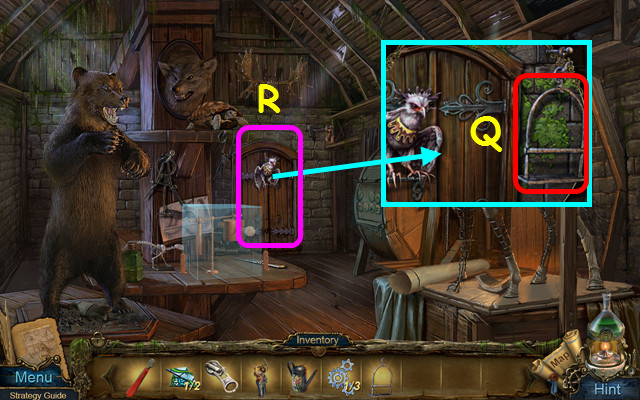
- Hang the PERCH on the hook (Q).
- Walk forward to the Street (R).
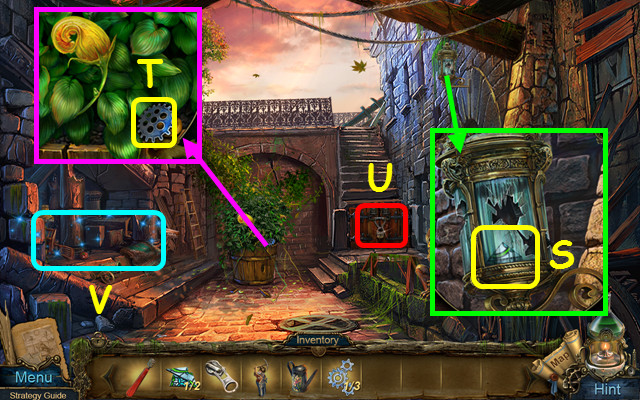
- Use the GLASS CUTTER to take the 2/2 GLASS PARTS (S).
- Take the 2/3 GEAR (T).
- Note the lock on the gate (U).
- Select the debris (V).
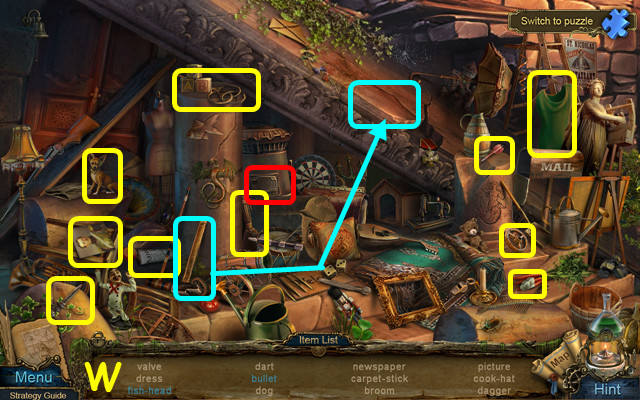
- Play the HOP to earn the VALVE (W).
- Walk down twice and go forward to the Crossroads.
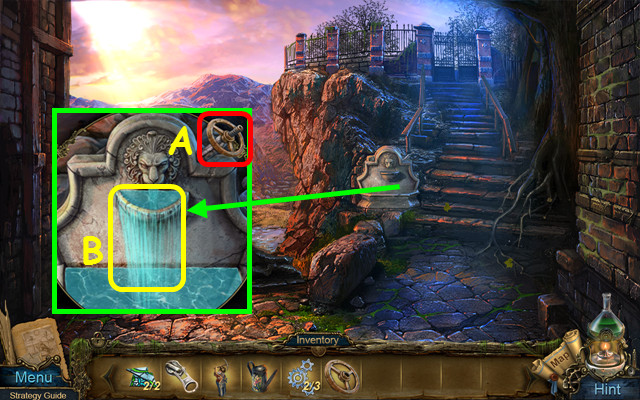
- Use the VALVE on the fountain (A).
- Use the EMPTY WATERING CAN on the water to get the FULL WATERING CAN (B).
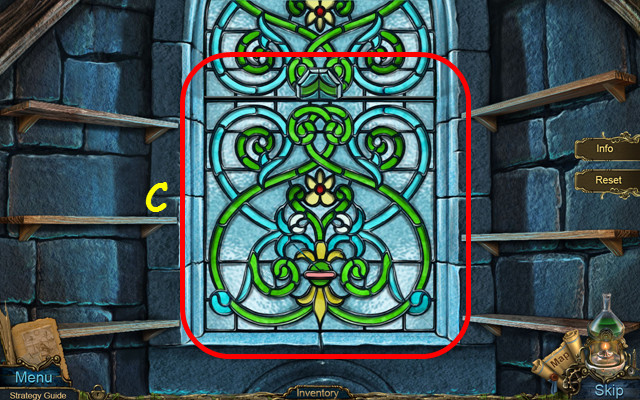
- Walk forward twice and select the stained glass window.
- Place the 2 GLASS PARTS on the shelves.
- Restore the window by placing the pieces into the frame (C).
- You will earn the 3/3 GEAR.
- Return to the Workrooom and select the turtle.
Chapter 4: The Workroom Area
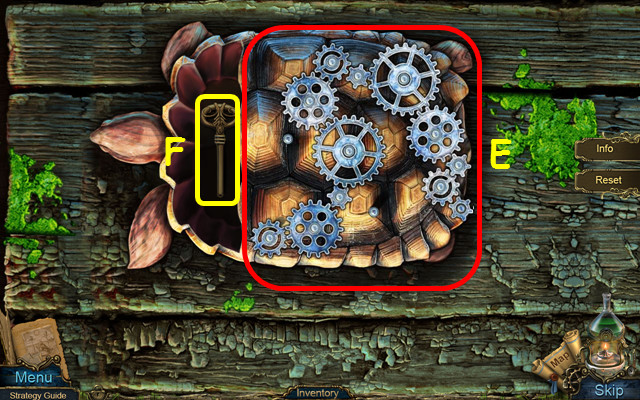
- Place the 3 GEARS on the table.
- Place all the gears into the mechanism (E).
- Take the WICKET KEY (F).
- Walk forward.
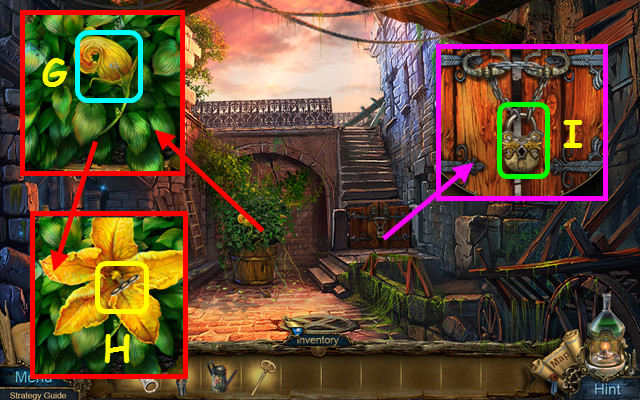
- Use the FULL WATERING CAN on the flower (G).
- Take the HANDCUFFS KEY (H).
- Use the WICKET KEY in the lock (I).
- Select the debris on the left.
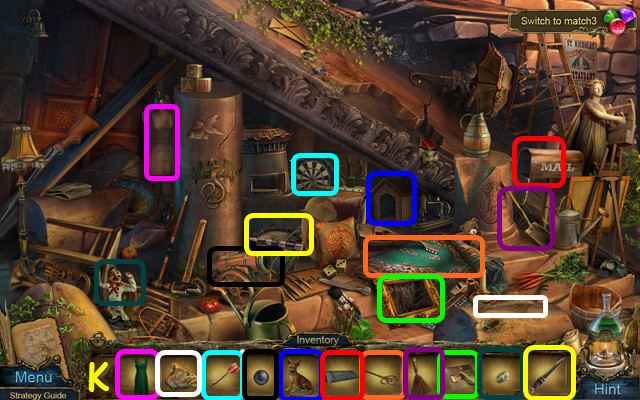
- Play the HOP to earn the 1/3 STICK (K).
- Walk forward to the Bridge.
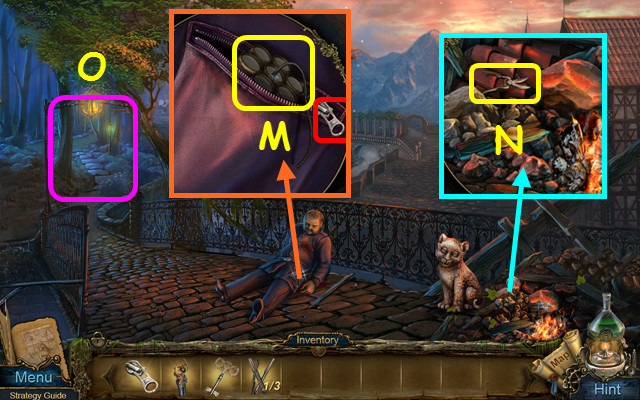
- Use the ZIPPER PULL on the zipper and take the DYNAMITE (M).
- Use the MINER on the rock; take the PRUNERS (N).
- Walk left to the Park (O).
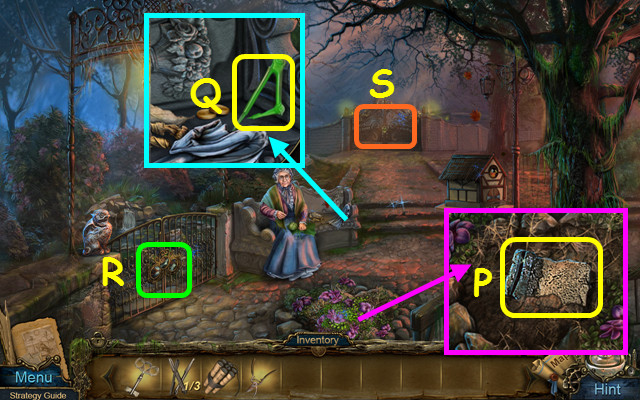
- Use the PRUNERS on the flowers; take the BRICK (P).
- Move the rag and use the CRUCIBLE on the green rods; take the BALLERINA (Q).
- Note the mini-game on the gate (R).
- Note the locked gate (S).
- Travel to the Ladder.
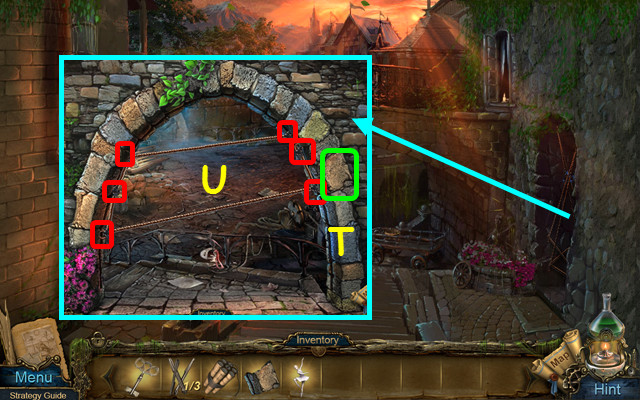
- Place the BRICK in the arch (T).
- Move the hooks (red) so the ropes do not cross (U).
- Walk right to the Terrace.
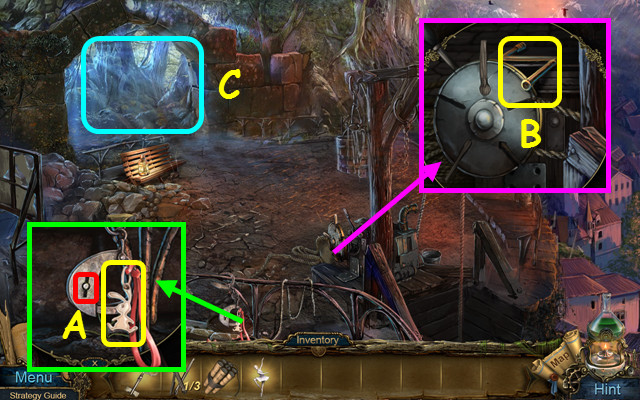
- Use the HANDCUFFS KEY in the lock and take the RABBIT (A).
- Take the HANDLE (B).
- Enter the Forest (C).
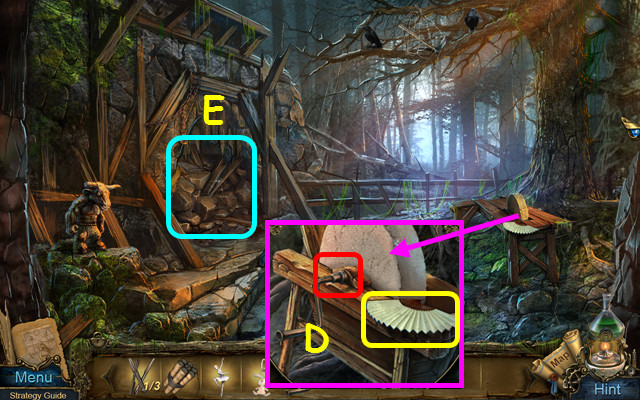
- Place the HANDLE on the stone wheel and take the FAN (D).
- Use the DYNAMITE on the rocks; select the debris (E).
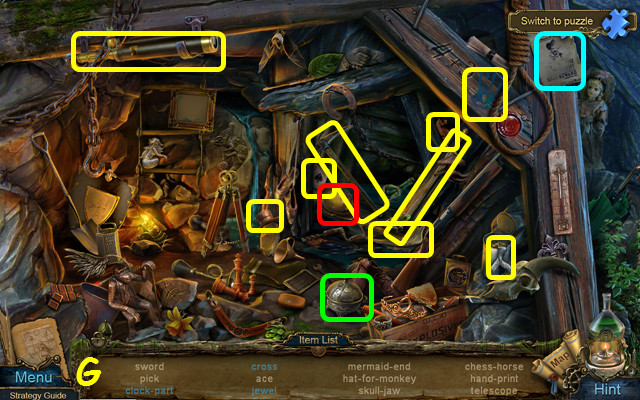
- Play the HOP to earn the SWORD (G).
- Use the SWORD on the stone wheel to get the SHARP SWORD.
- Walk down twice and go left into the Store.
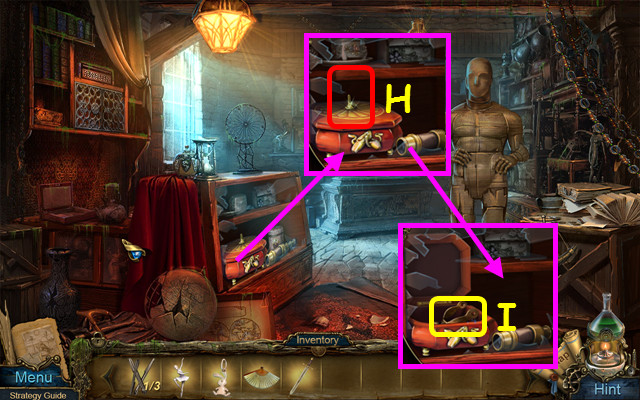
- Place the BALLERINA on the box (H).
- Take the SPUR (I).
- Walk down, right, and left.
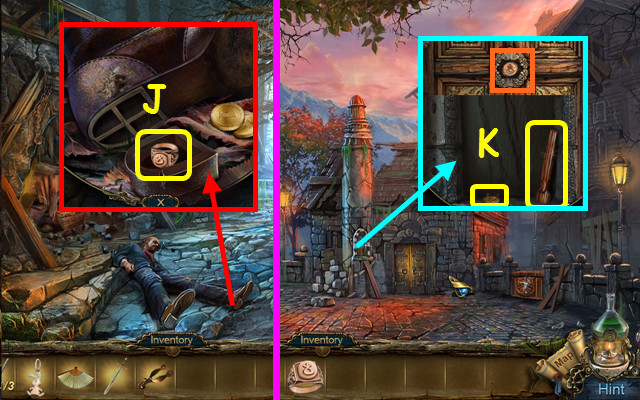
- Use the SPUR on the HEEL; take the RING (J).
- Walk down twice and go forward.
- Use the RING in the lock; take the STAR EMBLEM and the 2/3 STICKS (K).
- Walk down twice and select the barrels.
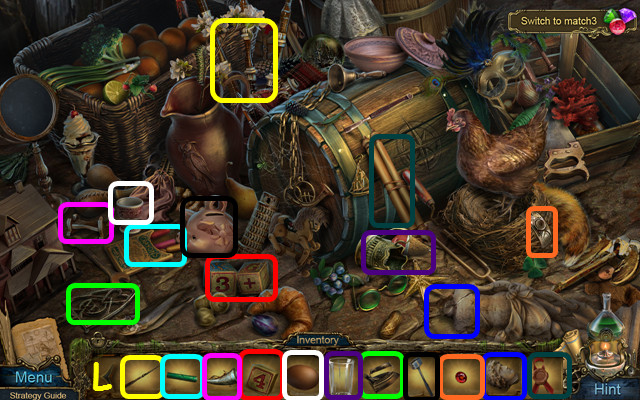
- Play the HOP to earn the SACK (L).
- Select the 2nd floor door.
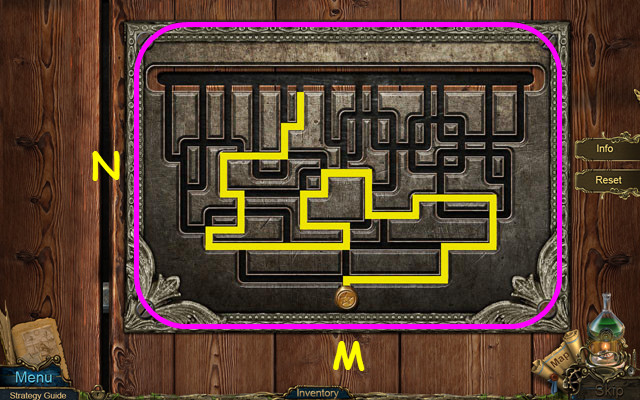
- Place the STAR EMBLEM at the bottom of the board (M).
- Drag the button to the top of the grid; it will fall if you choose the wrong path.
- Use the path shown to solve (N).
- Enter Uncle's Room.
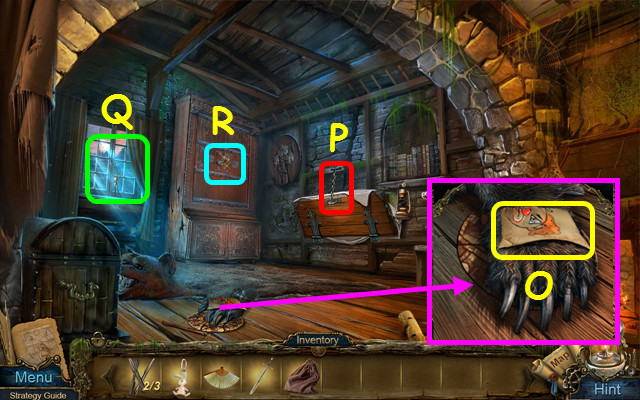
- Take the PHOTO (O).
- Use the SHARP SWORD on the chain (P).
- Note the window (Q).
- Note the lock on the cabinet (R).
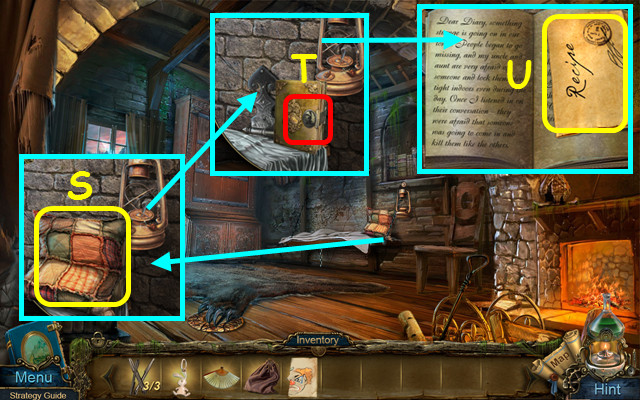
- Take the PILLOW (S).
- Use the RABBIT on the lock (T).
- Take the RECIPE (U).
- Return to the Park.
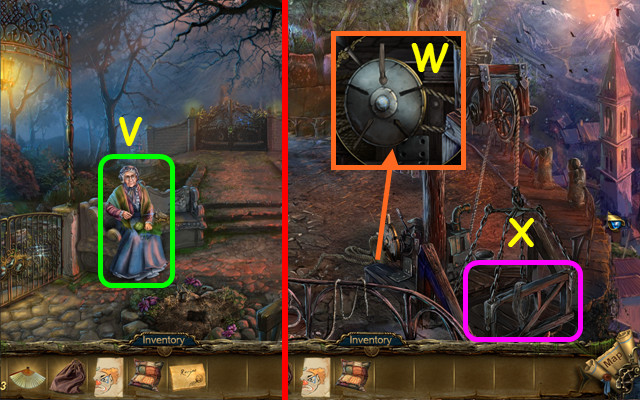
- Give the RECIPE to Samantha; you will receive the 3/3 STICK (V).
- Travel to the Terrace.
- Use the STICKS on the wheel (W).
- Enter the elevator to the Lowland (X).
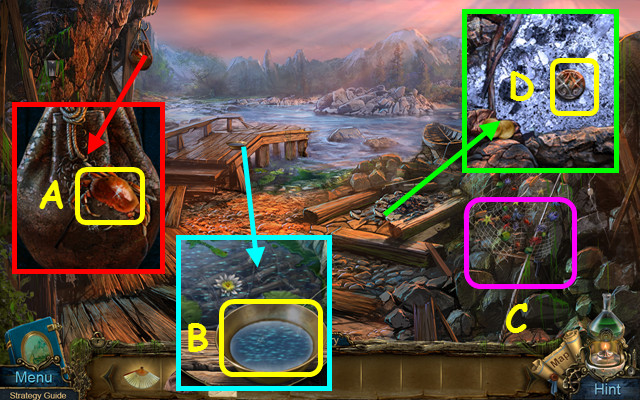
- Take the CRAB (A).
- Take the PLATE (B).
- Note the net (C).
- Use the FAN on the ash; take the HANDLE (D).
- Walk down.
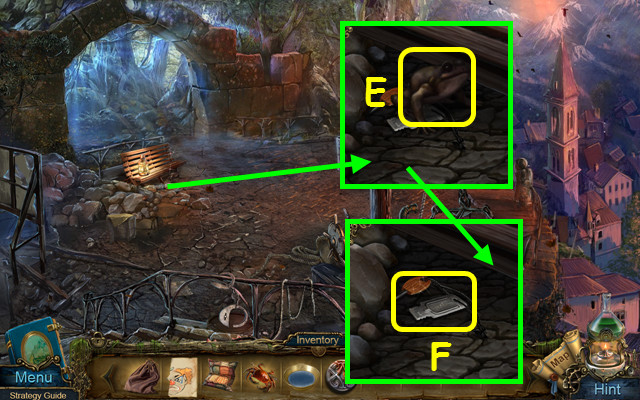
- Use the PLATE on the frog; take the PLATE WITH FROG (E).
- Take the FLINT (F).
- Travel to the Crossroads.
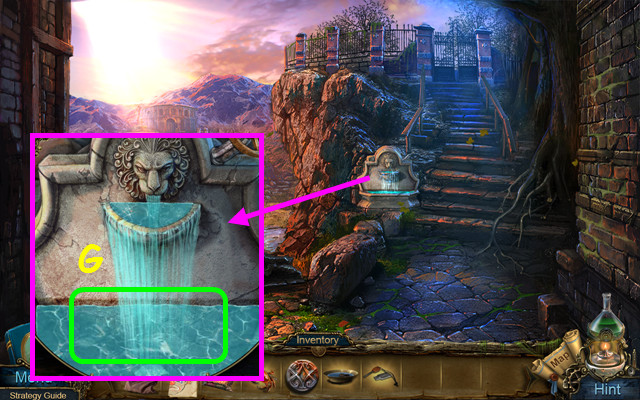
- Use the PLATE WITH FROG on the water to get the HEX TILE (G).
- Travel to the Store.
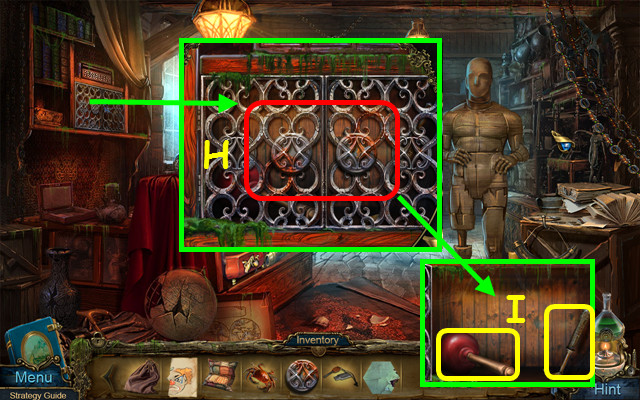
- Place the HANDLE on the cabinet and rotate the handles to the correct position (H).
- Take the PLUNGER and the CROWBAR (I).
- Walk down 3 times.
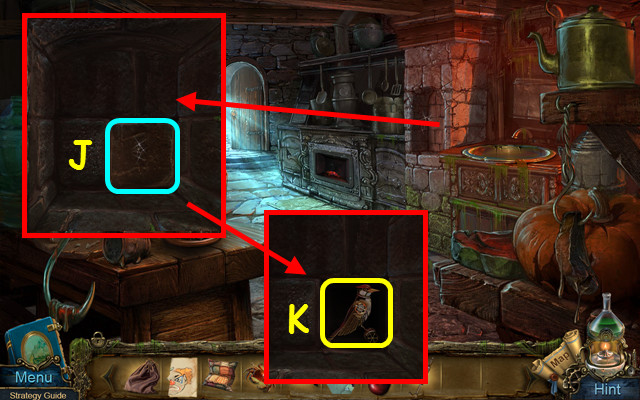
- Use the PLUNGER on the stone (J).
- Take the MECHANICAL WOOD PECKER (K).
- Travel to the Park and select the left gate.
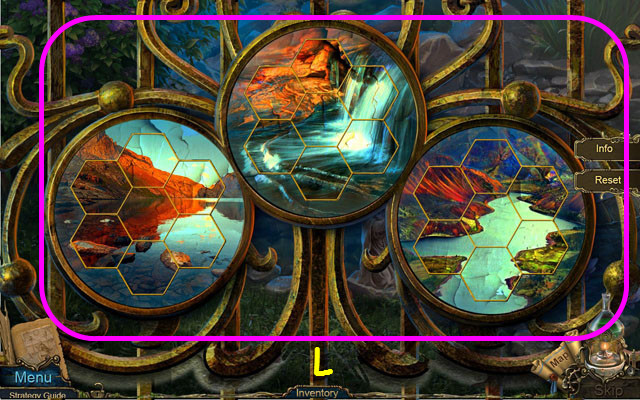
- Place the HEX TILE on the gate.
- Restore the 3 pictures; select 2 pieces to swap positions (L).
- Select the area behind the gate.
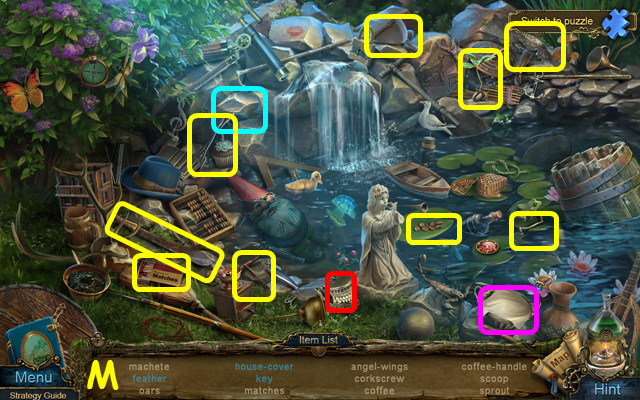
- Play the HOP to earn the MACHETE (M).
- Travel to Uncle's Room.
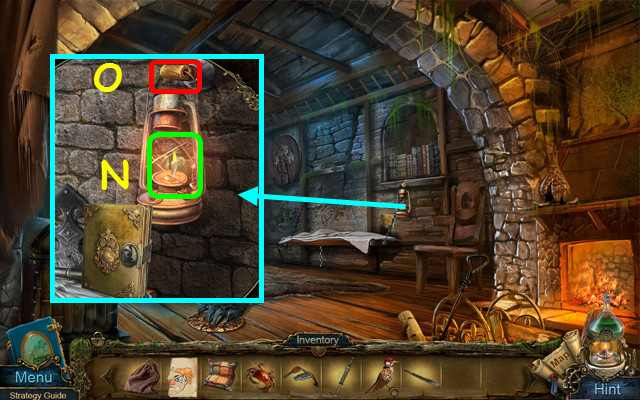
- Use the FLINT on the lamp (N).
- Use the MECHANICAL WOODPECKER on the wood; take the LAMP (O).
- Return to the Bridge.
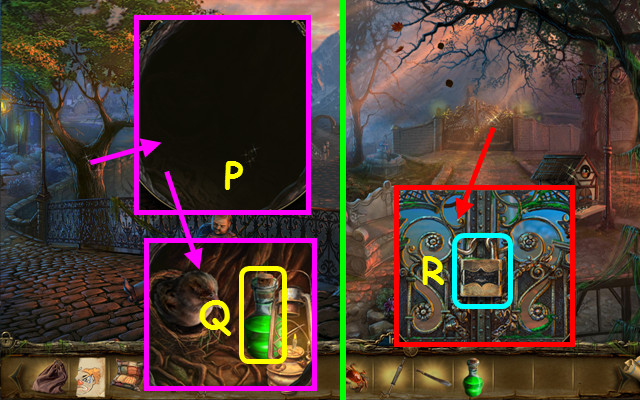
- Place the LAMP in the dark hole (P).
- Take the ACID (Q).
- Walk left.
- Use the ACID on the lock (R).
- Walk forward to the Ravine.
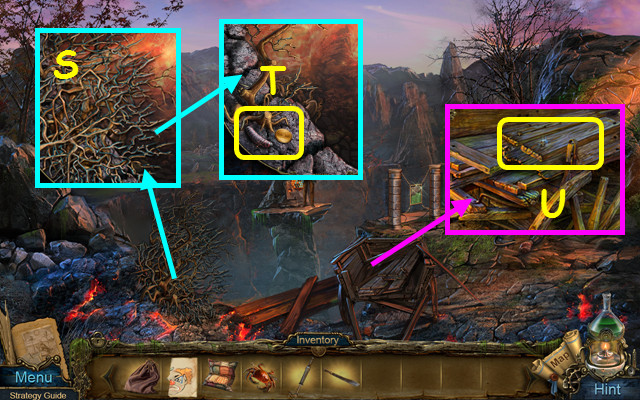
- Use the MACHETE on the brush (S).
- Take the CATERPILLAR (T).
- Use the CROWBAR to take the BOARDS (U).
- Return to the Bridge.
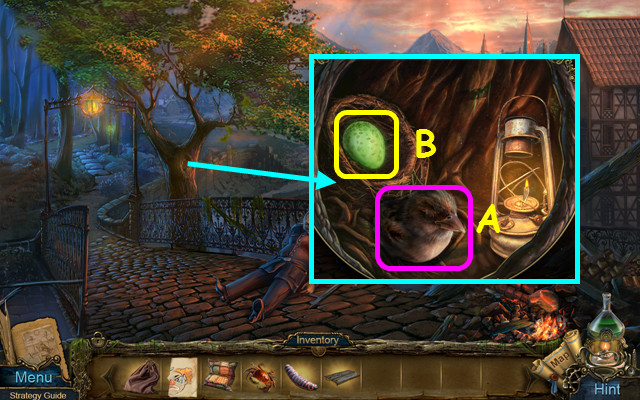
- Give the CATERPILLAR to the bird (A).
- Use the CRUCIBLE on the green egg; take the CHIP (B).
- Travel to the Workroom and select the tokens mini-game.
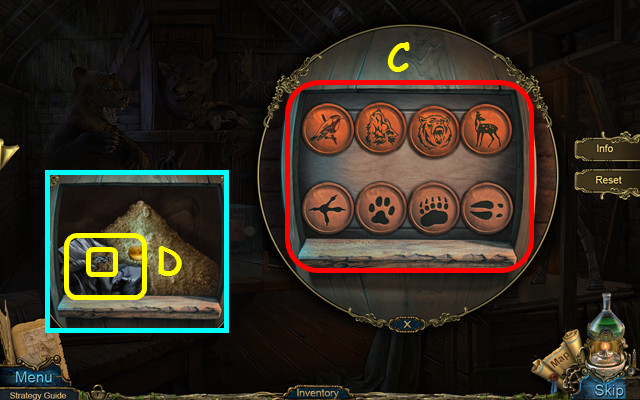
- Place the CHIP with the others.
- Move the upper tokens over the correct footprint (C).
- Take the RAG; use the SACK to collect the SEEDS (D).
- Walk down and forward.
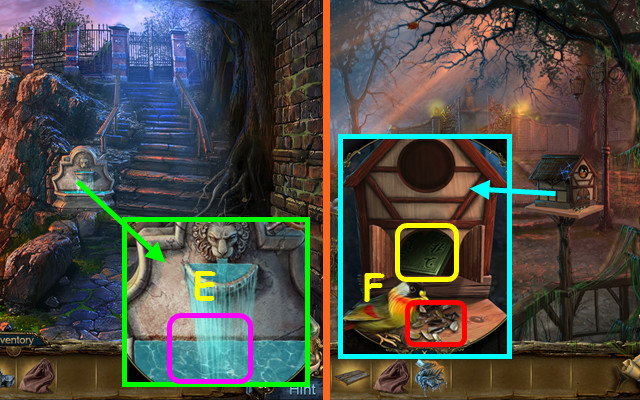
- Use the RAG on the fountain to get the WET RAG (E).
- Return to the Park.
- Give the SEEDS to the bird; take the SYMBOL (F).
- Select the pond on the left.
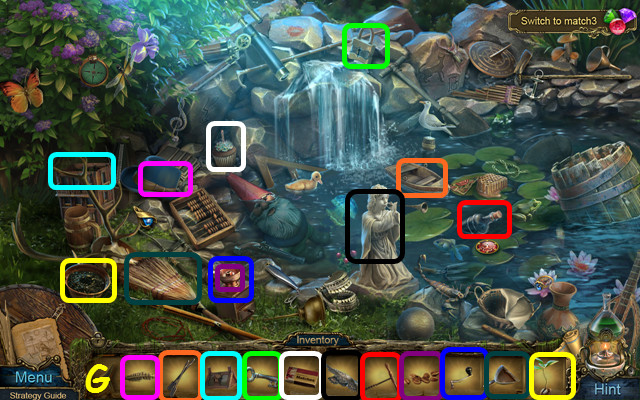
- Play the HOP to earn the ELEMENTAL (G).
- Walk forward to the Ravine.
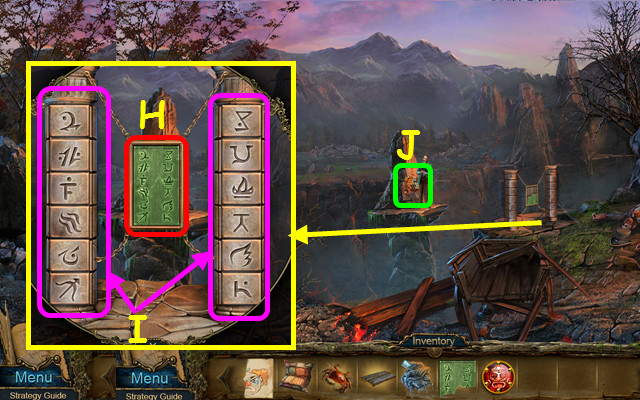
- Place the SYMBOL in the frame (H).
- Change the symbols on the pillars to match those in the frame (I).
- Select the mini-game on the island (J).
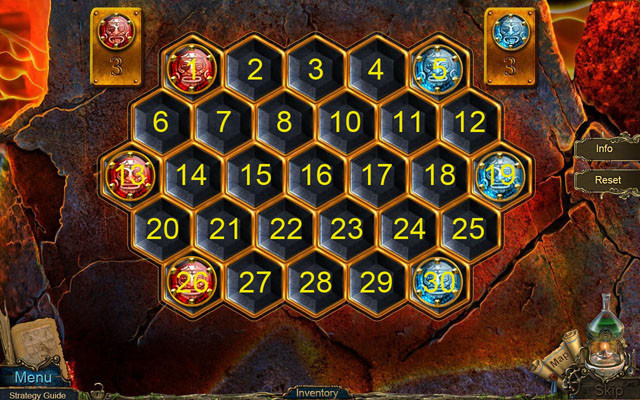
- Place the ELEMENTAL on the board.
- You are red, playing against the blue chips.
- Move a chip one place to duplicate and change the surrounding chips red.
- You can also jump a blue chip; you will leave an empty space.
- Have more chips when the board is full to win.
- Our solution was: 1-6, 26-20, 6-7, 6-14, 1-2, 14-15, 26-21, 26-27, 27-28, 22-17, 24-25, 19-12, and 5-4.
- The mini-game is randomized; the blue chips will move differently each time you play.
- Take the MAGNIFYING GLASS.
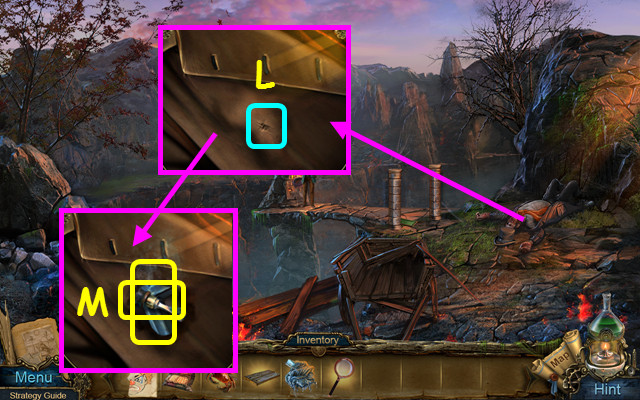
- Use the MAGNIFYING GLASS on the rip (L).
- Take the SCREWDRIVER and the CROSS (M).
- Travel to the Cemetery.
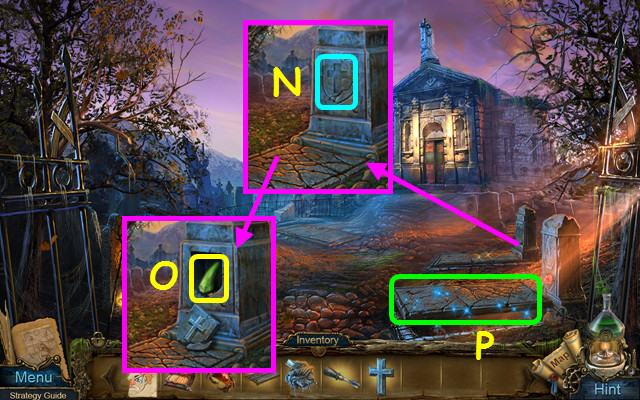
- Place the CROSS into the indentation (N).
- Use the CRUCIBLE on the green dragon's tooth; take the KNIFE (O).
- Select the open grave (P).
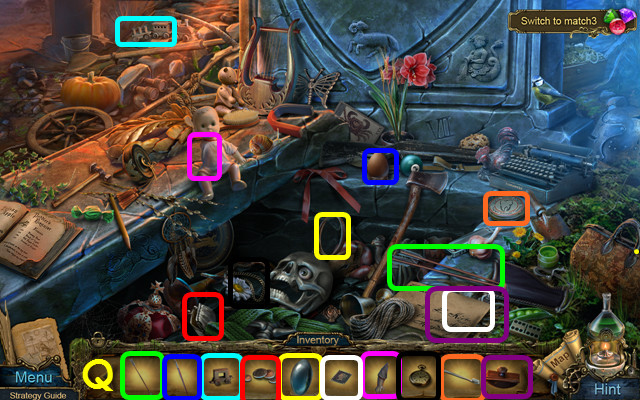
- Play the HOP to earn the EYE (Q).
- Walk forward.
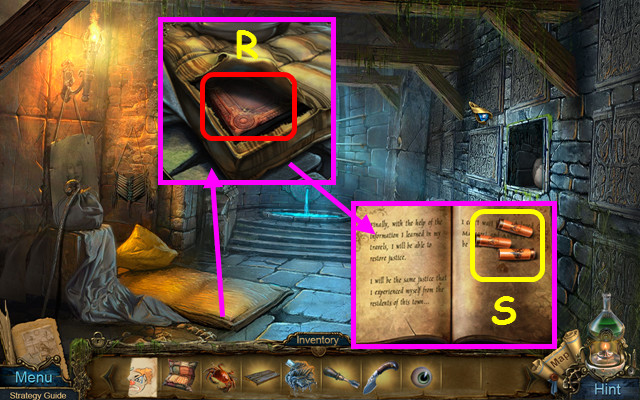
- Use the KNIFE on the mattress and read the book (R).
- Take the note and the SHOTGUN CARTRIDGES (S).
- Return to the Ravine.
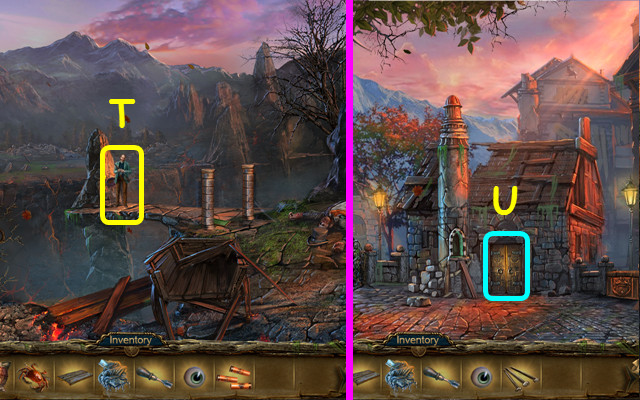
- Give the SHOTGUN CARTRIDGES to Robert (T).
- You will earn the NAILS.
- Travel to the Square.
- Select the door (U).
Chapter 5: The Alchemist
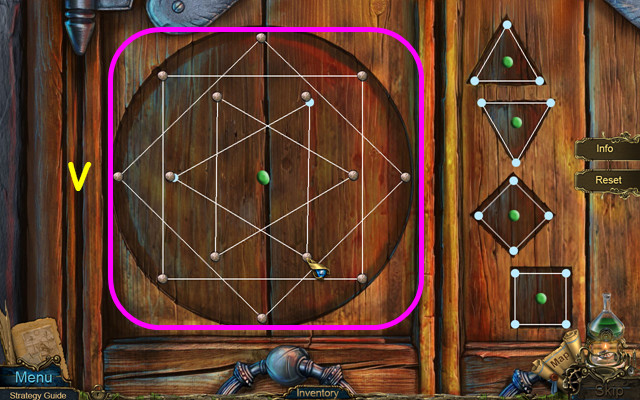
- Place the NAILS on the boards.
- Place the 4 figures onto the board (V).
- Stretch and rotate the figures so the points each hit a nail.
- Walk forward to the Hall.
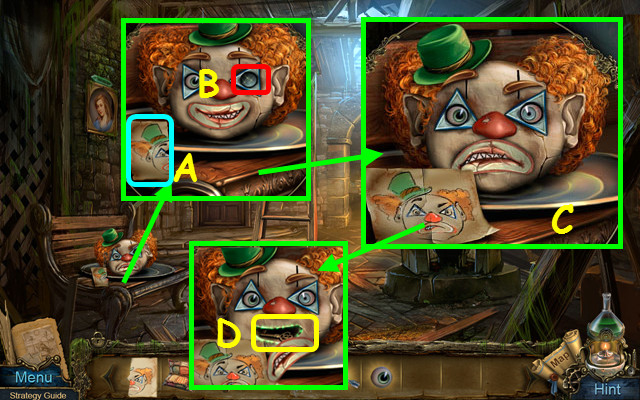
- Place the PHOTO next to the matching half (A).
- Place the EYE on the clown face (B).
- Move the pieces of the face to match the photo (C).
- Take the HATCH KEY (D).
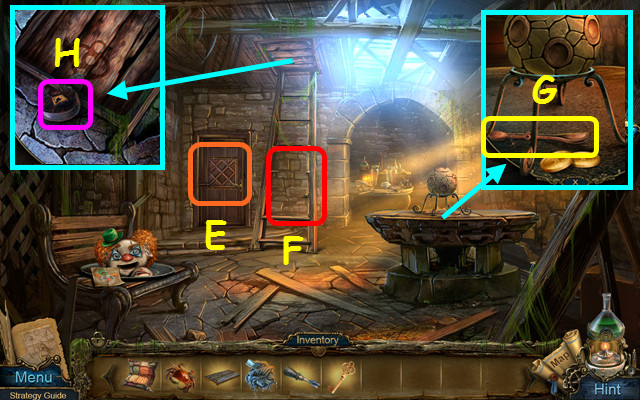
- Note the door mini-game (E).
- Place the BOARDS on the ladder (F).
- Take the 1st BALANCE (G).
- Use the HATCH KEY on the lock (H).
- Select the open hatch.
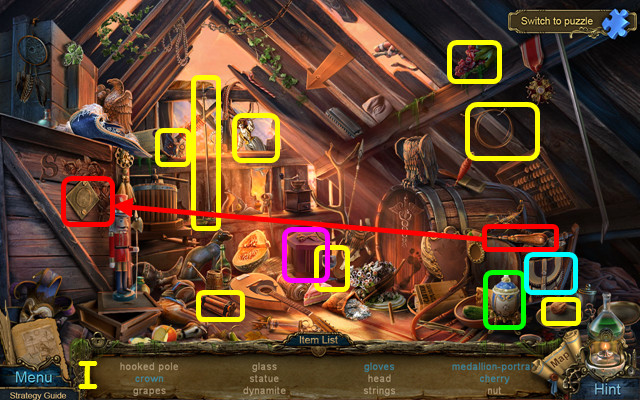
- Play the HOP to earn the GAFF (I).
- Return to the Lowland.
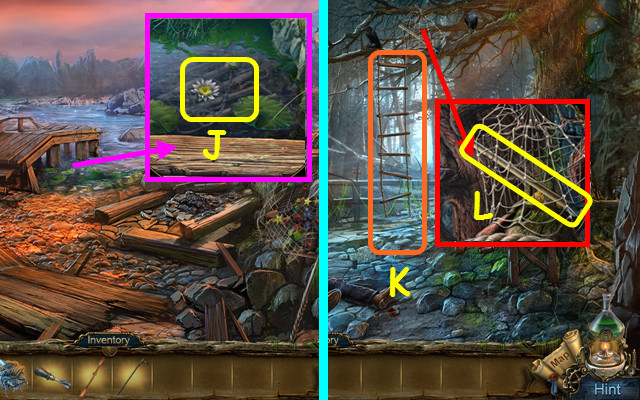
- Use the GAFF to take the LADDER (J).
- Use the map to travel to the Forest.
- Place the LADDER in the tree (K).
- Use the CRAB on the net; take the LEVER (L).
- Select the debris on the left.
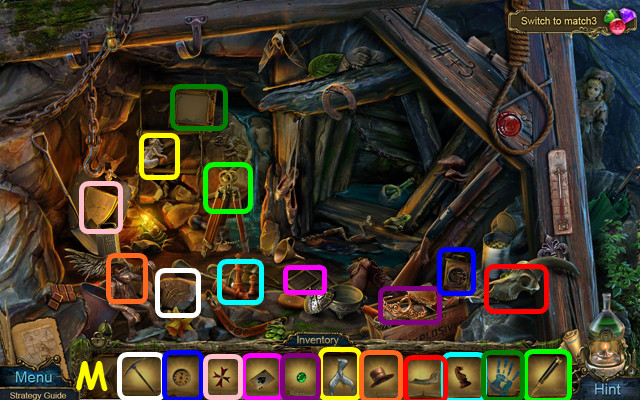
- Play the HOP to earn the WING (M).
- Travel to Uncle's Room.
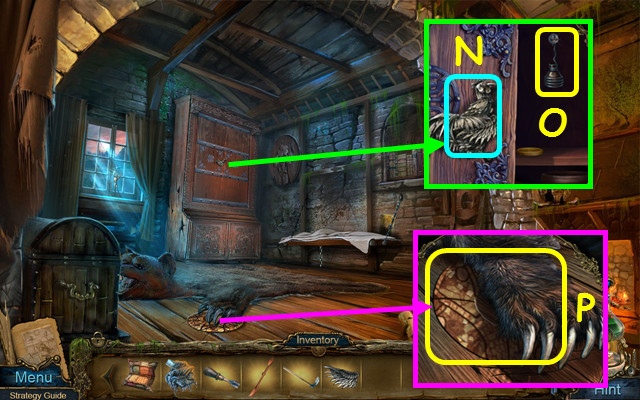
- Place the WING on the rooster (N).
- Use the SCREWDRIVER to take the FUNNEL (O).
- Use the LEVER on the paw; take the CELL (P).
- Walk down and select the floor mini-game.
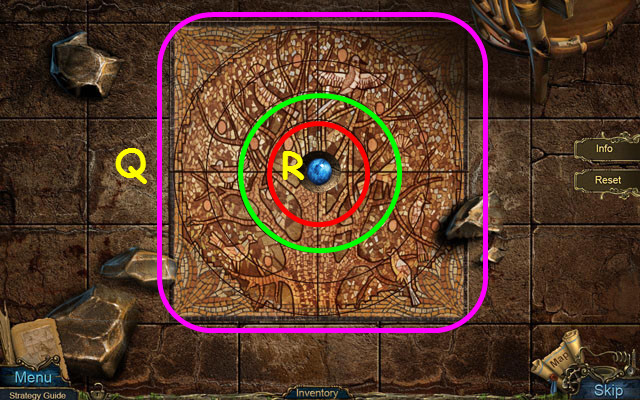
- Place the CELL in the center of the tile.
- Rotate the tiles to restore the mosaic (Q).
- Move the red ring clockwise 1/2 turn, and then turn the green ring 1/4 clockwise to solve.
- Take the 1/4 STONE (R).
- Return to the Hall and select the open hatch.
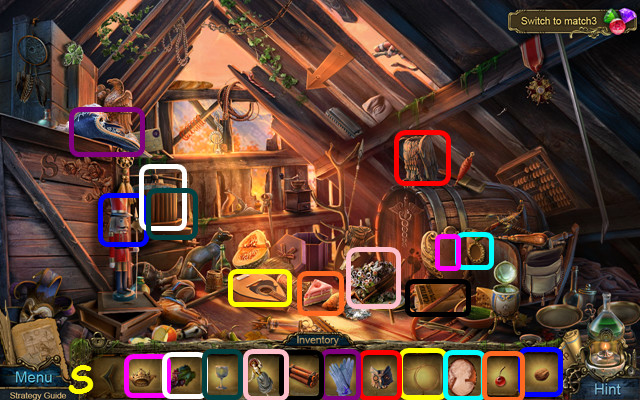
- Play the HOP to earn the PLASTER (S).
- Select the door mini-game.
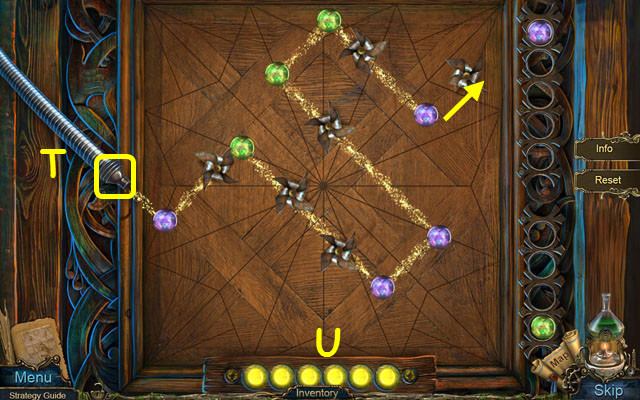
- Place the FUNNEL on the tube (T).
- Place the spheres on the board to direct the air to all the fans (U).
- Walk forward to the Alchemist's Room.
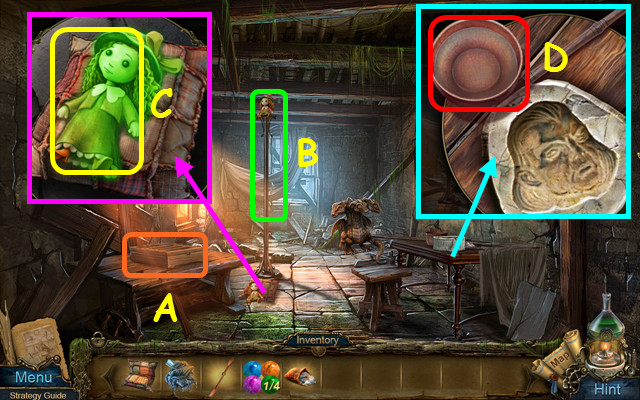
- Note the spring mini-game (A).
- Use the PILLOW on the pole (B).
- Use the CRUCIBLE on the green doll; take the GIRL EMBLEM (C).
- Use the PLASTER on the bowl to make the HEAD (D).
- Walk down twice to the Square.
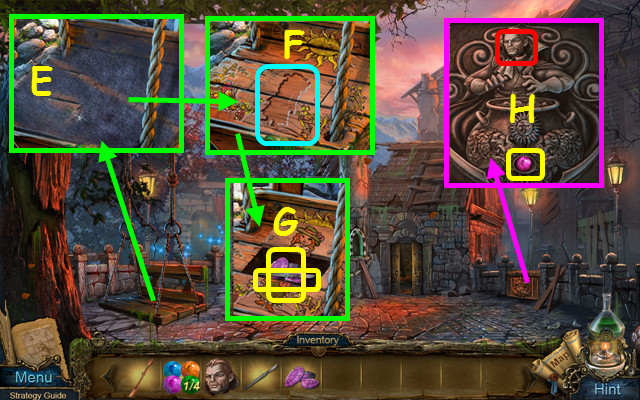
- Use the WET RAG on the swing seat (E).
- Place the GIRL EMBLEM in the indentation (F).
- Take the SHELLFISH and the SCALPEL (G).
- Place the HEAD on the right gate; take the 2/4 STONE (H).
- Select the left gate area.
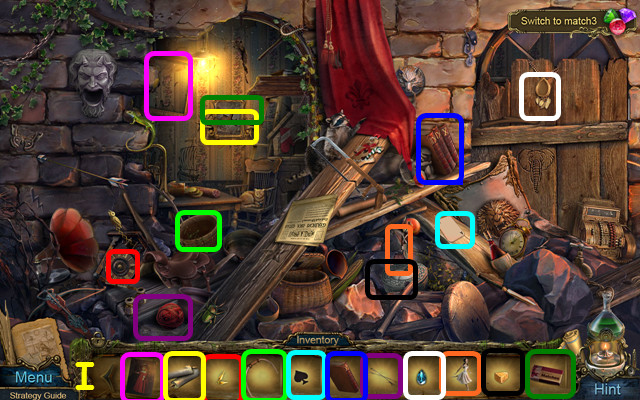
- Play the HOP to earn the PAPER KNIFE (I).
- Walk down.
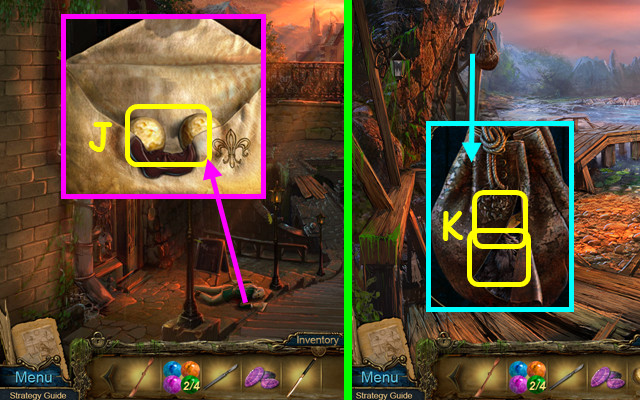
- Use the PAPER KNIFE on the envelope; take the BALL (J).
- Return to the Lowland.
- Use the SCALPEL on the bag; take the BRUSH and the DOLL (K).
- Select the net on the right.
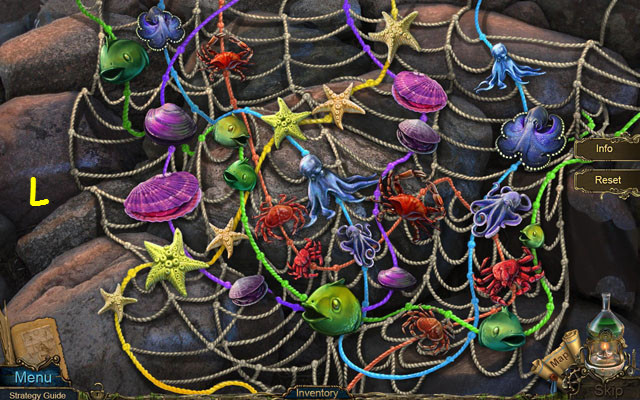
- Place the SHELLFISH on the net.
- Move all the animals to a rope with the same color (L).
- Take the PICK.
- Walk down.
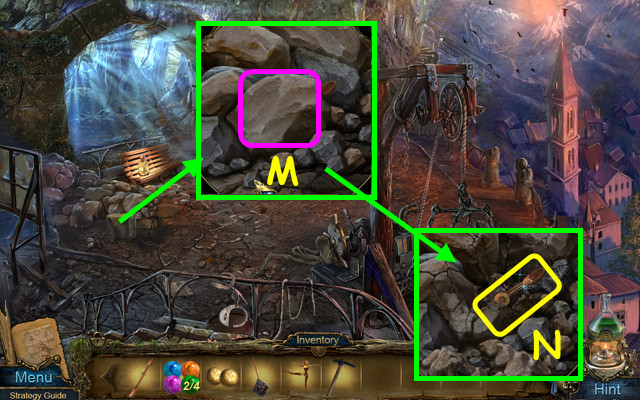
- Use the PICK on the rocks (M).
- Take the 2nd BALANCE (N).
- Walk down twice.
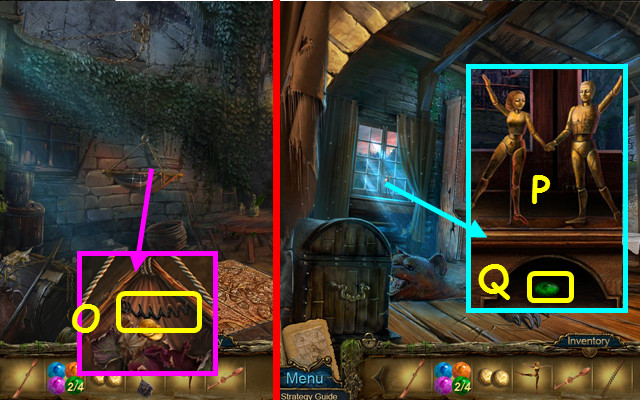
- Use the BRUSH on the cobwebs; take the SPRING (O).
- Enter Uncle's Room.
- Place the DOLL on the stand and move the dolls to match the carving (P).
- Take the 3/4 STONE (Q).
- Travel to the Alchemist's Room and select the spring mini-game.
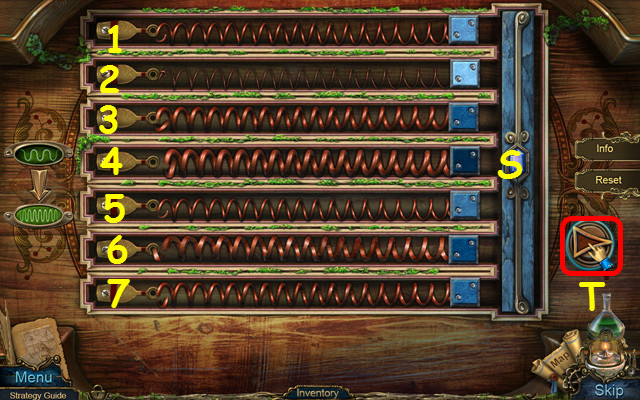
- Place the SPRING in the device.
- Swap the springs so the squares hit the right end at the same time (S).
- Press the button to test your solution (T).
- Swap springs 1-6, 2-7, 7-4, and 6-4.
- Take the 4/4 STONE.
- Walk down.
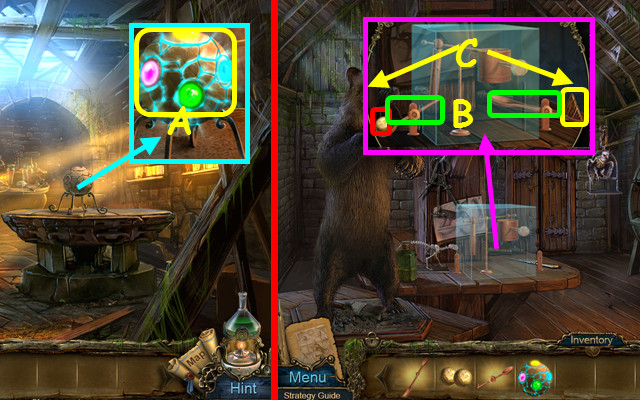
- Place the 4 STONES on the ball; take the ARTIFACT (A).
- Return to the Workroom.
- Place the 1st BALANCE on the right, and the 2nd BALANCE on the left (B).
- Place the BALL on the balances; take the TRIANGLE (C).
- Travel to the Amphitheater.
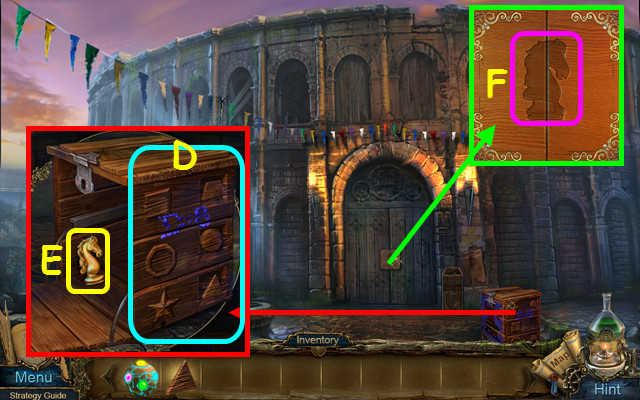
- Place the TRIANGLE on the box; swap the figures on the right to correspond to the left (D).
- Take the DOOR PART (E).
- Use the DOOR PART on the box (F).
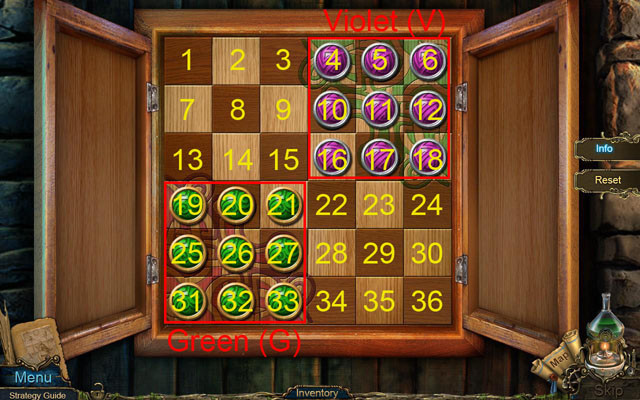
- Swap the location of the chips.
- Move the chips as a chess knight; 2 spaces ahead, and then a left or right.
- Move the chips: V16-V29, G20-G16, G21-G8, V17-V21, G27-G35, G33-G22, G26-G15, G32-G28, V29-V33, G28-G17, V18-V29, G22-G18, V10-V14, V14-V27, V21-V32, V29-V21, V11-V22.
- V22-V26, G35-G24, V12-V23, V5-V9, V9-V20, V6-V10, G25-G14, G17-G6, G15-G11, G14-G3, V10-V14, G19-G15, V14-V25, V20-V28, G31-G20, V27-V31, V4-V17, G8-G4, G16-G5.
- G20-G16, V23-V27, V28-V20, G16-G12, V17-V28, G3-G16, G15-G23, G23-G10, V27-V19, V28-V36, V36-V23, V23-V27, G24-G28, and G28-G17.
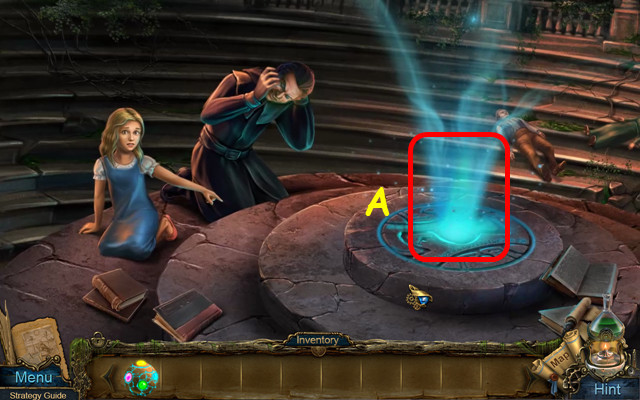
- Walk forward.
- Use the ARTIFACT on the blue glow (A).
- Congratulations! You have completed Mystery Tales: The Lost Hope!
Created at: 2014-02-23

