

Walkthrough Menu
- General Tips
- Chapter 1: The Inn
- Chapter 2: Kevin's House
- Chapter 3: The Theater
- Chapter 4: The House
- Chapter 5: The Boat
General Tips
- This is the official guide for Mystery Tales: The Twilight World!
- This guide does not mention each time you have to zoom into a location; the screenshots show each zoom scene.
- Hidden-object puzzles are referred to as HOPs. This guide does not show screenshots of the HOPs, however, it is mentioned when a HOP is available and the inventory item collected.
- This guide will give step-by-step solutions for all puzzles that are not random. Please read the instructions in the game for each puzzle.
- Use the map to travel quickly to a location.
Chapter 1: The Inn
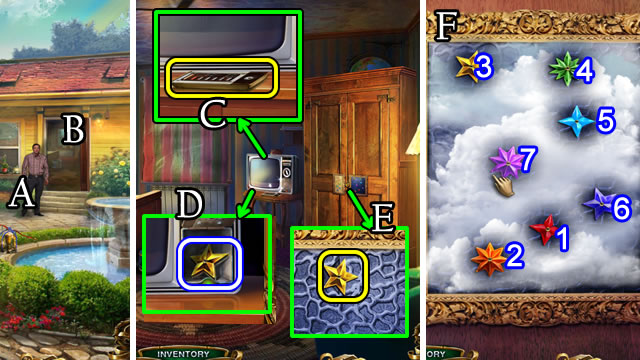
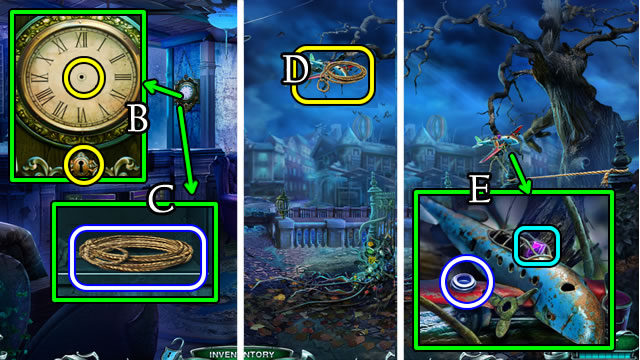
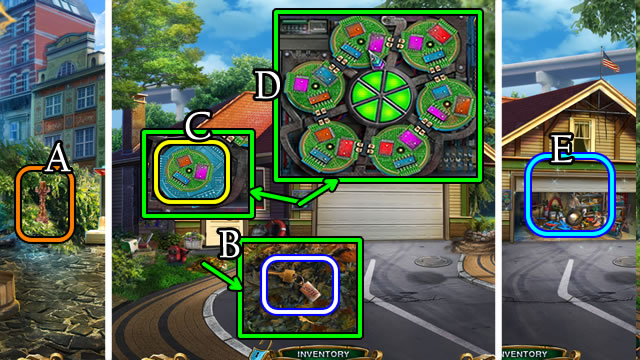
- Speak to the manager (A); enter the Hotel Room (B).
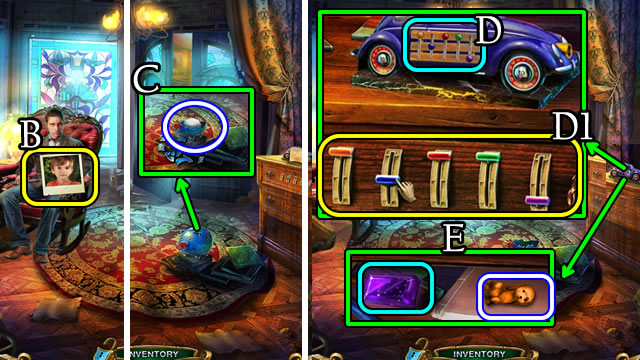
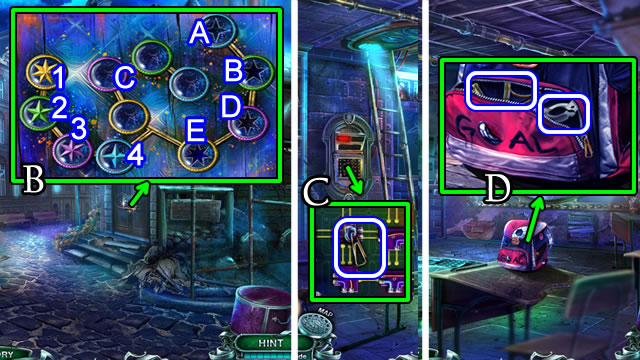
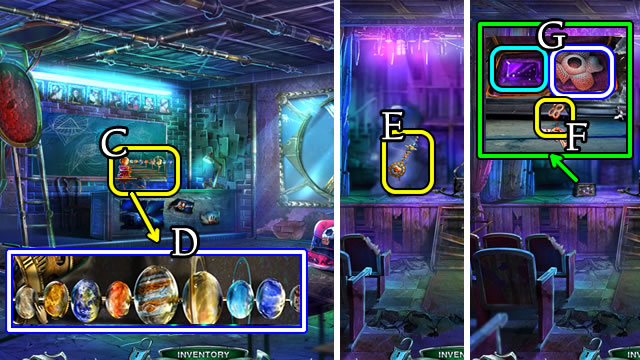
- Select the remote control (C); take the STAR (D).
- Place the STAR (E) for a puzzle.
- Solution (F). 1-7.
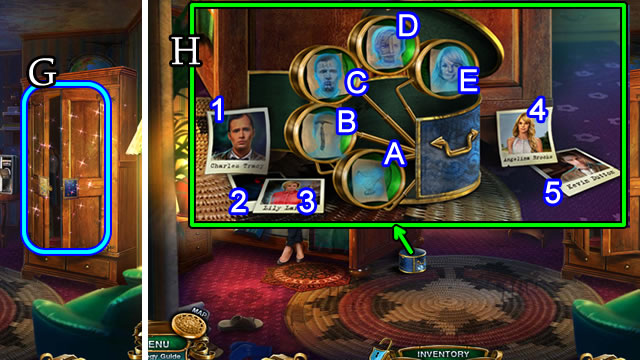
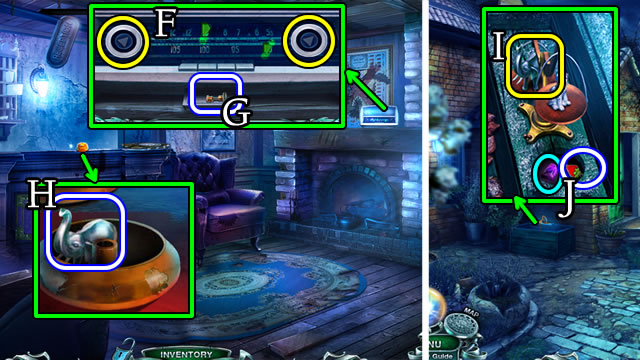
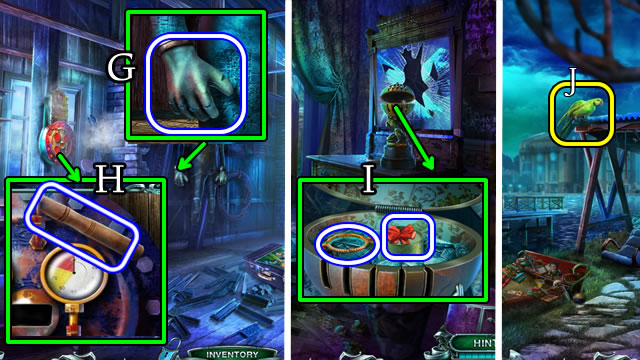
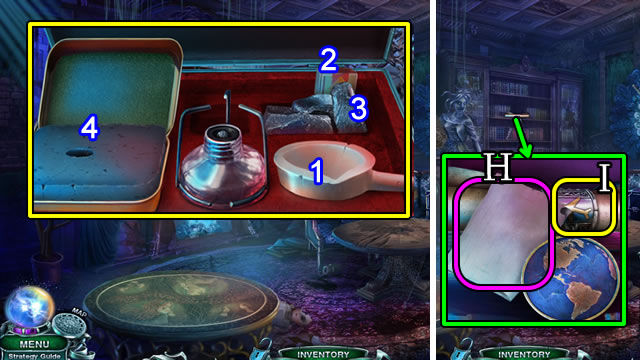
- Play the HOP (G); receive PHOTOS.
- Select the hatbox (G2); open the hatbox and read the note.
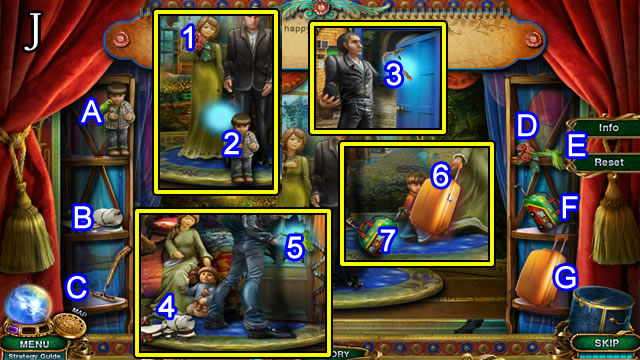
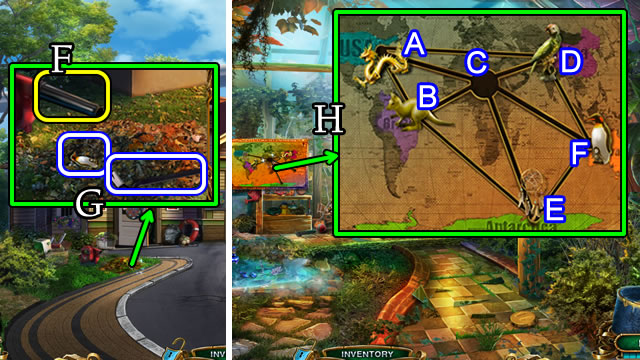
- Place the PHOTOS for a mini-game.
- Solution (H). 1-C; 2-A; 3-D; 4-E; 5-B.
- Select the box to receive the Magic Box in the user interface.
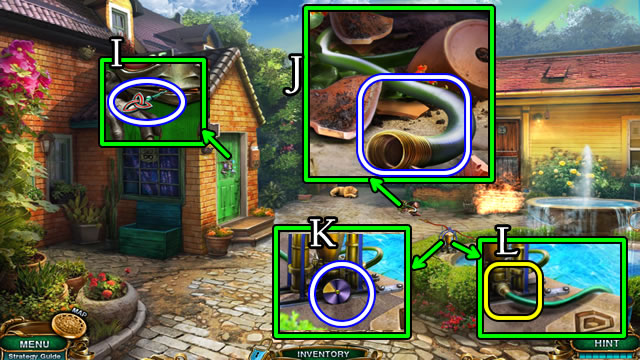
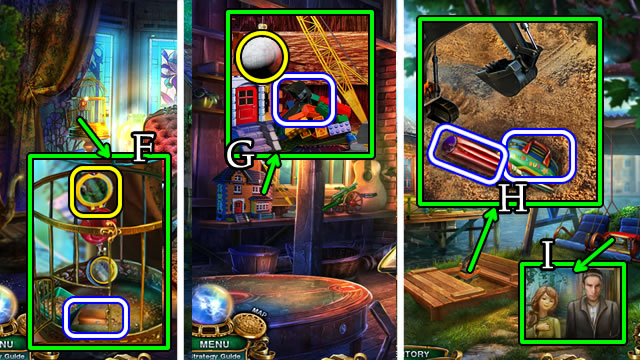
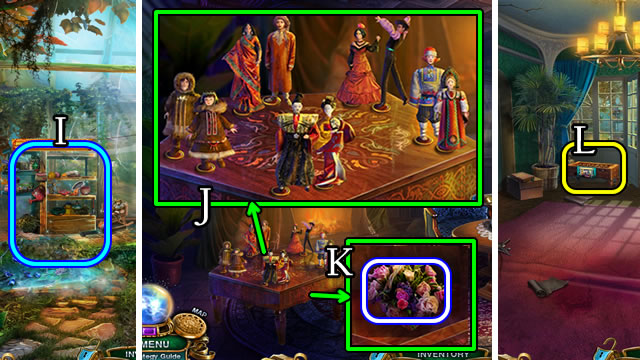
- Take the HAIR PIN (I).
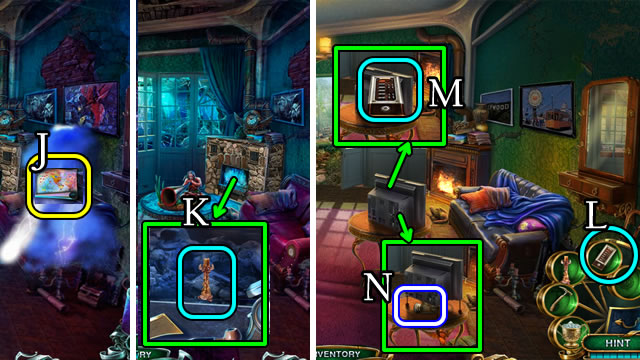
- Uncover and take the HOSE (J).
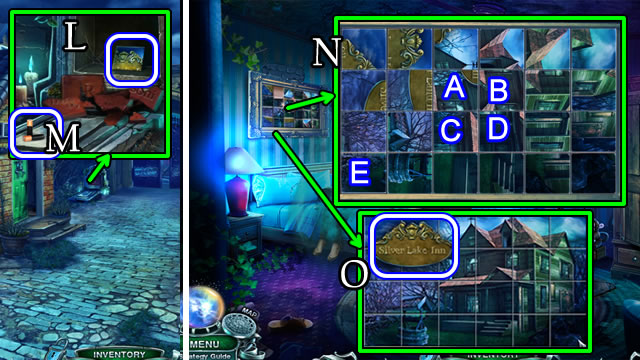
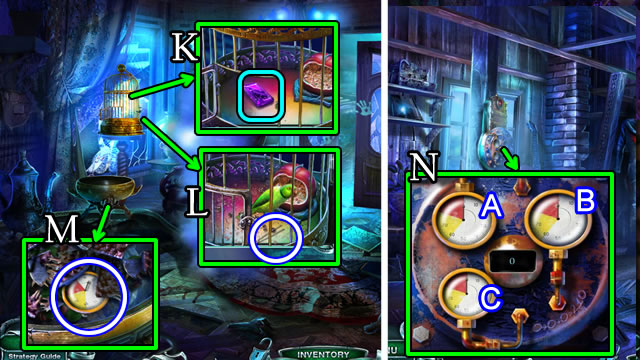
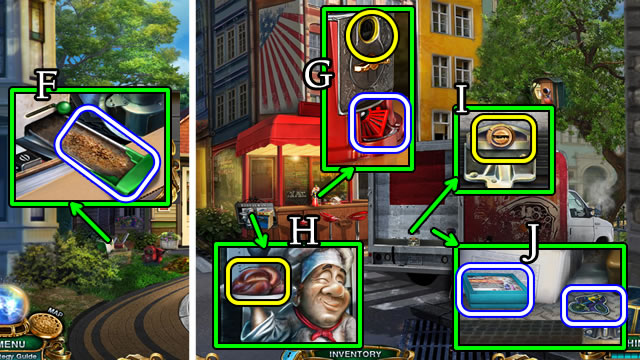
- Take the CIRCLE (K); place the HOSE (L).
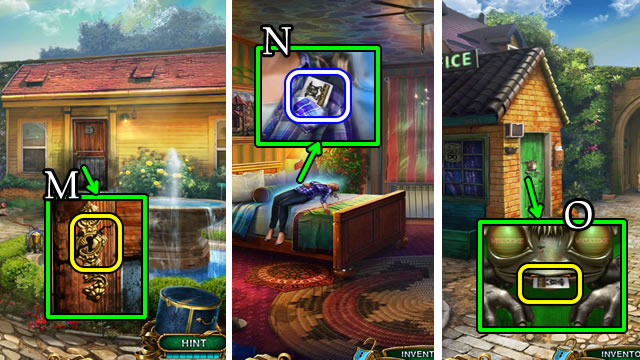
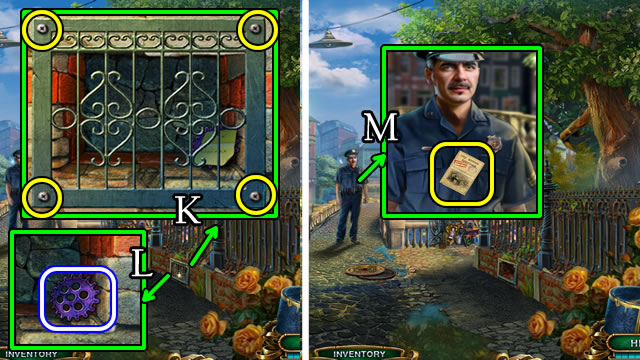
- Use the HAIR PIN (M); walk forward.
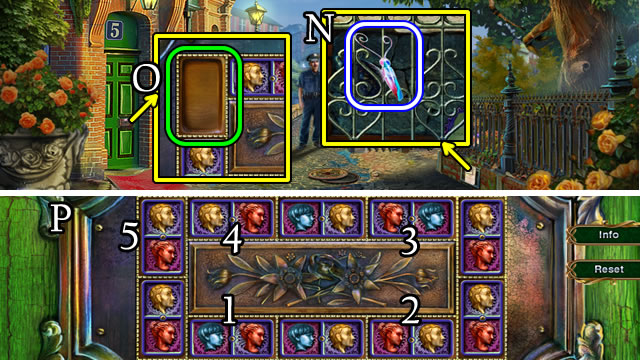
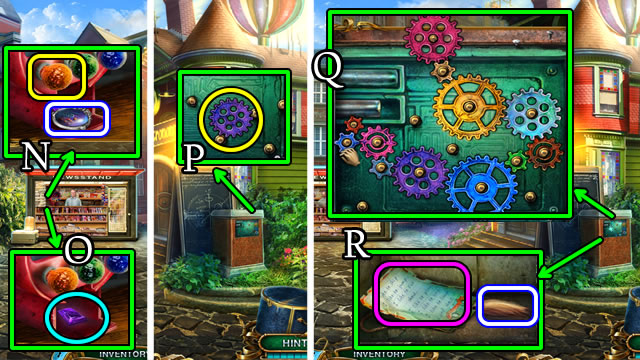
- Take the KEY CARD (N).
- Walk down.
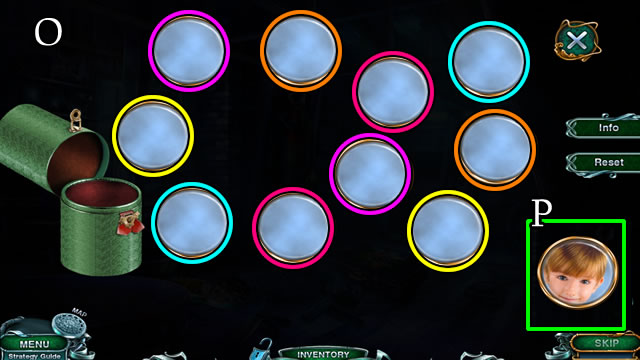
- Use the KEY CARD (O).
- Enter the Hotel Reception. Speak to the manager.
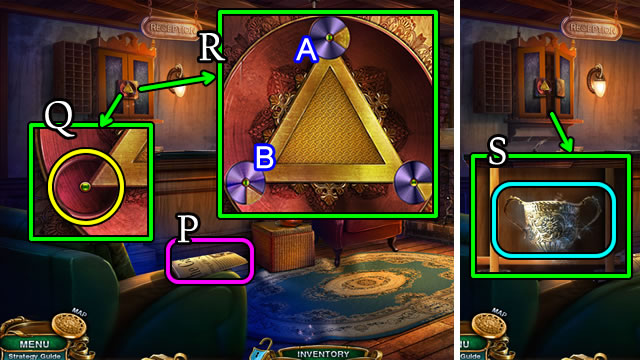
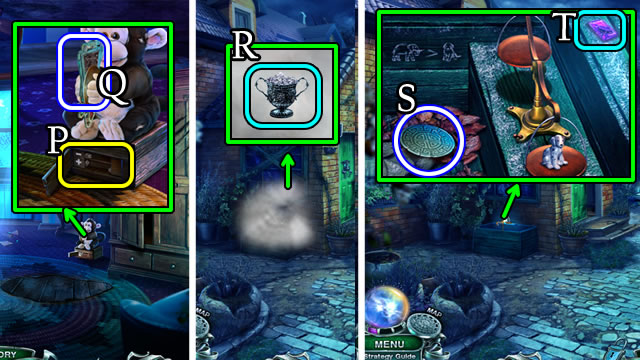
- Read the paper (P).
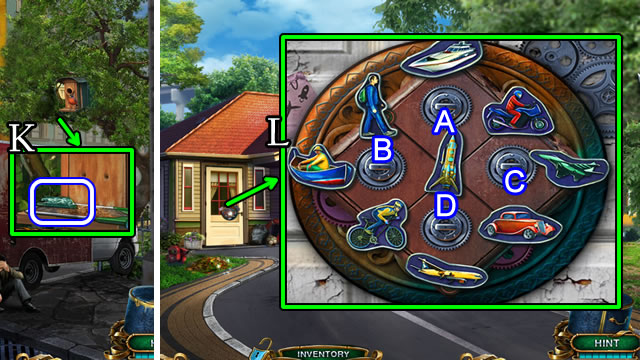
- Place the CIRCLE (Q) for a puzzle.
- Solution (R). Bx3-Ax2.
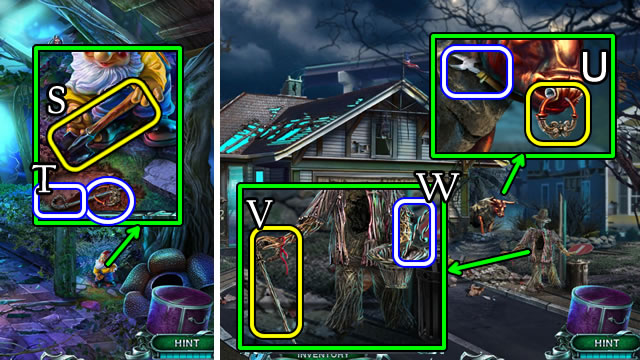
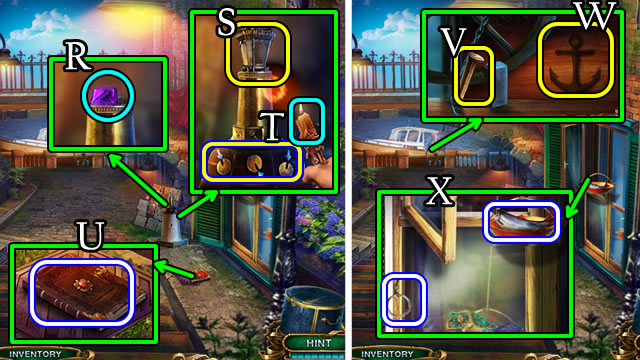
- Read the note; take the Magic Box Ice Bucket (S).
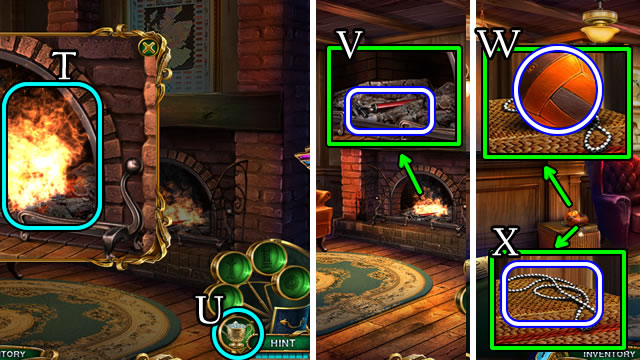
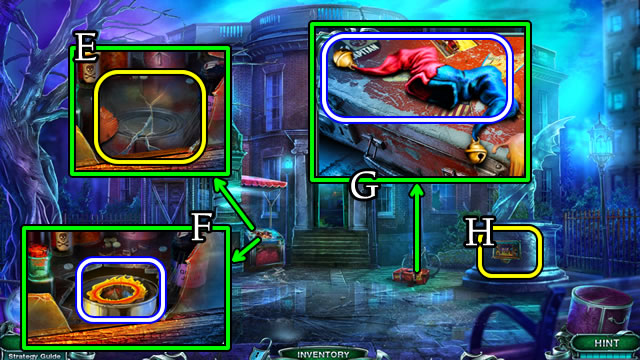
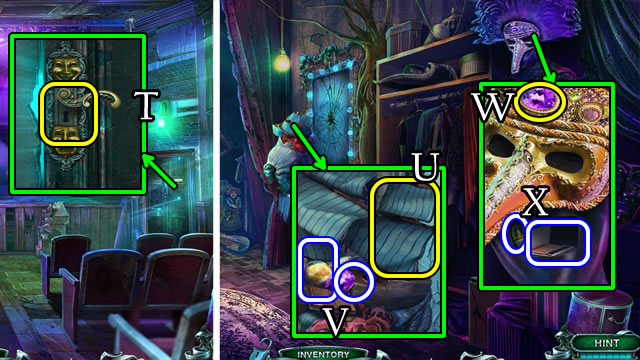
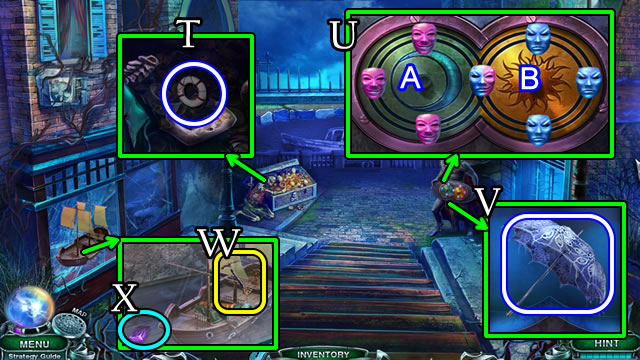
- Select the fireplace (T) to open the Magic Box.
- Select and use the Ice Bucket (U) on the flames.
- Take the PUMP (V).
- Open the vignette (V1); use the PUMP; take a BALL (W).
- Take the PULL CHAIN (X).
- Return to the Hotel Room.
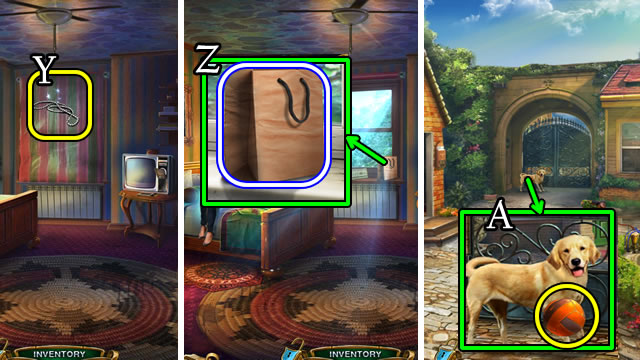
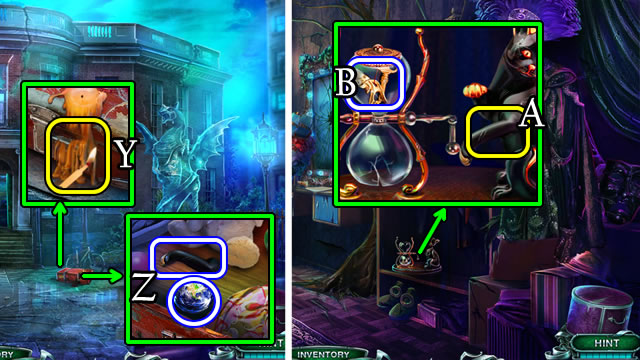
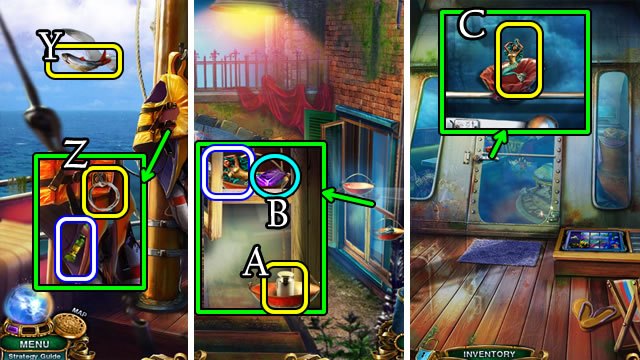
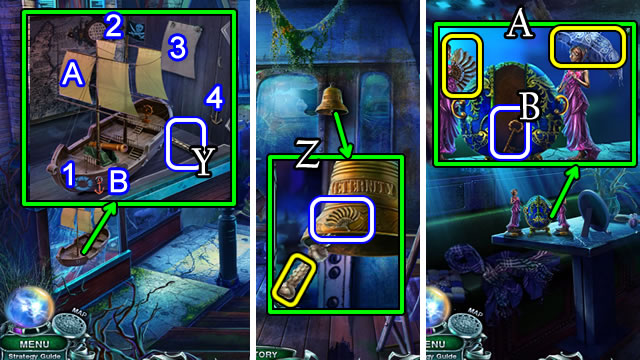
- Place the PULL CHAIN (Y).
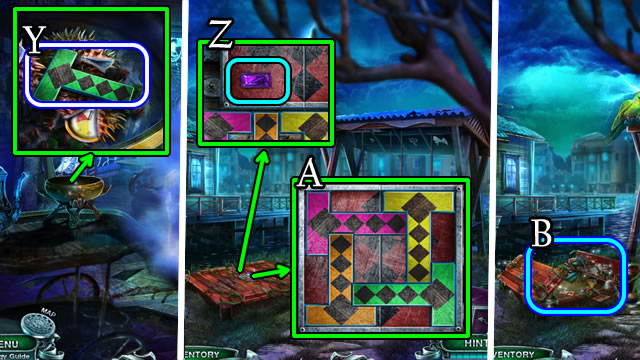
- Take the PAPER BAG (Z).
- Go to Courtyard.
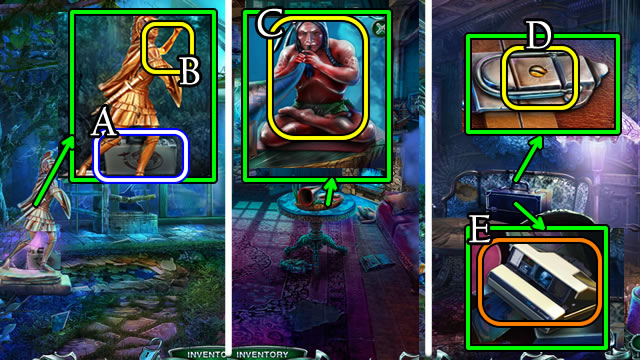
- Give the BALL (A).
- Walk to the Bridge.
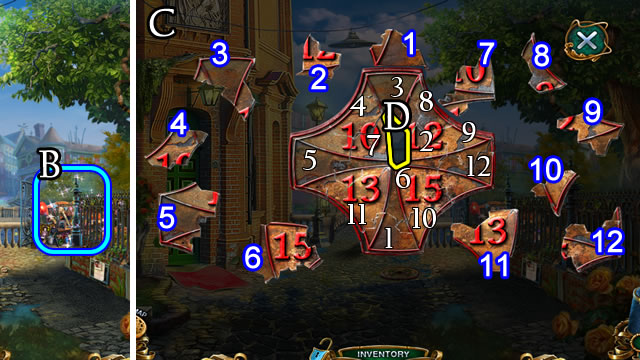
- Play the HOP (B); receive a BROKEN PART.
- Select the PAPER BAG (Inventory); place the BROKEN PART (D) for a mini-game.
- Solution (C).
- Take the NUMBERED LOCK.
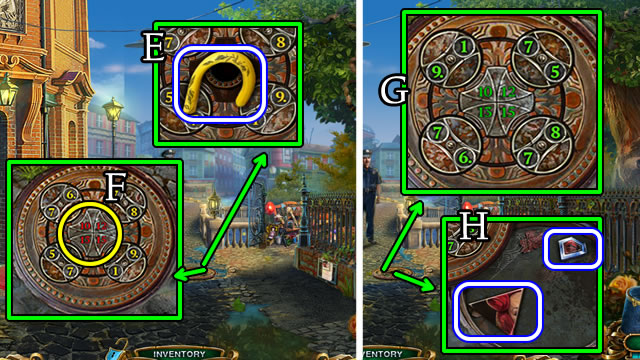
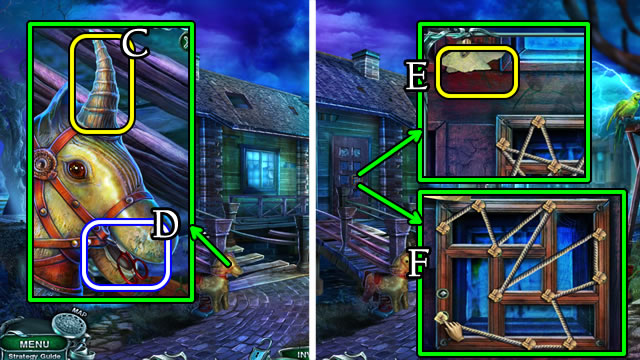
- Take the UMBRELLA HANDLE (E).
- Place the NUMBERED LOCK (F) for a puzzle.
- Solution (G).
- Take the WALL PART and DIAMOND (H).
- Walk down.
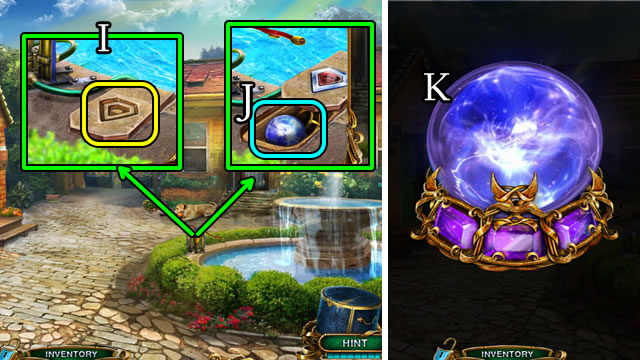
- Place the DIAMOND (I).
- Take the sphere, stand and gems (J) for a mini-game.
- Assemble the Magic Sphere (K) for the user interface.
- Use the rock to find and take the PICTURE PART (L).
- Grab the BATTERIES (M).
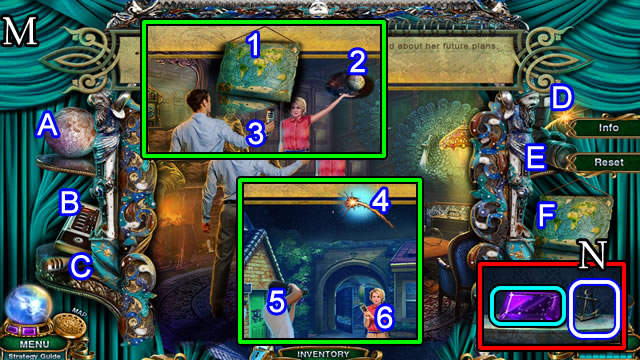
- Enter the Hotel Room.
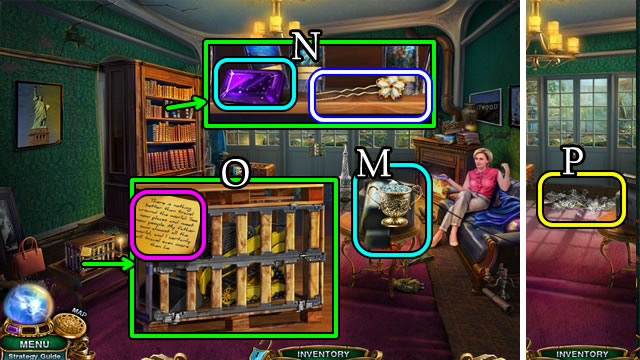
- Place the PICTURE PART (M1) for a puzzle.
- Solution (N). Ax3-Bx3-Cx3-Dx3-E.
- Receive a PLATE (O).
- Place the BATTERIES (P); take the WINDMILL BLADES (Q).
- Walk down.
- Select the Fog (Q1).
- Use the Ice Bucket (R).
- Take the WINDMILL GEAR (S) and Gem (T).
- Select the WINDMILL GEAR (Inventory) and place the WINDMILL BLADES for a puzzle.
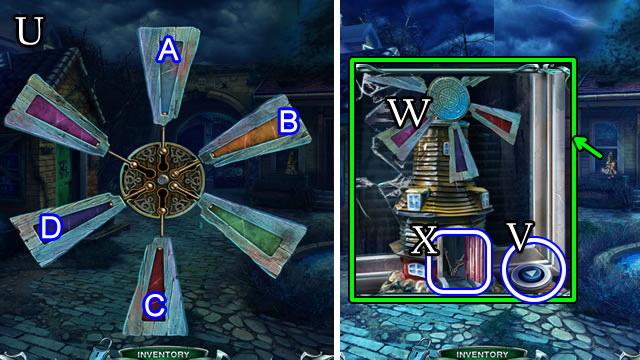
- Solution (U). A-B-C-A-D.
- Take the WINDMILL FAN.
- Take DIALS 1/2 (V).
- Place the WINDMILL FAN (W); take the CLOCK HANDS (X).
- Enter the Hotel Reception.
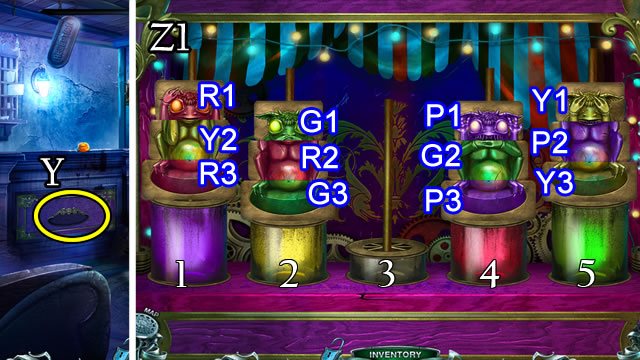
- Place the PLATE (Y) for a puzzle (Z1) where R-red, Y-yellow,P-purple. 1-head, 2-torso, 3-base. The pedestal numbers indicate piece placement.
- Solution, part one (Z1). P1-2, Y1-1, P2-4, Y3-3, P2-5, G2-3, P2-4, P1-4, G1-4, R2-3, G3-5, R2-2, G2-5, G1-5, P1-5, R2-4.
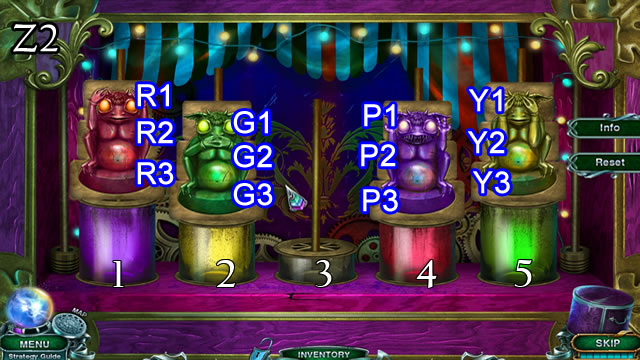
- Solution, part two (Z2). Y3-2, Y1-4, R1-3, Y2-2, Y1-2, R1-2, R3-3, R2-3, P2-3, P3-1, P2-1, R2-1, R3-4, R2-4, R1-4, P1-1.
- Solution (Z3).
- Play the HOP (A); receive a CLOCK KEY.
- Place the CLOCK HANDS and CLOCK KEY (B). Take the LASSO (C).
- Return to the Bridge.
- Place the LASSO (D).
- Take a Gem and DIALS 2/2 (E).
- Return to the Hotel Reception.
- Place DIALS 2/2 (F). Continually select the left dial to align the marks.
- Take the BELL CLAPPER (G).
- Place the BELL CLAPPER; take the ELEPHANT (H).
- Walk down.
- Place the ELEPHANT (I); take the CHEST KEY and Gem (J).
- Place the WALL PART for a puzzle (K).
- Solution (L).
- Take the DOMINO (M).
- Return to the Bridge.
Chapter 2: Kevin's House
- Select the note twice; take the BROKEN BUTTERFLY (N).
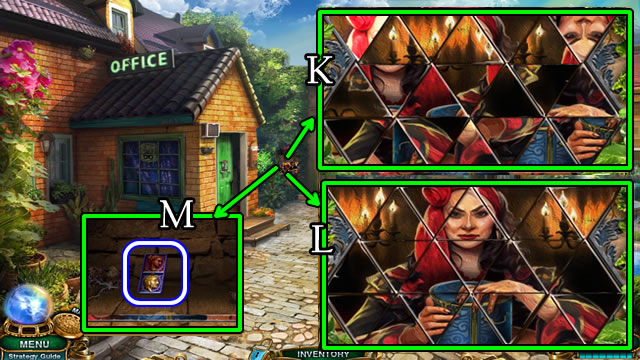
- Place the DOMINO (O) for a puzzle.
- Solution (P). 1-2-3-4-5.
- Enter Kevin's House.
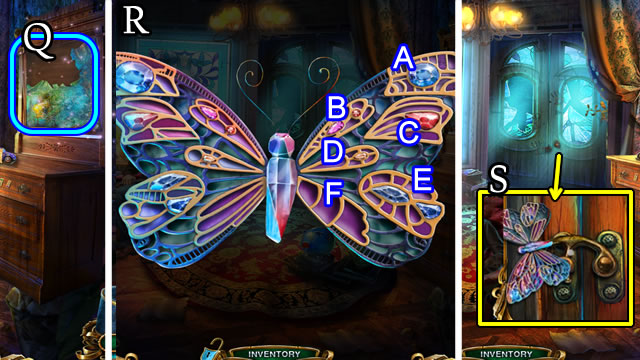
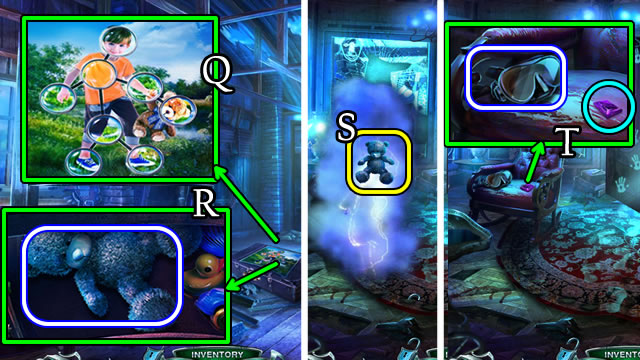
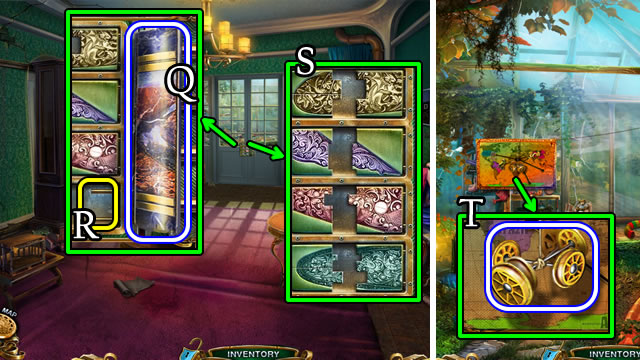
- Play the HOP (Q); receive a BUTTERFLY WING.
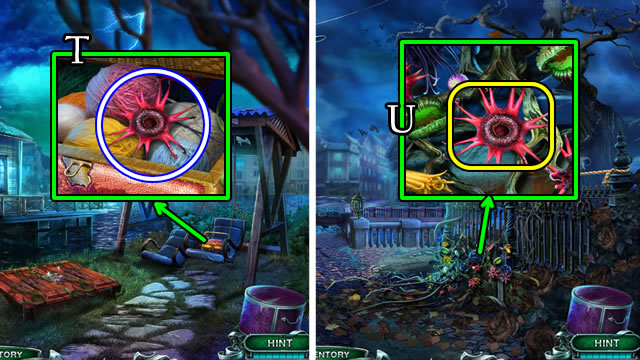
- Select the BROKEN BUTTERFLY (Inventory); attach the BUTTERFLY WING for a puzzle.
- Solution (R). A-Bx3-Cx4-D-Ex2-Fx4.
- Take the BUTTERFLY.
- Place the BUTTERFLY (S).
- Walk forward.
- Use the CHEST KEY; take the RED FLOWER (T).
- Walk down twice.
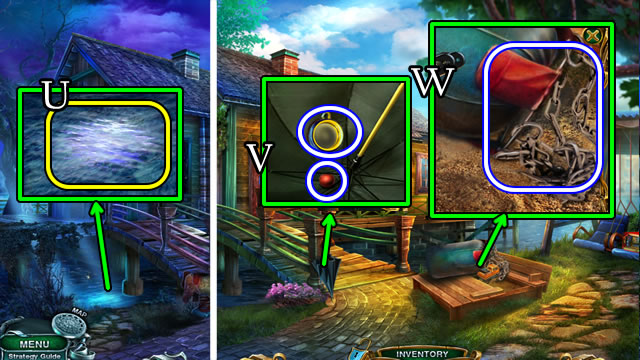
- Place the RED FLOWER (U) for a puzzle.
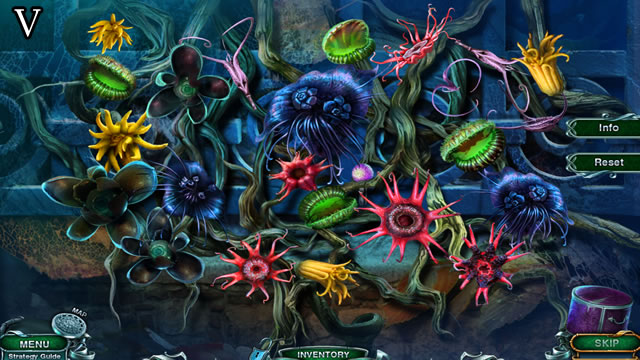
- Solution (V).
- Take the GLOBE LEVER (V1).
- Walk left.
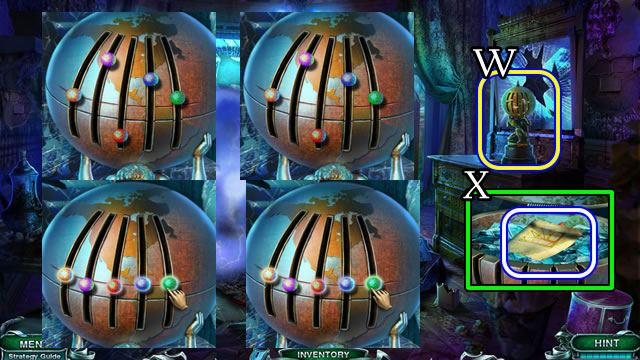
- Place the GLOBE LEVER for a puzzle (W).
- Solution (W1).
- Take the DIAGRAM (X).
- Take the T-SYMBOL (Y).
- Walk forward.
- Take CRYSTAL 1/3 (Z).
- Place the T-SYMBOL for a puzzle.
- Solution (A).
- Play the HOP (B); receive a HORN.
- Place the HORN (C); take SCISSORS (D).
- Place the DIAGRAM (E) for a puzzle.
- Solution (F).
- Walk forward.
- Use the SCISSORS (G); receive a GLOVE.
- Use the Ice Bucket; take the PESTLE (H).
- Walk down twice.
- Use the GLOVE. Take the PARROT RING and BOX WITH PHOTOS (I).
- Walk forward.
- Place the PARROT RING (J); receive a PARROT.
- Walk down.
- Take CRYSTAL 2/3 (K).
- Place the PARROT; receive a PIN (L).
- Use the PESTLE. Take the DIAL (M).
- Return to the Barn.
- Place the DIAL (N) for a puzzle.
- Solution (N1). Bx3-Cx4-A.
- Receive an UNDERWATER VACUUM CLEANER.
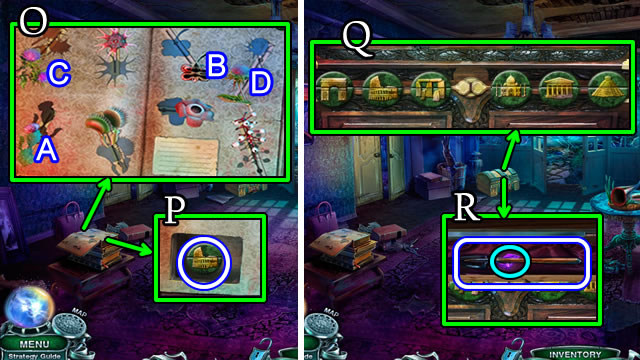
- Select the BOX WITH PHOTOS (Inventory); use the PIN; play the mini-game.
- Solution (O).
- Take the SUITCASE CHIP (P).
- Place the SUITCASE CHIP (Q) for a puzzle.
- Solution (Q1).
- Read the note; take PATRICK'S FAVORITE TOY (R).
- Walk down twice.
- Place PATRICK'S FAVORITE TOY (S).
- Take CRYSTAL 3/3 and the DIVING MASK (T).
- Walk forward.
- Place the DIVING MASK and UNDERWATER VACUUM CLEANER (U).
- Place the UMBRELLA HANDLE. Select the umbrella.
- Take the PARROT'S MIRROR and CANNONBALL (V).
- Take the PUNCHING BAG (W).
- Walk forward.
- Place the PUNCHING BAG (X).
- Play the HOP (Y); receive a LIGHTER.
- Place the CANNONBALL; use the LIGHTER. Take PHOTO OF KEVIN'S SON (Z) and CAR DOOR (A).
- Return to Kevin's House.
- Place the PHOTO OF KEVIN'S SON (B); receive a Hammer.
- Use the Hammer; take the WRECKING BALL (C).
- Read the note (D); place the CAR DOOR (D1) for a puzzle.
- Solution. A3-C3-E1-B2.
- Take the Gem and THEATER TOY 1/3 (E).
- Place the PARROT'S MIRROR; take THEATER TOY 2/3 (F).
- Return to the Barn.
- Place the WRECKING BALL; take the BUCKET (G).
- Walk down.
- Place the BUCKET. Take THEATER TOY 3/3 and a SCREWDRIVER (H).
- Place THEATER TOY 3/3 for a puzzle (I).
- Solution (J). 1-A, 2-E, 3-D, 4-C, 5-F, 6-G, 7-F.
- Take the BULB and PASS.
- Return to the Bridge.
- Use the SCREWDRIVER (K).
- Read the note; take the GEAR (L).
- Give the PASS (M); walk forward.
Chapter 3: The Theater
- Speak to the newsman.
- Place the BULB; take the MEDALLION (N) and Gem (O).
- Place the GEAR (P) for a puzzle.
- Solution (Q).
- Take the TASSEL 1/2 (R).
- Walk right; use the Ice Bucket (S).
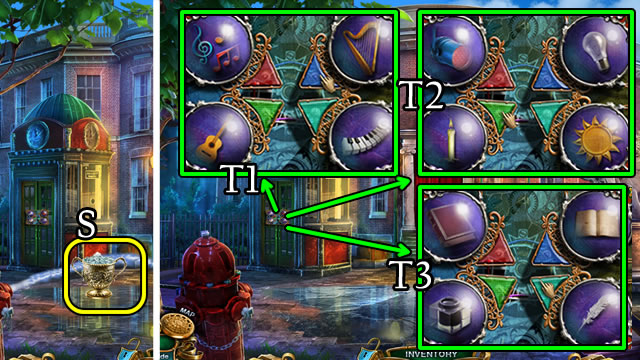
- Place the MEDALLION (T) for a puzzle.
- Solution, part one (T1).
- Solution, part two (T2).
- Solution, part three (T3).
- Solution, part four (T4).
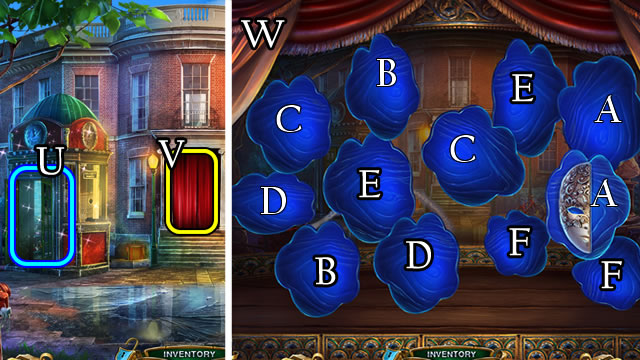
- Play the HOP (U); receive TASSEL 2/2.
- Place TASSEL 2/2 (V).
- Solution (W).
- Walk forward.
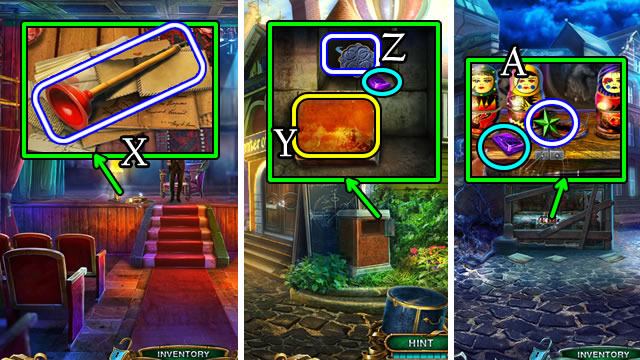
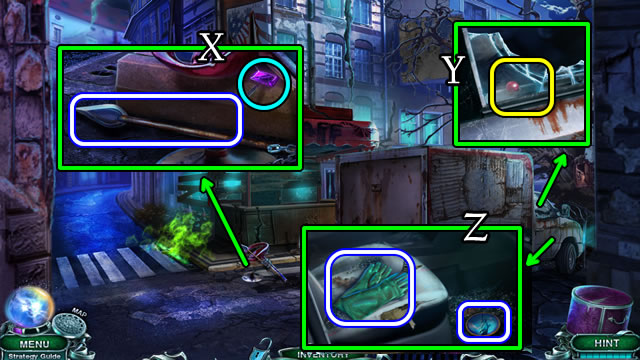
- Take the PLUNGER (X).
- Walk down twice.
- Use the PLUNGER (Y). Take the FASTENER and Gem (Z).
- Use the Hammer; take the Gem and STAR (A).
- Place the STAR (B) for a puzzle.
- Solution (B). 4-A; 3-C; 2-B; C-D; 1-E.
- Enter the School.
- Take the ZIPPER PULL (C).
- Place the ZIPPER PULL; take the OPENER and SLINGSHOT 1/2 (D).
- Return to the Theater.
- Use the Hammer and OPENER (E).
- Take the FIRE CIRCLE (F).
- Take the FOOL'S CAP (G).
- Place the FIRE CIRCLE for a puzzle (H).
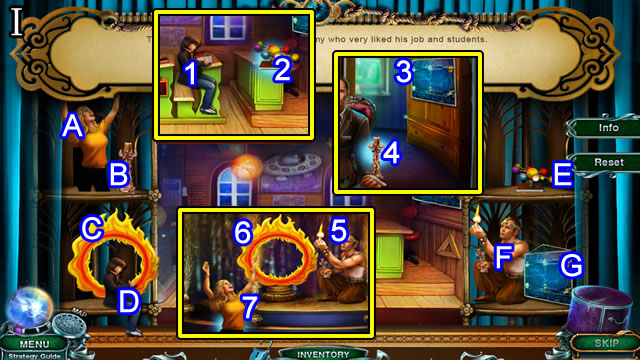
- Solution (I). 1-D; 2-E; 3-G; 4-B; 5-F; 6-C; 7-A.
- Take the ACCUMULATOR and LEVER.
- Walk forward.

- Take the SLINGSHOT 2/2 and Gem (J).
- Place the LEVER for a puzzle (K).
- Solution (L). 2-3-1-3.
- Place the FOOL'S CAP (M); receive a MATRIOSHKA.
- Return to the Crossroads.

- Place the MATRIOSHKA for a puzzle (N).
- Solution (O). Take the BATTERY.
- Place the SLINGSHOT 2/2 (P); receive a MAST.
- Enter the School.
- Select the ACCUMULATOR (Inventory) and BATTERY. Insert the BATTERY, connect the leads, and close the top. Take the BATTERY.
- Place the BATTERY for a puzzle (Q).
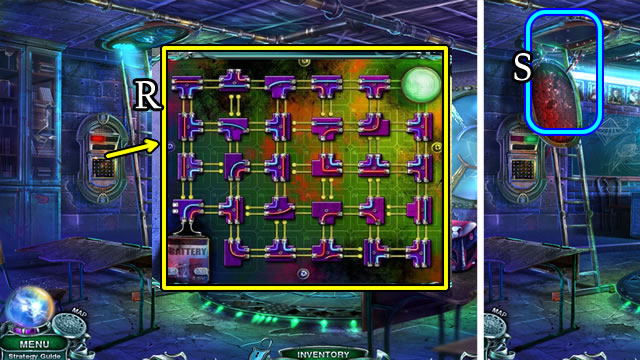
- Solution (R).
- Play the HOP (S); receive a THEATER KEY.
- Return to the Scene.
- Use the THEATER KEY (T); walk forward.
- Place the MAST (U); take the GEMSTONE and PLANETS 1/2 (V).
- Place the GEMSTONE (W); take the MATCHES and CHEST CHIP 1/2 (X).
- Walk down twice.
- Use the MATCHES (Y).
- Take PLANETS 2/2 and CAT PAW (Z).
- Return to the Dressing Room.
- Place the CAT PAW (A). Open and take the CASKET KEY (B).
- Return to the School.
- Read the note; place PLANETS 2/2 for a puzzle (C).
- Solution (D). Ax2-Dx3-Bx5-C-Ex4-H.
- Take a SOLAR SYSTEM.
- Return to the Scene.
- Place the SOLAR SYSTEM (E).
- Use the CASKET KEY (F). Take the FLOWER and Gem (G).
- Enter the Dressing Room.
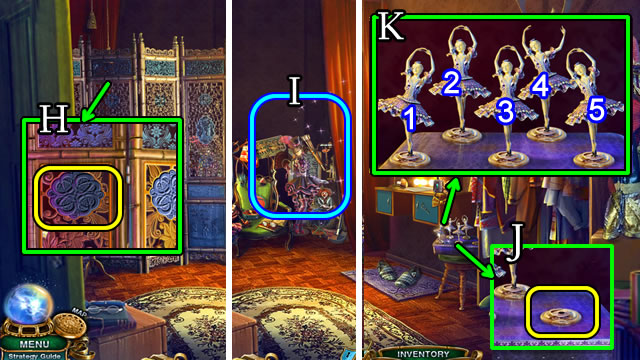
- Place the FASTENER (H) for a HOP (I); receive a BALLERINA. (Note: look in the nook at the Crossroads if the FASTENER isn't in Inventory).
- Place the BALLERINA (J) for a puzzle.
- Solution (K). Round one. 3-4-1. Round two. 1-2-3-5. Round three 1-5-4-3-2.
- Take the Gem and WRENCH.
- Walk down twice.
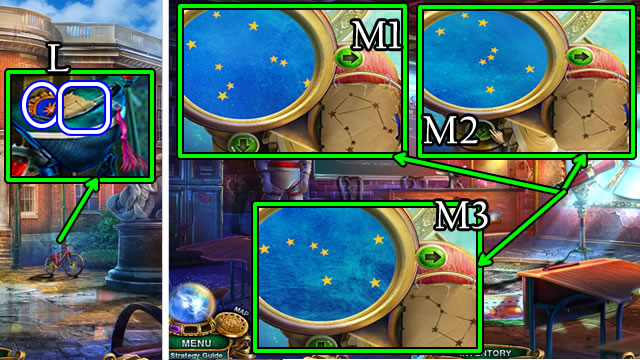
- Use the WRENCH; take the STAR MAP and STAR CHIP (L).
- Return to the School.
- Place the STAR MAP (M)for a puzzle.
- Solution, part one. M1-M2-M3.
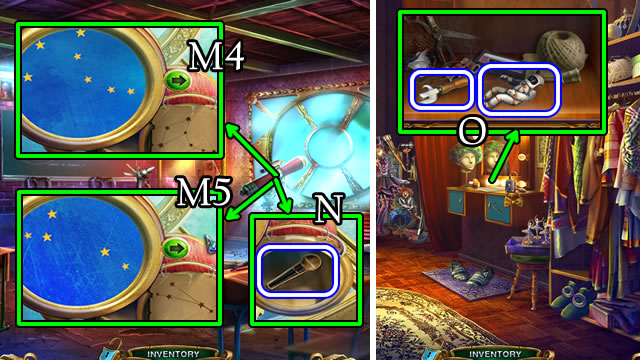
- Solution, part two. M4-M5.
- Take the MICROPHONE (N).
- Return to the Dressing Room.
- Place the MICROPHONE. Take the ASTRONAUT and OPENER (O).
- Return to the School.
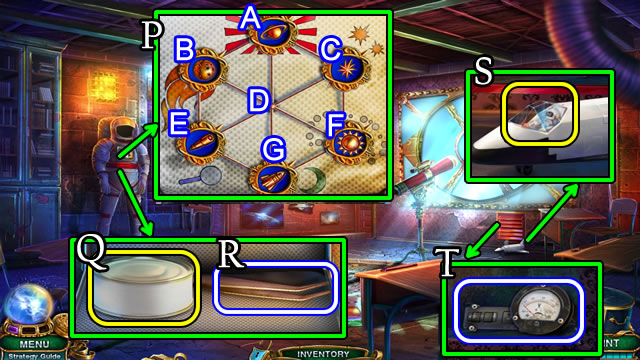
- Place the STAR CHIP for a puzzle (P).
- Solution. E-G-D-B-E-G-D-F-C-D-A-C-F-D.
- Use the OPENER (Q). Take the CANDY MACHINE COIN.
- Take the TWEEZERS (R).
- Place the ASTRONAUT (S). Take the COVER DETAILS (T).
- Return to the Scene.
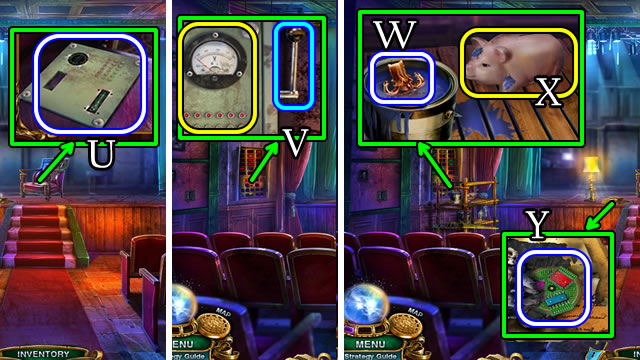
- Take the COVER (U).
- Select the COVER (Inventory) and COVER DETAILS. Place the details; receive a COVER.
- Place the COVER; pull the lever (V).
- Use the TWEEZERS (W); pick up the Candle.
- Use the Hammer (X); take the PASTRY.
- Use the Candle; take the CIRCUIT (Y).
- Go to Crossroads.
Chapter 4: The House
- Use the Candle (A).
- Walk forward 2x.
- Take the TRUCK KEY (B).
- Place the CIRCUIT (C) for a puzzle.
- Solution (D).
- Play the HOP (E); receive a LEVER.
- Place and slide the LEVER; take the CRUMBS (F).
- Walk down.
- Use the CANDY MACHINE COIN; take the COW CATCHER (G).
- Place the PASTRY (H); take TRANSPORTATION CHIP 1/2.
- Use the TRUCK KEY (I). Take the TRAIN BOX and TRANSPORTION CHIP 2/2 (J).
- Place the CRUMBS; take the LOCK DETAIL (K).
- Walk forward.
- Place TRANSPORTION CHIP 2/2 (L) for a puzzle.
- Solution (L). C-B-D-Bx2-D-B-Ax2-B-Ax2-Bx3.
- Walk forward.
- Place the Hammer (M).
- Take the HAIRPIN and Gem (N).
- Read the note; use the Candle; take the EXCAVATOR (O).
- Place the EXCAVATOR (P).
- Take SPINE 1/2 (Q).
- Place the LOCK DETAIL (R) for a puzzle.
- Solution (S).
- Walk forward.
- Take the TRAIN WHEELS (T).
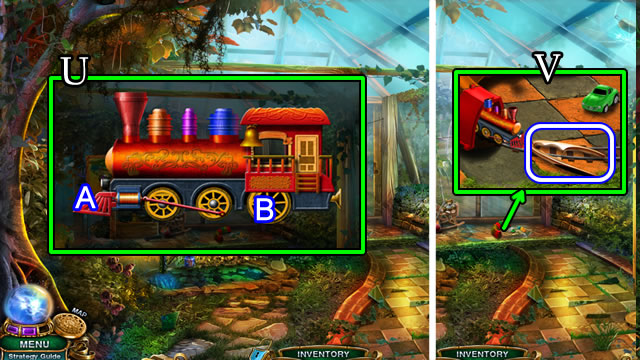
- Select the TRAIN BOX (Inventory). Place the COW CATCHER (A) and TRAIN WHEELS (B). Assemble the LOCOMOTIVE (U).
- Place the LOCOMOTIVE; take the NUTCRACKER (V).
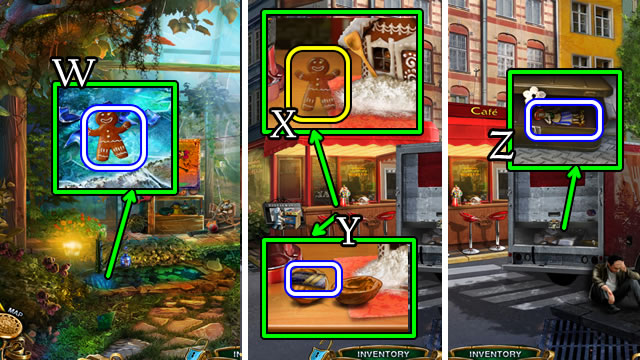
- Use the Ice Bucket and Hammer; take the GINGERBREAD MAN (W).
- Return to the Cafe.
- Place the GINGERBREAD MAN (X); receive a nut; use the NUTCRACKER; use the key on the Gumball Machine; receive a SPINE 2/2 (Y).
- Use the HAIRPIN; take the CLOCK DOLL (Z).
- Walk forward twice.
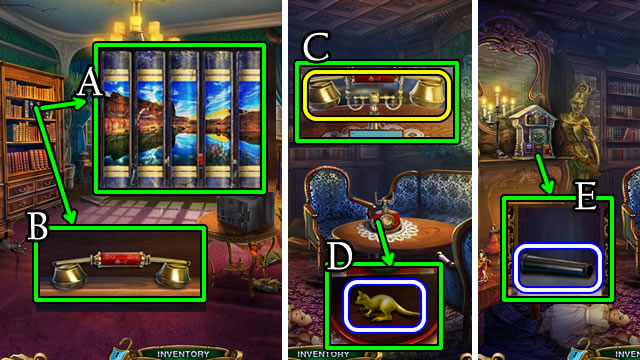
- Place SPINE 2/2 (A) for a puzzle.
- Solution (A).
- Take the HANDSET (B).
- Enter the Hidden Room.
- Place the HANDSET (C) for a puzzle.
- Solution. 5-3-5-4-2-7-9-8.
- Take ANIMAL CHIP 1/2 (D).
- Place the CLOCK DOLL; take the LEAF-BLOWER NOZZLE (E).
- Walk down twice.
- Place the LEAF-BLOWER NOZZLE (F).
- Take ANIMAL CHIP 2/2 and a CROWBAR (G).
- Return to the Greenhouse.
- Place ANIMAL CHIP 2/2 for a puzzle (H).
- Solution. B-E-F-C-D-A-B-C.
- Play the HOP (I); receive an INUIT DOLL.
- Return to the Hidden Room.
- Place the INUIT DOLL (J)for a puzzle.
- Solution (J).
- Take the MOON (K).
- Walk down.
- Place the MOON (L) for a puzzle.
- Solution (M). 1-E, 2-C, 3-A, 4-D, 5-B.
- Take the ANCHOR and Gem (N).
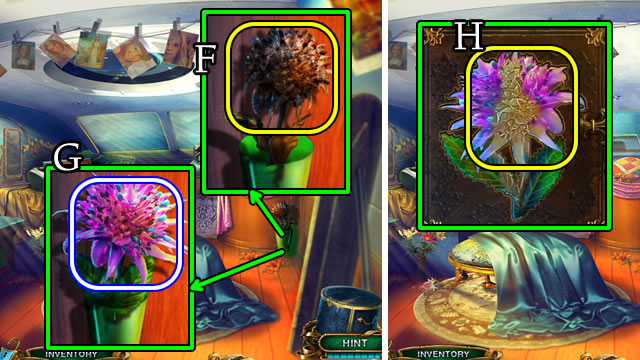
- Place the FLOWER (O)for a puzzle.
- Solution (O). E-A-B-D-F-C-H.
- Take CHEST CHIP 2/2 (P).
- Place CHEST CHIP 2/2 (Q) for a puzzle.
- Solution (Q).
- Take the SHOVEL and Gem (R).
- Enter the Greenhouse.
- Place the SHOVEL (S).
- Take the NOSE RING and CANE (T).
- Walk down twice.
- Place the NOSE RING (U); receive a WIRE CUTTERS.
- Place the CANE (V); take the WIRE (W).
- Walk down.
- Take the Gem; use the WIRE CUTTER; take the SPEAR (X).
- Use the WIRE (Y).
- Take TRAVEL CHIP 1/2 and GLOVES (Z).
- Return to the Greenhouse.
- Take the SUITCASE (A).
- Place the SPEAR (B); receive a FIGURINE.
- Walk down.
- Place the FIGURINE (C); receive a LOCKPICK.
- Enter the Hidden Room.
- Use the LOCKPICK (D); select and place the camera (E) for a HOP; receive TRAVEL CHIP 2/2.
- Walk down twice.
- Place TRAVEL CHIP 2/2 (F) for a puzzle.
- Solution (F). C-Ax2-Bx2.
- Receive a MASK.
- Walk down.
- Place the MASK and GLOVES; receive ALUMINUM (G).
- Return to the Hidden Room.
- Select the SUITCASE (Inventory); place the ALUMINUM. Select the bowl (1), use the matches (2) and add the ALUMINUM (3); pour (4); take a PLANE.
- Read the note (H); place the PLANE (I). Take the TRAVEL MAP and MASK PART.
- Walk down.
- Place the TRAVEL MAP (J).
- Place the Candle (K) for a HOP; receive a Gem.
- Receive a Remote Control (L).
- Place the Remote Control (M). Take a LAMP (N).
- Walk down twice.

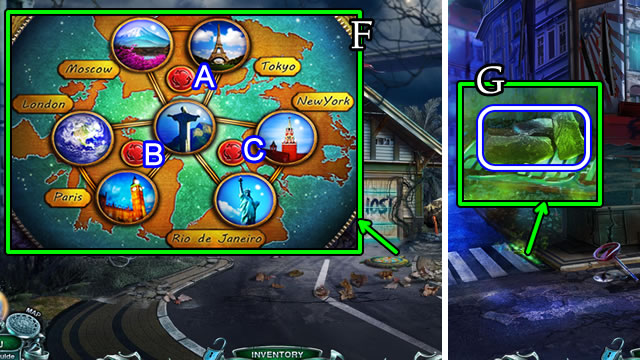
- Use the Remote Control (O).
- Follow the Footpath (P).
- Speak to the man (Q); receive a MERMAID TAIL.
Chapter 5: The Boat
- Take the Gem (R).
- Place the LAMP (S); use the Candle and turn the knobs (T).
- Take the WITCH'S DIARY (U).
- Use the CROWBAR (V); place the ANCHOR (W).
- Take the LIFE VEST RING and FISH (X).
- Walk forward.
- Place the FISH (Y); receive a WEIGHT.
- Place the LIFE VEST RING (Z); receive STEERING CONTROL SPOKE 1/3.
- Walk down.
- Place the WEIGHT (A); take the Gem and MERMAID HALF (B).
- Walk forward.
- Select the MERMAID HALF (Inventory) and MERMAID TAIL. Combine for a MERMAID.
- Place the MERMAID (C).
- Enter the Cabin.

- Move the papers; use the Remote Control; take the FISH CHIP (D).
- Use the Remote Control; take the PENDANT WATCH (E).
- Walk down.
- Place the FISH CHIP for a puzzle (F).
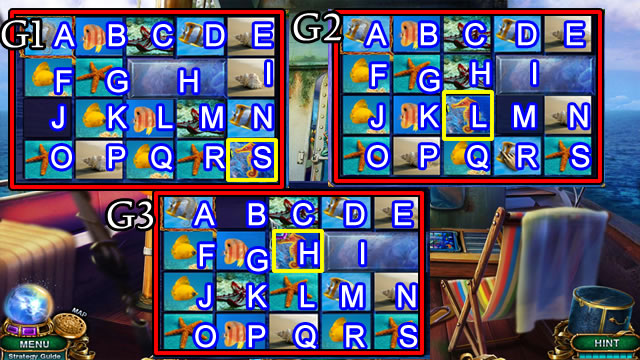
- Solution, part one (G1). K-L-M-N-S-R-M-N-I-H-L-M.
- Solution, part two (G2). R-Q-P-K-G-H-L-K-G-B.
- Solution, part three (G3). C-H-G-B-C-H-G-F-A-B.

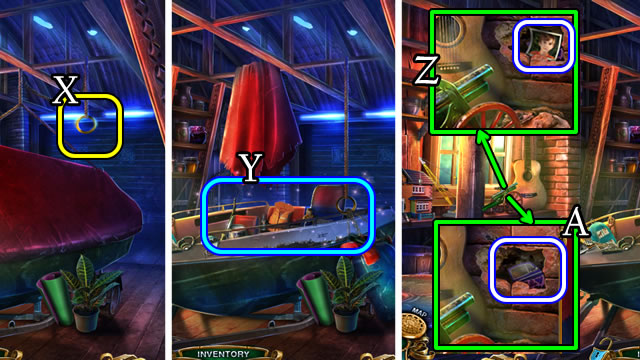
- Play the HOP (H); receive STEERING CONTROL SPOKE 2/3.
- Walk down.
- Place the PENDANT WATCH (I) for a puzzle.
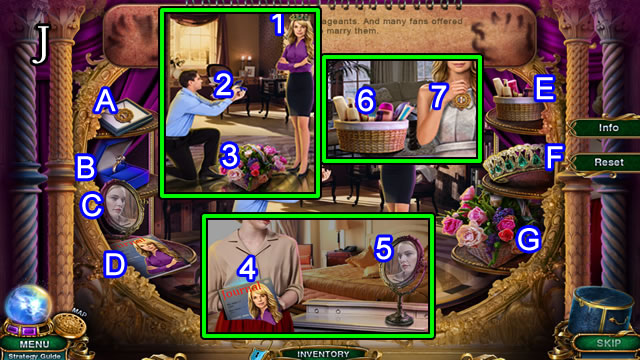
- Solution (J). 1-F, 2-B, 3-G, 4-D, 5-C, 6-E, 7-A.
- Receive STEERING CONTROL SPOKE 3/3.
- Return to the Cabin.
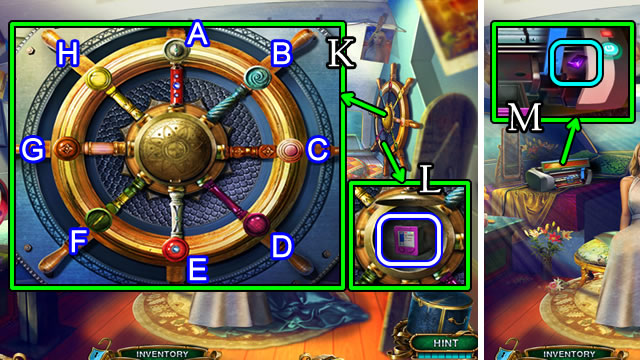
- Place the STEERING CONTROL SPOKE 3/3 for a puzzle.
- Solution (K). A-E, C-G, A-E, D-H, B-F.
- Take the CARTRIDGE (L).
- Place the CARTRIDGE; take the Gem (M).
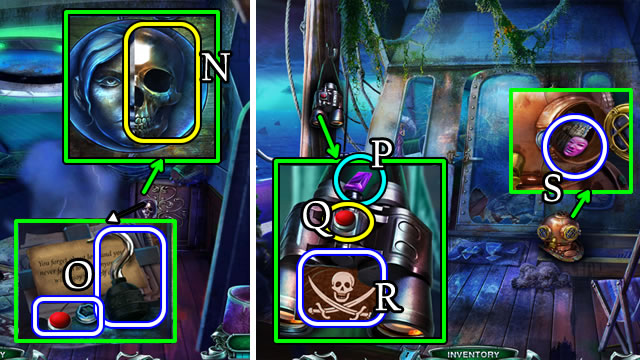
- Place the MASK PART (N).
- Take the HOOK; read the note; take the BUTTON and (O).
- Walk down.
- Take the Gem (P). Place the BUTTON (Q); receive a FLAG (R).
- Place the NUT (S); take the FACE.
- Walk down.
- Place the HOOK; take the LIFEBUOY (T).
- Place the FACE for a puzzle (U).
- Solution. A-B-A-B-A-B-A.
- Take the UMBRELLA (V).
- Use the Hammer (W); take the Gem (X); play the mini-game.
- Solution. 1-(Inventory), 2-(Inventory), 3-A, 4-B.
- Take the ROPE (Y).
- Walk forward.
- Place the ROPE; receive a FAN (Z).
- Walk forward.
- Place the FAN and UMBRELLA (A); take the LETTERS KEY (B).

- Place the LETTERS KEY (C); take the LETTERS.
- Place the LETTERS (D). Take the Gem (E).
- Receive a Watch.
- Place the Watch (F).
- Take a FLOWER (G).
- Select the WITCH'S DIARY (Inventory); place the FLOWER. Receive CARDS.
- Return to the Hotel Room.
- Place the CARDS for a puzzle.
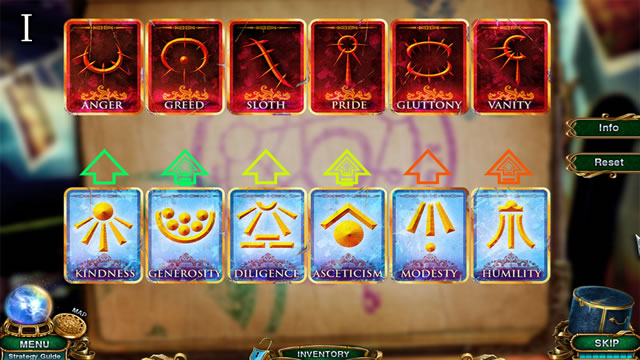
- Solution (I). Select the arrows after correctly arranging the Cards.
- Congratulations. You have completed playing Mystery Tales: The Twilight World.
Created at: 2015-02-22